Hitron TECHNOLOGIES HTGDS1 Garage Door Sensor User Manual 0440010185N0 3A
Hitron TECHNOLOGIES Garage Door Sensor 0440010185N0 3A
Contents
- 1. User Manual
- 2. User Manual Statement
User Manual

HT-GDS1
0440010185N0(3A)
Quick Guide / Manual Installation
1. Activate Battery
Slide open HT-GDS1’s top cover and
pull the tab to activate it for pairing.
2. Join the Network
Follow the instructions on your home
control system to add a new HT-GDS1.
During the joining need to slide off the
top cover, the LED on the HT-GDS1 will
blink while it’s searching for the network.
More information about this process can be
found at: http://www.hitron-americas.com
Key Features
Unobtrusive Compact Design
3+ Year Coin Cell Battery Life
Easy Installation with Tape or
Screws
Tamper Switch for Extra Security
100m Open space, 60m + Inside
Range
Contents
HT-GDS1
1 CR-2032 Battery
Screws and Tape (2 each)
LED Indicators/ Troubleshooting
Status/Action Description
The LED will light green) for 2 seconds when the
battery is inserted.
(
The LED will flash (green) 3 times every 5 seconds.
It will quit flashing when it finds a network.
Holding the tamper switch, inserting the battery,
and releasing it while the LED is green (within 2
seconds of inserting the battery).
Pressing and releasing the tamper switch 5 times
within 5 seconds.
Start using your HT-GDS1
HT-GDS1 is ON
Search for network
Factory reset
Forced rejoin
Low battery The LED will light (red) always.
CK 66 3
94V-0
E87263
D100
+
LED Tab
Tamper
switch
Battery
Hitron’s Garage Door Sensor (HT-GDS1) enable you to
monitor the opening of your garage door. Once the
garage door opens to a 45 degree angle, HT-GDS1
will report open message from iControl Touchscreen.
3. Test HT-GDS1
Test HT-GDS1 from the desired location
before permanently installing it by flipping
it forward as shown above, this is the same
action as the garage door opening. Check
if is reporting a close or open
message from both orientations.
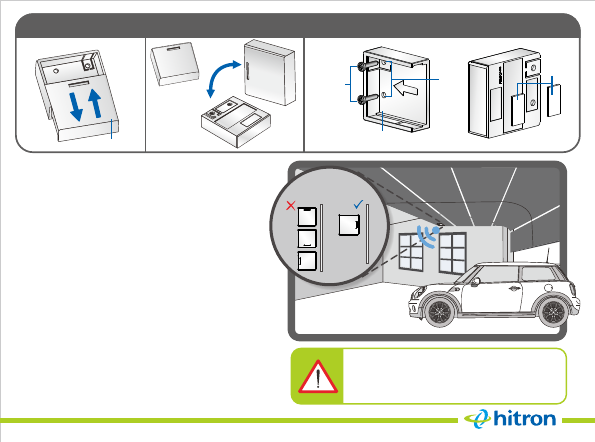
4. Install HT-GDS1
Install HT-GDS1 on a clean surface by using
double side tape or screws.
5. Close HT-GDS1’s housing
Once you have confirmed is
communicating, install it in its mounting
plate on the garage door
HT-GDS1
HT-GDS1
Tape
Screw
Mounting plate
Screw
holes
Open/ Close Test Install
Alignment
Flip
Top cover
Where not to place
(1) Metal can reduce transmission range
(2) Damp or Rain or very humid area
(3) Over 50 C or Below -10 C
o o