Users Manual
1
PWS700B
User’s Manual
2
Contents
1. Product Overview
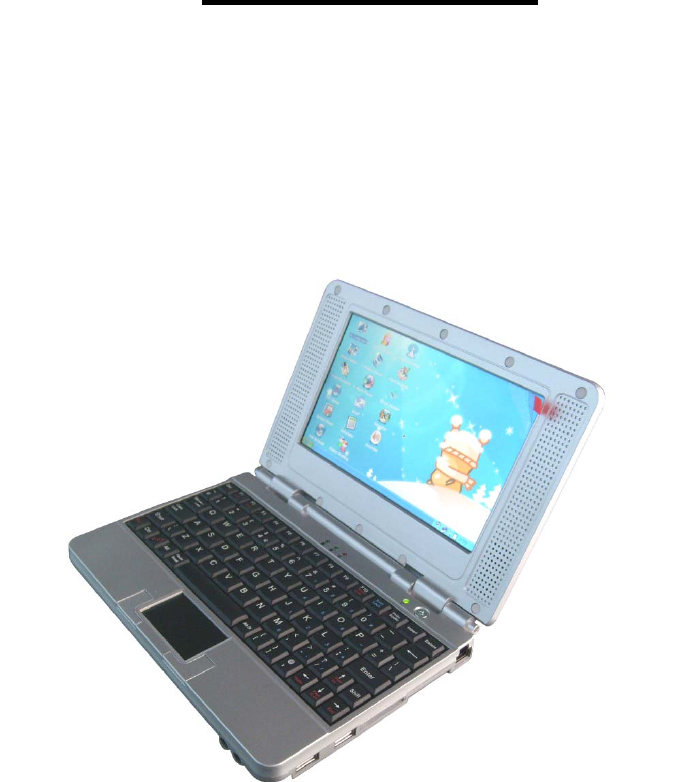
The PWS700B is an affordable product with low power consumption, designed for communication and
digital multimedia entertainment by accessing Internet through a broadband terminal. It can be easily
operated by the user, without bothering about intrusion of viruses. In addition to a variety of multimedia
entertainment and high-speed broadband Internet access functions, the PWS700B can be used for
other purposes, such as the e-book reader, picture browser, Flash player, instant communication,
e-dictionary, MP3 player, game simulator and PDA. Also, it provides the user with personalized and
abundant Flash desktops.
Remarkable characteristics
— 7-INCH TFT-LCD
— True color image display
— Broadband Internet access
— Highly secure Linux OS, free of viruses
— All kinds of Xiptech application software packages
Enriched experience
— Internet surfing, information searching and news reading
— Instant online communication with family, friends or classmates
— Movie and music downloading and enjoying
— Flash movies and games
— All types of games simulation
— Picture and image sharing
3
— English searching and learning
Office assistant
— Office software package
— E-mail receiving and sending management
— Daily work plan and management
— PDF viewer
— E-book reader
2. System Overview
Provided with the embedded Linux OS, the PWS700B features perfect performance, adaptability and
robustness. It gives the user a stable work environment and software running environment.
3. Hardware Overview
◆ Processor: Intel xsales 416MHz 32-bit CPU
◆ Display terminal: 7-inch 800*480 true-color LCD
◆ RAM: 64M RAM
◆ Storage: 1G NAND Flash
◆ USB port: 2 extensible USB ports
◆ External storage: SD card slot
◆ Input device: standard keyboard and mouse
◆ Broadband interface: 10/100MB Ethernet interface
◆ Network access: ADSL, WiFi, CDMA, GPRS (optional)
◆ Appearance of the device
4
4. PWS700B Discription
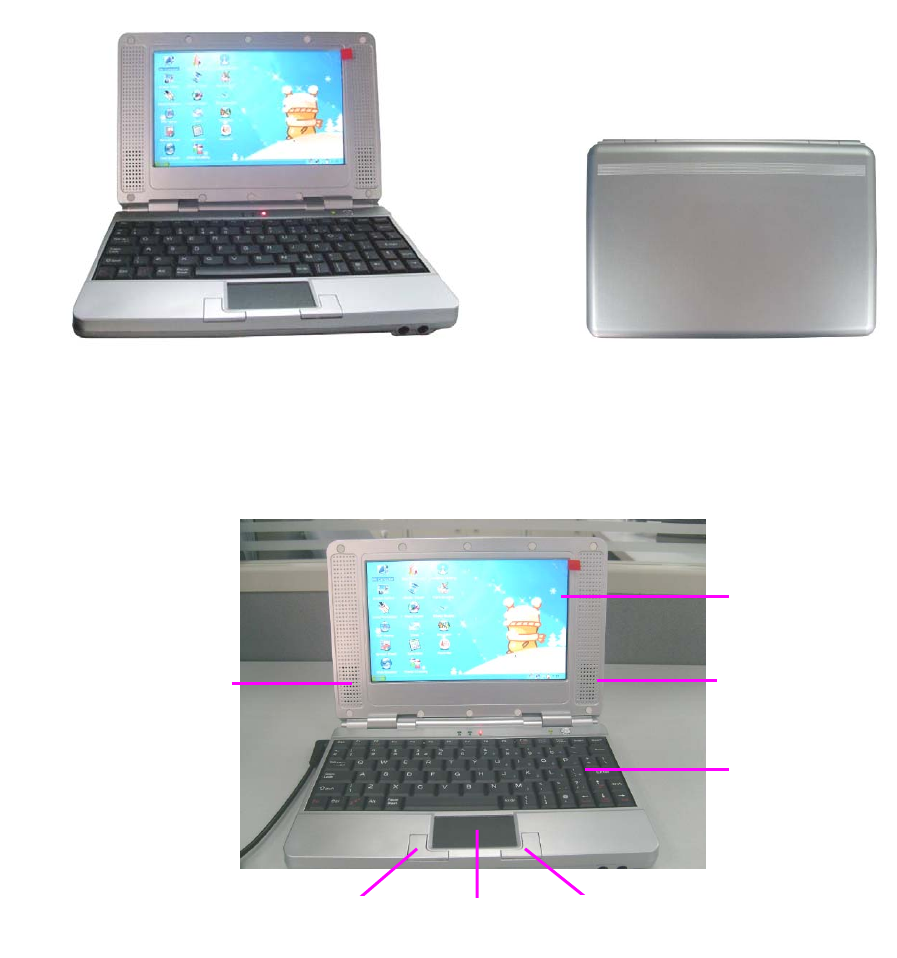
.1) Outlook Discription
Front View
Figure 1
LED status indicator discribe as from left to right:① Capital letter status;② Num Lock status;③
Battery charge status;④ Power on/off
Side View
Display
Speaker
Keyboard
Speaker
Left ke
y
Touch board
Ri
g
ht ke
y
Appearance
5
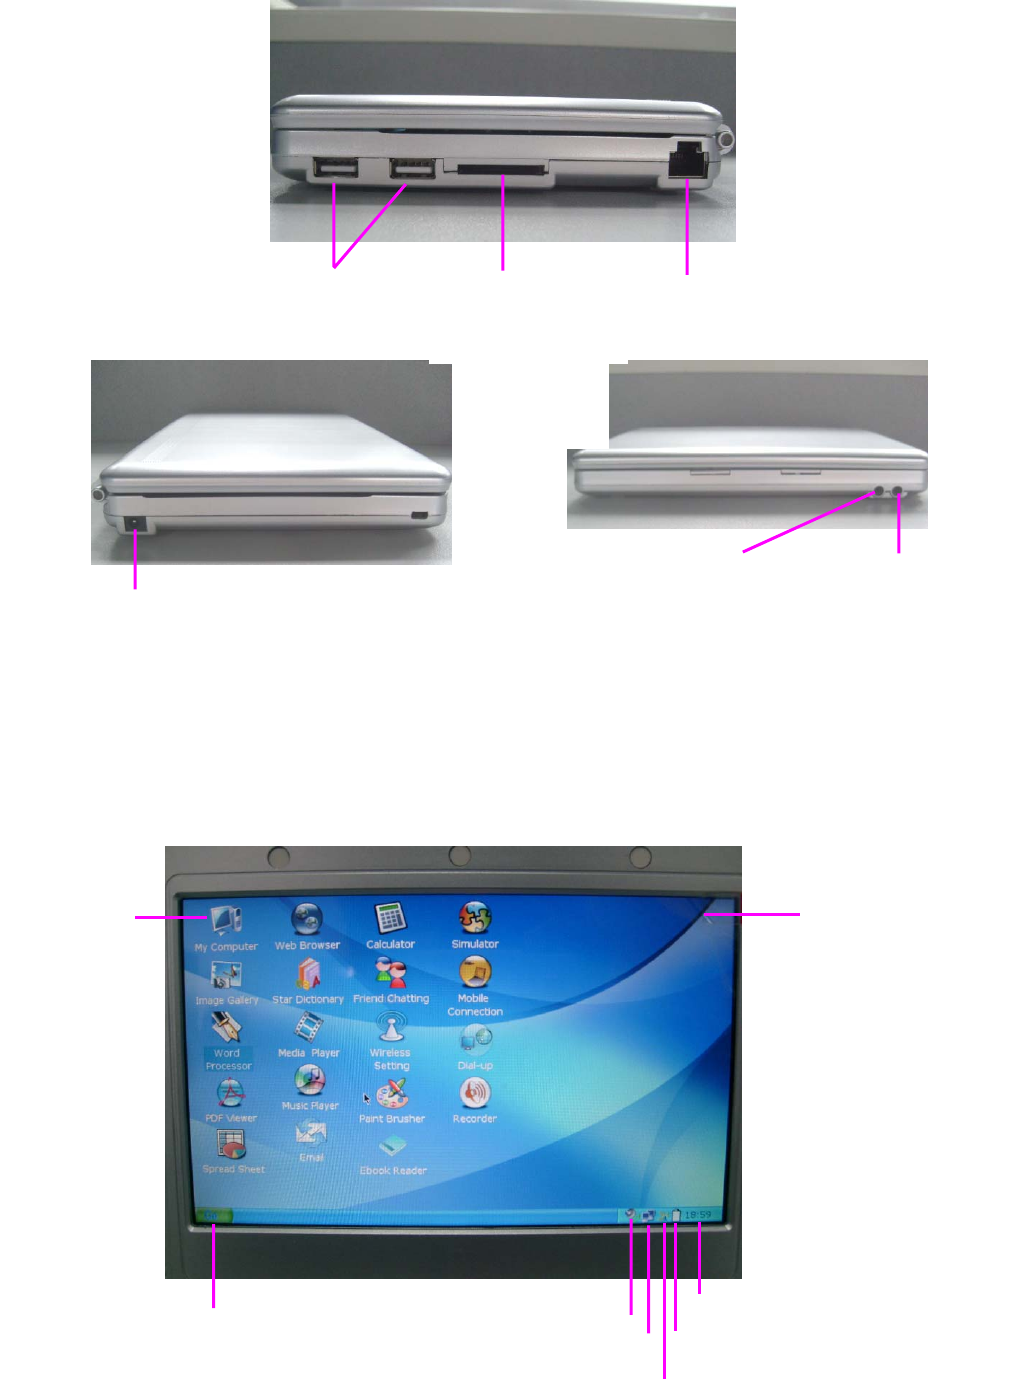
2) Desktop Discription
Ethernet Port SD/MMC Slot
USB Port
Figure 2
Power port
Microphone port Earphone
Figure 3 Figure 4
Desktop
Start Menu Volume Adjust Battery Charges Status
Current Time
Application
icons

6
Figure 5
5. Battery Charging
◆ Battery Charging for PWS700B
PWS700B is player with Internal Charging Battery,we suggest to charge up the battery when
the battery power is low.This can keep the best using for the battery,especially the first time of
charging.
◆ Way to Charging Battery
1) Plug in the power adapter to the power port of PWS700B,battery charges LED will light
up.Charging procedure will be completed once the LED turns off.
2) Plug in the power adapter to the power port of PWS700B,battery charges LED will light
up.Once power on PWS700B by pressing and hold Power on/off button,Charging status
will display on the sceen indicated as below.During battery charging,Charging indication
appears until Charging procedure is completed.Charging status LED should also turn
off,then user can unplug the power adapter.
3) During battery charging,user can operate PWS700B as usual.
4) Battery charging procedure normally need around 6 hours from low battery level to full
charging.During battery charging, the machine will become warm and this is a normal
condition.
6. Application discription
◆ Internet Access Express
The Internet access express is a kind of browser, also called the firefox browser. This browser allows
the user to open multiple pages in the same window and does not limit the page quantity. The system
resource occupation rate is relatively low. Its major functions include webpage browsing, webpage
LAN
WIFI Connetion Update Tool
Charging Charging finish
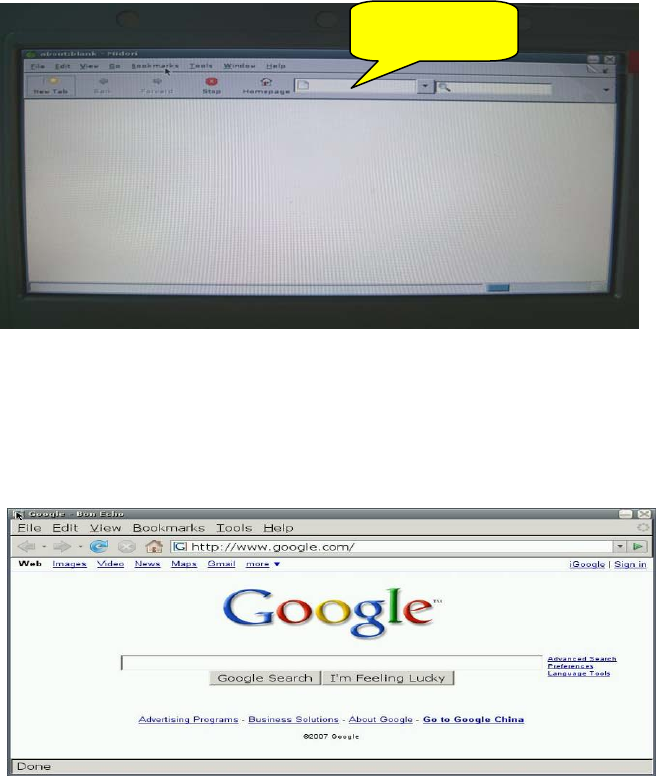
7
saving, online video, and opening pictures or files.
1) To open Web Browser, double click the Web Browser icon on the desktop, as shown in Figure 1:
2) Enter the web page address to be visited in the address bar on the interface in Figure 1. For
example, access http://www.google.com. The homepage of Google is opened in the window, as
shown in Figure 2:
Figure 2
3) You can open multiple web pages in the Web Browsing, but only currently browsed window is
displayed. To create a window, select File → New tab in the menu. To switch between different
tab pages, click the related tab. The tab browsing interface is shown in Figure 3:
Figure 1
Address bar
8
Figure 3
To close the current tab page, select File → Close tab in the menu.
To close the Web Browsing window, select File → Close window in the menu.
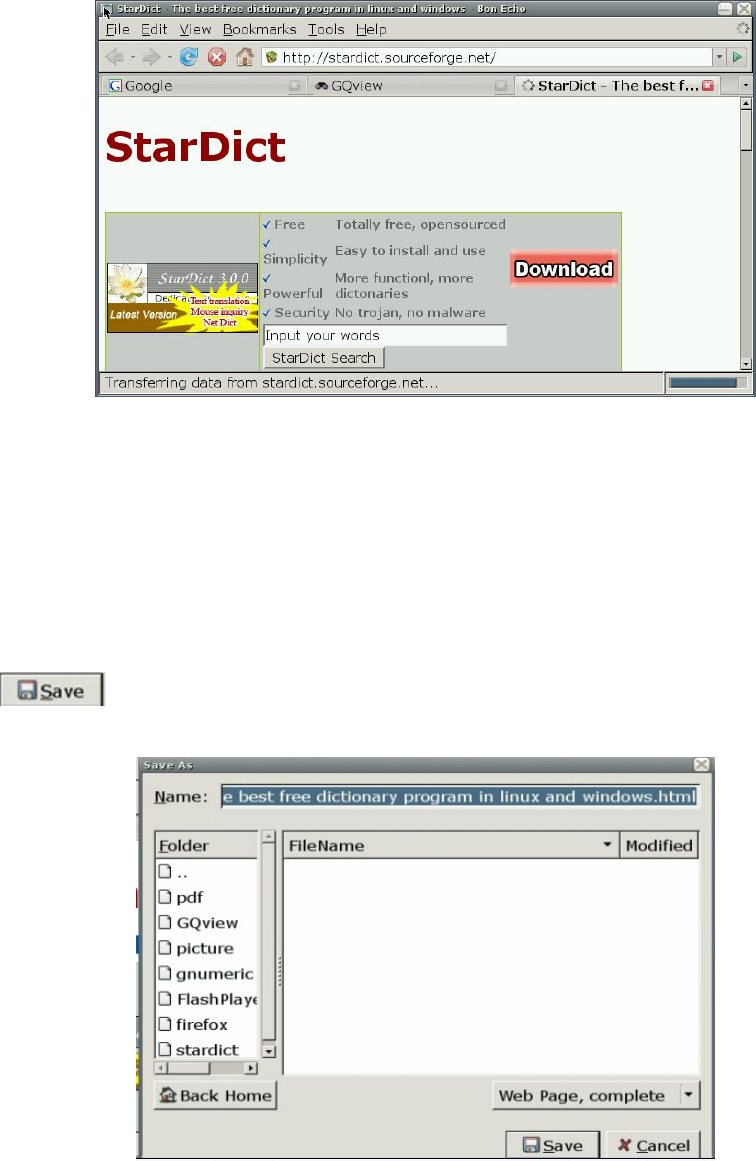
4) To save the favorite web page in the desired mode, select File → Save page as in the menu, as
shown in Figure 4. Enter the file name to be saved, select the saving directory, and click the
button to save the file.
Figure 4
5) For the personal private information stored in the browser, the Web Browsing provides the Clear
Private Data function through the Tools menu. Select Tools →Clear Private Data in the menu,
to display the window shown in Figure 5. Check the data to be cleared, and click the
9
button to clear the personal private information.
Figure 5
6) The bookmark management function of Web Browsing is equal to the My Favorite function of
Windows IE, but it is more powerful. To open the powerful bookmark manager, select
Bookmarks → Organize Bookmarks in the menu. With this function, You can add a bookmark
to the current page or manage bookmarks. Just experience the specific operation by yourself!
7) You can watch flash programs online by using the Web Browsing browser. When you browse
web pages, Web Browsing can display animated pictures on the web page or play the online
flash program. You can click to play the flash program, as shown in Figure 6:
Figure 6
8) To obtain the help information of Web Browsing, select Help → Help Contents in the menu, as
shown in Figure 7.
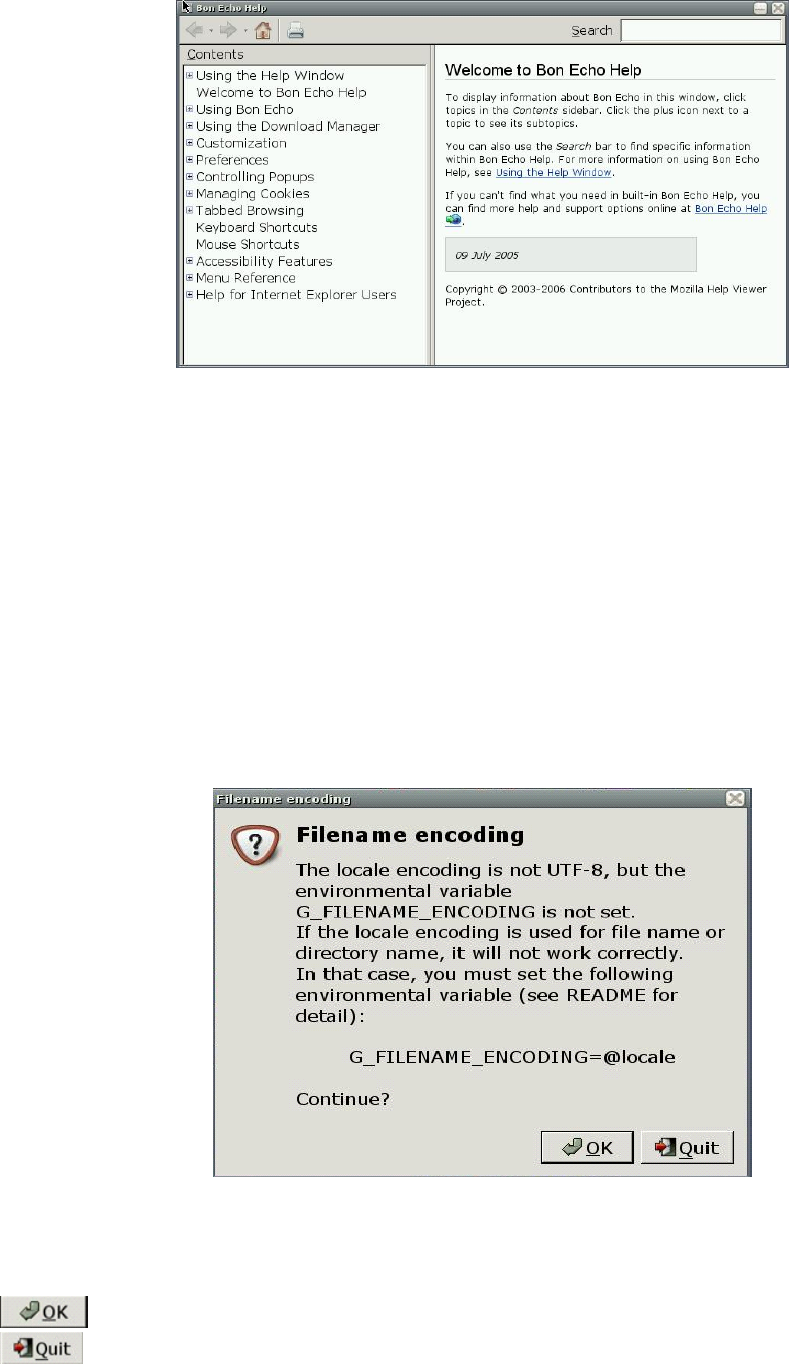
10
Figure 7
For more information about Web Browsing, visit http://www.mozilla.com/en-US/.
◆ Email Box
Email Box is a client email receiving and sending manager that can be operated easily just like
Outlook. If you have ever operated Outlook, you can use Email Box as easy as turning your hand
over.
1) Double click to open the Email Box application on the desktop, as shown in Figure 1:
Figure 1
The interface shown in Figure 1 will be displayed only when Email Box is opened for the first time. Click
on this interface to enter the Email Box, as shown in Figure 2. To exit the Email Box, click
.
11
Figure 2
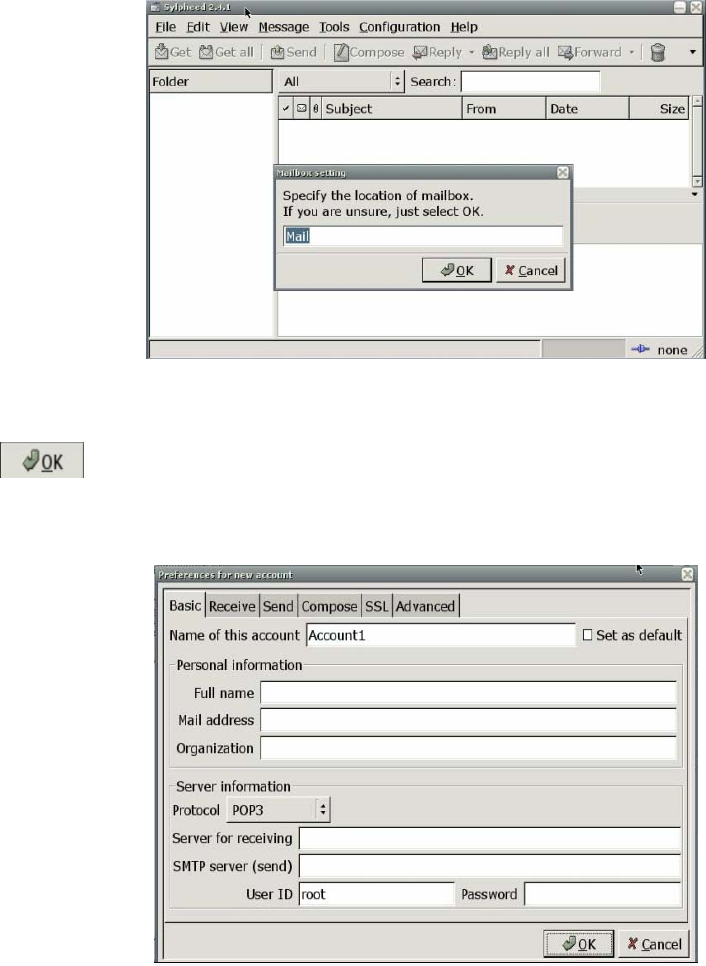
Click on this interface, to enter the interface for setting the user account, as shown in Figure
3. Set the personal account as prompted by the options on the interface.
Figure 3
For example, set the account anywhere@126.com, as described below:
1) Fill in the following content on the Basic tab page of the interface in Figure 3, as shown in Figure 4:
Name of this account: anywhere (you can fill your desired name)
Full name: anywhere
Mail address: anywhere@126.com (the email box to be set, namely, the email box to be
managed by using Email Box)
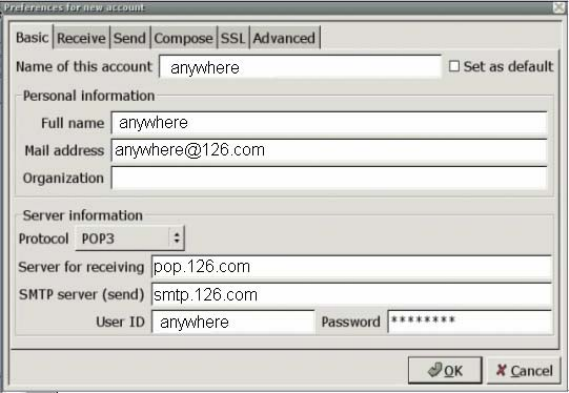
12
Protocol: POP3 (depending on the email box set by the user; here the POP3 for the 126 email
box is used)
Server for receiving: pop.126.com (depending on the email box set by the user; here pop of the
126 email box is used to receive emails)
SMTP server (send): smtp.126.com (depending on the email box set by the user; here smtp of
the 126 email box is used to send emails)
User ID: anywhere
Password: ****** (the email box password set by the user; here the password for
anywhere@126.com is used)
Figure 4
2) Fill in the following content on the Receive tab page of the interface in Figure 3, as shown in
Figure 5:
Check Filter messages on receiving (you can select it as needed. Here it is selected).
Default inbox: inbox (the default inbox; you can also select another one)
Check ‘Get all’ checks for new messages on this account.
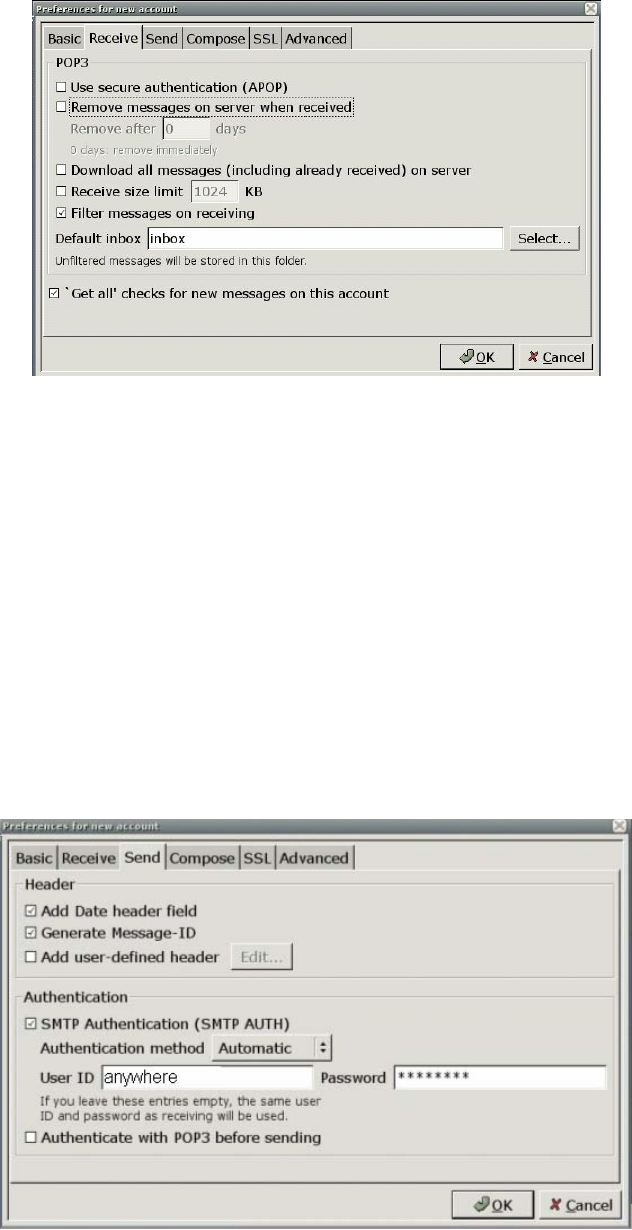
13
Figure 5
3) Fill in the following content on the Send tab page of the interface in Figure 3, as shown in Figure 6:
Check SMTP Authentication (SMTP AUTH) (this option must be selected, because SMTP is
used to send emails here).
Authentication method: Automatic
User ID: anywhere
Password: ****** (the email box password)
Figure 6
4) Fill in the following content on the Compose tab page of the interface in Figure 3, as shown in
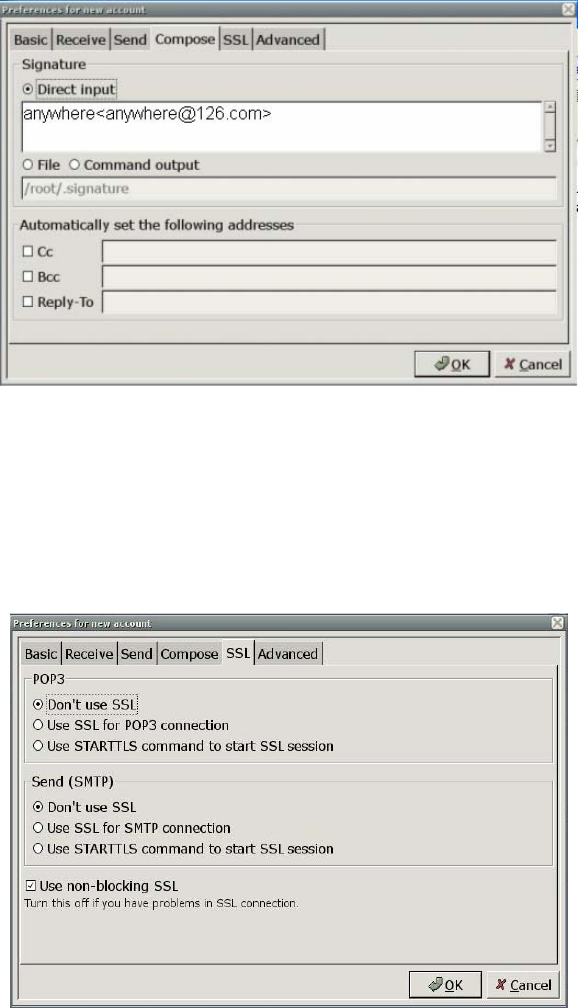
14
Figure 7:
Direct input: anywhere@126.com
Fill in the relevant email addresses in Cc, Bcc and Reply-To as needed. Here, no email address
is filled in.
5) Fill in the following content on the SSL tab page of the interface in Figure 3, as shown in Figure 8:
Check Don’t use SSL under POP3.
Check Don’t use SSL under SMTP.
Figure 8
6) Fill in the following content on the Advanced tab page of the interface in Figure 3, as shown in
Figure 7
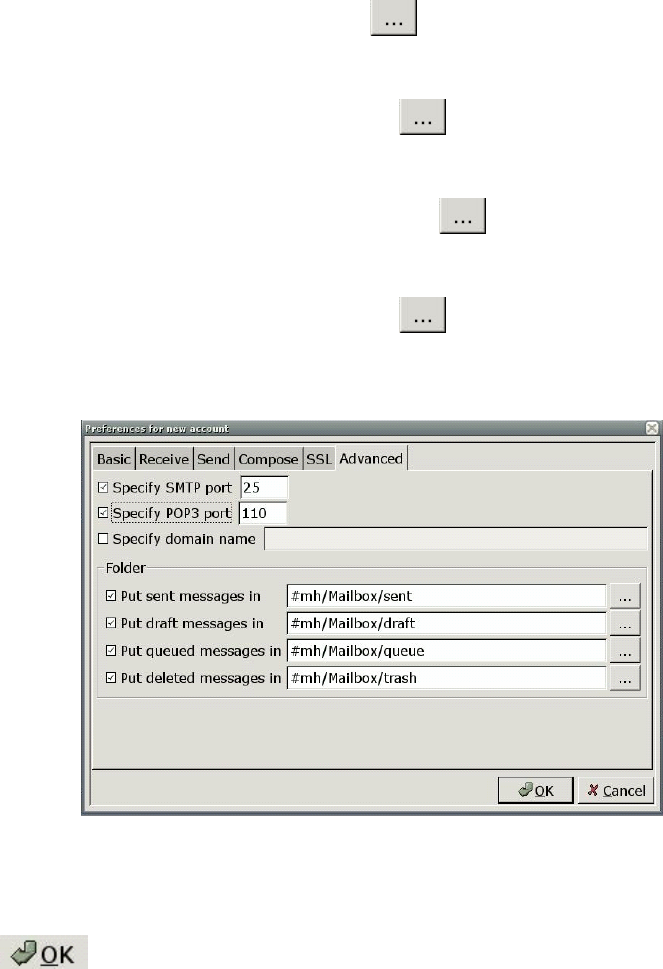
15
Figure 9:
Check Specify SMTP Port: 25 (SMTP port 25 is used for the 126 email box. You can fill in a
different port number according to the email box type).
Check Specify POP Port: 110 (POP port 110 is used for the 126 email box. You can fill in a
different port number according to the email box type).
Check Put sent message in, and then click to select the location for saving the sent email.
Here the sent folder is selected.
Check Put draft message in, and then click to select the location for saving the draft
email. Here the draft folder is selected.
Check Put queued message in, and then click to select the location for saving the
queued email. Here the queue folder is selected.
Check Put deleted message in, and then click to select the location for saving the deleted
email. Here the trash folder is selected.
Figure 9
By now, you have performed the relevant settings for the email box anywhere@126.com. Then,
click on the interface in Figure 9.
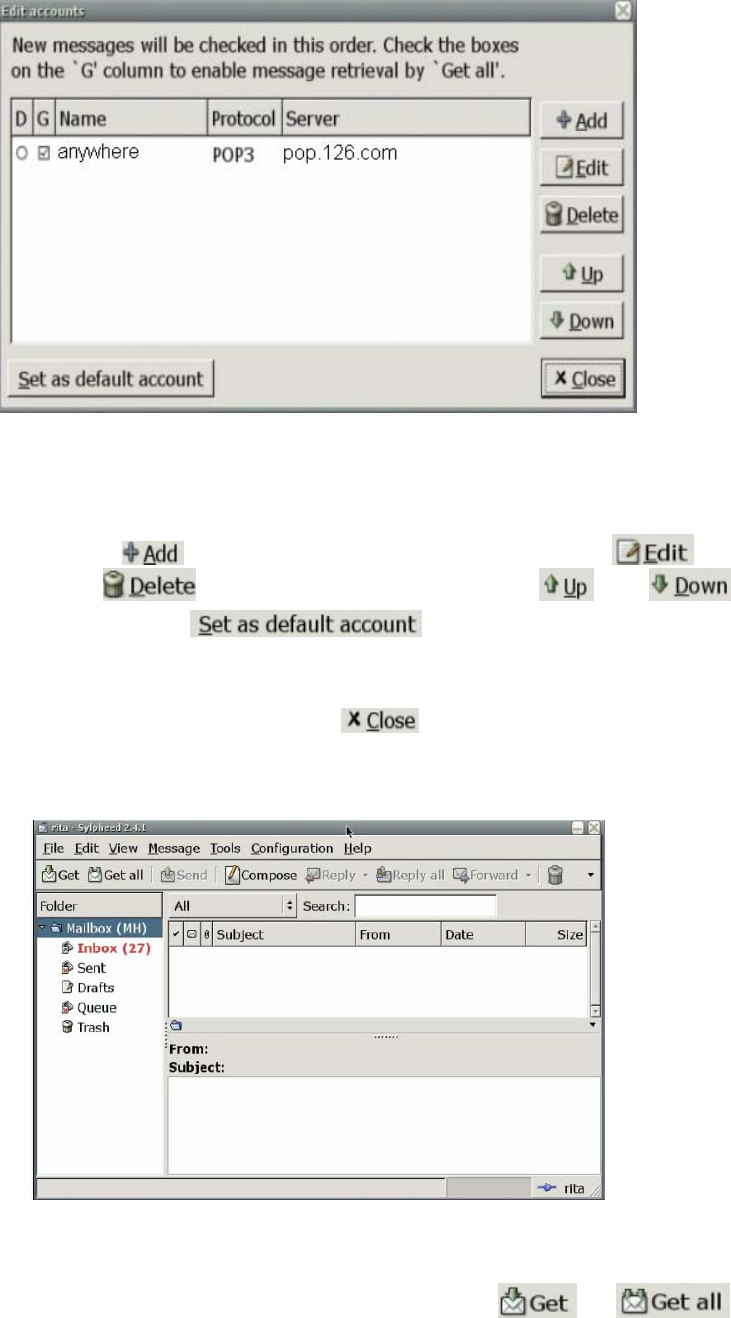
7) Edit the account information, as shown in Figure 10.
16
Figure 10
After the above settings in Steps 1 and 2, the Edit accounts interface will display the anywhere
account. You can click on this interface to add an account, click to edit an
existing account, click to delete an existing account, click and to sort
the existing accounts, and click use the selected account as the default
account.
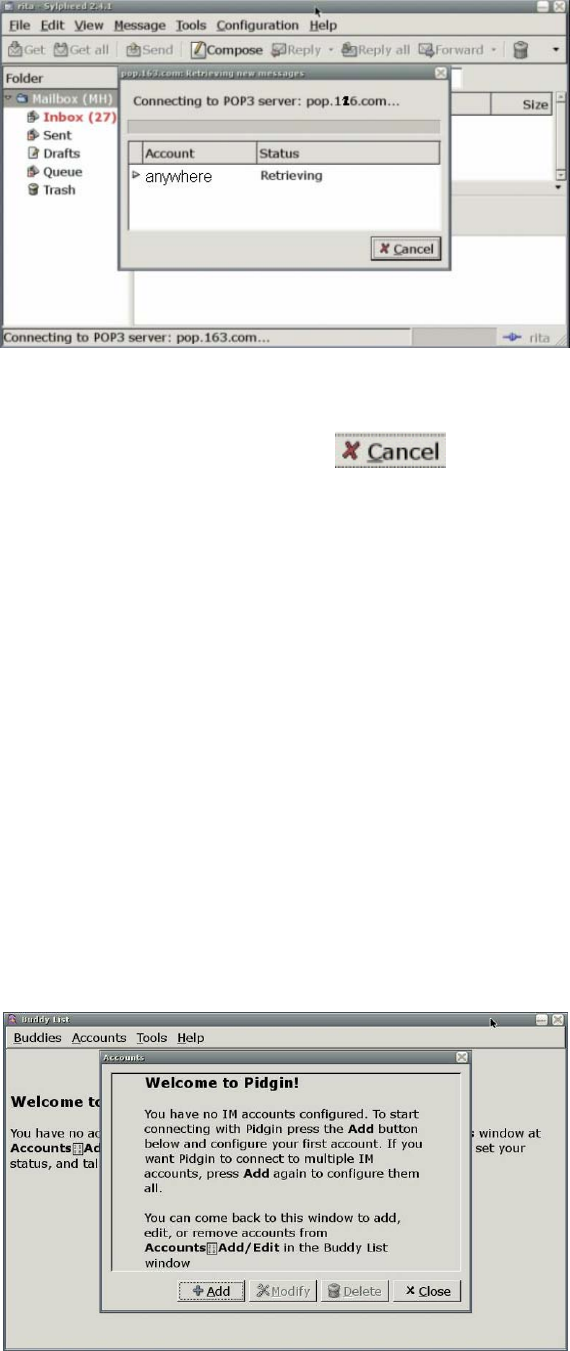
8) To enter the main interface of Email Box, click on the interface in Figure 10, as shown
in Figure 11.
Figure 11
To get the email in the email box anywhere@126.com just set, click or on the
interface in Figure 11, as shown in Figure 12.
17
Figure 12
To cancel the ongoing operation of receiving email, click on the interface in Figure 12.
Now, you have a general idea about how to use the Email Box email client. Email Box is used basically
the same as Outlook. If you are an Outlook user, you will get familiar with Email Box soon.
For more information about Email Box, visit http://www.Email Box.sraoss.jp/.
◆ Friend Chatting
Friend Chatting is an instant communication tool, which enables multiple persons to communicate with
each other at the same time. It provides multiple protocols for the user.
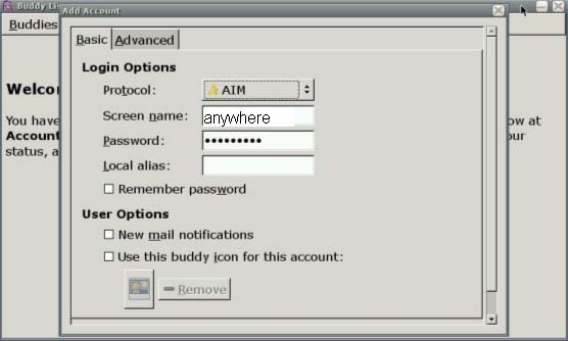
1. Configuring AIM at Pidgin
1) Click to open Pidgin.
i. Click Accounts → Add/Edit to display the window as shown in Figure 1.
18
Figure 1
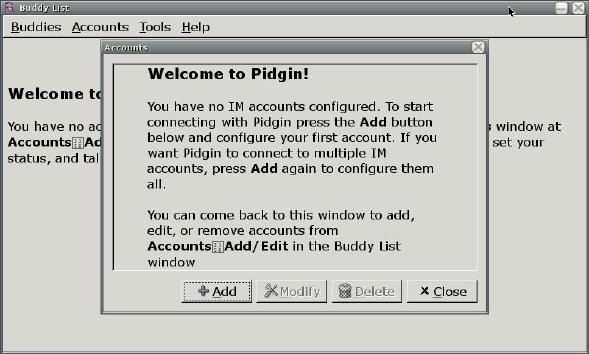
ii. Click the Add button on the interface in Figure 1, to display the Add Account
window, as shown in Figure 2. Configure as follows:
Protocol: AIM
Screen name: Your AIM username (excluding the symbol @ or network
domain)
Password: To increase the security, you are recommended to leave this
field null. To log in automatically, enter your password.
Local alias: Leave this field null.
Remember password: To let Pidgin remember your password, check
this box (after this option is selected, the system will not prompt you to
enter the password when you log in to the system).
Figure 2
Iv Click Save to save the setting.
Congratulations! Now, you can connect to the AIM service using Pidgin.
2. Configure Google Talk (XMPP) at Pidgin
a) Open Pidgin.
b) Click Accounts → Add/Edit to display the window as shown in Figure 1.
19
Figure 1
1. Click the Add button on the interface in Figure 1, to display the Add Account window, as shown
in Figure 2 and Figure 3. Configure as follows:
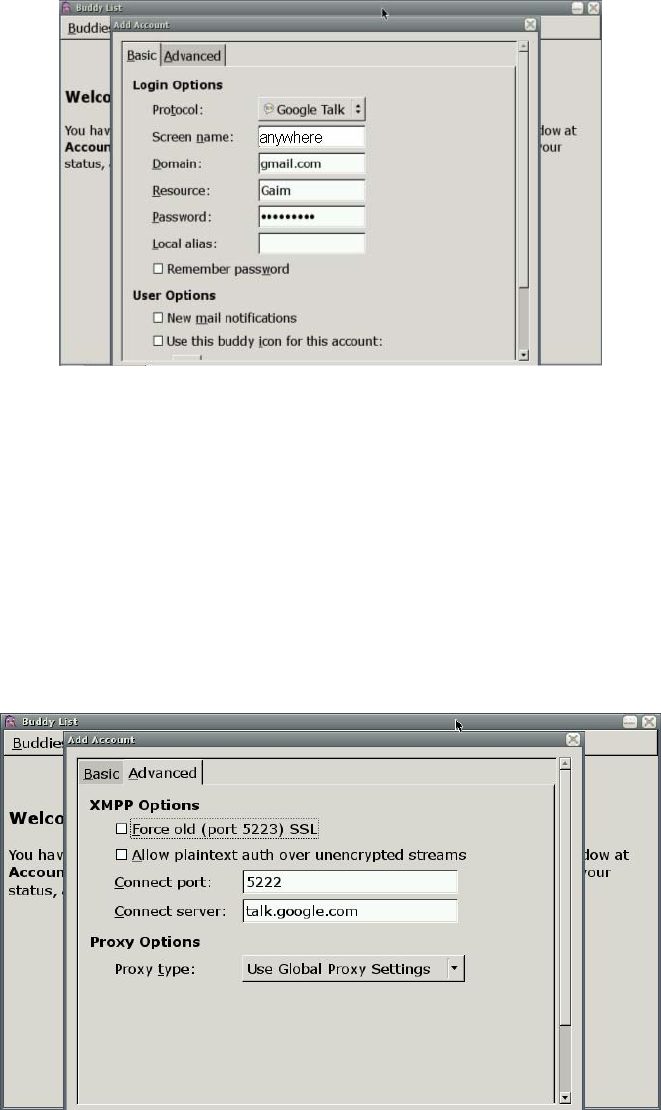
♦ Protocol: Google Talk
♦ Screen name: Your Google Talk username (excluding the symbol @ or network domain)
♦ Domain: gmail.com
♦ Resource: Gaim
♦ Password: To increase the security, you are recommended to leave this field null. To log in
automatically, enter your password.
♦ Local alias: Leave this field null.
♦ Remember password: To let Gaim remember your password, check this box (after this
option is selected, the system will not prompt you to enter the password when you log in to
the system).
20
Figure 2
2. Click the Advanced tag, and configure as follows on this tab:
Connect port: 5222
Connect server: talk.google.com
Proxy Options: Use Global Proxy Settings
Figure 3
Click Save to save the setting.
Congratulations! Now, you can connect to the Google Talk service using Pidgin.
The above part just simply introduces the usage of Instant Messaging. You need to use it by setting

21
other protocols.
◆ Word Processor
Word processor is a set of free word processing software based on Open Officer. It can process almost
all the prevailing types of documents in the world.
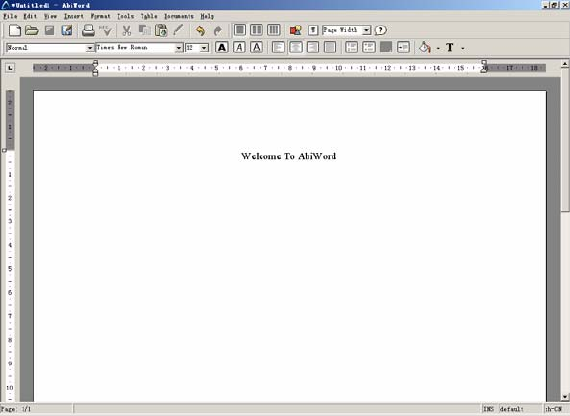
1) Double click the Word Processor icon on the desktop to open the Word Processor program.
Select File → Open from the menu, and then select and open the desired file on the displayed
interface, as shown in Figure 1:
2) Word Processor supports to open the files in the formats of doc., abw., dot., rt., txt., zabw., htm,
html. etc.You can also save your file in these formats.
3) After entering the relevant content in the word area, you can select Edit → Undo in the menu to
cancel the operation you just performed, or select Edit → Redo in the menu to redo the operation
you just canceled. With Word Processor, you can select Cut, Copy and Paste to perform
relevant operations. To search the relevant content, select Edit → Find in the menu. To replace
the found content, select Edit → Replace in the menu.
4) To set the required display format at Word Processor and the toolbar and status bar to be
displayed, select View in the menu. To enter the full screen display status, press F11 or select
View → Full Screen in the menu. To zoom in or zoom out the file, select View → Zoom in the
menu.
5) Make the edited file more neat
● To add a page header and a page footer to the file, select Insert → Header (Footer) in the
menu.
Figure 1
Menu bar
Toolba
r
Minimize
Close
Number of pages
22
● To add a background or a background color to the file, select Format → Page Background in
the menu.
● To insert a picture into the file to illustrate the file, select Insert → Picture in the menu.
6) Table usage in Word Processor
● To insert a table or insert a row and a column in the original table, select Table → Insert in the
menu.
● To delete a table, a row, a column or a cell, select Table → Delete in the menu.
● To select a table, a row, a column or a cell, select Table → Select in the menu.
● To merge cells, select Table → Merge Cells in the menu.
● To split cells, select Table → Merge Cells in the menu.
● To convert a table to a text file, select Table → Convert Table to Text in the menu.
● To convert a text file to a table, select Table → Convert Text to Table in the menu.
The following example details how to edit a file by using Word Processor:
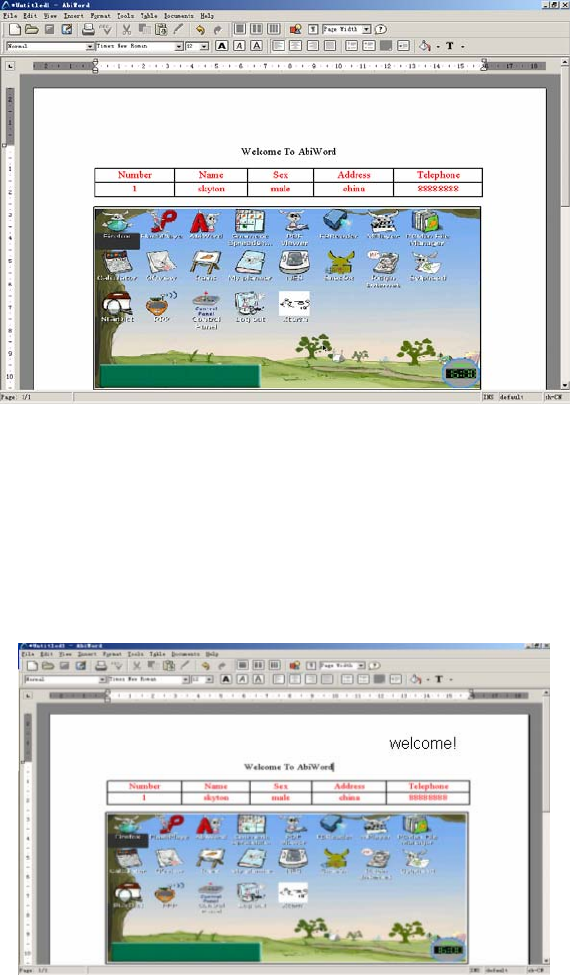
Step 1: Enter Welcome to Word Processor, and select it. Click Format → Align → Center in the
menu. Now, the content will be displayed at the center of the row in the editing area, as shown in Figure
2:
Figure 2
23
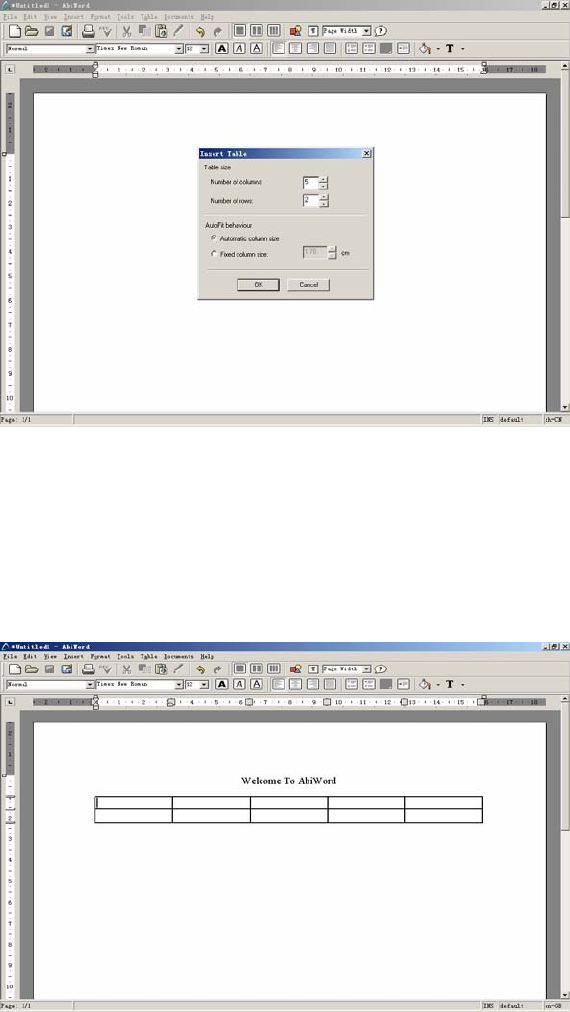
Step 2: Press Enter, and select Format → Align → Left in the menu. The cursor will be displayed at
the leftmost part of this row. Click Table → Insert → Table in the menu, to display the window as
shown in Figure 3.
Figure 3
Step 3: Enter 5 in the Number of columns box and 2 in the Number of rows box, and then click the
Insert button. You can see a table consisting of 2 rows and 5 columns in the editing area, as shown in
Figure 4.
Figure 4
Step 4: Now you can enter content in the table. Then, select the table and right click. On the displayed
shortcut menu, select Font. Here, you can set the font size, type can color (red in this example), as
shown in Figure 5.
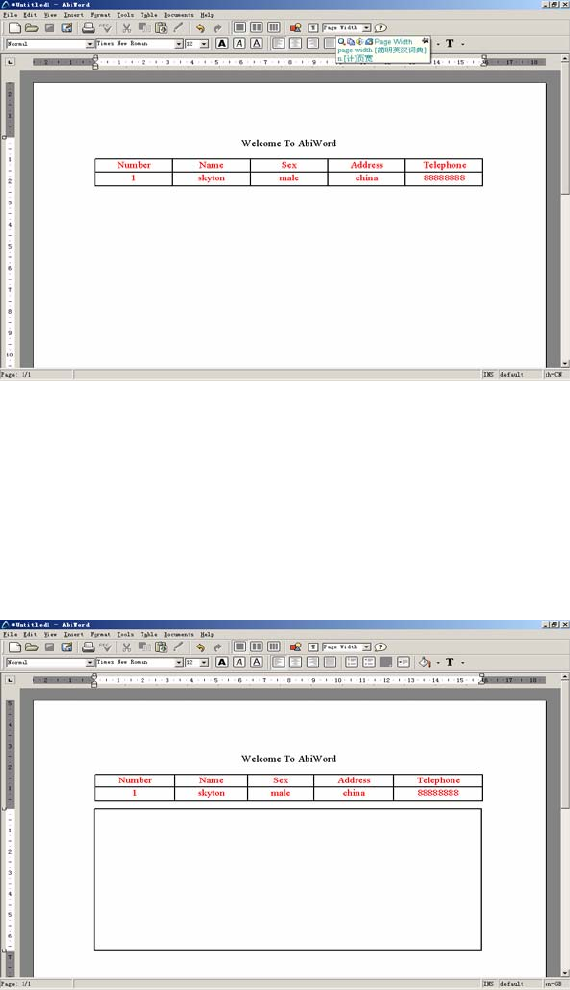
24
Figure 5
Step 5: After the table is prepared, click Insert → Text Box in the menu. The cursor changes to a cross
shape. Drag the cursor downward by pressing the left key of the mouse to make a text box in the
editing area, as shown in Figure 6.
Figure 6
Step 6: You can enter the relevant content or insert a picture in the text area. To insert a picture, select
Insert → Picture in the menu, select a picture from the displayed window, and then click the Open
button. The final result is shown in Figure 7.
25
Figure 7
Step 7: To perfect the file, click Insert → Header in the menu to insert a header. Enter the relevant
content, and click in the blank area. You will see a header displayed at the upper right corner, as shown
in Figure 8.
Figure 8
Step 8: A simple file is prepared, but it may look better if a background is also added. Xip Word also
provides this function. Select Format → Page Background → Page Image in the menu, and select a
picture to be inserted from the displayed window. The final result is shown in Figure 9.
26
Figure 9
Step 9: Now, a nice-looking file is in front of you. However, remember to save the file by selecting File
→ Save in the menu. Do you want to share this file with others? That’s easy. The printing function
provided by Word Processor can help you easily. Select File → Print in the menu, and click the Print
button in the displayed window to print the file.
Now, you have a general idea about how to use Word Processor. Word Processor is used basically the
same as Microsoft Word. If you are a Microsoft Word user, you will get familiar with Word Processor
soon.
For more information about Word Processor, please visit http://www.abisource.com.
◆ Spread Sheet
Spread Sheet is an e-table software, with the style and functions rather consistent with the current
Excel.
1) Double click the Spread Sheet icon on the desktop to open Spread Sheet system, as shown in
Figure 1.
Menu bar Toolbar Minimize
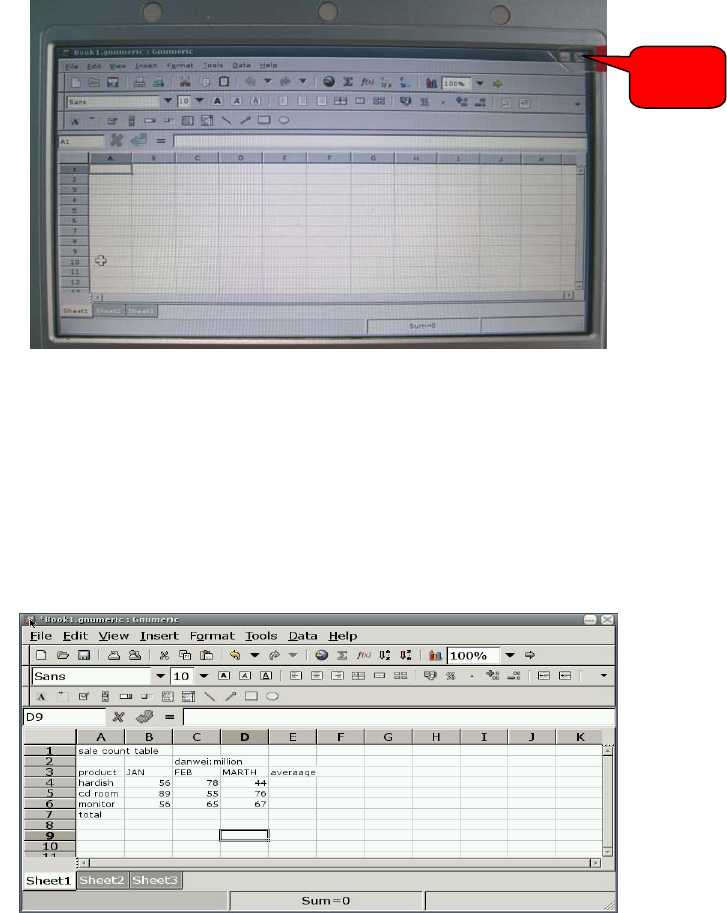
27
2) Spread Sheet provides the user with the table drawing and powerful data calculation functions.
The following example describes how to draw a sales count table using Spread Sheet.
Step 1: Confirm the area for drawing the table on the interface in Figure 1. Here, A1:E9 is selected.
Step 2: Select the relevant cells and enter data, as shown in Figure 2.
Figure 2
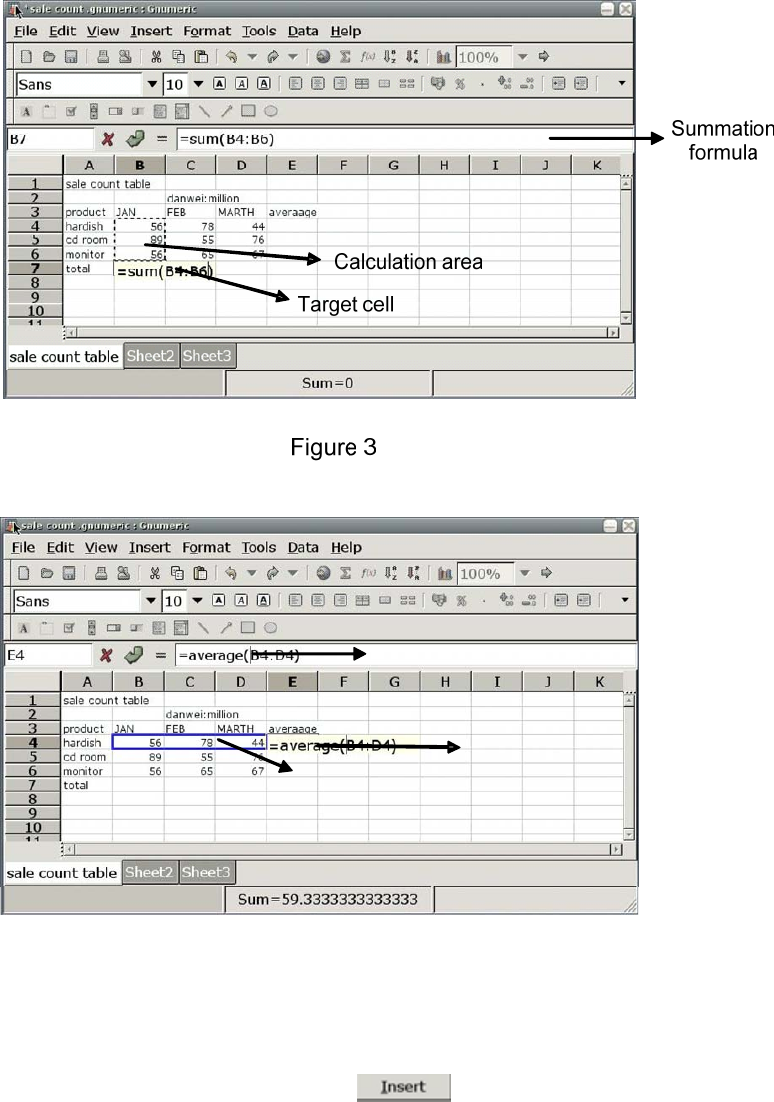
Step 3: Get the sums and averages using the functions provided by Spread Sheet. First select the
target cell to store the calculation result, insert the function in the target cell, and then select the area for
calculation, as shown in Figure 3 and Figure 4.
Close
Figure 1
28
Figure 4
Averaging formula
Calculation area
Target cell
Step 4: You can also more visually show the sales information by making a pie chart or a histogram
based on the data in the sales table. Select Insert → Chart in the menu, select the chart type to be
inserted in the displayed dialog box, and then the click , as shown in Figure 5.
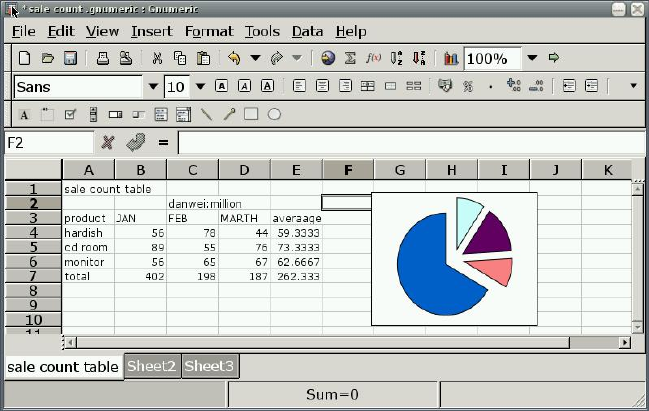
29
Figure 5
Thus, a pie chart of the sale statistics table is prepared.
3) Draw a graphics through the buttons on the toolbar in the interface of Figure 1. To draw a
rectangle in the work table, click the “□” button on the toolbar. The cursor changes to a cross
shape. Drag the cursor by pressing the left key of the mouse in the work table to select the area
for drawing a rectangle, and loosen the left key. Then, a required rectangle is drawn.
For more information about Spread Sheet, please visit http://www.gnumeric.org.
◆ Star Dictionary
Star Dictionary is a set of configurable desktop dictionary software, excluding the dictionary. The user
needs to download a dictionary to be used together with the software. Dictionary provides lots of
functions, including dictionary downloading, word searching, screen word capturing, wildcard query,
and fuzzy query.
1) Double click the Star Dictionary icon on the desktop to open Dictionary, as shown in Figure 1.
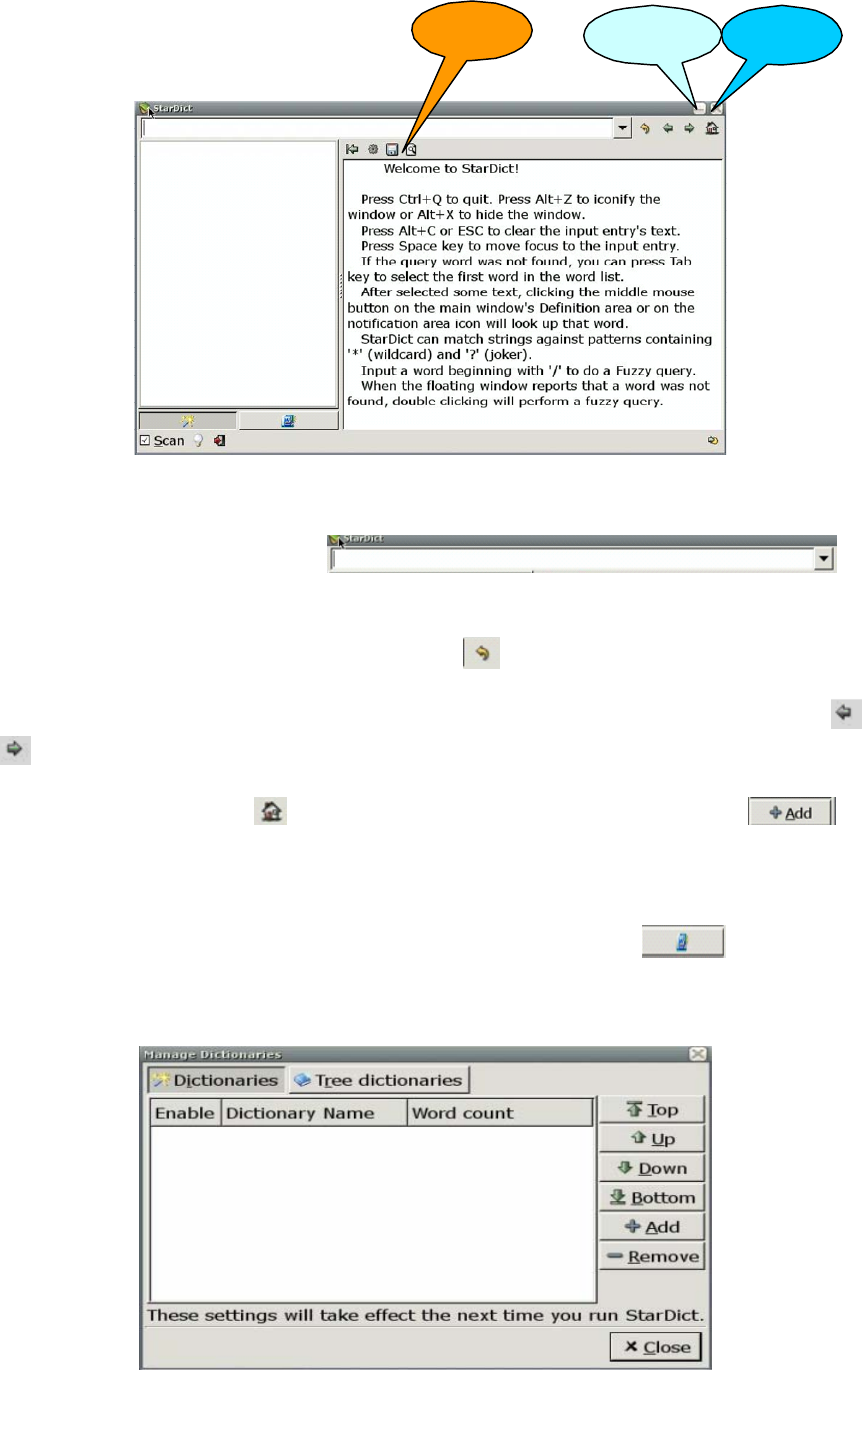
30
Figure 1
Toolbar Minimize Close
2) Enter the word to be searched in on the
interface in Figure 1. The window will display the information of the searched word.
3) To get the word that is previously searched, click on the toolbar on the interface in Figure 1.
4) To get the previous word and the next word of the current word in the left word list, click and
respectively on the toolbar on the interface in Figure 1.
5) To add a dictionary, click on the toolbar, select Manage Dict, and click on the
displayed interface, as shown in Figure 2.
When multiple dictionaries are added, the interface will display the information about the searched word
in all the directories. You can select a proper dictionary as needed. Click on the interface in
Figure 1 to display all the loaded dictionaries, and select the required dictionary.
Figure 2
31
6) Check on the main interface of Dictionary, to change it into . Dictionary will
enter the screen word capturing status, and you can select a word by using the cursor in other
windows. Double click or highlight a word. A floating window will pop up near the word, to display
the meaning of the word.
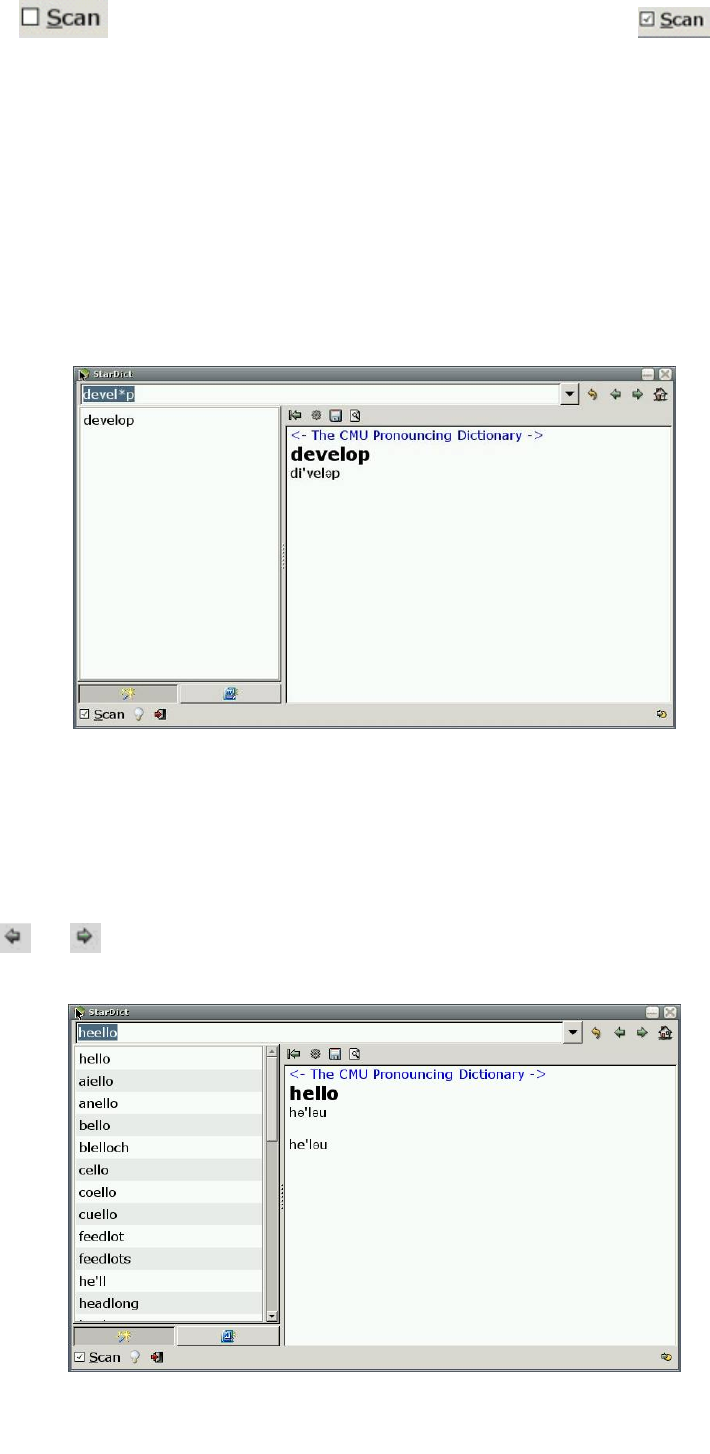
7) To query a word, you can enter the character string containing “*” and “?” as a wildcard for
matching. Here, “*” indicates any multiple characters, and “?” indicates a character. Press Enter,
to display the word that matches this rule in the left list box. This method can be used to query all
the matched words. You can find the queried word in the left list box, as shown in Figure 3.
Figure 3
8) If you are uncertain about the exact spelling of a word, try the fuzzy query function of Dictionary. If
the entered word is incorrect, Dictionary will provide the matching result of similar words in the list
box. To display the meaning of the previous word or the next word in the meaning display list box,
click or on the toolbar, as shown in Figure 4.
Figure 4
32
Just get to know how to use Dictionary in the practice.
◆ PDF Viewer
PDF Viewer is a PDF file viewer, which helps you to fast view the PDF file and can print and manage
the viewed PDF file.
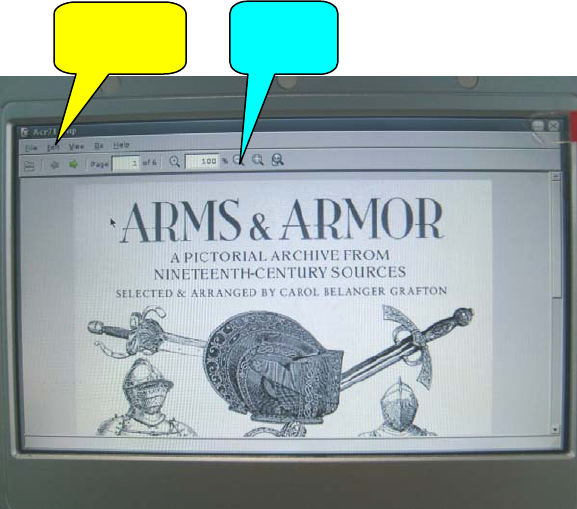
1) To open the program,double click the PDF Viewer icon on the desktop. Click File → Open in the
menu, select a file, and click the Open button. The displayed interface is shown in Figure 1.
Figure 1
2) To save a copy for the opened PDF file, select File → Save a Copy in the menu.
3) Setting your PDF Viewer interface
To set if the toolbar, status bar and index are displayed on the current interface, select the View
menu option. To zoom in or zoom out the PDF file, select the Zoon option under the View menu
option. To rotate the file to the right (left), click View → Rotate Right (Left) in the menu. To enter
the full screen display status, press F11 or select View → Full Screen in the menu.
4) Fast checking a PDF file
To fast find the desired content, select Edit → Find in the menu, or select the Page option on the
toolbar to rapidly go to the desired page.
Menu bar Toolbar
33
(5) To obtain the help information of PDF viewer, select Help → About in the menu. Click the
following address in the displayed window to enter the PDF Viewer website for more help
information:
http://www.emma-soft.com/project/epdfview
◆ E-book Reader
Ebook Reader can be used to read e-books in formats such as fb2, HTML, CHM, plucker, Palmdoc,
zTxt, TCR, RTF, OEB, OpenReader, Non-DRM’ed mobipocket and Plain text. Its simplified interface
provides powerful functions. After FB Reader is opened, the main interface will detail FB Reader. The
following part describes how to use FB Reader:
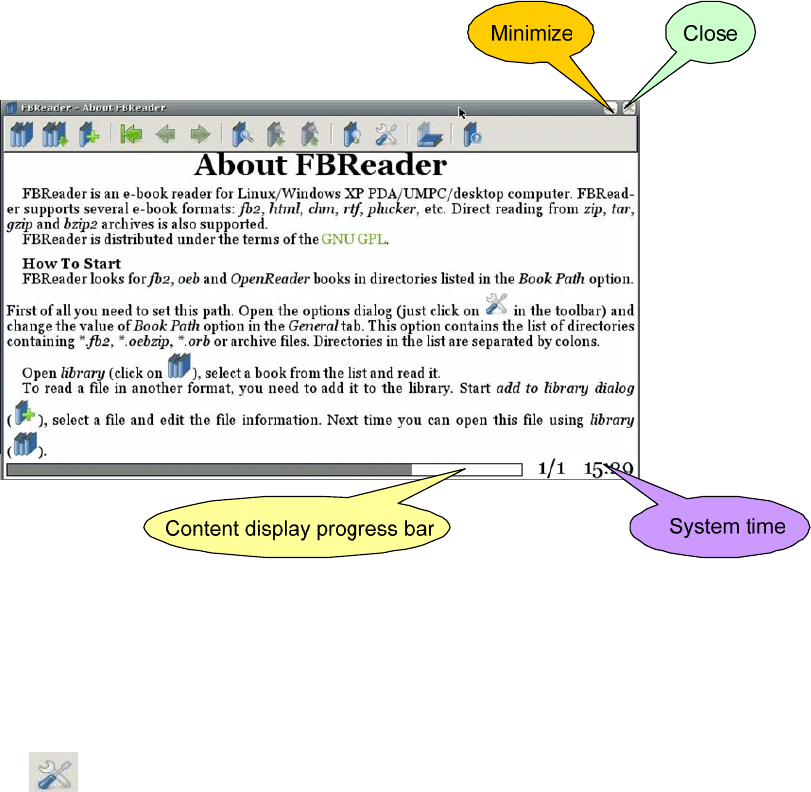
1) Double click the Ebook Reader icon on the desktop to display the interface, as shown in Figure 1.
Figure 1
The interface in Figure 1 displays the information about FB Reader, to enable the user to learn about
FB Reader. The interface displays the content display progress and the current system time.
2) Click the button on the interface in Figure 1, to display the option interface of FB Reader,
as shown in Figure 2. This interface is used to perform relevant settings for the file to be opened.
You can select relevant options as needed.
34
Figure 2
On the interface in Figure 2, you can set the font, color, font size, margin, scrolling bar and other
aspects of the opened e-book.
3) Click the button on the interface in Figure 1, and select the e-book path and e-book to be read.
Here, /my document/my file/FBreader/myman-5.0.3-alpha.chm is opened, as shown in Figure 3.
Figure 3
Click myman-5.0.3-alpha.chm on this interface, to display the Book Info interface, as shown in
Figure 4. The Book Info interface introduces some related information of the e-book. You can
perform the relevant setting as needed.
Figure 4
35
No setting is performed here. Directly click the button on the interface in Figure 4. Now,
you can read the content of myman-5.0.3-alpha.chm, as shown in Figure 5.
Figure 1
①
②
③
④
⑤
⑥
⑦
⑧
⑨
The usage of FB Reader is just briefed here. Please gradually grasp how to use it in the practice.
2 pages in total; the
content of page 1 is
being displayed
Current
system time
Click the button to display the related information of the currently opened e-book.
Click the button to search the related information in the currently opened e-book.
Click the button to list the contents of the currently opened e-book.
Click the button to rotate the currently opened e-book. The rotation degree is set by the user.
Click the button to return to the initial location of the opened e-book.
Click the button to go back.
Click the button to go forward.
Click the button to list the recently opened e-book list.
Click the button to list the tree structure of the book library.
◆ Media Player
As a flash player, Xip FlashPlayer is used to play flash animation. The Xip FlashPlayer of SW-T700 is in
three play modes: normal, low quality and half size.
1) Click the Xip FlashPlayer icon on the desktop to open Xip FlashPlayer, as shown in Figure 1.
36
Menu bar Minimize Close
Figure 1
2) Select File → Open in the menu on the interface in Figure 1, to display a dialog box. Select the
flash file to be played, and then click the button in the dialog box to play the flash file,
as shown in Figure 2.
Figure 2
3) To play the flash file in the low quality play mode, select Control → Low quality in the menu, as
shown in Figure 3.
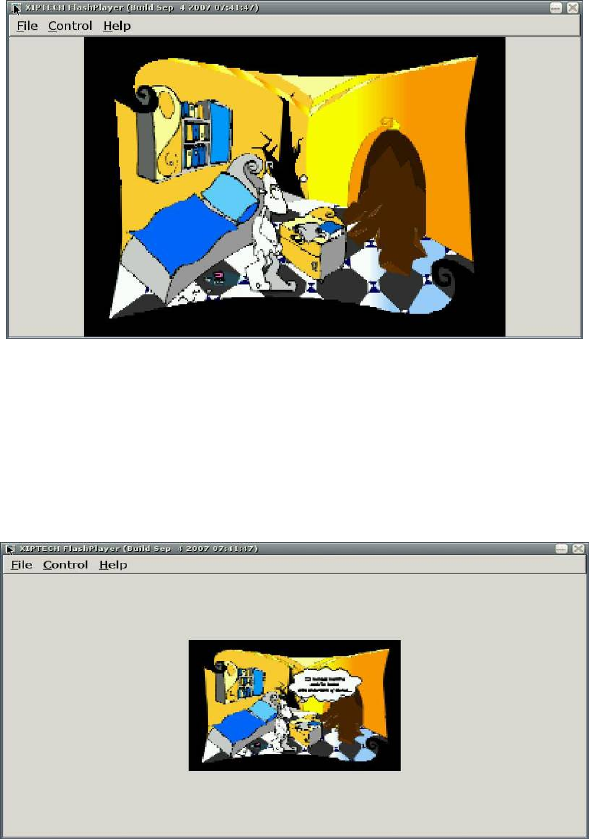
37
Figure 3
4) To play the flash file in the half size play mode, select Control → Half size in the menu, as
shown in Figure 4.
Figure 4
5) To stop playing the currently played flash file, select File → Close in the menu.
For more information about Xip FlashPlayer, please visit http://www.xiptech.com.
◆ Music Player
As a multimedia player, Media Player can be used to play files of mp3, wma and other formats.
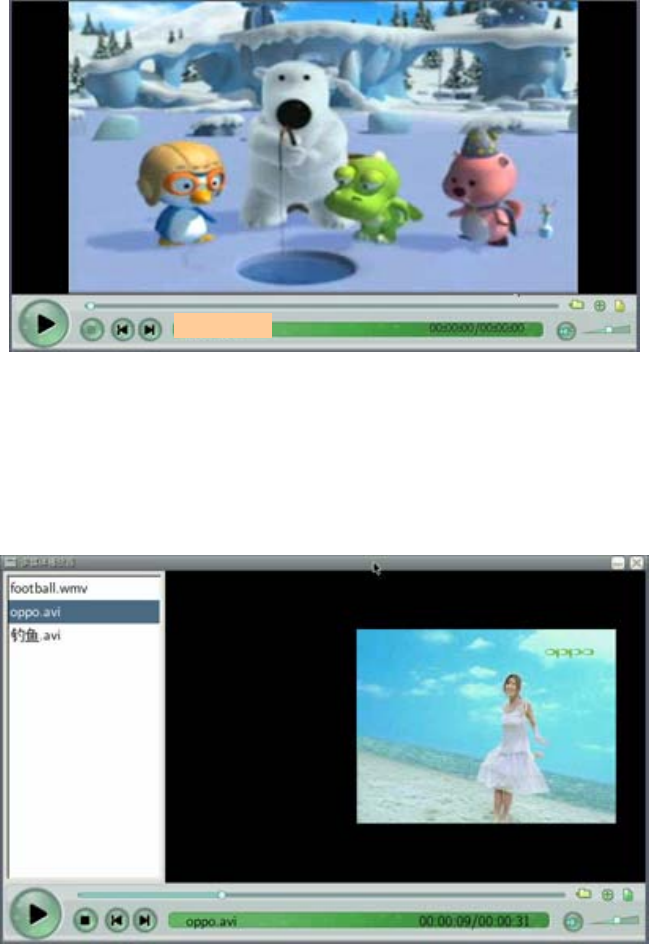
1) Double click the Music Player icon on the desktop to open the interface, as shown in Figure 1.

38
Play
Pause Go to the next
song
Return to the
previous song
Progress bar Tune volume
Open a file
Full screen
display
Play list
Minimize
Close
Figure 1
2) Simplified playing of multiple types of files
In the past, each type of media file format requires an independent player, and you must
download and configure these players.
With Media Player, you need not bother about configuration of each player. Media Player can
support playing of mp3, wma, wav, wmv, asf, avi, mpg, mpeg, mp2, mp4, mov and other video
formats.
3) Easy customization to satisfy your personal taste
When a movie is played, you can suspend playing, tune the volume, or go to your favorite part by
fast forwarding or rewinding. You can even enlarge the picture to the full screen.
4) High quality multimedia enjoyment
Media Player can provide the continuous watching effect even the file in multiple media types is
played.
The following example describes how to operate Media Player:
39
Step 1: Double click the Media Player icon on the desktop to open the interface, as shown in
Figure 1.
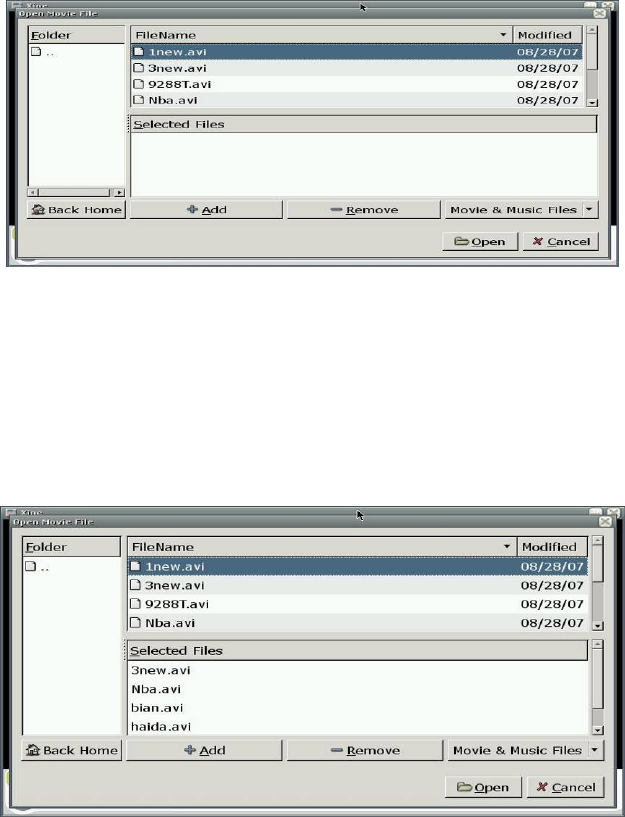
Step 2: Click the button for opening a file to display the interface, as shown in Figure 2.
Figure 2
Step 3: Select a video file, and click the Add button to add the video file to the Selected Files
box. If you cannot find the desired file in the folder, click the Movie&Music Files button and
select All Files, as shown in Figure 3.
Figure 3
Step 4: Click the Open button to return to the main interface of Media Player. Click the playing
button to play the video file, as shown in Figure 4.
40
Figure 4
Step 5: During the playing process, you can tune the volume or click the play list button or press
F11 to display the play list. Select the video file to be played from the play list, as shown in Figure 5.
Figure 5
Step 6: You can click the play button again to suspend playing, or browse the movie or select the
desired part by dragging the progress bar or pressing the fast forwarding or rewinding button.
Click the full screen play button to play the movie in the full screen, as shown in Figure 6.

41
Figure 6
Step 7: To exit the full screen display, click the title bar in the above, and then press F11 or ESC.
For more information about Media Player, please visit http://xinehq.de/index.php/features.
◆ Image Browser
Image Gallery is an image viewing tool that can be easily operated. It supports a big variety of image
browsing functions, including thumbnail generating, zoom-in and zoom-out functions.
1) Double click the Image Gallery icon on the desktop to open Image Gallery and also open the
image 01.jpg, as shown in Figure 1:
Toolba
r
File list
Picture list
Minimize
Close
Fi
g
ure 1
42
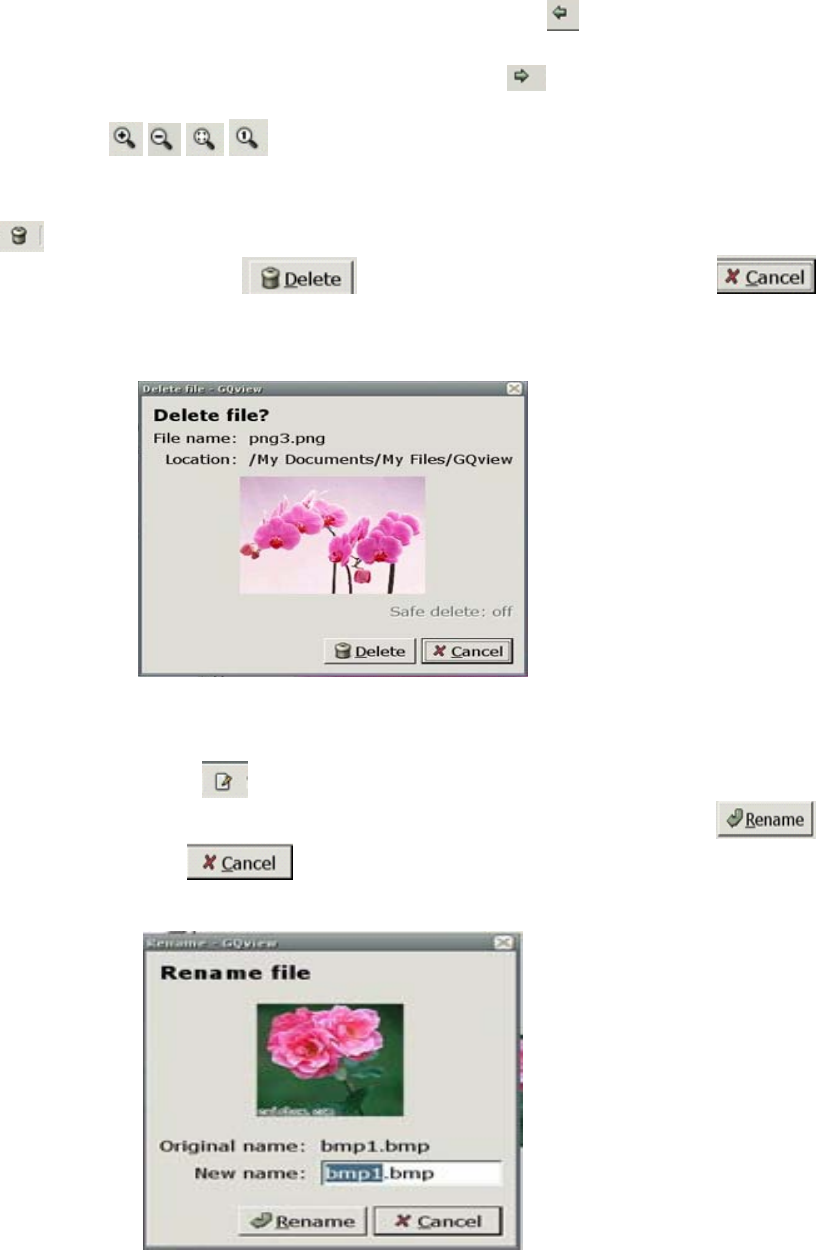
2) Open the folder where the images are located, and click to browse the images in this folder.
To view the previous image of the currently opened image, click the icon on the toolbar.
To view the next image of the currently opened image, click the icon on the toolbar.
3) As needed, click the / / / icon on the toolbar to zoom in/zoom out/adjust the image
size to a proper window/set the image length and width proportion to 1:1.
4) Click the button on the toolbar, or right click and select Delete from the shortcut menu. On
the displayed dialog box, click the button to delete the file, or click the
button to cancel the deleting, as shown in Figure 2.
Figure 2
5) To rename an image, click the button on the toolbar, or right click and select Rename from
the shortcut menu. On the displayed dialog box, enter the new file name, and click the
button to confirm, or click the button to cancel the operation, as shown in Figure 3.
Figure 3
43
6) To display the image in full screen, click the button on the toolbar, or right click and select
Full Screen from the shortcut menu. To exit the full screen display, right click and select Exit Full
Screen from the shortcut menu.
7) Image Gallery supports image editing using other editors. Right click and select the related option
from the shortcut menu. Open the image in the editing tool and edit it.
8) To hide file list and picture list shown in figure 1,right clike and select Hide file list from the
shortcut menu.
9) To play images in the slidershow mode, open an image using Image Gallery, right click and select
Start slidershow from the shortcut menu.
To pause slideshow, right click and select Pause slideshow from the shortcut menu. To continue
slideshow, select Continue slideshow from the shortcut menu. To stop slideshow, select Stop
slideshow from the shortcut menu.
For more information about Image Gallery, please visit http://Image Gallery.sourceforge.net.
◆ Calculator
You can use Calculator to perform all the standard operations that can be completed using a handhold
calculator. Calculator can execute all the basic operations, such as addition, subtraction, multiplication
and division, as well as functions of the scientific calculator, like square and factorial.
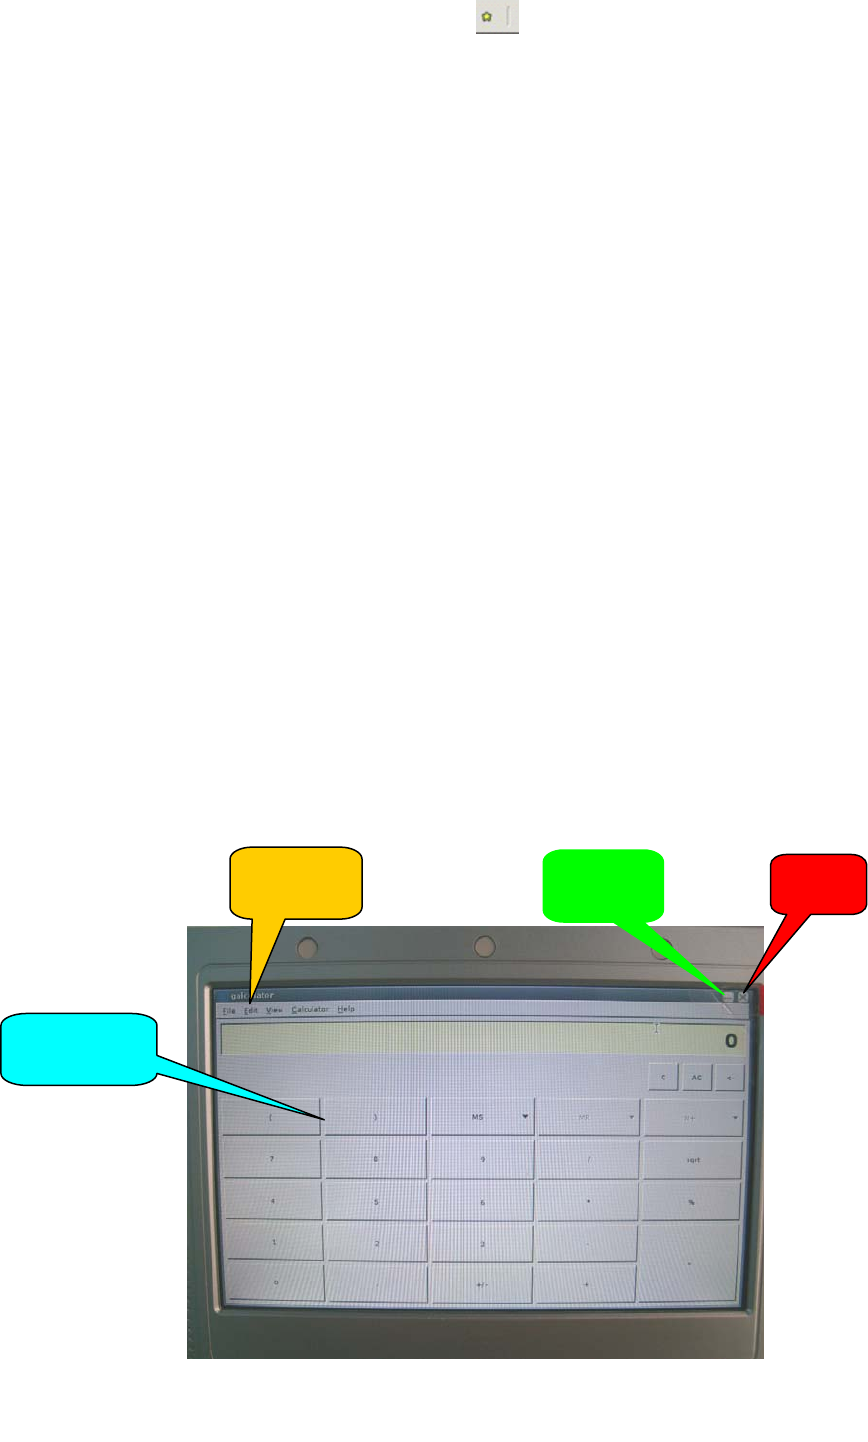
Double click the Calculator icon on the desktop to open the interface, as shown in Figure 1.
Display box
Menu bar Minimize
Close
Figure 1
44
1) Executing a simple calculation
z Key in the first number for calculation
z Click + for addition, - for subtraction, * for multiplication and / for division.
z Key in the next number for calculation
z Enter the other operators and numbers.
z Click =.
2) Using the numbers stored in the memory
z To store the displayed data, click MS.
z To recall the stored data, click MR.
z To add the displayed number to the existing number in the memory, click M+. To check a new
number, click MR.
For more information about Calculator, please visit http://www.calculator.com.
◆ Painting at Will
Paint Bursher is a drawing tool, which helps the user to create simple or elaborate images. These
images can be black and white or colorful, and saved in the .JPG and .PNG forms. The image can be
used as wallpaper or pasted to another file. The scanned photo can also be checked and edited using
the relevant function.
To open the program, double click the Paint Bursher icon on the desktop. Click the Lode Image File
button on the toolbar, select a file and click Open, to display an interface, as shown in Figure 1.
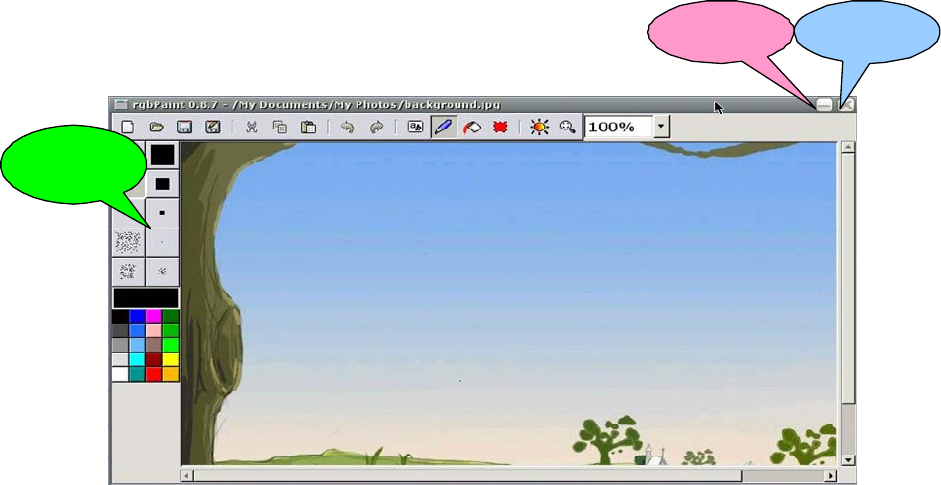
45
Toolbar
Minimize Close
Figure 1
1) Creating an image
● Click the Paint Bursh button on the toolbar. By default, you can draw a line by pressing the left
key of the mouse and dragging the cursor.
● Click the round black button in the toolbox. A small box appears under the pencil. Click to draw a
circle.
● Click the square black button in the toolbox. A small box appears under the pencil. Click to draw a
square.
● Other round and square buttons with different sizes are available in the toolbox. Click them to
draw the related circles and squares with various sizes.
● Click the Paste Text button on the toolbar, and key in text in the image.
2) Applying colors
● Select colors from the toolbox to paint your image colorful.
● Click the fog spot button in the toolbox, to get a spraying effect in the drawing.
● Click the Flood Fill button on the toolbar to fill color in the selected area.
● To customize your color, click the color button in the toolbar.
46
3) Processing an image
● To select a rectangle area, click Make Selection on the toolbar.
● To specify the area to be displayed, click Pan Window on the toolbar.
● To select the rectangle area to be copied or cut, click Make Selection on the toolbar. Drag cursor
by pressing the left key of the mouse to define the area to be copied or cut. Click the Paste
button on the toolbar to paste the area.
● To cancel/redo your operation, click the Undo/Redo button on the toolbar.
For more information about Paint Bursh, please visit http://mtpaint.sourceforge.net/rgbpaint.html.
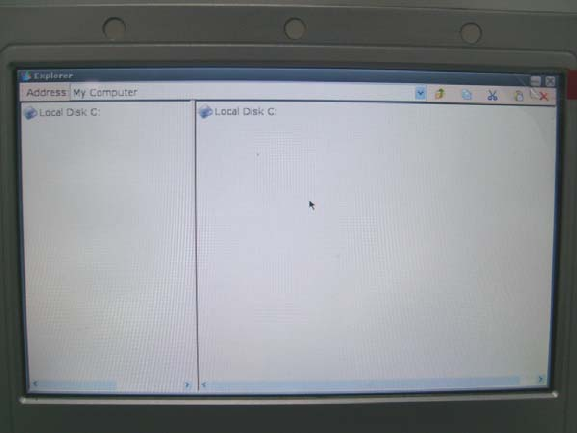
◆ My Computer
My Computer is a fast and light file manager, which safely keeps files saved at the PWS700B. It
provides the highly commended Tabbed Browsing feature, user friendly interface, and both the icon
checking and list checking modes.It can also display the size of the current folder.
The following part briefs how to use My Computer:
1) Double click the My Computer icon on the desktop to open My Computer, as shown in Figure 1.
Figure 1
You can see two panes on this interface. You can double clike the Local Disk C icon in the left
pane or the right pane to open it.
47
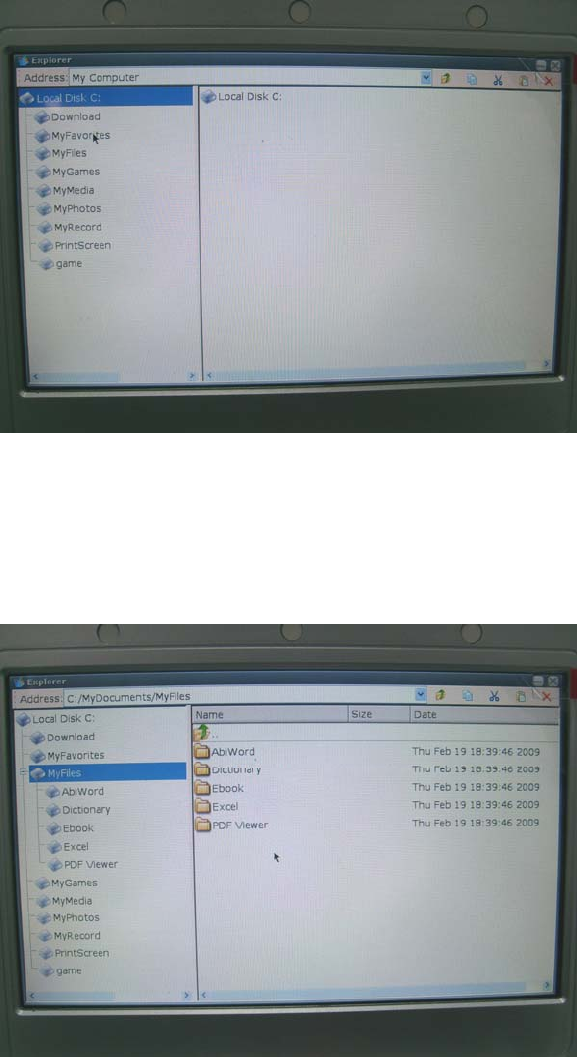
2) Double clike the Local Disk C in the left pane in Figure 1 to list the system folders, as shown in
Figure 2.My Computer contains these folders: Download, My Favorites, My Files, My Games,
My Media, My Photos,My Record and Print Screen.
Figure 2
3) Double click the My Files icon in the left pane on the interface in Figure 2,the left pane lists the
content contained in My Files accordingly, at the same time the right pane also displays the same
content,as shown in Figure 3.
Figure 3
4) After you open a folder, you can right click in the right pane, to display an option list. Here, you
can select these functions: Open,Copy,Cut,Paste,Delete,Rename,New folder and Property. as
48
shown in Figure 4.
Figure 4
◆ Wireless Setting
① Double click the Wireless Setting icon on the desktop to open the wireless network interface, as
shown in Figure 1.
Figure 1
A prompt box is displayed above the interface in Figure 1, indicating that you need to click the
Open Device button on the top left corner of the interface to search WIFI device.
49
② Waiting for a few moment, the wireless network interface displays the searching status after you
pressed the Open Device button, as shown in Figure 2.
Figure 2
③ On the interface shown in Figure 2, click the serched device named HIVISION and click the
Connect button again on the lower right corner,a dialog pane will pop up to request you to enter
the network key to connect to the network,as shown in Figure 3.When the selected device is an
open network,the machine will connect to the network automatically.
Figure 3
50
④ On the interface shown in Figure 3,enter the network key and press OK button to enter the
connecting network status.After a while,you will see the IP address of the network,as shown in
Figure 4.
Figure 4
Now,you can close the wireless interface and open the Web Browser application to enter your favorite
network.

51
6 Antenna Description
PWS700B uses 2.4GHz High Gain Built-in Antenna(Model:ZE-01) which manufactured by
SHENZHEN SUNBEN ADVANCED TECHNOLOGIES CO.,LTD.The radio utilizes
the antenna with a maximum gain of 2dBi.
2.4GHz High Gain Built-in Antenna Specification:
Item Specification
Working Frequency Range 2.4GHz ~ 2.5GHz
Gain 2dBi
VSWR ﹤1.5
Polarization isotropic
Length 192.0±2mm
Size 48*6mm
Temperature -40 ~ +120°C
This equipment complies with FCC RF radiation exposure limits set forth an uncontrolled environment.In
order to maintain compliance with the RF exposure requirement,must use only with supplied antenna.
Unauthorized antenna, modification, or attachments could damage the transmitter and may violate
regulations.
NOTE: The manufacturer is not responsible for any radio or TV interference
caused by unauthorized modifications to this equipment. Such
modifications could void the user’s authority to operate the equipment.
NOTE: This equipment has been tested and found to comply with the limits
for a Class B digital device, pursuant to part 15 of the FCC Rules. These
limits are designed to provide reasonable protection against harmful
interference in a residential installation.
This equipment generates, uses and can radiate radio frequency energy and,
if not installed and used in accordance with the instructions, may cause
harmful interference to radio communications. However, there is no
guarantee that interference will not occur in a particular installation.
If this equipment does cause harmful interference to radio or television
reception, which can be determined by turning the equipment off and
on, the user is encouraged to try to correct the interference by one or
more of the following measures:
—Reorient or relocate the receiving antenna.
—Increase the separation between the equipment and receiver.
—Connect the equipment into an outlet on a circuit different from that
to which the receiver is connected.
—Consult the dealer or an experienced radio/TV technician for help.