Hobart Hr5 Users Manual F 34486 Supplement (F 34046 & HR7 Rotisserie Ovens)
HR5 F34486
HR5 to the manual 545dd741-3347-5d24-d512-eb5699fd2732
2015-02-05
: Hobart Hobart-Hr5-Users-Manual-406797 hobart-hr5-users-manual-406797 hobart pdf
Open the PDF directly: View PDF ![]() .
.
Page Count: 8

THIS IS A SUPPLEMENT TO THE
INSTRUCTION MANUAL FORM 34046
(HR5 AND HR7 ROTISSERIE OVENS)
FOR THE 15-PROGRAM OPTIONAL
ACCESSORY
701 S. RIDGE AVENUE
TROY, OHIO 45374-0001
937-332-3000
www.hobartcorp.com
FORM 34486 (Aug. 2000)
NSTRUCTIONS
I

— 2 —
© HOBART CORPORATION, 2000
THIS IS AN ADDENDUM TO PAGE 13 OF FORM 34046
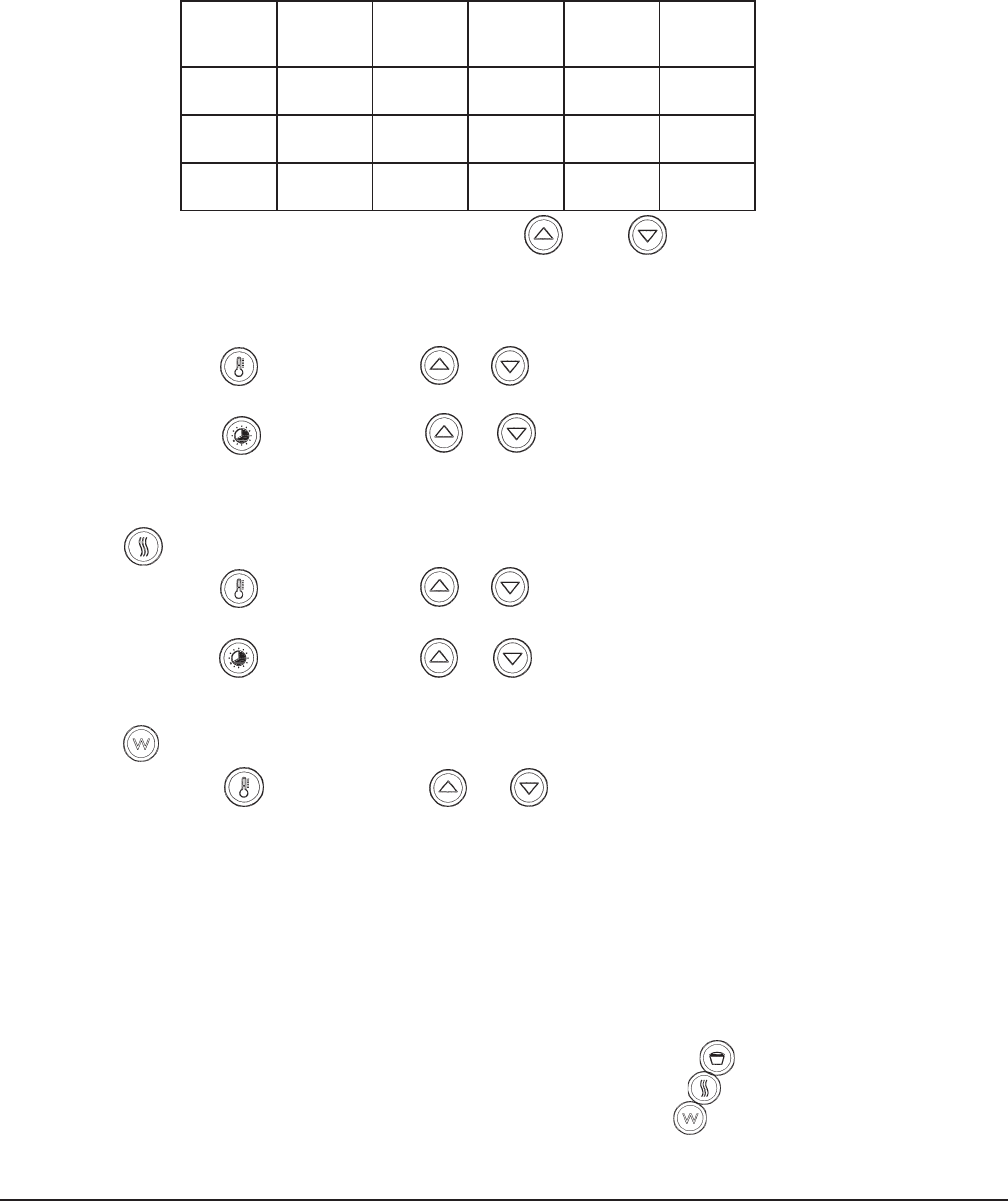
PROGRAMMABLE OVEN CONTROL PANEL WITH MANUAL CONTROLS (Fig. 5)
Display
Shows “Program 1” and “15Pr” when first turned on.
Colon flashes, remaining cooking time shows.
Programmable Controls
Set all control dials to "P". See pages 15-18.
Manual Controls
Use control dials. See page 14.
DISPLAY
PROGRAMMABLE
CONTROLS
THERMOSTAT
DIAL
ROTISSERIE
DIAL
MAIN POWER
DIAL
PL-53362
Manual
Fig. 5

— 3 —
THIS IS AN ADDENDUM TO PAGE 15 OF FORM 34046
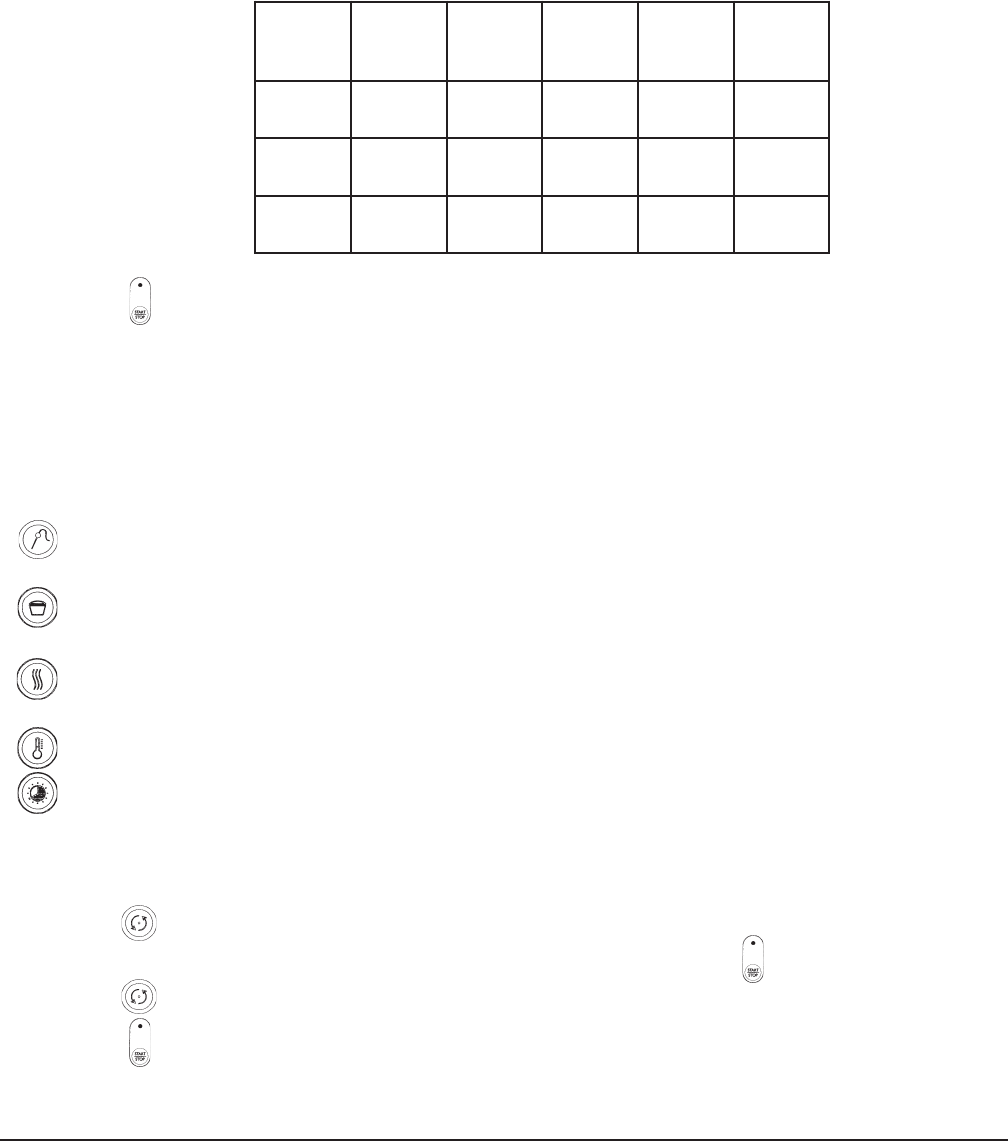
PROGRAMMABLE CONTROLS (Fig. 6)
All programming must be done with all dials in the "P" position (Thermostat , Rotisseries, and Main
Power dials). If all dials are not set to "P", the manual controls override the programmable controls.
When all dials are in the “P” position, the right display will show the code “15Pr” to indicate that the unit
is provided with an extended programming possibility. The left display will show “Program 1”.
The programmable control allows you to program three different functions for each of the 5 menu
buttons. The three functions are Cook, Grill, and Warm/Hold.
•Cook cycle is for roasting.
•Grill cycle is for searing and browning. This can be done at the beginning or end of the cycle.
•Warm/Hold cycle is a holding cycle.
- Recommended holding temperature is 160°F (71°C) or 180°F (82°C).
- Rotisserie will continue to turn during the hold cycle.
Fig. 6
Setting the Time of Day
1. Turn Main Power dial to "P".
2. Press and hold and adjust to current time by using or . This is a 12-hour clock.
The only way actual time of day can be displayed at any time is by pressing and holding the button.
PL-41185-1
TIME OF
DAY
PROCESS
INDICATORS
POWER
INDICATOR
START / STOP
BUTTON
WARM / HOLD
PROCESS
PROGRAM
INDICATORS
PROGRAM
KEYS
BUZZER
UP
TEMPERATURE
TIME DOWN GRILL
PROCESS
PROGRAM
END
PROBE ROTOR
COOKING
PROCESS
— 4 —
THIS IS AN ADDENDUM TO PAGE 16 OF FORM 34046
Programming Menu Buttons
1. Before entering the program mode, you must first press a Menu Button. Press desired Menu
Button once to access Programs 1-5; twice for Programs 6-10; and three times for Programs 11-
15. The selected Menu Button’s LED will light.
2. To enter Program mode, press and hold both and simultaneously until time display
shows "PROG" (approximately 2 seconds). The LED on Menu Button #1 and Cooking Process
Indicator will start blinking.
3. Cook function time and temperature must be programmed first.
Press and hold while pressing or to adjust to temperature desired.
• Maximum allowable temperature setting is 480°F (249°C); minimum is 32°F (0°C).
Press and hold while pressing or to adjust to time desired.
• Maximum time setting is 5 hours, 59 minutes.
4. Program the Grill function for Menu Button #1 (if needed).
Press . The Grilling Process Indicator and LED on Menu Button #1 will start blinking.
Press and hold while pressing or to adjust to temperature desired.
• Maximum allowable temperature setting is 480°F (249°C); minimum is 32°F (0°C).
Press and hold while pressing or to adjust to time desired.
5. Program the Warm/Hold function for Menu Button #1.
Press . The Warm/Hold Process Indicator and LED on Menu Button #1 will start blinking.
Press and hold while pressing or to set temperature for the hold cycle.
You cannot program a time for the warm/hold function. If you try to program a time, the buzzer
will sound for 3 seconds, then shut off.
6. Press flashing Menu Button #1 to lock in the programmed settings.
After programming, the display will show the program number and “15 Pr.”
7. Continue programming Menu Buttons 2-5 in the same manner. All functions must have a value
entered to allow the program to work properly.
Verifying Programmed Temperatures and Times
Cook function: Press and hold the desired Menu Button, then press .
Grill function: Press and hold the desired Menu Button, then press .
Warm/Hold: Press and hold the desired Menu Button, then press .
• Only the temperature will be displayed in the Warm/Hold function.
• Time display will show "00:00".
SSERP UNEM NOTTUB 1
UNEM NOTTUB 2
UNEM NOTTUB 3
UNEM NOTTUB 4
UNEM NOTTUB 5
emiT1 margorP 1margorP 2margorP 3margorP 4margorP 5
semiT2 margorP 6margorP 7margorP 8margorP 9margorP 01
semiT3 margorP 11 margorP 21 margorP 31 margorP 41 margorP 51
— 5 —
THIS IS AN ADDENDUM TO PAGE 17 OF FORM 34046
Starting a Processing Cycle
1. Press desired Menu Button (its LED will light). Press desired Menu Button once to access
Programs 1-5; twice for Programs 6-10; and three times for Programs 11-15.
2. Press (its LED will light).
• Time display will show total processing time and will count down to the end of the
processing cycle.
• Temperature display will show “pht” (preheat) until oven cavity temperature reaches 125°F
(52°C). Then it will show the actual cavity temperature while maintaining the programmed
temperature.
Displaying Time/Temperature During a Processing Cycle
— If pressed during a processing cycle, probe icon under temperature display will light and
probe temperature will be displayed for 20 seconds. You may press it again if you like.
— Press and hold to display both Cook temperature and time programmed for the Menu Button
you're using.
— Press and hold to display both Grill temperature and time programmed for the Menu Button
you're using.
— Press and hold to display programmed temperature only.
— Press and hold to display programmed time only.
Interrupting a Processing Cycle
1. Press if you want to check the food before the end of the processing cycle.
• This will turn off the heaters, front lamp (customer side), and will flash.
2. Press again to start cycle from where it left off.
3. Press to start all over at the beginning of programmed cycle.
SSERP UNEM NOTTUB 1
UNEM NOTTUB 2
UNEM NOTTUB 3
UNEM NOTTUB 4
UNEM NOTTUB 5
emiT1 margorP 1margorP 2margorP 3margorP 4margorP 5
semiT2 margorP 6margorP 7margorP 8margorP 9margorP 01
semiT3 margorP 11 margorP 21 margorP 31 margorP 41 margorP 51

— 6 —
THIS IS AN ADDENDUM TO PAGE 17 OF FORM 34046 (Cont’d.)
End of Processing Cycle
At the end of a Cook or Grill cycle, a buzzer will sound. Press to silence the buzzer.
When oven goes into Warm/Hold cycle, the buzzer will sound and operator side lamp will cycle on and
off with heaters.
• Press and hold to silence buzzer.
• The temperature and time displays will show actual oven cavity temperature and time of day until
reaching holding temperature.
• Press to end holding process.
Changing a Programmed Setting
You may modify temperature or time of a Cook or Grill function only on any Menu Button prior to
starting processing, or during processing.
• Press (for temperature) or (for time) while pressing or .
• This will not change the temperature or time programmed in the memory for that Menu Button.

— 7 —
— NOTES —

— 8 —
FORM 34486 (Aug. 2000) PRINTED IN U.S.A.
— NOTES —
