Hobbico 120 Ocular 120 FPV Drone With Camera RTF User Manual 58584 DRO Ocular Manual Update indd
Hobbico Inc Ocular 120 FPV Drone With Camera RTF 58584 DRO Ocular Manual Update indd
Hobbico >
User Manual
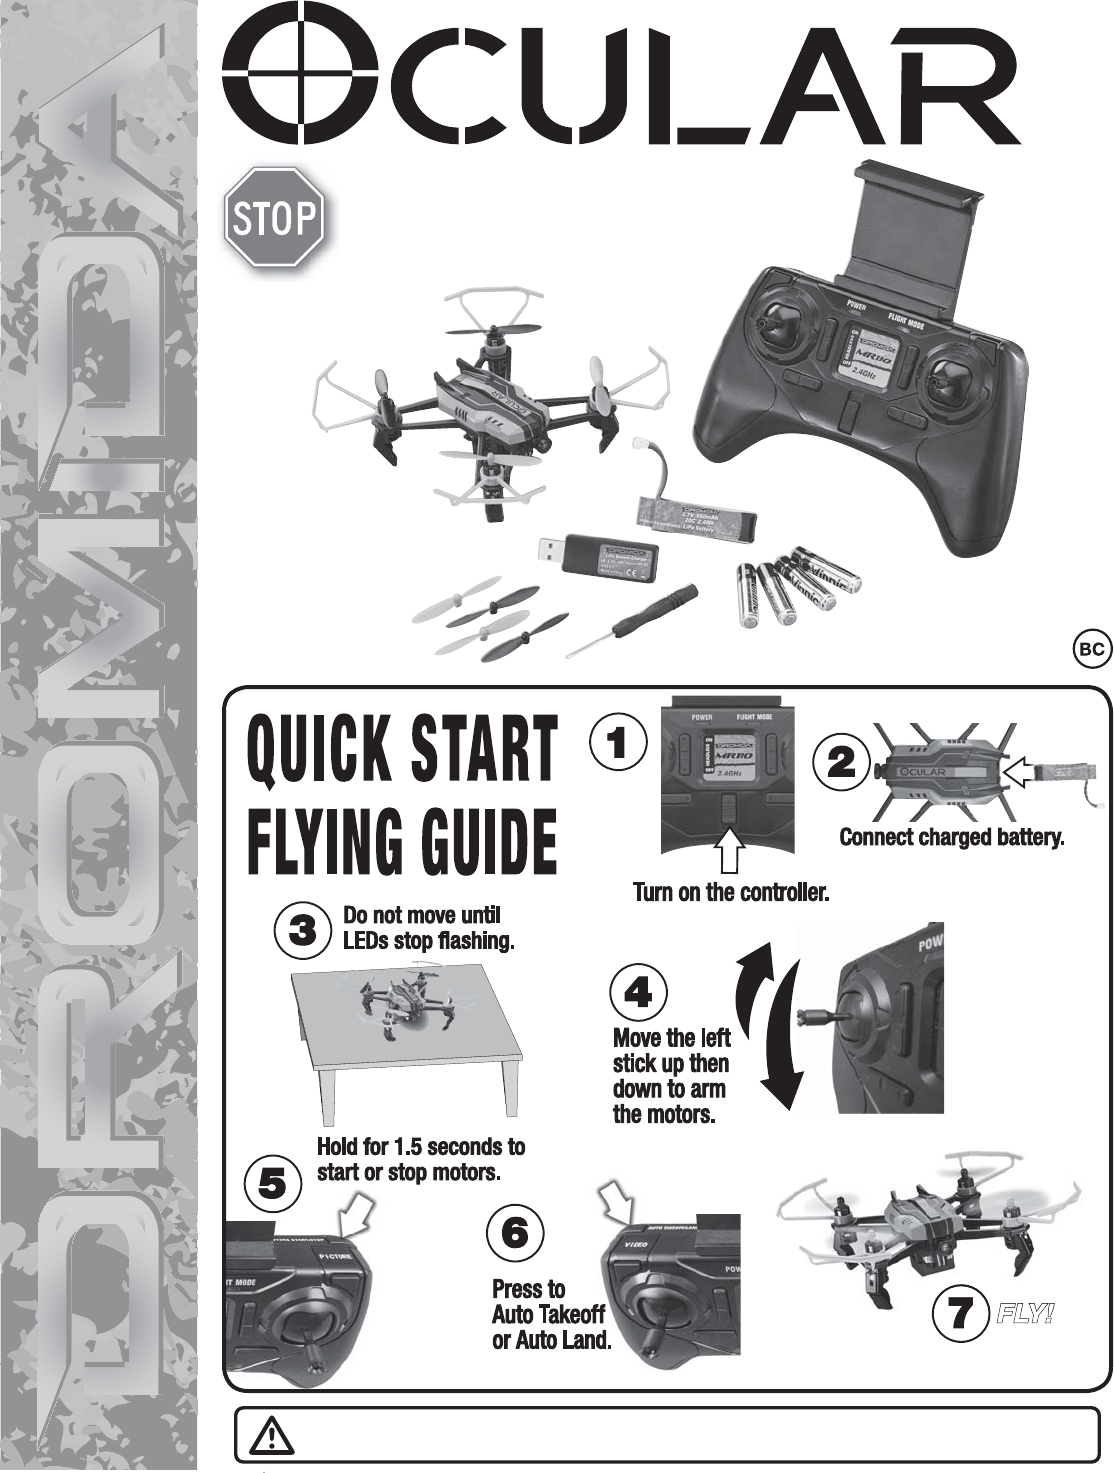
Ocular Drone
Controller
Screwdriver
USB Charger
Spare Blades
(2 black, 2 green)
Flight Battery
4 AAA Batteries
READ THESEREAD THESE
INSTRUCTIONSINSTRUCTIONS
BEFOREBEFORE FLYING ! FLYING !
™
1
2
FLY!
FLY!
WARNING! Product includes a lithium polymer (LiPo) battery. Improper handling may result in FIRE!
You are responsible for following all safety precautions as outlined in this instruction manual.

2
SAFETY PRECAUTIONS
Follow these safety precautions when operating this or any model drone.
• Adult supervision required.
• Do not touch the spinning blades or fly over people or animals.
• Keep your face and body as well as all spectators away from the rotors whenever
the battery is connected.
• Stay clear of buildings, trees and power lines. AVOID flying in or near crowded
areas. DO NOT fly close to people, children or pets.
• Maintain a safe pilot-to-drone distance while flying.
• Your Ocular drone should not be considered a toy, but rather a small, working
model. If not operated correctly, the model could possibly cause injury to you or
spectators and damage to property.
• Do not alter or modify the model, as doing so may result in an unsafe or unflyable
model.
• You must check the operation of the model before every flight to ensure that the
model has remained structurally sound.
CAUTION: Changes or modifications to this product not expressly
approved by the party responsible for compliance may void the user’s
authority to operate the equipment.
LOCATION PRECAUTIONS
The Ocular uses optical technology to hold it in place. This works by taking repeated
pictures of the ground and comparing the pixels from one picture to the next very
fast. If it senses a change, the sensor will command the drone to adjust its position.
While this technology is incredible, there are some things to watch for that can
confuse the sensor:
• Floors that are shiny and reflective may cause drifting as it tries to follow light reflections.
• Surfaces that are very consistent, like black asphalt, snow, or uniform tile floors,
can also confuse the sensor and cause drifting.
• Flying over water or anything that can move will cause the drone to drift.
• When it is windy outside and the grass or flowers are moving, the drone may drift.
If you find it is drifting where you are at, simply move to an area where the sensor
can see stationary objects.
WARNING: Read the ENTIRE instruction manual to become familiar with the features of the product before operating. Failure to operate the product correctly can
result in damage to the product, personal property and cause serious injury.
This is a sophisticated hobby product. It must be operated with caution and common sense and requires some basic mechanical ability. Failure to operate this Product
in a safe and responsible manner could result in injury or damage to the product or other property. This product is not intended for use by children without direct adult
supervision. Do not use with incompatible components or alter this product in any way outside of the instructions provided by Horizon Hobby, LLC. This manual contains
instructions for safety, operation and maintenance. It is essential to read and follow all the instructions and warnings in the manual, prior to assembly, setup or use, in
order to operate correctly and avoid damage or serious injury.
The following terms are used throughout the product literature to indicate various levels of potential harm when operating this product:
WARNING: Procedures, which if not properly followed, create the probability of property damage, collateral damage, and serious injury OR create a high probability
of super cial injury.
CAUTION: Procedures, which if not properly followed, create the probability of physical property damage AND a possibility of serious injury.
NOTICE: Procedures, which if not properly followed, create a possibility of physical property damage AND a little or no possibility of injury.
NOTICE
All instructions, warranties and other collateral documents are subject to change at the sole discretion of Horizon Hobby, LLC. For up-to-date product literature, visit
www.horizonhobby.com and click on the support tab for this product.
Meaning of Special Language
3
LITHIUM BATTERY WARNING
WARNING: This product includes a lithium polymer (LiPo) battery.
Improper handling could result in FIRE! A lithium battery fire has the
potential to ignite surrounding areas and may cause property damage or cause
personal injury.
For safe LiPo handling, follow all of these guidelines:
• ALWAYS keep out of reach of children!
• NEVER charge a LiPo battery on a flammable surface or near combustible materials.
• NEVER charge inside a vehicle or at a location that could be damaged in the
event of a LiPo fire.
• NEVER charge or use a battery that is deformed, bent, crushed or has any
type of visible damage.
• ALWAYS use the included, factory-approved charger with this LiPo battery.
• ALWAYS keep a supply of sand accessible when charging. Dumping sand on
the battery will assist in extinguishing a LiPo chemical fire.
• MOST IMPORTANT! NEVER leave the charger and LiPo battery unattended
while charging.
• It is normal for the charger to become warm to the touch. However,
disconnect the battery and unplug the charger immediately if either
becomes hot, begins to swell, or smoke!
• ALWAYS disconnect the battery and unplug the charger if the charge time
exceeds 3 hours.
• ALWAYS disconnect the battery and unplug the charger after the charge is
complete.
• ALWAYS disconnect and remove the battery from your model immediately
following operation.
• ALWAYS store/transport LiPo batteries in a fireproof container away from
combustible materials.
• NEVER put a LiPo battery in the pocket of any clothing.
• Keep LiPo batteries out of reach of animals. A punctured battery
may cause a fire.
• NEVER use the included charger for any other battery other than the one
included with this model.
• In the event of a crash, ALWAYS place the battery into a fireproof container
immediately. Examine the battery for damage before further use.
• ALWAYS operate and store batteries between 40-110° F (4-43° C).
• NEVER allow the battery temperature to exceed 140° F [60° C] during
operation.
• NEVER disassemble or modify a battery, its wiring, or puncture cells, as this
may result in fire.
• NEVER allow the battery to short circuit by touching exposed wires together.
• ALWAYS stop the operation of your model immediately when the battery
power is low. A battery failure can occur when attempting to recharge an
over-discharged battery.
LiPo batteries must always be recycled or disposed of properly.
If you are unable to follow these guidelines, return this product to the place of purchase.
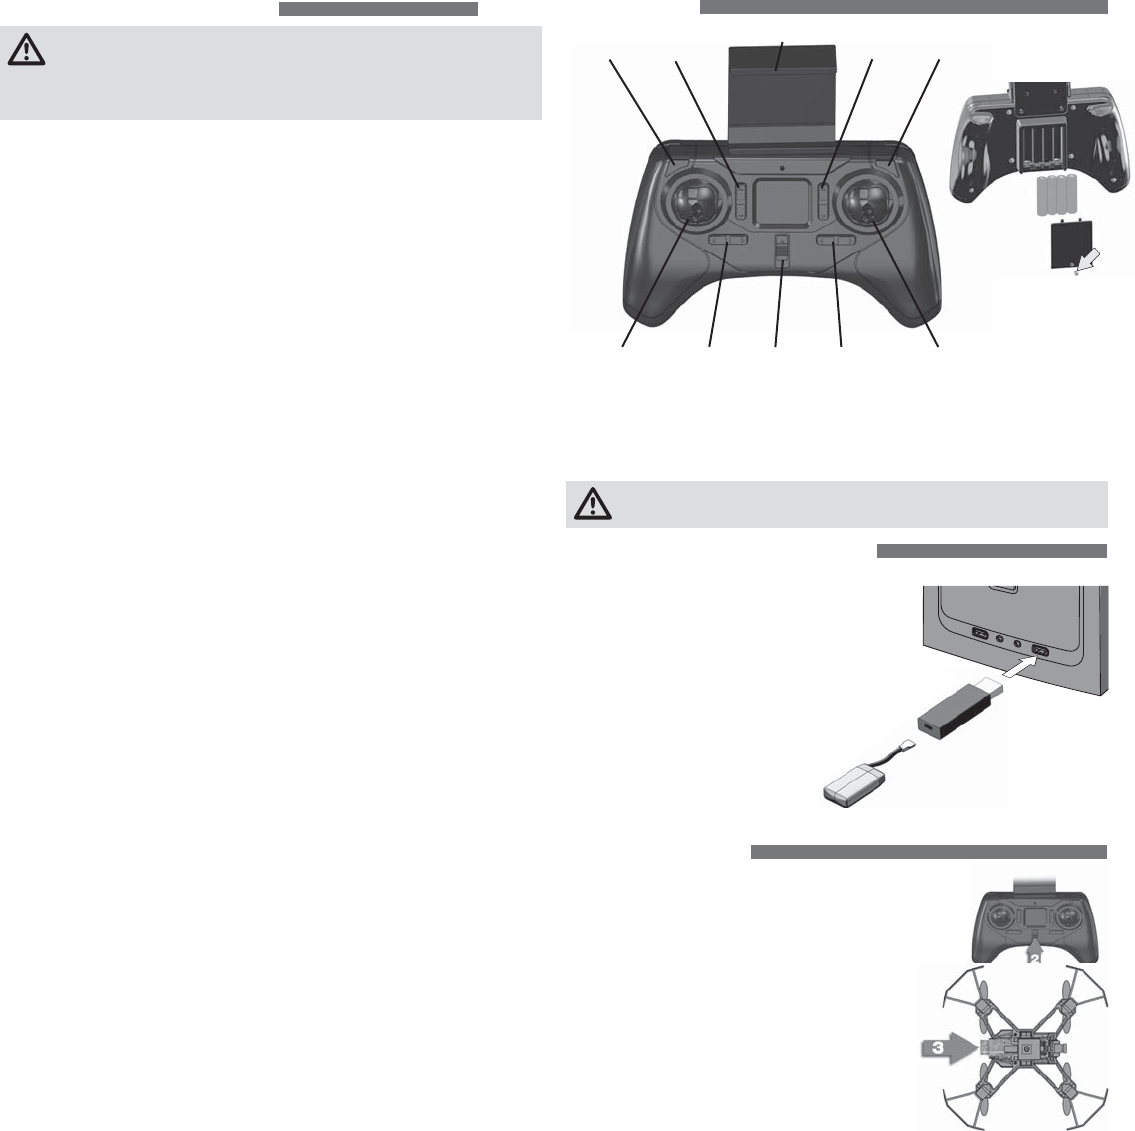
CONTROLLER
Picture
Button
Elevator
Trim
Throttle/Rudder
Stick Rudder
Trim ON/OFF Aileron
Trim Aileron/Elevator
Stick
Headless Mode
On/Off Switch Phone Holder
Video
Button
Remove the screw on the battery compartment cover. Take the cover off and insert
(4) AAA batteries. Replace cover, securing with the screw.
• Do not mix old and new batteries.
• Do not mix alkaline, standard, or rechargeable batteries.
CAUTION: Risk of explosion if battery is replaced by an incorrect type.
Dispose of used battery according to the instructions.
CHARGING the FLIGHT BATTERY
Plug the charger into a USB port or AC adapter
(DIDP1125, not included) and connect the battery.
The red LED will flash slowly while the battery is
charging. The LED will be steady when the battery
is fully charged.
• NEVER leave the battery unattended while charging.
• DO NOT allow the USB port to power down while
the charger is connected to the battery.
• ALWAYS unplug the charger from the USB
port and the battery when charging is
complete.
• The battery connector will only fit in one way.
GET READY TO FLY
1. Charge the ight battery.
2. Turn on the controller.
3. Connect the ight battery to the Ocular and set it on a
level surface. The controller will beep and the LEDs on
the drone’s arm will ash rapidly
.
4. For your rst ight, we recommend calibrating
the sensors (page 3).
5. Move the throttle stick to its highest position
and listen for a beep.
6. Move the throttle stick down to its lowest
position and listen for a beep. The ashing LEDs
on the Ocular’s arms will become steady.
The Ocular’s motors are now armed and can be started with the start/stop button.
4
HOW to FLY
A
A
A
A
CC
CCBB
D
D
D
D
B B
Basic Flight Press and hold the Motors Start/Stop button until the motors start
to spin. Tap the AUTO TAKEOFF/LAND button and the Ocular will take off and hover
about 3 feet (1 meter) above the floor. OPTION: After the motors are armed with the
MOTOR START/STOP button, the throttle stick can also be used to manually take off.
Slowly advance the throttle and release it when the Ocular reaches the desired height.
The controls are sensitive and the control sensitivity should be in the low setting
if flying indoors. Small movements of the pitch, roll and yaw control sticks
should be used to move the Ocular. Raise or lower the throttle stick to change
the Ocular’s altitude. When the drone is at the desired height, release the throttle
stick so the Altitude Hold sensor can maintain the Ocular’s height. If you get into
trouble and see that the drone is going to crash, press the MOTOR START/STOP
button to stop the motors as soon as possible.
Sensitivity Beep Flight Mode LED
Low 1 Blue
High 2 Purple
Sensitivity Adjustment Push down on the right stick
to change the sensitivity of the controls.
E
E
EE
E
Flips Push down on the left stick and release it when the controller beeps.
Move the right stick in the direction desired and release it when the Ocular
starts to flip.
IMPORTANT: Flips cannot be done when the LEDs indicate the battery voltage
is low.
Low Voltage Alarm The LEDs on the arms will flash when the battery
voltage is getting low. Land the Ocular as soon as possible and charge the
battery. The battery must be charged before it is stored. ALWAYS disconnect
the battery when it’s not in use!
Headless Mode
When you active this
mode, the Ocular movements will be relative to
the controller no matter which way the drone
is pointing. When you push forward on the
controller for example, the drone moves away
from you even if the camera is pointing to the
side or at you. When the Headless Mode is
active, the LEDs will flash slowly. For Headless
Mode to work:
1. The tail of the drone MUST face the pilot when the drone is rst plugged in
and set down.
2. The pilot must not change position or direction after the controller and drone
are linked.
CORRECTING DRIFT
It is normal for the Ocular to drift slightly. However, if it drifts in any direction
consistently, press the trim button that is opposite the movement as many times
as needed to eliminate the drift.
SENSOR CALIBRATION
It is normal for the Ocular to require minor corrections while hovering. If the quad
has a strong tendency to drift in one direction, the sensors may need calibration.
1. Power up and link the controller
and the Ocular.
2. Place the quad on a level surface.
3. Center all the trims.
4. Hold both sticks in the lower right
corners. When the LEDs on the
arms start to ash rapidly, release
the sticks. Do NOT move the Ocular
until the LEDs are steady again.
APP
The Ocular will link to an app on your iOS/Android based mobile
device so the Ocular can be flown in the FPV mode.
To download the app, open the App Store on your device and
enter “Horizon Hobby” as a search term. Select the Dromida app.
LINKING to the APP
With the Ocular turned on, open the
Wi-Fi settings on your device and
select the “UFO-…..” network.

5
APP CONTROLS
Tap the FLY button to connect to the FPV camera.
Tap the “?” button to view the help screens.
Camera Button – Tap to capture a photo.
Video Button – Tap to start/stop a video. While the video is being recorded, a
timer will be visible in the lower left corner of the screen.
Gallery Button – Tap to view photos and videos stored by the app. Open the
storage folder and tap on the thumbnail to view the image/video.
To delete an image/video
• Tap the Select button.
• Tap on the files to be deleted.
• Tap the Delete button.
REV Button – Tap on this button to invert the image.
Split Screen Button – This button changes the display to a split screen
view so your device can be used with a VR Headset (DIDZ1558 FPV Goggles,
sold separately).
FPV CAMERA CONTROLS
Press the picture button to capture
a photo.
Press the video button to start
a video.
The video button must be pressed again to stop and save the video.
The app can capture still photos and videos from the FPV feed going to your mobile
device. The images will be stored in the Gallery in the app and also in your mobile
device Photo Gallery.
The camera angle can be adjusted from straight ahead to about 90° down.
FLYING FPV
Your phone can be mounted in the
holder on the controller or inserted
in the VR headset (DIDZ1558) for
a more immersive feel.
The range of the FPV camera is
about 50 feet indoors, but may
be less if the location has a lot of
electromagnetic interference or
metal objects in the walls.
If you are new to FPV, start by
flying line of sight until you can
maneuver the drone without
having to think about which
control to use. Practice by
keeping both sticks centered and
making quick stick movements to
maneuver the Ocular.
When you are ready to start FPV, we recommend that a spotter be available to
tell what the drone is doing. Master each of the following steps before moving to
the next one.
Step 1
• Take off.
• Hover at about 3 feet.
• Move a few inches to the right in any direction and return to the hover point. Repeat
moving left, forward, and backward.
• Slowly land.
The goal is to get used to the view from the camera, the sensitivity of the
controls, and judging your height.
Step 2
• Take off.
• Fly slowly (about 10 feet away.)
• Turn around and return to the launch point.
• Slowly land.
The goal is to maintain your height until you are ready to land.
Step 3
• Set up a course.
Keep it simple at first. When you can fly while maintaining your altitude, set up a
course with gates or obstacles at different heights.
The goals are to fly the entire course while maintaining the altitude and increase
your speed around the course.
Video Button Picture Button

6
REPAIR AND MAINTENANCE
Blade Guard Replacment:
1. Carefully pry off the blade using a flat
head screwdriver.
Tip: Replace one corner at a time so you
don’t accidentally mix up the blades.
2. Pull the blade
guard up and off
the motor housing.
Install the new
guard and replace
the rotor blade.
Blade Replacment:
Each arm and rotor blade on
the Ocular is marked with the
letter “A” or “B”. The blade
must be installed on an arm
with the same letter or the
quadcopter will not be able
to fly.
Carefully pry the blade off of
the motor with a flat blade
screwdriver.
Colored blades are on the
front motors. Black blades
are on the rear.
Motor Replacment:
1. Remove the rotor blade and
prop guard.
2. Remove the two screws next to
the motor.
3. Turn the Ocular over and
carefully remove the motor
cover.
4. Unplug the motor from the
frame and remove the motor.
5. Replace the motor with a new
motor that has the same color
wires.
6. Use a small, at blade
screwdriver to push the wires
inside the arm.
TROUBLESHOOTING
Flying Problems
PROBLEM: The Ocular will not respond to the controller.
SOLUTION: (1) Charge or change the battery in the Ocular.
(2) Turn off the controller and disconnect the battery for the Ocular.
Re-link the Ocular and controller.
PROBLEM: Red controller LED light flashes after linking.
SOLUTION: Replace with new AA batteries.
PROBLEM: Unable to flip.
SOLUTION: Battery voltage too low.
PROBLEM: Unable to flip but the Ocular flies.
SOLUTION: Battery voltage is low and needs to be charged.
PROBLEM: Stabilization not working properly.
SOLUTION: (1) Battery voltage low.
(2) Calibrate the sensors.
(3) Check the rotor blades and motors for damage. A common
problem is lint wrapped around the motor shaft.
PROBLEM: Will not take off.
SOLUTION: (1) Rotor blades incorrectly installed. See Blade Replacement section.
(2) Battery is not fully charged.
(3) Check the rotor blades and motors for damage.
PROBLEM: Ocular is shaking.
SOLUTION: Check the canopy, chassis, motors and rotor blades for damage.
PROBLEM: The Ocular does not maintain altitude when the throttle stick is in the
center position.
SOLUTION: Calibrate the sensors.
Video Problems
PROBLEM: The Wi-Fi connection is lost during flight.
SOLUTION: (1) There may be interference in the area. Try flying in a different
location.
(2) You are exceeding the Wi-Fi range of the camera. Maintain a
closer proximity to your device during flight.
PROBLEM: The app does not re-establish connection after the connection has
been lost.
SOLUTION: Close the Dromida app and remove it from the background tasks.
Restart the app.
PROBLEM: Horizontal scrolling lines appear in video or pictures.
SOLUTION: Avoid aiming the camera directly into the sun or reflected sunlight.

7
LIMITED WARRANTY
What this Warranty Covers
Horizon Hobby, LLC, (Horizon) warrants to the original purchaser that the
product purchased (the “Product”) will be free from defects in materials and
workmanship at the date of purchase.
What is Not Covered
This warranty is not transferable and does not cover (i) cosmetic damage, (ii)
damage due to acts of God, accident, misuse, abuse, negligence, commercial use,
or due to improper use, installation, operation or maintenance, (iii) modi cation of
or to any part of the Product, (iv) attempted service by anyone other than a Horizon
Hobby authorized service center, (v) Product not purchased from an authorized
Horizon dealer, (vi) Product not compliant with applicable technical regulations, or
(vii) use that violates any applicable laws, rules, or regulations.
OTHER THAN THE EXPRESS WARRANTY ABOVE, HORIZON MAKES NO OTHER
WARRANTY OR REPRESENTATION, AND HEREBY DISCLAIMS ANY AND ALL
IMPLIED WARRANTIES, INCLUDING, WITHOUT LIMITATION, THE IMPLIED
WARRANTIES OF NON-INFRINGEMENT, MERCHANTABILITY AND FITNESS
FOR A PARTICULAR PURPOSE. THE PURCHASER ACKNOWLEDGES THAT THEY
ALONE HAVE DETERMINED THAT THE PRODUCT WILL SUITABLY MEET THE
REQUIREMENTS OF THE PURCHASER’S INTENDED USE.
Purchaser’s Remedy
Horizon’s sole obligation and purchaser’s sole and exclusive remedy shall be that
Horizon will, at its option, either (i) service, or (ii) replace, any Product determined
by Horizon to be defective. Horizon reserves the right to inspect any and all
Product(s) involved in a warranty claim. Service or replacement decisions are
at the sole discretion of Horizon. Proof of purchase is required for all warranty
claims. SERVICE OR REPLACEMENT AS PROVIDED UNDER THIS WARRANTY IS THE
PURCHASER’S SOLE AND EXCLUSIVE REMEDY.
Limitation of Liability
HORIZON SHALL NOT BE LIABLE FOR SPECIAL, INDIRECT, INCIDENTAL
OR CONSEQUENTIAL DAMAGES, LOSS OF PROFITS OR PRODUCTION OR
COMMERCIAL LOSS IN ANY WAY, REGARDLESS OF WHETHER SUCH CLAIM IS
BASED IN CONTRACT, WARRANTY, TORT, NEGLIGENCE, STRICT LIABILITY OR
ANY OTHER THEORY OF LIABILITY, EVEN IF HORIZON HAS BEEN ADVISED OF THE
POSSIBILITY OF SUCH DAMAGES. Further, in no event shall the liability of Horizon
exceed the individual price of the Product on which liability is asserted. As
Horizon has no control over use, setup, nal assembly, modi cation or misuse, no
liability shall be assumed nor accepted for any resulting damage or injury. By the
act of use, setup or assembly, the user accepts all resulting liability. If you as the
purchaser or user are not prepared to accept the liability associated with the use
of the Product, purchaser is advised to return the Product immediately in new
and unused condition to the place of purchase.
Law
These terms are governed by Illinois law (without regard to con ict of law
principals). This warranty gives you speci c legal rights, and you may also have
other rights which vary from state to state. Horizon reserves the right to change
or modify this warranty at any time without notice.
WARRANTY SERVICES
Questions, Assistance, and Services
Your local hobby store and/or place of purchase cannot provide warranty support
or service. Once assembly, setup or use of the Product has been started, you
must contact your local distributor or Horizon directly. This will enable Horizon
to better answer your questions and service you in the event that you may
need any assistance. For questions or assistance, please visit our website at
www.horizonhobby.com, submit a Product Support Inquiry, or call the toll free
telephone number referenced in the Warranty and Service Contact Information
section to speak with a Product Support representative.
Inspection or Services
If this Product needs to be inspected or serviced and is compliant in the country
you live and use the Product in, please use the Horizon Online Service Request
submission process found on our website or call Horizon to obtain a Return
Merchandise Authorization (RMA) number. Pack the Product securely using a
shipping carton. Please note that original boxes may be included, but are not
designed to withstand the rigors of shipping without additional protection. Ship
via a carrier that provides tracking and insurance for lost or damaged parcels, as
Horizon is not responsible for merchandise until it arrives and is accepted at our
facility. An Online Service Request is available at http://www.horizonhobby.com/
content/service-center_render-service-center. If you do not have internet access,
please contact Horizon Product Support to obtain a RMA number along with
instructions for submitting your product for service. When calling Horizon, you
will be asked to provide your complete name, street address, email address and
phone number where you can be reached during business hours. When sending
product into Horizon, please include your RMA number, a list of the included
items, and a brief summary of the problem. A copy of your original sales receipt
must be included for warranty consideration. Be sure your name, address, and
RMA number are clearly written on the outside of the shipping carton.
NOTICE: Do not ship LiPo batteries to Horizon. If you have any issue with a
LiPo battery, please contact the appropriate Horizon Product Support of ce.
Warranty Requirements
For Warranty consideration, you must include your original sales receipt
verifying the proof-of-purchase date. Provided warranty conditions have
been met, your Product will be serviced or replaced free of charge. Service or
replacement decisions are at the sole discretion of Horizon.
Non-Warranty Service
Should your service not be covered by warranty, service will be completed and
payment will be required without noti cation or estimate of the expense unless
the expense exceeds 50% of the retail purchase cost. By submitting the item
for service you are agreeing to payment of the service without noti cation.
Service estimates are available upon request. You must include this request with
your item submitted for service. Non-warranty service estimates will be billed
a minimum of ½ hour of labor. In addition you will be billed for return freight.
Horizon accepts money orders and cashier’s checks, as well as Visa, MasterCard,
American Express, and Discover cards. By submitting any item to Horizon for
service, you are agreeing to Horizon’s Terms and Conditions found on our website
http://www.horizonhobby.com/content/service-center_render-service-center.
ATTENTION: Horizon service is limited to Product compliant in the country of
use and ownership. If received, a non-compliant Product will not be serviced.
Further, the sender will be responsible for arranging return shipment of the
un-serviced Product, through a carrier of the sender’s choice and at the
sender’s expense. Horizon will hold non-compliant Product for a period of 60
days from noti cation, after which it will be discarded. 10/15
Country of Purchase Horizon Hobby Contact Information Address
United States of America
Horizon Service Center
(Repairs and Repair Requests) servicecenter.horizonhobby.com/RequestForm/
4105 Fieldstone Rd
Champaign, Illinois, 61822 USA
Horizon Product Support
(Product Technical Assistance)
productsupport@horizonhobby.com
877-504-0233
Sales websales@horizonhobby.com
800-338-4639
Warranty and Service Contact Information
8
IC: 11104A-120
IC: 11104A-MR110
aux appareils radio exempts de licence. L’exploitation est autorisée aux deux
conditions suivantes :
(1) l’appareil ne doit pas produire de brouillage, et (2) l’utilisateur de l’appareil
doit accepter tout brouillage radioélectrique subi, même si le brouillage est
susceptible d’en compromettre le fonctionnement.
REMARQUE:
FCC ID: IYF120
FCC ID: IYFMR110
This equipment has been tested and found to comply with the limits for Part 15 of
the FCC rules. These limits are designed to provide reasonable protection against
harmful interference in a residential installation. This equipment generates, uses
and can radiate radio frequency energy and, if not installed and used in accordance
with the instructions, may cause harmful interference to radio communications.
However, there is no guarantee that interference will not occur in a particular
installation. If this equipment does cause
harmful interference to radio or television reception, which can be determined
by turning the equipment off and on, the user is encouraged to try to correct the
interference by one or more of the following measures:
• Reorient or relocate the receiving antenna.
• Increase the separation between the equipment and receiver.
• Connect the equipment to an outlet on a circuit different from that to which the
receiver is connected.
• Consult the dealer or an experienced radio/TV technician for help.
This device complies with part 15 of the FCC rules. Operation is subject to the
following two conditions: (1) This device may not cause harmful interference, and
(2) this device must accept any interference received, including interference that
may cause undesired operation.
NOTICE: Modi cations to this product will void the user’s authority to operate this
equipment.
IC: 11104A-120
IC: 11104A-MR110
Operation is subject to the following two conditions: (1) this device may not
cause interference, and (2) this device must accept any interference, including
interference that may cause undesired operation of the device.”
IC Déclaration
IC InformationFCC Information
Compliance Information for the European Union
EU Compliance Statement:
Horizon Hobby, LLC hereby declares that this product is in compliance
with the essential requirements and other relevant provisions of the
RED Directive.
A copy of the EU Declaration of Conformity is available online at:
http://www.horizonhobby.com/content/support-render-compliance.
Instructions for disposal of WEEE by users in the European Union
This product must not be disposed of with other waste. Instead, it is
the user’s responsibility to dispose of their waste equipment by hand-
ing it over to a designated collections point for the recycling of waste
electrical and electronic equipment. The separate collection and
recycling of your waste equipment at the time of disposal will help
to conserve natural resources and make sure that it is recycled in a
manner that protects human health and the environment. For more
information about where you can drop off your waste equipment for
recycling, please contact your local city of ce, your household waste
disposal service or where you purchased the product.
This device complies with Innovation, Science, and Economic Development
Canad licence-exempt RSS standard(s).
Le présent appareil est conforme aux CNR d’ Innovation, Sciences et
Développement économique Canada applicables
The device is compliance with RF exposure guidelines, users
can obtain Canadian information on RF exposure and compliance. The
minimum distance from body to use the device is 20cm.
Le présent appareil est conforme
Après examen de ce matériel aux conformité ou aux limites d’intensité
de champ RF ,les utilisateurs peuvent sur l’exposition aux
radiofréquences et la conformité and compliance d’acquérir
les informations correspondantes. La distance minimale du corps à utiliser
le dispositif est de 20cm .
For aircraft
For remote control
9
REPLACEMENT PARTS
7
6
5
3
1
7
9
9
8
11
4
2
10
12
13
8
9
9
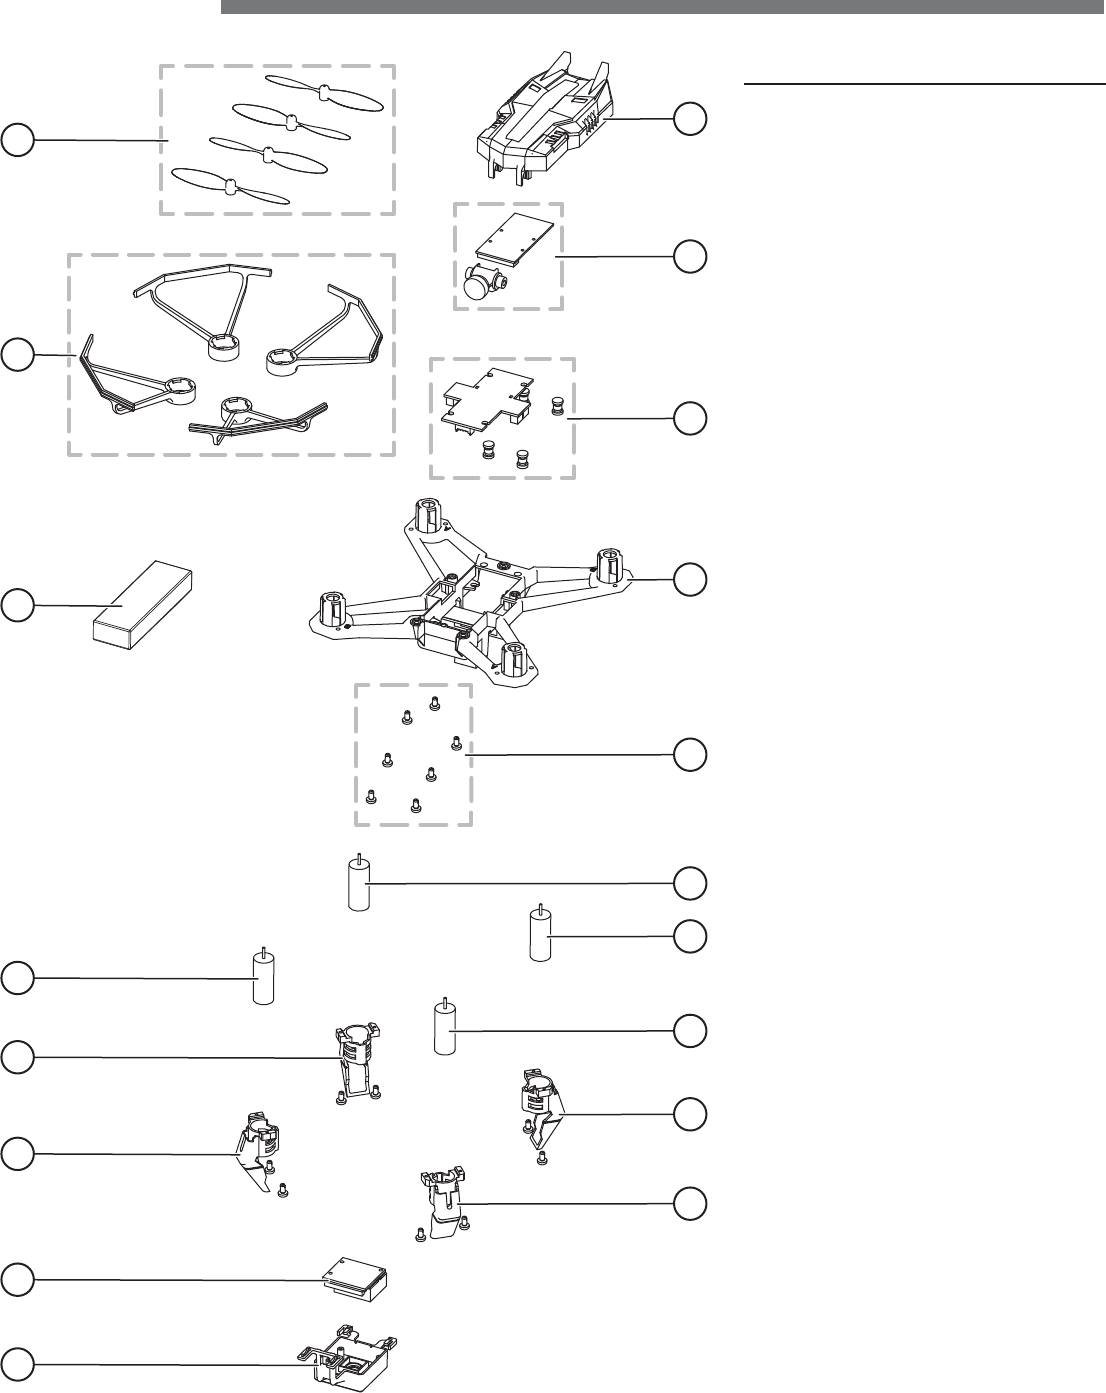
DIDE1310 1 Canopy
DIDE1311 2 Propeller Set
DIDE1312 3 Camera Assembly
DIDE1279 4 Prop Guards
DIDE1313 5 E-Board
DIDE1281 6 Main Frame
DIDE1282 7 Main Motor CW L/F, R/R
DIDE1283 8 Main Motor CCW R/F, L/R
DIDE1284 9 Landing Feet/Motor Covers
DIDE1275 10 LiPo 1S 3.7v 650mAh
DIDE1285 11 Screw Set
DIDE1314 12 Optical Flow E-Board with Bracket
DIDE1315 13 Optical Flow Support Bracket
DIDE1511 USB Charger 1S LiPo ZH Plug
DIDE1215 TX Mobile Phone Holder
DIDJ1110 MR110 Transmitter
OPTIONAL
DIDE1277 Prop Set (Red and Black, 2 of each)
DIDZ1558 FPV Goggles
www.dromida.com/support
Part
No.
Key
No. Description

www.dromida.com
©2018 Horizon Hobby, LLC
Dromida, Ocular and the Horizon Hobby logo are trademarks or registered trademarks of Horizon Hobby, LLC.
All other trademarks, service marks and logos are property of their respective owners.
Created 04/18 DIDE0020, DIDE1312, DIDJ1110 58584