Hobbico Z1020 Droneview 1080P Wi-Fi Camera User Manual DIDE05xx Dromida XL indd
Hobbico Inc Droneview 1080P Wi-Fi Camera DIDE05xx Dromida XL indd
Hobbico >
Contents
- 1. Users Manual Part One
- 2. Users Manual Part Two
Users Manual Part One
BEFORE FLYING, PLEASE
READ & UNDERSTAND
THESE INSTRUCTIONS!
and go to www.knowbeforeyoufly.org
Radio Controlled
Quadcopter
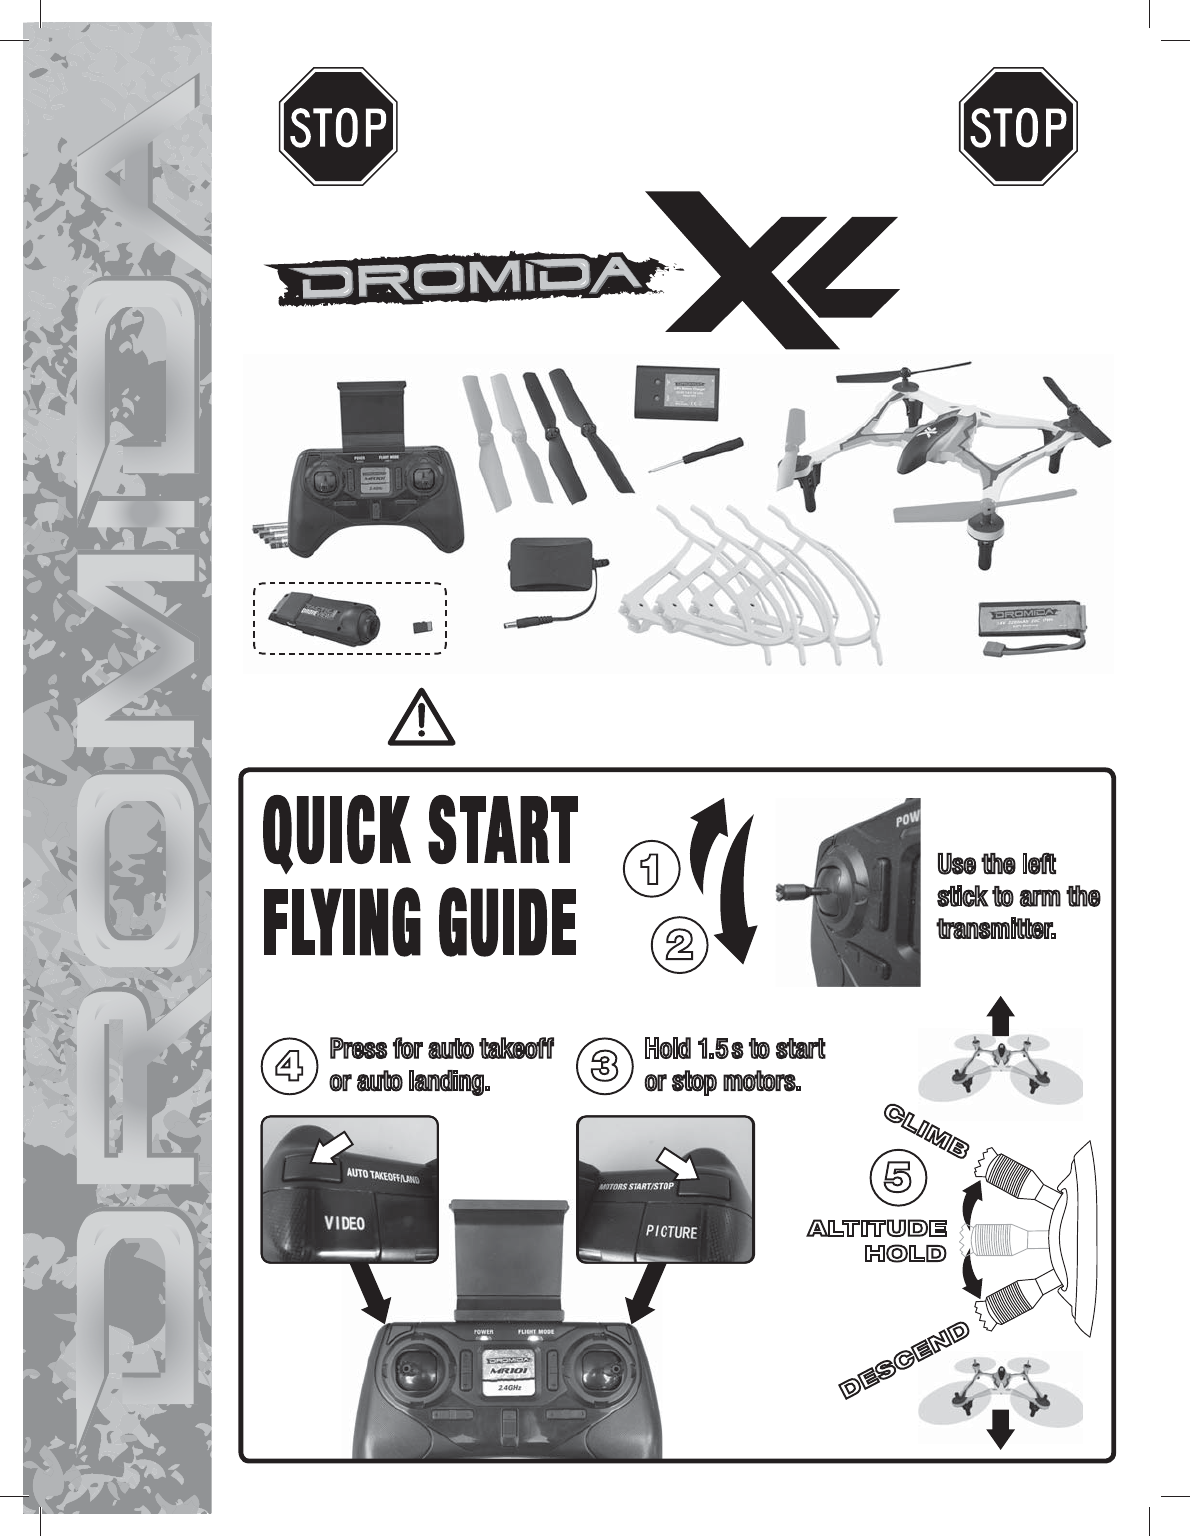
TO PREVENT MOTOR DAMAGE ALWAYS BE SURE THE THROTTLE IS
OFF WHEN THE BLADES ARE OBSTRUCTED OR CONTROL IS LOST.
Use the left
stick to arm the
transmitter.
1
2
Hold 1.5 s to start
or stop motors.
Press for auto takeoff
or auto landing.
4 3
5
ALTITUDE
HOLD
CLIMB
DESCEND
Dromida XL
Quadcopter
Flight
Battery
Spare Blades
(2 black, 2 color)
AAA
Batteries (4)
Controller
Screwdriver
Camera with Memory Card
DIDE06 Only
Battery Charger
AC Adapter
Prop Guards (4)
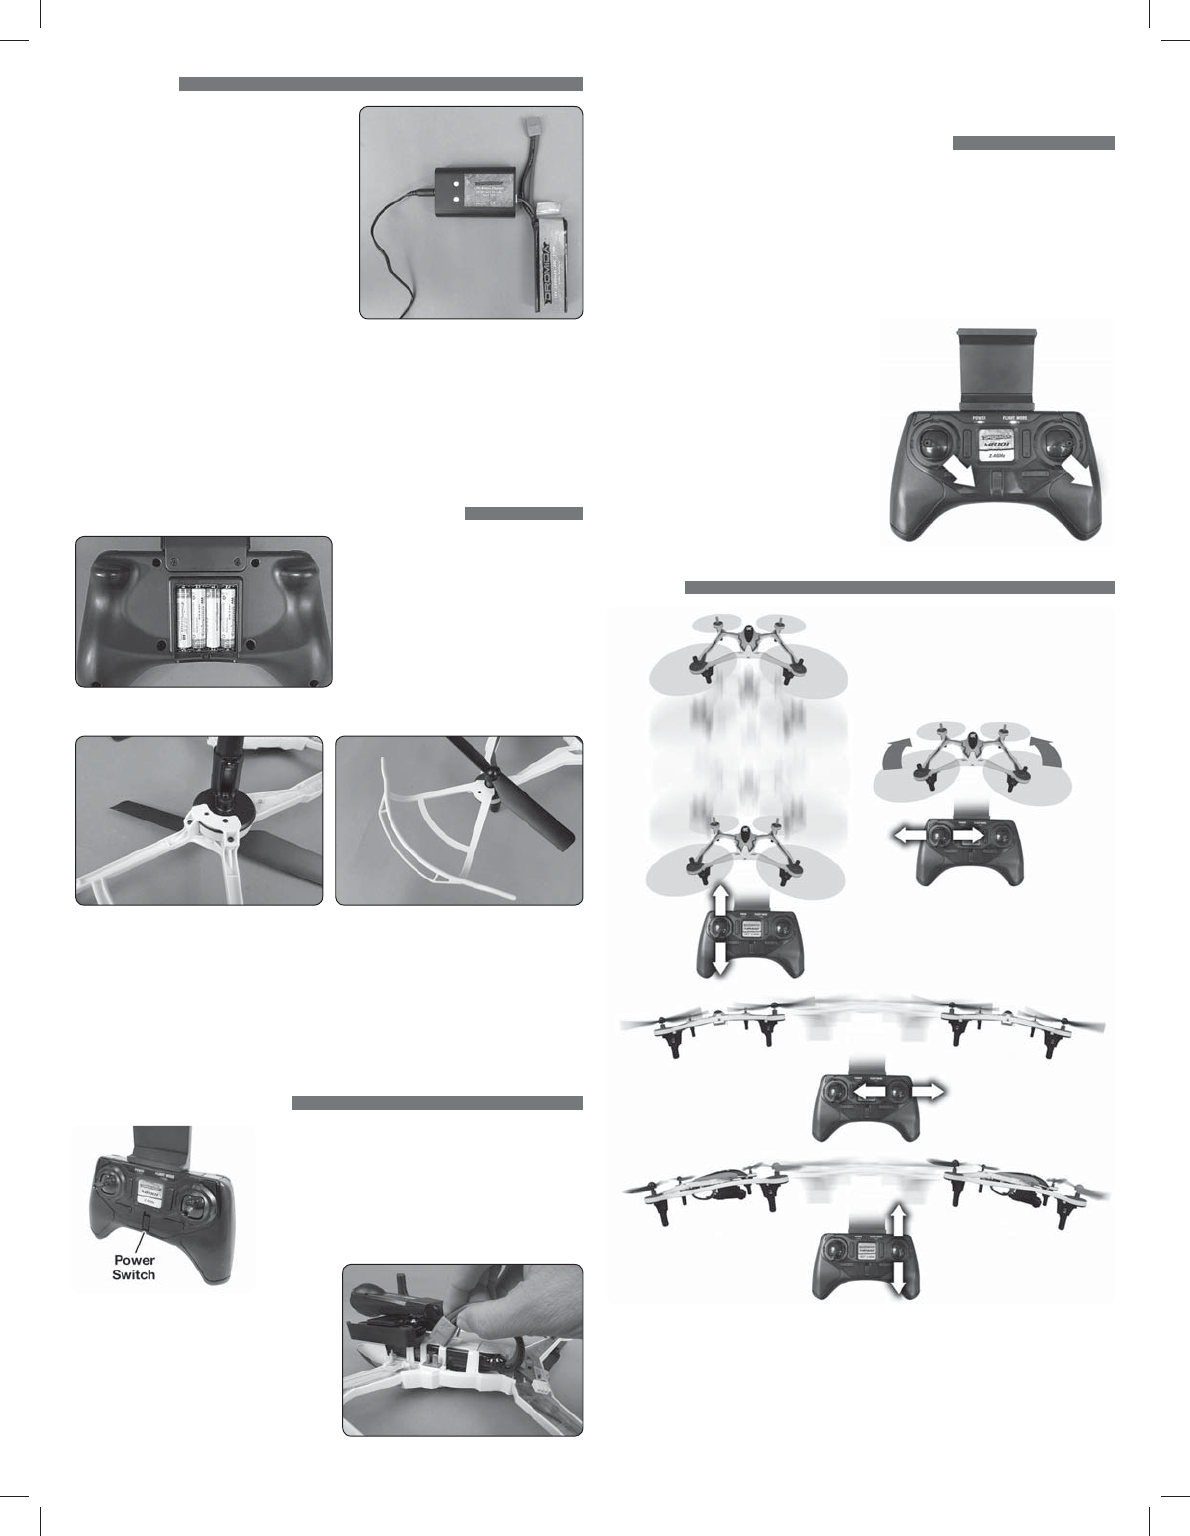
CHARGING
Plug the AC wall adapter into a 120V outlet
and connect the balance charger to the
wall adapter. The power LED will illuminate
solid RED. Plug the white balance plug on
the battery to the 2S port on the charger.
When charging, the charge status LED
will illuminate solid RED. When charge
is complete the LED will change to solid
GREEN. Typical charge time of a depleted
battery is approximately 2 hours. NOTE:
A blinking red charge status LED indicates
a charging error.
● NEVER leave the battery unattended while charging.
● ALWAYS unplug the charger from the outlet and the battery when charging
is complete.
● NEVER charge a puffed or damaged battery.
NOTE: It is normal for the charger to get warm during the charging process.
INSTALL BATTERIES IN THE CONTROLLER
Remove the screw and slide the cover
down to insert the included 4 AAA
batteries.
PROP GUARDS
NOTE: Prop guards are included to help protect the propellers from accidental
contact with obstacles. We recommend they be installed prior to your rst ight.
Fit the bottom prop guard retainer over the alignment pin on the motor cover.
Press the prop guard in place as shown with the pins in the alignment holes. It
should t snugly over the screw bosses on the retainer. Secure the prop guard
and retainer using three screws included in the package. Repeat this procedure
for the other three prop guards.
LINKING AND ARMING
1. Turn on the controller.
2. Connect the battery to the Dromida XL and place
it on a level surface. The LED on the quad will flash
rapidly when the quad is linked to the controller
and ready to fly.
The LEDs on the quad will then
flash slowly until the transmitter is armed.
ALWAYS unplug the battery after
flying! Damage to the battery
may result if left connected.
3.
Arm the transmitter by moving the throttle stick to full throttle and then down
to low throttle. The transmitter will beep once confirming that it is now armed.
QUADCOPTER SENSOR CALIBRATION
If the quadcopter is constantly drifting in the same direction or the quad is not
maintaining altitude, or any time a new ight control board has been installed,
the sensors on the Dromida XL should be calibrated.
1. Calibrate the sensors before the rst ight. Center all the trim adjustments.
To center the trim settings, hold down one side of the trim button until you
hear a long beep. If the controller stops beeping, release the trim button
and hold down the other side.
2. Place your Dromida XL on a
level surface and link the
quadcopter with the controller
and arm the transmitter.
3. Press and hold the right stick in its
lower right corner.
4. Move the left stick down and to the
right. When the quad LEDs start
to ash, release both sticks. The
LEDs will stop ashing when the
calibration is complete.
FLYING
MOTOR OFF PANIC BUTTON! In the event of a crash, hold down on the Motor
Stop Button to disable power immediately.
FLYING BASICS
1. Place the Dromida XL on a smooth, level surface away from yourself, spectators,
and obstacles. The quad should be facing away from you.
2
2. Start the motors by holding the MOTORS START/STOP button for 1.5 seconds.
Props will automatically spin slowly.
3. Press the AUTO TAKEOFF/LAND button and the Dromida XL will climb to
an altitude about eye level. The quad will attempt to maintain this altitude
as long as the left stick is not moved up or down.
NOTE: You can also take off by moving the left stick up.
4. Move the left stick up or down to increase or decrease altitude.
5. Use the right stick to move left, right, forward, or backward.
6. Use the left stick (left/right direction) to rotate the Dromida XL.
7. Press the AUTO TAKEOFF/LAND button during flight and the Dromida XL
will decrease in altitude until it detects landing. After landing the motors
will stop.
NOTE: You can also land by holding the left stick down until the Dromida XL
contacts the ground. Continue holding down until the motors stop.
TO PREVENT MOTOR DAMAGE ALWAYS BE SURE THE
THROTTLE IS OFF WHEN THE BLADES ARE OBSTRUCTED
OR CONTROL IS LOST. PUSH THE BUTTON!
DUAL RATES
Control sensitivity can be changed by pushing
down and releasing the right stick on the controller.
The default is low rate when the flight mode LED
is blue. The controller will make a beep and the
flight mode LED will change to orange indicating
high rate. This mode should be used when more
agility is desired. Pushing down on the right stick
again will return the controller to low rate indicated
by a beep and the flight mode LED changing back to blue. This mode should be
used when learning to fly or smoother video is desired (if equipped with a camera).
The overall controls can be adjusted independently by rate mode:
1. Hold down the right stick until the controller beeps once.
2. Continue to hold down the right stick and advance the throttle to the desired
setting.
3. Release the right stick and return the throttle to 0%.
The default setting for low rate mode is when the throttle stick is at
50% (midstick).
ALTITUDE HOLD
The Dromida XL has a barometer built in to the flight control board that detects
the surrounding air pressure which enables the quad to maintain a set altitude
automatically. After auto-takeoff, the Dromida XL will climb to a height of about
1.5m above its position at takeoff and then will attempt to maintain that altitude.
Move the throttle stick up or down to change the set altitude position. When
the stick is released back to center, the quad’s current height will be the new
set altitude.
NOTE: It is normal to see slight deviations from the set altitude. Windy
conditions or sensors that are out of calibration may increase the deviation
from the set altitude. Recalibrate the sensors if the quad is flying erratically
or does not appear to be maintaining altitude.
FLIPS
Your Dromida XL can
perform a flip when
the left stick is pressed
inward and released,
followed by moving the
right stick in the desired
ip direction. This stunt
needs lots of room and
should be done outside
free of obstacles.
NOTE: When the battery voltage is low ( ashing LEDs) the ip function is disabled.
LOW BATTERY INDICATOR
The LEDs on the Dromida XL will ash slowly when the LiPo battery voltage is
low. Thirty seconds after the lights begin to flash the Dromida XL will begin the
auto-land procedure. Always unplug the battery after ight. The battery
needs to be charged before the quadcopter is stored.
The controller will make five quick beeps when the AAA batteries need to
be charged.
MOTOR OVERLOAD PROTECTION
The Dromida XL is equipped with motor overload protection circuitry
that shuts down the motors in the event the propellers become
blocked by an obstruction and throttle is applied. In order to reset
the overload protection you will need to free the Dromida XL from
the obstruction and cycle the power to the transmitter and the
quad. If the overload protection is triggered repeatedly or late into a ight then it
may prematurely cause the low battery indicator to ash the LEDs. Disconnect
the battery and wait several seconds before reconnecting it. If the LEDs continue
to ash then you must recharge the battery.
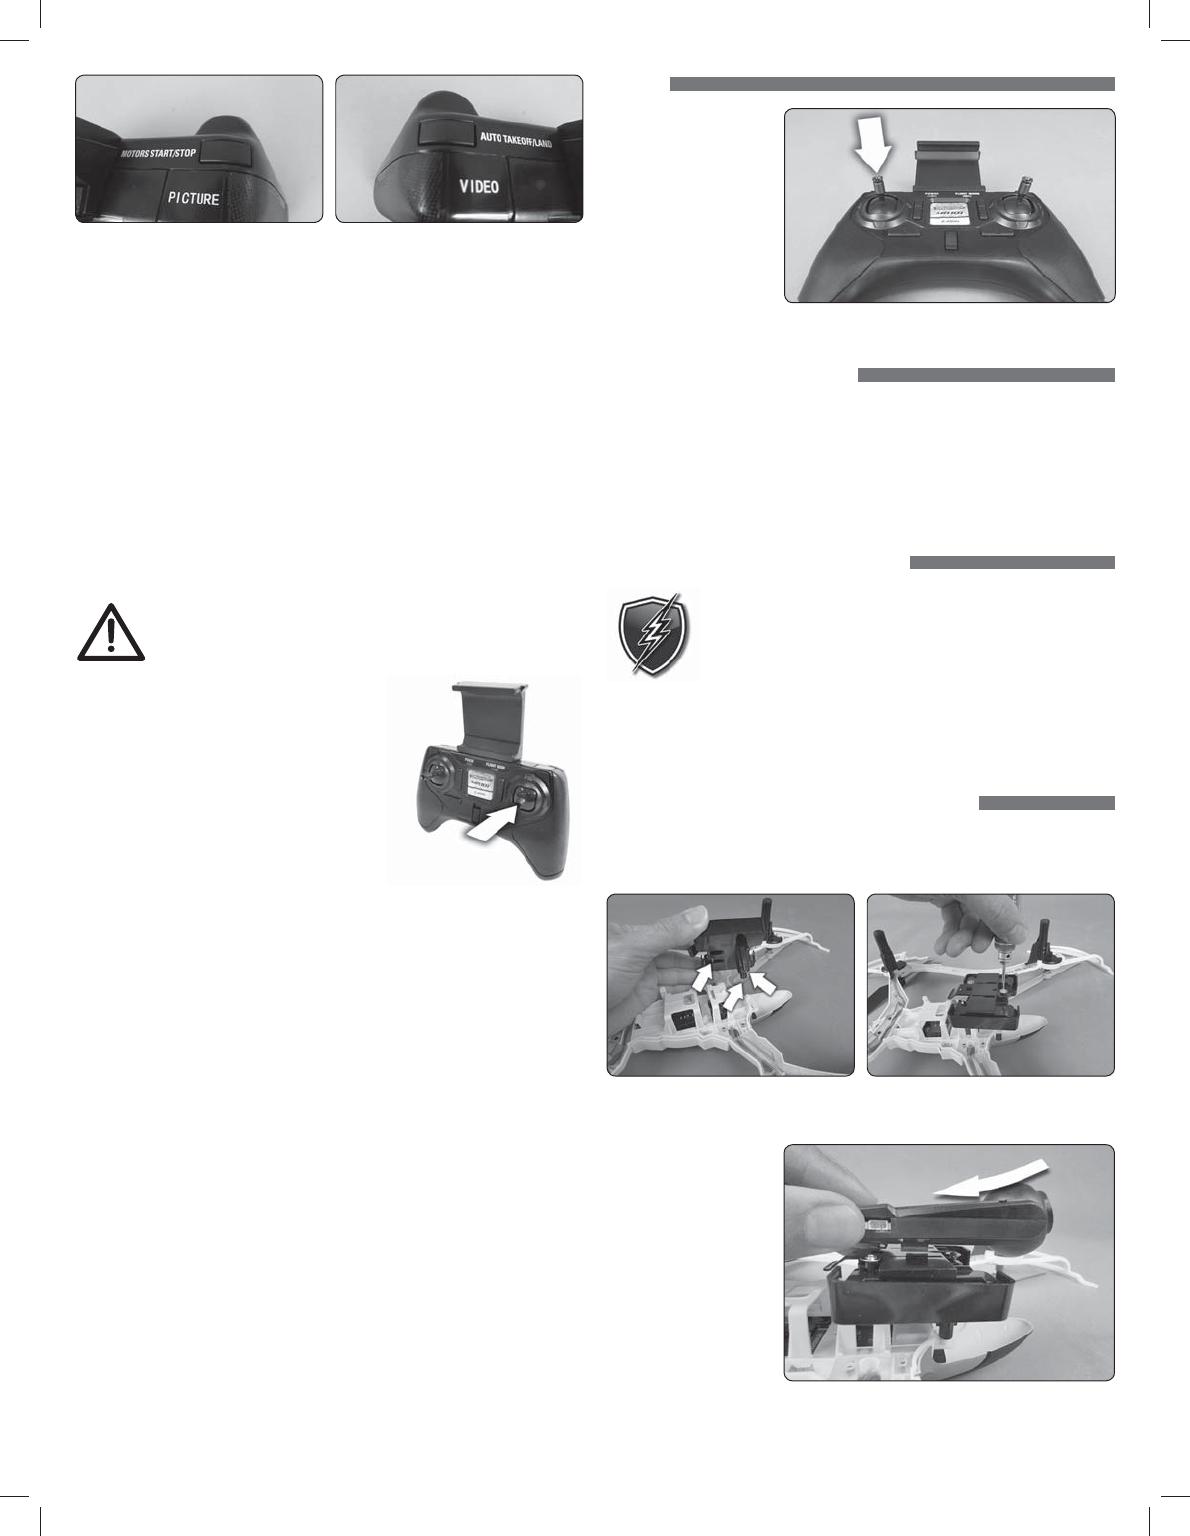
UPGRADING a DROMIDA XL UAV to FPV
Follow these instructions if you purchased the camera and mount separately to
convert your Dromida XL UAV to FPV. Part numbers for the camera and mount
can be found in the parts list at the end of this manual.
1. Install the camera mount onto the underside of the frame using the three
screws included with the mount. Do not over-tighten these screws.
2. Align the rails on
the camera with the
slots in the camera
mounting plate and
slide the camera
back until it clicks
into place. Con rm
that the camera is
secured.
3
3. Connect the camera
wire to the camera
and to the quad
as shown. The
connectors can only
t in one direction.
Do not force them.
RECORDING VIDEO & PICTURES WITHOUT THE APP
FPV Version Only
1. If you remove or
need to replace the
memory card in the
camera, insert it as
shown with the gold
contact points facing
down, away from the
Dromida XL. Push the
card in until it clicks
into place. To release the card, push in until it clicks and the card will spring
out of position to be removed. The memory card should never be inserted or
removed from the camera when the battery is plugged in. When inserting
the card, be sure to align the card correctly into the card slot.
2. Turn on the controller and connect the battery to the Dromida XL. Before taking
pictures or video you must allow the camera 30 seconds to initialize. Pictures
or video taken before the camera has initialized may not be saved to the card
or the file(s) will be corrupted.
3. Use the PICTURE and VIDEO buttons on the controller to take still images and
video recordings. Pressing and releasing the VIDEO button will start video
recording indicated by a long ‘beeeep’ from the controller. Pressing and
releasing the button again will stop recording, indicated by a short ‘beep’
from the controller, and the LEDs on the Dromida XL will flash. Pressing and
releasing the PICTURE button on the controller will take a photo indicated by a
short ‘beep’ from the controller. Photos can be taken using the PICTURE button
on the controller even if the DroneView camera is recording video. Allow at
least 2 seconds after taking a picture before taking another picture.
NOTE: Avoid pressing and holding the video and picture buttons. A quick ‘press
and release’ is sufficient to activate the camera.
BEFORE DISCONNECTING THE BATTERY FROM THE DROMIDA XL
AND REMOVING THE MEMORY CARD, YOU MUST ALLOW
AT LEAST 30 SECONDS FOR THE DRONEVIEW CAMERA
TO CLOSE THE FILES. FAILURE TO DO SO MAY RESULT IN
MISSING OR UNREADABLE FILES.
4. Wait at least 30 seconds following the end of the last video recorded.
Disconnect the battery from the Dromida XL, THEN remove the memory
card from the camera.
5. Insert the card into a memory card reader (not included) for use with a PC,
or tablet. Pictures are saved as .JPG files and videos are saved as .AVI files.
Pictures and videos can be viewed or edited using software that was bundled
with your PC or tablet, or there is a wide variety of software available from
third parties both free and for purchase.
NOTE: The DroneView camera’s maximum video length is 5 minutes. If video
is recorded for longer than 5 minutes the DroneView camera will automatically
close the video file and start a new file. There may be a short loss of video footage
during this switch to a new file. The DroneView will continue to create new video
files every 5 minutes of continuous recording until the memory card becomes
full or the battery is disconnected. Corrupt or missing files may result in video
recording being stopped in this way.
6. After you have retrieved your files from the memory card (copy the files you
wish to keep to a safe location) you can delete the files on the memory card.
The DroneView camera will create the sub folders it needs if they are deleted
from the card.
USING THE DRONEVIEW APP
The DroneView app is free software for your WiFi-capable Apple or Android device
that allows you to connect to the DroneView camera to use the FPV (First Person
View) function as well as to take videos and pictures and upload and view them
directly to your device.
1. Install the “DroneView” app
from Google Play (Android) or
the App Store (Apple).'
2. Insert the memory card into the
camera and connect a charged LiPo
battery to the Dromida XL.
3. iOS Only - Go to the WiFi setting
options in your device and select
the DroneView network. The actual
name of the DroneView network will
vary from the photo shown here. It
may take several seconds for the
DroneView network to appear in the
available network list in proximity
to your device. No password is
needed to connect to the DroneView
network. NOTE: Android devices
will automatically connect to the
DroneView WiFi network when the DroneView app is opened.
Apple and the Apple logo are trademarks of Apple Inc., registered in the U.S. and
other countries. App Store is a service mark of Apple Inc. Android™ and Google
Play are trademarks of Google Inc.
Wi-Fi® are Wi-Fi Alliance® are registered trademarks of the Wi-Fi Alliance.
4. Grasp your device as shown and attach it to the phone mount on the controller
by pushing up on your phone against the spring loaded top clip until you can
fit the other side into the bottom clip.
4

5. With your device connected to
the DroneView WiFi network,
open up the DroneView app. It
may take several seconds for the
app to locate and connect to the
DroneView WiFi network.
NOTE: If you’re in a populated
WiFi environment, it may take longer.
6. Once connected you will see on your device the image seen by the camera
(referred to in this manual as the FPV feed). Press anywhere on the screen to
pull up the main options.
Picture Button - Press to take a still image. Note: pictures cannot be taken with
the app while recording is in progress.
Video Button – Press to start recording (red stop button appears on right when
recording).
File Gallery Button – Opens gallery to display contents of memory card for
viewing, exporting and deleting.
Settings Button – Opens the setting menu.
NOTE: The FPV feed is for the purposes of displaying what the camera is
recording to improve the quality and accuracy of videos and pictures with respect
to the pilot’s intended field of view. We do not recommend attempting to fly the
Dromida XL relying solely on the FPV feed. Delays in the FPV feed can cause the
image shown in the app to not represent the exact current position of the Dromida
XL. Any interruption of the FPV feed will not be present in the recorded video files.
Flying without maintaining line of sight of the quad is unsafe.
FILE GALLERY
Opening the file
gallery displays the
contents of the
memory card in the
camera. Each
thumbnail represents
a picture or video.
Videos have a small
camera icon and the
length of the videos
on the thumbnails.
Pictures can be
viewed by clicking
on the picture
thumbnails. In order
to view videos, you
must first export
them by pressing
Select and then pressing each thumbnail that you wish to export. Press Export
to upload the files to your device. Pictures and videos will be copied to your device’s
camera roll. They can also be viewed in the DroneView app after the exporting
is complete by pressing the thumbnail you wish to view.
NOTE: We do not recommend exporting videos that exceed 3 minutes in
length because of the amount of time it will take to export the files. For longer
videos or a larger quantity of videos, we recommend removing the memory
card from the camera and transferring the contents directly to a PC using a
card reader.
When you have
confirmed that
the files have
been successfully
transferred to your
device’s camera roll,
press Select and
choose the files you
wish to delete if you
no longer want them
in the file gallery.
SETTINGS
The settings menu
allows you to change
the WiFi name, adjust
brightness and
contrast, date code,
resolution mode, and
rotate camera view.
Changing the WiFi
Name will change
how the Camera is
identified in the WiFi
network list.
The Brightness and Contrast will adjust the FPV feed display qualities. Video
and picture files will have the same display qualities as the feed. You may wish
to experiment with these settings depending on lighting conditions and personal
preferences. Press reset to return the brightness and contrast to the default values.
Resolution Mode switches the camera output between 1080p @ 30 frames/sec
and 720p @ 60 frames/sec. 1080p mode will provide you with a larger field of
view from the camera compared to 720p mode. 720p mode has the advantage
of smoother video recording which is also more suitable for post editing such
as applying slow-motion to video footage.
The Date Code will display the current date on the FPV feed when the Date Code
is turned ON. The date will also be seen in video recordings and pictures in the
same format as seen on the FPV feed. The Date Code is automatically updated
to match the date of your device when connected via WiFi network.
Rotate View will rotate the FPV feed and recorded videos and pictures 180°.
This feature is needed when the DroneView camera is used independently of the
Dromida XL with a separate R/C receiver and is mounted on top of a surface
rather than underneath like on the Dromida XL.
If you made any changes in the settings menu then you will be prompted to save
when exiting the settings menu. If you select NO when prompted to save then
the changes will be discarded. iOS Only - If you change the WiFi name then you
will need to exit the DroneView app and select the newly named network in the
WiFi setting options of your device.
USING TWO DEVICES SIMULTANEOUSLY
The DroneView camera can be connected with up to two devices simultaneously.
Two devices will have the ability to connect to the DroneView WiFi network and
share the FPV feed from the camera. Both devices will also be able to take pictures
and start/stop video recording.
5
NOTE: Exporting can only be done with one device at a time. Attempting to
export files simultaneously from a DroneView camera to two devices may cause
the transfer to freeze.
TROUBLESHOOTING
FLYING PROBLEMS
PROBLEM: The Dromida XL will not respond to the controller.
SOLUTION: (1) Charge or change the battery in the Dromida XL. (2) Turn off the
controller and disconnect the battery for the Dromida XL. Re-link the
Dromida XL and controller.
PROBLEM: Red controller LED light flashing after linking.
SOLUTION: Replace with new AAA batteries.
PROBLEM: Unable to flip.
SOLUTION: Battery voltage too low.
PROBLEM: Stabilization not working properly.
SOLUTION: (1) Battery voltage low. (2) Re-link. (3) Recalibrate the sensors.
PROBLEM: Will not take off.
SOLUTION: Rotor blades incorrectly installed. See Blade Replacement section.
PROBLEM: Dromida XL is shaking.
SOLUTION:
Check the canopy, chassis, motors and rotor blades for damage.
PROBLEM: The balance charger charge status LED blinks when attempting to
charge the battery.
SOLUTION: The battery voltage is too low to charge. The battery voltage may
recover on its own with time in order to be safely charged. Wait 1
hour and try charging again. If the charger LED still blinks then you
may need to replace the battery.
PROBLEM: The Dromida XL does not maintain altitude when the throttle stick
is in the center position.
SOLUTION: Recalibrate the sensors.
VIDEO PROBLEMS
PROBLEM: There are missing or corrupt files on the memory card.
SOLUTION: Refer to RECORDING VIDEO AND PICTURES WITHOUT THE APP for
information regarding camera initialization and closing of files.
SOLUTION: Allow 2-3 seconds between taking pictures.
PROBLEM: The video button on the controller does not work or works intermittently.
SOLUTION: The video button must be pressed and quickly released. The controller
will beep when the button works properly.
SOLUTION: The video button on the controller toggles between start/stop video.
If using both the app and the video button to control video recording,
you may need to press the video button a second time in some
instances to get the correct start or stop command.
PROBLEM: The WiFi connection is lost during flight.
SOLUTION: There may be interference in the area. Try flying in a different location.
SOLUTION: You are exceeding the WiFi range of the DroneView camera. Maintain
a closer proximity to your device during flight.
PROBLEM: The app does not re-establish connection after the connection has
been lost.
SOLUTION: Close the DroneView app and remove it from the background tasks.
Restart the DroneView app.
PROBLEM: Exporting files was interrupted and the export function cannot be
restarted.
SOLUTION: Close the DroneView app and remove it from the background tasks.
Restart the DroneView app. Run the export function again.
PROBLEM: You recorded videos/pictures but there are no files on the memory card.
SOLUTION: The memory card was incorrectly inserted into the camera. Refer to
RECORDING VIDEO AND PICTURES WITHOUT THE APP for instructions
on the proper installation of the memory card.
PROBLEM: Horizontal scrolling lines appear in video or pictures.
SOLUTION: Avoid aiming the camera directly into the sun or reflected sunlight.
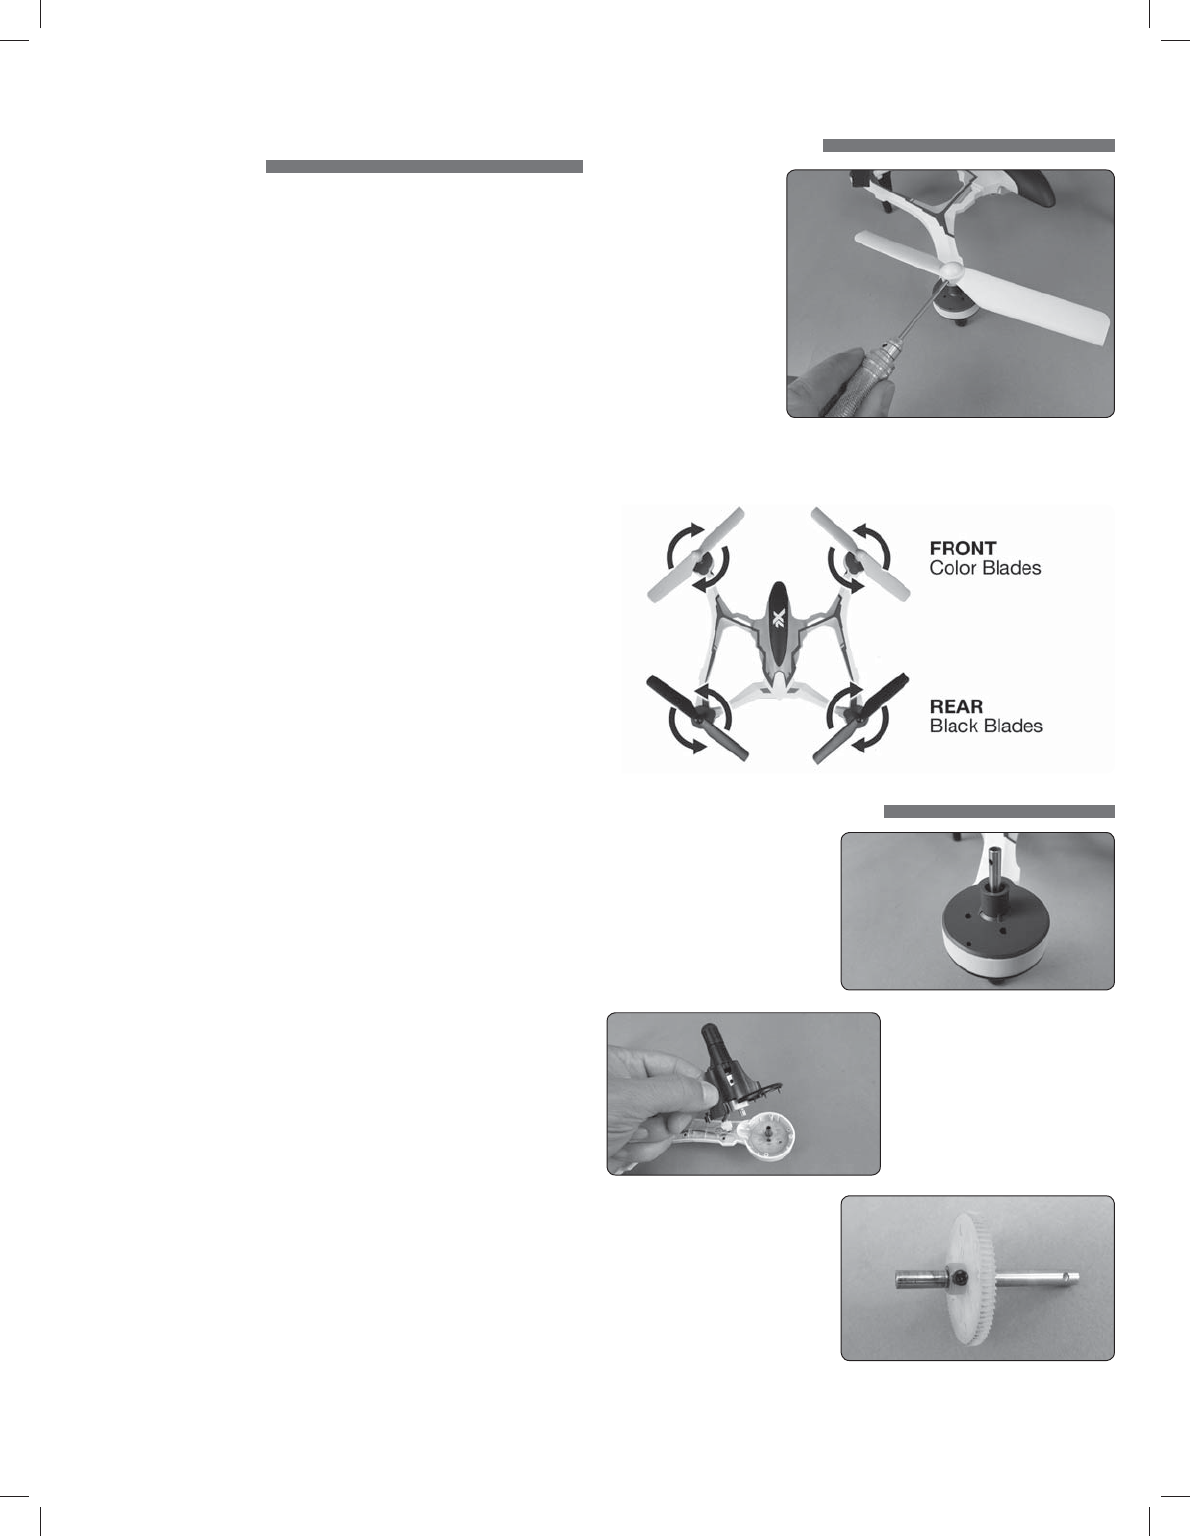
BLADE REPLACEMENT
1. Remove the screw that
secures the rotor blade
to the gear shaft.
2. Pull the prop off the
gear shaft.
3. Install the new rotor
blade and secure it
with the screw.
NOTE:
The rotor blades have arrows that indicate which direction they rotate.
Please refer to this diagram to verify that the correct replacement rotor blade
is installed.
PROP SHAFT REPLACEMENT
1. Remove the rotor blade from
the prop shaft.
2. Remove the four screws from
the black motor cover and lift
it off the frame (if installed, the
prop guard will also need to
be removed before the motor
cover can be removed). You do
not need to disconnect the
motor wires.
3. Slide the motor shaft out out of
the frame. Remove the screw
securing the gear to the shaft.
Slide the gear off the shaft.
4. Reinstall the parts in the
same order in which they
were removed.
NOTE: While the gear is out, check it carefully for any cracks or damage
to the teeth.
6