HomeScenario HSK50Z000A1 Z-Wave Portable Scenario Controller User Manual
HomeScenario, Inc Z-Wave Portable Scenario Controller
Users Manual
Z-Wave Portable Scenario Controller
HSK-50Z / HomeScenario
Introduction
The HSK-50Z is a Z-Wave Scene Controller. HSK-50Z can include/exclude Z-Wave
device, and provide two channels to associated. HSK-50Z can also assign association to connect the
controlling device and to be controlled device. In addition, The Scenario Hub HSC-200 can include
the HSK-50Z, and it will be a scenario controller. Replicating Network and Channel setting can join
the primary controller made HSK-50Z to be a secondary controller. The HSK-50Z has LED and
four button at frond side, and each button have three way Signal Click, Hold and Release. At the
back side have a configure switch and a 3V mercury battery.
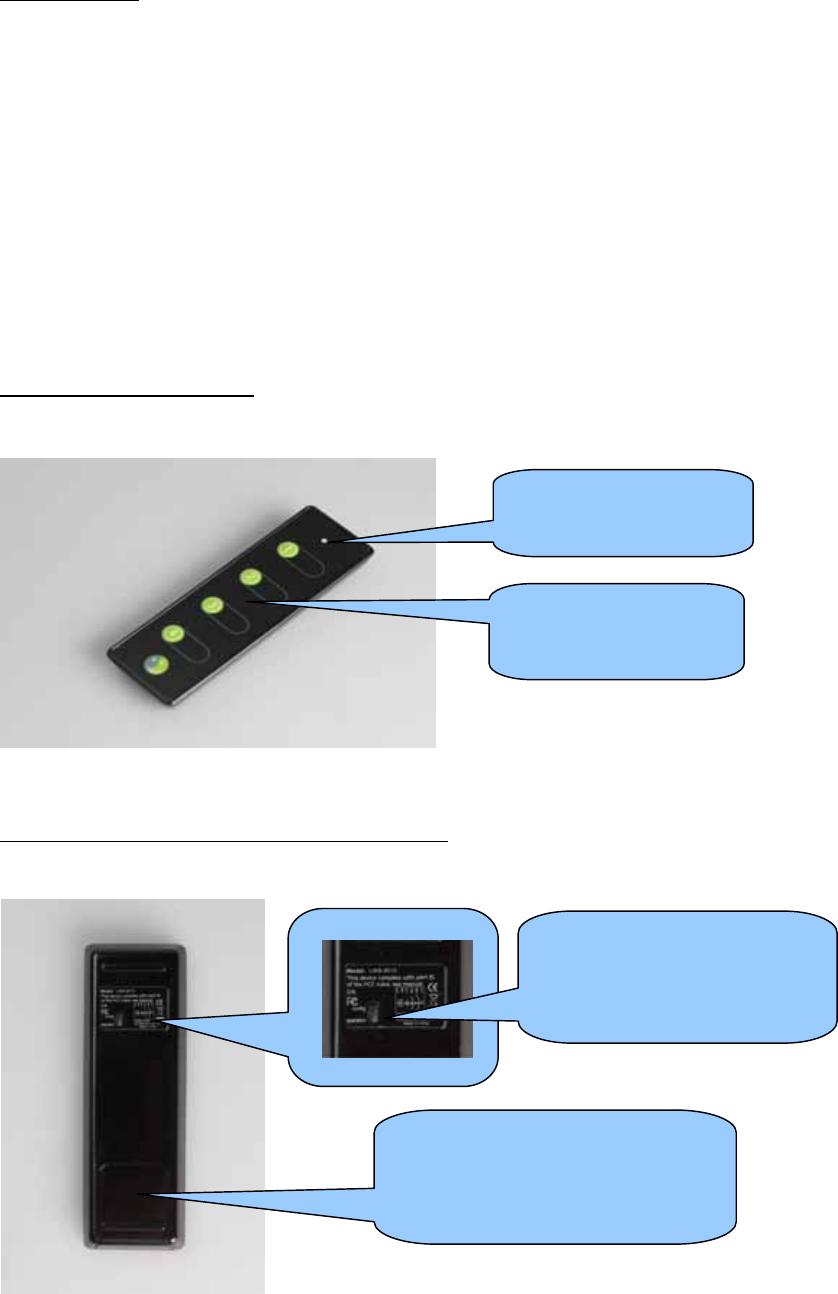
Externals of HSK-50Z
stalling Battery and Configure Switch
In
LED
4 Buttons
Please put in a 3V mercury battery
Configure switch
White is configuration mode
Green is operation mode

Z-Wave Portable Scenario Controller
HSK-50Z / HomeScenario
ncluding a Z-Wave Device to the NetworkI
To including a Z-Wave device to the network, we should make sure the device has not been
ther network, please follows the steps in
Excluding a Z-Wave Device from the Network” to exclude the device.
1. Turn the configure switch(back side) to CONFIGURATION mode. The switch color
2. Press & release BUTTON(1), the LED in front will blink in GREEN color (to expire
3. ROGRAM button on the device, the LED in front will turn solid
4. ion in NOT successful, the LED in front will turn solid RED for 2 sec;
xcluding a Z-Wave Device from the Network
included in other network. If the device already in o
“
The following steps can be used to include a new device.
will be WHITE.
in 10 sec).
Press & release P
GREEN for 2 sec, if successful.
If the Inclus
user has to redo 2&3.
E
To remove the device from the network. Perform the following steps:
1. Turn the configure switch(back side) to CONFIGURATION mode. The switch color
2. Press & release BUTTON(2), the LED in front will blink in YELLOW color (to
3. ROGRAM button on the device, the LED in front will turn solid
4. NOT successful, the LED in front will turn solid RED for 2 sec;
Associati
will be WHITE.
expire in 10 sec).
Press & release P
GREEN for 2 sec, if successful.
If the Exclusion in
user has to redo 2 & 3.
ng a Z-Wave Device to a Channel
HSK-50 provides support for two channels, which can control the on/off/dim state of
) and BUTTON(2), and the BUTTON(3) and
UTTON(4) is for channel 2. Before associating a Z-Wave device to a channel, you should make
1. Turn the configure switch(back side) to CONFUGURATION mode. The switch
HITE.
2. Press & release BUTTON(3), the LED in front will turn solid in GREEN color (to
3. ON(2) to connect with CANNEL 1, or press
GREEN color (to expire in 10 sec).
5. t will turn solid RED for 2 sec;
devices. The channel 1 is composed of BUTTON(1
B
sure the device has been already included in HSK-50Z.
Perform the following steps:
color will be W
expire in 10 sec).
Press & release BUTTON(1) or BUTT
& release BUTTON(3) or BUTTON(4) to connect with CHANNEL 2. The LED in
front will blink in
4. Press & release PROGRAM button on the device, the LED in front will turn solid
GREEN for 2 sec, if successful.
If the association is NOT successful, the LED in fron

Z-Wave Portable Scenario Controller
HSK-50Z / HomeScenario
6. e you would like to associate to the selected
Not
Dis-as
user has to redo steps 2 to 4.
Repeat steps 2 to 4 for each devic
operation button.
e: The button 1&3 is ON or DIM UP, the button 2&4 is OFF or DIM DOWN.
sociating a Z-Wave Device to a Channel
you want to change the Z-Wave device to other channel or you do not want to associate in
e from the channel. Perform the following
teps:
color will be WHITE.
2. Press & release BUTTON(4), the LED in front will turn solid in YELLOW color (to
3. ON(2) to disconnect with CHANNEL 1, or
ll blink in YELLOW color (to expire in 10 sec).
5. turn solid RED for
6. e you would like to dis-associate.
Enable All O
If
any channels, you can dis-associating the Z-Wave devic
s
1. Turn the configure switch(back side) to CONFUGURATION mode. The switch
expire 10 sec).
Press & release BUTTON(1) or BUTT
press & release BUTTON(3) or BUTTON(4) to disconnect with CHANNEL 2. The
LED in front wi
4. Press & release PROGRAM button on the device, the LED in front will turn solid
GREEN for 2 sec, if successful.
If the Dis-association is NOT successful, the LED in front will
2 sec; user has to redo steps 2 to 4.
Repeat steps 2 to 4 for each devic
n/ Off
Enable all the devices included in HSK-50Z, and control them to do all On/ Off. Perform the
ll be WHITE.
2. Press & hold BUTTON(1) & BUTTON(4) for 2 sec, and the LED in front will blink
3. UTTON(1) or BUTTON(3) , the LED in front will turn solid
4. will turn solid RED for 2 sec; user has to redo 2
No
delete.
Note 2: In case one or more associations are made to the selected button again the All
Resett
following steps:
1. Turn the configure switch(back side) to CONFIGURATION mode. The switch color
wi
in GREEN color (to expire 10 sec).
Press & release B
GREEN for 2 sec, if successful.
If NOT successful, the LED in front
& 3.
te 1: All associations previously made to the selected operation button pair will be
On/ Off will automatically be disabled.
ing Network & Channels
Resetting the network & channels to default setting. Perform the following steps:
1. Turn the configure switch(back side) to CONFIGURATION mode. The switch color
will be WHITE.

Z-Wave Portable Scenario Controller
HSK-50Z / HomeScenario
2. Press & hold BUTTON(1) & BUTTON(4) for 2 sec, and the LED in front will blink
3. BUTTON(2) & BUTTON(3) for about 10 sec until the LED in
uring the resetting process.
Including
in GREEN color (to expire 10 sec).
Press & keep hold
front will turn solid GREEN for 2 sec to mean successful. The LED in front will
alternate GREEN, RED, YELLOW d
4. If NOT successful, the LED in front will turn solid RED for 2 sec, and user has to
redo 2 & 3.
& Replicating Network & Channel Settings
If you already had a primary controller (HSK-50Z), You can add a secondary controller and
rform the following steps:
2. Press & hold primary HSK-50Z BUTTON(1) & BUTTON(2), the LED in front will
3. ), the LED in front
4. l.
Create As
replicating the Z-Wave device, network and channel settings. Pe
1. Turn the primary and secondary HSK-50Z configure switch(back side) to
CONFIGURATION mode. The switch color will be WHITE.
alternate GREEN and YELLOW color (to expire 10 sec).
Press & hold secondary HSK-50Z BUTTON(3) & BUTTON(4
will alternate GREEN and YELLOW color (to expire 10 sec).
The LED in front turn solid GREEN for 2 sec, if successfu
5. If the inclusion NOT successful, the LED in front will turn solid RED for 2 sec; user
has to redo 2 to 4.
signed Association
HSK-50Z can assign association to connect the controlling device and to be controlled
to connect two Z-Wave device, then the controlling device will
ontrol the other device. Perform the following steps:
2. Press & hold BUTTON(1) & BUTTON(3) for 2 sec, the LED in front will turn blink
3. Z in hand press the PROGRAM button on the device to be
4. PROGRAM button on the controlling device,
5.
Remove A
device. The HSK-50Z like a bridge
c
1. Turn the configure switch(back side) to CONFIGURATION mode. The switch color
will be WHITE.
GREEN quickly (to expire 10 sec).
With the HSK-50
controlled, and the LED in front will turn blink GREEN slowly. (to expire 10 sec).
With the HSK-50Z in hand press the
and the LED in front will turn solid GREEN for 2 sec, if successful.
If the assigned association in NOT successful, the LED in front will turn solid RED
for 2 sec; user has to redo 2 to 4.
ssigned Association
Remove the connection between the controlling device and to be controlled device. Perform
e WHITE.
2. Press & hold BUTTON(2) & BUTTON(4) for 2 sec, the LED in front will turn blink
3. Z in hand press the PROGRAM button on the device to be
the following steps:
1. Turn the configure switch(back side) to CONFIGURATION mode. The switch color
will b
YELLOW quickly (to expire 10 sec).
With the HSK-50
controlled, and the LED in front will turn blink YELLOW slowly ( to expire 10 sec).

Z-Wave Portable Scenario Controller
HSK-50Z / HomeScenario
4. ROGRAM button on the controlling device,
5.
Including e
With the HSK-50Z in hand press the P
and LED in front will turn solid GREEN for 2 sec, if successful.
If the removed association in NOT successful, the LED in front will turn solid RED
for 2 sec; user has to redo 2 to 4.
th HSK-50Z to a Scenario Hub
The HSK-50Z can act as the portable installation controller for the Scenario Hub(HSC-200),
Scenario Hub or press the buttons to control the
cenario. Perform the following steps:
2. Place the HSK-50Z next the Scenario Hub(HSC-200).
4. TON(3) & BUTTON(4) of HSK-50Z for 2 sec, the LED in front
rn solid RED for 2 sec; user
Not
delete.
OPERA
can control the device has been already included in
s
1. Turn the configure switch(back side) to CONFIGURATION mode, the switch color
will be WHITE.
3. Initiate the learning mode of Scenario Hub(HSC-200).
Press & hold BUT
will turn solid GREEN for 2 sec, if successful.
5. If the inclusion NOT successful, the LED in front will tu
has to redo 2 to 4.
e: When the HSK-50Z is included in Scenario Hub, all its existing setting will be
TION – On/ Off/ Dim
You can control the Z-Wave device by HSK-50Z. If you already completed “Associating a
turn the configure switch(back side) to OPERATION mode, the
witch color will be GREEN.
n/
for Off/ Dim Down; In channel 2, the control button is BUTTON(3)
BUTTON(4), the BUTTON(3) is for On/ dim Up and the BUTTON(4) is for Off/ Dim Down.
times when execute On/ Dim Up; The LED in front will blink in YELLOW 2 times when execute
Off/ D
Z-Wave Device to a Channel”,
s
In channel 1, the control button is BUTTON(1) & BUTTON(2), the BUTTON(1) is for O
Dim UP and the BUTTON(2) is
&
If you want to execute On/ Off, please press & release the buttons; If you want to execute
Dim Up/ Dim Down, please press & hold the buttons. The LED in front will blink in GREEN 2
im Down. If NOT successful, the LED will blink in RED 2 times.
OPERATION – All On/ Off
You can control the Z-Wave device by HSK-50Z. If you already completed “Enable All On/
ck side) to OPERATION mode, the switch color will be GREEN.
N; The LED will blink in YELLOW 2 times when execute ALL OFF. If NOT
Off”, turn the configure switch(ba
Press & release BUTTON(1) or BUTTON(3) will execute ALL ON, press & release
BUTTON(2) or BUTTON(4) will execute ALL OFF. The LED will blink in GREEN 2 times when
execute ALL O
successful, the LED will blink in RED 2 times.
OPERATION – Scenario Selector
You can through the Scenario Hub(HSC-200) to set the HSK-50Z to control the devices or

Z-Wave Portable Scenario Controller
HSK-50Z / HomeScenario
leted “Including the HSK-50Z to a Scenario Hub”, turn the
onfigure switch(back side) to OPERATION mode, the switch color will be GREEN.
sful. If NOT
uccessful, the LED in front will blink in RED 2 times.
select the scenarios. If you already comp
c
If you already set the scenario with HSK-50Z by Scenario Hub, Press & release the
BUTTON(1) to BUTTON(4), the LED in front will blink in GREEN 2 times, if succes
s
Trouble Shooting
• Problem: The LED always blink in RED 2 times when I press & release the buttons, and
l the device.
• Solution1: Please check the battery or power in your device.
• K-50Z within 15 feet of your device in house.
• Solution: Please check the configure switch(back side) is in configuration mode.
• Solution: Please check your HSK-50Z did not included in other network. If HSK-50Z
SK-50Z.
er can
• up or dim down the Z-Wave Lamp Module.
• Solution: Please check what channels that you associated.
• Solution: If the state is “Enable All On/ Off”, the Lamp Module just execute on/ off by
Fed a
can not contro
• Solution2: Please make sure the device associated in a channel.
Solution3: Please check HS
• Problem: I can not include/ exclude any devices by HSK-50Z.
included in other network, it will can not include any device in H
• Solution: The HSK-50Z might be a secondary controller, just the primary controll
include/ exclude the device.
Problem: Why I can not dim
HSK-50Z.
er l Communications Commission Statement

Z-Wave Portable Scenario Controller
HSK-50Z / HomeScenario
arrantyW
ou are cautioned that changes or modifications not expressly approved by the party responsible for
could void your authority to operate the equipment.
junction with any other antenna or
,
e
ainst harmful interference in a residential installation. This equipment generates, uses
r is
r help
Y
compliance
This device complies with part 15 of the FCC rules. Operation is subject to the following two
conditions
1) This device may not cause harmful interference and
(
(2) This device must accept any interference received, including interference that may cause
undesired operation
This transmitter must not be co-located or operating in con
transmitter.
This equipment has been tested and found to comply with the limits for a class B digital device
pursuant to part 15 of the FCC rules. These limits are designed to provide to provide reasonabl
rotection ag
p
and can radiate radio frequency energy and, if not installed and used in accordance with the
installation. , May cause harmful interference to radio communication. However, there is no
guarantee that interference
Will not occur in a particular installation. if this equipment does cause harmful interference to radio
or television reception, which can be determined by turning the equipment off and on, the use
encouraged to try to correct the interference by one or more of the following measures:
-Reorient or relocate the receiving antenna
-Increase the separation between the equipment and receiver
-Connect the equipment into an outlet on a circuit different from that to which the receiver is
connected
-Consult the dealer or an experienced radio / TV technician fo