Homedics Speaker Hx B322 Users Manual
HX-B322 to the manual 84920801-92e5-4f7d-90fc-756450a2509e
2015-02-04
: Homedics Homedics-Homedics-Speaker-Hx-B322-Users-Manual-368369 homedics-homedics-speaker-hx-b322-users-manual-368369 homedics pdf
Open the PDF directly: View PDF ![]() .
.
Page Count: 4

Instruction Manual and
Warranty Information HX-B322
El manual en español empieza
a la página 13
UNWIND
Docking Speaker
©2011 HMDX Audio, all rights reserved. HMDX Audio® is a registered trademark of
HMDX Audio and its affiliated companies.
IB-HXB322
ONE YEAR LIMITED WARRANTY
HMDX Audio sells its products with the intent that they are free of defects in manufacture and
workmanship for a period of one year from the date of original purchase, except as noted below.
HMDX Audio warrants that its products will be free of defects in material and workmanship under normal
use and service. This warranty extends only to consumers and does not extend to Retailers.
To obtain warranty service on your HMDX Audio product, mail the product and your dated sales receipt
(as proof of purchase), postpaid, to the following address:
HMDX Audio
Service Center
43155 W. Nine Mile Road, Suite 3
Novi, MI 48375
No COD's will be accepted.
HMDX Audio does not authorize anyone, including, but not limited to, Retailers, the subsequent consumer
purchaser of the product from a Retailer or remote purchasers, to obligate HMDX Audio in any way
beyond the terms set forth herein. This warranty does not cover damage caused by misuse or abuse;
accident; the attachment of any unauthorized accessory; alteration to the product; improper installation;
unauthorized repairs or modifications; improper use of electrical/power supply; loss of power; dropped
product; malfunction or damage of an operating part from failure to provide manufacturer’s recommended
maintenance; transportation damage; theft; neglect; vandalism; or environmental conditions; loss of use
during the period the product is at a repair facility or otherwise awaiting parts or repair; or any other
conditions whatsoever that are beyond the control of HMDX Audio.
This warranty is effective only if the product is purchased and operated in the country in which the
product is purchased. A product that requires modifications or adoption to enable it to operate in any
other country than the country for which it was designed, manufactured, approved and/or authorized, or
repair of products damaged by these modifications is not covered under this warranty.
THE WARRANTY PROVIDED HEREIN SHALL BE THE SOLE AND EXCLUSIVE WARRANTY. THERE
SHALL BE NO OTHER WARRANTIES EXPRESS OR IMPLIED INCLUDING ANY IMPLIED WARRANTY OF
MERCHANTABILITY OR FITNESS OR ANY OTHER OBLIGATION ON THE PART OF THE COMPANY WITH
RESPECT TO PRODUCTS COVERED BY THIS WARRANTY. SI PRODUCTS SHALL HAVE NO LIABILITY FOR
ANY INCIDENTAL, CONSEQUENTIAL OR SPECIAL DAMAGES. IN NO EVENT SHALL THIS WARRANTY
REQUIRE MORE THAN THE REPAIR OR REPLACEMENT OF ANY PART OR PARTS WHICH ARE FOUND TO BE
DEFECTIVE WITHIN THE EFFECTIVE PERIOD OF THE WARRANTY.
NO REFUNDS WILL BE GIVEN. IF REPLACEMENT PARTS FOR DEFECTIVE MATERIALS ARE NOT AVAILABLE,
SI PRODUCTS RESERVES THE RIGHT TO MAKE PRODUCT SUBSTITUTIONS IN LIEU OF REPAIR OR
REPLACEMENT.
This warranty does not extend to the purchase of opened, used, repaired, repackaged and/or resealed
products, including but not limited to sale of such products on Internet auction sites and/or sales of such
products by surplus or bulk resellers. Any and all warranties or guarantees shall immediately cease and
terminate as to any products or parts thereof which are repaired, replaced, altered, or modified, without
the prior express and written consent of HMDX Audio.
This warranty provides you with specific legal rights. You may have additional rights which may vary from
state to state. Because of individual regulations, some of the above limitations and exclusions may not
apply to you. For more information regarding our product line in the USA,
please visit: www.hmdxaudio.com
HMDX Audio
Service Center
1.800.466.3342
8:30 am – 7:00 pm (EST)
M – F
Mail To: HMDX Audio
Service Center
43155 W. Nine Mile Road
Suite 3
Novi, MI 48375
e-mail:
cservice@hmdxaudio.com
P
l
e
a
s
e
T
a
k
e
A
M
o
m
e
n
t
N
o
w
Register
Your Product At:
www.hmdxaudio.com
Your valuable input regarding this
product will help us create
the products you will
want in the future.
32
Unwind Alarm Dock Main Features
• SimpledockingtochargeandplayyouriPad/iPhone/iPod
• Autosetclock
• DualAlarmwithgradualwake
• Digitaltuneradiowithstationpresets
• Built-in6naturesounds
• Superiorspeakerqualitywithpassivesubwoofersforenhancedbass
• Colorchangingmoodlight
• RemoteControlforyourconvenience
• Batterybackuptokeepclocktimeduringpoweroutage
Remote Control Battery
Thebatteryisalreadyinstalled.Simplypulltabouttoactivatebatterypower.Toreplaceremotebattery,openthe
batterydoorbypressingthetwotabstogether.RemovetheoldbatteryandreplacewithaCR2025battery.
Replacing Backup Battery if needed
Thisalarmclockisequippedwithabatterybackupfeature(batteriesincludedandalreadyinstalled)tokeepthe
clocktimeduringpoweroutage.
1. Openbatterycompartmentdoorlocatedonthebottomoftheunit.
2. PleasemakesuretheACadaptorisconnected.Otherwiseallsettingsmaybelostduringbattery
replacement.
3. Insertproperreplacementbattery,checkingthatthepolarity(“+”and“–“endsofthebattery)matchesthe
drawingnearthebatterycompartment.Closethecompartmentdoor.
Battery Precautions
• Useonlythesizeandtypeofbatteriesspecied.
• Wheninstallingbatteries,observeproper+/-polarities.Incorrectinstallationofbatterymaycausedamageto
the unit.
• Donotmixdifferenttypesofbatteriestogether(e.g.,alkalinewithcarbon-zincoroldbatterieswithnewones).
• Iftheunitisnotgoingtobeusedforalongperiodoftime,removebatteriestopreventdamagedueto
possiblebatteryleakage.
• Donotdisposeofbatteriesinre.Batteriesmayexplodeorleak.
This product contains small parts that may present a choking hazard for young children.
Getting Started
Unpacktheunitcarefully.Removealltheaccessoriesfromthedisplaycarton.Donot
removeanylabelsorstickersonthebottomoftheunitandadaptor.Beforesettingupthe
unit,verifythatthefollowingaccessoriesarepresent:
• Instructionmanualx1
• ACpoweradaptorx1
• Mainunitx1
• Remotecontrolx1
• 3.5mmaudiocablex1
Power Source (Fig.1)
ThisunitissuppliedwithanACadaptor;takethefollowingstepstoconnecttheadaptor.
1. UnwindthepowercordoftheACadaptortoitsfulllength.
2. ConnecttheACadaptortotheDCJack(Fig.1).
VIDEO OUT
DC IN
LINE IN
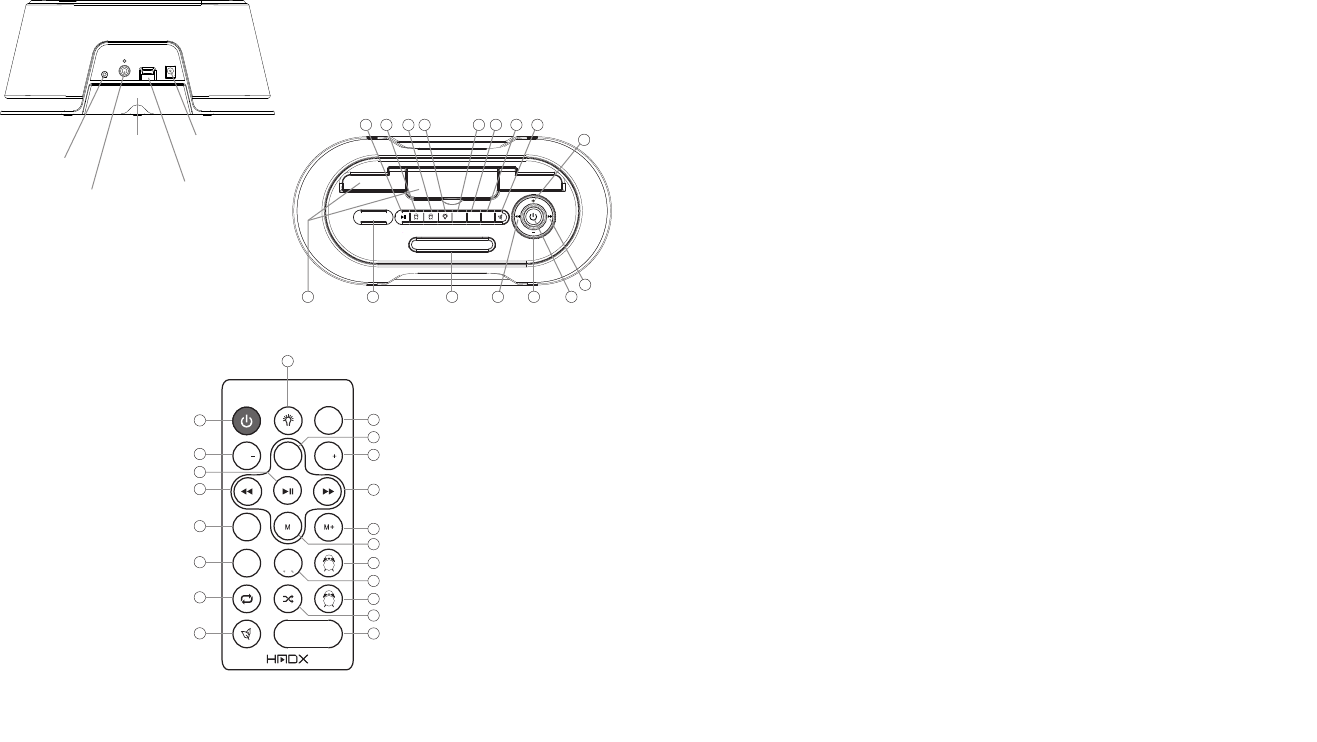
Docking Speaker Buttons and Parts:
USB Charging
Port
AC Adaptor
Jack
iPad
Stabilizing
Drawer
Line In
Jack
Video Out
Jack
(Fig. 1) (Fig. 2)
DST
12/24 TIME
ZONE
MUTE
SOURCE
VOL VOL
2
1
z
z
z
(Fig. 3)
1. Docks Doors
2. Source
3. Snooze/Dimmer
4. Previous Track
5. Volume Down
6. Power
7. Next Track
8. Play/Pause
9. Alarm 1
10. Alarm 2
11. Mood Light
12. Memory Set
13. Memory Select
14. Daylight Savings Time
15. Nature Sounds
16. Volume Up
1. Nature Sounds
2. Repeat
3. 12/24 Hour Clock Adjustment
4. Daylight Savings Time
5. Reverse/Previous Track
6. Play/Pause
7. Volume Down
8. Power
9. Mood Light
10. Mute
11. Source
12. Volume Up
13. Forward/Next Track
14. Memory Select
15. Memory Set
16. Alarm 1
17. Time Zone
18. Alarm 2
19. Shuffle
20. Snooze
SOURCE M M+ DST
12
z
z
z
1
1
9
9
2
2
10
10
3
3
11
11
4
4
12
12
5
5
13
13
6
6
14
14
7
7
15
15
8
8
16
16
17
18
19
20

4 5
3. PlugtheACadaptorintoanoutlet(110v–240vAC.60Hz).Connectingthissystemtoanyotherpower
sourcemaycausedamagetothesystem.Forsufcientventilation,keepotherobjectsatleast4inchesaway
from the unit.
4. Toswitchtheunitoffcompletely,withdrawtheACadaptorfromthewalloutlet.
Volume Control (Fig.2&3)
Toadjustthevolume,pressthe“+”and“-”controlsonthedraweroftheunitorontheremotecontrol.
iPad/iPhone/iPod Operation
Please Note:
• If docking an iPad, be sure to pull out the stabilizing drawer on the back of the unit to add
stability when the iPad is docked.
• Toavoiddamage,donotforcethedeviceontothedockingpin.
WARNING: The dock connector is designed for Apple iPad, iPhone, and iPod devices. Attempting
to attach a non-iPad/iPhone/iPod music player will damage or destroy your device and/or the
product.
Listening to Music from your iPad/iPhone/iPod (Fig.2&3)
1. PressthePOWERbutton,locatedontopoftheunittoturnON.
2. Openthedockdoor(s).ToplayiPodoriPhoneonlythecenterdoorneedstobeopened.ToplaytheiPad,
openbothdockdoors.
3. FitiPad/iPod/iPhonecarefullyontothedockingpin.
4. PresstheSOURCEbuttonontheunitorontheremotecontroluntiltheiPodiconappearsonthedisplay.
5. PressthePLAY/PAUSEbuttonontheunitortheremotecontroltoplayandagaintopause.
6. Toskipforwardandbackwardthroughtracks,presstheFORWARDandREVERSEbuttonsontheunitorthe
remote control.
7. Usetherepeat and shuffle buttonsontheremotetorepeatsongs,albums,orplaylistsortoshufe
songswithinanalbumorplaylist.
8. ToturntheunitOFF,pressthePOWERbutton.Note:Foryourconvenience,yourdevicewillcontinue
chargingonthedockwhiletheunitispluggedin,evenifthepoweristurnedoff.
Sending Movies & Videos from your iPad/iPhone/iPod touch to an external video source (Fig.1-3)
1. PressthePOWERbutton,locatedontopoftheunit,toturnON.
2. Openthedockdoor(s).ToplayiPodtouchoriPhoneonlythecenterdoorneedstobeopened.Toplaythe
iPad,openbothdockdoors.
3. FitiPad/iPod/iPhonecarefullyontothedockingpin.
4. PresstheSOURCEbuttonontheunitorontheremotecontroluntiltheiPodiconappearsonthedisplay.
5. ConnectastandardAVcable(notincluded)tothebackoftheunitandconnecttheotherendtotheexternal
videosource(TV,projector,etc.)
6. Selectthedesiredvideoormovieonthedeviceandpressplay.
7. Oncethevideobeginsplaying,holdthePLAYbuttonontheunitorontheremotecontroldownforve
seconds.
• If playing from the iPad,thevideowillstopplayingonyourdeviceandwillreturntotheopeningscreen
ofthevideo.Presstheplaybuttonagainontheunit,theremoteortheiPadandthevideowillbesenttothe
externalvideosource.
• If playing from the iPhone or iPod touch,thevideowillstopplayingonyourdeviceandwillreturntothe
mainmovie/videolistonyourdevice.PressthedesiredvideoagainfromthelistonyouriPhone/iPodtouch
andthevideowillbesenttotheexternalvideosource.
8. ToreturnyourmovieorvideobacktoyouriPad/iPhone/iPod,pressandholdthePLAY/PAUSEbuttonforve
seconds.Thescreenofyourdevicewillthenshowthemovie/videohomescreen.PressPLAY/PAUSEonthe
device,theunit,ortheremotecontrolandthevideowillstopplayingontheexternalvideosourceandwill
resumeplayonyourdevice.
Charging your Apple device while docked
1. FittheiPadcarefullyontothedockingpin.
2. Onceconnected,yourdevicewillbegincharging.Toconrm,checkthechargingindicatorlocatedin
theupperright-handcornerofyourdevice.The symbolmeansyourdeviceischarging.The
symbolmeansyourdeviceisstilldocked,butisfullycharged.
Listening to a non-docking iPod or other portable audio devices(Fig.2&3)
1. Usingthe3.5mmaudiocable(included),pluginthedeviceviatheLINEINinputlocatedonthebackofthe
unit.
2. PlugtheotherendoftheaudiocableintotheLINEOUTorheadphonejackofthedevice.
3. PressthePOWERbuttonlocatedontopofthedockorontheremotecontrol.
4. PresstheSOURCEbuttonontheunitorontheremotecontroluntiltheAUXiconappearsonthedisplay.
5. Pressplayontheconnecteddevice.
NOTE:Youmayneedtoadjustthevolumeonthedevicetoachievepropervolume.
6. PressthePOWERbuttontoturnunitoff.
Listening to the Radio/Station Presets(Fig.2&3)
Note: For best reception, fully extend the wire antenna. DO NOT strip, alter or attach to other
antennas.
1. Tolistentotheradio,pressthePOWERbuttonlocatedontopofalarmclockorontheremotecontrol.
2. PresstheSOURCEbuttonontheunitorontheremotecontroluntiltheRADIOiconappearsonthedisplay.
3. UsetheFORWARDandREVERSEbuttonsonthetopoftheunitorontheremotecontroltoselectdesired
station.
4. PressthePOWERbuttontoturnunitoff.
To set/listen to station presets
1. Whileinradiomode,useFORWARDandREVERSEbuttonstoselectdesiredstation.
2. PresstheMbuttononthetopoftheunitorontheremotecontroltoaddthestationtoyourpresets.Usethe
M+buttontosetthedesiredpresetnumber(1-20),thenpressMagaintoexit.
3. Tolistentostationpresets,presstheM+buttonontheunitortheremotetotogglethrough/selectapreset
station.
Listening to Nature Sounds
1. PressthePOWERbuttonlocatedontopofalarmclockorontheremotecontrol.
2. PressthebuttonontheunitorontheremotecontroluntiltheNATURESOUNDSiconappearsonthe
display.
3. UsetheFORWARD/REVERSEbuttonsonthetopoftheunitorontheremotecontroltoselectdesiredsound.
4. PressthePOWERbuttontoturnunitoff.
Setting Clock Time
AUTOSETCLOCK
TheUnwindalarmclockisequippedwithanautosetclock,meaningtheclockwillautomaticallysetitselfwhen
pluggedin.Pleasenote:theclockwillautomaticallydefaulttoEasternStandardTime,butcanbeadjustedby
pressingtheTIMEZONEbuttonontheremotecontrol(g.3)andscrollingthroughthedifferenttimezoneuntil
the proper time is set.
Usethechartbelowforsettingthepropertimezone:
A1.AST A3.CST A5.PST A7.HST
A2.EST A4.MST A6.AKST

76
MANUALLYSETTINGTHECLOCK(Fig.2&3)
1. Makesuretheunitispluggedin,butpoweredoff.
2. PressandholdtheMbuttontoenterTimeSettingmode.
3. UsetheForwardandReversebuttonstosetthepropertimezoneusingthelistabove.
4. PresstheMbutton.Thehourwillbeginashing.UsetheFORWARDandREVERSEbuttonstoadjustthe
hour,payingattentiontothePMindicator.
5. PresstheMbuttonagainandtheminutewillbeginashing.UsetheFORWARDandREVERSEbuttons
againtoadjusttheminute.
6. PresstheMbuttonagaintosetthedayoftheweek.UsetheFORWARDandREVERSEbuttonstosetthe
dayusing7forSunday,1forMonday,2forTuesday,3forWednesday,4forThursday,5forFriday,and6for
Saturday.The Unwind allows you to set a 7 day, 5 day, 2 day alarm (see SETTING THE ALARM
section for detailed instructions). For instance, setting a 5 day alarm means it will go off at
the same time Monday through Friday, which is why properly setting the day of the week is
important.
Oncethetimezoneisset,presstheMbuttonagaintoexitClockSettingmode.
DAYLIGHTSAVINGSTIME(Fig.2)
TheUnwindalarmclockisequippedwithasimpleDSTbuttontoadjusttheclockforDaylightSavings.Press
theDSTbuttononthetopoftheunittoadjusttheclocktoSummer,normalorWintertime.
Setting and Using the Alarms
SETTINGALARM1orALARM2(Fig.2&3)
1. Makesuretheunitispluggedin,butpoweredoff.
2. Pressandholdthedesiredalarmbutton(alarm1oralarm2)locatedonthetopoftheunitorontheremote
control.Thehourwillbeginashing.
3. UsetheFORWARDandREVERSEbuttonsontopoftheunitorontheremotetoadjustthehour,paying
attentiontothePMindicator.
4. Pressthealarmbuttonagainandtheminutewillbeginashing.UsetheFORWARDandREVERSEbuttons
againtoadjusttheminute.
5. Pressthealarmbuttonagaintoselectthesource.TheFlowcanbesettoBeep,Radio,oriPod/iPhone/
iPad.UsetheFORWARDandREVERSEbuttonstoselectwhichsourceyouwanttowaketo—Beep,Radio,
AppleDevice.Pleasenote:IfyousetthesourcetoAppleDeviceandyourdeviceisnotdocked,thealarm
willdefaulttoBeep.Ifyoudonotselectyoursourcewhenpromptedtodoso,thealarmwillalsodefaultto
Beep.
6. PressthealarmbuttonagainandusetheFORWARDandREVERSEtoselecta7,5,2,dayalarmsetting.
7-daywillsoundatthesametime7daysaweek,5-daywillsoundatthesametimeMondaythroughFriday,
2-daywillsoundatthesametimeSaturdayandSunday.
7. PressthealarmbuttonagaintoexitAlarmSettingmode.
TURNINGOFFTHEALARM/SNOOZEOPERATION(Figures2&3)
TheUnwindalarmclockisequippedwithgradualwake,whichmeansthatthealarmbeginssoftandslowlygets
louderoverthecourseoftwominutes.Thiswillensureanon-jarringwakeup.
• Pressthesnoozebuttonlocatedonthetopoftheunitorontheremotecontrolandthealarmwillsound
again in nine minutes.
Please note: You may only press the Snooze button during the Alarm mode for one hour (7 times).
After the seventh time, the alarm will turn off and will not sound again until the next set time.
• Toturnoffthealarm,pressanybuttononthetopoftheunit(exceptSnooze).
Dimmer Control
PresstheSNOOZEbuttontoadjustthebacklightintensityofclockdisplay.Thiscanbedoneatpoweroffstage.
Additional Features
Mood Light
1. PresstheMoodLightbuttonontopoftheunitorontheremotecontrol.Themoodlightwillturnonandwill
beginchangingcolors
2. PresstheMoodLightbuttonagaintofreezethecolor
3. PressandholdtheMoodLightbuttontoturnthemoodlightoff
Sleep Feature
Whilelisteningtomusicornaturesounds,presstheSNOOZEbuttontoactivatethesleepfeature.Thisallows
youtosetasleeptimerfor90,80,70...10,or5minutes.Onceset,theunitwillcontinueplayingfortheset
lengthoftime,thenwillautomaticallyturnoff.
USB Charging Port
Please note:
• ThisUSBportisforchargingonly.Itcannotbeusedtoplaymusicthroughtheunit.
• InordertousetheUSBchargingfeature,youmusthavethepropercordtoconnecttoyourdevicewitha
USBconnectorontheotherend.
TochargeyourdeviceusingtheUSBchargingport(locatedonthebackoftheunit):
1. ConnecttheUSBendofthedevice’scableintotheUSBportonthebackoftheunit
2. Connecttheotherendofthecordtoyourdevicetobegincharging
3. Ifyourdeviceisnotcharging,disconnectbothendsofthechargingcable,thenreconnecttothedeviceand
theUSBchargingport.
One Day Alarm
Thisalarmclockisequippedwitha1-DayAlarmfeature,whichallowsthealarmtobesetforonedayonly.To
activatethisfeature:
1. TurntheunitoverandpulltheiPadstabilizingdrawerouttoexposethebatterycompartmentandthe1-day
(Hotel)alarmswitch.
2. MovetheswitchtotheONposition.OncethisswitchisintheONposition,thealarmtimewillneedtobe
reset.PleaseseetheSetting and Using the Alarms section for instruction.
Please note:
• Whenthe1-Dayalarmfeatureisactivated,thealarmwillonlysoundonce.OncethealarmisturnedOFF,it
willnotsoundagainuntilthealarmisreset.
• Whensettingthealarmfora1-Dayalarm,youwillbepromptedtosetthehour,minute,andalarmsource,
butwillNOTbepromptedtosetthe7,5,or2-dayalarmasthisfeaturewillbedisabledforboth alarms.
ThisequipmenthasbeentestedandfoundtocomplywiththelimitsforaClassBdigitaldevice,pursuantto
Part15oftheFCCRules.Theselimitsaredesignedtoprovidereasonableprotectionagainstharmful
interferenceinaresidentialinstallation.Thisequipmentgenerates,usesandcanradiateradiofrequencyenergy
and,ifnotinstalledandusedinaccordancewiththeinstructions,maycauseharmfulinterferencetoradio
communications.However,thereisnoguaranteethatinterferencewillnotoccurinaparticularinstallation.If
thisequipmentdoescauseharmfulinterferencetoradioortelevisionreception,whichcanbedeterminedby
turningtheequipmentoffandon,theuserisencouragedtotrytocorrecttheinterferencebyoneormoreofthe
followingmeasures:
• Reorientorrelocatethereceivingantenna.
• Increasetheseparationbetweentheequipmentandreceiver.
• Connecttheequipmentintoanoutletonacircuitdifferentfromthattowhichthereceiverisconnected.
• Consultthedealeroranexperiencedradio/TVtechnicianforhelp.
