Honey Bee PAE-300-2 VITASOUND PERSONAL AUDIO ENHANCER-BASE UNIT User Manual PAE 300 manual ENG Ver2 preview

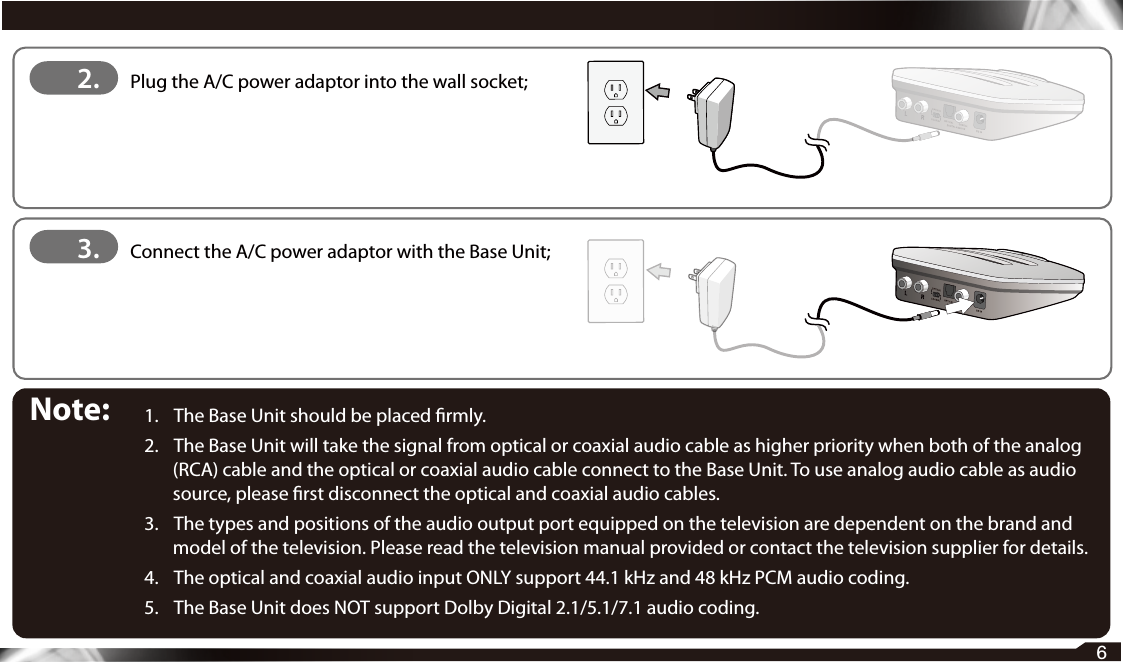
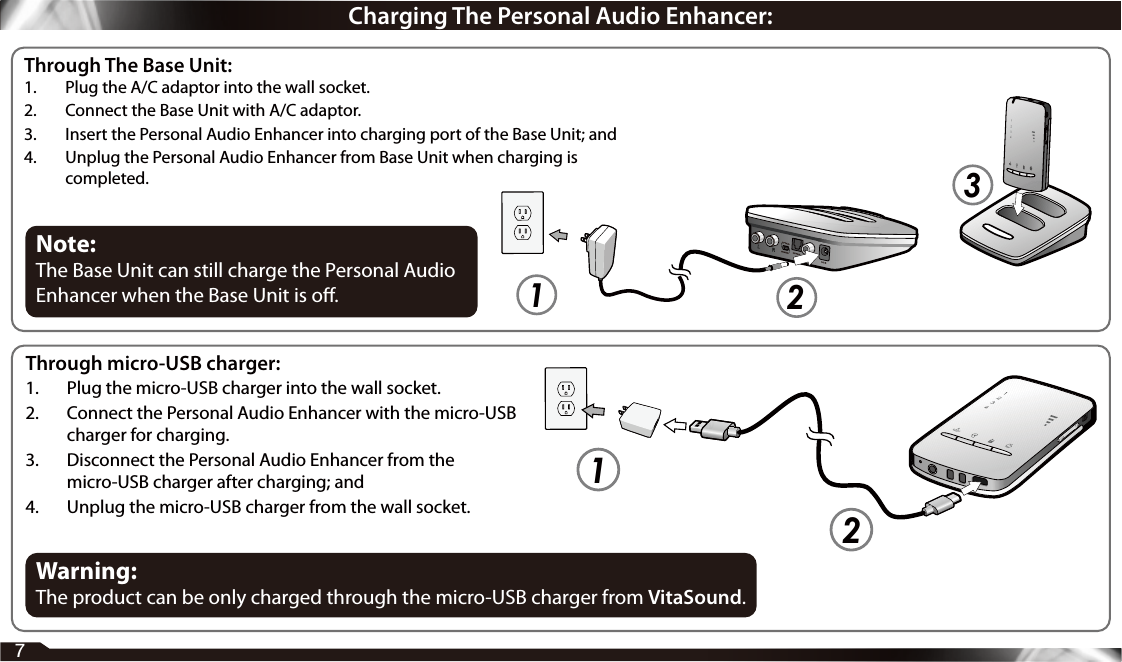
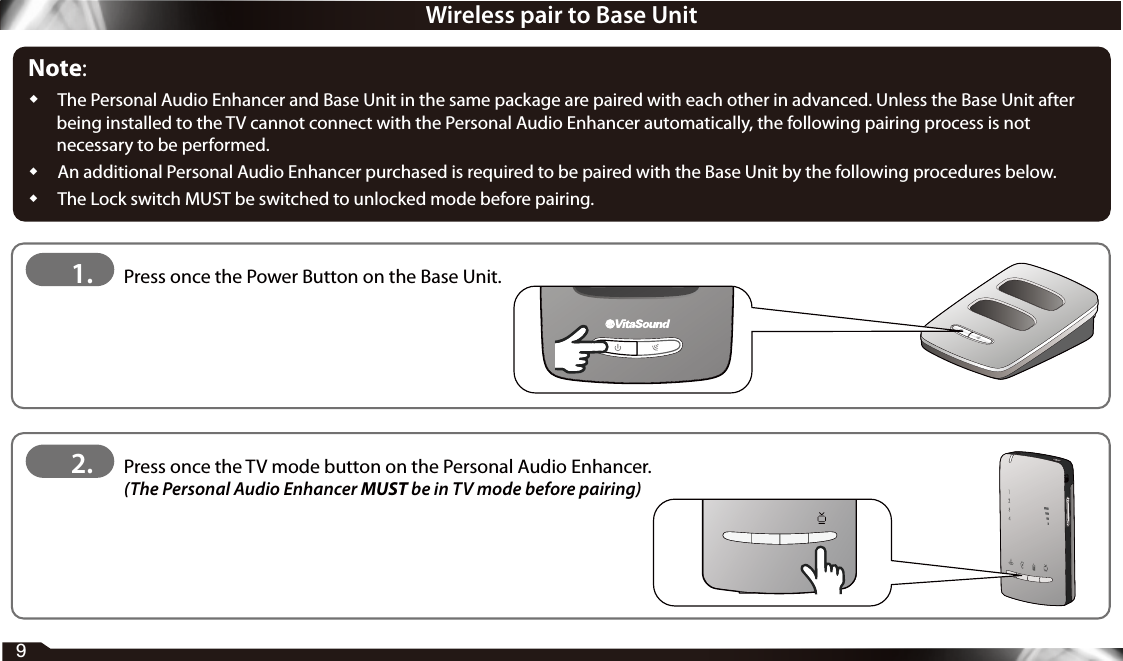
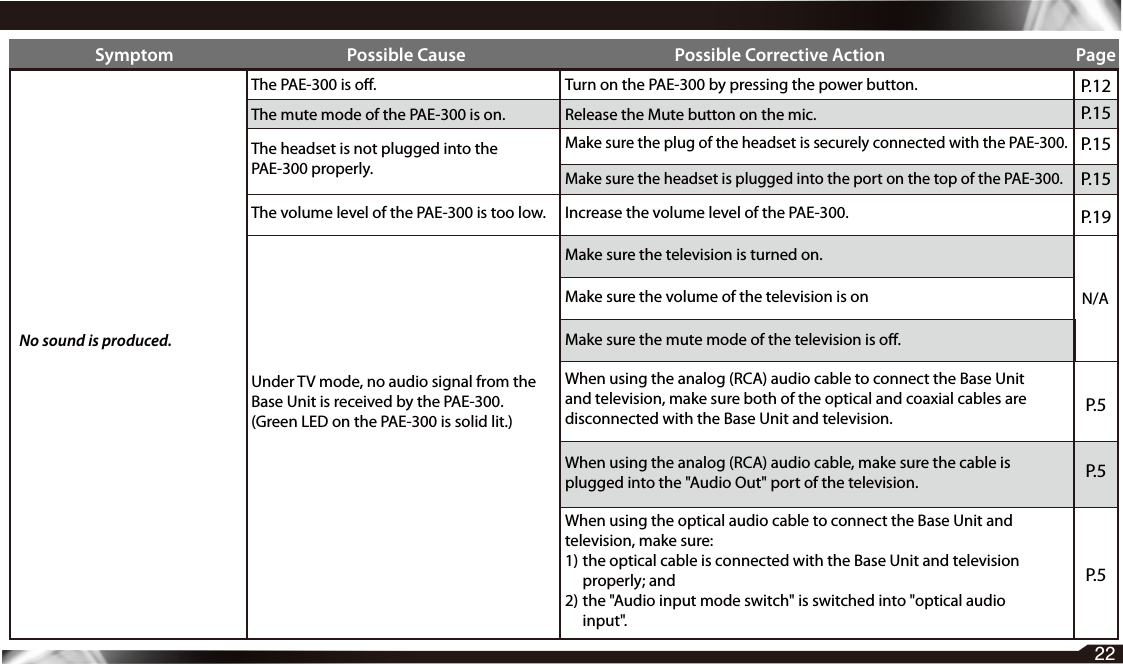
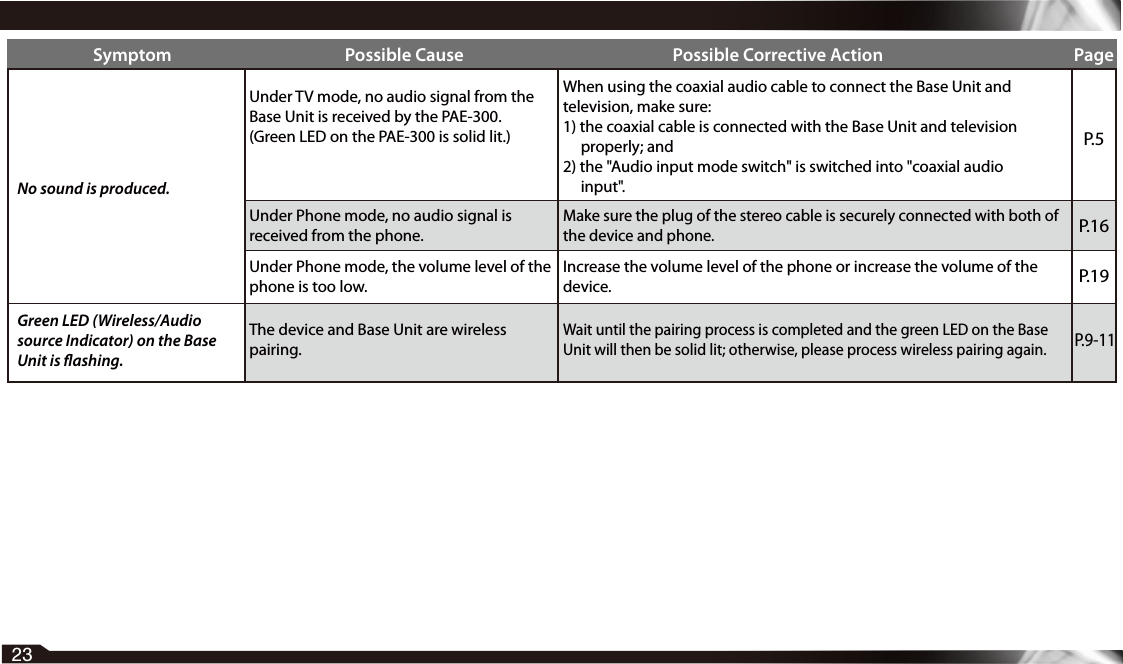
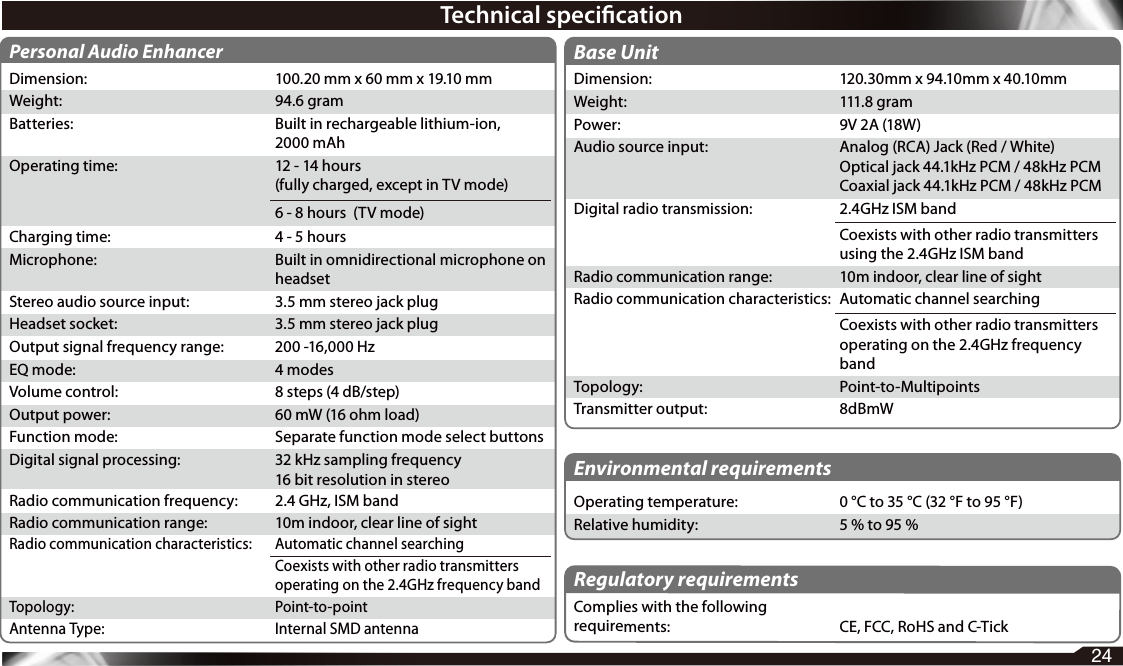
Honey Bee (Hong Kong) Ltd. VITASOUND PERSONAL AUDIO ENHANCER-BASE UNIT PAE 300 manual ENG Ver2 preview

User Manual

Personal Audio EnhancerPAE-300User Manual
THIS INSTRUCTION MANUAL HIGHLIGHTS KEY INFORMATION ABOUT SAFETY, OPERATION AND MAINTENANCE OF THE PERSONAL AUDIO ENHANCER.    PLEASE READ THROUGH THIS MANUAL IN ITS ENTIRETY BEFORE STARTING TO USE THE PRODUCT.   IT PROVIDES VALUABLEINFORMATION FOR HOW TO UTILIZE AND MAINTAIN THE PRODUCT AND FOR HOW TO PROTECT USER’S SAFETY DURING OPERATION. PLEASE CAREFULLY FOLLOW THE INSTRUCTIONS OUTLINED IN THIS MANUAL.Note :•  This product is not a hearing instrument. Anyone who is experiencing hearing loss is recommended to consult with a doctor. • This product will not restore normal hearing nor reduce hearing loss.•   This product has a sound amplifying function and the sound level can cause discomfort or damage hearing if the product is used improperly. Always turn the volume down to a low level before putting on the headset.• To ensure child safety, please keep the package and small parts included in this product out of reach of children.  IMPORTANT PRODUCT SAFETY AND OPERATION INSTRUCTIONS
 IMPORTANT PRODUCT SAFETY AND OPERATION INSTRUCTIONSOperating Your Personal Audio Enhancer•  Do not drop, disassemble, burn, paint or insert foreign objects into this product.•  Do not use this product if it has been cracked, punctured or damaged by water.Cleaning the Surface of Your Personal Audio Enhancer  •  Disconnect all power cables and turn o the system before cleaning this product.•  Use a soft slightly damp, lint-free cloth to clean this product.•  Do not use window cleaners, household cleaners, aerosol sprayers, solvents, alcohol, ammonia, or abrasives to clean this product.Charging•  This product use re-chargeable Lithium-ion battery.•  This product must be fully charged before the rst use.•  Only the Base Unit or Micro-USB charger provided with this product should be used for charging. •  The battery must be replaced by qualied personnel.•  It may cause explosion if the battery is replaced improperly.•  Battery charging should be performed at the temperature of  5 °C (41°F) to 40 °C (104°F).Charger•  If some trouble occurs while using the charger, immediately shut o the power by disconnecting the plug from the wall outlet.  •  To reduce the risk of fire or electric shock, avoid wetting, exposing under water, or placing containers with water on the product.•  To completely disconnect the power, unplug the charger from the AC power source.•  The rating of the charger is shown on the back of the charger.Maintenance•  This product should be repaired by VitaSound authorized dealers, or service center sta only.•  Unauthorized persons should not attempt to repair or modify this product.•  Any attempted disassembly or repair of the product by a user or unauthorized party will void the product warranty and may irreparably damage the product.Avoid Water or Direct Heat•  Do not expose the product into water or under rain.•  Do not expose under a temperature over 60 ˚C (140°F) such as directly under sunlight or in a car parked under sunlight.•  Do not burn, throw into re, or heat by microwave.
Table of contentsIntroduction  VitaSound Personal Audio Enhancer  1Getting started  Checking the accessories supplied 2   Identifying parts              3-4  Installation of Base Unit to television   5-6 Charging Personal Audio Enhancer 7-8  Wireless pair with Base Unit  9-11Using The Personal Audio Enhancer  Power-on 12 Power-o  12   General Operation  13   Select Function Mode  14-17  Select EQ Mode  18  Adjust Volume   19  Low Battery  19  Reset The Personal Audio Enhancer  20Other  Frequently Asked Questions  21-23  Technical specication  24
IntroductionThank you for choosing the Personal Audio Enhancer by VitaSound Audio Inc. This is a mul-funconal communicaon device which delivers high-definion sound for everyday listening situaons. Powered by patented neural-based technology, thePersonal Audio Enhancer allows users to benefit from improved sound quality where background noise or low volume levels make listening and communicaon difficult.1®POWERED BY:Using leading-edge brain science, patented Neuro-Compensatortechnology enforces an optimal electrical signal from the root ofthe auditory nerve to the brain. Improving the listeningexperience by delivering a clear and natural sound.®Personal Audio Enhancer
Standard package (Including Base Unit)•  Personal Audio Enhancer x 1•  Headset with microphone x 1•  Stereo cable x 1  (For connecting with cell phone or MP3 player)•  Neck strap x 1•  Headphone case x 1•  Ear tips (Size: S/M/L)•  Base Unit x 1•  A/C adaptor x 1•  RCA audio cable x 1•  Optical audio cable x 1•  Coaxial audio cable  x 1•  User manual (this manual) x 1Other accessory (Optional):•  Micro-USB charger for travel•  Leather case (for Personal Audio Enhancer)•  Travel caseVisit www.vitasound.com for more information.2Getting startedChecking the accessories supplied
31.  Power button2.  Hook for neck loop3.  Headset port (Connect to headset)4.  Power indicator:  Red:  Solid Red:   System is on  O:   System is o  Blinking Red:     Low battery: Device needs charging.  During Charging:  1.   Solid Red: Charging  2.  O: Charging completed  Green:  Solid Green: Device is paired successfully with the Base Unit.  Blinking Green:   Connection problem occurring, please re-pairing the device with the Base Unit.   After pressing wireless pairing button: Under pairing process with Base Unit. (Refer to “Wireless Pair with Base Unit” on P.9)5.  EQ mode indicator   1- Normal   2/3/4 - High pitch frequency boost6.  EQ mode button 7.  Wireless pair button8.  Function mode indicator9.  Function mode buttons   TV Mode   Talk Mode   Phone Mode   Relaxation Mode10.  Volume level indicator11.  Reset button12.  Stereo port  (For connecting with cell phone or MP3 player)13.  Charging port for Base Unit14.  Micro-USB charger port15.  Volume buttons   Volume up   Volume down16.  Lock switch:   Lock mode:All buttons will not be taken effect while being pressed (except power button)   Unlock Mode:    All buttons can be taken effect when pressed.Personal Audio Enhancer1 2 36547 8 9101211 13 14 15 16Identifying parts
417 1 8 19 202 122 2 3 24 25 2617.  Power indicator   Solid Red:  Base Unit is ON   O:  Base Unit is OFF18.  Power button19.  Wireless pair button20.  20.  Wireless/Audio source indicator   Solid Green:  Receiving audio signal from TV  Fast ashing:   Under pairing process with Personal Audio Enhancer. (Refer to “Wireless Pair with Base Unit” on P.9)21.  Charging port for Personal Audio Enhancer22.  Analog (RCA) audio-in port23.  Audio input mode switch      Optical audio input      Coaxial audio input24.  Optical audio-in port25.  Coaxial audio-in port 26.  A/C adaptor portBase Unit
L ROPTICALCOAXIAL OPTICAL COAXIALDIGITAL AUDIO IN DC INDIGITAL AUDIO OUTAUDIO OUTTV back panel12Connect with analog (RCA) audio cable:1.  Connect the Base Unit with one end of the analog (RCA) audio cable; (Red connector to Red port; White connector to White port)2.  Connect the other end of the analog (RCA) audio cable with the analog (RCA) audio-out port of the TV. (Red connector to Red port; White connector to White port)DIGITAL AUDIO OUTAUDIO OUTTV back panelL ROPTICALCOAXIAL OPTICAL COAXIALDIGITAL AUDIO IN DC INOPTICALCOAXIAL312Connect with optical audio cable:1. Switch “Audio input mode switch” into “Optical audio input”;2. Connect one end of the optical audio cable with the optical audio-in port of the Base Unit;3.   Connect the other end of the optical audio cable with the optical audio-out port of the TV.DIGITAL AUDIO OUTAUDIO OUTTV back panelL ROPTICALCOAXIAL OPTICAL COAXIALDIGITAL AUDIO IN DC INOPTICALCOAXIAL312Connect with coaxial audio cable:1. Switch “Audio input mode switch” into “Coaxial audio input”;2. Connect one end of the coaxial audio cable with the coaxial audio-in port of the Base Unit;3.  Connect the other end of the coaxial audio cable with the coaxial audio-out port of the TV.1.  Connect Base Unit with TV:5Installation of Base Unit to television
61.  The Base Unit should be placed rmly.2.  The Base Unit will take the signal from optical or coaxial audio cable as higher priority when both of the analog (RCA) cable and the optical or coaxial audio cable connect to the Base Unit. To use analog audio cable as audio source, please rst disconnect the optical and coaxial audio cables.3.  The types and positions of the audio output port equipped on the television are dependent on the brand and model of the television. Please read the television manual provided or contact the television supplier for details.4.  The optical and coaxial audio input ONLY support 44.1 kHz and 48 kHz PCM audio coding.5.  The Base Unit does NOT support Dolby Digital 2.1/5.1/7.1 audio coding.3.  Connect the A/C power adaptor with the Base Unit;2.  Plug the A/C power adaptor into the wall socket;Note:
7123Through The Base Unit:1.  Plug the A/C adaptor into the wall socket.2.  Connect the Base Unit with A/C adaptor.3.  Insert the Personal Audio Enhancer into charging port of the Base Unit; and4.  Unplug the Personal Audio Enhancer from Base Unit when charging is completed.Through micro-USB charger:1.  Plug the micro-USB charger into the wall socket.2.  Connect the Personal Audio Enhancer with the micro-USB charger for charging.3.  Disconnect the Personal Audio Enhancer from the micro-USB charger after charging; and4.  Unplug the micro-USB charger from the wall socket.Warning:The product can be only charged through the micro-USB charger from VitaSound.Charging The Personal Audio Enhancer:Note:The Base Unit can still charge the Personal Audio Enhancer when the Base Unit is o.12
8Complete charging time: Through Base Unit or micro-USB charger:    5 hoursNote: The above time required to fully charge is based on charging the battery at a temperature of 25 ˚C (77 °F). The actual charging time may be dierent depending on the remaining battery level, environment, and temperature.Battery Life: Talk Mode and Phone Mode:   12 to14 hours TV Mode:  6  to  8  hoursNote: The battery life depends on the conditions of use and circumstances after the battery is fully charged.
Wireless pair to Base UnitNote:  The Personal Audio Enhancer and Base Unit in the same package are paired with each other in advanced. Unless the Base Unit after being installed to the TV cannot connect with the Personal Audio Enhancer automatically, the following pairing process is not necessary to be performed.  An additional Personal Audio Enhancer purchased is required to be paired with the Base Unit by the following procedures below.  The Lock switch MUST be switched to unlocked mode before pairing.1.   Press once the Power Button on the Base Unit.2.    Press once the TV mode button on the Personal Audio Enhancer.  (The Personal Audio Enhancer MUST be in TV mode before pairing)9
103.  Press once the Wireless Pair Button on all of the Personal Audio Enhancers     needed for wireless pairing;4.   Press the Wireless Pair Button on the Base Unit to start wireless pairing;Connecting5.  The Wireless Indicators on both Personal Audio Enhancer and Base Unit will be ashing during pairing;
11Connected6.  The Wireless Indicators on both Personal Audio Enhancer and Base Unit will be solid green after pairing succeeds;Wireless pair to Base UnitNote: 1.  The distance between the Personal Audio Enhancer and Base Unit for wireless connection is about 10 meters without any object in between.2.  Please follow the exact order of the steps to pair the Personal Audio Enhancer and Base Unit; otherwise, please repeat the steps from the beginning.3.  The Personal Audio Enhancer will lose the connection with the Base Unit when the distance between them increases. The connection will be recovered automatically when the Personal Audio Enhancer re-enters the 10-meter range of the Base Unit without pairing again.4.  The background sound may be isolated during the TV mode such that users may not be aware of the environment around. Please be aware of the self-safety.
12•  Press and hold the power button until the RED power indicator is on; •  The function mode and volume will be automatically set to Talk Mode and Volume level 2 respectively every time the Personal Audio Enhancer is turned on.•  Press and hold the power button until all four function mode indicators are lit, then release the power button to turn o the Personal Audio Enhancer.2. Power O1. Power OnUsing Personal Audio Enhancer
13Lock mode:All buttons (except the Power Button) will be locked after sliding the lock switch downward in order to prevent any change of the setting. The lock mode will be cancelled when sliding the lock switch upward.3.   General OperationUsing Personal Audio EnhancerNote: Before operating the Personal Audio Enhancer, please sliding the lock switch upward; otherwise, no effect will be taken when pressing any buttons.Energy Save Mode for indicators:All indicators will be o after no operation is performed for 40 seconds for energy saving.Wake up the indicators:To wake up function and EQ mode indicators to indicate the current statues of the Personal Audio Enhancer, press any buttons during the energy save mode. This operation does not do any change on the status of the Personal Audio Enhancer.Taking eect by operation:All operations (Ex: switching function or EQ mode, adjusting volume) will ONLY take eect after the indicators wake up.
14TV ModeAudio source of TV is transmitted to the Personal Audio Enhancer through the Base Unit for watching the TV program and movie, and playing TV game.• Connect the Base Unit with the television (Refer to “Installation of the Unit Base to television” on P.5) • Wireless pair the Personal Audio Enhancer and Base Unit (if necessary) (Refer to “Wireless pair with the Base Unit” on P.9) •  Plug the headset into the Personal Audio Enhancer, and then put on the headset into the ears for listening to the TV program.4. Select function mode:    • Press the function mode button desired:Note: First time user is recommended to use TV mode rst for watching TV for 1 to 2 hours in order to get familiar with the operation and function of the Personal Audio Enhancer.GAME
15Talk modeThe Personal Audio Enhancer optimizes the voice of the people received by the mic on the headset for better communication.• Plug the headset into the headset port of the Personal Audio Enhancer rst; Then, put the headset onto ears to chat with people around; • In the Talk Mode, the headset will be in Mute Mode by pressing and holding the mute button. The Mute Mode will be cancelled when releasing the mute button.Mic and Mute ButtonUsing Personal Audio EnhancerNote: High pitch whistler that can aect hearing may be generated through the headset while the speaker and the microphone are too closed. Please decrease the volume of the device before putting on the headset to reduce or prevent the whistle.
Phone ModeReceive and chat on call or listen to music• Plug one end of the stereo cable into stereo port on the Personal Audio Enhancer; • Plug the other end of the stereo cable into the headset port on the phone or MP3 player. •  In the Phone Mode, the headset will be in Mute Mode by pressing and holding the mute button. The Mute Mode will be cancelled when releasing the mute button.16
17Relaxation modea relaxing sound is played through the headsetSelect sound effect:• Sound eect Cycle Selection: Press the EQ mode button to switch the sound mode once: from Sound 1 to Sound 2; from Sound 2 to Sound 3; from Sound 3 to Sound 4; from Sound 4 to Sound 1, and so on.•  The corresponding indicator will be lit after sound eect is selected.Using Personal Audio Enhancer
5.   Select EQ mode18The Personal Audio Enhancer is equipped with four differentEQ modes, each of which provide a different quality of sound in each function mode:   EQ mode 1:   Normal   EQ mode 2:   Low frequency boost   EQ mode 3:   Medium frequency boost   EQ mode 4:   High frequency boostSelect one of the sound modes according to the  personal preferences of the user.EQ Mode Cycle Selection: Press the EQ mode button to switch the EQ mode once: from Mode 1 to Mode 2; from Mode 2 to Mode 3; from Mode 3 to Mode 4; from Mode 4 to Mode 1, and so on.The corresponding indicator will be lit after sound mode is selected.Note: •  The EQ Mode can be switched anytime desired depending on the dierent environment.•  First time user is recommended to try each EQ mode for 1 minute to nd the most suitable EQ mode.
19Press and release       buttonfor increasing the volume levelVolume level indicators will be lit to present the volume level while adjusting the volume.• The Power Indicator will ash when battery level is low. Please turn o and charge the Personal Audio Enhancer immediately.•  A double Beep sound will be generated through the headset while battery level is low.7.  Low Battery6.  Volume up and down (Total 8 volume levels)Press and release       buttonfor lowering the volume level.Using Personal Audio Enhancer
•  When the Personal Audio Enhancer cannot be operated in any situation, press the reset button by a small pin object to reset the Personal Audio Enhancer.8. Reset the Personal Audio Enhancer20
Frequently Asked QuestionsSymptom Possible Cause Possible Corrective Action PageThe PAE-300 is not working.The PAE-300 is o. Turn on the PAE-300. P.12The PAE-300 is in "Lock Mode". Switch the lock switch upward to unlock the PAE-300.Operation is performed while the PAE-300 is under the energy save mode.Press any button of the PAE-300 once to wake up the indicators, then perform the operation before the indicators are turned o.The PAE-300 is hang o. Press the Reset Button with a small pin object to reset the PAE-300.All indicators of the PAE-300 turns o itself, except the power indicator.The behavior is normal. The indicators will be o automatically for energy saving when no operation is performed for 40 seconds.N/AGreen LED (Power indicator) of the PAE-300 is ashing.The PAE-300 is under pairing process with the Base Unit.Under TV mode, the PAE-300 is out of the 10 meters range of the Base Unit.Under TV mode, No signal from the Base Unit is received by the PAE-300 when the PAE-300 is within 10 meters range of the Base Unit.Wait until the pairing process is completed and the green LED on the PAE-300 will then be solid lit; otherwise, please process wireless pairing again.Make sure the PAE-300 is within 10 meters range of the Base Unit.Process wireless pairing the PAE-300 with the Base Unit.A double beep alert is emitted through headset.Red LED (Power indicator) of the PAE-300 is ashing.The battery is running low. Turn o the PAE-300 and recharge the PAE-300.P.13P.13P.20P.19P.9-11P.11P.9-11Acoustic feedback is produced. The volume level of the PAE-300 is too high.1) Pull the speaker away from the mic on the headset.2) Decrease the volume level of the PAE-300.P.19N/A21
Symptom Possible Cause Possible Corrective Action PageP.15The PAE-300 is o. Turn on the PAE-300 by pressing the power button.P.15The mute mode of the PAE-300 is on. Release the Mute button on the mic.P.15The headset is not plugged into the PAE-300 properly.Make sure the plug of the headset is securely connected with the PAE-300.P.19The volume level of the PAE-300 is too low. Increase the volume level of the PAE-300.    Under TV mode, no audio signal from the Base Unit is received by the PAE-300.(Green LED on the PAE-300 is solid lit.)When using the analog (RCA) audio cable to connect the Base Unit and television, make sure both of the optical and coaxial cables are disconnected with the Base Unit and television.When using the analog (RCA) audio cable, make sure the cable is plugged into the "Audio Out" port of the television.When using the optical audio cable to connect the Base Unit and television, make sure:1) the optical cable is connected with the Base Unit and television properly; and2) the "Audio input mode switch" is switched into "optical audio input".P. 5P. 5No sound is produced.Make sure the headset is plugged into the port on the top of the PAE-300.P.12Make sure the television is turned on.Make sure the volume of the television is onMake sure the mute mode of the television is o.P. 5N/A22
23Symptom Possible Cause Possible Corrective Action PageUnder TV mode, no audio signal from the Base Unit is received by the PAE-300.(Green LED on the PAE-300 is solid lit.)When using the coaxial audio cable to connect the Base Unit and television, make sure:1) the coaxial cable is connected with the Base Unit and television properly; and2) the "Audio input mode switch" is switched into "coaxial audio input".Under Phone mode, the volume level of the phone is too low.Increase the volume level of the phone or increase the volume of the device.No sound is produced.Under Phone mode, no audio signal is received from the phone.Make sure the plug of the stereo cable is securely connected with both of the device and phone.Green LED (Wireless/Audio source Indicator) on the Base Unit is ashing.P. 5P.16P.19The device and Base Unit are wireless pairing.Wait until the pairing process is completed and the green LED on the Base Unit will then be solid lit; otherwise, please process wireless pairing again.P.9-11
24Technical specicationPersonal Audio EnhancerDimension:  100.20 mm x 60 mm x 19.10 mmWeight:  94.6 gramBatteries:  Built in rechargeable lithium-ion,   2000 mAhOperating time:  12 - 14 hours  (fully charged, except in TV mode)  6 - 8 hours  (TV mode)Charging time:  4 - 5 hoursMicrophone:  Built in omnidirectional microphone on headsetStereo audio source input:  3.5 mm stereo jack plugHeadset socket:  3.5 mm stereo jack plugOutput signal frequency range:  200 -16,000 HzEQ mode:  4 modesVolume control:   8 steps (4 dB/step)Output power:  60 mW (16 ohm load)Function mode:  Separate function mode select buttonsDigital signal processing:  32 kHz sampling frequency  16 bit resolution in stereoRadio communication frequency:  2.4 GHz, ISM bandRadio communication range:  10m indoor, clear line of sightRadio communication characteristics:  Automatic channel searching  Coexists with other radio transmitters operating on the 2.4GHz frequency bandTopology: Point-to-pointAntenna Type:  Internal SMD antennaBase UnitDimension:  120.30mm x 94.10mm x 40.10mmWe ig ht:  111.8 g ramPower:  9V 2A (18W)Audio source input:  Analog (RCA) Jack (Red / White)  Optical jack 44.1kHz PCM / 48kHz PCM  Coaxial jack 44.1kHz PCM / 48kHz PCMDigital radio transmission:  2.4GHz ISM band  Coexists with other radio transmitters using the 2.4GHz ISM bandRadio communication range:  10m indoor, clear line of sightRadio communication characteristics:  Automatic channel searching  Coexists with other radio transmitters operating on the 2.4GHz frequency bandTopology: Point-to-MultipointsTransmitter output:  8dBmWEnvironmental requirementsOperating temperature:  0 °C to 35 °C (32 °F to 95 °F)Relative humidity:  5 % to 95 %Regulatory requirementsComplies with the following requirements:  CE, FCC, RoHS and C-Tick
Certication and ComplianceFCC Statement:This device complies with Part 15 of the FCC Rules. Operation is subject to the following two conditions: (1) this device may not cause harmful interference, and (2) this device must accept any interference received, including interference that may cause undesired operation.To maintain compliance with FCC RF exposure requirements,use accessories that maintain the distance to radiation elements no lesser than 20 cm.Changes or modications not expressly approved by the party responsible for compliance could void the user’s authority to operate the equipment. This equipment has been tested and found to comply with the limits for a Class B digital device, pursuant to Part 15 of the FCC Rules. These limits are designed to provide reasonable protection against harmful interference in a residential installation. This equipment generates, uses and can radiate radio frequency energy and, if not installed and used in accordance with the instructions, may cause harmful interference to radio communications. However, there is no guarantee that interference will not occur in a particular installation.If this equipment does cause harmful interference to radio or television reception, which can be determined by turning the equipment o and on, the user is encouraged to try to correct the interference by one or more of the following measures:-  Reorient or relocate the receiving antenna.-  Increase the separation between the equipment and receiver.-  Connect the equipment into an outlet on a circuit dierent from that to which the receiver is connected.-  Consult the dealer or an experienced radio/TV technician for help.
www.vitasound.cominfo@vitasound.com1-877-967-0742Version 2.0

Navigation menu