Honeywell 7850PGE Barcode Scanner User Manual Dolphin 7850 User s Guide Rev B
Honeywell International Inc Barcode Scanner Dolphin 7850 User s Guide Rev B
UserManual.wiki
>
Honeywell
>
7850PGE User Manual
>
User Manual
Contents
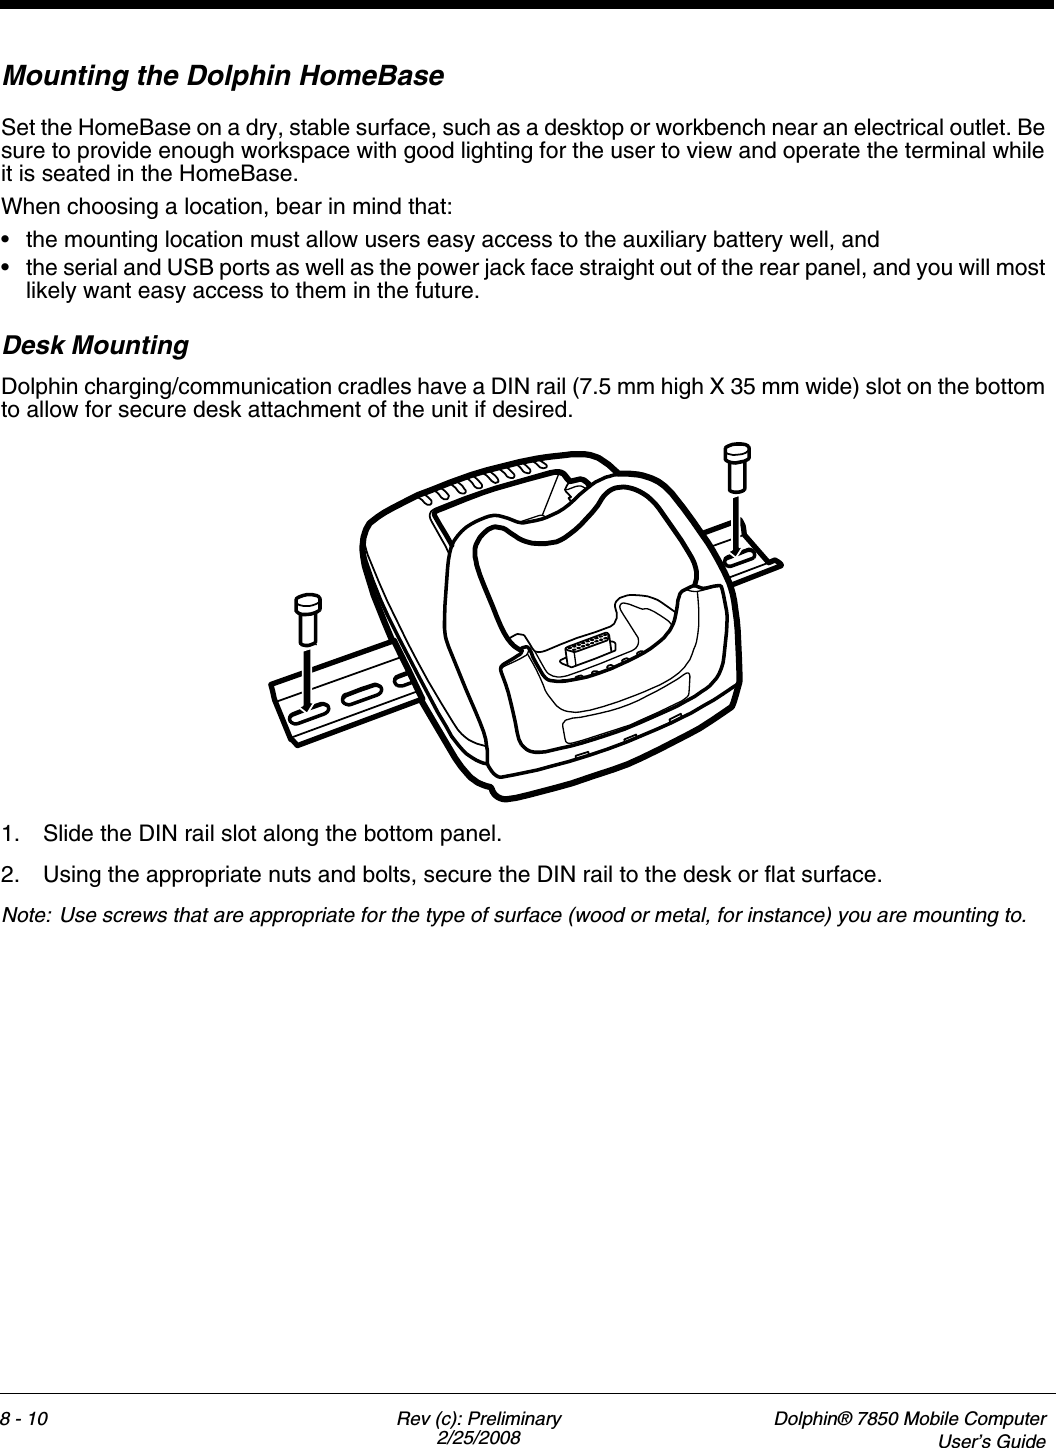
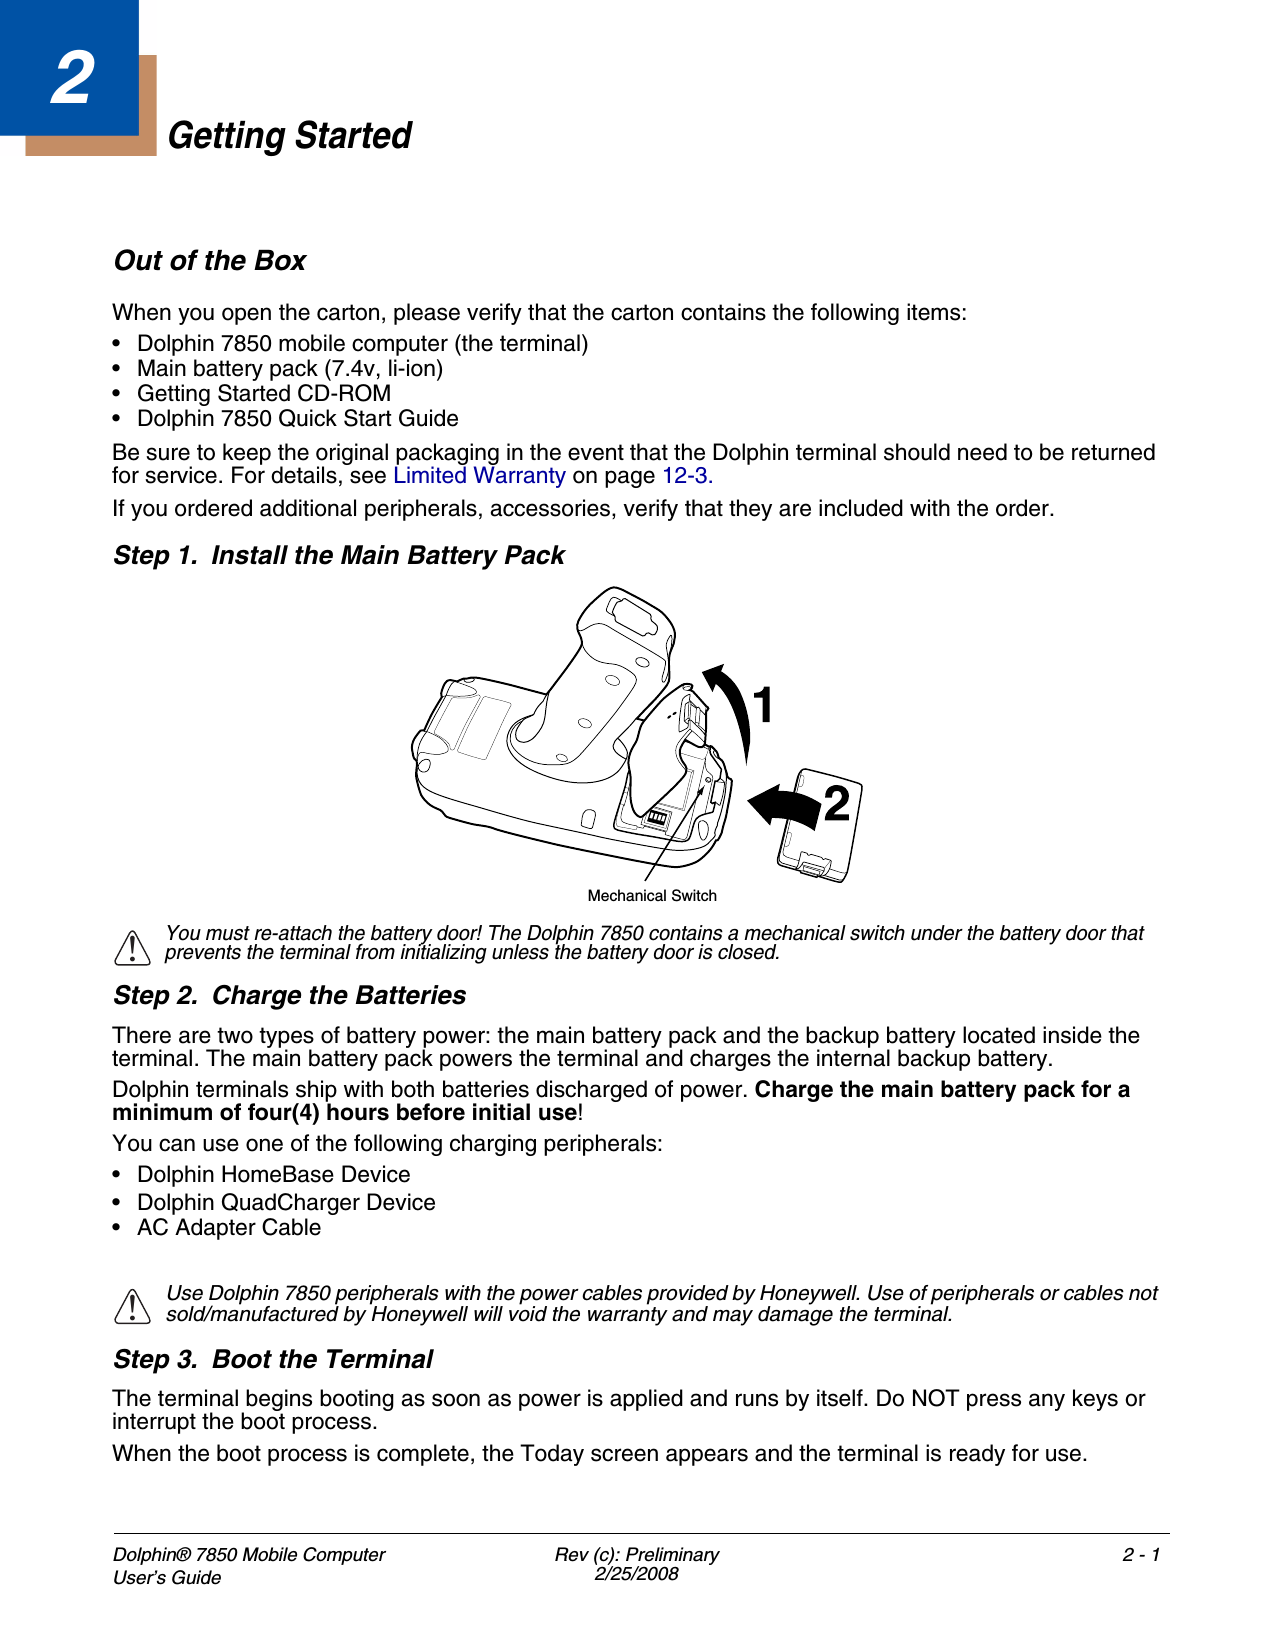
1.
User Manual
2.
New User Manual
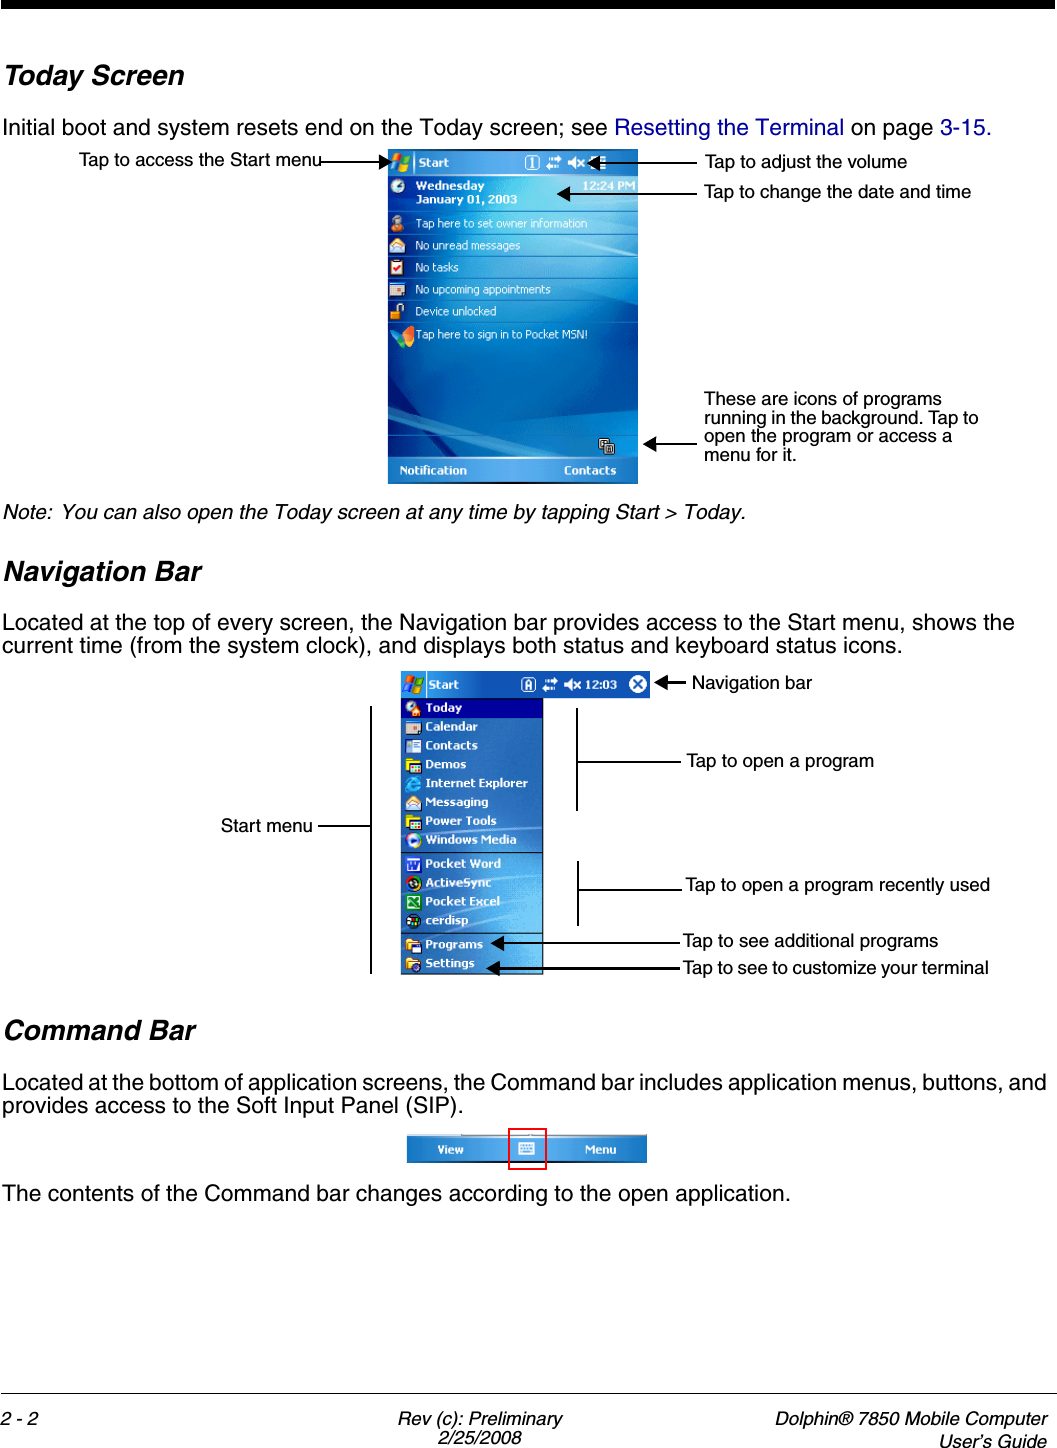
User Manual
Navigation menu
Upload a User Manual
Namespaces
Wiki Guide
HTML
PDF
Info
Views
User Manual
Discussion / Help
Navigation
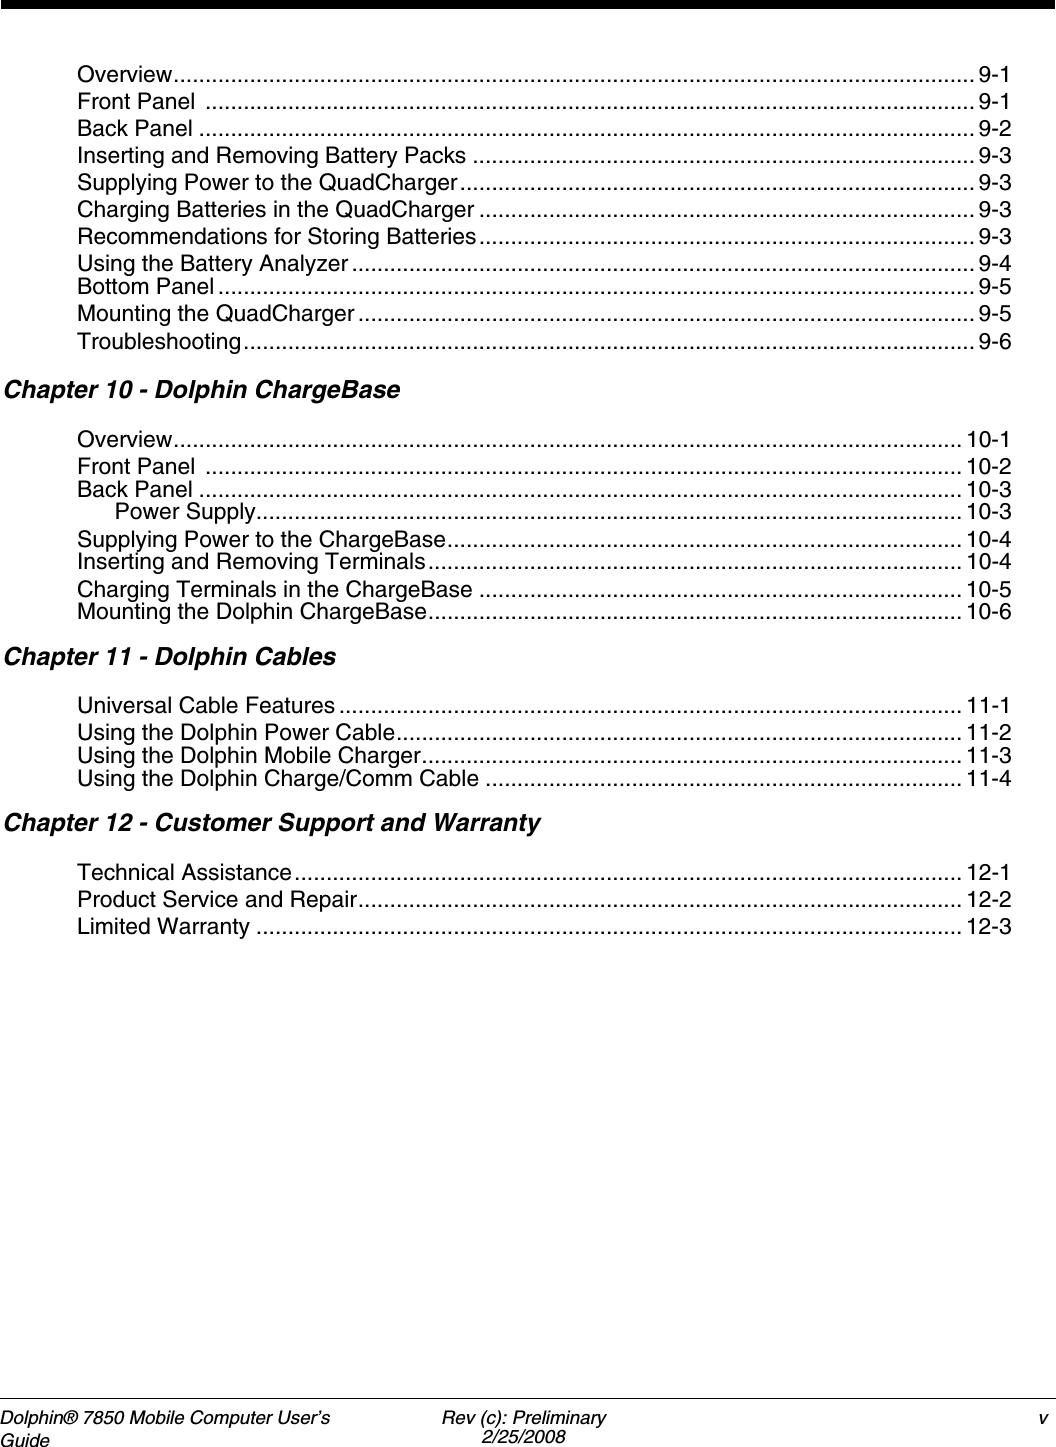


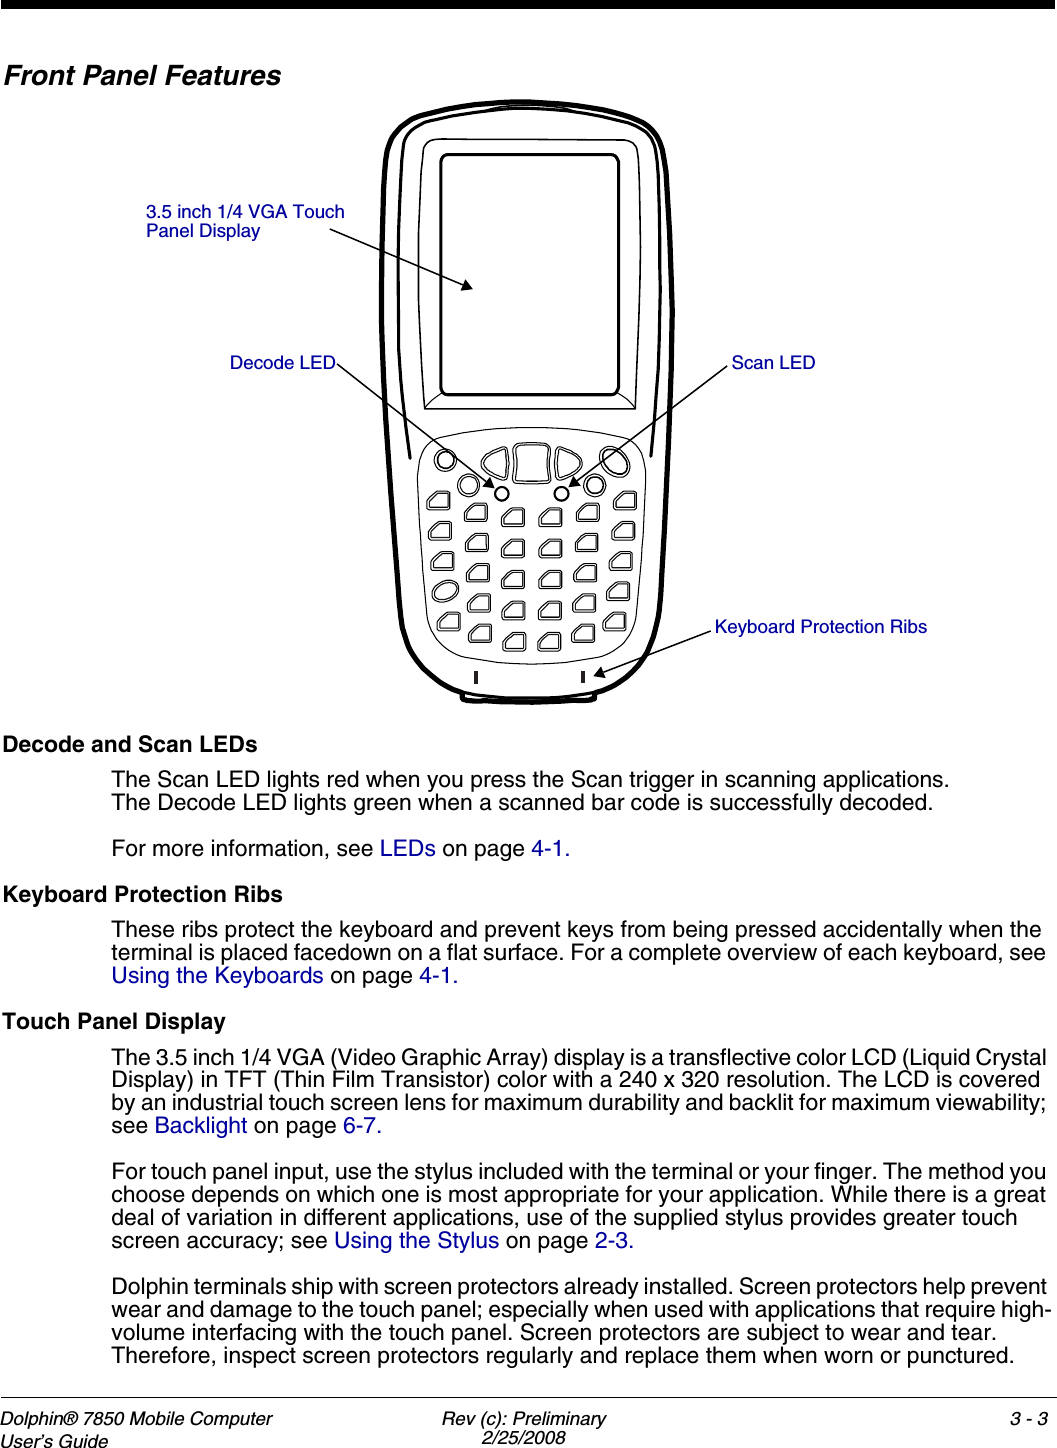
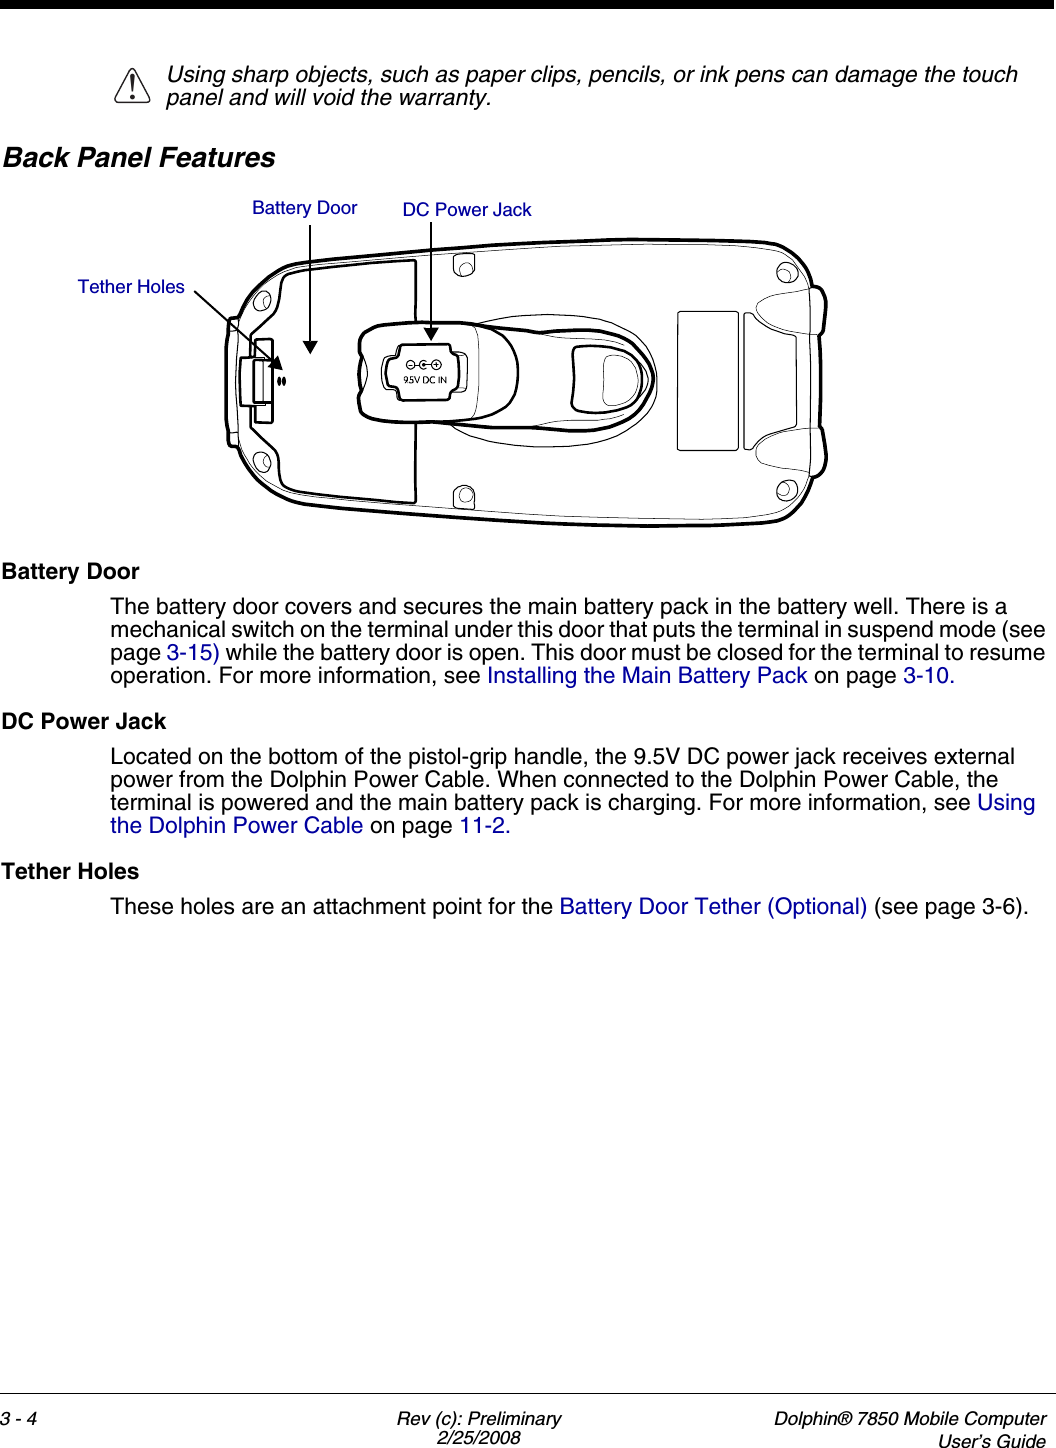
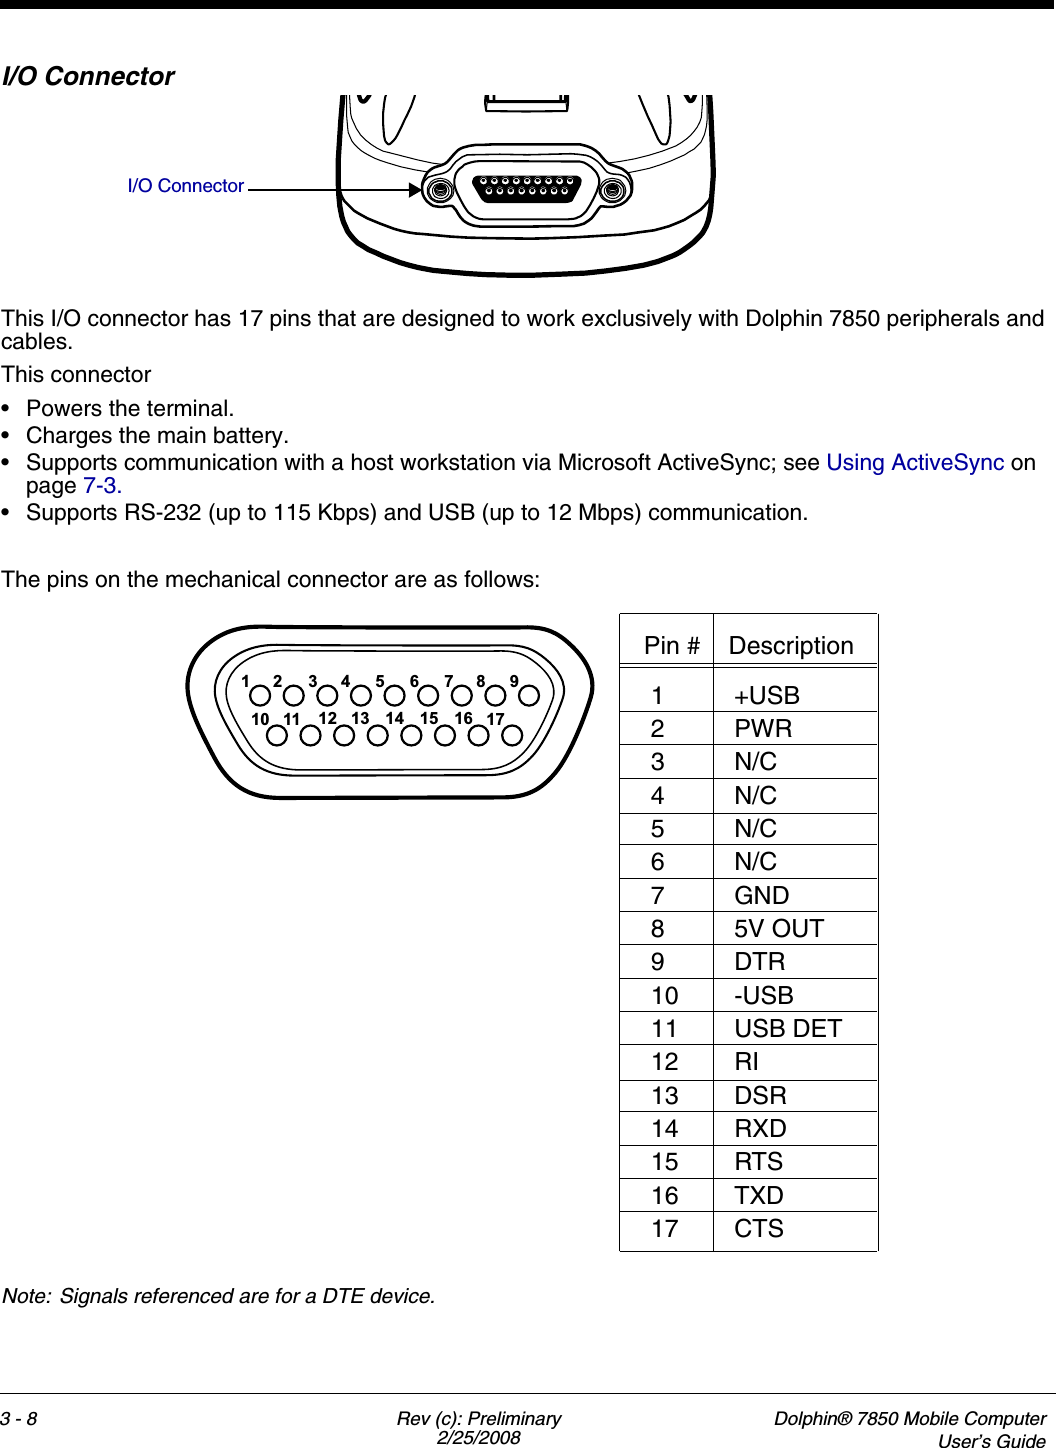

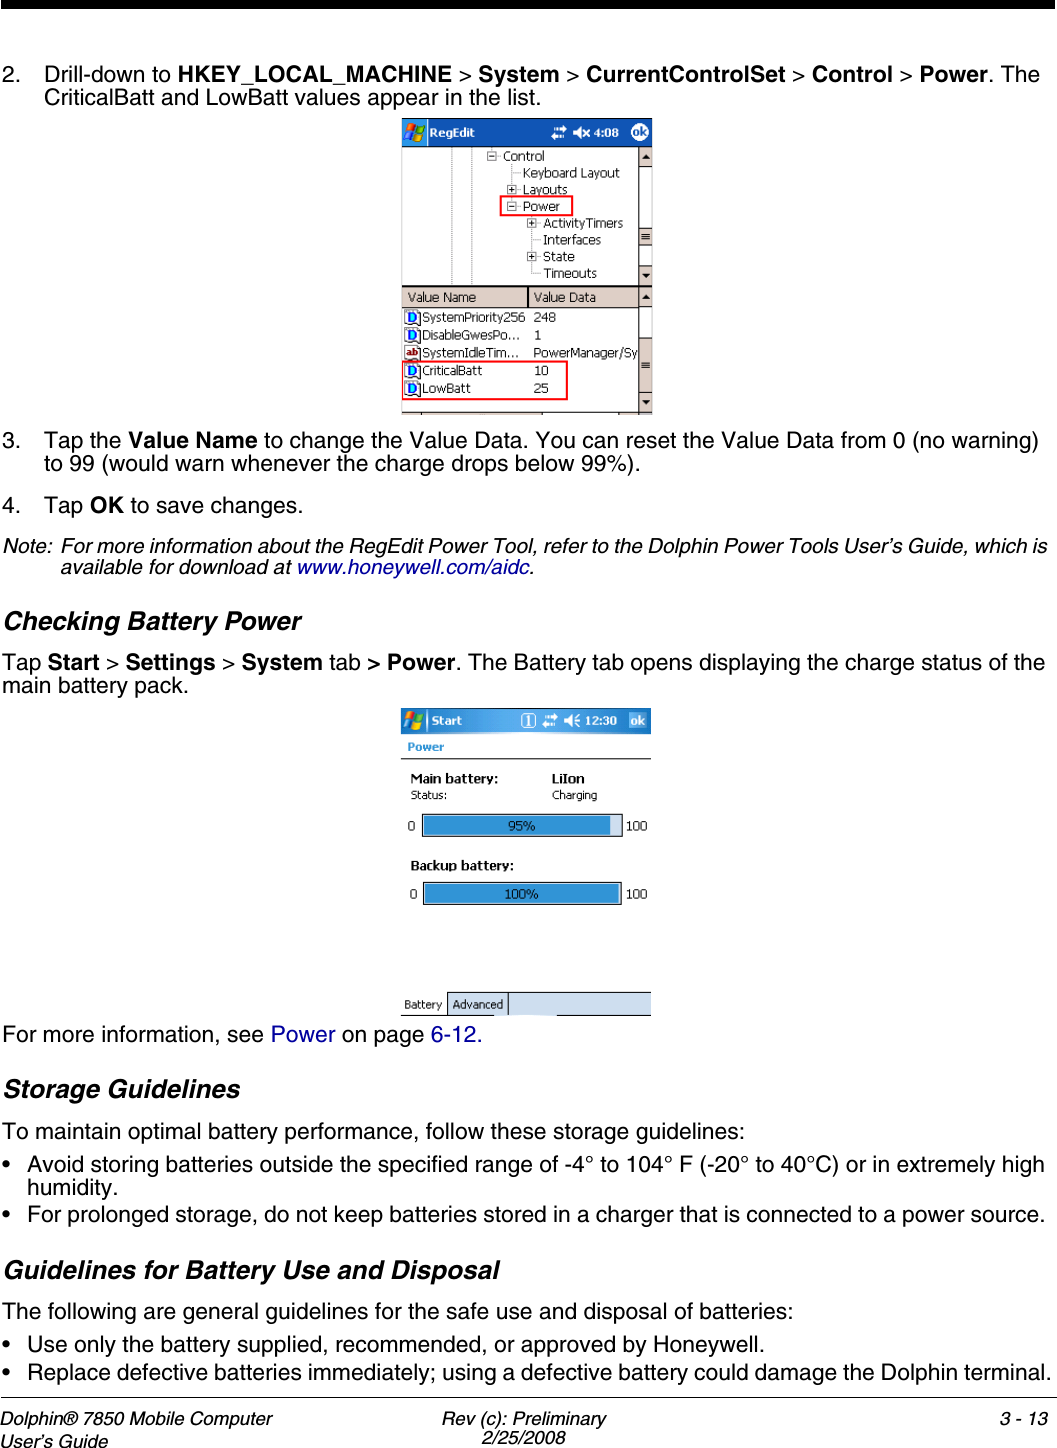
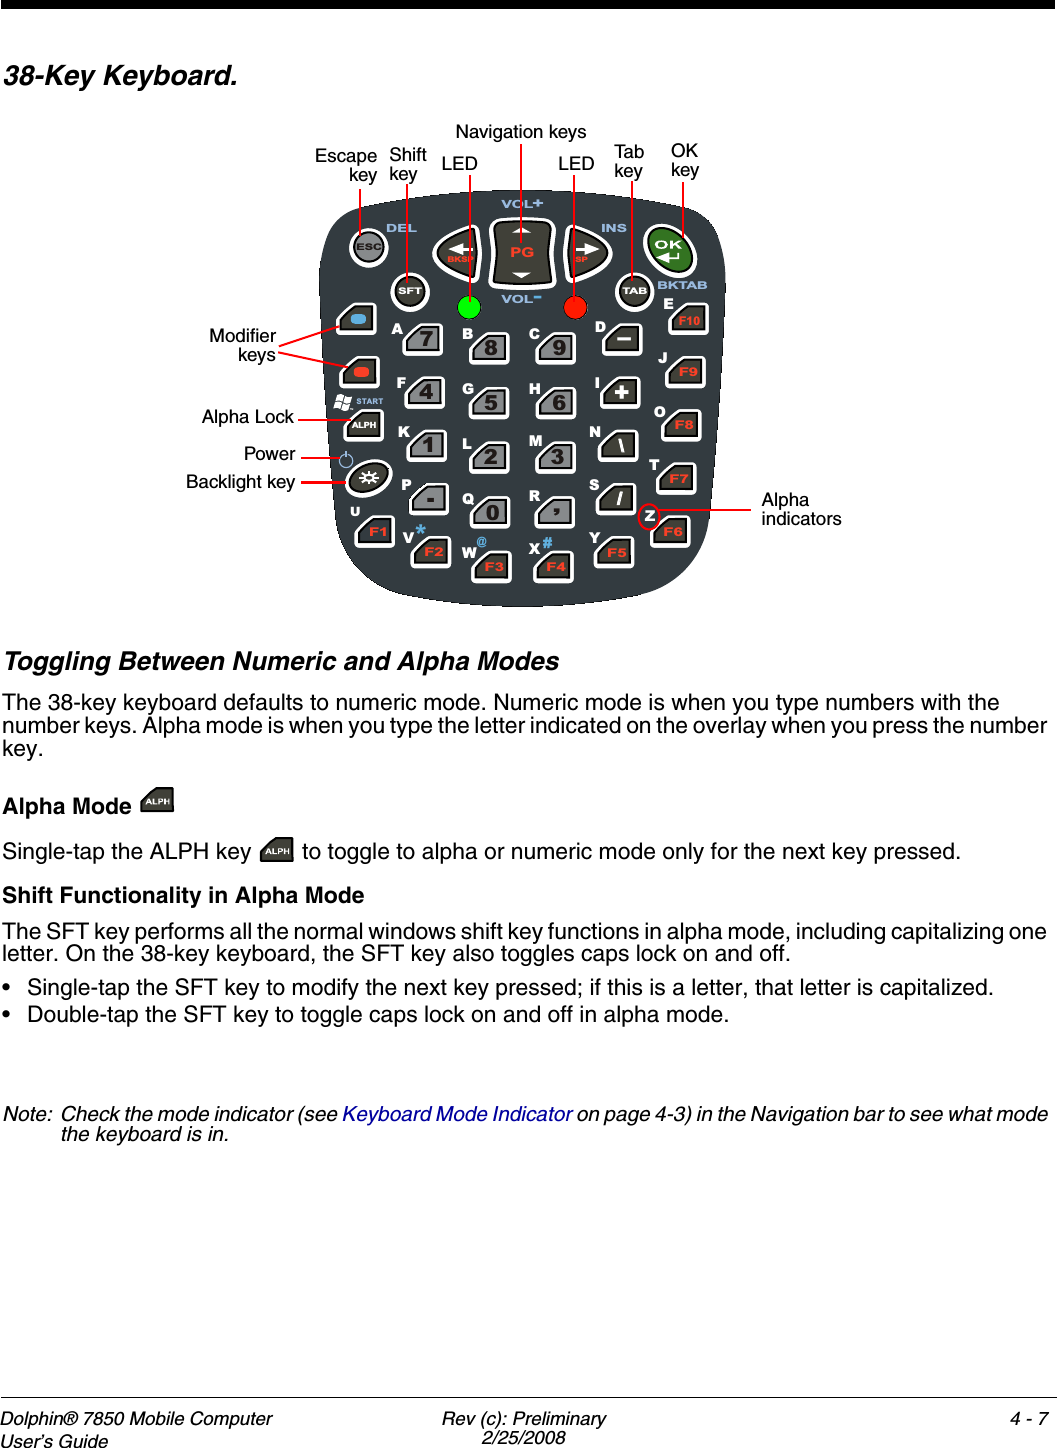
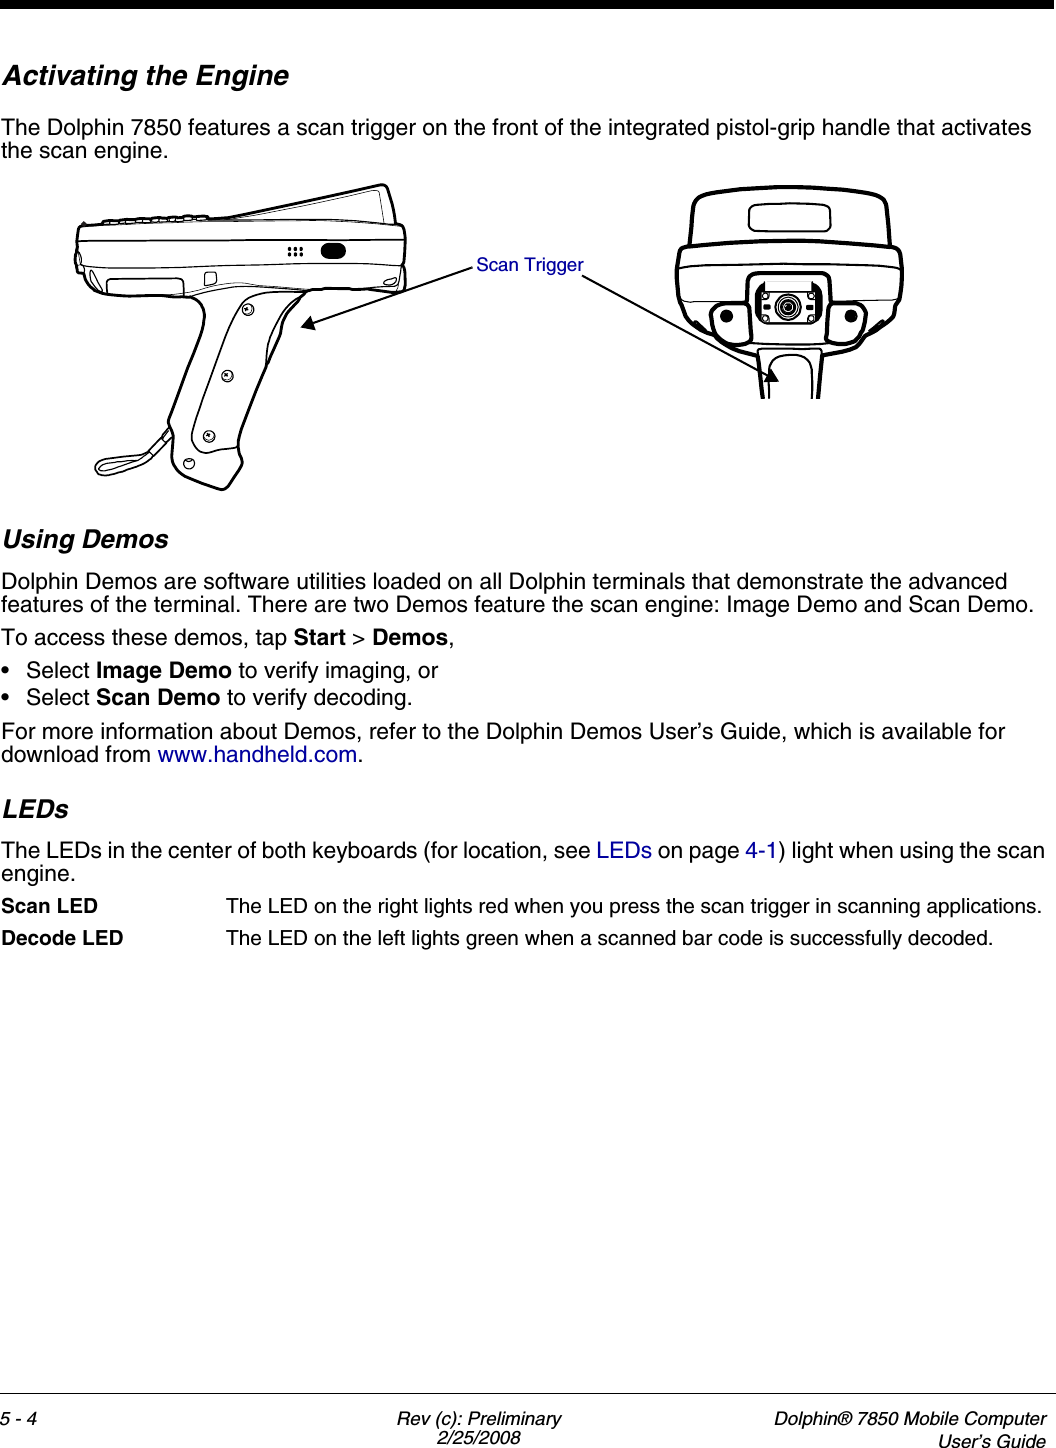
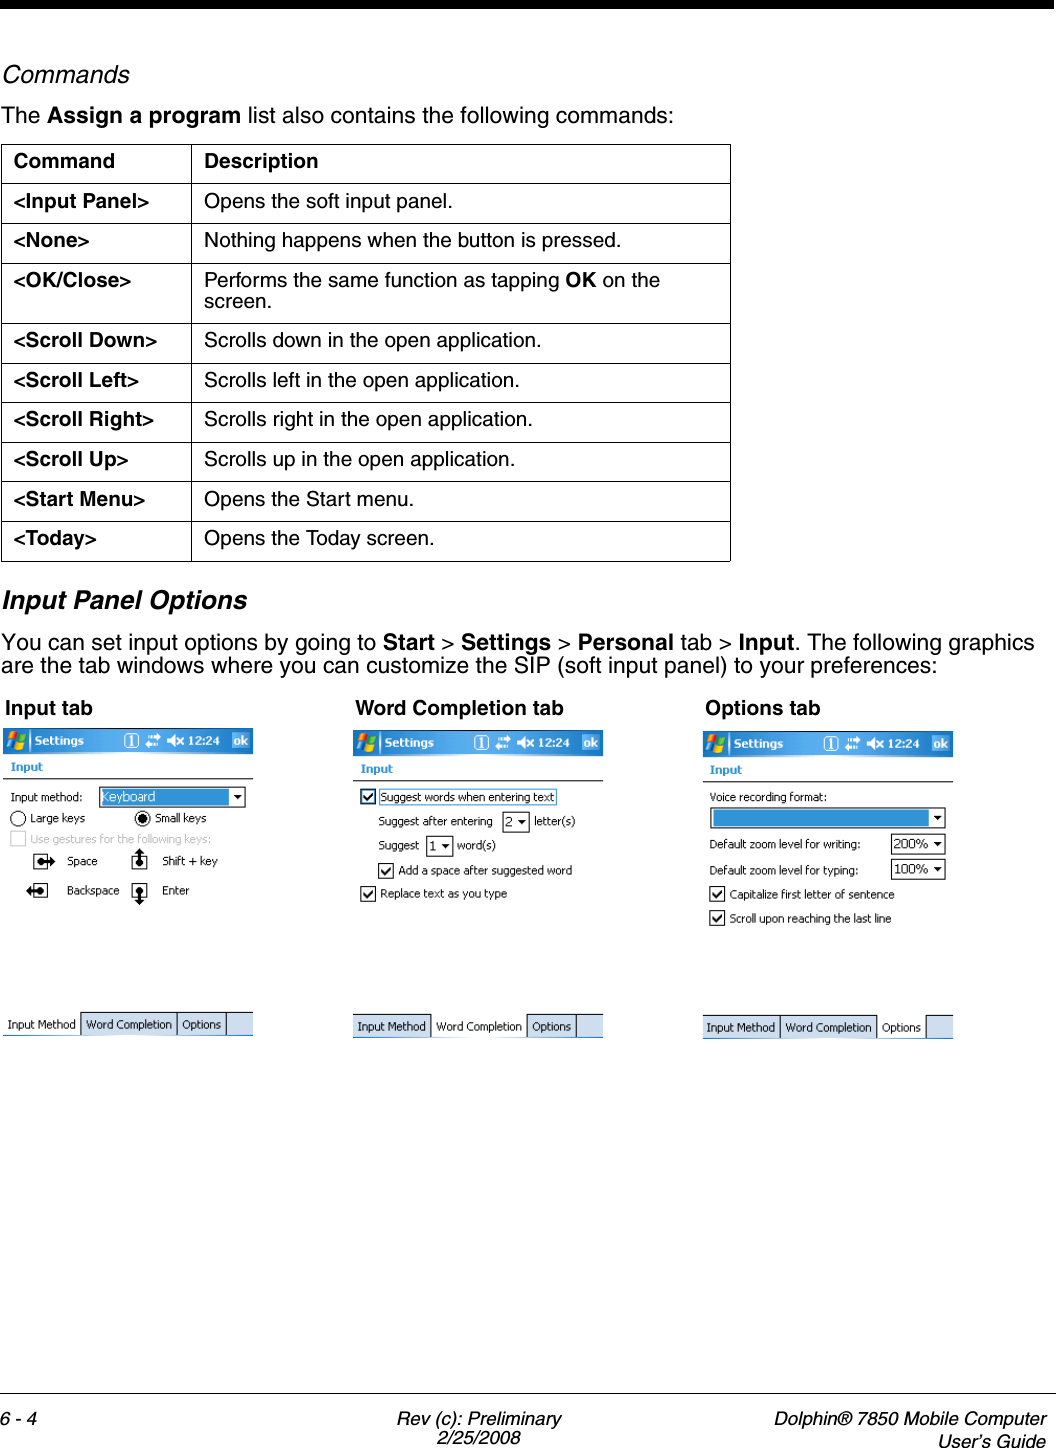
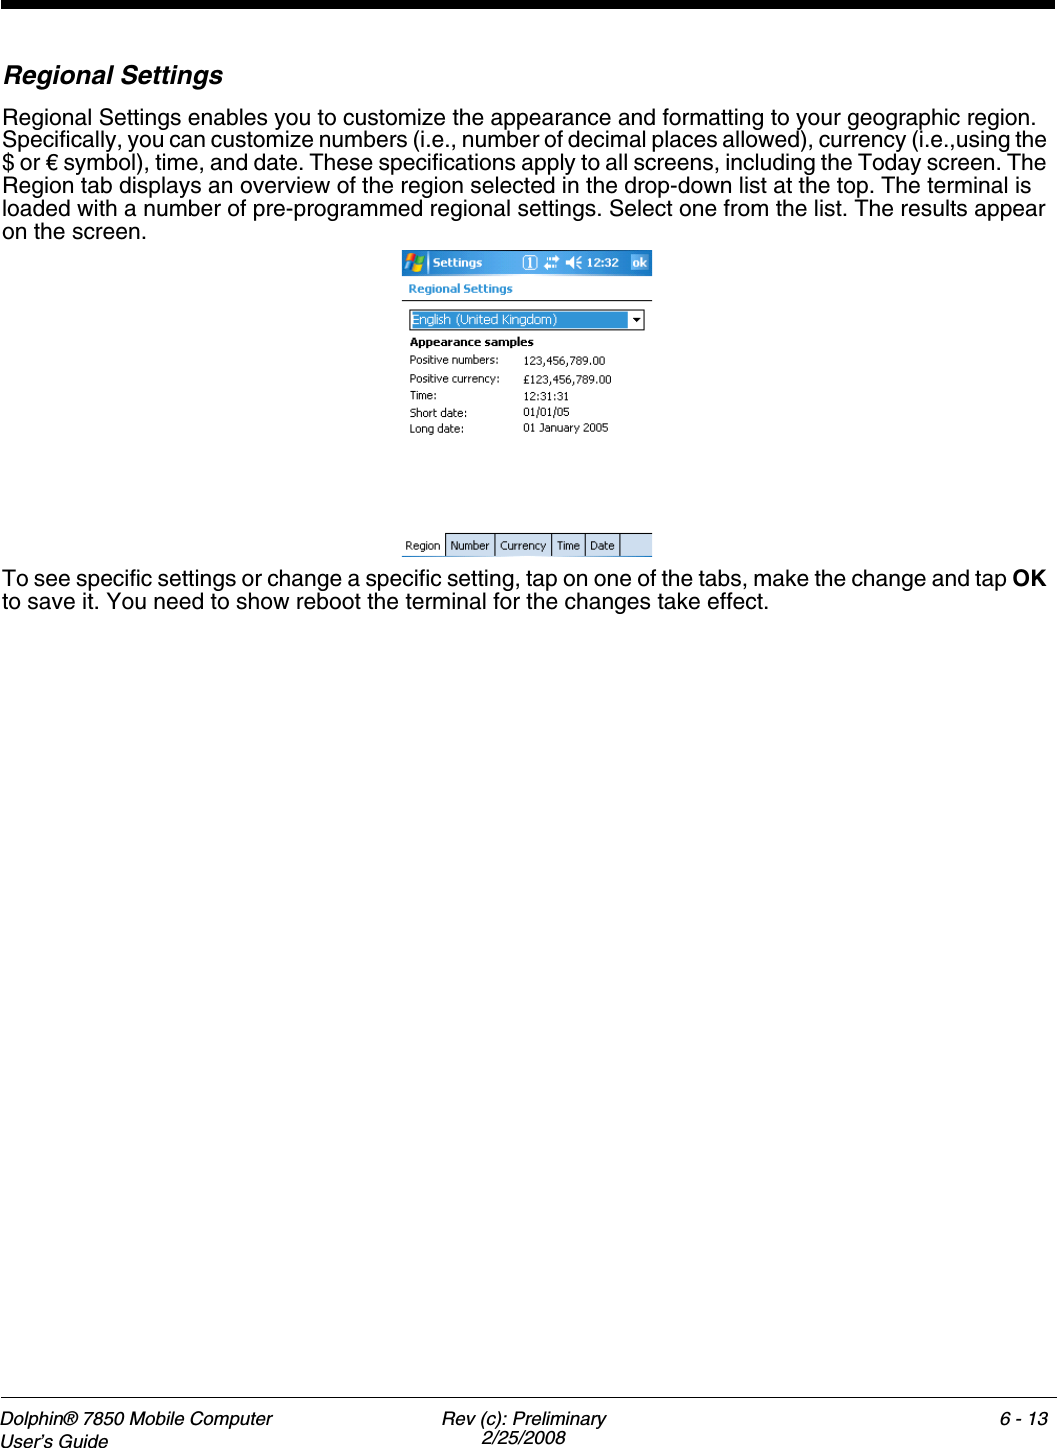
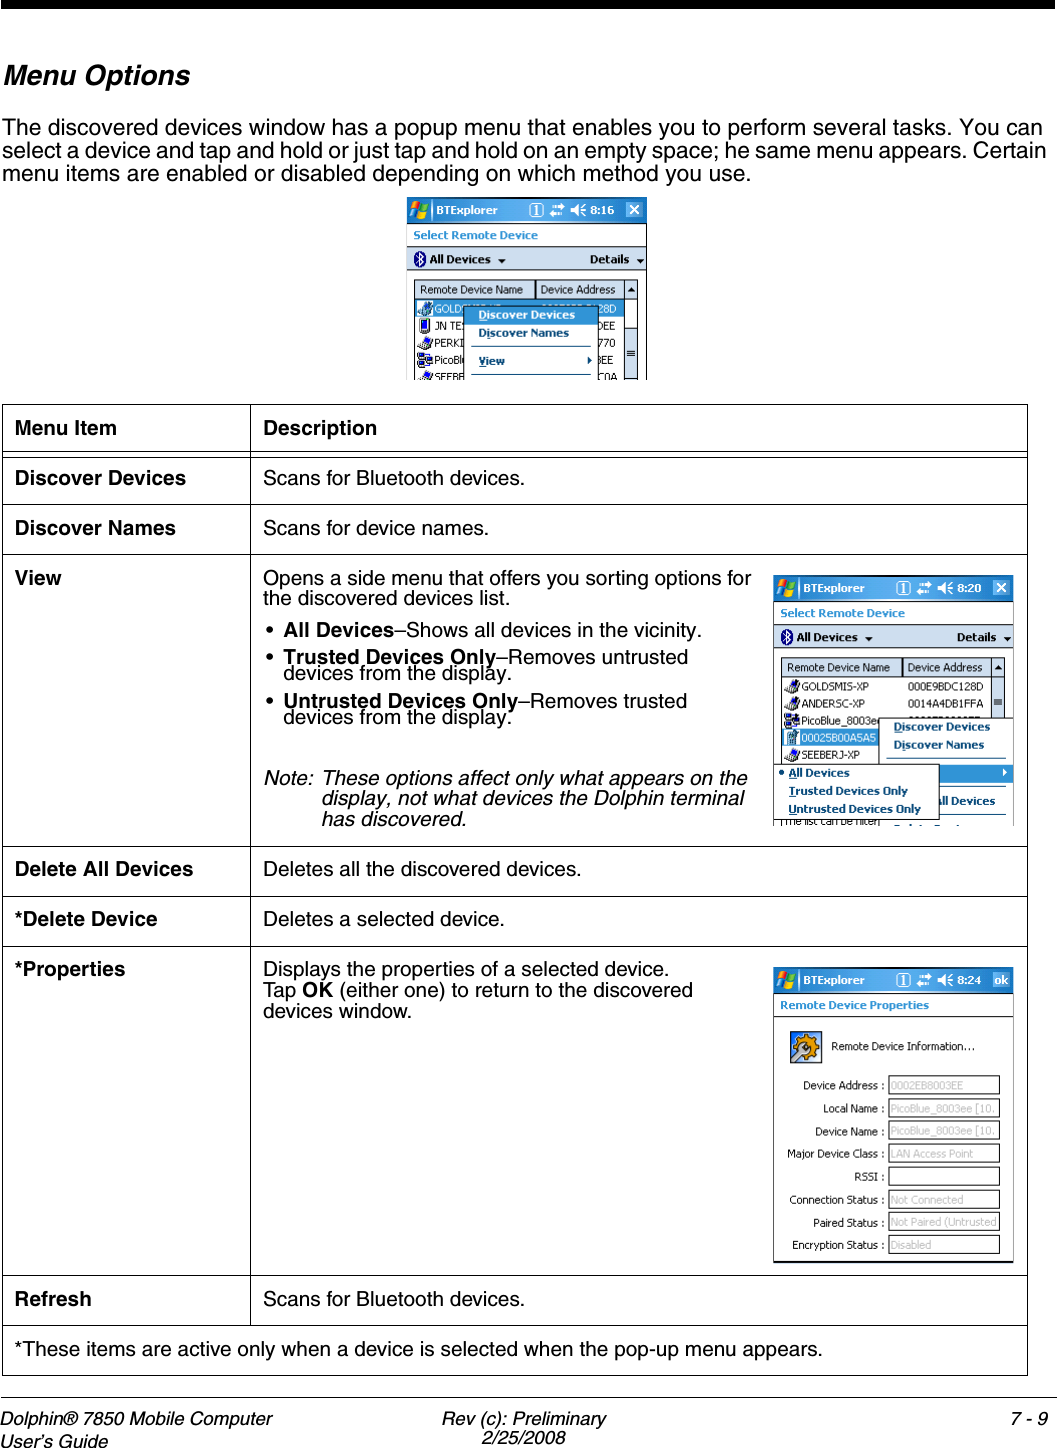
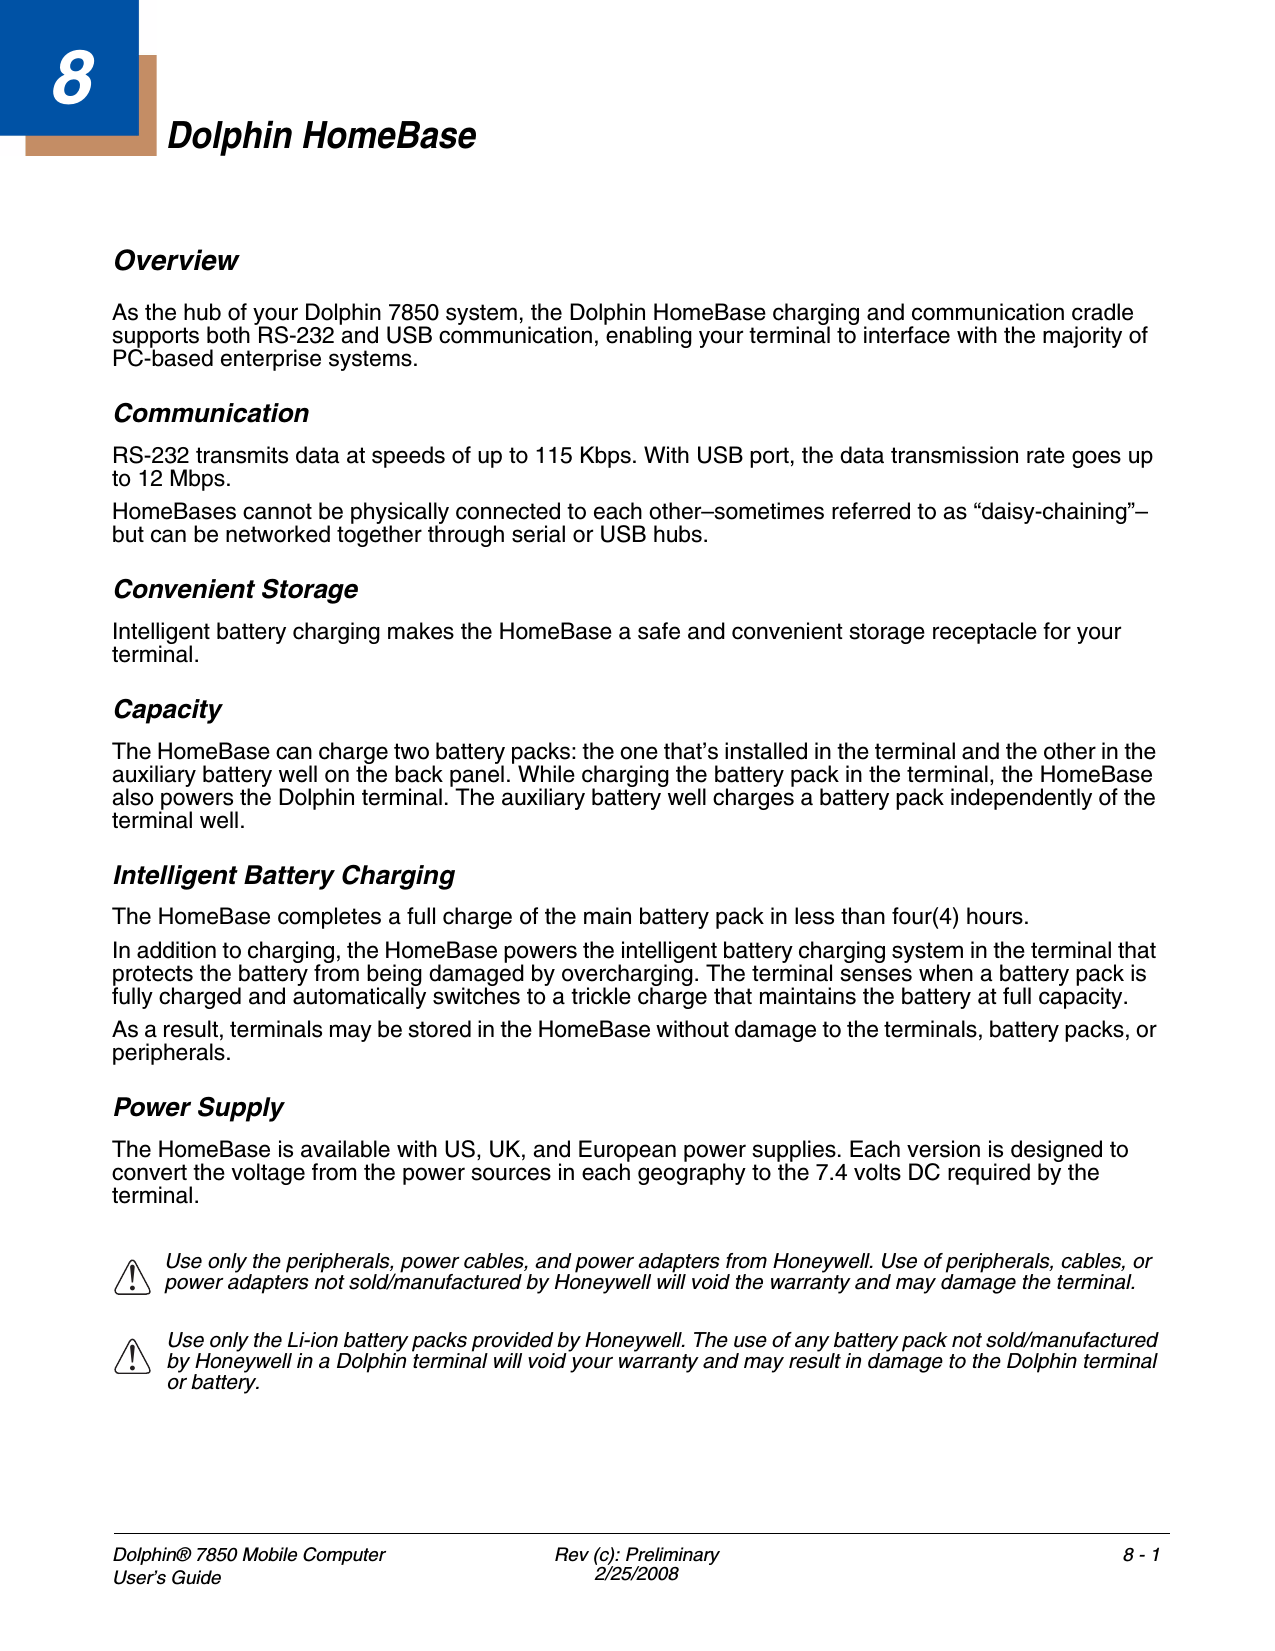
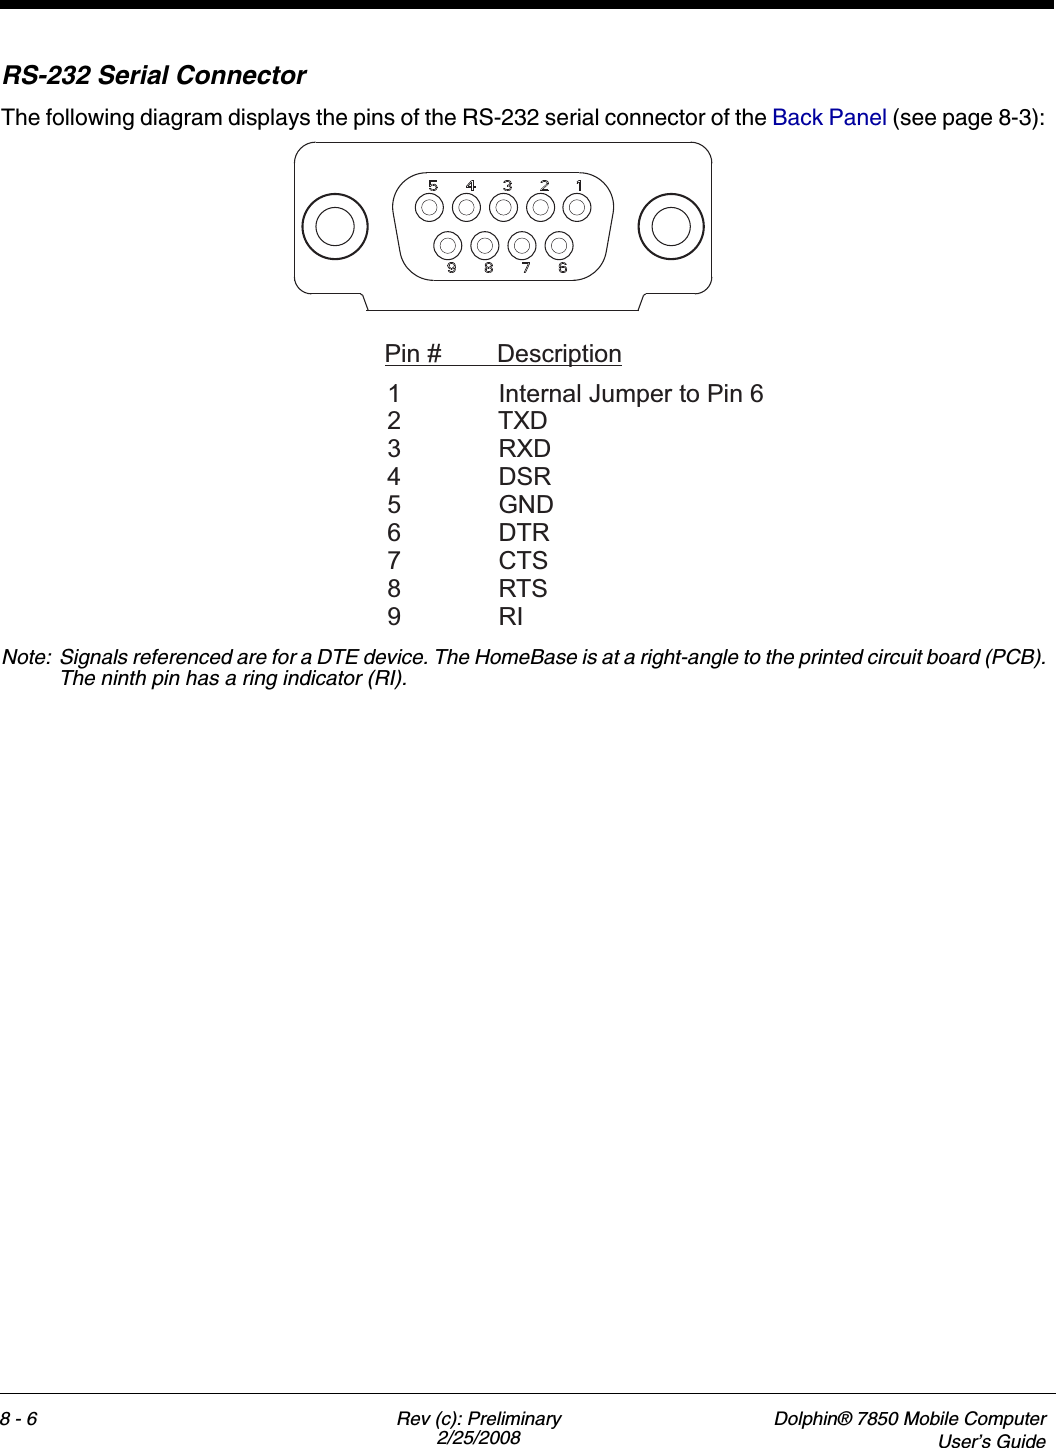
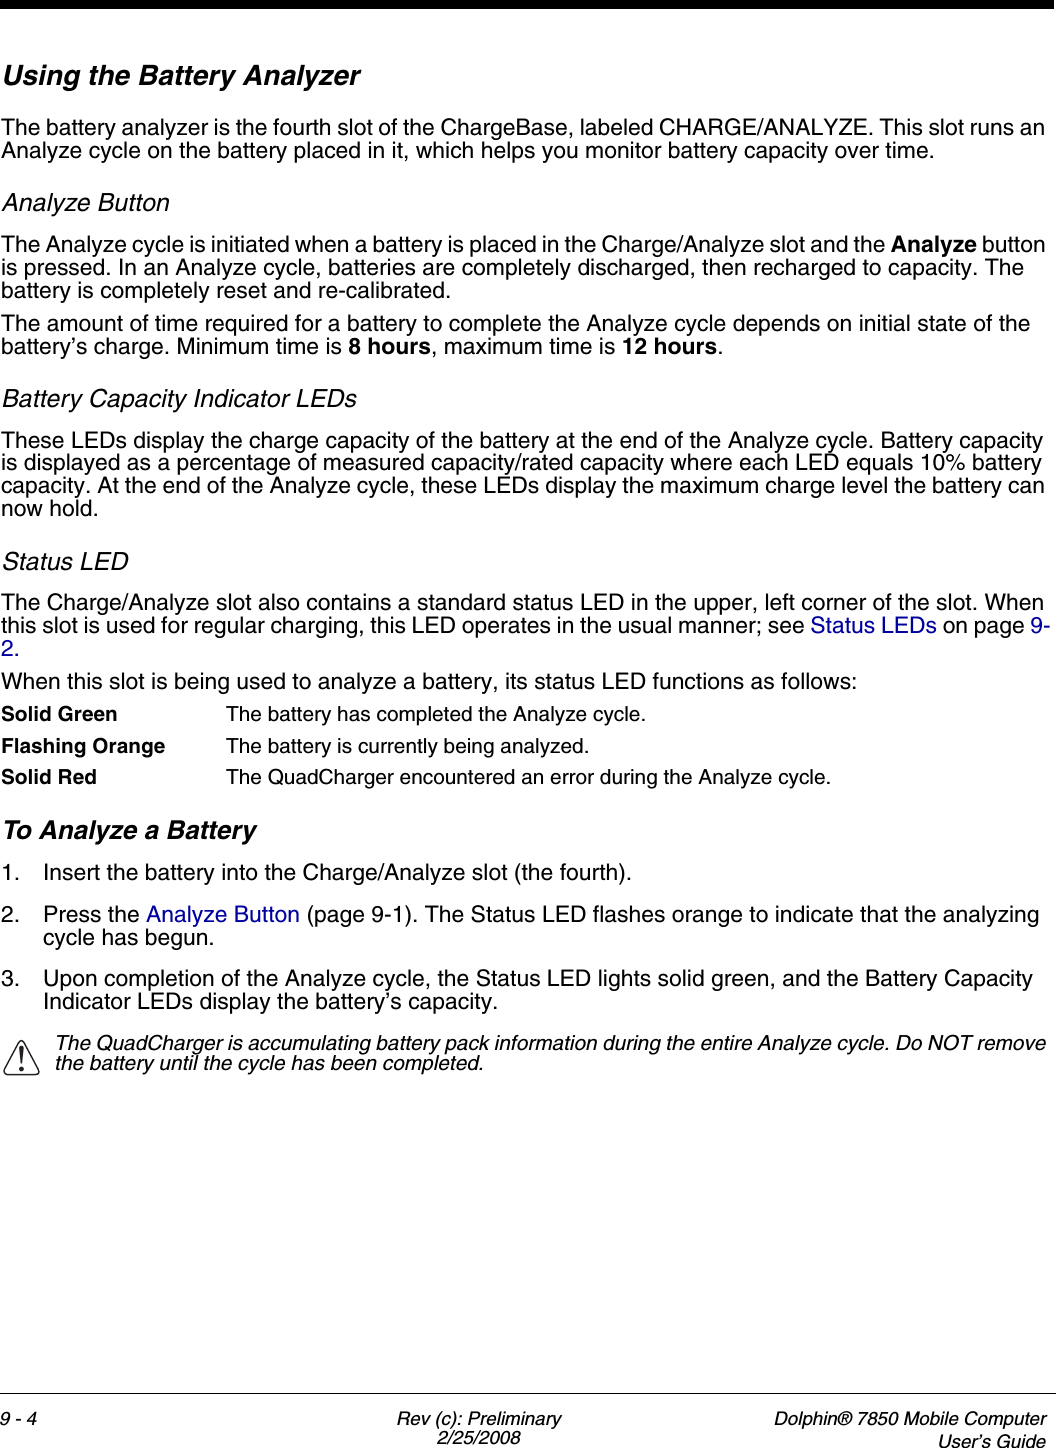
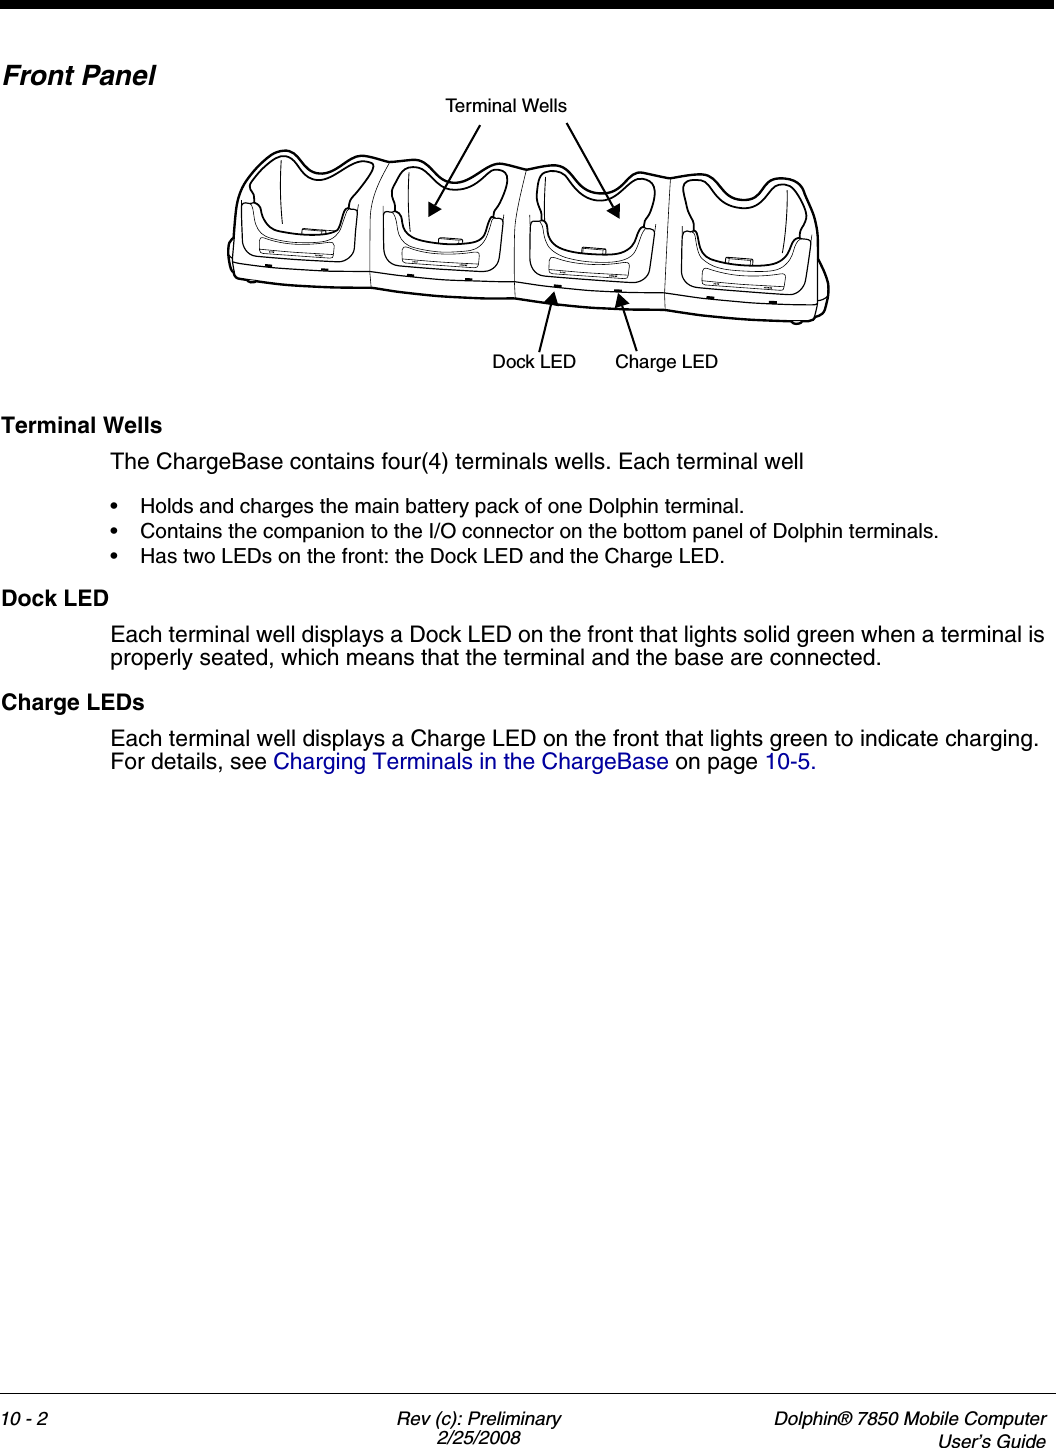
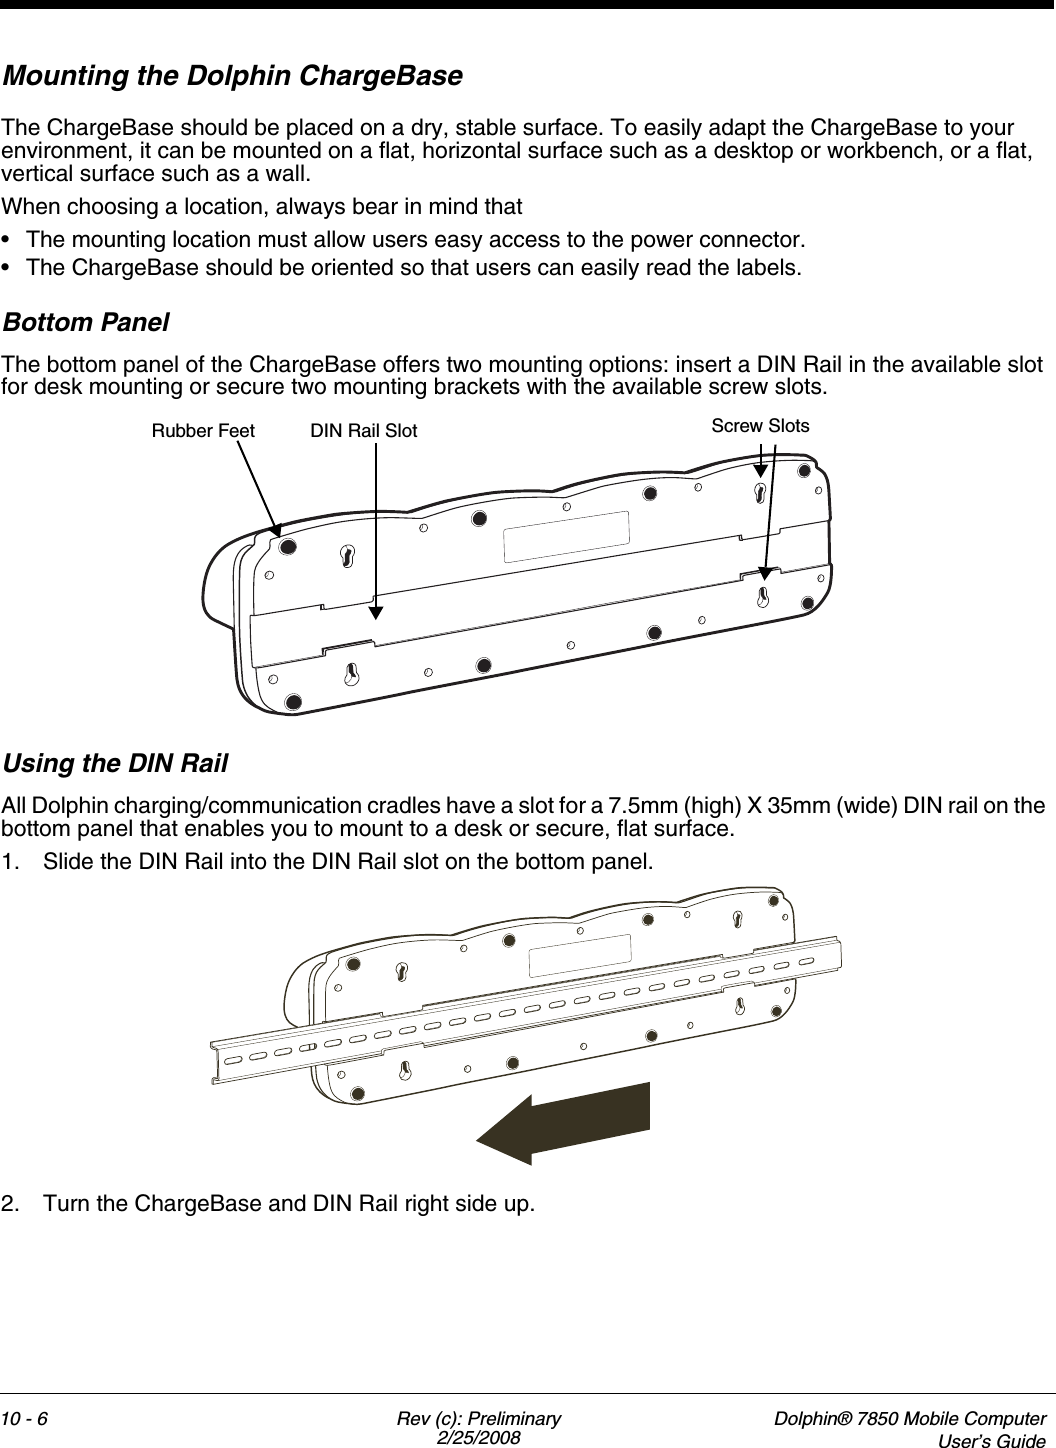
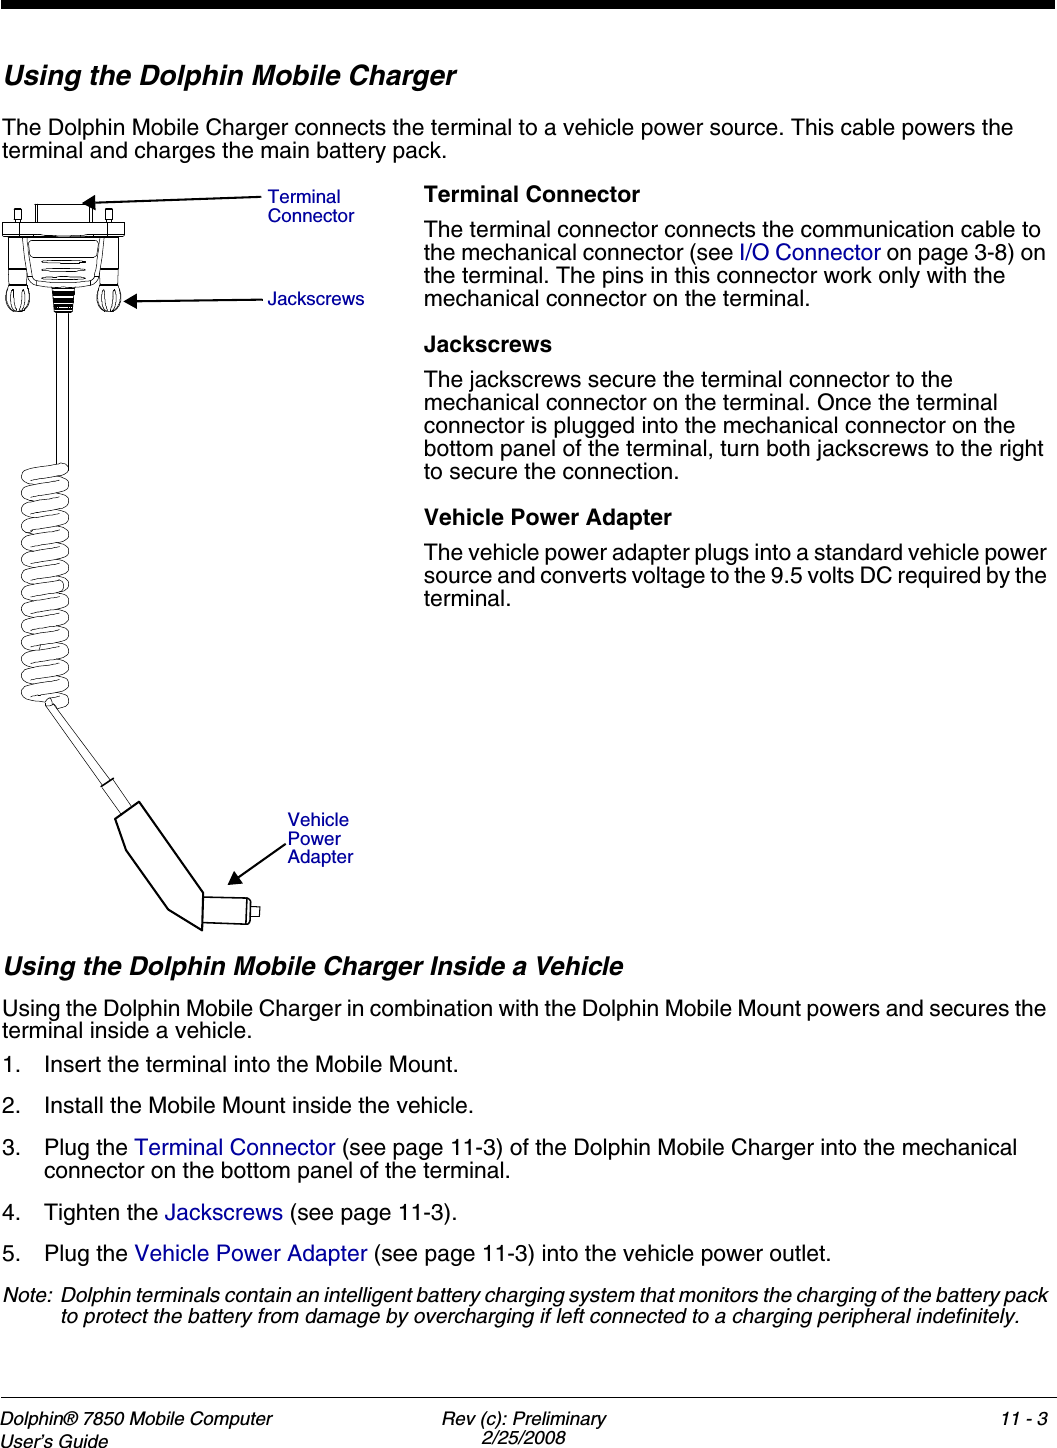
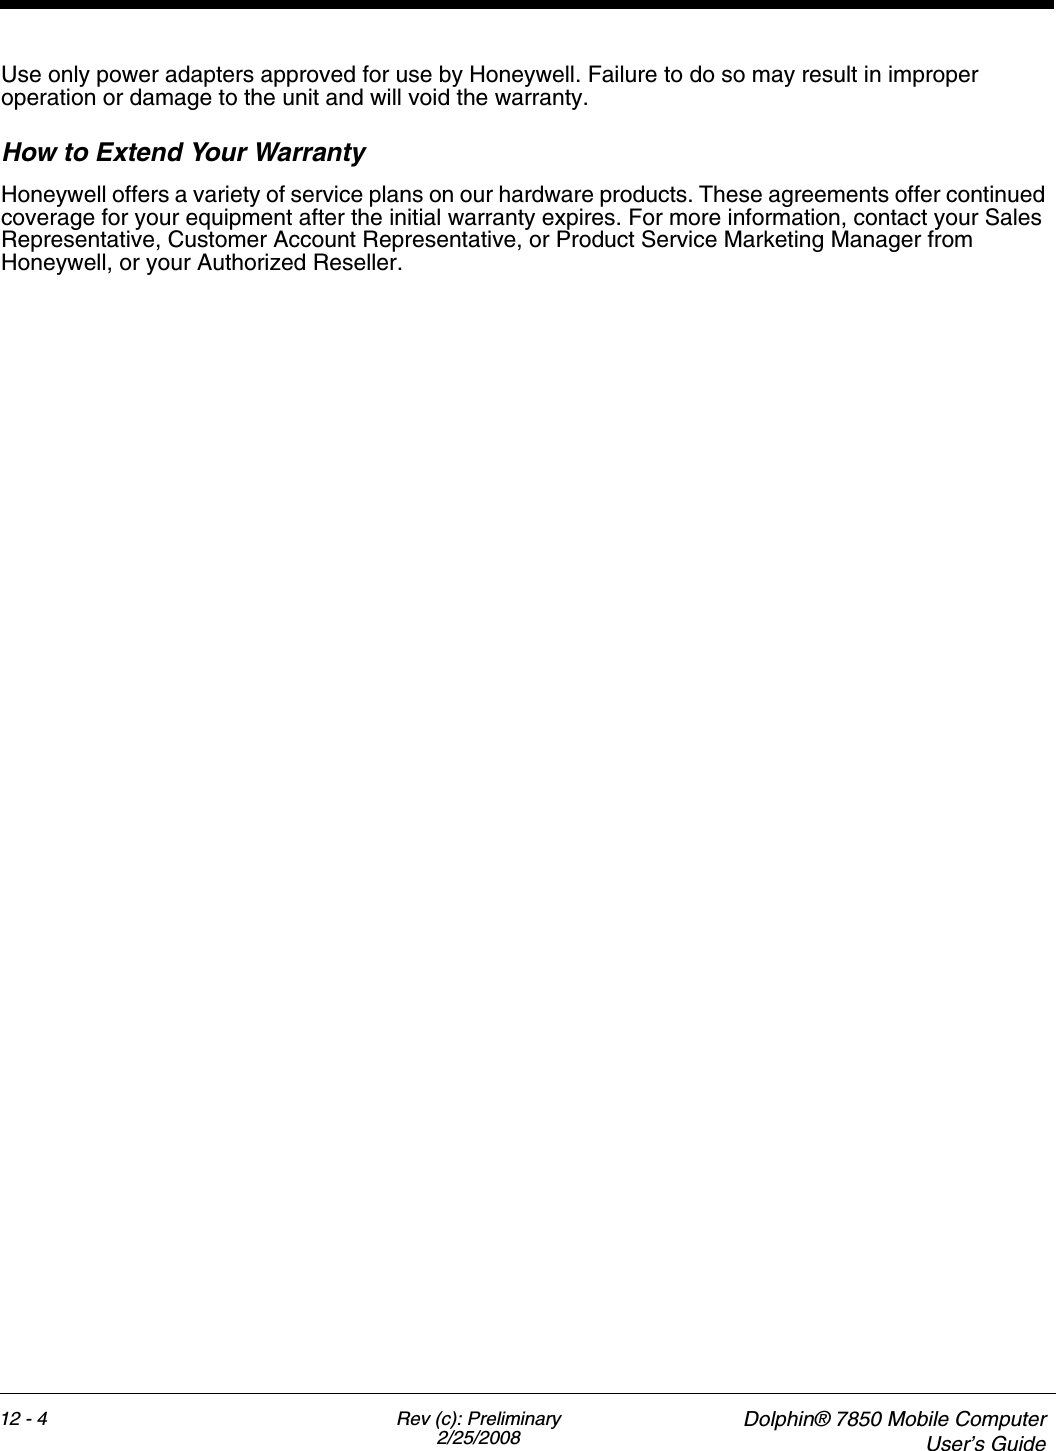
![Dolphin® 7850 Mobile Computer User’s Guide Rev (c): Preliminary2/25/20084 - 14Using the KeyboardsOverviewThe keyboard buttons are recessed under the overlay for maximum durability. The keyboard panel is backlit for maximum viewability in various lighting conditions.The Dolphin 7850 terminal has two keyboard options: Calculator Style NumberingBoth Dolphin 7850 keyboards default to numeric mode and feature calculator-style numbering for ease-of-use in the field.LEDsThe LEDs are in the center of the keyboard.Scan LED The LED on the right lights red when you press the Scan trigger in scanning applications.Decode LED The LED on the left lights green when a scanned bar code is successfully decoded.Note: Both LEDs are user-programmable.For more information, see Using the Imager Scanner Engine on page 5-1.Color-CodingKeyboard overlays are color-coded to indicate the functions performed or characters typed when the color-coded key is pressed with the red or blue modifier key. Key TypesIn addition to the standard number and letter keys, both keyboards contain three types of keys:1. Function Keys: Using the Function Keys (see page 4-2)2. Navigation Keys: Using the Navigation Keys (see page 4-3) 3. Modifier Keys: Using the Modifier Keys (see page 4-3)PGBKSPSPESCTABSFT74GHI1PQRS8ABC5JKL2TUV9DEF6MNO3WXYZ/\ _0+[]:–F1 F2F3F4 F5F6F7 F8F9F10VOL+DEL INSBKTABSTARTVOL-ALPHA“=F4F5F6F7F8F9F10-+\\//,3690258741.BKSPPGSPTA BESCALPHF1F2F3SFTOBEJUACDFGHIKLMNQSTVWXYZST ART P#*@DELVOL+VOL-INSRBKTAB24-Key Keyboard (see page 4-4) 38-Key Keyboard. (see page 4-7)](https://usermanual.wiki/Honeywell/7850PGE.User-Manual/User-Guide-927274-Page-33.png)
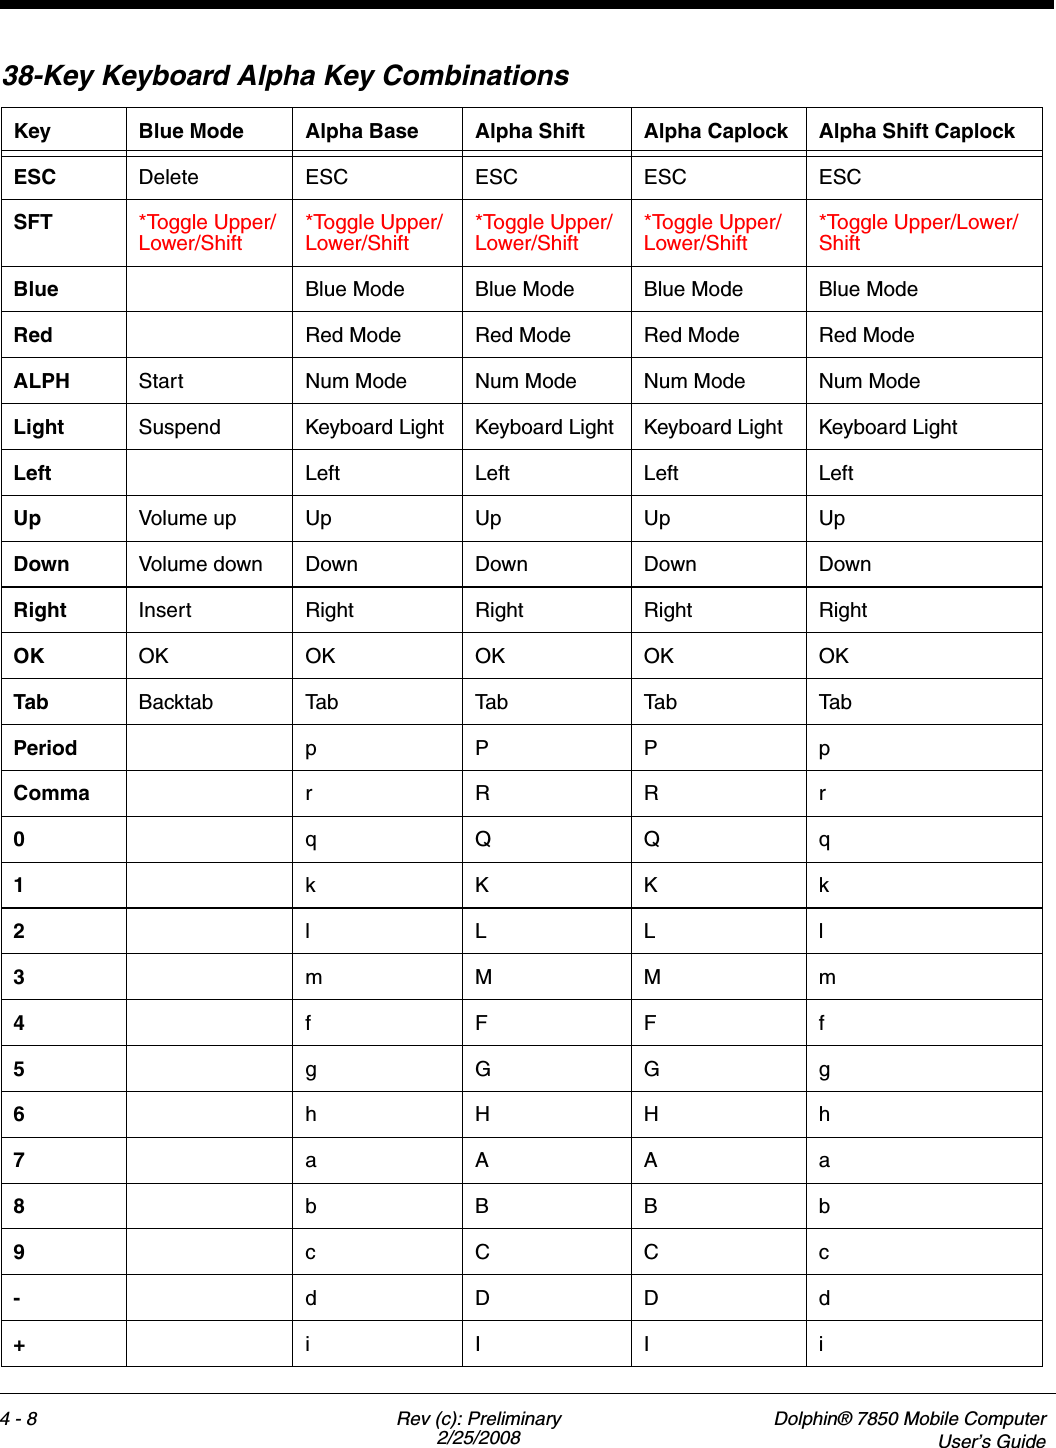
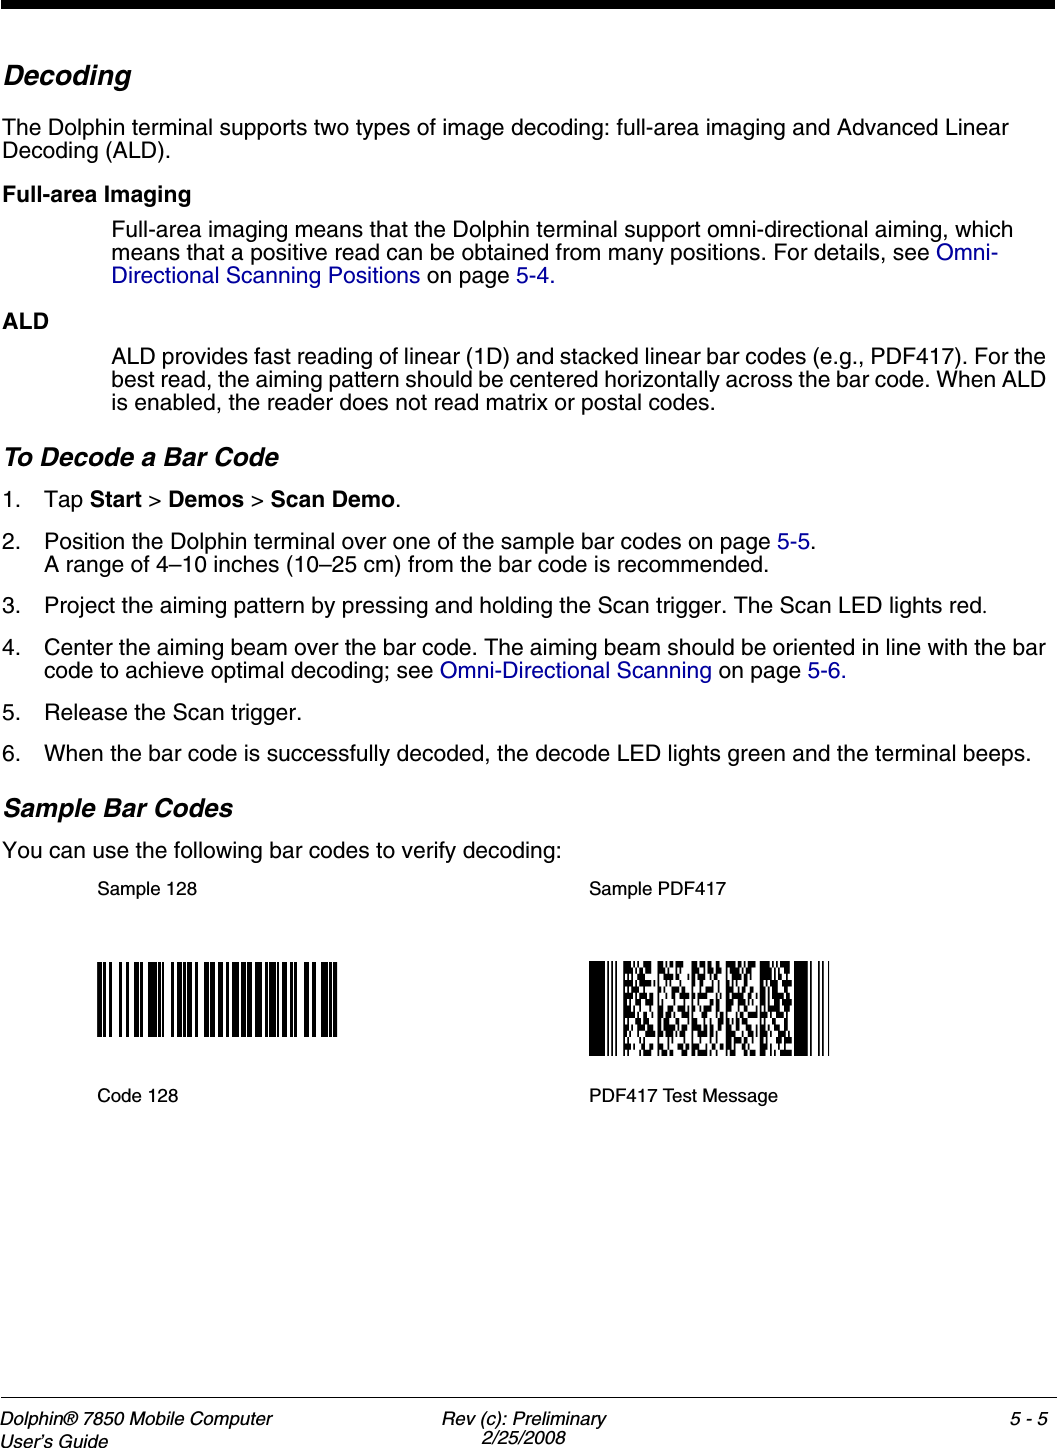
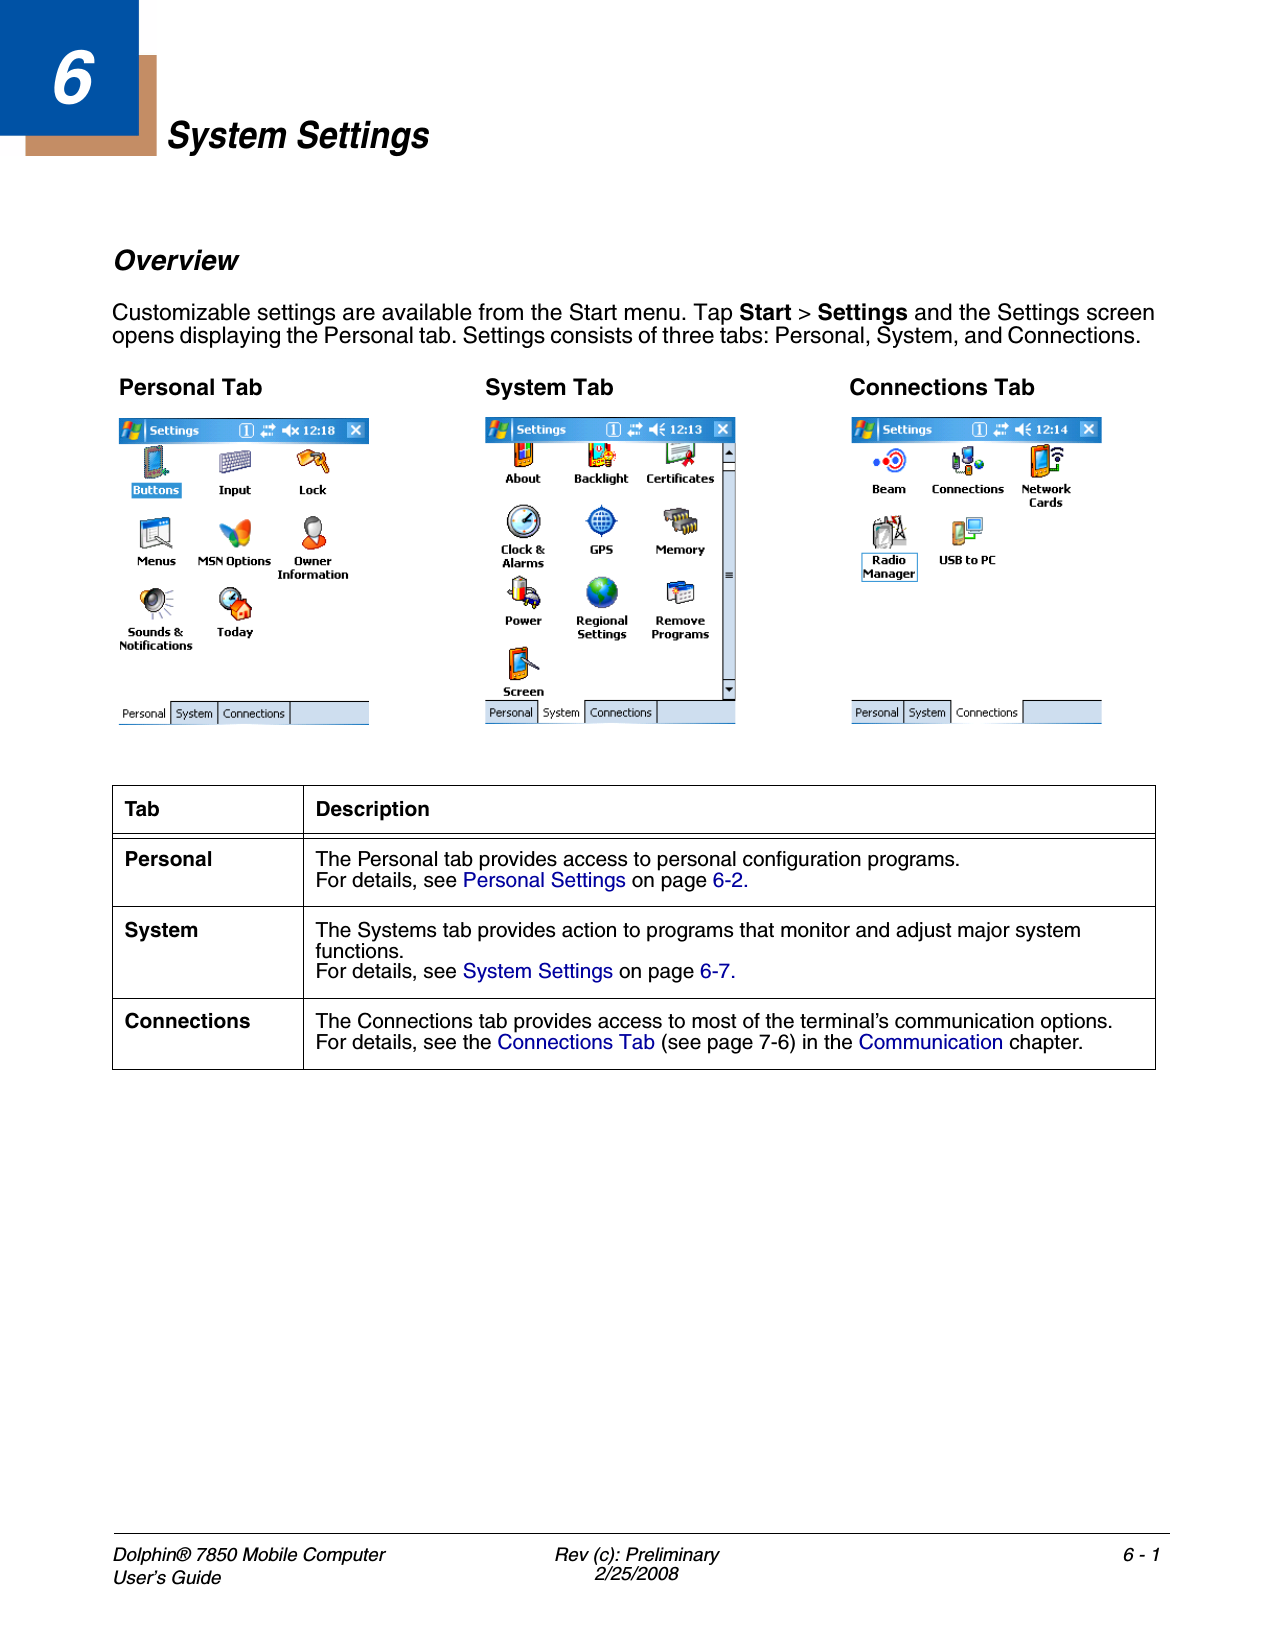
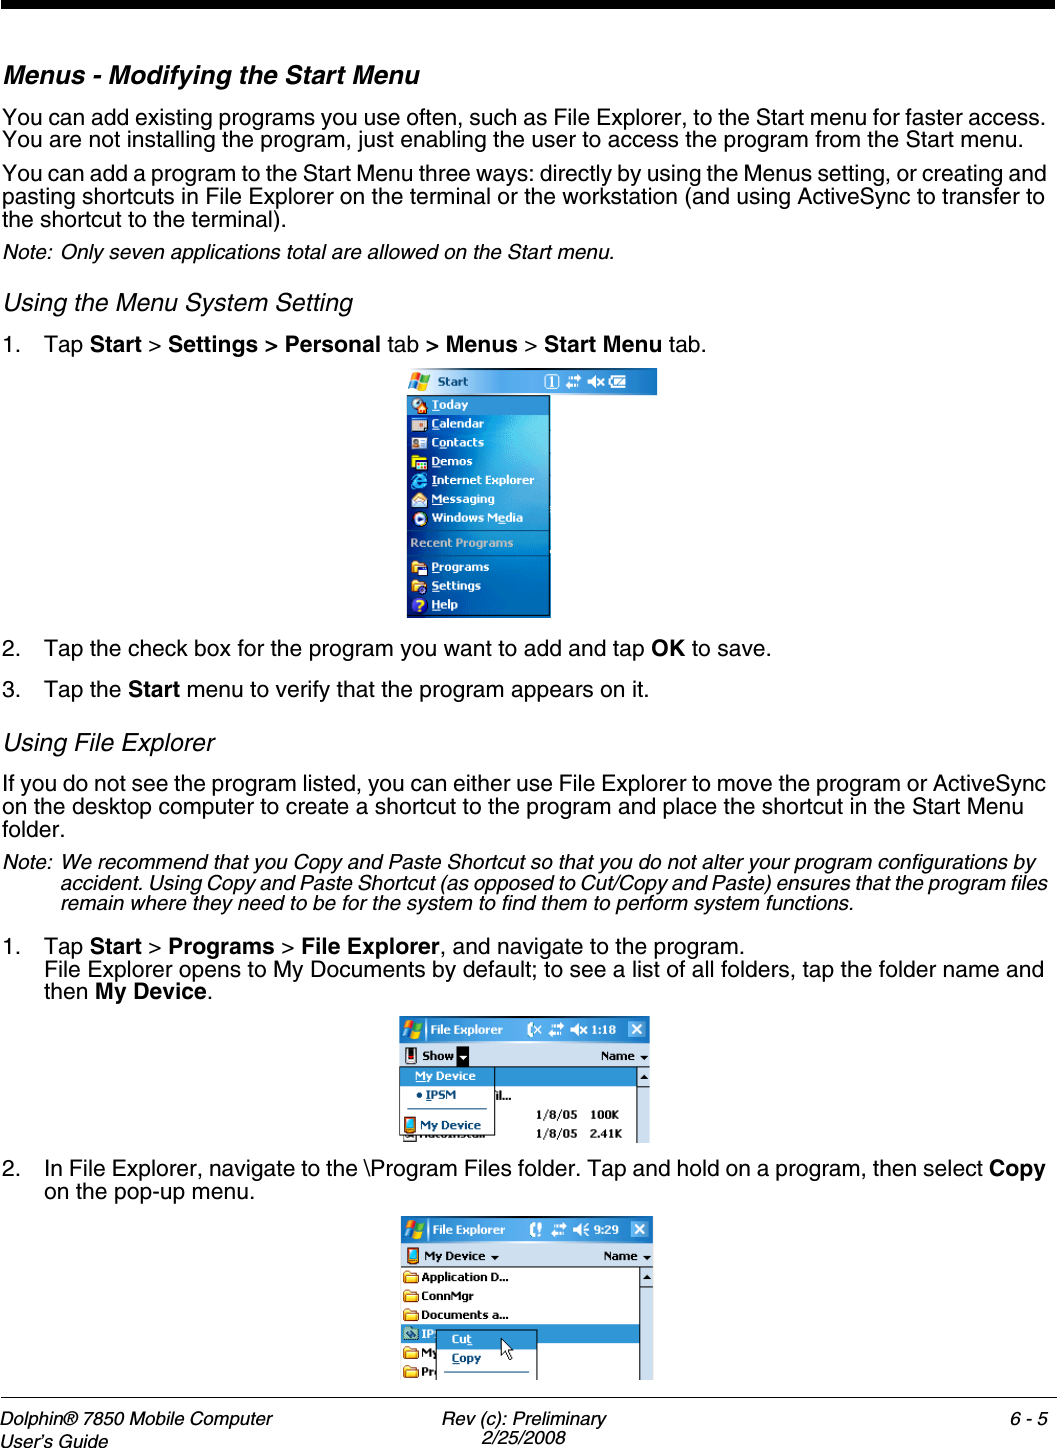
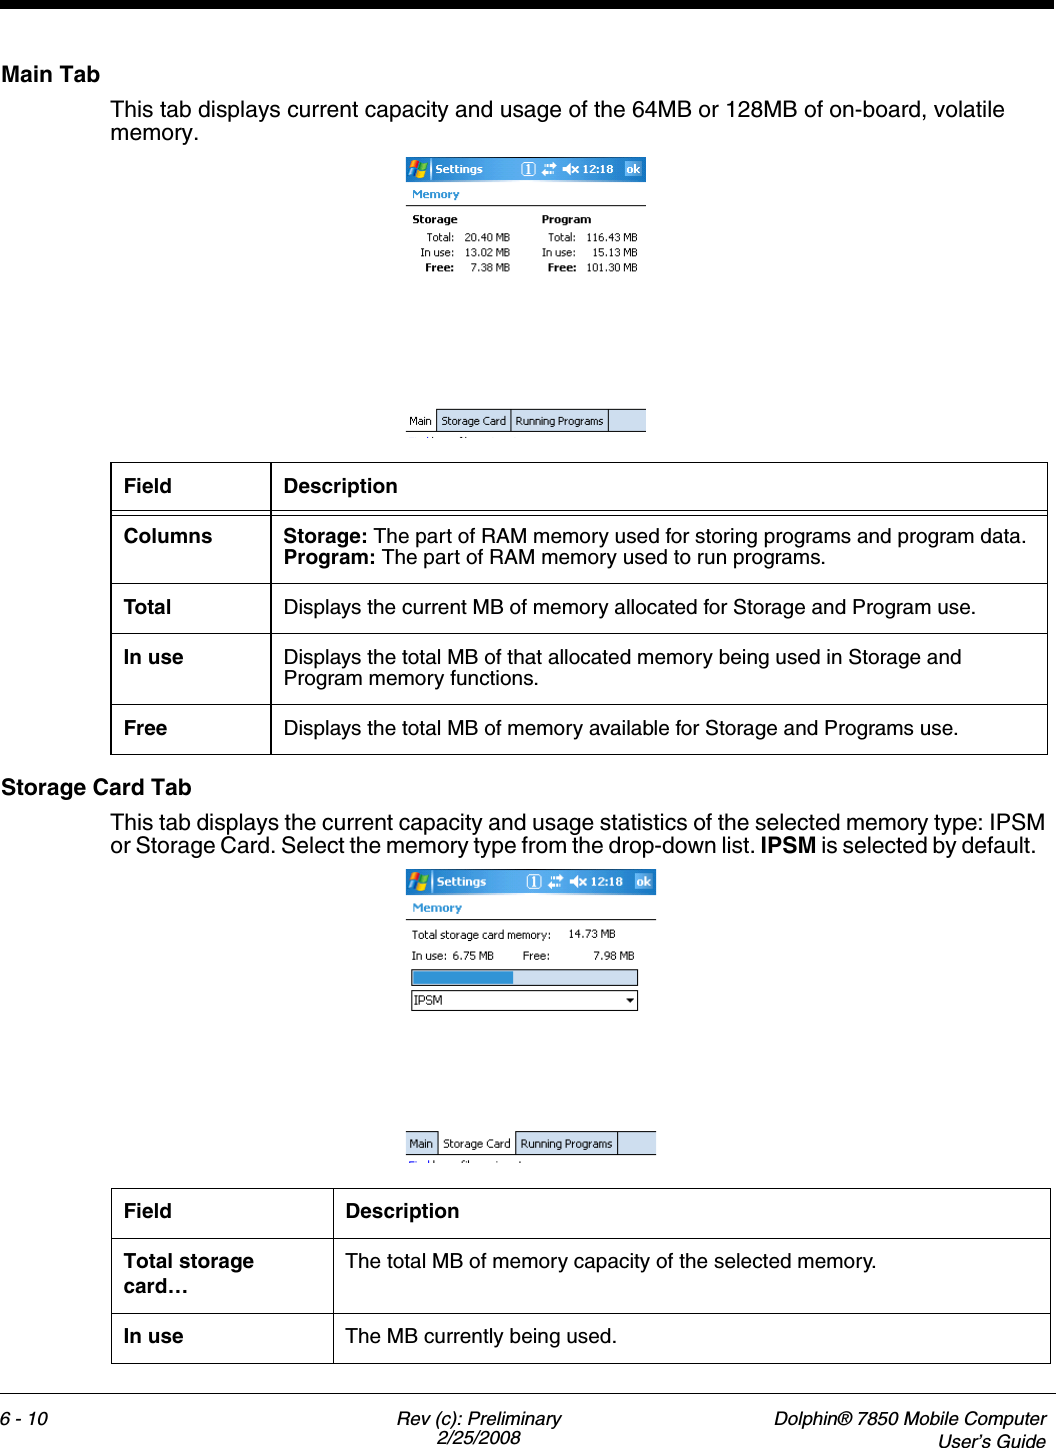
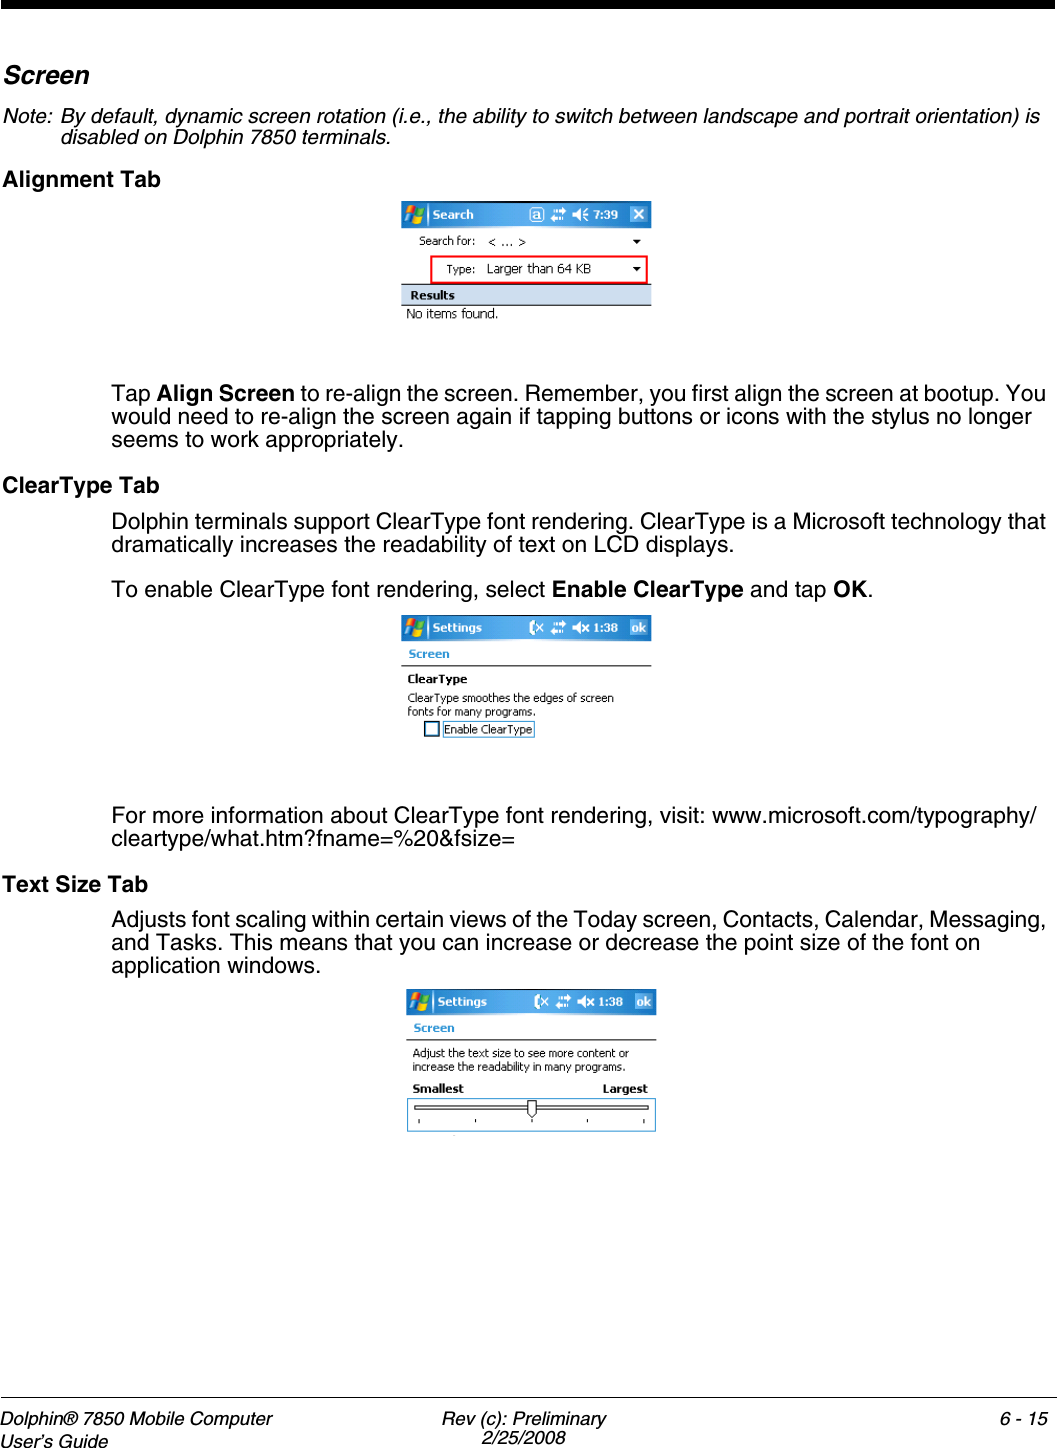
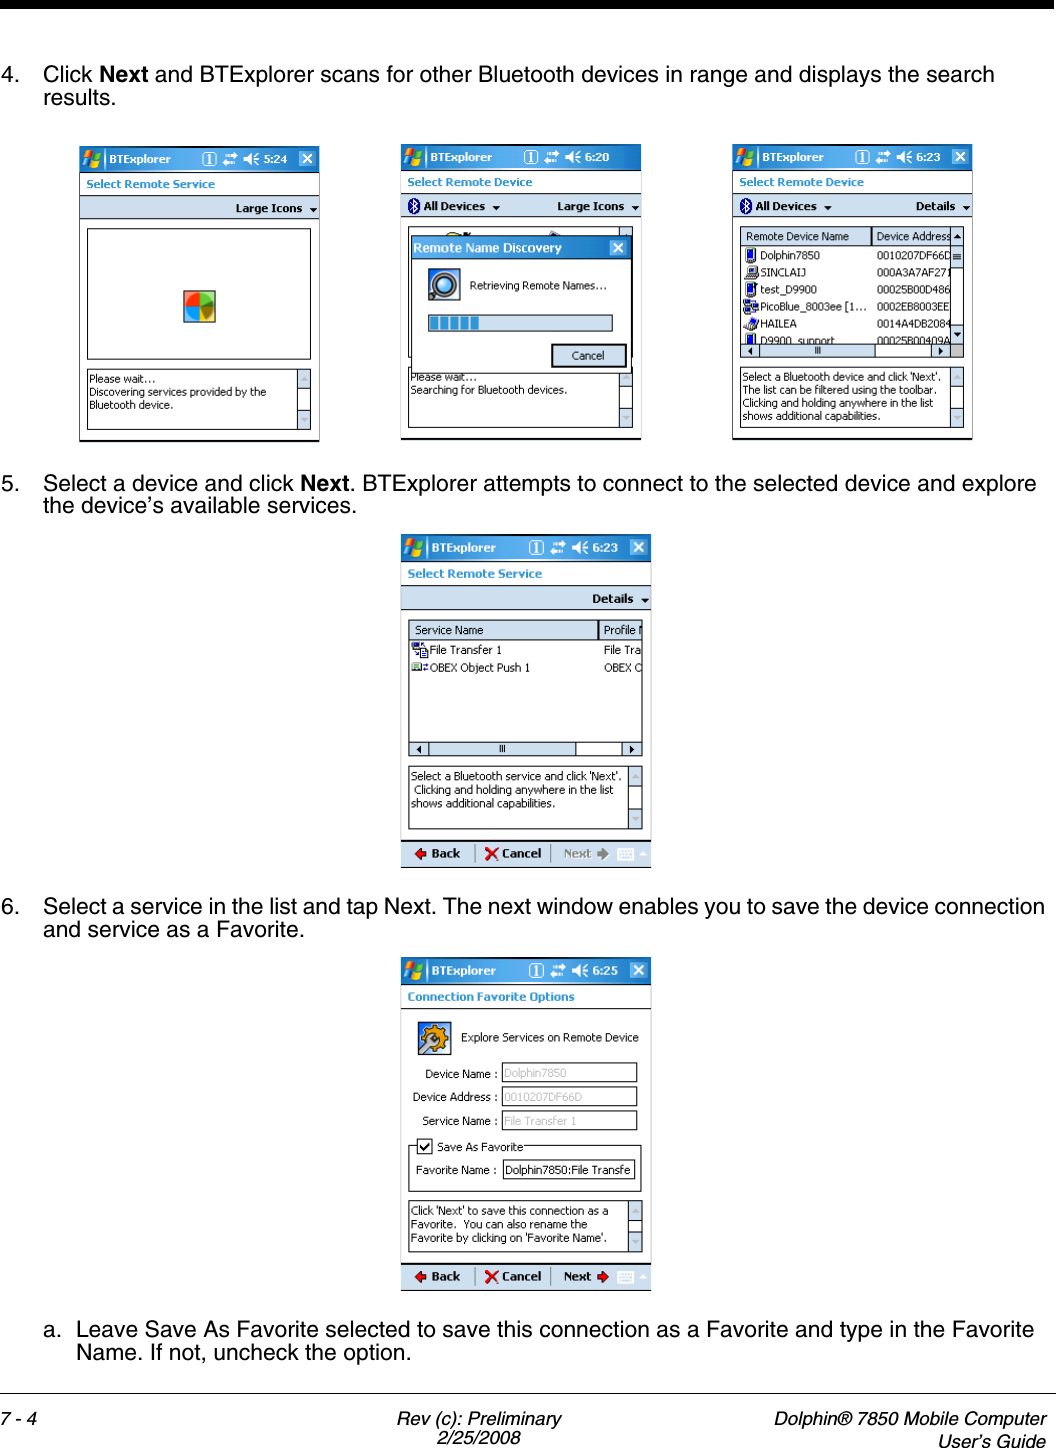
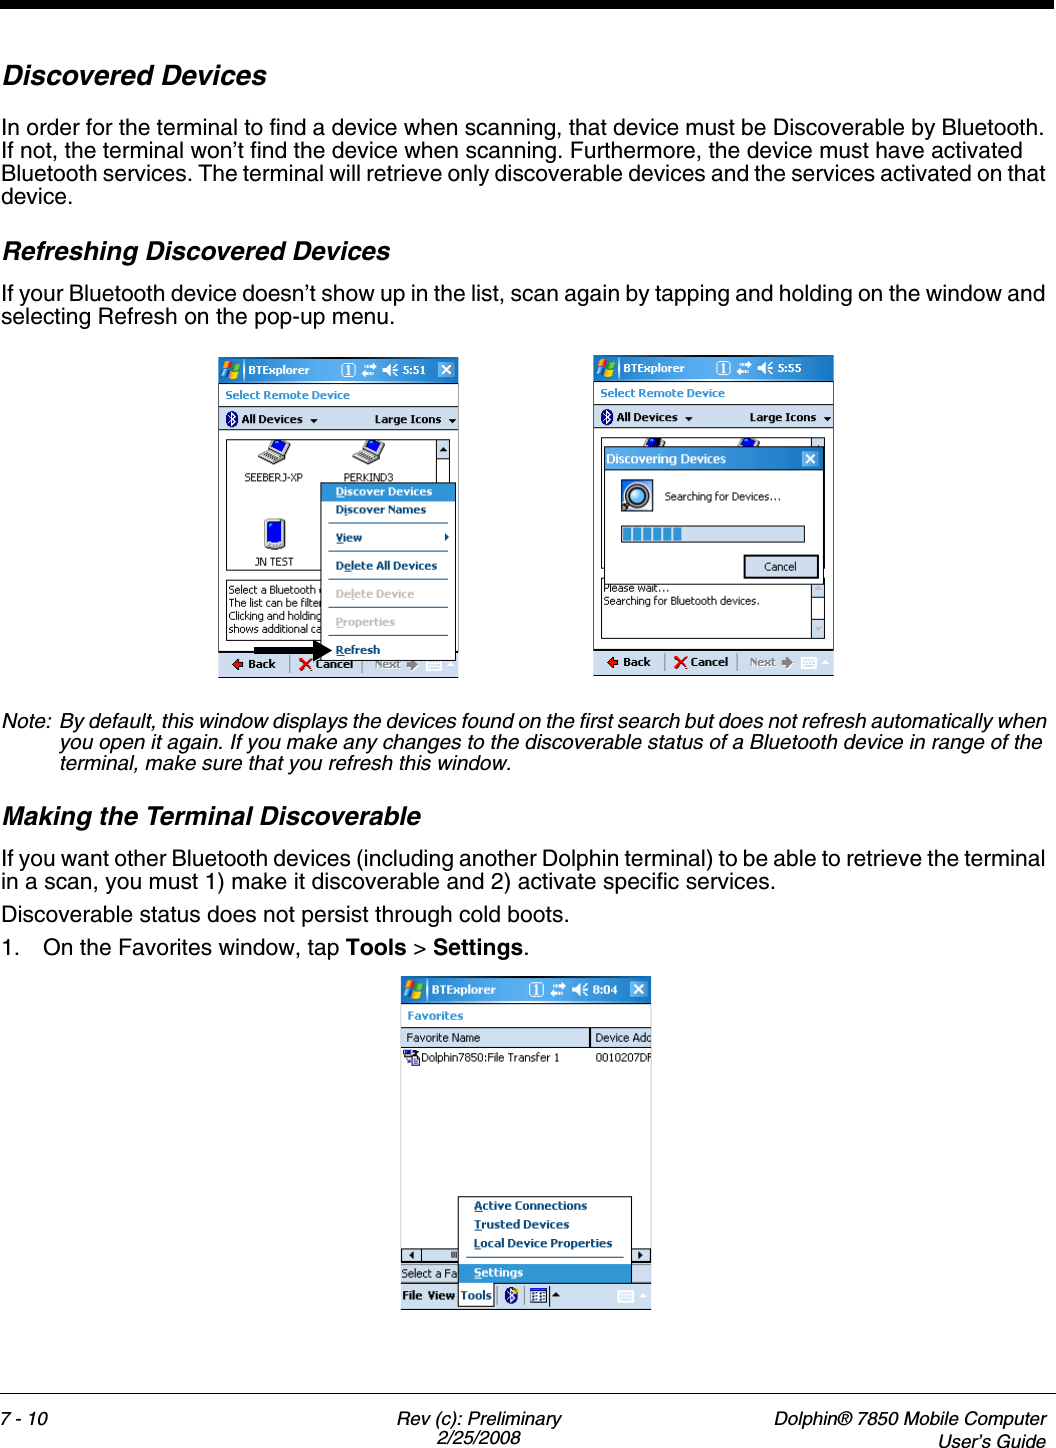
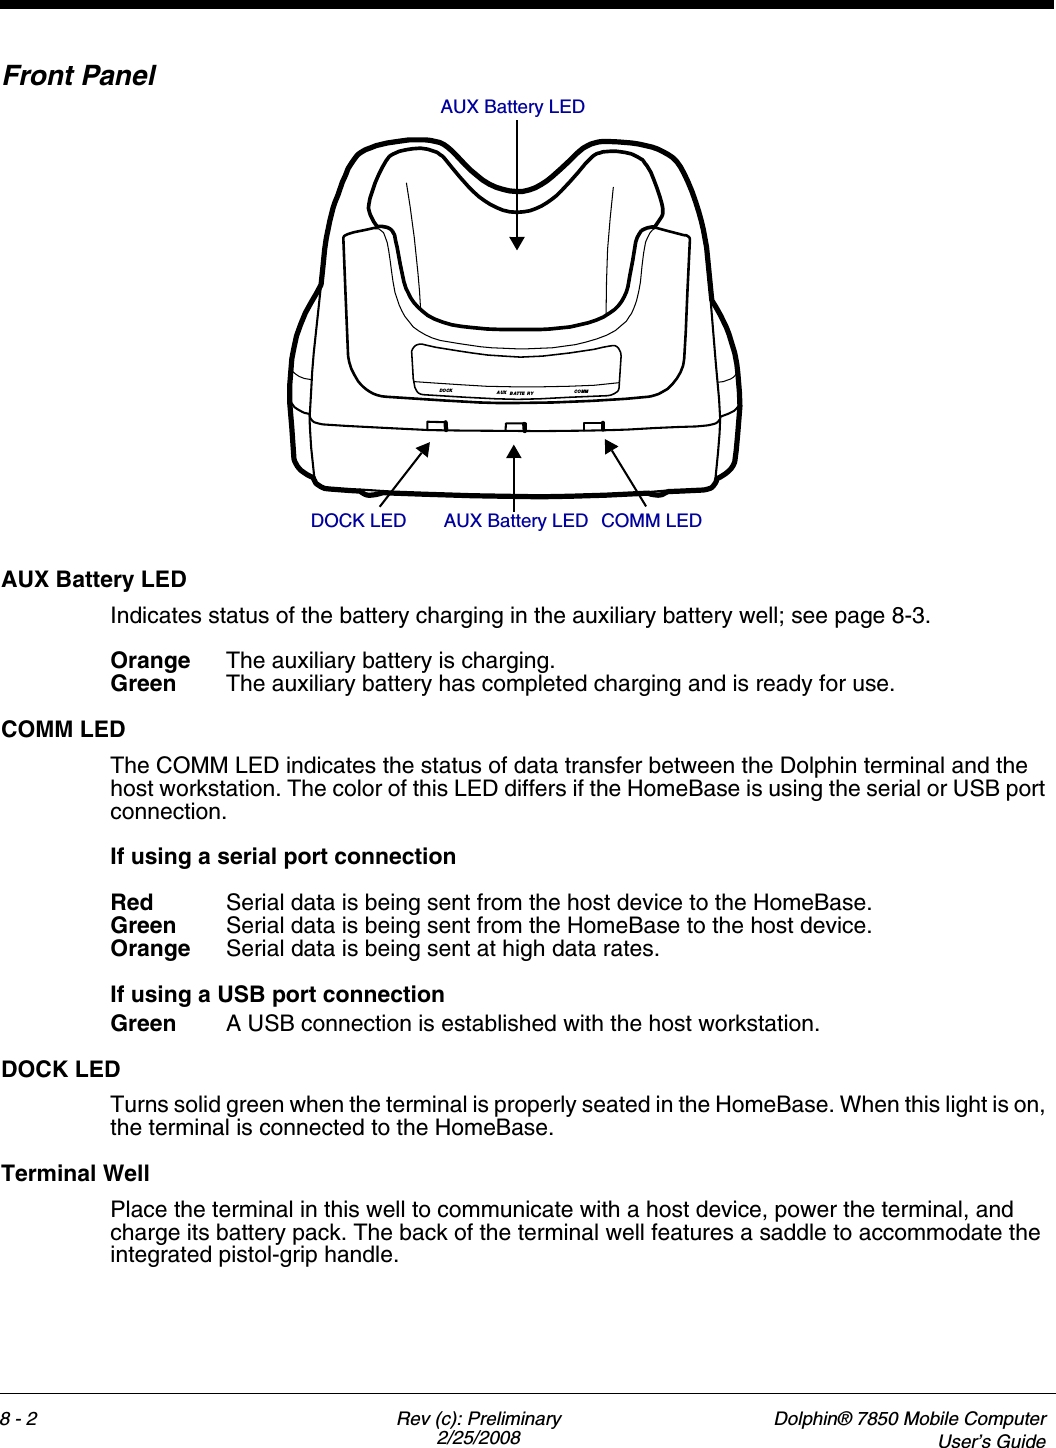
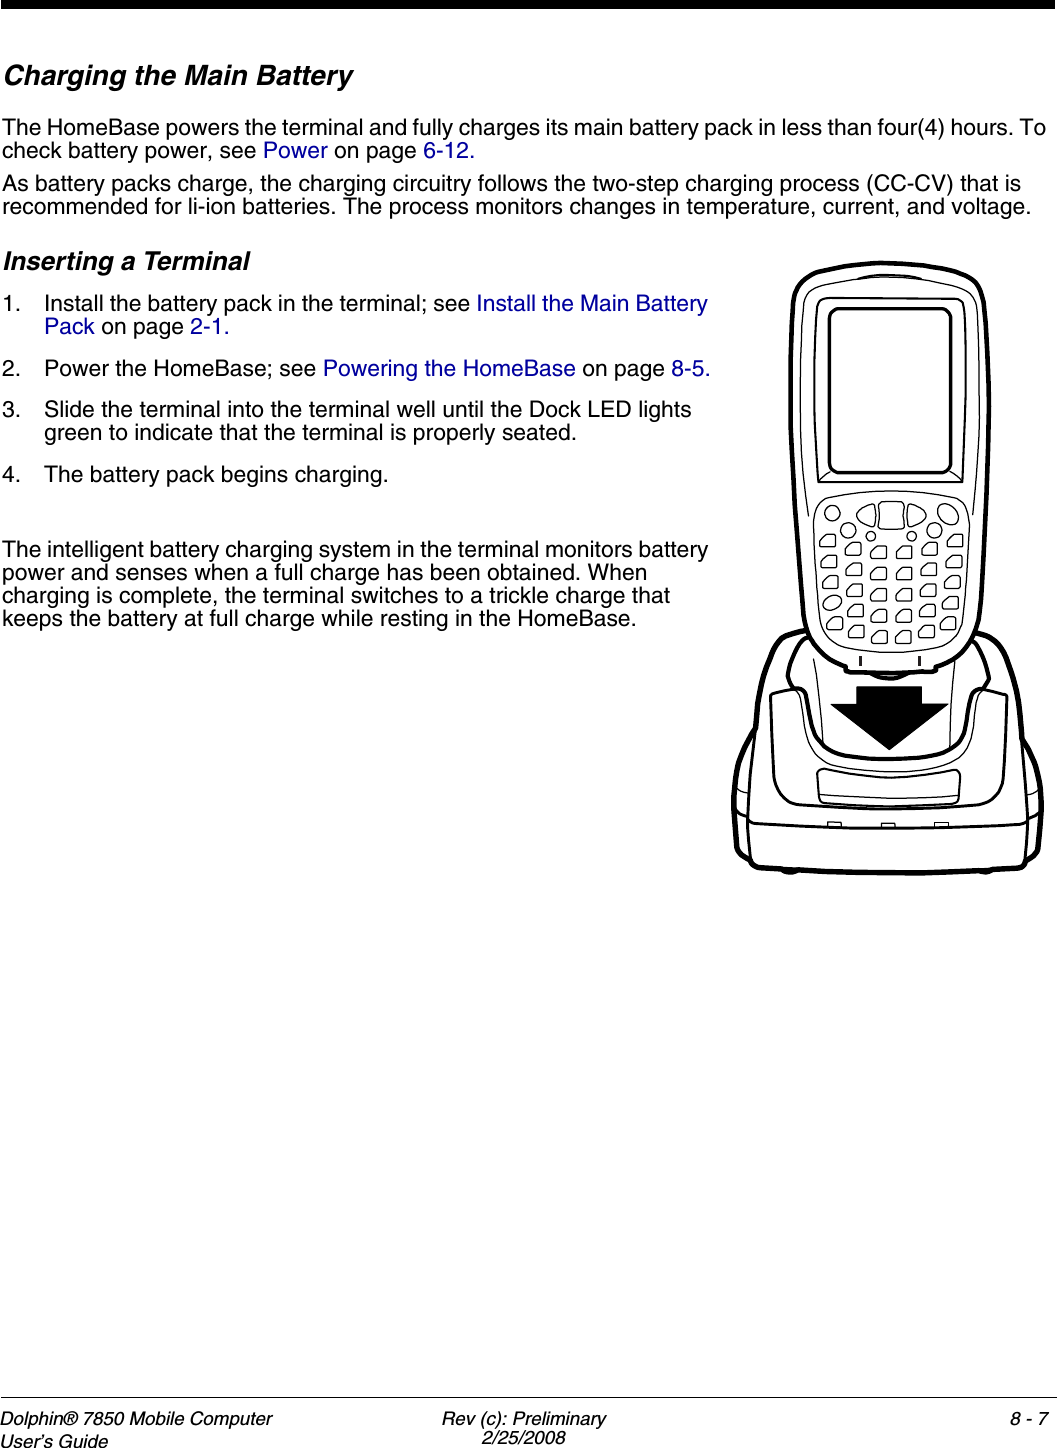
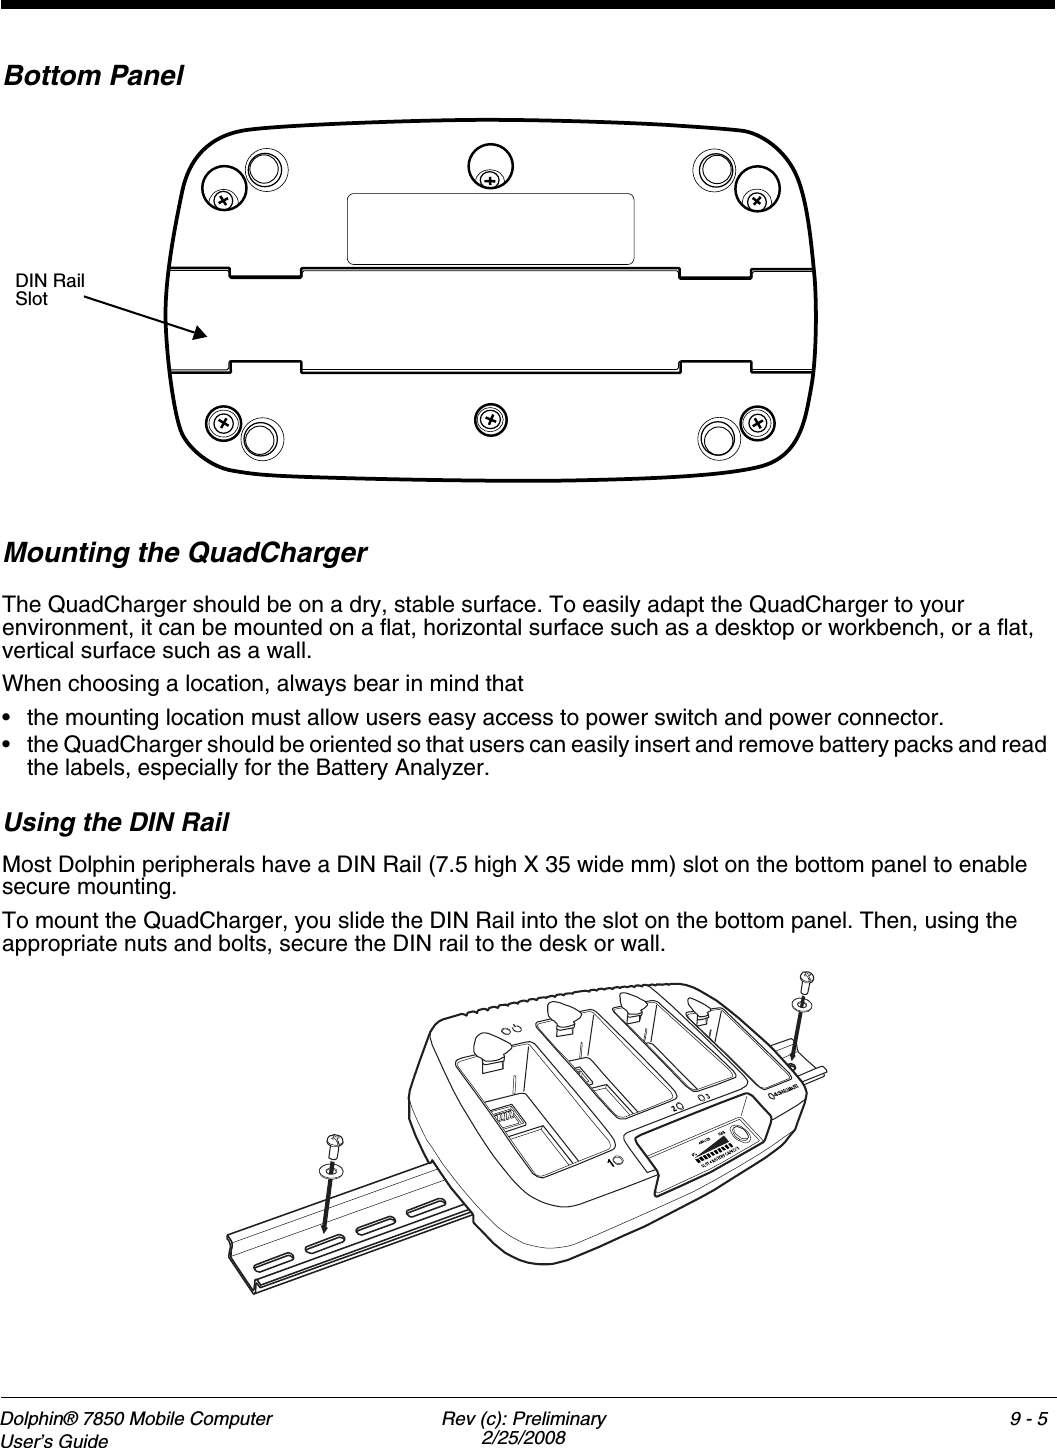
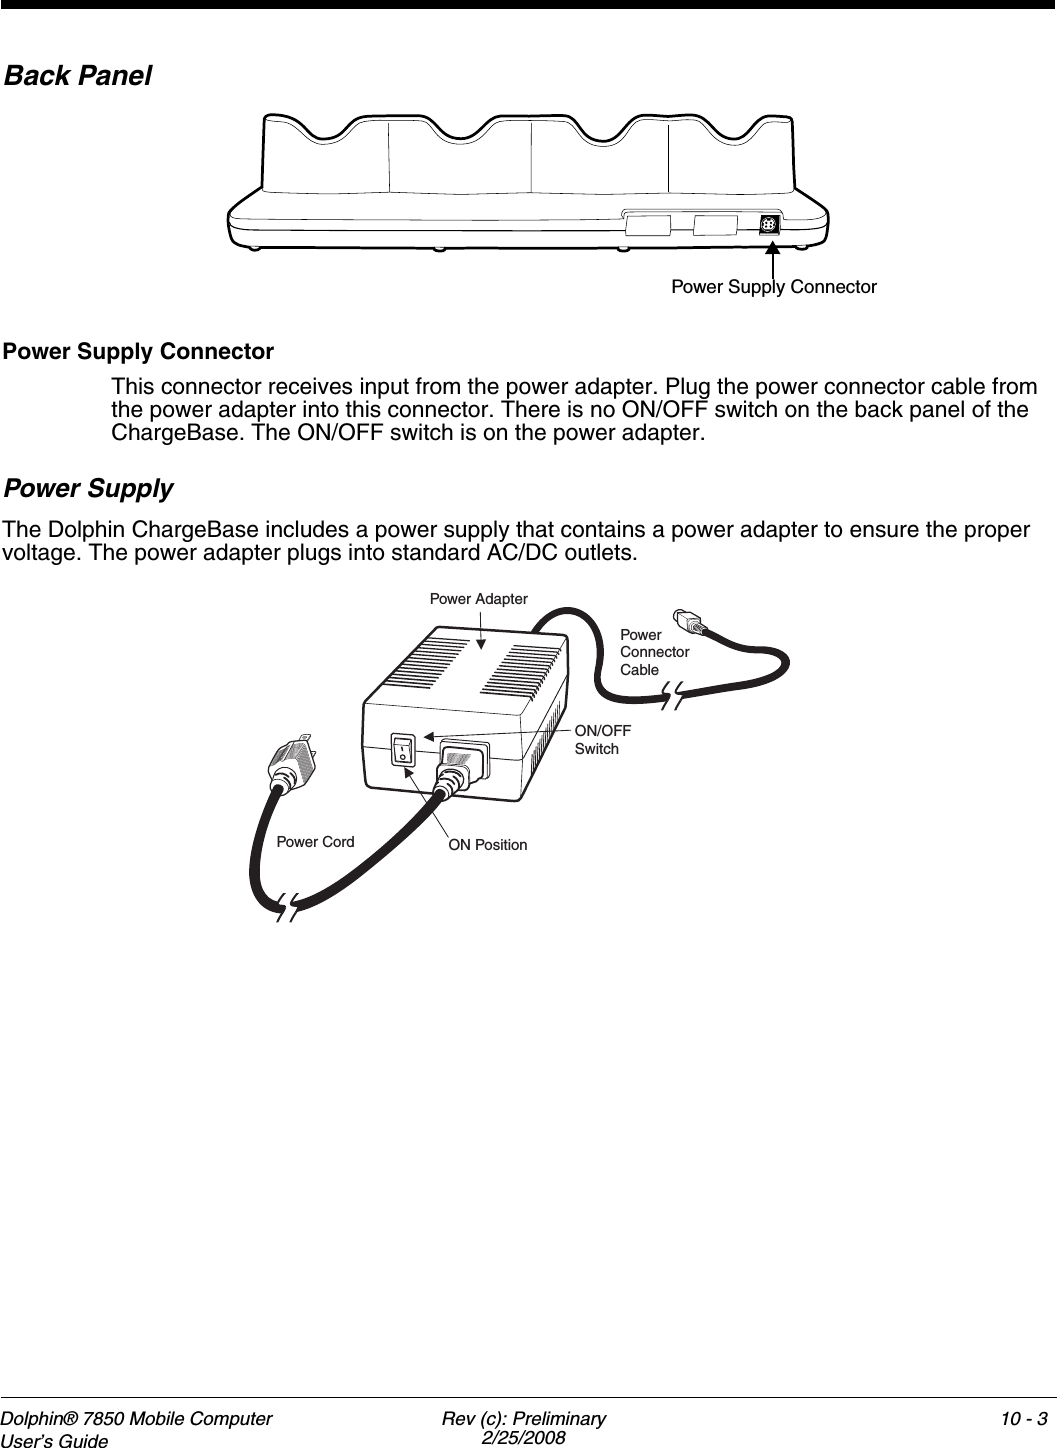
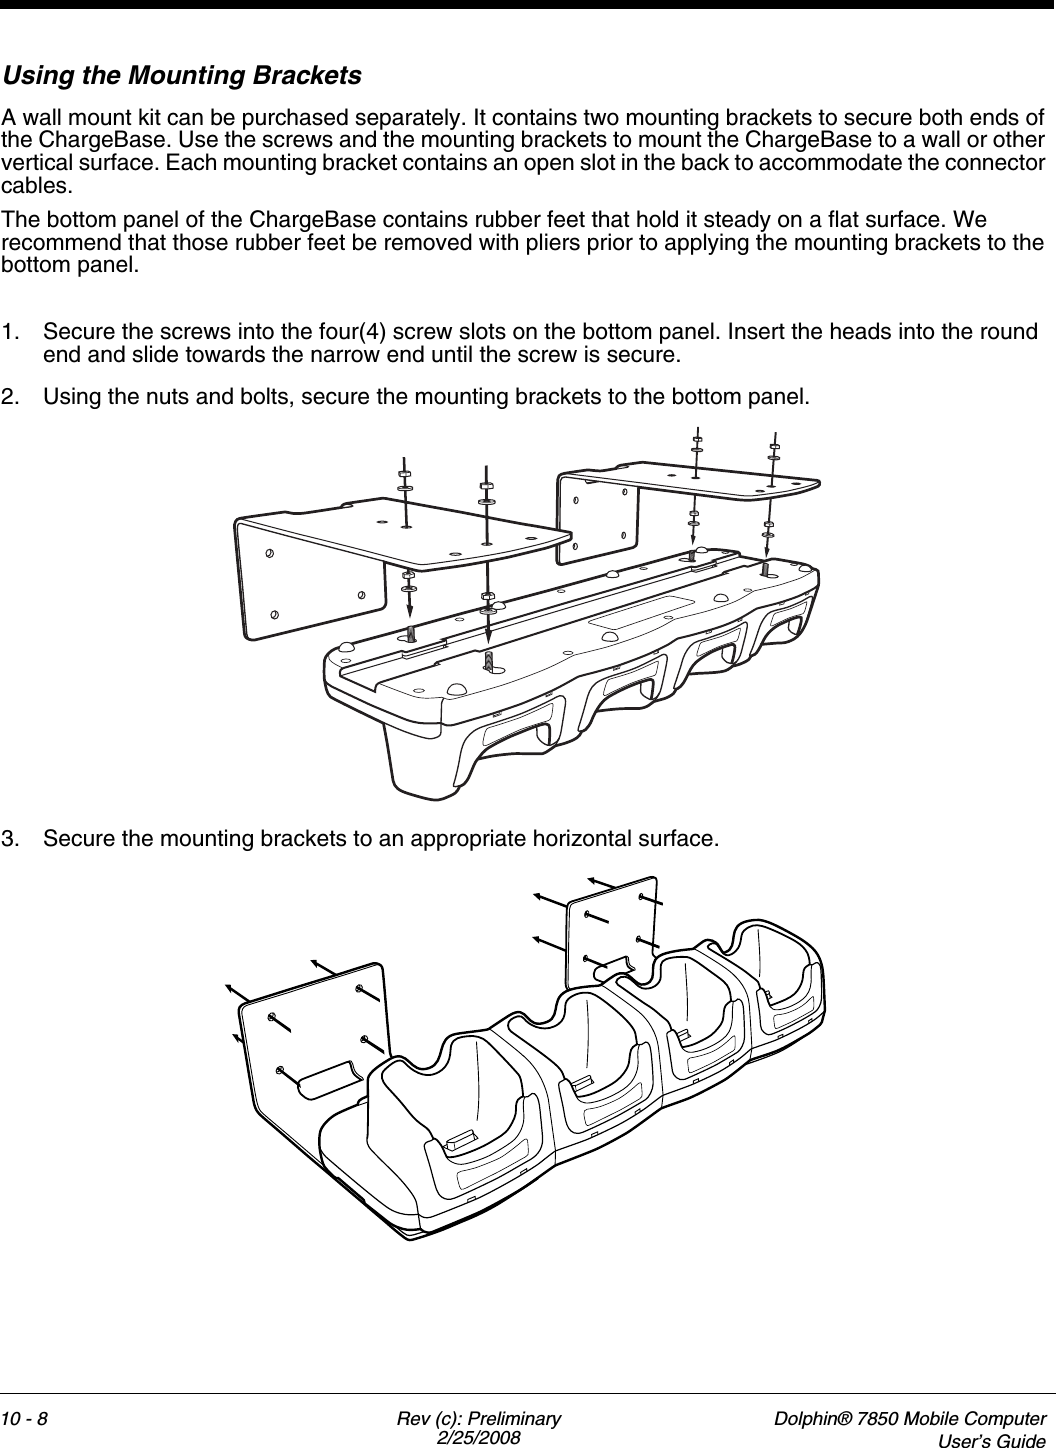
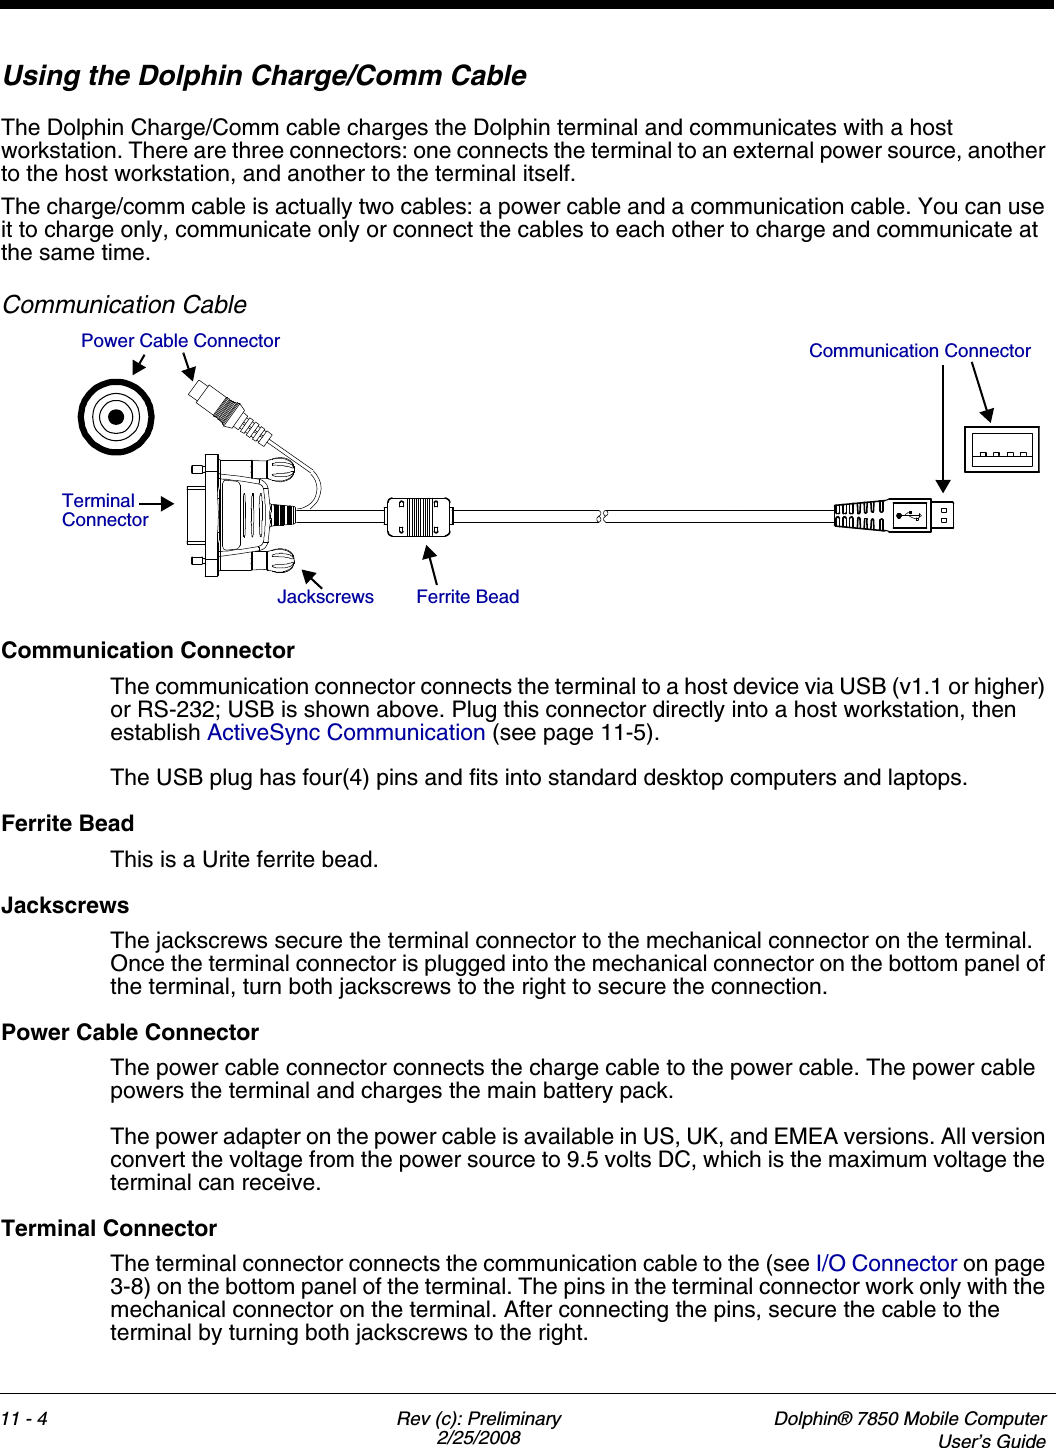
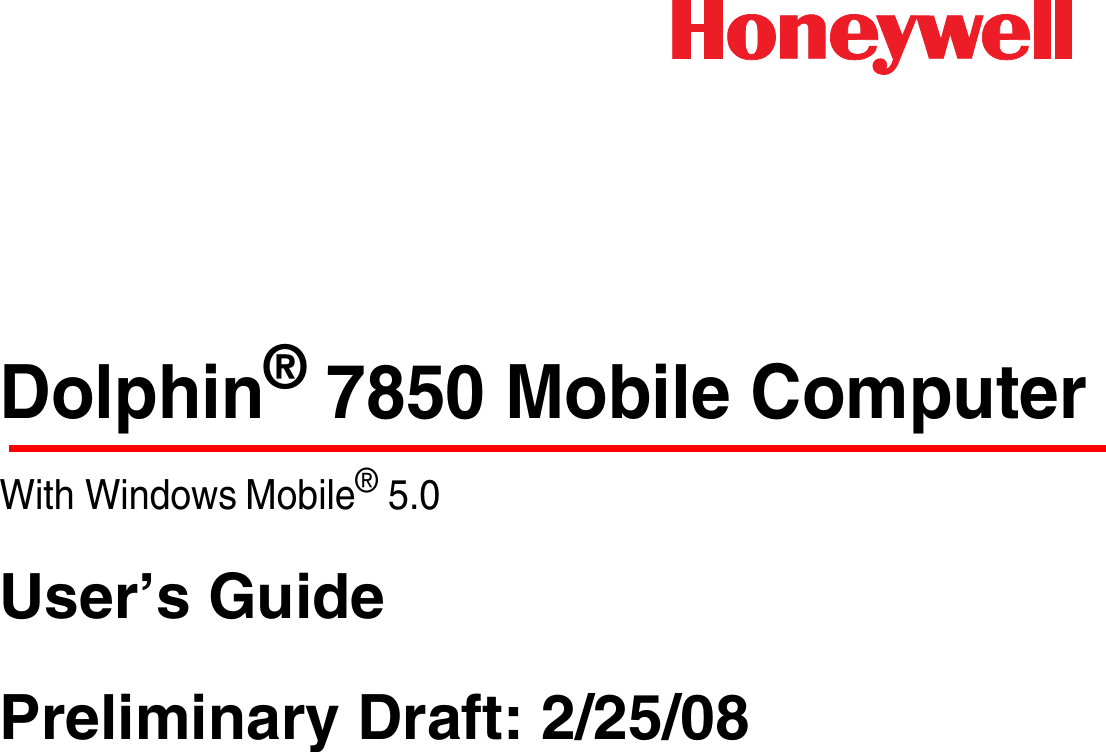
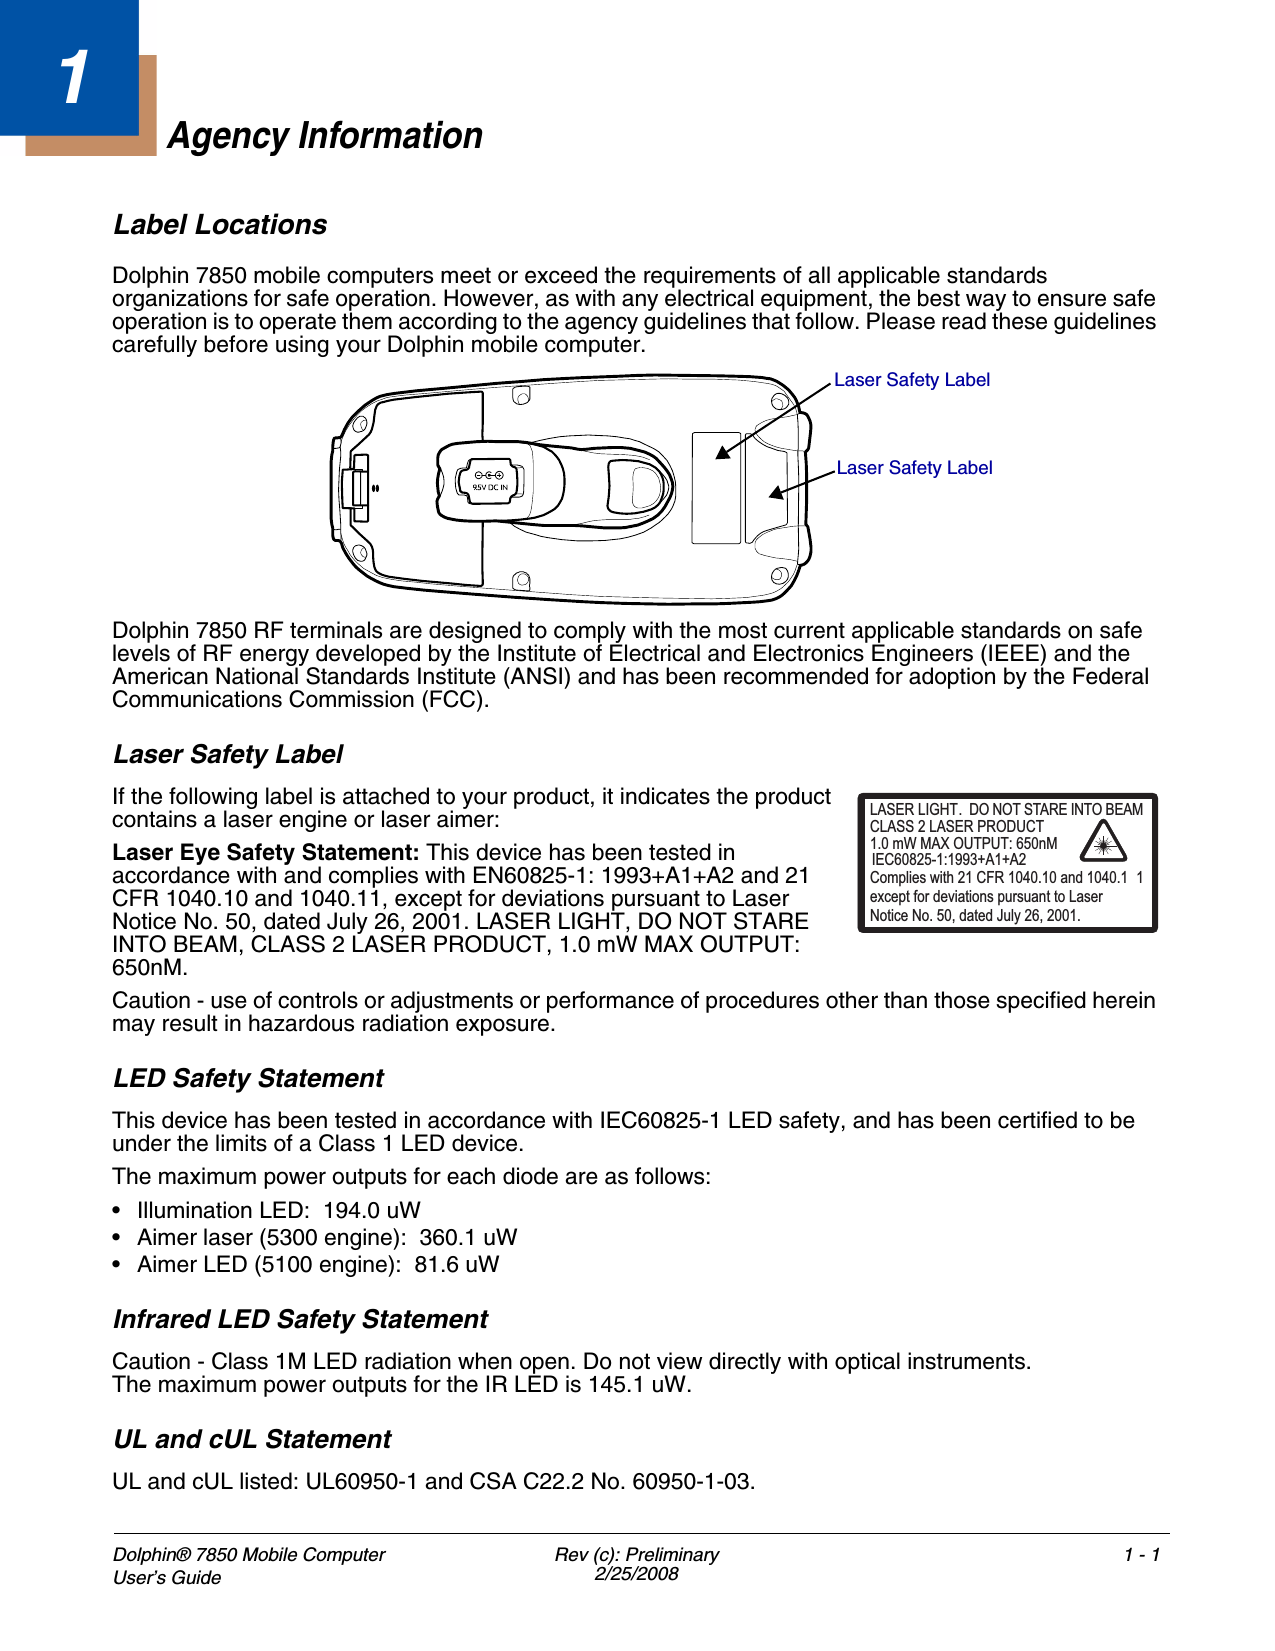
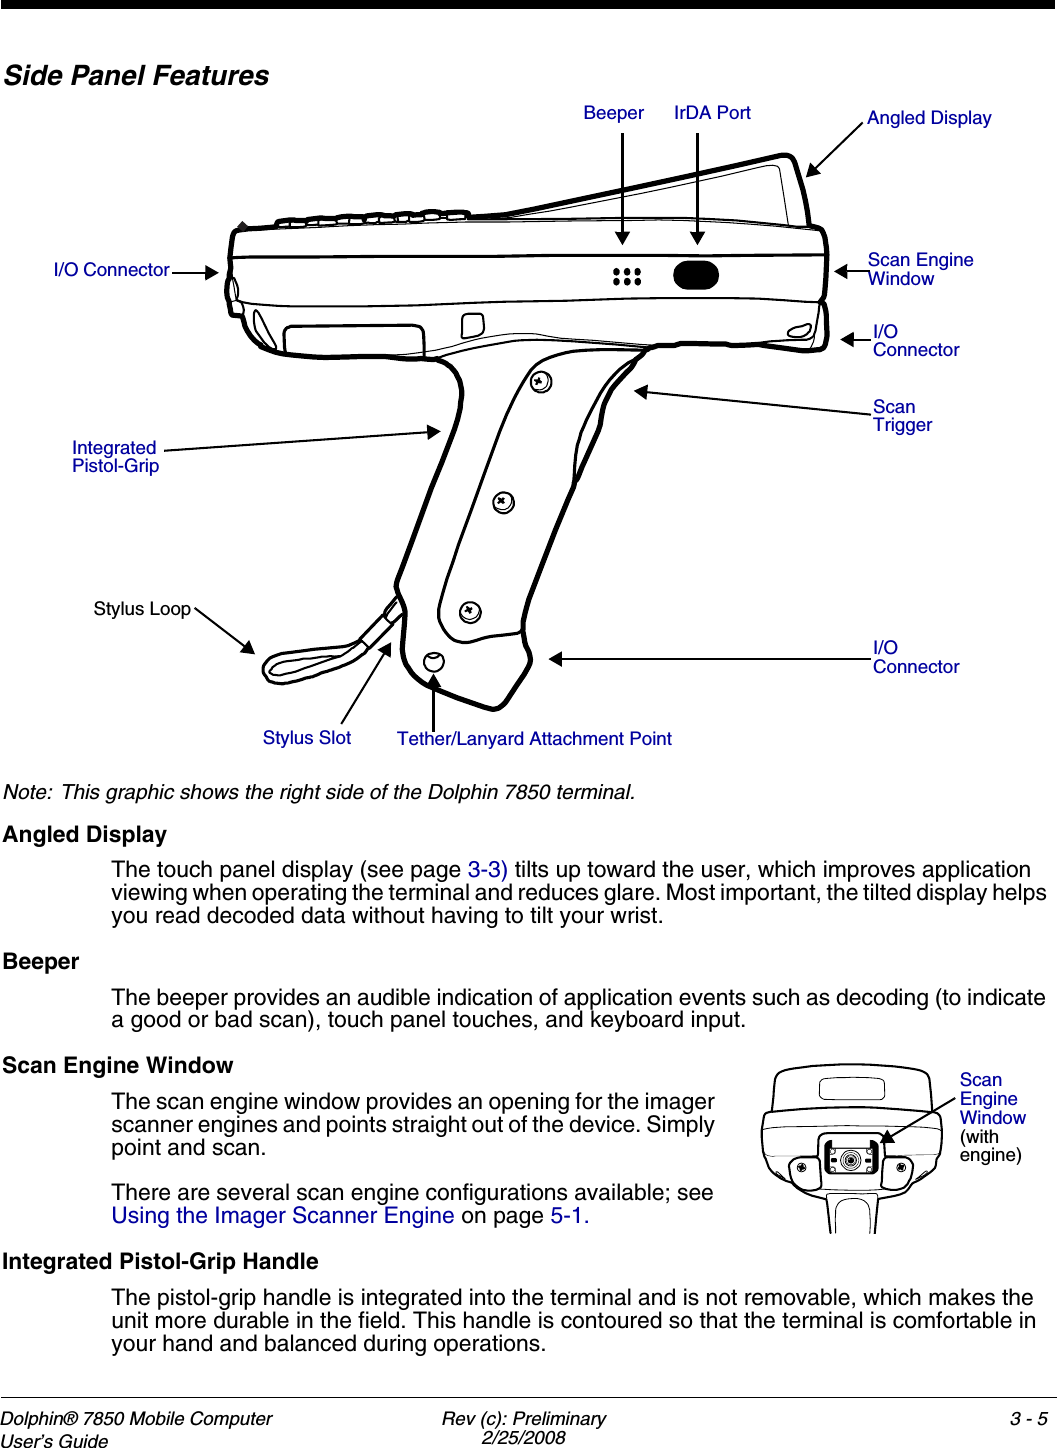
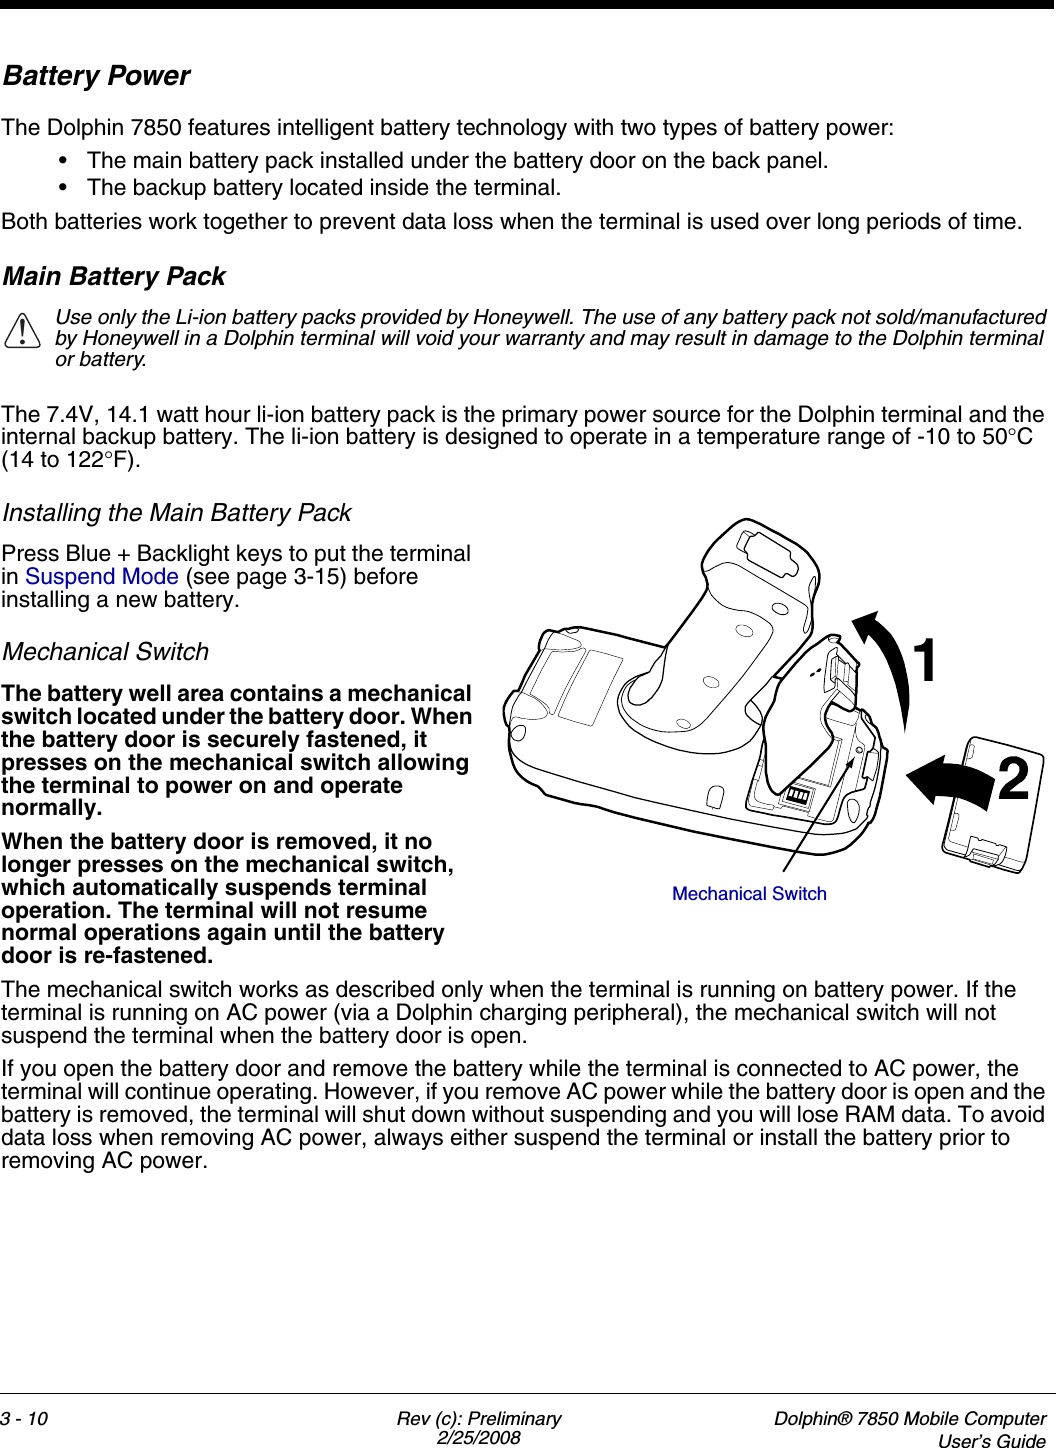
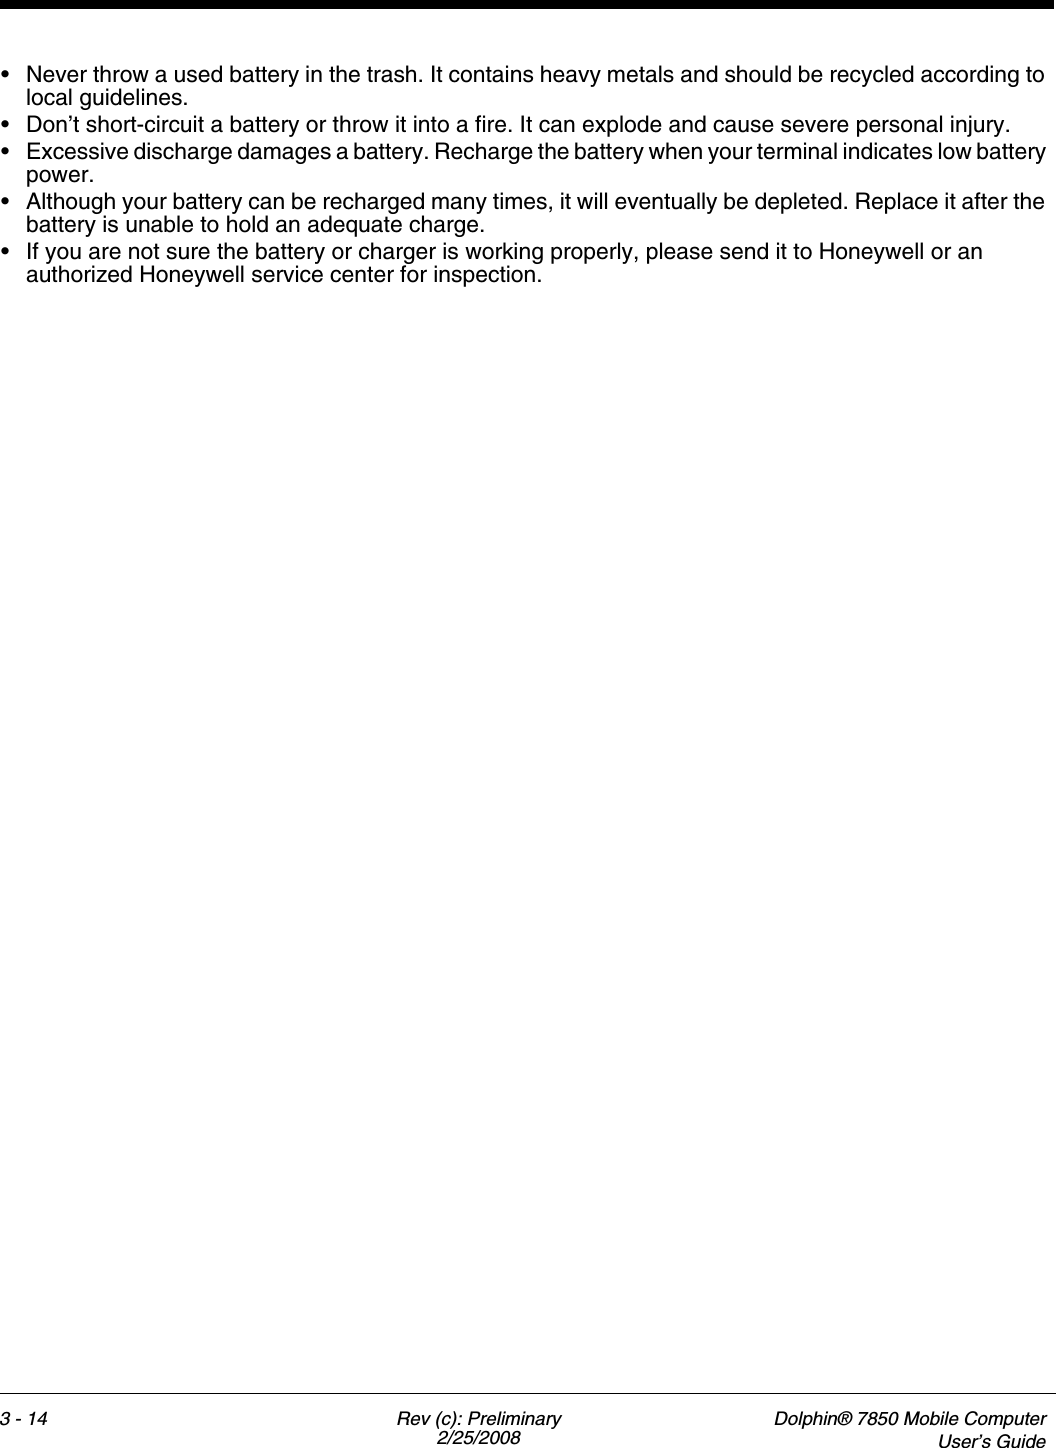
![4 - 4 Rev (c): Preliminary2/25/2008Dolphin® 7850 Mobile ComputerUser’s Guide24-Key KeyboardToggling Between Alpha and Numeric ModesThe 24-key keyboard defaults to numeric mode. Numeric mode is when you type numbers with the number keys. • Double-tap the Blue modifier key to toggle between alpha and numeric modes.• Single-tap the Blue modifier key to toggle to alpha or numeric mode only for the next key pressed. The keyboard returns to the previous state before the next key pressed.• Press and hold the Blue modifier key to toggle to alpha or numeric mode for all keys pressed until the Blue modifier key is released.Alpha Mode Alpha mode is when you type the letters or characters indicated in blue on the number keys.Please note that when typing in alpha mode, you must use the same multi-press method you would use when typing letters on a phone keypad. Each key press types the next letter in the sequence as displayed by the alpha indicator.You can still use the Blue modifier key for regular Blue key combinations in alpha mode; just press the Blue modifier key and the next key. For combinations, see 38-Key Keyboard. on page 4-7. Shift Functionality in Alpha ModeThe SFT key performs all the normal windows shift key functions alpha mode, including capitalizing one letter. On the 24-key keyboard, the SFT key also toggles caps lock on and off.• Single-tap the SFT key to modify the next key pressed; if this is a letter, that letter is capitalized.• Double-tap the SFT key to toggle caps lock on and off in alpha mode.Note: Check the mode indicator (see Keyboard Mode Indicator on page 4-3) in the Navigation bar to see what mode the keyboard is in.PGBKSPSPESCTABSFT74GHI1PQRS8ABC5JKL2TUV9DEF6MNO3WXYZ/\ _0+[]:–F1 F2F3F4 F5F6F7 F8F9F10VOL+DEL INSBKTABSTARTVOL-ALPHA“=PowerBacklight keyModifierkeysAlpha LockEscapekeyOK keyNavigation keysTab keyShift key LED LED](https://usermanual.wiki/Honeywell/7850PGE.User-Manual/User-Guide-927274-Page-36.png)
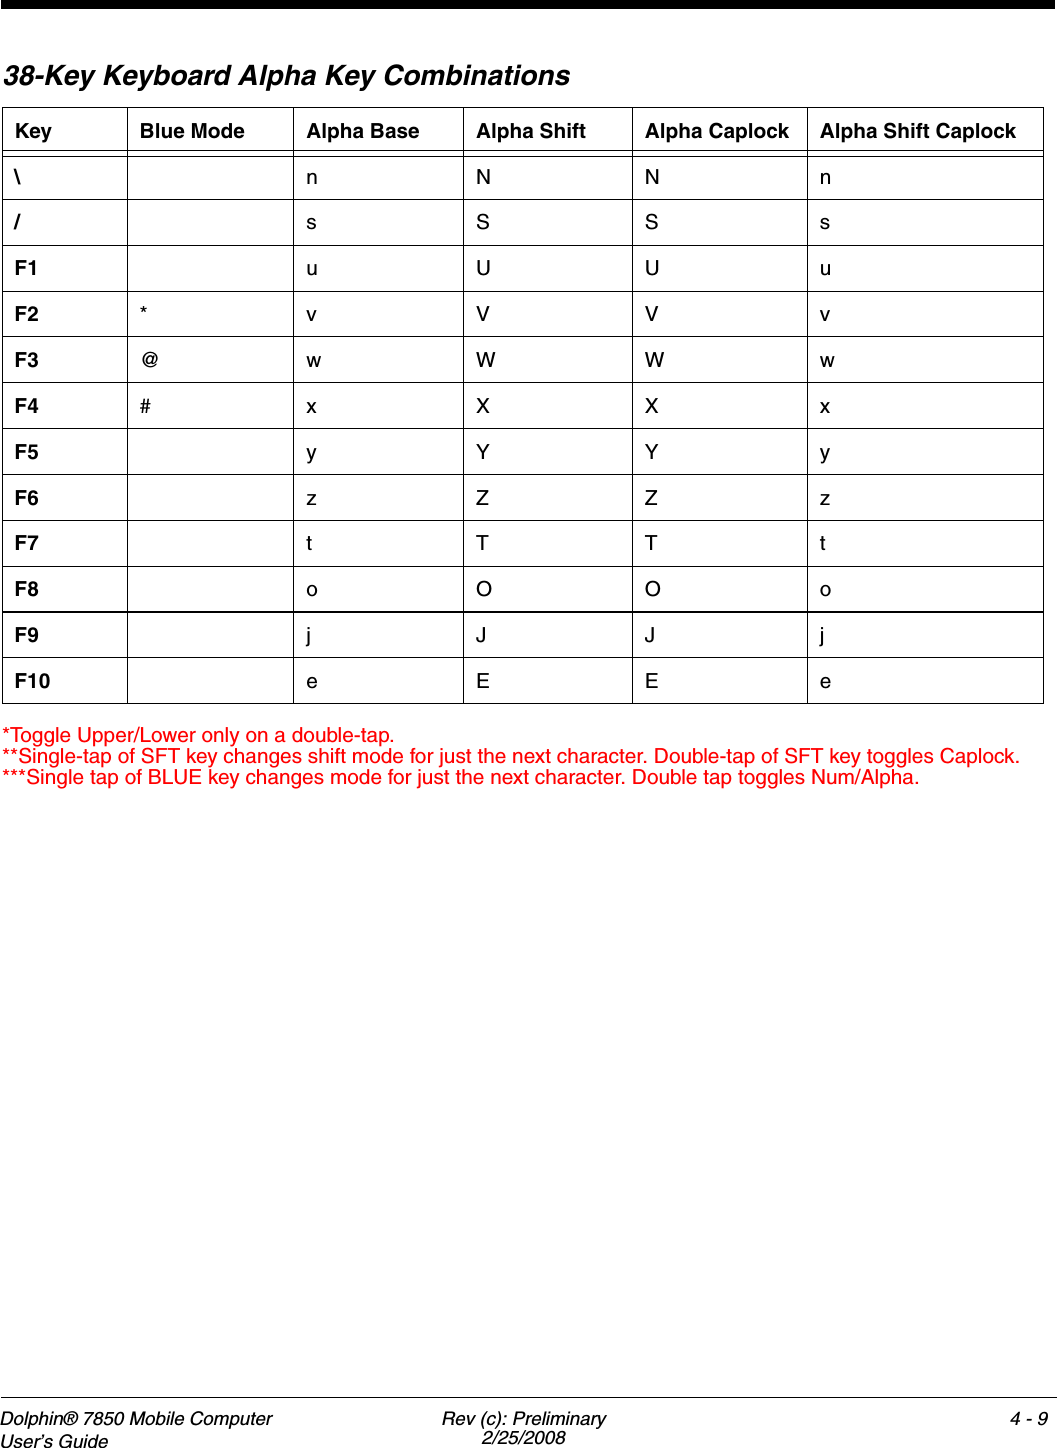
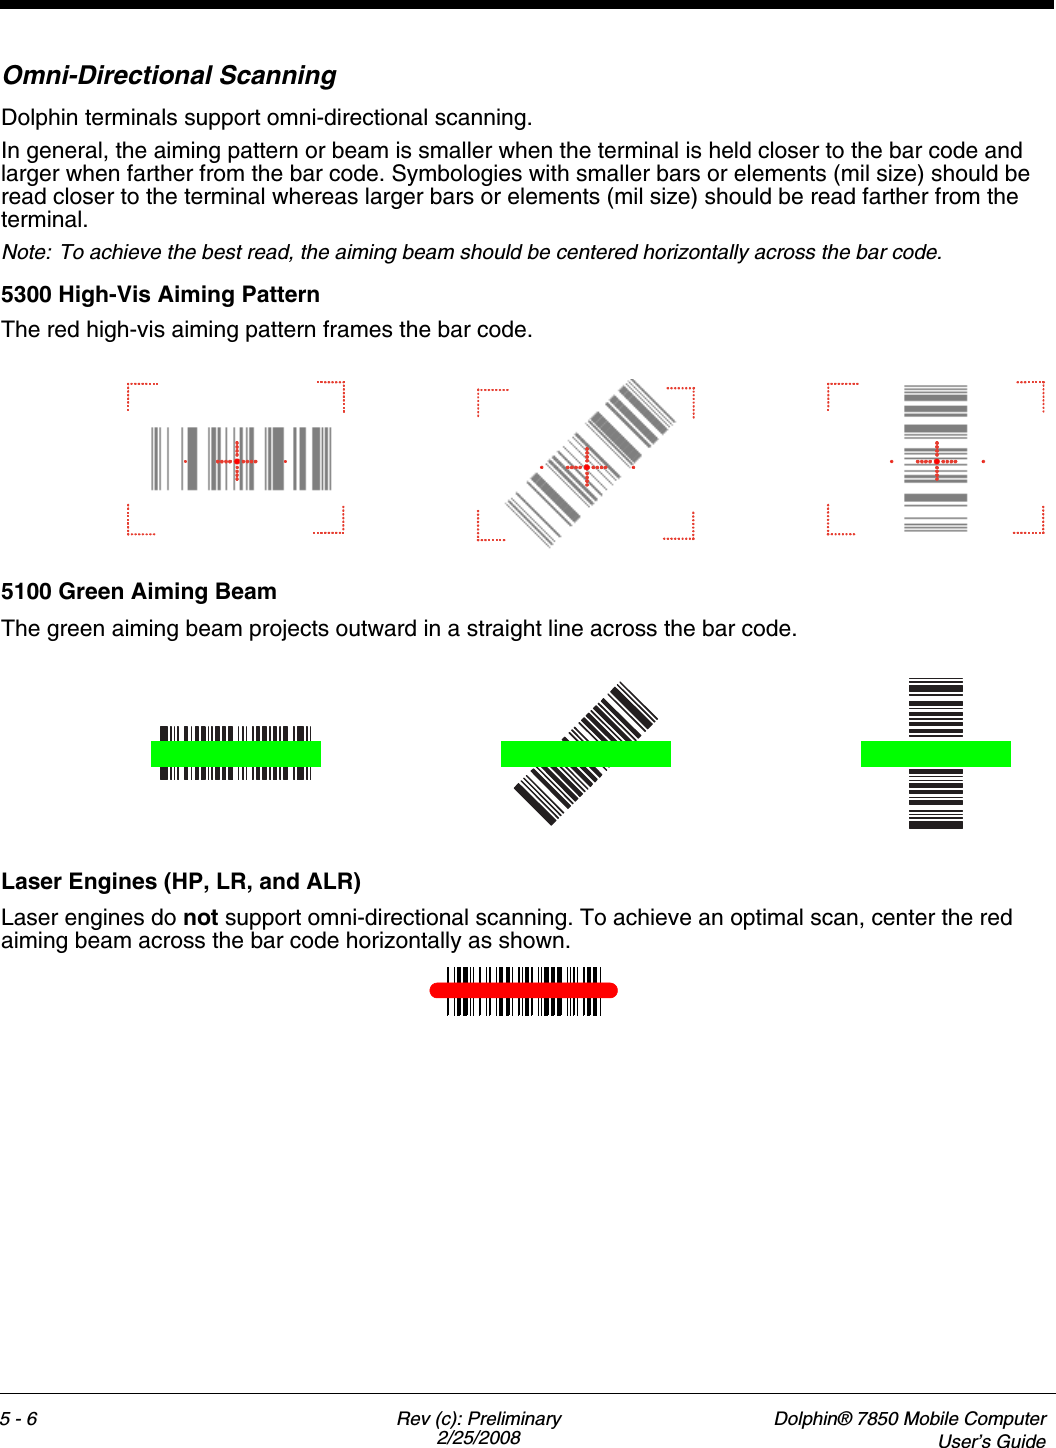
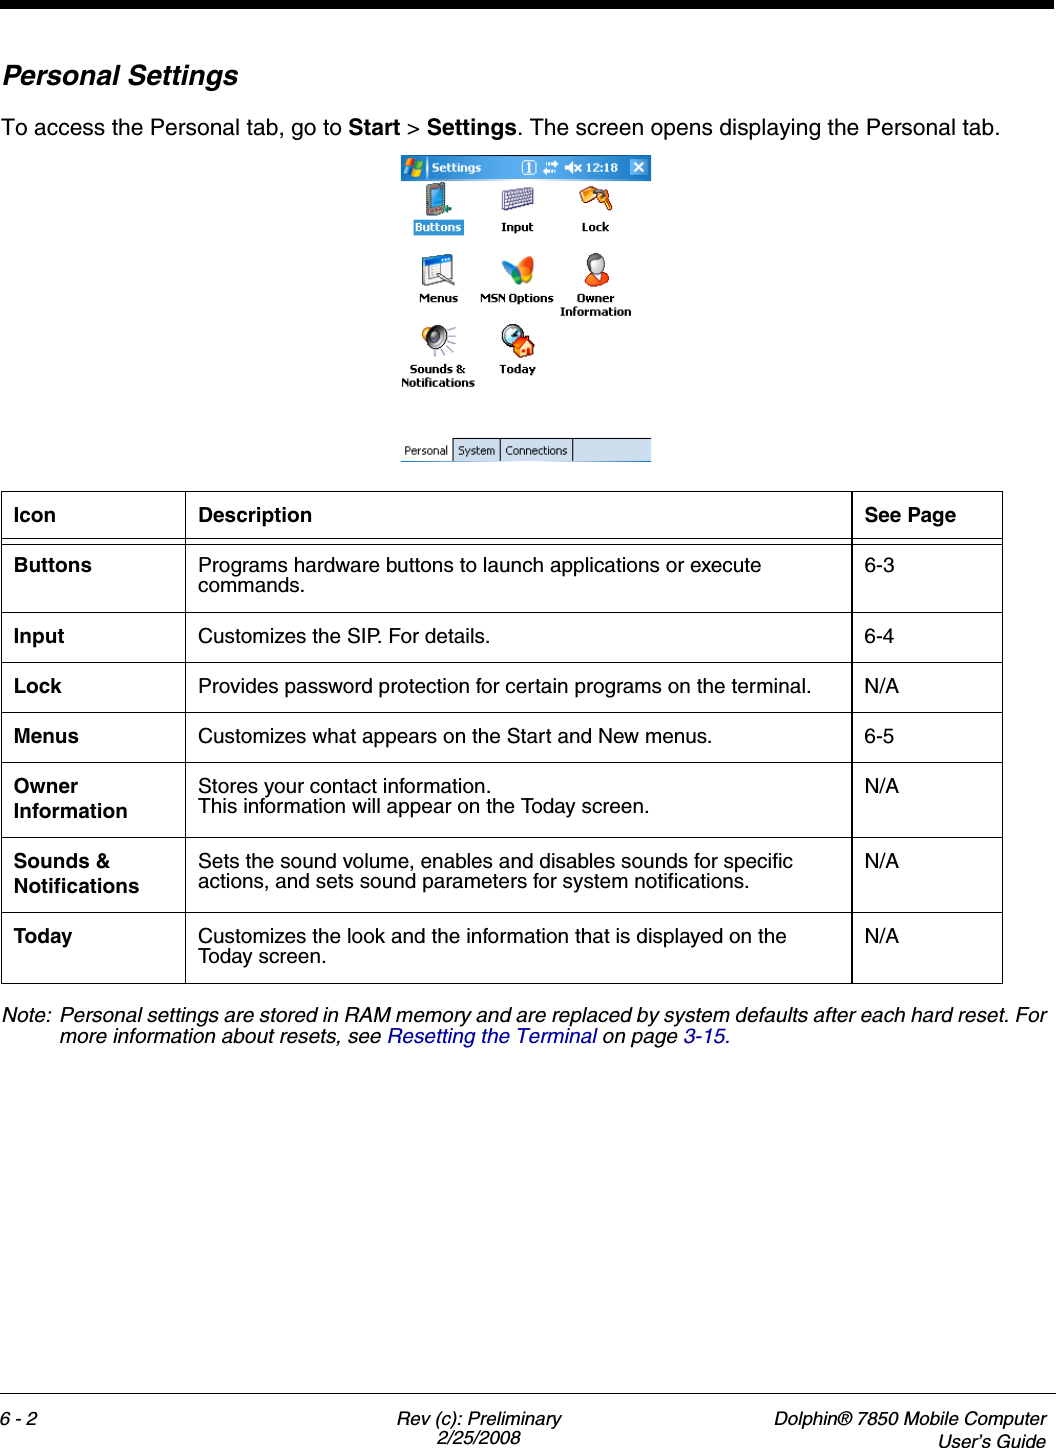
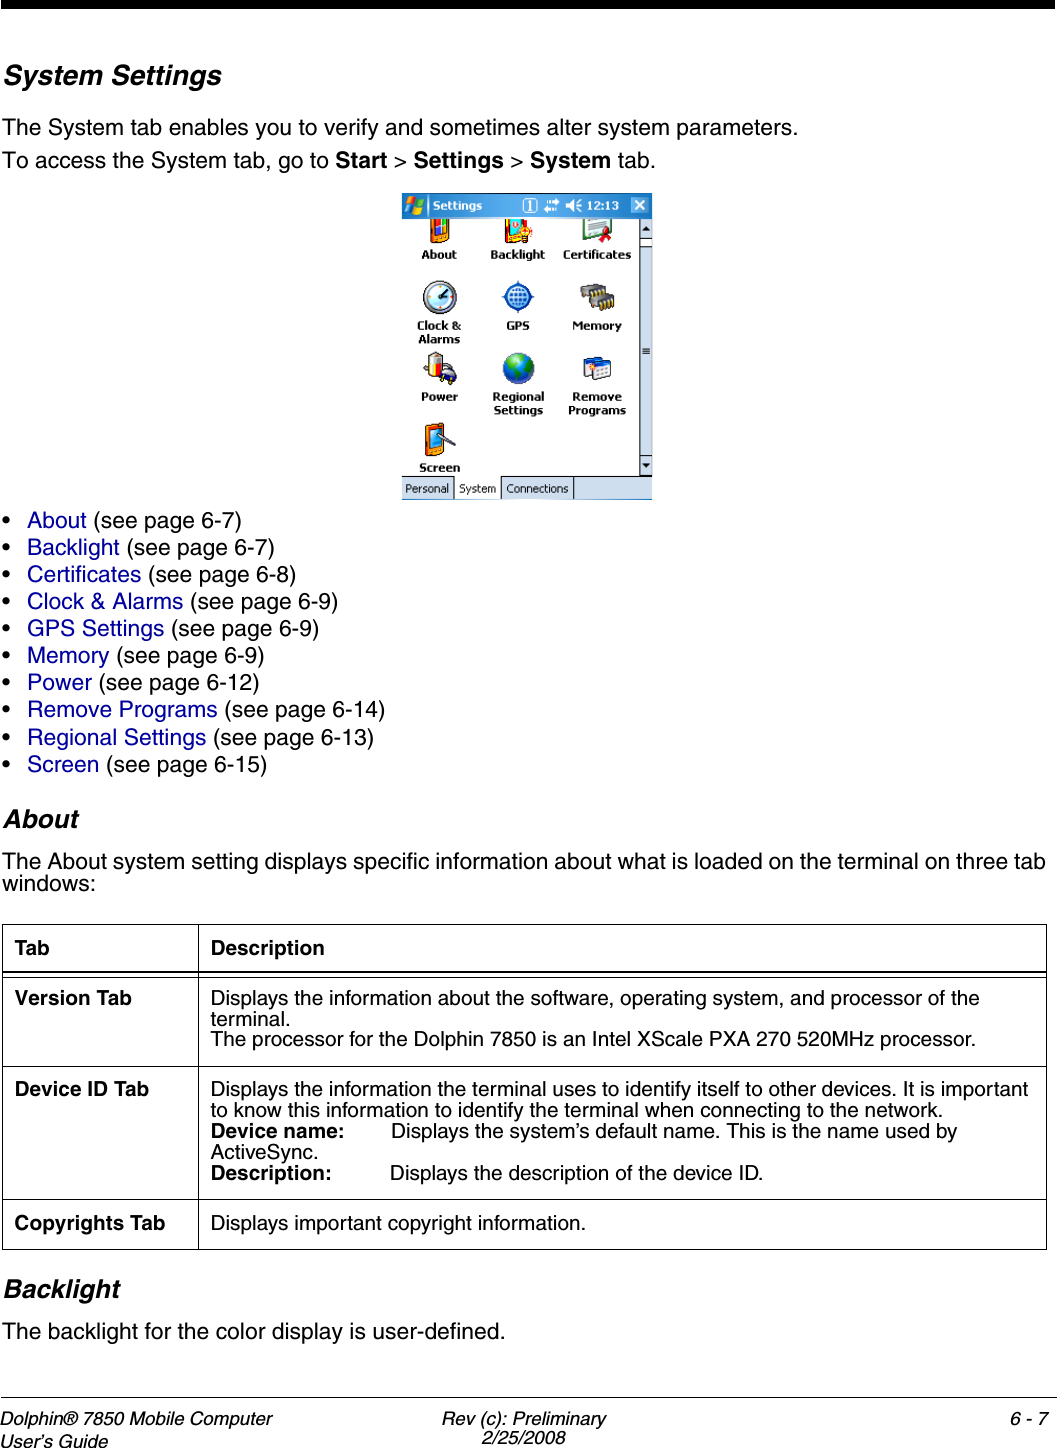
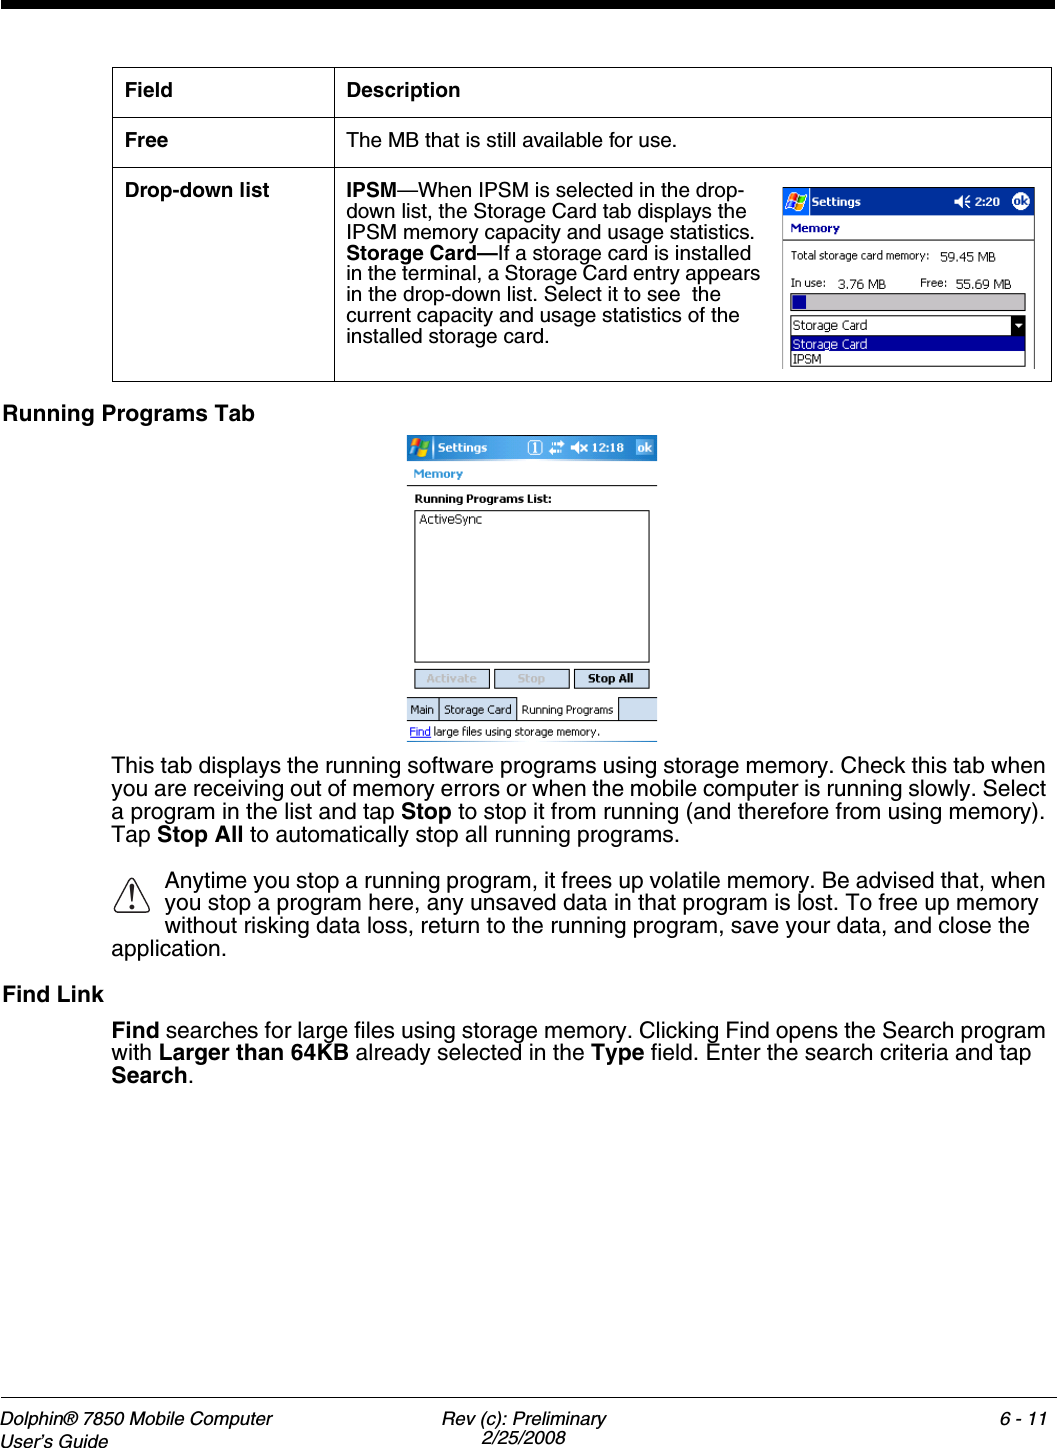
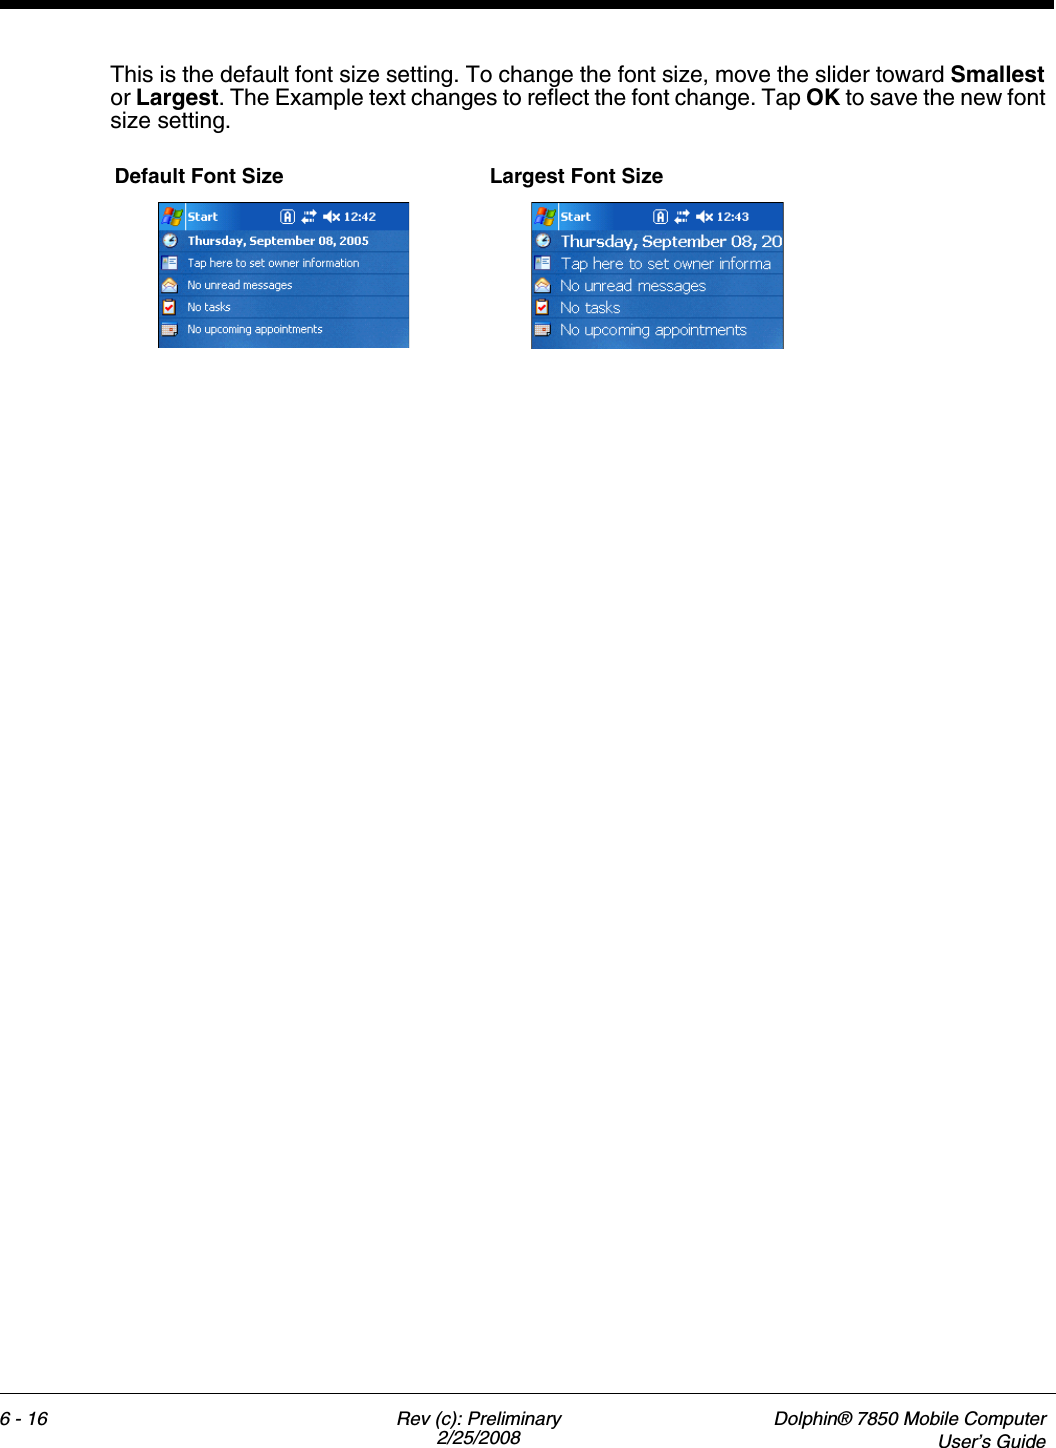
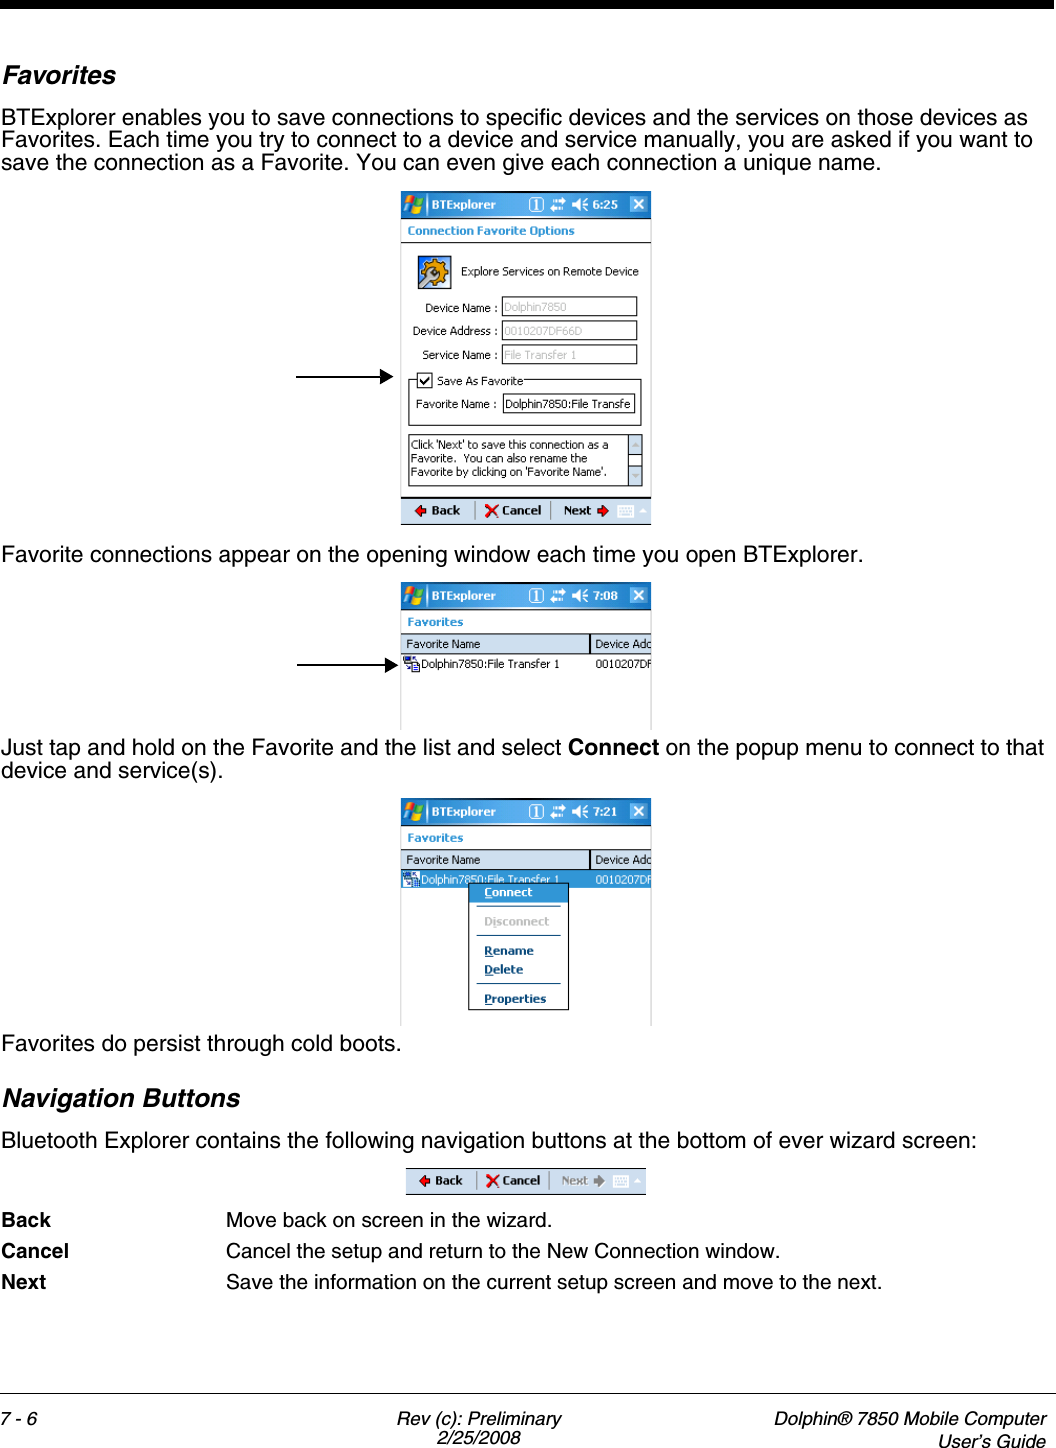
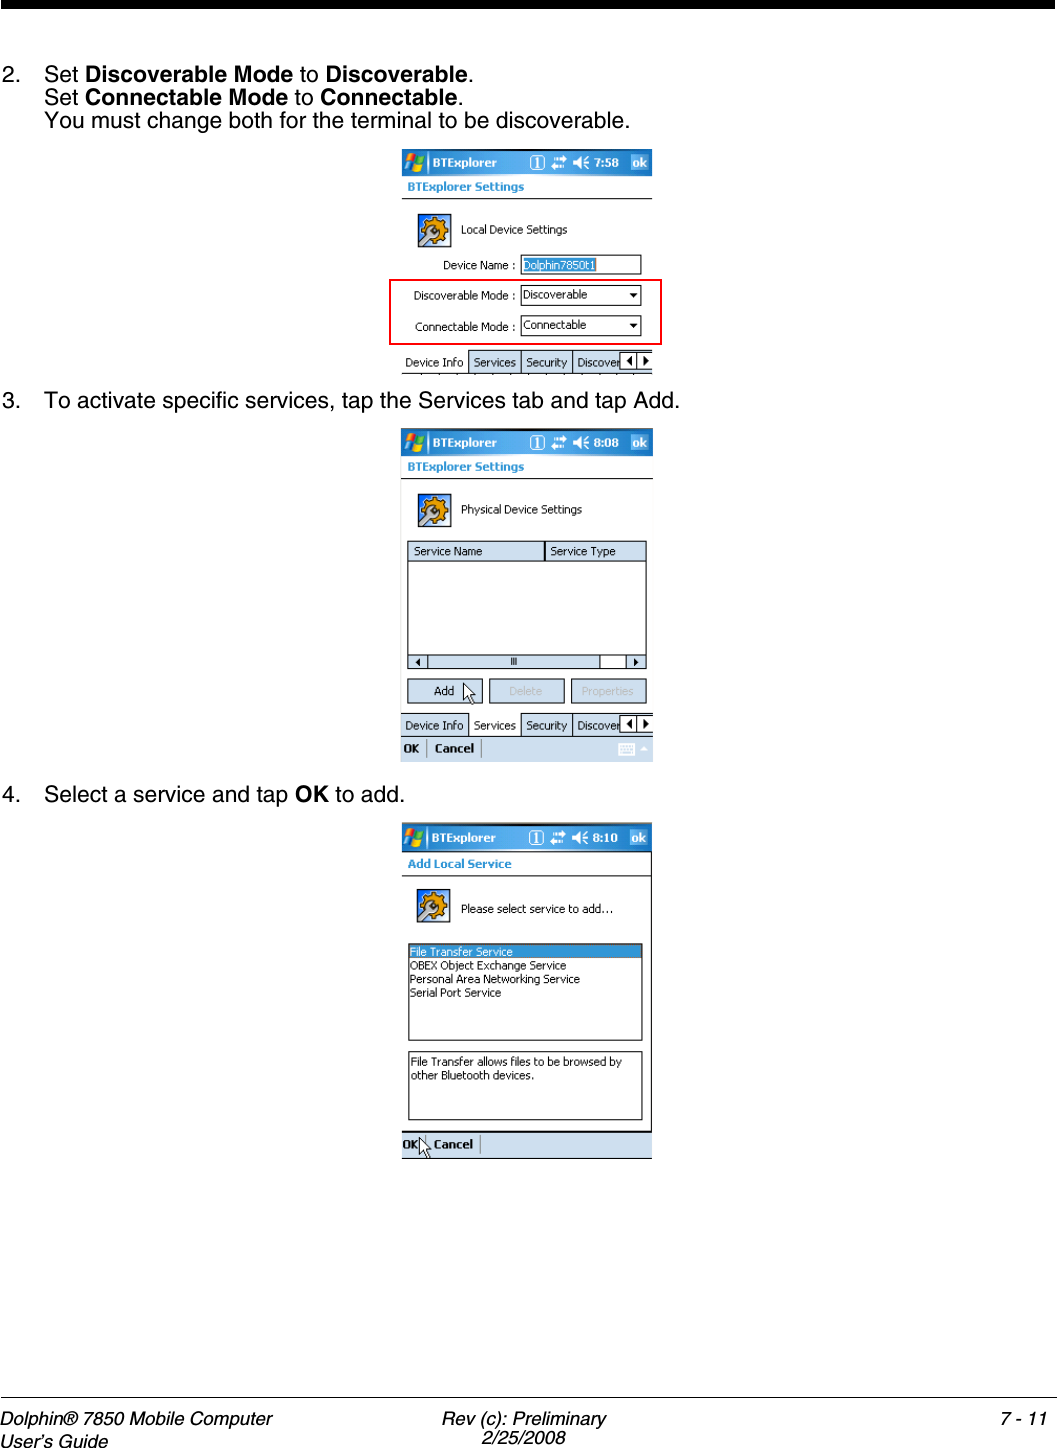
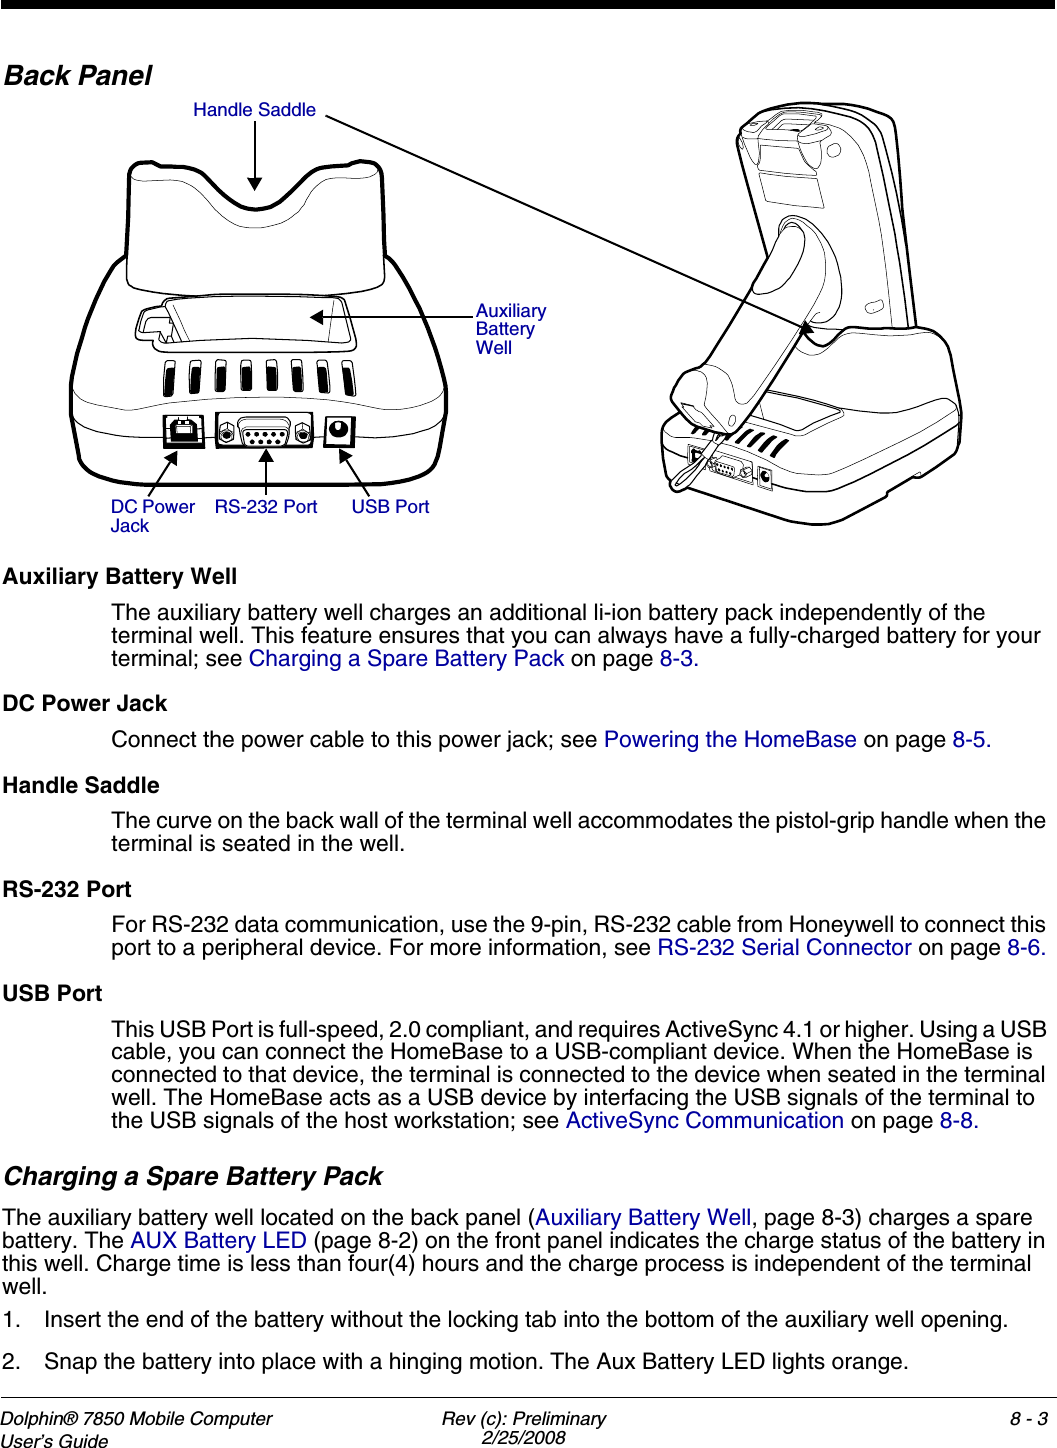
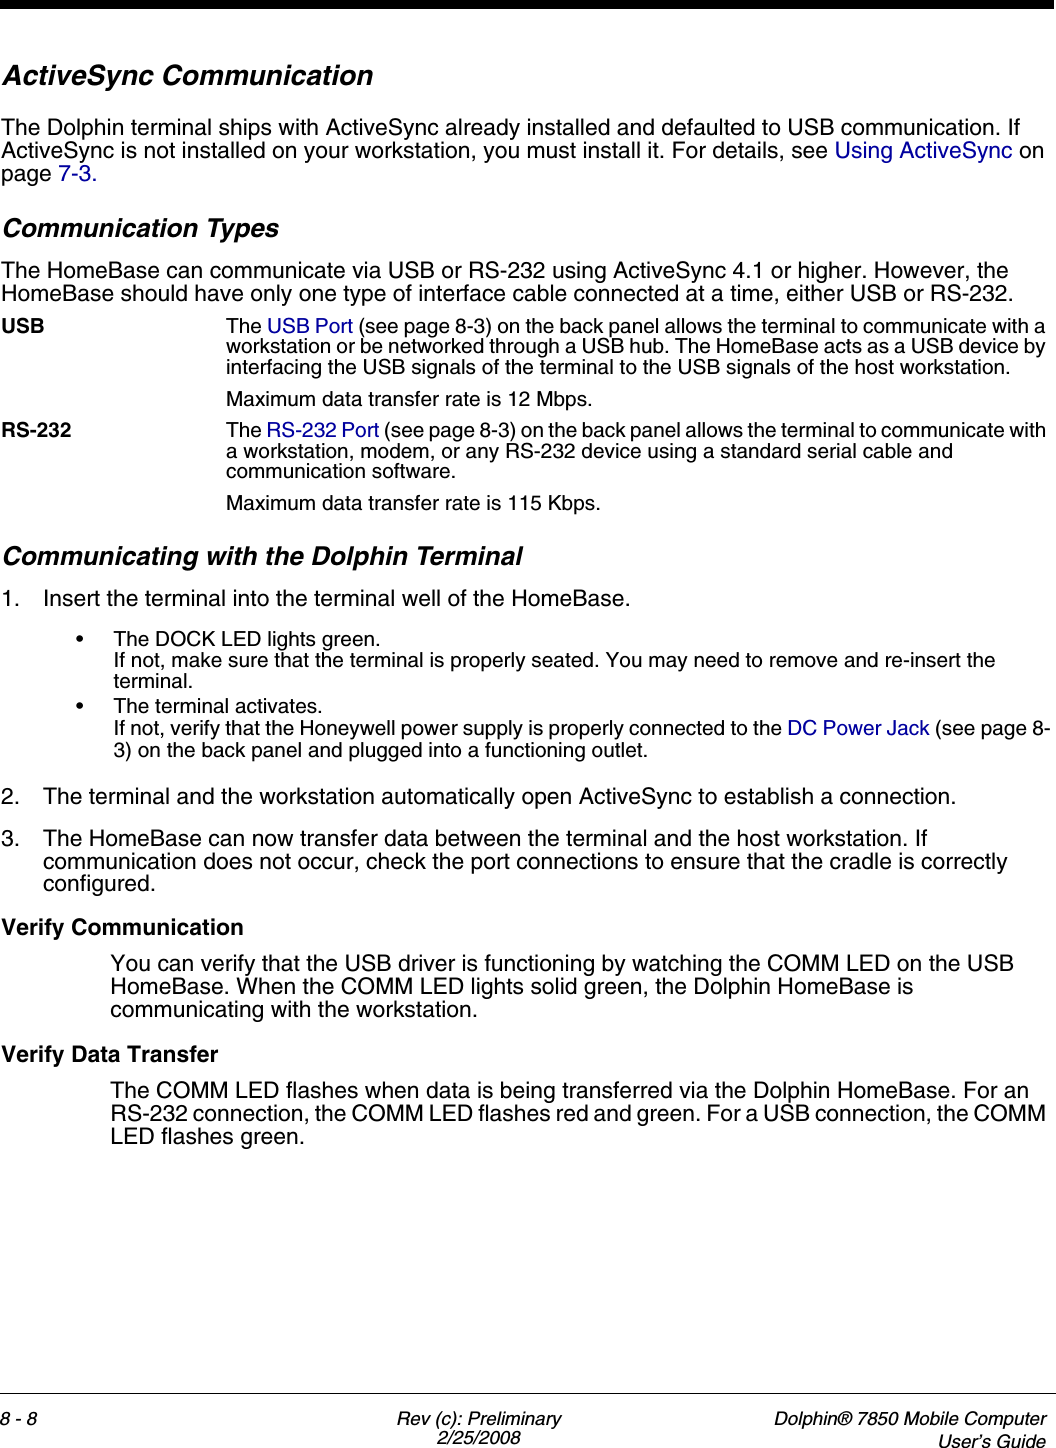
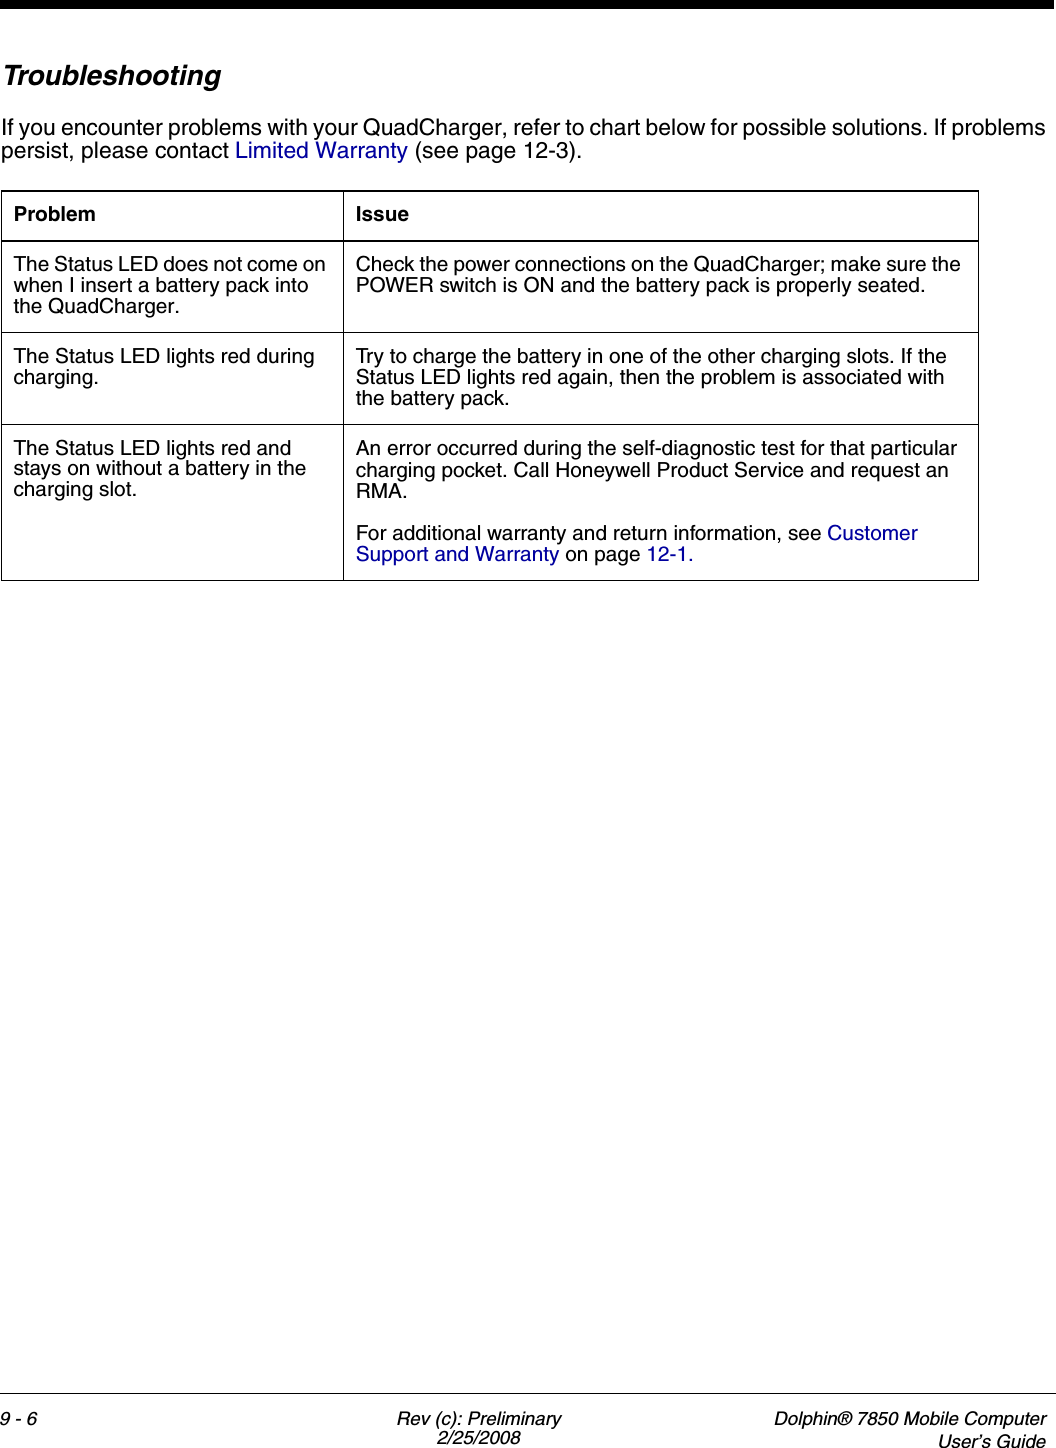
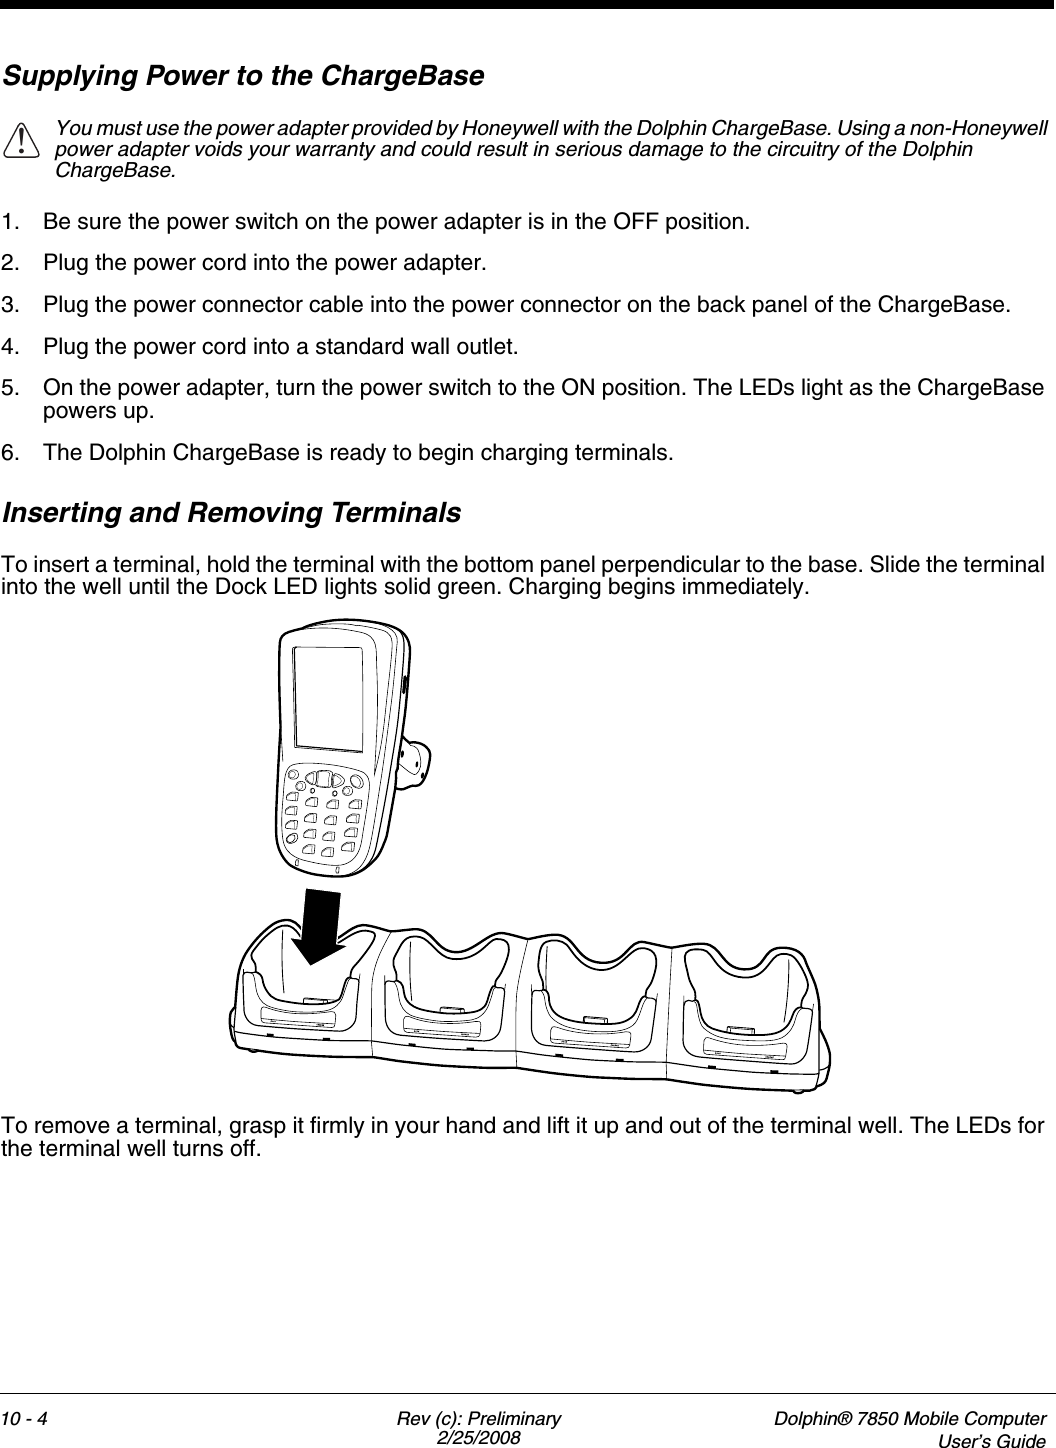
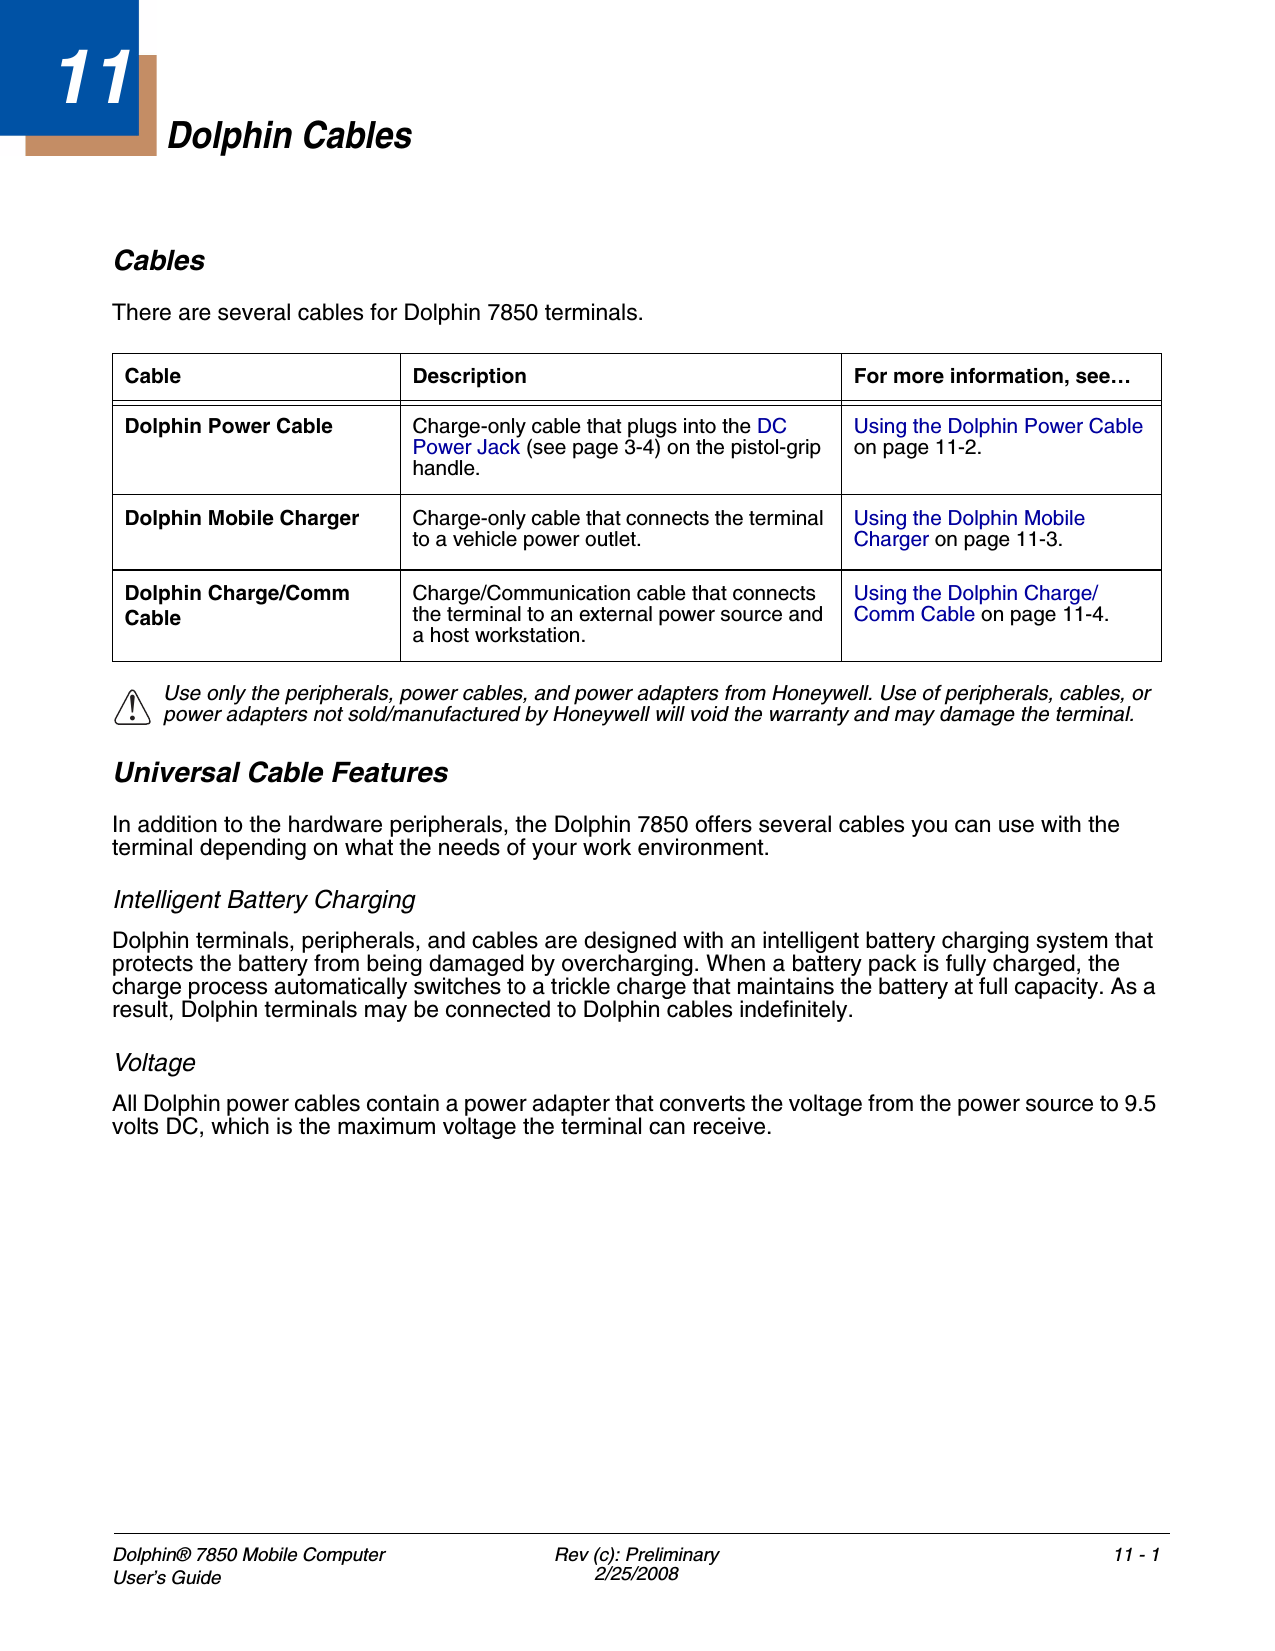
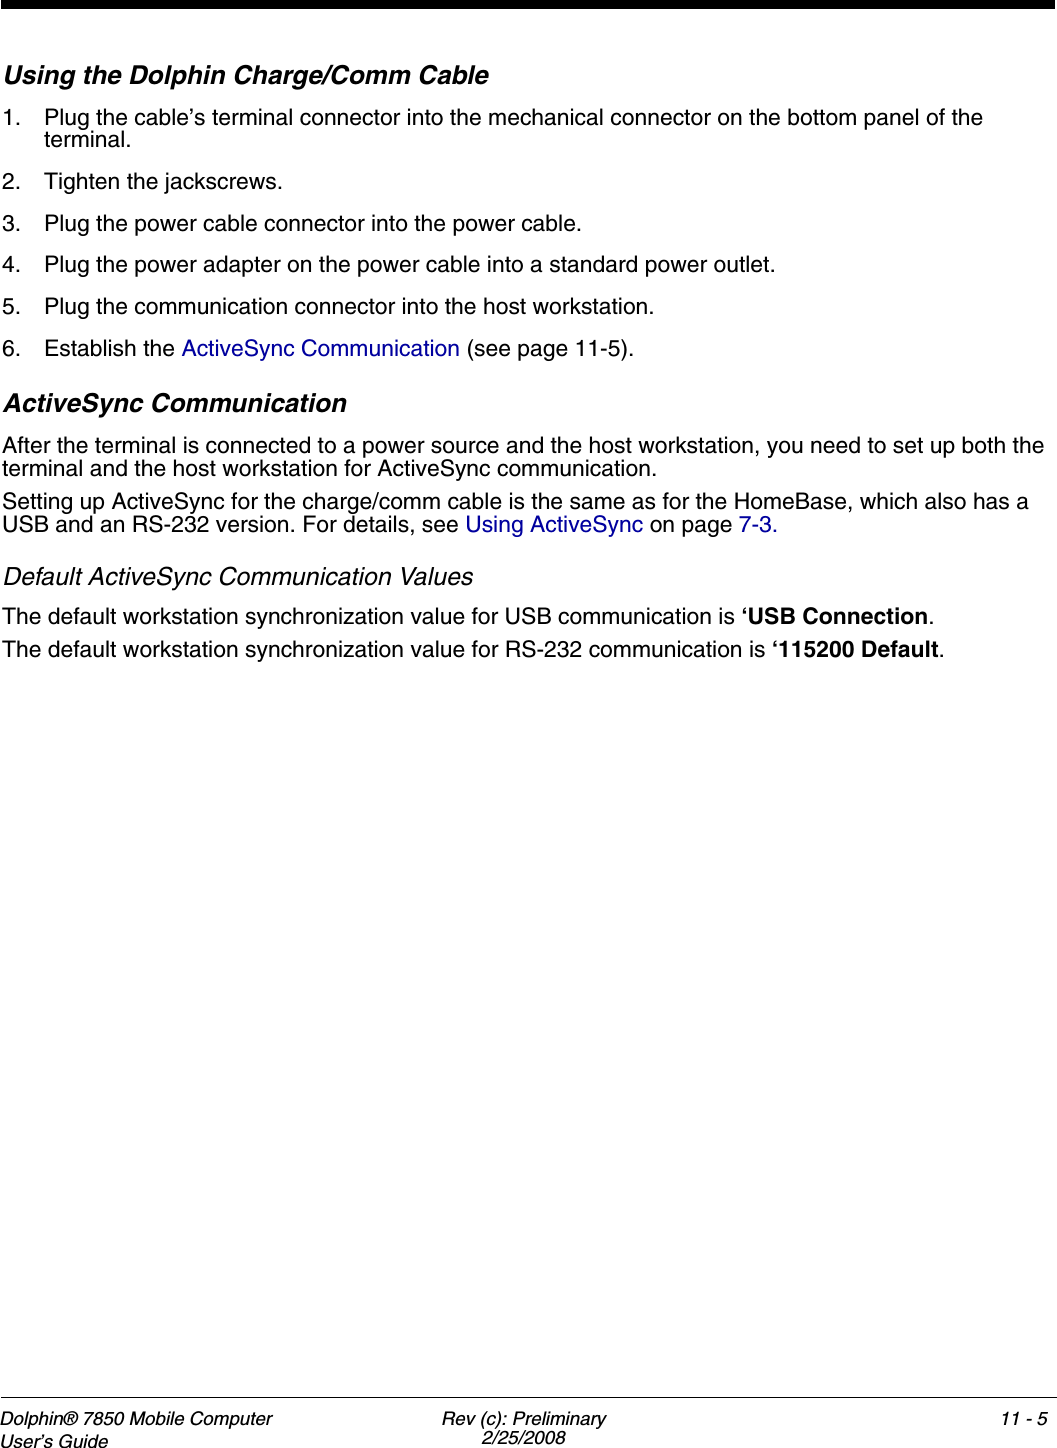
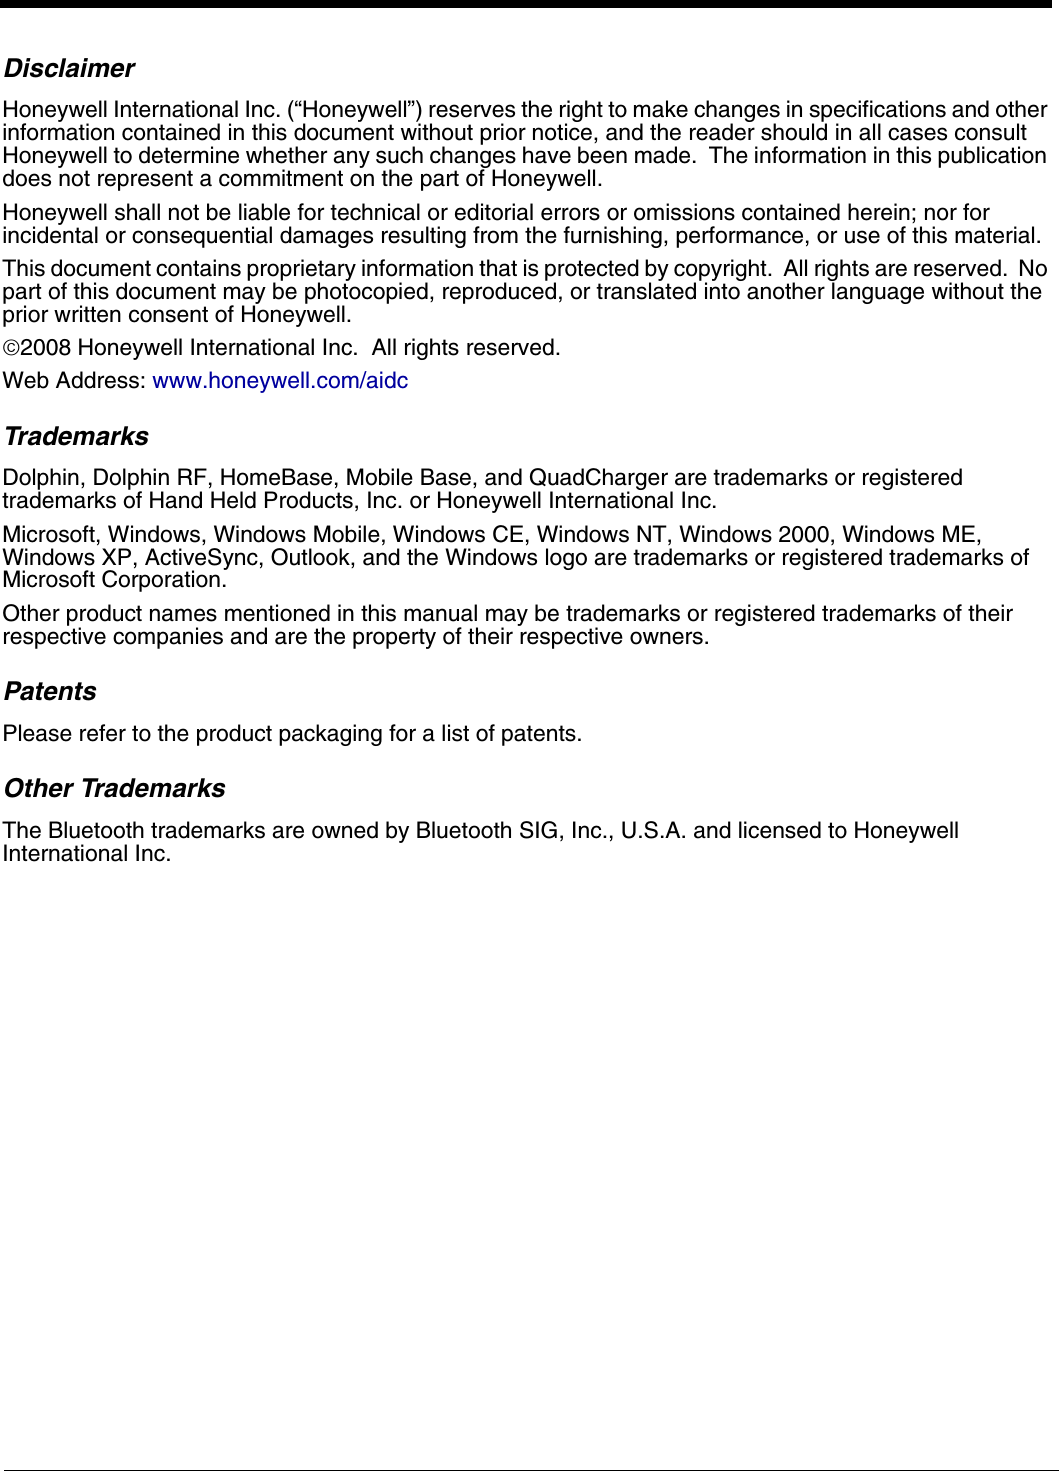
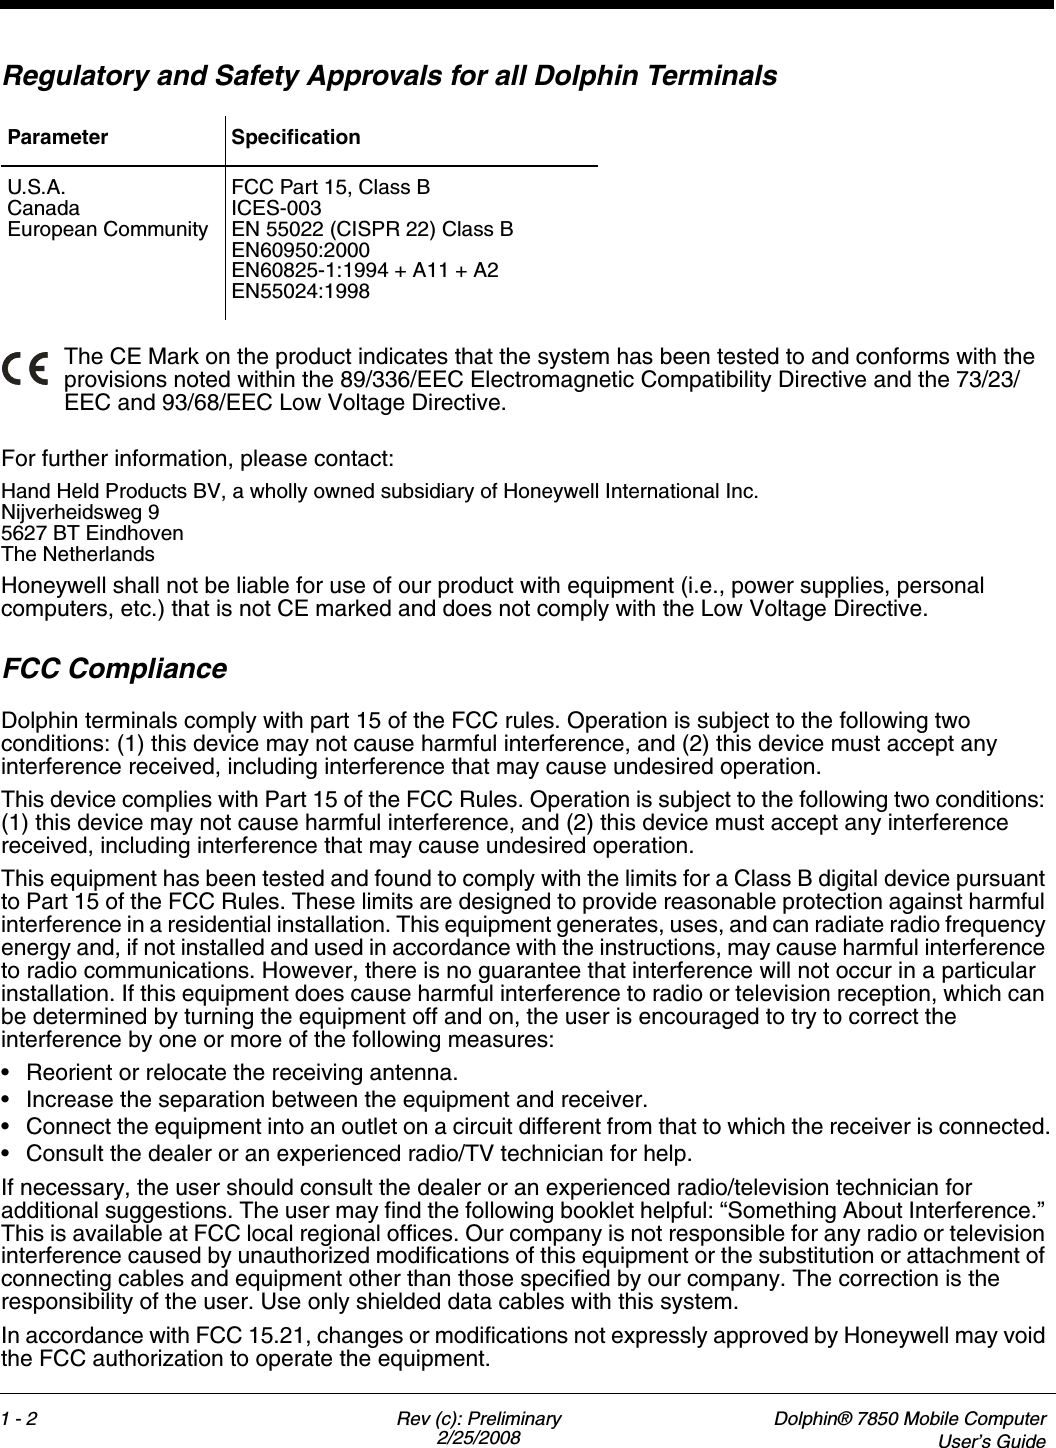
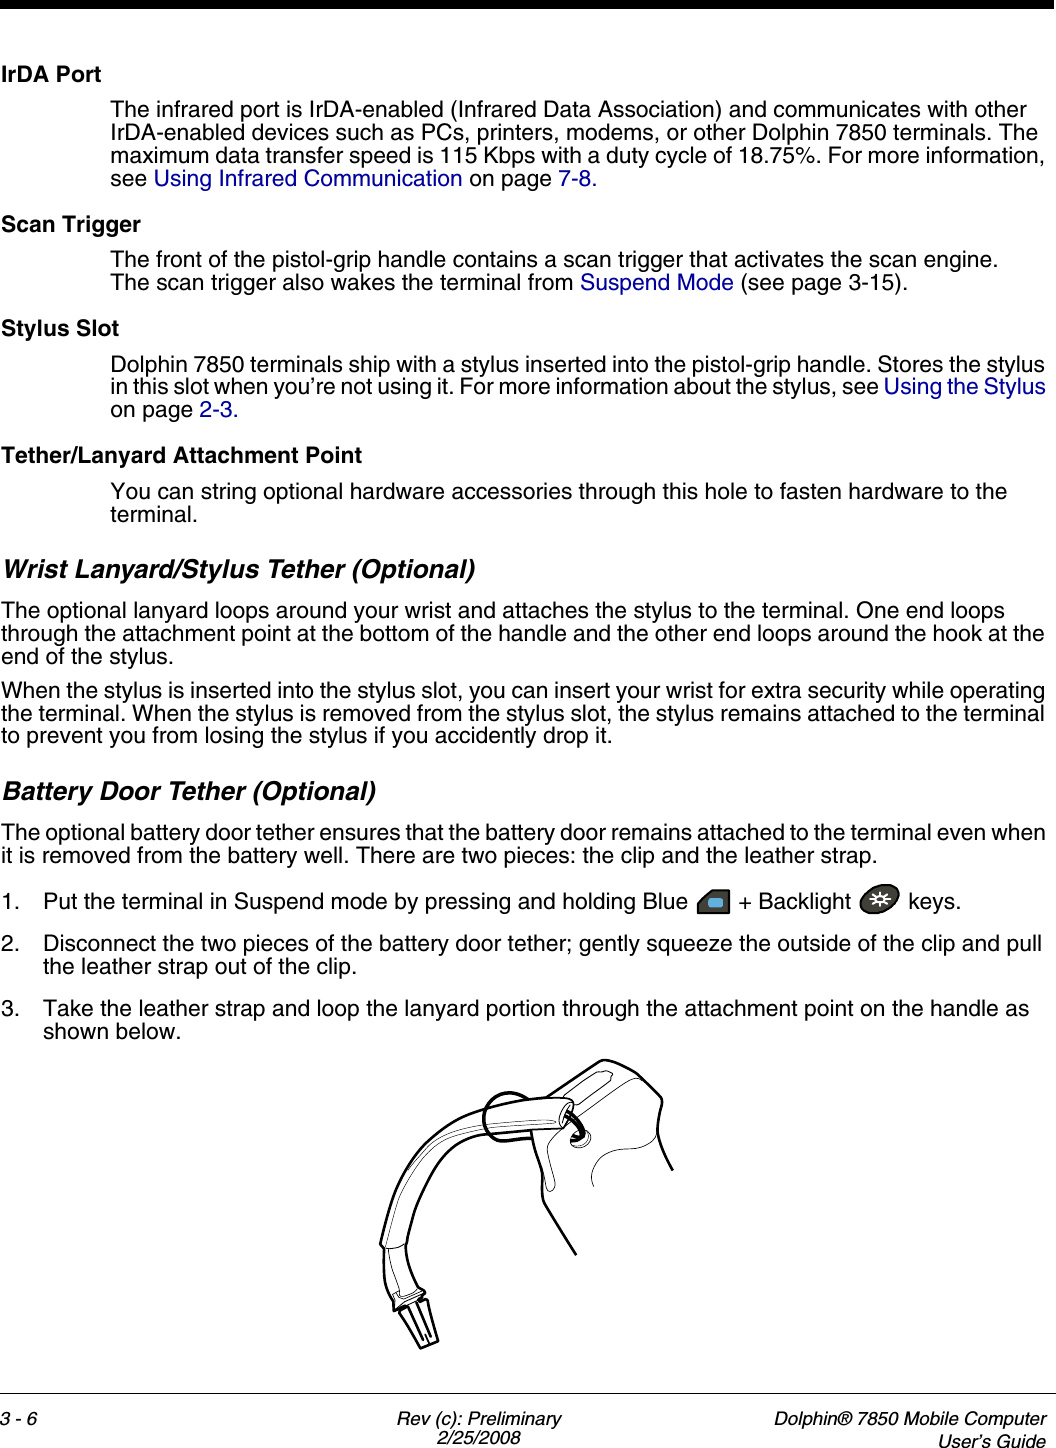
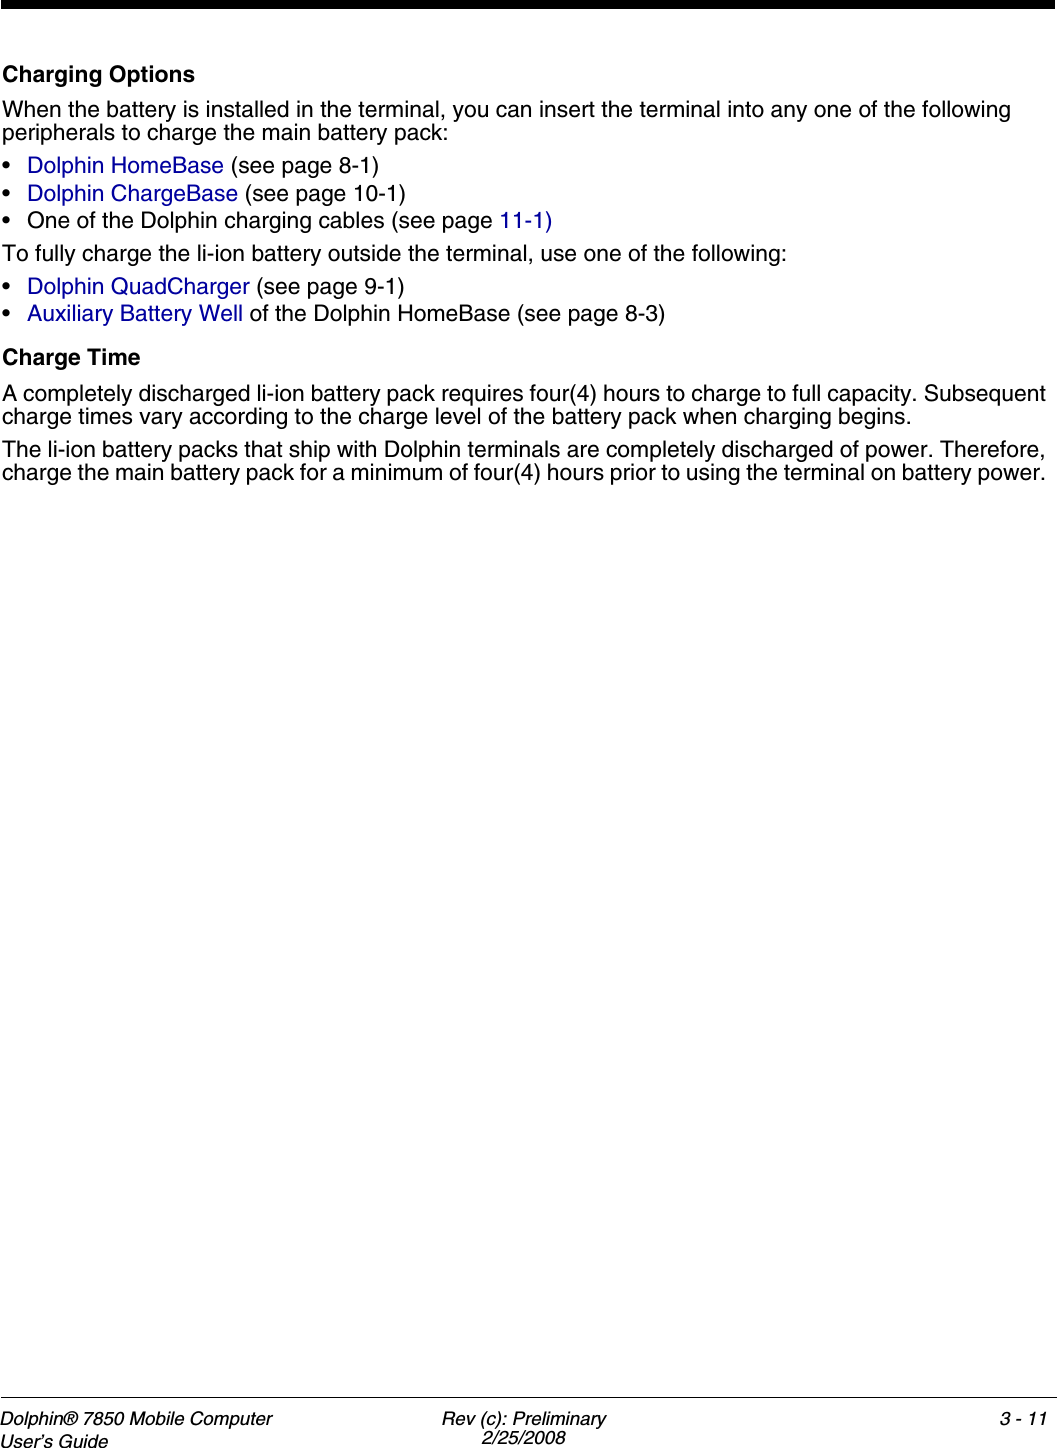
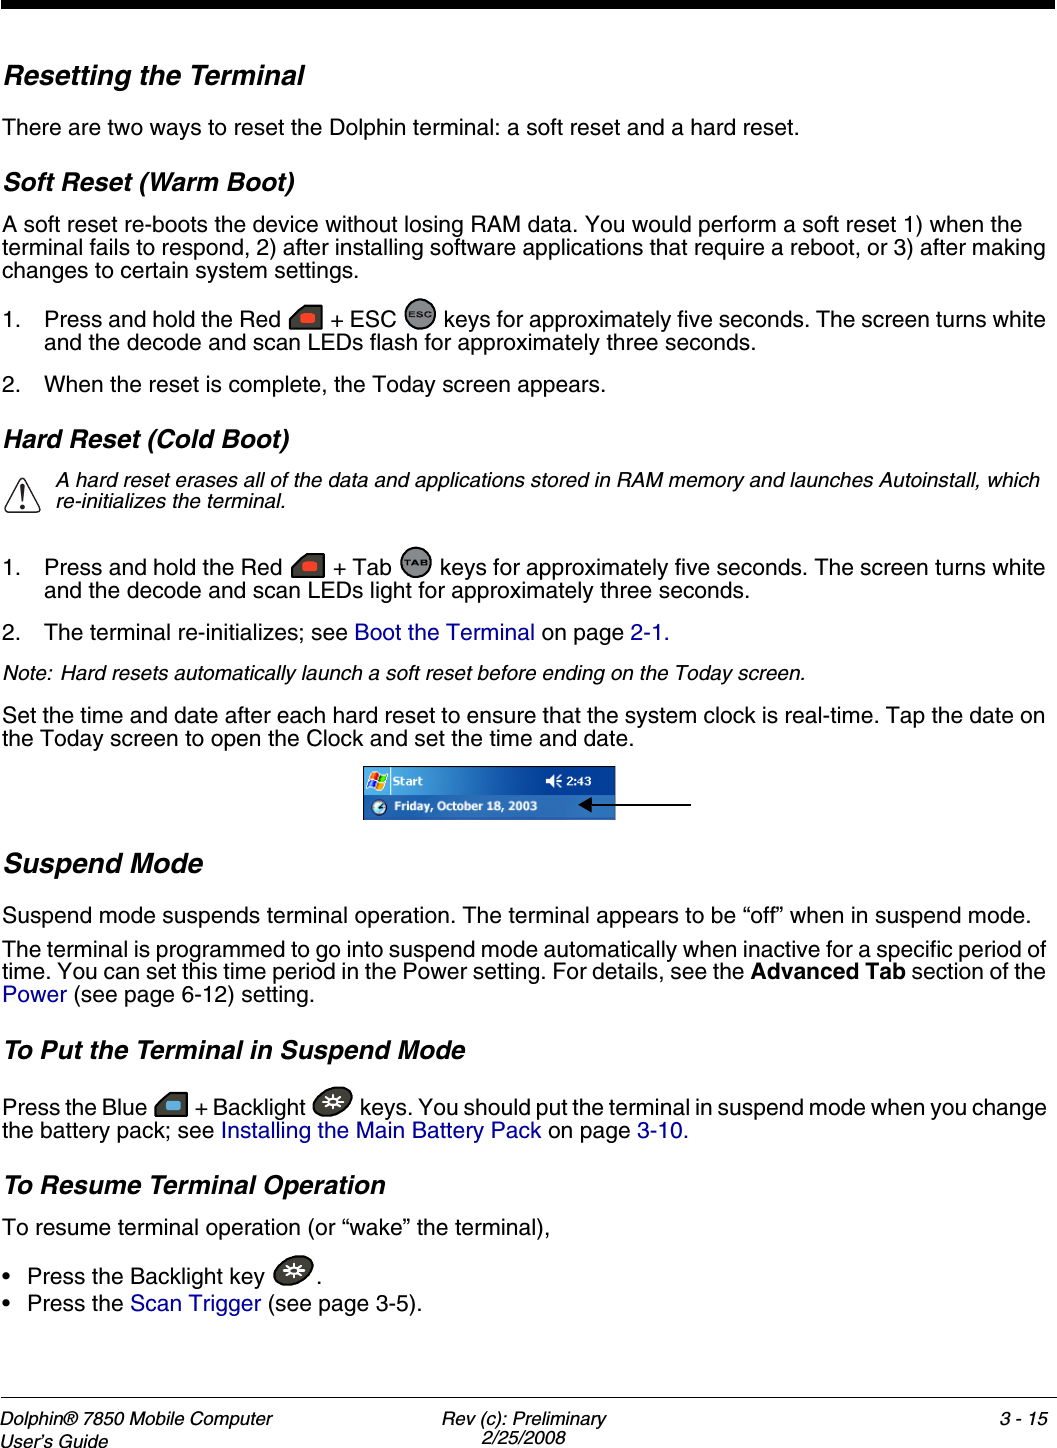
![Dolphin® 7850 Mobile Computer User’s Guide Rev (c): Preliminary2/25/20084 - 5*Toggles uppercase and lowercase only on a double-tap.**Single-tap SFT changes the mode for only the next character. Double-tap SFT key to change mode for all keys pressed after.***Toggles numeric and alpha modes only on a double-tap.24-Key Keyboard Numeric Key CombinationsKey Blue Mode Num Mode Num ShiftESC Delete ESC ESCSFT *Toggle Upper/Lower/Shift *Toggle Upper/Lower/Shift *Toggle Upper/Lower/ShiftBlue ***Toggle Num/Alpha Blue Mode ***Toggle Num/AlphaRed Red Mode; see 24-Key Keyboard Alpha Key Combinations on page 4-6.Asterisk Start menu * *Light Suspend Keyboard Light Keyboard LightLeft Left LeftUp Volume up Up UpDown Volume down Down DownRight Insert Right RightOK OK OK OKTab Backtab Tab TabPeriod - ; : . >Comma @ ? ! , <0+ [ ] 0 )1pqrs or PQRS 1 !2tuv or TUV 2 @3wxyz or WXYZ 3 #4ghi or GHI 4 $5jkl or JKL 5 %6mno or MNO 6 ^7/ \ _ 7 &8abc or ABC 8 *9def or DEF 9 (](https://usermanual.wiki/Honeywell/7850PGE.User-Manual/User-Guide-927274-Page-37.png)
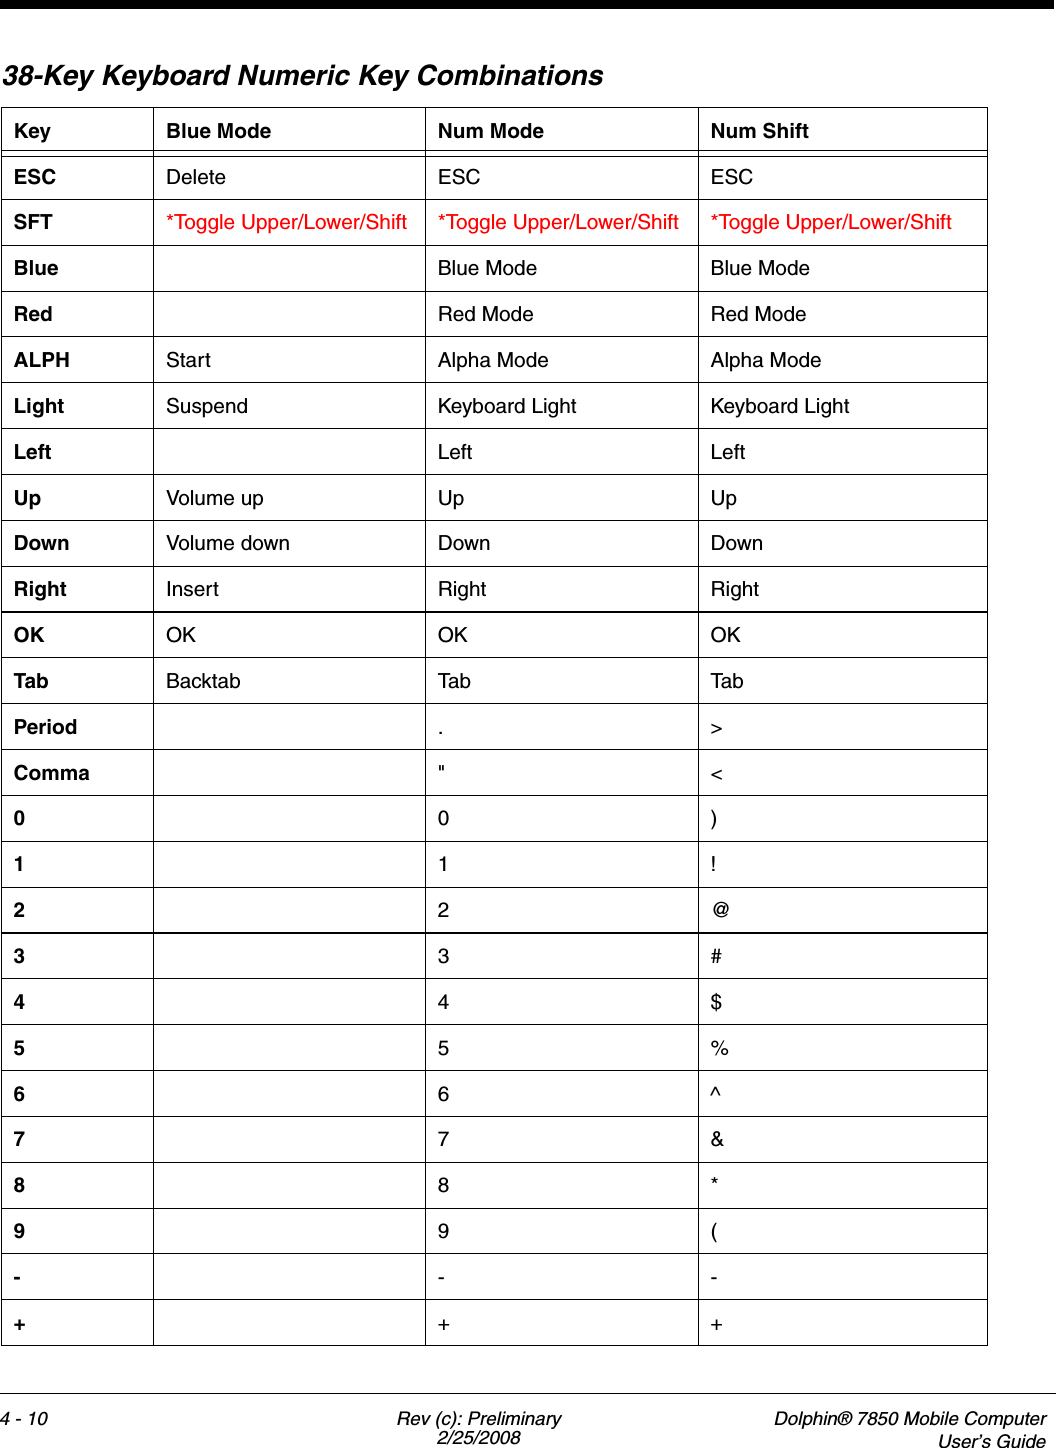
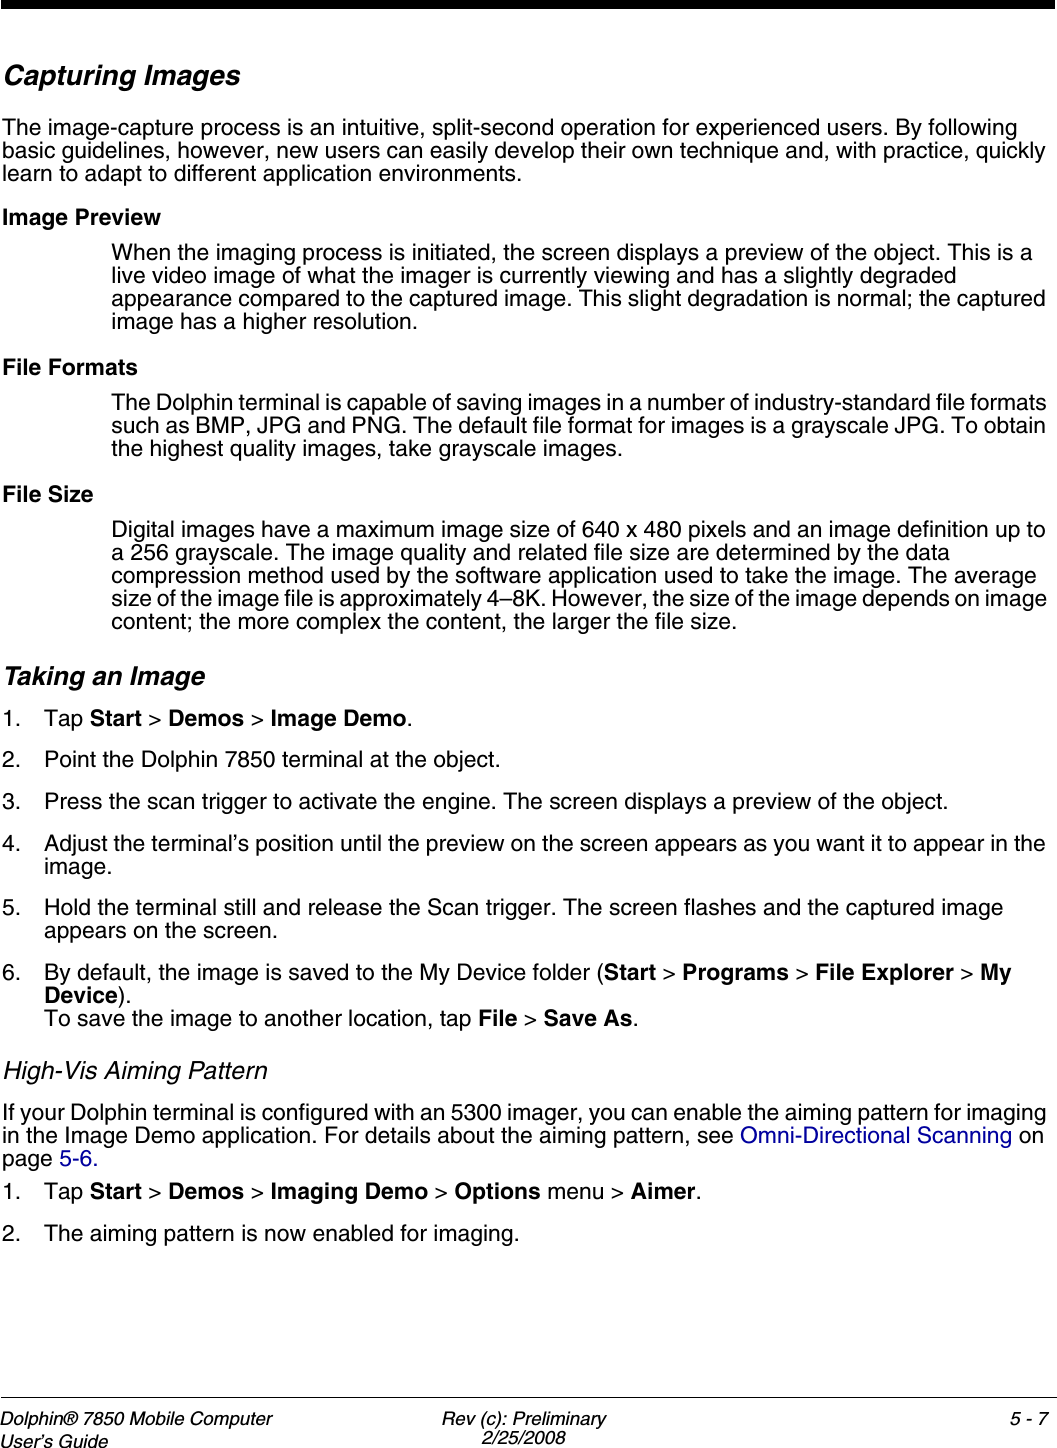
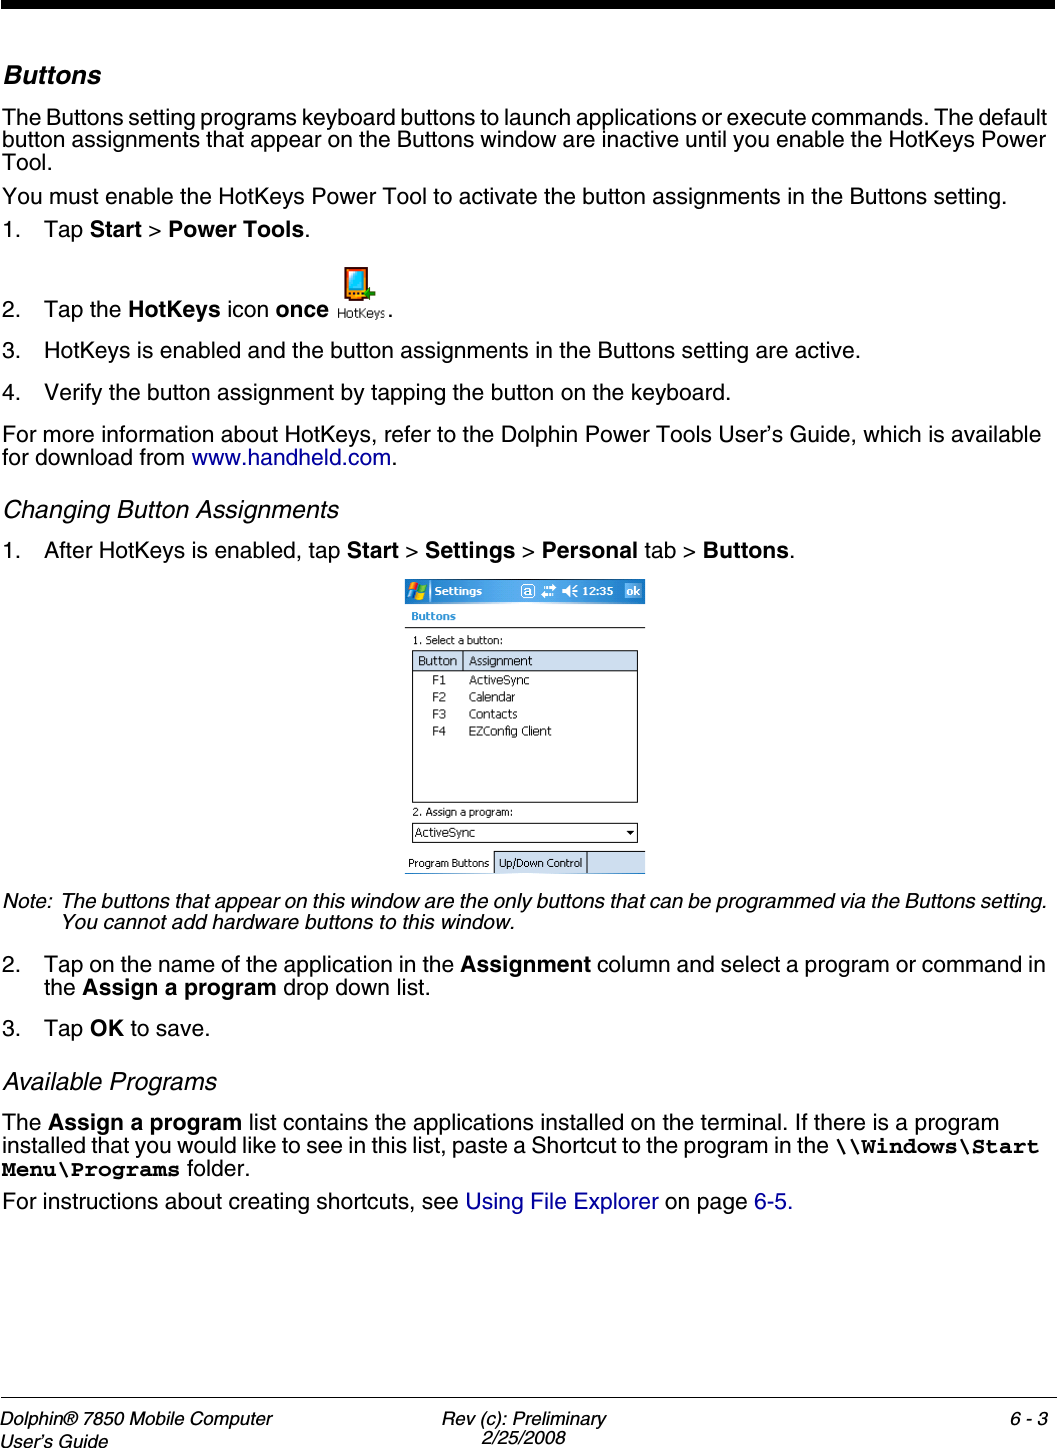
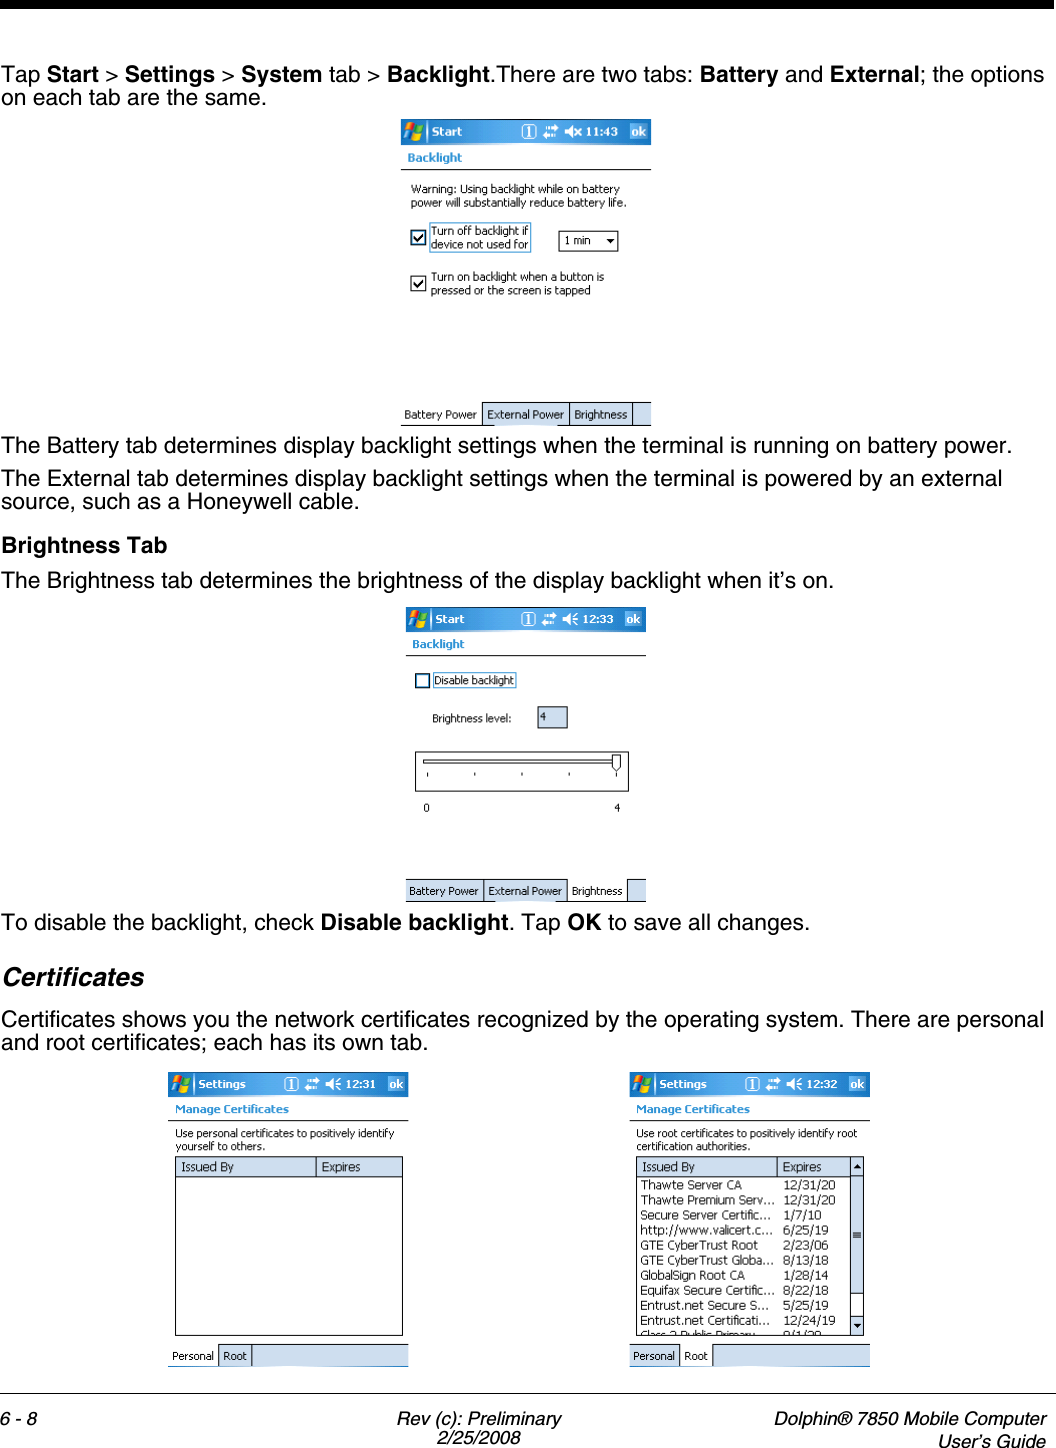
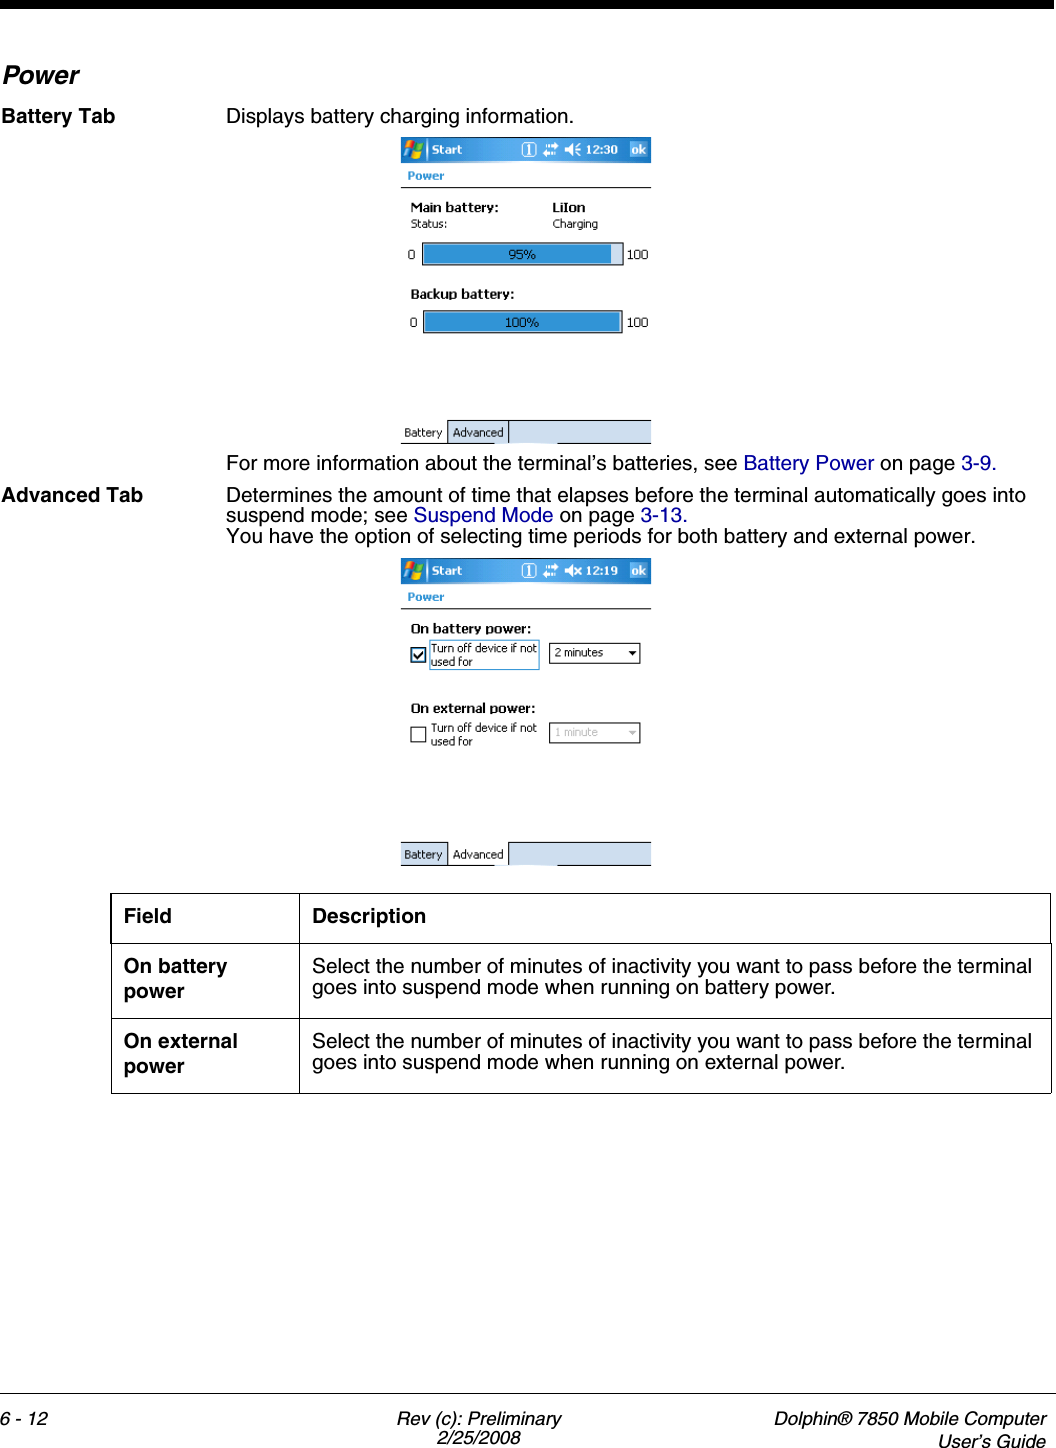
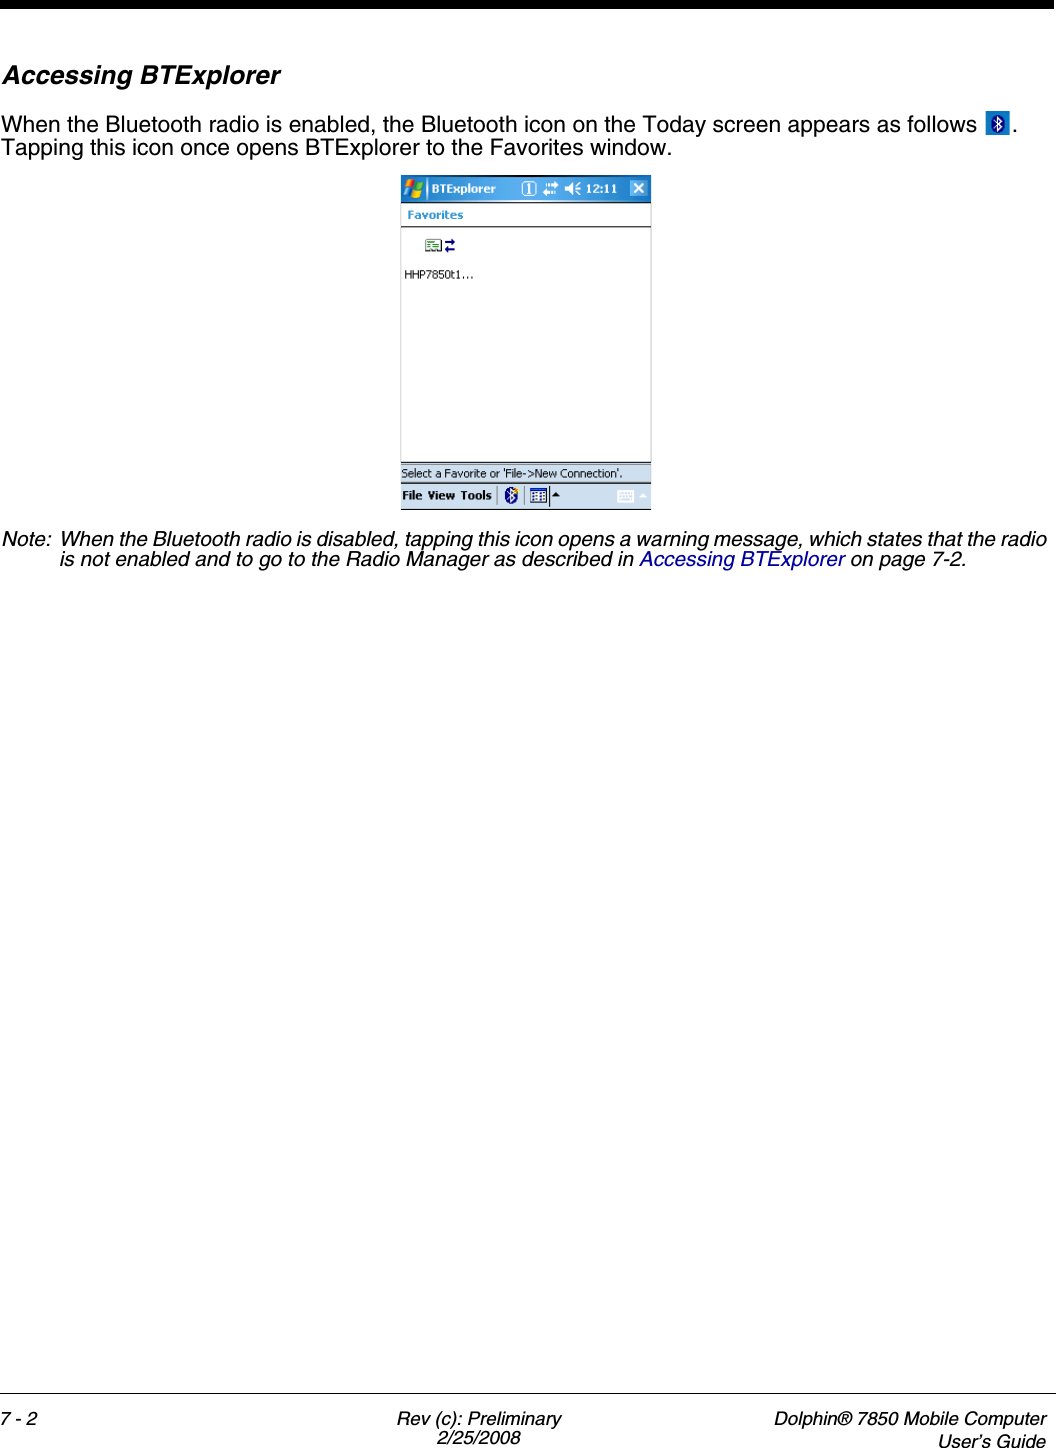
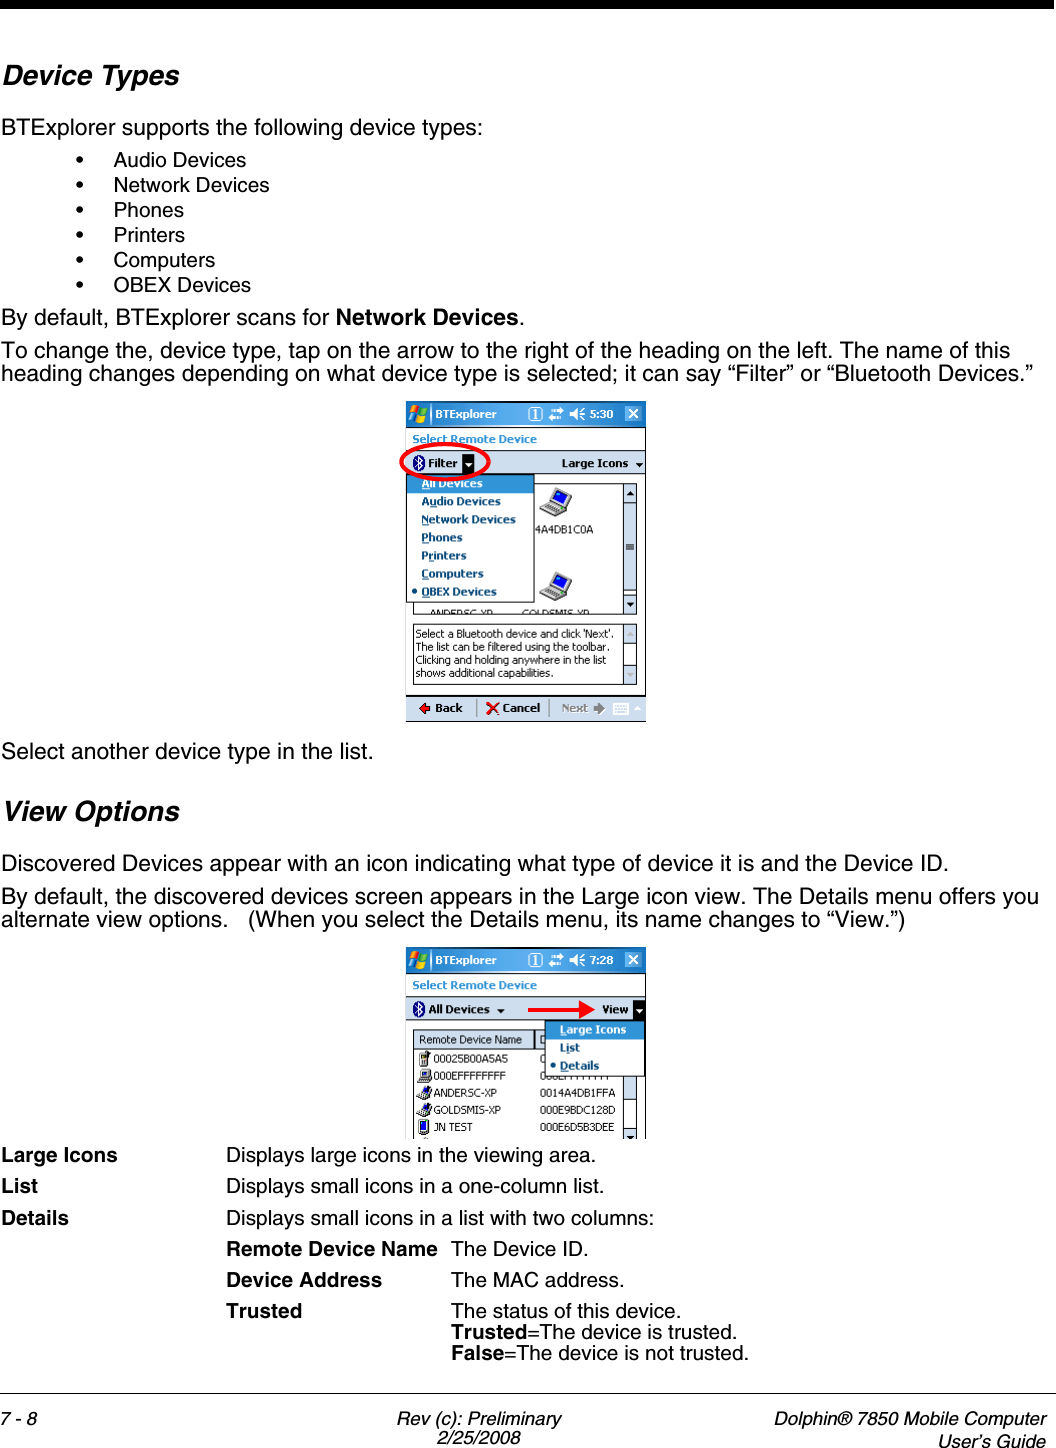
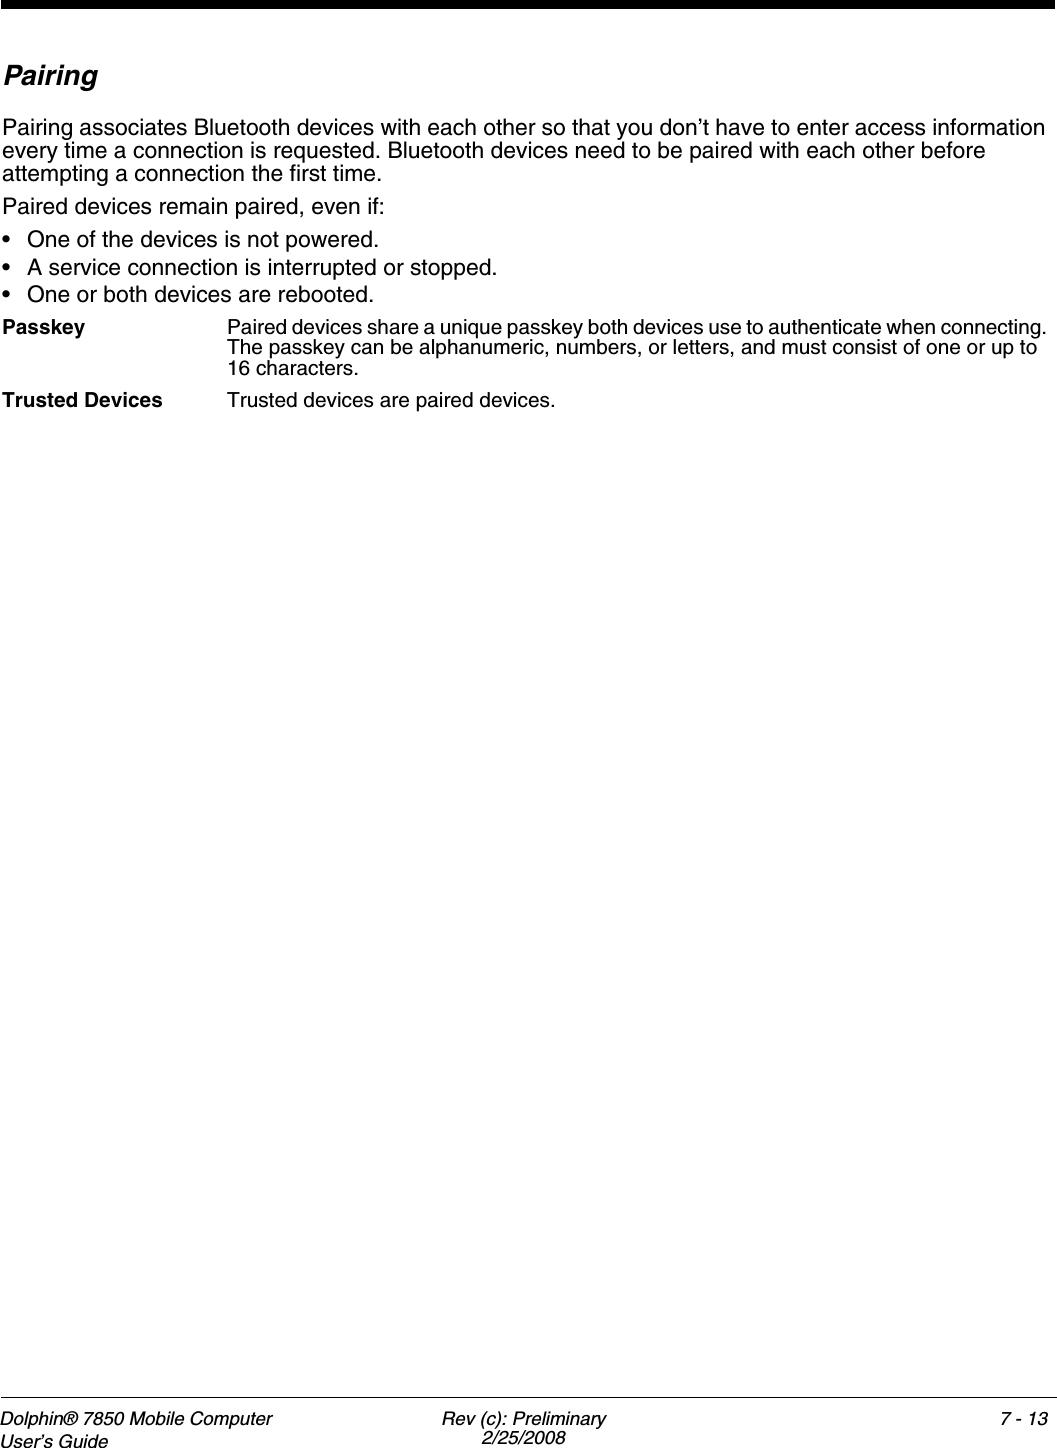
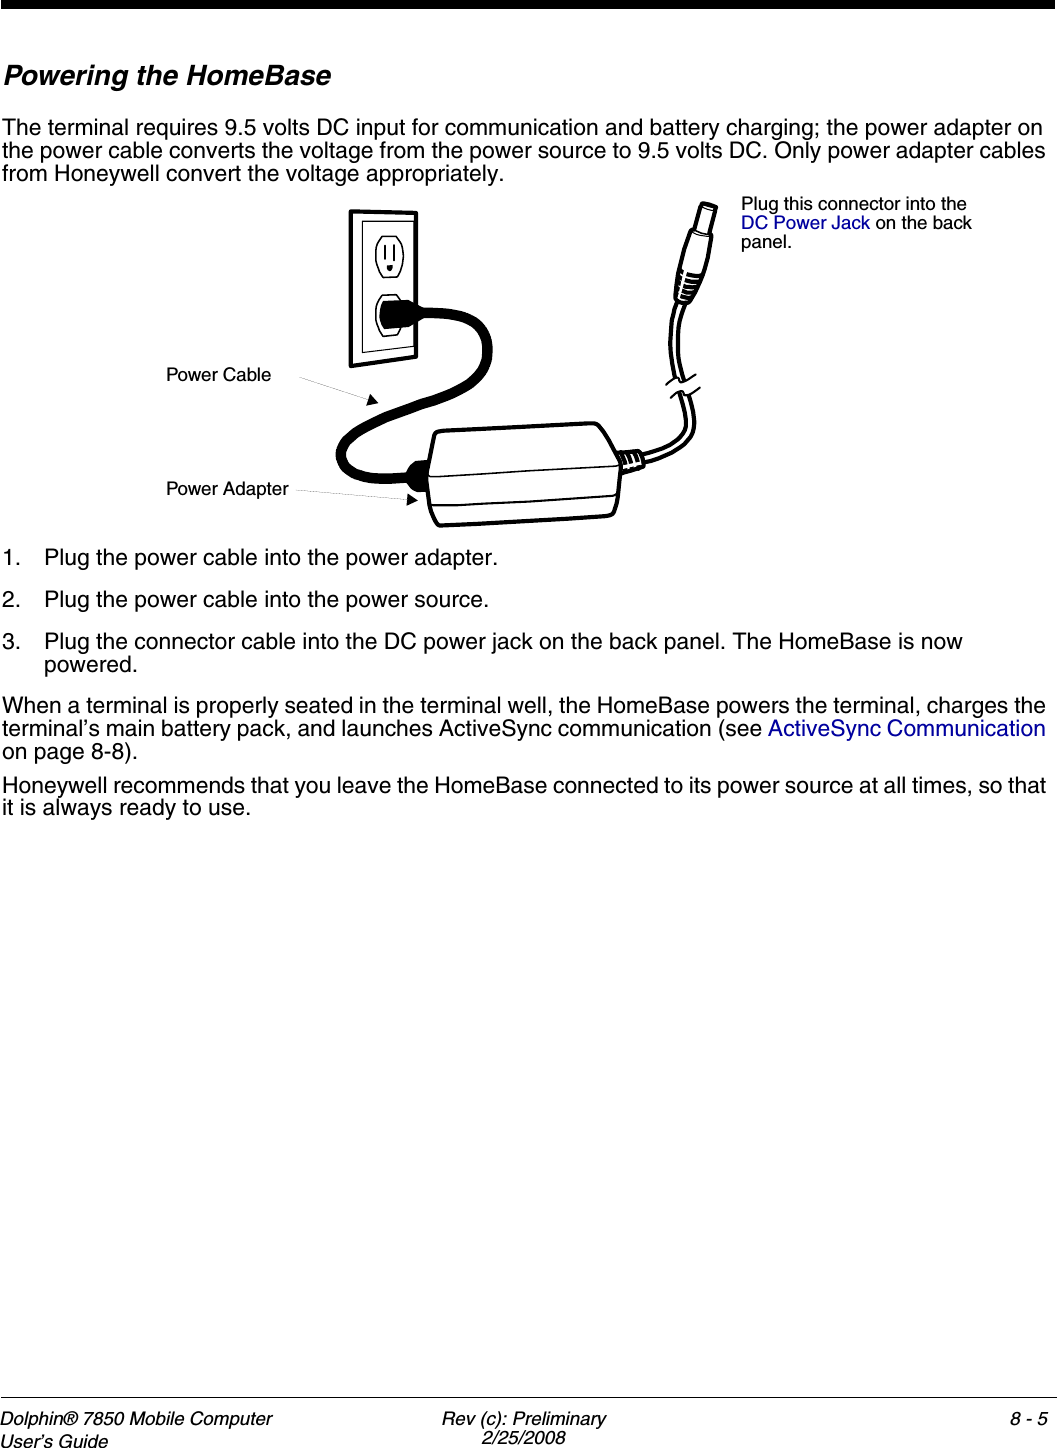
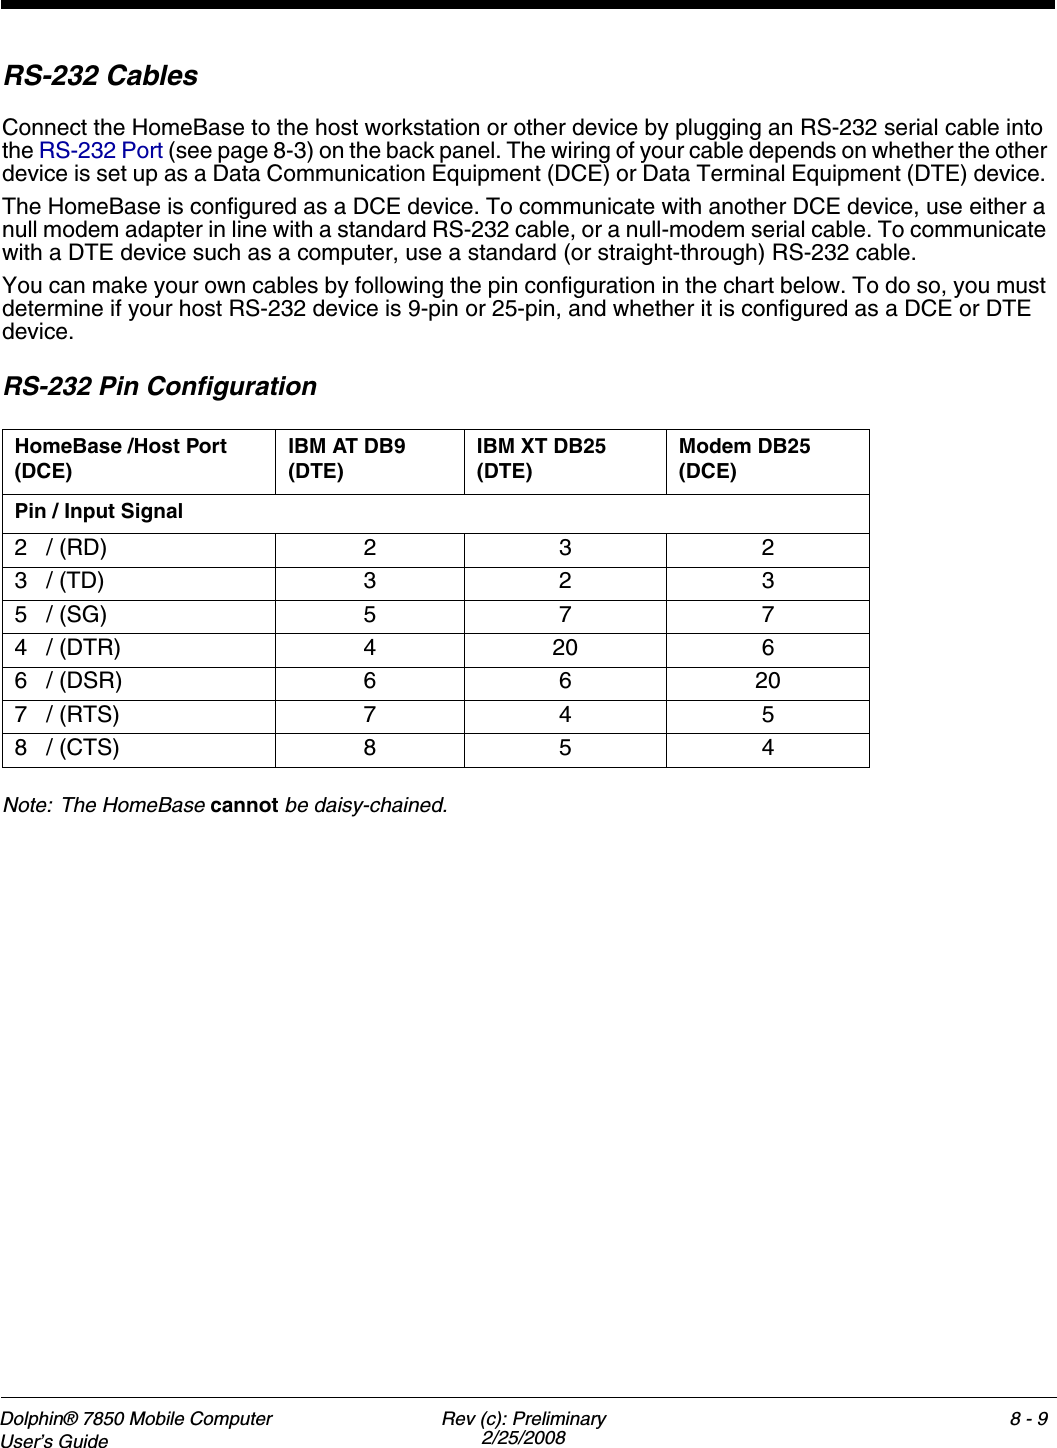
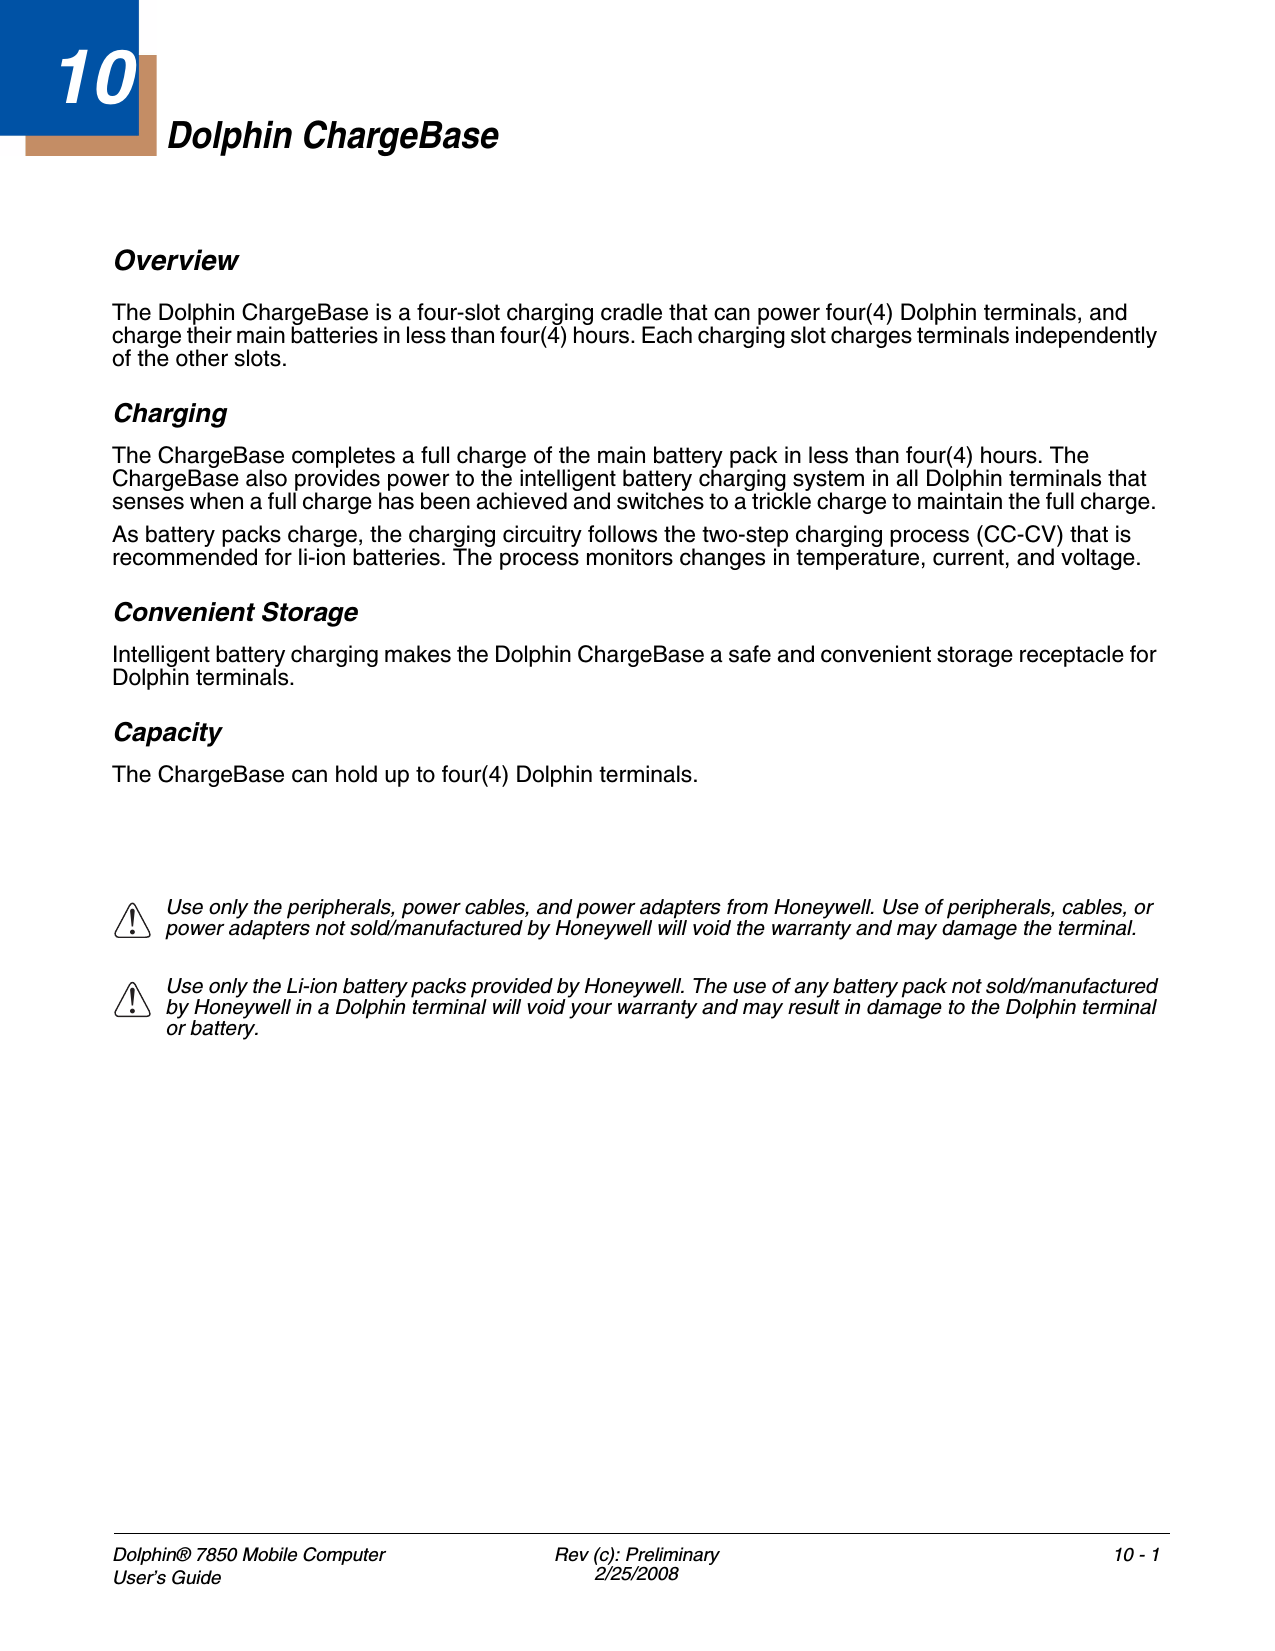
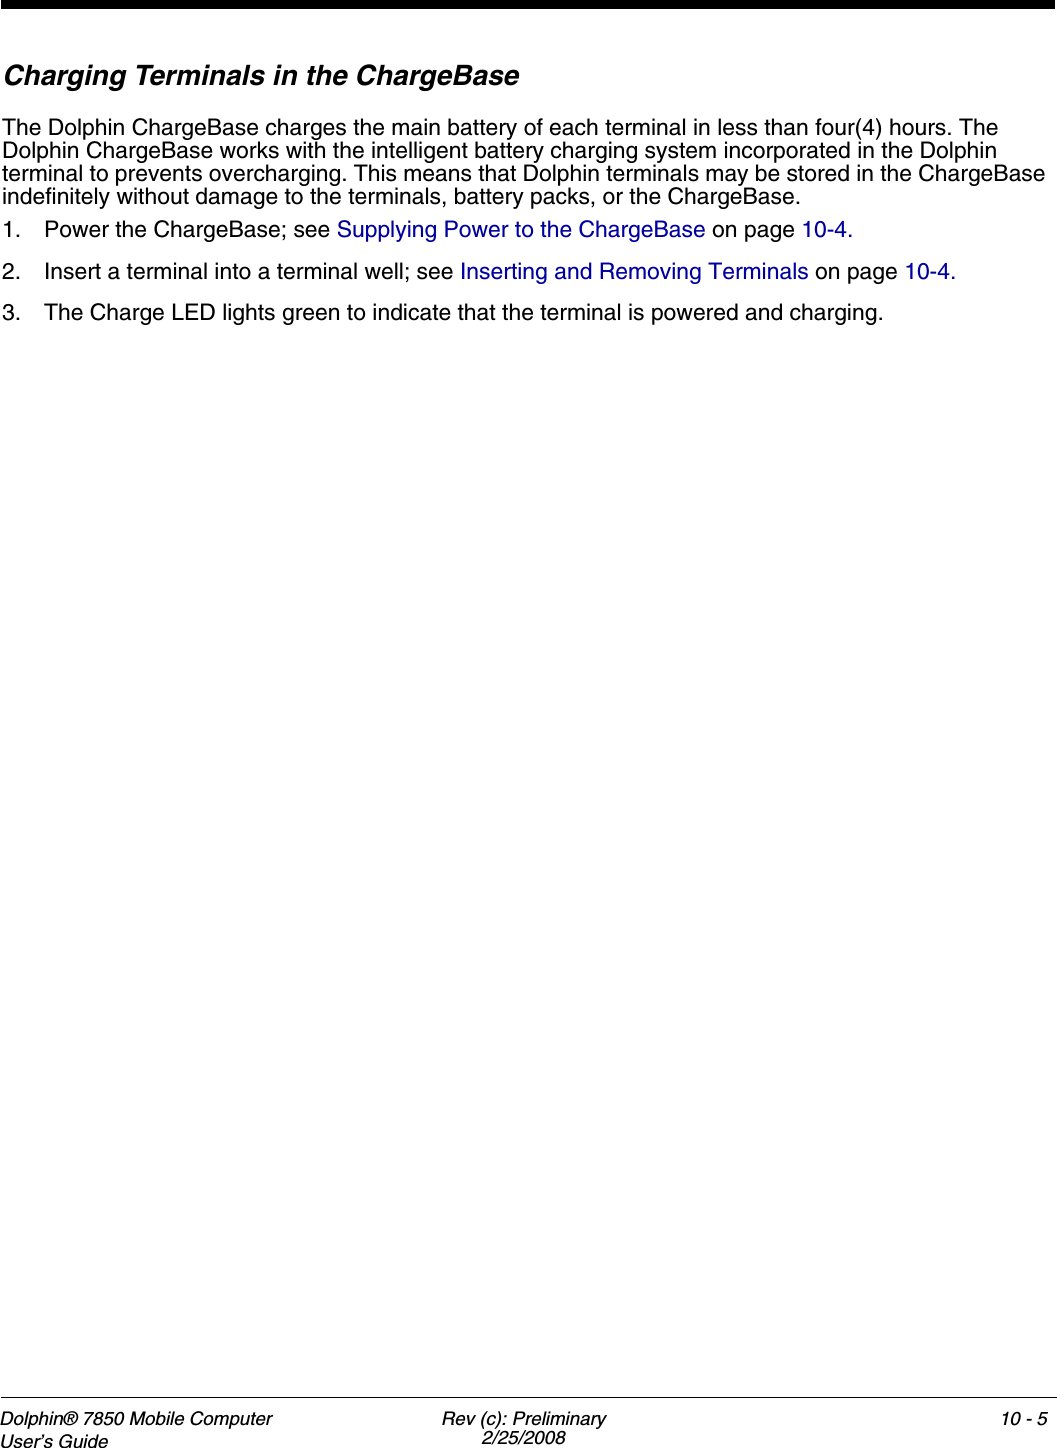
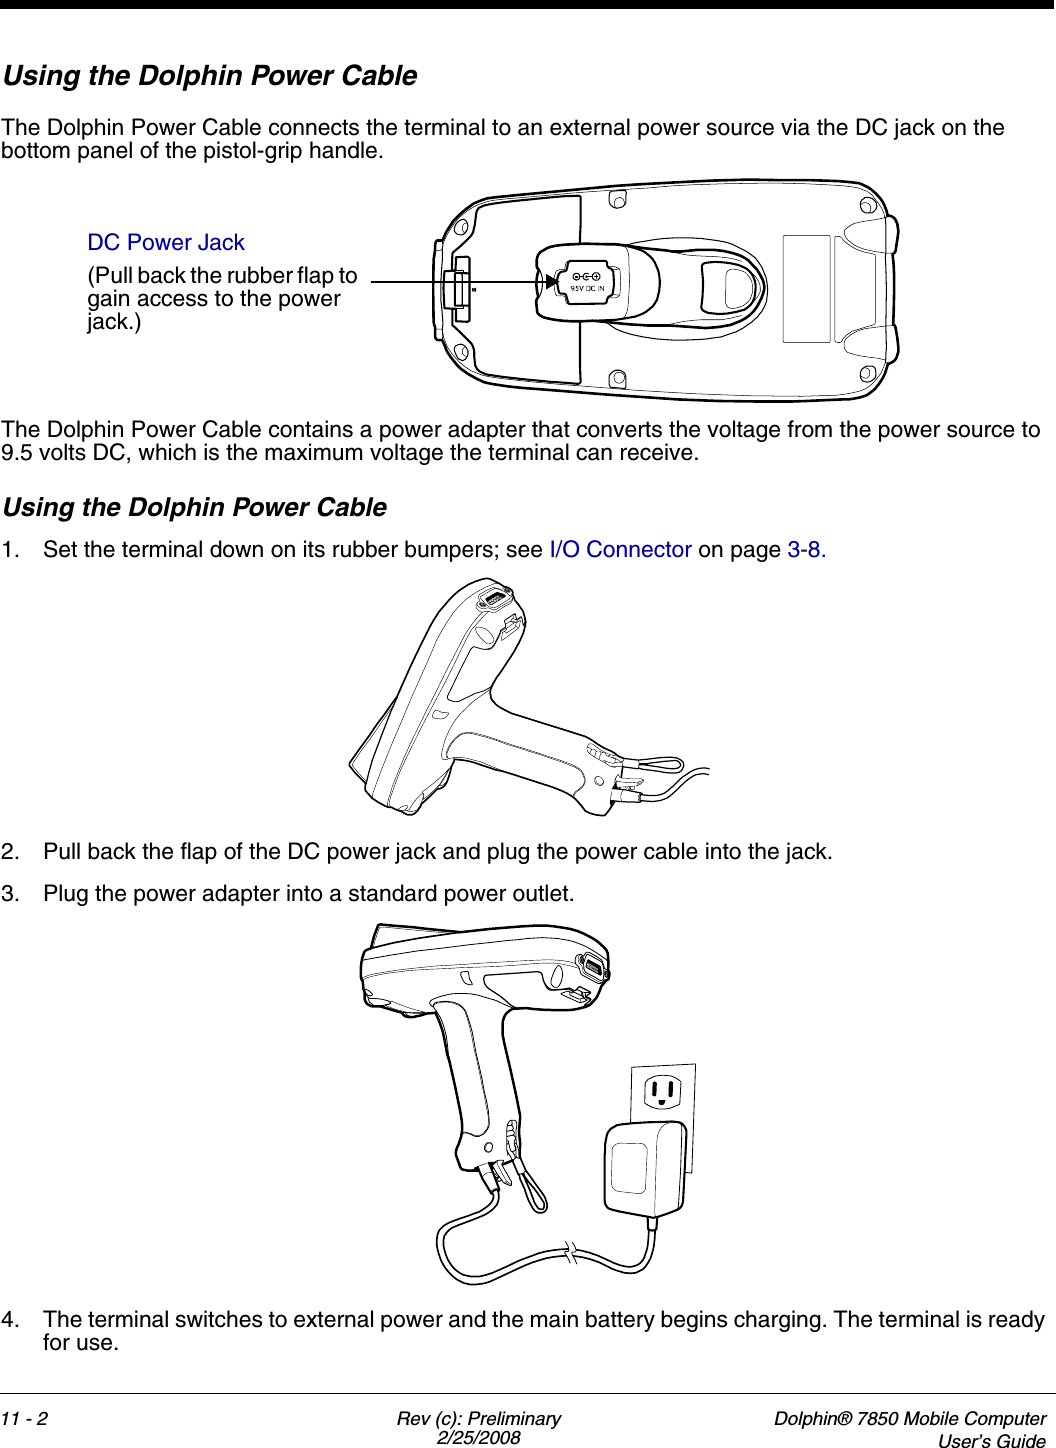
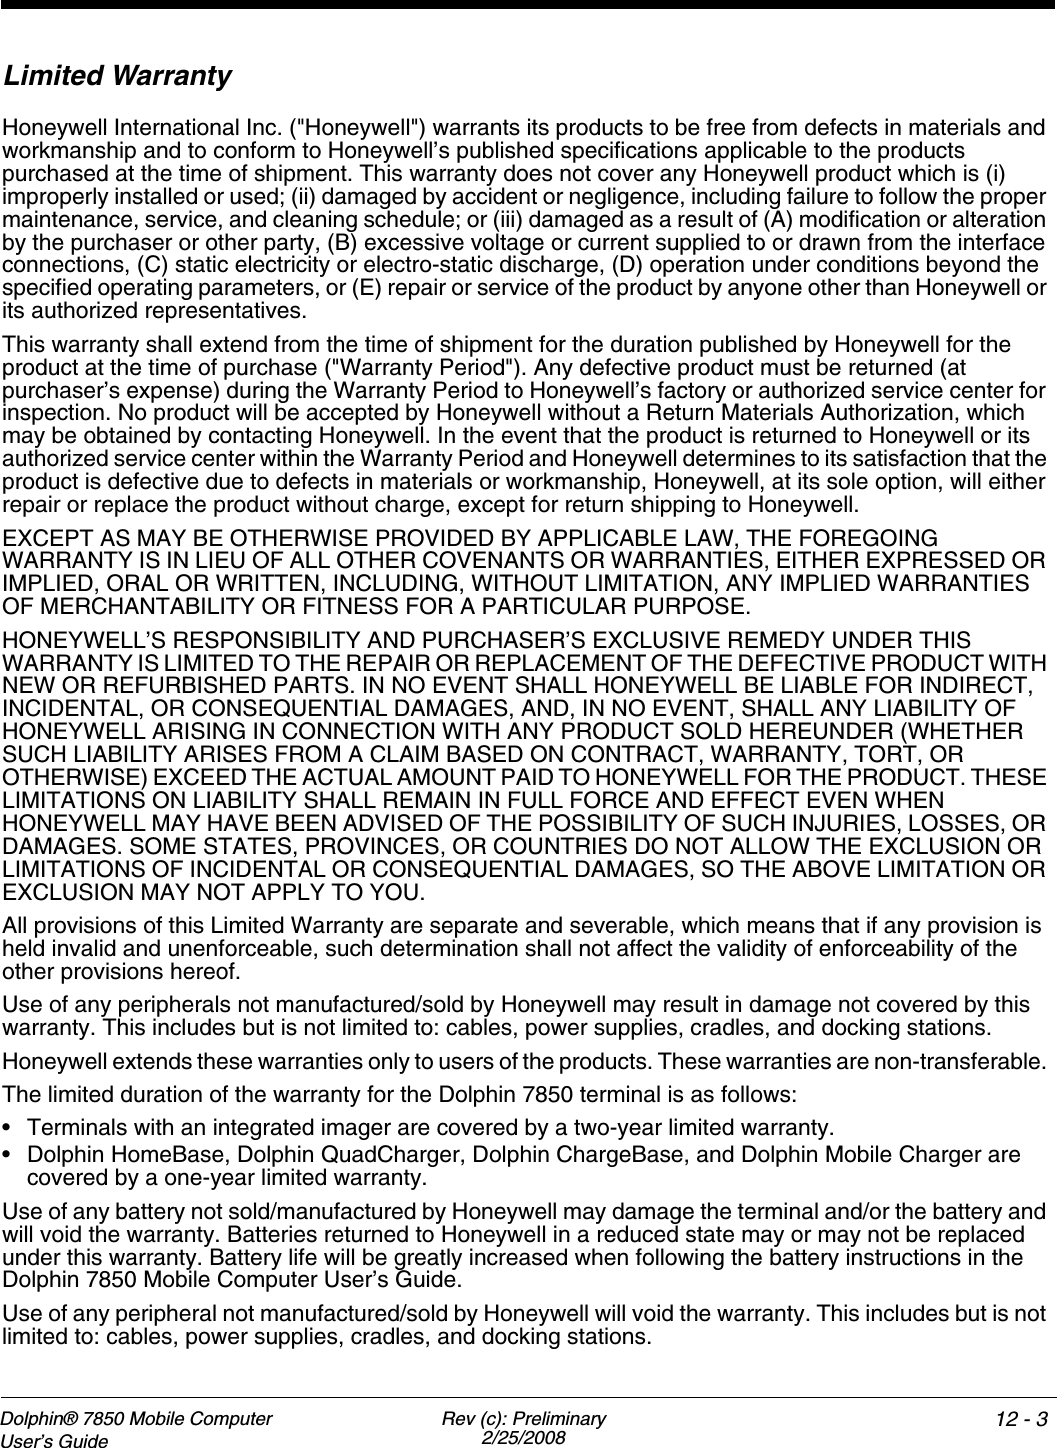
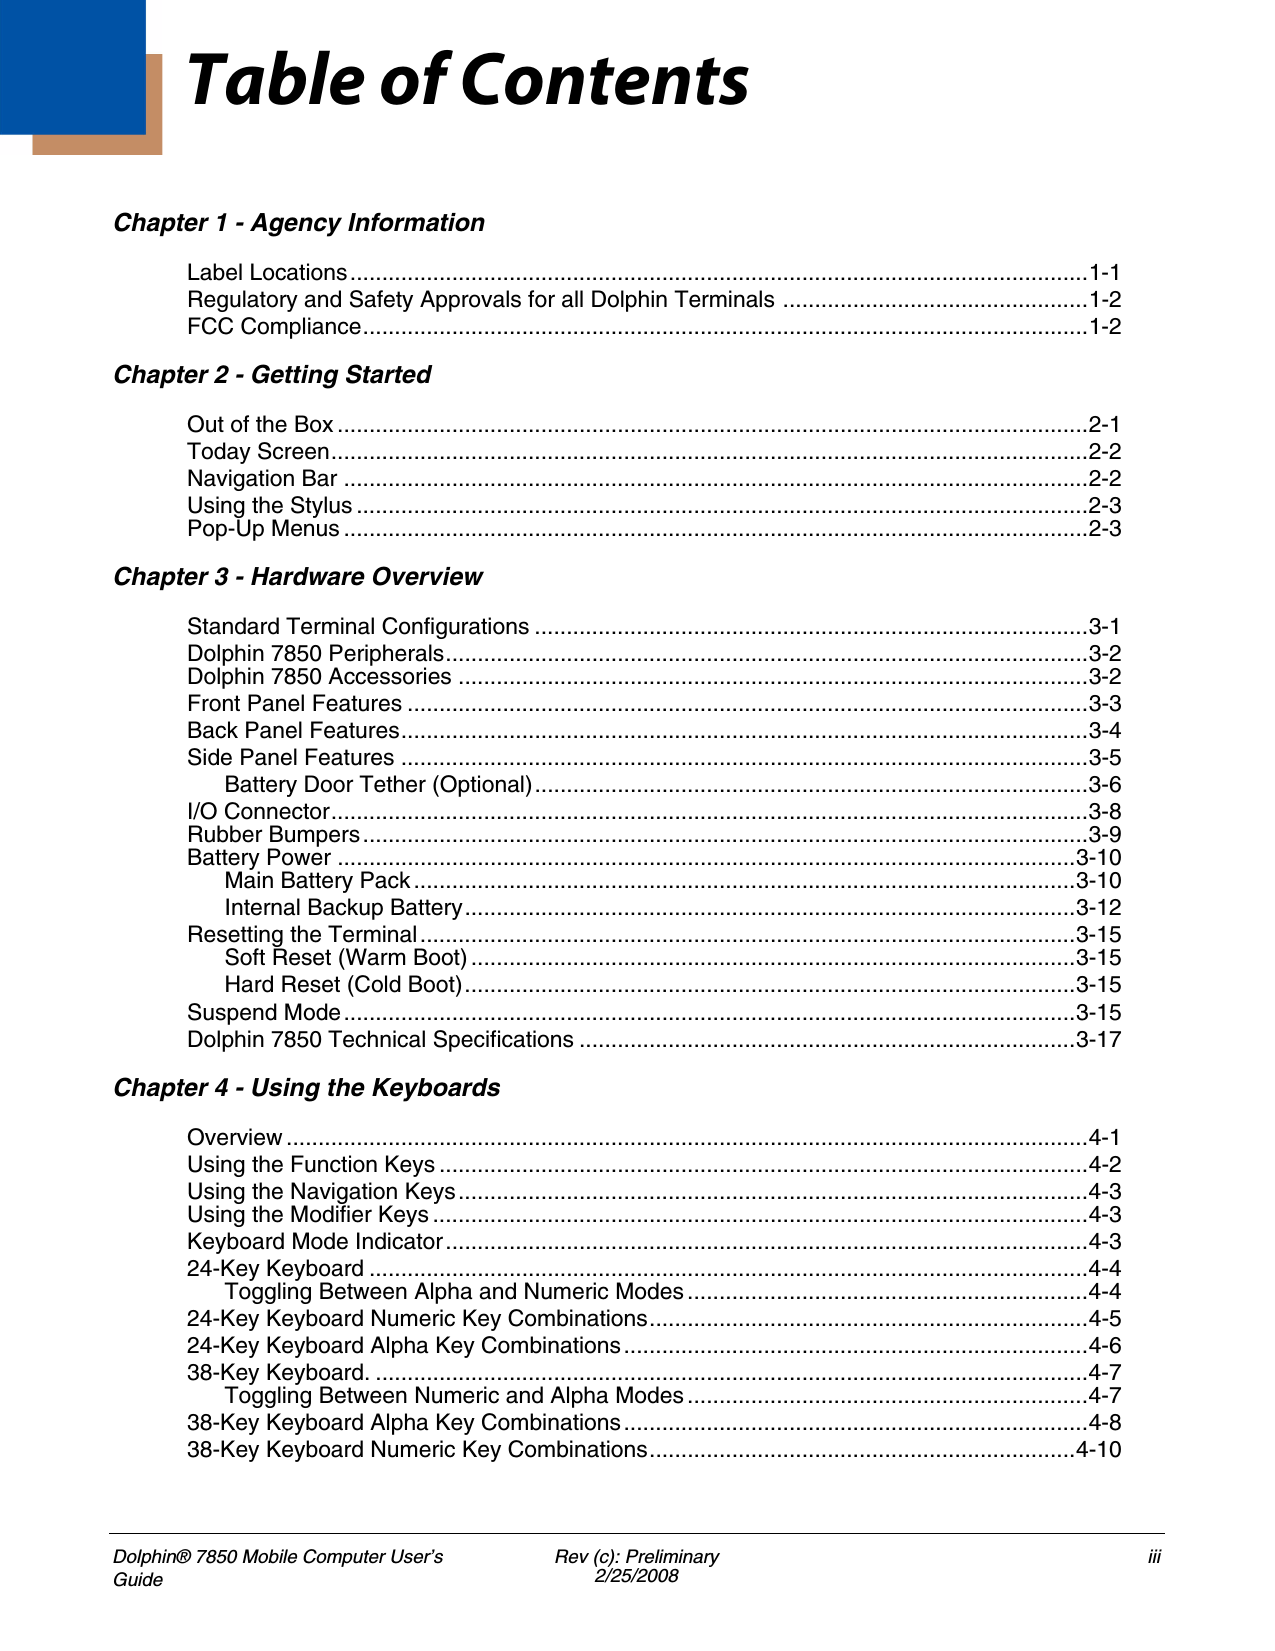
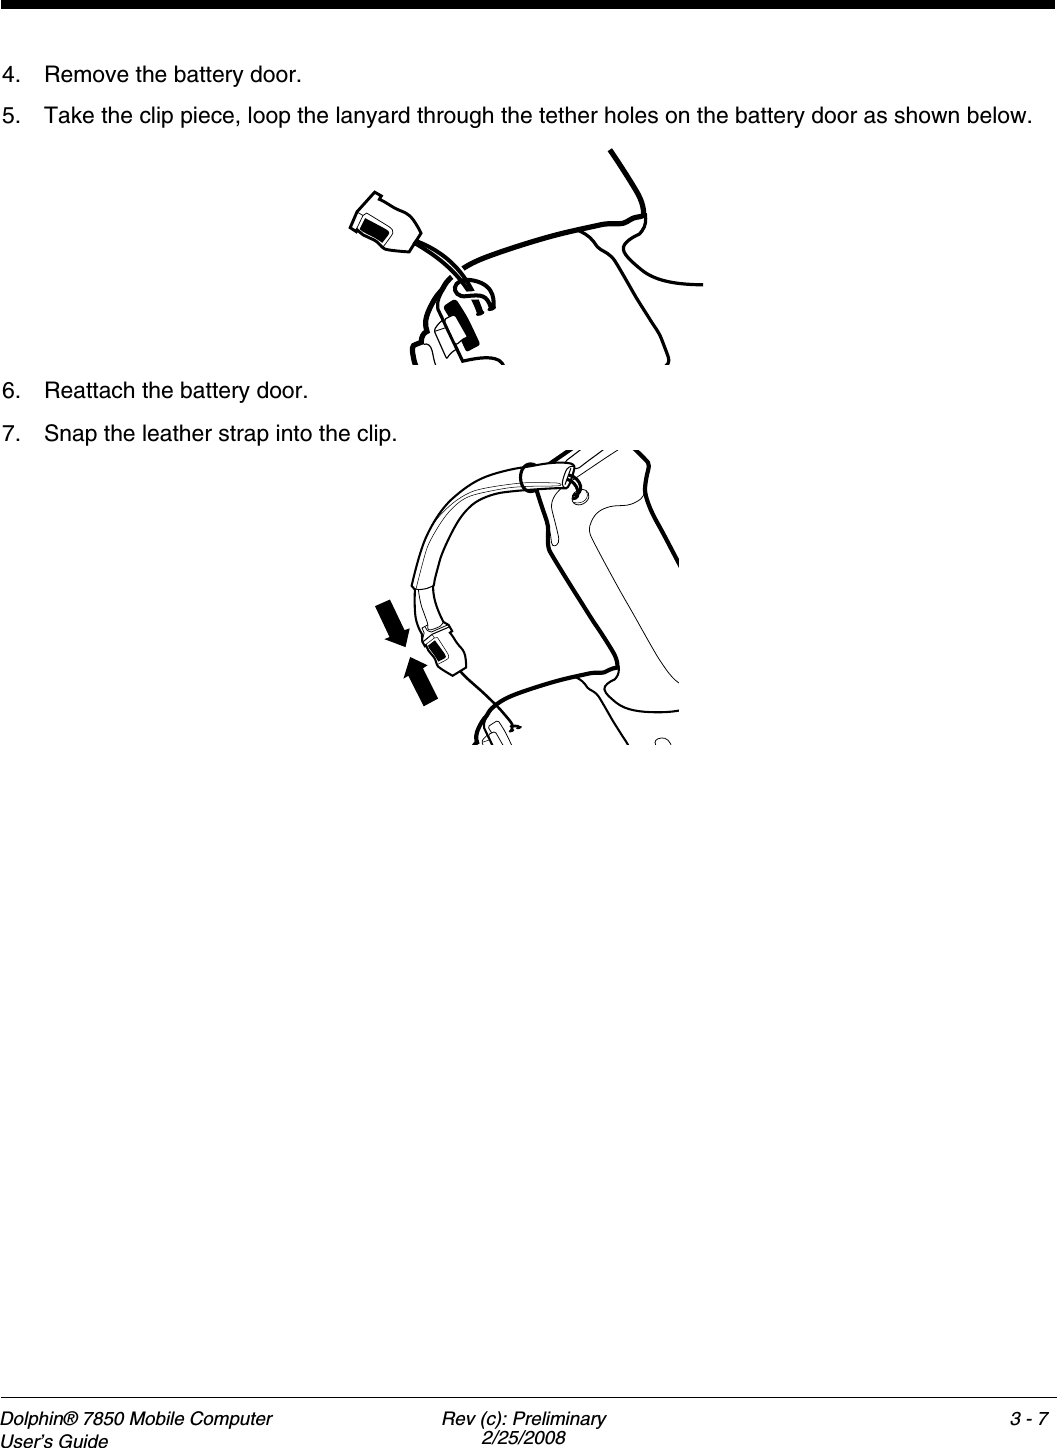
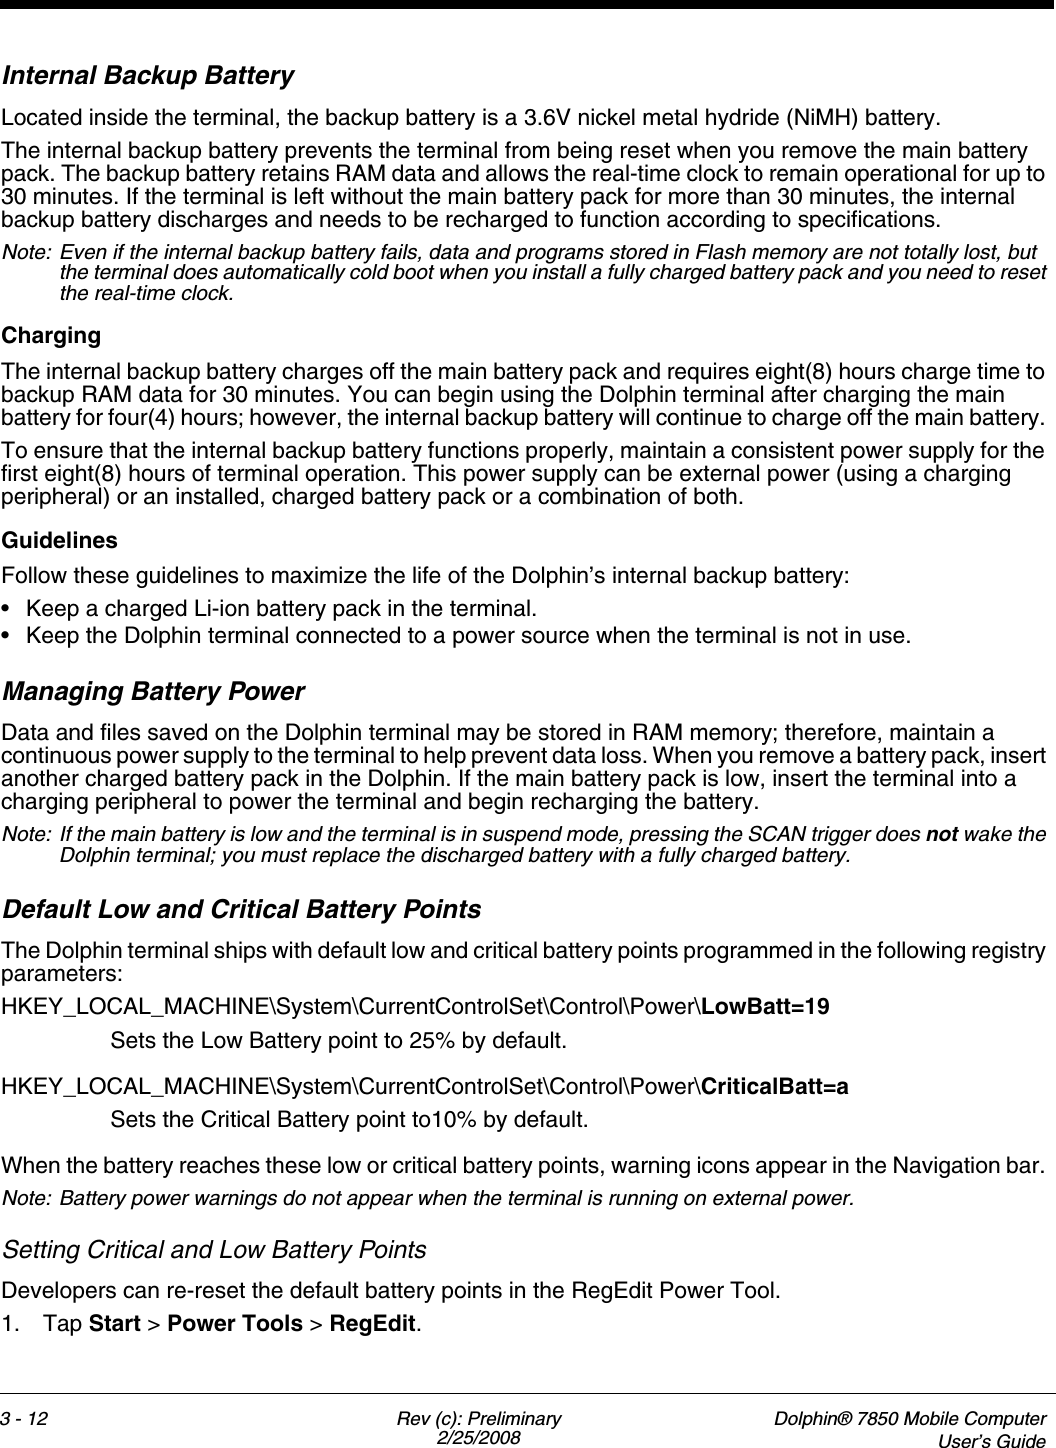
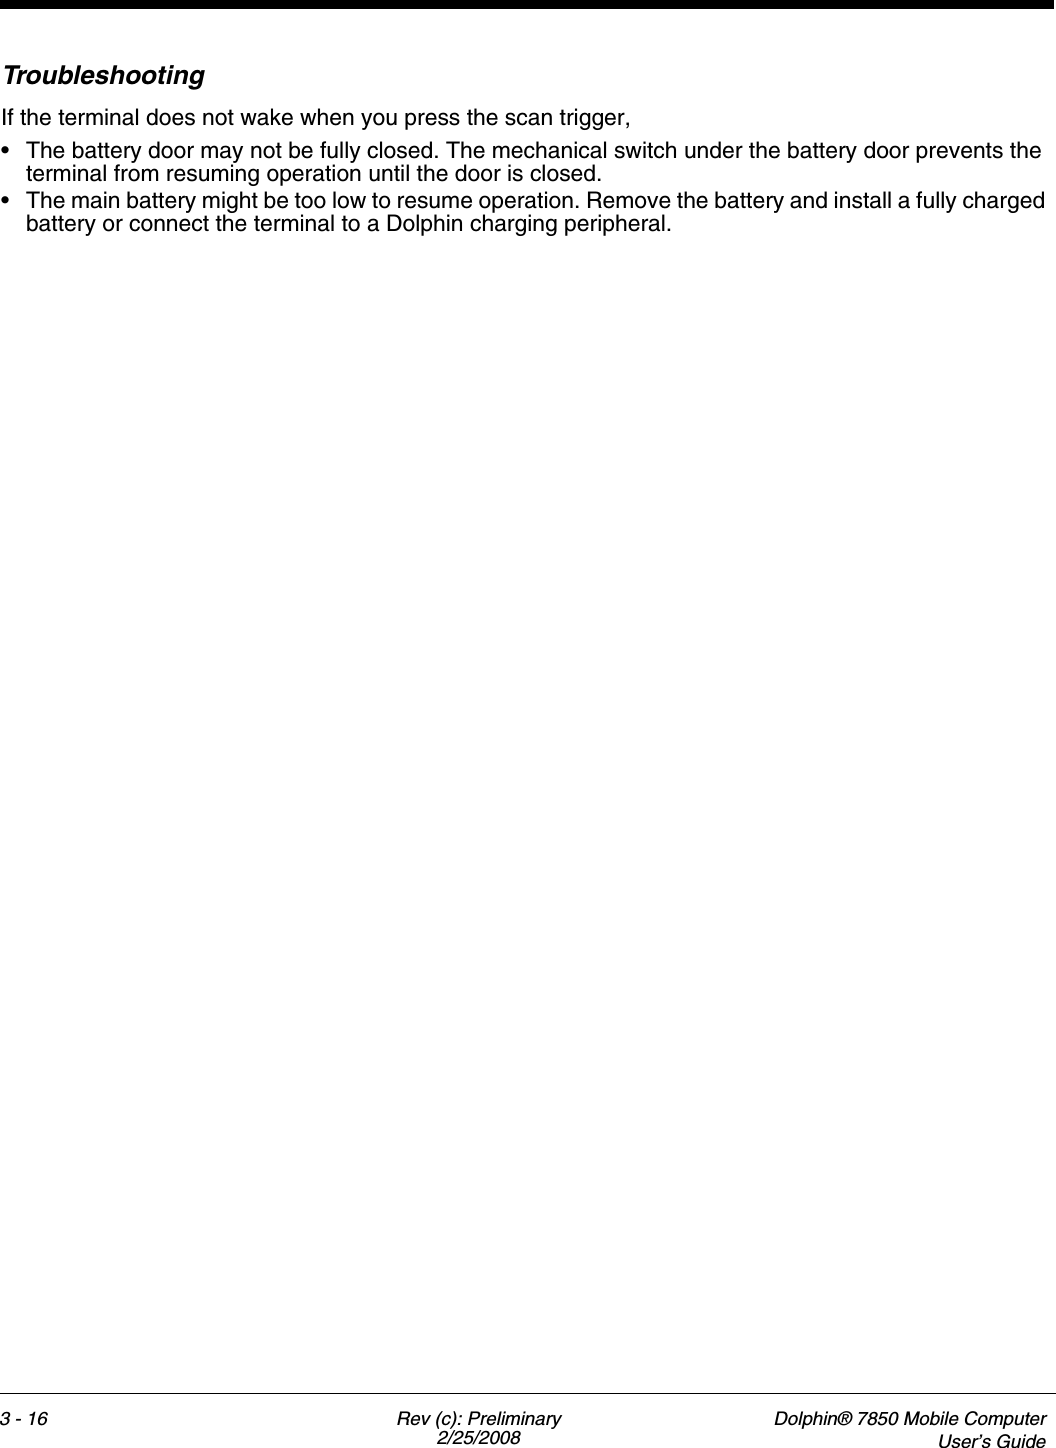
![4 - 6 Rev (c): Preliminary2/25/2008Dolphin® 7850 Mobile ComputerUser’s Guide*Toggles uppercase and lowercase only on a double-tap.**Single-tap SFT changes the mode for only the next character. Double-tap SFT key to change mode for all keys pressed after.***Toggles numeric and alpha modes only on a double-tap.24-Key Keyboard Alpha Key CombinationsKey Red Mode Alpha Base Alpha Shift Alpha Caplock Alpha Shift CaplockESC ESC ESC ESC ESC ESCSFT *Toggle Upper/Lower/Shift*Toggle Upper/Lower/Shift*Toggle Upper/Lower/Shift*Toggle Upper/Lower/Shift*Toggle Upper/Lower/ShiftBlue ***Toggle Num/Alpha***Toggle Num/Alpha***Toggle Num/Alpha***Toggle Num/AlphaRed Red Mode Red Mode Red Mode Red ModeAsterisk #****Light Keyboard Light Keyboard Light Keyboard Light Keyboard Light Keyboard LightLeft Backspace Left Left Left LeftUp Page Up Up Up Up UpDown Page Down Down Down Down DownRight Space Right Right Right RightOK OK OK OK OK OKTab Tab Tab Ta b TabPeriod = - ; : - ; : - ; : - ; :Comma “ @ ? ! @ ? ! @ ? ! @ ? !0F10 + [ ] + { } + [ ] + { }1F7 pqrs PQRS PQRS pqrs2F8 tuv TUV TUV tuv3F9 wxyz WXYZ WXYZ wxyz4F4 ghi GHI GHI ghi5F5 jkl JKL JKL jkl6F6 mno MNO MNO mno7F1 / \ _ { } _ / \ _ { } _8F2 abc ABC ABC abc9F3 def DEF DEF def](https://usermanual.wiki/Honeywell/7850PGE.User-Manual/User-Guide-927274-Page-38.png)