Honeywell CT50LFN DOLPHIN CT50 Mobile Computer (Terminal) User Manual Dolphin CT50 Mobile Computer User Guide Android

Honeywell International Inc DOLPHIN CT50 Mobile Computer (Terminal) Dolphin CT50 Mobile Computer User Guide Android
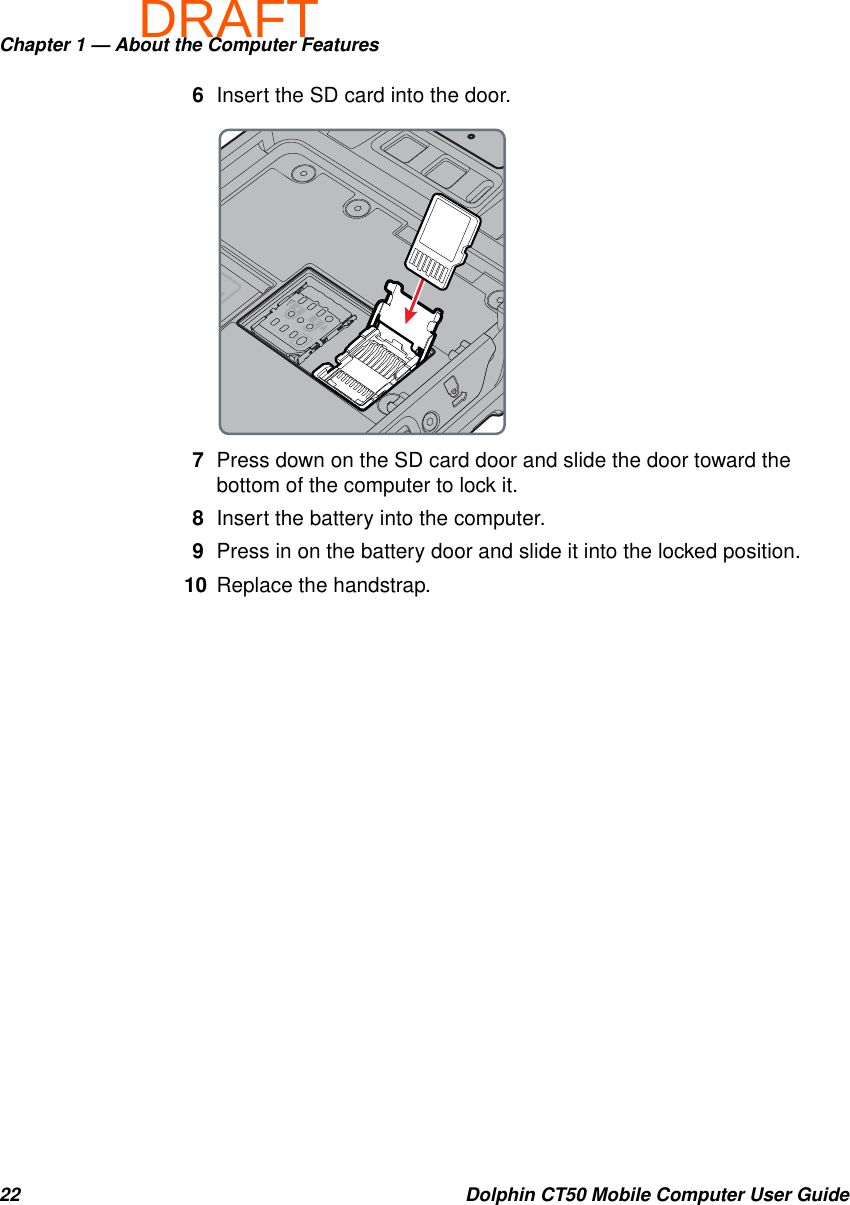
User Guide 1

DRAFTCT50Mobile Computerwith Android™ 4.4 Operating SystemUser Guide
DRAFTii Dolphin CT50 Mobile Computer User GuideDisclaimerHoneywell International Inc. (“HII”) reserves the right to make changes in specifications and other information contained in this document without prior notice, and the reader should in all cases consult HII to determine whether any such changes have been made. The information in this publication does not represent a commitment on the part of HII.HII shall not be liable for technical or editorial errors or omissions contained herein; nor for incidental or consequential damages resulting from the furnishing, performance, or use of this material. HII disclaims all responsibility for the selection and use of software and/or hardware to achieve intended results.This document contains proprietary information that is protected by copyright. All rights are reserved. No part of this document may be photocopied, reproduced, or translated into another language without the prior written consent of HII.TrademarksAndroid, Google, and other marks are trademarks of Google Inc.Microsoft, Windows are either registered trademarks or registered trademarks of Microsoft Corporation in the United Statesand/or other countries.The Bluetooth trademarks are owned by Bluetooth SIG, Inc., U.S.A. and licensed to Honeywell.Other product names mentioned in this manual may be trademarks or registered trademarks of their respective companies and are the property of their respective owners.PatentsFor patent information, see www.hsmpats.com.Copyright © 2015 Honeywell International Inc. All rights reserved.
DRAFTContentsDolphin CT50 Mobile Computer User Guide iiiContentsCustomer Support. . . . . . . . . . . . . . . . . . . . . . . . . . . . . . . . . . . . . . . . . . . . . . . . . .  viiProduct Service and Repair  . . . . . . . . . . . . . . . . . . . . . . . . . . . . .  viiLimited Warranty . . . . . . . . . . . . . . . . . . . . . . . . . . . . . . . . . . . . . .  viiSend Feedback . . . . . . . . . . . . . . . . . . . . . . . . . . . . . . . . . . . . . . .  vii1 About the Computer Features . . . . . . . . . . . . . . . . . . . . . . . . . . . . . . . . 1About the Dolphin CT50 Mobile Computer . . . . . . . . . . . . . . . . . . . . . . . . . . . . . . . . 2About the Battery  . . . . . . . . . . . . . . . . . . . . . . . . . . . . . . . . . . . . . . . . . . . . . . . . . . . 6Charge the Battery . . . . . . . . . . . . . . . . . . . . . . . . . . . . . . . . . . . . . . . . . . . . 6Change the Batttery . . . . . . . . . . . . . . . . . . . . . . . . . . . . . . . . . . . . . . . . . . . 7About the Battery Status  . . . . . . . . . . . . . . . . . . . . . . . . . . . . . . . . . . . . . . . 9Check the Battery Level . . . . . . . . . . . . . . . . . . . . . . . . . . . . . . . . . . . . . . . 11About Battery Life and Conservation . . . . . . . . . . . . . . . . . . . . . . . . . . . . . 11Battery Recommendations and Safety Precautions. . . . . . . . . . . . . . . . . . 12Enable Airplane Mode . . . . . . . . . . . . . . . . . . . . . . . . . . . . . . . . . . . . . . . . 12Power On the CT50. . . . . . . . . . . . . . . . . . . . . . . . . . . . . . . . . . . . . . . . . . . . . . . . . 13Unlock the Screen. . . . . . . . . . . . . . . . . . . . . . . . . . . . . . . . . . . . . . . . . . . . . . . . . . 14About the Good Read LED . . . . . . . . . . . . . . . . . . . . . . . . . . . . . . . . . . . . . . . . . . . 15Configure the Screen Backlight. . . . . . . . . . . . . . . . . . . . . . . . . . . . . . . . . . . . . . . . 16About the Audio Features . . . . . . . . . . . . . . . . . . . . . . . . . . . . . . . . . . . . . . . . . . . . 16Adjust Ringtone and Notification Volume . . . . . . . . . . . . . . . . . . . . . . . . . . 16Enable Vibrate Mode . . . . . . . . . . . . . . . . . . . . . . . . . . . . . . . . . . . . . . . . . 18Audio Settings  . . . . . . . . . . . . . . . . . . . . . . . . . . . . . . . . . . . . . . . . . . . . . . 19Insert a MicroSD Card. . . . . . . . . . . . . . . . . . . . . . . . . . . . . . . . . . . . . . . . . . . . . . . 20How to Transfer Files. . . . . . . . . . . . . . . . . . . . . . . . . . . . . . . . . . . . . . . . . . . . . . . . 23How to Browse Files on the CT50. . . . . . . . . . . . . . . . . . . . . . . . . . . . . . . . . . . . . . 23Accessories for the CT50 . . . . . . . . . . . . . . . . . . . . . . . . . . . . . . . . . . . . . . . . . . . . 24
DRAFTContentsiv Dolphin CT50 Mobile Computer User Guide2 About the User Interface and Applications . . . . . . . . . . . . . . . . 27About the User Interface . . . . . . . . . . . . . . . . . . . . . . . . . . . . . . . . . . . . . . . . . . . . . 28About the Home Screen. . . . . . . . . . . . . . . . . . . . . . . . . . . . . . . . . . . . . . . 28Navigation and Function Buttons . . . . . . . . . . . . . . . . . . . . . . . . . . . . . . . . 29Common Status and Notification Icons?  . . . . . . . . . . . . . . . . . . . . . . . . . . 29Remap a Button . . . . . . . . . . . . . . . . . . . . . . . . . . . . . . . . . . . . . . . . . . . . . 29View Notifications. . . . . . . . . . . . . . . . . . . . . . . . . . . . . . . . . . . . . . . . . . . . 30Manage Notifications . . . . . . . . . . . . . . . . . . . . . . . . . . . . . . . . . . . . . . . . . 30Customize the Home Screen . . . . . . . . . . . . . . . . . . . . . . . . . . . . . . . . . . . 31Customize the Favorites Tray . . . . . . . . . . . . . . . . . . . . . . . . . . . . . . . . . . . 31Use Google™ Search  . . . . . . . . . . . . . . . . . . . . . . . . . . . . . . . . . . . . . . . . 31About Screen Gestures . . . . . . . . . . . . . . . . . . . . . . . . . . . . . . . . . . . . . . . 32Set the Time Zone . . . . . . . . . . . . . . . . . . . . . . . . . . . . . . . . . . . . . . . . . . . 32About Honeywell Applications. . . . . . . . . . . . . . . . . . . . . . . . . . . . . . . . . . . . . . . . . 333 About the Scanner . . . . . . . . . . . . . . . . . . . . . . . . . . . . . . . . . . . . . . . . . . . . 35About the Scanner  . . . . . . . . . . . . . . . . . . . . . . . . . . . . . . . . . . . . . . . . . . . . . . . . . 36How to Send Data as Android Keyboard Input. . . . . . . . . . . . . . . . . . . . . . 36Change the Scanner Settings  . . . . . . . . . . . . . . . . . . . . . . . . . . . . . . . . . . 37Restore Default Scanner Settings  . . . . . . . . . . . . . . . . . . . . . . . . . . . . . . . 38Scanners Default Settings . . . . . . . . . . . . . . . . . . . . . . . . . . . . . . . . . . . . . 38Data Processing Settings  . . . . . . . . . . . . . . . . . . . . . . . . . . . . . . . 38Symbology Settings. . . . . . . . . . . . . . . . . . . . . . . . . . . . . . . . . . . . 40Imager Settings . . . . . . . . . . . . . . . . . . . . . . . . . . . . . . . . . . . . . . . 41Trigger Settings. . . . . . . . . . . . . . . . . . . . . . . . . . . . . . . . . . . . . . . 41Notification Settings. . . . . . . . . . . . . . . . . . . . . . . . . . . . . . . . . . . . 41Scan a Bar Code. . . . . . . . . . . . . . . . . . . . . . . . . . . . . . . . . . . . . . . . . . . . . . . . . . . 424 Use the Phone . . . . . . . . . . . . . . . . . . . . . . . . . . . . . . . . . . . . . . . . . . . . . . . . . 43About the Phone . . . . . . . . . . . . . . . . . . . . . . . . . . . . . . . . . . . . . . . . . . . . . . . . . . . 44Activate the UMTS Phone  . . . . . . . . . . . . . . . . . . . . . . . . . . . . . . . . . . . . . 44Activate the CDMA Phone . . . . . . . . . . . . . . . . . . . . . . . . . . . . . . . . . . . . . 47Make a Phone Call . . . . . . . . . . . . . . . . . . . . . . . . . . . . . . . . . . . . . . . . . . . 47Answer the Phone  . . . . . . . . . . . . . . . . . . . . . . . . . . . . . . . . . . . . . . . . . . . 48Switch Apps During a Phone Call  . . . . . . . . . . . . . . . . . . . . . . . . . . . . . . . 48Check Your Voicemail . . . . . . . . . . . . . . . . . . . . . . . . . . . . . . . . . . . . . . . . . . . . . . . 48Set Your Voicemail Number . . . . . . . . . . . . . . . . . . . . . . . . . . . . . . . . . . . . 49Change Voicemail Settings  . . . . . . . . . . . . . . . . . . . . . . . . . . . . . . . . . . . . 49
DRAFTContentsDolphin CT50 Mobile Computer User Guide vMake an Emergency Phone Call. . . . . . . . . . . . . . . . . . . . . . . . . . . . . . . . . . . . . . . 49Configure Phone Settings . . . . . . . . . . . . . . . . . . . . . . . . . . . . . . . . . . . . . . . . . . . . 495 Use the Camera. . . . . . . . . . . . . . . . . . . . . . . . . . . . . . . . . . . . . . . . . . . . . . . . 51About the Color Camera . . . . . . . . . . . . . . . . . . . . . . . . . . . . . . . . . . . . . . . . . . . . . 52Adjust the Camera and Video Settings . . . . . . . . . . . . . . . . . . . . . . . . . . . . . . . . . . 52How to Zoom . . . . . . . . . . . . . . . . . . . . . . . . . . . . . . . . . . . . . . . . . . . . . . . 52Change Camera Settings. . . . . . . . . . . . . . . . . . . . . . . . . . . . . . . . . . . . . . 52Take a Picture . . . . . . . . . . . . . . . . . . . . . . . . . . . . . . . . . . . . . . . . . . . . . . . . . . . . . 52Record a Video . . . . . . . . . . . . . . . . . . . . . . . . . . . . . . . . . . . . . . . . . . . . . . . . . . . . 53Change Video Settings . . . . . . . . . . . . . . . . . . . . . . . . . . . . . . . . . . . . . . . . . . . . . . 536 Configure the Computer. . . . . . . . . . . . . . . . . . . . . . . . . . . . . . . . . . . . . . 55How to Configure the Computer . . . . . . . . . . . . . . . . . . . . . . . . . . . . . . . . . . . . . . . 56Start the Settings App  . . . . . . . . . . . . . . . . . . . . . . . . . . . . . . . . . . . . . . . . 56About the Structure of the Settings App. . . . . . . . . . . . . . . . . . . . . . . . . . . 56About Network Communications. . . . . . . . . . . . . . . . . . . . . . . . . . . . . . . . . . . . . . . 60Connect to a Wi-Fi Network . . . . . . . . . . . . . . . . . . . . . . . . . . . . . . . . . . . . 60Configure Proxy Settings for a Wi-Fi Network. . . . . . . . . . . . . . . . 61Disable Wi-Fi Notifications  . . . . . . . . . . . . . . . . . . . . . . . . . . . . . . 62Connect to an Ethernet Network  . . . . . . . . . . . . . . . . . . . . . . . . . . . . . . . . 62How to Connect to Virtual Private Networks  . . . . . . . . . . . . . . . . . . . . . . . 63Add a VPN. . . . . . . . . . . . . . . . . . . . . . . . . . . . . . . . . . . . . . . . . . . 63Connect to a VPN . . . . . . . . . . . . . . . . . . . . . . . . . . . . . . . . . . . . . 63Edit VPN Information. . . . . . . . . . . . . . . . . . . . . . . . . . . . . . . . . . . 64About Wireless Security  . . . . . . . . . . . . . . . . . . . . . . . . . . . . . . . . . . . . . . . . . . . . . 64About Certificates. . . . . . . . . . . . . . . . . . . . . . . . . . . . . . . . . . . . . . . . . . . . 64Load a Certificate  . . . . . . . . . . . . . . . . . . . . . . . . . . . . . . . . . . . . . 65Disable or Remove Certificates. . . . . . . . . . . . . . . . . . . . . . . . . . . 65About Bluetooth Communications. . . . . . . . . . . . . . . . . . . . . . . . . . . . . . . . . . . . . . 66Connect a Bluetooth Device. . . . . . . . . . . . . . . . . . . . . . . . . . . . . . . . . . . . 66Configure Bluetooth Settings . . . . . . . . . . . . . . . . . . . . . . . . . . . . . . . . . . . 68Making the CT50 Discoverable  . . . . . . . . . . . . . . . . . . . . . . . . . . . . . . . . . 68Rename or Disconnect a Paired Device. . . . . . . . . . . . . . . . . . . . . . . . . . . 68
DRAFTContentsvi Dolphin CT50 Mobile Computer User GuideAbout Serial and USB Communications . . . . . . . . . . . . . . . . . . . . . . . . . . . . . . . . . 69About Near Field Communication (NFC). . . . . . . . . . . . . . . . . . . . . . . . . . . . . . . . . 70A Specifications. . . . . . . . . . . . . . . . . . . . . . . . . . . . . . . . . . . . . . . . . . . . . . . . . 71Physical and Environmental Specifications. . . . . . . . . . . . . . . . . . . . . . . . . . . . . . . 72
DRAFTCustomer SupportDolphin CT50 Mobile Computer User Guide viiCustomer SupportIf you need assistance installing or troubleshooting your product, contact us by using one of these methods:Knowledge Base: www.hsmknowledgebase.comOur Knowledge Base provides thousands of immediate solutions. If the Knowledge Base does not help you solve your problem, log into the Technical Support Portal to submit your problem or ask your question.Technical Support Portal: www.hsmsupportportal.comLog into the Technical Support Portal to search our Knowledge Base, submit your problem or question, request a call back, or provide feedback. When filling out one of the forms, provide as much detail as possible. You can even include attachments.Telephone: www.honeywellaidc.com/locationsFor our latest contact information, please check our website.Product Service and RepairHoneywell International Inc. provides service for all of its products through service centers throughout the world. To find your service center, go to www.honeywellaidc.com and select Support > Contact Support > Service and Repair. Contact your service center to obtain a Return Material Authorization number (RMA #) before you return the product.To obtain warranty or non-warranty service, return your product to Honeywell (postage paid) with a copy of the dated purchase record.Limited WarrantyFor warranty information, go to www.honeywellaidc.com and click Resources > Warranty.Send FeedbackYour feedback is crucial to the continual improvement of our documentation. To provide feedback about this manual, please contact the Technical Communications department directly at ACSHSMTechnicalCommunications@honeywell.com.
DRAFTCustomer Supportviii Dolphin CT50 Mobile Computer User Guide
DRAFT11About the Computer FeaturesThis chapter introduces the Dolphin CT50 Mobile Computer with the Android 4.4 operating system. Use this chapter to learn about the basic computer features, functions, and accessories.
DRAFTChapter 1 — About the Computer Features2 Dolphin CT50 Mobile Computer User GuideAbout the Dolphin CT50 Mobile ComputerThe Honeywell Dolphin CT50 Mobile Computer is an enterprise-focused smartphone that uses the Android operating system to provide reliable and secure management of corporate data and wireless communications. The CT50 offers a long availability cycle and key features such as a large display, long-lasting battery, bar code imager, and rugged durability.•Android 4.4 operating system.•2 GB DRAM, 16 GB flash memory•Large, sunlight-readable display with responsive multi-touch screen•High performance 2D imager with ergonomic scan trigger keys•Software-definable LTE/UMTS or CDMA/EVDO wireless WWAN radio for high speed data and quality voice support across all network technologies•IEEE 802.11a/b/g/n radio•Bluetooth radio•NFC technology for short-range wireless data exchange•Value-added software components supporting specialized imaging and OCR functions•Mid-tier rugged specifications with IP67 sealing•Customer-accessible microSD slot for removable memory cards (up to 32 GB)•Integrated GPS receiver (with WWAN radio option)•8-megapixel color camera
DRAFTChapter 1 — About the Computer FeaturesDolphin CT50 Mobile Computer User Guide 3Front View of the CT50Scan buttonsVolume buttonsNavigation panelTouch panel
DRAFTChapter 1 — About the Computer Features4 Dolphin CT50 Mobile Computer User GuideTop View of the CT50Power buttonBattery status LEDGood read LED Scanner window
DRAFTChapter 1 — About the Computer FeaturesDolphin CT50 Mobile Computer User Guide 5Back View of the CT50CameraCamera lensSIM doorBattery door latchSIM and MicroSD doorBattery
DRAFTChapter 1 — About the Computer Features6 Dolphin CT50 Mobile Computer User GuideAbout the BatteryThe CT50 uses a rechargeable 3.6 Vdc Li-ion battery as its main power source. The battery has a 14.6 watt hour capacity. Several factors determine the life of your battery, such as display brightness, display timeout, input device, extreme temperature, and your usage. Honeywell recommends that you keep the battery charged at all times to prevent data loss.Honeywell recommends that you keep the battery charged at all times to prevent data loss. When you change the battery, the computer automatically does into a power-off state and then cold boots.Contact your Honeywell representative for replacement batteries.Charge the BatteryMake sure you fully charge the battery (Model CT50-BTSC) before you use your CT50. You can charge the battery before or after you install it in the CT50.•Insert the battery into a Quad Battery Charger or the battery well of an eHomeBase.or•Insert the CT50 with the battery installed into an eHomeBase, ChargeBase, NetBase, USB Adapter, or Vehicle Power Adapter.Caution: The battery used in this device may present a fire or chemical burn hazard if it is mistreated. Do not disassemble it, heat it above 100 °C (212 °F), or incinerate it. Dispose of used batteries promptly. Keep away from children.Battery Charge TimesCharging Accessory Charge TimeeHomeBase 6 hoursChargeBase 6 hoursNetBase 6 hoursQuad Battery Charger 6 hoursUSB Adapter 6 hoursVehicle Power Adapter 6 hours
DRAFTChapter 1 — About the Computer FeaturesDolphin CT50 Mobile Computer User Guide 7Change the BattteryIf your battery power is low, you need to either charge the battery in the computer, or replace it with a charged battery.1Save your files and close any open applications.2Press and hold the Power button. This screen appears:3Tap Power off. 4When prompted that the CT50 will shut down, tap OK.
DRAFTChapter 1 — About the Computer Features8 Dolphin CT50 Mobile Computer User Guide5Disconnect the handstrap from the bottom of the computer.6Press and slide the battery door toward the bottom of the computer to unlock the door.
DRAFTChapter 1 — About the Computer FeaturesDolphin CT50 Mobile Computer User Guide 97Lift up on the edge of the battery and remove it from the computer.8Insert the charged battery into the computer.9Press in on the battery door and slide it into the locked position.About the Battery StatusUse the battery icon in the Status bar to see the power status of your battery. The table below only includes some of the icons. The icon actually goes from 100 percent all the way down to 15 percent? If you want more detailed information on your battery, such as usage time or charge remaining on the battery, go to Settings > Battery.Battery Status IconsIcon StatusThe battery charge is at 100%.The battery charge is at 50%.The battery is critically low. You need to replace the battery now.The computer is connect to external power and the battery is charging.?? There is a battery error. Install another battery. If the problem persists, call Honeywell Product Support.
DRAFTChapter 1 — About the Computer Features10 Dolphin CT50 Mobile Computer User GuideThe Battery status LED in the upper right corner of the computer indicates the charging status of the battery.Battery Status LED DescriptionsLED State DescriptionSteady green The computer is connected to a charger and the battery is more than 95% charged.Steady red The computer is connected to a charger and the battery is less than 95% charged.Blinking red The battery is very low. The computer will soon go into Suspend mode. Charge or replace the battery.Amber There is a battery error. The battery is not charging because it is missing, faulty, or outside the allowable charging temperature range. If it is outside the charging temperature range, charging will resume when the battery temperature returns to the acceptable range of 0 °C to 45 °C (32 °F to 113 °F).Off The computer is not connected to external power and the battery is operating normally.Battery status LED
DRAFTChapter 1 — About the Computer FeaturesDolphin CT50 Mobile Computer User Guide 11Check the Battery LevelIn addition to the Battery status icons and the Battery status LED, you can get the battery status from the Settings app.1Tap the Settings app.2Tap Battery. The current percentage of battery power remaining and the amount of usage time left on the battery appear on the screen. A list shows the battery usage for individual apps and services.For usage details, tap one of the apps or services in the list.About Battery Life and ConservationIf you store the batteries outside of the computer for long periods of time, they slowly discharge. Honeywell recommends storing the battery in a charger to maintain battery performance.Battery Conservation TipsWhen You Want to: Do this to Save Battery Power:Use the computer and the low battery status icon appears or the battery light turns on.Connect the computer to an external power source. Press and hold the Power button and then select Power off from the menu. After the computer turns off, remove the battery and insert a fully charged battery.Stop using the computer for 5 minutes or more.Make sure that the low battery status icon is not on the screen and that the battery status LED is not on. Press the Power button to suspend the computer.Store the computer for more than a day. •If you are storing the computer for a few days (such as over the weekend), install a charged battery or connect the computer to a power source.•If you are storing the computer for a longer period of time, remove and charge the battery. When the battery is done charging, store both the battery and the computer is a cool location.•If you store the battery for several months, recharge the battery periodically to keep it at peak performance.Store the battery outside of the computer.Store the batteries in a charger.
DRAFTChapter 1 — About the Computer Features12 Dolphin CT50 Mobile Computer User GuideBattery Recommendations and Safety Precautions•Charge the battery before use. Battery ships with a partial charge only.•See “Charge the Battery” on page 6 for approved charging methods. Use of this battery in other devices could result in damage to the device or battery.•The temperature range for charging this battery is 0 °C to 45 °C (32 °F to 113 °F). Do not charge this battery outside of this range. For maximum battery life, charge at 23 °C (73 °F).•Do not store the battery at temperatures above 60 °C (140 °F), such as inside a car on a hot day or in direct sunlight. Storage above 60 °C (140 °F) may damage the battery.•Avoid dropping the battery or computer. If you suspect that the battery or computer is damaged, send it to Honeywell service center for inspection.•Replace this battery only with another model CT50-BTSC battery. These batteries have been tested in accordance with applicable safety standards. Contact your Honeywell sales representative or distributor if this battery is no longer available.•Discarded batteries may create a safety hazard. Before disposal, cover the battery contacts with electrical insulating tape.•Do not modify the battery or attempt to insert foreign objects into it.•Do not solder directly to the battery contacts.•Do not short circuit the battery, and keep it away from metallic items.•Do not drop the battery or apply mechanical shocks or pressure to it.•Do not disassemble or open, crush, bend or deform, puncture, shred or burn the battery.•Do not immerse the battery in water or get the battery wet.•Battery usage by children should be supervised.Enable Airplane ModeIf you do not need to connect to any wireless networks, you can enable Airplane mode to turn off all the radios and save battery power.1Tap the Settings app.2In the Wireless & Networks section, tap More.3Select the Airplane mode check box to enable it.
DRAFTChapter 1 — About the Computer FeaturesDolphin CT50 Mobile Computer User Guide 13Power On the CT50The first time you power on the CT50, a Welcome screen appears. Follow the prompts on the Welcome screen as the setup wizard helps you:•set the default language for the CT50.•set up the Wi-Fi network connections.•set the time, date, and time zone.•personalize (name) the CT50.After you have fully charged and installed a battery, power on the CT50 for the first time:•Press and release the Power button.Note: Once you complete the Setup Wizard, the Welcome screen no longer appears when you power on the CT50. You will now see the Lock screen each time you power it on.
DRAFTChapter 1 — About the Computer Features14 Dolphin CT50 Mobile Computer User GuideUnlock the ScreenEvery time you power on the CT50, you will need to unlock it.•Drag the lock toward any edge of the screen to unlock it.After you start using the CT50, you should set a password to protect the computer. Tap All Apps > Settings > Security.
DRAFTChapter 1 — About the Computer FeaturesDolphin CT50 Mobile Computer User Guide 15About the Good Read LEDThe Good Read LED indicates the status of the scanner. For more information on how to scan bar codes, see “Scan a Bar Code” on page 42.IGood Read LED DescriptionsLED Color DescriptionGreen Good read of a bar code.Blinking red Bad read of a bar code. Include information on what you should do? Bad bar code?Blinking green The data collection engine is processing or starting up.Good read LED
DRAFTChapter 1 — About the Computer Features16 Dolphin CT50 Mobile Computer User GuideConfigure the Screen BacklightThe display has an ambient light sensor that automatically adjusts the backlight intensity to conserve power and ensure the display is readable. You can set the backlight intensity level as needed for your environment.1Tap the Settings app.2Tap Display > Brightness.3Tap AUTO to use the ambient light sensor to automatically adjust the brightness for your work environment.Or, adjust the slider to set the brightness level.About the Audio FeaturesThe CT50 has a speaker, a microphone, and several software tools for configuring the volume of sounds.Adjust Ringtone and Notification VolumeYou can quickly adjust the volume of ringtone and notification sounds by using the side volume buttons.Note: This method of adjusting the volume only affects the volume of ringtone and notification sounds. To change the volume for other sounds, open the Settings app and tap Sound > Volumes.
DRAFTChapter 1 — About the Computer FeaturesDolphin CT50 Mobile Computer User Guide 171Press one of the buttons on the right side of the computer. The Volume slider appears.2Press the buttons or adjust the slider to change the volume.
DRAFTChapter 1 — About the Computer Features18 Dolphin CT50 Mobile Computer User GuideEnable Vibrate ModeYou can switch to Vibrate mode and disable the speaker if necessary for your working environment.1Press and hold the Power button. The power options screen appears.2Tap   to turn on Vibrate mode.
DRAFTChapter 1 — About the Computer FeaturesDolphin CT50 Mobile Computer User Guide 19Audio SettingsThis section describes the audio and sound settings you can configure in the Settings app. To change audio settings, start the Settings app and tap Sound.Audio and Sound SettingsSetting DescriptionVolumes Use the sliders to set the volume for:•music, video, games, and other media.•ringtone and notifications. You can also use the side volume buttons to change the volume.•alarms.Phone ringtone Select a ringtone.Vibrate when ringing Select to enable vibrate mode when the phone is ringing.Default notification sound Select a notification sound.Dial pad touch tones Select to enable audio tones when you use the phone keypad.Touch sounds Select to enable audio sounds when you use the touch screen.Screen lock sound Select to enable an audio tone when the screen is locked.Vibrate on touch Select to enable vibrate mode when you touch the screen.
DRAFTChapter 1 — About the Computer Features20 Dolphin CT50 Mobile Computer User GuideInsert a MicroSD CardYou can use a microSD card to increase file storage capacity or to install software. Honeywell recommends the use of Single Level Cell (SLC) industrial grade microSD or microSDHC memory cards with the CT50 computer for maximum performance and durability.1Power off the computer.2Disconnect the handstrap from the bottom of the computer.3Press and slide the battery door toward the bottom of the computer to unlock the door.Note: Format memory card before initial use.
DRAFTChapter 1 — About the Computer FeaturesDolphin CT50 Mobile Computer User Guide 214Lift up on the edge of the battery and remove it from the computer.5Press down on the SD card door and slide it toward the top of the computer to open it.
DRAFTChapter 1 — About the Computer Features22 Dolphin CT50 Mobile Computer User Guide6Insert the SD card into the door.7Press down on the SD card door and slide the door toward the bottom of the computer to lock it.8Insert the battery into the computer.9Press in on the battery door and slide it into the locked position.10 Replace the handstrap.
DRAFTChapter 1 — About the Computer FeaturesDolphin CT50 Mobile Computer User Guide 23How to Transfer FilesYou can transfer files between your desktop PC and the CT50 with the HomeBase or USB adapter and a standard USB cable. When the computer is connected through USB, you can browse to it and drag-and-drop to move files back and forth to a Windows PC. If you are transferring files to and from a Mac, use the Android File Transfer application (available from www.android.com/filetransfer).By default, the computer connects using MTP (Media Transfer Protocol). If you are transferring mainly camera images, you can configure the connection to use PTP (Picture Transfer Protocol). If your Windows PC does not support MTP, you may be able to transfer files using PTP instead. 11 Connect the CT50 to your PC.12 On the CT50, select either Connected as a media device (MTP) or Camera (PTP). The CT50 stores your selection as the default.13 Browse to the CT50 from your PC. You can now copy, delete, or move files between the CT50 and your PC.How to Browse Files on the CT50You can use the File Browser application in Power Tools to browse the files on the CT50 and the microSD card.1Touch All Apps > Power Tools   > File Browser  .2Touch a folder name or file name to open it.Note: The CT50 supports Hi-Speed USB communications (USB 2.0) with a maximum data transfer rate of 480 Mbps.Note: Due to system permissions, some file cannot be opened. Depending on the associated application, a choice of applications may be available to open the file.
DRAFTChapter 1 — About the Computer Features24 Dolphin CT50 Mobile Computer User GuideAccessories for the CT50The CT50 with a battery. All other accessories are ordered and shipped separately. For help, contact your local sales representative.CT50 Accessories and DescriptionsAccessory DescriptionCT50 Battery (Model CT50-BTSC) The battery provides hours of power to the CT50. You may want to purchase spare battery packs for longer shifts.eHomeBase Use the eHomeBase to hold a CT50 with its battery installed, charge a spare battery pack, charge the main battery pack, and provide power to the mobile computer. The dock has USB host and client connectors as well as an Ethernet connector.ChargeBase The CT50 ChargeBase is a 4-slot charging cradle that can power four computers, and charge their main batteries in 6 hours.NetBase The Net Base enables up to four CT50 computers to communicate with a host device over an Ethernet network. The Net Base also provides a second RJ45 Ethernet port for connection to an additional device such as a printer, workstation, or another Net Base.Vehicle Power Adapter Use the vehicle power adapter to charge the battery installed in the CT50 from the accessory port in your vehicle.Vehicle Dock Use the vehicle docks to hold and charge the CT50 while using it on a vehicle.Quad Charger Use the quad charger to charge up to 4 batteries.USB Adapter Use this snap-on adapter to provide USB host and client communications through the CT50.
DRAFTChapter 1 — About the Computer FeaturesDolphin CT50 Mobile Computer User Guide 25DEX Adapter Use this snap-on adapter to provide a DEX connector for the CT50.Scan Handle Attach to a CT50 to have an easy way to grip the computer and scan labels.Holster Use the holster to carry the CT50 hands-free in the work environment.Screen Protector Use the screen protector to keep the touchscreen free of scratches and dirt.CT50 Accessories and DescriptionsAccessory Description
DRAFTChapter 1 — About the Computer Features26 Dolphin CT50 Mobile Computer User Guide
DRAFT272About the User Interface and ApplicationsUse this chapter to learn about the Android user interface and how to interact with the screen. You can also use this chapter to learn about the Honeywell applications on the computer.
DRAFTChapter 2 — About the User Interface and Applications28 Dolphin CT50 Mobile Computer User GuideAbout the User InterfaceThe Android 4.4 operating system provides a touch-friendly and easy to navigate user interface.About the Home ScreenWhen you turn on the mobile computer, the Home screen is the first screen that appears after language provisioning is complete.Understand the Home ScreenItem DescriptionStatus bar Status icons to the left tell you when an app has sent notifications, such as an arriving message or a meeting notice. System icons to the right display the current wireless and network connection state and battery level.Favorites tray App icons in the tray are visible on every Home screen. The All Apps icon is always in the center of the Favorites tray.Search bar Search the internet or the computer using Google.Status barFavorites traySearch bar
DRAFTChapter 2 — About the User Interface and ApplicationsDolphin CT50 Mobile Computer User Guide 29Navigation and Function ButtonsThere are navigation and function buttons below the Favorites tray on the front panel of the CT50.Common Status and Notification Icons?Should I include a table with the icons and descriptions here?Remap a ButtonYou can change the default function of the Left Scan, Right Scan, or Camera buttons.1Tap All Apps > Settings > Key remap.2Touch to button you want to remap.3Tap KEYS or APP to view the available functions.4Select the function you want to assign to the button. The function you selected now appears under the button name.Navigation and Function ButtonsButton Description FunctionBack Takes you back to the previous screen.Recent Apps Lets you view and switch between recently used apps.Home Returns you to the Home screenSearch Starts a search on the computer or the internet.Volume Raises or lowers the volume of the speaker.
DRAFTChapter 2 — About the User Interface and Applications30 Dolphin CT50 Mobile Computer User GuideView NotificationsYou can view the notifications shade to see a list of events on the CT50.•To open the shade, swipe down from the top of the screen.•To close the shade, swipe up from the bottom of the screen, or tap the Back or Home buttons.Manage NotificationsWhen an app sends a notification to the CT50, you can easily respond to it.1When a notification icon appears, swipe down from the top of the screen.2To respond to a notification, touch it. The associated app opens so that you can respond.•To dismiss a notification, swipe it sideways.•To dismiss all notifications, tap the X in the top right corner.
DRAFTChapter 2 — About the User Interface and ApplicationsDolphin CT50 Mobile Computer User Guide 31Customize the Home ScreenYou can add application icons to any Home screen to access them more easily.1Touch  . The All Apps screen appears.2To add an app icon to a Home screen, touch and hold the icon for the app, and then slide your finger to place the icon on one of the Home screens.To add a widget icon to a Home screen, touch WIDGETS at the top of the screen, touch and hold the icon for the widget, and then slide your finger to place the widget icon on one of the Home screens.3To remove an app or widget from the Home screen, touch and hold the icon and slide it over Remove at the top of the screen.Customize the Favorites TrayYou can add application icons to the Favorites tray to access them more easily.1Touch  . The All Apps screen appears.2Touch and hold an icon in the Favorites tray, and slide it over X Remove at the top of the screen.3To add an app icon to the Favorites tray, touch and hold the icon for the app, and then slide your finger to place the icon in the Favorites tray.To add a Widget icon to the Favorites tray, touch WIDGETS at the top of the All Apps screen, touch and hold the icon for the widget, and then slide your finger to place the icon in the Favorites tray.Use Google™ SearchUse the Google Search field at the top of the Home screen to help you find anything you need on the computer or on the web.1At the top of any Home screen, touch Google to type your search term. As you type, suggestions from Google web search appear below the Search box, and results from the computer (such as apps or contacts) appear below the web search results.2Tap a suggestion to search for it immediately, or touch its arrow just to add the term to the search field without starting to search.
DRAFTChapter 2 — About the User Interface and Applications32 Dolphin CT50 Mobile Computer User GuideAbout Screen GesturesUse your fingers or the stylus to manipulate icons, buttons, menus, the onscreen keyboard, and other items on the screen.•To select or activate something, tap it.•To type something, such as a name or password, touch where you want to type. A keyboard appears that lets you type into the field.Other common gestures include:•Touch and hold: Touch and hold an item by touching it and lifting your finger until an action occurs.•Drag: Touch and hold an item for a moment. Without lifting your finger, move your finger on the screen until you reach the target position. For example, you can drag to reposition shortcuts on the Home screen.•Swipe or slide: Quickly move your finger across the screen, without pausing when you first touch. For example, you can slide a Home screen left or right to view the other Home screens.•Double-tap: Tap quickly twice on a web page, map, or other screen to zoom in. Double-tap again to zoom out.•Pinch: In some apps, you can zoom in and out by placing two fingers on the screen at once and pinching them together (to zoom out) or spreading them apart (to zoom in).Set the Time ZoneThe CT50 gets the current date and time from its network connection. You can manually set the time zone for your location.1Start the Settings app.2Tap Date & time.3Clear the check box for Automatic time zone.4Tap Select time zone and select the time zone for your location.
DRAFTChapter 2 — About the User Interface and ApplicationsDolphin CT50 Mobile Computer User Guide 33About Honeywell ApplicationsShould I add anything about Power Tools or Demos here?Or maybe applications that might be on the product like Launcher for Android?Can you download HTML5 Browser?
DRAFTChapter 2 — About the User Interface and Applications34 Dolphin CT50 Mobile Computer User Guide
DRAFT353About the ScannerUse this chapter to understand how to scan bar codes and how to configure the scanner.
DRAFTChapter 3 — About the Scanner36 Dolphin CT50 Mobile Computer User GuideAbout the ScannerThe internal scanner can read 1D and 2D bar code symbologies, composite symbologies, and postal codes. It also supports omni-directional scanning for greater flexibility in real-world settings. The image engine can also capture black and white images, such as signatures and pictures of damaged inventory.How to Send Data as Android Keyboard InputThe scan wedge feature sends scanned bar code data to an active application as Android keypad input. By default, scan wedging is enabled on the CT50 computer. You can use applications that are coded to use the scanner or applications that receive data through the scan wedge feature. If an application claims the scanner through the BarcodeReader API, the scan wedge feature is temporarily disabled. You can find information on how to create custom applications for the CT50 in the Software Development Kit (SDK) available for download at www. honeywellaidc.com.Use this table to understand the settings associated with each step in the scan data process.Scan Data Processing and SettingsProcess Step Associated Scan SettingDecode bar code. Symbology SettingsInterpret bar code as ISO8859-1. Symbology SettingsDetect special bar codes and implement specific action instead of normal processing.•URL bar code starts browser•Scan-to-Intent starts an application•EZConfig bar code starts EZConfigData Processing Settings Launch BrowserScan to IntentLaunch EZConfigConvert to selected character set. Data Processing Settings Charset
DRAFTChapter 3 — About the ScannerDolphin CT50 Mobile Computer User Guide 37Substitutions occur within the Prefix and Suffix string values.Change the Scanner SettingsChanges you make to the Default profile apply to all applications with no profile.1Tap the Settings app.2Tap Scanning.3Tap Default.4Select Data Processing Settings, Symbology Settings, Imager Settings, Trigger Settings, or Notification Settings.5Modify the settings to meet your application needs.Attach Prefixes and Suffix. The data string is composed in the following order:•Prefix•Symbology prefix•Bar code data•SuffixInterpret substitutions of the Prefix and Suffix strings.Data Processing Settings PrefixSymbology PrefixSuffixActivate a Total Freedom plugin. Data Processing Settings Data Editing PluginInject the final data string as Android KeyEvents. Data Processing Settings WedgeScan Data Processing and SettingsProcess Step Associated Scan SettingPrefix and Suffix InterpretationSubstring Replacement Character Code Wedged as a KeyEvent\r 13 No\n 10 Yes\t 9 Yes\\ ‘\’ No
DRAFTChapter 3 — About the Scanner38 Dolphin CT50 Mobile Computer User GuideRestore Default Scanner SettingsYou can easily discard all changes you made to the Default profile and restore the default values.1Tap (insert graphic of three dots) in the upper right corner of any of the scan settings screens.2Tap Restore all defaults.Scanners Default SettingsUse these tables to understand the Data Processing Settings, Symbology Settings, Imager Settings, Trigger Settings, and Notification Settings.Data Processing SettingsUse the Data Processing Settings to specify how bar code data is processed by the CT50.Note: When you select to restore the default values of one of the settings, it also restores the default values of all settings within the profile.Data Processing SettingsSetting Description Default Wedge Enable or disable sending the bar code data as Android KeyEvents when sending data to the active application. EnabledCharset Select the character set to use when interpreting the bar code data into a string. Options include:•ISO-8859-1•US-ASCII•UTF-16•UTF-16BE•UTF-16LE•UTF-8Corresponds to BarcodeReader property:PROPERTY_DATA_PROCESSOR_CHARSETISO-8859-1Prefix Defines the string added before the decoded bar code data. NoneSuffix Defines the string added after the decoded bar code data. None
DRAFTChapter 3 — About the ScannerDolphin CT50 Mobile Computer User Guide 39Data Editing Plugin Specify a Total Freedom data editing plug-in. NoneSymbology Prefix Specify a symbology identifier prefix to the bar code data. Options include:•None•Honeywell•AIMNoneLaunch Browser Enable or disable URL bar code handling. If a bar code starts with http:// or https://, the browser opens using the bar code data as a URL.Corresponds to BarCodeReader property:PROPERTY_DATA_PROCESSOR_LAUNCH-BROWSEREnableScan to Intent Enable or disable special handling of scan-to-intent bar codes. Applies to bar codes in one of the following formats:‘//’ ACTION‘//’ intent-suffix ‘$’ extra-dataWhere:ACTION and extra-data are any string of characters. Launches an application listening for the intent:Intent action: “com.honeywell.scantointent.intent.action.” + ACTIONIntent extra “com.honeywell.scantointent.intent.extra.DATA” contains the remainder of the bar code data after the first ‘$’ character.Corresponds to BarCodeReader property:PROPERTY_DATA_PROCESSOR_SCAN_TO_INTENTEnabledLaunch EZ Config Enable or disable special handling of EZConfig bar codes. Applies to EZConfig bar codes, which are encoded with the Aztec symbology and containing specific header data.Corresponds to BarcodeReader property:PROPERTY_DATA_PROCESSOR_LAUNCH_EZ_CONFIGEnabledData Processing Settings (continued)Setting Description Default
DRAFTChapter 3 — About the Scanner40 Dolphin CT50 Mobile Computer User GuideSymbology SettingsUse the Symbology Settings to enable and disable bar code symbologies. Tap a symbology to view and modify the symbology configuration parameters.Symbology SettingsSetting DefaultCode 128 EnabledGS1-128 EnabledCode 39 EnabledDatamatrix EnabledUPC-A EnabledUPC-E DisabledEAN-8 DisabledEAN-13 EnabledAztec EnabledChina Post DisabledCodabar EnabledCodablock A EnabledCodablock F DisabledCode 11 DisabledCode 93 DisabledComposite DisabledHan Xin DisabledIATA 2 of 5 DisabledInterleaved 2 of 5 EnabledKorean Post DisabledMatrix 2 of 5 DisabledMaxicode DisabledMicro PDF 417 DisabledMSI DisabledPDF 417 DisabledQR Code DisabledRSS (GS1) DisabledStandard 2 of 5 Disabled
DRAFTChapter 3 — About the ScannerDolphin CT50 Mobile Computer User Guide 41Imager SettingsYou should not need to modify the Imager Settings. The Override Recommended Values setting is disabled by default. The recommended Imager Settings are designed to work in a wide range of environments and should only be modified if you have an advanced understanding of imagers.Trigger SettingsUse the Trigger Settings to configure how the scan buttons work. Notification SettingsUse the Notification Settings to configure how your CT50 responds when you scan a bar code.Telepen DisabledTLC 39 DisabledTrioptic Disabled2D Postal Settings DisabledOCR DisabledTrigger SettingsSetting Description DefaultDecode Timeout Scanning automatically turns off after this number of seconds if the scan trigger is pressed and nothing has successfully decoded.20Symbology Settings (continued)Setting DefaultNotification SettingsSetting Description DefaultGood Read Notification Enables or disables a good read notification. The notification consists of a green blink of the Good Read LED, a short beep, and an optional short vibration.Enabled
DRAFTChapter 3 — About the Scanner42 Dolphin CT50 Mobile Computer User GuideScan a Bar CodeThe scanner has an aiming beam to help you correctly frame bar codes. It also supports omni-directional (360°) scanning to make it easier for you to scan bar codes.1Point the scanner window at the bar code and hold the computer steady a few inches from the label.2Press one of the Scan buttons. The illumination frame appears.Make sure the entire bar code is inside of the frame. When the scanner successfully reads a bar code, you hear a high beep and the Good Read LED turns on briefly.3Release the Scan button.Bad Read Notification Enables or disables notification of a failed scan. The notification consists of a red blink of the Good Read LED, an error beep, and an optional short vibration.DisabledVibrate Enabled Enables or disables whether the computer vibrates when there is a good or bad read. DisabledNotification SettingsSetting Description DefaultNote: Before you start scanning bar codes, use the Settings app to enable only the bar code symbologies that you need.
DRAFT434Use the PhoneYou can use the phone feature to make and receive phone calls as well as transmit data through wireless wide-area networks (WWANs).
DRAFTChapter 4 — Use the Phone44 Dolphin CT50 Mobile Computer User GuideAbout the PhonePhone features on the computer include a speaker and a microphone. You can also use a Bluetooth headset or hands-free kit. The phone feature is enabled by default.The WAN radio in your computer determines the supported network types:•If your computer includes the UMTS/HSPA+ WAN radio, you can connect to UMTS networks.•If your computer includes the Flexible Network Radio, you can connect to CDMA or UMTS networks in all regions that support these technologies. The Flexible Network Radio is a software-defined radio (SDR) that can be configured for CDMA or UMTS depending on your wireless communication needs.Honeywell supports these CDMA network carriers:•Sprint (United States only)•Verizon (United States only)For other carriers, contact Honeywell Technical Support.After you turn on the phone and activate service with your wireless carrier, you can customize the phone features and network settings in the Wireless & Networks section of the Settings app.Activate the UMTS PhoneActivating the UMTS phone on your CT50 is done the same way whether your computer has the Flexible Network Radio or the UMTS/HSPA+WAN radio.You use a SIM card to activate the UMTS phone on the CT50. You can purchase the SIM card from your network provider.1Power off the CT50.2Disconnect the handstrap from the bottom of the computer.3Press and slide the battery door toward the bottom of the computer to unlock the door.4Lift up on the edge of the battery and remove it from the computer.Note: Both WWAN radios support Network Information and Time Zone (NITZ) messages to automatically set the system time.
DRAFTChapter 4 — Use the PhoneDolphin CT50 Mobile Computer User Guide 455Lift up on the SIM and MicroSD door.6Press down and slide the SIM door toward the top of the CT50 to open it.
DRAFTChapter 4 — Use the Phone46 Dolphin CT50 Mobile Computer User Guide7Insert the SIM card in the door.8Close the SIM card door and slide it toward the bottom of the CT50 to secure it.9Replace the battery, reconnect the handstrap, and press the Power button to turn on the CT50. The phone is now ready to use.
DRAFTChapter 4 — Use the PhoneDolphin CT50 Mobile Computer User Guide 47Activate the CDMA PhoneTo activate the CDMA phone in your mobile computer, you need to contact your wireless carrier and set up an account.You also need to provide the carrier with the Mobile Equipment Identifier (MEID) for the computer. You can find the MEID:•on a label located in the battery compartment.•on the outside of the computer shipping box.The activation process is slightly different for each CDMA carrier. Your carrier sales contact and an Honeywell representative can guide you through the process. In general, you activate the CDMA phone as follows:1Contact your wireless provider and give the provider the MEID for the computer.2If your carrier is Sprint, reboot the computer. As soon as the Sprint network detects your phone, Hands-Free Activation (HFA) begins, and a series of notification messages appear. When activation is complete, a completion message appears and the WAN radio reboots. The phone is ready to use.If your carrier is Verizon, tap  , enter *228 on the phone keypad, and tap  . After a short wait, a message appears, confirming either success or failure of the activation. After successful activation, the phone is ready to use.Make a Phone CallOnce the phone is activated, you can make a phone call.1On the Home or All Apps screen, tap  .If the Phone app opens to a list of numbers instead of the keypad, swipe left or touch   to return to the keypad.2Touch the keys to enter the number, and then touch   below the keypad to dial.3To end a call in progress, tap  .Note: For the CDMA phone, settings are permanently stored in the WWAN radio after activation. CDMA settings persist through a factory data reset.
DRAFTChapter 4 — Use the Phone48 Dolphin CT50 Mobile Computer User GuideAnswer the PhoneWhen you receive a phone call, the Incoming Call screen opens, showing the caller ID. All incoming calls are recorded in the Call log. If you miss a call, you receive a notification.When a call arrives, touch the white phone icon and slide over one of the icons:•To answer the call: •To send the call to voicemail: •To send a message from a list of default text messages: Switch Apps During a Phone CallYou can switch apps while a phone call is in progress. For example, you can use the People app to look up contact information during your call.•During a phone call, tap another app icon on the Home or All Apps screen to run that application. The green Phone icon appears in the Status bar while the call is underway.Check Your VoicemailWhen you have a new voicemail message, the voicemail icon appears at the top left of the screen.1Swipe down from the top of the screen to view your notifications. The voicemail notification shows the number of unread messages and a number to dial.2Touch New voicemail. The phone dials the number. Follow the instructions to retrieve your messages.Note: If you have only a WWAN connections, apps that need a data connection may be unable to access online data while the phone call is in progress. If simultaneous phone calls and stat connections are not possible due to provider limitations, voice calls receive priority. Check with your provider for more information.Note: Consult your service provider for more information on setting up your voicemail account.
DRAFTChapter 4 — Use the PhoneDolphin CT50 Mobile Computer User Guide 49Set Your Voicemail NumberTo access your voicemail, you must set your voicemail number in the Phone app.1Tap .2Tap   and then tap Settings. A list of call settings appears.3Tap Voicemail > Setup > Voicemail number.4If you are a Sprint customer, delete “*86” from the entry field and enter your voicemail number.If you are an AT&T customer, enter your voicemail number.5Tap OK.Change Voicemail Settings1Tap   on a Home or All Apps screen.2Tap   and then tap Settings.3Tap the voicemail setting you want to change.Make an Emergency Phone CallYou can use the phone to make an emergency phone call, even if the SIM card is missing from your UMTS phone or if you do not have a valid CDMA account. In either case, the phone shows that you have no service. However, if you dial certain emergency numbers (such as 112, 911, 000, 08, 118, 119, or 999) the call will go through.Configure Phone SettingsYou can customize settings for the phone, including the ringtone, voicemail options, keypad tones, internet call settings, and other options.1Tap .2Tap   and then tap Settings. The Call settings menu appears.3Change phone settings as necessary.Note: This procedure does not apply if you are a Verizon customer.
DRAFTChapter 4 — Use the Phone50 Dolphin CT50 Mobile Computer User Guide
DRAFT515Use the CameraUse this chapter to learn how to take pictures and record videos with the color camera.
DRAFTChapter 5 — Use the Camera52 Dolphin CT50 Mobile Computer User GuideAbout the Color CameraThe CT50 contains an 8-megapixel color camera for taking pictures and videos. The camera and flash are located on the back of the computer.Use the Gallery app   to view photos and videos stored on the CT50.Adjust the Camera and Video SettingsThe camera and video settings are adjustable from within the Camera app.How to ZoomThe camera zoom is controlled using a pinching motion on the touch screen. Place two fingers on the screen at the same time, and then: •spread them apart to zoom in (enlarge and object).•pinch them together to zoom out.Change Camera SettingsYou can change the camera settings for best results when taking pictures.1Press the Camera button and then tap  .2Tap 3Tap HDR or one of the icons   to change basic camera settings.•When HDR is enabled, the computer automatically captures multiple photos and combines them into one photo creating the best quality image possible.•Enable or disable different options such as scene mode, store location, and picture size.Take a Picture1Press the Camera button or tap All Apps and then tap Camera  .2Using the screen as a viewfinder, move the computer until you see the image you want to capture.3Tap the screen to set the focus. By default, the camera senses the lighting in the environment and turns the torch on if needed.
DRAFTChapter 5 — Use the CameraDolphin CT50 Mobile Computer User Guide 53(Optional) To zoom in or out, drag the slider at the bottom of the viewfinder.4Press Enter or the shutter button  . The camera takes a picture and a thumbnail image of the picture appears in the corner of the screen.•To view the picture, tap the thumbnail image.•To return to the Camera app, swipe the thumbnail image to the right.Record a VideoThis section explains how to record video with the camera in the computer.1Press the Camera button or tap All Apps and then tap Camera  .2Tap .3Tap  to begin recording video. To zoom in or out, drag the slider at the bottom of the viewfinder.4When you are done recording, tap  .Change Video SettingsYou can change the camera settings for best results when recording video.1Press the Camera button or tap All Apps and then tap Camera  .2Tap .3Tap .4Tap 5Tap one of the icons   to change basic video settings.
DRAFTChapter 5 — Use the Camera54 Dolphin CT50 Mobile Computer User Guide
DRAFT556Configure the ComputerUse this chapter to learn how to configure the CT50. You will also find information on how to configure network communications and wireless security.
DRAFTChapter 6 — Configure the Computer56 Dolphin CT50 Mobile Computer User GuideHow to Configure the ComputerYou can configure many parameters on the computer such as the bar code symbologies it decodes, or the network settings. The values you set for these parameters determine how the computer operates.You configure the computer using the Settings app.Start the Settings AppThe Settings app is located in the All Apps menu.•Tap All Apps > Settings.About the Structure of the Settings AppUse this section to learn about the structure of the Settings app so you can find parameters quickly.
DRAFTChapter 6 — Configure the ComputerDolphin CT50 Mobile Computer User Guide 57Wireless & NetworksSetting DescriptionWi-Fi Turns the Wi-Fi radio on and off. When Wi-Fi is turned on, tap the bar to see a list of Wi-Fi networks.Bluetooth Turns the Bluetooth radio on and off. when bluetooth is turned on, tap the bar to see a list of Bluetooth devices in range.Data usage Displays a list of phone data usage for the current data usage cycle. Tap the Data usage cycle list to select another date range.More... Airplane mode: Turns airplane mode on and off.VPN: Sets the password parameters for a virtual private network (VPN).Mobile networks: Includes settings for mobile networks, including enabling data access and roaming over mobile networks, selecting access points and network operators, or selecting only 2G networks (to save battery life).Mobile plan: ??Cell broadcasts: Sets what emergency information you want to receive and how you want to receive it.DeviceSetting DescriptionSound Settings for the phone and notification sounds, including tones and volume.Display Settings for the display brightness, wallpaper, sleep timeout, font size, and screen auto-rotation.Storage Shows the remaining amount of storage.Battery Shows battery usage data and the current battery state.Apps Lists downloaded and running apps.
DRAFTChapter 6 — Configure the Computer58 Dolphin CT50 Mobile Computer User GuidePersonalSetting DescriptionLocation Turns location services (Google and GPS satellite data) on and off.Security Sets screen lock and administrator privileges.Language & input Selects the active language and default keyboard. Sets auto-typing features such as capitalization and punctuation. Adjusts the pointer speed for an external mouse or trackpad.Backup & reset Restores factory default settings.Honeywell SettingsSetting DescriptionKey remap Remaps the Left Scan, Right Scan, and Camera buttons. For help, see “Remap a Button” on page 29.Smart sensors Configures the integrated motion detection sensors for advanced power management.Battery LED Configures the battery LED behavior. Do I need to explain the difference in the choices? Does the battery LED work the same as the D75e?Battery Health View the current health of the battery.Logger Activates a logging service that creates an Android logcat log and kernel log for APP and system troubleshooting.Scanning Configures the CT50 imager. For help, see “Change the Scanner Settings” on page 37.Web applications Enables the web interface settings and lets you set a port.AccountsSetting DescriptionAdd account Adds a Corporate or Email account to the CT50.
DRAFTChapter 6 — Configure the ComputerDolphin CT50 Mobile Computer User Guide 59SystemSetting DescriptionDate & time Configures all date and time settingsAccessibility Sets accessibility levels, such as larger display text and enabling text-to-speech output.PrintingDeveloper options Enables developer-specific options such as USB debugging and SD card protection.About phone
DRAFTChapter 6 — Configure the Computer60 Dolphin CT50 Mobile Computer User GuideAbout Network CommunicationsYou can use the mobile computer in your wireless or wired data collection network. You can connect your computer using:•802.11 radio communications.•Ethernet communications.•Bluetooth communications.•USB and serial communications.Connect to a Wi-Fi NetworkThe CN51 has an 802.11 radio to transfer data using wireless communications. Before you connect to a Wi-Fi network, you need to know about your network security protocol and its required credentials. By default, the 802.11 radio is disabled.1Start the Settings app and slide the Wi-Fi switch on.2When the switch turns blue, tap Wi-Fi. A list of discovered networks appears.
DRAFTChapter 6 — Configure the ComputerDolphin CT50 Mobile Computer User Guide 613To quickly connect to a network through Wi-Fi Protected Access (WPS), tap  . To search for a network not in the list, tap   and type the network name.4Tap a network name in the list to view details:If the network is secured, a list of required information appears (such as a certificate name, a password, or other credentials). To connect to the secured network, enter the required information and tap Connect.•To leave a connected network, tap Forget. For example, you could choose to forget a network you no longer use.•To close the network details screen, tap Cancel.Configure Proxy Settings for a Wi-Fi NetworkIf you need to connect to network resources through a proxy server, you can configure settings for the proxy server for each Wi-Fi network you add. By default, the Wi-Fi networks you add are not configured to connect through a proxy server.
DRAFTChapter 6 — Configure the Computer62 Dolphin CT50 Mobile Computer User Guide1Open the Settings app and tap Wi-Fi. The list of available Wi-Fi networks appears.2Tap and hold the network name and then tap Modify network. A list of network settings appears.3At the bottom of the list of network settings, select Show advanced options.4If the network has no proxy settings, tap None in the Proxy Settings list, and then tap Manual in that list.5Enter the proxy settings for the network.6Tap Save.Disable Wi-Fi NotificationsBy default, when Wi-Fi is enabled, you receive notifications in the Status bar when the computer discovers a wireless network. You can disable these notifications.1Start the Settings app.2Tap and hold Wi-Fi.3Tap and then tap Advanced. The Advanced Wi-Fi menu appears.4Clear the Network notification check box to disable notifications.Connect to an Ethernet NetworkTo connect the computer to an Ethernet network, you need an Ethernet dock.1Make sure the dock is connected to your Ethernet network.2Place the computer in the dock.3Start the Settings app and make sure Ethernet is enabled (Ethernet is enabled by default).To enable Ethernet, slide the Ethernet switch on. When the switch turns blue, Ethernet is enabled.Note: Proxy settings apply only to the Wi-Fi network you modify. You must change proxy settings for each network requiring a proxy server.
DRAFTChapter 6 — Configure the ComputerDolphin CT50 Mobile Computer User Guide 634Tap Ethernet. The Ethernet list shows the name of the current Ethernet connection. By default, the computer assumes a DHCP connection, and that your network has assigned an IP address automatically. If DHCP is working, the Ethernet dock should indicate that communication with the network is occurring.5(Optional) To assign a static IP address, tap the connection name (for example, eth0). The IP settings dialog box appears.aTap DHCP and then select Static from the list.bEnter the required network information and then tap Apply.How to Connect to Virtual Private NetworksThe computer supports connecting to virtual private networks (VPNs). This section describes how to add and connect to VPNs. To configure VPN access, you must obtain details from your network administrator. You view and change VPN settings in the Settings app.Add a VPNBefore you can connect to a VPN, you must add VPN information.1Start the Settings app.2In the Wireless & Networks section, tap More.3Tap VPN.4Tap Add VPN Profile.5Enter information for the VPN.6Tap Save. The VPN name appears in the VPN list.Connect to a VPN1Start the Settings app.2In the Wireless & Networks section, tap More.3Tap VPN.4Tap the name of the VPN in the list, and enter any necessary credentials when prompted.5Tap Connect. The computer connects to the VPN, and a Status icon and notification appear.To disconnect from the VPN, tap the notification.Note: Before you can access VPNs, you need to set a lock screen PIN or password.
DRAFTChapter 6 — Configure the Computer64 Dolphin CT50 Mobile Computer User GuideEdit VPN Information1Start the Settings app.2In the Wireless & Networks section, tap More.3Tap VPN.4Tap and hold the name of the VPN you want to edit, and select Edit network from the list.5Edit VPN settings as necessary.6When you are done, tap Save.About Wireless SecurityThe computer provides these security solutions for your wireless network:•Wi-Fi Protected Access 2 (WPA2™)•Wi-Fi Protected Access (WPA)•802.1x•LEAP•WEPHoneywell recommends WPA2 security with PSK (Personal) or 802.1x (Enterprise) key management.Before you set security, you need to enable the radio, set the date, and set the SSID on your computer. To use 802.1x security, you need to load a root certificate on your computer. To use transport layer security (TLS) with 802.1x security, you also need to load a user certificate.Use the Settings app to access and configure all wireless security settings.About CertificatesYou can use digital certificates to identify the computer for network access or authentication to servers. To use a certificate to identify your device, you must install it in the trusted credential storage on the computer.
DRAFTChapter 6 — Configure the ComputerDolphin CT50 Mobile Computer User Guide 65Android supports DER-encoded X.509 certificates saved in files with a .crt or .cer file extension. To install a valid certificate with a .der or it. Android also supports X.509 certificates saved in PKCS#12 key store files with a .p12 or .pfx entension. To install a valid key store file with another extension, you must change the extension to .p12 or .pfx to install it. When you install a certificate from a PKCS#12 key store, Android also installs any accompanying private key or certificate authority certificates.Load a CertificateTo use a certificate, you must install it in the trusted credential storage on the computer.1Copy the certificate or key store from your PC to a microSD card.2Install the microSD card in the computer and turn the computer on.3Start the Settings app and tap Security > Install from SD card.4Tap the name of the certificate or key store to install it. If prompted, enter the key store password and tap OK.5Enter a name for the certificate and tap OK.Disable or Remove CertificatesIf a certificate is compromised, or your organization chooses not to trust it, you can disable or remove it.1Start the Settings app and tap Security > Trusted credentials. The trusted credentials screen has two tabs:•System shows CA certificates that are installed in the ROM.•User shows CA certificates you have installed yourself.2Tap the name of the certificate to disable or remove. The certificate details screen appears.3Scroll to the bottom of the details screen and tap Disable (for System certificates) or Remove (for User certificates).If necessary, you can enable a disabled System certificate from this location. If you remove a User certificate, you must install it again to enable it.4Tap OK.Note: Apps such as Email and Browser that support certificates allow you to install certificates directly from within the app. For more information, see the Help that comes with the app.
DRAFTChapter 6 — Configure the Computer66 Dolphin CT50 Mobile Computer User GuideAbout Bluetooth CommunicationsThe CN51 is Bluetooth-enabled, which lets you connect to other Bluetooth devices.You need to turn on the Bluetooth radio before you can discover and connect to Bluetooth devices. By default, the radio is turned off.The Bluetooth radio maintains its current state through a system reset. If you perform a factory data reset, you must recreate pairings to devices.The System bar icons indicate Bluetooth status.Connect a Bluetooth DeviceTo connect to a Bluetooth device, you must enable Bluetooth and then select the device from a list of discovered devices.1Start the Settings app.2If Bluetooth is off, slide the Bluetooth switch on.3Tap Bluetooth. A list of available Bluetooth devices appears.
DRAFTChapter 6 — Configure the ComputerDolphin CT50 Mobile Computer User Guide 674(Optional) If the device you want does not appear in the list, make sure the device is turned on and discoverable, and tap Search for devices.5Tap a device in the list to select it. If a pairing request message appears, enter the device PIN and tap OK. When the device is paired with the computer, the device name appears in Paired Devices at the top of the list.6To disconnect a paired device, tap the Quick Settings icon   next to the device name and then tap Unpair.
DRAFTChapter 6 — Configure the Computer68 Dolphin CT50 Mobile Computer User GuideConfigure Bluetooth SettingsYou configure Bluetooth settings in the Settings app.1Start the Settings app and tap Bluetooth.2Tap the Menu icon   and select a setting from the menu:•Tap Rename phone to change the computer device name. Type the new name and then tap Rename.•Tap Visibility timeout to set the amount of time that the computer is visible to other Bluetooth devices. By default, the timeout is set to 2 minutes. You can select 5 minutes, one hour, or no timeout. Setting a shorter timeout value preserves battery life.•Tap Show received files to view statistics on the received files.Making the CT50 DiscoverableBy default, the CT50 is not discoverable, which means that the computer will not be found by other Bluetooth devices.1Tap All Apps > Settings.2Verify the Bluetooth radio is activated.3Tap Bluetooth.4Tap CT50 (the default computer name) at the top of the screen to make the device discoverable. The computer starts a 2 minute count down during which time the computer is temporarily discoverable by other devices using Bluetooth technology.Rename or Disconnect a Paired DeviceYou can rename or disconnect a paired Bluetooth device from the Settings app.1Open the Settings app and tap Bluetooth.2Tap the Settings icon   in the Paired Devices list.3To rename the device, tap Rename, type the new name, and then tap OK.•To disconnect the device, tap Unpair.
DRAFTChapter 6 — Configure the ComputerDolphin CT50 Mobile Computer User Guide 69About Serial and USB CommunicationsYou can use these accessories to transmit data to and receive data from another device through serial or USB communications:•vehicle dock•HomeBase•USB snap-on adapter•RS-232 DEX adapterFor information on these accessories, contact your local sales representative.
DRAFTChapter 6 — Configure the Computer70 Dolphin CT50 Mobile Computer User GuideAbout Near Field Communication (NFC)NFC technology provides the ability for short-range, wireless data transfer between the CT50 and NFC tags or other NFC enabled devices placed in close proximity to the back of the computer. NFC equipped CT50 models support the following modes of operation:• NFC tag reader/writer mode: The computer reads and/or writes digital information from or to an NFC tag.• Peer-to-Peer (P2P) mode: The computer uses Android Beam and/or Bluetooth technology to transfer screen content (such as a picture, contact information, Web page url, or file) between NFC enabled devices.• NFC card emulation mode: The computer emulates an NFC card (smart card) that an external card reader can access. You have the option to enable the embedded secure element (eSE) SmartMX™ or Host Emulation. Secure element implementation is commonly used for financial transactions or coupon and loyalty mobile marketing applications that require a secure memory and execution environment for the storage of personal information (such as account information and credentials) and running custom smart card applets.Note: Sleep Mode (Suspend Mode) and the screen lock temporarily turns the NFC radio off.
DRAFT71ASpecifications
DRAFTChapter A — Specifications72 Dolphin CT50 Mobile Computer User GuidePhysical and Environmental SpecificationsThis sections lists the physical and environmental specifications for the CT50.Screen Specifications4.8-inch TFT color LCD with backlight, 720-pixel HD, outdoor viewable touch screen.Physical DimensionsLength: 160 mmWidth: 82.5 mmDepth: 22 mmWeight (with battery): 350 g (including battery)Tumble and Drop SpecificationsTumble specification: 1000 1 m tumblesDrop specification: 5 ft multiple drops to unyielding steel plate, -10 to +50 °C temperature range and 4 ft drop at 20 ° CPower and Electrical SpecificationsOperating battery: Rechargeable Lithium-ion 3.7 V, 4000 mAh batteryBackup battery: ??Electrical rating: ??Temperature and Humidity SpecificationsOperating temperature: -20 °C to 50 °C (-4 °F to 122 °F)Storage temperature: -30 °C to 70 °C (-22 °F to 158 °F)For maximum battery life, store at 23 °C (73 °F) at 50% charge.Charging temperature: ??Relative humidity (operating): 5% to 95% non-condensingEnvironmental rating: IP67, Category 1
DRAFTChapter A — SpecificationsDolphin CT50 Mobile Computer User Guide 73Language SupportWorld-wide English, French, German, Italian, Spanish, Simplified Chinese, Traditional Chinese.Imager Reading Distances - what imager is in the CT50??MVT9V022 non-decoded slim imagerI need specifications and depth of field information.
DRAFTChapter A — Specifications74 Dolphin CT50 Mobile Computer User Guide

Navigation menu