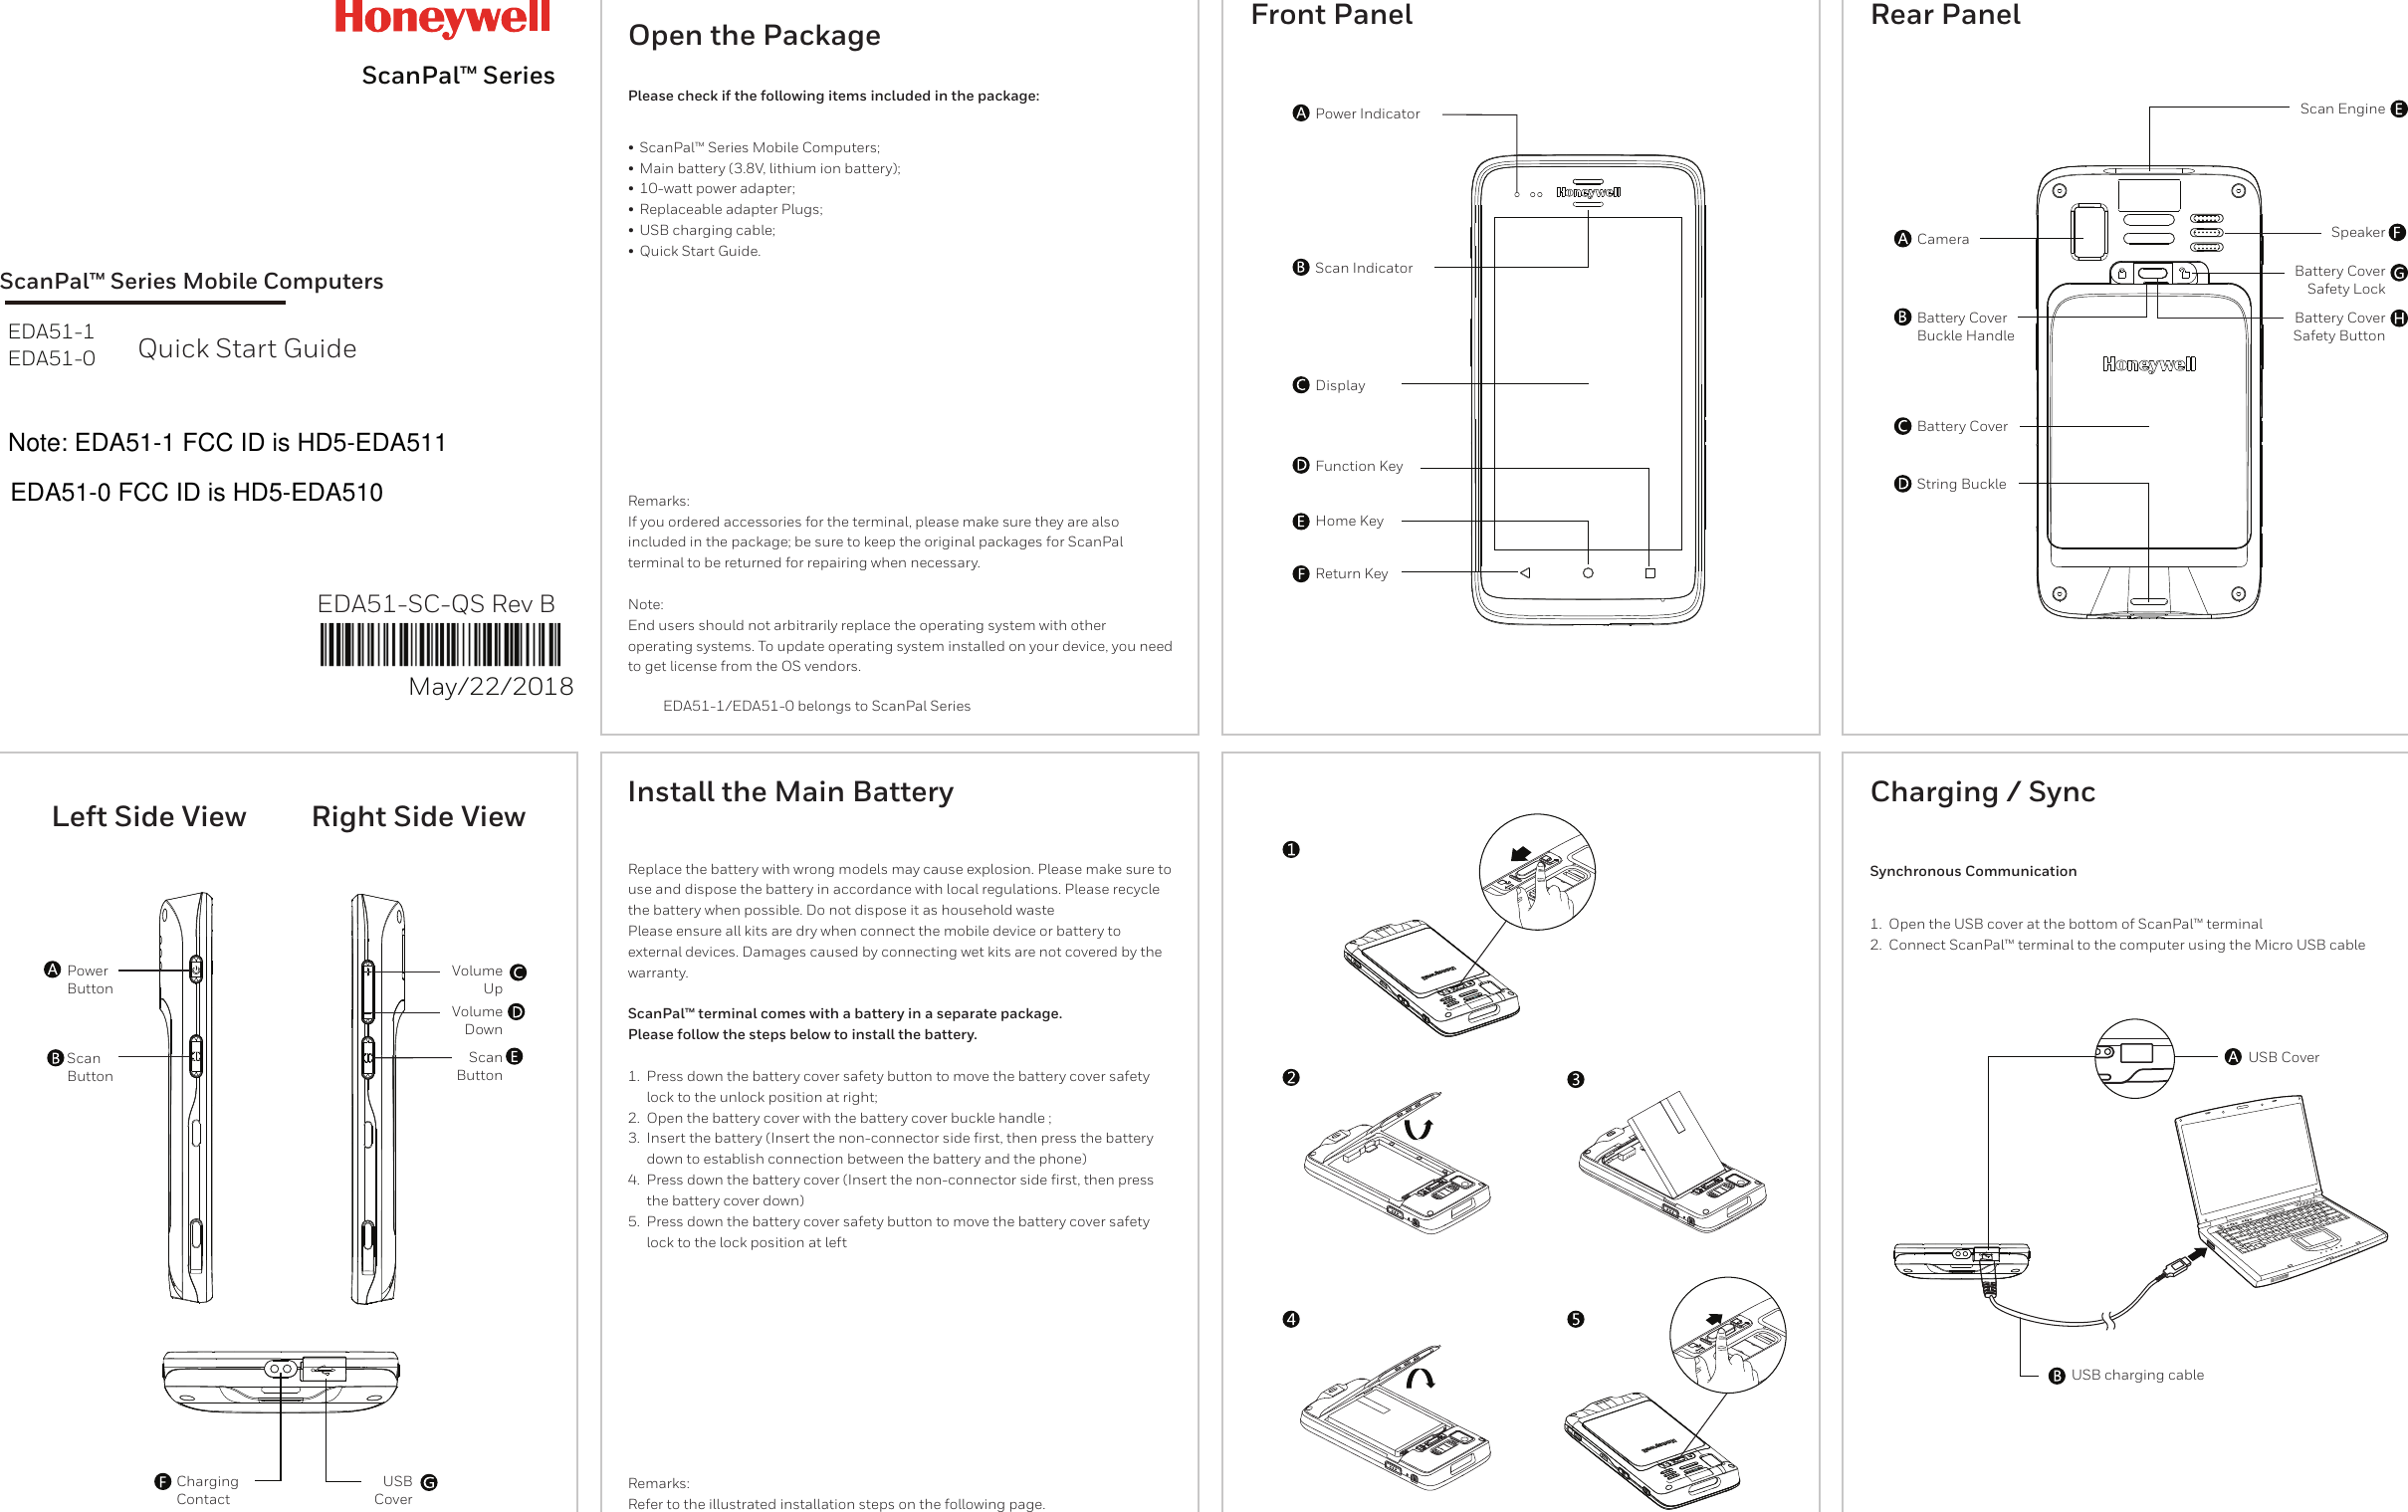
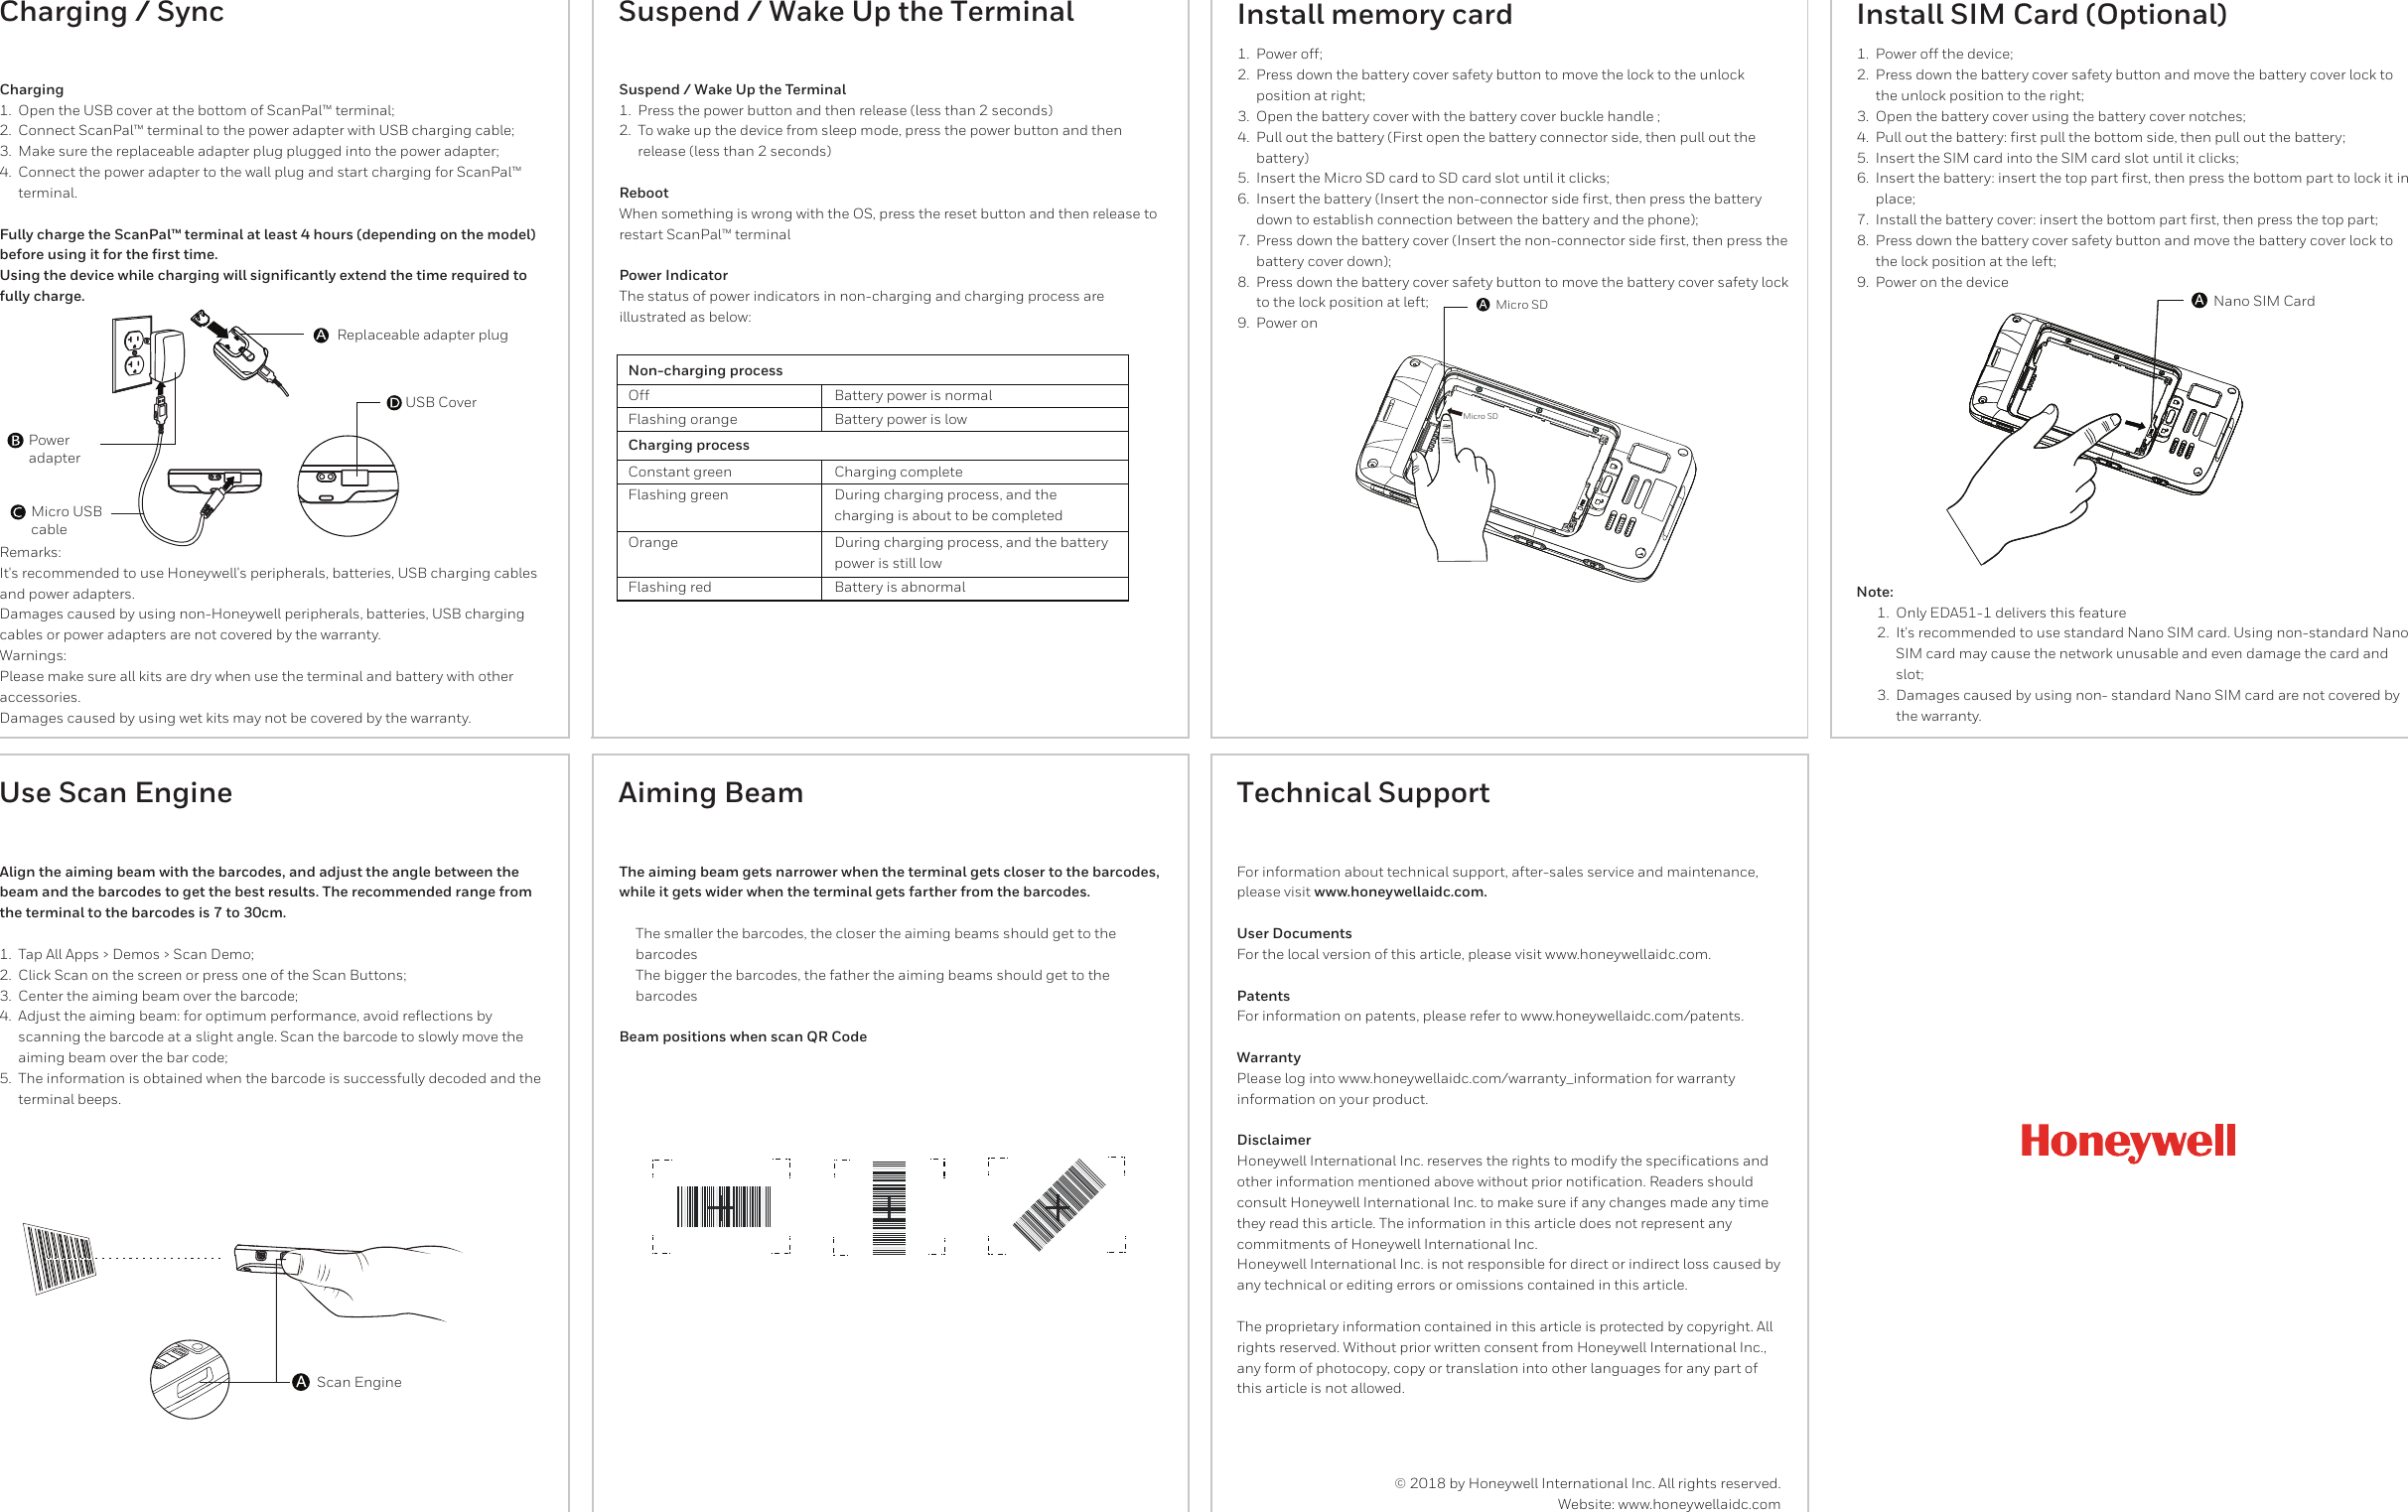
Honeywell EDA510 Mobile Computer User Manual EDA51 SC QS Rev B EN ai

Honeywell International Inc Mobile Computer EDA51 SC QS Rev B EN ai

EDA51-SC-QS_Rev B_EN rev3

ScanPal™ Series Mobile ComputersEDA51-1EDA51-0ScanPal™ SeriesMay/22/2018EDA51-SC-QS Rev BOpen the Package Front PanelLeft Side View Right Side View Install the Main BatteryRear PanelBattery Cover Buckle HandleQuick Start GuideSynchronous Communication•  ScanPal™ Series Mobile Computers;•  Main battery (3.8V, lithium ion battery); •  10-watt power adapter; •  Replaceable adapter Plugs; •  USB charging cable; •  Quick Start Guide.Remarks: If you ordered accessories for the terminal, please make sure they are also included in the package; be sure to keep the original packages for ScanPal terminal to be returned for repairing when necessary.Note: End users should not arbitrarily replace the operating system with other operating systems. To update operating system installed on your device, you need to get license from the OS vendors. Replace the battery with wrong models may cause explosion. Please make sure to use and dispose the battery in accordance with local regulations. Please recycle the battery when possible. Do not dispose it as household waste Please ensure all kits are dry when connect the mobile device or battery to external devices. Damages caused by connecting wet kits are not covered by the warranty.ScanPal™ terminal comes with a battery in a separate package. Please follow the steps below to install the battery.1.  Press down the battery cover safety button to move the battery cover safety lock to the unlock position at right; 2.  Open the battery cover with the battery cover buckle handle ; 3.  Insert the battery (Insert the non-connector side first, then press the battery down to establish connection between the battery and the phone) 4.  Press down the battery cover (Insert the non-connector side first, then press the battery cover down) 5.  Press down the battery cover safety button to move the battery cover safety lock to the lock position at leftCharging / Sync1.  Open the USB cover at the bottom of ScanPal™ terminal 2.  Connect ScanPal™ terminal to the computer using the Micro USB cableRemarks: Refer to the illustrated installation steps on the following page.EDA51-1/EDA51-0 belongs to ScanPal SeriesPlease check if the following items included in the package: Power IndicatorCameraBattery CoverString BuckleUSB CoverUSB charging cableScan IndicatorDisplayFunction KeyHome KeyPower ButtonScan ButtonCharging ContactScan ButtonUSB CoverVolume DownVolume UpReturn KeyScan EngineSpeakerBattery Cover Safety LockBattery Cover Safety ButtonNote: EDA51-1 FCC ID is HD5-EDA511EDA51-0 FCC ID is HD5-EDA510
Charging / SyncCharging1.  Open the USB cover at the bottom of ScanPal™ terminal; 2.  Connect ScanPal™ terminal to the power adapter with USB charging cable; 3.  Make sure the replaceable adapter plug plugged into the power adapter; 4.  Connect the power adapter to the wall plug and start charging for ScanPal™ terminal.Fully charge the ScanPal™ terminal at least 4 hours (depending on the model) before using it for the first time. Using the device while charging will significantly extend the time required to fully charge.Use Scan EngineAlign the aiming beam with the barcodes, and adjust the angle between the beam and the barcodes to get the best results. The recommended range from the terminal to the barcodes is 7 to 30cm.1.  Tap All Apps > Demos > Scan Demo; 2.  Click Scan on the screen or press one of the Scan Buttons; 3.  Center the aiming beam over the barcode; 4.  Adjust the aiming beam: for optimum performance, avoid reflections by scanning the barcode at a slight angle. Scan the barcode to slowly move the aiming beam over the bar code;5.  The information is obtained when the barcode is successfully decoded and the terminal beeps.Remarks: It's recommended to use Honeywell's peripherals, batteries, USB charging cables and power adapters. Damages caused by using non-Honeywell peripherals, batteries, USB charging cables or power adapters are not covered by the warranty. Warnings: Please make sure all kits are dry when use the terminal and battery with other accessories. Damages caused by using wet kits may not be covered by the warranty.Suspend / Wake Up the TerminalSuspend / Wake Up the Terminal1.  Press the power button and then release (less than 2 seconds) 2.  To wake up the device from sleep mode, press the power button and then release (less than 2 seconds) Reboot When something is wrong with the OS, press the reset button and then release to restart ScanPal™ terminal Power Indicator The status of power indicators in non-charging and charging process are illustrated as below:Install memory card1. Power off; 2.  Press down the battery cover safety button to move the lock to the unlock position at right; 3.  Open the battery cover with the battery cover buckle handle ; 4.  Pull out the battery (First open the battery connector side, then pull out the battery) 5.  Insert the Micro SD card to SD card slot until it clicks; 6.  Insert the battery (Insert the non-connector side first, then press the battery down to establish connection between the battery and the phone); 7.  Press down the battery cover (Insert the non-connector side first, then press the battery cover down); 8.  Press down the battery cover safety button to move the battery cover safety lock to the lock position at left; 9. Power onAiming BeamThe aiming beam gets narrower when the terminal gets closer to the barcodes, while it gets wider when the terminal gets farther from the barcodes. The smaller the barcodes, the closer the aiming beams should get to the barcodes The bigger the barcodes, the father the aiming beams should get to the barcodes Beam positions when scan QR CodeFor information about technical support, after-sales service and maintenance, please visit www.honeywellaidc.com. User Documents For the local version of this article, please visit www.honeywellaidc.com. Patents For information on patents, please refer to www.honeywellaidc.com/patents. Warranty Please log into www.honeywellaidc.com/warranty_information for warranty information on your product. Disclaimer Honeywell International Inc. reserves the rights to modify the specifications and other information mentioned above without prior notification. Readers should consult Honeywell International Inc. to make sure if any changes made any time they read this article. The information in this article does not represent any commitments of Honeywell International Inc. Honeywell International Inc. is not responsible for direct or indirect loss caused by any technical or editing errors or omissions contained in this article. The proprietary information contained in this article is protected by copyright. All rights reserved. Without prior written consent from Honeywell International Inc., any form of photocopy, copy or translation into other languages for any part of this article is not allowed.Technical SupportInstall SIM Card (Optional)Note:1.  Power off the device; 2.  Press down the battery cover safety button and move the battery cover lock to the unlock position to the right; 3.  Open the battery cover using the battery cover notches; 4.  Pull out the battery: first pull the bottom side, then pull out the battery; 5.  Insert the SIM card into the SIM card slot until it clicks; 6.  Insert the battery: insert the top part first, then press the bottom part to lock it in place; 7.  Install the battery cover: insert the bottom part first, then press the top part; 8.  Press down the battery cover safety button and move the battery cover lock to the lock position at the left; 9.  Power on the device1.  Only EDA51-1 delivers this feature2.  It's recommended to use standard Nano SIM card. Using non-standard Nano SIM card may cause the network unusable and even damage the card and slot;3.  Damages caused by using non- standard Nano SIM card are not covered by the warranty.Replaceable adapter plugPower adapterMicro USB cableUSB CoverScan EngineDuring charging process, and the charging is about to be completedDuring charging process, and the battery power is still lowNon-charging processCharging processOff Battery power is normalFlashing orange Battery power is lowConstant green Charging completeFlashing greenOrangeFlashing red Battery is abnormalMicro SD Nano SIM Card© 2018 by Honeywell International Inc. All rights reserved.Website: www.honeywellaidc.comMicro SD
The SAR limit adopted by USA is 1.6 watts/kilogram (W/kg) averaged over one gram of tissue. The highest SAR value reported to the Federal Communications Commission (FCC) for this device type when it is properly worn on the body is    W /kg.0.1 90 Body SAR is measured with the device at a seperation of 10mm to body while tranmitting at the highest certified output power at all frequency bands for this device.

Navigation menu