Honeywell SF61B-A SF61B (Rugged 2D Pocket Scanner) User Manual
Honeywell International Inc SF61B (Rugged 2D Pocket Scanner)
User Manual
SF61
Cordless Scanner
User’s Guide
ii SF61 Cordless Scanner User’s Guide
Intermec by Honeywell
6001 36th Ave.W.
Everett, WA 98203
U.S.A.
www.intermec.com
The information contained herein is provided solely for the purpose of allowing customers to
operate and service Intermec-manufactured equipment and is not to be released, reproduced, or
used for any other purpose without written permission of Intermec Technologies Corporation.
Information and specifications contained in this document are subject to change without prior
notice and do not represent a commitment on the part of Intermec Technologies Corporation.
© 2013-2014 by Intermec by Honeywell. All rights reserved.
The word Intermec, the Intermec logo, EasySet, and Ready-to-Work are either trademarks or
registered trademarks of Intermec by Honeywell.
For patent information, please refer to www.hsmpats.com.
Microsoft, Windows and the Windows logo are registered trademarks of Microsoft Corporation in
the United States and/or other countries.

SF61 Cordless Scanner User’s Guide iii
Document Change Record
This page records changes to this document. The document was
originally released as Revision 001.
Version
Number Date Description of Change
003 07/2014 - Added IP rating for Healthcare model.
- Added reading distances for SF61B2D Healthcare
model.
- Corrected software reset procedure.
002 01/2014 —Added the following accessories:
SD62 base station
USB Power Adapter
AC Power Adapter
— Added the SD62 base station to the connections
chapter.
— Took out the SD61 base station (EOL).
— Updated patent info.
—Added that charging time is longer for temps of
35° C and higher.
— Made corrections in “Connect the SF61B to Other
Bluetooth Devices” in Chapter 2.
—Added how to clean the trigger.
iv SF61 Cordless Scanner User’s Guide
Contents
SF61 Cordless Scanner User’s Guide v
Contents
Document Change Record. . . . . . . . . . . . . . . . . . . . . . . . . . . . . . . . . . . . . . . . iii
Before You Begin. . . . . . . . . . . . . . . . . . . . . . . . . . . . . . . . . . . . . . . . . . . . . . . . . . . . . . . . . . . . . . . . . ix
Safety Information . . . . . . . . . . . . . . . . . . . . . . . . . . . . . . . . . . . . . . . . . . . . . . . . . . . . . . . ix
Global Services and Support . . . . . . . . . . . . . . . . . . . . . . . . . . . . . . . . . . . . . . . . . . . . . . . x
Warranty Information. . . . . . . . . . . . . . . . . . . . . . . . . . . . . . . . . . . . . . . . . . . . . x
Web Support . . . . . . . . . . . . . . . . . . . . . . . . . . . . . . . . . . . . . . . . . . . . . . . . . . . . . x
Send Feedback. . . . . . . . . . . . . . . . . . . . . . . . . . . . . . . . . . . . . . . . . . . . . . . . . . . . x
Telephone Support . . . . . . . . . . . . . . . . . . . . . . . . . . . . . . . . . . . . . . . . . . . . . . . x
Who Should Read This Manual . . . . . . . . . . . . . . . . . . . . . . . . . . . . . . . . . . . . . . . . . . . xi
Related Documents . . . . . . . . . . . . . . . . . . . . . . . . . . . . . . . . . . . . . . . . . . . . . . . . . . . . . . xi
Patent Information . . . . . . . . . . . . . . . . . . . . . . . . . . . . . . . . . . . . . . . . . . . . . . . . . . . . . . xi
1 About the SF61B Cordless Scanner . . . . . . . . . . . . . . . . . . . . . . . . . . . . . . . . . . . . 1
About the SF61B Cordless Scanner . . . . . . . . . . . . . . . . . . . . . . . . . . . . . . . . . . . . . . . . . . . . . . . . . 2
Charge the Battery . . . . . . . . . . . . . . . . . . . . . . . . . . . . . . . . . . . . . . . . . . . . . . . . . . . . . . . . . . . . . . . . 3
Battery Charge Status during Operation . . . . . . . . . . . . . . . . . . . . . . . . . . . . . . . . . . . . 4
Understand Bluetooth Terms . . . . . . . . . . . . . . . . . . . . . . . . . . . . . . . . . . . . . . . . . . . . . . . . . . . . . . 5
Default settings and custom settings . . . . . . . . . . . . . . . . . . . . . . . . . . . . . . . . . . . . . . . . . . . . . . . 6
Turn On the SF61B . . . . . . . . . . . . . . . . . . . . . . . . . . . . . . . . . . . . . . . . . . . . . . . . . . . . . . . . . . . . . . . 7
Pair with a Bluetooth Host Device . . . . . . . . . . . . . . . . . . . . . . . . . . . . . . . . . . . . . . . . . . 7
Connect on Power-Up . . . . . . . . . . . . . . . . . . . . . . . . . . . . . . . . . . . . . . . . . . . . . . . . . . . . . 7
Host-Initiated (Outgoing) SPP Connection . . . . . . . . . . . . . . . . . . . . . . . . . 7
All Other Connection Types . . . . . . . . . . . . . . . . . . . . . . . . . . . . . . . . . . . . . . . 7
Inactivity Shutdown Period . . . . . . . . . . . . . . . . . . . . . . . . . . . . . . . . . . . . . . . . . . . . . . . . 8
Understand the SF61B Behavior. . . . . . . . . . . . . . . . . . . . . . . . . . . . . . . . . . . . . . . . . . . . . . . . . . . . 9
Blue Intermec-Ready-to-Work Indicator. . . . . . . . . . . . . . . . . . . . . . . . . . . . . . . . . . . . . 9
Status Light . . . . . . . . . . . . . . . . . . . . . . . . . . . . . . . . . . . . . . . . . . . . . . . . . . . . . . . . . . . . .10
Beeps and Vibrate Alert. . . . . . . . . . . . . . . . . . . . . . . . . . . . . . . . . . . . . . . . . . . . . . . . . . .11
Using Vibrate Alert. . . . . . . . . . . . . . . . . . . . . . . . . . . . . . . . . . . . . . . . . . . . . . .12
Scan Bar Codes . . . . . . . . . . . . . . . . . . . . . . . . . . . . . . . . . . . . . . . . . . . . . . . . . . . . . . . . . . . . . . . . . .14
Accessories . . . . . . . . . . . . . . . . . . . . . . . . . . . . . . . . . . . . . . . . . . . . . . . . . . . . . . . . . . . . . . . . . . . . . .17
Required Accessories . . . . . . . . . . . . . . . . . . . . . . . . . . . . . . . . . . . . . . . . . . . . . . . . . . . . .17
1-Bay Charger . . . . . . . . . . . . . . . . . . . . . . . . . . . . . . . . . . . . . . . . . . . . . . . . . . .17
4-Bay Charger . . . . . . . . . . . . . . . . . . . . . . . . . . . . . . . . . . . . . . . . . . . . . . . . . . .18
Contents
vi SF61 Cordless Scanner User’s Guide
FlexDock 4-Scanner Charger. . . . . . . . . . . . . . . . . . . . . . . . . . . . . . . . . . . . . .18
FlexDock Cup . . . . . . . . . . . . . . . . . . . . . . . . . . . . . . . . . . . . . . . . . . . . . . . . . . .19
Vehicle Power Adapter. . . . . . . . . . . . . . . . . . . . . . . . . . . . . . . . . . . . . . . . . . . .19
USB Power Adapter . . . . . . . . . . . . . . . . . . . . . . . . . . . . . . . . . . . . . . . . . . . . . .20
AC Power Adapter . . . . . . . . . . . . . . . . . . . . . . . . . . . . . . . . . . . . . . . . . . . . . . .20
SF61B Battery . . . . . . . . . . . . . . . . . . . . . . . . . . . . . . . . . . . . . . . . . . . . . . . . . . .21
Optional Accessories . . . . . . . . . . . . . . . . . . . . . . . . . . . . . . . . . . . . . . . . . . . . . . . . . . . . .21
SD62 Base Station . . . . . . . . . . . . . . . . . . . . . . . . . . . . . . . . . . . . . . . . . . . . . . .21
SF61B Magnet End-Cap & Belt Loop . . . . . . . . . . . . . . . . . . . . . . . . . . . . . .22
SF61B Ring End-Cap & Wrist Strap . . . . . . . . . . . . . . . . . . . . . . . . . . . . . . .22
Belt Clip Holder . . . . . . . . . . . . . . . . . . . . . . . . . . . . . . . . . . . . . . . . . . . . . . . . .23
Industrial Belt Clip Holder . . . . . . . . . . . . . . . . . . . . . . . . . . . . . . . . . . . . . . .23
Chest Strap Holder. . . . . . . . . . . . . . . . . . . . . . . . . . . . . . . . . . . . . . . . . . . . . . .23
2 Connect the SF61B . . . . . . . . . . . . . . . . . . . . . . . . . . . . . . . . . . . . . . . . . . . . . . . . . . . . . 25
Bluetooth Connection Considerations . . . . . . . . . . . . . . . . . . . . . . . . . . . . . . . . . . . . . . . . . . . . .26
Supported Bluetooth Devices . . . . . . . . . . . . . . . . . . . . . . . . . . . . . . . . . . . . . . . . . . . . .26
Bluetooth Versions. . . . . . . . . . . . . . . . . . . . . . . . . . . . . . . . . . . . . . . . . . . . . . . . . . . . . . .26
EasySet Setup Software. . . . . . . . . . . . . . . . . . . . . . . . . . . . . . . . . . . . . . . . . . . . . . . . . . .26
SF61B Bluetooth Device Address Location . . . . . . . . . . . . . . . . . . . . . . . . . . . . . . . . .27
Connection Lost Behavior . . . . . . . . . . . . . . . . . . . . . . . . . . . . . . . . . . . . . . . . . . . . . . . .27
Connect the SF61B to an Intermec Computer . . . . . . . . . . . . . . . . . . . . . . . . . . . . . . . . . . . . . .28
Disconnect the SF61B from an Intermec Computer. . . . . . . . . . . . . . . . . . . . . . . . .29
Connect the SF61B to an Intermec SD62 Base Station . . . . . . . . . . . . . . . . . . . . . . . . . . . . . .30
Disconnect the SF61B from an SD62 Base Station . . . . . . . . . . . . . . . . . . . . . . . . . .30
Connect the SF61B to Other Bluetooth Devices . . . . . . . . . . . . . . . . . . . . . . . . . . . . . . . . . . . .31
Bluetooth Device Profile. . . . . . . . . . . . . . . . . . . . . . . . . . . . . . . . . . . . . . . . . . . . . . . . . .31
HID Bluetooth Profile. . . . . . . . . . . . . . . . . . . . . . . . . . . . . . . . . . . . . . . . . . . .31
SPP Bluetooth Profile . . . . . . . . . . . . . . . . . . . . . . . . . . . . . . . . . . . . . . . . . . . .31
Bluetooth Connections. . . . . . . . . . . . . . . . . . . . . . . . . . . . . . . . . . . . . . . . . . . . . . . . . . .31
HID Connection. . . . . . . . . . . . . . . . . . . . . . . . . . . . . . . . . . . . . . . . . . . . . . . . .32
SPP Outgoing Connection (Host Initiated). . . . . . . . . . . . . . . . . . . . . . . . .34
SPP Incoming Connection (Scanner Initiated). . . . . . . . . . . . . . . . . . . . . .37
Connect to Other HID Devices (Smartphones, Tablets, PDAs, etc.) . . . . . . . . . . .41
Keyboard Wedge Emulation Using the SmartWedgeLite™ Application. . . . . . . . . . . . . . . .42
Run SmartWedgeLite. . . . . . . . . . . . . . . . . . . . . . . . . . . . . . . . . . . . . . . . . . . . . . . . . . . . .42
Scanner-initiated (Incoming) Connection with SmartWedgeLite . . . . . . . . . . . . .43
Read the Host’s Association Bar Code in SmartWedgeLite . . . . . . . . . . .43
Host-initiated (Outgoing) Connection with SmartWedgeLite . . . . . . . . . . . . . . . .44
Use the SmartWedgeLite Device List to Connect. . . . . . . . . . . . . . . . . . . .44
Use the Scanner’s Bluetooth Device Address to Connect. . . . . . . . . . . . .45
Successful Scanner Connection (SmartWedgeLite). . . . . . . . . . . . . . . . . . . . . . . . . .46
SF61 Cordless Scanner User’s Guide vii
Disconnect your Scanner from SmartWedgeLite . . . . . . . . . . . . . . . . . . . . . . . . . . . .47
3 Configure the SF61B Cordless Scanner. . . . . . . . . . . . . . . . . . . . . . . . . . . . . . . 49
Basic Setup with Configuration Bar Codes . . . . . . . . . . . . . . . . . . . . . . . . . . . . . . . . . . . . . . . . .50
Reset Your Scanner (Software Reset) . . . . . . . . . . . . . . . . . . . . . . . . . . . . . . . . . . . . . . .50
Select an International Keyboard (HID Connections Only) . . . . . . . . . . . . . . . . . .51
Configure the Postamble . . . . . . . . . . . . . . . . . . . . . . . . . . . . . . . . . . . . . . . . . . . . . . . . .53
Configure Your Scanner with EasySet. . . . . . . . . . . . . . . . . . . . . . . . . . . . . . . . . . . . . . . . . . . . . .54
Online Setup with EasySet . . . . . . . . . . . . . . . . . . . . . . . . . . . . . . . . . . . . . . . . . . . . . . . .55
Online Setup Via the SD62 Base Station . . . . . . . . . . . . . . . . . . . . . . . . . . . . . . . . . . .56
Offline Setup with EasySet . . . . . . . . . . . . . . . . . . . . . . . . . . . . . . . . . . . . . . . . . . . . . . .56
Configure your Scanner From Your Intermec Computer. . . . . . . . . . . . . . . . . . . . . . . . . . . . .57
To Configure the SF61B from Your Intermec Computer. . . . . . . . . . . . . . . . . . . . .57
4 Troubleshoot and Maintain the SF61B . . . . . . . . . . . . . . . . . . . . . . . . . . . . . . 59
Troubleshoot the SF61B. . . . . . . . . . . . . . . . . . . . . . . . . . . . . . . . . . . . . . . . . . . . . . . . . . . . . . . . . .60
Problems and Possible Solutions . . . . . . . . . . . . . . . . . . . . . . . . . . . . . . . . . . . . . . . . . .60
Recover the SF61B . . . . . . . . . . . . . . . . . . . . . . . . . . . . . . . . . . . . . . . . . . . . . . . . . . . . . . . . . . . . . . .65
Force a Hardware Reset. . . . . . . . . . . . . . . . . . . . . . . . . . . . . . . . . . . . . . . . . . . . . . . . . . .65
Force a Software Reset. . . . . . . . . . . . . . . . . . . . . . . . . . . . . . . . . . . . . . . . . . . . . . . . . . . .66
Call Product Support. . . . . . . . . . . . . . . . . . . . . . . . . . . . . . . . . . . . . . . . . . . . . . . . . . . . . . . . . . . . .67
Get SF61B Version Information . . . . . . . . . . . . . . . . . . . . . . . . . . . . . . . . . . . . . . . . . . .67
Read “Get version” Bar Codes . . . . . . . . . . . . . . . . . . . . . . . . . . . . . . . . . . . . .68
Use EasySet to Display Current Version Information. . . . . . . . . . . . . . . .69
Upgrade the SF61B Firmware . . . . . . . . . . . . . . . . . . . . . . . . . . . . . . . . . . . . . . . . . . . . . . . . . . . . .70
Prepare for Firmware Upgrade with EasySet and WinFlash . . . . . . . . . . . . . . . . . .70
Download the Latest SF61B Firmware Version . . . . . . . . . . . . . . . . . . . . .71
Disconnect any Existing Bluetooth Connection with your SF61B . . . .71
Use EasySet and WinFlash to Upgrade your SF61B Firmware . . . . . . . . . . . . . . . .72
Replace the Battery of the SF61B . . . . . . . . . . . . . . . . . . . . . . . . . . . . . . . . . . . . . . . . . . . . . . . . . .77
Replace the End-Caps of the SF61B. . . . . . . . . . . . . . . . . . . . . . . . . . . . . . . . . . . . . . . . . . . . . . . .78
Remove the SF61B End-Cap . . . . . . . . . . . . . . . . . . . . . . . . . . . . . . . . . . . . . . . . . . . . . .78
Install the SF61B End-Cap. . . . . . . . . . . . . . . . . . . . . . . . . . . . . . . . . . . . . . . . . . . . . . . .79
Clean the SF61B . . . . . . . . . . . . . . . . . . . . . . . . . . . . . . . . . . . . . . . . . . . . . . . . . . . . . . . . . . . . . . . . .80
viii SF61 Cordless Scanner User’s Guide
Clean Scanner Window. . . . . . . . . . . . . . . . . . . . . . . . . . . . . . . . . . . . . . . . . . . . . . . . . . .80
Clean Scanner Trigger Button. . . . . . . . . . . . . . . . . . . . . . . . . . . . . . . . . . . . . . . . . . . . .80
A Specifications and Reading Distances . . . . . . . . . . . . . . . . . . . . . . . . . . . . . . 81
Specifications. . . . . . . . . . . . . . . . . . . . . . . . . . . . . . . . . . . . . . . . . . . . . . . . . . . . . . . . . . . . . . . . . . . .82
Reading Distances . . . . . . . . . . . . . . . . . . . . . . . . . . . . . . . . . . . . . . . . . . . . . . . . . . . . . . . . . . . . . . .85
SF61B1D. . . . . . . . . . . . . . . . . . . . . . . . . . . . . . . . . . . . . . . . . . . . . . . . . . . . . . . . . . . . . . . .86
SF61B2D Standard Model . . . . . . . . . . . . . . . . . . . . . . . . . . . . . . . . . . . . . . . . . . . . . . . .87
SF61B2D Healthcare Model . . . . . . . . . . . . . . . . . . . . . . . . . . . . . . . . . . . . . . . . . . . . . .88
SF61BHP. . . . . . . . . . . . . . . . . . . . . . . . . . . . . . . . . . . . . . . . . . . . . . . . . . . . . . . . . . . . . . . .89

Before You Begin
SF61 Cordless Scanner User’s Guide ix
Before You Begin
This section provides you with safety information, technical support
information, and sources for additional product information.
Safety Information
Your safety is extremely important. Read and follow all warnings and
cautions in this document before handling and operating Intermec
equipment. You can be seriously injured, and equipment and data can
be damaged if you do not follow the safety warnings and cautions.
This section explains how to identify and understand dangers,
warnings, cautions, and notes that are in this document. You may also
see icons that tell you when to follow ESD procedures and when to
take special precautions for handling optical parts.
A warning alerts you of an operating procedure, practice,
condition, or statement that must be strictly observed to avoid
death or serious injury to the persons working on the equipment.
A caution alerts you to an operating procedure, practice,
condition, or statement that must be strictly observed to prevent
equipment damage or destruction, or corruption or loss of data.
Note: Notes either provide extra information about a topic or contain
special instructions for handling a particular condition or set of
circumstances.
Before You Begin
x SF61 Cordless Scanner User’s Guide
Global Services and Support
Warranty Information
To understand the warranty for your Intermec product, visit the
Intermec web site at www.intermec.com and click Support >
Returns and Repairs > Warranty.
Web Support
Visit the Intermec web site at www.intermec.com to download our
current manuals (in PDF).
Visit the Intermec technical knowledge base (Knowledge Central) at
www.intermec.com and click Support > Knowledge Central to
review technical information or to request technical support for your
Intermec product.
Send Feedback
Your feedback is crucial to the continual improvement of our
documentation. To provide feedback about this manual, please
contact the Intermec Technical Communications department directly
at TechnicalCommunications@intermec.com.
Telephone Support
In the U.S.A. and Canada, call 1-800-755-5505.
Outside the U.S.A. and Canada, contact your local Intermec
representative. To search for your local representative, from the
Intermec web site, click About Us > Contact Us.
Before You Begin
SF61 Cordless Scanner User’s Guide xi
Who Should Read This Manual
This guide is for the person who is responsible for installing,
configuring, and maintaining the SF61B Cordless Scanner.
This guide provides you with information about the features of the
SF61B Cordless Scanner, and how to install, configure, operate,
maintain and troubleshoot it.
Before you work with the SF61B Cordless Scanner, you should be
familiar with your network and general networking terms, such as IP
address.
Related Documents
The Intermec web site at www.intermec.com contains our
documents (as PDF files) that you can download for free.
To download documents
1Visit the Intermec web site at www.intermec.com.
2Click the Products tab.
3Using the Products menu, navigate to your product page. For
example, to find the CN3 computer product page, click
Computers > Handheld Computers > CN3.
4Click the Manuals tab.
If your product does not have its own product page, click Support >
Manuals. Use the Product Category field, the Product Family field,
and the Product field to help you locate your documentation.
Patent Information
For patent information, please refer to www.hsmpats.com.
Before You Begin
xii SF61 Cordless Scanner User’s Guide

1
1
About the SF61B Cordless Scanner
This chapter provides an overview of the SF61B Cordless
Scanner. This chapter covers these topics:
•About the SF61B Cordless Scanner
•Charge the Battery
•Understand Bluetooth Terms
•Default settings and custom settings
•Understand the SF61B Behavior
•Scan Bar Codes
•Accessories
Chapter 1 — About the SF61B Cordless Scanner
2 SF61 Cordless Scanner User’s Guide
About the SF61B Cordless Scanner
The SF61B Cordless Scanner is a rugged purpose-built handheld
scanner with an ergonomic design. It uses a Bluetooth™ radio for RF
communication.
SF61B Cordless Scanner
The SF61B is available in the following models:
•1D imager—SF61B1D-Sxxxx
•2D imager—SF61B2D-Sxxxx
•Healthcare 2D imager—SF61B2D-Hxxxx
•High performance 2D imager—SF61BHP-Sxxxx
Scan button
Magnet end-cap
or Ring end-cap
depending on version
Status light/Intermec
Ready-to-Work indicator
Beeper
Scanner
Chapter 1 — About the SF61B Cordless Scanner
SF61 Cordless Scanner User’s Guide 3
SF61B Model Type: The model type of your SF61B is indicated in the first part
of the configuration number. In this illustration, the model type is SF61BHP-
Sxxxx for high performance 2D imager.
Charge the Battery
The SF61B uses a lithium-ion battery as its main power source. You
need to fully charge the scanner before using it.
The SF61B can be charged using various types of charger (1-bay
charger, 4-bay charger, FlexDock 4-scanner charger, a vehicle power
adapter). See the Accessories section at the end of this chapter for
more details.
SN: XXXXXXXXXXX
CN: XXXXXXXXXXXXXX
Intermec Technologies Corp.
Everett, WA USA
BDA: XXXXXXXXXXXXXX
MODEL, MODELO, , :
1016SP01B
MFD, , : YYYYMMDD
1.7A
5V
SF61BHP-Sxxxx
The battery pack used in this device may ignite, create a chemical
burn hazard, explode, or release toxic materials if mistreated. Do
not incinerate, disassemble, or heat above 100°C (212°F). Do not
short circuit; may cause burns. Keep away from children.
Use only Intermec battery pack Model 1016AB01 (P/N SF61-
BAT-Sxxx). Use of incorrect battery pack may present risk of fire
or explosion. Promptly dispose of used battery pack according to
the instructions.
Chapter 1 — About the SF61B Cordless Scanner
4 SF61 Cordless Scanner User’s Guide
Make sure you fully charge the battery before you start to use the
SF61B. Should a problem arise with the battery, you can replace it (see
Replace the Battery of the SF61B in Chapter 4).
To charge the scanner’s battery
Place the SF61B in a charger bay or connect it to the vehicle power
adapter. The scanner beeps twice (two-tone beep) and the status light
shows the charge status:
•a fixed red light indicates "scanner charging"
•a fixed green light indicates "scanner fully charged"
SF61B with the 1-Bay Charger
It takes approximately 3 hours to charge a fully discharged battery.
Battery Charge Status during Operation
During SF61B operation, the status light blinks red when the battery
charge is less than 20% to indicate that you should charge the battery.
12
6
93
1
2
7
8
10
11
4
5
Note: Charging time is longer in temperatures of 35° C/95° F and
higher.
Chapter 1 — About the SF61B Cordless Scanner
SF61 Cordless Scanner User’s Guide 5
Understand Bluetooth Terms
The following terms are used in this User Guide:
Pairing: To be able to connect and exchange data with a Bluetooth
host device, your Bluetooth product must be "paired" with that
device. The way you authorize the pairing to take place depends on
the type of Bluetooth host device you are pairing with - see Chapter 2,
Connect the SF61B, for more details.
If your Bluetooth product and your Bluetooth host device are paired
but, for some reason, the connection cannot be established (your
product is out of range, one or both devices have been switched
off, ...), the pairing association is not lost and the devices can
communicate again when they are switched on and in range.
Discoverable: Your Bluetooth product is not yet paired with a
Bluetooth host device but it can be "seen" by that device (the
Bluetooth host device may also be able to "see" other Bluetooth
products that are nearby).
When your Bluetooth product is trying to connect or is connected to
a Bluetooth host device, it is no longer discoverable.
HID and SPP: Intermec Bluetooth scanners can use two specific
Bluetooth profiles to communicate with Bluetooth-enabled host
devices:
•HID: When you use the HID (Human Interface Device) profile,
your scanner is recognized as a keyboard by the host. Connection
information is stored so that if the scanner loses the connection
(out of range, low battery, etc.), it will try to reconnect as soon as
this becomes possible again (back into range, charged battery...).
No specific software is needed to collect data using the HID
profile (this is not the case if you use the SPP profile).
•SPP: The SPP profile (Serial Port Profile) allows your scanner to
communicate with the host device through the Bluetooth link as if
it were a serial port. In this way, your scanner is immediately
compatible with data management applications that collect data
through a serial port.
Chapter 1 — About the SF61B Cordless Scanner
6 SF61 Cordless Scanner User’s Guide
Default settings and custom settings
The product behavior described in this manual corresponds to the
default settings of your SF61B cordless scanner. Most of these
settings can be customized using EasySet, the Intermec scanner setup
software.
EasySet provides the full range of setup options for your SF61B (see
Configure Your Scanner with EasySet in Chapter 3 for details on
how to install and use EasySet).
In this Manual and in EasySet, default settings are indicated by "(*)"
after the name of the default setup command.

Chapter 1 — About the SF61B Cordless Scanner
SF61 Cordless Scanner User’s Guide 7
Turn On the SF61B
To turn the scanner on, press and release the scan button. The SF61B
beeps twice and vibrates at power-up (default behavior).
If your scanner connects or reconnects to a Bluetooth host device /
application, it emits a series of beeps from low to high and the blue
Intermec Ready-to-Work indicator turns solid blue (default scanner
behavior).
Pair with a Bluetooth Host Device
If your SF61B is discoverable (not connecting or not already
connected to a Bluetooth host) you can pair it with a Bluetooth host
device and establish a Bluetooth connection between the two devices
(see Chapter 2, Connect the SF61B).
Connect on Power-Up
While the scanner is waiting for a connection, the blue Intermec
Ready-To-Work LED blinks slowly.
Host-Initiated (Outgoing) SPP Connection
If your scanner is paired with a Bluetooth host device and was
connected when it powered down, you will have to re-establish the
connection manually when it powers up again.
After 5 minutes of inactivity (default behavior, modifiable), it will
power down if the connection is not established.
All Other Connection Types
If your scanner is paired with a Bluetooth host device and was
connected when it powered down, it will automatically try to
reconnect at power-up.
After 5 minutes of inactivity (default behavior, modifiable), it will
power down if the connection is not established.
Note: Being discoverable is the default behavior of the SF61B, but you
can use EasySet to make your product not discoverable if you wish
(Interface > Bluetooth > Discoverable > Not discoverable).
Chapter 1 — About the SF61B Cordless Scanner
8 SF61 Cordless Scanner User’s Guide
Inactivity Shutdown Period
By default the SF61B shuts down after a period of inactivity of 1 hour
if it is connected to a Bluetooth host and after 5 minutes of inactivity
if it is not connected.
You can use EasySet to modify these inactivity timeouts (Operating
settings > Scanning / Triggering > Power down).

Chapter 1 — About the SF61B Cordless Scanner
SF61 Cordless Scanner User’s Guide 9
Understand the SF61B Behavior
The SF61B uses lights, beeps and vibrations to indicate if a bar code
has been successfully decoded.
Blue Intermec-Ready-to-Work Indicator
The blue Intermec Ready-to-Work indicator™ LED gives information
about the Bluetooth connection. When a connection has been
established the light is always on (blue) unless the scanner is docked
in a charger (in this case the LED displays a green or red battery
charge indication even though the Bluetooth connection is still
active).
When using your scanner to scan bar codes (blue light on) your
scanner will also flash status information using green or red lights.
See the Status Light information in the next section.
Note: The SF61B has a different behavior (lights, beeps, vibrate alert)
to its predecessor, the SF51. If you prefer to use the beep and LED
mode of the SF51, you can use EasySet to activate the legacy mode
(Operating settings > Beeps / LEDs > Beep and LED mode >
Legacy mode).
Note: The blue Intermec Ready-to-Work light is enabled by default
but you can use EasySet to disable the light or choose another color if
you wish (Operating settings > Beeps / LEDs > Ready-to-Work
LED).
Blue Intermec Ready-to-Work Indicator
Light State What it Means
Off A Bluetooth connection has not been established.
Blinking, slow The scanner is trying to establish a Bluetooth
connection with a Bluetooth host device.
On A Bluetooth connection is established with a
Bluetooth base station or host computer and the
scanner is ready to scan bar codes and send data.

Chapter 1 — About the SF61B Cordless Scanner
10 SF61 Cordless Scanner User’s Guide
Status Light
The status light flashes green or red to indicate the status of the
scanner and/or battery. Status information is sometimes shown even
if the Intermec Ready-to-Work Indicator is on. This way the scanner
can communicate more than one type of information at the same
time.
For example while the blue LED is on to show that there is a
Bluetooth connection, the scanner will flash green when you have
successfully scanned and transmitted a bar code.
Note: The following tables show the default behavior of the status
light, you can use EasySet to modify this behavior if you wish
(Operating settings > Beeps / LEDs).
Default Status Light Description During Scanner Operation
Light State What it Means
Green light on for 2
seconds The scanner successfully decoded a bar code and sent
the data to the host.
Green light flashes
twice A configuration bar code was successfully read.
Red light comes on
for 2 seconds Transmission error
or
Configuration bar code was not accepted
Red blinking slow Battery power is low (< 20% - need to charge).
Red continuously on
and 6 fast beeps every
2 seconds
NVM (non-volatile memory) problem.
Default Status Light Description When the Scanner is Docked in a
Charger
Light State What it Means
Red continuously on The battery is not fully charged and is charging.
Green continuously
on The battery is fully charged.

Chapter 1 — About the SF61B Cordless Scanner
SF61 Cordless Scanner User’s Guide 11
Beeps and Vibrate Alert
The SF61B beeps to give you audio feedback and vibrates when
performing some functions. For example, you hear a beep each time
you scan a valid bar code.
Red continuously on
and 6 fast beeps every
2 seconds
NVM (non-volatile memory) problem.
Amber blinking Battery charging problem:
•battery failure
Solution: Replace the battery.
•temperature problem: the integrated charge
handler in the SF61B refuses to charge the battery
due to storage or use of the SF61B and/or the
battery charger outside the recommended battery
charging temperature range (see recommended
"Charging" temperature range in Temperature
and Environmental Specifications in the
Appendix)
Solution: Move the SF61B (and battery) and/or
battery charger to a location where they can regain
the recommended charging temperature and
charge the battery (no need to replace the battery).
Default Status Light Description When the Scanner is Docked in a
Charger
Light State What it Means
Note: The following table shows the default behavior of the beeps and
vibrate alert, you can use EasySet to modify many of these settings if
you wish (Operating settings > Beeps / LEDs).
Default SF61B Beep and Vibrate Alert Descriptions
Beep Sequence What it Means
Single beep and
vibrate alert Good read - the scanner successfully scanned a bar code.
Two fast beeps and
vibrate alert Power-up.

Chapter 1 — About the SF61B Cordless Scanner
12 SF61 Cordless Scanner User’s Guide
Using Vibrate Alert
You can configure the SF61B to vibrate when it successfully decodes a
bar code. This feature can be useful in these situations:
•You are in a noisy environment, such as a busy warehouse, where it
can be difficult to hear the beeps.
•You are working in a quiet environment, such as a library, where
you do not want to make a lot of noise.
Two fast beeps The scanner successfully scanned a configuration bar
code
Two beeps, bi-
tonal The scanner is docked correctly in a battery charger.
Six very fast beeps
and vibrate alert Transmission error
or
Configuration bar code was not accepted
Series of beeps
from low to high The scanner is connecting to a Bluetooth host.
Series of beeps
from high to low
(cannot be
deactivated)
The scanner is disconnecting from a Bluetooth host.
Note 1: The scanner does not beep when disconnecting
automatically after a long period of inactivity.
Note 2: The scanner performs a hardware reset (restart)
when it is disconnected from EasySet (two beeps and a
vibrate alert by default).
Six-beep melody
(cannot be
deactivated)
Scanner confirmation after rescue procedure (see in
Chapter 4).
Default SF61B Beep and Vibrate Alert Descriptions
Beep Sequence What it Means
Note: You can use EasySet to modify the default vibrate alert settings
if you wish (Operating settings > Beeps / LEDs > Vibrate alert).
In this Manual and in EasySet, default settings are indicated by "(*)"
after the name of the default setup command.

Chapter 1 — About the SF61B Cordless Scanner
SF61 Cordless Scanner User’s Guide 13
To turn on vibrate alert for a good read
•Scan this bar code:
Vibrate alert - On good read - Enable (*)
mp
To turn off vibrate alert for a good read
•Scan this bar code:
Vibrate alert - On good read - Disable

Chapter 1 — About the SF61B Cordless Scanner
14 SF61 Cordless Scanner User’s Guide
Scan Bar Codes
The SF61B1D contains a 1D linear imager and the SF61B2D and
SF61BHP contain 2D area imagers to scan bar code data. The scanner
model you are using and the type of bar code you are decoding
determine the way you scan the bar code.
When you unpack the SF61B, the following bar code symbologies are
enabled by default:
All models (1D and 2D)
•Code 39 (*)
•Code 128 / GS1-128 (*)
•EAN/UPC (*)
2D models only
•Data Matrix (*)
•PDF417 (*)
•QR Code (*)
Before you can scan bar codes and send data to your data collection
application, you need to establish a Bluetooth connection between
your SF61B and your Bluetooth host device. If your scanner is not
connected it will emit an error beep when scanning bar codes. For
more information about establishing a Bluetooth connection, see
Chapter 2, Connect the SF61B, for more details.
For the SF61BHP do not look directly into the window area or at
a reflection of the laser beam while the scanner is scanning. Long-
term exposure to the laser beam can damage your vision.
Note: Use EasySet to enable and configure other symbologies (you
will find them in the Symbologies section of the EasySet commands
window).
See Configure Your Scanner with EasySet in Chapter 3 for details
on how to use EasySet.
Chapter 1 — About the SF61B Cordless Scanner
SF61 Cordless Scanner User’s Guide 15
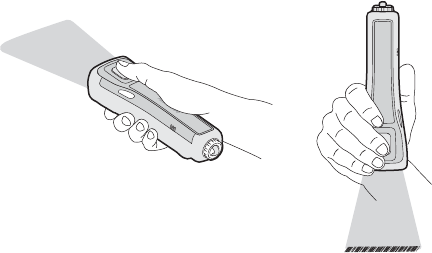
To scan with an SF61B 1D imager model
1Turn your scanner on by pressing the scan button.
2Connect your scanner to a Bluetooth device.
3Point the SF61B at the bar code and hold the SF61B at a slight
angle 5 to 10 cm (2 to 4 in) from the label.
4Press the scan button and direct the red beam so that it falls across
all the bars in the bar code label.
Use this test bar code:
Code 39 Test Bar Code
*123456*
*123456*
Tip: Depending on your screen resolution, you may be able to scan
bar codes displayed on your computer screen.
By default, when the SF61B successfully reads a bar code label, it
beeps once, the status light briefly turns green, and the scanner
beam turns off. If Vibrate Alert is enabled, the SF61B briefly
vibrates.
5Release the scan button.
Scanning Bar Codes (example showing a 1D scanner): The aiming and
scanner beams that you see depend on the SF61B model you are using.
To scan with the SF61B2D and SF61BHP
1Turn your scanner on by pressing the scan button.
2Connect your scanner to a Bluetooth device.
*INTERMEC*

Chapter 1 — About the SF61B Cordless Scanner
16 SF61 Cordless Scanner User’s Guide
3Point the scanner at the bar code and hold it steady a few inches
from the label.
4Press the scan button:
•If you are using the SF61B2D, use the red LED aiming beam to
position the imager over the bar code or area to capture.
•If you are scanning with the SF61BHP, use the laser framing to
position the imager over the bar code or area to capture.
SF61BHP Laser Framing
30°
20°
Note: When reading bar code labels that are printed close to each
other:
•use EasySet to activate the "center decoding" option to
minimize the risk of reading the wrong code (Operating
settings > Data decoding security > Center decoding)
•try to frame only the bar code you want to read to avoid reading
the wrong bar code
Chapter 1 — About the SF61B Cordless Scanner
SF61 Cordless Scanner User’s Guide 17
Accessories
This section provides a list of required and optional accessories for
your SF61B cordless scanner.
Required Accessories
You will need one of the following chargers for your SF61B.
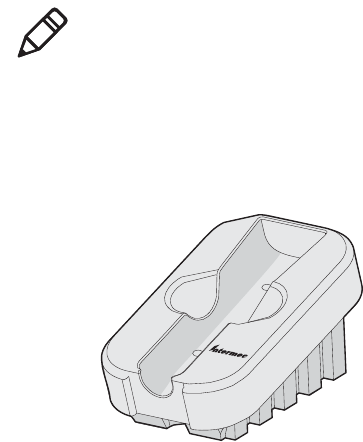
1-Bay Charger
1-Bay Charger (P/N 871-221-xxx): Used to charge a single SF61B scanner,
operates with a Universal 5V power supply (P/N 851-089-306).
Note: Most of the chargers in this section require a dedicated power
supply. You will need to acquire a country-specific mains cable to
connect it, ask your Intermec supplier or local contact for more
information.
Chapter 1 — About the SF61B Cordless Scanner
18 SF61 Cordless Scanner User’s Guide
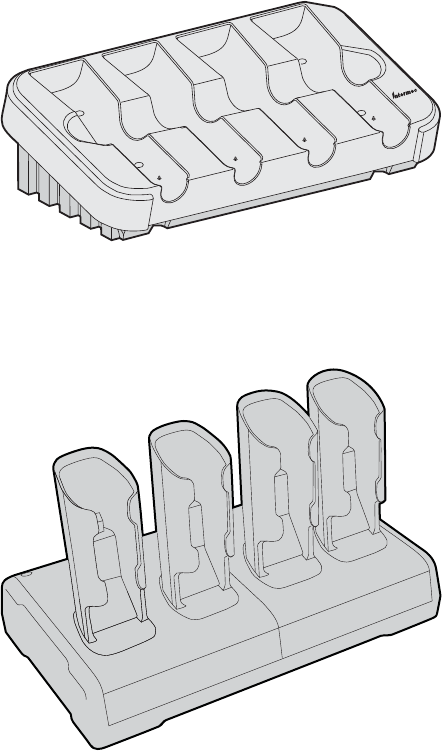
4-Bay Charger
4-Bay Charger P/N 871-222-xxx: Used to charge up to four SF61B scanners,
operates with a 4-bay charger power supply (P/N 851-088-201).
FlexDock 4-Scanner Charger
SF61 FlexDock 4-Scanner Charger (P/N DX2A28820): Used to charge up to
four SF61B scanners in two FlexDock Cups, operates with a dual-base power
supply (P/N XXXXXXXX).
p
Chapter 1 — About the SF61B Cordless Scanner
SF61 Cordless Scanner User’s Guide 19
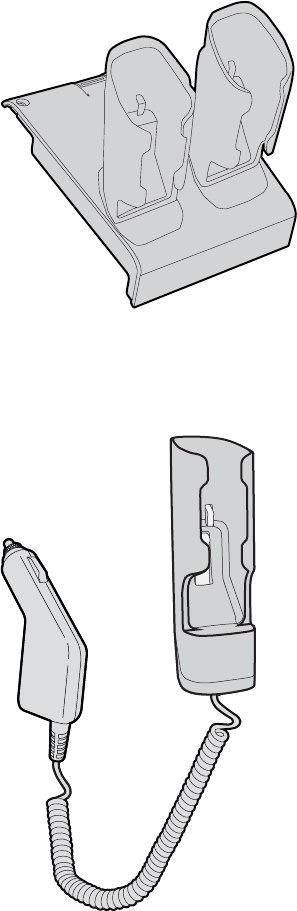
FlexDock Cup
SF61 FlexDock Dual Cup (P/N 213-007-xxx): Used to charge up to two SF61B
scanners in a FlexDock 4-Scanner Charger.
Vehicle Power Adapter
Vehicle Power Adapter (P/N SF61-VPK-Sxxx): Used to charge a single SF61B
scanner from a vehicle battery (cigar lighter connection).
Chapter 1 — About the SF61B Cordless Scanner
20 SF61 Cordless Scanner User’s Guide
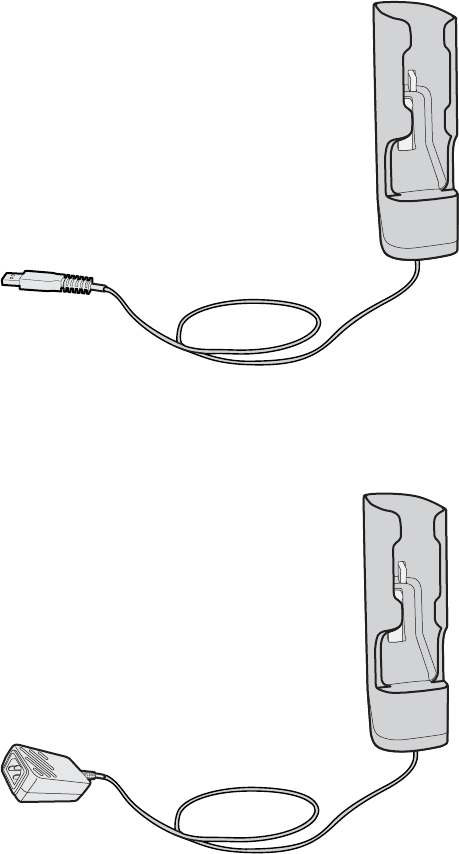
USB Power Adapter
USB Power Adapter (P/N SF61-UPK-Sxxx): Used to charge a single SF61B
scanner from a USB port.
AC Power Adapter
AC Power Adapter (P/N SF61-APK-Sxxx): Used to charge a single SF61B
scanner from an AC power supply. You will need a country specific power cord
(sold separately).
Chapter 1 — About the SF61B Cordless Scanner
SF61 Cordless Scanner User’s Guide 21
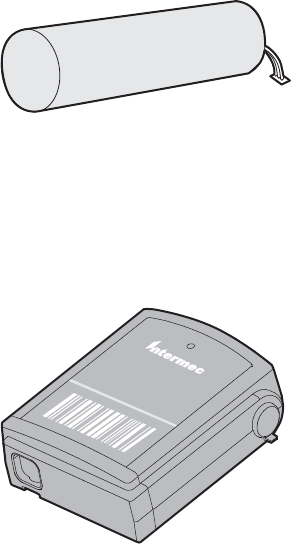
SF61B Battery
SF61B Battery (P/N SF61-BAT-xxx): Replacement battery for the SF61B.
Optional Accessories
The following accessories are optional.
SD62 Base Station
SD62 Base Station (P/N SD62-Sxxx): The SD62 Base Station is used to connect
up to seven Intermec cordless Bluetooth™ scanners to a non-Bluetooth host
device.
Chapter 1 — About the SF61B Cordless Scanner
22 SF61 Cordless Scanner User’s Guide
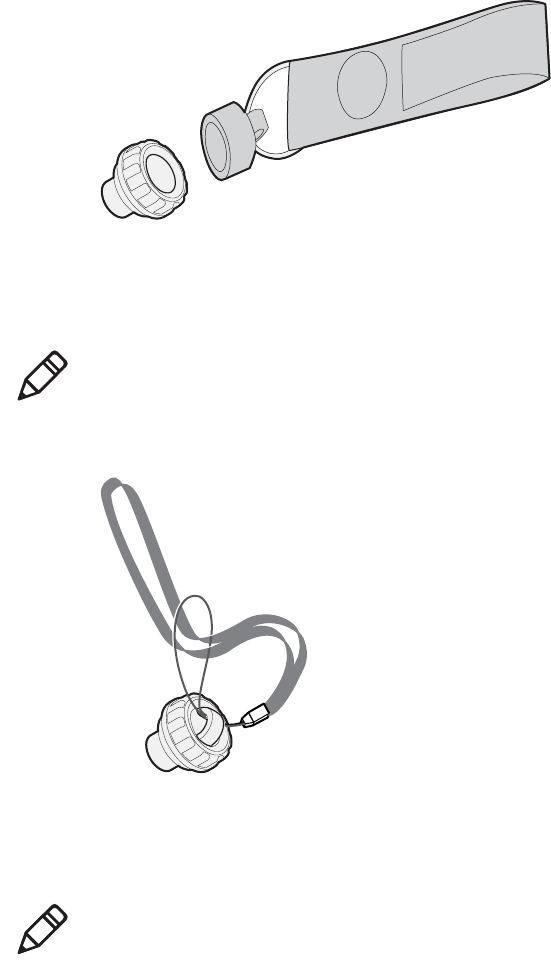
SF61B Magnet End-Cap & Belt Loop
SF61B Magnet End-Cap & Belt Loop (P/N SF61-MAG-Sxxx): Convenient belt
attachment accessory for the SF61B scanner, can be installed in place of a ring
end-cap.
SF61B Ring End-Cap & Wrist Strap
SF61B Ring End-Cap & Wrist Strap (P/N SF61-RIN-Sxxx): Convenient wrist
attachment accessory for the SF61B scanner, can be installed in place of a
magnet end-cap.
Note: For details on how to replace an SF61B end-cap, see Replace
the End-Caps of the SF61B in Chapter 4.
Note: For details on how to replace an SF61B end-cap, see Replace
the End-Caps of the SF61B in Chapter 4.
Chapter 1 — About the SF61B Cordless Scanner
SF61 Cordless Scanner User’s Guide 23
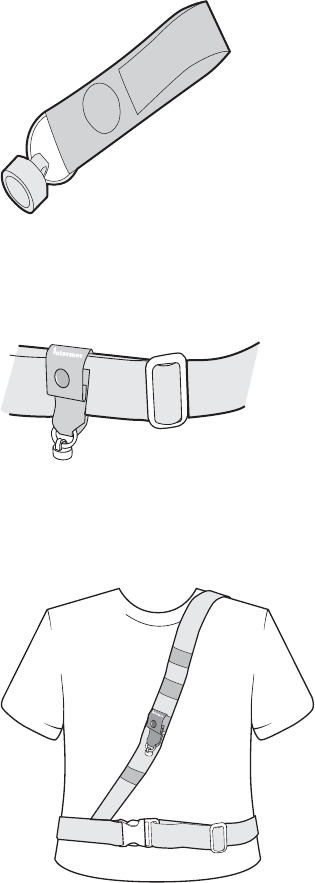
Belt Clip Holder
Belt Clip Holder (P/N 825-171-xxx): Convenient accessory to attach the SF61B
scanner to a belt.
Industrial Belt Clip Holder
Industrial Belt Clip Holder (P/N 825-172-xxx): Rugged accessory to attach the
SF61B scanner to a belt.
Chest Strap Holder
Chest Strap Holder (P/N 825-173-xxx): The Chest Strap Holder is a shoulder
strap and belt attachment accessory for the SF61B.
Chapter 1 — About the SF61B Cordless Scanner
24 SF61 Cordless Scanner User’s Guide

25
2
Connect the SF61B
Use this chapter to understand how to connect the SF61B to a
number of Bluetooth devices. This chapter covers these topics:
•Bluetooth Connection Considerations
•Connect the SF61B to an Intermec Computer
•Connect the SF61B to an Intermec SD62 Base Station
•Connect the SF61B to Other Bluetooth Devices
•Keyboard Wedge Emulation Using the
SmartWedgeLite™ Application

Chapter 2 — Connect the SF61B
26 SF61 Cordless Scanner User’s Guide
Bluetooth Connection Considerations
Supported Bluetooth Devices
You can use Bluetooth radio communication to connect up to seven
SF61B scanners to the following devices:
•Bluetooth-enabled Intermec computers
•the Intermec SD62 Base Station (see Optional Accessories in
Chapter 1)
•other Bluetooth-enabled devices that support the HID (Human
Interface Device) or SPP (Serial Port Profile) Bluetooth profiles
Bluetooth Versions
Product behavior may be different depending on the Bluetooth
version you are using with your product (version 2.0, 2.1, etc.).
EasySet Setup Software
To connect to a host device, you may need to install EasySet, the
Intermec scanner setup software. EasySet provides the full range of
setup options for your SF61B cordless scanner (see Configure Your
Scanner with EasySet in Chapter 3 for details on how to install and
use EasySet).
Note: Intermec’s SmartWedgeLite™ software provides an interesting
alternative for keyboard wedge emulation for this last category of
“other Bluetooth-enabled devices” as it allows simplified pairing /
connection with the host.
Chapter 2 — Connect the SF61B
SF61 Cordless Scanner User’s Guide 27
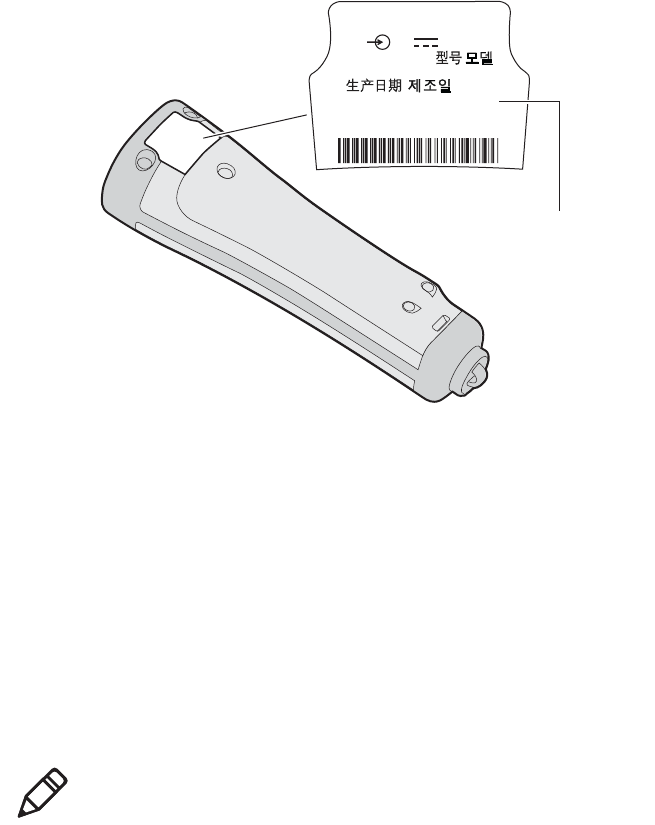
SF61B Bluetooth Device Address Location
When connecting your SF61B to a host device you may need to note
its Bluetooth Device Address (BDA) which you will find on the
product label:
SF61B Bluetooth Device Address: The SF61B Bluetooth Device Address (BDA) is
located on the scanner label.
You may also need the BDA of the Bluetooth host device you want to
connect to.
Connection Lost Behavior
If the Bluetooth connection is lost (out of range, scanner battery too
low, host reboot, etc.) the scanner will automatically try to reconnect
once the problem is resolved (back into range, recharge scanner
battery, etc.). If you try to read a bar code while the scanner is
disconnected from the host, the scanner will emit an error beep.
SN: XXXXXXXXXXX
CN: XXXXXXXXXXXXXX
Intermec Technologies Corp.
Everett, WA USA
BDA: XXXXXXXXXXXXXX
MODEL, MODELO, , :
1016SP01B
MFD, , : YYYYMMDD
1.7A
5V
Bluetooth device address
Note: This automatic reconnection will not occur if the SPP Outgoing
(host-initiated) profile is used to pair with the host.

Chapter 2 — Connect the SF61B
28 SF61 Cordless Scanner User’s Guide
Connect the SF61B to an Intermec Computer
This procedure tells you how to connect your SF61B cordless scanner
to a recent Intermec computer running Windows CE.
To activate Bluetooth on the Intermec computer
1Tap Start > Settings > Bluetooth > Mode and check the Turn on
Bluetooth check box.
To pair and connect the SF61B with the Intermec computer
1Tap Start > Settings > System > Wireless Scanning > Add
Device > Quick Connect > Next.
The computer displays a Bluetooth association bar code
containing the computer’s Bluetooth Device Address (BDA).
2Read the association bar code with your SF61B (you should be
able to read it on the screen of the Intermec computer).
The SF61B’s blue Intermec Ready-to-Work indicator blinks slowly
to show that it is waiting for a Bluetooth connection and the
computer asks if you want to add the scanner to its device list.
3Tap Yes, enter the scanner’s pairing code in the Passcode field if it
is requested (the default Intermec Bluetooth pairing code is
“0000”) and tap Next.
The SF61B emits the “connection successful” beep sequence
(series of beeps from low to high) and the Intermec Ready-to-Work
indicator comes on (continuous blue by default).
The Intermec computer displays a Device Added message to
indicate successful pairing and connection.
4Tap Done and Finish to exit the connection procedure.
Note: The following procedure is valid for recent Intermec computers.
If your Intermec computer has a different interface to the one
described here, the general principle will be the same.
Refer to the product-specific documentation for your Intermec
computer for full details on how to connect Bluetooth devices to your
product.

Chapter 2 — Connect the SF61B
SF61 Cordless Scanner User’s Guide 29
To test the Bluetooth communication
1Open a data input application on the Intermec computer (Start >
Text for example).
2Read the following test code to make sure your connection is
working correctly:
Code 39 Test Bar Code
*123456*
*123456*
Disconnect the SF61B from an Intermec Computer
This procedure tells you how to disconnect your SF61B cordless
scanner from a recent Intermec computer running Windows CE.
To remove the SF61B from the Intermec computer
1Tap Start > Settings > System > Wireless Scanning > Remove
Device > Remove.
The SF61B emits the “disconnect successful” beep sequence (series
of beeps from high to low) and the Intermec Ready-to-Work
indicator goes off.
2Tap Finish to exit the disconnect procedure.
Note: The following procedure is valid for recent Intermec computers.
If your Intermec computer has a different interface to the one
described here, the general principle will be the same.
Refer to the product-specific documentation for your Intermec
computer for full details on how to disconnect Bluetooth devices from
your product.

Chapter 2 — Connect the SF61B
30 SF61 Cordless Scanner User’s Guide
Connect the SF61B to an Intermec SD62 Base
Station
You can connect up to seven Intermec Bluetooth scanners to the
SD62 Base Station.
To connect up to 7 scanners
1Connect the SD62 base station to a host device using the correct
cable for your interface.
See the SD62 Base Station User’s Guide available on the Intermec web
site at www.intermec.com for details on how to connect your
SD62.
2With each scanner you want to connect, scan the Bluetooth
System Connect bar code label on the SD62 base station and wait
for the connection to be established.
The scanner beeps twice, the green status light flashes twice and
the blue Intermec Ready-to-Work indicator starts blinking (may
blink for a few seconds). When the scanner connects to the base
station it emits a series of beeps from low to high. The blue
Intermec Ready-to-Work indicator turns on and stays on for both
the scanner and base station.
Disconnect the SF61B from an SD62 Base Station
To disconnect your SF61B from the SD62 base station
1Read the Bluetooth Device Disconnect bar code.
Bluetooth Device Disconnect
The SF61B emits the “disconnect successful” beep sequence (series
of beeps from high to low) and the SF61B’s Intermec Ready-to-
Work indicator goes off.
Note: If you are connecting the SR61B to the SD62 base station use
the SD62 Base Station User’s Guide and the SD62 system command file
in EasySet for connections and setup.
Chapter 2 — Connect the SF61B
SF61 Cordless Scanner User’s Guide 31
Connect the SF61B to Other Bluetooth Devices
Bluetooth Device Profile
Choose the appropriate Bluetooth profile to communicate with your
host device (a Bluetooth-enabled PC for example) depending on the
requirements of your data management application:
•HID (Human Interface Device Profile) emulates keyboard data
entry
•SPP (Serial Port Profile) emulates data acquisition through a
virtual COM port.
HID Bluetooth Profile
With the HID (Human Interface Device) profile, your SF61B is
recognized as a keyboard. No specific software is needed to collect
data using the HID profile (this is not the case if you use the SPP
profile).
When you pair using the HID profile, you connect straight away
directly with the host.
SPP Bluetooth Profile
The SPP profile (
Serial Port Profile
) allows your SF61B to communicate
with the host device as if the Bluetooth link was a serial port. In this
way, your SF61B is immediately compatible with data management
applications that collect data through a serial port.
When you pair using the SPP profile, you do not connect straight
away with the host, you must then connect with your host application
either through an Outgoing (host-initiated) SPP connection or
through an Incoming (scanner-initiated) SPP connection.
Bluetooth Connections
You can connect to your Bluetooth device using one of the following
Bluetooth connections:
•HID connection (host initiated)
•SPP outgoing connection (host initiated)
•SPP incoming connection (scanner initiated)

Chapter 2 — Connect the SF61B
32 SF61 Cordless Scanner User’s Guide
This section will provide the procedure for each type of connection.
HID Connection
When connected in HID, connection information is stored, meaning
that if the scanner loses the connection (out of range, low battery,
etc.), it will try to reconnect as soon as possible (back into range,
charged battery, etc.).
To connect in HID device profile
1Before trying to pair and connect your scanner, make sure that:
•the scanner is not already trying to establish a Bluetooth
connection (blinking blue Intermec Ready-to-Work indicator),
in this case read the Bluetooth Device Disconnect bar code:
Bluetooth Device Disconnect
•the scanner is not already paired with your Bluetooth device
using another profile, in this case remove it from your host’s
list of Bluetooth devices
•your host is equipped for Bluetooth communication
•the scanner is turned on (if not pull the trigger to turn it on)
2Scan the HID Bluetooth device profile configuration code:
Bluetooth device profile - HID
3Pair the scanner with your device.
Note: To connect up to EasySet, Intermec’s scanner setup software,
running on a Windows PC you can use either of the following:
•a HID Bluetooth connection
•a host-initiated (Outgoing) SPP Bluetooth connection
See Configure Your Scanner with EasySet in Chapter 3 for details
on how to install and use EasySet.

Chapter 2 — Connect the SF61B
SF61 Cordless Scanner User’s Guide 33
•Double-click the Bluetooth icon in the Windows system tray
(or equivalent). The Bluetooth Devices window showing the
current list of paired devices is displayed.
•Click Add a device or the equivalent command depending on
your operating system.
The host searches for all active Bluetooth devices within range.
Your SF61B scanner appears in the Bluetooth device list with
the name SF61B - BDA, where BDA is the scanner’s Bluetooth
Device Address (by default - name can be changed).
•Select your scanner in the list and click Next (or the equivalent
command).
Note: If a pairing code is requested, click Enter the device’s
pairing code (or the equivalent command), enter the scanner’s
pairing code (the default Intermec Bluetooth pairing code is
“0000”) and confirm.
Your SF61B scanner is now displayed in the host PC’s list of
paired devices.
After a successful pairing the scanner is automatically connected
to the host - you hear the “connection successful” beep sequence
(series of beeps from low to high) and see the Intermec Ready-to-
Work indicator (continuous blue by default).
Test Your HID Connection With the Host
Start a simple data acquisition software such as Microsoft® Notepad
and read the following test code to make sure your connection is
working correctly:
Code 39 Test Bar Code
*123456*
*123456*
Note: If the scanner does not appear in the list, it might already
be paired with the host (under some operating systems,
already-paired Bluetooth devices do not appear in the
Bluetooth device search list).
It may also be switched off and therefore not visible to the host,
press the scan button to restart the scanner.

Chapter 2 — Connect the SF61B
34 SF61 Cordless Scanner User’s Guide
To Disconnect From the Host
To disconnect from the host, scan the disconnect bar code:
Bluetooth Device Disconnect
Check that the scanner is no longer in the host’s device list. If
necessary, manually remove the scanner from the list
SPP Outgoing Connection (Host Initiated)
A host-initiated (Outgoing) SPP connection requires opening the
Outgoing virtual COM port from your host application (EasySet or a
terminal emulation program for example).
The advantage of this method is that no Bluetooth association bar
code is required. However, if the connection with the host application
is lost, you must reconnect by re-opening the COM port (s.
To connect in SPP device profile—outgoing connection
1Before trying to pair and connect your scanner, make sure that:
•the scanner is not already trying to establish a Bluetooth
connection (blinking blue Intermec Ready-to-Work indicator),
in this case read the Bluetooth Device Disconnect bar code:
Bluetooth Device Disconnect
•the scanner is not already paired with your Bluetooth device
using another profile, in this case remove it from your host’s
list of Bluetooth devices
•your host is equipped for Bluetooth communication
•the scanner is turned on (if not pull the trigger to turn it on)
2Scan the SPP Bluetooth device profile configuration code:
Note: By default the SF61B uses the North American keyboard layout.
See “Select an International Keyboard (HID Connections Only)”
on page 51 if you are working with a different keyboard
configuration.
Chapter 2 — Connect the SF61B
SF61 Cordless Scanner User’s Guide 35
Bluetooth device profile - SPP (*)
3Pair the scanner with your device:
•Double-click the Bluetooth icon in the Windows system tray
(or equivalent). The Bluetooth Devices window showing the
current list of paired devices is displayed.
•Click Add a device or the equivalent command depending on
your operating system.
The host searches for all active Bluetooth devices within range.
Your SF61B scanner appears in the Bluetooth device list with
the name SF61B - BDA, where BDA is the scanner’s Bluetooth
Device Address (by default - name can be changed).
•Select your scanner in the list and click Next (or the equivalent
command).
Note: If a pairing code is requested, click Enter the device’s
pairing code (or the equivalent command), enter the scanner’s
pairing code (the default Intermec Bluetooth pairing code is
“0000”) and confirm.
Your SF61B scanner is now displayed in the host PC’s list of
paired devices. The scanner is paired but not connected to your
host application - you will not hear the “connection successful”
beep sequence (series of beeps from low to high) or see the blue
Intermec Ready-to-Work indicator (default scanner behavior)
until you connect to your host application.
SPP pairing created two Bluetooth virtual serial ports
(Outgoing and Incoming).
Note: If the scanner does not appear in the list, it might already
be paired with the host (under some operating systems,
already-paired Bluetooth devices do not appear in the
Bluetooth device search list).
It may also be switched off and therefore not visible to the host,
press the scan button to restart the scanner.
Chapter 2 — Connect the SF61B
36 SF61 Cordless Scanner User’s Guide
For an Outgoing SPP Bluetooth connection, you will need to
know which Outgoing virtual COM port to open from your
host application.
4Note the outgoing virtual COM port that has been created:
•Right-click the Bluetooth icon in the Windows system tray and
choose Open Settings (or its equivalent).
A Bluetooth settings window is displayed.
•Locate the COM Ports section and note the outgoing COM
port number.
•Close the Bluetooth settings window.
5Connect the host to the scanner by opening the COM port:
•Press the scan button to turn on your SF61B.
•Start your host application and select the Outgoing COM port
that you noted previously (see above).
Depending on your host configuration and the time elapsed
since your last connection / scanner reset, a popup may
indicate that a Bluetooth device is trying to connect.
If a pairing code is requested, click Enter the device’s pairing
code (or the equivalent command) and enter the scanner’s
pairing code (the default Intermec Bluetooth pairing code is
“0000”)
•When the scanner connects to your host application, it emits a
series of beeps from low to high, and the blue Intermec Ready-
to-Work indicator turns solid blue (default scanner behavior).
Test Your SPP Outgoing Connection With the Host
Read the following test code and check that it is correctly displayed by
the host application to make sure that your connection is working
correctly:
Code 39 Test Bar Code
*123456*
*123456*

Chapter 2 — Connect the SF61B
SF61 Cordless Scanner User’s Guide 37
To Disconnect from the Host
Use the Bluetooth disconnect procedure specific to your host
application.
When the scanner disconnects from the host, it emits a “disconnect
successful” beep sequence (series of beeps from high to low), and the
blue Intermec Ready-to-Work indicator turns off (default scanner
behavior).
SPP Incoming Connection (Scanner Initiated)
A scanner-initiated (Incoming) SPP connection requires reading a
Bluetooth association bar code then opening the Incoming port from
the host application (a terminal emulation program for example).
The advantage of this method is that the scanner automatically tries
to reconnect to the host application each time the connection is lost.
This method is recommended when you are collecting data for a data
management application.
To connect in SPP device profile—incoming connection
1Before trying to connect your scanner, make sure that:
•it is not already trying to establish a Bluetooth connection with
another host (blinking blue Intermec Ready-to-Work
indicator), in this case read the Bluetooth Device Disconnect
bar code:
Bluetooth Device Disconnect
•it is not already paired with your Bluetooth device using
another profile, in this case remove it from your host’s list of
Bluetooth devices
•your host is equipped for Bluetooth communication
2Scan the SPP Bluetooth device profile configuration code:
Bluetooth device profile - SPP (*)
3make sure that your host PC is enabled for Bluetooth connection
from an external device (your SF61B).
Chapter 2 — Connect the SF61B
38 SF61 Cordless Scanner User’s Guide
•Right-click the Bluetooth icon in the Windows system tray and
choose Open Settings (or its equivalent).
A Bluetooth settings window is displayed.
•Under the Options tab (or equivalent), activate the following
options or their equivalents:
Allow Bluetooth devices to find this computer
Allow Bluetooth devices to connect to this computer
Alert me when a new Bluetooth device wants to connect
•Under the COM Ports tab (or equivalent):
Note the host computer’s Incoming COM port. If there is no
incoming COM port, you must create one.
•Under the Hardware tab (or equivalent):
Select Properties > Advanced and note the host computer’s
Bluetooth address.
4Create a Bluetooth connection bar code in EasySet
•Run the EasySet scanner setup software and select the SF61B
product (Product > Select > Handheld scanners > SF61B).
•In the EasySet commands window, open the Interface >
Bluetooth > Bluetooth connection folder and chose
Bluetooth Quick Connect.
•Double-click the Compose BT address command to enter the
host’s Bluetooth Device Address (BDA) you noted previously
(see above), and click OK to confirm.
A Bluetooth association bar code is created containing the
BDA of your host computer.
5Read the Bluetooth connection bar code. You may be able to read
it on the screen in EasySet, if not you can print it out as a label and
perhaps stick it on your host device where it is easy to read
(suggestion).
The blue Intermec Ready-to-Work indicator blinks slowly for 5
minutes to indicate it is waiting to connect (default scanner
behavior).
Chapter 2 — Connect the SF61B
SF61 Cordless Scanner User’s Guide 39
If a pairing code or validation is requested, click Enter the
device’s pairing code (or the equivalent command) and enter the
scanner’s pairing code (the default Intermec Bluetooth pairing
code is “0000”)
6Start the host application you want to connect to and open the
Incoming COM port you noted previously.
When the scanner connects to your host application, it emits a
series of beeps from low to high, and the blue Intermec Ready-to-
Work indicator turns solid blue (default scanner behavior).
Test Your SPP Incoming Connection With the Host
Read the following test code and check that it is correctly displayed by
the host application to make sure that your connection is working
correctly:
Code 39 Test Bar Code
*123456*
*123456*
To Disconnect From the Host
Use the Bluetooth disconnect procedure specific to your host
application to close the Incoming COM port.
When the scanner disconnects from the host PC, it emits a
“disconnect successful” beep sequence (series of beeps from high to
low), and the blue Intermec Ready-to-Work indicator blinks slowly for
5 minutes to indicate it is waiting to connect (default scanner
behavior).
When you open the Incoming COM port again, if the scanner is
switched on it will reconnect to the host application.

Chapter 2 — Connect the SF61B
40 SF61 Cordless Scanner User’s Guide
Note: Using the Bluetooth Device Disconnect bar code to
disconnect your scanner will disconnect it permanently - it will not go
into the “waiting to connect” state (no blinking blue light) and you
will have to read the hosts’ association bar code label again to re-
establish the connection.
Bluetooth Device Disconnect

Chapter 2 — Connect the SF61B
SF61 Cordless Scanner User’s Guide 41
Connect to Other HID Devices (Smartphones, Tablets, PDAs,
etc.)
You can use your SF61B with many types of portable computer
devices running various operating systems (Win32, Android, WinCE,
iOS, …).
EasySet provides some useful predefined quick-setup commands to
simplify the HID Bluetooth connection for devices of this type (see
the Interface > Device profile > Predefined HID profile folder in
the EasySet commands window):
•PC/Linux
•WinCE 5 / WinMobile 6.x / Android
•iOS & MacOS (including a way to control the iOS virtual keyboard
from your scanner)
The Intermec web site also provides Technical Bulletins to help you
connect to devices of this type:
•Connecting a scanner via HID to an Android tablet
•Connecting a scanner via HID to iPad or iPhone
Note: When using your SF61B with an iPad tablet computer, reading
bar codes containing more than 200 characters may cause problems
(iPad application crash, unwanted restart of the scanner).
We recommend that you take this limitation into account when
working with an iPad.

Chapter 2 — Connect the SF61B
42 SF61 Cordless Scanner User’s Guide
Keyboard Wedge Emulation Using the
SmartWedgeLite™ Application
Intermec’s SmartWedgeLite™ software provides an interesting
alternative for keyboard wedge emulation as it allows simplified
pairing / connection with the host.
SmartWedgeLite uses the SPP Bluetooth profile to make the
connection but sends data from the scanner as if it was entered from a
keyboard.
Run SmartWedgeLite
Before connecting your scanner using SmartWedgeLite, make sure
that your host PC is Bluetooth-enabled and that SmartWedgeLite is
installed.
To connect your scanner as a keyboard wedge using SmartWedgeLite
1Scan the Bluetooth device profile - SPP configuration bar code:
Bluetooth Device Profile - SPP (*)
2Start SmartWedgeLite.
3Perform one of the following procedures to connect to the host.
Note: For more information about SmartWedgeLite, see the
application’s integrated help or online help at http://
intermec.custhelp.com/app/answers/detail/a_id/13629/kw/
smartwedgelite.
Note: You can download SmartWedgeLite at:
http://www.intermec.com/products/scansf61b/index.aspx
Chapter 2 — Connect the SF61B
SF61 Cordless Scanner User’s Guide 43
Scanner-initiated (Incoming) Connection with
SmartWedgeLite
Read the Host’s Association Bar Code in
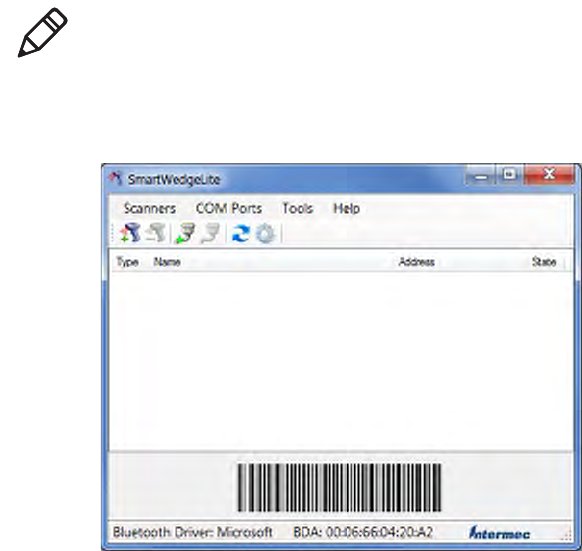
SmartWedgeLite
SmartWedgeLite main screen with the host’s association bar code
To read the host’s association bar code in SmartWedgeLite
1Read the association bar code displayed in the SmartWedgeLite
main window (the bar code contains the host’s Bluetooth Device
Address).
Note: With the scanner-initiated (Incoming) connection, if your
scanner loses the connection with the host PC it will automatically try
to reestablish it.

Chapter 2 — Connect the SF61B
44 SF61 Cordless Scanner User’s Guide
Host-initiated (Outgoing) Connection with SmartWedgeLite
Use the SmartWedgeLite Device List to Connect
Host-initiated connection: Choosing your scanner from SmartWedgeLite’s list
of detected Bluetooth devices
To choose your scanner from the SmartWedgeLite device list
1Click on Scanners > Add scanner (or the icon).
2Select Search for my scanner automatically.
3Choose your scanner from the list of detected Bluetooth devices
and click OK.
Note: With the host-initiated (Outgoing) connection, if your scanner
later loses the connection with the host PC, you will need to follow the
connection procedure again to reestablish the Bluetooth connection.
Chapter 2 — Connect the SF61B
SF61 Cordless Scanner User’s Guide 45
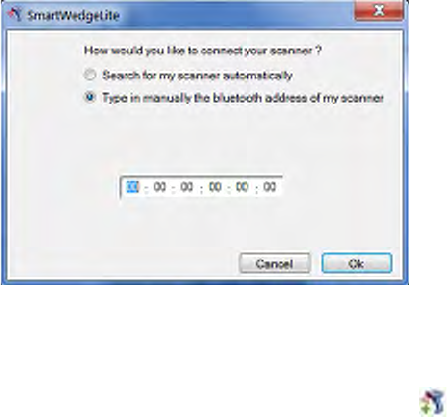
Use the Scanner’s Bluetooth Device Address to
Connect
Host-initiated connection: Entering your scanner’s Bluetooth Device Address
in SmartWedgeLite
To enter your scanner’s Bluetooth Device Address in SmartWedgeLite
1Click on Scanners > Add scanner (or the icon).
2Select Type in manually the Bluetooth address of my scanner.
3Enter your scanner’s Bluetooth Device Address and click OK.
Chapter 2 — Connect the SF61B
46 SF61 Cordless Scanner User’s Guide
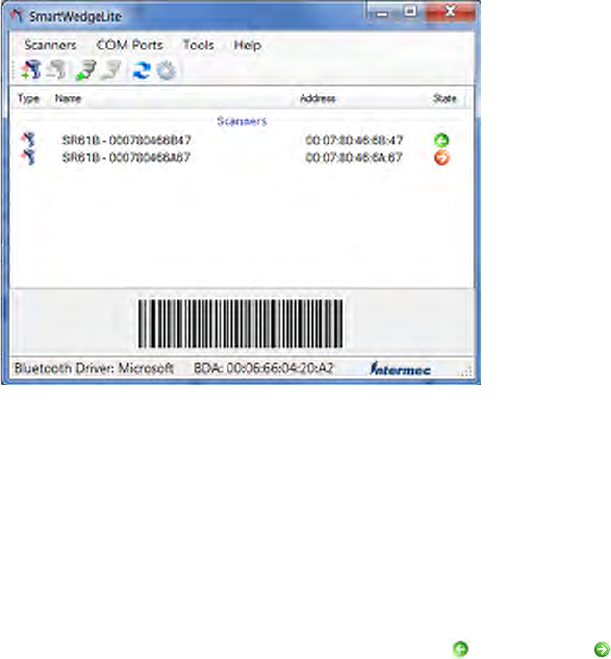
Successful Scanner Connection (SmartWedgeLite)
Connected scanners and connection statuses: An operational Incoming
connection and a problem with an Outgoing connection
When the scanner connects to the host PC, it emits a “connection
successful” beep sequence (series of beeps from low to high) and the
Intermec Ready-to-Work indicator comes on (continuous blue by
default).
The scanner is added to the list of connected scanners in the
SmartWedgeLite Scanners window.
An arrow indicates if the connection is incoming or outgoing .
The color of the arrow indicates if the connection is operational
(green) or if there is a connection problem (red).

Chapter 2 — Connect the SF61B
SF61 Cordless Scanner User’s Guide 47
Disconnect your Scanner from SmartWedgeLite
To disconnect your scanner
1Select your scanner in the list of connected devices in the
SmartWedgeLite Scanners window.
2Do one of the following:
•click Scanners > Remove scanner
•click the icon
•press the <Del> key on your keyboard
Your scanner is disconnected.
Chapter 2 — Connect the SF61B
48 SF61 Cordless Scanner User’s Guide

49
3
Configure the SF61B Cordless Scanner
This chapter provides some basic configuration bar codes and
information on how to configure the SF61B using the EasySet
scanner setup software or your Intermec computer. This
chapter includes:
•Basic Setup with Configuration Bar Codes
•Configure Your Scanner with EasySet
•Configure your Scanner From Your Intermec
Computer

Chapter 3 — Configure the SF61B Cordless Scanner
50 SF61 Cordless Scanner User’s Guide
Basic Setup with Configuration Bar Codes
This section provides configuration bar codes for a basic setup of your
scanner. Many more configuration options are available with EasySet
or with your Intermec computer, see Configure Your Scanner with
EasySet and Configure your Scanner From Your Intermec
Computer in the present chapter.
Default values are indicated by “(*)” in this manual and in EasySet.
Reset Your Scanner (Software Reset)
Read the Reset factory defaults configuration bar code to reset your
scanner’s parameter settings to their initial values.
Reset factory defaults
You can also perform a software reset of your SF61B using one of the
following methods:
•by sending a Reset factory defaults command to the scanner in
online setup with EasySet (see Online Setup with EasySet in the
present chapter)
•by forcing a software reset of the scanner (see Force a Software
Reset in Chapter 4, Troubleshoot and Maintain the SF61B)
The resulting software reset will reset your scanner’s parameter
settings to their initial values so you will have to reconfigure any
custom settings you have programmed in your scanner.
Note: Depending on your host configuration (device, Bluetooth
version), after a software reset of your scanner (Reset factory
defaults) you may have to re-pair your product with your host device /
application (see the appropriate section in Chapter 2, Connect the
SF61B), and in all cases you will have to re-connect with your host.

Chapter 3 — Configure the SF61B Cordless Scanner
SF61 Cordless Scanner User’s Guide 51
Select an International Keyboard (HID Connections Only)
By default the SF61B uses the North American Windows keyboard
layout when it is connected using the HID Bluetooth profile.
Use the following configuration bar codes to select the keyboard for
your country. Additional keyboards are available in EasySet.
North American Windows (*)
French Windows
French Canadian Windows 95/98
French Canadian Windows XP/2000
German Windows
Spanish Windows
Italian Windows
UK English Windows

Chapter 3 — Configure the SF61B Cordless Scanner
52 SF61 Cordless Scanner User’s Guide
Japanese Windows
Brazilian Portuguese Windows
Czech Republic Windows
Slovakian Windows
Hungarian 101-key

Chapter 3 — Configure the SF61B Cordless Scanner
SF61 Cordless Scanner User’s Guide 53
Configure the Postamble
The default postamble is <CR> <LF>. For certain applications or
when using your scanner as an HID Bluetooth device you may need to
change this setting. Use the following configuration bar codes to
change the default postamble in your scanner.
More postamble options are available with EasySet or with your
Intermec computer (see Configure Your Scanner with EasySet and
Configure your Scanner From Your Intermec Computer in the
present chapter).
Carriage Return + Line Feed (*)
None
Carriage Return
Enter
Chapter 3 — Configure the SF61B Cordless Scanner
54 SF61 Cordless Scanner User’s Guide
Configure Your Scanner with EasySet
EasySet is Intermec’s Windows-based scanner setup software
application.
You can use EasySet to set up your scanner product in two ways:
•Online setup—send configuration commands from EasySet
directly to your scanner.
•Online setup via the SD62 base station—send configuration
commands from EasySet to the scanner via the SD62 base station
•Offline setup—send configuration commands to a bar code setup
sheet, print out the setup sheet and scan the bar codes with your
scanner.
If it is not already installed on your host PC, download and install the
latest version of EasySet at this link on the Intermec web site:
www.intermec.com/EasySet
We recommend that you install EasySet in the default location
proposed by the installer.

Chapter 3 — Configure the SF61B Cordless Scanner
SF61 Cordless Scanner User’s Guide 55
Online Setup with EasySet
To configure your scanner online by sending commands from EasySet
1Pair your SF61B with your EasySet host PC and connect it using
one of the following methods described in Chapter 2:
•for an HID connection: see To connect in HID device
profile (with HID, pairing and connection are simultaneous)
•for a host-initiated (Outgoing) SPP connection: see To
connect in SPP device profile—outgoing connection.
2Start EasySet and select the SF61B product (Product > Select >
Handheld scanners > SF61B).
If the Select product dialog box does not appear, choose Product >
Select or click on the product icon in the upper left corner of the
EasySet window.
3Select Communication > Select communication interface. The
Device Selection dialog box appears.
4Select the connection channel corresponding to the connection
method you have chosen (Bluetooth Keyboard for an HID
connection or the Outgoing virtual COM port for a host-initiated
SPP connection) and click OK.
5EasySet connects to your scanner and displays your scanner’s
current configuration settings in blue next to the commands.
These settings are indicated by a blue check mark or blue text.
Open the folders in the EasySet commands window to find the
configuration commands you need and double-click each
command to send it to your scanner.
Note: In the following procedure you will use one of the following
methods to connect your scanner to EasySet for online setup:
•HID Bluetooth connection
•host-initiated (Outgoing) SPP Bluetooth connection
Note: The scanner does not beep when you send configuration
commands online from EasySet. It powers off when you select
Disconnect from the Communication menu in Easyset.
Chapter 3 — Configure the SF61B Cordless Scanner
56 SF61 Cordless Scanner User’s Guide
To disconnect your scanner from EasySet
1Select Disconnect from the Communication menu in Easyset.
HID connection: the scanner disconnects from EasySet and
restarts, and then goes into “ready to work” mode (the blue
Intermec Ready-to-Work indicator comes on) as it is still
connected to the host PC.
Host-initiated Outgoing SPP connection: the scanner
disconnects from EasySet and restarts but it is no longer
connected to the host PC.
Online Setup Via the SD62 Base Station
You can also setup you scanner via the SD62 base station using the
SD62 System command file in EasySet. See the SD62 Base Station User’s
Guide for more information.
Offline Setup with EasySet
To configure your scanner offline by scanning bar codes
1Start EasySet. The first time you start EasySet, the Select product
dialog box appears.
If the Select product dialog box does not appear, choose Product
> Select or click on the product icon in the upper left corner of the
EasySet window.
2Select your product.
3Open the folders in the EasySet commands window to find the
configuration commands you need and double-click each
command to send it to the setup sheet.
4Click on the Print icon to print out the setup sheet and then scan
the commands with your SF61B cordless scanner.

Chapter 3 — Configure the SF61B Cordless Scanner
SF61 Cordless Scanner User’s Guide 57
Configure your Scanner From Your Intermec
Computer
You can configure many settings for the SF61B from your Intermec
computer using Intermec Settings.
To Configure the SF61B from Your Intermec Computer
1Establish a Bluetooth connection with your Intermec computer
(see Connect the SF61B to an Intermec Computer in Chapter 2).
2On your Intermec computer, start the Intermec Settings
application which may be located in Settings > System folder
depending on your Intermec computer.
3Select Data Collection > SF61 Scanner BDA, where BDA is the
Bluetooth Device Address (BDA) of your SF61B. The SF61B
Bluetooth address is located on the label of your SF61B, see SF61B
Bluetooth Device Address Location in Chapter 2.
4Configure commands from the SF61 Scanner menu for your
SF61B.
5Select File > Save Settings. The SF61B is updated with the new
configuration command settings.
6Close Intermec Settings.
Note: The description in this section is provided as a general
guideline. Consult your Intermec computer’s documentation for full
details on how to set up your Bluetooth scanner from your Intermec
computer.
Note: When you first connect to an Intermec computer, only SF61B
settings common to the Intermec computer’s internal scanner settings
are changed to the internal scanner’s default settings.
Chapter 3 — Configure the SF61B Cordless Scanner
58 SF61 Cordless Scanner User’s Guide

59
4
Troubleshoot and Maintain the SF61B
Use this chapter to solve problems you may have while using
the SF61B. This chapter contains these topics:
•Troubleshoot the SF61B
•Recover the SF61B
•Call Product Support
•Upgrade the SF61B Firmware
•Replace the Battery of the SF61B
•Replace the End-Caps of the SF61B
•Clean the SF61B

Chapter 4 — Troubleshoot and Maintain the SF61B
60 SF61 Cordless Scanner User’s Guide
Troubleshoot the SF61B
Problems and Possible Solutions
If you have problems using your SF61B, use this section to try to find
a solution.
Problems and Possible Solutions
Problem Possible Solution
You press the scan
button, but nothing
happens.
The SF61B is powered by a rechargeable lithium-
ion battery. Make sure the battery is not fully
discharged. Charge the battery then try scanning
again (see Charge the Battery in Chapter 1).
The Status Light blinks
red slowly. The battery is low. Charge the battery (see Charge
the Battery in Chapter 1).
You press the scan
button, the red
scanning beam (1D) or
laser framing (2D) turns
on, but you cannot
successfully scan a bar
code.
Try these possible solutions:
•Make sure that the SF61B is configured for the
symbology you are scanning.
•Make sure that the SF61B is at the appropriate
scanning distance and angle from the bar code.
Move the SF61B closer and farther away and
tilt it up and down to find the appropriate
distance and angle.
•Make sure that the SF61B is able to read the
type of bar code you are scanning (1D, 2D).
•Make sure the bar code you are trying to scan is
not poorly printed or not too small. Scan a
known good bar code to make sure that the
SF61B is working properly.
•Clean the scan window if it is dirty.
For more information, see Scan Bar Codes in
Chapter 1.
You scan a bar code, the
SF61B vibrates and
emits six very fast beeps.
This indicates a transmission error, check that:
•your product is correctly connected to your
host device / application
•your host device / application is able to receive
the data from your scanner

Chapter 4 — Troubleshoot and Maintain the SF61B
SF61 Cordless Scanner User’s Guide 61
You scan a bar code, the
SF61B beeps twice, and
the status light blinks
green twice, but the data
is not transmitted to the
host computer.
Try these possible solutions:
•Make sure that your data collection application
is set up to receive data from the SF61B.
•If you are using an SD61 Base Station
connected to your host using an RS-232 cable,
make sure that the serial parameters on the
SD61 match the serial parameters of the host
computer. The default serial parameters for the
SD61 are 19200 baud, 8 data bits, no parity,
and 1 stop bit.
You scan a
configuration bar code
and the SF61B emits six
very fast beeps.
The SF61B does not recognize or support the
configuration bar code you scanned.
You scan a bar code and
the status light turns
on, but the SF61B does
not beep.
The beep duration, volume, frequency, and
number may be deactivated:
•use EasySet to check your product’s settings
(see Online Setup with EasySet in Chapter 3,
Configure the SF61B Cordless Scanner) and
reconfigure your product if required
You cannot establish a
Bluetooth connection
with your scanner.
There may be a problem with your host Bluetooth
interface, try one or more of the following:
•disable then enable your host Bluetooth radio
from the Device Manager (Windows host) or
equivalent for your host device
•disconnect then reconnect your Bluetooth
adapter if applicable
•force a restart of your SF61B (hardware reset),
see Force a Hardware Reset in the present
chapter)
•re-pair your scanner with your host device /
application (see the appropriate section in
Chapter 2, Connect the SF61B)
•your scanner may be connecting with /
connected to another Bluetooth host,
disconnect the other Bluetooth connection if
required (see Chapter 2, Connect the SF61B)
Problems and Possible Solutions (continued)
Problem Possible Solution

Chapter 4 — Troubleshoot and Maintain the SF61B
62 SF61 Cordless Scanner User’s Guide
After a software reset:
•by reading / sending
a Reset factory
defaults command
•by performing a
firmware upgrade
you can see the
Outgoing and Incoming
virtual COM ports in
your host’s Bluetooth
settings (SPP
connection) but your
host device / application
tells you that they are
not available.
Depending on your host configuration (host
device, Bluetooth version), you may have to re-pair
your product with your host device /application to
reset your scanner-host Bluetooth settings (see the
appropriate section in Chapter 2, Connect the
SF61B).
You have added your
scanner to your host
device during an SPP
pairing procedure but
you cannot see the
corresponding
Outgoing and Incoming
COM ports in your
host’s Bluetooth
settings.
There may be a Bluetooth management problem
on your host device, try the following procedure:
1Disconnect your scanner from your host device
(see Chapter 2, Connect the SF61B).
2Remove your scanner from the host’s device
list.
3Restart your host device (power down / power
up).
4Re-pair your scanner with your host for SPP
connection and check the available COM ports
in your host device’s Bluetooth settings.
If this does not solve the problem, try this
workaround (see Chapter 2, Connect the SF61B
for details on the different pairing / connection
methods):
1Pair / connect your scanner with your host
device using the HID profile.
2Disconnect your scanner from the host device.
3Remove your scanner from the host’s device list
if applicable.
4Re-pair your scanner with your host for SPP
connection and check the available COM ports
in your host device’s Bluetooth settings.
Problems and Possible Solutions (continued)
Problem Possible Solution

Chapter 4 — Troubleshoot and Maintain the SF61B
SF61 Cordless Scanner User’s Guide 63
You are trying to
establish a Bluetooth
connection from a host
device to your SF61B,
but the host device
cannot find your
scanner.
Your SF61B may be switched off or connected to
another Bluetooth host, or there may be a
Bluetooth management problem on your host
device. Try one or more of the following (see
Chapter 2, Connect the SF61B for details on the
different pairing / connection methods):
•press the scan button to power up your product
•disconnect your product if it is connected to
another host
•re-pair your product with your host device
•restart your host device (power down / power
up)
You established a
Bluetooth connection
with an Intermec
computer, and the
settings on your SF61B
were restored to their
default values.
When you first connect to an Intermec computer,
only SF61B settings common to the Intermec
computer’s internal scanner settings are changed
to the internal scanner’s default settings. Scan
configuration bar codes, or use Intermec Settings
on your Intermec computer to change your SF61B
settings.
You cannot use your
SF61B to change the
configuration settings
of an SD61 base station.
You must use an SF51 scanner or another
compatible product if you want to change the
settings of an SD61 base station.
Your scanner is
unresponsive or appears
to be locked.
Try to perform a hardware reset of your scanner
(see below, , in the present chapter).
A hardware reset will restart your scanner but it
will not reset your custom configuration settings.
Depending on the type of Bluetooth connection
you are using, your scanner will automatically
reconnect with your host device / application or
you will have to reconnect manually.
The trigger button is
stuck. Clean around the edges of the trigger button with
a can of compressed air.
Problems and Possible Solutions (continued)
Problem Possible Solution

Chapter 4 — Troubleshoot and Maintain the SF61B
64 SF61 Cordless Scanner User’s Guide
None of the previous
suggestions have solved
your problem
Perform a software reset (Reset factory defaults)
of your SF61B using one of the following
methods:
•read the Reset factory defaults configuration
code (see Reset Your Scanner (Software
Reset) in Chapter 3, Configure the SF61B
Cordless Scanner)
•send a Reset factory defaults command from
EasySet to the scanner in online setup mode
(see Online Setup with EasySet in Chapter 3,
Configure the SF61B Cordless Scanner)
•force a software reset of the scanner (see below,
Force a Software Reset, in the present chapter)
Bear in mind however:
•This will reset your scanner’s parameter
settings to their initial values so you will have
to reconfigure any custom settings you have
programmed in your scanner (see Chapter 3,
Configure the SF61B Cordless Scanner).
•Depending on your host configuration (host
device, Bluetooth version), you may have to re-
pair your product with your host device /
application (see the appropriate section in
Chapter 2, Connect the SF61B).
•In all cases you will have to re-connect with
your host (see the appropriate section in
Chapter 2, Connect the SF61B).
Problems and Possible Solutions (continued)
Problem Possible Solution
Note: You may find a solution to your problem in Knowledge Central, the
online knowledge base for Intermec products:
http://intermec.custhelp.com/app/home
and you can also find useful scanner-specific information on the Scanner FAQ
(Meta-Answer) page:
http://intermec.custhelp.com/app/answers/detail/a_id/
12923/kw/meta

Chapter 4 — Troubleshoot and Maintain the SF61B
SF61 Cordless Scanner User’s Guide 65
Recover the SF61B
If your SF61B appears “dead” or does not respond when you press the
scan button, you can try to:
•restart the product (hardware reset)
•reset the product’s configuration settings to their initial values
(software reset)
A hardware reset does not lose the current configuration settings.
A software reset sets all the configuration settings of the scanner back
to their default values, including custom default settings (same effect
as when you read the Reset factory defaults configuration bar code).
Force a Hardware Reset
A hardware reset will restart your scanner, keeping the current
configuration.
To force a hardware reset (restart) of your SF61B
1Turn the scanner on by pressing the trigger one time, then release.
2Press and hold the scan button for more than 20 seconds until the
scanner beeps twice and vibrates (no red LED).
3Release the scan button.
If you have a Bluetooth connection, the SF61B disconnects from
the host device when it switches off.
After a restart, your scanner may try to reestablish the Bluetooth
connection with the host depending on the type of connection (it
Note: If your scanner does not turn on after a hardware and/or
software reset and you are using a correctly charged and functioning
Intermec battery pack Model 1016AB01 (P/N SF61-BAT-xxx,), please
contact your Intermec representative.
Note: You may not be able to tell if the scanner is on, for example if
the LEDs have been disabled and do not light up when you pull the
trigger.

Chapter 4 — Troubleshoot and Maintain the SF61B
66 SF61 Cordless Scanner User’s Guide
will do so with an HID connection or a scanner-initiated Incoming
SPP connection for example).
Force a Software Reset
A software reset of your scanner will reset its parameter settings to
their initial values so you will have to reconfigure any custom settings
you have programmed in your scanner (see Chapter 3, Configure the
SF61B Cordless Scanner).
To force a software reset (Reset factory defaults) of your SF61B
1Turn the scanner on by pressing the trigger one time, then release.
2Press and hold the scan button for 30 seconds until the red LED
comes on.
The scanner will beep after 20 seconds (hardware reset) however,
keep the trigger pressed until the red LED comes on (10 more
seconds after the hardware reset).
3Press the scan button very rapidly five times in succession while
the red LED is on (you need to be quick as the red LED only stays
on for 2 seconds).
The green LED comes on, the scanner beeps a reset confirmation
(six-beep melody) and powers off and powers on (two beeps and
vibrate alert by default).
If you had a Bluetooth connection before the software reset, the
SF61B will disconnect from the host device.
Note: You may not be able to tell if the scanner is on, for example if
the LEDs have been disabled and do not light up when you pull the
trigger.
Note: Depending on your host configuration (device, Bluetooth
version), after a software reset of your scanner (Reset factory defaults)
you may have to re-pair your product with your host device /
application (see the appropriate section in Chapter 2, Connect the
SF61B).
Chapter 4 — Troubleshoot and Maintain the SF61B
SF61 Cordless Scanner User’s Guide 67
Call Product Support
To talk to an Intermec Product Support representative:
•In the U.S.A. and Canada, call 1-800-755-5505
•Outside the U.S.A. and Canada, contact your local Intermec
representative. For help, go to www.intermec.com > About Us >
Contact Us.
Before you call Intermec Product Support, make sure you have the
following information for your SF61B product:
•configuration number (“CN” on the product label)
•serial number (“SN” on the product label)
•firmware version
•sub-system versions
•decode version
Get SF61B Version Information
There are two ways to get the firmware version, subsystem versions
and decode version of your SF61B:
•read Get version bar codes and display your product’s version
information on your host device’s screen
•use EasySet in online setup mode to display your product’s version
information

Chapter 4 — Troubleshoot and Maintain the SF61B
68 SF61 Cordless Scanner User’s Guide
Read “Get version” Bar Codes
You can read Get version bar codes to display your product’s version
information if your SF61B is connected to a Bluetooth host device /
application.
To get version information by reading bar codes
1Connect your SF61B to a Bluetooth host using the appropriate
procedure for your host device /application (see Chapter 2,
Connect the SF61B).
2Run an application that can accept bar code information from
your SF61B (Microsoft® Notepad if you are using an HID
connection for example, or the host application you use for
Bluetooth serial emulation).
3Scan the following bar codes:
Get firmware version
Get sub-system version
Get decode version
The version information is displayed in your host application.
Chapter 4 — Troubleshoot and Maintain the SF61B
SF61 Cordless Scanner User’s Guide 69
Use EasySet to Display Current Version Information
You can use EasySet to get version information if your SF61B is
connected using an HID connection or a host-initiated (Outgoing)
SPP connection.
To get version information by reading bar codes
1Follow the procedure for online setup with EasySet (see Online
Setup with EasySet in Chapter 3).
2When the scanner is connected to EasySet, open the
Configuration modes and utilities section in the EasySet
commands window.
The current firmware, subsystem and decode versions appear in
blue next to the Get firmware version, Get sub-system versions
and Get decode version commands.

Chapter 4 — Troubleshoot and Maintain the SF61B
70 SF61 Cordless Scanner User’s Guide
Upgrade the SF61B Firmware
You may need to upgrade the SF61B firmware if there is an update
that incorporates changes to a feature or adds functionality to the
scanner. When you upgrade your scanner, the current settings are
erased and replaced with the default settings.
After a firmware upgrade, you will need to reestablish Bluetooth
communication between your SF61B and the other Bluetooth devices
and applications in your data collection system.
Upgrading the SF61B takes about 10 minutes to complete.
Prepare for Firmware Upgrade with EasySet and WinFlash
To upgrade the SF61B you will need:
•a Bluetooth connection with a Bluetooth enabled host (internal
Bluetooth controller or external Bluetooth adapter)
•a host PC running Microsoft® Windows® XP with SP2, Microsoft
Windows 2000 with SP4, or a more recent version of Microsoft
Windows
•the latest version of EasySet (includes the WinFlash firmware
upgrade utility) installed on the host PC (available at
www.intermec.com/EasySet)
•the SF61B .bin firmware file for your SF61B model (1D or 2D)
available at http://www.intermec.com/products/scansf61b/
index.aspx.
Note: Depending on your host configuration (device, Bluetooth
version), after a firmware upgrade of your scanner you may have to re-
pair your product with your host device /application (see the
appropriate section in Chapter 2, Connect the SF61B).
Note: If your SF61B LED blinks red before you start the upgrade
procedure, you will need to charge it before you perform the firmware
upgrade (see Charge the Battery in Chapter 1).

Chapter 4 — Troubleshoot and Maintain the SF61B
SF61 Cordless Scanner User’s Guide 71
Download the Latest SF61B Firmware Version
To download the latest firmware upgrade package
1Go to the SF61B section of the Intermec web site:
http://www.intermec.com/products/scansf61b/index.aspx
2Open the Downloads tab.
3Click the link to download the appropriate SF61B firmware
upgrade package for your SF61B model (1D or 2D) and save it to
your PC.
Disconnect any Existing Bluetooth Connection with
your SF61B
Firmware upgrade using EasySet and WinFlash requires a host-
initiated (Outgoing) SPP Bluetooth connection. If your SF61B is
currently connected to the host with another type of Bluetooth
connection, you will have to disconnect/deactivate that connection
before you perform the firmware upgrade procedure.
To disconnect your scanner from the host
1If your SF61B is connected to the host, read the Bluetooth Device
Disconnect bar code to disconnect it.
Bluetooth Device Disconnect
2Remove your SF61B from the host’s list of Bluetooth devices:
•Double-click the Bluetooth icon in the system tray, select your
scanner and click Remove device (or equivalent).
3Close the host’s Outgoing COM port if it is open.
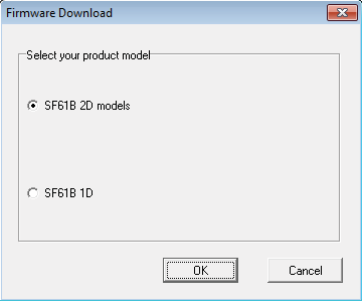
Chapter 4 — Troubleshoot and Maintain the SF61B
72 SF61 Cordless Scanner User’s Guide
Use EasySet and WinFlash to Upgrade your SF61B Firmware
To upgrade your scanner’s firmware
1Connect the SF61B to the host in SPP outgoing (host initiated)
connection - see “To connect in SPP device profile—outgoing
connection” on page 34.
2Start the latest version of EasySet and select the SF61B product
(Product > Select > Handheld scanners) if it is not already
selected.
3From the Tools menu, select Upgrade product firmware to start
WinFlash.
If WinFlash is not already installed you will be asked to install it -
click Yes and follow the installation instructions.
If you are connected to EasySet for online setup, a message will ask
if you want to quit online setup mode and start WinFlash.exe.
Click Yes to continue, the scanner disconnects (the blue Intermec
Ready-to-Work indicator goes off) and then restarts (2 beeps and
vibrate alert by default).
4Select your scanner model and click OK.
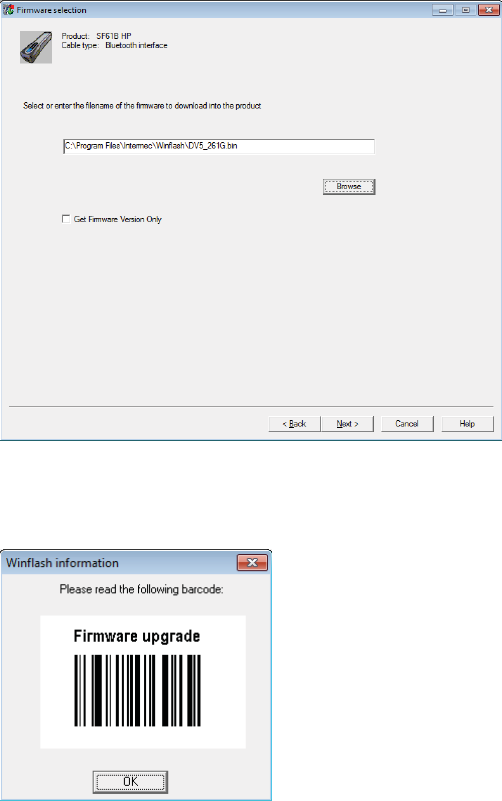
Chapter 4 — Troubleshoot and Maintain the SF61B
SF61 Cordless Scanner User’s Guide 73
5Click Browse to find the correct .bin firmware upgrade file you
downloaded for your product model and click Next.
6Scan the Firmware upgrade bar code that appears on the screen -
print out and read the code on this page if you can’t read it on the
screen.
The scanner emits two beeps and two green flashes to indicate a
good configuration bar code read and then blinks with a regular
red blink.
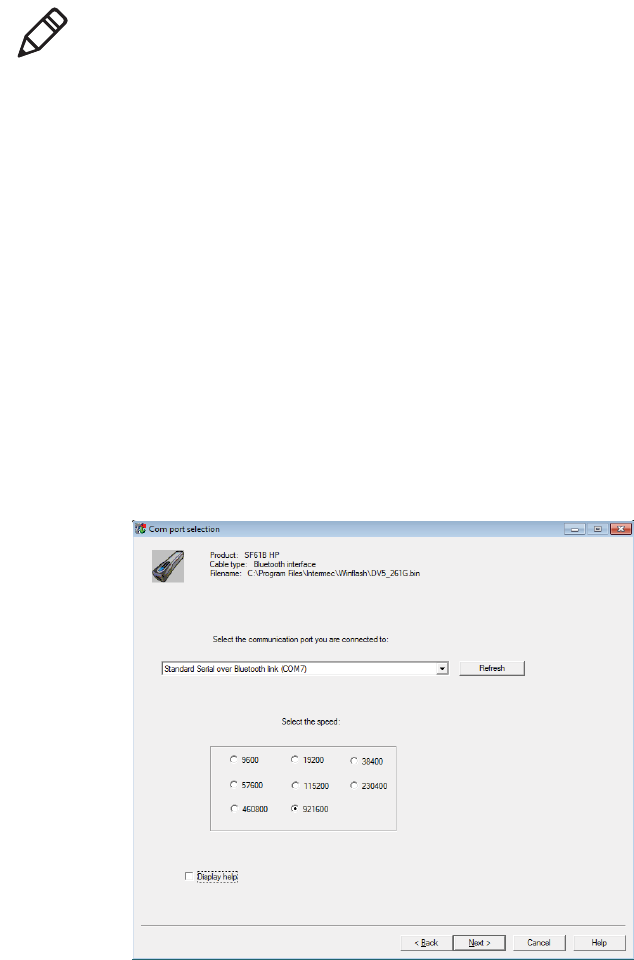
Chapter 4 — Troubleshoot and Maintain the SF61B
74 SF61 Cordless Scanner User’s Guide
7Click OK to continue.
8Select the Outgoing COM port your SF61B is connected to.
Note: If you do not proceed with the firmware upgrade procedure
within 5 minutes, the scanner performs a restart (emits two beeps and
vibrates). Close WinFlash and close EasySet and repeat the entire
procedure including removing your SF61B from the host’s list of
Bluetooth devices and re-pairing with the host system.
If you cannot re-pair successfully after interrupting the software
upgrade (you cannot see the Outgoing and Incoming virtual COM
ports in your host PC’s Bluetooth settings), try the following
workaround:
•remove your scanner from your host’s device list if present
•pair and connect your scanner using the HID profile
•disconnect your scanner from this HID connection (your
scanner should no longer be present in the host’s device list)
•repeat the entire firmware upgrade procedure including
removing your SF61B from the host’s list of Bluetooth devices
(if applicable) and re-pairing with the host system
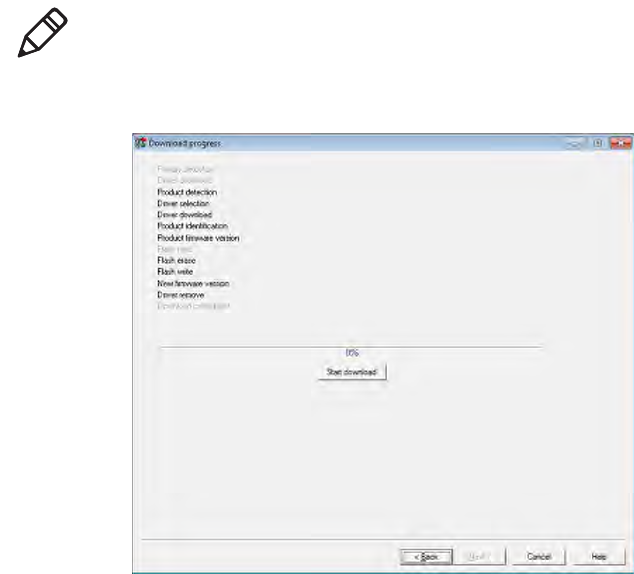
Chapter 4 — Troubleshoot and Maintain the SF61B
SF61 Cordless Scanner User’s Guide 75
9Click Start download.
Your host PC may display a message saying that a Bluetooth device
is trying to connect, if this is the case, click OK to launch the
upgrade process (you may have to enter your scanner’s pairing
code, the default pairing code is “0000”).
The scanner blinks with a slower red blink when the firmware
upgrade has started and is in progress.
When the firmware upgrade is complete, an “Operation
successful” message is displayed in the Download progress
window, the scanner emits a “success” beep sequence and then
powers down and restarts.
10 Click Finish. You have successfully upgraded your scanner
firmware.
Note: To identify the correct Outgoing port, right-click the Bluetooth
icon in the Windows system tray, choose the Open Settings option
(or equivalent) and look at the COM Ports details.

Chapter 4 — Troubleshoot and Maintain the SF61B
76 SF61 Cordless Scanner User’s Guide
Note: If the firmware upgrade procedure is interrupted, with a “Can’t
open communication port” message for example, close WinFlash and
close EasySet and repeat the entire procedure including removing
your SF61B from the host’s list of Bluetooth devices and re-pairing
with the host system.
When the firmware upgrade is completed you will need to pair again
with your host device and re-establish your Bluetooth connection.
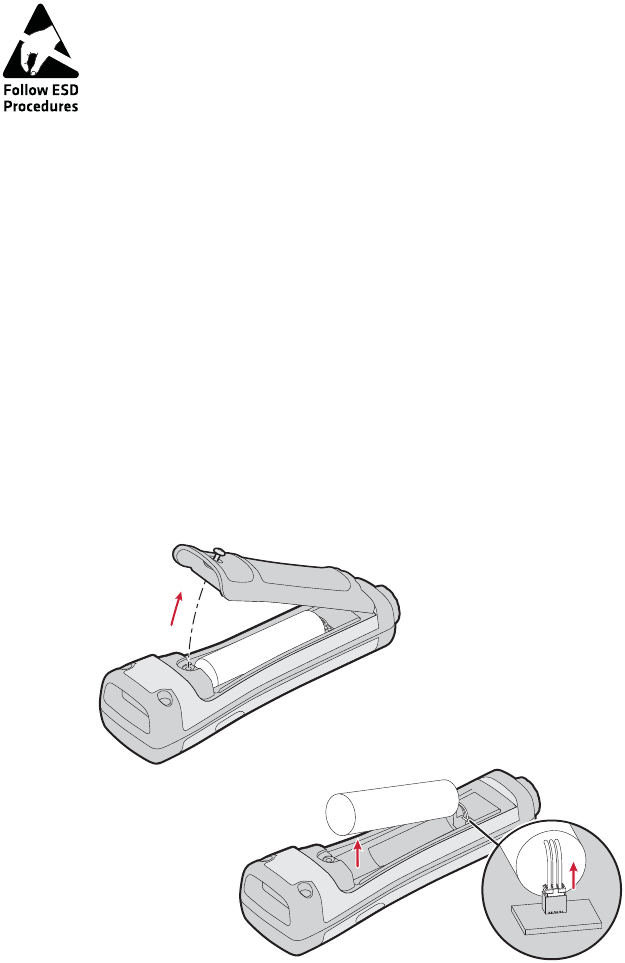
Chapter 4 — Troubleshoot and Maintain the SF61B
SF61 Cordless Scanner User’s Guide 77
Replace the Battery of the SF61B
To change the battery
1Loosen the screw holding the battery cover.
2Remove the battery cover.
3Disconnect the battery cable and remove the battery.
4Install the new battery
•Plug in connector
•Place connector side of battery gently against foam padding
•Lower the battery in to place
5Install the battery cover and tighten the screw (56 N cm/4.956 in-
lb).
Integrated circuits on printed circuit boards (PCBs) in this
equipment are sensitive to damage by electrostatic discharge
(ESD). Prevent ESD by always wearing skin contact ground
straps firmly attached to the equipment metal base assembly
when working inside of the equipment housing. Failure to
comply may result in damage to PCB components.
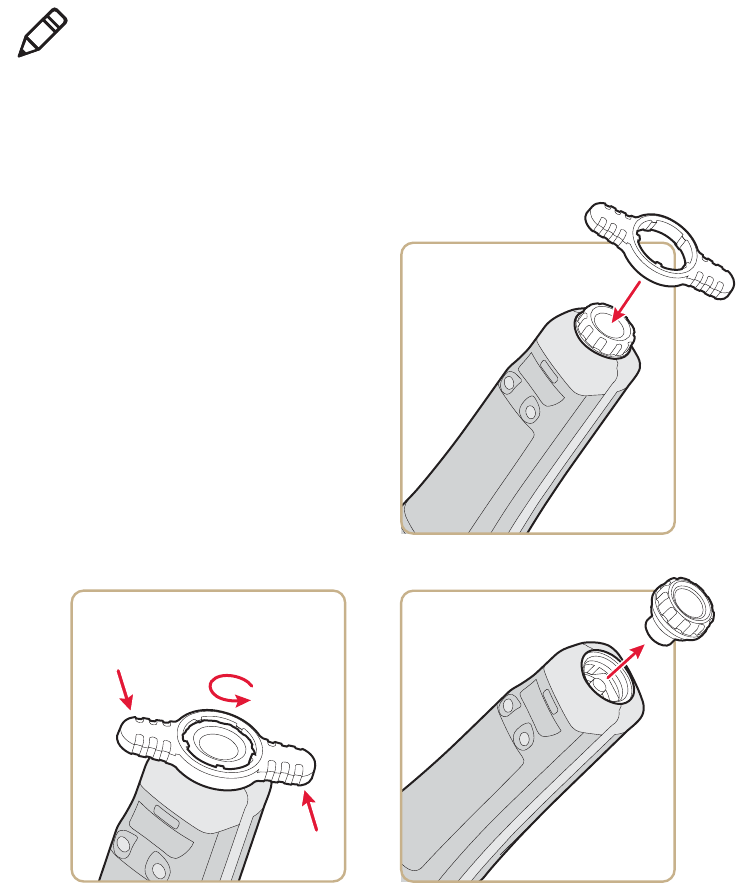
Chapter 4 — Troubleshoot and Maintain the SF61B
78 SF61 Cordless Scanner User’s Guide
Replace the End-Caps of the SF61B
Remove the SF61B End-Cap
Note: Do not apply excessive pressure to the battery cover when
removing and installing the screw (applying excessive pressure on the
battery cover during removal/installation may damage your product).

Chapter 4 — Troubleshoot and Maintain the SF61B
SF61 Cordless Scanner User’s Guide 79
Install the SF61B End-Cap
Torque 200 Ncm/
17.70 lb in

Chapter 4 — Troubleshoot and Maintain the SF61B
80 SF61 Cordless Scanner User’s Guide
Clean the SF61B
Clean Scanner Window
Clean the scanner window as often as needed for the environment in
which you are using the SF61B. To clean the scanner window, you can
use soapy water or isopropyl alcohol.
To clean the scanner window
1Dip a clean towel or rag in soapy water or isopropyl alcohol and
wring out the excess. Wipe the scanner window. Do not allow any
abrasive material to touch the window.
2Wipe dry with a lint-free cloth.
Clean Scanner Trigger Button
When working in a dusty environment, the trigger may collect dust
around it and even become stuck if there is too much dust. Clean
around the trigger button using compressed air (standard can of
compressed air).
Opening the SF61B may cause damage to the internal
components.

Rev (a)
Product documentation is
available at
www.honeywellaidc.com.
La documentation sur le
produit est disponible à
www.honeywellaidc.com.
La documentation du
produit est disponible sur
le site
www.honeywellaidc.com.
La documentazione sul
prodotto è disponibile sul
sito
www.honeywellaidc.com.
Die Produktdokumentation
ist unter
www.honeywellaidc.com
verfügbar.
La documentación del
producto está disponible
en
www.honeywellaidc.com.
La documentación del
producto está disponible
en
www.honeywellaidc.com.
A documentação do
produto está disponível em
www.honeywellaidc.com.
www.honeywellaidc.com
www.honeywellaidc.com
www.honeywellaidc.com
www.honeywellaidc.com
.
Документацию по изделию
можно найти на сайте
www.honeywellaidc.com.
Ürün belgelerine
www.honeywellaidc.com
adresinden ulaşılabilir.
FCC Part 15 Subpart B Class B
This device complies with part 15 of the FCC Rules. Operation is subject to the following two conditions:
1. This device may not cause harmful interference.
2. This device must accept any interference received, including interference that may cause undesired operation.
This equipment has been tested and found to comply with the limits for a Class B digital device pursuant to part 15 of the FCC Rules. These limits are designed to provide reasonable protection against harmful interference in a residential installation. This equipment generates, uses, and can radiate radio frequency
energy and, if not installed and used in accordance with the instructions, may cause harmful interference to radio communications. However, there is no guarantee that interference will not occur in a particular installation. If this equipment does cause harmful interference to radio or television reception, which can be
determined by turning the equipment off and on, the user is encouraged to try to correct the interference by one or more of the following measures:
• Reorient or relocate the receiving antenna.
• Increase the separation between the equipment and receiver.
• Connect the equipment into an outlet on a circuit different from that to which the receiver is connected.
• Consult the dealer or an experienced radio or television technician for help.
If necessary, the user should consult the dealer or an experienced radio/television technician for additional suggestions. Honeywell International Inc. is not responsible for any radio or television interference caused by unauthorized modifications of this equipment or the substitution or attachment of connecting cables
and equipment other than those specified by Honeywell International Inc. The correction is the responsibility of the user.
Para su uso en México, la operación de este equipo está sujeta a las siguientes dos condiciones:
1. Es posible que este equipo o dispositivo no cause interferencia perjudicial.
2. Este equipo o dispositivo debe aceptar cualquier interferencia, incluyendo la que pueda causar su operación no deseada.
Canadian Compliance
This ISM device complies with Canadian RSS-247.
Operation is subject to the following conditions:
1. This device may not cause harmful interference.
2. This device must accept any interference received, including interference that may cause undesired operation.
Conformité à la règlementation canadienne
Cet appareil ISM est conforme à la norme CNR-247 du Canada.
Son fonctionnement est assujetti aux conditions suivantes :
1. Cet appareil ne doit pas causer de brouillage préjudiciable.
2. Cet appareil doit pouvoir accepter tout brouillage reçu, y compris le brouillage pouvant causer un fonctionnement indésirable.
Caution: Any changes or modifications made to this equipment not expressly approved by Honeywell International Inc. may void the authorization to operate this equipment.
FRENCH CANADIAN TRANSLATION
Use only shielded data cables with
this system. This unit has been
tested with cables less than 3
meters. Cables greater than 3
meters may not meet class B
performance.
Utiliser uniquement des câbles de
données blindés avec ce système.
L’appareil a été testé avec des
câbles de moins de 3 mètres. Les
câbles de longueur supérieure à 3
mètres peuvent ne pas satisfaire à
la performance de la classe B.
Utilisez uniquement des câbles de
données blindés avec ce système.
Ce dispositif a été testé avec des
câbles de moins de 3 mètres. Il est
possible que les câbles de plus de
3 mètres ne permettent pas
d’atteindre des performances de
classe B.
Utilizzare solo cavi dati schermati
con questo sistema. Questa unità è
stata testata con cavi di lunghezza
inferiore a 3 metri. I cavi di
lunghezza superiore a 3 metri
potrebbero non essere conformi
alle prestazioni di classe B.
Für dieses System nur
abgeschirmte Datenkabel
verwenden. Dieses System wurde
mit Kabeln unter 3 Metern Länge
geprüft. Kabel mit einer Länge von
über 3 Metern erfüllen
möglicherweise nicht die
Richtlinien der Klasse B.
Utilice sólo cables de datos
blindados con este sistema. Esta
unidad se ha probado con cables
de longitud inferior a 3 metros.
Cables superiores a 3 metros quizá
no satisfagan los requisitos de
rendimiento de la clase B.
Use únicamente cables protegidos
para datos con este sistema. Esta
unidad ha sido evaluada con
cables de menos de 3 metros. Es
posible que los cables de más de 3
metros no cumplan con el
desempeño de clase B.
Use somente cabos de dados
blindados com este sistema. Esta
unidade foi testada com cabos
com menos de 3 metros. Cabos
com mais de 3 metros não
atendem o desempenho de classe
B.
此系统仅能使用屏蔽数据电缆。 此设
备是以短于 3 米的电缆进行的测试。
长度超过 3 米的电缆可能无法满足 B
级性能。
3
3
B
3 m
3 m
B
이 시스템에는 차폐된 데이터 케이블
만 사용하십시오 . 본 장치는 3 미터
미만의 케이블로 테스트를 받았습니
다 . 3 미터를 초과하는 케이블을 사
용하면 Class B 성능을 만족시키지
못할 수 있습니다 .
Используйте с этой системой
только экранированные кабели
передачи данных. Это устройство
прошло испытания с
использованием кабелей длиной
менее 3 метров. Рабочие
характеристики кабелей длиной
свыше 3 м могут не
соответствовать классу В.
The CE marking
indicates compliance
with the following
directives:
• 20014/53/EU Radio
Equipment Directive
(RED)
• 2011/65/EU RoHS (Recast)
In addition, complies to 2014/35/
EU Low Voltage Directive, when
shipped with recommended power
supply.
European contact:
Hand Held Products Europe
B.V.
Lagelandseweg 70
6545CG Nijmegen
The Netherlands
Le marquage CE indique
la conformité avec les
directives suivantes :
• 20014/53/EU Radio
Equipment Directive
(RED)
• 2011/65/UE – RoHS (Refonte)
De plus, ce produit est conforme à
la Directive européenne 2014/35/
EU relative aux basses tensions
lorsqu’il est expédié avec le bloc
d’alimentation recommandé.
Personne-ressource en Europe :
Hand Held Products Europe
B.V.
Lagelandseweg 70
6545CG Nijmegen
Les Pays-Bas
Le marquage CE indique
la conformité aux
directives suivantes :
• 20014/53/EU Radio
Equipment Directive
(RED)
• 2011/65/UE RoHS (refonte)
De plus, indique la conformité à la
directive 2014/35/EU Basse
tension, lorsque le dispositif est
livré avec l’alimentation électrique
recommandée. Contact en Europe :
Hand Held Products Europe
B.V.
Lagelandseweg 70
6545CG Nijmegen
Pays-Bas
La marcatura CE indica
conformità alle seguenti
direttive:
• 20014/53/EU Radio
Equipment Directive
(RED)
• Direttiva RoHS 2011/65/UE
(rifusione)
È inoltre conforme ai sensi della
Direttiva bassa tensione 2014/35/
EU, se spedito con l'alimentatore
consigliato. Contatto in Europa:
Hand Held Products Europe
B.V.
Lagelandseweg 70
6545CG Nijmegen
Paesi Bassi
Die CE-Kennzeichnung
signalisiert die
Konformität mit
folgenden Richtlinien:
• 20014/53/EU Radio
Equipment Directive
(RED)
• 2011/65/EU RoHS (Recast)
Weiterhin entspricht dieses
Produkt der
Niederspannungsrichtlinie 2014/
35/EU, wenn es mit dem
empfohlenen Netzteil geliefert
wird. Ansprechpartner Europa:
Hand Held Products Europe
B.V.
Lagelandseweg 70
6545CG Nijmegen
Niederlande
La marca CE indica el
cumplimiento de las
siguientes normativas:
• 20014/53/EU Radio
Equipment Directive
(RED)
• 2011/65/EU RoHS (Refundida)
Asimismo, cumple la normativa de
bajo voltaje 2014/35/EU cuando
se envía con la fuente de
alimentación recomendada.
Contacto europeo:
Hand Held Products Europe
B.V.
Lagelandseweg 70
6545CG Nijmegen
Países Bajos
La indicación CE indica
el cumplimiento con las
siguientes directivas:
• 20014/53/EU Radio
Equipment Directive
(RED)
• 2011/65/EU RoHS
(Reformulada)
Además, cumple con la directiva de
bajo voltaje 2014/35/EC cuando
se envía con la fuente de poder
recomendada. Contacto europeo:
Hand Held Products Europe
B.V.
Lagelandseweg 70
6545CG Nijmegen
Países Bajos
A marca CE indica
conformidade com as
seguintes diretivas:
• 20014/53/EU Radio
Equipment Directive
(RED)
• 2011/65/EU RoHS
(Reformulação)
Além disso, o produto está em
conformidade com a Diretiva para
baixa tensão 2014/35/EU, quando
fornecido com a fonte de
alimentação recomendada.
Contato na Europa:
Hand Held Products Europe
B.V.
Lagelandseweg 70
6545CG Nijmegen
Holanda
CE 标记表示符合以下指
令:
• 20014/53/EU Radio
Equipment Directive
(RED)
2011/65/EU RoHS
2014/35/EC
Hand Held Products Europe
B.V.
Lagelandseweg 70
6545CG Nijmegen
The Netherlands
CE 標記表示符合下列指
令:
• 20014/53/EU Radio
Equipment Directive
(RED)
2011/65/EU RoHS
2014/35/EC
Hand Held Products Europe B.V.
Lagelandseweg 70
6545CG Nijmegen
The Netherlands
CE マ
:
• 20014/53/EU Radio
Equipment Directive
(RED)
2011/65/EU RoHS ( )
2014/35/EC Low Voltage
Directive
:
Hand Held Products Europe B.V.
Lagelandseweg 70
6545CG Nijmegen
The Netherlands
CE 마크는 다음 지침을 준
수함을 나타냅니다 .
• 20014/53/EU Radio
Equipment Directive
(RED)
• 2011/65/EU RoHS
(Recast)
,
2014/35/EC Low Voltage
Directive( ) .
:
Hand Held Products Europe
B.V.
Lagelandseweg 70
6545CG Nijmegen
The Netherlands
CE
:
• 20014/53/EU Radio
Equipment Directive
(RED)
• 2011/65/EU RoHS
()
,
2014/35/EC
.
:
Ha nd He ld Pr od uct s E ur op e B. V.
Lagelandseweg 70
6545CG Nijmegen
The Netherlands
Class II Catégorie II Classe II Klasse II Clase II II 类 第 II 類
CAUTION: Improper
battery replacement or
incompatible device
usage may result in risk of
burns, fire, explosion, or
other hazard. Dispose of lithium-
ion batteries according to local
regulations.
ATTENTION : Un
remplacement inadéquat
de la batterie ou une
utilisation incompatible
de l'appareil peut
présenter des risques de brulures,
d'incendie, d'explosion ou d'autres
dangers. Jetez les piles en lithium-
ion conformément aux régulations
locales.
MISE EN GARDE : Le
remplacement incorrect
de la pile ou l'usage d'un
appareil non compatible
peut représenter des
risques de brûlures, d'incendie,
d'explosion ou d'autres dangers.
Éliminez les piles lithium-ion
usagées conformément aux
réglementations locales.
Attenzione. La
sostituzione inadeguata
delle batterie o un uso
incompatibile del
dispositivo possono
causare rischi di ustioni, incendi,
esplosioni o altri pericoli. Smaltire
le batterie agli ioni di litio in
conformità ai regolamenti locali.
VORSICHT. Ungeeignete
Ersatz-Akkus oder nicht
kompatible
Gerätenutzung kann zu
Verbrennungen, Feuer,
Explosion oder anderen Gefahren
führen. Entsorgen Sie die Lithium-
Ionen-Batterien gemäß den
lokalen Richtlinien.
PRECAUCIÓN: El
reemplazo inadecuado de
la batería o el uso de un
dispositivo incompatible
pueden dar como
resultado quemaduras, un
incendio, explosión u otros riesgos.
Descarte todas las baterías de litio
según las regulaciones locales.
PRECAUCIÓN: El
reemplazo inadecuado de
la batería o el uso de un
dispositivo incompatible
puede presentar riesgo de
quemaduras, incendio, explosión,
u otro tipo de riesgos. Deseche las
baterías de iones de litio de
acuerdo a las normativas locales.
CUIDADO: a substituição
incorreta da bateria ou o
uso de um dispositivo
incompatível pode
resultar em riscos de
queimaduras, incêndio, explosão
ou outros perigos. Descarte as
baterias de íon de lítio de acordo
com as regulamentações locais.
注意:电池更换不当或者用
于不兼容的设备可能导致燃
烧、起火、爆炸或其他危
险。请按照当地规定处置锂
电池。
注意:不適當的電池更換或
者與不相容的裝置搭配使
用,可能導致燃燒、火災、
爆炸或其他危險。請依照當
地法規處置鋰電池。
注意 : 誤った電池交換また
は互換性の無いデバイスの
使用により、やけど、発
火、爆発などの危険をお引
きおこす可能性がありま
す。リチウムイオン電池の廃棄につ
いては、地域の規則に従ってくださ
い。
주의 : 배터리를 부적절하
게 교체하거나 호환되지 않
는 장비를 사용하게 되면 ,
화상 , 화재 , 폭발 , 기타 위
험이 발생할 수 있습니다 .
지역 규정에 따라 리튬 이온 배터리를
처분하십시오 .
ВНИМАНИЕ: В случае
неправильной замены
аккумулятора или
использования
несовместимого
устройства существует опасность
ожога, пожара, взрыва, а также
других несчастных случаев.
Утилизация литий-ионных
аккумуляторов должна
производиться в соответствии с
местными нормативами.
LED Safety Statement
LEDs have been tested and
classified as “EXEMPT RISK
GROUP” to the standard: IEC
62471:2006.
Norme de sécurité sur les
DEL
Les DEL ont été testées et classées
en tant que « GROUPE DE RISQUE
EXEMPT » par rapport à la norme :
IEC 62471:2006.
Norme de sécurité DEL
Les DEL ont été testées et classées
« GROUPE SANS RISQUE » selon
la norme : CEI 62471:2006.
Disposizione di sicurezza
LED
I LED sono stati testati e
classificati come "GRUPPO
ESENTE DA RISCHI" rispetto allo
standard: IEC 62471:2006.
Hinweis zur Lasersicherheit
Die LEDs wurden geprüft und
gemäß der Norm IEC 62471:2006
unter „EXEMPT RISK GROUP“
eingestuft.
Declaración de seguridad
del LED
Los LED se han probado y
clasificado como “GRUPO EXENTO
DE RIESGOS” según la normativa:
IEC 62471:2006.
Declaración de seguridad
del LED
Las LED han sido evaluadas y
clasificadas como “GRUPO LIBRE
DE RIESGOS” según la norma: IEC
62471:2006.
Declaração de segurança
do LED
Os LEDs foram testados e
classificados como “GRUPO DE
RISCO ISENTO” conforme a norma:
IEC 62471:2006.
LED
LED IEC 62471:2006
(EXEMPT RISK
GROUP)
LED
LED IEC 62471:2006
(EXEMPT RISK
GROUP)
LED
LED IEC 62471:2006
EXEMPT
RISK GROUP (
)
LED
LED IEC 62471:2006
"EXEMPT RISK
GROUP" .
Заявление о безопасности
светодиода
«
»
62471:2006.
CB Scheme
Certified to CB Scheme IEC 60950-
1, Second Edition.
Plan OC (organismes de
certification)
Certifié CB CEI 60950-1, deuxième
édition.
Schéma OC
Certifié selon la norme CEI 60950-
1 seconde édition (schéma OC).
Schema CB
Certificato in base allo Schema CB
IEC 60950-1, seconda edizione.
CB-Zertifizierung
CB-zertifiziert gemäß IEC 60950,
Second Edition.
Esquema CB
Se ha certificado que cumple el
esquema CB IEC 60950-1,
segunda edición.
Esquema CB
Se ha certificado que cumple con
el esquema CB IEC 60950-1,
segunda edición.
Esquema CB
Certificação CB Scheme IEC
60950-1, Segunda edição.
CB
CB IEC 60950-1
CB Scheme
CB Scheme IEC 60950-
1
CB Scheme
CB Scheme IEC 60950-1, Second
Edition
CB Scheme
CB Scheme IEC 60950-1, Second
Edition .
Схема CB
CB
60950-1, .
Patents
For patent information, please
refer to www.hsmpats.com.
Brevets
Veuillez consulter le site
www.hsmpats.com pour obtenir
des renseignements au sujet du
brevet.
Brevets
Pour plus d’informations sur les
brevets, visitez la page
www.hsmpats.com.
Brevetti
Per i dettagli sui brevetti, fare
riferimento al sito Web
www.hsmpats.com.
Patente
Patentinformationen sind unter
www.hsmpats.com erhältlich.
Patentes
Para obtener información sobre las
patentes, visite www.hsmpats.com.
Patentes
Para obtener información sobre
patentes, consulte
www.hsmpats.com.
Patentes
Para obter informações sobre
patente, consulte
www.hsmpats.com.
www.hsmpats.com
www.hsmpats.com
www.hsmpats.com
www.hsmpats.com
.
Патенты
-
www.hsmpats.com.
ϲϟΎΗϟ ϊϗϭϣϟ ϰϠϋ ΞΗϧϣϟ ϕΎΛϭ έ˷ϓϭΗΗ
.www.honeywellaidc.com
ﻢﺗ .مﺎﻈﻨﻟا اﺬﻫ ﻊﻣ ﺢﻔﺼﳌا تﺎﻧﺎﻴﺒﻟا تﻼﺑﺎﻛ ﻂﻘﻓ مﺪﺨﺘﺳا
.رﺎﺘﻣأ
3
ﻦﻋ ﺎﻬﻟﻮﻃ ﻞﻘﻳ تﻼﺑﺎﻛ ﺔﻄﺳاﻮﺑ ةﺪﺣﻮﻟا هﺬﻫ رﺎﺒﺘﺧا
ﻊﻣ رﺎﺘﻣأ
3
ﻦﻋ ﺎﻬﻟﻮﻃ ﺪﻳﺰﻳ ﻲﺘﻟا تﻼﺑﺎﻜﻟا ﻖﺑﺎﻄﺘﺗ ﻻ ﺪﻗ
.
B
ﺔﺌﻔﻟا ءادأ
םיככוסמ םינותנ ילבכב שמתשהל שי ,וז תכרעמב
תוחפ לש ךרואב םילבכ םע קדבנ הז רישכמ .דבלב
מ-3 לע הלוע םכרואש םילבכש ןכתיי .םירטמ3
םירישכמ לש םיעוציבה תושירדב ודמעי אל םירטמ
גרדמ ה
B.
تﺎﻬﻴﺟﻮﺘﻟﺎﺑ ماﺰﺘﻟﻻا ﱃإ CE ﺔﻣﻼﻋ
:ﺔﻴﻟﺎﺘﻟا
•
• 2011/65/EU RoHS
(ﺔﻏﺎﻴﺼﻟا ةدﺎﻋإ)
ﺾﻔﺨﻨﳌا ﺪﻬﺠﻟا ﻪﻴﺟﻮﺘﺑ ماﺰﺘﻟﻻا ﻢﺘﻳ ،ﻚﻟذ ﱃإ ﺔﻓﺎﺿﻹﺎﺑ
.ﻪﺑ ﴅﻮﳌا ﺔﻗﺎﻄﻟا رﺪﺼﻣ ﻊﻣ ﻦﺤﺸﻟا ﺪﻨﻋ 2014/35/EU
:ﺔﻴﺑوروﻷا لﺎﺼﺗﻻا ﺔﻬﺟ
Hand Hand Held Products Europe B.V.
Lagelandseweg 70
6545CG Nijmegen
The Netherlands
20014/53/EU Radio
Equipment Directive (RED)
תיוותCE דמוע רצומהש הדיעמ
תושירדב תויחנה:םיאבה םינקתה
2011/65/EU RoHS (Recast)
ב דמוע רצומה ,ףסונבה תייחנה תושירד-
2014/35/EU
קפוסמ אוה םא ,ךומנ חתמ אשונב
ילמשחה חתמבהץלמומ.
תיפוריאה תוגיצנה םע רשק תריציל:
Hand Held Products Europe B.V.
Nijverheidsweg 9-13
5627 BT Eindhoven
The Netherlands
20014/53/EU Radio
Equipment Directive (RED)
2 ﺔﺌﻔﻟا
! ! ! ! ! ! ! !
! ! ! ! !
عﻮﻨﺑ ﺎﻬﻟاﺪﺒﺘﺳا ﻢﺗ اذإ ﺔﻳرﺎﻄﺒﻟا ﺮﺠﻔﻨﺗ ﺪﻗ :ﻪﻴﺒﻨﺗ
!
نﺎﻜﻣ ﰲ ﺔﻳرﺎﻄﺒﻟا ﻦﻣ ﺺﻠﺨﺘﻟا ﺐﺠﻳ .ﺢﻴﺤﺻ
ﻞﻣﺎﻌﺘﻟا ﻦﻋ ﺔﻟوﺆﺴﻣ ﺔﻬﺟ وأ ﺮﻳوﺪﺘﻟا ةدﺎﻋﻹ ﻞﻫﺆﻣ
ﻊﻣ ﺎﻬﻨﻣ ﺺﻠﺨﺘﻟﺎﺑ وأ ﺔﻳرﺎﻄﺒﻟا قﺮﺤﺑ ﻢﻘﺗ ﻻ .ةﺮﻄﺨﻟا داﻮﳌا ﻊﻣ
.ىﺮﺧﻷا ﺔﻳدﺎﻌﻟا تﺎﻔﻠﺨﳌا
!
ʤʬʬʥʱʡ ʤʬʬʥʱʤ ʺʴʬʧʤ :ʺʥʸʩʤʦ ʤʰʩʠʹ
ʤʮʩʠʺʮʬ ʭʥʸʢʬ ʤʬʥʬʲ ʬʲ .ʵʥʶʩʴ ʺʰʫʱ
ʤʧʮʥʮ ʩʣʩʡ ʲʶʡʺʤʬ ʤʬʬʥʱʤ ʺʫʬʹʤ
ʬʲ ʥʠ ʭʩʸʦʧʥʮʮ ʭʩʸʮʥʧʡ ʬʥʴʩʨʡ ʤʸʹʫʤ ʸʡʲʹ
ʯʩʠ .ʭʩʰʫʥʱʮ ʭʩʸʮʥʧ ʺʫʬʹʤʡ ʬʴʨʮʤ ʤʧʮʥʮ ʩʣʩ
ʤʴʹʠʡ ʤʺʥʠʪʩʬʹʤʬ ʥʠʤʬʬʥʱʤ ʺʠʳʥʸʹʬ
.ʤʬʩʢʸʤ
LED
ﺔﻣﻼﺳ نﺎﻴﺑ
ǀŸǞƵƆƵż)ƾƷƱƸƶƫůȶ LED ljƸŮƾƫžȤƾƃƄųȚƖ
:ȤƾƸƯƵƴŽƾȹƲźȶ(ǍƭƒȚǜžǑƴƈƄŽȚ
.IEC 62471:2006
ʺʸʤʶʤ ʺʥʧʩʨʡ- ʺʥʸʥʰLED
ʤ ʺʥʸʥʰ-LED" ʥʢʥʥʱʥ ʥʷʣʡʰ "ʯʥʫʩʱ ʺʥʬʥʨʰʫ
:ʯʷʺʬ ʭʠʺʤʡ
IEC 62471:2006
CB ﻂﻄﺨﻣ
.ﻲﻧﺎﺜﻟا
راﺪﺻﻹا ،CB IEC 60950-1 ﻂﻄﺨﻣ ﺪﻤﺘﻌﻣ
CB Schemeʤ ʯʷʺʬ ʭʠʺʤʡ ʸʹʥʠʮ ʸʶʥʮIEC
60950-1 ʯʥʢʸʠ ʬʹCB Scheme ,.ʤʩʰʹ ʤʸʥʣʤʮ
CB Scheme
عاﱰﺧﻻا تاءاﺮﺑ
عﻮﺟﺮﻟا ﻰﺟﺮُﻳ ،عاﱰﺧﻻا ةءاﺮﺑ ﺺﺨﺗ تﺎﻣﻮﻠﻌﻣ ﲆﻋ لﻮﺼﺤﻠﻟ
.www.hsmpats.com
ﱃإ
ʭʩʨʰʨʴ
ʨʰʸʨʰʩʠʤ ʸʺʠʡ ʯʩʩʲ ,ʭʩʨʰʨʴ ʬʲ ʲʣʩʮʬ
www.hsmpats.com
Agency Model: 1016SP01B (SF61B Scanner)
Draft
Hebrew Translation
Honeywell International Inc.
9680 Old Bailes Road
Fort Mill, SC 29707 USA
355-304-006 Rev (a)
4/17
Laser Safety Statement
If the following label is attached to
your product, it indicates the
product contains a laser:
This device has been tested in
accordance with and complies with
IEC60825-1 ed2.0 and 21 CFR
1040.10 and 1040.11, except for
deviations pursuant to Laser
Notice No. 50, dated June 24,
2007.
LASER LIGHT, DO NOT STARE
INTO BEAM, CLASS 2 LASER
PRODUCT, 1.0 mW MAX OUTPUT:
630-680nM.
Caution - use of controls or
adjustments or performance of
procedures other than those
specified herein may result in
hazardous radiation exposure.
Déclaration de sécurité
relative au laser
Si l’étiquette suivante est apposée
à votre produit, cela signifie que le
produit contient un laser :
Cet appareil a été testé et reconnu
conforme aux normes IEC60825-1
ed2.0 et 21 CFR 1040.10 et
1040.11sauf pour les dérogations
en accord avec l'avis de conformité
sur les lasers No. 50, en date du 24
juin 2007.
LUMIÈRE LASER, NE PAS
REGARDER DIRECTEMENT DANS
LE FAISCEAU, PRODUIT LASER DE
CLASSE 2, SORTIE MAX. DE 1,0
MW : 630-680 nm.
Mise en garde – l’utilisation de
contrôles ou d’ajustements ou de
performance de procédures autres
que ceux spécifiées dans la
présente peut provoquer une
exposition dangereuse au
rayonnement.
Déclaration de sécurité
laser
Si l'étiquette suivante est attachée
à votre produit, elle indique que le
produit contient un laser :
Cet appareil a été testé et certifié
conforme aux normes CEI 60825-1
ed2.0, 21 CFR 1040.10 et 21 CFR
1040.11, à l'exception des
déviations selon le document
Laser Notice n° 50 en date du 24
juin 2007.
ATTENTION, LUMIÈRE LASER : NE
PAS FIXER LE FAISCEAU,
PRODUIT LASER DE CLASSE 2 1
mW SORTIE MAX :630-680 nM.
L'utilisation de contrôles ou
réglages ou la réalisation de
procédures autres que ceux
spécifiés dans la documentation
utilisateur peut entraîner une
exposition à des rayonnements
dangereux.
Dichiarazione sulla
sicurezza del dispositivo
laser
La presenza della seguente
etichetta sul prodotto indica che il
prodotto contiene un laser:
Questo dispositivo è stato testato
in base a ed è conforme agli
standard IEC60825-1 ed. 2.0 e 21,
CFR 1040.10 e 1040.11, ad
eccezione delle deviazioni ai sensi
del documento Laser Notice No.
50, datato 24 giugno 2007.
LUCE LASER, NON FISSARE IL
RAGGIO LASER, PRODOTTO DI
CLASSE 2, POTENZA DI USCITA
MAX 1.0 mW : 630-680nM.
Un utilizzo dei comandi, dei
dispositivi di regolazione o delle
procedure non conforme a quanto
specificato nella documentazione
d'uso può determinare
un'esposizione pericolosa alle
radiazioni.
Hinweis zur Lasersicherheit
Wenn Ihr Produkt mit dem
folgenden Etikett gekennzeichnet
ist, bedeutet dies, dass das Produkt
einen Laser enthält:
Dieses Gerät wurde geprüft und
erfüllt die Anforderungen von
IEC60825-1 ed2.0, 21 CFR
1040.10 und 1040.11, mit
Ausnahme von Abweichungen
gemäß Laser Notice Nr. 50, vom
24. Juni 2007.
LASERSTRAHLUNG, NICHT IN
DEN STRAHL BLICKEN,
LASERPRODUKT DER KLASSE 2,
MAXIMALE ENERGIE DER
LASERSTRAHLUNG 1,0 mW: 630-
680 nM.
Die Verwendung oder Einstellung
von Reglern bzw. die Ausführung
von anderen als in dieser
Bedienungsanleitung
beschriebenen Abläufen kann zu
gefährlicher Laserstrahlung
führen.
Declaración de seguridad
del láser
Si la siguiente etiqueta se
encuentra adherida al producto,
indica que éste contiene un láser:
Este dispositivo se ha probado de
acuerdo con las normativas
IEC60825-1 ed2.0 y 21 CFR
1040.10 y 1040.11 y se ha
certificado que las cumple, excepto
en lo referente a desviaciones
según el aviso sobre láser n.º 50
del 24 de junio de 2007.
RAYO LÁSER, NO MIRAR
FIJAMENTE EL HAZ, PRODUCTO
LÁSER DE CLASE 2, POTENCIA
MÁXIMA 1 mw: 630-680 nm.
El uso de controles, ajustes o
procedimientos diferentes a los
descritos en la documentación del
usuario puede suponer la
exposición a radiaciones
peligrosas.
Declaración de seguridad
de láser
Si la siguiente etiqueta está
adherida al producto, indica que
éste contiene un láser:
Este dispositivo ha sido evaluado
según las normas IEC60825-1
ed2.0 y 21 CFR 1040.10 y 1040.11,
y cumple con ellas, excepto por las
diferencias en virtud del Aviso
sobre láser N.º 50 del 24 de junio
de 2007.
RAYO LÁSER, NO MIRAR
FIJAMENTE EL HAZ, PRODUCTO
LÁSER DE LA CLASE 2, POTENCIA
MÁXIMA 1 mW:630-680 nm.
El uso de controles, ajustes o
procedimientos diferentes a los
indicados en la documentación
para el usuario puede provocar la
exposición a radiaciones
peligrosas.
Declaração de segurança
de laser
Se a seguinte etiquete estiver
colada no seu produto, indica que
ele contém um laser:
Este dispositivo foi testado de
acordo e em conformidade com as
normas IECC60825-1 ed2.0 e 21
CFR 1040.10 e 1040.11, exceto por
divergências de acordo com o
Laser Notice nº50, datado de 24 de
junho de 2007.
LUZ DE LASER, NÃO OLHE
FIXAMENTE PARA O FEIXE,
PRODUTO A LASER CLASSE 2,
SAÍDA MÁXIMA DE 1,0 mW: 630-
680 nM.
A utilização de controles ou ajustes
ou a execução de procedimentos
de modo diferente do especificado
na documentação do usuário pode
resultar em exposição nociva à
radiação.
IEC60825-1
ed2.0 21 CFR 1040.10
1040.11 2007 6 24
50
2
1.0 mW630-
680nM
IEC60825-1
ed2.0 21 CFR 1040.10
1040.11 2007 6 24
50
CLASS
2 1.0 mW
630-680nM
IEC60825-1:
1993+A1+A2 21 CFR 1040.10
1040.11
Laser Notice No. 50 (2007624
)
2
1.0 mW : 630-680nM
.
IEC60825-1 ed2.021 CFR
1040.10 1040.11
. , 2007624
Laser Notice No. 50
.
,
, CLASS 2 , 1.0mW
: 630-680nM
.
Заявление о безопасности
лазера
,
,
,
: 60825-1 .
2.0 21 CFR 1040.10 1040.11,
50 24 2007 .
,
,
2, 10
:
630-680.
–
,
,
,
.
Product Environmental
Information
Refer to www.honeywellaidc.com/
environmental for the RoHS /
REACH / WEEE information.
Renseignements relatifs à
l’environnement à propos
des produits
Reportez-vous à la page
www.honeywellaidc.com/
environmental pour obtenir des
renseignements concernant les
directives RoHS/REACH/WEEE.
Informations
environnementales sur les
produits
Reportez-vous au site
www.honeywellaidc.com/
environmental pour obtenir les
informations sur les directives
RoHS/REACH/WEEE.
Informazioni ambientali
relative al prodotto
Consultare il sito web
www.honeywellaidc.com/
environmental per informazioni su
RoHS/REACH/RAEE.
Informationen zur
Umweltverträglichkeit von
Produkten
Unter www.honeywellaidc.com/
environmental finden Sie
Informationen über RoHS/
REACH/WEEE.
Información ambiental del
producto
Consulte www.honeywellaidc.com/
environmental para obtener
información sobre RoHS/REACH/
WEEE.
Información ambiental de
producto
Consulte la información RoHS/
REACH/WEEE en
www.honeywellaidc.com/
environmental.
Informações ambientais
sobre produtos
Consulte a página
www.honeywellaidc.com/
environmental para obter
informações sobre as normas
RoHS/REACH/WEEE.
RoHS / REACH / WEEE
www.honeywellaidc.com/
environmental
www.honeywellaidc.com/
environmental RoHS /
REACH / WEEE
RoHS / REACH / WEEE
www.honeywellaidc.com/
environmental
RoHS / REACH / WEEE
www.honeywellaidc.com/
environmental .
Экологическая
информация о продукции
RoHS / REACH /
WEEE
www.honeywellaidc.com/
environmental.
UL and C-UL listed: UL 60950-1, Second Edition and CSA
C22.2 No.60950-1-07, Second Edition. Homologué UL et C-UL : UL 60950-1, seconde édition et
CSA C22.2 No. 60950-1-07, seconde édition.
This document was prepared and executed in the English
language. In the event this document is translated into
another language and a conflict arises between the English
version and a non-English version, the English version
shall prevail, it being recognized and acknowledged that
the English language version most clearly expresses the
intent of the parties. Any notice or communication given in
connection with this document must include a version in
the English language.
Ce document a été préparé et exécuté dans la langue
anglaise. Dans l’éventualité où le document serait traduit
dans une autre langue et qu'un litige survenait entre la
version en anglais et la version autre qu'en anglais, la
version en anglais prévaudra, étant confirmé et reconnu
que la version en anglais exprime de façon plus précise
l’intention des parties. Tout avis ou toute communication
relatif à ce document doit inclure une version en anglais.
Ce document a été préparé et finalisé en anglais. Si ce
document est traduit dans une autre langue et si un conflit
survient entre la version en anglais et la version traduite, la
version en anglais prévaudra tant il est reconnu et établi
qu’elle exprime le plus clairement les intentions des parties.
Tout avis ou communication produit en relation avec ce
document doit comporter une version en anglais.
Questo documento è stato preparato e redatto in lingua
inglese. In caso di traduzione in altre lingue,
nell’eventualità sorgano conflitti fra la versione non inglese
e quella inglese, prevarrà quest’ultima in quanto viene
riconosciuto e accettato che la versione in lingua inglese
esprime più chiaramente gli accordi fra le parti. Qualsiasi
notifica o comunicazione inviata in rapporto a questo
documento deve includere una versione in lingua inglese.
Dieses Dokument wurde in englischer Sprache erstellt und
ausgefertigt. Wenn dieses Dokument in eine andere
Sprache übersetzt wird, und ein Konflikt zwischen der
englischen und nicht-englischen Fassung auftritt, hat die
englische Fassung Vorrang, da die Parteien anerkennen,
dass die Fassung in englischer Sprache ihren Absichten am
deutlichsten Ausdruck verleiht. Alle Hinweise oder
Mitteilungen in Zusammenhang mit diesem Dokument
müssen auch in einer Fassung in englischer Sprache
erfolgen.
Originalmente, este documento se creó y redactó en inglés.
En caso de que se traduzca a otro idioma y surja un
conflicto entre la versión en inglés y la versión en otro
idioma, prevalecerá la versión en inglés. Se reconoce y
admite que, en la versión en inglés, expresa la intención de
las partes con más claridad. Cualquier aviso o
comunicación proporcionada en relación con este
documento debe incluir una versión en inglés.
Este documento se preparó y redactó en inglés. En caso de
que se traduzca a otro idioma y surja algún conflicto entre
la versión en inglés y la del idioma extranjero, prevalecerá la
versión en inglés, dado que se reconoce y admite que la
versión en inglés expresa más claramente la intención
de las partes. Cualquier aviso o comunicación
proporcionada en relación con este documento deberá
incluir una versión en inglés.
Este documento foi preparado e feito em língua inglesa. Se
este documento for traduzido para outro idioma e surgirem
conflitos entre a versão em inglês e a versão no outro
idioma, a versão em inglês prevalecerá, sendo reconhecido
e atestado que a versão em língua inglesa expressa mais
claramente a intenção das partes. Qualquer comunicação
ou aviso relacionado a este documento deve conter a
versão em inglês.
.
,
.
.
.
,
,
.
,
. ,
,
.
For warranty information, go to www.honeywellaidc.com and click Resources > Warranty. Pour obtenir des informations sur la garantie, consultez le site www.honeywellaidc.com et cliquez sur
Ressources > Garantie. Pour obtenir des informations sur la garantie, consultez le site www.honeywellaidc.com et cliquez sur
Ressources > Garantie.
Per informazioni sulla garanzia, andare a www.honeywellaidc.com e fare clic su Resources > Warranty. Die Garantiebestimmungen finden Sie unter www.honeywellaidc.com. Klicken Sie dort auf Ressourcen
> Garantie. Para obtener información sobre la garantía, visite www.honeywellaidc.com y haga clic en Recursos >
Garantía.
Para obtener información sobre la garantía, visite www.honeywellaidc.com y haga clic en Recursos >
Garantía. Para obter informações sobre a garantia, vá para www.honeywellaidc.com e clique em Resources
(Recursos) > Warranty (Garantia). www.honeywellaidc.com Resources > Warranty
www.honeywellaidc.com Resources > Warranty www.honeywellaidc.com Resources > Warranty www.honeywellaidc.com Resources > Warranty .
. www.honeywellaidc.com Resources >
Warranty.
RAYONNEMENT LASER NE PAS
REGARDER DANS LE FAISCEAU.
APPAREIL A LASER DE CLASSE 2.
LASER LIGHT - DO NOT STARE INTO BEAM
CLASS 2 LASER PRODUCT
Max. 1mW: 630-680nm
IEC 60825-1:2007
RAYONNEMENT LASER NE PAS
REGARDER DANS LE FAISCEAU.
APPAREIL A LASER DE CLASSE 2.
LASER LIGHT - DO NOT STARE INTO BEAM
CLASS 2 LASER PRODUCT
Max. 1mW: 630-680nm
IEC 60825-1:2007
RAYONNEMENT LASER NE PAS
REGARDER DANS LE FAISCEAU.
APPAREIL A LASER DE CLASSE 2.
LASER LIGHT - DO NOT STARE INTO BEAM
CLASS 2 LASER PRODUCT
Max. 1mW: 630-680nm
IEC 60825-1:2007
RAYONNEMENT LASER NE PAS
REGARDER DANS LE FAISCEAU.
APPAREIL A LASER DE CLASSE 2.
LASER LIGHT - DO NOT STARE INTO BEAM
CLASS 2 LASER PRODUCT
Max. 1mW: 630-680nm
IEC 60825-1:2007
RAYONNEMENT LASER NE PAS
REGARDER DANS LE FAISCEAU.
APPAREIL A LASER DE CLASSE 2.
LASER LIGHT - DO NOT STARE INTO BEAM
CLASS 2 LASER PRODUCT
Max. 1mW: 630-680nm
IEC 60825-1:2007
RAYONNEMENT LASER NE PAS
REGARDER DANS LE FAISCEAU.
APPAREIL A LASER DE CLASSE 2.
LASER LIGHT - DO NOT STARE INTO BEAM
CLASS 2 LASER PRODUCT
Max. 1mW: 630-680nm
IEC 60825-1:2007
RAYONNEMENT LASER NE PAS
REGARDER DANS LE FAISCEAU.
APPAREIL A LASER DE CLASSE 2.
LASER LIGHT - DO NOT STARE INTO BEAM
CLASS 2 LASER PRODUCT
Max. 1mW: 630-680nm
IEC 60825-1:2007
RAYONNEMENT LASER NE PAS
REGARDER DANS LE FAISCEAU.
APPAREIL A LASER DE CLASSE 2.
LASER LIGHT - DO NOT STARE INTO BEAM
CLASS 2 LASER PRODUCT
Max. 1mW: 630-680nm
IEC 60825-1:2007
RAYONNEMENT LASER NE PAS
REGARDER DANS LE FAISCEAU.
APPAREIL A LASER DE CLASSE 2.
LASER LIGHT - DO NOT STARE INTO BEAM
CLASS 2 LASER PRODUCT
Max. 1mW: 630-680nm
IEC 60825-1:2007
RAYONNEMENT LASER NE PAS
REGARDER DANS LE FAISCEAU.
APPAREIL A LASER DE CLASSE 2.
LASER LIGHT - DO NOT STARE INTO BEAM
CLASS 2 LASER PRODUCT
Max. 1mW: 630-680nm
IEC 60825-1:2007
RAYONNEMENT LASER NE PAS
REGARDER DANS LE FAISCEAU.
APPAREIL A LASER DE CLASSE 2.
LASER LIGHT - DO NOT STARE INTO BEAM
CLASS 2 LASER PRODUCT
Max. 1mW: 630-680nm
IEC 60825-1:2007
RAYONNEMENT LASER NE PAS
REGARDER DANS LE FAISCEAU.
APPAREIL A LASER DE CLASSE 2.
LASER LIGHT - DO NOT STARE INTO BEAM
CLASS 2 LASER PRODUCT
Max. 1mW: 630-680nm
IEC 60825-1:2007
RAYONNEMENT LASER NE PAS
REGARDER DANS LE FAISCEAU.
APPAREIL A LASER DE CLASSE 2.
LASER LIGHT - DO NOT STARE INTO BEAM
CLASS 2 LASER PRODUCT
Max. 1mW: 630-680nm
IEC 60825-1:2007
رﺰﻴﻠﻟﺎﺑ ﺔﺻﺎﳋا ﺔﻣﻼﺴﻟا ةﺮﺸﻧ
ﺞﺘﻨﳌا نأ ﻰﻟإ ﺮﻴﺸﻳ ﻪﻧﺈﻓ ،ﺞﺘﻨﳌﺎﺑ ﺎﹰﻘﻓﺮﻣ ﻲﻟﺎﺘﻟا ﻖﺼﻠﳌا نﺎﻛ اذإ
:رﺰﻴﻠﻟا ﻰﻠﻋ يﻮﺘﺤﻳ
IEC60825- ﺮﻴﻳﺎﻌﻤﻠﻟ ﺎﹰﻘﻓو زﺎﻬﳉا اﺬﻫ رﺎﺒﺘﺧا ﰎ
ءﺎﻨﺜﺘﺳﺎﺑ 1040.11و ،CFR 1040.10 21 و ،1:2007
،50 ﻢﻗر رﺰﻴﻠﻟﺎﺑ صﺎﳋا رﺎﻌﺷﻹا ﺐﺟﻮﲟ تﺎﻓاﺮﺤﻧﻻا
.2007 ،ﻮﻴﻧﻮﻳ 24 ﺦﻳرﺎﺘﺑ
ﺞﺘﻨﻣ .عﺎﻌﺸﻟا ﻲﻓ ﻖﻳﺪﺤﺘﻟﺎﺑ ﻢﻘﺗ ﻻ .رﺰﻴﻠﻟا ءﻮﺿ
جاﺮﺧﻺﻟ ﻰﺼﻗﻷا ﺪﳊا .2 ﺔﺌﻔﻟا ﻦﻣ رﺰﻴﻠﻟﺎﺑ ﻞﻤﻌﻳ
.ﺮﻟﻮﻣ ﻮﻧﺎﻧ 630-680 :تاو ﻲﻠﻠﻣ 1.0
وأ ،ﻢﻜﺤﺘﻟا ﺮﺻﺎﻨﻋ ماﺪﺨﺘﺳا يدﺆﻳ ﺪﻗ – ﺮﻳﺬﲢ
ةدﺪﶈا ﻚﻠﺗ ﺮﻴﻏ ىﺮﺧأ تاءاﺮﺟﺈﺑ مﺎﻴﻘﻟا وأ ،تﻼﻳﺪﻌﺘﻟا
.ةﺮﻄﳋا تﺎﻋﺎﻌﺷﻹا ﻰﻟإ ضﺮﻌﺘﻟا لﺎﻤﺘﺣا ﻰﻟإ ﺎﻨﻫ
RAYONNEMENT LASER NE PAS
REGARDER DANS LE FAISCEAU.
APPAREIL A LASER DE CLASSE 2.
LASER LIGHT - DO NOT STARE INTO BEAM
CLASS 2 LASER PRODUCT
Max. 1mW: 630-680nm
IEC 60825-1:2007.
רזייל תוחיטב אשונב הרהצה
ליכמ רצומה ,רצומה לע תקבדומ האבה תיוותה םא
רזייל
ינקתל םאתהב קדבנ הז רישכמIEC60825-1
הרודהמ2.0ו-21 CFR 1040.10 ו-1040.11
תויטס דבלמ ,הלא םינקתב דמוע אוהש אצמנו
'סמ רזייל תעדוהל ףופכב50ה ךיראתמ-24 ינויב
2007.
הגרדמ רזייל רצומ ,ןרקה ךותל טיבהל ןיא ,רזייל ןרק
2ל יברמ קפסה ,-1mW :630-680Nm
תומאתה עוציב וא הרקבה ירותפכב שומיש :תוריהז
דבלמ םירחא םיכילה וא ,הז ןולעב םיניוצמה הלא
.הנירקל תנכוסמ הפישחל םורגל הלולע
RAYONNEMENT LASER NE PAS
REGARDER DANS LE FAISCEAU.
APPAREIL A LASER DE CLASSE 2.
LASER LIGHT - DO NOT STARE INTO BEAM
CLASS 2 LASER PRODUCT
Max. 1mW: 630-680nm
IEC 60825-1:2007.
ΞΗϧϣϠϟΔϳϳΑϟΕΎϔλϭϣϟ
ϰϟ·ωϭΟέϟϰΟέ˵ϳ
www.honeywellaidc.com/environmental
ΕΎϬϳΟϭΗϝϭΣΕΎϣϭϠόϣϰϠϋϝϭλΣϠϟ
.5R+65($&+:(((
ʺʥʣʥʠ ʭʩʨʸʴʬ ʩʸʶʥʮ ʬʹ ʩʺʡʩʡʱʤ ʲʣʩʮʤ
:ʺʡʥʺʫʡ ʨʰʸʨʰʩʠʤ ʸʺʠ
ʡ
www.honeywellaidc.com/envi
ronmental
for the RoHS / REACH / WEEE information.
UL and C-UL Statement
Norme UL and C-UL
اﺬﻫ ﺔﻤﺟﺮﺗ اذإ .ﺔﻳﺰﻴﻠﺠﻧﻹا ﺔﻐﻠﻟﺎﺑ هﺬﻴﻔﻨﺗو ﺪﻨﺘﺴﳌا اﺬﻫ داﺪﻋإ ﻢﺗ
راﺪﺻإو يﺰﻴﻠﺠﻧﻹا راﺪﺻﻹا فﻼﺘﺧا كﺎﻨﻫ نﺎﻛو ىﺮﺧأ تﺎﻐﻟ ﱃإ ﺪﻨﺘﺴﳌا
راﺪﺻﻹا نإ ﺚﻴﺣ ،يﺰﻴﻠﺠﻧﻹا راﺪﺻﻹا ﰲ ءﺎﺟ ماﺰﺘﻟﻻا ﻰﺟ ُ ،ﺮﺧآ
نأ ﺐﺠﻳ .فاﺮﻃﻷا ﺔﻴﻧ ﻦﻋ ﺔﺣاﴏو حﻮﺿﻮﺑ ﱪﻌﻳ يﺬﻟا ﻮﻫ يﺰﻴﻠﺠﻧﻹا
ﺔﻐﻠﻟﺎﺑ راﺪﺻإ ﲆﻋ ﺪﻨﺘﺴﳌا اﺬﻬﺑ ﺔﻠﺻ تاذ تﻻﺎﺼﺗا وأ تارﺎﻌﺷإ ﺔﻳأ ﻞﻤﺸﺗ
.ﺔﻳﺰﻴﻠﺠﻧﻹا
ʤʴʹʬ ʭʢʸʥʺʩ ʤʦ ʪʮʱʮʹ ʤʸʷʮʡ .ʺʩʬʢʰʠʤ ʤʴʹʡ ʷʴʥʤʥ ʪʸʲʰ ʤʦ ʪʮʱʮ
ʤʬʢʺʺʥ ʺʸʧʠ ,ʺʮʢʸʥʺʮʤ ʤʱʸʢʤʥ ʺʩʬʢʰʠʡ ʤʱʸʢʤ ʺʥʲʮʹʮ ʯʩʡ ʤʸʩʺʱ
ʤʱʸʢʤ ʩʫ ʭʩʣʣʶʤ ʬʲ ʭʫʱʥʮ .ʺʲʡʥʷʤ ʤʱʸʢʤ ʤʩʤʺ ʺʩʬʢʰʠʡ ʤʱʸʢʤ
ʤʲʣʥʤ ʬʫ .ʭʩʣʣʶʤ ʺʰʥʥʫ ʺʠʸʺʥʩʡ ʸʥʸʡʤ ʯʴʥʠʡ ʺʠʨʡʮ ʺʩʬʢʰʠʤ ʤʴʹʡ
.ʺʩʬʢʰʠʤ ʤʴʹʡ ʤʱʸʢʤ ʺʠʬʥʬʫʬ ʺʡʩʩʧ ʤʦ ʪʮʱʮʬ ʸʹʷʤʡ ʸʱʮʩʺʹ
ΓέΎϳίΑϝοϔΗˬϥΎϣοϟϥ΄ηΑΕΎϣϭϠόϣϰϠϋϝϭλΣϠϟ
Ωέϭϣϟ< ϥΎϣοϟϕϭϓέϘϧϭwww.honeywellaidc.com
ʺʡʥʺʫʬʥʰʴʠʰʺʥʩʸʧʠʤʺʥʣʥʠʲʣʩʮʬ
.Resources > Warranty ʥʷʩʬʷʤʥwww.honeywellaidc.com
Draft

Appendix A — Specifications and Reading Distances
82 SF61 Cordless Scanner User’s Guide
Specifications
Use this section to find technical information about the SF61B
scanner models.
Physical Dimensions
Length 15.6 cm (6.1 in) with magnet end-cap
16.0 cm (6.3 in) with ring end-cap
Height 3.9 cm (1.5 in)
Width 4.6 cm (1.8 in)
Weight 184 g (6.5 oz) with the battery
137 g (4.8 oz) without the battery
Battery = 47 g (1.7 oz)
Power and Electrical Specifications
Operating Rechargeable lithium-ion battery (2600 mAh)
Electrical rating x 5V, 2A
ESD sensitivity ± 8 kV (air discharge)
± 4 kV (contact discharge)
Temperature and Environmental Specifications
Operating -20°C to 50°C (-4°F to 122°F)
Storage -40°C to 70°C (-40°F to 158°F)
Charging 0°C to 45°C (32°F to 113°F)
Relative humidity 5 to 95% non-condensing
Shock 40G, half sinus, 6 ms, 6 directions
Vibrations 8G, from 10Hz to 500Hz, 2hr/axis, 3 axes
Tumble test 2000 tumbles at 1m height
Environmental rating Standard model IP65, Healthcare model IP64
Ambient light 0 to 100 000 lux

Appendix A — Specifications and Reading Distances
SF61 Cordless Scanner User’s Guide 83
Bluetooth Radio
Radio Type Bluetooth Class 1 version 2.1 + EDR
Frequency 2400 - 2483.5 MHz
Scanning Performance
SF61B1D Scan angle: 38°
Minimum X dimension: 4mils (0.1 mm)
Maximum scan rate: 200 scans/second
Minimum print contrast: 20%
SF61B2D Scan angles: 39° horizontal, 25.5° vertical
Minimum X dimension 1D: 4 mils (0.1 mm)
Minimum X dimension 2D: 6.6 mils (0.17 mm)
Minimum print contrast: 20%
SF61BHP Scan angles: 34.4° horizontal, 22.2° vertical
Framing angles: 30° horizontal, 20° vertical
Minimum X dimension 1D: 4 mils (0.1 mm)
Minimum X dimension 2D: 6.6 mils (0.17 mm)
Minimum print contrast: 20%
Bar Code Symbologies for 1D Models (SF61B1D)
Codabar GS1 DataBar Omni-Directional
Code 11 GS1 DataBar Stacked
Code 39 Interleaved 2 of 5
Code 93/93i Matrix 2 of 5
Code 128 / GS1-128 MSI
EAN/UPC Plessey
GS1 Composite (linear only) Standard 2 of 5
GS1 DataBar Expanded Telepen
GS1 DataBar Limited

Appendix A — Specifications and Reading Distances
84 SF61 Cordless Scanner User’s Guide
Bar Code Symbologies for 2D Models (SF61B2D, SF61BHP)
Australian Post Han Xin Code
Aztec Infomail
BPO Intelligent mail
Canada Post Interleaved 2 of 5
Codabar Japan Post
Codablock A Matrix 2 of 5
Codablock F Maxicode
Code 11 Micro PDF417
Code 39 MSI
Code 93/93i Multicode
Code 128 / GS1-128 PDF417
DataMatrix Planet
Dutch Post Plessey
EAN/UPC Postnet
GS1 Composite QR Code
GS1 DataBar Expanded Standard 2 of 5
GS1 DataBar Limited Sweden Post
GS1 DataBar Omni-Directional Telepen
GS1 DataBar Stacked TLC 39

Appendix A — Specifications and Reading Distances
SF61 Cordless Scanner User’s Guide 85
Reading Distances
Values shown are for typical distances measured from the front end of
the scanner bezel in an office environment (200 lux) with extended
reading range activated.
Note: Minimum distances depend on the number of characters
encoded in the bar code.
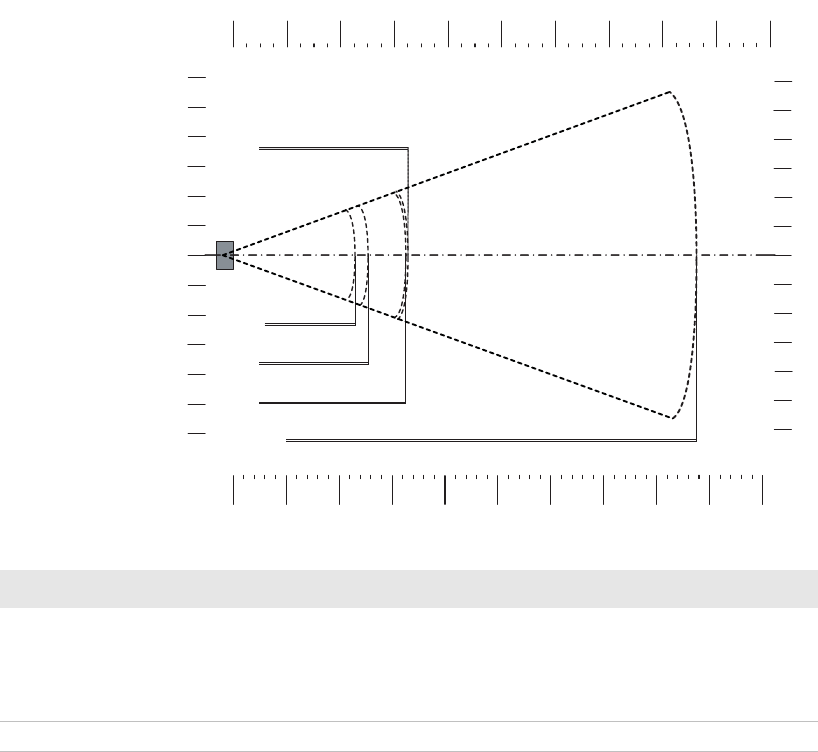
Appendix A — Specifications and Reading Distances
86 SF61 Cordless Scanner User’s Guide
SF61B1D
4"
8"
0"
4"
8"
12"
12"
cm
0.25 mm / 10 mils
1 mm / 40 mils
in
0.125 mm/5 mils
0.1 mm/4 mils
10
0
10
20
20
30
30
EAN/UPC
08070605040302010
0" 32"28"24"20"16"12"8"4" 36" 40"
90 100
Symbology Density Minimum Distance Maximum Distance
Code 39 0.1 mm (4 mils)
0.125 mm (5 mils)
0.25 mm (10 mils)
1 mm (40 mils)
6 cm (2.36 in)
5 cm (1.97 in)
5 cm (1.97 in)
10 cm (3.94 in)
23 cm (9.06 in)
25.5 cm (10.04 in)
32.5 cm (12.80 in)
87.5 cm (34.45 in)
EAN/UPC 0.33 mm (13 mils) 5 cm (1.97 in) 33 cm (12.99 in)
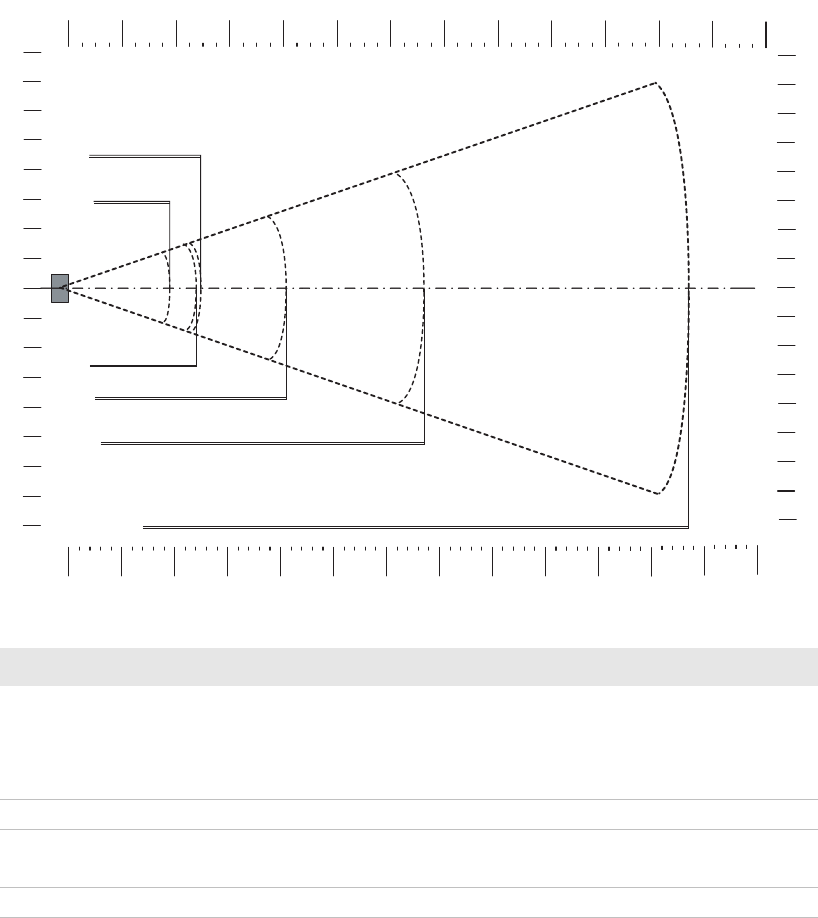
Appendix A — Specifications and Reading Distances
SF61 Cordless Scanner User’s Guide 87
SF61B2D Standard Model
mp
4"
8"
0"
4"
8"
12"
16"
12"
16"
cm
0.5 mm / 20 mils
1 mm / 40 mils
in
EAN/UPC
0.125mm/5 mils
10
0
10
20
20
30
40
30
40
PDF417 10 mils
Data Matrix 10 mils
0" 36"32"28"24"20"16"12"8"4" 40" 44" 48” 52”
0908070605040302010 90 100 110 120 130
Symbology Density Minimum Distance Maximum Distance
Code 39 0.1 mm (4 mils)
0.125 mm (5 mils)
0.5 mm (20 mils)
1 mm (40 mils)
4 cm (1.57 in)
4 cm (1.57 in)
6 cm (2.36 in)
14 cm (5.51 in)
19 cm (7.48 in)
24 cm (9.45 in)
67 cm (26.38 in)
117 cm (46.06 in)
EAN/UPC 0.33 mm (13 mils) 5 cm (1.97 in) 41 cm (16.14 in)
PDF417 0.25 mm (10 mils)
0.38 mm (15 mils)
4 cm (1.57 in)
4 cm (1.57 in)
25 cm (9.84 in)
36 cm (14.17 in)
DataMatrix 0.25 mm (10 mils) 5 cm (1.97 in) 19 cm (7.48 in)
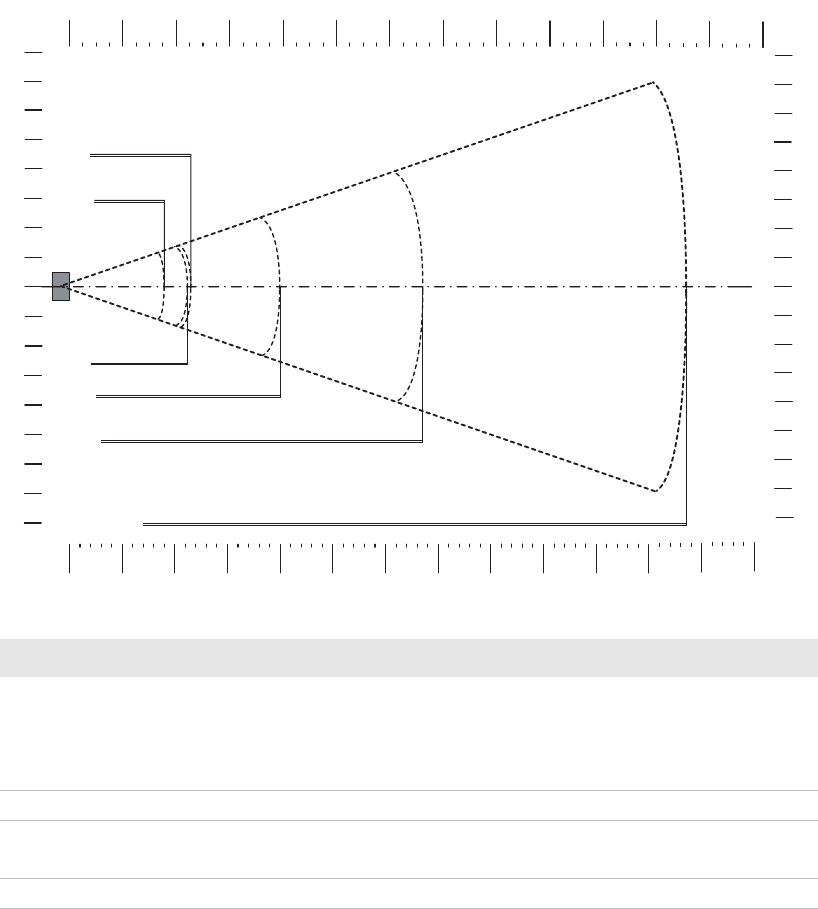
Appendix A — Specifications and Reading Distances
88 SF61 Cordless Scanner User’s Guide
SF61B2D Healthcare Model
4"
8"
0"
4"
8"
12"
16"
12"
16"
cm
0.5 mm / 20 mils
1 mm / 40 mils
in
EAN/UPC
0.125mm/5 mils
10
0
10
20
20
30
40
30
40
PDF417 10 mils
Data Matrix 10 mils
0" 36"32"28"24"20"16"12"8"4" 40" 44" 48” 52”
0908070605040302010 90 100 110 120 130
Symbology Density Minimum Distance Maximum Distance
Code 39 0.1 mm (4 mils)
0.125 mm (5 mils)
0.5 mm (20 mils)
1 mm (40 mils)
4 cm (1.57 in)
4 cm (1.57 in)
6 cm (2.36 in)
14 cm (5.51 in)
18 cm (7.09 in)
22.5 cm (8.86 in)
67 cm (26.38 in)
117 cm (46.06 in)
EAN/UPC 0.33 mm (13 mils) 5 cm (1.97 in) 40 cm (15.75 in)
PDF417 0.25 mm (10 mils)
0.38 mm (15 mils)
4 cm (1.57 in)
4 cm (1.57 in)
23 cm (9.06 in)
34 cm (13.39 in)
DataMatrix 0.25 mm (10 mils) 5 cm (1.97 in) 18 cm (7.09 in)

Appendix A — Specifications and Reading Distances
SF61 Cordless Scanner User’s Guide 89
SF61BHP
4"
8"
0"
4"
8"
12"
16"
12"
16"
cm
0.5 mm / 20 mils
1 mm / 40 mils
in
EAN/UPC
0.125mm/5 mils
10
0
10
20
20
30
40
30
40
PDF417 10 mils
Data Matrix 10 mils
0" 36"32"28"24"20"16"12"8"4" 40" 44" 48” 52”
0908070605040302010 90 100 110 120 130
Symbology Density Minimum Distance Maximum Distance
Code 39 0.1 mm (4 mils)
0.125 mm (5 mils)
0.5 mm (20 mils)
1 mm (40 mils)
5 cm (1.97 in)
4 cm (1.57 in)
6 cm (2.36 in)
14 cm (5.51 in)
22 cm (8.66 in)
27 cm (10.63 in)
71 cm (27.95 in)
125 cm (49.21 in)
EAN/UPC 0.33 mm (13 mils) 5 cm (1.97 in) 47 cm (18.50 in)
PDF417 0.25 mm (10 mils)
0.38 (15 mils)
4 cm (1.57 in)
4 cm (1.57 in)
27 cm (10.63 in)
36 cm (14.17 in)
DataMatrix 0.25 mm (10 mils) 6 cm (2.36 in) 22 cm (8.66 in)
Appendix A — Specifications and Reading Distances
90 SF61 Cordless Scanner User’s Guide

6001 36th Avenue West
Everett, Washington 98203
U.S.A.
tel 425.348.2600
fax 425.355.9551
www.intermec.com
© 2013-2014 Intermec by Honeywell
All rights reserved.
SF61 Cordless Scanner User’s Guide
*934-078-003*
PN 934-078-003