Hoover IronSteam Steam Generator Iron SFM4002 Instruction Manual Product Code 39600107 48007881 01 Ironspeed IM UK
User Manual: Hoover Instruction Manual SFM4002 - Iron Help and Advice from Hoover
Open the PDF directly: View PDF ![]() .
.
Page Count: 11

1
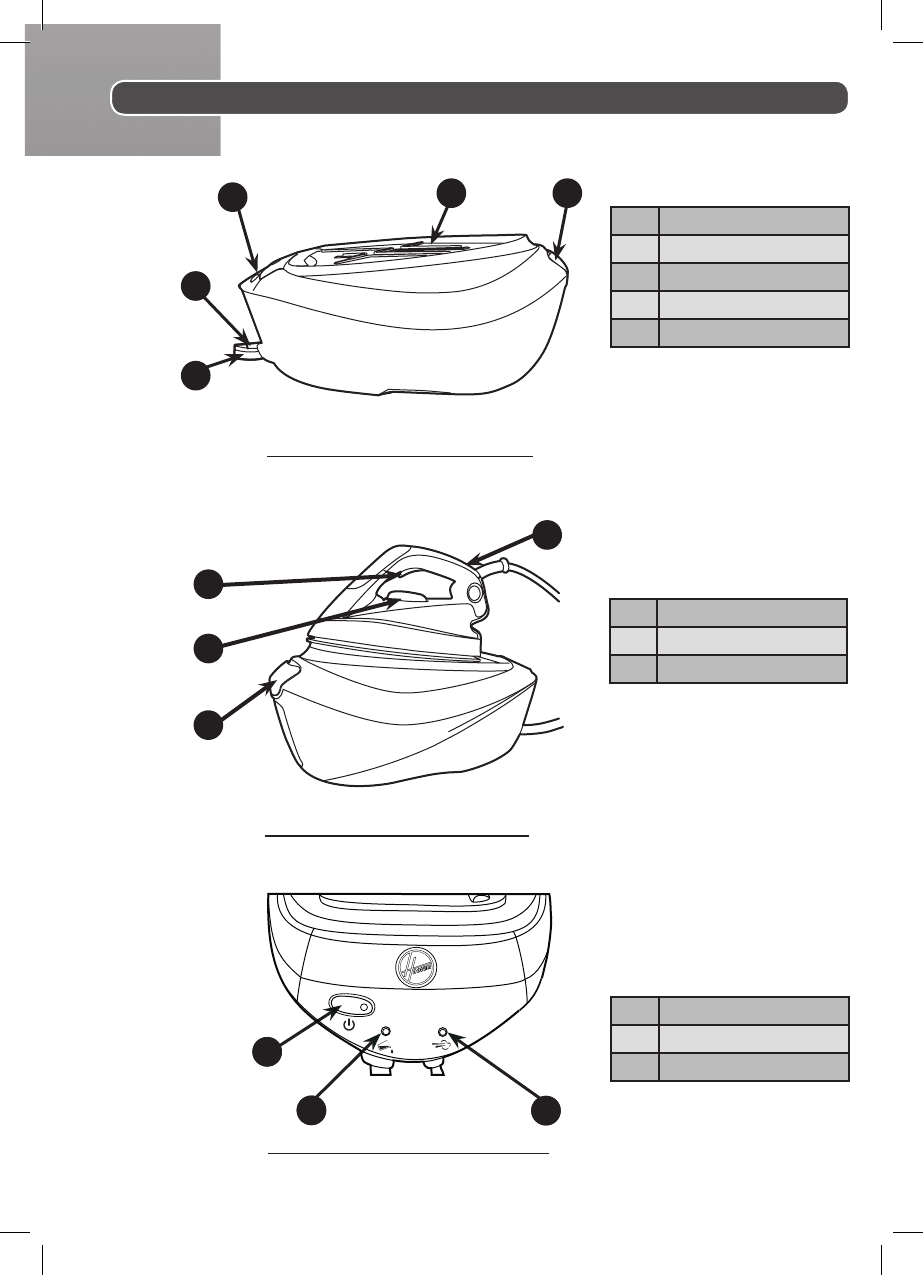
Parts Descripon
1Control Panel
2Iron Resng Mat
3Water Tank Filler Cover
4Supply Hose
5Mains
6Temperature Dial
7Steam Trigger
8Temperature Dial Indicator
Fig. 1: Base and Tank Descripon
Fig. 2: Domesc Iron Descripon
12 3
5
4
1B
1A
1C
1A On/o switch
1B “Water Tank Empty” Light
1C “Steam Ready” Light
Fig. 3: Domesc Iron Control Panel
3
6
7
8
2
2 -
Introducon
Dear customer,
First of all, we would like to congratulate you for purchasing this Hoover ironing system
and to thank you for the condence you have in Hoover brand.
This appliance has been manufactured with great care, respecng all of our quality
criteria and has been tested several mes. We hope its use will full your expectaons.
We are strongly convinced that it will make your ironing much faster and beer.
Before using your new Hoover appliance, please read carefully this user’s manual. If
you need further informaon or if you encounter any trouble which are not noced in
this manual, please contact the aer-sales service or your standard dealer.
Important Safety Instrucons
Read this user manual carefully before you rst use and save it for future reference.
This appliance can be used by children
aged from 8 years and above and
persons with reduced physical, sensory
or mental capabilies or lack of
experience and knowledge if they have
been given supervision or instrucon
concerning use of the appliance in a
safe way and understand the hazards
involved. Children shall not play with
the appliance. Cleaning and user
maintenance shall not be made by
children without supervision.

3
3
Important Safety Instrucons
• This product has been designed
for domesc use only. In case of any
commercial use, inappropriate use or
failure to comply with the instrucons, the
manufacturer is not responsible and the
guarantee will not apply.
• Before connecng your appliance, check
if the main voltage is the same as the
voltage indicated on your appliance and
that the power outlet is connected to the
earth.
• Ensure before each use that the electric
cord or any other important part is not
damaged.
• Keep the iron and its cord out of reach
of children less than 8 years of age when it
is energized or cooling down.
• Never direct the steam towards persons or
animals. Never direct the steam jet towards
any other electrical or/and electronic
appliances.
• The iron is not to be used if it has been
dropped, if there are visible signs of
damage or if it is leaking.
• If the appliance shows evidence of
breakdown, malfuncon, leakages. Please
make sure it is checked by an authorized
Service Centre to avoid any danger.
• Always make sure the appliance is
switched o, unplugged and cooled down

4
4
before doing any maintenance work.
• The iron must not be le unaended
while it is connected to the supply mains
and before it has cooled down.
• Do not unplug the appliance by pulling
on the cord or on the appliance.
• Never immerse the iron, the stand, the
cable or the plugs in water. Never hold
them under the water tap.
• The soleplate of the iron can become
extremely hot and may cause burns if
touched. Never touch the electric cords
with the soleplate.
• If the supply cord is damaged, it must
be replaced by the manufacturer, service
agent or similarly qualied persons in
order to avoid a hazard.
• When placing the iron on its stand,
ensure that the surface on which the stand
is placed is stable.
• The plug must be removed from the
socket-outlet before the water reservoir is
lled with water.
• The surfaces with are liable to get
hot during use.
• To have a electronic copy of the
instrucon manual contact the aer sales
service in guarantee card.
• The iron must be used and rested on a
stable surface.
Important Safety Instrucons
5
5
On/o switch (1A)
A light on the switch will illuminate to indicate that the appliance is switched on.
When the appliance is switched on and “Steam ready” light (1C) is o, it means
that steam is ready. You can press the steam trigger and steam will escape from the
soleplate. Please note that during use, the steam light will switch on but you can
connue steam ironing.
“Water tank empty” light (1B) is on: There is no more water in the tank.
Please rell the tank following the instrucons in the chapter 2.2
Chapter 1 - Control Panel
Chapter 2: Preparaon for Use
Chapter 2.1 : What Kind of Water May be Used?
Chapter 2.2 : Filling the Water Tank
Due to the powerful output of steam, Hoover recommends the use of an acve iron-
ing board with blowing and vacuuming funcon which allows escape of any excess
steam.
Place the ironing system on a stable and level surface, for example on the hard part of
an ironing board or on a heat-resistant surface.
The Hoover ironing system has been designed to be used with tap water only.
There is no need to use dislled or pure dislled water.
Nevertheless, in case you live in a hard water area, you can mix 50% of dislled water
with 50% of tap water.
Do not use any other kind of water or do not add any contents to water tank as it can
damage your appliance.
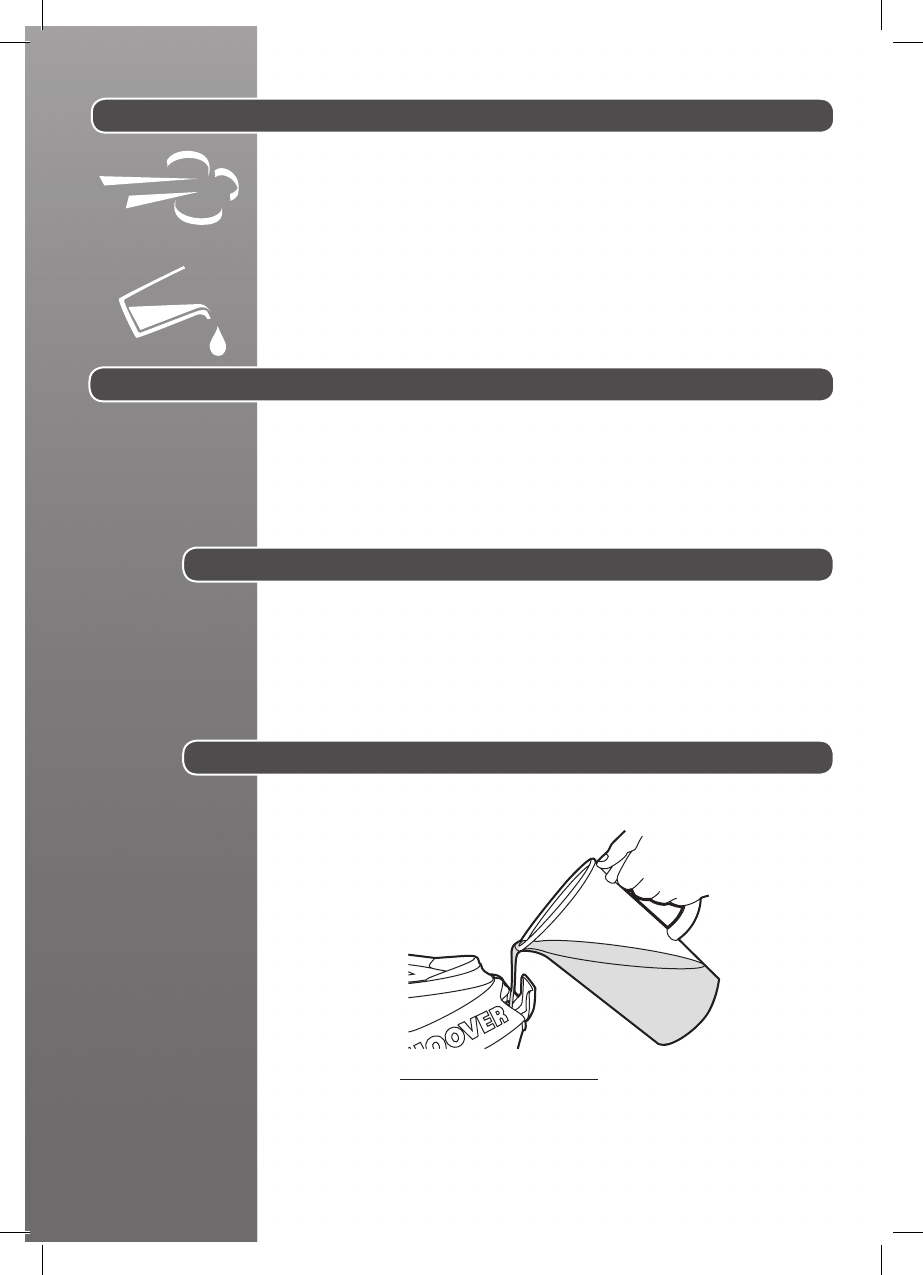
Switch o the appliance and unplug it.
Open the water tank ller cover (3) to gain access to the water tank.
Fill it with tap water with the help of a bole.
Do not exceed the max mark.
Warning: Do not add vinegar, hot water, perfume, or any other kind of chemical
agents or any other contents in the water tank. It could damage the steam generator
and shorten its life use.
Fig. 4: Water Tank Filling
6
6
Chapter 3: Using Your Steam Generator
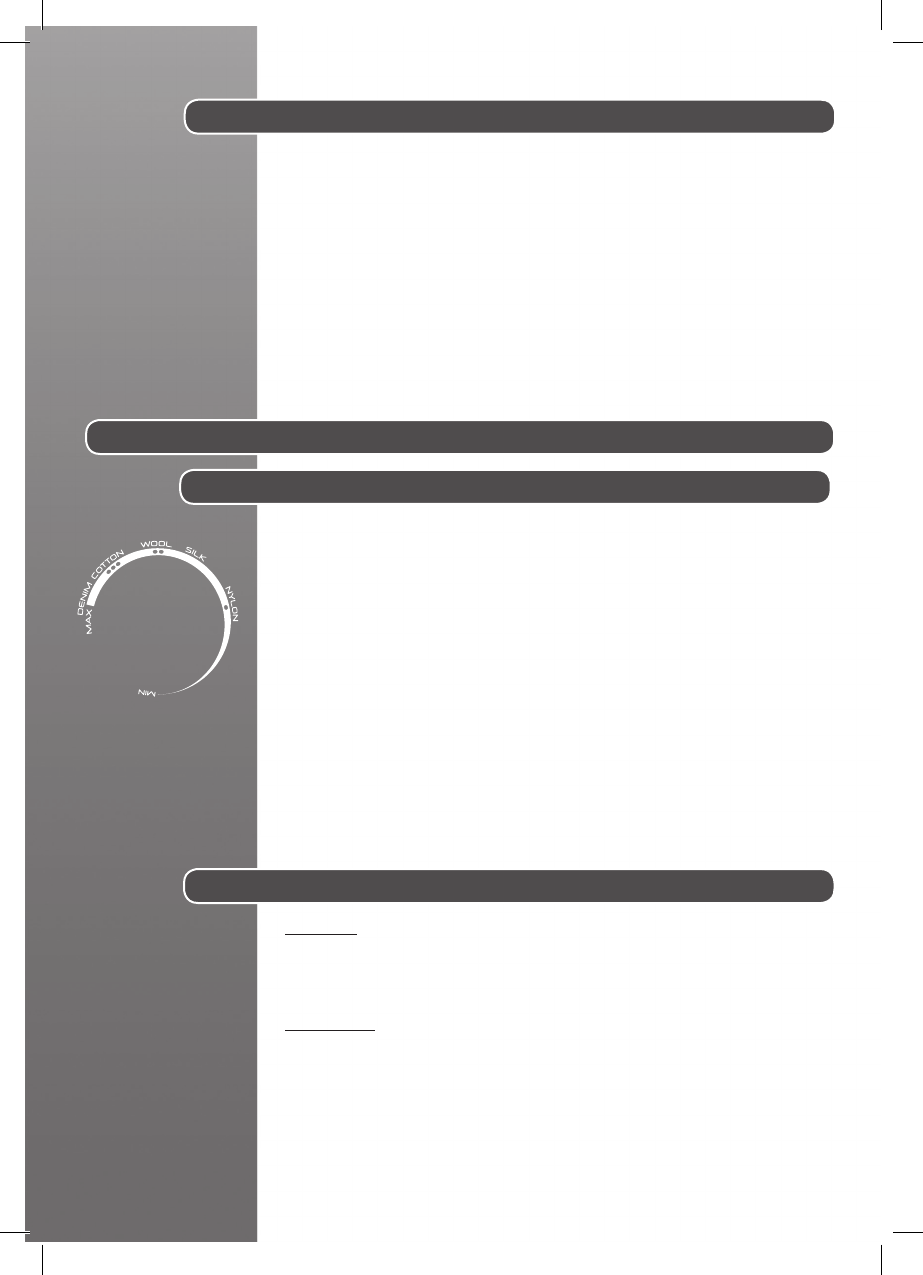
Select the temperature of the soleplate by turning the dial (6) on the iron to the desired posion.
Wait a few moments unl the temperature indicator (8) is o.
It will indicate to you that the soleplate has reached the requested temperature.
While ironing, the temperature dial indicator may turn on and o, the temperature
adjusts without interrupng your ironing.
Help
To know the best suitable temperature for each texle, check the laundry care label
of the arcle to be ironed. Please note that during use, the temperature light goes on
from me to me. It signies that the iron is heang up to the set temperature.
If a fabric is made with various kinds of bres always select the soleplate temperature
in adequacy with the most delicate one.
If you select a lower temperature while ironing, wait unl the iron has cooled down to
the set temperature before you connue ironing.
If the temperature is too low, some drops of water could escape from the soleplate.
Please raise up the temperature above the 2 dots (••) to avoid this issue.
Connect the appliance with the mains cord to an earthed socket and switch on the
power. Press the on/o switch. The light (1A) will illuminate, this tells you that the
appliance is working and that the boiler is heang up.
Aer approximately 2 minutes, the “steam ready” led will light o and you can now
start to use the steam feature.
N.B.
The rst me the appliance is used, you may nd some fumes, dust and a smell
should appear.
It’s quite normal and will quickly disappear.
This is due to a treatment applied to the soleplate that improves the steam performance.
Before use, please use the iron as described in Chapter 3.4 Vercal Steam Ironing.
Chapter 2.3 - Switching on the Appliance
Chapter 3.2 - Ironing
Dry Ironing
Select the temperature of the soleplate following the indicaons of chapter 3.1. Start
your ironing without pressing the steam trigger (7), when the soleplate reaches the
appropriate temperature.
Steam Ironing
Select the temperature of the soleplate following the indicaons of chapter 3.1. The
steam will be ready to be used aer 8 minutes and the dedicated lamp(1C) will turn
o..Starng from that me you can begin your ironing and press the steam trigger (7)
for having steam. The steam ow stops when you release the trigger.
N.B.
During use, you may hear noise coming from your steam generator. This is normal. It
signies that a pump is injecng water into the boiler. Ideally, avoid using the steam
trigger at this precise moment to avoid a fall in pressure.
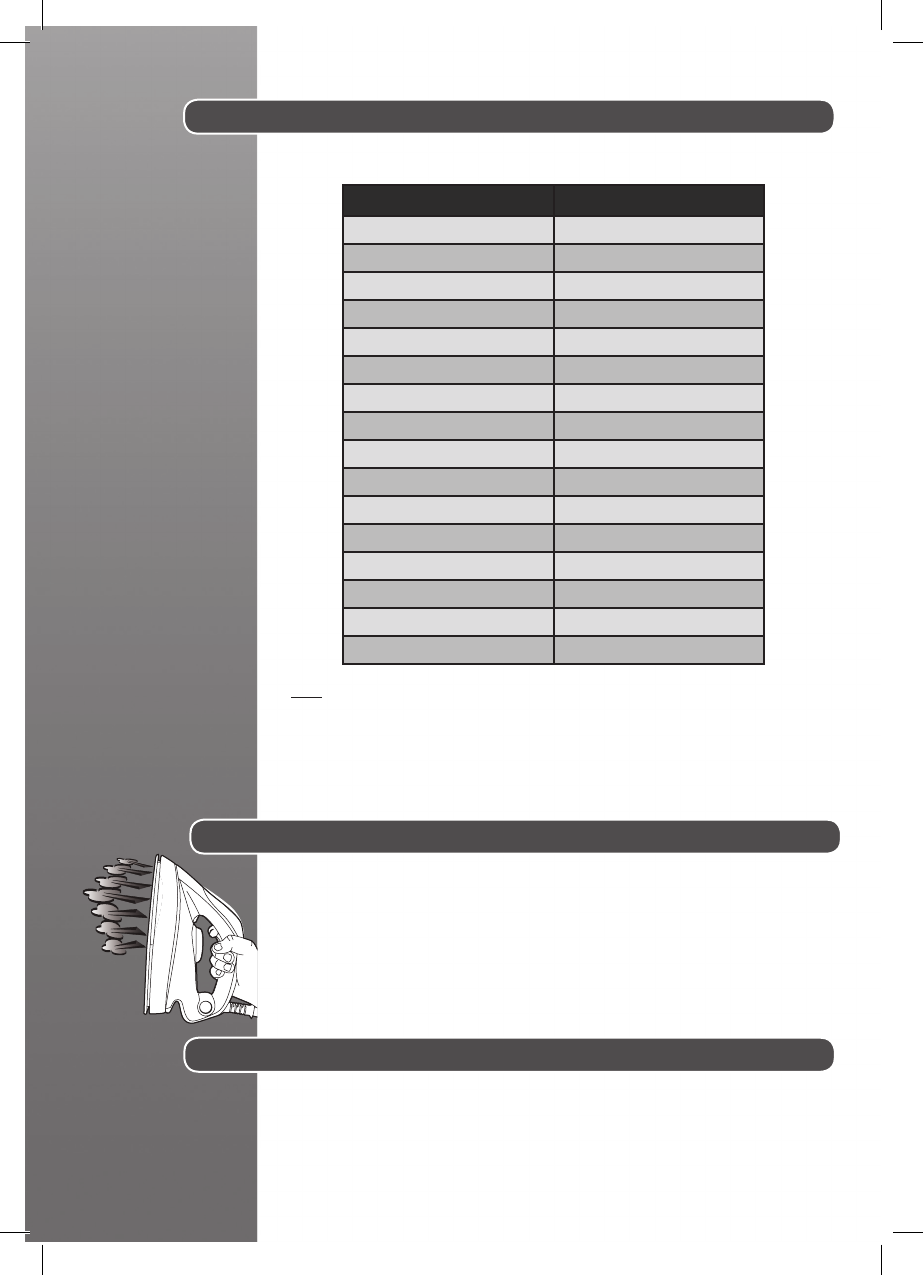
Chapter 3.1: Regulang the Soleplate Temperature
7
7
Texle Soleplate T°C
Wrinkled Texles •••/Max
Tricky Zone ••/•••
Jeans Max
Coon •••
Linen Max
Starched Clothes •••
Velvet/Alcantara ••
Wool ••
Silk ••
Cashmere ••
Rayon ••
Polyester •
Nylon •
Acrylic •
Lycra •
Polyamid •
To obtain the best results, it is important to set the correct temperature of the soleplate.
Chapter 3.3 - How to choose the Correct Soleplate temperature
Chapter 3.4 - Vercal Steam Ironing
Set the soleplate temperature (6) to the max temperature.
Hang curtains and clothes (jackets, suits, coats). Hold the iron in vercal posion at
a short distance of the fabric to avoid burning it. Press the steam trigger (7) to steam
iron moving it from top to boom.
Warning: Do not direct the steam jet towards people or animals
Help
When steam ironing clothes on which shiny patches may occur, we recommend you to set
the soleplate temperature to a lower temperature or to iron the garment on the reverse.
Start with the fabrics that needed to be ironed at a lower temperature (•) and nish
with those that needed to be ironed at the higher temperature (•••/Max).
Chapter 3.5 - Relling the Water Tank During Usage
You can ll the water tank at any me during use.
When the water tank is empty, the “Empty water tank” light (1B) will switch on.
No more steam escapes from the soleplate.
Open the water tank ller cover (3) and rell the water tank with the help of a bole
of water without exceeding the max mark level.
Please refer to chapter 2.2 for more detailed instrucons.
8
8
Chapter 4: Maintenance and Cleaning
To prevent any risk of burns, all maintenance and cleaning operaons should only be
carried out when the unplugged appliance has cooled down for at least 2 hours.
Chapter 4.1 - Cleaning the Appliance
Do not use any detergent or descaling products for cleaning the soleplate. Regularly
clean it with a humid and non-metallic pad.
Empty the water tank aer each use before storing it.
To clean the plasc parts of the stand, please use so clothes.
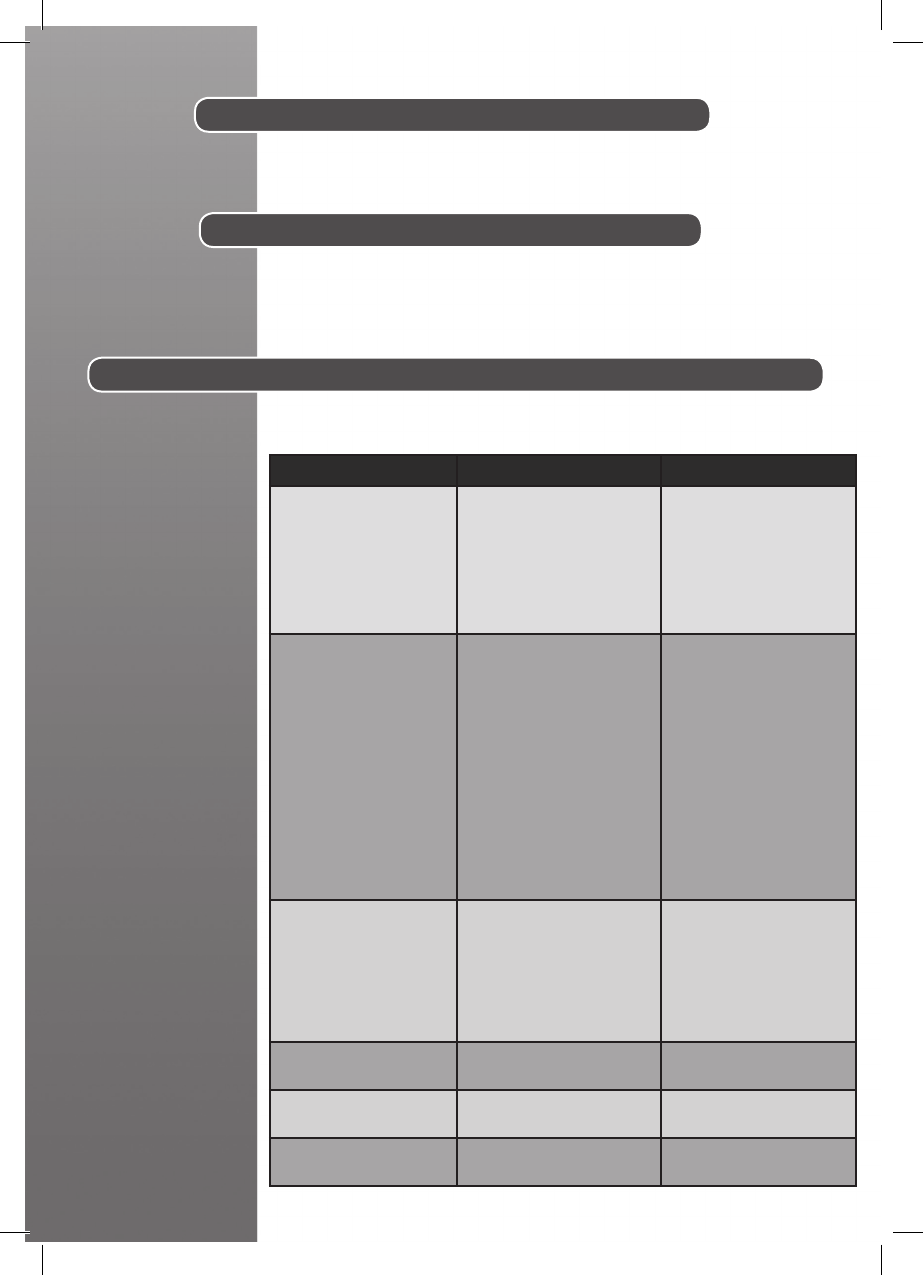
Troubleshoong
Problem Cause Soluon
The appliance does not
become hot
There is a connecon problem.
The appliance is not
switched on.
The soleplate temperature
is too low.
Check the mains cord, the
plug and the wall socket
Press on the on/o switch
Set a higher temperature
of the soleplate
The appliance does not
produce steam
The appliance is not
switched on
The boiler has not yet
heated up
The boiler may be empty
You are not pressing the
steam trigger
The soleplate temperature is
set to the maximum
Press on the on/o switch
Wait a few moments unl
the steam ready lamp is o
Rell the water tank
Press the steam trigger
It works but steam is not
visible as very hot and dry.
The soleplates becomes
dirty or brown
There should be chemical or
addives in the water used
for ironing
The linen is sll dirty
Never use any chemical
or addives in the water.
Contact your aer sales
service if the linen is sll dirty
Clean the soleplate with a
non-metallic sponge
Water stripes appear on
the texle
Your ironing board cover is
saturated in water
Change the cover or use a
mesh ironing board
Some scale deposit
appears on the soleplate
Your boiler has not been
rinsed for a while
Follow the indicaons in
the appropriate chapter
The empty water tank
LED is on
There is no more water in
the tank
Rell the water tank with
water
These are common problems you may encounter when using your appliance.
If you are unable to solve any issue please contact your local Hoover Service Oce.
9
9
Important Informaon
Hoover spares and Consumables
Always replace parts with genuine Hoover spares. These are available from your local
Hoover dealer or direct from Hoover. When ordering spare parts, always check your
model number.
Hoover Service
Should you require service at any me, please contact your local Hoover Service Oce.
Please see all the contact details below.
Safety
Hoo ver believes that independent approval is the best way of demonstrang safety in
design and manufacture.
All Hoover iron systems have been manufactured in compliance of all safety
regulaons and approved by the most qualied independent approval cercaon
bodies.
ISO 9001
Hoover’s factories have been independently assessed for quality. Our products are made
using a quality system which meets the requirements of ISO 9001
The Environment
The symbol on this appliance indicates that this appliance may not be treated
as household waste. Instead it must be handed over to the applicable
collecon point for the recycling of electrical and electronic equipment.
Disposal must be carried out in accordance with local environmental
regulaons for waste disposal. For more detailed informaon about treatment,
recovery and recycling of this appliance, please contact your local city oce,
your household and waste disposal service or the shop where you purchased the
appliance.
This product complies with the European Direcves 2006/95/EC, 2004/108/EC
and 2011/65/EC.
HOOVER Limited, Pentrebach, Merthyr Tydl, Mid Glamorgan, CF48 4TU, UK
Your Guarantee
The guarantee condions for this appliance are as dened by our representave in the
country in which it is sold. Details regarding these condions can be obtained from the
dealer from whom the appliance was purchased. The bill of sale or receipt must be
produced when making any claim under the terms of this guarantee.
Subject to change without noce.

Printed in P.R.C.
PART No. 48007881/01
®
