Hoover Frost Free Fully Integrated Fridge Freezer HFFB 3050AK Instruction Manual Product Code 34900186 HFFB3050AK
User Manual: Hoover Instruction Manual HFFBP3050/1K - Fridge Freezer Help and Advice from Hoover
Open the PDF directly: View PDF ![]() .
.
Page Count: 5
PROPERTY OF
CL N° REV. DATE
SPECIFICATION
1/1
MODIFY DESCRIPTION
MODIFIED BY
BASE CODE
TREATMENT
MATERIAL
DATE SIGNATURE
DRAWN
CHECKED
FOR
WEIGHT SCALE
SIZE
NAME
(LOCAL LANGUAGE)
PART CODE SHEET
REPLACE No ORIGIN CL No Class Specification
FR
35
RELEASE LEVEL
WITHOUT OUR WRITTEN CONSENT IS FORBIDDEN
ALL RIGHTS RESERVED, THE REPRODUCTION OF ANY PART
OF EU DIRECTIVE 2002/95/CE + AMENDMENTS
MATERIALS IN COMPLIANCE WITH REQUIREMENTS
A4 ------------
15-05-2009
SCHEDA TECNICA COMBI INCASSO - STATICO o FF -INGLESE
CL 30431
41031853
15-05-2009
Z STUDIO
BERTU’ ENGLISH LANGUAGE
COMBI INC.STATICO o FF - Y54
GENERAL TOLERANCE
ISO 2768 - m
-
-
SC 000-000
VALIDO PER PRODUZIONE
------------
-
A
B
C
D
E
MANUAL INSTRUCTION COMBI BUILT IN - STATIC or FROST FREE
TAGLIABUE
BUILT-IN FRIDGE-FREEZER AND BUILT-IN FROST FREE FRIDGE-FREEZER EN
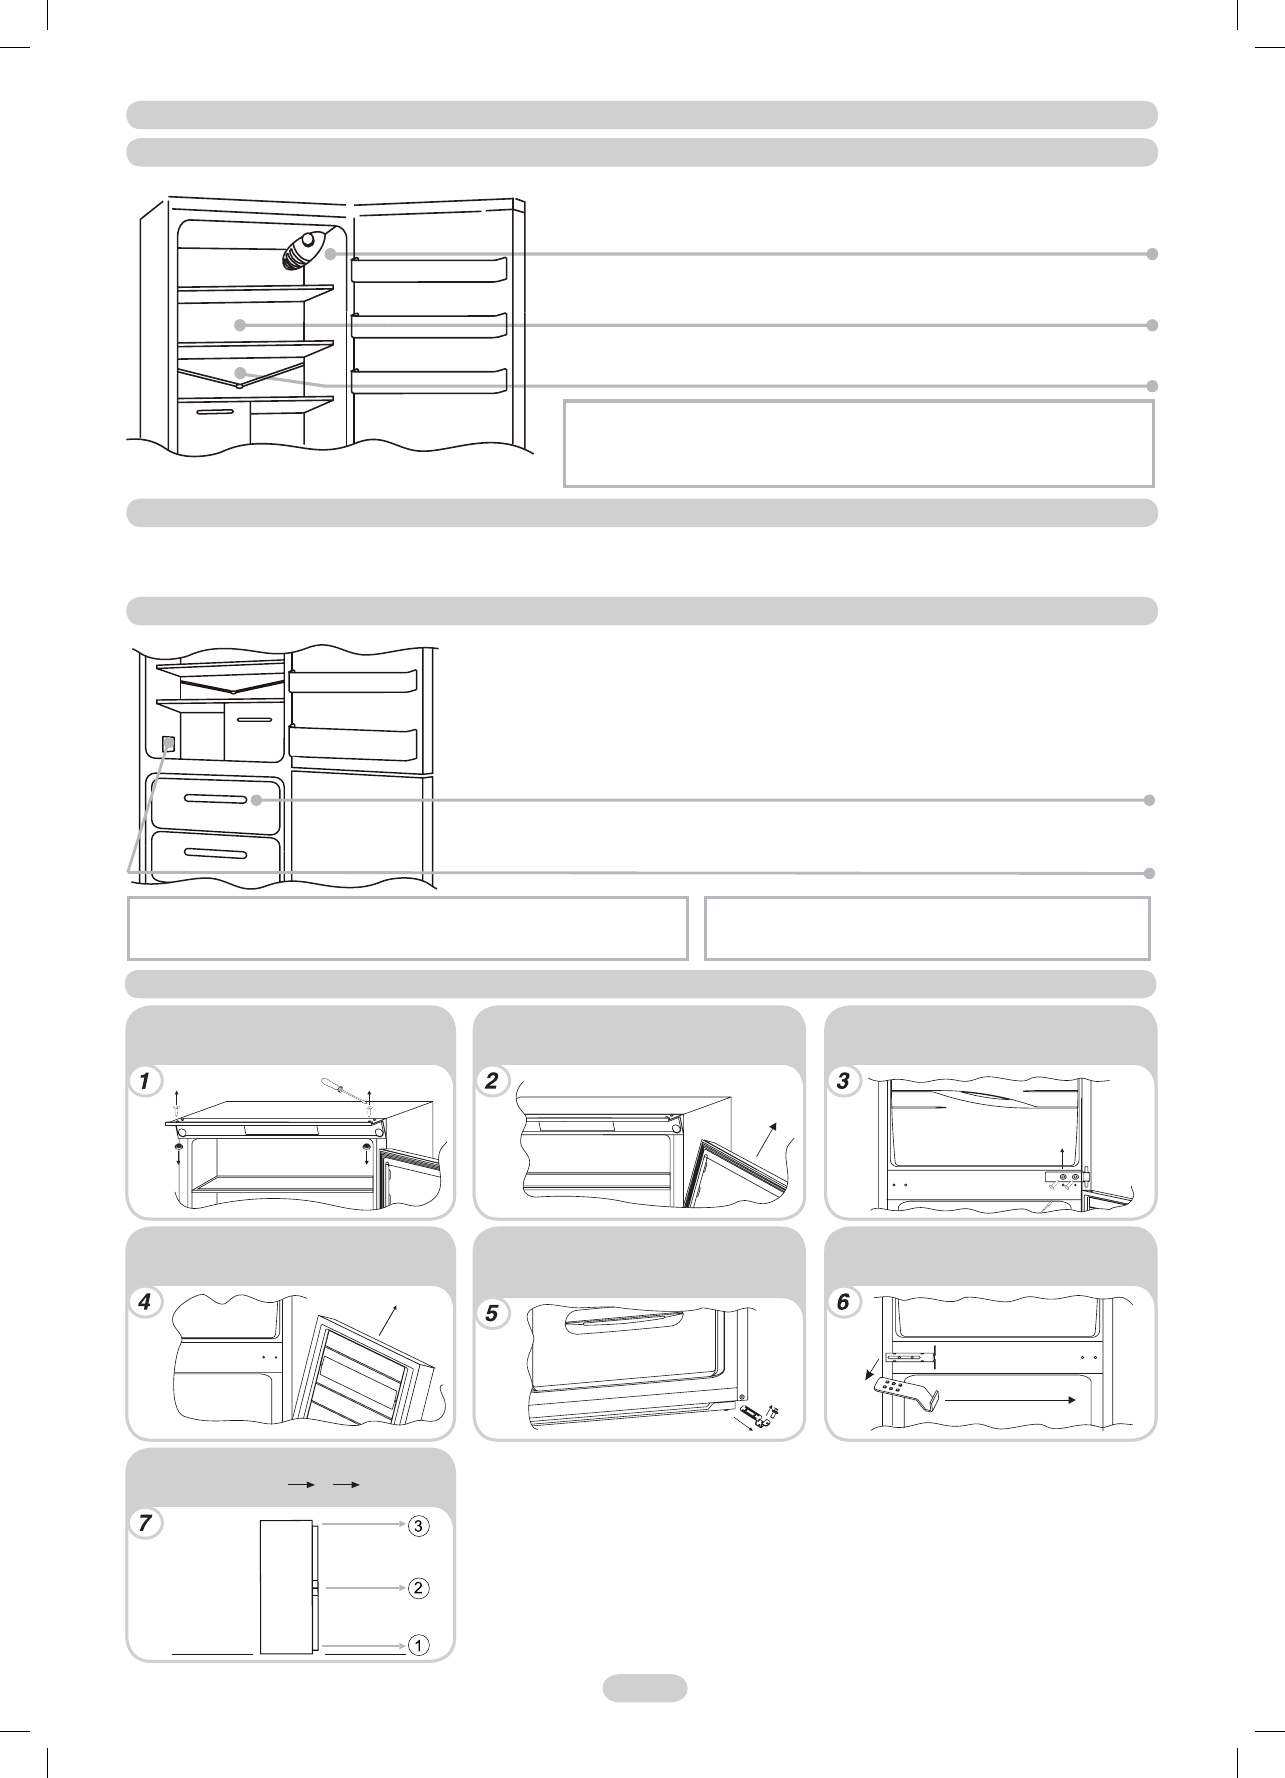
REVERSING THE OPENING OF THE DOORS
2 EN
Remove the pin and the corresponding
bush of the top crossbar.
Remove the top door. Remove the central hinge and the
corresponding washers.
Remove the bottom door. Remove the pin of the bottom right-hand
hinge and remount it on the bottom left-
hand hinge.
Invert the plate cover of the cabinet
mounted on the plate.
Reassemble the hinges and doors working
from bottom to top 1 2 3.
BUILT-IN FRIDGE-FREEZER AND BUILT-IN FROST FREE FRIDGE-FREEZER
CONTROL PANEL
FREEZING OF THE FREEZER COMPARTMENT
DEFROSTING OF THE FREEZER COMPARTMENT
The thermostat box to control the appliance is located inside the fridge compartment
on the top right. To check whether the appliance is functioning, make sure that the
thermostat knob is not set on "0“. Adjust the knob according to the desired temperature
in the fridge.
In this product the freezer compartment is automatically defrosted.
A small amount of frost or drops of water on the back of the fridge compartment when
the fridge is working is normal.
Make sure the water outlet is always clean. Make sure foods do not touch the back or
sides of the fridge compartment
Important: If the room temperature is very warm, the appliance may work
continuously and a layer of frost will deposit on the back of the fridge
compartment. In this case, turn the knob to lower settings.
Place the foods to be frozen in the drawer. At the start of the freezing process, so as not to make the fridge compartment excessively cold, it may
be necessary to turn the thermostat knob back, according to the load and room temperature. Once the freezing process is completed, return the
thermostat knob to the usual value. The rating plate states the maximum quantity of foods that can be frozen, (see fi gure 2).
In case of a fridge with FROST FREE technology, the freezer compartment does not need to be defrosted
because this product is equipped with an automatic system which prevents ice from forming;
In case of a version without FROST FREE technology, it is recommended to manually defrost the
product when the layer of frost is more than 3 mm thick, by setting the knob on "0". Open the door and
remove the foodstuffs, making sure to store them in a cool place. Leave the door open as long as is
necessary for the layer of frost to melt. Dry the inside of the freezer with a sponge/cloth. Reposition the
foodstuffs and reset the knob to the usual values.
N.B.: This is the rating plate. If you need to contact our Service Department in the event of faults,
remember to give them the information on the plate.
N.B.: For better air circulation, leave some room between the foodstuffs.
In case of models with FROST FREE technology, avoid obstructing the
cooling air vents.
N.B.: To TEST consumption and preservation standards,
remove all drawers except for the bottom one.
(fi gure 1)
(fi gure 2)
INSTALLATION OF THEAPPLIANCEIN THE COLUMN
Fasten the gasket provided with the appliance on the opposite
side of the hinges.
Insert the appliance in the column, positioning it on the opposite
side of the hinges.
3 EN
Make sure the top connecting plate of the
cabinet fi ts perfectly in the plate.
Fasten the top part of the appliance to the
cabinet, using the screws provided.
Fasten the bottom part of the appliance by
means of the screws provided.
Apply the ventilation grill. Loosen the fi xing screws of the central
right-hand hinge.
Position the plate close to the column.
Screw the plate to the column by means of
the screws provided.
Tighten the fi xing screws of the central
right-hand hinge.
Perform the same operations on the central
left-hand plate.
2
4
3
1
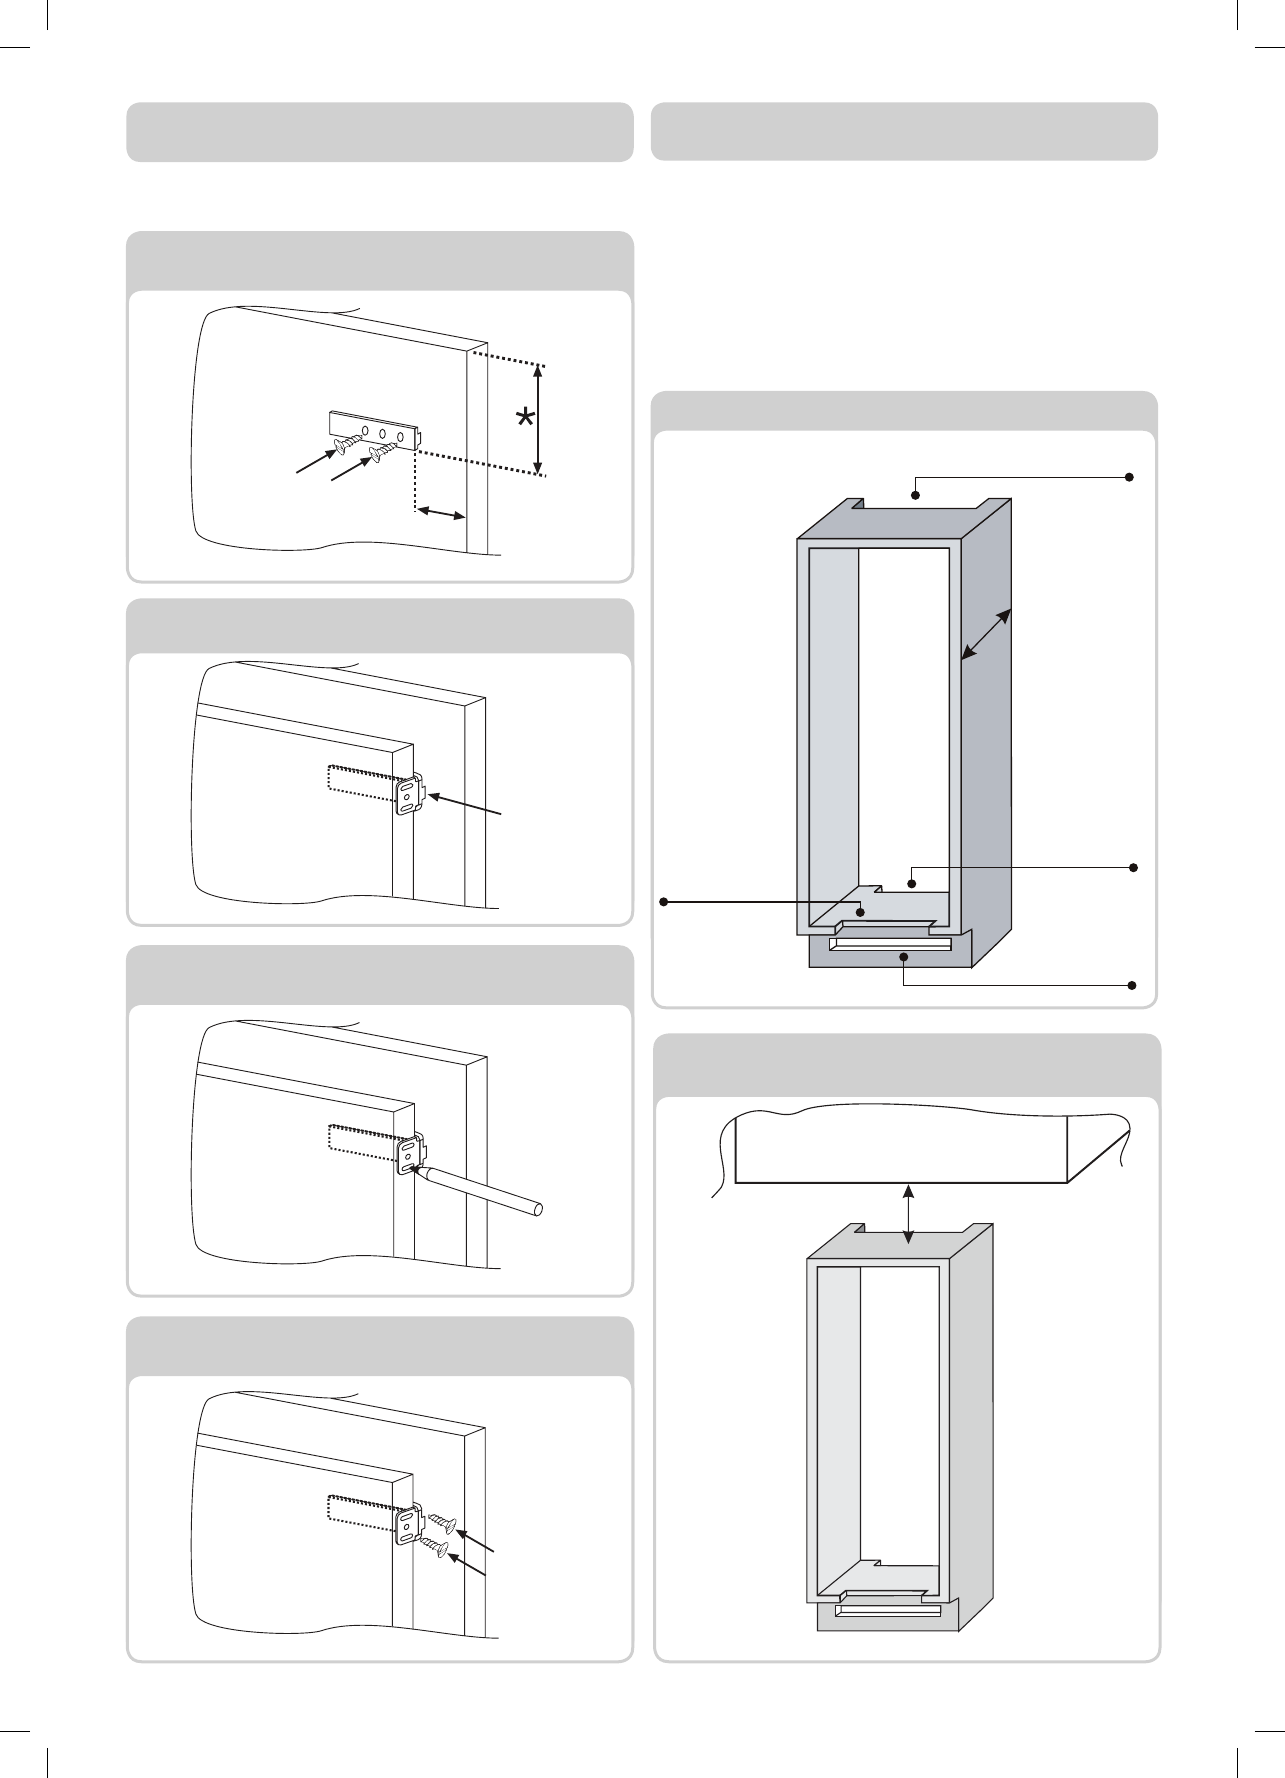
PRODUCT DIMENSIONS AND BUILT-IN COMPARTMENT
Z STUDIO > 04-2009 – Cod. 41031853
COUPLING OF THE PANELS OF THE BUILT-IN
COLUMN TO THE DOORS OF THE APPLIANCE
PRECAUTIONS FOR THE CORRECT
FUNCTIONING
Once the product has been built in, position the rear part of the column
in contact with the wall so as to prevent access to the compressor
compartment.
For the product to operate correctly it is essential to allow adequate air
circulation so as to cool down the condenser located in the rear part of
the appliance.
For this reason, the column must be equipped with a rear chimney, whose
upper opening must not be blocked and with a front slot which will be
covered with a ventilation grill.
The appliance is equipped with coupling devices for the appliance
doors with the panels of the column (drive sleds).
Open the doors of the built-in column and the fridge. Position the
built-in loader in the slide, then fi t it into the fridge door
Mark the fi xing points for the screws and drill with a bit of a diameter
of 2.5
Connect the appliance door to the cabinet panel using the sled slots
as references.
Dimensions of the column lock-pickings
Dimensions of the gap to be left between the column and the
ceiling
50mm
Fasten the sled in the inner part of the panel of the built-in column at the
desired height and at approx. 20 cm. From the outer wire of the door
20
540x50mm
540x50mm
380x37mm
380x50mm
575
