Hopwell Electronics HW Car Entertainment System User Manual IB 8202H A7 X1 13 U1N2
Hopwell Electronics Car Entertainment System IB 8202H A7 X1 13 U1N2
15_HW-6216BN UserMan

OPERATION MANUAL
Car Entertainment System
FCC ID:2ABQZ-HW
IMPORTANT NOTICE & PRECAUTIONS
Thank you for using our company multi-media player! To operate the unit correctly, please read
the operation manual carefully before using. Keep this operation manual for further reference.
The unit is designed only for DC 12V negative ground operation system. Make sure your vehicle is
connected to DC 12V negative ground operation system. Be sure to connect the speaker(-) leads
to the speaker(-) terminal. Never connect the left and right channel speaker wires together or to the
vehicle body.
The normal temperature for operation is between -20 and +60 degree Celsius. Do not work in
extreme high or low temperature and lock vents or radiator panels of the unit, blocking them will
cause heat to build up inside the unit and may cause damage or fire.
This unit can play the following discs (12 cm) and media files: DVD±R/RW / RMVB / 1080p / MPEG
4 / DivX / AVI / SVCD / VCD / MP3 / WMA / CD-R/RW / JPEG.
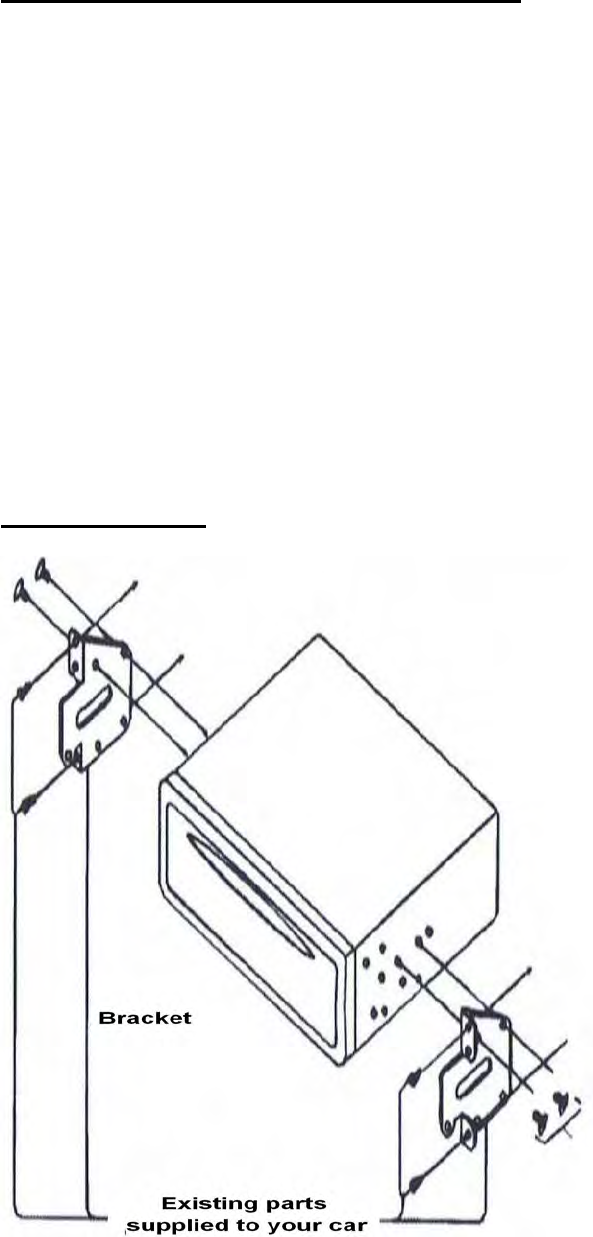
INSTALLATION
Notes:
-
-
-
-
Installation varies on type of cars and
supplied parts
Store small articles in places not
accessible to children
Install only with the supplied screws
Installation of unit by professional
technician is strongly recommended
Remarks:
Mounting brackets and screws are the
parts that supplied in your car and not
provided in this unit.
[ 1 ]
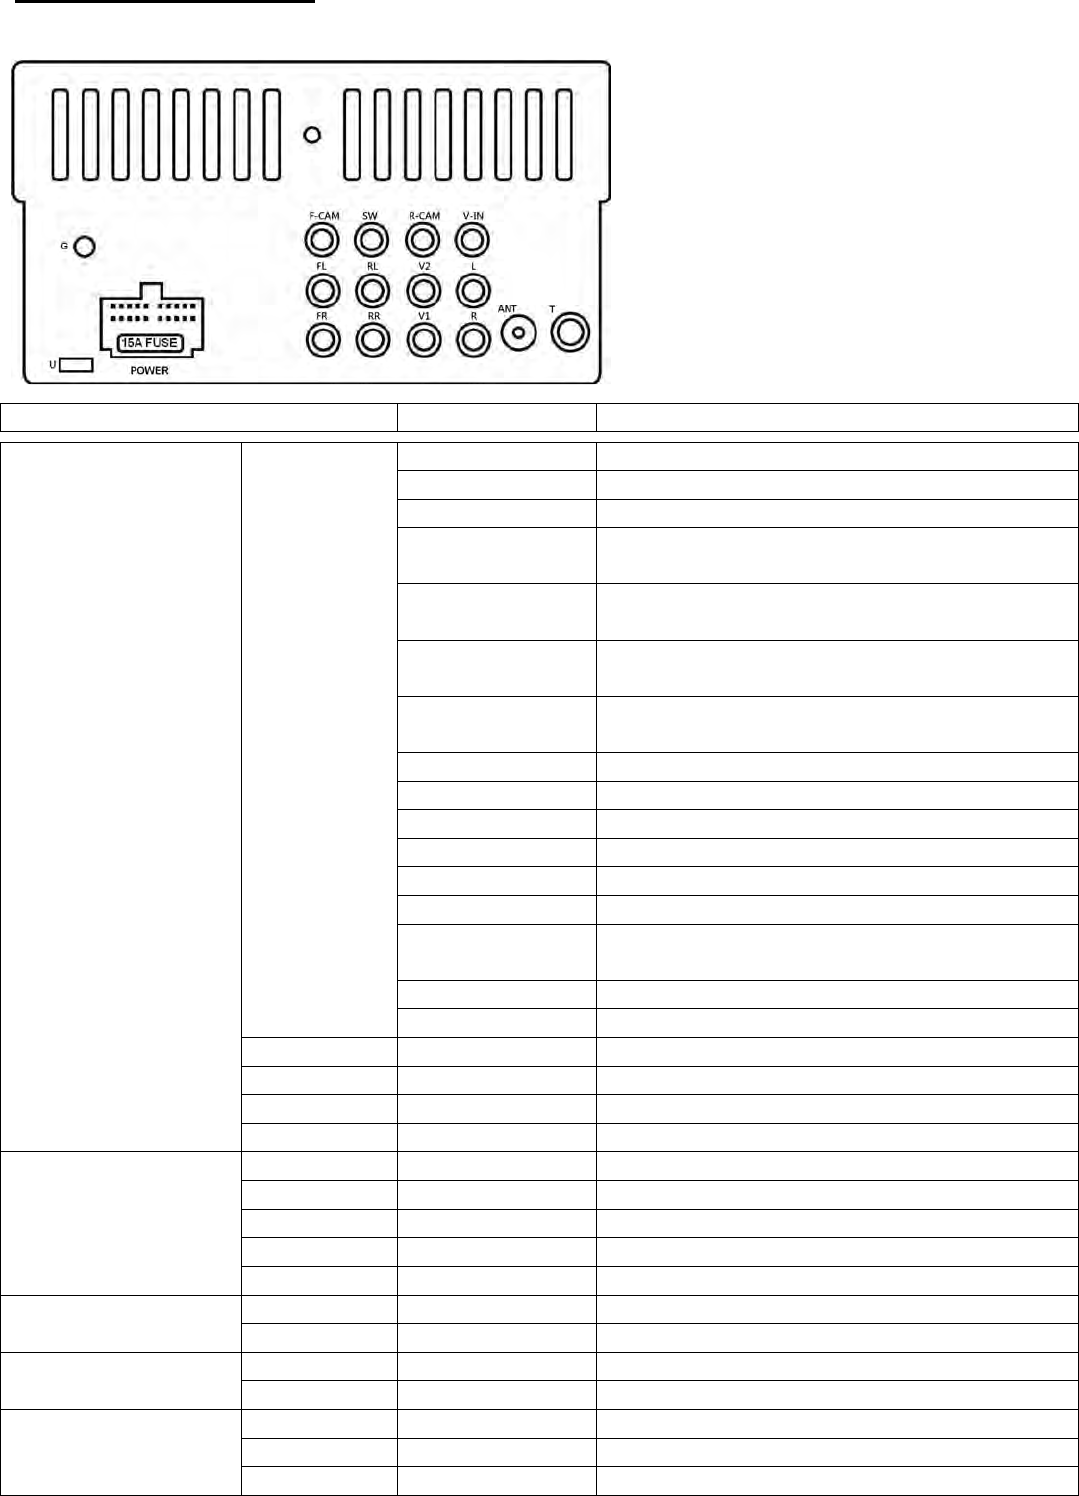
WIRING CONNECTION
BACK OF MAIN UNIT
Remarks:
Due to the law of some countries, video
playback is not allowed during driving.
To allow video playback during driving,
the brown wire (brake) should be
connected to ground (B-) of the car
battery.
Portion Colour Connection
Connecting Socket POWER Red Ignition switch (B+)
Black (Coarse) Ground (B-)
Yellow Memory back up (B+)
White
White / Black
Front left speaker (+)
Front left speaker (-)
Grey
Grey / Black
Front right speaker (+)
Front right speaker (-)
Green
Green / Black
Rear left speaker (+)
Rear left speaker (-)
Purple
Purple / Black
Rear right speaker (+)
Rear right speaker (-)
Blue / White Auto antenna (B+)
Pink Back sight (B+)
Pink / Black Front camera (B+)
Grey Steering wheel control (1)
Green Steering wheel control (2)
Black (Fine) Steering wheel control (Ground)
Orange Headlamp detection
(Connect to on/off control of car headlamp)
Blue Amplifier control (B+)
Brown Brake (B-)
ANT Radio antenna
T TV antenna
G GPS antenna
U Rear USB connecting cable
Audio output jack SW Green Sub-woofer output
FL White Front left speaker output
FR Red Front right speaker output
RL White Rear left speaker output
RR Red Rear right speaker output
Audio input jack L White Auxiliary left speaker input
R Red Auxiliary right speaker input
Video output jack V1 Yellow Video output
V2 Yellow Video output
Video input jack R-CAM Yellow Back sight camera input
V-IN Yellow Video input
F-CAM Brown Front camera input
[ 2 ]

MAIN UNIT OPERATION
Symbol / Function Operations & Controls
RES / RST Press with a pointed object (such as a ball point) to reset the unit to its initial
setting by the factory (default stage).
/ POWER When the unit is turned off, press to turn on the unit.
When the unit is turned on, press & hold shortly to turn off the unit.
MODE / MOD /
SRC
Press repeatedly to select the desired mode for operation.
M/N / MENU Press to shift between GPS navigation mode & current operation mode.
VOL / VOL /
VOL+ / VOL- /
VOLUME
For rotary control version, rotate to adjust sound output level.
For keys control version, press repeatedly to adjust sound output level.
MUTE / Press to turn on or off of sound mute control.
EQ Press repeatedly to select the desired preset equalization mode.
LOUD Press to turn on or off of loudness control.
IR Remote control sensor for signal reception from remote handset.
AUX Insert an external device to this jack in order to have sound output of that
external device through the unit.
USB Insert USB device to this slot for digital files playback.
MICRO SD / SD /
MINI SD / /
Insert micro SD card to this port for digital files playback.
BT Press to shift the current operation mode to Bluetooth mode.
MIC For voice reception under Bluetooth operation.
TFT SCREEN It shows the status of operation on the unit. This screen is also a touch
display – soft touch the screen for different operations of unit (refer to other
parts of this manual for operation details).
DVD Press to shift the current operation mode to disc operation mode (when a disc
has been inserted).
DISC SLOT Insert or remove disc from this disc slot (when a disc has been inserted).
/ EJECT Press to eject disc from the disc slot (when a disc has been inserted).
►▌▌ At media playback mode under disc / USB / SD card input & Bluetooth
operation, press to start, pause or resume playback.
BND / BAND At radio mode, press to select radio band for broadcasting.
During unit operation, press to shift the current operation mode to radio mode.
+►►▌/
▐◄◄
-
/
►►▌/▐◄◄
Radio Mode
Press repeatedly to fine tune the radio frequency upward or downward. Press
& hold shortly to tune the radio frequency to the upward or downward station
for broadcasting.
Disc / USB / SD Input Mode / Bluetooth Mode
Press repeatedly to shift track upward or downward for playback.
Each time press & hold shortly to activate various fast forward or fast rewind
speeds fort playback (Note: Fast forward or fast rewind is not available at
Bluetooth mode).
TV Mode
Press to shift to upward or downward channel for broadcasting.
Press & hold shortly to tune frequency and stop for broadcasting when a
channel received.
[ 3 ]
-TUN+ / ENT Radio Mode
Rotate to turn the radio frequency to the upward or downward preset station
for broadcasting.
DVD Mode
At DVD menu/title display mode, rotate to select the desired setting/setup and
press to confirm/enter.
(Note: Depends on the input DVD, this function may not be available for
operation)
Folder / Playlist Mode
During folder/playlist display at media playback mode, rotate to shift up or
down on playlist, press to confirm/enter.
(Note: Depends on the input media, these function may not be available for
operation)
TV Mode
Rotate to turn to the upward or downward channel for broadcasting.
Note
The above mentioned symbols / functions / operations & controls show the operations for various
version of the unit and may not be equipped or available for control in this unit. Printings and
symbols on the above may be varied from the exact main unit. Referred to the main unit for exact
functions and features that applied. User is highly recommended to use the touch screen control to
operate. Most of the operations of this unit cannot be controlled by the main unit.
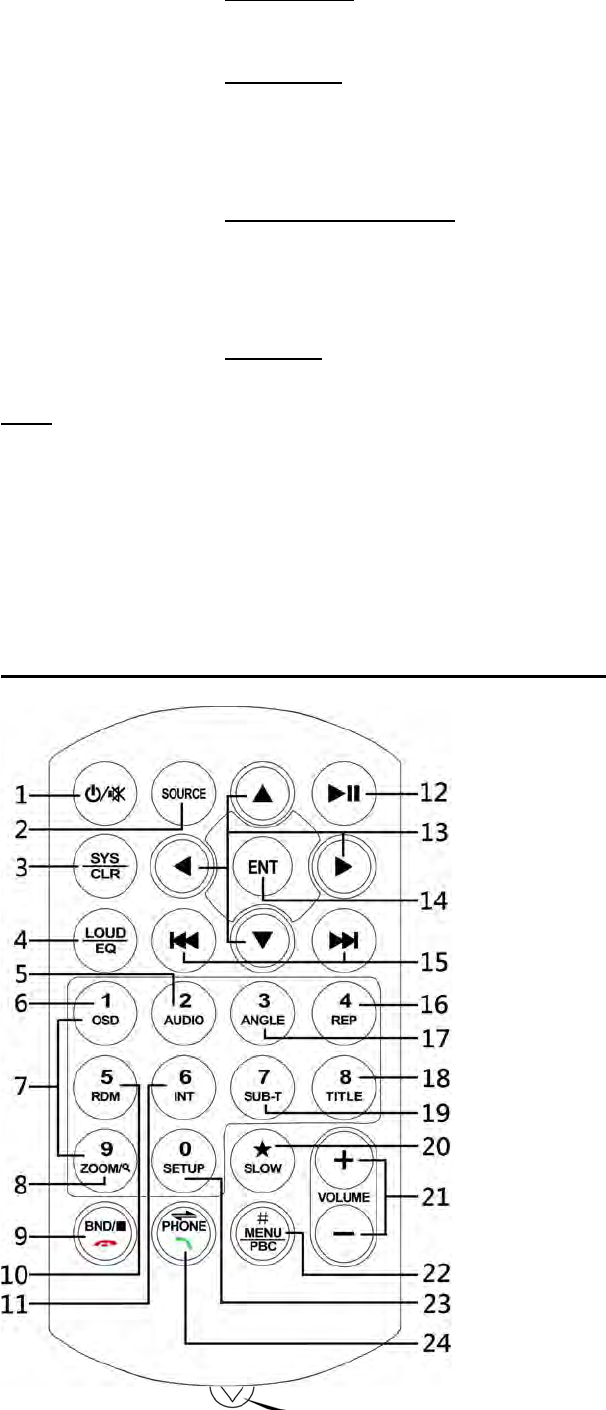
REMOTE HANDSET – GENERAL OPERATION
BATTERY REPLACEMENT
Refer to the back of remote handset for details on
how to replace the battery.
Remove this tab before using the remote handset
[ 4 ]
NO.
SYMBOL OPERATION & CONTROL MODES
1. When the unit is turn off, press to turn on the unit.
When the unit is turn on, press & hold shortly to turn off the unit.
During unit operation, press to turn on or off of sound mute control
2. SOURCE Press repeatedly to select the desired mode for operation
3. SYS / CLR At Bluetooth mode, press to erase the digit input by error.
4. EQ Press repeatedly to select the desired preset equalization mode.
LOUD Press & hold shortly to turn on or off of loudness control.
5. AUDIO At video and music playback mode, each time press & hold shortly to
select different audio output channels. (Note: Available on input device or
media files recorded with different output channels and this selection is not
available under Bluetooth mode)
6. OSD At media playback mode, press & hold shortly to display the contents of the
playback details on screen. (Note: Not available at music playback mode)
7. 1 – 6 Radio Mode
Press any one of the number key 1-6 to select a station that had been
stored in the preset memory number key 1-6 for broadcasting.
0 – 9 Disc / USB / SD / Input Mode
Press directly to input the number of track for playback.
Bluetooth Mode
Press directly to input the phone number for dial out.
TV Mode
Press directly to input the channel number for broadcasting
8. ZOOM Disc / USB / SD Input Mode
At video & photo playback, each time press & hold shortly to select various
zoom in and zoom out of screen for viewing.
Radio Mode
Press to start scanning all the preset stations on memory and stop for a
few seconds for broadcasting.
Press & hold shortly to start searching the frequency and storing the
strongest signal stations into the preset memory stations number 1-6. After
storing the stations, the unit starts scanning all the preset stations on
memory and stop for a few seconds for broadcasting.
9. BND Radio Mode
Press repeatedly to select the desired radio band for broadcasting.
Disc / USB / SD Input Mode
At playback mode, press to stop playback and shift to playlist for playback
selection (depended on the input device, playlist may not be available).
Note: Not available for control at music playback mode
Bluetooth Mode
Press to hang up or refuse an incoming call.
10. RDM At disc / USB / SD input playback mode, press & hold shortly to turn on or
off of random playback of the input device. (Note: Not available at photo
playback mode)
11. INT At music playback mode, press & hold shortly to turn on or off of intro
playback of the input device. (Note: Not available at Bluetooth mode)
12. ►▌▌ At disc / USB / SD / input & Bluetooth mode, press to pause, resume or
start playback.
13. ▲/▼/▶/◀ DVD Mode
At DVD menu/title display mode, press to select the desired setting/setup
and press ENT to confirm/enter.
[ 5 ]
Folder / Playlist Mode
During folder/playlist display at media playback mode, press repeatedly to
select track for playback. Once selected, press ENT to confirm.
Photo Playback Mode
Press to rotate photo position or show up-down, left-right mirror image.
14. ENT DVD Mode / Folder/Playlist Mode
At DVD menu/title display mode as well as folder/playlist display at media
playback mode, press ▲/▼/▶/◀ to select the desired setting/setup and
press ENT to confirm/enter.
15. / Radio Mode
Press repeatedly to fine tune radio frequency upward or downward.
Press & hold shortly to tune radio frequency upward or downward and stop
for broadcasting when a station received.
Disc / USB / SD Input Mode (Playback Mode)
Press repeatedly to shift track upward or downward for playback.
Each time press & hold shortly to activate various speed of fast forward or
fast rewind mode. (Note: Not available for operate at photo playback mode)
Bluetooth Mode
Press to shift track upward or downward for playback.
TV Mode
Press repeatedly to shift upward or downward channel for broadcasting.
Press & hold shortly to turn frequency upward or downward and stop for
broadcasting when a channel received.
16. REP At playback mode under disc / USB / SD input, each time press & hold
shortly to activate various repeat playback setting.
17. ANGLE At video playback mode, each time press & hold shortly to view angle
changes in sequential order (available on media files recorded with this
features).
18. TITLE DVD Mode
Press & hold shortly to display on screen the title of the disc for
setting/setup.
19. SUB-T Video Playback Mode
Each time press & hold shortly to select different sub-titles that recoded in
the input device or media files.
20. SLOW At DVD playback mode, press repeatedly to select different speeds on slow
motion playback.
21. VOL + / VOL - Press repeatedly or press & hold to adjust sound output level.
22. MENU / PBC DVD Mode
Press & hold shortly to display on screen the menu of the entire disc for
setting/setup.
VCD Mode
Press & hold shortly to turn on or off of PBC playback.
23. SETUP During unit operation, press & hold shortly to activate setup menu on
screen for various setup of the unit. Press & hold shortly again to return to
previous operation mode. (Note: Setup of unit cannot be operated by
remote handset. Setup of unit can only be operated by touch screen – refer
to ON SCREEN OPERATION for details)
24. Bluetooth Mode
Press to pick up an incoming call; dial out after input a phone number;
redial last dial out number.
[ 6 ]
24. / PHONE Bluetooth Conversation Mode
Press & hold shortly to shift conversation between main unit and mobile
phone.
Remarks: Depends on the input devices & playback media files, operation may be varied or not
available for operation.
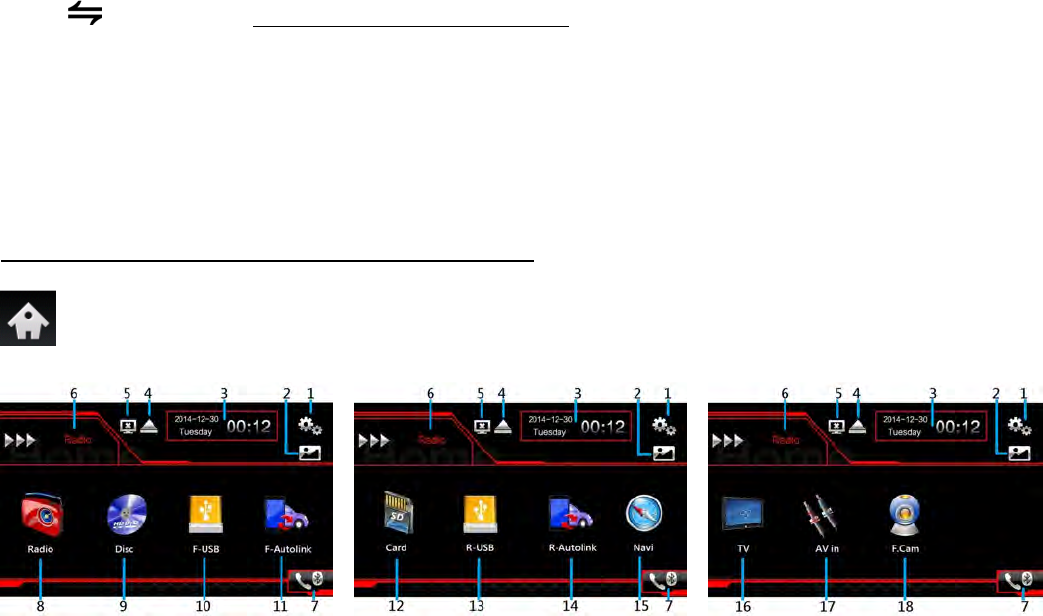
ON SCREEN – MAIN MENU OPERATION
During unit operation and when this icon appeared on screen, touch to shift screen to MAIN
MENU for various operation and setup.
MAIN MENU MAIN MENU MAIN MENU
At MAIN MENU, touch the icon of the desired mode on screen and the unit will then enter into the
mode that selected for operation. If no selection has been made for a white, the unit will shift back
to the previous operation mode.
At MAIN MENU, touch & hold on the center portion of screen and slide to left or right will shift
screen to another MAIN MENU for operation selection.
1.
Touch to activate SYSTEM SETUP MENU on screen to have various setup of the unit.
2.
Touch repeatedly to select the desired background (wallpaper) of the unit.
3.
This shows the calendar, date and time of the unit.
4.
Touch to eject the disc from the unit (when a disc has been inserted).
5.
Touch to turn off the screen. When the screen has been turned off, touch any portion of the
screen to turn it on again.
6.
This shows the current operation mode.
7.
Touch to start Bluetooth operation (when connected to a mobile phone).
Note: When a mobile phone has been connected, Bluetooth icon will be highlighted
8.
Touch to start radio operation (when the radio antenna connected).
9.
Touch to start disc input operation (when a disc inserted).
10.
Touch to start front USB input operation (when an USB device inserted to the front USB port).
11.
Touch to start mobile phone mirror linking operation (when the mobile phone connected to the
front USB port).
12.
Touch to start SD card input operation (when a micro SD card inserted).
13.
Touch to start rear USB input operation (when an USB device inserted to the rear USB port).
14.
Touch to start mobile phone mirror linking operation (when the mobile phone connected to the
rear USB port).
15.
Touch to start GPS navigation operation (when micro SD card with GPS software inserted).
16.
Touch to start TV operation (when the TV antenna connected).
17.
Touch to start auxiliary input operation (when an auxiliary device inserted).
18.
Touch to start viewing front camera (when connected to front camera and pink/black wire).
[ 7 ]
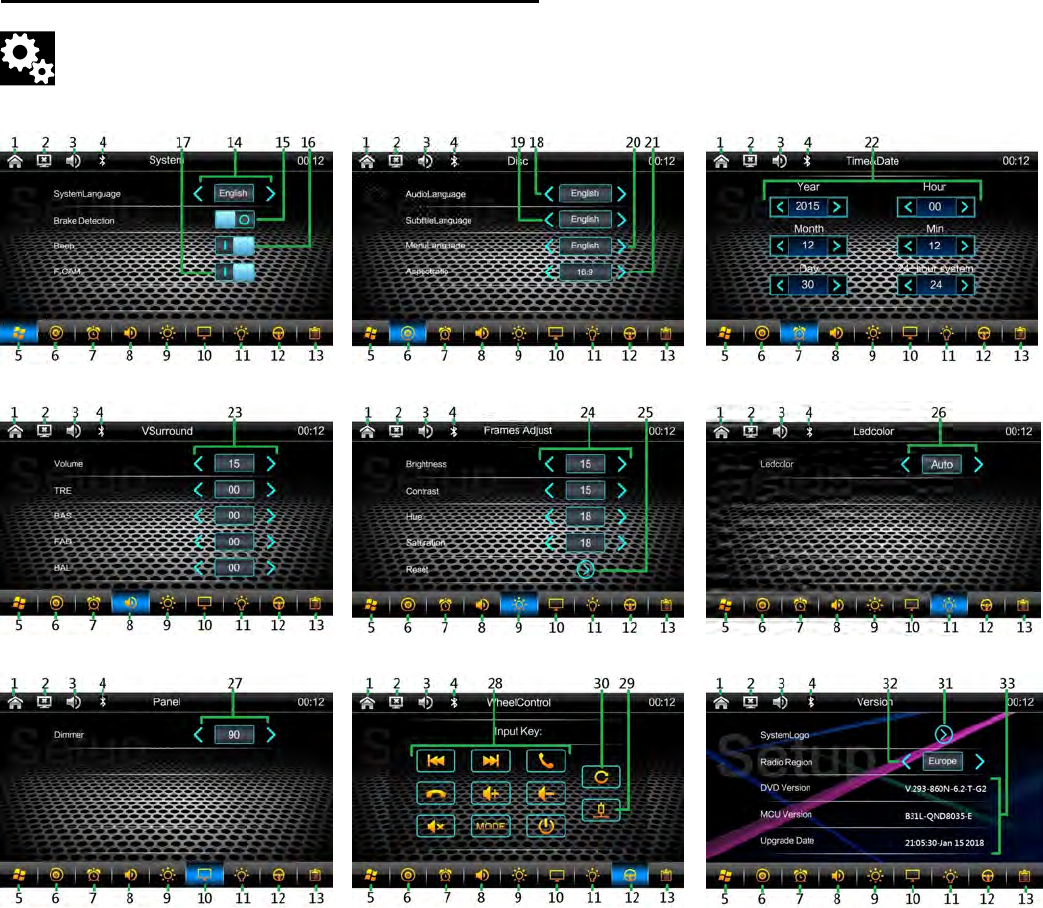
ON SCREEN – UNIT SETUP OPERATION
At MAIN MENU and RADIO MENU, touch to activate various setup of the unit.
SYSTEM SETUP MENU DISC INPUT SETUP MENU CALENDAR SETUP MENU
AUDIO SETUP MENU VISUAL SETUP MENU ILLUMINATION SETUP MENU
SCREEN SETUP MENU SW SETUP MENU VERSION MENU
1.
Touch to shift screen to MAIN MENU for various operation and setup.
2.
Touch to turn off the screen. When the screen turned off, touch any portion of the screen to
turn on the screen again.
3.
Touch to turn on or off of sound mute control.
4.
Touch to shift to Bluetooth operation.
Note: This icon will only be appeared when the unit has been linked up with a mobile phone.
5.
Touch to shift to SYSTEM SETUP MENU for various setting.
6.
Touch to shift to DISC INPUT SETUP MENU for various setting.
7.
Touch to shift to CALENDAR SETUP MENU for various setting.
8.
Touch to shift to AUDIO SETUP MENU for various setting.
9.
Touch to shift to VISUAL SETUP MENU for various setting.
10.
Touch to shift to SCREEN SETUP MENU for various setting.
11.
Touch to shift to ILLUMINATION SETUP MENU for various setting.
12.
Touch to shift to SW SETUP MENU for various setting.
13.
Touch to shift to VERSION MENU for various setting.
14.
Touch repeatedly to select the default on screen language.
[ 8 ]
15.
Touch to turn on or off of allowing watching video during driving (when the brake – brown wire
has not been connected).
16.
Touch to turn on or off of beep sound when touching on screen for control.
17.
Touch to turn on or off of front camera input (when front camera and the pink/black wire
connected):
~
~
when the front camera input is turn on and the car is shifted from backward mode to
forward mode, front camera input will be display for 10 seconds
the default setting after first installation is off and at this moment, no front camera input will
be display when the car is shifted from backward mode to forward mode
18.
Touch repeatedly to set for the desired audio language for DVD playback provided the DVD
recorded with relative language. (Note: During DVD playback mode, new setting cannot be
activated. It is recommended to set before inserting a DVD for playback)
19.
Touch repeatedly to set for the desired subtitle for DVD playback provided the DVD recorded
with relative subtitle. (Note: During DVD playback mode, new setting cannot be activated. It is
recommended to make relative setting before inserting a DVD for playback)
20.
Touch repeatedly to set for the desired menu language of the DVD provided the DVD
recorded with relative menu language. (Note: During DVD playback mode, new setting cannot
be activated. It is recommended to make relative setting before inserting a DVD for playback)
21.
Touch repeatedly to set for the aspect ratio of screen for viewing.
22.
Touch repeatedly to set for the year / month / day / hour / minute / 12/24 hour format.
23.
Touch repeatedly to set for the output level on volume / treble (TRE) / bass (BAS) / fader
(FAD) / balance (BAL).
24.
Touch repeatedly to set for the brightness / contrast / hue / saturation of screen.
25.
Touch to reset and brightness / contrast / hue / saturation will return to its default stage.
26.
Touch repeatedly to set for the desired illumination backlight colour.
At AUTO mode, colour of backlight will change automatically (cycle change).
27.
Touch repeatedly to set for the dimmer (brightness) of screen.
28.
Touch to select the function for learning and setting (when the steering wheel control wires –
grey & green as well as the ground wire connected).
29.
Touch to select for the high or low impedance value of the steering wheel control keys,
(Remarks: Impedance value of steering wheel control keys on some cars are relatively low
and functions cannot be learned & set. In this case, it is necessary to change the impedance
value)
30.
Touch to reset.
31.
Touch to activate the KEY PAD MENU on screen and input the password “1234” to shift to
LOGO MENU to select opening scene of unit.
32.
Touch repeatedly to select the radio frequency that suit the country/region located.
33.
These show the version of the unit and not available for setting.
[ 9 ]
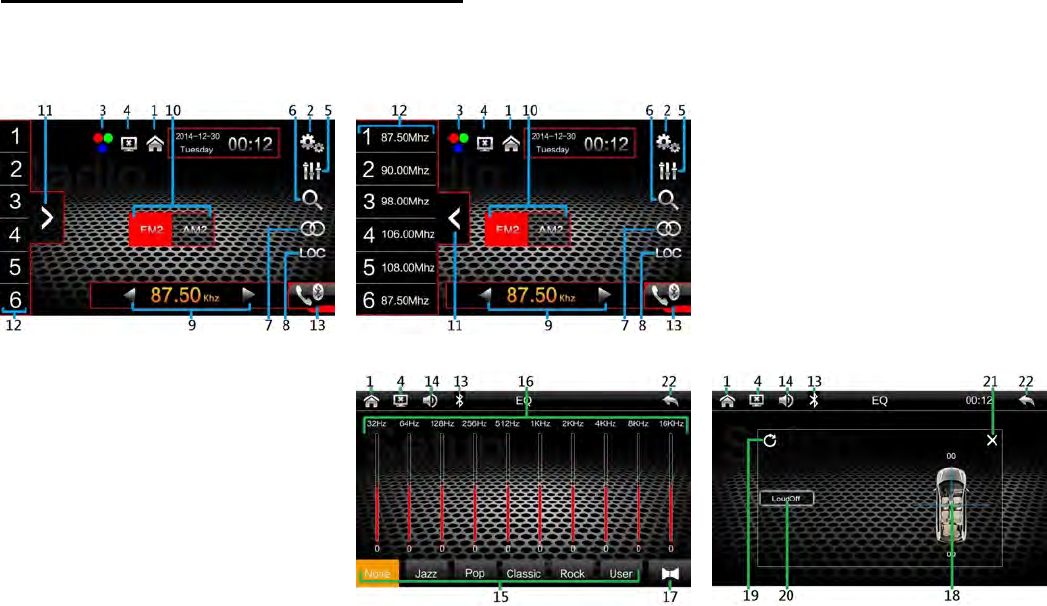
ON SCREEN – RADIO OPERATION
At MAIN MENU, touch「RADIO」icon to shift screen to RADIO MENU for radio operation.
RADIO MENU PRESET STATION MENU
EQ CONTROL MENU AUDIO CONTROL MENU
1.
Touch to shift to MAIN MENU for various operation and setup.
2.
Touch to shift to SYSTEM SETUP MENU for various setting.
3.
Touch repeatedly to select the desired background colour (red / blue / green).
4.
Touch to turn off the screen. When the screen turned off, touch any portion of the screen to
turn on the screen again.
5.
Touch to activate EQ CONTROL MENU for equalization setting and audio control.
6.
Touch to start intro broadcasting of the preset memory stations for a few seconds.
Touch & hold shortly to start searching the radio frequency & storing the strongest signal
stations into memory. After storing, the unit starts intro broadcasting of the preset memory
stations for a few seconds.
7.
Touch to select stereo (ST) or mono mode at FM radio band. When stereo signal received,
stereo indicator will be appeared on screen and this is no indicator for mono signal.
8.
Touch to select local (LOC) setting for reception of strong signal stations and a distant setting
for reception of weak stations. When local (LOC) setting is selected, LOC will appear on
screen and this is no indication for distant setting.
9.
Touch to turn frequency upward or downward and stop for broadcasting when a station
received.
Each time touch & hold shortly to fine tune radio frequency upward or downward.
10.
Touch repeatedly to select radio band for broadcasting.
11.
Turn to turn on or close the PRESET STATION MENU.
12.
Touch the desired preset station number (any of 1-6) to start broadcasting of the selected
station.
Touch & hold shortly the preset station number can store the current broadcasting station
(frequency) into that station number.
13.
Touch to shift to Bluetooth operation.
(Note: Bluetooth icon will be highlighted when the unit linked up with the mobile phone)
14.
Touch to turn on or off of sound mute control.
[ 10 ]
15.
Touch to select the desired preset equalization mode. At「User」mode, frequency response
can be set by user.
16.
At「User」mode, hold & slide up/down of the control bar to set for the desired frequency
response.
17.
Touch to activate AUDIO CONTROL MENU to set for the output level on front / rear / left /
right speaker as well as turn on or off of loudness control.
18.
Hold & slide to set for the output level on front / rear / left / right speakers.
19.
Touch to reset the output level on front / rear / left / right speakers and it will resume to the
default stage.
20.
Touch to turn on or off of loudness control.
21.
Touch to close AUDIO CONTROL MENU
22.
Touch to shift the current operation menu to the previous operation menu.
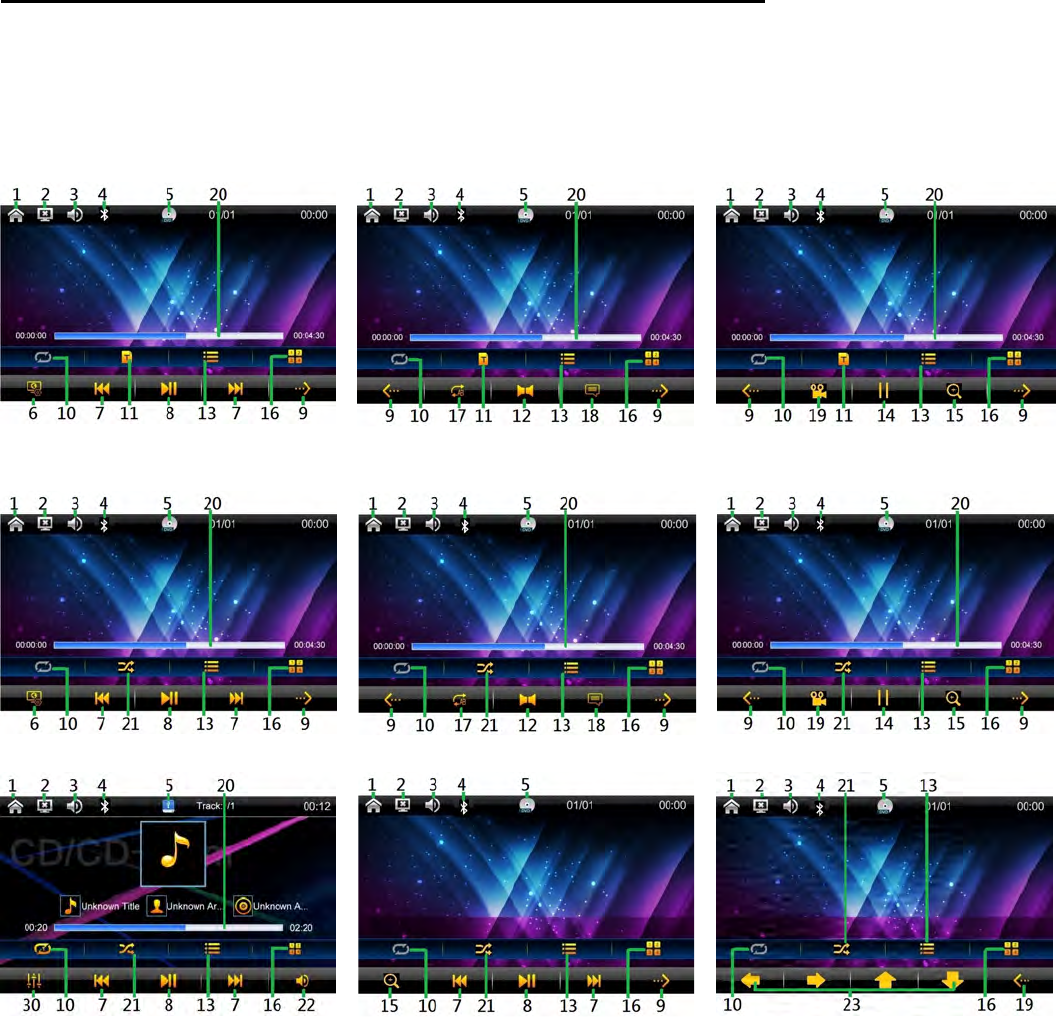
ON SCREEN – DISC / USB / SD CARD INPUT OPERATION
At MAIN MENU, touch「DISC」/「F-USB」/「R-USB」/「CARD」icon on screen to shift to multi-
media playback mode and playback will start automatically. Depends on the input device and
playback media, touch on screen to show various menus for operation.
DVD VIDEO
PLAYBACK MENU DVD VIDEO
PLAYBACK MENU DVD VIDEO
PLAYBACK MENU
VCD / VIDEO
PLAYBACK MENU VCD / VIDEO
PLAYBACK MENU VCD / VIDEO
PLAYBACK MENU
MUSIC PLAYBACK MENU PHOTO PLAYBACK MENU PHOTO PLAYBACK MENU
[ 11 ]
FOLDER/PLAYLIST MENU KEYBOARD MENU
EQ CONTROL MENU AUDIO CONTROL MENU VOLUME CONTROL MENU
1.
Touch to shift to MAIN MENU for various operation and setup.
2.
Touch to turn off the screen. When the screen has been turned off, touch any portion of the
screen to turn it on again.
3.
Turn to turn on or off of sound mute control.
4.
Touch to shift to Bluetooth operation.
Note: This icon will only be appeared when the unit has been linked up with a mobile phone.
5.
This shows the current input playback device.
6.
Touch to activate VOLUME CONTROL MENU for various audio setting.
7.
Touch to shift to next or previous track for playback.
Each time touch & hold shortly to activate various fast forward / fast rewind speeds for
playback.
8.
Touch to pause or resume playback.
9.
Touch to shift to next or previous menu.
10.
Touch repeatedly to select repeat playback mode.
11.
Touch to show title of DVD on screen. (Note: Depended on the input DVD, this function may
not be operated)
12.
Touch repeatedly to select the audio output channels that recorded in the playback device.
13.
At DVD mode, touch to show on screen the menu of the disc.
At VCD mode, touch to shift PBC on or off. At PBC on mode, touch to start the playback at
the beginning in sequence order.
At media playback mode, touch to activate FOLDER/PLAYLIST MENU (available for input
device recorded with folder) to select folder / track for playback.
14.
Touch repeatedly to select various slow motion playback.
15.
Touch repeatedly to zoom in and zoom out of screen for viewing.
16.
Touch to activate KEYBOARD MENU to direct input track number for playback.
17.
Touch repeatedly to select A/B repeat playback mode.
18.
Touch repeatedly to select different sub-titles that recorded in the playback device.
19.
Touch repeatedly to view the angle changes in sequential order.
20.
Hold & slide to select the desired position (time) for playback.
[ 12 ]
21.
Touch to turn on or off of random playback.
22.
Touch to activate VOLUME CONTROL MENU for various audio setting.
23.
Touch to rotate photo position or show up-down, left-right mirror image for viewing.
24.
Touch to shift page up and down.
25.
Touch to shift to MUSIC FOLDER/PLAYLIST MENU to select music folder/track for playback.
26.
Touch to shift to VIDEO FOLDER/PLAYLIST MENU to select video folder/track for playback.
27.
Touch to shift to PHOTO FOLDER/PLAYLIST MENU to select photo folder/track for playback.
28.
Touch to show folders on FOLDER/PLAYLIST MENU.
29.
At sub-folder playback, touch to shift to show folders on FOLDER/PLAYLIST MENU.
30.
Touch to activate EQ CONTROL MENU for various audio setting.
31.
Touch to select the desired preset equalization mode. At「User」mode, frequency response
can be set by user.
32.
At「User」mode, hold & slide up/down of the control bar to set for the desired frequency
response.
33.
Touch to activate AUDIO CONTROL MENU for various audio setting.
34.
Hold & slide to set for the output level on front / rear / left / right speakers.
35.
Touch to reset the output level on front / rear / left / right speakers and it will resume to the
default stage.
36.
Touch to turn on or off of loudness control.
37.
Touch to close AUDIO CONTROL MENU.
38.
Touch to shift the current operation menu to the previous operation menu.
39.
Touch repeatedly to select volume / treble (TRE) / bass (BAS) / Fader (FAD) / balance (BAL)
for output level setting.
40.
Hold & slide to adjust output level.
41.
Touch repeatedly or touch & hold to adjust output level.
42.
Touch directly to input track number for playback.
43.
Touch to confirm after inputting track number for playback.
44.
Touch to erase the input track number.
Note: Depends on the input device and playback media, not all the mentioned operations are
available for control.
[ 13 ]
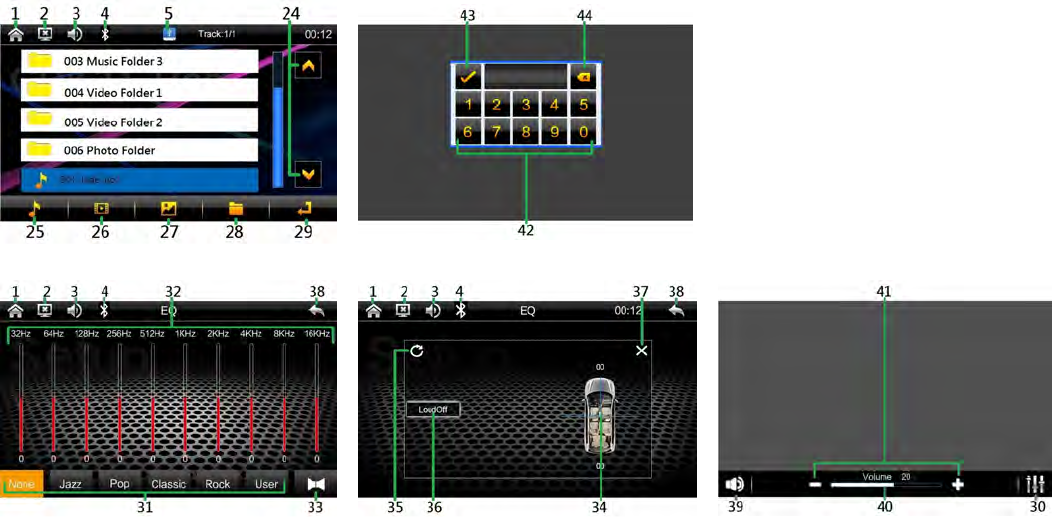
ON SCREEN – TV OPERATION
At MAIN MENU, touch「TV」icon to shift to TV operation. At TV mode, touch on screen to activate
TV OPERATION MENU for TV operation.
TV OPERATION MENU KEYBOARD MENU
EQ CONTROL MENU AUDIO CONTROL MENU VOLUME CONTROL MENU
1.
Touch to shift to MAIN MENU for various operation and setup.
2.
Touch to turn off the screen. When the screen has been turned off, touch any portion of the
screen to turn it on again.
3.
Turn to turn on or off of sound mute control.
4.
Touch to shift to Bluetooth operation.
Note: This icon will only be appeared when the unit has been linked up with a mobile phone.
5.
Touch to activate VOLUME CONTROL MENU for various audio setting.
6.
Touch to start searching the frequency and storing the channels received into the preset
memory channels.
7.
Touch repeatedly to select TV system (PAL / SECAM / NTSC) that suit your country / area.
8.
Touch repeatedly to shift the preset channel upward or downward for broadcasting.
Touch & hold shortly to start searching the frequency upward or downward and stop for
broadcasting when a channel received.
9.
Touch repeatedly to fine tune the frequency upward or downward for broadcasting.
10.
Touch to activate KEYBOARD MENU to direct input channel number for broadcasting.
11.
Touch directly to input channel number for broadcasting.
12.
Touch to confirm after inputting channel number for broadcasting.
13.
Touch to erase the input channel number.
14.
Touch to select the desired preset equalization mode. At「User」mode, frequency response
can be set by user.
15.
At「User」mode, hold & slide up/down of the control bar to set for the desired frequency
response.
16.
Touch to activate AUDIO CONTROL MENU for various audio setting.
17.
Hold & slide to set for the output level on front / rear / left / right speakers.
[ 14 ]
18.
Touch to reset the output level on front / rear / left / right speakers and it will resume to the
default stage.
19.
Touch to turn on or off of loudness control.
20.
Touch to close AUDIO CONTROL MENU.
21.
Touch to activate EQ CONTROL MENU for various audio setting.
22.
Touch repeatedly to select volume / treble (TRE) / bass (BAS) / Fader (FAD) / balance (BAL)
for output level setting.
23.
Hold & slide to adjust output level.
24.
Touch repeatedly or touch & hold to adjust output level.
25.
Touch to shift the current operation menu to the previous operation menu.
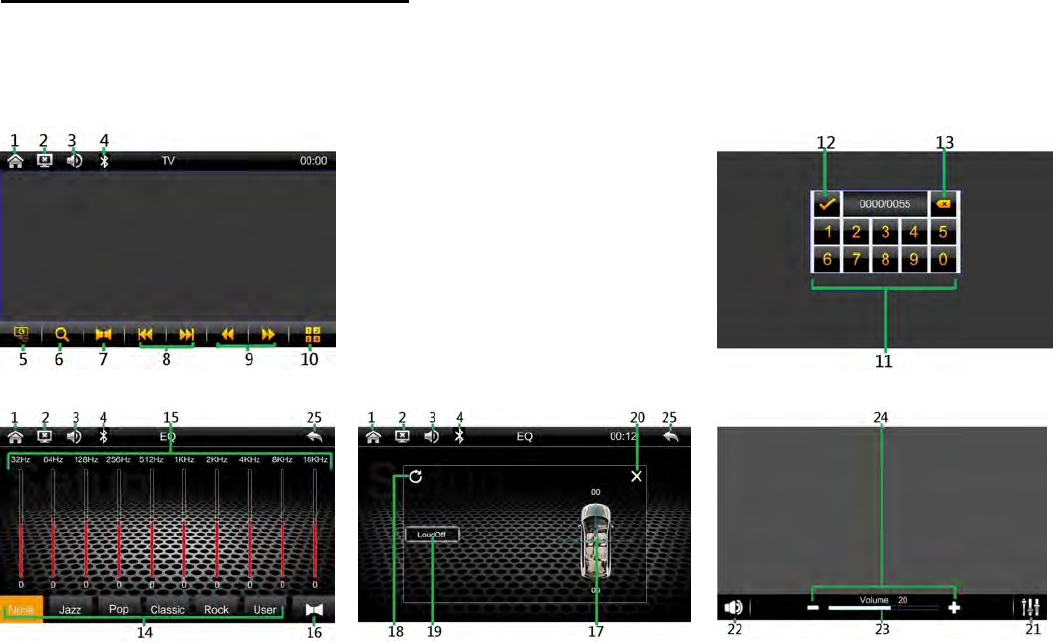
ON SCREEN – BLUETOOTH OPERATION
During unit operation, touch「Bluetooth」icon on screen to shift to Bluetooth operation.
LINK UP WITH MOBILE PHONE
To linkup Bluetooth connection with the mobile phone, take your phone and follow the steps:
- set the mobile phone to Bluetooth state
- start to search new device
- after searched, new device (CAR KIT / CAR BT or similar) searched out, confirm the search
- in case of need, input default code “0000” or “8888” in the mobile phone
- once connected, BT icon appeared on screen & “Connected” appeared on BT PHONE MENU.
- connection succeeded and you can start using Bluetooth function
BT
DIAL MENU BT
PHONEBOOK MENU BT PHONEBOOK
SEARCH MENU
BT PHONE MENU BT MUSIC MENU BT SETUP MENU
1.
Touch to shift to MAIN MENU for various operation and setup.
2.
Touch to turn off the screen. When the screen has been turned off, touch any portion of the
screen to turn it on again.
3.
Turn to turn on or off of sound mute control.
4.
Touch to shift to BT DIAL MENU for dial out of phone.
[ 15 ]
5.
Touch to shift to BT PHONE MENU to show record on dial out / incoming call / missing call.
6.
Touch to shift to BT PHONEBOOK MENU to show phonebook.
7.
Touch to shift to BT MUSIC MENU for transmission of music playback from the connected
mobile phone.
8.
Touch to shift to BT SETUP MENU to show the device name & pin code for pairing.
(Note: This menu is not available for setting)
9.
Touch to dial out after input the phone number or redial when no phone number input.
10.
Touch to hang up or refuse an incoming call.
11.
Touch directly to input the phone number.
12.
Touch to erase the digit input by error.
13.
Touch to shift conversation between mobile phone & Bluetooth of the unit.
14.
Touch to shift page up or down.
15.
Touch to start downloading the outgoing call from the linked mobile phone.
Touch anyone of the contact for dial out.
16.
Touch to start downloading the incoming call from the linked mobile phone.
Touch anyone of the contact for dial out.
17.
Touch to start downloading the missing call from the linked mobile phone.
Touch anyone of the contact for dial out.
18.
Touch to start / pause / resume music playback transmitted from the mobile phone.
19.
Touch repeatedly to select upward or downward track for playback.
20.
Touch to activate BT PHONEBOOK SEARCH MENU for searching contact details on
phonebook.
21.
Touch to shift letter keypad to digit keypad for searching contact details on phonebook
22.
Touch to input for searching.
23.
Touch to erase the input letter/digit.
24.
Touch to shift contact list up/down.
25.
Touch to exist BT PHONEBOOK SEARCH MENU.
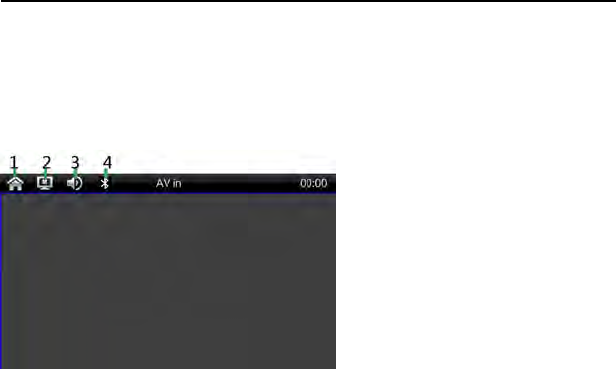
ON SCREEN – AUXILIARY INPUT OPERATION
At MAIN MENU, touch “AV IN” icon on screen to shift to auxiliary input operation (provided an
auxiliary device had been connected). At auxiliary input operation, touch any portion of screen to
activate AUX INPUT MENU for operation.
AUX INPUT MENU
1.
Touch to shift to MAIN MENU for various operation and
setup.
2.
Touch to turn off the screen. When the screen has been
turned off, touch any portion of the screen to turn it on again.
3.
Turn to turn on or off of sound mute control.
4.
Touch to shift to Bluetooth operation.
Note: This icon will only be appeared when the unit has
been linked up with a mobile phone.
[ 16 ]
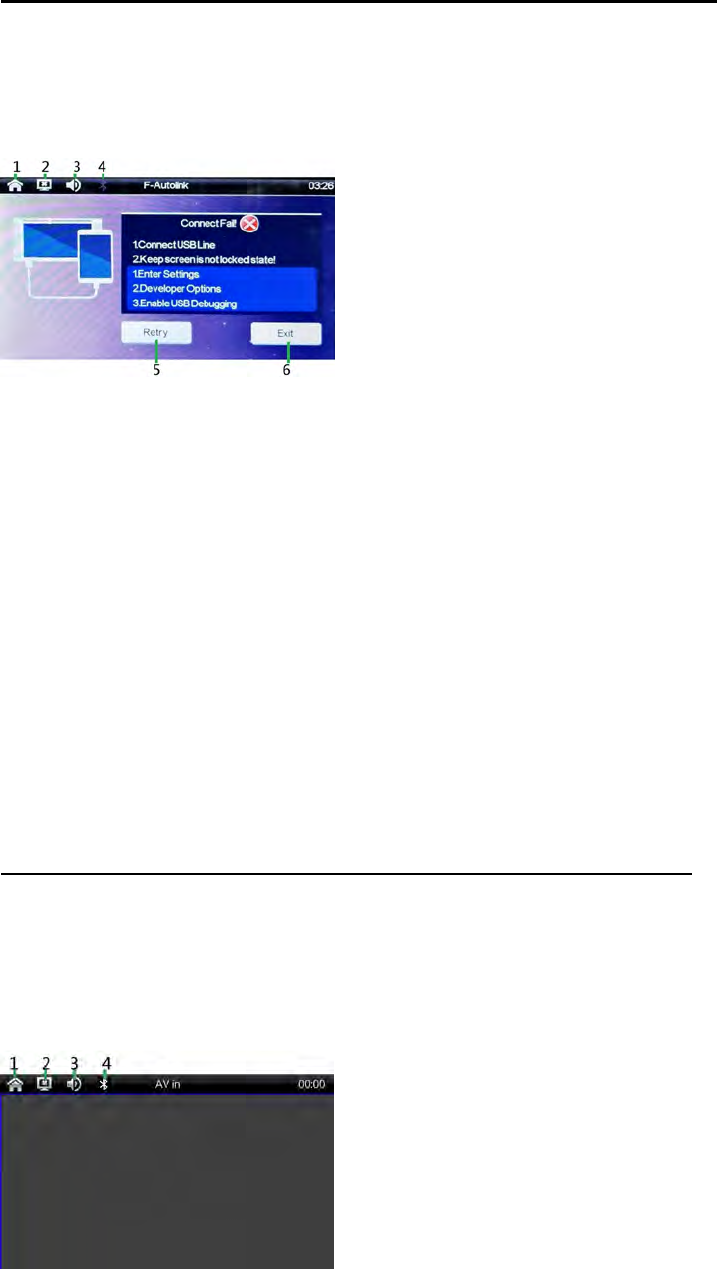
ON SCREEN – PHONE MIRROR LINKING OPERATION
At MAIN MENU and when mobile phone has been connected to front or back USB port, touch「F-
AUTOLINK」/「R-AUTOLINK」to shift PHONE LINKING MENU for phone mirror linking operation.
Linking with start automatically if setting had been made.
PHONE LINKING MENU
1.
Touch to shift to MAIN MENU for various operation and
setup.
2.
Touch to turn off the screen. When the screen has been
turned off, touch any portion of the screen to turn it on again.
3.
Turn to turn on or off of sound mute control.
4.
Touch to shift to Bluetooth operation.
Note: This icon will only be appeared when the unit has
been linked up with a mobile phone.
5.
Touch to retry mirror linking when linking failed.
6.
Touch to exist phone mirror linking and it will then shift to previous operation mode.
Important Notice on Phone Mirror Linking Operation:
1. Follow the step as shown on PHONE LINKING MENU for connection.
2. USB cable should be used to connect the mobile phone to the front or rear USB port of the
head unit.
3. In case connecting failed, USB debug of mobile phone is necessary. USB debug will be varied
from different phones. Refer to the operation method of the phone for detail (usually at setting
mode developer options USB debugging)
4. To disconnect the mirror linking, unplug the USB cable or use the remote handset to shift to
other operation mode
ON SCREEN – FRONT CAMERA INPUT OPERATION
At MAIN MENU, touch “F.CAM” icon on screen to shift to front camera viewing. At front camera
viewing mode, touch any portion of screen to activate FRONT CAMERA INPUT MENU for
operation.
FRONT CAMERA
INPUT MENU
1.
Touch to shift to MAIN MENU for various operation and
setup.
2.
Touch to turn off the screen. When the screen has been
turned off, touch any portion of the screen to turn it on again.
3.
Turn to turn on or off of sound mute control.
4.
Touch to shift to Bluetooth operation.
Note: This icon will only be appeared when the unit has
been linked up with a mobile phone.
[ 17 ]
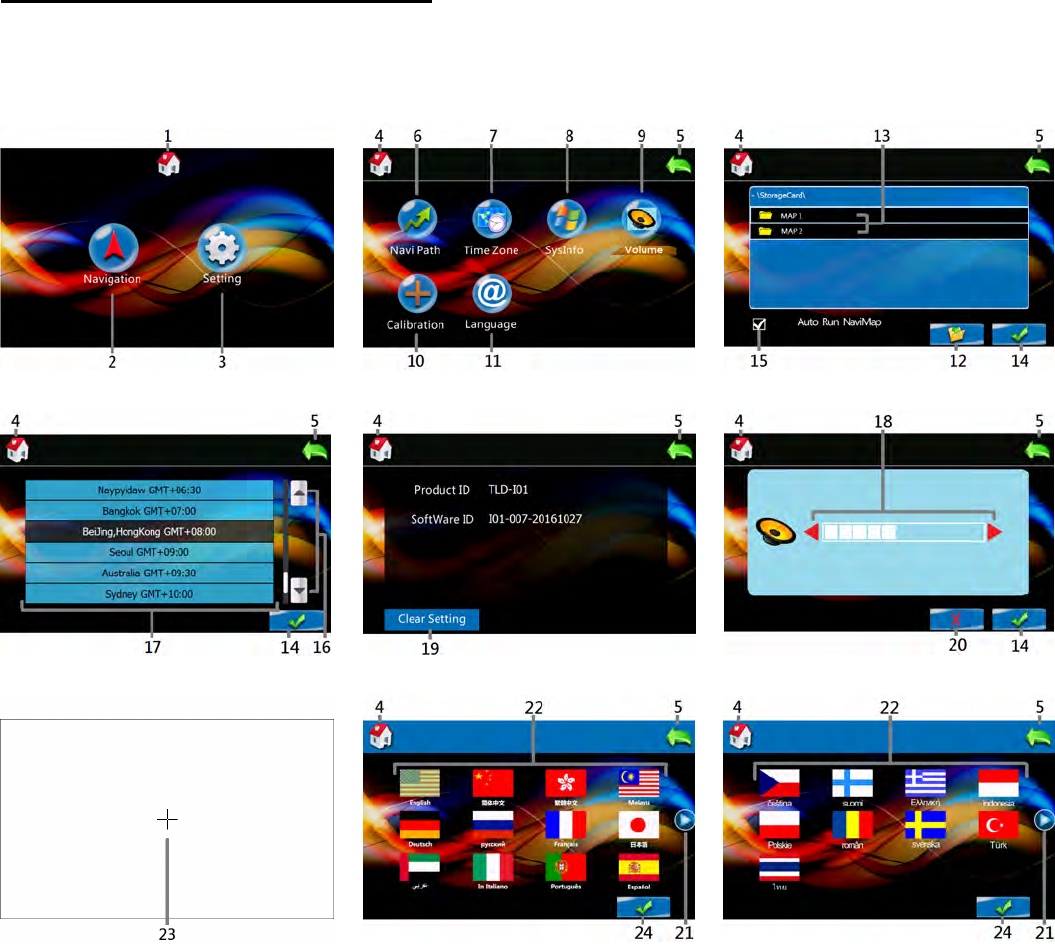
ON SCREEN – GPS OPERATION
At MAIN MENU, touch “NAVI” icon on screen to shift to GPS operation. At GPS navigation mode,
the previous mode may still be playing and vice versa, you may need to stop playback first.
GPS MAIN MENU GPS SETTING MENU SOFTWARE PATH MENU
TIME ZONE MENU SYSTEM INFO MENU VOLUME MENU
CALIBRATION MENU LANGUAGE MENU LANGUAGE MENU
1.
Touch to shift to current previous operation mode.
2.
Touch to start navigation (when navigation software path has been set) or to shift to
SOFTWARE PATH MENU to select navigation software path.
3.
Touch to shift to GPS SETTING MENU for various setup at GPS mode.
4.
Touch to shift to GPS MAIN MENU.
5.
Touch to shift to GPS SETTING MENU or GPS MAIN MENU (at GPS SETTING MENU).
6.
Touch to shift to SOFTWARE PATH MENU to select navigation software path.
7.
Touch to shift to TIME ZONE MENU to select time zone that located.
8.
Touch to shift to SYSTEM INFO MENU to show the software information and/or reset the
GPS setting.
9.
Touch to shift to VOLUME MENU to set for the sound output level during navigation mode.
10.
Touch to shift to CALIBRATION MENU for touch screen calibration.
11.
Touch to shift to LANGUAGE MENU for selection of language display at GPS mode.
12.
Touch or touch repeatedly to show folder list on screen for navigation path selection.
13.
Touch to select.
14.
Touch to confirm after selection / setting.
[ 18 ]

15.
Touch to turn on or off of auto run the selected GPS software path when GPS startup.
16.
Touch to shift page up or down.
17.
Touch to select the time zone that located.
18.
Touch repeatedly to set for the desired volume output at GPS mode.
19.
Touch to clear all the setting under GPS mode.
20.
Touch to erase the current setting.
21.
Touch to shift to next or previous LANGUAGE MENU.
22.
Touch to select the desired language at GPS mode.
23.
Touch and follow「+」mark on screen for calibration. When finish, touch OK to complete.
24.
Touch to confirm after setting and it will then return to GPS MAIN MENU.
Note: For GPS navigation, maximum 4 GB micro SD card installed with navigation software (map)
must be inserted into the micro SD card port for GPS. GPS software path cannot be stored in sub-
folder as sub-folder is not supported.
IMPORTATION NOTICE FOR ON SCREEN OPERATION
Interfaces, photos, images, icons & location as shown in this part of operation manual may be
varied from the exact unit. However, all of them come with similar outlook of the same type and
with the same operation method.
[ 19 ]

SPECIFICATION
GENERAL
Power Requirement: DC 12 Volts, negative ground
Load Impedance: 4 Ohms
Maximum Power Output: 40 watts x 4 (RMS)
Tone Control – Bass (at 100 Hz) +/- 8 dB
Treble (at 10 KHz) +/- 8 dB
AM RADIO SECTION
Frequency Range 522 – 1620 KHz (European)
530 – 1710 KHz (American)
Usable Sensitivity (-20 dB) 25 dB
FM RADIO SECTION
Frequency Range 87.5 – 108 MHz (European)
87.5 – 107.9 MHz (American)
Usable Sensitivity (-20 dB) 15 dB
Signal to Noise Ratio 60 dB
Stereo Separation (at 1 KHz) 30 dB
Frequency Response 30 Hz – 15 KHz
DISC SECTION
Disc Play: DVD / VCD / MP3/ CD
Mounting Angle: +/- 30 degree
VIDEO & TV SECTION
Video System: NTSC / SECAM / PAL
Video Output Level: 1.0Vp-p 75 Ohms
Horizontal Resolution: 500
BLUETOOTH SECTION
Communication type: V2.1
Maximum Distance: 5 meters
AUDIO SECTION
Maximum Output Level: 2 Vrms (+/-3 dB)
Frequency Response: 20 Hz to 20 KHz
Signal to Noise Ratio: 85 dB
Channel Separation: 80 dB
Note: Specification and design; functions and features; unit illumination; colour and display
segment are subject to change without prior notice. Photos and drawings on gift box or operation
manual might be varied from the exact unit. Depends on the input devices, operation might be
varied from the operation manual described.
[ IB – A7: X1.13.U1N2 ]
FCC Warning:
FCC ID: 2ABQZ-HW
Changes or modifications not expressly approved by the party responsible for compliance could void the user’s authority to operate
the equipment.
This device complies with Part 15 of the FCC Rules. Operation is subject to the following two conditions: (1) this device may not
cause harmful interference, and (2) this device must accept any interference received, including interference that may cause
undesired operation.
This equipment has been tested and found to comply with the limits for a Class B digital device, pursuant to Part 15 of the FCC
Rules. These limits are designed to provide reasonable protection against harmful interference in a residential installation. This
equipment generates, uses and can radiate radio frequency energy and, if not installed and used in accordance with the instructions,
may cause harmful interference to radio communications. However, there is no guarantee that interference will not occur in a
particular installation.
If this equipment does cause harmful interference to radio or television reception, which can be determined by turning the equipment
off and on, the user is encouraged to try to correct the interference by one or more of the following measures:
-- Reorient or relocate the receiving antenna.
-- Increase the separation between the equipment and receiver.
-- Connect the equipment into an outlet on a circuit different from that to which the receiver is connected.
-- Consult the dealer or an experienced radio/TV technician for help.
This device complies with FCC RF radiation exposure limits set forth for an uncontrolled environment. This transmitter must not be
co-located or operating in conjunction with any other antenna or transmitter