Horizon E500 User Manual ELLIPTICAL Manuals And Guides L0712072
HORIZON Elliptical Manual L0712072 HORIZON Elliptical Owner's Manual, HORIZON Elliptical installation guides
User Manual: Horizon E500 E500 HORIZON ELLIPTICAL - Manuals and Guides View the owners manual for your HORIZON ELLIPTICAL #E500. Home:Fitness Equipment Parts:Horizon Parts:Horizon ELLIPTICAL Manual
Open the PDF directly: View PDF ![]() .
.
Page Count: 43
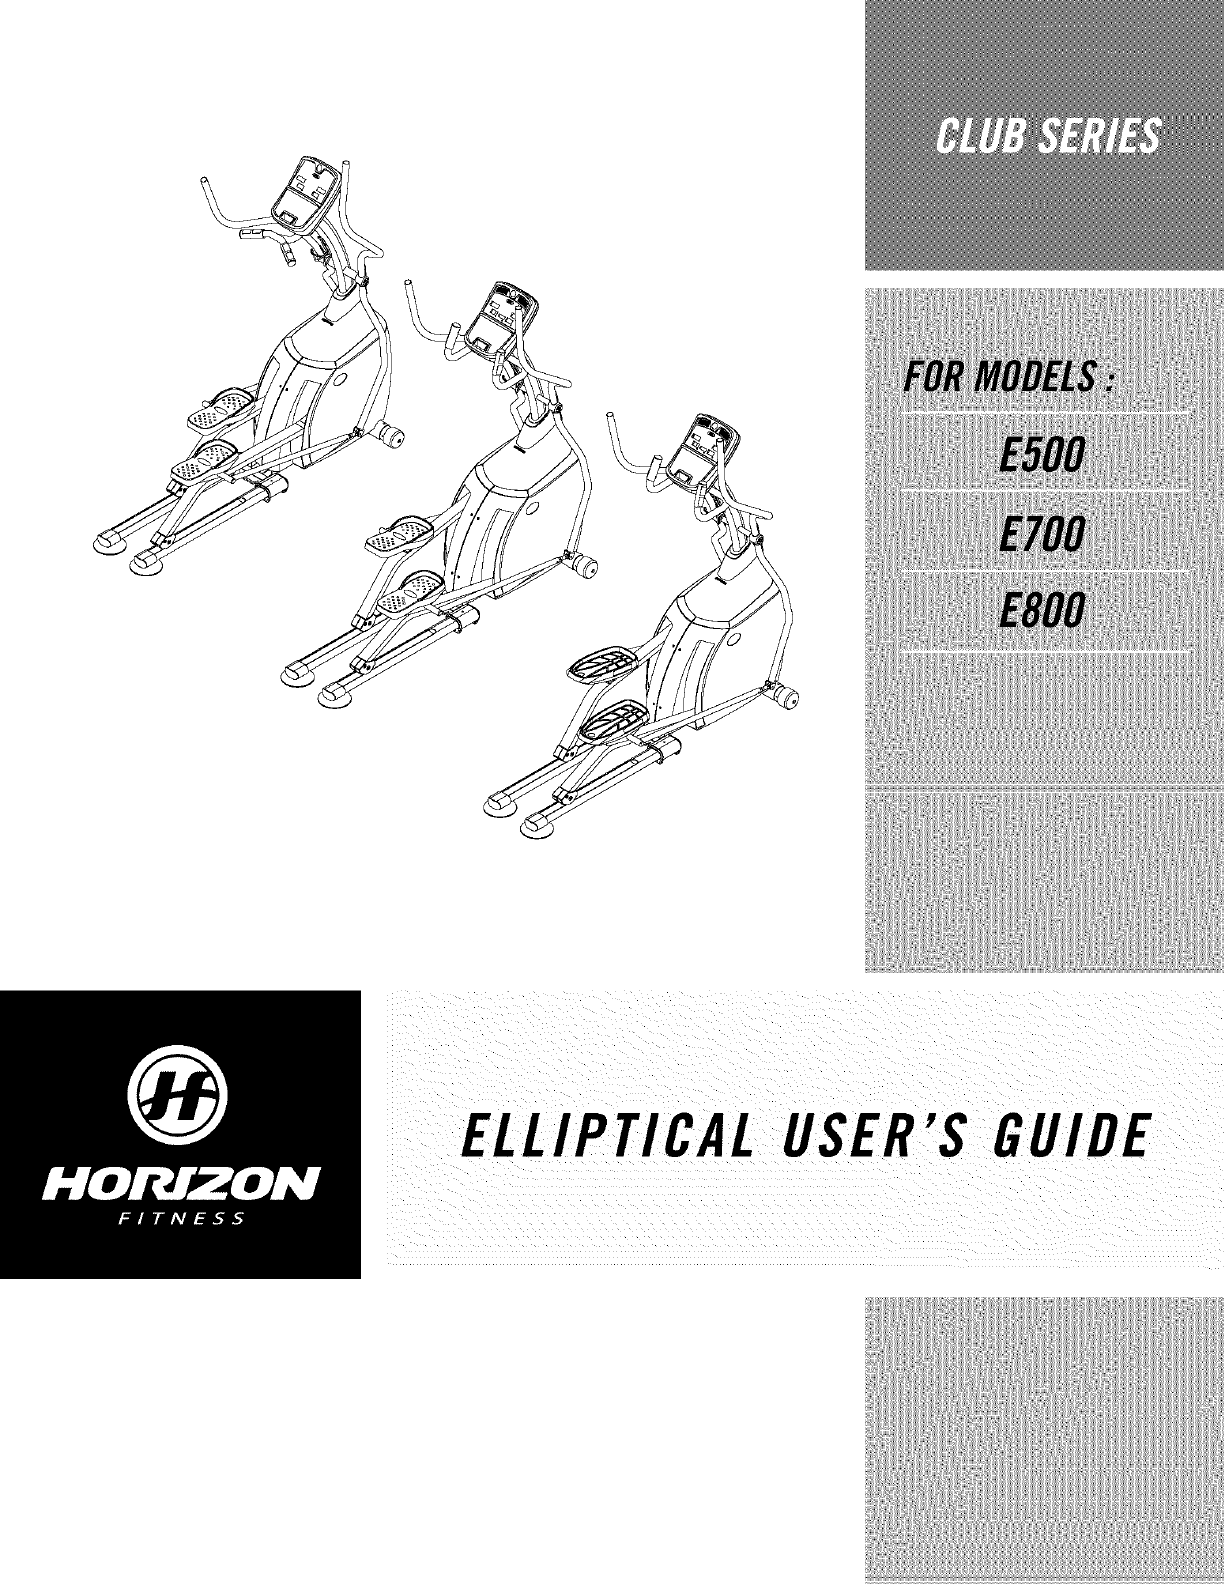
ELLIPTICAL USER'S GUIDE
CONGRATULATIONSand THANKYOUforyourpurchaseof this HorizonClubelliptical!
Whetheryour goal is to win races or simply enjoy a fuller, healthier lifestyle, a Horizon Club elliptical can
help you attain it -adding club-quafity performance to your at-home workouts, with the ergonomics
and innovative features you need to get stronger and healthier, faster. Because we're committed to
designing fitness equipment from the inside out, we use only the highest quality components. It's a
commitment we back with one of the strongest frame-to-brake warranty packages in the industry.
Youwant exerciseequipment that offers the most comfort, the best reliability and the highest quality
in its class.
TheHorizonC/ubElliptica/s de/iver.
Important Precautions
Assembly 5
Before YouBegin 17
Elliptical Operation 18
Conditioning Guidelines 35
Troubleshooting &Maintenance 39
Limited Warranty 43
CONTACTINFORMATION Back Panel
SAVETHESEINSTRUCTIONS
Read all instructions before using this elliptical. When using an electrical product, basic precautions
should always be followed, including the following: Read aft instructions before using this elliptical It is the
responsibility of the owner to ensure that aft users of this efliptical are adequately informed of aft warnings
and precautions. If you have any questions after reading this manual, contact Customer Tech Support at
the number listed on the back panel of this manual
•If you experience any kind of pain, including, but not limited to chest pains, nausea, dizziness, or
shortness of breath, stop exercising immediately and consult your physician before continuing.
• Maintain a comfortable pace. Do not sprint above 80 rpms on this machine.
• Tomaintain balance, it is recommended to keep a grip on the handlebars while exercising, mounting or
dismounting the machine.
•Do not wear clothes that might catch on any part of the elliptical.
• Do not turn pedal arms by hand.
• Make sure handlebars are secure before each use.
•Do not insert or drop any object into any opening.
• Unplug elliptical before moving or cleaning it. Toclean, wipe surfaces down with soap and slightly damp
cloth only,: never use solvents. (SeeMAINTENANCEpage 38)
• This elliptical should not be used by persons weighing more than 275 pounds on the ESO0and 300
pounds on the ETO0and ESO0.Failure to comply will void the warranty.
• This efliptical is intended for in-home use only. Do not use this elliptical in any commercial, rental, school
or institutional setting. Failure to comply wifl void the warranty.
•Do not use efliptical in any location that is not temperature controlled, such as but not limited to garages,
porches, pool rooms, bathrooms, car ports or outdoors. Failure to comply may void the warranty.
• Use the elliptical only as described in this manual
• tfeep the topside of the foot support clean and dry
• Care should be taken when mounting or dismounting the equipment. First bring the efliptical to a furl
stop. Second, carefully rotate one footpad to its lowest position. Third, mount or dismount from this side
of the elliptical.
• Disconnect aft power before servicing the equipment.
:_
......................
itt is essential that your elliptica! is used only indoors, in a climate controlled room: lf your ellipficai has been
iexposed to Co/derie mperaiure shigh moisture climates, is Strongly recommended thatthe e!lipticaiis
iwarmed up to room temperature before first time uselFailure to do so may cause premature electronic failure.
IMPORTANT..READTHESESAFETYINSTRUCTIONSBEFOREUSE!
Thereare several areas during the assembly process of a elliotical that special attention must be paid. It is
very important to follow the assembly instructions correctly and to make sure aft parts are firmly tightened.
If the assembly instructions are not followed correctly, the elliptical could have frame parts that are not
tightened and will seem loose and may cause irritating noises. Toprevent damage to the elliptical the
assembly instructions must be reviewed and corrective actions should be taken.
UNPACKING
Unpack the product where you will be using it. Place the product on a level flat surface. It is recommended
that you place a protective covering on your floor. During each assembly step, ensure that ALL nuts and
bolts are in place and partially threaded in before completely tightening any ONEbolt.
NOTE:A light application of greasemay aid in the installation of hardware.Anygrease, such as lithium
bike greaseis recommended.
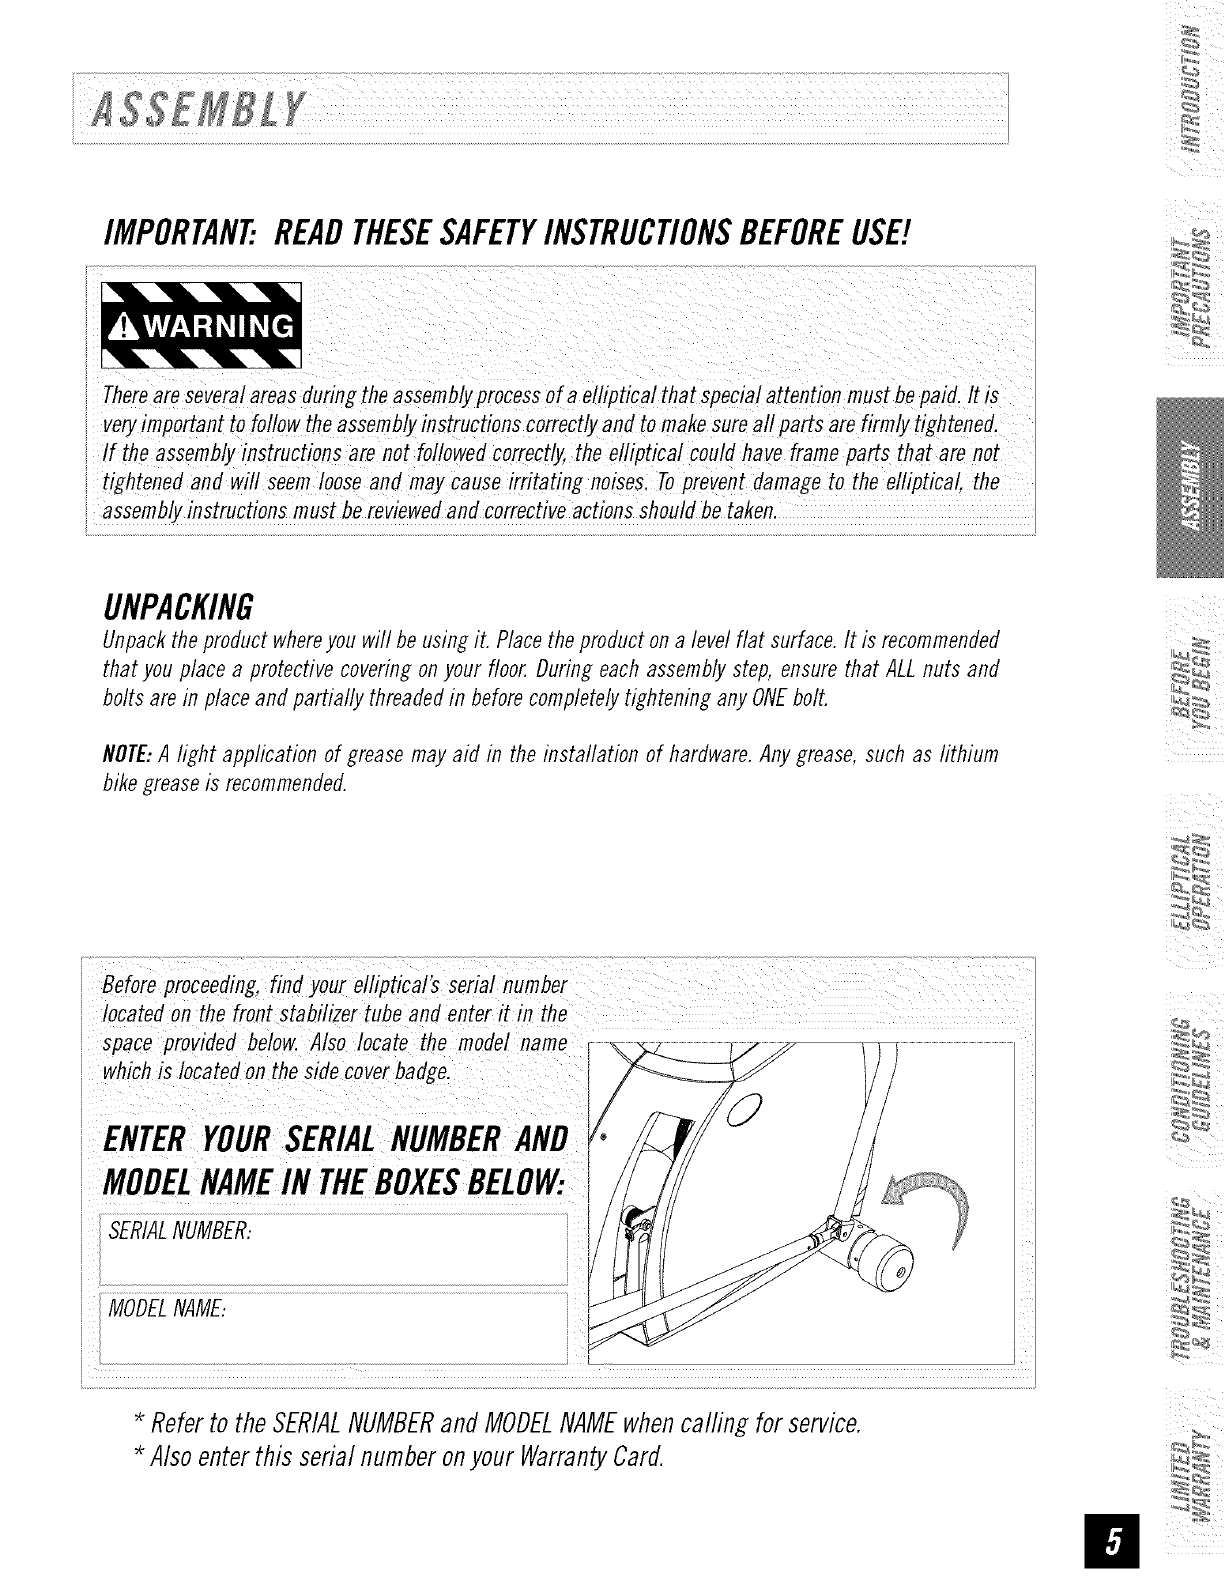
Before proceeding, find you_ eilipticai's seriai number
iiocated on the front stabilizer tube and enter it in the
ispace provided below. Also locate the modelname
iwhich is Iocated on the side cover badge,
ENTERYOURSERIALNUMBER
,MODELNAMEINTHEBOXESBELOW:
MODELNAME:
Referto the SERIALNUMBERand MODELNAMEwhencalfing for service.
Alsoenterthis serial numberonyour WarrantyCard.
ii
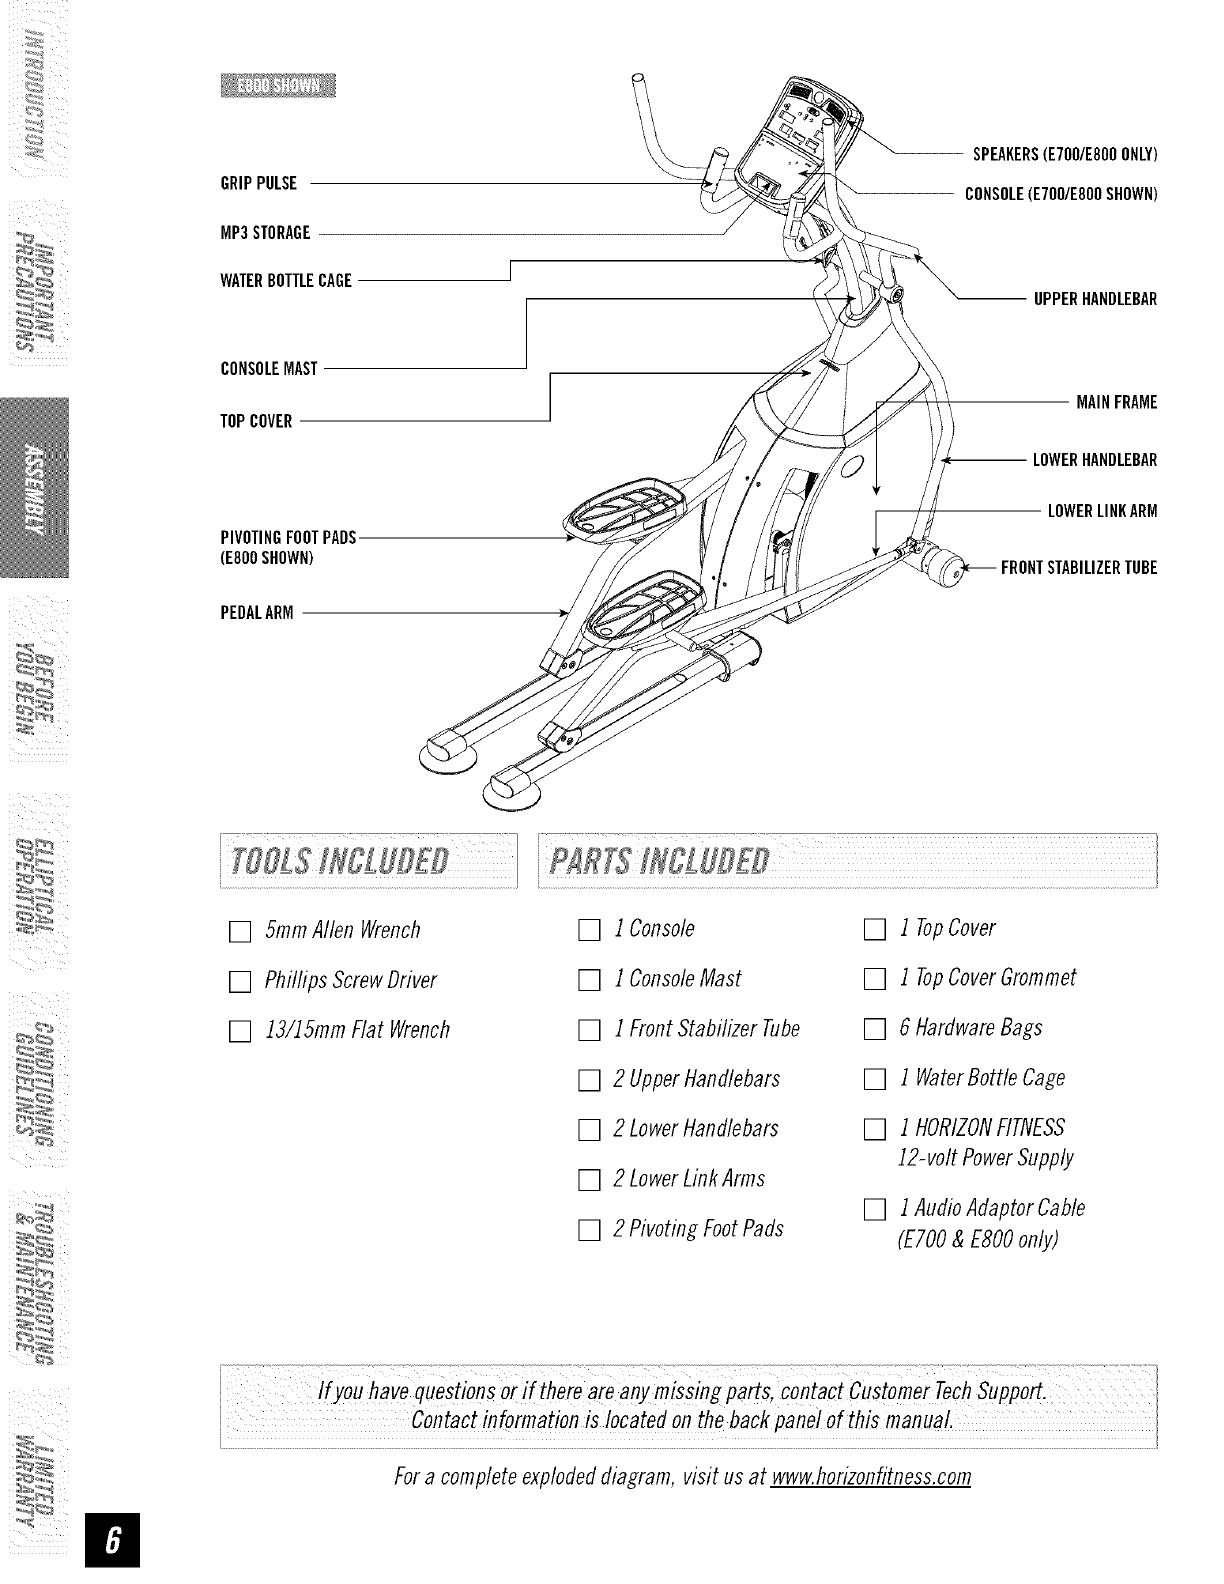
GRIPPULSE
MP3STORAGE
WATERBOTTLECAGE
SPEAKERS(E7OO/E800ONLY)
CONSOLE(E7OO/E800SHOWN)
UPPERHANDLEBAR
CONSOLEMAST
TOPCOVER MAINFRAME
LOWERHANDLEBAR
PIVOTINGFOOTPADS.
(E800SHOWN)
PEDALARM
LOWERLINKARM
FRONTSTABILIZERTUBE
[] 5ramAllen Wrench
[] Phillips ScrewDriver
[] 13/15mmFlat Wrench
[] 1Console
[] 1ConsoleMast
[] 1FrontStabilizer Tube
[] 2 UpperHandlebars
[] 2 LowerHandlebars
[] 2 LowerLinkArms
[] 2 PivotingFootPads
[] 1 TopCover
[] 1 TopCoverGrommet
[] 6 HardwareBags
[] 1 WaterBottleCage
[] 1 HORIZONFITNESS
12-volt PowerSupply
[] 1AudioAdaptorCable
(ETO0&ESO0only)
i i I
:_
Ifyou have questions or i( there are any misSing parts, Contact cUstomer Tech suPp_.
Fora completeexplodeddiagram, visit us at www.horizonfitness.com
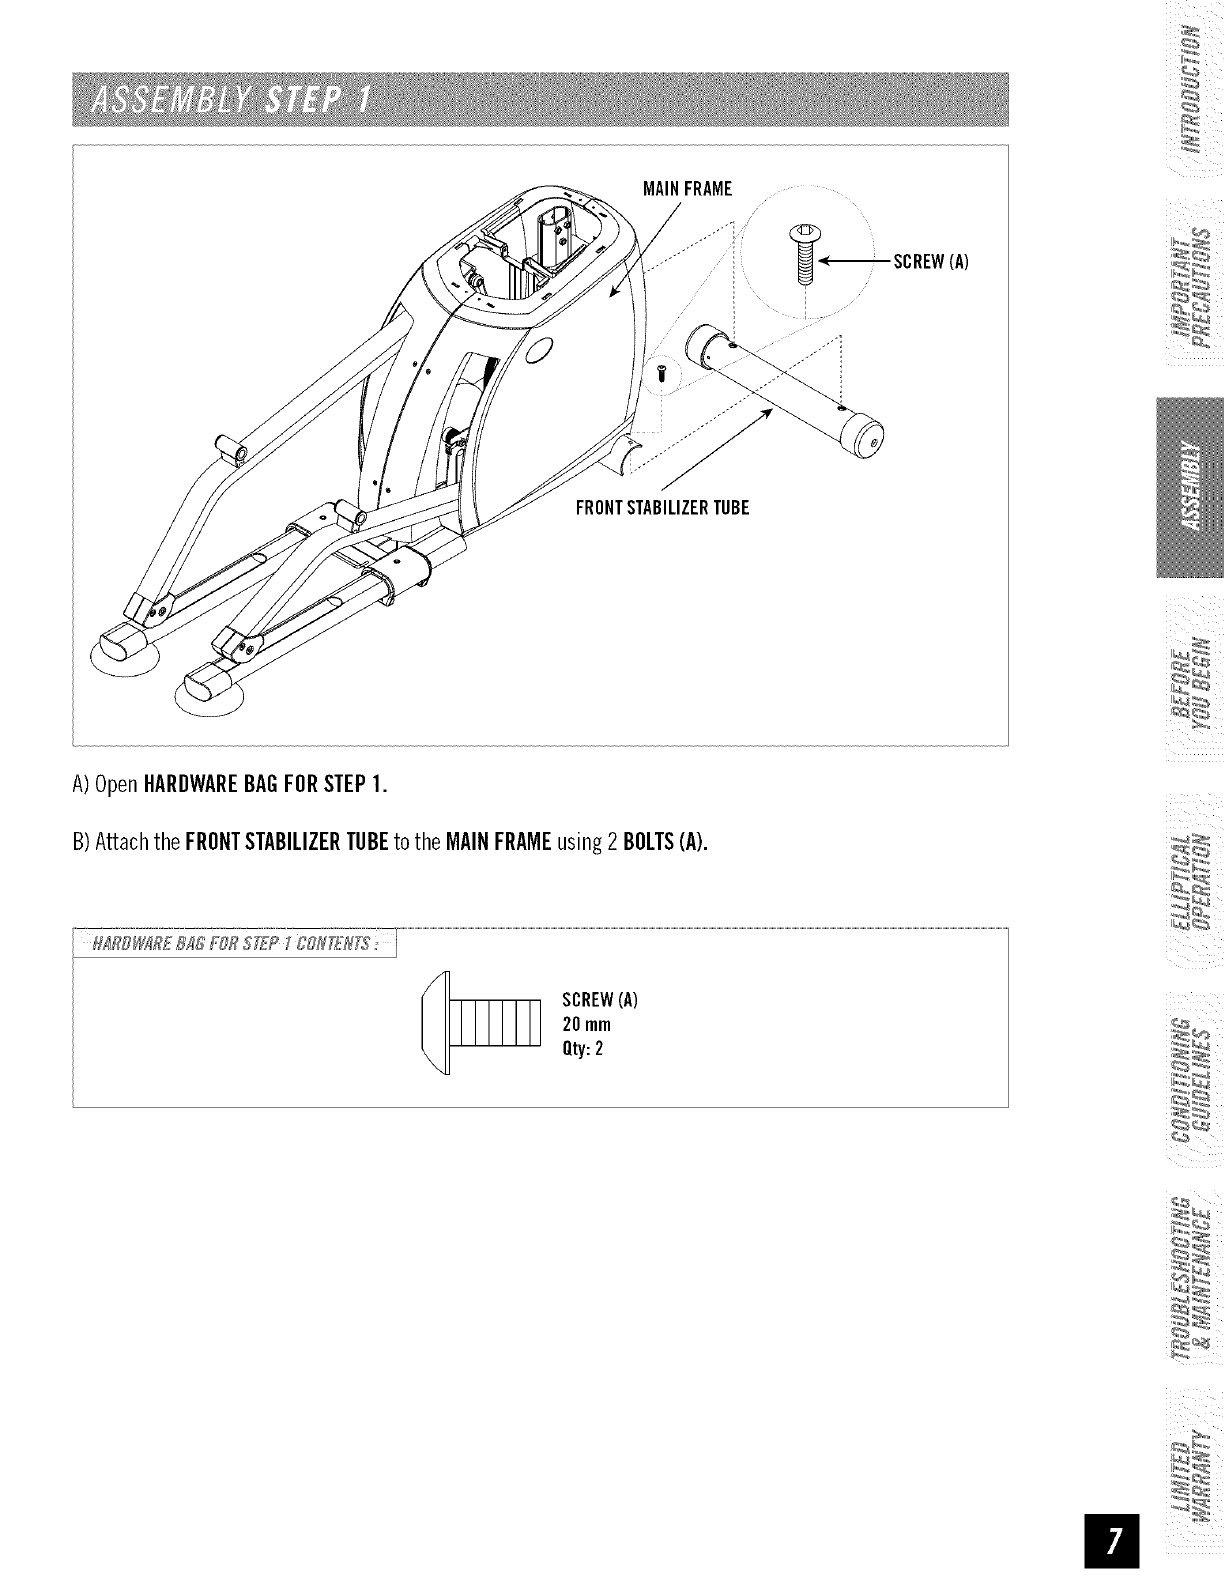
MAINFRAME
.............. : SCREW(A)
;I
I
FRONTSTABILIZERTUBE
A)OpenHARDWAREBAGFORSTEP1.
B)Attachthe FRONTSTABILIZERTUBEto the MAINFRAMEusing2 BOLTS(A).
SCREW(A)
20mm
Qty:2
ii
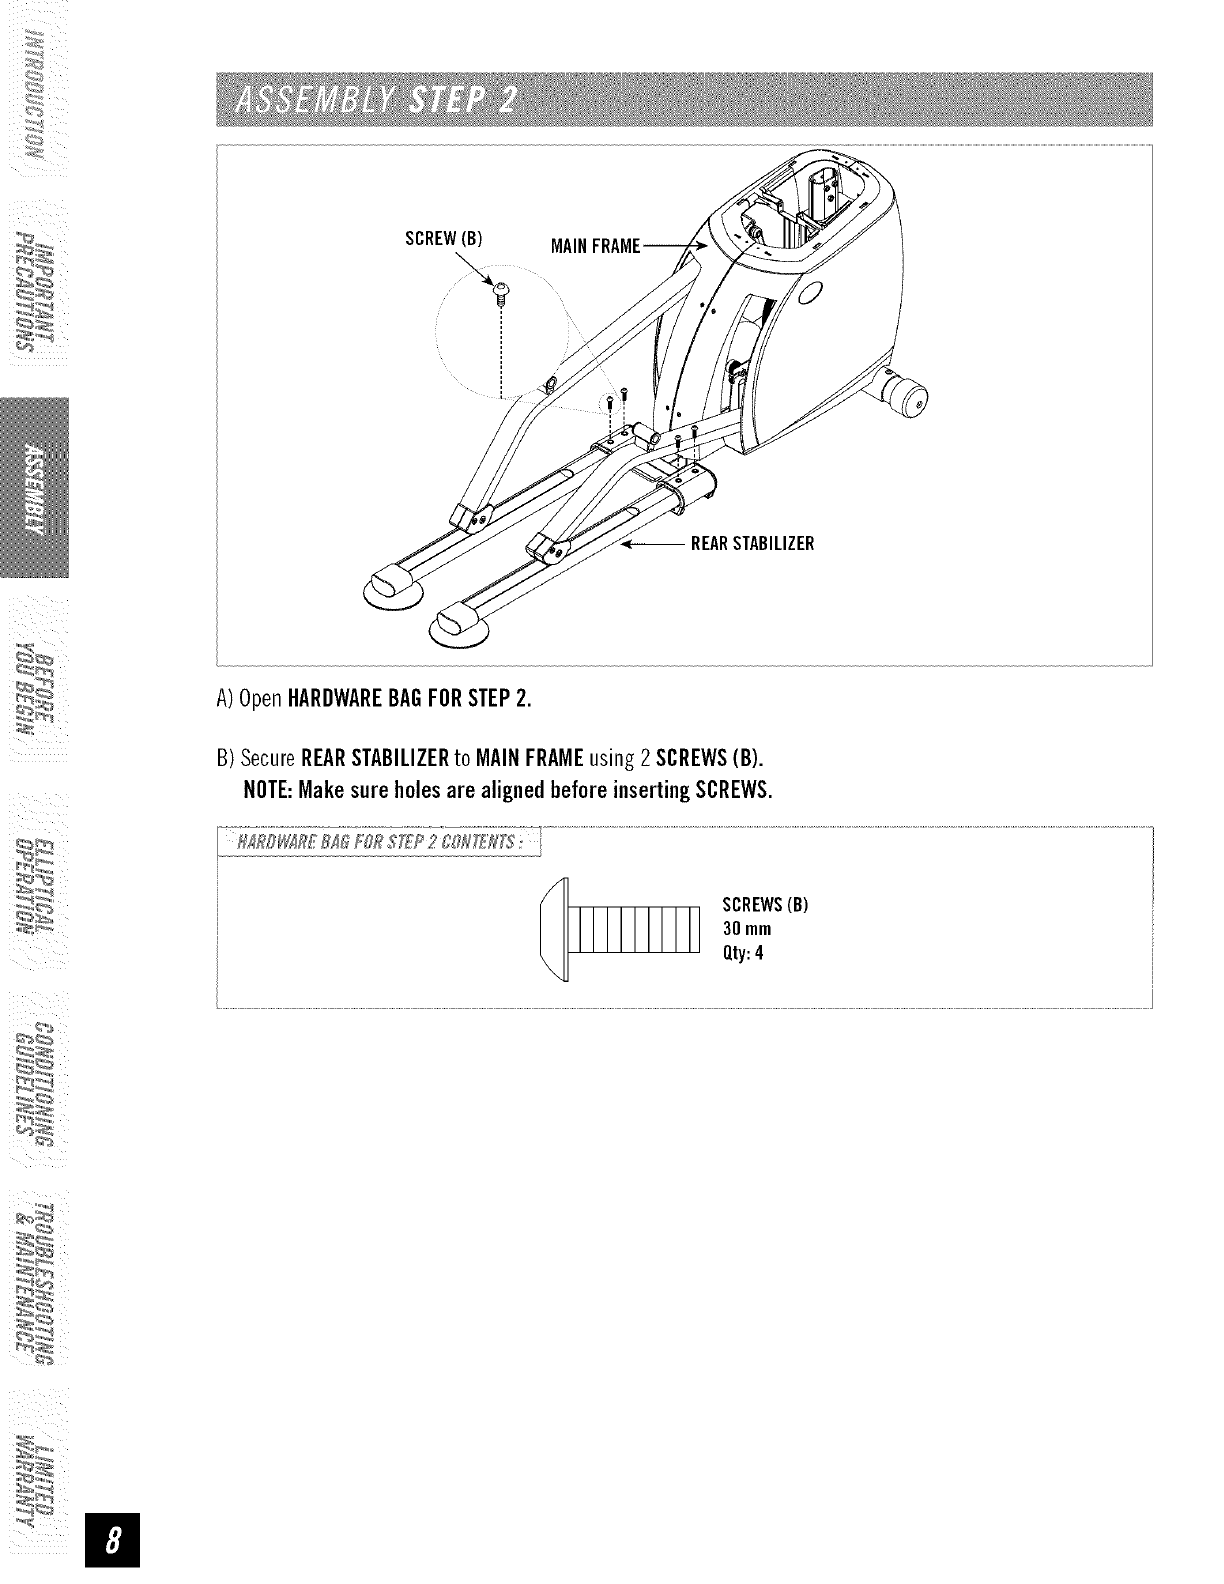
SCREW(B) MAIN
-- REARSTABILIZER
A)OpenHARDWAREBAGFORSTEP2.
B) SecureREARSTABILIZERto MAINFRAMEusing 2 SCREWS(B).
NOTE:Makesureholesare alignedbeforeinsertingSCREWS.
SCREWS(B)
30mm
Qty:4
:_
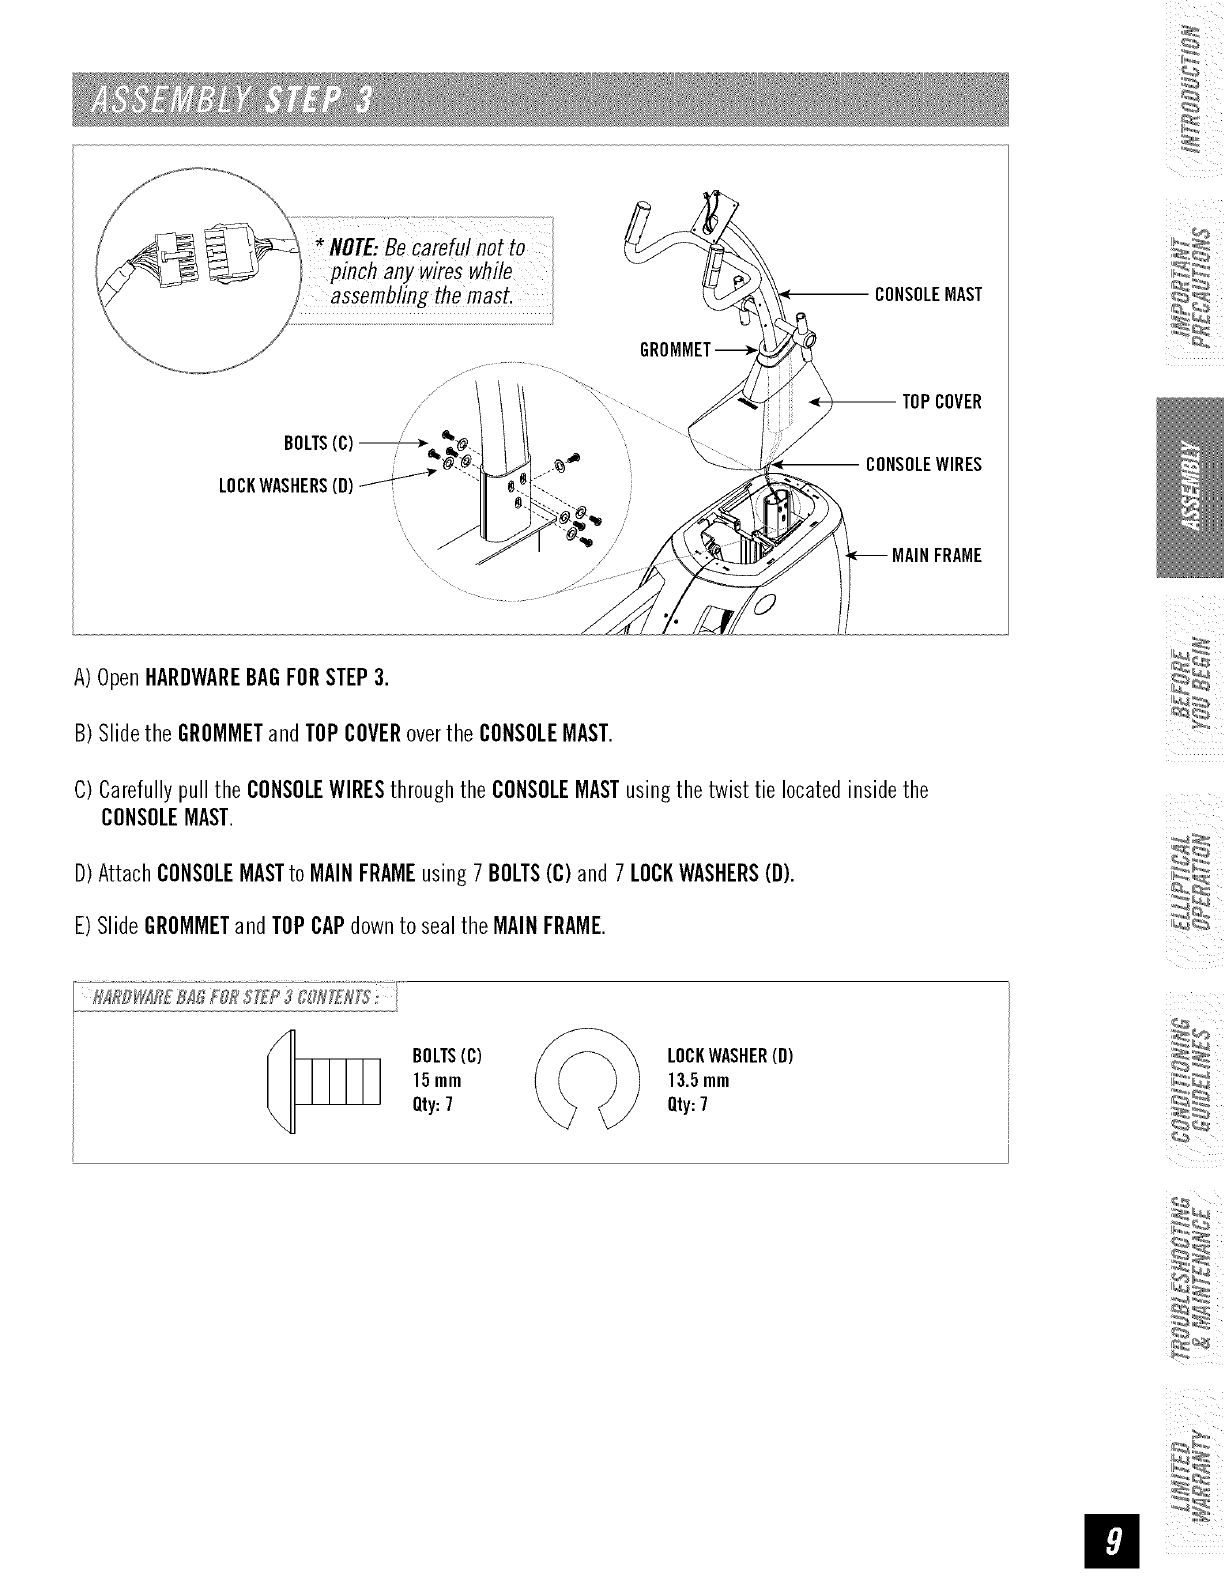
NOTE:Becareful not to
pinch any wires while
assembling the mast.
A)OpenHARDWAREBAGFORSTEP3.
B) Slidethe GROMMETandTOPCOVERoverthe CONSOLEMAST.
CONSOLEMAST
--TOP COVER
CONSOLEWIRES
MAINFRAME
C)Carefullypull the CONSOLEWIRESthroughthe CONSOLEMASTusingthe twist tie locatedinsidethe
CONSOLEMAST.
D)AttachCONSOLEMASTto MAINFRAMEusing7 BOLTS(C)and 7 LOCKWASHERS(D).
E)Slide GROMMETandTOPCAPdownto seal the MAINFRAME.
BOLTS(C)
15mm
Qty:7
LOCKWASHER(D)
13.5mm
Qty:7

ii
NOTCH
TAB
< HANDLEBARJOINT
LOWER
NOTE:Thereis NOhardwarebag for thisstep.
A)Slide LOWERHANDLEBARonto CONSOLEMASTandalign NOTCHwithTABmaking sure bars arejoined
togethercompletely.SecureLOWERHANDLEBARto CONSOLEMASTusing
PRE-ATTACHEDSETSCREWS.
B) Slide UPPERHANDLEBARonto CONSOLEMASTandalign NOTCHwithTABmaking sure bars arejoined
togethercompletely.SecureUPPERHANDLEBARto CONSOLEMASTusing PRE-ATTACHEDSETSCREWS.
C)Repeaton otherside.
_/: : : :: :ii_¸ i il : i_!!:::_i:!:!J? / /
After handlebarsare assembledtheywill rotate freely Cbe cautious: until the
machineis fully assembled,do notgrab thehandlebarsfor SUPport.
\
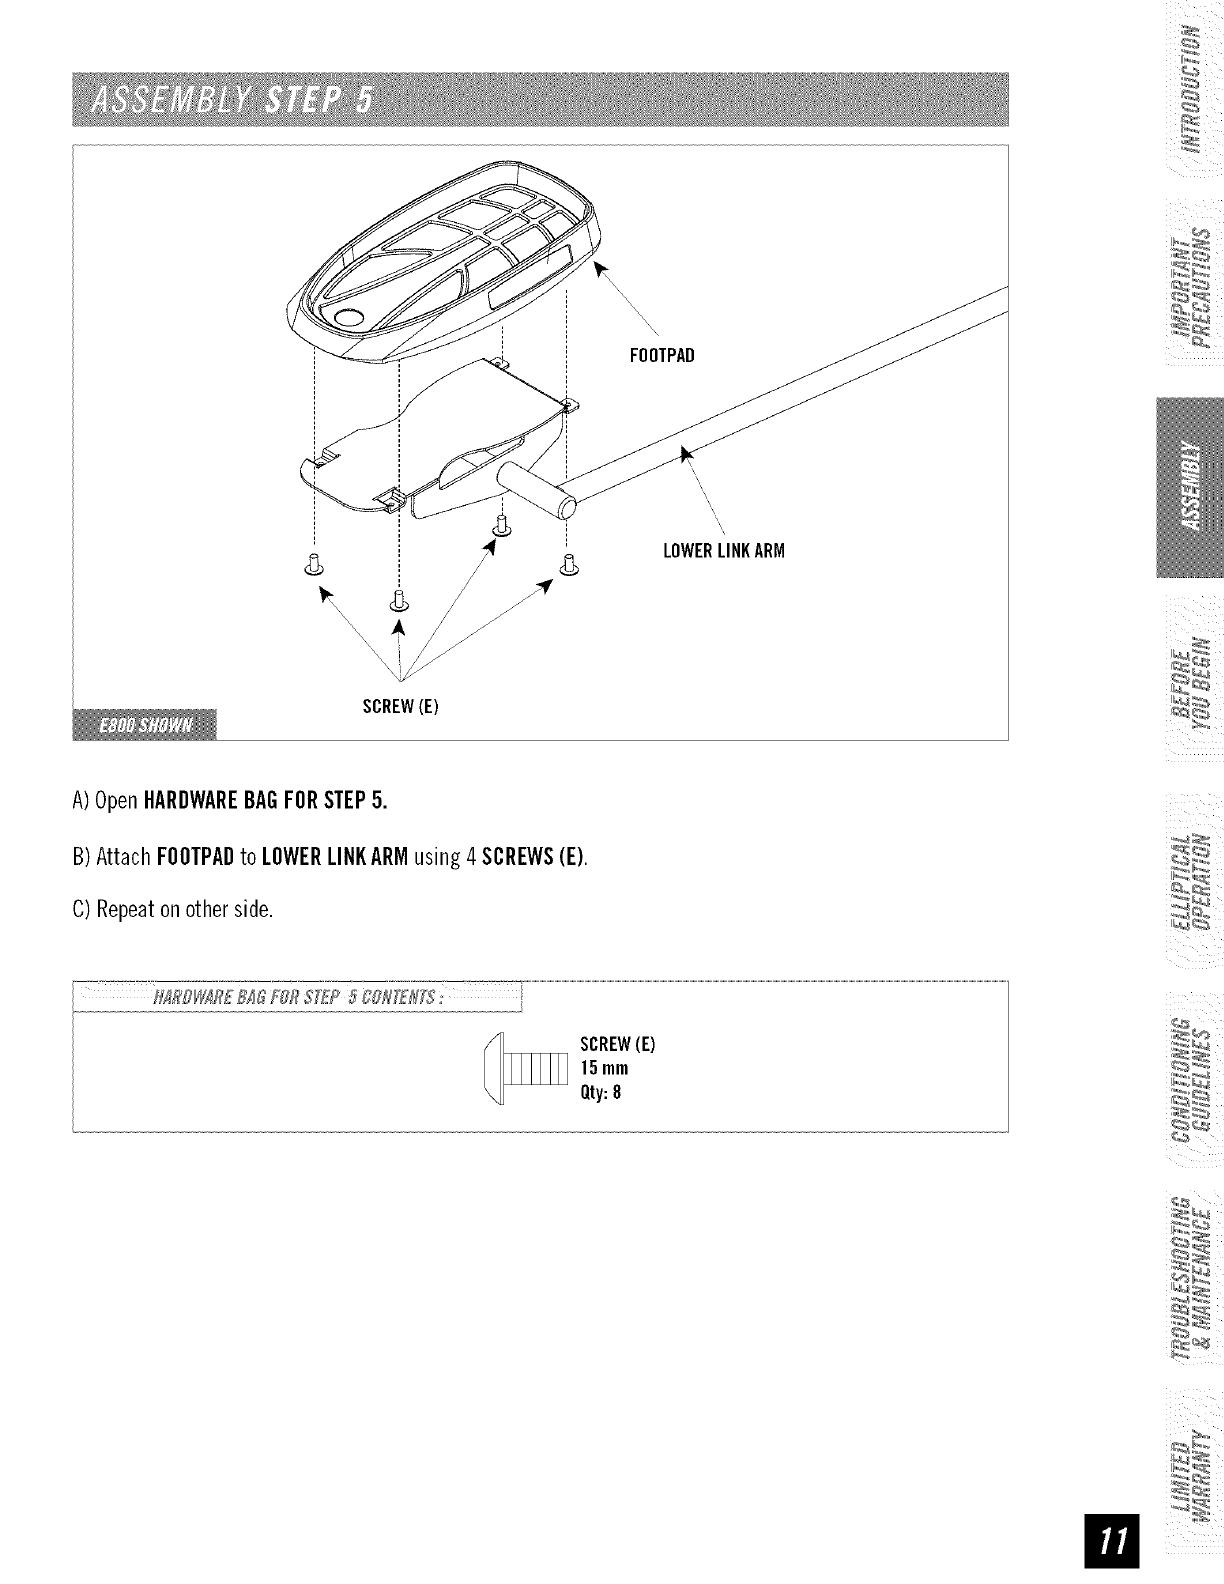
FOOTPAD
8
\\\\\\
_r
\
'\\
LOWERLINKARM
SCREW(E)
A)OpenHARDWAREBAGFORSTEP5.
B) Attach FOOTPADto LOWERLINKARMusing 4 SCREWS(E).
C)Repeaton otherside.
[
SCREW(E)
15mm
Qty:8
ii
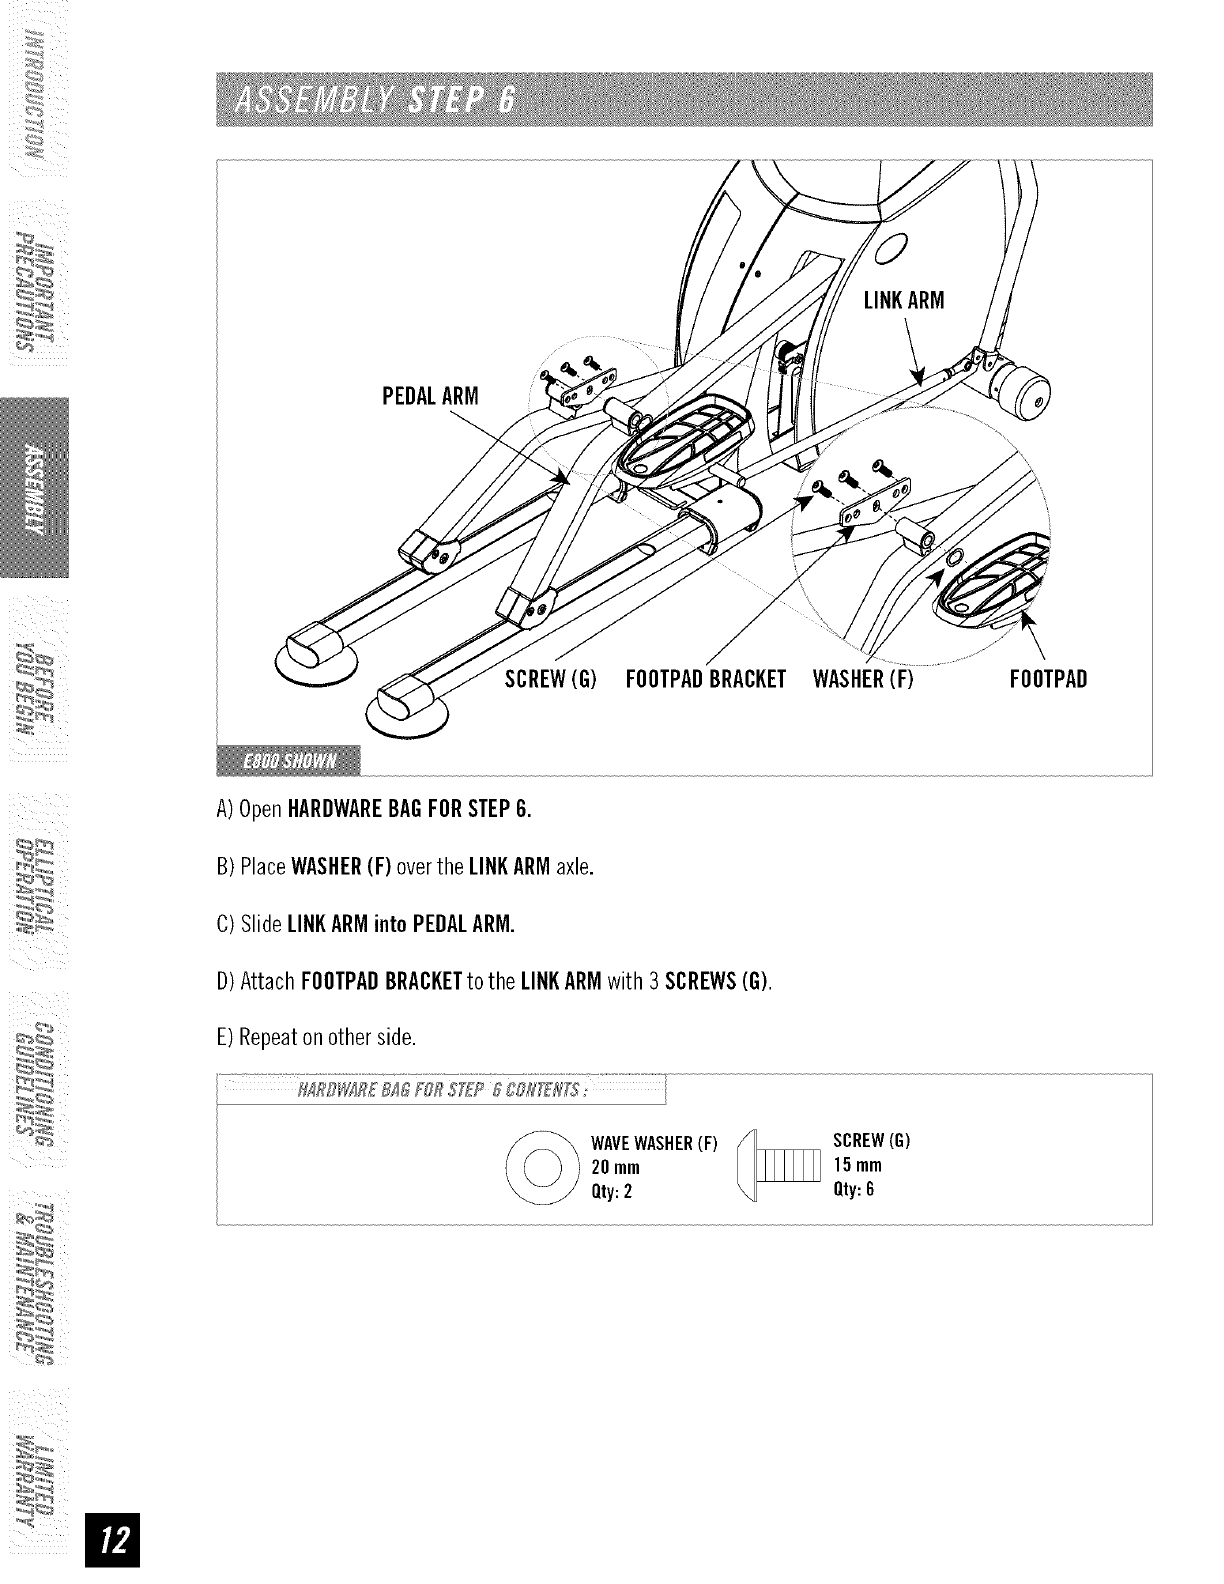
PEDALARM
SCREW(G) FOOTPADBRACKET WASHER(F) FOOTPAD
A)OpenHARDWAREBAGFORSTEP6.
B) PlaceWASHER(F) overthe LINKARMaxle.
C)Slide LINKARMintoPEDALARM.
D) Attach FOOTPADBRACKETto the LINKARMwith3SCREWS(G).
E) Repeaton otherside.
WAVEWASHER(F)
20mm
Qty:2
SCREW(G)
15mm
Qty:6
:_
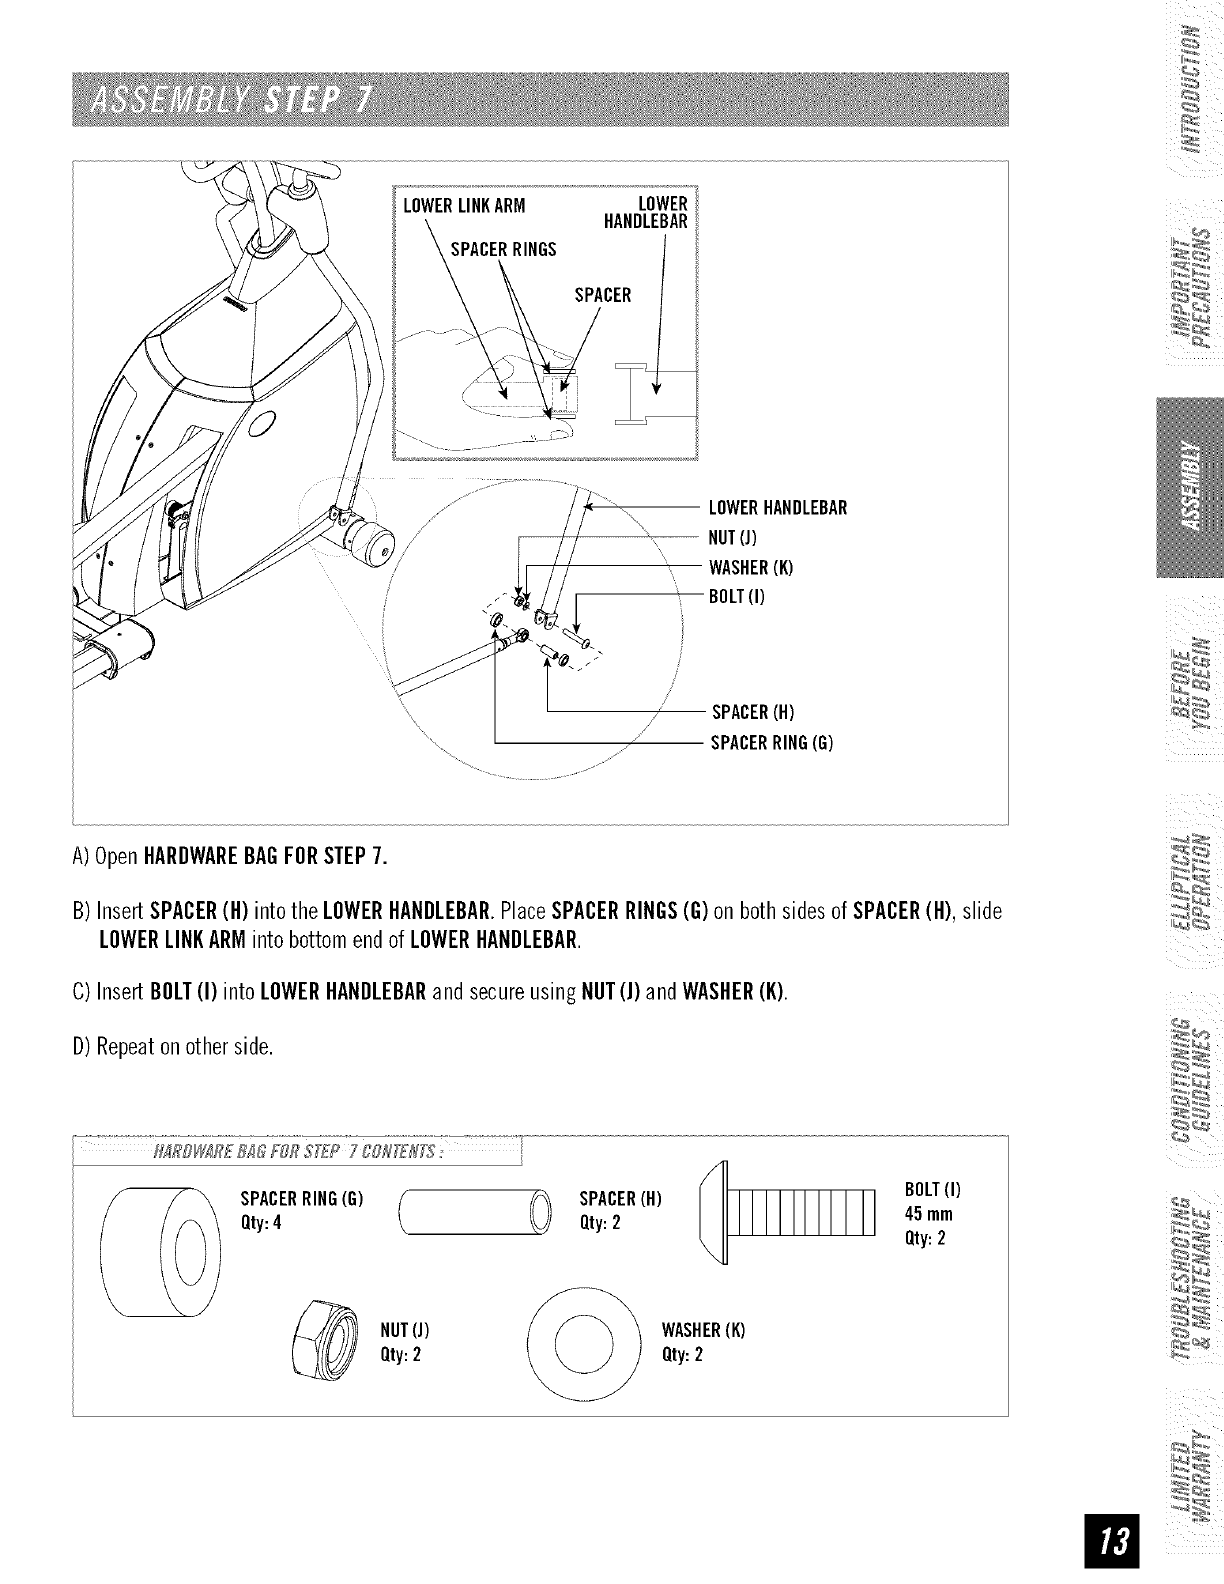
LOWERLINKARM LOWER
HANDLEBAR
SPACERRINGS
j_
SPACER
/
LOWERHANDLEBAR
-- NUT(J)
WASHER(K)
BOLT(I)
SPACER(H)
" _ SPACERRING(G)
A)OpenHARDWAREBAGFORSTEP7.
B) InsertSPACER(H) intothe LOWERHANDLEBAR.PlaceSPACERRINGS(G)on both sidesof SPACER(H), slide
LOWERLINKARMintobottomendof LOWERHANDLEBAR.
C)InsertBOLT(I) intoLOWERHANDLEBARand secureusingNUT(J)andWASHER(K).
D)Repeaton otherside.
[
Qty:4 / _ Qty:2 45mm
Qty:2
NUT(J) WASHER(K)
Qty:2 Qty:2
ii
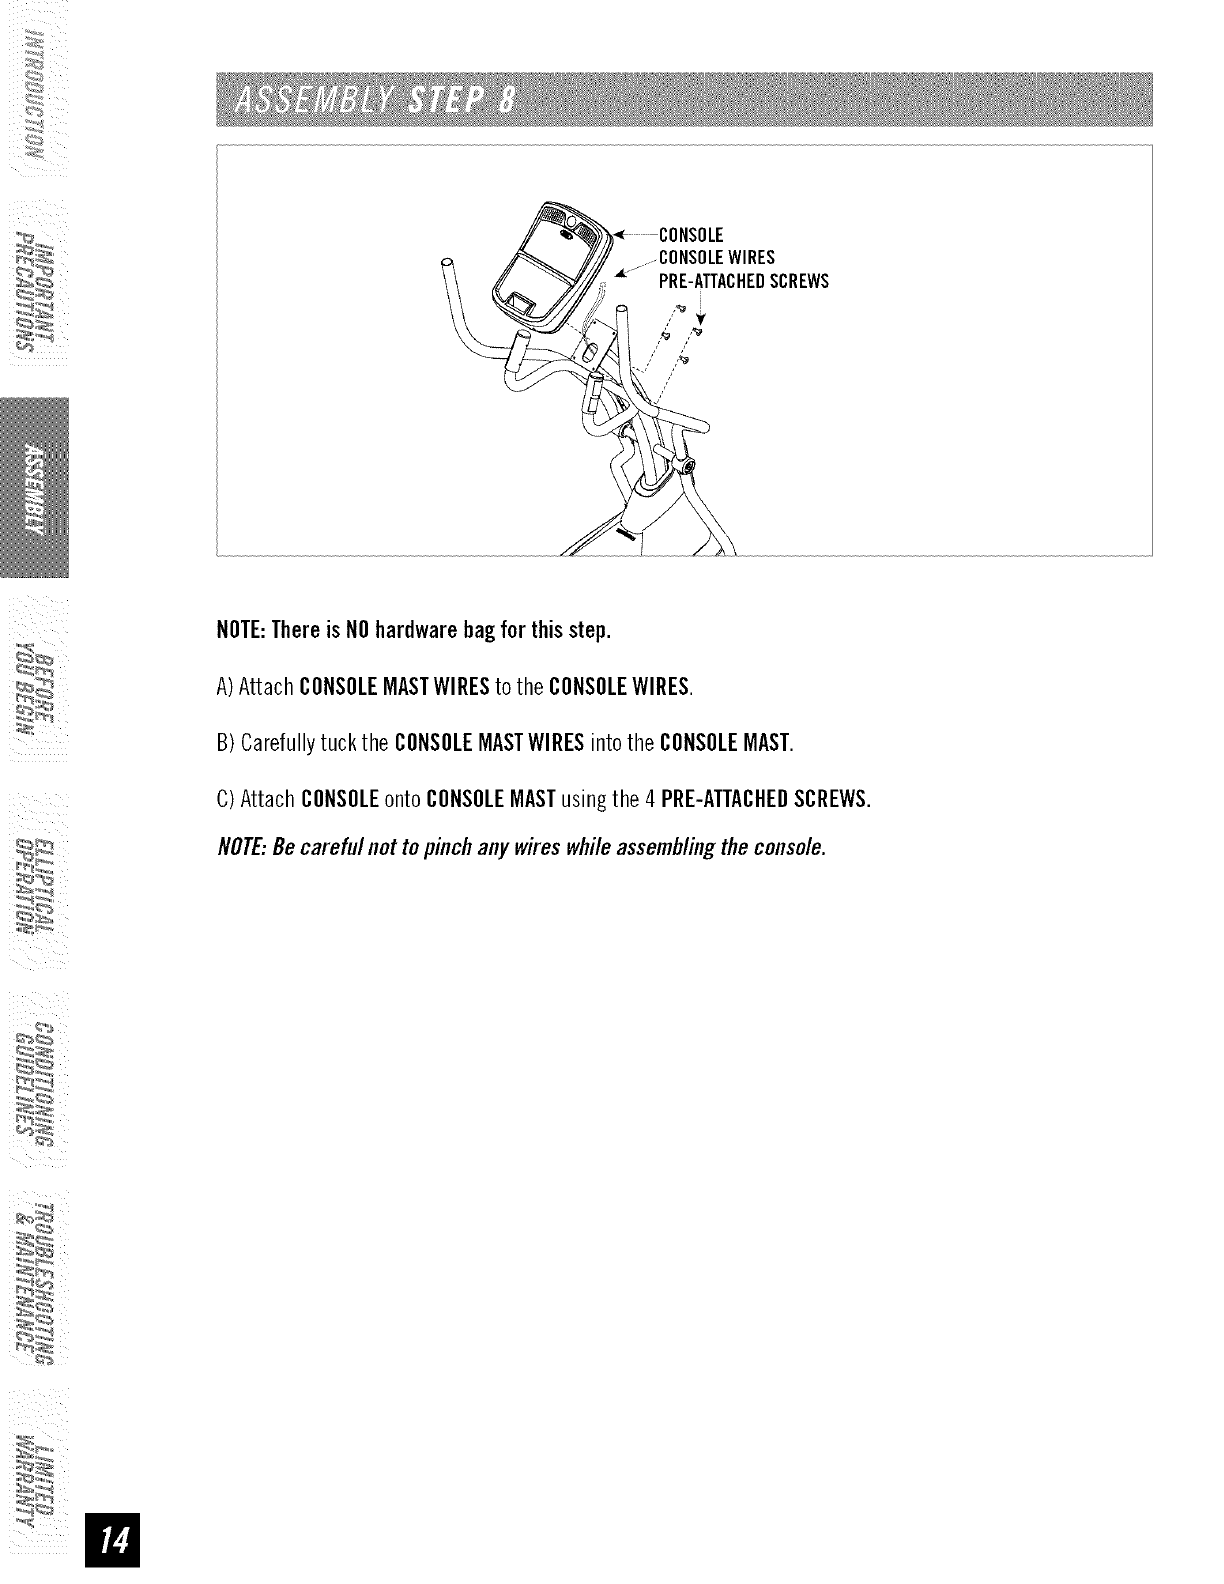
NOTE:Thereis NOhardwarebagfor thisstep.
A)Attach CONSOLEMASTWIRESto the CONSOLEWIRES.
B) Carefullytuck the CONSOLEMASTWIBESintothe CONSOLEMAST.
C) Attach CONSOLEonto CONSOLEMASTusingthe 4 PBE-ATTACHEDSCBEWS.
NOTE:Becarefulnot topinchany wireswhileassemblingtheconsole.
:_
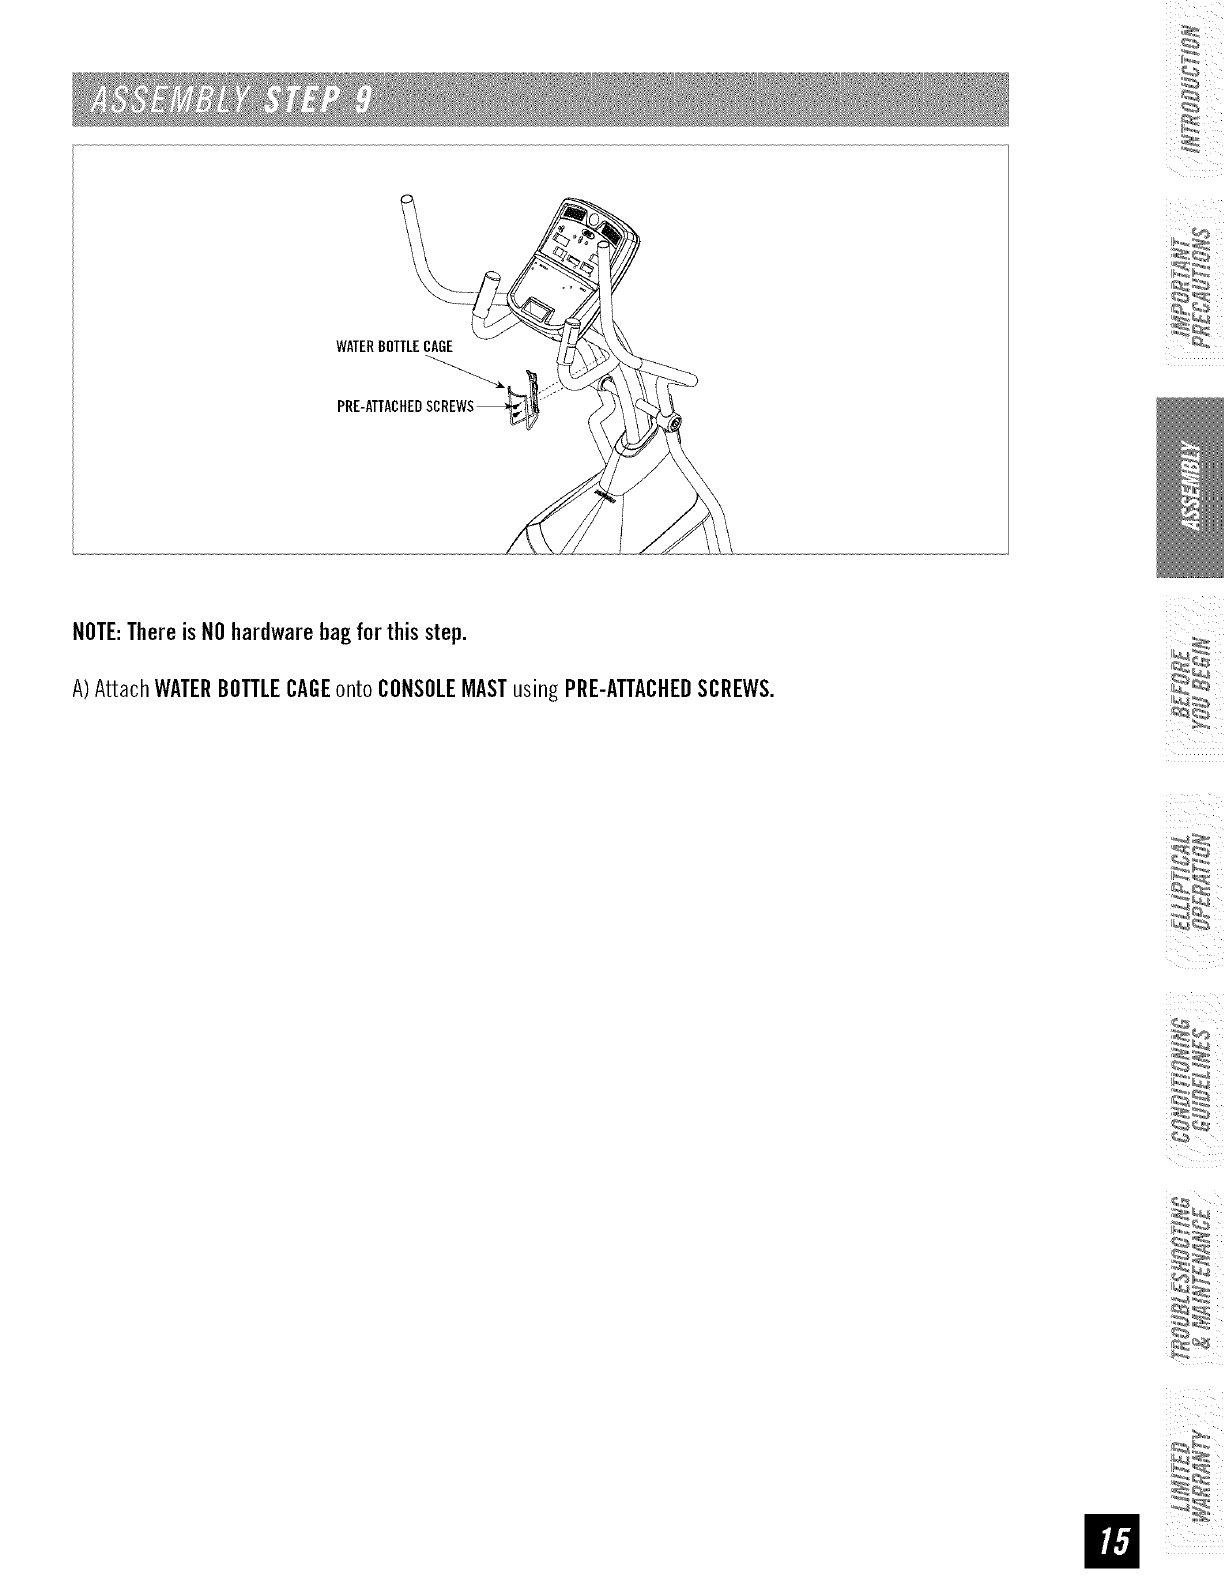
WATERBOTTLECAGE
NOTE:Thereis NOhardwarebagfor thisstep.
A)Attach WATERBOTTLECAGEonto CONSOLEMASTusing PRE-ATTACHEOSCREWS.
ii
i i I

CONGRATULATIONS!on choosingyourelliptical. You'vetakenan important stepin developingand
sustaining an exerciseprogram! Yourelliptical is a tremendouslyeffective tool for achievingyourpersonal
fitnessgoals. Regularuseof your elliptical can improvethe quality ofyour life in somany ways.
HEREAREJUSTA FEWOFTHEHEALTHBENEFITSOFEXERCISE:
•Weight Loss
• A Healthier Heart
• Improved Muscle Tone
• Increased Daily Energy Levels
The key to reaping these benefits is to develop an exercise habit. Your new
elliptical wifl help you eliminate obstacles that prevent you from exercising.
Inclement weather and darkness won't interfere with your workout when you
use your elliptical in the comfort of your home. This guide provides you with
basic information for using and enjoying your new machine.
LOCATIONOFTHEELLIPTICAL
Place the elliptical on a level surface. There should be 6 feet of clearance
behind the elliptical, 3 feet on each side and one foot in front for the power
cord (See diagram to the right). Do not place the efliptical in any area that
will block any vent or air openings. The elliptical should not be located in a
garage, covered patio, near water or outdoors.
i foot
3 feet Ii 3 feet
6 feet
POWER
Yourprogrammableelliptical is poweredbya powersupply.Thepowermust be pluggedinto the powerjack,
whichis located in the front of the machinenear the STABILIZERTUBE.Makesure the powerswitch on the
consoleis in the ONposition. Note:Not all units havean ON/OFFswitch on theconsole.
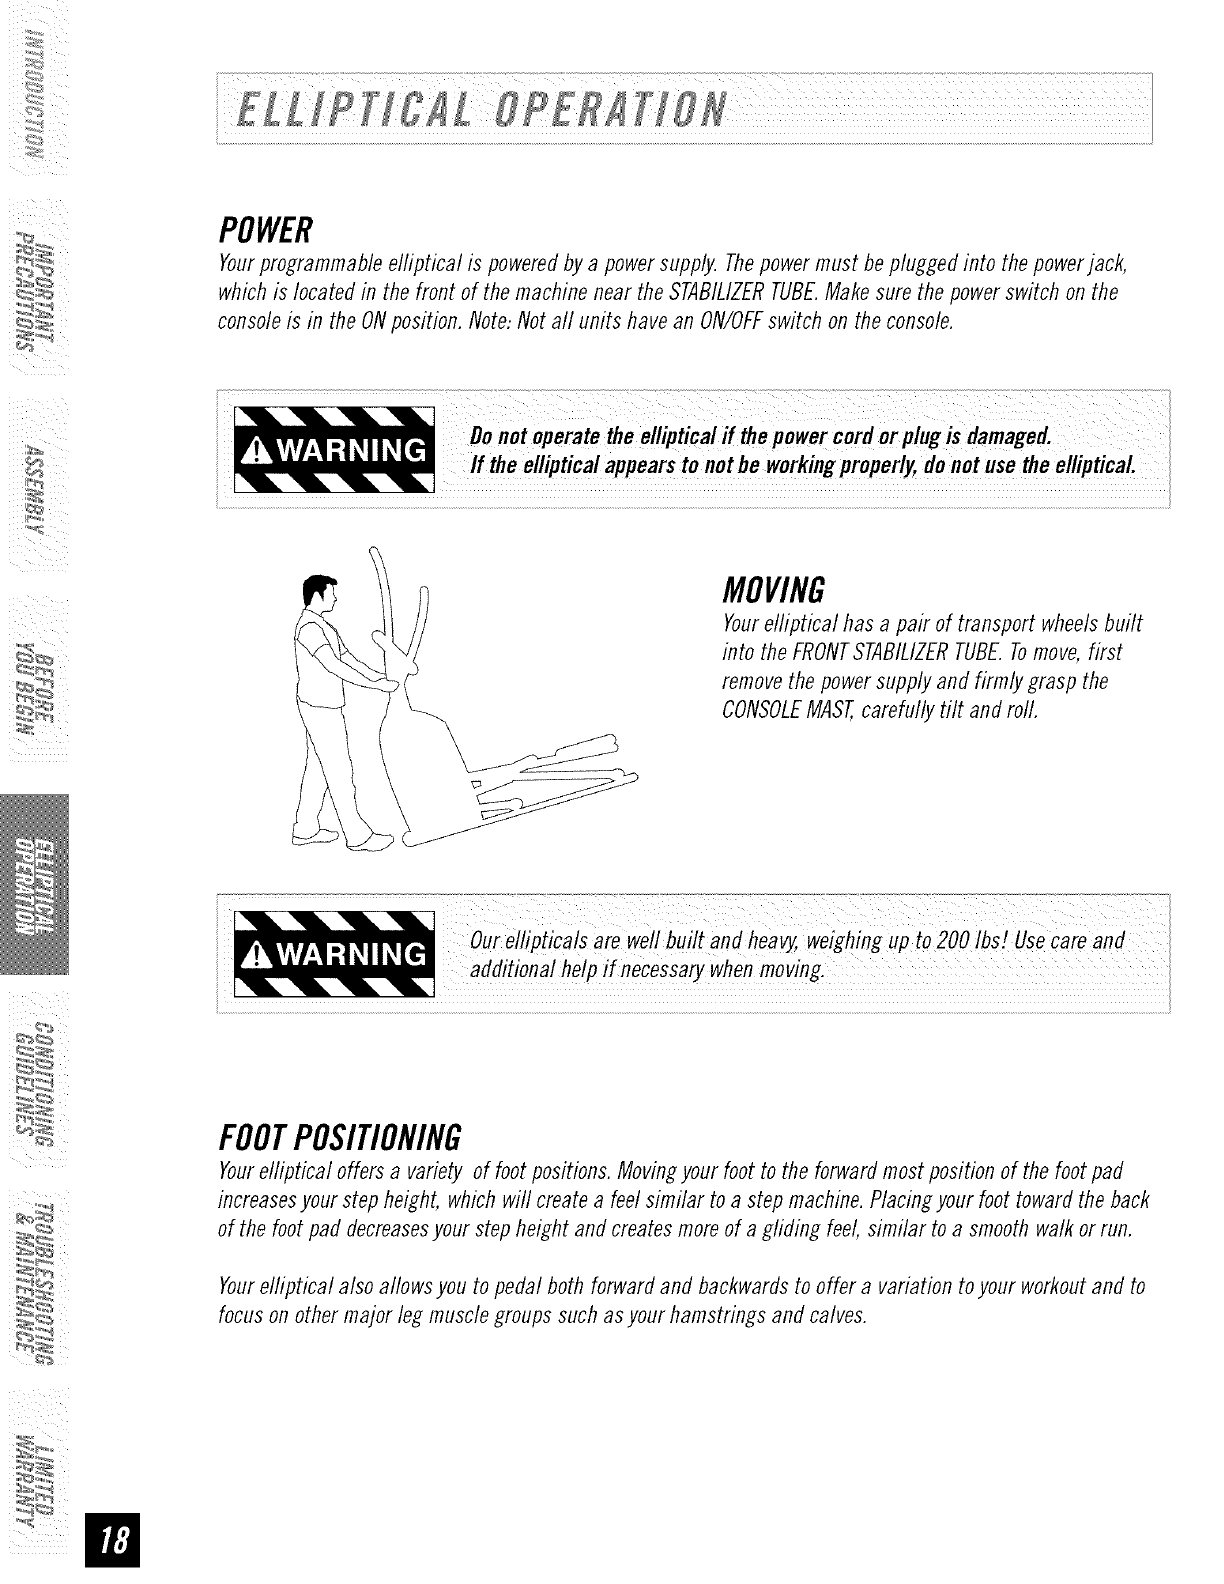
MOVING
Yourelliptical has a pair of transport wheelsbuilt
into theFRONTSTABILIZERTUBE.Tomove,first
removethe powersupplyand firmly grasp the
CONSOLEMAST,carefully tilt and rod.
our ellipticals are well built and heavy,weighing up to 200 IbsZUsecareand
additional help if necessarywhenmoving.
FOOTPOSITIONING
Yourelliptical offersa variety of footpositions.Movingyourfoot to the forwardmostposition of the footpad
increasesyourstepheight, whichwill createa feel similar to a stepmachine.Placingyour foottowardthe back
of the foot pad decreasesyour stepheight andcreatesmoreof a gliding feel, similar to a smoothwalk orrun.
Yourelliptical also allowsyou to pedal both forwardand backwardsto offer a variationto your workoutand to
focuson othermajor leg musclegroups such asyour hamstrings and calves.
:_
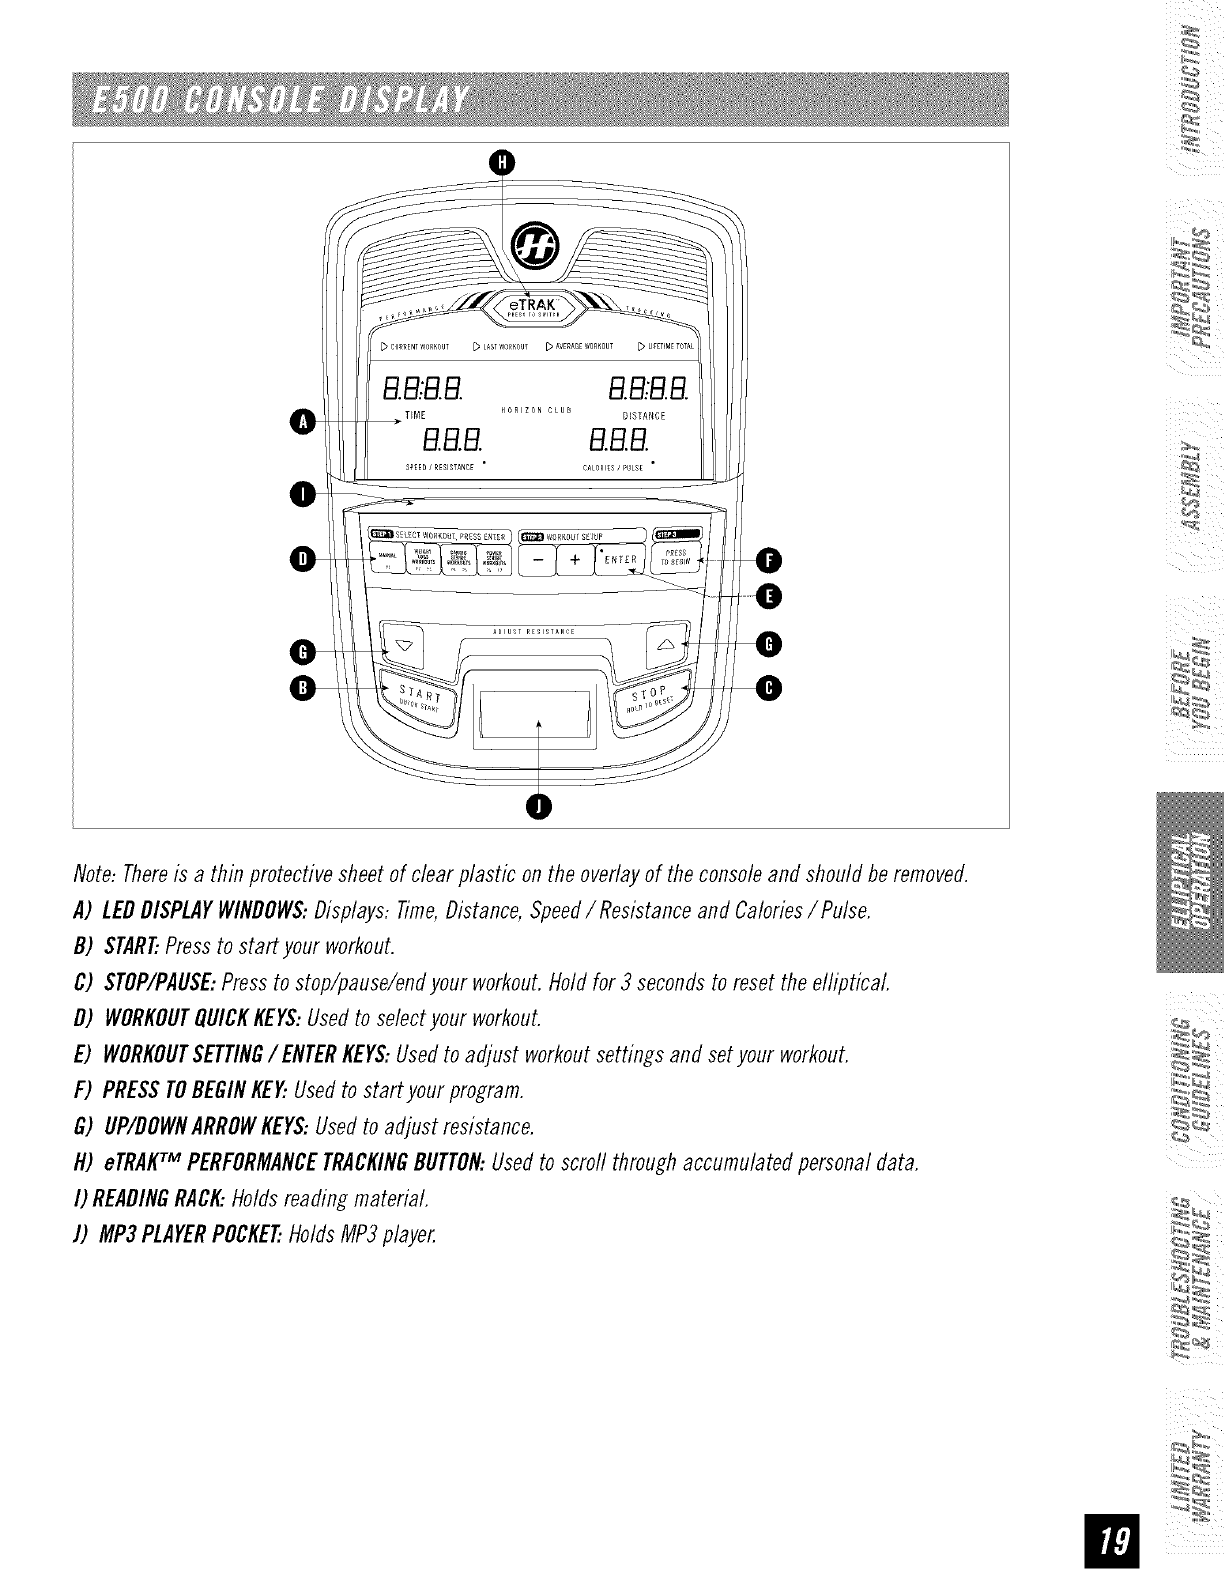
Note-Thereis a thin protective sheetof clearplastic on the overlayof the consoleand should be removed.
A) LEDDISPLAYWINDOWS:Displays:Time,Distance,Speed/ Resistanceand Calories/Pulse.
B) START..Pressto start your workout.
C) STOP/PAUSE:Pressto stop/pause/endyour workout.Hold for 3 secondsto reset the elliptical
D) WORKOUTQUICKKEYS:Usedto selectyour workout.
E) WORKOUTSETTING/ENTERKEYS:Usedto adjust workoutsettings and set yourworkout.
F) PRESSTOBEGINKENUsedto start yourprogram.
G) UP/DOWNARROWKEYS:Usedto adjust resistance.
H) eTRAKTM PERFORMANCETRACKINGBUTTON:Usedto scrod throughaccumulatedpersonal data.
I) READINGRACK..Holdsreading material.
J) MP3PLAYERPOCKET..HoldsMP3player.
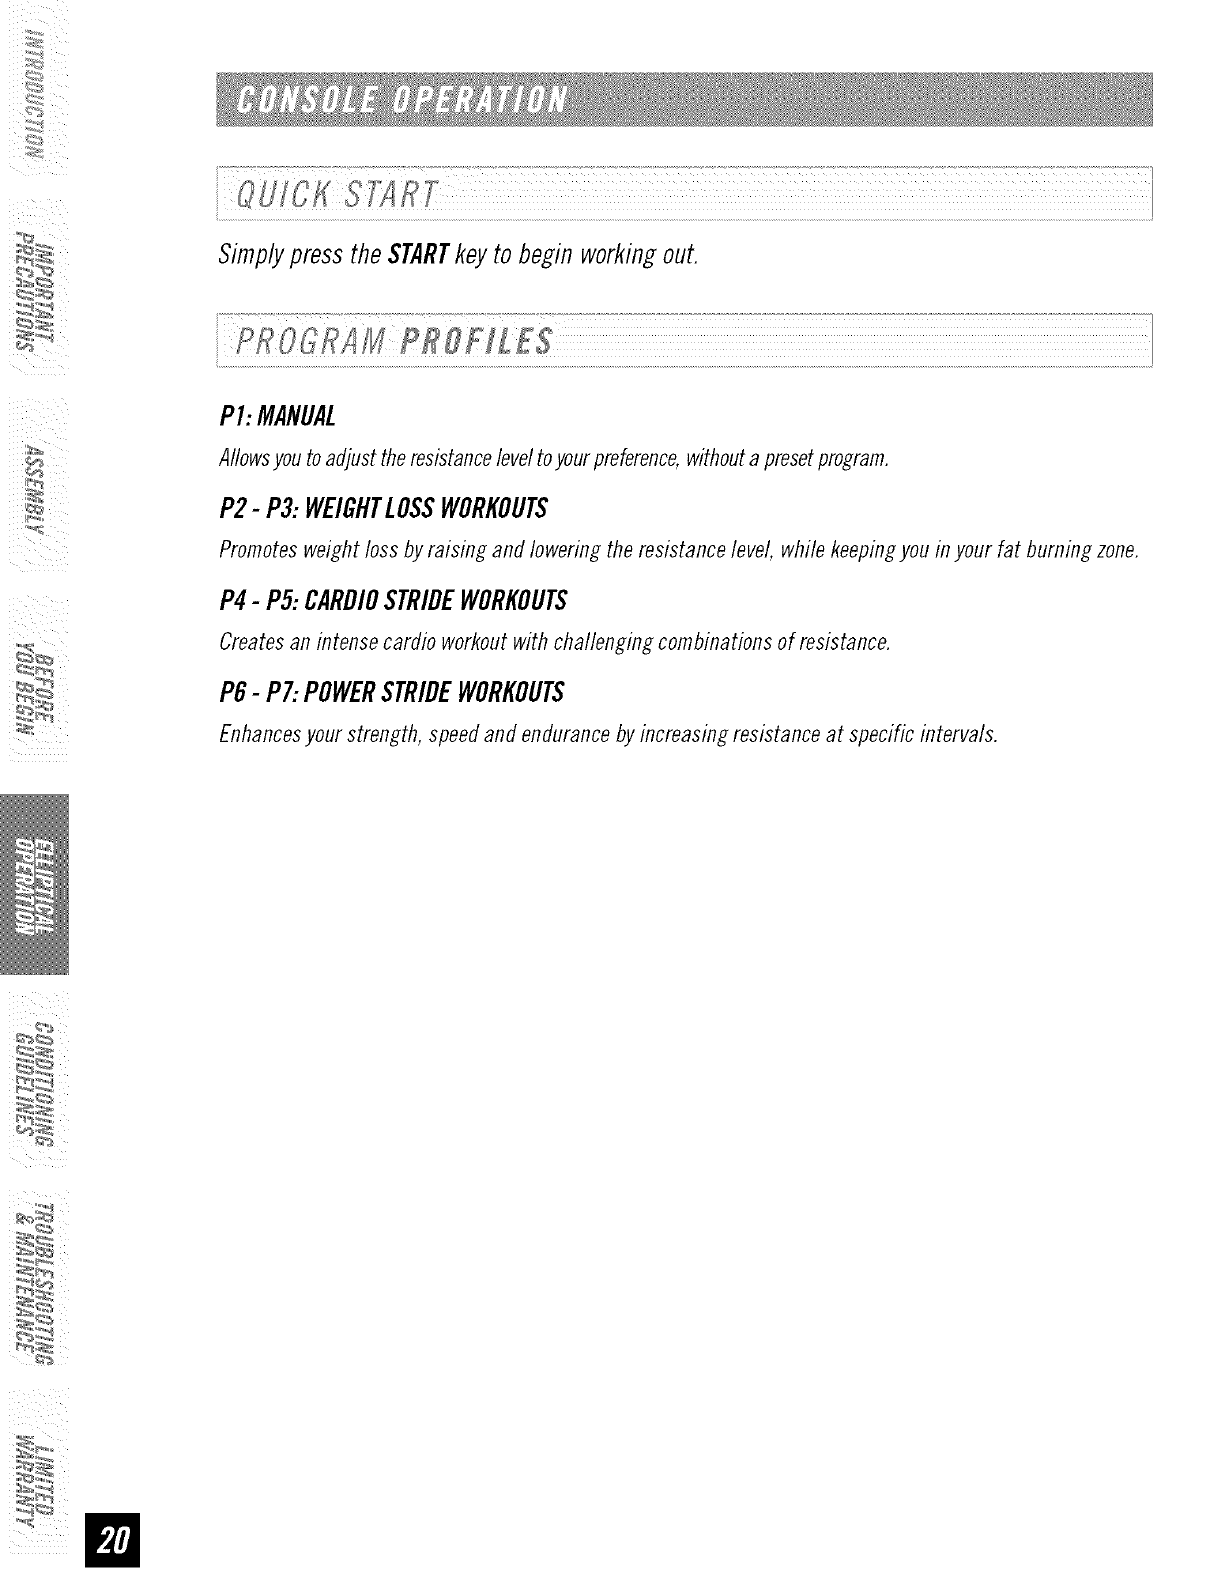
SimplypresstheSTARTkeyto beginworkingout.
P1:MANUAL
Allowsyoutoadjusttheresistanceleveltoyourpreference,withoutapresetprogram.
P2- P3:WEIGHTLOSSWORKOUTS
Promotesweightlossby raisin_ and Iowerin_the resistancelevel, while keepin_you inyour fat burnin_ zone.
P4- P5:CARDIOSTRIDEWORKOUTS
Createsan intensecardio workoutwith challen_in_ combinationsof resistance.
P6-P7:POWERSTRIDEWORKOUTS
Enhancesyour strength, speedand endurancebyincreasin_ resistanceat specific intervals.
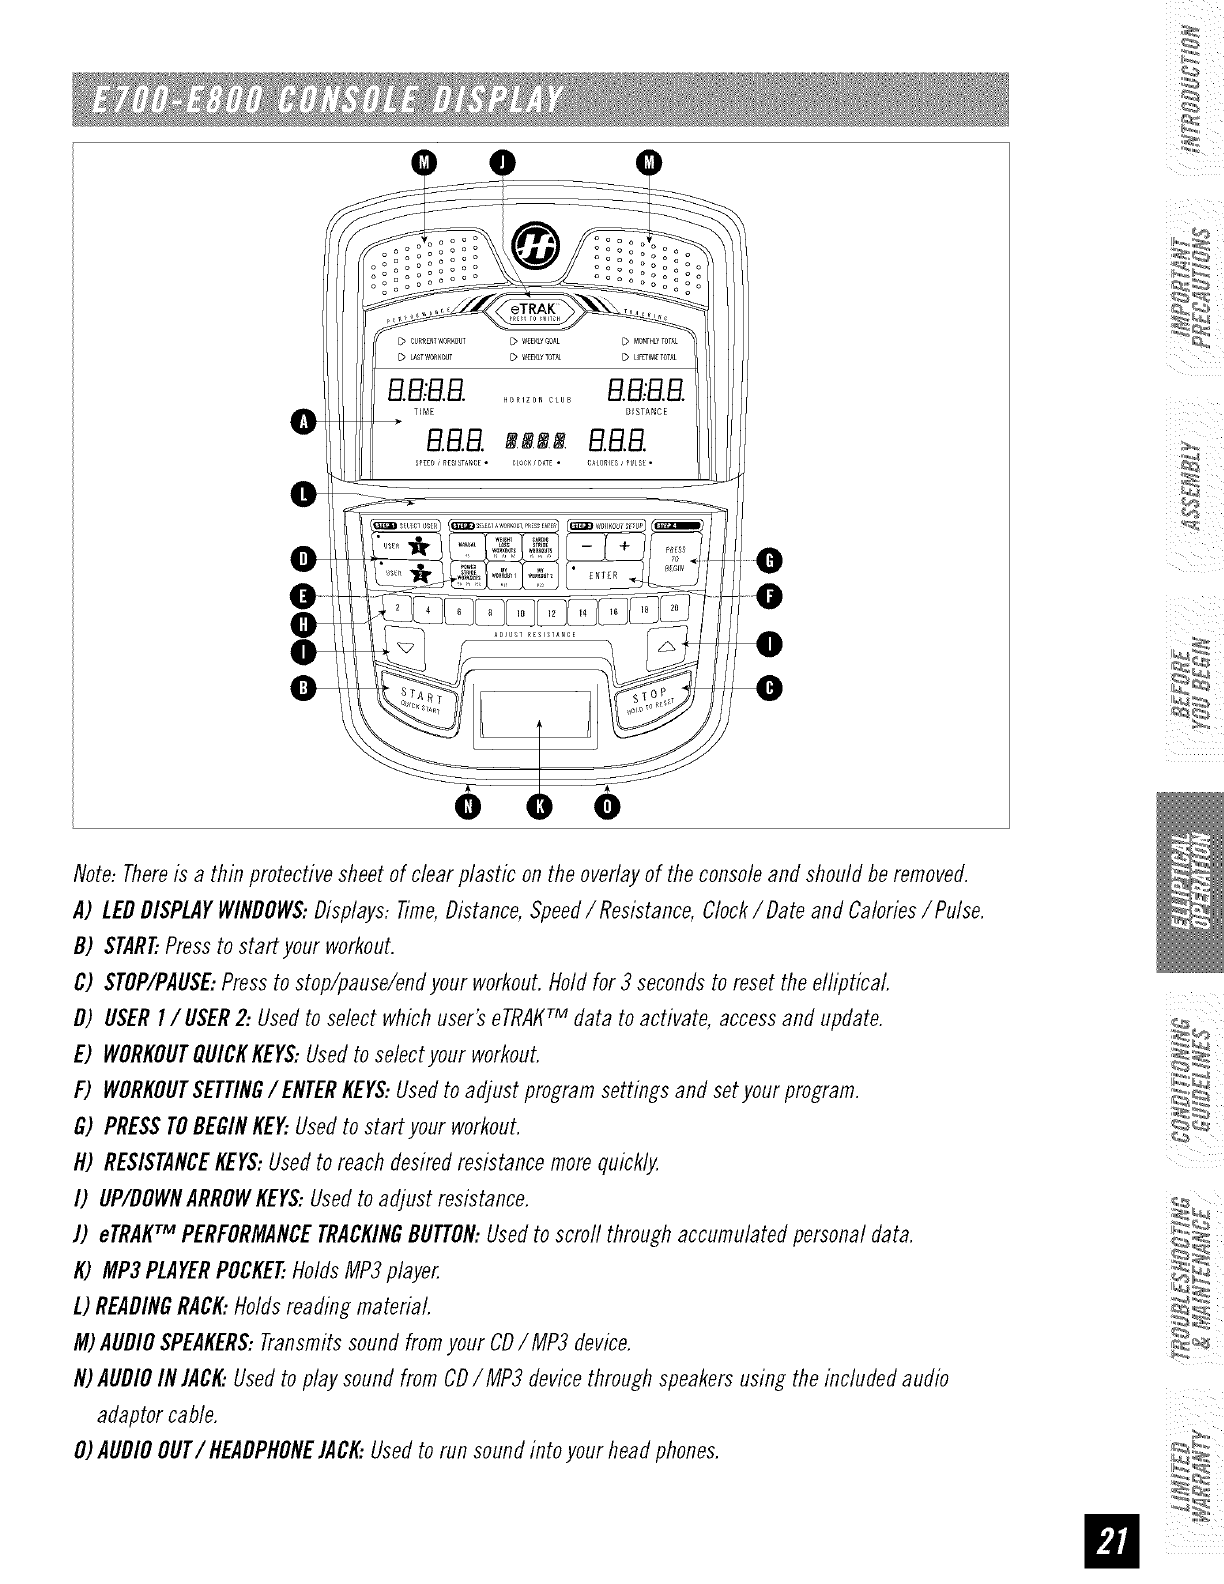
Note-Thereis athinprotectivesheetofclearplasticontheoverlayoftheconsoleandshouldberemoved.
A) LEDDISPLAYWINDOWS:Displays:Time,Distance,Speed/ Resistance,Clock/Date and Calories/Pulse.
B) START..Pressto start your workout.
C) STOP/PAUSE:Pressto stop/pause/endyour workout.Hold for 3 secondsto reset the elliptical
D) USERI/USER 2: Usedto select whichuser'seTRAKTM data to activate, accessand update.
E) WORKOUTQUICKKEYS:Usedto selectyour workout.
F) WORKOUTSETTING/ ENTERKEYS:Usedto adjust program settings and setyour program.
G) PRESSTOBEGINKE_ Usedto start your workout.
H) RESISTANCEKEYS:Usedto reach desiredresistancemorequickly.
I) UP/DOWNARROWKEYS:Usedto adjust resistance.
J) eTRAKTM PERFORMANCETRACKINGBUTTON:Usedto scrodthroughaccumulatedpersonaldata.
K) MP3PLAYERPOCKET..HoldsMP3player.
L) READINGRACK:Holds reading material.
M)AUDIOSPEAKERS:Transmitssound fromyour CDIMP3 device.
N)AUDIOIN JACK:Usedto playsoundfrom CDIMP3 devicethrough speakersusing the included audio
adaptor cable.
O)AUDIOOUT/HEADPHONEJACI_Usedto run soundinto your head phones.

SimplypresstheSTARTkeyto beginworkingout.
P1:MANUAL
Allowsyoutoadjusttheresistanceleveltoyourpreference,withoutapresetprogram.
P2- P3 WEIGHTLOSSWORKOUTS
Promotesweightlossby raising and lowering the resistancelevel, while keepingyou inyour fat burning zone.
P4-P5:CARDIOSTRIDEWORKOUTS
Createsan intensecardio workoutwith challenging combinationsof resistance.
P6-P7:POWERSTRIDEWORKOUTS
Enhancesyour strength, speedand endurancebyincreasing resistanceat specific intervals.
Allows 'On TheFly' manual RESISTANCEchanges. Time-based goal
I) Select MANUAL(PI) using the WORKOUTQUICK KEY and press ENTER.
2) Set Time using the +/- KEYSand press ENTER.
Next set RESISTANCE using the +/- KEYS and press ENTER.
3) Press the PRESS TO BEGIN key to start workout.
:_
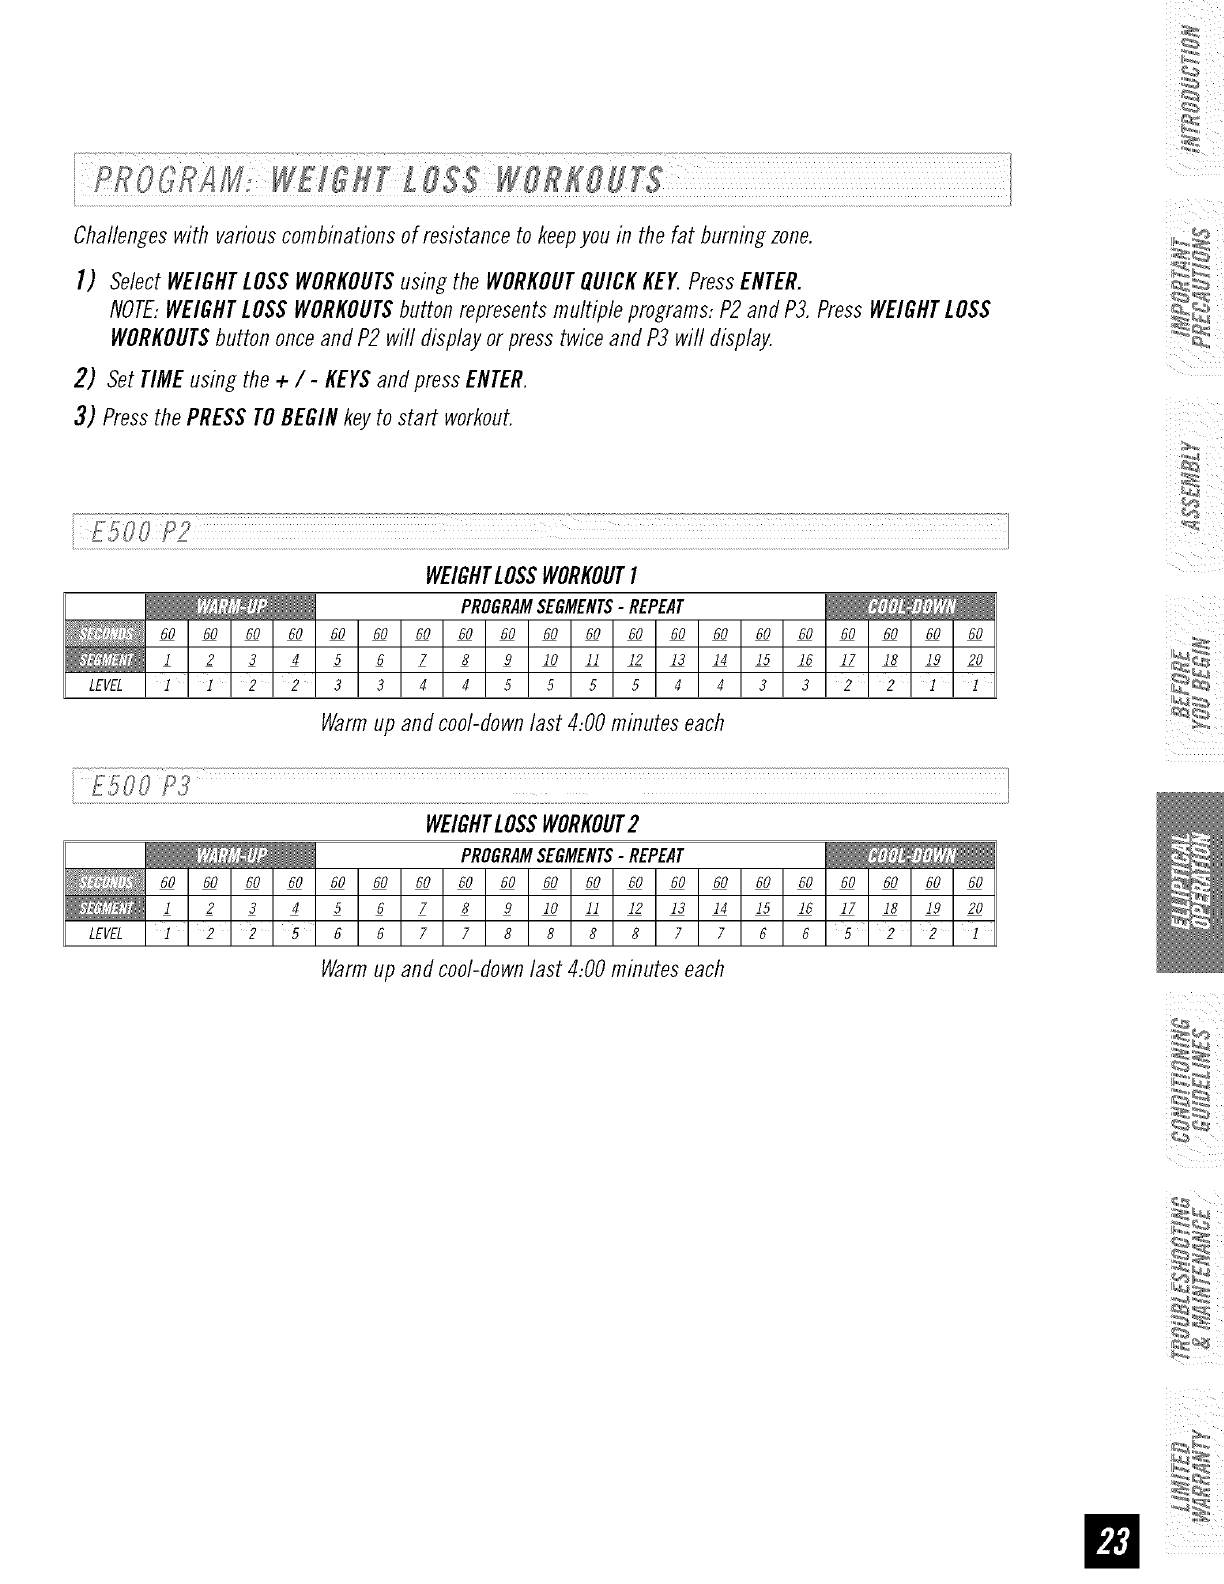
Challengeswith variouscombinationsof resistance to keepyou in the fat burningzone.
I) SelectWEIGHTLOSSWORKOUTSusing the WORKOUTQUICKKEY.PressENTER.
NOTE:WEIGHTLOSSWORKOUTSbutton representsmultiple programs:P2 andP3. PressWEIGHTLOSS
WORKOUTSbutton onceandP2 will display or presstwice and P3 will display.
2) Set TIMEusing the +/-KEYSandpress ENTER.
3) Pressthe PRESSTOBEGINkeyto start workout.
WEIGHTLOSSWORKOUTI
PROGRAMSEGMENTS-REPEAT
60 60 60 60 60 60 60 60 60 60 60 60 60 60 60 60 60 60 60 60
1 2 3 4 5 6 7 8 9 I0 II 12 13 14 15 16 17 18 19 20
LEVEL112233445555443322]1
Warmup and cool-downlast 4:00 minutes each
.............................P3" I
WEIGHTLOSSWORKOUT2
PROGRAMSEGMENTS-REPEAT
60 60 60 60 60 60 60 60 60 60 60 60 60 60 60 60 60 60 60 60
1 2 3 4 5 6 7 8 9 I0 II 12 13 14 15 16 17 18 19 20
LEVEL ]225667788887766 22 I
Warmup and cool-downlast 4:00 minutes each
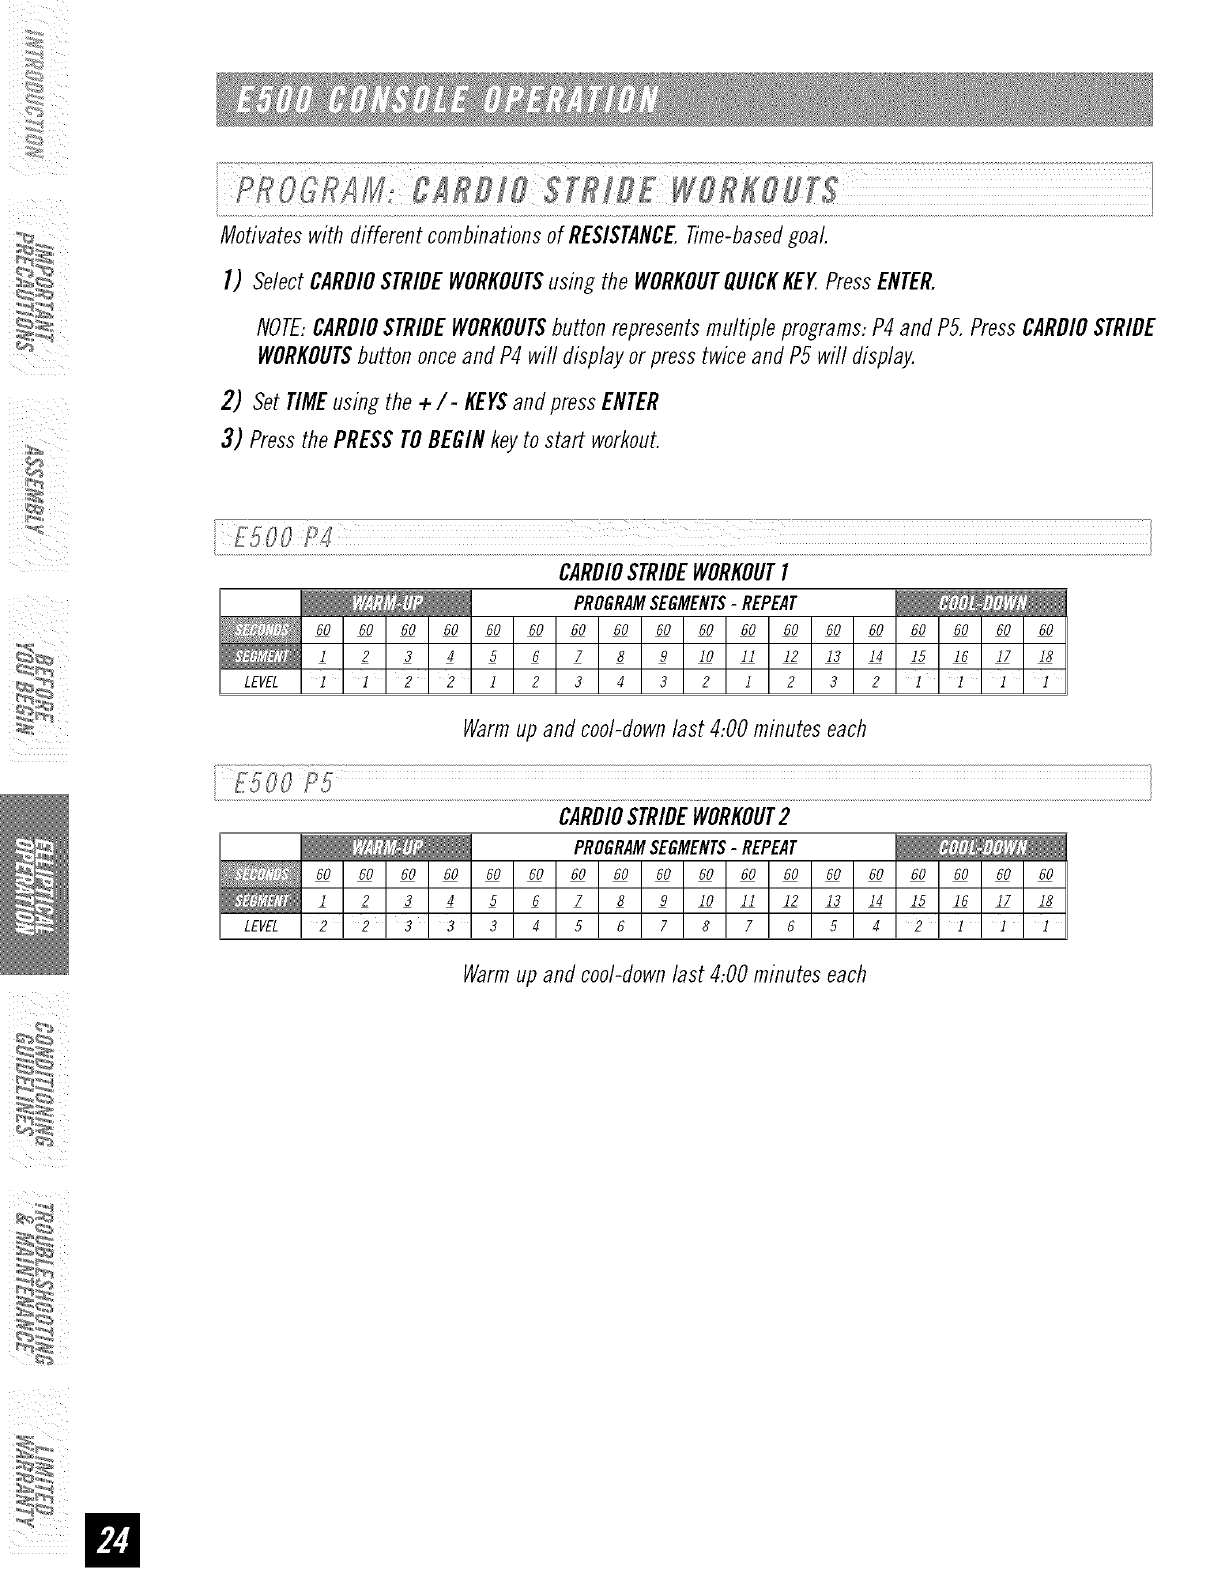
MotivateswithdifferentcombinationsofRESISTANCETime-basedgoaL
I) SelectCARDIOSTRIDEWORKOUTSusing the WORKOUTQUICKKEY.PressENTER.
NOTE:CARDIOSTRIDEWORKOUTSbutton representsmultiple programs:P4 and PS.PressCARDIOSTRIDE
WORKOUTSbutton onceand P4 wi// display or presstwice and P5 wi// display.
2) Set TIMEusing the +/- KEYSandpressENTER
3) Pressthe PRESSTOBEGINkeyto start workout.
i ¸f500 CI
CARDIOSTRIDEWORKOUTI
PROGRAMSEGMENTS-REPEAT
60 60 60 60 60 60 60 60 60 60 60 60 60 60 60 60 60 60
l 23456789 10 11 12 13 14 15 16 17 18
LEVEL ] 1 2 2 1 2 3 4 3 2 1 2 3 2 1 ] ] 1
Warmup and cool-downlast 4:00 minutes each
i...........................................................................................................................................................................................................................................................................................................................................................................................................................................................................................................................................i
CARDIOSTRIDEWORKOUT2
PROGRAMSEGMENTS-REPEAT
60 60 60 60 60 60 60 60 60 60 60 60 60 60 60 60 60 60
l 23456789 10 11 I2 13 14 I5 I6 17 18
LEVEL 2 2 8 3 3 4 5 6 7 8 7 6 5 4 2 l l 1
Warmup and cool-downlast 4:00 minutes each
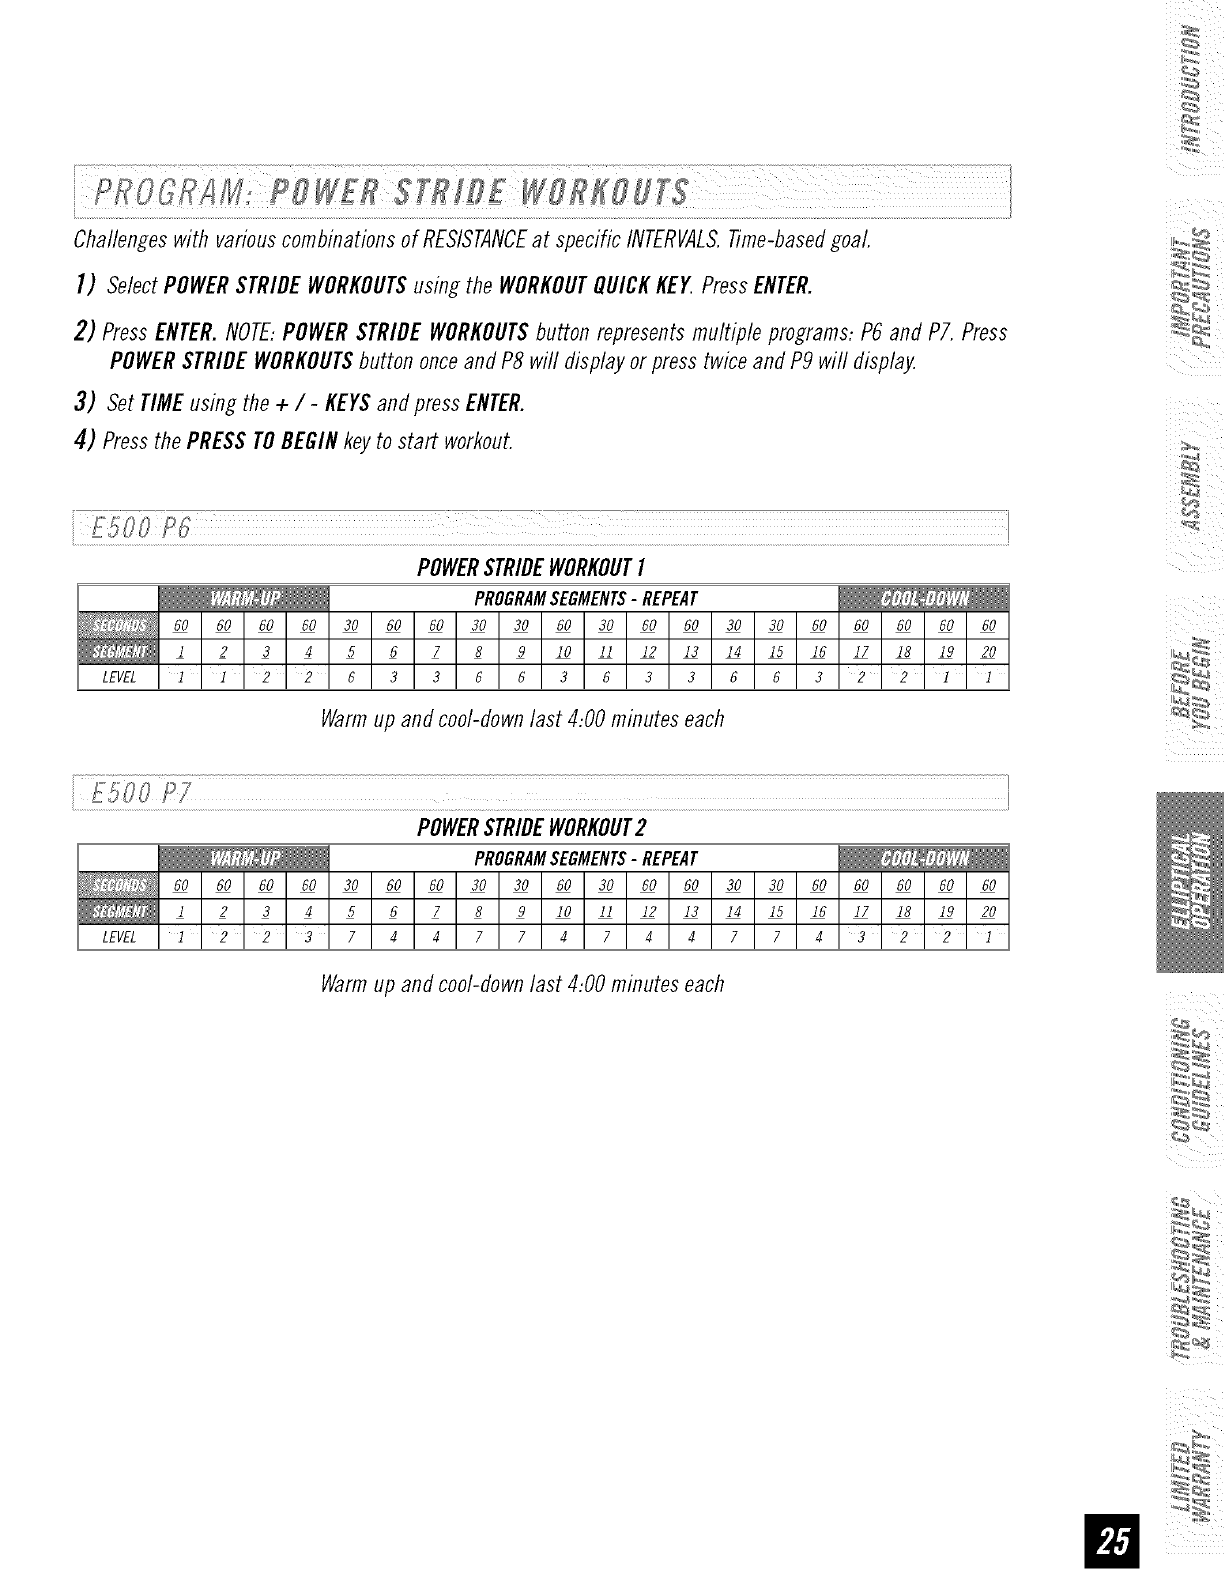
ChallengeswithvariouscombinationsofRESISTANCEat specificINTERVALS.Time-basedgoaL
I) SelectPOWERSTRIDEWORKOUTSusing the WORKOUTQUICKKEY PressENTER.
2) PressENTER.NOTE:POWERSTRIDEWORKOUTSbutton representsmultiple programs:P6 and P7. Press
POWERSTRIDEWORKOUTSbutton onceand P8 will displayor press twice andP9 will display.
3) Set TIMEusing the + / - KEYSandpress ENTER.
4) Pressthe PRESSTOBEGINkey to start workout.
POWERSTRIDEWORKOUTI
PROGRAMSEGMENTS-REPEAT
60 60 60 60 30 60 60 30 30 60 30 60 60 30 30 60 60 60 60 60
1 2 3 4 5 6 7 8 9 I0 II 12 13 14 15 16 17 18 19 20
LEVEL I I22633663 6336 6322II
Warmup and cool-clownlast 4:00 minutes each
POWERSTRIDEWORKOUT2
PROGRAMSEGMENTS-REPEAT
60 60 60 60 30 60 60 30 30 60 30 60 60 30 30 60 60 60 60 60
1 2 3 4 5 6 7 8 9 I0 II 12 13 14 15 16 17 18 19 20
LEVELI 223744774744774322I
Warmup and cool-clownlast 4:00 minutes each
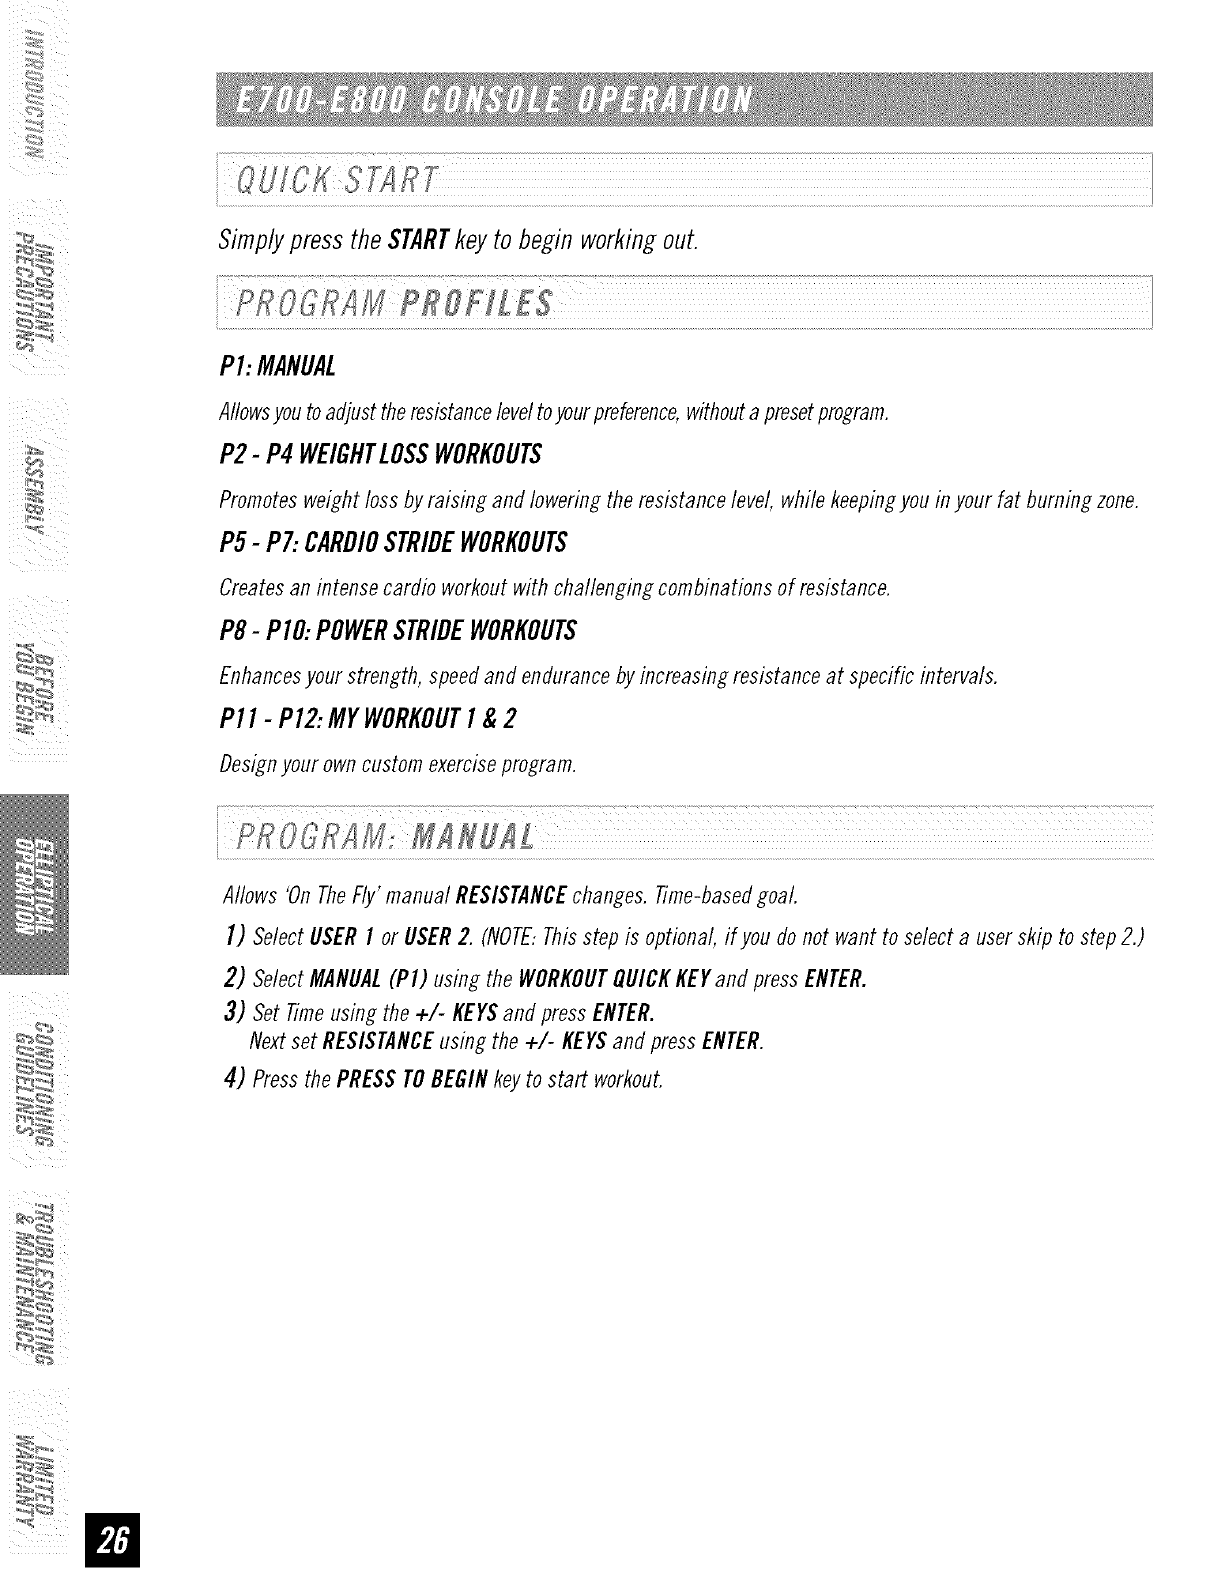
SimplypresstheSTARTkeyto beginworkingout.
P1:MANUAL
Allowsyoutoadjusttheresistanceleveltoyourpreference,withoutapresetprogram.
P2- P4 WEIGHTLOSSWORKOUTS
Promotesweightlossby raising and lowering the resistancelevel, while keepingyou inyour fat burning zone.
P5-P7:CARDIOSTRIDEWORKOUTS
Createsan intensecardio workoutwith challenging combinationsof resistance.
P8-PIO:POWERSTRIDEWORKOUTS
Enhancesyour strength, speedand endurancebyincreasing resistanceat specific intervals.
P11-P12:MYWORKOUTI &2
Designyourowncustom exerciseprogram.
u
Allows 'On TheFly' manual RESISTANCEchanges.Time-basedgoal.
]) SelectUSERI or USER2. (NOTE:Thisstep is optional, if you donot want to select a userskip to step 2.)
2) SelectMANUAL(PI) using the WORKOUTQUICKKEYand press ENTER.
3) Set Timeusing the +/- KEYSand pressENTER.
Nextset RESISTANCEusing the +/- KEYSandpress ENTER.
4) Pressthe PRESSTOBEGINkeyto start workout.
:_
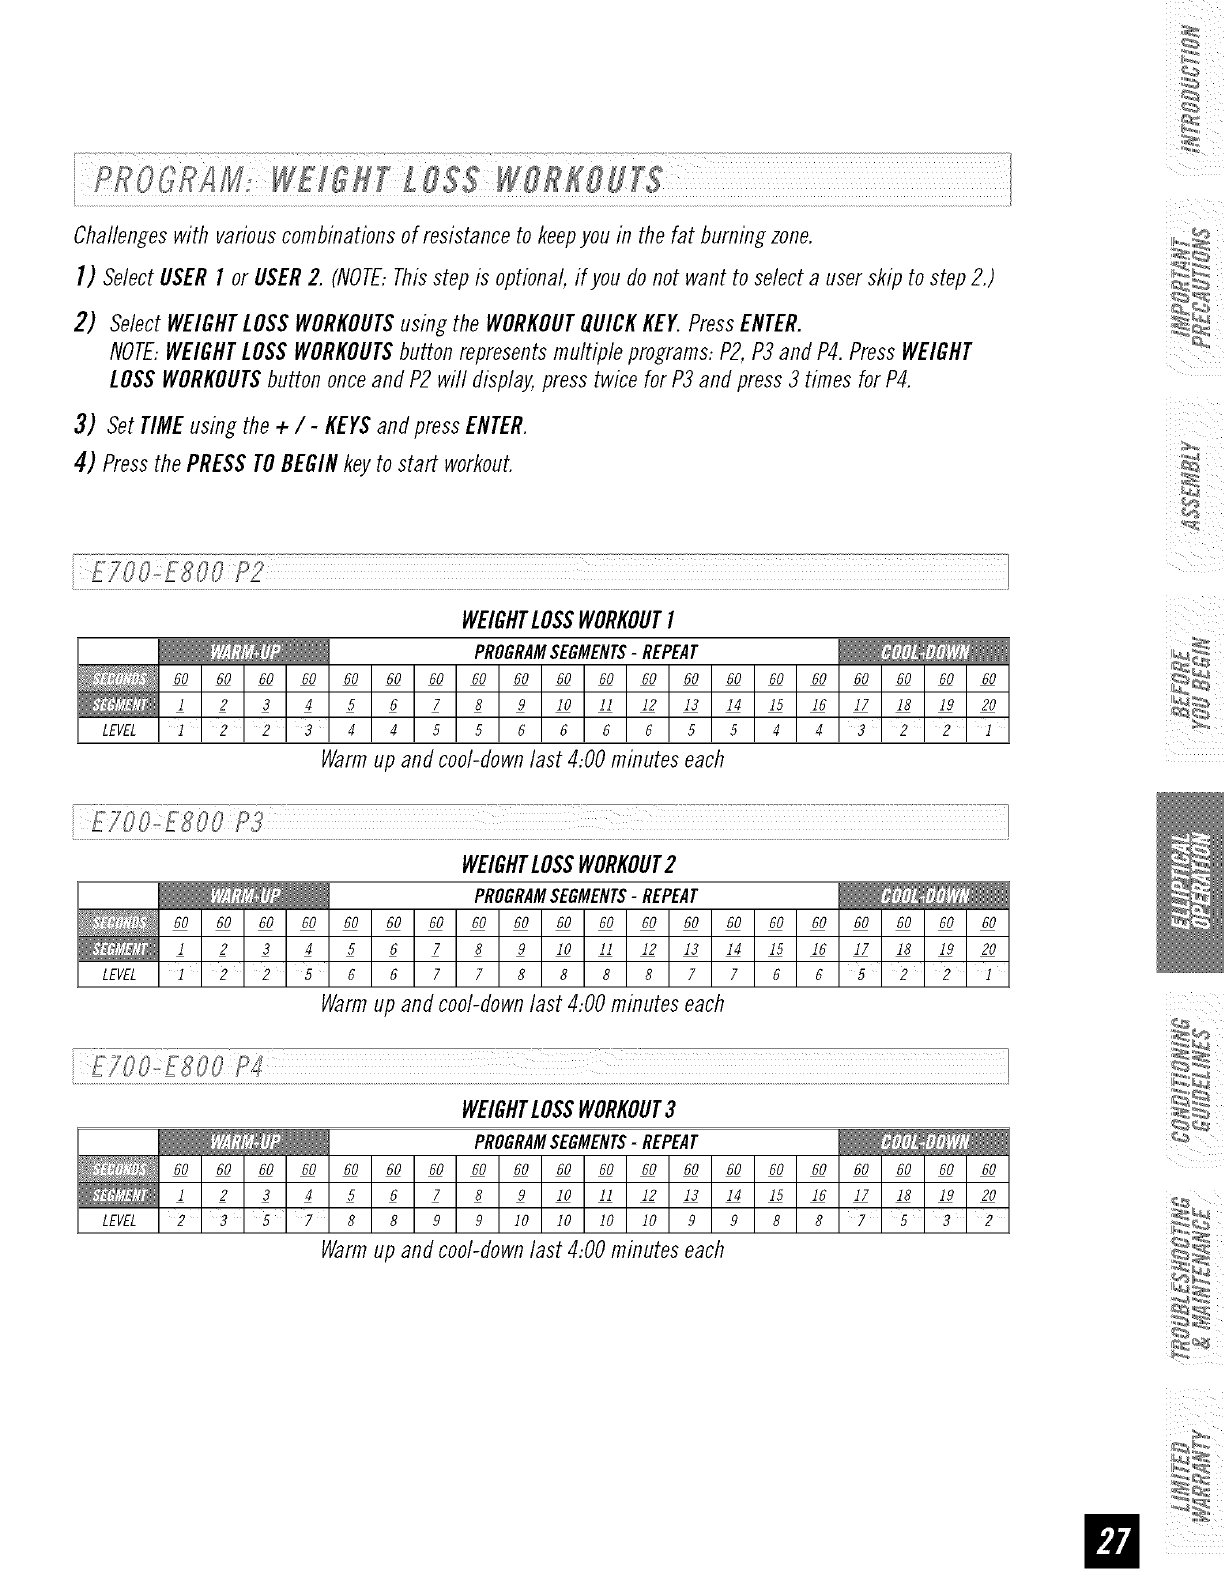
Challengeswith variouscombinationsof resistance to keepyou in the fat burningzone.
I) SelectUSERf or USER2. (NOTE:Thisstep is optional, #you do not want to select a userskip to step 2.)
2) SelectWEIGHTLOSSWORKOUTSusing the WORKOUTQUICKKEY.PressENTER.
NOTE:WEIGHTLOSSWORKOUTSbutton representsmultiple programs:P2,P3 and P4.Press WEIGHT
LOSSWORKOUTSbutton onceand P2 will display,press twice for P3 and press3 times for P4.
3) Set TIMEusing the + / - KEYSandpress ENTER.
4) Pressthe PRESSTOBEGINkeyto start workout.
i:::E::!J o:!L oo:PLL:LL¸]LLI:I:LLLL¸:IL:II:IilI::ILIL¸II:::::L_ !
WEIGHTLOSSWORKOUTI
PROGRAMSEGMENTS-REPEAT
60 60 60 60 60 60 60 60 60 60 60 60 60 60 60 60 60 60 60 60
1 2 3 4 5 6 7 8 9 I0 II 12 13 14 15 16 17 18 19 20
LEVEL12234455666655443221
Warmup and coo/-down/ast 4:00 minutes each
WEIGHTLOSSWORKOUT2
PROGRAMSEGMENTS-REPEAT
60 60 60 60 60 60 60 60 60 60 60 60 60 60 60 60 60 60 60 60
1 2 3 4 5 6 7 8 9 I0 II 12 13 14 15 16 17 18 19 20
LEVEL1225667788887766522I
Warmup and cool-downlast 4:00 minutes each
WEIGHTLOSSWORKOUT3
PROGRAMSEGMENTS-REPEAT
60 60 60 60 60 60 60 60 60 60 60 60 60 60 60 60 60 60 60 60
1 2 3 4 5 6 7 8 9 lO II 12 13 14 15 16 17 18 19 20
LEVEL 2 3 5 7 8 8 9 9 I0 I0 10 10 9 9 8 8 ? 3 2
Warm up and cool-down last 4:00 minutes each
%
4
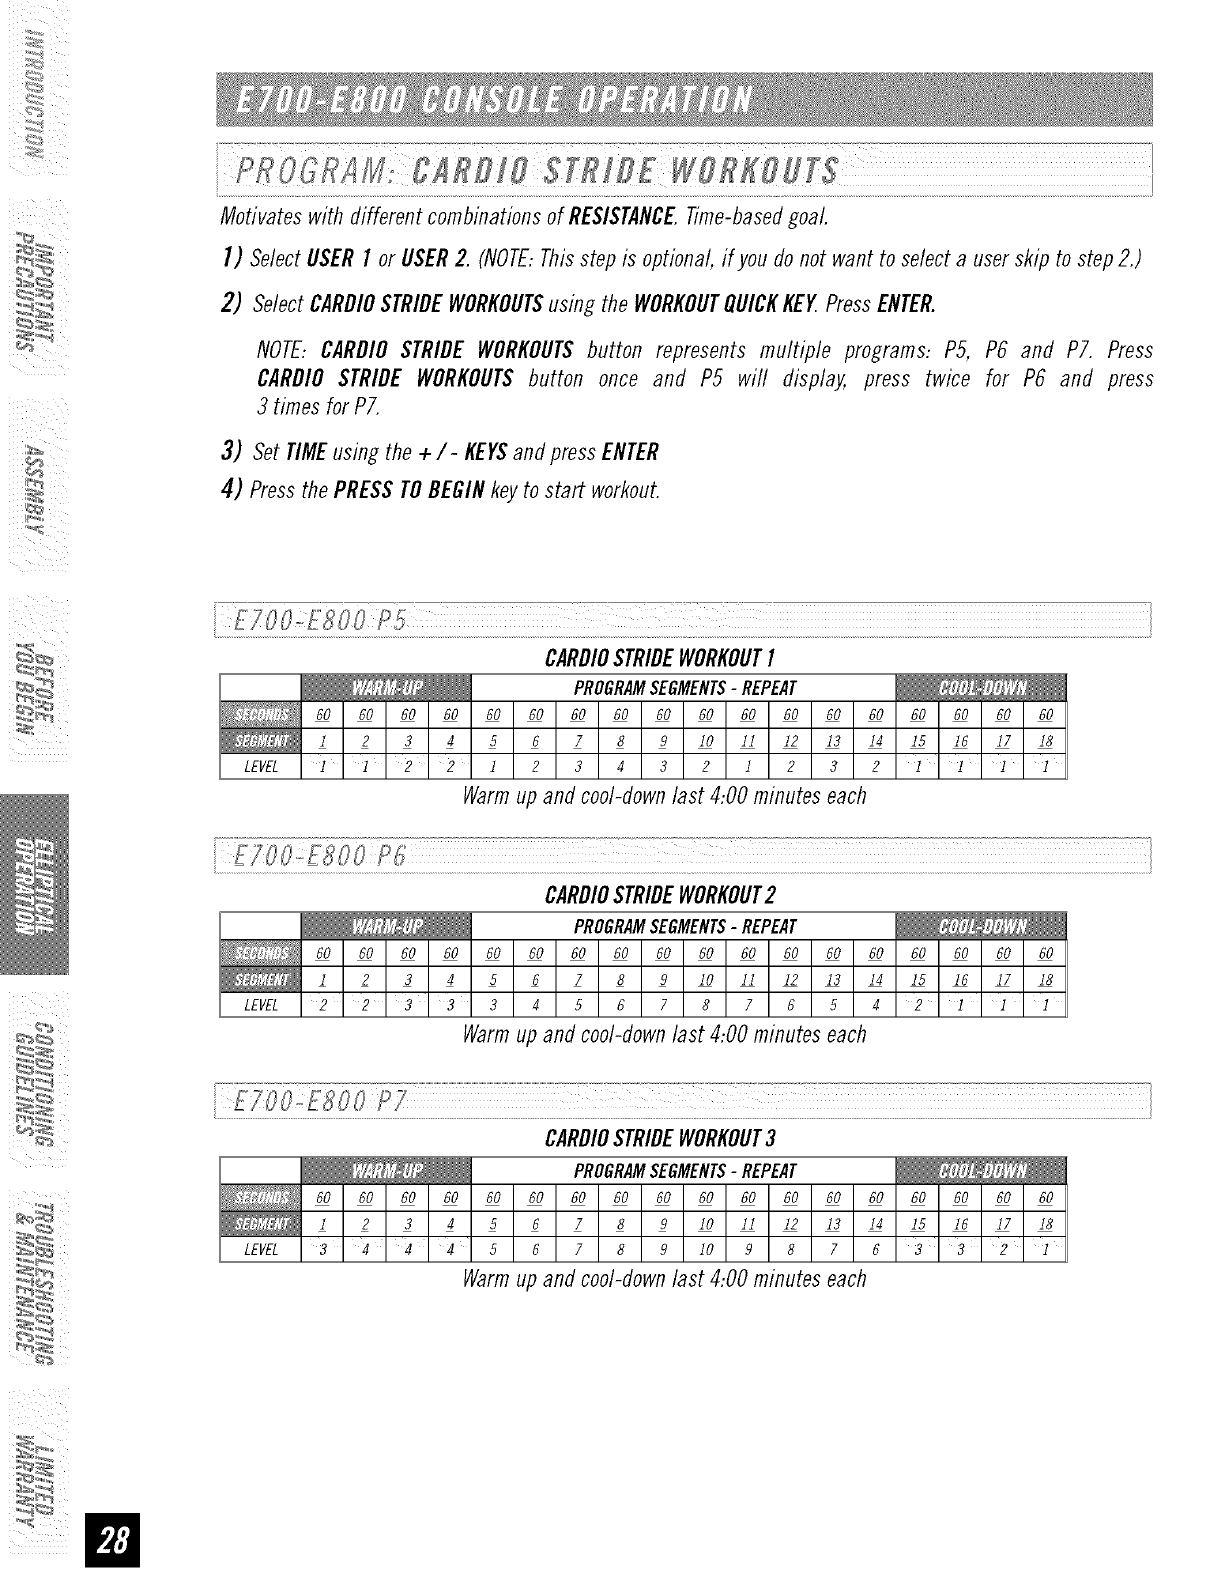
Motivateswith different combinationsof RESISTANCETime-basedgoal.
I) SelectUSERI or USER2. (NOTE:Thisstep is optional,#you do not want to selecta userskip to step2.)
2) SelectCARDIOSTRIDEWORKOUTSusing the WORKOUTQUICKKEY.PressENTER.
NOTE:CARD/OSTRIDE WORKOUTSbutton represents multiple programs: P5, P6 and P7. Press
CARDIO STRIDE WORKOUTSbutton once and P5 will display, press twice for P6 and press
3 times for PT.
3) Set TIMEusing the +/- KEYSandpressENTER
4) Pressthe PRESSTOBEGINkeyto start workout.
CARDIOSTRIDEWORKOUTI
PROGRAMSEGMENTS-REPEAT
60 60 60 60 60 60 60 60 60 60 60 60 60 60 60 60 60 60
1 2 3 4 5 6 7 8 9 I0 II 12 13 14 15 16 17 18
LEVEL ]12 212 3432 1232 1]]1
Warm up and cool-down last 4:00 minutes each
i FIIO,,[8OOPI; I
! I
CARDIOSTRIDEWORKOUT2
PROGRAMSEGMENTS-REPEAT
60 60 60 60 60 60 60 60 60 60 60 60 60 60 60 60 60 60
1 2 3 4 5 6 7 8 9 I0 II 12 13 14 15 16 17 18
LEVEL 2 2 3 3 3 4 5 6 7 8 7 6 5 4 2 ]]1
Warmup and cool-downlast 4:00 minutes each
ETOO.oESO0 P7 I
CARDIOSTRIDEWORKOUT3
PROGRAMSEGMENTS-REPEAT
60 60 60 60 60 60 60 60 60 60 60 60 60 60 60 60 60 60
1 2 3 4 5 6 7 8 9 I0 II 12 13 14 15 16 17 18
LEVEL 3 4 4 4 5 6 7 8 9 10 9 8 7 6 3 3 2 I
Warmup and cool-downlast 4:00 minutes each
:_
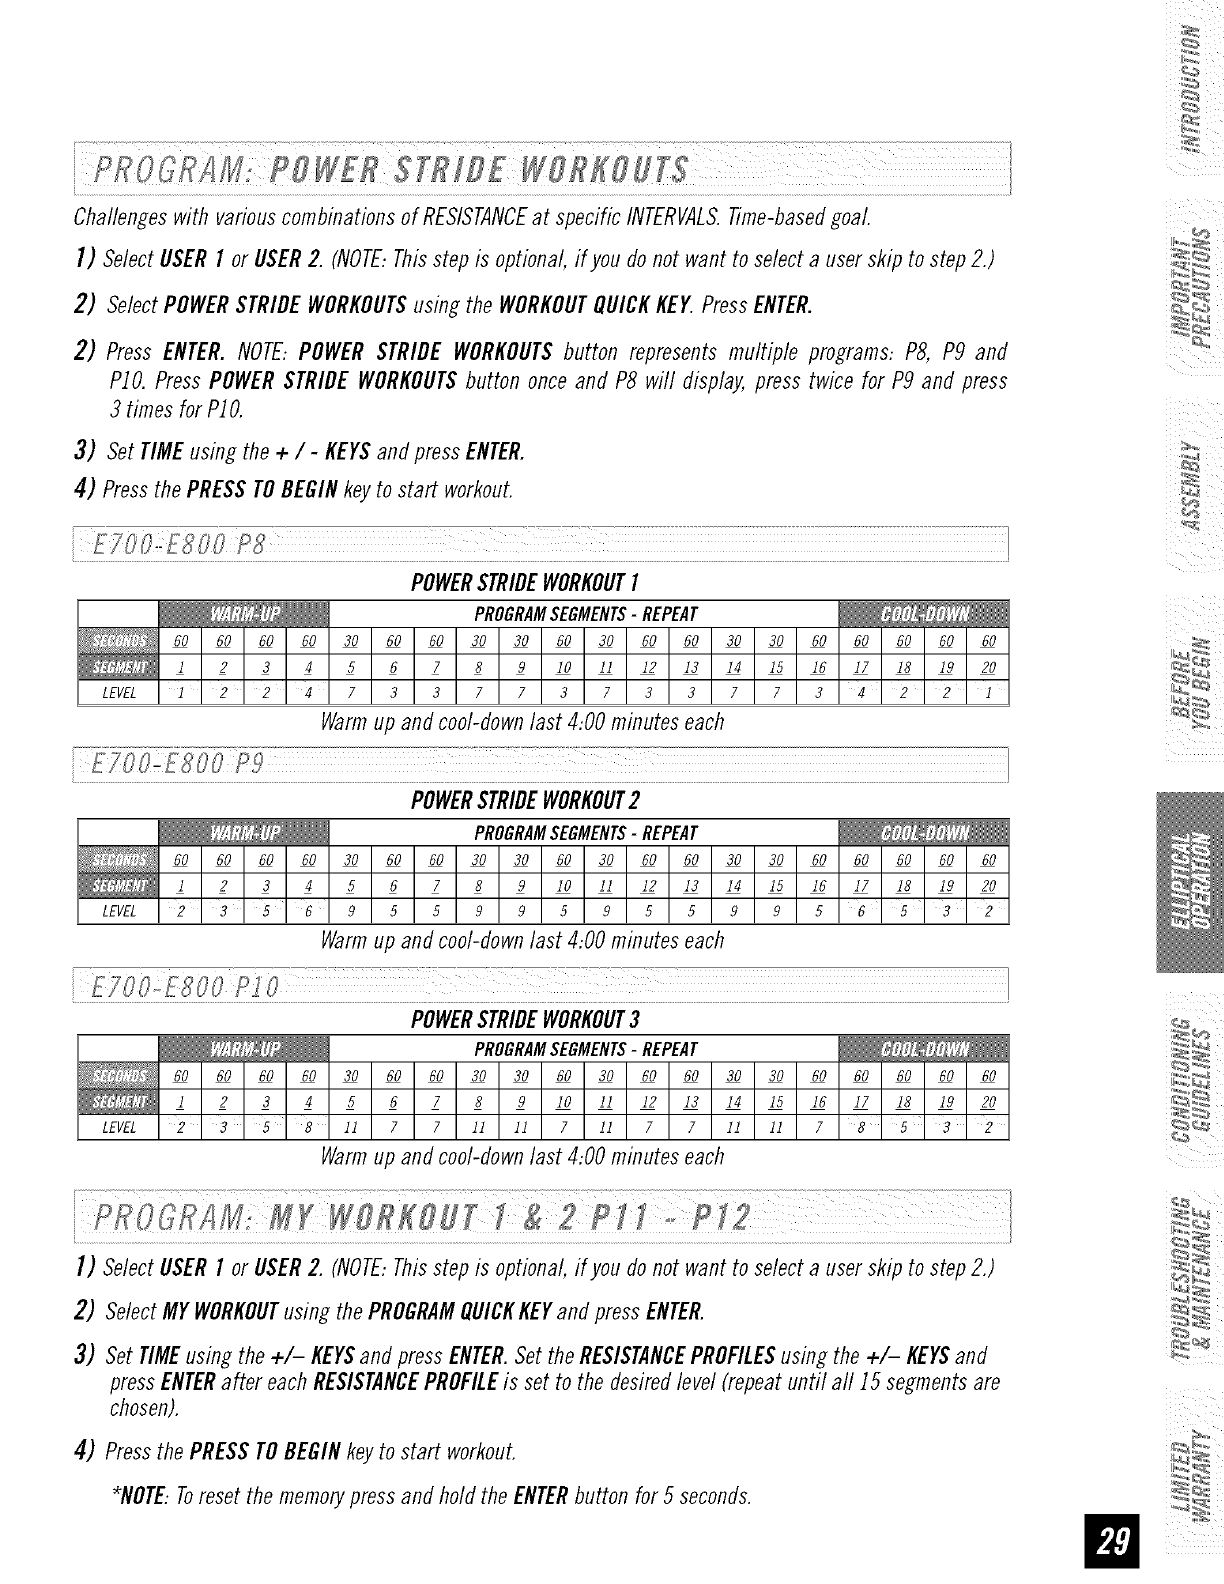
Challengeswith variouscombinationsof RESISTANCEat specific INTERVALS.Time-basedgoaL
I) SelectUSERI or USER2. (NOTE:Thisstep is optional, #you do not want to select a user skip to step 2.)
2) SelectPOWERSTRIDEWORKOUTSusing the WORKOUTQUICKKEY.PressENTER.
2) Press ENTER.NOTE:POWERSTRIDE WORKOUTSbutton represents multiple programs: PS, P9 and
PIO. PressPOWERSTRIDEWORKOUTSbutton once and P8 will display, press twice for P9 and press
3 times for PIO.
3) Set TIMEusing the + / -KEYSandpress ENTER.
4) Pressthe PRESSTOBEGINkey to start workout.
POWERSTRIDEWORKOUTI
PROGRAMSEGMENTS-REPEAT
60 60 60 60 30 60 60 30 30 60 30 60 60 30 30 60 60 60 60 60
1 2 3 4 5 6 7 8 9 I0 II 12 13 14 15 16 17 18 19 20
LEVELI 224733773733773422I
Warmup and cool-downlast 4:00 minutes each
£700_E800 P_9 ]
POWERSTRIDEWORKOUT2
PROGRAMSEGMENTS-REPEAT
60 60 60 60 30 60 60 30 30 60 30 60 60 30 30 60 60 60 60 60
1 2 3 4 5 6 7 8 9 I0 II 12 13 14 15 16 17 18 19 20
LEVEL 2 '3'5'69559959559956'5'32
Warmup and cool-downlast 4:00 minutes each
..................................................................................................................................................................................................!
POWERSTRIDEWORKOUT3
PROGRAMSEGMENTS-REPEAT
60 60 60 60 30 60 60 30 30 60 30 60 60 30 30 60 60 60 60 60
1 2 3 4 5 6 7 8 9 I0 II 12 13 14 15 16 17 18 19 20
LEVEL 2 35 8 11 7 7 11 11 7 11 7 7 11 11 7 8 5 3 2
Warmup and cool-downlast 4:00 minutes each
I) SelectUSERI or USER2. (NOTE:Thisstep is optional, #you do not want to select a user skip to step 2.)
2) SelectMYWORKOUTusing the PROGRAMQUICKKEYandpressENTER.
3) Set TIMEusing the +/- KEYSand press ENTER.Setthe RESISTANCEPROFILESusing the +/- KEYSand
pressENTERafter eachRESISTANCEPROFILEis set to the desiredlevel(repeatuntil all 15 segmentsare
chosen).
4) Pressthe PRESSTOBEGINkeyto start workout.
*NOTE:Toreset the memorypressand hold the ENTERbutton for 5 seconds.
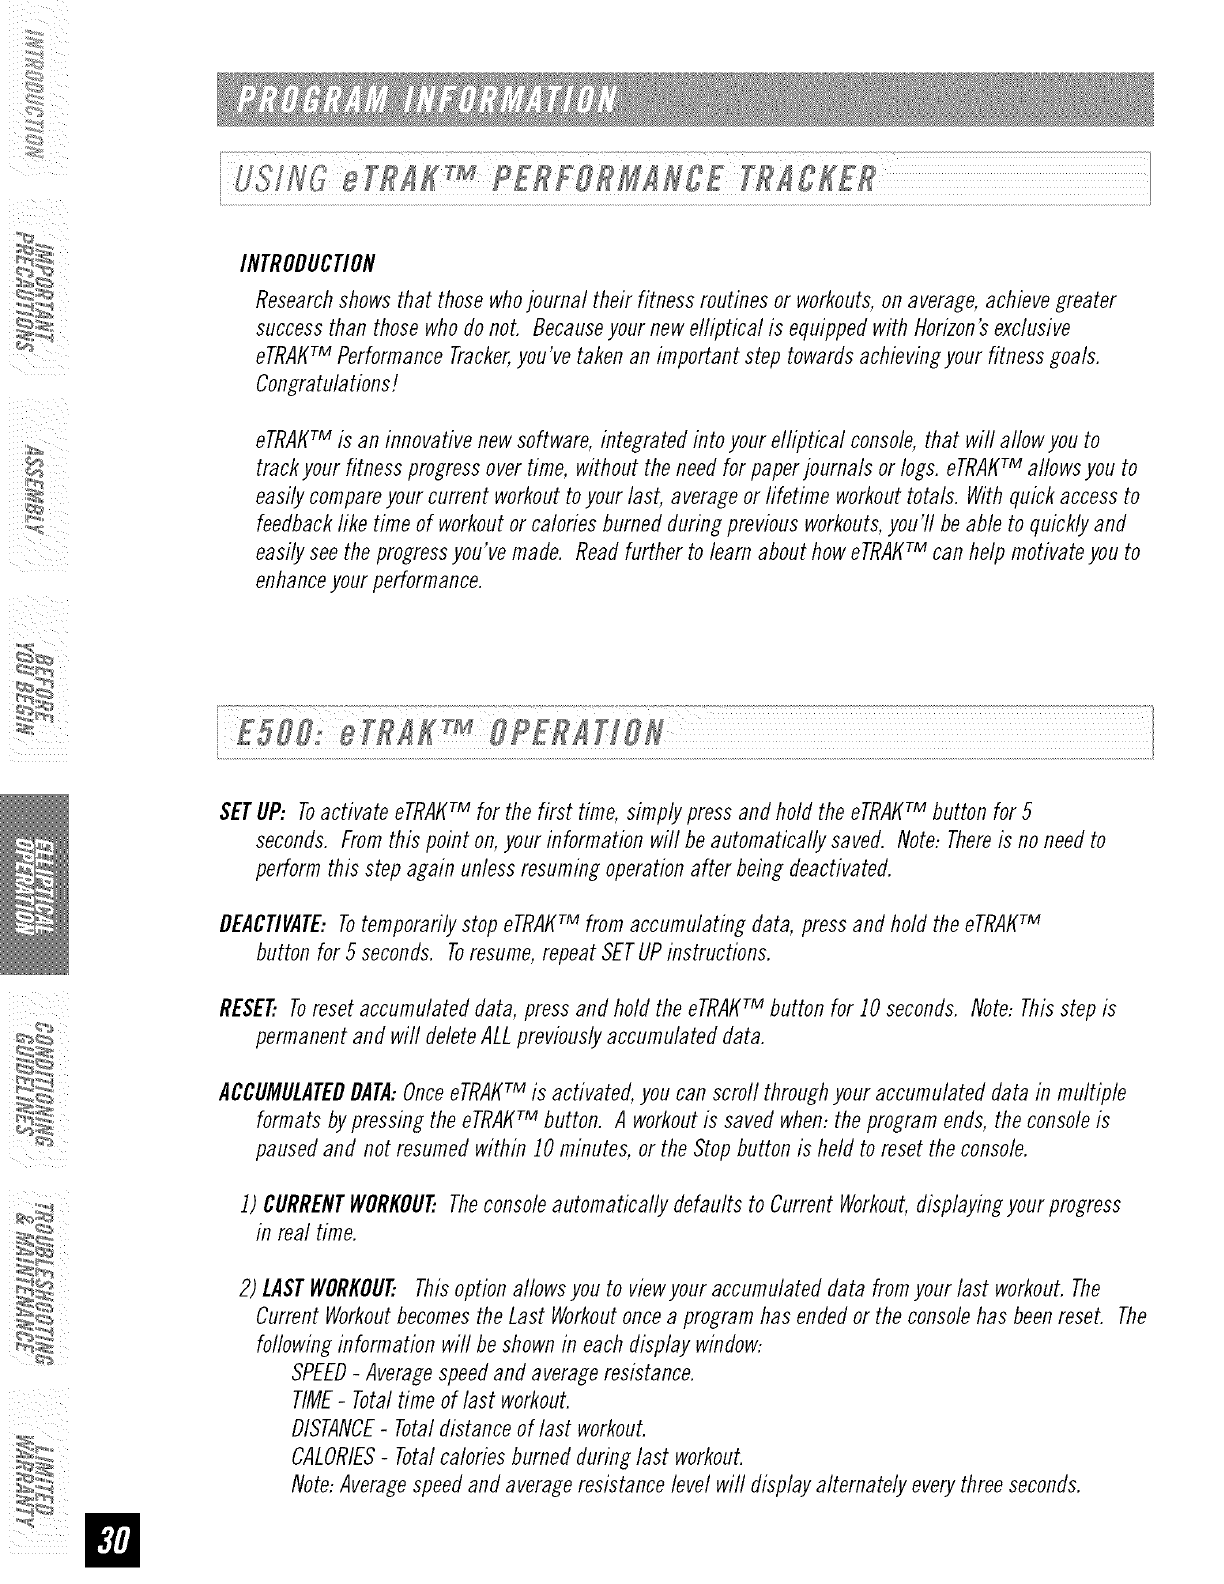
INTRODUCTION
Research shows that those who journal their fitness routines or workouts, on average, achieve greater
success than those who do not. Because your new efliptical is equipped with Horizon's exclusive
eTRAtffM Performance Tracker,you've taken an important step towards achieving your fitness goals.
Congratulations!
eTRAtffM is an innovative new software, integrated into your elliptical console, that will allow you to
track your fitness progress over time, without the need for paper journals or logs. eTRAtffM allows you to
easily compare your current workout to your last, average or fifetime workout totals. With quick access to
feedback fike time of workout or calories burned during previous workouts, you'll be able to quickly and
easily see the progress you've made. Read further to learn about how eTRAt(TM can help motivate you to
enhance your performance.
SETUP: Toactivate eTRAtffM for the first time, simplypressand hold the eTRAtffMbutton for 5
seconds. Fromthis point on,your information will be automatically saved. Note:Thereis no needto
performthis step again unlessresumingoperationafter being deactivated.
DEACtiVATE:Totemporarilystop eTRAt_TM from accumulating data, pressand hold the eTRAtffM
button for 5 seconds. Toresume,repeatSETUPinstructions.
RESET Toresetaccumulateddata, press and hold the eTRAI_TM button for JOseconds. Note:Thisstep is
permanentand will deleteALLpreviouslyaccumulateddata.
ACCUMULATEDDATA:OnceeTRAt_TM is activated,you can scroll throughyouraccumulateddata in multiple
formats by pressingthe eTRAt_TM button. A workoutis saved when:theprogram ends, the consoleis
pausedand not resumedwithin JOminutes, or the Stopbutton is held to reset the console.
J) CURRENTWORKOUTTheconsoleautomatically defaults to CurrentWorkout,displayingyour progress
in real time.
2) LASTWORKOUTThisoption allowsyou to viewyour accumulateddata fromyour last workout.The
Current Workoutbecomesthe Last Workoutoncea programhas endedor the consolehas beenreset. The
followinginformation will beshownin eachdisplay window:
SPEED-Averagespeedand averageresistance.
TIME-Totaltime of last workout.
DISTANCE-Totaldistance of last workout.
CALORIES-Totalcaloriesburned duringlast workout.
Note:Averagespeedand averageresistancelevelwifl displayalternately everythreeseconds.

3)AVERAGEWORKOU_Thisoption allowsyou to seeyour averageaccumulateddata for the last 30 workouts.
followinginformation will beshownin eachdisplay window:
SPEED-Averagespeedand averageresistance.
TIME-Averageworkouttime.
DISTANCE-Averageworkoutdistance.
CALORIES_Averagecaloriesburned.
Note:Averagespeedand averageresistancelevel will displayalternately everythreeseconds.
4) LIFETIMETOTAL:Thisoption aflowsyou to viewthe total accumulateddata fromyour first workout
toyour last savedworkout.Thefoflowinginformation will be shownin each display window:
SPEED-Averagespeedand averageresistance.
TIME_Totalaccumulatedtime. Note:If time is greaterthan 59:59, the time wifl no longer
displayminutes and will displayhours only.
DISTANCE-Totalaccumulateddistance.
CALORIES_Averagecaloriesburned.
Note:Averagespeedand averageresistancelevel wifl displayalternately everythreeseconds.
The
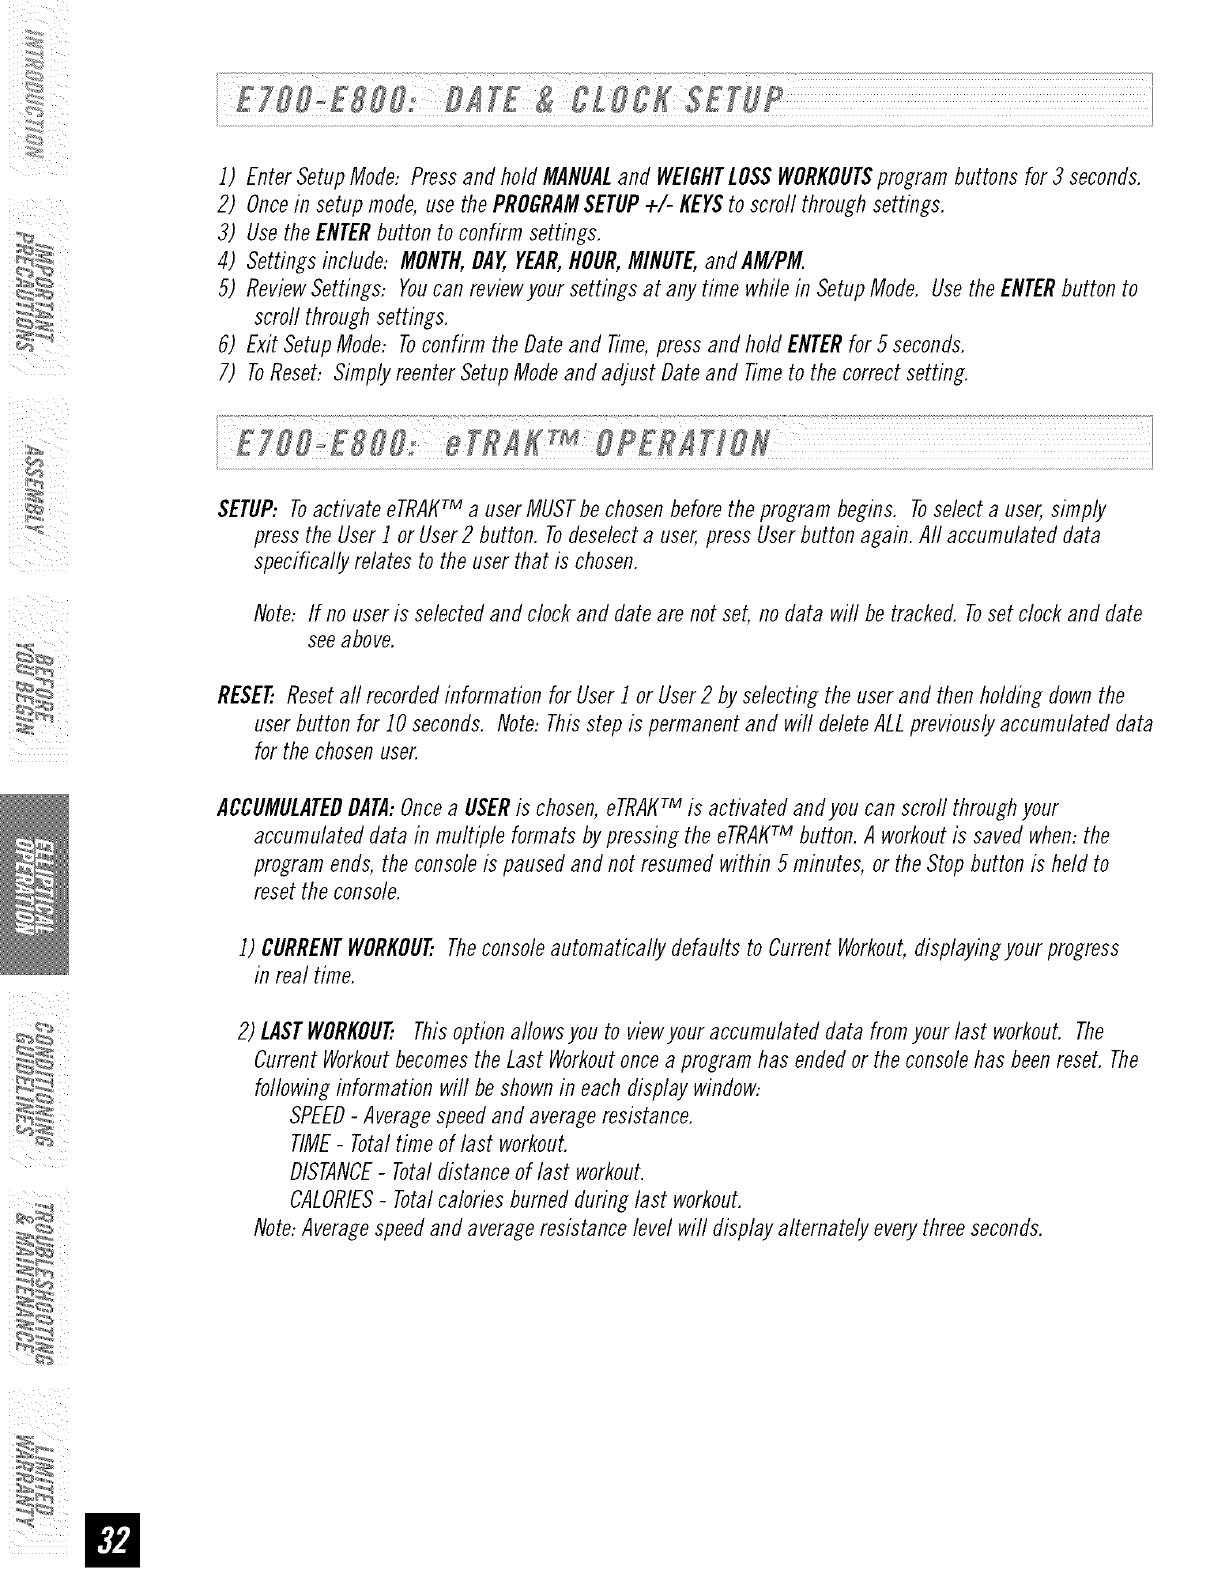
J) EnterSetupMode: Pressand hold MANUALand WEIGHTLOSSWORKOUTSprogrambuttons for3 seconds.
2) Oncein setup mode,use the PROGRAMSETUP+/- KEYSto scroll through settings.
3) Usethe ENTERbutton to confirm settings.
4) Settingsinclude: MONTH,DAY,YEAR,HOUR,MINUTE,andAM/PM.
5) ReviewSettings: Youcan reviewyour settings at any time while in SetupMode. UsetheENTERbutton to
scrodthrough settings.
6) ExitSetupMode: Toconfirm the Date and Time,pressand hold ENTERfor 5 seconds.
7) ToReset: SimplyreenterSetupModeand adjust Dateand Timeto the correctsetting.
SETUP: Toactivate eTRAKrM a user MUST be chosen before the program begins. Toselect a user, simply
press the User J or User2 button. Todeselect a user, press User button again. All accumulated data
specifically relates to the user that is chosen.
Note: If no useris selectedand clock and dateare not set, no data will be tracked. Tosetclock and date
seeabove.
RESEEResetall recordedinformation for UserJor User2 byselecting the userand then holding downthe
userbutton for JOseconds. Note:Thisstep is permanentand will deleteALLpreviouslyaccumulateddata
for the chosenuser.
ACCUMULATEDDATA:Once a USERis chosen, eTRAKTMis activated and you can scrod through your
accumulated data in multiple formats by pressing the eTRAKrM button. A workout is saved when: the
program ends, the console is paused and not resumed within 5 minutes, or the Stop button is held to
reset the console.
J) CURRENTWORKOUT:Theconsoleautomatically defaults to Current Workout,displayingyour progress
in real time.
2) LASTWORKOUT..Thisoption allowsyou to viewyouraccumulateddata fromyour last workout. The
CurrentWorkoutbecomesthe Last Workoutoncea programhas endedor the consolehas beenreset. The
followinginformation will beshownin eachdisplay window:
SPEED-Averagespeedand averageresistance.
TIME-Totaltime of last workout.
DISTANCE-Totaldistance of last workout.
CALORIES-Totalcaloriesburned during last workout.
Note:Averagespeedand averageresistancelevel will displayalternately everythreeseconds.
:_
3) WEEKLYGOAL:Thisoption aflowsyou to set and viewyour weeklytime or distancegoal basedon a
calendar weekand will run concurrentlywith the WEEKLYTOTALfunction. Thefollowinginformation will
beshownin eachdisplay window:
CLOCK/DATE
"GOAL"-Indicatesthe weeklygoalyou set.
"LEFT"- Indicates the time or distanceyou haveleft to completeto meetyour weeklygoal.
"GOALDONE"-Indicates thegoal has beencompleted.
TIMEor DISTANCE-Thetotal time or distance goalyou selectedanti the time or distanceyou haveleft to
completeto meetyour weeklygoal.
Note:
J. The "GOAL" and "LEFT" will display alternately every 3 seconds.
2. If the date and clock are not set and/or a weekly goal is not set, WEEKLYGOALwill displayzeros.
3. The WeeklyGoal will reset at the end of each week and will have to be set again using the Weekly
Goal Setup instructions.
4) WEEKLYTOTAL:Viewyour accumulatedclatafrom the last Sundayto the present day. Note: This
data is basedon weekto date NOTthe previoussevendays. Forinstance,if you havenot usedthe
machinesince Sunday.the consolewill reaclzeros. Thefollowinginformation will beshownin each
display window:
SPEED-Averagespeedand averageresistanceof weeklyworkouts.
TIME-Totaltime of weeklyworkout.
DISTANCE-Totaldistance of weeklyworkouts.
CALORIES-Averageweeklycalories burned.
Note:Averagespeedand averageresistancelevel will displayalternately everythree seconds.
If theDate anti Clockare not set, WeeklyTotalwill default to the Last Workoutdata.
5) MONTHLYTOTAL:Viewyour accumulateddata from the first clayof the month to thepresent day.
Note:Thisdata is basedon month to date NOTthepreviousthirty days. Forinstance, if youhavenot
usedthe machinesince the first of the month, the consolewill read zeros.Thefollowing information
will be shownin each display window:
SPEED-Averagespeedand averageresistance of monthly workouts.
TIME-Totaltime of monthlyworkout.
DISTANCE-Totaldistance of monthly workouts.
CALORIES-Averagemonthlycalories burned.
Note:Averagespeedand averageresistancelevel will displayalternately everythreeseconds.
If the Dateand Clockare not set, Monthly Totalwifl default to equal the Last Workoutdata.
6) LIFETIMETOTAL:Thisoption allowsyou to viewthe total accumulateddata fromyour first workout
toyour last savedworkout.Thefoflowinginformation will be shownin each display window:
SPEED-Averagespeedand averageresistance.
TIME-Totalaccumulatedtime. Note:If time is greaterthan 59:59, the time will no longer
displayminutes and will displayhours only.
DISTANCE-Totalaccumulateddistance.
CALORIES-Averagecaloriesburned.
Note:Averagespeedand averageresistancelevel will displayalternately everythreeseconds.
I) SelectUSERI or USER2.
2) PresseTRAKTMbutton andscroll to WEEKLYGOAL.
3)
4)
Enterthe SetupMode:PressENTER.Use÷/- KEYSto set a timegoal (leavetime at 00:00 if you want to set
a distancegoal).
Press ENTER button again and use the ÷/- KEYSto set a distance goal. If the distance is changed from
0.00, distance will be the goal.
Note: Youmay only set a time or distance goal, not both.
5) PressENTERbutton again to exit the SETUPMODE.
HANDLEBARS
Placethe palm of your hands directlyon the grip pulsehandlebars.Both hands must grip the barsforyour
heart rate to register.It takes 5 consecutiveheart beats (15-20 seconds)foryour heart rate to register. When
gripping the pulse handlebars,donot grip tightly. Holdingthe grips tightly mayelevateyour bloodpressure.
Keepa loose,cupping hold. Youmay experiencean erratic readoutif consistentlyholding thegrip pulse
handlebars.Makesureto clean the pulsesensorsto ensurepropercontact can bemaintained.
I) Connecttheincluded AUDIOADAPTORCABLEto theAUDIOINlACKon the top of the CONSOLEand the
HEADPHONElACKonyour CD/MP3 player.
2) Useyour CB/ MP3player buttons to adjust songsettings.
NOTE:If you don't want to usethe speakers,you can plugyour headphonesinto theAUDIOOUTIACKat
the bottomof the CONSOLE.
3) Removethe AUDIOADAPTORCABLEwhennot in use.
ALWAYSCONSULTYOURPHYSICIANBEFOREBEGINNINGANEXERCISEPROGRAM.
HOWOFTEN?(Frequencyof Workouts)
The American Heart Association recommends that you exercise at least 3 to 4 days per week to maintain
cardiovascular fitness. If you ha ve other goals such as weight or fat loss, you will achieve your goal faster with
more frequent exercise. Whether it's 3 days or 6 days, remember that your ultimate goal should be to make
exercise a lifetime habit. Many people are successful staying with a fitness program if they set aside a specific
time of day to exercise. It doesn't matter whether it's in the morning before breakfast, during lunch hour or while
watching the evening news. What's more irnportant is that it's a time that allows you to keep a schedule, and a
time when you won't be interrupted. Tobe successful with your fitness program, you have to make it a priofity in
your life. So decide on a time, puff out your day planner and pencil in your exercise times for the next month!
HOWLONG?(Durationof Workouts)
For aerobic exercise benefits, it's recommended that you exercise from between 24 and 60 minutes per session.
But start slowly and gradually increase your exercise times. If you've been sedentary during the past year, it may
be a good idea to keep your exercise times to as little as five minutes initially. Yourbody will need time to adjust
to the new activity. If your goal is weight loss, a longer exercise session at lower intensities has been found to
be most effective. A workout time of 48 minutes or more is recommended for best weight loss results.
HOWHARD?(Intensityof Workouts)
How hard you workout is also determined by your goals. If you use your machine to prepare for a 5K workout,
you will probably work out at a higher intensity than if your goal is general fitness. Regardless of your long
term goals, always begin an exercise program at low intensity. Aerobic exercise does not have to be painful to
be beneficia!! There are two ways to measure your exercise intensity. The first is by monitoring your heart rate
(using the grip pulse handlebars and the second is by evaluating your perceived exertion level (this is simpler
than it sounds!).
PERCEIVEDEXERTIONLEVEL
A simple way to gauge your exercise intensity is to evaluate your perceived exertion level. While exercising, if you
are too winded to maintain a conversation without gasping, you are working out too hard. A good rule of thumb
is to work to the point of exhilaration, not exhaustion. If you cannot catch your breath, it's time to slow down.
Always be aware of these warning signs of overexertion.
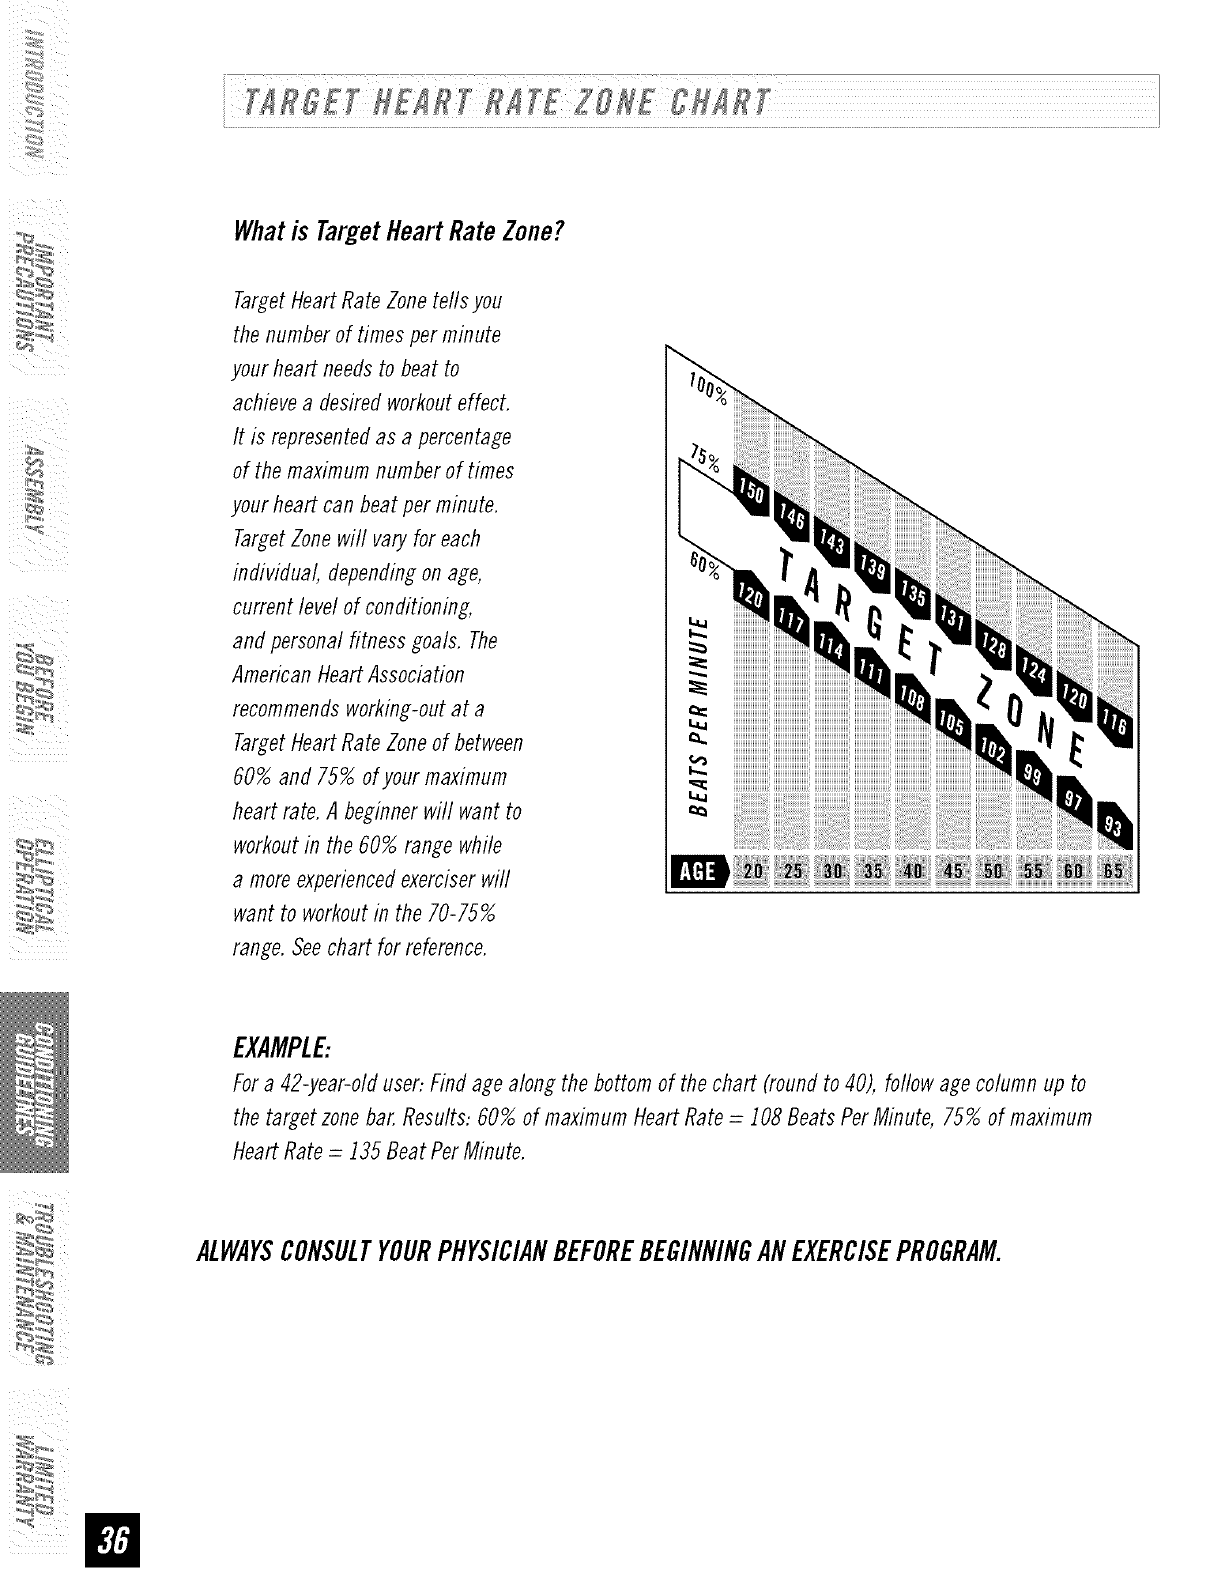
Whatis TargetHeartRateZone?
_'_
Target Heart Rate Zone tefls you
the number of times per minute
your heart needs to beat to
achieve a desired workout effect.
It is represented as a percentage
of the maximum number of times
your heart can beat per minute.
Target Zone will vary for each
individual, depending on age,
current level of conditioning,
and personal fitness goals. The
American Heart Association
recommends working-out at a
Target Heart Rate Zone of between
60% and 75% of your maximum
heart rate. A beginner will want to
workout in the 60% range while
a more experienced exerciser will
want to workout in the 70-75%
range. Seechart for reference.
|
EXAMPLE:
For a 42-year-old user: Find age along the bottom of the chart (round to 40), follow age column up to
the target zone bar. Results: 60% of maximum Heart Rate = 108 Beats Per Minute, 75% of maximum
Heart Rate = 135 Beat Per Minute.
ALWAYSCONSULTYOURPHYSICIANBEFOREBEGINNINGANEXERCISEPROGRAM.
:_
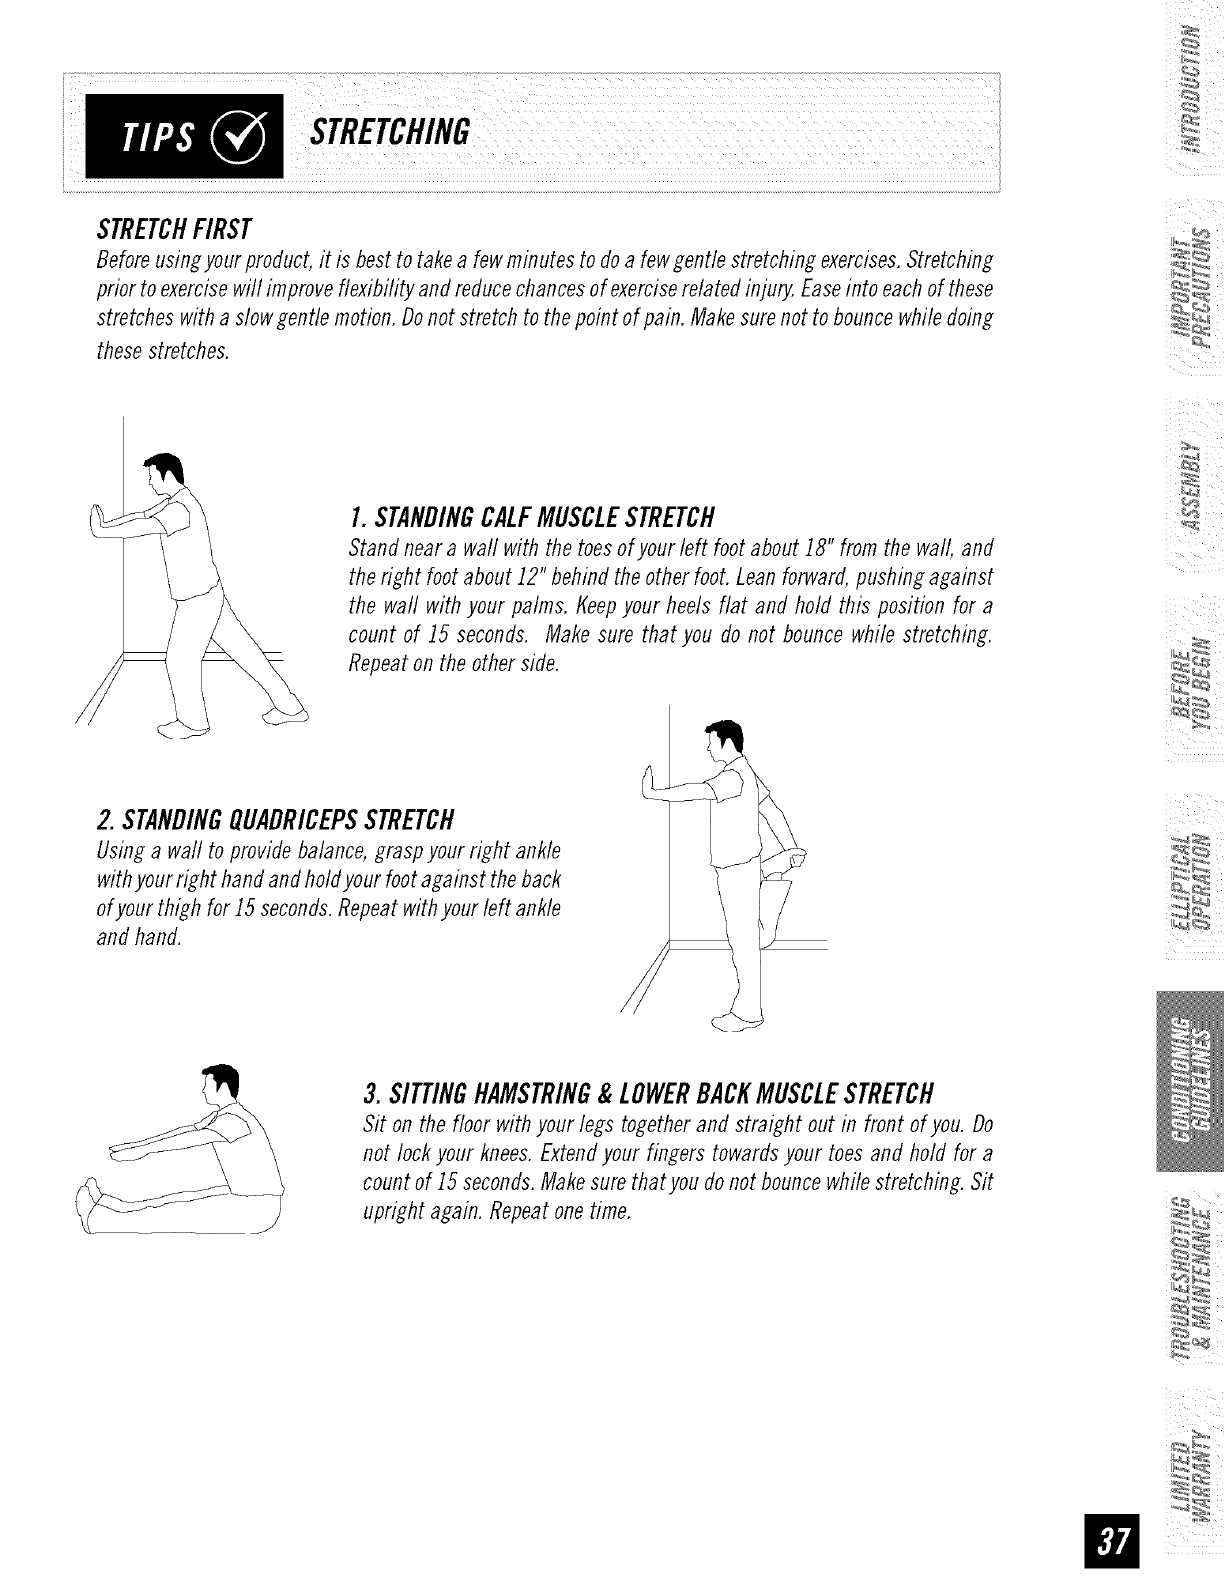
STRETCHFIRST
Before using your product, it is best to take a few minutes to do a few gentle stretching exercises. Stretching
prior to exercise will improve flexibility and reduce chances of exercise related inju_ Ease into each of these
stretches with a slow gentle motion. Do not stretch to the point of pain. Make sure not to bounce while doing
these stretches.
I. STANDINGCALFMUSCLESTRETCH
Stand near a wall with the toes of your left foot about 18" from the wall, and
the right foot about 12" behind the other foot. Lean forward, pushing against
the waft with your palms, t_eepyour heels flat and hold this position for a
count of 15 seconds. Make sure that you do not bounce while stretching.
Repeat on the other side.
2. STANDINGQUADRICEPSSTRETCH
Using a wall to provide balance, grasp your right ankle
with your right hand and holdyour foot against the back
of your thigh for 15 seconds. Repeat with your left ankle
and hand.
3. SITTINGHAMSTRING& LOWERBACKMUSCLESTRETCH
Sit on the floor with your legs together and straight out in front of you. Do
not lock your knees. Extend your fingers towards your toes and hold for a
count of 15 seconds. Make sure thatyou do not bounce while stretching. Sit
upright again. Repeat one time.
THEIMPORTANCEOFWARMUP& COOLDOWN
WARMUP
The first 2 to 5 minutes of a workout should be devoted to warming up. The warm-up will limber your
muscles and prepare them for more strenuous exercise. Make sure that you warm-up on your product at a
slow pace. The warm up should gradually bring your heart rate into your Target Heart Rate Zone.
COOLDOWN
Never stop exercising suddenly! A cool-flown period of 3-5 minutes allows your heart to readjust to the
decreased demand. Make sure that your cool down period consists of a very slow pace to allow your heart
rate to lower. After the cool-down, repeat the stretching exercises fisted above to loosen and relax your
muscles.
ACHIEVINGYOURFITNESSGOALS
An important step in developing a long term fitness program is to determine your goals. Is your primary
goal forexercising to lose weight? Improve muscle? Reduce stress? Prepare for the spring racing schedule?
t(nowing what your goals are will help you develop a more successful exercise program. Below are some
commonexercisegoals:
•Weight Loss -lower intensity, longer duration workouts
• Improve Body Shape and Tone-interval workouts, alternate between high and low intensities
• Increased Energy Level -more frequent daily workouts
• Improved Sports Performance -high intensity workouts
• Improved Cardiovascular Endurance -moderate intensity, longer duration workouts
If possible try to define your personal goals in precise, measurable terms, and then putyour goals in writing.
Themore specific you can be, the easier it will be to track your progress. If your goals are long term, divide
them up into monthly and weekly segments. Longer term goals can lose some of the immediate motivation
benefits. Short term goals are easier to achieve. Yourconsole provides you with several readouts that can
be used to record your progress. Youcan track Distance, Calories or Time.
KEEPINGANEXERCISEDIARY
Tomake your personal exercise log bookyou can print them off of your computer by going to:
:_
www.horizonfitness,com/_uifles/week!vlo_.pflf
www.horizonfitness,com/_uifles/monthlyIo_,pflf
As your fitness improves, you can look back and see how far you've come!
YourHorizonFitness elliptical is designedto be reliable. However,if you do experienceproblems with your
elliptical, pleasereferencethe troubleshootingguide listed below.
PROBLEM:Theconsoledoes not light up.
$OL UTJO_: Verifythe foflowing:
•Theoutlet the machine is plugged into is functional Doublecheck that the breaker has not tripped.
• Thecorrect cord is being used.Onlyuse the cord provided or authorizedby HorizonFitness.
• Thecord is not pinched or damagedand is properlyplugged into the outlet ANDthe machine.
• Thepower switch is turned to the ONposition (maynot apply to aft models).
• Turnoff the machine and unphlg power cord. Removethe consoleand check that aft connectionsto the console
are secureand not damaged or pinched.
NOTE:If your consoleusesbatteries, they mayneedto be replaced.
PROBLEM:Theconsolelightsup but the Time/RPM'sdo not count.
SOLUTION:Verifythefoflowing:
•Turnoff machine and unplug power cord.Removethe consoleand check that aft connections to the consoleare
secureand not damaged or pinched.
•If doing the above does not fix the problem, the speed sensor and/or magnet may have become dislodged or
damaged.
PROBLEM:Theresistance levelsseem to be incorrect, seemingtoo hard or too easy.
$OL UTIOH,: Verifythe following:
•Thecorrect adapter is being used. Onlyuse the adapter provided or authorizedby HorizonFitness.
•Reset the consoleand allow the resistance to reset to the default position. Restart and retry the resistance levels.
PROBLEM:Theroller wheelsappear to be leavingparticles on the guide rails.
$_: Thisis considerednormal wear of the elliptical wheels.
Toremove,simply wipe off the roller wheelsand guide rails with a damp cloth.
PROBLEM:Theelliptical makes a squeaking or chirping noise.
$OL UTIOH: Verifythe following:
•Theelliptical is on a level surface.
•Loosenaft bolts attached during the assemblyprocess,grease the threads, and tighten again.
PROBLEM:Thereis no heart rate reading.
$OLUfJON: Remove the console and verify that the heart rate cables are attached properly, making
sure that the cables are securely inserted into the console.
YOUMAYEXPERIENCEANERRATICREADOUTUNDERTHEFOLLOWINGCONDITIONS:
•Gripping the heart rate handlebars too tight. Tryto maintain moderate pressure while holding onto the
heart rate handlebars.
• Constant movement and vibration due to constantly holding the heart rate grips while exercising.
• Whenyou are breathing heavily during a workout.
• Whenyour hands are constricted by wearing a ring.
• Whenyour hands are dry or cold. Trymoistening your palms or rubbing them together to warm.
• Anyone with heavy arrhythmia.
• Anyone with arteriosclerosis or peripheral circulation disorder.
• Anyone whose skin on the measuring palms is especially thick.
NOTE:Outside interference sources such as computers, motors and fluorescent lights may cause the heart
rate reading to be erratic. Check your exercise environment for sources of interference such as high power lines,
large motors, etc.
If the above troubleshooting section does not remedy the problem, discontinue use and turn the power off.
The following information may be asked of you when you call Please have these items readily available:
• Model Name
• Serial Number
• Date of Purchase (receipt or credit card statement)
In order for Customer TechSupport to service your elliptical they may need to ask detailed questions about the
symptoms that are occurring. Some troubleshooting questions that may be asked are:
• How long has this problem been occurring?
• Does this problem occur with every use? With every user?
• If you are hearing a noise, does it come from the front, back or inside? What kind of noise is it (thumping,
grinding, squeaking, chirping etc.)?
• If you are having a resistance problem what is occurring? Is the resistance always too hard or too easy?
Does the resistance respond when pushing the buttons on the console? Does the resistance constantly cycle
through the levels during the workout?
• Has the machine been maintained per the maintenance schedule?
• Does the problem occur when using the handlebars? Without using the handlebars?
:_
Answeringtheseand otherquestionswill give the techniciansthe ability to sendproperreplacementparts and
the servicenecessaryto getyou andyourHorizonFitnesselliptical running again!
ARETHESOUNDSMYELLIPTICALMAKESNORMAL?
Our ellipticals are some of the quietest available because they use belt drives and friction free magnetic
resistance. Weuse the highest grade bearings and belts to minimize noise. However, because the resistance
system itself is so quiet, you will occasionally hear other slight mechanical noises. Unlike older, louder
technologies, there are no fans, friction belts, or alternator noises to mask these sounds on our ellipticals.
Thesemechanical noises, which may or may not be intermittent, are normal and are caused by the transfer
of significant amounts of energy to a rapidly spinning flywheel Aft bearings, belts and other rotating parts
will generate some noise which wifl transmit through the casing and frame. It is also normal for these
sounds to change slightly during a workout and over time because of thermal expansion of the parts.
WHYIS THEELLIPTICALI HADDELIVEREDLOUDERTHANTHEONEATTHESTORE?
All fitness products seem quieter in a large store showroom because there is generally more background
noise than in your home. Also, there will be less reverberation on a carpeted concrete floor than on a wood
overlay floor. Sometimes a heavy rubber mat will help reduce reverberation through the floor. If a fitness
product is placed close to a wall, there will be more reflected noise.
HOWLONGWILLTHEDRIVEBELTLAST?
The computer modeling we have done indicated virtually thousands of maintenance free hours. Belts are
now commonly used in far more demanding applications such as motorcycle drives.
CANI MOVETHETRAINEREASILYONCEIT ISASSEMBLED?
Yourelliptical has a pair of transport wheels built into the front legs. It is easy to move your elliptical by
rolling it on the front transport wheels. It is important that you place your elliptical in a comfortable and
in viting room. Yourefliptical is designed to use minimal floor space. Many people will place their eflipticals
facing the TVor a picture window. If at aft possible, avoid putting your elliptical in a unfinished basement.
Tomake exercise a desirable daily activity for you, the elliptical should be in a comfortable setting.
CANI PEDALBACKWARDSONMYELLIPTICAL?
Yourelliptical allows you to pedal both forward and backwards to exercise and strengthen a wider range
of muscles.
WHATKINDOFROUTINEMAINTENANCEISREQUIRED?
We use sealed bearings throughout our ellipticals so lubrication is not needed. The most important
maintenance step is to simply wipe your perspiration off the trainer after each use.
HOWDOI CLEANMYELLIPTICAL?
Clean with soap and water cleaners only. Never use solvents on plastic parts.
Cleanlinessof your elliptical and its operating environment will keep maintenance problems
and servicecalls to a minimum. Forthis reason,HorizonFitness recommendsthat the following
preventivemaintenanceschedulebe followed.
AFTEREACHUSE(DAILY)
Turn off the elliptical by unplugging the power cord from the wall outlet
•Wipe down the elliptical with a damp cloth. Never use solvents, as they can cause damage to the
elliptical.
• Inspect the power cord. If the power cord is damaged, contact Horizon Fitness.
• Make sure the power cord is not underneath the elliptical or in any other area where it can become
pinched or cut.
Toremove power from the elliptical, the power cord must be disconnected from
the wall outlet.
WEEKLY
Clean underneath the elliptical, following these steps:
• Turn off the efliptical
• Move the efliptical to a remote location.
• Wipe or vacuum any dust particles or other objects that may have accumulated underneath the
elliptical.
•Return the elliptical to its previous position.
EVERYMONTH
• Inspect all assembly bolts and pedals on the machine for proper tightness.
• Clean any debris off of the pedal arm wheels and guide rails.
:_
,_

FRAME•LIFETIME
Horizon Fitness warrants the frame
against defects in workmanship
and materials for the lifetime of the
original owner. (Theframe is defined
as the weldedmetal base of the unit
and does not include any parts that
can be removed.)
E500: BRAKE•25 YEARS
WeightCapacity =275/bs
Horizon Fitness warrants the brake
against defectsin workmanshipand
materials for the period of twenty-
fiveyears of the original owner.
E700-ESO0:BRAKE•LIFETIME
WeightCapacity =300 Ibs
Horizon Fitness warrants the brake
against defects in workmanship
and materials for the fifetime of the
original owner.
ELECTRONICS& PARTS• I YEAR
HorizonFitnesswarrantstheelectronic
componentsand all original parts for
a period of one year from the date
of original purchase, so longas the
deviceremains in the possessionof
the original owner.
LABOR• I YEAR
HorizonFitness shall cover the labor
cost for the repair of the devicefor a
period of one year from the date of
the original purchase,so long as the
deviceremains in the possessionof
the original owner.
EXgLU$1ON$ANBLIMITATIONS
Whois covered:
•Theoriginal ownerand is not transferable.
What IScovered:
•Repair orreplacementof a defectivemotor,electroniccomponent,or defective
part and is thesole remedyof the warranty
What ISNOTcovered:
• Normalwearand tear,improper assemblyor maintenance,or installation of
parts or accessoriesnot originally intended orcompatible with the equipment
as sold.
• Damageor failuredue to accident, abuse,corrosion,discolorationof paint
or plasfic, neglect,theft, vandalism,fire, flood, wind, lightning, freezing,or
other natural disasters of any kind, powerreduction, fluctuation or failure from
whatevercause,unusual atmosphericconditions,collision, introductionof
foreignobjectsinto the coveredunit, or modifications that are unauthorizedor
not recommendedbyHorizonFitness.
• Incidental or consequentialdamages.HorizonFitnessis notresponsible
or liable for indirect, specialor consequentialdamages,economicloss,
loss of property,orprofits, lossof enjoymentor use,or otherconsequential
damages of whatsoevernature in connectionwith the purchase,use,repair or
maintenanceof theproflucL
•Equipmentused for commercialpurposesor anyuseother than a single family
or Household,unlessendorsedbyHorizonFitnessfor coverage.
•Equipmentowneror operatedoutside theUSand Canada.
•Dellve_ assembly,installation, setup for original orreplacementunits or labor
or othercosts associatedwith removal orreplacementof the covereduniL
•Anyattempt to repair this equipmentcreatesa risk of injury,HorizonFitness
is not responsibleor liable for anydamage,lossor liability arising fromany
personalinjury incurredduring thecourseof, or as a result of anyrepair
or attempted repair of your fitness equipmentby otherthan an authorized
servicetechnician. Aft repairs attempted byyou onyour fitness equipmentare
undertakenATYOUROWNRISKand HorizonFitnessshall have noliability for
anyinjury to the personorpropertyarising fromsuchrepairs.
SERVICE/RETURNS
•In-homeserviceis available within J50 miles of the nearestauthorizedrepair
center (Mileagebeyond150miles from an authorizedservicecenteris the
responsibilityof the consumer).
•Allreturns must bepre-authorizeflbyHorizonFitness.
•Horizon Fitness' obligation under this warranty is limited to replacing or
repairing, at HorizonFitness' option, thesame or comparablemodel at oneof
its authorizedservicecenters.
•A HorizonFitnessauthorizedservicecentermust receiveall equipmentfor which
a warranty claim is made. This equipment must be received with all freight
and other transportationcharges prepaid, accompaniedby sufficient proof of
purchase.
•Replacementunits, parts and electronic componentsreconditionedto As-new
Conditionby HorizonFitness or its vendorsmay sometimes be supplied as
warrantyreplacementand constitute fulfillment of warranty terms.
•This warranty gives you specific legal rights, and your rights may vary from
state to state.
_:__

Forfast and friendly service,please contact oneof our
trained customertechnicians viaphone,email or our website.
[
Customer TechSupport Hotline: 1-800-244-4192
Emaih comments@horizonfitness. corn
Website: www.horizonfitness, corn
iii
iii
Everyemployeeat HorizonFitness takespride in providingyou with a high quality product.
Wewant to know if you have a problemand we want to havean opportunityto correctit foryou.
NOTE:Pleasereadthe TROUBLESHOOTINGsectionbeforecontactingCustomerTechSupport.
Toreceiveadditional product information, visit us at www.horizonfitness.com
ESOO-ESO0.Rev.1.7 I © 2007HorizonFitnessProductsI Designed& Engineeredin the U.S.A.IMadein China
