Hp E Commerce Xml Director Sa8250 Users Manual Senior Technical Writer
2015-01-05
: Hp Hp-E-Commerce-Xml-Director-Sa8250-Users-Manual-155735 hp-e-commerce-xml-director-sa8250-users-manual-155735 hp pdf
Open the PDF directly: View PDF ![]() .
.
Page Count: 394 [warning: Documents this large are best viewed by clicking the View PDF Link!]
- Introduction
- Theory of Operations
- General Operating Principles
- XML Operations
- XML Expression Syntax
- XML Data Model
- Commands and Operators
- Boolean Operators
- Function Calls
- Values
- XML Pattern Creation
- XML Pattern Matching
- MIME Content Type Support
- URL Encoded MIME Processing
- Multipart MIME Processing
- Document Number Specification
- Content Transfer Encoding Support
- Signed-Only S/MIME Support
- XML “Well formed” errors
- XML default special case
- Services
- FTP Limitations
- Sticky Options
- SSL Acceleration
- SSL Fundamentals
- Load Balancing Across Multiple Servers
- Server Configuration Options
- Routing with Dual Interfaces
- Prioritization and Policy Groups
- Routing Method for VIP Addresses
- Error Detection
- Serial Cable Failover
- XML Operations
- General Operating Principles
- Boot Monitor
- Graphical User Interface
- Command Line Interface
- Scenarios
- SA8250 Scenarios
- Scenario 1: Load Balancing a Web Site with Two Servers and the SA8250 in Inline Mode
- Scenario 2: Load Balancing Servers with Source Address Preservation
- Scenario 3: Routing Outbound Data Away from the SA8250 for OPR
- Scenario 4: Content Routing using RICH only
- Scenario 5: Using SSL Acceleration
- Scenario 6: Content Routing using RICH and XML expressions
- Scenario 7: Using CRLs
- SA8250 Scenarios
- SNMP Support
- Software Updates
- Security Configuration
- SSL Configuration
- Failover Method Dependencies
- Configuring Out-of- Path Return
- Diagnostics & Troubleshooting
- Cleaning the Dust Filter
- Regulatory Information
- Software License Agreement
- Glossary
- Support Services
- Index
KSHFRPPHUFH
[POGLUHFWRUVHUYHU
DSSOLDQFHVD
XVHUJXLGH
© Copyright 2001 Hewlett-Packard Company. All rights reserved.
Hewlett-Packard Company
3000 Hanover Street
Palo Alto, CA 94304-1185
Publication Number
5971-3003
March 2001
Disclaimer
The information contained in this document is subject to change without notice.
HEWLETT-PACKARD COMPANY MAKES NO WARRANTY OF ANY
KIND WITH REGARD TO THIS MATERIAL, INCLUDING, BUT NOT
LIMITED TO, THE IMPLIED WARRANTIES OF MERCHANTABILITY
AND FITNESS FOR A PARTICULAR PURPOSE. Hewlett-Packard shall not
be liable for errors contained herein or for incidental or consequential damages
in connection with the furnishing, performance, or use of this material.
Hewlett-Packard assumes no responsibility for the use or reliability of its
software on equipment that is not furnished by Hewlett-Packard.
Warranty
A copy of the specific warranty terms applicable to your Hewlett-Packard
products and replacement parts can be obtained from http://www.hp.com/
serverappliances/support/.
*Other brands and names are the property of their respective owners.

Contents
Chapter 1: Introduction . . . . . . . . . . . . . . . . . . . . . . . . . . . . . . . 1
Introduction to the SA8250. . . . . . . . . . . . . . . . . . . . . . . . . . . . . . . . . . . . . . . . . . . . . . 1
Assumptions . . . . . . . . . . . . . . . . . . . . . . . . . . . . . . . . . . . . . . . . . . . . . . . . . . . . . . . . . 2
Benefits of the SA8250. . . . . . . . . . . . . . . . . . . . . . . . . . . . . . . . . . . . . . . . . . . . . . . . . 3
Specifications . . . . . . . . . . . . . . . . . . . . . . . . . . . . . . . . . . . . . . . . . . . . . . . . . . . . . . . . 6
Typographic Conventions. . . . . . . . . . . . . . . . . . . . . . . . . . . . . . . . . . . . . . . . . . . . . . . 9
Chapter 2: Theory of Operations . . . . . . . . . . . . . . . . . . . . . . 11
General Operating Principles . . . . . . . . . . . . . . . . . . . . . . . . . . . . . . . . . . . . . . . . . . . 11
XML Operations . . . . . . . . . . . . . . . . . . . . . . . . . . . . . . . . . . . . . . . . . . . . . . . . . . 12
XML Expression Syntax. . . . . . . . . . . . . . . . . . . . . . . . . . . . . . . . . . . . . . . . . . 13
XML Data Model . . . . . . . . . . . . . . . . . . . . . . . . . . . . . . . . . . . . . . . . . . . . . . . 14
Commands and Operators . . . . . . . . . . . . . . . . . . . . . . . . . . . . . . . . . . . . . . . . . 15
Boolean Operators. . . . . . . . . . . . . . . . . . . . . . . . . . . . . . . . . . . . . . . . . . . . . . . 18
Function Calls . . . . . . . . . . . . . . . . . . . . . . . . . . . . . . . . . . . . . . . . . . . . . . . . . . 19
Values . . . . . . . . . . . . . . . . . . . . . . . . . . . . . . . . . . . . . . . . . . . . . . . . . . . . . . . . 21
XML Pattern Creation. . . . . . . . . . . . . . . . . . . . . . . . . . . . . . . . . . . . . . . . . . . . 22
XML Pattern Matching . . . . . . . . . . . . . . . . . . . . . . . . . . . . . . . . . . . . . . . . . . . 23

C O N T E N T S HP e-Commerce/XML Director Server Appliance SA8250 User Guide
ii
MIME Content Type Support . . . . . . . . . . . . . . . . . . . . . . . . . . . . . . . . . . . . . . 24
URL Encoded MIME Processing . . . . . . . . . . . . . . . . . . . . . . . . . . . . . . . . . . . 26
Multipart MIME Processing . . . . . . . . . . . . . . . . . . . . . . . . . . . . . . . . . . . . . . . 26
Document Number Specification . . . . . . . . . . . . . . . . . . . . . . . . . . . . . . . . . . . 27
Content Transfer Encoding Support . . . . . . . . . . . . . . . . . . . . . . . . . . . . . . . . . 28
Signed-Only S/MIME Support . . . . . . . . . . . . . . . . . . . . . . . . . . . . . . . . . . . . . 28
XML “Well formed” errors. . . . . . . . . . . . . . . . . . . . . . . . . . . . . . . . . . . . . . . . 29
XML default special case . . . . . . . . . . . . . . . . . . . . . . . . . . . . . . . . . . . . . . . . . 29
Services . . . . . . . . . . . . . . . . . . . . . . . . . . . . . . . . . . . . . . . . . . . . . . . . . . . . . . . . . 30
Layer 4 (HOT) Services . . . . . . . . . . . . . . . . . . . . . . . . . . . . . . . . . . . . . . . . . . 31
Layer 7 (RICH) Services. . . . . . . . . . . . . . . . . . . . . . . . . . . . . . . . . . . . . . . . . . 31
Out-of-Path Return (OPR) . . . . . . . . . . . . . . . . . . . . . . . . . . . . . . . . . . . . . . . . 32
FTP Limitations . . . . . . . . . . . . . . . . . . . . . . . . . . . . . . . . . . . . . . . . . . . . . . . . . . . 32
Sticky Options . . . . . . . . . . . . . . . . . . . . . . . . . . . . . . . . . . . . . . . . . . . . . . . . . . . . 33
Sticky Persistence . . . . . . . . . . . . . . . . . . . . . . . . . . . . . . . . . . . . . . . . . . . . . . . 34
Sticky-timeout. . . . . . . . . . . . . . . . . . . . . . . . . . . . . . . . . . . . . . . . . . . . . . . . . . 34
SSL and Sticky . . . . . . . . . . . . . . . . . . . . . . . . . . . . . . . . . . . . . . . . . . . . . . . . . 34
Server-timeout. . . . . . . . . . . . . . . . . . . . . . . . . . . . . . . . . . . . . . . . . . . . . . . . . . 35
Grouping Services. . . . . . . . . . . . . . . . . . . . . . . . . . . . . . . . . . . . . . . . . . . . . . . 35
SSL Acceleration . . . . . . . . . . . . . . . . . . . . . . . . . . . . . . . . . . . . . . . . . . . . . . . . . . 35
SSL Fundamentals . . . . . . . . . . . . . . . . . . . . . . . . . . . . . . . . . . . . . . . . . . . . . . . . . 36
Application Message Traffic Management. . . . . . . . . . . . . . . . . . . . . . . . . . . . 38
HTTPS Redirect . . . . . . . . . . . . . . . . . . . . . . . . . . . . . . . . . . . . . . . . . . . . . . . . 38
Client Authentication . . . . . . . . . . . . . . . . . . . . . . . . . . . . . . . . . . . . . . . . . . . . 39
HTTP Header Option Fields . . . . . . . . . . . . . . . . . . . . . . . . . . . . . . . . . . . . . . . 40
Load Balancing Across Multiple Servers . . . . . . . . . . . . . . . . . . . . . . . . . . . . . . . 41
Balancing Algorithms . . . . . . . . . . . . . . . . . . . . . . . . . . . . . . . . . . . . . . . . . . . . 41
Response-time Metrics . . . . . . . . . . . . . . . . . . . . . . . . . . . . . . . . . . . . . . . . . . . 41
Primary and Backup Servers. . . . . . . . . . . . . . . . . . . . . . . . . . . . . . . . . . . . . . . 42
Server Configuration Options . . . . . . . . . . . . . . . . . . . . . . . . . . . . . . . . . . . . . . . . 42
Source Address Preservation. . . . . . . . . . . . . . . . . . . . . . . . . . . . . . . . . . . . . . . 42
Multi-hop Source Address Preservation . . . . . . . . . . . . . . . . . . . . . . . . . . . . . . 43
RICH expressions in XML patterns . . . . . . . . . . . . . . . . . . . . . . . . . . . . . . . . . 44
Order of RICH expressions. . . . . . . . . . . . . . . . . . . . . . . . . . . . . . . . . . . . . . . . 45
Routing with Dual Interfaces . . . . . . . . . . . . . . . . . . . . . . . . . . . . . . . . . . . . . . . . . 46
Prioritization and Policy Groups . . . . . . . . . . . . . . . . . . . . . . . . . . . . . . . . . . . . . . 47
Routing Method for VIP Addresses. . . . . . . . . . . . . . . . . . . . . . . . . . . . . . . . . . . . 50
Error Detection. . . . . . . . . . . . . . . . . . . . . . . . . . . . . . . . . . . . . . . . . . . . . . . . . . . . 51

Contents
iii
Server Status Detection . . . . . . . . . . . . . . . . . . . . . . . . . . . . . . . . . . . . . . . . . . . 51
HTTP Error Detection. . . . . . . . . . . . . . . . . . . . . . . . . . . . . . . . . . . . . . . . . . . . 52
Serial Cable Failover . . . . . . . . . . . . . . . . . . . . . . . . . . . . . . . . . . . . . . . . . . . . . . . 53
Serial Cable Failover Configuration . . . . . . . . . . . . . . . . . . . . . . . . . . . . . . . . . 53
Replicating the Configuration. . . . . . . . . . . . . . . . . . . . . . . . . . . . . . . . . . . . . . 57
Status Information. . . . . . . . . . . . . . . . . . . . . . . . . . . . . . . . . . . . . . . . . . . . . . . 57
Chapter 3: Boot Monitor . . . . . . . . . . . . . . . . . . . . . . . . . . . . . 61
Using the Boot Monitor . . . . . . . . . . . . . . . . . . . . . . . . . . . . . . . . . . . . . . . . . . . . . . . 61
System Requirements. . . . . . . . . . . . . . . . . . . . . . . . . . . . . . . . . . . . . . . . . . . . . . . 62
Accessing the Boot Monitor . . . . . . . . . . . . . . . . . . . . . . . . . . . . . . . . . . . . . . . . . 62
Interrupting the Bootup Sequence. . . . . . . . . . . . . . . . . . . . . . . . . . . . . . . . . . . 62
Using the Run Time CLI. . . . . . . . . . . . . . . . . . . . . . . . . . . . . . . . . . . . . . . . . . 62
Boot Monitor Commands. . . . . . . . . . . . . . . . . . . . . . . . . . . . . . . . . . . . . . . . . . . . 63
Chapter 4: Graphical User Interface . . . . . . . . . . . . . . . . . . . . 79
Before You Begin . . . . . . . . . . . . . . . . . . . . . . . . . . . . . . . . . . . . . . . . . . . . . . . . . . . . 79
Logon Screen . . . . . . . . . . . . . . . . . . . . . . . . . . . . . . . . . . . . . . . . . . . . . . . . . . . . . . . 80
Logging on to the GUI. . . . . . . . . . . . . . . . . . . . . . . . . . . . . . . . . . . . . . . . . . . . . . 80
Topology Screen. . . . . . . . . . . . . . . . . . . . . . . . . . . . . . . . . . . . . . . . . . . . . . . . . . . . . 82
Using the Topology Screen . . . . . . . . . . . . . . . . . . . . . . . . . . . . . . . . . . . . . . . . . . 82
Purposes of the Topology Screen . . . . . . . . . . . . . . . . . . . . . . . . . . . . . . . . . . . 82
Topology Screen Toolbar . . . . . . . . . . . . . . . . . . . . . . . . . . . . . . . . . . . . . . . . . 83
Online Help . . . . . . . . . . . . . . . . . . . . . . . . . . . . . . . . . . . . . . . . . . . . . . . . . . . . 83
Topology Screen Elements . . . . . . . . . . . . . . . . . . . . . . . . . . . . . . . . . . . . . . . . 84
Window Controls . . . . . . . . . . . . . . . . . . . . . . . . . . . . . . . . . . . . . . . . . . . . . . . 85
Policy Manager Screen . . . . . . . . . . . . . . . . . . . . . . . . . . . . . . . . . . . . . . . . . . . . . . . . 86
Policy Manager Controls and Displays . . . . . . . . . . . . . . . . . . . . . . . . . . . . . . . . . 87
Policy Manager Toolbar. . . . . . . . . . . . . . . . . . . . . . . . . . . . . . . . . . . . . . . . . . . . . 87
Policy Manager’s Pop-up Menu. . . . . . . . . . . . . . . . . . . . . . . . . . . . . . . . . . . . . . . 88
Policy Groups. . . . . . . . . . . . . . . . . . . . . . . . . . . . . . . . . . . . . . . . . . . . . . . . . . . . . 88
Creating Policy Groups. . . . . . . . . . . . . . . . . . . . . . . . . . . . . . . . . . . . . . . . . . . 89
Throttling. . . . . . . . . . . . . . . . . . . . . . . . . . . . . . . . . . . . . . . . . . . . . . . . . . . . . . 90
Deleting Policy Groups. . . . . . . . . . . . . . . . . . . . . . . . . . . . . . . . . . . . . . . . . . . 90
Services . . . . . . . . . . . . . . . . . . . . . . . . . . . . . . . . . . . . . . . . . . . . . . . . . . . . . . . . . 91
Creating Services. . . . . . . . . . . . . . . . . . . . . . . . . . . . . . . . . . . . . . . . . . . . . . . . 91
Additional Service Tab Controls and Displays. . . . . . . . . . . . . . . . . . . . . . . . . 92

C O N T E N T S HP e-Commerce/XML Director Server Appliance SA8250 User Guide
iv
Balance Strategy . . . . . . . . . . . . . . . . . . . . . . . . . . . . . . . . . . . . . . . . . . . . . . . . 94
XML Service Tab . . . . . . . . . . . . . . . . . . . . . . . . . . . . . . . . . . . . . . . . . . . . . . . 95
Deleting Services. . . . . . . . . . . . . . . . . . . . . . . . . . . . . . . . . . . . . . . . . . . . . . . . 96
Servers . . . . . . . . . . . . . . . . . . . . . . . . . . . . . . . . . . . . . . . . . . . . . . . . . . . . . . . . . . 97
XML Server Tab . . . . . . . . . . . . . . . . . . . . . . . . . . . . . . . . . . . . . . . . . . . . . . . . 99
Deleting Servers . . . . . . . . . . . . . . . . . . . . . . . . . . . . . . . . . . . . . . . . . . . . . . . 101
Administration Screen . . . . . . . . . . . . . . . . . . . . . . . . . . . . . . . . . . . . . . . . . . . . . . . 102
Settings Tab . . . . . . . . . . . . . . . . . . . . . . . . . . . . . . . . . . . . . . . . . . . . . . . . . . . . . 102
Software Tab . . . . . . . . . . . . . . . . . . . . . . . . . . . . . . . . . . . . . . . . . . . . . . . . . . . . 103
System Software . . . . . . . . . . . . . . . . . . . . . . . . . . . . . . . . . . . . . . . . . . . . . . . 104
Agent Software . . . . . . . . . . . . . . . . . . . . . . . . . . . . . . . . . . . . . . . . . . . . . . . . 105
Users Tab . . . . . . . . . . . . . . . . . . . . . . . . . . . . . . . . . . . . . . . . . . . . . . . . . . . . . . . 109
Routing Tab . . . . . . . . . . . . . . . . . . . . . . . . . . . . . . . . . . . . . . . . . . . . . . . . . . . . . 112
System Role. . . . . . . . . . . . . . . . . . . . . . . . . . . . . . . . . . . . . . . . . . . . . . . . . . . 113
Active Routing Protocol . . . . . . . . . . . . . . . . . . . . . . . . . . . . . . . . . . . . . . . . . 113
RIP Protocol . . . . . . . . . . . . . . . . . . . . . . . . . . . . . . . . . . . . . . . . . . . . . . . . . . 113
OSPF Protocol. . . . . . . . . . . . . . . . . . . . . . . . . . . . . . . . . . . . . . . . . . . . . . . . . 114
Security Tab . . . . . . . . . . . . . . . . . . . . . . . . . . . . . . . . . . . . . . . . . . . . . . . . . . . . . 115
Source IP Filtering . . . . . . . . . . . . . . . . . . . . . . . . . . . . . . . . . . . . . . . . . . . . . 116
Access Options . . . . . . . . . . . . . . . . . . . . . . . . . . . . . . . . . . . . . . . . . . . . . . . . 116
GUI Tab . . . . . . . . . . . . . . . . . . . . . . . . . . . . . . . . . . . . . . . . . . . . . . . . . . . . . . . . 117
CLI Tab . . . . . . . . . . . . . . . . . . . . . . . . . . . . . . . . . . . . . . . . . . . . . . . . . . . . . . . . 119
SNMP Tab . . . . . . . . . . . . . . . . . . . . . . . . . . . . . . . . . . . . . . . . . . . . . . . . . . . . . . 121
SNMP Agent . . . . . . . . . . . . . . . . . . . . . . . . . . . . . . . . . . . . . . . . . . . . . . . . . . 121
Multi-Site Tab . . . . . . . . . . . . . . . . . . . . . . . . . . . . . . . . . . . . . . . . . . . . . . . . . . . 123
Logging Tab. . . . . . . . . . . . . . . . . . . . . . . . . . . . . . . . . . . . . . . . . . . . . . . . . . . . . 124
Specifying System Log Parameters. . . . . . . . . . . . . . . . . . . . . . . . . . . . . . . . . 124
Viewing the Log File. . . . . . . . . . . . . . . . . . . . . . . . . . . . . . . . . . . . . . . . . . . . 125
Configuration Screen . . . . . . . . . . . . . . . . . . . . . . . . . . . . . . . . . . . . . . . . . . . . . . . . 127
Saving Configuration Files . . . . . . . . . . . . . . . . . . . . . . . . . . . . . . . . . . . . . . . . . 127
Restoring Configuration Files . . . . . . . . . . . . . . . . . . . . . . . . . . . . . . . . . . . . . . . 128
Deleting Configuration Files . . . . . . . . . . . . . . . . . . . . . . . . . . . . . . . . . . . . . . . . 128
Copying Configuration Files . . . . . . . . . . . . . . . . . . . . . . . . . . . . . . . . . . . . . . . . 129
Viewing Configuration Files . . . . . . . . . . . . . . . . . . . . . . . . . . . . . . . . . . . . . . . . 130
Resetting the Factory Configuration . . . . . . . . . . . . . . . . . . . . . . . . . . . . . . . . . . 131
Sending and Retrieving Configuration Files . . . . . . . . . . . . . . . . . . . . . . . . . . . . 133
Tools Screen . . . . . . . . . . . . . . . . . . . . . . . . . . . . . . . . . . . . . . . . . . . . . . . . . . . . . . . 134
ARP . . . . . . . . . . . . . . . . . . . . . . . . . . . . . . . . . . . . . . . . . . . . . . . . . . . . . . . . . . . 135

Contents
v
Ether. . . . . . . . . . . . . . . . . . . . . . . . . . . . . . . . . . . . . . . . . . . . . . . . . . . . . . . . . . . 136
Ping . . . . . . . . . . . . . . . . . . . . . . . . . . . . . . . . . . . . . . . . . . . . . . . . . . . . . . . . . . . 137
Netstat . . . . . . . . . . . . . . . . . . . . . . . . . . . . . . . . . . . . . . . . . . . . . . . . . . . . . . . . . 138
Nslookup . . . . . . . . . . . . . . . . . . . . . . . . . . . . . . . . . . . . . . . . . . . . . . . . . . . . . . . 140
Reboot . . . . . . . . . . . . . . . . . . . . . . . . . . . . . . . . . . . . . . . . . . . . . . . . . . . . . . . . . 141
Trace. . . . . . . . . . . . . . . . . . . . . . . . . . . . . . . . . . . . . . . . . . . . . . . . . . . . . . . . . . . 142
Traceroute . . . . . . . . . . . . . . . . . . . . . . . . . . . . . . . . . . . . . . . . . . . . . . . . . . . . . . 146
Statistics Screen . . . . . . . . . . . . . . . . . . . . . . . . . . . . . . . . . . . . . . . . . . . . . . . . . . . . 147
Statistics Screen Controls. . . . . . . . . . . . . . . . . . . . . . . . . . . . . . . . . . . . . . . . . . . 147
Statistics Box. . . . . . . . . . . . . . . . . . . . . . . . . . . . . . . . . . . . . . . . . . . . . . . . . . 148
Graph Options . . . . . . . . . . . . . . . . . . . . . . . . . . . . . . . . . . . . . . . . . . . . . . . . . 149
Selection List. . . . . . . . . . . . . . . . . . . . . . . . . . . . . . . . . . . . . . . . . . . . . . . . . . 150
Window Options . . . . . . . . . . . . . . . . . . . . . . . . . . . . . . . . . . . . . . . . . . . . . . . 150
Graphing Statistics . . . . . . . . . . . . . . . . . . . . . . . . . . . . . . . . . . . . . . . . . . . . . 151
Chapter 5: Command Line Interface. . . . . . . . . . . . . . . . . . . 153
CLI Introduction . . . . . . . . . . . . . . . . . . . . . . . . . . . . . . . . . . . . . . . . . . . . . . . . . . . . 153
Secure Shell Support . . . . . . . . . . . . . . . . . . . . . . . . . . . . . . . . . . . . . . . . . . . . . . 153
Online Help . . . . . . . . . . . . . . . . . . . . . . . . . . . . . . . . . . . . . . . . . . . . . . . . . . . . . 154
Pipes. . . . . . . . . . . . . . . . . . . . . . . . . . . . . . . . . . . . . . . . . . . . . . . . . . . . . . . . . . . 154
Syntax. . . . . . . . . . . . . . . . . . . . . . . . . . . . . . . . . . . . . . . . . . . . . . . . . . . . . . . . . . 155
Categorical List of CLI Commands . . . . . . . . . . . . . . . . . . . . . . . . . . . . . . . . . . . . . 156
Global System Commands. . . . . . . . . . . . . . . . . . . . . . . . . . . . . . . . . . . . . . . . . . 156
Admin Commands . . . . . . . . . . . . . . . . . . . . . . . . . . . . . . . . . . . . . . . . . . . . . . . . 156
File Management Commands . . . . . . . . . . . . . . . . . . . . . . . . . . . . . . . . . . . . . . . 157
CLI Commands . . . . . . . . . . . . . . . . . . . . . . . . . . . . . . . . . . . . . . . . . . . . . . . . . . 157
IRV Commands . . . . . . . . . . . . . . . . . . . . . . . . . . . . . . . . . . . . . . . . . . . . . . . . . . 157
GUI Commands . . . . . . . . . . . . . . . . . . . . . . . . . . . . . . . . . . . . . . . . . . . . . . . . . . 157
Routing Commands . . . . . . . . . . . . . . . . . . . . . . . . . . . . . . . . . . . . . . . . . . . . . . . 158
Policy Group Commands. . . . . . . . . . . . . . . . . . . . . . . . . . . . . . . . . . . . . . . . . . . 158
Service Commands . . . . . . . . . . . . . . . . . . . . . . . . . . . . . . . . . . . . . . . . . . . . . . . 158
Server Commands . . . . . . . . . . . . . . . . . . . . . . . . . . . . . . . . . . . . . . . . . . . . . . . . 159
System Commands. . . . . . . . . . . . . . . . . . . . . . . . . . . . . . . . . . . . . . . . . . . . . . . . 159
Security Commands . . . . . . . . . . . . . . . . . . . . . . . . . . . . . . . . . . . . . . . . . . . . . . . 160
SNMP Commands . . . . . . . . . . . . . . . . . . . . . . . . . . . . . . . . . . . . . . . . . . . . . . . . 161
SSL Commands . . . . . . . . . . . . . . . . . . . . . . . . . . . . . . . . . . . . . . . . . . . . . . . . . . 162
Logging Commands. . . . . . . . . . . . . . . . . . . . . . . . . . . . . . . . . . . . . . . . . . . . . . . 162

C O N T E N T S HP e-Commerce/XML Director Server Appliance SA8250 User Guide
vi
Show Commands . . . . . . . . . . . . . . . . . . . . . . . . . . . . . . . . . . . . . . . . . . . . . . . . . 163
Run-Time CLI Command Reference . . . . . . . . . . . . . . . . . . . . . . . . . . . . . . . . . . . . 164
Global System Commands. . . . . . . . . . . . . . . . . . . . . . . . . . . . . . . . . . . . . . . . . . 164
Admin Commands . . . . . . . . . . . . . . . . . . . . . . . . . . . . . . . . . . . . . . . . . . . . . . . . 172
File Management Commands . . . . . . . . . . . . . . . . . . . . . . . . . . . . . . . . . . . . . . . 173
CLI Commands . . . . . . . . . . . . . . . . . . . . . . . . . . . . . . . . . . . . . . . . . . . . . . . . . . 176
IRV Commands . . . . . . . . . . . . . . . . . . . . . . . . . . . . . . . . . . . . . . . . . . . . . . . . . . 179
GUI Commands . . . . . . . . . . . . . . . . . . . . . . . . . . . . . . . . . . . . . . . . . . . . . . . . . . 180
Routing Commands . . . . . . . . . . . . . . . . . . . . . . . . . . . . . . . . . . . . . . . . . . . . . . . 182
Policy Group Commands. . . . . . . . . . . . . . . . . . . . . . . . . . . . . . . . . . . . . . . . . . . 186
System Commands. . . . . . . . . . . . . . . . . . . . . . . . . . . . . . . . . . . . . . . . . . . . . . . . 200
Security Commands . . . . . . . . . . . . . . . . . . . . . . . . . . . . . . . . . . . . . . . . . . . . . . . 204
SNMP Commands . . . . . . . . . . . . . . . . . . . . . . . . . . . . . . . . . . . . . . . . . . . . . . . . 207
SSL Commands . . . . . . . . . . . . . . . . . . . . . . . . . . . . . . . . . . . . . . . . . . . . . . . . . . 210
Logging Commands. . . . . . . . . . . . . . . . . . . . . . . . . . . . . . . . . . . . . . . . . . . . . . . 226
Show Commands . . . . . . . . . . . . . . . . . . . . . . . . . . . . . . . . . . . . . . . . . . . . . . . . . 228
Chapter 6: Scenarios . . . . . . . . . . . . . . . . . . . . . . . . . . . . . . . 235
SA8250 Scenarios. . . . . . . . . . . . . . . . . . . . . . . . . . . . . . . . . . . . . . . . . . . . . . . . . . . 235
Scenario 1: Load Balancing a Web Site with Two Servers and the SA8250 in Inline
Mode . . . . . . . . . . . . . . . . . . . . . . . . . . . . . . . . . . . . . . . . . . . . . . . . . . . . . . . . . . 236
Prerequisites for Scenario 1. . . . . . . . . . . . . . . . . . . . . . . . . . . . . . . . . . . . . . . 237
Procedure for Scenario 1. . . . . . . . . . . . . . . . . . . . . . . . . . . . . . . . . . . . . . . . . 237
Scenario 2: Load Balancing Servers with Source Address Preservation . . . . . . 241
Prerequisites for Scenario 2. . . . . . . . . . . . . . . . . . . . . . . . . . . . . . . . . . . . . . . 242
Procedure for Scenario 2. . . . . . . . . . . . . . . . . . . . . . . . . . . . . . . . . . . . . . . . . 242
Scenario 3: Routing Outbound Data Away from the SA8250 for OPR . . . . . . . 244
Prerequisites for Scenario 3. . . . . . . . . . . . . . . . . . . . . . . . . . . . . . . . . . . . . . . 245
Procedure for Scenario 3. . . . . . . . . . . . . . . . . . . . . . . . . . . . . . . . . . . . . . . . . 245
Scenario 4: Content Routing using RICH only. . . . . . . . . . . . . . . . . . . . . . . . . . 247
Prerequisites for Scenario 4. . . . . . . . . . . . . . . . . . . . . . . . . . . . . . . . . . . . . . . 248
Procedure for Scenario 4. . . . . . . . . . . . . . . . . . . . . . . . . . . . . . . . . . . . . . . . . 249
Scenario 5: Using SSL Acceleration. . . . . . . . . . . . . . . . . . . . . . . . . . . . . . . . . . 252
Procedure for Scenario 5. . . . . . . . . . . . . . . . . . . . . . . . . . . . . . . . . . . . . . . . . 253
Scenario 6: Content Routing using RICH and XML expressions . . . . . . . . . . . . 255
Using the default special case . . . . . . . . . . . . . . . . . . . . . . . . . . . . . . . . . . . . . 255
Scenario 7: Using CRLs . . . . . . . . . . . . . . . . . . . . . . . . . . . . . . . . . . . . . . . . . . . 257

Contents
vii
Prerequisites for Scenario 7. . . . . . . . . . . . . . . . . . . . . . . . . . . . . . . . . . . . . . . 257
Procedure for Scenario 7. . . . . . . . . . . . . . . . . . . . . . . . . . . . . . . . . . . . . . . . . 257
Chapter 7: SNMP Support . . . . . . . . . . . . . . . . . . . . . . . . . . . 261
Using SNMP. . . . . . . . . . . . . . . . . . . . . . . . . . . . . . . . . . . . . . . . . . . . . . . . . . . . . . . 261
Standards Compliance . . . . . . . . . . . . . . . . . . . . . . . . . . . . . . . . . . . . . . . . . . . . . 262
MIB Tree . . . . . . . . . . . . . . . . . . . . . . . . . . . . . . . . . . . . . . . . . . . . . . . . . . . . . . . 263
Supported MIBs . . . . . . . . . . . . . . . . . . . . . . . . . . . . . . . . . . . . . . . . . . . . . . . 264
Where to find MIB Files . . . . . . . . . . . . . . . . . . . . . . . . . . . . . . . . . . . . . . . . . 264
Trap Summary . . . . . . . . . . . . . . . . . . . . . . . . . . . . . . . . . . . . . . . . . . . . . . . . . . . 271
Standard SNMP Traps. . . . . . . . . . . . . . . . . . . . . . . . . . . . . . . . . . . . . . . . . . . 271
Displaying SNMP Parameters . . . . . . . . . . . . . . . . . . . . . . . . . . . . . . . . . . . . . . . 272
Configuring Community Authentication and Security Parameters . . . . . . . . . . . 272
Configuring Trap Parameters. . . . . . . . . . . . . . . . . . . . . . . . . . . . . . . . . . . . . . . . 273
Configuring Other SNMP Parameters . . . . . . . . . . . . . . . . . . . . . . . . . . . . . . . . . 274
Chapter 8: Software Updates . . . . . . . . . . . . . . . . . . . . . . . . 275
Updating Your System Software . . . . . . . . . . . . . . . . . . . . . . . . . . . . . . . . . . . . . . . 275
Multiple Software Images . . . . . . . . . . . . . . . . . . . . . . . . . . . . . . . . . . . . . . . . . . 276
Software Image Media. . . . . . . . . . . . . . . . . . . . . . . . . . . . . . . . . . . . . . . . . . . . . 276
Saving Your Current Configuration. . . . . . . . . . . . . . . . . . . . . . . . . . . . . . . . . . . 276
Downloading and Installing the Software . . . . . . . . . . . . . . . . . . . . . . . . . . . . . . . . 277
Rebooting with the New Image and Verifying Installation . . . . . . . . . . . . . . . . . 278
Upgrading Under Serial Cable Failover Configuration . . . . . . . . . . . . . . . . . . . . 279
Appendix A: Security Configuration. . . . . . . . . . . . . . . . . . . 281
Recommended Security Configuration. . . . . . . . . . . . . . . . . . . . . . . . . . . . . . . . . . . 281
Appendix B: SSL Configuration . . . . . . . . . . . . . . . . . . . . . . 283
Obtaining Keys and Certificates. . . . . . . . . . . . . . . . . . . . . . . . . . . . . . . . . . . . . . . . 283
Copying and Pasting Keys and Certificates. . . . . . . . . . . . . . . . . . . . . . . . . . . . . 284
Obtaining a Certificate from Verisign or another CA . . . . . . . . . . . . . . . . . . . . . 285
Procedure. . . . . . . . . . . . . . . . . . . . . . . . . . . . . . . . . . . . . . . . . . . . . . . . . . . . . 285
Importing Keys into the SA8250 . . . . . . . . . . . . . . . . . . . . . . . . . . . . . . . . . . . . . 286
Importing Certificates into the SA8250. . . . . . . . . . . . . . . . . . . . . . . . . . . . . . . . 287
Creating a new Key/Certificate on the SA8250. . . . . . . . . . . . . . . . . . . . . . . . . . 288

C O N T E N T S HP e-Commerce/XML Director Server Appliance SA8250 User Guide
viii
Procedure. . . . . . . . . . . . . . . . . . . . . . . . . . . . . . . . . . . . . . . . . . . . . . . . . . . . . 288
Using Global Site Certificates . . . . . . . . . . . . . . . . . . . . . . . . . . . . . . . . . . . . . . . 289
Overview . . . . . . . . . . . . . . . . . . . . . . . . . . . . . . . . . . . . . . . . . . . . . . . . . . . . . 289
Using the CLI . . . . . . . . . . . . . . . . . . . . . . . . . . . . . . . . . . . . . . . . . . . . . . . . . 289
Generating a Client CA. . . . . . . . . . . . . . . . . . . . . . . . . . . . . . . . . . . . . . . . . . . . . . . 291
Generating a CRL . . . . . . . . . . . . . . . . . . . . . . . . . . . . . . . . . . . . . . . . . . . . . . . . . . . 292
Revoking a Certificate . . . . . . . . . . . . . . . . . . . . . . . . . . . . . . . . . . . . . . . . . . . . . . . 293
Using Ciphers with the SA8250 . . . . . . . . . . . . . . . . . . . . . . . . . . . . . . . . . . . . . . . . 293
HTTP Header Information . . . . . . . . . . . . . . . . . . . . . . . . . . . . . . . . . . . . . . . . . . . . 295
Procedure . . . . . . . . . . . . . . . . . . . . . . . . . . . . . . . . . . . . . . . . . . . . . . . . . . . . . . . 295
Appendix C: Failover Method Dependencies . . . . . . . . . . . . 297
Failover Modes . . . . . . . . . . . . . . . . . . . . . . . . . . . . . . . . . . . . . . . . . . . . . . . . . . . . . 297
Appendix D: Configuring Out-of-Path Return . . . . . . . . . . . 301
Configure OPR for Windows* 2000 . . . . . . . . . . . . . . . . . . . . . . . . . . . . . . . . . . . . 301
Set the Loopback . . . . . . . . . . . . . . . . . . . . . . . . . . . . . . . . . . . . . . . . . . . . . . . . . 301
Configure OPR for Windows* NT* . . . . . . . . . . . . . . . . . . . . . . . . . . . . . . . . . . . . . 315
Set the Loopback . . . . . . . . . . . . . . . . . . . . . . . . . . . . . . . . . . . . . . . . . . . . . . . . . 315
Run a Web Service on the Loopback Interface Using IIS 3.0 . . . . . . . . . . . . 321
Run a Web Service on the Loopback Interface Using IIS 4.0 . . . . . . . . . . . . 322
Configuring OPR for a UNIX-based Apache Web Server. . . . . . . . . . . . . . . . . . . . 323
Appendix E: Diagnostics & Troubleshooting. . . . . . . . . . . . 325
Running Diagnostics on the SA8250 . . . . . . . . . . . . . . . . . . . . . . . . . . . . . . . . . . . . 325
Diagnostic LEDs . . . . . . . . . . . . . . . . . . . . . . . . . . . . . . . . . . . . . . . . . . . . . . . . . 326
Power Indication . . . . . . . . . . . . . . . . . . . . . . . . . . . . . . . . . . . . . . . . . . . . . . . 326
Boot-time LED Diagnostics . . . . . . . . . . . . . . . . . . . . . . . . . . . . . . . . . . . . . . 327
Run time LED Diagnostics . . . . . . . . . . . . . . . . . . . . . . . . . . . . . . . . . . . . . . . 327
Run time Errors. . . . . . . . . . . . . . . . . . . . . . . . . . . . . . . . . . . . . . . . . . . . . . . . 328
Troubleshooting . . . . . . . . . . . . . . . . . . . . . . . . . . . . . . . . . . . . . . . . . . . . . . . . . . . . 329
Appendix F: Cleaning the Dust Filter . . . . . . . . . . . . . . . . . . 335
Background. . . . . . . . . . . . . . . . . . . . . . . . . . . . . . . . . . . . . . . . . . . . . . . . . . . . . . . . 335
Cleaning Procedure. . . . . . . . . . . . . . . . . . . . . . . . . . . . . . . . . . . . . . . . . . . . . . . . . . 336

Contents
ix
Regulatory Information . . . . . . . . . . . . . . . . . . . . . . . . . . . . . . 337
Taiwan Class A EMI Statement . . . . . . . . . . . . . . . . . . . . . . . . . . . . . . . . . . . . . . . . 337
VCCI Class A (Japan). . . . . . . . . . . . . . . . . . . . . . . . . . . . . . . . . . . . . . . . . . . . . . . . 337
VCCI Statement . . . . . . . . . . . . . . . . . . . . . . . . . . . . . . . . . . . . . . . . . . . . . . . . . . . . 338
Australia . . . . . . . . . . . . . . . . . . . . . . . . . . . . . . . . . . . . . . . . . . . . . . . . . . . . . . . . . . 338
FCC Part 15 Compliance Statement . . . . . . . . . . . . . . . . . . . . . . . . . . . . . . . . . . . . . 339
Canada Compliance Statement (Industry Canada) . . . . . . . . . . . . . . . . . . . . . . . . . . 340
CE Compliance Statement . . . . . . . . . . . . . . . . . . . . . . . . . . . . . . . . . . . . . . . . . . . . 340
CISPR 22 Statement . . . . . . . . . . . . . . . . . . . . . . . . . . . . . . . . . . . . . . . . . . . . . . . . . 340
WARNING . . . . . . . . . . . . . . . . . . . . . . . . . . . . . . . . . . . . . . . . . . . . . . . . . . . . . . . . 341
AVERTISSEMENT . . . . . . . . . . . . . . . . . . . . . . . . . . . . . . . . . . . . . . . . . . . . . . . . . 342
WARNUNG . . . . . . . . . . . . . . . . . . . . . . . . . . . . . . . . . . . . . . . . . . . . . . . . . . . . . . . 343
AVVERTENZA . . . . . . . . . . . . . . . . . . . . . . . . . . . . . . . . . . . . . . . . . . . . . . . . . . . . 344
ADVERTENCIAS . . . . . . . . . . . . . . . . . . . . . . . . . . . . . . . . . . . . . . . . . . . . . . . . . . 345
Wichtige Sicherheitshinweise. . . . . . . . . . . . . . . . . . . . . . . . . . . . . . . . . . . . . . . . . . 346
Software License Agreement . . . . . . . . . . . . . . . . . . . . . . . . . 349
Mozilla* and expat* License Information . . . . . . . . . . . . . . . . . . . . . . . . . . . . . . . . 351
MOZILLA PUBLIC LICENSE, Version 1.1 . . . . . . . . . . . . . . . . . . . . . . . . . . . 351
Glossary . . . . . . . . . . . . . . . . . . . . . . . . . . . . . . . . . . . . . . . . . . 365
Support Services . . . . . . . . . . . . . . . . . . . . . . . . . . . . . . . . . . . 371
Support for your SA8250 . . . . . . . . . . . . . . . . . . . . . . . . . . . . . . . . . . . . . . . . . . . . . 371
U.S. and Canada. . . . . . . . . . . . . . . . . . . . . . . . . . . . . . . . . . . . . . . . . . . . . . . . . . 371
Europe . . . . . . . . . . . . . . . . . . . . . . . . . . . . . . . . . . . . . . . . . . . . . . . . . . . . . . . . . 372
Asia . . . . . . . . . . . . . . . . . . . . . . . . . . . . . . . . . . . . . . . . . . . . . . . . . . . . . . . . . . . 373
Latin America . . . . . . . . . . . . . . . . . . . . . . . . . . . . . . . . . . . . . . . . . . . . . . . . . . . 374
Other Countries . . . . . . . . . . . . . . . . . . . . . . . . . . . . . . . . . . . . . . . . . . . . . . . . . . 374
Index . . . . . . . . . . . . . . . . . . . . . . . . . . . . . . . . . . . . . . . . . . . . . 375

C O N T E N T S HP e-Commerce/XML Director Server Appliance SA8250 User Guide
x
Notes

Introduction
Introduction to the SA8250
The HP e-Commerce/XML Director Server Appliance SA8250
provides the flexibility to classify and load balance Extensible
Markup Language (XML) traffic according to content and distribute
it according to user-defined parameters. The SA8250 makes it easy
to use the most appropriate resources at the datacenter to handle
incoming requests.
The SA8250 is positioned in the network in front of the web,
application, or business-to-business (B2B) XML servers, where it
senses and parses XML messages or transaction data. It routes client
data to the most appropriate server, based on rules that have been pre-
configured for each web server. The most common application is a
B2B environment where the client will often be another server or
application.

C H A P T E R 1 HP e-Commerce/XML Director Server Appliance SA8250 User Guide
2
The SA8250 also provides reliable URL- and port-based load
balancing, failover, and policy-based management to your e-
Commerce site, web site, or Intranet. The SA8250 adds the ability to
look into the data beyond the URL, and is the best load balancing
solution available for the reasons shown in this table.
Assumptions
This document assumes that you are a network administrator and that
you have at least a basic understanding of the following:
•XML usage and syntax
•Networking concepts and terminology
•Network topologies
•Networks and IP routing
Feature Description
Reliability The SA8250 provides 7 x 24 uptime through failover systems and
the inherent robustness of leading network protocols.
Fault Resistance The SA8250-managed configurations offer many features and
capabilities that improve the availability and reliability of server-
based services.
Policy-based
Management The SA8250 allows system administrators to implement classes of
service, assign priority levels, and set target response times.
Intelligent Content
Routing The SA8250 takes application-aware routing to a new level with
the ability to segment Internet content according to the requested
URL and embedded XML data.
Error Recovery Application intelligence allows the SA8250 to understand and
correct transport-related application errors transparently to the end
user.
Secure Sockets Layer
Acceleration The SA8250 can offload encrypted web traffic (HTTPS) providing
a significant performance improvement over web server based
Secure Sockets Layer (SSL) processing.
SA8250 Features

C H A P T E R 1 Benefits of the SA8250
3
Benefits of the SA8250
This table lists the benefits of the SA8250.
Benefit Description
Distribute XML traffic
among multiple servers
according to content
The SA8250 analyzes and intelligently distributes XML traffic.
The SA8250 categorizes XML traffic by content according to
user-crafted rules, and then distributes it among multiple servers,
thus allowing network resources to be used in a manner consistent
with your corporate goals.
Substantial performance
boost and reliability for
e-Commerce
The SA8250 increases the speed, scalability, and reliability of
multi-server e-Business sites. It regains the speed lost by servers
processing secure transactions by delivering faster SSL
processing. It integrates SSL processing with XML traffic
management technology, eliminating errors and improving Quality
of Service (QoS). This unique capability ensures that customers
working with sensitive information or business-to-business
transactions online receive timely responses, do not see error
messages, and are confident that delivery of their information is
kept private.
SSL acceleration Some e-Commerce sites suffer dramatic performance degradation
as secure transactions increase. Using patent-pending technology
to perform cryptographic processing offloaded from the server, the
SA8250 can support up to 1200 SSL connections per second.
The SA8250 enables e-Commerce sites to transact secure business
and deliver sensitive information quickly, and confidentially. It
performs all key management and encryption. The result is a
tremendous performance boost for heavily trafficked e-Commerce
sites.
Substantial economic
benefits The SA8250 improves customer satisfaction by improving the
response time for secure transactions. This means that e-
Commerce sites can now enjoy the benefits provided by having
secure transactions participate in layer 7 intelligent traffic
management. This creates substantial economic savings for e-
Commerce sites through improved customer satisfaction, lower
cost of ownership, and reduced server provisioning requirements.
Benefits
C H A P T E R 1 HP e-Commerce/XML Director Server Appliance SA8250 User Guide
4
SSL acceleration and
intelligent traffic
management benefits
Performance degrades dramatically as more customers access a
site in SSL mode, frustrating the very customers who are
attempting to make a purchase. The SA8250 is essential to
providing high performance and superior levels of service when
building reliable, scalable, and secure e-Commerce sites.
Off-loading SSL handling from e-Commerce servers improves
overall site performance and customer response time
Accelerated SSL processing eliminates over-provisioning capacity
Lower processing demands on the server creates greater capacity
for your e-Commerce site
Drop-in installation avoids impacting your mission critical e-
Commerce servers
Response-time based prioritized service for secure transactions
Improved responsiveness, reliability, and QoS for secure
transactions means delivering the highest levels of support for
paying customers
Ensures that e-Commerce merchants are always open for business
by preventing “Server Too Busy” and “File Not Found” errors,
even for secure transactions
Patent pending
intelligent XML content
routing for secure
transactions
The SA8250 implements intelligent traffic management for secure
transactions, dramatically improving an e-Commerce site’s
responsiveness, reliability, and QoS. While typical traffic
management devices make decisions based only on information at
Layer 4 in the network stack, the SA8250 is the only XML
appliance that combines Layer 4 through 7 (application/content)
awareness to speed up response times and eliminate error
messages for secure transactions. It keeps e-Commerce sites open
for business, even during back-end transaction problems or content
glitches.
Benefit Description
Benefits (continued)
C H A P T E R 1 Benefits of the SA8250
5
Intelligent session
recovery for secure
transactions
The SA8250 provides Intelligent Session Recovery technology for
secure transactions. By monitoring content within the response
sent back by the server, Intelligent Session Recovery detects
HTTP 400, 500, or 600 series errors, transparently rolls back the
session, and redirects the transaction to another server until the
request is fulfilled.
Response-time base
prioritized service for
secure transactions
The SA8250 enables system administrators to implement varying
classes of service, assign priority levels, and set target response
times for secure transactions. The SA8250 continually measures
the response times of each class of service group and assigns
incoming requests to the server that can fulfill those requests
within the predefined response time. If the response time exceeds
the predefined threshold, requests designated as high priority
receive preference over those of lower priority. The SA8250
offers predictable performance for high-priority secure requests.
Benefit Description
Benefits (continued)
C H A P T E R 1 HP e-Commerce/XML Director Server Appliance SA8250 User Guide
6
Specifications
This table lists the specifications for the SA8250.
Specification Description
Servers supported Any Web server (Apache, Microsoft, Netscape, etc.)
Most operating systems, including UNIX*, Solaris*, Windows
NT*, BSD*/BSDI*, AIX*, etc.
Any server hardware (SUN, HP, IBM, Compaq, SGI, etc.)
No practical limit on number of servers
System administration Command line interface (CLI)
Web-based graphical user interface (GUI)
SNMP monitoring (MIB II and Private MIB)
Dynamic configuration through password-protected serial console,
telnet, SSH v1, and SSH v2
Performance Rated up to 1200 HTTPS connections/sec, 2500 RICH (Layer 7)
HTTP connections/sec, 6600 HOT (Layer 4) connections/sec,
95 Mb/sec
Layer 7 traffic management
Patent-pending technology offloads all cryptographic processing
from server
Dimensions Mounting: Standard 19-inch rack mount
Height: 3.5 inches (8.9 cm)
Width: 17 inches (43.2 cm)
Depth: 20.16 inches (51.21 cm)
Weight 24 pounds (10.89 kg)
Specifications

C H A P T E R 1 Specifications
7
Interface connections Dual 10/100 Ethernet
TTY Serial - console
Failover port
Transparent operation Supports single or multiple Virtual IP (VIP) addresses per domain
Priority classes Application/protocol types supported: HTTP, HTTPS, FTP,
NNTP, or any TCP port
Patent pending XML and
intelligent content
routing
Content: URL, file types such as *.GIF, file paths such as
\ads\, and file names such as index.html
Transactions: Transaction types such as *.CGI
XML patterns: Defined by RICH (Layer 7) and XML expressions,
in the form: */order.asp & //From[id=”acme”]
Intelligent session
recovery Automatically resubmits requests
Traps 400, 500, and 600 series errors for HTTP and HTTPS
Response-time based
priority for secure and
non-secure transactions
Sets and enacts target response times
Directs data based on class priority and target response times
Real-time performance monitoring
Automatic server weighting and tuning
Server-state aware (“sticky”) based on source IP, SSL session ID,
or HTTP cookie
System fault tolerance
and failover Single site, single or multiple connections
Automatic detection of status change and health of servers
Intelligent Resource Verification (IRV)
Specification Description
Specifications (continued)

C H A P T E R 1 HP e-Commerce/XML Director Server Appliance SA8250 User Guide
8
Security features
supported RSA, RC2, RC4, DES, Triple DES, IDEA, Blowfish, MD5, SHA
SSL v2 and v3 for transaction security
SSH for secure Command Line Interface (up to 168 bit)
IP filtering
Serial port logon
Specification Description
Specifications (continued)

C H A P T E R 1 Typographic Conventions
9
Typographic Conventions
The following typographic conventions are used throughout this
manual.
NOTE: This is an
example of a note. NOTES clarify a point, emphasize vital information, or describe
options, alternatives, or shortcuts. Except for tables, notes are always
found in the left margin.
CAUTION: This is an
example of a caution. CAUTIONS are designed to prevent possible mistakes that could
result in injury or equipment damage. Except for tables, cautions are
always found in the left margin.
NUMBERED LISTS indicate step-by-step procedures that you must
follow in numeric order, even if only one step is listed:
1. This is the first step.
2. This is the second step.
3. This is the third step, etc.
BULLETED LISTS indicate options or features available to you:
•A feature or option
•Another feature or option, etc.
ITALICS are used for emphasis or to indicate onscreen controls:
4. To edit the configuration settings, press the Configure tab.
COMMANDS are shown in the following ways:
•Any command or command response text that appears on the
terminal is presented in the courier font.
•Any text that you need to type at the command line appears in
bold courier, for example:
HP SA8250/config/policygroup#create gold
•Angled brackets (< >) designate where you enter variable
parameters
•Straight brackets ([ ]) show parameter choices, separated by
vertical bars
•Braces ({ }) show optional commands and parameters

C H A P T E R 1 HP e-Commerce/XML Director Server Appliance SA8250 User Guide
10
•Vertical Bars ( | ) separate the choices of input parameters within
straight brackets. You can choose only one of the set of choices
separated by vertical bars. Do not include the vertical bar in the
command.

Theory of
Operations
General Operating Principles
This chapter discusses the general operating principles of the HP e-
Commerce/XML Director Server Appliance SA8250. For details
about the complete SA8250 command set, see Chapter 5. For
information about completing specific tasks, see Chapter 6.

C H A P T E R 2 HP e-Commerce/XML Director Server Appliance SA8250 User Guide
12
XML
Operations
The SA8250 provides a powerful means of using eXtensible Markup
Language (XML) technology to facilitate B2B transactions. In
addition to its XML capability, the SA8250 provides Layer 4 (HOT)
services, Layer 7 (RICH) services, and Secure Sockets Layer (SSL)
acceleration.
The SA8250 accepts user-created rules regarding the content of
information transmitted in XML documents, and uses the rules to
route the information to the appropriate data center resources.
Before you can configure the SA8250, you must first obtain the
following information:
•Which of the several common formats or varieties of XML will
be used in the client application
•Which elements, attributes, or data in the anticipated XML traffic
represent the significant markers by which value is determined
You control the XML functionality using the XML Server Tab of
Policy Manager screen in the Graphical User Interface (GUI, Chapter
4), or the Command Line Interface (CLI, Chapter 5), as demonstrated
in this chapter. The SA8250 manages XML traffic using the “XML
expression,” a definition of one or more patterns that describe
specific conditions to be compared with incoming XML data.
Patterns are assigned only to servers identified by their IP address and
port. When a match between a pattern and the incoming data occurs,
the SA8250 routes that data to the desired server for fulfillment.

C H A P T E R 2 XML Operations
13
XML Expression Syntax
This table lists the valid XML expression syntax for the SA8250.
These are described in more detail on the following pages.
Expression Syntax
XML Expression PathExpression
PathExpression Path | PathExpression BooleanOperator PathExpression |
‘(‘ PathExpression ‘)’
Path ( ‘/’ | ‘//’ ) Element + Filter ?
Filter ‘[‘ FilterExpression ‘]’
FilterExpression (Element | Attribute | Function Call) (ComparisonOperator
Value )? | ‘(‘ FilterExpression ‘)’ | FilterExpression
BooleanOperator FilterExpression
Value Literal | Number
Number Integer | Decimal
ComparisonOperator ‘>’ | ‘<‘ | ‘=’ | ‘!=’ | ‘>=’ | ‘<=’
BooleanOperator ‘and’ | ‘or’
FunctionCall FunctionName ‘(‘ ( Argument ( ‘,’ Argument )* )? ‘)’
FunctionName ‘starts-with’ | ‘contains’ | ‘translate’
Attribute ‘@’ ( AttributeName | ‘*’ )
Element ElementName | ‘*’
XML Expression Syntax

C H A P T E R 2 HP e-Commerce/XML Director Server Appliance SA8250 User Guide
14
XML Data Model
For standard SA8250 operations, XML data consists of three
hierarchical components or nodes:
•Elements (data types)
•Attributes (subcategories of a data type or element)
•Text (specific data such as names, addresses, and quantities)
NOTE: We indented
XML commands for ease
of reading in this
document. However, the
leading spaces or tabs
are not significant.
The relevant content of an XML document is defined within these
three components. This example shows a block of incoming XML
text as received by the SA8250:
<employee>
<name lastName="Smith" firstName="John"
initial="K"/>
<id eid=”12345678” jobClass=”System
Engineer”/>
<benefits status=”active”>
<medicalCarrier>MedCo</medicalCarrier>
</benefits>
<grade title=”manager”>5</grade>
<address>
<street>13280 Evening Creek Dr</street>
<city>San Diego</city>
<state>California</state>
<zip>92128</zip>
</address>
</employee>
Where:
•employee, name, id, benefits, grade, address,
street, city, state, and zip are elements of the XML
document.
•lastName, firstName, and initial are attributes of the
name element.
•eid and jobClass are attributes of the id element.
•13280 Evening Creek Dr, San Diego, California,
and 92128 are text components of the street, city,
state, and zip elements, respectively.
XML expressions configured in the SA8250 are matched against
items as shown above and routed for fulfillment according to server
assignments.
C H A P T E R 2 XML Operations
15
Commands and Operators
The SA8250 uses an XML Path Language (XPath) subset.
NOTE: For a detailed
description of XML
commands, see Chapter
5.
XML patterns are created in the CLI or GUI using a set of commands,
operators, and comparison operators with XML elements, attributes,
and text components. Patterns take the form of a “path,” similar to
the “expressions” used in configuring the SA8250 for HTTP parsing
as described later in this chapter.
A path consists of a sequence of one or more XML elements
separated by single or double slashes (/ or //). The first element is also
preceded by single or double slashes. These slashes are step
operators and are used to select elements relative to the context node,
as described in this table.
The comparison operators are described in this table.
Operator Name Description
/child operator Selects all immediate children of the context node
// descendant operator Selects elements anywhere under the context node
XML Step Operators
Operator Name Description
=Equal Returns true if any values of the nodes specified in the pattern equals
to a given value
!= Not equal Returns true if at least one value of the nodes specified in the
patterns does not equal to a given value
<Less than Returns true if at least one value of the nodes specified in the
patterns is less than the specified value
<= Less than or
equal to Returns true if at least one value of the nodes specified in the
patterns is less than or equal to the specified value
>Greater than Returns true if at least one value of the nodes specified in the
patterns is greater than the specified value
>= Greater than
or equal to Returns true if at least one value of the nodes specified in the
patterns is greater than or equal to the specified value
XML Comparison Operators

C H A P T E R 2 HP e-Commerce/XML Director Server Appliance SA8250 User Guide
16
Each element together with the operator selects a set of nodes in the
XML data tree relative to a context node. This set of nodes must
match the name of the element specified in a step. Every path starts
with the root node as the first context node. Nodes selected in a step
form the set of context nodes for the following step.
You can specify an element as “*”, which selects any element relative
to the context node. You can also specify an optional filter at the end
of a path to further refine XML data stream parsing.
Using the “employee” from the earlier XML data example, an XML
pattern on the SA8250 might look like this:
* & //address[zip > 90000]
where:
•* is a Layer 7 (RICH) wildcard expression
•//address[zip > 90000] is an XML expression
For more information on XML patterns, see “XML Pattern Creation”
later in this chapter.
Because the server is configured for any zip codes greater than 90000,
and John K. Smith’s zip code is 92128, the SA8250 directs his
employee data to that server.
You can specify an attribute as @AttributeName, or @* to select any
attribute relative to the context node.
Filters are identified by a FilterExpression enclosed within square
brackets, [ ]. They define a pattern within a pattern following this
general structure:
( (’/’ | ’//’) Element )? [ FilterExpression ]
Filter expressions are applied to every element returned by the
preceding path pattern. They return a Boolean TRUE if the server is
a valid choice, or FALSE if that server will not be used.
An element or attribute by itself inside a filter expression specifies an
existence test. For example:
//a[b or @c]
C H A P T E R 2 XML Operations
17
The operative component of a FilterExpression is a comparison
expression or any FunctionCall expression that returns a string value,
which compares either an element or an attribute against a specified
value. An element in a FilterExpression refers to the child element of
the context node, while an attribute refers to the attribute of the
context node.
Comparison expression syntax:
(Element | Attribute | FunctionCall)
ComparisonOperator Value
FunctionCall expression syntax:
FunctionName ’(’ (Argument (’,’ Argument)*)? ’)’
For more information on Function Calls, see “Function Calls” later in
this chapter.
You can combine comparison expressions and the FunctionCall
expression with Boolean operators and parentheses to create complex
filter expressions, as shown in this table.
Sample Pattern Description
//employee[grade=5] Matches if an employee element with a child element grade
value equal to 5
//name[@lastName=
”Smith”] Matches if a name element with an attribute lastName=Smith
//employee[grade=5] and
//grade[@title=
”manager”]
Matches if an employee element with a child element grade
value equal to 5 and a child element with an attribute
title=”manager”
Comparison Expression Samples
C H A P T E R 2 HP e-Commerce/XML Director Server Appliance SA8250 User Guide
18
Boolean Operators
Boolean operators are logical operators between expressions. These
operators are used in the PathExpression and the FilterExpression:
•<PathExpression> BooleanOperator <PathExpression>
•<FilterExpression> BooleanOperator <FilterExpression>
This table shows two Boolean operators.
This table shows examples of Boolean operators.
Operator Name Description
and Logical AND operator Performs a logical AND operation
or Logical OR operator Performs a logical OR operation
Boolean Operators
Sample Pattern Description
//benefits[@status and
medicalCarrier] Matches if there is a benefits element, a status attribute, and a
medicalCarrier child element. status and medicalCarrier are
associated with the benefits element.
//benefits[@status or
medicalCarrier] Matches if there is a benefits element, a status attribute, or a
medicalCarrier child element. status and medicalCarrier are
associated with the benefits element.
//benefits or //grade Matches if there is a benefits or grade element
Boolean Expression Samples
C H A P T E R 2 XML Operations
19
Function Calls
A FunctionCall expression is evaluated by using the FunctionName
to identify a supported function, evaluating each of the arguments if
needed, and calling the function passing the required arguments. It is
an error if the number of arguments is wrong or if an argument is not
of the required type. The result of the FunctionCall expression is the
result returned by the function. A FunctionCall can only be specified
within a FilterExpression.
This table describes the three supported string functions.
Function Description
starts-with(value,
substring) The starts-with function test whether the string value of value starts the
specified substring. value can be either an element, attribute, or function
call that returns a string value. substring must be a literal value enclosed
in single or double quotes. A Boolean value of TRUE or FALSE is
returned.
contains(value,
substring) The contains function tests whether value contains the specified
substring. value can be either an element, attribute, or function call that
returns a string value. substring must be a literal value enclosed in single
or double quotes. A Boolean value of TRUE or FALSE is returned.
translate(value,
fromString,
toString)
The translate function replaces characters in the value string if they
appear in the fromString with the corresponding characters in the
toString. If a character appears in fromString but not in the
corresponding position in toString, the character will be dropped from
the value string. The result string is returned. value can be either an
element, attribute, or function call that returns a string value. Both
fromString and toString have to be a literal value enclosed in single or
double quotes.
Function Calls
C H A P T E R 2 HP e-Commerce/XML Director Server Appliance SA8250 User Guide
20
This table shows function call samples.
Sample Pattern Description
//employee/name[starts-
with(@lastName,”S”)] Matches if there is an employee element with a name child element
that has a lastName attribute value starting with “S”
//id[contains(@eid,
“456”)] Matches if there is an id element with the value of an eid attribute
containing “456”
//id[contains(translate
(@jobClass,’abcdefghijk
lmnopqrstuvwxyz’,
‘ABCDEFGHIJKLMNOP
QRSTUVWXYZ’),
‘SYSTEM ENGINEER’)]
Matches if there is an id element with the value of a jobClass
attribute containing “System Engineer.” All characters in the
jobClass attribute are converted to uppercase before being passed
to the contains function.
Function Call Samples

C H A P T E R 2 XML Operations
21
Values
Values are used to specify the right operand of a comparison
expression, and can be either a literal (such as a string) or a number.
A literal has to be enclosed either in single or double quotes. If the
literal string contains a single quote, double quotes should be used to
enclose the string. If the literal string contains double quotes, single
quotes should be used to enclose the string. Character references
(both decimal and hexadecimal format) and predefined entities as
described in the XML specification can be used within the literal
string.
The string value of the left operand is obtained for literal equality
comparisons. If an element is specified for the left operand, only
elements without a child element should be used. Although the upper
level elements are not supported, this generally is not a problem,
since in most cases only the lowest level element contains text values.
A number can be either a decimal number or an integer. Numbers
should not be enclosed in quotes. If a number is enclosed in quotes,
it is treated as a literal. A number can be signed by proceeding it with
a ’+’ or ’-’ sign. A decimal number must contain only one decimal
point with at least one digit.
A numeric comparison is either an equality comparison with a
numeric right operand or a non-equality comparison. Both the value
of the left and right operands, if needed, are converted to numeric
values before a numeric comparison is made. If the value cannot be
converted to a number, the comparison returns false.

C H A P T E R 2 HP e-Commerce/XML Director Server Appliance SA8250 User Guide
22
XML Pattern Creation
XML-related commands are issued at the /xmlpattern level of the
CLI, below the server port level. For example:
…/server/10.1.1.1/port/80/xmlpattern#
create */order.asp & doc=3 & //From[id="Acme"]
NOTE: Case is
significant for text
elements like “Acme.”
Incoming text using
“acme” (all lowercase)
does not match, unless
you use the translate()
function to convert text
case.
where:
•*/order.asp is the Layer 7 (RICH) expression
•doc=3 is the third document in a multipart or URL encoded
message. For more information, see “Document Number
Specification” later in this chapter.
•//From[id=”Acme”] is the XML expression.
It is imperative that XML commands be written as shown above, with
spaces on either side of all ampersands (&) used to separate the RICH
expression, document number (if used), and XML expression (if
used). Failure to do so results in an error.
Once created, XML patterns receive index numbers and are stored in
a list. You can display this list by typing the info command:
…/server/10.1.1.1/port/80/xmlpattern#info
This results in a list of expressions by their index number.
XML commands can also be entered and managed using the Policy
Manager screen of the Graphical User Interface. For more
information, see Chapter 4.
For more information on XML commands, see Chapter 5.

C H A P T E R 2 XML Operations
23
XML Pattern Matching
Please refer to this example XML command throughout this
discussion:
create */order.asp & doc=3 & //From[id="Acme"]
The SA8250 attempts to find XML pattern matches in the following
sequence:
1. RICH expression matches. If the RICH expression
(*/order.asp) does not match, the document number and
XML expression are ignored.
NOTE: We recommend
using the same document
number in all XML
patterns with the same
RICH expression for a
service. If you specify
different document
numbers for each XML
pattern of the same RICH
expression, it could cause
degraded performance,
because a different XML
document has to be
parsed for each XML
pattern to be matched.
2. Optional document number matches. doc=3 instructs the
SA8250 to use the third document for matching against the XML
expression. If the third document is missing, or is not an XML
document, the data is treated as a non-XML document and
directed to the first matching RICH expression server.
For more information on the document number, see “Document
Number Specification” later in this chapter.
3. Optional XML expression matches. If both the RICH and XML
expressions match, the SA8250 directs the client data to the
server matching the XML expression (//From[id=”Acme”]).
4. If only the RICH expression matches, or the XML expression is
missing, the SA8250 either directs the client data to a default
server, or returns an HTTP error 503, “No Servers Available”
message to the client. This depends upon the SA8250’s
configuration.
For information on how to configure a default server, see Chapter
4.
For more information on RICH expressions, see “RICH
expressions in XML patterns” later in this chapter.
If any server in a service has undefined XML expressions, that server
will be used for any XML data sent to that service, regardless of
content. To prevent this, ensure that you define XML expressions on
all servers within a service.

C H A P T E R 2 HP e-Commerce/XML Director Server Appliance SA8250 User Guide
24
MIME Content Type Support
Multipurpose Internet Mail Extension (MIME) values in the
“Content-Type” HTTP header are recognized by the SA8250 and
handled accordingly. This is primarily to support multipart and URL
encoded messages which can contain multiple documents in the
message body. The “Content-Type” header has the following format:
Content-Type: <media type>/<media subtype>
[ ; <parameter> ] *
The media type and subtype, the charset parameter, and the
boundary parameter are recognized. The boundary parameter is
only used for multipart messages.
The charset Parameter
The optional charset parameter in the “Content-Type” header is used
to identify the character set used for the XML document. If encoding
is also specified in the prolog of the XML document, the charset
parameter in the “Content-Type” header is used instead. Any
unrecognizable charset or encoding causes the SA8250 to treat the
document as non-XML. Valid character sets include:
•UTF-8
•UTF-16
•US-ASCII
•ISO-8859-1

C H A P T E R 2 XML Operations
25
Media Type and Subtype
This table lists the recognized media type and subtypes. The media
types listed are the currently defined types registered with the IANA
(Internet Assigned Number Authority). The SA8250 cannot
recognize all possible media subtypes, because many of them are
proprietary.
Media type recognition allows the XML engine to determine the
format of the message and the type of content being embedded. If a
media subtype is “xml,” the document is treated as an XML
document without further examination. If a media type indicates
explicitly non-XML, such as audio, video, or image, the document is
treated as non-XML.
Media Type Media Subtype How it is processed by the SA8250
text xml Treated as XML
other subtypes Check if XML
multipart voice-message Treated as non-XML
encrypted Treated as non-XML
other subtypes Extract individual part and classify
application xml Treated as XML
x-www-form-urlencoded Extract individual field value, check if XML
pkcs7-mime/x-pkcs7-mime Treated as non-XML
other subtypes Check if XML
message rfc822 Parse initial rfc822 header and classify
partial Treated as non-XML
other subtypes Check if XML
any other
media type any subtypes Treated as non-XML
Media Types and Subtypes

C H A P T E R 2 HP e-Commerce/XML Director Server Appliance SA8250 User Guide
26
URL Encoded MIME Processing
Messages with a “application/x-www-form-urlencoded” media type
are URL encoded messages in a special format that contains a set of
field names and values, with the values encoded. This shows how the
body of an URL encoded message is formatted:
<field name>=<encoded value>[ & <field name>=
<encoded value>] *
Each encoded value is potentially an XML document, and is referred
to as a document in the context of document selection. Each encoded
value is extracted from the message body and decoded before being
checked for XML data and matched against the XML expressions.
There can be multiple fields, and thus multiple potential XML
documents, in a URL encoded message. The first XML document is
used for pattern matching, unless a document number is specified, as
described in “Document Number Specification” later in this chapter.
Multipart MIME Processing
Multipart messages contain multiple body parts. Each body part is
preceded with a boundary string specified in the boundary parameter
in the “Content-Type” header. The body of each body part can be
optionally preceded with its own MIME headers. Each body part
contains a separate document and is extracted individually before any
XML parsing is made. If the boundary parameter is missing for a
multipart message, the message will be treated as a non-XML,
because there is no way to interpret the body of the message. This is
an example of a simple 2-part multipart message:
POST /Order.asp HTTP/1.0
Content-Type: multipart/mixed;
boundary = “Body Part Boundary”
Content-Length: 2048
--Body Part Boundary
Content-Type: text/xml
Content of Document 1
--Body Part Boundary
Content-Type: image/jpeg
Content of Document 2
--Body Part Boundary--

C H A P T E R 2 XML Operations
27
Multipart messages can also be nested:
POST /Order.asp HTTP/1.0
Content-Type: multipart/mixed;
boundary = “Body Part Boundary”
Content-Length: 2048
--Body Part Boundary
Content-Type: multipart/related;
boundary = “Nested Body Part Boundary”
--Nested Body Part Boundary
Content-Type: text/xml
Content of Document A
--Nested Body Part Boundary
Content-Type: text/xml
Content of Document B
--Nested Body Part Boundary--
--Body Part Boundary
Content-Type: text/xml
Content of Document C
--Body Part Boundary--
The first body part that contains an XML document is used for pattern
matching, unless a specific document number is specified.
Document Number Specification
NOTE: To maximize
performance, the
document number of all
XML patterns with the
same RICH expression
should be consistent on
all servers.
Since both URL encoded and multipart messages can contain
multiple XML documents, the document number specifes which
document is used for matching against a specific XML expression.
An incorrect match results if the wrong XML document is specified.
An example is shown in the “XML Pattern Matching” earlier in this
chapter.
Documents are counted as they are encountered sequentially in the
message body. If they are nested in a multipart message body, as
shown above, the innermost document is counted first. The
document number is used only for multipart and URL encoded
messages, and is ignored otherwise. If the document number is not
specified, the first XML document will be used for the pattern
matching.
Valid document numbers are integers from 1 to 99.

C H A P T E R 2 HP e-Commerce/XML Director Server Appliance SA8250 User Guide
28
Content Transfer Encoding Support
NOTE: The Content-
Transfer-Encoding
header is not an HTTP
header, and can only be
specified in a MIME
header (in the header of
an embedded body part).
Message bodies can be encoded so that they do not cause any problem
for some of the protocol transfer gateways, especially when sending
binary data. Even though HTTP is able to handle binary data, many
applications still encode certain types of the messages. This is
especially true if the encoding is being done at an application layer
that is unaware of the transport protocol being used.
There are basically two common transfer encoding schemes: quoted-
printable, and base64. Quoted-printable encodes non-printable
ASCII and non-ASCII characters into the corresponding hexadecimal
representation, while base64 uses a 64-character set to encode the
data.
Both the quoted-printable and base64 values in the “Content-transfer-
encoding” header are recognized. The encoded document is decoded
according the encoding scheme, before any XML document test and
pattern matching are made. The original message is not modified
with respect to content-transfer-encoding.
Signed-Only S/MIME Support
S/MIME messages can be either encrypted or signed-only messages.
For encrypted messages, the format can be either multipart/
encrypted, or application/pkcs7-mime with enveloped-data
or encrypted-data. Encrypted messages are not supported, and are
treated as non-XML.
For signed-only messages, 2 formats can be used: multipart/
signed or application/pkcs7-mime with signed-data. The
multipart/signed format is supported, because the signed data
content looks like a normal Multipart MIME body part. The
application/pkcs7-mime format is not supported, and messages
in this format are treated as non-XML.

C H A P T E R 2 XML Operations
29
XML “Well formed” errors
If the SA8250 detects punctuation or syntax errors in an incoming
XML data stream, it can be configured to send an error message to the
sending client (the default setting), or to direct the client data to
servers matching the RICH expression, effectively ignoring the
incoming XML data.
XML default special case
If a server is configured as the default in the SA8250, and none of the
XML expressions match the incoming data stream, the SA8250
directs the client to the default server, provided the RICH expression
matches. This feature specifes which server handles the transactions
if there are no matches for the XML expressions.
If the SA8250 is not programmed with a default server, and if none
of the XML expressions match the incoming data, the SA8250
returns HTTP error 503, “No Servers Available” to the client.
If the RICH expression does not match, the XML expression is
ignored and the SA8250 returns HTTP error 503, “No Servers
Available” to the client.
To set the default server using the Graphical User Interface (GUI),
see Chapter 4.
To set the default server using the Command Line Interface (CLI),
see Chapter 5.

C H A P T E R 2 HP e-Commerce/XML Director Server Appliance SA8250 User Guide
30
Services Services are the virtual resources that the SA8250 provides to
network clients. Services are defined by their Virtual Internet
Protocol (VIP) address and virtual port number. The SA8250 load
balances network client requests for a service by receiving requests
from the user and directing them for fulfillment to the most
appropriate resource in the provider’s server farm. Services are
defined and created within Policy Groups (see “Prioritization and
Policy Groups” later in this chapter) and are managed using the
following commands:
NOTE: The sample
commands used in this
chapter are meant as
examples only.
config policygroup <name> service create <name>
vip <ipaddr> port <number> {type [TCP | UDP |
RICH_HTTP]} {sticky [disable| src-ip |
cookie]} {sticky-timeout <seconds>} {backups
[enable | disable]} {response <milli-sec>}
{priority <level>} {balancing [load | robin]}
{server-timeout <seconds>}
config policygroup <name> service delete [<name>
| -all ]
config policygroup <name> service <name>
{enable} | {disable} | {balancing [robin |
load]} | {sticky [disable | src-ip | cookie]}
| {sticky-timeout <seconds>} {backups [enable
| disable]} | {response <milli-sec>} |
{dup-syn <micro-sec>} | {priority <level>} |
{server-timeout <seconds>}

C H A P T E R 2 Services
31
Layer 4 (HOT) Services
HOT services provide the fastest brokered performance and are
available on the SA8250. HOT services are defined in full by their
Virtual IP address (VIP) and port number.
In HOT or “Brokered” mode, the SA8250 performs Network Address
Translation (NAT) on all packets passing through the connection.
NAT changes the destination IP address and port of incoming packets
to those of the selected fulfillment server. The source IP address is
modified to be that of the SA8250.
Fulfillment servers can be addressable by IP address, and thus can be
on either local or wide area networks.
By default, in HOT mode the fulfillment server sees all connections
as coming from the SA8250 rather than from the client's address. In
some environments, it may be preferable to have the fulfillment
server see the requests as they were coming directly from the client.
Source Address Preservation (SAP) on the SA8250 allows this to
happen. For more details, see Source Address Preservation later in
this chapter.
Layer 7 (RICH) Services
The SA8250 allows more flexible service fulfillment for RICH (Real-
time Intelligent Content Handling) services. The service type
“RICH_HTTP” is available on the SA8250 and enables it to make
fulfillment decisions based on the URL content of each client HTTP
request. RICH services also include advanced error detection, and
automatic resubmission of HTTP requests under most error
conditions.
As with HOT services above, fulfillment servers can be addressable
by IP address, and thus can be on either local or wide area networks.
XML services are configured as RICH services.

C H A P T E R 2 HP e-Commerce/XML Director Server Appliance SA8250 User Guide
32
Out-of-Path Return (OPR)
NOTE: OPR is not
applicable to Layer 7
services.
Ordinarily, the SA8250 processes all traffic in both directions
between clients and the server farm. Viewing the server return traffic
helps the SA8250 accurately determine server response times and
handle HTTP errors. Often, the volume of data sent from the server
to the client is much larger than the traffic from client to server. In
such situations, you can use OPR mode to increase performance.
You enable OPR by typing this command:
config policygroup <name> service <name> server
<name> port <port> mode opr
Each server for which OPR is enabled must have its loopback
interface configured to identify itself as the VIP of the brokered
service. This allows the server to respond directly to the client. The
server’s loopback interface, or an equivalent interface that will not
respond to Address Resolution Protocol (ARP) requests, must be
configured before setting up the SA8250 for OPR. For more
information, see Appendix D.
FTP
Limitations
This table lists those limitations of FTP on the SA8250.
HOT with SAP does not change the server’s IP address during Passive
FTP because the server is making the connection directly to the client,
using its real IP address. If the server’s IP address is not a "real" IP
address, this mode will not work.
Mode Active FTP Passive FTP
HOT No Yes
HOT with SAP Yes Yes (see below)
OPR No No
FTP Limitations

C H A P T E R 2 Sticky Options
33
Sticky Options Some services operate best if all requests from a specific client during
a single session are directed to the same fulfillment server. For
example, if the server maintains a local database of client activity or
context (shopping cart, registration info, navigation history, etc.), it is
important that subsequent client requests go to the server with these
database records. The SA8250's “sticky” options allow this to occur.
Sticky is available in the two modes shown in this table.
Sticky source IP for SSL uses the SSL session ID for stickiness
instead of the source IP of the client.
Both HTTP and HTTPS services can be RICH. However, incoming
RICH SSL connections will always be decrypted and sent on to the
fulfillment servers in clear text. Sticky cookie must be used when the
clients need to remain stuck to the same server between HTTPS and
HTTP.
There is no sticky cookie requirement for HTTPS traffic.
Each brokered service can be configured with sticky cookie, sticky
IP, or no sticky option enabled. When a sticky option is configured,
all client requests (identified according to the enabled sticky mode)
during a session are routed to the same fulfillment server. When the
sticky option is disabled, the SA8250 determines the best fulfillment
server for each client request and directs them accordingly.
Mode Description
Source IP
address
(“src-ip”)
Requests from a given IP address are directed to a
single server.
Cookie The requesting browser is given a cookie, which
subsequently identifies it as a unique requestor to
be directed to a single server. This method uniquely
identifies the client even if the request passes
through a proxy server. RICH service is required.
Sticky Modes

C H A P T E R 2 HP e-Commerce/XML Director Server Appliance SA8250 User Guide
34
Sticky Persistence
For source-ip based sticky, the relationship between the client IP
address and the fulfillment server remains in effect for the entire time
the SA8250 is online or until the sticky timeout value expires. In the
event of failover, the sticky relationship is lost. Cookie sticky remains
in effect while the browser is running or until the sticky timeout value
expires. Since the browser maintains the cookie, cookie sticky is
maintained in the event of failover. The system clocks on both
SA8250s must be synchronized for failover handling to work. You do
this by enabling Network Time Protocol (NTP) using the Boot
Monitor. The administrator can control the length of time a server is
forced to handle serial requests from a single client using the sticky
timeout value.
Sticky-timeout
NOTE: All cookie sticky
RICH services will be
stuck to the same server
for the duration of the
sticky timeout value.
The SA8250 treats the timeout differently for cookie versus source-
ip sticky. With source-ip sticky, the timeout is reset with every
connection from the client (so that the timeout is effectively an "idle
time"). With cookie sticky, the timeout starts with the first
connection from the client to the server, and never gets reset. When
the cookie expires, even if actively being used, the next connection
will be load balanced to a new server.
We recommend that you set the cookie sticky timeout value to at least
1.5 times the maximum amount of time a user will expect to be stuck
to a server. If you are uncertain of the exact setting, we recommend
using 43200 seconds (12 hours) as the default.
SSL and Sticky
SSL (Secure Sockets Layer, or HTTPS) enabled services can also be
made sticky by specifying “sticky cookie” or “sticky src-ip” on the
CLI. For SSL services, sticky cookie behaves exactly as it does for
ordinary HTTP services. Source IP sticky uses the SSL session ID to
maintain server context. The server relationship will not survive
failover. As with sticky cookie, use of the session ID uniquely
identifies the client even if the request passes through a proxy server.

C H A P T E R 2 SSL Acceleration
35
Server-timeout
A server timeout, which causes a change in servers, can appear as a
cookie sticky state change. The recommended value for server
timeout is at least 1.5 times the maximum server response time.
We recommend that you use 120 seconds as the default.
Grouping Services
NOTE: RICH is required
for sticky service
grouping.
The SA8250’s sticky capabilities can ensure that all service requests
from the same user are routed to the same server. Enabling sticky
cookie on multiple services ensures that requests from the same client
will be routed to the same fulfillment server for the duration of the
sticky relationship. Of course the server must be able to fulfill all
service requests to have a true one-to-one client-server relationship.
SSL
Acceleration
The SA8250 is a powerful addition to any web site desiring high
security levels. It was specifically created to manage secure traffic
going to and from critical applications. It handles SSL traffic into and
out of the customer’s environment, as well as providing load
balancing, fault management, and error recovery.
The SA8250 includes cryptographic software features and hardware-
based acceleration. It provides up to 1200 SSL (HTTPS) connections
per second, far exceeding the performance of even the most powerful
web servers on the market today.
The SA8250 allows users to off load SSL processing from their back
end servers, and at the same time achieve full-featured traffic
management. In a SA8250 environment, all encrypted traffic—
required by e-Commerce applications—is handled at the SA8250.
The interaction between the SA8250 and the servers is done in the
clear, allowing load balancing and session management.
SSL processing is enabled by assigning an RSA private key (a public
encryption key algorithm invented in 1977) and an X.509 certificate
to a Layer 7 service. The SA8250 Command Line Interface (CLI)
creates or imports keys and certificates when you define a service.
Once the key and certificate are in place, secure HTTP (HTTPS)
requests are decrypted and passed on to the web server. The SA8250's
dual NIC and packet filtering capabilities can be used to isolate the
web servers from the Internet, further preventing unauthorized
access.

C H A P T E R 2 HP e-Commerce/XML Director Server Appliance SA8250 User Guide
36
SSL
Fundamentals
SSL involves an interchange of keys used both to authenticate the
parties and to provide information to securely encrypt confidential
data. The keys distributed in this medium are “one way,” or
asymmetric. That is, they can only be used to encrypt confidential
data, and only the “owner” of the public key can decrypt the data once
it is encrypted using the public key information. SSL assures the three
benefits shown in this table.
To establish a secure session with a server, the client sends a “hello”
message to which the server responds with its certificate and an
encryption methodology. The client then responds with an encrypted
random challenge, which is used to establish the session keys. This
method allows two parties to quickly establish each others’ identities
and establish a secure connection.
Several encryption methods are employed. Common ones are DES,
3DES, RC2, and RC4. Key size can be varied to determine the level
of security desired. A longer key is more secure.
The SA8250 supports all common keys and ciphers, as well as the
following encryption methods: DES, DES3, and RC2 & RC4. The
SA8250 includes a licensed version of the RSA code embedded in the
security module as well. The device's session management software
has been certified by prominent security agencies and meets all
standards for SSL traffic.
The SA8250 handles all the handshaking, key establishment, and
bulk encryption for SSL transactions. Essentially, the SA8250 is a
full-featured, SSL-enabled web server. Traditionally, these functions
are performed either at the server level, by web servers generally
providing SSL functionality by way of standalone software
components, or by embedded encryption software.
Benefit Description
Authenticity Verifies the identities of the two parties
Privacy None other than the transacting parties can access
the information being exchanged.
Integrity The message cannot be altered in transit between
the two parties by a third party without the
alteration being detected.
SSL Benefits
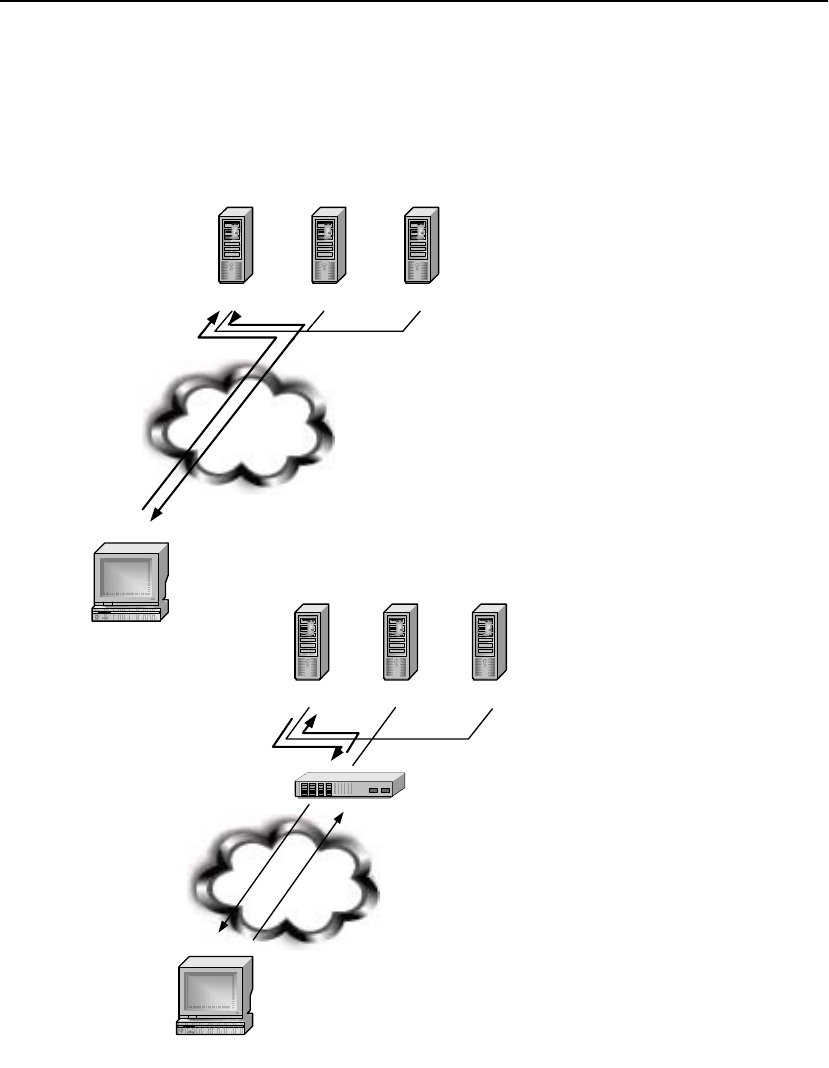
C H A P T E R 2 SSL Fundamentals
37
The SA8250 places encryption processing on the network side, thus
eliminating the need for processing on the servers. The servers never
see any of the SSL connection dialogue or the encrypted data. This
removes a substantial processing load from the servers allowing
improved response times and greater availability of system resources.
Basic SSL Operations
SA8250 1. Client connects to SA8250 with ClientHello
(includes ciphers supported)
2. SA8250 responds with SSL ServerHello
(includes selected cipher & session ID)
3. SA8250 sends certificate for server
4. Client sends ClientKeyExchange message;
includes PK (session key)
5. SA8250 and client send ChangeCipherSpec
message to indicate readiness
6. SA8250 and client send "finished" messages;
includes hash of whole conversation
7. Encrypted data sent to SA8250, decrypted and
forwarded to least busy server
8. Clear response sent to SA8250, encrypted and
sent to client.
1. Client connects to server
2. Server responds with certificate
3. Client encrypts random key
4. Server generates working key
5. Session established
Encrypted Traffic
Client
Client
Server Server Server
Server Server Server

C H A P T E R 2 HP e-Commerce/XML Director Server Appliance SA8250 User Guide
38
Application Message Traffic Management
The SA8250 was developed to perform load balancing in SSL
environments. The SA8250 allows users to load balance based on
application content (Layer 7, or RICH mode), as well as server
address and port (Layer 4, or HOT mode). SSL management is
handled independently of RICH mode processing. That is, once a
session is established and the message is decrypted, it is passed to the
SA8250’s RICH processing component. This allows even SSL traffic
to take full advantage of the features of the device, including error
recovery and session rollback.
The SA8250 allows non-encrypted traffic to be processed
independently of SSL traffic. The advantage of this is that it permits
load balancing (in either HOT or RICH mode) configuration on a per
virtual IP address, thus allowing you to isolate the impact of the SSL
processing. Many users tune their sites for maximum performance by
assigning HOT load balancing to all traffic except SSL.
One of other advantages of the SA8250 is its ability to recognize SSL
session IDs. This permits “sticky” (or persistent) sessions to be
established on a given server.
HTTPS Redirect
If desired, you can specify a page to return to the client if a successful
session cannot be negotiated because the client does not support the
required cipher suite. The SA8250 accomplishes this by sending an
HTTP 302 “redirect” message back to the client in the case of a cipher
negotiation failure. For example: The server supports 128-bit
encryption, but the client’s software is only capable of 40-bit
encryption.
The CLI parameter redirectpage=<URL> sets which page the
client is redirected to.
where <URL> is the fully qualified location of the page. For
example: redirectpage=http://www.companyname.com/
error.html.
The default configuration file setting is: redirectpage=none.

C H A P T E R 2 SSL Fundamentals
39
Fulfillment of each virtual service is load balanced across a number
of real servers depending on the load balancing algorithm chosen.
Servers capable of fulfilling requests for a service are identified and
managed with the following commands:
config policygroup <name> service <name> server
create <name> port <port>
config policygroup <name> service <name> server
delete <name> port <port>
If you make an error while creating the policygroup, you must delete
it and create a new policygroup.
Client Authentication
By default, the SA8250 does not authenticate client identities;
however you can configure services to request client certificates for
the purpose of verifying identities. When you enable this feature, the
SA8250 verifies that client certificates are signed by a known
Certificate Authority (CA).
Issued client certificates are expected to be in use for their entire
validity period. The CA periodically issues a signed data structure,
called a Certificate Revocation List (CRL), containing the serial
numbers of all expired certificates. You can configure the SA8250 to
obtain and use a CRL using LDAP, HTTP, or FTP protocols. The
SA8250 first verifies a client certificate against the installed CA
certificate, and then looks up its serial number in the installed CRL.
If the serial number exists in the CRL, the SA8250 returns a message
to the client indicating that the client’s certificate was revoked, and
the client connection is terminated.

C H A P T E R 2 HP e-Commerce/XML Director Server Appliance SA8250 User Guide
40
HTTP Header Option Fields
The SA8250 can make the IP address of a requesting client available
to a fulfillment server by constructing a custom HTTP header option,
with the client’s IP as the value:
HP_SOURCE_IP:<client-IP>
SSL-related HTTP header option fields are only used by the SA8250
with any SSL service. The HP_CIPHER_USED header option is
used whenever HP_SOURCE_IP is used, to provide the name of the
SSL-cipher negotiated between the SA8250 and the client:
HP_CIPHER_USED:<ssl-cipher>
These two header fields are used only by the SA8250 when client
authentication is in use:
HP_CLIENT_CERTIFICATE:<client-certificate>
HP_SESSION_ID: <SSL-session-ID>
Because a client certificate contains information useful for client/user
authorization, the SA8250 inserts the client certificate in the request
header before sending the request to the server. The server can then
extract the certificate from the request header and use it for
authorization or other purposes.
The client certificate is inserted in the request header only once per
session. Requests following the initial request will be sent to the
server with only the SSL-session-id in the header. The SSL-session-
id is unique for each session and allows the server to work with
multiple sessions. The client certificate is inserted in the request
header with a new SSL-session-id only when the client certificate has
been re-negotiated between the SA8250 and the client:
•New Session/Initial Request: The SA8250 sends both the
HP_CLIENT_CERTIFICATE and HP_SESSION_ID header
options.
•Existing Session/Subsequent Requests: The SA8250 sends
only the HP_SESSION_ID header option.
The use of header option fields is an efficient way of supplying
information to the server about the client. To ease the use of this
important feature, the SA8250 allows customization of all the above
header option field names. For more information, see Chapter 5.

C H A P T E R 2 Load Balancing Across Multiple Servers
41
Load
Balancing
Across
Multiple
Servers
Balancing Algorithms
The SA8250 provides a choice of load balancing algorithms.
Services can be separately configured to load balance using a round-
robin or a response time algorithm. In most networks, the best
performance results from use of the response time algorithm. Under
this algorithm, the SA8250 measures the response time of each
request to each server in the server farm. It then balances requests to
the service among the servers, sending more requests to the fastest
servers and fewer to the slower ones, thus optimizing the average
response time.
In cases where OPR is used in unpredictable WAN environments,
response time metrics may be obscured by WAN latency variance. In
these situations, round-robin load balancing can provide equal
distribution of client requests to each fulfillment server.
The balancing algorithm is specified with this command:
config policygroup <name> service <name>
balancing [robin | load]
Response-time Metrics
For both balancing algorithms, servers can be assigned target
response times. These values indicate the desired average response
time for requests for specified services to be fulfilled, and instructs
the SA8250 to use alternate resources for fulfillment if the average
response time exceeds target response time. Target response time is
controlled with this command:
config policygroup <name> service <name>
response <mil-seconds>
If the servers do not meet the specified response time threshold,
backup servers, if available and enabled, are activated. In addition,
the servers providing lower priority services are throttled if the
response time is still not being met (if throttle is enabled in the
policygroup). Both mechanisms are available for both of the load-
balancing algorithms.

C H A P T E R 2 HP e-Commerce/XML Director Server Appliance SA8250 User Guide
42
Primary and Backup Servers
Each server is identified as either a Primary or Backup for a given
service. Primary servers are always considered first for request
fulfillment. By default, Backup servers are considered for use only if
a primary server goes down, though they can optionally be
configured for use to maintain target response times. A server’s type
is established with this command:
config policygroup <name> service <name> server
<name> port <port> type [primary | backup]
Backup servers are enabled to maintain target response times with
this command:
config policygroup <name> service <name> backups
[enable | disable]
Server
Configuration
Options
Source Address Preservation
By default, brokered service requests arriving at a fulfillment server
appear to the server as requests originating from the SA8250.
Consequently, server log files record the SA8250 as the source of
these requests. When Source Address Preservation (SAP) is enabled
however, the SA8250 preserves the original source addresses of
requests delivered to the server farm. If you use the log files from
your server farm to gather information based on client source
addresses, use Source Address Preservation. SAP is controlled with
this command:
config policygroup <name> service <name> server
<name> port <port> mode sap
NOTE: For the SA8250
to operate in SAP mode,
the default gateway for
each SAP-enabled server
must be set to the
SA8250’s physical IP
address, not the VIP.
SAP cannot be used in WAN or multiple router LAN environments.
To use SAP, each server must be configured so that its default
gateway is set to the physical IP address of the SA8250, thus there can
be no routers between the SA8250 and the fulfillment servers.
Limitations of SAP mode operation:
•The client machine cannot be on the same subnet as the SA8250.
•The SA8250 and server must be on the same subnet.
When SAP is enabled, serial cable failover is the only failover option
— routing failover is not available.

C H A P T E R 2 Server Configuration Options
43
Multi-hop Source Address Preservation
It is possible in sophisticated network topologies to require requests
to pass through two SA8250s. In such configurations, the SA8250
topologically closest to the clients must be configured with the Multi-
hop Source Address Preservation (MSAP) feature enabled.
MSAP allows requests to pass through two cascaded SA8250s in
different geographical areas. Enabling MSAP ensures that the actual
IP addresses of requesting clients, rather than the virtual IP address of
the SA8250 that delivered the request, are recorded in the server logs.
This is similar to SAP (described in the preceding section), however
this feature allows SA8250s to be geographically-dispersed:
MSAP on a Geographically-Dispersed Network
NOTE: MSAP must be
disabled (the default). In the figure above, a client in San Diego sends a request to a
fulfillment server in Boston. MSAP is enabled on SA8250 Broker 1,
and Server 1’s default route is set to SA8250 Broker 2. The SA8250
Broker 2 doesn’t need SAP enabled for this service, since SAP is
automatically used on MSAP requests from SA8250 Broker 1. In this
configuration, the San Diego client's IP address will be preserved in
the Boston fulfillment servers' logs. To enable MSAP, type this
command:
config policygroup <name> service <name> server
<name> port <port> msap enable
%RVWRQ6DQ'LHJR
6$
ZLWK06$3
(QDEOHG
6$
ZLWK06$3
'LVDEOHG
&OLHQW 6HUYHU
%RVWRQ6DQ'LHJR
6$
ZLWK06$3
(QDEOHG
6$
ZLWK06$3
(QDEOHG
6$
ZLWK06$3
'LVDEOHG
6$
ZLWK06$3
'LVDEOHG
&OLHQW&OLHQW 6HUYHU6HUYHU

C H A P T E R 2 HP e-Commerce/XML Director Server Appliance SA8250 User Guide
44
RICH expressions in XML patterns
Layer 7 RICH_HTTP service configurations use rich expressions to
assign particular classes of URLs to particular servers for fulfillment.
RICH expressions are used, for example, to distinguish content
requested by clients performing online transactions, from content
typically requested by casual browsers. In this way, users performing
online transactions are given higher priority access to server
resources (and better response times) than other users.
Each server listed for fulfillment of a RICH_HTTP service can be
configured to serve any number of specific rich expressions. This is a
list of applicable expressions:
•File type expressions, such as *.gif, or */index.html
•Path expressions, such as /home/*, or /home/images/*, or
/home/images/a*.
•Unique file expressions, such as /index.html
•Wildcard expression, such as *.
•Negation expressions, such as !*.gif or !*/index.html
RICH and XML expressions are managed with these commands:
config policygroup <name> service <name> server
<name> port <port> xmlpattern create
<xmlpattern>
config policygroup <name> service <name> server
<name> port <port> xmlpattern delete
<xmlpattern>
config policygroup <name> service <name> server
<name> port <port> xmlpattern info
For more details on these commands, see Chapter 5.

C H A P T E R 2 Server Configuration Options
45
Order of RICH expressions
When using expressions in Layer 7 (RICH) operations, the order of
expressions is significant only when the not (!) operator is used.
Expressions are described in this table.
Three rules for expressions:
•The “*” and “!” are allowed in RICH expressions, but they can
only exist at the beginning or end of the expression.
•A positive RICH expression is required after a negative RICH
expression, otherwise the negative expression has no effect.
•Negative RICH expressions can be used alone, but not in XML
patterns.
Expression Yields
!*.gif All non-GIF files
*.jpg All JPG files
!/home/* No matches
Order of Expressions

C H A P T E R 2 HP e-Commerce/XML Director Server Appliance SA8250 User Guide
46
Routing with
Dual Interfaces
Because the SA8250 has two network interfaces, it can act as a router
in some contexts. This means that it can route between two subnets.
To do this, you must designate the SA8250 as the default gateway for
your fulfillment servers. Routes to the inside subnet are not
advertised to the outside router, but host routes are advertised to the
VIPs. Packets destined for defined VIPs are always routed through
the SA8250 to the server-side subnet. Other packets are forwarded
through the SA8250 only when the security mode is set to OPEN or
when set to CUSTOM and IP Forwarding is turned on. The SA8250’s
routing capabilities vary depending on which routing and failover
methods are used. For more details about these variations and their
relationships to routing and failover configurations, see Appendix C.
NOTE: The SA8250
cannot route multiple
subnets on one interface.
This table lists terms that are pertinent to SA8250 routing.
Term Description
Brokered
subnet The SA8250 interface attached to the side of the
physical network on which client requests arrive.
Server-side
subnet The SA8250 interface attached to the side of the
physical network that includes the fulfillment
servers.
“Outside”
device The router or switch one hop from the SA8250 on
the brokered subnet
“Inside”
device The router or switch one hop from the SA8250 on
the server-side subnet
Routing Terms
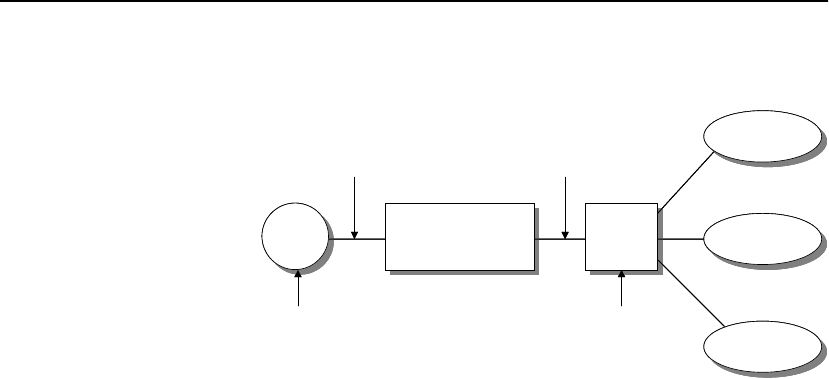
C H A P T E R 2 Prioritization and Policy Groups
47
This figure shows an example of the SA8250 routing topology.
SA8250 Routing Topology
Prioritization
and Policy
Groups
Policy groups are containers used to organize services. Service
prioritization uses policy group information to make decisions about
which services should get more or less server resources. Although
the assignment of services to policy groups can be arbitrarily
determined by the operator, effective use requires that each policy
group contain services related by their shared use of server resources.
Services and servers are assigned to Policy Groups at their time of
creation. This is a list of policy group management commands:
config policygroup create <name>
config policygroup delete <name>
config policygroup <name> throttle [enable |
disable]
The policy group framework allows the prioritization of categories of
client requests. Each service defined in a policy group is assigned a
priority within that group and a target response time. When the
average response time of a service exceeds its target response time,
that service is allocated, on the basis of its priority, a greater share of
common server resources to attempt to bring response time back
within the target range (this assumes that the throttling option is
enabled for the policy group).
6$
6HUYHU
6HUYHU
6HUYHU
+XERU
6ZLWFK
5RXWHU
%URNHUHG
6XEQHW
6HUYHUVLGH
6XEQHW
³2XWVLGH´
5RXWHU
³,QVLGH´+XE
RU6ZLWFK
6$6$
6HUYHU6HUYHU
6HUYHU6HUYHU
6HUYHU6HUYHU
+XERU
6ZLWFK
+XERU
6ZLWFK
5RXWHU5RXWHU
%URNHUHG
6XEQHW
6HUYHUVLGH
6XEQHW
³2XWVLGH´
5RXWHU
³,QVLGH´+XE
RU6ZLWFK
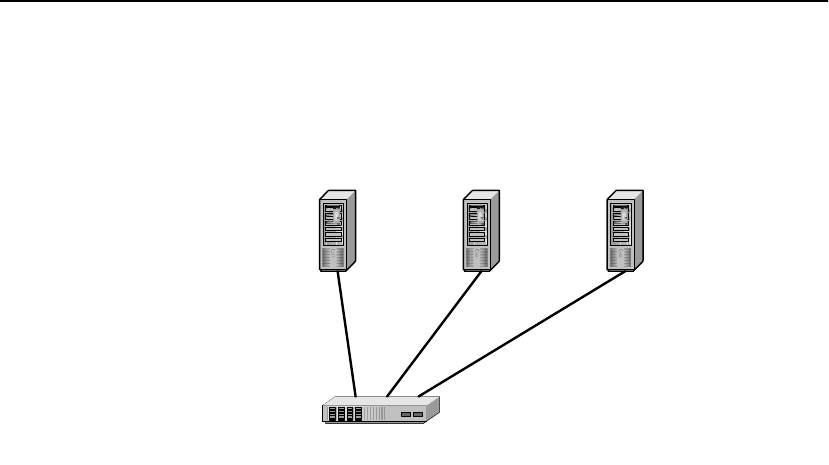
C H A P T E R 2 HP e-Commerce/XML Director Server Appliance SA8250 User Guide
48
Target Response Time Satisfied
For example, the services HTTP and HTTPS are both assigned to a
single policy group. HTTPS is designated the highest priority service,
and HTTP the second priority. The SA8250 monitors the response
time of each service, and if necessary re-prioritizes server resources
of subordinate services to keep the response time for the highest
priority service within the specified range. The figure above shows a
policy group with services sharing a defined VIP, two services, and
their associated target response times. When the average response
time of HTTPS is less than or equal to 10ms, Server 1 fulfills HTTP
requests, Server 2 fulfills HTTPS requests, and Server 3 fulfills both
HTTP and HTTPS requests. The figure on the next page illustrates
server utilization after HTTPS response time exceeds 10 ms.
SA8250
VIP: 10.2.2.4
HTTPS: 10 ms
HTTP: 10 ms
Server 1:
HTTP Server 2:
HTTPS
Server 3:
HTTP/HTTPS
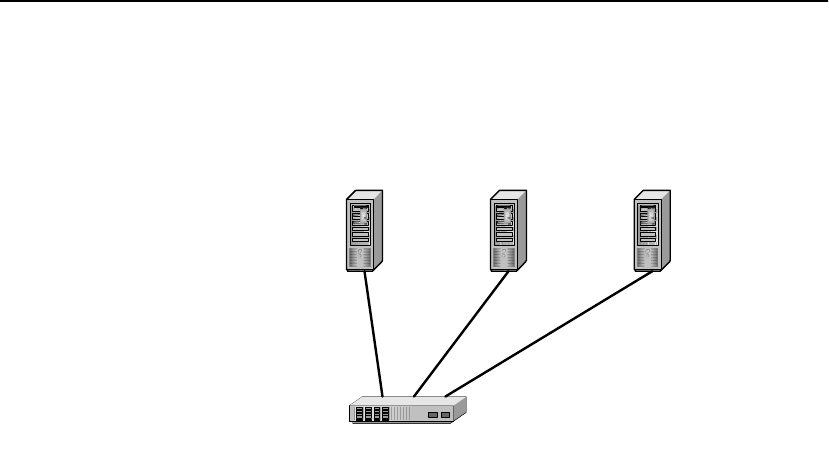
C H A P T E R 2 Prioritization and Policy Groups
49
Target Response Time Exceeded
Upon noticing a break in the target response time threshold, the
SA8250 scans the policy group’s active service and server pools for
shared resources. In this example, both the HTTP and HTTPS
services use Server 3. To provide the greatest server resources for the
highest priority service, shared resources are eliminated from
subordinate service pools (although each service will always have at
least one point of fulfillment). For example, in the figure above, new
HTTP connections are no longer sent to Server 3 in an effort to
guarantee the target response time for HTTPS. Server 3 will again
serve HTTP when target response times are met.
SA8250
VIP: 10.2.2.4
HTTPS: 12 ms
HTTP: 10 ms
Server 1:
HTTP Server 2:
HTTPS
Server 3:
HTTP

C H A P T E R 2 HP e-Commerce/XML Director Server Appliance SA8250 User Guide
50
Routing
Method for VIP
Addresses
After setting up a service, you must configure the SA8250 to route the
VIP address to the Internet. There are two possibilities:
•In single SA8250 installations, “Standalone” mode is preferred
as it allows the VIP to be ARP-accessible from the router.
•If there are multiple address spaces (such as a SA8250 on the
10.x.x.x network and a VIP on the 209.x.x.x), then a routing
protocol might be the best method to advertise the VIP. When
configuring routing on the SA8250, always match the router's
configuration. The SA8250 can be programmed to use RIP v1,
RIP v2, or OSPF.
For example (standalone mode):
HP SA8250#config route
HP SA8250/config/route#info
Route configuration:
----------------------------
Broker role: standalone
RIP Info:
Active:no
Version:2
OSPF Info:
Active: no
Area: backbone
Hello interval: 10
Router dead interval: 40
Authentication type: simple
Authentication key: <your key>

C H A P T E R 2 Error Detection
51
Error
Detection
The SA8250 is capable of recognizing and reacting to server error
conditions, detecting non-responsive (comatose) servers, and
directing traffic to alternate resources until the server is back in
operation. The SA8250 can also capture many HTTP errors before
they reach the client, and redirect the request to an alternate server.
Server Status Detection
The SA8250 uses multiple means to monitor the status of the
fulfillment servers. The Intelligent Resource Verification (IRV)
module periodically pings the servers to verify that they are alive. The
SA8250 also monitors a “dup-syn” interval to calculate packet loss
rate.
Intelligent Resource Verification
When the IRV module pings a server and receives no response, it tries
to connect to each port on which the suspect server is configured to
listen. If the SA8250 itself does not receive a response from a given
port, then that server/port combination is declared dead. If the server
maintains network connectivity and responds positively to IRV
pings, but its ports stop responding, then the dup-syn interval
threshold (described below) is used to decide if the server is declared
dead.
Dup-syn Interval
The SA8250 dynamically calculates the threshold for the acceptable
number of dropped packets within a given interval. If at any time in
this interval the number of dropped packets exceeds this threshold,
the server is considered dead. After the specified time value has
expired the lost packet (or dup-syn) count is divided by two and the
time interval starts again. In this way, some history information is
kept between time intervals.
The dup-syn interval for this threshold is established with the dup-
syn CLI command, and ranges in value from 1000 to 2,147,483,647
microseconds. The default time interval value is 500,000
microseconds (one half second), which is appropriate for most
environments. By lowering or raising this value, you render the
SA8250 respectively less or more sensitive to dropped packets, and
less or more likely to declare a server dead. The volume of network
traffic must be taken into account when setting the dup-syn interval.
Higher volumes of traffic require a shorter dup-syn interval to avoid
mistakenly declaring a server dead due to network congestion.

C H A P T E R 2 HP e-Commerce/XML Director Server Appliance SA8250 User Guide
52
The dup-syn command uses the following syntax:
config policygroup <name> service <name> dup-syn
<micro-seconds>
HTTP Error Detection
The SA8250 offers HTTP error detection for RICH services. When
HTTP error detection is enabled, the SA8250 scans the headers of
server responses for errors. If an HTTP error is found, the original
request is rerouted to another server for fulfillment, transparently to
the client. This process continues until a server responds without an
error, or all applicable servers have been tried. Conversely, if HTTP
error detection is disabled, the error is returned directly to the client.
HTTP error detection for errors 401-405 and 500-503 (as defined in
the HTTP specification) is configured with this command:
config policygroup <name> service <name> server
<name> port <port> http [enable | disable]
The SA8250 extends standard HTTP error handling by allowing the
server to return a special 606 error code. Detection and handling of
606 errors is configured separately. In this way, standard errors may
be passed to the client while 606 errors are handled transparently by
the system. If 606 error handling is enabled, the SA8250 scans for an
HTTP 606 response code. If the response code is found and another
server is available to handle the request, it is sent automatically. This
process continues until a server responds without an error, or until all
applicable servers have been tried.
The HTTP header for 606 handling is of the form: “HTTP/1.0 606
Error.” Users can generate this response through a variety of methods
including CGI and nph scripts. Consult your web server
documentation for information about generating custom error
messages.
config policygroup <name> service <name> server
<name> port <port> 606 [enable | disable]

C H A P T E R 2 Serial Cable Failover
53
Serial Cable
Failover
The SA8250 offers two failover methods:
•Router Failover (including OSPF, RIPv1 and RIPv2), and
•Serial Cable Failover
NOTE: DHCP is not
available when serial
cable failover is enabled.
When serial cable failover is configured, the Primary and Backup
SA8250s communicate heartbeat, configuration, and status
information using the included null modem serial cable. The Backup
SA8250 assumes control from the Primary when any of the following
occur:
•The Backup SA8250 does not detect the Primary SA8250's
heartbeat within the timeout period (the default is 3 seconds).
•The Primary SA8250's Ethernet interface becomes inactive. For
example, if the Ethernet cable is disconnected.
•The Primary SA8250 experiences an internal software error.
NOTE: You can log on to
the Backup SA8250, but
the full command set is
not available.
Both the Primary and Backup SA8250s need to know their own
identity and the “Online Identity” by address and name to satisfy
internal communication parameters. The SA8250s' own names and
the shared online identity are automatically entered into their host
files during failover configuration. If Dual NIC is enabled, the
identities for both the Outside (network-side) and Inside (server-side)
NICs are shared.
For information on failover method dependencies, see Appendix C.
Serial Cable Failover Configuration
NOTE: Before
configuring serial cable
failover, both the primary
and backup SA8250s
must be configured with
the setup command.
For more information,
see Chapter 3.
The following procedures are used to configure the Primary and
Secondary SA8250s for serial cable failover operation.
Configure the Primary SA8250
1. Connect the two SA8250s using their failover ports using the
provided null modem serial cable.
2. Reboot the SA8250 that will be the Primary and press a key at
the prompt to enter the Boot Monitor.
3. At the prompt, type this command:
monitor>failover

C H A P T E R 2 HP e-Commerce/XML Director Server Appliance SA8250 User Guide
54
NOTE: The Online IP
Address is the address
used by the SA8250 that is
currently accepting
connections — this can be
either the Primary or the
Backup SA8250 (though
it is typically the
Primary). The Online IP
Address is the address by
which you can access the
Online SA8250 using
telnet for administration.
4. For single NIC operation, follow the prompts as shown:
Set failover method (None, Serial, Route)
[ ] ---> serial
Checking for failover unit...
Failover unit not detected or may not be
configured.
Is this machine Primary or Backup? [Primary]--->
Enter the Network’s Online IP Address
--->10.6.3.200
Enter Network’s Online Hostname ---> netonline
Serial failover successfully configured
If Dual NIC operation is enabled, failover configuration looks
like this example:
monitor>failover
Set failover method (disabled, serial, route)
[disabled] --->serial
Disabling DHCP to allow serial failover.
Checking for failover unit...
Failover unit not detected or may not be
configured.
Is this machine Primary or Backup? [Primary]--->
Enter the Network side Online IP Address
[10.6.3.200] --->
Enter the Server side Online IP Address
[10.6.4.200] --->
Enter the Network side Online hostname
[netonline] --->
Enter the Server side Online hostname --->
servonline
Serial failover successfully configured

C H A P T E R 2 Serial Cable Failover
55
5. Save the Primary configuration.
monitor>save
List of currently saved configuration files(s).
You may save over an existing configuration file
or enter a new name.
File name
----------
active.cfg
backup.cfg
cris.cfg
‘active.cfg’ is the last booted configuration.
Enter configuration file name (- to cancel):
[active.cfg] --->
Configuration has been saved.
6. Boot the SA8250.
monitor>boot
Do you really want to continue boot? [y]
---> <Enter>
Boot which configuration? [active.cfg]
---> <Enter>
Please stand by, the system is being booted.
.... Done
Login>

C H A P T E R 2 HP e-Commerce/XML Director Server Appliance SA8250 User Guide
56
Configure the Backup SA8250
1. Reboot the SA8250 that will be the Secondary and press a key at
the prompt to enter the Boot Monitor.
2. At the prompt, type this command:
monitor>failover
3. Follow these prompts:
Specify failover method (disabled, serial,
route) [ ] --->s
Checking for failover unit...
Failover unit detected
--------------------------
Version : 2.3
Type : PRIMARY
State : ONLINE
Name : online13
IP : 13.1.1.20
Mac : 0:1:c9:ed:a6:fb
NOTE: Use the same
Online IP Address and
name for the Backup
SA8250 as the Primary
(these appear by default).
Is this machine Primary or Backup? [Backup]
---> <Enter>
Enter Online IP Address [13.1.1.20] ---> <Enter>
Enter Online Name [online13] ---> <Enter>
Serial failover successfully configured
monitor>
4. Save the Backup configuration.
monitor>save
List of currently saved configuration file(s).
You may save over an existing configuration file
or enter a new name.
File name
----------
active.cfg
backup.cfg
cris.cfg
‘active.cfg’ is the last booted configuration.
Enter configuration file name (- to cancel):
[active.cfg] --->
Configuration has been saved.

C H A P T E R 2 Serial Cable Failover
57
5. Boot the SA8250.
monitor>boot
... current configuration ...
... list of saved configuration files ...
Boot configuration file name? [active.cfg]
---> <Enter>
Do you really want to boot ‘active.cfg’? [y]
---> <Enter>
Please stand by, the system is being booted.
Replicating the Configuration
The active configuration is replicated upon changes to the Backup
SA8250 from the Primary. For most configurations, faults are
detected within 3 seconds, and the Backup is fully online within 25
seconds. The latter interval increases as the number of services
increases.
Status Information
You can display information about the SA8250s’ function and
failover status either via the Command Line Interface or the GUI.
Below are the commands to display status information followed by a
list of status messages and their explanations.
1. Log in to the SA8250.
2. At the CLI prompt, type this command:
HP SA8250>info

C H A P T E R 2 HP e-Commerce/XML Director Server Appliance SA8250 User Guide
58
The status appears on the last line of the info command’s output.
A description of the status message is shown in this table.
Failover Status Message Description
The broker is ONLINE, and
serial failover is NONE
(disabled).
One of the SA8250s is configured
for either “none” or “route”
failover.
The broker is PRIMARY and
ONLINE, the remote's serial
failover is NONE (disabled).
One of the SA8250s is configured
for either “none” or “route”
failover.
The broker is PRIMARY and
ONLINE, the remote's state is
READY.
Normal Serial Failover Operation
The broker is BACKUP and
READY, and the remote's
state is ONLINE.
The broker is PRIMARY and
NIC_FAILED, and the
remote's state is ONLINE.
Ethernet cable disconnected, or
cable, NIC, or HUB port failure
The broker is BACKUP and
ONLINE, and the remote's
state is NIC_FAILED.
The broker is PRIMARY and
ONLINE, the connection to
the remote has TIMED OUT.
The serial cable connecting the
SA8250s is disconnected
The broker is BACKUP and
IP_IN_USE_ERROR, the
connection to the remote has
TIMED OUT.
Status Message Descriptions

C H A P T E R 2 Serial Cable Failover
59
NOTE: The notation,
PRIMARY/BACKUP
indicates that either
“PRIMARY” or
“BACKUP” will be
displayed.
The Failover Status messages in this table are not specific to the
Primary or Backup SA8250s.
Failover Status Message Description
The broker is PRIMARY/
BACKUP and
WAITING_FOR_SYNC
One of the SA8250s has been
restarted. This status persists
while the configuration files are
loaded from the online SA8250.
The time this state persists
depends on the number of VIPs
and services configured.
The broker is PRIMARY/
BACKUP and
CONFIGURATION_
ERROR
Both SA8250s are configured as
Primary or as Backup. Neither
SA8250 will come online until
this condition is corrected
The broker is PRIMARY/
BACKUP and DNS_FAILED The online IP address is missing
from both the local host file and
the DNS server.
The broker is PRIMARY/
BACKUP and
CORE_APP_FAILED.
Indeterminate error. Use an earlier
working configuration. If the
condition persists, contact
Customer Support for assistance.
The broker is PRIMARY/
BACKUP and
RICH_APP_FAILED.
Additional Status Message Descriptions

C H A P T E R 2 HP e-Commerce/XML Director Server Appliance SA8250 User Guide
60
Notes

Boot Monitor
Using the Boot Monitor
CAUTION: After
configuring the SA8250
with the Boot Monitor,
you must enable Autoboot
with the autoboot
command or the SA8250
will not operate.
The HP e-Commerce/XML Director Server Appliance SA8250’s
Boot Monitor configures boot options and manage boot configuration
files. Typically, you will use the Boot Monitor only during the initial
configuration or after major reconfigurations, if the latter becomes
necessary. You can manage day-to-day operations using the
Graphical User Interface (GUI, Chapter 4) or the Command Line
Interface (CLI, Chapter 5).
General categories of tasks performed by the Boot Monitor:
•Configure and display boot options, including the configuration
file
•Manage the boot configuration file system
•Configure and change IP parameters

C H A P T E R 3 HP e-Commerce/XML Director Server Appliance SA8250 User Guide
62
System
Requirements
You can use any terminal or workstation with a terminal emulator to
run Boot Monitor, provided the terminal has the following features:
•9600 bits per second, 8 data bits, 1 stop bit no parity, no flow
control (9600-8-N-1)
•A terminal emulation program, such as HyperTerminal*
•Cable and connector to match the male DTE connector (DB-9)
Accessing the
Boot Monitor
You can access the Boot Monitor in either of the two ways described
below.
Interrupting the Bootup Sequence
1. Interrupt the SA8250's bootup sequence by pressing a key at the
following prompt:
Press any key to stop autoboot.
In a few seconds the following prompt displays, confirming that
the Boot Monitor is running:
monitor>
Using the Run Time CLI
1. Type this command at the prompt:
HP SA8250#config sys autoboot disable
2. Type this command at the prompt:
HP SA8250#reboot
The monitor> prompt displays, confirming that the Boot
Monitor is running.

C H A P T E R 3 Using the Boot Monitor
63
Boot Monitor
Commands
This section lists and describes all Boot Monitor commands available
on the SA8250.
autoboot Enables or disables the Autoboot function. If Autoboot is enabled
(the default), the SA8250 prompts you to press a key during restart to
enter the Boot Monitor command line interface. If you ignore the
prompt, restart finishes with the SA8250 in normal operating mode.
If Autoboot is disabled, the restart sequence ends by displaying the
Boot Monitor interface.
Example:
monitor>autoboot
Enable Autoboot? (yes,no) [yes] --->
boot Boots the device with a specific configuration. Variations on the use
of the reboot command are shown in this section.
Reboot with No Configuration Changes
NOTE: The first boot
after a factory_reset
command or a new
installation will prompt
you for the root
password.
1. Type the boot command.
The Boot Monitor displays the current configuration and prompts
you for confirmation:
Current active configuration
----------------------------
Product: HP SA8250
Version: 2.7
Patch Level: 0.0
Build: 12
Current time: Tue Sep 12 17:02:05 2000
Hostname: CSLab7k
-------------
Network side NIC:
IP Address: 10.6.3.21
Netmask: 255.255.255.0
MAC address: 0:a0:c9:ed:6c:cc
-------------
Service side NIC:
IP Address 10.6.5.21
Netmask: 255.255.255.0
MAC address: 0:d0:b7:6:c1:85
-------------

C H A P T E R 3 HP e-Commerce/XML Director Server Appliance SA8250 User Guide
64
Default Gateway: 10.6.3.1
Domain: None
Primary name server: None
DHCP: Disabled
Failover mode: Disabled
Network NIC setup: Auto
Server NIC setup: Auto
NTP: Disabled
Autoboot: Disabled
Static Routes: None
RICH_Biased: Enabled
Do you really want to boot active.cfg? [y] --->
2. To boot to the normal operational prompt, type y.
3. To return to the monitor> prompt, type n.
Reboot with Configuration Changes
When you use the boot command after changing the SA8250’s
configuration, you are presented with a number of options. With
these you can use the changed configuration, revert to the last saved
configuration, or choose among a list of previously saved
configurations. Procedures for choosing among these options are
organized within three groups described in this section.
1. Type the boot command.
2. The Boot Monitor displays the changed configuration
information and prompts you to save the new configuration:
Current active configuration
----------------------------
Product: HP SA8250
Version: 2.7
Patch Level: 0.0
Build: 12
Current time: Tue Sep 12 17:02:05 2000
Hostname: CSLab7k
-------------
Network side NIC:
IP Address: 10.6.3.21
Netmask: 255.255.255.0
MAC address: 0:a0:c9:ed:6c:cc
-------------

C H A P T E R 3 Using the Boot Monitor
65
Service side NIC:
IP Address 10.6.5.21
Netmask: 255.255.255.0
MAC address: 0:d0:b7:6:c1:85
-------------
Default Gateway: 10.6.3.1
Domain: None
Primary name server: None
DHCP: Disabled
Failover mode: Disabled
Network NIC setup: Auto
Server NIC setup: Auto
NTP: Disabled
Autoboot: Disabled
Static Routes: None
RICH_Biased: Enabled
The configuration has changed, save it? [y] --->
First Options:
1. If you accept the default, y, the system saves the configuration as
either active.cfg or the last loaded filename.
Configuration file name? [active.cfg] --->
NOTE: This list includes
backup.cfg, a backup
of the most recently
booted configuration.
This file is automatically
created when you change
the configuration and
save.
2. You can either accept the default, active.cfg, or enter a new
filename. The system then saves the file and presents a list of all
saved files.
Select a boot configuration from the following
files.
active.cfg
backup.cfg
Boot configuration file name? [active.cfg] --->
3. You can accept the default, active.cfg, or select another
previously saved configuration. No matter which file you select,
the configuration file you are about to boot is displayed to ensure
that the last file displayed is the configuration that is booted.
4. If you accept the default, y, the system boots to the normal
operational prompt, if you type n, it returns to the monitor>
prompt.

C H A P T E R 3 HP e-Commerce/XML Director Server Appliance SA8250 User Guide
66
Second Options:
1. If you choose not to save the modified file, the system displays a
warning that it is reverting to the previously booted
configuration:
Warning: The current configuration has NOT been
saved and will not be booted. Reverting to last
saved active.cfg.
2. If there are no additional saved configurations then the system
prompts you to confirm that want to boot the last saved
configuration, which will always be active.cfg.
Do you really want to boot active.cfg? [y] --->
3. If you accept the default, y, the system boots to the normal
operational prompt. If you type n, it returns to the monitor>
prompt.
Third Options:
1. If there are any previously saved configurations on the system,
you are offered a choice of configuration files to boot from.
Select a boot configuration from the following
files.
active.cfg
backup.cfg
Boot configuration file name? [active.cfg] --->
2. You can accept the default, active.cfg, or select another
previously saved configuration. If you select active.cfg, the
configuration is not redisplayed. If you select a file other than
active.cfg, the file’s contents are displayed to ensure that the
last file displayed is the configuration that is booted.
3. If you accept the default, y, the system boots to the normal
operational prompt. If you type n, it returns to the monitor>
prompt.

C H A P T E R 3 Using the Boot Monitor
67
delete Deletes the specified configuration file.
Example:
monitor>delete
Select a configuration to delete from the
following files.
Note: You cannot delete the active
configuration file active.cfg.
File name
--------------
active.cfg
backup.cfg
cris.cfg
‘active.cfg’ is the last booted configuration.
Enter the configuration filename to delete:
--->broker1.cfg
broker1.cfg successfully deleted.
dhcp Enables or disables the SA8250’s use of DHCP. When DHCP is
enabled, the SA8250 receives its configuration parameters from the
DHCP server at startup. When DHCP is disabled (the default setting),
the SA8250 ignores the DHCP server, and so it must be manually
configured at restart. Respond to the prompt with y to enable, or n to
disable.
Example:
monitor> dhcp
Enable DHCP (yes, no)? [no] --->
dir Displays the list of saved boot configuration files.

C H A P T E R 3 HP e-Commerce/XML Director Server Appliance SA8250 User Guide
68
dns Sets the domain and (optionally) nameserver(s). The system prompts
you for the required information.
Example:
monitor> dns
Would you like to configure DNS (yes, no)?
[no] --->
monitor>dns
Would you like to configure DNS (yes, no)?
[no] --->yes
Enter Domain name (‘-’ to cancel)
--->mydomain.com
Enter the IP Address of the Primary name server
(‘-’ to cancel) --->10.6.3.5
Specify additional name server
( <return> to end ) --->10.6.3.10
Specify additional name server
( <return> to end ) --->
dual Sets single or dual NIC operation.
Example:
monitor>dual
Enable dual NIC operation (yes, no) [no] --->

C H A P T E R 3 Using the Boot Monitor
69
factory_reset Resets the SA8250 to its factory defaults, as listed in this table.
NOTE: The first boot
after a factory_reset
command or a new
installation will prompt
you for the root
password. Also, the
factory_reset
command does not delete
saved configuration files.
Parameter Setting
All added user accounts Deleted
Policy groups, services, and servers Deleted
Route parameters Deleted
CLI parameters Deleted
IP address Deleted
Default route Deleted
Hostname Deleted
Domain Deleted
Name servers Deleted
DHCP Disabled
Dual NIC Disabled
Failover mode Disabled
Autoboot Disabled
Autoboot timeout 5 seconds
Added hosts in the host file Deleted
New root password on next boot Forced
Rich bias Enabled
Static routes Deleted
Factory Defaults

C H A P T E R 3 HP e-Commerce/XML Director Server Appliance SA8250 User Guide
70
failover Sets the SA8250’s failover method. Three failover options are
available:
•disabled: no failover method will be used
•serial: serial cable failover will be used
•route: router failover will be used
Example:
monitor>failover
Specify failover method (disabled, serial,
route): [disabled] --->serial
Checking for failover unit...
Failover unit not detected or may not be
configured.
Is this machine Primary or Backup?
[Primary] --->
Enter the Network side Online IP Address
--->10.6.3.200
Enter the Server side Online Address
--->10.6.5.200
Enter the Network side Online hostname
--->net-onlinehost
Enter the Server side Online hostname
--->serv-onlinehost
Serial failover successfully configured
gateway Specifies the default gateway.
Example:
monitor>gateway
Enter default gateway: --->10.6.3.1
help Lists all Boot Monitor commands, or optionally displays syntax for a
specified command.
Example:
gateway Set default gateway
interface Configure network interface card

C H A P T E R 3 Using the Boot Monitor
71
host Sets the SA8250’s host name.
Example:
monitor>host
Enter the hostname you would like to assign to
the Network NIC: --->CSLab7k
info Displays the current boot configuration.
interface Configures Ethernet port parameters (replaces the nic command).
Compatibility with some older switches, hubs, or routers, may
require that you manually specify the Ethernet speed and duplex
mode of the SA8250's network interface card.
Single NIC configuration example:
monitor>interface
Auto configure the network NIC speed and duplex
(yes,no)? [yes] --->no
1 - 100BaseTx
2 - 10BaseTx
Select Media Type (1 or 2): [1] --->2
Use Full Duplex? [n] --->n
Dual NIC configuration example:
monitor>interface
Auto configure the Network side NIC speed and
duplex (yes,no)? [yes] --->
Auto configure the Server side NIC speed and
duplex (yes,no)? [yes] --->
ip Sets the SA8250's IP address.
Example:
monitor>ip
Enter the IP address for the Network side NIC
[10.6.3.21] --->
Enter the IP address for the Server side NIC
[10.6.5.21] --->

C H A P T E R 3 HP e-Commerce/XML Director Server Appliance SA8250 User Guide
72
load Loads a previously saved configuration file into memory.
Example:
monitor>load
Select a configuration file to load from the
following files.
File name
--------------
active.cfg
backup.cfg
cris.cfg
‘active.cfg’ is the last booted configuration.
Enter the configuration filename to load
(- to cancel): [active.cfg] --->
Configuration loaded: active.cfg
netmask Sets the netmask.
Example:
monitor>netmask
Enter Netmask for Network side NIC
[255.255.255.0] --->
Enter Netmask for Service side NIC
[255.255.255.0] --->
rich-bias Optimizes RICH_HTTP service performance. If your RICH_HTTP
service responses consist mostly of files greater than 8K, the enabled
(default) setting of rich_bias will optimize performance. If your
site is experiencing performance problems and the RICH_HTTP
service responses are less than 8K, you should disable rich_bias.
This command has no effect on SSL terminated connections.
Example:
monitor>rich_bias
Unit is currently ‘RICH_Biased’, change it
(yes, no) [no] --->yes
RICH_Biased (enable, disable) [enable]
--->disable

C H A P T E R 3 Using the Boot Monitor
73
save Saves the current configuration. Changes made during the current
Boot Monitor session are lost unless you use the save command.
Example:
monitor>save
List of currently saved configuration file(s).
You may save over an existing configuration file
or enter a new name.
File name
-------------
active.cfg
bckup.cfg
cris.cfg
‘active.cfg’ is the last booted configuration.
Enter configuration file name (- to cancel):
[active.cfg] --->-Configuration save canceled!
settime Set the SA8250’s system date and time. If you select NTP, you will
be prompted for the IP address of the NTP server(s) you want to use.
If you set the date manually, you will be prompted for the date in 24-
hour format.
Example, with NTP:
monitor>settime
Use NTP? [enable] --->
Enter IP address of NTP server or <return> to
end: --->209.218.240.1
Enter IP address of NTP server or <return> to
end: --->209.218.240.238
Enter IP address of NTP server or <return> to
end: --->
Example 1, without NTP (manual setting)
NOTE: Example 1 is for
setting the time using
Greenwich Mean Time
(GMT). For example, the
GMT-14 timezone is
GMT minus 14 hours.
monitor>settime
Use NTP? [disable] --->
Select TIMEZONEs to list (GMT, US, Other or q to
quit: [GMT] --->GMT

C H A P T E R 3 HP e-Commerce/XML Director Server Appliance SA8250 User Guide
74
Select a TIMEZONE from the ‘GMT’ list.
1) GMT-14 2) GMT-13 3) GMT-12
4) GMT-11 5) GMT-10 6) GMT-9
7) GMT-8 8) GMT-7 9) GMT-6
10)GMT-5 11)GMT-4 12)GMT-3
13)GMT-2 14)GMT-1 15)GMT
16)GMT+1 17)GMT+2 18)GMT+3
19)GMT+4 20)GMT+5 21)GMT+6
22)GMT+7 23)GMT+8 24)GMT+9
25)GMT+10 26)GMT+11 27)GMT+12
Select a number between 1 and 27
(q to quit)--->2
Selected TIMEZONE ‘GMT-13’
The current time is now: Fri Sep 29 05:38:38
GMT-13 2000
Enter the year (YYYY): [2000] --->
Enter the month (MM): [09] --->
Enter the day (DD): [29] --->
Enter the hour (HH): [05] --->
Enter the minute (MM): [38] --->
Enter the seconds (SS): [38] --->
Fri Sep 29 05:38:38 GMT-13 2000
Example 2, without NTP (manual setting):
NOTE: Example 2 is for
setting the time using
United States time (US).
monitor>settime
Use NTP? [disable] --->
Select TIMEZONEs to list (GMT, US, Other or q to
quit: [GMT] --->US
Select a TIMEZONE from the ‘US’ list.
1) Alaska 2) Aleutian 3) Arizona
4) Central 5) Eastern 6) Hawaii
7) Indiana-East 8) Indiana-Starke 9) Michigan
10)Mountain 11)Pacific 12)Somoa
Select a number between 1 and 12
(q to quit): [11}--->5

C H A P T E R 3 Using the Boot Monitor
75
Selected TIMEZONE ‘Eastern’
The current time is now: Sat Oct 28 23:59:42
2000
Enter the year (YYYY): [2000]--->
Enter the month(MM): [10]--->
Enter the day (DD): [28]--->29
Enter the hour (HH): [23]--->01
Enter the minute (MM): [59]-->57
Enter the seconds (SS): [39]--->
Sun Oct 29 01:57:39 EDT 2000
Example 3, without NTP (manual setting):
NOTE: Example 3 is for
setting the time using any
timezone OTHER THAN
GMT or US.
monitor>settime
Use NTP? [disable] --->
Select TIMEZONEs to list (GMT, US, Other or q to
quit: [GMT] --->O
Select a TIMEZONE from the ‘Other’ list.
1) Bangkok 2) Belfast 3) Belgrade
4) Berlin 5) Brussels 6) Copenhagen
7) Hongkong 8) Israel 9) Japan
10)London 11)Madrid 12)Manila
13)Paris 14)Poland 15)Portugal
16)Prague 17)Rome 18)Singapore
19)Stockholm 20)Turkey 21)Warsaw
22)Zulu 23)Zurich
Select a number between 1 and 23 (q to quit):
[10]--->22
Selected TIMEZONE ‘Zulu’
The current time is now: Wed Jan 10 10:32:22 UTC
2001
Enter the year (YYYY): [2001]--->
Enter the month(MM): [01]--->
Enter the day (DD): [10]--->
Enter the hour (HH): [10]--->
Enter the minute (MM): [32]-->
Enter the seconds (SS): [22]--->
Wed Jan 10 10:32:22 UTC 2001

C H A P T E R 3 HP e-Commerce/XML Director Server Appliance SA8250 User Guide
76
setup Starts the SA8250’s setup procedure. The system displays prompts
for all inputs necessary to initialize it.
Example:
monitor>setup
Enable dual NIC operation(yes,no)? [no] ---> yes
Autoconfigure the Network side NIC speed and
duplex? (yes,no)? [yes] --->
Autoconfigure the Server side NIC speed and
duplex? (yes,no)? [yes] --->
DHCP is disabled for dual NIC operation.
Enter the hostname you would like to assign to
the Network NIC: --->CSLab7k
Enter the IP address for the Network side NIC
--->10.6.3.21
Enter the IP address for the Server side NIC
--->10.6.5.21
Enter the Netmask for the Network side NIC
--->255.255.255.0
Enter the Netmask for the Server side NIC
--->[255.255.255.0] --->255.255.255.0
Enter default gateway: --->10.6.3.1
Would you like to configure DNS (yes, no)? [no]
--->DNS not configured.
Specify failover method (disabled, serial,
route): [disabled] --->
Set Autoboot? (yes,no) [no] --->

C H A P T E R 3 Using the Boot Monitor
77
static_routes Deletes and adds any number of static IP routes. Shows the current
static IP routes (if any) when the function is entered. You are
prompted for the destination and gateway IP addresses. The info
command will show any static IP routes that are known to the Boot
Monitor, and factory_reset will remove all static IP routes as
part of its cleanup.
Example:
monitor>static_routes
Static Route information.
Enter Static route (1) dest IP(- to del, q to
quit): --->10.7.16.5
Enter Static route (1) gate IP(- to del, q to
quit): --->10.8.15.40
Enter Static route (2) dest IP(- to del, q to
quit): --->10.7.18.50
Enter Static route (2) gate IP(- to del, q to
quit): --->10.8.15.40
Enter Static route (3) dest IP(- to del, q to
quit): --->q
{2} Static Route(s).
version Displays the software version information.
Example:
monitor>version
Product: HP SA8250
Version: 2.8
Patch Level: 0.1
Build: 8

C H A P T E R 3 HP e-Commerce/XML Director Server Appliance SA8250 User Guide
78
Notes

Graphical User
Interface
Before You Begin
NOTE: Some functions
and features, such as
expressions, are not
available in the GUI.
The HP e-Commerce/XML Director Server Appliance SA8250 has
features and functions that are controlled through either the browser-
based Graphical User Interface (GUI), as discussed in this chapter, or
the Command Line Interface (CLI), as discussed in chapter 5.
In order to use the inside IP or inside online IP for administration, the
client must be on the same subnet as the inside interface, or must have
an alternate path back through the outside interface.
To type all XML commands and configurations, see the Policy
Manager screen, later in this chapter.
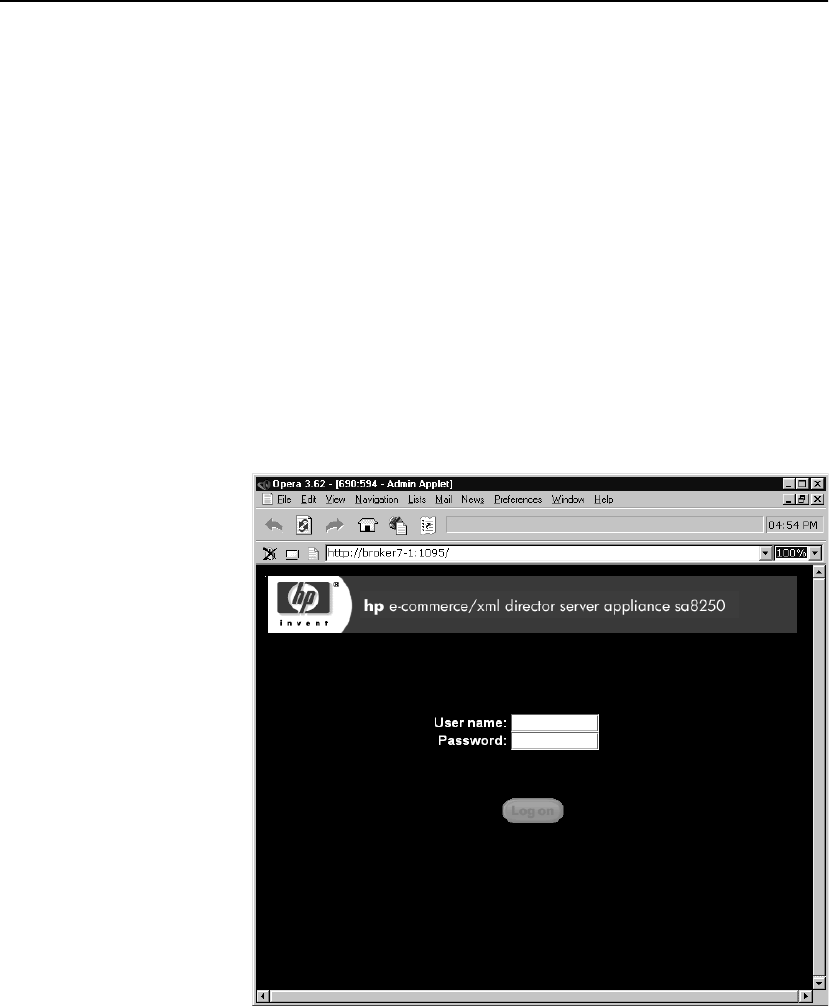
C H A P T E R 4 HP e-Commerce/XML Director Server Appliance SA8250 User Guide
80
Logon Screen
To access the various GUI services available to you on the SA8250,
you must first log on to the system as described in this section.
Logging on to
the GUI
1. Launch your browser.
2. In your browser’s Address or Location field, type the SA8250’s
address and specify port 1095. For example:
NOTE: If Internet
Explorer* 5.01 is your
browser, you must add a
trailing slash (/) to the
URL, as shown in step
(2). Also, the default GUI
port (1095) can be
changed. For details, see
“GUI Tab” later in this
chapter.
http://system_name:1095/
where system_name is the actual name or IP address of your
SA8250.
3. Press Enter.
The Logon screen displays.
Logon Screen

C H A P T E R 4 Logon Screen
81
NOTE: The factory
default for both the user
name and password is
admin (lowercase
required). To change
them, see “Users Tab”
later in this chapter.
4. In the space provided, type your User name.
5. In the space provided, type your Password.
6. Click Logon.
The Topology screen displays, as shown on the next page. The
number of server icons varies, depending upon your network
configuration.
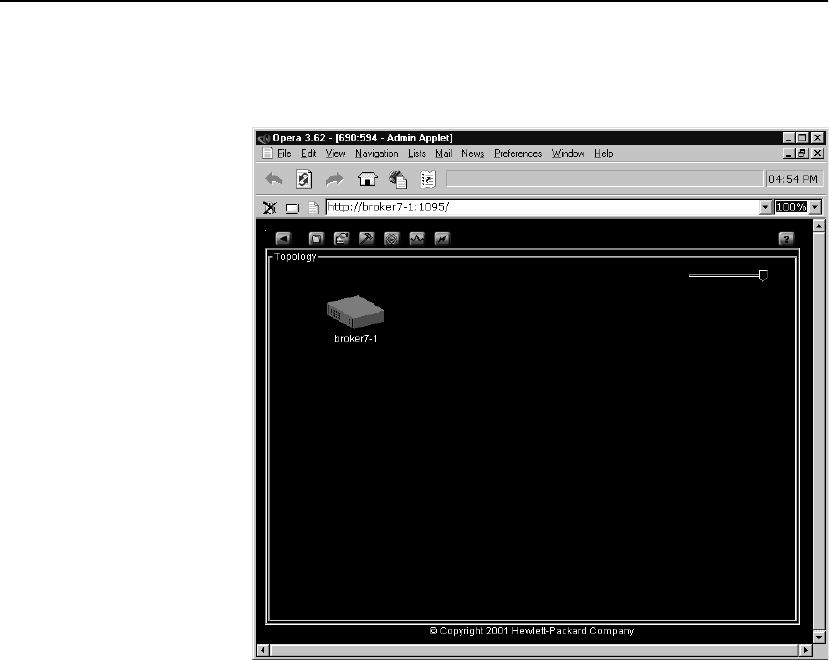
C H A P T E R 4 HP e-Commerce/XML Director Server Appliance SA8250 User Guide
82
Topology Screen
Topology Screen
Using the
Topology
Screen
Purposes of the Topology Screen
•Displays a graphical representation of the current topological
relationships between the SA8250 and network servers. The
SA8250’s status and Serial Cable failover, if configured, are also
reflected here.
•Serves as a gateway to the Administration and Policy Manager
screens, and the Configuration and Tools screens.
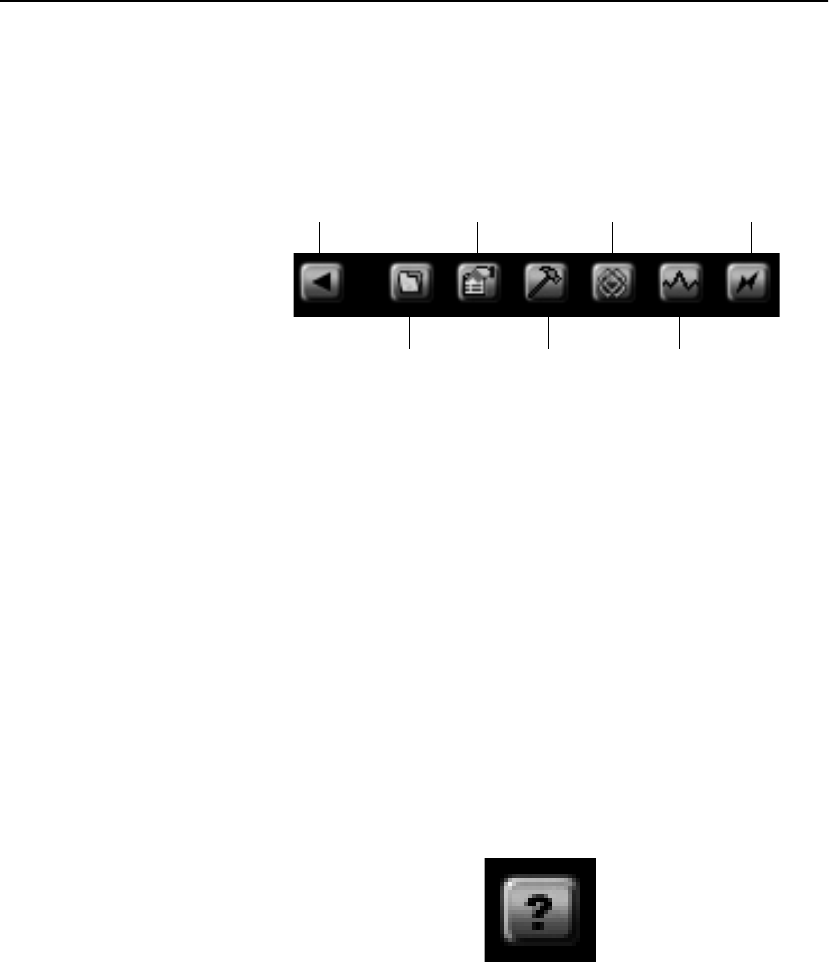
C H A P T E R 4 Topology Screen
83
Topology Screen Toolbar
Located at the top left of the window, the toolbar’s buttons are
described below.
Topology Screen Toolbar
•Back returns you to the previous screen. From the Topology
screen, this will log you off the system and return you to the
logon screen.
•Configuration displays the Configuration Screen
•Administration displays the Administration Screen
•Tools displays the Tools Screen
•Policy Manager displays the Policy Manager Screen
•Statistics displays the Statistics Screen
•Log File displays the SA8250's log file.
Online Help
Located at the top right of the window, the Help button is shown
below. Click Help to display the online help file.
Online Help Button
Back
Configuration
Administration Policy
Manager
Statistics
Log File
Tools

C H A P T E R 4 HP e-Commerce/XML Director Server Appliance SA8250 User Guide
84
Topology Screen Elements
This figure shows how the SA8250 is represented onscreen by a
horizontal "rack unit" icon.
SA8250 Icon
•Right-clicking on the SA8250 icon displays a popup menu that
can take you to other screens.
•Double-clicking the SA8250 icon takes you to the Policy
Management screen by default, but this can be changed in the
Administration screen later in this chapter.
This figure shows how servers are represented onscreen by vertical
"tower case" icons.
Server Icon
•Right-clicking on a server icon displays a popup menu that can
take you to other screens.
•Double-clicking the server icon takes you to the Statistics screen
by default, but this can be changed in the Administration screen
later in this chapter.

C H A P T E R 4 Topology Screen
85
Window Controls
To resize the Topology screen elements, click and drag the slider
control located in the upper right hand corner of the screen.
Slider Control
•Moving the slider control to the far right, as shown in the figure
above, for the largest display.
•Moving the slider control to the far left results in the smallest
display.
•You can also resize the Topology screen elements by right-
clicking on the background of the screen and making your
selection from the popup menu.
Background Zoom and Refresh Control
•Zoom In enlarges the display and is the equivalent of moving the
slider control to the right.
•Zoom Out reduces the display and is the equivalent of moving the
slider control to the left.
•Refresh Display updates the Topology screen.
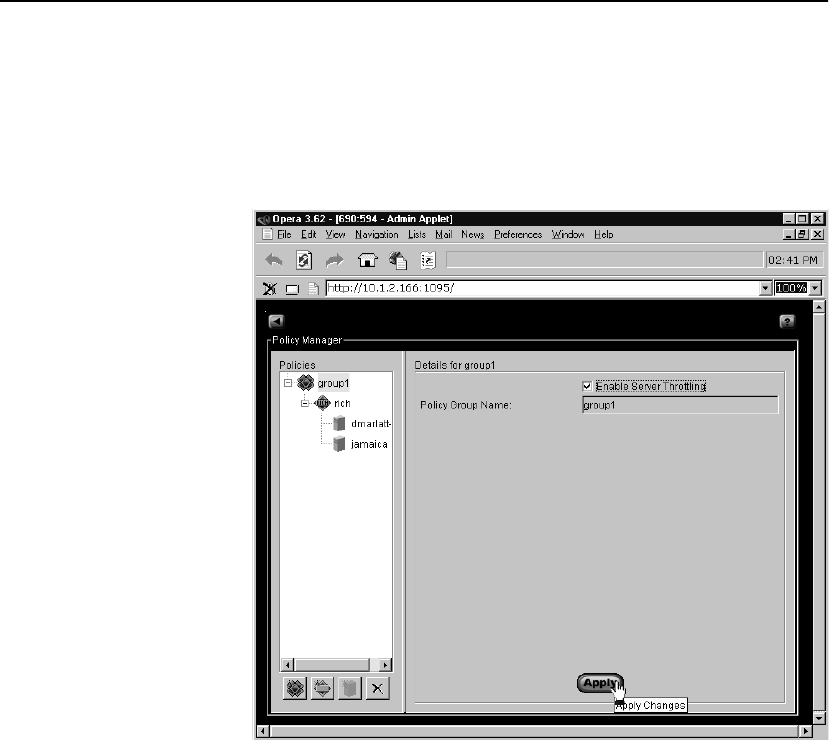
C H A P T E R 4 HP e-Commerce/XML Director Server Appliance SA8250 User Guide
86
Policy Manager Screen
When you double-click a SA8250 icon in the Topology screen (or
right-click and select Policy Management), the Policy Manager
screen displays.
Policy Manager Screen
The Policy Manager consists of a series of screens with multiple tabs
that includes the controls used in the implementation of Policies. The
discrete items created, altered, and deleted in the course of Policy
management are listed below:
•Policy Groups
•Services
•Servers

C H A P T E R 4 Policy Manager Screen
87
Policy
Manager
Controls and
Displays
The Policy Manager screen contains two main regions:
•Policies, on the left side of the Policy Manager screen
•Details, on the right side of the Policy Manager screen
You can adjust the relative sizes of the Policies and Details displays
by clicking and dragging the vertical line between the panels. The
Policies display includes existing Policy Groups, Services, and
Servers, reflecting the previously mentioned hierarchy. The Details
display includes controls and status displays relating to the item
selected in the Policies display, and changes according to the type
(Policy Group, Service, or Server) of the item selected. If a Service or
Server is selected, then the Details screen contains two tabs, each
containing related controls.
The three types of items form a hierarchy: policy groups contain
Services. Services in turn contain Servers. A lower hierarchy item
cannot be created unless its immediately superior type exists, that is,
a policy group must exist before you can create a Service, and a
Service must exist before you can create a Server.
Policy
Manager
Toolbar
The Policy Manager toolbar contains three buttons for creating Policy
Groups, Services and Servers, and one button to delete the currently
selected item, regardless of its type. The toolbar's buttons are enabled
or disabled (dimmed) according to the type of item selected in the
Policies display.
Policy Manager Toolbar
New
Policy
Group
Delete
Selected
Item
New
Server
New
Service

C H A P T E R 4 HP e-Commerce/XML Director Server Appliance SA8250 User Guide
88
Policy
Manager’s
Pop-up Menu
You can display the Policy Manager’s pop-up menu by right-clicking
in the Policies display.
Policy Manager’s Pop-up Menu
Policy Groups Services are virtual resources provided to a client. However, Services
can exist only in the context of Policy Groups. Policy Groups are
regarded as containers used to organize Services. Therefore, before
Services can be defined, Policy Groups must be created to contain
them.
The Policy Manager's Policy Group Details screen provides two
functions:
•Naming of newly created Policy Groups
•Enabling or disabling of the selected Policy Group's throttling
function
Display
Commands
Sort
Commands
Create/
Delete
Commands
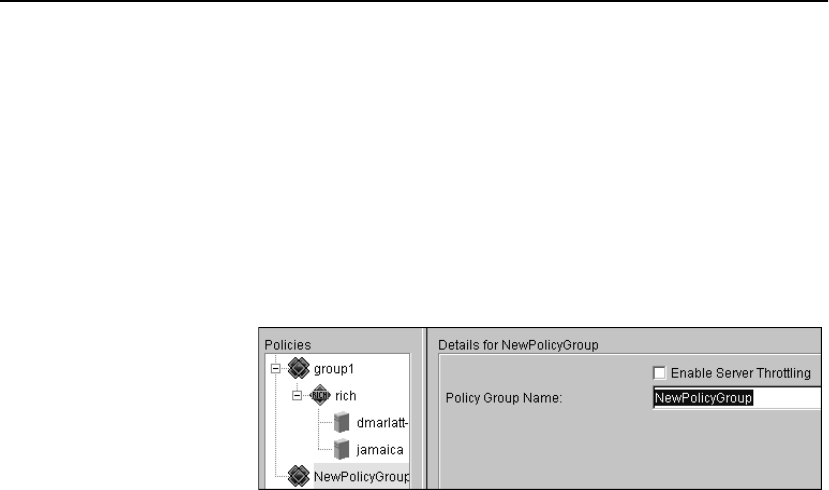
C H A P T E R 4 Policy Manager Screen
89
Creating Policy Groups
You can create Policy Groups in either of two ways:
1. In the left of the Policy Manager toolbar, click New Policy
Group, or
2. Right-click to display the menu, then select the New Policy
Group command.
A new Policy Group icon and the Detail screen displays in the
Policies.
Adding a New Policy Group
3. In the Policy Group Name field, type a name for the new Policy
Group. Policy Group names must adhere to the following
conventions:
•From 1 to 25 characters in length
•Any alphanumeric character
•Other eligible characters include hyphens ("-"), periods ("."), and
underscores ("_")
•Spaces must not be used.
NOTE: The names of
existing Policy Groups
cannot be changed.
Within these restrictions, the naming of Policy Groups is at your
discretion, though convenient naming schemes might include
serial names ("Group1," "Group2," etc.), or names that reflect a
Policy Group’s content, such as "e-CommerceGrp" or
"HTTP_Group."
4. To accept the specified name, click Apply. The new Policy
Group's new name displays in the Policies display.
When the new Policy Group name displays, New Service
becomes available. This reflects the fact that Services cannot be
created unless at least one Policy Group already exists.

C H A P T E R 4 HP e-Commerce/XML Director Server Appliance SA8250 User Guide
90
Throttling
When throttling is enabled, requests to eligible servers in lower-
priority services are stopped until response times of higher priority
services are met, or all eligible servers have been throttled. An
eligible server is one that is shared by both higher and lower priority
services. Throttling affects all services within a Policy Group.
To enable or disable throttling for the selected Policy Group, follow
these steps:
1. Select the Enable Server Throttling check box.
2. Click Apply.
Deleting Policy Groups
To delete a Policy Group, follow these steps:
1. In the Policies display, click to select the name of the Policy
Group to be deleted.
2. In the Policy Manager toolbar, click Delete (X), or right-click to
display the menu and click the Delete Selected Item command.
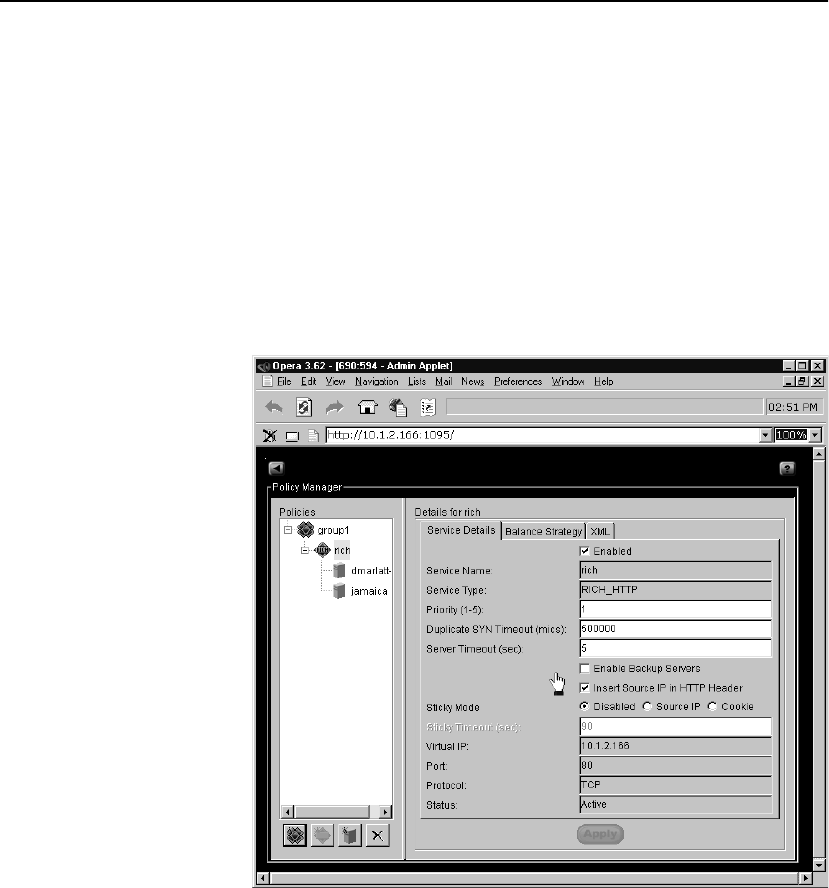
C H A P T E R 4 Policy Manager Screen
91
Services Once a Policy Group exists, you can create Services.
Creating Services
To create a Service, follow these steps:
1. In the Policies display, click to select a Policy Group.
2. In the Policy Manager toolbar, click New Service, or right-click
in the Policies display and select New Service from the pop-up
menu.
The Service Details tab displays in the Details for the service.
Service Details Tab
NOTE: All fields in steps
(3) through (6) become
read-only after the
service is created.
3. In the Service Name field, type a name for the service.
4. From the Service Type pull-down menu, click the desired Service
type. The choices are HOT TCP (the default), or RICH_HTTP.
5. From the Virtual IP pull-down menu, click the desired Virtual IP
(VIP) address. If there are no VIPs in the menu, or if the desired
one is absent, type it in.

C H A P T E R 4 HP e-Commerce/XML Director Server Appliance SA8250 User Guide
92
NOTE: The VIP/port
combination must be
unique.
6. In the Port field, type a port number. This is the listening port for
incoming connections, and you can select port numbers between
1 and 65535.
7. When you have finished filling in the fields in the Service Details
tab, click Apply.
The Policies display now reflects the name of the new Service
below the name of the Policy Group from which it was created.
Additional Service Tab Controls and Displays
This table lists items that can be changed after the Service has been
created.
Control or Display Description
Enabled Select this check box to activate the selected Service. Clear the check
box to disable the Service.
Priority Services within a single Policy Group can be prioritized. The SA8250
assures more server resources to Services with high priority numbers
than to those with lower numbers. The Priority setting is an integer
from 1 (highest priority) to 5 (lowest priority), and the default is 1.
Duplicate SYN
Timeout This value is the time interval (in microseconds) after which the
fulfillment server is declared dead if the dynamically calculated
number of duplicate SYNs (lost packets) to that server is detected. You
can specify a value from 1000 to 2,147,483,647, and the default is
500,000.
Server Timeout
(RICH Only) This value is the time interval (in seconds) during which a server must
respond before it is declared dead. If the server fails to respond before
the end of timeout interval, the outstanding request is passed to another
server. This value is only available for RICH_HTTP services.
Enable Backup
Servers This check box enables or disables servers designated as type
"Backup" to come on line if necessary to assure target response times.
For more details about servers, see “Servers” later in this chapter.
Insert Source IP in
HTTP Header
(RICH only)
This check box specifies whether or not the Source IP address is
embedded within the HTTP header information.
Additional Service Tab Controls and Displays

C H A P T E R 4 Policy Manager Screen
93
Sticky Mode The SA8250 is configured to maintain a session’s state so that serial
requests from a single client are allocated to the same server. This is
called a "sticky" port. This setting may be disabled, based on Source
IP, or based on a Cookie:
Source IP: Source IP sticky mode uses the client’s source IP address
to identify a series of requests to be directed to a single server.
Note: If using SSL services, the SSL session ID maintains a sticky
relationship when Source IP sticky is selected.
Cookie: In cases where requests come through a proxy server, all
requests display to originate from that server’s IP address, thus IP
address is of no use in identifying individual requestors. Cookie sticky
mode provides an active method of identifying requestors in such
situations. When Cookie sticky mode is enabled, a cookie is given to
requesting browsers. Subsequent requests from clients who have
received cookies contain identifying information allowing the SA8250
to direct them to a single server. Cookie mode is available only for
RICH_HTTP.
Sticky Timeout The current software version for the SA8250 treats the timeout
differently for cookie versus Source IP sticky. With Source IP sticky,
the timeout is reset with every connection from the client (so that the
timeout is effectively an "idle time"). With cookie sticky, the timeout
starts with the first connection from the client to the server, and never
gets reset. When the cookie expires, even if actively being used, the
next connection will be load balanced to a new server.
Workaround: We recommend that you set the cookie sticky timeout
value to at least 1.5 times the maximum amount of time a user will
expect to be stuck to a server. The default is 90 seconds.
Protocol This read-only field displays the protocol of the Service (TCP).
Status This read-only field displays the status of the selected Service
("Active" or "Inactive").
Control or Display Description
Additional Service Tab Controls and Displays (continued)
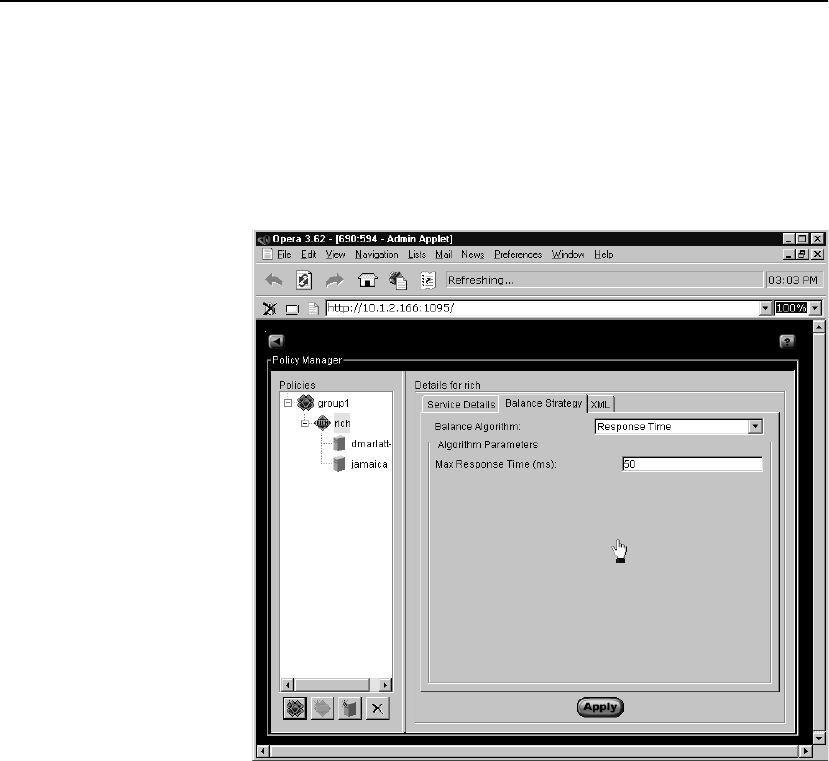
C H A P T E R 4 HP e-Commerce/XML Director Server Appliance SA8250 User Guide
94
Balance Strategy
HOT Services are assigned server resources according to either of
two Balance Algorithms.
1. Click the Balance Strategy tab of the Service Details screen to
display the Balance Algorithm controls.
Service Balance Strategy Tab
Two Balance Algorithms are available:
•Response Time: Requests for a Service using the Response
Time algorithm are forwarded to the server that can fulfill them
within the shortest time.
•Round Robin: Requests for a Service using the Round Robin
algorithm are distributed evenly among the available servers.
2. From the pull-down menu, click to select the desired Balance
Algorithm for the Service selected in the Policies display. If you
select Response Time, type a value (in milliseconds) in the Max
response time (ms) field.
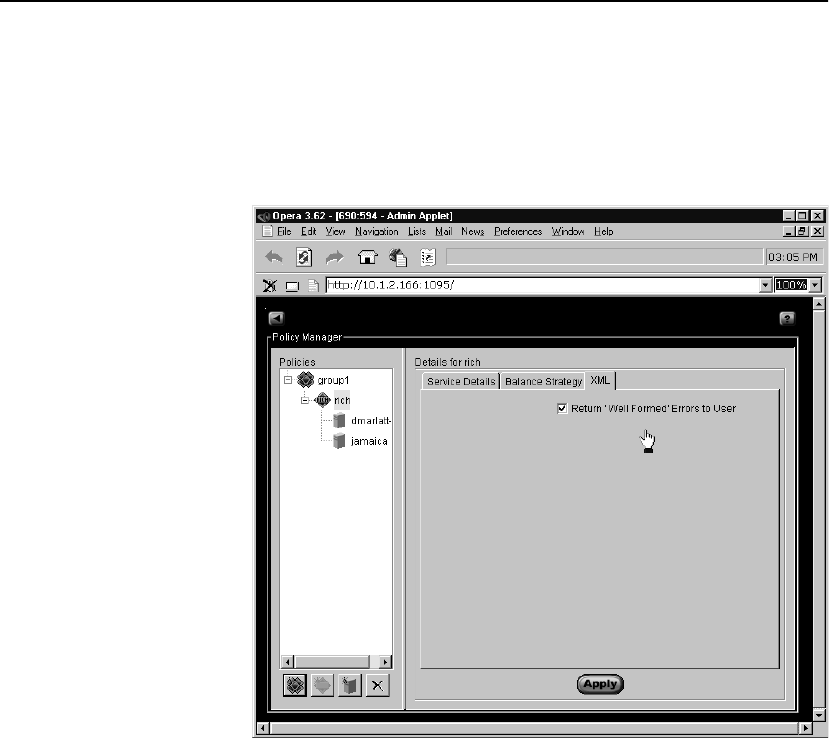
C H A P T E R 4 Policy Manager Screen
95
XML Service Tab
This screen controls how the SA8250 reacts to incorrect syntax or
punctuation errors it detects in the incoming client data.
1. Click the XML tab of the Service Details screen.
XML Services Tab
2. To enable the client error messages (HTTP 403, “POST data was
not well formed”), check the Return “Well Formed” Errors to
User checkbox. This is the default setting.
3. To disable this feature, uncheck the Return “Well Formed”
Errors to User checkbox. When disabled, no HTTP error
messages are sent, but the SA8250 directs the data to servers that
match the RICH expression, effectively ignoring the XML
expression.
4. Click Apply.

C H A P T E R 4 HP e-Commerce/XML Director Server Appliance SA8250 User Guide
96
Deleting Services
To delete a Service:
1. In the Tree, click select the name of the Service to delete.
2. In the Policy Manager toolbar, click Delete, or right-click to
display the menu and click the Delete Selected Item command.
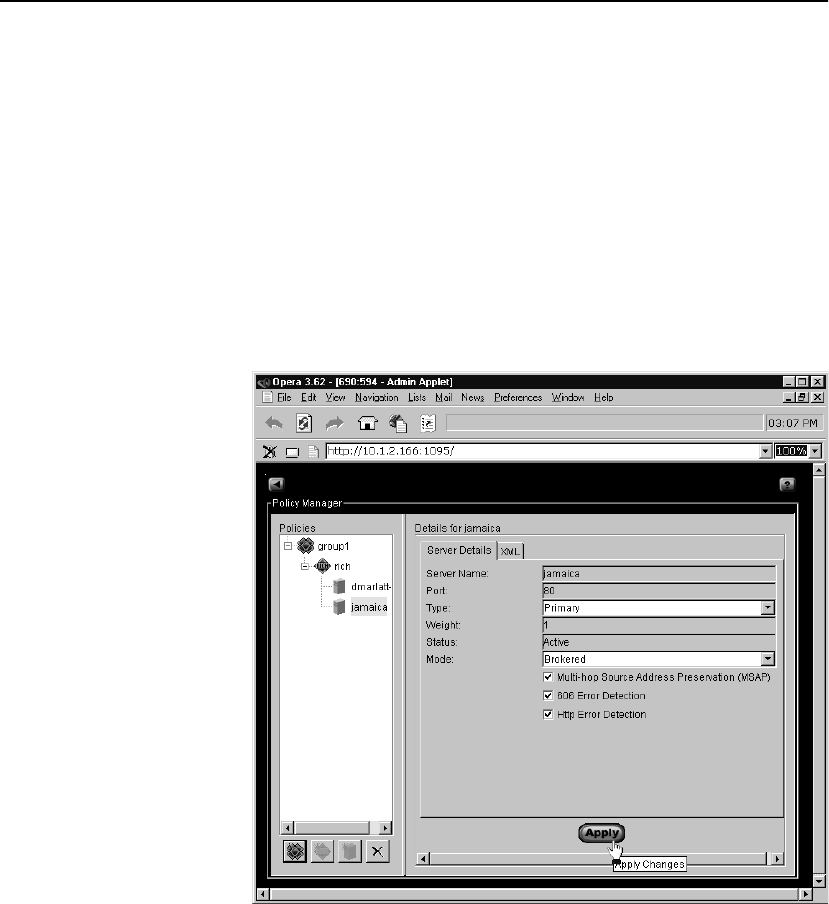
C H A P T E R 4 Policy Manager Screen
97
Servers After you create Services, you must designate, or "create" Servers to
fulfill client requests for Services. As Services must exist within
Policy Groups, a Server (for example, a fulfillment host) must be
mapped to a Service.
To create Servers, follow these steps:
1. In the Policies tree, click an existing Service.
2. In the Policy Manager toolbar, click Create Server, or right-click
in the Policies display and click New Server from the pop-up
menu.
The Server Details tab displays in the Details screen:
The Policy Manager’s Server Detail Screen
3. In the Server Name field, type an IP address or server name
known to the SA8250 via DNS or static host table. This value
cannot be changed after the server is created.
4. If appropriate, edit the Port field. The default value is the port
number of the Service under which this Server displays in the
Tree. This value cannot be changed after the server is created.

C H A P T E R 4 HP e-Commerce/XML Director Server Appliance SA8250 User Guide
98
5. From the drop down menu, click to select the desired Type:
•Primary: Primary servers are immediately available to
accept client requests forwarded from the SA8250.
•Backup: Backup servers are sent requests under only two
circumstances: First, when the primary servers are unable to
meet the configured target response times a backup server
may be used if and only if "backups" is enabled for this
service. Second, backup servers are given requests when a
primary server is unavailable. As primary servers become
inactive, backup servers are brought into service to handle
requests.
•Disabled: Renders the server unavailable to accept client
requests.
NOTE: OPR cannot be
used in conjunction with
Services of type
RICH_HTTP.
6. From the drop down menu, click to select the desired Mode. This
command enables or disables Source Address Preservation
(SAP) on the named server. When Out-of-Path Return (OPR) is
enabled, the user-designated server port is ignored and the
configured service server port is used. By default, SAP is enabled
(and cannot be disabled) when OPR is in effect.
For more details about SAP and OPR, see Chapter 2.
7. Check the appropriate RICH control checkboxes:
•Multi-hop Source Address Preservation: It is possible in
sophisticated network topologies to require that requests pass
through two cascaded SA8250s. In such configurations, the
SA8250 topologically closest to the clients must be configured
with the MSAP feature enabled. In most configurations, the
default setting (MSAP disabled) must be used.
•606 Error Detection: "606" is a user-defined error code, that is,
you can specify an application level error as a "606 error" so it is
detectable by the SA8250. When 606 Error Detection is enabled,
requests that generate a 606 error are rerouted, transparently to
the client, to the next available server. When disabled, the error is
sent back to the requesting client.
•HTTP Error Detection: When HTTP Error Detection is
enabled, requests that generate HTTP errors 401-405 and 500-
503 are rerouted, transparently to the client, to the next available
server. When disabled, these errors are sent back to the
requesting client.
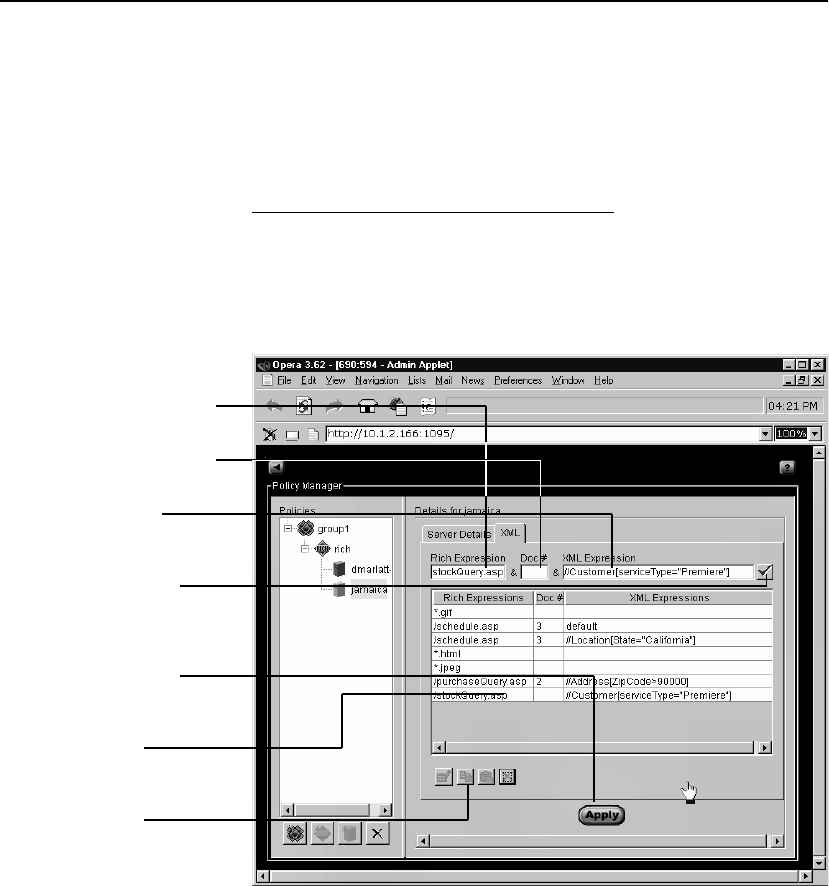
C H A P T E R 4 Policy Manager Screen
99
XML Server Tab
This screen defines the RICH and XML expressions that the SA8250
will look for in the incoming client data.
For more details on XML expressions, see Chapter 2.
Programming RICH and XML expressions
To program the RICH and XML expressions, follow these steps:
1. From the Server Details screen, click the XML tab.
This figure shows the XML Server Tab display.
XML Server Tab
1. Type the Layer 7
(RICH) expression here
4. Click the checkbox
to add the RICH and
XML expressions to
RICH and XML
expression list
RICH and XML
expression list
controls (Edit,
Copy, Paste, Delete)
5. Click Apply to add
your expressions to
the configuration
3. Type the XML
expression here
the list
2. Type the optional
document number here
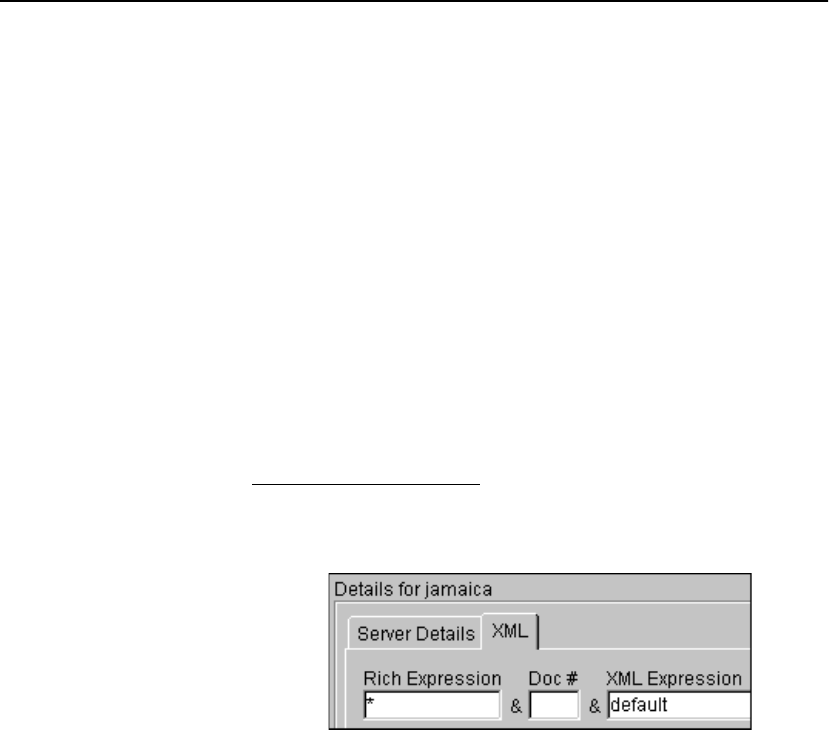
C H A P T E R 4 HP e-Commerce/XML Director Server Appliance SA8250 User Guide
100
NOTE: If the RICH
Expression field is blank,
XML expressions will be
ignored. If desired, you
can type an asterisk (*) as
a wildcard in the RICH
Expression field to accept
all RICH expressions
Also, you cannot use the
vertical bar ( | ) or the
carat (^) in XML
expressions.
2. In the RICH Expression field, type a valid RICH expression.
3. (Optional) In the Doc # field, type a valid document number if
using multipart or URL-encoded messages. The entry must be
an integer, and the valid range is from 1 to 99. If a document is
not specified, the SA8250 starts with the first XML document in
the message.
4. In the XML Expression field, type a valid XML expression.
5. To the right of the XML Expression field, click the checkbox.
Your RICH and XML expressions are added to the list.
6. Repeat steps (2) through (5) above as needed.
7. When you have finished adding expressions to the list, add the
expressions to the SA8250’s configuration by clicking Apply.
For more XML expression examples, see Chapter 6.
XML Default Special Case
We recommend programming the SA8250 with one of your servers
set to the default special case.
Typing the XML Default Special Case
The advantage of this is that if no XML expressions match, the client
is directed to the server you chose as the default server.
If no default servers exist, and no RICH or XML expressions match,
the client will receive a “Server not found” error from the SA8250.
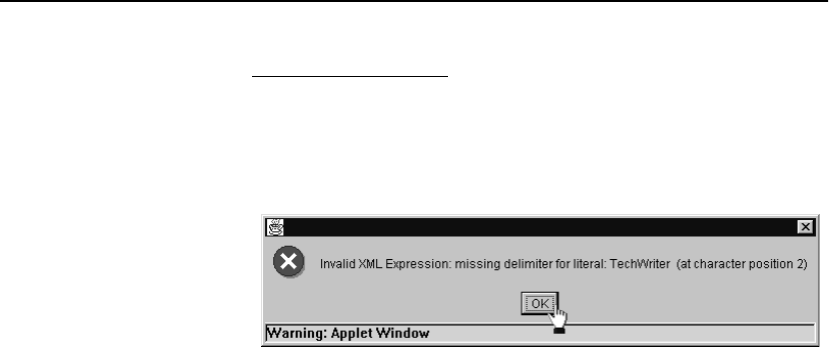
C H A P T E R 4 Policy Manager Screen
101
XML Syntax Checking
The SA8250 includes a syntax checker to ensure that XML
expressions you type are understood by the system. If your syntax is
incorrect, as in the case of a missing double quote (“) or an incorrect
document number, an error message is displayed.
GUI XML Syntax Error Window
The error message will tell you the location of the first error. In the
figure above, a closing double quote was missing in the second
character position of an XML expression.
Deleting Servers
To delete a Server:
1. In the Tree, click the name of the Server to delete.
2. In the Policy Manager toolbar, click Delete, or right-click to
display the menu and click Delete Selected Item.
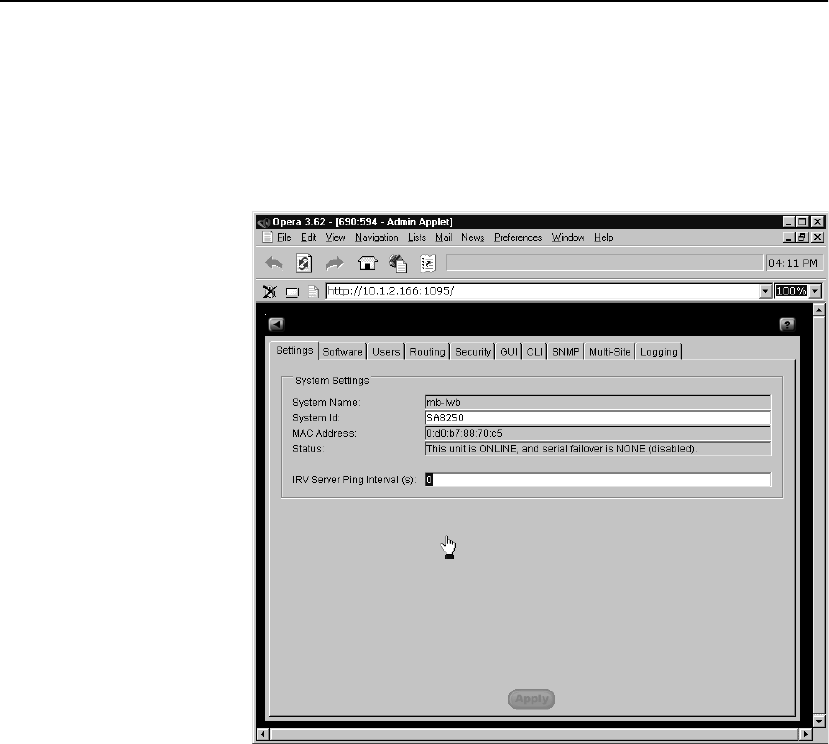
C H A P T E R 4 HP e-Commerce/XML Director Server Appliance SA8250 User Guide
102
Administration Screen
The Administration Screen is a set of ten tabs containing the
functions used to manage the SA8250. Each tab includes controls
and displays related to a specific category of administration tasks.
Administration Screen — Settings Tab
Settings Tab The Settings tab includes controls used to set the following:
•System ID: Edit this field to set the unit identifier. The SA8250s
are shipped with the unit serial number in this field. You can use
this control to change the identifier if your site requires alternate
asset tracking information. The new ID can be an alphanumeric
value from 1 to 64 characters. To change this value, type the
desired identifier, and then click Apply.

C H A P T E R 4 Administration Screen
103
•Server Verification Interval: Edit this field to change the
interval in seconds at which servers are "pinged" to verify they
are available and able to handle traffic requests. For more
details, see Chapter 5. The valid range for this field is 0 to 99999.
A value of 0 disables IRV.
In addition to the above controls, the Settings tab also contains
the following read-only displays:
•System Name: Displays the name given the SA8250 in its initial
configuration.
•MAC Address: Displays the SA8250's Media Access Control
address.
•Status: The Status field displays information about the
SA8250's function and failover status. For more details about
status messages, see Chapter 2.
Software Tab The Software tab contains controls and displays allowing you to
perform the following tasks:
•Specify image category as either System software or Agent
Software. Agent software lists software components other than
the SA8250 system image that may be installed on the unit, such
as the HP Multi-Site Traffic Director Server Appliance SA9200
agent.
•View the list of currently installed system software images (the
SA8250 can have up to five system images installed).
•View the list of currently installed agent software images (the
SA8250 can have up to four agents installed in addition to those
accompanying each system software image).
•Specify which of the installed software images is to be active.
•Install or update software images.
•Delete software images.
•Enable or disable Passive FTP.
•FTP or TFTP new Multi-Site Agents to the SA8250.
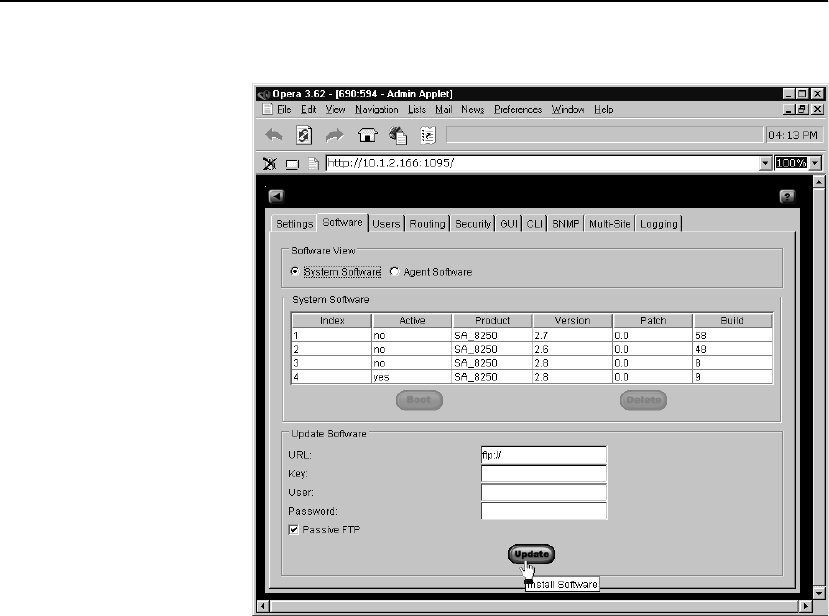
C H A P T E R 4 HP e-Commerce/XML Director Server Appliance SA8250 User Guide
104
Administration Screen — Software Tab (System Software View)
System Software
The SA8250 provides sufficient local storage for five software
images (though at any time, only one image is active and executing.)
The "System Software" area of the Software tab displays the list of
currently installed system images, including the following details for
each:
•Image index number
•"Active" status (yes/no)
•Product name
•Product version number
•Patch number
•Build number

C H A P T E R 4 Administration Screen
105
Agent Software
The SA8250 can interface with other HP Server Appliances by using
Agent Software images. The SA8250 provides sufficient local
storage for at least five Agent software images (though at any time,
only one image is enabled). To display the "Agent Software" area of
the Software tab, click Agent Software, which displays the list of
currently installed Multi-Site Director Agent images:
Software Tab in Agent Software View
Details displayed for each Agent include:
•Image index number
•"Active" status (yes/no)
•Product version number
•Patch number
•Build number
•Compatible Multi-Site Traffic Director version number
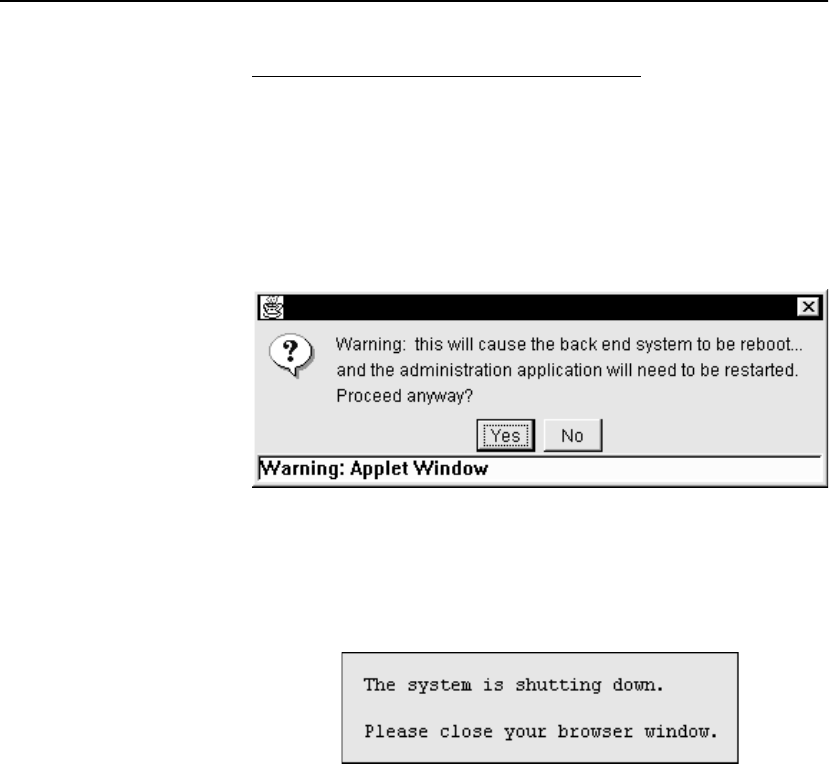
C H A P T E R 4 HP e-Commerce/XML Director Server Appliance SA8250 User Guide
106
Specifying the Active System Software Image
To change the active system image:
1. Click System Software.
2. In the System Software box, click the image you want to activate.
3. Click Boot.
The SA8250 warns you that it will reboot.
Boot Warning Window
NOTE: You can also
perform a soft reboot of
the SA8250 by selecting
the currently active
software image and
clicking Boot.
4. Click Yes.
As the SA8250 reboots, it prompts you to close your browser
window.
Reboot Screen
5. You must close all browser windows to ensure your browser uses
the newly activated Administration Application.
6. Wait three to five minutes for the SA8250 to finish rebooting,
and then run the administration application.
7. Go to the Software tab of the Administration screen and verify
that the "Active" column of the selected image displays yes.

C H A P T E R 4 Administration Screen
107
Installing Software Images
You can download and install new system and agent software images
for the SA8250 using the controls in the Update Software box at the
bottom of the Software tab.
Downloading a System Software Update
NOTE: A key is not
required to obtain Agent
Software.
1. To download the new image, contact HP Customer Support or
your System Administrator to obtain the URL, Key, User, and
Password information.
For more details about software installation and updates, see
Chapter 8.
Deleting Software Images
To delete a software image from the list of installed images:
1. In the Software View box, click the software type to be deleted.
2. In the Installed Software box, click the image to be deleted.
3. Click Delete. The SA8250 prompts you to confirm that you want
to delete the selected image.
Delete Image Confirmation (System View)
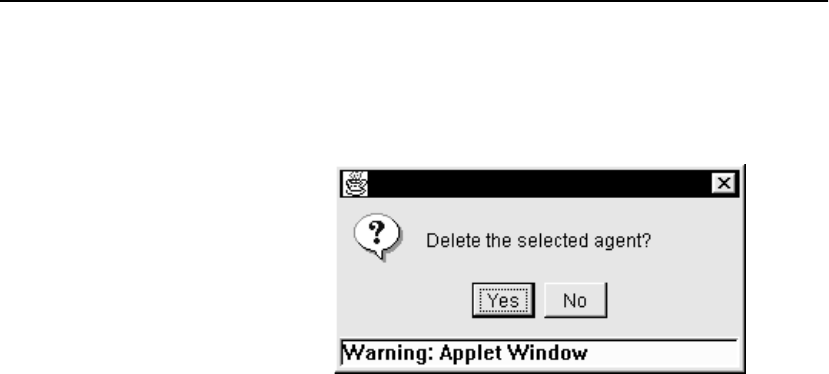
C H A P T E R 4 HP e-Commerce/XML Director Server Appliance SA8250 User Guide
108
4. Click Yes.
If you selected Agent Software, you are prompted to confirm the
deletion.
Delete Image Confirmation (Agent View)
5. Click Yes.
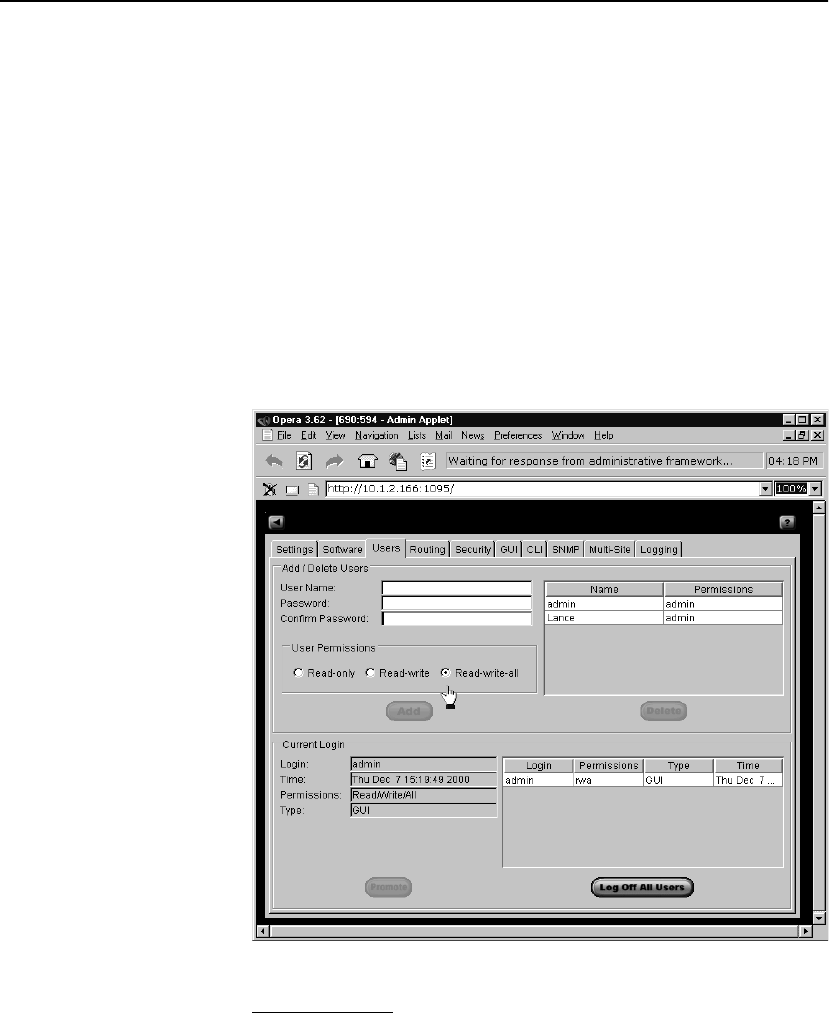
C H A P T E R 4 Administration Screen
109
Users Tab The Users tab contains controls and displays allowing you to perform
the following tasks:
•Add users
•Modify user permissions and passwords
•Delete users
•View the user names and permissions of all authorized users
•View the user names and permissions of all users currently
logged on
•Promote your permissions level
•Log off all other users currently logged on
Administration Screen — Users Tab
List of All Users
The Add/Delete Users box contains a list of all users allowed to log
on to the SA8250.

C H A P T E R 4 HP e-Commerce/XML Director Server Appliance SA8250 User Guide
110
Adding Users
To add a user:
1. In the User Name field, type the new user’s User Name.
2. In the Password field, type the new user’s password.
3. In the Confirm Password field, re-enter the password.
4. In the User Permissions box, select the appropriate permission
level: Read-only, Read-write, Read-write-all. Users with Read-
write-all permissions can add, modify, and delete other user
logon entries.
5. Click Add.
6. Verify that the new user’s name and permission level displays in
the "All User" list.
Editing User Profiles
To modify existing users’ permissions and passwords:
1. In the All Users List at the upper right sector of the tab, click the
user you want to modify.
2. If you are changing the password, type the new password in the
Password field, and then retype it in the Confirm Password field.
3. Click Change.
4. If you are changing the user’s permissions, click the appropriate
button in the User Permissions box.
5. Click Change.
Deleting Users
To delete a user:
1. In the User List, click the user you want to delete.
2. Below the list, click Delete.
3. Verify that the deleted user’s name no longer displays in the list.
Current User’s Information
The left-hand side of the "Current Logon" box at the bottom of the
Users tab displays the name and permissions of the user currently
logged on to this session. The log on time and date also display in this
area of the tab.
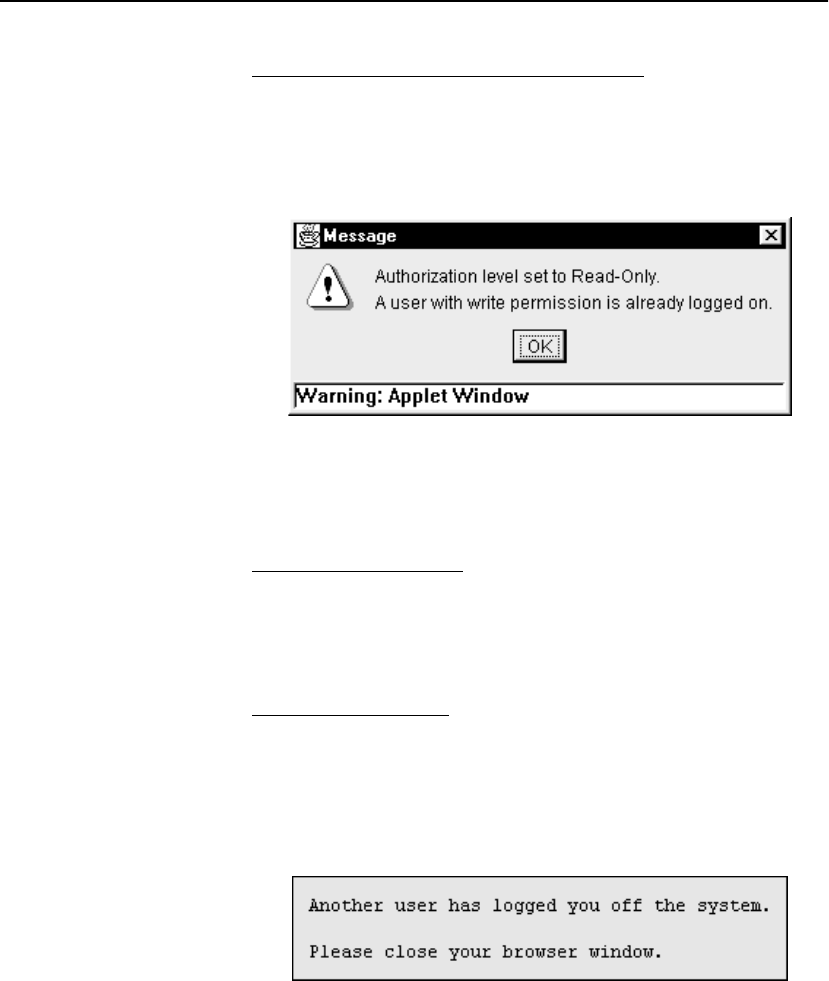
C H A P T E R 4 Administration Screen
111
Demotion and Promotion of Your Permissions
NOTE: Use Promote
with care. If you promote
your permissions, be
aware that conflicts may
arise among multiple
users who have Read-
Write-All permission. For
example, administrative
changes you make may be
overwritten by another
user.
If a user with Read-Write or Read-Write-All permission logs on
while another user with Read-Write or Read-Write-All permission is
logged on, the SA8250 "demotes" the later user’s permissions to
Read-only. The system informs the demoted user of their status.
Demoted Notification
The demoted Read-Write-All user can restore his or her original
permission level by clicking Promote in the User tab. This button is
located in the Current Logon box at the tab’s lower left.
List of Logged-On Users
The right hand side of the "Current Logon" box at the bottom of the
Users tab displays a list of all currently logged on users, their log on
times, their permissions, and their log on method (either the
Command Line Interface or the GUI).
Logoff All Other Users
NOTE: Use Logoff All
Users with care, as it can
leave the system in an
ambiguous state. For
example, if a user is in the
process of performing a
Restore operation, and
another user logs them off
before the Restore
completes, the system is
left in an unknown state.
Users with Read-Write-All permission can click Logoff All Users at
the Users tab’s lower right to end the sessions of all other users
currently logged on. This logs off all other administrative users from
the SA8250. Users logged on using the GUI who are logged off in this
manner will see this message in their browser window.
Logoff by Another User
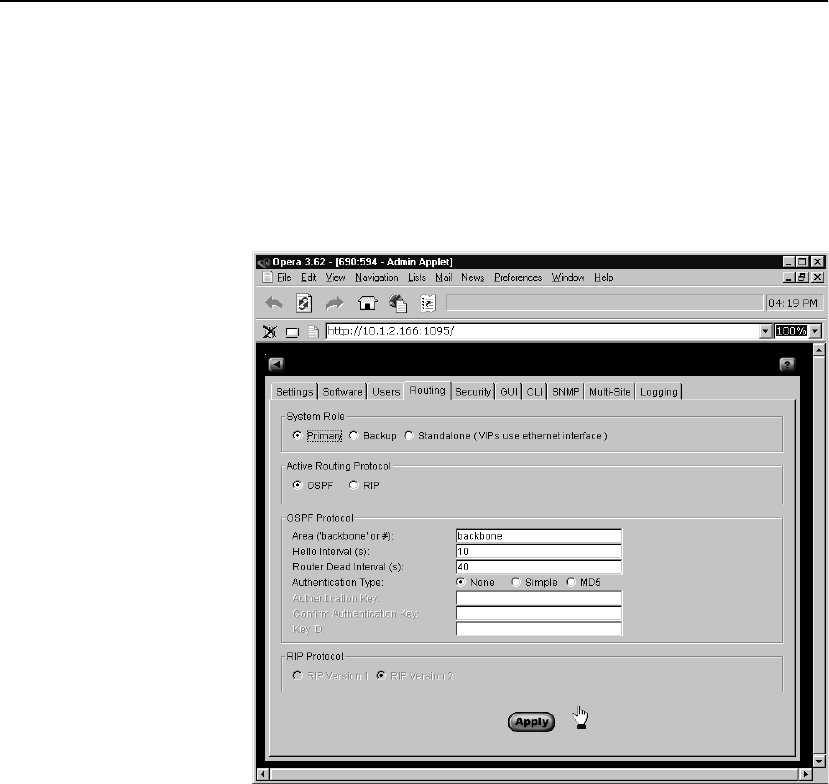
C H A P T E R 4 HP e-Commerce/XML Director Server Appliance SA8250 User Guide
112
Routing Tab The Administration screen’s Routing tab manages the following:
•System Role
•Active Routing Protocol
•OSPF Protocol
•RIP Protocol
The Administration Screen’s Routing Tab

C H A P T E R 4 Administration Screen
113
System Role
The choice of System Role (or simply "role") depends in part on your
network’s topology and on the number of SA8250s installed. A single
SA8250’s role must be "Standalone." If two SA8250s are employed,
and you intend to use serial cable failover you must designate both
SA8250s as "standalone." If two SA8250s are employed, and you
intend to use Router Failover, one must be designated as the
"Primary" and the other as the "Backup." In such cases, the primary
SA8250 accepts all client requests and routes them according to its
configuration while the backup SA8250 monitors the primary and
comes online if the primary fails.
The system roles are defined in this table.
To select the SA8250’s System Role:
1. In the System Role box, click the appropriate button.
Active Routing Protocol
The SA8250 needs to know what your network’s active routing
protocol is (either OSPF or RIP).
1. In the Active Routing Protocol box, click the appropriate radio
button.
RIP Protocol
If your network’s active routing protocol is RIP, click the appropriate
button in the RIP Protocol box to specify the applicable RIP version.
Failover Method System Role
for SA8250
#1
System Role
for SA8250
#2
N/A (Single-SA8250
Installation) Standalone N/A
Router Failover Primary Backup
Serial Cable Failover Standalone Standalone
Disabled Standalone Standalone
System Roles

C H A P T E R 4 HP e-Commerce/XML Director Server Appliance SA8250 User Guide
114
OSPF Protocol
NOTE: Unless the
config route
protocol command is
set to ospf, OSPF
protocol is not active.
For more information,
see Chapter 5.
The Router tab’s OSPF Protocol box specifies the following values:
•OSPF Area: This value must be set to the same OSPF area as the
ingress router to which the SA8250 is talking. This can be the
keywords "backbone" or “Default,” an integer, or dotted decimal
format (xxx.xxx.xxx.xxx). The integer range is from 0 to
2,147,483,647, and the default is Default.
•Hello Interval: The number of seconds between hello packets
sent on this interface. This value must match the hello interval of
the ingress router. The valid range is from 1 to 65,535, and the
default is 10.
NOTE: The Router Dead
value must be at least four
times the Hello interval.
•Router Dead Interval: The number of seconds the SA8250's
OSPF neighbors should wait before assuming this OSPF SA8250
is down. This value must match the router dead interval of the
ingress router. The valid range is from 1 to 2,147,483,647, and
the default is 40.
Authentication type and key are security mechanisms to
guarantee that routing information is exchanged only with trusted
routers. The type and key together comprise the "authentication
scheme." An OSPF Area can have only one OSPF
Authentication scheme.
NOTE: Both sides of the
OSPF connection must
use the same
authentication type and
key and key ID if
applicable.
•Authentication Type: Specifies the type of OSPF authentication.
To disable OSPF authentication, click None. To enable Simple
password authentication, click Simple and then proceed to the
Authentication Key field. To enable MD5 authentication, click
MD5, then enter an authentication key and key id.
•Authentication Key: A user-specified string (excluding double
quotes and spaces) used as an authentication password. The
authentication key is from 1 to 8 characters for Simple
authentication, and 1 to 16 characters for MD5 authentication.
•Confirm Authentication Key: Re-enter the Authentication Key to
verify it to the SA8250.
•Key ID: MD5 key id, an integer from 1 to 255. MD5
authentication provides a stronger level of security for OSPF
users.
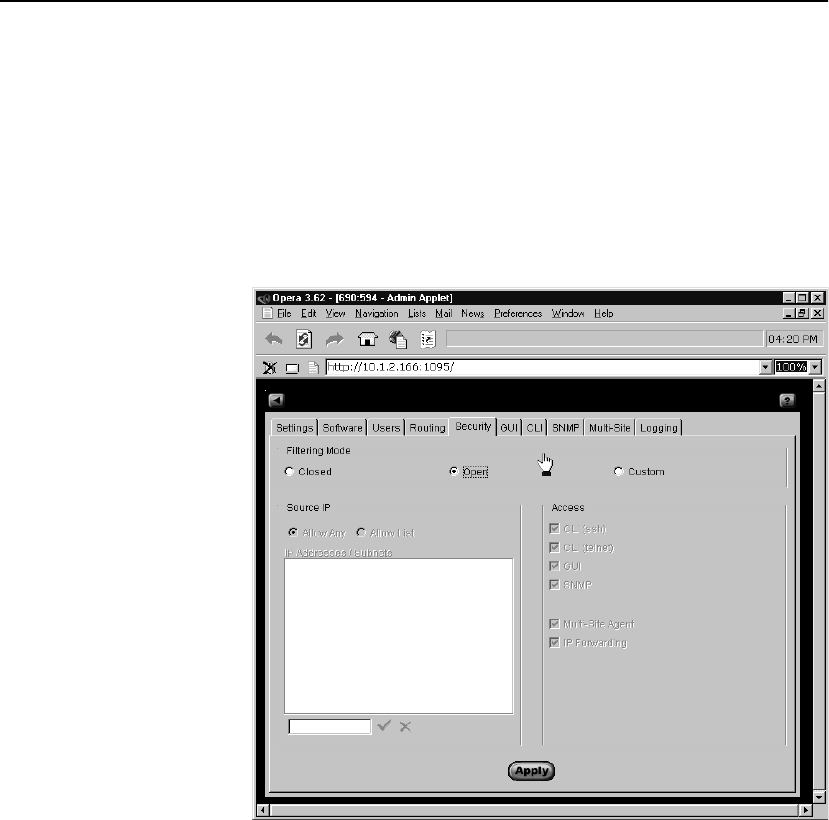
C H A P T E R 4 Administration Screen
115
Security Tab The security screen implements IP Packet Forwarding (IPFW)
security policies. Three modes are available:
•Closed mode disables all remote administration capabilities.
•Open mode enables all remote administration capabilities,
SA9200 agent traffic, and IP Forwarding.
•Custom mode specifies filtering of traffic based on traffic port
and source IP address.
The Administration Screen’s Security Tab

C H A P T E R 4 HP e-Commerce/XML Director Server Appliance SA8250 User Guide
116
Source IP Filtering
The Security Tab’s Source IP dialog box filters administration access
by source IP address. This dialog box contains a pair of buttons and
combo box. To allow any IP address to perform administrative tasks,
click Allow Any. To filter by source IP, click Allow List and type the
IP addresses and/or subnets allowed administrative access into the IP
Addresses/Subnets list. Subnets are specified in "slash" notation
(such as 209.218.0.0/16). Click the check icon to add the contents of
the text field into the list. You can delete an item from the list by
clicking the item to delete and clicking the "X" icon.
Access Options
When the Custom security mode is enabled, you can choose among
the access options in the Access security box. To enable an option,
select the corresponding check box and verify that a check mark
displays. To disable, click again to clear the check mark. Available
options are listed below:
•CLI (SSH) Enable "Secure Shell," that is, secure access to the
unit's Command Line Interface. Secure Shell operates like an
ordinary telnet session, but adds encryption.
•CLI (telnet) Enable standard unencrypted telnet access to the
unit's Command Line Interface.
•GUI Enable administration using the unit's Graphical User
Interface.
•SNMP Enable administration of the unit using SNMP (Simple
Network Management Protocol).
•Multi-Site Traffic Director Server Appliance SA9200 Agent.
Permit or deny traffic to the SA9200 port.
•IP Forwarding. Permit or deny traffic to specific servers. IP
forwarding allows administrative access to servers at their real IP
addresses via the SA8250. For more details, see Chapter 2.

C H A P T E R 4 Administration Screen
117
GUI Tab The GUI tab configures the following aspects of the SA8250’s
Graphical User Interface (GUI):
•Server port on which the GUI is accessible from the browser
•Response Timeout Value
•Choice of result from double-clicking the SA8250 icon in the
Topology Screen
•Choice of result from double-clicking the Server icon in the
Topology Screen
The Administration Screen’s GUI Tab
NOTE: After changing
this setting your browser
disconnects. You must
restart your browser and
connect it to the new port
to resume using the
administration
application.
•Admin HTTP Server Port: Edit this field to designate the port on
which the SA8250's GUI application listens. To change this
value, type the desired port number and click Apply. Valid ports
are any unused ports between 1 and 65535. The default is port
1095.

C H A P T E R 4 HP e-Commerce/XML Director Server Appliance SA8250 User Guide
118
•The Broker Response timeout (sec): This field specifies, in
seconds, the time the GUI will wait for a response from the
SA8250 before timing out. This value must be an integer
between 0 and 120. A value of 0 disables timeout. The default
value is 30.
•The Double-click Broker topology icon displays: The drop down
menu specifies the destination within the GUI after double-
clicking a SA8250 icon in the topology screen.
•The Double-click Server topology icon displays: The drop down
menu specifies the destination within the GUI after double-
clicking a Server icon in the topology screen.
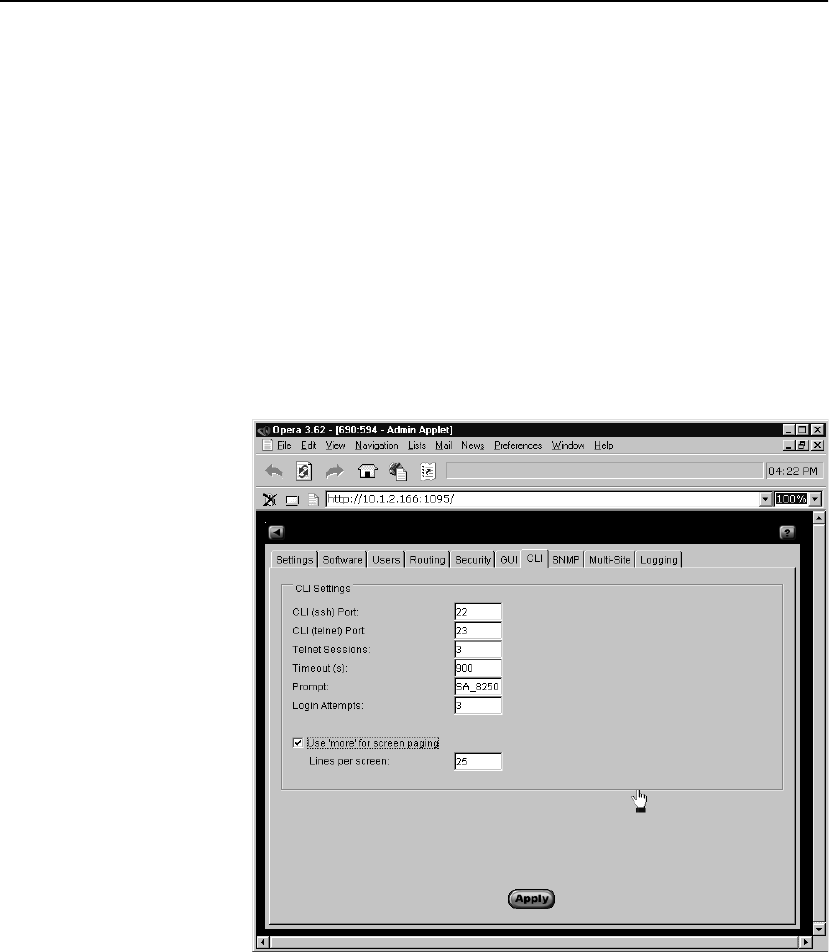
C H A P T E R 4 Administration Screen
119
CLI Tab The CLI tab configures the following aspects of the SA8250’s
Command Line Interface:
•SSH Port
•Telnet Port
•Telnet Sessions
•Timeout
•Prompt
•Login Attempts
•Enable "more" for screen paging
•Lines per screen
The Administration Screen’s CLI Tab
•The CLI (SSH) Port field specifies the secure telnet port on
which the CLI runs. Valid ports are port 22 (the default) or any
unused port between 1024 and 65535.

C H A P T E R 4 HP e-Commerce/XML Director Server Appliance SA8250 User Guide
120
•The CLI (telnet) Port field specifies the standard (unencrypted)
telnet port on which the CLI runs. Valid ports are port 23 (the
default) or any port between 1024 and 65535.
•The Telnet Sessions field specifies the maximum number of
concurrent inbound remote CLI logon sessions allowed. This
value must be an integer between 1 and 8. The default is 3.
•Use the Timeout field to set or change the idle timeout period
before automatic logoff for CLI sessions. This feature is disabled
by setting the timeout value to "0." This timeout period is
expressed in seconds (0, or 30 to 65535). The default is 900
seconds (15 minutes).
•Use the Prompt field to set or change the root level prompt. The
default prompt is an abbreviation of the product's name, for
example: "HP SA8250."
•The Login Attempts field specifies the maximum allowable
number of failed login attempts before closing the connection.
The valid range is from 1 to 30.
•Use 'more' for screen paging. When this box is not checked, the
CLI outputs a continuous scrolling display. When the box is
checked, the CLI scrolls one page at time.
•When more is selected, the Lines per screen field becomes
available. Use this field to specify the number of lines more
displays at a time.
1. Click Apply.
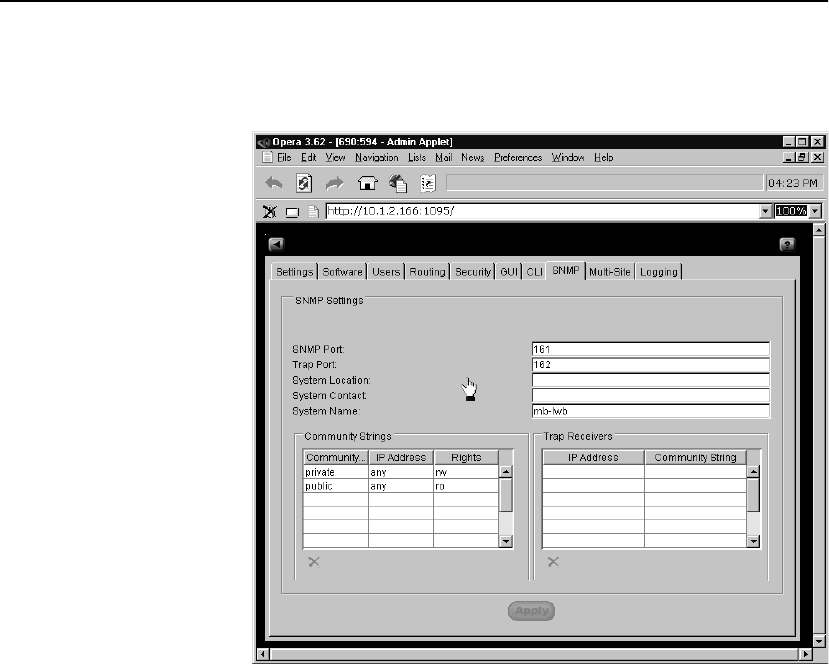
C H A P T E R 4 Administration Screen
121
SNMP Tab The SNMP tab includes controls for the SA8250’s Simple Network
Management Protocol (SNMP) agent.
Administration Screen’s SNMP Tab
SNMP Agent
The SNMP agent allows network management applications to
monitor and retrieve the SA8250’s status and statistics via SNMP.
NOTE: Ensure that the
SA8250’s IP Filtering
security mechanism
allows IP access to
SNMP, otherwise SNMP
requests will not pass
through the filter.
The SNMP Agent Start check box enables or disables the SA8250’s
SNMP agent. The default is Enabled.
•Use the SNMP Port: field to specify the port on which the
SA8250 receives SNMP requests. Allowable port numbers are
161 (the default) or any unused ports 5020 through 65535.
•Use the Trap Port: field to specify the port on which the SA8250
sends SNMP traps. Allowable port numbers are 162 (the default)
or any unused ports 5020 through 65535.

C H A P T E R 4 HP e-Commerce/XML Director Server Appliance SA8250 User Guide
122
•System Location: corresponds to the MIB variable sysLocation
in MIB-II. System Location (sysLocation) is the physical
location of this SA8250. By default, sysLocation is NULL.
•System Contact: corresponds to the MIB variable sysContact in
MIB-II. System Contact (sysContact) is the name of the
administrator of this SA8250. By default, sysContact is NULL.
•System Name: corresponds to the MIB variable sysName in
MIB-II. System Name (sysName) is the name of this SA8250.
By default, sysName is the hostname of the SA8250.
The Community Strings box contains community strings accepted by
the SA8250 on incoming SNMP requests. Up to ten community
strings can be configured for use by the SA8250. Each community
string can have read-only (ro) or read-write (rw) privilege, and can be
configured for use by a specific IP address or all IP addresses. When
the value "any" is used for <ip address>, the community string can be
used by all IP addresses.
For example, the string:
community=test ip=209.218.240.5 rights=ro
creates the community string test with read-only privilege. SNMP
read-only requests using community string test are accepted only
from IP address 209.218.240.5.
By default, the following community strings are defined:
public ro "any"
private rw "any"
The Trap Receivers box contains the IP addresses to which the
SA8250 will send traps. The SA8250 SNMP can send trap
notifications to up to ten configured trap receivers. Each IP address
configured as a trap receiver is associated with a community string,
which is included in traps sent to that IP address.
For example, the string:
ip=209.218.240.5 community=NOC1
causes traps to be sent to IP address 209.218.240.5, and causes the
SA8250 SNMP agent to put the community string, NOC1 in the trap
sent to that address.
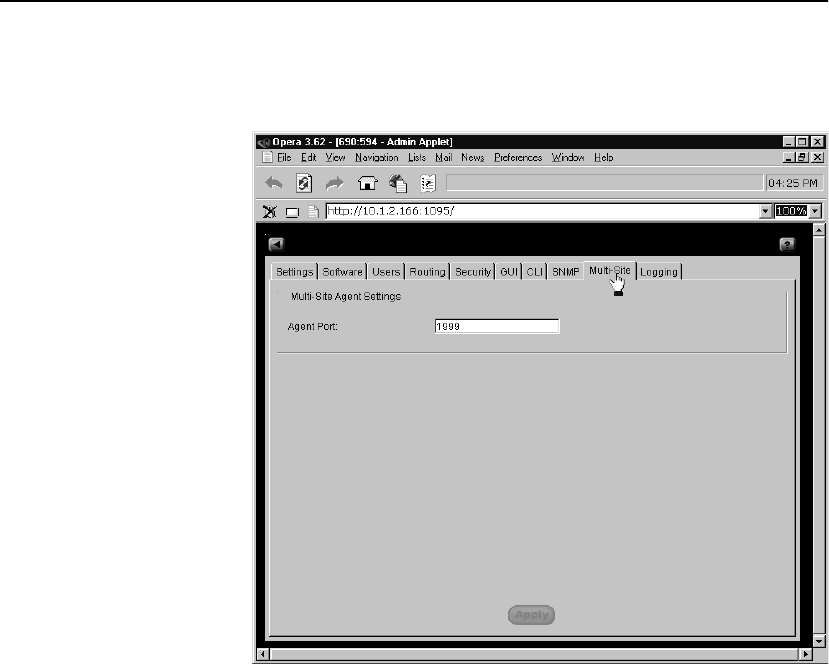
C H A P T E R 4 Administration Screen
123
Multi-Site Tab This tab contains controls for setting the port that communicates with
the HP Multi-Site Traffic Director Server Appliance SA9200.
Administration Screen Multi-Site Tab
To specify the Multi-Site Agent’s port:
1. In the Agent Port field, type that port number. Valid range is
from 1 to 65535, and 1999 is the default. We recommend using
ports 1024 and higher.
2. Click Apply.
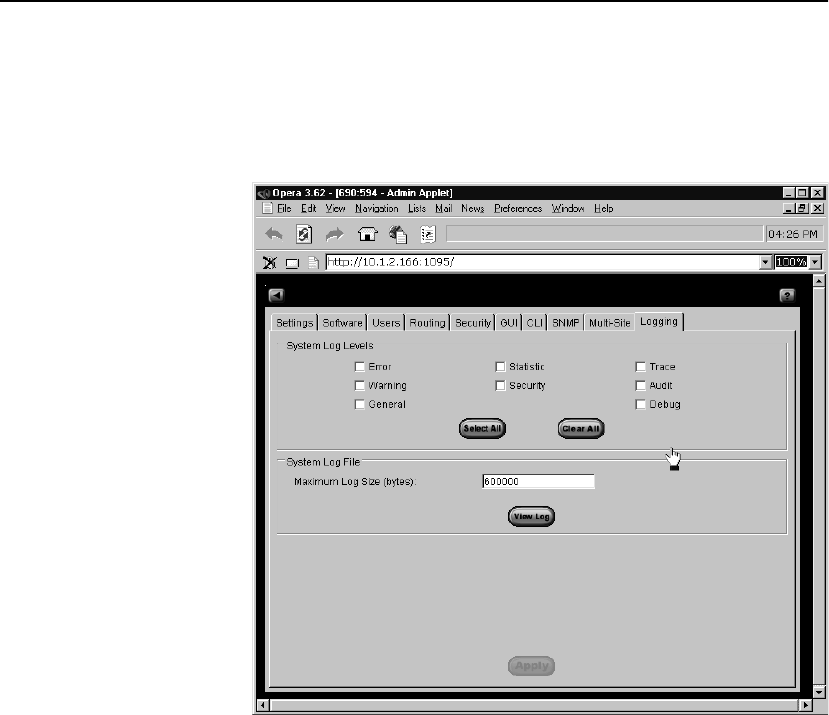
C H A P T E R 4 HP e-Commerce/XML Director Server Appliance SA8250 User Guide
124
Logging Tab The Logging tab specifies (or filters) the kinds of information written
to the SA8250’s log file. This file records operational events for
troubleshooting information. You can enable or disable the logging
of specific types of information, and specify the log file size.
Administration Screen’s Logging Tab
Specifying System Log Parameters
1. In the System Log Levels box, select the check boxes for those
types of system information you want the log file to reflect. To
record all available information types, click Select All.
2. In the System Log File box, type the size of the log file. Valid
range is from 1,024 to 600,000 bytes, and 600,000 is the default.
3. Click Apply.
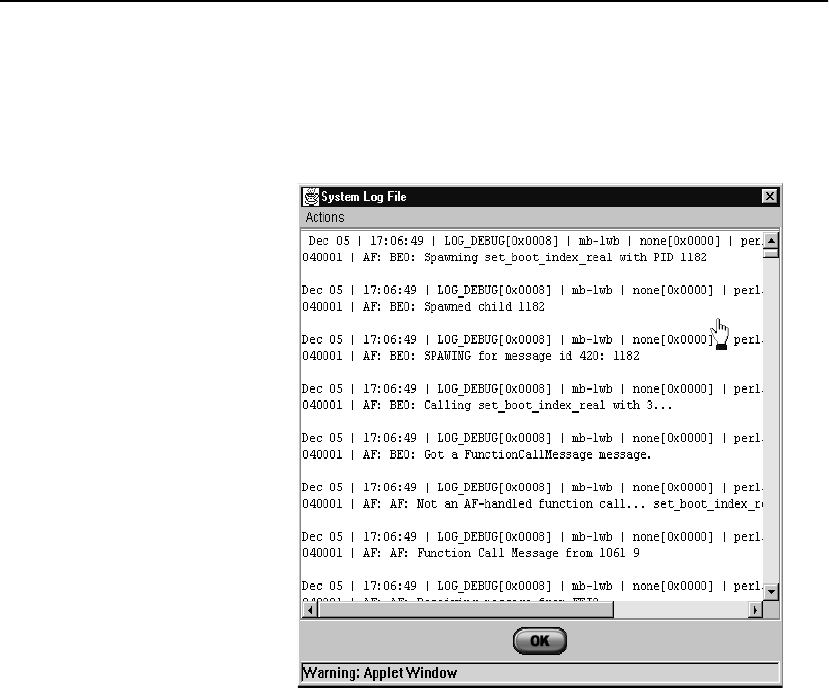
C H A P T E R 4 Administration Screen
125
Viewing the Log File
1. To view the log file, click View Log.
The System Log File displays.
The Logging Tab’s File Contents Window
The File Contents window’s Actions menu contains two items:
•Filter
•Mail To...

C H A P T E R 4 HP e-Commerce/XML Director Server Appliance SA8250 User Guide
126
The Log File Filter dialog box filters the view of the log displayed in
the File Contents window.
Log File Filter Window
1. Select or clear the appropriate check boxes to specify the types or
categories of messages you want to display.
2. Click Apply, or Cancel to abort.
Use the Mail Log File dialog box to email the contents of the log file.
Log Mail To Window
1. In the Enter Email Address field, type the email address to which
you want to send the log file.
2. In the Enter Mail Host field, type the name or IP address of your
network’s outgoing mail (SMTP) server.
3. Click OK, or Cancel to abort.
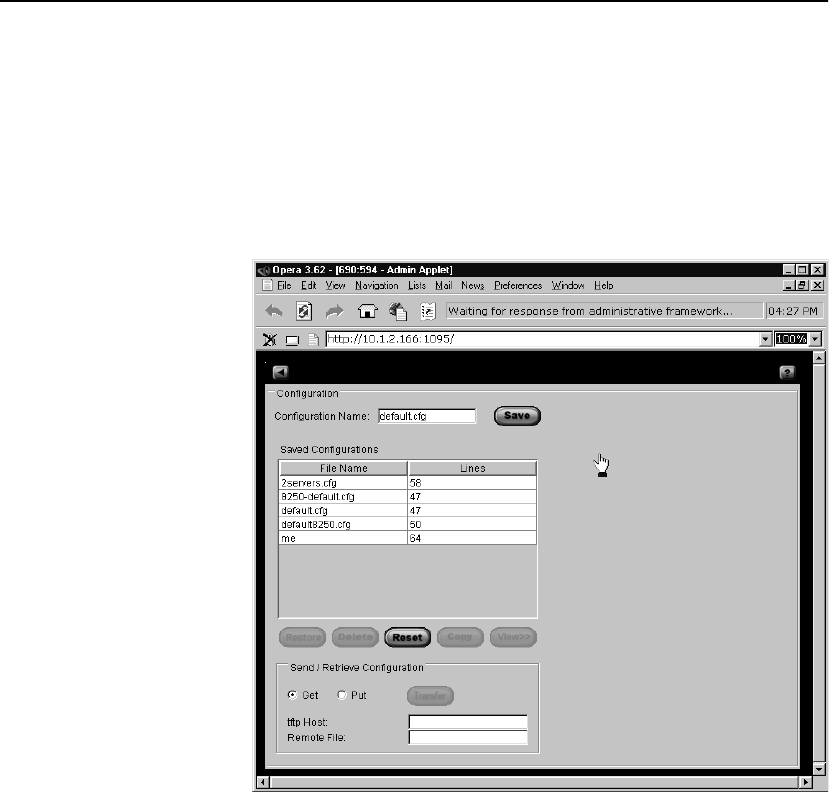
C H A P T E R 4 Configuration Screen
127
Configuration Screen
The Configuration screen saves, restores, sends, and receives
SA8250 configuration information in individual ASCII files. You can
save configuration files on the SA8250 and send them to a remote
TFTP server or retrieve them. The Configuration screen also has a
provision for restoring the factory default configuration.
Configuration Screen
Saving
Configuration
Files
To save the SA8250’s current configuration to a file:
1. In the Configuration Name field, type a filename.
Valid characters include letters, digits, (-), (_), and (.). File
names cannot begin with the (.) character.
2. Click Save.
3. Verify that the new file’s name displays in the Saved
Configurations list.
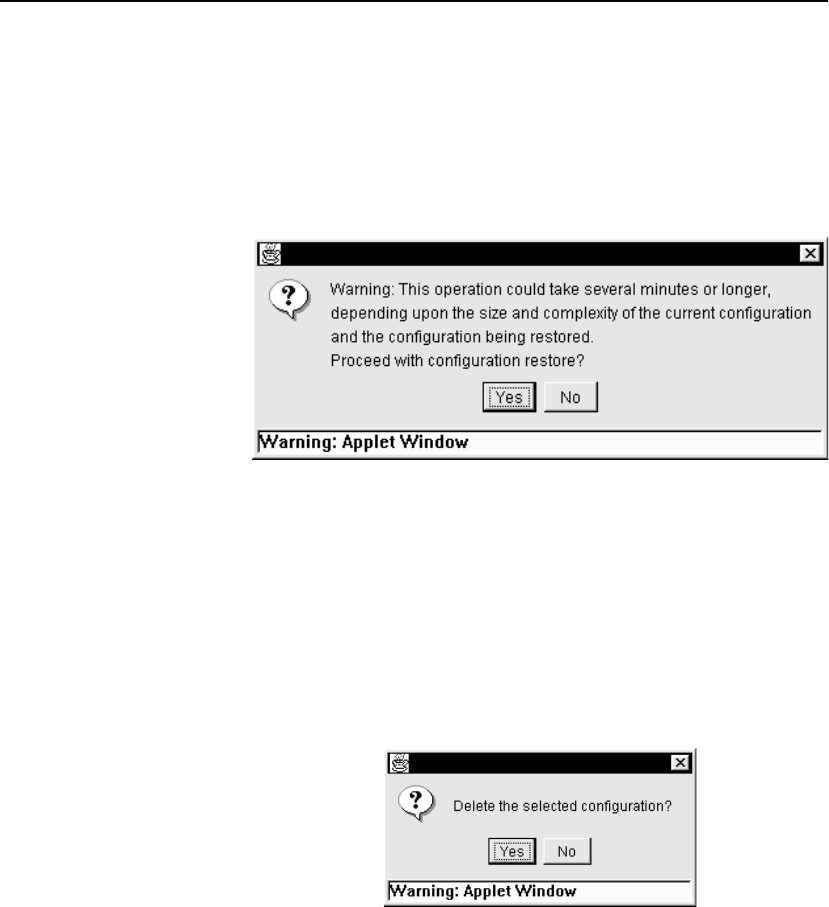
C H A P T E R 4 HP e-Commerce/XML Director Server Appliance SA8250 User Guide
128
Restoring
Configuration
Files
To restore a configuration file:
1. In the Saved Configurations list, click the name of the file you
wish to restore.
2. Click Restore.
The system prompts you to confirm the operation.
NOTE: Username
commands are not valid
in configuration files.
The save config and
restore config operations
do not include username
data. Use the
Administration Screen’s
Users Tab to specify
users.
Restore Confirmation Window
3. To finish the restore operation, click Yes, or No to abort.
Deleting
Configuration
Files
To delete a configuration file:
1. In the Saved Configurations list, click the name of the file you
want to delete.
2. Click Delete.
The system prompts you to confirm the operation.
Delete Confirmation Window
3. To delete the file, click Yes, or No to abort.
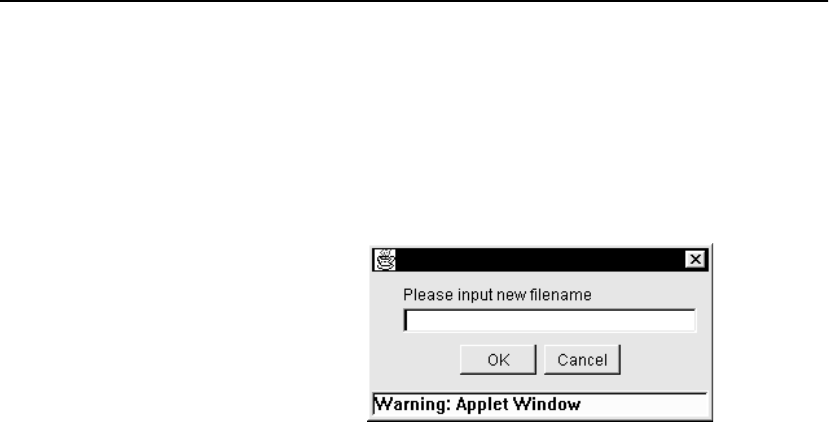
C H A P T E R 4 Configuration Screen
129
Copying
Configuration
Files
To copy an existing configuration file under a new name:
1. In the Saved Configurations list, click the name of the file you
wish to copy.
2. Click Copy.
The system prompts you for a file name.
Copy New Filename Window
Valid characters are letters, digits, (-), (_), and (.). File names
cannot begin with the (.) character.
3. To complete the operation, click OK, or Cancel to abort.
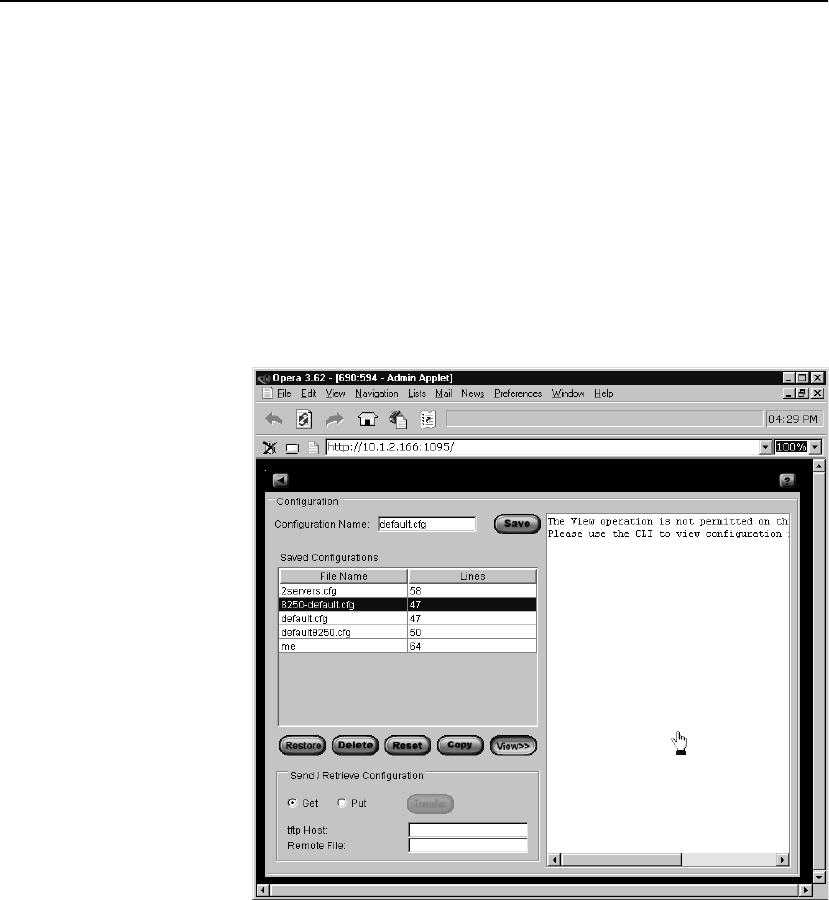
C H A P T E R 4 HP e-Commerce/XML Director Server Appliance SA8250 User Guide
130
Viewing
Configuration
Files
To prevent certificates and keys from being displayed or transmitted
as plain text across the network, the View Configuration File function
has been disabled.
1. In the Saved Configurations list, click the name of the file whose
contents you want to view.
2. Click View>>. The right hand panel of the Configuration screen
displays this message:
The View operation is not permitted on this
device for security reasons. Please use the CLI
to view configuration files.
Viewing a Configuration File (Disabled)
C H A P T E R 4 Configuration Screen
131
Resetting the
Factory
Configuration
This command resets the SA8250 to its original factory
configuration. Reset deletes all policy groups, services, and servers.
Original factory settings are listed in this table.
Type Parameter Default Setting
Route Role Standalone
Protocol None
OSPF-area Backbone
Hello interval 10 seconds
Dead interval 40 seconds
RIP version 2.0
Static routes static_route None
RICH Bias rich_bias Enabled
HTTPS Redirect Redirect None
CLI CLI SSH-port 22
CLI port 23
Prompt Product name
Maximum telnet sessions 3
Scrolling Disabled
Idle timeout 900 seconds
Maximum login attempts 3
SNMP sysContact NULL
sysName Host name of the unit
sysLocation NULL
Factory Configuration
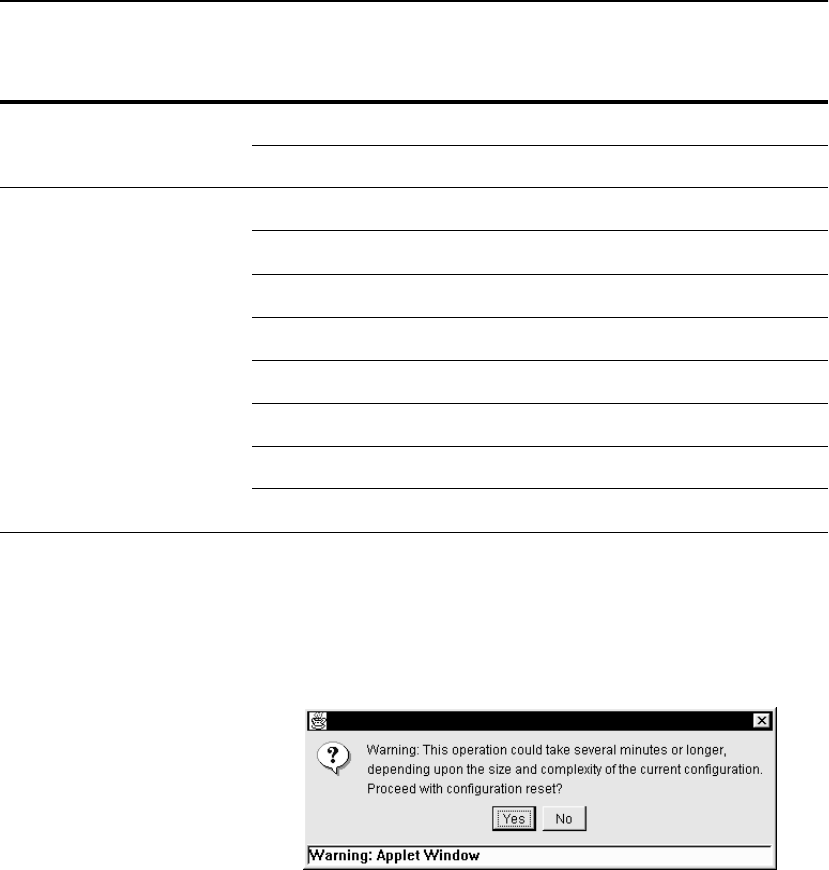
C H A P T E R 4 HP e-Commerce/XML Director Server Appliance SA8250 User Guide
132
To restore the factory default configuration:
1. Click Reset.
The system prompts you to confirm the operation.
Reset Confirmation Window
2. To confirm the operation, click Yes, or No to abort.
GUI broker-action 0 (Policy Manager)
server-action 1 (Statistics)
Security acl Cleared
custom access-control Disabled
custom forwarding Disabled
custom ssh Enabled
custom telnet Disabled
custom gui Disabled
custom snmp Disabled
security mode Closed
Type Parameter Default Setting
Factory Configuration (continued)

C H A P T E R 4 Configuration Screen
133
Sending and
Retrieving
Configuration
Files
By default, configuration files are saved on the SA8250 itself. You
can also send them to and retrieve them from remote TFTP servers.
To send a configuration file to a remote TFTP server:
1. In the Saved Configurations list, click the name of the file you
want to send.
2. In the Send/Receive Configuration box, click Put.
3. In the tftp Host field, type the name of the host where you will
send the file.
4. Optional: In the Remote Directory field, type the directory of
the remote host where you want to save the file.
5. Click Transfer.
To retrieve a configuration file from a remote TFTP server:
1. In the Send/Receive Configuration box, click Get.
2. In the tftp Host field, type the name of the host where you will
retrieve the file.
3. In the Remote File field, type the name of the file you want to
retrieve.
4. Click Transfer.
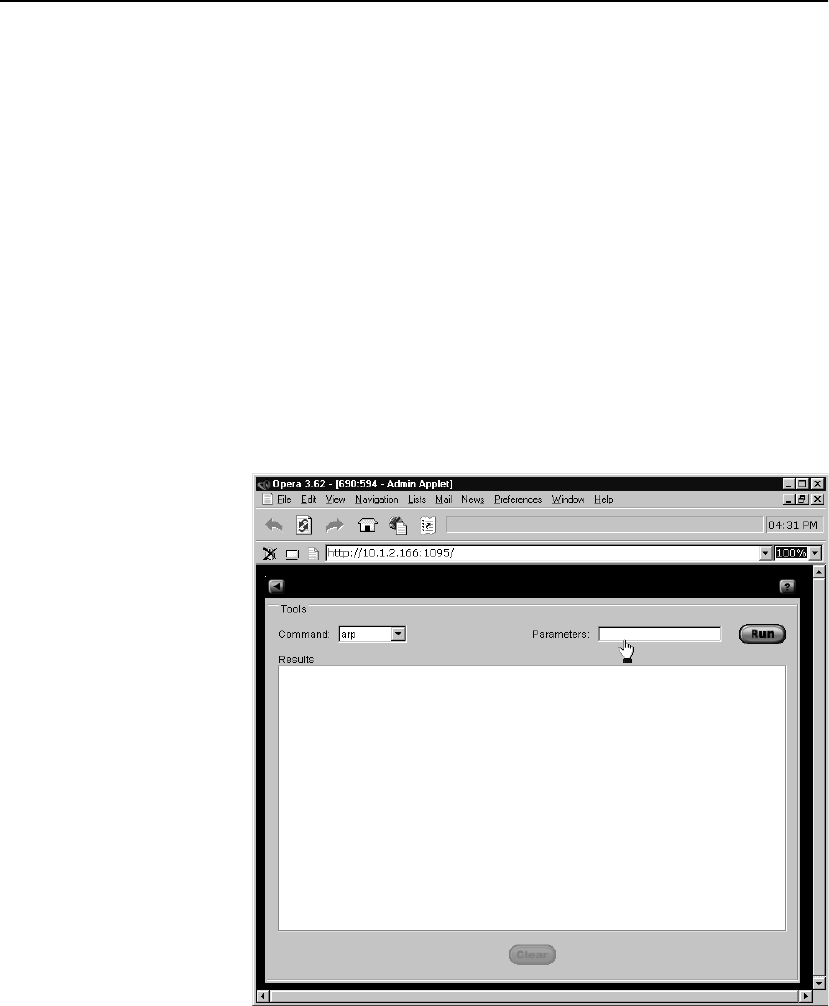
C H A P T E R 4 HP e-Commerce/XML Director Server Appliance SA8250 User Guide
134
Tools Screen
The SA8250’s Tools screen provides the following network
diagnostic tools for your convenience:
•ARP
•Ether
•Ping
•Netstat
•Nslookup
•Reboot
•Trace
•Traceroute
Tools Screen (defaults to ARP)
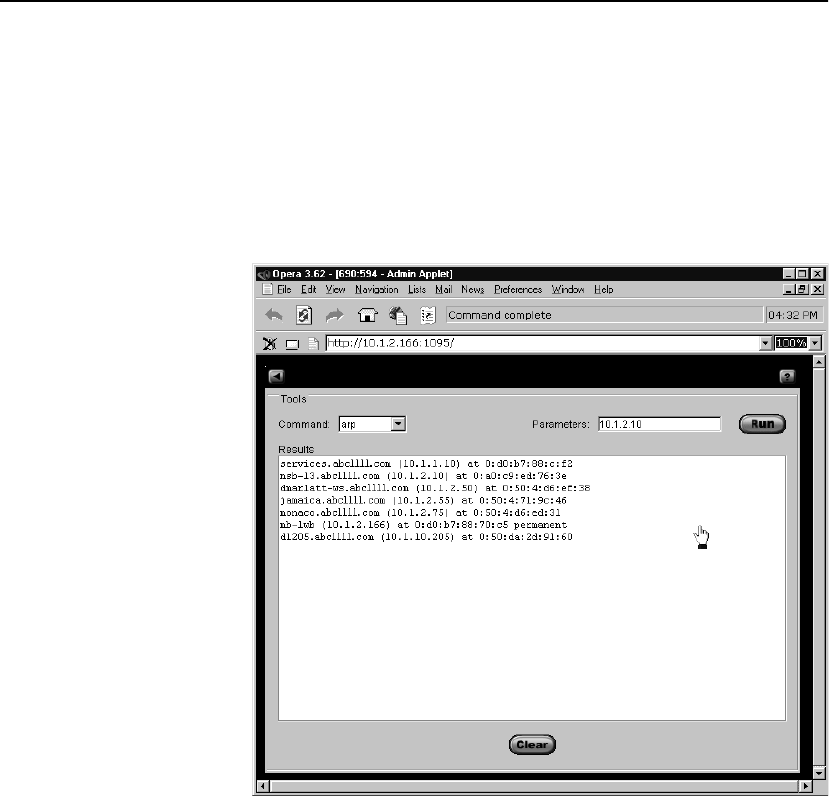
C H A P T E R 4 Tools Screen
135
ARP Displays the SA8250’s Address Resolution Protocol (ARP) table. To
use the command:
1. From the Command menu, click arp.
2. Click Run.
After a few seconds, the ARP information displays in the Results
window.
ARP Results
3. To clear the Results window, click Clear.
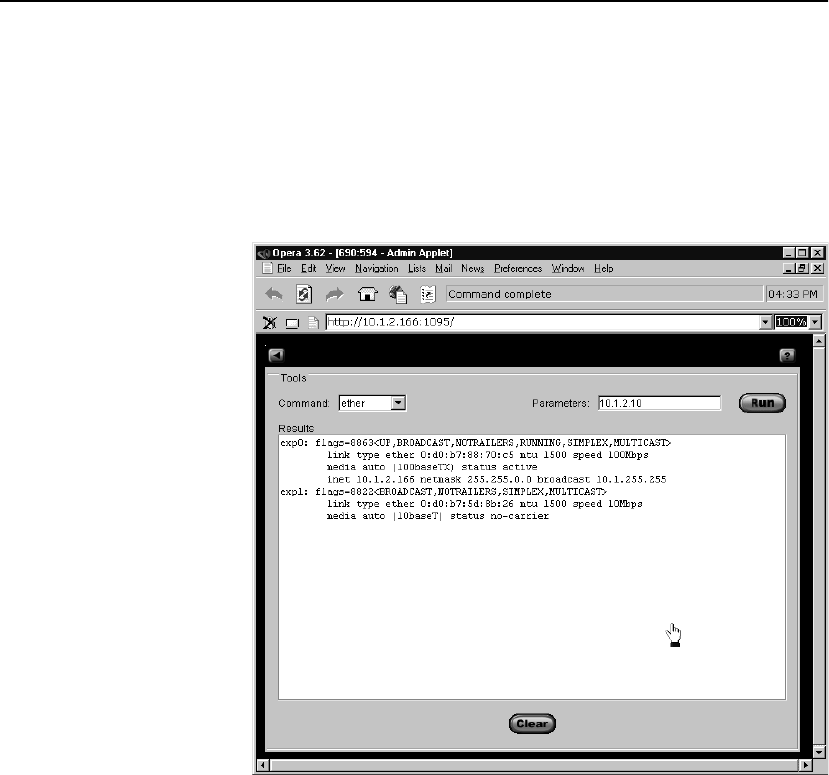
C H A P T E R 4 HP e-Commerce/XML Director Server Appliance SA8250 User Guide
136
Ether Displays the Ethernet interface values. To use the command:
1. From the Command menu, click ether.
2. Click Run.
The Ethernet interface information displays in the Results
window.
Ether Results
3. To clear the Results window, click Clear.
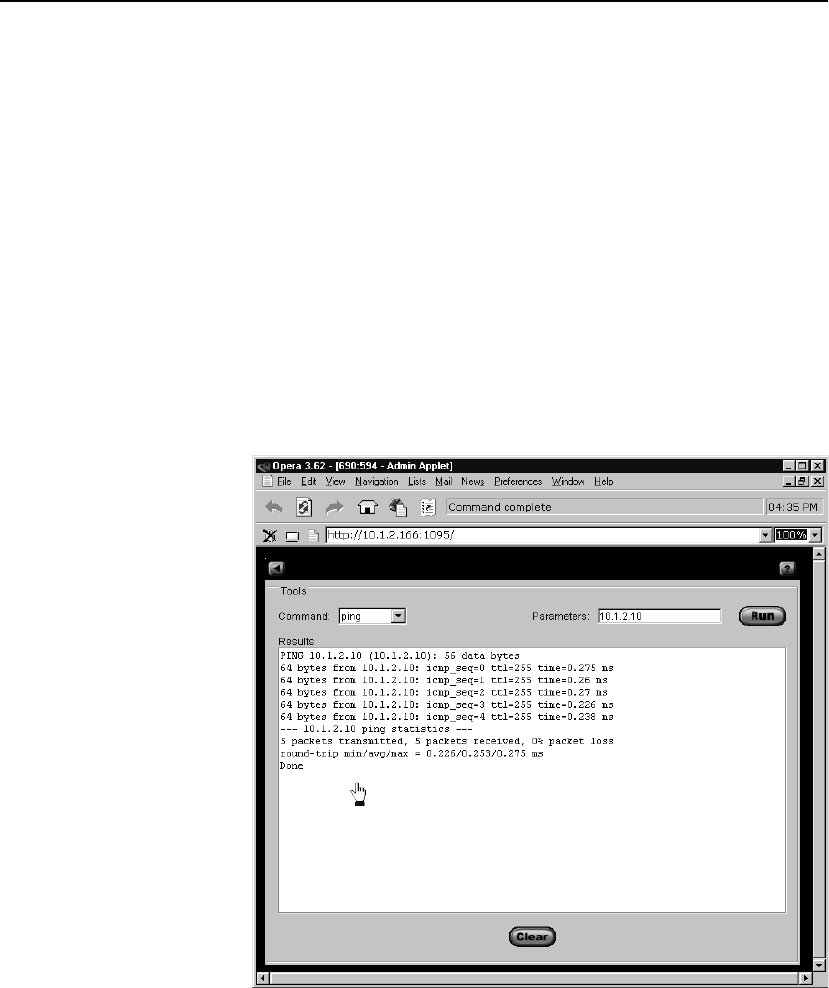
C H A P T E R 4 Tools Screen
137
Ping Ping tests the network connection to another networking device by
sending five ICMP packets from the SA8250 to the target device,
which if it receives them, sends a reply. When the SA8250 receives
the reply, it displays a message reflecting the response time from the
target device. If the SA8250 receives no reply, it displays a message
indicating that the target device is not responding.
To "ping" a network device:
1. From the Command menu, click ping.
2. In the Parameters field, type the host name or IP address of the
target device.
3. Click Run.
After a few seconds, the Ping information displays in the Results
window.
Ping Results
4. To clear the Results window, click Clear.

C H A P T E R 4 HP e-Commerce/XML Director Server Appliance SA8250 User Guide
138
Netstat Displays the SA8250’s routing tables. To use the command:
1. From the Command menu, click netstat.
2. (Optional) In the Parameter field, type any parameter from the
options/variables in this table.
3. Click Run.
After a few seconds, the routing tables display in the Results
window, as shown on the next page.
Parameter Description
-I <interface> Can be exp0 or exp1 for dual-homed device
-i Displays the interface configuration information
-is Displays the interface statistics
-n Do not use DNS to resolve IP addresses
-p <protocol> Where protocol can be either ip, icmp, igmp,
tcp, or udp
-r Displays the forwarding table
-rs Displays the forwarding table statistics
-s Displays the protocol statistics
none Displays the active network connections
Netstat Command Parameters
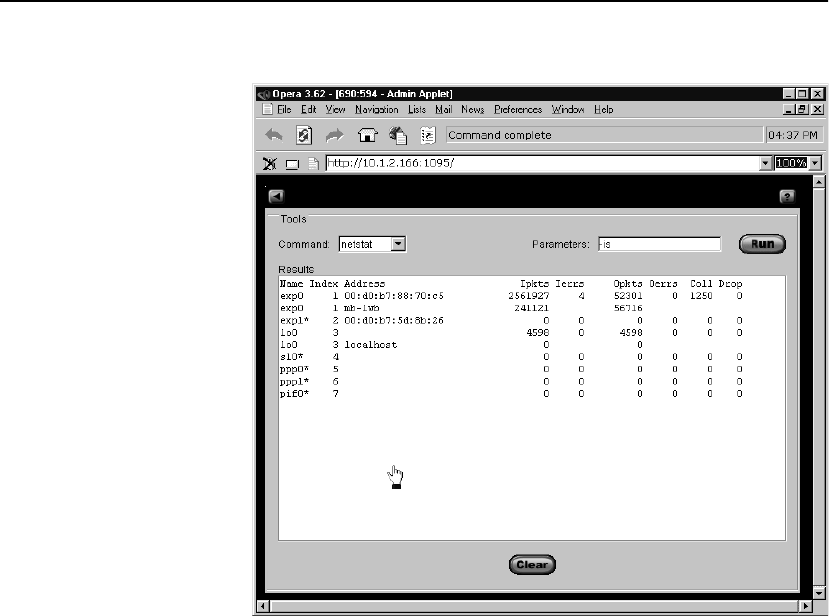
C H A P T E R 4 Tools Screen
139
Netstat -is Results
4. To clear the Results window, click Clear.
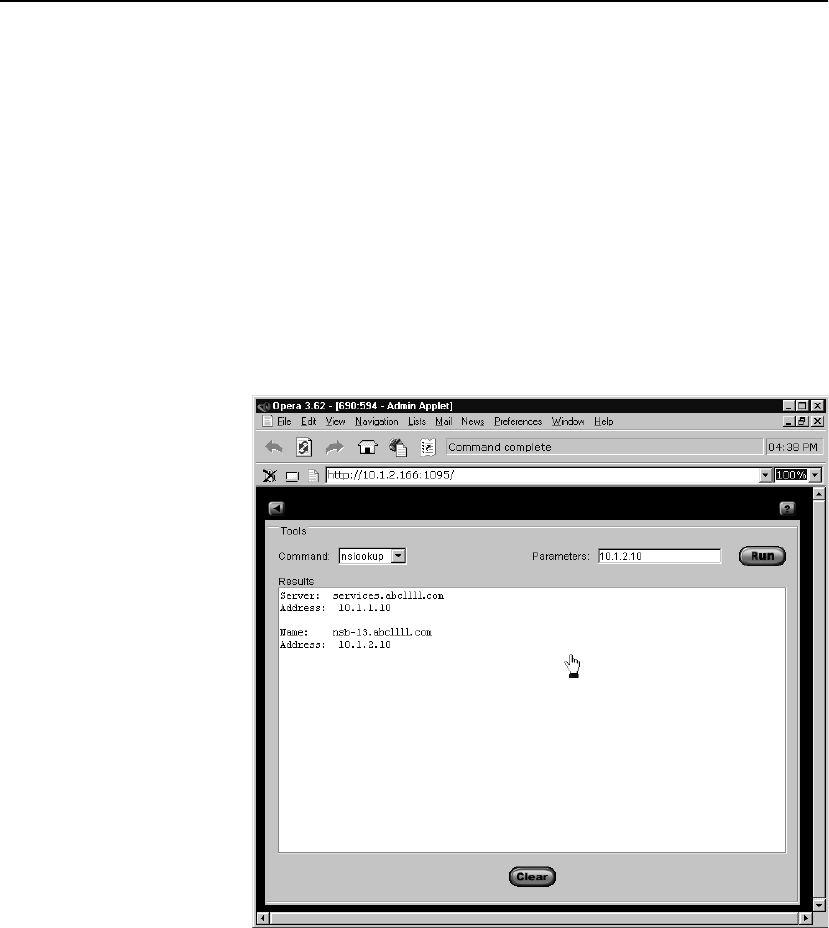
C H A P T E R 4 HP e-Commerce/XML Director Server Appliance SA8250 User Guide
140
Nslookup Identifies the IP address of a given host, or the host name of a given
IP address. You can use this tool to determine whether the SA8250
can resolve a host name or address, or to get the IP address of a
machine of which you know only the host name. To use the
command:
1. From the Command menu, click nslookup.
2. In the Parameters field, type the host name or IP address of the
target device.
3. Click Run.
After a few seconds, the nslookup information displays in the
Results window.
Nslookup Results
4. To clear the Results window, click Clear.
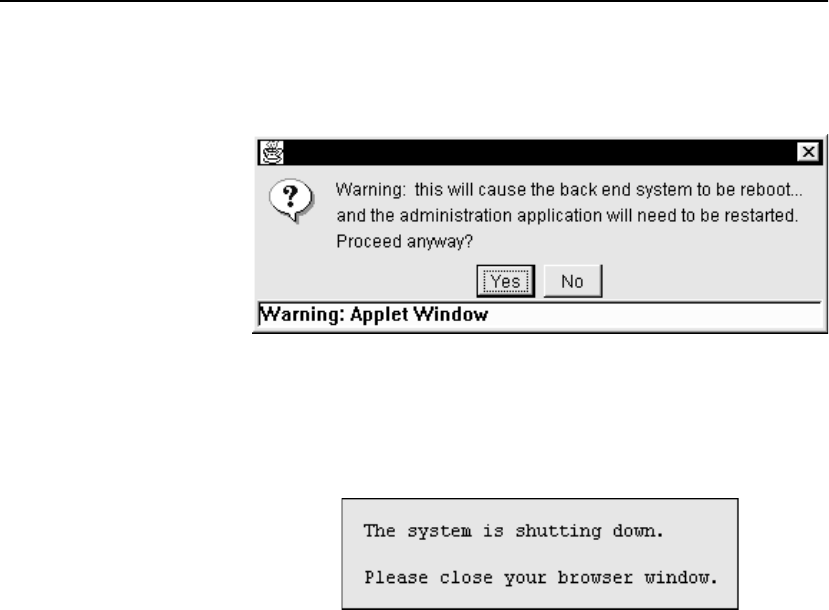
C H A P T E R 4 Tools Screen
141
Reboot The Reboot command reboots the SA8250. This command requires
no parameters, and when executed prompts for confirmation.
Reboot Confirmation
1. To reboot click Yes, or No to abort.
As the SA8250 reboots, it prompts you to close your browser
window.
Reboot Notification
2. Close all browser windows to ensure that your browser uses the
newly activated administration application.
3. Wait a few minutes (typically three to five) for the SA8250 to
finish rebooting before running the administration application.

C H A P T E R 4 HP e-Commerce/XML Director Server Appliance SA8250 User Guide
142
Trace The trace command captures traffic on a network that matches the
given expression. The trace output can be helpful for
troubleshooting network problems.
NOTE: By default,
trace will automatically
exit after 60 seconds. If
the GUI is configured for
a shorter timeout, the
trace information may
be lost. For more details,
see “GUI Tab” in this
chapter.
Syntax:
trace [-aefnNpqStvxX] [-c <count>]
[-i <interface>] [-s <snaplen>] [-T <type>]
-F <file> [-P] -w <file> -H <tftp-host>
-D <tftp-path>
Switches enclosed in brackets [] are optional. The -w, -F, -H, and -D
switches are required. A complete listing of the switches for the
trace command is found in the table on the next page.
Example:
This command TFTPs my.filter from dhcp8/var/tftpboot/
my.filter to the SA8250, captures five packets (using the
expressions in the my.filter file), and then writes the packet
information to the fred.dump file. Because of the -P switch, the
filter file is not deleted.
trace -c 5 -w fred.dump -F my.filter -H dhcp8
-D /var/tftpboot -P
If the -P switch is not used, the filter file is deleted.

C H A P T E R 4 Tools Screen
143
Switch Description
-a Attempt to use the DNS to convert address to names
-c <count> Exit after receiving <count> packets
-D <tftp-path> The TFTP path directory information. Required parameter.
-e Print the link-level header on each dump line
-f Print “foreign” Internet addresses numerically, rather than
symbolically
-F <file> The filter expression file. If this file does not exist on the SA8250,
it is TFTPed from the TFTP host (see the -D and -H options).
Required parameter.
-H <tftp-host> The TFTP host information. Required parameter.
-i <interface> Specify an interface to capture packets from (exp0 or exp1 for
dual-homed devices)
-n Don't convert addresses to names
-N Don't print domain name qualification of host names
-p Change the interface to promiscuous mode (every packet is
captured)
-P Preserves the filter expression file on the SA8250 for future use, so
that it is not TFTPed after the first use.
-q Output less protocol information
-s <snaplen> Capture <snaplen> (snapshot length) bytes of data from each
packet rather than the default of 76 bytes
-S Output absolute rather than relative TCP sequence numbers
-t Don't output a timestamp on each dump line
-tt Output an unformatted timestamp on each dump line
Switches for the Trace Command
C H A P T E R 4 HP e-Commerce/XML Director Server Appliance SA8250 User Guide
144
The table on the next page lists the <expression> primitives for the
filter expression file (-F <file>).
•If the filter expression file is empty, all packets on the net will be
captured.
•The <expression> primitives can be combined using parentheses
and '!' or 'not', '&&' or 'and', and '||' or 'or'.
-T <type> Force packets selected by <expression> to be interpreted as the
specified <type>
-v Slightly more verbose output
-vv Even more verbose output
-w <file> The trace output file. Required parameter.
-x Output each packet in hex
-X Output each packet in hex and ASCII
Switch Description
Switches for the Trace Command (continued)

C H A P T E R 4 Tools Screen
145
Expression Evaluation
dst host <host> True if the IP destination field of the packet is <host>
src host <host> True if the IP source field of the packet is <host>
host <host> True if either the IP source or destination field of the packet is
<host>
ether dst <ehost> True if the ethernet destination address is <ehost>
ether src <ehost> True if the ethernet source address is <ehost>
ether host <ehost> True if either the ethernet source or destination address is <ehost>
gateway <host> True if the packet used <host> as a gateway
dst net <net> True if the IP destination address of the packet has a network
number of <net>
src net <net> True if the IP source address of the packet has a network number
of <net>
net <net> True if the IP source or destination address of the packet has a
network number of <net>
net <net> mask <mask> True if the IP address matches <net> with the specific netmask
net <net>/<len> True if the IP address matches <net> a netmask <len> bits wide
dst port <port> True if the packet is IP/TCP and has a destination port value of
<port>
src port <port> True if the packet has a source port value of <port>
port <port> True if either the source port value or destination port has a value
of <port>
ip proto <protocol> True if the packet is an ip packet of protocol type <protocol>,
where <protocol> can be "ICMP" or "TCP"
ether broadcast True if the packet is an ethernet broadcast packet
ip broadcast True if the packet is an IP broadcast packet
Filter Expression File Primitives
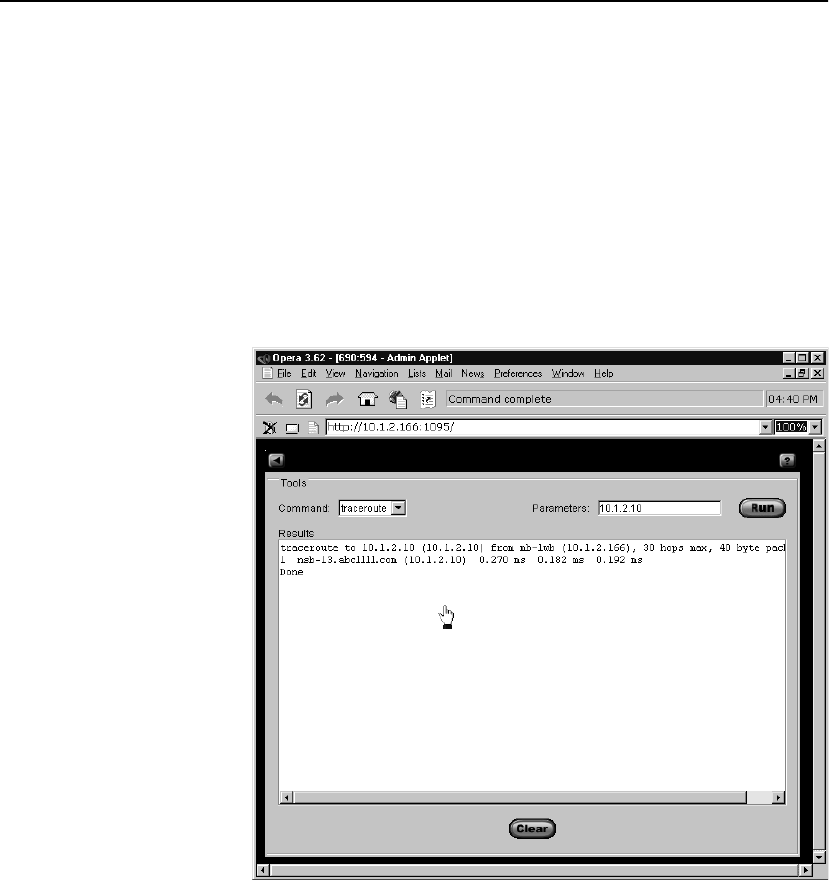
C H A P T E R 4 HP e-Commerce/XML Director Server Appliance SA8250 User Guide
146
Traceroute The Traceroute command displays the route that packets travel to the
specified network device. To trace the route from the SA8250 to
another device:
1. From the Command menu, click traceroute.
2. In the Parameters field, type the host name or IP address of the
target device.
3. Click Run.
After a few seconds, the Traceroute information displays in the
Results window.
Traceroute Results
4. To clear the Results window, click Clear.

C H A P T E R 4 Statistics Screen
147
Statistics Screen
The SA8250 provides a screen where you can view four different
statistical categories, in a variety of graphical display formats, at the
levels of Device, Service, and Server. Statistical data series are
defined in the main Screen, and subsequently displayed in a separate
window.
The four statistical categories for SA8250s are listed below:
•Average Connections per Second
•CPU Utilization
•Open Connections
•The SA8250’s Uptime
For services and servers, the available statistics are listed below:
•Average Response Time (ms)
•Average Connections per Second
NOTE: Statistics for
open connections in
RICH mode are not
available.
•Open Connections
•Service or Server Uptime
To display the Statistics screen:
1. In the Topology screen's toolbar, click the Statistics icon.
Statistics
Screen
Controls
The Statistics Screen, on the next page, is divided into the four
sections or functional areas below:
•Statistics Box
•Graph Options
•Selection List
•Window Options
•Selection buttons (the arrows between the Statistics Box and the
Selection List). These are for selecting statistical categories to be
displayed.
•Graph button to launch the graph display window.

C H A P T E R 4 HP e-Commerce/XML Director Server Appliance SA8250 User Guide
148
Statistics Screen
Statistics Box
The Statistics box contains controls for you to select the statistics you
want to view graphically, as well as the graph format in which you
want those statistics displayed.
•Type: This pull-down list specifies the type of statistics that are
available: System, Server, or Service.
•Items: Select the specific System, Services, or Servers whose
statistics you wish to view. You can select multiple like items
from this list.
Statistics Box
Graph Options
Graph Button Window Options
Selection List
Selection Buttons
(Arrow Buttons)

C H A P T E R 4 Statistics Screen
149
NOTE: Statistics for
open connections in
RICH mode are not
available.
•Available Statistics: In this graphical display, you can specify
which of the available statistics you want to view. These include
Average Response Time, Average Connections per Second, CPU
Utilization, Open Connections, and Uptime. The available
statistics will depend on your selection from the Type pull-down
list. You can select multiple items in this list.
Graph Options
The Graph Options box contains two controls:
•Style: This drop down list specifies the style of the graph used to
display the selected statistics for this data series. Available styles
are Plot, Scatter Plot, Bar, Stacking Bar, Area, and Stacking
Area. The style selected in this list applies to each statistical
category at the time it is selected with the right arrow button as
described above.
•Legend: After the Legend check box is selected, a legend
displays at the bottom of the Graph window for this data series.
This legend identifies each selected statistical category by color
and symbol as it displays on the graph. When disabled, the
legend does not display and the graph display expands to fill the
legend area. It is enabled by default.
To define a statistical data series, follow these steps:
1. Click the type of item whose statistics you want to display
(System, Server, Service).
2. Click the specific item(s).
3. Click the desired statistic.
4. Click the graph type (Plot, Scatter Plot, Bar, etc.).
5. Click the right arrow selection button to the right of the Statistics
box.
6. Verify that your selections display in the Selection list (to the
right of the Statistics box).
7. Repeat steps (1) through (6) above to graph more statistics, if
needed.

C H A P T E R 4 HP e-Commerce/XML Director Server Appliance SA8250 User Guide
150
Selection List
The Selection List reflects the item (System, Server, Service),
statistical category, and graph type of each defined data series. These
display in the List’s three columns, described below:
•Items: The specific System, Server, or Service selected in the
Statistics box's Items list.
•Statistics: The statistical category selected in the Statistics box's
Available Statistics list.
•Graph Type: The graph type name selected in the Graph
Options' Style drop down menu.
Window Options
The Window Options box includes these controls:
•Single Graph: Displays all data series in a single composite
graph.
•Multiple Graphs: Displays each data series in its own graph.
•X Gridlines: Displays the graph's vertical grid lines (the default
is enabled).
•Y Gridlines: Displays the graph's horizontal grid lines (the
default is enabled).
NOTE: Statistics
gathering generates
network overhead, and
increasing the refresh
rate (that is, lowering the
Refresh Intervals value)
increases that overhead.
•Refresh Interval(s): The refresh or update rate of the graph in
seconds (the default is five seconds).
•Maximum Data Points: The number of data points displayed in
the graph. After the maximum number of data points is
displayed, new data points are added to the right of the graph and
the oldest data point is displaced off the left side of the graph.
The graph can display between 1 and 1000 data points, and the
default is 100.
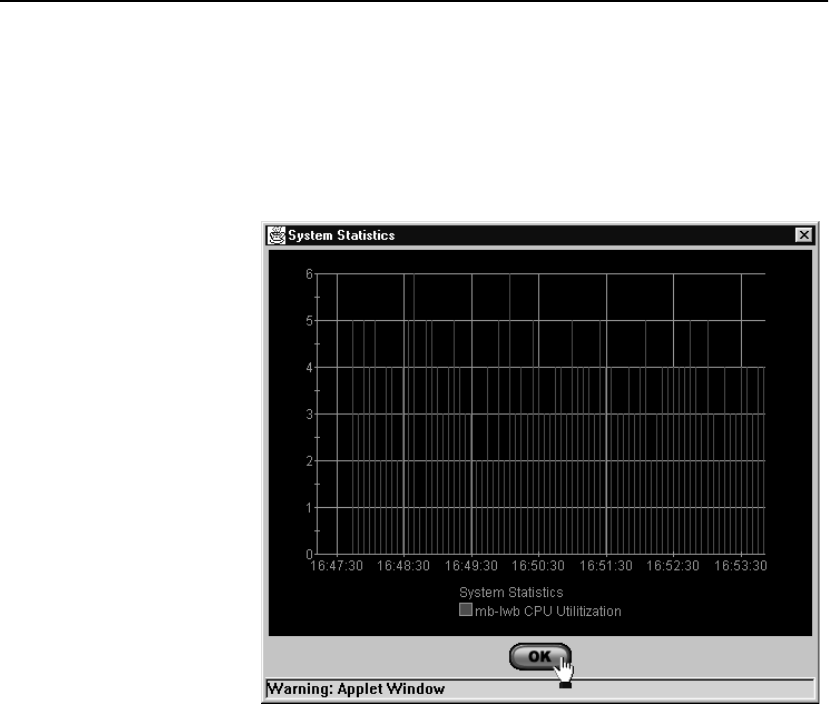
C H A P T E R 4 Statistics Screen
151
Graphing Statistics
NOTE: The graph
parameters, including the
Legend checkbox, can be
changed on the fly, but
the results will not be
displayed in the graph
window (in the figure at
right) until you stop and
restart the graph process
from the Statistics Screen.
1. After you’ve entered the desired parameters into the Statistics
Screen, display the graph (or graphs, if you’ve defined multiple
data series and have enabled Multiple Graphs) by clicking Graph
at the bottom of the Statistics Screen.
Graph Window with Bar Display
The meaning of the graph depends upon the items and statistics
that you have selected. For example, the graph above shows a
bar display of CPU Utilization for one system (SA8250) only.
Although the image is grey scaled in this text, each plot displays
in a unique color identified at the bottom of the graph.
You can use this information to compare performance of multiple
servers in relation to a service and adjust the Max Response Time
for the servers if needed.

C H A P T E R 4 HP e-Commerce/XML Director Server Appliance SA8250 User Guide
152
Notes

Command Line
Interface
CLI Introduction
The HP e-Commerce/XML Director Server Appliance SA8250 can
be fully configured using the Command Line Interface (CLI). The
CLI is accessible by using either the Telnet or the serial port.
Commands exist in a logical hierarchy.
Secure Shell
Support
The SA8250 provides secure shell (SSH) versions 1 and 2 support.
To use the secure shell:
NOTE: The secure shell
is available only when
administering the SA8250
over your network.
1. Launch your SSH client and connect to the SA8250’s IP address.
2. Log on to the secure shell using admin for both the user ID and
password. You can use the change_password command,
discussed in this chapter, to change the CLI password.

C H A P T E R 5 HP e-Commerce/XML Director Server Appliance SA8250 User Guide
154
Online Help The SA8250 provides online CLI command help in six forms:
1. Type help to describe help features.
2. Type help commands to display the list of commands you can
enter at the current prompt.
3. Type help ttychars to display a list of special terminal
editing characters.
4. Type help <command> for a description of a specific
command or, if relevant, a list of sub-commands you can enter
from within <command>.
5. Type ? to display a path list of commands and parameters
available from the current prompt or <command> forward.
6. Typing ? or help as one of a command’s parameters, that is,
<command> ?, displays help regarding the parameters available
for <command>.
Pipes Any command’s output can be "piped" using the ’|’ symbol with
"grep" or "more."
•Redirecting a command to more pages that command's output
regardless of the config cli more setting.
•Redirecting a command to grep displays only the command
output's lines that contain the word specified after grep to be
displayed.
HP SA8250#info | grep SNMP
The above command filters the output of the info command using
grep such that only lines containing "SNMP" are displayed.
•Pipes to grep can be cascaded.
HP SA8250/config/policygroup/test/service#
info | grep Primary | grep serv1.com
The above command displays only lines containing "Primary"
AND "serv1.com."
•The output of a command can be redirected to both grep and
more, but the pipe to more must be the last pipe present.
HP SA8250/config/policygroup/test/service#
info | grep Primary | grep serv1.com | more

C H A P T E R 5Syntax
155
Syntax CLI examples in this chapter use the syntax found in this table.
Syntax Description
Angled brackets
(< >) Designates where you enter variable
parameters
Straight brackets
([ ]) Choices of parameters appear between straight
brackets, separated by vertical bars.
Braces ({ }) Optional commands or parameters appear
between braces.
Boldface Commands that you enter after the CLI prompt
appear in boldface type. The prompt appears in
normal typeface to distinguish it from the
command text.
Vertical bar ( | ) Separates choices of input parameters within
straight brackets. You can choose only one of
the set of choices separated by vertical bars (do
not include the vertical bar in the command).
CLI Command Syntax

C H A P T E R 5 HP e-Commerce/XML Director Server Appliance SA8250 User Guide
156
Categorical List of CLI Commands
This section lists the SA8250’s CLI commands by functional
category. For more complete details regarding CLI commands, see
“Run-Time CLI Command Reference” later in this chapter.
Global System
Commands
?
!, !!
Tab key
arp
back, ..
box, top, toplevel
exit, logout, quit
ether
force-rwa
halt
help
history
info
list
logout, exit, quit
netstat {options}
nslookup
ping
quit, exit, logout
reboot
remove
reset
top, box, toplevel
toplevel, box, top
trace
traceroute
who
Admin
Commands
config admin info
config admin port

C H A P T E R 5 File Management Commands
157
File
Management
Commands
cat
copy
dir
get
put
remove
restore
restore-verbose
save
CLI
Commands
config
config cli delete <username>
config cli info
config cli login-attempts <tries>
config cli more [enable | disable]
config cli port <port>
config cli prompt <prompt>
config cli screenlines <nlines>
config cli ssh-port <sshport>
config cli telnet-sessions <nsessions>
config cli timeout <nseconds>
config cli username <name> password <password>
level <ro | rw | rwa>
config cli users
IRV
Commands
config irv
config irv info
config irv <ping-interval>
GUI
Commands
config gui broker-action <action>
config gui info
config gui response-timeout <seconds>
config gui server-action <action>

C H A P T E R 5 HP e-Commerce/XML Director Server Appliance SA8250 User Guide
158
Routing
Commands
config route ospf-area [backbone | <area>]
config route ospf-hello <nseconds>
config route ospf-dead <nseconds>
config route ospf-authtype [none | simple
ospf-authkey <simple key> | md5 [ospf-authkey
md5 <key> keyid <id>]
config route protocol [rip | ospf | none]
config route rip-version <version>
config route role [standalone | primary |
backup]
Policy Group
Commands
config policygroup create <name>
config policygroup delete <name> | -all
config policygroup <name> service <name>
header-names [certificate <headername> |
cipher-used <headername> | source-ip
<headername> | ssl-id <headername>]
config policygroup <name> throttle [enable |
disable]
Service
Commands
config policygroup <name> service create
<name> vip <ipaddr> port <port> {type
[TCP | UDP | RICH_HTTP]} {sticky [disable|
src-ip | cookie]} {sticky-timeout <seconds>}
{backups [enable | disable]} {response
<milli-sec>} {priority <level>} {balancing
[load | robin]} {server-timeout <seconds>}
config policygroup <name> service delete
[<name> | -all ]
config policygroup <name> service <name>
{enable} {disable} {balancing [robin | load]}
{sticky [disable | src-ip | cookie]}
{sticky-timeout <nseconds>} {backups [enable |
disable]} {response <milliseconds>} {dup-syn
<microseconds>} {priority <level>}
{server-timeout <seconds>}
config policygroup <name> service <name> header
config policygroup <name> service <name> header-
names [certificate <name> | cipher-used <name>
| source-ip <name> | ssl-id <name>]
config policygroup <name> service <name>
xml-well-formed (enabled | disabled)

C H A P T E R 5 Server Commands
159
Server
Commands
config policygroup <name> service <name> server
create <name> port <port> {type [primary |
backup | disabled]} {mode [brokered | sap |
opr]} {msap [enable | disable]}{606 [enable |
disable]} {http [enable | disable]}
config policygroup <name> service <name>
server delete <name> port <port> | -all
config policygroup <name> service <name> server
<name> port <port> {mode [brokered | sap |
opr]} {type [primary | backup]{msap [enable |
disable]}{606 [enable | disable]} {http
[enable | disable] {xmlpattern create
<xmlpattern> | xmlpattern delete <xmlpattern |
index> | xmlpattern info}
System
Commands
config sys
config sys autoboot [enable | disable]
config sys hosts info
config sys hosts delete <ipaddress>
config sys hosts add <ipaddress> alias
<hostname1> {alias2 <hostname2> alias3
<hostname3> alias4 <hostname4> alias5
<hostname5> alias6 <hostname6>}
config sys id <identifier>
config sys info
config sys msd
config sys msd info
config sys msd port <port>
config sys software
config sys software boot <index>
config sys software delete <index>
config sys software info
config sys software install <url> {key <license
key>} {user <user name>} {password
<password>} passive <enable | disable>}
config sys software ms-software info <index>
config sys software ms-software enable <index>
config sys software ms-software delete <index>
config sys software ms-software install

C H A P T E R 5 HP e-Commerce/XML Director Server Appliance SA8250 User Guide
160
Security
Commands
config sys security custom
config sys security custom access-control
[enable | disable]
config sys security custom acl add ip
<xxx.xxx.xxx.xxx>
config sys security custom acl add netmask
<xxx.xxx.xxx.xxx/xx>
config sys security custom acl delete ip
<xxx.xxx.xxx.xxx>
config sys security custom acl delete netmask
<xxx.xxx.xxx.xxx/xx>
config sys security custom acl info
config sys security custom forwarding [enable |
disable]
config sys security custom gui [enable |
disable]
config sys security custom info
config sys security custom ms-agent [enable |
disable]
config sys security custom snmp [enable |
disable]
config sys security custom ssh [enable |
disable]
config sys security custom telnet [enable |
disable]
config sys security info
config sys security mode <open | closed |
custom>

C H A P T E R 5 SNMP Commands
161
SNMP
Commands
config sys snmp community info
config sys snmp community create <community
string> ip [<ip address | any>] rights
[ro | rw]
config sys snmp community delete <string> ip
[<ip address> | any]
config sys snmp info
config sys snmp port <#>
config sys snmp sysContact <string>
config sys snmp sysLocation <string>
config sys snmp sysName <string>
config sys snmp trap <port>
config sys snmp trap create <ip address>
community <community string>
config sys snmp trap delete <ip address>
community <community string>
config sys snmp trap info
config sys snmp trap port <port>

C H A P T E R 5 HP e-Commerce/XML Director Server Appliance SA8250 User Guide
162
SSL
Commands
config policygroup <name> service <name> key
certificate [create | delete | import | export
| info]
config policygroup <name> service <name> key
client-ca [delete | export | import | info]
config policygroup <name> service <name> key
client-ca header-certificate [disable |
enable]
config policygroup <name> service <name> key
client-ca revocation [delete | import | info |
mode <disable | enable> | refresh <interval |
now> | url <url> {user <username> password
<password> | <none>}]
config policygroup <name> service <name> key
redirect [<url> | default | none]
config policygroup <name> service <name> key
signrequest [create | delete | export | info]
config policygroup <name> service <name> key
suite [ all | high | medium | low | export |
<custom> ] <ciphersuite>
config ssl info
config ssl redirect [<url> | none]
config ssl suite [ all | high | medium | low |
export | <custom> ]
config ssl cache [enable|disable]
config ssl dn [ name <name> | email <email> |
locality <local> | state <state> | country
<country> | organization <org> | unit <unit> ]
Logging
Commands
config logging info
config logging sys
config logging output
config logging sys info
config logging sys enable
config logging sys disable
config logging output info
config logging output logsize
config logging output viewlog
config logging output maillog

C H A P T E R 5 Show Commands
163
Show
Commands
show admin info
show cli info
show gui info
show irv info
show msd info
show policygroup info
show policygroup <name> info
show policygroup <name> service info
show policygroup <name> service <name> info
show policygroup <name> service <name> key info
show policygroup <name> service <name> key
certificate info
show policygroup <name> service <name> key
client-ca info
show policygroup <name> service <name> key
client-ca revocation info
show policygroup <name> service <name> key
signrequest info
show policygroup <name> service <name> server
info
show policygroup <name> service <name> server
<name> info
show policygroup <name> service <name> server
<name> port info
show policygroup <name> service <name> server
<name> port <port> info
show policygroup <name> service <name> server
<name> port <port> xmlpattern
show route info
show ssl info
show stats info
show stats service <vip> vport <port>
show stats service <vip> vport <port> server
<ipaddr> port <port> info
show sys date
show sys info
show sys snmp info
show sys software info
show sys software ms-software info
C H A P T E R 5 HP e-Commerce/XML Director Server Appliance SA8250 User Guide
164
Run-Time CLI Command Reference
Global System
Commands
This table includes descriptive examples of the Global System
commands.
Command Description
?Displays the help command tree
!Enter ! followed by an index number from the history list to
execute the indexed command.
! <n>
where n is the index number of the command you want to execute
!! Repeats the last command
Tab key View the commands available for the current prompt level, and
can be used to complete a command. For example, typing
“con<TAB>” will create the word “config.”
arp Displays the SA8250's Address Resolution Protocol (ARP) table
back, .. Brings you up one level in the CLI command tree
box, top, toplevel Brings you back to the beginning (root level) of the CLI branch
command tree
exit, logout, quit Exit the CLI
ether Display the Ethernet interface values
Global System Commands
C H A P T E R 5 Global System Commands
165
force-rwa If a user with Read-Write-All authorization logs on when another
user with the same authorization is already logged on, the SA8250
"demotes" the new user’s permission to Read-only. The force-
rwa command restores a demoted user’s permission to Read-
Write-All. This command is available only to users with "rwa"
authorization.
Note: The use of force-rwa potentially allows conflicts among
users of equivalent authorization.
force-rwa {-cleanup}
where -cleanup automatically logs off all other users
halt Halts the SA8250.
help Displays help for the CLI commands
history Displays the command history. Type "!" or "h" to recall a
command number from the history list.
info Displays configuration information, including the status of the
xml-well-formed setting, for the current prompt level
list Displays XML patterns by index number
logout, exit, quit Exit the CLI
Command Description
Global System Commands (continued)

C H A P T E R 5 HP e-Commerce/XML Director Server Appliance SA8250 User Guide
166
netstat Displays the SA8250’s routing tables. Global options for the
netstat command include:
•-I <interface> Can be exp0 or exp1 for dual-homed device
•-n Do not try to use DNS to resolve IP addresses
•-p <protocol> Where <protocol can be either “ip”, “icmp”,
“igmp”, “tcp”, or “udp”
Forms of the netstat command include:
•No switches dislays active network connections
•-r displays the device’s forwarding table
•-rs displays the device’s forwarding table statistics
•-s displays protocol statistics
•-i displays interface configuration information
•-is displays interface statistics
nslookup Performs an nslookup of the specified IP address or hostname
nslookup <ipaddr | hostname>
where:
•ipaddr is the IP address
•hostname is the name of the host
ping Tests the network connection to another networking device. The
command sends an ICMP packet from the SA8250 to the target
device, which (if it receives the packet), sends a ping reply. After
the SA8250 receives the reply, it displays a message indicating
that the specified IP address is alive. If the SA8250 receives no
reply, it displays a message indicating that the target device is not
responding.
ping <ipaddress | hostname>
where:
•ipaddress is the IP address of the other networking device
•hostname is the host name of the other networking device
Command Description
Global System Commands (continued)
C H A P T E R 5 Global System Commands
167
quit, exit, logout Exit the CLI
reboot Reboots the SA8250
reset Resets the SA8250 to its original factory configuration. Only
parameters set within the CLI are affected. Networking
parameters controlled through the Boot monitor are not affected by
the reset command.
Note 1: Reset causes all policy groups, services, and servers to be
deleted.
Note 2: This operation disables all remote administration access.
Use the config sys security command to enable remote
access.
CLI Factory Settings:
•Telnet port is set to 23.
•Prompt is reset to product name.
•Maximum telnet sessions is set to 3.
•Scrolling is disabled.
•Idle timeout is set to 90 seconds.
•Maximum login attempts is set to 3.
•Unit ID is set to the factory value.
•IRV is disabled.
•SSH port is set to 22.
•Screenlines is set to 25.
GUI Settings:
•Response timeout is set to 30 seconds.
•Broker-action is set to 0 (Policy Manager).
•Server-action is set to 1 (Statistics)
Multi-site Settings:
•MSD port is set to 1999.
Command Description
Global System Commands (continued)

C H A P T E R 5 HP e-Commerce/XML Director Server Appliance SA8250 User Guide
168
reset (continued) Route Factory Settings:
•Role is set to ‘standalone.’
•Protocol is set to ‘none’
•OSPF-area is set to ‘backbone.’
•Hello interval is set to 10 seconds.
•Dead interval is set to 40 seconds.
•RIP version is set to 2.0.
Security Settings:
•acl is cleared.
•custom access-control is disabled.
•custom forwarding is disabled.
•custom ssh is enabled.
•custom telnet is disabled.
•custom gui is disabled.
•custom snmp is disabled.
•custom ms-agent is disabled.
•security mode is set to closed.
SNMP Settings:
•sysContact is set to a blank value.
•sysName is set to the host name of the unit.
•sysLocation is set to a blank value.
•Community private string rights set to RW.
•Community public string rights set to RO.
•Port is set to 161.
•Trap port is set to 162.
•All traps are deleted.
SSL Settings:
•Suite is set to ‘default.’
•Cache is set to ‘enable.’
•Suite is set to ‘none.’
top, box, toplevel Changes the prompt to the system's top or box level
Command Description
Global System Commands (continued)

C H A P T E R 5 Global System Commands
169
trace Displays TCP packets coming into or out of the SA8250. It can be
helpful for troubleshooting network problems. Trace accepts a
tcpdump-style expression and several command line options that
cause the device to capture packets in the tcpdump binary format;
You can TFTP this capture to a remote machine for debugging.
Use the CLI File Management command put to TFTP the
resultant dump file from this device. Any machine with tcpdump
can decode the binary file into human-readable packet dumps
using the "-r" switch. This command will prompt you for the name
of an output file and a filter file. Press <return> when prompted
for a filter file if you do not have one. It is simply a text file
containing an arbitrarily long tcpdump-style expression which
trace can use.
trace <switches> {<expression>}
Available switches:
•-a Attempt to use the DNS to convert address to names.
•-c <int> Exit after receiving <int> packets (by default,
the command automatically exits after 60 seconds.
•-e Print the link-level header on each dump line.
•-i <interface> Specify an interface to capture packets
from (exp0 or exp1 for dual-homed devices).
•-n Don't convert addresses to names.
•-N Don't print domain name qualification of host names.
•-q Output less protocol information.
•-s <int> Capture <int> bytes of data from each packet
rather than the default of 76 bytes.
•-S Output absolute rather than relative TCP sequence
numbers.
•-t Don't output a timestamp on each dump line.
•-tt Output an unformatted timestamp on each dump line.
•-v Slightly more verbose output.
•-vv Even more verbose output.
•-x Output each packet in hex.
•-X Output each packet in hex and ASCII.
Command Description
Global System Commands (continued)

C H A P T E R 5 HP e-Commerce/XML Director Server Appliance SA8250 User Guide
170
trace (continued) The <expression> has the same format as a "tcpdump"
expression: If no <expression> is given all packets on the net
will be output. <expression> primitives can be combined using
parentheses and ’!’ or ’not’, ’&&’ or ’and’, and ’||’ or ’or.’
Here is a list of the <expression> primitives:
•dst host <host> : true if the IP destination field of the
packet is <host>.
•src host <host> : true if the IP source field of the packet
is <host>.
•host <host> : true if either the IP source or destination
field of the packet is <host>.
•ether dst <ehost> : true if the ethernet destination
address is <ehost>.
•ether src <ehost> : true if the ethernet source address is
<ehost>.
•ether host <ehost> : true if either the ethernet source or
destination address is <ehost>.
•gateway <host> : true if the packet used <host> as a
gateway.
•dst net <net> : true if the IP destination address of the
packet has a network number of <net>.
•src net <net> : true if the IP source address of the packet
has a network number of <net>.
•net <net> : true if the IP source or destination address of
the packet has a network number of <net>.
•net <net> mask <mask> : true if the IP address matches
<net> with the specific netmask
•net <net>/<len> : true if the IP address matches <net> a
netmask <len> bits wide.
•dst port <port> : true if the packet is ip/tcp or ip/udp
and has a destination port value of <port>.
•src port <port> : true if the packet has a source port
value of <port>.
•port <port> : true if either the source port value or
destination port has a value of <port>.
Command Description
Global System Commands (continued)

C H A P T E R 5 Global System Commands
171
trace (continued) •ip proto <protocol> : true if the packet is an ip packet
of protocol type <protocol>, where <protocol> is icmp,
udp, or tcp.
•ether broadcast : true if the packet is an ethernet
broadcast packet.
•ip broadcast : true if the packet is an IP broadcast packet
traceroute Displays the route that packets travel to the network host.
traceroute <ipaddr | hostname>
where:
•hostname is the name of the network host
•ipaddr is the network host's IP address
who Displays the list of currently logged on users, with their permission
levels and whether they are logged on using the CLI or GUI
who
Command Description
Global System Commands (continued)
C H A P T E R 5 HP e-Commerce/XML Director Server Appliance SA8250 User Guide
172
Admin
Commands
This table describes the SA8250’s admin commands, which specify
the server port where the Graphical User Interface is accessed and
verify the current port.
Command Description
config admin info Displays the current Graphical User Interface (GUI) port
config admin info
config admin port Sets the Graphical User Interface (GUI) port number. This is the
port where the admin GUI listens for connections. The Admin GUI
allows the user to configure the unit using a graphical user
interface.
config admin port <port>
where port is the GUI http port. You can select any available port
between 1 and 65535. The default is 1095.
Admin Commands

C H A P T E R 5 File Management Commands
173
File
Management
Commands
This table describes the File Management commands.
Command Description
cat Displays contents of the specified saved configuration file.
cat {filename}
where filename is the name of the file to be displayed. If not
specified, the file active.cfg is displayed.
copy Copies an existing configuration file to a new file.
copy <source> to <destination>
where source is the name of the original file and destination
is the name of the target file.
dir Displays a list of saved configuration files
dir
get Retrieves a configuration file from a TFTP server. Because the
TFTP protocol has no user-logon or validation, sites that support it
typically enforce some file access restrictions. Such restrictions are
specific to each site and vary widely in scope and methods.
get <tftpurl>
where tftpurl is the name of the TFTP server and file to
retrieve.
Example:
get tftp://192.168.10.1/default.cfg
File Management Commands

C H A P T E R 5 HP e-Commerce/XML Director Server Appliance SA8250 User Guide
174
put Puts a configuration to the specified remote file or directory. If the
remote-directory form is used, the remote host is assumed to be a
UNIX* machine. Because the TFTP protocol has no user-logon or
validation, sites that support it typically enforce some file access
restrictions. Such restrictions are specific to each site and vary
widely in scope and methods.
put <filename> to <tftpurl>
where:
•filename is the name of the file to send.
•tftpurl is the name of the TFTP server and file name to
which you want to send the configuration file
Example:
put default.cfg to tftp://192.168.10.1/
default.cfg
remove Removes a configuration file.
remove <filename>
where filename is name of the configuration file to be removed
restore Restores a CLI configuration from a previously saved file (see
save).
restore {filename}
where filename is the name of the configuration file to be
restored (the default file name is active.cfg).
Note: Username commands are not valid in configuration files,
that is, save config and restore config operations do not include
username data. Type the config cli username command to
restore usernames.
Command Description
File Management Commands (continued)

C H A P T E R 5 File Management Commands
175
restore-verbose Same as restore but displays every line as it is restored
restore-verbose {filename}
where filename is the name of the configuration file to be
restored (the default file name is active.cfg).
Note: Username commands are not valid in configuration files,
that is, save config and restore config operations do not include
username data. Type the config cli username command to
restore usernames.
save Saves the current CLI configuration to a file of the specified name.
This information is saved in an ASCII file (see also restore).
save {filename}
where filename is the file name used to store the configuration
(the default file name is active.cfg).
Note: Username commands are not valid in configuration files,
that is, save config and restore config operations do not include
username data. Type the config cli username command to
restore usernames.
Command Description
File Management Commands (continued)

C H A P T E R 5 HP e-Commerce/XML Director Server Appliance SA8250 User Guide
176
CLI
Commands
This table describes the Command Line Interface commands.
Command Description
config Changes the prompt to the CLI config branch.
config
config cli delete Deletes the specified user.
config cli delete <username>
Note: The default user name, "admin" cannot be deleted.
config cli info Shows all current CLI settings at this level.
config cli info
config cli login-attempts Specifies the maximum allowable number of failed login attempts
before closing the connection.
config cli login-attempts <tries>
where tries is a number from 1 to 30.
config cli more Sets scrolling of the output display to one page at a time or to
continuous display.
config cli more [enable | disable]
where:
•enable scrolls one page at a time.
•disable results in continuous scrolling.
CLI Commands
C H A P T E R 5 CLI Commands
177
config cli port Specifies the telnet port on which the CLI runs.
Note: If you are logged in using telnet, do not use this command.
Doing so will change the port parameters and you will be
disconnected.
config cli port <port>
where port is a valid port. Valid ports are port 23 (the default) or
any port between 1024 and 65535.
config cli prompt Changes the root level prompt.
config cli prompt <prompt>
where prompt is the new prompt name. The default prompt is an
abbreviation of the product’s name, such as "HP SA8250." The
default prompt can be restored by entering "" (two double quotes
with no space between them) as the prompt name.
config cli screenlines Specifies the number of lines in the output display.
config cli screenlines <nlines>
where nlines is the number of output lines (8 to 64, the default
is 23).
config cli telnet-
sessions Sets the allowable number of concurrent inbound remote CLI
logon sessions.
config cli telnet-sessions <nsessions>
where nsessions is the number of allowed sessions (1 to 8, the
default is 3).
Command Description
CLI Commands (continued)

C H A P T E R 5 HP e-Commerce/XML Director Server Appliance SA8250 User Guide
178
config cli ssh-port Sets the Secure Shell (SSH) port number.
Note: If you are logged in using SSH, do not use this command.
Doing so will change the port parameters and you will be
disconnected.
config cli ssh-port <port>
where port is a valid port. Valid ports are port 22 (the default) or
any unused port between 1024 and 65535.
config cli timeout Sets or changes the idle timeout period before automatic logout for
CLI sessions. This feature can be disabled by setting the timeout
value to "0."
config cli timeout <nseconds>
where nseconds is the timeout period in seconds (0, or 30 to
65535). The default is 900 seconds (15 minutes).
config cli username Adds or changes the logon entry or password
config cli username <name> password <password>
level <ro | rw | rwa>
where:
•name is the logon name (must be from 4 to 16 characters with
no spaces)
•password is the password (must be from 4 to 16 characters
with no spaces)
•level is the authorization level (ro = read only, rw = read
and write, and rwa = read, write all).
Note: Username commands are not valid in configuration files,
that is, save config and restore config operations do not include
username data.
config cli users View the logon and user levels for the different access levels.
config cli users
Command Description
CLI Commands (continued)
C H A P T E R 5 IRV Commands
179
IRV
Commands
This table describes the Intelligent Resource Verification (IRV)
commands.
Command Description
config irv Changes to the config/irv branch
config irv
config irv info Displays the current ping interval
config irv info
config irv ping-interval Sets the IRV ping interval
config irv <ping-interval>
where ping-interval is a the number of seconds from 0 to
99999. To disable IRV, set ping-interval to 0.
IRV Commands

C H A P T E R 5 HP e-Commerce/XML Director Server Appliance SA8250 User Guide
180
GUI
Commands
This table describes the SA8250’s GUI commands, which are used to
configure its Graphical User Interface.
Command Description
config gui broker-action Specifies the start screen within the GUI when you double-click a
SA8250 icon in the topology screen.
config gui broker-action [0-5]
where [0-5] is an integer between 0 and 5 that indicates one of
the following destination screens:
•0 = Policy Manager (default)
•1 = Statistics
•2 = Administration
•3 = Tools
•4 = Configuration Maintenance
•5 = Event Log
config gui info Displays current Graphical User Interface (GUI) configuration
information
config gui info
config gui response-
timeout Specifies the interval in seconds the GUI waits for a response from
the SA8250 before it times out.
config gui response-timeout <seconds>
where <seconds> is an integer between 0 and 120. A value of 0
disables timeout, and the default value is 30.
GUI Commands

C H A P T E R 5 GUI Commands
181
config gui server-action Specifies the start screen within the GUI when you double-click a
server icon in the topology screen.
config gui server-action [0-5]
where [0-5] is an integer between 0 and 5 that indicates one of
the following destination screens:
•0 = Policy Manager
•1 = Statistics (default)
•2 = Administration
•3 = Tools
•4 = Configuration Maintenance
•5 = Event Log
Command Description
GUI Commands (continued)

C H A P T E R 5 HP e-Commerce/XML Director Server Appliance SA8250 User Guide
182
Routing
Commands
The Routing Commands are used both in route and serial failover
modes. In serial failover mode, they advertise routes to the VIPs.
NOTE: Latency exists in
the refresh process of
normal routing tables. If
you configure OSPF
routing protocol for a
SA8250 on a specific
router, VIP destinations
may be inconsistent in the
routing table. Also, if you
change the role from or to
Standalone you must
specify the protocol on
the same line.
This is critical for VIPs that are not in the same subnet as the SA8250.
If you use route failover, you must configure a routing protocol
(OSPF or RIP) appropriate to your router.
Use of the first two commands in this section, config route role and
config route protocol, must be coordinated. If role is set to
"standalone," then protocol must be set to "none." If role is set to
"primary" or "backup," then protocol must be set to OSPF or RIP,
(such as config route role standalone protocol none).
For example:
config route role standalone protocol disable
or
config route role primary protocol ospf
Command Description
config route ospf-area Changes the OSPF area.
Note: ospf-area must be set to the same OSPF area as the
ingress router to which the SA8250 is talking. This can be the
keyword, "backbone," or an integer from 0 to 2,147,483,647, or
dotted decimal format (xxx.xxx.xxx.xxx).
config route ospf-area [backbone | <area>]
where:
•backbone sets the OSPF area to backbone (0.0.0.0)
•area is the OSPF area ID.
config route ospf-hello Changes the OSPF hello interval. The hello interval is the number
of seconds between hello packets sent on this interface. This must
match the hello interval of the ingress router. The valid range is 1
to 65535, and the default is 10.
config route ospf-hello <nseconds>
where nseconds is the number of seconds in the hello interval.
Routing Commands

C H A P T E R 5 Routing Commands
183
config route ospf-dead Changes the duration of the OSPF router dead interval. The router
dead interval is the number of seconds the SA8250’s OSPF
neighbors should wait before assuming that this OSPF SA8250 is
down. This must match the router dead interval of the ingress
router. Valid range is from 1 to 2,147,483,647, and the default is
40.
Note: This value must be at least four times the hello interval.
config route ospf-dead <nseconds>
where nseconds is the number of seconds in the OSPF router
dead interval.
Command Description
Routing Commands (continued)

C H A P T E R 5 HP e-Commerce/XML Director Server Appliance SA8250 User Guide
184
config route ospf-
authtype Specifies the OSPF authentication mode. Router Authentication
type and key are security mechanisms to guarantee that routing
information is exchanged only with trusted routers. The type and
key together comprise the "authentication scheme."
Note 1: An OSPF Area can have only one OSPF authentication
scheme. Select none to specify no OSPF authentication, or
simple to specify simple password authentication. If you select
simple, you must provide an authentication key: a string of from
one to eight characters (double quotes and spaces excluded). The
default is none.
Note 2: Both sides of the OSPF connection must use the same
authentication type and key.
config route ospf-authtype [none | simple
ospf-authkey <simplekey> | md5
ospf-authkey <md5key> keyid <id>
where:
•none disables OSPF Authentication
•simple enables OSPF Authentication (requiring you to
provide an authentication key)
•simplekey is a string of from one to eight characters used as
an authentication password. Spaces and double quotes are not
permitted. This string must match the SA8250's OSPF
neighbors.
•md5key is a string of from one to sixteen characters. Spaces
and double quotes are not permitted.
•id is an integer between 1 and 255.
Command Description
Routing Commands (continued)
C H A P T E R 5 Routing Commands
185
config route protocol Specifies the desired routing protocol.
config route protocol [rip | ospf | none]
where:
•rip enables Routing Information Protocol (RIP) on the
SA8250.
•ospf enables Open Shortest Path First (OSPF) routing
protocol on the SA8250.
•none disables both RIP and OSPF protocols.
config route rip-version Specifies the RIP version (1 or 2).
config route rip-version [1 | 2]
where 1 or 2 enables RIP version 1 or 2, respectively, and 2 is the
default.
config route role Specifies the SA8250's role as "Standalone," "Primary," or
"Backup." The default is Standalone.
config route role [standalone | primary |
backup]
where:
•standalone enables the SA8250's standalone mode
•primary enables the SA8250's primary mode
•backup enables the SA8250's backup mode.
Command Description
Routing Commands (continued)

C H A P T E R 5 HP e-Commerce/XML Director Server Appliance SA8250 User Guide
186
Policy Group
Commands
This table describes the Policy Group commands. Policy Group
names must adhere to the following conventions:
•From 1 to 25 characters in length
•Any alphanumeric character
•Other eligible characters include hyphens ("-"), periods ("."), and
underscores ("_")
•Spaces must not be used.
NOTE: The names of
existing Policy Groups
cannot be changed.
Within these restrictions, the naming of Policy Groups is at your
discretion, though convenient naming schemes might include
serial names ("Group1," "Group2," etc.), or names that reflect a
Policy Group’s content, such as "e-CommerceGrp" or
"HTTP_Group."
Command Description
config policygroup
create Creates a new Policy Group.
config policygroup create <policy-name>
where policy-name is the name of the Policy Group to be
created.
config policygroup
delete Deletes an existing Policy Group.
config policygroup delete [<policy-name> |
-all]
where policy-name is the name of Policy Group to be deleted.
Type "-all" to delete all policy groups.
Policy Group Commands

C H A P T E R 5 Policy Group Commands
187
config policygroup
throttle Enables throttling of services to meet specified response times.
config policygroup <policy-name> throttle
[enable | disable]
where:
•policy-name is the name of the policy group
•enable enables throttling
•disable disables throttling
Note: When throttling is activated, requests to eligible servers in
lower-priority services are throttled until response times are met or
all eligible servers have been throttled. An eligible server is one
that is shared by both a higher and lower priority service.
Throttling affects all services within the Policy Group.
config policygroup
service backups Enables or disables servers designated as "backup" to come on line
if necessary to assure target response times.
config policygroup <policy-name> service
<service-name> backups [enable | disable]
where:
•policy-name is the name of an existing Policy Group
•service-name is the name of the service
•enable enables backup server(s)
•disable disables the backup server(s)
config policygroup
service balancing Changes the load balancing algorithm. The default algorithm is
"load."
config policygroup <policy-name> service
<service-name> balancing [robin | load]
where:
•policy-name is the name of an existing Policy Group
•service-name is the name of the service
•robin directs the service to use the round-robin load
balancing algorithm
•load directs the service to use the response time load
balancing algorithm.
Command Description
Policy Group Commands (continued)

C H A P T E R 5 HP e-Commerce/XML Director Server Appliance SA8250 User Guide
188
config policygroup
service create Creates a service. The default type is TCP.
config policygroup <policy-name> service create
<service-name> vip <ipaddr> port <port>
{type [TCP | UDP | RICH_HTTP]}
Note 1: The VIP/port combination must be unique. The service
type defaults to TCP unless specified otherwise on the command
line.
Note 2: The service-name, ipaddr, and port cannot be
changed once you enter this command.
where:
•policy-name is the name of an existing Policy Group
service-name is the name of the service you want to create
•ipaddr is the virtual IP address (xxx.xxx.xxx.xxx)
•port is the listening port for incoming connections. You can
select port numbers between 1 and 65535.
config policygroup
service delete Deletes an existing service.
config policygroup <policy-name> service delete
[ <service-name> | -all ]
where:
•policy-name is the name of the Policy Group that contains
the service to be deleted
•service-name is the service to be deleted
•-all deletes all services and associated servers
config policygroup
service disable Disables the specified service.
config policygroup <policy-name> service
<service-name> disable
where:
•policy-name is the name of an existing policy group
•service-name is the name of the service
Command Description
Policy Group Commands (continued)

C H A P T E R 5 Policy Group Commands
189
config policygroup
service dup-syn Sets the time interval (in microseconds) within which if the
dynamically calculated number of duplicate SYNs (lost packets) to
a fulfillment server is detected, the server is declared dead.
config policygroup <policy-name> service
<service-name> dup-syn <microseconds>
where:
•policy-name is the name of an existing policy group
service-name is the name of the service
•microseconds is the time interval within which to count
dropped packets. You can specify a value from 1000 to
2,147,483,647, and the default is 500,000.
config policygroup
service enable Enables the specified service.
config policygroup <policy-name> service
<service-name> enable
where:
•policy-name is the name of an existing policy group
•service-name is the name of the service.
config policygroup
service header Enables or disables the HTTP header information.
config policygroup <policy-name> service
<service-name> header [enable | disable]
where:
•policy-name is the name of the policy group
•service-name is the name of the service
•enable enables the http header information
•disable disables the http header information.
Note: Enabled for SSL by default.
Command Description
Policy Group Commands (continued)

C H A P T E R 5 HP e-Commerce/XML Director Server Appliance SA8250 User Guide
190
config policygroup
service header-names Sets the name used in the HeaderNameField of the HTTP headers
inserted when header or header-certificate are enabled,
on a per-service basis.
config policygroup <policy-name> service
<service-name> header-names [certificate
<headername> | cipher-used <headername> |
source-ip <headername> | ssl-id <headername>]
where:
•policy-name is the name of the policy group
•service-name is the name of the service
•headername the name to use in the HTTP header
Note 1: With header enabled, the following is the default HTTP
header name:
•source-ip: HP_SOURCE_IP
Note 2: With header-certificate enabled, the following are
the default HTTP header names:
•certificate: HP_CLIENT_CERTIFICATE
•cipher-used: HP_CIPHER_USED
•ssl-id: HP_SSL_SESSION_ID
Note 3: With header-certificate enabled, and using
Internet Explorer* with a non-trusted CA (for example, a broker-
generated or Microsoft IIS) server- generated server certificate, the
client certificate may not pass through on the first request. Pass-
through behaves correctly if the server certificate is obtained from
a recognized Certificate Authority such as Verisign*.
Command Description
Policy Group Commands (continued)

C H A P T E R 5 Policy Group Commands
191
config policygroup
service priority Sets the priority level of the specified service.
config policygroup <policy-name> service
<service-name> priority <level>
where:
•policy-name is the name of an existing Policy Group
•service-name is the name of the service
•level is the service priority. You can specify a value from 1
(highest) to 5 (lowest), and 1 is the default.
config policygroup
service response Sets the target response time.
config policygroup <policy-name> service
<service-name> response <mil-seconds>
where:
•policy-name is the name of an existing Policy Group
•service-name is the name of the service
•mil-seconds is the number of milliseconds the service
should take to respond to a request. This value is ignored
unless throttling is activated in the Policy Group. You can
specify a value from 0 to 2,147,483,647, and the default is 50.
config policygroup
service server-timeout Specifies the amount of time a client request waits for the server to
respond before trying the next available server. If no server is
available, a 503 error ("No server available") message is sent to the
requesting client. Server-timeout mode is available only to
RICH_HTTP services.
config policygroup <policy-name> service
<service-name> server-timeout <seconds>
where:
•policy-name is the name of an existing Policy Group
•service-name is the name of the service
•seconds is the number of seconds to wait for a connection.
You can specify a value from 1 to 2,147,483,647, and the
default is 5.
Command Description
Policy Group Commands (continued)

C H A P T E R 5 HP e-Commerce/XML Director Server Appliance SA8250 User Guide
192
config policygroup
service server create Creates a new server.
Note: The server name and port must be unique.
config policygroup <policy-name> service
<service-name> server create <server-name>
where:
•policy-name is the name of an existing Policy Group
•service-name is the name of the service
•server-name is any valid server name
config policygroup
service server port 606 Enables or disables 606 error detection on the named server. 606 is
a user-defined error code. When 606 error detection is enabled,
requests that generate 606 errors are rerouted (transparently to the
client), to the next available server. When disabled, the error is sent
back to the requesting client.
config policygroup <policy-name> service
<service-name> server <server-name> port
<port> 606 [enable | disable]
where:
•policy-name is the name of an existing Policy Group
•service-name is the name of the service
•server-name is the name of the server
•port is the server port
•enable enables 606 error detection
•disable disables 606 error detection
config policygroup
service server delete Deletes an existing server.
config policygroup <policy-name> service
<service-name> server delete <name>
where:
•policy-name is the name of an existing Policy Group
•service-name is the name of the service
•name is the name of the server to be deleted
Command Description
Policy Group Commands (continued)

C H A P T E R 5 Policy Group Commands
193
config policygroup
service server port http Enables or disables HTTP error detection on the named server.
When HTTP error detection is enabled, requests that generate
HTTP errors 401-405 and 500-503 are rerouted (transparently to
the client), to the next available server. When disabled, these errors
are sent back to the requesting client.
config policygroup <policy-name> service
<service-name> server <server-name> port
<port> http [enable | disable]
where:
•policy-name is the name of an existing Policy Group
•service-name is the name of the service
•server-name is the name of the server
•port is the server port
•enable enables HTTP error detection
•disable disables HTTP error detection
config policygroup
service server port
mode
Enables or disables Source Address Preservation (SAP) on the
named server. When OPR is enabled, the CLI-configured server
port is ignored and the configured server service port is used. By
default, SAP is enabled (and cannot be disabled) when OPR is
enabled.
Note: OPR requires the use of servers' loopback adapters. For
more details, see Appendix D.
config policygroup <policy-name> service
<service-name> server <server-name> port
<port> mode [brokered | opr | sap]
where:
•policy-name is the name of an existing Policy Group
•service-name is the name of the service
•server-name is the name of the server
•port is the server port
•brokered is the default mode, with both SAP and OPR
disabled.
•opr enables Out-of-Path Return
•sap enables Source Address Preservation
Command Description
Policy Group Commands (continued)

C H A P T E R 5 HP e-Commerce/XML Director Server Appliance SA8250 User Guide
194
config policygroup
service server port msap Enables or disables Multi-hop Source Address Preservation
(MSAP) on the named server.
config policygroup <policy-name> service
<service-name> server <server-name> port
<port> msap [enable | disable]
where:
•policygroup-name is the name of an existing Policy
Group
•service-name is the name of the service
•server-name is the name of the server
•port is the server port
•enable enables MSAP
•disable disables MSAP
config policygroup
service server port type Specifies the server type of the named server.
config policygroup <policy-name> service
<service-name> server <server-name> port
<port> type [primary | backup | disable]
where:
•policy-name is the name of an existing Policy Group
•service-name is the name of the service
•server-name is the name of the server
•port is the server port
•primary specifies that this server is a primary server
•backup specifies that this server is a backup server
•disable disables the server
Note: A backup server is sent requests only under two
circumstances: First, when the primary servers are unable to meet
the configured target response times a backup server is used if and
only if "backups" is enabled for this service. Second, backup
servers are given requests when a primary server is unavailable. As
primary servers become inactive, backup servers are brought into
service to handle requests.
Command Description
Policy Group Commands (continued)

C H A P T E R 5 Policy Group Commands
195
config policygroup
service server port
xmlpattern create
Creates an XML pattern defined by the specified string for the
server and port specified in the current path
config policygroup <policy-name> service
<service-name> server <server-name> port
<port> xmlpattern create <xmlpattern>
where:
•policy-name is the name of the policy group
•service-name is the name of the service
•server-name is the name of the server
•port is the port number
•xmlpattern is the complete RICH and XML (or RICH
only) specification of the pattern to be created, including
elements, attributes, text, operators, and comparison operators
Valid RICH expressions include:
•File type expressions, such as *.gif, or */index.html
•Path expressions, such as /home/*, or /home/images/*,
or /home/images/a*
•Unique file expressions, such as /index.html
•Wildcard expressions, such as *.
Note 1: The above expressions can include the negation operator
(!), such as !*.gif, or !*/index.html, but cannot be used
with XML expressions.
Invalid RICH expressions include:
•Text on either side of the asterisk, such as /index*.gif
•Asterisk on either side of text, such as */images/*
•Expressions containing more than one asterisk, such as
/index*.*
•Expressions containing one or more spaces or the dollar sign
($) character
•Expressions containing a vertical bar ( | ) or a carat (^)
Note 2: There can be only one asterisk in any single expression.
An asterisk must be either the entire expression itself, or occur at
the beginning or the end of the expression.
Command Description
Policy Group Commands (continued)

C H A P T E R 5 HP e-Commerce/XML Director Server Appliance SA8250 User Guide
196
config policygroup
service server port
xmlpattern create
(continued)
An example xmlpattern_string:
create */order.asp & doc=5 & //Amount[Value
> 10000]
Note 3: You must include a single space before and after the
ampersands (&) used to separate the RICH expression, document
number, and XML expression.
Note 4: If the RICH expression matches, but no match can be
found for incoming XML expressions, the SA8250 returns a
“Server not found” error message to the client. To avoid this, we
recommend that you define one of your servers as the default
server if the XML expression does not match. To do this, type this
command:
create * & default
Note 5: If the RICH expression does not match, the XML
expression is ignored.
Note 6: The document number is optional. If used, it specifies the
document number within a multipart message or URL-encoded
document. In the example above, the SA8250 looks for the fifth
document within a multipart message. If the fifth document is not
and XML document, or does not exist, the XML expression is
ignored, and the data is treated as a non-XML document and
directed to the first matched RICH expression server. Valid range
is integers 1 to 99.
Note 7: For more information on XML expressions, see Chapter
2.
Command Description
Policy Group Commands (continued)

C H A P T E R 5 Policy Group Commands
197
config policygroup
service server port
xmlpattern delete
Deletes the XML pattern defined by the specified string, or by
index number, for the server and port specified in the current path
config policygroup <policy-name> service
<service-name> server <server-name> port
<port> xmlpattern delete [ <xmlpattern>
| <index> ]
where:
•policy-name is the name of the policy group
•service-name is the name of the service
•server-name is the name of the server
•port is the port number
•xmlpattern is the complete RICH, document number (if
used), and XML (or RICH only) alphanumeric specification of
the string to be deleted
•index is the index number of the pattern to be deleted
Note: You can determine the index number by typing the info
command.
config policygroup
service server port
xmlpattern info
Displays a list of all XML patterns and their index numbers on the
SA8250.
config policygroup <policy-name> service
<service-name> server <server_name> port
<port> xmlpattern info
where:
•policy-name is the name of the policy group
•service-name is the name of the service
•server-name is the name of the server
•port is the port number
Command Description
Policy Group Commands (continued)

C H A P T E R 5 HP e-Commerce/XML Director Server Appliance SA8250 User Guide
198
config policygroup
service sticky The SA8250 can be configured to maintain a session’s state so that
serial requests from a single client are allocated to the same server.
This is called "sticky port" functionality. This command enables or
disables the sticky port function. Sticky functionality is enabled in
either of two modes. "Src-ip" (source IP address) mode identifies
requesting clients by IP address."Cookie" mode entails sending a
cookie to requesting browsers which identifies subsequent
requests as coming from the same client.
Note: This mode must be used to enable sticky ports in
environments in which requests come to the SA8250 through
proxy servers. (All requests coming from a proxy server have that
server’s address as their apparent Source IP address, rather than the
actual address of their origination.) Sticky Cookie mode is
available only to RICH_HTTP services.
config policygroup <policy-name> service
<service-name> sticky [disable | src-ip |
cookie]
where:
•policy-name is the name of an existing Policy Group
•service-name is the name of the service
•disable disables sticky ports
•src-ip enables Source IP Address sticky mode
•cookie enables Cookie mode (available only to
RICH_HTTP)
Command Description
Policy Group Commands (continued)

C H A P T E R 5 Policy Group Commands
199
config policygroup
service sticky-timeout When the sticky port function is enabled, the maximum time
during which a single server is forced to serve serial requests by a
single client is called the "sticky timeout." This command sets the
sticky timeout.
config policygroup <policy-name> service
<service-name> sticky-timeout <nseconds>
where:
•policy-name is the name of an existing Policy Group
•service-name is the name of the service
•nseconds is the period, in seconds, that a connection is
guaranteed to connect to the same server. For each subsequent
connection, the timeout countdown is restarted. You can
specify a value from 1 to 2,147,483,647, and the default is 90
seconds.
config policygroup
service xml-well-formed Specifies if the SA8250 returns an error to the user or directs the
client data to servers with matching RICH expressions when it
detects an XML well-formed error on an incoming XML data
stream.
config policygroup <policy-name> service
<service-name> xml-well-formed [ enabled |
disabled ]
where:
•policy-name is the name of the policy group
•service-name is the name of the service
•enabled sends a error message to the sending client if a well-
formed XML error is detected (the default)
•disabled sends no error message to the sending client but
directs the client data to servers with matching RICH
expressions
Command Description
Policy Group Commands (continued)
C H A P T E R 5 HP e-Commerce/XML Director Server Appliance SA8250 User Guide
200
System
Commands
This table describes the System commands.
Command Description
config sys Changes the prompt to the config/sys branch
config sys
config sys autoboot Enables or disables the Autoboot function. If Autoboot is enabled,
the SA8250 prompts you to press a key during restart to enter the
Boot Monitor command line interface. If you ignore the prompt,
restart finishes with the SA8250 in normal operating mode. If
Autoboot is disabled, the restart sequence ends by displaying the
Boot Monitor interface. Autoboot is enabled by default. For more
details, see Chapter 3.
config sys autoboot [enable | disable]
config sys hosts info Displays the contents of the SA8250’s host file
config sys hosts info
config sys hosts delete Deletes the specified entry from the host file
config sys hosts delete <ipaddress>
config sys hosts add Adds the specified IP address to the host file and associates it with
the specified hostnames. Hostnames are separated on the
command line by spaces.
config sys hosts add <ipaddress> alias
<hostname1> { alias2 <hostname> alias3
<hostname> alias4 <hostname> alias5
<hostname> alias6 <hostname> }
System Commands

C H A P T E R 5 System Commands
201
config sys id Sets the unit identifier. The SA8250 is shipped pre-configured
with the unit’s serial number in this field. This command can
change the identifier if the site requires alternate asset tracking
information.
config sys id <identifier>
where identifier is an alphanumeric value from 1 to 64
characters.
config sys info Displays all current system information
config sys info
config sys msd Changes the prompt to the config/sys/msd branch
config sys msd
config sys msd info Shows the current Multi-Site Agent information
config sys msd info
config sys msd port Sets the Multi-Site Agent port
config sys msd port <port>
where port is an integer from 1 to 65535, and the default is 1999.
We recommend using available ports 1024 and higher.
config sys software Changes the prompt to the config/sys/software branch
config sys software
config sys software boot Select a software image and reboots the system under that image.
config sys software boot <index>
where index is a valid index of an installed software image, as
displayed with the show sys software info command.
Command Description
System Commands (continued)

C H A P T E R 5 HP e-Commerce/XML Director Server Appliance SA8250 User Guide
202
config sys software
delete Deletes old versions of SA8250 software from local storage. It can
be used to free local storage to install a version update or product
upgrade.
config sys software delete <index>
where index is a valid index of an installed software image, as
displayed using the command, show sys software info
config sys software
install Downloads and installs SA8250 software updates or upgrades.
Software downloads are performed via ftp protocol. Once
installed, images are selected for execution by typing the config
sys software boot command.
config sys software install <url> {key <license
key>} {user <user name>} {password
<password>} passive [ enable | disable ]
where:
•url is a valid URL identifying the software image to
download. It must be of the form ftp://<host>/
<path_name>.
•license key is a valid license key for the software image
and SA8250 unit to be installed. license key is required
only to upgrade from 7140 software to 7170 software; no key
is required for updates within a single version (you can obtain
a key from HP Customer Support).
•user name is the user name needed to log in during FTP file
transfer
•password is the password with which to log on during FTP
during file transfer
•passive permits you to enable or disable passive FTP
transfers. The default is "enable."
Note 1: IP Forwarding blocks active FTP transfers unless all ports
are opened.
Note 2: If you install the same image as the currently running
image, the system will automatically reboot. This is normal.
Command Description
System Commands (continued)

C H A P T E R 5 System Commands
203
config sys software
ms-software Specifies the multi-site software level. The parameters are used to
show all installed multi-site agents, enable a multi-site agent,
delete a multi-site agent, or install a new multi-site agent.
config sys software ms-software [info | enable
<index> | delete <index> | install <url>
{user <user> password <pass>}]
where:
•index is the (integer) index of the installed multi-site agent to
make active or delete
•url is the complete TFTP or FTP URL of an install agent
•user is a valid username
•pass is a valid password
Command Description
System Commands (continued)

C H A P T E R 5 HP e-Commerce/XML Director Server Appliance SA8250 User Guide
204
Security
Commands
This table describes the Security commands.
Command Description
config sys security
custom access-control Determines whether the access control list is enabled or disabled.
Access control lists are configured with the commands acl add
(ip or netmask) and acl delete (ip or netmask). If an IP or
netmask is on the access control list they are allowed to connect
with any of the enabled administrative methods. SNMP has further
restrictions based on IP, the other methods require user / password
authentication.
config sys security custom access-control
[enable | disable]
Disabled by default.
config sys security
custom acl add ip Adds an IP address to the access control list.
config sys security acl add ip
<xxx.xxx.xxx.xxx>
config sys security
custom acl add netmask Adds a netmask in dotted decimal notation to the access control
list.
config sys security acl add netmask
<xxx.xxx.xxx.xxx/xx>
config sys security
custom acl delete ip Deletes an IP address from the access control list.
config sys security acl delete ip
<xxx.xxx.xxx.xxx>
config sys security
custom acl delete
netmask
Deletes a netmask in dotted decimal notation from the access
control list.
config sys security acl delete netmask
<xxx.xxx.xxx.xxx/xx>
config sys security
custom acl info Displays the current access control list. The access control list is
only used if config sys security access-control is enabled
Security Commands

C H A P T E R 5 Security Commands
205
config sys security
custom Switches to custom security settings menu
config sys security custom
config sys security
custom forwarding Enables or disables IP forwarding. If IP forwarding is enabled, the
servers connected to the second interface of the SA8250 are
directly accessible by their IP addresses. There is no restriction on
direct access to the servers through the SA8250.
config sys security custom forwarding [enable |
disable]
Disabled by default.
config sys security
custom gui Enables or disables administration using the GUI. If enabled,
administrators can only log on to the GUI and perform
administration tasks through a web browser.
config sys security custom gui [enable |
disable]
Disabled by default.
config sys security
custom info Displays the current state of the custom configuration. If the mode
displayed is "custom," then the displayed configuration is the
active one. The default custom configuration is SSH access only.
config sys security
custom ms-agent Enables or disables the multi-site agent.
config sys security custom ms-agent [enable |
disable]
Disabled by default.
config sys security
custom snmp Enables or disables administration using SNMP.
config sys security custom snmp [enable |
disable]
Disabled by default.
Command Description
Security Commands (continued)
C H A P T E R 5 HP e-Commerce/XML Director Server Appliance SA8250 User Guide
206
config sys security
custom ssh Enables or disables administration using Secure Shell (SSH).
config sys security custom ssh [enable |
disable]
config sys security
custom telnet Enables or disables administration using telnet.
config sys security custom telnet [enable |
disable]
Disabled by default.
config sys security info Displays the current state of the security system
config sys security
mode Specifies the security mode. The default mode is "closed."
config sys security mode [ open | closed |
custom ]
where mode is one of the following:
•open permits all administration tasks to be performed without
restriction from all IP addresses and enables IP forwarding. IP
forwarding allows direct access to servers at their real IP
addresses.
•closed allows administration to be performed only from the
serial port.
•custom enables the configuration displayed by config sys
security custom info. Within config sys
security custom each SA8250 administration access
method can be configured individually.
Command Description
Security Commands (continued)

C H A P T E R 5 SNMP Commands
207
SNMP
Commands
This table describes the SNMP commands.
Command Description
config sys snmp
community create Specifies community strings that the SA8250 will accept on
incoming SNMP requests. Up to 10 community strings can be
created.
config sys snmp community create <string> ip
[<ip address>|any] rights [ro|rw]
where:
•<string> is the name of the community you wish to create
•<ip address> is the IP address of the host from which you
will accept this community string. If any is specified, the
community string will be accepted on requests from any IP
address.
•ro means the community string has read-only privilege.
•rw means the community string has read-write privilege.
The default community strings are public any ro and
private any rw.
config sys snmp
community delete Deletes a community string that the SA8250 can accept on
incoming SNMP requests.
config sys snmp community delete <string> ip
[<ip address> | any]
where:
•string is the name of the community string you want to
delete
•ip address is the IP address of the host from which you
will not accept this community string. If any is specified, the
community string will not be accepted on requests from any IP
address.
config sys snmp
community info Displays the community strings the SA8250 is configured to
accept.
config sys snmp community info
SNMP Commands

C H A P T E R 5 HP e-Commerce/XML Director Server Appliance SA8250 User Guide
208
config sys snmp info Displays information about the SNMP port, sysContact,
sysName, and sysLocation.
config sys snmp info
config sys snmp port Specifies the port where the SA8250 receives SNMP requests.
config sys snmp port <#>
where # is a number between 5020 and 65535 (the default is 161)
config sys snmp
sysContact Specifies a string for the MIB-II variable sysContact. The default
is NULL.
config sys snmp sysContact <string>
where string is a string of displayable characters.
config sys snmp
sysLocation Specifies a string for the MIB-II variable sysLocation. The default
is NULL.
config sys snmp sysLocation <string>
where string is a string of displayable characters.
config sys snmp
sysName Specifies a string for the MIB-II variable sysName. The default is
the hostname of the SA8250.
config sys snmp sysName <string>
where string is a string of displayable characters.
Command Description
SNMP Commands (continued)

C H A P T E R 5 SNMP Commands
209
config sys snmp trap
create community Specifies the host to which SA8250 sends SNMP traps. Up to 10
trap receivers can be created. By default the trap receiver list is
empty, thus no traps are sent.
config sys snmp trap create <ip address>
community <community string>
where:
•ip address is the IP address of the host to which you wish
to send SNMP traps
•community string is sent with all traps sent to the IP
address
config sys snmp trap
delete community Deletes a host from the trap receiver list.
config sys snmp trap delete <ip address>
community <community string>
where:
•ip address is the IP address of the host you want to delete
from the trap receiver list
•community string is an identifier associated with
specified access rights
config sys snmp trap
info Displays the trap receiver list.
config sys snmp trap
port Specifies the port to which the SA8250 sends traps.
config sys snmp trap port <port>
where port is a number between 5020 and 65535 (the default is
162)
show sys snmp info Displays all SNMP information
Command Description
SNMP Commands (continued)

C H A P T E R 5 HP e-Commerce/XML Director Server Appliance SA8250 User Guide
210
SSL
Commands
This table describes the Secure Transactions (SSL) commands.
Commands in this section are only valid for RICH_HTTP services.
Command Description
config policygroup
service key certificate
create
Creates a certificate. A private key must be created prior to using
this command. You can optionally provide distinguished name
(DN) information. If no DN information is provided, the default
DN information is used. The default DN information can be
viewed or changed by using the config ssl dn command.
config policygroup <policy-name> service
<service-name> key certificate create {life
<life>} {name <name>} {email <email>} {state
<state>} {organization <org>} {unit <unit>}
{locality <loc>} {country <country>}
where:
•policy-name is the name of a policy group
•service-name is the name of a service
•life is the number of days the certificate remains valid (the
default is 30 days)
•name is the common (server’s) name
•email is the email address, state is the name of your state
or province
•organization is the name of your company or
organization, unit is your organizational section
•locality is the name of your city or locality
For example, creating a certificate that expires in 120 days:
HP SA8250/.../<server> port <port>
number>#certificate create life 120
Note: When the procedure is complete, you can type info at the
prompt to verify the key's creation.
SSL Commands

C H A P T E R 5 SSL Commands
211
config policygroup
service key certificate
delete
Deletes a certificate.
config policygroup <policy-name> service
<service-name> key certificate delete
where:
•policy-name is the name of a policy group
•service-name is the name of a service
Example:
HP SA8250/.../service/<service>/key>#
certificate delete
Note: When the procedure is complete, you can type info at the
prompt to verify the certificate's deletion.
config policygroup
service key certificate
export
Exports a certificate. Certificates can be exported to the console or
to a remote machine via ftp.
config policygroup <policy-name> service
<service-name> key certificate export [<url>]
where:
•policy-name is the name of a policy group
•service-name is the name of a service
•url is a valid URL identifying where to export the certificate
(it must be in the form ftp://<host>/<path_name>)
Note: If no URL is provided, the certificate will be exported to the
console.
Command Description
SSL Commands (continued)

C H A P T E R 5 HP e-Commerce/XML Director Server Appliance SA8250 User Guide
212
config policygroup
service key certificate
import
Imports an existing certificate. We recommend you copy the
certificate (a block of ASCII text) from a server’s console window,
then paste it into the SA8250’s console window when prompted.
To paste in a certificate, type the import command and press
<Enter>. The CLI prompts you to paste in the certificate. When
finished, type three periods ("...") on a separate line, then press
<Enter>.
config policygroup <policy-name> service
<service-name> key certificate import [<url>
{user <username> password <password>}]
where:
•policy-name is the name of a policy group
•service-name is the name of a service
•url is a valid URL identifying the certificate file to
download. (It must be in the form ftp://<host>/
<path_name>)
•user is the username
•password is the password
Note: When the procedure is complete, you can type info at the
prompt to verify the certificate's transfer to the SA8250.
Command Description
SSL Commands (continued)

C H A P T E R 5 SSL Commands
213
config policygroup
service key client-ca Displays, deletes, exports, or imports a client certificate.
config policygroup <policy-name> service
<service-name> key client-ca [delete | export
| import | info]
where:
•policy-name is the name of a policy group
•service-name is the name of a service
•delete deletes a client certificate
•export exports a client certificate
•import imports a client certificate
•info displays the client certificate information
Note: Client certificates are actually loaded in the browser.
Certificates from the Certificate Authority (CA) that issued the
client certificates are loaded in the SA8250.
config policygroup
service key client-ca
header-certificate
Adds a PEM-encoded client certificate to the HTTP header of
requests sent to the servers.
config policygroup <policy-name> service
<service-name> key client-ca
header-certificate [disable | enable]
where:
•policy-name is the name of a policy group
•service-name is the name of a service
•disable (the default) disables the client certificate in the
HTTP header
•enable enables the client certificate in the HTTP header
Note: With header-certificate enabled, and using Internet
Explorer* with a non-trusted CA (for example, a broker-generated
or Microsoft IIS) server- generated server certificate, the client
certificate may not pass through on the first request. Pass-through
behaves correctly if the server certificate is obtained from a
recognized Certificate Authority such as Verisign*.
Command Description
SSL Commands (continued)

C H A P T E R 5 HP e-Commerce/XML Director Server Appliance SA8250 User Guide
214
config policygroup
service key client-ca
revocation delete
Deletes a Certificate Revocation List (CRL).
config policygroup <policy-name> service
<service-name> key client-ca revocation
delete
where:
•policy-name is the name of a policy group
•service-name is the name of a service
config policygroup
service key client-ca
revocation import
Imports a CRL from a server.
config policygroup <policy-name> service
<service-name> key client-ca revocation
import
where:
•policy-name is the name of a policy group
•service-name is the name of a service
For example, you can copy the CRL (a block of ASCII text) from a
certificate server's console window, then paste it into the SA8250's
console window. To paste in a CRL, type the import command
and press <Enter>. The CLI prompts you to paste in the
certificate. When finished, type three periods ("...") on a separate
line and press <Enter>
config policygroup
service key client-ca
revocation info
Displays detailed information about the CRL.
config policygroup <policy-name> service
<service-name> key client-ca revocation
info
where:
•policy-name is the name of a policy group
•service-name is the name of a service
Command Description
SSL Commands (continued)

C H A P T E R 5 SSL Commands
215
config policygroup
service key client-ca
revocation mode
Sets the mode to disable or enable.
config policygroup <policy-name> service
<service-name> key client-ca revocation
mode [ disable | enable ]
where:
•policy-name is the name of a policy group
•service-name is the name of a service
•disable means that client certificates are not checked
against the CRL (the default setting)
•enable means that client certificates are validated against the
CRL
Note: When mode is disabled, the presence of a valid CRL is
irrelevant, since no client certificate checking will occur. When
mode is enabled, a missing or invalid CRL will cause the service
to become disabled. Changing the mode to disabled, or importing
a valid CRL, will re-enable the service.
config policygroup
service key client-ca
revocation refresh
Sets the interval at which the SA8250 will download the CRL
from a certificate server.
config policygroup <policy-name> service
<service-name> key client-ca revocation
refresh <now>
where:
•policy-name is the name of a policy group
•service-name is the name of a service
•interval is an integer representing the number of minutes
from 0 to 625600 (1 year) to wait between attempted retrievals
of a CRL from a URL specified using the url parameter. A
value of 0 disables the feature, and a value of 30 will attempt
to retrieve the CRL every 30 minutes.
•now causes the CRL to be downloaded immediately
Note: This command supports both DER and PEM format
revocation lists.
Command Description
SSL Commands (continued)

C H A P T E R 5 HP e-Commerce/XML Director Server Appliance SA8250 User Guide
216
config policygroup
service key client-ca
revocation url
Retrieves the CRL.
config policygroup <policy-name> service
<service-name> key client-ca revocation url
<url> {user <username> password <password> |
none}
where:
•policy-name is the name of a policy group
•service-name is the name of a service
•url is a URL used to retrieve the CRL. The format of the
URL is protocol://server:port/path. Valid protocols are FTP,
HTTP, and LDAP protocols are supported.
•username is the optional username to access the URL
•password is the optional password to access the URL
•none clears the URL
Examples of the url parameter:
•url ftp://ftp.newhost.com/myrevoke.crl user
anonymous sets the URL path to myrevoke.crl on the host
ftp.newhost.com using the FTP protocol with the username of
anonymous, and no password.
•url http://www.myhost.com:9800/CertEnroll/
server.crl sets the URL path to CertEnroll/server.crl on
the host www.myhost.com using the HTTP protocol on port
9800.
•url ldap://server.com/DC=company,CD=com,
CN=cRL password U8#h2k0W sets the URL to /DC=
company, CD=com,CN=cRL on the host server.com using the
LDAP protocol with a password of U8#h2k0W.
Note 1: If refresh is set to a non-zero value, and the URL is
invalid (or specifies a non-valid CRL file), a message is entered
into the system logs. We recommend that network administrators
closely monitor these logs to ensure the SA8250 is receiving CRLs
properly. Using the refresh now command causes the log message
to be printed onscreen.
Note 2: This command supports both DER and PEM format
revocation lists.
Command Description
SSL Commands (continued)

C H A P T E R 5 SSL Commands
217
config policygroup
service key create Creates a private key.
config policygroup <policy-name> service
<service-name> key create {[512 | 1024]}
where:
•policy-name is the name of a policy group
•service-name is the name of a service
•512 (the default) creates a 512 bit RSA private key
•1024 creates a 1024 bit RSA private key
Note: When the procedure is complete, you can type info at the
prompt to verify the key's creation.
config policygroup
service key delete Deletes a private key.
Note 1: This command deletes the certificate, signing request, and
private key associated with the service.
config policygroup <policy-name> service
<service-name> key delete
where:
•policy-name is the name of a policy group
•service-name is the name of a service
Note 2: When the procedure is complete, you can type info at
the prompt to verify the key's deletion.
Command Description
SSL Commands (continued)

C H A P T E R 5 HP e-Commerce/XML Director Server Appliance SA8250 User Guide
218
config policygroup
service key export Exports a private key. The private key can be either exported to
the console or to a remote machine via ftp.
config policygroup <policy-name> service
<service-name> key export [<url>]
where:
•policy-name is the name of a policy group
•service-name is the name of a service
•url is a valid URL identifying where the private key is to be
exported (it must be in the form ftp://<host>/
<path_name>)
•user is the username
•password is the password
Note: If no URL is provided, the private key will be displayed on
the console.
Command Description
SSL Commands (continued)

C H A P T E R 5 SSL Commands
219
config policygroup
service key import Imports an existing private key. For example, you can copy the
key (a block of ASCII text) from a server’s console window, then
paste it into the SA8250’s console window, or the private key may
be copied via ftp. To paste in a key, type the import command
and press <Enter>. The CLI prompts you to paste in the
certificate. When finished, type three periods ("...") on a separate
line, then press <Enter>.
config policygroup <policy-name> service
<service-name> key import <url> {user <user
name>} {password <password>}
where:
•policy-name is the name of a policy group
•service-name is the name of a service
•url is a valid URL identifying the private key file to
download (it must be in the form, ftp://<host>/
<path_name>)
•user is the username
•password is the password
For example, importing a private key via FTP:
Import ftp://remotehost/key.pem user anonymous
Note: When the procedure is complete, you can type info at the
prompt to verify the key's transfer to the SA8250.
Command Description
SSL Commands (continued)

C H A P T E R 5 HP e-Commerce/XML Director Server Appliance SA8250 User Guide
220
config policygroup
service key redirect Specifies the default URL to return the user if the client does not
support the cipher suite. Each service may specify a different
URL.
config policygroup <policy-name> service
<service-name> key redirect [default | <url>
| none]
where:
•policy-name is the name of a policy group
•service-name is the name of a service
•default specifies the redirect value
•url is a valid URL identifying the redirect page in the form
http://<host>/<path name>
•none disables page redirect
Command Description
SSL Commands (continued)

C H A P T E R 5 SSL Commands
221
config policygroup
service key signrequest
create
Creates a signing request. Signing requests are used to obtain
certificates from a Certificate Authority. Once created, the signing
request is exported and emailed to the Certificate Authority, who
will mail you a certificate for you to import into the SA8250. You
can optionally include distinguished name (DN) information in the
request. If no DN information is provided, the default DN
information is used. The default DN information can be viewed or
changed by using the ssl dn command.
Note: You must create a private key prior to creating a signing
request.
config policygroup <policy-name> service
<service-name> key signrequest create {name
<name>} {email <email>} {state <state>}
{organization <org>} {unit <unit>} {locality
<loc>} {country <country>} {password
<password>} {company <company>}
where:
•policy-name is the name of a policy group
•service-name is the name of a service
•name is the common (or server’s) name
•email is the email address
•state is the name of your state or province
•organization is the name of your company or organization
•unit is your organizational section
•locality is the name of your city or locality
•password is the challenge password
•company is a company name
For example:
HP SA8250/.../service/<service>/key>#
signrequest create
Command Description
SSL Commands (continued)

C H A P T E R 5 HP e-Commerce/XML Director Server Appliance SA8250 User Guide
222
config policygroup
service key signrequest
delete
Deletes a signing request.
config policygroup <policy-name> service
<service-name> key signrequest delete
where:
•policy-name is the name of a policy group
•service-name is the name of a service
For example:
HP SA8250/.../service/<service>/key>#
signrequest delete
Note: When the procedure is complete, you can type info at the
prompt to verify the signing request's deletion.
config policygroup
service key signrequest
export
Exports a signing request. The request can be exported to the
console or to a remote machine via ftp.
config policygroup <policy-name> service
<service-name> key signrequest export <url>
where:
•policy-name is the name of an existing policy group
•service-name is the name of the service you want to create
•url is a valid URL identifying where to export the certificate
(it must be in the form ftp://<host>/<path_name>)
Command Description
SSL Commands (continued)

C H A P T E R 5 SSL Commands
223
config policygroup
service key suite Specifies a cipher suite for each type of service.
config policygroup <policy-name> service
<service-name> key suite [ all | high |
medium | low | export | <custom> | default ]
<ciphersuite>
where:
•policy-name is the name of an existing policy group
•service-name is the name of the service you want to create
•ciphersuite is a string representing the desired cipher
suite, for example: RC4-MD5
The suite is one of the following:
•all is all supported ciphers (including export ciphers)
•high is all ciphers with 168-bit encryption (triple-DES)
•medium is all ciphers with 128-bit and above encryption,
including high
•low is all ciphers with 64-bit and above encryption, including
medium and high
•export is all export ciphers only
•custom is a user-defined cipher
•default use the default specified value in the ‘config ssl’
level
config ssl cache Enables or disables the SA8250's SSL session reuse capability.
Enabling the cache can provide a performance benefit for SSLv2
clients. This option must be disabled if the majority of the traffic
uses SSLv3. Users must consult their client browser software to
determine the protocol used.
config ssl cache [enable|disable]
where:
•enable enables the SSL session reuse capability
•disable disables the SSL session reuse capability
Command Description
SSL Commands (continued)

C H A P T E R 5 HP e-Commerce/XML Director Server Appliance SA8250 User Guide
224
config ssl dn Sets the Distinguished Name (DN) configuration. This information
will be incorporated into new certificate or signing requests unless
otherwise specified.
Note: A unique DN should be specified when generating
certificates for each private key created or installed on the
SA8250. This prevents potential certificate conflicts with cached
certificates on the client’s browser. As an alternative, the same
private key and certificate pair can be used for multiple Layer 7
services. In this case, the user will see the service as coming from
the same trusted provider.
config ssl dn {name <name>} {email <email>}
{state <state>} {organization <org>} {unit
<unit>} {locality <loc>} {country <country>}
where:
•name is the common (server’s) name
•email is the email address
•state is the name of your state or province
•organization is the name of your company or organization
•unit your organizational section
•locality is the name of your city or locality
config ssl redirect Specifies the default URL to return the user if the client does not
support the cipher suite. Each service may specify a specific URL
(see the config policygroup service key redirect
command) at the service key level.
config ssl redirect [<url> | none]
where:
•url is a valid URL identifying the redirect page in the form
http://<host>/<path name>
•none (the default) disables page redirect.
Command Description
SSL Commands (continued)

C H A P T E R 5 SSL Commands
225
config ssl suite Configures the Cipher Suite the client is permitted to negotiate in
the SSL handshake phase. The value applies to all SSL-enabled
services.
config ssl suite [ all | high | medium | low |
export | default | <custom> ]
where:
•all is all supported ciphers (including export ciphers)
•high is all ciphers with 168-bit encryption (triple-DES)
•medium is all ciphers with 128-bit and above encryption,
including high
•low is all ciphers with 64-bit and above encryption,
including medium and high
•export is all export ciphers only
•default is the default cipher
•custom is a user-defined cipher
Note: For more information about supported ciphers, see
Appendix B.
Command Description
SSL Commands (continued)
C H A P T E R 5 HP e-Commerce/XML Director Server Appliance SA8250 User Guide
226
Logging
Commands
This table describes the Logging commands.
Command Description
config logging info Displays current logging configuration settings.
config logging sys Displays system-level logging configuration.
config logging output Log file viewing and configurations.
config logging sys info Displays the current system logging mask settings and available
logging mask.
config logging sys
enable Enables the system logging mask
config logging sys enable <mask>
where mask is one of the following:
•general
•trace
•audit
•debug
•statistic
•security
•warning
•error
config logging sys
disable Disables the system logging mask.
config logging sys disable <mask>
where mask is one of the following:
•general
•trace
•audit
•debug
•statistic
•security
•warning
•error
Logging Commands
C H A P T E R 5 Logging Commands
227
config logging output
info Displays the current logging configuration settings
config logging output
logsize Sets the maximum log file size. The range is from 1024 to 60000.
config logging output
viewlog Allows review of the log file. An option filter value can be
indicated to remove the logging mask from the log file upon
review.
config logging output viewlog <filter>
where filter is one of the following:
•general general debug and information logging
•trace function-level trace logging
•audit audit trail logging
•debug debug information logging
•statistic statistical information logging
•security security information logging
•warning warning statement logging
•error error statement logging
config logging output
maillog Reviews the log file. An SMTP email address is required to send
the log file to for review.
config logging output maillog <address>
mailhost <mailhost>
where:
•address is a valid SMTP email address to which the log file
is sent externally
•mailhost is a valid email server on your network
Command Description
Logging Commands (continued)

C H A P T E R 5 HP e-Commerce/XML Director Server Appliance SA8250 User Guide
228
Show
Commands
This table describes the Show commands.
Command Description
show admin info Displays the port used for communication with the GUI
show admin info
show cli info Displays the CLI configuration
show cli info
show cli users Displays the list of users
show cli users
show gui info Displays the GUI configuration
show gui info
show irv info Displays the current IRV ping interval
show irv info
show msd info Displays the current multi-site agent information
show msd info
show policygroup info To display the configurations of all policy groups:
show policygroup info
To display the configuration of a specified policy group:
show policygroup <policy-name> info
where policy-name is the name of the policy group whose
configuration you want to view
Show Commands

C H A P T E R 5 Show Commands
229
show policygroup
service info To display the configuration for all services in the specified policy
group:
show policygroup <policy-name> service info
where policy-name is the name of the policy group whose
service information you want to view
To display the configuration for a specified service:
show policygroup <policy-name> service
<service-name> info
where:
•policy-name is the name of the policy group
•service-name is the name of the service
show policygroup
service info Displays configuration for a specified service
show policygroup <policy-name> service
<service-name> info
where:
•policy-name is the name of the policy group
•service-name is the name of the service
show policygroup
service key certificate
info
Displays SSL certificate information
show policygroup <policy-name> service
<service-name> key certificate info
where:
•policy-name is the name of the policy group
•service-name is the name of the service
Command Description
Show Commands (continued)

C H A P T E R 5 HP e-Commerce/XML Director Server Appliance SA8250 User Guide
230
show policygroup
key client-ca info Displays client-ca information
show policygroup <policy-name> service
<service-name> key client-ca info
•policy-name is the name of the policy group
•service-name is the name of the service
show policygroup
key sign-request info Displays signing request information
show policygroup <policy-name> service
<service-name> key sign-request info
•policy-name is the name of the policy group
•service-name is the name of the service
show policygroup
key client-ca revocation Displays client-ca revocation information
show policygroup <policy-name> service
<service-name> key client-ca revocation info
•policy-name is the name of the policy group
•service-name is the name of the service
show policygroup
service key info Displays SSL private key information
show policygroup <policy-name> service
<service-name> key info
where:
•policy-name is the name of the policy group
•service-name is the name of the service
Command Description
Show Commands (continued)

C H A P T E R 5 Show Commands
231
show policygroup
service server info To display the server information for all servers:
show policygroup <policy-name> service
<service-name> server info
where:
•policy-name is the name of the policy group
•service-name is the name of the service
To display the server information for a specific server:
show policygroup <policy-name> service
<service-name> server <server-name> info
where:
•policy-name is the name of the policy group
•service-name is the name of the service
•server-name is the name of the server
show policygroup
service server port info To display all ports on a configured server:
show policygroup <policy-name> service
<service-name> server <server-name> port info
where:
•policy-name is the name of the policy group
•service-name is the name of the service
•server-name is the name of the server
To display specific port information on a configured server:
show policygroup <policy-name> service
<service-name> server <server-name> port
<port> info
where:
•policy-name is the name of the policy group
•service-name is the name of the service
•server-name is the name of the server
•port is the server port
Command Description
Show Commands (continued)
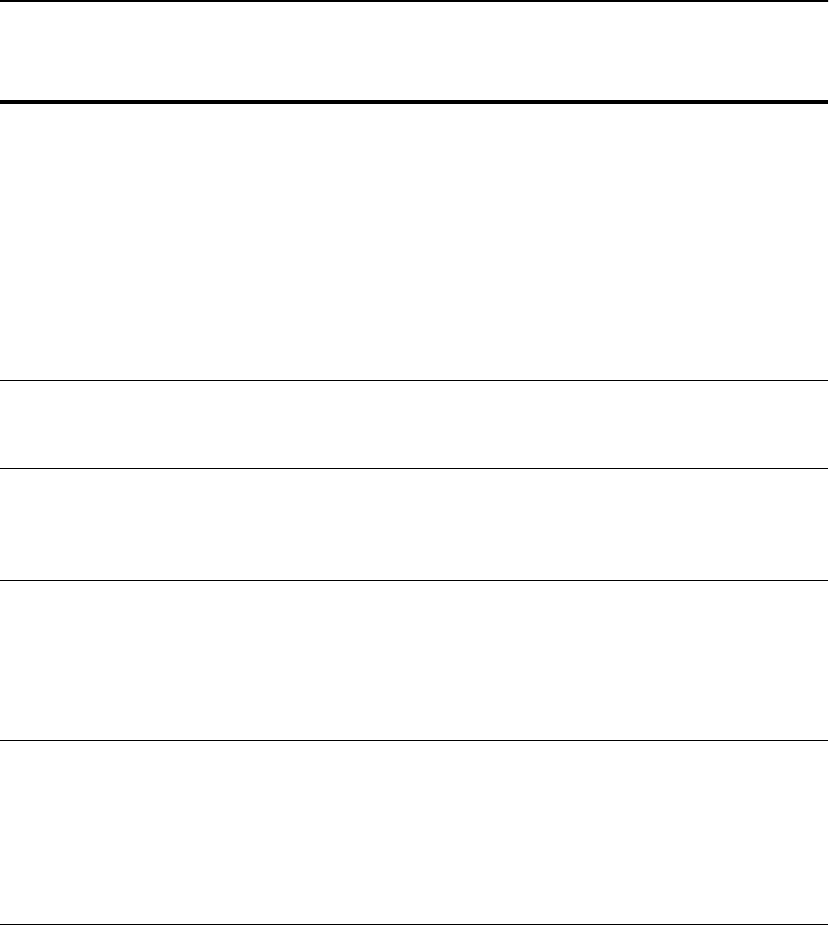
C H A P T E R 5 HP e-Commerce/XML Director Server Appliance SA8250 User Guide
232
show policygroup
service server port
xmlpattern info
Displays the list of XML expressions for a specified server
show policygroup <policy-name> service
<service-name> server <server-name> port
<port> xmlpattern info
where:
•policy-name is the name of the policy group
•service-name is the name of the service
•server-name is the name of the server
•port is the server port
show route info Displays the SA8250's routing configuration
show route info
show ssl info Displays the SSL distinguished name, cipher suite, and cache
configuration
show ssl info
show stats info Displays the SA8250’s statistics
show stats info
Note: Statistics for open connections in RICH mode are not
available.
show stats service vport Displays statistics for a specified service
show stats service <vip> vport <vport>
where:
•vip is the service IP address (Virtual IP)
•vport is the VIP port
Command Description
Show Commands (continued)

C H A P T E R 5 Show Commands
233
show stats service vport
server port Displays statistics for a specified server
show stats service <vip> vport <vport> server
<ipaddr> port <port>
where:
•vip is the service IP address (Virtual IP)
•vport is the VIP port
•ipaddr is the server IP address
•port is the server port
show sys date Displays the system date
show sys date
show sys info Displays the following system information: IP address, netmask,
broadcast, hostname, default route, name servers, and autoboot
status
show sys info
Note: If you need to contact Customer Support, you may be asked
to provide this information.
show sys snmp info Displays the current SNMP configuration information
show sys snmp info
show sys software info Displays a list of installed software images, their image index,
product, version, and build numbers
show sys software info
show sys software ms-
software info Displays all current installed multi-site software versions
show sys software ms-software info
Command Description
Show Commands (continued)

C H A P T E R 5 HP e-Commerce/XML Director Server Appliance SA8250 User Guide
234
Notes

Scenarios
SA8250 Scenarios
This chapter contains multiple scenarios that demonstrate the HP e-
Commerce/XML Director Server Appliance SA8250’s operation
using “real world” applications.
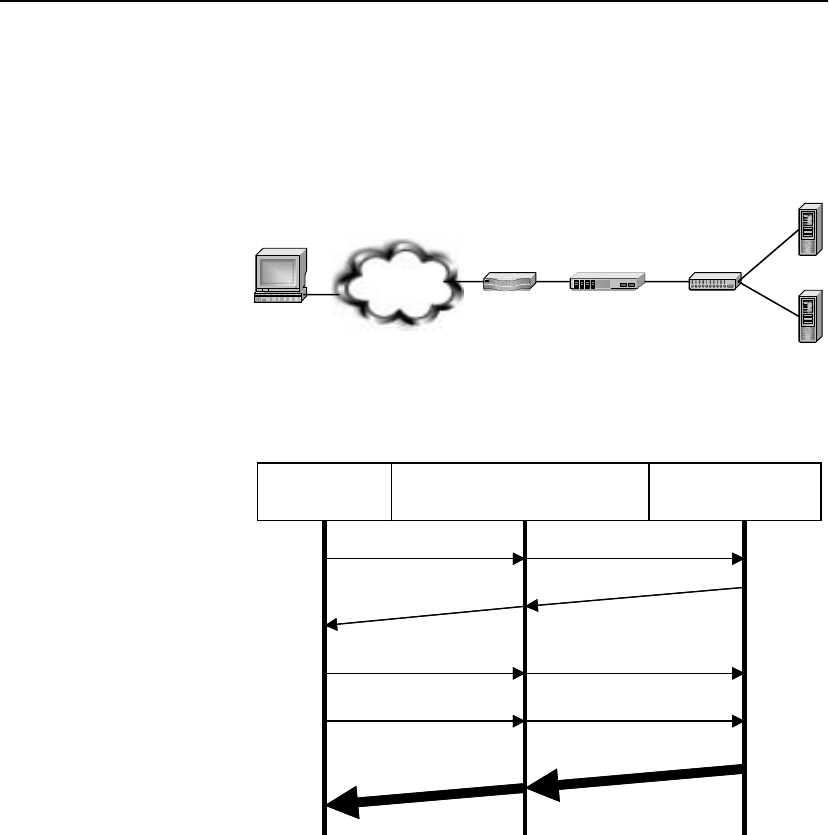
C H A P T E R 6 HP e-Commerce/XML Director Server Appliance SA8250 User Guide
236
Scenario 1:
Load
Balancing a
Web Site with
Two Servers
and the
SA8250 in
Inline Mode
An Internet Service Provider (ISP) wants to set up a load-balanced,
two server web site named “Acme Web” with the SA8250 operating
in Dual NIC mode. The service is HTTP and the website's address is
30.1.1.201. This diagram shows the network configuration for
scenario 1.
Network Configuration for Scenario 1
This diagram shows the data flow for scenario 1.
Data Flow for Scenario 1
In Dual NIC mode, the SA8250 uses two Ethernet ports. One is
connected to the router or switch on which client requests arrive, and
the other is connected to the server-side subnet. By contrast, Single
NIC mode refers to configurations in which the SA8250
communicates with the router or switch and the servers using a single
Ethernet port. For more information, see Chapter 2.
Client Switch
Server
Server
SA8250
Router
Internet
&OLHQW%URNHU 6HUYHU
6<1 6<1
6<1$&.
6<1$&.
$&.$&.
*HW85/*HW85/
'DWD'DWD
&OLHQW%URNHU 6HUYHU
6<1 6<1
6<1$&.
6<1$&.
$&.$&.
*HW85/*HW85/
'DWD'DWD

C H A P T E R 6 SA8250 Scenarios
237
Prerequisites for Scenario 1
•Two web servers are configured with replicated content. In this
example they are referred to as “serv1.acme.com” and
“serv2.acme.com” with IP addresses of 10.6.1.99 and 10.6.1.100,
respectively.
•One SA8250 is installed between two distinct subnets. The
outside subnet is connected to the router, and the inside subnet is
connected to the switch.
•The SA8250 must be physically installed on the network, and its
Boot Monitor and routing protocol configurations must be
complete. For more information, see the Getting Started Guide.
Procedure for Scenario 1
NOTE: Remember that
all commands you need to
type at the terminal
appear in bold in this
text.
1. Type these SA8250 initial configuration commands:
monitor>setup
Enable dual NIC operation(yes,no)? [no] ---> yes
Autoconfigure the Network side NIC speed and
duplex? (yes,no)? [yes] --->
Autoconfigure the Server side NIC speed and
duplex? (yes,no)? [yes] --->
DHCP is disabled for dual NIC operation.
Enter the hostname you would like to assign to
the Network NIC: --->tcslab
Enter the IP address for the Network side NIC
--->10.6.3.21
Enter the IP address for the Server side NIC
--->10.6.5.21
Enter the Netmask for the Network side NIC
--->255.255.255.0
Enter the Netmask for the Server side NIC
--->[255.255.255.0] --->255.255.255.0
Enter default gateway: --->10.6.3.1
Would you like to configure DNS (yes, no)? [no]
--->DNS not configured.
Specify failover method (disabled, serial,
route): [disabled] --->
Set Autoboot? (yes,no) [no] --->

C H A P T E R 6 HP e-Commerce/XML Director Server Appliance SA8250 User Guide
238
monitor>dns
Would you like to configure DNS (yes,no)?
[no] --->yes
Enter Domain name (‘-’ to cancel)
--->tcslab.acme.com
Enter the IP Address of the Primary name server
(‘-’ to cancel)--->10.6.5.11
Specify additional name server ( <return>
to end ) --->
monitor>save
List of currently saved configuration file(s).
You may save over an existing configuration file
or enter a new name.
File name
-----------
active.cfg
test.cfg
failover
backup.cfg
‘active.cfg’ is the last booted configuration.
Enter configuration file name (- to cancel):
[active.cfg] --->
monitor>boot
Current active configuration
------------------------------
Product: HP SA8250
Version: 2.7
Patch Level: 0.0
Build 38
Current time: Thu Oct 5 11:55:49
PDT 2000
Hostname: SA8250
--------------
Network side NIC:
IP Address: 10.6.2.99
Netmask: 255.255.255.0
MAC address: 0:90:27:f6:f6:22
---------------
Server side NIC:
IP Address: 10.6.4.99
Netmask: 255.255.255.0
MAC address: 0:d0:b7:7f:46:34
---------------

C H A P T E R 6 SA8250 Scenarios
239
Default Gateway: 10.6.2.1
Domain: tcslab.acme.com
Primary name server: 10.6.5.11
DHCP: Disabled
Failover mode: Disabled
Network NIC speed/duplex: Auto
Server NIC speed/duplex: Auto
NTP: Disabled
Autoboot: Disabled
Static Routes: None
RICH Biased: Enabled
Select a boot configuration from the following
files.
active.cfg
bobs
failover
backup.cfg
Boot configuration file name? [active.cfg] --->
Do you really want to boot ‘active.cfg’? [y]--->
Please stand by, the system is being booted.
..... Done
login: admin
Password:
HP SA8250 command line interface
Copyright (c) 2001 HP Corporation All Rights
Reserved.
Please wait ..
HP SA8250#
Create a Policy Group
1. To create a policy group, first move the prompt to the CLI’s
policy group level by typing this command:
HP SA8250#config policygroup
2. To specify the new policy group’s name (“gold” in this example),
type this command:
HP SA8250/config/policygroup#create gold
Policygroup gold created.

C H A P T E R 6 HP e-Commerce/XML Director Server Appliance SA8250 User Guide
240
3. To move the prompt to that level, type the name of the new
policy group:
HP SA8250/config/policygroup#gold
Add HTTP Service and VIP
1. To add HTTP service to policy group gold, type this command:
HP SA8250/config/policygroup/gold#
service create http vip 30.1.1.201 port 80
This command creates a new HTTP service on the SA8250 at IP
address 30.1.1.201, listening on TCP port 80.
2. To move the prompt to the level of the specific service (“http”),
type this command:
HP SA8250/config/policygroup/gold#service http
Add Servers to the HTTP Service
1. To add server “serv1.acme.com” to the HTTP service, type this
command:
HP SA8250/config/policygroup/gold/service/http#
server create serv1.acme.com port 80
Server serv1.acme.com port 80 has been created.
This command tells the SA8250 that serv1.acme.com can fulfill
requests arriving at 30.1.1.201 on port 80.
2. To add server “serv2.acme.com,” type this command:
HP SA8250/config/policygroup/gold/service/http#
server create serv2.acme.com port 80
Server serv2.acme.com port 80 has been created.
The SA8250 is now configured for load balancing a Web site
with two servers. When HTTP requests arrive at VIP 30.1.1.201
on port 80, the SA8250 balances the fulfillment of those requests
across serv1.acme.com and serv2.acme.com.
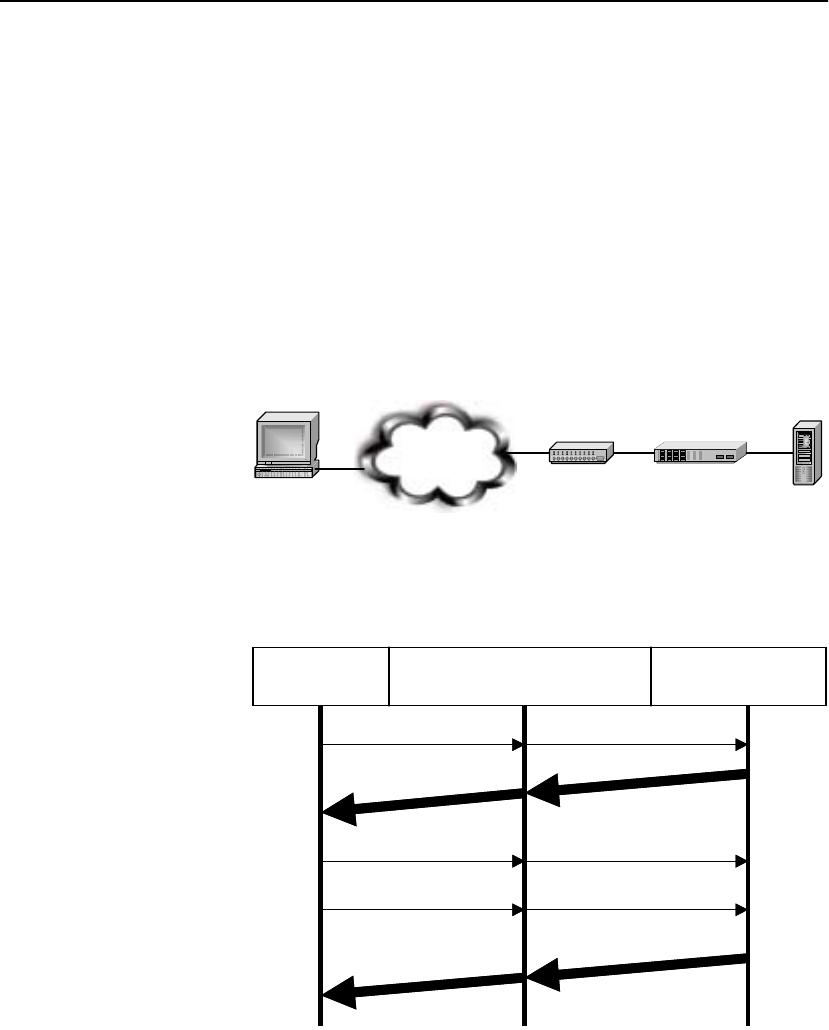
C H A P T E R 6 SA8250 Scenarios
241
Scenario 2:
Load
Balancing
Servers with
Source
Address
Preservation
In its default operating mode, the SA8250 alters source and
destination packet addresses so that fulfillment servers see only the
SA8250’s address. However, under some circumstances,
administrators may want to preserve incoming clients’ addresses in
the server log files.
The SA8250’s Source Address Preservation (SAP) mode ensures that
a client’s address remains as the source address of packets forwarded
to the server, thus ensuring the maintenance of a record of client
addresses in the server logs. This scenario illustrates the steps
required to enable Source Address Preservation and configure the
SA8250 to broadcast routes.
This diagram shows the network configuration for scenario 2.
Network Configuration for Scenario 2
This diagram shows the data flow for scenario 2.
Data Flow for Scenario 2
Client Server
SA8250
Switch
Internet
&OLHQW%URNHU 6HUYHU
6<1 6<1
6<1$&.
6<1$&.
$&.$&.
*HW85/*HW85/
'DWD'DWD
&OLHQW%URNHU 6HUYHU
6<1 6<1
6<1$&.
6<1$&.
$&.$&.
*HW85/*HW85/
'DWD'DWD

C H A P T E R 6 HP e-Commerce/XML Director Server Appliance SA8250 User Guide
242
Prerequisites for Scenario 2
•At least one Web server
•One client
•One SA8250 must be physically installed on the network, and its
Boot Monitor and routing protocol configurations must be
complete. For more information, see the Getting Started Guide.
Procedure for Scenario 2
Connect to the SA8250
1. Telnet to the SA8250's port 23 and log on as the administrator
(admin).
The Command Line prompt displays:
HP SA8250#
Create a Policy Group
1. To create a policy group, first move the prompt to the policy
group level by typing this command:
HP SA8250#config policygroup
2. To specify the new policy group's name (“saptest” in this
example), type this command:
HP SA8250/config/policygroup#create saptest
Policy group saptest created.
3. To move the prompt to that level, type the name of the policy
group just created:
HP SA8250/config/policygroup#saptest
Add Service and VIP
1. To add the SAP service to policy group saptest, type this
command:
HP SA8250/config/policygroup/saptest#
service create sap vip 30.1.1.201 port 80
This creates a new service on the SA8250, using the HTTP
protocol, at IP address 30.1.1.201, listening on TCP port 80.

C H A P T E R 6 SA8250 Scenarios
243
2. To move the prompt to the level of the specific service, type this
command:
HP SA8250/config/policygroup/saptest#service sap
Add Servers to the SAP Service
1. To add the server “serv1” to the SAP service, type this command:
HP SA8250/config/policygroup/saptest/service/
sap#server create serv1.prime.com port 80
Server serv1.prime.com port 80 has been created.
This tells the SA8250 that serv1.prime.com can fulfill requests
arriving at 30.1.1.201 on port 80.
2. Move the prompt again by typing this command:
HP SA8250/config/policygroup/saptest/service/
sap#server serv1.prime.com port 80
3. To finish, type this command:
HP SA8250/config/policygroup/saptest/service/
sap/server/serv1.prime.com/port/80#mode sap
The mode sap command allows clients' addresses to be
forwarded to the server in place of the SA8250's address.
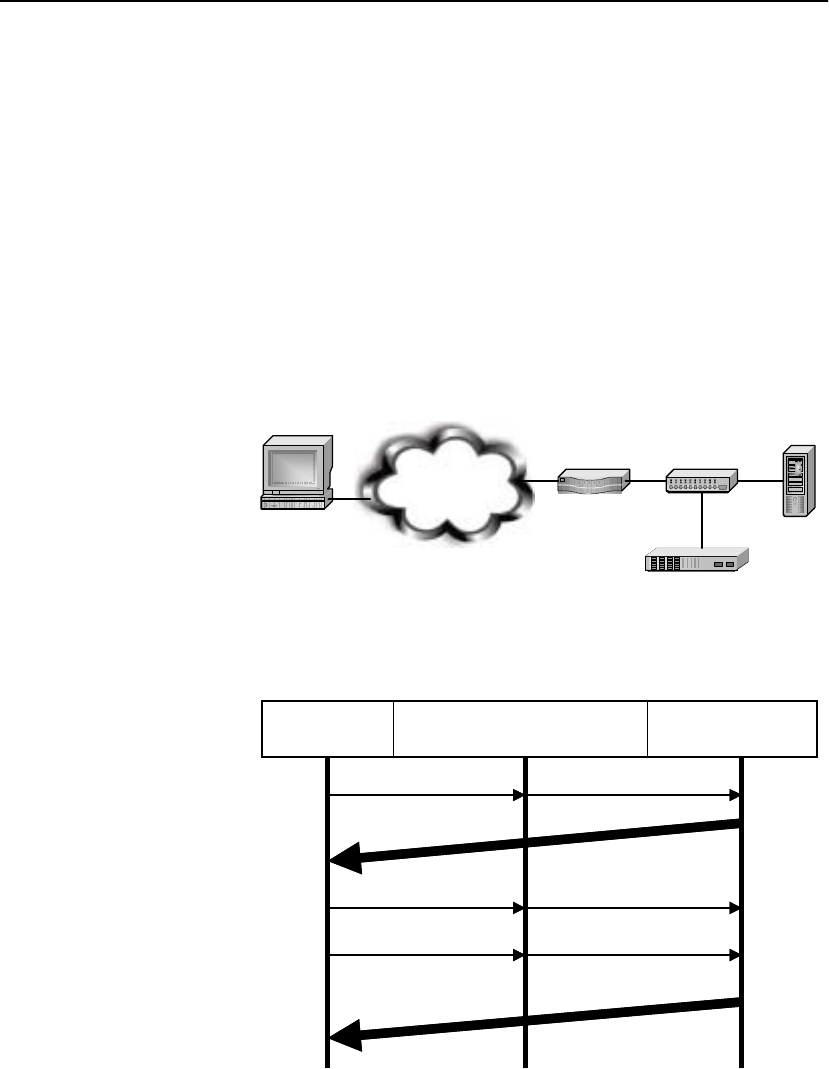
C H A P T E R 6 HP e-Commerce/XML Director Server Appliance SA8250 User Guide
244
Scenario 3:
Routing
Outbound Data
Away from the
SA8250 for
OPR
You can configure the SA8250 to direct outbound data from the
fulfillment servers to bypass the SA8250. Most requests to servers
elicit a disproportionate amount of return data. Under some
circumstances, it is desirable to avoid routing such volumes of
content through the SA8250 as it returns to the client.
The SA8250’s Out of Path Return (OPR) mode removes it from the
return path to the client. OPR sends requests to a back-end server and
allows the server to respond through its own default gateway—thus
bypassing the SA8250 altogether. OPR requires that the server's
loopback adapter be installed and configured with the VIP as an alias,
and that the server be programmed with a default gateway address
other than that of the SA8250.
This diagram shows the network configuration for scenario 3.
Network Configuration for Scenario 3
This diagram shows the data flow for scenario 3.
Data Flow for Scenario 3
Client Server
SA8250
Switch
Router
Internet
&OLHQW%URNHU 6HUYHU
6<1 6<1
6<1$&.
$&.$&.
*HW85/*HW85/
'DWD
&OLHQW%URNHU 6HUYHU
6<1 6<1
6<1$&.
$&.$&.
*HW85/*HW85/
'DWD

C H A P T E R 6 SA8250 Scenarios
245
Prerequisites for Scenario 3
Equipment
•At least one Web server with an installed loopback adapter (for
example, UNIX* or Windows* or NT*)
•One SA8250 physically installed on the network, with its Boot
Monitor and routing protocol configurations completed. For
more information, see the Getting Started Guide.
Procedure for Scenario 3
Connect to the SA8250
1. Telnet to the SA8250's port 23 and log on as the administrator
(admin).
The Command Line prompt displays:
HP SA8250#
Create a Policy Group
1. To create a policy group, first move the prompt to the policy
group level by typing this command:
HP SA8250#config policygroup
2. To specify the new policy group's name (“oprtest” in this
example), type this command:
HP SA8250/config/policygroup#create oprtest
policy group oprtest created.
3. To move the prompt to that level, type the new policy group's
name:
HP SA8250/config/policygroup#oprtest

C H A P T E R 6 HP e-Commerce/XML Director Server Appliance SA8250 User Guide
246
Add HTTP Service and VIP
1. To add HTTP service to policy group oprtest, type this
command:
HP SA8250/config/policygroup/oprtest#
service create OPR vip 30.1.1.201 port 80
This command creates a new service on the SA8250, using the
HTTP protocol, at IP address 30.1.1.201, listening on TCP port
80.
2. To move the prompt, type this command:
HP SA8250/config/policygroup/oprtest#service OPR
Add Servers to the OPR Service
NOTE: We recommend
that you test the
connectivity using
Brokered mode before
switching to OPR mode.
Verify that the VIP is
accessible from the client
before enabling OPR
mode.
1. To add the server “Serv1.com” to the OPR service, type this
command:
HP SA8250/config/policygroup/oprtest/service/
OPR#server create serv1.prime.com port 80
Server serv1.prime.com port 80 has been created.
This command tells the SA8250 that serv1.prime.com can fulfill
requests arriving at 30.1.1.201 on port 80.
2. To move the prompt, type this command:
HP SA8250/config/policygroup/oprtest/service/
OPR#serv1.prime.com port 80
3. Finish by typing this command:
HP SA8250/config/policygroup/oprtest/service/
OPR/serv1.prime.com/port/80#mode opr
This command allows client addresses to be forwarded to the
server rather than to the SA8250's address.
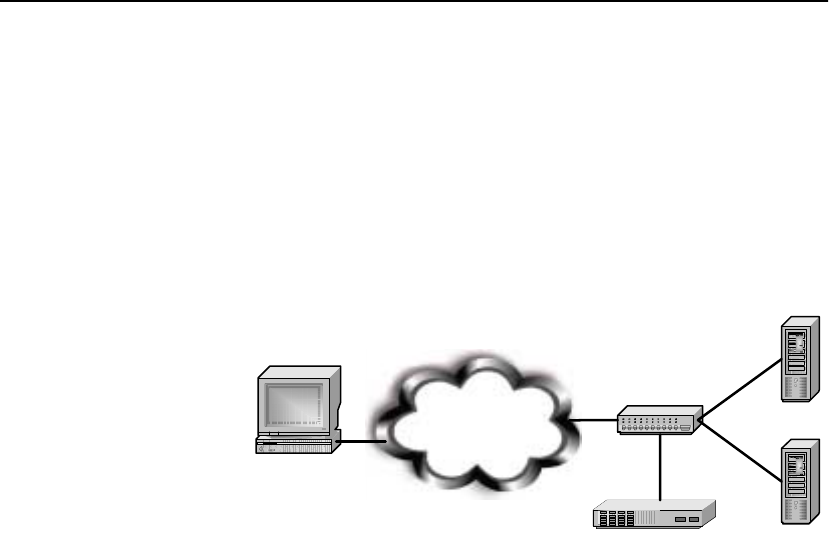
C H A P T E R 6 SA8250 Scenarios
247
Scenario 4:
Content
Routing using
RICH only
Because the SA8250 can differentiate servers according to their
content, it can apportion requests based on the type of content
requested. For example, an administrator might choose to run the
most processor-intensive processes (such as CGI scripts) on the most
powerful servers while placing the less processor-bound files on
slower servers. The SA8250 then sends requests for CGI scripts to
the faster servers, thus avoiding the slowdowns that would occur if
the slow servers were relied upon.
This diagram shows the network configuration for scenario 4.
Network Configuration for Scenario 4
Client
SA8250
Switch
Server
Server
Internet
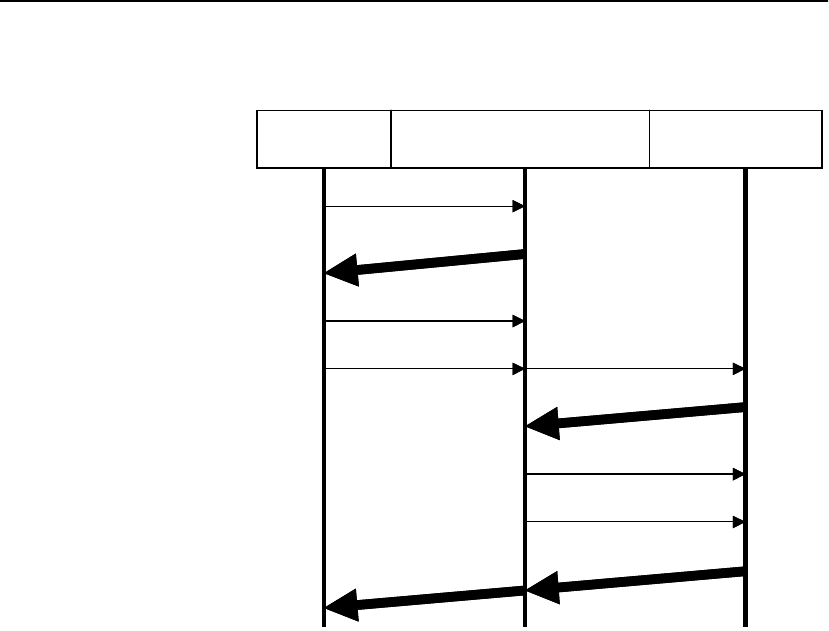
C H A P T E R 6 HP e-Commerce/XML Director Server Appliance SA8250 User Guide
248
This diagram shows the data flow for scenario 4.
Data Flow for Scenario 4
Prerequisites for Scenario 4
•At least two Web servers
•One for HTML and images
•One for CGI scripts
•One SA8250 physically installed on the network, and its Boot
Monitor and routing protocol configurations must be complete.
For more information, see the Getting Started Guide.
&OLHQW%URNHU 6HUYHU
6<1
6<1
6<1$&.
6<1$&.
$&.
$&.
*HW85/
*HW85/
'DWD'DWD
&OLHQW%URNHU 6HUYHU
6<1
6<1
6<1$&.
6<1$&.
$&.
$&.
*HW85/
*HW85/
'DWD'DWD

C H A P T E R 6 SA8250 Scenarios
249
Procedure for Scenario 4
Connect to the SA8250
1. Telnet to the SA8250’s port 23 and log on as the administrator
(admin).
The Command Line prompt displays:
HP SA8250#
Create a Policy Group
1. To create a policy group, first move the prompt to the policy
group level by typing this command:
HP SA8250#config policygroup
2. To specify the new policy group's name (“xml” in this example),
type this command:
HP SA8250/config/policygroup#create xml
3. To move the prompt to the new policy group's level, type this
command:
HP SA8250/config/policygroup#xml
Add RICH_HTTP Service and VIP
1. To add RICH_HTTP service to policy group xml, type this
command:
HP SA8250/config/policygroup/xml#
service create rich vip 30.1.1.201 port 80 type
RICH_HTTP
This creates a new RICH service on the SA8250 using the
RICH_HTTP protocol, at IP address 30.1.1.201, listening on
TCP port 80.
2. To move the prompt to the service level, type service rich:
HP SA8250/config/policygroup/xml#service rich

C H A P T E R 6 HP e-Commerce/XML Director Server Appliance SA8250 User Guide
250
Add Servers to the RICH Service
1. To add “serv1” to the rich service, type this command:
HP SA8250/config/policygroup/xml/service/
rich#server create serv1.prime.com port 80
Server serv1.prime.com port 80 has been created.
This tells the SA8250 that serv1.prime.com can fulfill requests
arriving at 30.1.1.201 on port 80.
2. To move the prompt to the server level, type this command:
HP SA8250/config/policygroup/xml/service/
rich#server serv1.prime.com port 80
Add Expressions to serv1's Configuration
1. Finish the configuration by adding expressions to server
Serv1.com to differentiate content by typing these commands:
HP SA8250/config/policygroup/xml/service/rich/
server/serv1.prime.com/port/80#xmlpattern create
*.html
HP SA8250/config/policygroup/xml/service/rich/
server/serv1.prime.com/port/80#xmlpattern create
*.jpg
HP SA8250/config/policygroup/xml/service/rich/
server/serv1.prime.com/port/80#xmlpattern create
*.gif
2. To verify the setup of serv1.prime.com, type this command at the
prompt:
HP SA8250/config/policygroup/xml/service/rich/
server/serv1.prime.com/port/80/xmlpattern#info
Policy group:xml
Service:xml
Server Name: serv1.prime.com
Status Port Type Weight Mode MSAP 606 HTTP
------------------------------------------------
Active 80 Primary 1 BROKERED Off Off Off
Index Pattern
1 *.html
2 *.jpg
3 *.gif

C H A P T E R 6 SA8250 Scenarios
251
3. To add “serv2” to the rich service, type these commands:
HP SA8250/config/policygroup/xml/service/rich/
server/serv1.prime.com/port/80#back
HP SA8250/config/policygroup/xml/service/rich/
server#create serv2.prime.com port 80
4. To move the prompt, type this command:
HP SA8250/config/policygroup/xml/service/rich/
server#serv2.prime.com port 80
Add an Expression to serv2's Configuration
1. Now add an expression to differentiate serv2's content from that
of serv1 by typing this command. In this example, serv2
contains CGI content:
HP SA8250/config/policygroup/xml/service/rich/
server/serv2.prime.com/port/80#
xmlpattern create /cgi-bin/*
2. To verify the setup of serv2, type this command at the prompt:
HP SA8250/config/policygroup/xml/service/rich/
server/serv2.prime.com/port/80/xmlpattern#
info
Policy group:xml
Service:xml
Server Name: serv2.prime.com
Status Port Type Weight Mode MSAP 606 HTTP
------------------------------------------------
Active 80 Primary 1 BROKERED Off On Off
Index Pattern
1 /cgi-bin/*
The SA8250 now directs requests to specific servers according to
the content requested. serv2 receives requests entailing CGI
scripts (files located in the /cgi-bin directory), while all other
requests go to serv1.
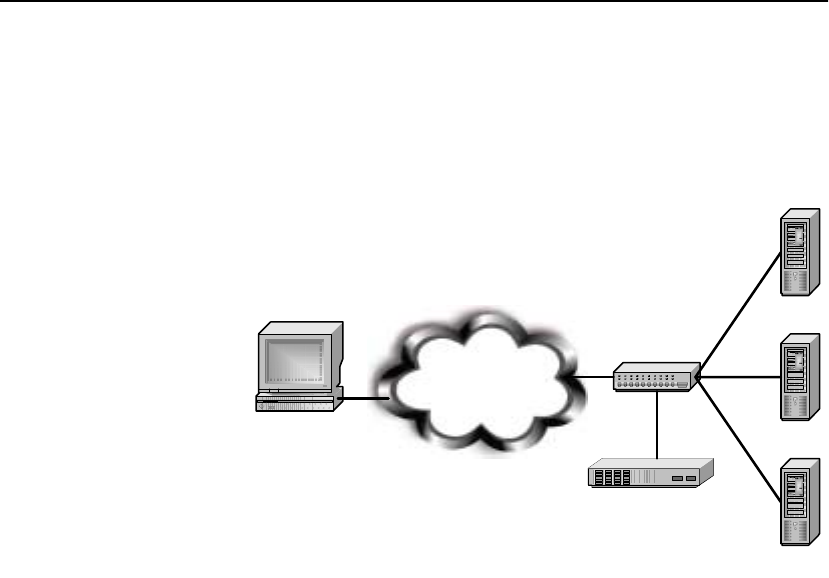
C H A P T E R 6 HP e-Commerce/XML Director Server Appliance SA8250 User Guide
252
Scenario 5:
Using SSL
Acceleration
We now build upon Scenario 4 by adding a Layer 7 service using the
SA8250’s SSL acceleration capabilities. As discussed earlier, the
SA8250 can off load SSL processing from the web server, providing
dramatically improved performance. This diagram shows the
network configuration for scenario 5.
Network Configuration for Scenario 5
In the conventional secure web server setup, protected data is
accessed using the HTTPS (HTTP over SSL) on port 443. In this
example we add a new web server, “Serv3,” which along with
“Serv2” (defined in Scenario 4) hosts this data and accesses it through
VIP 30.1.1.201 on port 443. We assume the data is accessed on server
port 80 to isolate it from normal HTTP traffic. It is also strongly
recommended that secure data be isolated from the rest of the
network through the use of the inside NIC interface and the SA8250's
security firewall capabilities.
The following processes occur in Scenario 5:
1. The client connects to the SA8250 with ClientHello (includes
ciphers supported).
2. The SA8250 responds with SSL Server Hello (includes selected
cipher and session ID).
3. The SA8250 sends the certificate for the server
4. The client sends the ClientKeyExchange message, including the
PK (session key).
Client
SA8250
Switch
Server
Server
Server
Internet

C H A P T E R 6 SA8250 Scenarios
253
5. The SA8250 and client send ChangeCipherSpec message to
indicate readiness.
6. The SA8250 and client send “finished” messages, including
whole conversation.
7. Encrypted data is sent to the SA8250, decrypted, and forwarded
to the least busy server.
8. A clear response is sent to the SA8250, encrypted, and sent to
client.
Procedure for Scenario 5
Using this procedure, you will add an SSL enabled service called
“SSL” to the previously defined “xml” policy group.
1. Telnet to the SA8250's port 23 and log on as the administrator
(admin).
The Command Line prompt displays:
HP SA8250#
2. To move the prompt to the xml policy group, type this
command:
HP SA8250#config policygroup xml
3. To add the new service to the xml policy group, type this
command:
HP SA8250/config/policygroup/xml#
service create SSL vip 30.1.1.201 port 443 type
RICH_HTTP
Service SSL created.
4. To move the prompt to the service SSL level, type this
command:
HP SA8250/config/policygroup/xml#
service SSL
NOTE: An existing key
may be imported using
the key import
command.
5. To create the RSA private key, type this command:
HP SA8250/config/policygroup/xml/service/SSL#key
create 1024
Finished creating key. Key strength is 1024.

C H A P T E R 6 HP e-Commerce/XML Director Server Appliance SA8250 User Guide
254
6. To create a certificate, type these commands:
HP SA8250/config/policygroup/xml/service/SSL#
key certificate create
Certificate created (Expires in 30 days).
The service is SSL enabled. Define the servers
to start processing.
HP SA8250/config/policygroup/xml/service/SSL#
server create serv2.prime.com port 80
Server serv2.prime.com port 80 has been created.
HP SA8250/config/policygroup/xml/service/SSL#
server create serv3.prime.com port 80
Server serv3.prime.com port 80 has been created.
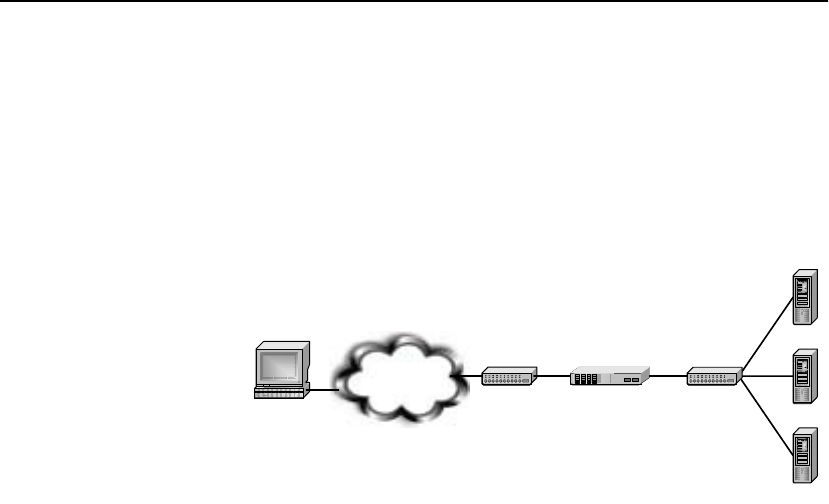
C H A P T E R 6 SA8250 Scenarios
255
Scenario 6:
Content
Routing using
RICH and XML
expressions
In addition to recognizing RICH expressions, the SA8250 has the
unique ability to direct traffic to servers based on its recognition of
patterns in the incoming XML data.
This diagram shows the network configuration for scenario 6. For
ease of reading, the SA8250 is interfaced to only three servers in this
scenario, but the principles demonstrated here could be applied to any
number of servers.
Network Configuration for Scenario 6
NOTE: There must be
one space before and
after the ampersand (&),
and the RICH expression
must always precede the
XML expression.
The table on the next page shows example XML patterns (in the form
of RICH and XML expressions) that would be programmed in the
SA8250 for each of the three servers in the figure above. For ease of
reading, the RICH and XML expressions are shown separately in the
table on the following page, but the actual pattern in the SA8250
would display in this form:
create */order.asp & //Amount[Value >= 10000]
For more information on XML commands, see Chapter 5.
Using the default special case
For more information on the XML default server setting, see Chapter
2.
Client SA8250
Server 1
Server 2
Server 3
SwitchSwitch
Internet

C H A P T E R 6 HP e-Commerce/XML Director Server Appliance SA8250 User Guide
256
This table shows example SA8250 responses to incoming XML data.
Server RICH Expression XML Expression
1 */order.asp //From[id = “Acme”]
*/order.asp //Amount[Value >= 10000]
*/order.asp default
2*/order.asp //From[id = “Widgets.com”]
*/order.asp //Amount[Value < 10000]
*/order.asp //Order[@type = “debit card”]
3*/order.asp //Amount[Value > 5000 and Value < 10000]
*/order.asp //Address[ZipCode > 90000]
*/order.asp //From[contains(id, “Your”)]
XML Patterns for Scenario 6
Incoming XML Data SA8250 Response
company name is Acme Directed to Server 1
company name is Widgets.com Directed to Server 2
company name is YourCo.com Directed to Server 3
purchase amount is $13,280 Directed to Server 1
purchase amount is $7,280 Load-balanced between Servers 2 and 3 because it
falls within the value range for both servers
purchase amount is $713 Directed to Server 2
order is paid for with a debit card Directed to Server 2
customer’s zip code is 92128 Directed to Server 3
customer’s zip code is 27513 Directed to Server 1 due to the default* setting
order is paid for with a credit card Directed to Server 1 due to the default* setting
Example SA8250 Responses to incoming XML traffic

C H A P T E R 6 SA8250 Scenarios
257
Scenario 7:
Using CRLs
The SA8250 can be configured to work with Client Revocation Lists
(CRLs). In this scenario, the SA8250 uses a CRL to validate that a
client certificate is not expired, meaning that it does not display in the
CRL. For more information on CRLs, see Appendix B.
Prerequisites for Scenario 7
NOTE: Scenario 7
assumes that you have
already completed all
steps in Scenario 5.
•A Web server
•A SA8250
•A valid client authentication (CA) certificate
•A public key infrastructure (PKI) server with a CA certificate
and the ability to:
• generate a CRL
• revoke certificates
• export the CRL using FTP, HTTP, or LDAP
Procedure for Scenario 7
Using this procedure, you will configure the SA8250 to use a CRL.
NOTE: The SA8250
cannot use CRLs with
more than 10,000 serial
numbers.
1. Telnet to the SA8250 and log on as the administrator (admin).
The Command Line prompt displays:
HP SA8250#
2. To move the prompt to the SSL service in the Richtest policy
group, type this command:
HP SA8250#config policygroup richtest service
SSL
3. To navigate to client-ca, type this command:
HP SA8250/config/policygroup/richtest/service/
SSL#key client-ca
4. To import the CA certificate from the PKI server, type this
command:
HP SA8250/config/policygroup/richtest/service/
SSL/key/client-ca#import

C H A P T E R 6 HP e-Commerce/XML Director Server Appliance SA8250 User Guide
258
You will see:
Paste in the data, end with ... alone on line.
5. Paste in the certificate.
After aproximately 30 seconds, you will see:
-----BEGIN CERTIFICATE-----
MIIDdDCCAt2gAwIBAgIBADANBgkqhkiG9w0BAQQFADCBiTEL
MAkGA1UEBhMCVVMxEzARBgNVBAgTCkNhbGlmb3JuaWExEjAQ
BgNVBAcTCVNhbiBEaWVnbzEOMAwGA1UEChMFSW50ZWwxDTAL
BgNVBAsTBEVOR1IxGjAYBgNVBAMTEUFuZHJlYXMgQVVUSE9S
SVRZMRYwFAYJKoZIhvcNAQkBFgdhQGUuYy5kMB4XDTAwMTAx
NzEwNTI1M1oXDTAxMTAxNzEwNTI1M1owgYkxCzAJBgNVBAYT
AlVTMRMwEQYDVQQIEwpDYWxpZm9ybmlhMRIwEAYDVQQHEwlT
YW4gRGllZ28xDjAMBgNVBAoTBUludGVsMQ0wCwYDVQQLEwRF
TkdSMRowGAYDVQQDExFBbmRyZWFzIEFVVEhPUklUWTEWMBQG
CSqGSIb3DQEJARYHYUBlLmMuZDCBnzANBgkqhkiG9w0BAQEF
AAOBjQAwgYkCgYEAwbizLs+d5+wLBcmTob9kc0uhuPUiMt7x
RzMNu6cNKZjC5hZnM0Gfp063s7HftllVYpbwyNu1UxQBNYfG
27vd95rCNe4XDy34j0HB4LMmmHRVn3HxiypWQZhmBlmSeBJz
kkLV4Y62IoGcypqnfLbEF+VoYdQ8cprHkpFIAPuCkCAwEAAa
OB6TCB5jAdBgNVHQ4EFgQUG+mshG5BnnVLidK97NuMXAi0lk
kwgbYGA1UdIwSBrjCBq4AUG+mshG5BnnVLidK97NuMXAi0
lkmhgY+kgYwwgYkxCzAJBgNVBAYTAlVTMRMwEQYDVQQIEwpD
YWxpZm9ybmlhMRIwEAYDVQQHEwlTYW4gRGllZ28xDjAMBgNV
BAoTBUludGVsMQ0wCwYDVQQLEwRFTkdSMRowGAYDVQQDExFB
bmRyZWFzIEFVVEhPUklUWTEWMBQGCSqGSIb3DQEJARYHYUBl
LmMuZIIBADAMBgNVHRMEBTADAQH/MA0GCSqGSIb3DQEBBA
UAA4GBAFFWGDxGIq5u5XhaLY4gb0j38BEtdj//qX5IXQi
1d+Xqnx+IpHKN3ID2ao44+eLGDFEJZd5vCVkDHFQw6pja1YX
7gaHTPswm/Qk3Tn5Wr97ThfK8JcJjNSzYg8w7NcnnFyq
8a0+Z7kdH9TxlazvF/blRosjGRfVrje8JAI5oZUI
-----END CERTIFICATE-----
...
Client certificate successfully imported
6. To move to the revocation level and enable CRLs, type this
command:
HP SA8250/config/policygroup/richtest/service/
SSL/key/client-ca#revocation

C H A P T E R 6 SA8250 Scenarios
259
7. To provide the SA8250 with the download address for the CRL,
type this command:
HP SA8250/config/policygroup/richtest/service/
SSL/key/client-ca/revocation#url ftp://
10.1.2.64/Certsrv/myCA.crl user john password
smith
where john is your username and smith is your password. You
will see:
URL updated
8. To verify that the SA8250 can retrieve the CRL from your PKI,
type this command:
HP SA8250/config/policygroup/richtest/service/
SSL/key/client-ca/revocation#refresh now
This downloads the CRL from your PKI server 10.1.2.64 to the
SA8250. You will see:
Refresh completed, revocation list was obtained
from: ftp://10.1.2.64/Certsrv/myCA.crl
9. To set up the SA8250 to periodically update the CRL, type this
command:
HP SA8250/config/policygroup/richtest/service/
SSL/key/client-ca/revocation#refresh 480
This sets the CRL update period to 8 hours (480 minutes). You
will see:
Refresh will begin in 480 minute(s), url: ftp://
10.1.2.64/Certsrv/myCA.crl
10.To enable the CRL feature for the SA8250, type this command:
HP SA8250/config/policygroup/richtest/service/
SSL/key/client-ca/revocation#mode enable
You will see:
Mode changed to enable

C H A P T E R 6 HP e-Commerce/XML Director Server Appliance SA8250 User Guide
260
Notes

SNMP Support
Using SNMP
The HP e-Commerce/XML Director Server Appliance SA8250
includes a fully compliant, embedded SNMP agent that supports
SNMPv1 and SNMPv2c requests. In addition to standard MIB-II, HP
private enterprise MIBs provide the following capabilities:
•Monitor the SA8250’s health
•Monitor health of a redundant SA8250 and failover readiness
•Monitor the SA8250’s load as indicated by CPU utilization,
connection count and connections per second
•Monitor status and performance of server farm
•Monitor status and performance of services (VIP, port) presented
to clients
•Monitor HTTP server errors and HTTP errors recovered by the
SA8250 for clients
•Monitor SSL acceleration performance and capacity

C H A P T E R 7 HP e-Commerce/XML Director Server Appliance SA8250 User Guide
262
Standards
Compliance
The SA8250 SNMP agent is bilingual and can support both SNMPv1
and SNMPv2c requests. HP private enterprise MIB files are
compliant with SMIv2 as specified in RFC 1902. The SNMP agent
supports Management Information Base-II (MIB-II) as specified in
RFC 1213, but allows SET operations only on the SYSTEM and
SNMP groups.
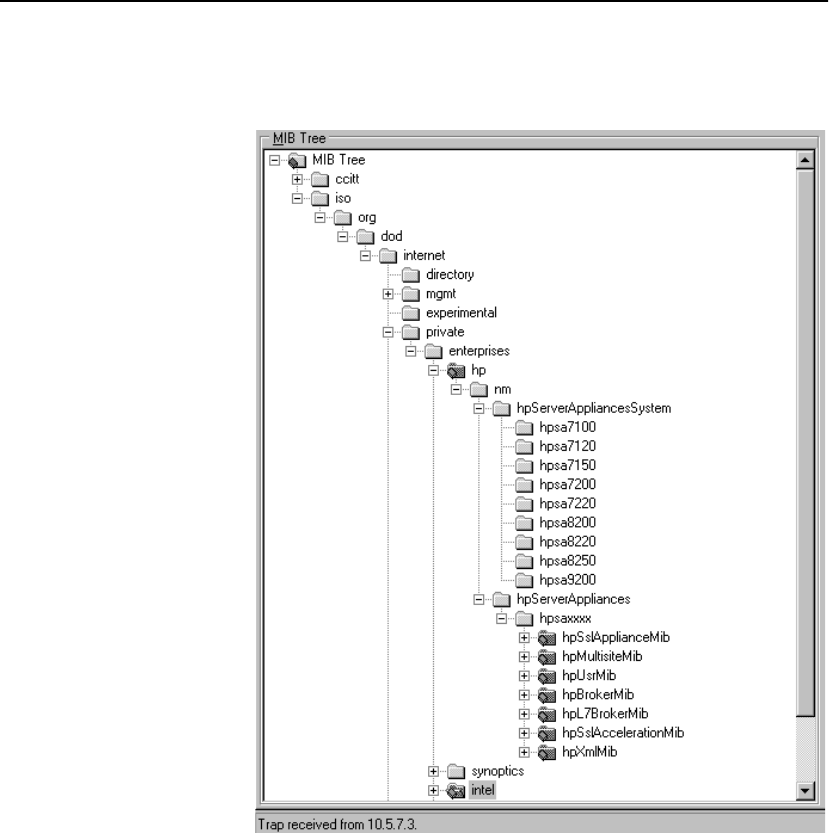
C H A P T E R 7 Using SNMP
263
MIB Tree This figure illustrates the HP MIB tree. Please refer to it as needed
throughout this chapter.
HP’s MIB Tree
All HP enterprise MIBs and MIB objects are defined under the
management branch of the hp tree. All sysObjectIds that identify
HP products are defined under the hpServerAppliancesSystem
branch of the hp tree.

C H A P T E R 7 HP e-Commerce/XML Director Server Appliance SA8250 User Guide
264
Supported MIBs
Management Information Base-II (MIB-II)
HP Enterprise MIBs:
hpserver-header.my
hpbroker-mib.my
hpl7-broker-mib.my
hpssl-acceleration-mib.my
hpuser-mib.my
Where to find MIB Files
Electronic copies of the HP MIB files used by the SA8250 are
shipped with the product on CD-ROM and are available from HP’s
web site:
http://www.hp.com/serverappliances/support/
Write access through MIB II SNMP SET is allowed only to the
System and SNMP groups. An SNMP SET on all other groups returns
a noAccess error for SNMPv2c or a noSuchName error for SNMPv1.
The SA8250 supports the coldStart, linkUp, linkDown, and
authenticationfailure standard SNMP traps.
hpserver-header.my
hpserver-header.my contains objects that define the top-level
branches of the HP MIB tree. This MIB file contains the
sysObjectId definition for the SA8250.
hpbroker-mib.my
hpbroker-mib.my defines objects and traps for Layer 4 load
balancing. hpbroker-mib.my also contains objects and traps
related to server availability, the SA8250’s CPU utilization, and its
operational status. The hpbroker-mib.my objects and traps are
discussed below.

C H A P T E R 7 Using SNMP
265
Server Availability (Ping)
NOTE: The Intelligent
Resource Verification
(IRV) CLI command is
config irv <ping-
interval> and the
default ping-interval is
zero. To make the
serverPingTable active,
ensure that the ping-
interval is NOT set to
zero.
The serverPingTable can be used to monitor server availability.
If a server is responding to periodic ping requests from the SA8250,
then its state is marked as responding. Otherwise, the server is
marked as notResponding. Whenever a server’s Ping state toggles,
the trap serverPingNormal or serverPingAlert is sent for
that server.
Server TCP Connection
The performance of TCP connections between the SA8250 and
servers are monitored. This performance data is stored in the
serverTcpTable. For each configured server mapping used for
load balancing a service (VIP, PORT), the following data is
maintained in the serverTcpTable:
•state, up or down (serverState)
•how long this server has been up (serverUpTime)
•response time (serverRspTm)
•number of established TCP connection instances
(serverConnCnt)
•TCP connections established per second (serverCps)
Trap thresholds are available in the MIB for serverRspTm,
serverConnCnt and serverCps. Different threshold settings can
be configured for each server TCP connection in
serverTcpTable.
Trap thresholds for server response time can be configured so that a
trap is sent if the response time reaches a specified value. When
serverRspTm reaches serverRspTmHiWater, a
serverRspTmAlert trap is sent. While in alert, if serverRspTm
dips to serverRspTmLoWater, a serverRspTmNormal trap is
sent. High- and low- water thresholds provide hysteresis and prevent
the spurious generation of traps. If the high-water threshold is set to
0, no traps are sent.
Trap thresholds for server connection count can be configured so that
a trap is sent if the connection count reaches a specified value. The
serverConnCntAlert and serverConnCntNormal traps and
applicable thresholds work similarly for server response time.

C H A P T E R 7 HP e-Commerce/XML Director Server Appliance SA8250 User Guide
266
Trap thresholds for server connections can be configured such that if
the connection/second rate reaches a given value, a trap is sent. The
serverCpsAlert and serverCpsNormal trap and applicable
thresholds work similarly for server response time.
Layer 4 Service (VIP, PORT)
The performance of each configured Layer 4 service (VIP, PORT)
presented to clients is monitored. Performance data is stored in the
serviceTcpTable. This data is computed by aggregating the
values in serverTcpTable that apply to the (VIP, PORT). That is,
all server TCP connections used for load balancing a (VIP, PORT)
are aggregated to derive performance data for that (VIP, PORT) in
serviceTcpTable. Per (VIP, PORT) pair, the following data is
available:
•State, up or down (serviceState)
•Length of time the service has been up (serviceUpTime)
•Response time (serviceRspTm)
•Number of established TCP connections (serviceConnCnt)
•TCP connections established per second (serviceCps)
Trap thresholds are available in the MIB for serviceRspTm,
serviceConnCnt and serviceCps. Different threshold settings
can be configured for each service in serviceTcpTable.
Trap thresholds for service response time can be configured such that
if the service response time reaches a specified value, a trap is sent.
When serviceRspTm reaches serviceRspTmHiWater, a
serviceRspTmAlert trap is sent. While in alert, if
serviceRspTm dips to serviceRspTmLoWater, a
serviceRspTmNormal trap is sent. High- and low-water
thresholds provide hysteresis and prevent spurious trap generation. If
the high-water threshold is set to 0, no traps are sent.
Trap thresholds for service connection count can be configured so
that a trap is sent if the connection count reaches a value. The traps,
serviceConnCntAlert and serviceConnCntNormal and
applicable thresholds work similarly for service response time.
Trap thresholds for service connection can be configured such that if
the connection/second rate reaches a value, a trap is sent. The
serviceCpsAlert and serviceCpsNormal trap and applicable
thresholds work similarly for service response time.

C H A P T E R 7 Using SNMP
267
Broker Connection Count, Connections/Second, and CPU Utilization
brokerConnCount is the number of established TCP connections
used for load balancing. This number aggregates all
serviceConnCnt values in the serviceTcpTable.
brokerCps is the number of TCP connections/second established
by the Director. brokerCps aggregates all serviceCps values in
the serviceTcpTable.
brokerCpuUtil returns the current CPU utilization of the
Director. Its value can be from 0 to 100%.
Trap thresholds are available in the MIB for brokerCpuUtil,
brokerConnCnt.
Trap thresholds for Director CPU utilization can be configured such
that if the Director CPU utilization reaches a value, a trap is sent.
When brokerCpuUtil reaches brokerCpuUtilHiWater, a
brokerCpuUtilAlert trap is sent. While in alert, if
brokerCpuUtil dips to brokerCpuUtilLoWater, a
brokerCpuUtilNormal trap is sent. High- and low-water
thresholds provide hysteresis and prevent the spurious generation of
traps. If the high water threshold is set to 0, no traps are sent.
Trap thresholds for Director connection count can be configured such
that if the connection count reaches a value, a trap is sent. The traps,
brokerConnCntAlert and brokerConnCntNormal and
applicable thresholds work similarly as described above for Director
CPU utilization.
Trap thresholds for Director connection/second can be configured
such that if the connection/second rate reaches a value, a trap is sent.
The brokerCpsAlert and brokerCpsNormal traps and
applicable thresholds work similarly for the SA8250’s CPU
utilization.
Director and Redundant Director Operational State
Operational state of the Director can be monitored through
operationState. Whenever the value of operationState
changes, the operationStateChanged trap is sent. The
operational state of the redundant Director in a serial-cable failover
configuration is monitored through redundantBrokerState.
The traps redundantBrokerUp and redundantBrokerDown
are sent to alert the administrator of any changes in the availability of
the redundant Director.

C H A P T E R 7 HP e-Commerce/XML Director Server Appliance SA8250 User Guide
268
hpl7-broker-mib.my
hpl7-broker-mib.my defines objects and traps for Layer 7 load
balancing. The hpl7-broker-mib.my objects and traps are
discussed below.
HTTP Monitor Table
A 24-hour history of HTTP performance is maintained in
httpMonTable. httpMonTable is indexed by hours of the day,
so httpMonTable is indexed from 0 to 23. To get the current http
performance numbers, index the table by the current hour. Each entry
in the table contains the following information:
httpRedirects
httpErrsToClient
http606Redirects
http606ErrsToClient
invalidHttpReq
httpServerErrs
Using the Intelligent Session Recovery feature, the Director can be
configured such that if a server returns an HTTP error, the Director
intercepts the error and resubmits the HTTP request to another server
for fulfillment. Each server is tried in sequence until the HTTP
request is fulfilled. If the HTTP request is fulfilled, the client sees a
successful completion of the request. Otherwise, the client receives a
503 error from the Director.
httpRedirects is the number of times during the hour that the
Director redirected a request to a server. httpErrsToClient is the
number of times during the hour that a 503 error is returned to the
client because all redirection attempts failed to fulfill an HTTP
request. A trap threshold, httpErrsToClientTh, is available in
the MIB. If httpErrsToClient reaches httpErrsToClientTh
during the current hour, a trap is sent. httpErrsToClientTh can
be set to any positive number. If httpErrsToClientTh is set to 0,
no trap is sent. Since the value of httpErrsToClient during the
hour is accumulative and does not fluctuate, low and high water
thresholds are not necessary for hysteresis.
The SA8250 can be configured such that if a server returns an HTTP
606 error, the Director intercepts the error and resubmits the HTTP
request to another server for fulfillment. Each server is tried in
sequence until the HTTP request is fulfilled. If the HTTP request is
fulfilled, the client sees a successful completion of the request.
Otherwise, the client receives a 503 error from the Director.

C H A P T E R 7 Using SNMP
269
http606Redirects is the number of times during the hour that the
Director redirected a request to a server. http606ErrsToClient
is the number of times during the hour that a 503 error is returned to
the client because all redirection attempts failed to fulfill an HTTP
request. A trap threshold, http606ErrsToClientTh, is available
in the MIB. If http606ErrsToClient reaches
http606ErrsToClientTh during the current hour, a trap is sent.
http606ErrsToClientTh can be set to any positive number. If
http606ErrsToClientTh is set to 0, no trap is sent. Since the
value of http606ErrsToClient during the hour is accumulative
and does not fluctuate, low and high water thresholds are not
necessary for hysteresis.
invalidHttpRequests returns the number of invalid HTTP
requests received by the Director during the hour.
httpServerErrs is the number of timeouts, HTTP errors and
HTTP 606 errors received from servers during the hour.
hpssl-acceleration-mib.my
hpssl-acceleration-mib.my defines objects and traps for
Layer 7 load balancing. This MIB is available on the SA8250 only.
The hpssl-acceleration-mib.my objects and traps are
discussed below.
SSL Monitor Table
A 24-hour history of SSL performance is maintained in
sslMonTable. sslMonTable is indexed by hours of the day, so
sslMonTable is indexed from 0 to 23. To get the current SSL
performance numbers, index the table by the current hour.
currentHour is defined in hpl7-broker-mib.my. Each entry in
the table contains the following information:
sslPeakCpsRate
sslCpsRate
sslConnProcessed
sslTraffic
sslErrs
sslPeakCpsRate is the peak SSL connection/second rate
processed by the SA8250 for the hour. sslCpsRate is the
connection/second rate for the hour.
sslConnProcessed is the number of SSL connections handled by
the SA8250 during the hour.

C H A P T E R 7 HP e-Commerce/XML Director Server Appliance SA8250 User Guide
270
sslTraffic indicates whether or not SSL traffic exceeded
maximum capacity at least once during the 1-hour period. This object
starts with the value "ok" and is changed to "overflow" at the first
instance in which SSL traffic exceeds the capacity of the box. The
value does not toggle back to "ok." In this way, a 24-hour history of
SSL traffic capacity can be retrieved. An sslTrafficOverflow
Alert trap is sent when the value goes to "overflow" for the current
hour.
hpuser-mib.my
The MIB file hpuser-mib.my contains definitions for the
operatorLogin and operatorLogout traps.

C H A P T E R 7 Using SNMP
271
Trap Summary This list summarizes the traps generated by the SA8250. For details
about a particular trap, please read the description of each MIB
above, or read the documentation within the MIB file. Traps are
generated by SNMPv2c.
Standard SNMP Traps
coldStart
authenticationFailure
linkUp
linkDown
hpbroker-mib.my
serverPingAlert
serverPingNormal
serverStateChanged
serverRspTmAlert
serverRspTmNormal
serverCpsAlert
serverCpsNormal
serverConnCntAlert
serverConnCntNormal
serviceStateChanged
serviceRspTmAlert
serviceRspTmNormal
serviceCpsAlert
serviceCpsNormal
serviceConnCntAlert
serviceConnCntNormal
brokerCpsAlert
brokerCpsNormal
brokerConnCntAlert
brokerConnCntNormal
brokerCpuUtilAlert
brokerCpuUtilNormal
operationStateChanged
redundantBrokerDown
redundantBrokerUp
hpl7-broker-mib.my
httpErrsToClientAlert
http606ErrsToClientAlert
hpssl-acceleration-mib.my
sslTrafficOverflowAlert

C H A P T E R 7 HP e-Commerce/XML Director Server Appliance SA8250 User Guide
272
hpuser-mib.my
operatorLogin
operatorLogout
Displaying
SNMP
Parameters
The GUI’s Administration SNMP tab displays all SNMP parameters.
In the CLI, use the following command to display all SNMP
parameters:
show sys snmp info
The SA8250 has an IP filtering capability accessible through the
Administration-Security tab or the config sys security command.
Make sure that security is configured so that SNMP request packets
are allowed to pass through the IP filter. Security mode must either be
OPEN or CUSTOM. If mode is CUSTOM, SNMP access must be
enabled. Either of the following two sets of CLI commands configure
Security to enable SNMP:
config sys security mode open
or
config sys security mode custom
config sys security custom snmp enable
Configuring
Community
Authentication
and Security
Parameters
The SA8250 SNMP supports community-based authentication. An
unlimited number of community strings can be configured for use by
the SA8250. Each community string can have read-only (ro) or read-
write (rw) privilege, and can be configured for use by a specific IP
address or all IP addresses. When the value any is used for <ip
address>, the community string can be used by all IP addresses.
The following CLI commands are used to display and configure
SNMP community strings. These parameters can be configured in
the Administration-SNMP tab of the Web-based GUI interface.
config sys snmp community info
config sys snmp community create <string> ip <ip
address> rights [ro|rw]
config sys snmp community delete <string> ip <ip
address>

C H A P T E R 7 Using SNMP
273
For example:
config sys snmp community create test ip
209.218.240.5 rights ro
This command creates the community string test with read-only
privilege. SNMP read-only requests using community string test will
be accepted only from IP address 209.218.240.5.
By default the following community strings are defined:
public ro any
private rw any
Configuring
Trap
Parameters
Use the following CLI commands to display and configure SNMP
trap parameters:
config sys snmp trap info
config sys snmp trap port <port>
config sys snmp trap create <ip address>
community <community>
config sys snmp trap delete <ip address>
community <community>
NOTE: You can also
configure these
parameters in the
Administration-SNMP
tab of the Web-based GUI
interface.
By default, the UDP port used for sending traps is 162. The trap port
can be changed to a number between 5020 and 65535, or left at 162.
The SA8250 SNMP can send trap notifications to an unlimited
number of configured trap receivers. Each IP address configured as a
trap receiver is associated with a community string included in traps
sent to that IP address. For example:
config sys snmp trap create 209.218.240.5
community NOC1
sends traps to IP address 209.218.240.5, and causes the SA8250
SNMP agent to include the community string, NOC1 in the trap.

C H A P T E R 7 HP e-Commerce/XML Director Server Appliance SA8250 User Guide
274
Configuring
Other SNMP
Parameters
The following CLI commands are used to display and configure
general SNMP parameters:
config sys snmp info
config sys snmp port <port>
config sys snmp sysContact <string>
config sys snmp sysName <string>
config sys snmp sysLocation <string>
NOTE: You can also
configure these
parameters in the
Administration-SNMP
tab of the GUI interface.
SNMP port is used by the SA8250 SNMP to listen for SNMP
requests. By default, the SNMP port is 161. The SNMP port can be
changed to a number between 5020 and 65535.
sysContact, sysName and sysLocation correspond to the MIB
variables of the same name in MIB-II. sysContact is the name of
the administrator of this SA8250. By default, sysContact is
NULL. sysName is the name of the SA8250. By default, sysName
contains the hostname of the SA8250. sysLocation indicates
where the SA8250 is physically located. By default, sysLocation
is NULL.

Software Updates
Updating Your System Software
We recommend that you visit http://www.hp.com/
serverappliances/support/ on a routine basis to ensure that
your system is running the current software release.
After initial installation and setup, you may be eligible for, or choose
to purchase, a software version update. Update procedures are
performed using either the Graphical User Interface (GUI, Chapter 4)
or the Command Line Interface (CLI, Chapter 5). This chapter
describes how to update your system using the CLI.

C H A P T E R 8 HP e-Commerce/XML Director Server Appliance SA8250 User Guide
276
Multiple
Software
Images
The SA8250 provides sufficient local storage for at least five
software images (though at any time, only one image is active and
executing). You can download and install new software images on
the SA8250 using the config sys software install CLI
command.
Software
Image Media
Depending on the circumstances, you may receive your software
update from a CD-ROM as part of a new software kit, or you can
download it from an HP software Web site. In either case, the
distribution consists of a single large binary file of approximately 50
MB. The first step in software installation is to place this install image
file on an ftp server accessible by the SA8250.
Saving Your
Current
Configuration
Username commands are not valid in configuration files, that is,
save config and restore config operations do not include
username data.
The SA8250 configurations are not, by default, preserved across
major software updates. It is however possible to save your existing
SA8250 configuration while running your currently installed
software, and subsequently restore it to your updated system. You can
save your current configuration with the save command.

C H A P T E R 8 Downloading and Installing the Software
277
Downloading and Installing the Software
NOTE: If you install the
same image as the
currently running image,
the system will
automatically reboot.
The process for downloading and installing the software is the same
whether the image is a version update or patch. After the install file is
on an ftp server, use the GUI or the CLI to download and install it
onto the SA8250. Although it is possible to install software while the
SA8250 is operating, we recommend that you configure a backup
SA8250 before installation to minimize your downtime. If no backup
is available, it is best to perform installations at off-peak times.
1. To install the image, type this command:
config sys software install
If you are installing a software version update, your unit is
already licensed to execute the update image.
This is an example of FTP download syntax:
NOTE: The example
shown here is for
illustrative purposes
only. Actual input is
unique to each
installation.
FTP software update (no key required)
config sys software install ftp://myftpserver/
dir1/dir2/install_Pivot.SA8250.2.3.0.0.221
user myftpuser password myftppw
Status information appears as the installation progresses. If the install
status information indicates that the installation failed due to an
incorrect URL, user name, or password information, verify this data
and reenter the command with the appropriate corrections.

C H A P T E R 8 HP e-Commerce/XML Director Server Appliance SA8250 User Guide
278
Rebooting with
the New Image
and Verifying
Installation
As an added security feature, you must be connected to the serial
console throughout this section.
After the image has been downloaded and installed, you can verify it
by typing the CLI command, show sys software info. For
example, after downloading and installing an update, the response to
show sys software info might look like the example shown in
this table.
NOTE: If any errors
occurred during
installation, the show
sys software info
command may display the
image as installed, but the
downloaded image is not
safe to use. Use config
sys software
delete to delete the
image and repeat the
installation before
continuing. If the
problem persists, contact
HP Customer Support.
The table above indicates that version 2.8 of SA8250 software has
been installed and is ready for service.
1. Verify your connection to the serial console.
2. To activate the new image, type this command:
config sys software boot 1
This causes the SA8250 to reboot under the new image. This
command can also be used to restore the previous version of
software.
Index Product Version Patch Build Active
1 SA8250 2.8 0.0 38
2 SA8250 2.6 1.0 40 Yes
Example show sys software info Response

C H A P T E R 8 Downloading and Installing the Software
279
Upgrading
Under Serial
Cable Failover
Configuration
Upgrading software versions on two SA8250s (System A and System
B) configured for serial cable failover presents a special case. This
procedure ensures minimum downtime during upgrade.
1. At System A’s run time CLI, type the save command to save its
current configuration in a file, such as beforeupgrade.cfg.
2. At System A’s CLI, type this command:
config sys software install ftp://url/path_to_
install_image user <username> password
<password>
This downloads the new image and installs it on System A.
NOTE: In this example,
System A is the failover
Primary and is online.
System B is the failover
Backup and is offline.
3. At System B’s CLI, type this command:
config sys software install ftp://url/path_to_
install_image user <username> password
<password>
This downloads the new image and installs it on System B.
4. At System B’s CLI, type this command:
config sys autoboot disable
This ensures that System B pauses at the Boot Monitor.
5. Boot System A with the newly installed software image (allow
System A to boot and enter the Boot Monitor by pressing a key at
the appropriate prompt during the boot sequence before
proceeding to the next step). This will force a failover, and
System B will come online as Backup.
6. Boot System B with the newly installed software image and
proceed immediately to step 7.
7. In the Boot Monitor on System A, type the boot command.
System A will come online as Primary. Proceed immediately to
step 8.
8. At the prompt, type the new root password. This password must
consist of 8 to 128 characters.
9. Log on to System A’s CLI and restore the previously saved
configuration file <beforeupgrade.cfg>.
10.In the Boot Monitor on System B, type the boot command.
System B will remain offline as backup.

C H A P T E R 8 HP e-Commerce/XML Director Server Appliance SA8250 User Guide
280
11.At the prompt, type the new password. This password must also
consist of 8 to 128 characters.
12.If desired, type the following command in System B’s CLI to
enable autoboot:
config sys autoboot enable

Security
Configuration
Recommended Security Configuration
This section describes configuration options to enhance the level of
protection of your SA8250. For more details, see Chapter 5.
1. If you have not already done so, change the admin password by
typing the config cli username command.
2. Set security to closed or custom mode typing the config sys
security mode [closed|custom] command. Closed
mode restricts administration to the serial port. By default, the
custom mode enables both SSH and the serial port. You can
view the current settings of your system typing the config sys
security info command.

A P P E N D I X A HP e-Commerce/XML Director Server Appliance SA8250 User Guide
282
3. With custom mode access, control lists can be used to further
enhance administration security by restricting management
functionality to either your IP or subnet. Type these commands:
config sys security custom access-control
enabled
config sys security custom acl add ip <ip
address>
For a subnet entirely under your control, type the following
command:
config sys security custom acl add netmask <ip
address>/<mask length>
4. If you want to use SNMP, reads and traps should be restricted to
the specific IP’s of logging hosts or administration machines.
Type the following commands for this purpose. The system must
be in custom mode and SNMP access must be enabled.
config sys snmp community delete public ip any
config sys snmp community delete private ip any
config sys snmp community create <community
string> ip <ip address> rights [ro|rw]
5. Always remember to save your configuration by typing the save
<filename> command.

SSL Configuration
Obtaining Keys and Certificates
NOTE: The SA8250
comes with default keys
and certificates for test
purposes. However,
certificates for
production use must be
obtained from a
recognized Certificate
Authority.
Keys and certificates are necessary for the successful operation of the
SA8250 for XML traffic processing. The SA8250 supports
certificates in PEM format. There are three ways to obtain them:
•Obtain a certificate from Verisign or another Certificate
Authority (CA)
•Import from a server
•Create a new key or certificate on the SA8250

A P P E N D I X B HP e-Commerce/XML Director Server Appliance SA8250 User Guide
284
Copying and
Pasting Keys
and
Certificates
Copying and pasting is an integral part of the next several procedures.
These are steps required to perform these tasks using
HyperTerminal*. If you use another terminal program, consult that
product’s documentation for the appropriate procedures.
To copy an item (key, certificate signing request, etc.) from
HyperTerminal§:
1. Open the HyperTerminal§ window.
2. Click and drag to select the item.
3. After the item is selected, open the Edit menu and click Copy (or
type <ctrl-c>).
4. Open the window where you will paste the data, and position the
cursor at the appropriate point.
5. In the Edit menu, click Paste (or type <ctrl-v>).
To paste an item (key, certificate signing request, etc.) into
HyperTerminal:
1. Display the item in the appropriate application window, then
click and drag to select the item.
2. Once the item is selected, click the Edit menu and select Copy
(or type <ctrl-c>).
3. Move to the HyperTerminal window, and position the cursor at
the appropriate point.
4. Pull down the Edit menu, and select Paste to Host (or type
<ctrl-v>).

A P P E N D I X B Obtaining Keys and Certificates
285
Obtaining a
Certificate
from Verisign
or another CA
Use the policy manager key create command to create your key
and the key signrequest create command to create a signing
request to be sent to Verisign or another CA for authentication. The
CA will return the certificate, but there may be a delay of 1-5 days.
This method is used when certificate authentication is desired. The
fields input as part of creating a signing request are called a
Distinguished Name (DN).
NOTE: Be sure to save
your configuration after
creating a key. If the
configuration is not
saved, and a power
outage or a
factory_reset
occurs, the unsaved key
will be lost, rendering the
certificate invalid. Also,
for optimal security, one
or more fields must be
modified to make the DN
unique.
Procedure
1. To create a key, type the following command:
HP SA8250#config policygroup <name> service
<name> key create [512 | 1024]
2. To create the signing request, type the following command:
HP SA8250#config policygroup <name> service
<name> key signrequest create <DN
parameters>
Where the optional DN parameters are shown in this table.
3. Use the policy manager key signrequest export
command to paste or ftp the signing request to another system
and submit it to the CA.
4. When returned by the CA, import the certificate into the SA8250.
Element Description
life The number of days that the certificate remains
valid. The default is 30 days.
name The common (server) name
email Your email address
state Your state or province
organization Your company name
unit Your organizational section
locality Your town or city
Optional DN Parameters

A P P E N D I X B HP e-Commerce/XML Director Server Appliance SA8250 User Guide
286
Importing
Keys into the
SA8250
We recommend importing an existing key by copying the key (a
block of ASCII text) from a server’s console window, then pasting it
into the SA8250’s console window when prompted.
For more details about copying and pasting, see “Copying and
Pasting Keys and Certificates” in this appendix.
NOTE: Do not interrupt
the key import process. If
you do interrupt the
process, delete the key
and start again.
To paste in a key:
1. Type the import command and press <Enter>.
The CLI prompts you to paste in the key.
2. When finished, type three periods (“...”) on a separate line, then
press <Enter>.
3. When the procedure is complete, you can type info at the
prompt to verify the key's transfer to the SA8250.
An alternative method for importing an existing key is to ftp the key:
config policygroup <name> service <name> key
import [<url> {user <user name>} {password
<password>}]
where:
•url is a valid URL identifying the private key file to download
(it must be in the form, ftp://<host>/<path_name>)
•user name is the username
•password is the password

A P P E N D I X B Obtaining Keys and Certificates
287
Importing
Certificates
into the
SA8250
We recommend importing an existing certificate by copying the
certificate (a block of ASCII text) from a server’s console window,
then pasting it into the SA8250’s console window when prompted.
For more details about copying and pasting, see “Copying and
Pasting Keys and Certificates” in this appendix.
NOTE: Do not interrupt
the import process. If you
do interrupt the process,
delete the certificate and
start again.
To paste in a certificate:
1. Type the import command and press <Enter>.
The CLI prompts you to paste in the certificate.
2. When finished, type three periods (“...”) on a separate line, then
press <Enter>.
3. When the procedure is complete, you can type info at the
prompt to verify the certificate's transfer to the SA8250.
An alternative method for importing an existing certificate is to ftp
the certificate:
config policygroup <name> service <name> key
certificate import [<url> {user <username>}
{password <password>}]
where:
•url is a valid URL identifying the private key file to download
(it must be in the form, ftp://<host>/<path_name>)
•user name is the username
•password is the password

A P P E N D I X B HP e-Commerce/XML Director Server Appliance SA8250 User Guide
288
Creating a new
Key/Certificate
on the SA8250
Use the policy manager key create and key create
certificate commands to create new keys and certificates for
SA8250 operation. This procedure can be used when there are no
existing keys and certificates on the server. The advantage of this
method is that it is very fast, but a CA has not signed the certificates.
This means that users will have to explicitly accept the certificate the
first time they connect to your site.
NOTE: For optimal
security, one or more
fields must be modified to
make the DN unique.
The fields input as part of creating a certificate are called a
Distinguished Name (DN).
Procedure
1. To create a key, type this command:
HP SA8250#config policygroup <name> service
<name> key create [512 | 1024]
2. To create a certificate, type this command:
HP SA8250#config policygroup <name> service
<name> key create certificate <DN
parameters>
NOTE: Alternatively,
default DN parameters
can be specified using the
config ssl dn
command. This allows
recurring parameters to
be specified once and
then reused for multiple
certificates.
Where the optional DN parameters are shown in this table.
Parameter Description
life The number of days that the certificate remains
valid. The default is 30 days.
name The common (server) name
email Email address
state Your state or province
organization Your company name
unit Your organizational section
locality Your town or city
Optional DN Parameters

A P P E N D I X B Obtaining Keys and Certificates
289
Using Global
Site
Certificates
Overview
The export versions of Internet Explorer and Netscape
Communicator initiate an SSL connection to the SSL server to use
40-bit encryption, even though the browser is capable of 128-bit
encryption. The server responds to the browser with a digital
certificate. If the certificate is not a global site certificate, both the
browser and server will continue the SSL handshake and use the 40-
bit key to encrypt application data. If the certificate is a global site
certificate (GSC), however, the client will terminate the previous SSL
handshake and renegotiate the connection to use 128-bit encryption.
A GSC is normally signed by an intermediate certificate authority
(CA), just like traditional certificates. The intermediate CA is either
Microsoft SGC Root, or Verisign Class 3 CA. These are called
chained certificates. When the browser gets the certificate from the
server along with the intermediate CA, it will verify the certificate,
the intermediate CA, and the root CA to determine the GSC
capability. The root CA is normally installed in the browser, but not
the intermediate CA. So the SA8250 should be able to send both the
certificate and the intermediate CA.
Using the CLI
If the certificate is not a global site certificate, the customer will only
need to import the certificate. If it is a global site certificate, the
customer has to import both the certificate and the intermediate CA
so that the CA is the last in the chain.
Type the import certificate command to import a certificate
or chained certificates. If the certificate is signed by a CA, paste the
CA after the certificate. If the CA is signed by another CA, paste the
CA after the signed CA, and so on. Here is an example:
HP SA8250/config/policygroup/test/service/test/
key/certificate#import
When you type or paste in data, you must end the data entry with three
periods (...) alone on a line. This returns you to the command prompt.

A P P E N D I X B HP e-Commerce/XML Director Server Appliance SA8250 User Guide
290
NOTE: There must be no
white space before,
between, or after
certificates, and the
“Begin” headers and
“End” trailers must all
be retained.
An example of a certificate:
-----BEGIN CERTIFICATE-----
MIIFZTCCBM6gAwIBAgIQCTN2wvQH2CK+rgZKcTrNBzANBgkq
hkiG9w0BAQQFADCBujEfMB0GA1UEChMWVmVyaVNpZ24gVHJ1
c3QgTmV0d29yazEXMBUGA1UECxMOVmVyaVNpZ24sIEluYy4x
MzAxBgNVBAsTKlZlcmlTaWduIEludGVybmF0aW9uYWwgU2Vy
:
:
dmVyIENBIC0gQ2xhc3MgMzFJMEcGA1UECxNAd3d3LnZlcmlz
aWduLmNvbS9DUFMgSW5jb3JwLmJ5IFJlZi4gTElBQklMSVRZ
IExURC4oYyk5NyBWZXJpU2lnbjAeFw05OTExMTEwMDAwMDBa
Fw0wMDExMTAyMzU5NTlaMIHHMQswCQYDVQQGEwJVUzETMBEG
-----END CERTIFICATE-----
-----BEGIN CERTIFICATE-----
MIIEMTCCA5qgAwIBAgIQI2yXHivGDQv5dGDe8QjDwzANBgkq
hkiG9w0BAQIFADBfMQswCQYDVQQGEwJVUzEXMBUGA1UEChMO
VmVyaVNpZ24sIEluYy4xNzA1BgNVBAsTLkNsYXNzIDMgUHVi
bGljIFByaW1hcnkgQ2VydGlmaWNhdGlvbiBBdXRob3JpdHkw
HhcNOTcwNDE3MDAwMDAwWhcN
:
:
OTk3IFZlcmlTaWduMA0GCSqGSIb3DQEBAgUAA4GBALiMmMMr
SPVyzWgNGrN0Y7uxWLaYRSLsEY3HTjOLYlohJGyawEK0Rak6
+2fwkb4YH9VIGZNrjcs3S4bmfZv9jHiZ/4PC/NlVBp4xZkZ9
G3hg9FXUbFXIaWJwfE22iQYFm8hDjswMKNXRjM1GUOMxlmaS
ESQeSltLZl5lVR5fN5qu
-----END CERTIFICATE-----
...
Certificate successfully imported
HP SA8250/config/policygroup/test/service/test/
key/certificate#
In this example, two certificates are imported: the certificate and then
the CA certificate. Together these two certificates will cause a step-
up in the encryption to RC4-128 bit RSA. No special command or
handling is required to paste these two certificates as long as they are
pasted in this order.

A P P E N D I X B Generating a Client CA
291
Generating a Client CA
NOTE: To acquire a
copy of OpenSSL* for
your environment, access
the OpenSSL website at
http://www.openssl.org.
This procedure will show you how to generate a client CA using
OpenSSL:
1. Create a working directory where all the keys and certificates
will be stored.
2. Copy the file openssl.cnf from the openSSL source
directory.
3. Create a private key by typing this command:
openssl genrsa -out key.pem 1024
4. Create another private key by typing this command:
openssl genrsa -out ca_key.pem 1024
NOTE: The DN
information typed in step
5 must differ from the DN
information typed in step
6.
5. Now generate the client CA by typing this command:
openssl req -new -x509 -config openssl.cnf -key
ca_key.pem -out ca_cert.pem
6. Generate the client certificate request by typing this command:
openssl req -new -config openssl.cnf -key
key.pem -out csr.pem
7. Sign the client certificate request by typing this command:
openssl X509 -req -CAcreatserial -CAkey
ca_key.pem -CA ca_cert.pem -in csr.pem -out
cert.pem
8. Combine the key.pem and cert.pem keys into one file by
typing this command:
cat key.pem cert.pem > all.pem
9. Convert to p12 format by typing this command:
openssl pkcs12 -export -in all.pem -out
<file>.p12 - name “MY NAME”
The output file <file>.p12 is imported into the browser as a
personal certificate.

A P P E N D I X B HP e-Commerce/XML Director Server Appliance SA8250 User Guide
292
Generating a CRL
NOTE: To acquire a
copy of OpenSSL for your
environment, access the
OpenSSL website at
http://www.openssl.org.
This procedure shows how to generate a Certificate Revocation List
(CRL) using OpenSSL. The SA8250 cannot use CRLs with more
than 10,000 serial numbers.
1. If you have not already done so, create a working directory where
all the keys and certificates will be stored.
2. If you have not already done so, copy the file openssl.cnf
from the openSSL source directory.
3. Create a private key for the SA8250 CA certificate by typing this
command:
openssl genrsa -out ca_key.pem 1024
NOTE: Most of these
commands use the
openssl.cnf file. Make
sure the information
presented in this file is
accurate and that it
reflects the directory
structure used. Filenames
and directory names are
both important for these
commands to work
properly. For more
information on how to use
openssl, visit http://
www.openssl.org.
4. Create the CA certificate SA8250 by typing this command:
openssl req -new -x509 -config openssl.cnf -key
key.pem -out ca_cert.pem
5. Import this file to the SA8250.
6. Create a private key for the signing request by typing this
command:
openssl genrsa -out clientkey1.pem 1024
7. Generate a signing request by typing this command:
openssl req -new -config openssl.cnf -key
clientkey1.pem -out clientrequest1.pem
8. Repeat steps (6) and (7) above for each additional client
certificate, incrementing clientrequest1.pem by one digit
each time.
9. Sign all the requests generated above by typing this command:
openssl ca keyfile ca_key.pem -cert ca_cert.pem
-infiles clientrequest1.pem clientrequest2.pem
clientrequest3.pem ...
10.For all client certificates, create a CRL by typing this command:
openssl ca -gencrl -out crl.pem
11. Import this file to the SA8250.

A P P E N D I X B Revoking a Certificate
293
12.Combine the clientkey1.pem and cert.pem files into one file by
typing this command:
cat clientkey1.pem cert.pem > all.pem
13.Convert to p12 format by typing this command:
openssl pkcs12 -export -in all.pem
-out <file>.p12 -name “MY NAME”
Revoking a Certificate
1. To revoke a certificate, type this command:
openssl ca -revoke clientcertificate.pem
2. To generate a new CRL to incorporate the revoked certificate,
type this command:
openssl ca -gencrl -out crl.pem
Using Ciphers with the SA8250
The SA8250 only supports RSA key exchange and authentication.
Diffie-Hellman (including Anonymous and Ephemeral) key
exchange/authentication and DSS authentication are not supported.
Use the set cipher command to specify the cipher. The command
prompts you for the cipher strength, as shown in this table.
Element Description
All All supported ciphers
High All ciphers using Triple-DES
Medium All ciphers with 128 bit encryption
Low All low strength ciphers (no export, single DES)
Export All export ciphers
Cipher Strength Listing

A P P E N D I X B HP e-Commerce/XML Director Server Appliance SA8250 User Guide
294
The default cipher value is all supported ciphers (both SSLv2 and
SSLv3).
This table provides ciphers supported by the SA8250. Notice that the
export version of the software supports only the ciphers marked “E”
in the Profile column.
Cipher Name Proto-
col Key
Exchange Authen-
tication Encryp-
tion (key
size)
Message
Authenti-
cation
(MAC)
Profile
(Hi/
Med/
Low/
Export)
DES-CBC3-SHA SSLv3 RSA RSA 3DES(168) SHA1 H
IDEA-CBC-SHA SSLv3 RSA RSA IDEA(128) SHA1 M
RC4-SHA SSLv3 RSA RSA RC4(128) SHA1 M
RC4-MD5 SSLv3 RSA RSA RC4(128) MD5 M
DES-CBC-SHA SSLv3 RSA RSA DES(56) SHA1 L
DES-CBC3-MD5 SSLv2 RSA RSA 3DES(168) MD5 H
IDEA-CBC-MD5 SSLv2 RSA RSA IDEA(128) MD5 M
RC2-CBC-MD5 SSLv2 RSA RSA RC2(128) MD5 M
RC4-MD5 SSLv2 RSA RSA RC4(128) MD5 M
RC4-64-MD5 SSLv2 RSA RSA RC4(64) MD5 L
DES-CBC-MD5 SSLv2 RSA RSA DES(56) MD5 L
EXP-DES-CBC-SHA SSLv3 RSA (512) RSA DES(40) SHA1 E
EXP-RC2-CBC-MD5 SSLv3 RSA (512) RSA RC2(40) MD5 E
EXP-RC4-MD5 SSLv3 RSA (512) RSA RC4(40) MD5 E
EXP-RC2-CBC-MD5 SSLv2 RSA (512) RSA RC2(40) MD5 E
EXP-RC4-MD5 SSLv2 RSA (512) RSA RC4(40) MD5 E
Listing of Various Ciphers

A P P E N D I X B HTTP Header Information
295
HTTP Header Information
The SA8250 includes the client IP address and current encryption
information in the HTTP request sent to the server. This information
is listed in this table.
Procedure These are the steps for setting up Header Certificates.
1. Verify that "header" is enabled (the default) at the service level
by typing this command:
config policygroup <policygroup name> service
<service name> info
NOTE: For more
information on these
commands, see Chapter
6.
2. If "header" is disabled, enable it by typing this command:
config policygroup <policygroup name> service
< service name > header enable
3. Enable "header-certificate" (disabled by default) by typing this
command:
config policygroup <policygroup name> service
< service name> key client-ca header-
certificate enable"
Tag Value
HP_CLIENT_
CERTIFICATE The client certificate in ASCII.
HP_CIPHER_USED The cipher suite for the connection.
For example: DES-CBC-SHA
HP_SOURCE_IP The client’s IP address in ASCII.
For example: 209.249.194.100
HP_SSL_SESSION_ID The SSL session ID in ASCII.
For example: 8273A4F348EFF90
HTTP Header Information

A P P E N D I X B HP e-Commerce/XML Director Server Appliance SA8250 User Guide
296
Notes

Failover Method
Dependencies
Failover Modes
This table describes the failover modes.
Failover
Mode Description
Disabled No failover method is selected
Serial Cable
Failover An “out-of-band” failover mode that uses the
serial cable to share both configuration and
failure status
Routed
Failover An “in-band” failover mode that employs routing
protocols
Description of Failover Modes

A P P E N D I X C HP e-Commerce/XML Director Server Appliance SA8250 User Guide
298
This table shows the feature availability under different failover
modes.
Failover
Mode Feature Single
Interface
with
“outside”
router
Dual Interface Dual
Interface
with
“outside”
router
Dual Interface
with “inside”
and “outside”
routers (3)
Serial
Cable
Failover
OR
Disabled
VIP ARPing Only on
same
subnet
Same subnet,
only on
“outside”
Same subnet,
only on
“outside”
Same subnet, only
on “outside”
DHCP Not with
“Serial”No No No
HOT Yes Yes Yes Yes (5)
HOT and SAP Yes (1) Yes (1) Yes (1) Yes (1) (4)
OPR Yes (needs
router) N/A Yes No
RICH Yes Yes Yes Yes (5)
RICH and
SAP Yes (1) Yes (1) Yes (1) Yes (1) (4)
Routed VIP ARPing No (uses
loopback) Requires router No (uses
loopback) Same subnet, only
on “outside”
DHCP Yes Requires router No No
HOT Yes Requires router Yes Yes (5)
HOT and SAP No Requires router Yes (1) Yes (1) (4)
OPR No Requires router No No
RICH Yes Requires router Yes Yes (5)
RICH and
SAP No Requires router Yes (1) Yes (1) (4)
Availability Under Different Failure Modes

A P P E N D I X C Failover Modes
299
Notes for the table above:
1. SAP only works if the default gateway = SA8250.
2. The offline SA8250’s routed mode is inactive.
3. Server(s) are on the other side of the inside router.
4. SAP only works if inside router has a default route to the
SA8250.
5. The router must have static routes from brokered subnet to
server-side subnet.
Serial
Cable
Failover
AND
Routed (2)
VIP ARPing N/A Same subnet,
only on
“outside”
N/A Same subnet, only
on “outside”
DHCP No No No No
HOT Yes Yes Yes Yes (5)
HOT and SAP Yes (1) Yes (1) Yes (1) Yes (1) (4)
OPR Yes N/A Yes No
RICH Yes Yes Yes Yes (5)
RICH and
SAP Yes (1) Yes (1) Yes (1) Yes (1) (4)
Failover
Mode Feature Single
Interface
with
“outside”
router
Dual Interface Dual
Interface
with
“outside”
router
Dual Interface
with “inside”
and “outside”
routers (3)
Availability Under Different Failure Modes (Continued)

A P P E N D I X C HP e-Commerce/XML Director Server Appliance SA8250 User Guide
300
Notes

Configuring Out-of-
Path Return
Configure OPR for Windows* 2000
Set the
Loopback
1. From the Start menu, click Settings.
2. Open the Control Panel.
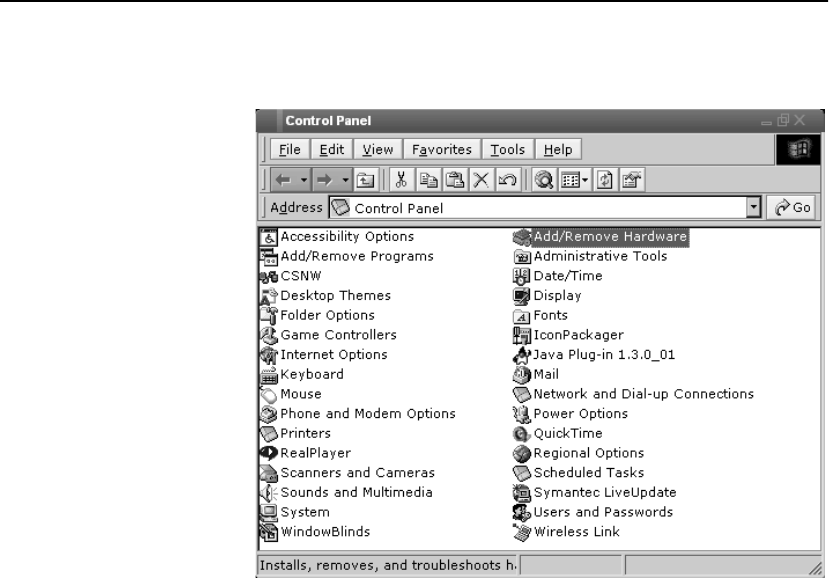
A P P E N D I X D HP e-Commerce/XML Director Server Appliance SA8250 User Guide
302
NOTE: OPR is not
available for SSL-
enabled services.
This figure shows the Control Panel.
Windows 2000 Control Panel
3. Double-click Add/Remove Hardware.

A P P E N D I X D Configure OPR for Windows* 2000
303
This figure shows the Add/Remove Hardware Wizard main
screen.
Add/Remove Hardware Wizard
4. Click Next.
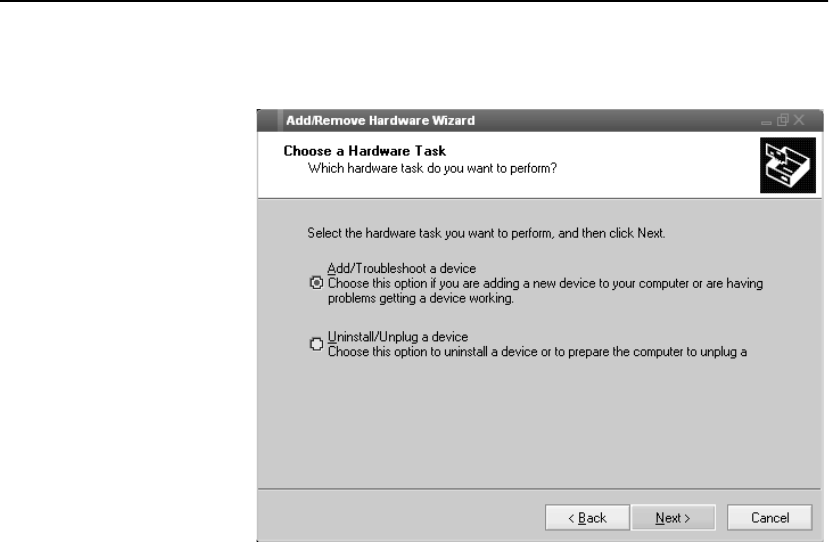
A P P E N D I X D HP e-Commerce/XML Director Server Appliance SA8250 User Guide
304
This figure shows the Choose a Hardware Task screen.
Choose a Hardware Task Screen
5. Select Add/Troubleshoot a device.
6. Click Next.
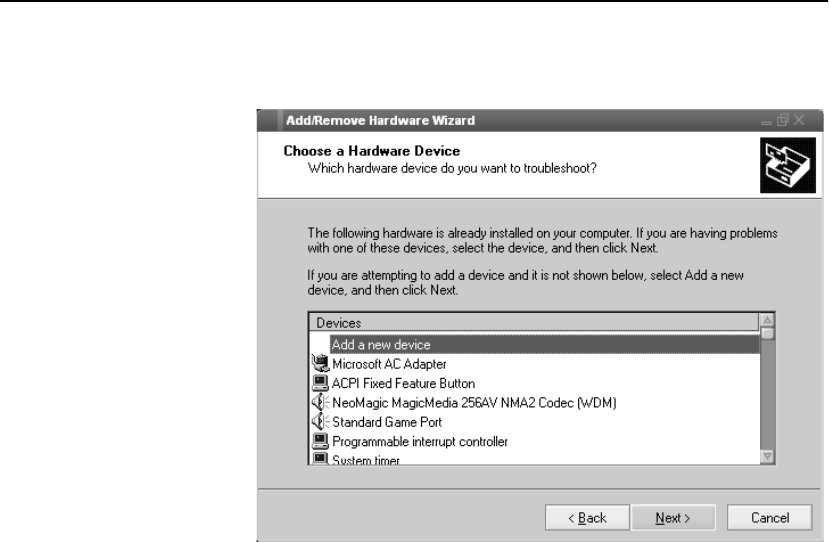
A P P E N D I X D Configure OPR for Windows* 2000
305
This figure shows the Devices list.
Devices List
7. From the Devices list, select Add a new device.
8. Click Next.
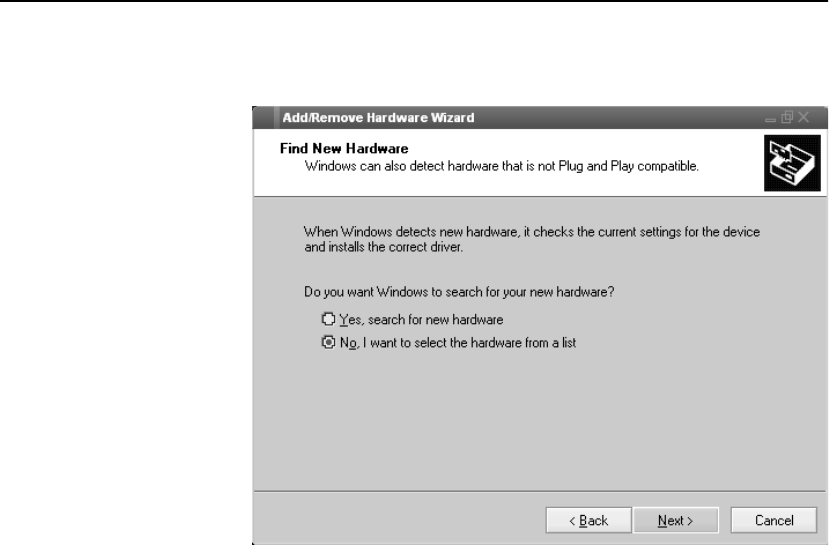
A P P E N D I X D HP e-Commerce/XML Director Server Appliance SA8250 User Guide
306
This figure shows the Find New Hardware screen.
Find New Hardware Screen
9. Select No, I want to select the hardware from a list to search for
new hardware.
10.Click Next.
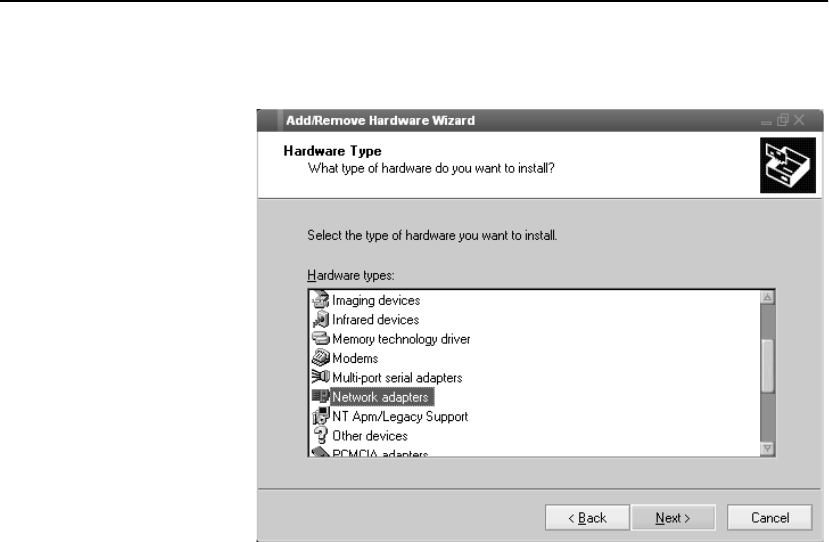
A P P E N D I X D Configure OPR for Windows* 2000
307
This figure shows the Hardware Type screen.
Hardware Type Screen
11. From the Hardware types menu, select Network adapters.
12.Click Next.
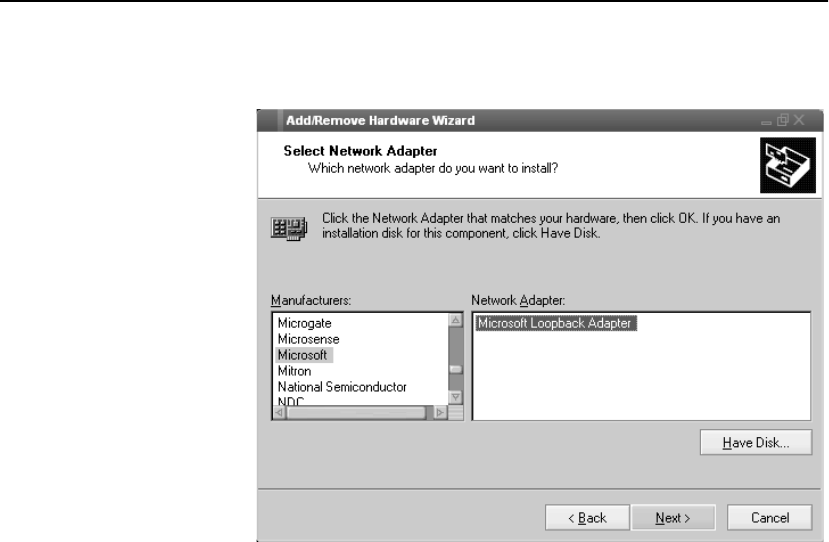
A P P E N D I X D HP e-Commerce/XML Director Server Appliance SA8250 User Guide
308
This figure shows the Select Network Adapter screen.
Select Network Adapter Screen
13.From the Manufacturers list, select Microsoft.
14.From the Network Adapter list, select Microsoft Loopback
Adapter.
15.Click Next.
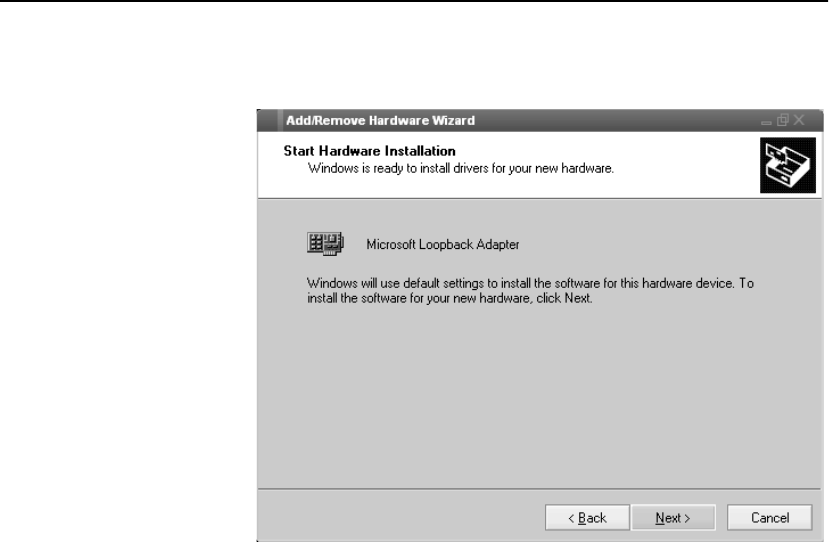
A P P E N D I X D Configure OPR for Windows* 2000
309
This figure shows the Start Hardware Installation screen.
Start Hardware Installation Screen
16.Click Next.
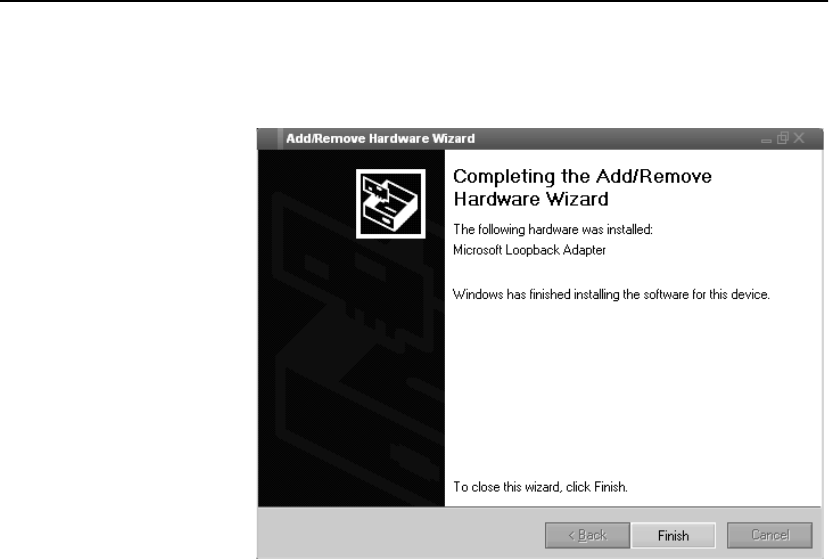
A P P E N D I X D HP e-Commerce/XML Director Server Appliance SA8250 User Guide
310
This figure shows the Completing the Add/Remove Hardware
Wizard screen.
Completing the Add/Remove Hardware Wizard Screen
17.Click Finish.
18.To configure the Loopback, open the Control Panel.
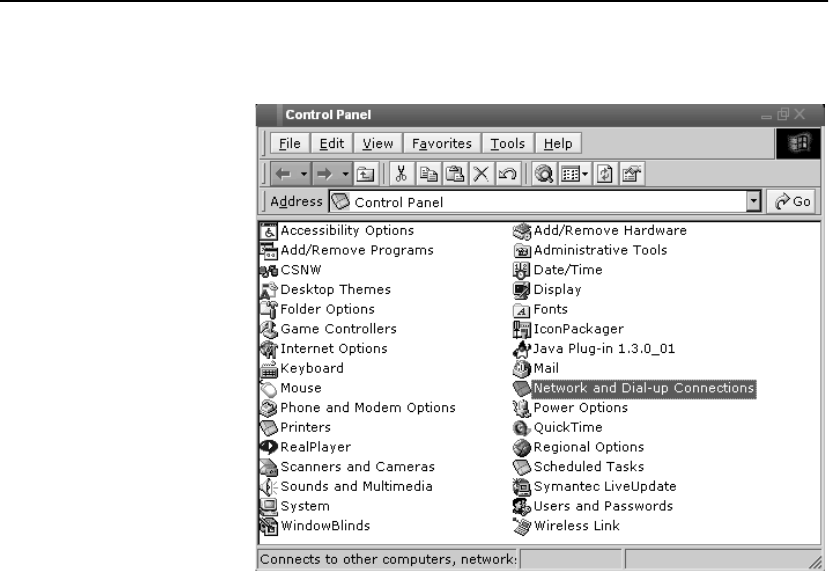
A P P E N D I X D Configure OPR for Windows* 2000
311
This figure shows the Control Panel.
Windows 2000 Control Panel
19.Double-click Network and Dial-up Connections.
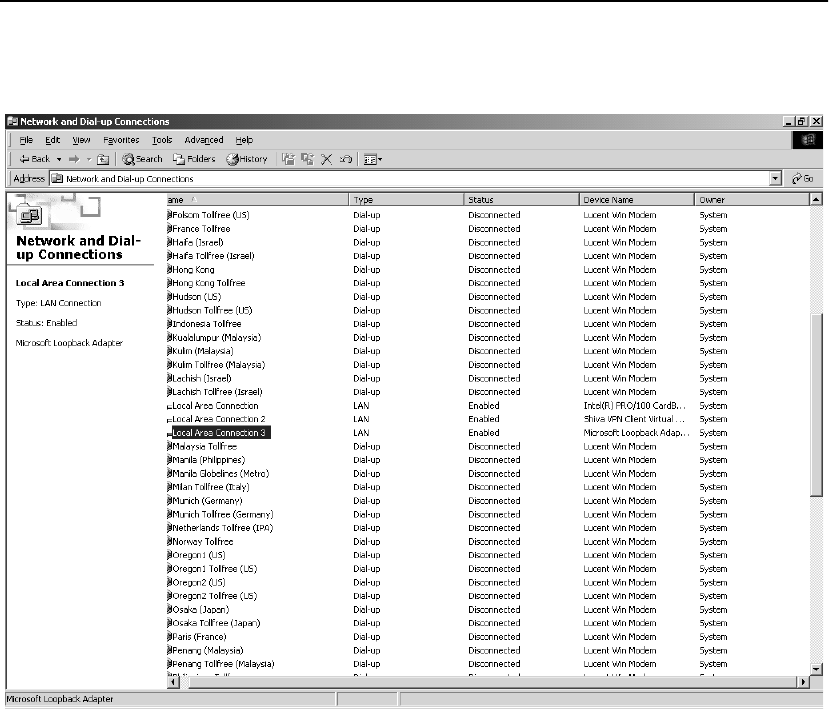
A P P E N D I X D HP e-Commerce/XML Director Server Appliance SA8250 User Guide
312
This figure shows the Network and Dial-up Connections screen.
Network and Dial-up Connections Screen
20.From the Device Name list, select the Microsoft Loopback
Adapter.
21.From the menu bar, select File > Properties.
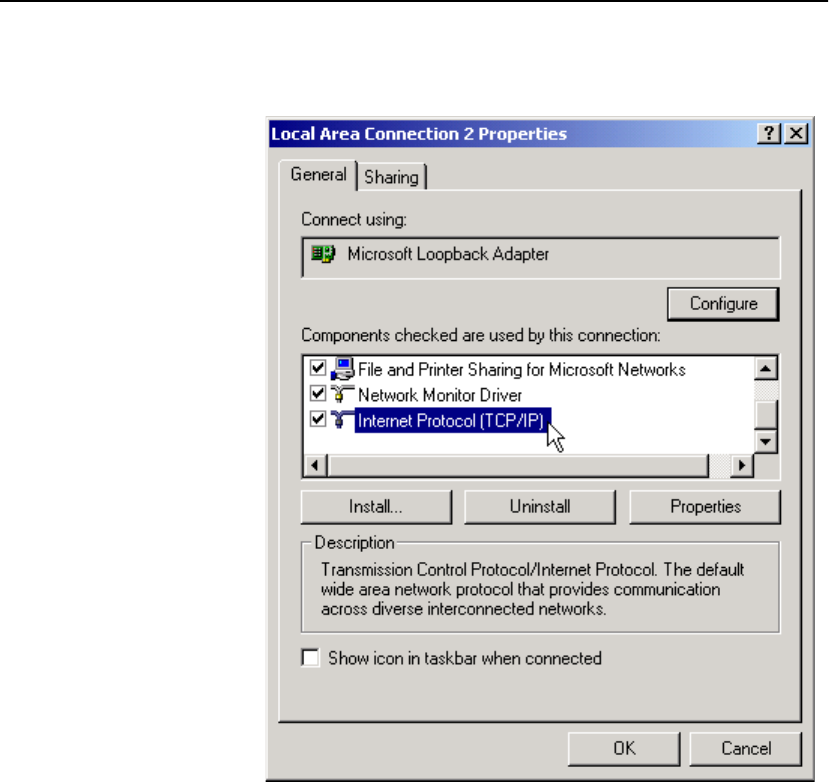
A P P E N D I X D Configure OPR for Windows* 2000
313
This figure shows the Properties screen.
Properties Screen
22.From the menu, double-click Internet Protocol (TCP/IP) to
display its properties.
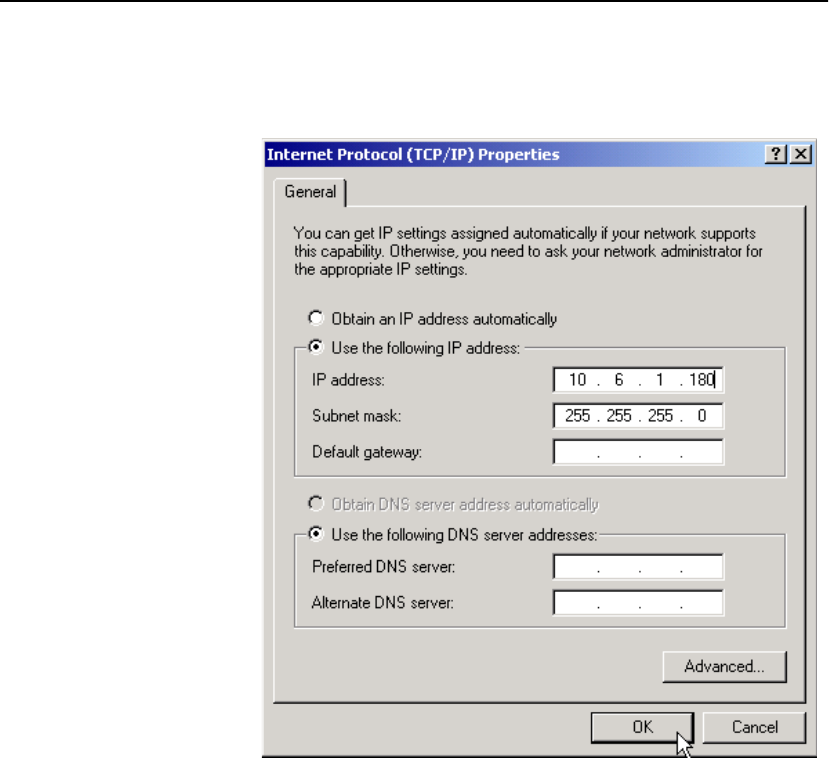
A P P E N D I X D HP e-Commerce/XML Director Server Appliance SA8250 User Guide
314
This figure shows the Internet Protocol (TCP/IP) Properties
screen.
Internet Protocol (TCP/IP) Properties Screen
23.In the IP address field, type the Virtual IP (VIP) address of the
SA8250.
24.In the Subnet Mask field, type the subnet mask appropriate for
your environment.
25.Leave the Default Gateway field blank.
26.Click OK.
27.Reboot the computer.
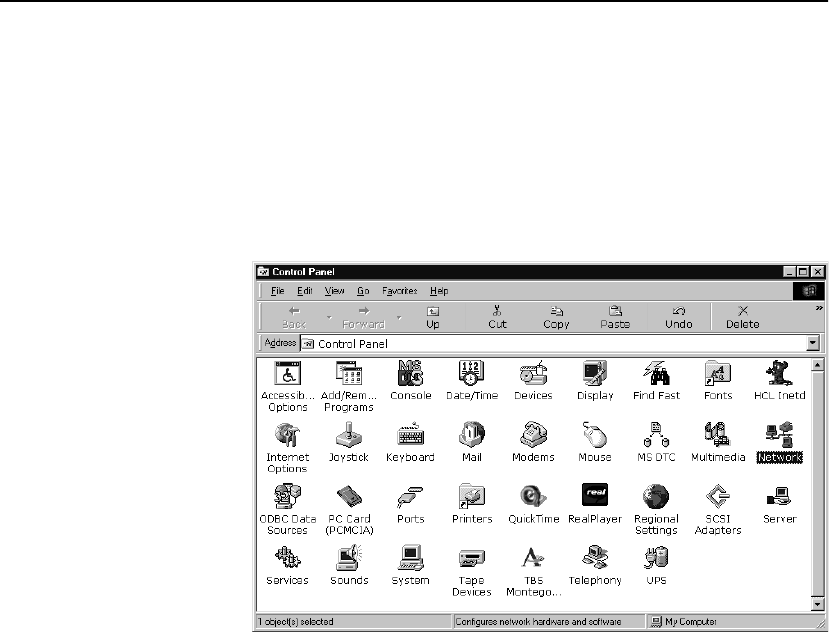
A P P E N D I X D Configure OPR for Windows* NT*
315
Configure OPR for Windows* NT*
Set the
Loopback
1. From the Start menu, click on Settings.
2. Open the Control Panel.
This figure shows the Control Panel.
NOTE: OPR is not
available for SSL-
enabled services.
Control Panel
3. Double-click on the Network icon.
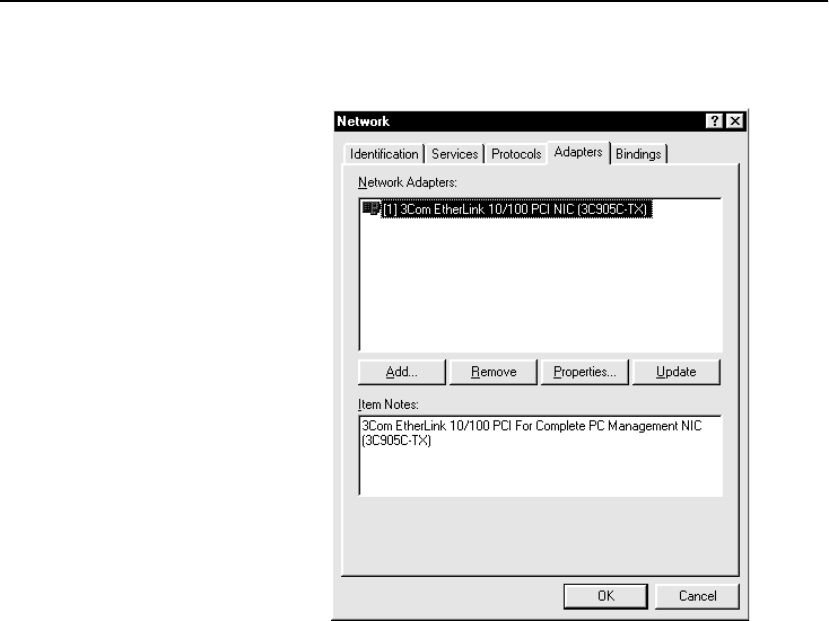
A P P E N D I X D HP e-Commerce/XML Director Server Appliance SA8250 User Guide
316
This figure shows the Network dialog display.
Network Adapter Setting
4. Click the Adapters tab.
5. Click Add.
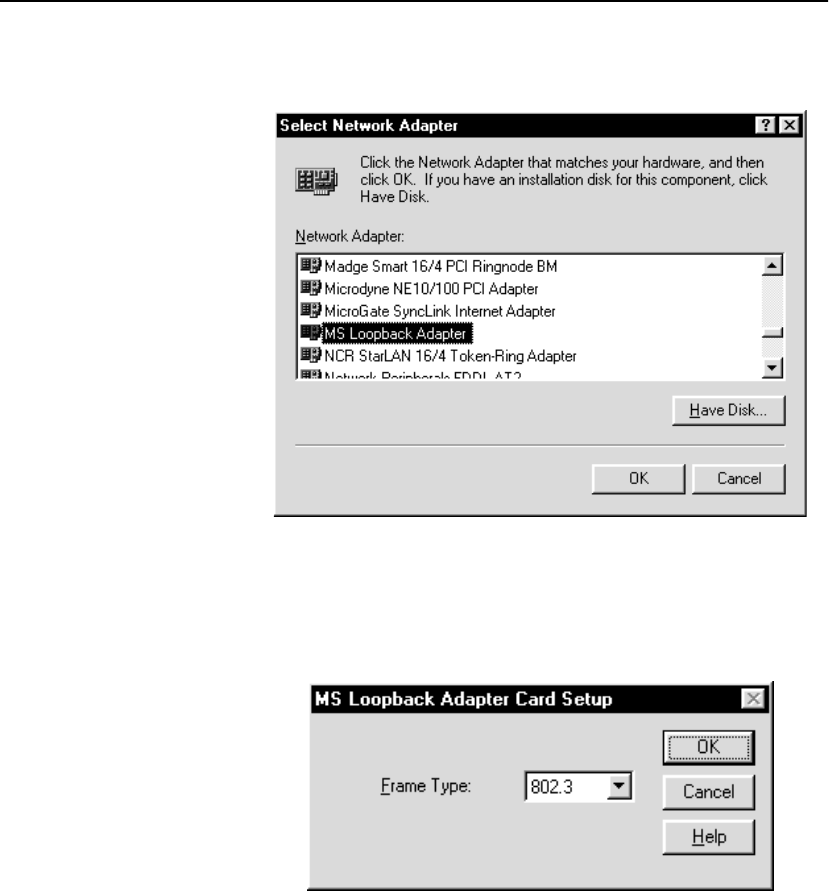
A P P E N D I X D Configure OPR for Windows* NT*
317
This figure shows the Select Network Adapter dialog.
Choosing the MS Loopback Adapter
6. From the Network Adapter list, select MS Loopback Adapter
and click OK.
This figure shows the MS Loopback Adapter Card Setup dialog.
Adapter Card Setup
7. Choose the default Frame Type (802.3) and click OK.
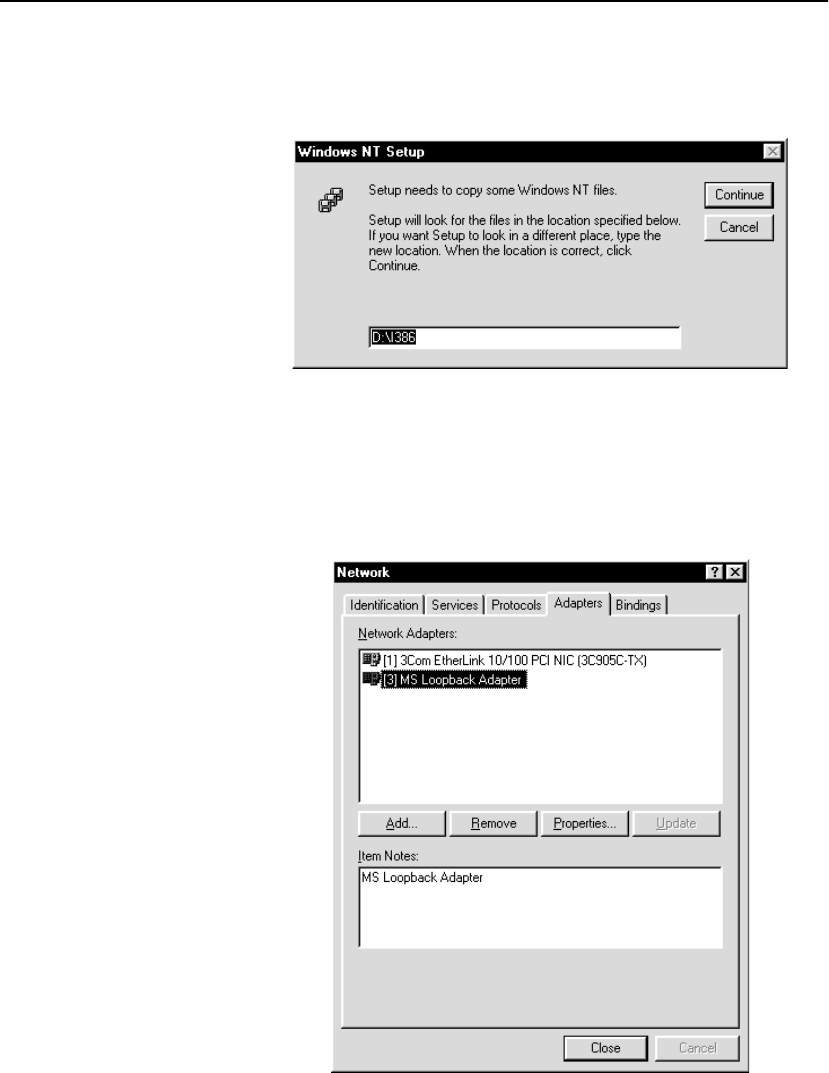
A P P E N D I X D HP e-Commerce/XML Director Server Appliance SA8250 User Guide
318
If the necessary files are not found on your system, the Windows
NT Setup dialog displays:
Copying Windows NT Files
8. If necessary, specify where Windows NT can find the files and
click Continue.
The files load on your system, and the MS Loopback Adapter
displays in the Network Adapters list:
MS Loopback Adapter Installed
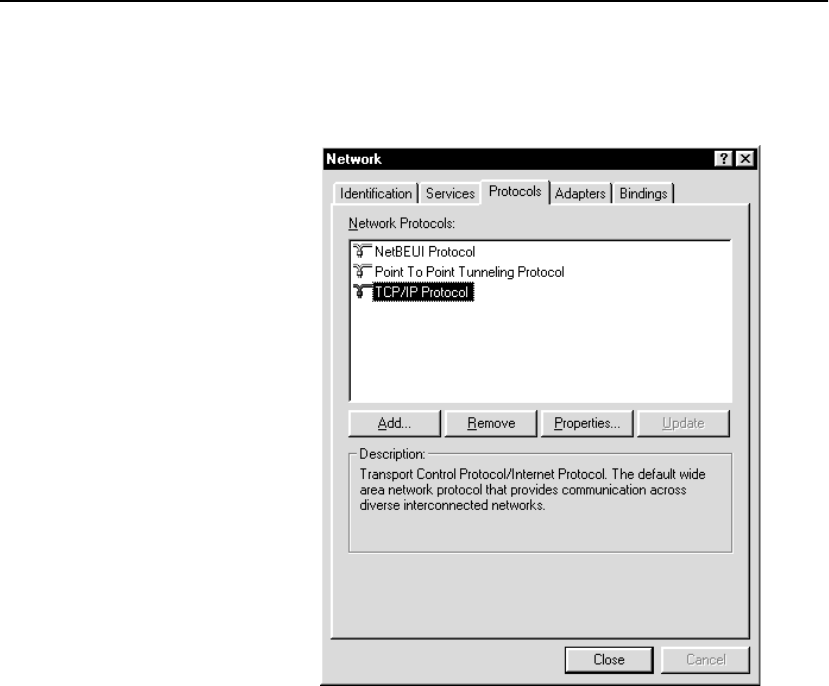
A P P E N D I X D Configure OPR for Windows* NT*
319
9. Click the Protocols tab.
This figure shows the protocol settings.
Protocol Settings
10.From the Network Protocols list, click TCP/IP Protocol.
11. Click Properties....
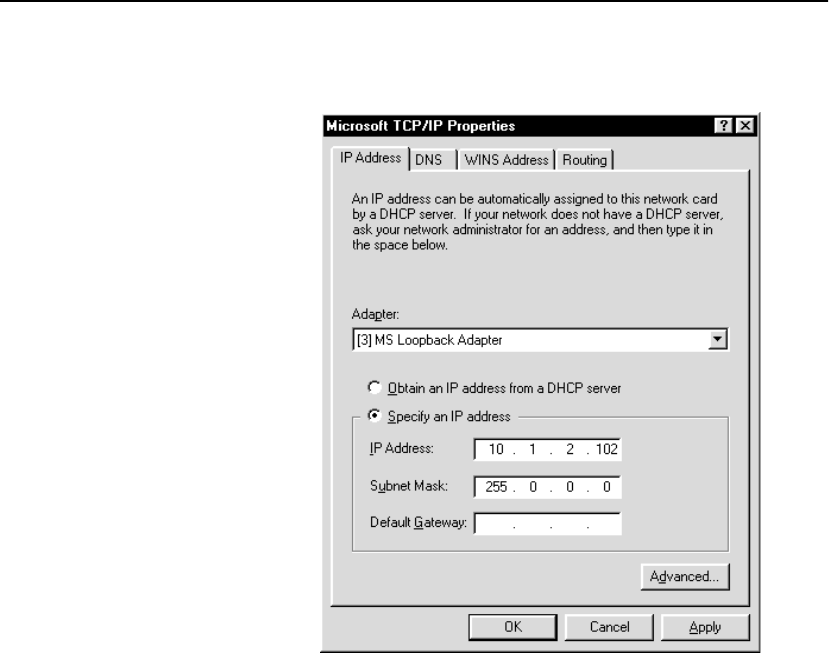
A P P E N D I X D HP e-Commerce/XML Director Server Appliance SA8250 User Guide
320
This figure shows the Microsoft TCP/IP Properties dialog.
Setting the TCP/IP Properties
12.From the Adapter pull-down menu, select the MS Loopback
Adapter.
13.Click Specify an IP address.
14.In the IP address field, type the Virtual IP (VIP) address of the
SA8250.
15.In the Subnet Mask field, type the subnet mask appropriate for
your environment.
16.Leave the Default Gateway field blank.
17.Click Apply.
18.Click OK.
19.Reboot the computer.

A P P E N D I X D Configure OPR for Windows* NT*
321
Run a Web Service on the Loopback Interface
Using IIS 3.0
NOTE: If you cannot
find Microsoft Internet
Server (Common), you do
not have IIS running on
your server. Install IIS
3.0 and start this
procedure again.
1. From the Start menu, click Programs and then Microsoft
Internet Server (Common) to run the Internet Service Manager.
2. After the Microsoft Internet Service Manager console displays,
double-click the WWW service.
The WWW Service Properties for <machine-name> dialog
box displays, where <machine-name> is the name of your
system.
3. In the TCP Port field, type the port number of the OPR service
on the SA8250.
4. Select the Directories tab and click Add.
The Directory Properties displays.
5. Browse and click to select the home directory for the server.
6. Click the Home Directory check box.
7. Click the Virtual Server check box, and in the text field provided
type the VIP that was aliased on the loopback. For more details,
see “Set the Loopback” in this chapter.
8. Click Ok.
9. Add the server to the SA8250.

A P P E N D I X D HP e-Commerce/XML Director Server Appliance SA8250 User Guide
322
Run a Web Service on the Loopback Interface
Using IIS 4.0
NOTE: If you cannot
find Internet Service
Manager, you do not have
IIS running on your
server. Download and
install the Option Pack,
then start this procedure
again.
1. From the Start menu, click Programs, click Windows NT 4.0
Option Pack, and then click Microsoft Internet Information
Server.
2. Run the Internet Service Manager.
3. After the Microsoft Management Console displays, expand the
Console Root and then the Internet Information Server nodes.
4. Right-click Default Web Service or the predefined service for this
Windows NT server and click the Properties option.
The <service name> Properties dialog box displays.
5. In the TCP Port field, type the port number of the OPR service
on the SA8250.
6. To save and close this dialog box, click Ok.
7. From the Internet Information Server node, right-click the
<machine-name> node. Click New and then click Web Site.
The New Web Site Wizard starts.
8. Type the description.
9. Type the IP, using the SA8250’s VIP.
10.Type the port number, using the service port defined on the
SA8250.
11.Browse and click to select the home directory for this service.
12.Configure the access permissions.
13.Click Finish.
The new service now displays under the <machine-name>
node as a new node.
14.Start the new service.

A P P E N D I X D Configuring OPR for a UNIX-based Apache Web Server
323
Configuring OPR for a UNIX-based Apache Web
Server
This section reproduces the commands required to configure Out-of-
Path Return for an Apache Web Server on a UNIX* machine.
ifconfig lo0 add <vip> or
ifconfig lo0 <vip> alias or
ifconfig lo0:1 <vip>
1. Add the appropriate command to an /etc/rc file to return this
configuration at boot time.
2. Edit the httpd.conf to reflect these settings (these are usually
found under /var/www/conf/):
Port <port_number>,
ServerName <the fully qualified name for this
server machine>
3. Configure a virtual service (in the same file, vip is the virtual IP
configured on the SA8250 to handle OPR):
<VirtualHost vip>
ServerName vip
ServerAdmin admin@mailserver
DocumentRoot (usually: /var/www/docs)
ErrorLog /var/log/httpd/vip-error_log
TransferLog /var/log/httpd/vip-access_log
# CustomLog /var/log/httpd/vip-access_log
combined
</VirtualHost>
4. Edit the /var/www/conf/srm.conf and set document root
to /var/www/docs. For the Apache server to start at boot
time, the index.html file must exist. Therefore, in /etc/rc
verify the following entry:
if [ -f /var/www/docs/index.html ]; then
echo -n ’ httpd’; /var/www/bin/start-apache fi

A P P E N D I X D HP e-Commerce/XML Director Server Appliance SA8250 User Guide
324
Notes

Diagnostics &
Troubleshooting
Running Diagnostics on the SA8250
This section describes the available diagnostic information and in-
field diagnostics.
A P P E N D I X E HP e-Commerce/XML Director Server Appliance SA8250 User Guide
326
Diagnostic
LEDs
The front panel’s LEDs provide information generated by the boot-
time power-on-self-test (POST) and application restart sequences.
This diagram shows the four LEDs on the front panel.
Diagnostic LEDs
Power Indication
The front panel Power LED connects directly to the unit’s power
supply. If the Power LED is not illuminated, power is not connected
to the unit, or the unit’s power supply has failed.
Power
Status
Act 1
Act 2
Power
Status
Act 1
Act 2

A P P E N D I X E Running Diagnostics on the SA8250
327
Boot-time LED Diagnostics
The front panel’s Status, Act 1 and Act 2 LEDs display the transition
through a sequence of codes at boot time indicating the SA8250’s
progress through the boot process. If the boot process aborts,
terminates, or hangs before the SA8250 is online and functional, the
state of the LEDs can help in diagnosing the problem. This table
describes the restart sequence and conditions.
After restart completes, the Status LED begins to blink and LED
activity begins as described in the next section, “Run time LED
Diagnostics.”
Run time LED Diagnostics
At run time, the LEDs provide this information about unit activity:
Status LED
•Blinks on and off quickly when serving as the active or
standalone SA8250.
•Blinks on and off slowly when configured for serial cable
failover and serving as the backup SA8250.
•Continuous on or off indicates a unit that has stopped responding
(hung).
Status Act 1 Act 2 Condition
Off Off Off BIOS boot failed
On Off Off OS boot process failed
Off On Off OS boot stage 1 failed
On On Off OS boot stage 2 failed
Off Off On OS boot stage 3 failed
On Off On Application never started up
Off On On Application restart stage 1 failed
On On On Application restart stage 2 failed
Boot-Time LED Diagnostic Indications

A P P E N D I X E HP e-Commerce/XML Director Server Appliance SA8250 User Guide
328
Activity LEDs
This table describes the run time behavior of the Activity LEDs (Act
1, Act 2).
Run time Errors
At run time, the SA8250’s health-monitoring processes indicate
critical error conditions by turning off the Status LED and blinking
error patterns on the two Activity LEDs. This table describes the run
time error indications.
Act 1 Act 2 Condition
Off Off No NIC activity
Slow blink Off 1 — 100 connections per second
Fast blink Off 100 — 300 connections per second
Solid Off 300 — 400 connections per second
Solid Blink 400 — 600 connections per second
Solid Solid 600+ connections per second
Activity LED Indications
Status Act 1 Act 2 Condition
Off Off Flash NIC failure
Off Blink Off Rich Application Failure
(applies only when serial cable
failover is enabled)
Off Blink Blink Core Application Failure
(applies only when serial cable
failover is enabled)
Blink Blink Blink Health Monitoring Failure
(each LED lights in sequence)
Run Time Error Indications

A P P E N D I X E Troubleshooting
329
Troubleshooting
This section contains descriptions of possible difficulties followed by
possible causes and suggestions for solutions.
This table contains the SA8250 Troubleshooting Guide.
Problem Possible Cause Solution
Cannot ping the VIP Route role/protocol
configuration is
incorrect.
Ensure that the route role and protocol are set
correctly. Route role must be set to
“standalone” and protocol must be set to
“none.”
Cannot run the GUI
Administrative
interface
DNS name resolution is
incomplete. To run the GUI, the SA8250 must be able to
resolve its own hostname via DNS, both
forward and reverse. The client machine on
which the browser is running must also be
able to resolve its own hostname using DNS,
both forward and reverse.
Java plug-in is not
installed To run the GUI using Windows, you must
have Java plug-in version 1.1.1_004 (or
earlier) installed on your workstation. For
more information, see the HP e-Commerce
XML Director Server Appliance SA8250
Getting Started Guide.
Java plug-in is the
wrong version To run the GUI using Windows, you must
have Java plug-in version 1.1.1_004 (or
earlier) installed on your workstation. If you
have a later version installed, it must be
removed before installting version 1.1.1_004
(or earlier). For more information, see the
HP e-Commerce XML Director Server
Appliance SA8250 Getting Started Guide.
Missing a trailing slash
for the GUI URL Some browsers will not launch the GUI if the
trailing slash is missing from the URL. Be
sure to included the trailing slash, as shown
here: http://CSLab7k:1095/
SA8250 Troubleshooting Guide

A P P E N D I X E HP e-Commerce/XML Director Server Appliance SA8250 User Guide
330
GUI Administrative
interface
initialization fails
DNS name resolution is
incomplete. The client machine’s host name must be
DNS-resolvable by the SA8250. If DNS is
not used, use the config sys hosts
add command at the CLI to add the client’s
hostname to the SA8250’s local host file. The
SA8250 also needs to be added to the client
machine’s local hosts file. For Windows*
NT*, the hosts file is located in
c:\winnt\System32\drivers\etc
directory. For Solaris*, edit the /etc/
nsswitch.conf to allow for local
resolution. For UNIX*, the hosts file is
located in /etc. The format of the entry is:
<IP> <SA8250Name>
<FullyQualifiedDomainName>
Example: 10.1.1.2 Broker1
Broker1.yourco.com
Slow client response
from a web server
through the SA8250
compared to
response time
directly from the web
server
Hostname/IP address
resolution on the server
may be misconfigured
or incomplete, causing
a delay in the server
response.
Add the hostname/real IP address of the
SA8250 to the HOSTS file on the server to
eliminate any delay in hostname/IP address
resolution on the server.
Slow client response
from a Web server
through the SA8250
compared to
response time
directly from the
Web server
Ethernet link
configuration needs
adjustment.
The SA8250 defaults to auto-negotiate mode
on the ethernet link. However, some older
routers may not handle auto-negotiate
correctly.
Problem Possible Cause Solution
SA8250 Troubleshooting Guide (continued)

A P P E N D I X E Troubleshooting
331
An attempt to
connect to the CLI
Administrative
interface results in
the message “CLI
not ready.”
Domain configuration
is incorrect or
incomplete.
Verify that the domain is correct. If it is
incorrect, use the dns command at the Boot
Monitor prompt to re-enter the correct
information. Reboot the SA8250 and restart
for changes to take effect.
DNS resolution is set
on the SA8250 but is
not being used at the
site.
If the customer is not using DNS, remove the
DNS entry by using the dns command at the
Boot Monitor prompt.
Corrupted network
configuration Perform “factory_reset” to clear network
info such as host name, IP address, subnet
mask, and default gateway. Reboot the
SA8250 and restart for changes to take
effect.
The SA8250 is
designated as the
backup SA8250 in a
serial failover
configuration.
This message is normal on a SA8250
designated as the backup for serial failover.
Telnet connection to
CLI on offline
SA8250 in serial
failover mode does
not appear to
connect, or, logon
prompt does not
appear immediately.
DNS resolution is
incomplete. The client machine's host name must be
DNS-resolvable by the SA8250. If DNS is
not used, use the config sys hosts add
command at the CLI to add the client's
hostname to the SA8250's local host file. The
SA8250 also needs to be added to the client
machine's local hosts file. For Windows NT,
the hosts file is located in
c:\winnt\System32\drivers\etc
directory. For Solaris, edit the /etc/
nsswitch.conf to allow for local
resolution. For UNIX, the hosts file is
located in /etc. The format of the entry is:
<IP> <SA8250Name>
<FullyQualifiedDomainName>
Example: 10.1.1.2 Broker1
Broker1.yourco.com
Problem Possible Cause Solution
SA8250 Troubleshooting Guide (continued)
A P P E N D I X E HP e-Commerce/XML Director Server Appliance SA8250 User Guide
332
Client connects
directly to the
fulfillment server,
bypassing the
SA8250
Timing issue with
routers Define a static route for the SA8250 on the
router.
Unexpected routing
behavior “Keepalive” option is
enabled on the
fulfillment servers
when configured with
the sticky option on the
SA8250.
Turn off “Keepalive” on the fulfillment
servers when using the sticky option.
Only some images
load when routing in
RICH-HTTP mode
“Keepalive” option is
enabled on the
fulfillment servers
when configured for
RICH-HTTP service on
the SA8250.
Turn off “Keepalive” on the fulfillment
servers when using RICH-HTTP. When
“Keepalive” is enabled on the fulfillment
servers, each GET request from the client
always returns to the same web server. If
GIFs are defined on one server and JPGs on
another, then only one of these image types
is seen at the client.
Round Robin Load
Balancing works
abnormally
The directory and/or
file content of the
fulfillment servers
defined under the
service is not identical.
Configure all the servers under the same
service with the same directory structure and
file content.
New TCP connections,
not client sessions, are
assigned to fulfillment
servers in a round robin
fashion.
This is normal behavior. Multiple
components of a web page (such as HTML
and GIFs) require separate TCP connections.
The requests are assigned to the fulfillment
servers in round robin fashion, although it
may not be apparent from the browser.
Problem Possible Cause Solution
SA8250 Troubleshooting Guide (continued)

A P P E N D I X E Troubleshooting
333
Client getting
timeout or “service
not found” errors
Proxy servers inhibit
use of sticky src-ip
option.
Some ISPs use proxy servers to load balance
client sessions. When the sticky src-ip
option is enabled and the client’s session is
switched to another proxy server, the source
IP address is changed. This may cause the
SA8250 to route the request to a different
server. The solution is to use the “sticky
cookie” option instead of “sticky src-ip.” In
this mode, a cookie is sent to the client to
force use of the same server regardless of the
source IP.
The client is on the
same subnet as server
(SAP mode only). This
causes the server to
return the response
directly to the client,
bypassing the SA8250.
The client discards the
response since the
destination is that of the
server and not the
SA8250.
Configure the client and server to reside on
different subnets.
For OPR
configurations, the
loopback adapter is not
configured on the
fulfillment server(s).
For instructions on configuring the loopback
adapter on the server(s), see Appendix D.
Problem Possible Cause Solution
SA8250 Troubleshooting Guide (continued)

A P P E N D I X E HP e-Commerce/XML Director Server Appliance SA8250 User Guide
334
Notes

Cleaning the Dust
Filter
Background
The HP e-Commerce/XML Director Server Appliance SA8250 has a
dust filter element mounted behind the front grille and in front of the
dual intake fans. This filter is washable and must be cleaned every six
months at a minimum. If you use your SA8250 in an abnormally
dusty environment, clean the filter more often. You need not interrupt
the SA8250’s operation to perform the following cleaning procedure.

A P P E N D I X F HP e-Commerce/XML Director Server Appliance SA8250 User Guide
336
Cleaning Procedure
To clean the dust filter, follow these steps:
1. Remove the two Phillips screws that secure the metal grille on
the left side of the SA8250’s front panel. Remove the grille to
expose the foam filter element.
2. Remove the foam filter element from its recess.
3. Replace the grille and its screws while the filter element is being
cleaned.
4. Wash the filter in warm water and set aside to dry.
5. Allow the filter to dry thoroughly before reinstalling in the
SA8250.
6. When the filter element is dry, remove the SA8250’s front grille
and replace the filter in its recess, ensuring that its entire
perimeter is behind the metal lip of the recess.
7. Replace the grille with its two Phillips screws.
Regulatory
Information
Taiwan Class A EMI Statement
VCCI Class A (Japan)

R E G U L A T O R Y HP e-Commerce/XML Director Server Appliance SA8250 User Guide
338
VCCI Statement
Class A ITE
This is a Class A product based on the standard of the Voluntary
Control Council for Interference by Information Technology
Equipment (VCCI). If this equipment is used in a domestic
environment, radio disturbance may arise. When such trouble occurs,
the user may be required to take corrective actions.
WARNING: This is a Class A product. In a domestic environment
this product may cause radio interference in which case the user may
be required to take adequate measures.
Internal access to this equipment is intended only for qualified service
personnel.
Australia

R E G U L A T O R Y FCC Part 15 Compliance Statement
339
FCC Part 15 Compliance Statement
This product has been tested and found to comply with the limits for
a Class A digital device pursuant to Part 15 of the FCC rules. These
limits are designed to provide reasonable protection against harmful
interference when the equipment is operated in a commercial
environment.
This product generates, uses, and can radiate radio frequency energy
and, if not installed and used in accordance with the instruction
manual, may cause harmful interference to radio communications.
However, there is no guarantee that interference will not occur in a
particular installation. If this equipment does cause harmful
interference to radio or television reception, which can be determined
by turning this equipment off and on, the user is encouraged to try to
correct the interference by one or more of the following measures:
•Change the direction of the radio or TV antenna.
•To the extent possible, relocate the radio, TV, or other receiver
away from the product.
•Plug the product into a different electrical outlet so that the
product and the receiver are on different branch circuits.
If these suggestions don't help, consult your dealer or an experienced
radio/TV repair technician for more suggestions.
NOTE: This device complies with Part 15 of the FCC Rules.
Operation is subject to the following two conditions: (1) This
device may not cause harmful interference, and (2) this device must
accept any interference received, including interference that may
cause undesired operation.
CAUTION: If you make any modification to the equipment not
expressly approved by HP, you could void your authority to operate
the equipment.

R E G U L A T O R Y HP e-Commerce/XML Director Server Appliance SA8250 User Guide
340
Canada Compliance Statement (Industry
Canada)
Cet appareil numérique respecte les limites bruits radioélectriques
applicables aux appareils numériques de Classe A prescrites dans la
norme sur le matériel brouilleur: "Appareils Numériques," NMB-003
édictée par le Ministre Canadien des Communications.
This digital apparatus does not exceed the Class A limits for radio
noise emissions from digital apparatus set out in the
interference-causing equipment standard entitled: "Digital
Apparatus," ICES-003 of the Canadian Department of
Communications.
CE Compliance Statement
The SA8250 complies with the EU Directive, 89/336/EEC, using the
EMC standards EN55022 (Class A) and EN50082-1. This product
also complies with the EU Directive, 73/23/EEC, using the safety
standard EN60950.
CISPR 22 Statement
WARNING: This is a Class A product. In a domestic environment
this product may cause radio interference in which case the user may
be required to take adequate measures.

R E G U L A T O R Y WARNING
341
WARNING
The system is designed to operate in a typical office environment.
Choose a site that is:
•Clean and free of airborne particles (other than normal room
dust).
•Well-ventilated and away from sources of heat including direct
sunlight.
•Away from sources of vibration or physical shock.
•Isolated from strong electromagnetic fields produced by
electrical devices.
•In regions that are susceptible to electrical storms, we
recommend you plug your system into a surge suppressor and
disconnect telecommunication lines to your modem during an
electrical storm.
•Provided with a properly grounded wall outlet.
Do not attempt to modify or use the supplied AC power cord if it is
not the exact type required.
Ensure that the system is disconnected from its power source and
from all telecommunications links, networks, or modem lines
whenever the chassis cover is to be removed. Do not operate the
system with the cover removed.

R E G U L A T O R Y HP e-Commerce/XML Director Server Appliance SA8250 User Guide
342
AVERTISSEMENT
Le système a été conçu pour fonctionner dans un cadre de travail
normal. L’emplacement choisi doit être:
•Propre et dépourvu de poussière en suspension (sauf la poussière
normale).
•Bien aéré et loin des sources de chaleur, y compris du soleil
direct.
•A l’abri des chocs et des sources de ibrations.
•Isolé de forts champs magnétiques géenérés par des appareils
électriques.
•Dans les régions sujettes aux orages magnétiques il est
recomandé de brancher votre système à un supresseur de
surtension, et de débrancher toutes les lignes de
télécommunications de votre modem durant un orage.
•Muni d’une prise murale correctement mise à la terre.
Ne pas utiliser ni modifier le câble d’alimentation C. A. fourni, s’il ne
correspond pas exactement au type requis.
Assurez vous que le système soit débranché de son alimentation ainsi
que de toutes les liaisons de télécomunication, des réseaux, et des
lignes de modem avant d’enlever le capot. Ne pas utiliser le système
quand le capot est enlevé.

R E G U L A T O R Y WARNUNG
343
WARNUNG
Das System wurde für den Betrieb in einer normalen Büroumgebung
entwickelt. Der entwickelt. Der Standort sollte:
•sauber und staubfrei sein (Hausstaub ausgenommen);
•gut gelüftet und keinen Heizquellen ausgesetzt sein
(einschließlich direkter Sonneneinstrahlung);
•keinen Erschütterungen ausgesetzt sein;
•keine starken, von elektrischen Geräten erzeugten
elektromagnetischen Felder aufweisen;
•in Regionen, in denen elektrische Stürme auftreten, mit einem
Überspannungsschutzgerät verbunden sein; während eines
elektrischen Sturms sollte keine Verbindung der
Telekommunikationsleitungen mit dem Modem bestehen;
•mit einer geerdeten Wechselstromsteckdose ausgerüstet sein.
Versuchen Sie nicht, das mitgelieferte Netzkabel zu ändern oder zu
verwenden, wenn es sich nicht um genau den erforderlichen Typ
handelt.
Das System darf weder an eine Stromquelle angeschlossen sein noch
eine Verbindung mit einer Telekommunikationseinrichtung, einem
Netzwerk oder einer Modem-Leitung haben, wenn die
Gehäuseabdeckung entfernt wird. Nehmen Sie das System nicht ohne
die Abdeckung in Betrieb.

R E G U L A T O R Y HP e-Commerce/XML Director Server Appliance SA8250 User Guide
344
AVVERTENZA
Il sistema è progettato per funzionare in un ambiente di lavoro tipico.
Scegliere una postazione che sia:
•Pulita e libera da particelle in sospensione (a parte la normale
polvere presente nell’ambiente).
•Ben ventilata e lontana da fonti di calore, compresa la luce solare
diretta.
•Al riparo da urti e lontana da fonti divibrazione.
•Isolata dai forti campi magnetici prodotti da dispositivi elettrici.
•In aree soggette a temporali, è consigliabile collegare il sistema
ad un limitatore di corrente. In caso di temporali, scollegare le
linee di comunicazione dal modem.
•Dotata di una presa a muro correttamente installata.
Non modificare o utilizzare il cavo di alimentazione in c. a. fornito
dal produttore, se non corrisponde esattamente al tipo richiesto.
Prima di rimuovere il coperchio del telaio, assicurarsi che il sistema
sia scollegato dall’alimentazione, da tutti i collegamenti di
comunicazione, reti o linee di modem. Non avviare il sistema senza
aver prima messo a posto il coperchio.

R E G U L A T O R Y ADVERTENCIAS
345
ADVERTENCIAS
El sistema está diseñado para funcionar en un entorno de trabajo
normal. Escoja un lugar:
•Limpio y libre de partículas en suspensión (salvo el polvo
normal).
•Bien ventilado y alejado de fuentes de calor, incluida la luz solar
directa.
•Alejado de fuentes de vibración.
•Aislado de campos electromagnéticos fuertes producidos por
dispositivos eléctricos.
•En regiones con frecuentes tormentas eléctricas, se recomienda
conectar su sistema a un eliminador de sobrevoltage y
desconectar el módem de las líneas de telecomunicación durante
las tormentas.
•Previsto de una toma de tierra correctamente instalada.
No intente modificar ni usar el cable de alimentación de corriente
alterna, si no se corresponde exactamente con el tipo requerido.
Asegúrese de que cada vez que se quite la cubierta del chasis, el
sistema haya sido desconectado de la red de alimentación y de todos
lo enlaces de telecomunicaciones, de red y de líneas de módem. No
ponga en funcionamiento el sistema mientras la cubierta esté quitada.

R E G U L A T O R Y HP e-Commerce/XML Director Server Appliance SA8250 User Guide
346
Wichtige Sicherheitshinweise
1. Bitte lesen Sie sich diese Hinweise sorgfältig durch.
2. Heben Sie diese Anleitung für den spätern Gebrauch auf.
3. Vor jedem Reinigen ist das Gerät vom Stromnetz zu trennen.
Vervenden Sie keine Flüssig- oder Aerosolreiniger. Am besten
dient ein angefeuchtetes Tuch zur Reinigung.
4. Um eine Beschädigung des Gerätes zu vermeiden sollten Sie nur
Zubehörteile verwenden, die vom Hersteller zugelassen sind.
5. Das Gerät is vor Feuchtigkeit zu schützen.
6. Bei der Aufstellung des Gerätes ist auf sichern Stand zu achten.
Ein Kippen oder Fallen könnte Verletzungen hervorrufen.
Verwenden Sie nur sichere Standorte und beachten Sie die
Aufstellhinweise des Herstellers.
7. Die Belüftungsöffnungen dienen zur Luftzirkulation die das
Gerät vor Überhitzung schützt. Sorgen Sie dafür, daß diese
Öffnungen nicht abgedeckt werden.
8. Beachten Sie beim Anschluß an das Stromnetz die
Anschlußwerte.
9. Die Netzanschlußsteckdose muß aus Gründen der elektrischen
Sicherheit einen Schutzleiterkontakt haben.
10.Verlegen Sie die Netzanschlußleitung so, daß niemand darüber
fallen kann. Es sollete auch nichts auf der Leitung abgestellt
werden.
11.Alle Hinweise und Warnungen die sich am Geräten befinden sind
zu beachten.
12.Wird das Gerät über einen längeren Zeitraum nicht benutzt,
sollten Sie es vom Stromnetz trennen. Somit wird im Falle einer
Überspannung eine Beschädigung vermieden.
13.Durch die Lüftungsöffnungen dürfen niemals Gegenstände oder
Flüssigkeiten in das Gerät gelangen. Dies könnte einen Brand
bzw. Elektrischen Schlag auslösen.
14.Öffnen Sie niemals das Gerät. Das Gerät darf aus Gründen der
elektrischen Sicherheit nur von authorisiertem Servicepersonal
geöffnet werden.

R E G U L A T O R Y Wichtige Sicherheitshinweise
347
15.Wenn folgende Situationen auftreten ist das Gerät vom
Stromnetz zu trennen und von einerqualifizierten Servicestelle zu
überprüfen:
a. Netzkabel oder Netzstecker sint beschädigt.
b. Flüssigkeit ist in das Gerät eingedrungen.
c. Das Gerät war Feuchtigkeit ausgesetzt.
d. Wenn das Gerät nicht der Bedienungsanleitung ensprechend
funktioniert oder Sie mit Hilfe dieser Anleitung keine
Verbesserung erzielen.
e. Das Gerät ist gefallen und/oder das Gehäuse ist beschädigt.
f. Wenn das Gerät deutliche Anzeichen eines Defektes aufweist.
16.Bei Reparaturen dürfen nur Orginalersatzteile bzw. den
Orginalteilen entsprechende Teile verwendet werden. Der
Einsatz von ungeeigneten Ersatzteilen kann eine weitere
Beschädigung hervorrufen.
17.Wenden Sie sich mit allen Fragen die Service und Repartur
betreffen an Ihren Servicepartner. Somit stellen Sie die
Betriebssicherheit des Gerätes sicher.
18.Zum Netzanscluß dieses Gerätes ist eine geprüfte Leitung zu
verwenden, Für einen Nennstrom bis 6A und einem
Gerätegewicht größer 3kg ist eine Leitung nicht leichter als
H05VV-F, 3G, 0.75mm2 einzusetzen.

R E G U L A T O R Y HP e-Commerce/XML Director Server Appliance SA8250 User Guide
348
Notes

Software License
Agreement
ATTENTION: USE OF THE SOFTWARE IS SUBJECT TO THE
HP SOFTWARE LICENSE TERMS SET FORTH BELOW. USING
THE SOFTWARE INDICATES YOUR ACCEPTANCE OF
THESE LICENSE TERMS. IF YOU DO NOT ACCEPT THESE
LICENSE TERMS, YOU MAY RETURN THE SOFTWARE FOR
A FULL REFUND. IF THE SOFTWARE IS BUNDLED WITH
ANOTHER PRODUCT, YOU MAY RETURN THE ENTIRE
UNUSED PRODUCT FOR A FULL REFUND.
HP SOFTWARE LICENSE TERMS
License Grant. HP grants you a license to Use one copy of the
Software. "Use" means storing, loading, installing, executing or
displaying the Software. You may not modify the Software or disable
any licensing or control features of the Software. If the Software is
licensed for "concurrent use," you may not allow more than the
maximum number of authorized users to Use the Software
concurrently.
Ownership. The Software is owned and copyrighted by HP or its
third party suppliers. Your license confers no title or ownership and
is not a sale of any rights in the Software, its documentation or the
media on which they are recorded or printed. Third party suppliers
may protect their rights in the Software in the event of any
infringement.

S O F T W A R E HP e-Commerce/XML Director Server Appliance SA8250 User Guide
350
Copies and Adaptations. You may only make copies or adaptations
of the Software for archival purposes or when copying or adaptation
is an essential step in the authorized Use of the Software on a backup
product, provided that copies and adaptations are used in no other
manner and provided further that Use on the backup product is
discontinued when the original or replacement product becomes
operable. You must reproduce all copyright notices in the original
Software on all copies or adaptations. You may not copy the
Software onto any public or distributed network.
No Disassembly or Decryption. You may not disassemble or
decompile the Software without HP’s prior written consent. Where
you have other rights under statute, you will provide HP with
reasonably detailed information regarding any intended disassembly
or decompilation. You may not decrypt the Software unless
necessary for the legitimate use of the Software.
Transfer. Your license will automatically terminate upon any
transfer of the Software. Upon transfer, you must deliver the
Software, including any copies and related documentation, to the
transferee. The transferee must accept these License Terms as a
condition to the transfer.
Termination. HP may terminate your license upon notice for failure
to comply with any of these License Terms. Upon termination, you
must immediately destroy the Software, together with all copies,
adaptations and merged portions in any form.
Export Requirements. You may not export or re-export the
Software or any copy or adaptation in violation of any applicable
laws or regulations.
U.S. Government Restricted Rights. The Software and any
accompanying documentation have been developed entirely at
private expense. They are delivered and licensed as "commercial
computer software" as defined in DFARS 252.227-7013 (Oct 1988),
DFARS 252.211-7015 (May 1991) or DFARS 252.227-7014 (Jun
1995), as a "commercial item" as defined in FAR 2.101(a), or as
"Restricted computer software" as defined in FAR 52.227-19 (Jun
1987)(or any equivalent agency regulation or contract clause),
whichever is applicable. You have only those rights provided for
such Software and any accompanying documentation by the
applicable FAR or DFARS clause or the HP standard software
agreement for the product involved.

S O F T W A R E Software License Agreement
351
Mozilla* and expat* License Information
1. expat (http://www.jclark.com/xml/expat.html) is code used in the
SA8250. The license governing the expat code is either the
Mozilla Public License (MPL) Version 1.1 or the GNU General
Public License.
2. The open source code has neither been modified by HP nor have
files been added to or deleted from the source code by HP. HP’s
code is simply linked to the expat code through its API function
call.
3. Requirements for distribution of expat: Executable distributions
must include: (i) a notice stating that the Source Code is
available under the terms of the MPL. (ii) Any related manuals/
documentation accompanying the product must include a copy of
the MPL, as shown below:
MOZILLA
PUBLIC
LICENSE,
Version 1.1
1. Definitions
1.0.1. “Commercial Use” means distribution or otherwise
making the Covered Code available to a third party.
1.1. “Contributor” means each entity that creates or contributes
to the creation of Modifications.
1.2. ''Contributor Version'' means the combination of the
Original Code, prior Modifications used by a Contributor, and
the Modifications made by that particular Contributor.
1.3. ''Covered Code'' means the Original Code or Modifications
or the combination of the Original Code and Modifications, in
each case including portions thereof.
1.4. ''Electronic Distribution Mechanism'' means a mechanism
generally accepted in the software development community for
the electronic transfer of data.
1.5. ''Executable'' means Covered Code in any form other than
Source Code.
1.6. ''Initial Developer'' means the individual or entity identified
as the Initial Developer in the Source Code notice required by
Exhibit A.

S O F T W A R E HP e-Commerce/XML Director Server Appliance SA8250 User Guide
352
1.7. ’’Larger Work’’ means a work which combines Covered
Code or portions thereof with code not governed by the terms of
this License.
1.8. ’’License’’ means this document.
1.8.1. "Licensable" means having the right to grant, to the
maximum extent possible, whether at the time of the initial grant
or subsequently acquired, any and all of the rights conveyed
herein.
1.9. ’’Modifications’’ means any addition to or deletion from the
substance or structure of either the Original Code or any previous
Modifications. When Covered Code is released as a series of
files, a Modification is:
(a) Any addition to or deletion from the contents of a file
containing Original Code or previous Modifications.
(b) Any new file that contains any part of the Original Code
or previous Modifications.
1.10. ’’Original Code’’ means Source Code of computer software
code which is described in the Source Code notice required by
Exhibit A as Original Code, and which, at the time of its release
under this License is not already Covered Code governed by this
License.
1.10.1. "Patent Claims" means any patent claim(s), now owned
or hereafter acquired, including without limitation, method,
process, and apparatus claims, in any patent Licensable by
grantor.
1.11. ’’Source Code’’ means the preferred form of the Covered
Code for making modifications to it, including all modules it
contains, plus any associated interface definition files, scripts
used to control compilation and installation of an Executable, or
source code differential comparisons against either the Original
Code or another well known, available Covered Code of the
Contributor’s choice. The Source Code can be in a compressed or
archival form, provided the appropriate decompression or de-
archiving software is widely available for no charge.
1.12. "You’’ (or "Your") means an individual or a legal entity
exercising rights under, and complying with all of the terms of,
this License or a future version of this License issued under
Section 6.1. For legal entities, "You’’ includes any entity which
controls, is controlled by, or is under common control with You.

S O F T W A R E Software License Agreement
353
For purposes of this definition, "control’’ means (a) the power,
direct or indirect, to cause the direction or management of such
entity, whether by contract or otherwise, or (b) ownership of
more than fifty percent (50%) of the outstanding shares or
beneficial ownership of such entity.
2. Source Code License.
2.1. The Initial Developer Grant.
The Initial Developer hereby grants You a world-wide, royalty-
free, non-exclusive license, subject to third party intellectual
property claims:
(a) under intellectual property rights (other than patent or
trademark) Licensable by Initial Developer to use, reproduce,
modify, display, perform, sublicense and distribute the
Original Code (or portions thereof) with or without
Modifications, and/or as part of a Larger Work; and
(b) under Patents Claims infringed by the making, using or
selling of Original Code, to make, have made, use, practice,
sell, and offer for sale, and/or otherwise dispose of the
Original Code (or portions thereof).
(c) the licenses granted in this Section 2.1(a) and (b) are
effective on the date Initial Developer first distributes
Original Code under the terms of this License.
(d) Notwithstanding Section 2.1(b) above, no patent license is
granted: 1) for code that You delete from the Original Code;
2) separate from the Original Code; or 3) for infringements
caused by: i) the modification of the Original Code or ii) the
combination of the Original Code with other software or
devices.
2.2. Contributor Grant.
Subject to third party intellectual property claims, each
Contributor hereby grants You a world-wide, royalty-free, non-
exclusive license
(a) under intellectual property rights (other than patent or
trademark) Licensable by Contributor, to use, reproduce,
modify, display, perform, sublicense and distribute the
Modifications created by such Contributor (or portions
thereof) either on an unmodified basis, with other
Modifications, as Covered Code and/or as part of a Larger
Work; and

S O F T W A R E HP e-Commerce/XML Director Server Appliance SA8250 User Guide
354
(b)under Patent Claims infringed by the making, using, or
selling of Modifications made by that Contributor either
alone and/or in combination with its Contributor Version (or
portions of such combination), to make, use, sell, offer for
sale, have made, and/or otherwise dispose of:
1) Modifications made by that Contributor (or portions
thereof); and 2) the combination of Modifications made by
that Contributor with its Contributor Version (or portions of
such combination).
(c) the licenses granted in Sections 2.2(a) and 2.2(b) are
effective on the date Contributor first makes Commercial Use
of the Covered Code.
(d) Notwithstanding Section 2.2(b) above, no patent license is
granted: 1) for any code that Contributor has deleted from the
Contributor Version; 2) separate from the Contributor
Version; 3) for infringements caused by: i) third party
modifications of Contributor Version or ii) the combination
of Modifications made by that Contributor with other
software (except as part of the Contributor Version) or other
devices; or 4) under Patent Claims infringed by Covered
Code in the absence of Modifications made by that
Contributor.
3. Distribution Obligations.
3.1. Application of License.
The Modifications which You create or to which You contribute
are governed by the terms of this License, including without
limitation Section 2.2. The Source Code version of Covered
Code may be distributed only under the terms of this License or a
future version of this License released under Section 6.1, and
You must include a copy of this License with every copy of the
Source Code You distribute. You may not offer or impose any
terms on any Source Code version that alters or restricts the
applicable version of this License or the recipients’ rights
hereunder. However, You may include an additional document
offering the additional rights described in Section 3.5.

S O F T W A R E Software License Agreement
355
3.2. Availability of Source Code.
Any Modification which You create or to which You contribute
must be made available in Source Code form under the terms of
this License either on the same media as an Executable version or
via an accepted Electronic Distribution Mechanism to anyone to
whom you made an Executable version available; and if made
available via Electronic Distribution Mechanism, must remain
available for at least twelve (12) months after the date it initially
became available, or at least six (6) months after a subsequent
version of that particular Modification has been made available
to such recipients. You are responsible for ensuring that the
Source Code version remains available even if the Electronic
Distribution Mechanism is maintained by a third party.
3.3. Description of Modifications.
You must cause all Covered Code to which You contribute to
contain a file documenting the changes You made to create that
Covered Code and the date of any change. You must include a
prominent statement that the Modification is derived, directly or
indirectly, from Original Code provided by the Initial Developer
and including the name of the Initial Developer in (a) the Source
Code, and (b) in any notice in an Executable version or related
documentation in which You describe the origin or ownership of
the Covered Code.
3.4. Intellectual Property Matters
(a) Third Party Claims. If Contributor has knowledge that a
license under a third party’s intellectual property rights is
required to exercise the rights granted by such Contributor
under Sections 2.1 or 2.2, Contributor must include a text file
with the Source Code distribution titled "LEGAL’’ which
describes the claim and the party making the claim in
sufficient detail that a recipient will know whom to contact. If
Contributor obtains such knowledge after the Modification is
made available as described in Section 3.2, Contributor shall
promptly modify the LEGAL file in all copies Contributor
makes available thereafter and shall take other steps (such as
notifying appropriate mailing lists or news groups)
reasonably calculated to inform those who received the
Covered Code that new knowledge has been obtained.
(b) Contributor APIs. If Contributor’s Modifications include
an application programming interface and Contributor has
knowledge of patent licenses which are reasonably necessary

S O F T W A R E HP e-Commerce/XML Director Server Appliance SA8250 User Guide
356
to implement that API, Contributor must also include this
information in the LEGAL file.
(c) Representations. Contributor represents that, except as
disclosed pursuant to Section 3.4(a) above, Contributor
believes that Contributor’s Modifications are Contributor’s
original creation(s) and/or Contributor has sufficient rights to
grant the rights conveyed by this License.
3.5. Required Notices.
You must duplicate the notice in Exhibit A in each file of the
Source Code. If it is not possible to put such notice in a
particular Source Code file due to its structure, then You must
include such notice in a location (such as a relevant directory)
where a user would be likely to look for such a notice. If You
created one or more Modification(s) You may add your name as
a Contributor to the notice described in Exhibit A. You must also
duplicate this License in any documentation for the Source Code
where You describe recipients’ rights or ownership rights relating
to Covered Code. You may choose to offer, and to charge a fee
for, warranty, support, indemnity or liability obligations to one or
more recipients of Covered Code. However, You may do so only
on Your own behalf, and not on behalf of the Initial Developer or
any Contributor. You must make it absolutely clear than any such
warranty, support, indemnity or liability obligation is offered by
You alone, and You hereby agree to indemnify the Initial
Developer and every Contributor for any liability incurred by the
Initial Developer or such Contributor as a result of warranty,
support, indemnity or liability terms You offer.

S O F T W A R E Software License Agreement
357
3.6. Distribution of Executable Versions.
You may distribute Covered Code in Executable form only if the
requirements of Section 3.1-3.5 have been met for that Covered
Code, and if You include a notice stating that the Source Code
version of the Covered Code is available under the terms of this
License, including a description of how and where You have
fulfilled the obligations of Section 3.2. The notice must be
conspicuously included in any notice in an Executable version,
related documentation or collateral in which You describe
recipients’ rights relating to the Covered Code. You may
distribute the Executable version of Covered Code or ownership
rights under a license of Your choice, which may contain terms
different from this License, provided that You are in compliance
with the terms of this License and that the license for the
Executable version does not attempt to limit or alter the
recipient’s rights in the Source Code version from the rights set
forth in this License. If You distribute the Executable version
under a different license You must make it absolutely clear that
any terms which differ from this License are offered by You
alone, not by the Initial Developer or any Contributor. You
hereby agree to indemnify the Initial Developer and every
Contributor for any liability incurred by the Initial Developer or
such Contributor as a result of any such terms You offer.
3.7. Larger Works.
You may create a Larger Work by combining Covered Code with
other code not governed by the terms of this License and
distribute the Larger Work as a single product. In such a case,
You must make sure the requirements of this License are fulfilled
for the Covered Code.
4. Inability to Comply Due to Statute or Regulation
If it is impossible for You to comply with any of the terms of this
License with respect to some or all of the Covered Code due to
statute, judicial order, or regulation then You must: (a) comply
with the terms of this License to the maximum extent possible;
and (b) describe the limitations and the code they affect. Such
description must be included in the LEGAL file described in
Section 3.4 and must be included with all distributions of the
Source Code. Except to the extent prohibited by statute or
regulation, such description must be sufficiently detailed for a
recipient of ordinary skill to be able to understand it.

S O F T W A R E HP e-Commerce/XML Director Server Appliance SA8250 User Guide
358
5. Application of this License
This License applies to code to which the Initial Developer has
attached the notice in Exhibit A and to related Covered Code.
6. Versions of the License.
6.1. New Versions.
Netscape Communications Corporation (’’Netscape’’) may
publish revised and/or new versions of the License from time to
time. Each version will be given a distinguishing version
number.
6.2. Effect of New Versions.
Once Covered Code has been published under a particular
version of the License, You may always continue to use it under
the terms of that version. You may also choose to use such
Covered Code under the terms of any subsequent version of the
License published by Netscape. No one other than Netscape has
the right to modify the terms applicable to Covered Code created
under this License.
6.3. Derivative Works.
If You create or use a modified version of this License (which
you may only do in order to apply it to code which is not already
Covered Code governed by this License), You must (a) rename
Your license so that the phrases ’’Mozilla’’, ’’MOZILLAPL’’,
’’MOZPL’’, ’’Netscape’’, "MPL", ’’NPL’’ or any confusingly
similar phrase do not appear in your license (except to note that
your license differs from this License) and (b) otherwise make it
clear that Your version of the license contains terms which differ
from the Mozilla Public License and Netscape Public License.
(Filling in the name of the Initial Developer, Original Code or
Contributor in the notice described in Exhibit A shall not of
themselves be deemed to be modifications of this License.)

S O F T W A R E Software License Agreement
359
7. DISCLAIMER OF WARRANTY.
COVERED CODE IS PROVIDED UNDER THIS LICENSE
ON AN "AS IS’’ BASIS, WITHOUT WARRANTY OF ANY
KIND, EITHER EXPRESSED OR IMPLIED, INCLUDING,
WITHOUT LIMITATION, WARRANTIES THAT THE
COVERED CODE IS FREE OF DEFECTS,
MERCHANTABLE, FIT FOR A PARTICULAR PURPOSE OR
NON-INFRINGING. THE ENTIRE RISK AS TO THE
QUALITY AND PERFORMANCE OF THE COVERED CODE
IS WITH YOU. SHOULD ANY COVERED CODE PROVE
DEFECTIVE IN ANY RESPECT, YOU (NOT THE INITIAL
DEVELOPER OR ANY OTHER CONTRIBUTOR) ASSUME
THE COST OF ANY NECESSARY SERVICING, REPAIR
OR CORRECTION. THIS DISCLAIMER OF WARRANTY
CONSTITUTES AN ESSENTIAL PART OF THIS LICENSE.
NO USE OF ANY COVERED CODE IS AUTHORIZED
HEREUNDER EXCEPT UNDER THIS DISCLAIMER.
8. TERMINATION.
8.1. This License and the rights granted hereunder will terminate
automatically if You fail to comply with terms herein and fail to
cure such breach within 30 days of becoming aware of the
breach. All sublicenses to the Covered Code which are properly
granted shall survive any termination of this License. Provisions
which, by their nature, must remain in effect beyond the
termination of this License shall survive.
8.2. If You initiate litigation by asserting a patent infringement
claim (excluding declaratory judgment actions) against Initial
Developer or a Contributor (the Initial Developer or Contributor
against whom You file such action is referred to as "Participant")
alleging that:
(a) such Participant’s Contributor Version directly or
indirectly infringes any patent, then any and all rights granted
by such Participant to You under Sections 2.1 and/or 2.2 of
this License shall, upon 60 days notice from Participant
terminate prospectively, unless if within 60 days after
receipt of notice You either: (i) agree in writing to pay
Participant a mutually agreeable reasonable royalty for Your
past and future use of Modifications made by such
Participant, or (ii) withdraw Your litigation claim with
respect to the Contributor Version against such Participant. If
within 60 days of notice, a reasonable royalty and payment

S O F T W A R E HP e-Commerce/XML Director Server Appliance SA8250 User Guide
360
arrangement are not mutually agreed upon in writing by the
parties or the litigation claim is not withdrawn, the rights
granted by Participant to You under Sections 2.1 and/or 2.2
automatically terminate at the expiration of the 60 day notice
period specified above.
(b) any software, hardware, or device, other than such
Participant’s Contributor Version, directly or indirectly
infringes any patent, then any rights granted to You by such
Participant under Sections 2.1(b) and 2.2(b) are revoked
effective as of the date You first made, used, sold, distributed,
or had made, Modifications made by that Participant.
8.3. If You assert a patent infringement claim against Participant
alleging that such Participant’s Contributor Version directly or
indirectly infringes any patent where such claim is resolved (such
as by license or settlement) prior to the initiation of patent
infringement litigation, then the reasonable value of the licenses
granted by such Participant under Sections 2.1 or 2.2 shall be
taken into account in determining the amount or value of any
payment or license.
8.4. In the event of termination under Sections 8.1 or 8.2 above,
all end user license agreements (excluding distributors and
resellers) which have been validly granted by You or any
distributor hereunder prior to termination shall survive
termination.

S O F T W A R E Software License Agreement
361
9. LIMITATION OF LIABILITY.
UNDER NO CIRCUMSTANCES AND UNDER NO LEGAL
THEORY, WHETHER TORT (INCLUDING NEGLIGENCE),
CONTRACT, OR OTHERWISE, SHALL YOU, THE INITIAL
DEVELOPER, ANY OTHER CONTRIBUTOR, OR ANY
DISTRIBUTOR OF COVERED CODE, OR ANY SUPPLIER
OF ANY OF SUCH PARTIES, BE LIABLE TO ANY PERSON
FOR ANY INDIRECT, SPECIAL, INCIDENTAL, OR
CONSEQUENTIAL DAMAGES OF ANY CHARACTER
INCLUDING, WITHOUT LIMITATION, DAMAGES FOR
LOSS OF GOODWILL, WORK STOPPAGE, COMPUTER
FAILURE OR MALFUNCTION, OR ANY AND ALL OTHER
COMMERCIAL DAMAGES OR LOSSES, EVEN IF SUCH
PARTY SHALL HAVE BEEN INFORMED OF THE
POSSIBILITY OF SUCH DAMAGES. THIS LIMITATION OF
LIABILITY SHALL NOT APPLY TO LIABILITY FOR
DEATH OR PERSONAL INJURY RESULTING FROM SUCH
PARTY’S NEGLIGENCE TO THE EXTENT APPLICABLE
LAW PROHIBITS SUCH LIMITATION. SOME
JURISDICTIONS DO NOT ALLOW THE EXCLUSION OR
LIMITATION OF INCIDENTAL OR CONSEQUENTIAL
DAMAGES, SO THIS EXCLUSION AND LIMITATION
MAY NOT APPLY TO YOU.
10.U.S. GOVERNMENT END USERS.
The Covered Code is a ’’commercial item,’’ as that term is defined
in 48 C.F.R. 2.101 (Oct. 1995), consisting of ’’commercial
computer software’’ and ’’commercial computer software
documentation,’’ as such terms are used in 48 C.F.R. 12.212
(Sept. 1995). Consistent with 48 C.F.R. 12.212 and 48 C.F.R.
227.7202-1 through 227.7202-4 (June 1995), all U.S.
Government End Users acquire Covered Code with only those
rights set forth herein.

S O F T W A R E HP e-Commerce/XML Director Server Appliance SA8250 User Guide
362
11. MISCELLANEOUS.
This License represents the complete agreement concerning
subject matter hereof. If any provision of this License is held to
be unenforceable, such provision shall be reformed only to the
extent necessary to make it enforceable. This License shall be
governed by California law provisions (except to the extent
applicable law, if any, provides otherwise), excluding its
conflict-of-law provisions. With respect to disputes in which at
least one party is a citizen of, or an entity chartered or registered
to do business in the United States of America, any litigation
relating to this License shall be subject to the jurisdiction of the
Federal Courts of the Northern District of California, with venue
lying in Santa Clara County, California, with the losing party
responsible for costs, including without limitation, court costs
and reasonable attorneys’ fees and expenses. The application of
the United Nations Convention on Contracts for the International
Sale of Goods is expressly excluded. Any law or regulation
which provides that the language of a contract shall be construed
against the drafter shall not apply to this License.
12.RESPONSIBILITY FOR CLAIMS.
As between Initial Developer and the Contributors, each party is
responsible for claims and damages arising, directly or indirectly,
out of its utilization of rights under this License and You agree to
work with Initial Developer and Contributors to distribute such
responsibility on an equitable basis. Nothing herein is intended or
shall be deemed to constitute any admission of liability.
13.MULTIPLE-LICENSED CODE.
Initial Developer may designate portions of the Covered Code as
“Multiple-Licensed.” “Multiple-Licensed” means that the Initial
Developer permits you to utilize portions of the Covered Code
under Your choice of the NPL or the alternative licenses, if any,
specified by the Initial Developer in the file described in Exhibit
A.
14.EXHIBIT A -Mozilla Public License.
“The contents of this file are subject to the Mozilla Public
License Version 1.1 (the "License"); you may not use this file
except in compliance with the License. You may obtain a copy of
the License at http://www.mozilla.org/MPL/.

S O F T W A R E Software License Agreement
363
Software distributed under the License is distributed on an "AS
IS" basis, WITHOUT WARRANTY OF ANY KIND, either
express or implied. See the License for the specific language
governing rights and limitations under the License.
The Original Code is _________________________________.
The Initial Developer of the Original Code is _______________.
Portions created by _____________________ are Copyright ©
______ _______________________. All Rights Reserved.
Contributor(s): ______________________________________.
Alternatively, the contents of this file may be used under the
terms of the _____ license (the “[___] License”), in which case
the provisions of [______] License are applicable instead of
those above. If you wish to allow use of your version of this file
only under the terms of the [____] License and not to allow
others to use your version of this file under the MPL, indicate
your decision by deleting the provisions above and replace them
with the notice and other provisions required by the [___]
License. If you do not delete the provisions above, a recipient
may use your version of this file under either the MPL or the
[___] License."
[NOTE: The text of this Exhibit A may differ slightly from the
text of the notices in the Source Code files of the Original Code.
You should use the text of this Exhibit A rather than the text
found in the Original Code Source Code for Your
Modifications.]

S O F T W A R E HP e-Commerce/XML Director Server Appliance SA8250 User Guide
364
Notes

Glossary
This section defines terms and acronyms used throughout the HP e-
Commerce/XML Director Server Appliance SA8250 User Guide.
ARP Address Resolution Protocol
B2B Business-to-business
CA Certificate Authority
Certificate A digitally-signed token in an SSL-encrypted transaction containing
information including the issuer (Certificate Authority that issued the
certificate), the organization that owns the certificate, public key, the
validity period for the certificate, and the hostname
Cipher Any encryption algorithm, either symmetric or public key, operating
either as a data stream or divided into blocks
Client Authentication A means of requesting client certificates to verify identities.
Client CA See Client Authentication.
CRL Certificate Revocation List. A timestamped list identifying revoked
certificates, each of which contain a serial number.

G L O S S A R Y HP e-Commerce/XML Director Server Appliance SA8250 User Guide
366
Default Server If defined, the server that the SA8250 directs client traffic to if it
cannot find a match for any RICH or XML expressions.
DHCP Dynamic Host Configuration Protocol. This protocol allows servers
to dynamically assign IP addresses to nodes (workstations) on the fly.
DN Distinguished Name. Used when creating a signing request.
DNS Domain Name Server. A mechanism used in the Internet for
translating the names of host machines into addresses.
DTD Document Type Definition
Eligible Server A server in a lower priority service’s server pool
FTP File Transfer Protocol. A low-level and extremely fast method of
transferring files over TCP/IP networks.
Fulfillment Server A server that stores content and runs applications to respond to user
requests
Heartbeat A signal acknowledging the existence/operation of SA8250. The
heartbeat command enables the SA8250 to display a message on the
console every heartbeat interval.
HOT Another name for Layer 4, the transport layer, which defines the rules
for information exchange and manages end-to-end delivery of
information within and between networks, including error recovery
and flow control.
HTTP Hypertext Transfer Protocol: the protocol used between a web
browser and a server to request a document and transfer its contents
HTTPS HTTP exchanged over an SSL-encrypted session
IANA Internet Assigned Number Authority
IP Internet Protocol
IP Address A unique identifier for a node on an IP network. Expressed in “dotted
decimal” notation. For example: 10.0.0.1
IP Service A network-accessible, IP-accessible Application Protocol. For
example: HTTP, FTP, and the like. For administration purposes,
services are identified by Virtual IP:Port.
KB Kilobytes, or thousands of bytes, of data

G L O S S A R Y HP e-Commerce/XML Director Server Appliance SA8250 User Guide
367
Key A public key and private key pair used to encrypt/decrypt messages
Key Strength Length, in bits, of keys used in data encryption or authentication. For
example: 56, 128, 512
Keypair Matching public and private keys
Layer 4 See HOT
Layer 7 See RICH
LDAP Lightweight Directory Access Protocol. Used to access common
directory information.
Load Balancing The distribution of processing and communications activity across a
computer network so that no single device is overwhelmed. Load
balancing is particularly important for networks on which it is
difficult to predict the volume of requests likely to be issued to a
server. Busy Web sites typically employ two or more Web servers in
load balancing roles.
MB Megabytes, or millions of bytes, of data
MIB Management Information Base. A repository of characteristics and
parameters managed in a network device, such as a NIC, hub, switch,
or router
MIME Multipurpose Internet Mail Extensions. MIME is the standard format
for including non-text information in Internet mail, thereby
supporting the transmission of mixed-media messages across TCP/IP
networks.
MSAP Multi-Hop Source Address Preservation. MSAP allows requests to
pass through two cascaded SA8250s in different geographical areas.
Similar to SAP, but with geographic dispersal. See also SAP.
NIC Network Interface Card. The attachment that connects a device to a
network by executing the code needed by the connected device to
share a cable or some other media with other workstations.
NTP Network Time Protocol. A means for setting time among Internet
hosts around the world.
OPR Out of Path Return. The ability to establish a session or connection
and then transfer the session to a fulfillment server. After the
fulfillment server receives the original request, it responds directly to

G L O S S A R Y HP e-Commerce/XML Director Server Appliance SA8250 User Guide
368
the client by a path other than the one established for the original
connection. This method typically results in faster delivery of the
requested content to the client.
OSPF Open Shortest Path First. A link-state routing algorithm used to
calculate routes based on the number of routers, transmission speed,
delays, and route cost.
Policy Rules used to effect changes in server resource apportionment
according to conditions and thresholds established by a system
administrator
Policy Group A set of services chosen and prioritized to automate network
performance to support a specific business model
Port In the context of TCP/IP sessions, a unique protocol-specific handle
Priority Description of an IP service’s place in the hierarchy of services within
a Policy Group
Private Key The part of a key in a public key system that is kept secret and used
only by its owner. It is used for decrypting messages and for making
digital signatures.
Public Key The part of a key in a public key system that is distributed widely, and
is not kept secure. Used for encryption or for verifying signatures.
RICH Real-time Intelligent Content Handling, or Layer 7. The manner in
which the SA8250 analyzes and allocates requests for IP services
according to the type of content requested.
RIP Routing Information Protocol
SAP Source Address Preservation. A SA8250 option which, when
enabled, allows server logs to reflect the true IP addresses of
requesting clients.
Service A service is an application protocol that is offered on a network. The
devices where the service is running are identified by an IP address.
A port is used to identify the protocol at the designated IP address.
Services contain an IP address and a port. For example,
10.54.67.6:80 describes a service consisting of a server’s HTTP
application listening on port 80.
Signing Request Required for a request for certificate authentication by a Certificate
Authority

G L O S S A R Y HP e-Commerce/XML Director Server Appliance SA8250 User Guide
369
S/MIME Secured MIME. See MIME.
SNMP Simple Network Management Protocol. A method by which network
management applications can query a management agent using a
supported MIB. See also MIB.
SSH Secure shell
SSL Secure Socket Layer. Protocol developed by Netscape* for
encrypted transmission over TCP/IP networks, setting up a secure
end-to-end link.
Target Response Time A time (expressed in milliseconds) representing the ideal maximum
time required to serve requests for that Service
URI Uniform Resource Indicator, derived from the HTTP Request-Line
that identifies the resource on which to apply the request. The URI
limit is 7,500 bytes on a GET request.
URL Uniform Resource Locator. Also network or web address.
Verisign A well-known Certificate Authority
XML eXtensible Markup Language
XML Pattern A definition of one or more keywords that describe specific
conditions to be compared with incoming XML data. This typically
consists of a RICH (or Layer 7) Expression, an ampersand (&), an
optional document number, another ampersand (&), and an XML
Expression. For example:
*/order.asp & doc=2 & //Address[zipcode > 90000]
The XML Expression is optional. However, the XML Expression
will be ignored if the RICH expression is missing.
XPath The XML Path Language Standard. The SA8250 uses a subset of this
language for its XML expressions.

G L O S S A R Y HP e-Commerce/XML Director Server Appliance SA8250 User Guide
370
Notes

Support Services
Support for your SA8250
U.S. and
Canada
For hardware service and telephone support, contact:
•An HP-authorized reseller
or
•HP Customer Support Center at 800-633-3600

S U P P O R T HP e-Commerce/XML Director Server Appliance SA8250 User Guide
372
Europe For hardware service and telephone support, contact:
•An HP-authorized reseller
or
•One of the following HP Customer Support Centers:
Country and Number
Austria – 0660 6386
Belgium (Dutch) – 02 626 8806
Belgium (French) – 02 626 8807
Czech Republic – 420 2 613 07 310
Denmark – 3929 4099
English (non-UK) – +44 20 7512 5202
Finland – 02 03 47 288
France – 01 43 62 3434
Germany – 0180 525 8143
Greece – +30 (0) 16196411
Hungary – 36 1 382 1111
Ireland – 01 662 5525
Israel – 972 9 952 4848
Italy – 02 2 641 0350
Netherlands – 020 6068751
Norway – 22 11 6299
Poland – +48 22 8659800
Portugal – 21 317 6333
Russia – 7095 797 3520
South Africa RSA – 086 000 1030
Outside RSA – +27 11 258 9301
Spain – 902 321 123
Sweden – 08 619 2170
Switzerland – 084 880 1111
Turkey – 90 212 221 6969
United Kingdom – 020 7512 5202

S U P P O R T Support for your SA8250
373
Asia For hardware service and telephone support, contact an HP-
authorized reseller or one of these support centers:
Country and Number
Australia – 03-8877-8000
Hong Kong – 800-96-2598
India – 91-11-6826035
Indonesia – 0800-21511
Japan – 0120-220-119
Korea – +82-2-32700911
Malaysia – 60 3 2931811 or 1-800-881811
New Zealand –
Upper North Island – 09-356-6640
Lower North Island – 04-499-2026
South Island – 03-365-9805
People’s Republic of China – 86-8008105959
Philippines – 63 2 811-0643
Singapore – +65-2725300
Taiwan – +866-080-010055 / 886-2-7170055
Thailand – 66 2 6613891
Vietnam –
Hanoi – 84 4 9430101
Ho Chi Minh City – 84 8 8324155

S U P P O R T HP e-Commerce/XML Director Server Appliance SA8250 User Guide
374
Latin America For hardware service and telephone support, contact an HP-
authorized reseller or one of these support centers:
Country and Number
Argentina – (541) 4778-8380
Brazil –
Sao Paulo – (11) 3747-7799
All Others – 0800-15-77-51
Chile – 800-360-9999
Columbia – 9-800-91-9477
Guatemala – 1-800-999-5305
Mexico –
Ciudad de Mexico – 5258-9922
All Others – 800-472-6684
Peru – 0-800-10111
Puerto Rico – 1-877-232-0589
Venezuela –
Caracas – 207-8488
All Others – 800-47-777
Other
Countries
For hardware service, contact your local authorized reseller or HP
sales office. For telephone support, contact your authorized reseller.

Index
Numerics
606 error detection 98
A
admin commands 156, 172
config admin info 156
config admin port 156
administration screen
CLI tab 119
GUI tab 117
logging tab 124
multi-site tab 123
routing tab 112
security screen 115
settings tab 102
SNMP tab 121
software tab 103
users tab 109
B
balance strategy 94
response time
94
round robin 94
boot monitor 61
boot monitor commands
autoboot 63
boot 63
delete 67
dhcp 67
dns 68
dual 68
factory_reset 69
failover 70
gateway 70
help 70
host 71
info 71
interface 71
ip 71
load 72
netmask 72

I N D E X HP e-Commerce/XML Director Server Appliance SA8250 User Guide
376
rich_bias 72
save 73
settime 73
setup 76
static_routes 77
version 77
boot monitor interface
accessing 62
interrupting 62
system requirements 62
C
Certificate Revocation List, see CRL
certificates & keys 283
copy and pasting 284
generating a client CA 291
generating a CRL 292
global site certificates 289
importing 287
obtaining from Verisign 285
revoking a certificate 293
cipher suite not supported by client 38
ciphers 293
cleaning dust filter 335
CLI commands 157, 176
! 156
? 154, 156
admin 153, 253
arp 156
autoboot 61
back 156
boot 55, 57, 238
box 156
cat 157
config admin info 156
config admin port 156
config cli 157
config gui 157
config irv 157
config logging 162
config policygroup 30, 41, 42, 43,
44, 47, 52, 158, 162, 239,
288
config route 158
config ssl 162
config sys 159
copy 157
dir 157
dup-syn 51
ether 156
exit 156
failover 53, 56
force-rwa 156
get 157
halt 156
help 154, 156
history 156
importing certificates 289
info 57, 156
list 156
logout 156
netstat 156
nslookup 156
ping 156
put 157
quit 156
reboot 156
remove 156, 157
reset 156
restore 157
restore-verbose 157
save 55, 56, 157
set cipher 293
show 162
show sys 278

I N D E X HP e-Commerce/XML Director Server Appliance SA8250 User Guide
377
Tab key 156
top 156
toplevel 156
trace 156
traceroute 156
who 156
client does not support cipher suite 38
command line interface (see CLI
commands)
configuration file
copying 129
deleting 128
restoring 128
retrieving and sending 133
saving 127
viewing 130
configuration, replicating 57
connecting to the 7180 242, 245, 249
creating XML patterns 195, 196
CRL
command description 214
D
default server 29, 100
deleting XML patterns 197
diagnostics 325
boot-time LED 327
run time LED 327
dust filter
cleaning 335
E
elements
topology screen 84
error detection 51
dup-syn interval 51
HTTP 52
run time 328
server status detection 51
ethernet interface value 136
expressions
adding to server configuration 250,
251
order of 45
programming RICH and XML 99
Extensible Markup Language (see
XML)
F
factory defaults
resetting 131
failover
configuration 53
method dependencies 297
modes 297
router 53, 113
serial cable 53, 82, 113
file management commands 157, 173
cat 157
copy 157
dir 157
get 157
put 157
remove 157
restore 157
restore-verbose 157
save 157
FTP
limitations of 32

I N D E X HP e-Commerce/XML Director Server Appliance SA8250 User Guide
378
G
general operating principles
error detection 51
load balancing 41
prioritization and policy groups 47
replicating the configuration 57
RICH services 31
routing 46
serial cable failover 53
status information 57
sticky options 33
global system commands 156, 164
! 156
!! 156
? 156
arp 156
back 156
box 156
ether 156
exit 156
force-rwa 156
halt 156
help 156
history 156
info 156
list 156
logout 156
netstat 156
nslookup 156
ping 156
quit 156
reboot 156
remove 156
reset 156
Tab key 156
top 156
toplevel 156
trace 156
traceroute 156
who 156
graphical user interface (see GUI)
GUI
administration screen 102
arp table 135
balance strategy 94
commands 157, 180
configuration screen 127
ethernet interface value 136
logon 80
ping 137
policy groups 88
policy manager 86
policy manager screen 86
reboot 141
RICH and XML expressions 99
RICH controls 98
servers 97
services 91
statistical screen 147
tools screen 134
topology screen 82
trace command 142
traceroute command 146
XML well formed errors 95
H
Help
online 83
HOT services (see services)
HTTP
adding service 240, 246
error detection 52, 98
header information 295
monitor table 268

I N D E X HP e-Commerce/XML Director Server Appliance SA8250 User Guide
379
service
adding servers to 240
HTTPS Redirect 38
I
installation
verifying software 278
interface statistics 138
IP source address filtering 116
IRV commands 157, 179
K
keys & certificates 283
copy and pasting 284
creating new 288
importing 286
L
Layer 4
HOT services 31
service 266
VIP 30
Layer 7
17-broker-mib.my 268
RICH services 31
LEDs
activity 328
diagnostic 326
diagnostics 327
power indication 326
run time diagnostics 327
run time errors 328
status 327
load balancing
across multiple servers 41
balancing algorithms 41
primary and backup servers 42
response-time metrics 41
servers with source address
preservation 241
web site with two servers 236
log file
viewing 125
logging
system log parameters 124
logging commands 162, 226
config logging 162
loopback
setting 301, 315
M
MIBs
broker connection count 267
connections/second 267
CPU Utilization 267
hpbroker-mib.my 264, 271
hpl7-broker-mib.my 268, 271
hpserver-header.my 264
hpssl-acceleration-mib.my 269, 271
hpuser-mib.my 270
HTTP monitor table 268
Layer 4 service 266
server availability 265
server TCP connection 265
SSL monitor table 269
supported 264
trap summary 271
Tree 263
MSAP 43

I N D E X HP e-Commerce/XML Director Server Appliance SA8250 User Guide
380
O
OPR 32, 244
adding servers 246
Apache Web Server 323
configuring for Windows 2000 301
configuring for Windows NT 315
setting loopback 301, 315
OSPF 114
Out-of-Path Return (see OPR)
P
packet and error counts 138
packets
dup-syn interval 51
ping 137, 265
pipes 154
policy group commands 158, 186
config policygroup 158
policy groups 30, 47, 88
creating 89, 239, 242, 245, 249
deleting 90
policy manager
controls and displays 87
pop-up menu 88
PORT 266
prioritization 47
R
reboot 141
regulatory information 337
RICH 31, 92
606 error detection 98
adding servers 250
controls 98
expressions 99
order of expressions 45
services 31
RICH_HTTP 91
adding service 249
RIP 113
routing 46, 244
active protocol 113
content 247
routing commands 158, 182
config route 158
S
SAP 42, 241, 242
adding servers 243
secure shell support 116, 153
setting 119
Secure Sockets Layer (see SSL)
security 281
configuration 281
security commands 160, 204
config sys 159
serial cable
failover 53
failover configuration 53
serial cable failover 53
upgrading under 279
server
606 error detection 98
availability 265
configuration 42, 97
general operating principles
42
Multi-Hop Source Address
Preservation 43
Source Address Preservation 42
deleting 101
Multi-hop Source Address
Preservation 98
TCP connection 265

I N D E X HP e-Commerce/XML Director Server Appliance SA8250 User Guide
381
server commands 159
config policygroup 158
service commands 158
config policygroup 158
services 30, 91
deleting 96
HOT services 31
HOT TCP 91
RICH services 31, 52
RICH_HTTP 91
VIP 30
show commands 163, 228
show admin info 163
show cli info 163
show gui info 163
show irv info 163
show msd info 163
show policygroup 163
show route info 163
show ssl info 163
show stats info 163
show sys 163
SNMP 116, 261
agent 121
traps 271
SNMP commands 161, 207
config sys 159
software
agent 105
deleting an image 107
downloading 277
install new images 107
installing 277
license agreement 349
system 104
updating 275
Source Address Preservation (see SAP)
SSH (see secure shell support)
SSL 289
acceleration 252, 257
commands 162, 210
config policygroup 162
config ssl 162
monitor table 269
statistical screen
graph options 149
status information 57
sticky options 33
grouping services 35
modes 93
persistence 34
server-timeout 35
SSL 34
timeout 34, 93
Support 371
Asia 373
Europe 372
Latin America 374
Other Countries 374
US and Canada 371
system commands 159, 200
config sys 159
T
Tab key command line option 164
TCP 265
Telnet 119
throttling 90
toolbar
policy manager 87
topology screen 83
topology screen
elements 84
policy manager 86

I N D E X HP e-Commerce/XML Director Server Appliance SA8250 User Guide
382
trap summary
standard SNMP traps 271
troubleshooting 329
U
update
system software 275
upgrade
failover configuration 279
V
VIP 91, 242, 266
adding 240, 246, 249
W
Web Service
loopback interface 321, 322
well formed errors 29, 95, 199
X
XML
adding servers 99
boundary parameter 24
charset parameter 24
checking syntax 101
commands and operators 15
content transfer encoding 28
creating patterns 22, 195, 196
creating services 95
data model 14
default special case 29, 100
deleting patterns 197
document number 27
document number in multipart
messages 22, 100, 196, 197
expression syntax 13
expressions 99
matching XML patterns 23
media types and subtypes 25
MIME content type support 24
multipart message document
numbers 22, 100, 196, 197
multipart MIME processing 26
operations 12
pattern 12
pattern creation 22
pattern info 197
pattern matching 23
RICH expressions in XML patterns
44
S/MIME 28
server tab 99
service tab 95
setting the default server 100
signed-only S/MIME support 28
syntax checking 101
URL encoded MIME processing 26
URL encoding 27
values 21
well formed errors 29, 95, 199
