Hp Ep9010 Instant Cinema Digital Projector Users Manual User's Guide
Hp-Ep9010-Users-Manual-549453 hp-ep9010-users-manual-549453
HP ep9010 Series Instant Cinema Digital Projector - User's Guide c00241172
ep9010 to the manual 5a12df3e-adf3-4aa3-9e4f-d4d7206c0153
2015-01-05
: Hp Hp-Ep9010-Instant-Cinema-Digital-Projector-Users-Manual-155417 hp-ep9010-instant-cinema-digital-projector-users-manual-155417 hp pdf
Open the PDF directly: View PDF ![]() .
.
Page Count: 85
- HP ep9010 Series Instant Cinema Digital Projector
- Contents
- Setting up
- Playing DVDs and CDs
- Showing video
- Adjusting the projector
- Maintaining the projector
- Fixing problems
- Support and warranty
- Reference
- Index

HP ep9010 Series Instant Cinema
Digital Projector
User’s Guide
© Copyright 2004 Hewlett-Packard Development Company, L.P.
The information contained herein is subject to change without notice. The only
warranties for HP products and services are set forth in the express warranty
statements accompanying such products and services. Nothing herein should be
construed as constituting an additional warranty. HP shall not be liable for technical
or editorial errors or omissions contained herein. Reproduction, adaptation, or
translation without prior written permission is prohibited except as allowed under the
copyright laws.
Consumer transactions in Australia and the United Kingdom: The above disclaimers
and limitations shall not apply to consumer transactions in Australia and the United
Kingdom and shall not affect the statutory rights of consumers.
Dolby is a trademark of Dolby Laboratories.
Manufactured under license from Dolby Laboratories. MPEG Layer-3 audio
decoding technology licensed from Fraunhofer IIS and Thomson.
Hewlett-Packard Company
Digital Projection and Imaging
1000 NE Circle Blvd.
Corvallis, OR 97330
First Edition July 2004

User’s Guide 3
Contents
1 Setting up
Safety precautions. . . . . . . . . . . . . . . . . . . . . . . . . . . . . . . . . 7
What’s in the box? . . . . . . . . . . . . . . . . . . . . . . . . . . . . . . . . 8
Identifying common features . . . . . . . . . . . . . . . . . . . . . . . . 9
Projector at a glance . . . . . . . . . . . . . . . . . . . . . . . . . . . 9
Projector buttons and lights . . . . . . . . . . . . . . . . . . . . 10
Back panel. . . . . . . . . . . . . . . . . . . . . . . . . . . . . . . . . . 12
Remote control . . . . . . . . . . . . . . . . . . . . . . . . . . . . . . 13
Accessories . . . . . . . . . . . . . . . . . . . . . . . . . . . . . . . . . 14
Setting up the projector. . . . . . . . . . . . . . . . . . . . . . . . . . . . 14
Planning your layout. . . . . . . . . . . . . . . . . . . . . . . . . . 14
Connecting power . . . . . . . . . . . . . . . . . . . . . . . . . . . . 18
Connecting a video source . . . . . . . . . . . . . . . . . . . . . 19
Connecting a sound system. . . . . . . . . . . . . . . . . . . . . 25
Connecting several video sources. . . . . . . . . . . . . . . . 27
Connecting a computer . . . . . . . . . . . . . . . . . . . . . . . . 28
Turning the projector on and off. . . . . . . . . . . . . . . . . . . . . 29
Turning the projector on . . . . . . . . . . . . . . . . . . . . . . . 29
Turning the projector off. . . . . . . . . . . . . . . . . . . . . . . 30
Moving the projector . . . . . . . . . . . . . . . . . . . . . . . . . 30
Making basic adjustments. . . . . . . . . . . . . . . . . . . . . . . . . . 31
Selecting a source . . . . . . . . . . . . . . . . . . . . . . . . . . . . 31
Aiming the projector. . . . . . . . . . . . . . . . . . . . . . . . . . 31
Adjusting the focus and zoom . . . . . . . . . . . . . . . . . . 32
Changing the picture mode . . . . . . . . . . . . . . . . . . . . . 33
Adjusting the shape of the picture . . . . . . . . . . . . . . . 34

4 User’s Guide
Contents
Adjusting a slanted picture . . . . . . . . . . . . . . . . . . . . 35
Adjusting the volume . . . . . . . . . . . . . . . . . . . . . . . . 35
2 Playing DVDs and CDs
Using the built-in DVD player . . . . . . . . . . . . . . . . . . . . . 37
Playing a DVD . . . . . . . . . . . . . . . . . . . . . . . . . . . . . 38
Using special play options. . . . . . . . . . . . . . . . . . . . . 39
Opening the DVD menu . . . . . . . . . . . . . . . . . . . . . . 39
Showing pictures . . . . . . . . . . . . . . . . . . . . . . . . . . . . 40
Playing audio CDs. . . . . . . . . . . . . . . . . . . . . . . . . . . 40
3 Showing video
Showing the video source . . . . . . . . . . . . . . . . . . . . . . . . . 43
Hiding or showing the picture. . . . . . . . . . . . . . . . . . . . . . 43
Showing a computer screen. . . . . . . . . . . . . . . . . . . . . . . . 43
4 Adjusting the projector
Adjusting the picture and sound . . . . . . . . . . . . . . . . . . . . 45
Adjusting the picture . . . . . . . . . . . . . . . . . . . . . . . . . 45
Adjusting the sound. . . . . . . . . . . . . . . . . . . . . . . . . . 45
Adjusting the projector setup . . . . . . . . . . . . . . . . . . 46
Using the on-screen menu . . . . . . . . . . . . . . . . . . . . . . . . . 46
Changing settings using the on-screen menu . . . . . . 46
Input menu. . . . . . . . . . . . . . . . . . . . . . . . . . . . . . . . . 47
Picture menu . . . . . . . . . . . . . . . . . . . . . . . . . . . . . . . 47
Sound menu. . . . . . . . . . . . . . . . . . . . . . . . . . . . . . . . 49
Setup menu . . . . . . . . . . . . . . . . . . . . . . . . . . . . . . . . 49
Help menu . . . . . . . . . . . . . . . . . . . . . . . . . . . . . . . . . 49
5 Maintaining the projector
Getting the projector status . . . . . . . . . . . . . . . . . . . . . . . . 51
Cleaning the projector lens . . . . . . . . . . . . . . . . . . . . . . . . 51

Contents
User’s Guide 5
Replacing the lamp module . . . . . . . . . . . . . . . . . . . . . . . . 52
Replacing the battery in the remote control . . . . . . . . . . . . 53
6 Fixing problems
Troubleshooting suggestions . . . . . . . . . . . . . . . . . . . . . . . 55
Warning light problems . . . . . . . . . . . . . . . . . . . . . . . 55
Start-up problems . . . . . . . . . . . . . . . . . . . . . . . . . . . . 56
Picture problems . . . . . . . . . . . . . . . . . . . . . . . . . . . . . 56
DVD player problems. . . . . . . . . . . . . . . . . . . . . . . . . 59
Sound problems . . . . . . . . . . . . . . . . . . . . . . . . . . . . . 60
Interruption problems . . . . . . . . . . . . . . . . . . . . . . . . . 61
Remote control problems . . . . . . . . . . . . . . . . . . . . . . 62
Testing the projector. . . . . . . . . . . . . . . . . . . . . . . . . . . . . . 62
7 Support and warranty
Support . . . . . . . . . . . . . . . . . . . . . . . . . . . . . . . . . . . . . . . . 63
Contacting HP support . . . . . . . . . . . . . . . . . . . . . . . . 63
Obtaining HP repair . . . . . . . . . . . . . . . . . . . . . . . . . . 65
Limited warranty . . . . . . . . . . . . . . . . . . . . . . . . . . . . . . . . 65
HP digital projector limited warranty statement. . . . . 65
8 Reference
Specifications . . . . . . . . . . . . . . . . . . . . . . . . . . . . . . . . . . . 69
Safety information . . . . . . . . . . . . . . . . . . . . . . . . . . . . . . . 72
Laser safety . . . . . . . . . . . . . . . . . . . . . . . . . . . . . . . . . 72
LED safety . . . . . . . . . . . . . . . . . . . . . . . . . . . . . . . . . 72
Mercury safety . . . . . . . . . . . . . . . . . . . . . . . . . . . . . . 73
Regulatory information. . . . . . . . . . . . . . . . . . . . . . . . . . . . 73
U.S.A. . . . . . . . . . . . . . . . . . . . . . . . . . . . . . . . . . . . . . 73
Canada . . . . . . . . . . . . . . . . . . . . . . . . . . . . . . . . . . . . 74
Japan . . . . . . . . . . . . . . . . . . . . . . . . . . . . . . . . . . . . . . 74
Korea. . . . . . . . . . . . . . . . . . . . . . . . . . . . . . . . . . . . . . 74
International . . . . . . . . . . . . . . . . . . . . . . . . . . . . . . . . 74
Index

6 User’s Guide
Contents

User’s Guide 7
1
Setting up
Safety precautions
ÅWARNING: Read and observe these precautions and all others in this manual to
reduce the risk of injury and equipment damage.
■Do not look directly into the lens when the lamp is on.
■Do not expose the projector to rain or moisture, and do not use it near water.
■Keep paper, plastic, and combustible material at least 0.5 m (2 ft) away from
the projector lens and exhaust vents.
■Do not allow liquid, food, or small objects to get inside the projector. If
material gets inside the projector, contact HP for assistance.
■Do not put anything on top of the projector. Do not place any liquids where
they might spill on the projector.
■Do not block any vents on the projector. Do not place the projector near any
source of heat, such as a radiator or amplifier.
■Use only an approved power cord rated for the voltage and current marked
on the product label. Do not overload any outlet or extension cord. Do not
circumvent the grounding prong on the power cord.
■Route all cables so they are not located where people can step on them or trip
on them.
■Place the projector flat on its base on a sturdy surface. Do not stand the
projector on its front surface.
■Do not touch the lens with your fingers. See “Cleaning the projector lens” on
page 51. Use a soft, dry cloth to clean the projector case.
■Do not open the projector except as instructed by this manual, and only after
allowing the projector to cool down.
■If the projector is damaged in any way, contact HP for assistance.
8 User’s Guide
Setting up
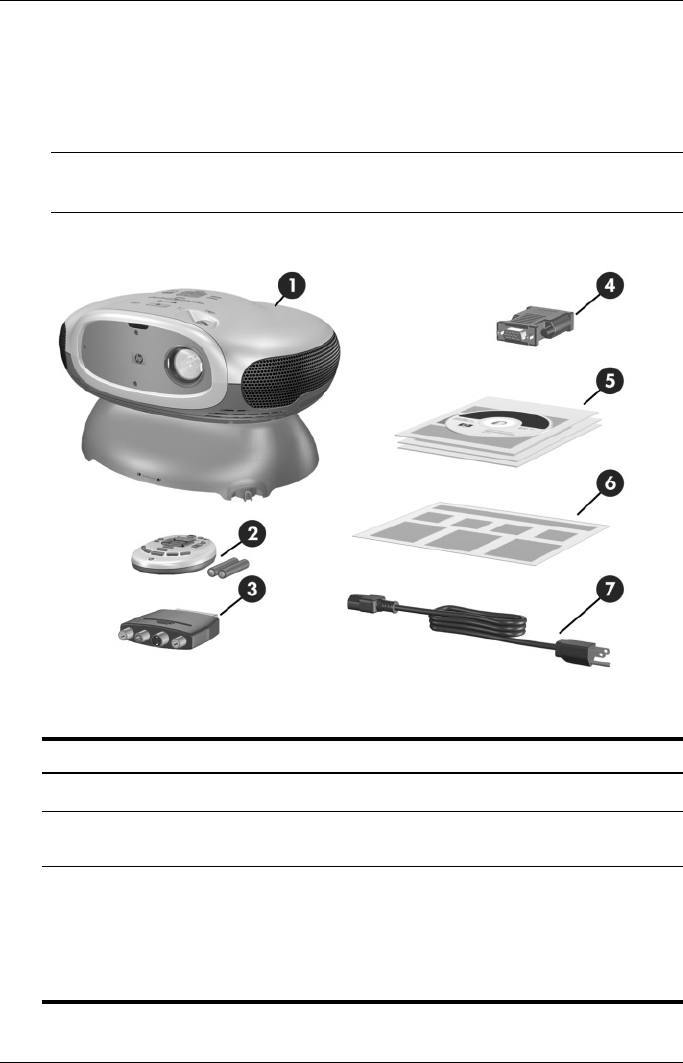
What’s in the box?
Before setting up your projector, be sure your shipping box includes the
following items. If the shipping box does not contain any of the following items,
contact HP.
✎After you open the box and remove the contents, save the box in case you
must ship the projector.
Identifying the contents of the box
Item Function
1Projector Displays images.
2Remote control (includes two AAA
batteries)
Controls projector.
3SCART-to-S-Video adapter Connects a SCART source output
to an S-video or composite-video
cable.
✎Included only with certain
models.
Setting up
User’s Guide 9
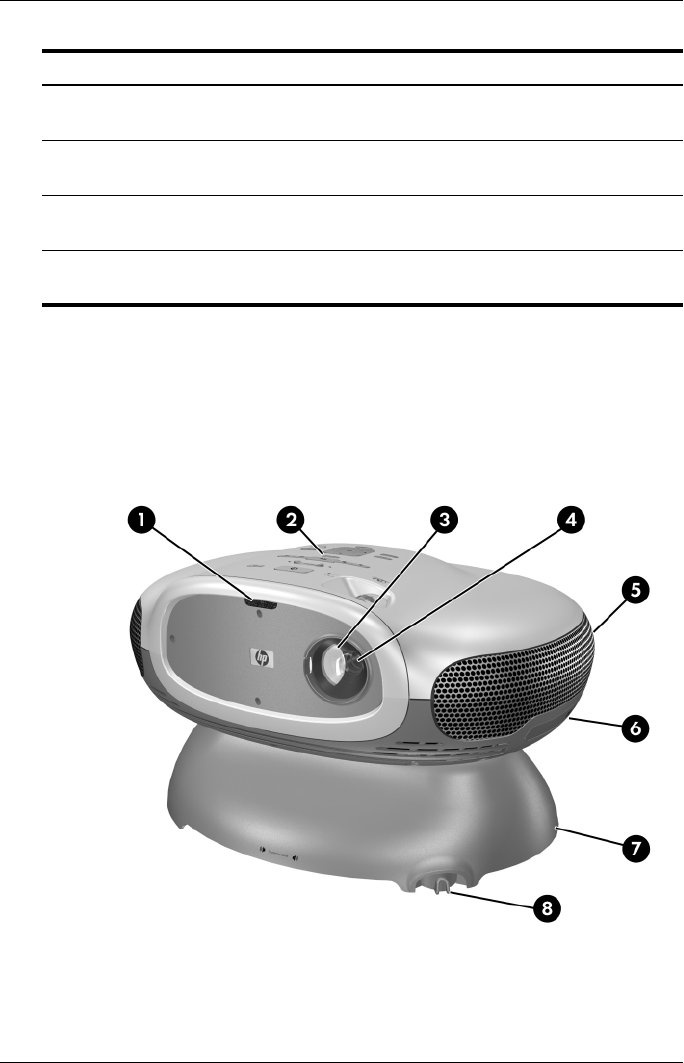
Identifying common features
Projector at a glance
4DVI-to-VGA adapter Connects a VGA cable to the DVI
port on the projector.
5User Guide package Contains documentation for the
setup and use of the projector.
6
Quick Setup Guide
Provides instructions to help get
started.
7Power cord Connects projector to power
source.
Identifying the contents of the box
(Continued)
Item Function
10 User’s Guide
Setting up
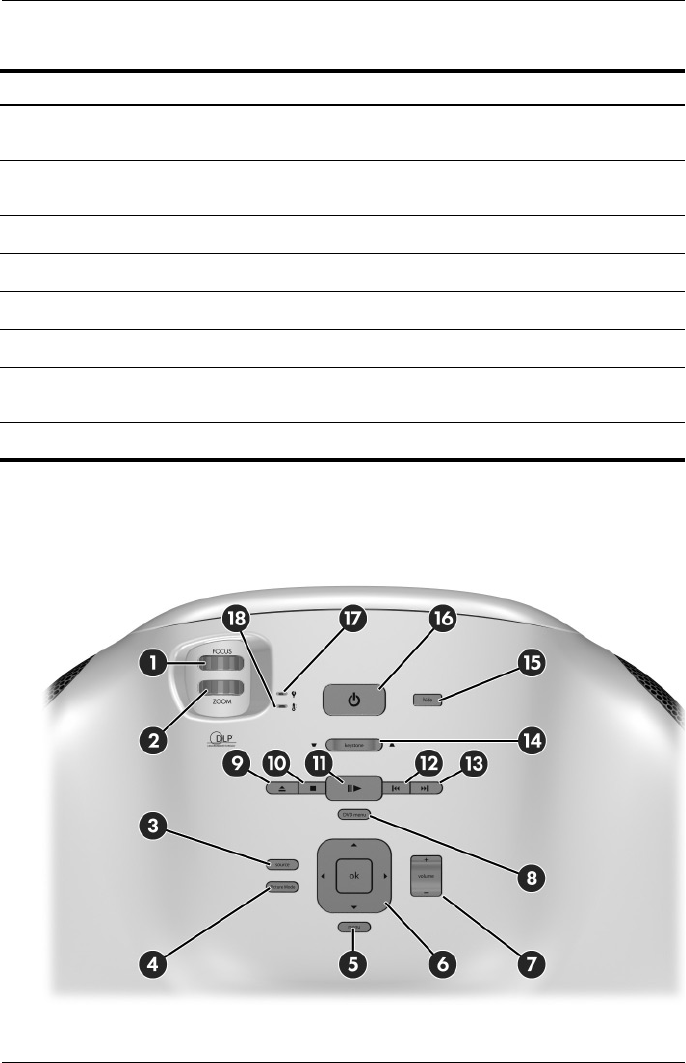
Projector buttons and lights
Identifying major components
Item Function
1Infrared port Receives signals from the remote
control.
2Button panel Contains control buttons and
indicator lights.
3Lens cover Protects the lens.
4Lens Projects the image.
5Speakers (4) Produce stereo sound.
6DVD tray Plays a DVD or CD.
7Base with subwoofer Produces low-frequency sound
effects.
8Tilt Lever Levels the projector.

Setting up
User’s Guide 11
Identifying the projector buttons and lights
Item Function
1Focus ring Focuses at distance of 1 to 10 m (3
to 33 ft).
2Zoom ring Enlarges picture size from 100% to
116%.
3Source button Displays picture from the next input
port.
4Picture mode button Selects the next picture and color
combination—can be customized.
5Menu button Opens or closes the on-screen
projector menu.
6Navigation buttons: up, down, left,
right, and ok
Select items in the projector menu
or DVD menu.
7Volume adjustment Raises or lowers the sound level.
8DVD menu button Opens the menu on a DVD.
9Eject button Opens or closes the DVD tray.
:Stop button Stops playing a DVD or CD.
;Play/pause button Plays a DVD or CD or pauses
playing.
<Next button Plays the next item on a DVD or
CD.
=Previous button Displays the previous item on a
DVD or CD.
>Keystone adjustment Adjusts picture to eliminate slanted
sides.
?Hide button Blanks picture, mutes sound,
pauses internal DVD player.
@Power button Turns the projector on or off.
ALamp indicator light Warns if the lamp is bad.
BTemperature indicator light Warns if the projector is too hot.
12 User’s Guide
Setting up
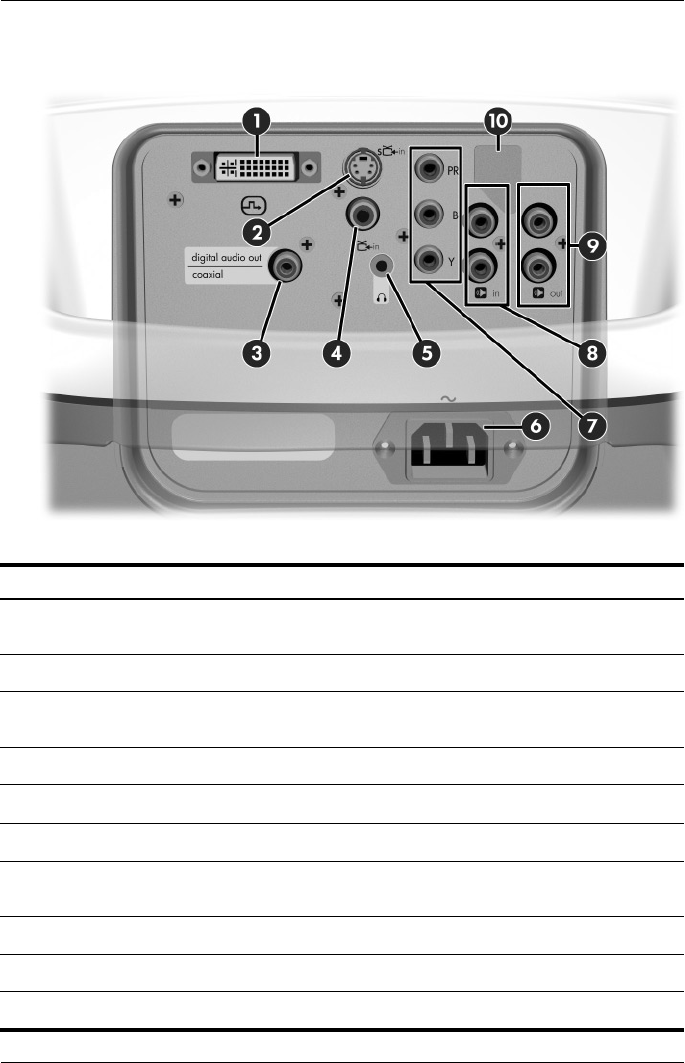
Back panel
Identifying back panel components
Item Function
1DVI input port Connects DVI video source. Also
supports computer video source.
2S-video input port Connects S-video source.
3Digital audio-out port Connects to a 5.1 digital sound
system.
4Composite-video input port Connects composite-video source.
5Headphone output port Connects headphones.
6Power cord socket Connects power cord to projector.
7Component-video input port
(YPbPr)
Connects component-video source.
8Audio-in port Connects stereo audio source.
9Audio-out port Connects to stereo sound system.
:Service port For service use only.
Setting up
User’s Guide 13
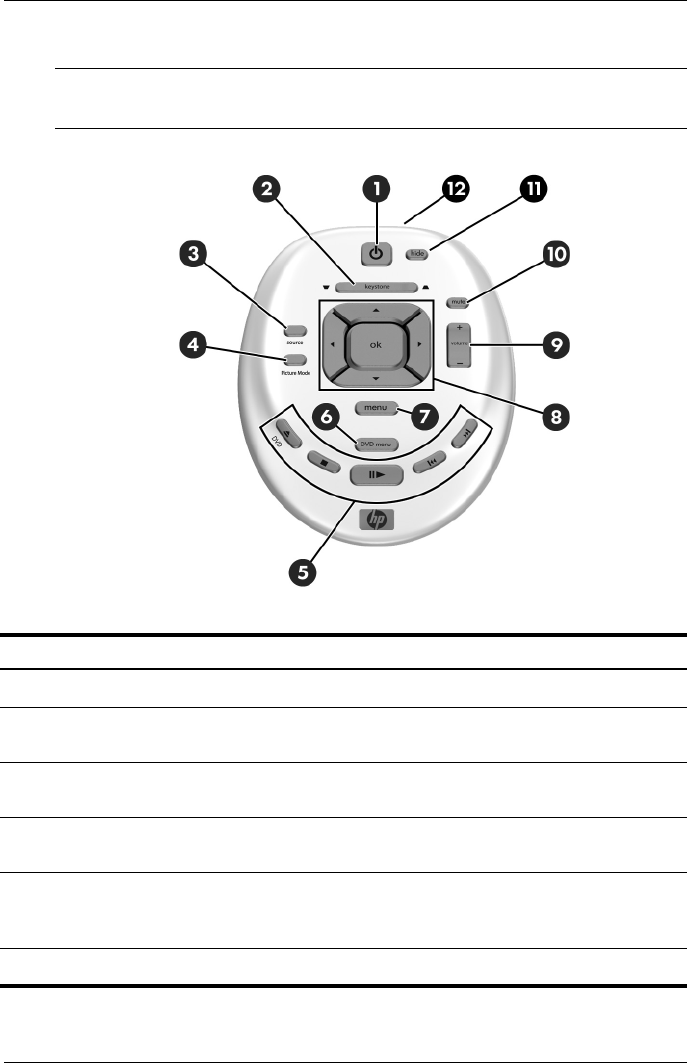
Remote control
✎Before using the remote control, install two AAA batteries. See “Replacing
the battery in the remote control” on page 53.
Identifying features of the remote control
Item Function
1Power button Turns the projector on or off.
2Keystone adjustment Adjusts the picture to eliminate
slanted sides.
3Source button Displays picture from the next input
port.
4Picture mode button Selects the next picture and color
combination—can be customized.
5DVD buttons Control the DVD player. See
“Projector buttons and lights” on
page 10.
6DVD menu button Opens the menu on a DVD.

14 User’s Guide
Setting up
Accessories
Enjoy more from your home theater with HP projector accessories. You can
purchase accessories at http://www.hp.com or through your projector dealer.
■HP mobile screens with built-in handles—designed to be easy to carry and
set up anywhere you need them.
■HP power cables—allow you to connect in any region.
■HP cables—allow you to connect all audio-video equipment.
■HP replacement lamp—brings your projector up to factory-fresh brightness.
Setting up the projector
Planning your layout
Consider the following suggestions when planning your room layout:
■Select the projector and screen positions and the screen size according to
your room layout and the distance chart below. The zoom control on the
projector gives you some flexibility.
■Be sure the projector is centered on the screen and perpendicular to it.
Otherwise, the picture might look lopsided.
7Menu button Opens or closes the on-screen
projector menu.
8Navigation buttons: up, down, left,
right, and ok
Select items in the projector menu
or DVD menu.
9Volume adjustment Raises or lowers the sound level.
:Mute button Turns sound on or off.
;Hide button Blanks picture, mutes sound,
pauses internal DVD player.
<Infrared lens Sends signal from the remote
control to the projector.
Identifying features of the remote control
(Continued)
Item Function

Setting up
User’s Guide 15
■For the best picture, consider purchasing a quality projection screen. Some
screens are designed for wide-angle viewing, while others are designed to
concentrate brightness in the center. A flat surface colored white or light
gray will also give acceptable results.
■For the most comfortable viewing, center your seating around the projection
line-of-sight. Depending on the screen material, viewing from far off center
might be unsatisfactory.
■The best viewing distance is roughly the same distance from the screen as
the projector, but personal preferences vary widely.
■If possible, place the bottom of the screen slightly above the level of the
projector.
■Design the room so you can control the ambient light. Most people prefer
viewing with minimal lighting, but you can have acceptable results if you
limit ambient light on the screen. Bright room lighting might cause a
washed-out picture.
■The most common video source is a DVD player, but sources can also
include devices, such as an audio/video receiver, VCR, hard disk video
recorder, video gaming device, or satellite receiver.
■Depending on your personal setup, try to locate devices to minimize the
lengths of cables connecting them to the projector. If any cable is more than
3 m (10 ft), consider using high-quality, low-loss cables for best video and
audio quality.
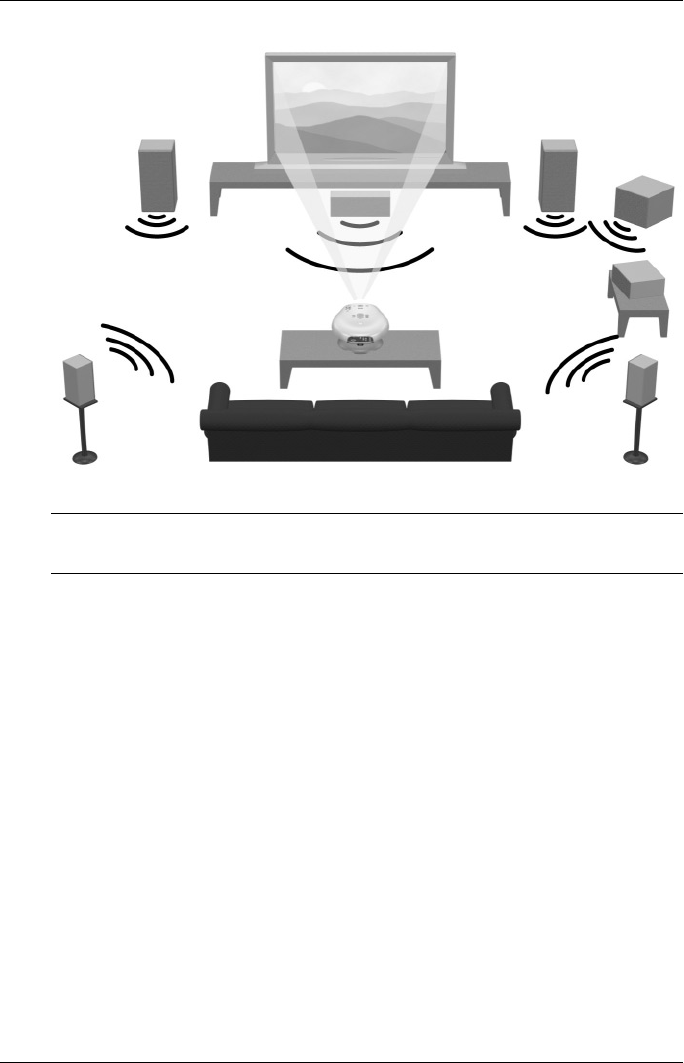
■For the ultimate home-theater experience, consider including a 5.1 surround
sound system, such as a Dolby Digital system. This system has five speakers
and a subwoofer.
■For an external sound system, see the following diagram for a possible
speaker layout. Place all front speakers at the same distance from the
listener. Place the subwoofer near a wall or corner. Place surround speakers
at least as high as the listener’s head. Experiment with the speaker
placement.
16 User’s Guide
Setting up
✎For best picture quality, place the projector 1.5 to 5 m (5 to 16 ft) from the
screen.

Setting up
User’s Guide 17
Image size relative to distance from the screen
Image size (diagonal) Image size (width) Distance (lens to screen)
(inches) (meters) (inches) (meters) (inches) (meters)
30 0.8 24 0.6 41 to 48 1.1 to 1.2
40 1.0 32 0.8 55 to 64 1.4 to 1.6
60 1.5 48 1.2 83 to 96 2.1 to 2.4
80 2.0 64 1.6 110 to 128 2.8 to 3.3
100 2.5 80 2.0 138 to 160 3.5 to 4.1
120 3.0 96 2.4 166 to 192 4.2 to 4.9
150 3.8 120 3.0 207 to 240 5.3 to 6.1
180 4.6 144 3.7 248 to 288 6.3 to 7.3
200 5.1 160 4.1 276 to 320 7.0 to 8.1
240 6.1 192 4.9 331 to 384 8.4 to 9.8
270 6.9 216 5.5 372 to 396 9.5 to 10.0
18 User’s Guide
Setting up
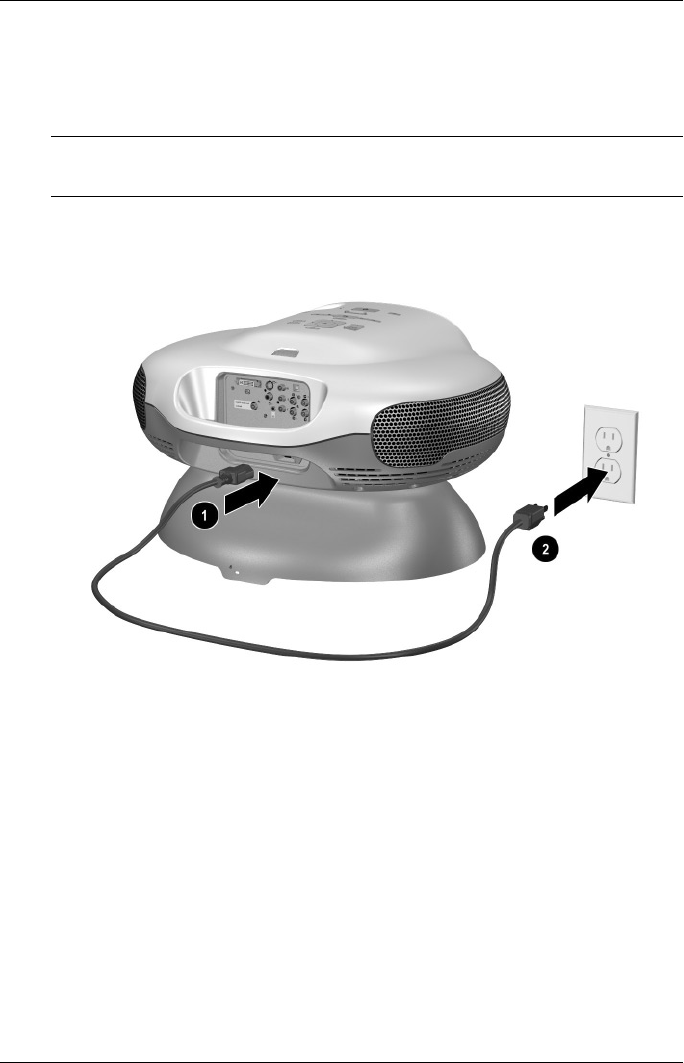
Connecting power
1. Place the projector on a stable platform located 1 to 10 m (3 to 33 ft) in front
of the screen. Ideally, the platform should be lower than the bottom of the
screen.
✎Do not place the projector on a soft surface, such as carpet or loose cloth.
This will severely limit the sound from the subwoofer.
2. Connect one end of the power cord to the back of the projector 1 and the
other end to a grounded electrical outlet 2.
Setting up
User’s Guide 19
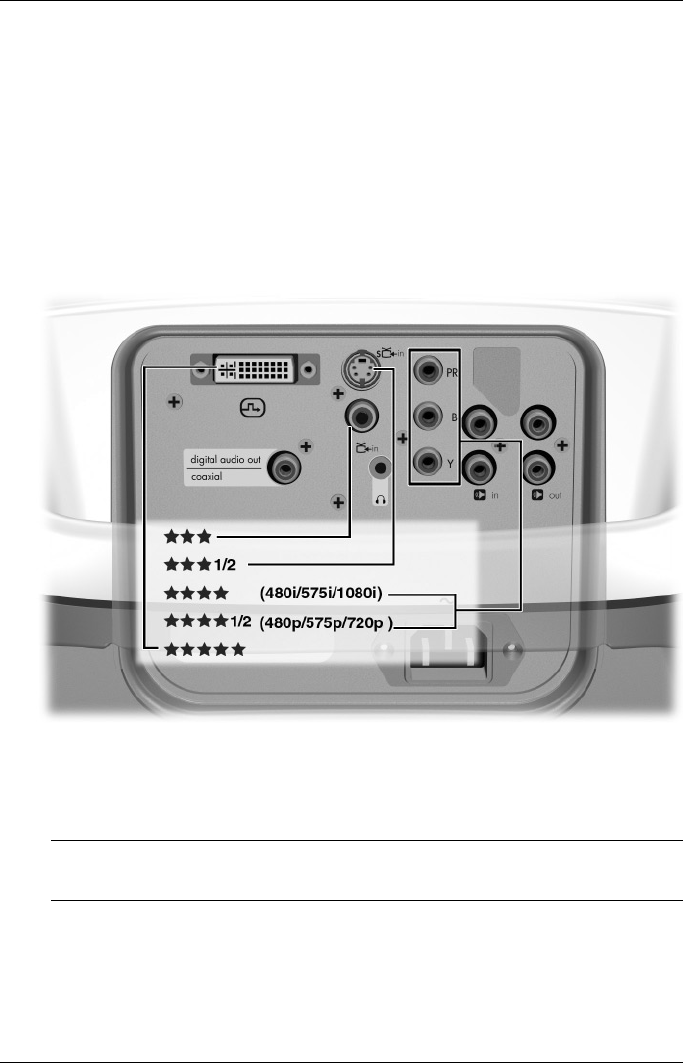
Connecting a video source
The internal DVD player provides optimal picture quality and the convenience of
a single remote control. If you connect an external video source, you should
consider picture quality.
Many video devices have more than one type of output port. When you connect
the device to the projector, choose the connection that provides the best picture
quality. Relative picture qualities are indicated by stars in the following diagram.
If you have several video sources, you can connect them to the different ports, or
you can connect them to an audio/video receiver and connect the receiver to the
projector (see “Connecting several video sources” on page 27).
The cables shown in the following sections are not included with the projector. If
you do not have an external audio system, you can connect the audio output from
the external video source to the projector audio input.
✎If you already have a home theater system with a TV, you can probably
connect the projector in place of the TV as the viewing device.
20 User’s Guide
Setting up
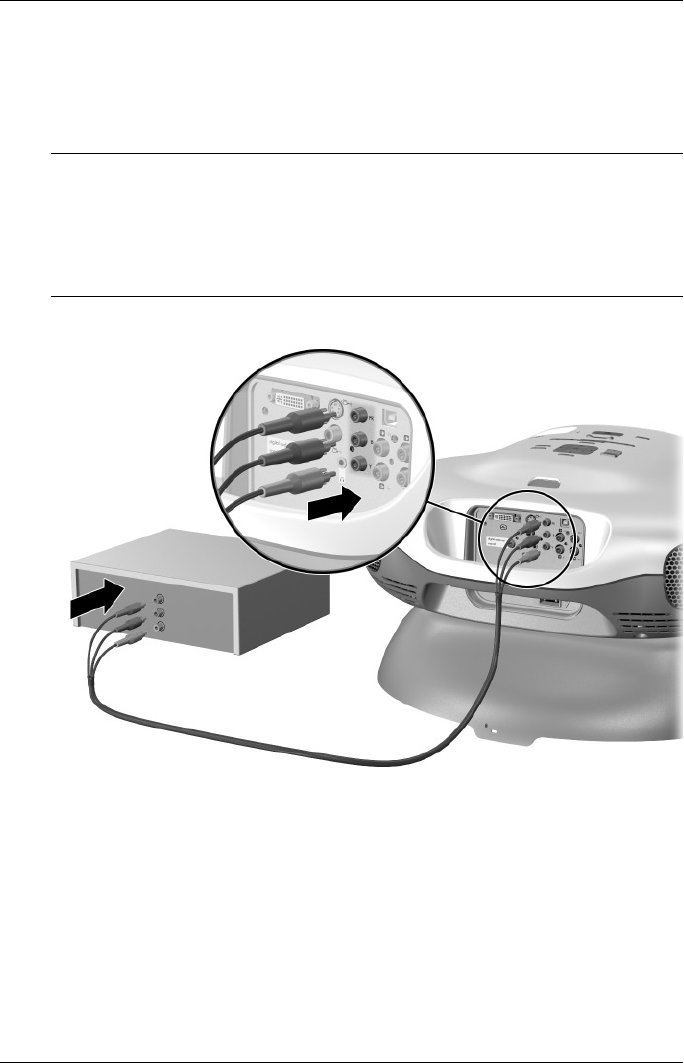
Connecting a component-video source
Examples: Cable box, DVD player, satellite receiver, and audio-video receiver
Requires:
■Component-video cable
✎■Many DVD players and other high-quality video devices provide
component video output. The three RCA connectors might be labeled
YPbPr or YCbCr.
■If possible, configure the video source to use progressive scan output,
such as 480p, 575p, or 720p. For additional information, refer to the
user documentation provided with the video source.
.
Setting up
User’s Guide 21
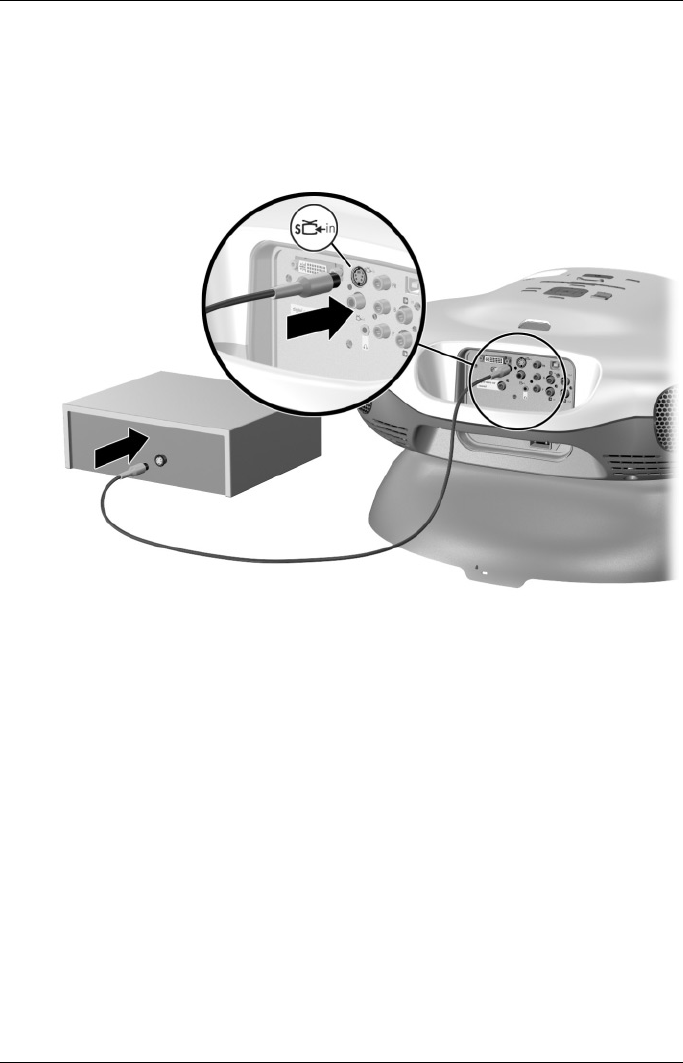
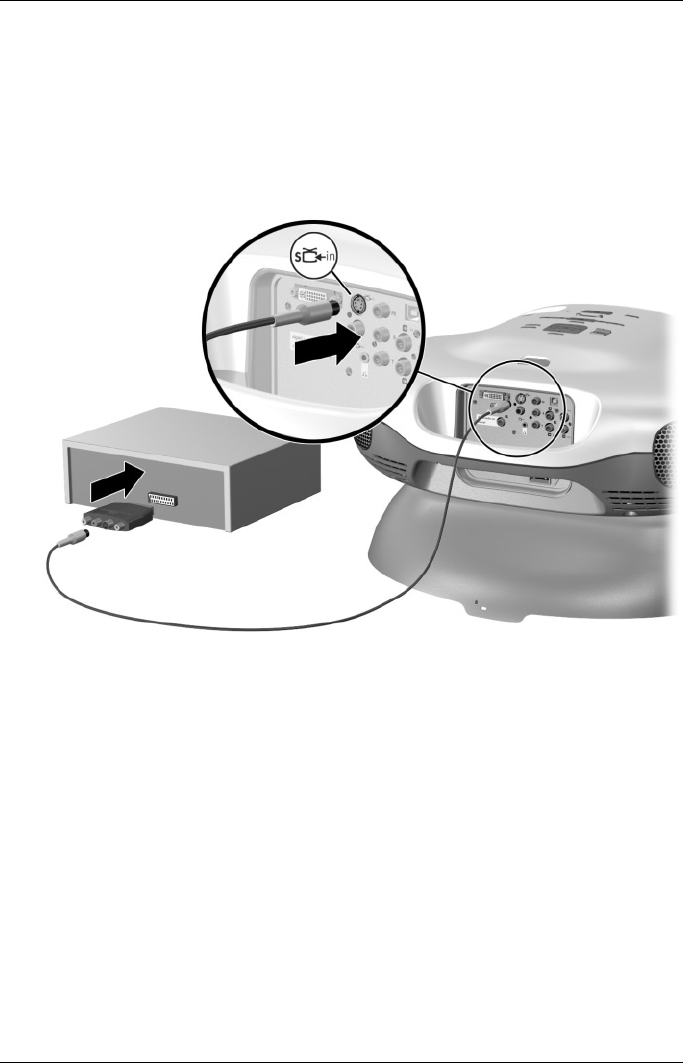
Connecting an S-video source
Examples: DVD players, VCRs, cable boxes, camcorders, and video gaming
devices
Requires:
■S-video cable
22 User’s Guide
Setting up
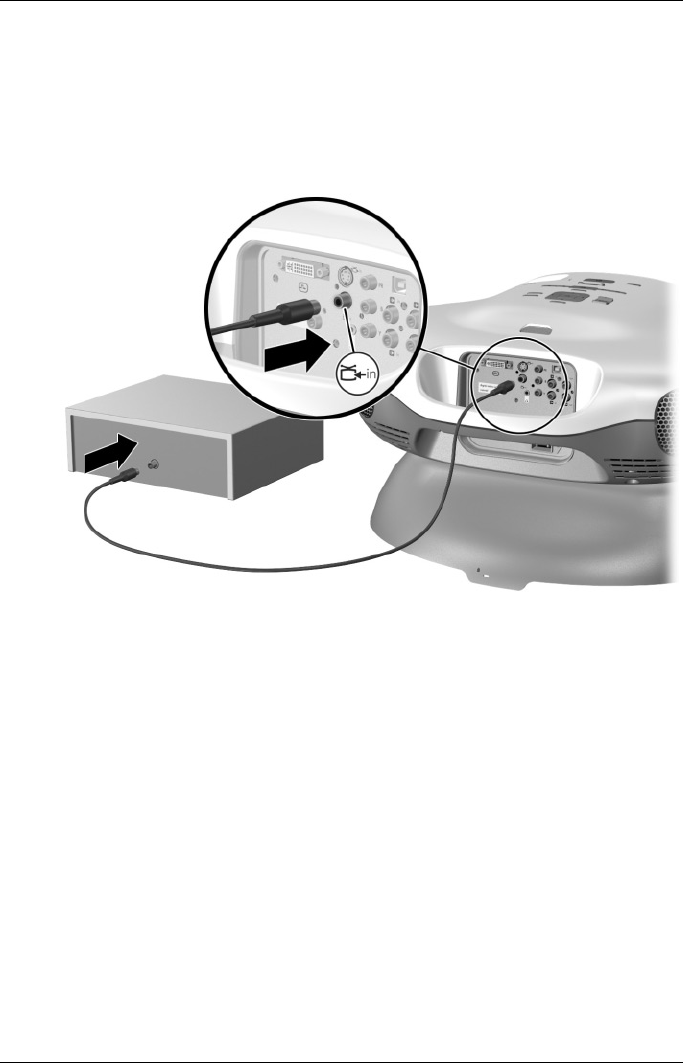
Connecting a composite-video source
Examples: VCRs, DVD players, audio-video receivers, and video gaming
devices
Requires:
■Composite-video cable
Setting up
User’s Guide 23
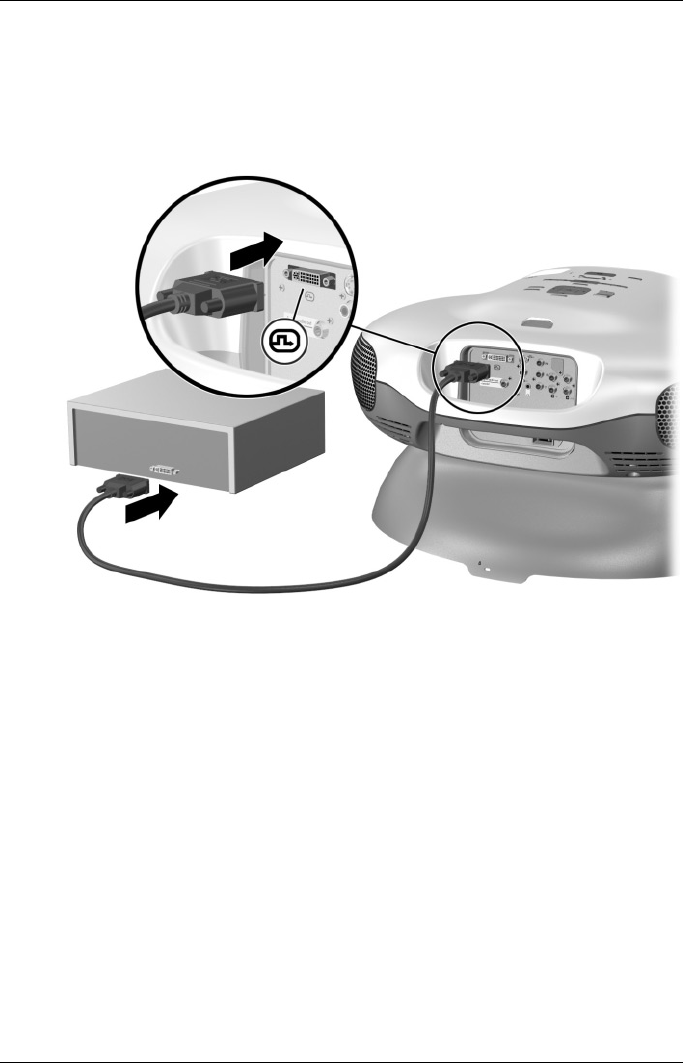
Connecting a DVI source
Examples: Cable boxes, satellite receivers, and some computers
Requires:
■DVI cable
24 User’s Guide
Setting up
Connecting a SCART source
Examples: VCRs and DVD players
Requires:
■S-video cable (or composite-video cable if source does not provide S-video
output)
■S-video-to-SCART adapter (included with certain models)
Setting up
User’s Guide 25
Connecting a sound system
A high-quality 2.1 sound system is built into the projector. No connections are
required when using the internal DVD player. If you connect an external video
source to the projector, you can also connect its audio output to the projector’s
audio input.
✎If you want to listen to the audio in private, connect a stereo headphone to
the headphone output. This disables the built-in speakers.
26 User’s Guide
Setting up
If you have a home theater system or external sound system, you can connect the
audio output from the internal DVD player to that system. You can connect a 5.1
surround sound system with five speakers and a subwoofer for full surround
sound (connection 1 in the following illustration). The digital audio output is
active only when using the internal DVD player. A digital audio connection
requires a digital coaxial cable, not an ordinary audio cable. Or you can connect a
stereo sound system to the projector (connection 2 in the following illustration).
✎If you connect an external sound system, turn off the internal speakers.
Press the menu button, go to Sound > Internal speakers, and turn them
off.
Setting up
User’s Guide 27
Connecting several video sources
If you have several video sources, connect them to an audio/video receiver or
switch box, then connect the video output from the receiver or switch box to the
projector using the highest quality connection available. Also connect the audio
outputs from all sources to the receiver, switch box, or sound system.
✎Connect the projector’s digital audio output or stereo audio output to the
receiver, switch box, or sound system. This sends the audio from the
internal DVD player to the sound system.
28 User’s Guide
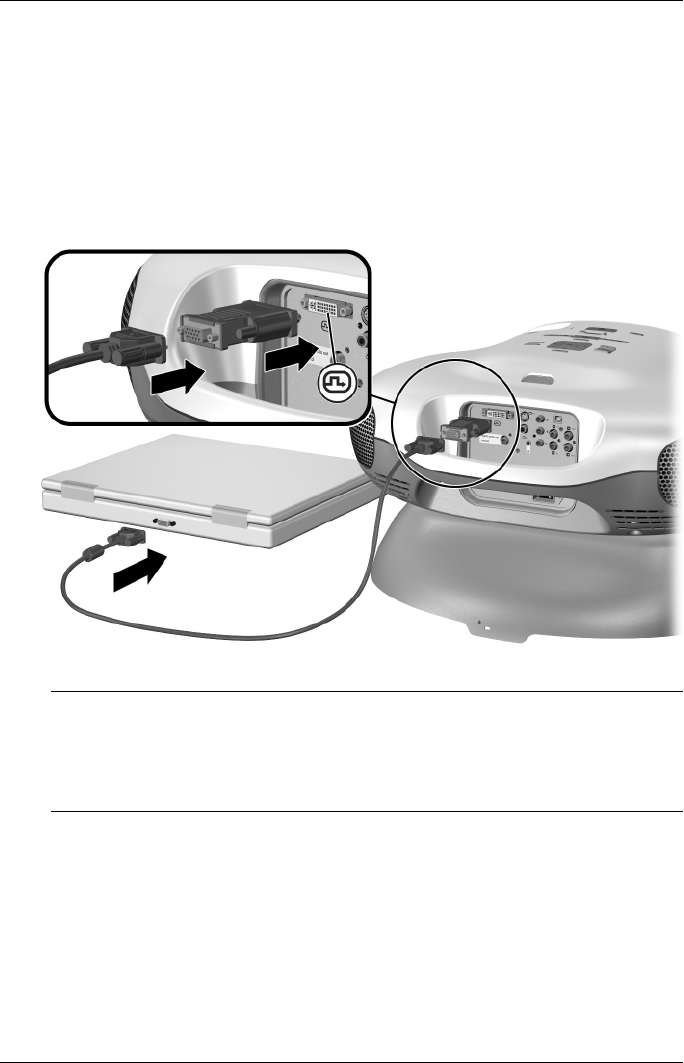
Setting up
Connecting a computer
You can connect a computer to the projector and show the computer display on
the screen. This requires a DVI-to-VGA adapter (included with the projector) and
a VGA cable (not provided).
Requires:
■DVI-to-VGA adapter
■VGA cable
See “Showing a computer screen” on page 43.
✎If the computer display does not appear on the projector, you might have to
press a combination of keys on the computer to turn on the computer’s
VGA output. For example, on some computers you must press Fn+F4 or
Fn+F5. For instructions, refer to the user documentation provided with your
computer.
Setting up
User’s Guide 29
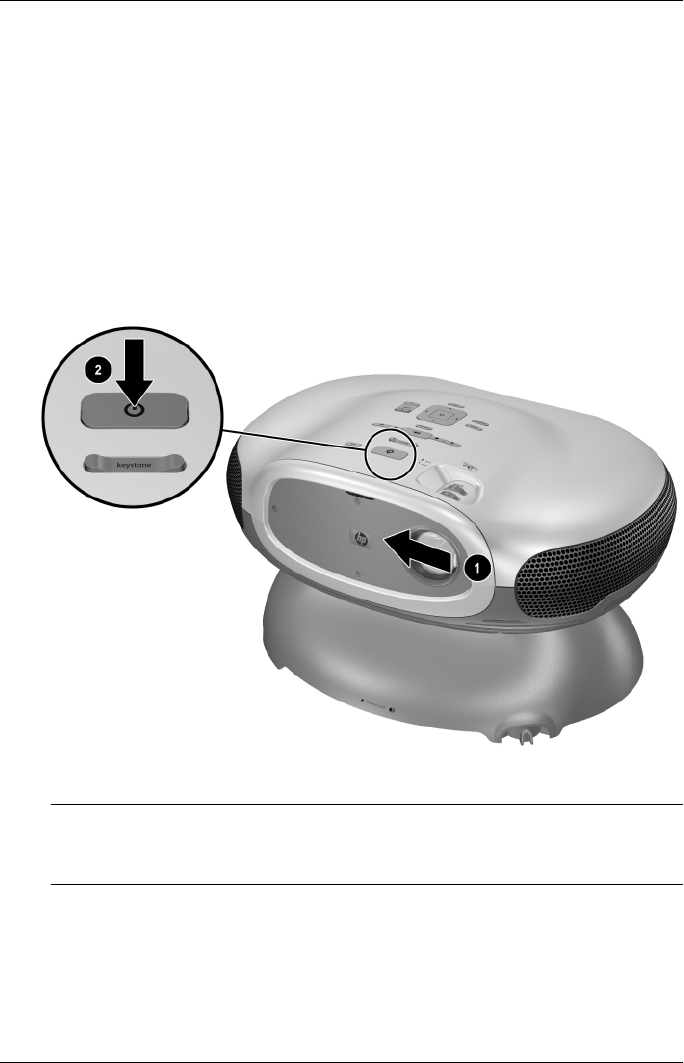
Turning the projector on and off
Turning the projector on
1. Be sure the power cord is connected.
2. Open the lens by sliding the lens cover 1 to the left.
3. Press the power button 2 on the projector or on the remote control.
The projector takes a minute or so to warm up. The power button blinks
during warm-up.
✎It is normal for parts of the projector and the air coming out of the projector
to be very warm. If the projector starts to overheat, the temperature warning
light will turn on and the projector will shut down.

30 User’s Guide
Setting up
Turning the projector off
1. Press the power button on the projector or remote control to turn off the
projector. Do not hold the button down.
The power button blinks during the cool-down period, then the projector
turns off. Even though the projector is off, it uses a small amount of power
internally.
2. If you want, disconnect video and audio equipment from the projector during
the cool-down period or after the power button stops blinking.
ÄCAUTION: Do not disconnect power until the projector has cooled down (the fan stops)
and the power button stops blinking. Otherwise, you might shorten the life of the lamp.
3. If you must unplug or remove the projector, wait until the power light stops
blinking, then unplug the power cord.
If you try to turn on the projector again or insert a disc in the DVD tray during the
cool-down period, the projector does not turn on. Wait until the cool-down period
ends and the power button stops blinking.
Moving the projector
When moving the projector:
■Allow the projector to cool down before moving it. Then disconnect all
cables.
■Avoid bumps and jolts. Use a padded container when possible.
■Observe temperature and humidity limits (see “Specifications” on page 69).
If the projector is cold, allow it to warm gradually to avoid condensation.

Setting up
User’s Guide 31
Making basic adjustments
This section provides instructions for making basic adjustments to the projector.
Selecting a source
If the picture from your video source does not appear on the screen, you can
quickly select the correct source.
■Press the source button one or more times—until you see the picture or you
see the name of the video port where the source is connected.
You should also be sure the video source is turned on and playing video.
Aiming the projector
■To raise or lower the projected picture on the screen, tilt the projector body
on the base 1.
■To level the picture on the screen, move the handle on the adjustable foot 2.
32 User’s Guide
Setting up
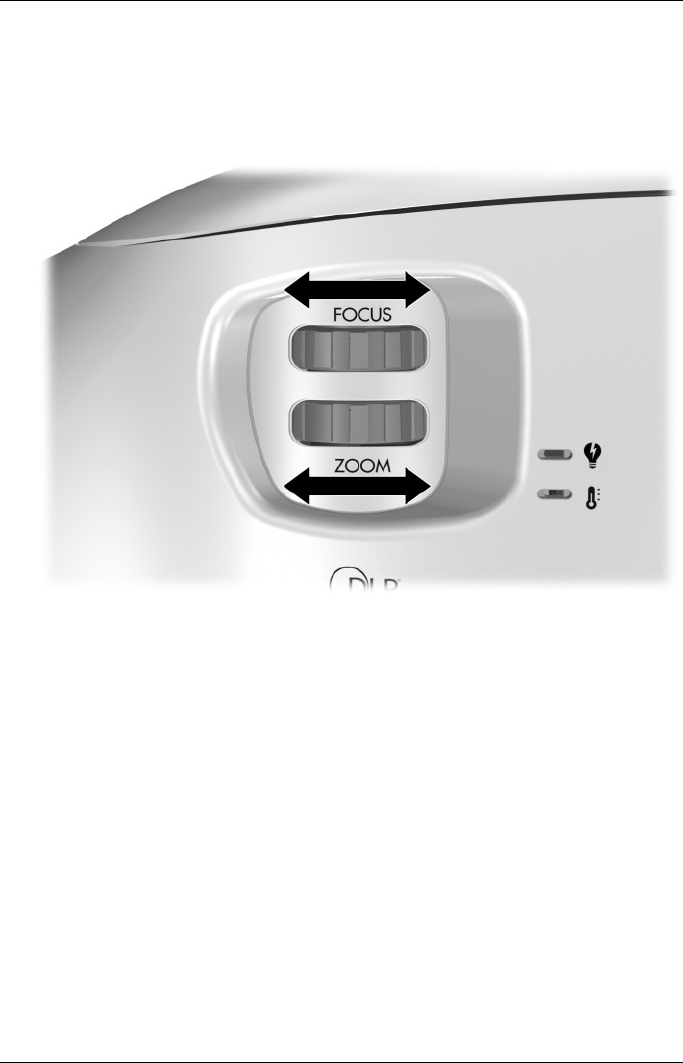
Adjusting the focus and zoom
1. Rotate the focus ring until the image becomes clear. The projector can be
focused at distances of 1 to 10 m (3 to 33 ft).
2. Rotate the zoom ring to adjust the picture size from 100 to 116%.
If the picture does not fit the screen, you might have to move the projector closer
to or farther away from the screen.
Setting up
User’s Guide 33
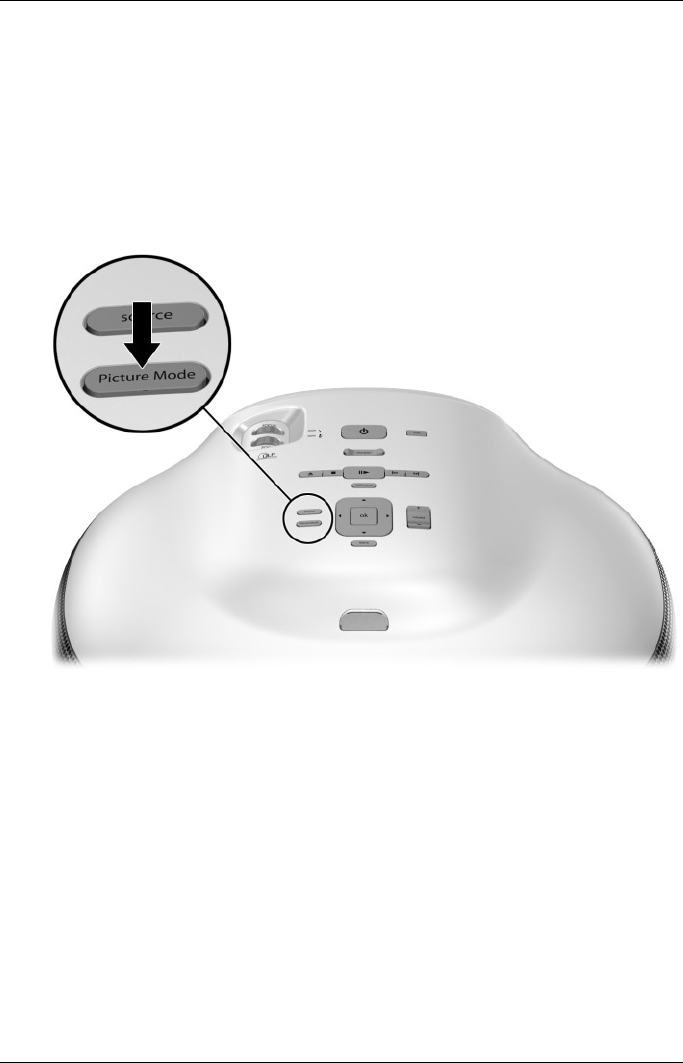
Changing the picture mode
When you are showing video from a video source, you can quickly choose a
different picture mode to make adjustments to the picture. Picture modes can
control properties such as color and size. They let you easily choose the best
settings for ambient lighting and the type of video content (see “Adjusting the
picture” on page 45).
■Press the picture mode button one or more times to select the picture mode
that gives the best picture.
You can also customize the picture modes so they are best for your video sources:
1. Press the picture mode button to select the picture mode you want to adjust.
2. Press menu and go to Picture > Customize picture mode.
3. Adjust the settings until you are satisfied with the picture.
4. Press menu to close the on-screen menu.
34 User’s Guide
Setting up
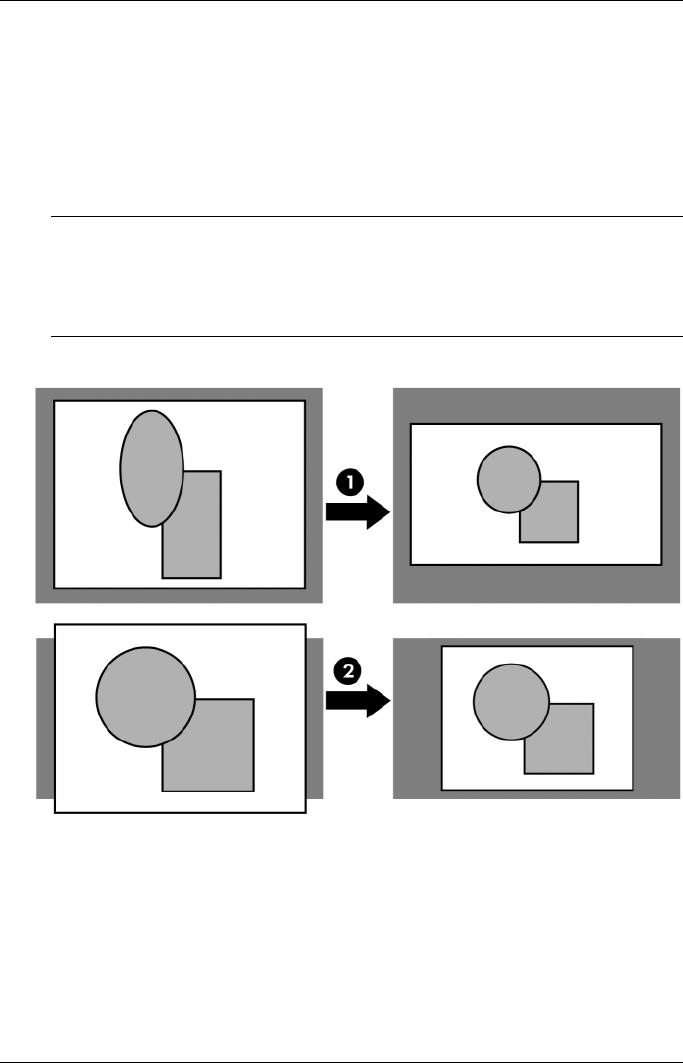
Adjusting the shape of the picture
Depending on the type of video source you are viewing, the picture might or
might not always look correct or fit on the screen:
■If the active video device sends widescreen output to the projector, press
menu, go to Picture > Shape settings, and set Widescreen input to Ye s.
See 1 in the following diagram.
■If the video device sends standard output, set Widescreen input to No.
✎If you show widescreen pictures on a wide projection screen, a standard
picture might not fit on the screen. One solution is to change the current
picture mode so it makes a smaller picture. Press menu, go to Picture >
Customize picture mode, and set Stretch to Reduced. See 2 in the
following diagram.
Setting up
User’s Guide 35
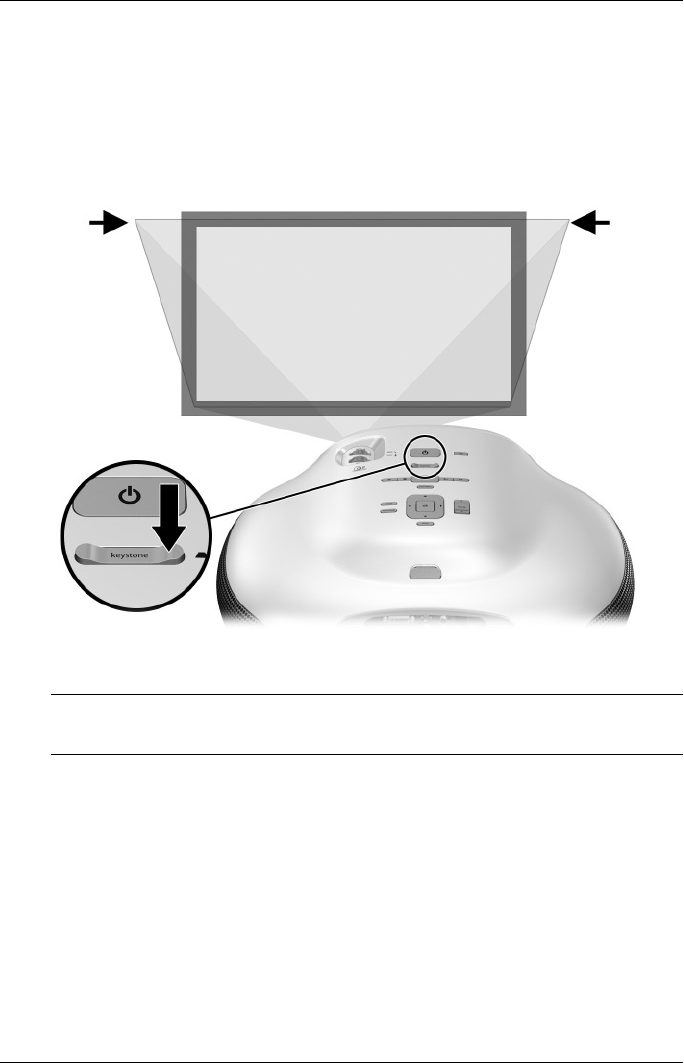
Adjusting a slanted picture
If the projector is tilted up or down, the sides of the picture on the screen might
slant in or out, even though the top and bottom are level. Keystone adjustment
corrects this problem:
■Press the keystone adjustment on the projector or on the remote control until
the picture looks correct.
You can also make the keystone adjustment in the on-screen menu. Press menu,
and go to Picture > Shape settings > Keystone to adjust the picture.
✎If the top and bottom of the picture slant in different directions, move the
projector until it is straight in front of the screen, not off to one side.
Adjusting the volume
You can control the volume of the projector’s speakers and headphone output:
■To change the volume of the projector’s speakers, press the volume
adjustment on the projector or remote control.
■To change the volume of only the subwoofer, press menu, go to Sound >
Subwoofer, and make the adjustment.
■To turn the sound on or off, press the mute button on the remote control, or
press menu, go to Input > Mute, and mute the sound.

36 User’s Guide
Setting up

User’s Guide 37
2
Playing DVDs and CDs
Using the built-in DVD player
The internal DVD player is capable of playing several types of video, graphics,
and audio discs, as listed in the following table. Discs not listed in the table are
not supported.
Type of disc Comments
DVD video Standard video, single- and dual-layer. For
full effect of Dolby Digital and Dolby Pro
Logic surround sound, you can connect an
external surround sound system. To play
DTS surround sound, you must connect an
external sound system that supports DTS
sound.
VCD
SVCD
Video CD. Video plays when a video CD is
inserted.
JPG disc
Kodak Picture CD
Shows as an automatic slide show. See
“Showing pictures” on page 40. The file
system must comply with the ISO 9660
standard.
Digital audio CD Standard audio CD. Songs are played track
by track. You can play songs with a song list
displayed or with the lamp off. Any other
information stored on the CD is ignored.
MP3 on CD Songs can be played only with the lamp on.
If JPG pictures are also on the CD, you can
show them as a slide show accompanied by
the MP3 music. See “Showing pictures” on
page 40.
38 User’s Guide
Playing DVDs and CDs
The following types of media are supported: DVD-ROM, DVD-R, DVD+R,
DVD-RW, DVD+RW, CD-R, and CD-RW. Recording conditions might affect
whether individual discs are playable.
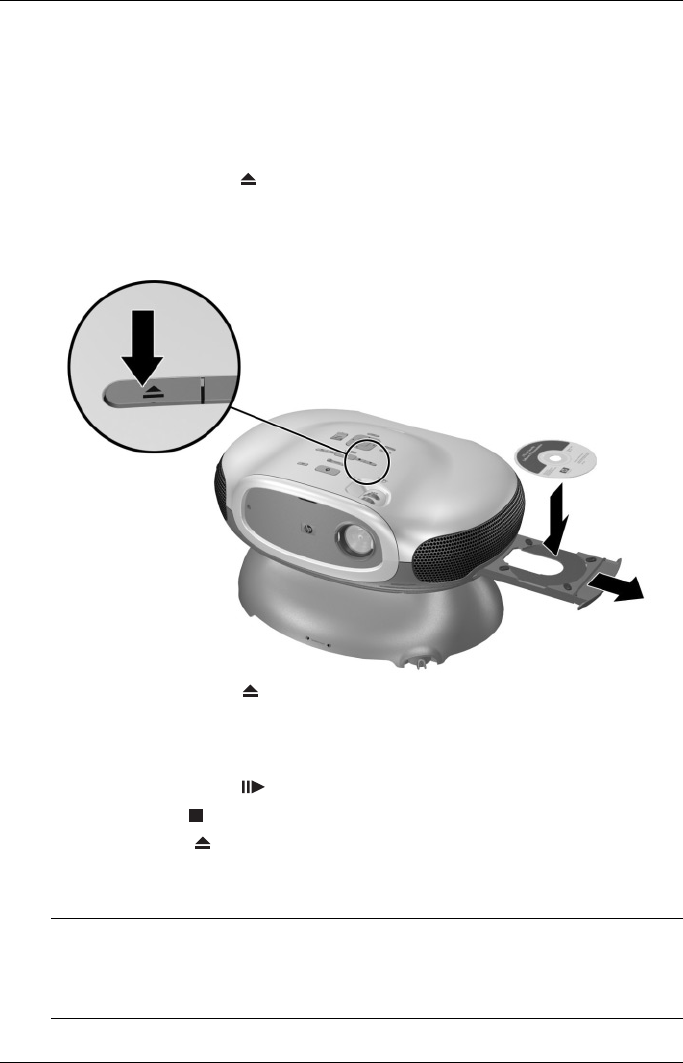
Playing a DVD
1. Press the DVD eject button on the projector or remote control to open the
tray.
2. Place the DVD on the tray.
3. Press the DVD eject button again to close the tray. If the projector is off,
it turns on and starts warming up. Then it starts playing the DVD.
4. If a DVD menu displays, press the navigation buttons to make a selection,
and then press ok.
5. Press the play/pause button to pause or resume playing.
6. Press the stop button to stop playing.
7. Press the eject button to open the tray and remove the DVD, and then
press it again to close the tray.
If you want to adjust the picture, see “Changing the picture mode” on page 33.
✎The internal DVD player and all DVDs are coded with a DVD region code.
These codes must match to play the DVD. If the DVD code does not match
the player’s code, the DVD does not play and the projector displays an error
message.
Playing DVDs and CDs
User’s Guide 39
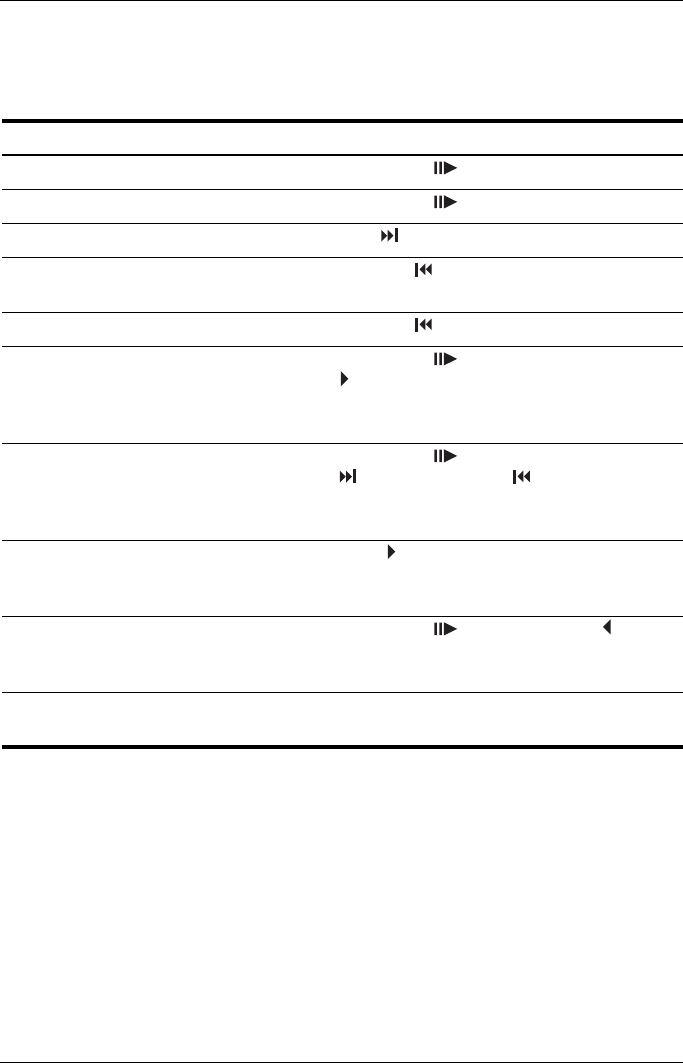
Using special play options
The internal DVD player provides several features for controlling DVD playback.
Opening the DVD menu
Many DVDs contain a menu in which you can select viewing options.
1. Press the DVD menu button on the projector or remote control.
2. Press the navigation buttons to make a selection, then press ok.
To do this... Press this...
Pause play Play/pause button.
Resume play Play/pause button.
Jump to the next scene (chapter) Next button.
Jump to start of current scene
(chapter)
Previous button.
Jump to the previous scene (chapter) Previous button two times.
Play in slow motion Play/pause button to pause, then right
button one or more times to increase
slow-motion speed. Press play/pause to
end slow motion.
Play one frame at a time Play/pause button to pause, then next
button or previous button for each
frame. Press play/pause to end
single-frame play.
Play in fast motion Right button one or more times to
increase speed. Press play/pause to end
fast motion.
Play backwards (slow, normal, or fast
speeds)
Play/pause to pause and left one or
more times. Press play/pause to end
backward play.
Pause, mute, and hide the picture hide button. Press any button to resume
the show.
40 User’s Guide
Playing DVDs and CDs
Showing pictures
If you insert a compatible picture disc in the DVD player, you can show the
pictures as a slide show.
1. Press the DVD eject button on the projector or remote control to open the
tray.
2. Place the picture disc on the tray.
3. Press the DVD eject button again to close the tray. If the projector is off,
it turns on and starts warming up. Then it starts showing the pictures, one at
a time.
4. Press the buttons shown in the following table to control the slide show.
5. Press the DVD eject button to open the tray and remove the disc, then
press it again to close the tray.
✎If the picture disc contains a supported sound track in addition to the
pictures, the DVD player allows you to play the sound track during the slide
show. If you press the hide button, the sound turns off also.
Playing audio CDs
1. Prepare the projector:
❏If you want to see a list of songs on the screen, turn on the projector.
❏If you have a standard music CD and want the lamp to be off during play,
turn off the projector.
To do this.... Press this...
Skip to next picture Next button.
Skip to previous picture Previous button.
Pause the show Play/pause button.
Resume the show Play/pause button.
Pause and hide the picture hide button. Press any button to resume
the show.
Browse list of pictures Stop or DVD menu button. Press up ,
down , left , and right buttons to
highlight a picture, then press ok to show
it, play/pause to continue slide show.
Playing DVDs and CDs
User’s Guide 41
2. Press the DVD eject button on the projector or remote control to open the
tray.
3. Place the CD on the tray.
4. Press the DVD eject button again to close the tray.
The projector selects the internal DVD player as the active source and begins
playing the first track. If the lamp is on, the projector shows the list of songs
on the CD.
5. Press the buttons shown in the following table to control the songs. If the
lamp is off, some controls are not applicable.
6. Press the DVD eject button to open the tray and remove the CD, then
press it again to close the tray.
To do this... Press this...
Play a song from the list Up or down to highlight the song
and then ok.
Skip to next song Next button.
Skip to start of current song Previous button.
Skip to previous song Previous button two times.
Pause the music Play/pause button.
Resume playing music Play/pause button.
Stop playing Stop button.
Stop playing, go to track 1 Stop button two times.
Mute the sound mute button.
Hide the list, pause the music hide button. Press any button to
resume.
Play at fast speeds Right one or more times. Press
play/pause for normal speed.
Play backwards at fast speeds Left one or more times. Press
play/pause for normal speed.

42 User’s Guide
Playing DVDs and CDs

User’s Guide 43
3
Showing video
This chapter describes how to show video from external sources connected to the
projector. See the previous chapter for information about using the internal DVD
player.
Showing the video source
1. Be sure the video device is connected to the projector and turned on. See
“Connecting a video source” on page 19.
2. Be sure the projector is set up, turned on, and adjusted. See “Making basic
adjustments” on page 31.
3. Press the source button on the projector or remote control one or more times
to select the input port where the device is connected.
4. Use the controls on the video device to start and control the show.
If you want to adjust the picture, see “Changing the picture mode” on page 33.
Hiding or showing the picture
1. Press the hide button on the projector or remote control to blank the picture
and turn off the projector speakers. This does not affect the video source,
which continues playing.
2. Press any button to show the picture again and turn on the projector speakers.
Showing a computer screen
1. Be sure the computer is connected to the projector and turned on. See
“Connecting a computer” on page 28.
2. Be sure the projector is set up, turned on, and adjusted. See “Making basic
adjustments” on page 31.

44 User’s Guide
Showing video
3. Press the source button on the projector or remote control one or more times
to select the DVI port.
4. If the computer display is not shown on the projector, you might have to turn
on the computer’s video output port. For example, some computers require
you to press a key combination, such as Fn+F4 or Fn+F5. See the user
documentation provided with your computer.
If you want to adjust the picture, see “Changing the picture mode” on page 33.

User’s Guide 45
4
Adjusting the projector
Adjusting the picture and sound
Adjusting the picture
The on-screen menu provides many settings that allow you to fine-tune the
picture.
1. Press menu, and go to Picture.
2. Change the picture adjustments as needed.
From the Picture menu, you can change many picture options, such as
brightness, contrast, and picture shape, as well as customize the picture
modes.
To get descriptions for all available picture adjustments, see “Picture menu” on
page 47.
✎To exit from any on-screen menu or adjustment, press the menu button.
Adjusting the sound
1. Press menu, and go to Sound.
2. Set the sound adjustments.
From the Sound menu, you can adjust sound settings, such as mute, volume,
and speaker operation.
To get descriptions for all available audio adjustments, see “Sound menu” on
page 49.

46 User’s Guide
Adjusting the projector
Adjusting the projector setup
1. Press menu, and go to Setup.
2. Set the setup adjustments as needed.
From the Setup menu, you can select settings, such as menu language,
projector position, and menu timeout.
To get descriptions for all available setup adjustments, see “Setup menu” on
page 49.
Using the on-screen menu
Changing settings using the on-screen menu
You can change the on-screen menu settings with the buttons on either the
projector or the remote control.
1. Press menu on the projector or remote control. This displays the on-screen
menu.
2. Press up or down to highlight the desired menu icon, then press right
to move into that menu.
3. Press up or down to highlight that setting, then press ok to begin
adjusting the setting.
4. Press left or right , or press up or down , to adjust the setting, as
prompted.
5. Press ok to return to the menu.
6. To go to a different menu, press left and select a menu.
7. To close the on-screen menu, press menu.
If you do nothing for a period of time, the on-screen menu closes. To change the
amount of time until the on-screen menu closes, press menu and select Setup >
Timeout for menu.
✎To exit from any on-screen menu or adjustment, press the menu button.

Adjusting the projector
User’s Guide 47
Input menu
For a visual aid, see “Back panel” on page 12.
Picture menu
Some picture adjustments are available only when certain input ports are in use.
Unavailable adjustments are shown in gray in the on-screen menu.
Input menu
Internal DVD Shows the video from the internal DVD player.
Component Shows the source connected to the component-video
port (YPbPr).
S-Video Shows the source connected to the S-video port.
Composite Shows the source connected to the composite-video
port.
DVI Shows the source connected to the DVI port.
Picture menu
Color settings... Adjusts the picture and colors.
Brightness Brightens or darkens the picture.
Contrast Sets the difference between light and dark areas.
Sharpness Sharpens or softens the picture.
Color saturation Adjusts the intensity of colors.
Tint Shifts colors toward red or green.
Color space For certain component inputs, selects the type of color
standard used by the source.
Reset color settings Restores these color settings to their default settings.
Shape settings... Adjusts the shape of the picture.
Keystone Corrects the slanted sides of the picture. This
compensates for a projector that is too high or low
relative to the screen.
Reset keystone Resets the keystone correction to zero (no correction).

48 User’s Guide
Adjusting the projector
Widescreen input Sets whether a widescreen (16:9) input device is in use.
Adjusts the height of the picture accordingly.
VGA settings... Adjusts settings for a computer input.
Auto-sync Resynchronizes the projector to the input signal. This
can compensate for any change in the signal.
Frequency Adjusts the timing of the projector relative to the
computer.
Tracking Adjusts the phase of the projector relative to the
computer.
Vertical offset Adjusts the picture up or down within the projection area.
Horizontal offset Adjusts the picture left or right within the projection area.
Picture Mode Adjusts color and picture settings to one of several
combinations designed for different types of viewing
situations. You can use a different picture mode for each
source or each viewing environment. You can also
customize each picture mode.
Customize picture
mode...
Changes settings associated with the current picture
mode.
Picture enhancement Refines the color, lightness, and other characteristics of
the picture.
Color temperature Shifts colors toward red or blue.
Stretch Selects how the picture fits on the screen:
■Best fit automatically fits the picture without stretching
it.
■1-to-1 shows each picture dot as one projected dot.
■Reduced fits a standard-shape picture onto a
widescreen projection screen.
Picture shift Moves the picture within the projection area. This is
useful if you are viewing a picture that is smaller than the
full projection area, such as a widescreen movie.
Reset picture shift Resets the picture shift to zero (centered).
Reset this picture
mode
Restores the current picture mode to its default settings.
Picture menu
(Continued)

Adjusting the projector
User’s Guide 49
Sound menu
Setup menu
Help menu
Sound menu
Mute Turns off sound output.
Volume Adjusts the loudness of the speakers.
Subwoofer Adjusts the loudness of only the subwoofer.
Internal speakers Sets whether the internal speakers are turned on.
Reset sound settings Restores sound settings to their default settings.
Setup menu
Language Selects the language used by the on-screen menu.
Timeout for menu Sets how many seconds the on-screen menu waits for
input before it closes.
Slide interval Sets how many seconds each picture shows before
changing to the next picture.
DVI compatibility Sets the configuration of DVI port. If a computer
connected to the DVI port always projects a
low-resolution image, use VGA only.
Reset lamp hours For a new lamp, resets the hours of use.
Reset all settings Restores all menu settings to factory default settings.
Help
Displays information and status for the projector.
Diagnostics... Show tests for checking the operation of the projector
and the remote control.

50 User’s Guide
Adjusting the projector

User’s Guide 51
5
Maintaining the projector
Getting the projector status
To get the projector status, press the menu button on the projector or remote
control and go to Help. This screen shows information and status for the
projector.
Cleaning the projector lens
You can clean the front lens of the projector using the following
recommendations. You cannot clean any of the internal surfaces.
■To minimize the risk of damaging or scratching the lens surface, blow dust
particles off the lens with clean, dry, deionized air.
■If this method does not work, use the following method:
a. Wipe the lens in a single direction with a clean, dry cloth. Do not wipe
back and forth across the lens.
b. If the cloth is dirty or smears the lens, wash the cloth. If the cloth is still
dirty after washing it or the fabric is damaged, replace it.
ÄCleaning requires special consideration:
■Do not spray any type of fluid or cleaner directly on the lens surface.
Cleaners might damage the lens.
■Do not use fabric softener when washing a cleaning cloth or softener
sheets when drying the cloth. Chemicals on the cloth might damage the
surface of the lens.
■Do not store a cleaning cloth in contact with the lens for a long time
because doing so contaminates the lens with dye from the cloth. The cloth
can be contaminated if left in the open air.
52 User’s Guide
Maintaining the projector
Replacing the lamp module
As the projector operates over time, the brightness of the projector lamp
gradually decreases and the lamp becomes more susceptible to breakage. You can
install a new lamp at any time to bring the projector up to factory-fresh
brightness. We recommend replacing the lamp if a warning message is displayed.
ÅReplacing the lamp module requires special consideration:
■To reduce the risk of injury, be careful when removing the lamp module as
broken glass might be present. If the lamp is broken, contact HP about
repairs that might be required due to glass fragments.
■The lamp contains a small amount of mercury. If the lamp breaks,
adequately ventilate the area where the breakage occurred. Disposal of
this lamp might be regulated due to environmental considerations. For
disposal or recycling information, contact your local authorities or the
Electronic Industries Alliance at http://www.eiae.org.
■Because the lamp assembly operates at a very high temperature, wait 30
minutes before removing the lamp module.
1. Turn off the projector and allow it to cool for 30 minutes.
2. Unplug the power cord.
3. Loosen the 3 screws 1 on the front cover and pull out the front cover until
the tab 2 at the right end comes out of the projector 3.
4. Loosen the two screws 4 on the lamp module, and pull out the module 5.
Maintaining the projector
User’s Guide 53
5. Insert the new lamp module into the projector and tighten the two screws.
6. Insert the tab on the front cover into the slot in the projector and close the
cover.
7. Tighten the screws that hold the cover.
8. Turn on the projector. If the lamp does not turn on after the warm-up period,
try reinstalling the lamp.
9. Press menu, go to Setup > Reset lamp hours, and press ok.
Replacing the battery in the remote
control
1. On the back of the remote control, push in the tab 1 and remove the battery
cover 2 to reveal the batteries.
2. Remove the old batteries and install two new AAA batteries 3.
3. Install the battery cover.
When discarding old batteries, contact your local waste-disposal provider
regarding local restrictions on the disposal or recycling of batteries.

54 User’s Guide
Maintaining the projector

User’s Guide 55
6
Fixing problems
Troubleshooting suggestions
If you have a problem with your projector, check the following statement that
most closely matches the nature of the problem, then look in that section of this
chapter:
■“Warning light problems” on page 55
■“Start-up problems” on page 56
■“Picture problems” on page 56
■“Sound problems” on page 60
■“Interruption problems” on page 61
■“Remote control problems” on page 62
✎If these suggestions do not solve your problem, go to
http://www.hp.com/support for additional information. To contact HP, see
Chapter 7, “Support and warranty.”
Warning light problems
If both red warning lights are blinking:
❏Allow the projector to cool down after it turns off. If this condition
occurs after you restart the projector, an internal component has failed.
Contact HP for assistance.
If the red temperature light is on or blinking:
❏Allow the projector to cool down after it turns off. Be sure that nothing is
near or blocking the vents on the projector, and that the vents are free of
lint and other objects. Remove any sources of excess heat in the room.
Observe temperature and altitude limits (see “Specifications” on
page 69). If the warning light turns on or blinks after you restart the
projector, contact HP for assistance.

56 User’s Guide
Fixing problems
If the red lamp light is on or blinking:
❏Allow the projector to cool down after it turns off. If the warning light
turns on or blinks after you restart the projector, install a new lamp. If
this occurs after you install a new lamp module, remove and reinstall the
lamp module. If a new lamp does not fix the problem, contact HP for
assistance.
If the red lamp light is flickering quickly:
❏Check that the cover around the lamp at the front of the projector is
correctly installed and fully attached. Check the tab at the right side of
the cover and the screw at the left side.
Start-up problems
If no lights or sounds turn on:
❏Be sure that the power cable is securely connected to the projector and
the other end is plugged into an outlet with power.
❏If you put a disc in the DVD tray but the projector did not turn on, the
disc is not recognized. Try a different disc.
❏Press the power button again.
❏Unplug the power cord for 15 seconds, then plug it in and press the
power button again.
Picture problems
If a “waiting” message is displayed on a blank screen:
❏Press the source button on the projector or remote control one or more
times until the correct source name is selected.
❏Be sure the external source is turned on and connected.
❏For a computer connection, ensure your notebook computer’s external
video port is turned on. Refer to the computer manual. On some
notebooks, for example, press the Fn + F4 or Fn+F5 function keys to turn
on the external video port.
If the wrong input source is displayed:
❏Press the source button on the projector or the remote control one or
more times to select another active input source.

Fixing problems
User’s Guide 57
If the image is out of focus:
❏Be sure the lens cover is open.
❏While displaying the on-screen menu, adjust the focus ring. (The image
size should not change; if it does, you are adjusting the zoom, not the
focus.)
❏Ensure the projection screen is 1 to 10 m (3 to 33 ft) from the projector.
❏Check the projection lens to see if it needs cleaning.
❏For a computer connection, set the display resolution on the computer to
800×600 pixels. If the computer has multiple monitors, adjust the
resolution of the monitor assigned to the projector.
❏For a computer connected to the S-video port, the picture cannot be as
high resolution as what you see on the computer display.
If the image is too small or too large:
❏Adjust the zoom ring on top of the projector.
❏Move the projector closer to or farther from the screen.
❏On the projector or remote control, press the picture mode button one or
more times to see if one of the picture modes makes the image the correct
size.
❏Press menu, go to Picture > Customize picture mode > Stretch. Try
the different settings.
❏If the source device sends wide-screen output, press menu, go to Picture
> Shape settings, and try setting Widescreen input to Ye s. Otherwise,
set it to No.
If the image has slanted sides:
❏As much as possible, reposition the projector so that it is centered on the
screen and below the bottom of the screen.
❏On the projector or remote control, press the keystone button until the
sides are vertical.

58 User’s Guide
Fixing problems
If the image is stretched:
❏On the projector or remote control, press the picture mode button one or
more times to see if one of the picture modes makes the image the correct
size.
❏Press menu, go to Picture > Customize picture mode > Stretch. Try
the different settings.
❏If the source device sends wide-screen output, press menu, go to Picture
> Shape settings, and try setting Widescreen input to Yes. Otherwise,
set it to No.
If the projected colors seem slightly wrong:
❏Press menu, go to Picture > Color settings, and adjust the color settings
as needed.
❏Press menu, go to Picture > Color settings > Color space. Try the
different settings.
❏Press menu, go to Help > Diagnostics, and run the color test.
If the projected colors seem completely wrong:
❏Be sure the pins on the cable connectors are not bent or broken.
❏Press menu, go to Picture > Color settings > Color space. Try the
different settings.
❏Press menu, go to Help > Diagnostics, and run the color test.
❏Press menu, go to Picture > Color settings > Reset color settings, and
press ok.
❏Press menu, go to Setup > Reset all settings, and press ok.
If the picture is not clear (ghost images, smearing, poor quality):
❏Be sure the video cable you are using is coaxial cable rated at 75 ohms.
Any other cable or impedance rating can reduce picture quality.
❏The video cable connecting the video source to the projector probably
must be higher quality, especially if the cable is longer than about 3 m
(10 ft). Low-loss cable is recommended for longer distances to avoid
degrading or losing the picture
If a DVI source is not displayed when the DVI port is selected:
❏Press menu, go to Setup > DVI compatibility, and select Standard
DVI.

Fixing problems
User’s Guide 59
If several picture settings seem completely wrong and you cannot fix
them:
❏Press menu, go to Picture > Color settings > Reset color settings, and
press ok.
❏Press menu, go to Setup > Reset all settings, and press ok.
If a scrolling or cut-off image is displayed for a computer connection:
❏Press menu, go to Picture > VGA settings > Auto sync, and press ok.
❏Turn everything off. Then power on the projector first and power on the
notebook or desktop computer second.
❏If the previous steps do not correct the display image, adjust the
resolution of the notebook or desktop computer to 800×600 pixels. If the
computer has multiple monitors, adjust the resolution of the monitor
assigned to the projector.
If the image is flickering or unstable for a computer connection:
❏Press menu, go to Picture > VGA settings > Auto sync, and press ok.
❏Press menu, go to Picture > VGA settings, and adjust Frequency or
Tracking.
If the image disappears from the computer screen:
❏For a notebook computer, you might be able to turn on both the external
VGA port and the built-in screen. See the computer manual.
If text or lines from a computer display seem rough or uneven:
❏Check the focus adjustment.
❏Press menu, go to Picture > Shape settings > Reset keystone, and press
ok.
If a computer display is projected with low resolution:
❏Press menu, go to Setup > DVI compatibility, and select VGA only.
Note that this setting is not compatible with standard DVI devices.
DVD player problems
If a message shows an error message:
❏Be sure the disc is inserted with the label facing up.
❏Check the disc for scratches or other problems. Try cleaning the disc. Try
a different disc.

60 User’s Guide
Fixing problems
❏The type of disc you inserted might not be supported by the internal
DVD player. If so, you cannot play this type of disc.
❏For a DVD, check its region code. Most DVDs have a region code
marked near the center hole. Compare its region code with the region
code for a DVD that plays properly on your projector. The projector can
play DVDs from only one region.
If a disc in the tray does not automatically play:
❏A disc automatically starts playing only at the time you close the tray. If a
disc is already loaded in the tray, press the play/pause button to start
playing.
❏If the projector is off, nothing happens if you insert a disc that is not
supported by the internal DVD player.
If some pictures on a CD do not show:
❏Some pictures with very high resolution (high number of pixels) cannot
be displayed. Convert them to standard JPG format with a lower
resolution.
If you cannot display a DVD menu:
❏Press the DVD menu button.
❏The current DVD probably does not have a menu.
If a ! icon appears on the screen:
❏You pressed a button that is not supported by the disc or by the DVD
player in the current situation. The button is ignored.
Sound problems
If no sound is coming out of the projector:
❏If you are playing an external source, be sure you have an audio cable
securely connected between the source device and the projector’s audio
input.
❏Be sure a headphone is not plugged into the headphone jack. A
headphone connection disables the internal speakers.
❏Press menu, go to Sound, and check that Mute is turned off and Vo lume
is correct.
❏Press menu, go to Sound > Internal speakers, and be sure the speakers
are turned on.

Fixing problems
User’s Guide 61
❏If the internal DVD player is playing a DVD with DTS sound, press
DVD menu and turn off the DTS sound and turn on stereo or Dolby
sound. DTS sound plays only on a DTS-compatible sound system
connected to the projector’s digital audio output.
❏Press menu, go to Help > Diagnostics, and run the sound test.
❏Be sure that the mute and volume settings are correct on the source
device, such as a VCR, camcorder, or computer.
If no sound is coming out of an external sound system:
❏If you are playing an external source, be sure you have an audio cable
securely connected between the source device and the sound system. The
digital audio output from the projector functions only while playing the
internal DVD player.
❏If you are playing the internal DVD player, be sure you have a correct
cable connecting the projector to the sound system—either a digital
audio cable connected between digital audio ports, or a standard audio
cable connecting stereo audio ports.
❏Press menu, go to Sound, and check that Mute is turned off. The volume
control does not affect the digital audio output and the stereo audio
output.
❏If the internal DVD player is playing a DVD with DTS sound, press
DVD menu and turn off the DTS sound and turn on stereo or Dolby
sound. DTS sound plays only on a DTS-compatible sound system
connected to the projector’s digital audio output.
If the projector speakers interfere with an external sound system:
❏Press menu, go to Sound > Internal speakers, and turn off the speakers
Interruption problems
If the projector stops responding to all controls:
❏If possible, turn off the projector, then unplug the power cord and wait at
least 15 seconds before reconnecting power.
If the lamp shuts off during a show:
❏A minor power surge might cause the lamp to shut off. This is normal.
Wait a few minutes, then power on the projector.
❏If a red warning light is on or blinking, see “Warning light problems” on
page 55.

62 User’s Guide
Fixing problems
If the lamp burns out or makes a popping sound:
❏If the lamp burns out and makes a popping sound, the projector will not
turn back on until the lamp module has been replaced.
❏If the lamp breaks, contact HP about repairs that might be required due to
glass fragments.
Remote control problems
If the remote control does not operate:
❏Be sure nothing is blocking the remote control receiver on the front or
back of the projector. Move to within 9 m (30 ft) of the projector.
❏Aim the remote control at the screen or at the front or back of the
projector.
❏Press menu, go to Help > Diagnostics, and run the remote control test.
❏Replace the batteries in the remote control.
Testing the projector
The on-screen menu contains diagnostic tests you can use to verify the proper
operation of the projector and the remote control.
1. Press menu and go to Help > Diagnostics.
2. Select a test and press ok.
3. Follow the displayed instructions.

User’s Guide 63
7
Support and warranty
Support
Contacting HP support
HP provides expert advice on using your HP digital projector or solving
problems with your digital projector. Support options and availability vary by
product, country/region, and language. The HP support process works most
effectively if you seek assistance in the following order:
Step 1: HP digital projector documentation
Use this owner’s manual and the setup guide included with the projector. From
our experience, a large percentage of customer issues are addressed in the
owner’s manual. Manuals in all supported languages are included on the CD
shipped with the projector.
Step 2: HP e-support
HP e-support offers online, instant access to support information, helpful tips,
and the latest updates 24 hours a day, seven days a week, at no cost to you. This
service requires access to the Internet. Visit our website at
http://www.hp.com/support.
Step 3: HP phone support
HP provides telephone support free of charge for as long as you own your
projector. (Standard phone company charges may apply.) Telephone support is
available in any country or region where the product is distributed by HP. HP
e-support is always available at no cost—see “Step 2: HP e-support”.
See the following table for a list of phone numbers. For the latest phone numbers,
visit http://www.hp.com/support. Have your projector’s model and serial number
available when you call.

64 User’s Guide
Support and warranty
Americas
Argentina (Buenos Aires):
(54)11-4778-8380
Argentina (other): 0-810-555-5520
Brazil (São Paulo): 11-3747-7799
Brazil (other): 0800-15-7751
Canada (Missauga): 905-206-4663
Canada (other): 1-800-474-6836
Chile: 800-360-999
Colombia: 01-800-51-HP-INVENT
Costa Rica: 0-800-011-4114 +
1-800-711-2884
Ecuador (Andinatel): 999-119 +
1-800-711-2884
Ecuador (Pacifitel): 1-800-225-528 +
1-800-711-2884
Guatemala: 1-800-999-5105
Mexico (Mexico City): (55)5258-9922
Mexico (other): 01-800-472-6684
Panama: 001-800-711-2884
Peru: 0-800-10111
Venezuela: 0-800-4746-8368
Jamaica: 1-800-7112884
Republica Dominicana: 1-800-711-2884
Trinidad and Tobago: 1-800-711-2884
United States: 1-800-474-6836
Europe
Austria: +43 (0)820 87 4417
Belgium (French): 070 300 004
Belgium (Dutch): 070 300 005
Czech Republic: +42 (0) 2 61307310
Denmark: +45 70202845
Finland: +358 (0)203 66 767
France: +33 (0)892 6960 22
Germany: +49 (0)180 5652 180
Greece: + 30 10 6073 603
Hungary: +36 (0) 1 382 1111
Ireland: 1890 923902
Italy: 848 800 871
Luxembourg (French): 900 40 006
Luxembourg (German): 900 40 007
Netherlands: 0900 2020 165
Norway: +47 815 62 070
Poland: + 48 22 865 98 00
Portugal: 808 201 492
Romania: +40 1 315 44 42
Russian Federation (Moscow): +7 095
7973520
Russian Federation (St. Petersburg): + 7
812 346 7997
Slovakia: + 421 2 6820 8080
Spain: 902 010 059
Sweden: + 46 (0)77 120 4765
Switzerland: 0848 672 672
Ukraine: + 7 (380 44) 490-3520
United Kingdom: +44 (0)870 010 4320
Middle East and Africa
Algeria: +213(0)61 56 45 43
Bahrain: +973 800 728
Egypt: + 20 02 532 5222
Israel: + 972 (0) 9 830 4848
Morocco: +212 224 04747
Nigeria: +234 1 3204 999
Saudi Arabia: +966 800 897 14440
South Africa (Republic of S. Africa): 086 000
1030
South Africa (other): +27-11 258 9301
Tunisia: + 216 1 891 222
Turkey: +90 216 579 7171
United Arab Emirates: 800 4910
Asia and Australia
Australia: +61 (3) 8877 8000 (or local (03)
8877 8000)
China: +86 (21) 3881 4518
Hong Kong SAR: +852 2802 4098
India: 1 600 447737
Indonesia: +62 (21) 350 3408
Japan (inside): 0570 000 511
Japan (outside): +81 3 3335 9800
Korea, Republic of : +82 1588-3003
Malaysia: 1 800 805 405
New Zealand: +64 (9) 356 6640
Philippines: +63 (2) 867 3551
Singapore: +65 6272 5300
Taiwan: +886 0 800 010055
Thailand: +66 - (0)2 353 9000
Vietnam: +84 (0) 8 823 4530

Support and warranty
User’s Guide 65
Obtaining HP repair
If your HP digital projector must be repaired, call HP support by phone. A trained
HP service technician will diagnose the problem and coordinate the repair
process. HP support will direct you to the best solution, whether it is an
authorized service provider or an HP facility. Repair covered by the limited
warranty is free during the limited warranty period. After the warranty period,
you will be quoted a repair cost.
Limited warranty
HP is committed to providing the best service to ensure that you get the most out
of your HP Digital Projector. This Limited Warranty Statement describes the
standard Digital Projector warranty.
HP digital projector limited warranty statement
Extent of limited warranty
1. Hewlett-Packard (HP) warrants to the end-user customer that the HP
products specified above will be free from defects in materials and
workmanship for the duration specified above, which duration begins on the
date of purchase by the customer. Customer is responsible for maintaining
proof date of purchase.
2. For software products, HP’s limited warranty applies only to a failure to
execute programming instructions. HP does not warrant that the operation of
any product will be uninterrupted or error free.
Product Warranty period
HP Digital Projector, warranty period
marked on rear label (excluding items
listed in this table).
Number of years marked on label, for
example: 1YR = 1 year, 3YR = 3 years
Limited parts and labor warranty.
HP Digital Projector Lamp Module
(included with the projector or
purchased separately).
One year or 2000 hours of use
(whichever comes first)
Limited hardware warranty.
HP Digital Projector Cables, Remote
Control, and other parts (included with
the projector).
Same period as projector
Limited hardware warranty.
HP Digital Projector Cables, Cords,
Adapters, and Remote Control
(purchased separately).
One year
Limited hardware warranty.

66 User’s Guide
Support and warranty
3. HP’s limited warranty covers only those defects which arise as a result of
appropriate use of the product, and do not apply to any:
❏Improper or inadequate maintenance, or unauthorized modification
❏Software, interfacing, media, parts, or supplies not provided or supported
by HP
❏Operation outside the product’s specifications
4. If HP receives notice of a defect in any hardware product covered by HP’s
warranty during the applicable warranty period, HP shall either repair or
replace the defective product at HP’s option.
5. If HP is unable to repair or replace, as applicable, a defective product which
is covered by HP’s warranty, HP shall, within a reasonable time after being
notified of the defect, refund the purchase price for the product.
6. HP shall have no obligation to repair, replace, or refund until the customer
returns the defective product to HP.
7. Any replacement product may be either new or like-new, provided that it has
functionality at least equal to that of the product being replaced.
8. HP products may contain remanufactured parts or components equivalent to
new in performance or may have been subject to incidental use.
9. HP’s limited warranty is valid in any country where the covered HP product
is distributed by HP.
Limitations of warranty
TO THE EXTENT ALLOWED BY LOCAL LAW, NEITHER HP NOR ITS
THIRD PARTY SUPPLIERS MAKE ANY OTHER WARRANTY OR
CONDITION OF ANY KIND, WHETHER EXPRESS OR IMPLIED, WITH
RESPECT TO THE HP PRODUCTS, AND SPECIFICALLY DISCLAIM THE
IMPLIED WARRANTIES OR CONDITIONS OF MERCHANTABILITY,
SATISFACTORY QUALITY, AND FITNESS FOR A PARTICULAR
PURPOSE.
Limitations of liability
1. To the extent allowed by local law, the remedies provided in this Warranty
Statement are the customer’s sole and exclusive remedies.
2. TO THE EXTENT ALLOWED BY LOCAL LAW, EXCEPT FOR THE
OBLIGATIONS SPECIFICALLY SET FORTH IN THIS WARRANTY
STATEMENT, IN NO EVENT WILL HP OR ITS THIRD-PARTY
SUPPLIERS BE LIABLE FOR DIRECT, INDIRECT, SPECIAL,
INCIDENTAL, OR CONSEQUENTIAL DAMAGES, WHETHER BASED
ON CONTRACT, TORT, OR ANY OTHER LEGAL THEORY AND
WHETHER ADVISED OF THE POSSIBILITY OF SUCH DAMAGES.

Support and warranty
User’s Guide 67
Local law
1. This Warranty Statement gives the customer specific legal rights. The
customer may also have other rights which vary from state to state in the
United States, from province to province in Canada, and from country to
country elsewhere in the world.
2. To the extent that this Warranty Statement is inconsistent with local law, this
Warranty Statement shall be deemed modified to be consistent with such
local law. Under such local law, certain disclaimers and limitations of this
Warranty Statement may not apply to the customer. For example, some states
in the United States, as well as some governments outside the United States
(including provinces in Canada), may:
❏Preclude the disclaimers and limitations in this Warranty Statement from
limiting the statutory rights of a consumer (for example, the United
Kingdom).
❏Otherwise restrict the ability of a manufacturer to enforce such
disclaimers or limitations.
❏Grant the customer additional warranty rights, specify the duration of
implied warranties which the manufacturer cannot disclaim, or not allow
limitations on the duration of implied warranties.
3. FOR CONSUMER TRANSACTIONS IN AUSTRALIA AND NEW
ZEALAND, THE TERMS IN THIS WARRANTY STATEMENT, EXCEPT
TO THE EXTENT LAWFULLY PERMITTED, DO NOT EXCLUDE,
RESTRICT, OR MODIFY, AND ARE IN ADDITION TO, THE
MANDATORY STATUTORY RIGHTS APPLICABLE TO THE SALE OF
HP PRODUCTS TO SUCH CUSTOMERS.

68 User’s Guide
Support and warranty

User’s Guide 69
8
Reference
This chapter lists the specifications, safety information, and regulatory
information for the projector.
Specifications
Because HP continually improves its products, the following specifications are
subject to change. For the latest specifications, visit the HP website at
http://www.hp.com.
Projector specifications
Size 524 × 400 × 320 mm (20.6 × 15.7 × 12.6 in.)
Weight 10.5 kg (23.0 lb)
Resolution SVGA (800 × 600)
Technology DLP
Internal DVD player Compatibility: DVD-video (including Dolby Digital and
Dolby Pro Logic, with DTS passed to digital audio-out),
DVD+R/RW, DVD-R/RW, VCD, SVCD, JPG images, MP3
audio, CDDA (standard audio CD), CD-R, CD-R/RW,
Kodak Picture CD
Video connectors S-video (mini-DIN)
Composite video (RCA)
Component video (3 RCA)
DVI-I
Audio connectors 5.1 digital audio-out (1 RCA, coaxial)
Stereo audio-out (2 RCA)
Stereo audio-in (2 RCA)
Other connectors Service port (for service only)

70 User’s Guide
Reference
Video compatibility NTSC 3.58 MHz and 4.43 MHz
PAL B, D, G, H, I, M, N
SECAM B, D, G, K, K1, L
HDTV (480i/p, 575i/p, 720p, 1080i)
DVI with HDCP
PC video up to SXGA (by DVI-I connector)
IR receiver Front and back of projector
Lamp 210-watt lamp
4000-hour average lamp life (to half of original brightness)
Replacement lamp: L1731A
Optics 1.7 to 2.0 throw ratio (distance/width)
1 to 10 m (3 to 33 ft) focus range
128% offset (relative to half-height)
1.16:1 optical zoom
Light engine 0.55-in. 12° DDR DMD
Audio 60-watt total peak power
15-watt per channel peak stereo speakers (two speakers
per channel facing front and rear)
30-watt peak subwoofer
Noise level less than 34 dBA
Vertical tilt ±10°
Vertical keystone
correction
±20%
Power 100 to 240 V at 50 to 60 Hz
Environment Operating:
Temperature: 5 to 35 °C (41 to 95 °F)
Humidity: 80% RH max, non-condensing
Altitude: up to 3,000 m (10,000 ft), up to 25 °C (77 °F)
Storage:
Temperature: –20 to 60 °C (–4 to 140 °F)
Humidity: 80% RH max, non-condensing
Altitude: up to 12,000 m (40,000 ft)
Projector specifications
(Continued)

Reference
User’s Guide 71
Video mode compatibility
Compatibility Resolution Refresh rates (Hz)
Analog
VGA 640 x 350 70, 85
640 x 400 85
640 x 480 60, 66.66, 66.68, 72, 75, 85, 117, 120
720 x 400 70, 85
SVGA 800 x 600 56, 60, 72, 75, 85, 95
832 x 624 74.55
XGA 1024 x 768 60, 70, 75, 85, 95
1152 x 870 75, 75.06
1280 x 960 75
SXGA 1280 x 1024 60, 75
SXGA+ 1400 x 1050 60
Digital
VGA 640 x 350 70, 85
640 x 400 85
640 x 480 60, 72, 75, 85
720 x 400 70, 85
SVGA 800 x 600 56, 60, 72, 75, 85
XGA 1024 x 768 60, 70, 75
SXGA 1280 x 1024 60, 75
SXGA+ 1400 x 1050 60

72 User’s Guide
Reference
Safety information
Laser safety
This product contains a DVD player which employs a laser. Only a qualified
service person should remove the cover or attempt to service this device, due to
the possibility of eye injury. The use of controls or adjustments or performance of
procedures other than those specified herein may result in hazardous radiation
exposure.
ÅWARNING: Visible and invisible laser radiation when the drawer is open. Avoid direct
exposure to the beam to prevent eye injury.
Laser data
LED safety
The infrared ports located on the digital projector and remote control are
classified as Class 1 LED devices according to International Standard IEC 825-1
(EN60825-1). This device is not considered harmful, but the following
precautions are recommended:
■If the unit requires service, contact an authorized HP service center.
■Do not attempt to make any adjustment to the unit.
■Avoid direct eye exposure to the infrared LED beam. Be aware that the beam
is invisible light and cannot be seen.
■Do not attempt to view the infrared LED beam with any type of optical
device.
■Type: Semiconductor two-wavelength laser
■Wave length DVD: 650 nm
■Wave length CD: 780 nm
■Optical output power DVD: 7 mW
■Optical output power CD: 7 mW

Reference
User’s Guide 73
Mercury safety
ÅWARNING: This digital projector lamp contains a small amount of mercury. If the lamp
breaks, adequately ventilate the area where the breakage occurred. Disposal of the
lamp might be regulated due to environmental considerations. For disposal or recycling
information, contact your local authorities or the Electronic Industries Alliance at
http://www.eiae.org.
Regulatory information
This section presents information that shows how your digital projector complies
with regulations in certain regions. Any modifications to your digital projector
not expressly approved by HP could void the authority to operate the digital
projector in these regions.
U.S.A.
This digital projector has been tested and found to comply with the limits for a
Class B digital device, pursuant to Part 15 of the FCC Rules. These limits are
designed to provide reasonable protection against harmful interference in a
residential installation.
This digital projector generates, uses, and can radiate radio frequency energy.
If not installed and used in accordance with the instructions, it can cause harmful
interference to radio communications. However, there is no guarantee that
interference will not occur in a particular installation. If this digital projector does
cause harmful interference to radio or television reception (which can be
determined by unplugging the unit), try the following:
■Reorienting or relocating the receiving antenna.
■Relocating the digital projector with respect to the receiver.
■Connecting the digital projector’s power cord to another power outlet.
Connections to peripheral devices
To maintain compliance with FCC Rules and Regulations, use properly shielded
cables with this device.
For more information, consult your dealer, an experienced radio/television
technician, or, prepared by the Federal Communications Commission, How to
Identify and Resolve Radio-TV Interference Problems. This booklet is available
from the U.S. Government Printing Office, Washington, DC 20402, Stock
Number 004-000-00345-4. At the first printing of this manual, the telephone
number was 202-512-1800.
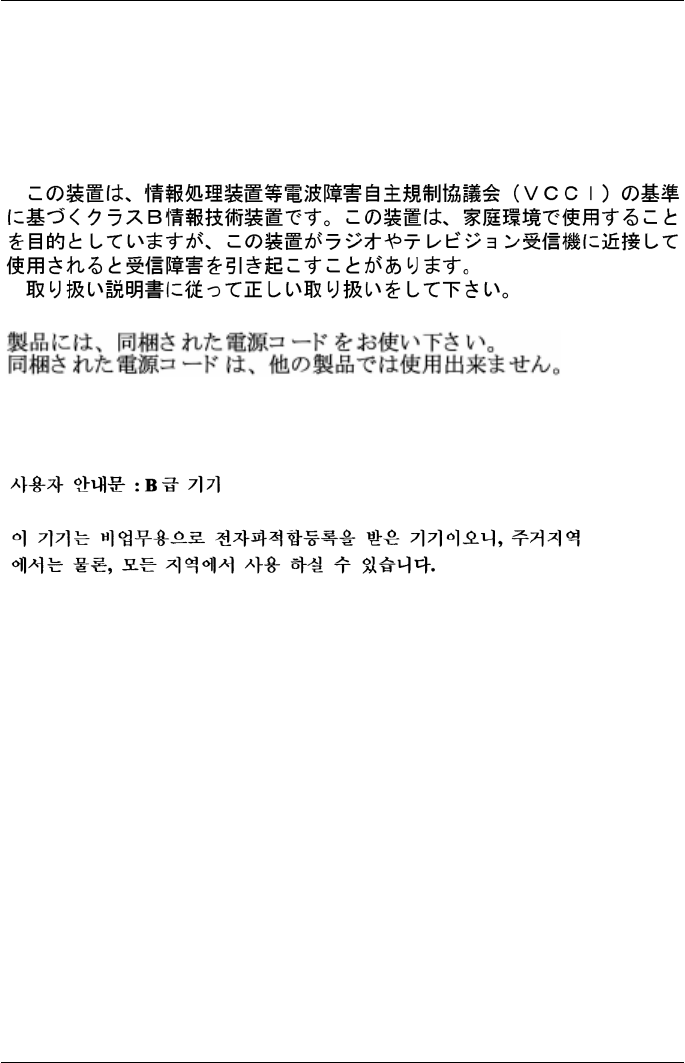
74 User’s Guide
Reference
Canada
This Class B digital apparatus complies with Canadian ICES-003.
Japan
Korea
International
For regulatory identification purposes, your product is assigned a regulatory
model number. The regulatory model number for your product is listed in the
declaration of conformity. This regulatory number is different from the marketing
name and product number.

Reference
User’s Guide 75
Declaration of conformity
According to ISO/IEC Guide 22 and EN 45014
Manufacturer's name: Hewlett Packard Company
Manufacturer's address: Hewlett Packard Company
Digital Projection & Imaging
1000 NE Circle Blvd.
Corvallis, OR 97330-4239
Declares, that the product(s):
Product name: Instant Cinema
Model number: ep9010 series
Regulatory model: CRVSB-04ZO
Conforms to the following product specifications:
Safety: IEC 60950:1999/ EN 60950:2000
IEC 60825-1:1993 +A1 / EN 60825-1:1994 +A11 Class 1 LED
GB4943-1995
EMC: EN 55022: 1998 Class B [1]
CISPR 24:1997 / EN 55024: 1998
IEC 61000-3-2:1995 / EN 61000-3-2:2000
IEC 61000-3-3:1994 / EN 61000-3-3:1995+A1:2001
GB9254-1998
FCC Title 47 CFR, Part 15 Class B/ANSI C63.4:1992
AS/NZS 3548:1995 Rules and Regulations of Class B
Supplementary information:
The product herewith complies with the requirements of following Directives and
carries the CE marking accordingly:
- Low Voltage Directive: 73/23/EEC
- EMC Directive: 89/336/EEC
[1] The product was tested in a typical configuration with Hewlett Packard Personal
Computer peripherals.
This device complies with Part 15 of the FCC Rules. Operation is subject to the
following two conditions: (1) this device may not cause harmful interference, and (2)
this device must accept any interference received, including interference that may cause
undesired operation.
Corvallis, Oregon, July 1, 2004
Steve Brown, General Manager
European Contact for regulatory topics only: Hewlett Packard GmbH, HQ-TRE, Herrenberger
Straße 140, 71034 Boeblingen, Germany. (FAX:+49-7031-143143).
USA Contact: Hewlett Packard Co., Corporate Product Regulations Manager, 3000 Hanover
Street, Palo Alto, CA 94304. Phone: (650) 857-1501.

76 User’s Guide
Reference

77
Index
A
accessories 14
adjusting
picture 33, 45
setup 46
sound 35, 45
subwoofer 35
aiming projector 31
analog video mode compatibility
71
audio
adjusting 35, 45
connecting 25
ports 12
troubleshooting 60
B
buttons
location 10
opening menu 46
C
cables
connections 19
length of 15
quality of 15
CDs
playing audio 40
playing video 38
showing pictures 40
cleaning 7, 51
component-video
connecting source 20
port 12
composite-video
connecting source 22
port 12
computer, connecting 28
connecting
audio source 25
component-video source 20
composite-video source 22
computer 28
DVI source 23
power 18
quality of picture 14, 19, 58
SCART source 24
sound system 25
S-video source 21
D
diagnostics 62
digital audio. See audio
DVD player
audio output 26
troubleshooting 59
using external 31, 43
using internal 38
DVDs
DVD menu 39
playing 38

78
Index
DVI video
connecting computer 28
connecting source 23
port 12
F
focus 9, 32
H
home theater 15
HP support 63
I
image. See picture
internal DVD player
troubleshooting 59
using 37
J
JPG pictures, showing 40
L
lamp, replacing 52
language, changing 46
laser safety 72
LED safety 72
lens
cleaning 51
cover 9
lights. See lamp; warning lights
M
menu. See on-screen menu
mercury safety 73
moving projector 30
MP3 audio, playing 40
music CDs 40
O
on-screen menu
DVD menu 39
language 49
listing 46
using 46
P
PC, connecting 28
picture
fixing slanted 35
focus 32
picture modes 33
quality of 14, 19, 58
shape 34
troubleshooting 56
zoom 32
picture modes 33
pictures, showing from CD 40
power
connecting 18
turning off 30
turning on 29
Q
quality of picture 19, 58
R
regulatory information 73
remote control
buttons 13
installing batteries 53
opening menu 46
troubleshooting 62
repair service 65
replacing lamp 52
room layout 14

Index
79
S
safety information 7, 72
SCART 24
screen
locating 17
selecting 15
service 65
setting up 14
sound. See audio
specifications 69
subwoofer
adjusting 35
location 9
support 63
S-video
connecting source 21
port 12
T
troubleshooting
audio 60
internal DVD player 59
interruptions 61
picture 56
remote control 62
start-up 56
warning lights 55
turning on and off 29
V
VGA, connecting 28
video mode compatibility 71
video sources
selecting 31
showing 43
volume, adjusting
W
warning lights
location 10
meanings 55
troubleshooting 55
warranty 65
Y
YPbPr. See component-video
Z
zoom 9, 32

80
Index

© 2004 Hewlett-Packard Development Company, L.P.
Printed in China
www.hp.com
5990-3664
Mercury Safety
WARNING: This digital projector lamp contains a small amount of mercury. If the
lamp breaks, adequately ventilate the area where the breakage occurred, discard any
nearby food and drink, and thoroughly clean the table surface around the projector.
Wash your hands after cleaning the area or handling a broken lamp. Disposal of this
lamp may be regulated due to environmental considerations. For disposal or
recycling information, please contact your local authorities or the Electronic
Industries Alliance (www.eiae.org). You can find safety information about the lamp
at www.hp.com/hpinfo/globalcitizenship/environment/productdata.
