Hp Ex490 Mediasmart Server Users Manual User's Guide_EN
2015-01-05
: Hp Hp-Ex490-Mediasmart-Server-Users-Manual-155742 hp-ex490-mediasmart-server-users-manual-155742 hp pdf
Open the PDF directly: View PDF ![]() .
.
Page Count: 331 [warning: Documents this large are best viewed by clicking the View PDF Link!]
- Welcome to the HP MediaSmart Server
- Chapter 2. Set up and Installation
- Chapter 3. Start Using Your Server
- Guided Tour
- First Steps
- Getting Help for Using Your Server
- Chapter 4. HP Media Collector
- Chapter 5. HP Video Converter
- Chapter 6. Media Streaming
- About Streaming Media
- In-home Streaming
- Web/iPhone Streaming
- TwonkyMedia for Media Sharing
- Server for iTunes
- HP Media Streamer
- About the HP Media Streamer
- HP Media Streamer Music Page
- HP Media Streamer Photos Page
- HP Media Streamer Videos Page
- Troubleshooting and FAQs
- Media Streamer, Does Not Load
- Media Streamer, How To Use The Buttons in the Player Pane
- No Music To Stream
- Starting Multiple M4A Files Stops Music and Additional Files Do Not Transcode
- Remote Media Streaming, Animated Gif Files do not Display Until the File is Selected
- Remote Media Streaming, Audio Files Are Truncated on a Slow Connection
- Streaming Media to a Device
- Chapter 7. HP Photo Publisher and HP Photo Viewer
- HP Photo Publisher
- HP Photo Viewer
- Chapter 8. Backup, Restore, and Recover
- Chapter 9. Server Storage
- Chapter 10. Network and Firewall
- Network Connection Issues
- Network Health
- Check that the Router is Correctly Configured for DHCP
- Check the Network is Set Up Properly for TCP/IP
- Check the Network NetBIOS Properties
- Network Frequently Asked Questions
- What are Optimum Data Throughput Speeds for Different Network Interfaces?
- The First Backup is Taking a Long Time
- Uninterruptible Power Supply is not Supported
- The Firewall is Blocking the Connection
- Update Your Firewall's Trusted Program List
- Chapter 11. Errors and Lights
- Server is Unresponsive
- Power Indicator is Off
- Light-Bar Breathing Aqua White
- Health Light is Red
- Light-Bar is Red
- Hardware Warning Messages
- File Transfer Failure
- Health Indicator Codes
- Network Connection Light is Off
- Network Connection Light Blinking Aqua White
- Server Not Showing Up on Your DMR
- Windows Home Server Frequently Asked Questions
- Hubs and Network Health Light
- Chapter 12. Product Information
- Chapter 13. Licenses, Copyrights and Notices for Open Source Components
- Copyrights
- Firefly: GPL License
- ImageMagick: Compatible with GPL
- MiscUtil.dll: MiscUtil
- Sample Code: WPF Calculator
- Libsmbclient.dylib From SAMBA 3.0.38 GPLv2
- Sqlite-dotnet2: Public Domain License
- Tftpd32 Artistic License
- PacketVideo
- Yahoo ASTRA Components for Flash: BSD License
- 1. Definitions.
- 2. Source Code License.
- 2.1. The Initial Developer Grant.
- 2.2. Contributor Grant.
- 3. Distribution Obligations.
- 3.1. Application of License.
- 3.2. Availability of Source Code.
- 3.3. Description of Modifications.
- 3.4. Intellectual Property Matters
- (a) Third Party Claims
- (b) Contributor APIs
- (c) Representations.
- 3.5. Required Notices.
- 3.6. Distribution of Executable Versions.
- 3.7. Larger Works.
- 4. Inability to Comply Due to Statute or Regulation.
- 5. Application of this License.
- 6. Versions of the License.
- 6.1. New Versions
- 6.2. Effect of New Versions
- 6.3. Derivative Works
- 7. Disclaimer of warranty
- 8. Termination
- 9. Limitation of liability
- 10. U.S. government end users
- 11. Miscellaneous
- 12. Responsibility for claims
- 13. Multiple-licensed code
- Exhibit A - Mozilla Public License.
- PureMVC Framework: Creative Commons Attribution License 3.0
- ScaleFilter: Software License Agreement (BSD License)
- Yahoo ASTRA Components for Flash: BSD License
- Glossary
- Index

HP MediaSmart Server User's Guide
Table of Contents
Chapter 1. Welcome to the HP MediaSmart Server 1
Chapter 2. Set up and Installation 3
What's in the Box? 3
The Server at a Glance 3
Find a Home for Your Server 5
Server Location 5
Network Requirements 5
Supported Operating Systems 6
Wireless Support 7
Turn on the Server 7
Install the Software 9
Update Your Firewall's Trusted Program List 9
Install Software on the First PC 20
Install Software on Additional PCs 28
Install the Software on a Mac 31
Troubleshooting a Mac Connection to the Server 32
Uninstall the Software 38
Uninstall the PC Client Software 38
Uninstall the Mac Client Software 39
HP Software Updates 39
HP Update Settings 39
Update and Roll Back the Server 42
Update and Roll Back Client PCs 46
Update and Roll Back Mac Clients 51
Chapter 3. Start Using Your Server 55
Guided Tour 55
HP Home Page 55
Windows Home Server Console 57
First Steps 59
PC Backup and Restore 59
Mac Time Machine Backup 60
Using Shared Folders 64
Enable Guest Account or Set up User Accounts 67
Configure Remote Access 70
Secure your Server from Intruders 72
Add Shared Folders to Network Places 76
Install HP Add-ins for Windows Home Server 77
Register Your Server 78
Configure Server Settings 79
Getting Help for Using Your Server 86
Chapter 4. HP Media Collector 89
About HP Media Collector 89
Configuring Media Collector 91
Configuring Media Collector General Settings 91
Configuring Media Collector for Photos 91
Configuring Media Collector for Music 94
Configure Media Collector for Videos 97
Media Collector Status 98
HP Media Collector Troubleshooting 98
iii

HP MediaSmart Server User's Guide
Chapter 5. HP Video Converter 103
Configure Video Converter 103
Video Converter Status 109
Troubleshooting and FAQs 110
Examples of Video Converter Profiles 110
Using Media Collector with Video Converter 112
Converting Non-Copy Protected DVDs 112
Giving Users Access to the Converted Videos Folder 113
Enabling Converted Videos for TwonkyMedia 114
Supported Video Formats 114
Video Conversion Fails 115
Network Bandwidth 116
Chapter 6. Media Streaming 117
About Streaming Media 117
In-home Streaming 118
Web/iPhone Streaming 121
TwonkyMedia for Media Sharing 125
About TwonkyMedia 125
Configure TwonkyMedia for Streaming Media 128
Troubleshooting and FAQs 129
Server for iTunes 130
Settings for iTunes 130
Troubleshooting and FAQs 131
HP Media Streamer 132
About the HP Media Streamer 132
HP Media Streamer Music Page 133
HP Media Streamer Photos Page 139
HP Media Streamer Videos Page 143
Troubleshooting and FAQs 149
Streaming Media to a Device 154
Why does the server show up twice on my DMA list? 154
Media Files (Audio/Video) of Supported Format Aren't Seen by Device. 155
My Files Do Not Show Up on My DMA 155
Why do I see duplicate songs, pictures, or videos on my DMA list? 157
Windows Media Connect 2.0 and TwonkyMedia Comparison 158
Chapter 7. HP Photo Publisher and HP Photo Viewer 163
HP Photo Publisher 163
About HP Photo Publisher 163
Log on to HP Photo Publisher 164
Log on to Photo Sharing Site 166
Select Existing Album or Create an Album 171
Select Photos 172
Server Continues Uploading 173
Troubleshooting HP Photo Publisher 175
HP Photo Viewer 187
HP Photo Viewer Home Page 187
HP Photo Viewer Slideshow 188
Select Existing Album or Create an Album 193
Select Photos 193
Troubleshooting HP Photo Viewer 195
Chapter 8. Backup, Restore, and Recover 203
Choose a Backup Strategy 203
iv

Table of Contents
PC Backup, Restore, and Recover 204
PC Backup and Restore 204
Restore an Entire PC Hard Drive 205
Mac Backup and Recover 205
Mac Time Machine Backup 205
Recover an Entire Mac Hard Drive 209
Server Backup, Recover, and Reset 211
Back up Server to a Device 211
Server Recovery and Factory Reset 213
Chapter 9. Server Storage 219
Expand Server Storage 219
Internal SATA Drives 219
Add an Internal SATA Drive 219
Remove an Internal SATA Drive 221
USB Drives, eSATA Drives, and Port Multipliers 224
Add and Remove an External USB Drive, eSATA Drive, or SATA Port Multiplier 224
Detach and Reattach a USB Drive 225
A USB Drive Accidentally Detaches from the Server 227
Add and Remove Drives from Server Storage 229
Replace the System Drive 230
Chapter 10. Network and Firewall 235
Network Connection Issues 235
Network Health 239
Check that the Router is Correctly Configured for DHCP 240
Check the Network is Set Up Properly for TCP/IP 240
Check the Network NetBIOS Properties 241
Network Frequently Asked Questions 242
What are Optimum Data Throughput Speeds for Different Network Interfaces? 243
The First Backup is Taking a Long Time 243
Uninterruptible Power Supply is not Supported 244
The Firewall is Blocking the Connection 244
Update Your Firewall's Trusted Program List 244
Chapter 11. Errors and Lights 257
Server is Unresponsive 257
Power Indicator is Off 258
Light-Bar Breathing Aqua White 258
Health Light is Red 258
Light-Bar is Red 259
Hardware Warning Messages 259
File Transfer Failure 261
Health Indicator Codes 261
Network Connection Light is Off 262
Network Connection Light Blinking Aqua White 263
Server Not Showing Up on Your DMR 263
Windows Home Server Frequently Asked Questions 264
Hubs and Network Health Light 265
Chapter 12. Product Information 267
Product Specifications 267
Regulatory Statements 271
WM-DRM 10 Licensed Technology 275
Limited Warranty and Technical Support Statement 275
HP MediaSmart Server 3.0 Update Read me 279
v

HP MediaSmart Server User's Guide
vi
Chapter 13. Licenses, Copyrights and Notices for Open Source
Components 283
Copyrights 283
Firefly: GPL License 283
ImageMagick: Compatible with GPL 288
MiscUtil.dll: MiscUtil 291
Sample Code: WPF Calculator 292
Libsmbclient.dylib From SAMBA 3.0.38 GPLv2 292
Sqlite-dotnet2: Public Domain License 297
Tftpd32 Artistic License 298
PacketVideo 299
Yahoo ASTRA Components for Flash: BSD License 299
PureMVC Framework: Creative Commons Attribution License 3.0 307
ScaleFilter: Software License Agreement (BSD License) 308
Glossary 313
Index 317
Chapter 1. Welcome to the HP MediaSmart
Server
The HP MediaSmart Server protects and shares digital content—providing an easy-to-use, central
repository for digital photos, music, videos, and documents. The HP MediaSmart Server supports
computers running Microsoft® Windows® and Apple® Mac® OS X, enabling a more protected
and reliable way of managing media and files.
The HP MediaSmart Server Provides
• Mac and Windows Supported Operating Systems
Support for networks that have a mix of Microsoft Windows
and Mac OS X 10.5 or later computers.
• HP Photo Viewer and HP Photo Publisher
A simple photo management and sharing tool that lets you
share photos directly from the server or through popular
photo sharing web sites like snapfish, facebook, flickr, and
Picasa Web Albums.
Photo web site services are subject to change without notice
and some services may not be available at the time of
product purchase. The available service providers may vary in your country/region.
• Media Collector
Media Collector automatically collects photos, music, and video files from computers on the
network and organizes them on the server.
• Media Streaming and Remote Media Streaming
Photos, videos, and music can be streamed to PCs or TVs on the network. Furthermore, you can
enjoy your photos, music, and videos—while on the network or away—with remote media
streaming to any Internet-connected computer.
• PC Backup and Mac Backup
An automatic backup process for Windows PCs and Apple Macs on your home network.
Automatic backup of computers running Microsoft Windows® Vista (32 & 64 bit), XP Home
(SP2), XP Professional (SP2), Media Center Edition 2004 (SP2) or later, and Macs running Time
Machine.
• Remote Computer Access
Remote access to media and files with an easy-to-use, browser-based interface. With proper
authorization, a remote user can log into their network and perform functions as if they were
sitting at their networked computer.
1

HP MediaSmart Server User's Guide
2
• iTunes Music Server
Any computer on the network that runs iTunes can access music on the server as an iTunes shared
library.
• Disk Duplication and Storage Expansion
A way to transparently duplicate selected folders on separate disk drives to help protect against a
hard disk failure. Plus, it's easy to add storage as needs grow.
Folder duplication requires at least two hard disks.
Chapter 2. Set up and Installation
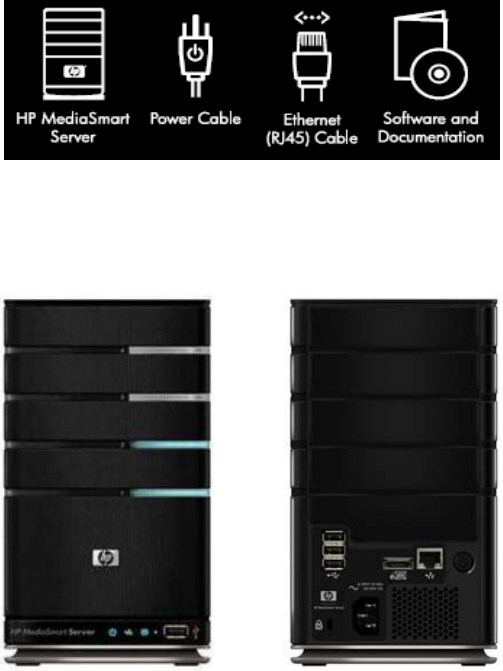
WHAT'S IN THE BOX?
In the box you will find:
• HP MediaSmart Server
• Power cord
• Ethernet (RJ-45) cable
• Software and Documentation
For warranty and support information, see the Warranty and Support Guide on the Software
Installation Disc.
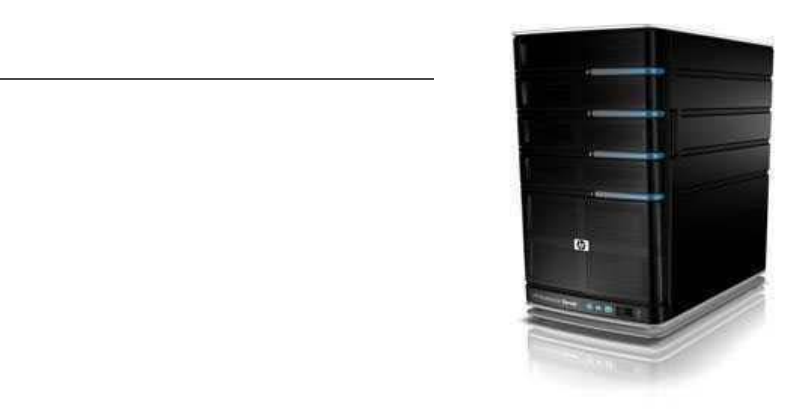
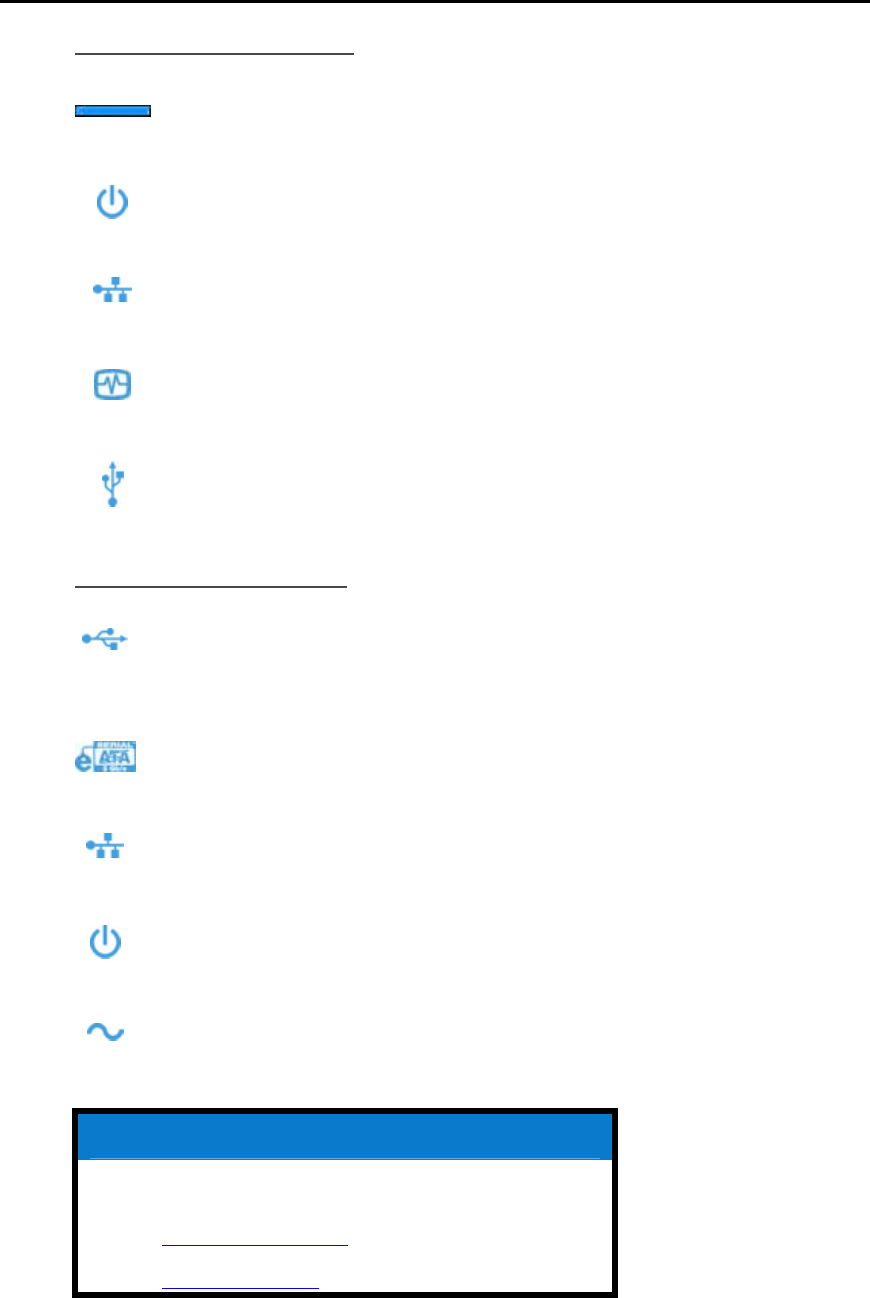
THE SERVER AT A GLANCE
The following lights and symbols are found on the front and back of the HP MediaSmart Server.
3
HP MediaSmart Server User's Guide
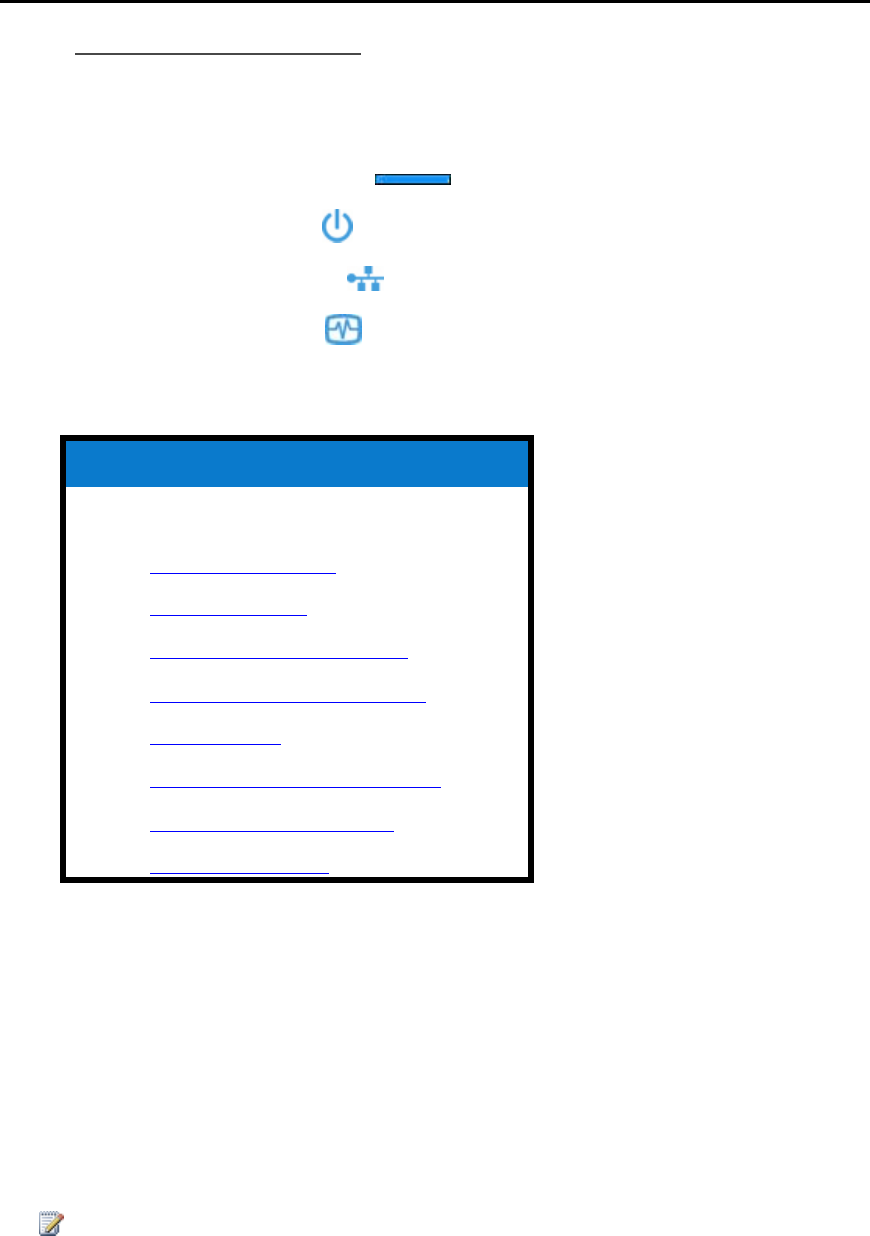
The Front of the Server
Light Bar. There is one light bar for each internal SATA disk in the HP
MediaSmart Server. The server can hold up to four disks.
Power Light. The power light is solid aqua white when the server is
turned on.
Network Connection Light. The network connection light is solid aqua
white when the server is connected to the network via a router or switch.
Health Light. The health light is solid aqua white when the server is
operating correctly.
USB Port. Plug up to four USB 2.0 or later disk drives into the USB
ports to expand your storage space. There is one USB port on the front
and three on the back of the server.
The Back of the Server
USB Port. Plug up to four USB 2.0 or later disk drives into the USB ports
to expand your storage space. There is one USB port on the front and
three on the back of the server.
eSATA Port. Plug an eSATA (external SATA) hard drive into the eSATA
port to expand your storage space.
Ethernet Port. Connect the HP MediaSmart Server to your network using
an Ethernet cable.
Power Switch. Press to turn the HP MediaSmart Server on.
Power Port. Plug the included AC power cord into the HP MediaSmart
Server.
Related Topics
HP MediaSmart Server User's Guide
Health Indicator Codes
Health Light is Red
4

Set up and Installation
Related Topics
Hubs and Network Health Light
Light-bar is Pulsating Aqua White
Light-bar is Red
Network Connection Light Blinking
Network Connection Light off
Power Indicator is Off
FIND A HOME FOR YOUR SERVER
Server Location
Find a suitable place to locate your HP MediaSmart Server before you install the software on your
computers. The location you choose must have either an available wired network connection to
your broadband router or a switch connected to your broadband router.
The server also requires adequate ventilation to ensure it does not get too hot:
• Do not locate the server in an unventilated space.
• Make sure that the server’s front and back panels are not blocked.
• Check that the location of the server is not too hot. Maximum environmental temperature for
operating the server is 35 °C (95 °F).
Network Requirements
To successfully use the HP MediaSmart Server , your network must meet the following
requirements:
Network Requirements
Requirement Recommended
Server connection 100 Mbps to 1000 Mbps (Gigabit Ethernet) wired
connection
5

HP MediaSmart Server User's Guide
Network Requirements
Requirement Recommended
Home computers One or more computers running a supported
operating system with a wired or wireless network
connection. For a list of supported operating
systems, see Supported Operating Systems.
The first installation must be on a Windows
computer. Subsequent installations can be on a
Windows or Mac computer.
Internet connection Broadband connection, such as DSL or cable,
required for remote access functionality.
Internet browser An Internet browser is required to run the HP
MediaSmart Server software. Choose one from the
following options.
• Download Internet Explorer from
http://www.microsoft.com/downloads.
• Download Firefox from
http://www.firefoxdownload.com/.
• Download Safari from
http://www.apple.com/safari/download/.
Router An external Internet broadband router with 100
Mbps (or faster) Ethernet connection to the server
for remote access functionality and wired or
wireless connections to the computers on the
network.
Additionally, your router must have DHCP enabled
to provide an automatic IP address to the server.
Supported Operating Systems
The following operating systems are supported to work with the HP MediaSmart Server.
Supported Operating Systems
Operating System Automatic Backup
of Computers
Running...
File Sharing for
Computers
Running...
Remote Access to
Computers
Running...
Linux X
Mac OS X 10.5 or later X X
6

Set up and Installation
Supported Operating Systems
Operating System Automatic Backup File Sharing for Remote Access to
of Computers
Running... Computers Computers
Running... Running...
Windows Vista Business 32-bit or 64-bit
SP2 X X X
Windows Vista Business N 32-bit or 64-bit
(European Union Only) X X X
Windows Vista Enterprise 32-bit or 64-bit
SP2 X X X
Windows Vista Home Basic 32-bit or 64-bit
SP2 X X
Windows Vista Home N 32-bit or 64-bit
(European Union Only) X X
Windows Vista Home Premium 32-bit or
64-bit SP2 X X
Windows Vista Ultimate 32-bit or 64-bit
SP2 X X X
Windows XP Home SP3 X X
Windows XP Professional SP3 X X X
Windows XP Media Center Edition 2005
with SP2 and Rollup 2 X X
Wireless Support
You must connect the HP MediaSmart Server to your router (or switch) with an Ethernet cable.
The server does not support wireless connection to your router. However, computers connected
wirelessly to a wireless access point or router are supported.
Turn on the Server
In this article...
The Server in Your Network
Turn on the Server
Check the Server Lights
The Server in Your Network
How you connect the HP MediaSmart Server to your network depends on the network
configuration.
This example shows a broadband router connecting the following:
7
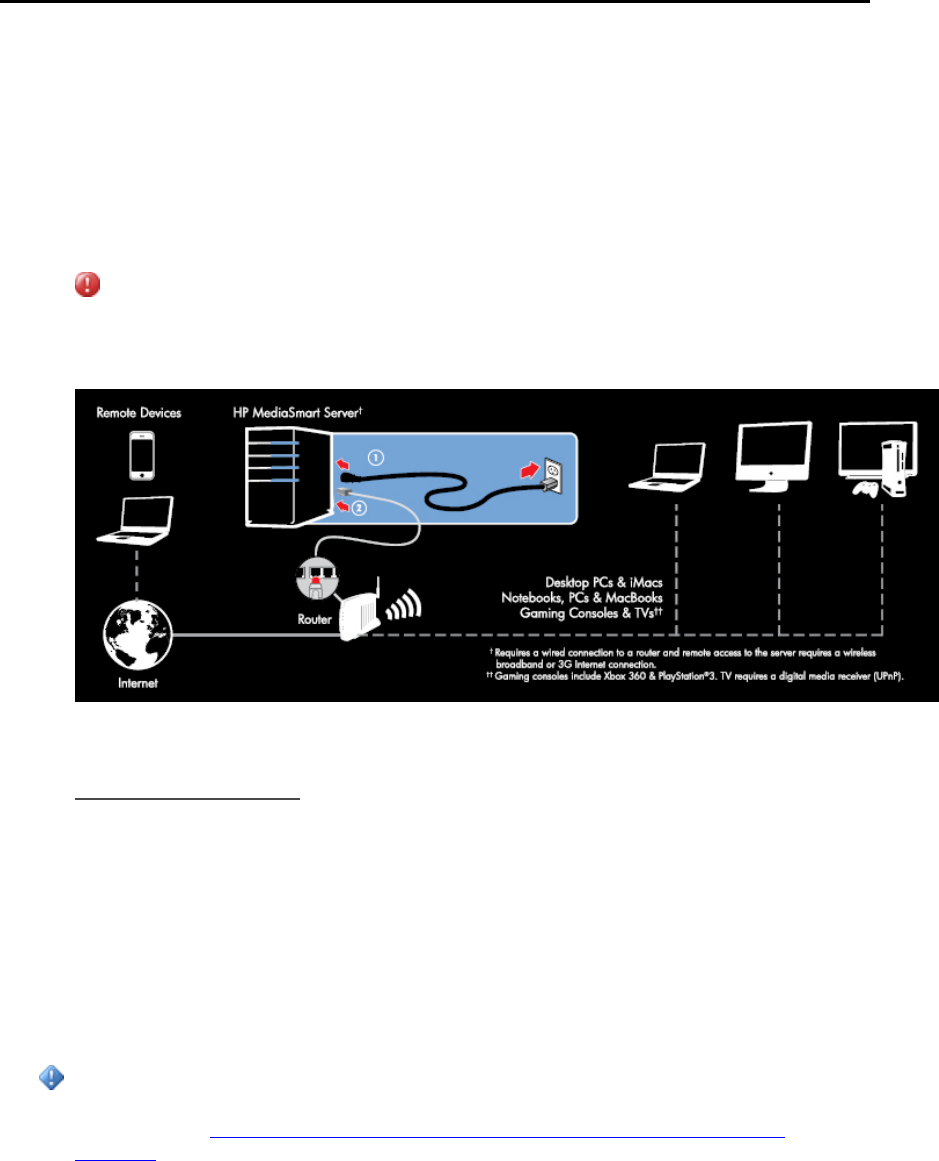
HP MediaSmart Server User's Guide
• HP MediaSmart Server (Requires wired connection to a router, and remote features require a
broadband Internet connection.)
• Wired and wireless network devices such as notebooks, desktop computers, TVs and gaming
consoles
• Remote devices such as notebooks and iPhones
The server requires a DHCP-enabled router to get its IP address. By default, most routers include a
DHCP server. For more information, check your router documentation.
Caution
If you have wireless functionality on your network, be sure to enable your router’s security
settings, such as WPA or WEP, to protect your network. See the documentation that came with
your router.
Turn on the Server
1. Plug in. Plug one end of the power cord into the server’s power receptacle and the other end into
an electrical outlet.
2. Connect. Connect one end of the Ethernet cable to the server and the other end to an available
Ethernet port on your router or to a switch that is connected to your router.
3. Power on. Press the Power button on the back of the server.
The server takes approximately 60 seconds to start up. The indicator lights blink and change color
throughout the startup process. Wait for all of the server lights to be pulsing before proceeding
with the software installation.
Important
Do not attach USB devices to the HP MediaSmart Server during initial setup. For additional
information, see Add and Remove an External USB Drive, eSATA Drive, or SATA Port
Multiplier.
8
Set up and Installation
Check the Server Lights
The lights on the front of the HP MediaSmart Server indicate the status of the server. After the HP
MediaSmart Server startup completes but prior to the first software installation, the indicator lights
show:
• Hard drives—breathing aqua white
• Power—breathing aqua white
• Network—breathing aqua white
• Health—breathing aqua white
After you complete the software installation, all lights should be solid aqua white.
Related Topics
HP MediaSmart Server User's Guide
Health Indicator Codes
Health Light is Red
Hubs and Network Health Light
Light-bar is Pulsating Aqua White
Light-bar is Red
Network Connection Light Blinking
Network Connection Light off
Power Indicator is Off
INSTALL THE SOFTWARE
Update Your Firewall's Trusted Program List
The Software Installation Disc installs several programs that enable your computer to
communicate with the HP MediaSmart Server over your network. Software firewalls installed on
your computer can block this communication and prevent the computer from locating the HP
MediaSmart Server on your network.
Note
If Media Collector is not collecting music, photos, or videos and you use a third party firewall, add
a firewall exception for port 21 TCP/outbound within the local subnet. Consult your software's
documentation for details on how to do this.
9

HP MediaSmart Server User's Guide
In this article...
Set Your Firewall or Anti-Virus Programs to Automatically "Learn" New Programs
Manually Add Programs to Your Firewall or Anti-Virus Program's Trusted List
Set Your Firewall or Anti-Virus Programs to Automatically
"Learn" New Programs
It is recommended that you set your firewall and anti-virus programs to "Learn" new programs
before installing the HP MediaSmart Server software. After the HP MediaSmart Server software is
installed, the firewall should prompt you to allow the installed programs to communicate with the
server.
Allow the following HP MediaSmart Server programs to communicate through your firewall or
anti-virus program:
C:\Program Files\Windows Home Server\
MountBackup.exe
RestoreOffProc.exe
WHSTrayApp.exe
WHSConsoleClient.exe
WHSConnector.exe
BackupEngine.exe
WHSOOBE.exe
C:\Program Files\Hewlett-Packard\HP MediaSmart Server\
MediaCollectorClient.exe
MSSConnectorService.exe
ControlCenter.exe
C:\Program Files\HP\HP Software Update\
HPWUCli.exe
Manually Add Programs to Your Firewall or Anti-Virus Program's
Trusted List
Some firewall or anti-virus programs may not automatically update their trusted programs list.
Instructions for manually updating several common firewall and anti-virus programs are listed
below. If your firewall or anti-virus program is not listed, please contact the vendor to find out
how to manually add programs to the trusted programs list. Additionally, see the documentation
that came with your firewall or anti-virus program for the latest information.
10
Set up and Installation
Click the vendor to expand and view the instructions on updating their trusted programs list. Click
again to hide the instructions.
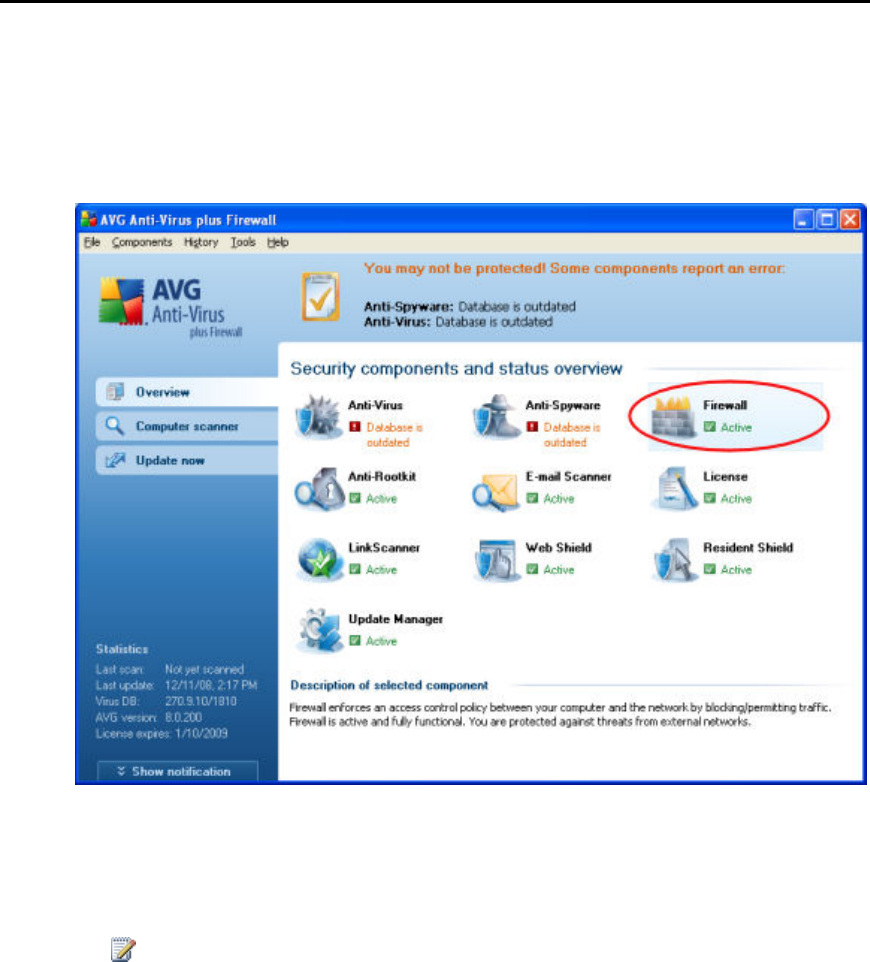
• AVG
Open the AVG Anti-Virus plus Firewall. Double-click the Firewall button to configure the
Firewall. Add the programs listed at the top of this page.
• McAfee
Open your McAfee Security Center, click Internet and Network, and then click the Advanced
button in the firewall section. Click Program Permissions, then click Add Allowed Program.
Add the programs listed at the top of this page.
Note
McAfee's firewall automatically disables Windows Firewall and sets itself as your default
firewall.
11

HP MediaSmart Server User's Guide
• Microsoft Windows Vista
To add exceptions to your firewall using Windows Vista, preform the following steps:
12
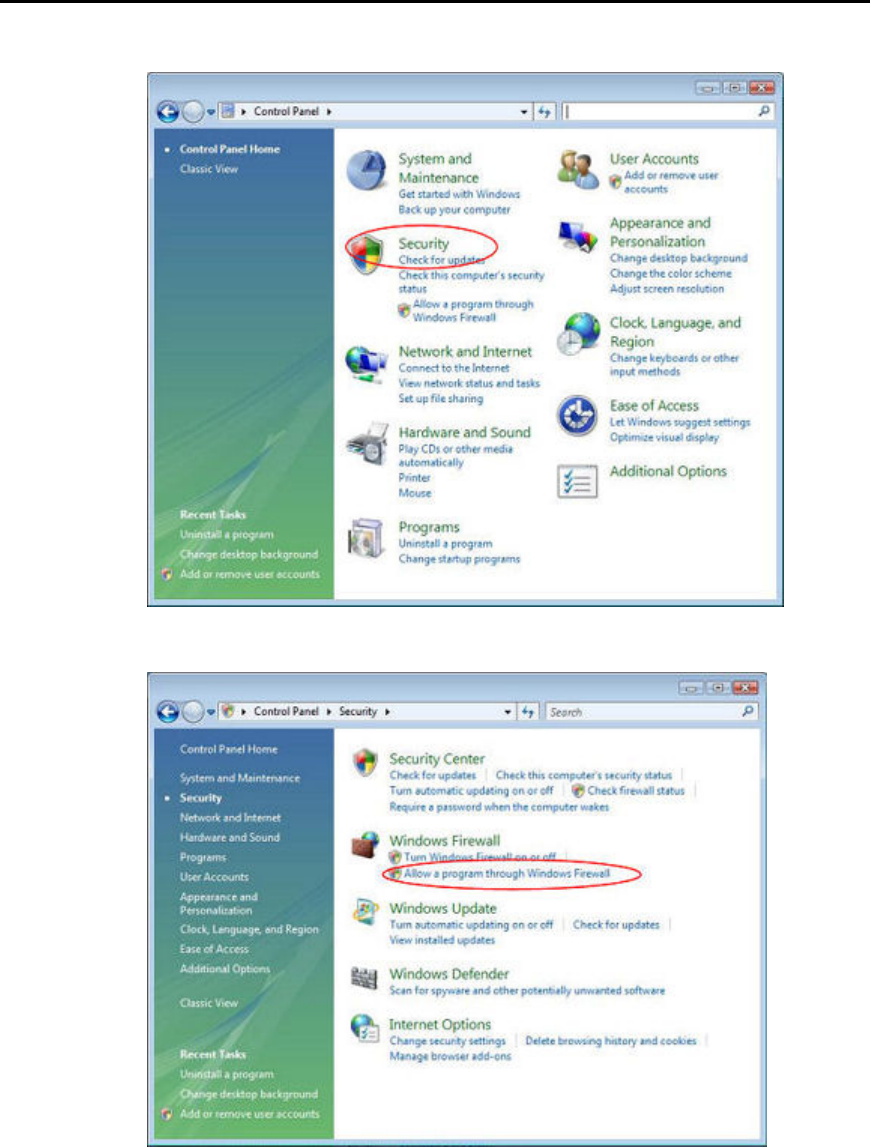
Set up and Installation
1. Click Start, Control Panel, and then Security Center.
2. Click Allow a program through Windows Firewall.
13
HP MediaSmart Server User's Guide
3. Select the Exceptions tab and then click Add Program.
4. In the Add a Program dialog box, click Browse. Add the programs listed at the top of
this page.
5. Click OK.
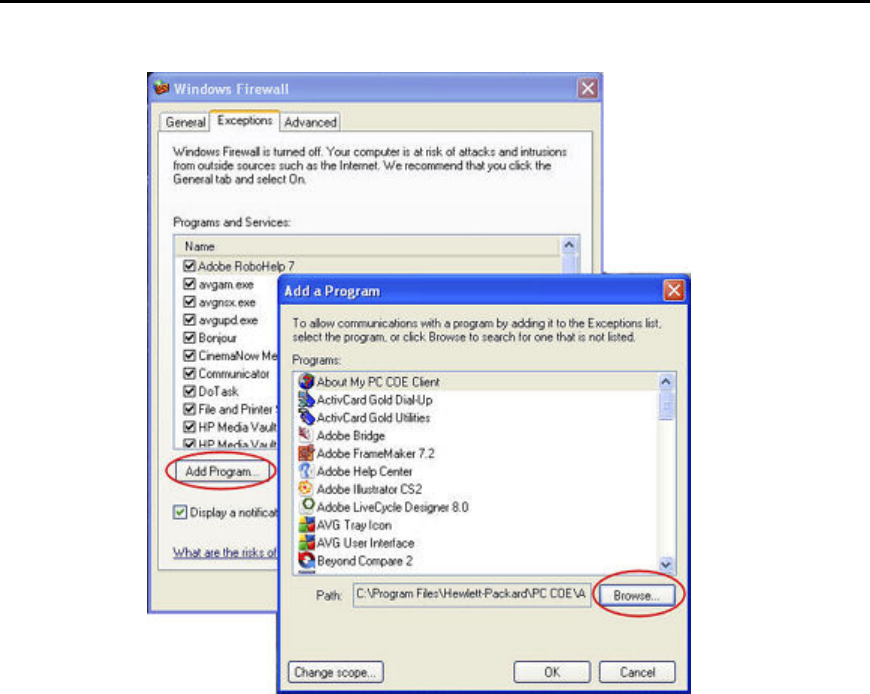
• Microsoft Windows XP
To add exceptions to your firewall using Windows XP, preform the following steps:
14

Set up and Installation
1. Click Start, Control Panel, and then Security Center.
2. Click Windows Firewall.
3. Select the Exceptions tab and then click Add Program.
4. In the Add a Program dialog box, click Browse. Add the programs listed at the top of
this page.
15

HP MediaSmart Server User's Guide
5. Click OK.
• Norton
Click Options in Norton to change the firewall settings. Add the programs listed at the top of this
page.
16

Set up and Installation
• Symantec
Open Symantec Endpoint Protection, click Change Settings, and then click Configure Settings
for Network Threat Protection. Add the programs listed at the top of this page.
• Trend Micro
1. Open the Trend Micro Main Console, select the Personal Network and Firewall
Controls tab, and then click Settings.
17
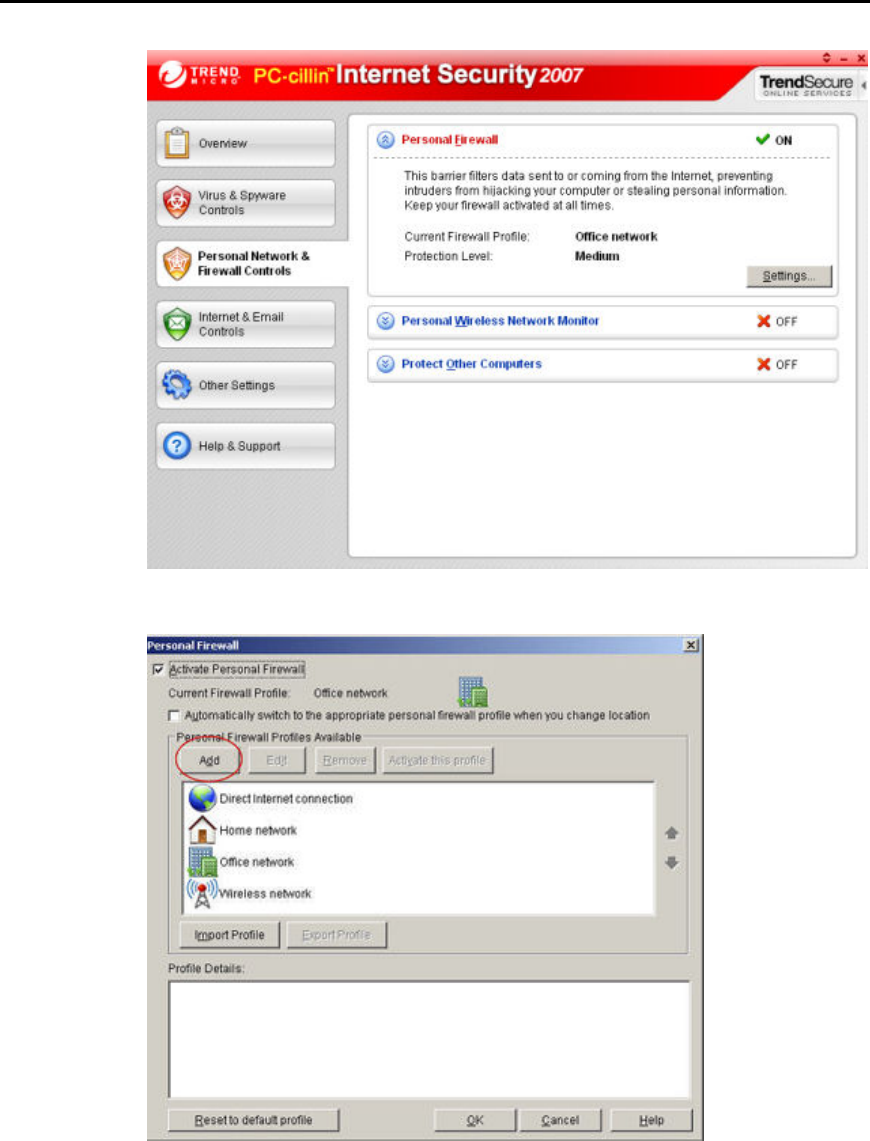
HP MediaSmart Server User's Guide
2. On the Personal Firewall page, click Add.
18
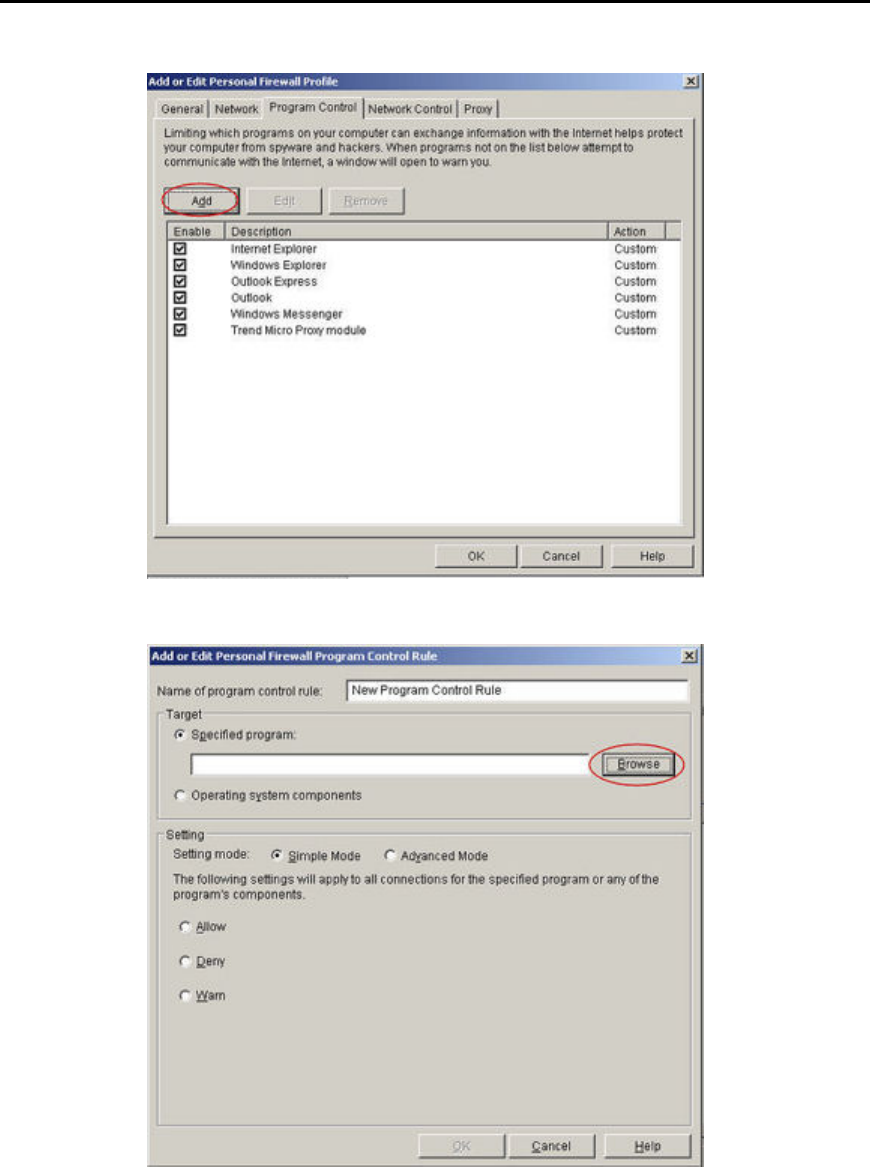
Set up and Installation
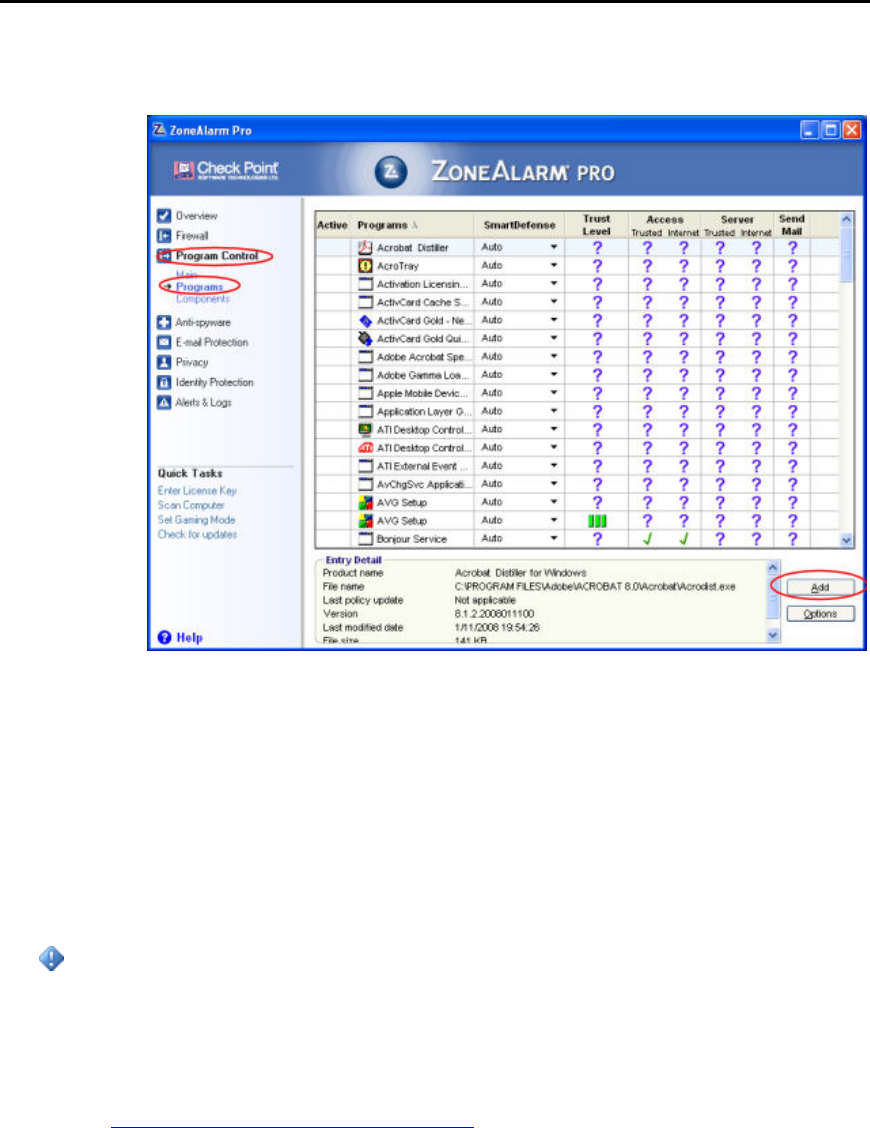
3. Select the Program Control tab and then click Add.
4. Click Browse and add the programs listed at the top of this page.
5. Click OK.
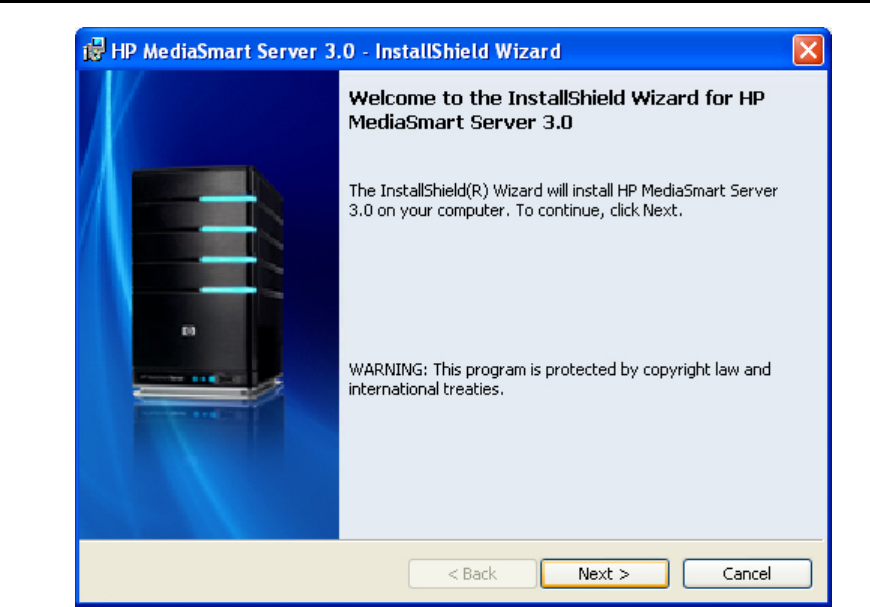
• ZoneAlarm
19
HP MediaSmart Server User's Guide
1. Open ZoneAlarm Security.
2. Click Program Control, Programs, and then Add.
3. Add the programs listed at the top of this page.
Install Software on the First PC
The following steps outline the key decision points during the software installation. Click each
step to expand it and see additional information.
Important
To ensure a smooth software installation,
• The first installation must be on a Windows computer. Subsequent installations can be on a
Windows or Mac computer.
• Update Your Firewall's Trusted Program List
• Verify that you have administrator privileges on the computer where you are doing the install
(step 1 below).
• Write down your server name (step 6 below).
• Write down your server password (step 7 below).
20

Set up and Installation
1. Check for Administrator Privileges.
You must have administrative privileges on your computer to install the software. Complete the
following steps to view or change user account settings.
On Windows Vista,
Click Start, Control Panel, and then User Accounts and Family Safety
On Windows XP,
Click Start, Control Panel, and then double-click User Accounts
On Mac OS X 10.5 or Later,
Click System Preferences, Accounts, and check Allow user to administer this
computer
2. Insert the Software Installation Disc into a network PC.
3. Click Next to progress through the Install Wizard and install the HP MediaSmart Server client
software.
The HP MediaSmart Server software installs first. This software is used to
Provide a single point of access for all of the server's features,
Share photos and videos easily over the Internet using HP Photo Publisher and HP Photo
Viewer
Centralize your photo, video, and music libraries using HP Media Collector
21
HP MediaSmart Server User's Guide
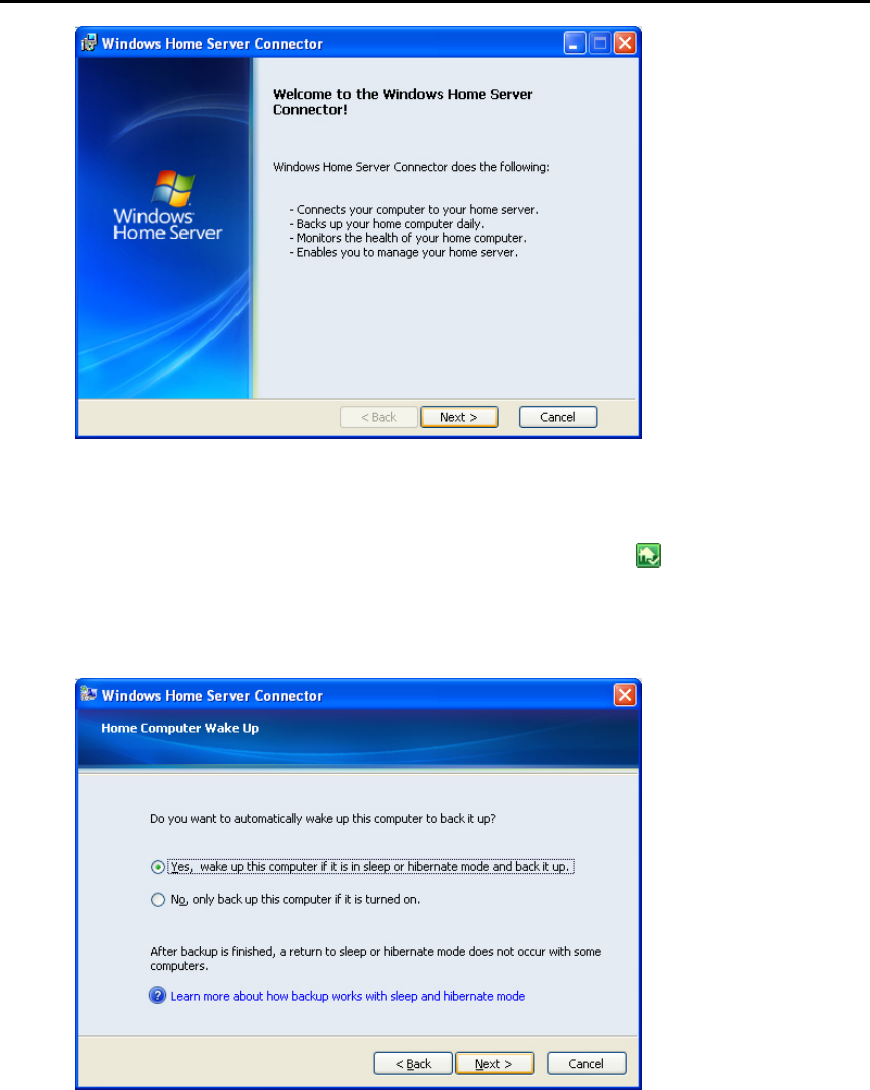
4. The Windows Home Server Connector installs next.
The Windows Home Server Connector:
Connects your computer to the server
Automatically backs up your computer every night
Monitors the health of the network and computers running Windows Vista
Enables configuration of the server from your computer
The Windows Home Server software installation runs only once—on the first computer where you
run the Software Installation Disc.
22
Set up and Installation
5. Select to wake up this computer if it is in sleep or hibernate mode to run a scheduled backup.
If you do not turn on this option now, you can enable it later.
a. At the computer, right-click the Windows Home Server icon in the system tray.
b. Check Wake this Computer for Backup in the shortcut menu.
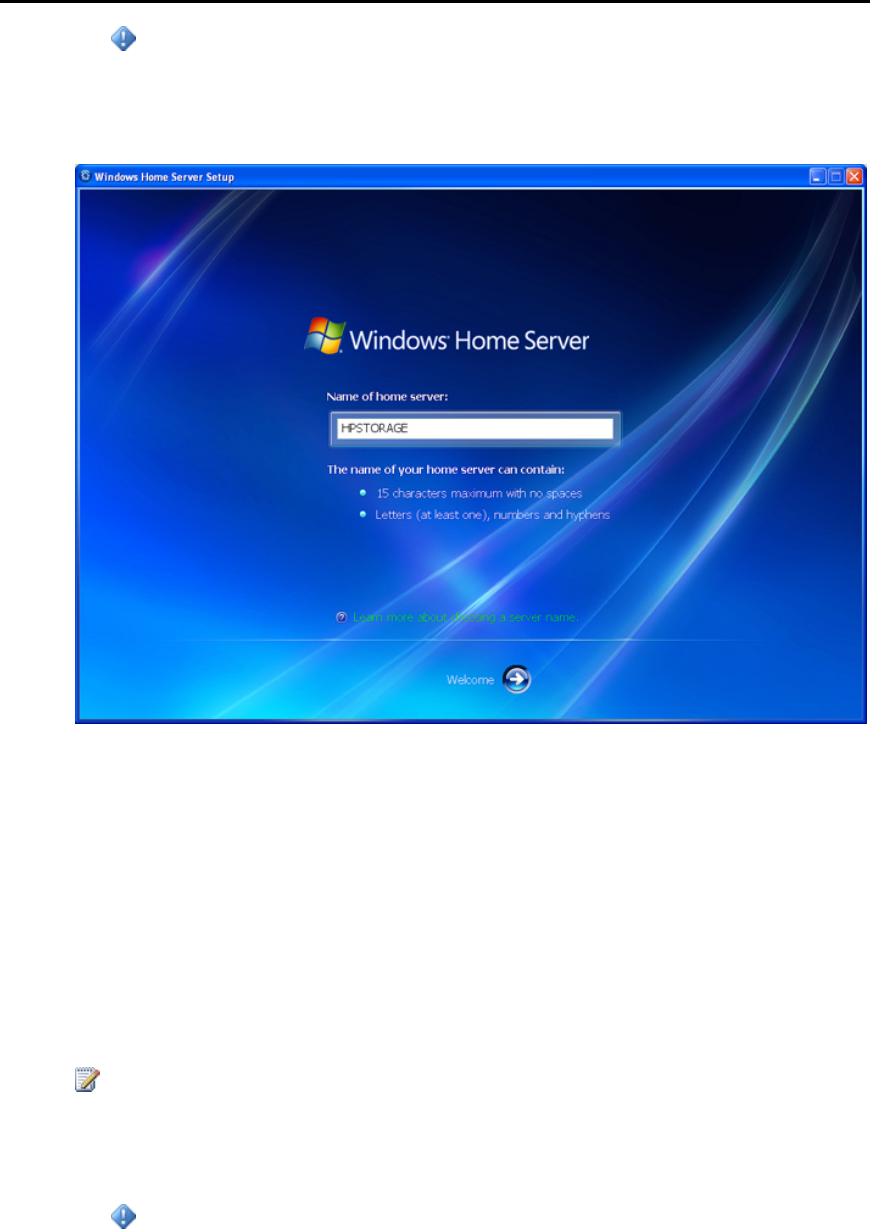
6. Name the HP MediaSmart Server.
Type a name for your server. Server names can be:
15 characters maximum with no spaces
Letters (at least one), numbers and hyphens
23
HP MediaSmart Server User's Guide
Important
This is the only time you can name your server. It cannot be changed later. Write down
your server name. The default name is hpstorage.
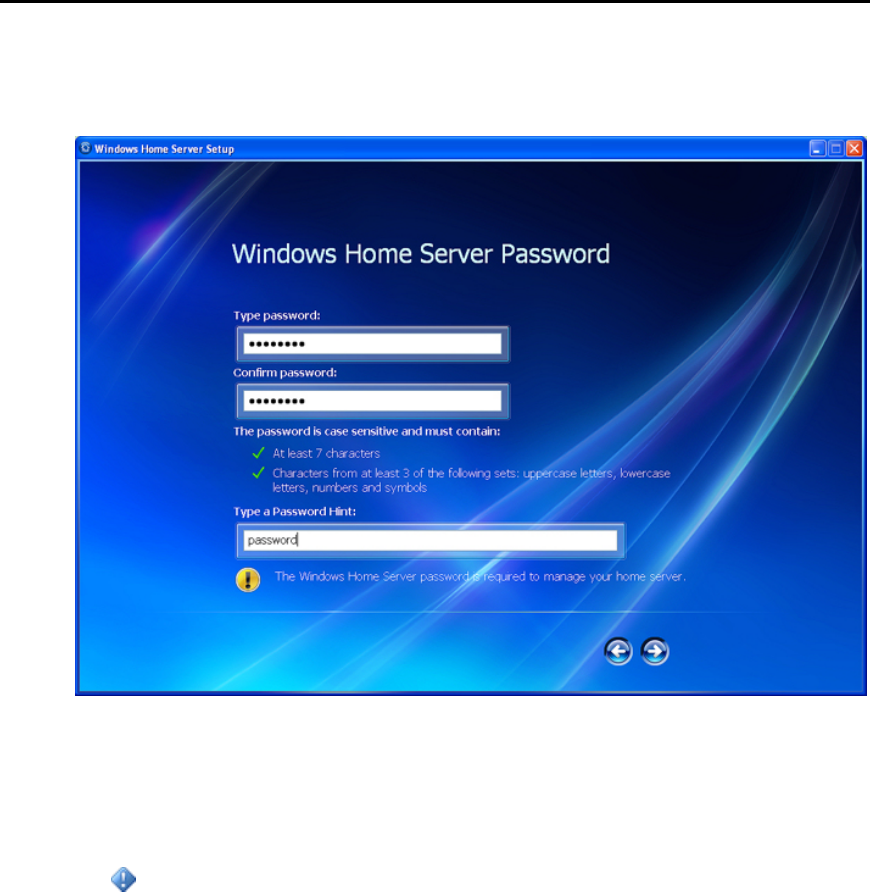
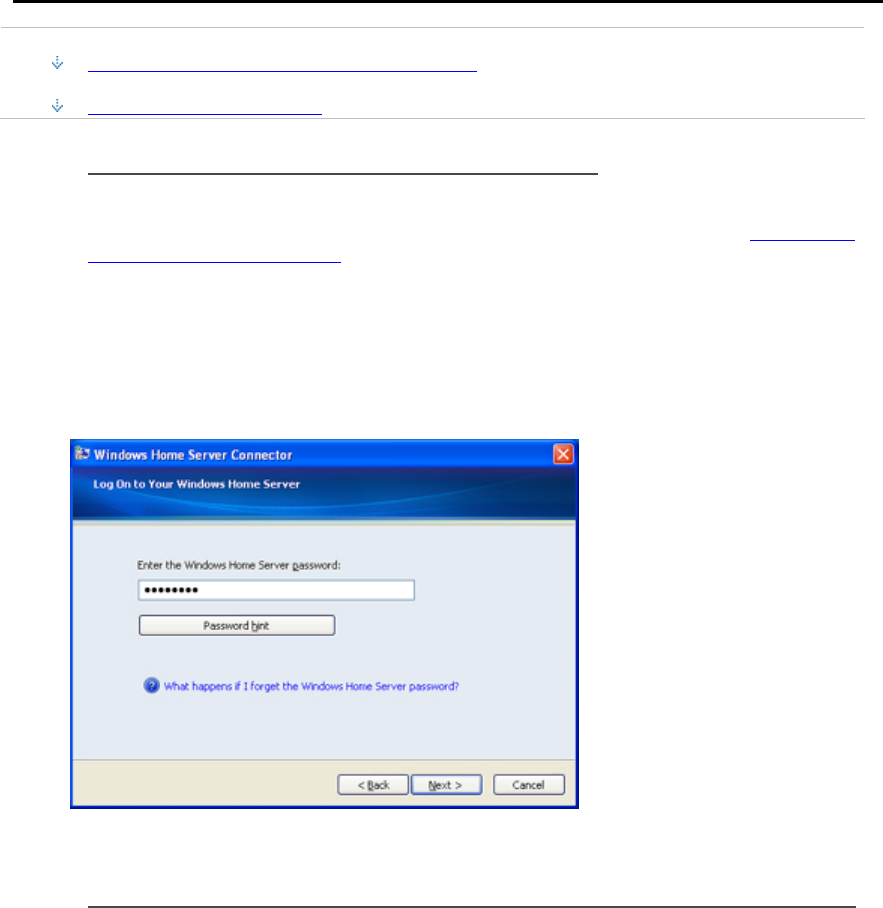
7. Set the server password.
Create a strong password. A strong password must be at least 7 characters long and must fulfill
three of the following requirements:
Uppercase characters
Lowercase characters
Numbers
Symbols (such as !, @, and #)
Note
The password hint can be seen by anyone who clicks the Password hint button on the Windows
Home Server Connector logon window.
Important
This is the only opportunity you will have to set the server password.
24
Set up and Installation
The server password is not the same as a user password. User accounts and passwords are
setup in the Windows Home Server Console.
8. The install checks for Windows Home Server Updates.
The Windows Home Server installation checks for any relevant important updates. This may take
some time to complete, but does not require additional information from you.
Important
Do not restart or turn off your home server during the update process.
25
HP MediaSmart Server User's Guide
9. Type the password you created above and log on to the Windows Home Server.
10. The install checks for HP MediaSmart Server updates.
The HP MediaSmart Server installation checks for any updates. Installing updates ensures that you
experience the full functionality and optimal performance of the HP MediaSmart Server.
26
Set up and Installation
Note
This check only occurs the first time you run the Software Installation Disc. If you want
to check for updates at a later time, see Updating and Rolling Back the Server.
11. Install server updates if they are available.
If there is an update, select it and complete the instructions on the screen to install it.
Important
Do not restart or turn off your home server during the update process.
27
HP MediaSmart Server User's Guide
12. The Windows Home Server Console opens.
The Windows Home Server console opens. Use the console to set up user accounts and configure
HP MediaSmart Server features. Click Help in the upper right corner of the Console to get
additional assistance.
Related Topics
HP MediaSmart Server User's Guide
Update Your Firewall's Trust Program List
Install Software on Additional PCs
Install Software on a Mac
Install Software on Additional PCs
You can install the client software through a web browser or you can use the Software Installation
Disc to install the HP MediaSmart Server client software and Windows Home Server Connector
on the other computers on the network. Install the software on one computer at time.
Note
If you misplaced or damaged your Software Installation Disc, you can also install the client
software directly from the server. For more information, see To install from the server using
Windows XP or Windows Vista below.
In this article...
Install from the Software Installation Disc
Install from the Server using Windows XP or Windows Vista
28
Set up and Installation
Install from the Server using a Browser Window
Set up Additional Computers
Install from the Software Installation Disc
1. Insert the Software Installation Disc into a computer connected to the network.
You must have administrative privileges to install. For additional information, see Installing the
Software on the First Computer.
2. Follow the instructions on the installation wizard.
The installation process is identical to installing on the first computer except for the following:
• The Windows Home Server Setup does not run.
• Your server password is required to install, as shown in the following figure:
Install the from the Server using Windows XP or Windows Vista
1. At the computer, click Start, and then Run.
Type the following (UNC) network address:
\\hpstorage\Software\Home Server Connector Software\setup.exe
The network address will be different if you renamed your server. In this case type,
\\<server name>\Software\Home Server Connector Software\setup.exe
2. Click OK.
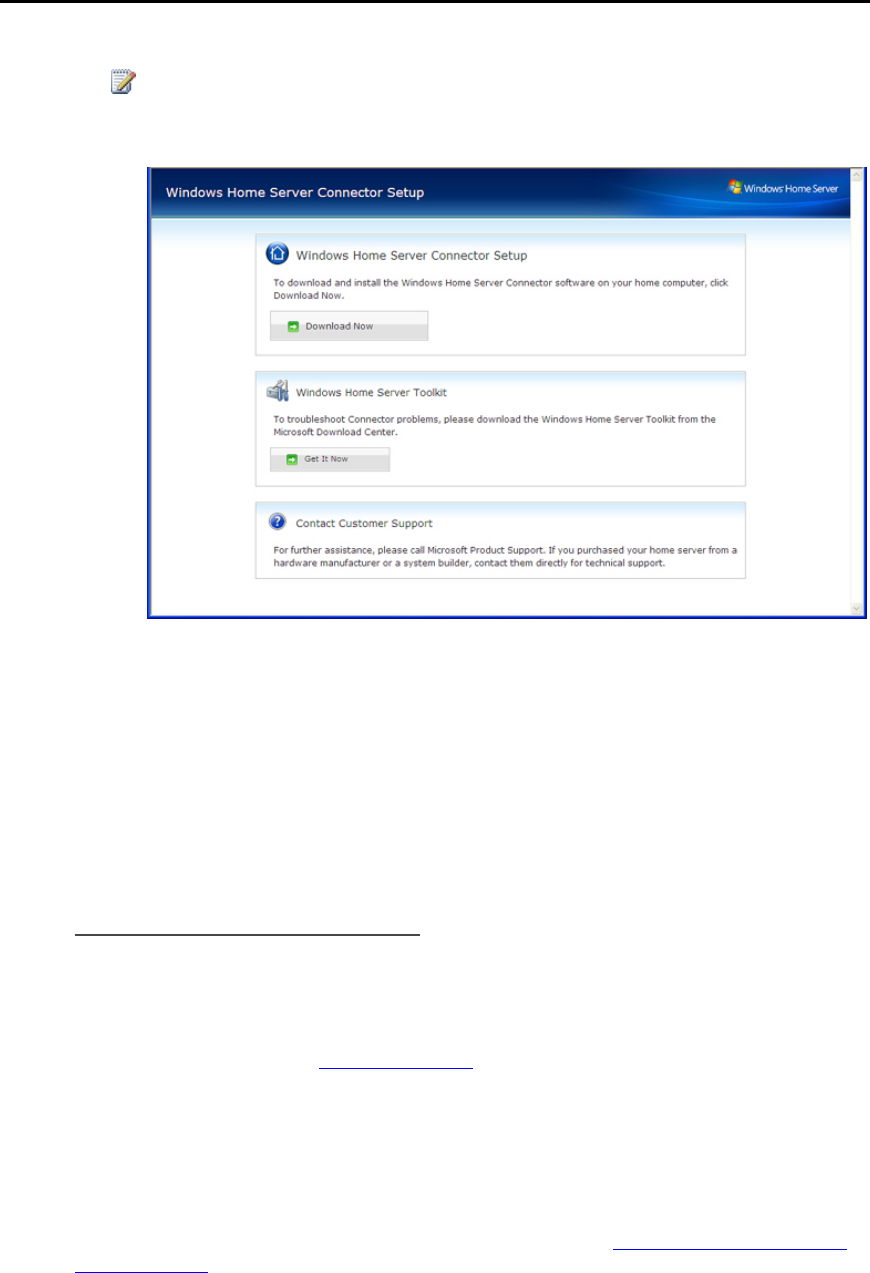
Install from the Server using a Browser Window
1. Open a web browser and type the following address http://hpstorage:55000.
The address will be different if you renamed your server. In this case, type http://<server
name>:55000. The Windows Home Server Connector Setup window opens.
29
HP MediaSmart Server User's Guide
2. Click Download Now.
Note
You can come back later to get the toolkit or contact information. Type the address,
http://<server name>:55000, in a browser window.
3. A file download security warning and a Internet Explorer dialog box may pop up. Click Run.
4. A dialog box opens stating that software is being downloaded from your server. Click Next, when
the download is complete.
5. The Install Wizard opens and gives you the rest of the installation instructions.
Set up Additional Computers
After installing the software on the Software Installation Disc, there are a few setup options for
you to consider.
• The computer is automatically set up to be backed up each night. If you want to customize back up
settings for this computer, see Computer Backups.
• If you created individual user accounts in Windows Home Server for one or more network
members that use this computer, you also need to set up computer user accounts for them if you
want them to be able to access features on the server without logging on. For additional
information, see User Accounts in the Windows Home Server help.
• If there are photos, music, or videos on this computer that you want collected on the server, set up
media collection for this computer. For additional information, see Configuring Media Collector
General Settings.
30
Set up and Installation
Install the Software on a Mac
In this article...
Install using the Software Installation Disc
Install from the Server
Install using the Software Installation Disc
The first client installation must be on a PC. Subsequent installations can be on a Mac or PC.
Note
You must have administrative privileges on your computer to install the software. Click System
Preferences, Accounts, and check Allow user to administer this computer.
1. Insert the Software Installation Disc.
2. Double-click Install HP MediaSmart Server Software.pkg.
3. Click Continue on the Welcome to the HP MediaSmart Server Software page.
4. Click Continue and Agree on the End User License Agreement.
5. Choose a location to install the client software or click Install to continue with the default
location.
You may be asked to type your Mac computer administrator password.
6. The summary screen notifies you that the software installed successfully. Click Close.
The Server Preferences dialog opens.
7. Type your server name and password.
Your server name will be hpstorage unless you changed it during the first PC client installation.
31
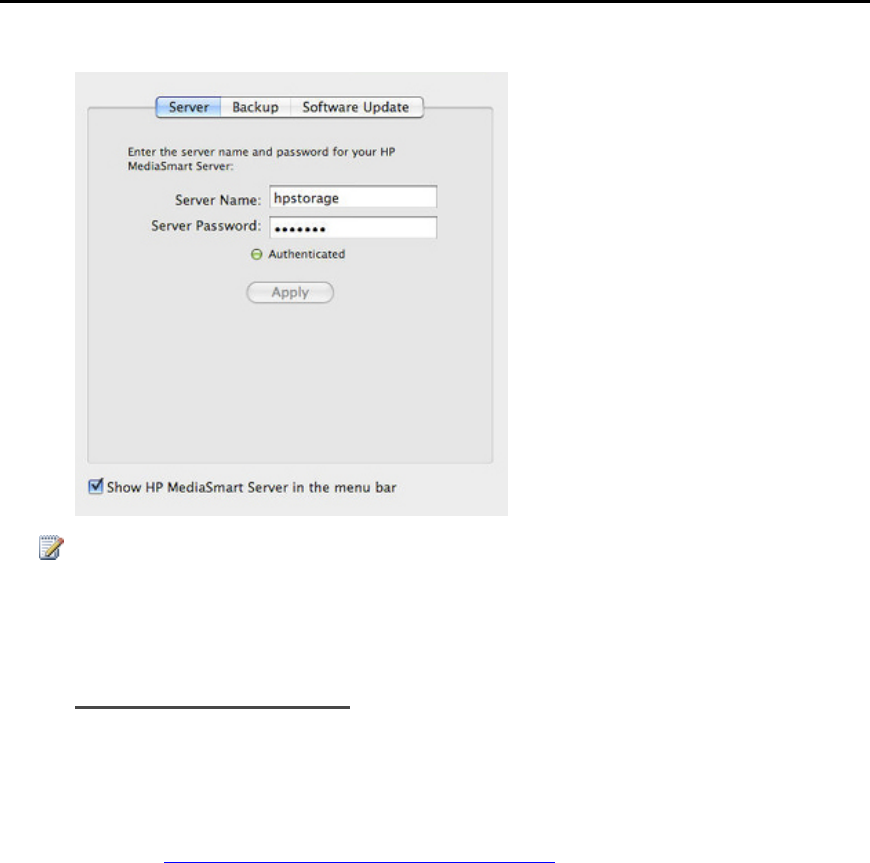
HP MediaSmart Server User's Guide
8. Once your credentials have been authenticated, click Apply.
Note
Server Name and Password have to be authenticated prior to using the HP Home Page, or entering
preferences for BackUp.
Install from the Server
1. At the Mac computer, open a Finder window.
2. Click hpstorage in the Shared category of the left Sidebar.
If you renamed the HP MediaSmart Server during the first installation, select that name in the
Shared category. You are connected to the server. If you experience problems connecting to the
server see, Troubleshooting a Mac Connection to the Server.
3. Open the Software folder.
4. Open the Mac folder.
5. Double-click HP MSS Client.dmg.
6. Double-click Install HP MediaSmart Server Software.pkg and follow the instructions on the
screen.
Troubleshooting a Mac Connection to the Server
File sharing is a key advantage of having a server. The HP MediaSmart Server enables you to
place documents, music, photos, or videos on the server and share them with all of the Macs and
32

Set up and Installation
PCs on your network. This document explains how to connect your Mac to the server so you can
access shared folder contents.
In this article...
Before Connecting to the Server
Connection Method A: Using the Finder
Connection Method B: Using Connect to Server and the Server Name
Connection Method C: Using Connect to Server and the Server's IP Address
Pinging the Server
Before Connecting to the Server
Some set up and decisions are required before connecting your Mac computer to the server and
accessing shared folders.
• The client software is installed on one PC.
• The client software is installed on the Mac you are trying to connect to the server.
• Decide how you will connect the Mac to the server—administrator account, user account, or guest
account.
Types of Accounts
Type of Account Description Server Account Creation
Guest Account The guest account is useful when
people are visiting your and need
temporary access to your server. In
these cases, it probably does not make
sense to create a user account for each
person. Instead, you can create a single
guest account that all visitors use. The
guest account may or may not have a
password.
1. From the Server menu , select Launch
Home Server Console.
2. Select the User Accounts tab.
3. Double-click the Guest account and click
Enable Account… on the Properties dialog.
You have the option to create a password for
the guest account or leave it blank.
4. Click the Shared Folder tab to define folder
access.
User Account The server pairs user accounts on the
server with those on a computer to
identify who is connecting to the server
and to maintain security. Each server
user account has a unique user name
and password that should match their
computer log on name and password.
Each user account on the server can
have their own shared folder access
levels.
1. From the Server menu , select Launch
Home Server Console.
2. Select the User Accounts tab.
3. Click Add from the Windows Home Server
Console User Accounts tab. Complete the
information in the Add User Account wizard.
33
HP MediaSmart Server User's Guide
Types of Accounts
Type of Account Description Server Account Creation
Administrator
Account Connecting as the server administrator
gives you access to all shared folders on
the server. The administrator account's
user name is always Administrator.
The server administrator account is created the first
time you install the client software on a PC. You
enter a password during the installation. See
Installing Software on the First PC.
• If you created a User Account on the server, create a matching User Account on the Mac (if it does
not already exist). The Mac user account should have the same user name and password as the
server user account.
On the Mac computer, choose Apple menu > System Preferences > Accounts. On the Accounts
dialog, verify the dialog features are unlocked and click "+" to add a user account. Complete
the information on the Accounts dialog.
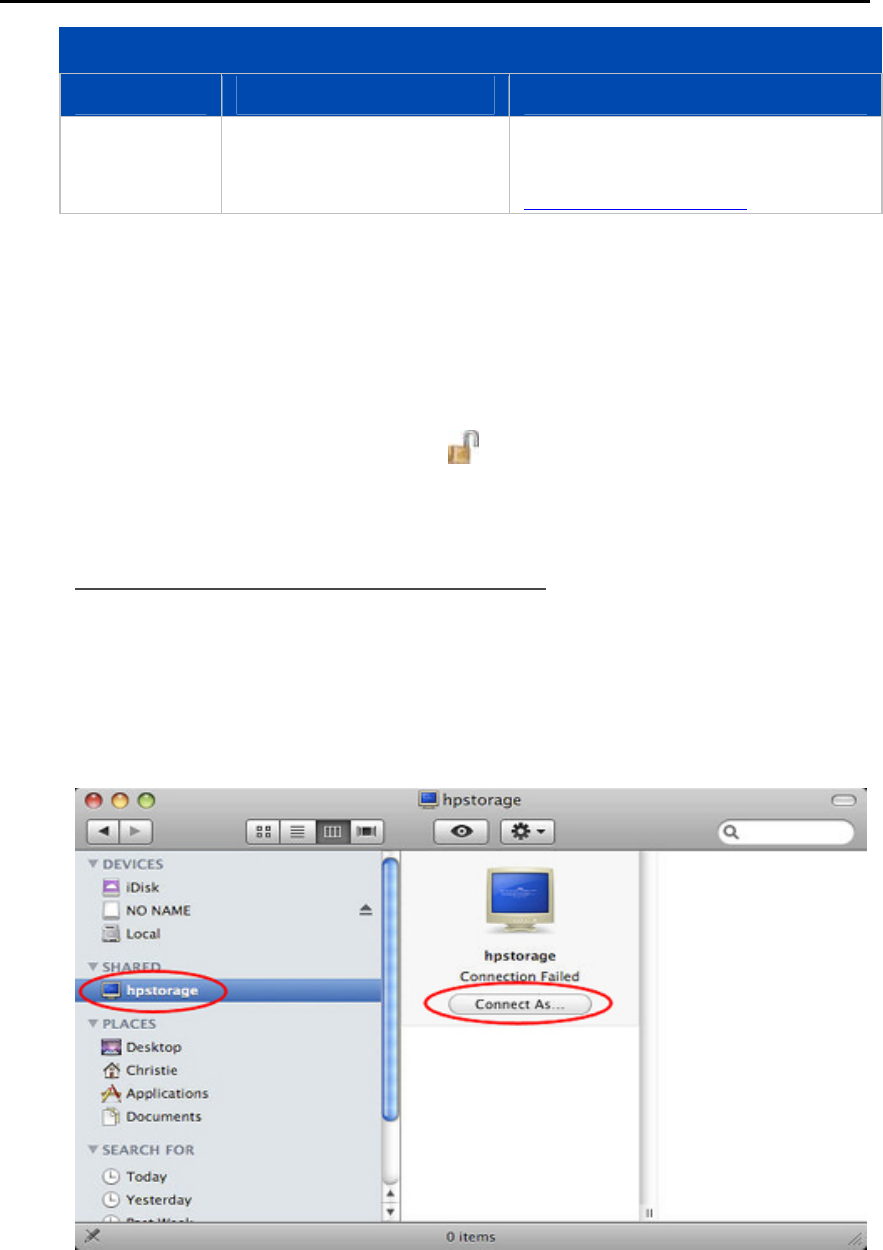
Connection Method A: Using the Finder
Connecting to the HP MediaSmart Server using the Finder is quick and easy. The Finder can also
remember your server logon settings so subsequent connections are effortless.
1. At the Mac computer, choose File > New Finder Window.
2. Click hpstorage in the Shared category of the left Sidebar. If you renamed the HP MediaSmart
Server during the first installation, select that name in the Shared category.
34
Set up and Installation
Note
The same Sidebar shows up in Save and Open dialog boxes of your programs too,
making your server available to you for opening and saving files.
If you don’t see the server in the Finder window’s Shared category,
• The server may not be connected to the network,
• The Mac computer may not be connected to the network,
• Or maybe the check box is turned off for Connected Servers and Bonjour Computers
in Finder > Preferences... > Sidebar.
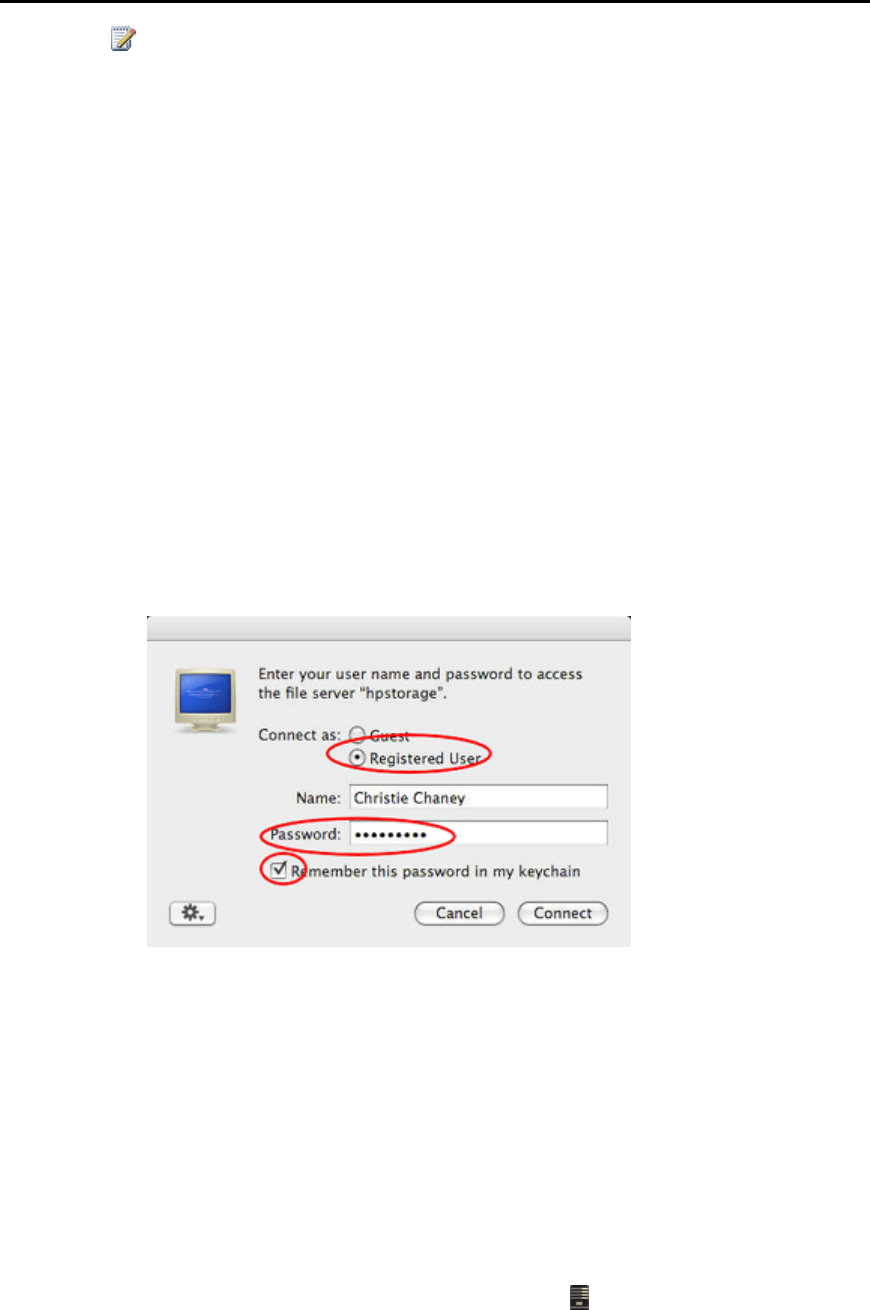
3. If you are not automatically connected to the server, click Connect As....
Precisely how you connect to the server depends on what kind of server account you are using:
Guest, User Account, or Administrator.
• Guest account with no password—You are automatically connected to the server when
you click the server name in the Finder.
• Guest account with a password—In the dialog that opens, select Registered User, type
the server's Guest account Password, and click Connect. You do not need to change the
Name. Check Remember this password in my keychain to remember your settings and
automatically connect to the server in the future.
• User account— If you have a User Account on the server, select Registered User, type
the Name and Password that was created in the server's user account in the Windows
Home Server Console, and click Connect. Check Remember this password in my
keychain to remember your settings and automatically connect to the server in the future.
• Administrator account—Alternately, you can connect to the server using the server's
administrator account. Select Registered User, type Administrator for the Name, and
type the server's Password. The server's password was created the first time you installed
the server software on a PC.
4. Navigate to the folder you want on the server.
The folders that display depend on the Shared Folder Access settings for the guest account or
user account that you used to connect to the server. To change Shared Folder Access settings,
select Launch Home Server Console from the Server menu . Click the User Accounts tab and
35
HP MediaSmart Server User's Guide
double-click the guest account or user account. Select the Shared Folder Access tab to change
settings. Click OK to accept the changes.
If you connected to the server using the Administrator account, you will see all of the server's
shared folders.
Connection Method B: Using Connect to Server and the Server
Name
Follow these steps to connect to Windows File Sharing (SMB) from Mac OS X 10.5 or later. SMB
is the native sharing protocol for Microsoft Windows operating systems.
1. At the Mac computer, choose Go > Connect to Server… on the Apple menu bar.
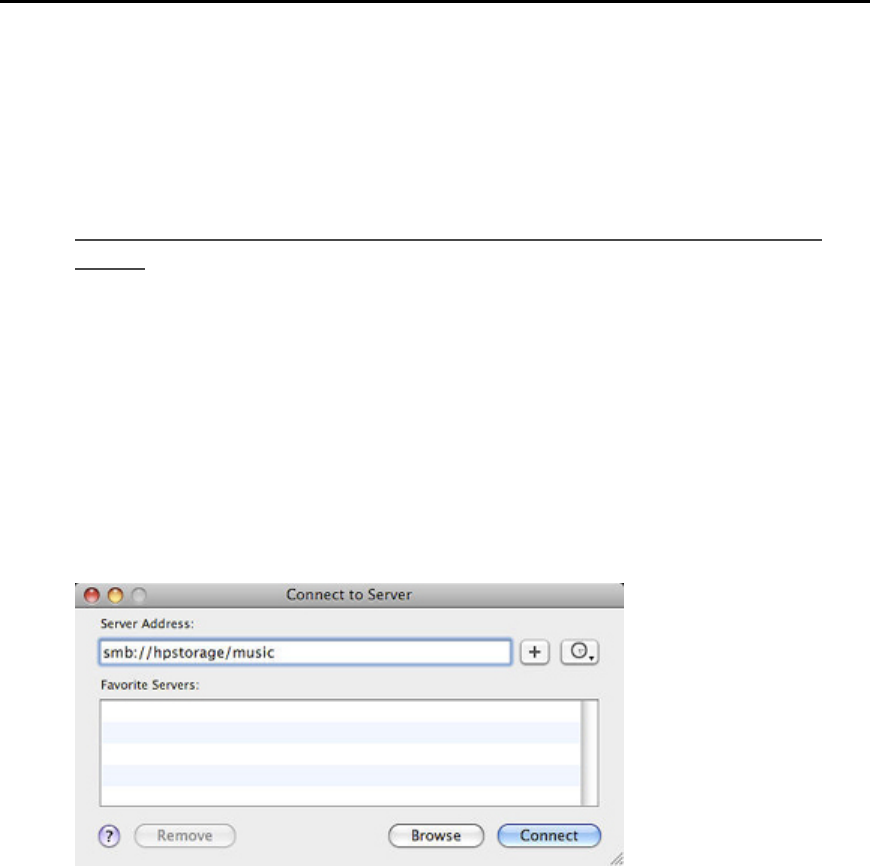
2. Type the following Server Address:
smb://ServerName/ShareName
For example, type the following server address to connect to the music shared folder:
smb://hpstorage/music
If you renamed your server during the first software installation, remember to use that server name
instead of hpstorage. A shared folder name is required. The shared folder name cannot contain
spaces; type %20 instead of spaces. Additionally, you cannot connect to a shared folder name that
contains a hyphen.
Connection Method C: Using Connect to Server and the Server's IP Address
The Mac computer may not recognize the server's name in some cases. If that happens, connect to
the server using its IP address instead of the server name. If you are unsure of your server's IP
address, you can log on to your router to see a list of IP addresses for all network connected
devices.
To log on to your router, open an Internet browser window, type the router's IP address in the
address bar and press Enter. The router's IP address will be one of the following,
192.168.1.1,
36
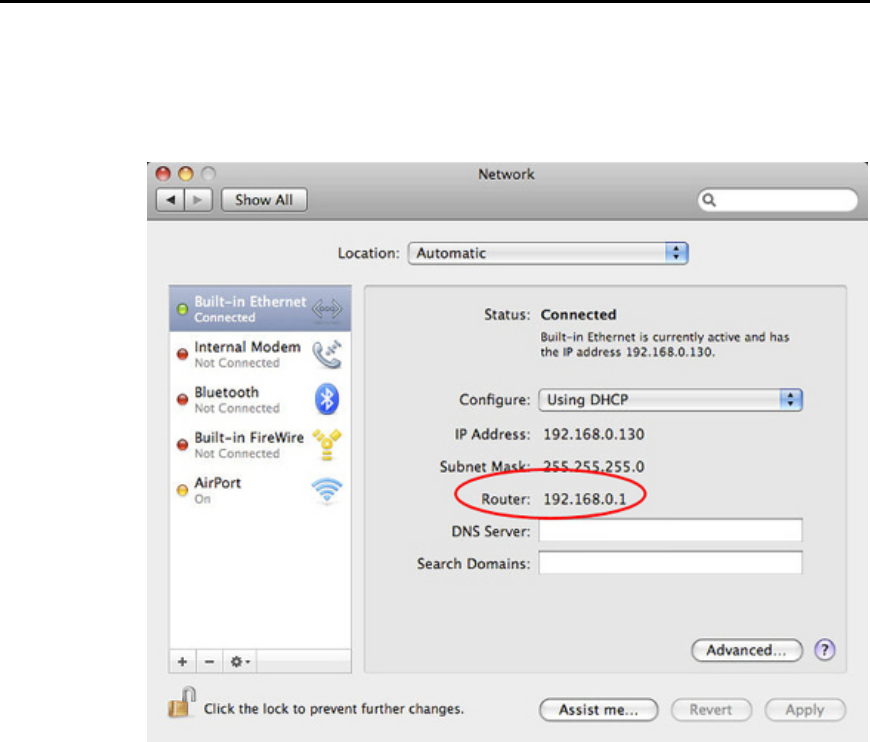
Set up and Installation
192.168.0.1, or
Obtain your router's IP address from a Mac by selecting Apple menu > System
Preferences > Network. Select Built-in Ethernet on the left menu. The router IP
address is on the right side of the Network dialog.
To obtain the router's IP address from a PC, select Start > Run. Type cmd and click OK.
In the DOS window, type ipconfig and press Enter. Use the Default Gateway IP address
to log on to your router.
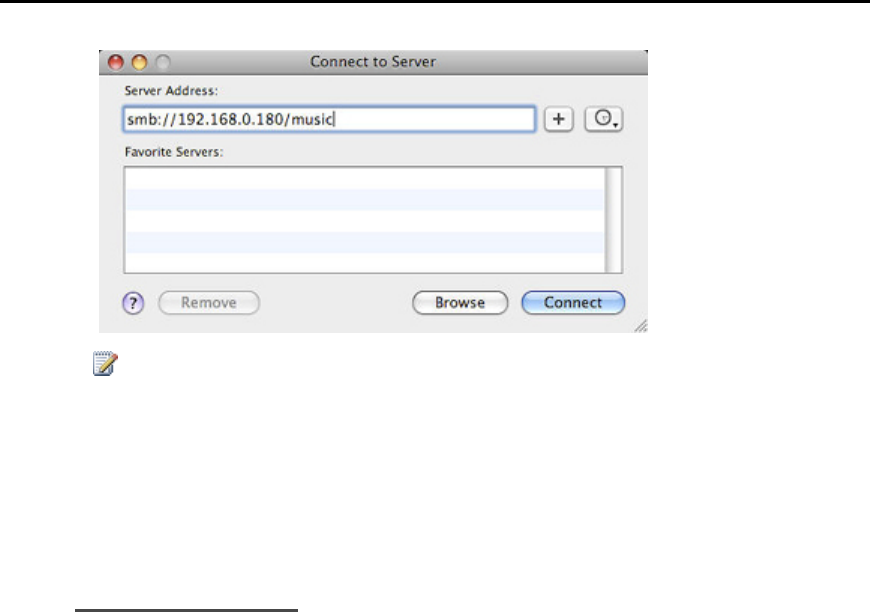
2. Once logged in to the router, look for a list of connected devices. Each router is different. See
your router's documentation if you do not find the server's IP address right away.
3. Once you find your server's IP address, choose Go > Connect to Server… on the Apple menu
bar.
4. Type the Server Address.
Your address will be different but will look similar to the following,
smb://192.168.0.180/music
37
HP MediaSmart Server User's Guide
Note
Click "+" to add the server address to your list of favorites.
5. Click Connect.
6. Log on to the server using either a guest account, user account, or administrator account.
Pinging the Server
To troubleshoot a connection failure, you can ping the server.
1. Open a Finder window and choose Applications > Utilities > Network Utility.
2. Select the Ping tab.
3. Type the server's IP address.
4. Click Ping.
A successful ping verifies a connection between the Mac computer and the server.
If you are unable to ping the server, check that the server is on and that all network cables are
securely connected. You may also need to reset your router.
UNINSTALL THE SOFTWARE
Uninstall the PC Client Software
1. Click the Start menu, Control Panel, and Add or Remove Programs.
2. Select HP MediaSmart Server and click Remove.
3. Select Windows Home Server Connector and click Remove.
4. Close Add or Remove Programs.
38

Set up and Installation
Uninstall the Mac Client Software
In this article...
Uninstall using the Software Installation Disc
Uninstall from the Server
Uninstall using the Software Installation Disc
1. Insert the Software Installation Disc.
2. Double-click Uninstall HP MediaSmart Server Software.
3. Follow the instructions on the screen.
Uninstall from the Server
1. At the Mac computer, open a Finder window.
2. Click hpstorage in the Shared category of the left Sidebar.
If you renamed the HP MediaSmart Server during the first installation, select that name in the
Shared category. You are connected to the server. If you experience problems connecting to the
server see, Troubleshooting a Mac Connection to the Server.
3. Open the Software folder.
4. Open the Mac folder.
5. Double-click HP MSS Client.dmg.
6. Double-click Uninstall HP MediaSmart Server Software and follow the instructions on the
screen.
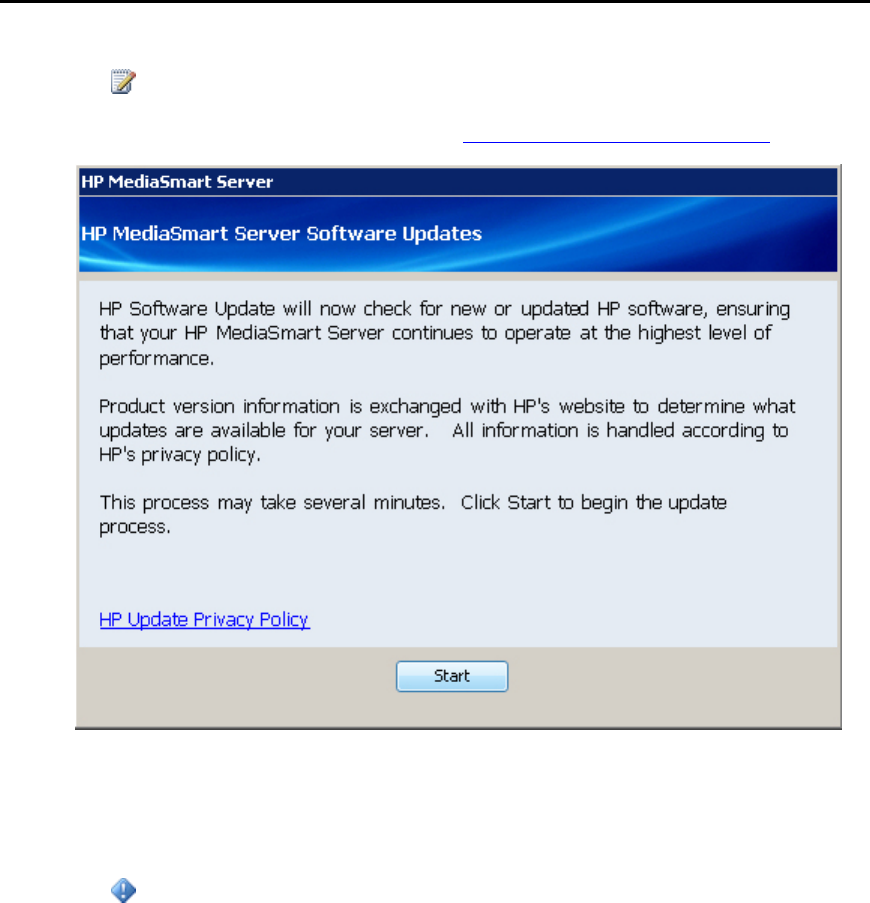
HP SOFTWARE UPDATES
HP Update Settings
Use the HP MediaSmart Server software update to keep your server and networked computers
current with the latest HP software, online help, and new features.
39
HP MediaSmart Server User's Guide
HP MediaSmart Server software update does not update the Microsoft Windows Home Server
operating system. For information about updating Windows Home Server, see Configuring
Windows Update in the Windows Home Server Console Help.
In this article...
Configure HP Update
Version Information
Configure HP Update
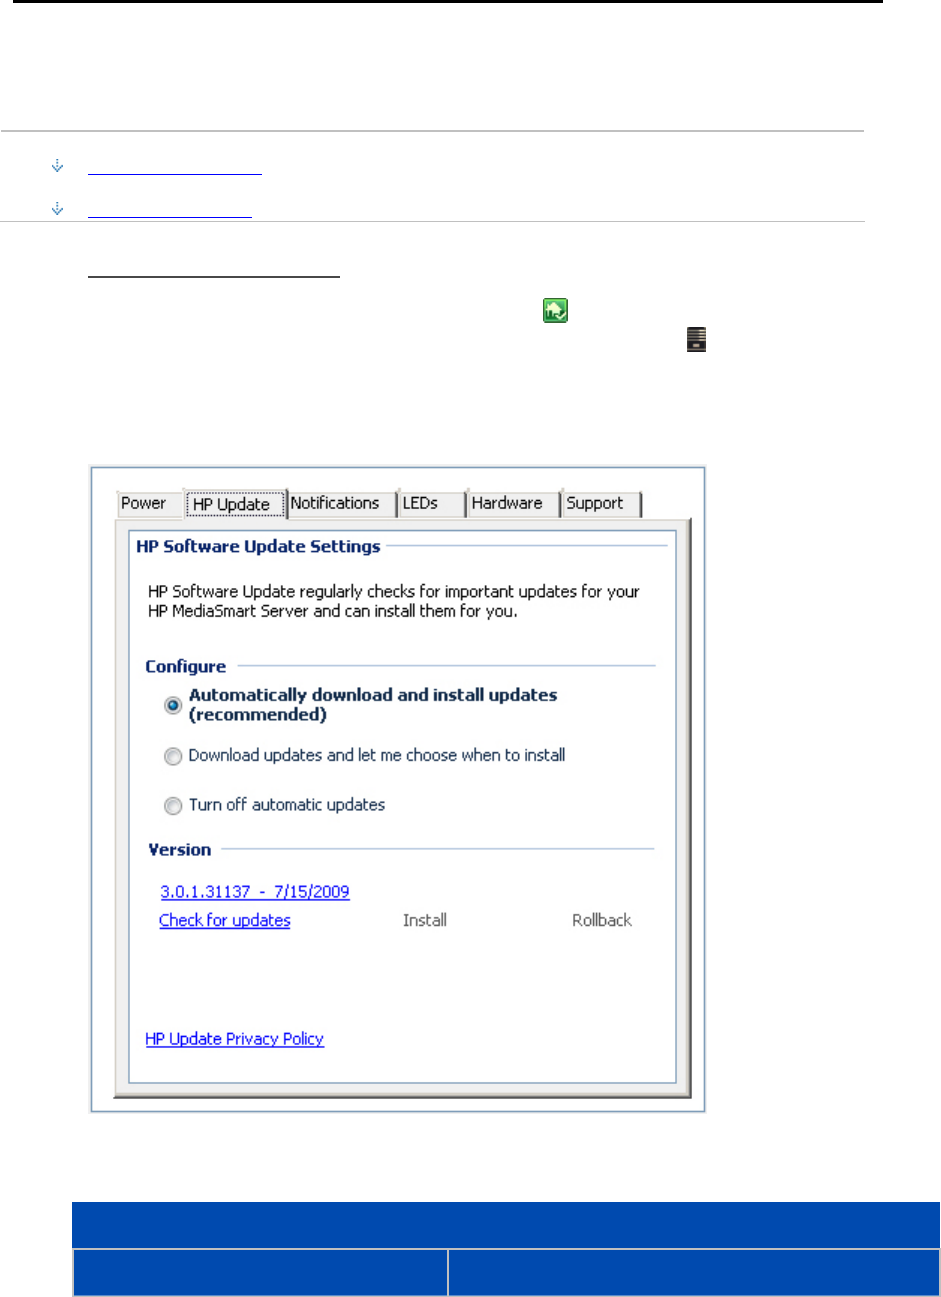
1. At the PC, double-click the Windows Home Server icon in the system tray and log on.
At the Mac, Select Launch Home Server Console from the Server menu .
2. Click Settings in the upper right of the Console.
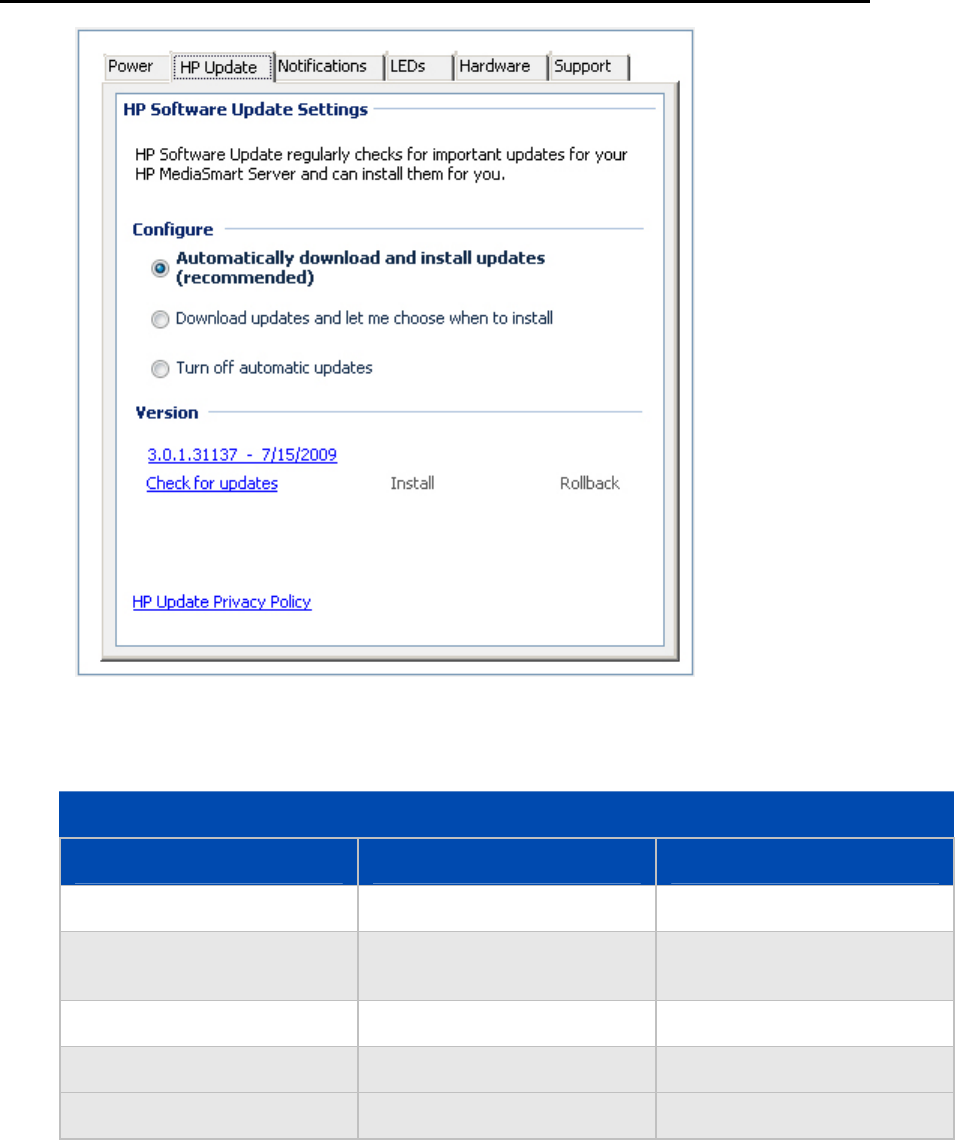
3. Select HP MediaSmart Server in the left menu and click the HP Update tab.
4. The following choices are available in the Configure section. HP recommends that you select
Automatically download and install updates.
Configure HP Software Update Options
Option Additional information
40

Set up and Installation
Automatically download and install
updates (recommended) Requires no user action.
Downloads and installs updates on the server in the
background. If necessary the server will automatically
reboot.
Download updates and let me choose
when to install Requires user action.
Your computer notifies you that an update has been
downloaded and is ready to install on the server.
Additionally, the Install link turns blue under HP
MediaSmart Server software updates.
To update the server after an update is downloaded, click
Install under HP MediaSmart Server software updates in
the Windows Home Server Console
Turn off automatic updates
Not recommended.
To get updates with this choice you will have to click
Check for updates located in the Version section.
5. Click OK.
Version Information
The following information and options are in the Version section of the HP Update dialog.
• The server software version number and date are shown.
• Click Check for updates to immediately check for available software updates, regardless of the
configuration settings you selected above.
• The Install link becomes active when an update has been downloaded, but not installed. Click
Install to run the server update.
• The Rollback link becomes active when a software update has been installed. Use this link to
uninstall the update on the server and revert to the previous server software version.
Important
Clicking Install or Rollback only makes changes to the server software. Each networked
computer still needs to be updated or rolled back so that the server and client computers are
running the same version of software. See Updating and Rolling Back Client PCs or Updating and
Rolling Back Mac Clients for more information.
41
HP MediaSmart Server User's Guide
Update and Roll Back the Server
Use HP Update to keep your server and networked computers current with the latest HP software,
online help, and new features.
Important
The server must be updated before client PCs and Macs are updated. The server and the client
computers must be running the same version of the HP MediaSmart Server software.
In this article...
Update the Server
Roll Back the Server
Update the Server
The method you use to update the server depends on how you configured HP Update. Click on a
bullet to see additional information.
• To automatically check for updates
If you selected Automatically download and install updates when you configured HP Update,
then you do not need to take further action. The server will install updates in the background as
they are available.
• To manually check for updates
Note
If you have never restarted your HP MediaSmart Server, you may need to turn it off and
back on before you check for updates.
1. At the computer, double-click the Windows Home Server icon in the system tray and
log on.
2. Click Settings in the upper right of the Console.
3. Select HP MediaSmart Server in the left menu and click the HP Update tab.
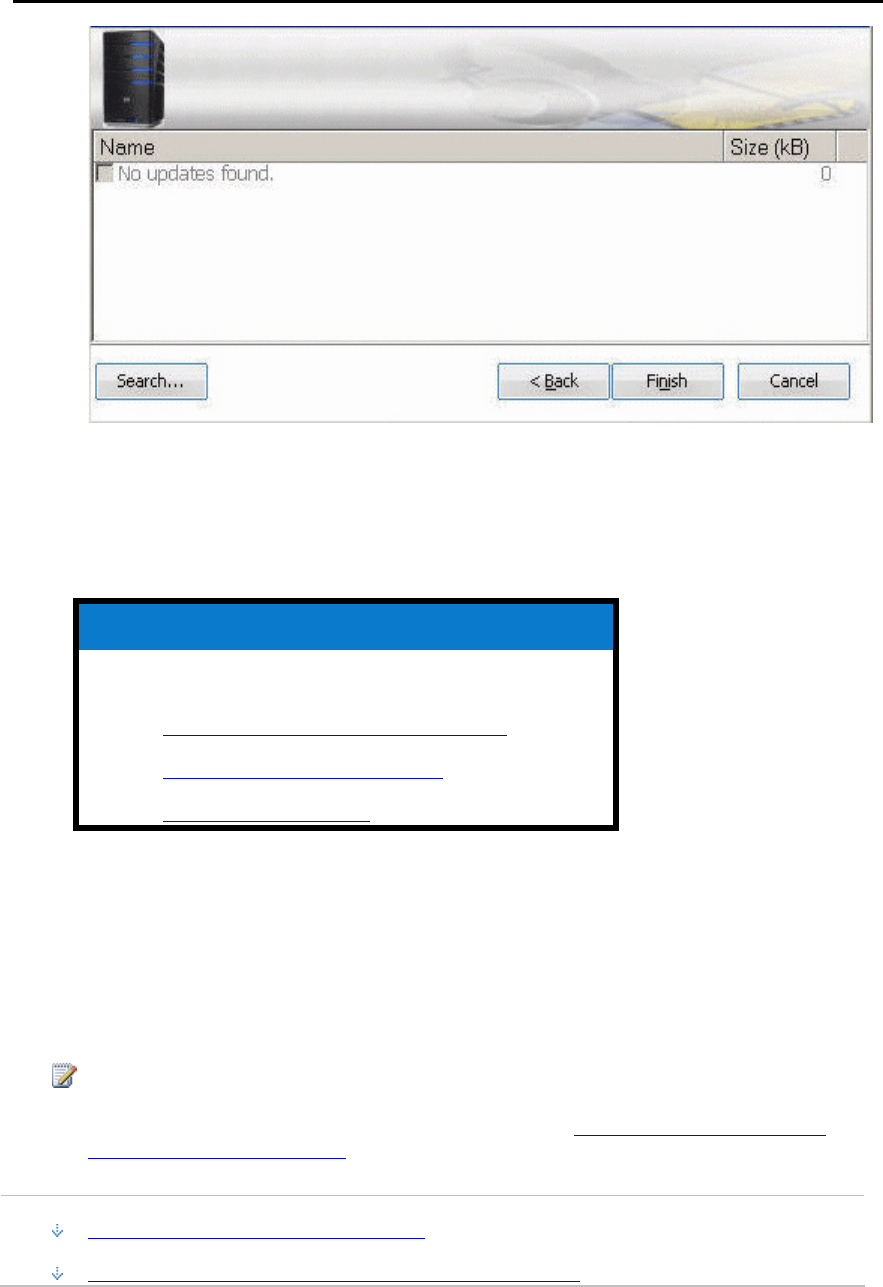
4. Click the Check for updates link.
5. If an update is found it will be listed as below. Click Next to start the install process and
follow default choices to complete the software install.
42
Set up and Installation
• To manually install an update copied to the server
1. If you downloaded a software update from the www.hp.com site, you can manually
install it by copying the software update package to your server. Once the update is on
the server, complete the following steps.
2. At the computer, double-click the Windows Home Server icon in the system tray and
log on.
3. Click Settings in the upper right of the Console.
4. Select HP MediaSmart Server in the left menu andclick the HP Update tab.
5. Click the Check for updates link. After the install wizard checks for pending updates on
your server, you will see the select package page where you can select the Search button.
43

HP MediaSmart Server User's Guide
6. Click Select file.
7. Type the full path to the file that you copied to the server or select the Browse button
navigate to the file and select OK.
8. Click Finish to start the install process and follow the default choices to complete the
server software install.
44
Set up and Installation
Roll Back the Server
1. At the PC, double-click the Windows Home Server icon in the system tray and log on.
At the Mac, select Launch Home Server Console from the Server menu .
2. Click Settings in the upper right of the Console.
3. Select HP MediaSmart Server in the left menu and click the HP Update tab.
4. Click Rollback and then click Yes in the confirmation screen.
Note
If you updated the client software, it must also be uninstalled so that the server and the
client are running the same version of the HP MediaSmart Server software.
Note
HP Update does not update the Microsoft Windows Home Server operating system. For
information about updating Windows Home Server, see Configuring Windows Update in
the Windows Home Server Console Help.
45

HP MediaSmart Server User's Guide
Update and Roll Back Client PCs
Note
Update the server software prior to updating the client software. If your server does not have the
correct software version, you will get an error message when you try to install the client software.
See Updating and Rolling Back the Server for more information.
In this article...
Update Client PCs
Roll Back Client PCs
Check the Client PC Version Number
Check the Server Version Number
Update Client PCs
There are multiple ways of updating your client PCs. Once the server is updated, the client PC
software update file is on the server and can be run from the software folder. The client PC update
can also be downloaded and run from HP Update. The following sections describe various
methods for installing the client PC update. Click an option to expand and view the instructions
for updating your client. Click again to hide the instructions.
• To Update Client PCs Using Run Programs
1. At the computer, click Start, and then Run.
Type the following (UNC) network address.
\\hpstorage\Software\Home Server Connector Software\setup.exe
If you renamed your server during the initial software installation the path will be \\<server
name>\Software\Home Server Connector Software\setup.exe.
2. Follow the instructions on your computer for installing the update.
• To Update Client PCs Using HP Update
1. Click the Start menu, HP, and HP Update.
46
Set up and Installation
2. Click Settings to configure HP Update.
3. Click Next to immediately check for a client PC update.
4. Follow the instructions on your computer for installing the update.
• To Update Client PCs Using the Software Installation Disc
The Software Installation Disc runs an executable file that is on your server. When the server
software is updated, the new client executable file is placed on the server but not installed. As
long as you run the Software Installation Disc after you update the server, the CD will find the
new client executable file on the server and install it.
• To Update Client PCs Using a Browser
1. Open a Web Browser and type the following address http://hpstorage:55000.
If you renamed your server during the initial installation the URL will be http://<server
name>:55000.
The Windows Home Server Connector Setup window opens.
2. Click Download Now.
Roll Back Client PCs
Important
You must roll back your server prior to rolling back the client PC. See Updating and Rolling Back
the Server.
1. Click the Start menu, Control Panel, and Add or Remove Programs.
2. Select HP MediaSmart Server and click Remove.
47
HP MediaSmart Server User's Guide
3. Select Windows Home Server Connector and click Remove.
4. Close Add or Remove Programs.
5. At the computer, click Start, and then Run.
Type the following (UNC) network address.
\\hpstorage\Software\Home Server Connector Software\setup.exe
The network address will be different if you renamed your server. In this case type,
\\<server name>\Software\Home Server Connector Software\setup.exe
6. Click OK.
Install the software on one computer at a time.
Check the Client PC Version Number
It is important for the server software and the PC client software to be on the same version in order
for them to work together properly. Complete the following steps to confirm that the server and
the client are on the same version.
On Windows XP
1. To check the PC client software version number on Windows XP, click Start and Control Panel.
2. Click Add or Remove Programs.
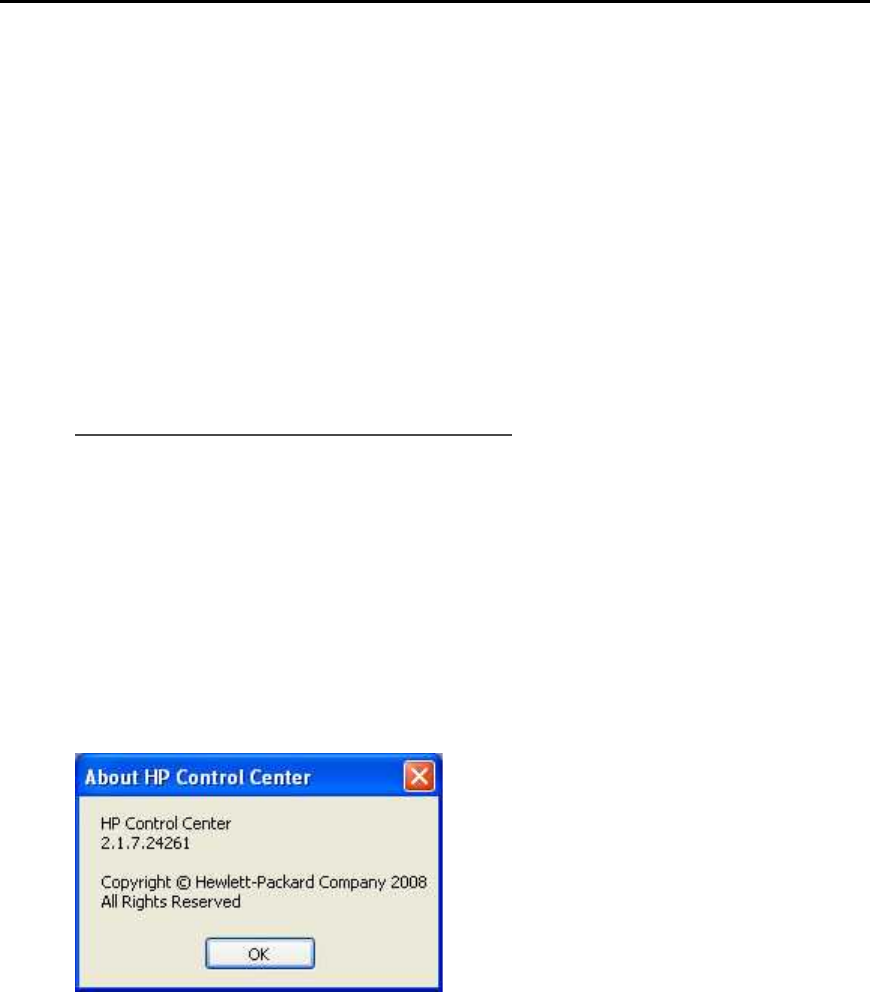
3. Select HP MediaSmart Server and then Click here for information support.
The About dialog opens.
On Windows Vista
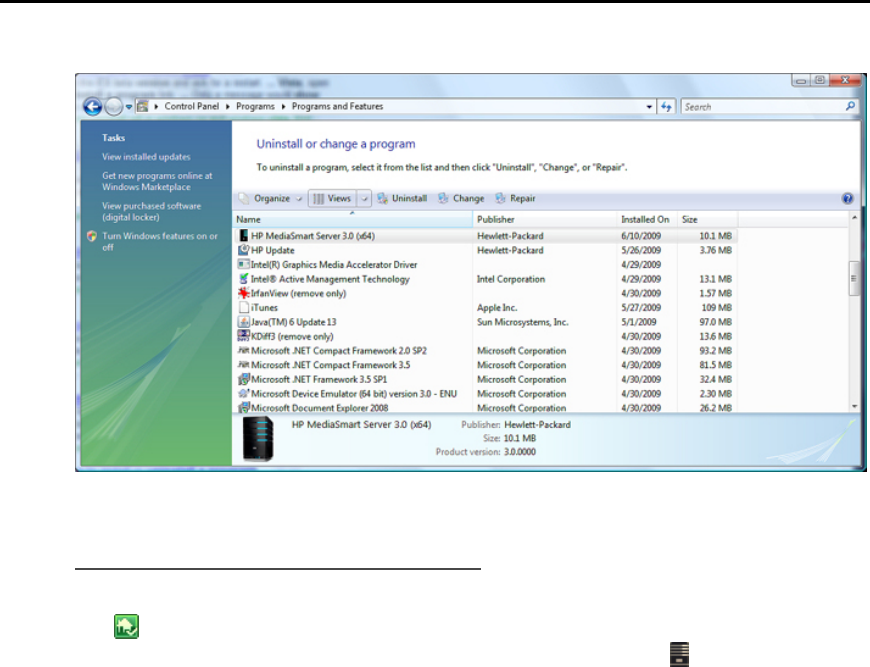
1. To check the client software version number on Windows Vista, click Start and Control Panel.
2. Select Programs and then Programs and Features.
3. If the details are not displayed, from the Organize menu select Layout and Details Pane.
48
Set up and Installation
4. Select HP MediaSmart Server to see the version number.
Check the Server Version Number
1. To check the server software version number on a PC, double-click the Windows Home Server
icon in the system tray and log on.
At the Mac, select Launch Home Server Console from the Server menu .
2. Click Settings in the upper right of the Console.
3. Select HP MediaSmart Server in the left menu and click the HP Update tab.
The version number is at the bottom of the HP Update tab.
49
HP MediaSmart Server User's Guide
The server and client software should have compatible version numbers. The following table lists
the version numbers that work together.
Compatible Software Version Numbers
Server Version PC Client Version Mac Client Version
1.3.6.21622 1.2.1.18999, 1.3.6.21622 N/A
1.3.8.25155 1.2.1.18999, 1.3.6.21622,
1.3.8.25155 N/A
2.1.7.24261 2.1.7.24261 1.0.0b20
2.5.10.26972, 2.5.10.27366 2.5.10.26972 2.5.0b51
3.0 3.0 3.0
50

Set up and Installation
Update and Roll Back Mac Clients
This article describes how to manually check for a Mac client update or roll back. Mac computers
connected to the network automatically check for changes to the HP MSS Client.dmg file once a
day and notify you if it has changed.
In this article...
Update Mac Clients
Roll Back Mac Clients
Check the Mac Client Version Number
Check the Server Version Number
Update Mac Clients
Important
Update the server software prior to updating the client software. The server update and the Mac
client update are downloaded at the same time through the HP Update mechanism in the Windows
Home Server Console. Updating the server ensures that the most recent copy of the HP MSS
Client.dmg is on your server and ready to install. See Updating and Rolling Back the Server for
more information.
1. From the HP MediaSmart Server menu, choose Open Preferences.
2. Click the Software Update tab.
3. Click Check Now.
If the HP MSS Client.dmg file on the server has changed, you will be prompted to install the file.
The HP MSS Client.dmg may have changed because an update was downloaded from HP or
because the server administrator rolled back the server software.
4. Follow the instructions on the screen for installing the file.
Roll Back Mac Clients
1. First, roll back the server software.
When the server is rolled back using the HP Update mechanism in the Windows Home Server
Console, it also rolls back the HP MSS Client.dmg file that is located on the server. See
Updating and Rolling Back the Server for more information.
2. On the Mac, choose Open Preferences from the HP MediaSmart Server menu.
3. Click the Software Update tab.
4. Click Check Now.
If the server roll back completed successfully, the HP MSS Client.dmg file on the server will
have changed and you will be prompted to install the file.
5. Follow the instructions on the screen for installing the file.
51
HP MediaSmart Server User's Guide
Check the Mac Client Version Number
It is important for the Server software and the Mac client software to be on the same version in
order for them to work together properly. Complete the following steps to confirm that the server
and the client are on the same version.
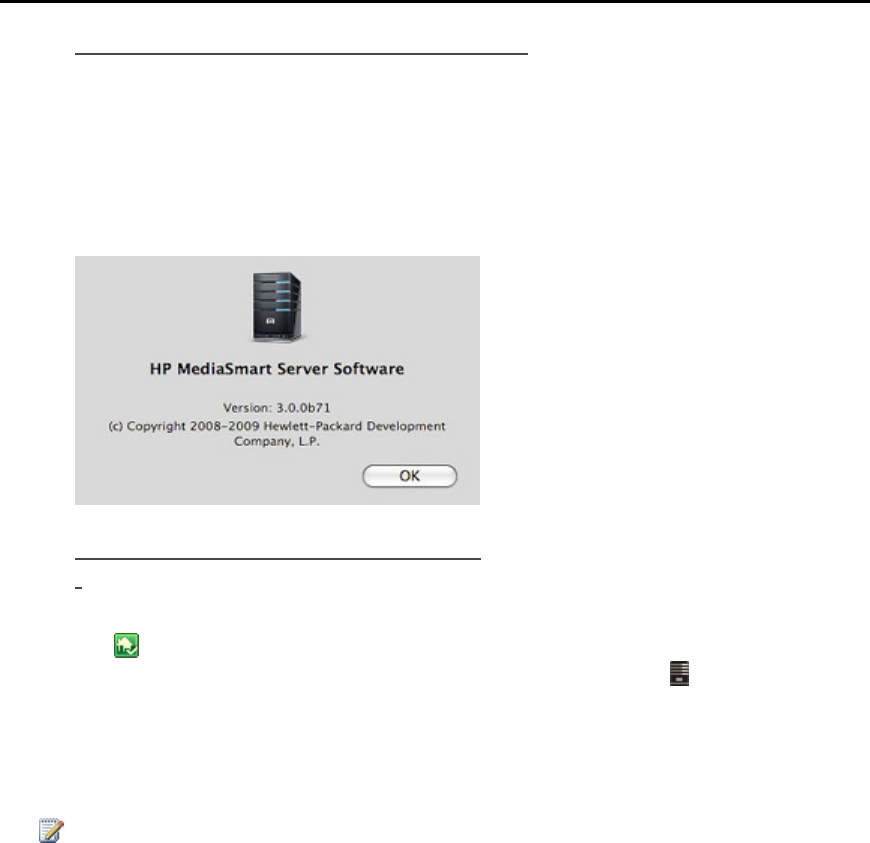
1. To check the Mac client software version number, go to the HP MediaSmart Server menu and
select About.
The Mac client version number is displayed in the About dialog.
Check the Server Version Number
1. To check the server software version number on a PC, double-click the Windows Home Server
icon in the system tray and log on.
At the Mac, select Launch Home Server Console from the Server menu .
2. Click Settings in the upper right of the Console.
3. Select HP MediaSmart Server in the left menu and click the HP Update tab.
The version number is at the bottom of the HP Update tab.
Note
Server version 2.1.7.24261 and Mac client version 1.0.0b20 work together. Starting with version
2.5, the server and the client version numbers will have the same first two numbers.
52

Set up and Installation
The server and client software should have compatible version numbers. The following table lists
the version numbers that work together.
Compatible Software Version Numbers
Server Version PC Client Version Mac Client Version
1.3.6.21622 1.2.1.18999, 1.3.6.21622 N/A
1.3.8.25155 1.2.1.18999, 1.3.6.21622,
1.3.8.25155 N/A
2.1.7.24261 2.1.7.24261 1.0.0b20
2.5.10.26972, 2.5.10.27366 2.5.10.26972 2.50b51
3.0 3.0 3.0
53
Chapter 3. Start Using Your Server
GUIDED TOUR
HP Home Page
The HP Home Page is the starting point for accessing the features of the HP MediaSmart Server.
In this article...
Open the HP Home Page on a PC
Open the HP Home Page on a Mac
The HP Home Page Icons
Open the HP Home Page on a PC
The HP Home Page can be accessed from the following:
Windows Start menu—At the computer, click Start, All Programs, and
then select HP MediaSmart Server.
Desktop icon—At the computer, double-click the HP MediaSmart Server
icon on the desktop.
Open the HP Home Page on a Mac
The HP Home Page can be accessed from the following:
Using the Finder—At the Mac, click Finder, Applications, and then
select HP MediaSmart Server Home.
Server Menu—Select Open Home Page from the HP MediaSmart
Server menu at the top of the screen.
If the Server menu is hidden, open System Preferences from the Apple
menu, and then select HP MediaSmart Server. Check Show HP
MediaSmart Server in the menu bar.
55
HP MediaSmart Server User's Guide
The HP Home Page Icons
Media Streamer—Opens a web application for streaming music, videos,
and photos in your home. For more information, see About Media
Streamer.
HP Photo Publisher—Publish photos from your Server to your favorite
photo-sharing site. Friends and family can see your photos on the
Internet. For more information, see About HP Photo Publisher.
HP Photo Viewer—View the photo albums that are shared from this
server. For more information, see HP Photo Viewer Home.
Access Files on Server—Browse the folders and files on your server.
This feature is optimized for remote browsing and is enabled when you
open the HP Home Page from a remote location.
Computer Access—Remotely connect to your server or a computer on
your home network. This feature is enabled when you open the HP
Home Page from a remote location.
Server—Opens a folder that displays a list of all your shared folders.
Music—Opens a folder that displays a list of music and music
subfolders.
Photos—Opens a folder that displays a list of photos and photo
subfolders.
Video—Opens a folder that displays a list of videos and video
subfolders.
Backup Now (PC) or Time Machine (Mac)—Backup your computer to
the server.
User’s Guide—Contains installation information, setup instructions,
how to use the server, tutorials, and other important information.
Online support—Go to the HP Support web site, where you can get
more information about the HP MediaSmart Server.
Registration—Click to go to https://register.hp.com and register your
HP MediaSmart Server. Registering your Server ensures that your
information is on file with HP if you should need technical support
services.
Shop HP—Get accessories for your server and shop HP Home & Home
Office.
56

Start Using Your Server
Windows Home Server Console
OPEN THE WINDOWS HOME SERVER CONSOLE
The Windows Home Server Console is where you manage and configure the HP MediaSmart
Server. You can access the Windows Home Server Console from a PC in the following ways. The
Windows Home Server Console cannot be opened on a Mac.
In this article...
Open the WHS Console from the Start Menu
Open the WHS Console from the HP MediaSmart Server Desk Icon
Open the WHS Console from the System Tray
Open the WHS Console from a Mac
Open the WHS Console from the Start Menu
1. At the computer, click Start, All Programs, and then select Windows Home Server Console.
2. Log on to the Windows Home Server Console.
Open the WHS Console from the HP MediaSmart Server Desktop
Icon
1. From the computer desktop, double-click HP MediaSmart Server icon.
2. In the HP Home Page, click the Tools tab.
3. Click Home Server Console.
4. Log on to the Windows Home Server Console.
Open the WHS Console from the System Tray
1. At the computer, double-click the Windows Home Server icon in the system tray.
2. Log on to the Windows Home Server Console.
Open t he WHS Console from a Mac
1. At the Mac, Select Launch Home Server Console from the Server menu .
THE SERVER TOUR
1. At the PC, double-click the Windows Home Server icon in the system tray and log on.
At the Mac, select Launch Home Server Console from the Server menu .
57

HP MediaSmart Server User's Guide
2. Click Overview and then Tour in the left menu.
The following features are illustrated.
The HP MediaSmart Server includes many features and applications designed to help you secure,
store and share your information.
HP MediaSmart Server Features
Feature Description
Backup Automatically backs up multiple Windows PCs and Macs on your home
network. Sophisticated PC backup software provides efficient and compact
backups to help save time and disk space on the server.
Media
Collector Automatically collects and consolidates media files from PCs and Mac’s
onto the server.
Photo Publisher Publish photos from your server to your favorite photo sharing sites.
Video
Converter Converts video libraries on the server into an MPEG-4 (H.264) format for
streaming to a range of devices.
Server for
iTunes Collects and stores iTunes music and playlists on your server for all
networked computers to access.
Stream to TV
via xBox, PS3,
DMA
Streams video from your HP MediaSmart Server to networked devices.
Share iTunes Streams music and playlists from your HP MediaSmart Server to computers
running iTunes.
HP Photo
Viewer Share photos with family and friends from your server.
Stream to PC Streams media from your HP MediaSmart Server to computers.
iStream to
iPhone The iStream application is a free download from Apple iTunes Store that
streams your photos, music and videos from your server directly to your
iPhone or iPod touch.
Online Backup
(optional) Save important files to an Amazon S3 account on the Internet.
Shop Online Visit the HP Applications store to shop for additional software for your
server and computer.
THE WINDOWS HOME SERVER TABS
The Windows Home Server enables you to share, store, access, and automatically protect your
pictures, videos, music, and files. It contains the following tabs:
• HP MediaSmart Server—Access HP features and functionality.
58

Start Using Your Server
• Computers & Backups—View and customize backups. Also, view the status of your home
computers. For more information, see Computers & Backup in the Windows Home Server
Console Help.
• User Accounts—Add, remove, and modify user accounts. For more information, see User
Accounts in the Windows Home Server Console Help.
Shared Folders—Add, open, remove, and view the properties of the shared folders on your server.
For more information, see Shared Folders in the Windows Home Server Console Help.
• Server Storage—View, add, repair, and remove hard drives from server storage. For more
information, see Server Storage in the Windows Home Server Console Help.
• Network—Displays health notifications from your server and your home computers. For more
information, see Network Health in the Windows Home Server Console Help.
• Settings—Configure general settings, such as date and time, backups, passwords, media sharing,
remote access, add-ins, resources, and more. For more information, see Server Settings in the
Windows Home Server Console Help.
• Help—Access the Windows Home Server Console Help.
FIRST STEPS
PC Backup and Restore
After running the Software Installation Disc on a computer it is automatically added to the list of
computers that are backed up by the HP MediaSmart Server each night. The entire computer is
backed up by default.
Complete the following steps to customize the hard drive volumes to back up, or to exclude
folders from the backup.
1. At the PC, double-click the Windows Home Server icon in the system tray and log on.
At the Mac, select Launch Home Server Console from the Server menu .
2. Click the Computers & Backups tab.
3. Select a computer and click Configure Backup.
Follow the instructions in the Backup Configuration Wizard.
Related Topics
Windows Home Server Console Help
Computers & Backup
How does backup work?
Managing and Configuring Backups
Restoring Computer Backups
59

HP MediaSmart Server User's Guide
Related Topics
Removing a Computer
Troubleshooting Computers & Backup
Mac Time Machine Backup
In this article...
Determine Used Space on Your Local Disk
Configure Time Machine Backups
Change the Backup Disk Size
Delete a Backup Disk
Determine Used Space on Your Local Disk
Begin by finding out how much space your data currently occupies on your Local disk. When you
set up Time Machine, the minimum backup disk size is automatically calculated for you.
However, you may want to increase the backup disk size depending on how often you create or
change files on your Mac.
1. Open a Finder window and select the Local disk.
2. On the Apple menu bar, choose File > Get Info.
3. In the Local Info window, look in the General section next to find the Used disk space.
60
Start Using Your Server
Multiply the used disk space by 1.5. The result is the minimum amount of disk space Time
Machine can work with (That’s because Time Machine needs space for all of your files plus some
extra room to enable it to store new data and multiple copies of files that change.). However, more
space is always better, because it enables Time Machine to retain backups that go further into the
past. A backup disk with at least 1.5 times as much free space as the amount occupied on your
local disk is recommended, and more if possible.
Configure Time Machine Backups
Before you begin,
• The HP MediaSmart Server software has to be installed on your Mac. See Installing and
Uninstalling Mac Software.
• You must be logged on to the Mac with an account that has administrator privileges.
To configure the HP MediaSmart Server as a valid Time Machine backup device,
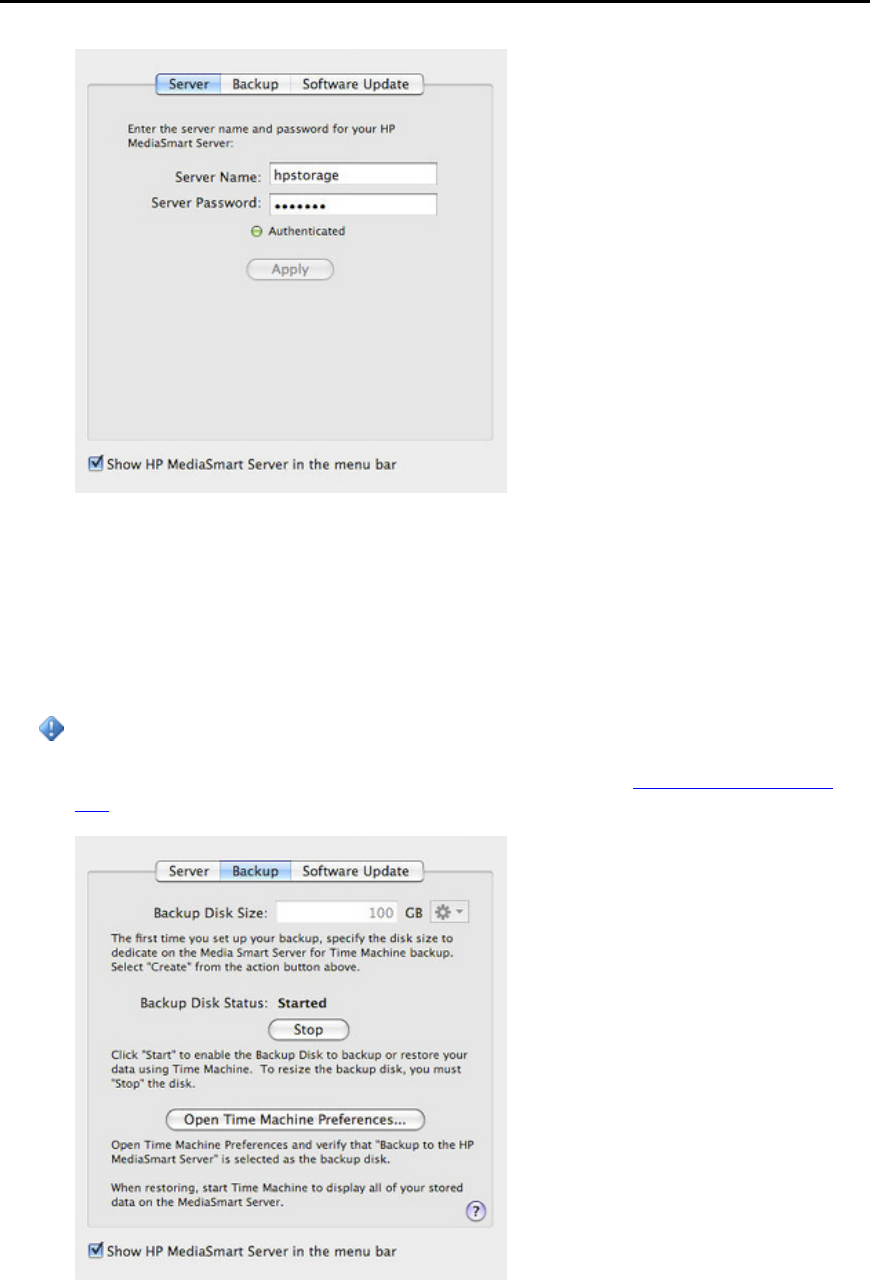
1. From the HP MediaSmart Server menu, select Open Preferences.
2. On the Server tab, verify that the server name and the server’s administrator password are
authenticated.
This information is used by Time Machine to set up the backup destination, as well as the links to
the shares on the server. This information may have been entered at the end of the Mac software
install. If so, you will be authenticated automatically.
61
HP MediaSmart Server User's Guide
3. Select the Backup tab and type a Backup Disk Size.
The suggested minimum disk space size displays in the dialog based on approximately 1.5 times
the size of your used disk space. However, HP recommends creating a backup disk that is at least
as large as your total local disc capacity, or larger if possible. When choosing a backup disk size,
you may want to consider how much you use your Mac and how much disk space you have
available on your server. The backup disk size cannot exceed the amount of free space that you
have available on one server disk.
Important
You can resize your backup disk later if you need more room. Resizing the backup disk
overwrites the current backup disk and causes all data to be lost. See Change the Backup Disk
Size.
62

Start Using Your Server
Note
The location for the backup is on the server at \\hpstorage\Mac\Backup. If the Mac shared folder
has been deleted from the server , you must create it. At a PC, double-click the Windows Home
Server icon in the system tray and log on. Or at a Mac, select Launch Home Server Console
from the Server menu . Click the Shared Folders tab and Add a shared folder named Mac.
4. Click Apply.
This process can take quite some time based on the size of the backup disk and server activity.
Once the formatting process is complete, the Backup Disk Status changes to Started.
Note
The backup file will be located at \\<server name>\Mac\Backup. The file name is based on the
serial number of the Mac system, and cannot be changed. Do not manually delete or rename this
file.
5. Click Open Time Machine Preferences, click Choose Backup Disk and select Backup to HP
MediaSmart Server as the backup disk.
Backup to HP MediaSmart Server may already be selected. You may have to change the
backup location to the HP MediaSmart Server if you had a previous Time Machine backup that
pointed to a different location.
Change the Backup Disk Size
1. From the HP MediaSmart Server menu, select Open Preferences.
2. Click the Backup tab.
3. In the Backup Disk Status, click Stop.
The Backup Disk Status changes to Stopped and the virtual disk icon on the desktop goes away
after the backup disk stops.
Note
You may have to wait several minutes for the backup disk to stop. Please be patient. If the
backup disk does not stop and it appears to hang, it could be because an application or other
process is accessing the backup disk in the background. If this is the case, attempt to eject the disk
using Finder.
4. Enter a new value in the Backup Disk Size and select Resize from the action menu.
You cannot select Resize until the disk is stopped and the disk size is changed.
5. Click Apply.
6. A pop up warning appears informing you the file already exists and that continuing will erase the
existing backup data and start over. To continue with the new size click Delete and Continue.
63

HP MediaSmart Server User's Guide
Delete a Backup Disk
You may want to delete a backup disk if you need to free up space on your server for other things
or if you are no longer using your Mac.
1. From the HP MediaSmart Server menu, select Open Preferences.
2. Click the Backup tab.
3. In the Backup Disk Status, click Stop.
The Backup Disk Status changes to Stopped and the virtual disk icon on the desktop goes away
after the backup disk is stopped.
Note
You may have to wait several minutes for the backup disk to stop. Please be patient. If the
backup disk does not stop and it appears to hang, it could be because an application or other
process is accessing the backup disk in the background. If this is the case, attempt to eject the disk
using Finder.
4. Select Delete from the action menu next to the Backup Disk Size.
Using Shared Folders
Shared folders are places for you to organize and store files on your server so that you can share
them with other people on your network. Start copying digital assets from your computer to shared
folders on the HP MediaSmart Server.
Important
Do not delete the shared folders that come with the HP MediaSmart Server: Converted Videos,
Mac, Music, Photos, Public, Recorded TV, Software, Users, Videos.
In this article...
Copy Files to Shared Folders
Access Shared Folders from the Run Dialog
Access Shared Folders from the HP Home Page
Access Shared Folders from the Desk Shortcut
Access Shared Folders from the System Tray
Access Shared Folders from My Network Places in Windows XP
Access Shared Folders from Network in Windows Vista
Access Shared Folders using the Finder
Copy Files to Shared Folders
1. Use one of the methods listed below to open shared folders.
2. Copy files to the appropriate shared folder or create shared folders for other digital content.
64

Start Using Your Server
Note
From the Media Sharing page on the Windows Home Server Settings tab, you can turn on digital
media streaming for the Photos, Music, or Videos shared folders. Click On for each folder that
you want to stream from.
Access Shared Folders from the Run Dialog
At the computer, click Start and Run. Type \\hpstorage or the name of your server and click OK.
Access Shared Folders from the HP Home Page
1. At the computer, click Start, All Programs, and then select HP MediaSmart Server.
2. Click one of the following:
• Server—opens a folder that contains all your shared folders.
• Photos—opens a folder for sharing photos.
• Music—opens a folder for sharing music.
• Videos—opens a folder for sharing videos.
Access Shared Folders from the Desktop Shortcut
1. At the computer, go to the desktop, and then double-click the Shared Folders on Server shortcut
.
2. Double-click the shared folder you want to open.
Access Shared Folders from the System Tray
1. Right-click the Windows Home Server icon and log on.
2. Click Shared Folders.
3. Double-click the shared folder you want to open.
Access Shared Folders from My Network Places in Windows XP
1. At the computer, click Start, and then click My Network Places.
2. Double-click the shared folder you want to open.
65

HP MediaSmart Server User's Guide
3. If the shared folders are not in My Network places, you can add them manually.
Access Shared Folders from Network in Windows Vista
1. At the computer, click Start, and then Network.
2. In Network, double-click the computer icon next to SERVER .
If you changed the default name of the server, that name appears next to the computer icon
instead.
3. Double-click the shared folder you want to open.
Access Shared Folder using the Finder
1. At the Mac computer, choose File > New Finder Window.
2. Click hpstorage in the Shared category of the left Sidebar. If you renamed the HP MediaSmart
Server during the first installation, select that name in the Shared category.
3. If you are not automatically connected to the server, click Connect As.... and log on.
4. Double-click the shared folder you want to open.
Related Topics
HP MediaSmart Server User's Guide
Troubleshooting a Mac Connection to the Server
Windows Home Server Console Help
Shared Folder
Adding a shared folder
Viewing shared folder properties
Opening a shared folder
Removing a shared folder
Viewing shared folder history
What is Folder Duplication?
66

Start Using Your Server
Enable Guest Account or Set up User Accounts
In this article...
Enable the Guest Account
Create PC and Mac User Accounts
Create Matching Server Accounts
Enable the Guest Account
If you want everyone to use the same logon account to access the HP MediaSmart Server, enable
the guest account. If the Guest account is enabled with no password, network users are not
required to logon to the server when they use networked computers. Additionally, all network
users can be set up to have Full access to all shared folders through the Guest account.
Important
If you enable the Guest account, everyone that connects to the network has the same privileges.
That may mean that they all have full access to shared folders and other resources on your server.
To protect your network from unwanted connections, see Securing your server from intruders.
Notes
The Guest account cannot be used to access the server using remote access.
1. At the PC, double-click the Windows Home Server icon in the system tray and log on.
At the Mac, select Launch Home Server Console from the Server menu .
2. Click the User Accounts tab.
3. Click Enable Guest on the User Accounts Setup dialog or on the Properties for Guest dialog.
Create PC and Mac User Accounts
If network users want to access information on your network from an Internet café, coffee shop, or
other location outside of your network, they need individual user accounts with strong passwords
on their computer or laptop and on the server.
Important
When you create user accounts on the server, use logon names and passwords that match the logon
names and passwords of existing user accounts on your networked computers. Creating matching
user accounts enables network members to automatically log on to the server when they log on to
their computer.
If the user accounts and passwords do not match, you will be prompted to type a user name and
password when you open the server’s shared folders.
If your computer does not have a password or if the computer uses a factory default user name, you
can change these parameters to eliminate the need to enter your user name and password when you
access a shared folder.
67

HP MediaSmart Server User's Guide
Create a User Account for a PC Running Windows XP
1. At the computer, click Start, Control Panel, and then User Accounts.
2. Click Add to create a user account.
-or-
Click Change an Account to change a logon name or password for an existing account.
A strong password is suggested to ensure security and is required to use remote access. A strong
password must be at least 7 characters long and must fulfill three of the following four character
criteria:
• Uppercase characters
• Lowercase characters
• Numbers
• Symbols (such as !, @, #, and so on.)
A password hint helps you remember your password. The password hint can be seen by anybody
who clicks the link to display it.
Create a User Account for a PC Running Windows Vista
1. At the computer, click Start and then Control Panel.
2. Under User Accounts and Family Safety, select Add or remove user accounts.
3. Add user accounts or make changes to existing user accounts.
A strong password is suggested to ensure security and is required to use remote access. A strong
password must be at least 7 characters long and must fulfill three of the following four character
criteria:
• Uppercase characters
• Lowercase characters
• Numbers
• Symbols (such as !, @, #, and so on.)
A password hint helps you remember your password. The password hint can be seen by anybody
who clicks the link to display it.
Create a Mac User Account
1. On the Apple menu, click System Preferences.
2. Click Accounts.
3. If the accounts page is locked, click the lock and enter you credentials to unlock the page.
4. Click + to open the new account page.
68

Start Using Your Server
Enter the user information.
A strong password is suggested to ensure security and is required to use remote access. A strong
password should be at least 7 characters long and fulfill three of the following four character
criteria:
• Uppercase characters
• Lowercase characters
• Numbers
• Symbols (such as !, @, #, and so on.)
A password hint helps you remember your password.
5. Click Create Account.
Create a Matching User Account on the Server
1. At the PC, double-click the Windows Home Server icon in the system tray and log on.
At the Mac, select Launch Home Server Console from the Server menu .
2. Click the User Accounts tab at the top of the page. If the User Accounts Setup dialog displays
click OK.
3. Click Add, this will open the Add User Account screen. enter user information. Check the
Enable Remote Access for this user check box. Make an appropriate choice concerning allowing
access to computer and folders.
4. Click Next.
5. Enter and confirm a strong password. A strong password is suggested to ensure security and is
required to use remote access. A strong password must be at least 7 characters long and must
fulfill three of the following four character criteria:
• Uppercase characters
• Lowercase characters
• Numbers
• Symbols (such as !, @, #, and so on.)
7. Click Next.
8. Select access to shared folders
9. Click Finish.
10. Click Done.
Repeat for each user account that you want to add.
69
HP MediaSmart Server User's Guide
Related Topics
Windows Home Server Console Help
User Accounts
Configure Remote Access
To easily access your server files and network PCs from a computer that is not attached to the
network, you must configure remote access.
In this article...
Configure Remote Access
About HP Personal Domain Name by TZO.COM
About TZO.COM Custom Domain Names
About Windows Live Personalized Domain Name
What Value does TZO Domain Names Provide Beyond the Microsoft Live Option
Configure Remote Access
1. At the PC, double-click the Windows Home Server icon in the system tray and log on.
At the Mac, select Launch Home Server Console from the Server menu .
2. Click Settings in the upper right of the Console.
3. Click Remote Access in the left menu.
Click to Turn on remote access.
The Remote Access wizard starts and attempts to configure your router. If you encounter
problems, see Configuring your broadband router in the Windows Home Server Console help.
4. The wizard then prompts you to select a Domain Name Provider and create a domain name.
A domain name is a web address. It allows you to access your HP MediaSmart Server from the
Internet. For instance, if you registered MyFamily.hpshare.net for your HP MediaSmart Server,
you would use this address to connect to your server using remote access. Additionally, this
address is part of the URL for accessing an album on the HP Photo Viewer.
The HP MediaSmart Server provides three alternatives for setting up a domain name:
HP Personal Domain Name by TZO.COM
TZO.COM Custom Domain Name
Windows Live Custom Domains
When choosing which service to use, consider the following:
70

Start Using Your Server
TZO domains names allow easy remote access, even if your broadband ISP blocks port 80.
Blocking port 80 prevents a Web browser from reaching the server.
With the TZO.COM Custom Domain Name option, you can create a domain name with
any name that is not already registered.
See additional information on domain names below.
6. Once the wizard is complete, customize Web site settings as desired.
7. Click OK.
About HP Personal Domain Name by TZO.COM
HP Personal domain name is free for the first year. After the first year, there is a charge.
An HP personal domain name has two parts:
Personalized name—enter a name of your choice. TZO.COM will check your choice against
existing names. If the name you picked already exists, TZO provides a list of alternatives.
Second part of the name—choose from an assortment of domain names such as
hphomeserver.com or hpshare.net.
Each part is combined so the Domain Name looks like MyFamily.hphomeserver.com.
About TZO.COM Custom Domain Names
With this option, you can create a domain name with any name you want, like MyName.com, as
long as that name is not already registered.
A domain name has several components:
Top-level or first-level domain names—all domain names end in a small list of generic names,
such as .com or .net, or in a country code, such as .es or .fr.
Second-level domain names—the part or parts of the domain name located to the left of the top-
level domain name. For example, “MyName” in MyName.com.
About Windows Live Personalized Domain Name
Microsoft also offers a service to get a personalized domain name for your server.
What Value does TZO Domain Names Provide Beyond the
Microsoft Live Option
• Some broadband ISPs block Port 80 which is required for easy remote access. The TZO service
allows you to obtain easy remote access even if Port 80 is blocked.
71

HP MediaSmart Server User's Guide
• With the Microsoft domain name, if you don't already have a Microsoft Live account, you'll have
to set that up.
• With TZO custom domain name option, you can get your own domain name (e.g.,
smithfamily.com).
• TZO customer support and troubleshooting
Related Topics
Windows Home Server Console Help
Remote Access
Secure your Server from Intruders
The HP MediaSmart Server is designed as a device that is always on, which comes in handy for
accessing files any time your network users need or want them. Additionally, remote access
network users to view, add, and delete files on the server from remote locations. If not properly
secured, these features present security risks, so you’ll want to ensure that unauthorized users can’t
access your server and the files stored on it.
In this article...
Firewall Protection
Wireless Security
Anti-virus Software
User Name and Password Protection
Remote Access Security
Firewall Protection
A firewall is a hardware device or software program that protects your network from unauthorized
access. It protects your system from hackers running programs, sending email, and gaining access
to your private information. The following types of firewalls protect your network and computers:
Broadband Router Firewall
Windows Home Server Firewall
Personal Firewall
Firewall Ports
72

Start Using Your Server
Broadband Router Firewall
The HP MediaSmart Server requires a broadband router. Broadband routers allow multiple
computers and devices to share an Internet connection using NAT (Network Address Translation)
technology. NAT allows all the computers and devices on your network to use a single Internet
connection (IP address). NAT acts as a firewall by masking the real IP addresses of your network
components—including the HP MediaSmart Server—which keeps them from being seen outside
the network.
Some broadband routers implement Stateful Packet Inspection (SPI), which adds enhanced
security by examining each packet of information before allowing it into the network. SPI can
prevent advanced forms of incursions like Denial of Service attacks.
Windows Home Server Firewall
Windows Home Server includes Windows Firewall, which protects communications between the
server and the computers on your network. This firewall is configured to allow remote access. It is
not configurable by the user.
Personal Firewall
A personal firewall is a software application that protects an individual computer. Because a
personal firewall is behind the broadband firewall, it protects the computer on which it is installed
from attacks from other computers within the network.
Firewall Ports
The following table lists the ports used by the server.
Ports used by the server
Type Port numbers Description
TCP 80, 443 Standard Web site
TCP 55000, 56000 internal (subnet only) Web site
for Windows Home Server Web
services
TCP 1138 Transport
TCP 8912 Backup and beacon
UDP 8912 Backup and beacon
TCP 2869 UPnP (Universal Plug and Play)
UDP 1900 UPnP
TCP 3389 Remote desktop
TCP 4125 Remote access (when enabled)
TCP 139, 445 File and print sharing
UDP 137, 138 File and print sharing
73

HP MediaSmart Server User's Guide
Ports used by the server
Type Port numbers Description
UDP 10284, 10283, 10282, 10281,
10280, 10243 Media connection
Wireless Security
If your router comes with wireless capability, it has a piece of equipment called a Wireless Access
Point (WAP). A WAP can come within an all-in-one-gateway, router, or as a standalone unit. In
many cases, WAP’s security settings are toggled off by default and you must manually turn on the
security settings. If the security settings are toggled off, anyone can access your network and may
be able to get into the server and any computer or other device on your network. Firewalls and
anti-virus software do not keep intruders out of wireless networks.
Most wireless networking equipment supports two forms of data encryption as security features:
Wired Equivalent Privacy (WEP)
Wi-Fi Protected Access (WPA)
For more information on how to configure the security for your wireless network, see the user’s
guide that came with your networking equipment.
Anti-virus Software
You should install anti-virus software on all the computers on your network, and configure the
software from one of the computers to scan all the shared folders on the server. You might be
required to assign (map) drive letters to all your shared folders to enable the anti-virus software to
scan the server.
Important
Remember to keep your anti-virus definitions up-to-date.
User Name and Password Protection
User names and passwords help secure the server by requiring authentication for managing the
server, accessing shared files, and using remote access.
Server password - during the first install of the HP MediaSmart Server, you are asked to create a
strong password to allow access for managing your server from the Windows Home Server
Console. This password protects the server from unwanted changes.
• User account passwords - it is recommended that each person who uses your network has a user
account so they can access shared folders on the server or, if configured, use remote access.
74

Start Using Your Server
• Computer passwords - by using the same user name and password for logging onto a computer
as for the server user account, you can avoid having to enter the user name and password when
accessing a shared folder. Requiring logon to each computer on your network adds a level of
security.
Remote Access Security
By default Remote Access is turned off.
Using a computer to remotely access the files on your server is protected in several ways:
• Security certificate
HTTPS (encrypted Secure Sockets Layer (SSL) protocol)
• User account with strong password
Security Certificate
When you install the HP MediaSmart Server software on your network computers, the Windows
Home Server Connector software adds the Windows Home Server security certificate to the
computer’s trusted certificate list. This security certificate helps secure the information that is
exchanged between the server and your computer’s Web browser. The best way to access the files
on the server from a computer that is not attached to the network is using a browser with Internet
access.
Using remote access to access your server from public or other untrusted computers is not
recommended. Doing so can potentially expose your server to malicious software and viruses.
HTTPS
Remote Access is secure because the connection between the remote computer and the server is
done over HTTPS. HTTPS uses the encrypted Secure Sockets Layer (SSL) protocol, the same
protocol used for banking transactions and retail commerce.
User Account with Strong Password
Remote access does not allow logging on from the Guest or Administrator account. Moreover,
user accounts must be enabled for remote access, which requires a strong password to ensure that
authentication is as secure as possible.
Note
If you have configured a Domain name to your server, any photos that are placed into the HP
Photo Viewer are viewable by any one that finds your domain. The Photos that are found and
seen in this manner cannot be deleted or modified. Deleting photos can only be done by users that
have successfully logged into the server with a user account and password.
Related Topics
Windows Home Server Console Help
75

HP MediaSmart Server User's Guide
Configuring your broadband router
Why can't I connect to some computers?
Learn more about router configuration
User Accounts
Setting User Accounts Password Policy
Why should logon names match?
Add Shared Folders to Network Places
In this article...
Add Shared Folders to My Network Places in Windows XP
Add a Network Place in Windows Vista
Add Shared Folders to My Network Places in Windows XP
1. At the computer, click Start and then click My Computer.
Note
If you use the classic start menu, click My Computer on the desktop.
2. Under Other Places, click My Network Places.
3. Under Network Tasks, click Add a network place.
4. In the Add Network Place Wizard, click Next.
5. Highlight Choose another network location, and then click Next.
6. To add the network place, you have two options:
In the Internet or network address box, enter the path to the shared folder you want to map, and
then click Next.
For example, enter \\hpstorage\Music
Where hpstorage is the default name. If you changed the name of the server, use that name.
Music is the shared folder’s name.
• Click Browse and then use Windows Explorer to locate the network place.
The path is usually: Entire Network, Microsoft Windows Network, Workgroup, <Name
of Server>.
7. After locating the shared folder, click to highlight it, and then click OK.
The location appears in the Folder box.
8. Specify whether you want to reconnect every time that you log on to your computer, and then
click Finish.
76

Start Using Your Server
Once you create a network place for one of the shared folders, the other shared folders on the
server will be available on My Network Places.
Add a Network Place in Windows Vista
Note
Network discovery must be turned on to add a shared folder to Network places in Windows Vista.
1. At the computer, click Start, and then click Network.
2. Under Network Tasks, click Add a network place.
3. In the Network Place Wizard, click Next.
4. Highlight Choose another network location and then click Next.
5. To add the network place, you have two options:
• In the Internet or network address box, enter the path to the shared folder you want to
map and then click Next.
For example, enter \\hpstorage\Software
Where hpstorage is the default name. If you changed the name of the server, use that
name. Software is shared folder’s name.
• Click Browse and then use Windows Explorer to locate the network place.
The path is usually: Entire Network, Microsoft Windows Network, Workgroup, <Name
of Server>.
After locating the shared folder, click to highlight it, and then click OK. The location will
appear in the Internet or network address box.
6. To create a name for the network place, enter a name in the Type a name for this
network place box, and then click Next.
7. Specify whether you want to reconnect every time that you log on to your computer, and
then click Finish.
Install HP Add-ins for Windows Home Server
HP add-ins are software programs that extend the functionality of Windows Home Server. The
McAfee add-in delivers server side anti-virus protection.
In this article...
McAffe Anti-virus Protection
Install Add-ins
McAfee Anti-virus Protection
To receive McAfee Anti-virus protection, you must activate the service. The McAfee anti-virus
add-in with Total Protection Service is a comprehensive security management solution that:
77

HP MediaSmart Server User's Guide
• Checks for viruses, spyware, unwanted programs, and other potential threats. Every time a file is
accessed on your Windows Home Server, Total Protection Service scans the file to make sure it is
free of viruses and spyware.
• Sends security status information for your server to an administrative web site that is unique to
your account, known as the McAfee SecurityCenter. You can visit the SecurityCenter to check
detection reports or to set up security rules, known as policies, to define the types of programs that
do not pose a security threat.
• Updates itself automatically at regular intervals with the latest versions of components and
detection definition (dat) files. This ensures that Total Protection Service is always able to protect
you against the latest threats.
Total Protection Service typically operates in the background without any interaction on your part.
To learn more about the McAfee anti-virus add-in, see their online documentation in one of the
following languages:
• English—http://us.mcafee.com/root/campaign.asp?cid=39906&l=enu&action=whshelp
• French—http://us.mcafee.com/root/campaign.asp?cid=39906&l=fra&action=whshelp
• German—http://us.mcafee.com/root/campaign.asp?cid=39906&l=deu&action=whshelp
• Spanish—http://us.mcafee.com/root/campaign.asp?cid=39906&l=esp&action=whshelp
After you activate McAfee antivirus protection, you receive a 90-day trial period. Internet access
is required to receive updates. Subscription is required for updates after seven months.
Install Add-ins
1. At the PC, double-click the Windows Home Server icon in the system tray and log on.
At the Mac, select Launch Home Server Console from the Server menu .
2. Click Settings in the upper right corner of the Console.
3. Click Add-ins in the left menu.
4. Click the Available tab.
5. Click Install to install an add-in.
6. Click OK on the Installation succeeded dialog box to restart the console.
For additional information, see Add-ins in the Windows Home Server help.
Register Your Server
1. On a PC, click Start, All Programs, and then select HP MediaSmart Server.
On a Mac, click Open Home Page on the HP MediaSmart Server menu.
78
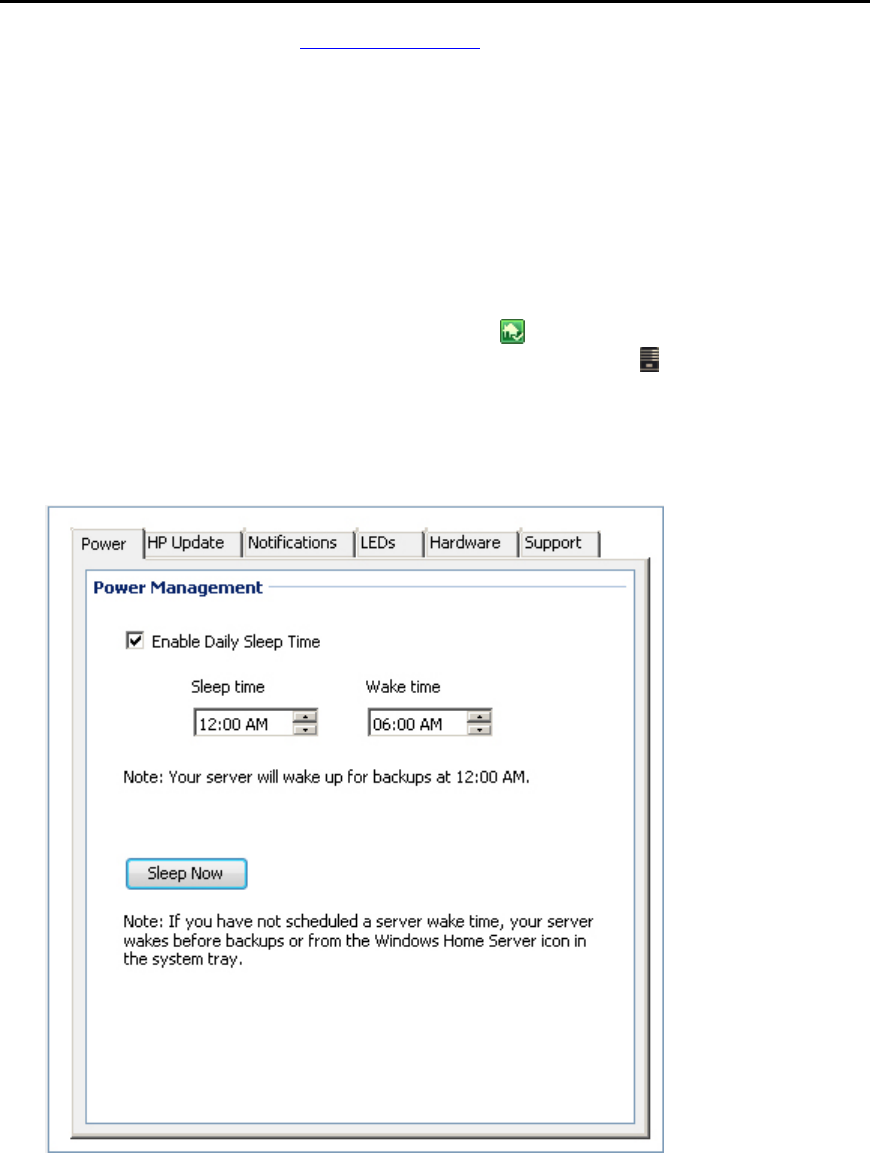
Start Using Your Server
2. Click Registration to go to https://register.hp.com and register your HP MediaSmart Server.
Registering your server ensures that your information is on file with HP if you should need
technical support services.
Configure Server Settings
POWER SETTINGS
The Power Management screen allows you to put the Server into a sleep mode to save power.
1. At the PC, double-click the Windows Home Server icon in the system tray and log on.
At the Mac, select Launch Home Server Console from the Server menu .
2. Click Settings in the upper right corner of the Console.
3. Click HP MediaSmart Server in the left menu.
4. Click the Power tab.
5. Select options.
Enable Daily Sleep Time—The Enable Daily Sleep Time checkbox allows the Server to be put
into a sleep mode and wake up based on times entered into the Sleep time and Wake time fields.
The server will wake up for a scheduled backup.
79

HP MediaSmart Server User's Guide
Sleep Now— Clicking the Sleep Now button puts the Server into sleep mode. The server will
wake up for a backup, input from the HP Home Page, or pressing the power button on the Server.
6. Click OK.
HP UPDATE SETTINGS
Use the HP MediaSmart Server software update to keep your server and networked computers
current with the latest HP software, online help, and new features.
HP MediaSmart Server software update does not update the Microsoft Windows Home Server
operating system. For information about updating Windows Home Server, see Configuring
Windows Update in the Windows Home Server Console Help.
In this article...
Configure HP Update
Version Information
Configure HP Update
1. At the PC, double-click the Windows Home Server icon in the system tray and log on.
At the Mac, Select Launch Home Server Console from the Server menu .
2. Click Settings in the upper right of the Console.
3. Select HP MediaSmart Server in the left menu and click the HP Update tab.
80
Start Using Your Server
4. The following choices are available in the Configure section. HP recommends that you select
Automatically download and install updates.
Configure HP Software Update Options
Option Additional information
Automatically download and install
updates (recommended) Requires no user action.
Downloads and installs updates on the server in the
background. If necessary the server will automatically
reboot.
Download updates and let me choose
when to install Requires user action.
Your computer notifies you that an update has been
downloaded and is ready to install on the server.
Additionally, the Install link turns blue under HP
MediaSmart Server software updates.
To update the server after an update is downloaded, click
Install under HP MediaSmart Server software updates in
the Windows Home Server Console
81

HP MediaSmart Server User's Guide
Configure HP Software Update Options
Option Additional information
Turn off automatic updates
Not recommended.
To get updates with this choice you will have to click
Check for updates located in the Version section.
5. Click OK.
Version Information
The following information and options are in the Version section of the HP Update dialog.
• The server software version number and date are shown.
• Click Check for updates to immediately check for available software updates, regardless of the
configuration settings you selected above.
• The Install link becomes active when an update has been downloaded, but not installed. Click
Install to run the server update.
• The Rollback link becomes active when a software update has been installed. Use this link to
uninstall the update on the server and revert to the previous server software version.
Important
Clicking Install or Rollback only makes changes to the server software. Each networked
computer still needs to be updated or rolled back so that the server and client computers are
running the same version of software. See Updating and Rolling Back Client PCs or Updating and
Rolling Back Mac Clients for more information.
NOTIFICATION SETTINGS
The Notifications screen gives you control of which notifications will show up as messages in
your system tray.
1. At the computer, double-click the Windows Home Server icon in the system tray and log on.
At the Mac, select Launch Home Server Console from the Server menu .
2. Click Settings in the upper right corner of the Console.
3. Click HP MediaSmart Server in the left menu.
82
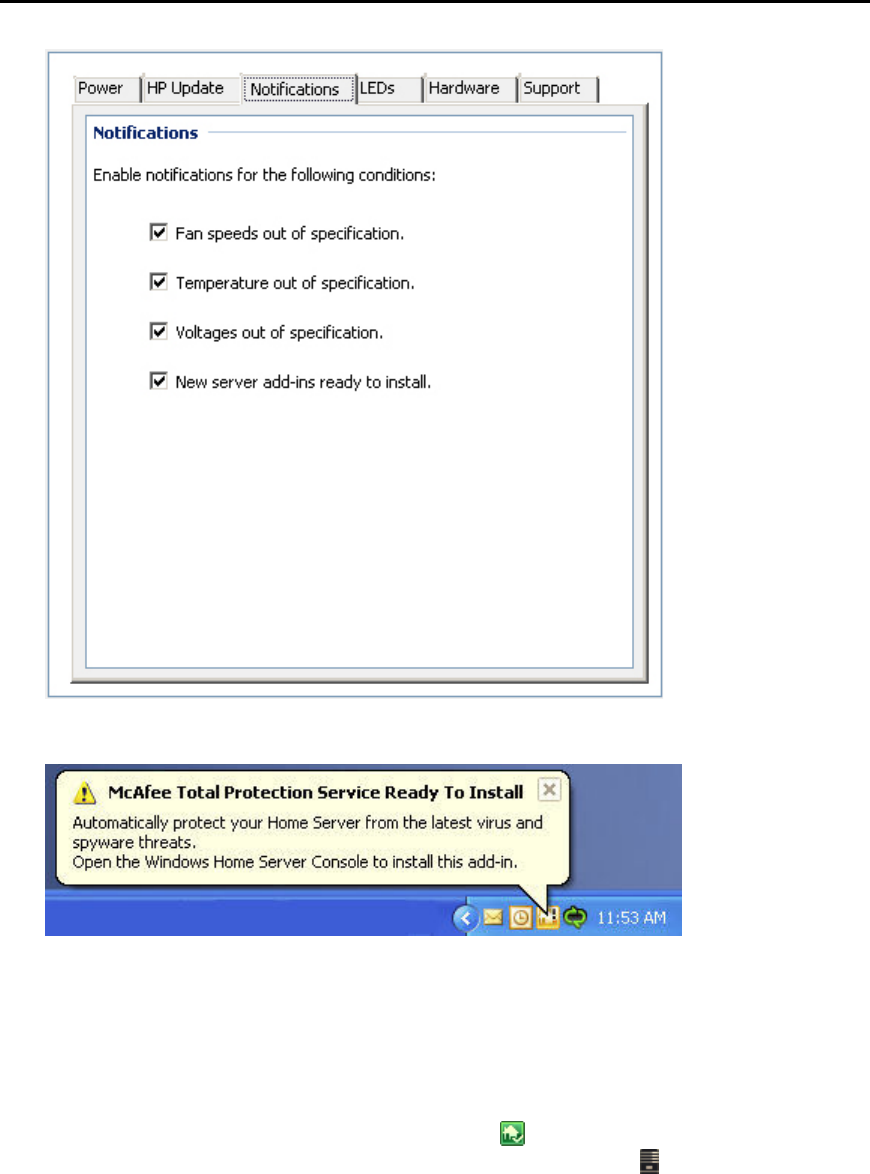
Start Using Your Server
4. Click the Notifications tab.
5. Select options.
The following is an example of a notification message.
6. Click OK.
LED SETTINGS
The LED screen gives you control of two different LED behaviors.
1. At the PC, double-click the Windows Home Server icon in the system tray and log on.
At the Mac, select Launch Home Server Console from the Server menu .
2. Click Settings in the upper right corner of the Console.
3. Click HP MediaSmart Server in the left menu.
83
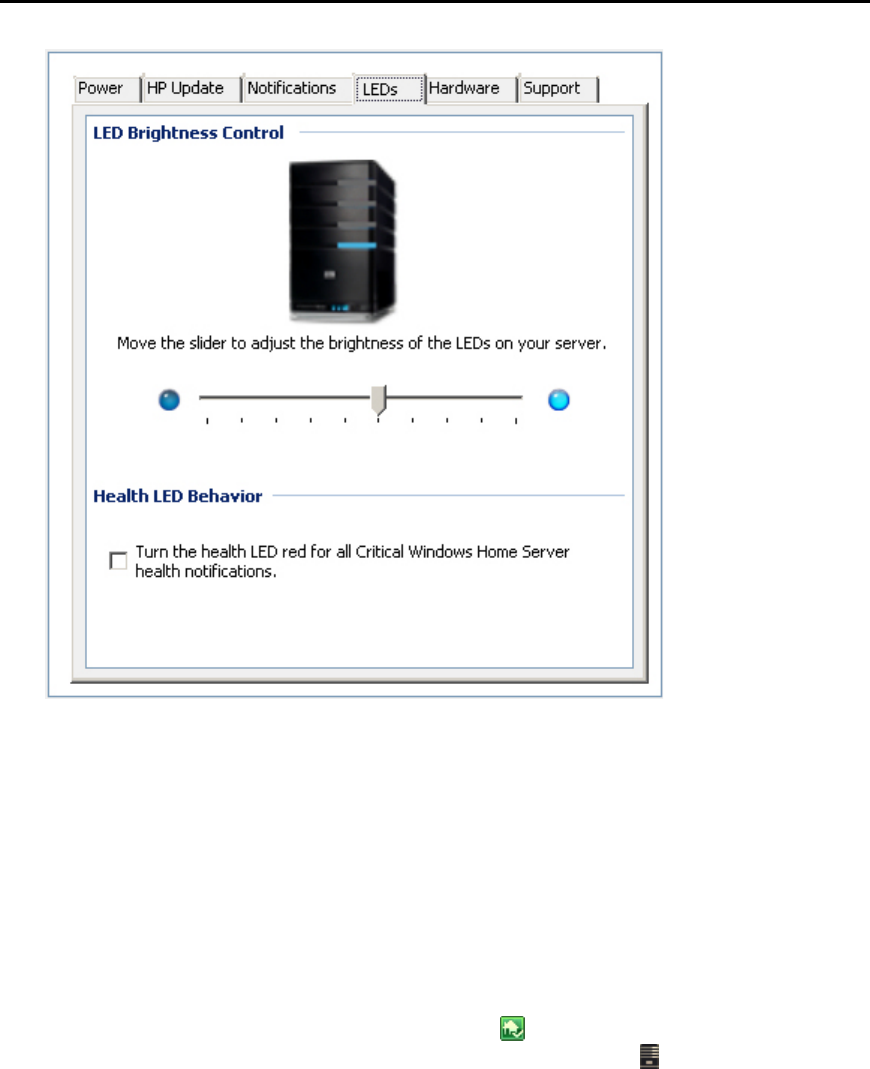
HP MediaSmart Server User's Guide
4. Click the LEDs tab.
5. Select options.
LED brightness control—The LED brightness control allows you to adjust the brightness of all
LEDs on the front panel of the Server. Grab the slider and move for a brighter or dimmer LED.
Health LED Behavior—The Health LED Behavior checkbox allows for the Server’s health
LED to show red you for any Critical Windows Home Server health notifications.
6. Click OK.
HARDWARE INFORMATION
1. At the PC, double-click the Windows Home Server icon in the system tray and log on.
At the Mac, select Launch Home Server Console from the Server menu .
2. Click Settings in the upper right corner of the Console.
3. Click HP MediaSmart Server in the left menu.
4. Click the Hardware tab.
Information presented on this screen is gathered from various sensors within the Server Solution.
84

Start Using Your Server
Hardware Status Levels
Green Yellow Red
Fan Speed Greater than or equal to
800 rpm Between 600 rmp and
800 rpm Less than 600 rpm
Temperature (PECI):
HP MediaSmart
Server EX490
Less than 74 Between 74 and 80 Greater than or equal to
80
Temperature (PECI):
HP MediaSmart
Server EX495
Less than 85 Between 85 and 100 Greater than or equal to
100
3.3 V Between 3.069V and
3.531V 7-10% greater or lesser
than 3.3V More than 10% greater
or lesser than 3.3V
5.0V Between 4.650V and
5.350V 7-10% greater or lesser
than 5.0V More than 10% greater
or lesser than 5.0V
12.0V Between 10.200V and
13.800V 15-20% greater or
lesser than12.0V More than 20% greater
or lesser than 12.0V
85
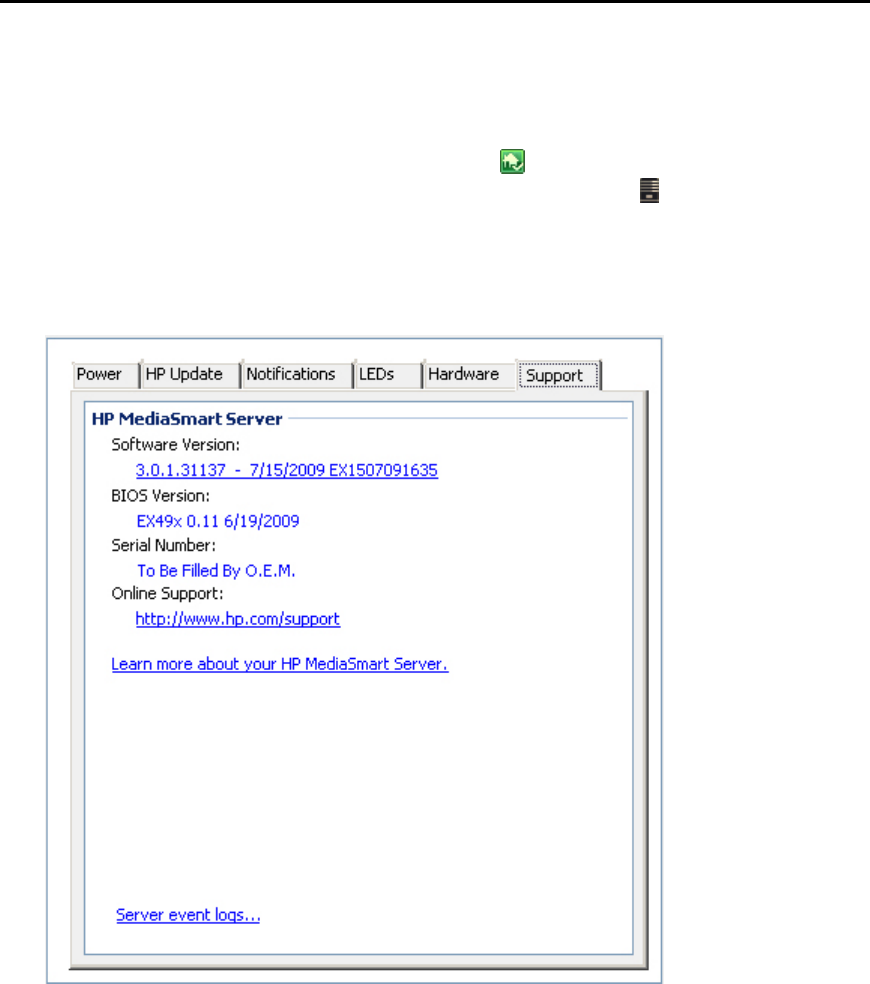
HP MediaSmart Server User's Guide
5. Click OK.
SUPPORT INFORMATION
1. At the PC, double-click the Windows Home Server icon in the system tray and log on.
At the Mac, select Launch Home Server Console from the Server menu .
2. Click Settings in the upper right corner of the Console.
3. Click HP MediaSmart Server in the left menu.
4. Click the Support tab.
5. Click OK.
GETTING HELP FOR USING YOUR SERVER
The HP MediaSmart Server enables multiple computers on a network to enjoy their digital
experiences when and where they want. The HP MediaSmart Server includes remote access to
files, automatic computer backups, virtually unlimited storage expandability, and media streaming
to the entertainment center.
Help is available from most windows on the HP MediaSmart Server.
In this article...
86
Start Using Your Server
HP Server Help
Windows Home Server Console Help
HP Server Help
HP Server Help includes the types of help shown in the following table. Additionally, the online
User’s Guide includes references to topics in the Windows Home Server Help.
User’s Guide—Contains online help, installation instructions, guidance for set up,
using the product, tutorials, recovery information, and other important information.
Online Help—A Help button is available on most pages.
HP Support Web site—Additional support and informational articles are available
at http://www.hp.com/support.
Windows Home Server Console Help
Some tasks, such as creating users and using shared folders, are done through the Windows Home
Server Console.
1. At the PC, double-click the Windows Home Server icon in the system tray and log on.
At the Mac, select Launch Home Server Console from the Server menu .
2. Click Help in the upper right corner when you are not on the HP MediaSmart Server tab. The help
button is indicated by a icon. Or click Help buttons on Microsoft dialog boxes in the Console.
Windows Home Server Console Help
Main Topics Description
Welcome to the Windows Home Server
Console Learn what the Windows Home Server tray icon
colors mean. This topic also provides an overview
of adding user accounts, organizing files,
configuring backups, and customizing server
settings.
Computers & Backup Explains how backups work and how to configure,
restore, and troubleshoot backups.
User Accounts How to add users to your server.
Shared Folders Adding, opening, removing, viewing the history of
shared folders, and using folder duplication.
Server Storage View, add, repair, and remove hard drives from
total storage.
Network Health What health notifications mean and what to do
about them.
87

HP MediaSmart Server User's Guide
88
Windows Home Server Console Help
Main Topics Description
Windows Home Server Settings How to configure backups, passwords, media
sharing, remote access, add-ins, resources, and
more.
Remote Access How to set up the server to easily access your files
on your server using an Internet connection from a
remote location.

Chapter 4. HP Media Collector
ABOUT HP MEDIA COLLECTOR
The HP Media Collector takes media files from the computers on your network and copies them to
your HP MediaSmart Server. This allows you to maintain a comprehensive library of music,
photos, and videos in one location in your home. You can stream media to your television and
stereo. You can share music with iTunes applications on other computers in your network. You
can even stream media to the Internet where any computer with a Web browser can play it.
Note
Media Collector copies only media files. It does not collect other file types, such as Microsoft
Office documents.
In this article...
Media Collection
HP Media Collector Default Settings
Organization Options and Defaults
Ignored Directories and Skipped Files
Supported File Formats
Media File Duplication
Media Collection
HP Media Collector scans your network computers for music, image, and video files and it copies
them to the server. You can choose how, where, and when Media Collector gathers your media.
For example:
• You can tell Media Collector to look for videos in all folders or only in your My Videos folders.
• You can tell Media Collector to look for music and not to look for photos and video.
• You can tell Media Collector to gather photos from your computer and not from your children’s
computers.
Schedule
Media Collector scans the computers in your network on an automatic schedule that you choose.
After you enable media collection and set the schedule, Media Collector collects new media files
when you add them to your computers.
Media Collection Order
When all media types are enabled for collection, Media Collector collects photo files first; then
music files, and it takes video files last.
89

HP MediaSmart Server User's Guide
HP Media Collector Default Settings
Media Collector is disabled by default. Before Media Collector can begin to copy media to your
HP MediaSmart Server, you must enable the media types you want to collect.
Media Collector copies media files only from computers that are installed as clients on your
Windows Home Server network. For example, if you have a computer that you use only for
gaming and you have not made it part of your Windows Home Server network, this computer is
not available for Media Collection.
Organization Options and Defaults
You can tell HP Media Collector how you want to organize your media on your HP MediaSmart
Server. For example, you can organize media in these ways:
Photos
• By date taken, or existing file structure
• Default is existing file structure
Music
• By Artist/Album or existing file structure
• Default is Artist/Album
Videos
• By existing file structure
Ignored Directories and Skipped Files
HP Media Collector skips picture files that are less than 45 K in size. Media Collector ignores
some directories for each media. See the list below:
Photos
temporary Internet files, My Music folder, windows system directories
Music
temporary Internet files, windows system directories
Videos
temporary Internet files, windows system directories, mov files located under My Pictures,
Pictures
90

HP Media Collector
Supported File Formats
The files and types listed below are compatible for Media Collection:
Photos
jpg, gif, tif, pct, mov files located under My Pictures, Pictures
Music
mp3, wma, m4a, aac, wav, playlists (m3u, wpl), album art
Videos
AVI, MOV, m4v, MPEG, MP2, WMV, FLV, DIVX, DVR-MS, M2TS, VOB file collections
Media File Duplication
Note
When HP Media Collector copies media files from all your computers and users, it
attempts to reduce duplicates. For example, if two users have the same media file, Media
Collector copies only one file to the Server.
CONFIGURING MEDIA COLLECTOR
Configuring Media Collector General Settings
1. At the PC, double-click the Windows Home Server icon in the system tray and log on.
At the Mac, select Launch Home Server Console from the Server menu .
2. Click Media and then HP Media Collector in the left menu.
3. Click Configuration.
The HP Media Collector General Settings panel opens.
4. On General Settings, move available computers to enabled for collection.
When enabled, Media Collector automatically scans the enabled for collection computers for
media. Media Collector does not scan computers in the available computers box. Move a
computer out of the enabled for collection box and into available computers if you want to
disable media collection for that computer.
Configuring Media Collector for Photos
1. At the PC, double-click the Windows Home Server icon in the system tray and log on.
At the Mac, select Launch Home Server Console from the Server menu .
2. Click Media and then HP Media Collector in the left menu.
91
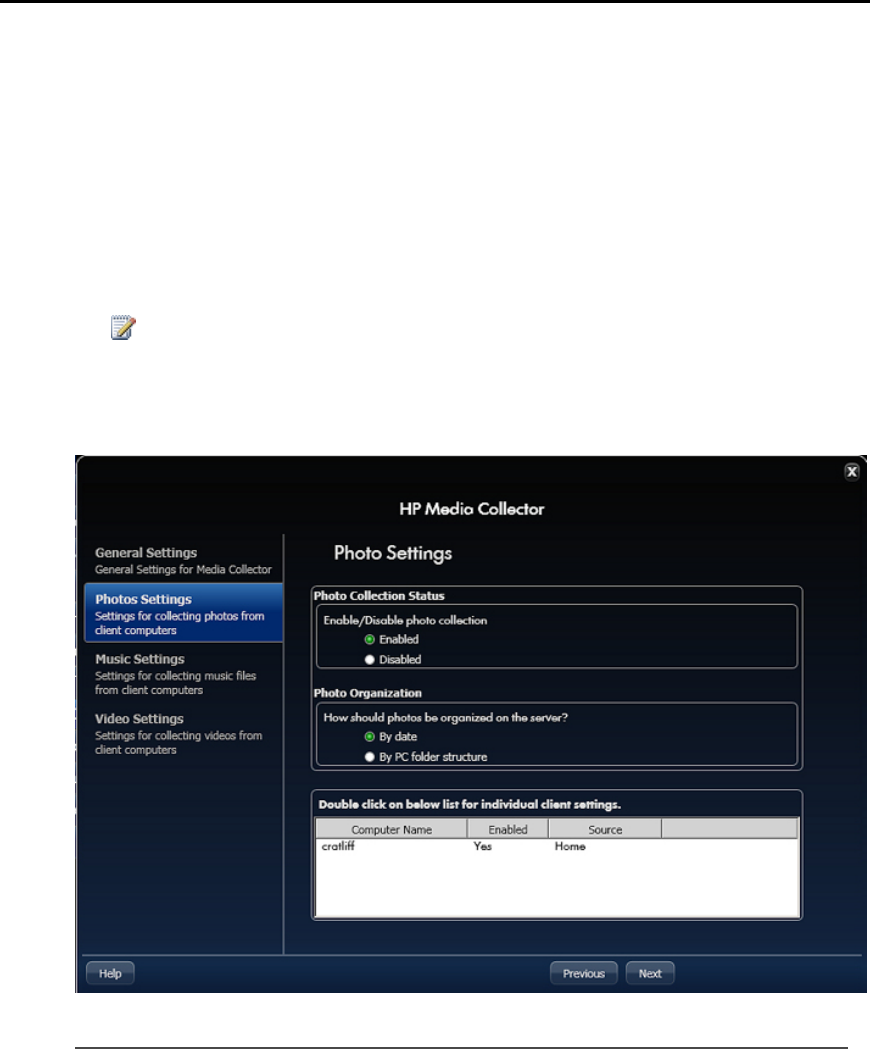
HP MediaSmart Server User's Guide
3. Click Configuration.
The HP Media Collector General Settings panel opens.
4. Click Photo Settings in the left menu.
You can configure these settings in this tab:
• Photo Collection Status—Enable or Disable photo collection
• Photo Organization—Organize by date or by PC folder structure
• Photo Source—Double-click a computer name to select either My Pictures folders or All
Folders as the source.
Note
If you select All folders, Media Collector may collect graphics and images from your
computer that are not a part of your photo collection, such as graphics associated with
software applications.
Example of Photos Collected by Date and by PC Folder Structure
First of all, it’s helpful to understand the underlying data used to build the two examples below.
In this case, the files that are being shown are based on two groups of photos. One group is
located under user Susan’s home Pictures folder, with a number of uploaded photos and a single
named photo (Beach_sunrise.jpg). This group of photos could be on any particular computer in
the network (or even split across two computers). The second group of photos is on a particular
computer (LaptopDad), but not under a user’s home Pictures folder. In this case, it’s under
D:\Photo Collection\... Also, note that all of the photos on LaptopDad are organized and named
with meaningful names, including a copy of the Beach_sunrise.jpg file that also exists on Susan's
group of files.
92
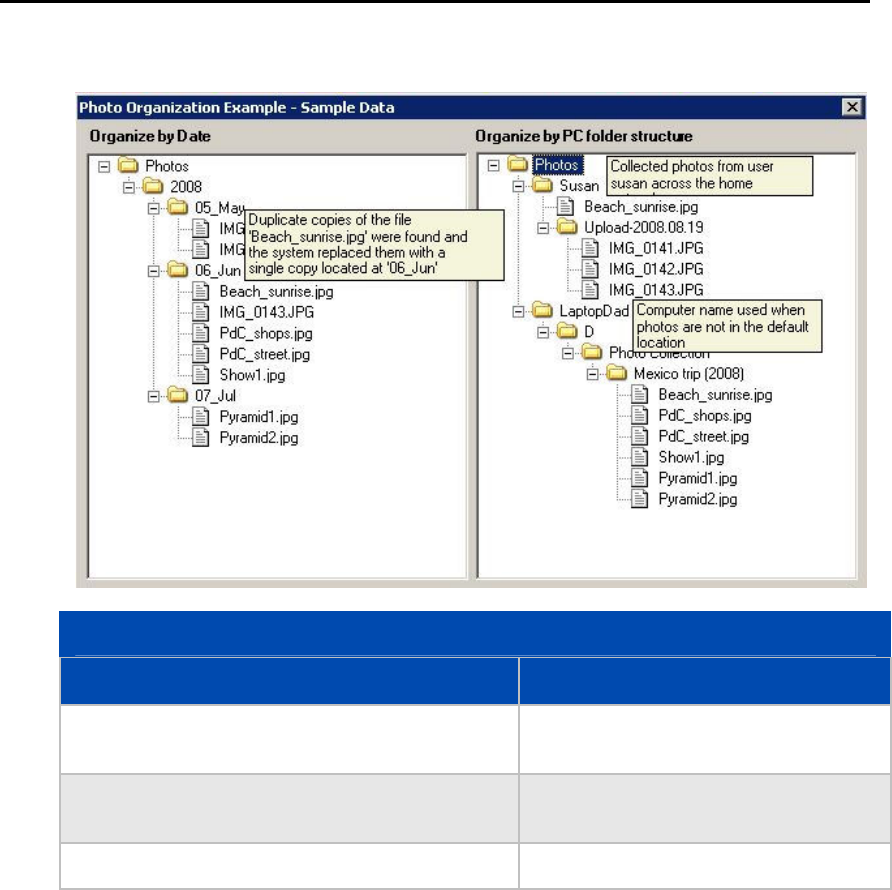
HP Media Collector
The photo example shows two panes with different file/folder organizations for the same group of
sample photos.
Things to Consider
Organize by Date Organize by PC Folder Structure
Uses Date Picture Taken tag or Modified Date to
organize files Sorts files by user or source computer
Good for organizing large groups of unsorted image
files Good for maintaining original photo
sorting
Reduces duplication of photos
On the left, the files are organized by date
There are two things of interest
1. The photos from the two groups are now grouped together based on date, and
2. The one photo that was duplicated between the two groups is only present once.
The single grouping is what the Organize by Date option accomplishes – it uses the Date Picture
Taken tag within the file to place the photos by date. If this is not set, the system will use the file
property Modified Date to place the photo. Be aware that this model ignores your folder
structure, so it’s most useful in the case where you don’t have a meaningful folder structure (e.g.
unsorted groups of folders or groups based on the camera software’s defaults). Regarding the
duplicate file, only one copy is kept as shown in the example. If two duplicate files are different,
the newest one is retained on the server.
93

HP MediaSmart Server User's Guide
In contrast, the right pane is organized by PC folder structure
If photos are found under a user’s home Pictures folder, then they will be grouped just under the
user’s name with the underlying folder organization. This still may include some simplification in
that photos for user Susan on computer1 and user Susan on computer2 will be coalesced into a
single group. This may result in some duplicate photos being represented once.
On the other hand, if the photos were found on a computer in a folder other than a user’s home
Pictures folder, they will be grouped under the computer name, with a path showing their
placement on the computer. In general, the “by folder” organization is most helpful if you have
already organized your photos and don't want to lose your folder structure.
Configuring Media Collector for Music
To Configure Media Collector for Music, follow the steps below:
1. At the PC, double-click the Windows Home Server icon in the system tray and log on.
At the Mac, select Launch Home Server Console from the Server menu .
2. Click Media and then HP Media Collector in the left menu.
3. Click Configuration.
The HP Media Collector General Settings panel opens.
4. Click Music Settings in the left menu.
You can configure these settings in this tab:
• Music Collection Status—Enable or Disable music collection
• Music Organization—Organize by Artist/Album or by PC folder structure
• Music Source—Double-click a computer name to select either My Music folders, iTunes
libraries, Windows Media Player libraries, or All Folders as the source.
Note
If you select All folders, Media Collector may collect sound files from your computer
that are not a part of your music collection, such as sound files that are associated with
software applications.
94
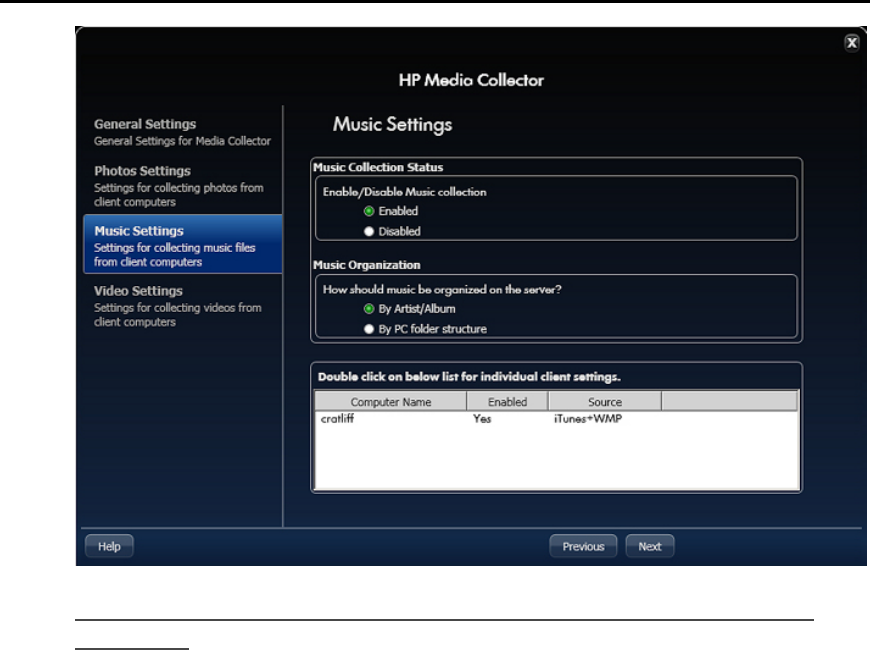
HP Media Collector
Example of Music Collected by Artist/Album and by PC Folder
Structure
We’ll start by looking at the underlying data used to build the two examples below. The files that
are shown are based on two music collections. One group is located under user Susan’s home
Music folder, with some songs organized by album as well as some that are included within her
iTunes library. This music could be on any particular computer in the network, or even split
across two computers. The second group of music files is on a particular computer (LaptopDad),
but not under a user’s home Music folder. In this case, it’s under D:\Misc Music\... Notice that
these files are not organized by album name and they include a duplicate song (U2’s Bullet the
Blue Sky).
The music example shows two panes with different file/folder organizations for the same group of
music files.
95
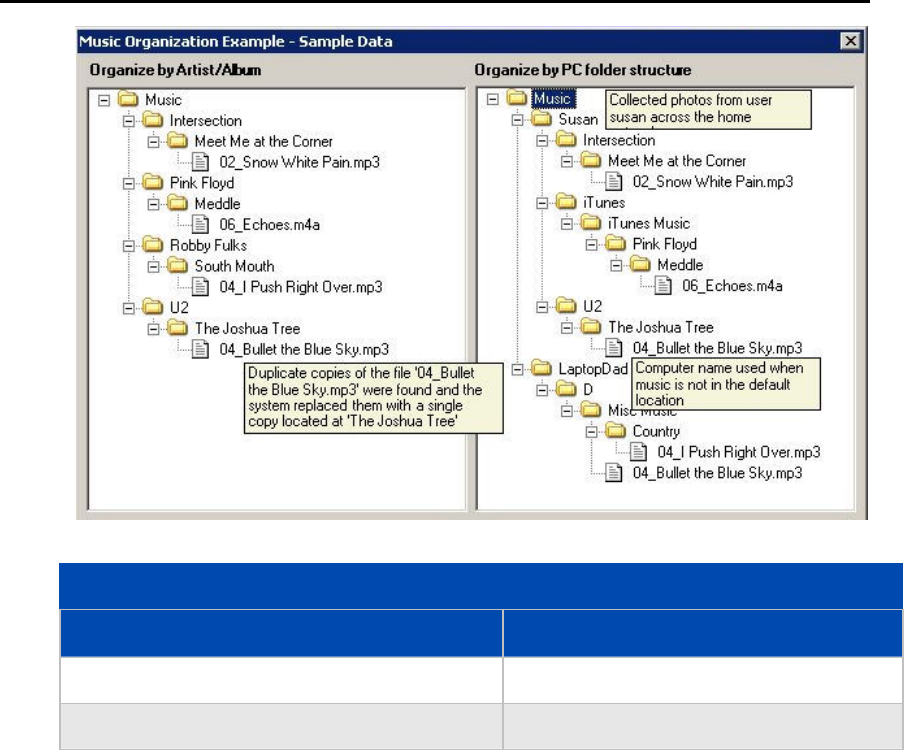
HP MediaSmart Server User's Guide
Things to Consider
Organize by Artist/Album Organize by PC Folder Structure
Uses music file tags to organize files Sorts files by user or source computer
Reduces duplication of files on the server Good for maintaining original music sorting
On the left, the files are organized by Artist/Album
There are two things of interest
1. The two groups of music files are now organized uniformly, and
2. The one song that was duplicated between the two groups is only present once.
The uniform organization is what the Organize by Artist/Album option accomplishes – it uses
the Album and Artist tags within the file to place the files. If a music file doesn’t have both of
these tags set, it will be placed based on its location on the user’s computer. This organizational
approach is useful for organizing multiple music collections into a single collection and reducing
file duplication. This means that browsing the server music share for music streaming will be
more streamlined without duplicate file entries. The example illustrates duplicate file handling by
pointing out the single file entry on the left pane that was duplicated on the right. If the two
duplicate files are different, the newest one is retained on the server.
In contrast, the right pane is organized by PC folder structure
If music is found under a user’s home Music folder, it will be grouped under the user’s name with
the underlying folder organization. This still may include some simplification in that music for
user Susan on computer1 and user Susan on computer2 will be coalesced into a single group. This
may result in some duplicate songs being represented once.
96

HP Media Collector
On the other hand, if the music was found on a computer in a folder other than your home Music
folder, it will be grouped under the computer name, with a path showing their placement on the
computer. This type of organization is most helpful if you have organized your music in a special
way and doesn’t want to lose this folder structure or if multiple users have different quality
versions of the music and you want to maintain the multiple copies of songs.
Configure Media Collector for Videos
To configure Media Collector for Videos, follow the steps below:
1. At the PC, double-click the Windows Home Server icon in the system tray and log on.
At the Mac, select Launch Home Server Console from the Server menu .
2. Click Media and then HP Media Collector in the left menu.
3. Click Configuration.
The HP Media Collector General Settings panel opens.
4. Click Video Settings in the left menu.
You can configure these settings in this tab:
• Video Collection Status—Enable or Disable photo collection
• Video Source—Double-click a computer name to select either My Pictures folders or All
Folders as the source.
Note
If you select All folders, Media Collector may collect video files from your computer
that are not a part of your video collection, such as videos that are associated with
software applications.
97

HP MediaSmart Server User's Guide
MEDIA COLLECTOR STATUS
1. At the PC, double-click the Windows Home Server icon in the system tray and log on.
At the Mac, select Launch Home Server Console from the Server menu .
2. Click Media and then HP Media Collector in the left menu.
3. View the following information.
Client Name—The name of the computer where media is being collected.
Connection Status—The status will be Connected if the server can find the computer on
the network.
Files Copied—The number of files that have been copied to the server. Click Files
Copied to view details. Media Collector keeps track of all of the files that have been
copied to the server. Click the Close button in the upper right corner to return to the
status page.
Files Pending—The number of files that are waiting to be copied to the server.
Files Not Needed—The number of files that were ignored by Media Collector and not
copied to the server. Click Files Not Needed to view details. Select a file in the list to
view the reason it was not copied to the server. Click the Close button in the upper right
corner to return to the status page.
4. Click Reset Database to clear the counts and history for Files Copied, Files Pending, and Files
Not Needed and restart at zero.
HP MEDIA COLLECTOR TROUBLESHOOTING
HP Media Collector is used by the HP MediaSmart Server to copy music, photos, and videos of
users that have accounts on the HP MediaSmart Server.
There are some common causes for the HP Media Collector to appear not to work.
In this article...
No Music, Photos, or Videos are Being Collected
The Server may not have refreshed yet
Media Type is not Enabled for Collection
Home Computer is not Included as a Scanned Computer
No Music, Photos, or Videos are Being Collected
• The aggregation application may not be accessing the desired media files on the client computer
• The server may be down or unreachable
• Services may not be running on the client computer
98

HP Media Collector
• A Firewall may be Blocking Applications or Port 21 TCP/Outbound
The aggregation application may not be accessing the desired media files on
the client computer
Media Collector runs with the permissions of the logged on user, if the material to be aggregated
is in a folder that the user doesn't have permission to access, then that folder's contents can't be
collected when this user is logged in.
The server may be down or unreachable
The client computer cannot access the shares or server console. The server may be down, so
aggregation cannot occur. Restart the server.
Services may not be running on the client computer
Reboot the client computer.
A Firewall may be Blocking Applications or Port 21 TCP/Outbound
If Media Collector is not collecting music, photos, or videos and you use a third party firewall, add
a firewall exception for port 21 TCP/outbound within the local subnet. Consult your software's
documentation for details on how to do this. For additional information, see Update Your
Firewall’s Trusted Program List.
The Server may not have refreshed yet
Click the HP MediaSmart Server tab on the Windows Home Server Console and your media
files should now be listed on the Media Collector status page.
Media Type is not Enabled for Collection
The HP MediaSmart Server may not be set up to scan for photos, music, or videos. Check your
HP Media Collector settings to make sure the media type is configured for collection.
1. At the PC, double-click the Windows Home Server icon in the system tray and log on.
At the Mac, select Launch Home Server Console from the Server menu .
2. Click Settings.
3. Click Media Collector in the left menu of the Windows Home Server Settings dialog.
99
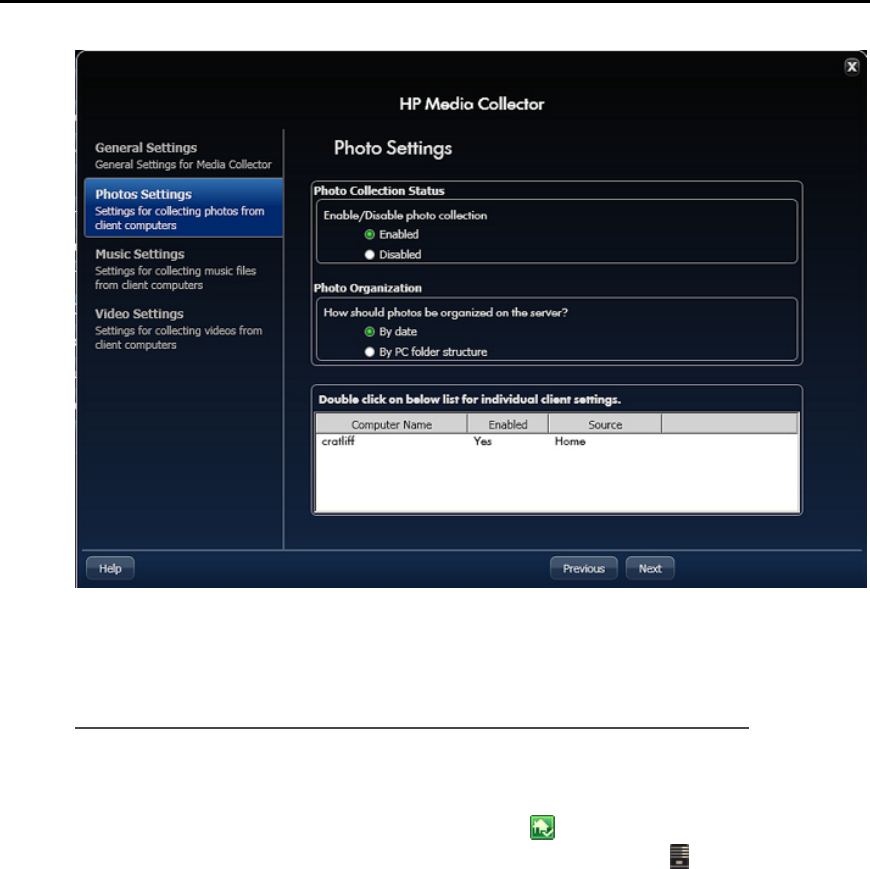
HP MediaSmart Server User's Guide
4. Click the Photos, Music, or Videos tab.
5. Check that the media collection status is set to Enabled.
6. Click OK.
Home Computer is not Included as a Scanned Computer
The HP MediaSmart Server may not be set up to scan one of your network computers. Check
your HP Media Collector settings to make sure all of your home computers are included.
1. At the PC, double-click the Windows Home Server icon in the system tray and log on.
At the Mac, select Launch Home Server Console from the Server menu .
2. Click Settings.
3. Click Media Collector in the left menu of the Windows Home Server Settings dialog.
100
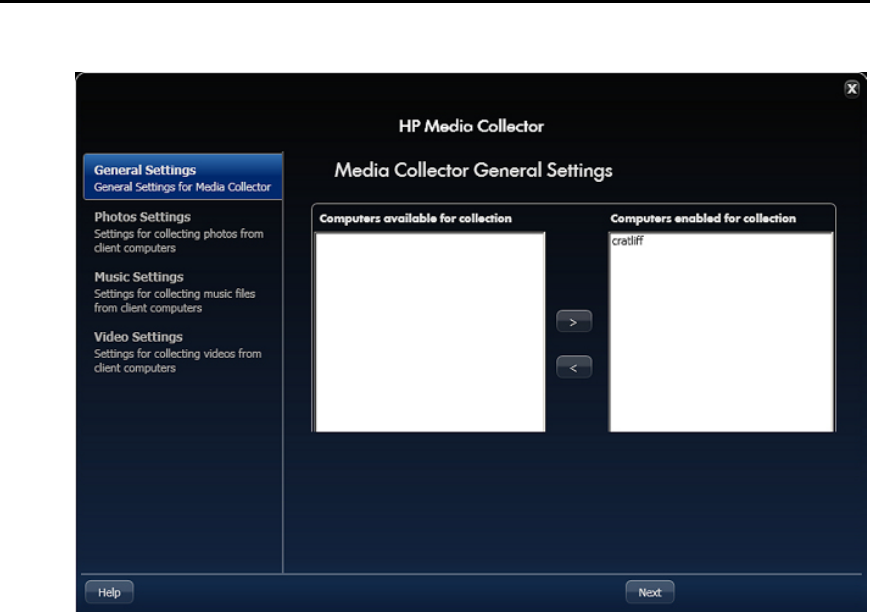
HP Media Collector
4. On the General Settings tab, check that all of the necessary computers are Included in the
Scanned Computers list.
5. Click OK.
101

Chapter 5. HP Video Converter
CONFIGURE VIDEO CONVERTER
The HP Video Converter converts most popular video formats into a file format that can be played
on a variety of devices like notebook PCs, xBox, Playstation, and iPhone. In some cases, you will
want to convert videos because the original video format cannot be played by the video player or
device you are trying to use. In other cases, video conversion can be used to reduce the resolution
and file size so you experience improved performance during video streaming.
In this article...
About Video Converter
Configure Video Converter
Select Video Converter Profile
Input Folders
DVD Settings
Output Settings
Enable Video Converter
About Video Converter
The Video Converter monitors selected shared folders and attempts to perform video conversion
(also known as transcoding) on files with common video file formats. The video converter also
supports DVD file system conversion, for DVD files that are commonly used in camcorders.
Videos are converted to a single file format: an MPEG-4 video file using an H.264 video codec
and AAC stereo audio codec. Check the video player documentation for support of this video
format. At the time of this writing, some devices supporting this format included:
Microsoft xBox 360
Sony PlayStation 3
Sony PlayStation Portable
Apple iPod (newer iPods with video support)
Apple iPhone
Microsoft Zune
103

HP MediaSmart Server User's Guide
Note
The Video Converter will not transcode copy protected DVDs or electronic videos with Digital
Rights Management (DRM) protection.
Configure Video Converter
1. At the PC, double-click the Windows Home Server icon in the system tray and log on.
At the Mac, select Launch Home Server Console from the Server menu .
2. Click Media and then Video Converter in the left menu.
3. Click Configure.
The HP Video Converter Settings panel opens.
Select Video Converter Profile
Perform one of the following options.
Edit—Select a profile to edit and click Next.
Create—Click Create to add a new profile to the list. Name the profile and select settings to use
as a basis for the profile depending on how the converted video files will be used.
Delete—Select a profile and click Delete to remove it from the list.
There are two default profiles.
Full—Full resolution keeps the source video’s screen resolution, and basically creates an output
file with the new format for the provided input. Video and audio quality should be very similar to
the source material for Full resolution videos. You may notice some differences between the
original and Full resolution output, but these differences are minimal in most situations.
Mobile—The Mobile resolution creates a video that is suitable for mobile devices and remote
video streaming (the video will be no larger than QVGA: 320w x 240h). This is to make support
of mobile devices easier and to provide videos suitable for remote media streaming.
104
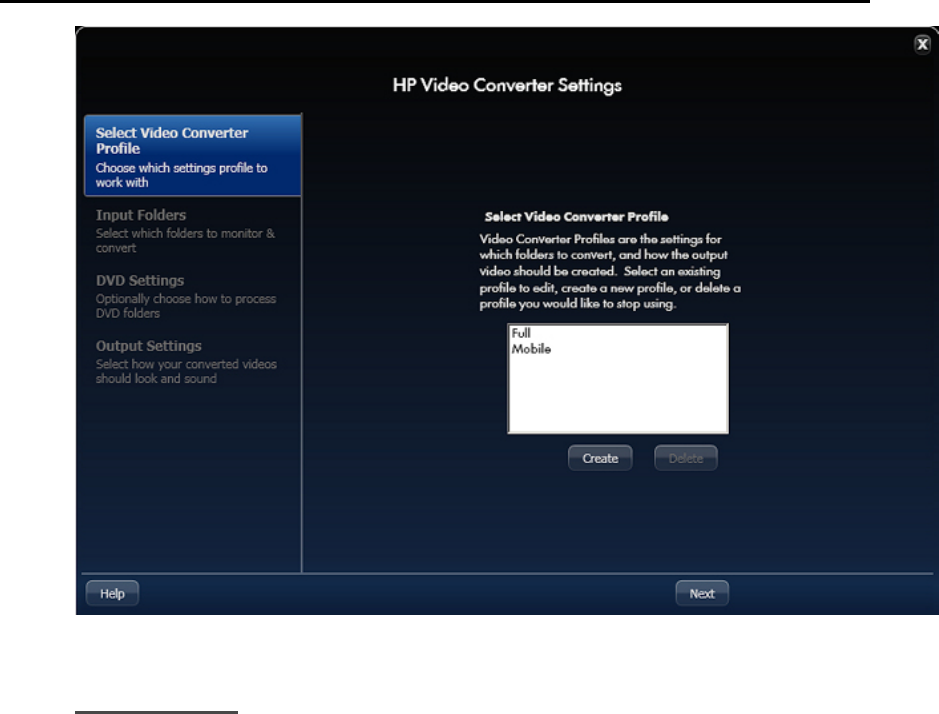
HP Video Converter
Input Folders
Select a shared folder where you will place the original videos that you want to convert. The HP
Video Converter monitors this folder for changes and automatically converts videos that are
placed there. After the video is converted, it is put in the Converted Videos folder.
You can select any number of folders or subfolders to monitor. If you select a folder that has
subfolders, all of the folders within the selected folder will be monitored. For example, if you
select the Videos shared folder and Videos has a subfolder named FamilyMovies, then the Videos
and FamilyMovies folders will be monitored. If you only want the FamilyMovies folder to be
monitored, select that folder and do not select Videos.
105

HP MediaSmart Server User's Guide
DVD Settings
The DVD Settings sections applies to DVD folders, which must be named VIDEO_TS. This
settings allows you to customize how titles within your DVDs should be treated. All DVDs
contain one or more titles, with each title being made up of one or more chapters. Each DVD can
be authored slightly differently, and you may want to consult your DVD creation program or
camcorder documentation for more information on how titles are created and structured. As
explained within the DVD Settings screen, these settings allow you to change how your DVD is
read during conversion.
Break apart each title (RECOMMENDED) - This setting takes each title within your DVD,
and creates a new output file. This option is recommended because it provides a good balance
between making sure all of your DVD content is converted but also breaking up the content into
smaller files.
Use the single longest title - This setting finds the longest duration title within the DVD and
ONLY convert this title. The title number will still be used for the output file name, so if the 3rd
title is the longest duration title your output file might be "My DVD - Title 3.mp4". This setting
works well when you are comfortable that you only want the longest title 100% of the time. This
assumption can be problematic, however, as frequently you may find DVDs with a couple of
longer titles of similar length and this setting prevents you from getting these other longer titles.
Append all titles - This setting is for when you are comfortable that you want the entire DVD
appended into a single output file. If you have DVDs with a relatively small amount of content or
your DVD creation process creates many shorter titles (like some camcorders sometimes may),
then this approach can be the best option.
106
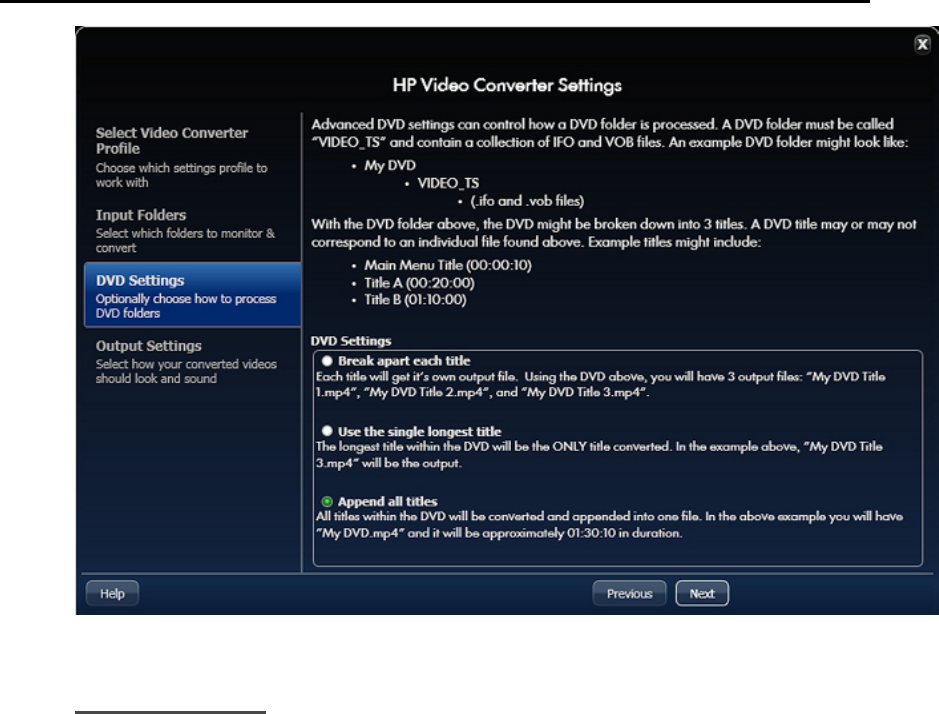
HP Video Converter
Output Settings
• Select Output Preset Settings—Some common uses for converted videos have been anticipated
and are listed here. When you select one of the presets, the rest of the output settings are selected
for you. You may choose to accept these settings as they are or change them to suite your
individual needs. If you do not like the changes you made, you can always return to a preset
setting by clicking one of these options.
• Output Resolution View—This area displays your selected video dimensions on top of some
common video resolutions as a reference point. As you change your video dimensions in the
advanced settings, the Output Resolution View dynamically updates to reflect your changes.
• Required Bandwidth—This gauge estimates the network speed required to view the video after it
is converted. It is calculated by taking the total bit rate (audio + video), and then approximating
the type of network needed to view the converted video.
Why is my total bit rate placed in such a high category?
You may notice that your total bit rate may be low in comparison to the network speed. For
example, a 6 mb/s video will likely be on the upper edge of a WiFi G network (which should
support 54 mb/s). This is due to a couple of different factors:
• The total bit rate is an average, but the maximum bit rate can be up to 3 or 4 times the
average bit rate. This gauge tries to provide extra room in its estimates for this variation.
107

HP MediaSmart Server User's Guide
• Network speeds seldom work 100% efficiently. For example, a WiFi G network under
good conditions can frequently max throughput out at around 20-30 mb/s even if the
reported connected speed is 54 mb/s.
Advanced Output Controls
• Screen Size—The video width and height control the size of the video. If you place "0" values for
both height and width, the source video's dimensions will be used for the output file. If you choose
a specific resolution, you should not feel obligated to create output videos that exactly match your
desired viewing device. For example, if you have a TV that supports 1080p there is no strict rule
that states you should convert videos to match this resolution.
Videos are upscaled when the output resolution is greater than the source material; however, the
quality of this upscaled copy varies a great deal depending upon the source material. That is to
say, a source video that is of poor quality or is very small in display resolution seldom looks
pleasant when upscaled to a 1080p screen size. As rule of thumb, if the source material is of good
quality, you should be able to nearly double the display resolution and only see minor issues.
Also of note is that some smaller devices only support a limited display resolution. You might
need to check device documentation for supported video resolutions.
• Video Frame Rate—The video frame rate effects how smooth a video plays and how good the
video quality is within each frame. Choosing a higher frame rate will create a smoother video, but
may increase the need for a higher video bit rate. Conversely, a lower frame rate can create a more
jumpy video, but each frame may look more crisp and you might be able to use a lower video bit
rate setting.
• Video Bit Rate—The video bit rate controls the average amount of storage dedicated for a video
as it plays. A higher bit rate can cause network problems, but a low bit rate can create low quality
videos. Staying within the recommended green area may help you determine the best video bit rate
to use. The green area is based on the size of your output video.
108
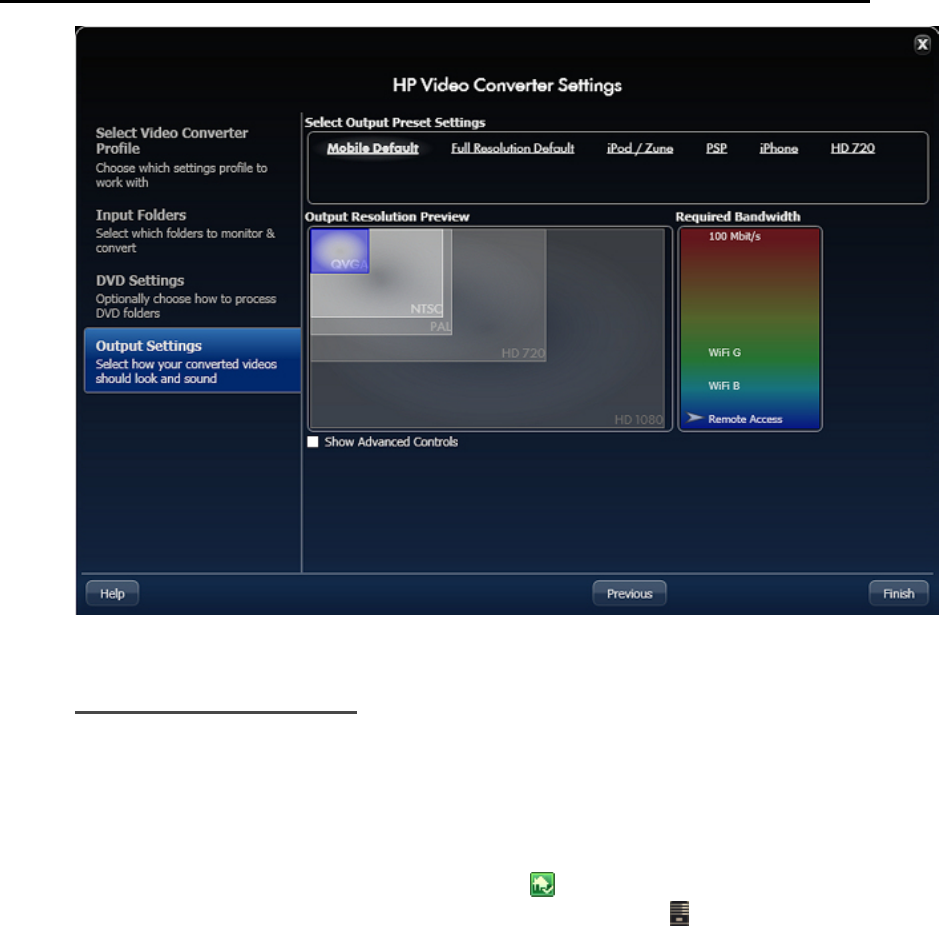
HP Video Converter
Enable Video Converter
After you click Finish on the HP Video Converter Settings, you are returned to the Converter
Status page. Click Enable Video Converter to begin converting videos.
VIDEO CONVERTER STATUS
1. At the PC, double-click the Windows Home Server icon in the system tray and log on.
At the Mac, select Launch Home Server Console from the Server menu .
2. Click Media and then Video Converter in the left menu.
3. Select options on the Video Converter Status page.
Enable Video Converter—Check to turn Video Converter on. Clear to turn it off. If
you turn Video Converter off after it has been in use, it will remember videos that have
already been converted or canceled. Videos that were in progress or waiting to be
converted will be removed from the queue.
Sort by—Choose an option from the list to sort converted videos.
Show All Converted Videos—Check this box to display your entire video converter
history. Clear this check box to list videos that are coping to your source folder, currently
being converted, or are in the queue to be converted.
109

HP MediaSmart Server User's Guide
The buttons at the bottom of the page only apply to selected videos on the status page. To select
multiple continuous videos, click the top video and Shift+Click the bottom one. To select random
videos, hold down the Ctrl key and click each video individually. Buttons are active when they can
be applied to the entire selection.
Re-convert—If the video conversion fails or is interrupted, select the video in the status
list and click Re-convert to attempt the conversion again.
Cancel—Click Cancel to remove a video from the queue to be converted. If you later
decide to convert a canceled video, you can see it by checking Show All Converted
Videos. Then, select the canceled video and click Re-convert.
Resume—Once the Video Converter is paused, you can restart it by clicking Resume.
The Video Converter will continue converting the video that it was last working on.
Pause—You can pause the Video Converter when you select a video that is in progress
and click Pause. Use this option when you want to temporarily stop Video Converter but
plan to resume it later.
TROUBLESHOOTING AND FAQS
Examples of Video Converter Profiles
This page gives a couple of examples of Video Converter profiles and their particular uses.
In this article...
Create a Profile to Use When You Want to Stream Videos to an iPhone using iStream
Create a Profile to Use When You Want to Copy Converted Videod to a Mobile Device
Create a Profile to Use When You Want to Stream Videos to an
iPhone using iStream
The HP MediaSmart Server iStream is an application that allows you to stream photos, music, and
videos stored on your HP MediaSmart Server to your iPhone or iPod touch from anywhere that
you have an Internet connection. iStream can be downloaded for free from the Apple App Store.
When using iStream, the video is on your server and it is streamed to your iPhone over an Internet
connection. The quality of the Internet connection can effect playback of the video. iStream
works best on high speed connections like 3G and WiFi. So, you want to create a profile that
creates a converted video with a high enough resolution that the video is enjoyable to watch and a
small enough file size so that the streams smoothly to your iPhone.
1. At the PC, double-click the Windows Home Server icon in the system tray and log on.
At the Mac, select Launch Home Server Console from the Server menu .
2. Select the HP MediaSmart Server tab.
3. Click Media and then Video Converter in the left menu.
4. Click Configure.
110

HP Video Converter
5. On the Select Video Converter Profile page, click Mobile and then Next.
6. On the Input Folders page, select Videos and click Next.
This assumes you will place all of your original videos that you want to convert in the videos
folder or a subfolder within Videos, and that you want to convert all of your videos using the
mobile profile.
If you want to convert a some of your videos for mobile streaming but not all of them, you could
create a subfolder within Videos called Mobile (\\Videos\Mobile) and select Mobile as your input
folder instead of Videos.
7. On the DVD Settings page, select Break apart each title and click Next.
This setting takes each title within your DVD, and creates a new output file. This option is
recommended because it converts all of your DVD content and it breaks up the content into
smaller files based on the DVD titles. When you watch the video using iStream, you will stream
only the converted video title that contains the movie, and not other artifacts like menus or movie
previews.
8. On the Output Settings page, verify that Mobile Default is selected and click Finish.
The HP Video Converter will monitor the Videos input folder, or other folder that you selected,
for new videos and convert them using the mobile settings. The final videos are placed in the
Converted Videos shared folder and are ready to be streamed using iStream. These settings are
also suggested for streaming videos to a Mac or PC using the HP Media Streamer.
Create a Profile to Use When You Want to Copy Converted Videos
to a Mobile Device
You will have different considerations if you want to copy a video to a mobile device such as a
Microsoft Zune or iPod Touch. In this case, the video will be on your mobile device so you do not
have to worry about Internet connection speeds that you have when streaming videos. This often
means that the video resolution can be higher than it is when streaming videos. However, you will
still want to keep the file size relatively small so the video does not consume all of the space on
your mobile device.
1. At the PC, double-click the Windows Home Server icon in the system tray and log on.
At the Mac, select Launch Home Server Console from the Server menu .
2. Select the HP MediaSmart Server tab.
3. Click Media and then Video Converter in the left menu.
4. Click Configure.
5. On the Select Video Converter Profile page, click Create.
A dialog box opens.
6. Give the profile a Name, such as My iPod, and select iPod/Zune from the drop down list.
7. Click Create to return to the Select Video Converter Profile page.
8. Select the profile you just created from the list and click Next.
9. On the Input Folders page, select Videos and click Next.
Assuming you will place all of your original videos that you want to convert in the videos folder
111

HP MediaSmart Server User's Guide
or a subfolder within Videos, and that you want to convert all of your videos using this profile.
If you want to convert a some of your videos using this profile but not all of them, you could
create a subfolder within Videos called My iPod (\\Videos\My iPod) and select My iPod as your
input folder instead of Videos.
10. On the DVD Settings page, select Break apart each title and click Next.
Since this setting converts each title on your DVD as a separate output file, you will only need to
copy the converted video file to your mobile device that contains the movie and not other content
like menus or movie previews.
11. On the Output Settings page, verify that iPod/Zune is selected and click Finish.
The HP Video Converter will monitor the Videos input folder, or other folder that you selected,
for new videos and convert them using the iPod/Zune settings. The final videos are placed in the
Converted Videos shared folder and are ready to be copied to your mobile device.
Using Media Collector with Video Converter
If you have videos on multiple network computers and you want to convert them using Video
Converter, it may save you time to move the videos to the server using Media Collector. You may
find this scenario ideal if you have little to moderate video content on your network computers. If
you have a lot of video content on your network computers, you may want to consider the Video
Converter profile settings you are using and how much time will be required to convert the videos
and how much disk space will they take up on the server.
1. At the PC, double-click the Windows Home Server icon in the system tray and log on.
At the Mac, select Launch Home Server Console from the Server menu .
2. If you have not already, create user accounts on your server.
User accounts give network computers a way to authenticate with the server during media
collection. See Enable Guest Account and Set up User Accounts.
3. Configure Media Collector to copy all videos on your network computers to the videos shared
folder.
See Configuring Media Collector General Settings and Configuring Media Collector for Videos.
4. Click Media and then Video Converter in the left menu.
5. Click Configure and create a Video Converter profile.
6. While creating the profile, select the Videos shared folder as your input folder since that is where
Media Collector places videos.
For more information on creating profiles, see Configure Video Converter.
Depending on the number of videos you are converting and their size, the HP Video Converter
may take a very long time to convert files.
Converting Non-Copy Protected DVDs
Video content is becoming more and more popular, whether you're recording your last vacation or
creating a YouTube video. If you used software to create a DVD, you can use the HP Video
112
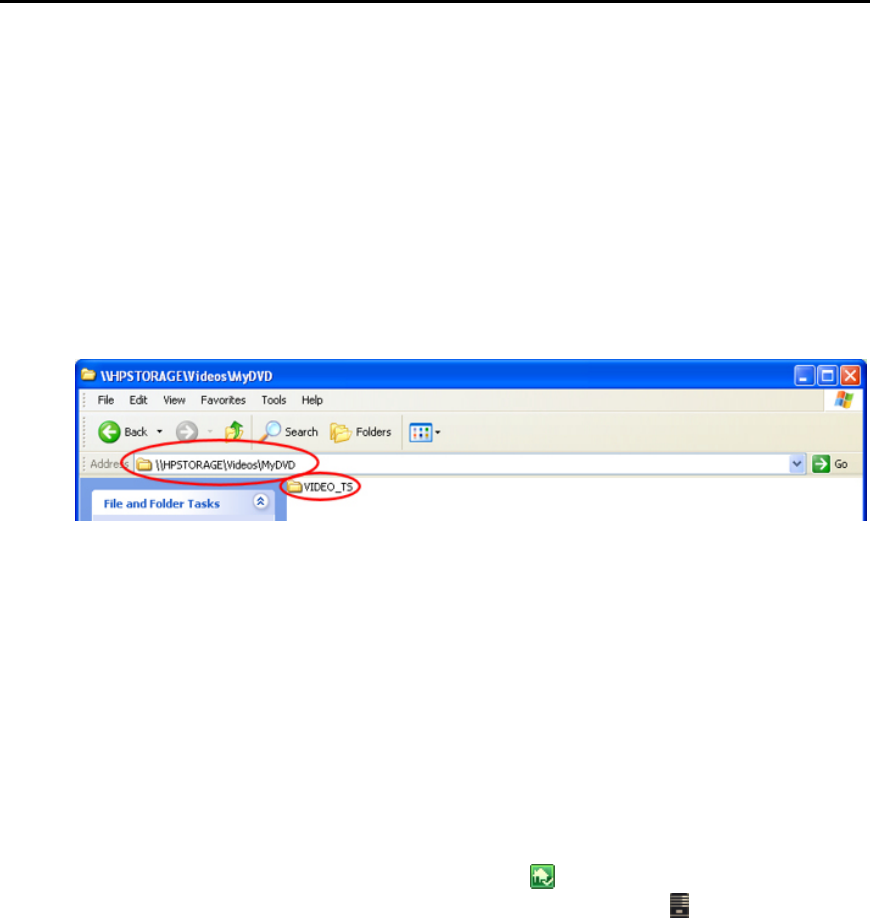
HP Video Converter
Converter to transcode the DVD into a format suitable to streaming to many devices on your
network, in your home, or mobile devices.
1. Insert the DVD in your computer's DVD-ROM drive.
2. Navigate to a folder on your server that is enabled for video conversion.
This is typically your videos shared folder at \\hpstorage\videos. If you changed the name of your
server during the installation, the path will be different. Navigate to \\<server name>\videos.
3. Create a folder for the DVD content.
4. Navigate to the DVD-ROM in Windows Explorer and copy the Video_TS folder to the folder you
created on your server.
In the example, the full path on the server is \\hpstorage\videos\MyDVD\Video_TS.
5. When the HP Video Converter scans the Videos shared folder it will transcode the DVD content
and put it in a subfolder within \\hpstorage\converted videos.
Giving Users Access to the Converted Videos Folder
You may want to give users on your network access to the Converted Videos folder so they can
see what is in the folder or so they can add, delete, or change videos from the folder. By default,
users have no access to the Converted Videos folder. Users that do not have access to the
Converted Videos folder are still able to stream content from the folder.
Complete the following steps to change user permissions.
1. At the PC, double-click the Windows Home Server icon in the system tray and log on.
At the Mac, select Launch Home Server Console from the Server menu .
2. Click the User Accounts tab at the top of the page. If the User Accounts Setup dialog displays
click OK.
3. Double-click a user account to open the Properties dialog.
4. Select the Shared Folder Access tab.
5. Select an access level for the user—Full, Read, or None.
• Full—The user will be able to create, change, or delete any files in the folder.
• Read—The user will only be able to read files in the folder. They cannot create, change,
or delete files in the folder.
• None—The user will not be able to access any files in the folder.
6. Click OK.
113

HP MediaSmart Server User's Guide
Enabling Converted Videos for TwonkyMedia
The Converted Videos folder is enabled for TwonkyMedia by default. If the Converted Videos
folder is disabled, your mobile devices and in-house media streaming will not see the converted
videos. Complete the following steps to enable the Converted Videos folder for TwonkyMedia.
1. At the PC, double-click the Windows Home Server icon in the system tray and log on.
At the Mac, select Launch Home Server Console from the Server menu .
2. Click Settings in the upper right of the Console.
3. Click TwonkyMedia in the left menu of the Settings dialog.
The right pane shows current TwonkyMedia status for Media Sharing Folders, Media Receivers,
and Maintenance.
4. If Converted Videos is not listed under Media Sharing Folders, click Add.
5. Select the Converted Videos folder and click Videos for the Content Type.
6. Click OK to return to the Settings dialog.
Converted Videos should be listed in the Settings dialog with a green light next to it. If the light is
not green, double-click Converted Videos.
7. Click OK to close the Setting dialog.
Supported Video Formats
The following table lists several popular video formats supported by the Video Converter. This
list is not comprehensive. For a comprehensive list, see http://www.hp.com/support. A list of
unsupported formats is also included.
Supported Video Formats
Container Video Audio
AVI DivX (4,5,6) mp3
AVI DivX (4,5,6) aac
AVI XviD mp3
AVI XviD aac
WMV WMV, VC1 WMA
MPG MPEG-1, MPEG-2 mp2, PCM, AC3
AVI MJPEG ADPCM, PCM
VOB MPEG-2 AC3, ADPCM, PCM
MOV MJPEG-A , B PCM
114
HP Video Converter
Supported Video Formats
Container Video Audio
MP4,M4V AVC (h264) AAC
MP4, M4V MPEG-4 AAC
DVR-MS MPEG-2 AC3
Unsupported Video Formats
Container Video Audio
WTV MPEG-1, 2, 4; WMV, VC1
MOV AVC (h264) AAC and others
Multiple other
containers AVC (h264)
MKV AVC (h264)
MTS AVC (h264)
No Support for ISO
To determine if your video is compatible with Video Converter, check the following
• Check to see if the video file extension matches one of those listed in the Containers column. If it
matches, it is likely that the video is compatible with Video Converter. However, if the embedded
video or audio is an unsupported format, the file will not convert.
• See the documentation that came with the software or device that you used to create the video.
• Try converting a single test video using Video Converter.
Video Conversion Fails
1. To view the status of video conversion at the PC, double-click the Windows Home Server icon
in the system tray and log on.
At the Mac, select Launch Home Server Console from the Server menu .
2. Click Media and then Video Converter on the left side of the Console.
3. Check Show All Converted Videos.
4. Click the Status column header to sort and group all Failed videos conversions together.
5. Examine the failed video conversions to determine the reason they failed.
115

HP MediaSmart Server User's Guide
116
• Copy protected DVD—The HP Video Converter will not transcode copy protected
DVDs.
DRM protected content—The HP Video Converter will not transcode electronic videos with
Digital Rights Management (DRM) protection.
• Unsupported video format—The original video format is unsupported by the HP Video
Converter.
• Media Collector files—If you copy videos to the server using Media Collector, the HP
Video Converter may start transcoding videos before they are completely copied to the
server. If this happens, the video conversion will fail. Select the video in the Converter
Status list and click Re-Convert to attempt to transcode the video again. See
Automating Video Conversion for more information on using Media Collector to copy
videos to the server.
Network Bandwidth
One benefit of using the Full resolution output settings is that older video formats like MPEG-2
videos are often much larger in size than the format used by the video converter. The output of a
Full resolution video conversion can be approximately 25% of the file size of an original DVD
(MPEG-2). This significant reduction in size can make streaming via 802.11G less problematic
(although many factors impact streaming videos wirelessly and results may vary widely).
When considering remotely streamed video content (using a Windows Home Server with Remote
Access Enabled), Full resolution videos will be difficult to stream remotely on many broadband
connections. HP recommends using the Mobile resolution videos when streaming remotely for
more success. These videos are very limited in resolution and visual fidelity, to provide a better
chance for successfully accessing videos remotely. The Mobile resolution setting produces a
video that is commonly supported for the mobile devices listed above. The Mobile resolution is
also ideal for streaming playback on Internet connected PCs using the HP Media Streamer or the
HP MediaSmart Server iStream application for iPhone or iPod touch.

Chapter 6. Media Streaming
ABOUT STREAMING MEDIA
Streaming media allows you to enjoy your videos, music, and photos in any room of your home
and outside your home. Even when you are away from home, you can enjoy your media on any
computer that has a Web browser.
In this article...
Streaming Media Requirements
Streaming Media Types
Putting Media on the Server
Streaming to your Television, Stereo, and Home PC
Streaming to Xbox
Streaming to PlayStation3
Streaming to a Remote Computer
Streaming to iTunes
Streaming Media Requirements
Before Streaming Media can work, you must:
• Store media on the HP MediaSmart Server
• Set up and enable Remote Access
• Set up Digital Media Receivers in your home
Streaming Media Types
Your HP MediaSmart Server can only stream media files such as music, photos, and videos. Non-
media files are not available for streaming (Microsoft Word files, Spreadsheet files, etc).
Putting Media on the Server
You can put media on your HP MediaSmart Server in two ways:
• Drag and drop media files to the folders on your Server
• Configure Media Collector to copy files to your Server
117

HP MediaSmart Server User's Guide
Media Collector scans the computers in your home network and copies media to the server. You
can choose how often Media Collector copies files; and you can choose what Media Collector
copies and how to organize media on the server.
Streaming to your Television, Stereo, and Home PC
Your HP MediaSmart Server uses Digital Media Servers to stream media from the Server to a
Digital Media Receiver that is attached to your television and stereo.
Streaming to Xbox
1. Open Xbox and navigate to My Xbox.
2. Select either Music Library, Picture Library, or Video Library.
3. Select hpstorage from the list of sources.
If you renamed your server during the initial software installation, that name will be listed.
4. Navigate to the file you want to view or play.
Streaming to PlayStation3
1. Open PlayStaion3 and navigate to Photo, Music, or Video.
2. Select hpstorage from the list of sources.
If you renamed your server during the initial software installation, that name will be listed.
3. Navigate to the file you want to view or play.
Streaming to a Remote Computer
You can stream from the Internet using the HP Web Streamer application. When you are traveling,
you can stream media from your HP MediaSmart Server to any computer that has a Web browser.
Your Server has a Digital Media Server called TwonkyMedia and a Web server. TwonkyMedia
prepares your media for streaming and the Web server streams media to the Internet where your
computer can play it on a Web browser.
Streaming to iTunes
You can listen to the music files from your HP MediaSmart Server using iTunes. You cannot
stream photos or videos to iTunes, only music files. iTunes can stream DRM-protected media.
IN-HOME STREAMING
In this article...
Verify Media Server is Enabled
Configure TwonkyMedia to Stream Photos, Music, and Videos
Configure Server for iTunes
118
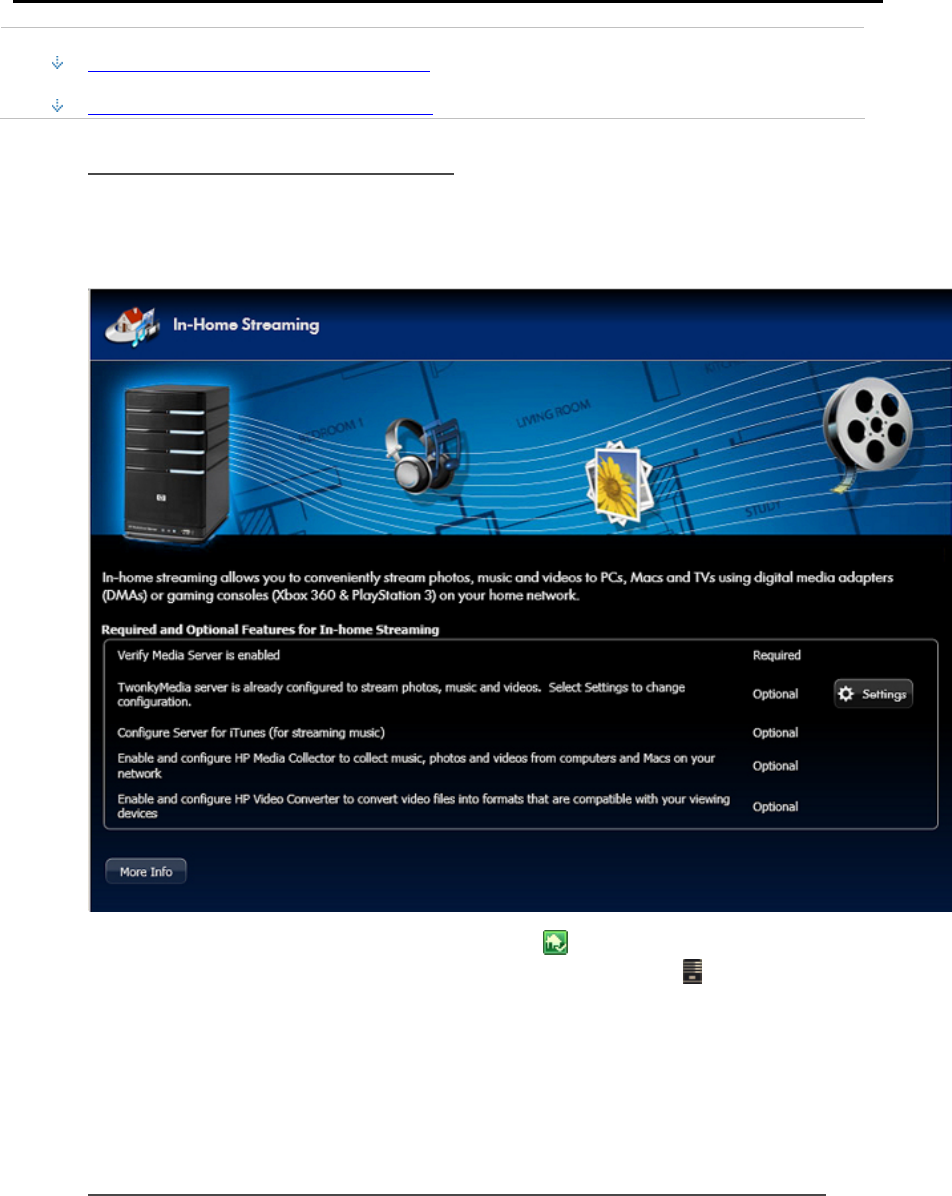
Media Streaming
Enable and Configure HP Media Collector
Enable and Configure HP Video Converter
Verify Media Server is Enabled
Before you can stream photos, music, and videos in the home, Media Server must be enabled.
Media Server is enabled out-of-the-box. To verify that Media Server is enabled, perform the
following steps.
1. At the PC, double-click the Windows Home Server icon in the system tray and log on.
At the Mac, select Launch Home Server Console from the Server menu .
2. Click Media and then In-home Streaming in the left menu.
3. Verify the button at the top of the page says Stop Sharing.
If the button says Start Sharing, click it to enable media sharing.
Configure TwonkyMedia to Stream Photos, Music, and Videos
TwonkyMedia is enabled by default in your HP MediaSmart Server. To configure or change
TwonkyMedia settings, follow these steps:
119

HP MediaSmart Server User's Guide
1. At the PC, double-click the Windows Home Server icon in the system tray and log on.
At the Mac, select Launch Home Server Console from the Server menu .
2. Click Settings in the upper right corner of the Console.
3. Click TwonkyMedia in the left menu.
You can change settings here by using these tabs:
• Media Sharing Folders—Add, Edit, or Remove.
• Media Receivers—Add, Edit, or Remove. Check Automatic Sharing here to enable
sharing for new media receivers automatically.
• Maintenance—Rebuild the database, and Reset to Default all media server settings.
Create and View Log Files for debugging purposes. And you can change the default Web
server port.
5. Click OK to finish.
Configure Server for iTunes
You can centralize your iTunes library for playback on any computer on your home network that
runs iTunes.
Your Server is enabled for iTunes by default. To set up your Server for iTunes follow these steps:
1. At the PC, double-click the Windows Home Server icon in the system tray and log on.
At the Mac, select Launch Home Server Console from the Server menu .
2. Select Media and then Server for iTunes in the left menu.
3. Click Configuration.
Here you can set up the following:
• Status—enable or disable.
• Shared name—specify the shared name you want to display in iTunes.
• Require password—check to require password. The default setting here is no password. If you
assign a password, then only users who provide the correct password can play music from your
Server's shared library.
• Check interval—how often to check for music that has been added to the shared Music folder on
the server. By default this is set to check every 5 minutes.
5. Click OK to finish.
Enable and Configure HP Media Collector
1. At the PC, double-click the Windows Home Server icon in the system tray and log on.
At the Mac, select Launch Home Server Console from the Server menu .
120

Media Streaming
2. Click Media and then HP Media Collector in the left menu.
3. Click Configuration.
The HP Media Collector General Settings panel opens.
4. Complete the steps in the wizard.
For additional information, see the following help topics.
Configuring Media Collector General Settings
Configuring Media Collector for Photos
Configuring Media Collector for Music
Configuring Media Collector for Videos
Enable and Configure HP Video Converter
1. At the PC, double-click the Windows Home Server icon in the system tray and log on.
At the Mac, select Launch Home Server Console from the Server menu .
2. Click Media and then Video Converter in the left menu.
3. Click Configure.
The HP Video Converter Settings panel opens.
4. Complete the steps in the wizard.
For additional information, see Configure Video Converter.
WEB/IPHONE STREAMING
In this article...
Configure Remote Access
Create User Account with Remote Access Enabled
Verify Media Server is Enabled
Configure TwonkyMedia to Stream Photos, Music, and Videos
Enable and Configure HP Media Collector
Enable and Configure HP Video Converter
121
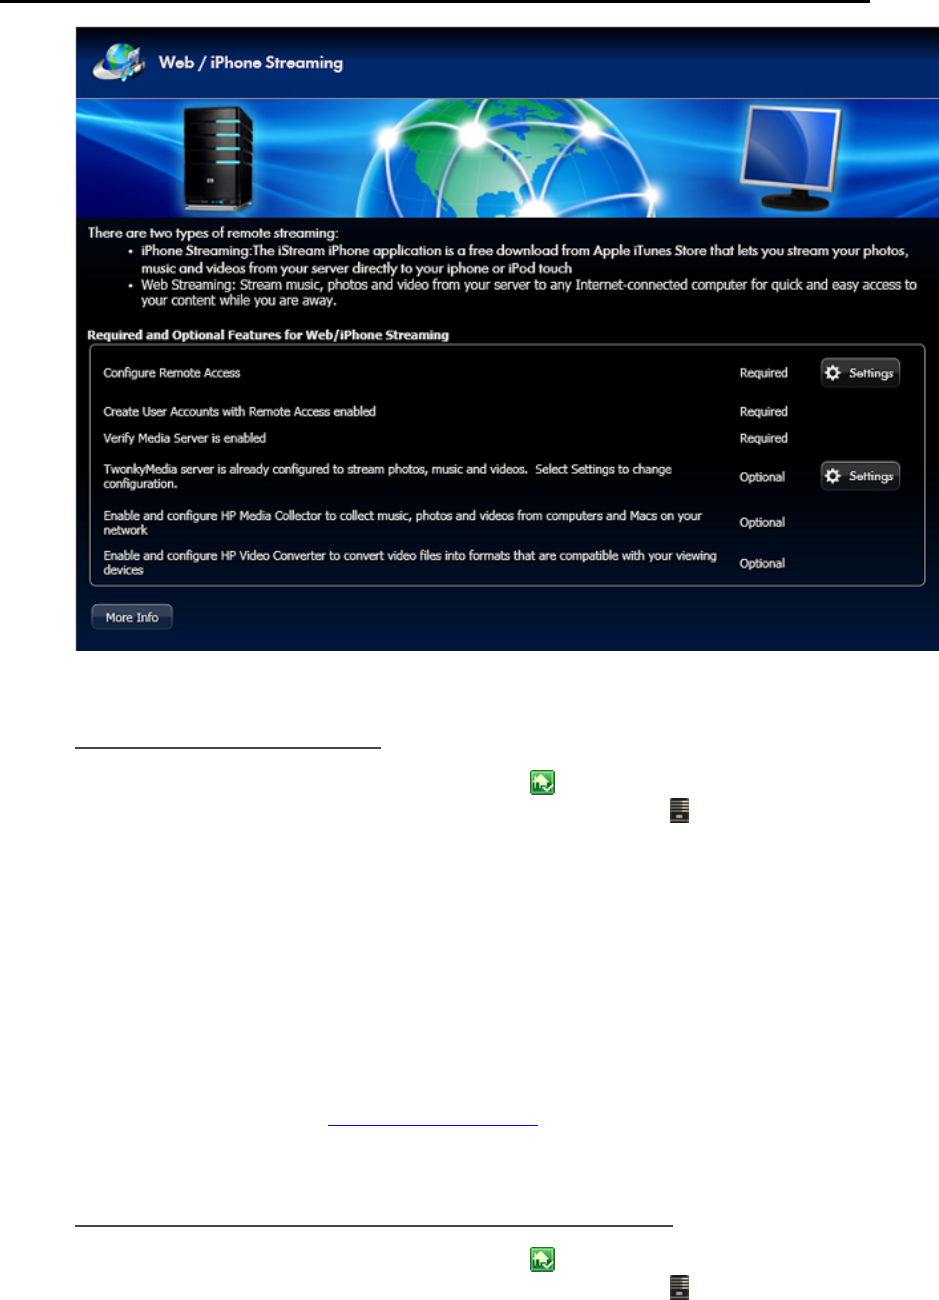
HP MediaSmart Server User's Guide
Configure Remote Access
1. At the PC, double-click the Windows Home Server icon in the system tray and log on.
At the Mac, select Launch Home Server Console from the Server menu .
2. Click Settings in the upper right of the Console.
3. Click Remote Access in the left menu.
4. Click to Turn on remote access.
5. The wizard then prompts you to select a Domain Name Provider and create a domain name.
6. Once the wizard is complete, customize Web site settings as desired.
7. Click OK.
For additional information, see Configure Remote Access.
Create User Account with Remote Access Enabled
1. At the PC, double-click the Windows Home Server icon in the system tray and log on.
At the Mac, select Launch Home Server Console from the Server menu .
122

Media Streaming
2. Click the User Accounts tab at the top of the page. If the User Accounts Setup dialog displays
click OK.
3. Click Add, this will open the Add User Account screen. enter user information. Check the
Enable Remote Access for this user check box. Make an appropriate choice concerning allowing
access to computer and folders.
4. Click Next.
5. Enter and confirm a strong password. A strong password is suggested to ensure security and is
required to use remote access. A strong password must be at least 7 characters long and must
fulfill three of the following four character criteria:
• Uppercase characters
• Lowercase characters
• Numbers
• Symbols (such as !, @, #, and so on.)
7. Click Next.
8. Select access to shared folders
9. Click Finish.
10. Click Done.
For additional information, see Enable Guest Account or Set up User Accounts.
Verify Media Server is Enabled
1. At the PC, double-click the Windows Home Server icon in the system tray and log on.
At the Mac, select Launch Home Server Console from the Server menu .
2. Click Media and then In-home Streaming in the left menu.
3. Verify the button at the top of the page says Stop Sharing.
If the button says Start Sharing, click it to enable media sharing.
Configure TwonkyMedia to Stream Photos, Music, and Videos
TwonkyMedia is enabled by default in your HP MediaSmart Server. To configure or change
TwonkyMedia settings, follow these steps:
1. At the PC, double-click the Windows Home Server icon in the system tray and log on.
At the Mac, select Launch Home Server Console from the Server menu .
2. Click Settings in the upper right corner of the Console.
123

HP MediaSmart Server User's Guide
3. Click TwonkyMedia in the left menu.
You can change settings here by using these tabs:
• Media Sharing Folders—Add, Edit, or Remove.
• Media Receivers—Add, Edit, or Remove. Check Automatic Sharing here to enable
sharing for new media receivers automatically.
• Maintenance—Rebuild the database, and Reset to Default all media server settings.
Create and View Log Files for debugging purposes. And you can change the default Web
server port.
5. Click OK to finish.
Enable and Configure HP Media Collector
1. At the PC, double-click the Windows Home Server icon in the system tray and log on.
At the Mac, select Launch Home Server Console from the Server menu .
2. Click Media and then HP Media Collector in the left menu.
3. Click Configuration.
The HP Media Collector General Settings panel opens.
4. Complete the steps in the wizard.
For additional information, see the following help topics.
Configuring Media Collector General Settings
Configuring Media Collector for Photos
Configuring Media Collector for Music
Configuring Media Collector for Videos
Enable and Configure HP Video Converter
1. At the PC, double-click the Windows Home Server icon in the system tray and log on.
At the Mac, select Launch Home Server Console from the Server menu .
2. Click Media and then Video Converter in the left menu.
3. Click Configure.
The HP Video Converter Settings panel opens.
4. Complete the steps in the wizard.
For additional information, see Configure Video Converter.
124

Media Streaming
TWONKYMEDIA FOR MEDIA SHARING
About TwonkyMedia
We strongly recommend that you use TwonkyMedia as your Digital Media Server. TwonkyMedia
is enabled by default in your HP MediaSmart Server. TwonkyMedia includes these features:
Allows your digital media receiver (DMR) to see photo thumbnails for pictures and album artwork
for music
Supports remote media streaming
• Supports more media formats than Windows Media Connect
Complies with the Digital Living Network Alliance (DLNA) protocol which allows support for
more DMRs
In this article...
File Compatibility for Local Streaming
TwonkyMedia Default Settings
UPnP A/V and DLNA
TwonkyMedia and Remote Streaming
File Compatibility for Local Streaming
The table below compares local streaming file compatibility between TwonkyMedia and Windows
Media Connect.
TwonkyMedia and Windows
Media Connect File
Compatibility
File
Types TwonkyMedia Windows
Media
Connect
Music Formats
3gp Yes
ac3 Yes
aiff Yes
asf Yes Yes
FLAC Yes
LPCM Yes
m4a Yes
125

HP MediaSmart Server User's Guide
TwonkyMedia and Windows
Media Connect File
Compatibility
File TwonkyMedia Windows
Types Media
Connect
mp1 Yes
mp2 Yes
mp3 Yes
mp4 Yes
mpa Yes
ogg Yes
wav Yes Yes
wma Yes Yes
Picture Formats
bmp Yes Yes
gif Yes Yes
jpg Yes Yes
png Yes Yes
tif, tiff Yes Yes
Video Formats
3gp Yes
asf Yes
avi Yes Yes
DivX Yes
dvr-ms Yes Yes
m1v Yes
m4v Yes
mpe Yes
mpg/mpeg Yes Yes
126

Media Streaming
TwonkyMedia and Windows
Media Connect File
Compatibility
File
Types TwonkyMedia Windows
Media
Connect
MPEG-1 Yes Yes
MPEG-2 Yes
MPEG-2-
T-S Yes
MPEG-4 Yes
vdr Yes
vob Yes
wmv Yes Yes
Xvid Yes
Playlist Formats
m3u Yes Yes
pla Yes
wpl Yes Yes
TwonkyMedia Default Settings
1. At the PC, double-click the Windows Home Server icon in the system tray and log on.
At the Mac, select Launch Home Server Console from the Server menu .
2. Click Settings in the upper right corner of the Console.
3. Click TwonkyMedia in the left menu.
TwonkyMedia has these default settings in your HP MediaSmart Server:
Enables three folders for media streaming (You can add more.):
Music—music only (album art is displayed but is not shared as a picture)
Photos—music, photos, and videos
Videos—videos only
Gives all newly-detected DMRs access to your media
127

HP MediaSmart Server User's Guide
UPnP A/V and DLNA
Universal Plug and Play Audio Video (UPnP A/V) and Digital Living Network Alliance (DLNA)
define standard network protocols for streaming media.
• UPnP A/V is a set of network protocols that allow networked devices to communicate seamlessly
in a home networking environment. The Digital Media Servers on your HP MediaSmart Server,
TwonkyMedia and Windows Media Connect, use UPnP/AV.
• DLNA is a set of standards (that includes UPnP A/V) for sharing media between devices.
TwonkyMedia is DLNA compliant. Windows Media Connect is not. This compliance allows
TwonkyMedia to work with more DMRs.
TwonkyMedia and Remote Streaming
You can stream media to your laptop in the hotel room or to your friend’s computer in London.
TwonkyMedia takes media from the folders on your disk and streams this to the Web server. The
Web server streams your media files to the Internet where you can access them from any computer
that has an Internet browser.
Configure TwonkyMedia for Streaming Media
TwonkyMedia is enabled by default in your HP MediaSmart Server. To configure or change
TwonkyMedia settings, follow these steps:
1. At the PC, double-click the Windows Home Server icon in the system tray and log on.
At the Mac, select Launch Home Server Console from the Server menu .
2. Click Settings in the upper right corner of the Console.
3. Click TwonkyMedia in the left menu.
You can change settings here by using these tabs:
• Media Sharing Folders—Add, Edit, or Remove.
• Media Receivers—Add, Edit, or Remove. Check Automatic Sharing here to enable
sharing for new media receivers automatically.
• Maintenance—Rebuild the database, and Reset to Default all media server settings.
Create and View Log Files for debugging purposes. And you can change the default Web
server port.
5. Click OK to finish.
128
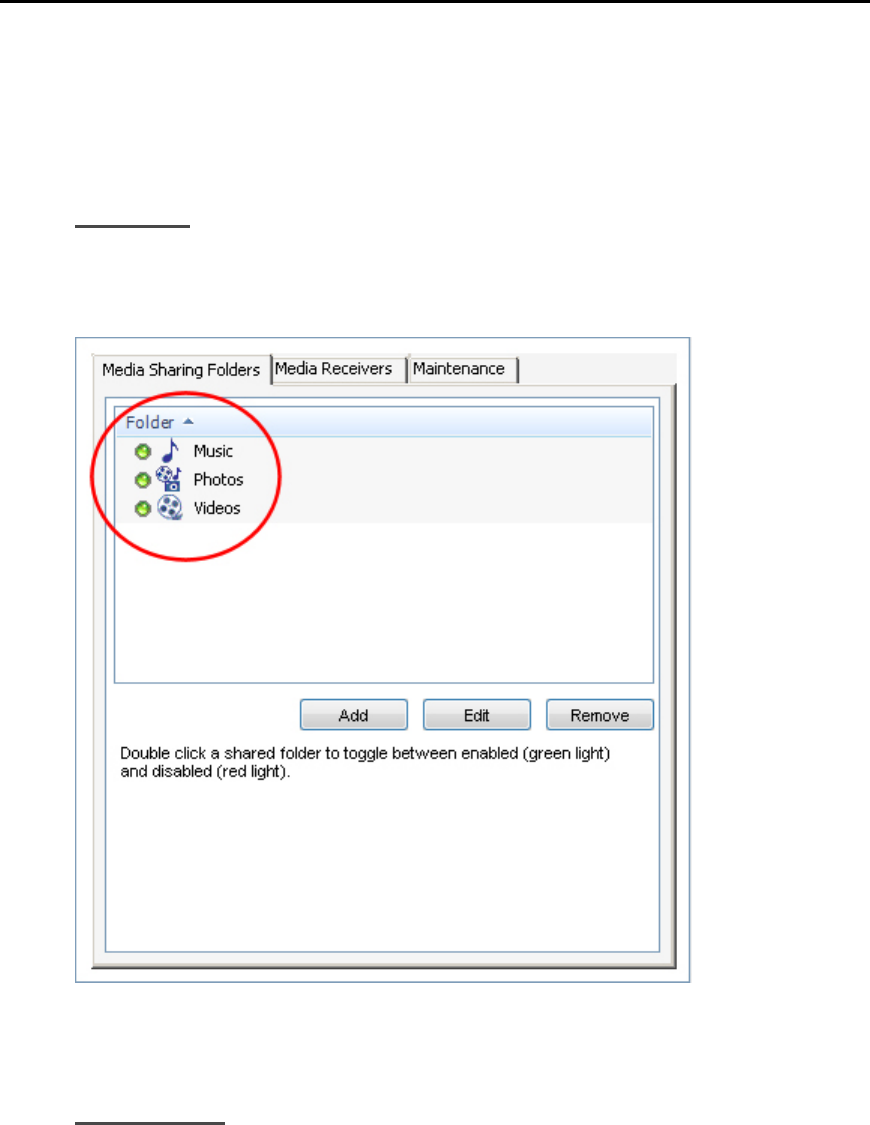
Media Streaming
Troubleshooting and FAQs
TWONKYMEDIA: DISABLING MEDIA SHARING FOLDERS
STILL STREAMS TO DMA
Symptom
TwonkyMedia was connected to a DMA and now I want to Disable Media Sharing. I go to the
TwonkyMedia, click Media server settings and click the Media Sharing Folders tab. I double click
on each of the folders to disable sharing.
TwonkyMedia is still streaming media.
Workaround
Disabling the media sharing does not halt the media sharing. This has to be accomplished through
the TwonkyMedia pane of the Windows Home Server Console.
129
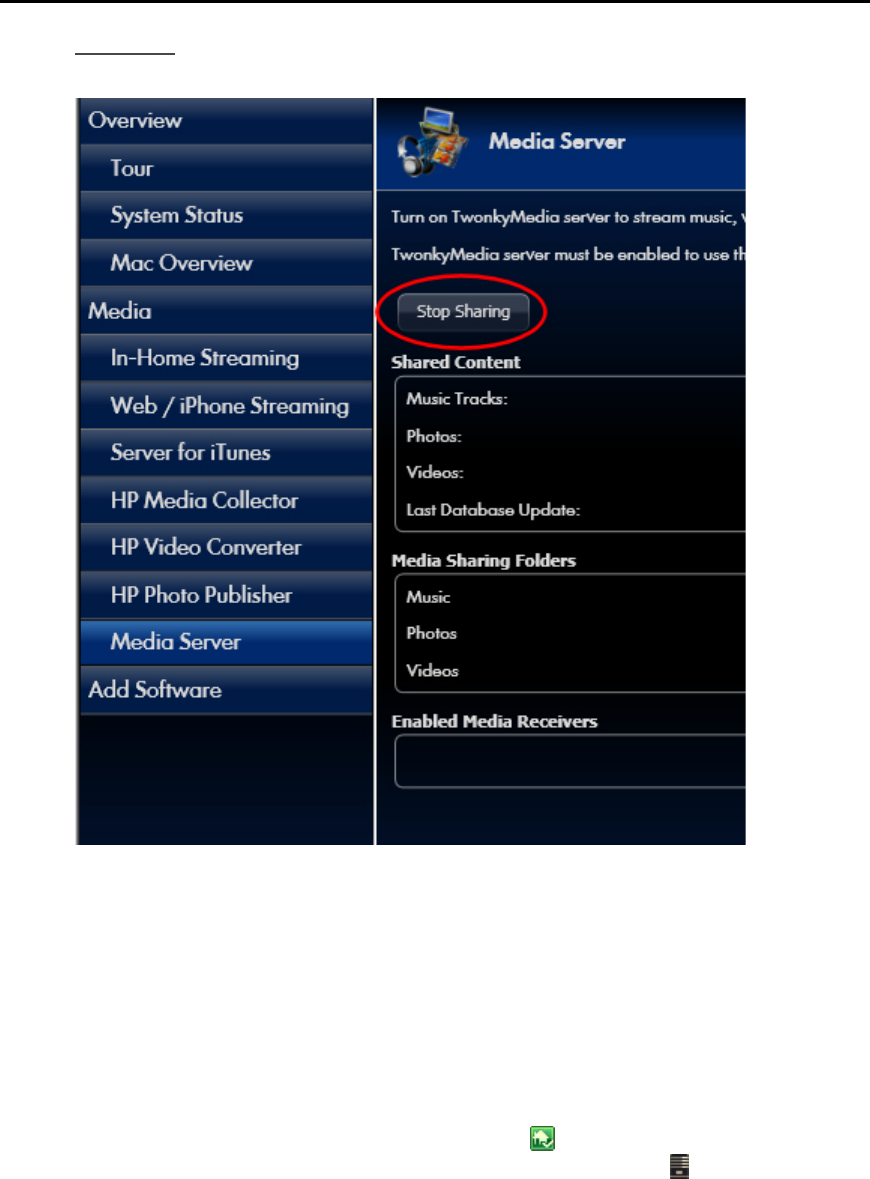
HP MediaSmart Server User's Guide
Solution
Click Stop Sharing on the TwonkyMedia pane of the Windows Home Server Console.
SERVER FOR ITUNES
Settings for iTunes
You can centralize your iTunes library for playback on any computer on your home network that
runs iTunes.
Your Server is enabled for iTunes by default. To set up your Server for iTunes follow these steps:
1. At the PC, double-click the Windows Home Server icon in the system tray and log on.
At the Mac, select Launch Home Server Console from the Server menu .
2. Select Media and then Server for iTunes in the left menu.
3. Click Configuration.
Here you can set up the following:
130

Media Streaming
• Status—enable or disable.
• Shared name—specify the shared name you want to display in iTunes.
• Require password—check to require password. The default setting here is no password. If you
assign a password, then only users who provide the correct password can play music from your
Server's shared library.
• Check interval—how often to check for music that has been added to the shared Music folder on
the server. By default this is set to check every 5 minutes.
5. Click OK to finish.
Troubleshooting and FAQs
ITUNES FREQUENTLY ASKED QUESTIONS
Song Selection from the Server is not Updating with New
Additions.
Server has not refreshed yet.
• Wait for the Server to synchronize.
• Click on eject button on the Server bar.
Podcasts not Showing in Playlist.
Podcasts copied over will not show in playlist for server.
WHY CAN I PLAY AND STREAM DRM CONTENT MY HOME
COMPUTER BUT NOT STREAM IT FROM MY SERVER?
The HP MediaSmart Server includes a media server for streaming iTunes music to PCs running
iTunes through the house. See the section in the User's Guide on iTunes.
For Windows Media DRM (WMDRM) content (protected .wma music and .wmv videos), the HP
MediaSmart Server does not support streaming of this content to DMAs at this time. Playing (and
streaming) of WMDRM protected content requires that the device that is playing the content have
a license for the content. When you downloaded the content to your PC, you also received a
license to play the content on that PC. If you copy the files to the HP MediaSmart Server, you
cannot copy or transfer the license to the server. The server must obtain its own license, and we do
not provide for this feature in the current product.
What you can do however, is store your protected content on the HP MediaSmart Server. This
allows all of the PCs in the home that have a license for the content to play it from the HP
MediaSmart Server by accessing it through the network. For example, to add all of the music on
your Server to the Windows Media Player library on your PC:
1. Open Windows Media Player on your PC.
131

HP MediaSmart Server User's Guide
2. Select File, then Add to Media Library, and click Add Folder….
3. In the Add Folder dialog, type \\<YourServerName>\Music and click OK.
This will add all of the music files in your Music shared folder on the HP MediaSmart Server to
your Windows Media Player library. You will then be able to play all of the protected content for
which this PC has a license.
HP MEDIA STREAMER
About the HP Media Streamer
The HP Media Streamer allows you to store music, videos, and photos on your server and stream
them to computers on your network or logged in remotely over the Internet for viewing and
listening.
In this article...
Open Media Streamer from the HP Home Page
Open Media Streamer using a Web Browser
File Formats Supported by the HP Media Streamer
Before You Begin Using the HP Media Streamer
Open Media Streamer from the HP Home Page
You can open the Media Streamer from the HP Home Page while your computer is connected to
the network or logged in remotely over the Internet.
1. At the PC, double-click the HP MediaSmart Server desktop icon.
At the Mac, select Open Home Page from the Server menu .
2. Click Media Streamer.
Open Media Streamer using a Web Browser
Media Streamer is a Web application that can be opened using a web browser such as Internet
Explorer, Firefox, or Safari, and a personal URL. When you open Media Streamer this way, it
assumes you are opening it through a remote Internet connection and you must log on using a
server user account.
1. Open a Web browser and type your personal URL address in the address bar.
An example URL is: smithfamily.HPhome.com. If you have not created a URL for your server,
see Configure Remote Access. The browser opens the Windows Homer Server home page.
2. Click Media Streamer.
3. Enter your HP MediaSmart Server User Name and Password.
If you have not created a user account, see Enable Guest Account or Set up User Accounts.
132

Media Streaming
File Formats Supported by the HP Media Streamer
The files and types listed below are compatible for Media Streaming:
Audio Formats
MP3, AAC-LC, PCM
Compatibility for Audio
.wma, .mp3, .m4a, .mp4, .aac, .wav
Compatibility for Photo
.jpg, .tif, .tiff, .png, .gif, .bmp
Before You Begin Using the HP Media Streamer
Before you can run Media Streamer you must:
• Install Flash 9 plugin for the Web browser on your computer
• Configure TwonkyMedia for Streaming Media on your HP MediaSmart Server
• Configure Remote Access on your Server (required for remote access only)
Create a User Account with a strong password (required for remote access only)
HP Media Streamer Music Page
In this article...
Album View
Artists View
Folders View
Playlists View
Media Player
Tracks Panel
Album View
The Album view on the Music page has two selection panels (Album and Tracks) and a media
Player. The blue background shows the item selected in each panel.
The Album panel shows a list of the albums available on the server sorted alphabetically by
album title. When you select an album, the tracks for that album appear in the tracks panel. You
can jump to a different album in the list by typing the first letter of an album.
133
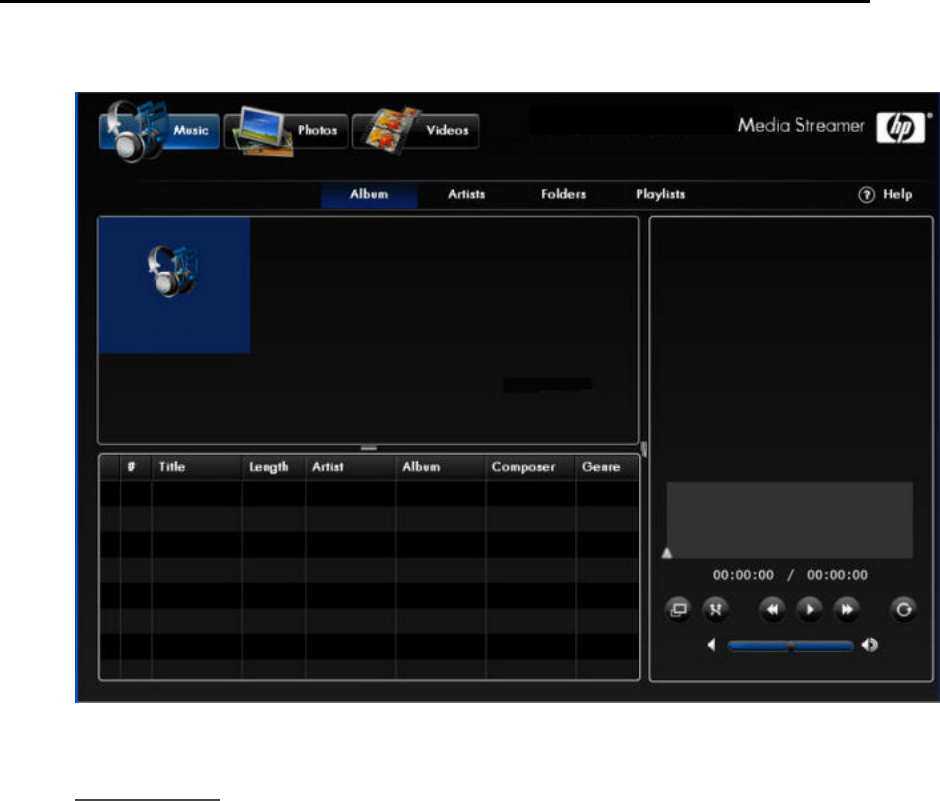
HP MediaSmart Server User's Guide
In the Tracks panel, the tracks sort by track order. Again, you can jump to a different section of
each column by typing the first letter of any Title, Artist, or Album.
Artists View
The Artists view on the Music page has three selection panels (Artists, Albums, Tracks) and a
media Player. The blue bar shows the item selected in each panel.
In the Artists and Albums panels, names sort alphabetically. When you select an artist, the
albums for that artist appear in the Albums panel. When you select a single album, the tracks for
the selected album appear in the tracks panel sorted by song title.
The Artists and Albums panels have an – All – item at the top. This allows you to select all artists
or albums and this option always stays on screen.
• Selecting – All – in the Artists panel will list all albums in the albums panel.
• Selecting –All – in the Albums panel will list the tracks from all albums by that artist in the tracks
panel.
The Albums column in the Artist panel shows the number of albums for – All – and for each
artist. The Tracks column in the Albums panel shows the number of tracks for – All – and for
each artist.
134

Media Streaming
In the Tracks panel, the Tracks sorts by song title.
Folders View
The Folders View of the Music page has two selection panels and a media player.
The top selection panel shows folders in a typical file browser view sorted in alphabetical order.
Tracks Panel
The tracks panel shows tracks sorted by track number.
Note
Music tracks in sub folders are not included in the Tracks panel list.
Selection Bar
This blue bar shows the item selected in each panel.
135
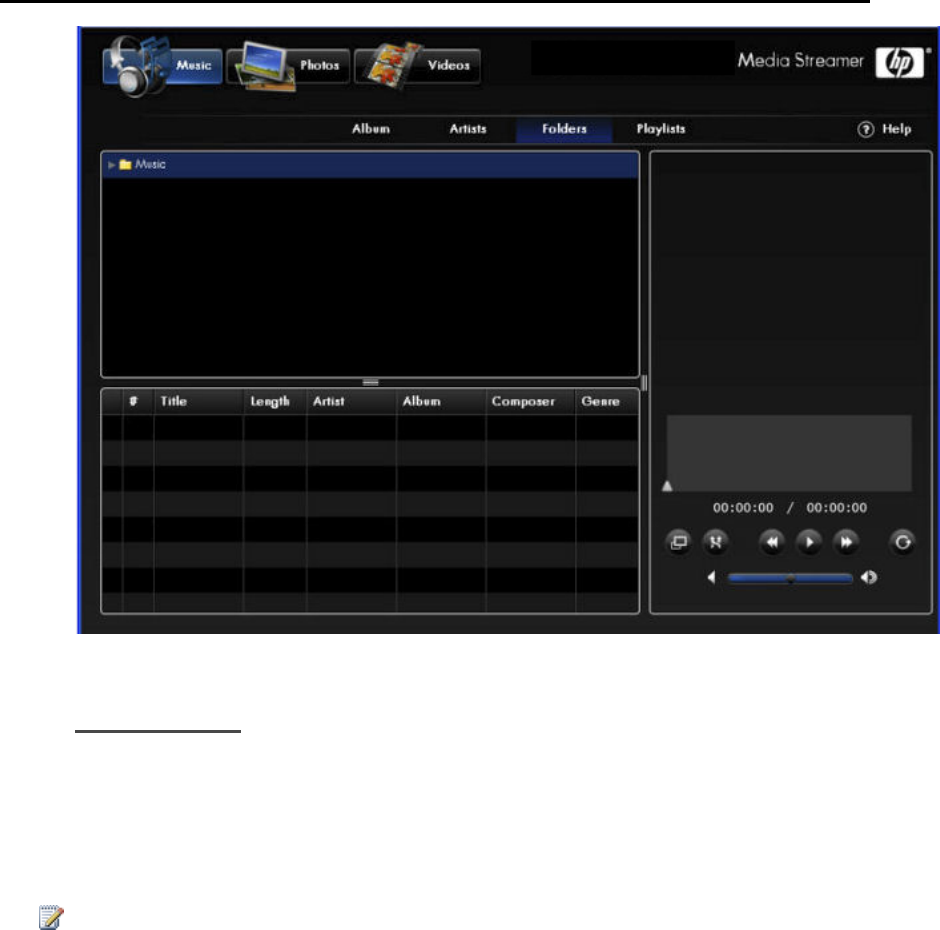
HP MediaSmart Server User's Guide
Playlists View
The Playlists View has two selection panels and a media player.
There are three pre-defined playlists: -Last played- , -Most played-, and Recently added. And
the user’s personal playlists are listed below.
Tracks from the selected playlist display in the Tracks panel. Playlist tracks sort in playlist order.
Note
Playlists display up to 500 songs.
Selection Bar
This blue bar shows the item selected in each panel. When you open Media Streamer the Selection
Bar highlights what you last selected.
136
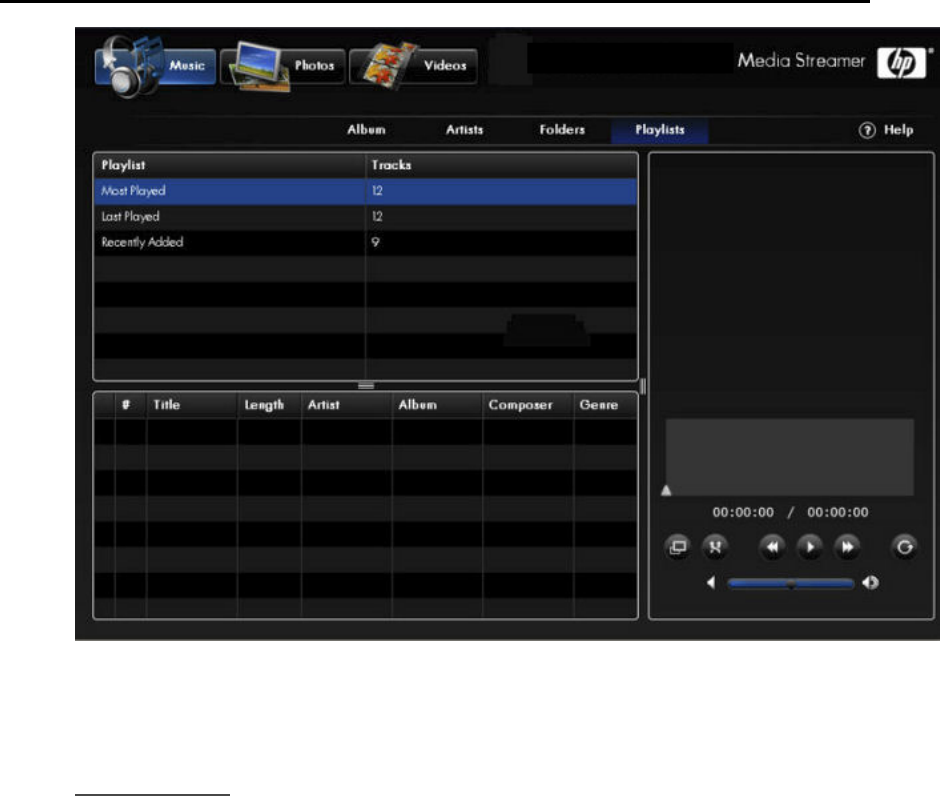
Media Streaming
Media Player
From the top down, the Player shows these features:
137
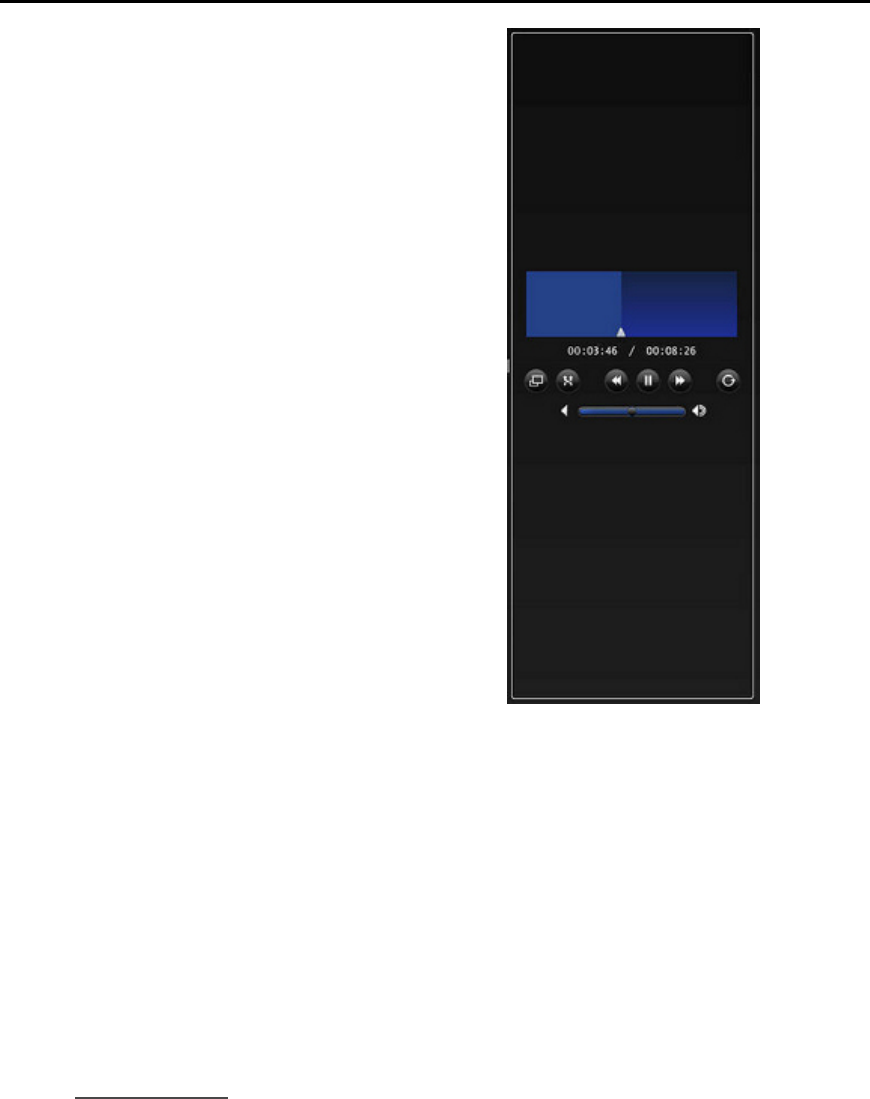
HP MediaSmart Server User's Guide
• Player window shows album art (if
available)
• Blue Display area – shows artist on top
line, album in the middle line, track
name on the bottom line. Below the Text
the progress bar shows the amount of
time played. Names that are too wide to
fully display in the player can be read in
a tool tip by hovering the mouse over
desired name.
• Progress Bar –Click the progress bar at
the place you want to play or slide the
arrow to the desired time.
• Song progress text – shows the current
position in time for the song and total
song duration.
• Player Controls are in left to right order:
• Full Screen Toggle
• Shuffle Toggle – blue circle
outline indicated shuffle is
turned on
• Previous Track
• Play/Pause toggle
• Next track
• Repeat Toggle -- blue circle
outline indicates repeat is
turned on
• Below the player controls is the volume
control slider bar. You can grab and
move this to left and right or click the
desired position on the slider bar.
Tracks Panel
The columns: Length, Artist, Album, Composer, and Genre give information about each track and
are sort-able by clicking the column header. Once the column is sorted, type the first letter of the
value you are looking for, and the first track with a value in that column that matches will be
selected, but not played. Repeating the key press will move the selection to the next value
beginning with the letter typed.
Click the desired track with mouse and it will begin to play.
138

Media Streaming
HP Media Streamer Photos Page
In this article...
Date View
Folder View
Playlist View
Full Screen view
Date View
The Photo Page, Date View has three selection panels and one media player.
The Year panel has a column showing years and a column showing the number of photos in that
year.
The Month panel has a month column that shows the number of the month, only the months that
have photos show up and a column showing the number of photos in that month and year.
The Photos panel displays thumbnails, if you hover over a thumbnail a tool tip will display the
filename.
Selection Bar
This blue bar shows the item selected in each panel.
– All – The Year and Month panels have an – All – item.
• Selecting - All - in the year panel will list all months in the month panel, each month entry
includes the photos from that month for all years combined.
• Selecting – All – in the month panel will show all photos for the selected year in the photos panel.
Selecting a particular year in the year panel will load all months that contain images from that
year.
Selecting on a particular month will load the thumbnails of all images for that month in the photos
panel.
Selecting a photo thumbnail in the photos panel will load the image in the media player.
The figure below shows the Photos Page—Date View
139
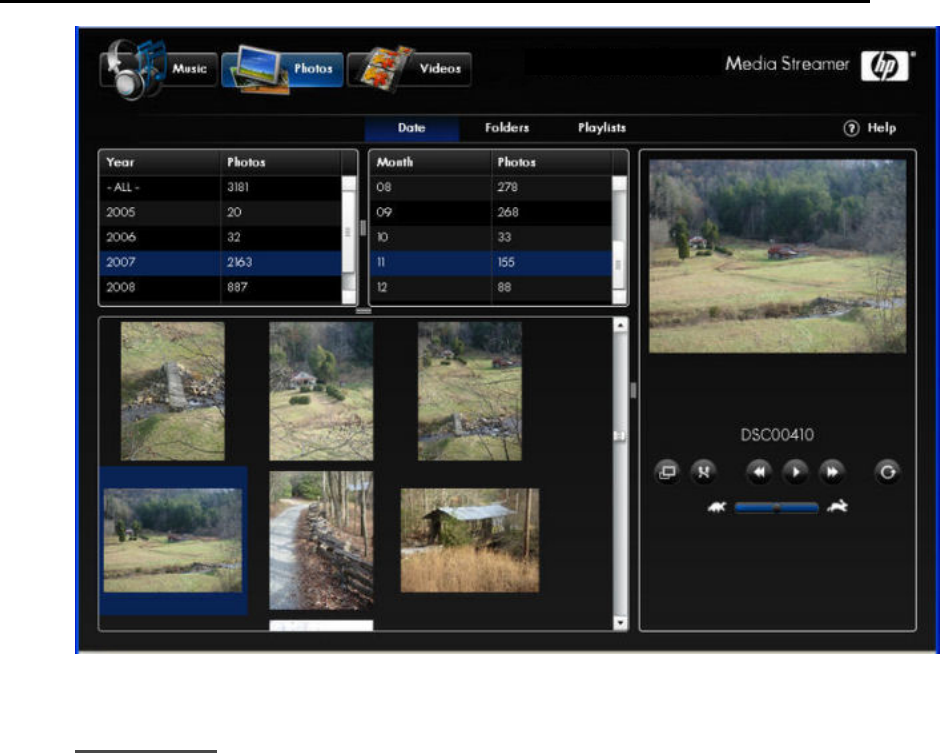
HP MediaSmart Server User's Guide
Folder View
The Photos Page, Folder View has two selection panels and one media player
The top selection panel shows folders in a typical file browser view.
In the photos panel thumbnails of the images in the folder selected in the file browser view are
displayed. Images in sub folders are not shown in the photo panel.
Selecting a photo thumbnail in the photos panel will load the image in the media player.
Selection Bar
This blue bar shows the item selected in each panel.
The figure below shows the Photos Page—Folder View
140
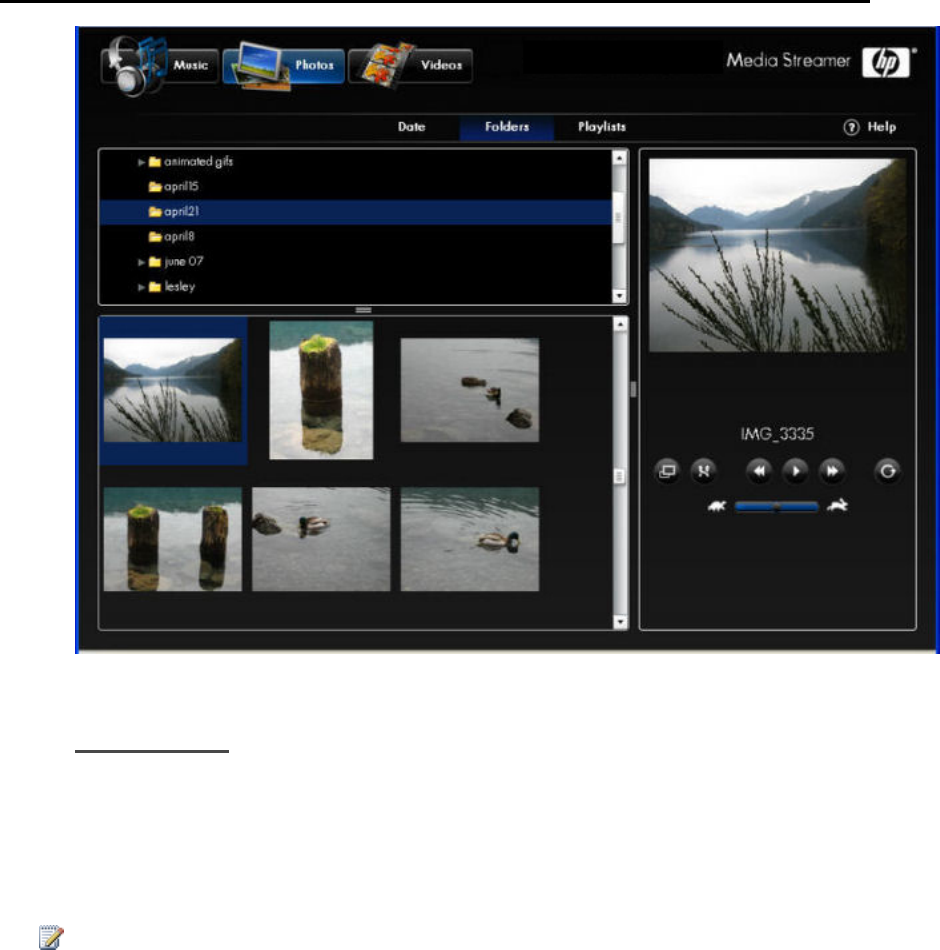
Media Streaming
Playlist View
The Playlists View has two selection panels and a media player.
There are three pre-defined playlists: -Most played-, -Last played-, and -Recently Added-.
Photo thumbnails from the selected playlist display in the photos panel. Playlist photos sort in
playlist order.
Note
Playlists display up to 500 photos.
Selection Bar
This blue bar shows the item selected in each panel.
The figure below shows the Photos Page—Playlist View
141
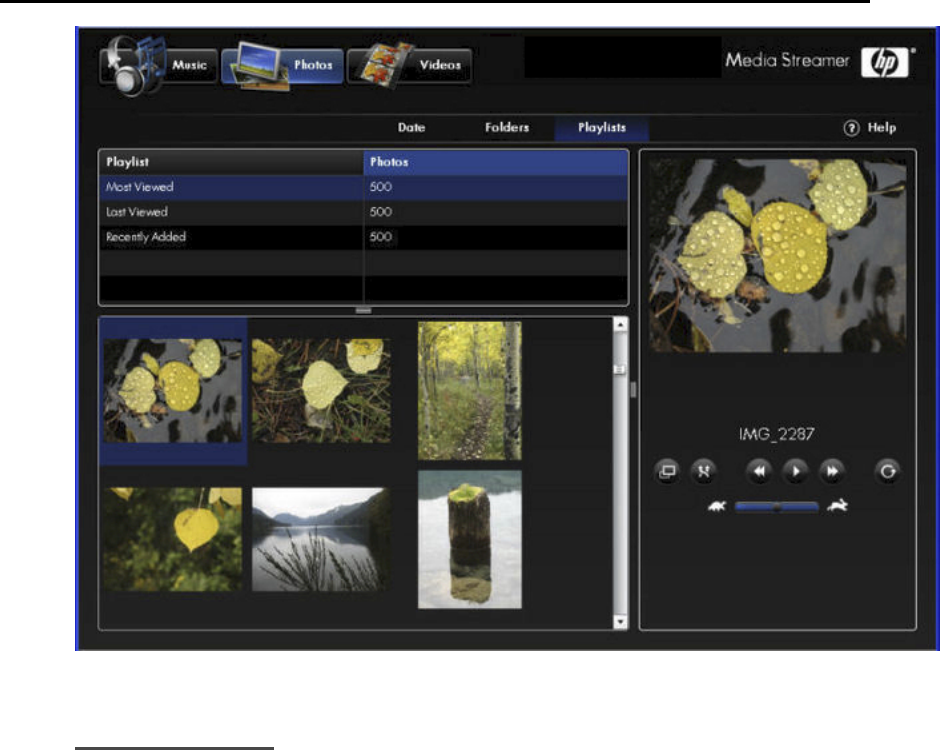
HP MediaSmart Server User's Guide
Full Screen View
This view shows the picture in the full browser window. The player controls appear in a semi-
transparent gray bar in the bottom center of the picture. The controls will fade out after 3 seconds.
Moving the mouse in the photo viewer window will make the controls appear again.
The figure below shows the Photos Page—Full Screen View
142

Media Streaming
HP Media Streamer Videos Page
Note
To ensure that your videos can be streamed, videos should be processed through the HP Video
Converter, for more information see About HP Video Converter.
In this article...
All View
Folders View
Playlists View
Video Quality Filter
Status Link
Videos Panel
Player
All View
The All view of the Videos page has one selection panel and the media player.
In the Videos panel, videos available for streaming are presented.
Selection Bar
143
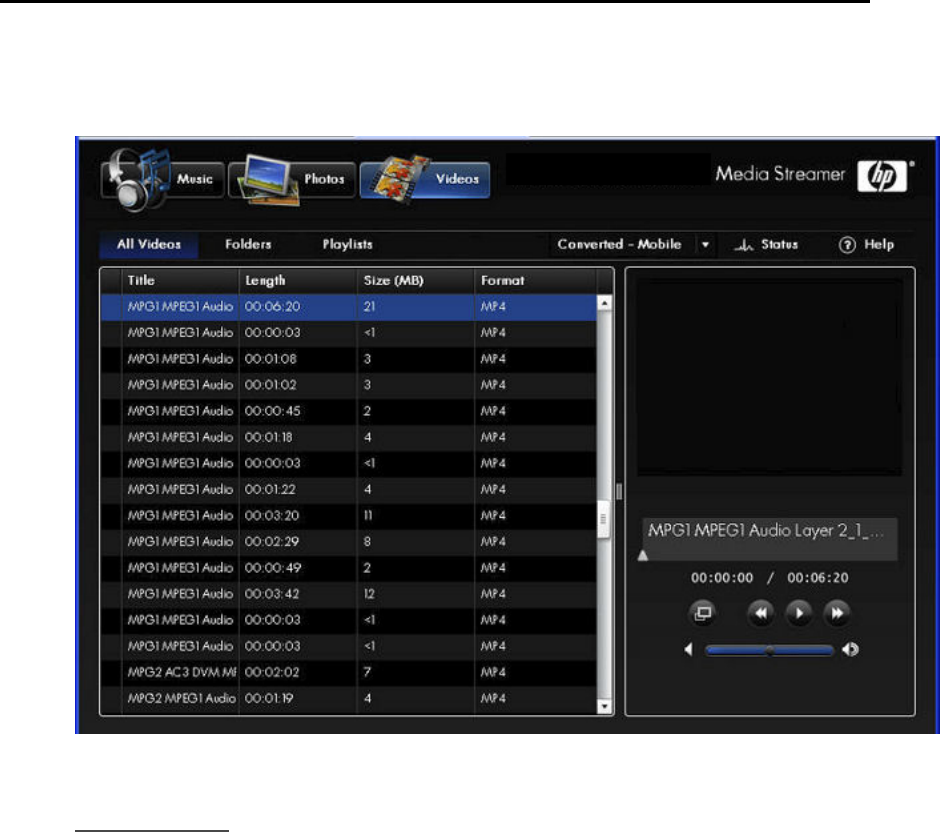
HP MediaSmart Server User's Guide
This blue bar shows the item selected in each panel.
Selecting a video in the Videos Panel will start loading the video in the video player. You must
then click the play button to start the video.
Folders View
The Folders view of the Videos page has two selection panels.
The top selection panel shows folders in a typical file browser view. The lower panel lists videos
for the selected folder.
Selection Bar
This blue bar shows the item selected in each panel.
Selecting a video in the Folder Panel lists the videos in that folder in the Videos Panel.
Selecting a video in the Videos Panel will start loading the video in the video player. You must
then click the play button to start the video.
The figure below shows the Videos Page – Folders View
144
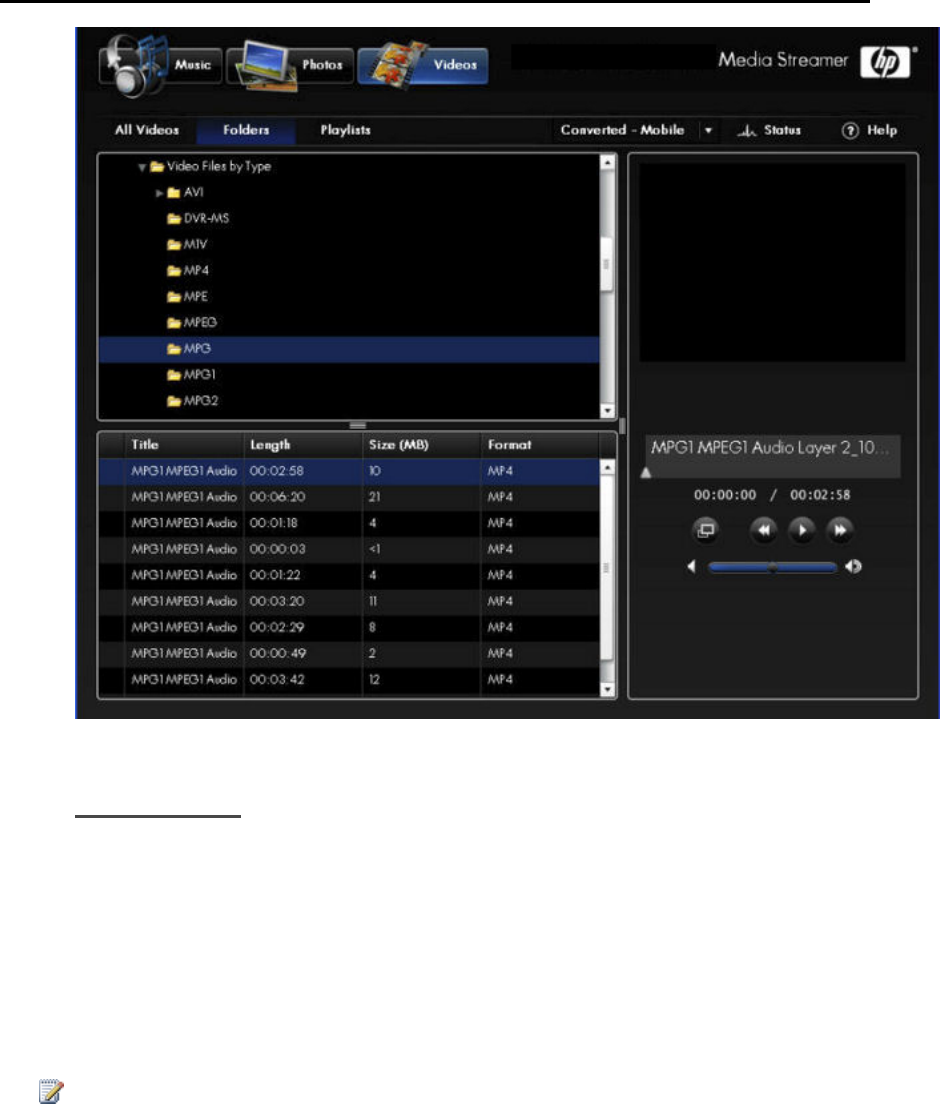
Media Streaming
Playlists View
The Playlists View has two selection panels and a media player.
There are three pre–defined playlists: – Most played–, –Last played–, and –Recently Added–
which are displayed in the Playlist panel. The playlist panel also lists the number of videos in
each playlist.
Videos from the selected playlist display in the videos panel. Playlist videos sort in playlist order.
Selecting a video in the Videos Panel will start loading the video in the video player. You must
then click the play button to start the video.
Note
Playlists display up to 500 videos.
145
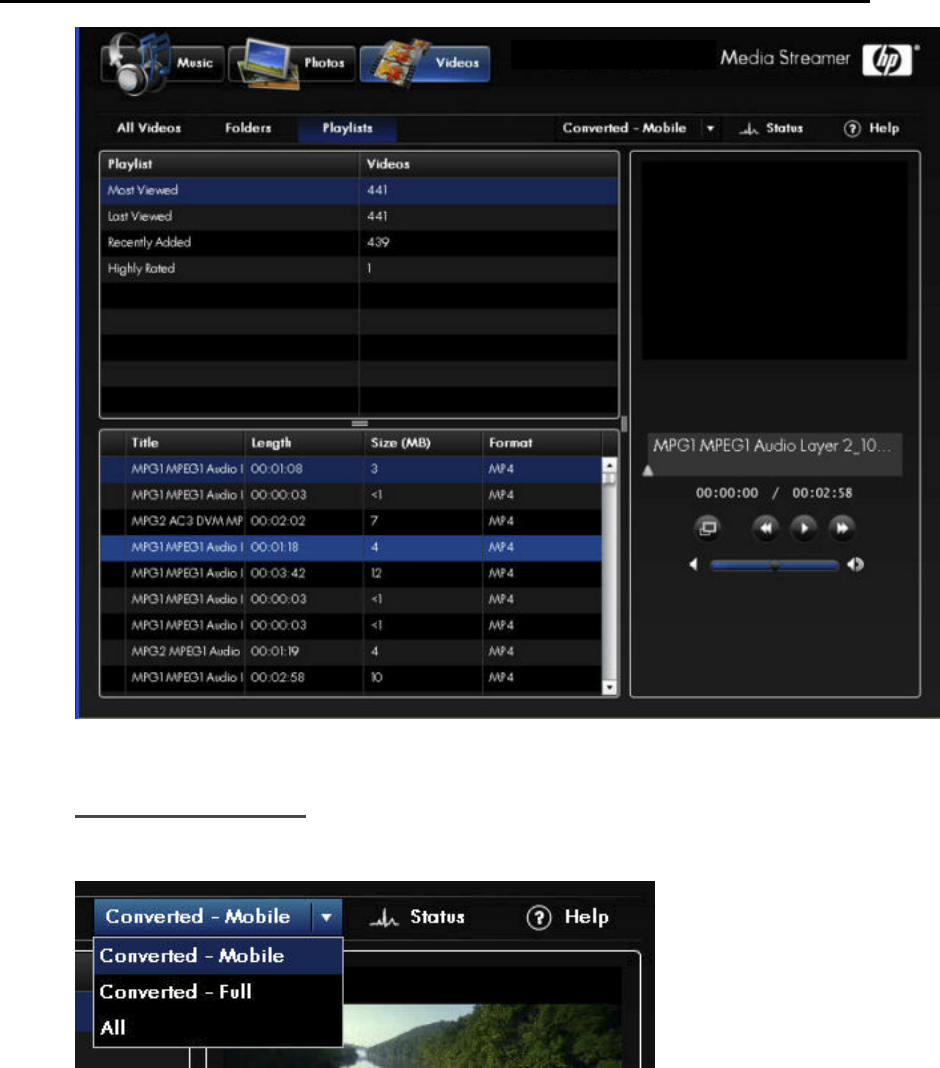
HP MediaSmart Server User's Guide
Video Quality Filter
By default the Video page will open with Converted Mobile videos.
You have three choices for Video Quality
Converted – Mobile These Videos are suitable for mobile devices and remote video streaming
(the video will be no larger than QVGA: 320w x 240h). This is to make support of mobile devices
easier, and to provide videos suitable for remote media streaming.
• Converted – Full. Full resolution keeps the source video’s screen resolution, and basically just
creates an output file with the new format for the provided input. Video and audio quality should
be very similar to the source material for Full resolution videos. You may notice some differences
146
Media Streaming
between the original and Full resolution output, but these differences are minimal in most
situations.
• All. Displays all videos in the shared folder.
Status link
Clicking the Status link will bring up a report that can tell you the status of your video
conversions. For more information see Automating Video Conversion.
Clicking a file will give a more detailed explanation of its status. If the explanations disappear too
soon, remove the check from the Auto-Fresh box.
Should the Converter Status be red (off), go to the Video Converter settings as detailed in
Automating Video Conversion.
Videos Panel
In the videos panel, videos sort alphabetically by name. There are three other columns. The Length
columns shows length in minutes, the Size in mega-bytes, and the Format column shows video file
formats, such as .mp4.
147
HP MediaSmart Server User's Guide
Player
Player window
• Blue Display area – shows video title.
Behind the text the progress bar shows
the amount of time played. Names that
are too wide to fully display in the player
can be read in a tool tip by hovering the
mouse over desired name.
• Progress Bar –Click the progress bar at
the place you want to play or slide the
arrow to the desired time.
• Video progress text – shows the current
position in time for the song and total
song duration.
• Player Controls are in left to right order:
• Full Screen Toggle
• Previous Video
• Play/Pause toggle
• Next Video
• Below the player controls is the volume
control slider bar. You can grab and
move this to left and right or click the
desired position on the slider bar.
• If you choose full screen you can return
to the player view by pressing the
Escape key.
148
Media Streaming
Troubleshooting and FAQs
MEDIA STREAMER, DOES NOT LOAD
Symptom
Navigate to Media Streamer:
• Page loads as blank page
or
• You are requested to Open, Save, or Cancel the file scalable_ui.swf. Click Cancel.
Cause
Adobe Flash Player 9.0.115.0 or later is required.
Solution
Go to www.adobe.com and click Get Adobe Flash Player. Install Adobe Flash Player version
9.0.115.0 or higher.
MEDIA STREAMER, HOW TO USE THE BUTTONS IN THE
PLAYER PANE
What is the Player Pane
The Player Pane is where you control the streaming music or the selected photo, see the examples
below.
149
HP MediaSmart Server User's Guide
150
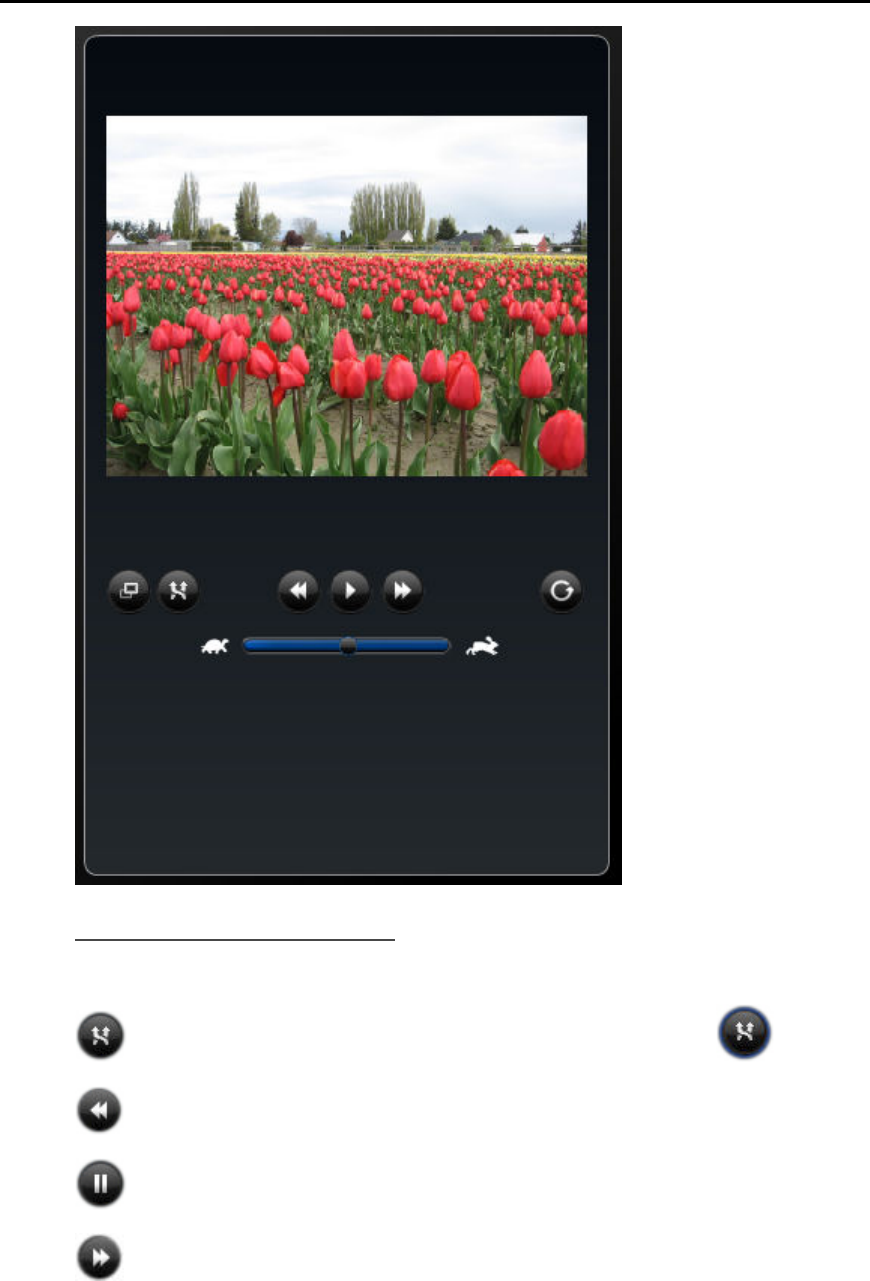
Media Streaming
Music Player Pane Buttons
The list below describes the music player pane button functionality:
• Shuffle Songs button, when this button is selected it will have a blue ring
• Previous Song button
• Play/Pause button
• Next Song button
151
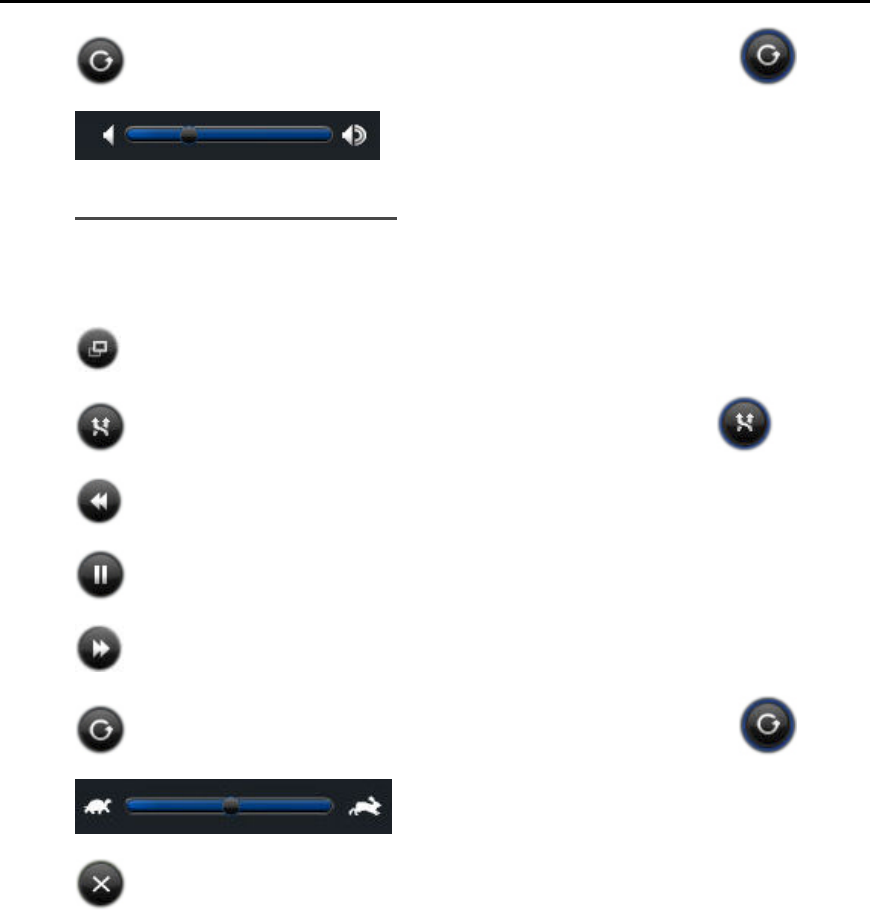
HP MediaSmart Server User's Guide
• Repeat all Songs button, when this button is selected it will have a blue ring
• Volume Control Bar
Photo Player Pane Buttons
The list below describes the photo player pane button functionality:
• Enlarge Slide Show button, when this button is selected the slide show will fill the browser
• Shuffle Songs button, when this button is selected it will have a blue ring
• Previous Song button
• Play/Pause button
• Next Song button
• Repeat all Songs button, when this button is selected it will have a blue ring
• Slide Show Speed Control Bar
• Shrink Slide Show button, when this button is selected the slide show will shrink to fit the
player pane
152
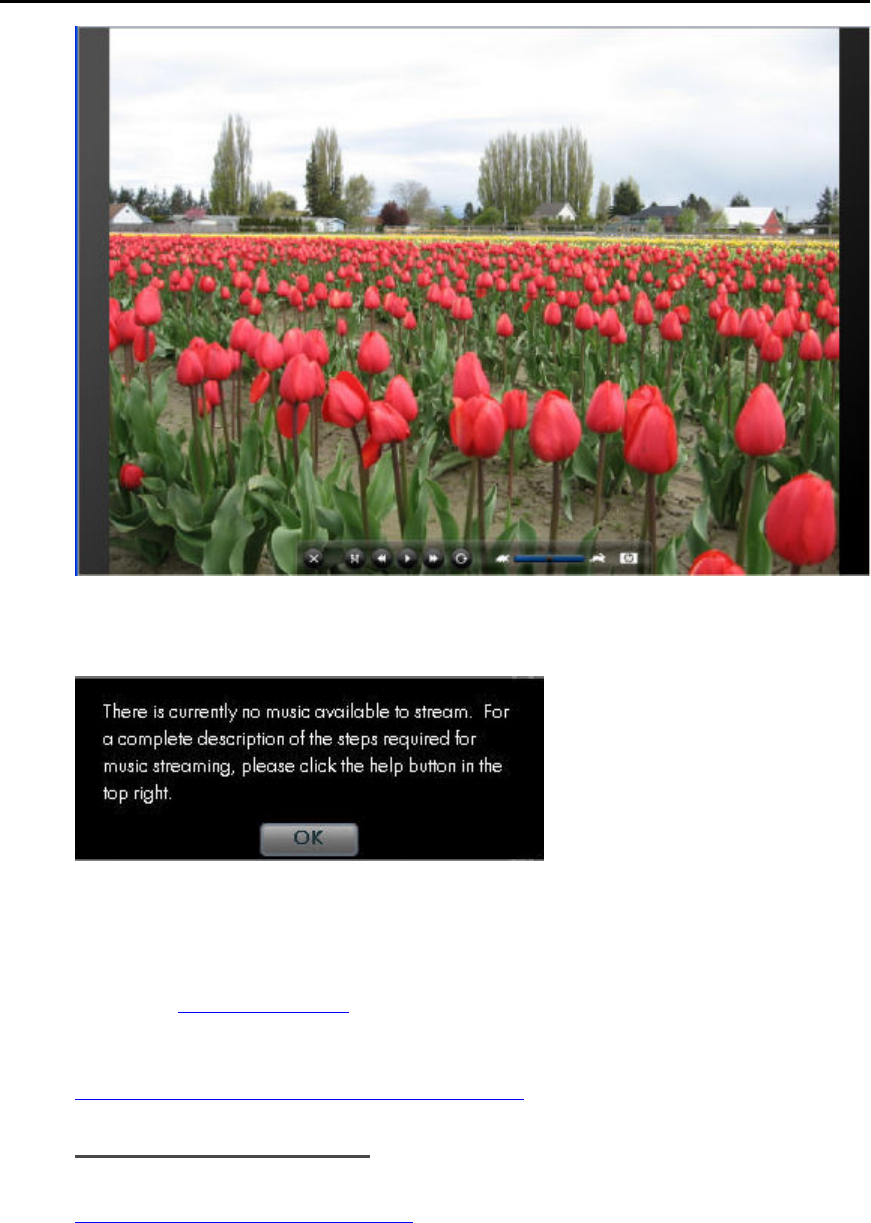
Media Streaming
NO MUSIC TO STREAM
This dialog box will appear when you open Media Streaming and you click the Music button and
you:
• Do not have music on your Server
or
• You have not configured the server for streaming media.
No music on your Server
Place music on your server in the following location "<name of server>/Music" and then
configure your server for streaming media.
153

HP MediaSmart Server User's Guide
STARTING MULTIPLE M4A FILES STOPS MUSIC AND
ADDITIONAL FILES DO NOT TRANSCODE
Symptom
Go to a folder with m4a files. Start playing the first track, when music starts click next a few
times. The music will stop after a few seconds.
Cause
The server is transcoding multiple files and this can cause gaps in the playing of music.
Solution
Do not click next as rapidly, give the Server some time to do it's transcoding
REMOTE MEDIA STREAMING, ANIMATED GIF FILES DO NOT
DISPLAY UNTIL THE FILE IS SELECTED
In Web Media Remote Streamer, looking at a folder with animated gif files; the thumbnail
preview and the display pane do not show an image.
REMOTE MEDIA STREAMING, AUDIO FILES ARE TRUNCATED
ON A SLOW CONNECTION
Symptom
Audio file playback is truncated on a slow uplink connection.
The files play about 3/4 of the way through and then playback stops and the next song starts. This
happens on connections below approximately 400Kbits.
Cause
Uplink Connection is slow.
STREAMING MEDIA TO A DEVICE
Why does the server show up twice on my DMA list?
If you are running both Windows Media Connect and TwonkyMedia, they will both show up
when you view menus on your digital media adaptor.
Once you turn on media sharing using Windows Media Connect, this program will always display
the HP MediaSmart Server in your digital media adaptor list. However, you can disable media
sharing for the folders under the HP MediaSmart Server. See Why do I see duplicate songs,
154

Media Streaming
pictures, or videos on my DMA list? for information on disabling media sharing for shared
folders.
Alternately, you can turn off TwonkyMedia media sharing and remove the duplicate HP
MediaSmart Server from your digital media adaptor list.
For additional information on these programs, see Windows Media Connect 2.0 and
TwonkyMedia Comparison.
To turn off TwonkyMedia media sharing
1. At the PC, double-click the Windows Home Server icon in the system tray and log on.
At the Mac, select Launch Home Server Console from the Server menu .
2. Click Settings in the upper right corner of the Console.
3. Click TwonkyMedia in the left menu.
4. Click Stop Sharing.
Media Files (Audio/Video) of Supported Format Aren't Seen
by Device.
Possible naming convention issues.
Double-check names on server, make sure they start with a letter, and not a number or symbol.
My Files Do Not Show Up on My DMA
In this article...
Once WMC has been enabled to share a shared folder, it continually monitors the folder for
new files.
If your DMA does not display WMC from the HP MediaSmart Server, or none of your files
are found by the DMA.
If some of your files (e.g., files newly copied to the server) are not found by the DMA.
Digital Media Adapters (DMA, or Digital Media Receivers - DMR) use the Universal Plug 'n Play
(UPnP) protocol to automatically discover Digital Media Servers (DMS). The HP MediaSmart
Server uses Windows Media Connect 2.0 (WMC) as its DMS. In order for a DMA to discover the
HP MediaSmart Server and access its content, WMC must be enabled. WMC defaults to being
disabled; it is automatically enabled for all DMAs when the server administrator selects one or
more of the three media shared folders (Music, Photos and Videos) for media sharing. On your
DMA, you should then see the HP MediaSmart Server listed as:
<YourServerName>: 1 : Windows Media Connect
Note
Some DMAs aggregate the content from all DMSs into a single view; in such a case you may not
be able to identify each DMS individually. Further troubleshooting steps form DMA follow:
155

HP MediaSmart Server User's Guide
Once WMC has been enabled to share a shared folder, it
continually monitors the folder for new files.
1. At the PC, double-click the Windows Home Server icon in the system tray and log on.
At the Mac, select Launch Home Server Console from the Server menu .
2. Click Settings in the upper right corner of the Console.
3. Click Media Sharing in the left menu.
4. Select at least one of the shared folders for sharing by selecting the On radio button.
5. Click Apply.
This will automatically start WMC, which will then share all of the files in the selected shared
folders.
If your DMA does not display WMC from the HP MediaSmart
Server, or none of your files are found by the DMA.
1. Check that WMC is enabled (use the above steps to get to the Media Sharing settings, and verify
that at least one of the shared folders is On).
Check that the HP MediaSmart Server and DMA are both connected to the same home network (a
router or firewall between them could interfere with the discovery and content sharing protocols).
2. Restart the DMA.
3. Restart the HP MediaSmart Server.
If some of your files (e.g., files newly copied to the server) are
not found by the DMA.
1. Check that the files were copied to the correct location. Only the Music, Photos and Videos shared
folders may be enabled for media sharing. Note that if one of these folders is enabled for media
sharing; then all folders below that are also enabled for media sharing.
2. Re-enable the shared folder for media sharing.
• Go to the Media Sharing Settings panel (see the instructions above for how to get here).
• Turn sharing Off for the shared folder with the missing files and select Apply.
• Turn sharing back On for the shared folder and select Apply.
3. Restart the DMA.
4. Restart the HP MediaSmart Server.
156
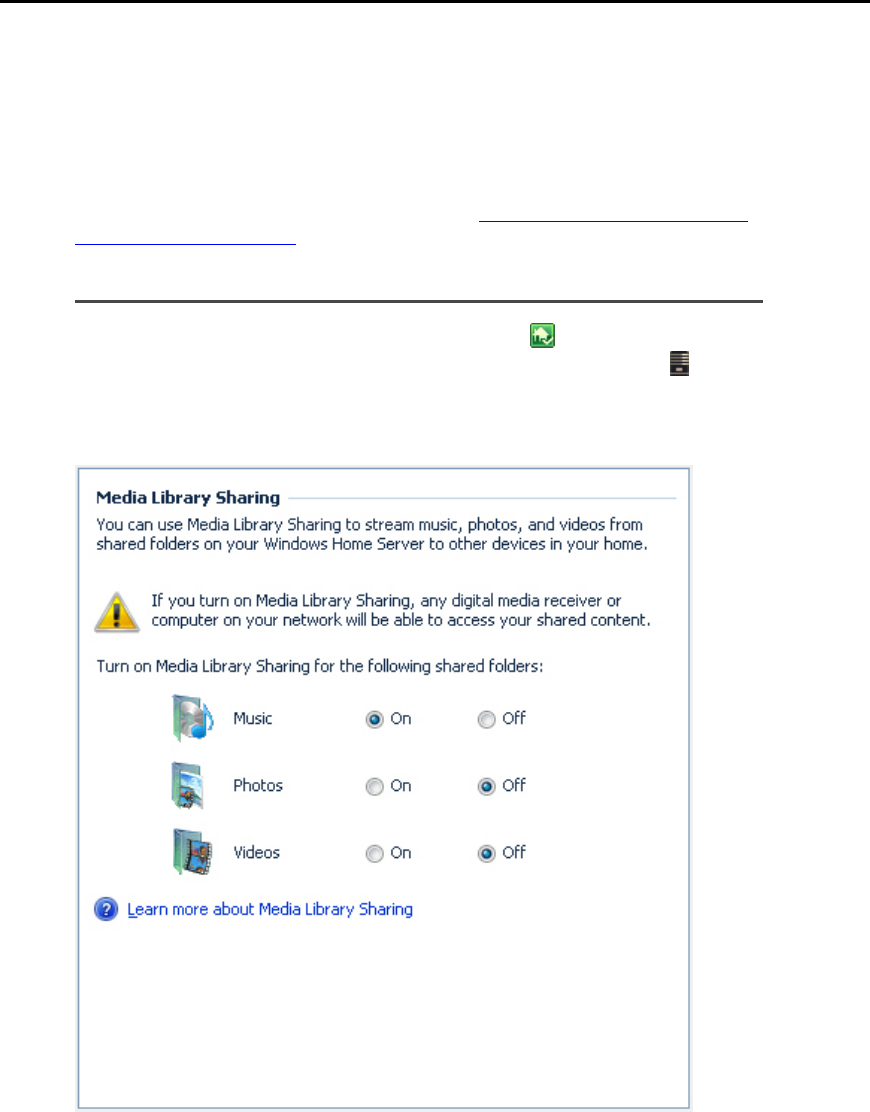
Media Streaming
Why do I see duplicate songs, pictures, or videos on my
DMA list?
If you are streaming content from shared folders using both Windows Media Connect and
TwonkyMedia, you may see duplicate entries of your songs, pictures, or videos on your digital
media adaptor. To eliminate this problem, disable media sharing for one of the shared folders.
For additional information on these programs, see Windows Media Connect 2.0 and
TwonkyMedia Comparison.
To disable a shared folder in Windows Media Connect 2.0
1. At the PC, double-click the Windows Home Server icon in the system tray and log on.
At the Mac, select Launch Home Server Console from the Server menu .
2. Click Settings in the upper right corner of the Console.
3. Click Media Sharing in the left menu.
4. On the right side under Media Sharing Library, click Off for the shared folders that you do not
want to use for streaming content using Windows Media Connect.
5. Click OK.
For additional information on using Windows Media Connect, see Media Sharing in the Windows
Home Server help.
157
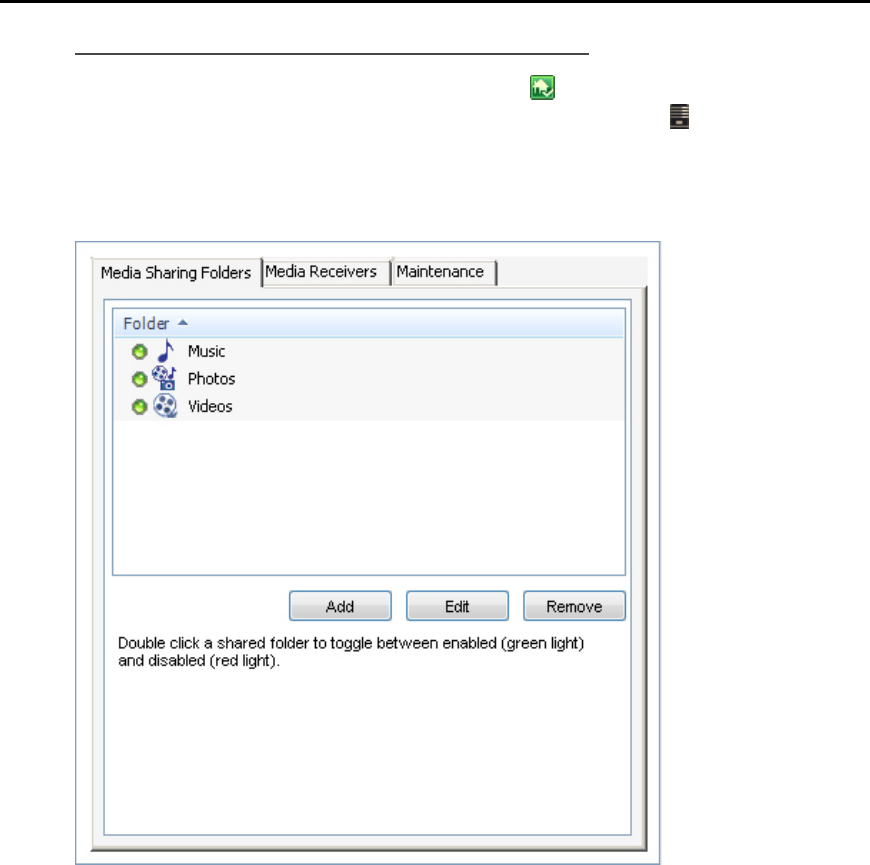
HP MediaSmart Server User's Guide
To disable a shared folder in TwonkyMedia
1. At the PC, double-click the Windows Home Server icon in the system tray and log on.
At the Mac, select Launch Home Server Console from the Server menu .
2. Click Settings in the upper right corner of the Console.
3. Click TwonkyMedia in the left menu.
4. On the Media Sharing Folders tab, select a shared folder and click Remove for each folder that
you do not want to use for streaming content using TwonkyMedia.
5. Click OK.
For additional information on using TwonkyMedia, click Help while on the TwonkyMedia tab of
the Windows Home Server Console or click Help on any of the TwonkyMedia dialog boxes.
Windows Media Connect 2.0 and TwonkyMedia
Comparison
The following tables provide a detailed comparison of Windows Media Connect 2.0 and
TwonkyMedia features.
At a high level, TwonkyMedia
158
Media Streaming
• Allows your digital media adaptor or digital media receiver to see photo thumbnails for pictures
and album artwork for music
• Supports a lot more media formats
In this article...
General Features
Views
File Formats
General Features
Comparison of General Windows Media Connect and TwonkyMedia Features
Feature Windows Media Connect 2.0 TwonkyMedia
DLNA Support Some Capability 1.0 compliant
1.5 reference
Number of Shared
Folders Music
Photos
Videos
User Controlled
Shared Folders/Media
Types Music/all media types
Photos/all media types
Videos/all media types
Music/music media types
Photos/all media types
Videos/video media types
User selectable folders/media
types
Album Art/Thumbnail
Support Music album art
Photo thumbnails
Picture Scaling Limited JPG_MED support
Video Trick Modes No Yes
Server Side Shuffle No Yes
Status/Summary User
Interface No Yes
Folder Monitoring Yes Yes
DMR Exclusion No Yes
159

HP MediaSmart Server User's Guide
Views
Comparison of Windows Media Connect and TwonkyMedia Views
Views Windows Media Connect 2.0 TwonkyMedia
Music Views
Album X X
All Tracks X X
Artist X X
Artist Index X
Artist/Folder X
Folder X X
Genre X X
Genre Index X
Genre/Artist X
Playlist X X
Year/Artist X
Picture Views
Album X
All Photos X X
Date X (flat) X (hierarchal)
Folder X X
Playlist X
Video Views
Actor X
Album X
All Videos X
Folder X
Genre X
Playlist X
160

Media Streaming
File Formats
Comparison of Windows Media Connect and TwonkyMedia File Formats
File Formats Windows Media Connect 2.0 TwonkyMedia
Music Formats
3gp X
ac3 X
aiff X
asf X X
FLAC X
LPCM X
m4a X
mp1 X
mp2 X
mp3 X X
mp4 X
mpa X
ogg X
wav X X
wma X X
Picture
Formats
bmp X X
gif X X
jpg/jpeg X X
png X X
tif/tiff X X
Video Formats
161

HP MediaSmart Server User's Guide
162
Comparison of Windows Media Connect and TwonkyMedia File Formats
File Formats Windows Media Connect 2.0 TwonkyMedia
3gp X
asf X
avi X X
DivX X
dvr-ms X X
m1v X
m4v X
mpe X
mpg/mpeg X X
MPEG-1 X X
MPEG-2 X X
MPEG2-TS X
MPEG-4 X
vdr X
vob X
wmv X X
Xvid X
Playlist
Formats
m3u X X
pls X
wpl X X
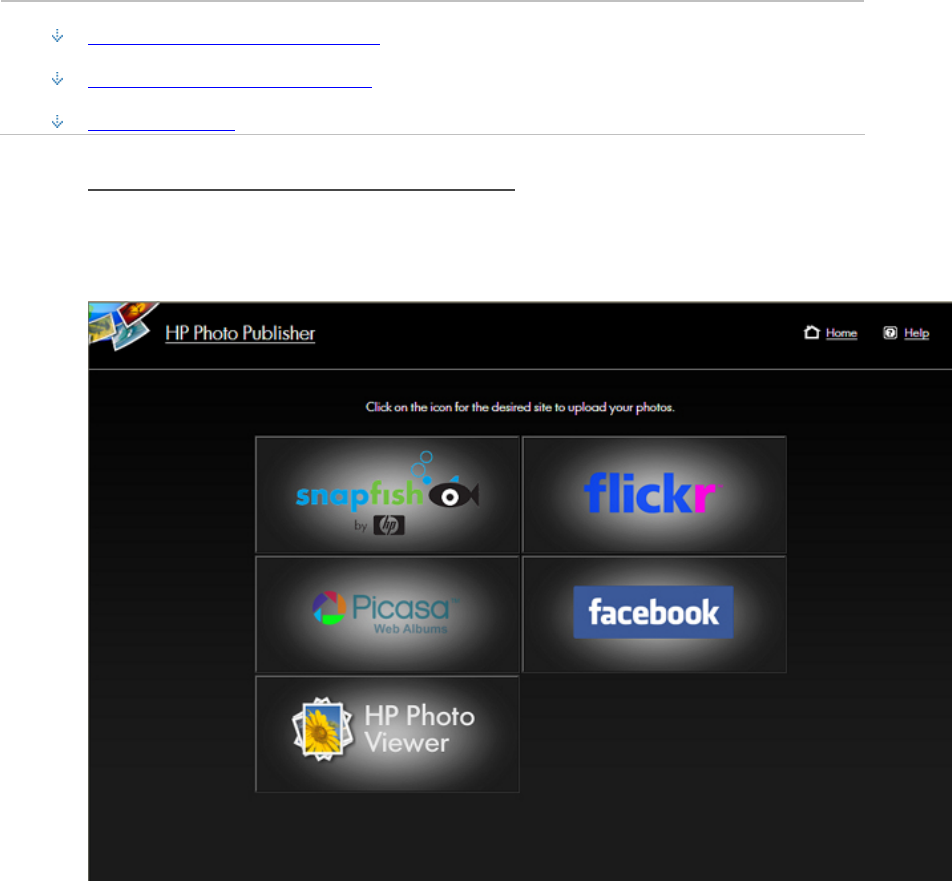
Chapter 7. HP Photo Publisher and HP Photo
Viewer
HP PHOTO PUBLISHER
About HP Photo Publisher
In this article...
The HP Photo Publisher Home Page
Before you use HP Photo Publisher
File Compatibility
The HP Photo Publisher Home Page
Publish photos from your server to your favorite photo sharing site or share photos directly from
your server using HP Photo Viewer. People outside of your network can see your photos using
the Internet.
163
HP MediaSmart Server User's Guide
Before you use HP Photo Publisher
You must have a user name and password to log on to HP Photo Publisher. User names and
passwords are set up in the Windows Home Server Console.
1. At the PC, double-click the Windows Home Server icon in the system tray and log on.
At the Mac, select Launch Home Server Console from the Server menu .
2. Click the User Accounts tab.
3. Click Add and follow the instructions in the Add user account wizard.
4. Enable remote access for the user account.
File Compatibility
The table below tells what file types are accepted at the various photo sharing and social
networking sites:
*.jpg, *.jpeg *.gif *.png *.bmp
Picasa X X X X
Snapfish X
facebook X X X X
flickr X X
HP Photo Viewer X X X
Some limitations, by site, for the free account:
• At time of writing; flickr only allows for 3 photo sets, and a limit of 100MB worth of photo
uploads each calendar month.
• At time of writing; facebook allows only 60 photos for album, but you can have an unlimited
number of albums
• At time of writing; Picasa has a storage limit of 250mb
• At time of writing; Snapfish does not have any restriction to number of photos uploaded.
Log on to HP Photo Publisher
1. At the PC, double-click the HP MediaSmart Server desktop icon.
At the Mac, select Open Home Page from the Server menu .
2. Double-click HP Photo Publisher.
164
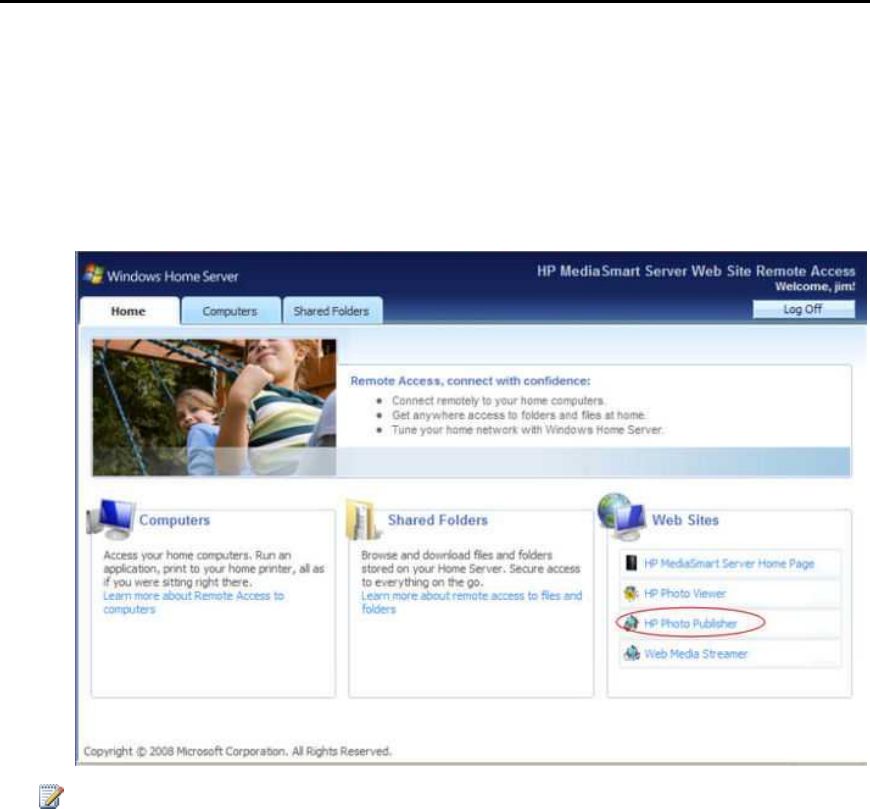
HP Photo Publisher and HP Photo Viewer
3. Type your Username and Password and click the Log On button.
If you do not have a user name and password, select the User Accounts tab in the Windows Home
Server Console and add an account. Then, return to the HP Photo Publisher logon page and enter
your credentials.
4. The HP Photo Publisher home page opens.
5. If you entered incorrect credentials then you be brought to the Remote Access page. Click the HP
Photo Publisher and you will be brought to the HP Photo Publisher home page.
Note
You can also open HP Photo Publisher by clicking Start, All Programs, and HP MediaSmart
Server. The HP Home Page opens. Click HP Photo Publisher.
165
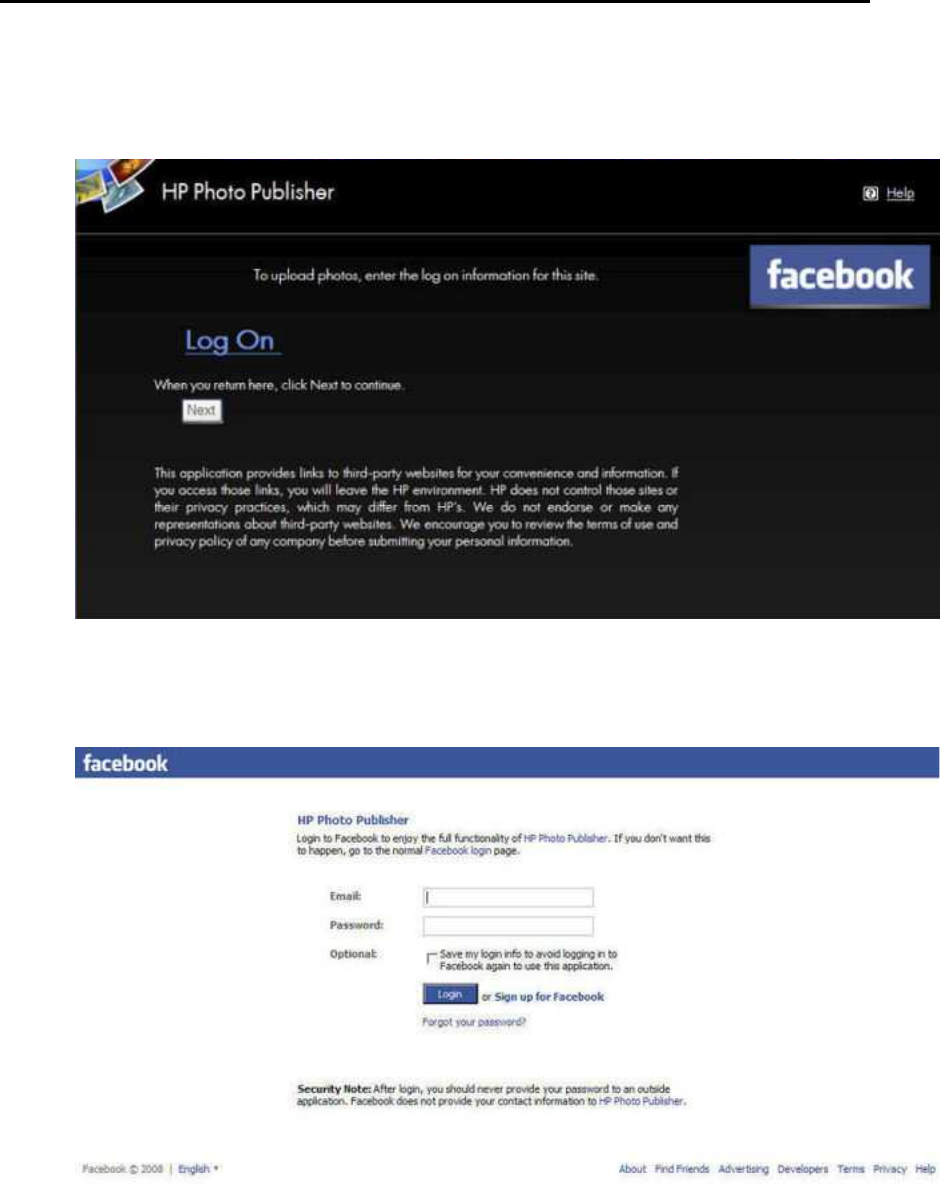
HP MediaSmart Server User's Guide
Log on to Photo Sharing Site
FACEBOOK LOGON
To log into your facebook account click the Log on link.
You will be taken to a page to enter your credentials for that site.
This takes you to the facebook confirmation page. Close this page.
166
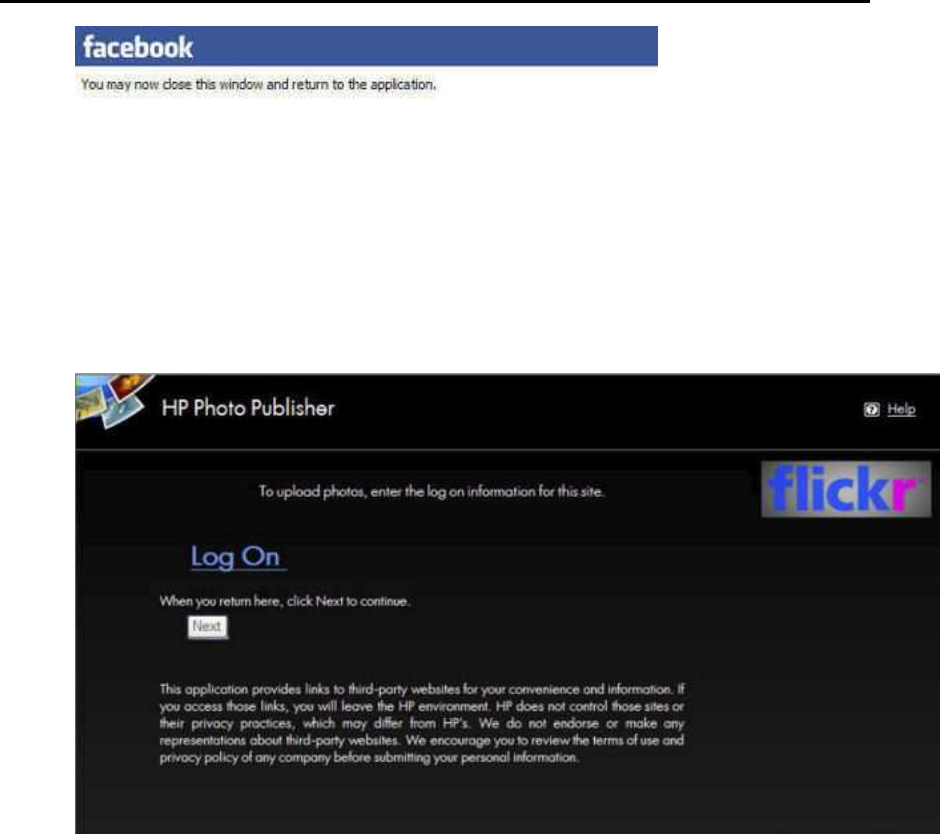
HP Photo Publisher and HP Photo Viewer
At the Photo Publisher login screen click Next. You are then taken to a page where you can
create or add to an existing album.
FLICKR LOG ON PAGE
To logon to Flickr, click the blue Log On link as shown below.
167
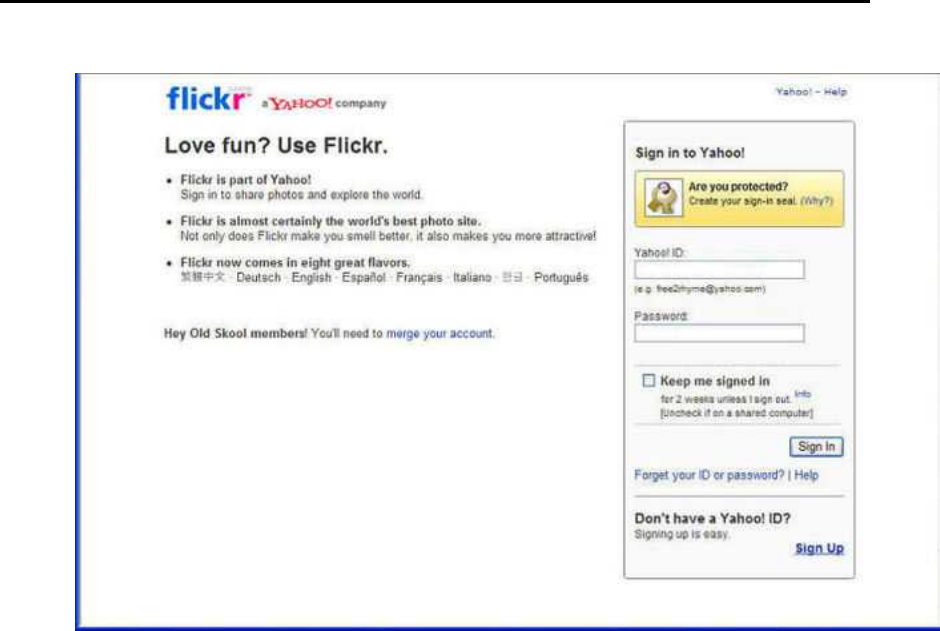
HP MediaSmart Server User's Guide
This takes you to the Flickr sign in page. Enter your credentials and return to the HP Photo
Publisher page.
Flickr then asks you to allow HP MediaSmart Server to link to your account.
Click OK, I’LL ALLOW IT
168
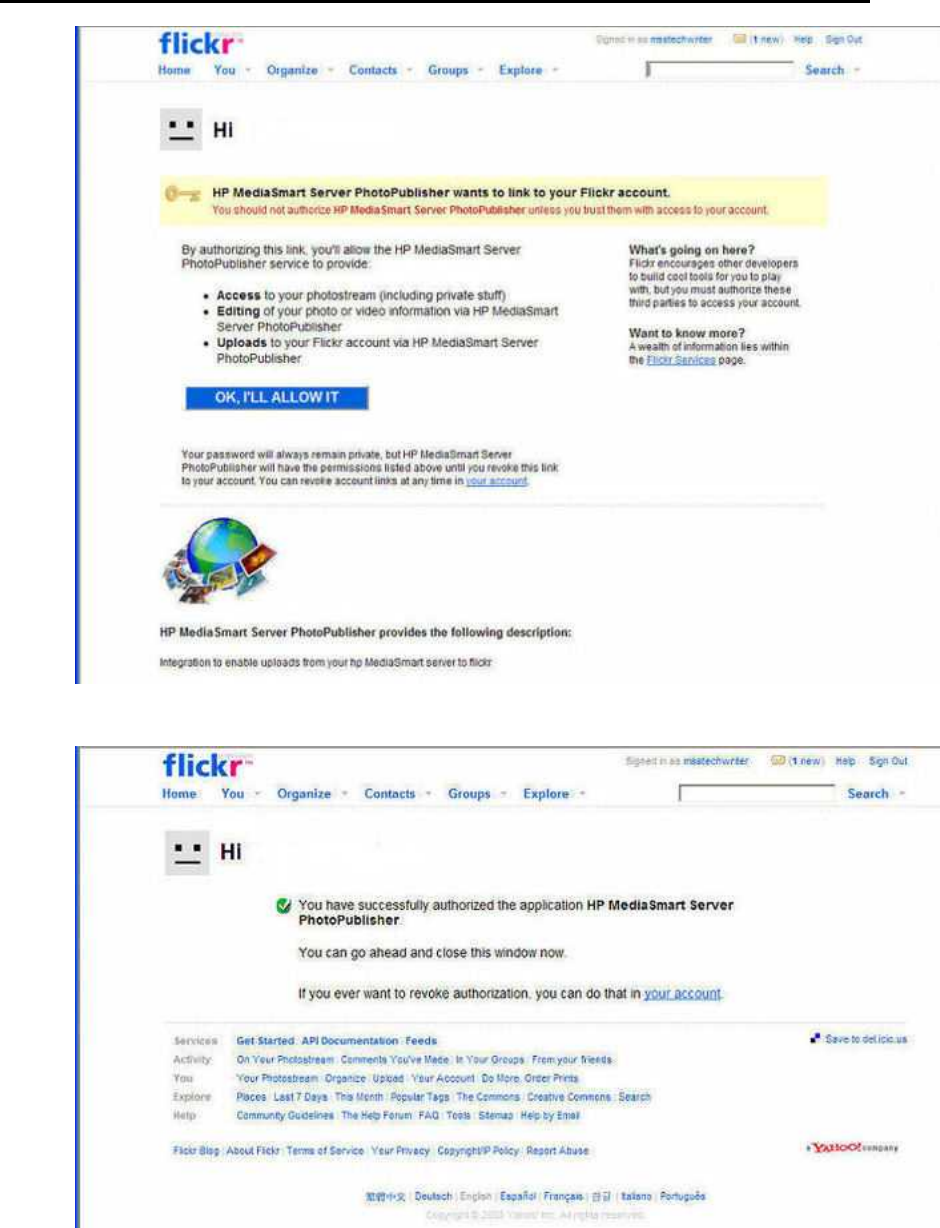
HP Photo Publisher and HP Photo Viewer
This takes you to the Flickr confirmation page. Close this page.
Click Next.
This takes you to the HP Photo Publisher Albums page.
169
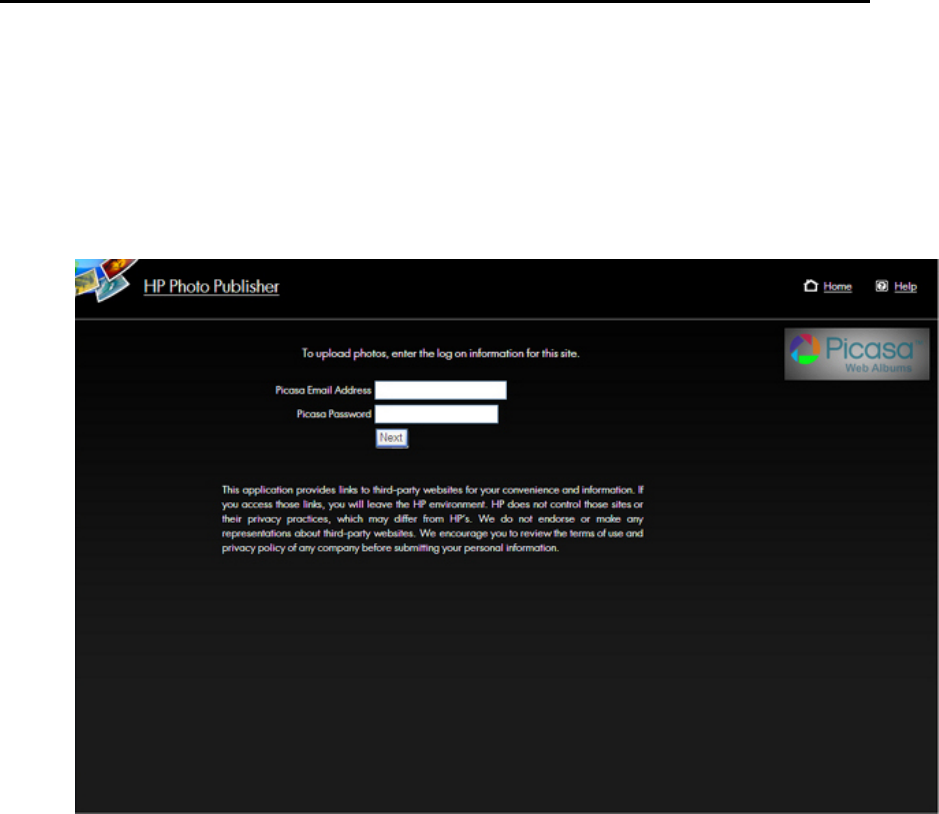
HP MediaSmart Server User's Guide
You can now create or add to albums.
PICASA LOGON
To logon to Picasa, enter your credentials as shown in the figure below. Click Next.
After your credentials are accepted, this takes you to a page where you can upload photos and
create albums.
SNAPFISH LOGON
To login to Snapfish, enter your credentials. Click Next.
After your credentials are accepted, this takes you to a page where you can create or add to
albums.
170
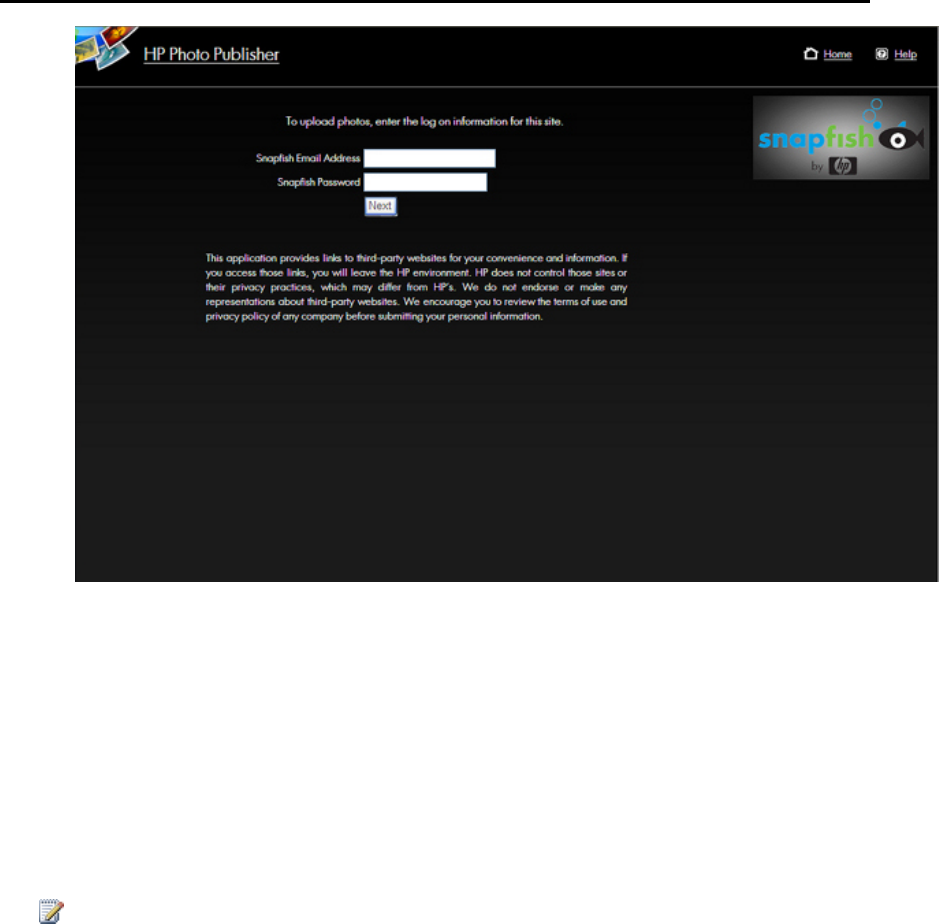
HP Photo Publisher and HP Photo Viewer
Select Existing Album or Create an Album
1. Select Upload to an existing album and select the album from the drop down list.
or,
Select to create a new album or set. Type the name of the album.
2. Click Next.
Note
Flickr uses the term set instead of album. Another term that Flickr uses is photo stream. The
photo stream is the default presentation mode for Flickr and uses no sets.
171
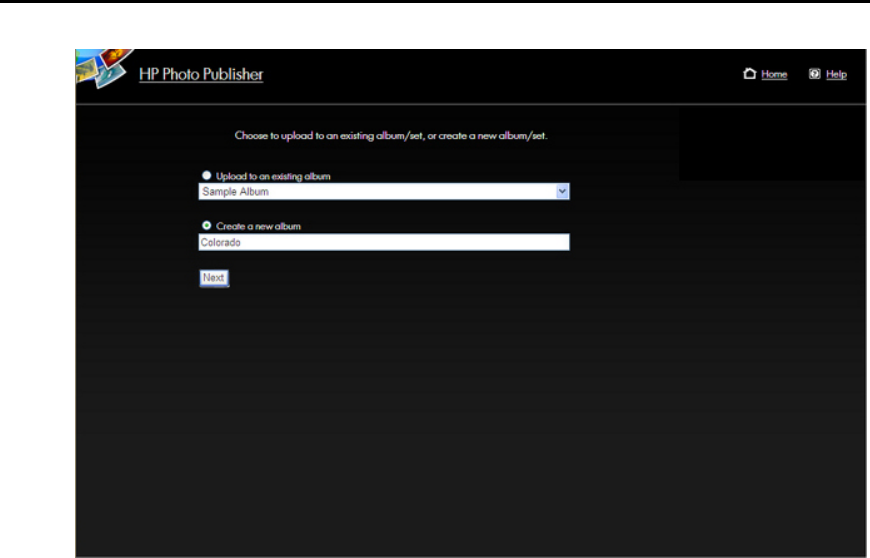
HP MediaSmart Server User's Guide
Select Photos
The HP Photo Publisher queries the server and displays a list of folders and photos available to the
current user.
1. Click the Arrow to see an expanded view of folders.
2. Select photos to publish.
Select an entire folder by putting a check in the checkbox by the folder.
Select individual files using the checkboxes beside individual files.
3. Once you have finished your selections click Finish.
The photos selected will now upload to the photo sharing site you are logged onto.
172
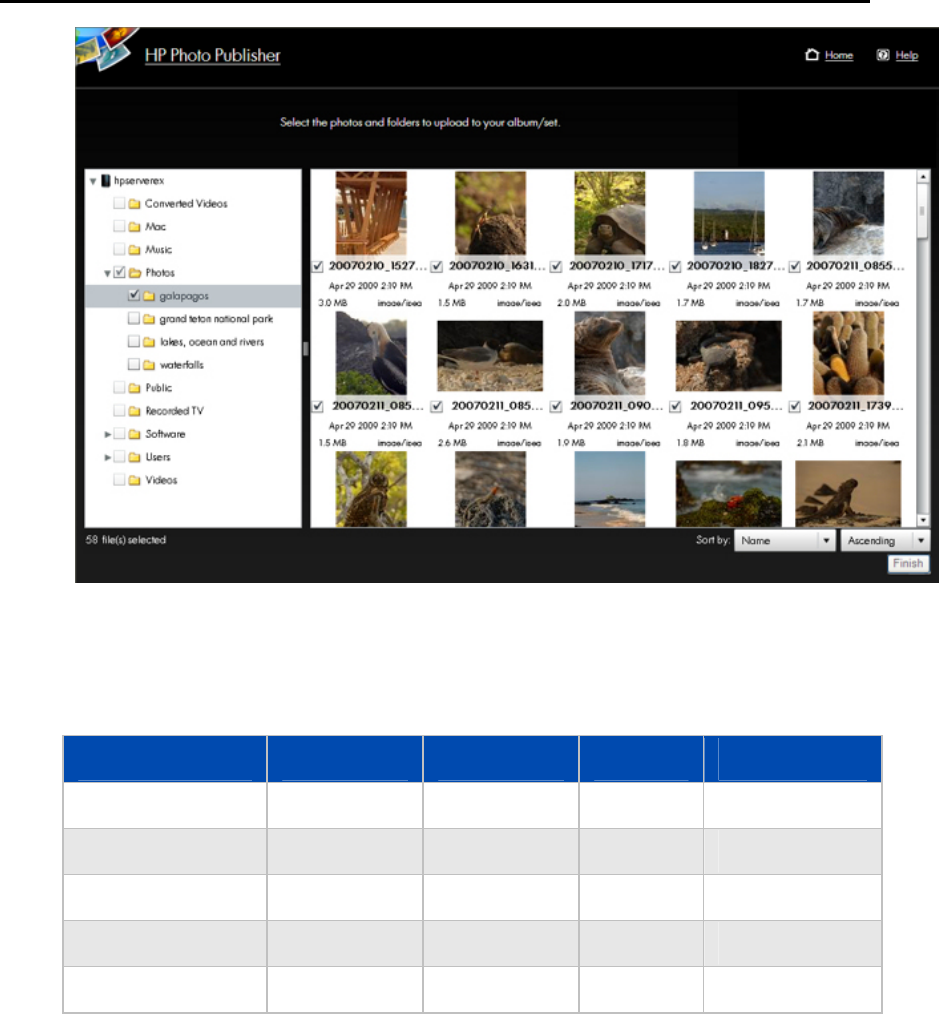
HP Photo Publisher and HP Photo Viewer
Only file types that are supported by the photo sharing site are available to upload.
The table below tells what file types are accepted at the various photo sharing and social
networking sites.
*.jpg, *.jpeg *.gif *.png *.bmp
Picasa X X X X
Snapfish X
facebook X X X X
flickr X X
HP Photo Viewer X X X
Server Continues Uploading
This page gives a status concerning the uploading of the photos.
If the browser stops responding, you can close the browser, or you can visit another Web site; your
HP MediaSmart Server will continue the upload.
173
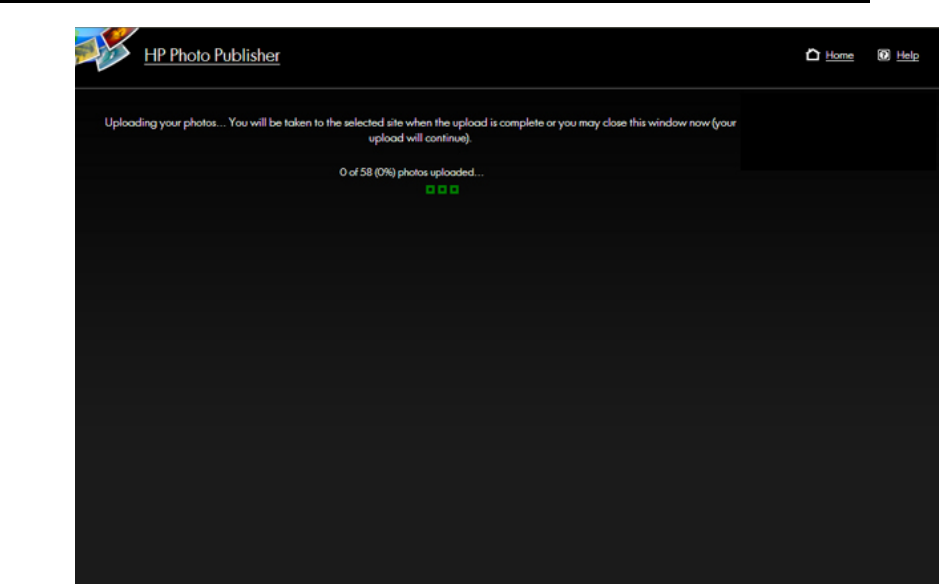
HP MediaSmart Server User's Guide
174
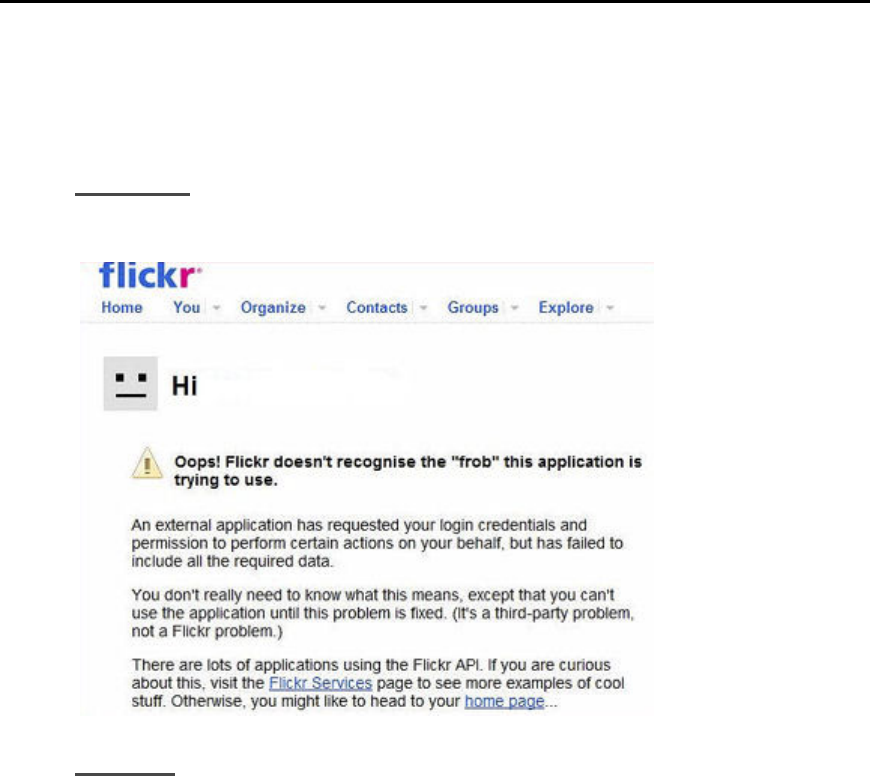
HP Photo Publisher and HP Photo Viewer
Troubleshooting HP Photo Publisher
PHOTO PUBLISHER, FLICKR “FROB” ERROR
Symptom
While logged into flickr, I open a second Firefox browser session and try to log into flickr. I get
the following error.
Solution
Close all Firefox browsers that are logged into flickr. You will be able to log back into flickr.
175
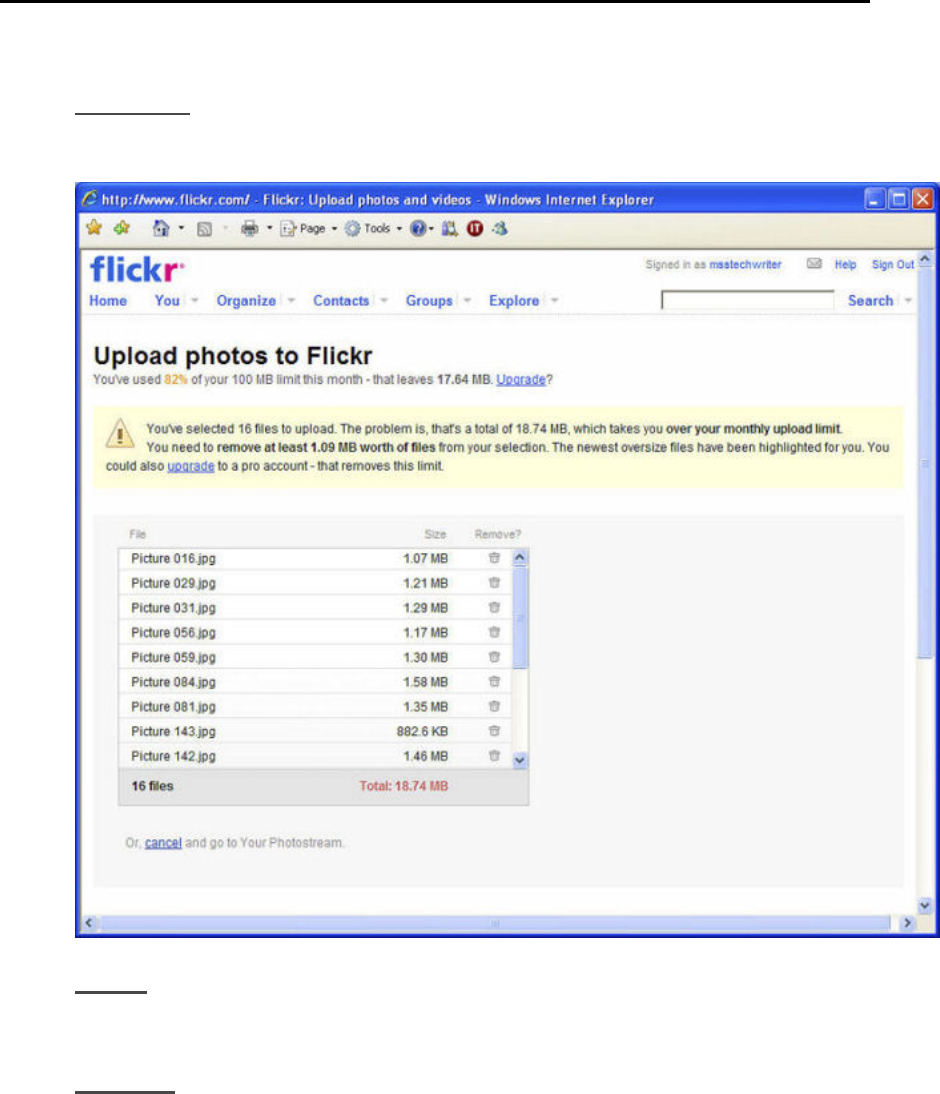
HP MediaSmart Server User's Guide
PHOTO PUBLISHER, FLICKR PHOTO UPLOAD FAILS
Symptom
Trying to upload photos to my flickr account, and I get an error saying that I've exceeded a
monthly limit.
Cause
At the time of writing, flickr only allows the free accounts to upload 100MB per month.
Solution
Wait until the following month to upload to your free account; or follow the upgrade link to
purchase flickr pro account.
176
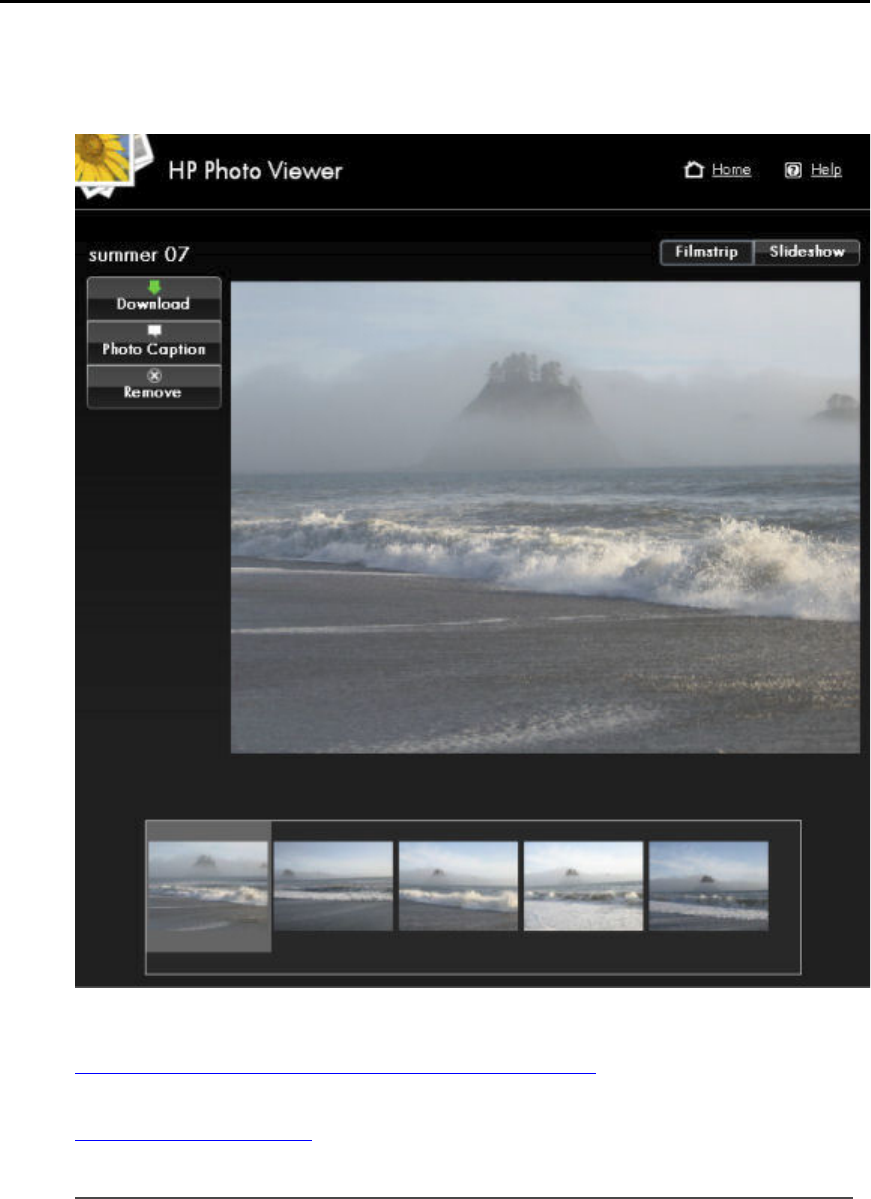
HP Photo Publisher and HP Photo Viewer
PHOTO PUBLISHER, HOW TO ADD ADDITIONAL PHOTOS TO
AN ALBUM
To add additional photos to an album after you have initially added photos.
• Use the HP Home Page to access the Photo Publisher logon page
or
• Use the browsers back button
Use the HP Home Page to access the Photo Publisher logon page
HP recommends that you use the HP Home Page to re-access the Photo Publisher to add photos to
an existing photo album.
177
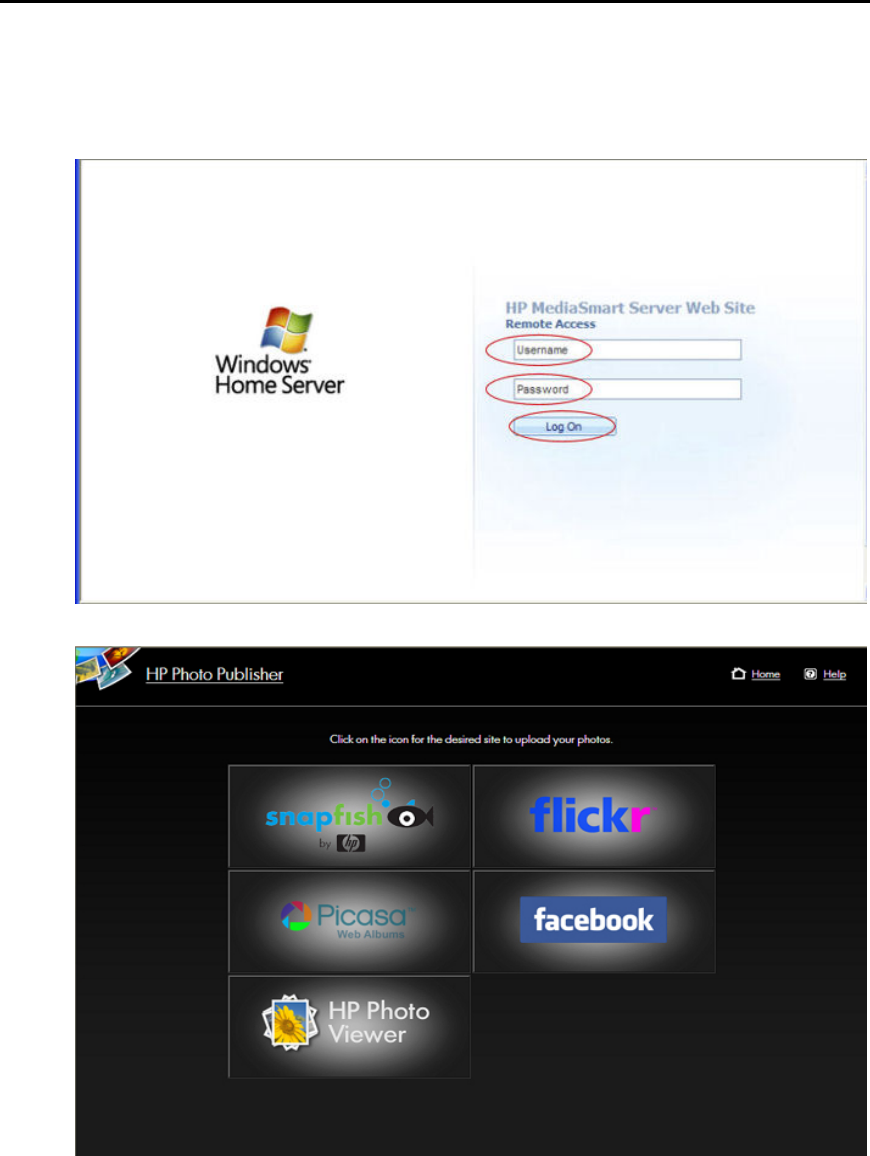
HP MediaSmart Server User's Guide
1. At the PC, close your browser and double-click the HP MediaSmart Server desktop icon.
At the Mac, close you browser and select Open Home Page from the Server menu .
2. Double-click HP Photo Publisher.
3. Log into HP Photo Publisher. Enter your Username, Password and click the Log On button.
4. You will be brought the HP Photo Publisher home page.
5. Click the site and login.
178

HP Photo Publisher and HP Photo Viewer
6. Choose the album to add photos to.
179

HP MediaSmart Server User's Guide
7. Select photos and click Finish.
180
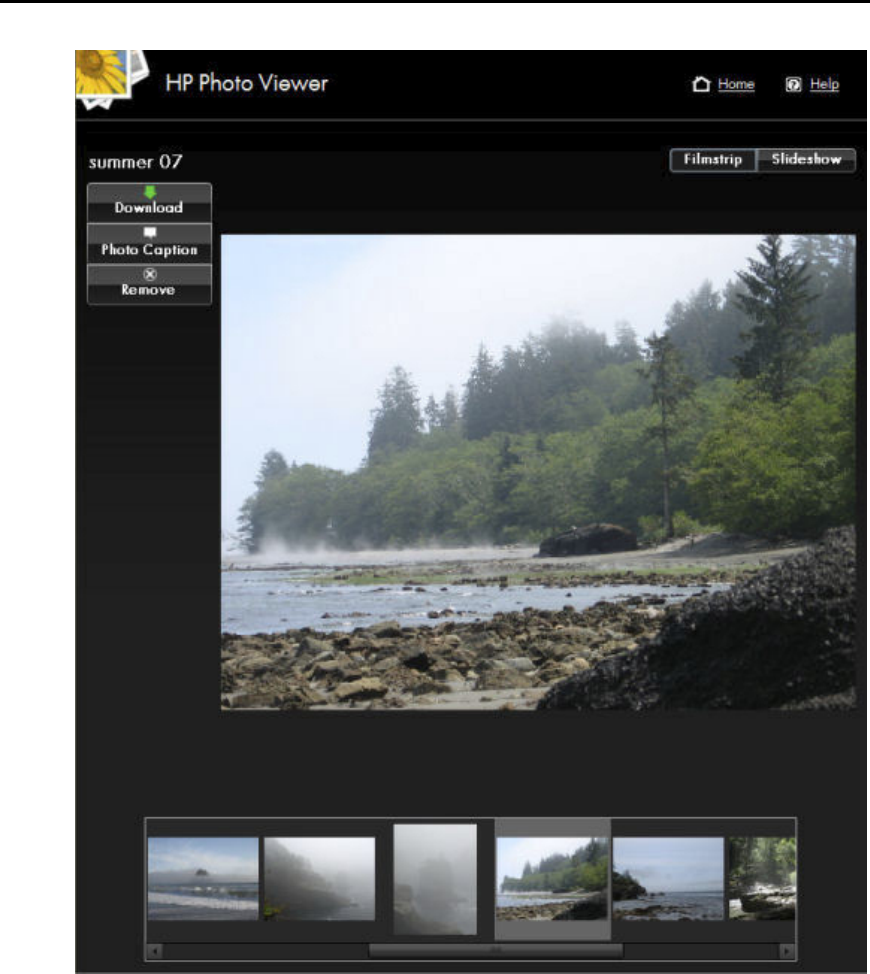
HP Photo Publisher and HP Photo Viewer
8. Select the photo album to view.
181
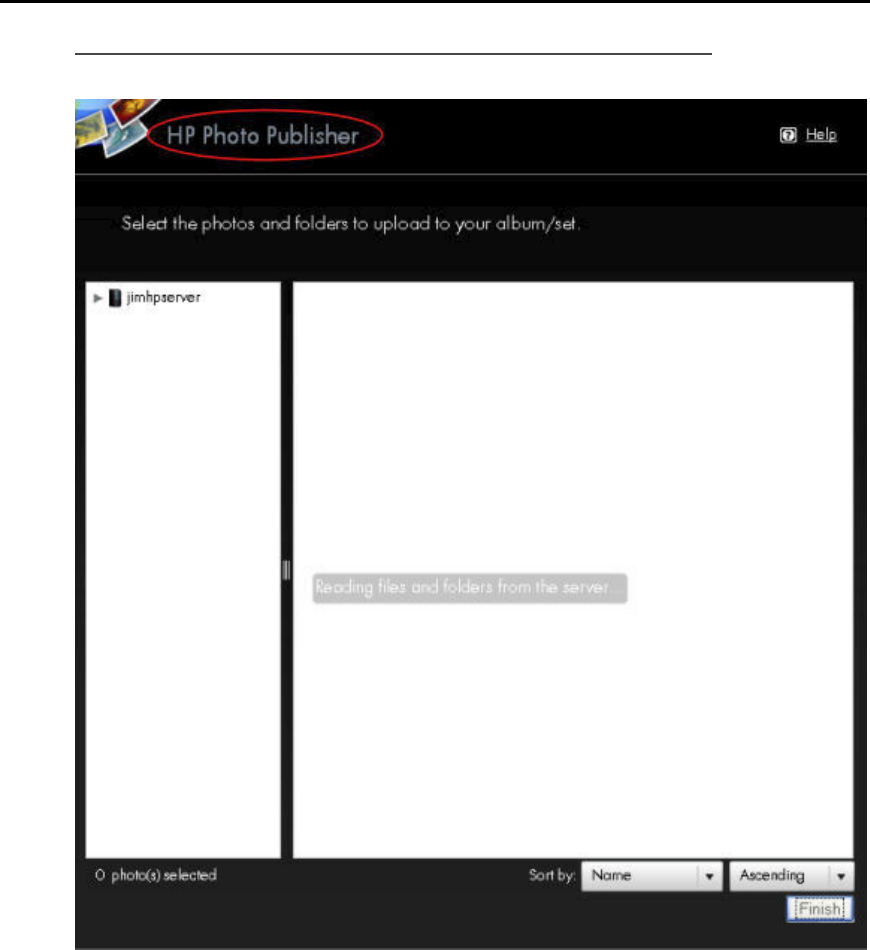
HP MediaSmart Server User's Guide
Using the back button to access the add photos page
1. Click the back button until you arrive at the Select Photos page. Click Photo Publisher.
2. Click the site and login.
182
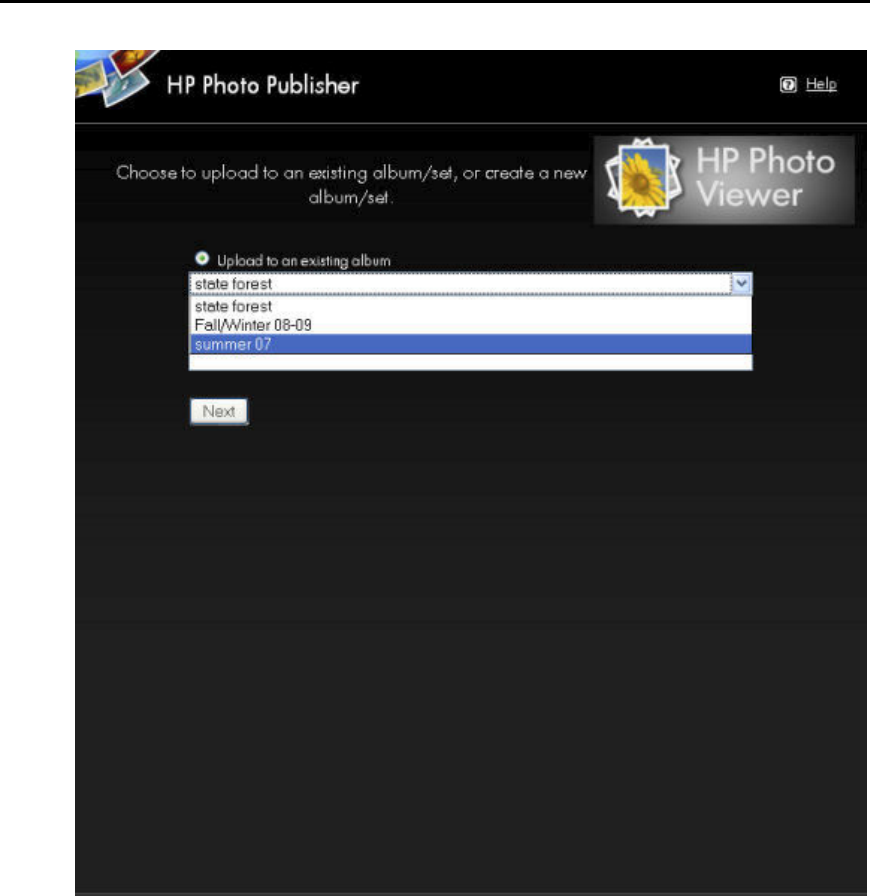
HP Photo Publisher and HP Photo Viewer
3. Choose the album to add photos to.
183
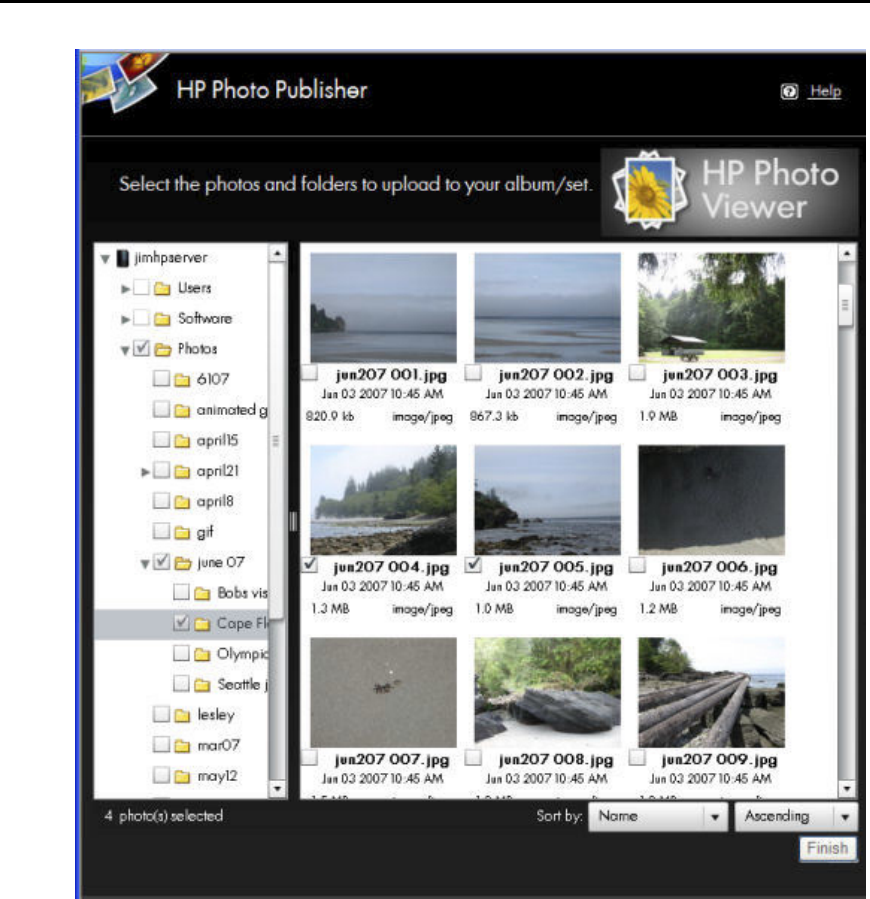
HP MediaSmart Server User's Guide
4. Select photos and click Finish.
184
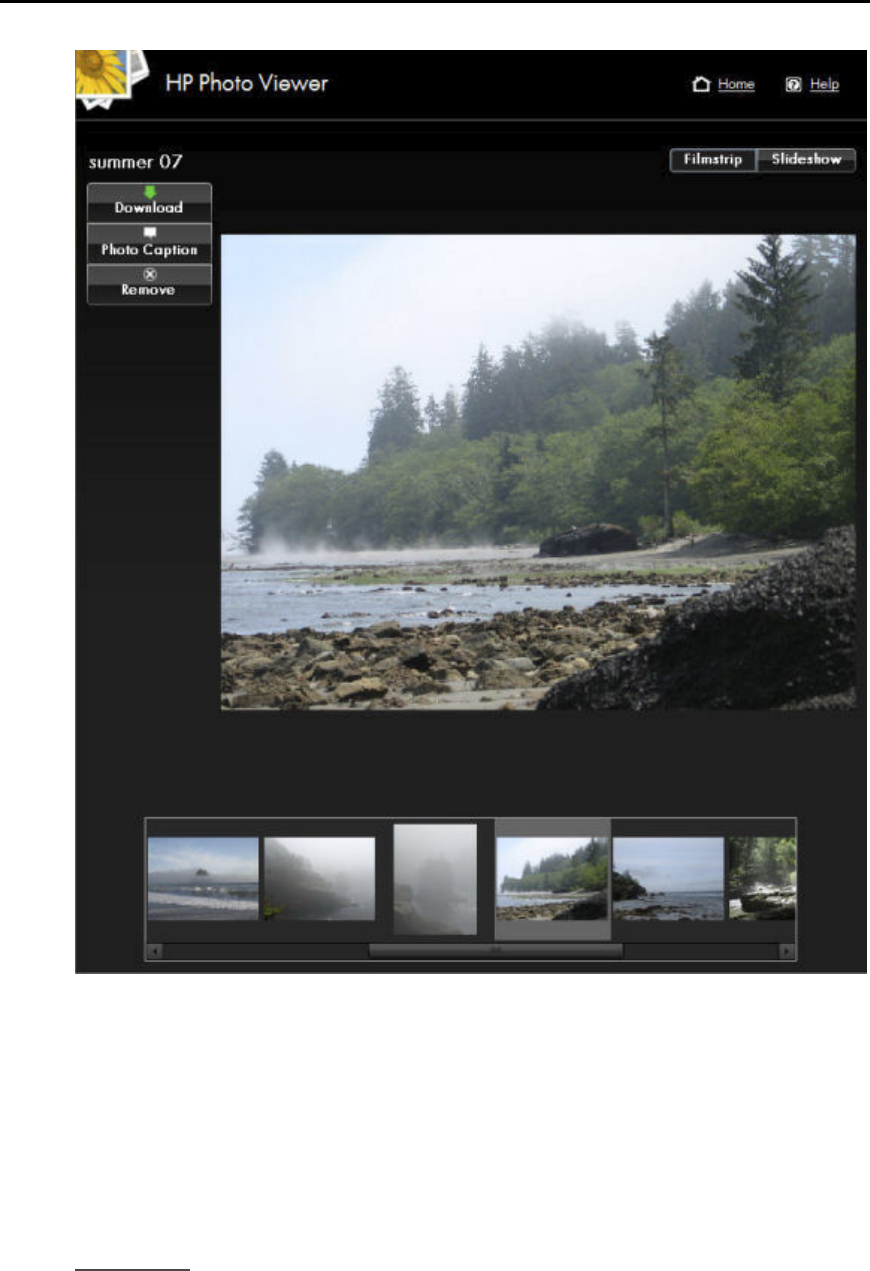
HP Photo Publisher and HP Photo Viewer
5. Select the photo album to view.
NOTE:
You might need to close your browser and reopen or clear out your internet cache.
PHOTO PUBLISHER, UPLOAD ERROR MESSAGE
"FORBIDDEN" IN PICASA
Symptom
Trying to upload photos to my Picasa account, I get an error saying "forbidden".
185
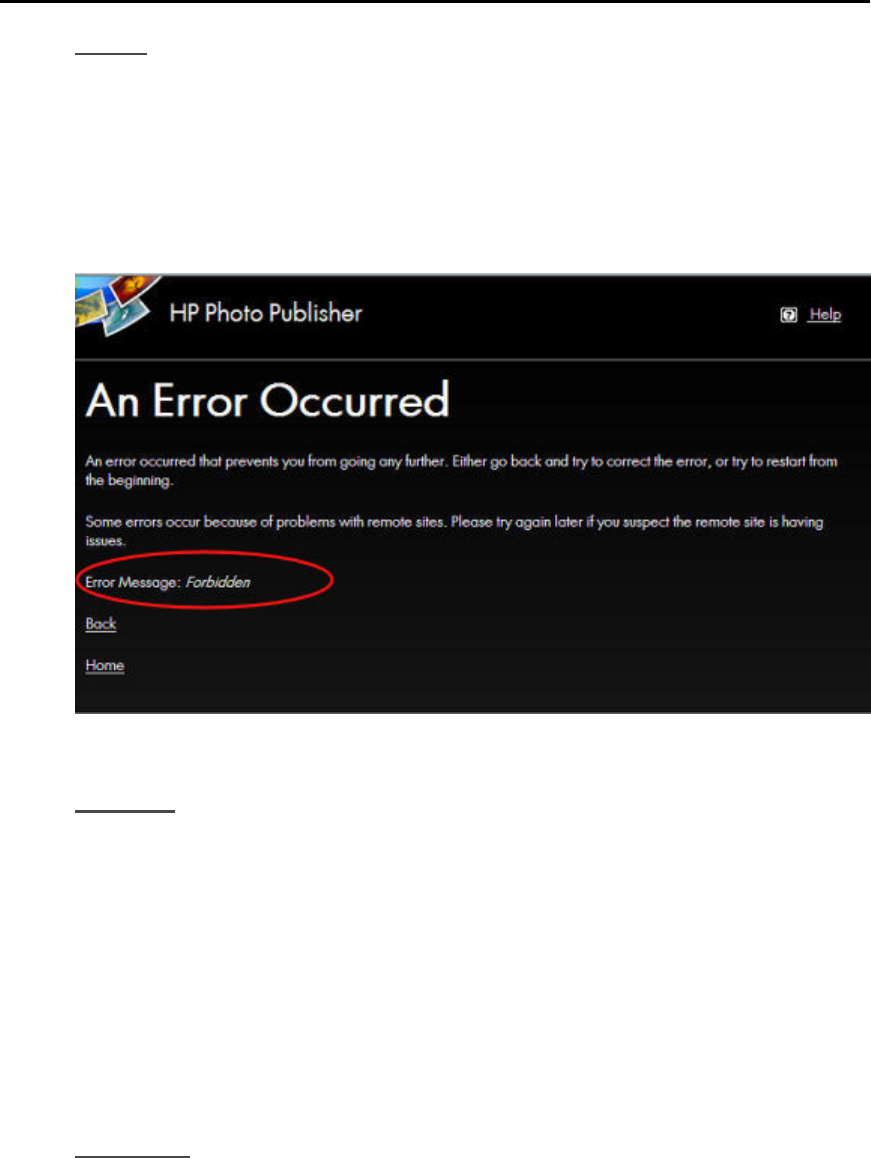
HP MediaSmart Server User's Guide
Cause
At the time of writing; the "Forbidden Error Message" can be caused by exceeding one or both of
the following conditions:
• Picasa allows 500 photos in an album on their free accounts.
• Picasa allows for 1GB of storage on there free accounts.
Solution
Consider either:
• Breaking your large album into smaller albums
• Clearing off some of your existing photos to make room for the photos you want to load
• Going to the Picasa web site and purchasing more storage space.
PHOTO PUBLISHER, USING BACK BUTTON UNABLE TO
SELECT PHOTOS
Symptom
I want to add more photos to my photo album, but i have passed the photo select page. Clicking
the browsers back button, I get back to the photo select page where I select photos. When I click
finish my browser does not read the albums properly.
186
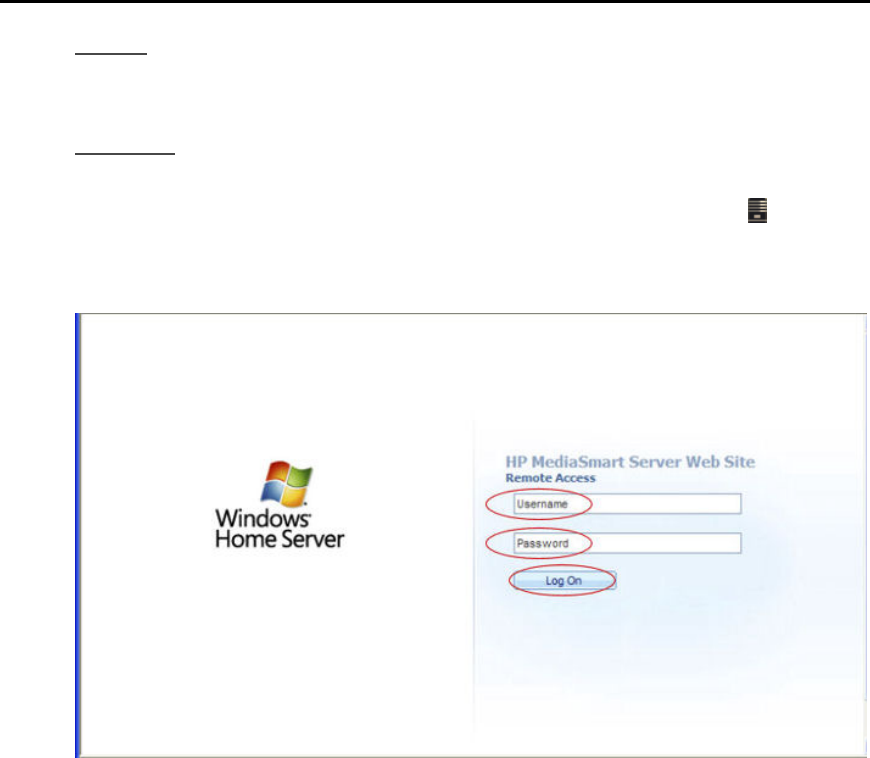
HP Photo Publisher and HP Photo Viewer
Cause
Sometimes the browser will display cached album information.
Solution
1. At the PC, close your browser and double-click the HP MediaSmart Server desktop icon.
At the Mac, close you browser and select Open Home Page from the Server menu .
2. Double-click HP Photo Publisher.
3. Enter your Username, Password and click the Log On button.
4. You will be brought the HP Photo Publisher home page.
HP PHOTO VIEWER
HP Photo Viewer Home Page
The Photo Viewer Home Page gives you the opportunity to View, Rename, Delete an album Photo
Viewer lets you make an album Public or Private.
The Public/Private choice is designed for additional privacy for Server owners that have set up
their servers for remote access. This feature allows the administrator to make an album private,
while allowing access to friends and family that know the URL of the album.
187
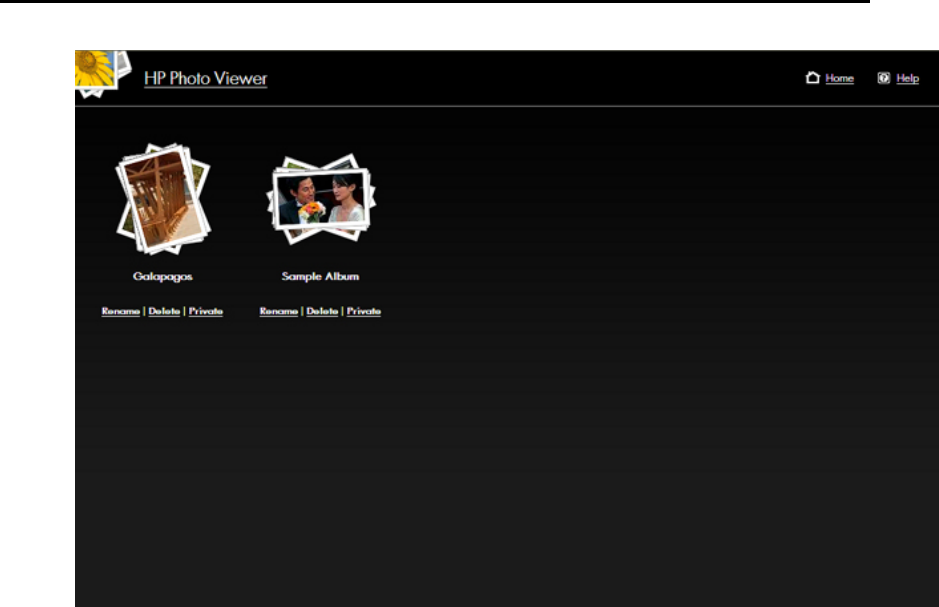
HP MediaSmart Server User's Guide
To share a Private album:
1. Open the Album
2. Either
• Use your browser’s menu to send the URL, click File, Send, Link by E-mail to start
sending an email to outside users
• Copy the URL
http://myserver.homeserver.com/PhotoViewer/album633689042886093750/index.xml to
paste into your email.
NOTE: Make sure you use the URL that has been set up for Internet/Remote Access. Using local
address for your album such as:
http://hpstorage/PhotoViewer/album633689042886093750/index.xml will not work for remote
users.
3. Send the URL to your friend or family member, and they can now gain access to the Album.
HP Photo Viewer Slideshow
You have two choices:
• Filmstrip View
• Slideshow View
188
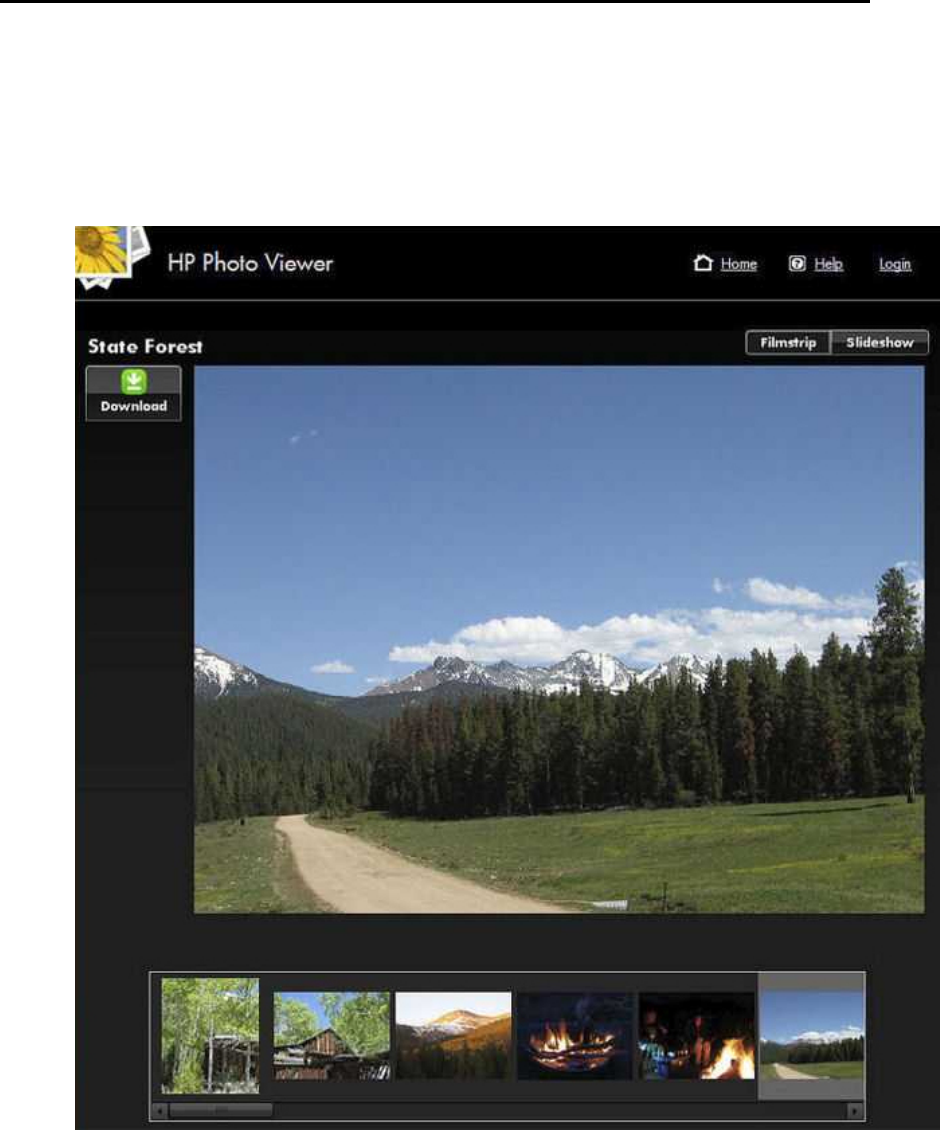
HP Photo Publisher and HP Photo Viewer
Filmstrip View
Viewing the album in Filmstrip view, you will see a page similar to below. As long as you are
logged into the server you will see three buttons on the left: Download, Photo Caption, and
Remove.
If you have been logged off the server due to inactivity you will only see the Download button.
Click the Login link in the upper right part of the screen and provide credentials to log back on.
The Download Button allows visitors to download the photo to there Computer.
189
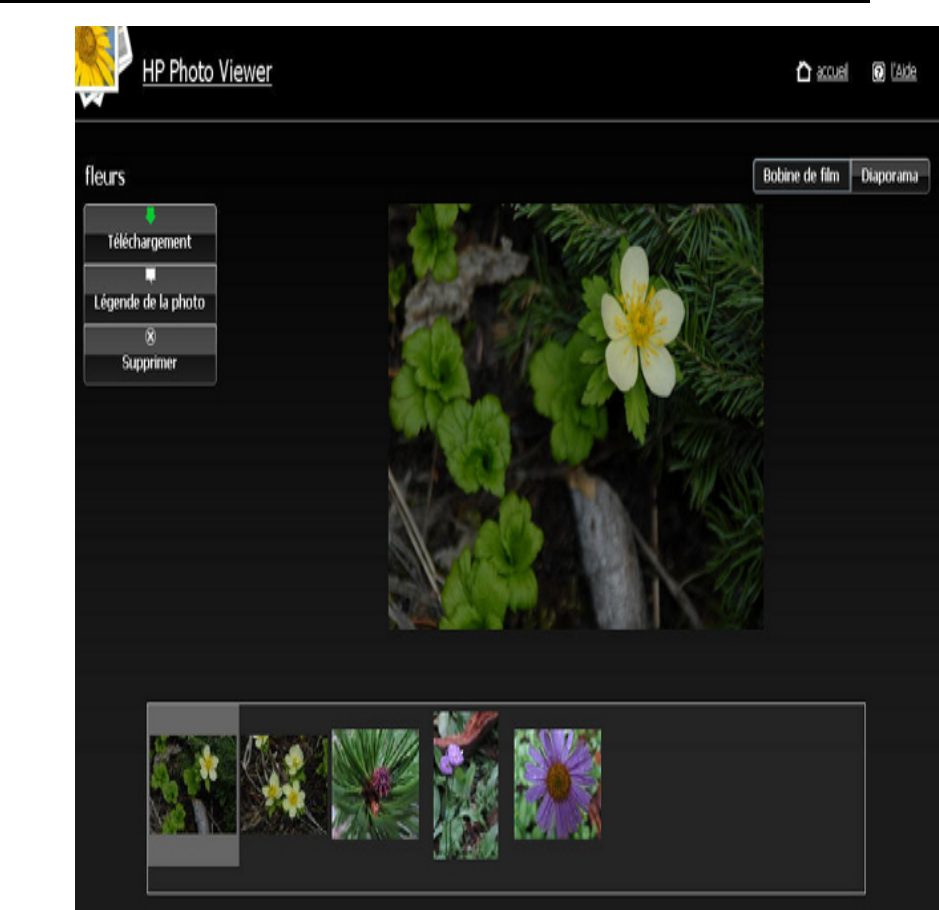
HP MediaSmart Server User's Guide
Photo Caption allows you to add a caption for the photo. Enter text in the field that appears below
the photo as shown in the example below. Click the Save button to keep the Caption
190

HP Photo Publisher and HP Photo Viewer
Remove lets you remove the photo from the album, please note that the photo still remains on the
Server. Click Yes or No to confirm the removal.
Slideshow View
Viewing the album in Slideshow will give you larger views of the photos. If the photo has a
caption, it will show as in the example below.
191
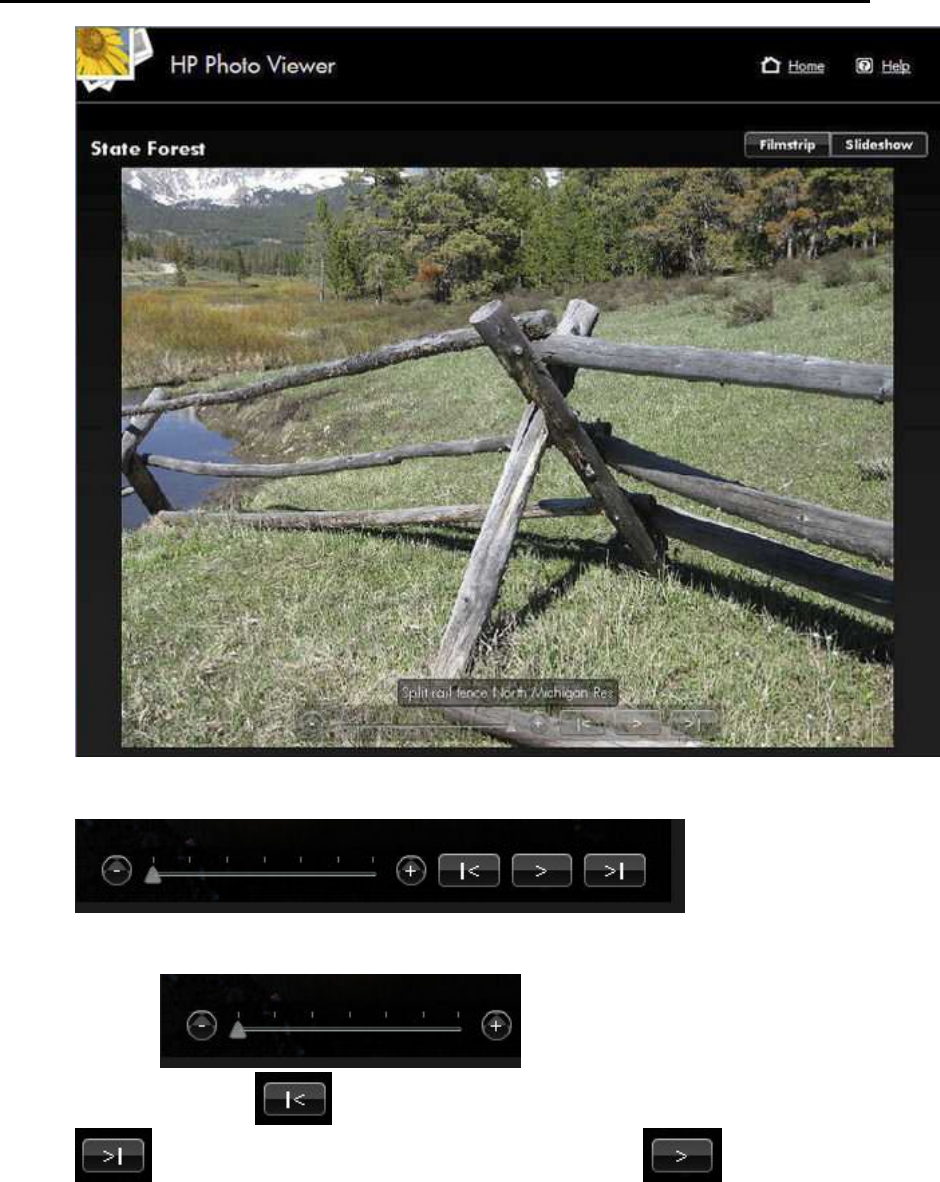
HP MediaSmart Server User's Guide
The Control Bar for the slideshow will appear towards the bottom of the screen.
The slider half of the bar controls how fast the next
photo will show. The button will bring up the previous photo in the slideshow, the
button will bring up the next photo in the slideshow, and the button is a toggle
switch; playing or pausing the slideshow.
192

HP Photo Publisher and HP Photo Viewer
Select Existing Album or Create an Album
1. Select Upload to an existing album and select the album from the drop down list.
or,
Select to create a new album or set. Type the name of the album.
2. Click Next.
Note
Flickr uses the term set instead of album. Another term that Flickr uses is photo stream. The
photo stream is the default presentation mode for Flickr and uses no sets.
Select Photos
The HP Photo Publisher queries the server and displays a list of folders and photos available to the
current user.
1. Click the Arrow to see an expanded view of folders.
2. Select photos to publish.
Select an entire folder by putting a check in the checkbox by the folder.
Select individual files using the checkboxes beside individual files.
3. Once you have finished your selections click Finish.
The photos selected will now upload to the photo sharing site you are logged onto.
193

HP MediaSmart Server User's Guide
Only file types that are supported by the photo sharing site are available to upload.
The table below tells what file types are accepted at the various photo sharing and social
networking sites.
*.jpg, *.jpeg *.gif *.png *.bmp
Picasa X X X X
Snapfish X
facebook X X X X
flickr X X
HP Photo Viewer X X X
194
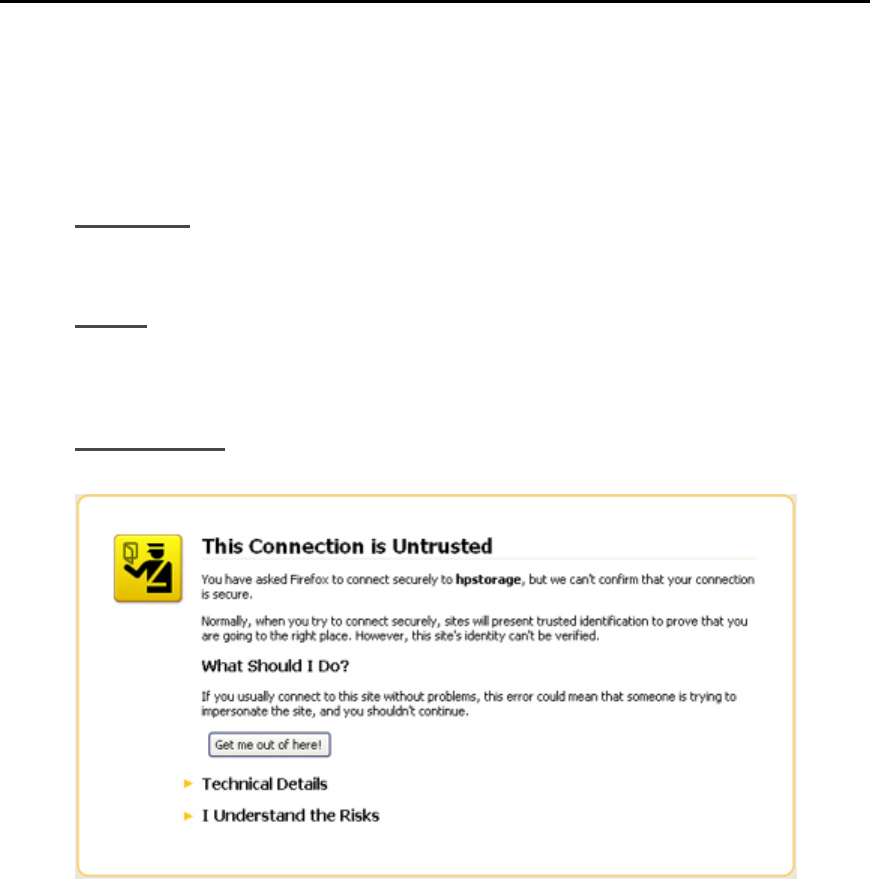
HP Photo Publisher and HP Photo Viewer
Troubleshooting HP Photo Viewer
FIREFOX CERTIFICATION NEEDED TO ACCESS HP PHOTO
VIEWER
Symptom
When trying to enter HP Photo Viewer, Firefox gives an untrusted connection message.
Cause
A signed SSL certificate is required to access this Server. This certificate is created when you first
visit the server from each computer.
Workaround
1. Click I Understand the Risks.
195
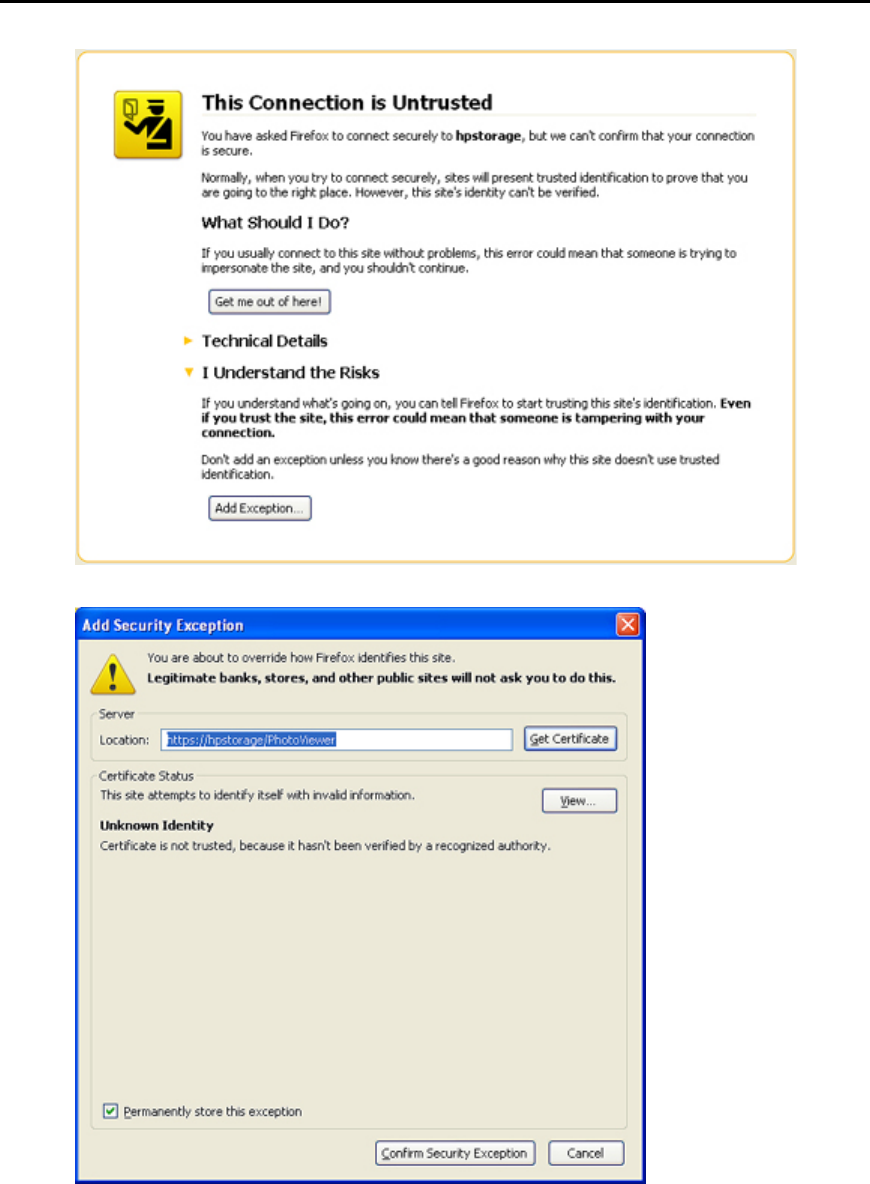
HP MediaSmart Server User's Guide
2. Click Add Exception.
3. The location will populate automatically, click Get Certificate.
4. Click Confirm Security Exception.
196
HP Photo Publisher and HP Photo Viewer
LAUNCHING HP PHOTO VIEWER IN FIREFOX AFTER
BROWSER CRASH GIVES ERROR MESSAGE
Symptom
Closed a Firefox browser using CTRL+ALT+DEL.
Open the Windows Home Server Console, click on the HP MediaSmart Server tab, click HP
Photo Publisher, click the Launch Photo Viewer.
Firefox displays an error message.
Cause
Clicking on a link in the admin console, which starts a local browser session. The user's firefox
browser does not start immediately due to a previous firefox crash.
The admin console incorrectly thinks this is an error.
Solution
Open Firefox and click either restore session or start new session, then click photo viewer link.
PHOTO VIEWER SLIDESHOW CAPTION TOOL TIP DOES NOT
REFRESH
Symptom
While running a slideshow a tool tip displaying the photo caption will appear over a picture and
not go away.
197
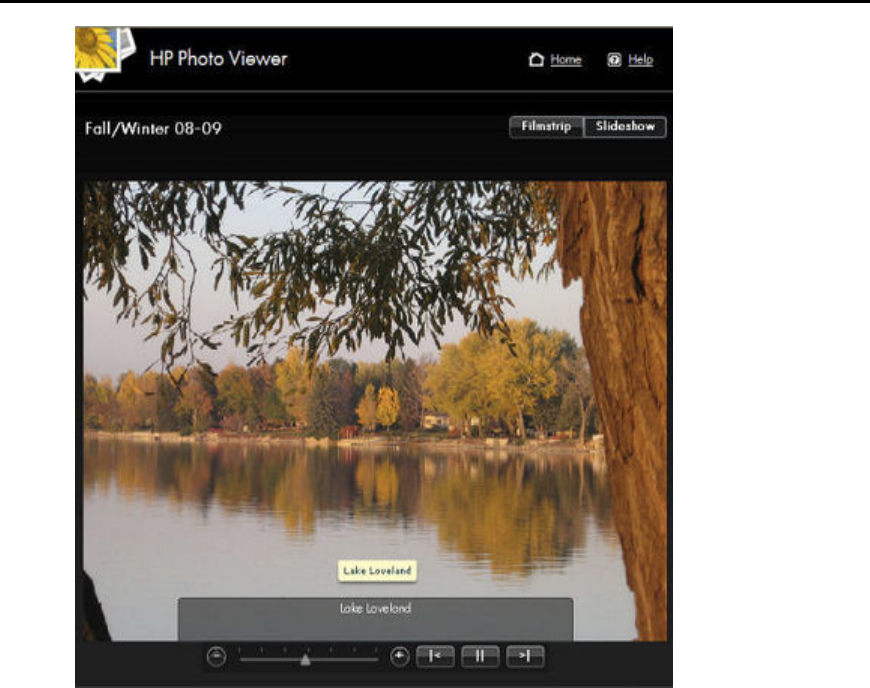
HP MediaSmart Server User's Guide
198
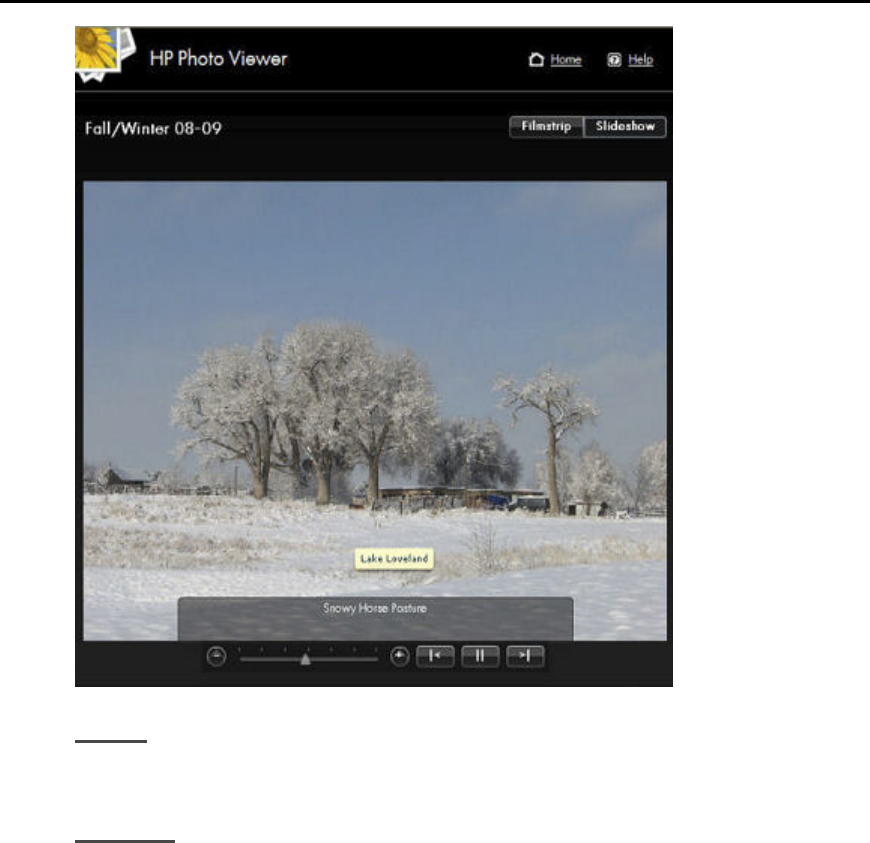
HP Photo Publisher and HP Photo Viewer
Cause
The tool tip does not refresh if the mouse is stationary.
Solution
Move the Mouse and the photo caption will disappear. The best practice for viewing a slideshow
would be to position the mouse out of the slideshow viewing area.
HP PHOTO VIEWER ALBUM MISSING PHOTOS
When viewing an album I have missing photos.
This occurs when photos that have been added to an album have been moved from the location
that they were originally located when the photos were added to the album. The photos may still
reside on the server, just in a different location. A Photo Album is very much like a play list – it
contains a reference to photos on your server, but does not contain its own copy of these photos.
199
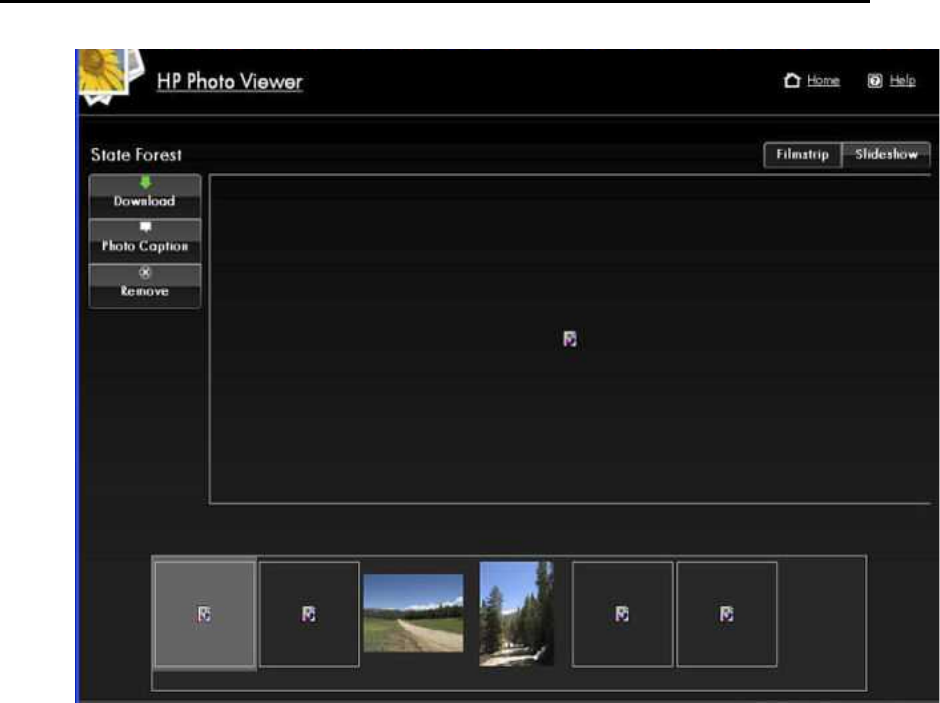
HP MediaSmart Server User's Guide
To remove the missing photos placeholders:
1. Log into Photo Viewer as the administrator
2. Open the album.
3. Click the Yes button in the Remove Photos dialog.
200
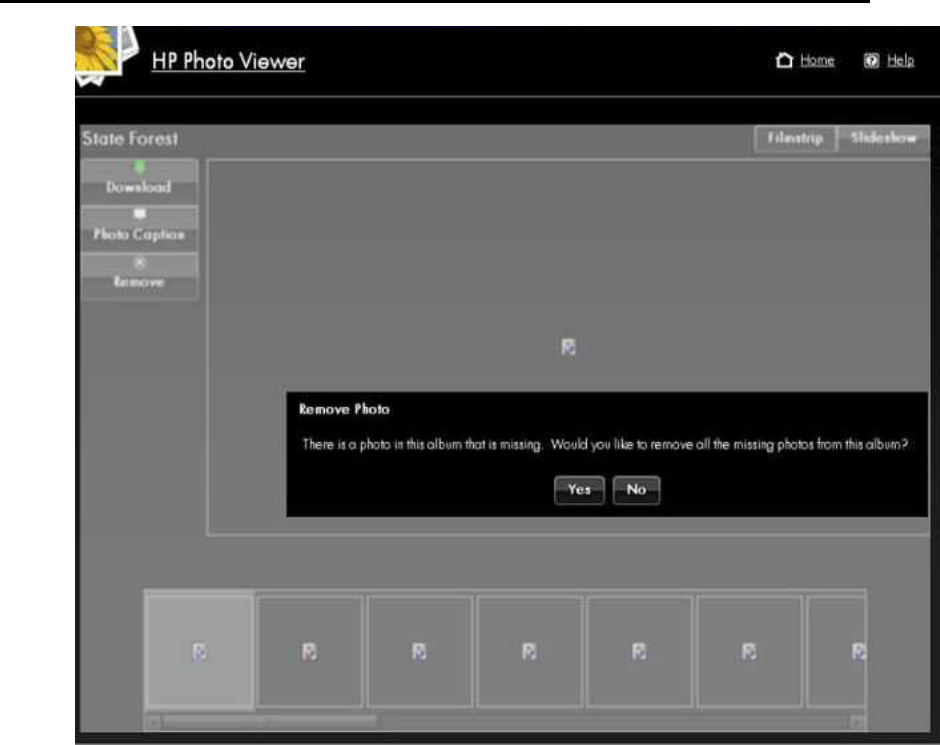
HP Photo Publisher and HP Photo Viewer
201

Chapter 8. Backup, Restore, and Recover
CHOOSE A BACKUP STRATEGY
The following table describes the different backup options that are available with the HP
MediaSmart Server and when to use them.
Backup Options
Backup Option Description When to use Setting it up
Windows Home
Server Backup for
PCs
Backs up your entire PC. If a
PC drive dies, replace the
drive, run the PC restore disk
and the PC is restored to the
last backup.
You can configure Windows
Home Server Backup to
exclude specific volumes or
folders.
Choose this option if you
want to be able to recover
your entire PC, including the
operating system, software
and all files, in the case of a
hard drive failure.
Also, choose this option if
your original working copies
of files are on your PC and
you want the security of
knowing that there are copies
on the server.
Run the Software Installation
Disc on your PC.
No additional configuration is
required. Your entire PC will
be backed up automatically.
See PC Backup and Restore
to learn how to exclude
volumes or folders from the
backup.
Time Machine
Backup for Macs Creates a Time Machine
backup of your Mac and
stores it on the server.
Choose this option if you
want to be able to recover
your entire Mac, including
the operating system,
software and all files, in the
case of a hard drive failure.
Also, choose this option if
you store original working
copies of files on your Mac
and you want them backed up
to the server.
Run the Software Installation
Disc on your Mac.
Configure Mac Backup.
Server Shared
Folder
Duplication
Creates two copies of any
shared folder on the server
that has duplication enabled.
If a server drive fails, other
than the system drive, simply
remove it and replace. This is
similar to a RAID 1 array for
shared folders.
Choose this option if you
keep your original working
copies of files in the shared
folders on your server and
you want a copy of them.
Storing original files on your
server reduces the number of
copies on your network and
makes it possible for
everyone to share the same
files.
Windows Home Server
requires that two or more
drives are added to server
storage.
See Shared Folders in the
Windows Home Server help.
203

HP MediaSmart Server User's Guide
Backup Options
Backup Option Description When to use Setting it up
Back up Server to
a Device Uses Windows Home Server
Backup Now to backup
server shared folders to a
device that can be stored off
site.
Choose this option if you
want to back up shared
folders on the server to a
SATA, eSATA, or USB drive
and store it off site. This
option protects you against
total disasters, such as a fire
or flood.
Run the Software Installation
Disc on your PC.
Attach an eSATA or USB
drive to your server, or add a
SATA drive to an empty bay
in your server using the
backup drive option.
See Back up Server to a
Device.
PC BACKUP, RESTORE, AND RECOVER
PC Backup and Restore
After running the Software Installation Disc on a computer it is automatically added to the list of
computers that are backed up by the HP MediaSmart Server each night. The entire computer is
backed up by default.
Complete the following steps to customize the hard drive volumes to back up, or to exclude
folders from the backup.
1. At the PC, double-click the Windows Home Server icon in the system tray and log on.
At the Mac, select Launch Home Server Console from the Server menu .
2. Click the Computers & Backups tab.
3. Select a computer and click Configure Backup.
Follow the instructions in the Backup Configuration Wizard.
Related Topics
Windows Home Server Console Help
Computers & Backup
How does backup work?
Managing and Configuring Backups
Restoring Computer Backups
Removing a Computer
Troubleshooting Computers & Backup
204

Backup, Restore, and Recover
Restore an Entire PC Hard Drive
To help you recover your computer and data in the event of a hard drive failure, the HP
MediaSmart Server includes a PC Restore Disc. Use this disc to restore your computer from the
HP MediaSmart Server in the event of the following:
To restore the system drive.
• When the operating system will not start (boot).
• If you cannot use System Restore to restore the system files.
Caution
To ensure that you have the latest version of the PC Restore Disc, contact HP support at
http://www.hp.com/support.
The Microsoft Windows Preinstallation Environment software included with this computer or
software may be used for boot, diagnostic, setup, restoration, installation, configuration, test or
disaster recovery purposes only.
Note
THIS SOFTWARE CONTAINS A SECURITY FEATURE THAT WILL CAUSE THE END
USER CUSTOMER'S SYSTEM TO REBOOT WITHOUT PRIOR NOTIFICATION TO THE
END USER CUSTOMER AFTER 24 HOURS OF CONTINUOUS USE.
Recover Your Computer
1. Insert the PC Restore Disc into a CD/DVD drive in the computer you want to restore.
2. Restart the computer, and boot from the CD.
3. Follow the instructions in the Restore Wizard.
For additional information about restoring computer backups, see Restoring Computer Backups in
the Windows Home Server Console Help.
MAC BACKUP AND RECOVER
Mac Time Machine Backup
In this article...
Determine Used Space on Your Local Disk
Configure Time Machine Backups
Change the Backup Disk Size
Delete a Backup Disk
205
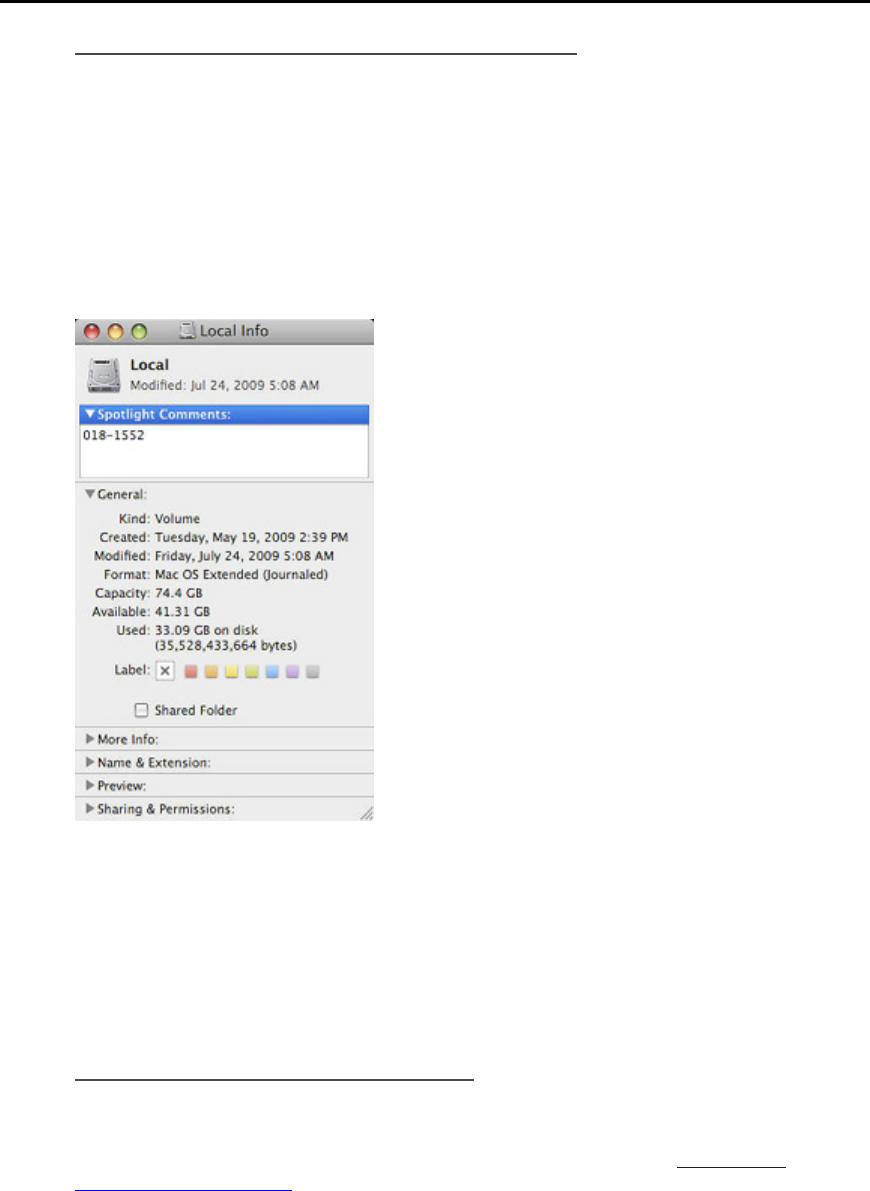
HP MediaSmart Server User's Guide
Determine Used Space on Your Local Disk
Begin by finding out how much space your data currently occupies on your Local disk. When you
set up Time Machine, the minimum backup disk size is automatically calculated for you.
However, you may want to increase the backup disk size depending on how often you create or
change files on your Mac.
1. Open a Finder window and select the Local disk.
2. On the Apple menu bar, choose File > Get Info.
3. In the Local Info window, look in the General section next to find the Used disk space.
Multiply the used disk space by 1.5. The result is the minimum amount of disk space Time
Machine can work with (That’s because Time Machine needs space for all of your files plus some
extra room to enable it to store new data and multiple copies of files that change.). However, more
space is always better, because it enables Time Machine to retain backups that go further into the
past. A backup disk with at least 1.5 times as much free space as the amount occupied on your
local disk is recommended, and more if possible.
Configure Time Machine Backups
Before you begin,
• The HP MediaSmart Server software has to be installed on your Mac. See Installing and
Uninstalling Mac Software.
• You must be logged on to the Mac with an account that has administrator privileges.
To configure the HP MediaSmart Server as a valid Time Machine backup device,
206
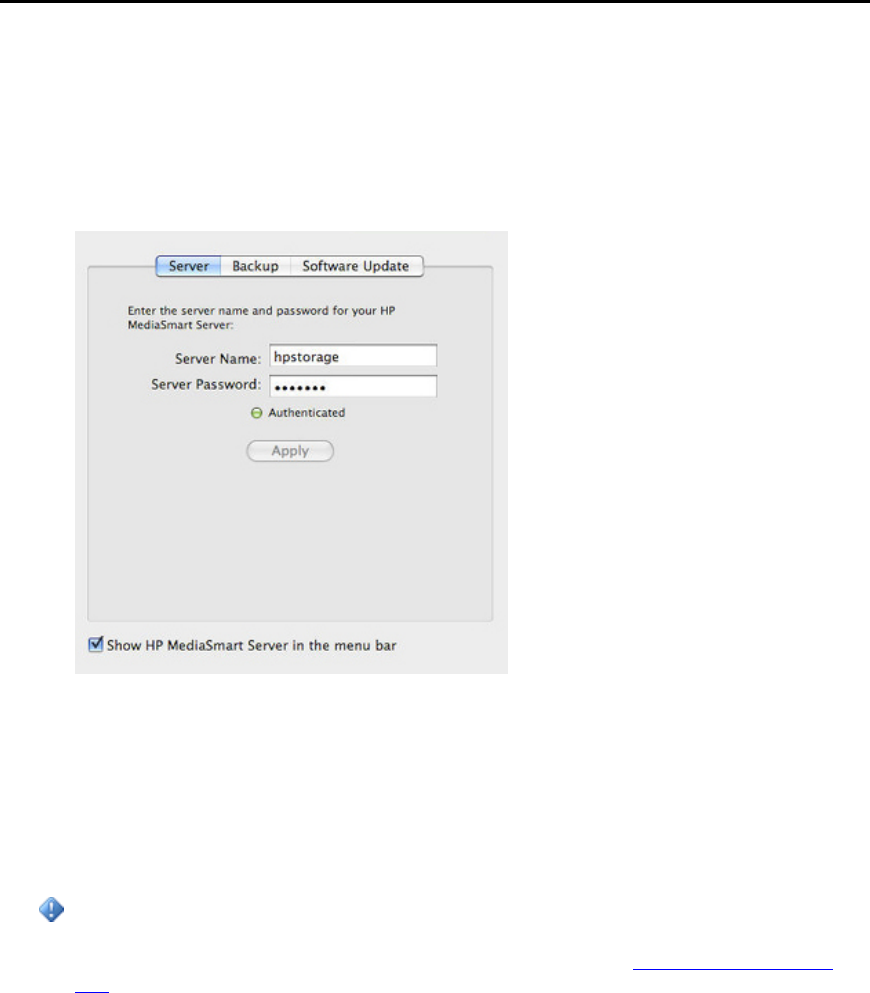
Backup, Restore, and Recover
1. From the HP MediaSmart Server menu, select Open Preferences.
2. On the Server tab, verify that the server name and the server’s administrator password are
authenticated.
This information is used by Time Machine to set up the backup destination, as well as the links to
the shares on the server. This information may have been entered at the end of the Mac software
install. If so, you will be authenticated automatically.
3. Select the Backup tab and type a Backup Disk Size.
The suggested minimum disk space size displays in the dialog based on approximately 1.5 times
the size of your used disk space. However, HP recommends creating a backup disk that is at least
as large as your total local disc capacity, or larger if possible. When choosing a backup disk size,
you may want to consider how much you use your Mac and how much disk space you have
available on your server. The backup disk size cannot exceed the amount of free space that you
have available on one server disk.
Important
You can resize your backup disk later if you need more room. Resizing the backup disk
overwrites the current backup disk and causes all data to be lost. See Change the Backup Disk
Size.
207
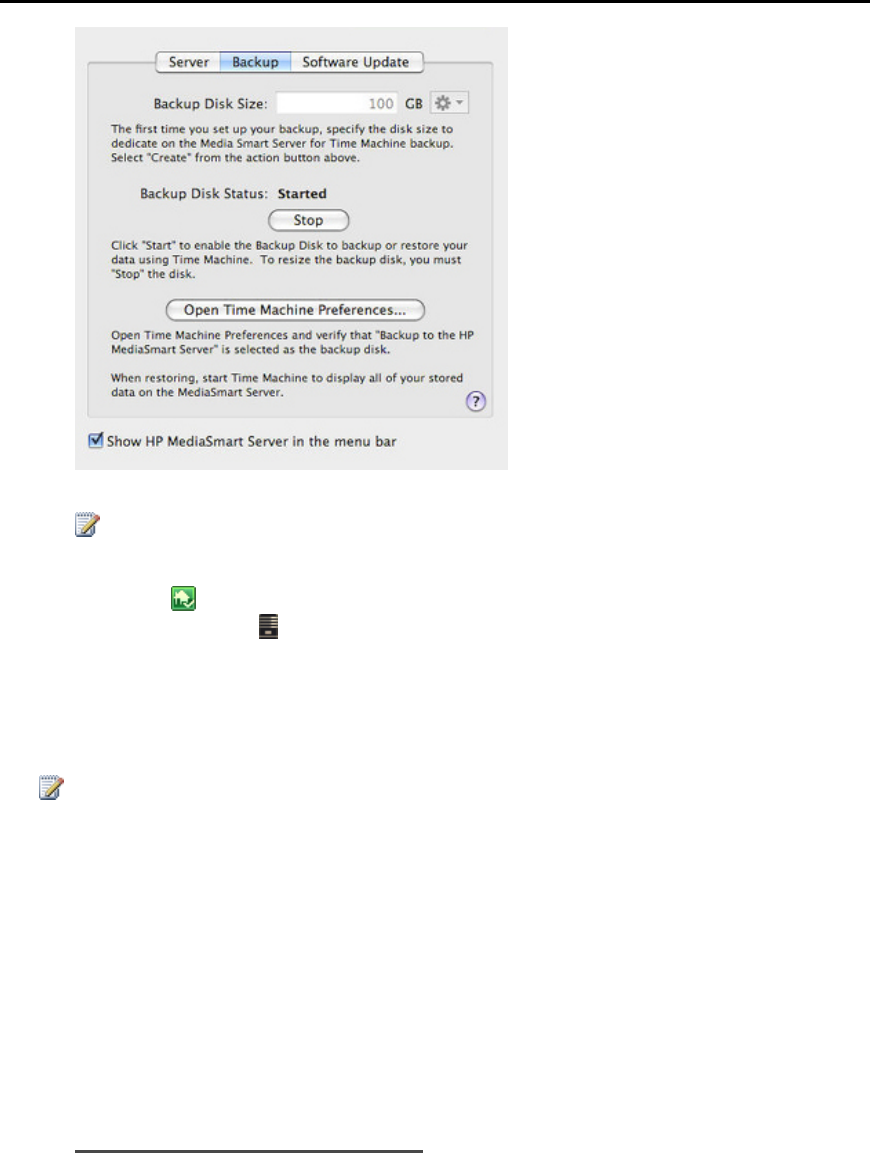
HP MediaSmart Server User's Guide
Note
The location for the backup is on the server at \\hpstorage\Mac\Backup. If the Mac shared folder
has been deleted from the server , you must create it. At a PC, double-click the Windows Home
Server icon in the system tray and log on. Or at a Mac, select Launch Home Server Console
from the Server menu . Click the Shared Folders tab and Add a shared folder named Mac.
4. Click Apply.
This process can take quite some time based on the size of the backup disk and server activity.
Once the formatting process is complete, the Backup Disk Status changes to Started.
Note
The backup file will be located at \\<server name>\Mac\Backup. The file name is based on the
serial number of the Mac system, and cannot be changed. Do not manually delete or rename this
file.
5. Click Open Time Machine Preferences, click Choose Backup Disk and select Backup to HP
MediaSmart Server as the backup disk.
Backup to HP MediaSmart Server may already be selected. You may have to change the
backup location to the HP MediaSmart Server if you had a previous Time Machine backup that
pointed to a different location.
Change the Backup Disk Size
1. From the HP MediaSmart Server menu, select Open Preferences.
2. Click the Backup tab.
208

Backup, Restore, and Recover
3. In the Backup Disk Status, click Stop.
The Backup Disk Status changes to Stopped and the virtual disk icon on the desktop goes away
after the backup disk stops.
Note
You may have to wait several minutes for the backup disk to stop. Please be patient. If the
backup disk does not stop and it appears to hang, it could be because an application or other
process is accessing the backup disk in the background. If this is the case, attempt to eject the disk
using Finder.
4. Enter a new value in the Backup Disk Size and select Resize from the action menu.
You cannot select Resize until the disk is stopped and the disk size is changed.
5. Click Apply.
6. A pop up warning appears informing you the file already exists and that continuing will erase the
existing backup data and start over. To continue with the new size click Delete and Continue.
Delete a Backup Disk
You may want to delete a backup disk if you need to free up space on your server for other things
or if you are no longer using your Mac.
1. From the HP MediaSmart Server menu, select Open Preferences.
2. Click the Backup tab.
3. In the Backup Disk Status, click Stop.
The Backup Disk Status changes to Stopped and the virtual disk icon on the desktop goes away
after the backup disk is stopped.
Note
You may have to wait several minutes for the backup disk to stop. Please be patient. If the
backup disk does not stop and it appears to hang, it could be because an application or other
process is accessing the backup disk in the background. If this is the case, attempt to eject the disk
using Finder.
4. Select Delete from the action menu next to the Backup Disk Size.
Recover an Entire Mac Hard Drive
In this article...
Prepare the USB Flash Drive
Recover the Mac Hard Drive Using the USB Flash Drive
209

HP MediaSmart Server User's Guide
Prepare the USB Flash Drive
The flash drive is prepared with software that enables the Mac OS X Installer to restore the entire
Mac hard drive, including the operating system, applications, and files, from a Time Machine
backup on the HP MediaSmart Server.
The flash drive will be formatted and any files already on the drive will be lost. Save files already
on the drive to a different location.
You also need to have configured the HP MediaSmart Server backup file before you prepare the
USB Flash Drive.
1. Insert a USB flash drive into a USB slot on the Mac computer that has the HP MediaSmart Server
Mac Client software installed.
2. From the HP MediaSmart Server menu, select Open Recovery Assistant.
The Recovery Assistant opens.
3. On the Welcome page, click Continue.
4. Select the USB flash drive as the destination and click Continue.
5. Type your Mac administrator name and password and click Continue.
The USB flash drive is formatted and initialized with the recovery software.
6. On the Summary page, click Close.
Recover the Mac Hard Drive Using the USB Flash Drive
The USB flash drive contains the HP MediaSmart Server Recovery software that enables you to
restore your entire Mac hard drive from a backup on your HP MediaSmart Server. The USB flash
drive activates and mounts backup disks of your Mac computer created on the server using the HP
MediaSmart Server backup utility. The USB flash drive is used in the Mac OS X Installer
environment to make the backup disks available in the Mac OS X Installer Restore assistant.
Note
Your computer must be connected to the network with an Ethernet network cable before you begin
the restore. In most cases, you cannot use a wireless connection.
You also need at least one Time Machine backup on the HP MediaSmart Server before you can
recover the entire hard drive.
1. Insert the prepared USB flash drive into a USB slot on the computer that you want to restore.
2. Insert the Mac OS X Install Disc into the DVD-ROM drive.
3. Double-click Install Mac OS X, or boot from the Mac OS X Install Disc.
4. Select a language and click the arrow.
5. At the Welcome page, choose Utilities>Terminal.
6. Type the following command in the Terminal window. The command is case sensitive.
/Volumes/Restore/run
210

Backup, Restore, and Recover
7. A message displays that the HP MediaSmart Server backup disk has been activated. Click OK.
8. On the Recovery Center dialog, verify that your server name and password are authenticated.
9. Quit the Recovery Center.
10. Quit the Terminal.
You are returned to the Welcome page.
11. Choose Utilities>Restore System From Backup.
12. Click Continue.
13. Select Backup to HP MediaSmart Server and click Continue.
14. Select a Time Machine backup on the server and click Continue.
You will probably want to select the most recent backup.
15. Select the Local disk and click Restore.
16. Follow the instructions on your screen to complete the restore.
SERVER BACKUP, RECOVER, AND RESET
Back up Server to a Device
Back up shared folders on the server to a SATA, eSATA, or USB drive and store it off site. This
option protects you against total disasters, such as a fire or flood.
In this article...
Add the Device to the Server
Back up the Server to the Device
Remove the Device from the Server
Add the Device to the Server
1. Add an internal SATA drive to the server or attach an eSATA,USB drive, or SATA port
multiplier.
For additional information see,
Add an Internal SATA Drive
Add and Remove an External USB Drive, eSATA Drive, or SATA Port Multiplier
2. To add the drive as a backup drive at a PC, double-click the Windows Home Server icon in the
system tray and log on.
At the Mac, select Launch Home Server Console from the Server menu .
3. Click the Server Storage tab.
211

HP MediaSmart Server User's Guide
4. Click Add.
5. Click Next on the Add a Hard Drive Wizard.
6. Select Use this hard drive to back up files that are stored on your home server and click Next.
7. Choose whether to format the drive or not and click Next.
Formatting the drive—Any files already on the drive will be lost. Save important files
already on the drive to a different location.
Not formatting the drive—The server will not be able to browse to files already on the
drive.
8. Name the drive and click Next.
9. Click Finish.
10. Once the device is added, click Done.
Back up the Server to the Device
1. Still in the Windows Home Server Console, click the Computers & Backup tab.
2. Select the HP MediaSmart Server from the list and click Backup Now.
3. Choose the backup device as the Destination for each shared folder you want to back up.
4. Check Remember these settings for future backups to save the settings.
5. Click Backup Now.
6. Click Close once the backup is complete.
Remove the Device from the Server
1. In the Windows Home Server Console, click the Server Storage tab.
2. Select the device from the list and click Remove.
3. Follow the instructions in the Remove a Hard Drive wizard.
4. Detach the hard drive from the server.
Note
If files are added to the drive while it is unattached to the server, you will not be able to browse to
those files from the server when the drive is reattached. The space occupied by those files is
unavailable to the server and it will not see them.
212

Backup, Restore, and Recover
Related Topics
HP MediaSmart Server User's Guide
Remove an Internal SATA Drive
Remove and Reattach a USB Drive
A USB Drive Accidentally Detaches from the Server
Server Recovery and Factory Reset
To help recover or reset the server, the server includes a Server Recovery Disc. Using this disc
requires a DVD drive.
Server Recovery attempts to recover all data and restore the folders. However, because of the state
of the system prior to the recovery, not all data may be able to be recovered or integrated into the
folder structure.
In this article...
Choose Server Recovery or Factory Reset
Recover or Reset the Server
No Server Found
Server Recovery Fails
Choose Server Recovery or Factory Reset
The following table will help you determine whether to choose Server Recovery or Factory Reset.
Caution
During Server Recovery, all system settings, such as user accounts and settings, are lost. You will
need to recreate them. During Factory Reset, in addition to losing all system settings, the data on
all drives is lost.
Choosing Server Recovery or Factory Reset
Choose Server Recovery if... Choose Factory Reset if...
Server operating system has been corrupted. The partition data on the other storage drive is
corrupted.
Disk replacement - partition data on other
storage drives are okay. You are giving away or selling the server. See
the caution below this table.
If you have lost your password.
Server’s system hard drive has been replaced.
213
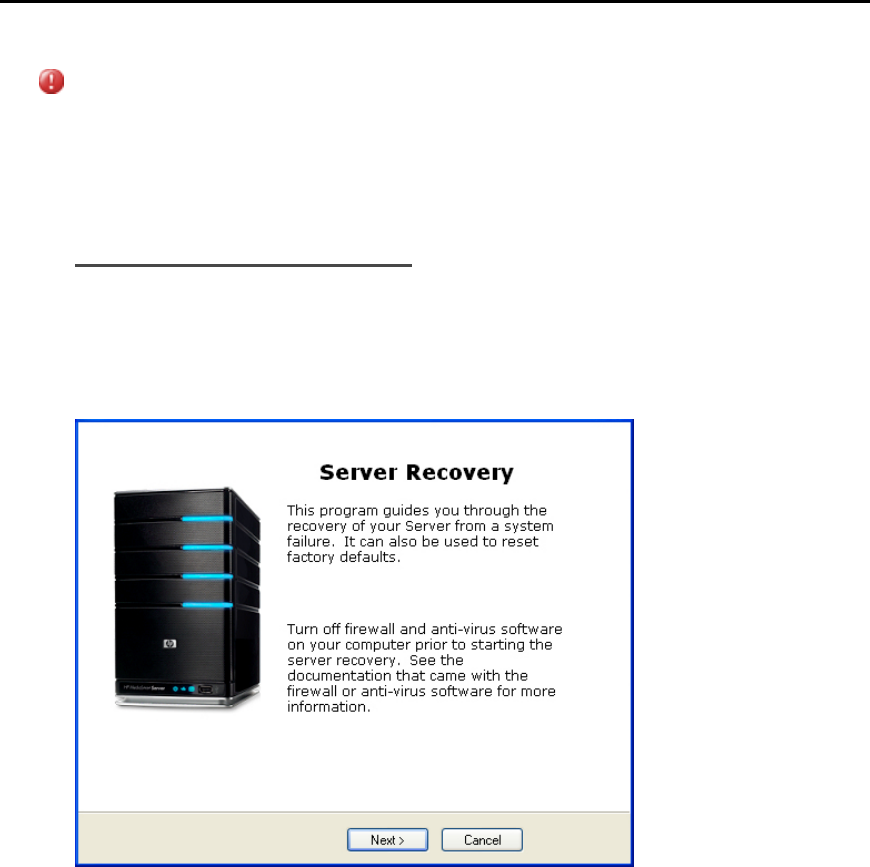
HP MediaSmart Server User's Guide
Caution
Factory Reset does not remove data from the drives; instead, it allows the existing data to be
overwritten. To insure that your data can never be accessed, use a “shredder” program that
overwrites the hard drives with random numbers or meaningless data.
Recover or Reset the Server
1. If the Home Page is open on your computer, close it before proceeding.
2. Insert the Server Recovery Disc into a PC DVD drive.
The Server Recovery program automatically starts.
3. Click Next on the Server Recovery dialog.
214
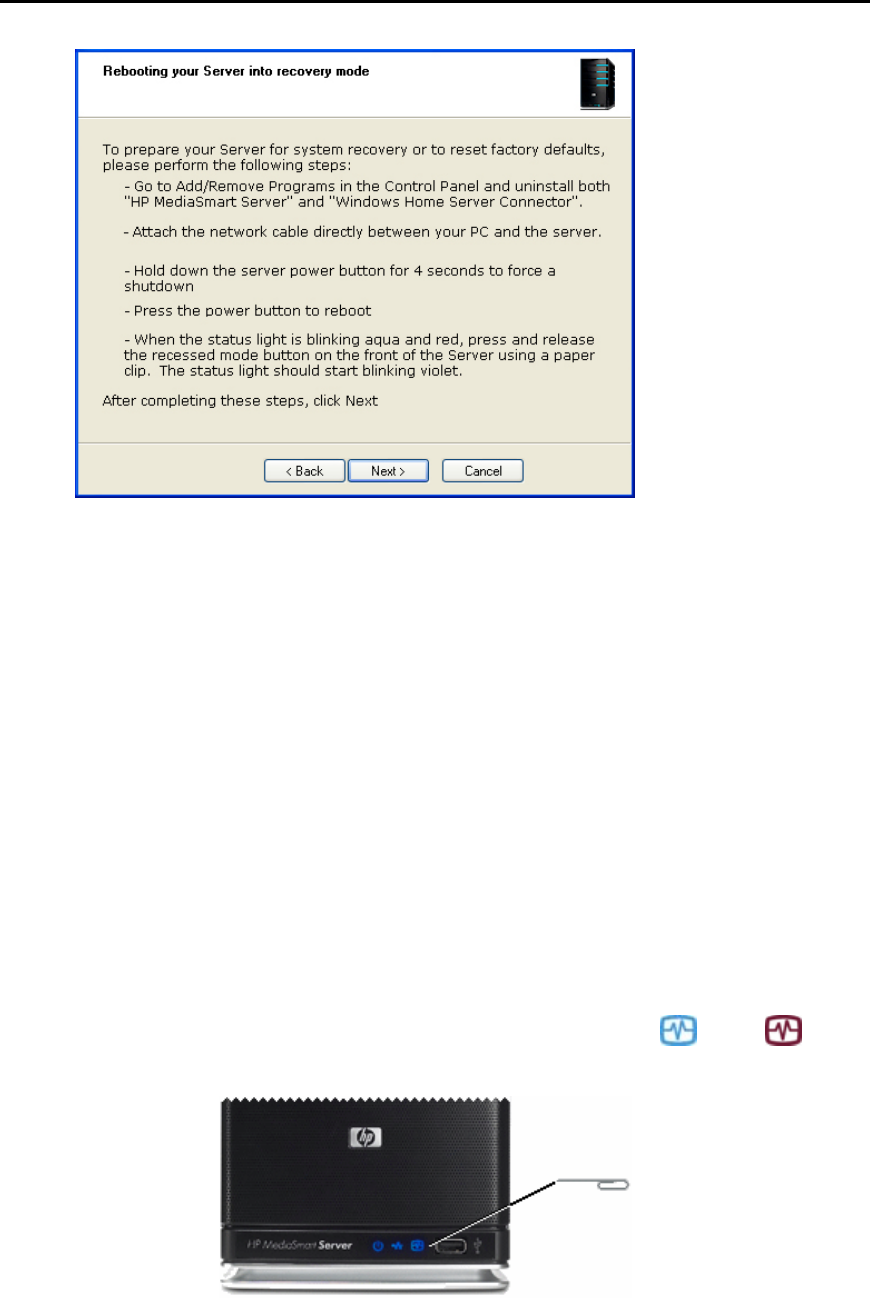
Backup, Restore, and Recover
4. Follow the instructions on the Rebooting your server into recovery mode dialog and click Next.
Uninstall the HP MediaSmart Server and Windows Home Server Connector.
a. Click Start, Control Panel and select Add or Remove Programs.
b. Select HP MediaSmart Server and click Remove.
c. Select Windows Home Server Connector and click Remove.
Attach an network cable directly between your PC and the server.
a. Unplug one end of the server Ethernet cable from your router or switch.
b. Plug the free end of the Ethernet cable into your computer so there is a direct
connection between the server and the computer.
Prepare the server for recovery or reset.
a. If the server is on, hold down the Power button on the back of the server for at
least 4 seconds to force the server to shut down. If the server is not on, skip to
the next step.
b. On the back of the server, press the Power button to restart.
c. While the Health indicator light is blinking aqua white and red , press
and release the status/recovery button on the front of the server using a paper
clip.
215

HP MediaSmart Server User's Guide
d. If recovery mode is successfully initiated, the Health indicator light blinks violet
.
5. Please wait while the server enters recovery mode and click Next.
This may take up to 15 minutes.
During the recovery process, the following may happen:
If the recovery program cannot find the server, see No server found.
If the Server Recovery cannot recover the partition data, the progress bar will go to 100%
and then back to zero and start over.
If the recovery fails, see Recovery fails.
6. Select Server Recovery or Factory Reset and click Next.
For help deciding which option to select, see Choose Server Recovery or Factory Reset above.
7. Follow the instructions on your computer to complete the server recovery or factory reset.
8. Click Finish on the Server recovery complete dialog box to reboot your server.
Once the server reboots, the server lights will be breathing aqua white .
9. Re-connect the Ethernet cable to your router.
10. Complete the server software installation on the computer where you performed the Server
Recovery or Factory Reset and all other network computers.
No Server Found
If the recovery program cannot find the server, the most likely causes are:
• The Recovery Mode was not successfully initiated—repeat step 4 if you did not push the
Status/Recovery button while the Health indicator lights was blinking red and aqua white.
• A firewall is blocking the connection - configure the firewall to allow the Windows Home Server
Recovery application or to allow connections over TCP port 8192 and UDP port 8192. If opening
these ports, be sure to close them after the recovery has completed. For more information, see the
vendor’s documentation.
• The network connection is not working.
Server Recovery Fails
If the recovery fails, one of the following messages will be displayed:
• The server disks could not be reformatted.
• The partition data on the server could not be written.
• The primary volume on the server could not be written.
• The recovery image could not be loaded.
216

Backup, Restore, and Recover
217
The most likely cause for these messages is a connection failure.
1. Make sure that you are using a wired connection to the server from the computer you are using to
do the recovery.
2. Check network connections.
3. Repeat the server recovery or factory reset.

Chapter 9. Server Storage
EXPAND SERVER STORAGE
You can expand storage in the HP MediaSmart Server in several ways:
Add one or more SATA hard drives to the server’s internal expansion bays. (Integrated Drive
Electronics (IDE) drives are not supported.)
• Add up to four USB disk drives to the server’s USB ports.
• Add an external SATA (eSATA) hard drive to the server’s external eSATA port.
• Add a SATA port multiplier to the server’s external eSATA port.
Related Topics
HP MediaSmart Server User's Guide
Add an internal SATA drive
Add and Remove a USB Drive, eSATA Drive, or SATA Port Multiplier
Add and Remove Drives from Server Storage
INTERNAL SATA DRIVES
Add an Internal SATA Drive
How to place a hard drive into an expansion bay in the HP MediaSmart Server.
Important
Do not remove the bottom drive. This drive contains the Windows Home Server operating system.
Important
There are two steps to adding an internal drive. First, add the drive to an expansion bay. Second,
add the drive to the total server storage or set it up as a backup drive.
1. Determine which expansion bay to use:
• The light bar for an empty expansion bay is off.
• Add the new hard drive to the lowest available expansion bay.
2. Open the door on the front of the server.
219
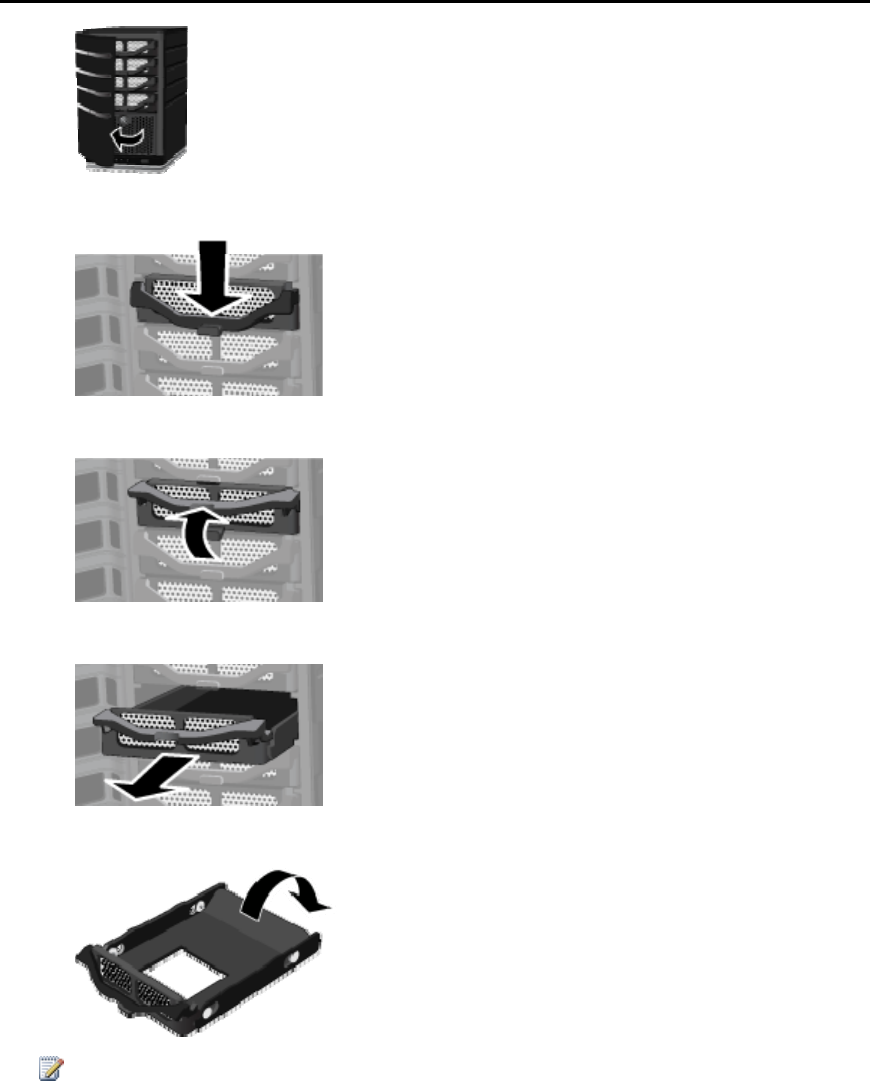
HP MediaSmart Server User's Guide
3. On the lowest empty hard drive tray, press down the lever to unlock the handle.
4. Lift the handle all the way up.
5. Gently pull the hard drive tray from the expansion bay.
6. Fold down the flap near the back of the hard drive tray.
Note
This flap improves air flow through the server. If you remove a drive, be sure to fold this flap back
up.
7. Insert the new drive into the left side of the hard drive tray, making sure that the pins go into the
hard drive’s mounting holes.
220
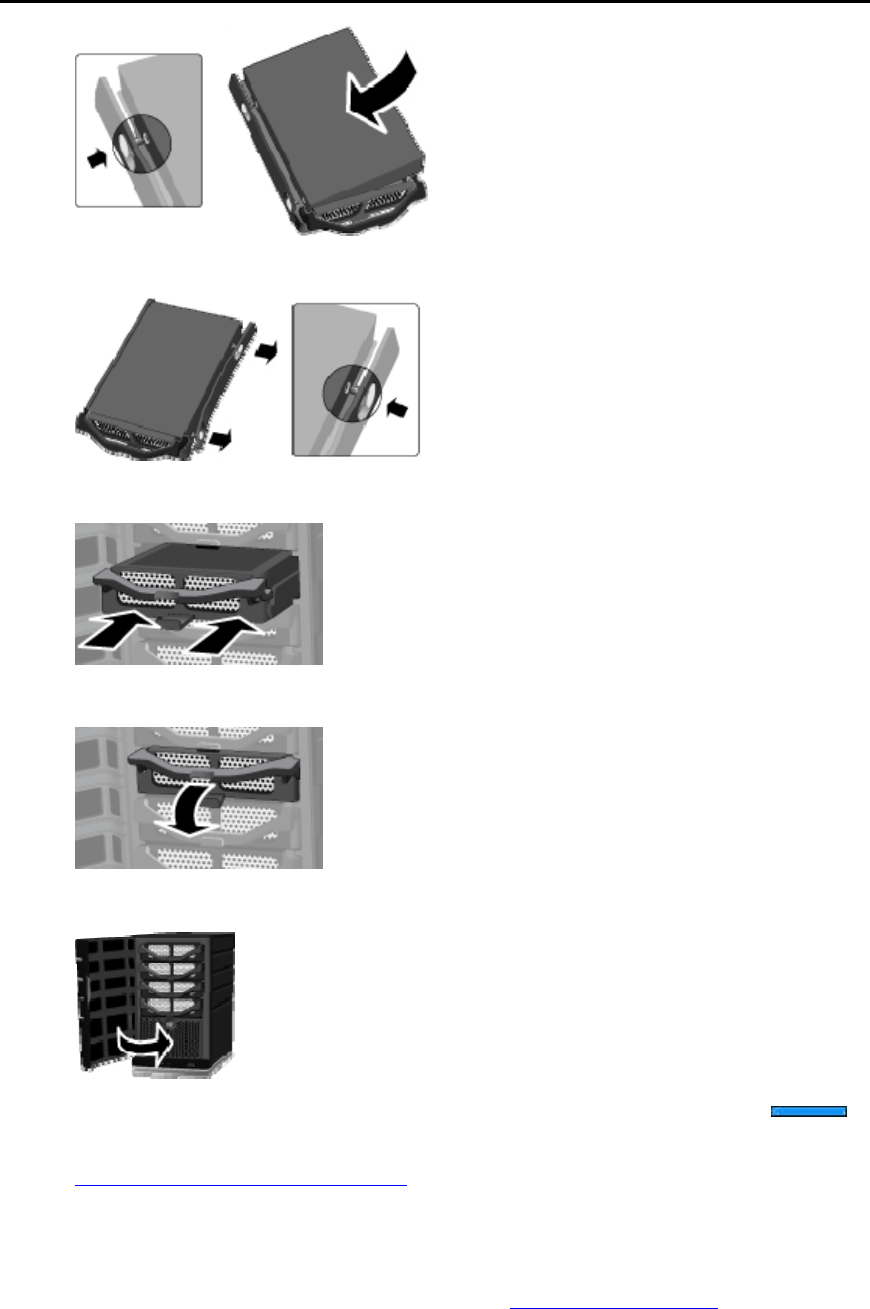
Server Storage
8. Flex the right side rail, and then insert the pins into the hard drive’s mounting holes.
9. With the handle up, slide the hard drive tray and drive into the expansion bay.
10. Press down on the handle on the hard drive tray until it locks.
11. Close the door on the front of the server.
11. Notice that within a few seconds the light bar for the new hard drive blinks aqua white
This indicates that the hard drive has been installed, but has not been initialized.
12. Add the drive to the server’s total storage.
Remove an Internal SATA Drive
For information about removing the system drive, see Replace the System Drive.
221
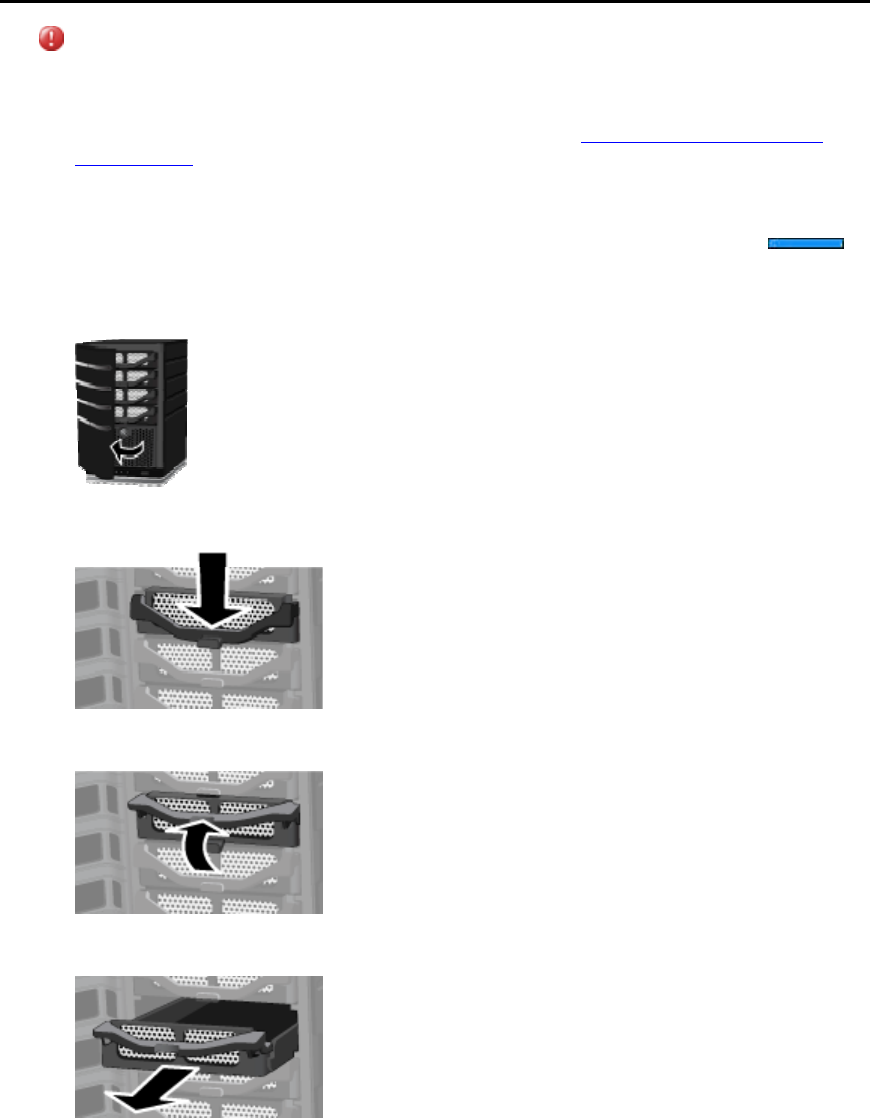
HP MediaSmart Server User's Guide
Caution
Before removing a drive from an expansion bay, you must remove the drive from the server’s total
storage.
For information about removing a drive from total storage, see Add and Remove Drives from
Server Storage.
1. Be sure that the light bar for the hard drive you want to remove is blinking aqua white .
This indicates that the drive has been properly removed from the server’s total storage.
2. Open the door on the front of the HP MediaSmart Server.
3. On the drive you want to remove, press down the lever to unlock the handle.
4. Lift the handle of the hard drive tray all the way up.
5. Gently pull the system drive from the drive bay.
6. Flex the back of the right side rail, and then withdraw the back pin from the hard drive by gently
pulling the side rail down and away.
222
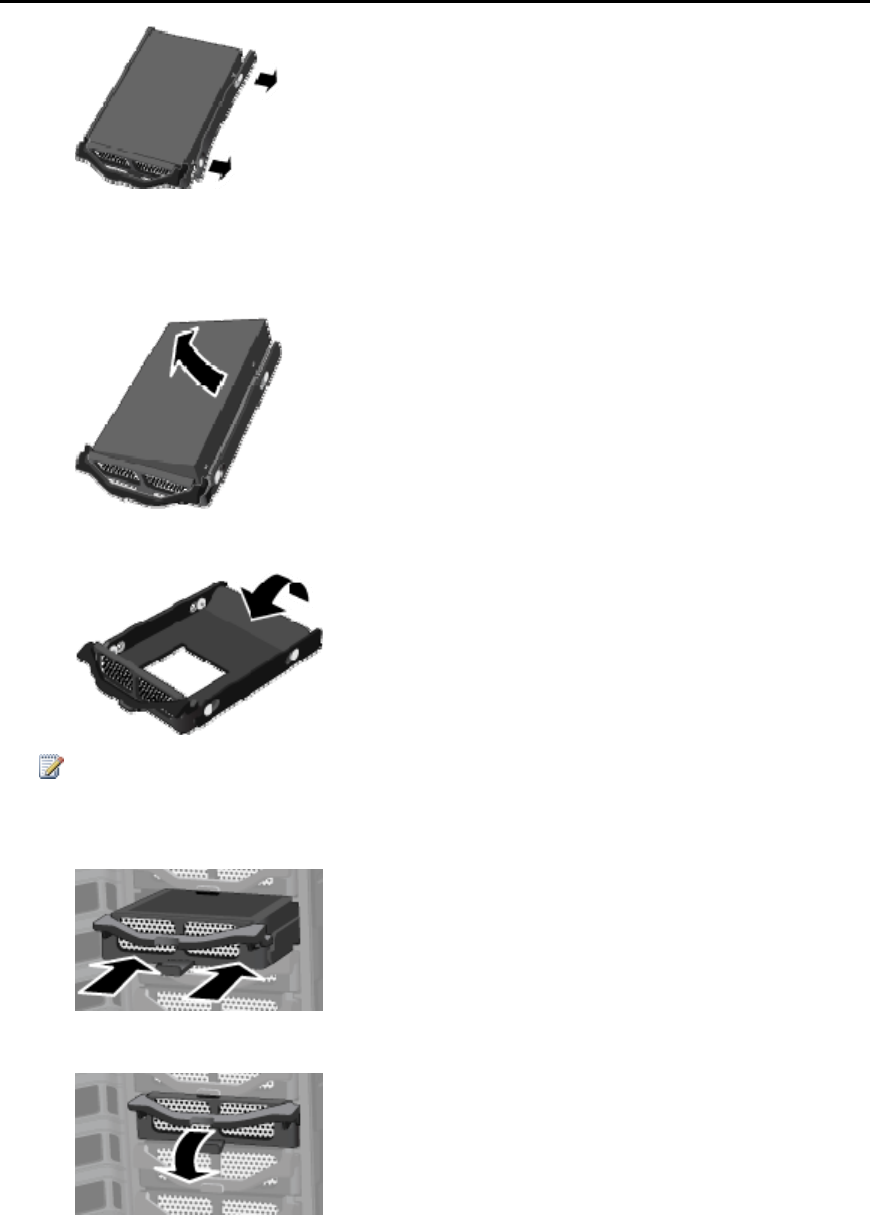
Server Storage
7. Flex the front of the right side rail, and then withdraw the front pin from the hard drive by gently
pulling the side rail down and away.
8. Remove the drive from the hard drive tray.
9. Fold up the flap near the back of the hard drive tray.
Note
Folding up the flap improves air flow and helps keep the server cool.
10. With the handle up, slide the hard-drive tray back into the system bay.
11. Close the handle on the hard drive tray until it locks.
12. Close the door on the front of the server.
223
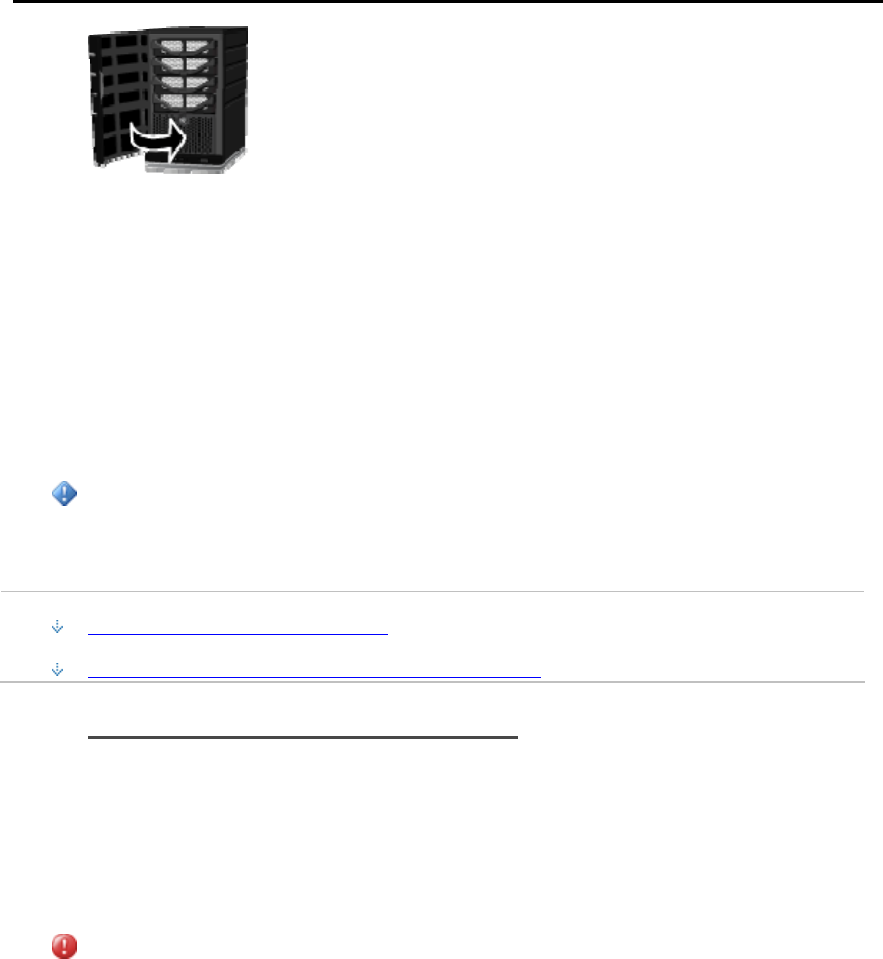
HP MediaSmart Server User's Guide
USB DRIVES, ESATA DRIVES, AND PORT
MULTIPLIERS
Add and Remove an External USB Drive, eSATA Drive, or
SATA Port Multiplier
You can add external USB disk drives to any of the HP MediaSmart Server’s four USB ports. You
can add either an eSATA drive or SATA port multiplier to the eSATA port.
Important
There are two parts to adding external drives: connect the drive to a port and then initialize the
drive so it becomes part of the total server storage.
In this article...
Connect an External USB Disk Drive
Connect an eSATA Disk Drive or SATA Port Multiplier
Connect an External USB Disk Drive
If you use a USB disk drive, it is recommended that you use a drive that conforms to USB 2.0 or
later.
1. Plug in the USB cable into one of the USB ports on the server.
2. To plug in and power up your external USB drive, see the documentation that came with your
USB disk drive.
Caution
The addition of multiple USB disk drives through an external USB hub is neither recommended
nor supported.
224
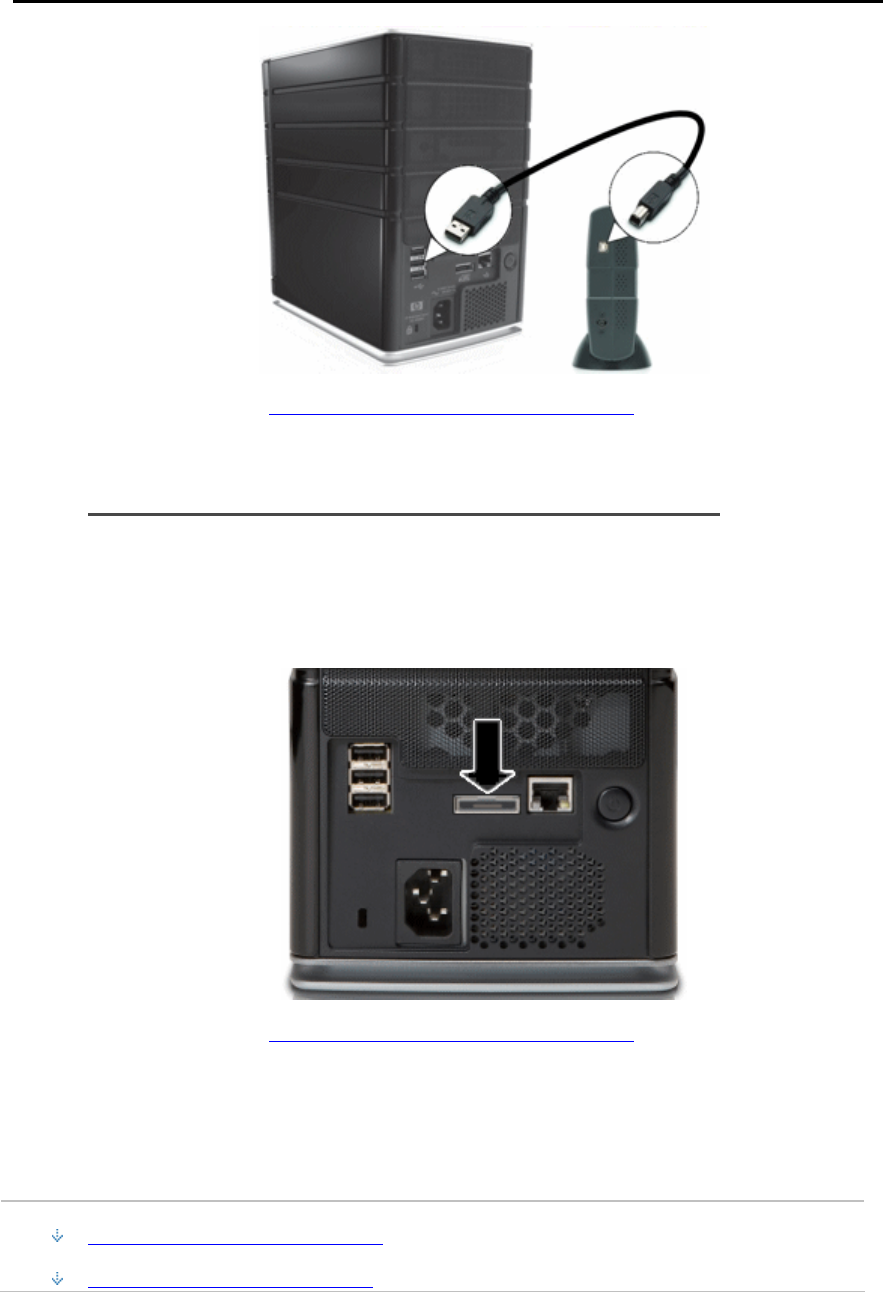
Server Storage
3. Follow instructions to Add and Remove Drives from Server Storage.
Connect an eSATA Disk Drive or SATA Port Multiplier
1. Plug the eSATA cable into the eSATA port on the back of the server, as shown in the following
figure.
2. To plug in and turn on your eSATA disk drive or SATA port multiplier, see the documentation
that came with your device.
3. Follow instructions to Add and Remove Drives from Server Storage.
Detach and Reattach a USB Drive
In this article...
Detach a USB Drive from the Server
Reattach a USB Drive to the Server
225

HP MediaSmart Server User's Guide
Detach a USB Drive from the Server
USB drives may be attached to the server to either increase the server's storage capacity or to back
up server files. You can detach any USB drive that is attached to the server.
To safely remove a drive, remove the drive from server storage using the Windows Home Server
Console before detaching the drive from the server.
1. At the PC, double-click the Windows Home Server icon in the system tray and log on.
At the Mac, select Launch Home Server Console from the Server menu .
2. Select the device from the list and click Remove.
3. Follow the instructions in the Remove a Hard Drive wizard.
4. Detach the hard drive from the server.
If a USB drive is removed can be reattached and added back to server storage.
Reattach a USB Drive to the Server
Add an internal SATA drive to the server or attach an eSATA,USB drive, or SATA port
multiplier.
For additional information see,
Add an Internal SATA Drive
Add and Remove an External USB Drive, eSATA Drive, or SATA Port Multiplier
2. To add the drive as a backup drive on a PC, double-click the Windows Home Server icon in the
system tray and log on.
At the Mac, select Launch Home Server Console from the Server menu .
3. Click the Server Storage tab.
4. Click Add.
5. Click Next on the Add a Hard Drive Wizard.
6. Select Use this hard drive to back up files that are stored on your home server and click Next.
7. Choose whether to format the drive or not and click Next.
Formatting the drive—Any files already on the drive will be lost. Save important files
already on the drive to a different location.
Not formatting the drive—The server will not be able to browse to files already on the
drive.
8. Name the drive and click Next.
9. Click Finish.
10. Once the device is added, click Done.
226

Server Storage
Note
If files are added to the drive while it is unattached to the server, you will not be able to browse to
those files from the server when the drive is reattached. The space occupied by those files is
unavailable to the server and it will not see them.
A USB Drive Accidentally Detaches from the Server
In this article...
The USB Drive is Missing from Server Storage
The USB Drive Detaches During a Backup
The USB Drive is Missing from Server Storage
A USB drive that has been successfully added to the Servers Backup Hard Drives or Storage
Hard Drives can detach from the server. If your USB drive detaches from the server, the drive
will not be listed in the Windows Home Server Console Server Storage tab.
Some of the reasons a USB drive might become detached include,
• The USB Drive loses its power supply, or
• The USB cable comes loose from the drive or server.
Verify that your USB drive has power and the cable connecting the drive to the server is firmly
seated. Once the USB drive is reattached, it will be reappear on Server Storage tab.
227
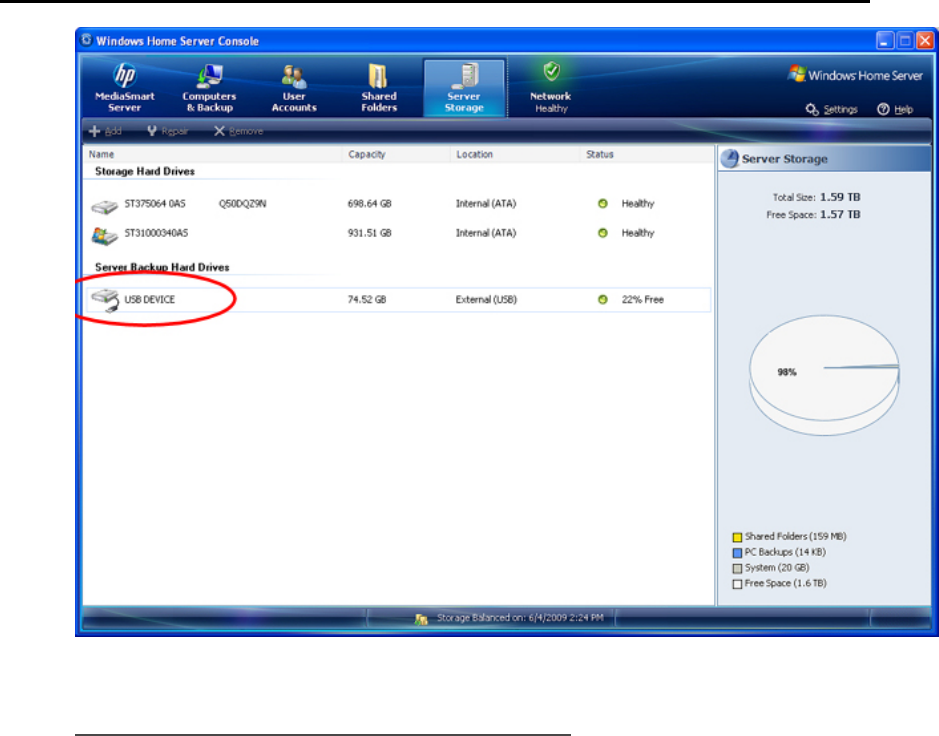
HP MediaSmart Server User's Guide
The USB Drive Detaches During a Backup
If the USB drive detaches from the server for any reason during the backup, the backup will fail.
Once the USB drive is successfully seen by the server again, the next back up should work as long
as the USB drive is in a healthy state.
228
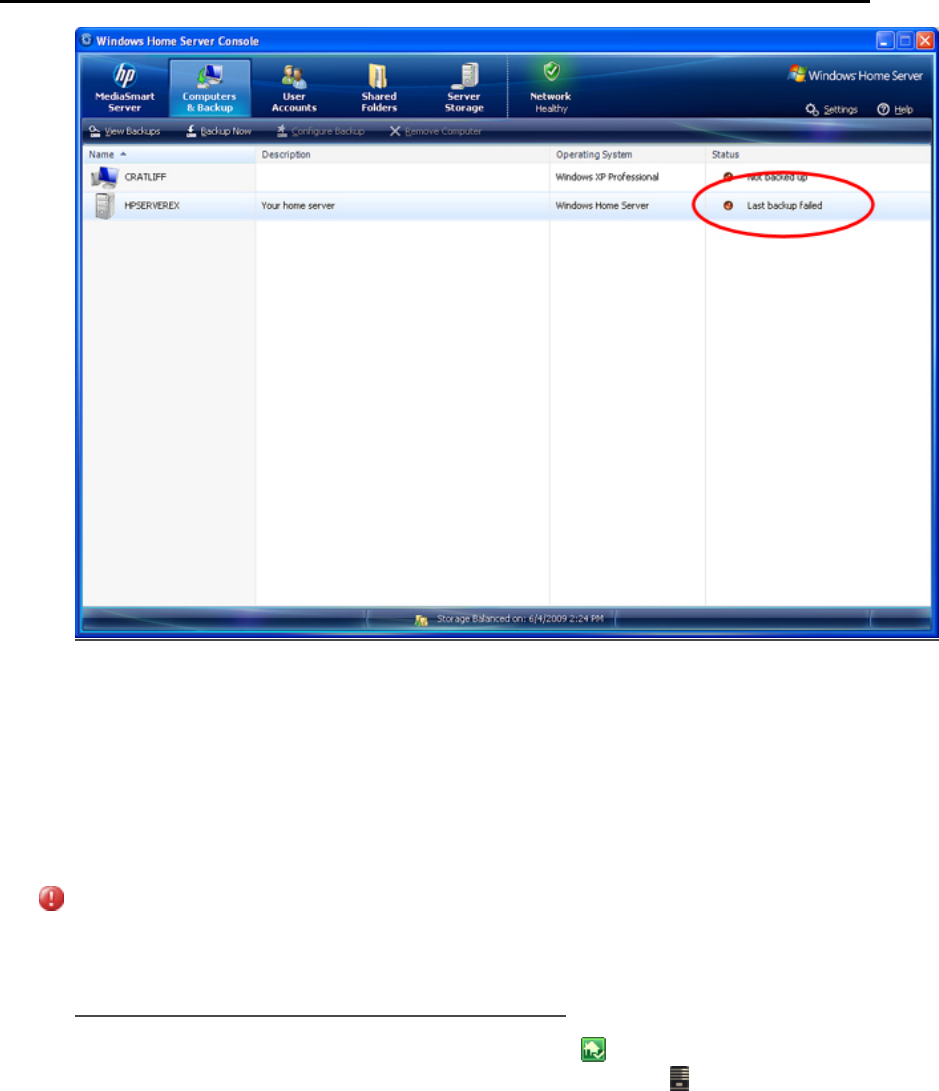
Server Storage
ADD AND REMOVE DRIVES FROM SERVER STORAGE
Drives added or removed from an expansion bay or port must be added or removed from total
server storage.
Caution
When adding a hard drive to server storage, the hard drive is formatted. Make sure to back up any
important files that are on the hard drive before adding it to server storage.
Add a Drive to the Server’s Total Storage
1. At the computer, double-click the Windows Home Server icon in the system tray and log on.
At the Mac, select Launch Home Server Console from the Server menu .
2. Click the Server Storage tab.
3. Follow the instructions in Adding a hard drive in the Windows Home Server Console Help.
229

HP MediaSmart Server User's Guide
Remove a Drive from the Server’s Storage
If the server does not have enough remaining storage, and you do not first add another hard drive
to server storage, either you will lose shared-folder duplication or you will lose files. This depends
on how much server storage space remains after you remove a hard drive.
1. At the computer, double-click the Windows Home Server icon in the system tray.
2. Log on to the Windows Home Server Console.
3. Click the Server Storage tab.
4. Follow the instructions in Removing a hard drive in the Windows Home Server Console Help.
REPLACE THE SYSTEM DRIVE
In this article...
Remove the Old System Drive
Insert the New System Drive
After replacing the system drive, you must
Reset the system drive. See Server Recovery and Factory Reset.
Reinstall the software on each computer. See Install the Software on Additional PCs.
Important
The system drive contains the Microsoft Windows Home Server operating system. The server
cannot operate while the system drive is removed and must be re-installed via the Server Recovery
Disc or factory reset. See Server Recovery and Factory Reset.
Remove the Old System Drive
The following figure shows the location of the system hard drive.
To remove the system drive
1. Hold in the Power button for at least 4 seconds to force the server to shut down.
230

Server Storage
2. Open the door on the front of the server.
3. Using a coin, turn the security knob clockwise to unlock the drive.
4. On the bottom drive, press down the lever to release the handle.
5. Lift the handle all the way up.
6. Gently pull the system drive from the drive bay.
7. Flex the back of the right side rail and withdraw the back pin from the hard drive by gently pulling
the side rail down and away.
8. Flex the front of the right side rail and withdraw the front pin from the hard drive by gently pulling
the side rail down and away.
231
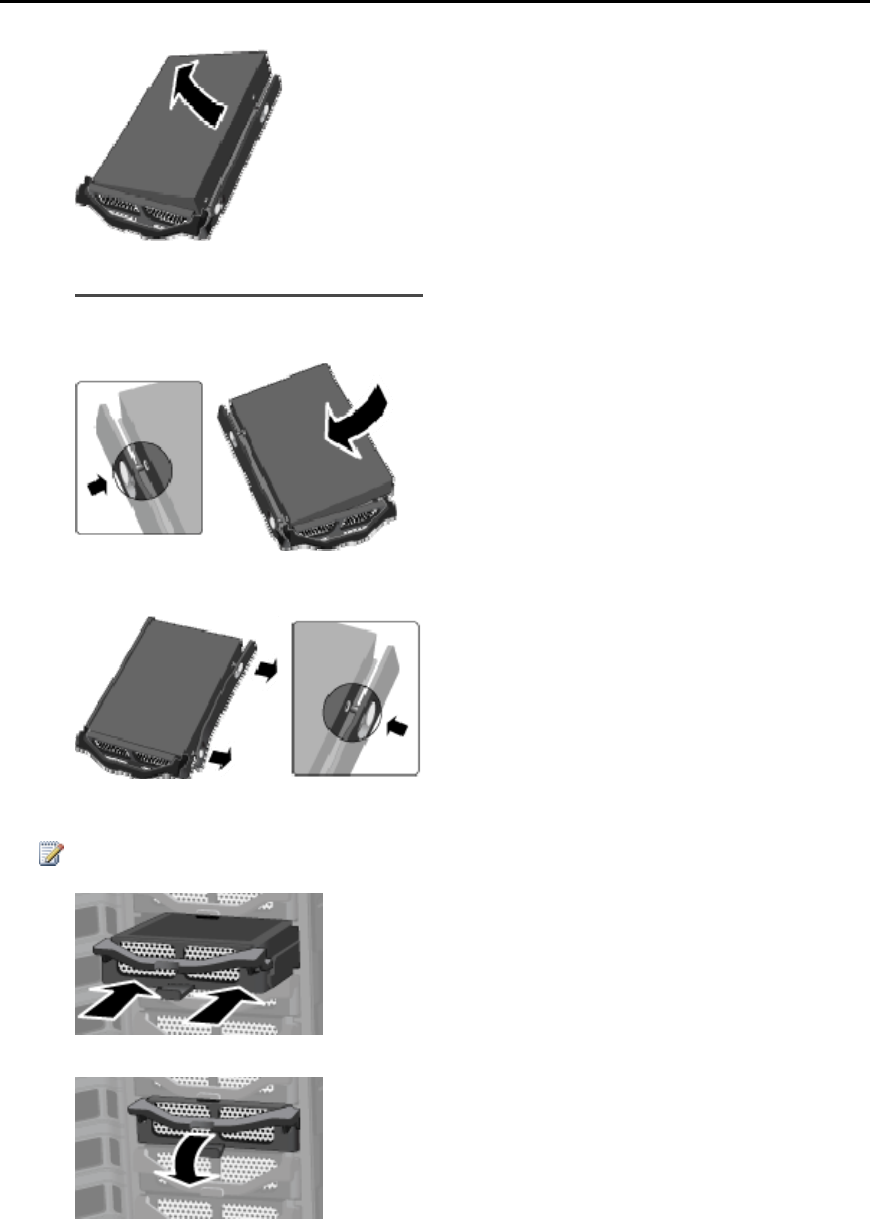
HP MediaSmart Server User's Guide
9. Remove the drive from the hard-drive tray.
Insert the New System Drive
1. Insert the new system drive into the left side of the hard drive tray, making sure that the pins go
into the hard drive’s mounting holes.
2. Flex the front of the right side rail and insert the pin into the hard drive’s mounting hole, and then
flex the back of the right side rail and insert the pin into the other mounting hole.
3. With the handle up, slide the hard drive tray and drive into the system bay.
Note
Don’t push on the handle; the tray won’t slide in.
4. Close the handle on the hard-drive tray by pressing down until it locks.
232

Server Storage
5. Using a coin, turn the security knob counterclockwise to lock system drive in its bay.
6. Close the door on the front of the server.
7. Power on the server.
8. The HP MediaSmart Server lights will pulsate aqua white.
9. Perform a Factory Reset to initiate the drive. See Server Recovery and Factory Reset.
233

Chapter 10. Network and Firewall
NETWORK CONNECTION ISSUES
In this article...
No Available Port on Network Router
Why did URL not Work?
What_do_Firewall_Blocking_Messages_Mean?
Why is the Network Connection Light Off?
The Firewall is Blocking the Connection
Windows Vista: Check that Network Discovery is turned on
Windows XP: To ensure your network is set up properly for TCP/IP
Windows Vista: To ensure your network is set up properly for TCP/IP
Windows XP: To ensure your network has the correct NetBIOS set up
Windows Vista: To ensure your network has the correct NetBIOS set up
No Available Port on Network Router
Take the following steps:
To add more Ethernet ports, connect an Ethernet switch to the router. Refer to the switch
documentation for instructions on how it connects to the router.
Connect one end of the Ethernet cable that came with the server to the switch and the other end to
the HP MediaSmart Server.
Why did URL not Work?
DNS has not updated, wait about 10 minutes for DNS to update.
What do Firewall Blocking Messages Mean?
Firewalls block certain types of communications between network devices. This helps protect your
data from hackers, viruses, spyware, and Trojan horse software. The computer might have one or
more firewall programs installed. For example, if the latest version of the Microsoft Windows XP
operating system is installed, the computer may be using the Windows XP Firewall.
235
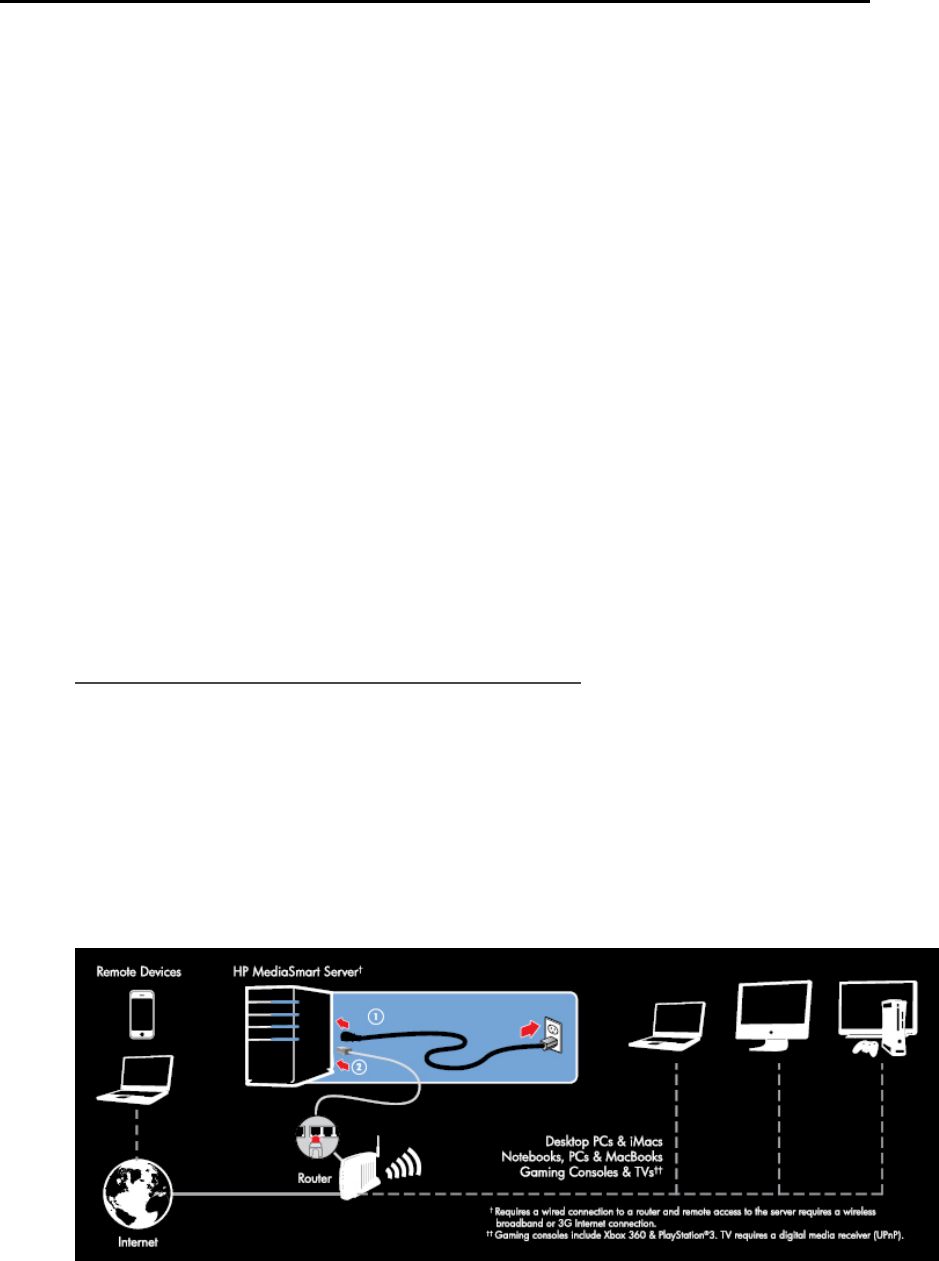
HP MediaSmart Server User's Guide
The HP MediaSmart Server comes with software applications that must communicate over the
network. Sometimes these programs are blocked by a firewall. When this happens, security alerts
pop up on the computer screen.
Security alerts usually have a list of possible options. The particular messages or alerts displayed
depend on the vender.
For example, the alert might offer the following options:
• Keep Blocking
• Unblock
• Defer the choice and be reminded later
If a security alert dialog box for an HP MediaSmart Server application or the Windows Home
Server is displayed by the firewall, click Unblock or Allow to permit the application to execute. It
is safe to unblock the communications because no connection or communication with the Internet
is enabled, only those between the server and its software applications. After unblocking an
application, if any software is reinstalled, moved to a new disk location, or if the application is
deleted from the exception list using the Windows XP Security Center control panel,
communications between that software and the server may once again be blocked by the firewall.
Configure your firewall to allow any HP MediaSmart Server or Windows Home Server
applications.
Why is the Network Connection Light Off?
To determine why the network connection light is off:
• Make sure that all the cable connections are correctly plugged in.
• Make sure the router or switch has power.
• Restart the router or switch (or unplug and plug it back in).
• If you are using your own Ethernet cable, try using the Ethernet cable that came with the HP
MediaSmart Server.
236

Network and Firewall
The Firewall is Blocking the Connection
If using a firewall program, configure it to allow any HP MediaSmart Server or Windows Home
Server applications.
For instructions to unblock, see the software vendor's documentation.
For information about firewall blocking alerts, see What do firewall blocking messages mean?.
Windows Vista: Check that Network Discovery is turned on
To ensure that Network Discovery is turned on
1. Click the Start menu, and then select Control Panel.
2. In the Control Panel, click View network status and tasks.
3. In the Network and Sharing Center, make sure that Network discovery is on.
4. If Network discovery is off, click the down arrow , then select Turn on network discovery
and Apply.
Windows XP: To ensure your network is set up properly for TCP/IP
1. Click Start, and then select Control Panel.
2. Double-click Network and Internet Connections.
3. Double-click Network Connections.
If the computer is connected via Ethernet cable to the network, right-click Local Area
Connection (LAN).
4. If the computer is using a wireless connection, right-click Wireless Network Connection.
5. Click Properties. In the dialog box that opens, check to ensure that TCP/IP is listed and selected.
If TCP/IP is not listed, click Install, Protocol, and then Add. In the dialog box that appears, select
Internet Protocol (TCP/IP).
If TCP/IP is listed and checked, highlight it and click Properties, then select Obtain IP address
automatically and Obtain DNS server address automatically.
6. All computers should be set identically.
Windows Vista: To ensure your network is set up properly for
TCP/IP
1. Click Start, and then select Control Panel.
2. Click View network status and tasks under Network and Internet.
237

HP MediaSmart Server User's Guide
3. In the left pane, click Manage Network Connections.
4. If the computer is connected via Ethernet cable to the network, right-click Local Area
Connection (LAN).
5. If the computer is using a wireless connection, right-click Wireless Network Connection.
6. Click Properties. In the dialog box that opens, check to ensure that Internet Protocol Version 4
TCP/IPv4 is listed and selected.
• If TCP/IP is not listed, click Install, Protocol, and then Add. In the dialog box that
appears, select Internet Protocol (TCP/IPv4).
• If TCP/IP is listed and checked, highlight it and click Properties, then select Obtain IP
address automatically and Obtain DNS server address automatically.
7. All computers should be set identically.
Windows XP: To ensure your network has the correct NetBIOS
set up
1. Click Start, and then select Control Panel.
2. Double-click Network and Internet connections.
3. Double-click Network Connections.
4. Double-click your default network connection.
• Local Area Connection for wired networks.
• Wireless for wireless connections.
5. Click Properties.
6. Highlight Internet Protocol (TCP/IP).
7. Click Properties.
8. Click Advanced.
9. Click the WINS tab.
WINS refers to Windows Internet Naming Service, which converts NetBIOS network names to IP
addresses.
10. NetBIOS settings are found at the bottom of the dialog box. Make sure that the NetBIOS setting is
not set to Disable NetBIOS over TCP/IP.
Windows Vista: To ensure your network has the correct NetBIOS
set up
1. Click Start, and then select Control Panel.
238

Network and Firewall
2. Click View network status and tasks under Network and Internet.
3. In the left pane, click Manage Network Connections.
4. Right-click your default network connection.
• Local Area Connection for wired networks.
• Wireless for wireless connections.
5. Highlight Internet Protocol Version 4(TCP/IP).
6. Click Properties.
7. Click Advanced.
8. Click the WINS tab.
WINS refers to Windows Internet Naming Service, which converts NetBIOS network names to IP
addresses.
9. NetBIOS settings are found at the bottom of the dialog box. Make sure that the NetBIOS setting is
not set to Disable NetBIOS over TCP/IP.
NETWORK HEALTH
The Windows Home Server console contains a Network Health button to view the health of your
network.
The Home Network Health dialog box shows health notifications from the server and the
computers that are running Windows Vista.
To access the Network Health button
1. At the PC, double-click the Windows Home Server icon in the system tray and log on.
At the Mac, select Launch Home Server Console from the Server menu .
2. Click the Network Health button.
Related Topics
Windows Home Server Console Help
Network Health
Home Server Health Notifications
Home Computer Health Notifications
239

HP MediaSmart Server User's Guide
CHECK THAT THE ROUTER IS CORRECTLY
CONFIGURED FOR DHCP
The HP MediaSmart Server comes automatically set to use a DHCP server to dynamically assign
IP addresses. Most router come with a built-in DHCP server.
Check that the router has the DHCP server correctly enabled. Refer to the documentation that
came with the router for instructions on proper DHCP server configuration.
For information about configuring a router for remote access, see Configuring your broadband
router in the Windows Home Server Console Help.
Windows Vista: Check that Network Discovery is turned on
To ensure that Network Discovery is turned on
1. Click the Start menu, and then select Control Panel.
2. In the Control Panel, click View network status and tasks.
3. In the Network and Sharing Center, make sure that Network discovery is on.
4. If Network discovery is off, click the down arrow , then select Turn on network discovery
and Apply.
CHECK THE NETWORK IS SET UP PROPERLY FOR
TCP/IP
Check the network is set up properly for TCP/IP Check that each computer on the network has
TCP/IP listed and selected for the network properties with these options selected:
Obtain IP address automatically
Obtain DNS server address automatically
Windows XP: To ensure your network is set up properly for
TCP/IP
1. Click Start, and then select Control Panel.
2. Double-click Network and Internet Connections.
3. Double-click Network Connections.
If the computer is connected via Ethernet cable to the network, right-click Local Area
Connection (LAN).
4. If the computer is using a wireless connection, right-click Wireless Network Connection.
5. Click Properties. In the dialog box that opens, check to ensure that TCP/IP is listed and selected.
If TCP/IP is not listed, click Install, Protocol, and then Add. In the dialog box that appears, select
Internet Protocol (TCP/IP).
240

Network and Firewall
• If TCP/IP is listed and checked, highlight it and click Properties, then select Obtain IP
address automatically and Obtain DNS server address automatically.
6. All computers should be set identically.
Windows Vista: To ensure your network is set up properly for
TCP/IP
1. Click Start, and then select Control Panel.
2. Click View network status and tasks under Network and Internet.
3. In the left pane, click Manage Network Connections.
4. If the computer is connected via Ethernet cable to the network, right-click Local Area
Connection (LAN).
5. If the computer is using a wireless connection, right-click Wireless Network Connection.
6. Click Properties. In the dialog box that opens, check to ensure that Internet Protocol Version 4
TCP/IPv4 is listed and selected.
• If TCP/IP is not listed, click Install, Protocol, and then Add. In the dialog box that
appears, select Internet Protocol (TCP/IPv4).
• If TCP/IP is listed and checked, highlight it and click Properties, then select Obtain IP
address automatically and Obtain DNS server address automatically.
7. All computers should be set identically.
CHECK THE NETWORK NETBIOS PROPERTIES
Check that each computer on the network has TCP/IP advanced network properties set to Enable
NetBIOS over TCP/IP. All computers should be set identically.
Windows XP: To ensure your network has the correct NetBIOS
set up
1. Click Start, and then select Control Panel.
2. Double-click Network and Internet connections.
3. Double-click Network Connections.
4. Double-click your default network connection.
• Local Area Connection for wired networks.
• Wireless for wireless connections.
5. Click Properties.
Highlight Internet Protocol (TCP/IP).
6. Click Properties.
241

HP MediaSmart Server User's Guide
7. Click Advanced.
8. Click the WINS tab.
WINS refers to Windows Internet Naming Service, which converts NetBIOS network names to IP
addresses.
9. NetBIOS settings are found at the bottom of the dialog box. Make sure that the NetBIOS setting is
not set to Disable NetBIOS over TCP/IP.
Windows Vista: To ensure your network has the correct NetBIOS
set up
1. Click Start, and then select Control Panel.
2. Click View network status and tasks under Network and Internet.
3. In the left pane, click Manage Network Connections.
4. Right-click your default network connection.
• Local Area Connection for wired networks.
• Wireless for wireless connections.
5. Highlight Internet Protocol Version 4(TCP/IP).
6. Click Properties.
7. Click Advanced.
8. Click the WINS tab.
WINS refers to Windows Internet Naming Service, which converts NetBIOS network names to IP
addresses.
9. NetBIOS settings are found at the bottom of the dialog box. Make sure that the NetBIOS setting is
not set to Disable NetBIOS over TCP/IP.
NETWORK FREQUENTLY ASKED QUESTIONS
The following questions are answered in this document. Click the question to find the solution:
No Available Port on Network Router
• Why did URL not Work?
No Available Port on Network Router
Take the following steps:
1. To add more Ethernet ports, connect an Ethernet switch to the router. Refer to the switch
documentation for instructions on how it connects to the router.
2. Connect one end of the Ethernet cable that came with the server to the switch and the other end to
the HP MediaSmart Server.
242

Network and Firewall
Why did URL not Work?
DNS has not updated, wait about 10 minutes for DNS to update.
WHAT ARE OPTIMUM DATA THROUGHPUT SPEEDS
FOR DIFFERENT NETWORK INTERFACES?
Depending on the network interface your computer uses, you will experience different rates of
data transfer to your server. Network Interfaces are described in terms of their ideal maximum
speed, but many factors can affect the actual data transfer speeds you will experience. For
example, your optimal wireless transfer speed will be reduced depending on the type of security
and encryption you have enabled on your wireless network and by the amount of other work your
computer and server are performing at the same time.
What are optimum data throughput speeds for different network
interfaces?
• Gigabit Ethernet - 1000mbps/125MBs
• Fast Ethernet - 100mbps/12.5MBs
• Wireless N - 600mbps/75MBs
• Wireless G - 54mbps/6.75MBs
• Wireless A -54mbps/6.75MBs
• Wireless B - 11mbps/1.375MBs
What is the ideal minimum time to transfer a 1GB file for
different network interfaces?
• Gigabit Ethernet - 8s
• Fast Ethernet - 1min 20s
• Wireless N -13.3s
• Wireless G - 2min 28s
• Wireless A - 2min 28s
• Wireless B -12min 7s
THE FIRST BACKUP IS TAKING A LONG TIME
Your initial PC backup could take several hours, depending on how much data you have on your
computer. Subsequent backups will go much faster since only the data that has changed is copied
to the server.
243

HP MediaSmart Server User's Guide
UNINTERRUPTIBLE POWER SUPPLY IS NOT
SUPPORTED
The HP MediaSmart Server does not support active Uninterruptible Power Supply (UPS). Using
the USB cable to allow the UPS to communicate with the HP MediaSmart Server, can cause a
wide range of false errors. Using the UPS in a passive mode (USB cable not attached) does not
appear to cause any false error reporting.
THE FIREWALL IS BLOCKING THE CONNECTION
If using a firewall program, configure it to allow any HP MediaSmart Server or Windows Home
Server applications.
For instructions to unblock, see the software vendor's documentation.
What do Firewall Blocking Messages Mean?
Firewalls block certain types of communications between network devices. This helps protect your
data from hackers, viruses, spyware, and Trojan horse software. The computer might have one or
more firewall programs installed. For example, if the latest version of the Microsoft Windows XP
operating system is installed, the computer may be using the Windows XP Firewall.
The HP MediaSmart Server comes with software applications that must communicate over the
network. Sometimes these programs are blocked by a firewall. When this happens, security alerts
pop up on the computer screen.
Security alerts usually have a list of possible options. The particular messages or alerts displayed
depend on the vender.
For example, the alert might offer the following options:
• Keep Blocking
• Unblock
• Defer the choice and be reminded later
If a security alert dialog box for an HP MediaSmart Server application or the Windows Home
Server is displayed by the firewall, click Unblock or Allow to permit the application to execute. It
is safe to unblock the communications because no connection or communication with the Internet
is enabled, only those between the server and its software applications. After unblocking an
application, if any software is reinstalled, moved to a new disk location, or if the application is
deleted from the exception list using the Windows XP Security Center control panel,
communications between that software and the server may once again be blocked by the firewall.
Configure your firewall to allow any HP MediaSmart Server or Windows Home Server
applications.
UPDATE YOUR FIREWALL'S TRUSTED PROGRAM
LIST
The Software Installation Disc installs several programs that enable your computer to
communicate with the HP MediaSmart Server over your network. Software firewalls installed on
244

Network and Firewall
your computer can block this communication and prevent the computer from locating the HP
MediaSmart Server on your network.
Note
If Media Collector is not collecting music, photos, or videos and you use a third party firewall, add
a firewall exception for port 21 TCP/outbound within the local subnet. Consult your software's
documentation for details on how to do this.
In this article...
Set Your Firewall or Anti-Virus Programs to Automatically "Learn" New Programs
Manually Add Programs to Your Firewall or Anti-Virus Program's Trusted List
Set Your Firewall or Anti-Virus Programs to Automatically
"Learn" New Programs
It is recommended that you set your firewall and anti-virus programs to "Learn" new programs
before installing the HP MediaSmart Server software. After the HP MediaSmart Server software is
installed, the firewall should prompt you to allow the installed programs to communicate with the
server.
Allow the following HP MediaSmart Server programs to communicate through your firewall or
anti-virus program:
C:\Program Files\Windows Home Server\
MountBackup.exe
RestoreOffProc.exe
WHSTrayApp.exe
WHSConsoleClient.exe
WHSConnector.exe
BackupEngine.exe
WHSOOBE.exe
C:\Program Files\Hewlett-Packard\HP MediaSmart Server\
MediaCollectorClient.exe
MSSConnectorService.exe
ControlCenter.exe
C:\Program Files\HP\HP Software Update\
HPWUCli.exe
245
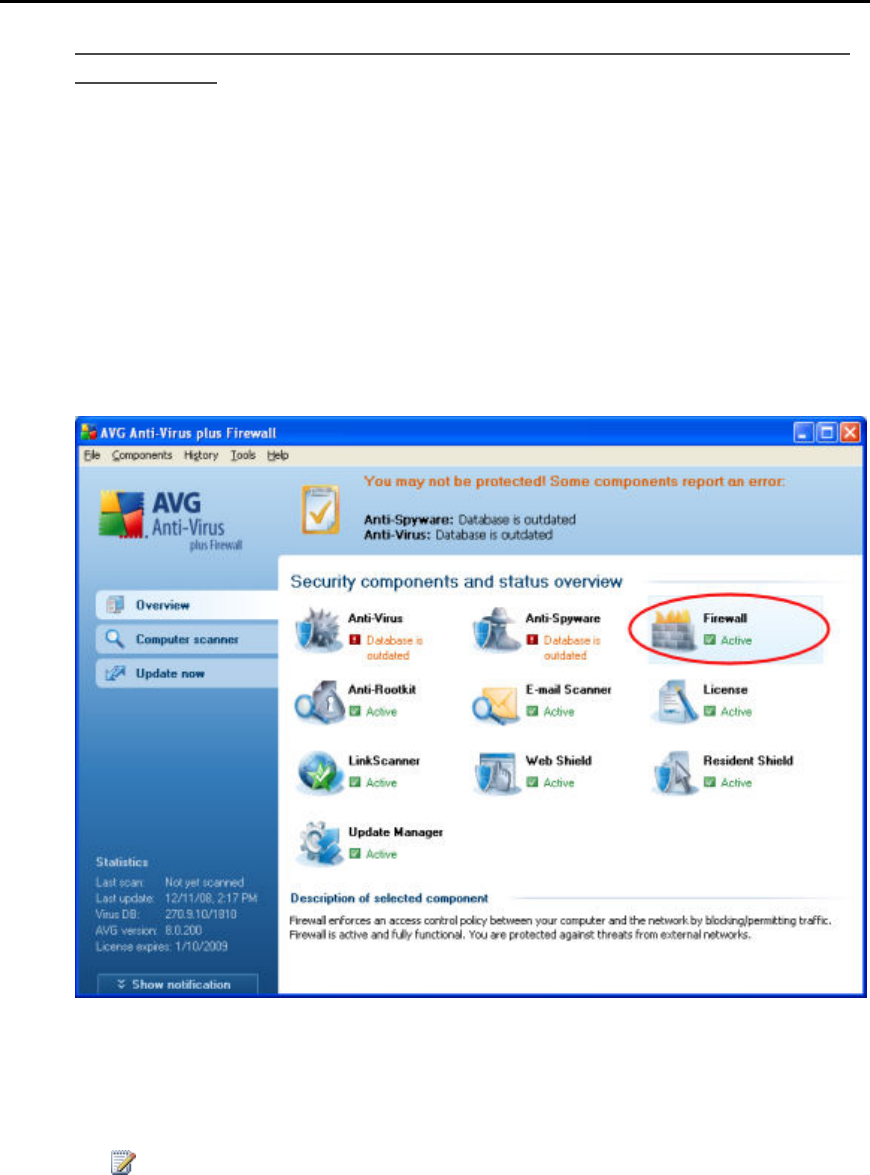
HP MediaSmart Server User's Guide
Manually Add Programs to Your Firewall or Anti-Virus Program's
Trusted List
Some firewall or anti-virus programs may not automatically update their trusted programs list.
Instructions for manually updating several common firewall and anti-virus programs are listed
below. If your firewall or anti-virus program is not listed, please contact the vendor to find out
how to manually add programs to the trusted programs list. Additionally, see the documentation
that came with your firewall or anti-virus program for the latest information.
Click the vendor to expand and view the instructions on updating their trusted programs list. Click
again to hide the instructions.
• AVG
Open the AVG Anti-Virus plus Firewall. Double-click the Firewall button to configure the
Firewall. Add the programs listed at the top of this page.
• McAfee
Open your McAfee Security Center, click Internet and Network, and then click the Advanced
button in the firewall section. Click Program Permissions, then click Add Allowed Program.
Add the programs listed at the top of this page.
Note
McAfee's firewall automatically disables Windows Firewall and sets itself as your default
firewall.
246
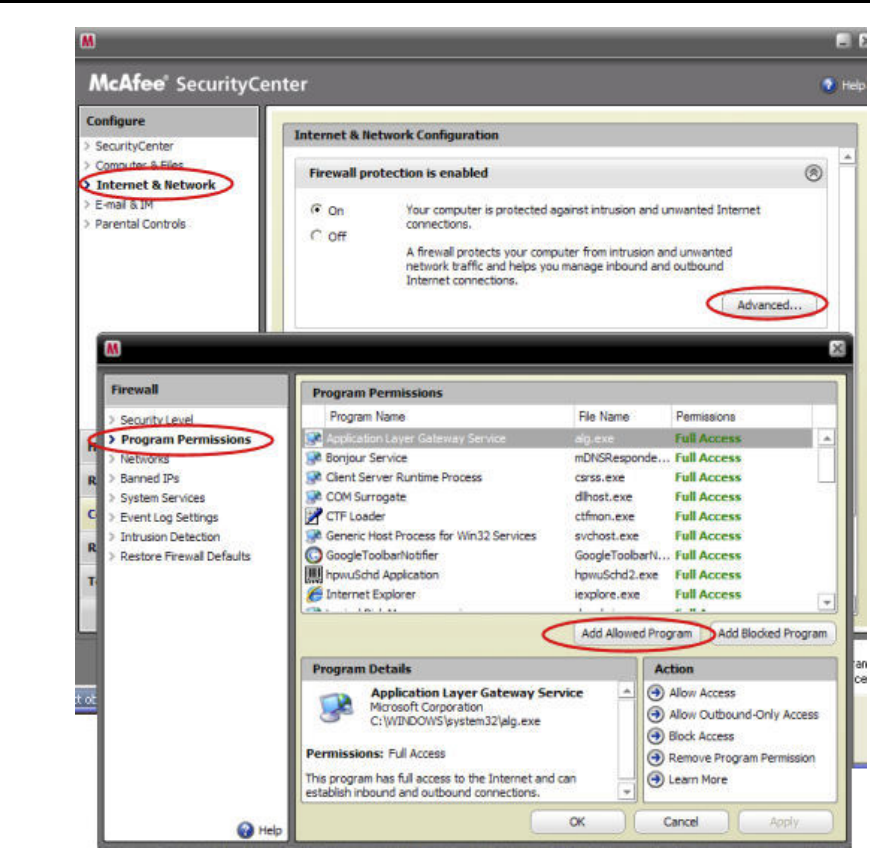
Network and Firewall
• Microsoft Windows Vista
To add exceptions to your firewall using Windows Vista, preform the following steps:
247

HP MediaSmart Server User's Guide
1. Click Start, Control Panel, and then Security Center.
2. Click Allow a program through Windows Firewall.
248

Network and Firewall
3. Select the Exceptions tab and then click Add Program.
4. In the Add a Program dialog box, click Browse. Add the programs listed at the top of
this page.
5. Click OK.
• Microsoft Windows XP
To add exceptions to your firewall using Windows XP, preform the following steps:
249

HP MediaSmart Server User's Guide
1. Click Start, Control Panel, and then Security Center.
2. Click Windows Firewall.
3. Select the Exceptions tab and then click Add Program.
4. In the Add a Program dialog box, click Browse. Add the programs listed at the top of
this page.
250
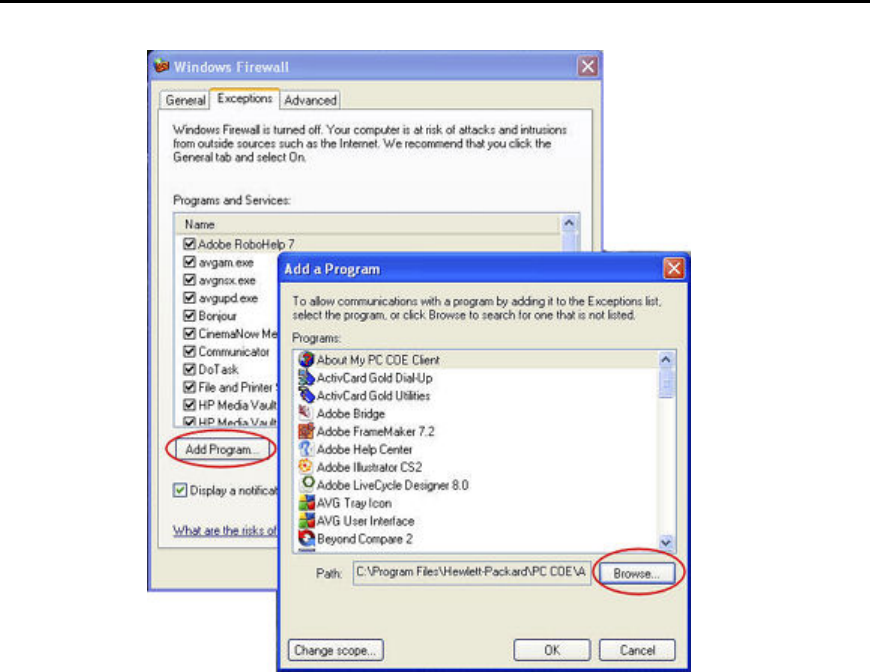
Network and Firewall
5. Click OK.
• Norton
Click Options in Norton to change the firewall settings. Add the programs listed at the top of this
page.
251

HP MediaSmart Server User's Guide
• Symantec
Open Symantec Endpoint Protection, click Change Settings, and then click Configure Settings
for Network Threat Protection. Add the programs listed at the top of this page.
• Trend Micro
1. Open the Trend Micro Main Console, select the Personal Network and Firewall
Controls tab, and then click Settings.
252

Network and Firewall
2. On the Personal Firewall page, click Add.
253

HP MediaSmart Server User's Guide
3. Select the Program Control tab and then click Add.
4. Click Browse and add the programs listed at the top of this page.
5. Click OK.
• ZoneAlarm
254
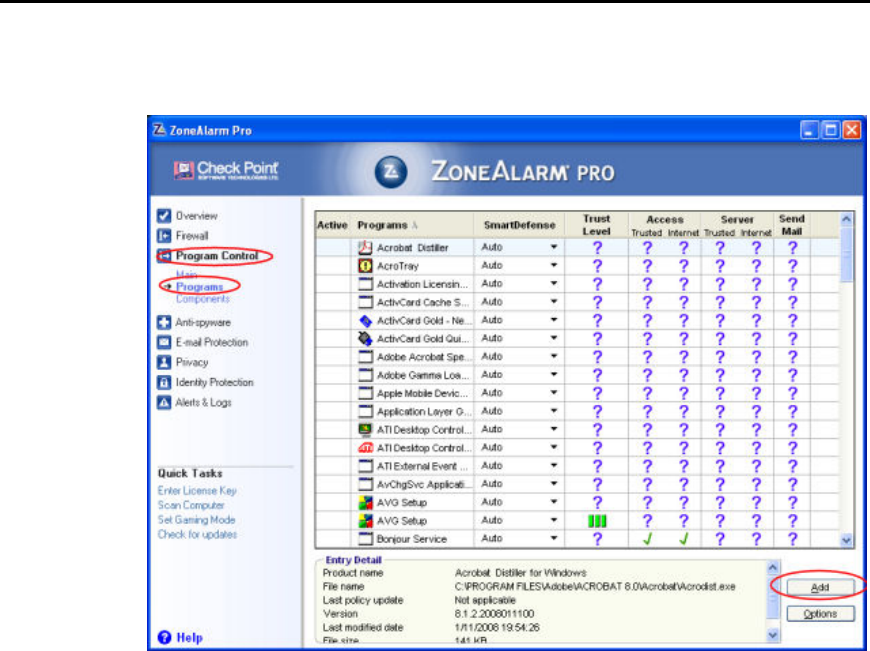
Network and Firewall
1. Open ZoneAlarm Security.
2. Click Program Control, Programs, and then Add.
3. Add the programs listed at the top of this page.
255

Chapter 11. Errors and Lights
SERVER IS UNRESPONSIVE
If the server appears to be unresponsive, do either of the following:
• Reset the server console
• Shutdown and restart the server manually
Reset the server console
How to reset the server from the Windows Home Server Console.
To reset the server
1. If the Windows Home Server Console is open, click the Close button in the upper-left corner of
the console.
2. Double-click the Windows Home Server icon in the task tray.
3. On the Windows Home Server Console startup page, click Options.
4. From the drop-down menu, select Reset the Windows Home Server Console.
5. Click OK to verify that you want to reset the console.
Shutdown and restart the server manually
How to force the server to turn off and restart.
To perform a soft shut down and restart
1. On the back of the server, press the Power button.
2. The health light should begin blinking.
The shutdown process may take up to two minutes to complete.
3. After the server is completely off, press the Power button to restart.
To force a shutdown and restart
1. On the back of the server, hold in the Power button for at least 4 seconds to force the server to
shutdown.
2. After the server is completely off, press the Power button to restart.
257
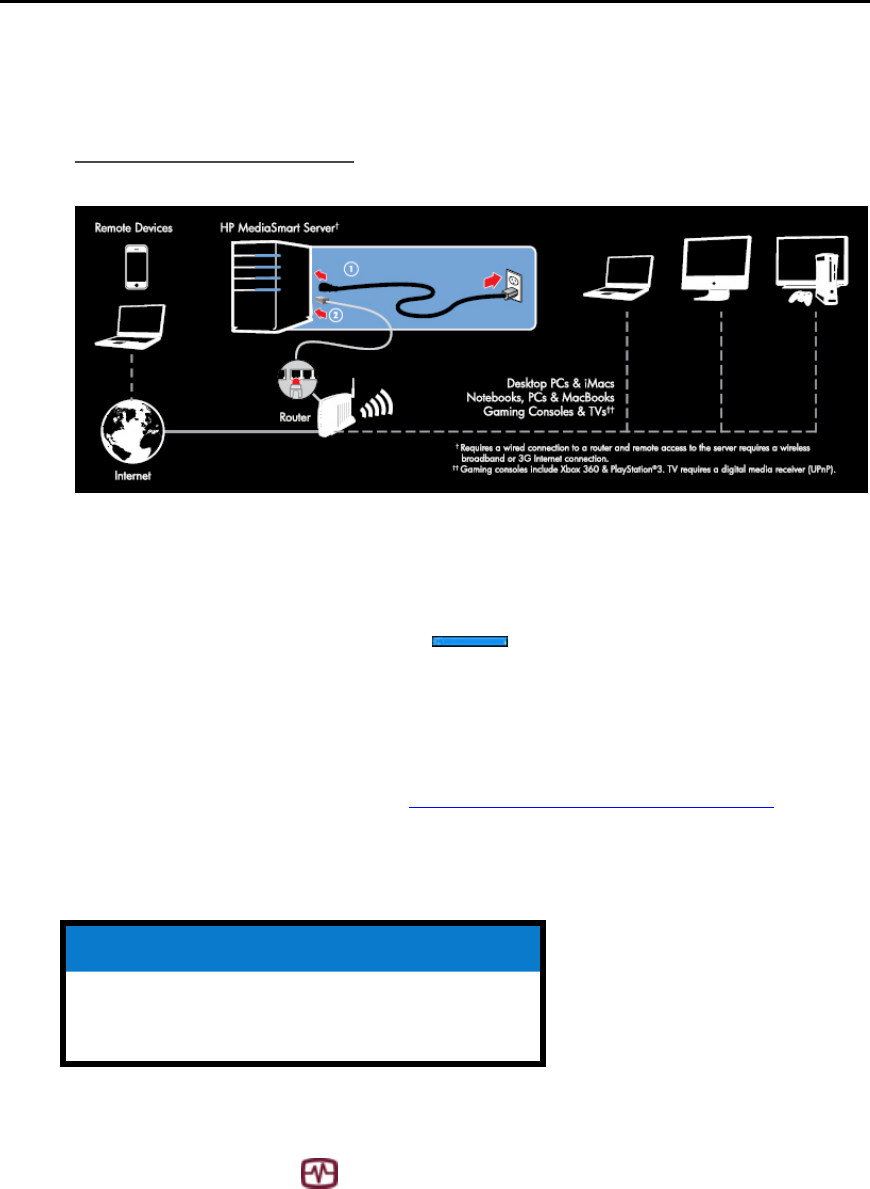
HP MediaSmart Server User's Guide
POWER INDICATOR IS OFF
The server is not powered on.
To power on the server
1. Make sure the power cord is fully plugged into the server and a powered electrical outlet.
2. If plugged into a surge protector or power strip, make sure the device is switched on.
LIGHT-BAR BREATHING AQUA WHITE
A breathing or blinking aqua white light bar indicates that a hard drive has been
installed, but has not been initialized. It occurs in the following conditions:
• When setting up the server for first time—the light-bar is breathing aqua white until the set up on
the first computer is complete.
• The drive has been removed from total storage and the light bar is blinking—for example, when
removing a drive from the drive bay. See Add and Remove Drives from Server Storage.
• When adding a new drive the light bar blinks aqua white, before it has been added to server
storage.
Related Topics
Windows Home Server Console Help
Server Storage
HEALTH LIGHT IS RED
A red Health indicator light has the following states:
• Solid red - operating system failure.
Blinking red - power on test has failed or BIOS failed.
258
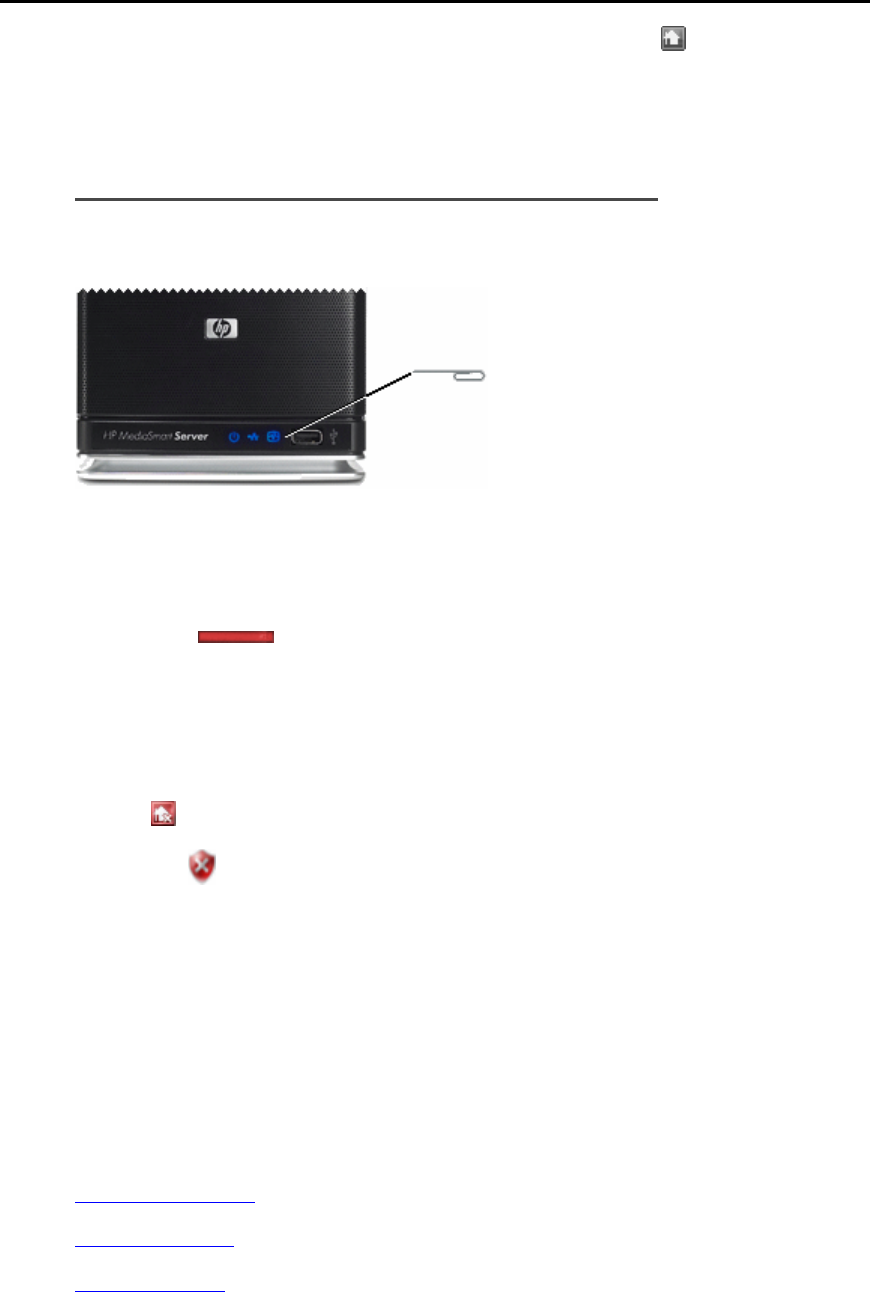
Errors and Lights
Additionally, on your computers the Windows Home Server icon is grey on the task tray,
which indicates the computer cannot contact Windows Home Server.
To get more information about the failure, the HP MediaSmart Server provides additional error
codes.
To get the specific error code causing the failure
Use a paper clip to press and release the recessed Status/Recovery button on the front of the
server.
LIGHT-BAR IS RED
A red light-bar indicates the following:
• That a hard drive has failed and must be replaced. Additionally, the connected computers show the
following:
• The drive was removed from the drive bay before removing it from total storage. See Removing a
hard drive in the Windows Home Server Console Help.
• Red icon on the task tray.
• Red indicator on the Windows Home Server Console Network Health tab.
HARDWARE WARNING MESSAGES
Warning messages indicate Critical issues or At Risk issues.
• Critical issues - address immediately; otherwise, the server may be damaged.
• At Risk issues - address as soon as possible.
The HP MediaSmart Server monitors the temperature of the microprocessor (CPU), fan speed, and
voltages. It displays the following messages:
• Temperature warnings
• Fan speed warnings
• Voltages warnings
259

HP MediaSmart Server User's Guide
Temperature warnings
Temperature warning messages indicate that some server components are too hot.
To lower the temperature of the server
1. Check the ventilation surrounding the server:
• If the server is located in a small unventilated space, move the server to a more ventilated
location.
• Check that the server’s front and back panels are not blocked.
• Check that the location of the server is not too hot. Maximum environmental temperature
for operating the server is 35° C (95° F).
2. Remove any accumulated dust on the back and front of the server.
Fold up the flap on any empty system drive trays. For more information, see Adding an internal
SATA drive.
3. If none of the previous steps return the temperature to normal:
• Write down the temperatures of the CPU.
• Turn off the server.
• Contact HP Support at http://www.hp.com/support.
Fan speed warnings
The fans cool the disk drives and other electronics. If they are not cooling the server sufficiently,
the hard drives and server may be damaged.
For fan speed out of specification
1. Write down the speeds of the upper and lower fans.
2. Turn off the server.
3. Contact HP Support at http://www.hp.com/support.
Voltages warnings
The voltages indicate the health of the server’s power supply.
For voltages out of specification
1. Write down the voltages.
2. Turn off the server.
3. Contact HP Support at http://www.hp.com/support.
260
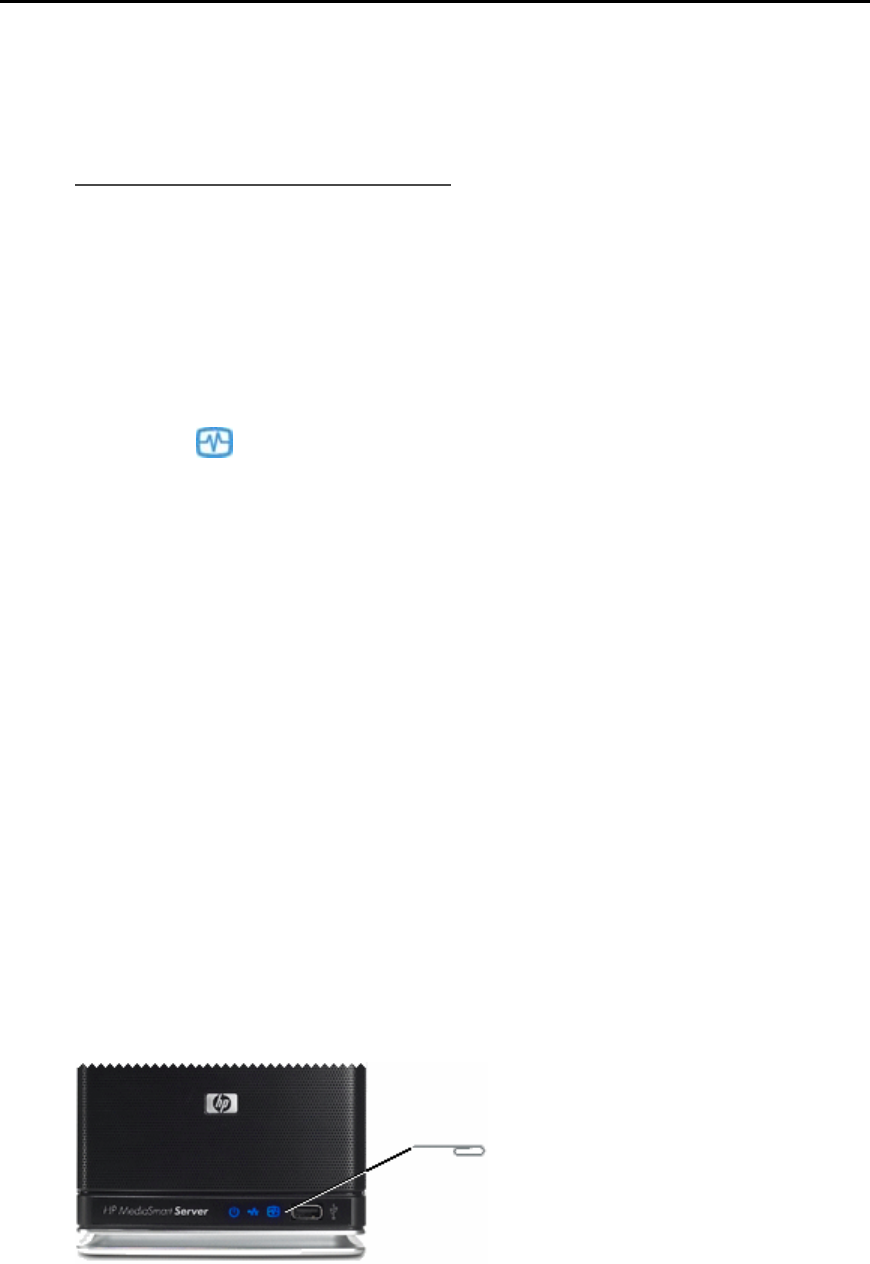
Errors and Lights
FILE TRANSFER FAILURE
What to do about a failure when transferring files to the HP MediaSmart Server from your
computer.
To correct a file transfer failure
1. Compare files that you were transferring with the files on the shared folder and try transferring the
missing files again.
2. If the transfer fails again, check that you can access the Windows Home Server.
3. If you cannot access the Windows Home Server, check the network connections:
• Make sure that all the cable connections are correctly plugged in.
• Make sure the HP MediaSmart Server has power and the Network indicator light is aqua
white .
Make sure the router (or switch) has power.
• Restart the router or switch (or unplug and plug it back in).
• Restart all the devices on the network, including the computers and the server.
Make sure your server and computers are on the same logical network (subnet). See What is an
advanced network configuration? in the Windows Home Server Console Help.
4. If the computer that you transferring files from is connected wirelessly to the network, try
connecting it with an ethernet cable.
5. Check the Event Viewer to see if the System logs show a disconnect:
• In Windows XP, click Start, Control Panel, Performance and Maintenance,
Administrative Tools, and then select Event Viewer.
• In Windows Vista, click Start, Control Panel, System and Maintenance,
Administrative Tools, and then select Event Viewer.
HEALTH INDICATOR CODES
The Tables below are a breakdown of the Health indicator displays. To see this code, using a
paper clip, press and release the recessed Status/Recovery button on the front of the server.
261
HP MediaSmart Server User's Guide
Health indicator codes when the indicator starts as solid red
Code Description Action
Solid red—no code Operating system or application
error. See Windows Home Server
Console for error condition.
1 aqua white, 2 red System drive failed to boot. If the light-bar for the system
drive (the lowest light-bar) is
also red, you need to replace the
system hard drive.
1 aqua white, 3 red Operating system USB boot
failed. Check that lowest USB port on
back of server has boot source.
1 aqua white, 4 red Recovery mode failed. Contact HP Support at
http://www.hp.com/support.
1 aqua white, 5 red Multiple boot failure. Contact HP Support at
http://www.hp.com/support.
1 aqua white, 6 red Service code. Do not hold state button longer
that 3 seconds. Shut down and
repeat.
Codes when the indicator starts as blinking red
Code Description Action
2 aqua white, 1 red BIOS corrupted. Repeat power-on to validate. If
repeats Contact HP Support at
http://www.hp.com/support.
2 aqua white, 2 red Memory failure. Contact HP Support at
http://www.hp.com/support.
2 aqua white, 3 red BIOS recovery source not
present. Contact HP Support at
http://www.hp.com/support.
NETWORK CONNECTION LIGHT IS OFF
To determine why the network connection light is off:
• Make sure that all the cable connections are correctly plugged in.
Make sure the router or switch has power.
• Restart the router or switch (or unplug and plug it back in).
262
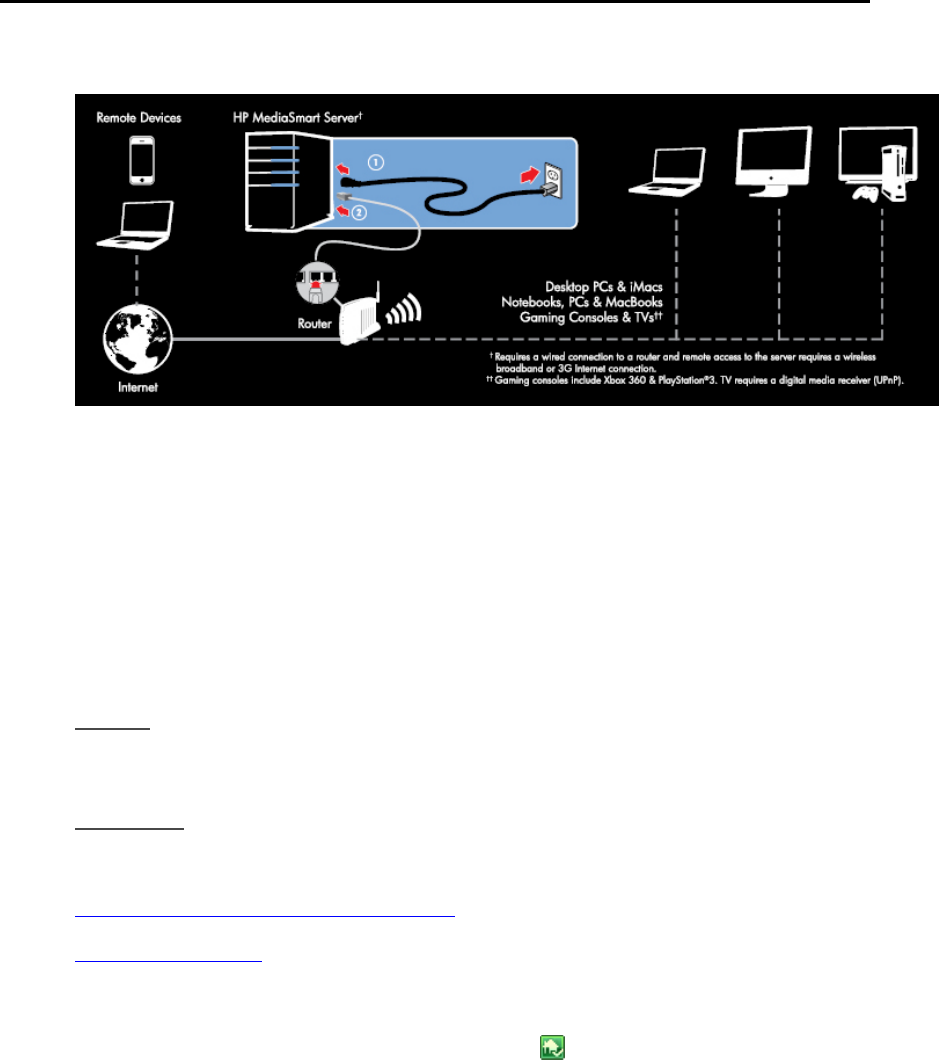
Errors and Lights
• If you are using your own Ethernet cable, try using the Ethernet cable that came with the HP
MediaSmart Server.
NETWORK CONNECTION LIGHT BLINKING AQUA
WHITE
The server is intermittently connected to the network.
Check the cable connection between the server and the router/switch.
SERVER NOT SHOWING UP ON YOUR DMR
Issue:
The HP MediaSmart Server is not listed on your DMR or DMA.
Solution:
You can either:
• Turn on Windows Home Server Media Sharing
• Turn on TwonkyMedia
Turn on Windows Home Server Media Sharing
1. At the PC, double-click the Windows Home Server icon in the system tray and log on.
At the Mac, select Launch Home Server Console from the Server menu .
2. Click Settings in the upper right corner.
3. Click the Media Sharing link in the left navigation bar.
263
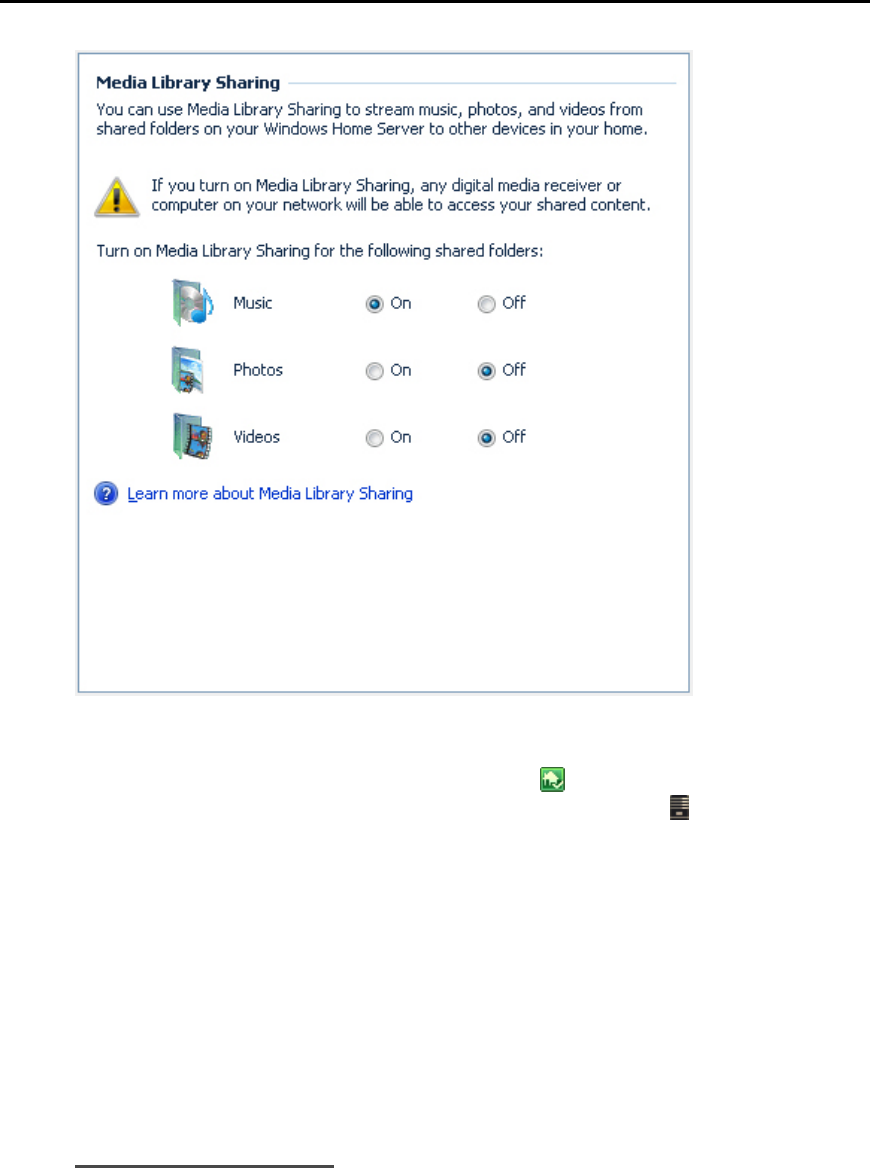
HP MediaSmart Server User's Guide
4. Click the On radio button for at least one of the folders.
Turn on TwonkyMedia
1. At the PC, double-click the Windows Home Server icon in the system tray and log on.
At the Mac, select Launch Home Server Console from the Server menu .
2. Click TwonkyMedia in the left navigation.
If you do not see TwonkyMedia in the left navigation, the add-in is not installed. Click Settings
in the upper right corner. Click Add-ins in the left navigation of the Windows Home Server
Settings dialog. On the Available tab, install the TwonkyMedia Server for HP MediaSmart
Server.
3. In the right pane, click Start Sharing and then click Media Server Settings.
WINDOWS HOME SERVER FREQUENTLY ASKED
QUESTIONS
Server Low on Space.
Clean out unused files.
Earmark backups for deletion and 'clean up now', delete unused docs from Shared Folders.
264

Errors and Lights
265
Cannot Connect to Server Shares.
• A duplicate device exists on the network.
Verify that there is no device on the network named hpstorage.
• User names and passwords do not match.
Create a user on the server whose name and password match the user on the PC or enable the
Guest account.
HUBS AND NETWORK HEALTH LIGHT
Some network hubs, as opposed to switches or routers, may reduce performance between your
computer and the HP MediaSmart Server, or the hub may prevent your computer from
communicating with the server. If this is a problem, the network health indicator light on the front
of the server will be off. Replacing the hub with a switch may improve the network performance
or restore connectivity.

Chapter 12. Product Information
PRODUCT SPECIFICATIONS
The product specifications contain information about the HP MediaSmart Server, its requirements,
and standards.
• Minimum Client-computer Requirements
• Server Specifications
• Network Information
• Environmental
• Electrical and Power
Minimum Client-computer Requirements
One or more computers that meet or exceed these requirements:
Computer Requirements
Any computer capable of running the supported operating systems listed in the following table.
Operating Systems
Supported Operating Systems
Operating System Automatic Backup
of Computers
Running...
File Sharing for
Computers
Running...
Remote Access to
Computers
Running...
Linux X
Mac OS X 10.5 or later X X
Windows Vista Business 32-bit or 64-bit
SP2 X X X
Windows Vista Business N 32-bit or 64-bit
(European Union Only) X X X
Windows Vista Enterprise 32-bit or 64-bit
SP2 X X X
Windows Vista Home Basic 32-bit or 64-bit
SP2 X X
Windows Vista Home N 32-bit or 64-bit
(European Union Only) X X
267

HP MediaSmart Server User's Guide
Supported Operating Systems
Operating System Automatic Backup File Sharing for Remote Access to
of Computers
Running... Computers Computers
Running... Running...
Windows Vista Home Premium 32-bit or
64-bit SP2 X X
Windows Vista Ultimate 32-bit or 64-bit
SP2 X X X
Windows XP Home SP3 X X
Windows XP Professional SP3 X X X
Windows XP Media Center Edition 2005
with SP2 and Rollup 2 X X
Client-computer Hard Drive
25 MB free for software installation on client computers
Other Client-computer Requirements
CD-ROM drive for client-computer installation
DVD-ROM drive for Server Recovery
Server Specifications
Server Specifications
Specification HP MediaSmart Server EX490 HP MediaSmart Server EX495
Internal Drive
Storage 1.0 TB 1.5 TB
Processor Intel Celeron 450 Single-Core
Processor Intel Pentium Dual-Core E5200
Processor
Drive Expandability 3 Serial ATA expansion bays
4 USB 2.0 ports
1 eSATA port
Maximum storage space:
unlimited
3 Serial ATA expansion bays
4 USB 2.0 ports
1 eSATA port
Maximum storage space:
unlimited
268
Product Information
Server Specifications
Specification HP MediaSmart Server EX490 HP MediaSmart Server EX495
Dimensions Width: 14cm (5.5")
Height: 25cm (9.8")
Depth: 23cm (base)-25cm (top)
(9.2"-9.5”)
Width: 14cm (5.5")
Height: 25cm (9.8")
Depth: 23cm (base)-25cm (top)
(9.2"-9.5”)
Weight 5.00 kg (11.0 lb.) 5.10 kg (11.24 lb.)
Network Information
Default Network Name
hpstorage
Network Requirements
Network Requirements
Requirement Recommended
Server connection 100 Mbps to 1000 Mbps (Gigabit Ethernet) wired
connection.
Home computers One or more computers running a supported
operating system with a wired or wireless network
connection.
Internet Connection Broadband connection, such as DSL or cable,
required for remote access functionality.
Router An external Internet broadband router with 100
Mbps (or faster) Ethernet connection to the server
for remote access functionality and wired or
wireless connections to the computers on the
network.
Additionally, your router must have DHCP enabled
to provide automatic IP address to the server.
Connector types
Ethernet: RJ45
eSATA: I-Type
269

HP MediaSmart Server User's Guide
Maximum transmission distances
Ethernet: 100 meters
eSATA: 2 meters
USB: 5 meters
Browser
Internet Explorer 6.0 or greater
Netscape 8.0 or greater
Firefox 2.0 or greater
Safari 3.0 and greater (Mac only)
Environmental
Temperature
Operating: 5 to 35 °C (4 to 95 °F)
Nonoperating: –30 to 65 °C (–22 to 149 °F)
Humidity (no condensation allowed)
Operating: 15% to 90% RH
Nonoperating: 5% to 95% RH
Shock
Nonoperating: 85 G
Vibration
Operating: 0.2 Grms
Nonoperating: 2.1 Grms
Electrical and Power
Electrical Ratings
100-240Vac, 5.0A, 50-60Hz
Power Consumption
HP MediaSmart Server EX490
270

Product Information
Sleep: 1W
Idle: 41W
Active Load: 43W
Extreme Load: 57W
HP MediaSmart Server EX495
Sleep: 1W
Idle: 44W
Active Load: 46W
Extreme Load: 70W
Safety
IEC 950-compliant
USA – UL, CDRH Radiation Control Standards 21
CFR 1010 and 1020-1 0.50
Canada – CSA or CUL
Europe – LVD 73/23/EEC 93/68/EC
IEC 60950-1 plus amendments
EN60825 plus amendments
REGULATORY STATEMENTS
The HP MediaSmart Server complies to the following:
• Federal Communications Commission Notice
• Modifications
• Cables
• Declaration of Conformity for Products Marked with the FCC Logo (United States only)
• California Perchlorate Material Notice
• Canadian Notice
• Avis Canadien
• WEEE Declaration
• REACH Statement
• European Union Regulatory Notice
271

HP MediaSmart Server User's Guide
• Japanese Notice
Federal Communications Commission Notice
This equipment has been tested and found to comply with the limits for a Class B digital device,
pursuant to Part 15 of the FCC Rules. These limits are designed to provide reasonable protection
against harmful interference in a residential installation. This equipment generates, uses, and can
radiate radio frequency energy and, if not installed and used in accordance with the instructions,
may cause harmful interference to radio communications. However, there is no guarantee that
interference will not occur in a particular installation. If this equipment does cause harmful
interference to radio or television reception, which can be determined by turning the equipment off
and on, the user is encouraged to try to correct the interference by one or more of the following
measures:
• Reorient or relocate the receiving antenna.
• Increase the separation between the equipment and the receiver.
• Connect the equipment into an outlet on a circuit different from that to which the receiver is
connected.
• Consult the dealer or an experienced radio or television technician for help.
Modifications
The FCC requires the user to be notified that any changes or modifications made to this device
that are not expressly approved by Hewlett-Packard Company may void the user's authority to
operate the equipment.
Cables
Connections to this device must be made with shielded cables with metallic RFI/EMI connector
hoods in order to maintain compliance with FCC Rules and Regulations.
Declaration of Conformity for Products Marked with the FCC Logo
(United States only)
This device complies with Part 15 of the FCC Rules. Operation is subject to the following two
conditions:
1. This device may not cause harmful interference, and
2. This device must accept any interference received, including interference that may cause
undesired operation.
For questions regarding the product, contact:
272

Product Information
Hewlett-Packard Company
P. O. Box 692000, Mail Stop 530113
Houston, Texas 77269-2000
Or, call 1-800-HP-INVENT (1-800-474-6836).
For questions regarding this FCC declaration, contact:
Hewlett-Packard Company
P. O. Box 692000, Mail Stop 510101
Houston, Texas 77269-2000
Or, call (281) 514-3333.
To identify this product, refer to the part, series, or model number found on the product.
California Perchlorate Material Notice
Perchlorate material - special handling may apply See
http://www.dtsc.ca.gov/hazardouswaste/perchlorate/
This product’s real-time clock battery or coin cell battery may contain perchlorate and may require
special handling when recycled or disposed of in California.
Canadian Notice
This Class B digital apparatus meets all requirements of the Canadian Interference-Causing
Equipment Regulations.
Avis Canadien
Cet appareil numérique de la classe B respecte toutes les exigences du Règlement sur le matériel
brouilleur du Canada.
WEEE Declaration
Disposal of Waste Equipment by Users in Private Household in the European
Union
This symbol on the product or on its packaging indicates that this product must not be
disposed of with your other household waste. Instead, it is your responsibility to dispose
of your waste equipment by handing it over to a designated collection point for the
273

HP MediaSmart Server User's Guide
recycling of waste electrical and electronic equipment. The separate collection and recycling of
your waste equipment at the time of disposal will help to conserve natural resources and ensure
that it is recycled in a manner that protects human health and the environment. For more
information about where you can drop off your waste equipment for recycling, please contact your
local city office, your household waste disposal service or the shop where you purchased the
product.
REACH Statement
Chemical Substances
HP is committed to providing our customers with information about the chemical substances in
our products as needed to comply with legal requirements such as REACH (Regulation EC No
1907/2006 of the European Parliament and the Council). A chemical information report for this
product can be found at: http://www.hp.com/go/reach
European Union Regulatory Notice
This product complies with the following EU Directives:
• Low Voltage Directive 2006/95/EC
• EMC Directive 2004/108/EC
Compliance with these directives implies conformity to applicable harmonized European
standards (European Norms) which are listed on the EU Declaration of Conformity issued by
Hewlett-Packard for this product or product family.
This compliance is indicated by the following conformity marking placed on the product:
Hewlett-Packard GmbH, HQ-TRE, Herrenberger Strasse 140, 71034 Boeblingen, Germany
Japanese Notice
274

Product Information
WM-DRM 10 LICENSED TECHNOLOGY
Content providers are using the digital rights management technology for Windows Media
contained in this device (“WM-DRM”) to protect the integrity of their content (“Secure Content”)
so that their intellectual property, including copyright, in such content is not misappropriated. This
device uses WM-DRM Software to play Secure Content (“WM-DRM Software”). If the security
of the WM-DRM Software in this device has been compromised, owners of Secure Content
(“Secure Content Owners”) may request that Microsoft revoke the WM-DRM Software’s right to
acquire new licenses to copy, display and/or play Secure Content. Revocation does not alter the
WM-DRM Software’s ability to play unprotected content. A list of revoked WM-DRM Software
is sent to your device whenever you download a license for Secure Content from the Internet or
from a PC. Microsoft may, in conjunction with such license, also download revocations lists onto
your device on behalf of Secure Content Owners.
LIMITED WARRANTY AND TECHNICAL SUPPORT
STATEMENT
HP MediaSmart Server Limited Warranty
Duration
Hardware: 1 year Limited Warranty
Software: 1 year Technical Support
General Terms
This HP Hardware Limited Warranty gives you, the customer, express limited warranty rights
from HP, the manufacturer. Please refer to HP’s Web site for an extensive description of your
limited warranty entitlements. In addition, you may also have other legal rights under applicable
local law or special written agreement with HP.
HP MAKES NO OTHER EXPRESS WARRANTY OR CONDITION, WHETHER WRITTEN
OR ORAL, AND HP EXPRESSLY DISCLAIMS ALL WARRANTIES AND CONDITIONS
NOT STATED IN THIS LIMITED WARRANTY. TO THE EXTENT ALLOWED BY THE
LOCAL LAW OF JURISDICTIONS OUTSIDE THE UNITED STATES, HP DISCLAIMS ALL
IMPLIED WARRANTIES OR CONDITIONS, INCLUDING ANY IMPLIED WARRANTIES
OF MERCHANTABILITY AND FITNESS FOR A PARTICULAR PURPOSE. FOR ALL
TRANSACTIONS OCCURRING IN THE UNITED STATES, ANY IMPLIED WARRANTY
OR CONDITION OF MERCHANTABILITY, SATISFACTORY QUALITY, OR FITNESS FOR
A PARTICULAR PURPOSE IS LIMITED TO THE DURATION OF THE EXPRESS
WARRANTY SET FORTH ABOVE. SOME STATES OR COUNTRIES/REGIONS DO NOT
ALLOW A LIMITATION ON HOW LONG AN IMPLIED WARRANTY LASTS OR THE
EXCLUSION OR LIMITATION OF INCIDENTAL OR CONSEQUENTIAL DAMAGES FOR
CONSUMER PRODUCTS. IN SUCH STATES OR COUNTRIES/REGIONS, SOME
EXCLUSIONS OR LIMITATIONS OF THIS LIMITED WARRANTY MAY NOT APPLY TO
YOU.
THE LIMITED WARRANTY TERMS CONTAINED IN THIS STATEMENT, EXCEPT TO
THE EXTENT LAWFULLY PERMITTED, DO NOT EXCLUDE, RESTRICT, OR MODIFY
BUT ARE IN ADDITION TO THE MANDATORY STATUTORY RIGHTS APPLICABLE TO
THE SALE OF THIS PRODUCT TO YOU.
275

HP MediaSmart Server User's Guide
This Limited Warranty is applicable in all countries/regions and may be enforced in any
country/region where HP or its authorized service providers offer warranty service for the same
product model number subject to the terms and conditions set forth in this Limited Warranty.
Under the HP Global Limited Warranty program, products purchased in one country/region may
be transferred to another country/region, where HP or its authorized service providers offer
warranty service for the same product model number, without voiding the warranty. Warranty
terms, service availability, and service response times may vary from country/region to
country/region. Standard warranty service response time is subject to change due to local parts
availability. If so, your HP authorized service provider can provide you with details.
HP is not responsible for any tariffs or duties that may be incurred in transferring the products.
Transfer of the products may be covered by export controls issued by the United States or other
governments.
This Limited Warranty applies only to HP-branded and Compaq-branded hardware products
(collectively referred to in this Limited Warranty as “HP Hardware Products”) sold by or leased
from Hewlett-Packard Company, its worldwide subsidiaries, affiliates, authorized resellers, or
country/region distributors (collectively referred to in this Limited Warranty as “HP”) with this
Limited Warranty. The term “HP Hardware Product” is limited to the hardware components and
required firmware. The term “HP Hardware Product” DOES NOT include any software
applications or programs; non-HP products or non-HP branded peripherals. All non-HP products
or non-HP branded peripherals external to the HP Hardware Product — such as external storage
subsystems, displays, printers, and other peripherals — are provided “AS IS” without HP
warranty. However, non-HP manufacturers and suppliers, or publishers may provide their own
warranties directly to you.
HP warrants that the HP Hardware Products that you have purchased or leased from HP are free
from defects in materials or workmanship under normal use during the Limited Warranty Period.
The Limited Warranty Period starts on the date of purchase or lease from HP or from the date HP
completes installation. Your dated sales or delivery receipt, showing the date of purchase or lease
of the product, is your proof of the purchase or lease date. You may be required to provide proof
of purchase or lease as a condition of receiving warranty service. You are entitled to hardware
warranty service according to the terms and conditions of this document if a repair to your HP
Hardware Product is required within the Limited Warranty Period.
Unless otherwise stated, and to the extent permitted by local law, new HP Hardware Products may
be manufactured using new materials or new and used materials equivalent to new in performance
and reliability. HP may repair or replace HP Hardware Products (a) with new or previously used
products or parts equivalent to new in performance and reliability or (b) with equivalent products
to an original product that has been discontinued. Replacement parts are warranted to be free from
defects in material or workmanship for ninety (90) days or, for the remainder of the Limited
Warranty Period of the HP Hardware Product they are replacing or in which they are installed,
whichever is longer.
During the Limited Warranty Period, HP will, at its discretion, repair or replace any defective
component. All component parts or hardware products removed under this Limited Warranty
become the property of HP. In the unlikely event that your HP Hardware Product has recurring
failures, HP, at its sole discretion, may elect to provide you with (a) a replacement unit of HP’s
choosing that is the same or equivalent to your HP Hardware Product in performance or (b) to give
you a refund of your purchase price or lease payments (less interest) instead of a replacement. This
is your exclusive remedy for defective products.
276

Product Information
Exclusions
HP does not warrant that the operation of this product will be uninterrupted or error-free. HP is not
responsible for damage that occurs as a result of your failure to follow the instructions intended for
the HP Hardware Product.
This Limited Warranty does not apply to expendable or consumable parts and does not extend to
any product from which the serial number has been removed or that has been damaged or rendered
defective (a) as a result of accident, misuse, abuse, contamination, improper or inadequate
maintenance or calibration, or other external causes; (b) by operation outside the usage parameters
stated in the user documentation that shipped with the product (c) by software, interfacing, parts,
or supplies not supplied by HP; (d) by improper site preparation or maintenance; (e) by virus
infection; (f) from loss or damage in transit; (g) by modification or service by anyone other than
(i) HP, (ii) an HP authorized service provider, or (iii) your own installation of end-user-replaceable
HP or HP-approved parts if available for your product in the servicing country/region.
YOU SHOULD MAKE PERIODIC BACKUP COPIES OF THE DATA STORED ON
YOUR HARD DRIVE OR OTHER STORAGE DEVICES AS A PRECAUTION AGAINST
POSSIBLE FAILURES, ALTERATION, OR LOSS OF THE DATA. BEFORE
RETURNING ANY UNIT FOR SERVICE, BE SURE TO BACK UP DATA AND
REMOVE ANY CONFIDENTIAL, PROPRIETARY, OR PERSONAL INFORMATION.
HP IS NOT RESPONSIBLE FOR DAMAGE TO OR LOSS OF ANY PROGRAMS, DATA,
OR REMOVABLE STORAGE MEDIA. HP IS NOT RESPONSIBLE FOR THE
RESTORATION OR REINSTALLATION OF ANY PROGRAMS OR DATA OTHER
THAN SOFTWARE INSTALLED BY HP WHEN THE PRODUCT IS MANUFACTURED.
UNITS SENT IN FOR SERVICE MAY HAVE THE DATA ERASED FROM THE HARD
DRIVE AND THE PROGRAMS RESTORED TO THEIR ORIGINAL STATE.
Exclusive Remedy
TO THE EXTENT ALLOWED BY APPLICABLE LOCAL LAW, THESE TERMS AND
CONDITIONS CONSTITUTE THE COMPLETE AND EXCLUSIVE WARRANTY
AGREEMENT BETWEEN YOU AND HP REGARDING THE HP HARDWARE PRODUCT
YOU HAVE PURCHASED OR LEASED. THESE TERMS AND CONDITIONS SUPERSEDE
ANY PRIOR AGREEMENTS OR REPRESENTATIONS — INCLUDING
REPRESENTATIONS MADE IN HP SALES LITERATURE OR ADVICE GIVEN TO YOU
BY HP OR AN AGENT OR EMPLOYEE OF HP — THAT MAY HAVE BEEN MADE IN
CONNECTION WITH YOUR PURCHASE OR LEASE OF THE HP HARDWARE PRODUCT.
No change to the conditions of this Limited Warranty is valid unless it is made in writing and
signed by an authorized representative of HP.
Limitation of Liability
IF YOUR HP HARDWARE PRODUCT FAILS TO WORK AS WARRANTED ABOVE, HP’S
MAXIMUM LIABILITY UNDER THIS LIMITED WARRANTY IS EXPRESSLY LIMITED
TO THE LESSER OF THE PRICE YOU HAVE PAID FOR THE PRODUCT OR THE COST
OF REPAIR OR REPLACEMENT OF ANY HARDWARE COMPONENTS THAT
MALFUNCTION IN CONDITIONS OF NORMAL USE.
EXCEPT AS INDICATED ABOVE, IN NO EVENT WILL HP BE LIABLE FOR ANY
DAMAGES CAUSED BY THE PRODUCT OR THE FAILURE OF THE PRODUCT TO
PERFORM, INCLUDING ANY LOST PROFITS OR SAVINGS OR SPECIAL, INCIDENTAL,
OR CONSEQUENTIAL DAMAGES. HP IS NOT LIABLE FOR ANY CLAIM MADE BY A
THIRD PARTY OR MADE BY YOU FOR A THIRD PARTY.
277

HP MediaSmart Server User's Guide
THIS LIMITATION OF LIABILITY APPLIES WHETHER DAMAGES ARE SOUGHT, OR A
CLAIM MADE, UNDER THIS LIMITED WARRANTY OR AS A TORT CLAIM
(INCLUDING NEGLIGENCE AND STRICT PRODUCT LIABILITY), A CONTRACT
CLAIM, OR ANY OTHER CLAIM. THIS LIMITATION OF LIABILITY CANNOT BE
WAIVED OR AMENDED BY ANY PERSON. THIS LIMITATION OF LIABILITY WILL BE
EFFECTIVE EVEN IF YOU HAVE ADVISED HP OR AN AUTHORIZED
REPRESENTATIVE OF HP OF THE POSSIBILITY OF ANY SUCH DAMAGES. THIS
LIMITATION OF LIABILITY, HOWEVER, WILL NOT APPLY TO CLAIMS FOR
PERSONAL INJURY.
THIS LIMITED WARRANTY GIVES YOU SPECIFIC LEGAL RIGHTS. YOU MAY ALSO
HAVE OTHER RIGHTS THAT MAY VARY FROM STATE TO STATE OR FROM
COUNTRY/REGION TO COUNTRY/REGION. YOU ARE ADVISED TO CONSULT
APPLICABLE STATE OR COUNTRY/REGION LAWS FOR A FULL DETERMINATION OF
YOUR RIGHTS.
Limited Warranty Period
The Limited Warranty Period for an HP Hardware Product is a specified, fixed period
commencing on the date of purchase. The date on your sales receipt is the date of purchase unless
HP or your reseller informs you otherwise in writing.
Types of Warranty Service
To enable HP to provide the best possible support and service during the Limited Warranty
Period, you may be directed by HP to verify configurations, load most recent firmware, patches,
run HP diagnostics tests, or use HP remote support solutions where applicable.
HP strongly encourages you to accept the use of or to employ available support technologies
provided by HP. If you choose not to deploy available remote support capabilities, you may incur
additional costs due to increased support resource requirements. Listed below are the types of
warranty support service that may be applicable to the HP Hardware Product you have purchased.
Customer Self Repair Warranty Service
In countries/regions where it is available, your HP Limited Warranty may include a customer self
repair warranty service. If applicable, HP will determine in its sole discretion that customer self
repair is the appropriate method of warranty service. If so, HP will ship approved replacement
parts directly to you to fulfill your HP Hardware Product warranty service. This will save
considerable repair time. After you contact the HP Technical Support Center and the fault
diagnosis identifies that the problem can be fixed using one of these parts, a replaceable part can
be sent directly to you. Once the part arrives, replace the defective part pursuant to the provided
instructions and documentation. If further assistance is required, call the HP Technical Support
Center, and a technician will assist you over the phone. In cases where the replacement part must
be returned to HP, you must ship the defective part back to HP within a defined period of time,
normally thirty (30) days. The defective part must be returned with the associated documentation
in the provided shipping material. Failure to return the defective product may result in HP billing
you for the replacement.
With a customer self repair, HP will pay all shipping and part return costs and determine the
courier/carrier to be used. If customer self repair applies to you, please refer to your specific HP
Hardware Product announcement. You can also obtain information on this warranty service on the
HP Web site at:
http://www.hp.com/support
278

Product Information
Pickup and Return Warranty Service
Your HP Limited Warranty may include a pickup and return warranty service. Under the terms of
pickup and return service, HP will pick up the defective unit from your location, repair it, and
return it back to your location. HP will incur all repair, logistics, and insurance costs in this
process.
Carry-in Warranty Service
Under the terms of carry-in service, you will be required to deliver your HP Hardware Product to
an authorized service location for warranty repair. You must prepay any shipping charges, taxes,
or duties associated with transportation of the product to and from the service location. In addition,
you are responsible for insuring any product shipped or returned to an authorized service location
and assume risk of loss during shipping.
Service Upgrades
HP has a range of additional support and service coverage for your product that can be purchased
locally. However, some support and related products may not be available in all countries/regions.
For information on availability of service upgrades and the cost for these service upgrades, refer to
the HP Web site at:
http://www.hp.com/support
Options Limited Warranty, Software and Digital Content
Your Options Limited Warranty is a one (1) year (HP Options Limited Warranty Period) parts
replacement warranty on any HP branded or Compaq-branded options (HP Options). If your HP
Options are installed in an HP Hardware Product, HP may provide warranty service either for the
HP Options Limited Warranty Period or the remaining Limited Warranty Period of the HP
Hardware Product in which the HP Options are being installed, whichever period is the longer but
not to exceed three (3) years from the date you purchased the HP Options. The HP Options
Limited Warranty Period starts on your date of purchase. Your dated sales or delivery receipt,
showing the date of purchase, is your start date. Non-HP options are provided “AS IS”. Non-HP
manufacturers and suppliers may provide warranties directly to you. EXCEPT AS PROVIDED IN
ANY SOFTWARE END-USER LICENSE OR PROGRAM LICENSE AGREEMENT, OR IF
OTHERWISE REQUIRED BY LOCAL LAW, SOFTWARE AND THIRD PARTY DIGITAL
CONTENT, INCLUDING THE OPERATING SYSTEM OR ANY SOFTWARE OR THIRD
PARTY DIGITAL CONTENT PREINSTALLED BY HP ARE PROVIDED “AS IS”. EXCEPT
AS SPECIFICALLY PROVIDED IN THIS LIMITED WARRANTY, IN NO EVENT WILL HP
BE LIABLE FOR ANY DAMAGES CAUSED BY OR ARISING FROM ANY THIRD PARTY
DIGITAL CONTENT PREINSTALLED ON YOUR HP HARDWARE PRODUCT.
HP MEDIASMART SERVER 3.0 UPDATE READ ME
In this article...
Easy, automatic backup of your digital memories
Enjoy your digital media experiences
Centralize your digital life for sharing with friends and family
279

HP MediaSmart Server User's Guide
Easy, automatic backup of your digital memories
Set it and forget it! Your home server automatically manages many important activities (daily
backup, media collection, and power management) for you behind the scenes.
The HP MediaSmart Server will automatically backup multiple computers in your home including
both Windows PCs (Microsoft’s Windows Home Server Backup) and Macs (Apple's Time
Machine) and allows you to easily retrieve your digital media—music, photos, and videos—so
they are never lost.
Easy internal expandability with tool-free expansion bays allowing you to add additional internal
SATA disk drives. Or expand your storage capacity externally using the 4 USB ports and the fast
eSATA port.
Automated PC backup software provides efficient backups to help save disk space and time.
Enjoy your digital media experiences
Extend your digital media experiences by conveniently streaming photos, music and videos to
your TVs, through gaming consoles such as Xbox 360 or PLAYSTATION3, and computer's
within your home.
Eliminate the frustration of trying to play your videos on different devices! The HP Video
Converter automatically converts your library of videos (including unprotected DVDs) into a
video format that can be played in your home and remotely on PCs and/or Macs and streamed to
popular media devices such as xBox 360s and PS3s. Plus, you control how your videos are
converted by selecting the device your video will be played on or specify the video settings
yourself.
Take your videos with you… The HP MediaSmart Server creates a mobile version of your videos
that you can download and play on your iPod, iPhone, PlayStation Portable (PSP), Zune and other
popular mobile devices.
The HP MediaSmart Server supports iTunes and Windows Media Player devices so you can enjoy
your music libraries throughout your home.
Centralize your digital life for sharing with friends and family
The HP MediaSmart Server will automatically centralize your digital media for sharing with
family and friends, and enable you to enjoy your digital media while at home or away.
Stream music, photos and video from your server to any Internet-connected computer. Now, all of
your media is just a fingertip away! The MediaSmart Server iPhone app lets you stream all your
media to your iPod touch or iPhone!
HP Media Collector automatically collects, organizes and centralizes your media files from
multiple Windows PCs and Macs (including iPhoto, iTunes, and iMovie libraries) to the server so
you can easily find, share and stream your media.
Using an Internet connected PC, you can quickly publish the photos on your server and/or directly
to popular web sites such as Snapfish, Flickr, Picasa Web Albums, and even Facebook.
The HP Photo Viewer allows you to create photo albums for sharing with family and friends.
280

Product Information
281
Chapter 13. Licenses, Copyrights and Notices for
Open Source Components
COPYRIGHTS
The information contained herein is subject to change without notice. The only warranties for HP
products and services are set forth in the express warranty statements accompanying such products
and services. Nothing herein should be construed as constituting an additional warranty. HP shall
not be liable for technical or editorial errors or omissions contained herein.
This document contains proprietary information that is protected by copyright. No part of this
document may be photocopied, reproduced, or translated to another language without the prior
written consent of Hewlett-Packard Company.
Hewlett-Packard Company
P.O. Box 4010
Cupertino, CA 95015-4010 USA
Copyright © 2009 Hewlett-Packard Development Company, L.P.
Apple, Mac, Macintosh, Mac OS, iMac, Mac mini, MacBook, iPhone, iPod and Time Machine are
either registered trademarks or trademarks of Apple Inc. in the U.S. and/or other countries.
Microsoft, Windows, Windows Vista, Windows NT, Zune, and Xbox are either registered
trademarks or trademarks of Microsoft Corporation in the U.S. and/or other countries. Celeron
and Pentium are registered trademarks of Intel Corporation in the U.S. and other countries.
PlayStation3 and PSP3 are trademarks of Sony Corporation, registered in the U.S. and/or other
countries. Amazon, AmazonS3, and other Amazon.com graphics, logos, page headers, button
icons, scripts, and service names are trademarks, registered trademarks or trade dress of Amazon
in the U.S. and/or other countries. Flickr is a trademark of Yahoo! Inc. registered in the U.S.
and/or other countries. Picasa™ is a trademark of Google Inc. TwonkyMedia is a trademark of
PacketVideo, registered in the U.S. and/or other countries. iStream is a trademark of Hewlett-
Packard Company, registered in the U.S. and/or other countries. All other trademarks are the
property of their respective owners.
HP supports lawful use of technology and does not endorse or encourage the use of its products
for purposes other than those permitted by copyright law.
The information in this document is subject to change without notice.
FIREFLY: GPL LICENSE
GNU GENERAL PUBLIC LICENSE
Version 2, June 1991
283

HP MediaSmart Server User's Guide
Copyright (C) 1989, 1991 Free Software Foundation, Inc.,
51 Franklin Street, Fifth Floor, Boston, MA 02110-1301 USA
Everyone is permitted to copy and distribute verbatim copies of this license document, but
changing it is not allowed.
Preamble
The licenses for most software are designed to take away your freedom to share and change it. By
contrast, the GNU General Public License is intended to guarantee your freedom to share and
change free software--to make sure the software is free for all its users. This General Public
License applies to most of the Free Software Foundation's software and to any other program
whose authors commit to using it. (Some other Free Software Foundation software is covered by
the GNU Lesser General Public License instead.) You can apply it to your programs, too.
When we speak of free software, we are referring to freedom, not price. Our General Public
Licenses are designed to make sure that you have the freedom to distribute copies of free software
(and charge for this service if you wish), that you receive source code or can get it if you want it,
that you can change the software or use pieces of it in new free programs; and that you know you
can do these things.
To protect your rights, we need to make restrictions that forbid anyone to deny you these rights or
to ask you to surrender the rights. These restrictions translate to certain responsibilities for you if
you distribute copies of the software, or if you modify it.
For example, if you distribute copies of such a program, whether gratis or for a fee, you must give
the recipients all the rights that you have. You must make sure that they, too, receive or can get
the source code. And you must show them these terms so they know their rights.
We protect your rights with two steps: (1) copyright the software, and (2) offer you this license
which gives you legal permission to copy, distribute and/or modify the software.
Also, for each author's protection and ours, we want to make certain that everyone understands
that there is no warranty for this free software. If the software is modified by someone else and
passed on, we want its recipients to know that what they have is not the original, so that any
problems introduced by others will not reflect on the original authors' reputations.
Finally, any free program is threatened constantly by software patents. We wish to avoid the
danger that redistributors of a free program will individually obtain patent licenses, in effect
making the program proprietary. To prevent this, we have made it clear that any patent must be
licensed for everyone's free use or not licensed at all.
284

Licenses, Copyrights and Notices for Open Source Components
The precise terms and conditions for copying, distribution and modification follow.
GNU GENERAL PUBLIC LICENSE
TERMS AND CONDITIONS FOR COPYING, DISTRIBUTION AND MODIFICATION
1. This License applies to any program or other work which contains a notice placed by the copyright
holder saying it may be distributed under the terms of this General Public License. The
"Program", below, refers to any such program or work, and a "work based on the Program" means
either the Program or any derivative work under copyright law: that is to say, a work containing
the Program or a portion of it, either verbatim or with modifications and/or translated into another
language. (Hereinafter, translation is included without limitation in the term "modification".)
Each licensee is addressed as "you".
Activities other than copying, distribution and modification are not covered by this License; they
are outside its scope. The act of running the Program is not restricted, and the output from the
Program is covered only if its contents constitute a work based on the Program (independent of
having been made by running the Program). Whether that is true depends on what the Program
does.
2. You may copy and distribute verbatim copies of the Program's source code as you receive it, in
any medium, provided that you conspicuously and appropriately publish on each copy an
appropriate copyright notice and disclaimer of warranty; keep intact all the notices that refer to
this License and to the absence of any warranty; and give any other recipients of the Program a
copy of this License along with the Program.
You may charge a fee for the physical act of transferring a copy, and you may at your option offer
warranty protection in exchange for a fee.
3. You may modify your copy or copies of the Program or any portion of it, thus forming a work
based on the Program, and copy and distribute such modifications or work under the terms of
Section 1 above, provided that you also meet all of these conditions:
a. You must cause the modified files to carry prominent notices stating that you changed the
files and the date of any change.
b. You must cause any work that you distribute or publish, that in whole or in part contains
or is derived from the Program or any part thereof, to be licensed as a whole at no charge
to all third parties under the terms of this License.
c. If the modified program normally reads commands interactively when run, you must
cause it, when started running for such interactive use in the most ordinary way, to print
or display an announcement including an appropriate copyright notice and a notice that
there is no warranty (or else, saying that you provide a warranty) and that users may
redistribute the program under these conditions, and telling the user how to view a copy
of this License. (Exception: if the Program itself is interactive but does not normally
print such an announcement, your work based on the Program is not required to print an
announcement.)
These requirements apply to the modified work as a whole. If identifiable sections of that work
are not derived from the Program, and can be reasonably considered independent and separate
works in themselves, then this License, and its terms, do not apply to those sections when you
distribute them as separate works. But when you distribute the same sections as part of a whole
285

HP MediaSmart Server User's Guide
which is a work based on the Program, the distribution of the whole must be on the terms of this
License, whose permissions for other licensees extend to the entire whole, and thus to each and
every part regardless of who wrote it.
Thus, it is not the intent of this section to claim rights or contest your rights to work written
entirely by you; rather, the intent is to exercise the right to control the distribution of derivative or
collective works based on the Program.
In addition, mere aggregation of another work not based on the Program with the Program (or with
a work based on the Program) on a volume of a storage or distribution medium does not bring the
other work under the scope of this License.
3. You may copy and distribute the Program (or a work based on it, under Section 2) in object code
or executable form under the terms of Sections 1 and 2 above provided that you also do one of the
following:
a. Accompany it with the complete corresponding machine-readable source code, which
must be distributed under the terms of Sections 1 and 2 above on a medium customarily
used for software interchange; or,
b. Accompany it with a written offer, valid for at least three years, to give any third party,
for a charge no more than your cost of physically performing source distribution, a
complete machine-readable copy of the corresponding source code, to be distributed
under the terms of Sections 1 and 2 above on a medium customarily used for software
interchange; or,
c. Accompany it with the information you received as to the offer to distribute
corresponding source code. (This alternative is allowed only for noncommercial
distribution and only if you received the program in object code or executable form with
such an offer, in accord with Subsection b above.)
The source code for a work means the preferred form of the work for making modifications to it.
For an executable work, complete source code means all the source code for all modules it
contains, plus any associated interface definition files, plus the scripts used to control compilation
and installation of the executable. However, as a special exception, the source code distributed
need not include anything that is normally distributed (in either source or binary form) with the
major components (compiler, kernel, and so on) of the operating system on which the executable
runs, unless that component itself accompanies the executable.
If distribution of executable or object code is made by offering access to copy from a designated
place, then offering equivalent access to copy the source code from the same place counts as
distribution of the source code, even though third parties are not compelled to copy the source
along with the object code.
4. You may not copy, modify, sublicense, or distribute the Program except as expressly provided
under this License. Any attempt otherwise to copy, modify, sublicense or distribute the Program
is void, and will automatically terminate your rights under this License. However, parties who
have received copies, or rights, from you under this License will not have their licenses terminated
so long as such parties remain in full compliance.
5. You are not required to accept this License, since you have not signed it. However, nothing else
grants you permission to modify or distribute the Program or its derivative works. These actions
are prohibited by law if you do not accept this License. Therefore, by modifying or distributing
the Program (or any work based on the Program), you indicate your acceptance of this License to
do so, and all its terms and conditions for copying, distributing or modifying the Program or works
based on it.
286

Licenses, Copyrights and Notices for Open Source Components
6. Each time you redistribute the Program (or any work based on the Program), the recipient
automatically receives a license from the original licensor to copy, distribute or modify the
Program subject to these terms and conditions. You may not impose any further restrictions on
the recipients' exercise of the rights granted herein. You are not responsible for enforcing
compliance by third parties to this License.
7. If, as a consequence of a court judgment or allegation of patent infringement or for any other
reason (not limited to patent issues), conditions are imposed on you (whether by court order,
agreement or otherwise) that contradict the conditions of this License, they do not excuse you
from the conditions of this License. If you cannot distribute so as to satisfy simultaneously your
obligations under this License and any other pertinent obligations, then as a consequence you may
not distribute the Program at all. For example, if a patent license would not permit royalty-free
redistribution of the Program by all those who receive copies directly or indirectly through you,
then the only way you could satisfy both it and this License would be to refrain entirely from
distribution of the Program.
If any portion of this section is held invalid or unenforceable under any particular circumstance,
the balance of the section is intended to apply and the section as a whole is intended to apply in
other circumstances.
It is not the purpose of this section to induce you to infringe any patents or other property right
claims or to contest validity of any such claims; this section has the sole purpose of protecting the
integrity of the free software distribution system, which is implemented by public license
practices. Many people have made generous contributions to the wide range of software
distributed through that system in reliance on consistent application of that system; it is up to the
author/donor to decide if he or she is willing to distribute software through any other system and a
licensee cannot impose that choice.
This section is intended to make thoroughly clear what is believed to be a consequence of the rest
of this License.
8. If the distribution and/or use of the Program is restricted in certain countries either by patents or
by copyrighted interfaces, the original copyright holder who places the Program under this License
may add an explicit geographical distribution limitation excluding those countries, so that
distribution is permitted only in or among countries not thus excluded. In such case, this License
incorporates the limitation as if written in the body of this License.
9. The Free Software Foundation may publish revised and/or new versions of the General Public
License from time to time. Such new versions will be similar in spirit to the present version, but
may differ in detail to address new problems or concerns.
Each version is given a distinguishing version number. If the Program specifies a version number
of this License which applies to it and "any later version", you have the option of following the
terms and conditions either of that version or of any later version published by the Free Software
Foundation. If the Program does not specify a version number of this License, you may choose
any version ever published by the Free Software Foundation.
10. If you wish to incorporate parts of the Program into other free programs whose distribution
conditions are different, write to the author to ask for permission. For software which is
copyrighted by the Free Software Foundation, write to the Free Software Foundation; we
sometimes make exceptions for this. Our decision will be guided by the two goals of preserving
the free status of all derivatives of our free software and of promoting the sharing and reuse of
software generally.
NO WARRANTY
287

HP MediaSmart Server User's Guide
11. BECAUSE THE PROGRAM IS LICENSED FREE OF CHARGE, THERE IS NO WARRANTY
FOR THE PROGRAM, TO THE EXTENT PERMITTED BY APPLICABLE LAW. EXCEPT
WHEN OTHERWISE STATED IN WRITING THE COPYRIGHT HOLDERS AND/OR
OTHER PARTIES PROVIDE THE PROGRAM "AS IS" WITHOUT WARRANTY OF ANY
KIND, EITHER EXPRESSED OR IMPLIED, INCLUDING, BUT NOT LIMITED TO, THE
IMPLIED WARRANTIES OF MERCHANTABILITY AND FITNESS FOR A PARTICULAR
PURPOSE. THE ENTIRE RISK AS TO THE QUALITY AND PERFORMANCE OF THE
PROGRAM IS WITH YOU. SHOULD THE PROGRAM PROVE DEFECTIVE, YOU
ASSUME THE COST OF ALL NECESSARY SERVICING, REPAIR OR CORRECTION.
12. IN NO EVENT UNLESS REQUIRED BY APPLICABLE LAW OR AGREED TO IN WRITING
WILL ANY COPYRIGHT HOLDER, OR ANY OTHER PARTY WHO MAY MODIFY
AND/OR REDISTRIBUTE THE PROGRAM AS PERMITTED ABOVE, BE LIABLE TO YOU
FOR DAMAGES, INCLUDING ANY GENERAL, SPECIAL, INCIDENTAL OR
CONSEQUENTIAL DAMAGES ARISING OUT OF THE USE OR INABILITY TO USE THE
PROGRAM (INCLUDING BUT NOT LIMITED TO LOSS OF DATA OR DATA BEING
RENDERED INACCURATE OR LOSSES SUSTAINED BY YOU OR THIRD PARTIES OR A
FAILURE OF THE PROGRAM TO OPERATE WITH ANY OTHER PROGRAMS), EVEN IF
SUCH HOLDER OR OTHER PARTY HAS BEEN ADVISED OF THE POSSIBILITY OF
SUCH DAMAGES.
END OF TERMS AND CONDITIONS
IMAGEMAGICK: COMPATIBLE WITH GPL
Before we get to the text of the license lets just review what the license says in simple terms:
It allows you to:
• freely download and use ImageMagick software, in whole or in part, for personal, company
internal, or commercial purposes;
• use ImageMagick software in packages or distributions that you create.
It forbids you to:
• redistribute any piece of ImageMagick-originated software without proper attribution;
• use any marks owned by ImageMagick Studio LLC in any way that might state or imply that
ImageMagick Studio LLC endorses your distribution;
• use any marks owned by ImageMagick Studio LLC in any way that might state or imply that you
created the ImageMagick software in question.
It requires you to:
• include a copy of the license in any redistribution you may make that includes ImageMagick
software;
• provide clear attribution to ImageMagick Studio LLC for any distributions that include
ImageMagick software.
It does not require you to:
288

Licenses, Copyrights and Notices for Open Source Components
• include the source of the ImageMagick software itself, or of any modifications you may have
made to it, in any redistribution you may assemble that includes it;
• submit changes that you make to the software back to the ImageMagick Studio LLC (though such
feedback is encouraged).
A few other clarifications include:
• ImageMagick is freely available without charge; you may include ImageMagick on a DVD as long
as you comply with the terms of the license;
• you can give modified code away for free or sell it under the terms of the ImageMagick license or
distribute the result under a different license, but you need to acknowledge the use of the
ImageMagick software;
• the license is compatible with the GPL.
The legally binding and authoritative terms and conditions for use, reproduction, and distribution
of ImageMagick follow:
Copyright 1999-2007 ImageMagick Studio LLC, a non-profit organization dedicated to making
software imaging solutions freely available.
1. Definitions.
License shall mean the terms and conditions for use, reproduction, and distribution as defined by
Sections 1 through 9 of this document.
Licensor shall mean the copyright owner or entity authorized by the copyright owner that is
granting the License.
Legal Entity shall mean the union of the acting entity and all other entities that control, are
controlled by, or are under common control with that entity. For the purposes of this definition,
control means (i) the power, direct or indirect, to cause the direction or management of such
entity, whether by contract or otherwise, or (ii) ownership of fifty percent (50%) or more of the
outstanding shares, or (iii) beneficial ownership of such entity.
You (or Your) shall mean an individual or Legal Entity exercising permissions granted by this
License.
Source form shall mean the preferred form for making modifications, including but not limited to
software source code, documentation source, and configuration files.
Object form shall mean any form resulting from mechanical transformation or translation of a
Source form, including but not limited to compiled object code, generated documentation, and
conversions to other media types.
Work shall mean the work of authorship, whether in Source or Object form, made available under
the License, as indicated by a copyright notice that is included in or attached to the work (an
example is provided in the Appendix below).
Derivative Works shall mean any work, whether in Source or Object form, that is based on (or
derived from) the Work and for which the editorial revisions, annotations, elaborations, or other
modifications represent, as a whole, an original work of authorship. For the purposes of this
License, Derivative Works shall not include works that remain separable from, or merely link (or
bind by name) to the interfaces of, the Work and Derivative Works thereof.
289

HP MediaSmart Server User's Guide
Contribution shall mean any work of authorship, including the original version of the Work and
any modifications or additions to that Work or Derivative Works thereof, that is intentionally
submitted to Licensor for inclusion in the Work by the copyright owner or by an individual or
Legal Entity authorized to submit on behalf of the copyright owner. For the purposes of this
definition, submitted means any form of electronic, verbal, or written communication intentionally
sent to the Licensor by its copyright holder or its representatives, including but not limited to
communication on electronic mailing lists, source code control systems, and issue tracking
systems that are managed by, or on behalf of, the Licensor for the purpose of discussing and
improving the Work, but excluding communication that is conspicuously marked or otherwise
designated in writing by the copyright owner as Not a Contribution.
Contributor shall mean Licensor and any individual or Legal Entity on behalf of whom a
Contribution has been received by Licensor and subsequently incorporated within the Work.
2. Grant of Copyright License. Subject to the terms and conditions of this License, each
Contributor hereby grants to You a perpetual, worldwide, non-exclusive, no-charge, royalty-free,
irrevocable copyright license to reproduce, prepare Derivative Works of, publicly display, publicly
perform, sublicense, and distribute the Work and such Derivative Works in Source or Object form.
3. Grant of Patent License. Subject to the terms and conditions of this License, each Contributor
hereby grants to You a perpetual, worldwide, non-exclusive, no-charge, royalty-free, irrevocable
patent license to make, have made, use, offer to sell, sell, import, and otherwise transfer the Work,
where such license applies only to those patent claims licensable by such Contributor that are
necessarily infringed by their Contribution(s) alone or by combination of their Contribution(s)
with the Work to which such Contribution(s) was submitted.
4. Redistribution. You may reproduce and distribute copies of the Work or Derivative Works
thereof in any medium, with or without modifications, and in Source or Object form, provided that
You meet the following conditions:
a. You must give any other recipients of the Work or Derivative Works a copy of this
License; and
b. You must cause any modified files to carry prominent notices stating that You changed
the files; and
c. You must retain, in the Source form of any Derivative Works that You distribute, all
copyright, patent, trademark, and attribution notices from the Source form of the Work,
excluding those notices that do not pertain to any part of the Derivative Works; and
d. If the Work includes a NOTICE text file as part of its distribution, then any Derivative
Works that You distribute must include a readable copy of the attribution notices
contained within such NOTICE file, excluding those notices that do not pertain to any
part of the Derivative Works, in at least one of the following places: within a NOTICE
text file distributed as part of the Derivative Works; within the Source form or
documentation, if provided along with the Derivative Works; or, within a display
generated by the Derivative Works, if and wherever such third-party notices normally
appear. The contents of the NOTICE file are for informational purposes only and do not
modify the License. You may add Your own attribution notices within Derivative Works
that You distribute, alongside or as an addendum to the NOTICE text from the Work,
provided that such additional attribution notices cannot be construed as modifying the
License.
You may add Your own copyright statement to Your modifications and may provide additional or
different license terms and conditions for use, reproduction, or distribution of Your modifications,
or for any such Derivative Works as a whole, provided Your use, reproduction, and distribution of
the Work otherwise complies with the conditions stated in this License.
290

Licenses, Copyrights and Notices for Open Source Components
5. Submission of Contributions. Unless You explicitly state otherwise, any Contribution
intentionally submitted for inclusion in the Work by You to the Licensor shall be under the terms
and conditions of this License, without any additional terms or conditions. Notwithstanding the
above, nothing herein shall supersede or modify the terms of any separate license agreement you
may have executed with Licensor regarding such Contributions.
6. Trademarks. This License does not grant permission to use the trade names, trademarks, service
marks, or product names of the Licensor, except as required for reasonable and customary use in
describing the origin of the Work and reproducing the content of the NOTICE file.
7. Disclaimer of Warranty. Unless required by applicable law or agreed to in writing, Licensor
provides the Work (and each Contributor provides its Contributions) on an AS IS BASIS,
WITHOUT WARRANTIES OR CONDITIONS OF ANY KIND, either express or implied,
including, without limitation, any warranties or conditions of TITLE, NON-INFRINGEMENT,
MERCHANTABILITY, or FITNESS FOR A PARTICULAR PURPOSE. You are solely
responsible for determining the appropriateness of using or redistributing the Work and assume
any risks associated with Your exercise of permissions under this License.
8. Limitation of Liability. In no event and under no legal theory, whether in tort (including
negligence), contract, or otherwise, unless required by applicable law (such as deliberate and
grossly negligent acts) or agreed to in writing, shall any Contributor be liable to You for damages,
including any direct, indirect, special, incidental, or consequential damages of any character
arising as a result of this License or out of the use or inability to use the Work (including but not
limited to damages for loss of goodwill, work stoppage, computer failure or malfunction, or any
and all other commercial damages or losses), even if such Contributor has been advised of the
possibility of such damages.
9. Accepting Warranty or Additional Liability. While redistributing the Work or Derivative
Works thereof, You may choose to offer, and charge a fee for, acceptance of support, warranty,
indemnity, or other liability obligations and/or rights consistent with this License.
MISCUTIL.DLL: MISCUTIL
"Miscellaneous Utility Library" Software License
Version 1.0
Copyright (c) 2004-2006 Jon Skeet. All rights reserved.
Redistribution and use in source and binary forms, with or without modification, are permitted
provided that the following conditions are met:
1. Redistributions of source code must retain the above copyright notice, this list of conditions and
the following disclaimer.
2. Redistributions in binary form must reproduce the above copyright notice, this list of conditions
and the following disclaimer in the documentation and/or other materials provided with the
distribution.
3. The end-user documentation included with the redistribution, if any, must include the following
acknowledgment:
"This product includes software developed by Jon Skeet (skeet@pobox.com,
http://www.pobox.com/~skeet/)."
291

HP MediaSmart Server User's Guide
Alternately, this acknowledgment may appear in the software itself, if and wherever such third-
party acknowledgments normally appear.
4. The name "Miscellaneous Utility Library" must not be used to endorse or promote products
derived from this software without prior written permission. For written permission, please
contact skeet@pobox.com.
5. Products derived from this software may not be called "Miscellaneous Utility Library", nor may
"Miscellaneous Utility Library" appear in their name, without prior written permission of Jon
Skeet.
THIS SOFTWARE IS PROVIDED "AS IS" AND ANY EXPRESSED OR IMPLIED
WARRANTIES, INCLUDING, BUT NOT LIMITED TO, THE IMPLIED WARRANTIES OF
MERCHANTABILITY AND FITNESS FOR A PARTICULAR PURPOSE ARE DISCLAIMED.
IN NO EVENT SHALL JON SKEET BE LIABLE FOR ANY DIRECT, INDIRECT,
INCIDENTAL, SPECIAL, EXEMPLARY, OR CONSEQUENTIAL DAMAGES (INCLUDING,
BUT NOT LIMITED TO, PROCUREMENT OF SUBSTITUTE GOODS OR SERVICES; LOSS
OF USE, DATA, OR PROFITS; OR BUSINESS INTERRUPTION) HOWEVER CAUSED AND
ON ANY THEORY OF LIABILITY, WHETHER IN CONTRACT, STRICT LIABILITY, OR
TORT (INCLUDING NEGLIGENCE OR OTHERWISE) ARISING IN ANY WAY OUT OF
THE USE OF THIS SOFTWARE, EVEN IF ADVISED OF THE POSSIBILITY OF SUCH
DAMAGE.
SAMPLE CODE: WPF CALCULATOR
http://clraddins.codeplex.com/Release/ProjectReleases.aspx?ReleaseId=9454
Release Notes
This sample demonstrates how AppDomain isolated add-ins can contribute directly to the host's
UI using WPF. This sample was originally posted on our team blog
(http://blogs.msdn.com/clraddins/archive/2007/08/06/appdomain-isolated-wpf-add-ins-jesse-
kaplan.aspx) and has been updated to work on v3.5 RTM.
Released: Jan 10 2008
Updated: Jan 10 2008 by Jesse Kaplan
(http://www.codeplex.com/site/users/view/JesseKaplan)
Dev status: -not yet defined by owner-
Rated: No ratings yet for this release
Reviewed: 0 reviews
Downloaded: 2331 downloads
Wiki link: [release:9454]
LIBSMBCLIENT.DYLIB FROM SAMBA 3.0.38 GPLV2
GNU GENERAL PUBLIC LICENSE
Version 2, June 1991
292

Licenses, Copyrights and Notices for Open Source Components
Copyright (C) 1989, 1991 Free Software Foundation, Inc.
51 Franklin Street, Fifth Floor, Boston, MA 02110-1301, USA
Everyone is permitted to copy and distribute verbatim copies of this license document, but
changing it is not allowed.
Preamble
The licenses for most software are designed to take away your freedom to share and change it. By
contrast, the GNU General Public License is intended to guarantee your freedom to share and
change free software--to make sure the software is free for all its users. This General Public
License applies to most of the Free Software Foundation's software and to any other program
whose authors commit to using it. (Some other Free Software Foundation software is covered by
the GNU Lesser General Public License instead.) You can apply it to your programs, too.
When we speak of free software, we are referring to freedom, not price. Our General Public
Licenses are designed to make sure that you have the freedom to distribute copies of free software
(and charge for this service if you wish), that you receive source code or can get it if you want it,
that you can change the software or use pieces of it in new free programs; and that you know you
can do these things.
To protect your rights, we need to make restrictions that forbid anyone to deny you these rights or
to ask you to surrender the rights. These restrictions translate to certain responsibilities for you if
you distribute copies of the software, or if you modify it.
For example, if you distribute copies of such a program, whether gratis or for a fee, you must give
the recipients all the rights that you have. You must make sure that they, too, receive or can get the
source code. And you must show them these terms so they know their rights.
We protect your rights with two steps: (1) copyright the software, and (2) offer you this license
which gives you legal permission to copy, distribute and/or modify the software.
Also, for each author's protection and ours, we want to make certain that everyone understands
that there is no warranty for this free software. If the software is modified by someone else and
passed on, we want its recipients to know that what they have is not the original, so that any
problems introduced by others will not reflect on the original authors' reputations.
Finally, any free program is threatened constantly by software patents. We wish to avoid the
danger that redistributors of a free program will individually obtain patent licenses, in effect
making the program proprietary. To prevent this, we have made it clear that any patent must be
licensed for everyone's free use or not licensed at all.
The precise terms and conditions for copying, distribution and modification follow.
TERMS AND CONDITIONS FOR COPYING, DISTRIBUTION AND
MODIFICATION
1. This License applies to any program or other work which contains a notice placed by the copyright
holder saying it may be distributed under the terms of this General Public License. The "Program",
below, refers to any such program or work, and a "work based on the Program" means either the
Program or any derivative work under copyright law: that is to say, a work containing the Program
or a portion of it, either verbatim or with modifications and/or translated into another language.
(Hereinafter, translation is included without limitation in the term "modification".) Each licensee
is addressed as "you".
293

HP MediaSmart Server User's Guide
Activities other than copying, distribution and modification are not covered by this License; they
are outside its scope. The act of running the Program is not restricted, and the output from the
Program is covered only if its contents constitute a work based on the Program (independent of
having been made by running the Program). Whether that is true depends on what the Program
does.
2. You may copy and distribute verbatim copies of the Program's source code as you receive it, in
any medium, provided that you conspicuously and appropriately publish on each copy an
appropriate copyright notice and disclaimer of warranty; keep intact all the notices that refer to
this License and to the absence of any warranty; and give any other recipients of the Program a
copy of this License along with the Program.
You may charge a fee for the physical act of transferring a copy, and you may at your option offer
warranty protection in exchange for a fee.
3. You may modify your copy or copies of the Program or any portion of it, thus forming a work
based on the Program, and copy and distribute such modifications or work under the terms of
Section 1 above, provided that you also meet all of these conditions:
a. You must cause the modified files to carry prominent notices stating that you changed the
files and the date of any change.
b. You must cause any work that you distribute or publish, that in whole or in part contains
or is derived from the Program or any part thereof, to be licensed as a whole at no charge
to all third parties under the terms of this License.
c. If the modified program normally reads commands interactively when run, you must
cause it, when started running for such interactive use in the most ordinary way, to print
or display an announcement including an appropriate copyright notice and a notice that
there is no warranty (or else, saying that you provide a warranty) and that users may
redistribute the program under these conditions, and telling the user how to view a copy
of this License. (Exception: if the Program itself is interactive but does not normally print
such an announcement, your work based on the Program is not required to print an
announcement.)
These requirements apply to the modified work as a whole. If identifiable sections of that
work are not derived from the Program, and can be reasonably considered independent
and separate works in themselves, then this License, and its terms, do not apply to those
sections when you distribute them as separate works. But when you distribute the same
sections as part of a whole which is a work based on the Program, the distribution of the
whole must be on the terms of this License, whose permissions for other licensees extend
to the entire whole, and thus to each and every part regardless of who wrote it.
Thus, it is not the intent of this section to claim rights or contest your rights to work
written entirely by you; rather, the intent is to exercise the right to control the distribution
of derivative or collective works based on the Program.
In addition, mere aggregation of another work not based on the Program with the
Program (or with a work based on the Program) on a volume of a storage or distribution
medium does not bring the other work under the scope of this License.
4. You may copy and distribute the Program (or a work based on it, under Section 2) in object code
or executable form under the terms of Sections 1 and 2 above provided that you also do one of the
following:
294

Licenses, Copyrights and Notices for Open Source Components
a. Accompany it with the complete corresponding machine-readable source code, which
must be distributed under the terms of Sections 1 and 2 above on a medium customarily
used for software interchange; or,
b. Accompany it with a written offer, valid for at least three years, to give any third party,
for a charge no more than your cost of physically performing source distribution, a
complete machine-readable copy of the corresponding source code, to be distributed
under the terms of Sections 1 and 2 above on a medium customarily used for software
interchange; or,
c. Accompany it with the information you received as to the offer to distribute
corresponding source code. (This alternative is allowed only for noncommercial
distribution and only if you received the program in object code or executable form with
such an offer, in accord with Subsection b above.)
The source code for a work means the preferred form of the work for making
modifications to it. For an executable work, complete source code means all the source
code for all modules it contains, plus any associated interface definition files, plus the
scripts used to control compilation and installation of the executable. However, as a
special exception, the source code distributed need not include anything that is normally
distributed (in either source or binary form) with the major components (compiler, kernel,
and so on) of the operating system on which the executable runs, unless that component
itself accompanies the executable.
If distribution of executable or object code is made by offering access to copy from a
designated place, then offering equivalent access to copy the source code from the same
place counts as distribution of the source code, even though third parties are not
compelled to copy the source along with the object code.
5. You may not copy, modify, sublicense, or distribute the Program except as expressly provided
under this License. Any attempt otherwise to copy, modify, sublicense or distribute the Program is
void, and will automatically terminate your rights under this License. However, parties who have
received copies, or rights, from you under this License will not have their licenses terminated so
long as such parties remain in full compliance.
6. You are not required to accept this License, since you have not signed it. However, nothing else
grants you permission to modify or distribute the Program or its derivative works. These actions
are prohibited by law if you do not accept this License. Therefore, by modifying or distributing the
Program (or any work based on the Program), you indicate your acceptance of this License to do
so, and all its terms and conditions for copying, distributing or modifying the Program or works
based on it.
7. Each time you redistribute the Program (or any work based on the Program), the recipient
automatically receives a license from the original licensor to copy, distribute or modify the
Program subject to these terms and conditions. You may not impose any further restrictions on the
recipients' exercise of the rights granted herein. You are not responsible for enforcing compliance
by third parties to this License.
8. If, as a consequence of a court judgment or allegation of patent infringement or for any other
reason (not limited to patent issues), conditions are imposed on you (whether by court order,
agreement or otherwise) that contradict the conditions of this License, they do not excuse you
from the conditions of this License. If you cannot distribute so as to satisfy simultaneously your
obligations under this License and any other pertinent obligations, then as a consequence you may
not distribute the Program at all. For example, if a patent license would not permit royalty-free
redistribution of the Program by all those who receive copies directly or indirectly through you,
then the only way you could satisfy both it and this License would be to refrain entirely from
distribution of the Program.
295

HP MediaSmart Server User's Guide
If any portion of this section is held invalid or unenforceable under any particular circumstance,
the balance of the section is intended to apply and the section as a whole is intended to apply in
other circumstances.
It is not the purpose of this section to induce you to infringe any patents or other property right
claims or to contest validity of any such claims; this section has the sole purpose of protecting the
integrity of the free software distribution system, which is implemented by public license
practices. Many people have made generous contributions to the wide range of software
distributed through that system in reliance on consistent application of that system; it is up to the
author/donor to decide if he or she is willing to distribute software through any other system and a
licensee cannot impose that choice.
This section is intended to make thoroughly clear what is believed to be a consequence of the rest
of this License.
9. If the distribution and/or use of the Program is restricted in certain countries either by patents or
by copyrighted interfaces, the original copyright holder who places the Program under this License
may add an explicit geographical distribution limitation excluding those countries, so that
distribution is permitted only in or among countries not thus excluded. In such case, this License
incorporates the limitation as if written in the body of this License.
10. The Free Software Foundation may publish revised and/or new versions of the General Public
License from time to time. Such new versions will be similar in spirit to the present version, but
may differ in detail to address new problems or concerns.
Each version is given a distinguishing version number. If the Program specifies a version number
of this License which applies to it and "any later version", you have the option of following the
terms and conditions either of that version or of any later version published by the Free Software
Foundation. If the Program does not specify a version number of this License, you may choose
any version ever published by the Free Software Foundation.
11. If you wish to incorporate parts of the Program into other free programs whose distribution
conditions are different, write to the author to ask for permission. For software which is
copyrighted by the Free Software Foundation, write to the Free Software Foundation; we
sometimes make exceptions for this. Our decision will be guided by the two goals of preserving
the free status of all derivatives of our free software and of promoting the sharing and reuse of
software generally.
NO WARRANTY
11. BECAUSE THE PROGRAM IS LICENSED FREE OF CHARGE, THERE IS NO WARRANTY
FOR THE PROGRAM, TO THE EXTENT PERMITTED BY APPLICABLE LAW. EXCEPT
WHEN OTHERWISE STATED IN WRITING THE COPYRIGHT HOLDERS AND/OR
OTHER PARTIES PROVIDE THE PROGRAM "AS IS" WITHOUT WARRANTY OF ANY
KIND, EITHER EXPRESSED OR IMPLIED, INCLUDING, BUT NOT LIMITED TO, THE
IMPLIED WARRANTIES OF MERCHANTABILITY AND FITNESS FOR A PARTICULAR
PURPOSE. THE ENTIRE RISK AS TO THE QUALITY AND PERFORMANCE OF THE
PROGRAM IS WITH YOU. SHOULD THE PROGRAM PROVE DEFECTIVE, YOU ASSUME
THE COST OF ALL NECESSARY SERVICING, REPAIR OR CORRECTION.
12. IN NO EVENT UNLESS REQUIRED BY APPLICABLE LAW OR AGREED TO IN WRITING
WILL ANY COPYRIGHT HOLDER, OR ANY OTHER PARTY WHO MAY MODIFY
AND/OR REDISTRIBUTE THE PROGRAM AS PERMITTED ABOVE, BE LIABLE TO YOU
FOR DAMAGES, INCLUDING ANY GENERAL, SPECIAL, INCIDENTAL OR
CONSEQUENTIAL DAMAGES ARISING OUT OF THE USE OR INABILITY TO USE THE
296

Licenses, Copyrights and Notices for Open Source Components
PROGRAM (INCLUDING BUT NOT LIMITED TO LOSS OF DATA OR DATA BEING
RENDERED INACCURATE OR LOSSES SUSTAINED BY YOU OR THIRD PARTIES OR A
FAILURE OF THE PROGRAM TO OPERATE WITH ANY OTHER PROGRAMS), EVEN IF
SUCH HOLDER OR OTHER PARTY HAS BEEN ADVISED OF THE POSSIBILITY OF
SUCH DAMAGES.
SQLITE-DOTNET2: PUBLIC DOMAIN LICENSE
The Artistic License
Preamble
The intent of this document is to state the conditions under which a Package may be copied, such
that the Copyright Holder maintains some semblance of artistic control over the development of
the package, while giving the users of the package the right to use and distribute the Package in a
more-or-less customary fashion, plus the right to make reasonable modifications.
Definitions:
"Package" refers to the collection of files distributed by the Copyright Holder, and derivatives of
that collection of files created through textual modification.
"Standard Version" refers to such a Package if it has not been modified, or has been modified in
accordance with the wishes of the Copyright Holder.
"Copyright Holder" is whoever is named in the copyright or copyrights for the package.
"You" is you, if you're thinking about copying or distributing this Package.
"Reasonable copying fee" is whatever you can justify on the basis of media cost, duplication
charges, time of people involved, and so on. (You will not be required to justify it to the Copyright
Holder, but only to the computing community at large as a market that must bear the fee.)
"Freely Available" means that no fee is charged for the item itself, though there may be fees
involved in handling the item. It also means that recipients of the item may redistribute it under
the same conditions they received it.
1. You may make and give away verbatim copies of the source form of the Standard Version of this
Package without restriction, provided that you duplicate all of the original copyright notices and
associated disclaimers.
2. You may apply bug fixes, portability fixes and other modifications derived from the Public
Domain or from the Copyright Holder. A Package modified in such a way shall still be considered
the Standard Version.
3. You may otherwise modify your copy of this Package in any way, provided that you insert a
prominent notice in each changed file stating how and when you changed that file, and provided
that you do at least ONE of the following:
a. place your modifications in the Public Domain or otherwise make them Freely Available,
such as by posting said modifications to Usenet or an equivalent medium, or placing the
modifications on a major archive site such as ftp.uu.net, or by allowing the Copyright
Holder to include your modifications in the Standard Version of the Package.
b. use the modified Package only within your corporation or organization.
297

HP MediaSmart Server User's Guide
c. rename any non-standard executables so the names do not conflict with standard
executables, which must also be provided, and provide a separate manual page for each
non-standard executable that clearly documents how it differs from the Standard Version.
d. make other distribution arrangements with the Copyright Holder.
4. You may distribute the programs of this Package in object code or executable form, provided that
you do at least ONE of the following:
a. distribute a Standard Version of the executables and library files, together with
instructions (in the manual page or equivalent) on where to get the Standard Version.
b. accompany the distribution with the machine-readable source of the Package with your
modifications.
TFTPD32 ARTISTIC LICENSE
SQLite is in the public domain.
(http://en.wikipedia.org/wiki/Public_Domain)
All of the deliverable code in SQLite has been dedicated to the public domain by the authors. All
code authors, and representatives of the companies they work for, have signed affidavits
dedicating their contributions to the public domain (http://en.wikipedia.org/wiki/Public_Domain)
and originals of those signed affidavits are stored in a firesafe at the main offices of Hwaci
(http://www.hwaci.com/). Anyone is free to copy, modify, publish, use, compile, sell, or distribute
the original SQLite code, either in source code form or as a compiled binary, for any purpose,
commercial or non-commercial, and by any means.
The previous paragraph applies to the deliverable code in SQLite - those parts of the SQLite
library that you actually bundle and ship with a larger application. Portions of the documentation
and some code used as part of the build process might fall under other licenses. The details here
are unclear. We do not worry about the licensing of the documentation and build code so much
because none of these things are part of the core deliverable SQLite library.
All of the deliverable code in SQLite has been written from scratch. No code has been taken from
other projects or from the open internet. Every line of code can be traced back to its original
author, and all of those authors have public domain dedications on file. So the SQLite code base is
clean and is uncontaminated with licensed code from other projects.
298

Licenses, Copyrights and Notices for Open Source Components
PACKETVIDEO
Yahoo ASTRA Components for Flash: BSD License
Software License Agreement
The copyrights to the software code or designs (i.e., excluding any logos or trademarks or service
marks of Yahoo! Inc.) written by Yahoo! are licensed under the following terms:
Copyright (c) 2008, Yahoo! Inc. All rights reserved.
Redistribution and use of this software in source and binary forms, with or without modification,
are permitted provided that the following conditions are met:
• Redistributions of source code must retain the above copyright notice, this list of conditions and
the following disclaimer.
• Redistributions in binary form must reproduce the above copyright notice, this list of conditions
and the following disclaimer in the documentation and/or other materials provided with the
distribution.
• Neither the name of Yahoo! Inc. nor the names of its contributors may be used to endorse or
promote products derived from this software without specific prior written permission of Yahoo!
Inc.
THIS SOFTWARE IS PROVIDED BY THE COPYRIGHT HOLDERS AND CONTRIBUTORS
"AS IS" AND ANY EXPRESS OR IMPLIED WARRANTIES, INCLUDING, BUT NOT
LIMITED TO, THE IMPLIED WARRANTIES OF MERCHANTABILITY AND FITNESS FOR
A PARTICULAR PURPOSE ARE DISCLAIMED. IN NO EVENT SHALL THE COPYRIGHT
OWNER OR CONTRIBUTORS BE LIABLE FOR ANY DIRECT, INDIRECT, INCIDENTAL,
SPECIAL, EXEMPLARY, OR CONSEQUENTIAL DAMAGES (INCLUDING, BUT NOT
LIMITED TO, PROCUREMENT OF SUBSTITUTE GOODS OR SERVICES; LOSS OF USE,
DATA, OR PROFITS; OR BUSINESS INTERRUPTION) HOWEVER CAUSED AND ON
ANY THEORY OF LIABILITY, WHETHER IN CONTRACT, STRICT LIABILITY, OR TORT
(INCLUDING NEGLIGENCE OR OTHERWISE) ARISING IN ANY WAY OUT OF THE USE
OF THIS SOFTWARE, EVEN IF ADVISED OF THE POSSIBILITY OF SUCH DAMAGE.
This also code contains software from the following sources, and licensed under the following
terms:
In Charts:
DynamicRegistration. Copyright (c) 2003 Darron Schall (according to author, based on Robert
Penner's (www.robertpenner.com) ActionScript 1 implementation); modified by Yahoo! Inc. for
ActionScript 3 implementation)
Redistribution and use in source and binary forms, with or without modification, are permitted
provided that the following conditions are met:
1. Redistributions of source code must retain the above copyright notice, this list of conditions and
the following disclaimer.
299

HP MediaSmart Server User's Guide
2. Redistributions in binary form must reproduce the above copyright notice, this list of conditions
and the following disclaimer in the documentation and/or other materials provided with the
distribution.
3. The name of the author may not be used to endorse or promote products derived from this
software without specific prior written permission.
THIS SOFTWARE IS PROVIDED BY THE AUTHOR "AS IS" AND ANY EXPRESS OR
IMPLIED WARRANTIES, INCLUDING, BUT NOT LIMITED TO, THE IMPLIED
WARRANTIES OF MERCHANTABILITY AND FITNESS FOR A PARTICULAR PURPOSE
ARE DISCLAIMED. IN NO EVENT SHALL THE AUTHOR BE LIABLE FOR ANY DIRECT,
INDIRECT, INCIDENTAL, SPECIAL, EXEMPLARY, OR CONSEQUENTIAL DAMAGES
(INCLUDING, BUT NOT LIMITED TO, PROCUREMENT OF SUBSTITUTE GOODS OR
SERVICES; LOSS OF USE, DATA, OR PROFITS; OR BUSINESS INTERRUPTION)
HOWEVER CAUSED AND ON ANY THEORY OF LIABILITY, WHETHER IN CONTRACT,
STRICT LIABILITY, OR TORT (INCLUDING NEGLIGENCE OR OTHERWISE) ARISING
IN ANY WAY OUT OF THE USE OF THIS SOFTWARE, EVEN IF ADVISED OF THE
POSSIBILITY OF SUCH DAMAGE.
In Charts:
Modified version of mc.drawWedge prototype by Ric Ewing (ric@formequalsfunction.com) -
version 1.3 - 6.12.2002
• Thanks to: Robert Penner, Eric Mueller and Michael Hurwicz for their contributions.
• Source: http://www.adobe.com/devnet/flash/articles/adv_draw_methods.html (code is "free to use
as you see fit. They are free of charge or obligation. I have endeavored to make these methods
robust and useful, however I can make no guarantees about their suitability to your specific needs.
I similarly make no guarantees that they are bug or problem free: caveat emptor.")
In Layout Utility and Layout Containers:
PercentageSizeUtil
The Initial Developer of the Original Code is Adobe Systems Incorporated (see original files for
appropriate copyright notices)
Contributor(s): Yahoo! Inc.
Mozilla Public License Version 1.1
1. Definitions.
1.0.1. "Commercial Use"
means distribution or otherwise making the Covered Code available to a third party.
1.1. "Contributor"
means each entity that creates or contributes to the creation of Modifications.
1.2. "Contributor Version"
300

Licenses, Copyrights and Notices for Open Source Components
means the combination of the Original Code, prior Modifications used by a Contributor, and the
Modifications made by that particular Contributor.
1.3. "Covered Code"
means the Original Code or Modifications or the combination of the Original Code and
Modifications, in each case including portions thereof.
1.4. "Electronic Distribution Mechanism"
means a mechanism generally accepted in the software development community for the electronic
transfer of data.
1.5. "Executable"
means Covered Code in any form other than Source Code.
1.6. "Initial Developer"
means the individual or entity identified as the Initial Developer in the Source Code notice
required by Exhibit A.
1.7. "Larger Work"
means a work which combines Covered Code or portions thereof with code not governed by the
terms of this License.
1.8. "License"
means this document.
1.8.1. "Licensable"
means having the right to grant, to the maximum extent possible, whether at the time of the initial
grant or subsequently acquired, any and all of the rights conveyed herein.
1.9. "Modifications"
means any addition to or deletion from the substance or structure of either the Original Code or
any previous Modifications. When Covered Code is released as a series of files, a Modification is:
Any addition to or deletion from the contents of a file containing Original Code or previous
Modifications.
Any new file that contains any part of the Original Code or previous Modifications.
1.10. "Original Code"
means Source Code of computer software code which is described in the Source Code notice
required by Exhibit A as Original Code, and which, at the time of its release under this License is
not already Covered Code governed by this License.
1.10.1. "Patent Claims"
means any patent claim(s), now owned or hereafter acquired, including without limitation,
method, process, and apparatus claims, in any patent Licensable by grantor.
1.11. "Source Code"
301

HP MediaSmart Server User's Guide
means the preferred form of the Covered Code for making modifications to it, including all
modules it contains, plus any associated interface definition files, scripts used to control
compilation and installation of an Executable, or source code differential comparisons against
either the Original Code or another well known, available Covered Code of the Contributor's
choice. The Source Code can be in a compressed or archival form, provided the appropriate
decompression or de-archiving software is widely available for no charge.
1.12. "You" (or "Your")
means an individual or a legal entity exercising rights under, and complying with all of the terms
of, this License or a future version of this License issued under Section 6.1. For legal entities,
"You" includes any entity which controls, is controlled by, or is under common control with You.
For purposes of this definition, "control" means (a) the power, direct or indirect, to cause the
direction or management of such entity, whether by contract or otherwise, or (b) ownership of
more than fifty percent (50%) of the outstanding shares or beneficial ownership of such entity.
2. Source Code License.
2.1. The Initial Developer Grant.
The Initial Developer hereby grants You a world-wide, royalty-free, non-exclusive license, subject
to third party intellectual property claims:
a. under intellectual property rights (other than patent or trademark) Licensable by Initial Developer
to use, reproduce, modify, display, perform, sublicense and distribute the Original Code (or
portions thereof) with or without Modifications, and/or as part of a Larger Work; and
b. under Patents Claims infringed by the making, using or selling of Original Code, to make, have
made, use, practice, sell, and offer for sale, and/or otherwise dispose of the Original Code (or
portions thereof).
c. the licenses granted in this Section 2.1 (a) and (b) are effective on the date Initial Developer first
distributes Original Code under the terms of this License.
d. Notwithstanding Section 2.1 (b) above, no patent license is granted: 1) for code that You delete
from the Original Code; 2) separate from the Original Code; or 3) for infringements caused by: i)
the modification of the Original Code or ii) the combination of the Original Code with other
software or devices.
2.2. Contributor Grant.
Subject to third party intellectual property claims, each Contributor hereby grants You a world-
wide, royalty-free, non-exclusive license
a. under intellectual property rights (other than patent or trademark) Licensable by Contributor, to
use, reproduce, modify, display, perform, sublicense and distribute the Modifications created by
such Contributor (or portions thereof) either on an unmodified basis, with other Modifications, as
Covered Code and/or as part of a Larger Work; and
b. under Patent Claims infringed by the making, using, or selling of Modifications made by that
Contributor either alone and/or in combination with its Contributor Version (or portions of such
combination), to make, use, sell, offer for sale, have made, and/or otherwise dispose of: 1)
Modifications made by that Contributor (or portions thereof); and 2) the combination of
Modifications made by that Contributor with its Contributor Version (or portions of such
combination).
302

Licenses, Copyrights and Notices for Open Source Components
c. the licenses granted in Sections 2.2 (a) and 2.2 (b) are effective on the date Contributor first makes
Commercial Use of the Covered Code.
d. Notwithstanding Section 2.2 (b) above, no patent license is granted: 1) for any code that
Contributor has deleted from the Contributor Version; 2) separate from the Contributor Version;
3) for infringements caused by: i) third party modifications of Contributor Version or ii) the
combination of Modifications made by that Contributor with other software (except as part of the
Contributor Version) or other devices; or 4) under Patent Claims infringed by Covered Code in the
absence of Modifications made by that Contributor.
3. Distribution Obligations.
3.1. Application of License.
The Modifications which You create or to which You contribute are governed by the terms of this
License, including without limitation Section 2.2. The Source Code version of Covered Code may
be distributed only under the terms of this License or a future version of this License released
under Section 6.1, and You must include a copy of this License with every copy of the Source
Code You distribute. You may not offer or impose any terms on any Source Code version that
alters or restricts the applicable version of this License or the recipients' rights hereunder.
However, You may include an additional document offering the additional rights described in
Section 3.5.
3.2. Availability of Source Code.
Any Modification which You create or to which You contribute must be made available in Source
Code form under the terms of this License either on the same media as an Executable version or
via an accepted Electronic Distribution Mechanism to anyone to whom you made an Executable
version available; and if made available via Electronic Distribution Mechanism, must remain
available for at least twelve (12) months after the date it initially became available, or at least six
(6) months after a subsequent version of that particular Modification has been made available to
such recipients. You are responsible for ensuring that the Source Code version remains available
even if the Electronic Distribution Mechanism is maintained by a third party.
3.3. Description of Modifications.
You must cause all Covered Code to which You contribute to contain a file documenting the
changes You made to create that Covered Code and the date of any change. You must include a
prominent statement that the Modification is derived, directly or indirectly, from Original Code
provided by the Initial Developer and including the name of the Initial Developer in (a) the Source
Code, and (b) in any notice in an Executable version or related documentation in which You
describe the origin or ownership of the Covered Code.
3.4. Intellectual Property Matters
(a) Third Party Claims
If Contributor has knowledge that a license under a third party's intellectual property rights is
required to exercise the rights granted by such Contributor under Sections 2.1 or 2.2, Contributor
must include a text file with the Source Code distribution titled "LEGAL" which describes the
claim and the party making the claim in sufficient detail that a recipient will know whom to
contact. If Contributor obtains such knowledge after the Modification is made available as
described in Section 3.2, Contributor shall promptly modify the LEGAL file in all copies
Contributor makes available thereafter and shall take other steps (such as notifying appropriate
mailing lists or newsgroups) reasonably calculated to inform those who received the Covered
Code that new knowledge has been obtained.
303

HP MediaSmart Server User's Guide
(b) Contributor APIs
If Contributor's Modifications include an application programming interface and Contributor has
knowledge of patent licenses which are reasonably necessary to implement that API, Contributor
must also include this information in the legal file.
(c) Representations.
Contributor represents that, except as disclosed pursuant to Section 3.4 (a) above, Contributor
believes that Contributor's Modifications are Contributor's original creation(s) and/or Contributor
has sufficient rights to grant the rights conveyed by this License.
3.5. Required Notices.
You must duplicate the notice in Exhibit A in each file of the Source Code. If it is not possible to
put such notice in a particular Source Code file due to its structure, then You must include such
notice in a location (such as a relevant directory) where a user would be likely to look for such a
notice. If You created one or more Modification(s) You may add your name as a Contributor to
the notice described in Exhibit A. You must also duplicate this License in any documentation for
the Source Code where You describe recipients' rights or ownership rights relating to Covered
Code. You may choose to offer, and to charge a fee for, warranty, support, indemnity or liability
obligations to one or more recipients of Covered Code. However, You may do so only on Your
own behalf, and not on behalf of the Initial Developer or any Contributor. You must make it
absolutely clear than any such warranty, support, indemnity or liability obligation is offered by
You alone, and You hereby agree to indemnify the Initial Developer and every Contributor for any
liability incurred by the Initial Developer or such Contributor as a result of warranty, support,
indemnity or liability terms You offer.
3.6. Distribution of Executable Versions.
You may distribute Covered Code in Executable form only if the requirements of Sections 3.1,
3.2, 3.3, 3.4 and 3.5 have been met for that Covered Code, and if You include a notice stating that
the Source Code version of the Covered Code is available under the terms of this License,
including a description of how and where You have fulfilled the obligations of Section 3.2. The
notice must be conspicuously included in any notice in an Executable version, related
documentation or collateral in which You describe recipients' rights relating to the Covered Code.
You may distribute the Executable version of Covered Code or ownership rights under a license of
Your choice, which may contain terms different from this License, provided that You are in
compliance with the terms of this License and that the license for the Executable version does not
attempt to limit or alter the recipient's rights in the Source Code version from the rights set forth in
this License. If You distribute the Executable version under a different license You must make it
absolutely clear that any terms which differ from this License are offered by You alone, not by the
Initial Developer or any Contributor. You hereby agree to indemnify the Initial Developer and
every Contributor for any liability incurred by the Initial Developer or such Contributor as a result
of any such terms You offer.
3.7. Larger Works.
You may create a Larger Work by combining Covered Code with other code not governed by the
terms of this License and distribute the Larger Work as a single product. In such a case, You must
make sure the requirements of this License are fulfilled for the Covered Code.
4. Inability to Comply Due to Statute or Regulation.
If it is impossible for You to comply with any of the terms of this License with respect to some or
all of the Covered Code due to statute, judicial order, or regulation then You must: (a) comply
with the terms of this License to the maximum extent possible; and (b) describe the limitations and
304

Licenses, Copyrights and Notices for Open Source Components
the code they affect. Such description must be included in the legal file described in Section 3.4
and must be included with all distributions of the Source Code. Except to the extent prohibited by
statute or regulation, such description must be sufficiently detailed for a recipient of ordinary skill
to be able to understand it.
5. Application of this License.
This License applies to code to which the Initial Developer has attached the notice in Exhibit A
and to related Covered Code.
6. Versions of the License.
6.1. New Versions
Netscape Communications Corporation ("Netscape") may publish revised and/or new versions of
the License from time to time. Each version will be given a distinguishing version number.
6.2. Effect of New Versions
Once Covered Code has been published under a particular version of the License, You may always
continue to use it under the terms of that version. You may also choose to use such Covered Code
under the terms of any subsequent version of the License published by Netscape. No one other
than Netscape has the right to modify the terms applicable to Covered Code created under this
License.
6.3. Derivative Works
If You create or use a modified version of this License (which you may only do in order to apply it
to code which is not already Covered Code governed by this License), You must (a) rename Your
license so that the phrases "Mozilla", "MOZILLAPL", "MOZPL", "Netscape", "MPL", "NPL" or
any confusingly similar phrase do not appear in your license (except to note that your license
differs from this License) and (b) otherwise make it clear that Your version of the license contains
terms which differ from the Mozilla Public License and Netscape Public License. (Filling in the
name of the Initial Developer, Original Code or Contributor in the notice described in Exhibit A
shall not of themselves be deemed to be modifications of this License.)
7. Disclaimer of warranty
Covered code is provided under this license on an "as is" basis, without warranty of any
kind, either expressed or implied, including, without limitation, warranties that the covered
code is free of defects, merchantable, fit for a particular purpose or non-infringing. The
entire risk as to the quality and performance of the covered code is with you. Should any
covered code prove defective in any respect, you (not the initial developer or any other
contributor) assume the cost of any necessary servicing, repair or correction. This disclaimer
of warranty constitutes an essential part of this license. No use of any covered code is
authorized hereunder except under this disclaimer.
8. Termination
8.1. This License and the rights granted hereunder will terminate automatically if You fail to
comply with terms herein and fail to cure such breach within 30 days of becoming aware of the
breach. All sublicenses to the Covered Code which are properly granted shall survive any
termination of this License. Provisions which, by their nature, must remain in effect beyond the
termination of this License shall survive.
305

HP MediaSmart Server User's Guide
8.2. If You initiate litigation by asserting a patent infringement claim (excluding declatory
judgment actions) against Initial Developer or a Contributor (the Initial Developer or Contributor
against whom You file such action is referred to as "Participant") alleging that:
a. such Participant's Contributor Version directly or indirectly infringes any patent, then any and all
rights granted by such Participant to You under Sections 2.1 and/or 2.2 of this License shall, upon
60 days notice from Participant terminate prospectively, unless if within 60 days after receipt of
notice You either: (i) agree in writing to pay Participant a mutually agreeable reasonable royalty
for Your past and future use of Modifications made by such Participant, or (ii) withdraw Your
litigation claim with respect to the Contributor Version against such Participant. If within 60 days
of notice, a reasonable royalty and payment arrangement are not mutually agreed upon in writing
by the parties or the litigation claim is not withdrawn, the rights granted by Participant to You
under Sections 2.1 and/or 2.2 automatically terminate at the expiration of the 60 day notice period
specified above.
b. any software, hardware, or device, other than such Participant's Contributor Version, directly or
indirectly infringes any patent, then any rights granted to You by such Participant under Sections
2.1(b) and 2.2(b) are revoked effective as of the date You first made, used, sold, distributed, or had
made, Modifications made by that Participant.
8.3. If You assert a patent infringement claim against Participant alleging that such Participant's
Contributor Version directly or indirectly infringes any patent where such claim is resolved (such
as by license or settlement) prior to the initiation of patent infringement litigation, then the
reasonable value of the licenses granted by such Participant under Sections 2.1 or 2.2 shall be
taken into account in determining the amount or value of any payment or license.
8.4. In the event of termination under Sections 8.1 or 8.2 above, all end user license agreements
(excluding distributors and resellers) which have been validly granted by You or any distributor
hereunder prior to termination shall survive termination.
9. Limitation of liability
Under no circumstances and under no legal theory, whether tort (including negligence), contract,
or otherwise, shall you, the initial developer, any other contributor, or any distributor of covered
code, or any supplier of any of such parties, be liable to any person for any indirect, special,
incidental, or consequential damages of any character including, without limitation, damages for
loss of goodwill, work stoppage, computer failure or malfunction, or any and all other commercial
damages or losses, even if such party shall have been informed of the possibility of such damages.
This limitation of liability shall not apply to liability for death or personal injury resulting from
such party's negligence to the extent applicable law prohibits such limitation. Some jurisdictions
do not allow the exclusion or limitation of incidental or consequential damages, so this exclusion
and limitation may not apply to you.
10. U.S. government end users
The Covered Code is a "commercial item," as that term is defined in 48 C.F.R. 2.101 (Oct. 1995),
consisting of "commercial computer software" and "commercial computer software
documentation," as such terms are used in 48 C.F.R. 12.212 (Sept. 1995). Consistent with 48
C.F.R. 12.212 and 48 C.F.R. 227.7202-1 through 227.7202-4 (June 1995), all U.S. Government
End Users acquire Covered Code with only those rights set forth herein.
11. Miscellaneous
This License represents the complete agreement concerning subject matter hereof. If any provision
of this License is held to be unenforceable, such provision shall be reformed only to the extent
necessary to make it enforceable. This License shall be governed by California law provisions
(except to the extent applicable law, if any, provides otherwise), excluding its conflict-of-law
306

Licenses, Copyrights and Notices for Open Source Components
provisions. With respect to disputes in which at least one party is a citizen of, or an entity
chartered or registered to do business in the United States of America, any litigation relating to
this License shall be subject to the jurisdiction of the Federal Courts of the Northern District of
California, with venue lying in Santa Clara County, California, with the losing party responsible
for costs, including without limitation, court costs and reasonable attorneys' fees and expenses.
The application of the United Nations Convention on Contracts for the International Sale of Goods
is expressly excluded. Any law or regulation which provides that the language of a contract shall
be construed against the drafter shall not apply to this License.
12. Responsibility for claims
As between Initial Developer and the Contributors, each party is responsible for claims and
damages arising, directly or indirectly, out of its utilization of rights under this License and You
agree to work with Initial Developer and Contributors to distribute such responsibility on an
equitable basis. Nothing herein is intended or shall be deemed to constitute any admission of
liability.
13. Multiple-licensed code
Initial Developer may designate portions of the Covered Code as "Multiple-Licensed". "Multiple-
Licensed" means that the Initial Developer permits you to utilize portions of the Covered Code
under Your choice of the MPL or the alternative licenses, if any, specified by the Initial Developer
in the file described in Exhibit A.
Exhibit A - Mozilla Public License.
"The contents of this file are subject to the Mozilla Public License Version 1.1 (the "License");
you may not use this file except in compliance with the License. You may obtain a copy of the
License at http://www.mozilla.org/MPL/ Software distributed under the License is distributed on
an "AS IS" basis, WITHOUT WARRANTY OF ANY KIND, either express or implied. See the
License for the specific language governing rights and limitations under the License. The Original
Code is ______________________________________. The Initial Developer of the Original
Code is ________________________. Portions created by ______________________ are
Copyright (C) _____________________________. All Rights Reserved. Contributor(s):
______________________________________. Alternatively, the contents of this file may be
used under the terms of the _____ license (the "[___] License"), in which case the provisions of
[______] License are applicable instead of those above. If you wish to allow use of your version of
this file only under the terms of the [____] License and not to allow others to use your version of
this file under the MPL, indicate your decision by deleting the provisions above and replace them
with the notice and other provisions required by the [___] License. If you do not delete the
provisions above, a recipient may use your version of this file under either the MPL or the [___]
License."NOTE: The text of this Exhibit A may differ slightly from the text of the notices in the
Source Code files of the Original Code. You should use the text of this Exhibit A rather than the
text found in the Original Code Source Code for Your Modifications.
PureMVC Framework: Creative Commons Attribution
License 3.0
To view the Creative Commons Attribution License terms please see
http://creativecommons.org/licenses/by/3.0/us/.
307

HP MediaSmart Server User's Guide
ScaleFilter: Software License Agreement (BSD License)
Copyright (c) 2008, Meraka Institute
All rights reserved.
Redistribution and use in source and binary forms, with or without modification, are permitted
provided that the following conditions are met:
• Redistributions of source code must retain the above copyright notice, this list of conditions and
the following disclaimer.
• Redistributions in binary form must reproduce the above copyright notice, this list of conditions
and the following disclaimer in the documentation and/or other materials provided with the
distribution.
• Neither the name of the Meraka Institute nor the names of its contributors may be used to endorse
or promote products derived from this software without specific prior written permission.
THIS SOFTWARE IS PROVIDED BY THE COPYRIGHT HOLDERS AND CONTRIBUTORS
"AS IS" AND ANY EXPRESS OR IMPLIED WARRANTIES, INCLUDING, BUT NOT
LIMITED TO, THE IMPLIED WARRANTIES OF MERCHANTABILITY AND FITNESS FOR
A PARTICULAR PURPOSE ARE DISCLAIMED. IN NO EVENT SHALL THE COPYRIGHT
OWNER OR CONTRIBUTORS BE LIABLE FOR ANY DIRECT, INDIRECT, INCIDENTAL,
SPECIAL, EXEMPLARY, OR CONSEQUENTIAL DAMAGES (INCLUDING, BUT NOT
LIMITED TO, PROCUREMENT OF SUBSTITUTE GOODS OR SERVICES; LOSS OF USE,
DATA, OR PROFITS; OR BUSINESS INTERRUPTION) HOWEVER CAUSED AND ON
ANY THEORY OF LIABILITY, WHETHER IN CONTRACT, STRICT LIABILITY, OR TORT
(INCLUDING NEGLIGENCE OR OTHERWISE) ARISING IN ANY WAY OUT OF THE USE
OF THIS SOFTWARE, EVEN IF ADVISED OF THE POSSIBILITY OF SUCH DAMAGE.
Real-Time Video Coding
Contents
1 Background
2 Contact Details
3 Seminars
4 Papers
5 Downloads
5.1 DirectShow Filter Downloads
5.2 Source Downloads
6 Links
7 Media
Background
The objective of the Real-Time Video Coding group is to research and develop intelligent
multimedia software components and delivery systems that adapt to congested and low
308

Licenses, Copyrights and Notices for Open Source Components
infrastructure network environments. The emphasis is on jointly-optimised or co-operative
behaviour between the delivery context, as in real-time network conditions, and the video/audio
encoder rate control mechanisms. Innovative solutions are sought to enhance the Internet video
experience in a developing world context where bandwidth is a scarce resource.
Current research within the group is concentrating on optimal and weighted context-based bit
allocation techniques and implementations within international standard video codecs. A scalable
and bandwidth adaptive multimedia broadcasting platform is under development to encompass the
novelty of the bit allocation research.
Contact Details
Contact Person: Dr Keith Ferguson
Tel: +27(0)12 841 4433
Fax: +27(0)12 841 4720
Email: kferguson[at]csir.co.za
Seminars
30 September 2007 - IEEE students seminar at UCT
13 March 2008 - Seminar at UKZN
14 May 2008 - Guest lecture on Video Coding at University of Pretoria
Papers
Papers will be available here once complete.
Downloads
A part of the objective of the Real-Time Video Coding group is to utilise open source frameworks
and to contribute to the open source community as well as to provide source code that is available
for general usage. Please send comments, feedback, suggestions to rtvc[at]meraka.org.za.
DirectShow Filter Downloads
The following DirectShow filters are available for download as DLLs. These need to be registered
using the regsvr32 command. Download the documentation below for more information about the
filters.
Filter Version Description
ScaleFilter v1.1 The ScaleFilter is a DirectShow
filter that can scale RGB24
media to specified target
dimensions.
CropFilter v1.3 The CropFilter is a DirectShow
filter that can crop RGB24 and
RGB32 media.
309

HP MediaSmart Server User's Guide
Version Description Filter
RGBtoYUV420Filter v1.0 This filter converts RGB24 or
RGB32 media to a YUV4:2:0
Planar format whilst retaining
the original VideoInfoHeader
of the media.
YUV420toRGBFilter v1.0 This filter converts the custom
packed YUV420 planar format
back to RGB24.
Source Downloads
• Base classes and interfaces - DirectShow base classes and interfaces have been written which
simplify the creation of a transform filter. The CCustomBaseFilter class provides a base class for
filters with a single input and output pin. The MultiIOBaseFilter project provides support for
writing DirectShow transform filters with multiple input and output pins such as multiplexers and
demultiplexers. All Meraka RTVC filters inherit these base classes, which are available in the
download. The base class have been compiled into a static library which the user can reference in
the project.
• Filter Source Code - The download also contains the source code for the above-mentioned
scaling, cropping and color conversion filters.
• Image Utilities - The ImageUtils folder contains source code for various image processing such as
cropping, scaling, etc. These files have been compiled into a static library which is also referenced
by filters that require such functionality.
• DirectShow LiveMedia RTSP Live Audio Streaming Server - This project provides an
example as to how the DirectShow framework can be integrated with a RTP/RTCP/RTSP
streaming library in order to stream live audio.
Source Code v1.3
Documentation
Links
• DirectShow related
• Blog containing free DirectShow filters and GraphStudio, which offers some improved
functionality over GraphEdit
• DirectShow training
• RTP/RTCP/RTSP related
• Open source RTP/RTCP/RTSP library that covers framing, sending of many media formats with a
high level of importance based on standards. Main support via mailing list.
310

Licenses, Copyrights and Notices for Open Source Components
311
Media
• CSIR researcher profile series: Streamlining delivery of internet video broadcasting
• DST-Innovation Fund investment boosts collaborative research on real-time video broadcasting
project
• Innovation Fund investment boosts collaborative research on real-time video broadcasting project
Glossary
A
all-in-one-gateway: A device that provides multiple network features such as a router, modem, local area
network (LAN) switch, firewall, and/or a wireless access point. Also see LAN.
anti-virus software: Software that checks a hard drive for viruses (harmful computer code) that may infect
a computer.
B
BIOS: Basic Input/Output Services—the firmware code run by the server when first powered on. The
BIOS prepares the server for operation and allows the server software to load, execute, and
assume control of the server. This process is also known as booting up.
Browser window: A browser window is used to display web pages either on a web site or stored locally
such as the server’s User’s Guide.
C
client computers: A client computer is a computer that accesses the server by the home network. This term
also applies to computers using remote access to the server.
D
DHCP: Dynamic Host Configuration Protocol—the protocol used to assign IP addresses to network
devices, such as computers. DHCP automatically assigns IP addresses to network devices; the
assigned address can change over time. Also see IP address, Protocol, and Static IP Address.
Digital Living Network Alliance: A set of standards (that includes UPnP A/V) for sharing media between
devices. PVConnect is DLNA compliant. Windows Media Connect is not. This compliance allows
PVConnect to work with more DMRs.
digital rights management: Technology built into digital media, such as music and movies, that allows
companies in charge of their copyrights to decide how and where media can be used.
DMR: Digital Media Receiver (DMR), Digital Media Adapter (DMA), Digital Media Player (DMP)—a
consumer electronic device that communicates with the server and brings digital media streams—
such as photos, music, or video—to your entertainment center.
DNS: Domain Name System—a server that associates network names with IP addresses. Also see IP
address.
F
folder duplication: Folder duplication duplicates folders and files across multiple hard drives. If you
enable folder duplication and one hard drive fails, you will not lose any files stored in a shared
folder. Any folder that has folder duplication enabled uses twice the amount of server storage.
H
313

HP MediaSmart Server User's Guide
HTTPS: A secure HTTP connection. HTTP (HyperText Transfer Protocol) is the format used to transfer
and send web page information across networks, on the Internet, and in help systems. HTTPS is an
HTTP connection over encrypted Secure Sockets Layer (SSL) transport mechanism. Also see
Protocol.
I
IP address: An IP (Internet Protocol) address is a number that uniquely identifies devices, such as
computers, on a network.
L
LAN: Local area network—a small number of computers that are connected together in a small area,
usually in the same building.
logical: A device, such as a partition named by the logic of a software system, regardless of its physical
relationship to the system. For example, a computer with a single physical hard disk that contains
two logical drives, C: and D:.
M
Map: Assigning a drive letter to the connection on a computer to access a shared folder on the server.
Mbps: Megabits per second.
Media streaming: Media streaming sends media—music, photos and video files—from the server to other
devices that can play the media. The server includes functionality that allows media to stream to a
Digital Media Adapter (DMA). Also see DMR.
N
NAT: Network Address Translation—Broadband routers use NAT technology to allow network
components to share Internet access over a single IP address. Additionally, NAT acts like a
firewall because the computers and other devices—including the server—on the network are given
IP address that are non-routable (non-internet addresses). This masks the real IP addresses of your
network components and keeps them from being seen outside the home. Also see IP address.
P
partition: A logical division of a physical hard disk. Partition data refers to the information contained
within the divisions on the drive. For example, some computers are formatted with a C: and D:
drive, both of which use the same physical hard drive.
password hint: A password hint helps you remember your password. The password hint can be seen by
anybody who clicks the link to display it.
PECI: Platform Environment Control Interface, abbreviated as PECI, is a recent (introduced in 2006)
technology used for thermal management in the Intel Core 2 Duo microprocessors. While previous
thermal management technologies have made use of thermal diodes, PECI instead uses on-die
digital thermal sensors (DTS). These sensors, after being calibrated at the factory, are able to
provide digital data concerning processor temperature information. The PECI bus, allowing access
to this data from chipset components, is a proprietary single-wire interface with a variable data
transfer speed (from 2 kbit/s to 2 Mbit/s).
physical hard disk: The actual hard disk (hard drive) located in a device that stores files and data.
314

Glossary
port 80: Usually, an HTTP client, such as a Web browser, initiates contact to a server through port 80.
After contacting the server, the server sends back a response, such as a Photo Publisher page.
Privilege level: A level assigned by the user that decides what access levels are available to other users.
Protocol: The standard(s) of how computers communicate data with each other.
R
router: A device connected to your computer that joins two or more networks. For example, a router
connects your local network to the Internet.
S
SATA: Serial Advanced Technology Attachment (or Serial ATA) is an interface standard that moves
information to and from a storage device, such as a hard drive.
shared folders: A “share folder” means the same as a “share,” and you can use these terms
interchangeably: A shared folder is a top-level folder that is shared on the network and stores other
folders within it. For example, the Music shared folder can store other folders (called sub-folders).
A subfolder might be named for a musician, such as Mark Knopfler.
SMTP: Simple Mail Transfer Protocol—The main protocol used to send email on the Internet, consisting
of rules for how programs sending mail should interact with programs receiving mail.
Static IP Address: A number assigned to a device, such as a computer, on a network to be its permanent
IP address. Also see IP address and DHCP.
strong password: A strong password must be at least 7 characters long and must fulfill three of the
following four character criteria: uppercase characters, lowercase characters, numbers, and
symbols (such as !, @, #, and so on.) Also see password hint.
Sub-folders: A folder within a folder or a shared folder.
Subnet Mask: Identifies the portion of the network IP address that can be used for subnetworks. Also see
IP address.
System drive: The hard drive (or drive partition) containing the operating system.
T
TB: Terabyte—refers to a data storage capacity equal to approximately 1000 gigabytes.
TCP/IP: Transmission Control Protocol/Internet Protocol. A set of communications protocols used to
transmit data over networks. TCP provides for the establishment of connections and exchanges
streams of data. IP specifies the format of the data. Also see IP address.
TCP/IPv4: TCP/IPv4 is the standard TCP/IP protocol in use today.
TCP/IPv6: TCP/IPv6 is the standard TCP/IP protocol used by Windows Vista. IPv6 main advantage is the
increase in number of available addresses.
U
UNC: Uniform Naming Convention—identifies shared network devices, such as the server. It is a format
for specifying the location of resources on a local-area network (LAN). It identifies each shared
resource with a unique address in the following format: \\server-name\sharedfolder-name. For
example, \\SERVER\software. Also see LAN.
315

HP MediaSmart Server User's Guide
316
UPnP: Universal Plug and Play—a networking protocol that allows for many different types of devices to
interact with one another. UPnP is the protocol used by media streaming.
W
WAP: Wireless Access Point—a device, such as a wireless router, that connects wireless communication
devices together to form a wireless network. A WAP often connects to a wired network, and can
relay data between wireless devices and wired devices.
Web browser: An application used to access information on networks, on the internet, and in help systems.
Common web browsers include Internet Explorer, Netscape, and Firefox.
WEP: Wired Equivalent Privacy—a protocol that encrypts data on a wireless system for security.
WPA: Wi-Fi Protected Access—a technology that allows for increased security with wireless networks.
Index
Chapter 14.
3
3gp 125
A
Aac 89, 132
About Hardware Warning Messages 259
About HP Add-ins 77
Ac3 125
Accesses 39, 80
HP MediaSmart Server 39, 80
Add 219
Internal SATA Drive 219
Additional Computers 28
Installing 28
Administrative Privileges 20
Aiff 125
Album 89, 171, 193
Create 171, 193
Album Missing Photos 199
Allow 244
UPS 244
Asf 125
Audio 132
Audio Formats 132
Automatic Windows Updates 20
Available Port 242
AVI 89, 125, 132, 143
B
Backup 60, 205
HP MediaSmart Server 60, 205
Performing 60, 205
Backup Disk Size 60, 205
Backup Disk Status 60, 205
Bar Pulsating Aqua White 258
Before Media Collector 89
BIOS 86
Bmp 125, 132, 172, 193
Bonjour Computers 32
Browse button 39, 80
select 39, 80
BSD License 308
C
Check 39, 80
Updates 39, 80
Checkboxes 172, 193
using 172, 193
Choose Backup Disk 60, 205
Client computer 39, 80
Computer Recovery 205
Computer Requirements 267
Computers & Backup 59, 86, 204
Restoring 59, 204
Configure 39, 60, 80, 205
317

HP MediaSmart Server User's Guide
Time Machine 60, 205
Configure HP Media Collector General Settings
91
Configure HP MediaSmart Software Update 39,
80
Configure Mac Client 60, 205
Configure Media Collector 91, 94, 97
Music 94
Photos 91
Videos 97
Configure PVConnect 128, 132
Streaming Media 128
Configure Remote Access 132
Configuring Windows Update 42
Connect As 32
Contact 9, 244
firewall 9, 244
Control Center application 60, 205
Converted Videos Folder 113, 114
Copied 39, 80
Server 39, 80
Copyright 283
Create 60, 205
Mac Folder 60, 205
D
Defaults 89
Digital Media Adapter 86, 114, 116, 125, 132,
155, 263
stream 125, 132
Digital Media Player 125, 155, 263
Digital Media Receiver 125, 155, 158, 263
Digital Media Server 125
DIVX 89, 112, 125
DLNA 125
DMA 7, 86, 114, 116, 125, 132, 153, 155, 263
DMP 125, 155, 263
DMR7, 77, 86, 114, 116, 125, 132, 153, 155, 263
Domain Name System 242
DRM 112, 116
Duplicate Songs 154, 157
DV 132
DVD 112, 116
DVR 89, 132
Dvr-ms 125
Dynamic Host Configuration Protocol 7
E
Electrical Ratings 267
ESATA 219, 267
Ethernet 7
Ethernet switch 242
External USB Drive 224
F
Facebook 172, 193
Facebook Logon 166
Firefly License 283
Firefox 175, 195, 197
Firefox 2.0 267
Firefox Certification Needed 195
Firewall 9, 155, 244
contact 9, 244
using 9, 244
Firewall Blocking Messages Mean 244
318

Index
First Backup 243
FLAC 125
Flickr 175, 176
Flickr Login Page 167
FLV 89
Folders View 139, 143
Forbidden Error Message 185
Format 143
Format Compatibility 132
Frob 175
Full Resolution 112, 116
G
German 77
Get Certificate 195
Gif 89, 125, 132, 172, 193
Guest Account 112, 264
H
Hard Drive Light 258, 259
Hardware Status 259
Hardware Tab 84
Health Indicator Codes 261
Health LED Behavior 83
Help systems 132
Home network 39, 80
Home Server Connector Software 28
HP 39, 80
HP Media Collector 89
HP Media Collector Default Settings 89
HP Media Collector Features 89
HP MediaSmart Server 5, 7, 9, 28, 39, 80, 86, 89,
125, 132, 244, 263
accesses 39, 80
Connect 7
Install 28
installing 9, 244
locating 9, 244
HP MediaSmart Server Control Center 60, 205
HP MediaSmart Server Requirements 132
HP MediaSmart Server Settings 84, 86
HP MediaSmart Server Software Installation
Disc 9, 244
HP MediaSmart Server Software Update 39, 80
HP Photo Publisher 164, 177, 186, 197
HP Photo Publisher Home 163
HP Photo Publisher Log on Page 164
HP Photo Viewer Slideshow 188
HP Software 39, 80
Rollback 39, 80
HP Software Update Install Wizard 39, 80
HP Software Version 86
HP Update 42, 51
Hubs 265
I
IDE 219
Ignored Directories 89
ImageMagick 288
In the Box 3
Install Flash 132
Install HP MediaSmart Server Mac Client 60,
205
Install Mac OS 60, 205
Install Wizard 20
319

HP MediaSmart Server User's Guide
Installing 9, 20, 28, 31, 39, 80, 244
Additional Computers 28
Features 31
First Computer 20
HP MediaSmart Server 9, 20, 28, 244
Mac Features 20
Mac Software 31
Windows Home Server Connector 20
Internal SATA Drive 221
Removing 221
Internet Explorer 6.0 267
Internet Protocol 7
IP 7
IPhone application 116
IPhones 116
IPods 116
ITunes 20, 89, 94, 98, 130
Settings 130
ITunes Frequently Asked Questions 131
J
Jpeg 172, 193
Jpg 89, 125, 132, 172, 193
L
Launch Time Machine 60, 205
LC 132
Learn 9, 244
Lights 3
Link 39, 80
uninstall 39, 80
Locating 9, 244
HP MediaSmart Server 9, 244
Log 132
LPCM 125
M
M1v 125
M2TS 89
M3u 89, 125
M4a 89, 125, 132, 154
M4v 89, 125, 132
Mac 32, 60, 205
Mac Backup 60, 205
Mac Client Version Number 51
Mac Features 20
install 20
Mac Folder 60, 205
create 60, 205
Manage Network Connections 241
Manually Check 39, 80
Updates 39, 80
Manually Install 39, 80
Update Copied 39, 80
McAfee SecurityCenter 77
Media 77, 263
Media Collection 89
Media Collection Order 89
Media Collector 89, 94, 98, 112
Media Collector General 91
Media Sharing 154, 155, 263
Media Smart Server 244
Media Streamer 149
320

Index
Media streaming 114, 116, 153, 155
MediaSmart Photo Viewer 172, 193
MediaSmart Server 244
Microsoft Windows Home Server 39, 80
update 39, 80
MiscUtil 291
MJPEG 132
Mobile devices 112
Mobile Resolution 112, 116
Mov 89, 132
Mp1 125
MP2 89, 125
Mp3 89, 125, 132
Mp4 125, 132
Mpa 125
Mpe 125
MPEG 89, 132
MPEG-1 125
MPEG-2 125
MPEG-2-T-S 125
MPEG-4 112, 125
Mpg 132
Mpg/mpeg 125
MS 89, 132
Music 94
Configure Media Collector 94
Music Collection Status 94
Music Duplication 89
Music Formats 125
Music Organization 94
Music Source 94
N
Naming 20
HP MediaSmart Server 20
NET 2.0 20
Netscape 132, 267
Network Connection Issues 235
Network Connection Light Blinking Aqua White
263
Network Connection Light Off 262
Network Health 239
Network Health Light 9, 244, 265
Network NetBIOS Properties 241
Check 241
Network Places 76
Add Shared Folders 76
Network Requirements 5, 267
Networks 132
New Additions 131
Next 39, 80
Notifications 82
O
Obtain DNS server address 240
Ogg 125
Online Support 86
Links 86
Optimum Data Throughput Speeds 243
Organization Options 89
Output Services 86
P
Password hint 20
321

HP MediaSmart Server User's Guide
PC Restore Disc 205
PCM 132
Pct 89
Photo Caption 188
Photo Publisher 167, 172, 175, 176, 177, 185,
186, 193
Photo Viewer 197, 199
Photo Viewer Home Page 187
Photos 77, 139
Photos Uploading 173
Picasa 172, 185, 193
Picasa Logon 170
Picture Formats 125
Pictures 89
Pla 125
Player 143
Playlist 131
Playlist Formats 125
Playlists 89
Png 125, 132, 172, 193
Podcasts 131
Power 79
Power Consumption 267
Power Management 79
Power-On Indicator 258
Product Specifications 267
Progress bar 143
PureMVC 307
PVConnect 77, 125, 128
PVConnect Features 125, 158
PVConnect File Formats 158
R
Readme 279
Regulatory Statements 271
Remote Access 86, 116
Remote Media Streaming 154
Remote Streaming 154
Remote video 112
Removing 224
External USB Drive 224
Removing Drives 229
Replacing 230
System Drive 230
Rollback 39, 80
HP Software Click 39, 80
Rolling Back Mac Clients 51
Router 240, 242
S
SATA 219
Add 219
Search button 39, 80
select 39, 80
Secure Connection Failed 195
SecurityCenter 77
Select 39, 80
Browse button 39, 80
Search button 39, 80
Select file 39, 80
Select Photos 172, 193
Serial ATA 267
Serial Number 86
322

Index
Server 86
Server 7, 39, 80, 89
Connecting 7
copied 39, 80
Server bar 131
Server Location 5
Server Low on Space 264
Server Not Showing Up on Your DMR 263
Server Password 20
Setting 20
Server Recovery 213
performing 213
Server Recovery Disc 213
Server Solution 84
Server Storage 86, 219, 229
Expanding 219
Server's Health Indicator Light Red 258
Settings 39, 80, 130, 263
iTunes 130
Share folder 64, 86, 129, 264
Shared Folders on Server 64
Sharing 263
Skipped Files 89
Sleep Now button 79
Sleep Time 79
Slideshow 188
Slideshow View 188
Smithfamily.HPhome.com 132
Snapfish 172, 193
Snapfish Logon 170
Software firewalls 9, 244
Software Installation Disc 20
Use 20
Song Selection 131
Static IP Address 7
Stop Sharing 129
TwonkyMedia 129
Stream DRM Content 131
Streaming 7, 125, 131, 132
Digital Media Adapter 7, 125, 132
iTunes 131
Support Tab 86
Supported File Formats 89, 155
Supported Operating Systems 6, 267
T
TCP/IP 240
TCP/IPv4 240
Tif 89, 125, 132
Time Machine 60, 205
Configuring 60, 205
dedicated 60, 205
Time Machine System Preferences 60, 205
Total Protection Service 77
Transcoding 116, 154
Transfer Failure 261
TV 7
TwonkyMedia 114, 129, 154
Stop Sharing 129
Types 125
323

HP MediaSmart Server User's Guide
U
Uninstall 39, 80
link 39, 80
Update 39, 80
Uninstall HP MediaSmart Server 213
Uninterruptible Power Supply 244
Unresponsive 257
Update Client Computers 39, 80
Update Copied 39, 80
Manually Install 39, 80
Updating 9, 39, 80, 131, 244
Check 39, 80
Manually Check 39, 80
Microsoft Windows Home Server 39, 80
Uninstall 39, 80
Windows Home Server 39, 80
Your Firewall's Trusted Program List 9, 244
UPnP 125, 155
UPS 244
allow 244
Using 244
URL 132, 242
USB 244
Using 244
Use 39, 80
HP MediaSmart 39, 80
Used 132
access information 132
User account 32, 67, 86, 112, 113
User's Guide 86
User's Guide on iTunes 131
V
Vdr 125
Version 39, 80
Version Numbers 51
Video codec 112, 116
Video Collection Status 97
Video Conversion
Fails 115
Video Converter 112, 116
Video File Types 132
Video files 77
Video Formats 125, 132
Video Resolution 116
Video streaming 116
Videos 132, 143
Vob 125
W
Warranty and Support 275
Wav 89, 125, 132
Web 89
Web Media Streamer 132, 133, 139, 143, 149
Selection Bar 143
Wi-Fi Protected Access 7, 72
Windows Client 20
Windows Firewall 72
Windows Home Server 39, 80, 89
updating 39, 80
Windows Home Server Connector 20, 72
install 20
324

Index
325
Windows Home Server Connector Setup
window 20
loaded 20
Windows Home Server Console 1, 39, 57, 80,
263
Opening 57
Windows Home Server Console Help 39, 80, 258
Windows Home Server Settings window 94, 97
Windows Home Server Tabs 58
Windows Homer Server 132
Windows Media Connect 77, 125, 154, 158
Windows Media Connect File Compatibility 125
Windows Media DRM 131
Windows Media Player 94
Windows Server Console 89
Wired Equivalent Privacy 7
Wireless Network Connection 240, 267
Wireless Support 7
Wma 89, 125, 132
WM-DRM 10 Licensed Technology 275
WMV 89, 125, 132
Wpl 89, 125
X
Xbox 360 7
Xvid 112, 125
Y
Yahoo ASTRA Components 299
Your Firewall's Trusted Program List 9, 244
