Hp Laserjet 4250 Users Manual Print Server Appliance 4200
4250 to the manual ccb9c937-d42b-4ee1-baba-9f570468285d
2015-02-09
: Hp Hp-Laserjet-4250-Users-Manual-547482 hp-laserjet-4250-users-manual-547482 hp pdf
Open the PDF directly: View PDF ![]() .
.
Page Count: 223 [warning: Documents this large are best viewed by clicking the View PDF Link!]
- Local Disk
- HP Print Server Appliance 4250 User's Guide
- HP Print Server Appliance Documentation for Firmware Version 2.5.x
- Product Overview
- Product Specifications
- Web Interface for the PSA
- Getting Started
- Installing Printers on Clients
- Front Panel
- Hardware Installation
- TCP/IP and DNS Settings
- Microsoft Network Settings
- LPD
- SNMP Settings
- Print Shares
- Configuring the Adminsistrator Account
- SSL
- Backing Up, Restoring, Reseting, Rebooting, and Upgrading the PSA
- System Summary
- Diagnostic Report
- Event Log
- Event Log Messages
- System Messages
- Troubleshooting the HP Print Server Appliance
- Frequently Asked Questions
- Contact HP
- Warranty, Regulatory, and Licensing Information

HP Print Server
Appliance 4250
User's Guide
Click a title to view a topic.
Home
General Information
Product Overview
Product Specifications
Setting the Date and Time
Initial Set Up
Getting Started
Installing Printers on Clients
Front Panel
Hardware Installation
Web Interface
Networking
TCP/IP and DNS Settings
Microsoft Network Settings
LPD Printing
SNMP Settings
Print Shares and Drivers
Managing Print Shares
Installing Print Shares
Managing Printer Drivers
Security
Microsoft NT Authentication
Administrators
LPD
Front Panel Password
SSL Certificate
Maintenance
Backup, Restore, Upgrade, and Reboot
Troubleshooting
System Summary Page
Diagnostics Page
Event Log
Event Log Messages
System Messages
Troubleshooting Tips
Questions
Support
Contacting HP
Warranty and Regulations
HP Print Server Appliance Documentation
for Firmware Version 2.5.x
© 1999-2004 Hewlett-Packard Company

Product Overview
Links within this page:
Product Introduction
Operation and Management
Product Description
Compatibility with HP Print Servers
Compatibility with Other (Non-HP) Print Servers
Product Updates
Links to related pages:
Technical Specifications
Product Introduction
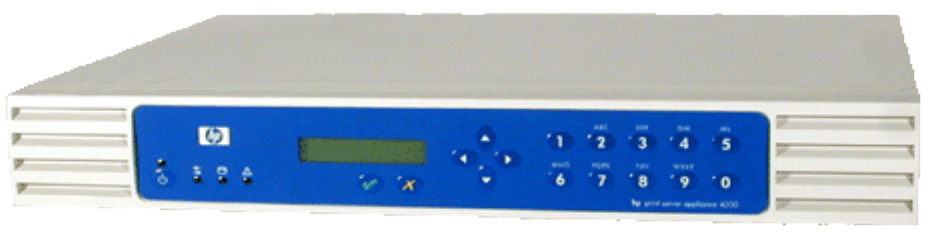
Figure 1: The HP Print Server PSA 4250
The HP Print Server Appliance 4250 is a state-of-the-art device for managing and monitoring printing over a
network. It is a network device that has been designed to provide a quick and easy way to add print capacity
without affecting the general purpose server. It has several distinct advantages over conventional network printing
configurations which can result in improved performance in both printing and file access. These advantages are
discussed below.
Microsoft NT domain security, also known as Microsoft NT Authentication and Authority, is a feature that allows
administrators to easily authorize or restrict print administration and services to specific groups or users by using
their existing user name and password of the NT 4.0 domain. An NT domain is a logical grouping of network servers
and other computers that share a common security and user account for each user. Users log on to the domain, not
to individual servers in the domain.
Installing printers on each client computer is required in order for clients to be able to print using the PSA. With the
Microsoft Point and Print technology, printers are added to the PSA and associated with a factory-installed driver or
a driver already associated with a printer. Clients can be easily set up with access to that printer and its driver
without having to install the driver again.
In a typical network, general purpose servers manage both the printing tasks and the file/application serving. The
PSA handles the spooling and network traffic associated with printing, reducing the workload on the general
purpose server.
When printing takes place at remote offices or other locations distant from the servers, the speed of printing can be
degraded. A PSA installed in a remote office can dramatically increase printing performance by eliminating the need
for print requests to travel from the remote office to the central site and back to a remote office printer.
An additional benefit is that if general purpose file/application servers go down, remote office users can still print
many jobs directly, using the PSA.
Operation and Management
Once the PSA is configured, virtually no management tasks are required. However, system administrators can
monitor print activity, manage the printers, or alter the configuration of the PSA from anywhere on the network
using the PSA's web-based graphical user interface and a supported browser, or by using Web Jetadmin.
Web Jetadmin plug-ins have been designed to configure and manage multiple PSAs. The Web Jetadmin plug-ins for
PSA firmware version 2.4.x. are dependent on Web Jetadmin (version 7.2). The Web Jetadmin plug-ins provide LAN
administrators and IT managers a single tool to manage their printing environment. The plug-ins provide the
following management capabilities for the PSA:
● Automated migration of printers from Microsoft Windows servers
● Automated migration of existing printer connections on Microsoft Windows clients
● Auto-discovery of PSAs
● Batch configuration of most settings
● Remote print path creation
● Remote management of printer drivers
● Central device status reporting
● Scheduled batch firmware upgrades
● Scheduled backup/restore of configuration settings
Product Description
The PSA contains a large disk drive for spooling print jobs from clients. Print jobs are stored on the disk drive. The
number of print jobs is only limited by the disk space available on the PSA.
The PSA provides web-accessible printer management and configuration and spools print jobs from the following
clients:
● Microsoft Windows 95
● Microsoft Windows 98
● Microsoft Windows 2000

● Microsoft Windows NT
● Microsoft Windows ME
● Microsoft Windows XP
● UNIX
Following are some main features of the PSA:
● Off-loads spooling from a UNIX or Windows NT server
● Easy installation
● Easy management
❍ Centralized management using Web Jetadmin
❍ Can be managed from any supported web browser on the network
❍ Virtually no management required once installed
● Supports APC uninterruptible power supplies (UPSs) (simple or basic signaling protocol)
● Increases performance of general purpose servers
● Remote management using Web Jetadmin
● Supports SNMP v1, v2c, and v3
● Provides data privacy, data integrity, and server authentication using Secure Sockets Layer (SSL v2/v3) and
Transport Layer Security (TLS v1)
● Easy replication of configuration and printer drivers across PSAs
● Reduces network traffic
● Seamless integration into Microsoft networking environment (security, authentication, authorization, and
active directory)
● Transparent to client users
● Easy to pre-configure before shipping to a remote office
● Web configuration interface
● Password security on the front panel and for the web interface
● Upgradable
● Front panel LCD display and keypad
● 10/100Base-TX Ethernet network interface
● Microsoft networking (SMB over IP)
● Support for native Microsoft client printing tools
● Compatible with Microsoft's Point and Print technology (automatic driver download from the PSA to clients)
● Windows NT Domain integration
● Line Printer Daemon (LPD) support for UNIX clients
Compatibility with HP Print Servers
The PSA will work with any HP print server with firmware version x.03 and above.
Compatibility with Other (Non-HP) Print Servers
Any print server that supports LPD should work with the PSA. The proper LPD remote queue name for the print
server might have to be known. Many print servers will work without specifying a remote queue name (use the
default HP PRINT SERVER setting); however, some require a special string in order to work. The LPD remote queue
name can be obtained from the print server vendor.
Product Updates
When new firmware or other device-specific support information is available for the PSA, the PSA can be notified
automatically. On the TCP/IP and DNS page, a field Check for print server PSA firmware updates during
each web login can be checked to enable this feature. If this is checked and new firmware or support information
is available, the picture of the PSA image on the Overview page in the web interface will change.

This feature is enabled by default and can be disabled by unchecking this box. Each time an image is retrieved, it is
logged like any other visit to HP's website. In addition, each request includes the serial number of the requesting
unit. HP uses this to provide support information relative to the specific unit. No personally identifiable information
such as user name, email address, or physical address is gathered as part of this process. HP does monitor web
logs in order to understand our customers and improve our products. All web transactions are subject to HP's
privacy policy which can be found at:http://www.hp.com/country/us/eng/privacy.htm.
Product Specifications
Links within this page:
Model Number
System Requirements
Language Options and Power Cord Requirements
Supported Clients
Supported Printers
Supported Web Browsers
What Ships in the Box
Security Features
Physical Specifications
Electrical Specifications
Environmental Specifications
Safety Certifications
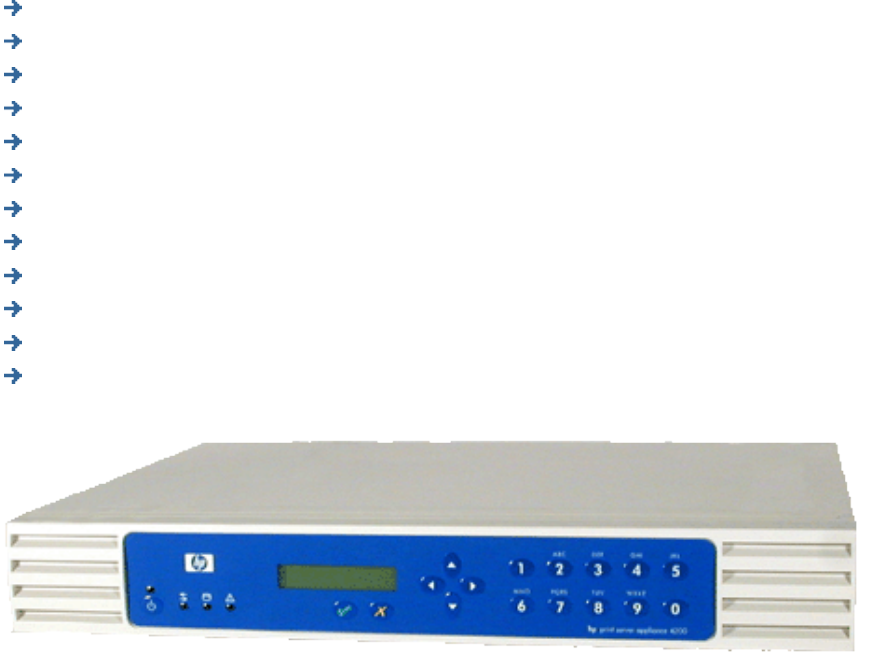
Figure 1: The HP Print Server Appliance 4250 (J7941)
Model Number
Product Model number
HP Print Server PSA 4250 J7941A
System Requirements
The computer printing to the PSA must be running TCP/IP and have Microsoft Windows 95, 98, NT, 2000, ME, XP, or other
operating systems running LPD.
Language Options and Power Cord Requirements
The following localization options are available for the power cord. The power cord must be be a standard IEC-320 female
power cord, terminated by a male plug appropriate for the country/region of use.
Country/Region Option Code Power Cord
U.S.
Canada (excluding Quebec) ABA 8120-6805
Argentina AKY 8121-0766
Brazil AKY 8121-0670
Chile AKY 8121-0765
Europe, including:
Austria
Belgium
Finland
France
Germany
Italy
Netherlands
Norway
Portugal
Spain
Sweden
401 8120-6802
Denmark ACE 8120-6806
Switzerland AR8 8120-6807
United Kingdom
Singapore ACC 8120-0550
South Africa ACQ 8120-6808

Australia
New Zealand ABG 8120-6810
Hong Kong SAR AB5 8120-0550
Supported Clients
Clients are networked PCs that submit print jobs to the PSA. The PSA can accept print jobs from the following clients:
● Windows 95
● Windows 98
● Windows NT 4.0
● Windows 2000
● Windows ME
● Windows XP
● Any RFC 1179-compliant LPD client including (not all LPD implementations are RFC 1179-compliant):
❍ HP-UX 10.x and above
❍ Solaris
❍ Linux
Note: The Microsoft Point and Print feature for Windows NT and Windows 2000 is only supported on an x86 PC.
The PSA provides easy, consistent PSA management for multiple PSAs simultaneously. An SNMP agent provides network
device information to monitor, configure, and control networked systems. It provides SNMP clients a method of
communicating with PSAs for administration over a network. Operations in SNMP are limited to retrieving and modifying
management information values and reporting events. SNMP v1, v2c, and v3 are supported for the 2.4.x firmware. An SNMP
MIB defining the PSA's SNMP interface is available from www.hp.com or by contacting HP's support center.
Supported Printers
Any printer or print server that supports the LPD protocol should work with the PSA.
Supported Web Browsers
The following web browsers are supported:
● Netscape Navigator 6.0 or greater
● Microsoft (R) Internet Explorer 5.5 or greater
What Ships in the Box
The following are included in the box:
1. HP Print Server Appliance 4250 (J7941)
2. 3 Quick Start Posters (English/Spanish (5990-4778), French/German (5990-4779), and Italian/Portuguese (5990-
4780))
3. Documentation CD-ROM (5069-4434 for the CD and sleeve, and 5011-4598 for the CD)
4. Rackmount Kit (5069-4433)
5. Power cable
The PSA has a front panel password to prevent unauthorized front panel configuration. It also has a web administrator name
and password, which are required to configure the device or manage printers (the default user name is admin and the
default password is admin). Additional web administrator accounts can be added.
The existing user account information of the NT 4.0 domain (name and password) is used; users or groups of users can be
authorized to print through the PSA without requiring the creation of user accounts and passwords on the PSA.
For NT Domain networks, administrators can easily restrict print administration and services to specific groups or users. Valid
access levels are:
● Print (print, pause, and delete your own print jobs)
● Manage Documents (print, pause, and delete other user's print jobs)
● Full Control (print, pause, and delete other user's print jobs; delete printers; and change security settings using
native NT tools)
● No Access
Physical Specifications
Attribute Specification
Dimensions 441 millimeters (mm) (17.4 inches) W x 323 mm (12.7 inches) D x 63 mm (2.5
inches) H
Weight 4.6 kilograms (10.1 pounds)
Temperature Operating: +5 degrees Celsius (C) to +40 degrees C (41 degrees Fahrenheit (F)
to 104 degrees F)
Non-operating: -40 degrees C to +70 degrees C (-40 degrees F to 158 degrees F)
Network connection RJ-45
Serial port DB-9 (supports all APC uninterruptible power supplies with a Simple Signaling
cable (APC part # 940-0020B))
Acoustic noise 52 dB
Minimum Hard Drive 10 Gigabytes
Minimum Processor Speed 300 Megahertz
Recommended Number of Printers
Supported 50
Largest Spoolable File Size 2 Gigabytes
Security Features
Minimum Spooling Capacity 7 Gigabytes
Electrical Specifications
Attribute Specification
Power requirements 120/240 VAC at 50/60 Hz
Power consumption 100-127 V ~ 1000mA
200-240 V ~ 750mA
Power connection IEC-320
Environmental Specifications
Attribute Specification
Relative humidity 80 percent at 40 degrees C (104 degrees F)
Temperature (Operating) +5 degrees Celsius (C) (41 degrees Fahrenheit (F)) to +40 degrees
Celsius (104 degrees F)
(Non-operating) -40 degrees Celsius (-38 degrees F) to +70 degrees Celsius (158
degrees F)
Safety Certifications
Products comply with:
● IEC 950: (1991)+A1,A2,A3,A4/EN60950 (1992)+A1,A2,A3,A4
● UL 1950
● CSA 950
● NOM-019-SCFI-1994

Web Interface for the PSA
Links within this page:
Supported Web Browsers
Accessing the Web Interface
Menu
Overview Page
Changing the Date and Time
The PSA contains a web server. The web server allows administrators to manage the configuration of the PSA,
review the status of the device, and view print jobs from your web browser.
This page explains what can be configured through this interface and how to access the web interface on the PSA.
Supported Web Browsers
The following web browsers are supported:
● Netscape Navigator 6.0 or greater
● Microsoft (R) Internet Explorer 5.5 or greater
Accessing the Web Interface
Follow these steps to access the web interface:
1. Open the web browser.
2. In the Location field (Netscape Navigator) or Address field (Microsoft Internet Explorer), enter the IP
address of the PSA, as displayed on the front panel liquid-crystal display (LCD) (for example:
http://10.1.2.3).
Or, type the DNS name of the PSA (if the DNS server has been configured with the correct name entry).
3. Type the administrator name and password. (The default is "admin" for the user name and "admin" for the
password.) The Overview page is displayed with the menu on the left.
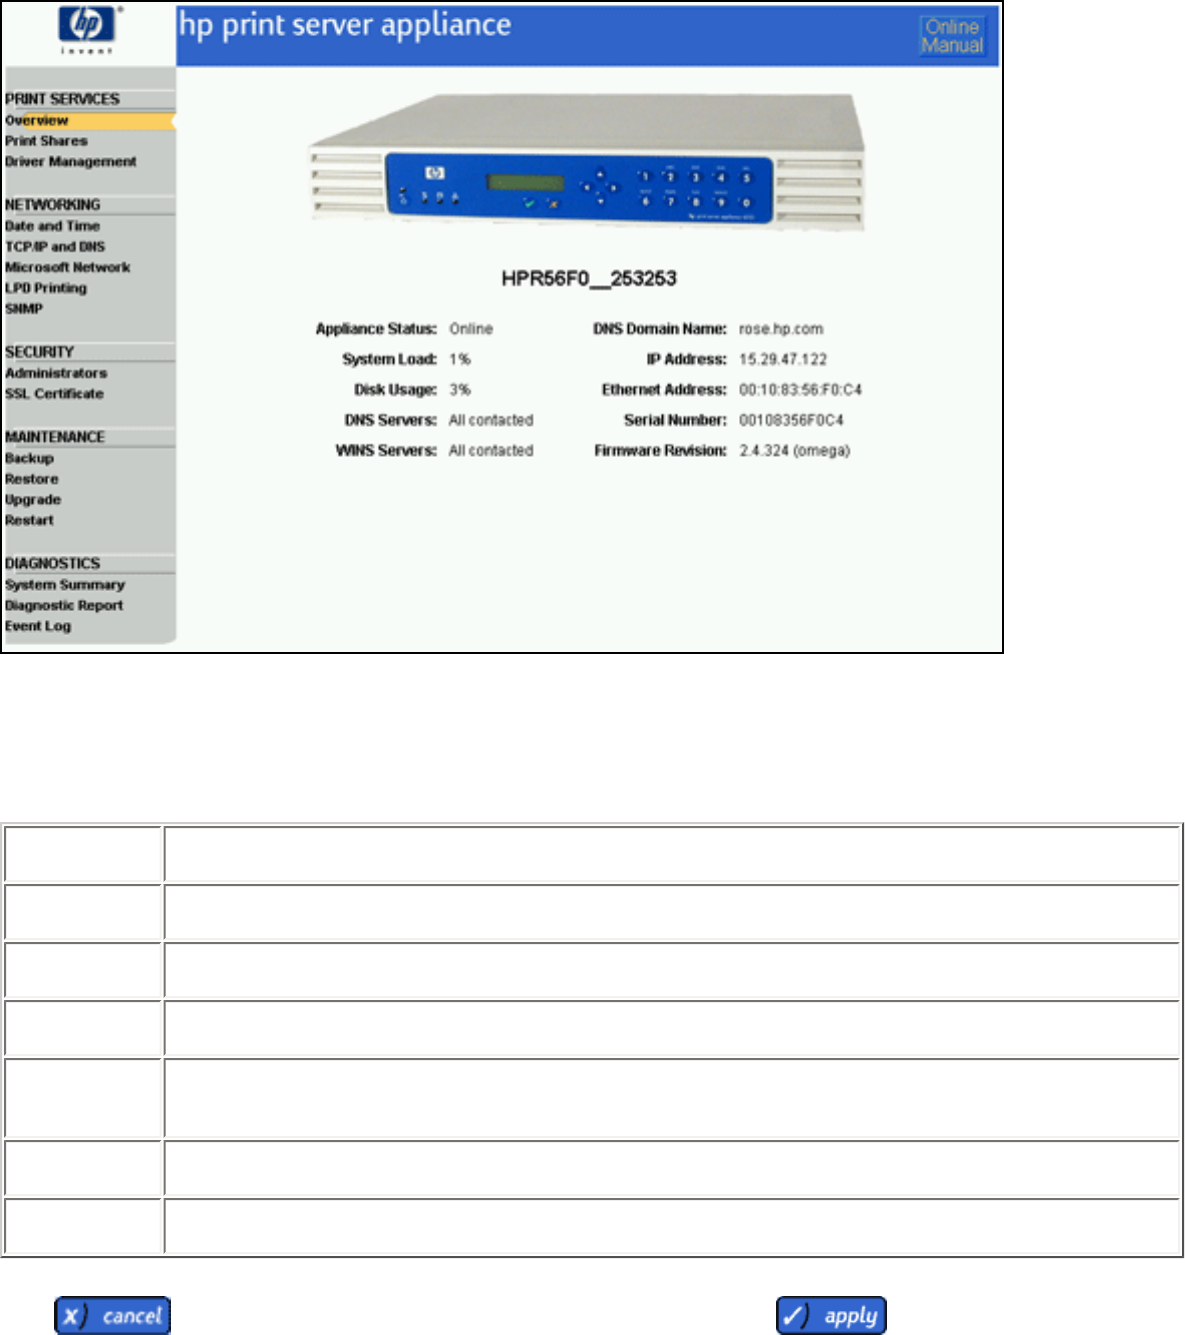
The Overview page displays general information about the PSA.
Menu
The menu is always displayed on the left side of the displayed page in the web interface. Click on any of the
following topics listed on the menu for more information:
Print Services
Overview
Print Shares
Driver Management
Networking
Date and Time
TCP/IP and DNS
Microsoft Network
LPD Settings
SNMP
Security
Administrators
SSL Certificate
Maintenance
Backup
Restore
Upgrade
Restart
Diagnostics
System Summary
Diagnostic Report
Event Log
Overview Page
The following information is displayed on the Overview page:
Overview Page
Field Name Description
Print Server Name Name as typed in the Print Server Appliance Name field on the Microsoft Network
Settings page (in the web interface under Networking).
Appliance Status Status of this PSA. If a backup, restore, or upgrade is in process, shows the current
state of that operation.
System Load Shows how heavily the PSA has been used in the past 15 minutes. (See the System
Load section on the Diagnostic Report for more information.)
Disk Usage Percentage of disk space used on the PSA.
DNS Servers Lists the number of configured DNS servers that are reachable across the network. This
value is updated every ten minutes or whenever Diagnostics are run.
WINS Servers Lists the number of configured WNS servers that are reachable across the network. This
value is updated every ten minutes or whenever Diagnostics are run.
Microsoft Domain If Domain Mode is enabled on the PSA (on the Microsoft Network Settings page) ,
this displays the name of the domain it is a member of and its status.
DNS Domain The DNS Domain name as typed in the DNS Domain field on the TCP/IP and DNS page
(in the web interface under Networking).
IP Address The IP address for the PSA as typed on the IP Address field on the TCP/IP and DNS
page (in the web interface under Networking).
Ethernet Address The PSA's IEEE Ethernet (802.3) Link Level MAC (Media Access Control) address.
Serial Number Serial number for the PSA.
Firmware revision Firmware revision number currently on the PSA.
Changing the Date and Time
Use the Date and Time Settings page to set the date and time of the PSA.
Field Name Description
Day Type the day of the month numerically (for example: "01" or "20").
Month Type the month (for example: "01", "02", and so on).
Year Type the four-digit year (for example, "2003").
Time Type the time in the format: hh:mm:ss. The seconds and leading zeroes may be omitted (for
example: "5:35" and "12:00:00").
AM/PM Use the drop-down box to select AM or PM. The 24-hour time format is not supported.
Time Zone Select the appropriate time zone from the drop-down box.
Click to keep the time and date at their previous values, or click to set the date and time.

Getting Started
Links within this document:
What Ships in the Box
Steps for Installation and Configuration
Hardware Installation
Links to related documents:
Troubleshooting the Appliance
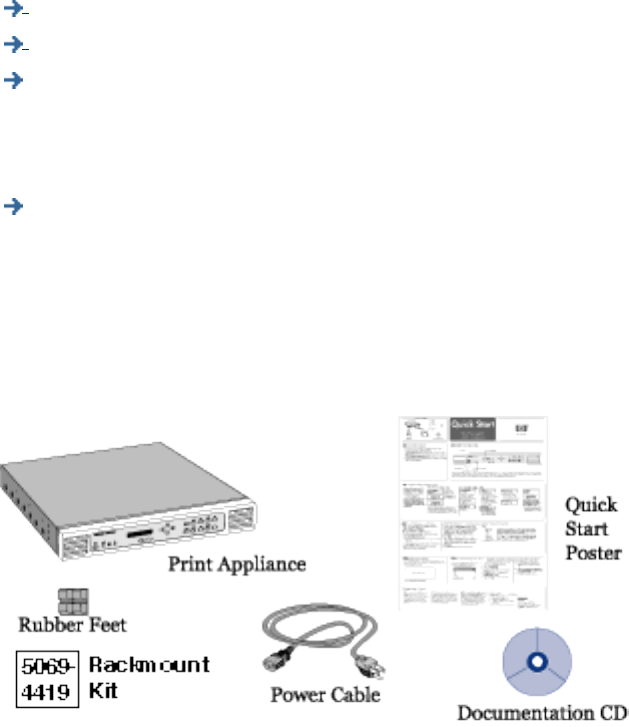
What Ships in the Box
The following items ship with PSA. If something is missing from the box, please contact the HP Dealer or Reseller
where the PSA was purchased.
Figure 1: Contents of the box
Steps for Installation and Configuration
To install the PSA, complete these steps:
1. Unpack the PSA, and make sure the six items are included in the box.

2. Attach its rubber feet for desktop, rack shelf, or under-printer installation. For rackmount installation, click
here.
3. Connect the cables and components.
4. Configure the IP settings using the front panel (for the first time). The IP address can be changed through
the web interface if desired.
5. Access the web interface.
6. Complete the TCP/IP and DNS Settings page (on the menu under Networking).
7. Complete the Microsoft Network Settings page (on the menu under Networking) to identify the WINS
server address and the Windows NT domain or workgroup. For NT Domain security, complete the other
fields on this page.
8. Install printers on clients.
9. Back up the settings.
10. Be sure to register the PSA (http://www.hp.com/go/printappliance_registration).

Installing Printers on Clients
Links within this document:
Installing Printers on Microsoft Clients (the Microsoft Point and Print feature)
Bypassing Point and Print
Configuring Printing for UNIX Clients
Links to related documents:
Troubleshooting the Appliance
Installing printers on each client computer is required in order for clients to be able to print using the PSA.
Note: Hewlett-Packard recommends verifying installation with one client computer before configuring more clients.
This will confirm operation. It is easier to troubleshoot settings on one client computer than on many.
Installing Printers on Microsoft Clients (the Microsoft Point and Print feature)
Use one of the following procedures to install printers on each client computer (this feature is only supported on an
x86 PC running Microsoft Windows 9x, ME, NT, 2K, or XP). Before you begin, check the following:
● The PSA is installed on the network and properly configured.
● Each client workstation is connected to the network.
● The printers are set up and turned on.
For Windows 9x, ME, NT, and 2K:
1. On the client workstation, click Tools in Microsoft's Explorer and select Find… Computer. Type the name
or IP address of the PSA. Or, find the PSA in the Network Neighborhood.
2. Open the Printers folder.
3. Right-click on the printer to install.
4. Select Install from the drop-down menu.
5. For Windows NT, 2000, and XP clients, driver installation is complete. For Windows 95, 98, and ME clients, a
wizard will ask several things (for example, Do you want to print from DOS, and so forth.).
Or:
1. On the client workstation, click Start-->Settings-->Printers.
2. Double-click the Add Printer icon.
3. Select the Network print server radio button.
4. Select the PSA and printer from the list box. Or, type the Universal Naming Convention (UNC) path (for
example: "\\spooler1\printer1"). See Microsoft documentation for more information about UNC. Click OK.
5. Answer subsequent questions to complete the driver installation.
For Windows XP:
1. On the client workstation, click Start and then choose My Computer. Under Other Places, click My
Network Places. Now click Search on the toolbar and type the name or IP address of the PSA.
2. Double-click the PSA that was found. This will expand into a list of printers available on the PSA.
3. Right-click on the printer and click Connect to install. The printer should now be in the printers and faxes
folder.
Or:
1. On the client workstation, click Start and then choose Printers and Faxes.
2. Under Printer Tasks select Add a printer.Double-click the Add Printer icon.
3. Select the Network print server radio button.
4. Select the Connect to this printer radio button and type the Universal Naming Convention (UNC) path (for
example: "\\spooler1\printer1"). See Microsoft documentation for more information about UNC. Click Next.
5. Answer subsequent questions to complete the driver installation.
Bypassing Point and Print
Installing printers on each client computer is required in order for clients to be able to print using the PSA. With the
Microsoft Point and Print technology, when a printer is added to a client, an associated driver is automatically
installed on the client also. This helps make printer installation easy. However, the driver associated with a given
printer can only be managed at an administrator level, so changes to that driver such as enabling duplex or
changing the driver itself will be reflected on all Windows NT, 2K, and XP clients using that printer; only one driver
can be associated with a given printer.
In order to bypass this functionality, clients can install a local printer that uses a local port to print through the PSA.
Note: This requires the client to install a driver locally. Because the installed printer is viewed by the computer as a
local printer, it will not receive job status feedback from the PSA. For example, if the printer on the PSA has been
paused, the client printer will not reflect this and it may look like a job was printed when it was not.
To install a local printer with local driver that prints through the PSA, follow the following steps.
For Windows 2000 and XP Clients:
1. Start the Add Printer wizard (in Windows 2000 or XP).
2. Click Next.
3. On the Local or Network Printer screen, select Local printer and then click Next.
Note: On this screen, make sure Automatically detect and install any Plug and Play printer is not
selected.
4. On the Select the Printer Port screen, select Create a new port and then select Local Port as the
Type. Click Next.
5. On the Port Name screen, type the UNC name for the printer in the following format and click OK:

\\<psa_name>\<printer_name> (where "psa_name" is the name of the PSA and "printer_name" is the
name of the printer)
6. On the screen showing printer manufacturers and printers, select a printer driver and then click Next.
7. On the Name Your Printer screen, specify a printer name and then click Next.
8. On the Printer Sharing screen, select Do not share this printer and then click Next.
9. On the Print Test Page screen, click Next.
10. Click Finish.
For Windows NT Clients:
Note: Before you begin, make sure you have Microsoft's Service Pack 6a (or greater) installed on the client(s).
1. Start the Add Printer wizard (in Windows NT).
2. Select My Computer and click Next.
3. On the screen showing available ports, click on the Add Port button.
4. On the Printer Ports screen, select Local Port and then click New Port.
5. On the Port Name screen, type the UNC name for the printer in the following format and click OK:
\\<psa_name>\<printer_name> (where "psa_name" is the name of the PSA and "printer_name" is the
name of the printer)
6. Click OK.
7. On the Printer Ports screen, click Close.
8. On the screen showing available ports, select your newly created port and click Next.
9. On the screen showing printer manufacturers and printers, select a printer driver and then click Next.
10. On the screen asking for a printer name, enter your printer name and click Next.
11. On the screen referring to printer sharing, select Not Shared and click Next.
12. Click Finish.
Configuring Printing for UNIX Clients
The following topics are discussed in the section:
● configuring print queues for BSD-like systems
● configuring print queues using SAM (HP-UX systems)
● printing a test file
A print queue must be set up for each printer or printer personality (text, PCL, or PostScript) used.
If printing text documents from UNIX clients to an HP Jetdirect print server, a special queue must be configured on
the PSA. First add the printer through the Print Share page in the web interface. On the Identify Printer page, for
connectivity select Other and then specify the Remote Queue Name. For the remote queue name on the target
printer, TEXT must be specified (or TEXT2, TEXT3 for multi-port Jetdirect print servers). This must be done even
though the target printer is an HP Jetdirect device. Use the normal print queue when printing jobs that have been
formatted with a printer-specific page description language such as PDL (like PostScript) or PCL.
Configuring Print Queues for BSD-like Systems
If the printer supports automatic language switching, the application may select the printer language using
commands embedded in the print data.
Make sure users know the printer names for the printers, since they will have to enter those names on the
command line for printing.
Following is an example of configuring print queues for BSD-like systems (for example, Linux):
1. Edit the /etc/printcap file to include the following entries:
printer_name:\
:lp=:\
:rm=print_appliance_name:\
:rp=remote_printername_argument:\ (this should be the same as the printer name on the
appliance)
:lf=/var/spool/lpd/error_log_filename:\
:sd=/var/spool/lpd/printername:\
:sh:
where printer_name is the name of the printer on the local computer. , print_appliance_name identifies
the printer on the network, and remote_printername_argument is the print queue designation on the
appliance.
For more information on printcap, see the printcap man page in the UNIX documentation.
2. Create the spooling directory by making the following entries. As the root user, enter:
cd /var/spool/lpd
mkdir printername
chown root printername
chgrp lp printername
chmod 755 printername
where printername is the name of the printer on the local computer.
Configuring Print Queues Using SAM (HP-UX Systems)
On HP-UX systems, the SAM utility can be used to configure remote print queues for printing.
Before the SAM program is executed, select an IP address for the appliance and set up an entry in the /etc/hosts
file on the system running HP-UX. (This is not required if DNS is configured.)
1. Start the SAM utility as a super user.
2. Select Printers/Plotters from the Peripheral Devices menu.
3. Select LP Spooler.
4. Select Printers/Plotters from the Printers/Plotters menu.
5. Select Action from the top menu and then select Add Remote Printer or Plotter.
6. Complete the Add Remote Printer/Plotter screen.
❍ The Printer Name field should be the local printer name.
❍ Be sure to check the box Remote Printer is on a BSD System.
7. Click OK.
8. Select Exit from the List menu.
9. Exit SAM.
Printing a Test File
To verify that the printer and PSA connections are correct, print a test file.
1. At the UNIX prompt type:
lp -dprintername file_name
or on a BSD-like system:
lpr -Pprintername file_name
where printername is the name of the printer as added to the appliance, and file_name is the file to be
printed.
2. To get print queue status, type the following at the prompt:
lpstat printername
or on a BSD-like system:
lpq -Pprintername
where printername is the designated printer.
Example: lpq -Pappliance1
Front Panel
Links to related pages:
Troubleshooting the PSA
The following activities can be performed from the front panel:
Start Up or Shut Down the PSA
Configure the IP Address for the PSA
Configure the Link Speed and Duplex Mode for the PSA
Set or Change the Front Panel Password
The front panel on the HP Print Server Appliance 4250 has the following components:
LEDs
There are four indicator lights (LEDs) on the front of the PSA. Understanding how the lights function is important for
proper operation of the PSA. This page describes normal and problem LED status displays.
LED LED Name Description
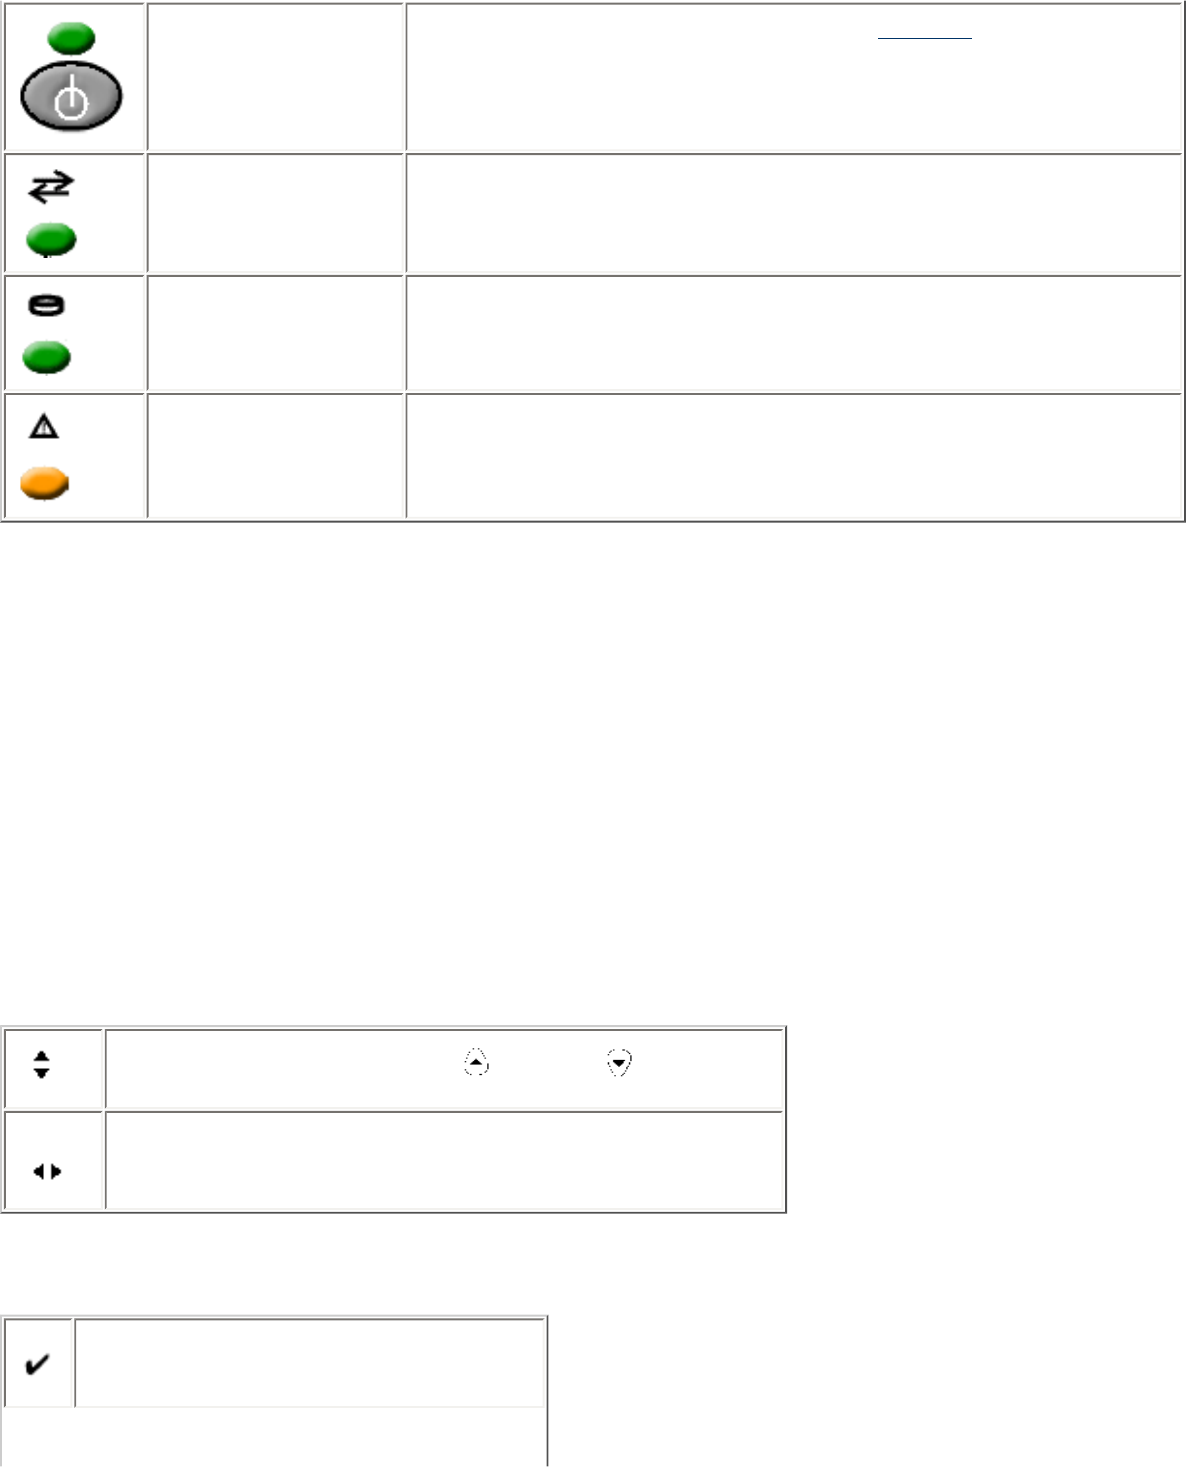
Power LED ON when power is supplied to the PSA and it is turned on.
Network Activity LED LIT when there is a connection between the PSA and other network devices.
BLINKS when there is network activity between the PSA and other network
devices.
Disk Activity LED ON when there is disk activity on the PSA.
Alert LED OFF during normal operations (ON during bootup and shutdown).
Power Button - Starting Up and Shutting Down the PSA
Press the Power button to power up the PSA. The bootup process begins. When the device is powered on, the Power LED
is lit. To turn off the PSA, press the Power button and wait for about 20 seconds for the PSA to power down. The PSA
performs an orderly shutdown.
If print jobs are printing when the PSA is powered down, the print jobs will not be completed. Jobs waiting to be printed
will resume printing when the PSA is fully booted. If the PSA loses power unexpectedly and is not powered down, spooled
print jobs that had not yet begun printing or print jobs that were in the middle of printing will resume printing when
power is restored and the PSA is powered up again. If, however, the integrity of the PSA or print jobs are compromised,
print jobs that were not spooled would have to be resent.
Front Panel Display
The LCD display has two rows of 16 characters or spaces. It is used to display the status of the PSA and to display
configuration information entered at the front panel. The following arrow buttons are displayed on the front panel:
Indicates that the menu can scroll. scrolls up, scrolls down.
Indicates that choices can be toggled through.
Enter and Cancel Buttons
Enter. Accept changes or begin an operation.
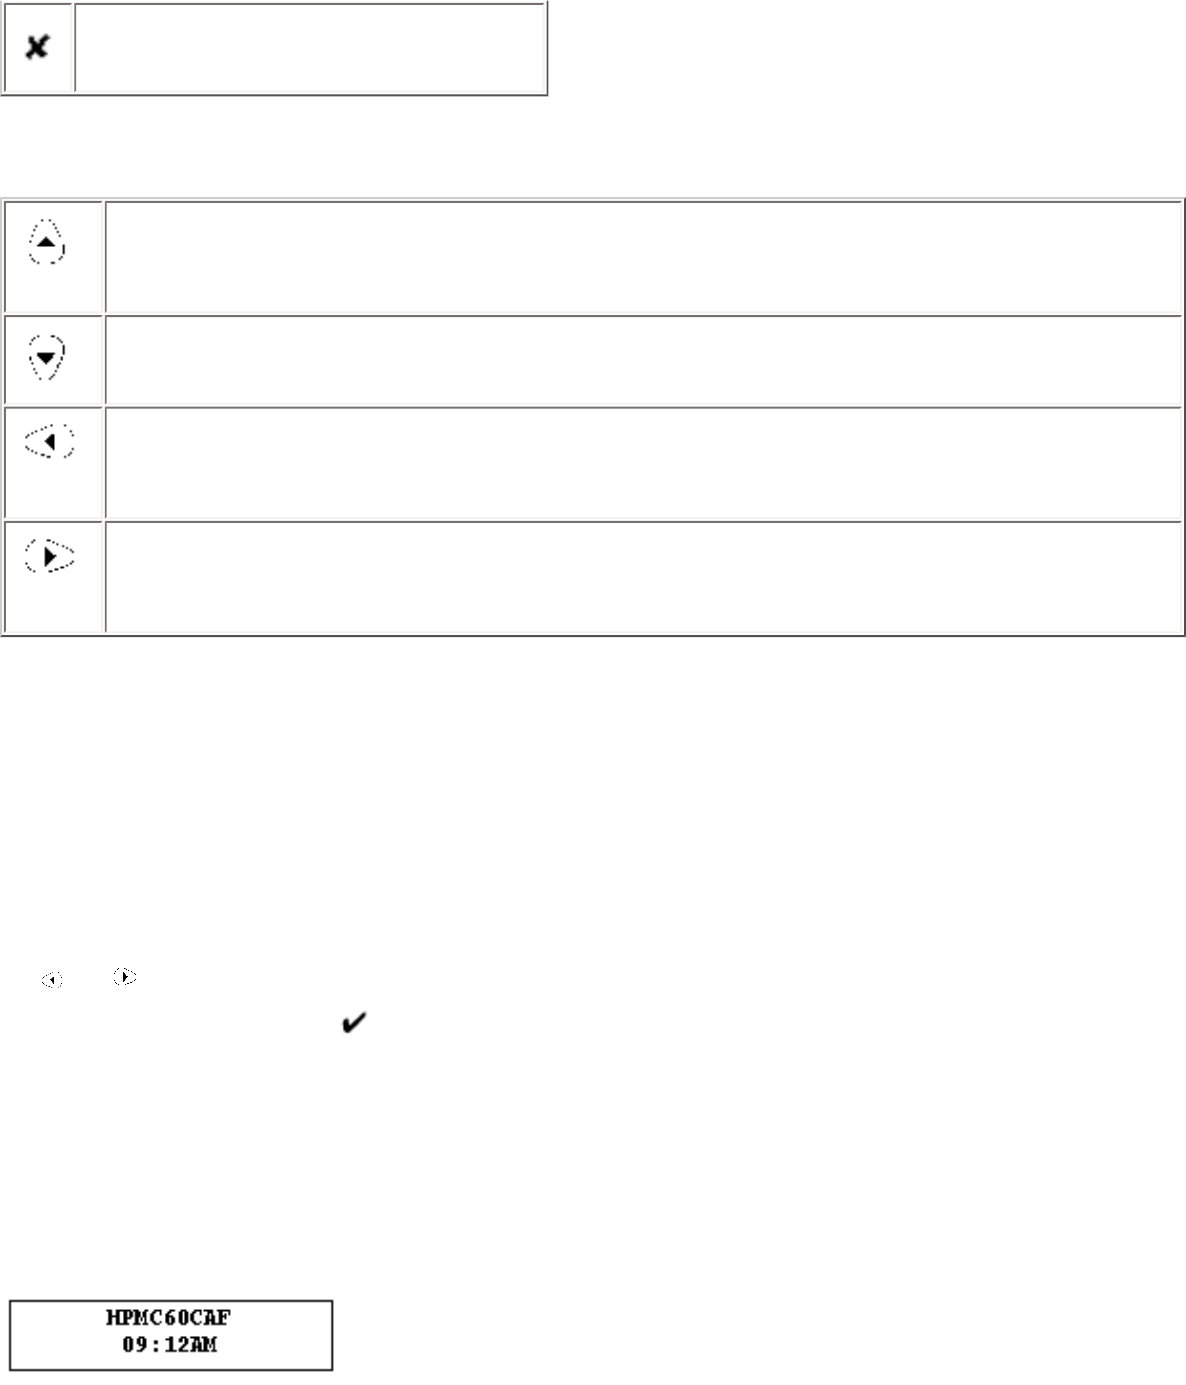
Cancel changes or end an operation.
Direction Buttons
Up. Press this button to return to the previous menu item or step of a procedure. If Enter hasn't been
pressed, changes will not be applied.
Down. Press this button to advance to the next menu item or step of a procedure.
Left. When there is a choice of options (as indicated in the front panel display), press this button to toggle
backward through the choices.
Right. When there is a choice of options (as indicated in the front panel display), press this button to toggle
forward through the choices.
Numeric Keypad
The numeric keypad has buttons for the numbers 0-9. Above the keys are letters of the alphabet, like the keypad on a
telephone.
Use the numeric keypad to enter numeric values, such as IP address, subnet mask, and so forth, when configuring the
PSA. The letters above the keys can be useful as a mnemonic aid when entering the device's password.
Making Entries
Use and on the front panel to move the cursor in the front panel display. Enter only numbers from the keypad.
When the entry is complete, press .
Messages on the Front Panel
When the PSA is powered up, it executes a series of self tests. It then displays a series of messages, including "Booting...
Configuring... Validating... Extracting... Formatting..." etc.
When the startup process is complete, the PSA displays a repeating series of normal operating messages.
The first line of the display shows the PSA name which can be entered from the web interface during configuration (on the
Microsoft Network Settings page). If the name is not typed in the web interface, the default name, based on the device's
MAC address, is displayed.
The second line of the display shows date, time, IP address, and firmware version in a repeating sequence.
Starting Front Panel Operation
Configure the IP Address for the PSA
Configure the Link Speed and Duplex Mode for the PSA
Set or Change the Front Panel Password
There are three front panel operations: IP configuration, link speed and duplex mode configuration, and password
configuration
Use the web interface to further configure the PSA. Refer back to the Getting Started procedures, or refer directly to
information about using the web interface to further configure the device.
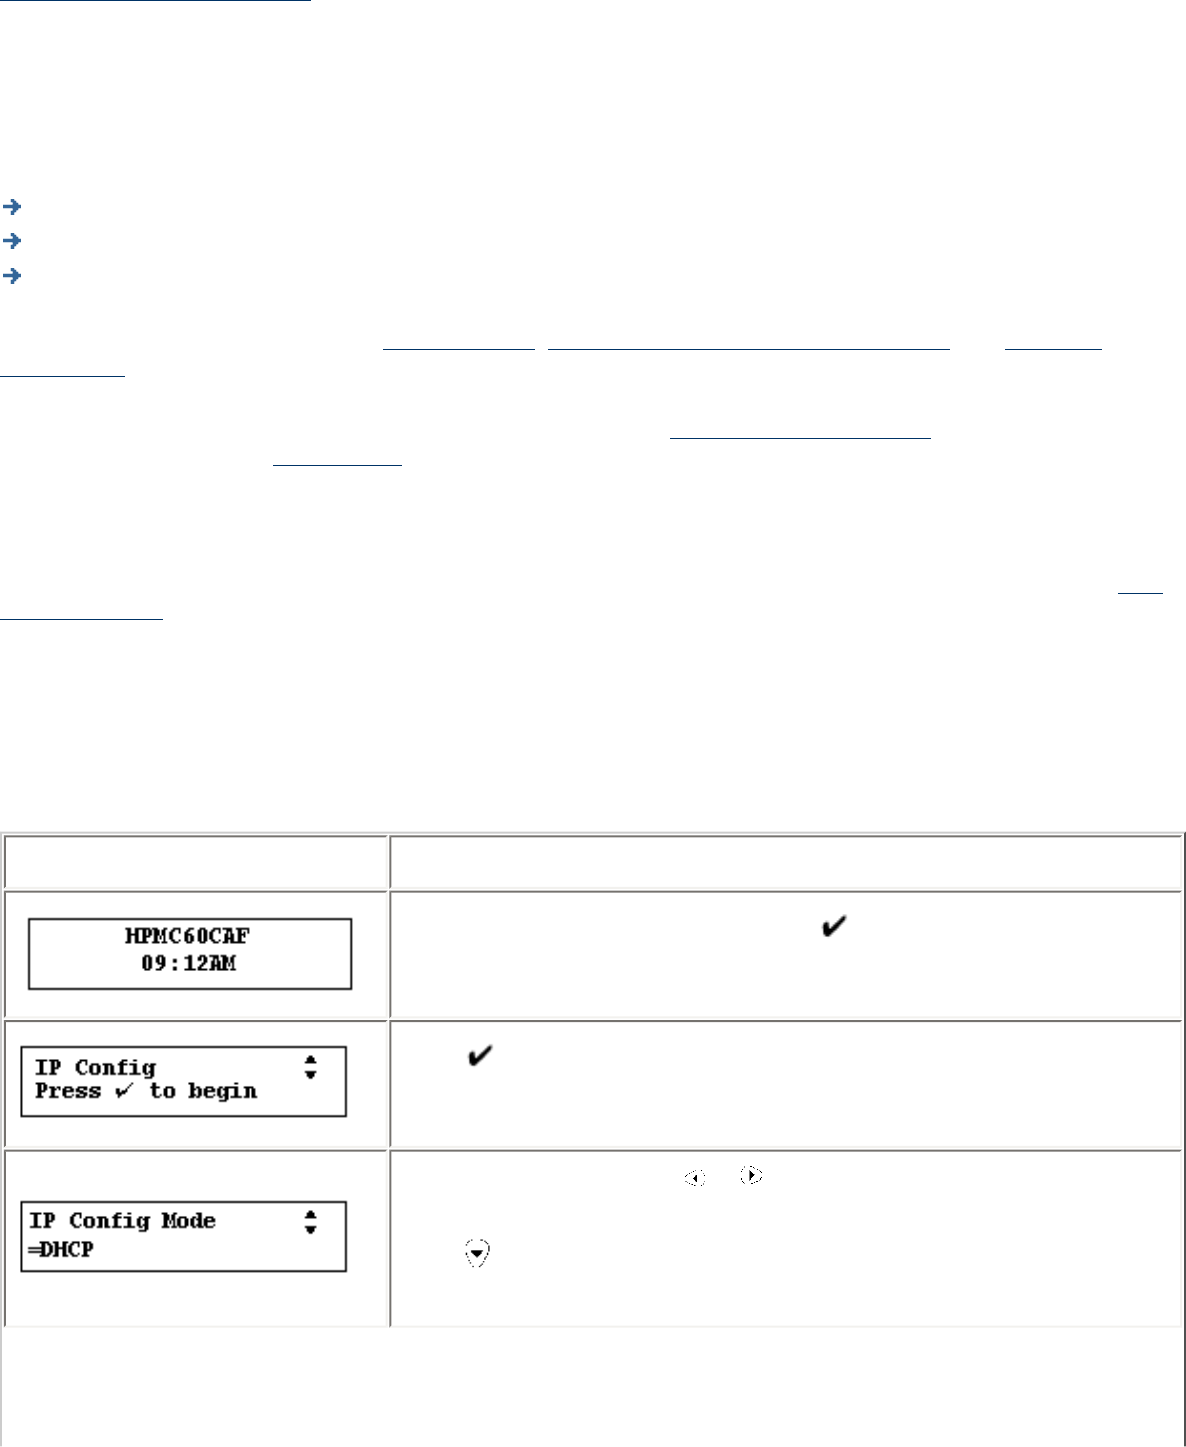
Configuring the IP Address Using the Front Panel
These procedures explain how to configure an Internet Protocol (IP) address on the PSA using the front panel. (The TCP/
IP and DNS page in the web interface can also be used to do the same.) Configuring the IP address allows the PSA to
route print tasks properly.
If the network does not use Dynamic Host Configuration Protocol (DHCP), use the front panel of the PSA to manually
enter the IP address, subnet mask, and default gateway.
Configuring the IP Address
Display Action
To begin configuring the IP address, press once.
Press again.
Select the mode by pressing or to toggle between Manual and DHCP.
Press to continue.
If Manual: Use the number buttons on the front panel of the PSA to enter the
IP address. Then press .
If DHCP: Press to continue.
If Manual: Use the number buttons on the front panel of the PSA to enter the
subnet mask. Press .
If DHCP: Press to continue.
If Manual: Use the numbers on the front panel of the PSA to enter the
default gateway. Press .
If DHCP: Press to continue.
Press .
Press .
After a moment, the PSA will resume displaying normal operating messages if
the IP address is valid.
Configuring the Link Speed and Duplex Mode Using the Front Panel
These procedures explain how to configure the link speed (100 Mbps or 10 Mbps) and the duplex mode (full or half) for
the PSA using the front panel. This can be done manually or the settings can be automatically detected (which is the
default). The link speed is the speed at which the PSA communicates over the network. The speed is expressed in
megabits per second and is either 10 or 100. The duplex mode defines whether data can be sent at the same time it is
received:
● Full duplex: data can flow both directions at the same time
● Half duplex: data can only flow one way at a time and any attempt to do both at the same time creates a
collision.
The current setting is displayed on the System Summary page (under Maintenance in the web interface).
Display Action
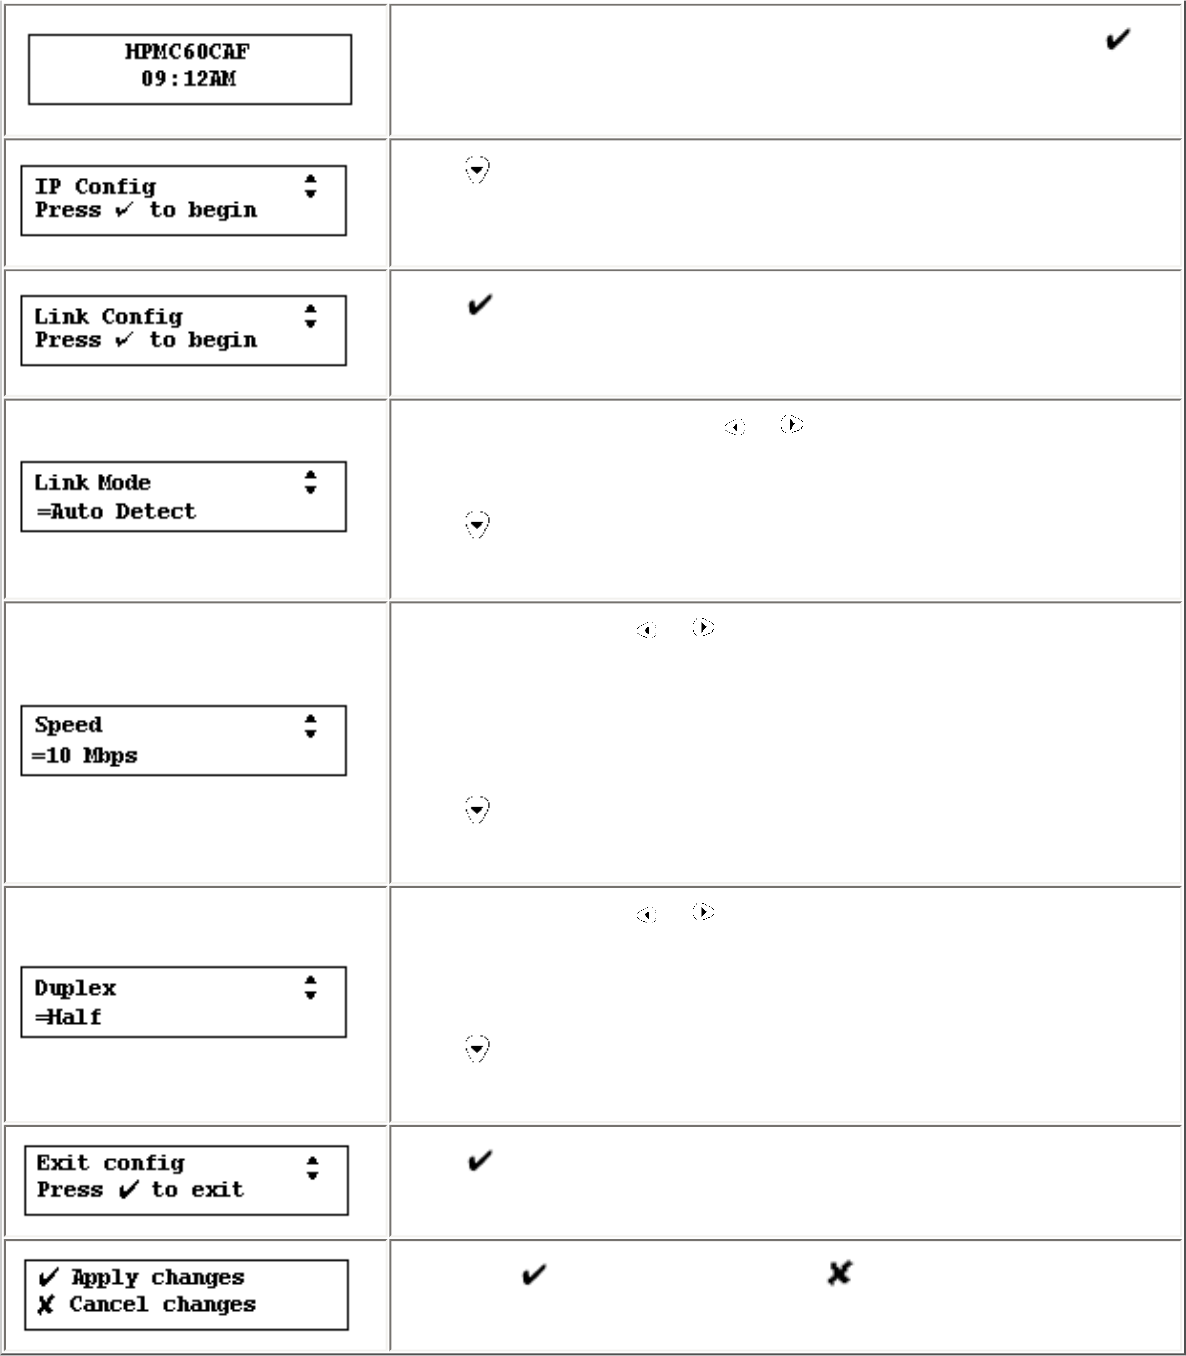
To begin configuring the link speed and duplex mode for the PSA, press
once.
Press to skip the IP configuration and to go to the Link Speed and Duplex
Mode configuration.
Press .
Select the link mode by pressing or to toggle between Manual and
Auto Detect.
Press to being configuring the link speed.
If Manual mode: Press or to select the link speed (10 Mbps or 100
Mbps).
If Auto Detect mode: The detected setting is displayed (10 Mbps or
100Mbps).
Press to begin configuring the duplex mode.
If Manual mode: Press or to select the duplex mode (Half or Full).
If Auto Detect mode: The detected duplex mode is displayed (Half or Full).
Press to continue.
Press .
Then press to apply changes, or press to cancel the changes.
Setting or Changing the Front Panel Password
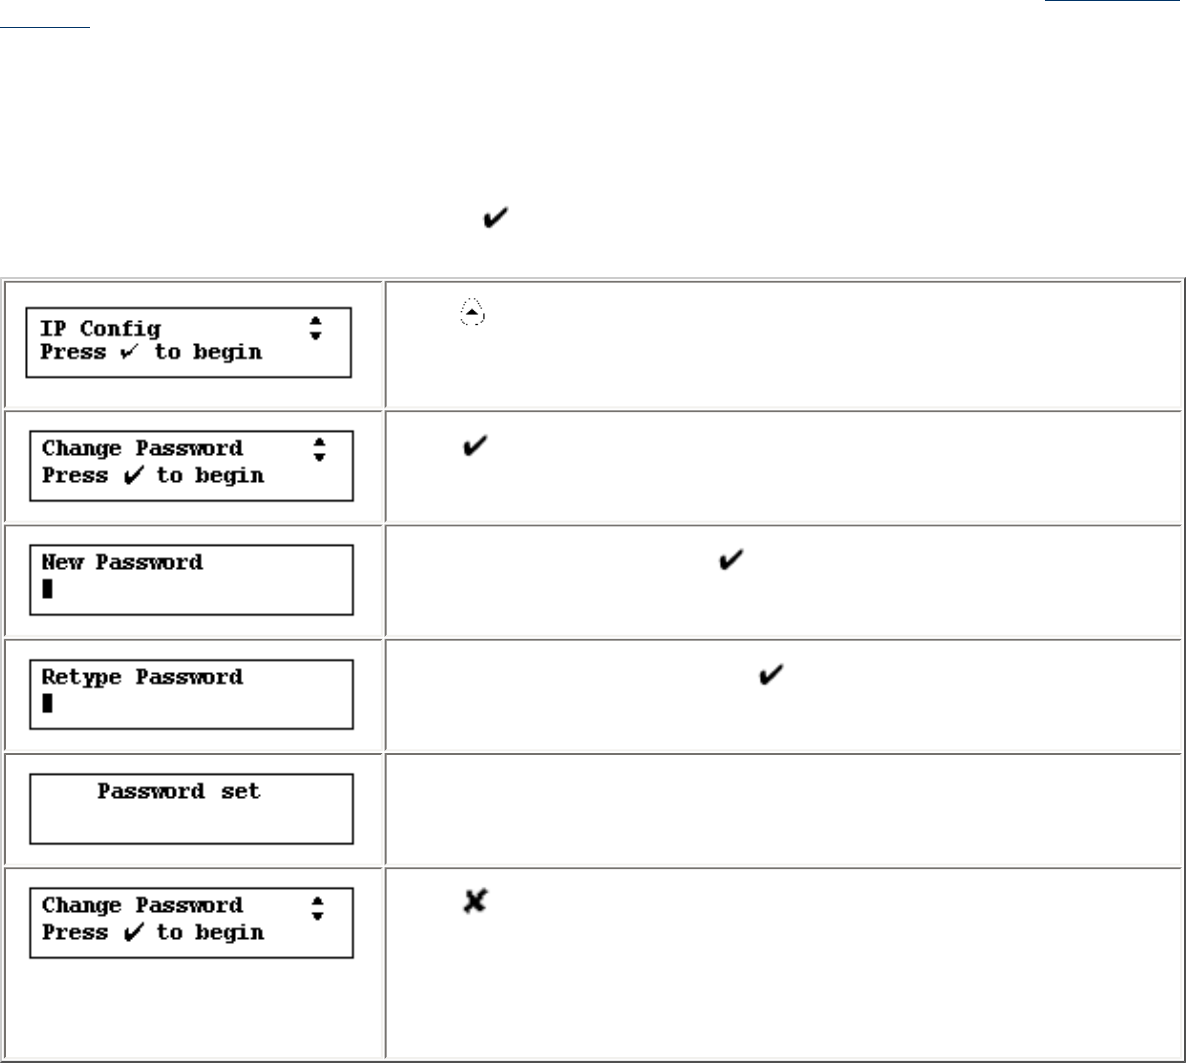
There are two types of passwords that can be set for the PSA: a front panel password (one per PSA) and an administrator
password (can be multiple accounts, but there must be at least one), which enables access to the web interface to
manage the PSA. The front panel password is discussed in this section.
There is no front panel password until it is set. This password limits access to front panel functions. A password will
prevent unauthorized configuration changes. After the front panel password is set, it must be entered before future
configuration tasks can be performed at the front panel display.
To set or change the front panel password, press once. The following messages are displayed:
Press
Press .
Type a new password and press .
Retype the new password and press .
The front panel displays this message briefly.
Press to end the operation and the device will return to the display of
normal operating messages.
Or, after a moment, it will display normal operating messages.

Hardware Installation
Links within this document:
Desktop/Rack Shelf/Under-Printer Installation
Rackmount Installation
Cable Connections
Troubleshooting the Appliance
Links to related documents:
Troubleshooting the Appliance
This document explains how to connect the components of the appliance. When installing the hardware for the
appliance, be certain to carefully follow all instructions to ensure the proper connection and function of the
appliance.
Desktop/Rack Shelf/Under-Printer Installation
Use the following procedure to perform the desktop/rack shelf/under-printer installation:
CAUTION: For under-printer installation, the appliance can support printers that weigh up to 60 pounds.
Do not place heavier printers on the appliance.
1. Turn the appliance so it rests on its top.
2. The appliance ships with a set of four self-adhesive rubber "feet" on a paper backing sheet. Remove each
foot from the paper backing. Install each foot on the bottom of the appliance in the indentation provided.
Press each foot firmly into place.
3. Turn the appliance over so it rests on its rubber feet.
4. Locate the appliance for easy access to a power source and network connection. It may be located on any
solid surface, in a rack shelf, or under a printer.
5. Connect cables.
Rackmount Installation
The appliance may be rack-mounted into industry-standard instrument/computer racks. The appliance is shipped
with a pair of rack-mount brackets with four screws. There are also four screws for mounting the brackets to the
appliance in the rack.
The appliance requires 1.5 rack units (RU) of vertical space. It does not require rails for rack mounting.
Note: The rackmount installation should be performed by an experienced individual, using appropriate tools, and
exercising appropriate safety precautions.
Use the following procedure to perform the rackmount installation:
1. Attach the rackmount brackets to the sides of the appliance.
2. Position the appliance in the rack.
3. Install the appliance into the rack. Use all of the provided screws in both vertical rails of the rack.
Caution: To prevent unstable mounting of the appliance, Hewlett-Packard recommends using two screws
per bracket.
4. Now the cables should be connected.
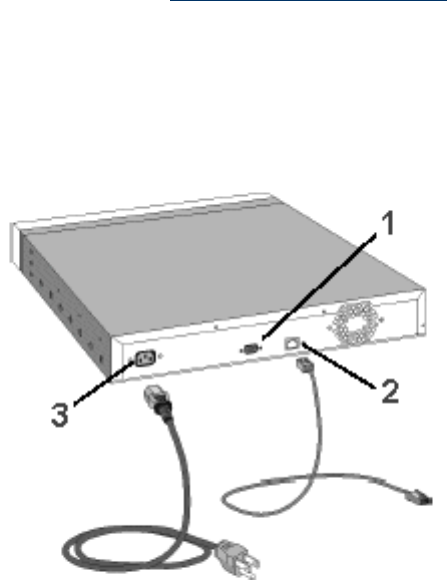
Cable Connections
Use the following steps to connect the cables:
1. DB-9 Serial Port (supports all APC uninterruptible power supplies with a Simple Signaling cable (APC
part # 940-0020B))
2. RJ-45 Network Jack
3. Power Receptacle
1. Connect a twisted pair network cable (not included) with an RJ-45 connector to the RJ-45 jack on the back
of the appliance (see Figure 1, number 2).
2. Connect the other end of the network cable to a network port.
3. If using an APC uninterruptible power supply (UPS), connect a Simple Signaling cable from the UPS to the
DB-9 serial port on the back of the appliance.
Note: The Simple Signaling cable is not included with the appliance or with the APC UPS. This cable can be
ordered from APC (APC part # 940-0020B).
4. Connect the power cable to the power receptacle on the back of the appliance.
Note: Make certain that air flow is not restricted around the back of the unit.
5. Connect the other end of the power cable to a power source. If a UPS is being used, connect the power
cable to the UPS.


TCP/IP and DNS Settings
Links within this page:
TCP/IP and DNS Settings
Configuring the PSA Using the Web Interface
Links to related pages:
Related System Messages
Troubleshooting the PSA
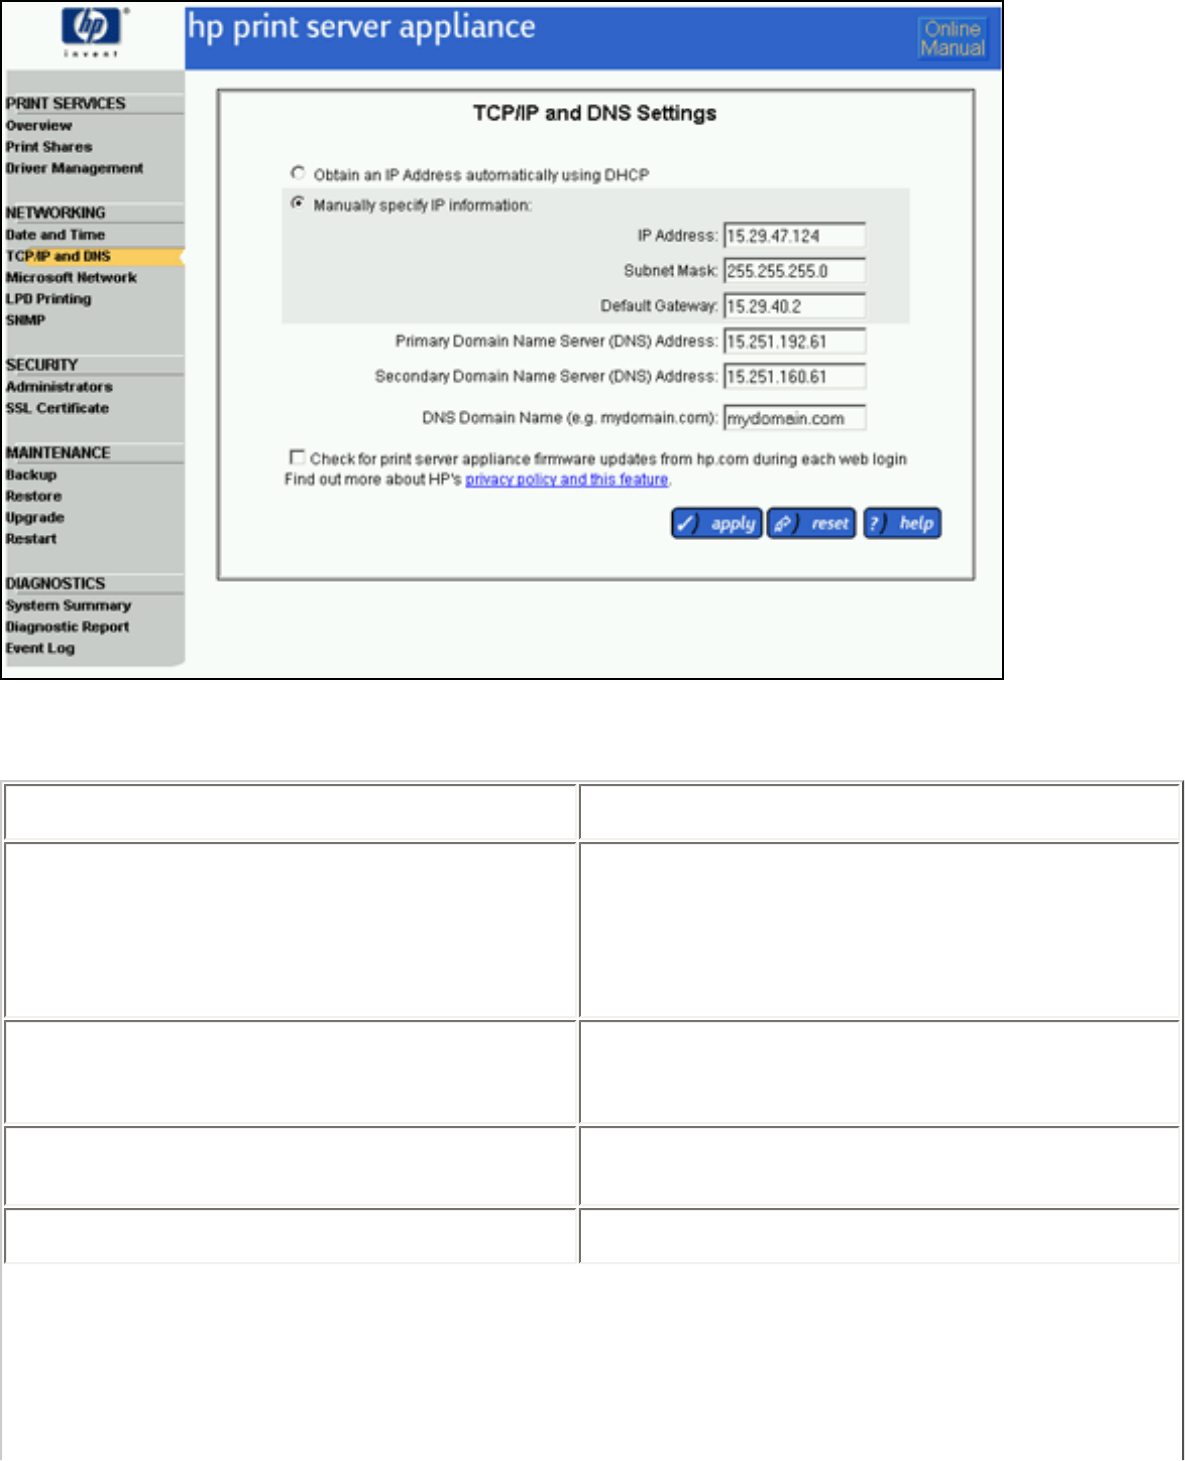
TCP/IP and DNS Settings
The TCP/IP and DNS Settings page is accessible under Networking on the menu in the web interface. On this
page, administrators can configure:
● the IP address
● subnet mask
● gateway
● Primary Domain Name Server (DNS) address
● Secondary Domain Name Server (DNS) address
● DNS Domain Name
screen to change
Field Name Description
Obtain an IP address automatically using DHCP Select this option for the PSA to be automatically
configured using Dynamic Host Configuration Protocol
(DHCP). Ensure that a valid DHCP server and address
leases are available. If DHCP was chosen, the IP
address, subnet mask, and default gateway will be
automatically configured.
Manually specify IP information Select this option to manually specify the IP address
information for the PSA. Each field must be entered
manually.
IP address Enter an IP address without leading zeroes (for
example: "10.1.2.3").
Subnet Mask Enter a subnet mask (for example: "255.0.0.0").

Default Gateway Enter the IP address of the default gateway used to
access other networks or subnets. This enables the
PSA to communicate with devices (such as printers and
PCs) on different subnets.
If a gateway is not available, or if the address of the
gateway is unknown, enter the same IP address used
for the PSA, or leave this field blank (or empty).
Primary Domain Name Server (DNS) Address The DNS enables network resources (such as PCs and
printers) to be specified by their friendly names instead
of their IP addresses. In order to use this functionality,
specify the primary DNS server by its IP address, not
by its friendly name. Once the primary DNS is
specified, use friendly names across other
configuration areas of the PSA (such as the queue
configuration screen). If the network does not have a
DNS, leave this field blank (or empty).
Secondary Domain Name Server (DNS) Address If the primary DNS is unavailable, this server will be
contacted. Specify the secondary DNS server by its IP
address, not by its friendly name. After this is server
specified, use friendly names across other
configuration areas of the PSA (such as the queue
configuration screen). If the network does not have a
DNS, leave this field blank (or empty).
DNS Domain Name The DNS domain name. For example, a server named
mail.hp.com (hp.com is the DNS name and mail is the
host name).
The domain name must match standard naming
conventions. The name must be alphanumeric. It may
also contain dashes ( - ) (for example : mycompany.
com).
If the network does not have a DNS domain name,
"defaultdomain" is entered as the default.
Check for Print Server PSA firmware updates
during each web login The Overview page can display new information
regarding the PSA if this box is checked.
Configuring the PSA Using the Web Interface
1. At a workstation, access the web browser.
2. Log on to the PSA as an administrator (The default is "admin" for the user name and "admin" for the
password.)
3. Complete the TCP/IP and DNS Settings page. See the description of the fields (above) for more
information.
4. Click .
After this screen has been completed, complete the Microsoft Networking Settings page to identify the WINS server
address and the Windows NT domain or workgroup. For the Windows NT domain security feature, complete the
other fields on that page.
Microsoft Network Settings
Links within this page:
Microsoft Network Settings Page
Microsoft Domain Authentication Features
Adding the PSA to a Domain
Enabling and Disabling Microsoft Domain Authentication
Granting Printer Access or Authority to Users and Groups
Administrator Accounts for the Appliance
Links to related pages:
Troubleshooting the Appliance
Related System Messages
Microsoft Network Settings Page
The Microsoft Network Settings page is accessible from the menu (under Networking in the web interface). On
this page, administrators can:
● change the name of the PSA.
● identify the primary and secondary WINS server addresses.
● identify the Windows domain or workgroup.
● enable Microsoft Domain authentication.
Microsoft Network Settings Page
Field Name Description

Print Server
Appliance
Name
Type a name for the PSA. The PSA name will be displayed:
● In the Network Neighborhood and in My Network Places on each client workstation.
Both are visible from Microsoft Windows Explorer.
● On the Overview page in the web interface for the PSA.
● On the front panel of the PSA.
If the network uses DNS to identify network resources, this name should match the DNS
name.
The PSA name can contain up to 15 alphanumeric characters. It may also contain hyphens
( - ) and underscores (_). (This name cannot begin with a hyphen (-), but it can have a
hyphen within the name. The hyphen cannot be the first character because the PSA name is
also used as a host name, and the hyphen character is not allowed as the first character in a
host name.)
Primary
WINS Server
Address
(Windows Internet Name Server) Enables network resources (such as PCs and printers) to
be specified by their friendly names instead of their IP addresses. In order to use this
functionality, specify the primary WINS server by its IP address, not by its friendly name.
Once the primary WINS server is specified, use friendly names across other configuration
areas of the PSA (such as the queue configuration screen).
If the network does not have a WINS server configured, leave this field (and the next field)
blank. Without a WINS server configured, Windows 95, 98, and ME clients may be unable to
print to a PSA located on a different subnet. Domain integration may behave unpredictably
if this field is blank.
Secondary
WINS Server
Address
If the primary WINS server is unavailable, this secondary server will be contacted. Specify
the secondary WINS server by its IP address, not by its friendly name.
If the network does not have a WINS server configured, leave this field blank (or empty).
Windows
Domain or
Workgroup
Specify the Windows domain or workgroup (NT, 2K, or Windows Server 2003) to which this
PSA belongs. The PSA will appear under this name in Network Neighborhood.
Enable
Domain
Authentication
Check this box to enable domain security for the PSA (for NT, 2K, or Windows Server 2003).
Uncheck the box to disable domain security. (The default is disabled.)
Automatically
Discover
Domain
Controllers
Select this to automatically discover the domain controller for the domain or workgroup as
specified above in the Windows Domain or Workgroup field (for NT, 2K, or Windows
Server 2003) .
Manually
Specify
Domain
Controllers
Select this to manually specify the domain controllers for NT, 2K, or Windows Server 2003.
Domain
Controller Type the domain controller's name or IP address to be added to the list of Configured
Domain Controllers; click to add it to the list.
Specified
Domain
Controllers
List of specified domain controllers to use for user name and password validation. The PSA
will try to communicate with the first domain controller in the list. If the PSA cannot
communicate with the first one, it will then try the second domain controller in the list, and
so forth. If none of the domain controllers in the list are successfully contacted, the PSA will
attempt to automatically discover a domain controller. Click or to
reorder the domain controller names in the list. Click to take a domain
controller off the list. (This is only valid when in manual mode.)
Domain
Membership
Status
The current status of the PSA's membership in the domain (for NT, 2K, or Windows Server
2003).
Create an
account for
this device in
the domain
Check this to create a new computer account for the PSA in the domain; then enter the
domain administrator user name and password below.
Note: A WINS server must be specified in the WINS Server Addressfield on this page.
Domain
Administrator
Name
A valid administrator's name as stored on the Domain Controller.
Domain
Administrator
Password
A valid administrator's password as stored on the Domain Controller.
To complete the Microsoft Network Settings page, follow these steps:
1. At a workstation, access the web browser and type the IP address for the PSA.
2. Log on to the PSA as an administrator. (The default user name is "admin" and the default password is
"admin".)
3. Under Networking on the menu, select Microsoft Network. (See the description of the fields above for
more information.)
4. Complete the Print Appliance Name field.
5. Complete the Primary WINS Server Address field.
6. Complete the Secondary WINS Server Address field.
7. Complete the Windows Domain or Workgroup field.
8. If the security feature for Windows authentication and authority is being used, complete the other fields on
this page.
9. Click . The network will be restarted with the new settings.
Note: Hewlett-Packard recommends backing up the settings after this page is completed.
Microsoft Windows Domain Authentication Features

A domain is a logical grouping of network servers and other computers that share a common security and user
account for each user. Users log on to the domain, not to individual servers in the domain. Microsoft domain
security is a feature that allows administrators to easily authorize or restrict print administration and services to
specific groups or users by using their existing user name and password of the domain.
The domain security feature provides the following features:
● Seamless integration for the print client user (the native tools for printing and managing personal
documents work the same as they do with Microsoft spoolers).
● Assignment of permissions are on a per-printer basis.
● Disabling and enabling domain security and authority without losing configuration information.
● Setting or changing permissions using the web interface or native tools.
● Specifying selected groups that can have one of the following four permission levels for each printer, using
native tools:
❍ Print (print, pause, and delete your own print jobs)
❍ Manage Documents (pause and delete other user's print jobs)
❍ Full Control (print, pause, and delete other user's print jobs, delete printers, and change security
settings)
❍ No Access
❍ Special Access (for some Windows 2000 and XP print permissions that do not map directly to the
above four permission levels)
Adding the PSA to a Domain
There are two ways to add the PSA to a domain:
● Complete the fields on the Microsoft Network Settings page. Type the PSA name and then, at a
minimum, select the box for Create account for this device in the domain and complete Domain
Administrator Name and Domain Administrator Password.
OR
● Create a machine account on the domain controller using Server Manager. A machine account must be
created before the PSA can join the specified domain.
Note: This method must be used if a WINS Server was not specified on the Microsoft Network Settings
page.
1. Log on to the server as an administrator.
2. Add the PSA to the domain using the Server Manager.
3. Log on to the PSA as PSA Administrator using the PSA's web interface. (The default user name is
"admin" and the default password is "admin".)
4. Set the domain name on the Microsoft Network Settings page by completing the Windows
Domain or Workgroup field.
5. Enable Domain Authentication by checking the box Enable Domain Authentication.
6. Click .
Enabling and Disabling Microsoft Domain Security
The administrator can, at any time, turn on or off domain security. If domain security is on and the PSA cannot
communicate with the domain controller over the network, users will not be able to print using the PSA. The
administrator can turn off domain security, which would enable users to continue printing although no security will
be enforced. To disable domain security, access the Microsoft Network Settings page, and make sure the box for
"Enable Domain Authentication" is not checked.

With Domain authentication disabled, local administrator accounts must be used to manage the PSA and access the
web interface because all domain administrator accounts will be disabled by this action as well.
Granting Printer Access or Authority to Users and Groups
On Security page for a specific print share, assign domain users and/or groups appropriate access for that print
share. The Account(s) to Add to List box (on the left) contains all of the group or user names within the selected
domain. Select from this list to grant access to the print share and click . After the account has been
granted access, its name will be moved from the Account(s) to Add to List box to the Current Account(s) in
List box.
By default, every user on the PSA has print access to any newly created print share.
Administrator Accounts for the PSA
There are two types of administrator accounts on the PSA:
● Local Administrator Accounts - user names and passwords are stored on the PSA and are not
synchronized with any domain accounts.
● Domain Administrator Accounts - user names and passwords are synchronized with domain accounts.
If domain authentication is enabled on the Microsoft Network Settings page, both local and domain administrator
accounts can be added to the PSA.
If domain authentication is not enabled on the Microsoft Network Settings page, only local administrator
accounts can be added to the PSA.

LPD
Links within this page:
LPD Printing
Configuring LPD Printing
Links to related pages:
System Messages for LPD Printing
Troubleshooting the PSA
Configuring Printing for UNIX Clients
This feature enables the Line Printer Daemon (LPD) protocol (sometimes referred to as "BSD compatible" network
printing) to spool and control print jobs on the PSA from any RFC 1179-compliant LPD client including:
● HP-UX 10.x and above
● Solaris
● Linux
● AIX 4.3 and above
Note: Not all LPD implementations are RFC 1179-compliant.
LPD print jobs are visible to Windows clients, but Windows users cannot manage (pause, resume, restart or cancel)
them unless that user has the appropriate administrative rights on the PSA.
Both UNIX and Windows clients can simultaneously print to the same printer regardless of whether a printer driver
has been associated with the printer.
As a default, LPD printing is enabled for all hosts. Administrators can restrict printing to a certain set of hosts, if
desired.
Note: The PSA does not process control files for printing options such as number of copies. Instead it will pass this
information straight through to the target device and the target device may choose to handle or ignore these
options.
LPD Printing
On the LPD Settings page, the administrator can enable or disable LPD printing.
LPD Settings Page
Field Name Description
Disable LPD printing Disables LPD printing and print job management from any and
all hosts.
Enable LPD printing from ALL hosts Enables LPD printing and print job management from any and
all hosts (default).
Enable LPD printing from specified hosts Enables LPD printing and print job management from the hosts
typed in the Host Names list on this screen. If this is selected,
the fully qualified domain name or IP address of each computer
system using LPD must be typed. (Without the fully qualified
name, this will not work.)
Host Name or IP Address Type the host name or IP address to be added to the Specified
Hosts list. This field is only active when Enable LPD printing
from specified hosts is selected. For example, host name.
domain.com or 1.160.10.240.
Specified LPD Hosts Host names permitted to print and manage print jobs using
LPD. This field is active only when Enable LPD printing from
specified hosts is selected.
Configuring LPD Printing
To enable or disable LPD printing, follow these steps:
1. In the web interface, click LPD Printing (on the menu under Networking).
2. Complete the fields as described above.

SNMP Settings
Links within this page:
SNMP and the PSA
SNMP Traps
SNMPv3
Configuring SNMP Settings
Links to related pages:
Related System Messages
Troubleshooting the PSA
SNMP and the PSA
The SNMP agent supports MIB II (Management Information Base II), Host Resources MIB (portions), its own MIB,
called the HP-PRINT-SPOOLER-APPLIANCE-MIB, SNMPv3, and SNMPv2 Traps.
Note: For a copy of the HP-PRINT-SPOOLER-APPLIANCE-MIB, check http://www.hp.com.
SNMP Traps
Users can register for traps using the following, as outlined in RFC#2573:
● snmpTargetAddrTable
● snmpNotifyTable
● snmpTargetParamsTable
Registering for traps through the tables can be difficult; it is recommended that only administrators familiar with the
tables register for traps in this manner. A simple interface to the tables was added to the PSA's interface.
Registering for Traps
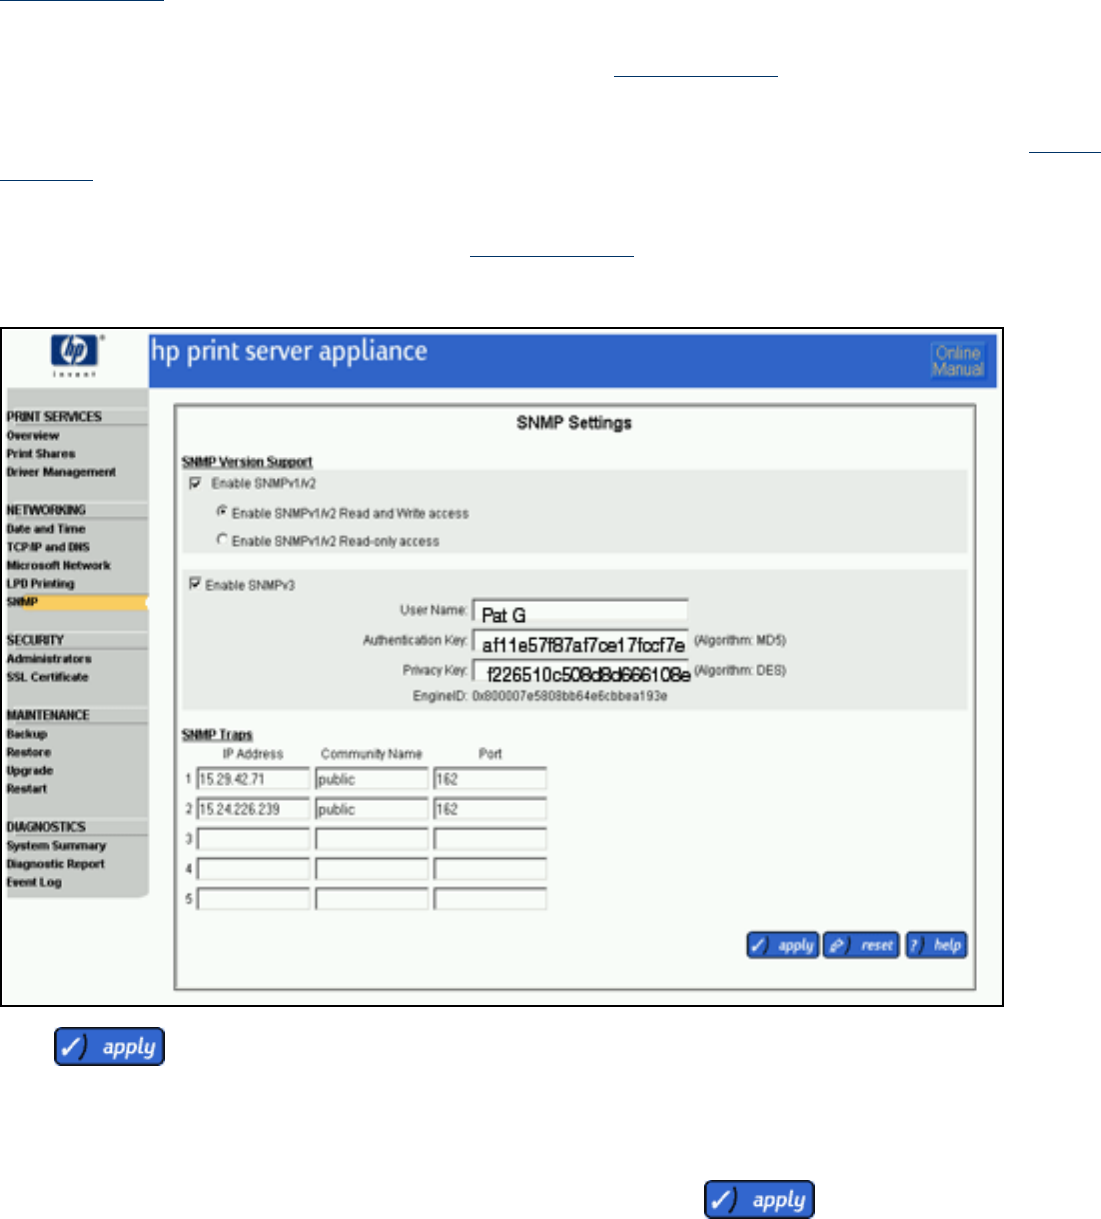
The SNMP Settings page is displayed when SNMP is selected (on the menu under Networking).
SNMP Settings Page
Field Name Description
Enable SNMPv3 Select this to enable SNMPv3. User account information will be saved and
restored during a firmware upgrade.
User Name User name must be between 2 and 32 characters long.
Authentication Key Must be 32 characters long. Can be numbers 0-9 or characters a-f or A-F.
Privacy Key Can be numbers 0-9 or characters a-f or A-F.
Engine ID SNMP v3 engine's administratively unique identifier; used solely for
identification, not for addressing.
SNMP Traps: IP Address Type the IP address of where the trap is being sent.
SNMP Traps: Community Name Type a community name for the trap packet. ("Public" is a common
community name.)
SNMP Traps: Port Specify the port number. (Most SNMP agents receive traps on port 162)
To register for traps, follow these steps:

1. At a workstation, access the web browser and type the IP address for the PSA.
2. Log on to the PSA as an administrator. (The default user name is "admin" and the default password is
"admin".)
3. Under Networking on the menu, select SNMP. (See the description of the fields above for more
information.)
4. In IP Address, type the IP address for where the trap is to be sent.
5. In Community Name, type a community name for the trap packet. "Public" is a commonly used
community name.
6. In Port, specify the port number. Most SNMP agents receive traps on port 162.
7. Click to complete the registration process. The SNMP agent is shut down and restarted. This
causes a trap to be sent out:
1: coldStart 1.3.6.1.6.3.1.1.5.1.
Trap Testing
The OID snmpTrapTest (1.3.6.1.4.1.11.2.46.2.1.10.4) will cause a trap to be sent to each registered host when set
to an integer value. For example, if an SNMP set is done on 1.3.6.1.4.1.11.2.46.2.1.10.4.0 with a value of 15, each
registered host will receive the trap TrapTest (1.3.6.1.4.1.11.2.46.2.2.0.100).
Trap Format
The PSA can generate three different traps:
● coldStart
STATUS: current
DESCRIPTION: A coldStart trap signifies that the SNMPv2 entity, acting in an agent role, is reinitializing
itself and that its configuration may have been altered.
::= { snmpTraps 1 }
● trapTest
OBJECTS: {snmpTrapTest}
STATUS: current
DESCRIPTION: When a set is done on trapTest this notification will be sent out.
::= { psaEventV2 100 }
● logEventCriticalAlert
OBJECTS: { logCriticalCategory, logCriticalID, logCriticalMessageNumeric, logCriticalMessageString }
STATUS: current
DESCRIPTION: When a new critical entry is added to the logTable a notification of this type will be sent to
all entities registered for this notification.
::= { psaEventV2 1 }
This trap corresponds to critical entries in the Event Log. Six different events have been defined as critical:
❍ Cannot communicate with any domain controllers. Domain name:
❍ Cannot communicate with any WINS servers.
❍ Cannot communicate with any DNS servers.
❍ Cannot connect to printer-connection refused by printer.
❍ Cannot print due to problem at the printer.
❍ Critically high disk utilization - disk utilization is at 90-100% of capacity. If this log is added to the
event log the following trap will be sent.
logEventCriticalAlert notification received
Community: public
Bindings (6)
#1: sysUpTime.0 0 days 00h:00m:32s.52th
#2: snmpTrapOID.0 logEventCriticalAlert 
#3: logCriticalCategory administrative(3)
#4: logCriticalID 110
#5: logCriticalMessageNumeric NULL
#6: logCriticalMessageString Critically high disk utilization - disk utilization is at 90-100% of
capacity.
SNMPv3
The SNMPv3 RFCs do not specify a mechanism for creating the initial SNMPv3 account. The initial account creation
is left to the developer. Users can create the initial account and add it to the PSA using one of two methods: using
the web interface (covered in this document) or using SNMP (intended for use by other applications and not covered
in this document).
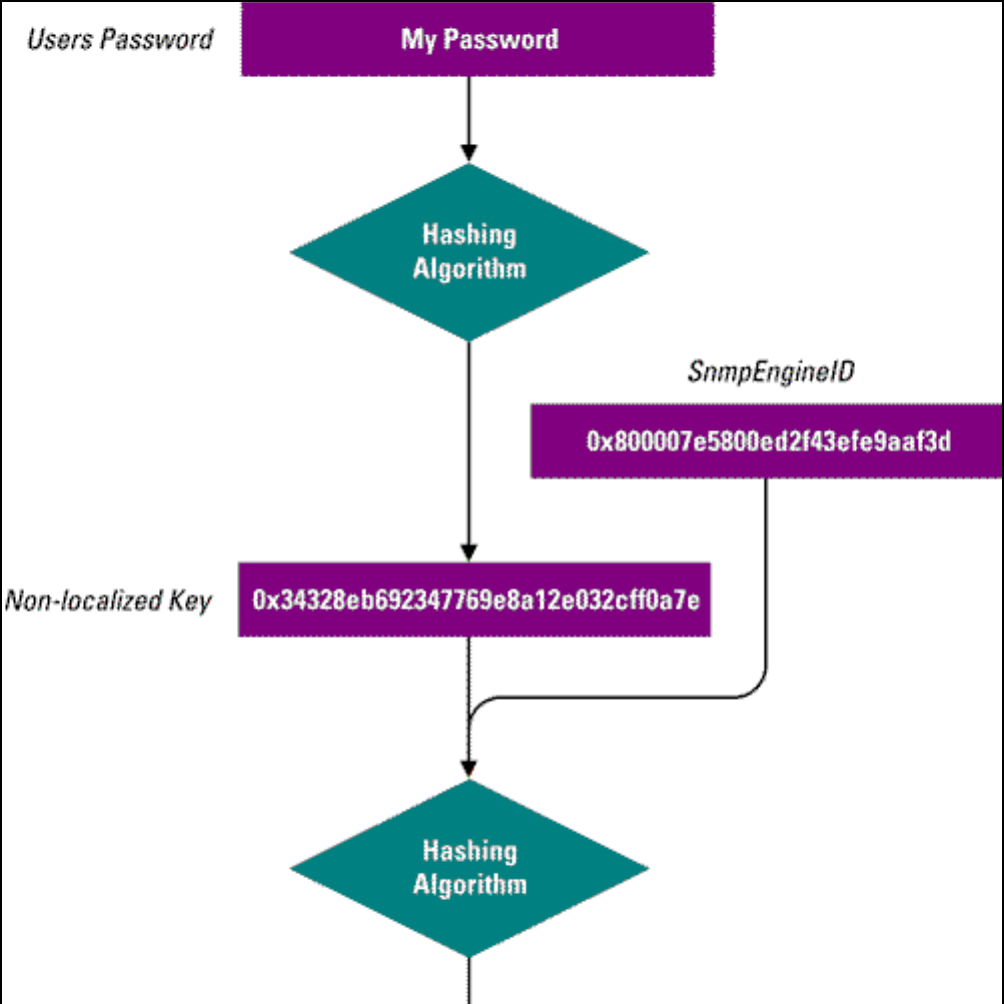
SNMPv3 security relies upon the creation of two separate keys: one for encryption and the other for authentication.
The keys are hex strings. To make hex strings easy to remember, two different algorithms for turning passwords
into keys were defined for use: HMAC-MD5-96 and HMAC-SHA-96. Once the key is generated from the passwords,
the key can be localized to a specific SNMP agent by combining the key with the SNMP agent's engine ID and then
by running a hashing algorithm on the combined pair. The following flowchart illustrates this.
Initial Account Creation Through the PSA's Web Interface
Using the PSA's web interface, users can create an SNMPv3 account by supplying a user name, an authentication
key, and a privacy key. The PSA will except either a localized or non-localized key, but not a password. This was
done by design to maintain backward compatibility with other JetDirect products. How a user determines whether to
use a localized or non-localized key largely depends upon the SNMP application that will be used to communicate
with the PSA. If an SNMP application that is highly configurable such as "Mg-Soft Mib Browser" is being used, then a
user can use a non-localized key. However, if the user is using a less configurable tool, such as the net-SNMP tools,
the user may have to type a localized key that was generated from a password.
Note: A valid key is 32-characters long and only contains the characters 0-9, a-f, and/or A-F.
Initial Account Creation Using Passwords
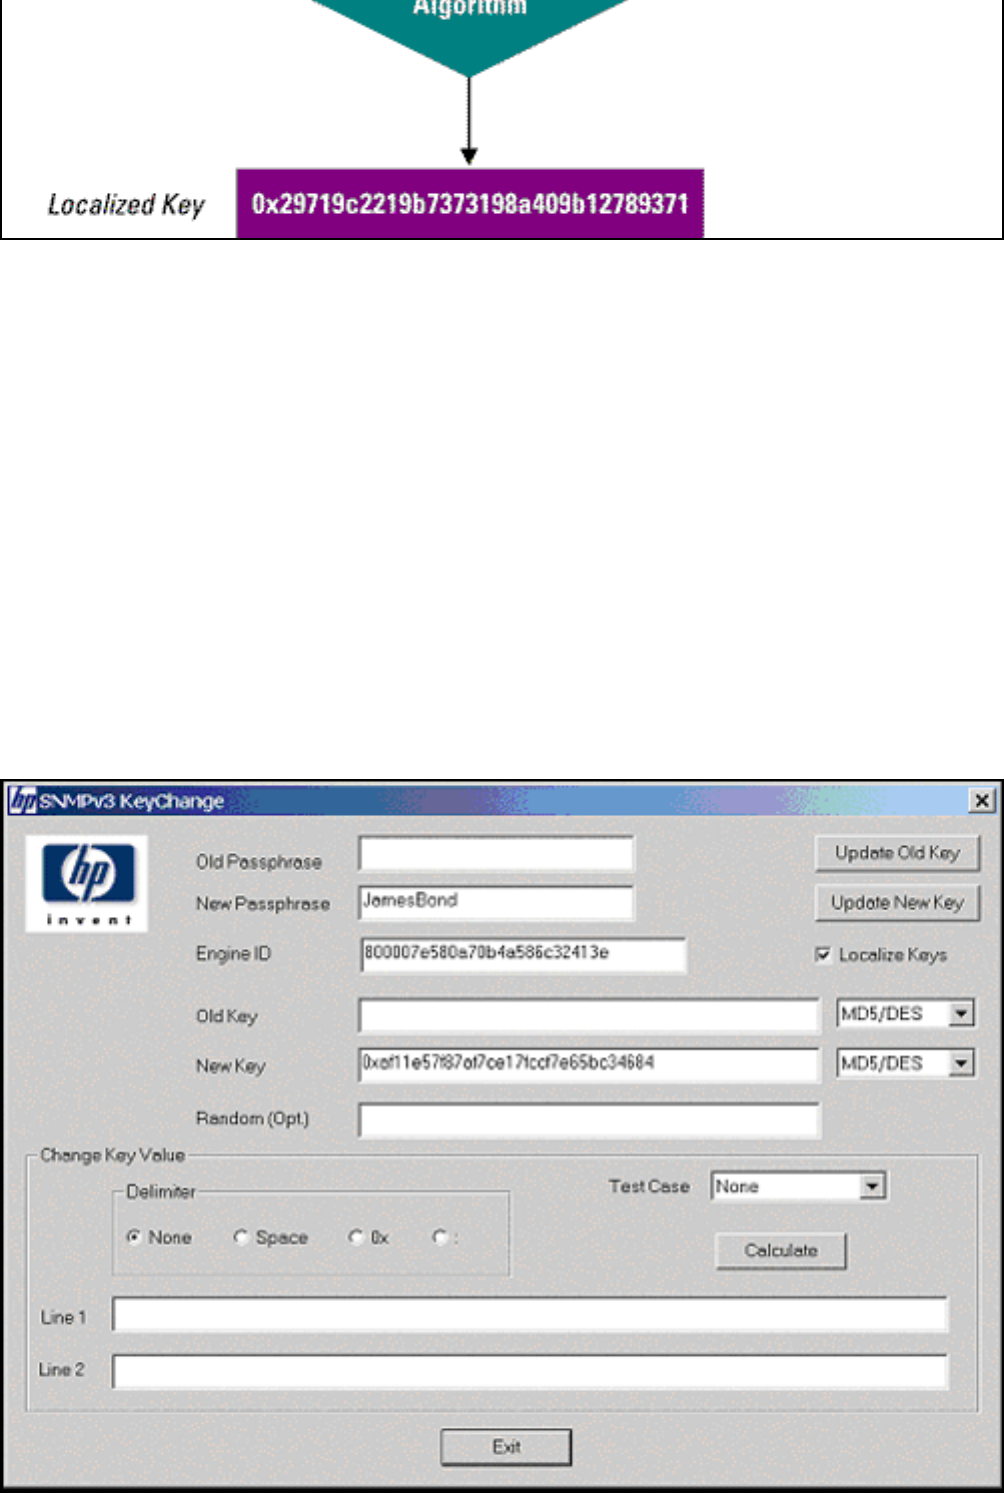
Since the PSA only accepts authentication keys, users must first convert their password to a key. Follow these steps
to convert a password to a key:
1. Start the application KeyChange.exe that is supplied on the CD shipped with the PSA.
2. Create the Authentication Key:
a. In New Passphrase, type the password. Use the engine ID you wish to communicate with (on the
SNMP Settings page in the web interface under Networking). Do not include the beginning "0x" which
indicates the value is given in hexadecimal.
b. Click Update New Key. This value, excluding "0x", is the authentication key. Copy this key (omitting the
"0X") and paste it into the Authentication Key field on the SNMP Settings page (on the menu in the
PSA's web interface under Networking).
3. Create the Privacy Key:
a. In New Passphrase, type the password. Use the engine ID you wish to communicate with(on the SNMP
Settings page in the web interface under Networking). Do not include the beginning "0x" which indicates
the value is given in hexadecimal.
b. Click Update New Key. This value, excluding "0x", is the privacy key. Copy this key (omitting the "0X")
and paste it into the Privacy Key field on the SNMP Settings page (on the menu in the PSA's web
interface under Networking).
4. Click .
Removing the SNMPv3 Account
To remove the SNMPv3 account, uncheck the Enable SNMPv3 box and click . This will destroy all
SNMPv3 accounts that have been created including accounts that were cloned from the original. It is also important
to note that the SNMP agent's engine ID will change each time the SNMPv3 account is deleted.

Print Shares
Links within this page:
Print Shares Option
Adding a Print Share
Deleting a Print Share
Viewing and Managing Print Jobs
Print Share Properties
Print Share Security
Printer Drivers
Printer Driver Management
Adding New Drivers to the PSA
Security Warning When Adding New Drivers
Links to related pages:
Installing Printers on Clients
Related System Messages
Troubleshooting the PSA
Print Shares Option
After Print Shares is selected from the menu (in the web interface under Print Services), the Print Share List
page is displayed. On this page, administrators can:
● view and manage print jobs
● add print shares
● modify existing print shares
● delete a print share (and all of its jobs)
Print Share List Page
Field
Names Description
Share
Name Name of the print share as typed in the Print Share Name field on the Add Print Share page
in the web interface. This name is displayed in Network Neighborhood or in My Network Places
as an available print share configured on the PSA. The print share name can be up to 79
characters long, including alphanumeric characters and the following special characters: _ - . ?.
(Print share names longer than 12 characters might cause problems with Windows 9x and ME
or MS-DOS clients. Various LPD implementations might also have length restrictions.)
Status Status of the print share:
● Active
● Cannot be contacted (The printer cannot be found. It does not respond to a network
query or ping.)
● Connected
● Disabled
● Door open
● Error
● Error-Printer Unknown
● Low paper
● Low toner
● LPD not supported
● No paper
● No toner
● Offline
● Online
● Paper jam
● Paused
● Service required
● Unknown state
Jobs Number of print jobs waiting to be printed on the corresponding print share.
Properties Displays the Properties page. Use this page to:
● display and/or modify the properties of a selected print share, including the print
share's name, IP address, or description.
● pause and resume printing from the print share.
● print a test page.
Driver Displays the Driver page on which the driver for the print share can be viewed or changed.
Security Displays the Security page.
Delete
(Print Share) To delete a print share from the PSA, follow these steps:
1. Find the print share to delete from the PSA and click on that same line.
2. The message, "Are you sure you want to delete the print share and all of its print
jobs?" is displayed.
3. Click . The selected print share and all of its print jobs will be deleted.
Adding a Print Share to the PSA
While there is no fixed limit on the number of print shares that can be attached to the PSA, many factors impact
performance in your environment and create an effective limit for your environment and use model. Factors that
impact performance include the number of users printing through the PSA, how frequently the users print, whether
NT Domain security is enabled, the size of the jobs being printed, the types of jobs being printed (for example, color
print jobs), the speed of your printer(s), and how many print shares are installed on the PSA.
Both UNIX and Windows clients can simultaneously print to the same print share. UNIX clients ignore any Windows
driver selections.
The following postscript printer drivers for Windows 9x and NT are factory-installed. These drivers, and any others
that have been added to the PSA, can be associated with a print share on the PSA. The HP LaserJet 4 has both the
postscript and PCL drivers installed; the default is the PCL driver.
Note: When upgrading to 2.5.x, drivers that were installed prior to the upgrade will be available.
HP Business Inkjet Printers
HP Business Inkjet 2280 series printers HP Business Inkjet 3000 series printers
HP Color LaserJet Printers
HP Color LaserJet 2500 series printers HP Color LaserJet 5500 series printers
HP Color LaserJet 4500 series printers HP Color LaserJet 8500 series printers
HP Color LaserJet 4550 series printers HP Color LaserJet 8550 series printers
HP Color LaserJet 4600 series printers
HP LaserJet Printers
HP LaserJet 4 series printers HP LaserJet 4050 series printers
HP LaserJet 4/4M Plus printer HP LaserJet 4100 series printers
HP LaserJet 4Si printer HP LaserJet 4200 series printers
HP LaserJet 4V printer HP LaserJet 4300 series printers
HP LaserJet 5/5M series printers HP LaserJet 5000 series printers
HP LaserJet 5Si series printers HP LaserJet 5100 series printers
HP LaserJet 6P/6MP series printers HP LaserJet 8000 series printers
HP LaserJet 2100 series printers HP LaserJet 8100 series printers
HP LaserJet 3300 series printers HP LaserJet 8150 series printers
HP LaserJet 4000 series printers HP LaserJet 9000 series printers
To add a print share, see the next section.
Note: If Domain Authentication is enabled (on the Microsoft Network Settings page), the administrator must
either have a local account on the PSA with the same user name and password as their domain account, or a
domain account for the administrator must be added to the PSA. If Domain Authentication is not enabled, the
administrator logged onto the PC must have a local administrator account with the same name and password as
their domain account.
Adding a Printer to the PSA, or Using the Add Print Share Wizard
While there is no fixed limit on the number of printers that can be attached to the PSA, many factors impact
performance in your environment and create an effective limit for your environment and use model. Factors that
impact performance include the number of users printing through the PSA, how frequently the users print, whether
NT Domain security is enabled, the size of the jobs being printed, the types of jobs being printed (for example, color
print jobs), and how many printers are installed on the PSA.
Both UNIX and Windows clients can simultaneously print to the same printer. UNIX clients ignore any Windows
driver selections.
Numerous printer drivers are factory-installed. Click here to see a list of those drivers.
To add a printer, follow these steps:
Note: If Domain Authentication is not enabled (on the Microsoft Networking Settings page), the administrator
logged onto the PC must have a local administrator account with the same name and password as their domain
account. If Domain Authentication is enabled, the administrator must either have a local account on the PSA with
the same user name and password as their domain account, or a domain account for the administrator must be
added to the PSA.
1. Select Print Shares (in the web interface under Print Services).
2. Click . The Add Print Share wizard will be launched.
❍ Add Print Share (Step 1 of 3): Type the IP address or hostname and the network connection for
the print share being added.
Add Print Share (Step 1 of 3) Page
Field Names Description
IP Address or Hostname DNS name or IP address of the network printer that will be
servicing the print jobs in this queue (for example, hpprinter.
mycomputer.com or 192.0.0.192) . In order to use the DNS
name, a DNS server address must be configured on the PSA in
the TCP/IP and DNS Settings page.
The name must be alphanumeric and can contain hyphens ( - )
and periods (.).
Printer Network Connection: ■ HP Jetdirect internal card or single-port external box:
Select this if the printer has an internal HP Jetdirect print
server card, or is connected to an external single-port
HP Jetdirect print server.
■ HP Jetdirect 3-port external box: Some external HP print
servers support more than one printer (for example, the
HP Jetdirect 500X). For these cases, choose which port
the printer is connected to.
■ Other print server: Select this option if the target print
server is not an HP Jetdirect print server. Many print
servers will work with the default selections of Hewlett-
Packard Jetdirect Print Server selected. If, however, the
print jobs do not appear on the printer, select this option
and complete Remote Queue Name with the remote
queue name recommended by the print server
manufacturer. This field is case-sensitive. Refer to the
lpr or UNIX printing section of the print server manual.
(For example, Xerox printers use a remote queue name
of "LP" (and not "lp") while other manufacturer of print
servers or systems administrators may choose different
names. )
❍ Add Print Share (Step 2 of 3): Type the print share name and description.
Add Print Share (Step 2 of 3) Page
Field Names Description
Print Share
Name The print share name is displayed in Network Neighborhood or in My
Network Places as a print share configured on the PSA.
It can be up to 79 characters long, including alphanumeric characters and
the following special characters: _ - + , .
(Print share names longer than 12 characters might cause problems with
Windows 9x and ME or MS-DOS clients. Various LPD implementations might
also have length restrictions.)
Print Share
Description
(optional)
Description of the print share.
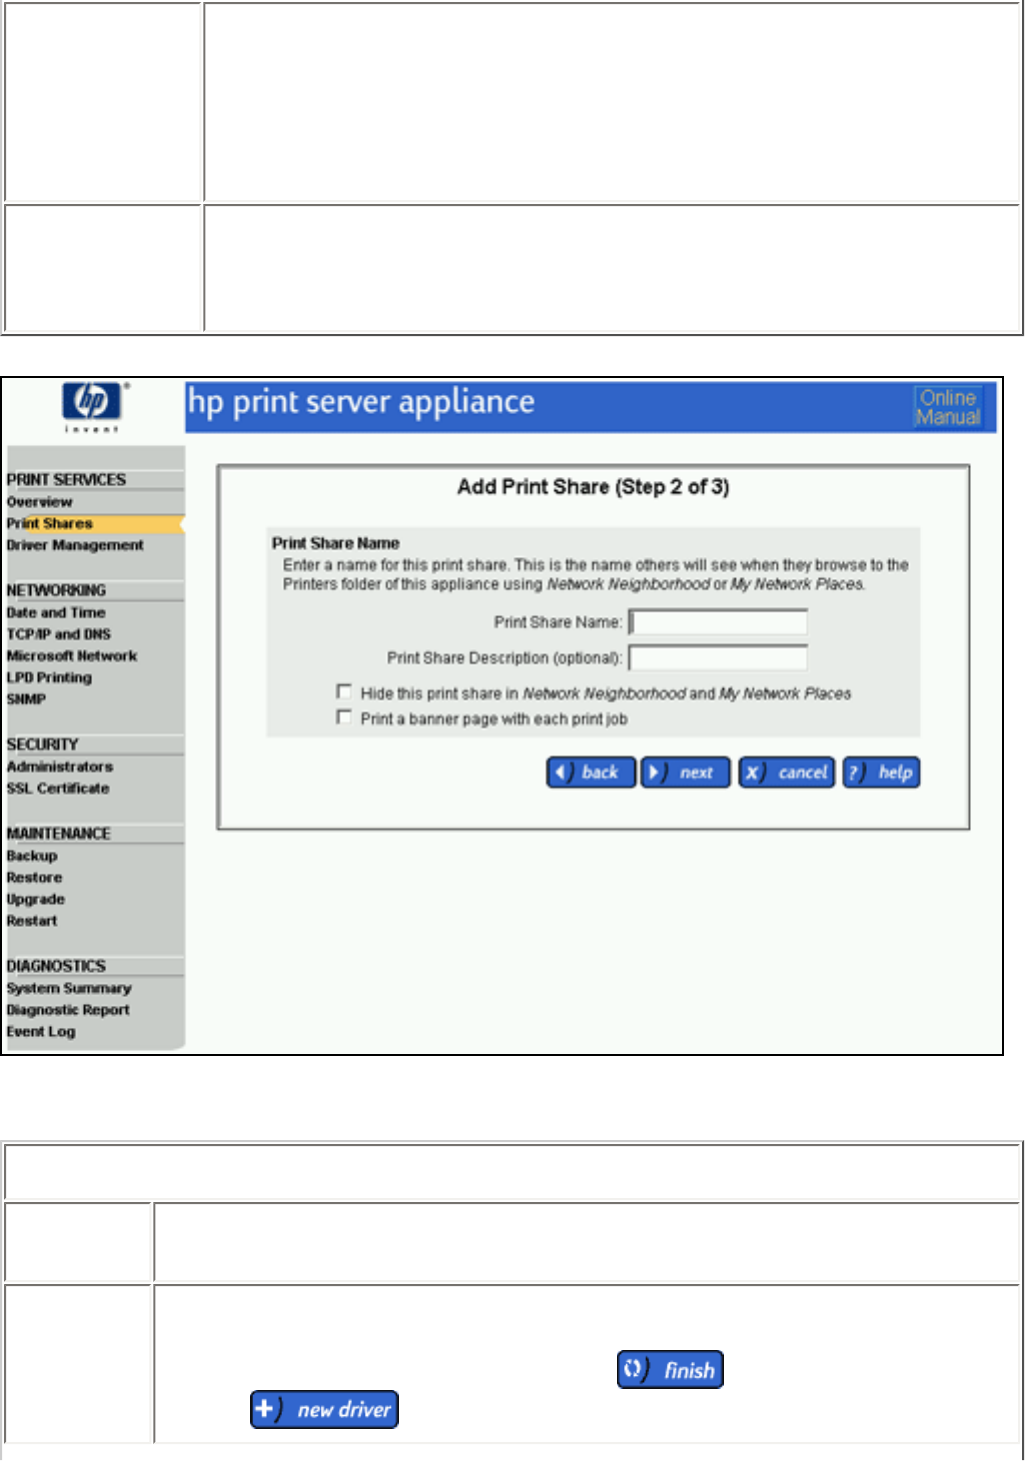
Hide this
print share in
Network
Neighborhood
and My
Network
Places
Select this option to hide this print share's name in Network Neighborhood
or in My Network Places for clients. (This does not prevent the print share
from being used, just from being displayed in Network Neighborhood or in
My Network Places.)
Print a
banner page
with each
print job
Select this option to insert a banner page at the beginning of each print job.
(The contents of the banner page are not configurable.)
❍ Add Print Share (Step 3 of 3) :
Add Print Share (Step 3 of 3) Page
Field
Names Description
Client
Printer
Driver
Displays all printer drivers currently installed on the PSA, and highlights the
driver currently associated with the specified printer. To change the driver for the
printer, highlight a different driver and click . Or, add a new driver by
clicking on this page.
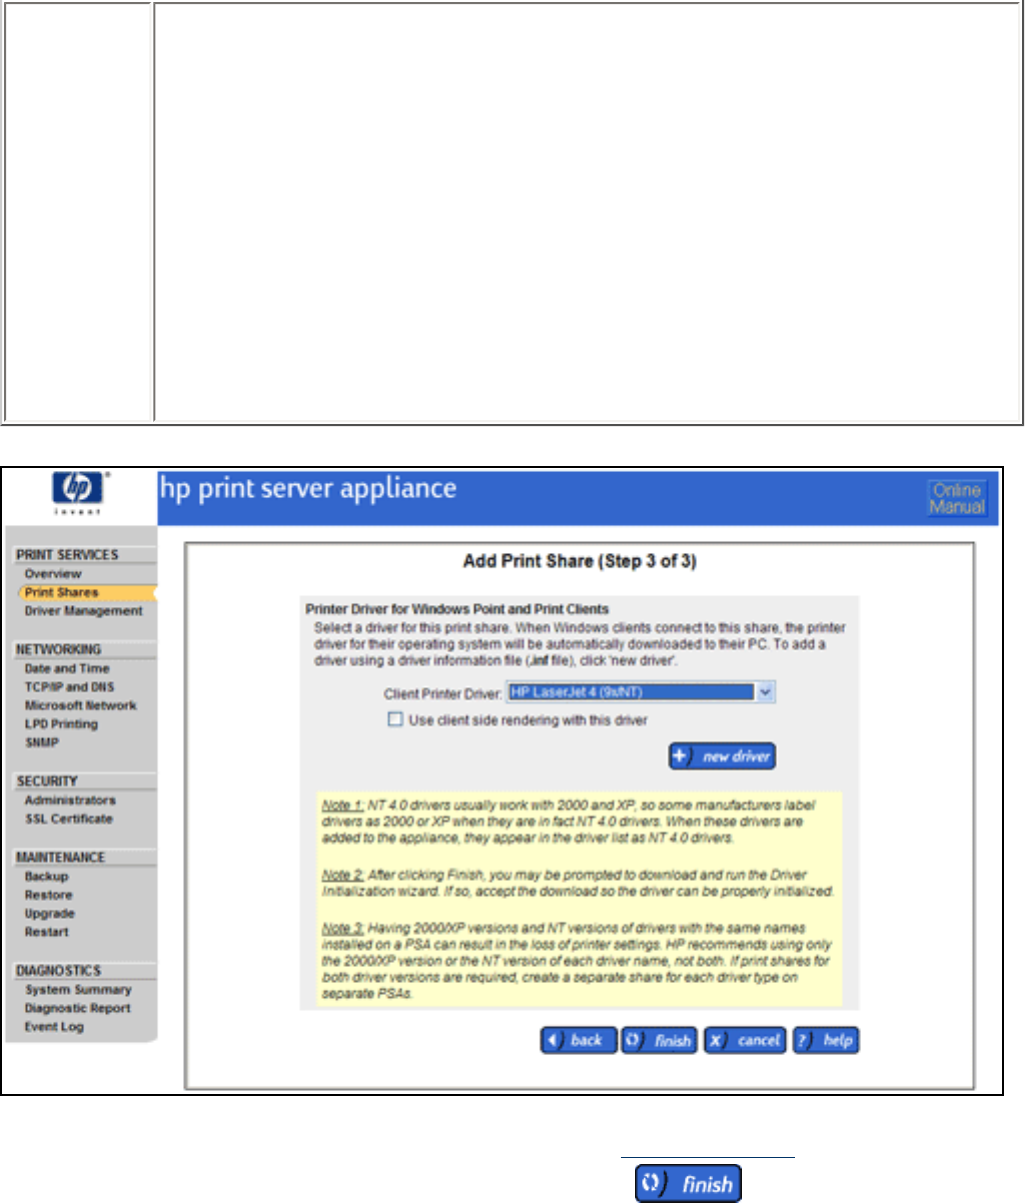
Client
Side
Rendering
Do not select this option unless you are having problems with your W2K drivers
working properly. Symptoms include trouble with:
■ N-up (printing multiple pages in a reduced format on one page)
■ booklet style (format the print job into a printed booklet)
■ watermark (print a watermark on each page of the document)
■ ZoomSmart (scales a letter-sized/A4 document or poster to tabloid/A3,
or vice versa)
■ back-to-front (prints the document in reverse order)
■ rotate 180 degrees (rotates the document layout but not the paper)
If you are having problems with any of these features, first update the firmware.
If the problem persists, reinstall the driver and select the "Use client side
rendering with this driver" checkbox when selecting the driver to use with the
print share. The problem should then be resolved.
Select the printer driver for the print share being added. The Print Share List will be displayed. If
the driver is displayed in the Client Printer Driver field, click .
To use the CSR compatible driver for 2K and XP clients only, click on Use client side rendering
with this driver.
Note: NT clients will not be able to use this print share if a CSR driver is attached to this share.
If the printer driver for the print share is not displayed in the drop-down list on this page, click
. A security warning is displayed. Click Yes to continue and then follow the steps to
add the printer driver and associate it with the print share just added.
Note: After the PSA has been configured and drivers have been associated with print shares, the configuration
should be backed up.
Note: Having Windows 2000/XP versions and NT versions of drivers with the same names installed on a PSA can
result in the loss of printer settings and functionality (e.g., inability to print in landscape mode or loss of
watermarks). To eliminate this risk of lost printer functionality, HP recommends two workarounds:
1. Install and distribute only NT printer drivers on the PSA for all of the NT, 2K, and XP clients; or
2. If print shares for both driver versions are required, create a separate share for each driver type on
separate PSAs. This only affects NT and 2K/XP printer drivers and not 9X drivers. 9X drivers can still be
installed along with NT or 2000/XP drivers.
For more information, please refer to the white papers on client migration from NT to 2K/XP clients (http://www.hp.
com/go/psa_whitepapers).
Viewing and Managing Print Jobs
Use the Print Jobs page to view the jobs for a selected print share:
Print Jobs Page
Field Names Description
File Name Name of the file(s) or print job(s) for this print share.
Status Status of the print job:
● Printing: currently printing on the print share.
● Paused: user paused the print job.
● Spooling: job is being spooled to the PSA by a client.
● Queued: job is queued and is waiting to be printed.
● Unknown: error occurred; unknown status (the user should delete the print job with
this status).
User Name of the client user who submitted each print job.
Date Date the print job was sent.
Size Size of the print job (in bytes).
Delete Delete this specific print job.
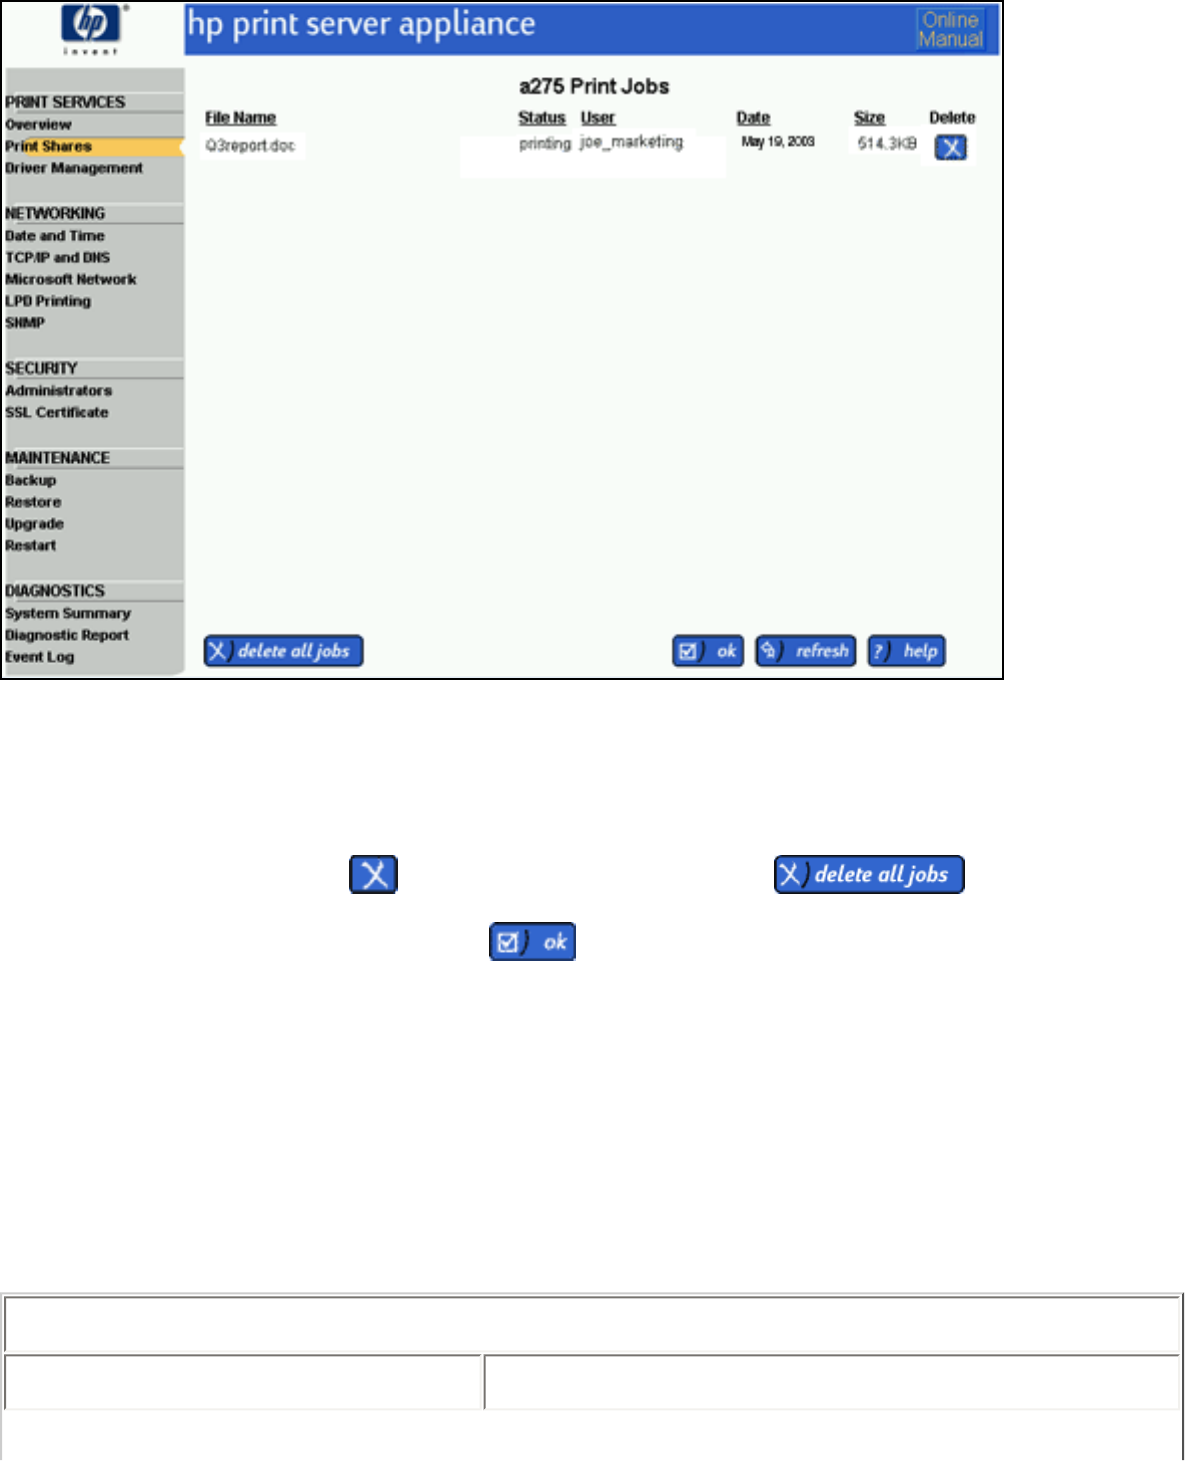
To manage print jobs for a print share, follow these steps:
1. Select Print Shares (in the web interface under Print Services). The Print Share List page is displayed.
2. Find the appropriate print share and click in the Jobs column for that print share. The Print Jobs page is
displayed.
3. To delete a print job, click on the line for the print job. Or click to delete all jobs
(as displayed) for the print share.
4. Click refresh to update the page or click to return to the Print Share List page.
Print Share Properties
The Print Share Properties page is displayed when Properties is selected for a specific print share on the Print
Share List page. Use the Properties page to:
● display and/or modify the properties of a selected print share, including the print share's name, printer's IP
address, or description
● pause and resume printing from the print share
● print a test page
Properties Page
Field Names Description
Print Share Description (optional) Description of the print share.
Hide this print share in Network
Neighborhood or My Network Places Select this to hide this print share's name in Network
Neighborhood or in My Network Places for clients. (This does not
prevent the print share from being used, just from being
displayed in Network Neighborhood or in My Network Places.)
Print a banner page with each print job Select this to print a banner page preceding every print job.
(The contents of the banner page are not configurable.)
Pause printing from this print share Check this box to pause printing from this print share. To
resume printing from this print share, clear this box.
Printer IP Address or host name IP address or host name of the printer that will be servicing the
print jobs in this queue. This may be the DNS name or the IP
address of the network printer (for example,
hpprint share.mycomputer.com or 192.0.0.192) . In order to
use the DNS name, a DNS server address must be configured on
the PSA in the Microsoft Network Settings page (in the web
interface under Print Services).
The name must be alphanumeric and can contain hyphens ( - ).
Printer Network Connector ● HP Jetdirect internal card or single-port external box:
Select this if the printer has an internal HP Jetdirect print
server card, or is connected to an external single-port
HP Jetdirect print server.
● HP Jetdirect 3-port external box: Some external HP print
servers support more than one printer (for example, the
HP Jetdirect 500X). For these cases, choose the port to
which the printer is connected.
● Other print server: Select this option if the target print
server is not an HP Jetdirect print server. Many print
servers will work well with the default selections of
Hewlett-Packard Jetdirect Print Server. If, however, the
print jobs do not appear on the printer, select this option
and complete Remote Queue Name with the remote
queue name recommended by the print server
manufacturer. Refer to the lpr or UNIX printing section
of the print server manual. (For example, Xerox printers
use a remote queue name of "LP".)
To make any changes to this page, follow these steps.
1. Select Print Share (in the web interface under Print Services).
2. Click for the print share.
3. If desired, make any changes to the print share's properties.
4. If desired, click to print a test page.
5. Click . The Print Share List page is displayed again.
Printer Driver Page
The Driver page is displayed when Drivers is selected for a specific print share on the Print Share List page.
The Drivers page displays all printer drivers that are installed on the PSA. A different printer driver can be selected
in the list of installed drivers for the specified print share. (See also Printer Driver Management.) The print share
name is displayed at the top of the Drivers page. This is the name of the print share as typed in the Print Share
Name field on the Add Print Share page in the web interface. This name is displayed in Network Neighborhood or
in My Network Places as an available print share configured on the PSA.
Drivers Page
Field Name Description
Client Printer Driver Displays all printer drivers added to the PSA, and highlights the driver currently
associated with the specified print share. To change the driver for the print share,
highlight a different driver and click .
Client Side Rendering Do not select this option unless you are having problems with your W2K drivers
working properly. Symptoms include trouble with:
● N-up (printing multiple pages in a reduced format on one page)
● booklet style (format the print job into a printed booklet)
● watermark (print a watermark on each page of the document)
● ZoomSmart (scales a letter-sized/A4 document or poster to tabloid/A3, or
vice versa)
● back-to-front (prints the document in reverse order)
● rotate 180 degrees (rotates the document layout but not the paper)
If you are having problems with any of these features, first update the firmware. If
the problem persists, reinstall the driver and select "Client side rendering" on this
page. The problem should then be resolved.
Print Share Security Page
The Print Share Security page is displayed when Security is selected for a specific print share on the Print
Share List page. The Print Share Security page shows print share security information if NT Domain security is
enabled (an NT domain is specified on the Microsoft Network Settings page).
Note: Microsoft Windows 2000 and XP permissions that do not map directly to the four access levels of Windows NT
(Print, Manage, Full Control, and No Access) appear as "Special Access".
Print Share Security Page
Field Name Description
Type account name Type the account name in the format Domain\Accountname.
Select accounts from This drop-down list contains names of the primary domain and all trusted
domains. Select one from which to select accounts.
Domain Members Shows all of the NT groups on the domain specified in the above field. To show
users also, click .
Highlight the group or user and click . The user or group will be
added to the list shown under Current Account(s) in List with the level of
access indicated in parentheses.
(To highlight multiple groups/users, use the Control or Shift key.)
Note: If the domain has its anonymous enumeration of SAM accounts security
policy set to "disabled", the web interface will ask for a user name and password
so it can retrieve the group or user list. The name and password is not saved on
the PSA, so subsequent requests for browse lists will ask for the name and
password again.
Select Access Type Lists possible access rights that can be assigned to users and/or groups. Highlight
the desired access level and it will be applied to any accounts added when clicking
. Valid access types are:
● Print (print, pause, and delete your own print jobs)
● Manage Documents (print, pause, and delete other user's print jobs)
● Full Control (print, pause, and delete other user's print jobs, delete print
shares, and change security settings (using native NT tools))
● No Access (the user will be denied access even if permitted access under
another entry)
● Special Access (for some Windows 2000 and XP permissions that do not
map directly to the above four permission levels)
Current Accounts in List Lists all groups and/or users with their access rights.
Printer Driver Management
Links within this page:
Driver Name Mismatch
Security Warning When Adding New Drivers
Links to related pages:
System Messages for Driver Management
Printer drivers are factory-installed, or they might already be loaded from a previously-added printer. All printer
drivers added to the PSA are displayed on the Driver Management page. Drivers can also be initialized or deleted
on this page.
Note: Client-side rendering (CSR) drivers and Windows 2000 drivers can be initialized, enabled, and disabled
separately. However, these drivers are installed and deleted at the same time.
Note: Drivers for Microsoft Windows NT 4.0 usually work with both Windows 2000 and Windows XP. Consequently,
many vendors will label a driver as Windows 2000 or XP when the driver conforms to the NT 4.0 driver specification.
As a result, any of the following can occur.
● Windows 2000 drivers can show up as Windows NT or Windows 2000 drivers.
● Windows NT drivers show up as Windows NT drivers.
● Windows XP drivers show up as Windows NT or Windows 2000 drivers.
Note: Having Windows 2000/XP versions and NT versions of drivers with the same names installed on a PSA can
result in the loss of printer settings and functionality (e.g., inability to print in landscape mode or loss of
watermarks). To eliminate this risk of lost printer functionality, HP recommends two workarounds:
1. Install and distribute only NT printer drivers on the PSA for all of the NT, 2K, and XP clients; or
2. If print shares for both driver versions are required, create a separate share for each driver type on
separate PSAs. This only affects NT and 2K/XP printer drivers and not 9X drivers. 9X drivers can still be
installed along with NT or 2000/XP drivers.
For more information, please refer to the white papers on client migration from NT to 2K/XP clients (http://www.hp.
com/go/psa_whitepapers).
Driver Management Page
Field Name Description
Shows installed printer drivers
for
Specify an operating system to display printer drivers for that operating
system only. Or, select All Operating Systems to display all printer
drivers installed on the PSA.
Printer Drivers List the printer drivers for the operating system specified above, or lists
all printer drivers if All Operating Systems is chosen.
Each driver can have only one name (the same as in the .ini file)
regardless of the number or type of printers associated with it.
If a driver is displayed in blue and preceded with a "~" (tilde), that
driver has been disabled either by the user (to prevent it from being
used) or by the system (in the case that it failed to initialize during its
installation). When a driver is disabled, it can be associated with a
printer but will not be downloaded to a client PC for point and print. (The
user will be prompted to install a driver locally.) When a client connects
to a print share with a disabled driver, it receives the name of the driver
to install and a prompt requesting that the driver be installed.
If the administrator enables the driver, it will be available to clients
through point and print if the client connects to a print share associated
with that driver.
To enable a driver:
● If the driver was disabled by the user, click . The
driver can now be downloaded to a client's PC for point and print.
● If the driver had been disabled by the system due to a failure
during driver initialization, the administrator cannot enable this
driver until it is successfully initialized. (A failure might be
attributed to file corruption.) To initialize the driver, first try
installing the printer again. When asked for a printer driver,
consider using a different source for the printer driver in case the
original file was corrupted. If a driver is disabled by the system,
it must be installed again for it to be enabled (use the Add Driver
wizard to install the driver again.)

If the driver persistently fails to initialize then the printer created
can still be used, but when clients connect to that printer they
will be prompted to install the driver files for that driver locally.
The end user will be required to provide driver files for a driver
whose name matches the name of the driver associated with the
printer on the PSA.
Note: Having Windows 2000/XP versions and NT versions of drivers with
the same names installed on a PSA can result in the loss of printer
settings and functionality (e.g., inability to print in landscape mode or
loss of watermarks). To eliminate this risk of lost printer functionality,
HP recommends two workarounds:
1. Install and distribute only NT printer drivers on the PSA for all of
the NT, 2K, and XP clients; or
2. If print shares for both driver versions are required, create a
separate share for each driver type on separate PSAs. This only
affects NT and 2K/XP printer drivers and not 9X drivers. 9X
drivers can still be installed along with NT or 2000/XP drivers.
For more information, please refer to the white papers on client
migration from NT to 2K/XP clients (http://www.hp.com/go/
psa_whitepapers).
To initialize or reset drivers that are already installed on the PSA,
highlight the driver and click Initialize.
Client side rendering
Client side rendering (CSR) is a process built into a new architecture of
printer drivers for 2K and XP clients called Unidriver. If the printer driver
you are installing is a Unidriver and you are having problems with any if
the following advanced printing features then use the CSR version of the
printer driver to see if it resolves your printing problems.
● N-up (printing multiple pages in a reduced format on one page)
● booklet style (format the print job into a printed booklet)
● watermark (print a watermark on each page of the document)
● ZoomSmart (scales a letter-sized/A4 document or poster to
tabloid/A3, or vice versa)
● back-to-front (prints the document in reverse order)
● rotate 180 degrees (rotates the document layout but not the
paper)
To see client side rendering drivers, select this option.
Note: Print queues using the CSR driver are not compatible with NT
clients.
1. To access the Driver Management page, select Driver Management (in the web interface under Print
Services).
2. Select the operating system for the driver(s) to be viewed or deleted (or select All Operating Systems).
The corresponding drivers are displayed in the Printer Drivers list box.
3. If desired, highlight the printer driver to delete, enable, initialize, or disable and click the corresponding
button.
Note: The HP LaserJet 4 printer driver can never be deleted.
4. Then click the appropriate button on the right.
If adding a driver, a security warning is displayed. Click Yes to continue and then the Add Printer Driver
wizard is displayed.
Adding New Drivers to the PSA, or Using the Add Driver Wizard
Links within this page:
Adding a New Printer Driver
Links to related pages:
System Messages for Driver Management
Printer drivers are factory-installed, or they might already be loaded from a previously-added printer. While these
will cover many needs, other drivers may be required. This section discusses the procedure for adding drivers to the
PSA.
Note: After the PSA has been configured and drivers have been associated with printers, the configuration should
be backed up.
Adding a New Printer Driver
To add a driver to the PSA, click on the Driver Management page. The New Printer Driver (Step 1
of 3) page is displayed. This page can also be accessed by clicking on the Add Print Share (Step 3
of 3) page.
Note: Before drivers can be initialized, Java Scripting must be enabled (in Internet Explorer, under: Internet
Options-->Security (tab)-->Custom Level (button)-->Scripting-->Scripting of Java Applets (subheading). If a Java
virtual machine is not installed in the browser, refer to Sun Microsystem's web site or to Microsoft's web site for
information about downloading one.
● New Printer Driver (Step 1 of 3):
New Printer Driver (Step 1 of 3)
Field Name Description
Driver setup information file Type the path for the printer driver, or click the Browse button.
Note: An XP, 2K, or NT driver must be added before a 9x driver can
be added.
Supported operating system Specify the operating system for the driver being added.
Note: The driver's operating system specified must never be newer
than the operating system of the PC you are working from. For
example, if you are working from an NT system, you can only add NT
and 9x drivers. If you are working from an XP system, you can add
XP, 2K, NT, and 9x drivers.
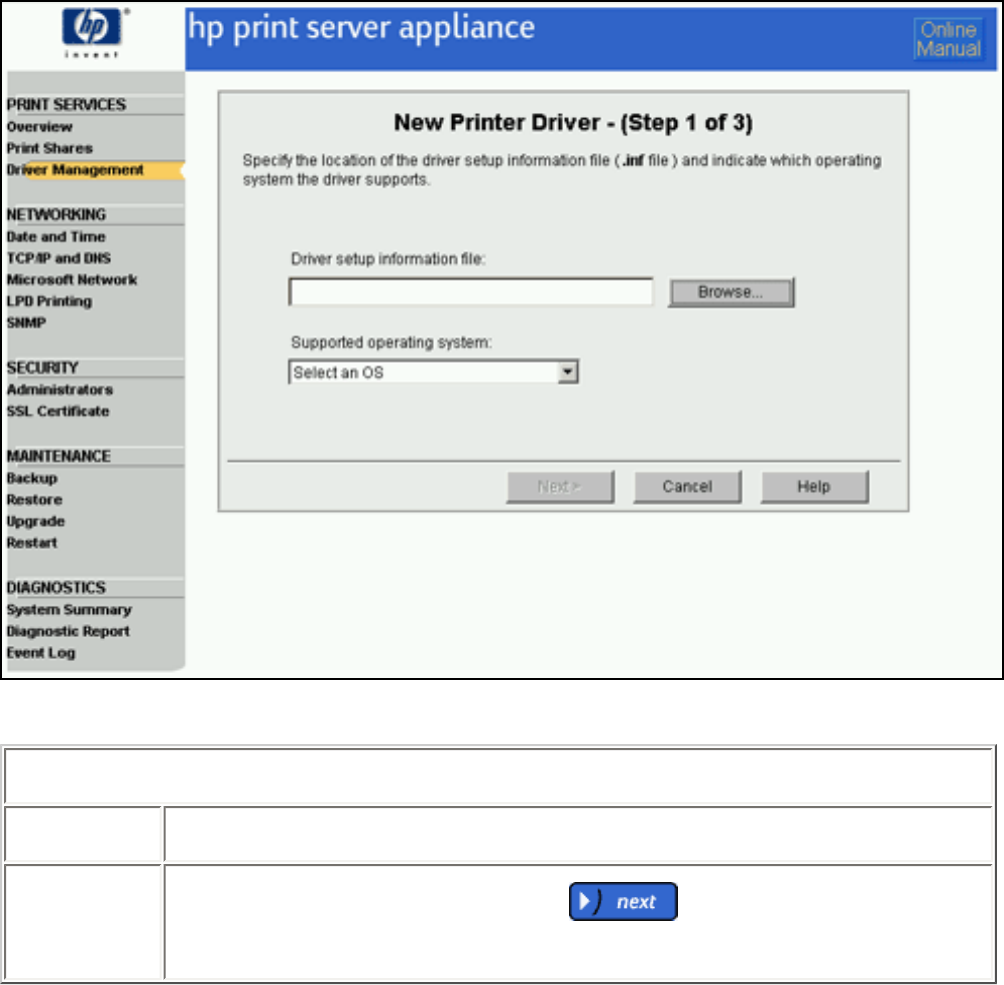
● New Printer Driver page (Step 2 of 3):
New Printer Driver (Step 2 of 3)
Field Name Description
Drivers Highlight the driver to install and click .
Note: An XP, 2K, or NT driver must be added before a 9x driver can be added.
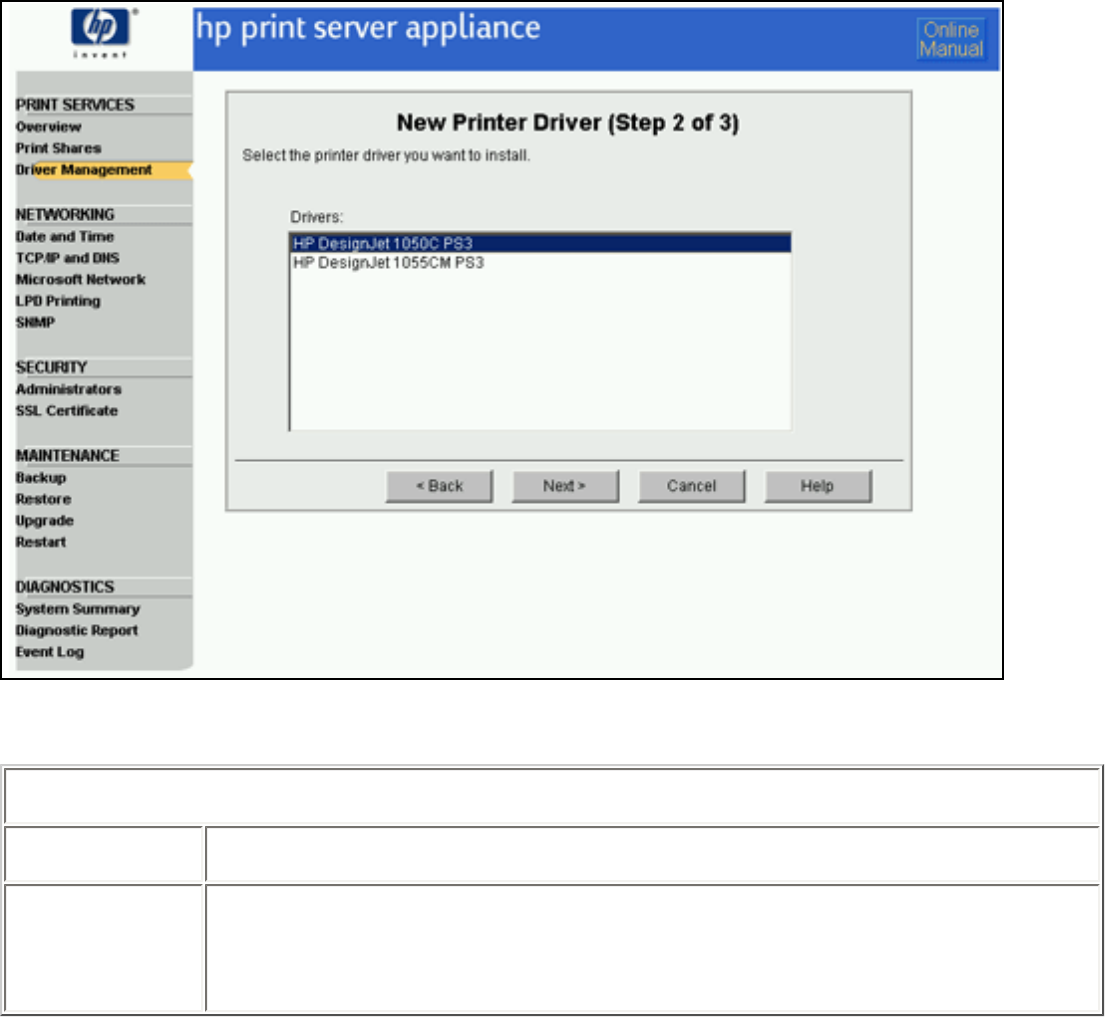
● New Printer Driver page (Step 3 of 3):
New Printer Driver (Step 3 of 3)
Field Name Description
Install a driver Select additional printer drivers to install. Additional printer drivers can be installed
for the client OS or any previous version of the OS. For example, if the client OS is
XP, drivers for 2K, NT, or 9x can be installed. If the client OS is NT, only drivers for
NT and 9x can be installed.
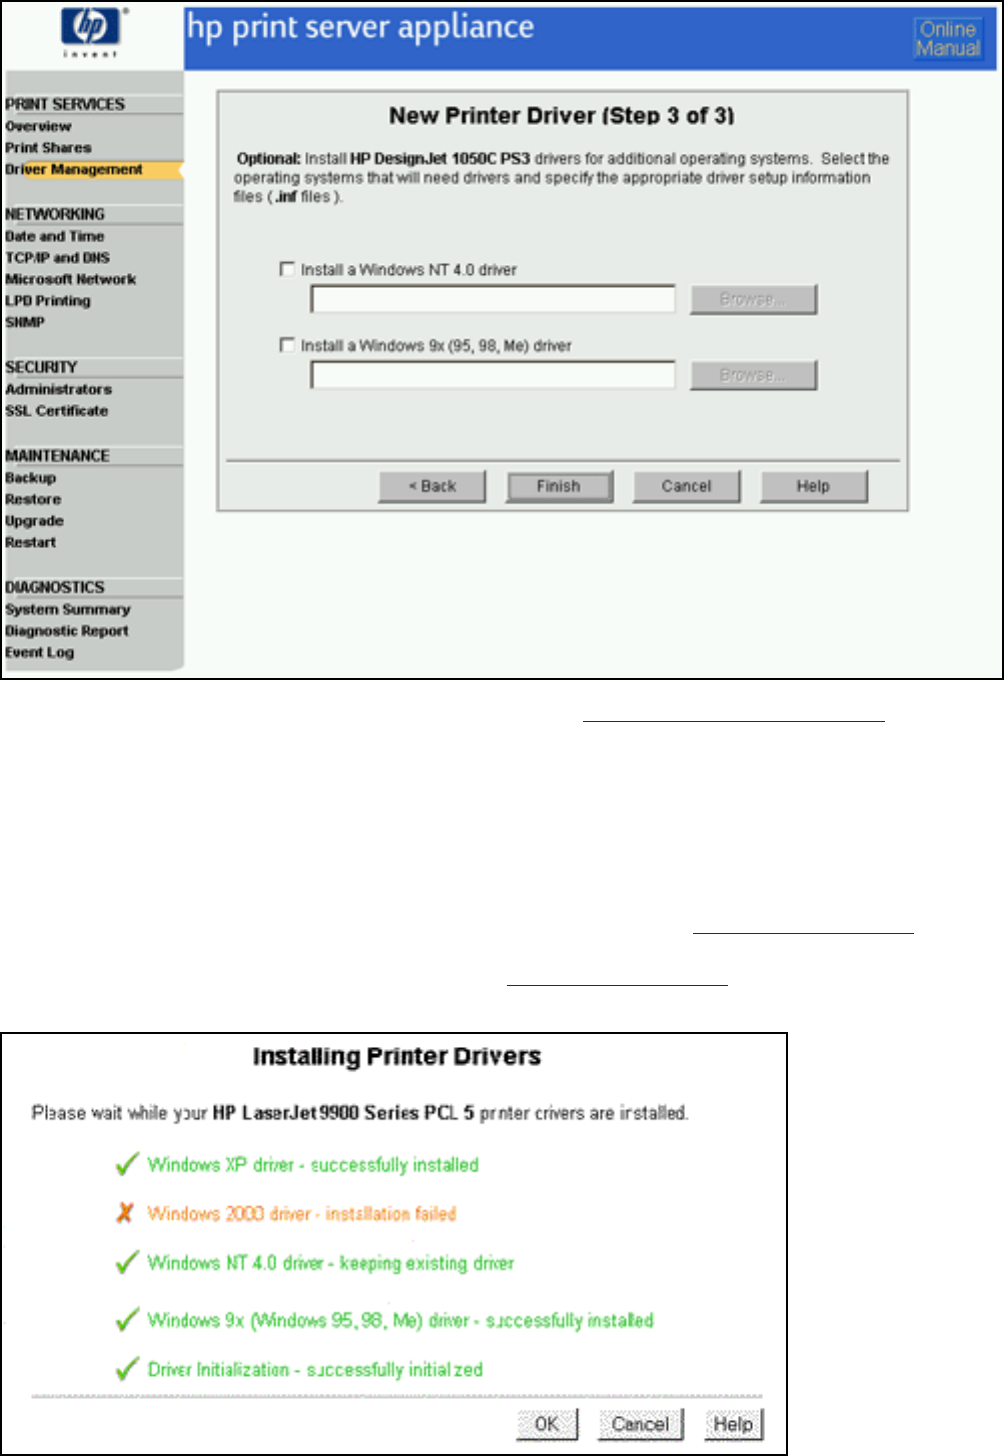
If no duplicate drivers were found during installation, the Installing Printer Drivers page is displayed. If,
during installation, a duplicate driver has been found, you can either replace or keep the existing one.
Installing Printer Drivers page
While the drivers selected are being installed and initialized, this screen displays the status of each step. If a
driver has two versions being added (one for client side rendering), then these messages will appear twice.
The final status indicates the status of the driver for the client OS. If the driver you are installing is a
Unidriver, you will see the file copy screen appear twice and initialize screen appear only once; this is
normal operation. If initialization fails, the driver is displayed on the Driver Management page as disabled.
This means that driver cannot be downloaded to client PCs for point and print. To try initializing the driver
again, you must add the driver again through the Driver Management page.
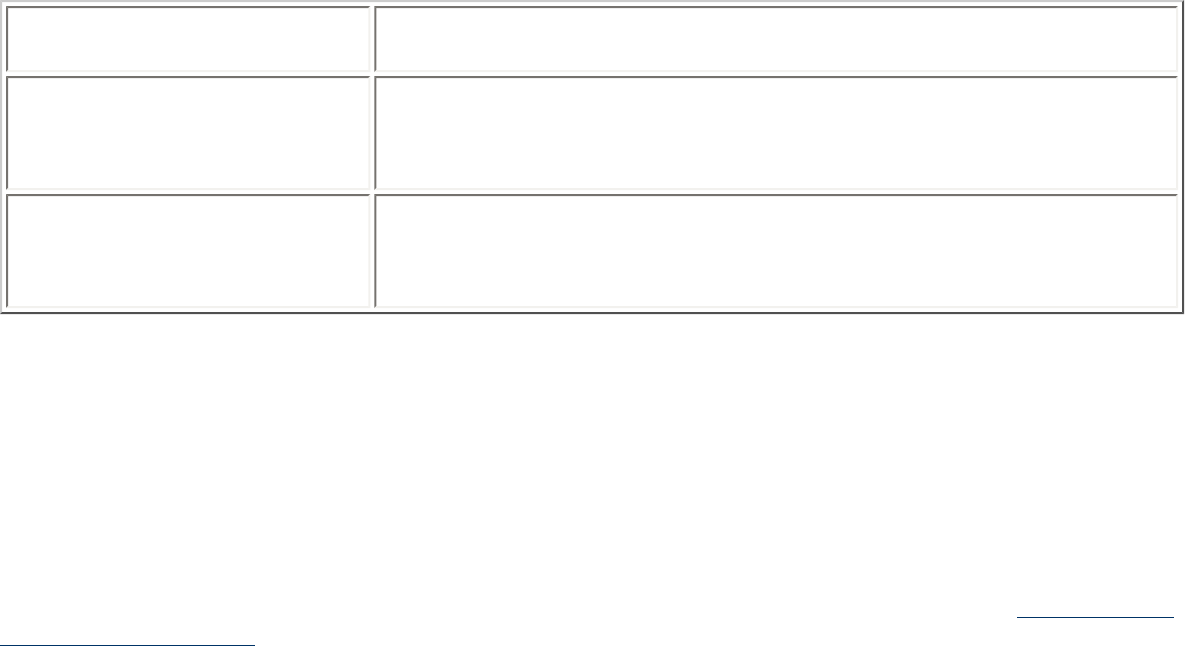
After the final status is displayed, click OK.
Driver Name Mismatch
When installing drivers for multiple operating systems, it is possible that the driver names do not match. Several
scenarios and suggestions are possible:
Scenario Resolution
Windows 2000 and XP drivers will
not have the same name as a
Windows NT driver
Add the same printer to the PSA twice: once with the Windows NT driver.
Then add the printer again (with a different name) with a Windows 2000 or
XP driver.
Windows 2000 and XP or NT
drivers does not have the same
name as a Windows 9x driver
The PSA displays the Driver Name Mismatch dialog; you will then be able to
install the Windows 9x driver using the Windows 2000/XP or the NT as the
display name. This will allow the 9x drivers to become point-and-print capable.
Note: Having Windows 2000/XP versions and NT versions of drivers with the same names installed on a PSA can
result in the loss of printer settings and functionality (e.g., inability to print in landscape mode or loss of
watermarks). To eliminate this risk of lost printer functionality, HP recommends two workarounds:
1. Install and distribute only NT printer drivers on the PSA for all of the NT, 2K, and XP clients; or
2. If print shares for both driver versions are required, create a separate share for each driver type on
separate PSAs. This only affects NT and 2K/XP printer drivers and not 9X drivers. 9X drivers can still be
installed along with NT or 2000/XP drivers.
For more information, please refer to the white papers on client migration from NT to 2K/XP clients (http://www.hp.
com/go/psa_whitepapers).
Security Warning When Adding New Drivers
In order to add new printer drivers to the PSA, either through the Add Print Share wizard or through the Driver
Management page, executable files must be copied through the web browser onto the client PC.
The following security warning is displayed and must be accepted for these executable files to be downloaded.
These files will be used to initialize printer drivers, which is an integral part of adding printer drivers to the PSA. If
you choose not to accept this security warning, you will not be able to add printer drivers.
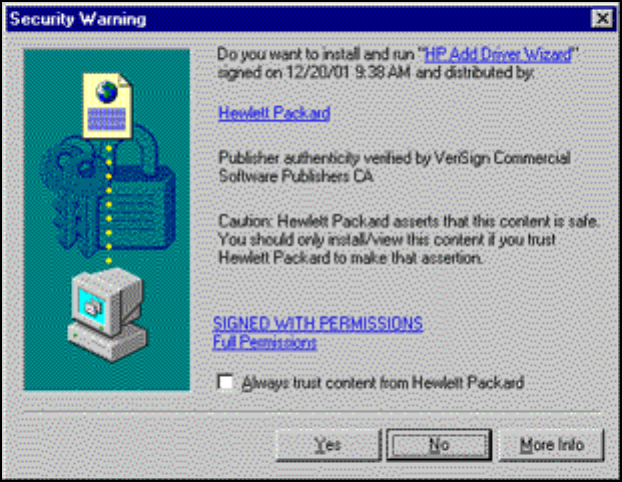
Configuring the Administrator Account
Links within this page:
Administrator Accounts
Local Administrator Accounts
Adding a Local Administrator Account
Deleting a Local Administrator Account
Changing the Password for an Existing Local Administrator Account
Domain Administrator Accounts
Adding a Domain Administrator Account
Single Sign-on (SSO)
Basic Authentication
Configuring Internet Explorer
Links to related pages:
Related System Messages
Troubleshooting the PSA
Administrator Accounts
Use the Administrators page to change passwords or add account names for local and domain administrator
accounts. There can be multiple administrator accounts for the PSA, but all accounts have the same privileges.
There must always be at least one local administrator account on the PSA.
Note: The administrator account names and passwords are not related to the front panel password of the PSA,
which is set and changed through the front panel.
Caution: If all local administrator passwords are forgotten, the only way to gain access to the PSA through a local
administrator account is to reset the PSA to factory defaults (using the front panel). After the PSA is reset to factory
defaults, all configuration information will be lost including network settings and printers, and the PSA will possibly
revert to a previous version of the firmware.
To access the Administrators page, follow these steps:

1. Log on to the web interface. (The default is "admin" for the user name and "admin" for the password.)
2. On the menu under Security, click Administrators. The Administrators page is displayed:
Administrators Page
Page Field
Names Description
Local
Administrators Lists all local administrator accounts added to the PSA. Local accounts are stored on the
PSA and are independent from domain accounts.
Domain
Administrators Lists all domain administrator accounts added to the PSA.
Local Administrator Accounts
There must always be at least one local administrator account on the PSA. When an administrator accesses the PSA
using a local account, an administrator name and password must be supplied for the PSA. (This user name and
password are passed over the network in cleartext; HP recommends accessing the PSA over SSL (HTTPS) to protect
the confidentiality of information like passwords.) Local administrator accounts can be added, deleted, or their
passwords can be changed through the Administrators page.
Note: In order to use NT native tools without NT domain authentication enabled (on the Microsoft Network Settings
page), the administrator logged onto the PC must have a local administrator account with the same name and
password as the domain account.
Adding a Local Administrator Account
New Local Administrator
Page Field Names Description
Administrator Name Type the new administrator name (must be unique for the PSA). The administrator
name is case-sensitive and can contain up to 20 alphanumeric characters and/or the
following special characters:
~ ` ! @ $ % ^ ( ) - _ { } .
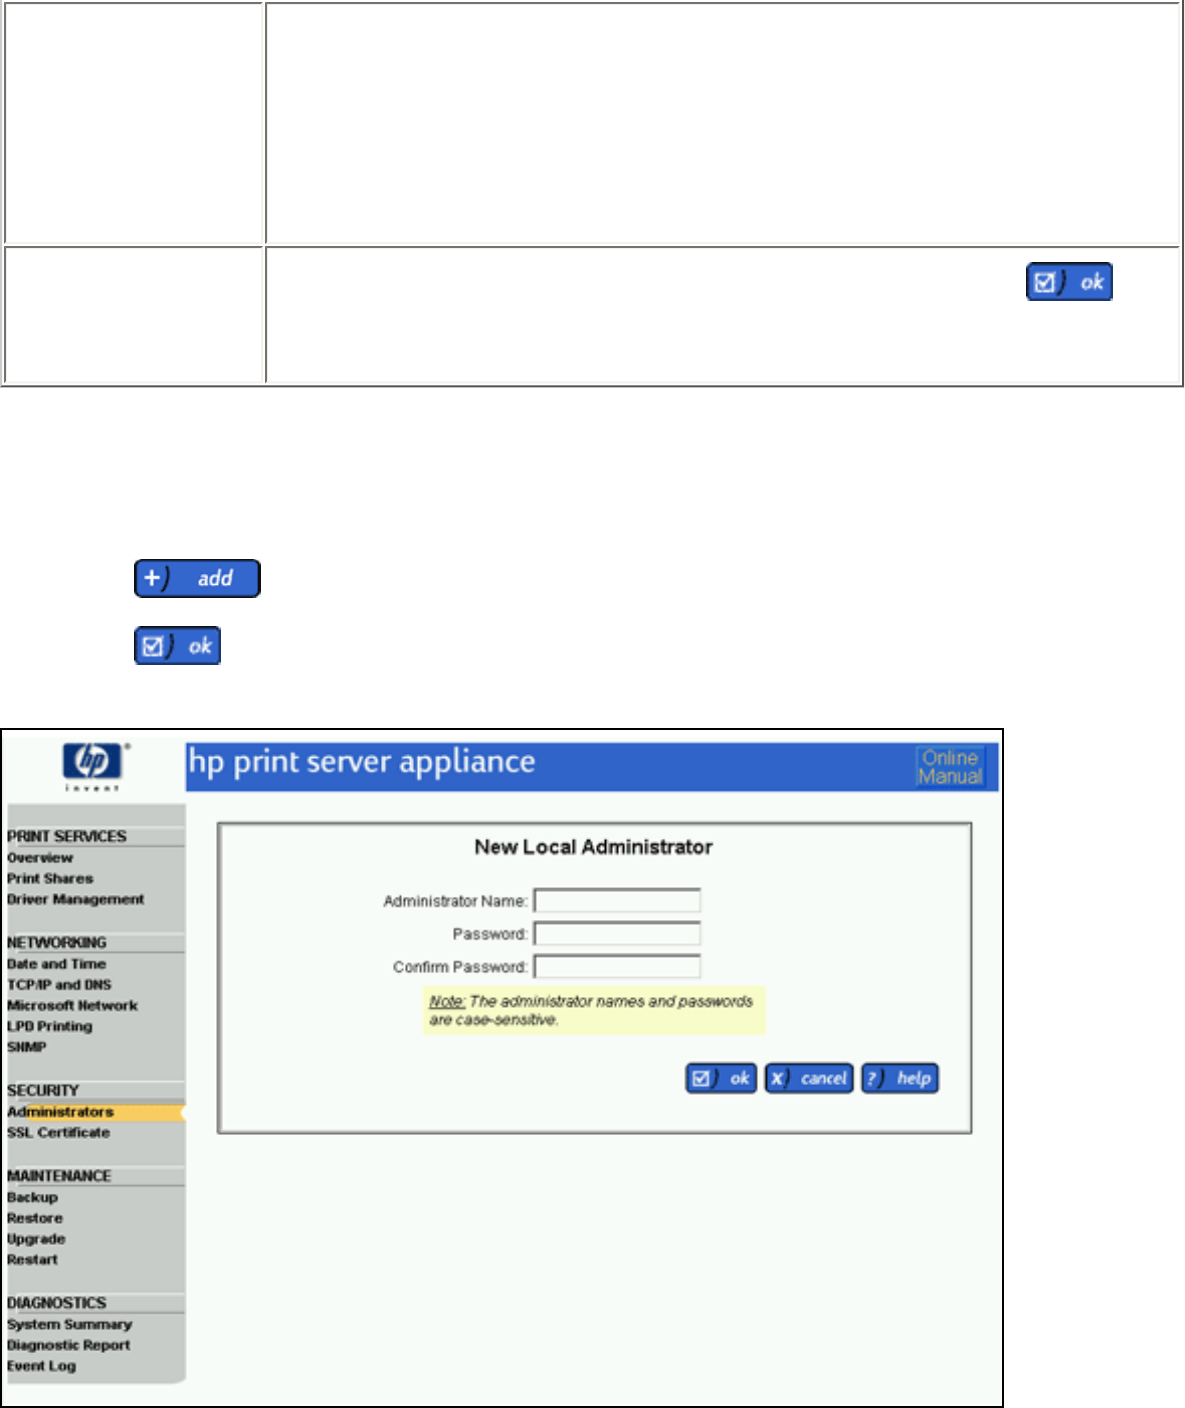
Password Type the password. The password is case-sensitive and can contain up to 14
alphanumeric characters and/or the following special characters:
~ ` ! $ % ^ ( ) - _ { } .
Note: The PSA will accept a null or blank password.
Confirm Password Type the password again to confirm it (if there is a password). Then click to
add this administrator to the PSA.
In addition to the default local administrator account, other administrator accounts can be to the PSA. To add an
administrator account, follow these steps:
1. Log on to the web interface.
2. On the menu under Security, click Administrators. The Administrators page is displayed.
3. Click under the list of local administrators. The New Local Administrator page is displayed.
4. Complete the fields as described below.
5. Click . The message "Administrator Account Added" is displayed.
Deleting a Local Administrator Account
Administrator accounts can be deleted from the PSA, but there always must be at least one administrator account
remaining on the PSA. Follow these steps to delete an administrator account:
1. Log on to the web interface.
2. On the menu under Security, click Administrators. The Administrators page is displayed.
3. Highlight the local administrator account to delete.
4. Click to delete the administrator account. (If this is the only administrator account, it cannot be
deleted.)
Changing the Password for an Existing Local Administrator Account
The password for an existing local administrator account can be changed through the the Administrators page.
Follow these steps to change a password for an administrator account:
1. Log on to the web interface.
2. On the menu under Security, click Administrators. The Administrators page is displayed.
3. Highlight the local administrator account for which the password is changing.
4. Click . The Local Administrator Password page is displayed.
5. Type the new password in the New Password field.
6. Repeat the password in the Confirm New Password field.
7. Click . The Administrators page will be displayed.
Once the administrator account name and password have been changed, the current browser session is no longer
authenticated and you will be prompted to re-enter your password. Re-connect to the PSA, using the new
administrator account name and password.
Note: Local administrator accounts on the PSA cannot be renamed. If necessary, delete the local account and then
add it with its new administrator name.
Local Administrator Password
Page Field Names Description
Administrator Name Displays the administrator name.
Password Type the password. The password is case-sensitive and can contain alphanumeric
characters and the following special characters:
~ ` ! @ $ % ^ ( ) - _ { } .
Note: The PSA will accept a null or blank password.
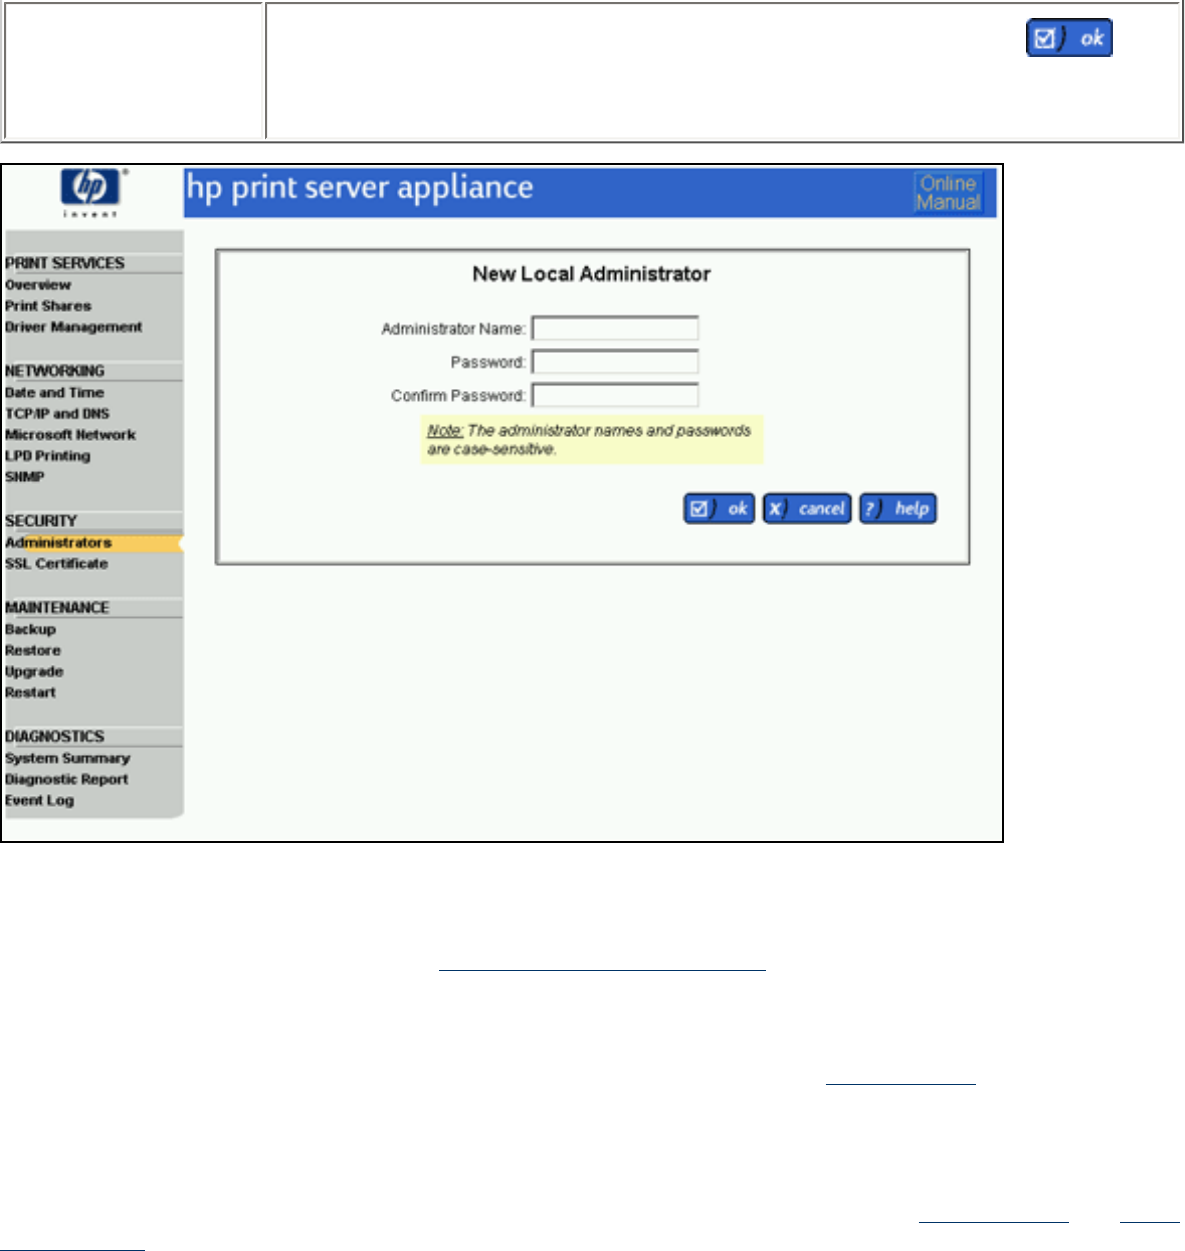
Confirm Password Type the password again to confirm it (if there is a password). Then click to
add this administrator to the PSA.
Domain Administrator Accounts
If Domain Authentication is enabled on the Microsoft Network Settings page, administrators can be identified by
their Microsoft domain account. A list of domain user or group accounts can be configured in the PSA. This list is
similar to the entries in the Administrators group of a Windows member server.
When administrators access the PSA, they can provide their domain identity (see Single Sign-On below). If the
name provided matches an entry in the Domain Administrators list, or if they are a member of a domain group in
the list, they will be allowed access to the PSA management interface.
Note: When there is a Local Administrator account name that is the same as an account name in the Domain
Administrators list, the PSA will first attempt to authenticate the domain account first (see Single Sign-On and Basic
Authentication below). If the password given does not match the domain account, the PSA will perform Basic
Authentication with the local administrator account.
Adding a Domain Administrator Account
To add a domain administrator account, follow these steps:
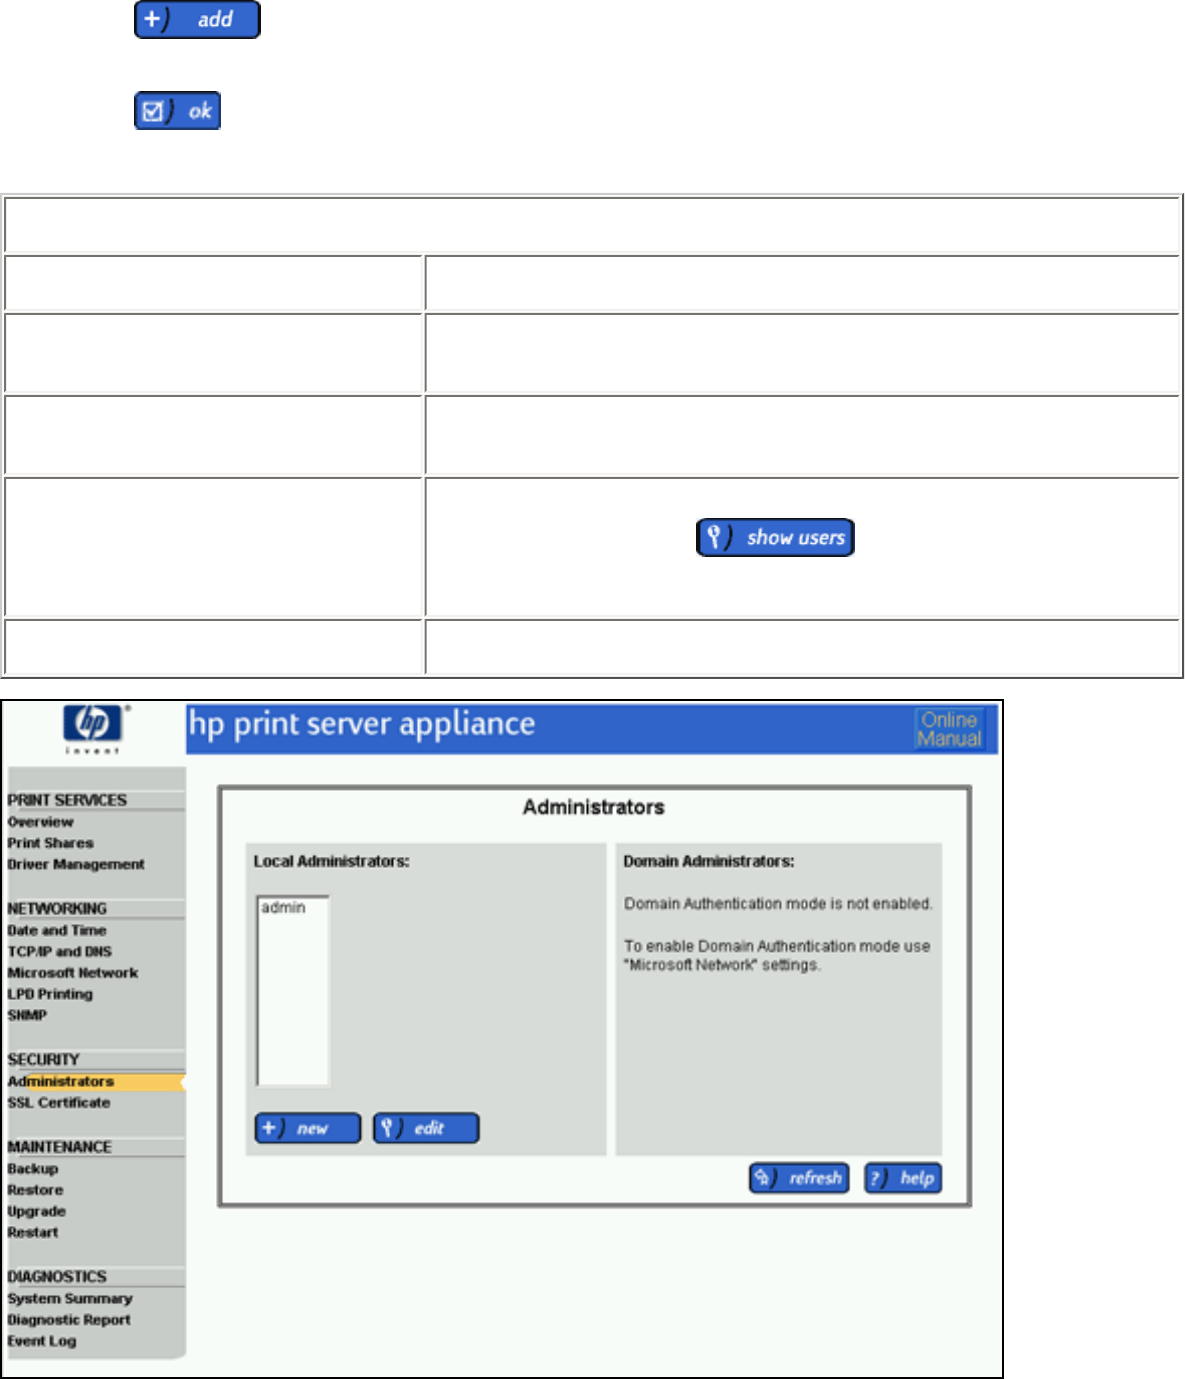
1. Log on to the web interface.
2. On the menu under Security, click Administrators. The Administrators page is displayed.
3. Click under the list of domain administrators. The Administrator-Add Domain Accounts
page is displayed.
4. Complete the fields as described below.
5. Click . The message "Administrator Account Added" is displayed.
Admin Accounts - Domain Accounts Page
Field Name Description
Type Account Name Type the account name for the domain in the format Domain
\Accountname.
Select Account(s) from The drop-down list contains names of the primary domain and all
trusted domains.
Domain Members Shows all of the members in the domain specified in the above field.
To show users also, click .
(To highlight multiple groups/users, use the Control or Shift key.)
Accounts to add as Administrators Lists all groups and/or users with administrator rights for the PSA.
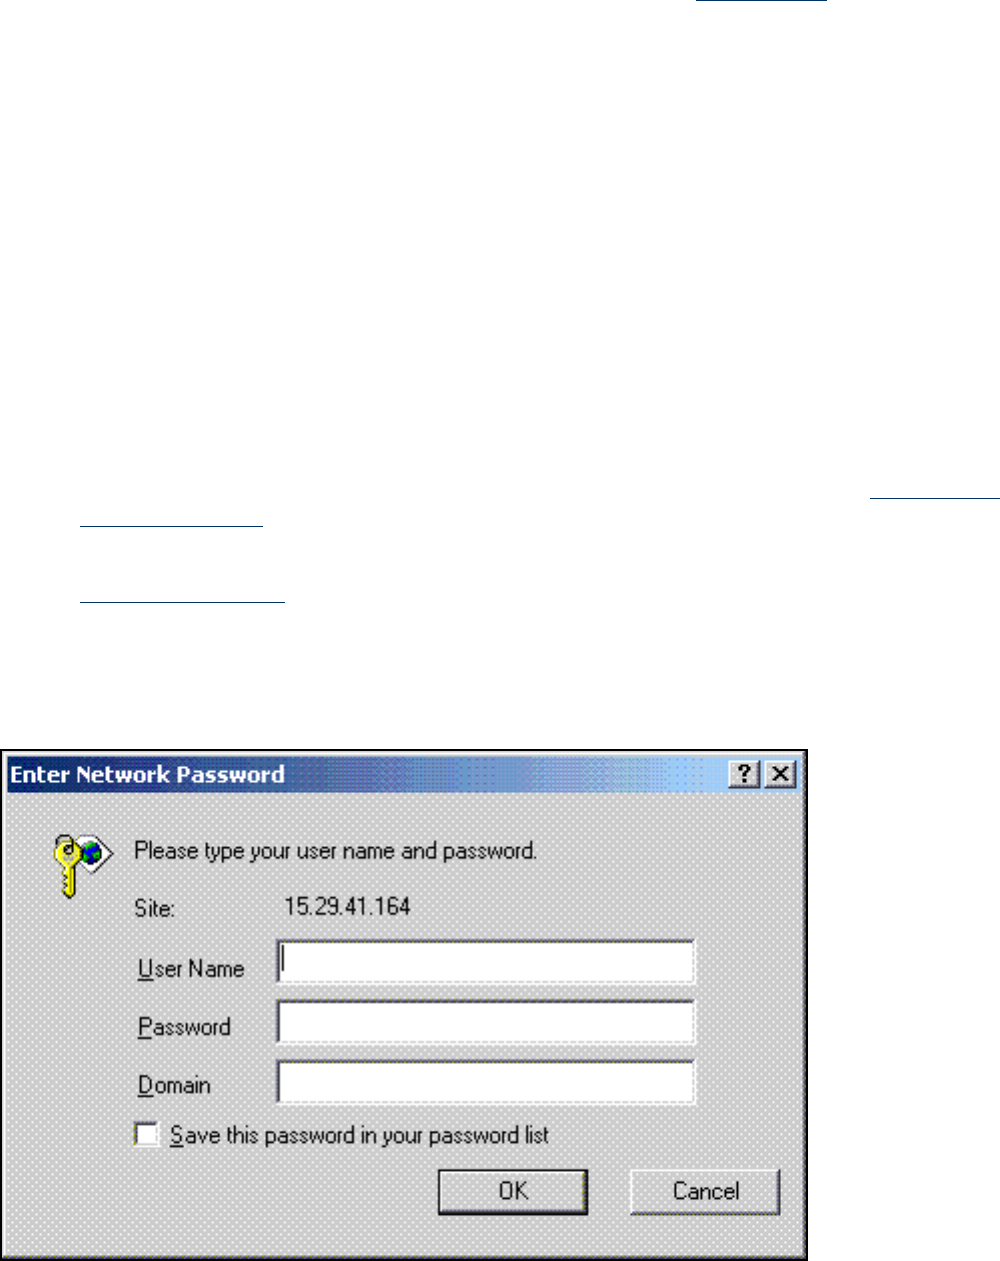
Note: If the Domain Controller is not available, administrators can use their local account.
When browsing for domain accounts from the Select Account(s) from list of domains, the PSA may ask for a user
name and password. The reason is the domain's security policy requires a trusted user account to connect to the
domain controller to retrieve the account list. A machine account (i.e. the PSA's) is not sufficient when the domain
is configured to protect enumeration of users and groups account information.
Single Sign-On (SSO)
Single Sign-On allows an administrator, using Internet Explorer, to access the PSA without prompting for an
account name and password. The PSA will request the browser to provide credentials given when the administrator
logged into the Windows workstation. The following scenarios could occur:
1. When an administrator is using Internet Explorer and the URL specified for the PSA is within the browser’s
local intranet zone, the browser will automatically send the credentials used to log into the Windows
workstation.
❍ If the credentials are successfully authenticated with a domain controller and the administrators are
also authorized to access the PSA's web interface, then the requested page will be served to the
browser. Administrators are authorized if their domain account is listed in the PSA Domain
Administrators list.
❍ If the credentials are not authenticated with a domain controller or the administrator's account is
not authorized to access the PSA, the PSA will prompt for another account name and password (see
Basic Authentication).
2. If the PSA administrator is using Internet Explorer but the URL used to access the PSA is not within the local
intranet, then the administrator will be prompted for account name and password. In this case, the security
prompt given to the administrator will have three fields and the information entered here will be encrypted
before being passed to the PSA (the screen shown is for Microsoft Windows NT 4.x; this screen might vary
depending on your operating system).
After the name, password, and domain or entered the process is as (1) above.
3. If the administrator is not using Internet Explorer the browser will use the ‘Basic Authentication’ protocol.
Basic Authentication
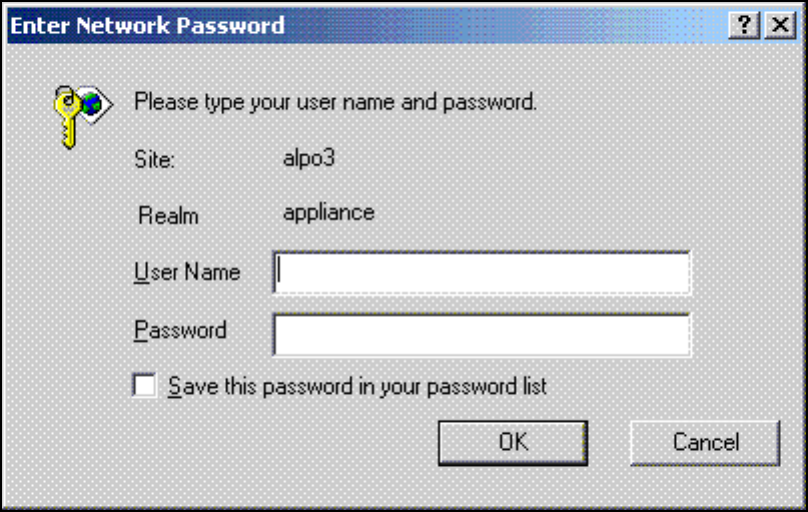
If an administrator uses a browser other than Internet Explorer, SSO will not be supported; the browser will
communicate with the PSA through Basic security and all security information will be passed to the PSA in cleartext.
The administrator will be prompted with a Basic security password prompt having two fields and can then either
choose to use a local administrator account user name and password, or specify a domain user name and password
where the user name includes the domain name (for example, domainname\user name). In the latter case, a user
with a domain administrator account on the PSA can access the web interface through a Basic security prompt
without having a local administrator account. (However, this user name and password are passed in cleartext.) (The
screen shown is for Microsoft Windows NT 4.x; this screen might vary depending on your operating system.)
Configuring Internet Explorer
By default, URLs (including IP addresses) with periods in the name (for example, http//www.hp.com and
http://10.0.0.1) or URLs that go through a proxy server are not included in a browser's local intranet. An
administrator can view or change their local intranet settings in the Internet Options page under the Security tab
by selecting Local Intranet and clicking on the Sites button.
In order to have SSO work with IP addresses, the proxy must be bypassed for that IP address; type the IP address
under Tools-->Options-->Connections-->Proxy Server-->Advanced-->Exceptions. Also, under Security-->Sites,
select Include all sites that bypass the proxy server.

SSL
Links within this page:
SSL Certificates
SSL Certificate Page
Viewing the SSL Certificate
Requesting a New Certificate
Self-Signed Certificate
Installing a Certificate from a Certificate Authority
Links to related pages:
Related System Messages
Troubleshooting the PSA
SSL Certificates
SSL/TLS secures the PSA's web interface by providing data privacy, data integrity, and server authentication. SSL/
TLS (Secure Sockets Layer (SSL v2/v3) and Transport Layer Security (TLS v1)) is based upon the exchange of
certificates that are used to validate a public key. These public keys are then used to generate a shared secret key
that is used for encryption and decryption. Encrypting the data before it is sent out over the network and decrypting
the data when it has been retrieved from the network provides data privacy.
SSL/TLS is always enabled on the PSA. By default, a certificate is automatically created and installed on the PSA. To
create a newer certificate on the PSA, the administrator must provide data to create a key pair and certificate. The
PSA's web interface always listens on the secure data channel (Port 443, HTTPS) and on the unsecure data channel
(Port 80). All transactions between the web browser and the PSA's web interface requiring security take place on
this secure port.
SSL Certificate Page
The SSL Certificate page is displayed when SSL Certificate is selected (on the menu under Security).
SSL Certificate Page
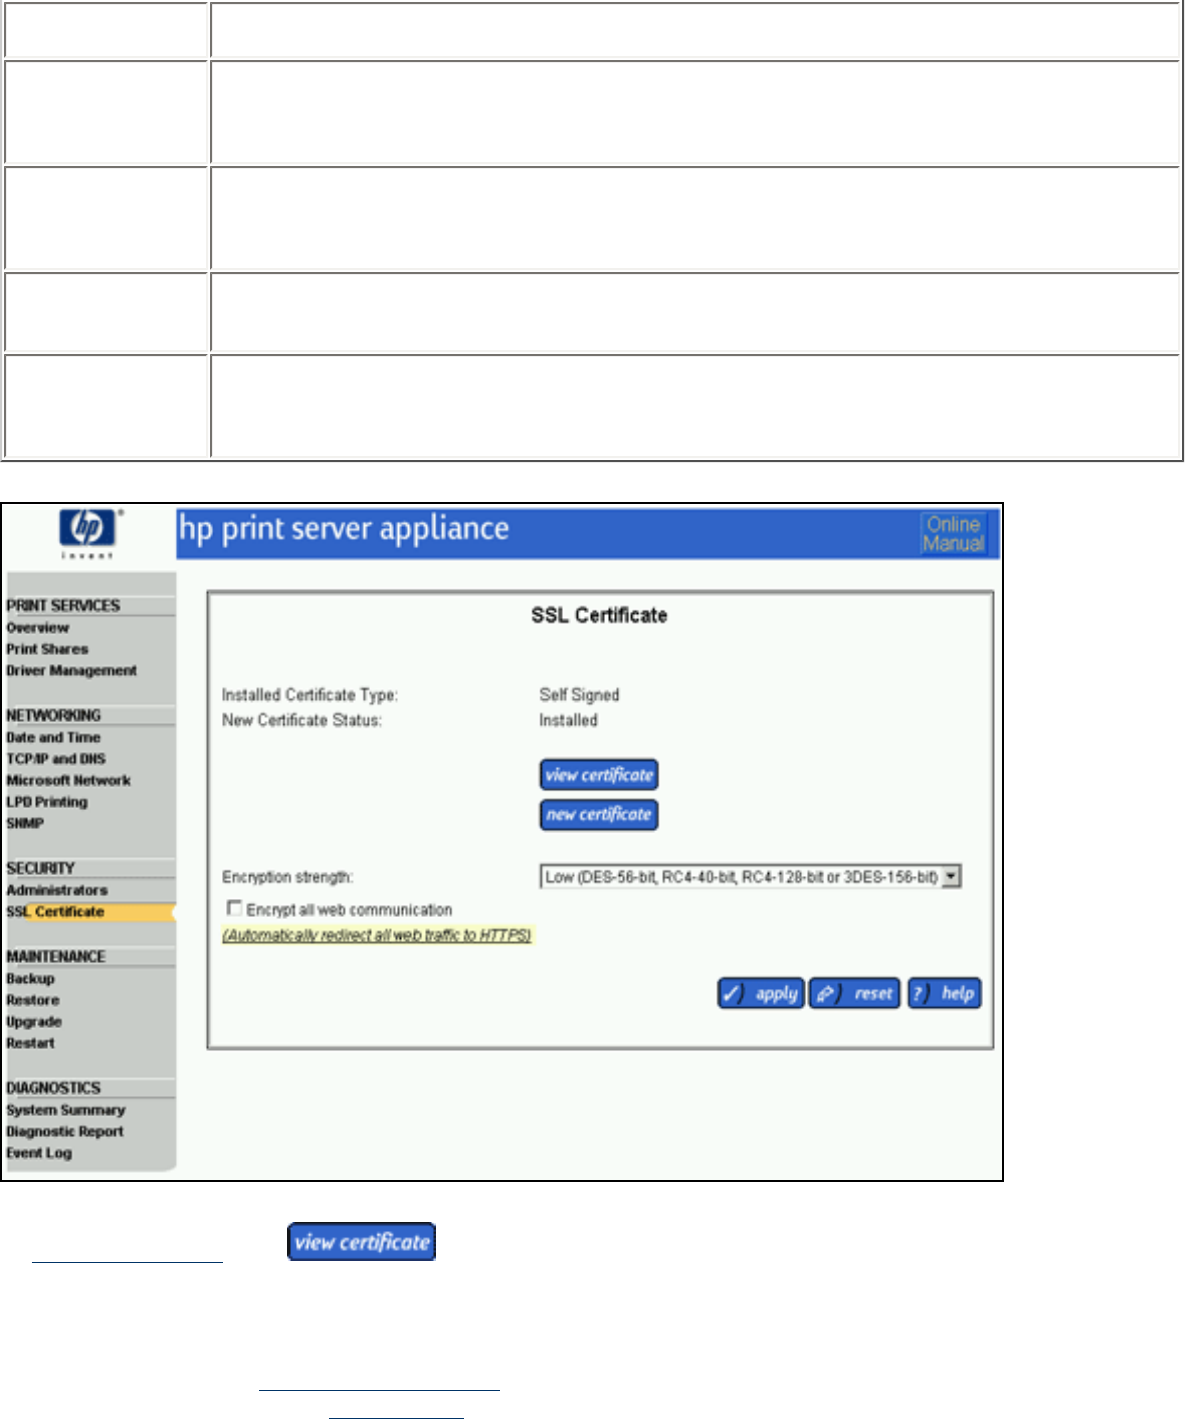
Field Names Description
Installed
Certificate
Type
Type of certificate installed (self-signed or CA signed).
New
Certificate
Status
Status of the certificate (installed or pending).
Encryption
strength Low, Medium, or High.
Encrypt all
web
communication
Select this to redirect all communication through a secure port (HTTPS).
To view the certificate, click on the SSL Certificate page.
To change the encryption strength or to encrypt web communication, follow these steps:
1. At a workstation, access the web browser and type the IP address for the PSA.
2. Log on to the PSA as an administrator. (The default user name is "admin" and the default password is
"admin".)
3. Under Security on the menu, select SSL Certificate. (See the description of the fields above for more
information.)
4. Click on the Encryption strength drop-down list and select the cipher value for the certificate (Low
(default), Medium, or High).
5. To redirect all communication through a secure port (HTTPS), check Encrypt all web communication.
6. Click .
Viewing the SSL Certificate
The View Certificate page is displayed after is clicked on the SSL Certificate page.
View Certificate Page
Field Names Description
Common Name Fully qualified domain name or IP Address of the PSA. Used to identify the device HPX595.
rose.hp.com.
Organization Full legal name of your company.
Organizational
Unit Specific department or division within your organization.
Validity Period Length of time (in days) for validity of the certificate.
Cipher Value Cipher value of the certificate (low, medium, or high).
Locality (City) City in which your organization is physically located.
State/
Province State or province (up to 68 characters).
Country/
Region Two-character ISO country code.

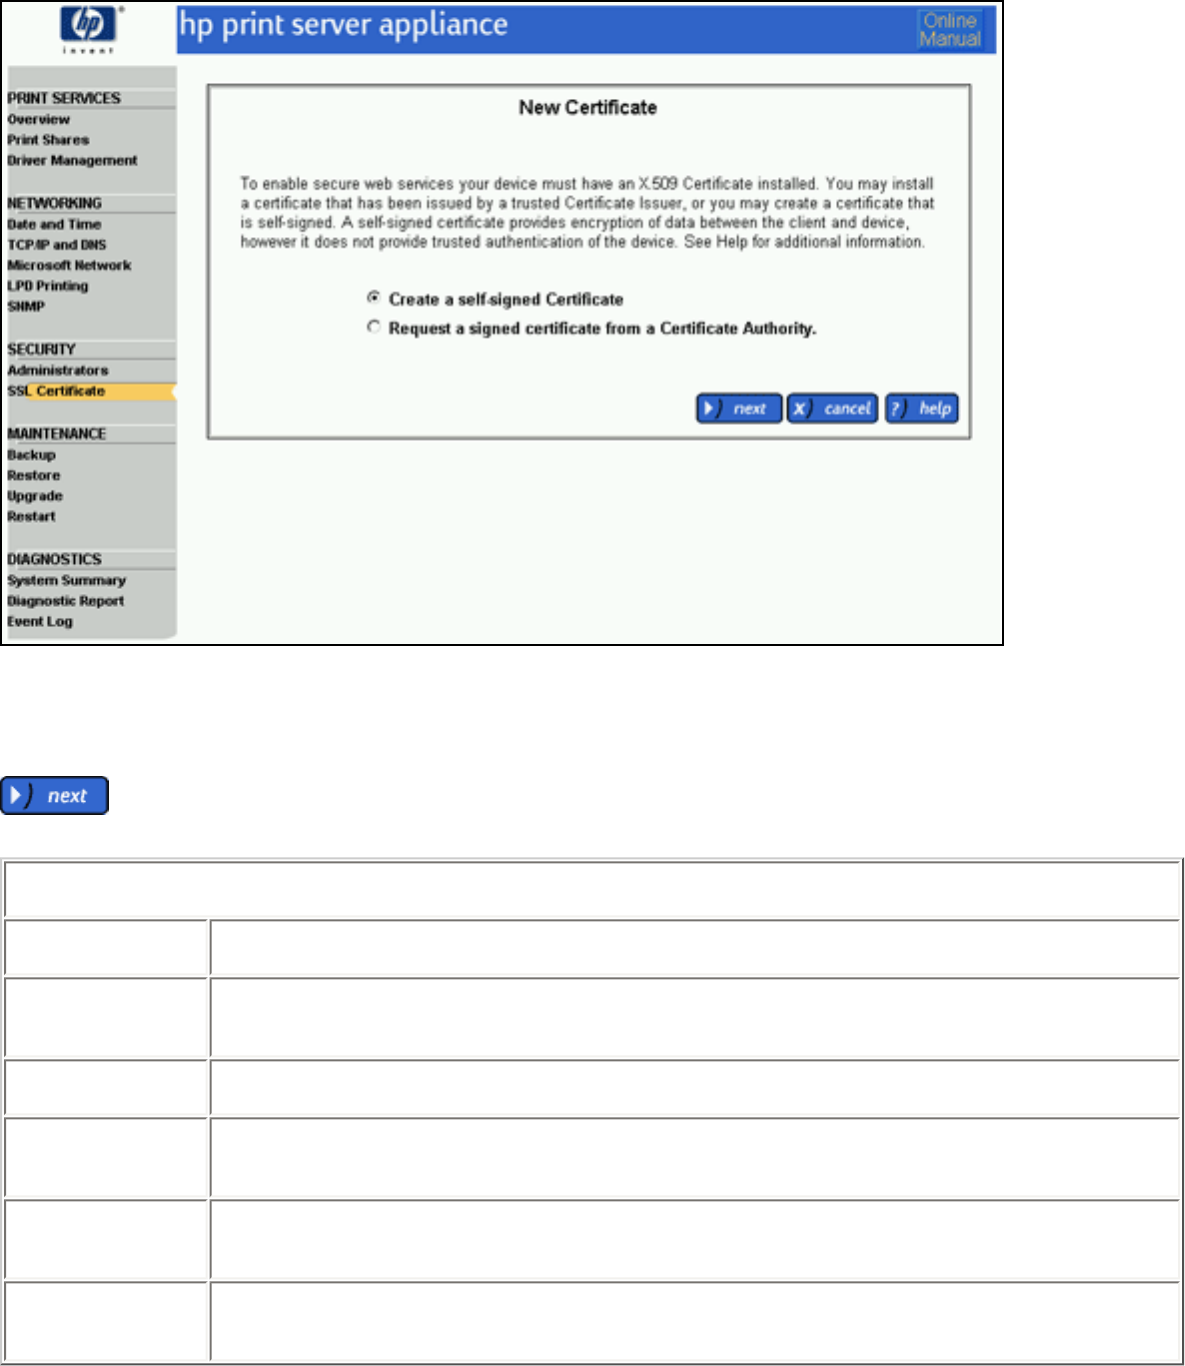
Creating a Self-Signed Certificate
To create a new self-signed certificate, select the radio button for this option on the New Certificate page and click
. The Self-Signed Certificate page is displayed.
Self-Signed Certificate Page
Field Names Description
Common Name Fully qualified domain name or IP Address of the PSA. Used to identify the device HPX595.
rose.hp.com.
Organization Full legal name of your company.
Organizational
Unit Specific department or division within your organization.
Validity Start
Date The start date for the validity of the certificate.
Validity Period
(Days) Validity period for the certificate, in days. (The default is 365 days.)
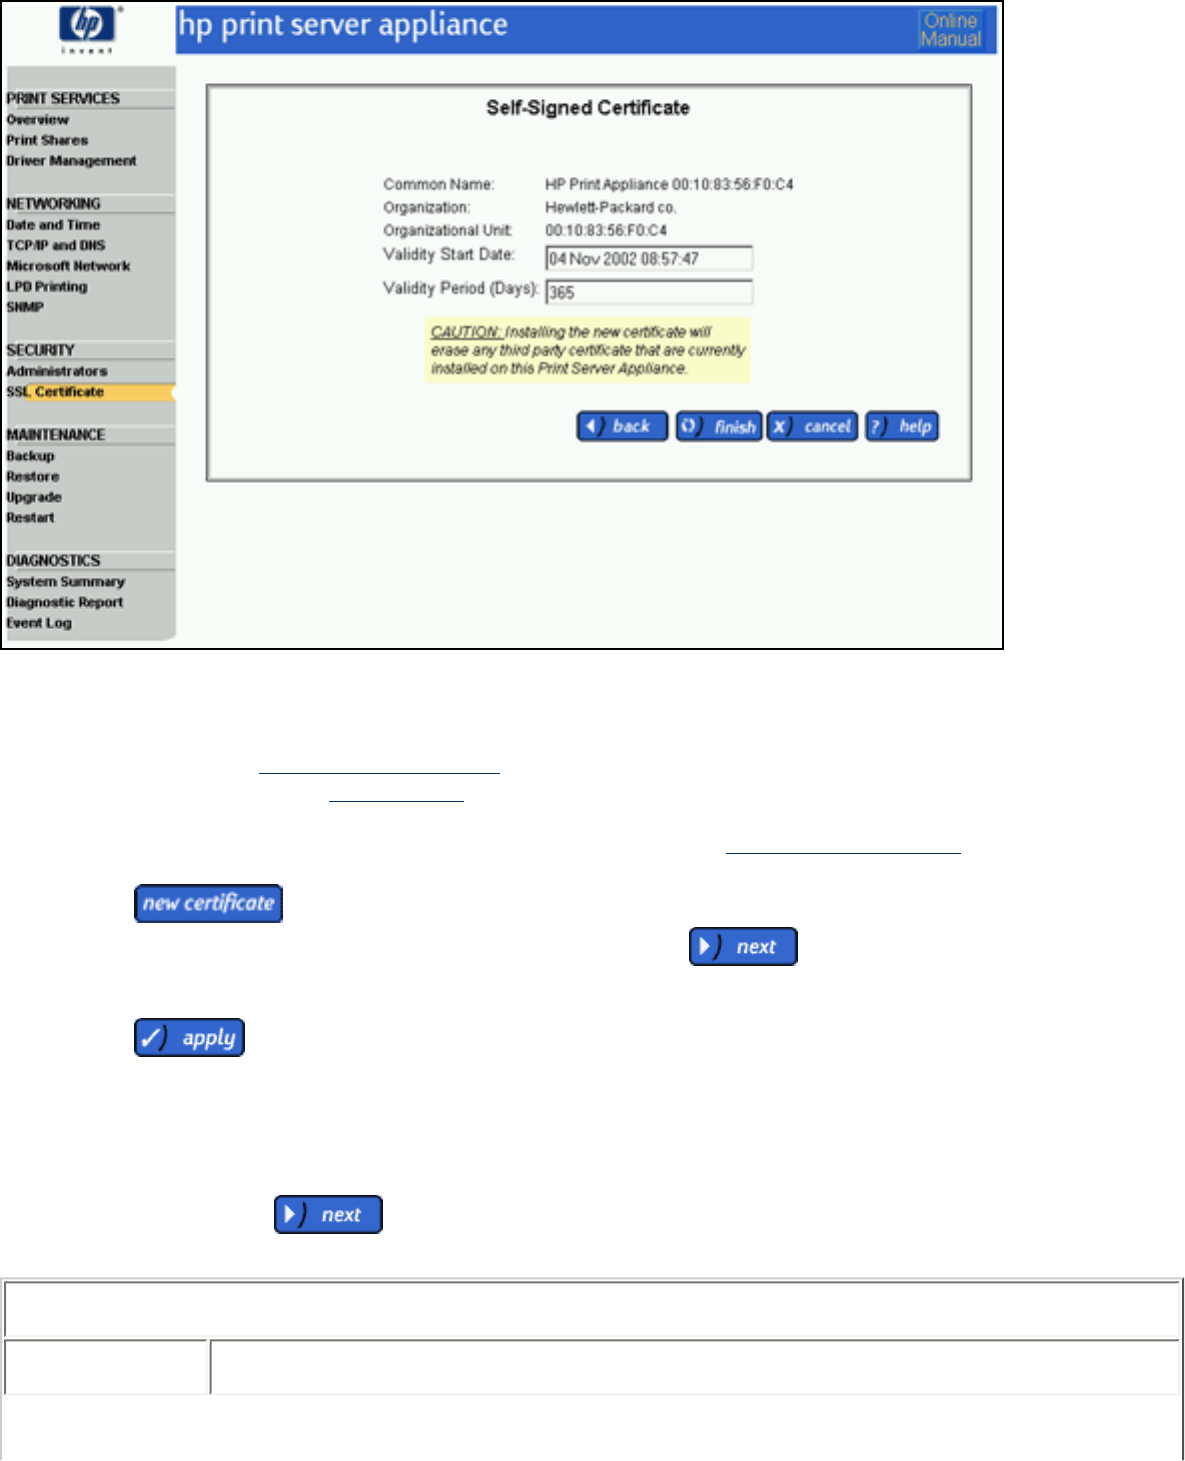
To create a new self-signed certificate, follow these steps:
1. At a workstation, access the web browser and type the IP address for the PSA.
2. Log on to the PSA as an administrator. (The default user name is "admin" and the default password is
"admin".)
3. Under Security on the menu, select SSL Certificate. (See the description of the fields above for more
information.)
4. Click .
5. Select the radio button for a self-signed certificate and click .
6. Complete the validity start date for the certificate.
7. Complete the validity period for the certificate.
8. Click .
Requesting a Signed Certificate from a Certificate Authority
To request a signed certificate from a Certificate Authority, select the radio button for this option on the New
Certificate page and click . The Request Signed Certificate page is displayed.
Request Signed Certificate Page
Field Names Description
Common Name Fully qualified domain name or IP Address of the PSA. Used to identify the device HPX595.
rose.hp.com.
Organization Full legal name of your company.
Organizational
Unit Specific department or division within your organization.
Locality (City) City in which your organization is physically located.
State/
Province State or province (up to 68 characters).
Country/
Region Two-character ISO country code.
To request a signed certificate from a Certificate Authority, follow these steps:
1. At a workstation, access the web browser and type the IP address for the PSA.
2. Log on to the PSA as an administrator. (The default user name is "admin" and the default password is
"admin".)
3. Under Security on the menu, select SSL Certificate. (See the description of the fields above for more
information.)
4. Click .
5. Select the radio button for a certificate from a Certificate Authority and click .

6. Complete the fields on the Request Signed Certificate page (as described above).
7. Click . The Certificate Request in PEM Encoding page is displayed.
8. Follow the instructions on the page and click .
Installing a Certificate from a Certificate Authority
After the signed certificate has been received from the Certificate Authority, follow these steps to install it:
1. At a workstation, access the web browser and type the IP address for the PSA.
2. Log on to the PSA as an administrator. (The default user name is "admin" and the default password is
"admin".)
3. Under Security on the menu, select SSL Certificate. (See the description of the fields above for more
information.)
4. Click . The Install Certificate page is displayed.
5. Cut and paste the text from the signed certificate into the text box displayed.
6. Click . The web interface will restart and the new certificate will be valid.
Backing Up, Restoring, Reseting, Rebooting, and
Upgrading the PSA
Links within this page:
Backing Up Network Settings and Printer Information
Restoring Network Settings and Printer Information (Using the Web Interface)
Resetting the PSA to Factory Defaults (Using the Front Panel)
Rebooting (or Restarting) the PSA
Upgrading the Firmware on the PSA
Links to related pages:
Troubleshooting the PSA
Related System Messages
Backing Up Network Settings and Printer Information
Saving the configuration parameters makes it easy to restore those parameters if the PSA must be replaced or if its
configuration values are accidentally changed or lost. Use the Backup page to save the following configuration
parameters:
● administrator account user names and passwords
● network settings
● printer information
● printer drivers
Use the following procedure to save the configuration parameters:
1. On the menu under Maintenance, select Backup.
2. Click to begin the process. A File Download window appears.
3. At the next screen, click Save This File to Disk and then click . A Save As dialog box appears.
4. Choose a file name, drive, and directory to hold the saved configuration.
5. Click . The saved configuration is in binary format and cannot be edited using a text editor.

Now that there is a backup file for the PSA, settings can be restored if required (see the next section).
Note: If the PSA is joined to a domain, the domain password for the domain controller is included in the backup
file. When that PSA backup file is restored, it might be necessary to join the PSA to that domain again because the
password might have changed since the backup file was created.
Restoring Network Settings and Printer Information (Web Interface)
If configuration values have been accidentally changed or lost, a previously saved copy of the configuration
parameters can be restored to the PSA. This technique can also be used to replace a PSA. A copy of the
configuration parameters is saved while the PSA's settings and files are being backed up.
Use the following procedure to restore backup settings:
1. On the menu under Maintenance, select Restore.
2. Select the settings to restore:
❍ Administrator Accounts (restores all administrator accounts previously added and saved in the
backup of the PSA)
❍ PSA Network Settings (restores all PSA address and name information)
❍ Printers and Printer Client Drivers: (restores all printer definitions and factory-installed drivers plus
any added to the PSA for Microsoft's Point and Print feature)
3. Type the full path and file name of the saved configuration in the Configuration File field. Or, click
Browse to locate and select the file.
4. Click to begin the restore process.
-or-
Click to return to the Restore page without restoring the configurations.
5. The Restore Configuration Successful window appears. Click .
System Messages for Restoring the Settings on the PSA
Resetting the PSA to Factory Defaults (Front Panel)
Once the PSA is configured, the configuration settings are retained in memory unless they are manually reset to
factory defaults through the front panel of the PSA. This procedure will reset the PSA to its factory defaults. All
configuration information will be lost, including network settings, queues, and any firmware upgrades. The
administrator account name and password will be reset to factory defaults.
Note: If the PSA is reset to factory defaults, factory-installed drivers will be restored. All other settings (including
network configuration, administrator settings, printers, and user-added drivers) will be lost.
1. Make sure queues are empty and no printing activity is taking place.
2. Press the Power button on the front panel of the PSA to turn it off.
CAUTION: To prevent possible file corruption on the PSA, do not simply disconnect the power
cord.
3. Turn on the PSA again by pressing the Power button.
4. During the restart sequence, when the front panel display reads Configuring, press . The following
message is displayed:
5. Press to reset the PSA to its factory defaults. Press to cancel the restart process and retain all
current configuration information. The PSA will then finish restarting.
If was pressed and the factory default settings are being restored, the following message will be
displayed during restart:
System Messages for Restarting the PSA
Restarting (or Rebooting) the PSA
Use the Restart feature to reboot the PSA. Before restarting the PSA, read the following:
● The restart process will take from three to six minutes. During this time, the PSA is not available for use
and the connection to this browser session may be lost.
● Any print jobs actively being spooled from client users to the PSA will probably be lost and must be
reprinted.
● Any print jobs currently spooled on the PSA will be retained.
● Any print jobs currently being de-spooled from the PSA to the printers may be restarted (automatically)
once the PSA is ready to function.
Follow these steps to restart the PSA:
1. On the menu under Maintenance, click Restart.
2. Click to begin the reboot process.
Upgrading the Firmware on the PSA
Before installing an upgrade, save the current configuration of the PSA using the Backup feature. One firmware
version 2.3.x (and not earlier versions) can be upgraded to firmware version 2.4.x.
CAUTION: This information should be automatically saved on the PSA, but if a catastrophic event occurs during the
upgrade (for example, a power failure), it is possible that the configuration may be lost. This step is precautionary.
Note: If migrating to firmware version 2.4.x, printers that had been added to earlier firmware versions (2.3.x or
before) need to be associated with their driver again. To do this easily, go to the Print Shares page and click
Drivers for that print share. In the drop-down list, select any other driver and click . Then, select the
original driver and click again.
Use the following procedure to install an upgrade:
1. Download the firmware image (*.hp) from the HP support website and save it on a local hard drive or CD
(http://www.hp.com/cposupport). The exact file location will be needed for step 3.
2. Access the PSA's web interface and click Upgrade (on the menu under Maintenance).
3. On the Upgrade page, type the complete path to the firmware image on the local hard drive (for example,
"C:\TEMP\UPGRADE.HP") or click Browse to find the firmware image downloaded in step 2.
4. Click to upload the upgrade file to the PSA.
5. After the upgrade has completed, the Overview page is displayed.
System Summary
Links to related pages:
Troubleshooting the PSA
Viewing and Printing the System Summary Page From the Web Interface
This page explains how to view and print the PSA System Summary from the web interface. PSA settings are shown on the
System Summary page. To access this page, select System Summary (in the web interface under Diagnostics). This page
can be printed using the print function of the browser.
The System Summary page has the following sections:
General Information on the System Summary Page
TCP/IP Network Configuration Information
Microsoft Network Configuration Information
SNMP Configuration Information
SNMP Traps Information
Administrators Information
SSL Configuration Information
LPD Configuration Information
Print Shares Information
Installed Printer Drivers Information
To refresh this page, click .
General Information on the System Summary Page
Parameter Description
Model Name HP Print Server PSA 4250.
Model Number Model number of the PSA.
Ethernet Address Ethernet address of the PSA.

Current Firmware Revision Current version of firmware running on this PSA.
Base (Factory) Firmware Revision Version of firmware that the PSA would be rolled back to if it was reset to
factory defaults.
Patches Applied Lists any patches that have been applied to the PSA.
BIOS Version Version of the BIOS on the device.
Manufacturing Date Code Manufacturing information for use by the factory.
Serial Number Serial number of this unit.
Hard Drive Information Hard drive's identifier code.
Operating System Restored Date and time of last restore of the operating system.
Data Area Restored Date and time of last restore of the data area.
Spool Area Restored Date and time of last restore of the spool area.
TCP/IP Network Configuration Information
Parameter Description
IP Configuration Mode How this unit was configured (manual or DHCP).
Current IP Address IP address of this PSA.
Current Subnet Mask IP subnet mask of this PSA.
Default Gateway Default gateway of this PSA.
Primary Domain Name Server (DNS)
Address IP address of the primary DNS server.
Secondary Domain Name Server (DNS)
Address IP address of the secondary DNS server.
DNS Domain Name Name of the IP domain to which this PSA belongs.
Auto-negotiate Network link mode (enabled or disabled), speed (10T or 100T), and duplex
(full or half).
Microsoft Network Configuration Information
Parameter Description
Print Server Appliance Name Name of the PSA.
Windows Domain or Workgroup Microsoft (R) domain or workgroup to which this PSA belongs.
Primary WINS Server Address IP address of the primary WINS server.
Secondary WINS Server Address IP address of the secondary WINS server.
Domain Authentication Status of domain authentication (checked is enabled or "on").
Domain Controller Auto Discovery Status of auto discovery (checked is enabled or "on").
Specified Domain Controllers List of domain controllers.
SNMP Configuration Information
Parameter Description
SNMPv1/v2 Enables and disables SNMPv1/v2.
SNMPv1/v2 Read and Write access Allows SNMPv1/v2 read and write access.
SNMPv1/v2 Read-only access Allows SNMPv1/v2 read-only access.
SNMPv3 Enables and disables SNMPv3 access.
SNMPv3 User Name SNMPv3 account name.
SNMPv3 Authentication Key Authentication Key for SNMPv3 account.
SNMPv3 Privacy Key Privacy Key for SNMPv3 account.
SNMP Traps Information
Parameter Description
IP Address IP address of the trap recipient.
Community Name Community Name that will be used in the traps packet (not the PSA's
SNMP community name).
Port Number of the port where the trap will be sent (typically 162).
Administrators
Parameter Description
Local Administrators Names of the local administrators.
DomainAdministrators Names of the domain administrators.
SSL Configuration Information
Parameter Description
Installed Certificate Type of certificate installed (Self-Signed or CA signed).
New Certificate Status Status of certificate (Installed or Pending).
Common Name Fully qualified domain name or IP Address of the PSA. Used to identify
the device HPX595.rose.hp.com.
Organization Full legal name of your company.
Organizational Unit Specific department or division within your organization.
Validity Period Length of time (in days) for validity of the certificate.
Cipher Value Cipher value of the certificate (Low, Medium, or High).
Locality (City) City in which your organization is physically located.
State/Province State or province (up to 68 characters).
Country Two-character ISO country code.
LPD Configuration Information
Parameter Description
LPD Printing Mode Status of LPD printing (checked is enabled or "on").
Specified LPD Hosts List of host names permitted to print and manage print jobs using LPD.
Print Shares Information
This section consists of two lines:
● The first line lists the printer name, the IP address or hostname, the remote queue name, drivers the share will point
and print, any printer properties (for example: Paused, Print Banner, or Hide), and any share description text.
Note: The suffix "CSR" means that driver is capable of client side rendering. When the driver was added and initialized,
CSR capability was requested to resolve issues with W2K drivers. Problems resolved with a CSR driver include:
❍ N-up (printing multiple pages in a reduced format on one page)
❍ booklet style (format the print job into a printed booklet)
❍ watermark (print a watermark on each page of the document)
❍ ZoomSmart (scales a letter-sized/A4 document or poster to tabloid/A3, or vice versa)
❍ back-to-front (prints the document in reverse order)
❍ rotate 180 degrees (rotates the document layout but not the paper)
● The second line lists the security rights for the printer (who can print and at what level of access).
Note: For Jetdirect internal cards or single-port external print servers, the Remote Queue Name will be raw. For Jetdirect 3-
port external print servers, the Remote Queue Name will be raw1, raw2, or raw3.
Installed Printer Drivers Information
This section lists the printer drivers installed on this PSA.
Diagnostic Report
Links to related pages:
Administrator Visible Logs
System Summary
Troubleshooting the PSA
Viewing and Printing the Diagnostic Report from the Web Interface
This page explains how to view and print the Diagnostic Report for the PSA from the web interface. To access this report, select
Diagnostic Report (in the web interface under Diagnostics). This report can be printed using the print function of the browser.
The Diagnostic Report has the following sections:
Diagnostic
System
DNS/WINS Servers
Domain Controllers
Printer Status
Network Statistics
The Diagnostic Report is a background process that is automatically run every ten minutes, querying resources across the
network (for example, DNS, WINS, domain controllers, and printers).
To refresh this page, click . This will initiate the process of querying the network, which can take a few minutes
depending on the number of nodes contacted and their responsiveness. Each section of the Diagnostic Report has a different
"freshness" attribute. See the section below for its attribute.
Diagnostic
Parameter Description
Status last gathered Date and time that the diagnostic tests were last run. These tests are run
every ten minutes and also when the administrator clicks the refresh button
on the Diagnostic Report page.
Report displayed Date and time that the Diagnostic Report was last displayed.
System
The values in the section are updated every minute.
Parameter Description
System Load (past 15 minutes): This metric ranges from 0% to 100% and shows how heavily the PSA has been
used in the past 15 minutes. If the System Load often displays over 80%, the
PSA is overloaded and some of the printers should be migrated to another PSA.
Disk Usage This metric ranges from 0% to 100% and shows the amount of spool disk in
use. If the Disk Usage value is
● above 80%: an error log is generated.
● above 90%: a critical log is generated
● 100%: the PSA will not be able to print. The most common reason for
high disk utilization is that one or more printers is not printing and
print jobs are accumulating on the PSA for that printer or printers.
Check the Printer Status on the Diagnostic Report page to see if this is
true.
High spool utilization can also indicate that the PSA is overloaded. If the PSA is
frequently overloaded, some of the printers should be migrated to another PSA.
DNS/WINS Servers
The values in this section are updated each time status is gathered.
Parameter Description
DNS IP Address IP address of the DNS server
Connection Status Valid statuses are
● Connected
● Cannot be contacted: The DNS server cannot be found. It does not
respond to a network query or ping.
● No entry: The forward entry, the reverse entry, or both forward and
reverse entries for the PSA are missing from the DNS server. These
entries should be added to the DNS server.
WINS IP Address IP address of the WINS server

Connection Status Valid statuses are
● Connected
● Cannot be contacted: The WINS server cannot be found. It does not
respond to a network query or ping.
● No entry: The WINS server automatically adds an entry for the PSA
onto the WINS server. If there is no entry for the PSA on the WINS
server, the WINS server is not functioning properly.
Domain Controllers
This section is displayed if Domain Authentication is enabled on the PSA. The values in this section are updated each time
status is gathered.
Parameter Description
Hostname Host name of the Domain Controller. This field is blank if there is no
DNS entry for a domain controller, or if the PSA cannot access any DNS
servers.
IP Address IP Address of the Domain Controller
Role Determined by the NetBIOS name from the WINS server. Valid statuses
are
● Primary: Primary Domain Controller.
● Backup: Backup Domain Controller.
● Unknown: Either the Domain Controller cannot be contacted,
or it is an Active Directory Domain Controller which means it is
a peer (and there are no primary or backup domain controllers)..
Connection Status Valid statuses are
● Connected
● Not configured: The PSA is in workgroup mode.
● Cannot be contacted: The domain controller cannot be found.
It does not respond to a network query or ping.
● No DNS entry for the Domain Controller: The IP address for
the domain controller on the DNS server is either not valid or
not for the domain controller.
● No WINS entry for the domain: The WINS server
automatically adds an entry for the PSA onto the domain
controller. If there is no entry for the PSA on the domain
controller, the WINS server is not functioning properly.
● Domain Controller not in the current domain: The domain
controller is a valid domain controller. However, it is not
associated with the same domain to which the PSA is currently
joined.
● There is no machine account for this PSA on the Domain
Controller: The machine account is not joined to the domain.
Printer Status
The values in this section are updated each time status is gathered.
Parameter Description
Share Name Share name for the printer.
Printer Address The printer address will be in the format <address>:<queuename>,
where address is either the hostname or IP address, depending on what
form the administrator entered when creating the share.
Printer Connection Status* Valid statuses are
● Connected
● Printer cannot be contacted: The printer cannot be found. It
does not respond to a network query or ping.
● LPD not supported: The printer does not support LPD.
Printer SNMP Status* Valid statuses are
● Door open
● Low paper
● Low toner
● No paper
● No toner
● Offline
● Online
● Printer jammed
● Service required
● Unknown state: The printer might not support SNMP, or the
network is busy and a response to the SNMP query was not
received in the time-out period.
Note: Printer information is only returned from printers that support the standard printer MIB (RFC1759). Printers that do not
support the standard printer MIB or who have a real community name other than "Public" will display "Status unknown".
Network Statistics
The values in this section are updated every time the Diagnostic Report is displayed. To refresh only this section, select
Diagnostic Report (on the menu under Maintenance) rather than pressing the Refresh button. New network statistics will
be displayed without waiting for the network requests to all of the DNS servers, WINS servers, domain controllers, and printers.
Parameter Description
Total Packets Received Total number of network packets this unit has received since the last reboot.
Total Packets Transmitted Total number of network packets this unit has transmitted since the last reboot.
Bad Packets Received Total number of improperly formatted network packets received since the last
reboot. A large number of bad packets may indicate network problems.
Received Packets Dropped Number of packets dropped since the last reboot because the receive buffer is
full.
Framing Errors Received Number of improperly formatted frames received since the last reboot.
Transmit Packet Errors Total number of errors that occurred since the last reboot while attempting to
transmit.
Transmit Packets Dropped Number of attempted transmit packets dropped since the last reboot because
of excessive collisions.
Transmit Packet Overruns Number of packets dropped since the last reboot while attempting to transmit
because the receive buffer is full.
Transmit Collisions Number of collisions encountered since the last reboot while attempting to
transmit packets.

Event Log
Links within this document:
Event Log Page
Buttons on the Event Log Page
Fields on the Event Log Page
Event Log Filters
Links to related documents:
Event Log Messages
The Event Log is accessible through the web interface under General. It contains information about the appliance to
facilitate troubleshooting and maintenance at your site. In addition, this log helps HP customer support in resolving
problems. Events are listed on the log. Event log filters are used to sort the events displayed.
Event Log Page
To access the Event Log, click Event Log on the Main Menu (under General) in the web interface on the appliance.
The Event Log page is displayed:
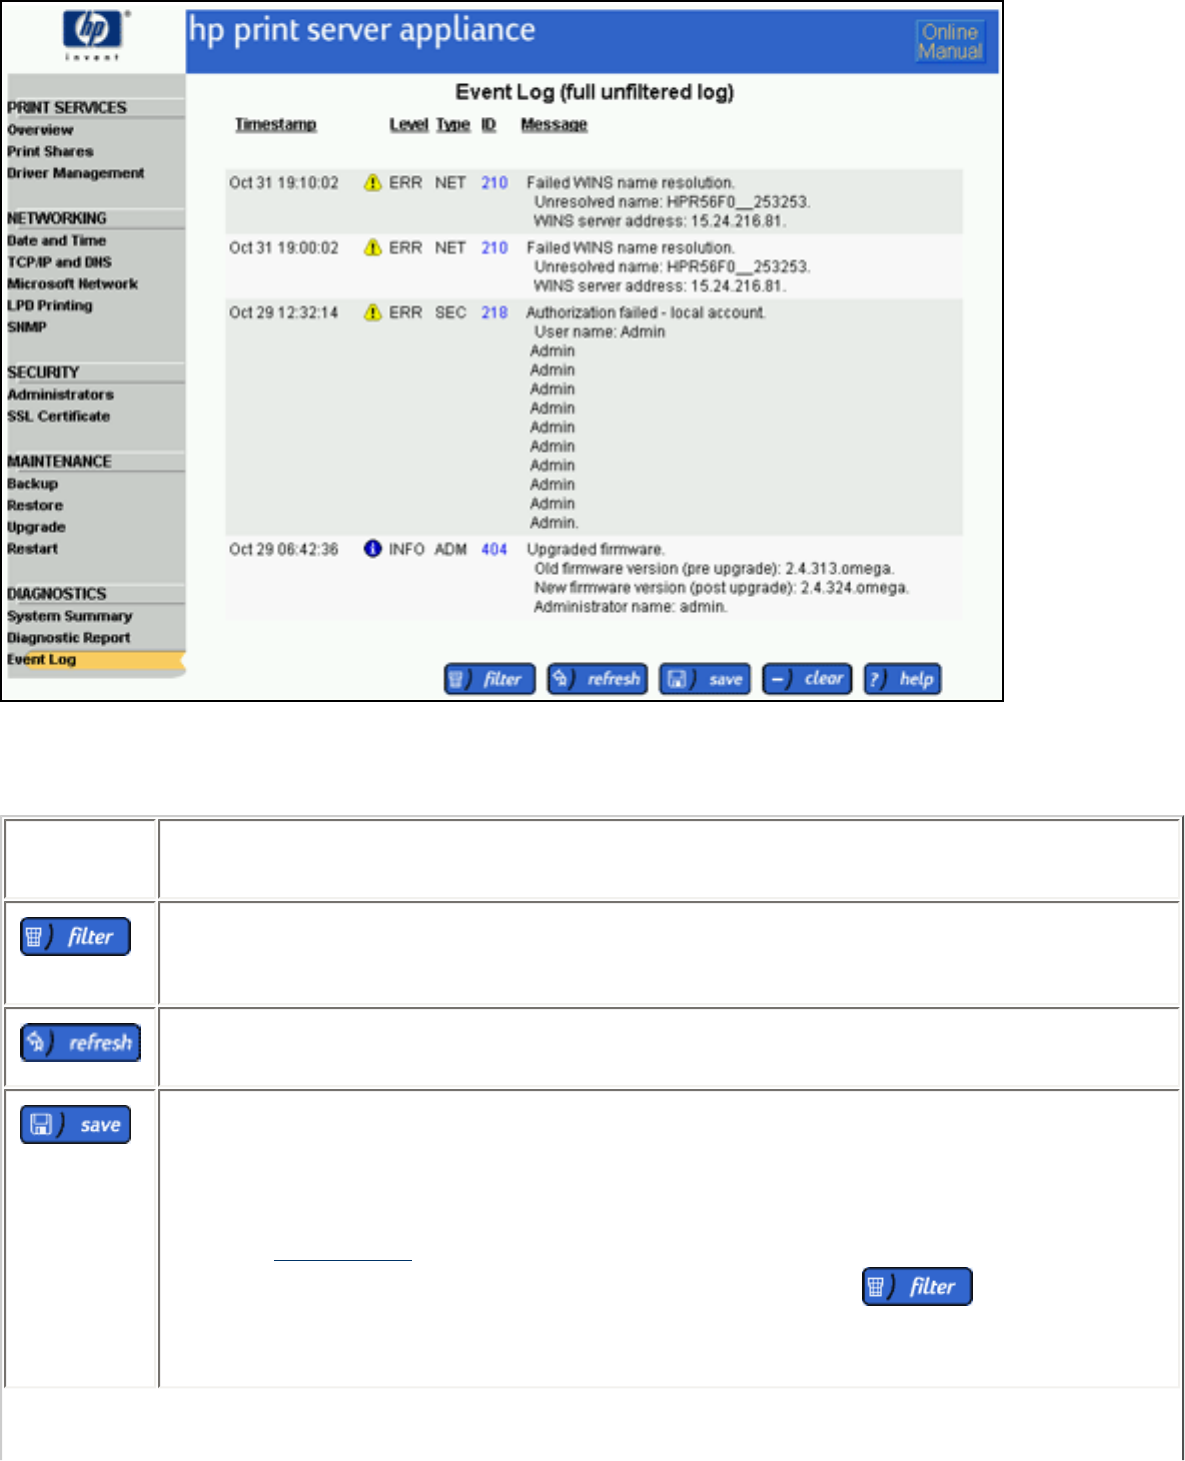
Buttons on the Event Log Page
Button
Name Description
Displays the Event Log Filters page where filters can be selected, based on the message level
and type. Only those events with the Level(s) and/or Type(s) selected will be included on the
Event Log page.
Displays any new events that have occurred. Use this button instead of the browser's Refresh
button to ensure consistent behavior.
Saves the event log, which is a tab-delimited file (psalog.tab), to the directory specified. Once
saved, the file can be dragged and dropped onto a Microsoft Excel spreadsheet, placing each
event into its own row. The events can then be sorted. (The file can also be opened in a text
editor but the results are not as clean.)
Note: If "Filters are ON" is displayed at the top of the log, there might be events that are not
displayed. Before the event log is saved, it is recommended to click and check all of
the filters. Then review the log prior to saving it.
Deletes all entries from the Event Log. A confirmation message is displayed. After the log is
cleared, a new entry is displayed in the log with the date and time the log was cleared and the
name of the administrator who cleared it.
Note: If "Filters are ON" is displayed at the top of the log, there might be logged events that are
not displayed. Before the event log is cleared, it is recommended to click and check
all of the filters. Then review the log prior to clearing it.
Displays online help for the Event Log.
Fields on the Event Log Page
Field Name Description
Event Log
(filtered log)
or
Event Log (full
unfiltered log)
filtered log - On the Event Log Filters page, filters (Types and Levels) have been selected
that have screened out messages that are currently in the Event Log.
full unfiltered log - All of the messages in the Event Log are displayed; none have been
filtered out.
Timestamps The date and time of the event.
Level Indicates the urgency of the message. One or more of the following levels of messages
(determnined by the filter(s) selected on the Event Log Filters page) can be displayed:
● CRIT (Critical error) - an error that affects the basic funtions of multiple users and/
or administrators. For example, users cannot print or administrators cannot
perform administrative functions. Typically caused by a complete failure of a
network component.
● ERR (Error) - an error that affects the functions of only one or more users or
administrators, but not all. The majority of users or administrators can still perform
their functions.
● INFO (Informational) - an important system event. For example, a new driver has
been added. (Events that occur more often, such as completing a print job, are not
included.)
Type Groupings of Event Log messages. One or more of the following types of messages
(determnined by the filter(s) selected on the Event Log Filters page) can be displayed:
● SEC (Security) - displays all Security-related messages
● NET (Networking) - displays all Networking-related messages
● ADM (Administrative) - displays all Administrative-related messages
ID Log number for the event. Click on the message ID number to get more information about
that message.
Message Text message that describes the event.
Event Log Filters
Event Log filters are used to sort messages automatically so that only those messages of a certain type and/or level
are displayed. Click to display the Event Log Filters page:
The following filters can be selected for events. One or more Type filters and one or more Level filters must be
selected:
Levels (at least one must be selected):
● CRIT (Critical error) - an error that affects the basic funtions of multiple users and/or
administrators. For example, users cannot print or administrators cannot perform
administrative functions. Typically caused by a complete failure of a network component.
● ERR (Error) - an error that affects the functions of only one or more users or administrators,
but not all. The majority of users or administrators can still perform their functions.
● INFO (Informational) - an important system event. For example, a new driver has been
added. (Events that occur more often, such as completing a print job, are not included.)
Types (at least one must be selected):
● SEC (Security) - displays all Security-related messages
● NET (Networking) - displays all Networking-related messages
● ADM (Administrative) - displays all Administrative-related messages

Initiated standard shutdown (102)
Level: Informational
Category: Administrative
Description: The PSA was shut down safely. This is generally done by using the power
button on the front panel or through Restart (in the web interface under Maintenance).
Completed standard startup (103)
Level: Informational
Category: Administrative
Description: The PSA completed startup. The preceding shutdown was a safe shutdown
(typically through the power button on the front panel or through the web interface using
Restart (in the web interface under Maintenance).
Note: If the administrator's name cannot be determined and is displayed as "None", then it
must have been changed using the front panel.
Completed non-standard startup -- followed abrupt shutdown (104)
Level: Informational
Category: Administrative
Description: The PSA completed startup after an abrupt shutdown, perhaps from a power
disruption.
Action: Non-standard startups may require the PSA to restore the operating system from a
safe copy. If configuration data (for example, networking, printer, and driver settings) is
no longer resident on the PSA, use a backup to restore the settings.

Running on UPS battery due to power failure (105)
Level: Informational
Category: Administrative
Description:A power failure occurred and the PSA began relying on the Uninterruptable
Power Supply (UPS) battery for its power.
Shutdown initiated due to low UPS battery (106)
Level: Informational
Category: Administrative
Description: After a power disruption, the PSA is schedule to run for one minute on the
Uninterruptable Power Supply (UPS) battery. This permits a safe shutdown of the PSA.
However, during this period, the UPS reached a power level that was too low and, in
response to this, the PSA shut itself down. The battery might be weak or old. Or the power
might have cycled multiple times but the battery did not have a chance to recharge.
Action: Try recharging the UPS battery or replacing the battery with a new one.
Shutdown initiated. UPS battery run time expired (107)
Level: Informational
Category: Administrative
Description: After a power disruption, the PSA is scheduled to run for one minute on the
UPS (Uninterruptable Power Supply) battery. This permits a safe shutdown of the PSA.
That one minute period has expired, so the PSA shut itself down.

Shutdown cancelled. Normal power restored (108)
Level: Informational
Category: Administrative
Description: Normal power has been restored to the PSA, so the PSA is no longer reliant
on the UPS (Uninterruptable Power Supply) battery backup. Additionally, the shutdown
that was planned for the PSA due to the power disruption has been cancelled.
High disk utilization-disk utilization is at 80-90% of capacity (109)
Level: Error
Category: Administrative
Description: The spool partition on the PSA is at 80-90% of capacity. This may be due to
one of the following conditions:
● one or more printers are not online
● connectivity to one or more printers has been disrupted
● unusually high printing volume by users
Action: It is necessary for the administrator to take one or more of the following actions:
● check online status of printers
● check the connectivity of printers
● evaluate print network configuration (improved throughput can occur with the
addition of more printers per PSA or with the reduction of the number of users per
PSA)
Critically high disk utilization-disk utilization is at 90-100% of capacity (110)
Level: Critical Error
Category: Administrative

Description: The spool partition on the PSA is at 90-100% of capacity. This may be due
to one of the following conditions:
● one or more printers are not online
● connectivity to one or more printers has been disrupted
● unusually high printing volume by users
Action: It is necessary for the administrator to take one or more of the following actions:
● check online status of printers
● check the connectivity of printers
● evaluate print network configuration (improved throughput can occur with the
addition of more printers per PSA or with the reduction of the number of users per
PSA)
DHCP provided hostname discarded-value is too long or invalid. Using manually provided value
(111)
Level: Informational
Category: Networking
Description: The hostname provided by DHCP was longer than the maximum number of
characters allowed or it included invalid characters. (This does not include the domain
portion of the hostname.) As a result, the hostname provided on the TCP/IP and DNS
Settings is being used. If no hostname has been provided, the default value is used.
Action: The administrator should ensure that they have provided a valid and appropriate
hostname on the TCP/IP and DNS Settings page.
DHCP provided domain name discarded- value is too long or invalid. Using manually provided
value (112)
Level: Informational
Category: Networking

Description: The DNS domain name provided by DHCP was longer than the maximum
number of characters allowed or it included invalid characters. As a result, the DNS
domain name provided on the TCP/IP and DNS Settings page is being used. If no DNS
domain name has been provided, the default value is used.
Action: The administrator should ensure that they have provided a valid and appropriate
DNS domain name on the TCP/IP and DNS Settings page.
Cannot communicate with domain controller (200)
Level: Error
Category: Administrative
Description: The domain controller experienced one of the following conditions:
● network problems (cable malfunction, hub, or router problems)
● not on the network
● the IP address or host name specified is not a domain controller
● power is disconnected or interrupted
Action: Check the Domain Membership Status field on the Microsoft Network Settings
page (in the web interface under Networking) to verify that the PSA can communicate
with the domain controller. If the domain controller the PSA was communicating with is
no longer available, the PSA will attempt to find another domain controller from the
following:
● the WINS server
● broadcasting on the local subnet
● the DNS server
If the DNS server, WINS server, or Domain Controller is not on the same subnet as the
PSA, ensure that the TCP/IP configurations, as entered on the TCP/IP and DNS page (in
the web interface under Networking), are configured correctly and that the network
infrastructure, such as the default gateway, is configured and is operational.
Cannot communicate with any domain controllers (201)

Level: Critical Error
Category: Security
Description: The PSA was unable to communicate with a Primary Domain Controller
(PDC) or a Backup Domain Controller (BDC) (if one is set up) to verify the user's name
and password. This means that clients will not be allowed to print because a Domain
Controller was not available to verify the user's name and password.
Action:
● Check your WINS server, domain controllers, routers, and other network
infrastructure to verify proper set up and operation. Are they plugged in and turned
on?
● If you specified automatic discovery of the domain controllers on the Microsoft
Network Settings page (in the web interface under Networking), try changing to a
list of specific domain controllers on that same page.
● If the DNS server, WINS server, or Domain Controller is not on the same subnet as
the PSA, ensure that the TCP/IP configurations, as entered on the TCP/IP and
DNS page (in the web interface under Networking), are configured correctly and
that the network infrastructure, such as the default gateway, is configured and is
operational.
● If the problem persists, try specifying the list of Domain Controllers using IP
addresses instead of NetBIOS or DNS names.
Authentication failed -- user authentication via Microsoft networking was unsuccessful (203)
Level: Error
Category: Security
Description:The user attempted to access the PSA using NT native tools, but the request
was denied because either the user identity was not confirmed or the user was not
authorized to use the PSA. One or more of the following errors may have occurred:
● The user name and password combination was not valid.
● The user logged into a machine that was not joined to the NT domain.
Action:

● Retype the user name and password combination.
● If the user machine was not in the same domain as the PSA or was not in a trusted
domain, the user should type domain\user name and password for correct
authentication.
● Verify that the user account exists.
● Monitor the log file for additional unauthorized access attempts.
Permission denied - user not allowed to connect to printer (205)
Level: Error
Category: Security
Description: The user tried to perform an action without the proper access level.
Action:
● If NT Domain authentication has been enabled on the Microsoft Network
Settings page (in the web interface under Networking), the security settings may
have changed. Verify that the user has authority to print. This can be done from the
web interface by selecting Print Shares -->Security.
By default, the group "Everyone" has permission to print. If "Everyone" does not
have permission to print, add either the specific user, or a group to which the user
belongs. The group "Everyone" normally contains all the users.
● Monitor the log file for additional unauthorized access attempts.
Cannot communicate with WINS server (209)
Level: Error
Category: Networking
Description: The WINS server specified on the Microsoft Network Settings page (in the
web interface under Networking) experienced one of the following conditions:

● network problems (cable malfunction, hub, or router problems)
● not on the network
● the IP address or host name specified is not a domain controller
● power is disconnected or interrupted
Action:
● Retype the WINS server address in the xxx.xxx.xxx.xxx format on Microsoft
Network Settings page and try again.
A properly configured WINS server is essential for the proper operation of the
PSA. If the PSA cannot reach the WINS server, users on other subnets (on the
other side of a router) will not be able to see the PSA in Network Neighborhood.
● If the DNS server, WINS server, or Domain Controller is not on the same subnet as
the PSA, ensure that the TCP/IP configurations, as entered on the TCP/IP and
DNS page (in the web interface under Networking), are configured correctly and
that the network infrastructure, such as the default gateway, is configured and is
operational.
Failed WINS name resolution (210)
Level: Error
Category: Networking
Description: The PSA could communicate with the WINS server but could not resolve
the name. A properly configured WINS server is essential for the proper operation of the
PSA. If the PSA cannot use the WINS server to resolve IP addresses, it will not be able to
communicate with the device.
Action: The NT Domain Name might have been misspelled on the Microsoft Network
Settings page (in the web interface under Networking).
Make sure the network has a WINS server configured and the WINS server address on the
Microsoft Network Settings page is correct. Make sure the WINS server has an entry for
the device being looked up.
For example, if the WINS server does not reply with the IP address of a Domain

Controller, the PSA will not be able to authenticate users.
Permission denied- user not allowed to delete, pause, or resume print job (213)
Level: Error
Category: Security
Description: The user did not have proper access rights to delete, pause, or resume print
jobs.
Access rights include:
● Print (print, pause, and delete your own print jobs)
● Manage Documents (pause and delete other user's print jobs)
● Full Control (print, pause, and delete other user's print jobs, delete printers, and
change security settings)
● No Access
● Special Access (for some Windows 2000 permissions that do not map directly to
the above four permission levels)
Action: One or more of the following actions may apply.
● Grant the user "Manage Documents" or "Full control" through the Print Shares
page (in the web interface under Print Services).
● Monitor the log file for additional unauthorized access attempts.
For more information, see NT Domain Security.
Cannot communicate with DNS server (214)
Level: Error
Category: Networking
Description: The DNS server specified on the Microsoft Network Settings page (in the
web interface under Networking) experienced one of the following conditions:

● network problems (cable malfunction, hub, or router problems)
● not on the network
● the IP address or host name specified is not a domain controller
● power is disconnected or interrupted
Action:
● Retype the DNS server address in the xxx.xxx.xxx.xxx format on Microsoft
Network Settings page and try again.
A properly configured DNS server is essential for the proper operation of the PSA.
If the PSA cannot reach the DNS server, users on other subnets (on the other side
of a router) will not be able to see the PSA in Network Neighborhood.
● If the DNS servers, WINS servers, or Domain Controller are not on the same
subnet as the PSA, ensure that the TCP/IP configurations, as entered on the TCP/
IP and DNS page (in the web interface under Networking), are configured
correctly and that the network infrastructure, such as the default gateway, is
configured and is operational.
Cannot communicate with any WINS servers (215)
Level: Critical Error
Category: Networking
Description: The WINS servers specified on the Microsoft Network
Settings page (in the web interface under Networking) experienced one of
the following conditions:
● network problems (cable malfunction, hub, or router problems)
● not on the network
● the IP address or host name specified is not a domain controller
● power is disconnected or interrupted
Action:
● Retype the WINS servers' addresses in the xxx.xxx.xxx.xxx format
on Microsoft Network Settings page and try again.

Properly configured WINS servers are essential for the proper
operation of the PSA. If the PSA cannot reach the WINS servers,
users on other subnets (on the other side of a router) will not be able
to see the PSA in Network Neighborhood.
● If the DNS servers, WINS servers, or Domain Controller are not on
the same subnet as the PSA, ensure that the TCP/IP configurations,
as entered on the TCP/IP and DNS page (in the web interface under
Networking), are configured correctly and that the network
infrastructure, such as the default gateway, is configured and is
operational.
Cannot communicate with any DNS servers (216)
Level: Critical Error
Category: Networking
Description: The DNS servers specified on the Microsoft Network Settings page (in the
web interface under Networking) experienced one of the following conditions:
● network problems (cable malfunction, hub, or router problems)
● not on the network
● the IP address or host name specified is not a domain controller
● power is disconnected or interrupted
Action:
● Retype the DNS servers' address in the xxx.xxx.xxx.xxx format on Microsoft
Network Settings page and try again.
Properly configured DNS servers are essential for the proper operation of the PSA.
If the PSA cannot reach the DNS servers, users on other subnets (on the other side
of a router) will not be able to see the PSA in Network Neighborhood.
● If the DNS servers, WINS server, or Domain Controller is not on the same subnet
as the PSA, ensure that the TCP/IP configurations, as entered on the TCP/IP and
DNS page (in the web interface under Networking), are configured correctly and
that the network infrastructure, such as the default gateway, is configured and is

operational.
Authentication failed (217)
Level: Error
Category: Security
Description: The user attempted to access the PSA, but the request was denied because
the user identity was not confirmed or user was not authorized to use the PSA.
Action: It is necessary for the administrator to take one or more of the following actions:
● retype the name and password combination
● verify that the user account exists
● monitor the log file for additional unauthorized access attempts
Authorization failed - local account (218)
Level: Error
Category: Security
Description: The user attempted to access PSA, but the request was but the request was
denied because the user identity was not confirmed or user was not authorized to use the
PSA. Local account access to the PSA is supported when NT Domain authentication is
disabled on the Microsoft Network Settings page (in the web interface under
Networking).
Action: It is necessary for the administrator to take one or more of the following actions:
● retype the name and password combination
● verify that the user account exists
● monitor the log file for additional unauthorized access attempts

Authorization failed - domain account (219)
Level: Error
Category: Security
Description: The user attempted to access the PSA, but the request was denied because
the user identity was not confirmed or the user was not authorized to use the PSA. Domain
account access to the PSA is supported when NT Domain authentication is enabled on the
Microsoft Network Settings page (in the web interface under Networking).
Action: It is necessary for the administrator to take one or more of the following actions:
● retype the name and password combination
● verify that the user account exists
● monitor the log file for additional unauthorized access attempts
Rejected client connection due to resource limits (221)
Level: Error
Category: Administrative
Description: The PSA limits the number of simultaneous client printer connections.
For printing, this limit is rarely an issue; clients usually connect, then send their print job
(s), and then disconnect. Across a large population it is possible, although unlikely, that a
sufficiently large number of clients might choose to print at the same time.
Another situation that can use up available connections occurs when clients open the
printer window in order to view their print jobs. Leaving the printer window open will
hold the connection open even after the jobs have been printed.
Action:
● If a large number of clients frequently print at the same time, it might be necessary
to redistribute some clients onto another PSA.
● Clients should be encouraged to close the printer window when it is no longer
showing their jobs.

Cannot communicate with the printer (300)
Level: Error
Category: Networking
Description: Communications between the PSA and the printer were interrupted while
the PSA was sending a print job to the printer. This could be due to a potential printer
problem.
Action:
● Make sure the printer is plugged in and turned on.
● Make sure the IP address entered is the correct IP address for the printer.
● Check the cables for the PSA and the printer to make sure they are connected and
secure.
Failed DNS name resolution (301)
Level: Error
Category: Networking
Description:
● The IP address and host name of the printer were incorrect (see the TCP/IP and
DNS page (in the web interface under Networking).
● The DNS server configuration was incorrect.
Action: One or more of the following may apply:
● Use the IP address rather than the host name.
● Check the IP address and host name of the printer on the printer's Properties page
(in the web interface under Print Services-->Print Shares).
● Check the DNS Address and DNS Domain Name on the TCP/IP and DNS page
(in the web interface under Networking). Note that only alphanumeric characters

with no spaces are allowed. Dashes ( - ) and periods ( . ) are also accepted.
● Verify that the domain controllers, WINS servers, and printers have valid DNS
entries.
Failure to resolve DNS names can cause the PSA to not function properly. For
example, if the PSA cannot resolve the Domain Controller's name to an IP address,
it cannot authenticate users.
You should verify that the domain controllers, WINS servers, and printers all have
valid DNS entries. A valid DNS entry requires an entry in both the forward and
reverse lookup tables on the DNS server to enable the resolution from the DNS
Domain Name (printers.my.com) or from the IP address.
Permission denied- host not allowed print access to printer (302)
Level: Error
Category: Security
Description: The client computer sending the print job was not allowed to make LPD
connections to the printer.
Action: One or more of the following actions may apply:
● On the LPD Printing page (in the web interface under Networking), add that
host's IP address or DNS Domain Name to the list of allowed hosts.
● Monitor the log file for additional unauthorized access attempts.
Cannot route print job to printer- network path not found (303)
Level: Error
Category: Networking
Description: There is a problem with the network between the PSA and the printer.
Action: One or more of the following actions may apply:

● Check to make sure the printer is plugged in, is turned on, and is online.
● Check the status of network components in the print path. This includes whether
components are in-service and powered up.
● Check the configuration of network components in the print path. This includes IP
addresses and other settings. components include the PSA, the default gateway of
the PSA, the printer, and network infrastructure (routers, switches, cables, and so
forth.).
Cannot connect to printer-- connection refused by the printer (304)
Level: Critical Error
Category: Networking
Description: The printer was able to communicate with the PSA, but the printer refused
to allow the PSA to connect to the LPD port (port 515). HP networked printers only allow
8 simultaneous LPD connections and refuse connection number 9. HP printers with many
separate sources for LPD print jobs may generate this error.
Action: Verify that the IP address for the printer is for a printer (not some other device)
(in the web interface under Print Services-->Print Shares-->Properties). Some older HP
Jetdirect print server firmware (the network interface card for HP Printers) only allows
one connection; you should upgrade the Jetdirect firmware card to the latest available
version of firmware for the card. (Access the latest firmware at http://www.hp.com.)
Detected printer problem (305)
Level: Critical Error
Category: Administrative
Description: The PSA was able to communicate with the printer, but the print job was not
printed due to one of the following reasons:
● no paper
● no toner
● printer door open

● paper jam
● printer is off-line
● service required for the printer
Action: Fix the identified problem at the printer.
Changed IP address (400)
Level: Informational
Category: Administrative
Description: The IP address of the PSA has been changed successfully on the TCP/IP
and DNS page of the web interface or through the front panel of the PSA.
Note: If the administrator's name cannot be determined and is displayed as "None", then it
must have been changed using the front panel.
Added printer (401)
Level: Informational
Category: Administrative
Description: The printer has been added to the PSA successfully using the Add Printer
feature either in Web Jetadmin (on the PSA Print Share Management page) or in the
web interface (Print Services-->Print Share List).
Deleted printer (402)
Level: Informational
Category: Administrative
Description: The printer was deleted successfully on the Printer Share List page (in the

web interface under Print Services).
Changed printer IP address (403)
Level: Informational
Category: Administrative
Description: The IP address for the printer has been changed successfully on the printer's
Properties page (in the web interface under Print Services-->Print Shares--
>Properties).
Upgraded firmware (404)
Level: Informational
Category: Administrative
Description: The firmware for the PSA has been upgraded successfully using the
Upgrade feature (in the web interface under Maintenance).
Deleted printer driver (405)
Level: Informational
Category:Administrative
Description: The printer driver was deleted successfully on the Driver Management
page (in the web interface under Print Services-->Driver Management).
Cleared log file (406)

Level: Informational
Category: Administrative
Description: The event log file has been cleared successfully on the Event Log page (in
the web interface under Maintenance).
Backed up settings (407)
Level: Informational
Category: Administrative
Description: The configuration settings for the PSA have been backed up successfully
using the Backup feature (in the web interface under Maintenance).
Failed to restore settings from backup file (408)
Level: Informational
Category: Administrative
Description: The configuration settings for the PSA could not be restored from the
specified backup file using the Restore feature (in the web interface under Maintenance).
Added administrator account (409)
Level: Informational
Category: Administrative
Description: The administrator account has been added to the PSA successfully using the
Administrators feature (in the web interface under Security).

Deleted administrator account (410)
Level: Informational
Category: Administrative
Description: The administrator account was removed from the PSA successfully using
the remove feature in Administrators (in the web interface under Security).
Changed WINS server address (411)
Level: Informational
Category: Administrative
Description: The WINS server address has been successfully changed on the Microsoft
Network Settings page (in the web interface under Networking).
Changed Windows domain or workgroup name (412)
Level: Informational
Category: Administrative
Description: The Windows NT domain or workgroup name has been changed
successfully on the Microsoft Network Settings page (in the web interface under
Networking).
Enabled NT domain authentication (413)
Level: Informational

Category: Administrative
Description: NT domain authentication has been enabled on the Microsoft Network
Settings page (in the web interface under Networking).
Disabled NT domain authentication (414)
Level: Informational
Category: Administrative
Description: NT domain authentication has been disabled on the Microsoft Network
Settings page (in the web interface under Networking)..
Added account in NT domain (415)
Level: Informational
Category: Administrative
Description: A new computer account for the PSA was created on the NT domain using
the Microsoft Network Settings page (in the web interface under Networking).
Enabled LPD printing for all hosts (416)
Level: Informational
Category: Administrative
Description: LPD printing has been enabled for all hosts on the LPD Settings page (in
the web interface under Networking).

Enabled LPD printing for specified hosts (417)
Level: Informational
Category: Administrative
Description: LPD printing has been enabled for selected hosts on the LPD Settings page
(in the web interface under Networking).
Disabled LPD printing for all hosts (418)
Level: Informational
Category: Administrative
Description: LPD printing has been disabled on the LPD Settings page (in the web
interface under Networking).
Set NT user capabilities (419)
Level: Informational
Category: Administrative
Description: A user's access level for a particular printer has been changed through
Administrators (in the web interface under Security).
Failed to create NT domain machine account (420)
Level: Informational
Category: Administrative
Description: Using the Microsoft Network Settings page (in the web interface under

Networking), creation of a machine account failed. This means that Microsoft networking
will not work until a machine account has been created. This could be due to any of the
following reasons.
● The user name and password combination was not valid.
● The user specified does not have authority to create a machine account.
● The WINS server was not properly configured.
Action: One or more of the following actions may apply:
● Re-type the user name and password and try again.
● Check the security levels for that user on the Primary Domain Controller (PDC).
● Verify that you have a WINS server configured and that the WINS server has an
entry for the Primary Domain Controller.
● Use the MS Server Manager to create the account (and avoid using the Microsoft
Network Settings page).
Failed to join NT domain (421)
Level: Informational
Category: Administrative
Description: NT Domain Authentication will not work.
Action: Verify that the WINS server configuration on the PSA is correct (as entered on
the Microsoft Network Settings page). Attempt to recreate the machine account on the
NT Domain. Instead of specifying automatic discovery of the domain controller, enter the
IP address of the domain controller.
Changed PSA name (422)
Level: Informational
Category: Administrative
Description: The name of the print server PSA was changed successfully on the

Microsoft Network Settings page (in the web interface under Networking).
Changed time (423)
Level: Informational
Category: Administrative
Description: The time was changed successfully on the Date and Time page (in the web
interface under Networking).
Removed administrator access from domain accounts (424)
Level: Informational
Category: Administrative
Description: An administrator account was successfully deleted from the specified
domain on the Admin Accounts - Domain Accounts page (in the web interface under
Security-->Administrators).
Changed DNS server address (425)
Level: Informational
Category: Administrative
Description: The DNS server address has been successfully changed on the TCP/IP and
DNS page (in the web interface under Networking).
Changed SSL encryption level (426)

Level: Informational
Category: Administrative
Description: The level of SSL encryption used for encrypting the http data has been
changed successfully.
Installed self-signed certificate (427)
Level: Informational
Category: Administrative
Description: A new self-signed certificate (signed by the PSA) has been created and is
now on the PSA.
Note: If the administrator's name cannot be determined and is displayed as "None", then it
must have been changed using the front panel.
Generated a certificate request to send to a certificate signing authority (428)
Level: Informational
Category: Administrative
Description: A certificate signing request has been generated; the user now needs to send
this request to the Certification Authority to sign and install the certificate.
Installed certificate from a certificate signing authority (429)
Level: Informational
Category: Administrative
Description: The new certificate that was requested from the Certification Authority has

been installed on the PSA. The new certificate will be used for future connections.
Failed to install certificate from a certificate signing authority - the certificate credentials do not
match the pending request (430)
Level: Error
Category: Administrative
Description: The attempt to install or replace the existing certificate on the PSA has
failed due to the certificate's public key.
Action: Ensure that the signed certificate is being installed against the same certificate
request. This means modifications cannot be made to the signed certificate after it has
been received from the certificate authority. The signed certificate must also belong to the
same PSA on which the certificate request was generated.
Enabled SNMP v1/v2 (431)
Level: Informational
Category: Administrative
Description: SNMP v1/v2 has been enabled. In "RO" mode the agent will only respond to
snmp-get requests. In "RW" mode the agent will respond to both snmp-get and snmp-set
requests.
Disabled SNMP v1/v2 (432)
Level: Informational
Category: Administrative
Description: SNMP v1/v2 has been turned off. The PSA will no longer respond to
SNMPv1/v2 requests. However, registered hosts will still receive traps.

Enabled SNMP v3 (433)
Level: Informational
Category: Administrative
Description: An SNMPv3 account has been created and installed on the PSA.
Disabled SNMP v3 (434)
Level: Informational
Category: Administrative
Description: All SNMPv3 accounts have been removed from the PSA.
Added destination to SNMP trap notification list (435)
Level: Informational
Category: Administrative
Description: A host has been added to the list of recipients of SNMPv2 traps.
Removed destination from SNMP trap notification list (436)
Level: Informational
Category: Administrative
Description: A host has been deleted from the list of recipients of SNMPv2 traps.

Enabled redirection to HTTPS (437)
Level: Informational
Category: Administrative
Description: Redirecting the http request to the secure port has been enabled. Any http
request for port 80 will be sent over the SSL (secure socket layer).
Disabled redirection to HTTPS (438)
Level: Informational
Category: Administrative
Description: Redirecting the http request to the secure port has been disabled. Any http
request for port 80 will be processed by the web server as a non-secure request and any
https request will get processed as a secure connection.
Added WINS server (439)
Level: Informational
Category: Administrative
Description: The WINS server was added successfully on the Microsoft Network
Settings page (in the web interface under Networking).
Deleted WINS server (440)
Level: Informational
Category: Administrative

Description: The WINS server was deleted successfully on the Microsoft Network
Settings page (in the web interface under Networking).
Added DNS server (441)
Level: Informational
Category: Administrative
Description: The DNS server was added successfully on the TCP/IP and DNS page (in
the web interface under Networking).
Deleted DNS server (442)
Level: Informational
Category: Administrative
Description: The DNS server was deleted successfully on the TCP/IP and DNS page (in
the web interface under Networking).
Failed to upgrade firmware (443)
Level: Informational
Category: Administrative
Description: The firmware for the PSA has not been upgraded.
Failed to backup settings (444)
Level: Informational

Category: Administrative
Description: The configuration settings for the PSA have failed to back up. A backup file
has not been generated.
Failed to restore settings from backup file (445)
Level: Informational
Category: Administrative
Description: The configuration settings from the backup file have not been restored.
Created NT domain account (446)
Level: Informational
Category: Administrative
Description:The NT domain account was successfully created.
Joined NT domain (447)
Level: Informational
Category: Administrative
Description:The administrator account successfully joined the NT domain.
Installed printer driver (500)
Level: Informational

Category: Administrative
Description: The printer driver was successfully installed onto the PSA.
Initialized printer driver (501)
Level: Informational
Category: Administrative
Description: The printer driver was successfully initialized on the PSA and can now be
used for point and print.
Printer driver installation failed (502)
Level: Error
Category: Administrative
Description: The printer driver was not installed onto the PSA. One of the following
conditions exist:
● The user trying to install the printer driver has insufficient rights on the PSA or on
the PC.
In order to install drivers onto the PSA, a user must be logged onto the PC with a
user account that has permission to install software on that PC, and have a
corresponding administrator account on the PSA. If NT domain authentication is
enabled (in the web interface under Networking-->Microsoft Network Settings
page), administrator accounts on the PSA can be set up on the Domain Account
page (in the web interface under Security-->Administrators). If NT domain
authentication is not enabled, the user must set up a local administrator account on
the PSA, with a user name and password that matches the NT user account.
● There is a communication error with the PSA.
● There is a problem with the printer driver. Reasons might be:
❍ the INF file is an inappropriate format.

❍ the INF file cannot be found.
❍ the process was canceled by the user.
❍ insufficient memory on the PC.
❍ the driver failed to queue correctly.
❍ the path to the .inf file exceeds the 128 character maximum.
❍ the .inf file is for an operating system that is incompatible with the
operating system that the user selected.
❍ there is another instance of the HP Add Driver Wizard running on this PC.
Action:
● In the case of a communication error, try again when there is less traffic on the
network.
● Check for an updated version of the driver. (Go to http:\\www.hp.com.)
● Select a different .inf file that matches the operating system selected.
● Select an .inf file with a path less than 128 characters in length.
● Configure the PSA and PC with appropriate access credentials as described in
Description above.
Printer driver initialization failed. Driver has been disabled for automatic driver download (point
and print) (503)
Level: Error
Category: Administrative
Description: The driver could not be initialized and has been disabled by the PSA.
Disabled drivers are not suitable for point and print.
Action:
Add drivers from http:\\www.hp.com if you need HP drivers. You will be sure to get the
latest version of the driver.
Installed printer driver - installed driver was for a different OS version than specified (504)
Level: Informational

Category: Administrative
Description: Drivers for older operating systems (for example, NT) can successfully
work with newer operating systems (for example, XP). Consequently, new drivers are not
always developed for newer operating systems if an older driver works with the operating
system. This message indicates that a newer driver was actually installed, and not an older
driver.

System Messages
Links within this page:
Add Printer and Add Driver Wizards
Under Print Services:
Print Shares Page
Driver Management Page
Under Networking:
Date/Time Page
TCP/IP and DNS Settings Page
Microsoft Network Settings Page
LPD Printing Page
SNMP Settings Page
Under Security:
Administrators Page
SSL Certificate Page
Under Maintenance:
Backup, Restore, Upgrade, and Restart Pages
Under Diagnostics:
Event Log Page
Links to related pages:
Diagnostics
Event Log Messages
Frequently Asked Questions
System Summary
Troubleshooting
Add Printer Wizard and Add Driver Wizard

Message Explanation / Remedy
driver failed to initialize In order for drivers to be deployed to client machines via point
and print, the drivers must be properly initialized. If a driver has
failed to initialize it will be disabled by the PSA and cannot be
enabled (but it can be re-installed).
A disabled driver may still be associated with a printer, but when
a client tries to install that printer the driver files will not be
provided by the PSA and the user will be prompted to provide
the printer driver files.
driver failed to install The driver was not installed successfully. Please try again.
driver_name installed as a Windows NT 4.0
driver The driver you specified for Windows 2000/XP is really a
Windows NT 4.0 driver and has been installed as such. Although
this driver will probably work, you may wish to determine if
there is a "native" 2000/XP driver available for this printer. To
do this, locate and install the native Windows 2000/XP driver in
order to ensure this driver works properly with Windows 2000
and Windows XP. If you choose not to find the native driver,
make sure to test the driver thoroughly after it has been
installed and initialized.
driver - installing... Informational.
driver_name driver - invalid .inf file. The .inf file specified might be corrupted or it might not be a
driver setup information file. Verify that the specified .inf file is a
printer setup information file and retry. If the problem persists,
try a different copy of the desired driver or consider using a
different driver.
driver successfully initialized Informational.
driver successfully installed Informational.
driver - keeping existing driver User chose to not replace a driver that was already installed on
the PSA.
Adding drivers requires Java. Your browser
doesn't have Java, or has disabled Java.
To enable Java, change your browser's settings.
If you're using Internet Explorer 6, you
probably need to download Java. Search the
Microsoft web site for Q299672 to learn how to
install Microsoft's Java Component.
Before drivers can be installed, Java must be installed and
JavaScript enabled in your web browser. JavaScript can be
enabled in Internet Explorer, under:
Internet Options-->Security (tab)-->Custom Level (button)--
>Scripting-->Scripting of Java Applets (subheading)
If a Java virtual machine is not installed in the browser, refer to
Sun Microsystem's web site or to Microsoft's web site for
information about downloading one. Then make sure the virtual
machine is turned on. In Internet Explorer, go to:
Internet Options-->Security (tab)-->Custom Level (button)--
>Microsoft VM
Select any option other than "disable".
Application Error
Driver Management software not installed
properly.
Try emptying your browser's cache, then close down all
instances of your browser. Then restart your browser. If the
problem persists, please contact HP support.

Application Error
There may be another instance of the HP Add
Driver Wizard running on this PC. Close down
all instances of the Add Driver Wizard, then try
running the Add Driver Wizard again.
There may be another instance of the HP Add Driver Wizard
running on this PC. Make sure there are no other instances of
the Add Driver Wizard running, then try running the Add Driver
Wizard again.
Application error:
This application experienced an error
error_description. Try running it again. If the
problem persists, consult the help file or the on-
line documentation. (Possible errors are listed
below.)
● Add printer driver failure
● Printer driver is not compatible with OS
● Insufficient memory
● Can't build driver info from *.inf file
● Initialization setup file queue failure
● Commit setup file queue failure
● Access denied
● Cannot find MFG
● File not found
● Server not found
● Driver not found
The application performing the driver installation and
initialization has experienced an error. This error may be
generated by a variety of problems from network
communication issues to .inf file corruption.
Verify the following:
● that the PSA network configuration information are
correct and running (for example, WINS server or
manually specified domain controller addresses), and
● the provided .inf files are valid printer setup information
files and that the correct operating system has been
associated with each .inf file.
Try using a different copy of the desired driver or a different
driver. If the problem persists, please contact HP support.
Canceling. Please wait... Informational.
Download Error: Add Driver Software
There may be another instance of the HP Add
Driver Wizard running on this PC or you may be
logged to this PC with insufficient privileges.
Make sure there are no other instances of the
Add Driver Wizard running and verify that you
are logged in to this PC with the appropriate
access privileges, then try running the Add
Driver Wizard again.
Self explanatory.
Driver could not be initialized:
This driver could not be initialized on the PSA,
so it has been disabled for automatic driver
download (for example, point and print).
Clients will have to supply their own driver.
Try adding this driver again. Add the version of
this driver that supports this PC's operating
system first. Then add drivers for additional
operating systems.
In order for drivers to be deployed to client machines via point
and print, the drivers must be properly initialized. If a driver has
failed to initialize it will be disabled by the PSA and cannot be
enabled (but it can be re-installed).
A disabled driver may still be associated with a printer, but when
a client tries to install that printer the driver files will not be
provided by the PSA and the user will be prompted to provide
the printer driver files.
Driver could not be initialized:
This PC has no FILE: port. A file port is required
to perform the necessary driver initialization.
Please re-install the file port on this PC before
adding more drivers to the PSA.
This driver could not be initialized on the PSA,
so it has been disabled for automatic driver
download (for example, point and print).
Clients will have to supply their own driver.
In order for driver initialization to run, a FILE: port must be
installed on your PC. Because the driver could not be initialized,
it has been disabled. Please reinstall the FILE: port and then
reinstall this driver.

Driver does not match OS:
The driver information file file_name that was
specified for Windows 2000/XP is actually a
driver information file for Windows NT 4.0. The
specified driver has been installed, but it will
appear in your driver list as a Windows NT 4.0
driver. This driver may or may not be
compatible with Windows 2000/XP. HP
recommends that you test the driver
thoroughly. For more information about drivers,
consult the online manual.
The driver specified for Windows 2000/XP is really a Windows NT
4.0 driver and has been installed as such.
Although this driver will probably work, you may wish to
determine if there is a "native" 2000/XP driver available for this
printer. To do this, locate and install the native Windows 2000/
XP driver; this will ensure this driver works properly with
Windows 2000 and Windows XP.
If you choose not to find the native driver, test the driver
thoroughly after it has been installed and initialized.
Driver does not match OS:
file _name is not the correct driver information
file for Windows 4.0. To add a driver for
Windows NT 4.0, rerun this Add Driver wizard
and specify the correct driver setup information
file (*.inf). For more information about drivers,
consult the online manual.
The .inf file specified for the Windows NT 4.0 driver is not a
Windows NT 4.0 driver file.
You will need to re-run the Add Driver Wizard and either specify
the correct operating system for this .inf file, or specify a
Windows NT 4.0 .inf file.
Driver information not found:
The driver information in file_name does not
match the selected printer model driver_name.
Please specify another driver setup information
file (*.inf) for OS. For more details on driver
name mismatches, refer to the Online Manual.
The name of the printer driver specified in the indicated file does
not match the name of the printer driver in the other driver .inf
files being installed.
If you are trying to install both an NT and a 2K driver, consider
adding two printers to the PSA: one with the NT driver and the
second (same printer with a different name) with a 2K driver.
If you are trying to install a 9x driver and the name does not
match, it is possible that the driver names provided for different
operating systems are not the same. If this is the case, please
contact HP support.
Driver Initialization - initialization complete Informational.
Driver Initialization - initialization failed In order for drivers to be deployed to client machines via point
and print, the drivers must be properly initialized. If a driver has
failed to initialize it will be disabled by the PSA and cannot be
enabled (but it can be re-installed).
A disabled driver may still be associated with a printer, but when
a client tries to install that printer the driver files will not be
provided by the PSA and the user will be prompted to provide
the printer driver files.
Driver Installation Complete Informational.
Driver Initialization Required In order for drivers to be deployed to client machines via point
and print, the drivers must be properly initialized. If a driver has
failed to initialize it will be disabled by the PSA and cannot be
enabled (but it can be re-installed).
A disabled driver may still be associated with a printer, but when
a client tries to install that printer the driver files will not be
provided by the PSA and the user will be prompted to provide
the printer driver files.

Error: Driver does not match OS
.inf_file_name is not the correct driver
information file for selected_OS. It only
contains driver information for
OS_supported_by_.inf. The specified driver will
NOT be installed. To add a driver for
selected_OS, rerun this Add Driver wizard and
specify the correct driver setup information file
(*.inf). For more information on drivers,
consult the online manual.
The .inf file specified for the selected operating system is
actually a driver for another operating system. You will need to
re-run the Add Driver wizard and either specify the correct
operating system for this .inf file, or specify a .inf file that
supports your selected operating system.
Error: Driver does not match OS
.inf_filename is not the correct driver
information file for Windows 9x (Windows 95,
98, or Me.) It only contains driver information
for supported_OS. Please specify another driver
setup information file (*.inf).
The .inf file specified for Windows 9x is actually a driver for
another operation system. You will need to re-run the Add
Driver wizard and either specify the operating system supported
by the selected .inf file, or choose a .inf file that supports
Windows 9x.
Error: Driver does not match OS
.inf_file_name is not the correct driver
information file for selected_OS. It only
contains driver information for Windows 9x
(Windows 95, 98, or Me.) The specified driver
will NOT be installed. To add a driver for
selected_OS, rerun this Add Driver wizard and
specify the correct driver setup information file
(*.inf). For more information on drivers,
consult the online manual.
The .inf file specified for the selected operating system is
actually a driver for Windows 9x. You will need to re-run the Add
Driver wizard and either specify Windows 9x as the operating
system for this .inf file, or specify a .inf file that supports your
selected operating system.
Initialization Complete Informational.
Initializing: driver_name Informational.
Initializing driver for this version of firmware. Informational.
Initializing Printer Driver Informational.
Install a Windows NT, 2000, or XP Driver First:
You must install a printer_name driver for
Windows XP, Windows 2000, or Windows NT
4.0 before you install a driver for Windows 9x
(Windows 95, 98, and Me).
The PSA has been unable to detect a Windows XP, 2K, or NT
printer driver to correspond with this 9X driver.
● If a Windows XP, 2K, or NT driver has not yet been
installed, please install one before or with the specified
9X driver.
● If a Windows XP, 2K, or NT driver has already been
installed, it is possible that the driver name of the 9X
driver does not match that of the higher operating
systems. Verify that the driver specified is the correct
driver. If it is the correct driver, please contact HP
support.
Installing: driver Informational.
Installing Printer Drivers Informational.
Invalid Driver Setup Information File:
file_name could not be read or does not contain
any printer drivers. Please specify another
driver setup information file (*.inf).
The .inf file specified might be corrupted or it might not be a
driver setup information file.
Verify that the specified .inf file is a printer setup information file
and retry. If the problem persists, try a different copy of the
desired driver or consider using a different driver.
Invalid Driver Setup Information File:
file_name does not contain driver information
for specified_OS_ name. Please specify another
driver setup information file (*.inf).
The .inf file specified conflicts with the user-specified operating
system for that file.
Verify that the correct operating system was specified with the .
inf file you are typing.
Invalid Driver Setup Information File:
file_name is not the correct file type. This
application can only install printer drivers using
*.inf files. Please specify another driver setup
information file (*.inf).
The file specified does not have a .inf file name suffix and is not
viewed as a driver setup information file.
Verify that the specified file is a driver setup information file with
the appropriate .inf file name extension and retry.
Invalid Driver Setup Information File:
No driver setup information file selected.
Please enter a driver setup information file (*.
inf).
The .inf file name is blank. Complete the file name.
Keep the existing driver Skip the installation and keep the driver version that is already
installed in the PSA.
Loading Loading the Add Driver Wizard.
New Driver - Replace Driver?
This driver has already been installed. A version
of this driver is already installed on the print
server appliance. Do you want to keep the
existing driver or use the new one?
Applications may print differently with the new
driver.
A warning message that informs the user that there is already a
version of the driver installed on the PSA. Asks if he/she would
like to replace that driver or keep the existing installed version.
Optional: Install driver_name drivers for
additional operating systems. Select the
operating systems that will need drivers and
specify the appropriate driver setup
information files ( .inf files ).
The user may choose to install drivers for additional operating
systems.
Please wait while the driver_name printer
driver is initialized. Informational.
Please wait while your driver_name printer
drivers are installed. Informational.
Please wait while your printer drivers are
initialized. Informational.
Please wait while your printer drivers are
installed. Informational.
Preparing to install drivers... Informational.
Replace the existing driver Replace the driver that is already installed on the PSA with the
new .inf selected.

Resource Error
This Windows system is either out of memory
or out of disk space. If it is out of disk space,
delete some files and try again. If it is out of
memory, restart the system and try again.
The Add Driver Wizard requires that your system's physical
memory usage be less than 90% and that there is a minimum of
15MB hard disk space on your client PC in order to execute
properly. Check your system resources: if you are out of disk
space, delete some files and run the Add Driver Wizard again.
If you are out of memory, reboot your system and run the Add
Driver Wizard again.
It is possible that the physical memory usage check would still
fail after a reboot, if there are a lot of applications that start
automatically upon login. The user might have to shut down
some applications and try again.
Security Failure
The security setting of your browser is too
restrictive. This applet requires access to run
an application on your PC and to read and write
to file system on your PC.
In order to install drivers on your PSA, this tool must run an
application on your client PC. When your browser displays a
security message asking if you trust content signed by HP, you
need to grant the requested privileges in order to install drivers.
Sending query to PSA. A query is being sent to the PSA to find out which drivers are
already installed on the PSA.
Specify the location of the driver setup
information file (.inf file) and indicate which
operating system the driver supports.
In order to install a driver, the user must select a .inf file for the
printer and OS in question.
Successfully initialized driver Informational.
The driver you have selected needs to be
initialized using Java. Your browser doesn't
have Java, or has disabled Java.
To enable Java, change your browser's settings.
If you are using Internet Explorer 6, you
probably need to download Java. Search the
Microsoft web site for Q299672 to learn how to
install Microsoft's Java Component.
Before drivers can be installed, Java must be installed and
JavaScript enabled in your web browser. JavaScript can be
enabled in Internet Explorer, under:
Internet Options-->Security (tab)-->Custom Level (button)--
>Scripting-->Scripting of Java Applets (subheading)
If a Java virtual machine is not installed in the browser, refer to
Sun Microsystem's web site or to Microsoft's web site for
information about downloading one. Then make sure the virtual
machine is turned on. In Internet Explorer, go to:
Internet Options-->Security (tab)-->Custom Level (button)--
>Microsoft VM
Select any option other than "disable".
This driver has not been initialized yet. To
ensure that this driver will work properly for
automatic driver download it needs to be
initialized. Click to continue.
In order for drivers to be deployed to client machines using
point and print, the drivers must be properly initialized.
This driver has now been initialized and is
enabled for automatic driver download. In order for drivers to be deployed to client machines via using
and print, the drivers must be properly initialized.

Unable to initialize driver for this version of
firmware:
This driver will be disabled for automatic driver
download. Clients attaching to the printer will
have to supply their own driver.
In order for drivers to be deployed to client machines using
point and print, the drivers must be properly initialized. If a
driver has failed to initialize it will be disabled by the PSA and
cannot be enabled (but it can be re-installed).
A disabled driver may still be associated with a printer, but when
a client tries to install that printer the driver files will not be
provided by the PSA and the user will be prompted to provide
the printer driver files.
Unauthorized to Perform this Action:
You are logged into the PC as : user_name.
That user does not have administrative or
power user rights on this PSA. To perform this
action, you must be logged into Windows with a
user name that has:
● administrative or power user rights on
this PC
● administrative rights (a corresponding
admin account) on the PSA
In order to install printer drivers onto the PSA, they must be
initialized. In order to run driver initialization, a user must:
● be logged onto their PC with a user account that has
permission to install programs and administer printing
on that PC, and
● have a corresponding administrator account on the PSA.
Verify that the user account being used has these permissions.
Then empty your browser's cache , close down all instances of
your browser, and then restart your browser.
Unauthorized to Perform this Action:
You are logged into the PC as : user_name.
That user does not have administrative rights
on this PSA. To perform this action, you must
be logged into Windows with a user name that
has:
● administrative rights on this PC.
● administrative rights (a corresponding
admin account) on the PSA.
In order to install printer drivers onto the PSA, they must be
initialized. In order to run driver initialization, a user must:
● be logged onto their PC with a user account that has
permission to install programs and administer printing
on that PC, and
● have a corresponding administrator account on the PSA.
Verify that the user account being used has these permissions.
Then empty your browser's cache , close down all instances of
your browser, and then restart your browser.
Windows 9x Driver Name Mismatch
The specified Windows 9x setup information
file does not contain a driver named
driver_name. Select the driver that you want to
install for your Windows 9x clients, then click
. To specify a different Windows 9x
setup information file, click .
You have good text for this in your other document.
Print Shares Page
Message Explanation / Remedy
Name is a reserved name. That name is reserved for internal use. Retype the name.
Active Informational message.
A printer already exists with the name (name). Each printer must have a unique name. Retype the name
and make sure it's different from any other printer name
on this PSA.
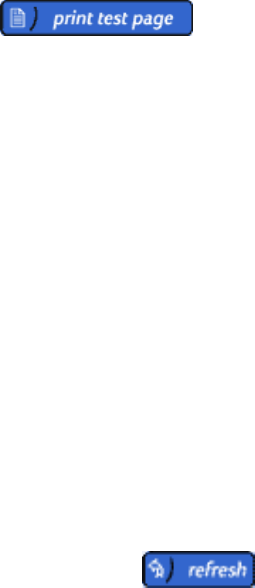
A print server appliance test page has been queued to
the (queue) printer queue. Confirmation message after was
pressed.
Attempts to print to the printer failed. A configuration (test) page was requested but LPR was
not able to print the job on the selected printer. The disk
space might be full, or the printer might be off or offline.
Cannot be contacted The printer cannot be found. It does not respond to a
network query or ping.
Changes have been made to the print queue. Please
apply these changes before printing a test page. An attempt was made to print a test page before applying
the changes made on the print share's Properties page.
Connected Confirmation message.
Disabled Informational message.
Door open Informational message.
Driver name not found. That driver was not found. Choose another driver or
reinstall this driver.
Error-Printer unknown The status of this printer is unknown. Click to
update the status.
Insufficient disk space to write file name.Internal Error. Try reducing the number of print queues.
Invalid Queue Name. Max length is %(len)s,
disallowed characters are: %(disallowed)s Retype the queue name.
Invalid Printer Address
The printer address must be an IP address or a
hostname. IP address must be in the format xxx.xxx.
xxx.xxx. Hostnames must be alphanumeric with no
spaces. Dashes (-) and periods (.) are acceptable.
Printer addresses use the same format as IP addresses or
hostnames. Retype the printer address using the
appropriate format.
For IP addresses: x.x.x.x where the first number is
between 1 and 255 and the other three numbers are
between 0 and 255.
For hostnames, use only alphanumeric characters with no
spaces. Dashes ( - ) and periods ( . ) are acceptable.
Invalid Print Share Description
Printer descriptions can contain alphanumeric
characters, spaces, dashes (-), underscores (_), plus
signs (+), commas (,), and periods (.).
The Print Share Description field is optional. If desired,
retype the description.
Invalid print share name
Print Share names may only contain alphanumeric
characters, underscores ( _ ), dashes ( - ), periods
( . ), and question marks ( ? ).
Retype the printer name.
Low paper Informational message.
Low toner Informational message.
LPD Not Supported The LPD protocol is not supported on this printer, and
therefore it cannot be used with a PSA.
No paper Informational message.

No toner Informational message.
Off line Informational message.
Online Informational message.
Paper jam Informational message.
Paused Informational message.
printing Confirmation message.
queued Confirmation message.
Service required Informational message.
spooling Confirmation message.
The IP Address you entered is the address of this
PSA. Please enter the name or IP address for the
printer you wish to add.
Each printer on the network has a unique IP address. This
may be the printer's IP address or its DNS hostname. If a
DNS hostname is being used, a DNS server address must
be specified for the PSA on the TCP/IP and DNS
Settings page (on the menu in the web interface under
under Networking).
The printer hostname you entered is the same as this
print server appliance. Please enter the name or IP
address for the printer you wish to add.
Each printer on the network should have a unique
hostname. Retype the name or IP address and make sure
it is unique.
The printer you selected was not found. An attempt was made to print to a printer that does not
exist.
You must specify a printer name for this printer. The PSA allows up to 79 characters for the share name.
However, for any name over 12 characters, Windows
95/98/ME and older systems might not be able to access
the share.
You must specify the address of this printer. The printer address can only contain alphanumeric
characters, spaces, dash (-) underscore (_) plus sign (+)
ampersand (&), comma (,) and period (.).
You must specify the remote queue name for this
printer. When Other print server is selected, the Remote
Queue Name field must be completed. Specify the
Remote Queue Name of this printer.
The driver you have selected does not support client
side rendering. A print share is being created and the client side
rendering box is checked but thie driver is not capable
of client side rendering.
NT clients cannot print with drivers using client side
rendering. If you have NT clients, do not connect
them to this share or go back and deselect client side
rendering.
A print share is being created and the driver selected is
capable of client side rendering. This is a warning to not
use drivers capable of client side rendering with NT
clients.
Driver Management Page
Message Explanation / Remedy

Are you sure you want to remove the following
drivers…? One or more drivers were selected and was
pressed. Confirm removal or cancel the operation.
The HP LaserJet 4 printer driver is essential and
cannot be deleted. The HP LaserJet 4 printer driver is a default driver and
cannot be deleted.
The following drivers are in use and cannot be
deleted.... To delete these drivers, you must either
delete the printers that use them, or associate a
different driver with those printers.
You attempted to delete the listed active driver(s). To
delete an active driver you must either delete the print
shares that use it, bind those print shares to a different
printer driver, or the driver you are deleting must be an
NT or 2K/XP driver where another (non-9x) version of
that driver still exists on the PSA.
Cannot add drivers using this operating system and/
or browser.
To add drivers, your PC must be running one of the
following OSs and browsers:
● Windows NT 4.0, Windows 2000, or Windows
XP
● Internet Explorer 5.0 (or above) or Netscape
4.7 (or above)
An attempt was made to add a driver to the PSA from an
unsupported platform. A combination of the specified
operating systems and browsers is needed in order to run
the driver initialization functionality needed to install a
new driver on the PSA.
You attempted to delete more than one active driver.
Only one active driver may be deleted at a time. Only
the first active driver in the list will be deleted.
More than one active driver is selected for deletion.
Active drivers must be deleted one at a time, so that the
corresponding NT version of the driver can be properly
initialized.
Deleting this XP/2K driver will require initialization of
the NT driver, which requires you to have
administrative priveleges both on this PC and on the
PSA.
An XP/2K driver that is in-use has been selected for
deletion. You should cancel the delete operation if you do
not have appropriate priveleges. Then log back in as an
appropriate user and delete the driver. Or, you can
proceed with this delete and then log back in as an
appropriate user later and initialize the driver using the
Initialize button.
You attempted to delete the following active CSR
driver(s): ... To delete an active CSR driver you must
either turn off Client Side Rendering on the print
shares that use it, point those shares to a different
driver, or delete those shares entirely.
An in-use driver capable of client side rendering is
selected for deletion. Before if can be deleted, any
queues using this driver must be deleted or pointed to a
different driver (including the non-client side rendering
version of this driver), by unchecking the client side
rendering box.
Date / Time Page
Message Explanation / Remedy
Invalid Date
The date must be in mm/dd/yyyy format. Retype the date in mm/dd/yyyy format.
Invalid Time
The time must be entered in the format hh:mm:ss. Retype the time in hh:mm:ss format.
Invalid Time/Date
The date and/or time fields contain non-numeric
character(s).
The date and/or time fields may only contain numbers
and the specified separator characters. Retype the date
and/or time using the correct format and characters.

The necessary information to set the date and time
was not found. The date and/or time fields are blank. Complete both fields and click .
Your date and time settings have been applied. Confirmation message.
TCP/IP and DNS Settings Page
Message Explanation / Remedy
DNS server IP address cannot be contacted. Informational.
Gateway is not a valid gateway for IP address IP
address and subnet mask subnet mask.The IP address of the gateway is unreachable with the
currently assigned PSA IP address and subnet mask.
Invalid DNS Server Address
The DNS server address address must be in the
format xxx.xxx.xxx.xxx.
Retype the DNS server address in the xxx.xxx.xxx.xxx
format.
Note: This must be the DNS server's IP address, not its
friendly name. If the network does not have a DNS
server, leave this field blank.
Invalid Domain Name
The DNS Domain Name must be alphanumeric with no
spaces. Dashes (-) and periods (.) are acceptable.
Retype the DNS Domain Name. Use only alphanumeric
characters with no spaces. Dashes ( - ) and periods ( . )
are acceptable.
Invalid Gateway Address
The gateway address must be in the format xxx.xxx.
xxx.xxx. If the gateway address is unknown, use the
PSA's IP address.
Gateway addresses are written as four numbers
separated by periods, where the first number is between
1 and 255 and the other three numbers are between 0
and 255. Retype the gateway address in the format xxx.
xxx.xxx.xxx. If the address is unknown, use the PSA's IP
address.
Invalid IP Address
The IP address must be in the format xxx.xxx.xxx.xxx. IP addresses are written as four numbers separated by
periods, where the first number is between 1 and 255
and the other three numbers are between 0 and 255.
Retype the IP address in the format xxx.xxx.xxx.xxx.
Invalid Subnet Mask
The subnet mask must be in the format xxx.xxx.xxx.
xxx.
Subnet masks are written as four numbers separated by
periods, where the first number is between 1 and 255
and the other three numbers are between 0 and 255.
Subnet masks must be well formed to match your
network.
Retype the subnet mask in the format xxx.xxx.xxx.xxx.
NAC Internal Error Retry the operation.
Restarting network, please wait.
Your network settings have been updated. Confirmation message.
This field's value is being assigned by DHCP. If you
remain in DHCP mode, your changes to this field will
be lost.
Self-explanatory.
WINS server IP address cannot be contacted. Informational.
Microsoft Network Settings Page

Message Explanation / Remedy
Connected Confirmation message.
Invalid administrator name: name The administrator name consists of the domainname
\administratorname or the adminstratorname. The
administrator portion of the administrator name can be
up to 20 characters long and include alphanumeric
characters and the following special characters:
~ ` ! @ $ % ^ ( ) - _ { } .
Invalid Domain Controller
Domain controller names must be alphanumeric with
no spaces. Dashes (-) and periods (.) are acceptable.
Retype the Domain Controller Name, using only
alphanumeric characters with no spaces. The following
special characters are acceptable:
dash ( - ), period ( . )
Invalid domain or workgroup name: name Domain and workgroup names can be up to 15 characters
long and include alphanumeric characters and the
following special characters:
dash (-), period (.), underscore (_)
Invalid hostname name The name of the domain controller is invalid. It must be a
valid IP address, contain up to 255 characters, and
consist only of alphanumeric characters and the following
special characters:
dash (-), period (.), underscore (_), dollar sign ($)
Invalid password The password can be up to 14 characters long and cannot
include following characters:
number sign (#), at sign (@)
Invalid PSA Name
The PSA name must be alphanumeric. Dashes (-) and
underscores (_) are acceptable. It can be up to 15
characters long.
Retype the PSA name.
Invalid WINS Server Address (wins address)
The WINS server address must be in the format xxx.
xxx.xxx.xxx.
WINS server addresses are written as four numbers
separated by periods, where the first number is between
1 and 255 and the other three numbers are between 0
and 255. Retype the WINS server address in the format
xxx.xxx.xxx.xxx. The WINS server address and the IP
address must be in the same format.
Invalid Workgroup Name (workgroup) The workgroup name typed is not valid. Retype the
workgroup name.
Joined to domain Successfully joined the PSA to the domain.
Not joined. Cannot contact domain controller(s).The PSA did not successfully join the domain, because
there is difficulty contacting the domain controller.
Not joined. No account for this device on domain
controller(s).The PSA did not successfully join the domain. No account
was created for the device. Try retyping the administrator
name and password and rejoining the domain.
The domain controller name is not in domain domain The domain controller that has been manually specified is
not part of the domain that the PSA is joined to.

This field's value is being assigned by DHCP. If you
remain in DHCP mode, your changes to this field will
be lost.
Self-explanatory.
WINS server IP address cannot be contacted. Informational.
WINS server IP address has no entry for this PSA. Informational.
You must specify your domain administrator name
and password to join the NT domain. Specify the Domain Administrator Name and Domain
Administrator Password
Your Microsoft networking settings have been updated Confirmation message
LPD Printing Page
Message Explanation / Remedy
Invalid Hostname
Hostnames must be alphanumeric characters with no
spaces. Dashes ( - ) and periods ( . ) are acceptable.
Retype the hostname using only alphanumeric characters
with no spaces. Dashes ( - ) and periods ( . ) are
acceptable.
Your LPD printing settings have been updated Confirmation message
SNMP Settings Page
Message Explanation / Remedy
Duplicate IP Address and Port Number The trap destination is already in the table.
Illegal Community Name. Valid characters are
characters Retype the community name using only the valid
characters.
Invalid Community Name length. Maximum length is
length The community name must be between 2 and 32
characters.
Internal Error - SNMPV3AccountAlreadyInstalled The SNMPv3 account has already been created. To delete
it, uncheck Enable SNMPv3 and then click .
Invalid character in Authentication Key. Valid 0-9, a-f,
A-F Retype the Authentication Key using only numbers 0-9
or characters a-f or A-F.
Invalid character in Privacy Key. Valid 0-9, a-f, A-F Retype the Privacy Key using only numbers 0-9 or
characters a-f or A-F.
Invalid IP Address IP addresses are written as four numbers separated by
periods, where the first number is between 1 and 255
and the other three numbers are between 0 and 255.
Retype the IP address in the format xxx.xxx.xxx.xxx.
Invalid length for Authentication Key The authentication key must be 32 characters long.
Invalid length for Privacy Key The privacy key must be 32 characters long.
Invalid length for User Name The user name can be between 2 and 32 characters long.

Invalid Port Number: port number The port number must be between 0 and 65535.
System call error Reapply the last command.
Administrators Page
Message Explanation / Remedy
Name(s) cannot be contacted. The domain controller(s) cannot be contacted. Check that
you have entered the correct Domain Controller.
A name is required for the user account. Type a name for the user account.
Backup Informational.
Cannot contact the Domain Controller. The domain controller cannot be contacted. Check that
you have entered the correct Domain Controller.
Connected. Informational.
Domain account name is too long. Maximum length is:
length Retype the domain account name.
Domain controller unavailable. The domain controller is currently unavailable. Check that
you have entered the correct Domain Controller.
Domain controller unavailable. Cached data will be
returned. Informational.
Incorrect Domain Name or Password. Retype the domain name and password.
Invalid Administrator Name
The Administrator Name must be alphanumeric and
can contain the following special characters:
~ ` ! @ $ % ^ ( ) - + { } ' .
Retype the administrator name.
Invalid domain account name: name Retype the administrator name.
Invalid domain name: name Retype the administrator name.
Invalid domain account name. Valid characters are: Retype the administrator name.
Insufficient disk space to write file name.Internal Error. Try reducing the number of queues.
Invalid password set. Retype the domain controller password.
It is not permitted to remove name. The PSA grants
administrator access to members of this group. This Domain Admins group cannot be deleted.
Joined to domain controller(s).Informational.
No account for this device on the Domain Controller. An account must be created on the Domain Controller
before joining the domain.
No group or user list returned. Try again or type in
the name(s). No groups or users were returned by the Domain
Controller. Try again, or type the name manually.

No password set. The domain administrator name or password is incorrect.
Retype them.
Not configured. Informational.
No DNS entry for domain controller: name(s).Informational.
No entry in the WINS server for the domain. Informational.
No entry in the WINS server for the Domain
Controller. Informational.
Passwords don't match
The password and confirmation do not match. Retype the password and confirmation password. Make
sure the passwords typed in both fields are the same.
Primary Informational.
The administrator account name and password
changes have been applied Confirmation message.
The Administrator Name contains invalid characters.
The allowable characters are characters.Retype the Administrator Name.
The Administrator Name is too long. The maximum
length is length.Retype the Administrator Name.
The Password contains invalid characters. The
allowable characters are characters.Retype the password.
The Password is too long. The maximum length is.
length Retype the password.
Unable to join domain: domain.The PSA was unable to join the domain. Check the
domain name.
Unknown role. Informational.
SSL Certificate Page
Message Explanation / Remedy
Invalid common name The common name is the fully qualified name or IP
address of the PSA. This field can contain up to 64
characters and it cannot be blank (or empty).
Invalid period The period of time that the certificate is valid for could
not be zero or a negative number.
Backup, Restore, Upgrade, and Restart Pages
Message Explanation / Remedy
A downgrade is in process. Please wait until the process
is complete. Informational.

An I/O Error occurred while transferring the file. The specified file name is not a valid upgrade file.
Retype the file name and try again.
Another backup, restore, upgrade is already in progress. Informational.
Backup, Restore, Upgrade in progress. Informational.
Error executing setup. Reboot appliance to continue
upgrading. Verify the file is a valid PSA upgrade file and then
retry the upgrade process.
Error processing the restore, _or_upgrade_file_name file. Verify the file is a valid restore or upgrade file for the
PSA and then retry the restore process.
File corruption has been detected the downgrade process
will not complete. Verify the file is a valid PSA file and then retry the
downgrade process.
Generating the backup file. Informational.
Internal error. Status = status.Verify the file is a valid PSA file and reboot the PSA.
Then retry the upgrade or restore process.
Invalid checksum. Verify file is a valid PSA file and then retry the
restore process.
Invalid file type. Verify the file is a valid PSA file and then retry the
restore process.
Invalid upgrade, restore file. Verify the file is a valid PSA file and then retry the
upgrade or restore process.
I/O error generating the backup file. Reboot the PSA and then retry the backup process.
I/O error processing the backup file. Verify the the file is a valid PSA file. Then reboot the
PSA and retry the restore process.
I/O error transferring file. Verify the file is a valid PSA file and then retry the
process.
No backup, upgrade file was provided with the restore
request. Retype the file name and retry the restore process.
No backup file is available to transfer. Please retry the
backup process. Retry the backup process.
No file was provided with the upgrade request. No upgrade file was transferred to the PSA. Retype
the complete path to the firmware image (for
example, "C:\TEMP\UPGRADE.HP") or click Browse
to find the saved firmware image. http://www.hp.
com/cposupport).
Retype the file name and path and then retry the
upgrade process.
If the file name is unknown, access HP's web site and
download the upgrade image (http://www.hp.com/
cposupport).

No restore items were selected. Please select at least one
item. Click at least one option and then continue the
restore process.
No upgrade, backup file was provided with the upgrade,
restore request. Type the file name and path and retry the upgrade or
restore process.
No upgrade file was provided with the upgrade request. No upgrade file was transferred to the PSA. Retype
the complete path to the firmware image (for
example, "C:\TEMP\UPGRADE.HP") or click Browse
to find the saved firmware image.
Retype the file name and path and retry the upgrade
process.
If the file name is unknown, access HP's web site and
download the upgrade image (http://www.hp.com/
cposupport).
No upgrade is in progress. Type the file name and path and retry the upgrade or
restore process.
Not enough disk space. Try again when there are fewer
print jobs pending. Self-explanatory.
Not enough disk space for a restore file. Try again when
there are fewer print jobs pending. Self-explanatory.
Please enter a valid path to the upgrade configuration
file, or click Browse to find the saved upgrade
configuration file.
When attempting to restore settings or upgrade the
firmware, no configuration or upgrade file was
specified. Type the complete path to the file (for
example, "C:\TEMP\file.HP") or click Browse to find
the saved file or firmware image.
Processing the restore, backup file. Informational message.
Rebooting the device. Informational message.
Status not available - retrying. The status is currently not available but will be
updated in a few moments.
The backup, restore, upgrade failed. Reboot the PSA and then retry the backup, restore,
or upgrade process.
The backup, restore, upgrade is blocked. Reboot the PSA and then retry the backup, restore,
or upgrade process.
The backup file has been restored successfully. Confirmation message.
The backup file is ready to transfer. The data has been backed up and is ready to be
saved to the specified location.
The configuration file was successfully restored on this
PSA. Confirmation message.
The restart of the PSA has begun. This system restart will
take approximately 5-10 minutes. There will not be any
web notification that the system has been restarted.
Confirmation message.

The specified file is not a valid PSA configuration, upgrade
file. Retype the complete path to the configuration file
(for example, "C:\TEMP\file.HP") or click Browse to
find the saved file or firmware image.
The specified upgrade file cannot be used to upgrade this
PSA. Please check for a newer upgrade file. Verify the file is a valid PSA file whose firmware
version is later than the current firmware for your
PSA. Then retry the upgrade process.
The upgrade file has been transferred successfully. You
will need to restart your PSA for the upgrade to take
effect.
Confirmation message.
The upgrade has successfully completed. Confirmation message.
The upgrade, etc. is in progress. A backup, restore, or upgrade is already in progress.
Please wait until it is complete before attempting
another process.
This appliance cannot be configured, upgraded with this
upgrade, restore file version. Please check for a newer
version, upgrade file.
Verify the file is a valid PSA file and then retry the
upgrade process.
Validating the checksum. Informational message.
Event Log Page
Click here to view possible events in the Event Log.
Message Explanation / Remedy
Please select at least one category to view. On the Filters page in the Event Log, at least one
category must be selected:
● Security (SEC)
● Networking (NET)
● Administrative (ADM)
Please select at least one level to view. On the Filters page in the Event Log at least one level
must be selected:
● Critical (CRIT)
● Error (ERR)
● Informational (INFO)
Troubleshooting the HP Print Server Appliance
Links within this page:
Hardware Problems
Configuration Problems
Printing Problems
Printer Driver Problems
Security Problems
About the Indicator Lights (LEDs)
Links to related pages:
System Messages
Event Log and Messages
Frequently Asked Questions
Diagnostics
Note: Always check the Event Log for messages when troubleshooting a problem with the PSA.
Hardware Problems
#Condition Possible Cause/Solution
1 The PSA does not power
up. Bad power cable or AC outlet. Replace cable and/or verify that the outlet is
working properly. If the outlet and cable are good, contact HP support to
replace the unit.
2 I select DHCP and
initialization continues.
However, DHCP No
Reply, Press to
continue appears on the
LCD display.
● The RJ-45 network cables are not connected. Securely connect the
network cables. If the cable is securely connected, the network LED
should blink when their is traffic on that network segment
● A DHCP server could not be found on the network. Verify DHCP
server configuration.

3 The Power On LED is lit,
but the Network LED does
not light.
● The RJ-45 network cables are not connected. Securely connect the
network cables.
● The cable may be faulty. See if another device can communicate on
the network using the same cable.
● Verify the hub or switch is connected and working properly.
4 The Alert LED is lit. ● The PSA is not fully booted. Wait for the bootup process to complete.
● A critical defect has been detected. Power cycle the unit to see if
this corrects the problem.
● If the Alert LED stays lit, contact HP support.
5 I can't locate the PSA on
the network. ● Make sure the PSA is configured with an IP address, a subnet mask,
and a default gateway.
● Make sure the Network LED is lit.
● The RJ-45 network cables are not connected. Securely connect the
network cables.
● A network hub has lost AC power. Re-establish AC power to the hub.
● The PSA is not powered up. Power up the PSA on and let it boot up.
For alternative causes/solutions, see Client Setup Problems below.
6 We had a power outage.
What do I need to do to
recover?
At the time the outage occurred:
● Jobs that were spooled but not yet printing may need to be sent
again from the client PC, after the PSA has been normally powered
up again. These jobs should require no action, as they will print
after the PSA is powered up again.
● Jobs in the middle of printing will resume printing when the PSA is
powered up again.
● Jobs that were not yet spooled need to be resent.
If print operations do not appear normal (new jobs do not spool correctly)
after the outage, then power off the PSA and power it back up again.
After a power outage or any other improper shutdown, the PSA might
experience so many errors in its file system that it rebuilds the disk from
the default image. The printers, network configuration, and drivers will be
not be automatically restored. The configuration must be restored manually
using the Restore functionality with the last configuration manually backed
up.
Configuration Problems
Num. Condition Possible Cause/Solution
1 I can't find the PSA in
Network Neighborhood. ● The PSA will install itself in the workgroup called workgroup. If
there are no PCs in this workgroup, the PSA will not show up in
network neighborhood. Microsoft (R) browsing requires a PC in
the workgroup to host a browse list. The administrator must
change the workgroup name through the Web interface on the
PSA.
To choose another workgroup name for the PSA:
1. Access the PSA's web interface by typing the IP address
in a supported browser window.
2. Click Microsoft Network Settings page (under
Networking in the PSA's web interface).
3. In the window labeled Windows NT Domain or
Workgroup change the name to the correct workgroup
name.
4. Click .
● A less common cause is that the Master Browser list (Network
Neighborhood) has not yet been updated with the new PSA.
Depending on the size and speed of the network, it may take up
to 30 minutes before the network's master browser list gets
updated.
● Once this browser list gets updated on the PC that's hosting this
list, other PCs on the network will check the browser list and be
able to see any new devices on the network via Network
Neighborhood.
To find the PSA more quickly:
1. Select Start, Find, then Computer.
2. Type the IP address of the PSA then click Find Now.
2 I can't print a test page
from the PSA to a printer. ● Incorrect printer IP address or DNS name. Verify or correct the IP
address.
● Duplicate PSA IP address. Verify or correct the IP address.
● Printer is offline or not present on the network. Verify network
connectivity by pinging the printer and then place the printer
online.
3 I get browser errors
when trying to access
the PSA.
A browser that is not supported or has known limitations may be in the
problem. Check the supported web browsers to see if the browser is
supported.
4 I can't locate the printer
from the client. The client is on a different subnet than the PSA. Verify that WINS is
configured correctly on the Microsoft Network Settings page.
5 How do I know the
printer driver I installed
on the PSA was installed
on the client? Or how
can I tell whether the
updated driver I installed
on the PSA was
successfully installed?
An updated driver will be copied to the client if the driver has the same
name and a newer version or date. You can verify this by printing a test
page from the client. The test page will list all the files associated with
the driver along with version information.

6 I am trying to use the
Properties page in
Network Neighborhood
to configure the PSA, but
the PSA seems to ignore
some of my settings.
The PSA uses the printer configuration page on the Printer Properties
window (which is displayed after right-clicking on a printer and then
selecting Properties) for driver configuration changes and recognizes
some other settings, such as security settings. However, the PSA does
not recognize many of the settings if they are changed using these driver
management tools.
● General tab
❍ Comments text field - supported
❍ Location text field - supported
❍ Driver drop-down list- the driver can be changed if and
only if the driver is an initialized driver; otherwise, the
administrator will be prompted to change the driver
through the PSA's web interface so that the driver can be
initialized.
❍ New Driver button - the driver can be uploaded to the
PSA, but will not be associated with this printer until the
administrator uses the PSA's web interface to change the
driver so that it can be initialized.
❍ Separator Page button - not supported
❍ Print Processor button - not supported
❍ Print Test Page button - supported
● Ports tab (all buttons are disabled for remote printers)
❍ Enable bi-directional support check box - not supported
❍ Enable printer pooling check box - not supported
● Scheduling tab
❍ Availability - should be left on "Always"; print jobs
submitted during unavailable time will be deleted and not
spooled.
❍ Priority scale - not supported
❍ Spool print document so program finishes printing faster
toggle - supported
❍ Print directly to the printer toggle - supported
❍ Hold mismatched documents check box - not supported
❍ Print spooled documents first check box - not supported
(the PSA always uses this behavior)
❍ Keep documents after they have printed check box - not
supported
● Sharing tab
❍ Not Shared toggle - not supported (may be selected but
will be ignored)
❍ Shared toggle - supported
❍ Share Name text field - not supported
❍ Alternate Drivers - not supported
● Security tab
❍ Permissions button - supported
❍ Auditing button - not supported
❍ Ownership button - not supported

7 I keep getting prompted
for a password when I
use a web browser to
access the PSA even
though the PSA is a
member of a domain.
Whether you get prompted for a password and what the password
prompt looks like are a function of your web browser and its
configuration. If the PSA is a member of a domain, it will always ask your
browser to use your existing Windows Domain authentication. Microsoft's
Internet Explorer uses a concept of security zones to determine whether
the web server (in this case, the PSA) is within the "Intranet Zone".
There are a number of ways to include the PSA in the "Intranet Zone",
but the easiest is to open:
Tools--> Internet Options-->Connections-->LAN Settings-->Advanced
and type the full name, the IP address, and the short name in the
"Exceptions" box. This will cause Microsoft's Internet Explorer to connect
directly with the PSA and avoid your proxy server. By default, Internet
Explorer considers direct connections in the "Intranet Zone". Consult
your Microsoft Internet Explorer documentation to determine other ways
to include the PSA in the "Intranet Zone". If you are using proxy servers
in your environment and you want to use the single sign-on functionality,
your web browser will need to be set up to bypass the proxy server for
the PSA's host name (if it includes periods) and IP address. An
administrator can view or change their local Intranet settings in the
Internet Options page under the Security tab by selecting Local Intranet
and clicking on the Sites button.
Note: The single sign-on feature of the PSA only works with Microsoft's
Internet Explorer.
8 I want to use a hyphen
in the beginning of some
of my PSA names, so
that they will print first in
a list of PSAs.
The PSA name (entered on the Microsoft Networking Settings page) can
contain up to 15 alphanumeric characters. It may also contain dashes
( - ) and underscores (_). (The hostname cannot begin with a hyphen
(-), but it can have a hyphen within the name. The hyphen cannot be the
first character because the PSA name is is also used for the DNS name
generation, and the hyphen character is not allowed as the first character
in a DNS name.)
9 I have a Windows 2000
environment and I am
trying to integrate my
PSAs into it.
The PSA can use a Windows 2000 system for authorization and
participate in a Windows 2000 domain in much the same manner as an
NT 4.0 server can. The Windows 2000 system must be configured to
support NTLM V1, which is a version of the authorization protocol used
by Windows system.
10 I have a non-HP print
server I am trying to use
with my PSA. Will this
work?
Yes, if the printer supports LPD. You may have to know the proper LPD
remote queue name for the print server. Many print servers will work
without specifying a remote queue name (use the default HP PRINT
SERVER setting); however, some require a special string in order to
work. The LPD remote queue name can be obtained from the print server
vendor.
11 I am trying to configure
the PSA using TELNET.
Will this work?
No. You can assign IP addresses via DHCP, the front panel, and a web
browser. After an IP address is assigned, you must use a web browser to
finish configuring the PSA.
12 The Network
Neighborhood browser
has not yet updated.
Try accessing the PSA by selecting Start from the task bar, and select
Find and Computer.

13 I get prompted for a
password when I use a
web browser to access
the PSA even though the
PSA is a member of a
domain.
Whether you get prompted for a password and what the password
prompt looks like are a function of your web browser and its
configuration. If the PSA is a member of a domain, it will always ask your
browser to use your existing Windows Domain authentication. Microsoft's
Internet Explorer uses a concept of security zones to determine whether
the web server (in this case, the PSA) is within the "Intranet Zone".
There are a number of ways to include the PSA in the "Intranet Zone",
but the easiest is to open:
Tools--> Internet Options-->Connections-->LAN Settings-->Advanced
and enter the full name, the IP address, and the short name in the
"Exceptions" box. This will cause Microsoft's Internet Explorer to connect
directly with the PSA and avoid your proxy server. By default, Internet
Explorer considers direct connections in the "Intranet Zone". Consult
your Microsoft Internet Explorer documentation to determine other ways
to include the PSA in the "Intranet Zone".
If you are using proxy servers in your environment and you want to use
the single sign-on functionality, your web browser will need to be set up
to bypass the proxy server for the PSA's host name (if it includes
periods) and IP address. An administrator can view or change their local
intranet settings in the Internet Options page under the Security tab by
selecting Local Intranet and clicking on the Sites button.
Note: The single sign-on feature of the PSA only works with Microsoft's
Internet Explorer.
Printing Problems
Num. Condition Possible Cause/Solution
1 I can't print from a client
to the intended printer,
although I have done so
previously.
● The selected printer may be paused. Unpause the printer.
● Wait a moment and then resend the print job, which should then
be printed successfully.
● Go to the Printers Management Page and see if any print queues
have an inordinate number of jobs waiting to be printed. If the
jobs do not seem to be printing, delete a few and try sending a
new job.
● If NT Domain Security is enabled, the security settings may have
changed. Verify that the user has authority to print. This can be
done from the PSA's web interface by selecting Print Shares-
>Security. By default, the group "Everyone" has permission to
print. If "Everyone" does not have permission to print, add it.
● The PSA may be unable to communicate with a domain controller
in order to verify the clients ID and password. Check the Domain
Membership Status field on the Microsoft Network Settings
page to verify that the PSA can communicate with the domain
controller.
2 I have not been able to
print from any client to
the intended printer.
● The IP address or printer name may not be correctly configured
for the desired printer. Verify that the PSA can print to the
printer by using the "print test page" functionality of the printer
property page in the web interface of the PSA. If the test page
does not print, there is a problem in the communication between
the PSA and the printer. See more information about the TCP/IP
and DNS Settings page or the Microsoft Network Settings
page.
● The PSA may be unable to communicate with a domain controller
in order to verify the clients ID and password. Check the Domain
Membership Status field on the Microsoft Network Settings
page to verify that the PSA can communicate with the domain
controller.
● If NT Domain Security is enabled, the security settings may have
changed. Verify that the user has authority to print. This can be
done from the PSA's web interface by selecting Print Shares-
>Security. By default, the group Everyone has permission to
print. If Everyone does not have permission to print, add it.
● If NT Domain Security is enabled, verify that the group
Everyone exists in the domain.
3 The printer's Property
page in Network
Neighborhood does not
work properly. An error
message appears
whenever a change is
accepted.
The user you are logged in as may not have the appropriate permissions
to perform the operation. For NT Domain security, verify that the user
you are logged in as is a member of the Domain Administrators group.
If you are not using NT Domain security, verify that there is an
administrator account on the PSA with the same name and password as
the user that you are logged in as.
4 A printer had to be taken
off the network for
repair, and it was
replaced by one having a
different IP address.
Print jobs reach the
queue but never print.
Open a web browser, point it at the PSA, and select the Print Shares
page. Select the Properties page for that printer. Change the IP address
or DNS host name for the printer and click . If the printer was
stopped in the middle of a print job, that job will be lost, but any other
jobs in the queue will now print to the new printer.
5 The PSA is set up to use
DHCP. When I powered it
off and then powered it
back up again, DHCP
reassigned it to a
different IP address than
it had previously. Now
the clients can no longer
print. How can I avoid
this?
Use a WINS server along with DHCP, so that when the PSA powers up it
will always be reassigned the same IP address.
If you are not using WINS, you may alternatively set the PSA IP address
manually and have the DHCP administrator select an IP Address Pool
range which excludes the PSA address.
Or, have the DHCP administrator supply the PSA with an "infinite lease"
duration for its assigned IP address.
6 I changed the printer
name and now the
clients cannot print.
Use the Windows Add Printer wizard at the clients and enter or browse
to the new printer name. Also, delete the client's old printer driver which
referred to the previous printer name.
7 The status of a print job
is Unknown on the
Jobs page for that
printer in the web
interface.
Delete the print job and resend it.
8 I am trying to print a
large print file. Is there a
maximum size of print
job that the PSA will
handle?
There is no limit for a file size that the PSA can handle.
9 There are a lot of jobs
spooled on the PSA. Is
there a limit?
Up to 10,000 jobs can be spooled at a time, which might be further
restricted by the disk space available on the PSA.
10 I am trying to print in
Landscape mode, Duplex
mode, or multiple copies,
but the margins are
offset.
If you have not done so, upgrade your firmware to version 2.4.x and
initialize the driver for that printer.
Delete the print driver from the computer and delete the port created for
it. Install the print driver on the computer as a network printer and
browse to the print queue on the PSA.
11 The performance of the
PSA is very slow when
connecting to the PSA
via Network
Neighborhood or when
opening a printer's
Property Page in Network
Neighborhood.
Several workarounds or solutions are available. Performance issues can
be subjective. If printing seems to be slow using the PSA, compare
printing through some other means (such as an LPR port on the
workstation that prints directly to the printer's IP address). A comparison
helps to identify general network, printer, or application problems versus
specific print server PSA problems.
● Upgrade the PSA firmware. Click here to download the most
current firmware version for the PSA. The latest firmware
revision (2.4.x or newer) should fix the following conditions:
❍ Slow printing/performance - At first printing is fast,
afterwards printing seems to be very slow. Turning the
print PSA off then on seems to help.
❍ Slow Web Pages - When attempting to access or make
changes to the Web page for the PSA, the Web pages are
very slow.
❍ Locks up - PSA locks up or is unable to print. Turning
the PSA off and then on seems to help.
● Verify the configuration of the DNS server with the network
administrator. An incorrectly configured entry on the DNS server
for the PSA can cause delays:
❍ connecting to a printer in Network Neighborhood
❍ delays displaying the Property page in Network
Neighborhood
❍ in printing
The PSA must have a correctly configured DNS server and the
PSA requires entries in both the DNS server's forward and
reverse lookup tables. If the DNS server is not configured
properly, when a computer tries to connect to the PSA through
Network Neighborhood, it could take one to two minutes while
the PSA tries to communicate with the DNS server.
Verify the DNS lookup tables using the following steps:

At the command prompt of a Windows NT or Windows 2000
computer, type the following commands:
❍ The following command verifies an entry for the PSA
name: nslookup printappliancename.domain DNS
server IP address (For example: nslookup mypsa.usa
192.168.100.90)
If the name lookup does not reply with the PSA's IP
address, that means there is no entry for the PSA in the
DNS server's Forward Lookup table. The Forward Lookup
table is the table the DNS server uses to determine the
IP address based on the DNS name.
❍ The following command verifies an entry for the PSA's IP
address: nslookup printappliance IP Address DNS
server IP address (For example: nslookup
192.168.100.80 192.168.100.90)
If the IP address lookup does not reply with the PSA
name, it means there is no entry for the PSA in the DNS
server's Reverse Lookup table. The Reverse Lookup table
is the table the PSA uses to find a system's name based
on its IP address.
● Check the PSA's Microsoft Network Settings page (under
Networking in the PSA's web interface). If the Specified NT
Domain Controllers settings show the host name of the domain
server, use the IP address of the server instead. If Manually
specify NT Domain Controllers is selected, try selecting
Automatically discover NT Domain Controllers instead.
● As a test, try the following: Check the PSA's Microsoft Network
Settings page (by opening the PSA's web interface). If the PSA
is configured to Enable NT Domain Authentication (so that it
is joining the domain), re-configure it so that it does not join a
domain, then see if printing is faster. If it is consistently faster
when not joined to the domain than when it is, be sure that the
print server has the most current firmware (use the link above).
If it is possible to use the PSA when it is not joined to a domain,
do so temporarily, then contact HP support.
● Check the PSA's Microsoft Network Settings page (under
Networking in the PSA's web interface). If the PSA is configured
to use a WINS Server Address, make sure that address is
correct. If it is, type the following command at the command
prompt of a Windows NT or Windows 2000 computer:
nbtstat -a PSA_hostname
(where PSA_hostname is the host name of your PSA)
The response should include three to five entries. If the response
is a host not found message, there may be a problem with the
WINS server. Contact your network administrator for this
problem.
12 Jobs are getting stuck on
the PSA for one of my
printers.
The PSA uses LPD to send print jobs to its printers. If the print server
connecting a printer to the network does not support LPD, jobs for that
printer will get stuck on the PSA. You may need to upgrade the firmware
of the offending print server or it may need to be replaced with a print
server that supports LPD.
13 HP LaserJet print jobs
are missing text of
graphics, or are printing
garbage.
It is strongly recommend that the PSA's firmware be upgraded to latest
(2.4.x or newer) to alleviate problems with printer drivers. Click here to
download the latest firmware for the PSA.
Remove the printer driver from the PSA and from any computer printing
to that printer. Download the latest printer driver form the HP Web site
and install it on the PSA.
14 The Xerox Document
Center 265ST fails to
print from the PSA. Print
jobs hang in the queue.
These Xerox printers use their own print server cards that require the
remote name to be lp (in lower case only). In Printer Properties,
Other print server must be selected. The Remote Queue Name must
be lp (lower case).
15 I'm unable to see any
advanced printing
options in the Print
Preferences pages on 2K
or XP clients.
Newer Windows 2K and XP drivers now use a new print driver
architecture. This new architecture is not compatible with the PSA
firmware 2.3.252 or older. Upgrade the PSA firmware to 2.5.XX and
reload the 2K/XP printer driver. Select the option "Use client side
rendering".
16 I am having problems
printing advance features
like Watermark, N-up,
Rotate 180*, back to
front, Booklet...or other
advanced printing
features.
Newer Windows 2K and XP drivers now use a new print driver
architecture. This new architecture is not compatible the PSA firmware
2.3.252 or older. Upgrade the PSA firmware to 2.5.x and reload the 2K/
XP printer driver. Select the option "Use client side rendering".
Printer Driver Problems
Num. Condition Possible Cause/Solution
1 I can't install the
Windows 9x driver for a
printer for which I
already have a Windows
NT, 2K, or XP driver
installed.
Your Windows 9x driver may not have the same name in its .inf file as
the Windows NT, 2K, or XP drivers. Please contact HP support.
2 I am using Internet
Explorer 6 and am trying
to install and initialize a
driver. I keep getting a
message about Java
having to be turned on.
How do I do this?
Before drivers can be installed, Java must be installed and JavaScript
enabled in your web browser. JavaScript can be enabled in Internet
Explorer, under:
Internet Options-->Security (tab)-->Custom Level (button)-->Scripting--
>Scripting of Java Applets (subheading)
If a Java virtual machine is not installed in the browser, refer to Sun
Microsystem's web site or to Microsoft's web site for information about
downloading one. Then make sure the virtual machine is turned on. In
Internet Explorer, go to:
Internet Options-->Security (tab)-->Custom Level (button)-->Microsoft
VM
Select any option other than "disable".

3 I am trying to add a
printer driver to the PSA,
but I keep getting the
error: Unauthorized to
perform this action.
In order to install drivers onto the PSA, a user must be logged onto their
PC with a user account that has permission to install software on that
PC, and have a corresponding administrator account on the PSA. If NT
domain authentication is enabled (on the Microsoft Network Settings
page), administrator accounts on the PSA can be set up on the
Administrators-Add Domain Accounts page (in the PSA's web
interface under Security). If NT domain authentication is not enabled,
the user must set up a local administrator account on the PSA, with a
name and password that matches their NT user account.
4 I added a Windows 2000
driver to the PSA, but it
did not show up in the
driver list.
Drivers for Microsoft Windows NT 4.0 usually work with both Windows
2000 and Windows XP. Consequently, many vendors will label a driver
as Windows 2000 or XP when the driver conforms to the NT 4.0 driver
specification. As a result, Windows 2000 drivers can show up as
Windows NT drivers.
5 I added a Windows XP
driver to the PSA, but it
did not show up in the
driver list.
Drivers for Microsoft Windows NT 4.0 usually work with both Windows
2000 and Windows XP. Consequently, many vendors will label a driver
as Windows 2000 or XP when the driver conforms to the NT 4.0 driver
specification. Since there is no unique XP driver specification, drivers
labeled by a printer vendor for XP will always appear as either NT 4.0 or
Windows 2000 drivers.
6 I am having problems
with Windows 2K and XP
drivers.
Problems with Windows 2K and XP drivers can include:
● N-up (printing multiple pages in a reduced format on one page)
● booklet style (format the print job into a printed booklet)
● watermark (print a watermark on each page of the document)
● ZoomSmart (scales a letter-sized/A4 document or poster to
tabloid/A3, or vice versa)
● back-to-front (prints the document in reverse order)
● rotate 180 degrees (rotates the document layout but not the
paper)
If you are having problems with any of these features, first update the
firmware. If the problem persists, reinstall the driver and select the "Use
client side rendering with this driver" checkbox when selecting the driver
to use with the print share. The problem should then be resolved.
7 I cannot point and print
a printer driver from the
PSA onto my NT client
PC.
If you are running version 2.5.XX of the PSA firmware, make sure Client
Side Rendering (CSR) is not selected for the particular printer driver you
are using. CSR drivers are only compatible with 2K or XP clients. If you
have a combination of 2K/XP clients and NT clients, either create
separate print queues for each platform, or create a single queue and
only use the NT driver.
8 Special printing property
options like Watermark,
N-up, Back to Front,
Zoomsmart, and rotate
180 degrees do not show
up on the printer pages.
Newer Windows 2K and XP drivers now use a new print driver
architecture. This new architecture is not compatibe the PSA firmware
2.3.252 or older. Upgrade the PSA firmware to 2.5.XX and reload the 2K/
XP printer driver. Select the option to "Use client side rendering".
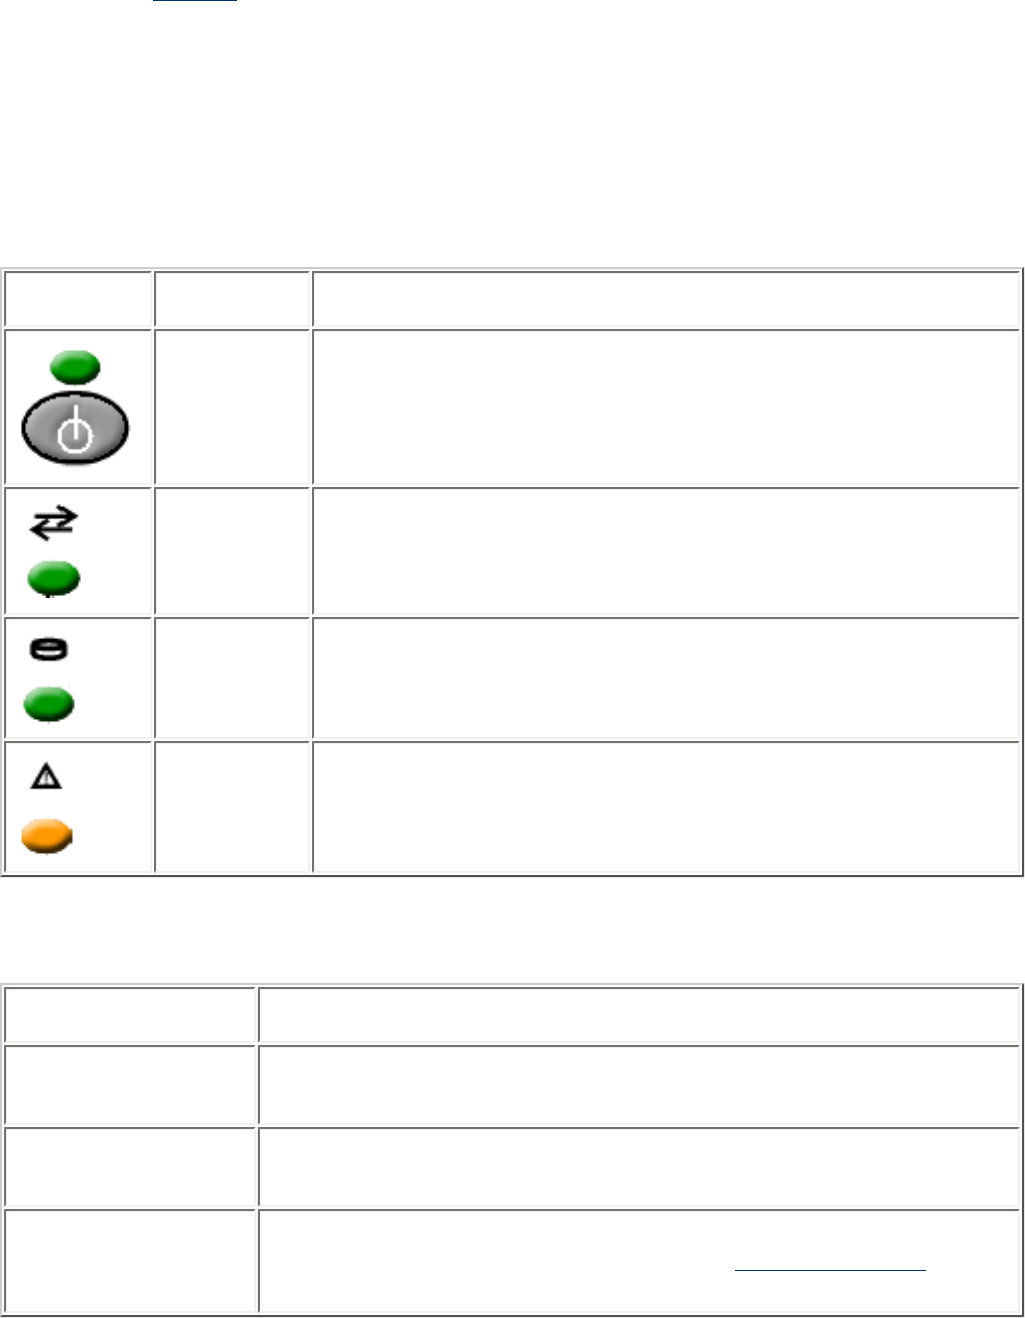
Security Problems
If the PSA is joined to a domain, the domain password for the domain controller is included in the backup file. When
that PSA backup file is restored, it might be necessary to join the PSA to that domain again because the password
might have changed since the backup file was created.
About the Indicator Lights (LEDs)
There are four indicator lights (LEDs) on the front of the PSA.
LED Normal Conditions
LED LED Name Description
Power LED ON when power is supplied to the PSA and it is turned on.
Network
Activity
LED
LIT when there is a connection between the PSA and other
network devices.
BLINKS when there is network activity between the PSA and
other network devices.
Disk
Activity
LED
ON when there is disk activity on the PSA.
Alert LED OFF during normal operations (ON during bootup and shutdown).
LED Problem Conditions
Condition Possible Cause/Solution
Power LED is not lit. Power failure. Restore AC power. Bad power cord or power cord
unplugged. Verify and replace cord.
Network LED never
blinks. Network connection is bad. Verify network cable connections, replace
cable.
Alert LED remains
lit after bootup is
completed.
Critical failure is detected. Note the message on LCD front panel.
Power cycle the unit. If the problem persists, contact HP support.

Frequently Asked Questions
Links within this document:
Configuration
Printing
Printer Drivers
Power Outages
Configuration
1. Can I use Web Jetadmin to manage my PSA?
2. Does the PSA support bootp or rarp?
3. What features on the Properties Page in Network Neighborhood are supported by the PSA?
4. Can I use a hyphen in the PSA name?
5. Can the PSA integrate into a Windows 2000 environment?
6. Can the PSA be configured via TELNET?
7. Is the PSA compatible with non-HP print servers?
8. The PSA does not show up in Network Neighborhood.
Printing
1. Is there a maximum size print job I can send to the PSA?
2. How does the PSA work with my existing print spooling strategy?
3. What is the Microsoft Point and Print feature and how does it work?

4. Can the PSA accept print jobs from UNIX clients?
5. Can I print over my network using Novell as the network OS?
6. What is the limit on the number of jobs that can be spooled?
7. How are print jobs sent to the PSA?
8. How are print jobs sent from the PSA to the printer?
9. I am trying to print in Landscape mode, Duplex mode, or multiple copies, but the margins are
offset.
10. Why is the performance so slow when connecting to the PSA via Network Neighborhood or when
opening a printer's Property Page in Network Neighborhood?
11. Jobs are getting stuck on the PSA for one of my printers.
12. HP LaserJet print jobs are missing text of graphics, or are printing garbage.
13. The Xerox Document Center 265ST fails to print from the PSA. Print jobs hang in the queue.
Printer Driver
1. I can't install a Windows 9x driver for a printer for which I already have a Windows NT, 2K, or
XP driver installed.
2. I am using Internet Explorer 6 and am trying to install and initialize a driver. I keep getting a
message about Java having to be turned on. How do I do this?
3. I am going to upgrade to firmware version 2.3.xx. Will the printer drivers have to be initialized
again?
4. I am trying to add a printer driver to the PSA, but I keep getting an "unauthorized to perform
this action" error message.
5. I added a Windows 2000 driver to the PSA, but it shows up in the driver list as a Windows NT 4.0
driver.
6. I added a Windows XP driver to the PSA, but it shows up in the driver list as a Windows NT 4.0
driver.
7. I am having problems with Windows 2000 drivers.
8. What does it mean to "Use client side rendering with this driver?"
Power Outages
1. What happens if the PSA experiences an unplanned power interruption?
2. How do I connect an uninterruptible power supply (UPS)?
3. How does an uninterruptible power supply (UPS) work with the PSA PSA when the power fails?
Answers
Configuration
1. Can I use Web Jetadmin to manage my PSA?
Yes, With Web JetAdmin 7.2 (and above), and the downloadable PSA plugins for WJA , you can now
configure and manage all of your PSAs that are running on the 2.4.X version of firmware. Features include
the ability to schedule backups and firmware upgrades after hours, pushing printer drivers to multiple PSAs
simultaneously, and setting traps and alerts for different events.
2. Does the PSA support bootp or rarp?
No, but the PSA does support DHCP.
3. What features on the Properties Page in Network Neighborhood are supported by the PSA?
The PSA uses the printer configuration page on the Printer Properties window (which is displayed after right-
clicking on a printer and then selecting Properties) for driver configuration changes and recognizes some
other settings, such as security settings. However, the PSA does not recognize many of the settings if they
are changed using these driver management tools.
❍ General tab
■ Comments text field - supported
■ Location text field - supported
■ Driver dropdown - the driver can be changed if and only if the driver is an initialized driver;
otherwise, the administrator will be prompted to change the driver through the PSA's web
interface so that the driver can be initialized.
■ New Driver button - the driver can be uploaded to the PSA, but will not be associated with
this printer until the administrator uses the PSA's web interface to change the driver so that
it can be initialized.
■ Separator Page button - not supported
■ Print Processor button - not supported
■ Print Test Page button - supported
❍ Ports tab (all buttons are disabled for remote printers)
■ Enable bi-directional support check box - not supported
■ Enable printer pooling check box - not supported
❍ Scheduling tab
■ Availability - should be left on "Always"; print jobs submitted during unavailable time will be
deleted and not spooled.
■ Priority scale - not supported
■ Spool print document so program finishes printing faster toggle - supported
■ Print directly to the printer toggle - supported

■ Hold mismatched documents check box - not supported
■ Print spooled documents first check box - not supported (the PSA always uses this behavior)
■ Keep documents after they have printed check box - not supported
❍ Sharing tab
■ Not Shared toggle - not supported (may be selected but will be ignored)
■ Shared toggle - supported
■ Share Name text field - not supported
■ Alternate Drivers - not supported
❍ Security tab
■ Permissions button - supported
■ Auditing button - not supported
■ Ownership button - not supported
4. Can I use a hyphen in the PSA name?
The PSA name (entered on the Microsoft Network Settings page) can contain up to 15 alphanumeric
characters. It may also contain dashes ( - ) and underscores (_). (The hostname cannot begin with a
hyphen (-), but it can have a hyphen within the name. The hyphen cannot be the first character because
the PSA name is is also used for the DNS name generation, and the hyphen character is not allowed as the
first character in a DNS name.)
5. Can the PSA integrate into a Windows 2000 environment?
The PSA can use a Windows 2000 system for authorization and participate in a Windows 2000 domain in
much the same manner as an NT 4.0 server can. The Windows 2000 system must be configured to support
NTLM V1, which is a version of the authorization protocol used by Windows system.
6. Can the PSA be configured via TELNET?
No. You can assign IP addresses via DHCP, the front panel, and a web browser. After an IP address is
assigned, you must use a web browser to finish configuring the PSA.
7. Is the PSA compatible with non-HP print servers?
Yes. Any print server that supports LPD should work with the PSA. You may have to know the proper LPD
remote queue name for the print server. Many print servers will work without specifying a remote queue
name (use the default HP PRINT SERVER setting); however, some require a special string in order to work.
The LPD remote queue name can be obtained from the print server vendor.
8. The PSA does not show up in Network Neighborhood.
● The PSA will install itself in the workgroup called workgroup. If there are no PCs in this workgroup,
the PSA might not show up in network neighborhood. Microsoft (R) browsing requires a PC in the
workgroup to host a browse list. The administrator must change the workgroup name through the
Web interface on the PSA.
To choose another workgroup name for the PSA:
1. Access the PSA's web interface by typing the IP address in a supported browser window.
2. Click Microsoft Network Settings page (under Networking in the PSA's web interface).
3. In the window labeled Windows NT Domain or Workgroup change the name to the
correct workgroup name.
4. Click .
● A less common cause is that the Master Browser list (Network Neighborhood) has not yet been

updated with the new PSA. Depending on the size and speed of the network, it may take up to 30
minutes before the network's master browser list gets updated.
● Once this browser list gets updated on the PC that's hosting this list, other PCs on the network will
check the browser list and be able to see any new devices on the network via Network
Neighborhood.
To find the PSA more quickly:
1. Select Start, Find, then Computer.
2. Type the IP address of the PSA then click Find Now.
Printing
1. Is there a maximum size print job I can send to the PSA?
There is no limit for a file size that the PSA can handle.
2. How does the PSA work with my existing print spooling strategy?
It can offload printing tasks from servers and localize print traffic at remote sites. For details, see the
product overview.
3. What is the Microsoft Point and Print feature and how does it work?
Point and Print is a Microsoft term to describe the automatic installation of drivers on the printer client. It
involves two steps. The first step is installing a shared driver on a network print server or print server PSA.
The second step is "pointing" to the print server or PSA from a network client for driver installation on the
client. This process is also sometimes described as a network installation of a printer driver.
4. Can the PSA accept print jobs from UNIX clients?
Print jobs are accepted from HP-UX, Solaris, and any other RFC 1179-compliant LPD clients. To set up LPD
printing, go to the LPD page in the PSA's web interface (under Network Settings).
5. Can I print in a Novell environment?
Yes. If the Microsoft networking client is loaded and the IP address is properly configured on the client and
printer, then the PSA can be used. However, the PSA will not appear as a Bindery object or as an NDS
object on the Novell server.
6. What is the limit on the number of jobs that can be spooled?
Up to 10,000 jobs can be spooled at a time, which might be further restricted by the disk space available on
the PSA.
7. How are print jobs sent to the PSA?
Clients send print jobs via SMB or LPD to the PSA. SMB (Server Message Block) is the normal Microsoft

networking protocol. LPD (Line Printer Daemon) is an Internet standard (RFC 1179) supported by many
operating systems.
8. How are print jobs sent from the PSA to the printer?
The PSA uses LPD to send the print job to the printer.
9. I am trying to print in Landscape mode, Duplex mode, or multiple copies, but the margins are
offset.
If you have not done so, upgrade your firmware to version 2.4.x and initialize the driver for that printer.
Delete the print driver from the computer and delete the port created for it. Install the print driver on the
computer as a network printer and browse to the print queue on the PSA.
10. Why is the performance so slow when connecting to the PSA via Network Neighborhood or when
opening a printer's Property Page in Network Neighborhood?
Several workarounds or solutions are available. Performance issues can be subjective. If printing seems to
be slow using the PSA, compare printing through some other means (such as an LPR port on the
workstation that prints directly to the printer's IP address). A comparison helps to identify general network,
printer, or application problems versus specific print server appliance problems.
❍ Upgrade the PSA firmware. Click here to download the most current firmware version for the PSA.
The latest firmware revision (2.4.x or newer) should fix the following conditions:
■ Slow printing/performance - At first printing is fast, afterwards printing seems to be
very slow. Turning the print appliance off then on seems to help.
■ Slow Web Pages - When attempting to access or make changes to the Web page for the
print appliance, the Web pages are very slow.
■ Locks up - Print appliance locks up or is unable to print. Turning the print appliance off
then on seems to help.
❍ Verify the configuration of the DNS server with the network administrator. An incorrectly configured
entry on the DNS server for the PSA can cause delays:
■ connecting to a printer in Network Neighborhood
■ delays displaying the Property page in Network Neighborhood
■ in printing
The PSA must have a correctly configured DNS server and the print server appliance requires
entries in both the DNS server's forward and reverse lookup tables. If the DNS server is not
configured properly, when a computer tries to connect to the print server appliance through
Network Neighborhood, it could take one to two minutes while the print server appliance tries to
communicate with the DNS server.
Verify the DNS lookup tables using the following steps:
At the command prompt of a Windows NT or Windows 2000 computer, type the following
commands:
■ The following command verifies an entry for the PSA name: nslookup
printappliancename.domain DNS server IP address (For example: nslookup mypsa.usa
192.168.100.90)
If the name lookup does not reply with the PSA's IP address, that means there is no entry
for the PSA in the DNS server's Forward Lookup table. The Forward Lookup table is the table
the DNS server uses to determine the IP address based on the DNS name.
■ The following command verifies an entry for the PSA's IP address: nslookup

printappliance IP Address DNS server IP address (For example: nslookup
192.168.100.80 192.168.100.90)
If the IP address lookup does not reply with the print server appliance name, it means there
is no entry for the print server appliance in the DNS server's Reverse Lookup table. The
Reverse Lookup table is the table the print server appliance uses to find a system's name
based on its IP address.
❍ Check the PSA's Microsoft Network Settings page (under Networking in the PSA's web
interface). If the Specified NT Domain Controllers settings show the host name of the domain
server, use the IP address of the server instead. If Manually specify NT Domain Controllers is
selected, try selecting Automatically discover NT Domain Controllers instead.
❍ As a test, try the following: Check the PSA's Microsoft Network Settings page (by opening the
PSA's web interface). If the PSA is configured to Enable NT Domain Authentication (so that it is
joining the domain), re-configure it so that it does not join a domain, then see if printing is faster. If
it is consistently faster when not joined to the domain than when it is, be sure that the print server
has the most current firmware (use the link above). If it is possible to use the print appliance when
it is not joined to a domain, do so temporarily, then contact HP support.
❍ Check the PSA's Microsoft Network Settings page (under Networking in the PSA's web
interface). If the PSA is configured to use a WINS Server Address, make sure that address is
correct. If it is, type the following command at the command prompt of a Windows NT or Windows
2000 computer:
nbtstat -a PSA_hostname
(where PSA_hostname is the host name of your PSA)
The response should include three to five entries. If the response is a host not found message,
there may be a problem with the WINS server. Contact your network administrator for this problem.
11. Jobs are getting stuck on the PSA for one of my printers.
The PSA uses LPD to send print jobs to its printers. If the print server connecting a printer to the network
does not support LPD, jobs for that printer will get stuck on the PSA. You may need to upgrade the firmware
of the offending print server or it may need to be replaced with a print server that supports LPD.
12. HP LaserJet print jobs are missing text of graphics, or are printing garbage.
It is strongly recommend that the OSA's firmware be upgraded to latest (2.4.x or newer) to alleviate
problems with printer drivers. Click here to download the latest firmware for the PSA.
Remove the printer driver from the PSA and from any computer printing to that printer. Download the latest
printer driver form the HP Web site and install it on the PSA.
13. The Xerox Document Center 265ST fails to print from the PSA. Print jobs hang in the queue.
These Xerox printers use their own print server cards that require the remote name to be lp (in lower case
only). only). In Printer Properties, Other print server must be selected. The Remote Queue Name
must be lp (lower case).
Printer Drivers
1. I can't install the Windows 9x driver for a printer for which I already have a Windows NT, 2K, or
XP driver installed.
Your Windows 9x driver may not have the same name in its .inf file as the Windows NT, 2K, or XP drivers.
Please contact HP support.

2. I am using Internet Explorer 6 and am trying to install and initialize a driver. I keep getting a
message about Java having to be turned on. How do I do this?
Before drivers can be installed, Java must be installed and JavaScript enabled in your web browser.
JavaScript can be enabled in Internet Explorer, under:
Internet Options-->Security (tab)-->Custom Level (button)-->Scripting-->Scripting of Java Applets
(subheading)
If a Java virtual machine is not installed in the browser, refer to Sun Microsystem's web site or to
Microsoft's web site for information about downloading one. Then make sure the virtual machine is turned
on. In Internet Explorer, go to:
Internet Options-->Security (tab)-->Custom Level (button)-->Microsoft VM
Select any option other than "disable".
3. I am going to upgrade to firmware version 2.4.x. Will my printer drivers have to be initialized
again?
If migrating to firmware version 2.4.x, printers that had been added to earlier firmware versions (2.3.x or
before) need to be associated with their driver again. To do this easily, use either the PSA's web interface or
Web Jetadmin.
In the PSA's web interface: go to the Print Shares page (on the menu in the web interface under Print
Services) and then click (Drivers). In the drop-down list, select any other driver and click .
Then, select the original driver and click again.
In Web Jetadmin under Driver Management, access the Printer Drivers page and click the Initialize
button. Select the appropriate driver and click the Initialize button again.
4. I am trying to add a printer driver to the PSA, but I keep getting an "unauthorized to perform
this action" error message.
In order to install drivers onto the PSA, a user must be logged onto their PC with a user account that has
permission to install software on that PC, and have a corresponding administrator account on the PSA. If NT
domain authentication is enabled (on the Microsoft Networking Settings page), administrator accounts on
the PSA can be set up on the Domain Account page (in the PSA's web interface under Admin Accounts). If
NT domain authentication is not enabled, the user must set up a local administrator account on the PSA,
with a name and password that matches their NT user account.
5. I added a Windows 2000 driver to the PSA, but it did not show up in the driver list.
Drivers for Microsoft Windows NT 4.0 usually work with both Windows 2000 and Windows XP. Consequently,
many vendors will label a driver as Windows 2000 or XP when the driver conforms to the NT 4.0 driver
specification. As a result, Windows 2000 drivers can show up as Windows NT drivers.
6. I added a Windows XP driver to the PSA, but it did not show up in the driver list.
Drivers for Microsoft Windows NT 4.0 usually work with both Windows 2000 and Windows XP. Consequently,
many vendors will label a driver as Windows 2000 or XP when the driver conforms to the NT 4.0 driver
specification. Since there is no unique XP driver specification, drivers labeled by a printer vendor for XP will
always appear as either NT 4.0 or Windows 2000 drivers.
7. I am having problems with Windows 2000 drivers.
Problems with Windows 2000 drivers can include:
❍ N-up (printing multiple pages in a reduced format on one page)
❍ booklet style (format the print job into a printed booklet)
❍ watermark (print a watermark on each page of the document)
❍ ZoomSmart (scales a letter-sized/A4 document or poster to tabloid/A3, or vice versa)
❍ back-to-front (prints the document in reverse order)
❍ rotate 180 degrees (rotates the document layout but not the paper)
If you are having problems with any of these features, first update the firmware. If the problem persists,
reinstall the driver and select the "Use client side rendering with this driver" checkbox when selecting the
driver to use with the print share. The problem should then be resolved.
8. What does it mean to "Use client side rendering with this driver"?
A new Windows 2K and XP printer driver architecture has been developed where advanced printing features
like the following are handled by a print processor in the print server:
❍ N-up (printing multiple pages in a reduced format on one page)
❍ booklet style (format the print job into a printed booklet)
❍ watermark (print a watermark on each page of the document)
❍ ZoomSmart (scales a letter-sized/A4 document or poster to tabloid/A3, or vice versa)
❍ back-to-front (prints the document in reverse order)
❍ rotate 180 degrees (rotates the document layout but not the paper)
If you intend to use this 2K or XP version of the driver with the PSA, select "Use Client Side rendering".
Power Outages
1. How do I connect an uninterruptible power supply (UPS)?
The PSA supports APC UPSs only in the Simple Signaling mode with a Simple Signaling cable (APC part #
940-0020B). Connect the UPS cable to the connector labeled UPS on the back of the PSA.
Note: The Simple Signaling cable is not included with the PSA or with the APC UPS. This cable can be
ordered from APC (APC part # 940-0020B).
2. How does an uninterruptible power supply (UPS) work with the PSA when the power fails?
The UPS communication cable enables the UPS to signal the PSA to perform an orderly shutdown after a
delay of about 60 seconds in the event of a power failure. During an orderly shutdown, processes are closed
and data is saved. No configuration is necessary to enable UPS support, other than simply connecting the
DB-9 cable.

3. What happens if the PSA experiences an unplanned power interruption?
After a power outage the PSA will automatically recover and rebuild its settings as necessary. To reduce the
chance of data loss, the PSA can be connected to a UPS. (See the questions regarding UPS below.)
Print jobs that were printing and print jobs that were spooled but not printing will automatically resume
when the PSA is powered up again. Print jobs that had not been spooled yet need to be resent.
Loss of power could initially cause corruption of the data on the PSA hard disk. However, the PSA is
designed to make internal data loss unlikely, since the corrupted data will be automatically corrected during
its next uninterrupted bootup.
It is always a good idea to have a backup of the settings and files in case they need to be restored.
After a power outage or any other improper shutdown, the PSA may experience so many errors in its file
system that it rebuilds the disk from the default image. The printers, network configuration, and drivers will
be not be automatically restored. The configuration must be restored manually using the Restore
functionality with the last configuration manually backed up.

Contact HP
General Information
(The central location on HP's web site for the HP Print Server PSAs and similar products)
Online Customer Forum
(Where customers can discuss ideas and suggestions for using the HP PSAs)
Customer Support
(Lists all of the support options offered by HP and contact information such as phone numbers and
e-mail addresses)
Warranty and Regulatory Information
(Includes the product, regulatory information, and GNU public licenses)
Trademarks and Copyrights
(Includes all trademarks and copyrights for the HP PSAs)
Warranty, Regulatory, and Licensing Information
Links within this page:
Hewlett-Packard Limited Warranty Statement
Regulatory Compliance
Declaration of Conformity
Trademarks and Copyrights
HP Software License
HP Limited Warranty/Limitation of Liability
Software Copyright Notices
Other Software Licenses
Hewlett-Packard Limited Warranty Statement
HP Product Duration of Limited Warranty
HP Print Server Appliance 4250 (J7941A) 1 year
1. HP warrants to you, the end-user customer, that HP hardware, accessories, and supplies will be free from
defects in materials and workmanship after the date of purchase, for the period of one (1) year. If HP
receives notice of such defects during the warranty period, HP will, at its option, either repair or replace
products that prove to be defective. Replacement products may be either new or equivalent in performance
to new.
2. HP warrants to you that HP software will not fail to execute its programming instructions after the date of
purchase, for a period of NINETY (90) DAYS, due to defects in material and workmanship when properly
installed and used. If HP receives notice of such defects during the NINETY (90) day period, HP will replace
software that does not execute its programming instructions due to such defects.
3. You are responsible for restoring any configuration or data. In no event will HP or its affiliates,
subcontractors, or suppliers be liable for any of the following: damages for loss of data, or software
restoration; damages relating to Customer's procurement of substitute products or services (i.e., "cost of
cover"); or incidental, special or consequential damages (including downtime costs or lost profits).
4. The remedies herein are the customer's sole and exclusive remedies.
5. HP does not warrant that the operation of HP products will be uninterrupted or error free. If HP is unable,
within a reasonable time, to repair or replace any product to a condition as warranted, you will be entitled
to a refund of the purchase price upon prompt return of the product.
6. HP products may contain remanufactured parts equivalent to new in performance or may have been subject
to incidental use.
7. Warranty does not apply to defects resulting from (a) improper or inadequate maintenance or calibration,
(b) software, interfacing, parts, or supplies not supplied by HP, (c) unauthorized modification or misuse, (d)
operation outside of the published environmental specifications for the product, or (e) improper site
preparation or maintenance.
8. TO THE EXTENT ALLOWED BY LOCAL LAW, THE ABOVE WARRANTIES ARE EXCLUSIVE AND NO OTHER
WARRANTY OR CONDITION, WHETHER WRITTEN OR ORAL, IS EXPRESSED OR IMPLIED AND HP
SPECIFICALLY DISCLAIMS ANY IMPLIED WARRANTIES OR CONDITIONS OF MERCHANTABILITY,
SATISFACTORY QUALITY, AND FITNESS FOR A PARTICULAR PURPOSE. Some countries, states, or provinces
do not allow limitations on the duration of an implied warranty, so the above limitation or exclusion might
not apply to you. This warranty gives you specific legal rights and you might also have other rights that
vary from country to country, state to state, or province to province.
9. HP will be liable for damage to tangible property per incident up to the greater of $300,000 or the actual
amount paid for the product that is the subject of the claim, and for damages for bodily injury or death, to
the extent that all such damages are determined by a court of competent jurisdiction to have been directly
caused by a defective HP product.
10. TO THE EXTENT ALLOWED BY LOCAL LAW, THE REMEDIES IN THIS WARRANTY STATEMENT ARE YOUR
SOLE AND EXCLUSIVE REMEDIES. EXCEPT AS INDICATED ABOVE, IN NO EVENT WILL HP OR ITS
SUPPLIERS BE LIABLE FOR LOSS OF DATA OR FOR DIRECT, SPECIAL, INCIDENTAL, CONSEQUENTIAL
(INCLUDING LOST PROFIT OR DATA), OR OTHER DAMAGE, WHETHER BASED IN CONTRACT, TORT, OR
OTHERWISE. Some countries, states, or provinces do not allow the exclusion or limitation of incidental or
consequential damages, so the above limitation or exclusion may not apply to you.
THE WARRANTY TERMS CONTAINED IN THIS STATEMENT, EXCEPT TO THE EXTENT LAWFULLY PERMITTED, DO NOT
EXCLUDE, RESTRICT, OR MODIFY AND ARE IN ADDITION TO THE MANDATORY STATUTORY RIGHTS APPLICABLE
TO THE SALE OF THIS PRODUCT TO YOU.
Local Warranty Statements
"HP's limited warranty is valid in any country or locality where HP has a support presence for this product and
where HP has marketed this product. The level of warranty service you receive may vary according to local
standards. HP will not alter form, fit or function of the product to make it operate in a country for which it was
never intended to function for legal or regulatory reasons.
Regulatory Statements
FCC Statement (USA)
General Information. This device complies with Part 15 of the FCC Rules. Operation is subject to the following two
conditions: (1) This device may not cause interference, and (2) this device must accept any interference received,
including interference that may cause undesired operation.
Pursuant to Part 15.21 of the FCC Rules, any changes or modifications to this equipment not expressly approved by
the Hewlett-Packard Company may cause interference and void the FCC authorization to operate this equipment.
The Federal Communications Commission has prepared a booklet titled Interference Handbook (1986), which may
be helpful to you. This booklet (stock number 004-000-004505-7) may be purchased from the Superintendent of
Documents, U.S. Government Printing Office, Washington, D.C. 20402.
This equipment has been tested and found to comply with the limits for a Class A digital device, pursuant to Part 15
of the FCC Rules.
These limits are designed to provide reasonable protection against interference in a commercial environment. This
equipment generates, uses and can radiate radio frequency energy and, if not installed and used in accordance with
the instructions, may cause interference to radio communications.

Installing this equipment in an FCC Level B product results in an FCC Level A Composite System (as defined in the
FCC Rules and Regulations) when attached to an Ethernet (IEEE 802.3/802.3u) or Token Ring (IEEE 802.5) network.
European Community
This is a class A product. In a domestic environment, this product may cause radio interference, in which case the
user may be required to take adequate measures.
Electromagnetic Emissions
FCC part 15 Class A (U.S.A.), ICES-003 (Canada), CISPR-22/EN55022 Class A, AS/NZS 3548 (Australia/New
Zealand).
Note: For EU compliance, see the Declaration of Conformity.
Safety Certifications
Products comply with:
● IEC 950: (1991)+A1,A2,A3,A4/EN60950 (1992)+A1,A2,A3,A4
● UL 1950
● CSA 950
● NOM-019-SCFI-1994
Australia
This equipment complies with Australian EMC requirements.
Canada
This equipment complies with Canadian EMC Class-A requirements.
Declaration of Conformity
DECLARATION OF CONFORMITY
according to ISO/IEC Guide 22 and EN45014

Manufacturer's Name: Hewlett-Packard Company
Manufacturer's Address: 8000 Foothills Blvd.
Roseville, CA 95747-5677
U.S.A.
declares that the product:
Product Name:
HP Print Server Appliance 4250 (Model Number J7941A)
HP Print Server Appliance 4200 (Model Number J4117A)
HP JetDirect 4000 Network Print Appliance ( Model Number: J4107A)
conforms to the following Product Specifications:
Safety: EN60950 (1992) +A1,A2,A3,A4,AII / IEC 950 (1991) +A1, A2, A3, A4
EN60825-1 (1994) / IEC 825-1 (1993), Class 1
GB 4943 (1995)
EMC: EN 55022 (1998) / CISPR-22 (1997) Class A
GB 9254 (1988)
EN 55024 (1998)
IEC 61000-4-2 (1995); EN 61000-4-2 (1995)
IEC 61000-4-3 (1995); EN 61000-4-3 (1996)
IEC 61000-4-4 (1995); EN 61000-4-4 (1995)
IEC 61000-4-5 (1995); EN 61000-4-5 (1995)
IEC 61000-4-6 (1996); EN 61000-4-6 (1996)
IEC 61000-4-8 (1993); EN 61000-4-8 (1993)
IEC 61000-4-11 (1994); EN 61000-4-11 (1994)
EN61000-3-2 (1995)
EN61000-3-3 (1995)
FCC Title 47 CFR, Part 15 Class A
Supplementary Information:
The product herewith complies with the requirements of the Low Voltage Directive 73/23/EEC and the EMC
Directive 89/336/EEC and carries the CE marking accordingly. Shielded cables are recommended to meet the
above specifications.
Tested with Hewlett-Packard Co. products only.
Roseville, March 4, 2003
Signature of HP Representative
Jill Stevenson, Regulatory Manager
European Contact: Your local Hewlett-Packard Sales and Service Office or Hewlett-Packard GmbH, Department
TRE, Herrenberger Strasse 130, D-71034 Böblingen (FAX:+49-7031-14-3143).
Trademarks and Copyrights
Copyright (C) Hewlett-Packard Co. 1999-2003
This information is subject to change without notice and is provided "as is" with no warranty. Hewlett-Packard shall
not be liable for any direct, indirect, special, incidental or consequential damages in connection with the use of this
material.
Microsoft, MS-DOS, Windows, Windows NT are U.S. registered trademarks of Microsoft Corporation.
Netscape and Netscape Navigator are U.S. registered trademarks of Netscape Communications Corporation.
APC and other names of APC products referenced herein are trademarks or registered trademarks of American
Power Conversion Corporation.
UNIX is a registered trademark of The Open Group.
JetDirect is a registered trademark of Hewlett-Packard Company.
HP-UX Release 10.20 and later and HP-UX Release 11.00 and later (in both 32 and 64-bit configurations) on all HP
9000 computers are Open Group UNIX 95 branded products.
Solaris is a product of Sun Microsystems.
Other product names are U.S. trademarks or registered trademarks of their respective owners.
HP Limited Warranty/Limitation of Liability
HP warrants to you that HP software will not fail to execute its programming instructions after the date of purchase,
for a period of NINETY (90) DAYS, due to defects in material and workmanship when properly installed and used. If
HP receives notice of such defects during the NINETY (90) day period, HP will replace software that does not
execute its programming instructions due to such defects. HP does not warrant that the operation of the Software
will be uninterrupted or error free.
TO THE EXTENT ALLOWED BY LOCAL LAW, THE ABOVE WARRANTIES ARE EXCLUSIVE AND NO OTHER WARRANTY
OR CONDITION, WHETHER WRITTEN OR ORAL, IS EXPRESSED OR IMPLIED AND HP SPECIFICALLY DISCLAIMS ANY
IMPLIED WARRANTIES OR CONDITIONS OF MERCHANTABILITY, SATISFACTORY QUALITY, AND FITNESS FOR A
PARTICULAR PURPOSE. Some countries, states, or provinces do not allow limitations on the duration of an implied
warranty, so the above limitation or exclusion might not apply to you. This warranty gives you specific legal rights
and you might also have other rights that vary from country to country, state to state, or province to province.
HP will be liable for damage to tangible property per incident up to the greater of $300,000 or the actual amount
paid for the product that is the subject of the claim, and for damages for bodily injury or death, to the extent that
all such damages are determined by a court of competent jurisdiction to have been directly caused by a defective
HP product.
TO THE EXTENT ALLOWED BY LOCAL LAW, THE REMEDIES IN THIS WARRANTY STATEMENT ARE YOUR SOLE AND
EXCLUSIVE REMEDIES. EXCEPT AS INDICATED ABOVE, IN NO EVENT WILL HP OR ITS SUPPLIERS BE LIABLE FOR
LOSS OF DATA OR FOR DIRECT, SPECIAL, INCIDENTAL, CONSEQUENTIAL (INCLUDING LOST PROFIT OR DATA), OR
OTHER DAMAGE, WHETHER BASED IN CONTRACT, TORT, OR OTHERWISE. Some countries, states, or provinces do
not allow the exclusion or limitation of incidental or consequential damages, so the above limitation or exclusion
may not apply to you.
THE WARRANTY TERMS CONTAINED IN THIS STATEMENT, EXCEPT TO THE EXTENT LAWFULLY PERMITTED, DO NOT
EXCLUDE, RESTRICT, OR MODIFY AND ARE IN ADDITION TO THE MANDATORY STATUTORY RIGHTS APPLICABLE
TO THE SALE OF THIS PRODUCT TO YOU.
HP Software License
The following License Terms govern your use of the Software which is embedded in (firmware) or accompanies this
product unless you have a separate signed agreement with HP.
License Grant. HP grants you a license to Use one copy of the Software. "Use" means storing, loading, installing,
executing or displaying the Software. You may not modify the Software or disable any licensing or control features
of the Software. If the Software is licensed for "concurrent use", you may not allow more than the maximum
number of authorized users to Use the Software concurrently.
Ownership. The Software is owned and copyrighted by HP or its third party suppliers. Your license confers no title
to, or ownership in, the Software and is not a sale of any rights in the Software. HP's third party suppliers may
protect their rights in the event of any violation of these License Terms.
Copies and Adaptations. You may only make copies or adaptations of the Software for archival purposes or when
copying or adaptation is an essential step in the authorized Use of the Software. You must reproduce all copyright
notices in the original Software on all copies or adaptations. You may not copy the Software onto any public
network.
No Disassembly or Decryption. You may not disassemble or decompile the Software unless HP's prior written
consent is obtained. In some jurisdictions, HP's consent may not be required for limited disassembly or
decompilation. Upon request, you will provide HP with reasonably detailed information regarding any disassembly or
decompilation. You may not decrypt the Software unless decryption is a necessary part of the operation of the
Software.
Transfer. Your license will automatically terminate upon any transfer of the Software. Upon transfer, you must
deliver the Software, including any copies and related documentation, to the transferee. The transferee must accept
these License Terms as a condition to the transfer.
Termination. HP may terminate your license upon notice for failure to comply with any of these License Terms.
Upon termination, you must immediately destroy the Software, together with all copies, adaptations and merged
portions in any form.
Export Requirements. You may not export or re-export the Software or any copy or adaptation in violation of any
applicable laws or regulations.
U.S. Government Restricted Rights. The Software and any accompanying documentation have been developed
entirely at private expense. They are delivered and licensed as "commercial computer software" as defined in
DFARS 252.227-7013 (Oct 1988), DFARS 252.211-7015 (May 1991) or DFARS 252.227-7014 (Jun 1995), as a
"commercial item" as defined in FAR 2.101(a), or as "Restricted computer software" as defined in FAR 52.227-19
(Jun 1987)(or any equivalent agency regulation or contract clause), whichever is applicable. You have only those
rights provided for such Software and any accompanying documentation by the applicable FAR or DFARS clause or
the HP standard software agreement for the product involved.
Software Copyright Notices
Copyright 1999-2003 Hewlett-Packard Company All rights reserved worldwide.
Portions of this software are also:
Copyright (c) 2000 Carnegie Mellon University
Copyright (c) 1995-2001 The Internet Software Consortium
Copyright (c) 2001 Python Software Foundation
Copyright (c) 1983 Regents of the University of California
Copyright (c) 1995-1997 The Apache Group
Copyright (c) 1989, 1991 Free Software Foundation, Inc.
Copyright (c) 2000 Gregory Trubetskoy
Copyright (c) 1998-2001 Ralf S. Engelschall
Copyright (c) 1999-2001 John Coffman
Copyright (c) 1996-2000 Julian R Seward
Copyright (c) 1990, 1993, 1994, 1995, 1996, 1997, 1998 Sleepycat Software
Copyright (c) 1995, 1996 The President and Fellows of Harvard University
Copyright (c) 1998, 1999, 2000 Thai Open Source Software Center Ltd and Clark Cooper
Copyright (c) 1995-1998 Eric Young
Copyright (c) 1998-2001 The OpenSSL Project
Copyright (c) 1988 - 1997, Julianne F. Haugh
Copyright (c) 1991, 1992 Paul Kranenburg
Copyright (c) 1993 Branko Lankester
Copyright (c) 1993 Ulrich Pegelow
Copyright (c) 1995, 1996 Michael Elizabeth Chastain
Copyright (c) 1993, 1994, 1995, 1996 Rick Sladkey
Copyright (c) 1999,2000 Wichert Akkerman
Copyright (c) 1995 by Wietse Venema
Copyright (c) 1990-2001 Info-ZIP
Copyright (c) 1988,1990,1993 by Paul Vixie
Copyright (c) 1992 by Panagiotis Tsirigotis
Copyright (c) 1995-1998 Jean-loup Gailly and Mark Adler
Copyright (c) 1994-1996,1998-2002
Other Software Licenses
This product includes software licensed under the GNU General Public License and other open source licenses.
Copies of these licenses and information about obtaining source code for software licensed under the GNU GPL are
available below.
To obtain source code for product software licensed under the GNU GPL and under Sleepycat Software, make a
written request to Hewlett-Packard at:
Hewlett-Packard Company
Connectivity Technical Marketing
8000 Foothills Blvd., MS 5661
Roseville, CA 95747
This product includes software developed by:
● the Open SSL Project for use in the Open SSL Toolkit (http://www.openssl.org/)
● Gregory Trubetskoy
● Eric Young
● Tim Hudson
Copyright (c) 2000 Carnegie Mellon University. All rights reserved.
Redistribution and use in source and binary forms, with or without modification, are permitted provided that the
following conditions are met:
1. Redistributions of source code must retain the above copyright notice, this list of conditions and the
following disclaimer.
2. Redistributions in binary form must reproduce the above copyright notice, this list of conditions and the
following disclaimer in the documentation and/or other materials provided with the distribution.
3. The name "Carnegie Mellon University" must not be used to endorse or promote products derived from this
software without prior written permission. For permission or any other legal details, please contact:
Office of Technology Transfer
Carnegie Mellon University
5000 Forbes Avenue
Pittsburgh, PA 15213-3890
(412) 268-4387, fax: (412) 268-7395
tech-transfer@andrew.cmu.edu
4. Redistributions of any form whatsoever must retain the following acknowledgment: "This product includes
software developed by Computing Services at Carnegie Mellon University (http://www.cmu.edu/
computing/)."
CARNEGIE MELLON UNIVERSITY DISCLAIMS ALL WARRANTIES WITH REGARD TO THIS SOFTWARE, INCLUDING
ALL IMPLIED WARRANTIES OF MERCHANTABILITY AND FITNESS, IN NO EVENT SHALL CARNEGIE MELLON
UNIVERSITY BE LIABLE FOR ANY SPECIAL, INDIRECT OR CONSEQUENTIAL DAMAGES OR ANY DAMAGES
WHATSOEVER RESULTING FROM LOSS OF USE, DATA OR PROFITS, WHETHER IN AN ACTION OF CONTRACT,
NEGLIGENCE OR OTHER TORTIOUS ACTION, ARISING OUT OF OR IN CONNECTION WITH THE USE OR
PERFORMANCE OF THIS SOFTWARE.
Copyright (c) 1995-2001
The Internet Software Consortium. All rights reserved.
Redistribution and use in source and binary forms, with or without modification, are permitted provided that the
following conditions are met:
Redistributions of source code must retain the above copyright notice, this list of conditions and the following
disclaimer.
Redistributions in binary form must reproduce the above copyright notice, this list of conditions and the following
disclaimer in the documentation and/or other materials provided with the distribution.
Neither the name of The Internet Software Consortium - DHCP nor the names of its contributors may be used to
endorse or promote products derived from this software without specific prior written permission.
THIS SOFTWARE IS PROVIDED BY THE INTERNET SOFTWARE CONSORTIUM AND CONTRIBUTORS "AS IS" AND ANY
EXPRESS OR IMPLIED WARRANTIES, INCLUDING, BUT NOT LIMITED TO, THE IMPLIED WARRANTIES OF
MERCHANTABILITY AND FITNESS FOR A PARTICULAR PURPOSE ARE DISCLAIMED. IN NO EVENT SHALL THE
INTERNET SOFTWARE CONSORTIUM OR CONTRIBUTORS BE LIABLE FOR ANY DIRECT, INDIRECT, INCIDENTAL,
SPECIAL, EXEMPLARY, OR CONSEQUENTIAL DAMAGES (INCLUDING, BUT NOT LIMITED TO, PROCUREMENT OF
SUBSTITUTE GOODS OR SERVICES; LOSS OF USE, DATA, OR PROFITS; OR BUSINESS INTERRUPTION) HOWEVER
CAUSED AND ON ANY THEORY OF LIABILITY, WHETHER IN CONTRACT, STRICT LIABILITY, OR TORT (INCLUDING
NEGLIGENCE OR OTHERWISE) ARISING IN ANY WAY OUT OF THE USE OF THIS SOFTWARE, EVEN IF ADVISED OF
THE POSSIBILITY OF SUCH DAMAGE.
PSF LICENSE AGREEMENT FOR PYTHON 2.2
1. This LICENSE AGREEMENT is between the Python Software Foundation ("PSF"), and the Individual or
Organization ("Licensee") accessing and otherwise using Python 2.2 software in source or binary form and
its associated documentation.
2. Subject to the terms and conditions of this License Agreement, PSF hereby grants Licensee a nonexclusive,
royalty-free, world-wide license to reproduce, analyze, test, perform and/or display publicly, prepare
derivative works, distribute, and otherwise use Python 2.2 alone or in any derivative version, provided,
however, that PSF's License Agreement and PSF's notice of copyright, i.e., "Copyright (c) 2001 Python
Software Foundation; All Rights Reserved" are retained in Python 2.2 alone or in any derivative version
prepared by Licensee.
3. In the event Licensee prepares a derivative work that is based on or incorporates Python 2.2 or any part
thereof, and wants to make the derivative work available to others as provided herein, then Licensee
hereby agrees to include in any such work a brief summary of the changes made to Python 2.2.
4. PSF is making Python 2.2 available to Licensee on an "AS IS" basis. PSF MAKES NO REPRESENTATIONS OR
WARRANTIES, EXPRESS OR IMPLIED. BY WAY OF EXAMPLE, BUT NOT LIMITATION, PSF MAKES NO AND
DISCLAIMS ANY REPRESENTATION OR WARRANTY OF MERCHANTABILITY OR FITNESS FOR ANY
PARTICULAR PURPOSE OR THAT THE USE OF PYTHON 2.2 WILL NOT INFRINGE ANY THIRD PARTY RIGHTS.
5. PSF SHALL NOT BE LIABLE TO LICENSEE OR ANY OTHER USERS OF PYTHON 2.2 FOR ANY INCIDENTAL,
SPECIAL, OR CONSEQUENTIAL DAMAGES OR LOSS AS A RESULT OF MODIFYING, DISTRIBUTING, OR
OTHERWISE USING PYTHON 2.2, OR ANY DERIVATIVE THEREOF, EVEN IF ADVISED OF THE POSSIBILITY
THEREOF.
6. This License Agreement will automatically terminate upon a material breach of its terms and conditions.
7. Nothing in this License Agreement shall be deemed to create any relationship of agency, partnership, or
joint venture between PSF and Licensee. This License Agreement does not grant permission to use PSF
trademarks or trade name in a trademark sense to endorse or promote products or services of Licensee, or
any third party.
8. By copying, installing or otherwise using Python 2.2, Licensee agrees to be bound by the terms and
conditions of this License Agreement.
Copyright (c) 1983 Regents of the University of California.
All rights reserved.
Redistribution and use in source and binary forms, with or without modification, are permitted provided that the
following conditions are met:
1. Redistributions of source code must retain the above copyright notice, this list of conditions and the
following disclaimer.
2. Redistributions in binary form must reproduce the above copyright notice, this list of conditions and the
following disclaimer in the documentation and/or other materials provided with the distribution.
3. All advertising materials mentioning features or use of this software must display the following
acknowledgement: This product includes software developed by the University of California, Berkeley and its
contributors.
4. Neither the name of the University nor the names of its contributors may be used to endorse or promote
products derived from this software without specific prior written permission.
THIS SOFTWARE IS PROVIDED BY THE REGENTS AND CONTRIBUTORS ``AS IS'' AND ANY EXPRESS OR IMPLIED
WARRANTIES, INCLUDING, BUT NOT LIMITED TO, THE IMPLIED WARRANTIES OF MERCHANTABILITY AND FITNESS
FOR A PARTICULAR PURPOSE ARE DISCLAIMED. IN NO EVENT SHALL THE REGENTS OR CONTRIBUTORS BE LIABLE
FOR ANY DIRECT, INDIRECT, INCIDENTAL, SPECIAL, EXEMPLARY, OR CONSEQUENTIAL DAMAGES (INCLUDING,
BUT NOT LIMITED TO, PROCUREMENT OF SUBSTITUTE GOODS OR SERVICES; LOSS OF USE, DATA, OR PROFITS;
OR BUSINESS INTERRUPTION) HOWEVER CAUSED AND ON ANY THEORY OF LIABILITY, WHETHER IN CONTRACT,
STRICT LIABILITY, OR TORT (INCLUDING NEGLIGENCE OR OTHERWISE) ARISING IN ANY WAY OUT OF THE USE OF
THIS SOFTWARE, EVEN IF ADVISED OF THE POSSIBILITY OF SUCH DAMAGE.
Copyright (c) 1995-1997 The Apache Group.
All rights reserved.
Redistribution and use in source and binary forms, with or without modification, are permitted provided that the
following conditions are met:
1. Redistributions of source code must retain the above copyright notice, this list of conditions and the
following disclaimer.
2. Redistributions in binary form must reproduce the above copyright notice, this list of conditions and the
following disclaimer in the documentation and/or other materials provided with the distribution.
3. All advertising materials mentioning features or use of this software must display the following
acknowledgment: "This product includes software developed by the Apache Group for use in the Apache
HTTP server project (http://www.apache.org/)."
4. The names "Apache Server" and "Apache Group" must not be used to endorse or promote products derived
from this software without prior written permission.
5. Redistributions of any form whatsoever must retain the following acknowledgment: "This product includes
software developed by the Apache Group for use in the Apache HTTP server project (http://www.apache.
org/)."
THIS SOFTWARE IS PROVIDED BY THE APACHE GROUP ``AS IS'' AND ANY EXPRESSED OR IMPLIED WARRANTIES,
INCLUDING, BUT NOT LIMITED TO, THE IMPLIED WARRANTIES OF MERCHANTABILITY AND FITNESS FOR A
PARTICULAR PURPOSE ARE DISCLAIMED. IN NO EVENT SHALL THE APACHE GROUP OR ITS CONTRIBUTORS BE
LIABLE FOR ANY DIRECT, INDIRECT, INCIDENTAL, SPECIAL, EXEMPLARY, OR CONSEQUENTIAL DAMAGES
(INCLUDING, BUT NOT LIMITED TO, PROCUREMENT OF SUBSTITUTE GOODS OR SERVICES; LOSS OF USE, DATA,
OR PROFITS; OR BUSINESS INTERRUPTION) HOWEVER CAUSED AND ON ANY THEORY OF LIABILITY, WHETHER IN
CONTRACT, STRICT LIABILITY, OR TORT (INCLUDING NEGLIGENCE OR OTHERWISE) ARISING IN ANY WAY OUT OF
THE USE OF THIS SOFTWARE, EVEN IF ADVISED OF THE POSSIBILITY OF SUCH DAMAGE.
This software consists of voluntary contributions made by many individuals on behalf of the Apache Group and was
originally based on public domain software written at the National Center for Supercomputing Applications,
University of Illinois, Urbana-Champaign. For more information on the Apache Group and the Apache HTTP server
project, please see <http://www.apache.org/>.
GNU GENERAL PUBLIC LICENSE
Version 2, June 1991 Copyright (c) 1989, 1991
Free Software Foundation, Inc.
59 Temple Place, Suite 330,
Boston, MA 02111-1307 USA
Everyone is permitted to copy and distribute verbatim copies of this license document, but changing it is not
allowed.
Preamble
The licenses for most software are designed to take away your freedom to share and change it. By contrast, the
GNU General Public License is intended to guarantee your freedom to share and change free software--to make
sure the software is free for all its users. This General Public License applies to most of the Free Software
Foundation's software and to any other program whose authors commit to using it. (Some other Free Software
Foundation software is covered by the GNU Library General Public License instead.) You can apply it to your
programs, too.
When we speak of free software, we are referring to freedom, not price. Our General Public Licenses are designed
to make sure that you have the freedom to distribute copies of free software (and charge for this service if you
wish), that you receive source code or can get it if you want it, that you can change the software or use pieces of it
in new free programs; and that you know you can do these things.
To protect your rights, we need to make restrictions that forbid anyone to deny you these rights or to ask you to
surrender the rights. These restrictions translate to certain responsibilities for you if you distribute copies of the
software, or if you modify it.
For example, if you distribute copies of such a program, whether gratis or for a fee, you must give the recipients all
the rights that you have. You must make sure that they, too, receive or can get the source code. And you must
show them these terms so they know their rights.
We protect your rights with two steps: (1) copyright the software, and (2) offer you this license which gives you
legal permission to copy, distribute and/or modify the software.
Also, for each author's protection and ours, we want to make certain that everyone understands that there is no
warranty for this free software. If the software is modified by someone else and passed on, we want its recipients to
know that what they have is not the original, so that any problems introduced by others will not reflect on the
original authors' reputations.
Finally, any free program is threatened constantly by software patents. We wish to avoid the danger that
redistributors of a free program will individually obtain patent licenses, in effect making the program proprietary. To
prevent this, we have made it clear that any patent must be licensed for everyone's free use or not licensed at all.
The precise terms and conditions for copying, distribution and modification follow.
GNU GENERAL PUBLIC LICENSE
TERMS AND CONDITIONS FOR COPYING, DISTRIBUTION AND MODIFICATION
0. This License applies to any program or other work which contains a notice placed by the copyright holder saying
it may be distributed under the terms of this General Public License. The "Program", below, refers to any such
program or work, and a "work based on the Program" means either the Program or any derivative work under
copyright law: that is to say, a work containing the Program or a portion of it, either verbatim or with modifications
and/or translated into another language. (Hereinafter, translation is included without limitation in the term
"modification".) Each licensee is addressed as "you".
Activities other than copying, distribution and modification are not covered by this License; they are outside its
scope. The act of running the Program is not restricted, and the output from the Program is covered only if its
contents constitute a work based on the Program (independent of having been made by running the Program).
Whether that is true depends on what the Program does.
1. You may copy and distribute verbatim copies of the Program's source code as you receive it, in any medium,
provided that you conspicuously and appropriately publish on each copy an appropriate copyright notice and
disclaimer of warranty; keep intact all the notices that refer to this License and to the absence of any warranty; and
give any other recipients of the Program a copy of this License along with the Program. You may charge a fee for
the physical act of transferring a copy, and you may at your option offer warranty protection in exchange for a fee.
2. You may modify your copy or copies of the Program or any portion of it, thus forming a work based on the
Program, and copy and distribute such modifications or work under the terms of Section 1 above, provided that you
also meet all of these conditions:
a) You must cause the modified files to carry prominent notices stating that you changed the files
and the date of any change.
b) You must cause any work that you distribute or publish, that in whole or in part contains or is
derived from the Program or any part thereof, to be licensed as a whole at no charge to all third
parties under the terms of this License.
c) If the modified program normally reads commands interactively when run, you must cause it,
when started running for such interactive use in the most ordinary way, to print or display an
announcement including an appropriate copyright notice and a notice that there is no warranty (or
else, saying that you provide a warranty) and that users may redistribute the program under these
conditions, and telling the user how to view a copy of this License. (Exception: if the Program itself
is interactive but does not normally print such an announcement, your work based on the Program
is not required to print an announcement.)
These requirements apply to the modified work as a whole. If identifiable sections of that work are not derived from
the Program, and can be reasonably considered independent and separate works in themselves, then this License,
and its terms, do not apply to those sections when you distribute them as separate works. But when you distribute
the same sections as part of a whole which is a work based on the Program, the distribution of the whole must be
on the terms of this License, whose permissions for other licensees extend to the entire whole, and thus to each
and every part regardless of who wrote it.
Thus, it is not the intent of this section to claim rights or contest your rights to work written entirely by you; rather,
the intent is to exercise the right to control the distribution of derivative or collective works based on the Program.
In addition, mere aggregation of another work not based on the Program with the Program (or with a work based
on the Program) on a volume of a storage or distribution medium does not bring the other work under the scope of
this License.
3. You may copy and distribute the Program (or a work based on it, under Section 2) in object code or executable
form under the terms of Sections 1 and 2 above provided that you also do one of the following:
a) Accompany it with the complete corresponding machine-readable source code, which must be
distributed under the terms of Sections 1 and 2 above on a medium customarily used for software
interchange; or,
b) Accompany it with a written offer, valid for at least three years, to give any third party, for a
charge no more than your cost of physically performing source distribution, a complete machine-
readable copy of the corresponding source code, to be distributed under the terms of Sections 1 and
2 above on a medium customarily used for software interchange; or,
c) Accompany it with the information you received as to the offer to distribute corresponding source
code. (This alternative is allowed only for noncommercial distribution and only if you received the
program in object code or executable form with such an offer, in accord with Subsection b above.)
The source code for a work means the preferred form of the work for making modifications to it. For an executable
work, complete source code means all the source code for all modules it contains, plus any associated interface
definition files, plus the scripts used to control compilation and installation of the executable. However, as a special
exception, the source code distributed need not include anything that is normally distributed (in either source or
binary form) with the major components (compiler, kernel, and so on) of the operating system on which the
executable runs, unless that component itself accompanies the executable.
If distribution of executable or object code is made by offering access to copy from a designated place, then offering
equivalent access to copy the source code from the same place counts as distribution of the source code, even
though third parties are not compelled to copy the source along with the object code.
4. You may not copy, modify, sublicense, or distribute the Program except as expressly provided under this License.
Any attempt otherwise to copy, modify, sublicense or distribute the Program is void, and will automatically
terminate your rights under this License. However, parties who have received copies, or rights, from you under this
License will not have their licenses terminated so long as such parties remain in full compliance.
5. You are not required to accept this License, since you have not signed it. However, nothing else grants you
permission to modify or distribute the Program or its derivative works. These actions are prohibited by law if you do
not accept this License. Therefore, by modifying or distributing the Program (or any work based on the Program),
you indicate your acceptance of this License to do so, and all its terms and conditions for copying, distributing or
modifying the Program or works based on it.
6. Each time you redistribute the Program (or any work based on the Program), the recipient automatically receives
a license from the original licensor to copy, distribute or modify the Program subject to these terms and conditions.
You may not impose any further restrictions on the recipients' exercise of the rights granted herein. You are not
responsible for enforcing compliance by third parties to this License.
7. If, as a consequence of a court judgment or allegation of patent infringement or for any other reason (not limited
to patent issues), conditions are imposed on you (whether by court order, agreement or otherwise) that contradict
the conditions of this License, they do not excuse you from the conditions of this License. If you cannot distribute so
as to satisfy simultaneously your obligations under this License and any other pertinent obligations, then as a
consequence you may not distribute the Program at all. For example, if a patent license would not permit royalty-
free redistribution of the Program by all those who receive copies directly or indirectly through you, then the only
way you could satisfy both it and this License would be to refrain entirely from distribution of the Program.
If any portion of this section is held invalid or unenforceable under any particular circumstance, the balance of the
section is intended to apply and the section as a whole is intended to apply in other circumstances.
It is not the purpose of this section to induce you to infringe any patents or other property right claims or to contest
validity of any such claims; this section has the sole purpose of protecting the integrity of the free software
distribution system, which is implemented by public license practices. Many people have made generous
contributions to the wide range of software distributed through that system in reliance on consistent application of
that system; it is up to the author/donor to decide if he or she is willing to distribute software through any other
system and a licensee cannot impose that choice.
This section is intended to make thoroughly clear what is believed to be a consequence of the rest of this License.
8. If the distribution and/or use of the Program is restricted in certain countries either by patents or by copyrighted
interfaces, the original copyright holder who places the Program under this License may add an explicit geographical
distribution limitation excluding those countries, so that distribution is permitted only in or among countries not
thus excluded. In such case, this License incorporates the limitation as if written in the body of this License.
9. The Free Software Foundation may publish revised and/or new versions of the General Public License from time
to time. Such new versions will be similar in spirit to the present version, but may differ in detail to address new
problems or concerns.
Each version is given a distinguishing version number. If the Program specifies a version number of this License
which applies to it and "any later version", you have the option of following the terms and conditions either of that
version or of any later version published by the Free Software Foundation. If the Program does not specify a version
number of this License, you may choose any version ever published by the Free Software Foundation.
10. If you wish to incorporate parts of the Program into other free programs whose distribution conditions are
different, write to the author to ask for permission. For software which is copyrighted by the Free Software
Foundation, write to the Free Software Foundation; we sometimes make exceptions for this. Our decision will be
guided by the two goals of preserving the free status of all derivatives of our free software and of promoting the
sharing and reuse of software generally.
NO WARRANTY
11. BECAUSE THE PROGRAM IS LICENSED FREE OF CHARGE, THERE IS NO WARRANTY FOR THE PROGRAM, TO THE
EXTENT PERMITTED BY APPLICABLE LAW. EXCEPT WHEN OTHERWISE STATED IN WRITING THE COPYRIGHT
HOLDERS AND/OR OTHER PARTIES PROVIDE THE PROGRAM "AS IS" WITHOUT WARRANTY OF ANY KIND, EITHER
EXPRESSED OR IMPLIED, INCLUDING, BUT NOT LIMITED TO, THE IMPLIED WARRANTIES OF MERCHANTABILITY
AND FITNESS FOR A PARTICULAR PURPOSE. THE ENTIRE RISK AS TO THE QUALITY AND PERFORMANCE OF THE
PROGRAM IS WITH YOU. SHOULD THE PROGRAM PROVE DEFECTIVE, YOU ASSUME THE COST OF ALL NECESSARY
SERVICING, REPAIR OR CORRECTION.
12. IN NO EVENT UNLESS REQUIRED BY APPLICABLE LAW OR AGREED TO IN WRITING WILL ANY COPYRIGHT
HOLDER, OR ANY OTHER PARTY WHO MAY MODIFY AND/OR REDISTRIBUTE THE PROGRAM AS PERMITTED ABOVE,
BE LIABLE TO YOU FOR DAMAGES, INCLUDING ANY GENERAL, SPECIAL, INCIDENTAL OR CONSEQUENTIAL
DAMAGES ARISING OUT OF THE USE OR INABILITY TO USE THE PROGRAM (INCLUDING BUT NOT LIMITED TO
LOSS OF DATA OR DATA BEING RENDERED INACCURATE OR LOSSES SUSTAINED BY YOU OR THIRD PARTIES OR A
FAILURE OF THE PROGRAM TO OPERATE WITH ANY OTHER PROGRAMS), EVEN IF SUCH HOLDER OR OTHER PARTY
HAS BEEN ADVISED OF THE POSSIBILITY OF SUCH DAMAGES.
END OF TERMS AND CONDITIONS
How to Apply These Terms to Your New Programs
If you develop a new program, and you want it to be of the greatest possible use to the public, the best way to
achieve this is to make it free software which everyone can redistribute and change under these terms.
To do so, attach the following notices to the program. It is safest to attach them to the start of each source file to
most effectively convey the exclusion of warranty; and each file should have at least the "copyright" line and a
pointer to where the full notice is found.
<one line to give the program's name and a brief idea of what it does.>
Copyright (C) 19yy <name of author>
This program is free software; you can redistribute it and/or modify it under the terms of the GNU
General Public License as published by the Free Software Foundation; either version 2 of the
License, or (at your option) any later version.
This program is distributed in the hope that it will be useful, but WITHOUT ANY WARRANTY; without
even the implied warranty of MERCHANTABILITY or FITNESS FOR A PARTICULAR PURPOSE. See the
GNU General Public License for more details.
You should have received a copy of the GNU General Public License along with this program; if not,
write to the Free Software Foundation, Inc., 59 Temple Place, Suite 330, Boston, MA 02111-1307
USA
Also add information on how to contact you by electronic and paper mail.
If the program is interactive, make it output a short notice like this when it starts in an interactive mode:
Gnomovision version 69, Copyright (C) 19yy name of author
Gnomovision comes with ABSOLUTELY NO WARRANTY; for details type `show w'.
This is free software, and you are welcome to redistribute it under certain conditions; type `show c'
for details.
The hypothetical commands `show w' and `show c' should show the appropriate parts of the General Public
License. Of course, the commands you use may be called something other than `show w' and `show c'; they could
even be mouse-clicks or menu items--whatever suits your program.
You should also get your employer (if you work as a programmer) or your school, if any, to sign a "copyright
disclaimer" for the program, if necessary. Here is a sample; alter the names:
Yoyodyne, Inc., hereby disclaims all copyright interest in the program
`Gnomovision' (which makes passes at compilers) written by James Hacker.
<signature of Ty Coon>, 1 April 1989
Ty Coon, President of Vice
This General Public License does not permit incorporating your program into proprietary programs. If your program
is a subroutine library, you may consider it more useful to permit linking proprietary applications with the library. If
this is what you want to do, use the GNU Library General Public License instead of this License.
GNU LIBRARY GENERAL PUBLIC LICENSE
Version 2, June 1991 Copyright (C) 1991
Free Software Foundation, Inc.
59 Temple Place, Suite 330,
Boston, MA 02111-1307 USA
Everyone is permitted to copy and distribute verbatim copies of this license document, but changing it is not
allowed. [This is the first released version of the library GPL. It is numbered 2 because it goes with version 2 of the
ordinary GPL.]
Preamble
The licenses for most software are designed to take away your freedom to share and change it. By contrast, the
GNU General Public Licenses are intended to guarantee your freedom to share and change free software--to make
sure the software is free for all its users.
This license, the Library General Public License, applies to some specially designated Free Software Foundation
software, and to any other libraries whose authors decide to use it. You can use it for your libraries, too.
When we speak of free software, we are referring to freedom, not price. Our General Public Licenses are designed
to make sure that you have the freedom to distribute copies of free software (and charge for this service if you
wish), that you receive source code or can get it if you want it, that you can change the software or use pieces of it
in new free programs; and that you know you can do these things.
To protect your rights, we need to make restrictions that forbid anyone to deny you these rights or to ask you to
surrender the rights. These restrictions translate to certain responsibilities for you if you distribute copies of the
library, or if you modify it.
For example, if you distribute copies of the library, whether gratis or for a fee, you must give the recipients all the
rights that we gave you. You must make sure that they, too, receive or can get the source code. If you link a
program with the library, you must provide complete object files to the recipients so that they can relink them with
the library, after making changes to the library and recompiling it. And you must show them these terms so they
know their rights.
Our method of protecting your rights has two steps: (1) copyright the library, and (2) offer you this license which
gives you legal permission to copy, distribute and/or modify the library.
Also, for each distributor's protection, we want to make certain that everyone understands that there is no warranty
for this free library. If the library is modified by someone else and passed on, we want its recipients to know that
what they have is not the original version, so that any problems introduced by others will not reflect on the original
authors' reputations.
Finally, any free program is threatened constantly by software patents. We wish to avoid the danger that companies
distributing free software will individually obtain patent licenses, thus in effect transforming the program into
proprietary software. To prevent this, we have made it clear that any patent must be licensed for everyone's free
use or not licensed at all.
Most GNU software, including some libraries, is covered by the ordinary GNU General Public License, which was
designed for utility programs. This license, the GNU Library General Public License, applies to certain designated
libraries. This license is quite different from the ordinary one; be sure to read it in full, and don't assume that
anything in it is the same as in the ordinary license.
The reason we have a separate public license for some libraries is that they blur the distinction we usually make
between modifying or adding to a program and simply using it. Linking a program with a library, without changing
the library, is in some sense simply using the library, and is analogous to running a utility program or application
program. However, in a textual and legal sense, the linked executable is a combined work, a derivative of the
original library, and the ordinary General Public License treats it as such.
Because of this blurred distinction, using the ordinary General Public License for libraries did not effectively promote
software sharing, because most developers did not use the libraries. We concluded that weaker conditions might
promote sharing better.
However, unrestricted linking of non-free programs would deprive the users of those programs of all benefit from
the free status of the libraries themselves. This Library General Public License is intended to permit developers of
non-free programs to use free libraries, while preserving your freedom as a user of such programs to change the
free libraries that are incorporated in them. (We have not seen how to achieve this as regards changes in header
files, but we have achieved it as regards changes in the actual functions of the Library.) The hope is that this will
lead to faster development of free libraries.
The precise terms and conditions for copying, distribution and modification follow. Pay close attention to the
difference between a "work based on the library" and a "work that uses the library". The former contains code
derived from the library, while the latter only works together with the library.
Note that it is possible for a library to be covered by the ordinary General Public License rather than by this special
one.
GNU LIBRARY GENERAL PUBLIC LICENSE
TERMS AND CONDITIONS FOR COPYING, DISTRIBUTION AND MODIFICATION
0. This License Agreement applies to any software library which contains a notice placed by the copyright holder or
other authorized party saying it may be distributed under the terms of this Library General Public License (also
called "this License"). Each licensee is addressed as "you".
A "library" means a collection of software functions and/or data prepared so as to be conveniently linked with
application programs (which use some of those functions and data) to form executables.
The "Library", below, refers to any such software library or work which has been distributed under these terms. A
"work based on the Library" means either the Library or any derivative work under copyright law: that is to say, a
work containing the Library or a portion of it, either verbatim or with modifications and/or translated
straightforwardly into another language. (Hereinafter, translation is included without limitation in the term
"modification".)
"Source code" for a work means the preferred form of the work for making modifications to it. For a library,
complete source code means all the source code for all modules it contains, plus any associated interface definition
files, plus the scripts used to control compilation and installation of the library.
Activities other than copying, distribution and modification are not covered by this License; they are outside its
scope. The act of running a program using the Library is not restricted, and output from such a program is covered
only if its contents constitute a work based on the Library (independent of the use of the Library in a tool for writing
it). Whether that is true depends on what the Library does and what the program that uses the Library does.
1. You may copy and distribute verbatim copies of the Library's complete source code as you receive it, in any
medium, provided that you conspicuously and appropriately publish on each copy an appropriate copyright notice
and disclaimer of warranty; keep intact all the notices that refer to this License and to the absence of any warranty;
and distribute a copy of this License along with the Library.
You may charge a fee for the physical act of transferring a copy, and you may at your option offer warranty
protection in exchange for a fee.
2. You may modify your copy or copies of the Library or any portion of it, thus forming a work based on the Library,
and copy and distribute such modifications or work under the terms of Section 1 above, provided that you also
meet all of these conditions:
a) The modified work must itself be a software library.
b) You must cause the files modified to carry prominent notices stating that you changed the files
and the date of any change.
c) You must cause the whole of the work to be licensed at no charge to all third parties under the
terms of this License.
d) If a facility in the modified Library refers to a function or a table of data to be supplied by an
application program that uses the facility, other than as an argument passed when the facility is
invoked, then you must make a good faith effort to ensure that, in the event an application does not
supply such function or table, the facility still operates, and performs whatever part of its purpose
remains meaningful.
(For example, a function in a library to compute square roots has a purpose that is entirely well-
defined independent of the application. Therefore, Subsection 2d requires that any application-
supplied function or table used by this function must be optional: if the application does not supply
it, the square root function must still compute square roots.)
These requirements apply to the modified work as a whole. If identifiable sections of that work are not derived from
the Library, and can be reasonably considered independent and separate works in themselves, then this License,
and its terms, do not apply to those sections when you distribute them as separate works. But when you distribute
the same sections as part of a whole which is a work based on the Library, the distribution of the whole must be on
the terms of this License, whose permissions for other licensees extend to the entire whole, and thus to each and
every part regardless of who wrote it.
Thus, it is not the intent of this section to claim rights or contest your rights to work written entirely by you; rather,
the intent is to exercise the right to control the distribution of derivative or collective works based on the Library.
In addition, mere aggregation of another work not based on the Library with the Library (or with a work based on
the Library) on a volume of a storage or distribution medium does not bring the other work under the scope of this
License.
3. You may opt to apply the terms of the ordinary GNU General Public License instead of this License to a given
copy of the Library. To do this, you must alter all the notices that refer to this License, so that they refer to the
ordinary GNU General Public License, version 2, instead of to this License. (If a newer version than version 2 of the
ordinary GNU General Public License has appeared, then you can specify that version instead if you wish.) Do not
make any other change in these notices.
Once this change is made in a given copy, it is irreversible for that copy, so the ordinary GNU General Public License
applies to all subsequent copies and derivative works made from that copy.
This option is useful when you wish to copy part of the code of the Library into a program that is not a library.
4. You may copy and distribute the Library (or a portion or derivative of it, under Section 2) in object code or
executable form under the terms of Sections 1 and 2 above provided that you accompany it with the complete
corresponding machine-readable source code, which must be distributed under the terms of Sections 1 and 2 above
on a medium customarily used for software interchange.
If distribution of object code is made by offering access to copy from a designated place, then offering equivalent
access to copy the source code from the same place satisfies the requirement to distribute the source code, even
though third parties are not compelled to copy the source along with the object code.
5. A program that contains no derivative of any portion of the Library, but is designed to work with the Library by
being compiled or linked with it, is called a "work that uses the Library". Such a work, in isolation, is not a
derivative work of the Library, and therefore falls outside the scope of this License.
However, linking a "work that uses the Library" with the Library creates an executable that is a derivative of the
Library (because it contains portions of the Library), rather than a "work that uses the library". The executable is
therefore covered by this License. Section 6 states terms for distribution of such executables.
When a "work that uses the Library" uses material from a header file that is part of the Library, the object code for
the work may be a derivative work of the Library even though the source code is not. Whether this is true is
especially significant if the work can be linked without the Library, or if the work is itself a library. The threshold for
this to be true is not precisely defined by law.
If such an object file uses only numerical parameters, data structure layouts and accessors, and small macros and
small inline functions (ten lines or less in length), then the use of the object file is unrestricted, regardless of
whether it is legally a derivative work. (Executables containing this object code plus portions of the Library will still
fall under Section 6.)
Otherwise, if the work is a derivative of the Library, you may distribute the object code for the work under the
terms of Section 6. Any executables containing that work also fall under Section 6, whether or not they are linked
directly with the Library itself.
6. As an exception to the Sections above, you may also compile or link a "work that uses the Library" with the
Library to produce a work containing portions of the Library, and distribute that work under terms of your choice,
provided that the terms permit modification of the work for the customer's own use and reverse engineering for
debugging such modifications.
You must give prominent notice with each copy of the work that the Library is used in it and that the Library and its
use are covered by this License. You must supply a copy of this License. If the work during execution displays
copyright notices, you must include the copyright notice for the Library among them, as well as a reference
directing the user to the copy of this License. Also, you must do one of these things:
a) Accompany the work with the complete corresponding machine-readable source code for the
Library including whatever changes were used in the work (which must be distributed under
Sections 1 and 2 above); and, if the work is an executable linked with the Library, with the
complete machine-readable "work that uses the Library", as object code and/or source code, so that
the user can modify the Library and then relink to produce a modified executable containing the
modified Library. (It is understood that the user who changes the contents of definitions files in the
Library will not necessarily be able to recompile the application to use the modified definitions.)
b) Accompany the work with a written offer, valid for at least three years, to give the same user the
materials specified in Subsection 6a, above, for a charge no more than the cost of performing this
distribution.
c) If distribution of the work is made by offering access to copy from a designated place, offer
equivalent access to copy the above specified materials from the same place.
d) Verify that the user has already received a copy of these materials or that you have already sent
this user a copy.
For an executable, the required form of the "work that uses the Library" must include any data and utility programs
needed for eproducing the executable from it. However, as a special exception, the source code distributed need
not include anything that is normally distributed (in either source or binary form) with the major components
(compiler, kernel, and so on) of the operating system on which the executable runs, unless that component itself
accompanies the executable.
It may happen that this requirement contradicts the license restrictions of other proprietary libraries that do not
normally accompany the operating system. Such a contradiction means you cannot use both them and the Library
together in an executable that you distribute.
7. You may place library facilities that are a work based on the Library side-by-side in a single library together with
other library facilities not covered by this License, and distribute such a combined library, provided that the
separate distribution of the work based on the Library and of the other library facilities is otherwise permitted, and
provided that you do these two things:
a) Accompany the combined library with a copy of the same work based on the Library, uncombined
with any other library facilities. This must be distributed under the terms of the Sections above.
b) Give prominent notice with the combined library of the fact that part of it is a work based on the
Library, and explaining where to find the accompanying uncombined form of the same work.
8. You may not copy, modify, sublicense, link with, or distribute the Library except as expressly provided under this
License. Any attempt otherwise to copy, modify, sublicense, link with, or distribute the Library is void, and will
automatically terminate your rights under this License. However, parties who have received copies, or rights, from
you under this License will not have their licenses terminated so long as such parties remain in full compliance.
9. You are not required to accept this License, since you have not signed it. However, nothing else grants you
permission to modify or distribute the Library or its derivative works. These actions are prohibited by law if you do
not accept this License. Therefore, by modifying or distributing the Library (or any work based on the Library), you
indicate your acceptance of this License to do so, and all its terms and conditions for copying, distributing or
modifying the Library or works based on it.
10. Each time you redistribute the Library (or any work based on the Library), the recipient automatically receives a
license from the original licensor to copy, distribute, link with or modify the Library subject to these terms and
conditions. You may not impose any further restrictions on the recipients' exercise of the rights granted herein. You
are not responsible for enforcing compliance by third parties to this License.
11. If, as a consequence of a court judgment or allegation of patent infringement or for any other reason (not
limited to patent issues), conditions are imposed on you (whether by court order, agreement or otherwise) that
contradict the conditions of this License, they do not excuse you from the conditions of this License. If you cannot
distribute so as to satisfy simultaneously your obligations under this License and any other pertinent obligations,
then as a consequence you may not distribute the Library at all. For example, if a patent license would not permit
royalty-free redistribution of the Library by all those who receive copies directly or indirectly through you, then the
only way you could satisfy both it and this License would be to refrain entirely from distribution of the Library.
If any portion of this section is held invalid or unenforceable under any particular circumstance, the balance of the
section is intended to apply, and the section as a whole is intended to apply in other circumstances.
It is not the purpose of this section to induce you to infringe any patents or other property right claims or to contest
validity of any such claims; this section has the sole purpose of protecting the integrity of the free software
distribution system which is implemented by public license practices. Many people have made generous
contributions to the wide range of software distributed through that system in reliance on consistent application of
that system; it is up to the author/donor to decide if he or she is willing to distribute software through any other
system and a licensee cannot impose that choice.
This section is intended to make thoroughly clear what is believed to be a consequence of the rest of this License.
12. If the distribution and/or use of the Library is restricted in certain countries either by patents or by copyrighted
interfaces, the original copyright holder who places the Library under this License may add an explicit geographical
distribution limitation excluding those countries, so that distribution is permitted only in or among countries not
thus excluded. In such case, this License incorporates the limitation as if written in the body of this License.
13. The Free Software Foundation may publish revised and/or new versions of the Library General Public License
from time to time. Such new versions will be similar in spirit to the present version, but may differ in detail to
address new problems or concerns.
Each version is given a distinguishing version number. If the Library specifies a version number of this License
which applies to it and "any later version", you have the option of following the terms and conditions either of that
version or of any later version published by the Free Software Foundation. If the Library does not specify a license
version number, you may choose any version ever published by the Free Software Foundation.
14. If you wish to incorporate parts of the Library into other free programs whose distribution conditions are
incompatible with these, write to the author to ask for permission. For software which is copyrighted by the Free
Software Foundation, write to the Free Software Foundation; we sometimes make exceptions for this. Our decision
will be guided by the two goals of preserving the free status of all derivatives of our free software and of promoting
the sharing and reuse of software generally.
NO WARRANTY
15. BECAUSE THE LIBRARY IS LICENSED FREE OF CHARGE, THERE IS NO WARRANTY FOR THE LIBRARY, TO THE
EXTENT PERMITTED BY APPLICABLE LAW. EXCEPT WHEN OTHERWISE STATED IN WRITING THE COPYRIGHT
HOLDERS AND/OR OTHER PARTIES PROVIDE THE LIBRARY "AS IS" WITHOUT WARRANTY OF ANY KIND, EITHER
EXPRESSED OR IMPLIED, INCLUDING, BUT NOT LIMITED TO, THE IMPLIED WARRANTIES OF MERCHANTABILITY
AND FITNESS FOR A PARTICULAR PURPOSE. THE ENTIRE RISK AS TO THE QUALITY AND PERFORMANCE OF THE
LIBRARY IS WITH YOU. SHOULD THE LIBRARY PROVE DEFECTIVE, YOU ASSUME THE COST OF ALL NECESSARY
SERVICING, REPAIR OR CORRECTION.
16. IN NO EVENT UNLESS REQUIRED BY APPLICABLE LAW OR AGREED TO IN WRITING WILL ANY COPYRIGHT
HOLDER, OR ANY OTHER PARTY WHO MAY MODIFY AND/OR REDISTRIBUTE THE LIBRARY AS PERMITTED ABOVE,
BE LIABLE TO YOU FOR DAMAGES, INCLUDING ANY GENERAL, SPECIAL, INCIDENTAL OR CONSEQUENTIAL
DAMAGES ARISING OUT OF THE USE OR INABILITY TO USE THE LIBRARY (INCLUDING BUT NOT LIMITED TO LOSS
OF DATA OR DATA BEING RENDERED INACCURATE OR LOSSES SUSTAINED BY YOU OR THIRD PARTIES OR A
FAILURE OF THE LIBRARY TO OPERATE WITH ANY OTHER SOFTWARE), EVEN IF SUCH HOLDER OR OTHER PARTY
HAS BEEN ADVISED OF THE POSSIBILITY OF SUCH DAMAGES.
END OF TERMS AND CONDITIONS
How to Apply These Terms to Your New Libraries
If you develop a new library, and you want it to be of the greatest possible use to the public, we recommend
making it free software that everyone can redistribute and change. You can do so by permitting redistribution under
these terms (or, alternatively, under the terms of the ordinary General Public License).
To apply these terms, attach the following notices to the library. It is safest to attach them to the start of each
source file to most effectively convey the exclusion of warranty; and each file should have at least the "copyright"
line and a pointer to where the full notice is found.
<one line to give the library's name and a brief idea of what it does.>
Copyright (C) <year> <name of author>
This library is free software; you can redistribute it and/or modify it under the terms of the GNU
Library General Public License as published by the Free Software Foundation; either version 2 of the
License, or (at your option) any later version.
This library is distributed in the hope that it will be useful, but WITHOUT ANY WARRANTY; without
even the implied warranty of MERCHANTABILITY or FITNESS FOR A PARTICULAR PURPOSE. See the
GNU Library General Public License for more details.
You should have received a copy of the GNU Library General Public License along with this library; if
not, write to the Free Foundation, Inc., 59 Temple Place, Suite 330, Boston, MA 02111-1307 USA
Also add information on how to contact you by electronic and paper mail.
You should also get your employer (if you work as a programmer) or your school, if any, to sign a "copyright
disclaimer" for the library, if necessary. Here is a sample; alter the names:
Yoyodyne, Inc., hereby disclaims all copyright interest in the library `Frob' (a library for tweaking
knobs) written by James Random Hacker.
<signature of Ty Coon>, 1 April 1990
Ty Coon, President of Vice
That's all there is to it!
====================================================================
Copyright (c) 2000 Gregory Trubetskoy. All rights reserved.
Redistribution and use in source and binary forms, with or without modification, are permitted provided that the
following conditions are met:
1. Redistributions of source code must retain the above copyright notice, this list of conditions and the following
disclaimer.
2. Redistributions in binary form must reproduce the above copyright notice, this list of conditions and the following
disclaimer in the documentation and/or other materials provided with the distribution.
3. The end-user documentation included with the redistribution, if any, must include the following acknowledgment:
"This product includes software developed by Gregory Trubetskoy." Alternately, this acknowledgment may appear in
the software itself, if and wherever such third-party acknowledgments normally appear.
4. The names "mod_python", "modpython" or "Gregory Trubetskoy" must not be used to endorse or promote
products derived from this software without prior written permission. For written permission, please contact
grisha@modpython.org.
5. Products derived from this software may not be called "mod_python" or "modpython", nor may "mod_python" or
"modpython" appear in their names without prior written permission of Gregory Trubetskoy.
THIS SOFTWARE IS PROVIDED BY GREGORY TRUBETSKOY ``AS IS'' AND ANY EXPRESSED OR IMPLIED
WARRANTIES, INCLUDING, BUT NOT LIMITED TO, THE IMPLIED WARRANTIES OF MERCHANTABILITY AND FITNESS
FOR A PARTICULAR PURPOSE ARE DISCLAIMED. IN NO EVENT SHALL GREGORY TRUBETSKOY OR HIS
CONTRIBUTORS BE LIABLE FOR ANY DIRECT, INDIRECT, INCIDENTAL, SPECIAL, EXEMPLARY, OR CONSEQUENTIAL
DAMAGES (INCLUDING, BUT NOT LIMITED TO, PROCUREMENT OF SUBSTITUTE GOODS OR SERVICES; LOSS OF
USE, DATA, OR PROFITS; OR BUSINESS INTERRUPTION) HOWEVER CAUSED AND ON ANY THEORY OF LIABILITY,
WHETHER IN CONTRACT, STRICT LIABILITY, OR TORT (INCLUDING NEGLIGENCE OR OTHERWISE) ARISING IN ANY
WAY OUT OF THE USE OF THIS SOFTWARE, EVEN IF ADVISED OF THE POSSIBILITY OF SUCH DAMAGE.
====================================================================
This software is based on the original concept as published in the book "Internet Programming with Python" by
Aaron Watters, Guido van Rossum and James C. Ahlstrom, 1996 M&T Books, ISBN: 1-55851-484-8. The book and
original software is Copyright 1996 by M&T Books.
This software consists of an extension to the Apache http server.
More information about Apache may be found at http://www.apache.org/
More information on Python language can be found at http://www.python.org/
The mod_ssl package falls under the Open-Source Software label because it's distributed under a BSD-style license.
The detailed license information follows.
====================================================================
Copyright (c) 1998-2001 Ralf S. Engelschall. All rights reserved.
Redistribution and use in source and binary forms, with or without modification, are permitted provided that the
following conditions are met:
1. Redistributions of source code must retain the above copyright notice, this list of conditions and the following
disclaimer.
2. Redistributions in binary form must reproduce the above copyright notice, this list of conditions and the following
disclaimer in the documentation and/or other materials provided with the distribution.
3. All advertising materials mentioning features or use of this software must display the following acknowledgment:
"This product includes software developed by Ralf S. Engelschall <rse@engelschall.com> for use in the mod_ssl
project (http://www.modssl.org/)."
4. The names "mod_ssl" must not be used to endorse or promote products derived from this software without prior
written permission. For written permission, please contact rse@engelschall.com.
5. Products derived from this software may not be called "mod_ssl" nor may "mod_ssl" appear in their names
without prior written permission of Ralf S. Engelschall.
6. Redistributions of any form whatsoever must retain the following acknowledgment: "This product includes
software developed by Ralf S. Engelschall <rse@engelschall.com> for use in the mod_ssl project (http://www.
modssl.org/)."
THIS SOFTWARE IS PROVIDED BY RALF S. ENGELSCHALL ``AS IS'' AND ANY EXPRESSED OR IMPLIED
WARRANTIES, INCLUDING, BUT NOT LIMITED TO, THE IMPLIED WARRANTIES OF MERCHANTABILITY AND FITNESS
FOR A PARTICULAR PURPOSE ARE DISCLAIMED. IN NO EVENT SHALL RALF S. ENGELSCHALL OR HIS
CONTRIBUTORS BE LIABLE FOR ANY DIRECT, INDIRECT, INCIDENTAL, SPECIAL, EXEMPLARY, OR CONSEQUENTIAL
DAMAGES (INCLUDING, BUT NOT LIMITED TO, PROCUREMENT OF SUBSTITUTE GOODS OR SERVICES; LOSS OF
USE, DATA, OR PROFITS; OR BUSINESS INTERRUPTION) HOWEVER CAUSED AND ON ANY THEORY OF LIABILITY,
WHETHER IN CONTRACT, STRICT LIABILITY, OR TORT (INCLUDING NEGLIGENCE OR OTHERWISE) ARISING IN ANY
WAY OUT OF THE USE OF THIS SOFTWARE, EVEN IF ADVISED OF THE POSSIBILITY OF SUCH DAMAGE.
====================================================================
The OpenLDAP Public License
Version 2.5, 11 May 2001
Redistribution and use of this software and associated documentation
("Software"), with or without modification, are permitted provided
that the following conditions are met:
1. Redistributions of source code must retain copyright statements and notices.
2. Redistributions in binary form must reproduce applicable copyright statements and notices, this list of conditions,
and the following disclaimer in the documentation and/or other materials provided with the distribution.
3. Redistributions must contain a verbatim copy of this document.
4. The names and trademarks of the authors and copyright holders must not be used in advertising or otherwise to
promote the sale, use or other dealing in this Software without specific, written prior permission.
5. Due credit should be given to the authors of the Software.
6. The OpenLDAP Foundation may revise this license from time to time. Each revision is distinguished by a version
number. You may use the Software under terms of this license revision or under the terms of any subsequent
revision of the license.
THIS SOFTWARE IS PROVIDED BY THE OPENLDAP FOUNDATION AND CONTRIBUTORS ``AS IS'' AND ANY
EXPRESSED OR IMPLIED WARRANTIES, INCLUDING, BUT NOT LIMITED TO, THE IMPLIED WARRANTIES OF
MERCHANTABILITY AND FITNESS FOR A PARTICULAR PURPOSE ARE DISCLAIMED. IN NO EVENT SHALL THE
OPENLDAP FOUNDATION, ITS CONTRIBUTORS, OR THE AUTHOR(S) OR OWNER(S) OF THE SOFTWARE BE LIABLE
FOR ANY DIRECT, INDIRECT, INCIDENTAL, SPECIAL, EXEMPLARY, OR CONSEQUENTIAL DAMAGES (INCLUDING,
BUT NOT LIMITED TO, PROCUREMENT OF SUBSTITUTE GOODS OR SERVICES; LOSS OF USE, DATA, OR PROFITS;
OR BUSINESS INTERRUPTION) HOWEVER CAUSED AND ON ANY THEORY OF LIABILITY, WHETHER IN CONTRACT,
STRICT LIABILITY, OR TORT (INCLUDING NEGLIGENCE OR OTHERWISE) ARISING IN ANY WAY OUT OF THE USE OF
THIS SOFTWARE, EVEN IF ADVISED OF THE POSSIBILITY OF SUCH DAMAGE.
OpenLDAP is a trademark of the OpenLDAP Foundation.
Copyright 1999-2001 The OpenLDAP Foundation, Redwood City,
California, USA. All Rights Reserved. Permission to copy and
distributed verbatim copies of this document is granted.
Copyright 1999-2001 John Coffman.
All rights reserved.
License
=======
Redistribution and use in source and binary forms, with or without modification, are permitted provided that the
following conditions are met:
Redistributions of source code must retain the above copyright notice, this list of conditions and the following
disclaimer.
Redistributions in binary form must reproduce the above copyright notice, this list of conditions and the following
disclaimer in the documentation and/or other materials provided with the distribution.
Neither the names of the author(s) nor the names of other contributors may be used to endorse or promote
products derived from this software without specific prior written permission.
Disclaimer
THIS SOFTWARE IS PROVIDED BY THE COPYRIGHT HOLDERS AND CONTRIBUTORS "AS IS" AND ANY EXPRESS OR
IMPLIED WARRANTIES, INCLUDING, BUT NOT LIMITED TO, THE IMPLIED WARRANTIES OF MERCHANTABILITY AND
FITNESS FOR A PARTICULAR PURPOSE ARE DISCLAIMED. IN NO EVENT SHALL THE AUTHORS OR CONTRIBUTORS
BE LIABLE FOR ANY DIRECT, INDIRECT, INCIDENTAL, SPECIAL, EXEMPLARY, OR CONSEQUENTIAL DAMAGES
(INCLUDING, BUT NOT LIMITED TO, PROCUREMENT OF SUBSTITUTE GOODS OR SERVICES; LOSS OF USE, DATA,
OR PROFITS; OR BUSINESS INTERRUPTION) HOWEVER CAUSED AND ON ANY THEORY OF LIABILITY, WHETHER IN
CONTRACT, STRICT LIABILITY, OR TORT (INCLUDING NEGLIGENCE OR OTHERWISE) ARISING IN ANY WAY OUT OF
THE USE OF THIS SOFTWARE, EVEN IF ADVISED OF THE POSSIBILITY OF SUCH DAMAGE.
(Note: The above license is copied from the BSD license at:
http://www.opensource.org/licenses/bsd-license.html, substituting the appropriate references in the template.)
(end)
This program, "bzip2" and associated library "libbzip2", are copyright (C) 1996-2000 Julian R Seward. All rights
reserved.
Redistribution and use in source and binary forms, with or without modification, are permitted provided that the
following conditions are met:
1. Redistributions of source code must retain the above copyright notice, this list of conditions and the following
disclaimer.
2. The origin of this software must not be misrepresented; you must not claim that you wrote the original software.
If you use this software in a product, an acknowledgment in the product documentation would be appreciated but is
not required.
3. Altered source versions must be plainly marked as such, and must not be misrepresented as being the original
software.
4. The name of the author may not be used to endorse or promote products derived from this software without
specific prior written permission.
THIS SOFTWARE IS PROVIDED BY THE AUTHOR ``AS IS'' AND ANY EXPRESS OR IMPLIED WARRANTIES,
INCLUDING, BUT NOT LIMITED TO, THE IMPLIED WARRANTIES OF MERCHANTABILITY AND FITNESS FOR A
PARTICULAR PURPOSE ARE DISCLAIMED. IN NO EVENT SHALL THE AUTHOR BE LIABLE FOR ANY DIRECT,
INDIRECT, INCIDENTAL, SPECIAL, EXEMPLARY, OR CONSEQUENTIAL DAMAGES (INCLUDING, BUT NOT LIMITED
TO, PROCUREMENT OF SUBSTITUTE GOODS OR SERVICES; LOSS OF USE, DATA, OR PROFITS; OR BUSINESS
INTERRUPTION) HOWEVER CAUSED AND ON ANY THEORY OF LIABILITY, WHETHER IN CONTRACT, STRICT
LIABILITY, OR TORT (INCLUDING NEGLIGENCE OR OTHERWISE) ARISING IN ANY WAY OUT OF THE USE OF THIS
SOFTWARE, EVEN IF ADVISED OF THE POSSIBILITY OF SUCH DAMAGE.
Julian Seward, Cambridge, UK.
jseward@acm.org
bzip2/libbzip2 version 1.0 of 21 March 2000
The following are the copyrights and redistribution conditions that apply to this copy of the Berkeley DB software.
For a license to use, redistribute or sell Berkeley DB software under conditions other than those described here, or
to purchase support for this software, please contact Sleepycat Software at one of the following addresses:
Sleepycat Software
394 E. Riding Dr.
Carlisle, MA 01741
USA
+1-617-633-2429
db@sleepycat.com
=-=-=-=-=-=-=-=-=-=-=-=-=-=-=-=-=-=-=-=-=-=-=-=-=
Copyright (c) 1990, 1993, 1994, 1995, 1996, 1997, 1998
Sleepycat Software. All rights reserved.
Redistribution and use in source and binary forms, with or without modification, are permitted provided that the
following conditions are met:
1. Redistributions of source code must retain the above copyright notice, this list of conditions and the following
disclaimer.
2. Redistributions in binary form must reproduce the above copyright notice, this list of conditions and the following
disclaimer in the documentation and/or other materials provided with the distribution.
3. Redistributions in any form must be accompanied by information on how to obtain complete source code for the
DB software and any accompanying software that uses the DB software. The source code must either be included in
the distribution or be available for no more than the cost of distribution plus a nominal fee, and must be freely
redistributable under reasonable conditions. For an executable file, complete source code means the source code for
all modules it contains. It does not mean source code for modules or files that typically accompany the operating
system on which the executable file runs, e.g., standard library modules or system header files.
THIS SOFTWARE IS PROVIDED BY SLEEPYCAT SOFTWARE ``AS IS'' AND ANY EXPRESS OR IMPLIED WARRANTIES,
INCLUDING, BUT NOT LIMITED TO, THE IMPLIED WARRANTIES OF MERCHANTABILITY AND FITNESS FOR A
PARTICULAR PURPOSE ARE DISCLAIMED. IN NO EVENT SHALL SLEEPYCAT SOFTWARE BE LIABLE FOR ANY DIRECT,
INDIRECT, INCIDENTAL, SPECIAL, EXEMPLARY, OR CONSEQUENTIAL DAMAGES (INCLUDING, BUT NOT LIMITED
TO, PROCUREMENT OF SUBSTITUTE GOODS OR SERVICES; LOSS OF USE, DATA, OR PROFITS; OR BUSINESS
INTERRUPTION) HOWEVER CAUSED AND ON ANY THEORY OF LIABILITY, WHETHER IN CONTRACT, STRICT
LIABILITY, OR TORT (INCLUDING NEGLIGENCE OR OTHERWISE) ARISING IN ANY WAY OUT OF THE USE OF THIS
SOFTWARE, EVEN IF ADVISED OF THE POSSIBILITY OF SUCH DAMAGE.
Copyright (c) 1995, 1996
The President and Fellows of Harvard University. All rights reserved.
Redistribution and use in source and binary forms, with or without modification, are permitted provided that the
following conditions are met:
1. Redistributions of source code must retain the above copyright notice, this list of conditions and the following
disclaimer.
2. Redistributions in binary form must reproduce the above copyright notice, this list of conditions and the following
disclaimer in the documentation and/or other materials provided with the distribution.
3. All advertising materials mentioning features or use of this software must display the following
acknowledgement: This product includes software developed by Harvard University and its contributors.
4. Neither the name of the University nor the names of its contributors may be used to endorse or promote
products derived from this software without specific prior written permission.
THIS SOFTWARE IS PROVIDED BY HARVARD AND ITS CONTRIBUTORS ``AS IS'' AND ANY EXPRESS OR IMPLIED
WARRANTIES, INCLUDING, BUT NOT LIMITED TO, THE IMPLIED WARRANTIES OF MERCHANTABILITY AND FITNESS
FOR A PARTICULAR PURPOSE ARE DISCLAIMED. IN NO EVENT SHALL HARVARD OR ITS CONTRIBUTORS BE LIABLE
FOR ANY DIRECT, INDIRECT, INCIDENTAL, SPECIAL, EXEMPLARY, OR CONSEQUENTIAL DAMAGES (INCLUDING,
BUT NOT LIMITED TO, PROCUREMENT OF SUBSTITUTE GOODS OR SERVICES; LOSS OF USE, DATA, OR PROFITS;
OR BUSINESS INTERRUPTION) HOWEVER CAUSED AND ON ANY THEORY OF LIABILITY, WHETHER IN CONTRACT,
STRICT LIABILITY, OR TORT (INCLUDING NEGLIGENCE OR OTHERWISE) ARISING IN ANY WAY OUT OF THE USE OF
THIS SOFTWARE, EVEN IF ADVISED OF THE POSSIBILITY OF SUCH DAMAGE.
Copyright (c) 1998, 1999, 2000 Thai Open Source Software Center Ltd and Clark Cooper
Permission is hereby granted, free of charge, to any person obtaining a copy of this software and associated
documentation files (the "Software"), to deal in the Software without restriction, including without limitation the
rights to use, copy, modify, merge, publish, distribute, sublicense, and/or sell copies of the Software, and to permit
persons to whom the Software is furnished to do so, subject to the following conditions:
The above copyright notice and this permission notice shall be included in all copies or substantial portions of the
Software.
THE SOFTWARE IS PROVIDED "AS IS", WITHOUT WARRANTY OF ANY KIND, EXPRESS OR IMPLIED, INCLUDING BUT
NOT LIMITED TO THE WARRANTIES OF MERCHANTABILITY, FITNESS FOR A PARTICULAR PURPOSE AND
NONINFRINGEMENT. IN NO EVENT SHALL THE AUTHORS OR COPYRIGHT HOLDERS BE LIABLE FOR ANY CLAIM,
DAMAGES OR OTHER LIABILITY, WHETHER IN AN ACTION OF CONTRACT, TORT OR OTHERWISE, ARISING FROM,
OUT OF OR IN CONNECTION WITH THE SOFTWARE OR THE USE OR OTHER DEALINGS IN THE SOFTWARE.
/* Copyright (C) 1995-1998 Eric Young (eay@cryptsoft.com)
All rights reserved.
This package is an SSL implementation written by Eric Young (eay@cryptsoft.com).
The implementation was written so as to conform with Netscapes SSL.
This library is free for commercial and non-commercial use as long as the following conditions are aheared to. The
following conditions apply to all code found in this distribution, be it the RC4, RSA, lhash, DES, etc., code; not just
the SSL code. The SSL documentation included with this distribution is covered by the same copyright terms except
that the holder is Tim Hudson (tjh@cryptsoft.com).
Copyright remains Eric Young's, and as such any Copyright notices in the code are not to be removed.
If this package is used in a product, Eric Young should be given attribution as the author of the parts of the library
used.
This can be in the form of a textual message at program startup or in documentation (online or textual) provided
with the package.
Redistribution and use in source and binary forms, with or without modification, are permitted provided that the
following conditions are met:
1. Redistributions of source code must retain the copyright notice, this list of conditions and the following disclaimer.
2. Redistributions in binary form must reproduce the above copyright notice, this list of conditions and the following
disclaimer in the documentation and/or other materials provided with the distribution.
3. All advertising materials mentioning features or use of this software must display the following
acknowledgement: "This product includes cryptographic software written by Eric Young (eay@cryptsoft.com)" The
word 'cryptographic' can be left out if the rouines from the library being used are not cryptographic related :-).
4. If you include any Windows specific code (or a derivative thereof) from the apps directory (application code) you
must include an acknowledgement: "This product includes software written by Tim Hudson (tjh@cryptsoft.com)"
THIS SOFTWARE IS PROVIDED BY ERIC YOUNG ``AS IS'' AND ANY EXPRESS OR IMPLIED WARRANTIES,
INCLUDING, BUT NOT LIMITED TO, THE IMPLIED WARRANTIES OF MERCHANTABILITY AND FITNESS FOR A
PARTICULAR PURPOSE ARE DISCLAIMED. IN NO EVENT SHALL THE AUTHOR OR CONTRIBUTORS BE LIABLE FOR
ANY DIRECT, INDIRECT, INCIDENTAL, SPECIAL, EXEMPLARY, OR CONSEQUENTIAL DAMAGES (INCLUDING, BUT
NOT LIMITED TO, PROCUREMENT OF SUBSTITUTE GOODS OR SERVICES; LOSS OF USE, DATA, OR PROFITS; OR
BUSINESS INTERRUPTION) HOWEVER CAUSED AND ON ANY THEORY OF LIABILITY, WHETHER IN CONTRACT,
STRICT LIABILITY, OR TORT (INCLUDING NEGLIGENCE OR OTHERWISE) ARISING IN ANY WAY OUT OF THE USE OF
THIS SOFTWARE, EVEN IF ADVISED OF THE POSSIBILITY OF SUCH DAMAGE.
The licence and distribution terms for any publically available version or derivative of this code cannot be changed. i.
e. this code cannot simply be copied and put under another distribution licence [including the GNU Public Licence.]
====================================================================
Copyright (c) 1998-2001 The OpenSSL Project. All rights reserved.
Redistribution and use in source and binary forms, with or without modification, are permitted provided that the
following conditions are met:
1. Redistributions of source code must retain the above copyright notice, this list of conditions and the following
disclaimer.
2. Redistributions in binary form must reproduce the above copyright notice, this list of conditions and the following
disclaimer in the documentation and/or other materials provided with the distribution.
3. All advertising materials mentioning features or use of this software must display the following acknowledgment:
"This product includes software developed by the OpenSSL Project for use in the OpenSSL Toolkit. (http://www.
openssl.org/)"
4. The names "OpenSSL Toolkit" and "OpenSSL Project" must not be used to endorse or promote products derived
from this software without prior written permission. For written permission, please contact openssl-core@openssl.
org.
5. Products derived from this software may not be called "OpenSSL" nor may "OpenSSL" appear in their names
without prior written permission of the OpenSSL Project.
6. Redistributions of any form whatsoever must retain the following acknowledgment: "This product includes
software developed by the OpenSSL Project for use in the OpenSSL Toolkit (http://www.openssl.org/)"
THIS SOFTWARE IS PROVIDED BY THE OpenSSL PROJECT ``AS IS'' AND ANY EXPRESSED OR IMPLIED
WARRANTIES, INCLUDING, BUT NOT LIMITED TO, THE IMPLIED WARRANTIES OF MERCHANTABILITY AND FITNESS
FOR A PARTICULAR PURPOSE ARE DISCLAIMED. IN NO EVENT SHALL THE OpenSSL PROJECT OR ITS
CONTRIBUTORS BE LIABLE FOR ANY DIRECT, INDIRECT, INCIDENTAL, SPECIAL, EXEMPLARY, OR CONSEQUENTIAL
DAMAGES (INCLUDING, BUT NOT LIMITED TO, PROCUREMENT OF SUBSTITUTE GOODS OR SERVICES; LOSS OF
USE, DATA, OR PROFITS; OR BUSINESS INTERRUPTION) HOWEVER CAUSED AND ON ANY THEORY OF LIABILITY,
WHETHER IN CONTRACT, STRICT LIABILITY, OR TORT (INCLUDING NEGLIGENCE OR OTHERWISE) ARISING IN ANY
WAY OUT OF THE USE OF THIS SOFTWARE, EVEN IF ADVISED OF THE POSSIBILITY OF SUCH DAMAGE.
====================================================================
This product includes cryptographic software written by Eric Young (eay@cryptsoft.com). This product includes
software written by Tim
Hudson (tjh@cryptsoft.com). This software is copyright 1988 - 1997, Julianne F. Haugh. All rights reserved.
Redistribution and use in source and binary forms, with or without modification, are permitted provided that the
following conditions are met:
1. Redistributions of source code must retain the above copyright notice, this list of conditions and the following
disclaimer.
2. Redistributions in binary form must reproduce the above copyright notice, this list of conditions and the following
disclaimer in the documentation and/or other materials provided with the distribution.
3. Neither the name of Julianne F. Haugh nor the names of its contributors may be used to endorse or promote
products derived from this software without specific prior written permission.
THIS SOFTWARE IS PROVIDED BY JULIE HAUGH AND CONTRIBUTORS ``AS IS'' AND ANY EXPRESS OR IMPLIED
WARRANTIES, INCLUDING, BUT NOT LIMITED TO, THE IMPLIED WARRANTIES OF MERCHANTABILITY AND FITNESS
FOR A PARTICULAR PURPOSE ARE DISCLAIMED. IN NO EVENT SHALL JULIE HAUGH OR CONTRIBUTORS BE LIABLE
FOR ANY DIRECT, INDIRECT, INCIDENTAL, SPECIAL, EXEMPLARY, OR CONSEQUENTIAL DAMAGES (INCLUDING,
BUT NOT LIMITED TO, PROCUREMENT OF SUBSTITUTE GOODS OR SERVICES; LOSS OF USE, DATA, OR PROFITS;
OR BUSINESS INTERRUPTION) HOWEVER CAUSED AND ON ANY THEORY OF LIABILITY, WHETHER IN CONTRACT,
STRICT LIABILITY, OR TORT (INCLUDING NEGLIGENCE OR OTHERWISE) ARISING IN ANY WAY OUT OF THE USE OF
THIS SOFTWARE, EVEN IF ADVISED OF THE POSSIBILITY OF SUCH DAMAGE.
Copyright (c) 1991, 1992 Paul Kranenburg <pk@cs.few.eur.nl>
Copyright (c) 1993 Branko Lankester <branko@hacktic.nl>
Copyright (c) 1993 Ulrich Pegelow <pegelow@moorea.uni-muenster.de>
Copyright (c) 1995, 1996 Michael Elizabeth Chastain <mec@duracef.shout.net>
Copyright (c) 1993, 1994, 1995, 1996 Rick Sladkey <jrs@world.std.com>
Copyright (c) 1999,2000 Wichert Akkerman <wakkerma@debian.org>
All rights reserved.
Redistribution and use in source and binary forms, with or without modification, are permitted provided that the
following conditions are met:
1. Redistributions of source code must retain the above copyright notice, this list of conditions and the following
disclaimer.
2. Redistributions in binary form must reproduce the above copyright notice, this list of conditions and the following
disclaimer in the documentation and/or other materials provided with the distribution.
3. The name of the author may not be used to endorse or promote products derived from this software without
specific prior written permission.
THIS SOFTWARE IS PROVIDED BY THE AUTHOR ``AS IS'' AND ANY EXPRESS OR IMPLIED WARRANTIES,
INCLUDING, BUT NOT LIMITED TO, THE IMPLIED WARRANTIES OF MERCHANTABILITY AND FITNESS FOR A
PARTICULAR PURPOSE ARE DISCLAIMED. IN NO EVENT SHALL THE AUTHOR BE LIABLE FOR ANY DIRECT,
INDIRECT, INCIDENTAL, SPECIAL, EXEMPLARY, OR CONSEQUENTIAL DAMAGES (INCLUDING, BUT NOT LIMITED
TO, PROCUREMENT OF SUBSTITUTE GOODS OR SERVICES; LOSS OF USE, DATA, OR PROFITS; OR BUSINESS
INTERRUPTION) HOWEVER CAUSED AND ON ANY THEORY OF LIABILITY, WHETHER IN CONTRACT, STRICT
LIABILITY, OR TORT (INCLUDING NEGLIGENCE OR OTHERWISE) ARISING IN ANY WAY OUT OF THE USE OF THIS
SOFTWARE, EVEN IF ADVISED OF THE POSSIBILITY OF SUCH DAMAGE.
/************************************************************************
* Copyright 1995 by Wietse Venema. All rights reserved. Some individual
* files may be covered by other copyrights.
*
* This material was originally written and compiled by Wietse Venema at
* Eindhoven University of Technology, The Netherlands, in 1990, 1991,
* 1992, 1993, 1994 and 1995.
*
* Redistribution and use in source and binary forms are permitted
* provided that this entire copyright notice is duplicated in all such
* copies.
*
* This software is provided "as is" and without any expressed or implied
* warranties, including, without limitation, the implied warranties of
* merchantibility and fitness for any particular purpose.
************************************************************************/
This is version 2001-Jan-27 of the Info-ZIP copyright and license.
The definitive version of this document should be available at ftp://ftp.info-zip.org/pub/infozip/license.html
indefinitely.
Copyright (c) 1990-2001 Info-ZIP. All rights reserved.
For the purposes of this copyright and license, "Info-ZIP" is defined as the following set of individuals: Mark Adler,
John Bush, Karl Davis, Harald Denker, Jean-Michel Dubois, Jean-loup Gailly, Hunter Goatley, Ian Gorman, Chris
Herborth, Dirk Haase, Greg Hartwig, Robert Heath, Jonathan Hudson, Paul Kienitz, David Kirschbaum, Johnny Lee,
Onno van der Linden, Igor Mandrichenko, Steve P. Miller, Sergio Monesi, Keith Owens, George Petrov, Greg Roelofs,
Kai Uwe Rommel, Steve Salisbury, Dave Smith, Christian Spieler, Antoine Verheijen, Paul von Behren, Rich Wales,
Mike White
This software is provided "as is," without warranty of any kind, express or implied. In no event shall Info-ZIP or its
contributors be held liable for any direct, indirect, incidental, special or consequential damages arising out of the
use of or inability to use this software.
Permission is granted to anyone to use this software for any purpose, including commercial applications, and to
alter it and redistribute it freely, subject to the following restrictions:
1. Redistributions of source code must retain the above copyright notice, definition, disclaimer, and this list of
conditions.
2. Redistributions in binary form must reproduce the above copyright notice, definition, disclaimer, and this list of
conditions in documentation and/or other materials provided with the distribution.
3. Altered versions--including, but not limited to, ports to new operating systems, existing ports with new graphical
interfaces, and dynamic, shared, or static library versions--must be plainly marked as such and must not be
misrepresented as being the original source. Such altered versions also must not be misrepresented as being Info-
ZIP releases--including, but not limited to, labeling of the altered versions with the names "Info-ZIP" (or any
variation thereof, including, but not limited to, different capitalizations), "Pocket UnZip," "WiZ" or "MacZip" without
the explicit permission of Info-ZIP. Such altered versions are further prohibited from misrepresentative use of the
Zip-Bugs or Info-ZIP e-mail addresses or of the Info-ZIP URL(s).
4. Info-ZIP retains the right to use the names "Info-ZIP," "Zip," "UnZip," "WiZ," "Pocket UnZip," "Pocket Zip," and
"MacZip" for its own source and binary releases. Vim is Charityware. You can use and copy it as much as you like,
but you are encouraged to make a donation to orphans in Uganda. Please read the file "doc/uganda.txt" for details.
There are no restrictions on distributing an unmodified copy of Vim. Parts of Vim may also be distributed, but this
text must always be included. You are allowed to include executables that you made from the unmodified Vim
sources, your own usage examples and Vim scripts.
If you distribute a modified version of Vim, you are encouraged to send the maintainer a copy, including the source
code. Or make it available to the maintainer through ftp; let him know where it can be found. If the number of
changes is small (e.g., a modified Makefile) e-mailing the diffs will do.
When the maintainer asks for it (in any way) you must make your changes, including source code, available to him.
The maintainer reserves the right to include any changes in the official version of Vim. This is negotiable. You are
not allowed to distribute a modified version of Vim when you are not willing to make the source code available to
the maintainer.
The current maintainer is Bram Moolenaar <Bram@vim.org>. If this changes, it will be announced in appropriate
places (most likely www.vim.org and comp.editors). When it is completely impossible to contact the maintainer, the
obligation to send him modified source code ceases.
It is not allowed to remove these restrictions from the distribution of the Vim sources or parts of it. These
restrictions may also be used for previous Vim releases instead of the text that was included with it.
Copyright 1988,1990,1993 by Paul Vixie
All rights reserved
Distribute freely, except: don't remove my name from the source or documentation (don't take credit for my work),
mark your changes (don't get me blamed for your possible bugs), don't alter or remove this notice. May be sold if
buildable source is provided to buyer. No warrantee of any kind, express or implied, is included with this software;
use at your own risk, responsibility for damages (if any) to anyone resulting from the use of this software rests
entirely with the user.
Send bug reports, bug fixes, enhancements, requests, flames, etc., and I'll try to keep a version up to date. I can
be reached as follows:
Paul Vixie
<paul@vix.com>uunet!decwrl!vixie!paul
(c) Copyright 1992 by Panagiotis Tsirigotis
The author (Panagiotis Tsirigotis) grants permission to use, copy,
and distribute this software and its documentation for any purpose
and without fee, provided that the above copyright notice extant in
files in this distribution is not removed from files included in any
redistribution and that this copyright notice is also included in any
redistribution.
Modifications to this software may be distributed, either by distributing
the modified software or by distributing patches to the original software,
under the following additional terms:
1. The version number will be modified as follows:
a. The first 3 components of the version number (i.e <number>.<number>.<number>) will remain unchanged.
b. A new component will be appended to the version number to indicate the modification level. The form of this
component is up to the author of the modifications.
2. The author of the modifications will include his/her name by appending it along with the new version number to
this file and will be responsible for any wrong behavior of the modified software. The author makes no
representations about the suitability of this software for any purpose. It is provided "as is" without any express or
implied warranty.
Modifications:
Version: 2.1.8.7-current
Copyright 1998-2001 by Rob Braun
Sensor Addition
Version: 2.1.8.9pre14a
Copyright 2001 by Steve Grubb
This is an exerpt from an email I recieved from the original author, allowing xinetd as maintained by me, to use the
higher version numbers:
I appreciate your maintaining the version string guidelines as specified in the copyright. But I did not mean them to
last as long as they did.
So, if you want, you may use any 2.N.* (N >= 3) version string for future xinetd versions that you release. Note
that I am excluding the 2.2.* line; using that would only create confusion. Naming the next release 2.3.0 would put
to rest the confusion about 2.2.1 and 2.1.8.*.
(C) 1995-1998 Jean-loup Gailly and Mark Adler
This software is provided 'as-is', without any express or implied warranty. In no event will the authors be held liable
for any damages arising from the use of this software.
Permission is granted to anyone to use this software for any purpose, including commercial applications, and to
alter it and redistribute it freely, subject to the following restrictions:
1. The origin of this software must not be misrepresented; you must not claim that you wrote the original software.
If you use this software in a product, an acknowledgment in the product documentation would be appreciated but is
not required.
2. Altered source versions must be plainly marked as such, and must not be misrepresented as being the original
software.
3. This notice may not be removed or altered from any source distribution.
Jean-loup Gailly
jloup@gzip.org
Mark Adler
madler@alumni.caltech.edu
If you use the zlib library in a product, we would appreciate *not*
receiving lengthy legal documents to sign. The sources are provided
for free but without warranty of any kind. The library has been
entirely written by Jean-loup Gailly and Mark Adler; it does not
include third-party code.
If you redistribute modified sources, we would appreciate that you include
in the file ChangeLog history information documenting your changes.
Copyright (c) 1994-1996,1998-2002 Todd C. Miller <Todd.Miller@courtesan.com>
All rights reserved.
Redistribution and use in source and binary forms, with or without modification, are permitted provided that the
following conditions are met:
1. Redistributions of source code must retain the above copyright notice, this list of conditions and the following
disclaimer.
2. Redistributions in binary form must reproduce the above copyright notice, this list of conditions and the following
disclaimer in the documentation and/or other materials provided with the distribution.
3. The name of the author may not be used to endorse or promote products derived from this software without
specific prior written permission from the author.
4. Products derived from this software may not be called "Sudo" nor may "Sudo" appear in their names without
specific prior written permission from the author.
THIS SOFTWARE IS PROVIDED ``AS IS'' AND ANY EXPRESS OR IMPLIED WARRANTIES, INCLUDING, BUT NOT
LIMITED TO, THE IMPLIED WARRANTIES OF MERCHANTABILITY AND FITNESS FOR A PARTICULAR PURPOSE ARE
DISCLAIMED. IN NO EVENT SHALL THE AUTHOR BE LIABLE FOR ANY DIRECT, INDIRECT, INCIDENTAL, SPECIAL,
EXEMPLARY, OR CONSEQUENTIAL DAMAGES (INCLUDING, BUT NOT LIMITED TO, PROCUREMENT OF SUBSTITUTE
GOODS OR SERVICES; LOSS OF USE, DATA, OR PROFITS; OR BUSINESS INTERRUPTION) HOWEVER CAUSED AND
ON ANY THEORY OF LIABILITY, WHETHER IN CONTRACT, STRICT LIABILITY, OR TORT (INCLUDING NEGLIGENCE
OR OTHERWISE) ARISING IN ANY WAY OUT OF THE USE OF THIS SOFTWARE, EVEN IF ADVISED OF THE
POSSIBILITY OF SUCH DAMAGE.
Additionally, lsearch.c, fnmatch.c, getcwd.c, snprintf.c, strcasecmp.c and fnmatch.3 bear the following UCB license:
Copyright (c) 1987, 1989, 1990, 1991, 1993, 1994
The Regents of the University of California. All rights reserved.
Redistribution and use in source and binary forms, with or without modification, are permitted provided that the
following conditions are met:
1. Redistributions of source code must retain the above copyright notice, this list of conditions and the following
disclaimer.
2. Redistributions in binary form must reproduce the above copyright notice, this list of conditions and the following
disclaimer in the documentation and/or other materials provided with the distribution.
3. Neither the name of the University nor the names of its contributors may be used to endorse or promote
products derived from this software without specific prior written permission.
THIS SOFTWARE IS PROVIDED BY THE REGENTS AND CONTRIBUTORS ``AS IS'' AND ANY EXPRESS OR IMPLIED
WARRANTIES, INCLUDING, BUT NOT LIMITED TO, THE IMPLIED WARRANTIES OF MERCHANTABILITY AND FITNESS
FOR A PARTICULAR PURPOSE ARE DISCLAIMED. IN NO EVENT SHALL THE REGENTS OR CONTRIBUTORS BE LIABLE
FOR ANY DIRECT, INDIRECT, INCIDENTAL, SPECIAL, EXEMPLARY, OR CONSEQUENTIAL DAMAGES (INCLUDING,
BUT NOT LIMITED TO, PROCUREMENT OF SUBSTITUTE GOODS OR SERVICES; LOSS OF USE, DATA, OR PROFITS;
OR BUSINESS INTERRUPTION) HOWEVER CAUSED AND ON ANY THEORY OF LIABILITY, WHETHER IN CONTRACT,
STRICT LIABILITY, OR TORT (INCLUDING NEGLIGENCE OR OTHERWISE) ARISING IN ANY WAY OUT OF THE USE OF
THIS SOFTWARE, EVEN IF ADVISED OF THE POSSIBILITY OF SUCH DAMAGE.
