Hp Secure Encryption Users Manual Installation And User Guide
2015-01-05
: Hp Hp-Secure-Encryption-Users-Manual-156151 hp-secure-encryption-users-manual-156151 hp pdf
Open the PDF directly: View PDF ![]() .
.
Page Count: 77
- HP Secure Encryption Installation and User Guide
- Abstract
- Notice
- Contents
- Overview
- Planning
- Configuration
- Operations
- Accessing Encryption Manager
- Managing passwords
- Working with keys
- Creating a plaintext volume
- Converting plaintext volumes into encrypted volumes
- Changing key management modes
- Enabling/disabling plaintext volumes
- Enabling/disabling the firmware lock
- Enabling/disabling local key cache
- Importing drive sets in Local Key Management Mode
- Maintenance
- Troubleshooting
- Support and other resources
- Appendix
- Glossary
- Documentation feedback
- Index

HP Secure Encryption
Installation and User Guide
Abstract
This document includes feature, installation, and configuration information about HP Secure Encryption and is for the person who installs,
administers, and troubleshoots servers and storage
systems. HP assumes you are qualified in the servicing of computer equipment and trained in
recognizing hazards in products with hazardous energy levels.
Part Number: 759078-002
August 2014
Edition: 2
© Copyright 2014 Hewlett-Packard Development Company, L.P.
The information contained herein is subject to change without notice. The only warranties for HP products and services are set forth in the express
warranty statements accompanying such products and services. Nothing herein should be construed as constituting an additional warranty. HP shall
not be liable for technical or editorial errors or omissions contained herein.
Microsoft® is a U.S. registered trademark of Microsoft Corporation.Google™ is a trademark of Google Inc.

Contents 3
Contents
Overview ..................................................................................................................................... 5
About HP Secure Encryption .......................................................................................................................... 5
Benefits ............................................................................................................................................. 6
Encryption features ............................................................................................................................. 6
HP ProLiant servers ............................................................................................................................. 9
Solution components ........................................................................................................................... 9
Planning .................................................................................................................................... 13
Encryption setup guidelines ......................................................................................................................... 13
Recommended security settings at remote sites .............................................................................................. 13
Encrypted backups ..................................................................................................................................... 13
Security domains ........................................................................................................................................ 14
Deployment scenarios ................................................................................................................................. 14
Remote and local key management requirements ................................................................................. 14
Configuration ............................................................................................................................. 15
Local key management mode ...................................................................................................................... 15
Configuring the controller (local mode) ............................................................................................... 15
Remote Key Management Mode .................................................................................................................. 17
Configuring Remote Key Management Mode ...................................................................................... 17
Configuring the controller (remote mode) ............................................................................................ 31
Operations................................................................................................................................. 33
Accessing Encryption Manager ................................................................................................................... 33
Opening Encryption Manager ........................................................................................................... 33
Logging into Encryption Manager ...................................................................................................... 33
Managing passwords ................................................................................................................................. 34
Set or change the Crypto Officer password ........................................................................................ 34
Set or change the password recovery question .................................................................................... 35
Set or change user account password ................................................................................................ 35
Set or change the controller password ................................................................................................ 36
Suspending the controller password ................................................................................................... 37
Resuming the controller password ...................................................................................................... 38
Working with keys ..................................................................................................................................... 39
Changing the Master Encryption Key ................................................................................................. 39
Rekeying the Drive Encryption Keys .................................................................................................... 39
Rescanning keys .............................................................................................................................. 40
Creating a plaintext volume......................................................................................................................... 40
Converting plaintext volumes into encrypted volumes ..................................................................................... 43
Changing key management modes .............................................................................................................. 44
Enabling/disabling plaintext volumes ........................................................................................................... 45
Enabling/disabling the firmware lock ........................................................................................................... 46
Enabling/disabling local key cache ............................................................................................................. 47
Importing drive sets in Local Key Management Mode..................................................................................... 48
Importing drives with different Master Keys ......................................................................................... 48
Maintenance .............................................................................................................................. 50
Controllers ................................................................................................................................................. 50
Contents 4
Clearing the controller ...................................................................................................................... 50
Replacing an encrypted controller ...................................................................................................... 50
Replacing a server while retaining the controller .................................................................................. 50
Preconfiguring replacement components ............................................................................................. 50
Flashing firmware ............................................................................................................................. 51
Drives ....................................................................................................................................................... 51
Replacing a physical drive ................................................................................................................ 51
Validating the number of encrypted drives for license compliance ......................................................... 51
Groups ..................................................................................................................................................... 52
Locating groups associated with a drive ............................................................................................. 52
Displaying log information .......................................................................................................................... 56
Running queries ......................................................................................................................................... 57
Troubleshooting .......................................................................................................................... 61
Common issues .......................................................................................................................................... 61
Lost or forgotten Crypto Officer password ........................................................................................... 61
Lost or forgotten controller password .................................................................................................. 61
Lost or forgotten Master Key .............................................................................................................. 62
Forgotten which Master key goes with which drive .............................................................................. 64
Logical drives remain offline .............................................................................................................. 65
Master key not exporting .................................................................................................................. 65
Testing the connection between HP iLO and the HP ESKM .............................................................................. 66
Potential errors encountered ........................................................................................................................ 67
Clearing the encryption configuration ........................................................................................................... 69
Support and other resources ........................................................................................................ 70
Before you contact HP ................................................................................................................................ 70
HP contact information ................................................................................................................................ 70
Appendix ................................................................................................................................... 71
Encryption algorithms ................................................................................................................................. 71
Glossary .................................................................................................................................... 72
Documentation feedback ............................................................................................................. 75
Index ......................................................................................................................................... 76

Overview 5
Overview
About HP Secure Encryption
HP Secure Encryption is a controller-based, enterprise-class data encryption solution that protects data at rest
on bulk storage hard drives and SSDs attached to a compatible HP Smart Array Controller. The solution is
compatible with the HP Enterprise Secure Key Manager, and can operate with or without the presence of a
key manager in the environment, depending on individual customer settings.
HP Secure Encryption provides encryption for data at rest as an important component for complying with
sensitive data protection requirements including PCI-DSS, HIPAA/HITECH, Sarbanes/Oxley, and state
privacy laws. HP Secure Encryption secures any data deemed sensitive and requiring extra levels of
protection through the application of XTS-AES 256-bit data encryption. Many companies under government
regulations require that sensitive privacy data must be secured and uncompromised using NIST-approved
algorithms and methodologies for key management. As a result, HP has applied for FIPS-140-2 Level 2
validation for controllers supporting encryption. For more information, see the the Cryptographic Module
Validation Program (CMVP) on the National Institute of Standards and Technology website
(http://csrc.nist.gov/groups/STM/cmvp/index.html).
HP Secure Encryption requires the following core components:
• HP ProLiant Gen8 or later server. For more information, see "HP ProLiant servers (on page 9)."
• HP Smart Array Controller. For a list of currently supported controllers, see "HP Smart Array Controller
(on page 10)."
• HP Secure Encryption license, per drive
• HP Smart Storage Administrator, version 1.60 or later
• Compatible SAS/SATA hard drive or SSD
• Compatible storage enclosure
HP Secure Encryption can operate in Remote Key Management Mode, or Remote Mode, through the use of
a separate, clustered, appliance-based server called the HP Enterprise Secure Key Manager 3.1 and later.
The HP ESKM manages all encryption keys throughout the data center. When utilizing the HP ESKM, the
communication path between the HP ESKM and the HP Smart Array Controller is established through the HP
iLO interface. The controller communicates with the HP ESKM as new keys are generated and as old keys are
retired. The HP ESKM acts as a key vault where all keys are managed via a web browser interface. For more
information about the HP ESKM, see "HP Enterprise Secure Key Manager 3.1 and later (on page 11)." For
more information about HP iLO connectivity, see "HP iLO (on page 10)."
The following additional components are required for operating HP Secure Encryption in Remote Mode:
• Integrated Lights Out (iLO) Advanced or Scale Out Edition license, per ProLiant server
• HP Enterprise Secure Key Manager 3.1 and later
HP Secure Encryption can also operate without an attached key management solution through Local Key
Management Mode, or Local Mode.

Overview 6
Benefits
Broad encryption coverage
• Encrypts data on both the attached bulk storage and the cache memory of HP Smart Array Controllers
• Supports any hard drive or SSD in the Smart Drive portfolio for HP ProLiant Gen8 or later servers or the
Supported Storage Enclosures
High availability and scalability
• Scales with the amount of data privacy requirements
o Server counts up to 25,000
o Millions of drives
o Millions of encryption keys
• The HP ESKM supports High Availability Clustering, from 2-8 modes.
Simplified deployment and management
• HP Smart Storage Administrator configures the cryptographic features of HP Secure Encryption, and
manages the controller and other direct-attached storage devices
Helps users meet compliance regulations
• The HP ESKM has completed FIPS 140-2 Level-2 validation, certificate #1922
• HP has applied for FIPS 140-2 Level-2 validation for the HP Smart Array family of controllers
Encryption features
Most HP Secure Encryption features and security settings are available through HP Smart Storage
Administrator. Additional features for Remote Mode deployments are available through HP Enterprise Secure
Key Manager 3.1 and later and Integrated Lights Out (iLO).
Feature Description Notes
Automatic key management Encryption keys are automatically
created, saved, and deleted by HP Smart
Array Controllers without the need for
user intervention or management when
logical drives are created or deleted.
—
Compliance HP Secure Encryption has been designed
to meet NIST-approved standards. HP is
in the process of applying for FIPS 140-2
Level 2 validation for HP Secure
Encryption. The HP ESKM has completed
FIPS 140-2 Level-2 validation, certificate
#1922.
HP Secure Encryption helps enterprises
comply with the data privacy and
protection requirements associated with
the U.S. Health Insurance Portability and
Accountability Act (HIPAA) and the
Sarbanes-Oxley Acts.
For more information, see
"Encryption Algorithms (on page
71)."

Overview 7
Feature Description Notes
Controller key cache HP Smart Array Controllers can optionally
store all keys required at boot time inside
the controller, enabling the server to
survive a variety of network outages.
Remote Mode only
Controller password Protects the server in the event of theft by
applying a secondary password upon
boot to lock down the controller.
For more information, see "Set or
change the controller password (on
page 36)."
Dynamic Encryption Enables smooth transitions between local
and remote modes, the conversion of
plaintext data to encrypted data, and
rekey services for both data and key
wraps.
—
Encryption keys Data is protected using a series of keys
that provide layered protection at the
volume and drive levels. The solution
utilizes XTS-AES 256-bit encryption.
—
Firmware lock Prevents controller firmware from being
updated unintentionally or by
unauthorized personnel.
For more information, see
"Enabling/disabling the firmware
lock (on page 46)."
Hardware-based encryption Utilizes the HP Smart Array Controller
hardware to accelerate all cryptographic
algorithms when securing data and keys.
For more information about Smart
Array controllers, see the HP website
(http://www.hp.com/products/sma
rtarray).
HP Enterprise Secure Key
Manager 3.1 and later
The HP ESKM or later unifies and
automates an organization’s encryption
controls by securely creating, protecting,
serving, controlling, and auditing access
to encryption keys.
Remote Mode only. For more
information, see "HP Enterprise
Secure Key Manager 3.1 and later
(on page 11)."
HP ESKM key search Individual Drive Encryption Keys are
visible by serial number identification on
the HP ESKM to enable unique tracking
and management from a central location.
The HP ESKM supports query by serial
number, server name, bay number, PCI
slot, and date.
Remote Mode only. For more
information, see "Running queries
(on page 57)."
HP Smart Storage
Administrator
HP Smart Storage Administrator
v1.60.xx.0 and later provides the
configuration and management of the
cryptographic features of HP Secure
Encryption associated with HP Smart
Array Controllers.
For more information, see "HP Smart
Storage Administrator (on page 9)."

Overview 8
Feature Description Notes
Integrated Lights Out (iLO) HP iLO Management is a comprehensive
set of embedded management features
supporting the complete lifecycle of the
server, from initial deployment, through
ongoing management, to service alerting
and remote support. HP iLO is provided
on all HP ProLiant Gen8 and later servers.
HP iLO 4 Advanced or Scale Out editions
v1.40 or later connect and auto-register
with the HP ESKM. HP iLO provides key
exchange support between the HP Smart
Array Controller and the HP ESKM to
enable pre-boot support for OS disk
encryption. Audit support is provided for
all key management transactions.
Remote Mode only. For more
information, see "HP iLO (on page
10)."
Instant volume erase Provides ability to instantly,
cryptographically erase logical volumes
without having to delete the volume first
—
Key rotation support Supports the rekeying of all keys utilized
by the controller to enable a robust key
rotation strategy
—
Local Key Management Mode
Focused on single server deployments
where there is one Master Encryption Key
per controller that is managed by the user.
In Local Mode, all volumes still have their
own unique key for data encryption.
For more information, see "Local Key
Management Mode (on page 15)."
One-way encryption As a security feature, data volumes
cannot be converted back to plaintext
after the volume is encrypted. Restoration
of data is required to revert back to
plaintext.
—
Pre-deployment support Supports the ability to preconfigure all
cryptographic security settings while in a
server, then store the powered-off
controller for later use while retaining the
settings securely.
—
Remote Key Management
Mode
Designed for enterprise-wide
deployments with the HP Smart Array
Controller. It requires the HP Enterprise
Secure Key Manager 3.1 and later to
manage all keys related to encryption
deployments. All keys are managed
automatically between the HP Smart
Array Controller, HP iLO and the HP
ESKM.
For more information, see "Remote
Key Management Mode (on page
17)."
Security reset function The feature clears all secrets, keys, and
passwords from the controller, and places
the controller's encryption configuration
in a factory new state.
For more information, see "Clearing
the encryption configuration (on
page 69)."
Two encryption roles HP Secure Encryption supports two roles
for managing encryption services: a
Crypto Officer role and a User role.
—

Overview 9
Feature Description Notes
Volume level encryption Provides flexibility in allowing the user to
selectively encrypt at the volume or logical
drive level regardless of RAID level.
—
HP ProLiant servers
The following HP ProLiant server components are compatible with HP Secure Encryption:
Component Gen8 Model Gen9 Model
Blades
•
BL420c
•
BL460c
•
BL465c
•
BL660c
BL460c
ML
•
ML350e V2
•
ML350p
ML350
Rack
•
DL320e Gen8 v2
•
DL360e/p
•
DL380e/p
•
DL385p
•
DL560
•
DL580
•
Apollo 6000
•
DL360
•
DL380
•
DL160
•
DL180
SL
•
SL270s
•
SL210t
•
SL4540*
SL4540*
Other WS460c —
*External storage
For more information about HP ProLiant servers, see the HP website
(http://www.hp.com/go/proliantgen8/docs).
Solution components
HP Smart Storage Administrator
HP SSA is a configuration and management tool for HP Smart Array controllers. Starting with HP ProLiant
Gen8 servers, HP SSA replaces ACU with an enhanced GUI and additional configuration features.
HP SSA exists in three interface formats: the HP SSA GUI, the HP SSA CLI, and HP SSA Scripting. Although
all formats provide support for configuration tasks, some of the advanced tasks are available in only one
format.
Some HP SSA features include the following:
• Supports online array capacity expansion, logical drive extension, assignment of online spares, and
RAID or stripe size migration
• Suggests the optimal configuration for an unconfigured system
• Provides diagnostic and SmartSSD Wear Gauge functionality on the Diagnostics tab
• For supported controllers, provides access to additional features.
Overview 10
For more information about HP SSA, see the HP website (http://www.hp.com/go/hpssa).
Minimum requirements
For minimum operating system requirements to run any HP SSA format, see the HP website
(http://www.hp.com/go/ossupport).
Minimum video requirements to run the HP SSA GUI include a minimum monitor resolution of 1024x768 and
16-bit color. The GUI supports the following browsers:
• Mozilla Firefox 9.0 or later
• Microsoft Internet Explorer 8.0 or later
• Google Chrome
For a list of supported controllers, see HP Smart Array RAID Controllers on the HP website
(http://www.hp.com/go/smartarray).
HP Smart Array Controller
HP Secure Encryption is supported on HP Smart Array PX3X and PX4X controllers, and HP Smart HBAs
operating in RAID mode.
For more information about controllers supporting HP Secure Encryption, see the HP website
(http://www.hp.com/go/smartarray).
For more information about HP Smart Array controllers, see the appropriate Smart Array controller user
guide on the HP website (http://www.hp.com/go/smartstorage/docs).
HP SmartCache
HP SmartCache can be used in conjunction with HP Secure Encryption. HP SmartCache enables solid state
drives to be used as caching devices for hard drive media. Data can be accessed from the solid state drive
instead of hard drives. Data stored on the HP SmartCache drive utilizes the same encryption methods and
keys as the originating volume where the data is permanently stored, extending protection to the HP
SmartCache drives.
HP SmartCache provides the following features:
• Accelerates application performance
• Provides lower latency for transactions in applications
• Supports all operating systems, without the need for changes
HP SmartCache requires an HP SmartCache license. For more information, or to obtain a license, see the
SmartCache website (http://www.hp.com/go/smartcache).
HP iLO
HP iLO Management is a set of embedded management features that support the complete life cycle of the
server, from initial deployment, to ongoing management, to service alerting and remote support.
The HP iLO subsystem is a standard component of HP ProLiant servers that simplifies initial server setup,
server health monitoring, power and thermal optimization, remote server administration, and key exchanges
between the HP ESKM and the HP Smart Array Controller. The HP iLO subsystem includes an intelligent
microprocessor, secure memory, and a dedicated network interface. This design makes HP iLO independent
of the host server and its operating system. This system provides client credentials, registration to the key
Overview 11
management database, key management, encryption activation, and audit support for the devices within the
platform.
For the full implementation of HP Secure Encryption with the HP ESKM, HP iLO Advanced or HP iLO Scale
Out editions are required to connect and auto-register with the HP ESKM. HP iLO provides key exchange
support between the HP Smart Array Controller and the HP ESKM to enable pre-boot support for OS disk
encryption. Audit support is provided for all for key management transactions.
For more information about HP iLO, see the HP website (http://www.hp.com/go/ilo).
HP Enterprise Secure Key Manager 3.1 and later
HP Enterprise Secure Key Manager 3.1 and later acts as a secure, reliable repository for keys used by HP
Secure Encryption. In Remote Key Management Mode, HP iLO connects to the HP ESKM using
username/password and digital certificate authentication to securely store and retrieve keys. Each HP iLO
must be registered as an HP ESKM user by an administrator, or Crypto Officer, of the HP ESKM for access
to be granted. If a user is registered and has the necessary permissions, the HP ESKM accepts requests and
provides keys to the client. As standard practice, communication with the HP ESKM is configured for SSL to
ensure the security of the connection and authorized access to keys.
The HP ESKM keys and users can be organized into different groups depending on the policies set by an
administrator. These groups determine whether a particular user can retrieve a particular key, and supports
both key sharing and separation for multi-tenant and hosted service provider environments.
Characteristics
• Used only in Remote Mode, requiring a network connection
• Supports high-availability clustering of 2-8 HP ESKM nodes for automatic replication and failover
• Provides key services to HP iLO clients using username and password, certificate authentication, or both
• Communicates using SSL encryption to ensure the security of the connection and authorized access to
keys
• Provides reliable, secure access to business-critical encryption keys
• Supports audit and compliance requirements, including PCI-DSS and HIPAA/HITECH
• Provides scalability for multiple data centers, thousands of clients, and millions of keys
• Uses a FIPS-140-2 Level 2 validated secure appliance which supports the latest NIST cryptographic
guidance
HP ESKM and key management
The HP Smart Array Controller manages keys by separating them into the following categories:
• Keys stored off-controller on the HP ESKM
• Keys stored on the drive media
• Keys stored on the controller
The separation of keys helps ensure the safety of the data residing on the drives, the portability of the drives,
and the ability to manage keys in a centralized manner. The controller uses the HP ESKM to back up a
segment of its keys using an encryption method that protects the keys from exposure in plaintext.
Overview 12
Licensing
HP Secure Encryption licensing is based on the number of physical drives requiring encryption. You will need
one HP Secure Encryption license per drive.
To operate HP Secure Encryption in Local Key Management Mode, you will need the following HP Secure
Encryption license:
• HP Secure Encryption E-LTU 24x7 Supp Lic D8S85AAE
• HP Secure Encryption 1 Svr 24x7 Supp Lic D8S84A
Remote Key Management Mode requires the following additional licenses:
• Integrated Lights Out (iLO), Advanced or Scale Out edition
• One HP Enterprise Secure Key Manager 3.1 and later Client License per HP ProLiant server

Planning 13
Planning
Encryption setup guidelines
When setting up HP Secure Encryption, consider the information described in the following table.
Configuration Options Deciding factors
Encryption mode
•
Local Key
Management Mode
•
Remote Key
Management Mode
Choose Local Key Management Mode when:
•
Data is stored at a site without network access.
•
In a small deployment center or lab
•
Manual key management is available.
Choose Remote Key Management Mode when:
•
Using a large number of servers
•
A network is available between the HP ESKM
and a server.
•
Automatic key management is preferred,
including backups and redundancy
configurations
Plaintext volumes
•
Allow
•
Disallow (default)
Allow future plaintext logical drives when:
•
Drive migration might occur to a non-encrypting
controller.
•
Data is not privacy-sensitive.
For more information, see "Enabling/disabling
plaintext volumes (on page 45)."
Key naming conventions Master Encryption Keys
are customizable. Create a specific naming convention when
managing multiple keys and multiple servers.
Recommended security settings at remote sites
For added security, HP recommends the following configuration when operating HP Secure Encryption at
remote sites outside the main data center.
• Firmware lock enabled ("Enabling/disabling the firmware lock" on page 46)
• Controller password enabled ("Set or change the controller password" on page 36)
• Plaintext volumes disabled ("Enabling/disabling plaintext volumes" on page 45)
• Local Key Cache disabled
Applies to Remote Key Management Mode only
Encrypted backups
At system startup, all encrypted data-at-rest becomes accessible to the host system in unencrypted form via the
controller and the appropriate keys. This method of startup allows the system to boot into an operating system
installed on an encrypted volume. As a result, encrypted backups are not available, and all data appears

Planning 14
unencrypted when accessed from the host system and placed on tape. Software or hardware utilizing an
independent encryption feature is not impacted by HP Secure Encryption.
Security domains
A security domain is a blueprint for separating out different groups of servers or key management escrows
where access to a set of keys is inhibited by the structure of the various domains. The best mechanisms for
establishing separate security domains are either through the use of separate HP ESKM or via the use of
groups within the HP ESKM. Unique groups provide a software mechanism for each server to partition off
their key sets from one server to another. Groups are created on the HP ESKM and assigned to a server via
the HP iLO Key Manager page. For more information, see "Remote Key Management Mode (on page 17)."
Deployment scenarios
Remote and local key management requirements
Use the table below to determine which encryption mode is right for you.
Mode parameters Local Key Management Mode Remote Key Management Mode
Number of servers <99 (recommended) 100 or more
Support of HP ESKM by customer
No Yes
Utilize Integrated Lights Out (iLO)
Advanced or Scale Out License in the
infrastructure
No Yes
Requirement to escrow keys No Yes
Manual tracking of keys Yes No
Poor or no network connectivity to HP
ESKM
Yes No

Configuration 15
Configuration
Local key management mode
Local Key Management Mode, or Local Mode, is a solution designed for small to medium-size data centers
using few encrypting controllers. The solution utilizes a paraphrase password, or Master Encryption Key
name, to set the security on the controller and enable encryption. The paraphrase password must be tracked
independently of the controllers, in case the controller needs replacement or drive migration is required
among controllers with different passwords. In local mode, the Master Key name is considered a
cryptographic secret and should be protected as such. Key creation and management is maintained at the
local controller level without the use of a key manager.
Characteristics
• Requires physical paraphrase password management, such as writing and storing Master Key
information in a notebook or computer file
• Utilizes one paraphrase password-derived 256-bit key to encrypt a unique, per-volume XTS-AES
256-bit data encryption key
Prerequisites
• An installed HP Smart Array Controller compatible with HP Secure Encryption
• A valid HP Secure Encryption license for each drive to be encrypted
• HP Smart Storage Administrator v1.60.xx.0 and later
• HP ProLiant Gen8 or later server
Configuring the controller (local mode)
IMPORTANT: HP recommends that you keep a record of the Master Encryption Keys when
encryption is configured in Local Mode. The local Master Encryption Key is not displayed by any
available tool or firmware because it is considered a cryptographic secret by FIPS 140-2. HP
Secure Encryption design follows the NIST architecture requirements and does not allow HP to
assist in the recovery of a lost Master Encryption Key.
To configure the controller to operate in Local Key Management Mode:
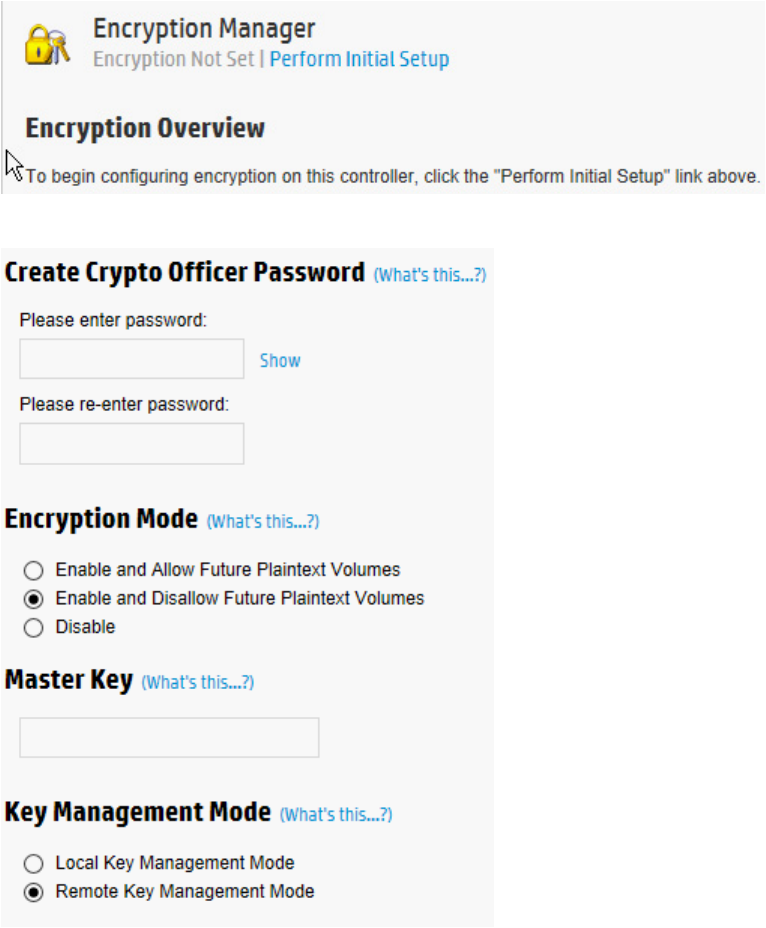
1. Open Encryption Manager ("Opening Encryption Manager" on page 33).

Configuration 16
2. Click Perform Initial Setup.
The following screen appears.
3. Complete the following:
o Under Create Crypto Officer Password, enter, and re-enter the password in the fields provided.
o Under Encryption Mode, select either:
— Enable and Allow Future Plaintext Volumes: Allowing future plaintext volumes still requires
authentication by the Crypto Officer or the User before a plaintext volume can be created.
— Enable and Disallow Future Plaintext Volumes: This option prevents the creation of new plaintext
volumes on the controller. This setting can be changed later by the Crypto Officer. Selecting this
option does not prevent the migration of a set of drives with existing plaintext volumes to the
controller.
o Enter the Master Key name in the field provided. The Master Key name must be between 10 and 64
characters.

Configuration 17
o Under Key Management Mode, select Local Key Management Mode.
4. Click OK.
5. A warning appears, prompting the user to record the Master Key. Click Yes to continue.
6. If you have read and agree to the terms of the EULA, select the check box and click Accept.
7. A summary screen appears indicating the controller has been successfully configured for encryption
use. Click Finish to continue.
8. The Encryption Manager screen appears with updated Settings, Accounts and Utilities options.
IMPORTANT: HP recommends setting up a password recovery question and answer after initial
configuration. If the Crypto Officer password is lost and a recovery question and answer have not
been set, you will need to erase and reconfigure all HP Secure Encryption settings in order to reset
the Crypto Officer password. For more information, see "Set or change the password recovery
question (on page 35)."
Remote Key Management Mode
IMPORTANT: HP Enterprise Secure Key Manager 3.1 and later must already be installed and
configured to operate HP Secure Encryption in Remote Mode. For more information, see
"Configuring the HP ESKM 3.1 ("Configuring the HP ESKM" on page 18)."
In Remote Key Management Mode, keys are imported and exported between the controller and the HP
ESKM, which provides a redundant, secure store with continuous access to the keys. To enable key
exchanges between the HP Smart Array Controller and the HP ESKM, a network connection is required both
during pre-OS boot time and during OS operations. Because the controller does not have direct network
access capabilities, HP iLO provides the necessary network access to facilitate key exchanges between the
controller and the HP ESKM. HP iLO has both network presence and is constantly running on AUX power
regardless of the server state. The keys exchanged between HP iLO, HP ESKM, and the controller are all
secured.
Characteristics
• High volume key storage
• Keys are kept in separate storage from servers to protect against physical removal
• Requires network availability and a remote key management system
Configuring Remote Key Management Mode
IMPORTANT: HP Secure Encryption and other HP encryption client products must be
coordinated for a successful installation and configuration. It is recommended to refer to each
product's user guide to ensure proper installation and encryption protection.
To configure HP Secure Encryption to operate in Remote mode:
1. Configure the HP ESKM ("Configuring the HP ESKM" on page 18). For more information about
installation, configuration and operation of the HP ESKM, see the HP Enterprise Secure Key Manager
User Guide and the HP Installation and Replacement Guide.
2. Connect HP iLO to the HP ESKM ("Connecting HP iLO to HP ESKM" on page 29).
3. Install HP SSA. For more information, see the HP Smart Storage Administrator User Guide.

Configuration 18
4. Configure the HP Smart Array Controller ("Configuring the controller (remote mode)" on page 31,
"Configuring the controller (local mode)" on page 15).
Configuring the HP ESKM
1. Log in to the HP ESKM ("Logging in to the HP ESKM" on page 18).
2. Create initial user accounts ("Adding a user" on page 18).
a. Create a temporary user account for deployment.
b. Create a user account to host Master Encryption Keys.
3. Create a group ("Adding a group" on page 20).
4. Assign the user account for hosting Master Encryption Keys to the group created in step 3 ("Assigning
a user to a group" on page 21).
5. Create a Master Encryption Key to be used by the controller ("Creating a Master Key" on page 24).Be
sure to set the owner of the key to the user account created to host the Master Encryption Key created
in Step 2b.
6. Place the Master Encryption Key in the group created in step 3 ("Placing a key in a group" on page 25).
Logging in to the HP ESKM
1. Open a new browser window and enter the IPv4 address and web administration port number using
https. The port is user-configurable. The default port is 9443.
Example: https://11.12.13.14:9443
2. Log in using administrator credentials.
Adding a user
IMPORTANT: Passwords must contain at least five different characters. Passwords cannot:
• Contain only whitespace
• Resemble a phone number, dictionary word or reversed dictionary word
• Be based on the username associated with the password
The deployment user is the first user account created and is typically deleted after initial configuration has
been completed. It is a temporary account set up to allow HP iLO to connect to the HP ESKM and begin using
keys. Subsequent standard user accounts are assigned Master Encryption Keys and are not considered
temporary.
To add a user:
1. Log in to the HP ESKM ("Logging in to the HP ESKM" on page 18).
Configuration 19
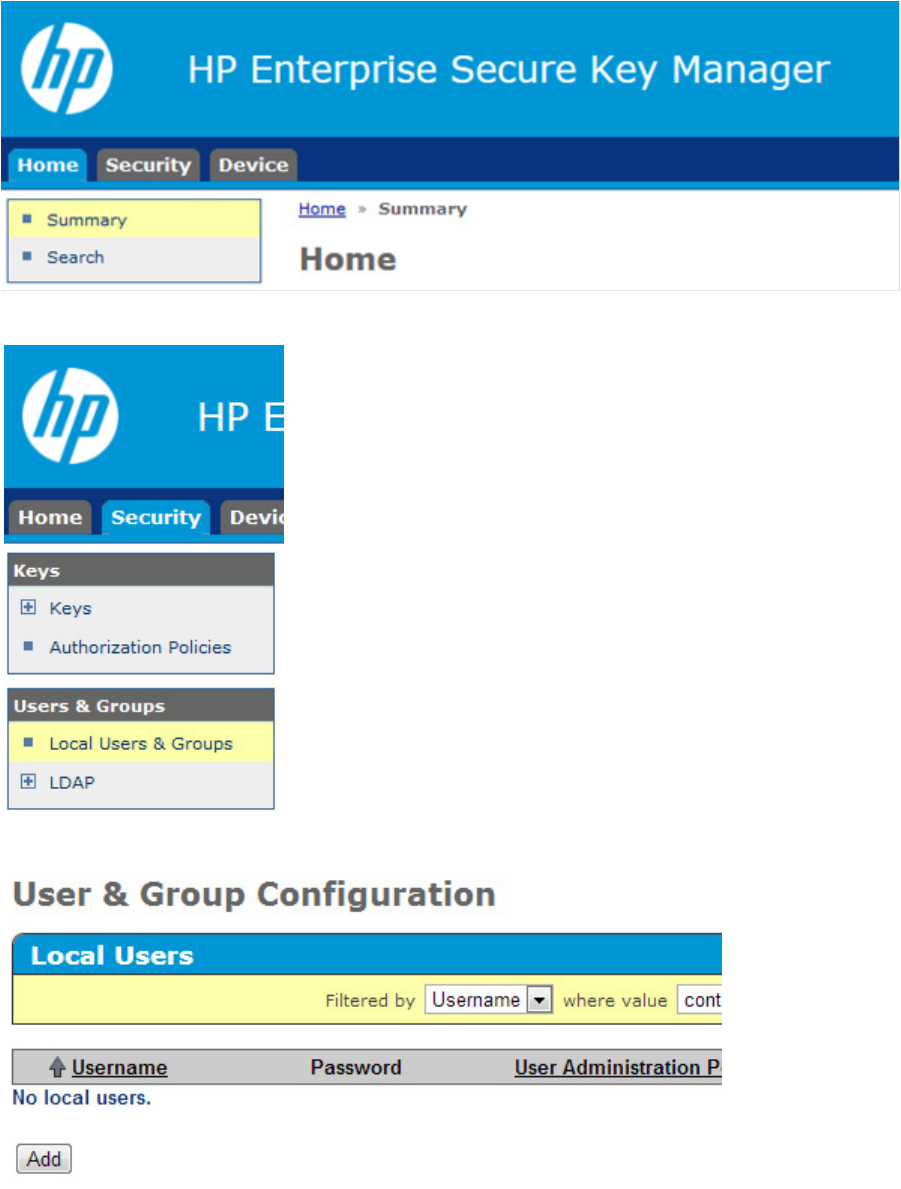
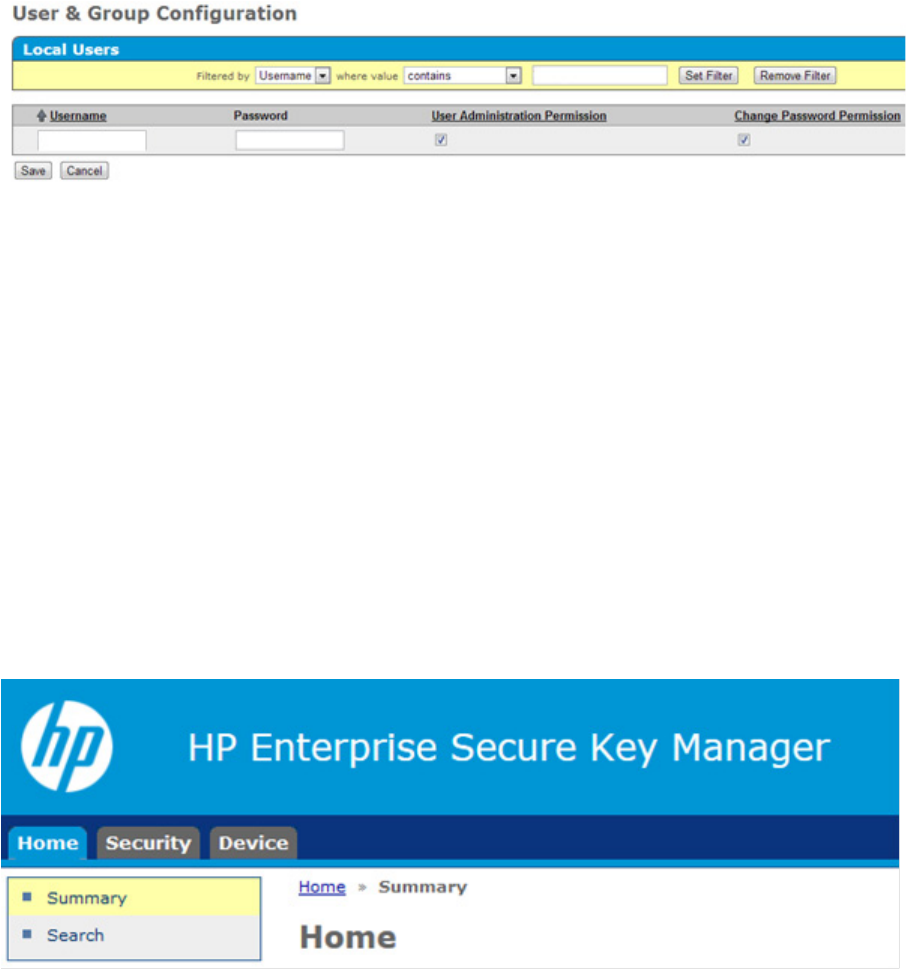
2. Click the Security tab.
3. Click Local Users & Groups.
4. Under Local Users, click Add.
Configuration 20
The following fields appear.
5. Complete the following fields:
a. Username
b. Password
c. If this is the deployment user account, select the User Administration Permission and Change
Password Permission check boxes.
d. If this is a standard user account, leave the User Administration Permission and Change Password
Permission check boxes empty.
6. Click Save.
Adding a group
Groups enable you to organize a set of servers together and restrict access only to a specific set of users.
To add a group:
1. Log in to the HP ESKM ("Logging in to the HP ESKM" on page 18).
2. Click on the Security tab.

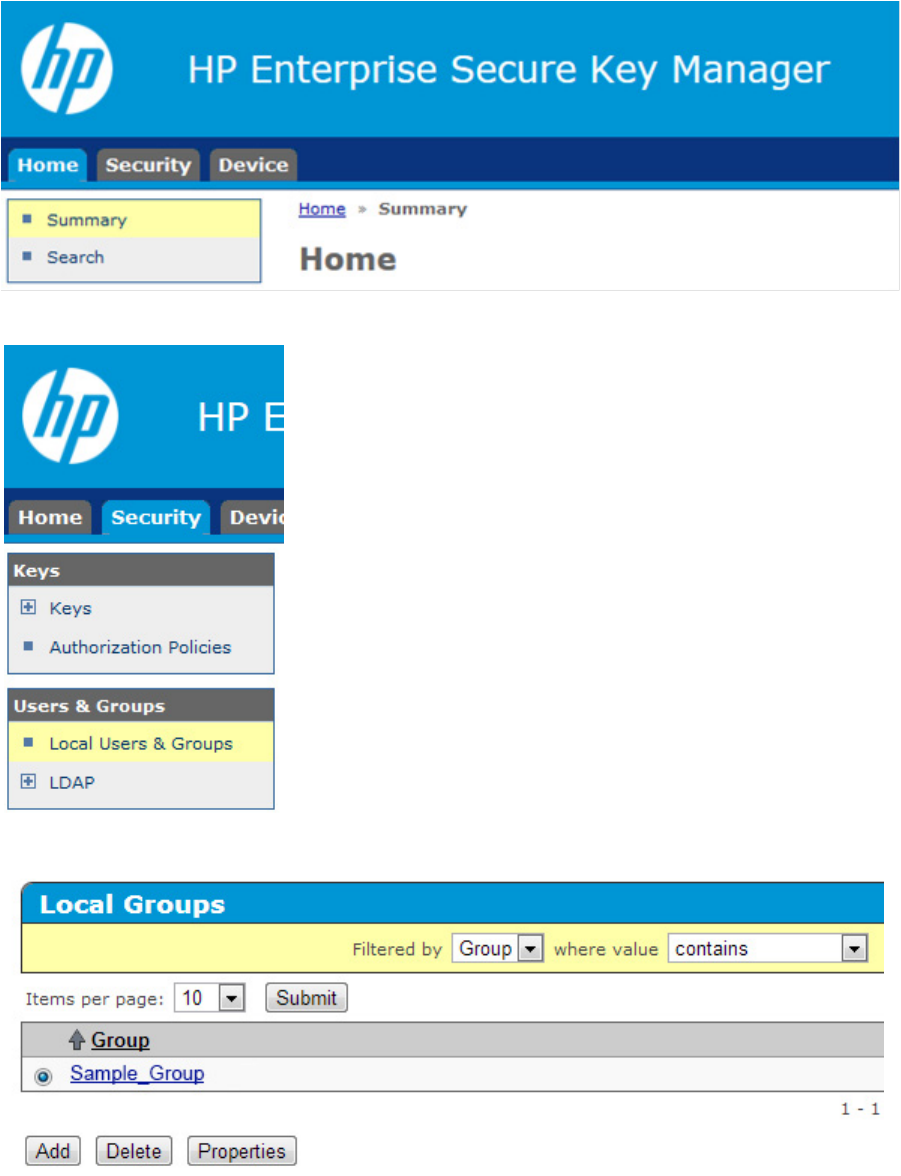
Configuration 22
2. Click on the Security tab.
3. Click Local Users & Groups.
4. Under Local Groups, select the group name and click Properties.
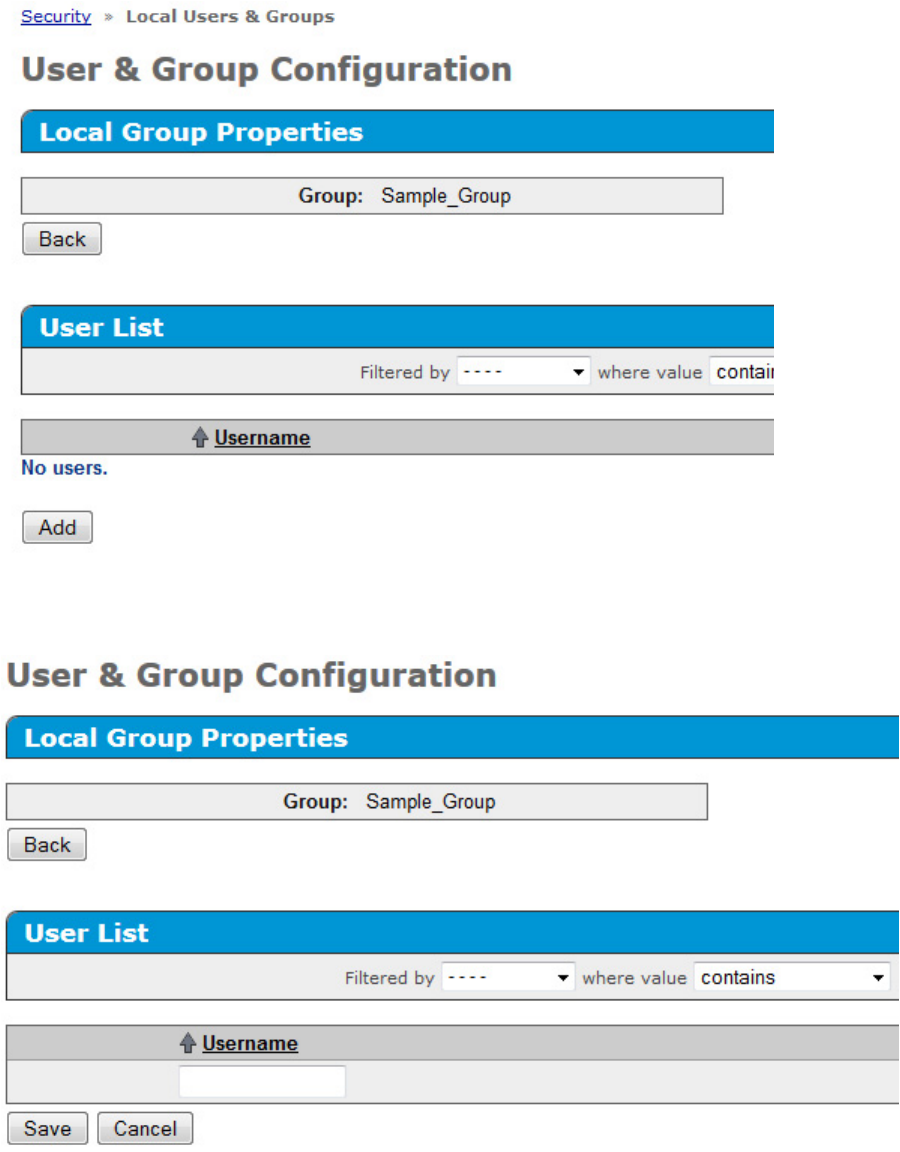
Configuration 23
A new window appears, listing the group properties.
5. Click Add.
6. Enter the Username in the field provided.
7. Click Save.

Configuration 24
Creating a Master Key
The steps below outline how to create a key in the HP ESKM. The HP ESKM does not differentiate between
key types such as Master Encryption Key or Drive Encryption Key. If creating a Master Encryption Key, HP
recommends applying a specific Master Encryption Key naming convention to distinguish the Master Key
from all other keys created in the HP ESKM.
To create a key:
1. Log in to the HP ESKM ("Logging in to the HP ESKM" on page 18).
2. Click the Security tab.
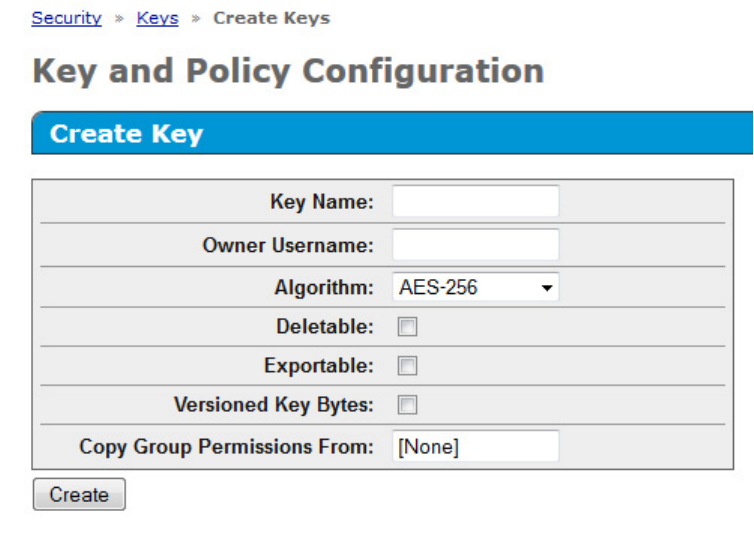
3. From the left side panel, expand the Keys menu, and then click Create Keys.
The following screen appears.
Configuration 25
4. Under the section Create Key, complete the following:
o Key Name: Enter the preferred key name.
The name must consist only of US-ASCII letters, numbers, or the underscore or hyphen characters,
and must be between 8 and 64 characters. The minimum character length is required by the Smart
Array controller, not by the ESKM.
o Owner Username: Enter the name of the user account to be paired with the key. If creating the
Master Encryption Key, do not assign keys to the deployment user account.
o Algorithm: Select AES-256.
o Select the Exportable checkbox. Leave the remaining fields as the default values.
5. Click Create. You will receive a notification that the key was created successfully.
Placing a key in a group
A key must be assigned a group in order to enable access by HP iLO. To place a key in a group, do the
following:
1. Run a key query and locate the key created ("Running a key query" on page 25).
2. Assign the key to a group ("Assigning a key to a group" on page 27).
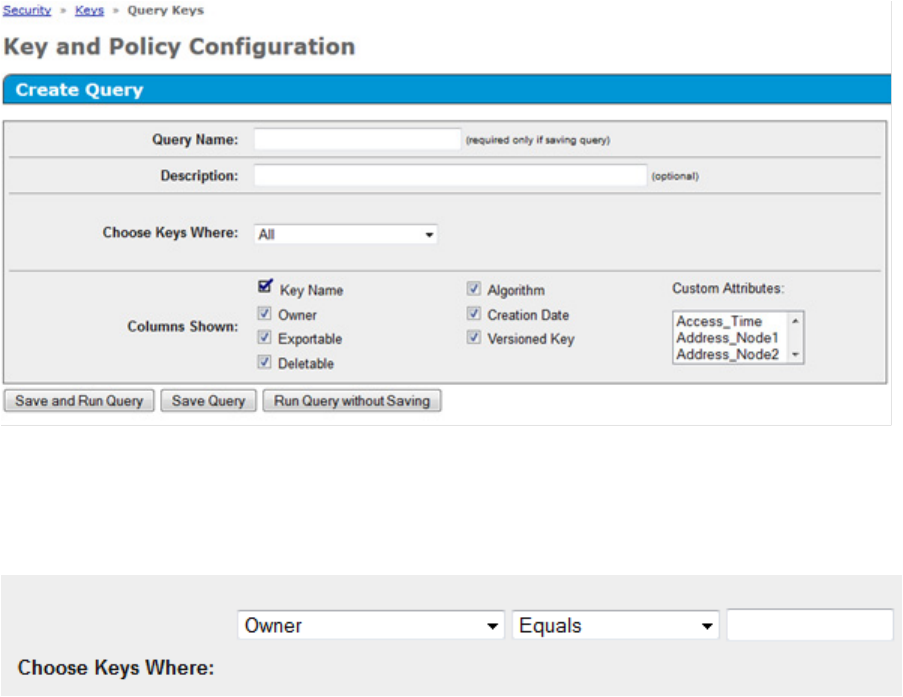
Running a key query
1. Log in to the HP ESKM ("Logging in to the HP ESKM" on page 18).
2. Click the Security tab.
Configuration 26
3. From the left side panel, expand the Keys menu and click Query Keys.
Configuration 27
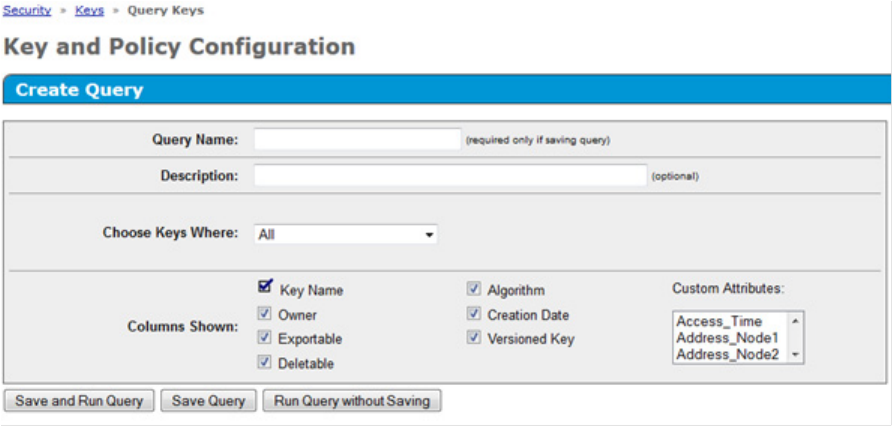
The following screen appears.
4. Under Create Query, complete the following:
a. Query Name: Enter a query name here. Your query will be saved for future use.
b. Choose Keys Where drop down menu: select Owner, or Key Name. Two additional Choose Keys
Where fields appear.
5. Complete the following fields:
a. Field 1: Leave as default.
b. Field 2: Leave as default.
c. Field 3: Enter the user account name associated with the Master Key, or the Master Key name,
depending on your selection for Choose Keys Where.
6. Click Save and Run Query. A results screen appears, displaying the Master Key name.
Assigning a key to a group
1. Log in to the HP ESKM ("Logging in to the HP ESKM" on page 18).
2. Run a key query for the preferred key ("Running a key query" on page 25).
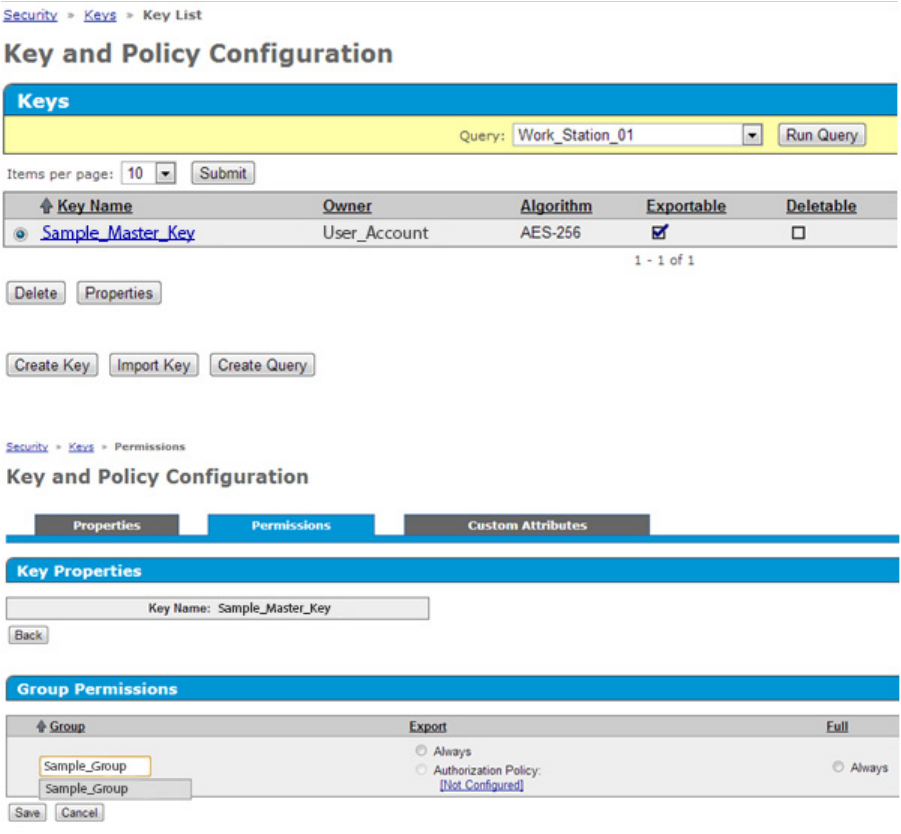
Configuration 28
3. Select the key, and then click Properties.
4. A new Key and Policy Configuration screen appears. Click the Permissions tab.
5. Under Group Permissions, complete the following:
a. In the Group field, enter the Group name created previously.
b. Under Export, select Always.
6. Click Save. The screen will refresh and list the group permissions.
Configuring HP iLO
Integrated Lights Out (iLO) manages key exchanges between the HP ESKM and the Smart Array controller.
HP iLO initially uses user credentials with administrative privileges created on the HP ESKM to automatically
register and create a private, unique, MAC address-based username account for all key exchanges. The
administrative account is termed the deployment user account. All HP iLO accounts can be viewed in the HP
ESKM under Users And Groups and take the form iLO-MAC Address. The HP iLO-specific account is placed
in the group indicated in the group field on the HP iLO Key Manager page. If the group does not exist, HP
iLO creates one and places the account in that group along with all future keys generated.
Prerequisites
Configuration 29
• The HP ESKM must be configured with a deployment user. For more information, see "Configuring the
HP ESKM (on page 18)."
• HP iLO must be installed and operating properly with the appropriate iLO-supporting license. For more
information, see the HP website (http://www.hp.com/go/ilo).
Connecting HP iLO to HP ESKM
If you intend to use a second HP ESKM for a redundant key repository, complete the fields under Secondary
Key Server and select the Enable Enterprise Secure Key Manager Redundancy checkbox. HP strongly
recommends a redundant pair of HP ESKM devices in a cluster configuration.
To connect HP iLO to the HP ESKM:
1. Log in to HP iLO using your server's credentials.
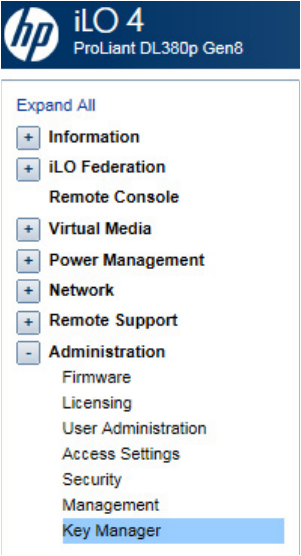
2. From the left side panel, expand the Administration menu and select Key Manager.
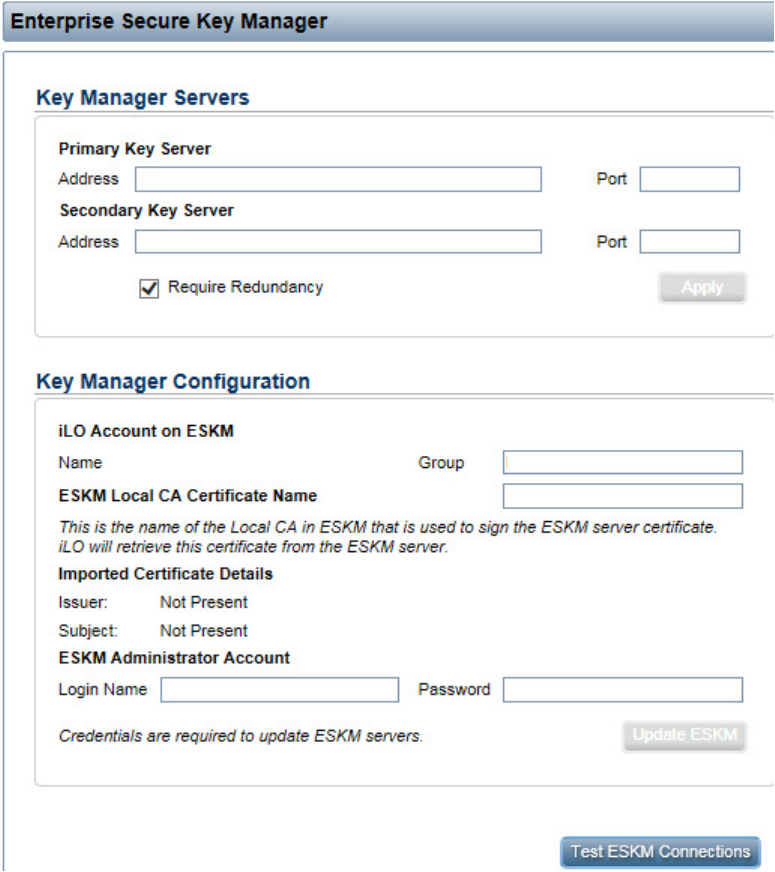
Configuration 30
3. The Enterprise Secure Key Manager configuration page appears.
4. Under Key Manager Servers, complete the following:
a. Primary Key Server:
— Enter the primary IP address of the HP ESKM in the Address field.
— Enter the primary port number of the HP ESKM in the Port field. This port number should match
the value on the HP ESKM, located on the Device tab under KMS Server Settings. SSL should be
enabled on the HP ESKM as well.
b. Optional: Secondary Key Server:
— Enter the secondary IP address of the HP ESKM in the Address field.
— Enter the secondary port number of the HP ESKM in the Port field.
c. Optional: Select the Require Redundancy checkbox.
5. Click Apply. A confirmation message appears.
Configuration 31
6. Under Key Manager Configuration, enter the group name created previously in the HP ESKM in the
Group field.
7. Under ESKM Administrator Account, complete the following fields using the deployment username and
password created earlier on the HP ESKM.
a. Login Name: Enter the deployment account username.
b. Password: Enter the deployment account password.
8. Click Update ESKM. A confirmation screen appears indicating the configuration was saved and
connected successfully.
Configuring the controller (remote mode)
1. Open Encryption Manager ("Opening Encryption Manager" on page 33).
2. Click Perform Initial Setup.
A new screen appears.

Configuration 32
3. Complete the following:
o Under Create Crypto Officer Password, enter and re-enter the password in the fields provided.
o Under Encryption Mode, select one of the following:
— Enable and Allow Future Plaintext Volumes: Allowing future plaintext volumes still requires
authentication by the Crypto Officer or the User if attempting to create a plaintext logical drive.
— Enable and Disallow Future Plaintext Volumes: This option prevents the creation of new plaintext
volumes on the controller. This setting can be changed later by the Crypto Officer. Selecting this
option does not prevent the migration of a set of drives with existing plaintext volumes to the
controller.
o Enter the name of the Master Key that was created on the ESKM in the field provided. The Master
Key name must be between 8 and 64 characters.
o Under Key Management Mode, select Remote Key Management Mode.
4. Click OK.
5. A EULA screen appears. If you have read and agree to the terms of the EULA, select the check box and
click Accept.
6. A summary screen appears indicating the controller has been successfully configured for encryption
use. Click Finish to continue.
7. The Encryption Manager home screen appears with updated Settings, Accounts, and Utilities options.
IMPORTANT: HP recommends setting up a password recovery question and answer after initial
configuration. If the Crypto Officer password is lost and a recovery question and answer have not
been set, you will need to erase and reconfigure all HP Secure Encryption settings in order to reset
the Crypto Officer password. For more information, see "Set or change the password recovery
question (on page 35)."
Operations 33
Operations
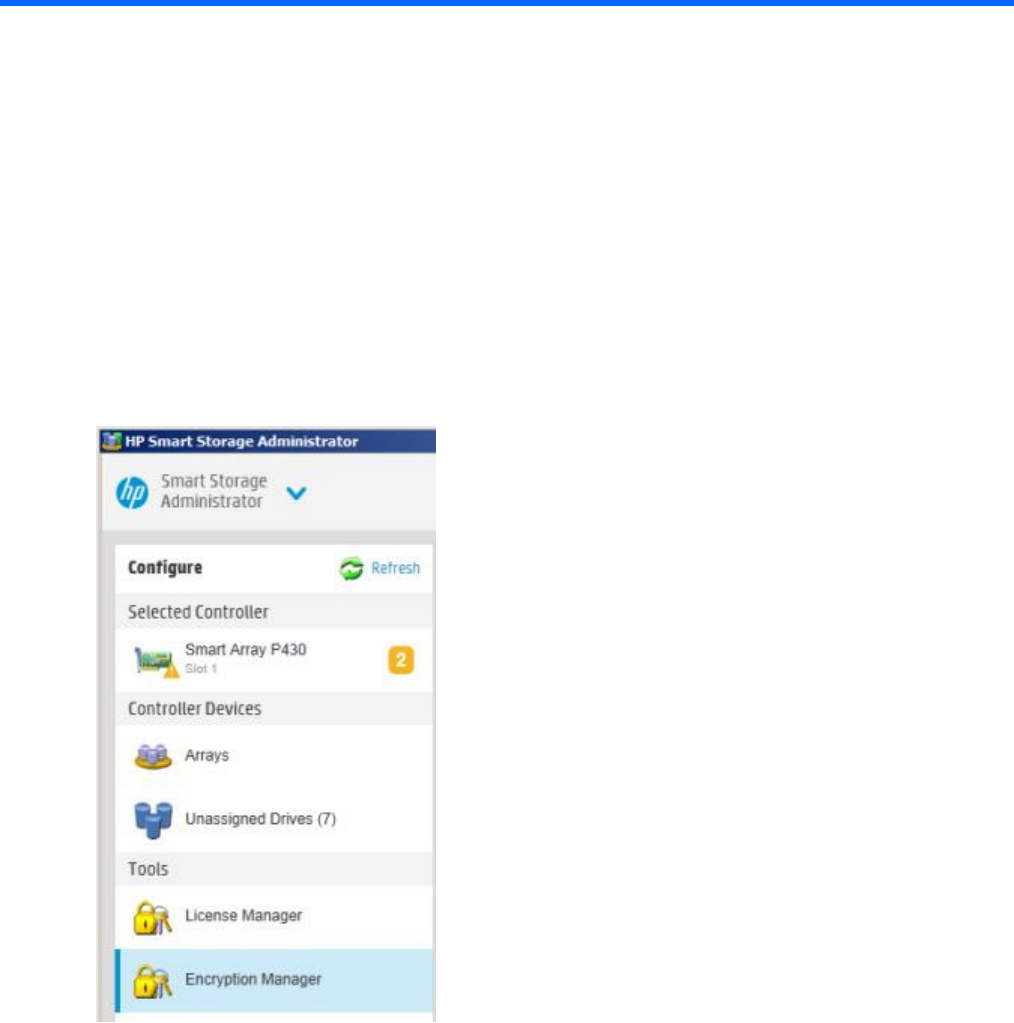
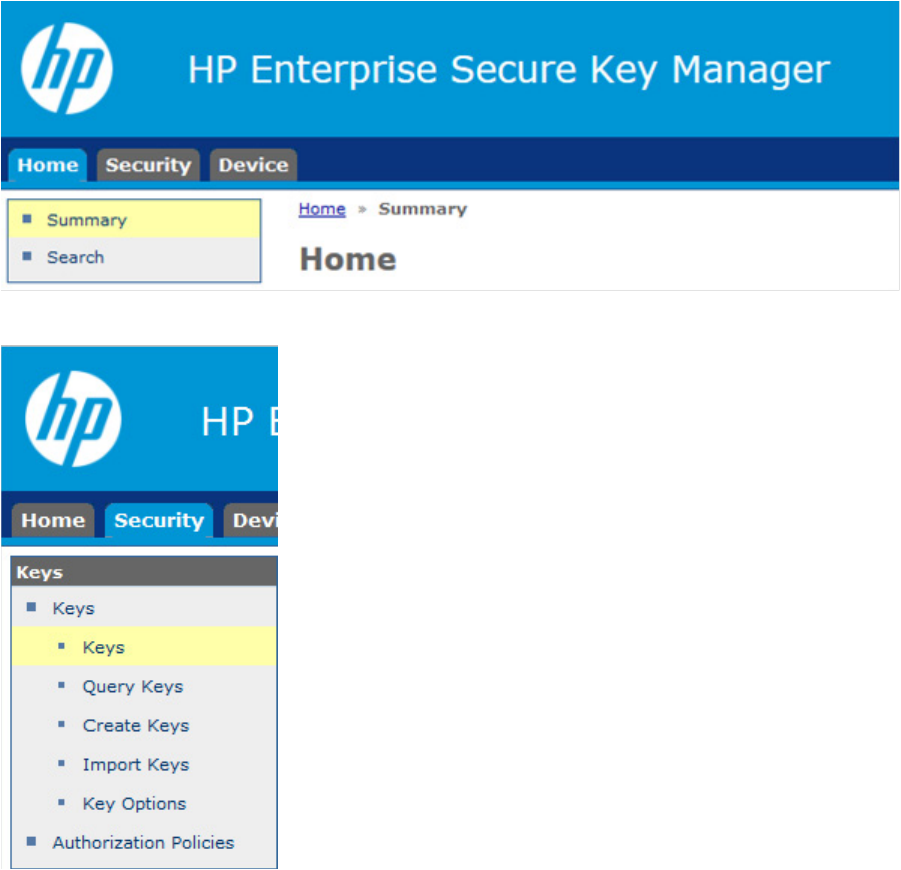
Accessing Encryption Manager
Opening Encryption Manager
1. Start HP SSA. For more information, see the HP Smart Storage Administrator User Guide.
2. Select an HP Secure Encryption-compatible controller.
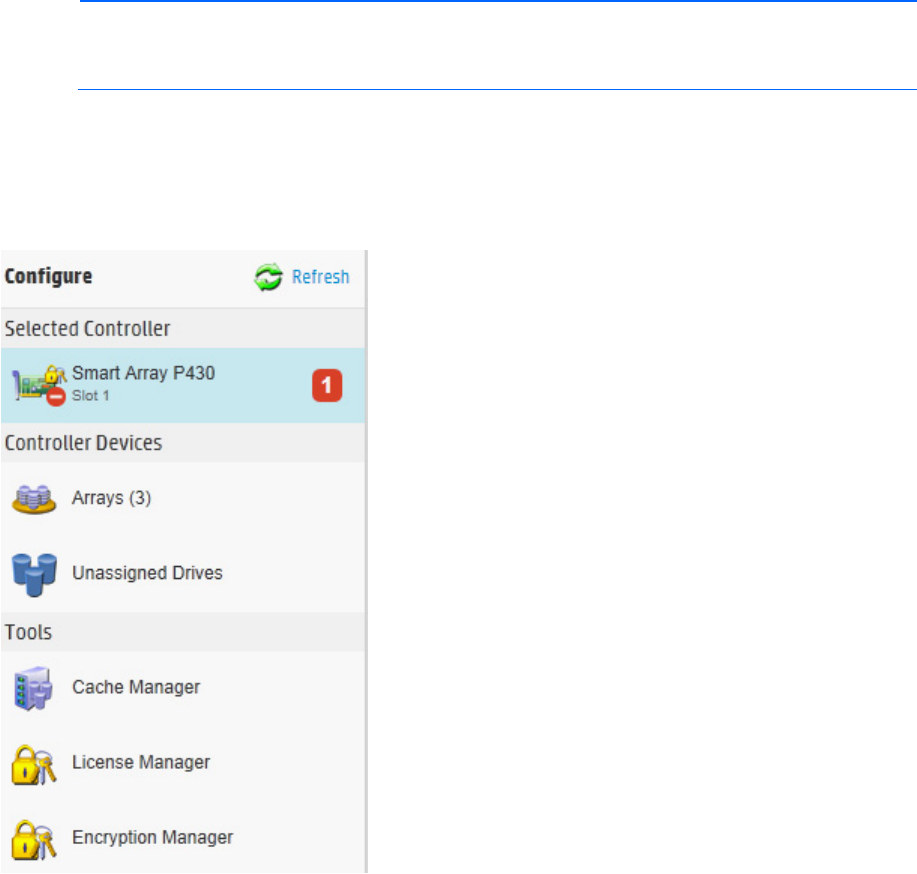
3. Click Configure.
4. Under Tools, click Encryption Manager.
Logging into Encryption Manager
1. Open Encryption Manager ("Opening Encryption Manager" on page 33).
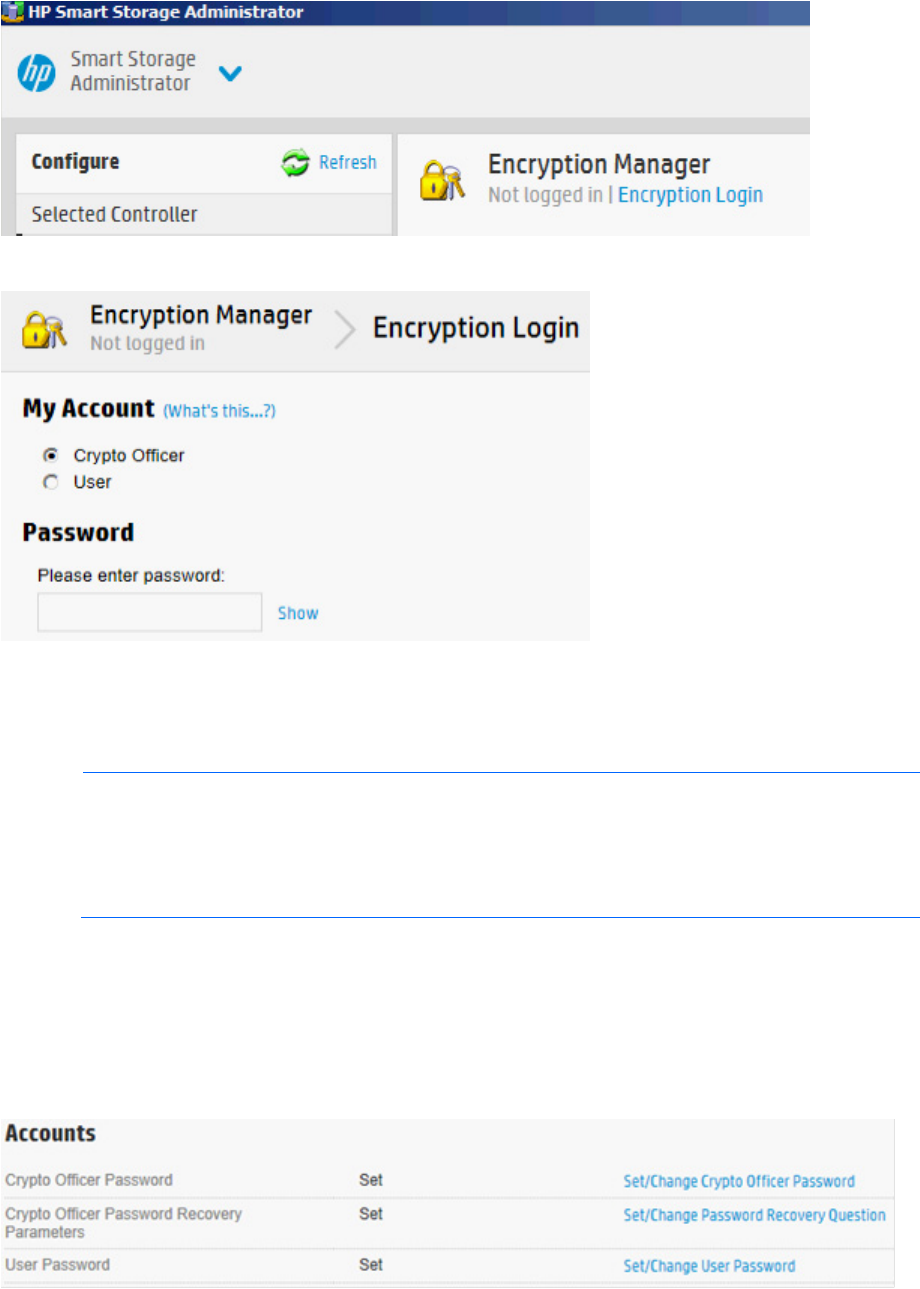
Operations 34
2. Click Encryption Login.
3. A new window appears. Select an account to log in with and enter the password in the field provided.
4. Click OK to continue.
Managing passwords
NOTE: Valid passwords must be 8 to 16 US-ASCII characters long and contain the following:
• At least one lowercase letter
• At least one uppercase letter
• At least one number
• At least one non-alphanumeric character, such as # or $
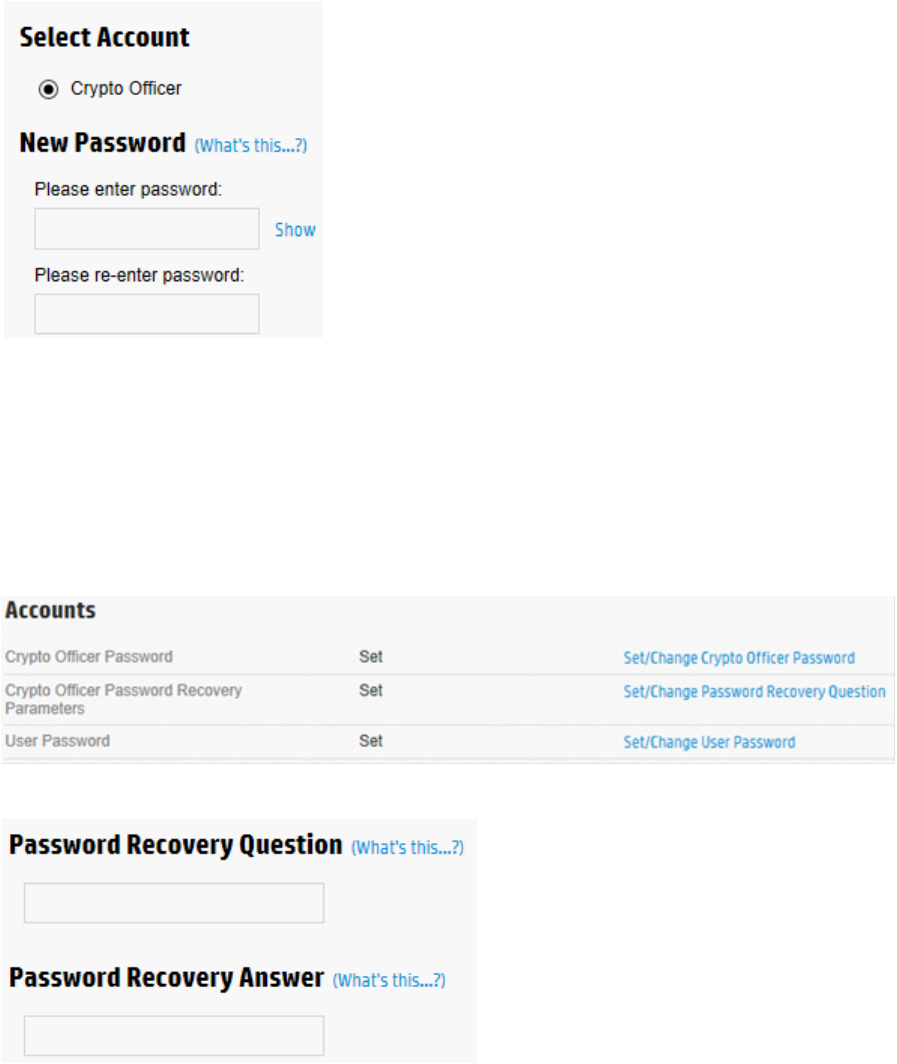
Set or change the Crypto Officer password
1. Open Encryption Manager ("Opening Encryption Manager" on page 33).
2. Log in as the Crypto Officer ("Logging into Encryption Manager" on page 33).
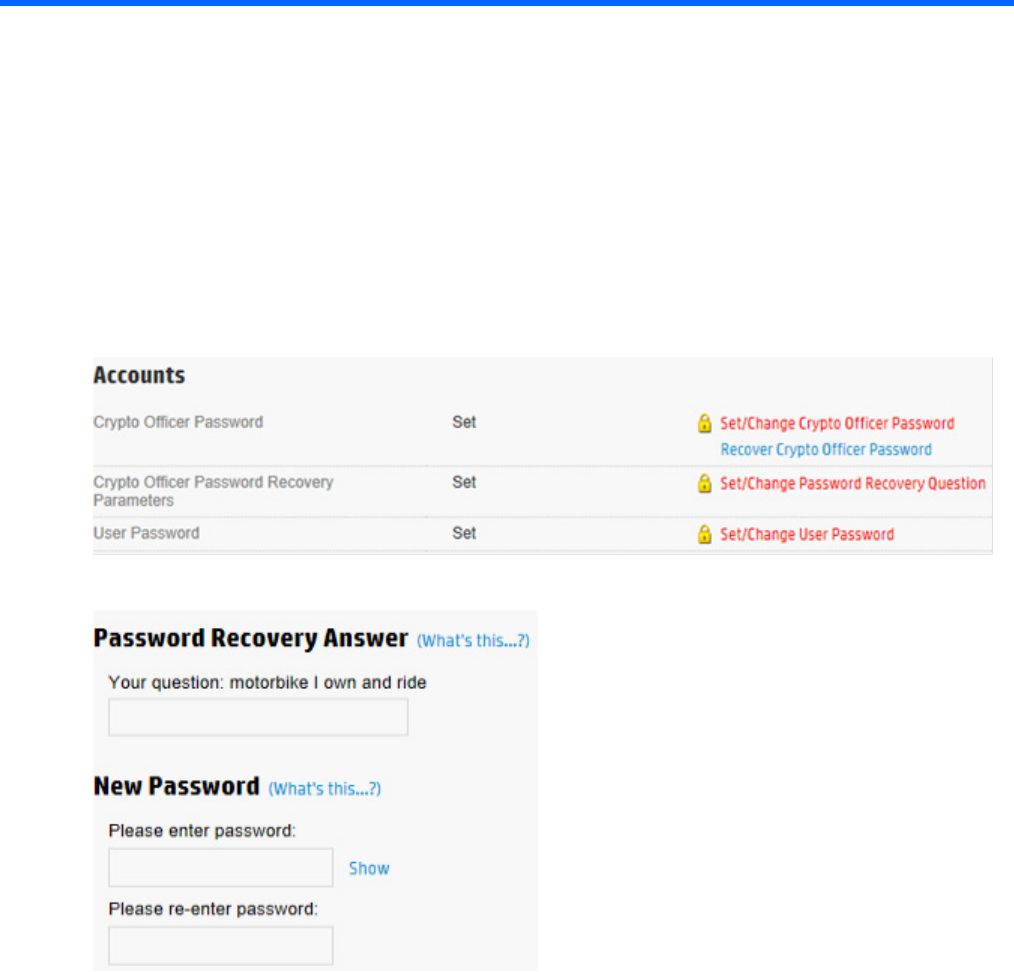
3. Under Accounts, locate Crypto Officer Password. Click Set/Change Crypto Officer Password.
Operations 35
4. A new window appears. Enter in the new password in the New Password fields.
5. Click OK.
Set or change the password recovery question
1. Open Encryption Manager ("Opening Encryption Manager" on page 33).
2. Log in as the Crypto Officer ("Logging into Encryption Manager" on page 33).
3. Under Accounts, locate Crypto Officer Password Recovery Parameters. Click Set/Change Password
Recovery Question.
A new window appears.
4. Complete the following fields:
a. Password Recovery Question: Enter a question to which only you know the answer.
b. Password Recovery Answer: Enter the answer to the question entered above.
5. Click OK.
Set or change user account password
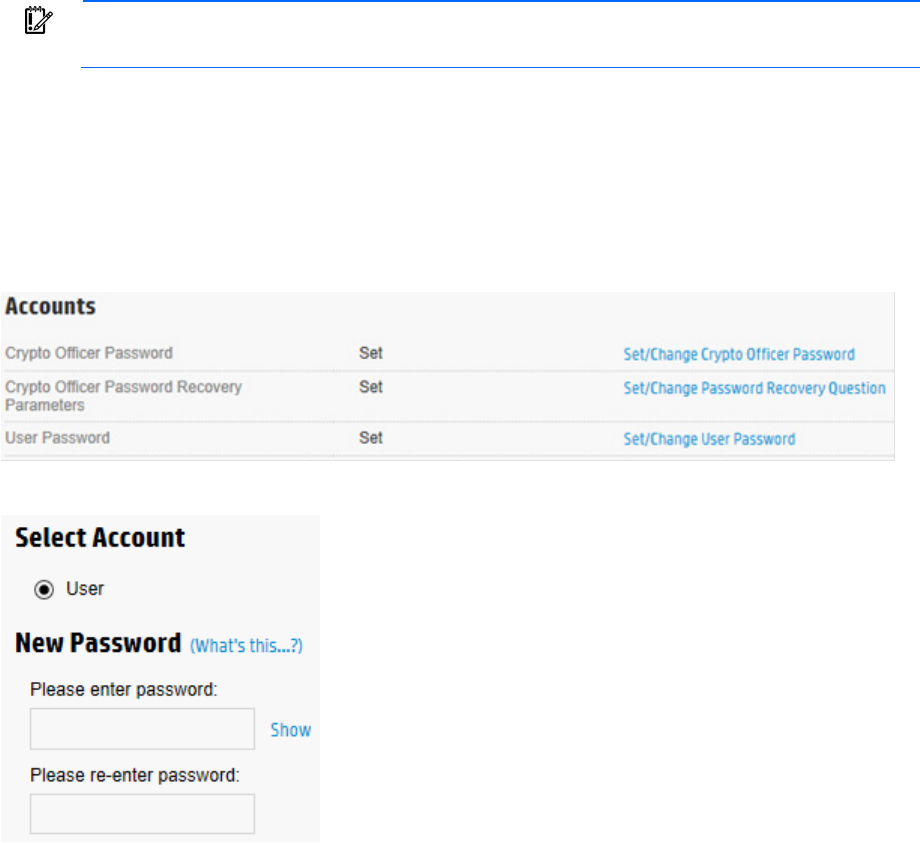
Operations 36
IMPORTANT: If this is the first time setting the User password, you must be logged in as the
Crypto Officer.
The User account is disabled by default until the Crypto Officer sets the User account password for the first
time.
To set or change the User account password:
1. Open Encryption Manager ("Opening Encryption Manager" on page 33).
2. Log in to the Encryption Manager ("Logging into Encryption Manager" on page 33).
3. Under Accounts, locate User Password. Click Set/Change User Password.
4. A new window appears. Enter and re-enter the new password in the New Password fields.
5. Click OK.
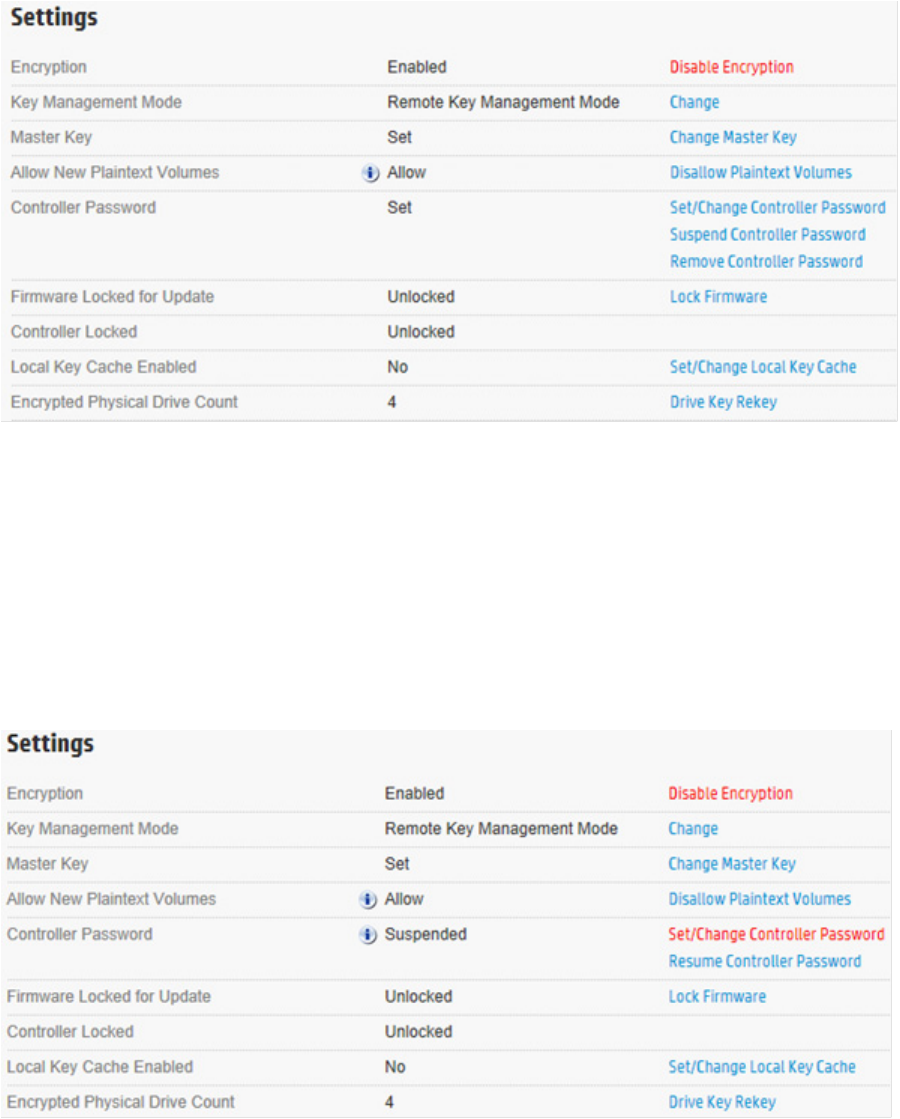
Set or change the controller password
A controller password enables all encrypted volumes on the controller to be offline at startup until the
controller password is entered.
The "Set/Change Password" action enables the controller password feature and sets the initial password.
After a password is set, re-executing this action replaces the existing controller password with a new one.
This procedure can only be performed by the Crypto Officer. The controller password cannot be changed
while the controller password feature is suspended or while the controller is locked. However, the controller
password can be removed by the Crypto Officer and later reset.
To set or change the controller password:
1. Open Encryption Manager ("Opening Encryption Manager" on page 33).
2. Log in to Encryption Manager ("Logging into Encryption Manager" on page 33).
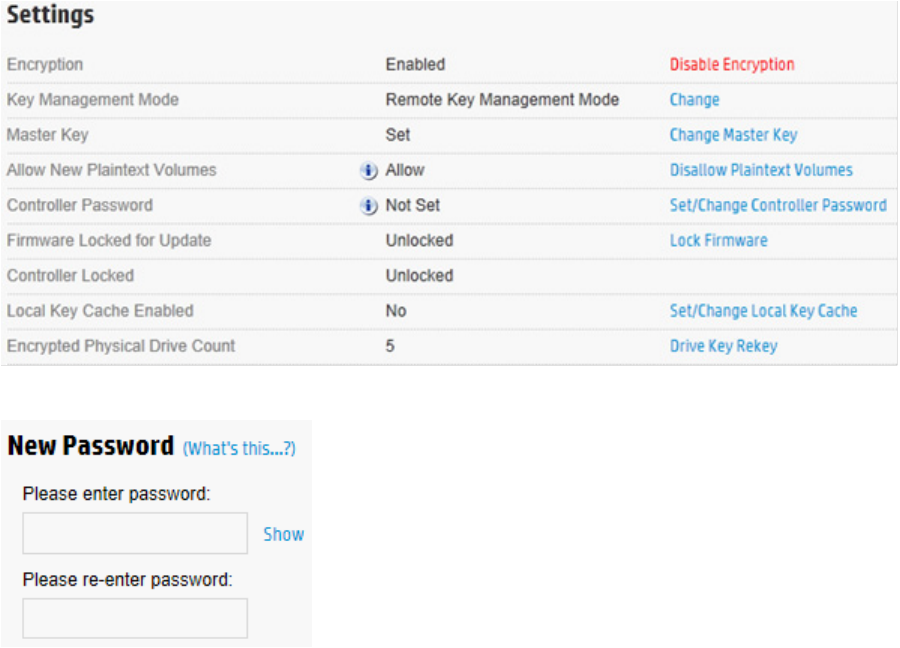
Operations 37
3. Under Settings, locate Controller Password. Click Set/Change Controller Password.
4. A new window appears. Enter and re-enter the new password in the New Password fields.
5. Click OK.
Suspending the controller password
The controller does not prompt for a password at system startup if the controller password is suspended. If
suspended, the controller password feature can be resumed without requiring a password reset.
To suspend the controller password:
1. Open Encryption Manager ("Opening Encryption Manager" on page 33).
2. Log in to Encryption Manager ("Logging into Encryption Manager" on page 33).
Operations 38
3. Under Settings, locate Controller Password. Click Suspend Controller Password.
4. A new window appears, asking if you want to suspend the controller password. Click Yes to continue.
Resuming the controller password
Resuming a suspended controller password re-enables password prompts at system startup.
To resume the controller password:
1. Open Encryption Manager ("Opening Encryption Manager" on page 33).
2. Log in to Encryption Manager ("Logging into Encryption Manager" on page 33).
3. Under Settings, locate Controller Password. Click Resume Controller Password.
4. A new window appears, asking if you want to resume the controller password. Click Yes to continue.
Operations 39
Working with keys
Changing the Master Encryption Key
IMPORTANT: HP recommends that you keep a record of the Master Encryption Keys when
encryption is configured in Local Mode. The local Master Encryption Key is not displayed by any
available tool or firmware because it is considered a cryptographic secret by FIPS 140-2. HP
Secure Encryption design follows the NIST architecture requirements and does not allow HP to
assist in the recovery of a lost Master Encryption Key.
To change the Master Encryption Key:
1. Open Encryption Manager ("Opening Encryption Manager" on page 33).
2. Log in to Encryption Manager ("Logging into Encryption Manager" on page 33).
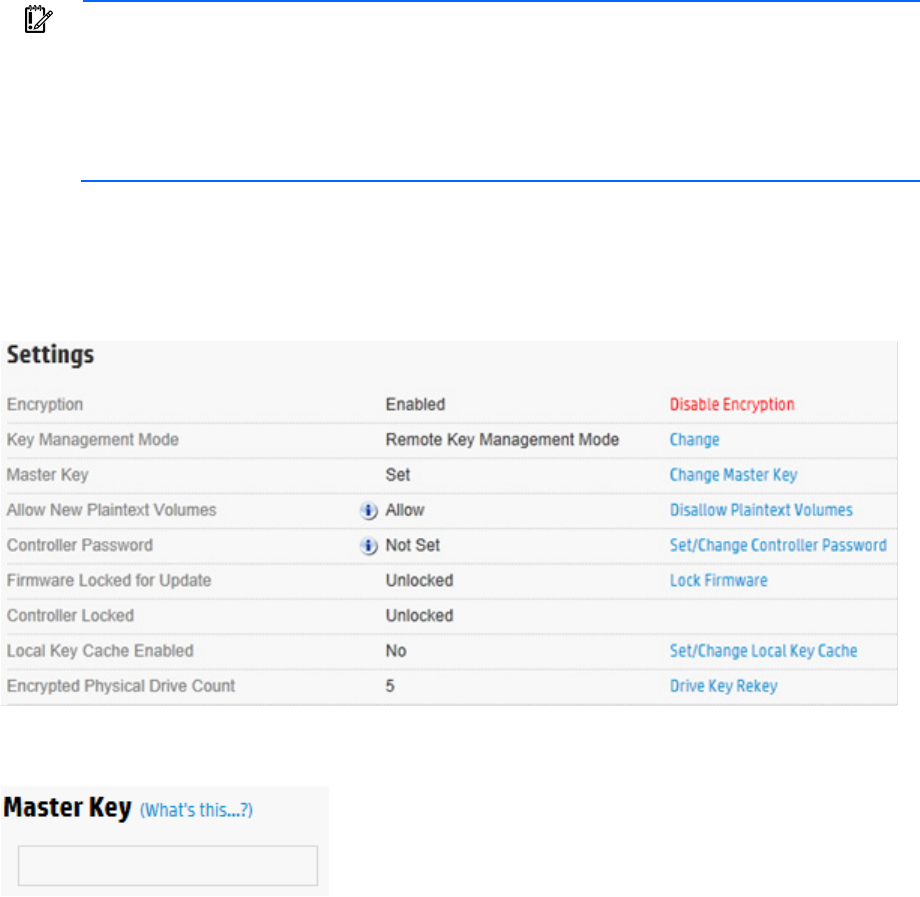
3. Under Settings, locate Master Key. Click Change Master Key.
4. A new window appears. Enter the new Master Key in the field provided. The Master Key name must be
between 8 and 64 characters.
5. Click OK.
Rekeying the Drive Encryption Keys
This procedure creates a new set of Drive Keys used for encrypting the volume keys on the controller. This task
is available to all roles in the system.
To rekey the Drive Keys:
1. Open Encryption Manager ("Opening Encryption Manager" on page 33).
2. Log in to Encryption Manager ("Logging into Encryption Manager" on page 33).
Operations 40
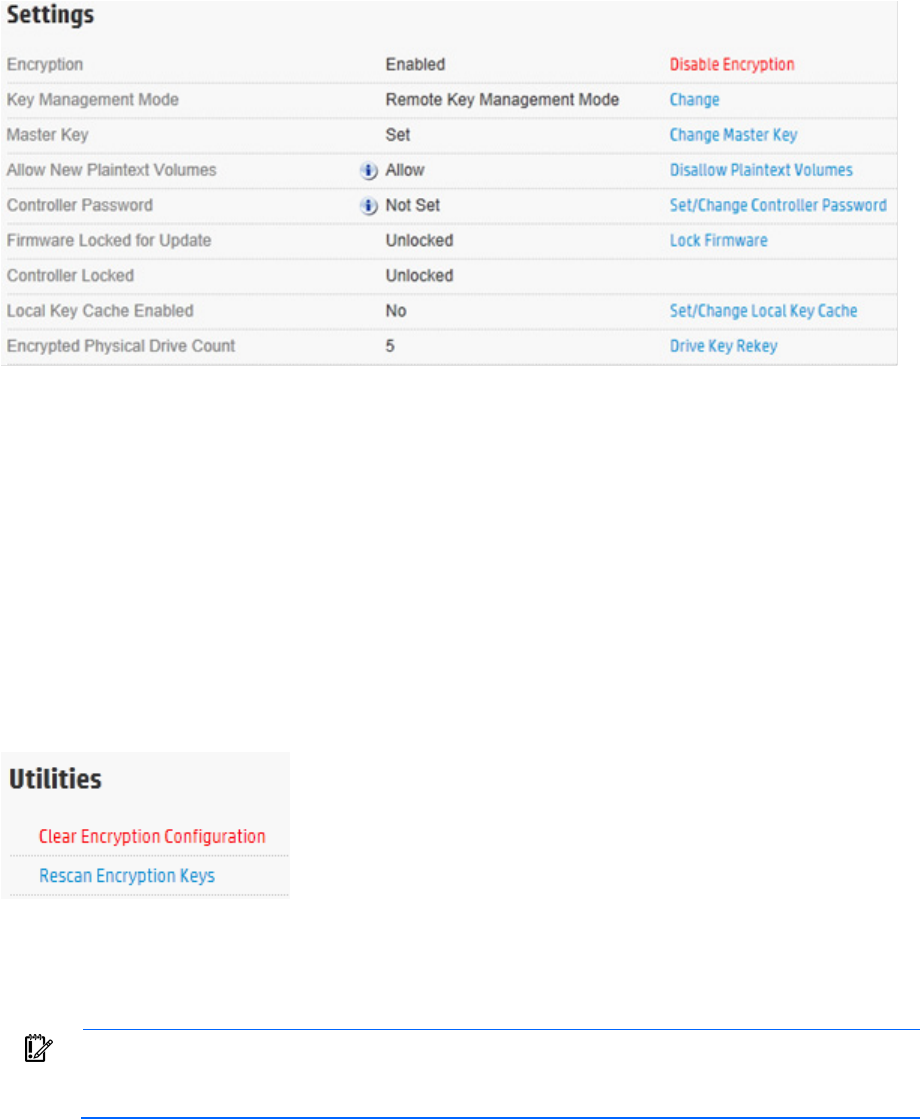
3. Under Settings, locate Encrypted Physical Drive Count. Click Drive Key Rekey.
4. A prompt appears, indicating new Drive Encryption Keys will be created for all physical drives. Click
OK to continue.
Rescanning keys
In Remote Mode, this procedure signals the controller to retrieve all encryption keys from the HP ESKM. This
procedure resolves potentially locked volumes that could have been locked as a result of failure to initially
retrieve the associated keys.
To rescan keys:
1. Open Encryption Manager ("Opening Encryption Manager" on page 33).
2. Log in to Encryption Manager ("Logging into Encryption Manager" on page 33).
3. Under Utilities, click Rescan Encryption Keys.
4. A new window appears, indicating HP iLO will retrieve keys from the HP ESKM. Click OK to continue.
Creating a plaintext volume
IMPORTANT: The controller only allows the creation of new plaintext volumes if it has been
configured to do so by the Crypto Officer. Refer to the Encryption Manager screen to determine
if plaintext volume creation is enabled on the controller.
To create a plaintext volume:
1. Start HP SSA. For more information, see the HP Smart Storage Administrator User Guide.
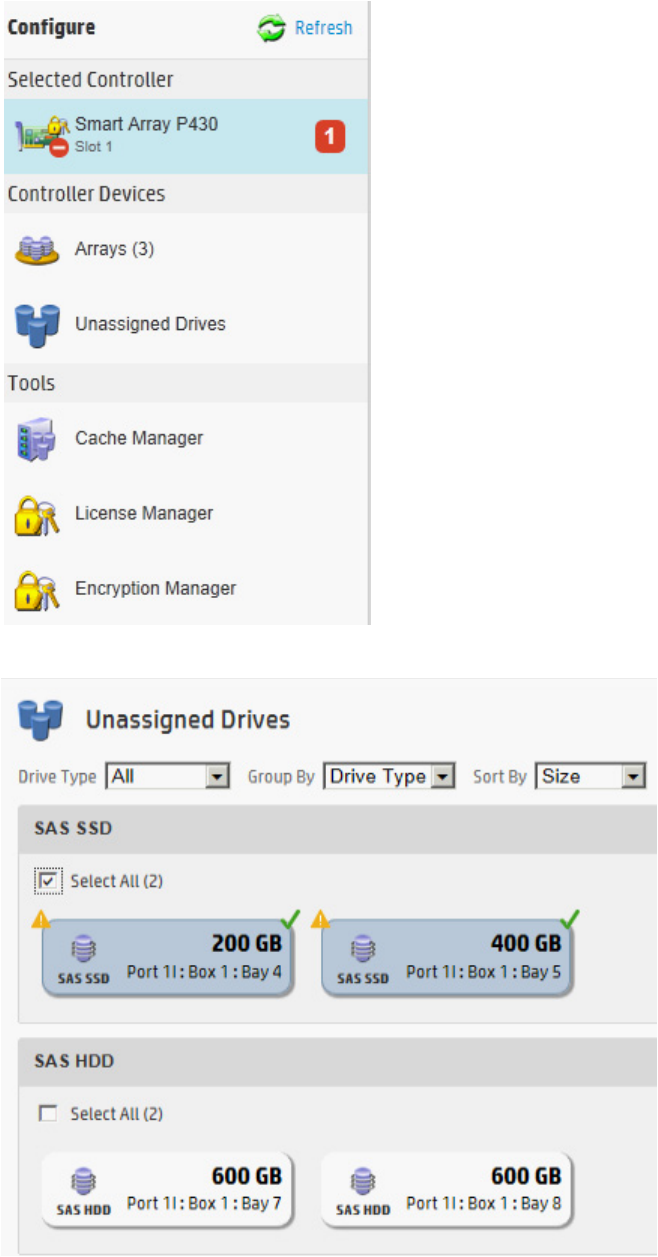
Operations 41
2. Under Controller Devices, click on Unassigned Drives.
3. Select drives.
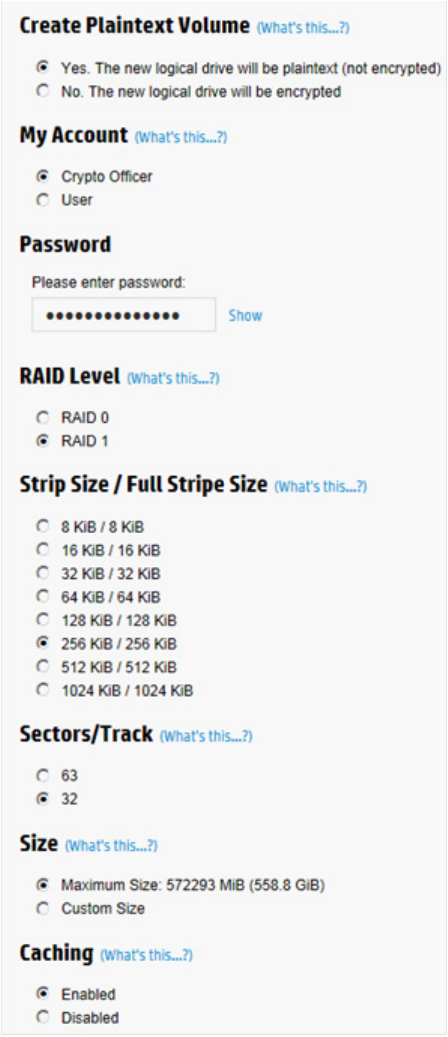
Operations 42
4. Click Create Array. A new window appears.
5. Complete the following fields:
a. Create Plaintext Volume: Select Yes.
b. My Account: Select the account to log in with.
c. Password: Enter the account password.
6. Complete remaining fields as necessary.
7. Click Create Logical Drive.
Operations 43
8. Array Details, Logical Drives, Physical Drives and Device Path specifications appear. Click Finish to
complete.
Converting plaintext volumes into encrypted volumes
NOTE: The controller must read and rewrite the entire volume in order to complete the
conversion process. Conversion may take some time to complete, especially if there is competing
drive activity from the host system.
To convert plaintext volumes into encrypted volumes:
1. Open Encryption Manager ("Opening Encryption Manager" on page 33).
2. Log in to Encryption Manager ("Logging into Encryption Manager" on page 33).
3. Under Controller Devices, click Arrays.
4. Select the plaintext volume.
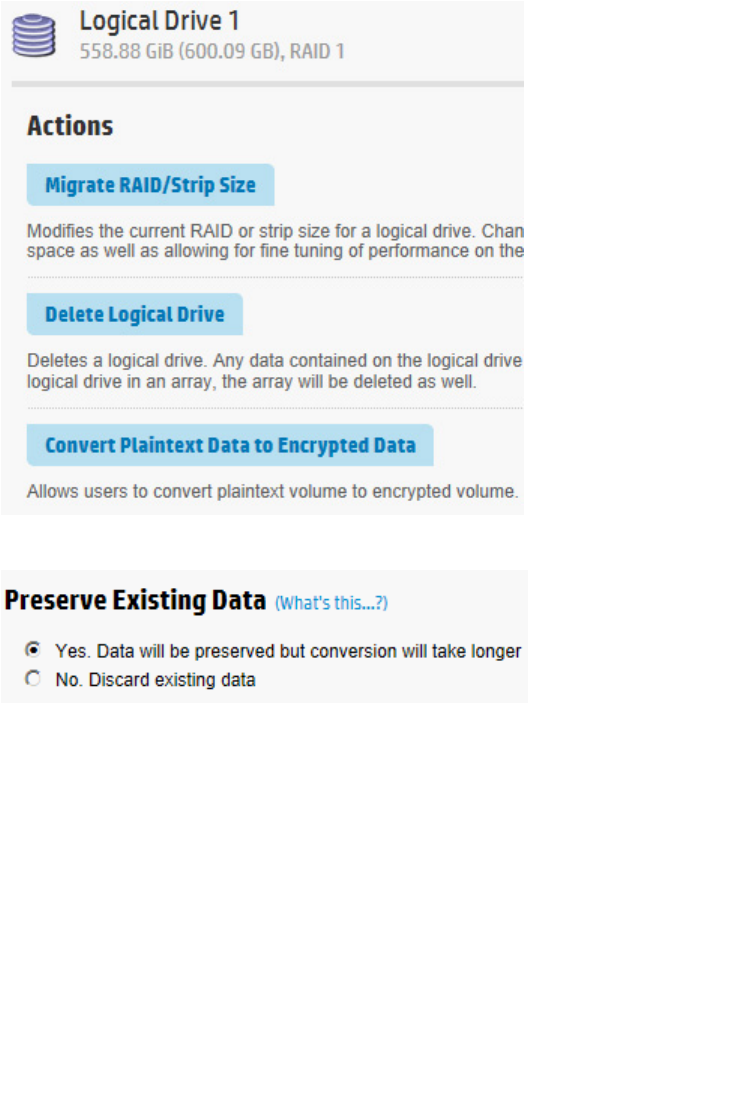
Operations 44
5. Under Actions, click Convert Plaintext Data to Encrypted Data.
A new window appears.
6. Select one of the following:
a. To preserve existing data, select Yes.
b. To discard existing data, select No. If selected, a warning prompt appears after clicking OK,
confirming your selection. Click OK to continue past the warning.
7. Click OK. A new window appears, listing the Logical Drive Details, Logical Drive Acceleration Method,
and Device Path details.
8. Click Finish.
Changing key management modes
1. Open Encryption Manager ("Opening Encryption Manager" on page 33).
2. Log in to Encryption Manager ("Logging into Encryption Manager" on page 33).
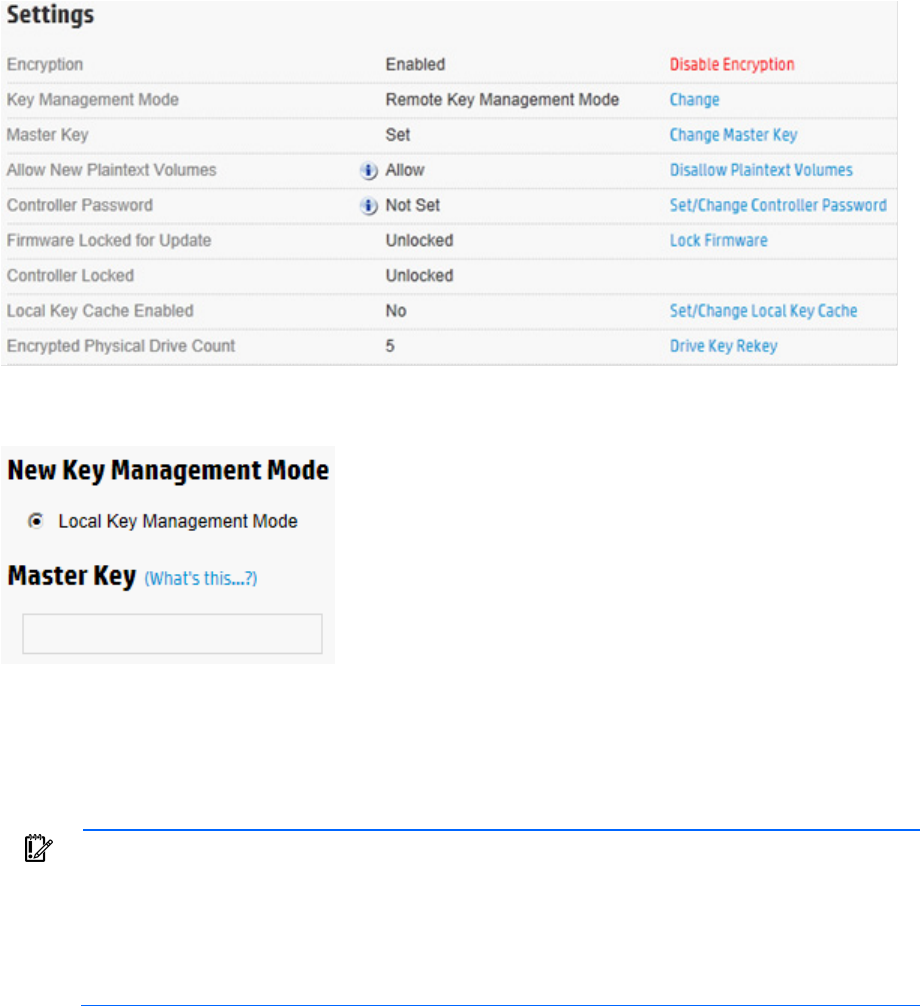
Operations 45
3. Under Settings, locate Key Management Mode. Click Change.
4. A new window appears with the key management mode selected. Enter the Master Key in the field
provided. The Master Key name must be between 10 and 64 characters.
5. Click OK.
6. A warning appears, prompting the user to record the Master Key. Click Yes to continue.
Enabling/disabling plaintext volumes
IMPORTANT: Plaintext volumes are unencrypted. The option of allowing or disabling the
creation of plaintext volumes depends on the following:
• The type of data to be stored on the plaintext volume
• The level of security you want or need in the system
HP recommends that you do not enable this option for systems requiring high security or
containing highly sensitive data.
To change plaintext volumes permissions after initial configuration:
1. Open Encryption Manager ("Opening Encryption Manager" on page 33).
2. Log in as the Crypto Officer ("Logging into Encryption Manager" on page 33).
Operations 46
3. Under Settings, locate Allow New Plaintext Volumes.
4. Do one of the following:
a. If encryption is disabled, click Allow Plaintext Volumes.
b. If encryption is enabled, click Disallow Plaintext Volumes.
5. A prompt appears, asking you to confirm the change. Click Yes to continue.
Enabling/disabling the firmware lock
The firmware lock prevents the updating of firmware on the controller and is disabled by default. For security
purposes, HP recommends enabling the firmware lock function.
To change the firmware lock setting:
1. Open Encryption Manager ("Opening Encryption Manager" on page 33).
2. Log in to Encryption Manager ("Logging into Encryption Manager" on page 33).
3. Under Settings, locate Firmware Locked for Update.
4. Do one of the following:
a. If unlocked, click Lock Firmware.
b. If locked, click Unlock Firmware.
Operations 47
5. A prompt appears, asking you to confirm the change. Click Yes to proceed.
Enabling/disabling local key cache
1. Open HP Encryption Manager ("Opening Encryption Manager" on page 33).
2. Log in to Encryption Manager ("Logging into Encryption Manager" on page 33).
3. Under Settings, locate Local Key Cache Enabled. Click Set/Change Local Key Cache.
4. Do one of the following:
o To disable, select No.
o To enable, select Yes. If you select Yes, two new fields appear.
5. Complete the following fields:
IMPORTANT: HP recommends using the default settings, which will disable checking for the
presence of the HP ESKM prior to booting. Only change these values if there is a concern that an
unintended individual might remove the server from the environment. After repeated failures to
locate the HP ESKM, the local key cache is deleted prior to boot if the number of access attempts
is set to any value other than zero. All volumes remain locked until the HP ESKM is reached and
retrieves the required keys.
Operations 48
o Number of Access Attempts Before Deleting Local Key Cache
o Retry Interval in Minutes
6. Click OK.
Importing drive sets in Local Key Management Mode
When the Master Encryption Key on an imported drive set is different from the Master Encryption Key on the
receiving HP Smart Array Controller, the importing volumes remain offline until user intervention is taken. HP
SSA can be used to supply the Master Key name for the importing drives.
In Remote Key Management Mode, drives automatically import when the associated key is present on the HP
ESKM. If keys are unable to be retrieved but are confirmed to be on the HP ESKM, it is possible they are
assigned to a different group.
Importing drives with different Master Keys
Migrating drives to a non-encrypted controller results in the logical volumes associated with those drives
remaining offline until encryption is enabled with the proper Master Encryption Key settings and mode for
that volume.
If non-encrypted drives are migrated to an encrypting controller, the controller automatically brings the
logical volumes associated with those physical drives online and makes them available for use.
To import drives with a different Master Key into a controller when using Local Key Management Mode:
1. Power down the server. For more information, see the documentation that ships with the server.
2. Attach drives. For more information, see the documentation that ships with the drives.
3. Power up the server. For more information, see the documentation that ships with the server.
4. Start HP SSA. For more information, see the HP Smart Storage Administrator User Guide.
5. Under Array Controller(s), click the controller assigned to the new drives. Red alert message indicators
will appear next to it.
6. Under Actions, click Configure.
7. From the side menu, click Encryption Manager.
8. Log in to Encryption Manager ("Logging into Encryption Manager" on page 33).
9. Under Utilities, click Import Foreign Local Key.
Operations 49
10. A new screen appears. Enter the new Master Encryption Key name assigned to the drives being
imported in the Master Key field.
11. Click OK.
The drives will be incorporated, unlocked, and assigned the Master Encryption Key of the receiving
controller.

Maintenance 50
Maintenance
Controllers
Clearing the controller
To clear all logical drives and arrays on controllers:
1. Start HP SSA. For more information, see the HP Smart Storage Administrator User Guide.
2. Select the controller to be cleared.
3. Under Actions, click Clear Configuration.
4. A new window appears, confirming your request to clear the controller's configuration. To continue,
click Clear.
5. A new window appears, displaying controller settings and configuration. To continue, click Finish.
Replacing an encrypted controller
If some or all of the drives managed by the controller being replaced are encrypted, you must re-configure the
replacement controller with the same settings and key management mode you used for the controller you are
replacing. For more information, see the documentation that ships with the controller.
In Local Key Management Mode, you must provide the correct Master Key name that matches the one used
for the attached drives.
In Remote Key Management Mode, any valid Master key name will work, since the Master key names are
part of the drive configuration information stored on each drive.
Replacing a server while retaining the controller
If you retain the same controller and physical disks, then there are no encryption-related tasks to complete.
If Remote Key Management Mode is in use, the previous HP iLO configuration for key management must be
applied to the new server.
For more information on configuring HP iLO, see "Configuring HP iLO (on page 28)."
For more information on locating the group name, see "Locating groups associated with a drive (on page
52)."
Preconfiguring replacement components
It is possible to configure replacement controllers ahead of time for encryption. After installing the HP Smart
Array Controller, enable encryption on the controller. For more information, see "Configuration (on page
15)."
After the server is powered down, the controller can be physically removed and set aside for later use.
Maintenance 51
Flashing firmware
If the firmware lock function is enabled, the firmware lock on the controller must be unlocked before
attempting to flash the controller. To disable the firmware lock function, see "Enabling/disabling the
firmware lock (on page 46)."
Drives
Replacing a physical drive
No HP Secure Encryption-related steps are associated with this procedure. To replace a drive, see the server
maintenance and service guide.
Validating the number of encrypted drives for license compliance
Encryption Manager
1. Open Encryption Manager ("Opening Encryption Manager" on page 33).
2. Locate Encrypted Physical Drive Count, under Settings. The number to the right of this setting indicates
the number of encrypted physical drives.
3. Repeat for every controller with HP Secure Encryption enabled.
HP ESKM
Because all Drive Encryption Key names begin the same character sequence, run a query with the Choose
Key Name field filtered by Key Name and containing "HP_HDD" and "HP_SSD". For more information, see
"Running queries (on page 57)."

Maintenance 52
Groups
Locating groups associated with a drive
Use one of the following methods to locate the group name associated with a drive.
• Query by drive serial number (on page 52)
• Query by previous server name (on page 54)
Query by drive serial number
1. Log in to the HP ESKM ("Logging in to the HP ESKM" on page 18).
2. Click the Security tab.
3. Under Keys, click Query Keys.
Maintenance 53
The Key Policy and Configuration screen appears.
4. If you want to save this query, enter a name in the Query Name field.
5. Under Choose Keys Where, do the following:
a. Field 1: Select Key Name from the drop down menu.
b. Field 2: Select Contains from the drop down menu.
c. Field 3: Enter the serial number of one of the drives in the server.
6. If you assigned a name to this query, click Save and Run Query. Otherwise, click Run Query without
Saving.
7. Click on the key. A new screen appears, listing the Key Properties.
8. Click Permissions to view the group name.


Maintenance 55
The Key Policy and Configuration screen appears.
4. If you want to save this query, enter a name in the Query Name field.
5. Under Choose Keys Where, do the following:
a. Field 1: Select Custom: Server_Name from the drop down menu.
b. Field 2: Select Equals from the drop down menu.
c. Field 3: Enter the previous server name associated with the drive.
6. If you assigned a name to this query, click Save and Run Query. Otherwise, click Run Query without
Saving.
7. Click on the key. A new screen appears, listing the Key Properties.
Maintenance 56
8. Click the Permissions tab to view the group name.
Displaying log information
The event log displays events for all controllers in the system and does not differentiate between events
produced by different controllers.
When operating HP Secure Encryption in Remote Mode, you can access the HP ESKM events log for
information on key retrieval and exchange, including the following:
• Connection status
• Master Key retrieval
• Drive Key retrieval
• Drive Key save requests
• Drive Key deletion
To view the event log:
1. Log in to HP iLO using your server's credentials.
Maintenance 57
2. From the left side panel, expand the Administration menu.
3. Click Key Manager. The Enterprise Secure Key Manager Events appears at the bottom of the screen.
Navigating away from the page and returning or clicking Test ESKM Connections refreshes the list of events.
Running queries
To run a query:
1. Log in to the HP ESKM ("Logging in to the HP ESKM" on page 18).
2. Click the Security tab.

Maintenance 58
3. From the left side panel, expand the Keys menu and click Query Keys.
Maintenance 59
A new screen appears.
4. Under Create Query, complete the following:
a. If you want to save the query for future use, fill in the following fields:
— Query Name
— Description
b. In the Choose Keys Where field, structure queries that combine any or all of the following criteria:
— Key Name
— Owner
— Group Name
— Algorithm
— Creation Date
— Latest Key Version Date
— Any Key Version Date
— Versioned Key
— Not Versioned Key
— Exportable
— Not Exportable
— Deletable
— Not Deletable
— Access Time
— Controller identification criteria
— Custom criteria
c. Structure the report by displaying the following columns:
— Key Name
— Owner
Maintenance 60
— Exportable
— Deletable
— Algorithm
— Creation Date
— Versioned Key
— Custom attributes
d. When you have finished structuring the query, click one of the following buttons:
— Save and Run Query
— Save Query
— Run Query without saving
The report appears with the selected criteria.
Troubleshooting 61
Troubleshooting
Common issues
Lost or forgotten Crypto Officer password
1. Open Encryption Manager ("Opening Encryption Manager" on page 33).
2. Under Accounts, locate Crypto Officer Password. Click Recover Crypto Officer Password.
A new window appears.
3. Do the following:
a. Answer the security question in the Password Recovery Answer field.
b. Enter and then re-enter a new password in the New Password fields.
4. Click OK.
Lost or forgotten controller password
The controller password is used to protect data in the event of a storage system theft. Once enabled, the
controller will not unlock encrypted volumes until the correct controller password has been provided. If the
controller password is lost or forgotten, the controller will remain locked and all encrypted volumes will be
offline and inaccessible.
Troubleshooting 62
If the OS logical drive is encrypted, offline HP SSA will be required to perform the steps below. For more
information, see the HP Smart Storage Administrator User Guide.
To clear the controller password:
1. Open Encryption Manager ("Opening Encryption Manager" on page 33).
2. Log in as the Crypto Officer ("Logging into Encryption Manager" on page 33).
3. Under Settings, locate Controller Password. Click Remove Controller Password.
4. A window appears, asking you to confirm that you want to remove the controller password. Click Yes.
Volumes appear online and are available.
Lost or forgotten Master Key
IMPORTANT: HP strongly recommends storing a backup of the Master Encryption Key in a
secure location. In some instances it is possible that a missing key will render your data
inaccessible. If operating HP Secure Encryption in Remote Key Management Mode, HP strongly
recommends that you back up the ESKM regularly.
Local mode
If operating HP Secure Encryption in Local Mode, securing the Master Encryption Key value is critical to
accessing the encrypted logical drive data. If the controller requires replacement or if the physical drives are
moved to another controller, a matching Master Key is required to gain access to the data. Master Keys are
not recoverable if lost. If the Master Key is lost or forgotten, you must perform a data restore operation from
the backup media to regain access to the data.
Remote mode
Locating the key using the HP ESKM
To locate a lost or forgotten Master Encryption Key using the HP ESKM:
1. Log in to the HP ESKM ("Logging in to the HP ESKM" on page 18).
Troubleshooting 63
2. Click the Security tab.
3. From the left side panel, expand the Keys menu and click Keys.
4. The Key and Policy Configuration page displays a list of all keys. Scroll through the list to locate the
Master Key.
5. If you remember specific attributes about the Master Key, run a key query ("Running queries" on page
57).
If you cannot locate the Master Key name, it may have been accidentally deleted from the HP ESKM. You
may be able to locate the key by using an HP ESKM backup.
Locating the key using iLO
HP iLO utilizes an event log listing recent key activity. If the lost or forgotten key was recently modified, it
might appear in the event log.
To locate a lost or forgotten Master Encryption Key using HP iLO:
1. Log in to HP iLO using your server's credentials.

Troubleshooting 64
2. From the left side panel, expand the Administration menu.
3. Click Key Manager. The Enterprise Secure Key Manager Events appears at the bottom of the screen.
Review the event log for the missing key.
Forgotten which Master key goes with which drive
Recovery of the Master Encryption Key name corresponding to a specific set of drives is possible when
operating HP Secure Encryption in Remote Key Management Mode.
To recover the Master Encryption Key name:
1. Log in to the HP ESKM ("Logging in to the HP ESKM" on page 18).
Troubleshooting 65
2. Run a key query with the following search parameters ("Running queries" on page 57):
a. Choose Keys Where drop down menu: select Custom: Server_Name. Two new fields appear.
b. In the second drop down menu, select Equals.
c. In the third field, enter the name of the server to be associated with the Master Encryption Key.
d. Under Custom Attributes, select Master_Key.
Logical drives remain offline
If cryptographic information is missing, logical drives remain offline after system start. General causes
include a missing, incorrect, or inaccessible key. Restoring the cryptographic information to match the
attached drives results in the appropriate access to the logical drive.
Possible causes
• Encryption is not enabled.
• The matching Master Encryption Key is missing or incorrect.
• The controller password was enabled but is not entered or is incorrect.
Possible causes (Remote Mode only)
• Network connectivity issues are occurring between HP iLO and the HP ESKM.
• HP iLO is not configured properly.
• The Drive Keys are missing from the HP ESKM.
• The Drive Encryption Keys and HP iLO groups are mismatched.
To view a diagnostic report, see the HP Smart Storage Administrator User Guide.
Master key not exporting
This issue occurs only in Remote Key Management Mode. The problem appears as either a locked controller
or as locked volumes.
Possible causes
• A network problem prevents key retrieval from the HP ESKM.
• Lost or incorrect HP iLO configuration
• Missing or incorrectly configured Master Encryption Key
Possible Resolutions
• Troubleshoot the network connection between HP iLO and the HP ESKM. For more information, see
"Testing the connection between HP iLO and the HP ESKM (on page 66)."
• Ensure the Master Encryption Key exists. For more information, see "Locate the key using the HP ESKM
("Locating the key using the HP ESKM" on page 62)."
• Ensure the Master Encryption Key is in the correct group. If the Master Key is incorrectly assigned, see
"Placing a key in a group (on page 25)."
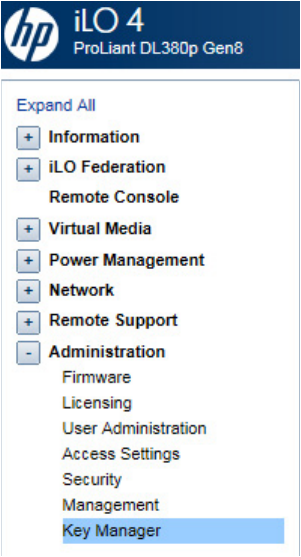
Troubleshooting 66
Testing the connection between HP iLO and the HP
ESKM
HP iLO connects and manages key exchanges between the controller and HP ESKM. If you suspect HP iLO
has lost its connection to the HP ESKM, you can test the connection in HP iLO.
To test the connection between HP iLO and the HP ESKM:
1. Log into HP iLO using your server's credentials.
2. From the left side panel, expand the Administration menu and then click Key Manager.

Troubleshooting 67
The following screen appears.
3. Under Key Manager Configuration, click Test ESKM Connections:
o If HP iLO is connected to the HP ESKM, a green checkmark appears indicating the key managers
are accessible.
o If the connection has been lost, you will need to re-configure HP iLO to communicate with the HP
ESKM. For more information, see "Connecting HP iLO to HP ESKM (on page 29)."
Potential errors encountered
The following table describes errors that might be encountered when configuring or operating HP Secure
Encryption.

Troubleshooting 68
Error Description Action
Remote key manager
communication failure
Slot X Encryption Failure –
Communication issue prevents
drive keys from being
retrieved. Encrypted logical
drives are offline. System may
not boot.
To troubleshoot, see the Key Manager page in
HP iLO interface.
Incorrect or missing Master
Key on Remote key manager
Slot X Encryption Failure –
Master Encryption Key is
incorrect or not retrieved from
HP ESKM. Encrypted logical
drives may be offline. System
may not boot.
Correct the problem on the HP ESKM.
Volume Key decryption failure
Invalid Drive Encryption Keys
on HP ESKM. Encrypted logical
drives may be offline. System
may not boot.
Restore the correct version of the Drive
Encryption Key on the HP ESKM.
Unable to establish
communication with controller
Communication issue prevents
keys from being retrieved.
Dependent encrypted logical
drives are offline. System may
not boot.
Reset the controller by rebooting the server.
Missing local Master Key Imported encrypted logical
drives are offline; the matching
local Master Encryption Key is
required. System may not boot.
Use HP Smart Storage Administrator to enter the
local Master Encryption Key.
Controller password failure All encrypted local drives are
offline due to failure to enter
proper controller password.
Reboot the server and enter the proper
controller password, or unlock the controller
using HP Smart Storage Administrator.
Controller encryption not
enabled
Encrypted logical drives are
present but encryption is not yet
enabled. Encrypted logical
drives are offline.
Use HP Smart Storage Administrator to enable
encryption.
Encryption parameters not set
Encryption is enabled for the
controller but the Master
Encryption Key name is not set.
Use Encryption Manager to set the Master Key
name for the controller and reboot.
Controller/logical drive
encryption type mismatch
Key management mode
mismatch between controller
and drives. Dependent
encrypted drives offline.
Use Encryption Manager to match key
management modes. For more information, see
"Importing drives with different Master Keys (on
page 48)".
Encryption failure -
unsupported system ROM
detected
Unsupported system ROM
detected. Encrypted logical
drives may be offline. System
may not boot.
Update the system ROM to a version supporting
encryption.
Encrypted logical drives on
non-encrypting controller
Encrypted logical drives are
offline. Encryption feature is
not available on this controller.
Move drives to a controller with encryption
support or delete the logical drives.
Encryption failure -
unsupported iLO firmware
detected
Unsupported HP iLO firmware
detected. Encrypted drive may
be offline. System may not
boot.
Update HP iLO firmware to a version supporting
encryption.
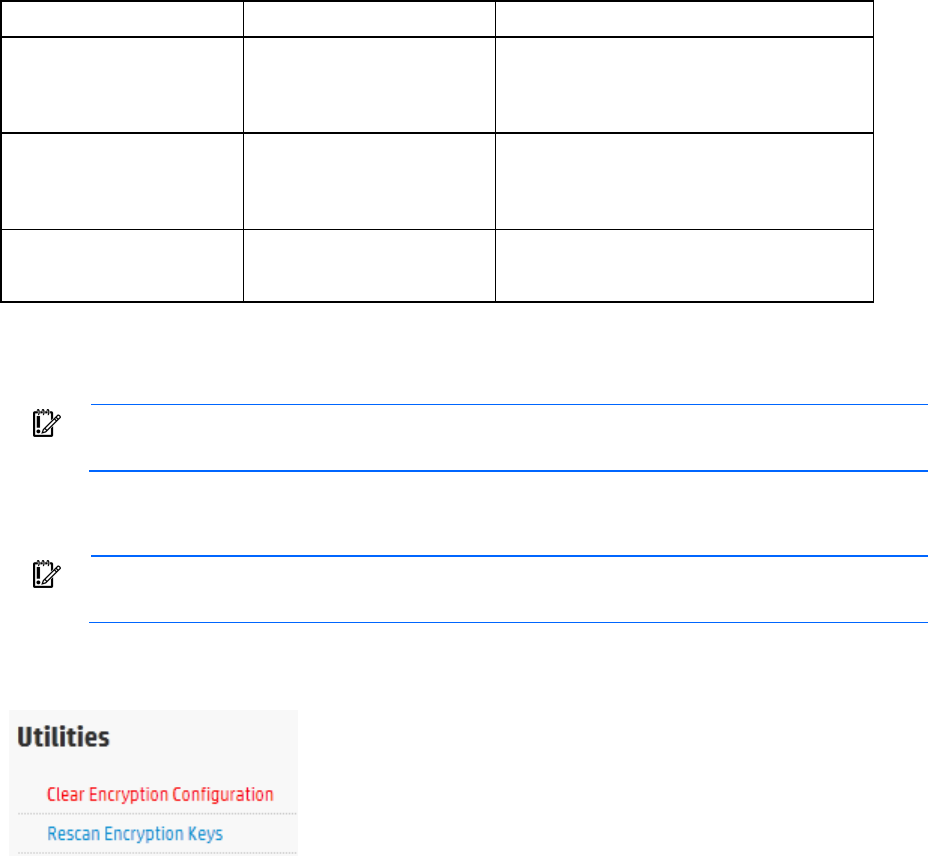
Troubleshooting 69
Error Description Action
NVRAM failure Non-volatile storage corrupted.
Critical Security Parameters
erased per policy. Encrypted
drives are offline.
Use HP Smart Storage Administrator to
reestablish CSPs.
Encryption engine self-test
failure
Encryption engine hardware
failure. Encrypted logical
drives are offline until the
problem is corrected.
Replace the controller to bring encrypted drives
online.
Unable to create a plaintext
volume
While logged into the system,
you are unable to create a
plaintext volume.
Verify that Encryption Manager has been set to
allow the creation of future plaintext volumes.
Clearing the encryption configuration
IMPORTANT: Clearing all encryption settings clears all secrets, keys, and passwords from the
controller. HP Secure Encryption will be returned to a factory-new state.
To clear all encryption settings:
1. Clear the controller ("Clearing the controller" on page 50).
IMPORTANT: Clearing the controller is not necessary if there are no encrypted drives present or
if HP Smart Storage Administrator is operating in an offline mode.
2. Log in to Encryption Manager ("Logging into Encryption Manager" on page 33).
3. Under Utilities, click Clear Encryption Configuration.
4. A prompt appears, indicating all encryption settings will be cleared from the controller. To continue,
click Clear.

Support and other resources 70
Support and other resources
Before you contact HP
Be sure to have the following information available before you call HP:
• Active Health System log (HP ProLiant Gen8 or later products)
Download and have available an Active Health System log for 3 days before the failure was detected.
For more information, see the HP iLO 4 User Guide or HP Intelligent Provisioning User Guide on the HP
website (http://www.hp.com/go/ilo/docs).
• Onboard Administrator SHOW ALL report (for HP BladeSystem products only)
For more information on obtaining the Onboard Administrator SHOW ALL report, see the HP website
(http://www.hp.com/go/OAlog).
• Technical support registration number (if applicable)
• Product serial number
• Product model name and number
• Product identification number
• Applicable error messages
• Add-on boards or hardware
• Third-party hardware or software
• Operating system type and revision level
HP contact information
For United States and worldwide contact information, see the Contact HP website
(http://www.hp.com/go/assistance).
In the United States:
• To contact HP by phone, call 1-800-334-5144. For continuous quality improvement, calls may be
recorded or monitored.
• If you have purchased a Care Pack (service upgrade), see the Support & Drivers website
(http://www8.hp.com/us/en/support-drivers.html). If the problem cannot be resolved at the website,
call 1-800-633-3600. For more information about Care Packs, see the HP website
(http://pro-aq-sama.houston.hp.com/services/cache/10950-0-0-225-121.html).

Appendix 71
Appendix
Encryption algorithms
In keeping with the encryption standards outlined in FIPS 140-2
(http://csrc.nist.gov/groups/STM/cmvp/documents/fips140-2/FIPS1402IG.pdf), controllers utilizing HP
Secure Encryption are designed to meet FIPS-140-2 Level 2 requirements by implementing both physical
security and cryptographic methods in protecting data-at-rest. Specifically, HP Secure Encryption satisfies the
cryptographic requirements established in FIPS 140-2 by using NIST-approved algorithms in protecting both
data and encryption keys. For more information, see the Cryptographic Algorithm Validation Program
website (http://csrc.nist.gov/groups/STM/cavp/standards.html).
Algorithm Description
XTS-AES 256-bit The XTS algorithm is used to encrypt data on the drive platter as described in NIST
special publication SP 800-38E.
AES-ECB The AES algorithm is used to perform symmetric key encryption.
SHA-256 The SHA secure hashing algorithms are described in FIPS 180-4.
HMAC The HMAC algorithm is described in the FIPS 198-1 standard.
PBKDF2 The PBKDF2 algorithm derives cryptographic keying material from user-provided
passwords. The algorithm is described in NIST special publication SP 800-132.
DRBG An implementation of the SP800-90A algorithm is used to produce random bit
sequences.

Glossary 72
Glossary
ACU
Array Configuration Utility
Controller key
A key created by the controller and permanently saved to the Remote Key Manager after being wrapped by
the Master Encryption Key. This key is used on a temporary basis to alleviate potential bottlenecks to the
Remote Key Manager during volume creation/change events. Use of a Controller Key is on a temporary
basis only and is ultimately transitioned via a rekey operation to the appropriate Drive Encryption Key.
Controller-secured region
The section of a device where data and Critical Security Parameters can exist in an unencrypted format. This
boundary must be secured against tampering as acquiring this sensitive data may result in unauthorized
access to data.
Critical Security Parameters (CSPs)
An industry standard term referring to security related information such as keys, passwords, and so forth,
whose disclosure would compromise an encrypted system.
Crypto officer
Personnel who have permission to access the full range of encryption functions available on the controller.
This includes turning encryption on and off, resetting keys, importing Master Encryption Keys, and so forth.
Drive array
The group of physical drives containing a logical volume.
Drive encryption key
Key generated by the Smart Array controller for each physical drive that contains at least one encrypted
logical drive. The Drive Encryption Key for each physical drive is used to encrypt (wrap) the Volume
Encryption Keys for all of the logical drives resident on that physical drive.
Drive key caching
In Remote mode, the Drive Encryption Keys are typically stored on the Remote Key Manager. However, it is
possible to enable the controller to cache all of these Drive Encryption Keys necessary to decrypt attached
logical drives within the controller-secured region. This option is available to the user through HP SSA.
Encrypted data
Data that has been encrypted through the use of an encryption key.
Glossary 73
ESKM
Enterprise Secure Key Manager
FIPS
Federal Information Processing Standard
HIPAA
Health Insurance Portability and Accountability Act
HITECH
Health Information Technology for Economic and Clinical Health
HP SSA
HP Smart Storage Administrator
iLO 4
Integrated Lights-Out 4
Local Master Encryption Key
The equivalent of a Master Encryption Key in Local mode. The Local Master Encryption Key name is stored
in non-volatile memory within the controller-secured region and used to generate a Local Master Encryption
Key for wrapping the Drive Encryption Keys.
Master Encryption Key
A two-part key established on the Remote Key Manager. This key consists of both a name and a value. The
name consists of a maximum of 64 characters and is used to uniquely identify this key to all controllers within
a given Security Domain. The Master Encryption Key value is a 256-bit quantity used by controllers to wrap
Drive Encryption and Controller Keys for secure storage on the controller and import into the Remote Key
Manager.
NIST
National Institute of Standards and Technology
NVRAM
nonvolatile memory
PCI-DSS
Payment Card Industry Data Security Standard
Plaintext
Data in unencrypted form.
Glossary 74
Remote Key Manager
A server used to store, backup and retrieve keys for a group of controllers in a data center.
Volume encryption key
The key used in conjunction with hardware-based algorithms to perform the encryption of data resident on
logical volumes.

Documentation feedback 75
Documentation feedback
HP is committed to providing documentation that meets your needs. To help us improve the documentation,
send any errors, suggestions, or comments to Documentation Feedback (mailto:docsfeedback@hp.com).
Include the document title and part number, version number, or the URL when submitting your feedback.

Index 76
A
access 33
algorithms, supported 71
Array Configuration Utility (ACU) 9
B
backing up data 13
before you contact HP 70
benefits 6
C
common problems 61
components 9
configuration 13, 15, 17, 28
configuration overview 17
configuration, troubleshooting 69
configuring the ESKM 18
connection problems 66
connection status 66
contacting HP 70
controller 10, 11, 15, 31, 36, 37, 38, 50, 61, 65
controller configuration 15, 31, 50
controller, replacing 50
crypto officer 34, 61
customer self repair (CSR) 70
D
deployment scenarios 14
drive 48, 51, 64
drives, encrypted 51
drives, removing 51
E
encryption 5, 6, 13, 43, 71
error messages 67
errors 61, 67
ESKM 11, 14, 17, 18, 20, 21, 24, 25, 48, 51, 52,
57, 62, 64, 65, 66
ESKM, configuring 18, 29
F
factory defaults, resetting 69
features, overview 6
features, standard 6
firmware 46, 51
firmware lock 46
firmware update 46
G
groups 14, 20, 21, 25, 48, 52
groups, adding 20
groups, managing 21, 27, 52
GUI tasks 33
GUI, accessing 33
GUI, logging on 33
H
HP contact information 70
HP Smart Storage Administrator (HP SSA) 9, 33
HP SSA (HP Smart Storage Administrator) 9, 33
HP website 70
I
iLO (Integrated Lights-Out) 10, 17, 28, 29, 56, 63,
66
iLO, event log 56, 63
implementation 13
importing drives 48
K
key manager 11, 18, 52, 57, 62, 65
keys 24, 25, 27, 39, 62, 63
keys, creating 24, 39
keys, deleting 39
keys, managing 39, 40, 56, 62, 64, 65
L
license 12, 51
license, iLO 12
Local Key Management Mode 15, 62
Index
Index 77
log information, displaying 56
logging in 18, 33
logical drive 65
logical drive, troubleshooting 65
M
maintenance 50
Master key 24, 25, 27, 39, 48, 62, 64, 65
minimum requirements 10
O
operations 33
overview 5
P
password recovery, administrator 35, 61
password, changing 34, 35, 36
passwords 34, 35, 36, 37, 38, 61
phone numbers 70
plaintext volume 40, 43, 45
preconfiguring replacement components 50
preparation procedures 33
product overview 5, 6
Q
queries, executing 25, 52, 54, 57, 62, 64
R
Remote Key Management Mode 15, 17, 31, 62
replacement components, preconfiguring 50
replacing the controller 50
S
Secure Encryption 5, 6
security domain 14
security settings 13
server, replacing 50
settings 13
settings, password 13
setup 13
Smart Array 11
Smart Array options 11
SmartCache 10
support and other resources 70
supported servers 9, 61
T
technical support 70
telephone numbers 70
troubleshooting 61
U
user account, adding 18
user account, modifying 21, 34, 35
V
volume 40, 43, 45
W
website, HP 70
