Hp Serviceguard Metrocluster Security Solutions Building Disaster Recovery Using Continentalclusters A.08.00
2015-03-28
: Hp Hp-Serviceguard-Metrocluster-Security-Solutions-669844 hp-serviceguard-metrocluster-security-solutions-669844 hp pdf
Open the PDF directly: View PDF ![]() .
.
Page Count: 151 [warning: Documents this large are best viewed by clicking the View PDF Link!]
- Building Disaster Recovery Serviceguard Solutions Using Continentalclusters A.08.00
- Contents
- 1 Introduction
- 2 Building the Continentalclusters configuration
- Creating the Serviceguard clusters at both the sites
- Creating data replication between the clusters
- Creating volume groups or disk groups on the replicated disks if required
- Installing and Configuring an application in the primary site
- Installing and configuring a redundant copy of the application in the recovery site
- Configuring the Continentalclusters primary and recovery packages
- Configuring primary and recovery packages as modular packages when using Continuous Access P9000 or XP
- Configuring the primary and recovery packages as modular packages when using Continuous Access EVA
- Configuring the primary and recovery packages as modular packages when using EMC SRDF
- Configuring the primary and recovery packages as modular packages when using 3PAR Remote Copy
- Configuring the monitor package
- Creating a Continentalclusters configuration
- Checking and applying the Continentalclusters configuration
- Starting the Continentalclusters monitor package
- Testing the Continentalclusters
- 3 Performing a recovery operation in Continentalclusters environment
- Performing recovery in case of disaster
- Receiving notification
- Verifying that recovery is required
- Preparing the storage manually in the recovery cluster
- Using cmrecovercl to recover the recovery groups
- Previewing the storage preparation
- Recovering the entire cluster after a cluster alarm
- Recovering the entire cluster after a cluster alert
- Recovering a single cluster in an N-1 configuration
- Viewing the Continentalclusters status
- Performing recovery in case of disaster
- 4 Restoring disaster recovery cluster after a disaster
- 5 Disaster recovery rehearsal in Continentalclusters
- Overview of Disaster Recovery rehearsal
- Configuring Continentalclusters Disaster Recovery rehearsal
- Precautions to be taken while performing DR Rehearsal
- Performing Disaster Recovery rehearsal in Continentalclusters
- Cleanup of secondary mirror copy
- Recovering the primary cluster disaster during DR Rehearsal
- Limitations of DR rehearsal feature
- 6 Configuring complex workloads in a Continentalclusters environment using SADTA
- Setting up replication
- Configuring the primary cluster with a single site
- Configuring the recovery cluster with a single site
- Setting up the complex workload in the primary cluster
- Configuring the storage device for the complex workload at the primary cluster
- Configuring the Site Controller Package in the primary cluster
- Configuring the Site Safety Latch dependencies in the primary cluster
- Suspending the replication to the recovery cluster
- Setting up redundant complex workload in the recovery cluster
- Configuring the identical complex workload stack at the recovery cluster
- Configuring the Site Controller package in the recovery cluster
- Configuring Site Safety Latch dependencies
- Resuming the replication to the recovery cluster
- Configuring Continentalclusters
- 7 Administering Continentalclusters
- Checking the status of clusters, nodes, and packages
- Notes on Packages in Continentalclusters
- Enabling and disabling maintenance mode
- Recovering a cluster when the storage array or disks fail
- Starting a recovery package forcefully
- Adding or Removing a Node from a Cluster
- Adding a Recovery Group to Continentalclusters
- Modifying a package in a recovery group
- Modifying Continentalclusters configuration
- Removing a recovery group from the Continentalclusters
- Removing a rehearsal package from a recovery group
- Modifying a recovery group with a new rehearsal package
- Changing monitoring definitions
- Behavior of Serviceguard commands in Continentalclusters
- Verifying the status of Continentalclusters daemons
- Renaming the Continentalclusters
- Deleting the Continentalclusters configuration
- Checking the Version Number of the Continentalclusters Executables
- Maintaining the data replication environment
- Administering Continentalclusters using SADTA configuration
- Maintaining a Node
- Maintaining the Site
- Maintaining Site Controller Package
- Moving the Site Controller Package to a Node in the local cluster
- Deleting the Site Controller Package
- Starting a Complex Workload
- Shutting Down a Complex Workload
- Moving a Complex Workload to the Recovery Cluster
- Restarting a Failed Site Controller Package
- 8 Troubleshooting Continentalclusters
- A Migrating to Continentalclusters A.08.00
- B Continentalclusters Worksheets
- C Configuration file parameters for Continentalclusters
- D Continentalclusters Command and Daemon Reference
- E Package attributes
- F Legacy packages
- Migrating complex workloads using Legacy SG SMS CVM/CFS Packages to Modular SG SMS CVM/CFS Packages with minimal downtime
- Migrating legacy to modular packages
- Migrating legacy monitor package
- Migrating legacy style primary and recovery packages to modular packages
- Migrating legacy style primary and recovery packages to modular packages when using Continuous Access P9000 and XP
- Migrating legacy style primary and recovery packages to modular packages using Continuous access EVA
- Migrating legacy style primary and recovery packages to modular packages using EMC SRDF
- Configuring legacy packages
- Configuring storage devices for complex workload
- G Configuration rules for using modular style packages in Continentalclusters
- H Sample Continentalclusters ASCII configuration file
- I Sample input and output files for cmswitchconcl command
- J Configuring Oracle RAC in Continentalclusters in Legacy style
- Support for Oracle RAC instances in a Continentalclusters environment
- Configuring the environment for Continentalclusters to support Oracle RAC
- Serviceguard/Serviceguard extension for RAC and Oracle Clusterware configuration
- Initial startup of Oracle RAC instance in a Continentalclusters environment
- Failover of Oracle RAC instances to the recovery site
- Failback of Oracle RAC instances after a failover
- Rehearsing Oracle RAC databases in Continentalclusters
- Support for Oracle RAC instances in a Continentalclusters environment
- K Configuring Oracle RAC database with ASM in Continentalclusters using SADTA
- Setting up replication
- Configure a primary cluster with a single site
- Configure a recovery cluster with a single site
- Installing and configuring Oracle Clusterware
- Installing Oracle Real Application Clusters (RAC) software
- Creating the RAC database with ASM in the primary cluster
- Configuring the ASM disk group in the primary cluster
- Configuring SGeRAC toolkit packages for the ASM disk group in the primary cluster
- Creating the Oracle RAC database in the primary cluster
- Configuring and testing the RAC MNP stack in the primary cluster
- Halting the RAC database in the primary cluster
- Suspending the replication to the recovery cluster
- Configuring the identical ASM instance in the recovery cluster
- Configuring the identical RAC database in the recovery cluster
- Configuring the Site Controller package in the primary cluster
- Configuring the Site Safety Latch dependencies at the primary cluster
- Configuring the Site Controller package in the recovery cluster
- Configuring the Site Safety Latch dependencies at the recovery cluster
- Database with ASM in the Continentalclusters in the primary cluster
- Glossary
- Index

Building Disaster Recovery Serviceguard
Solutions Using Continentalclusters A.08.00
HP Part Number: 698669-001
Published: February 2013
Legal Notices
© Copyright 2013 Hewlett-Packard Development Company, L.P.
Confidential computer software. Valid license from HP required for possession, use, or copying. Consistent with FAR 12.211 and 12.212, Commercial
Computer Software, Computer Software Documentation, and Technical Data for Commercial Items are licensed to the U.S. Government under
vendor’s standard commercial license.
The information contained herein is subject to change without notice. The only warranties for HP products and services are set forth in the express
warranty statements accompanying such products and services. Nothing herein must be construed as constituting an additional warranty. HP shall
not be liable for technical or editorial errors or omissions contained herein.
Intel®, Itanium®, registered trademarks of Intel Corporation or its subsidiaries in the United States or other countries.
Oracle ® is a registered trademark of Oracle Corporation.
UNIX® is a registered trademark in the United States and other countries, licensed exclusively through The Open Group.

Contents
1 Introduction...............................................................................................8
2 Building the Continentalclusters configuration...............................................10
Creating the Serviceguard clusters at both the sites ....................................................................10
Easy deployment method....................................................................................................10
Traditional deployment method............................................................................................10
Setting up security..............................................................................................................11
Creating data replication between the clusters............................................................................12
Using array based physical replication supported by Metrocluster............................................12
Using any other array based physical replication technology...................................................13
Using software based logical replication...............................................................................13
Creating volume groups or disk groups on the replicated disks if required......................................13
Creating and Exporting LVM Volume Groups ........................................................................14
Creating VxVM Disk Groups...............................................................................................15
Installing and Configuring an application in the primary site........................................................15
Installing and configuring a redundant copy of the application in the recovery site .........................15
Configuring the Continentalclusters primary and recovery packages..............................................15
Configuring primary and recovery packages as modular packages when using Continuous Access
P9000 or XP.....................................................................................................................16
Configuring the primary and recovery packages as modular packages when using Continuous
Access EVA.......................................................................................................................17
Configuring the primary and recovery packages as modular packages when using EMC SRDF....19
Configuring the primary and recovery packages as modular packages when using 3PAR Remote
Copy................................................................................................................................20
Configuring the monitor package..............................................................................................21
Creating a Continentalclusters configuration...............................................................................22
Cluster information.............................................................................................................22
Recovery groups................................................................................................................23
Monitoring definitions.........................................................................................................24
Checking and applying the Continentalclusters configuration........................................................25
Starting the Continentalclusters monitor package........................................................................26
Testing the Continentalclusters..................................................................................................26
Testing Individual Packages.................................................................................................26
Testing Continentalclusters Operations..................................................................................26
3 Performing a recovery operation in Continentalclusters environment.................29
Performing recovery in case of disaster......................................................................................29
Receiving notification..........................................................................................................29
Verifying that recovery is required........................................................................................29
Preparing the storage manually in the recovery cluster............................................................29
Using cmrecovercl to recover the recovery groups...................................................................30
Previewing the storage preparation......................................................................................30
Recovering the entire cluster after a cluster alarm....................................................................30
Recovering the entire cluster after a cluster alert.....................................................................31
Recovering a single cluster in an N-1 configuration.................................................................31
Viewing the Continentalclusters status........................................................................................31
4 Restoring disaster recovery cluster after a disaster.........................................32
Retaining the original roles for primary and recovery cluster.........................................................32
Switching the Primary and Recovery Cluster Roles..................................................................32
Switching the Primary and Recovery Cluster Roles using cmswitchconcl.................................33
Creating a new Primary Cluster................................................................................................34
Creating a new Recovery Cluster..............................................................................................35
Contents 3
5 Disaster recovery rehearsal in Continentalclusters..........................................36
Overview of Disaster Recovery rehearsal...................................................................................36
Configuring Continentalclusters Disaster Recovery rehearsal.........................................................36
Configuring maintenance mode in Continentalclusters.............................................................36
Overview of maintenance mode feature...........................................................................36
Setting up the file system for Continentalclusters state directory............................................36
Configuring the monitor package to mount the file system from the shared disk......................37
Configuring Continentalclusters rehearsal packages................................................................38
Modifying Continentalclusters configuration...........................................................................38
Precautions to be taken while performing DR Rehearsal...............................................................39
Client access IP address at recovery cluster............................................................................39
Cluster role switch during rehearsal......................................................................................39
Performing Disaster Recovery rehearsal in Continentalclusters.......................................................39
Cleanup of secondary mirror copy............................................................................................41
Recovering the primary cluster disaster during DR Rehearsal.........................................................41
Limitations of DR rehearsal feature............................................................................................42
6 Configuring complex workloads in a Continentalclusters environment using
SADTA.......................................................................................................43
Setting up replication..............................................................................................................44
Configuring the primary cluster with a single site........................................................................44
Configuring the recovery cluster with a single site.......................................................................45
Setting up the complex workload in the primary cluster................................................................45
Configuring the storage device for the complex workload at the primary cluster.........................45
Configuring the storage device using CFS or SG SMS CVM................................................45
Configuring the storage device using Veritas CVM.............................................................46
Configuring the storage device using SLVM......................................................................47
Configuring the complex workload at the primary cluster....................................................48
Configuring complex workload packages to use CFS....................................................48
Configuring complex workload packages to use CVM...................................................48
Configuring complex workload packages to use SLVM..................................................48
Halting the complex workload in the primary cluster..........................................................48
Configuring the Site Controller Package in the primary cluster.......................................................49
Configuring the Site Safety Latch dependencies in the primary cluster............................................49
Suspending the replication to the recovery cluster.......................................................................50
Setting up redundant complex workload in the recovery cluster.....................................................51
Configuring the storage device for the complex workload at the recovery cluster........................51
Configuring the storage device using CFS or SG SMS CVM ...............................................51
Configuring the storage device using Veritas CVM.............................................................51
Configuring the storage device using SLVM......................................................................52
Configuring the identical complex workload stack at the recovery cluster.......................................52
Configuring the Site Controller package in the recovery cluster.....................................................52
Configuring Site Safety Latch dependencies...............................................................................52
Resuming the replication to the recovery cluster...........................................................................53
Configuring Continentalclusters.................................................................................................53
7 Administering Continentalclusters................................................................54
Checking the status of clusters, nodes, and packages..................................................................54
Notes on Packages in Continentalclusters...................................................................................56
Startup and Switching Characteristics...................................................................................57
Network Attributes.............................................................................................................57
Enabling and disabling maintenance mode...............................................................................57
Recovering a cluster when the storage array or disks fail..............................................................58
Starting a recovery package forcefully.......................................................................................58
Adding or Removing a Node from a Cluster...............................................................................59
4 Contents
Adding a Recovery Group to Continentalclusters.........................................................................59
Modifying a package in a recovery group.................................................................................60
Modifying Continentalclusters configuration...............................................................................60
Removing a recovery group from the Continentalclusters..............................................................60
Removing a rehearsal package from a recovery group................................................................61
Modifying a recovery group with a new rehearsal package.........................................................61
Changing monitoring definitions...............................................................................................61
Behavior of Serviceguard commands in Continentalclusters..........................................................61
Verifying the status of Continentalclusters daemons......................................................................62
Renaming the Continentalclusters..............................................................................................62
Deleting the Continentalclusters configuration.............................................................................63
Checking the Version Number of the Continentalclusters Executables.............................................63
Maintaining the data replication environment.............................................................................63
Maintaining Continuous Access P9000 and XP Data Replication Environment............................63
Resynchronizing the device group....................................................................................63
Using the pairresync command.......................................................................................64
Additional points ..........................................................................................................64
Maintaining Metrocluster with Continuous Access EVA P6000 data replication environment.........65
Continuous Access EVA Link Suspend and Resume Modes..................................................65
Maintaining EMC SRDF data replication environment.............................................................66
Normal Startup.............................................................................................................66
Maintaining 3PAR Remote Copy data replication environment.................................................66
Viewing the Remote Copy volume group details................................................................66
Remote Copy Link Failure and Resume Modes...................................................................67
Restoring replication after a failover.................................................................................67
Administering Continentalclusters using SADTA configuration........................................................67
Maintaining a Node..........................................................................................................67
Maintaining the Site...........................................................................................................67
Maintaining Site Controller Package.....................................................................................68
Moving the Site Controller Package to a Node in the local cluster............................................68
Deleting the Site Controller Package.....................................................................................69
Starting a Complex Workload.............................................................................................69
Shutting Down a Complex Workload....................................................................................70
Moving a Complex Workload to the Recovery Cluster.............................................................70
Restarting a Failed Site Controller Package............................................................................70
8 Troubleshooting Continentalclusters.............................................................71
Reviewing Messages and Log Files............................................................................................71
Reviewing Messages and Log Files of Monitoring Daemon......................................................71
Reviewing Messages and Log Files of Packages in Recovery Groups.........................................71
Reviewing Logs of Notification Component............................................................................71
Troubleshooting Continentalclusters Error Messages.....................................................................71
A Migrating to Continentalclusters A.08.00....................................................74
B Continentalclusters Worksheets...................................................................75
Data Center Worksheet ..........................................................................................................75
Recovery Group Worksheet ....................................................................................................75
Cluster Event Worksheet .........................................................................................................76
Recovery Checklist..................................................................................................................76
Site Aware Disaster Tolerant architecture configuration worksheet .................................................77
Continentalclusters Site configuration....................................................................................77
Replication configuration.....................................................................................................77
CRS Sub-cluster configuration – using CFS.............................................................................78
RAC database configuration................................................................................................79
Site Controller package configuration...................................................................................80
Contents 5
C Configuration file parameters for Continentalclusters.....................................82
D Continentalclusters Command and Daemon Reference..................................85
E Package attributes.....................................................................................88
Package Attributes for Continentalcluster with Continuous Access for P9000 and XP........................88
Package Attributes for Continentalcluster with Continuous Access EVA............................................95
Package Attributes for Continentalcluster with EMC SRDF.............................................................97
F Legacy packages....................................................................................100
Migrating complex workloads using Legacy SG SMS CVM/CFS Packages to Modular SG SMS
CVM/CFS Packages with minimal downtime............................................................................100
Migrating legacy to modular packages...................................................................................100
Migrating legacy monitor package....................................................................................100
Migrating legacy style primary and recovery packages to modular packages..........................101
Migrating legacy style primary and recovery packages to modular packages when using
Continuous Access P9000 and XP.................................................................................101
Migrating legacy style primary and recovery packages to modular packages using Continuous
access EVA................................................................................................................102
Migrating legacy style primary and recovery packages to modular packages using EMC
SRDF.........................................................................................................................103
Configuring legacy packages.................................................................................................104
Configuring the monitor package in legacy style..................................................................104
Configuring primary and recovery packages as legacy packages when using Continuous
Access P9000 and XP.................................................................................................105
Configuring primary and recovery packages as legacy packages when using Continuous
Access EVA................................................................................................................107
Configuring primary and recovery packages as legacy packages when using EMC SRDF....109
Configuring storage devices for complex workload...................................................................111
Configuring the storage device for the complex workload at the Source Disk Site using SG SMS
CFS or CVM...................................................................................................................111
Configuring the storage device for complex workload at the target disk site using SG SMS CFS
or CVM..........................................................................................................................112
G Configuration rules for using modular style packages in Continentalclusters...114
H Sample Continentalclusters ASCII configuration file.....................................115
Section 1 of the Continentalclusters ASCII configuration file........................................................115
Section 2 of the Continentalclusters ASCII configuration file........................................................116
Section 3 of the Continentalclusters ASCII configuration file........................................................118
# Section1: Cluster Information...............................................................................................121
I Sample input and output files for cmswitchconcl command............................123
J Configuring Oracle RAC in Continentalclusters in Legacy style.......................125
Support for Oracle RAC instances in a Continentalclusters environment .......................................125
Configuring the environment for Continentalclusters to support Oracle RAC.............................126
Serviceguard/Serviceguard extension for RAC and Oracle Clusterware configuration...............131
Initial startup of Oracle RAC instance in a Continentalclusters environment..............................132
Failover of Oracle RAC instances to the recovery site............................................................132
Failback of Oracle RAC instances after a failover.................................................................134
Rehearsing Oracle RAC databases in Continentalclusters......................................................135
K Configuring Oracle RAC database with ASM in Continentalclusters using
SADTA.....................................................................................................136
Setting up replication............................................................................................................137
Configure a primary cluster with a single site...........................................................................137
Configure a recovery cluster with a single site..........................................................................138
6 Contents
Installing and configuring Oracle Clusterware..........................................................................138
Installing Oracle Real Application Clusters (RAC) software.........................................................138
Creating the RAC database with ASM in the primary cluster......................................................138
Configuring the ASM disk group in the primary cluster..........................................................138
Configuring SGeRAC toolkit packages for the ASM disk group in the primary cluster................139
Creating the Oracle RAC database in the primary cluster......................................................139
Configuring and testing the RAC MNP stack in the primary cluster.........................................139
Halting the RAC database in the primary cluster..................................................................139
Suspending the replication to the recovery cluster.....................................................................140
Configuring the identical ASM instance in the recovery cluster....................................................140
Configuring the identical RAC database in the recovery cluster...................................................141
Configuring the Site Controller package in the primary cluster....................................................142
Configuring the Site Safety Latch dependencies at the primary cluster..........................................142
Configuring the Site Controller package in the recovery cluster...................................................143
Configuring the Site Safety Latch dependencies at the recovery cluster.........................................143
Database with ASM in the Continentalclusters in the primary cluster............................................144
Glossary..................................................................................................145
Index.......................................................................................................150
Contents 7

1 Introduction
Continentalclusters provides disaster recovery between multiple Serviceguard clusters. A single
cluster can act as the recovery for a set of primary clusters. It is also possible to have two clusters
act as recovery for each other. This allows increased utilization of hardware resources.
Continentalclusters eliminates the cluster itself as a single point of failure. There is no distance
limitation as the cluster hearbeats are restricted to single clusters and the data replication latency
can be removed using asynchronous replication.
The Continentalclusters monitoring mechanism periodically verifies the health of the primary clusters
that are defined in its configuration. When it detects a change, the mechanism can issue
notifications. The notification message and type are configurable. Email, SNMP, OPC and syslogs
are the examples of notifications that are supported in Continentalclusters.
The recovery steps to recover an application in a Continentalclusters is completely automated, but
the recovery process must be initiated manually. This is termed as “Push-Button” recovery. After
the administrator confirms the disaster and runs the recovery command, the recovery process does
not require further manual input.
Figure 1 shows a basic s configuration where Site A cluster is defined as a primary cluster and
Site B cluster is defined as a recovery cluster.
8 Introduction

Figure 1 Sample Continentalclusters Configuration
Site A
Node 1
Monitor
Package
Site A Disk Array
Site A Cluster (Primary)
Site A
Node 2
Site B
Node 1
Site B
Node 2
Data Replication Links
Recovery
Group
Packages
Recovery
Group Packages
Continentalclusters
Configuration
Package
Monitor
Package
Site B Disk Array
Site B Cluster (Recovery)
FC Switch FC Switch
WAN
Converters
WAN
Converters
WAN
WAN
PRI_SCM_DB_PKG
cconfpkg
REC_CRM_DB_PKG
ccmonpkg
REC_SCM_DB_PKG
cconfpkg
PRI_CRM_DB_PKG ccmonpkg
For more information about Continentalclusters concepts, see Understanding and Designing
Serviceguard Disaster Recovery Architectures manual available at http://www.hp.com/go/
hpux-serviceguard-docs.
9

2 Building the Continentalclusters configuration
To build a Continentalclusters configuration, complete the following list of steps:
1. Create a Serviceguard cluster at both the data center sites.
2. Establish the security credentials for Continentalclusters operation.
3. Create data replication between the two clusters.
4. If required, then create the volume groups or disk groups on the replicated disks.
5. Install and configure an application in the primary site using the replicated disks.
6. Install and configure a redundant copy of the application in the recovery site using the same
replicated disks.
7. Package the primary and the recovery copy of the applications using Serviceguard and
Continentalclusters package modules.
8. Configure a monitor package in the recovery cluster.
9. Specify the clusters, the cluster events with its notifications and the recovery groups in the
Continentalclusters configuration ASCII file.
10. Validate and deploy the Continentalclusters configuration.
NOTE: This section provides information about configuring a single-instance application in a
Continentalclusters environment. Complex workloads are configured in a Continentalclusters
environment using Site Aware Disaster Tolerant Architecture (SADTA). Complex workloads are
applications configured using multi-node and failover packages with dependencies. SAP and
Oracle RAC database are some examples of complex workloads. For configuring a complex
workload in a Continentalclusters environment using SADTA, see section “Configuring complex
workloads in a Continentalclusters environment using SADTA” (page 43) .
Creating the Serviceguard clusters at both the sites
The clusters can be created using easy deployment method or the traditional deployment methods.
Easy deployment method
A cluster can be created in a single step using cmdeploycl command. The command takes in
the nodes, the sites, and the lock disk/quorum server information. It produces and applies the
produced configuration and then starts up the cluster as well.
The cmdeploycl command and options are as follows:
# cmdeploycl [-t] [-s site ]... [-n node ]... [-N net_template ] [-c
clustername] [-q qs_host [qs_ip] | -L locklun] [-cfs]
For example,
To create a single site cluster with nodes n1, n2 with a quorum server, run the following command:
# cmdeploycl -n n1 -n n2 -q qs.quorum.com
Traditional deployment method
The traditional approach of cluster deployment is used when there is a need to tune the cluster
parameters specifically. First run the cmquerycl command to get the cluster configuration template,
modify the parameter values as required and then validate the cluster configuration using
cmcheckconf command.
Once the cluster configuration validation is completed, then apply the cluster configuration using
cmapplyconf command.
# cmquerycl -v -C /etc/cmcluster/cluster.config -n node1 -n node2 -w
full
10 Building the Continentalclusters configuration

# cmapplyconf -v -C /etc/cmcluster/cluster.config
For more information, see Managing Serviceguard, latest edition at http://www.hp.com/go/
hpux-serviceguard-docs —>HP Serviceguard.
Setting up security
From Continentalclusters, all the nodes in all the clusters must be able to communicate with one
another using SSH.
When Continentalclusters is installed, a special Continentalclusters user group, conclgrp, and
a special user, conclusr are created using groupadd and useradd commands.
NOTE: The conclusr is used by Continentalclusters software for inter node communication. All
Continentalclusters commands and operations must be performed as root user only. When a node
is no longer part of Continentalclusters configuration, the user must be deleted from the removed
node.
To set up the SSH environment for Continentalclusters on all the nodes of all the clusters:
1. Set a password for the Continentalclusters user. By default, the Continentalclusters user is
conclusr.
a. Log in as root user.
b. Set the password for conclusr on the node.
# passwd conclusr
2. Set up SSH equivalence between the nodes in the Continentalclusters.
a. Log in to any node in the Continentalclusters as conclusr.
b. Create a text file and add the Fully Qualified Domain Names (FQDN) of all the nodes
in all the clusters to be configured in the Continentalclusters.
For example, consider a Continentalclusters with two clusters, Cluster A and Cluster B,
each having two nodes, Node 1 and Node 2. Create a text file <host-list-file>,
with the following entries:
Node1.cup.hp.com
Node2.cup.hp.com
Node1.ind.hp.com
Node2.ind.hp.com
c. Run the following Serviceguard command to create and distribute the SSH keys:
csshsetup -r -k rsa -f <host-list-file>
The SSH keys set up trust among all the Continentalclusters nodes. This command also
prompts for the password of the user conclusr, for every node specified in the file
created in step 2b. Enter the password when prompted.
After the keys are created and distributed, the SSH connection is tested. If errors are detected
in the SSH connection, an error message appears. Rectify the error on the node, and run the
following command:
csshsetup -r -k rsa -f <host-list-file>
3. The conclusr must have a USER_ROLE of MONITOR. All users on a node have this role by
default. To confirm if conclusr has MONITOR access, on every node that belongs to
Continentalclusters, log in as conclusr and run the following command:
# cmviewcl
In case conclusr user does not have MONITOR access, the execution of the command fails
with the following error:
# cmviewcl
Creating the Serviceguard clusters at both the sites 11

Permission denied to 127.0.0.1
cmviewcl: Cannot view the cluster configuration:
Permission denied. This user doesn't have access to view the cluster configuration.
nl
To resolve this error, edit the cluster configuration file, by including the following information:
USER_NAME conclusr
USER_HOST ANY_SERVICEGUARD_NODE
USER_ROLE MONITOR
Apply the cluster configuration file. Now, you must be able to view the cluster configuration
using the cmviewcl command.
Creating data replication between the clusters
Data replication between the Serviceguard clusters in a Continentalclusters recovery pair extends
the scope of high availability to the level of the Continentalclusters. Select a technology for data
replication between the two clusters. There are many possible choices, including:
•Logical replication of databases
•Logical replication of file systems
•Physical replication of data volumes via software
•Physical replication of disk units via hardware
For more information on these replication technologies, see Understanding and Designing
Serviceguard Disaster Recovery Architectures manual available at http://www.hp.com/go/
hpux-serviceguard-docs.
The following are different means of creating data replication between the primary and the recovery
clusters:
•Array based physical replication supported by Metrocluster products
•Any other array based physical replication technology.
•Logical replication
Continentalclusters offers flexibility in choosing the data replication method to enable recovery.
Using array based physical replication supported by Metrocluster
The following array based physical replication solutions are supported with Metrocluster.
1. XP P9000 Continuous Access
2. EVA P6000 Continuous Access
3. HP 3PAR Remote Copy
4. EMC SRDF
For specific guidelines and steps to configure data replication, see the following manuals:
For XP P9000, see Building Disaster Recovery Serviceguard Solutions Using Metrocluster with
Continuous Access for P9000 and XP A.11.00 available at http://www.hp.com/go/
hpux-serviceguard-docs.
For EVA P6000, see Building Disaster Recovery Serviceguard Solutions Using Metrocluster with
Continuous Access EVA A.05.01 available at http://www.hp.com/go/hpux-serviceguard-docs.
For HP 3PAR Remote Copy, see Building Disaster Recovery Serviceguard Solutions Using
Metrocluster with 3PAR Remote Copy available at http://www.hp.com/go/hpux-serviceguard-docs.
For EMC SRDF, see Building Disaster Recovery Serviceguard Solutions Using Metrocluster with
EMC SRDF available at http://www.hp.com/go/hpux-serviceguard-docs.
12 Building the Continentalclusters configuration

After configuring data replication using any one of the above arrays, the applications in the cluster
that needs disaster recovery must be packaged with the appropriate Continentalclusters package
module. This must be done at both the primary and the recovery clusters.
Using any other array based physical replication technology
If you select a data replication technology is chosen that is not described in the previous section,
and if the integration is performed independently, then note the following:
•Continentalclusters product is only responsible for Continentalclusters configuration and
management commands, the monitoring of remote cluster status, and the notification of remote
cluster events.
•Continentalclusters product provides a single recovery command to start all recovery packages
that are configured in the Continentalclusters configuration file. These recovery packages are
typical Serviceguard's packages. Continentalclusters recovery command does not verify on
the status of the devices and data that are used by the application before starting the recovery
package. The user is responsible for checking the state of the devices and the data before
executing Continentalclusters recovery command.
As part of the recovery process, you must follow the guidelines described in section “Preparing
the storage manually in the recovery cluster” (page 29).
Using software based logical replication
If the data replication software is separate from the application itself, a separate Serviceguard
package must be created for it.
Logical data replication may require the use of packages to handle software processes that copy
data from one cluster to another or that apply transactions from logs that are copied from one
cluster to another. Some methods of logical data replication may use a logical replication data
sender package, and others may use a logical replication data receiver package while some may
use both. Configure and apply the data sender package, or data receiver package, or both as
required. Logical replication data sender and receiver packages are configured as part of the
Continentalclusters recovery group, as shown in section, “Creating a Continentalclusters
configuration” (page 22).
Creating volume groups or disk groups on the replicated disks if required
The LVM volume groups or VxVM disk groups that use the application device group must be created
(or imported) on all Continentalclusters nodes. Create the LVM volume groups or disk groups in
one of the primary site nodes and, import all of them for the rest of the Continentalclusters nodes.
For more information on creating volume group, see the section Building Volume Groups and
Logical Volumes in the latest edition of Managing Serviceguard A.11.20 available at http://
www.hp.com/go/hpux-serviceguard-docs
For more information on configuring LVM volume group using XP P9000, see Building Disaster
Recovery Serviceguard Solutions Using Metrocluster with Continuous Access for P9000 and XP
A.11.00 available at http://www.hp.com/go/hpux-serviceguard-docs.
For more information on configuring LVM volume group using EVA P6000, see Building Disaster
Recovery Serviceguard Solutions Using Metrocluster with Continuous Access EVA A.05.01 available
at http://www.hp.com/go/hpux-serviceguard-docs.
For more information on configuring LVM volume group using 3PAR Remote Copy, see Building
Disaster Recovery Serviceguard Solutions Using Metrocluster with 3PAR Remote Copy available
at http://www.hp.com/go/hpux-serviceguard-docs.
For more information on configuring LVM volume group using EMC SRDF, see Building Disaster
Recovery Serviceguard Solutions Using Metrocluster with EMC SRDF available at http://
www.hp.com/go/hpux-serviceguard-docs.
Creating volume groups or disk groups on the replicated disks if required 13

Creating and Exporting LVM Volume Groups
Run the following procedure to create and export volume groups:
NOTE: If you are using the March 2008 version or later of HP-UX 11i v3, skip step1; vgcreate
(1m) will create the device file. Define the appropriate Volume Groups on each host system that
might run the application package.
# mkdir /dev/vgxx
# mknod /dev/vgxx/group c 64 0xnn0000
where the name /dev/vgxx and the number nn are unique within the entire cluster.
1. Define the appropriate Volume Groups on each host system that might run the application
package.
2. Create the Volume Group on the source volumes.
# pvcreate -f /dev/rdsk/cxtydz
# vgcreate /dev/vgname /dev/dsk/cxtydz
3. Create the logical volume(s) for the volume group.
4. Deactivate and export the Volume Groups on the primary system without removing the special
device files.
# vgchange -a n <vgname>
Make sure that you copy the mapfiles to all of the host systems.
# vgexport -s -p -m <mapfilename> <vgname>
5. On the source disk site import the VGs on all of the other systems that might run the
Serviceguard package and backup the LVM configuration.
# vgimport -s -m <mapfilename> <vgname>
# vgchange -a y <vgname>
# vgcfgbackup <vgname>
# vgchange -a n <vgname>
6. To make the disk read/write, prepare the storage at the target disk site.
For more information using on XP P9000, see Building Disaster Recovery Serviceguard Solutions
Using Metrocluster with Continuous Access for P9000 and XP A.11.00 available at http://
www.hp.com/go/hpux-serviceguard-docs.
For more information using on EVA P6000, see Building Disaster Recovery Serviceguard
Solutions Using Metrocluster with Continuous Access EVA A.05.01 available at http://
www.hp.com/go/hpux-serviceguard-docs.
For more information on using using 3PAR Remote Copy , see Building Disaster Recovery
Serviceguard Solutions Using Metrocluster with 3PAR Remote Copy available at http://
www.hp.com/go/hpux-serviceguard-docs.
For more information on using EMC SRDF, see Building Disaster Recovery Serviceguard
Solutions Using Metrocluster with EMC SRDF available at http://www.hp.com/go/
hpux-serviceguard-docs.
7. On the target disk site import the VGs on all of the systems that might run the Serviceguard
recovery package and backup the LVM configuration.
# vgimport -s -m <mapfilename> <vgname>
# vgchange -a y <vgname>
# vgcfgbackup <vgname>
# vgchange -a n <vgname>
14 Building the Continentalclusters configuration
Creating VxVM Disk Groups
Run the following procedure to create VxVM Disk Groups
1. Initialize disks to be used with VxVM by running the vxdisksetup command only on the
primary system.
# /etc/vx/bin/vxdisksetup -i c5t0d0
2. Create the disk group to be used with the vxdg command only on the primary system.
# vxdg init logdata c5t0d0
3. Verify the configuration.
# vxdg list
4. Use the vxassist command to create the volume.
# vxassist -g logdata make logfile 2048m
5. Verify the configuration.
# vxprint -g logdata
6. Make the filesystem.
# newfs -F vxfs /dev/vx/rdsk/logdata/logfile
7. Create a directory to mount the volume group.
# mkdir /logs
8. Mount the disk group.
# mount /dev/vx/dsk/logdata/logfile /logs
9. Check if file system exits, then unmount the file system.
# umount /logs
Installing and Configuring an application in the primary site
Install the application at the primary site in a non replicated disk and configure it to run such that
the data is stored in the replicated disks. The installed application and its resources such as volume
groups , file system mount points must be configured as a Serviceguard package as explained in
the section “Configuring the Continentalclusters primary and recovery packages” (page 15).
Installing and configuring a redundant copy of the application in the
recovery site
Install the application at the secondary site and configure it to use the same replicated disks as in
the previous step. Then configure the application and its resources as a Serviceguard package.
Configuring the Continentalclusters primary and recovery packages
The packages can be created using any modules supported by HP Serviceguard.
For example, for Oracle application, the Serviceguard Oracle toolkit can be used to create the
primary and recovery packages in Continentalclusters.
Continentalclusters supports the following pre-integrated physical replication solutions:
•Continuous Access P9000 and XP
•Continuous Access EVA
•EMC Symmetrix Remote Data Facility
•3PAR Remote Copy
Installing and Configuring an application in the primary site 15

When any of these pre-integrated solutions are used, the corresponding Continentalclusters specific
module must be included in the primary and recovery packages.
For example, while using Continuous Access P9000 or XP replication, the dts/ccxpca module
must be used to create the primary and recovery packages.
NOTE: If none of the above pre-integrated physical replications are used, then it is not required
to include any Continentalclusters specific module.
Configuring primary and recovery packages as modular packages when using
Continuous Access P9000 or XP
When using Continuous Access P9000 or XP replication in Continentalclusters, the primary and
recovery packages must be created using the dts/ccxpca module. To use this module, Metrocluster
with Continuous Access for P9000 and XP must be installed on all the nodes in the
Continentalclusters. If Metrocluster with Continuous Access for P9000 and XP is not installed on
all the nodes, then the following error message is displayed when cmmakepkg command is run.
The file /etc/cmcluster/modules/dts/ccxpca does not exist or read/search permission not set for a component of
the path: No such file or directory 1 number of errors found in specified module files!
Please fix the error(s) before re-running the command.
cmmakepkg: Error encountered. Unable to create template file.
When the package configuration is applied in the cluster using the cmapplyconf command, the
Metrocluster environment file is automatically generated in the package directory on all the nodes
in the cluster.
CAUTION: Do not delete the Metrocluster environment file that is generated in the package
directory. This file is crucial for the startup of the package in Continentalclusters.
To configure the primary and recovery packages as modular packages using Continuous Access
P9000 and XP with Continentalclusters:
1. Run the following command to create package configuration file:
# cmmakepkg –m dts/ccxpca temp.config
NOTE: Continentalclusters is usually used with applications such as Apache. So, the
application toolkit module must also be included when Continentalclusters is used in conjunction
with an application.
For Example, when Continentalclusters is used in conjunction with the Apache toolkit, the
Apache toolkit module and other required modules must also be included with the
Continentalcluster module. Run the following command:
# cmmakepkg –m dts/ccxpca –m sg/filesystem -m sg/package_ip -m
ecmt/apache/apache temp.config
2. Edit the following attributes in the temp.config file:
•dts/xpca/dts_pkg_dir
This is the package directory for this modular package. This value must be unique for all
packages.
For example,
dts/xpca/dts_pkg_dir <pkg_dir_name>
•DEVICE_GROUP
Specify the XPCA device group name managed by this package, as defined in the RAID
Manager configuration file.
•HORCMINST
Specify the name of the RAID manager instance that manages the XPCA device group
used by this package.
16 Building the Continentalclusters configuration

•FENCE
Specify the fence level configured for the XPCA device group that is managed by this
package.
•AUTO_RUN
Set the value of this parameter to no.
There are additional parameters available in the package configuration file. HP
recommends that you retain the default values of these variables unless there is a specific
business requirement to change them. For more information about the additional
parameters, see “Package Attributes for Continentalcluster with Continuous Access for
P9000 and XP” (page 88).
3. Validate the package configuration file.
# cmcheckconf -P temp.config
4. Apply the package configuration file.
# cmapplyconf -P temp.config
Configuring the primary and recovery packages as modular packages when using
Continuous Access EVA
When using Continuous Access EVA replication in Continentalclusters, the primary and recovery
packages must be created using the dts/cccaeva module. To use this module, Metrocluster with
Continuous Access EVA must be installed on all the nodes in the Continentalclusters. If Metrocluster
with Continuous Access EVA is not installed on all the nodes, then the following error message is
displayed when cmmakepkg command is run.
The file /etc/cmcluster/modules/dts/cccaeva does not exist or read/search permission not set for a component
of the path: No such file or directory
1 number of errors found in specified module files!
Please fix the error(s) before re-running the command.
cmmakepkg: Error encountered. Unable to create template file.
When configuring the modular packages using Continuous Access EVA, only the package
configuration file must be edited. The Metrocluster environment file is automatically generated on
all the nodes when the package configuration is applied in the cluster.
CAUTION: Do not delete the Metrocluster environment file that is generated in the package
directory. This file is crucial for the startup of the package in a Continentalclusters.
To configure the primary and recovery packages as modular packages using Continuous Access
P6000 EVA with Continentalclusters as follows:
1. Run the following command to create a Continuous Access EVA modular package configuration
file:
# cmmakepkg –m dts/cccaeva temp.config
NOTE: Continentalclusters is usually used with applications such as Apache. So, the
application toolkit module must also be included when Continentalclusters is used in conjunction
with an application.
For Example, when Continentalclusters is used in conjunction with the Apache toolkit, the
Apache toolkit module and other required modules must also be included with the
Continentalcluster module. Run the following command:
Configuring the Continentalclusters primary and recovery packages 17
# cmmakepkg –m dts/cccaeva –m sg/filesystem -m sg/package_ip -m
tkit/apache/apache temp.config
2. Edit the following attributes in the temp.config file:
•dts/caeva/dts_pkg_dir
This is the package directory for the modular package. This value must be unique for all
the packages.
•AUTO_RUN
Set the value of this parameter to no.
•DT_APPLICATION_STARTUP_POLICY
This parameter defines the preferred policy by allowing the application to start with
respect to the state of the data in the local volumes. This can be either
Availability_Preferred or Data_Currency_Preferred.
•DR_GROUP_NAME
The name of the DR group used by this package. The DR group name is defined when
the DR group is created.
•DC1_STORAGE_WORLD_WIDE_NAME
The world wide name of the EVA storage system that resides in Data Center 1. This
storage system name is defined when the storage is initialized.
•DC1_SMIS_LIST
A list of the Windows management servers, which is located in Data Center 1.
•DC1_HOST_LIST
A set of the cluster nodes, which is located in Data Center 1.
•DC2_STORAGE_WORLD_WIDE_NAME
The world wide name of the EVA storage system that is located in Data Center 2. This
storage system name is defined when the storage is initialized.
•DC2_SMIS_LIST
A list of the Windows management servers, which is located in Data Center 2.
•DC2_HOST_LIST
A list of the clustered nodes, which is located in Data Center 2.
There are additional parameters available in the package configuration file. HP recommends
that you retain the default values of these variables are retained unless there is a specific
business requirement to change them.
For more information on the additional parameters, see the section “Package Attributes for
Continentalcluster with Continuous Access EVA” (page 95).
3. Validate the package configuration file.
# cmcheckconf -P temp.config
4. Apply the package configuration file.
# cmapplyconf -P temp.config
18 Building the Continentalclusters configuration

Configuring the primary and recovery packages as modular packages when using
EMC SRDF
When using EMC SRDF replication in Continentalclusters, the primary and recovery packages must
be created using the dts/ccsrdf module. To use this module, Metrocluster with EMC SRDF must
be installed on all the nodes in Continentalclusters. If Metrocluster with EMC SRDF is not installed
on all the nodes, then the following error message is displayed when cmmakepkg command is
run:
The file /etc/cmcluster/modules/dts/ccsrdf does not exist or read/search permission not set for a component of
the path: No such file or directory
1 number of errors found in specified module files!
Please fix the error(s) before re-running the command.
cmmakepkg: Error encountered. Unable to create template file.
When configuring modular packages with EMC SRDF, only the package configuration file must
be edited. The Metrocluster environment file is automatically generated on all the nodes when the
package configuration is applied in the cluster.
CAUTION: Do not delete the Metrocluster environment file that is generated in the package
directory. This file is crucial for the startup of the package in Continentalclusters.
To configure the primary and recovery packages as modular packages using EMC SRDF with
Continentalclusters as follows:
1. Run the following command to create an SRDF modular package configuration file:
# cmmakepkg –m dts/ccsrdf temp.config
2. Edit the following attributes in the temp.config file:
•dts/dts/dts_pkg_dir
This is the package directory for the modular package. The Metrocluster environment file
is generated for this package in this directory. This value must be unique for all the
packages.
For example,
dts/dts/dts_pkg_dir /etc/cmcluster/<package_name>
•AUTO_RUN
Set the value of this parameter to “no”.
•DEVICE_GROUP
This variable contains the name of the Symmetrix device group for the package.
•RDF_MODE
This parameter defines the data replication modes for the device group. There are
additional parameters available in the package configuration file. HP recommends that
the default values of these variables are retained unless there is a specific business
requirement to change them.
For more information about the additional parameters, see “Package Attributes for
Continentalcluster with EMC SRDF” (page 97).
3. Halt the package.
# cmhaltpkg <package_name>
4. Validate the package configuration file.
# cmcheckconf -P temp.config
5. Apply the package configuration file.
# cmapplyconf -P temp.config
Configuring the Continentalclusters primary and recovery packages 19

6. Run the package on a node in the Serviceguard cluster.
# cmrunpkg -n <node_name> <package_name>
7. Enable global switching for the package.
# cmmodpkg -e <package_name>
Configuring the primary and recovery packages as modular packages when using
3PAR Remote Copy
When using HP 3PAR Remote Copy in Continentalclusters, the primary and recovery packages
must be created using the dts/cc3parrc module. To use this module, Metrocluster with 3PAR
Remote Copy must be installed on all the nodes in the Continentalclusters.
To configure the primary and recovery packages as modular packages using 3PAR Remote Copy
with Continentalclusters:
1. Run the following command to create a modular primary or recovery package configuration
file using the Continentalclusters module dts/cc3parrc:
# cmmakepkg –m dts/cc3parrc pkgName.config
NOTE: Continentalclusters is usually used with applications such as Apache. So, the
application toolkit module must also be included when Continentalclusters is used in conjunction
with an application.
For Example, when Continentalclusters is used in conjunction with the Apache toolkit, the
Apache toolkit module and other required modules must also be included with the
Continentalcluster module. Run the following command:
# cmmakepkg –m dts/cc3parrc –m sg/filesystem -m sg/package_ip -m
tkit/apache/apache temp.config
2. Edit the following attributes in the pkgName.config file:
•AUTO_RUN
Set the value of this parameter to no.
•DTS_PKG_DIR
This is the package directory for the modular package. This value must be unique for all
the packages.
•DC1_NODE_LIST
The cluster nodes which resides in Data Center 1.
•DC2_NODE_LIST
The cluster nodes which resides in Data Center 2.
•DC1_STORAGE_SYSTEM_NAME
The DNS resolvable name or IP address of the HP 3PAR storage system, which is located
in Data center 1.
•DC2_STORAGE_SYSTEM_NAME
The DNS resolvable name or IP address of the HP 3PAR storage system, which is located
in Data center 2.
•DC1_STORAGE_SYSTEM_USER
The user on the HP 3PAR storage system, which is located in Data Center 1.
•DC2_STORAGE_SYSTEM_USER
The user on the HP 3PAR storage system, which is located in Data Center 2.
20 Building the Continentalclusters configuration
•DC1_RC_VOLUME_GROUP
The Remote Copy volume group name configured on the HP 3PAR storage system, which
is located in Data Center 1, containing the disks used by the application.
•DC2_RC_VOLUME_GROUP
The Remote Copy volume group name configured on the HP 3PAR storage system, which
is located in Data Center 2, containing the disks used by the application.
•DC1_RC_TARGET_FOR_DC2
The target name associated with the Remote Copy volume group on data center 1 for
the HP 3PAR storage system in Data Center 2.
•DC2_RC_TARGET_FOR_DC1
The target name associated with the Remote Copy volume group on data center 2 for
the HP 3PAR storage system in Data Center 1.
•RESYNC_WAIT_TIMEOUT
The timeout, in minutes, to wait for completion of the Remote Copy volume group
resynchronization.
•AUTO_NONCURDATA
Parameter used to decide whether package can start up with non current data or not.
3. Validate the package configuration file.
# cmcheckconf -P pkgName.config
4. Apply the package configuration file.
# cmapplyconf -P pkgName.config
Configuring the monitor package
The template file for creating a monitor package ccmonpkg is available in the /opt/cmconcl/
scripts directory. This package configuration file includes the Continentalclusters monitoring
daemon /usr/lbin/cmclsentryd as a pre-configured service.
To configure the monitoring daemon as a modular package:
1. On any node in the monitoring cluster, create a directory to store the configuration file of the
monitor package. For example, /etc/cmcluster/ccmonpkg/
2. Copy the modular package template file, /opt/cmconcl/scripts/
ccmonpkg_modular.config to the directory created in step 1.
# cp /opt/cmconcl/scripts/ccmonpkg_modular.config
/etc/cmcluster/ccmonpkg/ccmonpkg.conf
3. Skip this step if you are not using the DR Rehearsal feature.
If the rehearsal feature is configured, then provide the following information of the filesystem
and volume group used as a state directory:
•Volume group name
•mount point
•logical volume name
•Filesystem type
•mount and unmount options
•fsck options
For Example:
Configuring the monitor package 21

vg ccvg
fs_name /dev/ccvg/lvol1
fs_directory /opt/cmconcl/statedir
fs_mount_opt "-o rw"
fs_umount_opt ""
fs_fsck_opt ""
fs_type "vxfs"
For more information about DR Rehearsal feature, see “Performing Disaster Recovery rehearsal
in Continentalclusters” (page 39).
4. Specify a name for the ccmonpkg log file using script_log_file parameter.
script_log_file /etc/cmcluster/ccmonpkg/ccmonpkg.log
5. Validate the package configuration file.
# cmcheckconf –P ccmonpkg.conf
6. Apply the package configuration.
# cmapplyconf –P ccmonpkg.conf
Creating a Continentalclusters configuration
Continentalclusters configuration is created using a template configuration file. This template
configuration file can be produced using the cmqueryconcl command.
First, on one cluster, generate an ASCII configuration template file using the cmqueryconcl
command. The recommended name and location for this file is/etc/cmcluster/
cmconcl.config. (If preferred, choose a different name.)
For example,
# cd /etc/cmcluster
# cmqueryconcl -C cmconcl.config
This file has three editable sections:
•Cluster information
•Recovery groups
•Monitoring definitions
Cluster information
Configure the following parameters:
Mandatory or OptionalValueParameter
Mandatory.Any valid string.CONTINENTAL_CLUSTER_NAME
For Example
CONTINENTAL_CLUSTER_NAME ccluster1
Optional: Used only when if the
maintenance mode feature is required.
Full path to the directory on the shared
volume.
CONTINENTAL_CLUSTER_STATE_DIR
For Example
CONTINENTAL_CLUSTER_STATE_DIR /opt/cmconcl/statedir
Mandatory.The name of the Serviceguard cluster
that is a part of the Continentalclusters.
CLUSTER_NAME
Mandatory: Multiple nodes must have
separate NODE_NAME entries.
The name of the node that is a part of
the Serviceguard cluster defined in the
CLUSTER_NAME parameter.
NODE_NAME
22 Building the Continentalclusters configuration

Mandatory or OptionalValueParameter
Mandatory.The DNS domain of the nodes defined
above.
CLUSTER_DOMAIN
This parameter is required only when
the cluster specified in CLUSTER_NAME
acts as a the recovery cluster.
The name of the monitoring package,
usually ccmonpkg.
MONITOR_PACKAGE_NAME
This parameter is required only when
the cluster specified in CLUSTER_NAME
acts as a the recovery cluster.
The amount of time between two
consecutive monitoring operations.
MONITOR_INTERVAL
For Example:
CLUSTER_NAME recovery_cluster
CLUSTER_DOMAIN myorg1.myorg.com
NODE_NAME recovery_node1
NODE_NAME recovery_node2
MONITOR_PACKAGE_NAME ccmonpkg
MONITOR_INTERVAL 60 SECONDS
CLUSTER_NAME primary_cluster
CLUSTER_DOMAIN myorg1.myorg.com
NODE_NAME primary_node1
NODE_NAME primary_node2
Recovery groups
In the Recovery groups, the following parameters are available:
Mandatory or OptionalValueParameter
Mandatory.Any string.RECOVERY_GROUP_NAME
Mandatory.The name of the package acts as
primary along with the name of the
primary cluster.
PRIMARY_PACKAGE
Optional: This is used only when a
software based replication is used. This
The name of the package is in charge
of copying data from primary to
DATA_SENDER_PACKAGE**
package runs only in the primary
cluster.
recovery along with the name of the
primary cluster.
Mandatory.The name of the package acts as
recovery along with the name of the
recovery cluster.
RECOVERY_PACKAGE
Optional: This is required only when a
software based replication is used. This
The name of the package is in charge
of pulling data from the primary to
DATA_RECEIVER_PACKAGE**
package runs only in the recovery
cluster.
recovery along with the name of the
recovery cluster.
Optional: This is required only when
the DR Rehearsal feature is used.
The name of the package acts as the
rehearsal package along with the
name of the recovery cluster.
REHEARSAL_PACKAGE
For Example:
RECOVERY_GROUP_NAME rggroup1
PRIMARY_PACKAGE primary_cluster/primary_pkg
RECOVERY_PACKAGE recovery_cluster/recovery_pkg
RECOVERY_GROUP_NAME rggroup2
PRIMARY_PACKAGE primary_cluster/primary_pkg1
DATA_SENDER_PACKAGE primary_cluster/data_sender1
RECOVERY_PACKAGE recovery_cluster/recovery_pkg1
DATA_RECEIVER_PACKAGE recovery_cluster/data_receiver1
REHEARSAL_PACKAGE recovery_cluster/rehearsal_pkg1
Creating a Continentalclusters configuration 23

** Most software based replication will need either a data sender package or data receiver package
while some might need both.
Multiple recovery groups in Continentalclusters can be configured by repeating parameters.
Monitoring definitions
The monitoring definitions has the following parameters:
Mandatory or OptionalValueParameter
Mandatory.The name of the primary cluster followed by
cluster status. The following cluster status’
are supported:
CLUSTER_EVENT
1. UNREACHABLE
2. UP
3. DOWN
4. ERROR
Mandatory.The name of the recovery cluster that is
monitoring the cluster for which alerts are
configured.
MONITORING_CLUSTER
Mandatory.The time to wait before placing the primary
cluster into alert state for being in the current
status.
CLUSTER_ALERT
Optional.The time to wait before placing the primary
cluster into alarm state for being in the
current status.
CLUSTER_ALARM
Optional.The email address.NOTIFICATION EMAIL**
The notification content is provided in the
next line.
Optional.The notification content is provided in the
next line.
NOTIFICATION CONSOLE**
Optional.The OPC level followed by the notification
message. The value of <level>might be 8
NOTIFICATION OPC**
(normal), 16 (warning), 32 (minor), 64
(major), 128(critical). The notification
message is provided in the next line.
Optional.The SNMP level followed by the notification
message. The value of <level> might be 1
NOTIFICATION SNMP**
(normal), 2 (warning), 3 (minor), 4 (major),
5 (critical). The message is provided in the
next line.
Optional.The notification message is provided in the
next line.
NOTIFICATION SYSLOG**
Optional.The node name and the port number is
provided. The notification message is
provided in the next line.
NOTIFICATION TCP**
Optional.The path name to the log file is provided.
The log file must be under the /var/opt/
NOTIFICATION TEXTLOG**
resmon/log directory. The notification
message is provided in the next line.
Optional.The node name and the port number is
provided. The notification message is
provided in the next line.
NOTIFICATION UDP**
For Example
24 Building the Continentalclusters configuration

Mandatory or OptionalValueParameter
CLUSTER_EVENT primary_cluster/UNREACHABLE
MONITORING_CLUSTER recovery_cluster
CLUSTER_ALERT 5 MINUTES
NOTIFICATION EMAIL admin@primary.site
"primary_cluster status unknown for 5 min. Call
recovery site."
NOTIFICATION EMAIL admin@recovery.site
"Call primary admin. (555) 555-6666."
NOTIFICATION CONSOLE
"Cluster ALERT: primary_cluster not responding."
NOTIFICATION TEXTLOG /var/opt/resmon/log/logging
“primary_cluster UNREACHABLE alert”
NOTIFICATION SYSLOG
“primary_cluster UNREACHABLE alert”
NOTIFICATION UDP central_node1:6624
"primary_cluster UNREACHABLE alert"
NOTIFICATION TCP central_node1:9921
"primary_cluster UNREACHABLE alert"
NOTIFICATION OPC 64
"primary_cluster UNREACHABLE alert"
NOTIFICATION SNMP 4
"primary_cluster UNREACHABLE alert"
** These notifications can be configured for both CLUSTER_ALERT and CLUSTER_ALARMS
separately.
Mutlitple cluster events can be defined by repeating parameters.
For more information, see “Sample Continentalclusters ASCII configuration file” (page 115).
Checking and applying the Continentalclusters configuration
After editing the configuration file on any of the participating clusters in the Continentalcluster.
To apply the configuration on all the nodes in the Continentalclusters:
1. Halt all the monitor packages if running.
# cmhaltpkg ccmonpkg
2. Verify the Continentalclusters configuration.
# cmcheckconcl -v -C cmconcl.config
This command will verify if all the parameters are within range, all fields are filled, and the
entries (such as NODE_NAME) are valid.
3. Distribute the Continentalclusters configuration information to all the nodes in the
Continentalclusters.
# cmapplyconcl -v -C cmconcl.config
After apply operation, a package named ccconfpkg is automatically created. This package
is used to store the Continentalclusters configuration data to all the nodes in the cluster. This
package is managed by Continentalclusters internally.
NOTE: It is not required to run this package in the primary or recovery cluster for proper
Continentalclusters operation. This special package will be displayed with Serviceguard status
commands, such as cmviewcl. Cluster administrators must not attempt to modify, delete,
start, or stop this package using Serviceguard commands. This package is automatically
deleted from all the clusters when the Continentalclusters configuration is deleted using the
cmdeleteconcl command.
Checking and applying the Continentalclusters configuration 25

Starting the Continentalclusters monitor package
Starting the monitoring package enables the recovery clusters to monitor the primary clusters.
Before doing this, ensure that the primary packages configured are running normally. If logical
data replication is configured, ensure that the data receiver and data sender packages are running
properly.
If using physical data replication, ensure that it is operational.
On every monitoring cluster start the monitor package.
# cmmodpkg -e ccmonpkg
After the monitor package is started, a log file /var/adm/cmconcl/logs/cmclsentryd.log
is created on the node where the package is running to record the Continentalclusters monitoring
activities. HP recommends that this log file be archived or cleaned up periodically.
Testing the Continentalclusters
This section presents some test procedures and scenarios. You can run the testing procedures as
applicable to your environment. In addition, you must perform the standard Serviceguard testing
individually on each cluster.
CAUTION: Testing can result in data corruption. Hence, always backup data before testing.
Testing Individual Packages
Use procedures like the following to test individual packages:
1. Use the cmhaltpkg command to shut down the package in the primary cluster that corresponds
to the package to be tested on the recovery cluster.
2. Do not switch any users to the recovery cluster. The application must be inaccessible to users
during this test.
3. Start up the package to be tested on the recovery cluster using the cmrunpkg command.
4. Access the application manually using a mechanism that tests network connectivity.
5. Perform read-only actions to verify that the application is running appropriately.
6. Shut down the application on the recovery cluster using the cmhaltpkg command.
7. If using physical data replication, do not resync from the recovery cluster to the primary cluster.
Instead, manually issue a command that will overwrite any changes on the recovery disk array
that may inadvertently have been made.
8. Start the package up in the primary cluster and allow connection to the application.
Testing Continentalclusters Operations
1. Halt both clusters in a recovery pair, then restart both clusters. The monitor packages on both
clusters must start automatically. The Continentalclusters packages (primary,data sender,
data receiver, and recovery) must not start automatically. Any other packages might
or might not start automatically, depending on the configuration.
NOTE: If an UP status is configured for a cluster, then an appropriate alert notification (email,
SNMP, and so on.) must be received at the configured time interval from the node running
the monitor package on the other cluster. Due to delays in email or SNMP, the notifications
may arrive later than expected.
2. While the monitor package is running on a monitoring cluster, halt the monitored cluster
(cmhaltcl -f). An appropriate alert notification (email, SNMP, and so on.) must be received
at the configured time interval from the node running the monitor package. Run the
cmrecovercl. The command should fail. Additional notifications must be received at the
configured time intervals. After the alarm notification is received, run the cmrecovercl
26 Building the Continentalclusters configuration
command. Any data receiver packages on the monitoring cluster must halt and the recovery
packages must start with package switching enabled. Halt the recovery packages.
3. Test 2 should be rerun under a variety of conditions (and multiple conditions) such as the
following:
•Rebooting and powering off systems one at a time.
•Rebooting and powering off all systems at the same time.
Running the monitor package on each node in each cluster.◦
◦Disconnecting the WAN connection between the clusters.
If physical data replication is used, disconnect the physical replication links between the
disk arrays:
◦Powering off the disk array at the primary site.
◦Powering off the disk array at the recovery site.
•Testing the cmrecovercl -f as well as the cmrecovercl command.
Depending on the condition, the primary packages must be running to test real life failures
and recovery procedures.
4. After each scenario in tests 2-3, restore both clusters to their production state, restart the
primary package (as well as any data sender and data receiver packages) and note any
issues, including time delays, and so on.
5. Halt the monitor package on one cluster. Halt the other cluster. Notifications that the other
cluster has failed are not generated. Test the mechanisms available to detect manual shutdown
of Continentalclusters monitor daemon.
6. Halt the packages on one cluster, but do not halt the cluster. Notifications that the packages
on that cluster have failed are not generated. Test the mechanisms available to detect the
manual shutdown or failure of primary packages.
7. After the testing is complete, view the status of Continentalclusters:
# cmviewconcl
WARNING: Primary cluster primary_cluster is in an alarm state (cmrecovercl is enabled on recovery cluster
recovery_cluster)
CONTINENTAL CLUSTER ccluster1
RECOVERY CLUSTER recovery_cluster
PRIMARY CLUSTER STATUS EVENT LEVEL POLLING INTERVAL
primary_cluster down alarm 1 min
PACKAGE RECOVERY GROUP test-group
PACKAGE ROLE STATUS
primary_cluster/primary_package primary down
recovery_cluster/recovery_package recovery down
To view detailed information on continentalcluster status, run the following command.
# cmviewconcl —v
WARNING: Primary cluster primary_cluster is in an alarm state (cmrecovercl is enabled on recovery cluster
recovery_cluster)
CONTINENTAL CLUSTER ccluster1
RECOVERY CLUSTER recovery_cluster
PRIMARY CLUSTER STATUS EVENT LEVEL POLLING INTERVAL
primary_cluster down alarm 1 min
CONFIGURED EVENT STATUS DURATION LAST NOTIFICATION SENT
alert unreachable 1 min --
alarm unreachable 2 min --
alert down 1 min Tue Jun 05 10:52:32 IST 2012
alarm down 2 min Tue Jun 05 10:53:37 IST 2012
alert up 1 min --
PACKAGE RECOVERY GROUP test-group
Testing the Continentalclusters 27
PACKAGE ROLE STATUS
primary_cluster/test-pri primary down
recovery_cluster/test-rec recovery down
28 Building the Continentalclusters configuration

3 Performing a recovery operation in Continentalclusters
environment
Performing recovery in case of disaster
You can also initiate recovery forcefully even if the alarm event has not triggered but the alert event
has happened. An administrator can initiate the recovery using cmrecoverclcommand. However,
an administrator must confirm from the primary cluster administrator for the need of the recovery.
After the confirmation is obtained, the administrator can start the recovery process using the
cmrecovercl command. The administrator can choose to recover all the primary packages, or
specific packages by specifying the recovery group names.
The primary steps for failing over a package are:
1. Receiving notification.
2. Verifying that recovery is required.
3. Preparing the storage in the recovery cluster
4. Using the cmrecovercl command to failover the recovery groups.
Receiving notification
After the monitor is started, as described in the section “Starting the Continentalclusters monitor
package” (page 26), the monitor sends notifications as configured. The following types of
notifications are generated as configured in cmclconf.ascii:
•CLUSTER_ALERT is a change in the status of a cluster. Recovery via the cmrecovercl
command is not enabled by default. This must be treated as information that the cluster either
might be developing a problem or might be recovering from a problem.
•CLUSTER_ALARM is a change in the status of a cluster, and indicates that the cluster has been
unavailable for an unacceptable period of time. Recovery via the cmrecovercl command
is enabled.
NOTE: The cmrecovercl command is fully enabled only after a CLUSTER_ALARM is issued;
however, the command might be used with the -f option when a CLUSTER_ALERT has been
issued.
Verifying that recovery is required
It is important to follow an established protocol for coordinating with the remote cluster administrators
to determine whether it is necessary to move the package. This includes initiating person-to-person
communication between cluster sites. For example, it might be possible that the WAN network
failed, causing the cluster alarm. Even if the cluster is down, it could be intentional and might not
require recovery.
Some network failures, such as those that prevent clients from using the application, might require
recovery. Other network failures, such as those that only prevent the two clusters from
communicating, might not require recovery. Following an established protocol for communicating
with the remote site must verify this. For an example of a recovery checklist, see the section “Recovery
Checklist” (page 76).
Preparing the storage manually in the recovery cluster
If Metrocluster with Continuous Access for P9000 and XP, or Metrocluster with Continuous Access
EVA, or Metrocluster with EMC SRDF, or Metrocluster with 3PAR Remote Copy is not being used,
use the following steps before executing the Continentalclusters recovery command, cmrecovercl.
Performing recovery in case of disaster 29

Once the notification is received, and it is determined that recovery is required by using the recovery
checklist (For a sample checklist , see the section “Recovery Checklist” (page 76)) do the following:
•Ensure the data used by the application is in usable state. Usable state means the data is
consistent and recoverable, even though it might not be current.
•Ensure the secondary devices are in read-write mode. If you are using database or software
data replication ensure the data copy at the recovery site is in read-write mode as well.
•If LVM and physical data replication are used, the ID of the primary cluster is also replicated
and written on the secondary devices in the recovery site. The ID of the primary cluster must
be cleared and the ID of the recovery cluster must be written on the secondary devices before
they can be used.
If LVM exclusive-mode is used, issue the following commands from a node in the recovery
cluster on all the volume groups that are used by the recovery packages:
# vgchange -c n <volume group name>
# vgchange -c y <volume group name>
If LVM shared-mode (SLVM) is used, from a node in the recovery cluster, issue the following
commands:
# vgchange -c n -S n <volume group name>
# vgchange -c y -S y <volume group name>
•If VxVM and physical data replication are used, the host name of a node in the primary cluster
is the host name of the last owner of the disk group. It is also replicated and written on the
secondary devices in the recovery site. The host name of the last owner of the disk group must
be cleared out before the secondary devices can be used.
If VxVM is used, issue the following command from a node in the recovery cluster on all the
disk groups that are used by the recovery packages.
# vxdg deport <disk group name>
Using cmrecovercl to recover the recovery groups
CAUTION: When the Continentalclusters is in recovery enabled state, do not start up the recovery
packages using cmrunpkg command. Instead use cmrecovercl command to start up the recovery
packages.
Previewing the storage preparation
Before starting up the recovery groups, it is recommended to use the cmdrprev command to
preview the storage failover process. If the cmdrprev commands exits with failure, then it implies
that the storage cannot be prepared successfully. Examine the output of the cmdrprev command
to take appropriate action. The cmdreprev command is supported only in Continentalclusters
configuration that uses Metrocluster supported array based replication.
Recovering the entire cluster after a cluster alarm
Once the cmdrprev command succeeds, use the following commands to start the failover recovery
process if the Continentalclusters is in an alarm state:
# cmrecovercl
NOTE: The cmrecovercl command will skip recovery for recovery groups in maintenance
mode.
30 Performing a recovery operation in Continentalclusters environment
Recovering the entire cluster after a cluster alert
If a notification defined in a CLUSTER_ALARM statement in the configuration file is not received,
but a CLUSTER_ALERT and the remote site has confirmed the must fail over has been received,
then override the disabled cmrecovercl command by using the -f forcing option.
Use this command only after a confirmation from the primary cluster site.
# cmrecovercl -f
Recovering a single cluster in an N-1 configuration
In a multiple recovery pair configuration where more than one primary cluster is sharing the same
recovery cluster, running cmrecovercl without any option will attempt to recover packages for
all of the recovery groups of the configured primary clusters. Recovery can also be done in this
multiple recovery pair case on a per cluster basis by using option -c.
# cmrecovercl -c <PrimaryClusterName>
Viewing the Continentalclusters status
The cmviewconcl command is used to vie the continentalcluster status.
# cmviewconcl
WARNING: Primary cluster primary_cluster is in an alarm state
(cmrecovercl is enabled on recovery cluster recovery_cluster)
CONTINENTAL CLUSTER ccluster1
RECOVERY CLUSTER recovery_cluster
PRIMARY CLUSTER STATUS EVENT LEVEL POLLING INTERVAL
primary_cluster down alarm 1 min
PACKAGE RECOVERY GROUP test-group
PACKAGE ROLE STATUS
primary_cluster/primary_package primary down
recovery_cluster/recovery_package recovery down
To view detailed information on continentalcluster status, run the following command.
# cmviewconcl —v
WARNING: Primary cluster primary_cluster is in an alarm state
(cmrecovercl is enabled on recovery cluster recovery_cluster)
CONTINENTAL CLUSTER ccluster1
RECOVERY CLUSTER recovery_cluster
PRIMARY CLUSTER STATUS EVENT LEVEL POLLING INTERVAL
primary_cluster down alarm 1 min
CONFIGURED EVENT STATUS DURATION LAST NOTIFICATION SENT
alert unreachable 1 min --
alarm unreachable 2 min --
alert down 1 min Tue Jun 05 10:52:32 IST 2012
alarm down 2 min Tue Jun 05 10:53:37 IST 2012
alert up 1 min --
PACKAGE RECOVERY GROUP test-group
PACKAGE ROLE STATUS
primary_cluster/test-pri primary down
recovery_cluster/test-rec recovery down
Viewing the Continentalclusters status 31

4 Restoring disaster recovery cluster after a disaster
After a failover to a cluster occurs, restoring disaster recovery is a manual processs, the most
significant of which are:
•Restoring the failed cluster.
Depending on the nature of the disaster it might be necessary to either create a new cluster
or to repair the failed cluster.
Before starting up the new or the failed cluster, ensure the auto_run flag for all of the
Continentalclusters application packages is disabled. This is to prevent starting the packages
unexpectedly with the cluster.
•Resynchronizing the data.
To resynchronize the data, you either restore the data to the cluster and continue with the
same data replication procedure, or set up data replication to function in the other direction.
The following sections briefly outline some scenarios for restoring disaster tolerance.
Retaining the original roles for primary and recovery cluster
After disaster recovery, the packages running on the recovery cluster can be moved back to the
primary cluster. To do this:
1. Ensure that both clusters are up and running, with the recovery packages continuing to run
on the surviving cluster.
2. Compare the clusters to ensure their configurations are consistent. Correct any inconsistencies.
3. For every recovery group where the repaired cluster will run the primary package.
a. Synchronize the data from the disks on the surviving cluster to the disks on the repaired
cluster. This might be time-consuming.
b. Halt the recovered application on the surviving cluster if necessary, and start it on the
repaired cluster.
c. To keep application down time to a minimum, start the primary package on the cluster
before resynchronizing the data of the next recovery group.
4. View the status of the Continentalclusters.
# cmviewconcl
Switching the Primary and Recovery Cluster Roles
Configure the failed cluster in a recovery pair as a recovery-only cluster and the recovery cluster
as a primary-only cluster. This minimizes the downtime involved with moving the applications back
to the restored cluster. It is also assumed that the original recovery cluster has sufficient resources
to run all critical applications indefinitely.
NOTE: In a multiple recovery pairs scenario, where more than one primary cluster are configured
to share the same recovery cluster, the following procedure to switch the role of the failed cluster
and the surviving cluster must not be used.
Do the following:
1. Halt the monitor packages. Run the following command on every cluster.
# cmhaltpkg ccmonpkg
2. Edit the Continentalclusters ASCII configuration file. It is necessary to change the definitions
of monitoring clusters, and switch the names of primary and recovery packages in the definitions
of recovery groups. It might also be necessary to re-create data sender and data receiver
packages.
32 Restoring disaster recovery cluster after a disaster

3. Check and apply the Continentalclusters configuration.
# cmcheckconcl -v -C cmconcl.config
# cmapplyconcl -v -C cmconcl.config
4. Restart the monitor packages on every cluster.
# cmmodpkg -e ccmonpkg
5. View the status of the Continentalclusters.
# cmviewconcl
Before applying the edited configuration, the data storage associated with every cluster needs to
be prepared to match the new role. In addition, the data replication direction needs to be changed
to mirror data from the new primary cluster to the new recovery cluster.
Switching the Primary and Recovery Cluster Roles using cmswitchconcl
Continentalclusters provides the command cmswitchconcl to facilitate steps two and three
described in the section “Switching the Primary and Recovery Cluster Roles” (page 32). The
command cmswitchconcl is used to switch the roles of primary and recovery packages of the
Continentalclusters recovery groups for which the specified cluster is defined as the primary cluster.
Do not use the cmswitchconcl command in a multiple recovery pair configuration where more
than one primary cluster is sharing the same recovery cluster. Otherwise, the command will fail.
When switching roles for a recovery group configured with a rehearsal package, the rehearsal
package in the old recovery cluster must be removed before the configuration is applied. The newly
generated recovery group configuration will not have any rehearsal package configured.
WARNING! When you configure the maintenance mode for a recovery group, you must move
all recovery groups, whose roles have been switched out of the maintenance mode before applying
the new configuration.
NOTE: Before running the cmswitchconcl command, the data storage associated with every
cluster needs to be prepared properly to match the new role. In addition, the data replication
direction needs to be changed to mirror data from the new primary cluster to the new recovery
cluster.
The cmswitchconcl command cannot be used for the recovery groups that have both data
sender and data receiver packages specified.
To restore disaster tolerance with cmswitchconcl while continuing to run the packages on the
surviving cluster, use the following procedures:
1. Halt the monitor package on every cluster.
# cmhaltpkg ccmonpkg
2. Run this command.
# cmswitchconcl -C currentContinentalclustersConfigFileName -c
oldPrimaryClusterName [-a] [-F NewContinentalclustersConfigFileName]
The above command switches the roles of the primary and recovery packages of the
Continentalclusters recovery groups for which “OldPrimaryClusterName” is defined as
the primary cluster.
The default values of monitoring package name (ccmonpkg) and interval (60 seconds), and
notification scheme (SYSLOG) with notification delay (0 seconds) added for cluster
“OldPrimaryClusterName”, which will serve as the recover-only cluster.
If editing of the default values are desired, do it with file
“NewContinentalclusterConfigFileName” if -F is specified, or with file,
“CurrentContinentalclustersConfigFileName” if -F is not specified. If editing of
Retaining the original roles for primary and recovery cluster 33

the new configuration file is required, do not use the -a option. If option -a is specified the
new configuration applied automatically.
3. If option -a is specified with cmswitchconcl in step 2, skip this step. Otherwise manually
apply the new Continentalclusters configuration.
# cmapplyconcl -v -c newContinentalclustersConfigFileName (if -F is
specified in step 2)
# cmapplyconcl -v -c CurrentContinentalcusterConfigFileName (if -F is
not specified in step 2)
4. Restart the monitor packages on every cluster.
# cmmodpkg -e ccmonpkg
5. View the status of the Continentalclusters.
# cmviewconcl
NOTE: The cluster shared storage configuration file /etc/cmconcl/ccrac/ccrac.config
is not updated by cmswitchconcl. The CCRAC_CLUSTER and CCRAC_INSTANCE_PKGS
variables in the cluster shared storage configuration file must be manually updated on all the nodes
in the clusters to reflect the new primary cluster and package names.
The cmswitchconcl command is also used to switch the package role of a recovery group. If
only a subset of the primary packages will remain running on the surviving (recovery) cluster, a
new option -g is provided with the cmswitchconclcommand. This option reconfigures the roles
of the packages of a recovery group and helps retain recovery protection after a failover.
Usage of option -g (recovery group based role switch reconfiguration) is the same as the one for
-c(cluster based role switch reconfiguration). Note, option -c and -g of the cmswitchconcl
command are mutually exclusive.
# cmswitchconcl \
-C currentContinentalclustersConfigFileName \
-g RecoverGroupName \
[-a] [-F NewContinentalclustersConfigFileName]
Creating a new Primary Cluster
After creating a new cluster, restore the critical applications to the new cluster and restore the
original recovery cluster to act as the recovery cluster for the newly created primary cluster. To do
this:
1. Configure the new cluster as a Serviceguard cluster. Use the cmviewcl command on the
surviving cluster and compare the results to the new cluster configuration. Correct any
inconsistencies on the new cluster.
2. Halt the monitor package on the original recovery cluster.
# cmhaltpkg ccmonpkg
3. Edit the Continentalclusters configuration file to replace the data from the old failed cluster
with data from the new cluster. Check and apply the Continentalclusters configuration.
# cmcheckconcl -v -C cmconcl.config
# cmapplyconcl -v -C cmconcl.config
4. Do the following for every recovery group where the new cluster will run the primary package.
a. Synchronize the data from the disks on the surviving recovery cluster to the disks on the
new cluster.
b. To keep application down time to a minimum, start the primary package on the newly
created cluster before resynchronizing the data of the next recovery group.
34 Restoring disaster recovery cluster after a disaster

5. If the new cluster acts as a recovery cluster for any recovery group, create a monitor package
for the new cluster.
Apply the configuration of the new monitor package.
# cmapplyconf -p ccmonpkg.config
6. Restart the monitor package on the recovery cluster.
# cmrunpkg ccmonpkg
7. View the status of the Continentalclusters.
# cmviewconcl
Creating a new Recovery Cluster
After creating a new cluster to replace the failed primary cluster, if the downtime involved in moving
the applications back is a concern, then make the newly created cluster as the recovery cluster. It
is also assumed that the original recovery cluster has sufficient resources to run all critical
applications indefinitely. Do the following to set up the recovery cluster.
•Change the original recovery cluster to the role of primary cluster for all recovery groups.
•Configure the new cluster as a recovery cluster for all those groups.
Configure the new cluster as a standard Serviceguard cluster, and follow the usual procedure to
configure the Continentalclusters with the new cluster used as a recovery cluster for all recovery
groups.
NOTE: In a multiple recovery pairs scenario, (where more than one primary cluster is configured
to share the same recovery cluster), reconfiguration of the recovery cluster must not be done due
to the failure of one of the primary clusters.
Creating a new Recovery Cluster 35

5 Disaster recovery rehearsal in Continentalclusters
Overview of Disaster Recovery rehearsal
The disaster recovery setup must be validated to ensure that a recovery can be performed smoothly
when disaster strikes. Since disasters are once in a lifetime events, it is likely that a disaster recovery
is never performed for long time. In this time, a lot of configuration drift and other changes will
appear in either at the production data center or at the recovery data center.
Disaster Recovery Rehearsal is a mechanism that allows administrators to test and validate the
disaster recovery processes without actually performing a recovery.
Configuring Continentalclusters Disaster Recovery rehearsal
A BC is required for every secondary mirror copy in the device group, on the recovery cluster. In
XP terminology, one dedicated BC is required for every SVOL device in a P9000 and XP device
group on the recovery cluster. Before the start of rehearsal, this BC is split from the secondary
mirror copy so that it retains a copy of the production data while rehearsal is in progress.
To configure DR Rehearsal:
1. Configure Maintenance Mode Feature in Continentalclusters
a. Set up the file system for Continentalclusters state directory.
b. Configure the monitor package to mount the file system from the shared disk.
2. Configure the rehearsal package.
3. Modify the Continentalclusters configuration.
Configuring maintenance mode in Continentalclusters
Overview of maintenance mode feature
Continentalclusters allows any recovery group to be in maintenance mode. When a recovery group
is in maintenance mode, the Continentalclusters cmrecovercl command does not start up the
recovery package even if the primary cluster is in an ALARM state.
The maintenance mode feature requires a shared disk to be presented to all the nodes in the
recovery cluster. A filesystem is created over the shared disk,and is mounted on the node where
the monitor package is running. This filesystem directory is used to store information about the
maintenance mode of the recovery groups. Having the maintenance mode information on a shared
disk, prevents the loss of maintenance mode information due to monitor package failover.
The following sections describe the procedure to configure the filesystem over the shared disk and
enable automatic mounting of the filesystem via monitor package.
Setting up the file system for Continentalclusters state directory
Setting up the Continentalclusters state directory on those clusters that are set up with
Continentalclusters monitor package using a non-replicated shared disk.
To create the filesystem, on any node in the recovery cluster:
1. Create the volume group with the disk that is presented to all the nodes in the recovery cluster.
# pvcreate -f <device>
# vgcreate /dev/<vgname> <device>
For Example:
# pvcreate -f /dev/sda1
36 Disaster recovery rehearsal in Continentalclusters
# vgcreate /dev/vgcc -f /dev/sda1
2. Create a logical volume in the volume group and install ’vxfs’ file system in the logical
volume:
# lvcreate –L <size> <vgname>
mke2fs -j <Lvol>
For Example:
# lvcreate –L 1000 /dev/vgcc;
mke2fs -j /dev/vgcc/rlvol1
3. On every node of the recovery cluster, create the Continentalclusters shared directory
/opt/cmconcl/statedir as follows:
# mkdir <directorypath>
For Example:
# mkdir /opt/cmconcl/statedir
4. Run vgscan to make the LVM configuration visible on the other nodes in the recovery cluster.
vgscan
Configuring the monitor package to mount the file system from the shared disk
On the recovery cluster, re-configure the monitor package to activate the volume group configured
with the shared disk in exclusive mode, and mount the Continentalclusters state filesystem directory
that was created on the shared disk.
To configure the monitor package with the state directory as follows:
1. Obtain the package configuration for the monitor package.
# cmgetconf –p ccmonpkg > cc_new.config
2. Provide the name of the volume group used for state directory as a value to the parameter
“vg”.
For Example:
vg vgcc
3. Provide the name of the logical volume used for the state directory as a value to the parameter
“fs_name”.
For Example:
fs_name /dev/vgcc/lvol1
4. Provide the absolute path of the state directory as the value for the parameter
“fs_directory”.
For Example:
fs_directory /opt/cmconcl/statedir
5. Provide the type of the file system used for the state directory as the value for the parameter
“fs_type”.
For Example:
fs_type ext2
6. Provide proper values for the parameters fs_mount_opt, fs_umount_opt and
fs_fsck_opt.
For Example:
fs_mount_opt -o rw
Configuring Continentalclusters Disaster Recovery rehearsal 37
7. Halt the monitor package ccmonpkg and apply the edited configuration file.
For Example:
# cmhaltpkg ccmonpkg
# cmapplyconf –P cc_new.config
8. Start the monitor package ccmonpkg after applying the configuration.
For Example:
# cmrunpkg ccmonpkg
Configuring Continentalclusters rehearsal packages
The rehearsal packages use all the modules that are used to create the recovery package. However,
when using any of the pre-integrated physical replication solutions, the replication technology
specific Continentalclusters module must not be included.
If Continentalclusters is used with EMC SRDF, then set the variable AUTOSPLITR1 to 1 before
splitting the replication links. This ensures high availability of primary packages within the primary
site in case of failures during the rehearsal process.
For Example:
In a Continentalclusters configuration that uses Continuous Access P9000 and XP, the recovery
package must be created with dts/ccxpca module. While creating the rehearsal package for this
recovery group, the dts/ccxpca module must not be included.
To create a rehearsal package:
1. Create a package configuration identical to the recovery package configuration but without
any Continentalclusters module.
2. Change the values of the following parameters:
•package_name
•package_ip
•service_name
For all other parameters, provide the same values as specified in the recovery package
configuration.
3. Validate the package configuration.
# cmcheckconf –P <package_name>
4. Apply the package configuration.
# cmapplyconf –P <package_name>
Modifying Continentalclusters configuration
The Continentalclusters parameter CONTINENTAL_CLUSTER_STATE_DIR is the absolute path to
the filesystem directory created in section “Setting up the file system for Continentalclusters state
directory” (page 36).
To update the configuration with the rehearsal packages and the Continentalclusters shared directory
name:
1. In the Cluster section of the Continentalclusters configuration ASCII file, uncomment the
CONTINENTAL_CLUSTER_STATE_DIR field, and against it enter the value for filesystem
directory that was added in the fs_name of ccmonpkg configuration.
For Example:
38 Disaster recovery rehearsal in Continentalclusters
CONTINENTAL_CLUSTER_STATE_DIR /opt/cmconcl/statedir
2. Under the recovery group section for which the rehearsal package was configured, enter the
rehearsal package name against REHEARSAL_PACKAGE field.
For Example:
Recovery group inv_rac10g_recgp
Primary package Atlanta/inv_rac10g_primpkg
Recovery package Houston/inv_rac10g_recpkg
Rehearsal package Houston/inv_rac10g_rhpkg
3. Halt the monitor package.
# cmhaltpkg ccmonpkg
4. Verify the Continentalclusters configuration ASCII file.
# cmcheckconcl -v -C cmconcl.config
5. Apply the Continentalclusters configuration file.
# cmapplyconcl -v -C cmconcl.config
6. Start the monitor package.
# cmrunpkg ccmonpkg
Precautions to be taken while performing DR Rehearsal
This section describes the precautions that the operator must follow while performing DR rehearsals.
Client access IP address at recovery cluster
During a DR rehearsal, Continentalclusters will start the rehearsal package that is configured to
bring up the application instance at the recovery cluster. After the application instance starts at the
recovery cluster, clients must presume that a recovery has occurred, and must attempt to connect
to it to perform production transactions. This can lead to split brain situation, where one set of
clients are connected to the application instance at the primary cluster while the second set of
clients are connected to the application instance at the recovery cluster (which was started for
rehearsal). Hence, during rehearsal, it is the operator’s responsibility to ensure that production
clients do not access the application instance at the recovery cluster and attempt production
transactions.
One way to prevent split brain is to prevent application access to clients, which can be done by
modifying the client access IP address at the recovery cluster during rehearsal. For example, when
rehearsal package is configured for Oracle Single Instance, ensure that the rehearsal package IP
address is different from that of the recovery package.
Cluster role switch during rehearsal
Using the Continentalclusters commands cmswitchconcl and cmapplyconcl, the recovery
cluster role can be changed to be the new primary cluster. Operators are responsible for ensuring
that the recovery groups are not in maintenance mode before attempting to switch cluster roles.
This can potentially allow primary packages to start on disks invalidated by the rehearsal at the
new primary cluster.
Performing Disaster Recovery rehearsal in Continentalclusters
To start and stop rehearsal for a recovery group:
1. Verify the data replication environment.
2. Move the recovery group into maintenance mode.
3. Prepare the replication environment for DR rehearsal.
4. Start the rehearsal for the recovery group.
5. Stop the rehearsal package.
Precautions to be taken while performing DR Rehearsal 39

6. Restore the replication environment for recovery.
7. Move the recovery group out of maintenance mode.
8. Clean up the mirror copy.
Verify data replication environment
You can use the cmdrprev command to preview the preparation of data replication environment
for an actual recovery can be previewed. The command identifies errors in data replication
environment which will potentially fail an actual recovery.
Run the following command on every node of the recovery cluster and verify that the command
returns a value 0.
# cmdrprev -p <recovery_package>
nl
Move the recovery group into maintenance mode
Before starting the disaster recovery rehearsal operation, the recovery packages must be moved
into maintenance mode. This prevents startup of the recovery packages even if disaster recovery
is triggered during rehearsal operation.
# cmrecovercl -d -g <recovery_group_name>
Run the cmviewconclcommand to verify that the recovery group is in maintenance mode.
# cmviewconcl -v
nl
Prepare the replication environment for DR rehearsal
Manually suspend the replication and enable write access to secondary mirror copy configured
for the package.
# pairsplit –g <device_group> -rw (in case of XP)
# symrdf -g <device_group> split (in case of EMC SRDF)
For every volume group that is configured for the package, delete the host id tag by running the
following command from any of the recovery cluster nodes.
Split the BC pair at recovery cluster.
# export HORCC_MRCF=1
# pairsplit –g <device_group> (in case of XP)
# symrdf -g <device_group> split (in case of EMC SRDF)
# unset HORCC_MRCF
nl
Start rehearsal
To perfrom rehearsal operation on a recovery group, run the cmrecovercl command.
# cmrecovercl -r -g <recovery_group>
The cmrecovercl command runs the rehearsal package that is configured in the recovery group.
NOTE: Before starting the rehearsal, make any application configuration changes that might be
required due to the change in the client access IP address, which is now the rehearsal package IP
address. For example, in case of Oracle Single Instance application, reconfigure the listener to
listen on the rehearsal package IP address. See “ Precautions to be taken while performing DR
Rehearsal” (page 39) for the list of precautionary steps.
After the cmrecovercl command completes , run the cmviewcl command to verify that the
rehearsal packages are up.
nl
40 Disaster recovery rehearsal in Continentalclusters
Stop rehearsal package
After performing the rehearsal operations, the rehearsal package must be halted using the
cmhatlpkg command.
# cmhaltpkg <rehearsal_pkg>
nl
Restore replication environment for recovery
First, synchronize the secondary mirror copy with the primary mirror copy and then synchronize
the BC with the secondary mirror copy.
# pairresync –g <device_group> (In case of XP)
# symrdf -g <device_group> establish (In case of EMC SRDF)
# export HORCC_MRCF=1
# pairresync –g <device_group> (In case of XP)
# symrdf -g <device_group> establish (In case of EMC SRDF)
# unset HORCC_MRCF
nl
Move the recovery group out of maintenance mode
After the rehearsal operations are completed, the recovery groups must be taken out of maintenance
mode. If not, an actual recovery using the cmrecovercl command might fail to start up the
recovery packages in the recovery groups.
# cmrecovercl –e -g <recovery_group_name>
Run the cmviewconcl command to verify that the recovery group is not in maintenance mode.
# cmviewconcl -v
Cleanup of secondary mirror copy
After the rehearsal is completed and before the recovery groups are moved out of maintenance
mode, the operator must ensure that the rehearsal changes on the secondary mirror copy are
cleaned up.
During rehearsal, the rehearsal application will have invalidated the secondary mirror copy with
non-production I/O. Hence, before moving the recovery group out of maintenance, the operator
must clean up the secondary mirror copy by synchronizing it with the primary mirror copy or
restoring from the BC (in case the primary cluster fails during rehearsal). If not, recovery (via
cmrecovercl) or recovery package startup via the cmrunpkg and cmmodpkg commands must
potentially start up the recovery package on data invalidated by rehearsal.
Recovering the primary cluster disaster during DR Rehearsal
In case of a disaster at the primary cluster while performing DR Rehearsal, follow the below steps
to recover the application at the recovery cluster:
•Halt the rehearsal package.
# cmhaltpkg <rehearsal_package_name>
•Restore the recovery cluster data using the BC.
# export HORCC_MRCF=1
# pairresync -restore –g <device_group> -I <instance_no>
# unset HORCC_MRCF
Cleanup of secondary mirror copy 41
•Move the recovery group out of maintenance mode
# cmrecovercl –e -g <recovery_group_name>
•Run cmrrcovercl command.
# cmrecovercl
Limitations of DR rehearsal feature
Following are the limitations of the DR rehearsal feature:
1. The replication, preparation, and restoration for rehearsal and restoration for recovery is
manual. The operator must prepare and restore the replication environment for every recovery
group.
2. The cmdrprev preview command currently supports only verbose output.
3. Since the replication between the primary and recovery cluster is suspended during rehearsal,
the production changes to the primary mirror copy must not be replicated to the recovery
cluster. Hence, in the case of a disaster and subsequent recovery of primary cluster during
rehearsal, the production changes since the start of rehearsal is lost. Therefore, to minimize
the “potential” data loss, HP recommends that you adjust the DR rehearsal time window to
be less than the recovery point object.
42 Disaster recovery rehearsal in Continentalclusters
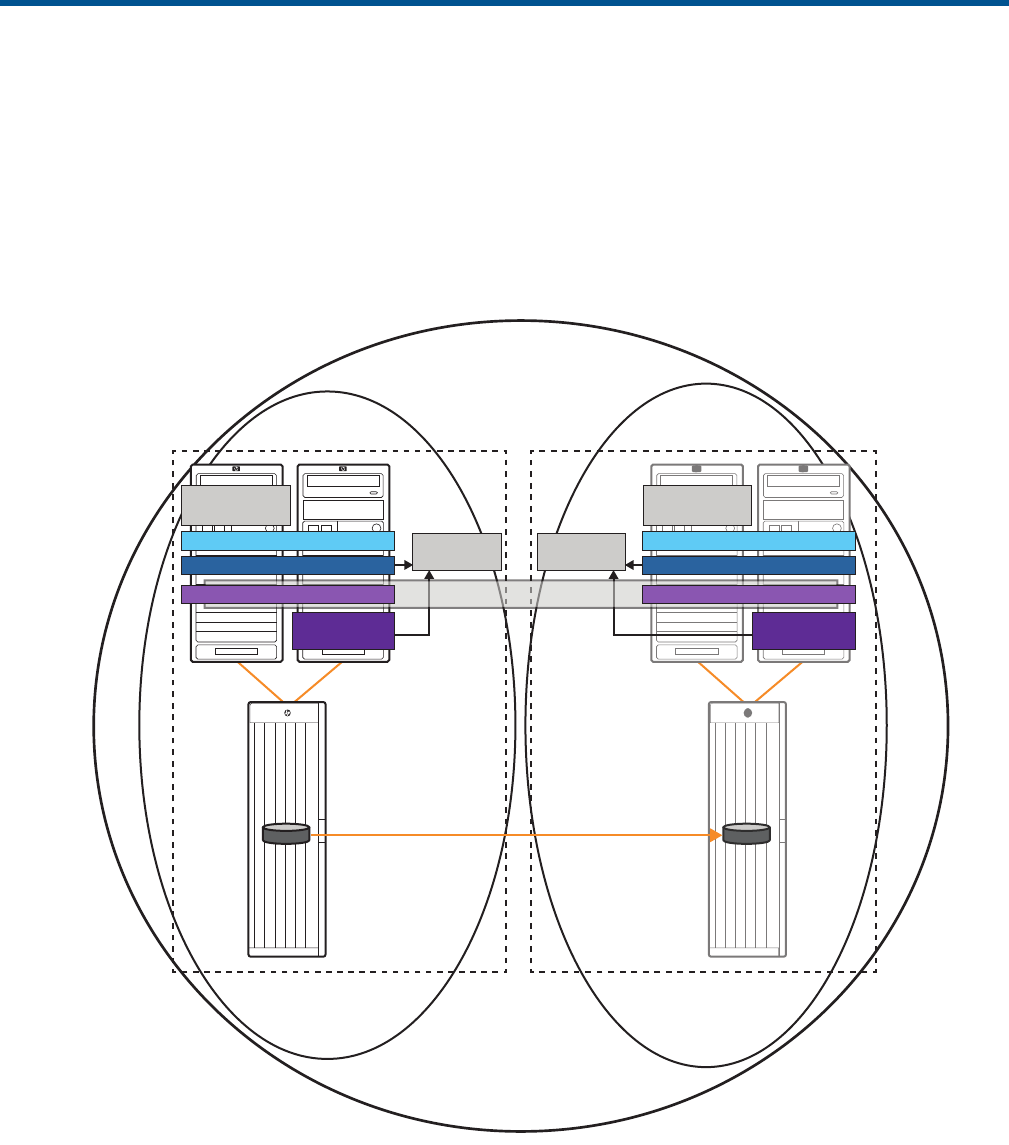
6 Configuring complex workloads in a Continentalclusters
environment using SADTA
Site Aware Disaster Tolerant Architecture (SADTA) enables automatic recovery of an entire
application stack that is protected using physical data replication. The application stack can be
packaged using mulit-node packages and failover packages with dependencies among them.
SADTA also provides a single interface for manual failover of all the packages configured for an
application stack.
Figure 2 SADTA Configuration in Continentalclusters
Continentalclusters
Node 1 Node 2
Disk Array
Active Application
Configuration
Primary Cluster Recovery Cluster
Data Replication
Passive Application
Configuration
Site A
Site A
App. Pkg
Site Safety
Latch
Site Safety
Latch
Site A Mount Point MNP
Site A Disk Group MNP
Site
Controller
Node 1 Node 2
Disk Array
Site B
Site B Mount Point
Site B CFS Sub Cluster
Site A CFS Sub Cluster SG CFS SMNP
Site B
App. Pkg
Application
Data Disk
Application
Data Disk
Site
Controller
Site B Disk Group
This section lists and describes the procedures for configuring a complex workload in
Continentalclusters using SADTA.
To configure a complex workload in Continentalclusters:
1. Set up the replication between the arrays in the primary cluster and the recovery cluster.
2. Configure a primary cluster with a single site defined in the Serviceguard cluster configuration
file.
3. Configure a recovery cluster with a single site defined in the Serviceguard cluster configuration
file.
4. Set up the complex workload in the primary cluster.
43

5. Configure the Site Controller Package in the primary cluster.
6. Configure the Site Safety Latch dependencies in the primary cluster.
7. Suspend the replication to the recovery cluster.
8. Set up the redundant complex workload in the recovery cluster.
9. Configure the Site Controller Package in the recovery cluster.
10. Configure the Site Safety Latch dependencies in the recovery cluster.
11. Resume the replication to the recovery cluster.
12. Configure Continentalclusters.
13. Configure Continentalclusters recovery group with the Site Controller Package in the primary
cluster as the primary package and, Site Controller package in the recovery cluster as a
recovery package.
Setting up replication
When complex workloads are configured using SADTA, the data of the complex workload must
be replicated in all the disk arrays in every cluster. The replication mechanism differs depending
on the type of array in your environment.
SADTA supports the following replication types:
•Metrocluster with Continuous Access for P9000 and XP
•Metrocluster with Continuous Access EVA
•Metrocluster with EMC SRDF
•Metrocluster with 3PAR Remote Copy
For more information about configuring replication for the arrays in your environment, see the
following manuals.
For XP P9000, see Building Disaster Recovery Serviceguard Solutions Using Metrocluster with
Continuous Access for P9000 and XP A.11.00 available at http://www.hp.com/go/
hpux-serviceguard-docs.
For EVA P6000, see Building Disaster Recovery Serviceguard Solutions Using Metrocluster with
Continuous Access EVA A.05.01 available at http://www.hp.com/go/hpux-serviceguard-docs.
For HP 3PAR Remote Copy, see Building Disaster Recovery Serviceguard Solutions Using
Metrocluster with 3PAR Remote Copy available at http://www.hp.com/go/hpux-serviceguard-docs.
For EMC SRDF, see Building Disaster Recovery Serviceguard Solutions Using Metrocluster with
EMC SRDF available at http://www.hp.com/go/hpux-serviceguard-docs.
Configuring the primary cluster with a single site
To configure complex workloads using SADTA in Continentalclusters, the primary cluster must be
created with a single site configured in the Serviceguard cluster configuration file.
NOTE: The primary cluster can be a Metrocluster with two sites in case of a Three Data Center
configuration.
To configure the primary cluster with a single site defined in the Serviceguard configuration file:
1. Run the cmquerycl command to create a cluster configuration file.
2. Specify a site configuration in the cluster configuration file you just created.
Following is a sample of the site configuration:
SITE_NAME <site name>
NODE_NAME <node1>
SITE <site name>
... ...
NODE_NAME <node2>
44 Configuring complex workloads in a Continentalclusters environment using SADTA

SITE site name>
...
NOTE: Only one site must be specified in the cluster configuration file, and all the nodes in
the cluster must belong to this site.
3. Run the cmapplyconf command to apply the configuration file.
4. Run the cmruncl command to start the cluster.
After the cluster is started, you can run the cmviewcl command to view the single site configuration.
Configuring the recovery cluster with a single site
The recovery cluster must be created with a single site configured in the Serviceguard cluster
configuration file. The procedure to create a recover cluster with single site is identical to the
procedure for creating a primary cluster with a single site. To configure a recovery cluster with a
single site, complete the procedure described in section “Configuring the primary cluster with a
single site” (page 44), for the recovery cluster.
Setting up the complex workload in the primary cluster
To create a complex workload, configure the required storage device (volume groups or disk
groups) on the disks that are part of the replication pair at the primary cluster. Then, configure a
complex workload package stack in this cluster.
Setting up the complex workload in the primary cluster involves the following steps:
1. Configuring the storage device for the complex workload in the primary cluster.
2. Configuring the complex workload stack in the primary cluster.
3. Halting the complex workload in the primary cluster.
Configuring the storage device for the complex workload at the primary cluster
The shared storage device for storing data of a complex workload can be configured using CFS,
CVM, or SLVM. When using CFS, appropriate Cluster File Systems must be created on the replicated
disks. When using SLVM or CVM, appropriate SLVM volume groups or CVM disk groups must be
created with the required raw volumes over the replicated disks.
Configuring the storage device using CFS or SG SMS CVM
Serviceguard enables you to manage all the CVM diskgroups and the CFS mountpoints required
by an application within a single package. This helps in significantly reducing the number of
packages a cluster administrator must manage.
To set up the CVM disk group volumes on the CVM cluster master node in the primary cluster:
1. Initialize the source disks of the replication pair:
# /etc/vx/bin/vxdisksetup -i <replicated_disk_1>
# /etc/vx/bin/vxdisksetup -i <replicated_disk_2>
2. Create a disk group for the complex workload data.
# vxdg –s init <cvm_dg_name> <replicated_disk_1> <replicated_disk_2>
3. Activate the CVM disk group in the primary cluster.
# vxdg -g <cvm_dg_name> set activation=sw
4. Create a volume from the disk group.
# vxassist -g <cvm_dg_name> make <cvm_dg_vol_name> 4500m
NOTE: Skip this step if CVM raw volumes are used for storing the data.
Configuring the recovery cluster with a single site 45

5. Create a filesystem.
# newfs -F vxfs /dev/vx/rdsk/<cvm_dg_name>/<cvm_dg_vol_name>
6. Create a package configuration file.
# cmmakepkg -m sg/cfs_all /etc/cmcluster/cfspkg1.ascii
7. Edit the following package parameters in the cfspkg1.ascii package configuration file.
•node_name <node1>
•node_name <node2>
•package_name <siteA_cfs_pkg_name>
•cvm_disk_group <cvm_dg_name>
•cvm_activation_mode "node1=sw node2=sw"
•cfs_mount_point <cvm_mount_point>
•cfs_volume <cvm_dg_name>/<cvm_dg_vol_name>
•cfs_mount_options "node1=cluster node2=cluster"
•cfs_primary_policy ""
where, node1 and node2 are the nodes at the primary cluster. Do not configure any mount
specific attributes such as cfs_mount_point,cfs_mount_options if SG SMS CVM is
configured as raw volumes.
8. Verify the package configuration file.
# cmcheckconf -P cfspkg1.ascii
9. Apply the package configuration file.
# cmapplyconf -P cfspkg1.ascii
10. Run the package.
# cmrunpkg <siteA_cfs_pkg_name>
Configuring the storage device using Veritas CVM
To set up the CVM disk group volumes on the CVM cluster master node in the primary cluster:
1. Initialize the source disks of the replication pair:
# /etc/vx/bin/vxdisksetup -i <replicated_disk_1>
# /etc/vx/bin/vxdisksetup -i <replicated_disk_2>
2. Create a disk group for the complex workload data.
# vxdg –s init <cvm_dg_name> <replicated_disk_1> <replicated_disk_2>
3. Activate the CVM disk group on all the nodes in the primary cluster CVM sub-cluster.
# vxdg -g <cvm_dg_name> set activation=sw
4. Create a volume from the disk group.
# vxassist -g <cvm_dg_name> make <cvm_dg_vol_name> 4500m
5. Create Serviceguard Disk Group MNP packages for the disk group.
IMPORTANT: Veritas CVM disk groups must be configured as a dedicated modular MNP package
using the cvm_dg attribute. This modular MNP package must be configured to have a package
dependency on the SG-CFS-pkg SMNP package.
To create a Modular package for a CVM disk group as follows:
46 Configuring complex workloads in a Continentalclusters environment using SADTA
1. Create a package configuration file using the following modules:
# cmmakepkg -m sg/multi_node -m sg/dependency -m\
sg/resource -m sg/volume_group <cvm_dg_pkg_name>.conf
2. Edit the configuration file and specify values for the following attributes:
package_name <cvm_dg_pkg_name>
package_type multi_node
cvm_dg <cvm_dg_name>
cvm_activation_cmd "vxdg -g \${DiskGroup}set activation=sharedwrite"
3. Specify the nodes in the primary cluster using the node_name attribute.
node_name <node1>
node_name <node2>
In this command, <node1> and <node2> are nodes in the primary cluster.
4. Specify the Serviceguard dependency.
dependency_name SG-CFS-pkg_dep
dependency_condition SG-CFS-pkg=up
dependency_location same_node
5. Apply the newly created package configuration.
# cmapplyconf -v -P <cvm_dg_pkg_name>.conf
Configuring the storage device using SLVM
To create volume groups on the primary cluster:
1. Define the appropriate volume groups on every host system in the primary cluster.
# mkdir /dev/<vg_name>
# mknod /dev/<vg_name>/group c 64 0xnn0000
where the name /dev/<vg_name> and the number nn are unique within the entire cluster.
2. Create the volume group on the source volumes.
# pvcreate -f /dev/rdsk/cxtydz
# vgcreate /dev/<vg_name> /dev/dsk/cxtydz
3. Create the logical volume for the volume group.
# lvcreate -L XXXX /dev/<vg_name>
In this command, XXXX indicates the size in MB.
4. Export the volume groups on the primary system without removing the special device files.
# vgchange -a n <vg_name>
# vgexport -s -p -m <map_file_name> <vg_name>
Ensure that you copy the mapfiles to all host systems.
5. On the nodes in the primary cluster, import the volume group.
# vgimport -s -m <map_file_name> <vg_name>
6. On every node, ensure that the volume group to be shared is currently inactive on all the
nodes.
# vgchange -a n /dev/<vg_name>
7. On the configuration node, make the volume group shareable by members of the primary
cluster in the cluster.
# vgchange -S y -c y /dev/<vg_name>
Setting up the complex workload in the primary cluster 47

Run this command on the configuration node only. The cluster must be running on all the nodes
for the command to succeed.
NOTE: Both the -S and the -c options are specified.
The -S y option makes the volume group shareable, and the -c y option causes the cluster
ID to be written out to all the disks in the volume group. In effect, this command specifies the
cluster to which a node must belong in order to obtain shared access to the volume group.
Configuring the complex workload at the primary cluster
Install and configure the complex workload on the nodes in the primary cluster. Create Serviceguard
packages for the complex workload in the primary cluster. This package must be configured to
run on the nodes in the primary cluster. The procedure to configure a complex workload stack in
the primary cluster differs depending on CVM, CFS, and SLVM.
Configuring complex workload packages to use CFS
When the storage for the complex workload is configured on a Cluster File System (CFS), the
complex workload package must be configured to depend on the MNP package managing CFS
mount point through package dependency. With package dependency, the Serviceguard package
that starts the complex workload will not run until its dependent MNP package managing CFS
mount point is up, and will halt before the MNP package managing CFS mount point is halted.
Set up the following dependency conditions in the Serviceguard package configuration file:
DEPENDENCY_NAME <cfs_mp_pkg_name_dep>
DEPENDENCY_CONDITION <cfs_with_mp_pkg_name>=UP
DEPENDENCY_LOCATION SAME_NODE
Configuring complex workload packages to use CVM
When the storage for the complex workload is configured on a CVM disk groups, the complex
workload package must be configured to depend on the MNP package managing CVM disk
groups through package dependency. With package dependency, the Serviceguard package that
starts the complex workload will not run until its dependent MNP package managing CVM disk
group is up, and will halt before the MNP package managing CVM disk group is halted.
Set up the following dependency conditions in the Serviceguard package configuration file:
DEPENDENCY_NAME <cvm_mp_pkg_name_dep>
DEPENDENCY_CONDITION <cvm_with_mp_pkg_name>=UP
DEPENDENCY_LOCATION SAME_NODE
Configuring complex workload packages to use SLVM
When the storage for the complex workload is configured on an SLVM volume group, the complex
workload package must be configured to activate and deactivate the required storage in the
package configuration file.
vg <vgname>
vgchange_cmd “vgchange –a s”
Halting the complex workload in the primary cluster
Halt the complex workload stack on the node in the primary cluster using the cmhaltpkg command.
For example:
# cmhaltpkg complex_workload_pkg1
# cmhaltpkg complex_workload_pkg2
# cmhaltpkg complex_workload_pkg3
48 Configuring complex workloads in a Continentalclusters environment using SADTA

Configuring the Site Controller Package in the primary cluster
The procedure on a node in the primary cluster to configure the Site Controller Package as follows:
1. Create a Site Controller Package configuration file using the dts/sc and array-specific
module.
For example, when using Continuous Access P9000 and XP, the command is:
# cmmakepkg -m dts/sc –m dts/ccxpca cw_sc.config
When using Continuous Access EVA, the command is:
# cmmakepkg -m dts/sc –m dts/cccaeva cw_sc.config
When using EMC SRDF, the command is:
# cmmakepkg -m dts/sc –m dts/ccsrdf cw_sc.config
When using 3PAR Remote Copy, the command is:
# cmmakepkg -m dts/sc –m dts/cc3parrc cw_sc.config
2. Edit the cw_sc.config file by specifying the following:
•Name for the package_name attribute.
package_name <site_controller_package_name>
•Names of the nodes explicitly using the node_name attribute.
•The Site Controller Package directory for the dts/dts/dts_pkg_dir attribute.
dts/dts/dts_pkg_dir /etc/cmcluster/<site_controller_package_name>
This is the package directory for this Site Controller Package. The Metrocluster environment
file is automatically generated for this package in this directory.
•Specify a name for the log file.
script_log_file <log_file_name>
•Specify the site without any packages.
Do not specify any packages using the critical_package or managed_package
attributes.
site <site name>
•Edit the array specific parameters. For configuring these parameters, see the following
sections based on the type of the array used in your environment.
3. Apply the Site Controller Package configuration file in the cluster.
# cmapplyconf -P cw_sc.config
IMPORTANT: Ensure packages are not configured with the critical_package or
managed_package attributes in the Site Controller Package configuration file. These attributes
must be configured only after configuring the Site Safety Latch dependencies. For information about
configuring these dependencies, see “Configuring the Site Safety Latch dependencies in the primary
cluster” (page 49).
Configuring the Site Safety Latch dependencies in the primary cluster
After the Site Controller Package configuration is applied, the corresponding Site Safety Latch is
automatically configured in the cluster. This section describes the procedure to configure Site Safety
Latch dependencies.
The procedure to configure the Site Safety Latch dependencies:
Configuring the Site Controller Package in the primary cluster 49

1. If you have SG SMS CVM or CFS configured in your environment, add the EMS resource
dependency to all DG MNP packages in the complex workload stack in the primary cluster.
If you have SLVM configured in your environment, add the EMS resource details in the packages
that are the foremost predecessors in the dependency order among the workload packages
in the primary cluster. If you have Veritas CVM configured in your environment, add the EMS
resource details in the CVM disk group packages in the primary cluster.
resource_name /dts/mcsc/cw_sc
resource_polling_interval 120
resource_up_value != DOWN
resource_start automatic
Run the cmapplyconf command to apply the modified package configuration.
2. Verify the Site Safety Latch resource configuration in the primary cluster.
Run the following command to view the EMS resource details:
# cmviewcl -v –p <pkg_name>
3. Configure the Site Controller Package with complex-workload packages in the primary cluster.
site <site1>
critical_package <site1>_cw
managed_package <site1>_cw_dg
managed_package <site1>_cw_mp
NOTE:
•There must be no comments in the same line as the critical and managed packages.
•Always set auto_run parameter to yes for failover packages configured as critical or
managed packages.
•The packages configured with mutual dependency must not be configured as critical or
managed packages.
4. Re-apply the Site Controller Package configuration.
# cmapplyconf -v -P /etc/cmcluster/cw_sc/cw_sc.config
After applying the Site Controller Package configuration, you can run the cmviewcl command
to view the packages that are configured.
Suspending the replication to the recovery cluster
In the earlier procedures, the complex workload and Site Controller package were created in the
primary cluster. Now, an identical complex workload using the target replicated disk must be
configured with the complex workload stack in the recovery cluster. Before creating an identical
complex workload at the recovery cluster, ensure that the Site Controller Package is halted in the
primary cluster. Split the data replication such that the target disk in the recovery cluster is in the
Read/Write mode.
The procedure to split the replication depends on the type of arrays that are configured in the
environment.
For information about splitting the replication on XP P9000, see Building Disaster Recovery
Serviceguard Solutions Using Metrocluster with Continuous Access for P9000 and XP A.11.00
available at http://www.hp.com/go/hpux-serviceguard-docs.
For information about splitting the replication on EVA P6000, see Building Disaster Recovery
Serviceguard Solutions Using Metrocluster with Continuous Access EVA A.05.01 available at
http://www.hp.com/go/hpux-serviceguard-docs.
50 Configuring complex workloads in a Continentalclusters environment using SADTA

For information about splitting the replication on HP 3PAR Remote Copy, see Building Disaster
Recovery Serviceguard Solutions Using Metrocluster with 3PAR Remote Copy available at http://
www.hp.com/go/hpux-serviceguard-docs.
For information about splitting the replication on EMC SRDF, see Building Disaster Recovery
Serviceguard Solutions Using Metrocluster with EMC SRDF available at http://www.hp.com/go/
hpux-serviceguard-docs.
After configuring data replication using any one of the above arrays, the applications in the cluster
that requires disaster recovery must be packaged with the appropriate Continentalclusters package
module. This must be done in both the primary and the recovery clusters.
Setting up redundant complex workload in the recovery cluster
After the Site Controller Package is created at the primary cluster, an identical complex workload
and Site Controller Package must be created on the recovery cluster.
Configuring the storage device for the complex workload at the recovery cluster
The storage device for complex workload must be configured for the data of the complex workload
from the replicated disks at the recovery cluster. The procedure to configure the storage device
differs depending on whether CFS, CVM, or SLVM is used.
Configuring the storage device using CFS or SG SMS CVM
The procedure on the CVM cluster master node in the recovery cluster as follows:
1. Import the diskgroup.
# vxdg -stfC import <cvm_dg_name>
2. Create a package configuration file.
# cmmakepkg -m sg/cfs_all /etc/cmcluster/cfspkg1.ascii
3. Edit the following package parameters in the cfspkg1.ascii package configuration file.
node_name <node3>
node_name <node4>
package_name <siteB_cfs_pkg_name>
cvm_disk_group <cvm_dg_name>
cvm_activation_mode <cvm_mount_point>
cfs_volume <cvm_dg_name>/<cvm_dg_vol_name>
cfs_mount_options "node3=cluster node4=cluster"
cfs_primary_policy
where node3 and node4 are the nodes at the recovery cluster.
Do not configure any mount specific attributes such as cfs_mount_point and
cfs_mount_options if the storage deployment requires only CVM raw volumes.
4. Verify the package configuration file.
# cmcheckconf -P cfspkg1.ascii
5. Apply the package configuration file.
# cmapplyconf -P cfspkg1.ascii
6. Run the package.
# cmrunpkg <siteB_cfs_pkg_name>
Configuring the storage device using Veritas CVM
To import CVM disk groups on the nodes in the recovery cluster and to create a Serviceguard
CVM disk group package:
Setting up redundant complex workload in the recovery cluster 51

1. From the CVM master node at the recovery cluster, import the disk groups used by the complex
workload.
# vxdg -stfC import <cvm_dg_name>
2. Create Serviceguard disk group modular MNP packages for the CVM disk group.
IMPORTANT: Veritas CVM disk groups must be configured in a dedicated modular MNP
package using the cvm_dg attribute. This modular MNP package must be configured to have
a package dependency on the SG-CFS-pkg SMNP package.
Configuring the storage device using SLVM
To import volume groups on the nodes in the recovery cluster:
1. Export the volume groups on the primary cluster without removing the special device files:
# vgchange -a n <vg_name>
# vgexport -s -p -m <map_file_name> <vg_name>
Ensure that the map files are copied to all the nodes in the recovery cluster.
2. On the recovery cluster, import the VGs on all systems that will run the Serviceguard complex
workload package.
# vgimport -s -m <map_file_name> <vg_name>
To activate LVM or SLVM volume groups in the recovery cluster, the cluster ID of the LVM or
SLVM volume groups must be changed as shown in the following sample. For LVM volume
groups, run the following commands to modify the cluster ID:
# vgchange -c n <vg_name>
# vgchange -c y <vg_name>
For SLVM volume groups, run the following commands to modify the cluster ID:
# vgchange -c n -S n <vg_name>
# vgchange -c y -S y <vg_name>
Configuring the identical complex workload stack at the recovery cluster
The complex workload must be packaged as Serviceguard MNP or failover packages. This creates
the complex workload stack at the recovery cluster that will be configured to be managed by the
Site Controller Package.
Halting the complex workload on the recovery cluster must halt the complex workload stack on the
recovery cluster, so that it can be restarted at the primary cluster. Halt all the packages related to
complex workload using the cmhaltpkg command.
Configuring the Site Controller package in the recovery cluster
The procedure for configuring the Site Controller Package in the recovery cluster is identical to
configuring the Site Controller Package in the primary cluster. For information about configuring
the Site Controller Package, see “Configuring the Site Controller Package in the primary cluster”
(page 49).
Configuring Site Safety Latch dependencies
The procedure to configure the Site Safety Latch dependencies in the recovery cluster is identical
to the procedure for configuring the dependencies in the primary cluster. For information about
configuring these dependencies, see “Configuring the Site Safety Latch dependencies in the primary
cluster” (page 49).
52 Configuring complex workloads in a Continentalclusters environment using SADTA
Resuming the replication to the recovery cluster
Ensure that the Site Controller package and complex workload are halted on the recovery cluster.
Re-synchronize the replicated disk in the recovery cluster from the source disk in the primary cluster
for the replication. The procedure to resume the replication depends on the type of arrays that are
configured in the environment.
Based on the arrays in your environment, see the respective manuals to resume the replication.
Configuring Continentalclusters
After the complex workload is configured along with the Site Controller Package on both the
primary and recovery clusters, ensure that the Continentalclusters software is installed in all the
nodes in both clusters. The Continentalclusters is configured between primary and recovery clusters.
For more information about configuring Continentalclusters, see “Building the Continentalclusters
configuration” (page 10).
Resuming the replication to the recovery cluster 53

7 Administering Continentalclusters
Checking the status of clusters, nodes, and packages
To verify the status of the Continentalclusters and associated packages, use the cmviewconcl
command, which lists the status of the clusters, associated package status, and status of the
configured events. This command also displays, if configured, the mode of the recovery group.
The following is an example output of the cmviewconcl command in a situation where there is
a single recovery group for which the primary cluster is cjc838 and the recovery cluster is
cjc1234.
# cmviewconcl
WARNING: Primary cluster cjc838 is in an alarm state
(cmrecovercl is enabled on recovery cluster cjc1234)
Continentalclusters cjccc1
RECOVERY CLUSTER cjc1234
PRIMARY CLUSTER STATUS EVENT LEVEL POLLING INTERVAL
cjc838 down ALARM 20
PACKAGE RECOVERY GROUP prg1
MAINTENANCE MODE NO
PACKAGE ROLE STATUS cjc838/primary primary down
cjc1234/recovery recovery up
cjc1234/rehearsal rehearsal down
The following is an example of cmviewconcl output from a primary cluster that is down.
cmviewconcl -v
WARNING: Primary cluster cjc838 is in an alarm state
(cmrecovercl is enabled on recovery cluster cjc1234)
Primary cluster cjc838 is not configured to monitor recovery
cluster cjc1234
Continentalclusters cjccc1
RECOVERY CLUSTER cjc1234
PRIMARY CLUSTER STATUS EVENT LEVEL POLLING INTERVAL
cjc838 down ALARM 20
CONFIGURED EVENT STATUS DURATION LAST NOTIFICATION SENT
alert unreachable 15 sec --
alarm unreachable 30 sec --
alarm down 0 sec Fri May 12 12:13:06 PDT 2000
alert error 0 sec --
alert up 20 sec --
alert up 40 sec --
PACKAGE RECOVERY GROUP prg1
MAINTENANCE MODE NO
PACKAGE ROLE
STATUS cjc838/primary
primary down
cjc1234/recovery recovery up
cjc1234/rehearsal rehearsal down
The following is the output of the cmviewconcl command that displays data for a mutual recovery
configuration in which each cluster has both the primary and the recovery roles—the primary role
for one recovery group and the recovery role for the other recovery group:
Continentalclusters ccluster1
RECOVERY CLUSTER PTST_dts1
54 Administering Continentalclusters
PRIMARY CLUSTER STATUS EVENT LEVEL POLLING INTERVAL
PTST_sanfran Unmonitored unmonitored 1 min
CONFIGURED EVENT STATUS DURATION LAST NOTIFICATION SENT
alert unreachable 1 min --
alert unreachable 2 min --
alarm unreachable 3 min --
alert down 1 min --
alert down 2 min --
alarm down 3 min --
alert error 0 sec --
alert up 1 min --
RECOVERY CLUSTER PTST_sanfran
PRIMARY CLUSTER STATUS EVENT LEVEL POLLING INTERVAL
PTST_dts1 Unmonitored unmonitored 1 min
CONFIGURED EVENT STATUS DURATION LAST NOTIFICATION SENT
alert unreachable 1 min --
alert unreachable 2 min --
alarm unreachable 3 min --
alert down 1 min --
alert down 2 min --
alarm down 3 min --
alert error 0 sec --
alert up 1 min --
PACKAGE RECOVERY GROUP hpgroup10
PACKAGE ROLE STATUS
PTST_sanfran/PACKAGE1 primary down
TST_dts1/PACKAGE1 recovery down
PACKAGE RECOVERY GROUP hpgroup20
PACKAGE ROLE STATUS
PTST_dts1/PACKAGE1x_ld primary down
PTST_sanfran/PACKAGE1x_ld recovery down
For a more comprehensive status of component clusters, nodes, and packages, use the cmviewcl
command on both the clusters. On each cluster, note the nodes on which the primary packages
are running on, as well as data sender and data receiver packages, if they are being used for
logical data replication. Verify that the monitor is running on every cluster on which it is configured.
The following is an example of output of the cmviewcl command for a cluster (nycluster) that is
running a monitor package. Note that the recovery package salespkg_bak is not running, and is
shown as an unowned package. This is the expected display while the other cluster is running
salespkg.
CLUSTER STATUS
nycluster up
NODE STATUS STATE
nynode1 up running
Network Parameters:
INTERFACE STATUS PATH NAME
PRIMARY up 12.1 lan0
PRIMARY up 56.1 lan2
NODE STATUS STATE:
nynode2 up running
Network Parameters:
Checking the status of clusters, nodes, and packages 55
INTERFACE STATUS PATH NAME
PRIMARY up 4.1 lan0
PRIMARY up 56.1 lan1
PACKAGE STATUS STATE PKG_SWITCH NODE
ccmonpkg up running enabled nynode2
Script_Parameters:
ITEM NAME STATUS MAX_RESTARTS RESTARTS
Service ccmonpkg.srv up 20 0
Node_Switching_Parameters:
NODE_TYPE STATUS SWITCHING NAME
Primary up enabled nynode2 (current)
Alternate up enabled nynode1
UNOWNED Packages:
PACKAGE STATUS STATE PKG_SWITCH NODE
salespkg_bak down unowned
Policy_Parameters:
POLICY_NAME CONFIGURED_VALUE
Failover unknown
Failback unknown
Script_Parameters:
ITEM STATUS NODE_NAME NAME
Subnet unknown nynode1 195.14.171.0
Subnet unknown nynode2 195.14.171.0
Node_Switching_Parameters:
NODE_TYPE STATUS SWITCHING NAME
Primary down nynode1
Alternate down nynode2
Use the ps command to verify the status of the Continentalclusters monitor daemons cmclsentryd
which must be running on the cluster node where the monitor package is running.
Notes on Packages in Continentalclusters
Packages have different behavior in Continentalclusters than in a normal Serviceguard environment.
There are specific differences in
•Startup and Switching Characteristics
•Network Attributes
From Continentalclusters version A.0.08.00 and above, you can configure the following package
types in a recovery group:
•Failover
•Oracle RAC Multi-node packages
•Complex workloads using SADTA
For details, see “Configuring complex workloads in a Continentalclusters environment using
SADTA” (page 43).
In the case of a multi-node package, a recovery process recovers all instances of the package in
a recovery cluster.
56 Administering Continentalclusters

NOTE:
•System multi-node packages cannot be configured in Continentalclusters recovery groups.
Multi-node packages are supported only for Oracle with CFS or CVM environments.
•Starting with Continentalclusters version A.08.00, packages in Continentalclusters can be
configured as modular packages.
Startup and Switching Characteristics
Normally, an application (package) can run on only one node at a time in a cluster. However, in
Continentalclusters, there are two clusters in which an application—the primary package or the
recovery package—could operate on the same data. Both the primary and the recovery package
must not be allowed to run at the same time. To prevent this, it is important to ensure that packages
are not allowed to start automatically and are not started at inappropriate times.
To keep packages from starting up automatically, when a cluster starts, set the AUTO_RUN
(PKG_SWITCHING_ENABLED used prior to Serviceguard A.11.12 parameter for all primary and
recovery packages to NO. Then use the cmmodpkg command with the -e <packagename>option
to start up only the primary packages and enable switching. The cmrecovercl command, when
run, will start up the recovery packages and enable switching during the cluster recovery operation.
CAUTION: After initial testing is complete, the cmrunpkg and cmmodpkg commands or the
equivalent options in Serviceguard Manager should never be used to start a recovery package
unless cluster recovery has already taken place.
To prevent packages from being started at the wrong time and in the wrong place, use the following
strategies:
•Set the AUTO_RUN (PKG_SWITCHING_ENABLED used prior to Serviceguard
A.11.12 parameter for all primary and recovery packages to NO.
•Ensure that recovery package names are well known, and that personnel understand they
should never be started with a cmrunpkg or cmmodpkg command unless the cmrecovercl
command has been invoked first.
•If a cluster has no packages to run before recovery, then do not allow packages to be run on
that cluster with Serviceguard Manager.
Network Attributes
Another important difference between the packages configured in Continentalclusters and the
packages configured in a standard Serviceguard cluster is that the same or different subnets can
be used for primary cluster and recovery cluster configurations. In addition, the same or different
relocatable IP addresses can be used for the primary package and its corresponding recovery
package. The client application must be designed properly to connect to the appropriate IP address
following a recovery operation. For recovery groups with a rehearsal package configured, ensure
that the rehearsal package IP address is different from the recovery package IP address.
Enabling and disabling maintenance mode
Any recovery group in Continentalclusters is moved into maintenance mode using cmrecovercl
command with —d option. The —d flag is used to disable recovery of the recovery groups.
For Example:
# cmrecovercl —d recovery_group1
Any recovery group in Continentalclusters is moved out of maintenance mode using cmrecovercl
command with —e option. The —e flag is used to enable recovery of the recovery groups.
For Example:
Enabling and disabling maintenance mode 57

# cmrecovercl —e recovery_group1
Recovering a cluster when the storage array or disks fail
If the monitored cluster returns to UP status following an alert or alarm, but it is certain that the
primary packages cannot start (say, because of damage to the disks on the primary site), then use
a special procedure to initiate recovery:
1. Use the cmhaltcl command to halt the primary cluster.
2. Wait for the monitor to send an alert.
3. Use the cmrecovercl -f command to perform recovery.
After the cmrecovercl command is run, Continentalclusters displays a warning message, such
as the following and prompts for a verification that recovery should proceed (the names “LAcluster”
and “NYcluster” are examples).
WARNING: This command will take over for the primary cluster “LAcluster”
by starting the recovery package on the recovery cluster "NYCluster.You
must follow your site disaster recovery procedure to ensure that the
primary packages on "LAcluster" are not running and that recovery on
"NYCluster" is necessary. Continuing with this command while the
applications are running on the primary cluster may result in data
corruption.Are you sure that the primary packages are not running and
will not come back, and are you certain that you want to start the
recovery packages? [Y/N].
Reply Yto proceed only if you are certain that recovery should take place. After replying Y, a
group of messages will appear as shown below.
As the processing of each recovery group occurs (the message about the data receiver package
appears only using logical data replication with data sender and receiver packages):Processing
the recovery group nfsgroup on recovery cluster eastcoast.Disabling
switching for data receiver package nfsreceiverpkg on recovery cluster
eastcost.Halting data receiver package nfsreceiverpkg on recovery cluster
east coast.Starting recovery package nfsbackuppkg on recovery cluster
eastcoast.Enabling package nfsbackuppkg in cluster
eastcoast.----------------exit status = 0----------------
The command cmrecovercl starts up all the recovery packages that are configured in the recovery
groups. The cmrecovercl -c command skips recovery for recovery groups in maintenance
mode.
In addition to starting the recovery packages all at once, another option is to recover an individual
recovery group by using the following command:
# cmrecovercl -g Recovery_Group_Name
Running the cmrecovercl command with option -g starts up only the recovery package configured
in the specified recovery group. The cmrecovercl -g command fails to recover if the specified
recovery group is in maintenance mode.
NOTE: After the cmrecovercl command is run, there is a delay of at least 90 seconds per
recovery group as the command makes sure that the package is not active on another cluster.
Use the cmviewcl command on the local cluster to confirm that the recovery packages are running
correctly.
Starting a recovery package forcefully
You can use the cmforceconcl command to force a Continentalclusters package to start even
if the status of a remote package in the recovery group is unknown. This command is used as a
prefix with the cmrunpkg and cmmodpkg command.
58 Administering Continentalclusters

Under normal circumstances, Continentalclusters does not allow a package to start in the recovery
cluster unless it can determine that the package is not running in the primary cluster. In some cases,
communication between the two clusters might be lost, and it might be necessary to start the
package on the recovery cluster anyway. To do this, use the cmforeconcl command, which is
used along with a cmrunkpg or cmmodpkg command, as in the following example:
# cmforceconcl cmrunpkg -n node3 Pkg1
CAUTION: When using the cmforceconcl command, ensure that the other cluster is not running
the package. Failure to do this might result in the package running in both clusters, which causes
data corruption.
Adding or Removing a Node from a Cluster
To add a node or to remove a node from Continentalclusters, use the following procedure:
1. Halt any monitor packages that are running.
# cmhaltpkg ccmonpkg
2. Add or remove the node in a cluster by editing the Serviceguard cluster configuration file and
applying the configuration.
# cmapplyconf -C cluster.config
3. Edit the Continentalclusters configuration ASCII file to add or remove the node in the cluster.
4. If a new node is added, then setup SSH equivalence as described in the “Sample
Continentalclusters Configuration” (page 11).
If a node is removed, delete Continentalclusters user along with its HOME directory to remove
all SSH credentials.
5. Verify and apply the configuration using the cmcheckconcl and cmapplyconcl commands.
6. Restart the monitor packages.
7. View the status of Continentalclusters.
# cmviewconcl
Adding a Recovery Group to Continentalclusters
To add a new package to the Continentalclusters configuration, it is necessary to configure a new
primary package and recovery package. Then, you must add a new recovery group to the
Continentalclusters configuration file. In addition, it is necessary to ensure that the data replication
is provided for the new package, using either software based replication or array based replication.
Adding a new package does not require bringing down either cluster. However, to implement the
new configuration:
1. Configure data replication for the applications to be configured as packages.
2. Configure the new primary and recovery packages by creating and editing package
configuration files.
3. Use cmapplyconf command to add the primary package to one cluster, and the recovery
package to the other cluster.
4. Create a new recovery group in the Continentalclusters configuration ASCII file.
5. Halt the monitor packages on both clusters.
6. Use the cmapplyconcl command to apply the edited Continentalclusters configuration file.
7. Restart the monitor packages on both the clusters.
8. View the status of the Continentalclusters.
# cmviewconcl
Adding or Removing a Node from a Cluster 59

Modifying a package in a recovery group
There might be situations where a package must be halted for modifications purposes without
having the package moved to another node. The following procedure is recommended for package
maintenance and normal maintenance of Continentalclusters:
1. Shut down the package with the appropriate command.
For example,
# cmhaltpkg <pkgname>
2. Perform the changes to the packages in primary and recovery cluster.
3. Distribute the package configuration changes, if any.
For example,
In Primary cluster
# cmapplyconf - P <pkgconfig>
In Recovery cluster
# cmapplyconf -P <bkpkgconfig>
4. Run the package with the any one of the following Serviceguard command.
For example,
In Primary cluster
# cmmodpkg -e <pkgname>
In Recovery cluster
# cmrunpkg <pkgname>
CAUTION: Never enable package switching on both the primary package and the recovery
package.
Modifying Continentalclusters configuration
1. Halt the monitor package.
# cmhaltpkg ccmonpkg
2. Apply the new Continentalclusters configuration.
# cmapplyconcl -C <configfile>
3. Restart the monitor package.
# cmrunpkg ccmonpkg
Removing a recovery group from the Continentalclusters
To remove a package from the Continentalclusters configuration, you must remove the recovery
group from the Continentalclusters configuration file.
To remove the package it is not necessary to bring down either cluster. However, to implement the
new configuration:
1. Remove the recovery group from the Continentalclusters configuration file.
2. Halt the monitor packages that are running on the clusters.
3. Use the cmapplyconcl command to apply the new Continentalclusters configuration.
4. Restart the monitor packages on both clusters.
60 Administering Continentalclusters
5. Use the Serviceguard cmdeleteconf command to remove every package in the recovery
group.
6. View the status of the Continentalclusters.
# cmviewconcl
Removing a rehearsal package from a recovery group
To remove a rehearsal package from a recovery group:
1. Move the recovery group out of maintenance mode using the cmrecovercl -e command.
2. Delete the rehearsal package from the recovery cluster using the cmdeleteconf command.
3. Edit the Continentalclusters configuration ASCII file to remove the REHEARSAL_PACKAGE
parameter.
4. Apply the edited configuration ASCII file using the cmapplyconcl command.
Modifying a recovery group with a new rehearsal package
To change the rehearsal package configured for a recovery group:
1. Move the recovery group out of maintenance mode using the cmrecovercl -e command.
2. Delete the rehearsal package from the recovery cluster using the cmdeleteconf command.
3. Create the new rehearsal package by following the steps in “Configuring Continentalclusters
rehearsal packages” (page 38) section.
4. Edit the Continentalclusters configuration ASCII file to replace the REHEARSAL_PACKAGE
parameter with the new rehearsal package name.
5. Apply the edited configuration ASCII file using the cmapplyconcl command.
.
Changing monitoring definitions
You can change the monitoring definitions in the configuration without bringing down either cluster.
This includes adding, removing, or changing the cluster events, changing the timings, and adding,
removing, or changing the notification messages.
To change the monitoring definitions:
1. Edit the Continentalclusters configuration file to incorporate the new or changed monitoring
definitions.
2. Halt the monitor packages on both clusters.
3. Use the cmapplyconcl command to apply the new configuration.
4. Restart the monitor packages on both clusters.
5. View the status of the Continentalclusters.
# cmviewconcl
Behavior of Serviceguard commands in Continentalclusters
Continentalclusters packages are manipulated manually by the user via Serviceguard commands
and by cmcld automatically in the same way as any other packages.
In Continentalclusters the recovery package is not allowed to run at the same time as the primary,
data sender, or data receiver packages. To enforce this, several Serviceguard commands behave
in a slightly different manner when used in Continentalclusters.
Table 1 describes the Serviceguard commands whose behavior is different in Continentalclusters
environment. Specifically, when one of the commands listed in Table 1 attempts to start or enable
switching of a package, it first verifies the status of the other packages in the recovery group.
Based on the status, the operation is either allowed or disallowed.
Removing a rehearsal package from a recovery group 61

The verification is done based on the stable clusters' environment and the proper functioning of
the network communication. In case the network communication between clusters can not be
established or the cluster or package status cannot be determined, manual verification must be
done to ensure that the operation to be performed on the target package will not have a conflict
with other packages configured in the same recovery group.
Table 1 Serviceguard and Continentalclusters Commands
How the command works in ContinentalclustersHow the command
works in Serviceguard
Command
Will not start a recovery package if any of the primary, data receiver,
or data sender package in the same recovery group is running or
Runs a package.cmrunpkg
enabled. Will not start recovery package if the recovery group is in
maintenance mode. Will not start a primary, data receiver, or data
sender package if the recovery package in the same recovery group is
running or enabled. Will not start a rehearsal package when the
recovery group is not in maintenance mode.
Will not enable switching on a recovery package if any of the primary,
data receiver, or data sender package in the same recovery group is
Enables switching
attribute for a highly
available package.
cmmodpkg -e
running or enabled. Will not enable switching for a recovery package
if the recovery group is in maintenance mode. Will not enable a primary,
data receiver, or data sender package if the recovery package in the
same recovery group is running or enabled. Will not enable switching
for a rehearsal package when the recovery group is not in maintenance
mode.
Will not re-enable switching on a recovery package if any of the primary,
data receiver, or data sender package in the same recovery group is
Halts a node in a
highly available
cluster.
cmhaltnode -f
running or enabled. Will not re-enable a primary, data receiver, or data
sender package if the recovery package in the same recovery group is
running or enabled.
Will not re-enable switching on a recovery package if any of the primary,
data receiver, or data sender package in the same recovery group is
This command halts
daemons on all
cmhaltcl -f
running or enabled. Will not re-enable a primary, data receiver, or datacurrently running
systems. sender package if the recovery package in the same recovery group is
running or enabled.
Verifying the status of Continentalclusters daemons
Use the ps command to verify the status of the Continentalclusters monitor daemons cmclsentryd,
which must be running on the cluster node where the monitor package is running.
For Example:
# ps —ef | grep cmclsentryd
Use the ps command to verify the status of the Continentalclusters daemon cmclapplyd on all
the nodes in Continentalclusters. This daemon is started as part of the Continentalclusters installation
and is required for applying the Continentalclusters configuration.
# ps -ef | grep cmclapplyd
Renaming the Continentalclusters
To rename an existing Continentalclusters:
1. Remove the Continentalclusters configuration.
# cmdeleteconcl
2. Edit the CONTINENTAL_CLUSTER_NAME field in the configuration ASCII file, and run the
cmapplyconcl command to configure the Continentalclusters with a new name.
62 Administering Continentalclusters
Deleting the Continentalclusters configuration
The cmdeleteconcl command is used to delete the configuration on all the nodes in the
Continentalclusters configuration. To delete Continentalclusters and the Continentalclusters
configuration run the following command.
# cmdeleteconcl
While deleting a Continentalclusters configuration with the recovery group maintenance feature,
the shared disk is not removed. Before applying a fresh Continentalclusters configuration using an
old shared disk, you must re-initialize the file system in the shared disk using the mkfs command.
Checking the Version Number of the Continentalclusters Executables
For Continentalclusters version A.08.00, use what command to get the versions of the executables.
For example,
# what /usr/sbin/cmviewconcl
Maintaining the data replication environment
Continentalclusters supports the pre-integrated physical replication solutions using Continuous
Access P9000 and XP, Continuous Access EVA, EMC Symmetrix Remote Data Facility, and 3PAR
Remote Copy.
•See, “Maintaining Continuous Access P9000 and XP Data Replication Environment” (page 63)
for administering Continentalclusters when the Continentalclusters solution is built on Continuous
Access P9000 and XP for the physical data replication.
•See, “Maintaining Metrocluster with Continuous Access EVA P6000 data replication
environment” (page 65) for administering Continentalclusters when the Continentalclusters
solution uses Continuous Access EVA.
•See, “Maintaining EMC SRDF data replication environment” (page 66) for administering
Continentalclusters when the Continentalclusters uses EMC SRDF data replication solution.
•See, “Maintaining 3PAR Remote Copy data replication environment” (page 66) for
administering Continentalclusters when the Continentalclusters uses 3PAR Remote Copy data
replication solution.
Maintaining Continuous Access P9000 and XP Data Replication Environment
Resynchronizing the device group
After certain failures, data is no longer remotely protected. In order to restore disaster-tolerant data
protection after repairing or recovering from the failure, you must manually run the command
pairresync. This command must run successfully for disaster-tolerant data protection to be
restored. Following is a partial list of failures that require running the pairresync command to
restore disaster-tolerant data protection:
•Failure of ALL Continuous Access links without restart of the application.
•Failure of ALL Continuous Access links with Fence Level DATA with restart of the application
on a primary host.
•Failure of the entire recovery Data Center for a given application package.
•Failure of the recovery P9000 and XP disk array for a given application package while the
application is running on a primary host.
Deleting the Continentalclusters configuration 63

Following is a partial list of failures that require full resynchronization to restore disaster-tolerant
data protection. Resynchronization is automatically initiated by moving the application package
back to its primary host after repairing the failure.
•Failure of the entire primary Data Center for a given application package.
•Failure of all of the primary hosts for a given application package.
•Failure of the primary P9000 and XP disk array for a given application package.
•Failure of all Continuous Access links with application restart on a secondary host.
NOTE: The preceding steps are automated provided the default value of 1 is being used for the
auto variable AUTO_PSUEPSUS. After the Continuous Access link failure is fixed, you must halt
the package at the failover site and restart on the primary site. However, if you want to reduce
downtime, you must manually invoke pairresync before failback.
Full resynchronization must be manually initiated (as described in the next section) after repairing
the following failures:
•Failure of the recovery P9000 and XP disk array for a given application package followed
by application startup on a primary host.
•Failure of all Continuous Access links with Fence Level NEVER or ASYNC with restart of the
application on a primary host.
Pairs must be manually recreated if both the primary and recovery P9000 and XP disk arrays are
in the SMPL (simplex) state.
Ensure you periodically review the following files for messages, warnings, and recommended
actions. HP recommends to review these files after system, data center, and application failures.
•/var/adm/syslog/syslog.log
•/etc/cmcluster/<package-name>/<package-name>.log
•/etc/cmcluster/<bkpackage-name/<bkpackage-name>.log
Using the pairresync command
The pairresync command can be used with special options after a failover in which the recovery
site has started the application and has processed transaction data on the disk at the recovery site,
but the disks on the primary site are intact. After the Continuous Access link is fixed, depending
on which site you are on, use the pairresync command in one of the following two ways:
•pairresync -swapp—from the primary site.
•pairresync -swaps—from the failover site.
These options take advantage of the fact that the recovery site maintains a bit-map of the modified
data sectors on the recovery array. Either version of the command will swap the personalities of
the volumes, with the PVOL becoming the SVOL and SVOL becoming the PVOL. With the
personalities swapped, data written to the volume on the failover site (now PVOL) are copied to
the SVOL, which is now running on the primary site. During this time, the package continues running
on the failover site. After resynchronization is complete, you can halt the package on the failover
site, and restart it on the primary site. Metrocluster swaps the personalities between the PVOL and
the SVOL, returning PVOL status to the primary site.
Additional points
•This toolkit might increase package startup time by 5 minutes or more. Packages with many
disk devices will take longer to start up than those with fewer devices because of the time
required to get device status from the P9000 and XP disk array or to synchronize.
64 Administering Continentalclusters

NOTE: Long delays in package startup time will occur in situations when recovering from
broken pair affinity.
•The value of RUN_SCRIPT_TIMEOUT in the package ASCII file must be set to NO_TIMEOUT
or to a large enough value to take into consideration the extra startup time required for getting
status information from the P9000 and XP disk array. (See the earlier paragraph for more
information on the extra startup time).
•Online cluster configuration changes might require a Raid Manager configuration file to be
changed. Whenever the configuration file is changed, the Raid Manager instance must be
stopped and restarted. The Raid Manager instance must be running before any
Continentalclusters package movement occurs.
•A file system must not reside on more than one P9000 and XP frames for either the PVOL or
the SVOL. An LVM Logical Volume (LV) must not reside on more than one P9000 and XP
frames for either the PVOL or the SVOL.
•The application is responsible for data integrity, and must use the O_SYNC flag when ordering
of I/Os is important. Most relational database products are examples of applications that
ensure data integrity by using the O_SYNC flag.
•Each host must be connected to only the P9000 and XP disk array that contains either the
PVOL or the SVOL. A given host must not be connected to both the PVOL and the SVOL of a
Continuous Access pair.
Maintaining Metrocluster with Continuous Access EVA P6000 data replication
environment
While the package is running, the package might halt because of unexpected conditions in the
Continuous Access EVA volumes caused by a manual storage failover on Continuous Access EVA
outside of Metrocluster Continuous Access EVA software. HP recommends that manual storage
failover must not be performed while the package is running.
A manual change of Continuous Access EVA link state from suspend to resume is allowed to
re-establish data replication while the package is running.
Continuous Access EVA Link Suspend and Resume Modes
Upon Continuous Access links recovery, Continuous Access EVA automatically normalizes (the
Continuous Access EVA term for “synchronizes”) the source Vdisk and destination Vdisk data.
If the log disk is not full, when a Continuous Access connection is re-established, the contents of
the log are written to the destination Vdisk to synchronize it with the source Vdisk. This process of
writing the log contents, in the order that the writes occurred, is called merging. Since write ordering
is maintained, the data on the destination Vdisk is consistent while merging is in progress.
If the log disk is full, when a Continuous Access connection is re-established, a full copy from the
source Vdisk is done to the destination Vdisk. Since a full copy is done at the block level, the data
on the destination Vdisk is not consistent until the copy completes.
If all Continuous Access links fail and if failsafe mode is disabled, the application package continues
to run and writes new I/O to source Vdisk. The virtual log in EVA controller collects host write
commands and data; DR group's log state changes from normal to logging. When a DR group is
in a logging state, the log grows in proportion to the amount of write I/O being sent to the source
Vdisks. If the links are down for a long time, the log disk might be full, and full copy happens
automatically upon link recovery. If primary site fails while copy is in progress, the data in destination
Vdisk is not consistent, and is not usable. To prevent this, after all the Continuous Access links fail,
HP recommends manually setting the Continuous Access link state to suspend mode by using the
Command View EVA UI. When Continuous Access link is in suspend state, Continuous Access
EVA does not try to normalize the source and destination Vdisks upon links recovery until you
manually change the link state to resume mode.
Maintaining the data replication environment 65
Maintaining EMC SRDF data replication environment
Normal Startup
The following is the normal Continentalclusters startup procedure. On the source disk site:
1. Start the source disk site.
# cmruncl -v
The source disk site comes up with ccmonpkg up. The application packages are down, and
ccmonpkg is up.
2. Manually start application packages on the source disk site.
# cmmodpkg -e <Application_pkgname>
3. Confirm source disk site status.
# cmviewcl -v
and
# cmviewconcl -v
4. Verify SRDF Links.
# symrdf list
On the target disk site, do the following:
1. Start the target disk site.
# cmruncl -v
The target disk site comes up with ccmonpkg up. The application packages are in halted
state, and ccmonpkg is running.
2. Do not manually start application packages on the target disk site; this will cause data
corruption.
3. Confirm target disk site status.
# cmviewcl -v
and
# cmviewconcl -v
Maintaining 3PAR Remote Copy data replication environment
While the package is running, a manual storage failover on Remote Copy volume group outside
of Metrocluster with 3PAR Remote Copy software can cause the package to halt due to unexpected
condition of the 3PAR Remote Copy virtual volumes. HP recommends that no manual storage
failover be performed while the package is running.
If the Remote Copy replication was stopped due to link failures, you can manually start the
replication even while the package is running. You do not have to manually start the replication
if the auto_recover option is set for the Remote Copy volume group.
Viewing the Remote Copy volume group details
To associate the Remote Copy volume group name with the package, run the cmgetpkgenv
command:
# cmgetpkgenv <pkg_name>
To list the various properties of 3PAR Remote Copy volume group, run the CLI command showrcopy
command.
You can view the Remote Copy volume group details using HP 3PAR Management Console.
66 Administering Continentalclusters

Remote Copy Link Failure and Resume Modes
When the link is failed, snapshots are created for all the primary volumes, but not for the secondary
volumes while replication is stopped. When replication is restarted for the volume, all differences
between the base volume and the snapshot taken when the replication was stopped are sent over
in order to resynchronize the secondary volume with the primary volume.
When the Remote Copy links are recovered, HP 3PAR Remote Copy automatically restarts the
replication if the auto_recover policy is set. If the auto_recover policy is not set, when the
links are restored, you can copy any writes from the primary to the secondary groups by running
the startrcopygroup command on the system that holds the primary group to resynchronize
the primary and secondary groups.
Restoring replication after a failover
When the primary package fails over to the remote site and the links are not up or the primary
storage system is not up, Metrocluster runs the setrcopygroup failover command. This
command changes the role of the Remote Copy volume group on the storage system in the recovery
site from Secondary to Primary-Rev. In this role, the data is not replicated from the recovery
site to the primary site. After the links are restored or the primary storage system is restored,
manually run the setrcopygroup recover command on the storage system in the recovery
site to resynchronize the data from the recovery site to the primary site. This results in the change
of the role of the Remote Copy volume group on the storage system in the primary site from "Primary"
to "Secondary-Rev".
CAUTION: When the roles are Secondary-Rev and Primary-Rev, a disaster on the recovery
site results in a failure of the Metrocluster package. To avoid this, immediately halt the package
on the recovery site and start it up on the primary site. This will restore the role of the Remote Copy
volume group to its original role of Primary and Secondary.
Administering Continentalclusters using SADTA configuration
This section elaborates the procedures that must be followed to administer a SADTA configuration
in which complex workloads other than Oracle RAC are configured.
Maintaining a Node
To perform maintenance procedures on a cluster node, the node must be removed from the cluster.
Run the cmhaltnode -f command to move the node out of the cluster. This command halts the
complex workload package instance running on the node. As long as there are other nodes in the
site and the Site Controller Package is still running on the site, the site aware disaster recovery
workload continues to run with one less instance on the same site.
Once the node maintenance procedures are complete, join the node to the cluster using the
cmrunnode command. If the Site Controller Package is running on the site that the node belongs
to, the active complex-workload package instances on the site must be manually started on the
restarted node since the auto_run flag is set to no.
Prior to halting a node in the cluster, the Site Controller Package must be moved to a different node
in the site. However, if the node that needs to be halted in the cluster is the last surviving node in
the site, then the Site Controller Packages running on this node must be moved to the other site. In
such scenarios, the site aware disaster recovery workload must be moved to the remote site before
halting the node in the cluster. For more information on moving a site aware disaster recovery
complex workload to a remote cluster, see the section “Moving a Complex Workload to the
Recovery Cluster” (page 70).
Maintaining the Site
Maintenance operation at a site might require that all the nodes on that site are down. In such
scenarios, the site aware disaster tolerant workload can be started on the other site in the recovery
Administering Continentalclusters using SADTA configuration 67
cluster to provide continuous service. For more information on moving a site aware disaster tolerant
complex workload to a remote cluster, see “Moving a Complex Workload to the Recovery Cluster”
(page 70).
Maintaining Site Controller Package
The Site Controller Package is a Serviceguard failover package. The package attributes that can
be modified online can be modified without halting the Site Controller package. Certain package
attributes require that the Site Controller package is halted. Halting the Site Controller package
halts the workload packages and closes the Site Safety Latch on the site. The DETACH mode flag
allows the Site Controller package to halt without halting the workload packages.
To halt the Site Controller package in the DETACH mode as follows:
1. Identify the node where the Site Controller package is running.
# cmviewcl –p <site_controller_package_name>
2. Log in to the node where the Site Controller package is running and go to the Site Controller
package directory.
# cd <site_controller_package_directory>
3. Run the HP-UX touch command with the DETACH flag, in the Site Controller package directory.
# touch DETACH
4. Halt the Site Controller package.
# cmhaltpkg <site_controller_package_name>
The Site Controller package halts without halting the complex workload packages. The Site Controller
package leaves the Site Safety Latch open on this site. The DETACH mode file is automatically
removed by the Site Controller package when it halts. After the maintenance procedures are
complete, restart the Site Controller package in the same cluster where it was previously halted in
the DETACH mode. You cannot start the Site Controller package on a different cluster node.
Commands to start the Site Controller package as follows:
# cmrunpkg <site_controller_package_name>
Enable global switching for the Site Controller package.
# cmmodpkg –e <site_controller_package_name>
When the Site Controller package is halted in the DETACH mode, the active complex workload
configuration on the site can be halted and restarted at the same cluster as the Site Safety Latch
is still open in the site.
Moving the Site Controller Package to a Node in the local cluster
To complete maintenance operations on a node, there are instances where a node in the cluster
needs to be brought down. In such cases, the Site Controller package that is running on the node
needs to be moved to another node in the local cluster.
The procedure to move the Site Controller package to another node in the local cluster as follows:
1. Log in to the node where the Site Controller package is running and go to the Site Controller
package directory.
# cd <site_controller_package_directory>
2. Run the HP-UX touch command with the DETACH flag, in the Site Controller package directory.
# touch DETACH
68 Administering Continentalclusters
3. Halt the Site Controller package.
# cmhaltpkg <site_controller_package_name>
4. Log in to the other node in the local cluster, and start the Site Controller package.
# cmrunpkg <site_controller_package_name>
Deleting the Site Controller Package
To remove a site controller package from the Continentalclusters configuration, you must first remove
the associated recovery group from the Continentalclusters configuration file.
Removing the site controller package does not require you to bring down either cluster. However,
in order to implement the new configuration, the following steps are required:
1. Edit the Continentalclusters configuration file, deleting the recovery group for the site controller
package.
2. Halt the monitor packages that are running on the clusters.
3. Use the cmapplyconcl command to apply the new Continentalclusters configuration.
4. Restart the monitor packages on both clusters.
5. Halt the Site Controller Package.
6. Remove all the Site Safety Latch dependencies configured for the packages managed by the
Site Controller Package.
Also remove the Site Controller EMS resource dependency from packages managed by the
Site Controller Packages on both clusters.
For example, if you have CVM or CFS configured in your environment, run the following
commands from a node on both clusters.
# cfsdgadm delete_ems pkg1dg /dts/mcsc/cw_sc
7. Delete Site Controller package.
Use the Serviceguard cmdeleteconf command in both the clusters to delete the Site Controller
package configuration on all the nodes.
8. View the status of the Continentalclusters.
# cmviewconcl
Starting a Complex Workload
The complex workload in SADTA can be started in a Continentalclusters by starting the Site
Controller package.
The procedure to start the complex workload as follows:
1. Ensure that the Site Controller package is enabled on all the nodes in the cluster where the
complex workload must be started.
# cmmodpkg –e –n <Primary_Cluster node 1> –n <Primary_Cluster node
2> <site_controller_package_name>
2. Start the Site Controller package by enabling it.
# cmmodpkg –e <site_controller_package_name>
The Site Controller Package starts on the preferred node in the cluster. At startup, the Site Controller
package starts the corresponding complex-workload packages that are configured in that cluster.
After the complex-workload packages are up, verify the package log files for any errors that will
have occurred at startup.
Administering Continentalclusters using SADTA configuration 69
Shutting Down a Complex Workload
The complex workload in SADTA can be shut down by halting the corresponding Site Controller
package.
To shutdown the complex workload, run the following command on any node in the cluster:
# cmhaltpkg <site_controller_package_name>
This command halts the Site Controller package and the current active complex-workload packages.
After shutting down, verify the Site Controller package log file and the workload package log files
to ensure that the complex workload has shut down appropriately.
Moving a Complex Workload to the Recovery Cluster
To perform maintenance operations that require the entire site to be down, you can move the
disaster tolerant complex workload to a remote cluster. To move the complex workload to a remote
cluster, the local complex workload configuration must be first shut down and then the remote
complex workload configuration must be started.
The procedure to move a complex workload to the recovery cluster as follows:
1. Halt the Site Controller package of the complex workload.
# cmhaltpkg <site_controller_package_name>
2. Ensure the complex-workload packages are halted successfully.
# cmviewcl -l package
3. Start the Site Controller package on a node in the recovery cluster.
# cmrunpkg <site_controller_package_name>
The Site Controller package starts up on a node in the recovery cluster and starts the
complex-workload packages that are configured.
Restarting a Failed Site Controller Package
If the running Site Controller package fails because of transient error conditions, restart the Site
Controller package on a node in the cluster where it was previously running.
To restart the failed Site Controller Package as follows:
1. Determine the error message logged in the package log, and fix the problem.
2. Ensure that the Site Controller package is enabled on all the nodes in the site where it was
failed.
# cmmodpkg –e –n <node 1> —n <node 2> <site_controller_package_name>
3. Start the Site Controller package on a node in the same cluster where it was previously running.
# cmrunpkg <site_controller_package_name>
70 Administering Continentalclusters

8 Troubleshooting Continentalclusters
Reviewing Messages and Log Files
Starting with Continentalclusters A.08.00, logs messages into the standard output. Continentalclusters
commands, such as cmquerycl,cmcheckconcl,cmapplyconcl, and cmrecovercl output.
Multiple log files are also used to log various operations. All log messages are stored in the
/var/adm/cmconcl/logs directory with appropriate names. The cmviewconcl command
logs messages in the /var/adm/cmconcl/logs/cmviewconcl.log file.
General information about Serviceguard operation is located at var/adm/syslog/syslog.log
file.
Reviewing Messages and Log Files of Monitoring Daemon
The monitoring daemon, by default, logs messages into the
/var/adm/cmconcl/logs/cmclsentryd.log file.
Review the monitor package log file at the location specified by script_log_file parameter.
If you are using legacy monitoring package, the monitor package log file is ccmonpkg.cntl.log
located at /etc/cmcluster/ccmonpkg/ on any node where a Continentalclusters monitor is
running.
Reviewing Messages and Log Files of Packages in Recovery Groups
Information about the primary or recovery packages might be found in their respective package
log files specified in the script_log_file. More information package start up will be present
in the logs of split brain component of Continentalclusters. This log file is available at /var/adm/
cmconcl/logs/checkpkg.log.
Reviewing Logs of Notification Component
All notification messages associated with cluster events are reported in
/var/opt/resmon/log/cc/eventlog on the cluster where monitoring is taken place. An
example of output from this file follows:
>-----Event Monitoring Service Event Notification ------------<
Notification Time: Wed Nov 10 21:00:39 1999
system1 sent Event Monitor notification information:
/cluster/concl/ccluster1/clusters/LAclust/status/unreachable is = 15
User Comments:
Cluster "LAclust" has status "unreachable" for 15 sec
>-----End Event Monitoring Service Event Notification ----------<
In addition, if you have defined a TEXTLOG destination, notification messages are sent to the file
that were specified.
The Continentalclusters EMS resource monitor logs messages to the /etc/opt/
resmon/log/api.log and the registrar logs messages to the
/etc/opt/resmon/log/registrar.log.
The Continentalclusters EMS client, by default, logs messages to the
/etc/opt/resmon/log/client.log file.
Troubleshooting Continentalclusters Error Messages
This section contains a list of error messages that users might encounter while using
Continentalclusters Version A.08.00. It also provides the probable cause for these errors and
recommended solutions.
Reviewing Messages and Log Files 71

Table 2 Troubleshooting Continentalclusters Error Messages
ResolutionCauseSymptomsCommand/Component
Ensure that the host name,
localhost, resolves to the
The system is unable to
resolve the IP address of the
The ccmonpkg package fails
to start. The following error
ccmonpkg
loopback address. Checklocalhost. As a result, the
EMS initialization fails.
message is written to the
/var/opt/ resmon/ whether the /etc/hosts
log/client.log file: file has entries for the name
localhost.
Process ID: 26962
(/usr/lbin/cmclsentryd) Log
Level: “Error
rm_client_connect: Cannot
get IP address for localhost.”
The cause must be one of the
following:
The cmcheckconcl
command fails with the
following error message:
cmcheckconcl •Ensure all nodes of the
primary and recovery
cluster are specfied under
the CLUSTER
•The Fully Qualified
Domain Name (FQDN)
“Not all the nodes are
specified in cluster.” CONFIGURATION
Section in the
cannot be resolved
amongst the nodes in the
Continentalclusters. Continentalclusters
configuration file.
•The SSH trust is not
established. •Ensure that the FQDNs
are resolvable amongs
the nodes in the
Continentalclusters.
•Ensure that the SSH trust
is set up properly.
Set the HOME variable to the
conclusr’s home directory:
$HOME=/home/conclusr
The HOME variable is not set.Following error messages
are encountered while using
the csshsetup command:
“grep: can't open
csshsetup
/.ssh/authorized_keys2
/opt/dsau/bin/csshsetup[29]:
/.ssh/authorized_keys2:
Cannot create the specified
file.”
Set the HOME variable to the
conclusr’s home directory:
$HOME=/home/conclusr
The HOME variable is not set.The following command
output is displayed:
“Generating
public/private rsa
csshsetup
key pair. Please be
patient.... Key
generation might
take a few minutes
open /.ssh/id_rsa
failed: Permission
denied. Saving the
key failed:
/.ssh/id_rsa. Error:
Unable to generate
key pair on local
host Error: Unable
to setup local
system
<machine_name>”.
The cause must be one of the
following:
The following error message
is encountered while using
the cmcheckconcl
cmcheckconcl •Set the AUTO_RUN flag
in the package
configuration file to NO.
•The AUTO_RUN flag in
the package
command: Error: “Global
package switching flag is set •Ensure that the autorun
attribute is set to NO for
72 Troubleshooting Continentalclusters

Table 2 Troubleshooting Continentalclusters Error Messages (continued)
ResolutionCauseSymptomsCommand/Component
recovery or rehearsal
packages. Disable the
configuration file is set to
YES.
to true for package
<PackageName> on cluster
<ClusterName>”. flag using the cmmodpkg
–dcommand.
•The global switching for
the package is enabled
using the cmmodpkg -e
<package_name>
command. The value is
set to YES.
Ensure that the Volume
Group information for
Volume Group (VG) is not
configured for the ccmonpkg
package.
The cmclsentryd daemon
fails to start. The following
error message is logged in
cmclsentryd
maintenance mode is
the /var/adm/cmconcl/ configured properly for the
ccmonpkg package. Verify
logs/
that the correct directory
cmclsentryd.log or
path is specified for the sate
/var/ adm/cmcluster/
directory attribute
log/ ccmonpkg.log file:
“State dir is not mounted”. CONTINENTAL_CLUSTER_STATE_DIR
configuration file.
Check the reason for the
error in the log file /var/
The Continentalclusters split
brain prevention module
(vpaccrlb) is not allowing the
package to start.
The cmrunpkg command
fails with the following error
message:
Error: Cannot start
package
cmrunpkg/cmmodpkg
adm/cmconcl/logs/
checkpkg.log and fix
accordingly.
<package_name>:Disallowed
by the
ContinentalClusters
product
or
The cmmodpkg command
fails with the following error
message:
Error: Cannot enable
package
<package_name>:Disallowed
by the
ContinentalClusters
product
Troubleshooting Continentalclusters Error Messages 73

A Migrating to Continentalclusters A.08.00
Continentalclusters version A.08.00 includes enhanced features and capabilities, such as support
for modular packages, IPv6 support, and a secure communication protocol for inter-cluster
operations. HP recommends that you migrate Continentalclusters to the latest version to obtain the
benefits of these features.
NOTE: Upgrading to Continentalclusters A.08.00 requires re-applying the Continentalclusters
configuration.
IMPORTANT: Continentalclusters A.06.00 or higher can only be upgraded to Continentalclusters
A.08.00. For configurations versions earlier than A.06.00 must upgrade to version A.06.00 before
migrating to Continentalclusters A.08.00.
To migrate to Continentalclusters A.08.00:
1. Set up the secure communication environment.
For more information on setting up the SSH environment for Continentalclusters, see “Sample
Continentalclusters Configuration” (page 11).
2. Halt the monitor package.
# cmhaltpkg ccmonpkg
3. Install Continentalclusters A.08.00 using the swinstall command on all the nodes of the
cluster.
4. Verify the Continentalclusters configuration ASCII file that was used to create this
Continentalclusters configuration.
# cmcheckconcl -v -C cmconcl.config
5. Apply the same Continentalclusters configuration file used in step 4.
# cmapplyconcl -v -C cmconcl.config
6. Start the monitor package.
# cmrunpkg ccmonpkg
7. Verify the configuration and the status of the cluster.
# cmviewconcl
74 Migrating to Continentalclusters A.08.00

B Continentalclusters Worksheets
Planning is an essential effort in creating a robust Continentalclusters environment. HP recommends
to record the details of your configuration on planning worksheets. These worksheets can be filled
in partially before configuration begins, and then completed as you build the Continentalclusters.
All the participating Serviceguard clusters in one Continentalclusters must have a copy of these
worksheets to help coordinate initial configuration and subsequent changes. Complete the worksheets
in the following sections for every recovery pair of clusters that are monitored by the
Continentalclusters monitor.
Data Center Worksheet
The following worksheet helps you describe your specific data center configuration. Fill out the
worksheet and keep it for future reference.
==============================================================
Continentalclusters Name: _____________________________________
Continentalclusters State Dir: ________________________________
==============================================================
Primary Data Center Information:_________________________________
Primary Cluster Name: ________________________________________
Data Center Name and Location: _______________________________
Main Contact: _______________________________________________
Phone Number: ________________________________________________
Beeper: ______________________________________________________
Email Address: _______________________________________________
Node Names: __________________________________________________
Monitor Package Name: __ccmonpkg______________________________
Monitor Interval: _____________________________________________
Continentalclusters State Shared Disk: ________________________
==============================================================
Recovery Data Center Information:
Recovery Cluster Name: ______________________________________
Data Center Name and Location: ______________________________
Main Contact: _______________________________________________
Phone Number: _______________________________________________
Beeper: _____________________________________________________
Email Address: ______________________________________________
Node Names: _________________________________________________
Monitor Package Name: __ccmonpkg_____________________________
Monitor Interval: ___________________________________________
Continentalclusters State Shared Disk: ________________________
Recovery Group Worksheet
The following worksheet helps you to organize and record your specific recovery groups. Fill out
the worksheet and keep it for future reference.
===============================================================
Continentalclusters Name: _____________________________________
==============================================================
Recovery Group Data: _________________________________________
Recovery Group Name: _________________________________________
Primary Cluster/Package Name:_________________________________
Data Sender Cluster/Package Name:_____________________________
Recovery Cluster/Package Name:________________________________
Rehearsal Cluster/Package Name: ______________________________
Data Receiver Cluster/Package Name:___________________________
Recovery Group Data:_________________________________________
Recovery Group Name: ________________________________________
Primary Cluster/Package Name:________________________________
Data Sender Cluster/Package Name:___________________________
Recovery Cluster/Package Name:_______________________________
Data Center Worksheet 75

Rehearsal Cluster/Package Name:______________________________
Data Receiver Cluster/Package Name:__________________________
Recovery Group Data:
Recovery Group Name: ________________________________________
Primary Cluster/Package Name:________________________________
Data Sender Cluster/Package Name:____________________________
Recovery Cluster/Package Name:_______________________________
Rehearsal Cluster/Package Name:______________________________
Data Receiver Cluster/Package Name:____________________________
Cluster Event Worksheet
The following worksheet helps you to organize and record the cluster events you want to track. Fill
out a worksheet for each primary or recovery cluster that you want to monitor. You must monitor
each cluster containing a primary package which needs to be recovered.
Continentalclusters Name: _____________________________________
===============================================================
Cluster Event Information:
Cluster Name ________________________________________________
Monitoring Cluster: __________________________________________
UNREACHABLE:
Alert Interval:______________________________________________
Alarm Interval:______________________________________________
Notification:_________________________________________________
Notification:_________________________________________________
Notification:_________________________________________________
DOWN:
Alert Interval:______________________________________________
Notification:________________________________________________
Notification:_______________________________________________
UP:
Alert Interval:_____________________________________________
Notification:_______________________________________________
Notification:_______________________________________________
ERROR:
Alert Interval:_____________________________________________
Notification:_______________________________________________
Notification:_______________________________________________
Recovery Checklist
The following recovery checklist helps the administrators and operators at both sites of a
Continentalclusters to define the recovery procedures.
Identify the level of alert that the monitoring site received.
Cluster Alert
Cluster Alarm
Contact the monitored site by phone to rule out the following:
WAN network failure, primary cluster and packages are still fine.
Cluster and/or package have come back up but UP notification not yet received
by recovery site.
Get authorization from the monitored site using one of the following:
Authorized person contacted:
Director 1
Admin 1
Authorization received:
Human-to-human voice authorization
Voice mail
76 Continentalclusters Worksheets

Notify the monitored site of successful recovery using one of the following:
Authorized person contacted:
Director 1
Admin 1
Confirmation received
Human-to-human voice authorization
Voice mail
Site Aware Disaster Tolerant architecture configuration worksheet
This appendix includes the worksheets that you must use while configuring Site Aware Disaster
Tolerant Architecture in your environment.
Continentalclusters Site configuration
Table 3 Site configuration
ClusterClusterItem
Site Physical Location
Name of the location
Site Name
One word name for
the site that is used in
configurations
1)Node Names
Name of the nodes to
be used for
configurations
1st Heart Beat Subnet
IP
IP address of the node
on the 1st
Serviceguard Heart
Beat Subnet
2nd Heart Beat Subnet
IP
IP address of the node
on the 2nd
Serviceguard Heart
Beat Subnet
Replication configuration
Table 4 Replication configuration
DataItem
Replication RAID
Device Group Name
Name of the
Continuous Access
device group
(dev_group)
Sites
Site Aware Disaster Tolerant architecture configuration worksheet 77

Table 4 Replication configuration (continued)
DataItem
Name of the sites
Disk Array Serial #
Serial Number of Disk
Arrays at every site
Node Names
Name of Nodes at
every site
Command Device on
Nodes
Raw device file path
at every node
CLuster 2 LUNCluster 1 LUNDevice group device
name Specify luns in CU:LDEV formatSpecify luns in CU:LDEV format
Dev_name parameter
1)
2)
3)
4)
5)
6)
7)
8)
9)
10)
CRS Sub-cluster configuration – using CFS
Table 5 Configuring a CRS sub-cluster using CFS
ClusterClusterItem
CRS Sub Cluster Name
Name of the CRS cluster
CRS Home
Local FS Path for CRS HOME
CRS Shared Disk Group name
CVM disk group name for CRS
shared disk
CRS cluster file system mount
point
Mount point path where the
vote and OCR are created
CRS Vote Disk
78 Continentalclusters Worksheets

Table 5 Configuring a CRS sub-cluster using CFS (continued)
ClusterClusterItem
Path to the vote disk or file
CRS OCR Disk
Path to the OCR disk or file
CRS DG MNP package
Path to the OCR disk or file
CRS MP MNP package
Path to the OCR disk or file
CRS MNP package
Path to the OCR disk or file
CRS Member Nodes
Node Names
Private IP
IP addresses for RAC
Interconnect
Private IP names
IP address names for RAC
Interconnect
Virtual IP
IP addresses for RAC VIP
Virtual IP names
IP addresses names for RAC
VIP
RAC database configuration
Table 6 RAC database configuration
ValueProperty
Database Name
Name of the database
Database Instance Names
Instance names for the database
RAC data files file system mount
point
Mount Point for oracle RAC data
files
RAC data files CVM Disk group
name
CVM Disk Group name for oracle
RAC data files file system
RAC flash files file system mount
point.
Mount Point for oracle RAC flash
Site Aware Disaster Tolerant architecture configuration worksheet 79

Table 6 RAC database configuration (continued)
ValueProperty
RAC flash files CVM Disk group
name
CVM Disk Group name for oracle
RAC flash file system
ClusterClusterEntry
RAC Home
Local file system directory to install
Oracle RAC
RAC MNP
Package name for RAC database
RAC Data file DG MNP
CFS DG MNP package name for
RAC data files file system
RAC Data file MP MNP
CFS MP MNP package name for
RAC data files file system
RAC Flash Area DG MNP
CFS DG MNP package name for
RAC flash file system
RAC Flash Area MP MNP
CFS MP MNP package name for
RAC flash file system
Node Names
Database Instance Names
Site Controller package configuration
Table 7 Site Controller package configuration
PACKAGE_NAME
Name of the Site Controller
Package
/dts/mcsc/Site Safety Latch
Name of the EMS resource
name. The format is
/dts/mcsc/<site controller
package name>
managed_packagecritical_packageSite
values for the managed_package attribute in
this cluster
values for the critical_package attribute
in this cluster
value for the site attribute
1)1)
2)2)
3)3)
4)4)
80 Continentalclusters Worksheets

Table 7 Site Controller package configuration (continued)
1)1)
2)2)
3)3)
4)4)
Site Aware Disaster Tolerant architecture configuration worksheet 81

C Configuration file parameters for Continentalclusters
This appendix lists all Continentalclusters configuration file variables.
CLUSTER_ALARM [Minutes]
MINUTES [Seconds] SECONDS
This is a time interval, in minutes and/or seconds, after
which the notifications defined in the associated
NOTIFICATION parameters are sent and failover to the
Recovery Cluster using the cmrecovercl command is
enabled. This number must be a positive integer. Minimum
is 30 seconds, maximum is 3600 seconds or 60 minutes
(one hour).
CLUSTER_ALERT [Minutes]
MINUTES [Seconds] SECONDS
This is a time interval, in minutes and/or seconds, after
which the notifications defined in the associated
NOTIFICATION parameters are sent. Failover to the
Recovery Cluster using the cmrecovercl command is not
enabled at this time. This number must be a positive integer.
Minimum is 30 seconds, maximum is 3600 seconds or 60
minutes (one hour).
CLUSTER_DOMAIN domainname This is the domain of the nodes in the previously specified
cluster. This domain is appended to the NODE_NAME to
provide a full system address across the WAN.
CLUSTER_EVENT Clustername/Status
This is a cluster name associated with one of the following changes of status:
•up - the cluster is up and running.
•unreachable - the cluster is unreachable.
•down - the cluster is down, but nodes are responding.
•error - an error is detected.
The maximum length is 47 characters.
When the MONITORING_CLUSTER detects a change in status, one or more
notifications are sent, as defined by the NOTIFICATION parameter, at time
intervals defined by the CLUSTER_ALERT and CLUSTER_ALARM parameters.
CLUSTER_NAME clustername The name of a member cluster within the Continentalclusters.
It must be the same name that is defined in the Serviceguard
cluster configuration ASCII file. Maximum size is 31 bytes.
All the nodes in the cluster must be listed after this variable
using the NODE_NAME variable.
A MONITOR_PACKAGE_NAME and MONITOR_INTERVAL
must also be associated with every CLUSTER_NAME.
CONTINENTAL_CLUSTER_NAME name
The name of Continentalclusters managed by the
Continentalclusters product. Maximum size is 31 bytes. This
name cannot be changed after the configuration is applied.
You must first delete the existing configuration if you want
to choose a different name.
DATA_RECEIVER_PACKAGE clustername/packagename
This variable is only used if the data replication is carried out
by a separate software application that must be kept highly
available. If the replication software uses a receiver process,
you include this variable in the configuration file. Maximum size
is 80 characters.
82 Configuration file parameters for Continentalclusters
The parameter consists of a pair of names: the name of the cluster
that receives the data to be replicated (usually the Recovery
Cluster) as defined in the Serviceguard cluster configuration
ASCII file, followed by a slash (“/”), followed by the name of
the data replication receiver package as defined in the
Serviceguard package configuration ASCII file. Some replication
software might only have a receiver package as separate
package because the sender package is built into the application.
DATA_SENDER_PACKAGE clustername/packagename
This variable is only used if the data replication is carried out by a
separate software application that must be kept highly available.
If the replication software uses a sender process, you include this
variable in the configuration file. Maximum size is 80 characters.
The parameter consists of a pair of names: the name of the cluster
that sends the data to be replicated (usually the Primary Cluster) as
defined in the Serviceguard cluster configuration ASCII file, followed
by a slash (“/”), followed by the name of the data replication sender
package as defined in the Serviceguard package configuration
ASCII file. Some replication software might only have a receiver
package as separate package because the sender package is built
into the application.
MONITOR_INTERVAL n
The interval, in seconds, that the Continentalclusters monitor polls the
cluster, nodes, and packages to see if the status has changed. This
number must be an integer. The minimum value is 30 seconds, the default
is 60 seconds, and the maximum is 300 seconds (5 minutes).
MONITOR_PACKAGE_NAME
packagename
This is the name of the Serviceguard package containing
the Continentalclusters monitor. Maximum size is 31 bytes.
MONITORING_CLUSTER Name
This is name of the cluster that polls the cluster named in the
CLUSTER_EVENT and sends notification. Maximum length is 31 bytes.
NODE_NAME nodename This is the unqualified node name as defined in the DNS name server
configuration. Maximum size is 31 bytes.
NOTIFICATION Destination
“Message”
This is a destination and message associated with a specific
CLUSTER_ALERT or CLUSTER_ALARM. The maximum size
of the message string is 170 characters including the
quotation marks. The message string must be entered on a
separate single line in the configuration file.
The following destinations are acceptable:
•CONSOLE - write the specified message to the console.
•EMAIL Address - send the specified message to an
email address. You can use an email address provided
by a paging service to set up automatic paging. Consult
your pager service provider for details.
•OPC Level - send the specified message to OpenView
IT/Operations. The Level can be 8 (normal), 16
(warning), 64 (minor), 128 (major), or 32 (critical).
•SNMP Level - send the specified message as an
SNMP trap. The Level can be 1 (normal), 2 (warning),
3 (minor), 4 (major), or 5 (critical).
•SYSLOG - Append a notice of the specified message
to the /var/adm/syslog/syslog.log file. Note
83
that the text of the message is not placed in the syslog
file, only a notice from the monitor.
•TCP Nodename:Portnumber - send the specified
message to a TCP port on the specified node.
•TEXTLOG Pathname - append the specified message
to a specified text log file.
•UDP Nodename:Portnumber - send the specified
message to a UDP port on the specified node.
Any number of notifications can be associated with a given
alert or alarm.
PRIMARY_PACKAGE Clustername/Packagename
This is a pair of names: the name of a cluster as defined in the
Serviceguard cluster configuration ASCII file, followed by a slash (“/”),
followed by the name of the primary package as defined in the
Serviceguard package configuration ASCII file. Maximum size is 80
characters.
RECOVERY_GROUP_NAME name
This is a name for the set of related primary packages on one cluster
and the recovery packages on another cluster that protect the
primary packages. The maximum size is 31 bytes.
You create a recovery group for every package that must be started
on the recovery cluster in case of a failure in the primary cluster. A
PRIMARY_PACKAGE and RECOVERY_PACKAGE must be associated
with every RECOVERY_GROUP_NAME.
RECOVERY_PACKAGE Clustername/Packagename
This is a pair of names: the name of the recovery cluster as defined in
the Serviceguard cluster configuration ASCII file, followed by a slash
(“/”), followed by the name of the recovery package as defined in the
Serviceguard package configuration ASCII file. Maximum size is 80
characters.
CONTINENTAL_CLUSTER_STATE_DIR <directory location>
Absolute path to a file system where the Continentalclusters
state data stored. The state data file system must be created
on a shared disk in the cluster and specified as part of the
monitor package configuration. The path specified here
must be created in all the nodes in the Continentalclusters.
The monitor package control script must mount the file system
at this specified path on the node it is started. This parameter
is optional if the maintenance mode feature for recovery
groups is not required. This parameter is mandatory if
maintenance mode feature for recovery groups is required.
REHEARSAL_PACKAGE ClusterName/PackageName
This is a pair of names: the name of a cluster as defined in the
Serviceguard cluster configuration ASCII file, followed by a slash ("/"),
followed by the name of the rehearsal package as defined in the
Serviceguard package configuration ASCII file. This variable is only
used for rehearsal operations. This package is started on the recovery
cluster by the cmrecovercl-r command.
84 Configuration file parameters for Continentalclusters

D Continentalclusters Command and Daemon Reference
This appendix lists all commands and daemons used with Continentalclusters. Manual pages are
also available.
cmapplyconcl [-v] [-C]
filename
This command verifies the Continentalclusters configuration
as specified in filename, creates or updates the binary,
and distributes it to all the nodes in the Continentalclusters.
It is not necessary to halt the Serviceguard cluster in order
to run this command; however, the Continentalclusters
monitor package must be halted. If cmapplyconcl is
specified when the continentalclusters has already been
configured, the configuration updated with the configuration
changes. Before updating Continentalclusters, all impacted
recovery groups must be moved out of maintenance mode
(i.e. enabled). The cmapplyconcl command must be run
when a configuration change is made to the Serviceguard
cluster that impacts the Continentalclusters configuration.
For Example, if a node is added to the Serviceguard cluster,
the Continentalclusters ASCII file must be edited to include
the new NODE_NAME. All the nodes within the Serviceguard
cluster must be running prior to the cmapplyconcl
command being run.
Options are:
-v Verbose mode displays all messages.
-C filename The name of the ASCII configuration file.
This is a required parameter.
cmcheckconcl [-v] -C
filename
This command verifies the Continentalclusters configuration
specified in filename. It is not necessary to halt the
Serviceguard cluster in order to run this command; however,
the Continentalclusters monitor package must be halted.
This command will parse the ASCII_file to ensure proper
syntax, verify parameter lengths, and validate object names
such as the CLUSTER_NAME and NODE_NAME.
Options are:
-C filename The name of the ASCII configuration file.
This is a required parameter.
cmclapplyd A special daemon in Continentalclusters version A.08.00,
used by the cmapplyconcl command, to apply the
Continentalclusters configuration package. This daemon
must be configured to run as root on all the nodes in
Continentalclusters.
cmclrmond This is the Continentalclusters monitor daemon that provides
notification of remote cluster status through the Event
Monitoring Service (EMS). This monitor runs on both the
primary and recovery clusters. The cmclsentryd daemon
notifies cmclrmond of any change in cluster status. Log
messages are written to the EMS log file /etc/resmon/
log/api.log on the node where the monitor was running
when it detected a status event.
cmclsentryd This daemon, which is run from the monitor package
(ccmonpkg) starts up the Continentalclusters monitor
cmclrmond. Messages are logged to log file/var/adm/
cmconcl/logs/cmclsentryd.log.
85
cmdeleteconcl [-f] This command is used to delete the Continentalclusters
configuration from the entire Continentalclusters. This
command will not remove the file system configured for
recovery group maintenance mode feature.
Options are:
-f Delete the configuration files on all reachable nodes
without further prompting. If this option is not used and
if some nodes are unreachable, you prompted to
indicate whether to proceed with deleting the
configuration on the reachable nodes. If this option is
used and some node has configuration files for
Continentalclusters with a different name, you
prompted to indicate whether to proceed with deleting
the configuration on that node.
cmforceconcl
ServiceguardPackageEnableCommand
This command is used to force a Continentalclusters package
to start. It allows a package to run even if the status of a
remote package in the recovery group is unknown, which
indicates that the software will not determine the status of
the remote package.
ServiceguardPackageEnableCommand is either a
cmrunpkg or cmmodpkg command.
cmomd This daemon is the Object Manager, which communicates
with Serviceguard to provide information about cluster
objects to the Continentalclusters monitor. Messages are
logged to log file/var/opt/cmom/cmomd.log, which
can be read using the cmreadlog command.
This daemon is not required starting from Continentalclusters
version A.08.00.
cmqueryconcl filename This command cmqueryconcl creates a template ASCII
Continentalclusters configuration file. The ASCII file must be
customized for a specific Continentalclusters environment.
After customization, this file must be verified by the
cmcheckconcl command and distributed by using the
cmapplyconcl command. If an ASCII file is not provided,
output directed to stdout. This command must be run as
the first step in preparing for Continentalclusters
configuration.
Options are:
-v Verbose mode displays all messages.
-C filename Declares an alternate location for the
configuration file. The default is/etc/
cmcluster/cmoncl.config.
cmrecovercl [-f] This command performs the recovery actions necessary to
start the recovery groups on current cluster. Care must be
taken before issuing this command. It is important to contact
the primary cluster site to determine if recovery is necessary
prior to running this command.
This command will perform recovery actions only for
recovery groups that are out of the maintenance mode (i.e.
enabled). If the specified recovery group for -g option is in
maintenance mode; the command will exit without
recovering it. When -c option is used; the command will
skip recovering recovery groups which are in the
maintenance mode.
86 Continentalclusters Command and Daemon Reference
This command can be issued from any node on the recovery
cluster. This command first connects to the Continentalclusters
monitoring package running on the recovery cluster. This
might be a different cluster node than where the
cmrecovercl command is being run. cmrecovercl
connects to the monitoring package to verify that the primary
cluster is in an Unreachable or Down state. If the primary
cluster is reachable and the cluster is Up, this command will
fail. Next, the data receiver packages on the recovery cluster
(if any) are halted sequentially. Finally, the recovery
packages are started on the recovery cluster. The recovery
packages are started by enabling package switching
globally (cmmodpkg -e) for every package. This will cause
the package to be started on the first available node within
the recovery cluster. The cmrecovercl command can only
be run on a recovery cluster. The cmrecovercl command
will fail if there has not been sufficient time since the primary
cluster became unreachable. This command is only enabled
after the time as configured via CLUSTER_ALARM
parameters has been reached. Once a cluster alarm has
been triggered, this command enabled and can be run. The
-f option can be used to enable the command after the time
as configured via CLUSTER_ALERT parameters has been
reached.
Options are:
-f The force option enables cmrecovercl to function
even though a CLUSTER_ALARM has not been
received.
cmrecovercl {-e | -d [f]
}-g <recovery group name>
This command moves a recovery group in and out of the
maintenance mode by disabling or enabling it. This
command must be run only on the recovery cluster.
Options are:
-e Moves a recovery group out of the
maintenance mode by enabling it.
-d [-f] Moves a recovery group into the maintenance
mode by disabling it. Use the -f option to
forcefully move a recovery group into the
maintenance mode when the primary cluster
status is unknown or unreachable.
cmrecovercl [-r]-g
<recovery group name>
This command starts the rehearsal for the specified recovery
group. This command must be run only on the recovery
cluster. This command will fail if the specified recovery group
is not in the maintenance mode.
cmviewconcl [-v] This command allows you to view the status and much of
the configuration of Continentalclusters. This command must
be run as the last step when creating a Continentalclusters
configuration to confirm the cluster status, or any time you
like to know cluster status.
Options are:
-v Verbose mode displays all messages.
87

E Package attributes
Package Attributes for Continentalcluster with Continuous Access for P9000
and XP
This appendix lists all Package Attributes for Metrocluster with Continuous Access for P9000 and
XP. HP recommends that you use the default settings for most of these variables, so exercise caution
when modifying them:
AUTO_FENCEDATA_SPLIT (Default = 1)
This parameter applies only when the fence level is set to
DATA, which will cause the application to fail if the
Continuous Access link fails or if the remote site fails.
Values:
0 – Do NOT startup the package at the primary site. Require
user intervention to either fix the hardware problem or to
force the package to start on this node by creating the
FORCEFLAG file. Use this value to ensure that the SVOL
data is always current with the trade-off of long application
downtime while the Continuous Access link and/or the
remote site are being repaired.
1 – (DEFAULT) Startup the package at the primary site.
Request the local disk array to automatically split itself from
the remote array. This will ensure that the application able
to startup at the primary site without having to fix the
hardware problems immediately. Note that the new data
written on the PVOL will not be remotely protected and the
data on SVOL non-current. When the Continuous Access
link and/or the remote site is repaired, you must manually
use the command “pairresync” to re-join the PVOL and
SVOL. Until that command successfully completes, the PVOL
will NOT be remotely protected and the SVOL data will not
be current. Use this value to minimize the down time of the
application with the trade-off of having to manually
resynchronize the pairs while the application is running at
the primary site.
If the package has been configured for a three data center
environment, this parameter is applicable only when the
package is attempting to start up in either the primary (DC1)
or secondary (DC2) data center. This parameter is not
relevant in the recovery cluster or the third data center. Use
this parameter’s default value in the third data center.
AUTO_NONCURDATA (Default = 0)
This parameter applies when the package is starting up with
possible non-current data under certain Continuous Access
pair states. During failover, this parameter will apply when
the SVOL is in the PAIR or PFUL state and the PVOL side is
in the PSUE, EX_ENORMT, EX_CMDIOE or PAIR (for
Continuous Access Journal) state. During failback, this
parameter will apply when the PVOL is in the PSUS state
and the SVOL is in the EX_ENORMT or EX_CMDIOE state.
When starting the package in any of the above states, you
run the risk of losing data.
Values:
88 Package attributes

0 – (DEFAULT) Do NOT startup the application on
non-current data. If Metrocluster/Continuous Access cannot
determine the data is current, it will not allow the package
to start up. (Note: for fence level DATA and NEVER, the
data is current when both PVOL and SVOL are in PAIR state.)
1 – Startup the application even when the data cannot be
current.
NOTE: When a device group state is SVOL_PAIR on the
local site and EX_ENORMT (Raid Manager or node failure)
or EX_CMDIOE (disk I/O failure) on the remote site (this
means it is impossible for Metrocluster/Continuous Access
to determine if the data on the SVOL site is current),
Metrocluster/Continuous Access conservatively assumes that
the data on the SVOL site can be non-current and uses the
value of AUTO_NONCURDATA to determine whether the
package is allowed to automatically start up. If the value is
1, Metrocluster/Continuous Access allows the package to
startup; otherwise, the package will not be started.
NOTE: In a three data center environment, if the package
is trying to start up in data center three (DC3), within the
recovery cluster, only AUTO_NONCURDATA can be
checked. All other AUTO parameters are not relevant when
a package tries to start up on DC3.
Use the two scenarios below to help you determine the
correct environment settings for AUTO_NONCURDATA and
AUTO_FENCEDATA_SPLIT for your Metrocluster/Continuous
Access packages.
Scenario 1: With the package device group fence level
DATA, if setting AUTO_FENCEDATA_SPLIT=0, it is
guaranteed that the remote data site will never contain
non-current data (this assumes that the FORCEFLAG has not
been used to allow the package to start up if the Continuous
Access links or SVOL site are down). In this environment,
you can set AUTO_NONCURDATA=1 to make the package
automatically startup on the SVOL site when the PVOL site
fails, and it is guaranteed the package data is current. (If
setting AUTO_NONCURDATA=0, the package will not
automatically startup on the SVOL site.)
Scenario 2: When the package device group fence level is
set to NEVER or ASYNC, you are not guaranteed that the
remote (SVOL) data site still contains current data (The
application can continue to write data to the device group
on the PVOL site if the Continuous Access links or SVOL site
are down, and it is impossible for Metrocluster/Continuous
Access to determine whether the data on the SVOL site is
current.) In this environment, it is required to set
AUTO_NONCURDATA=0 if the intention is to ensure the
package application is running on current data. (If setting
AUTO_NONCURDATA=1, the package started up on SVOL
site whether the data is current or not.)
AUTO_PSUEPSUS (Default = 0)
In asynchronous mode, when the primary site fails, either
due to Continuous Access link failure, or some other
hardware failure, and we fail over to the secondary site,
the PVOL will become PSUE and the SVOL will become
Package Attributes for Continentalcluster with Continuous Access for P9000 and XP 89

PSUS(SSWS). During this transition, horctakeover will
attempt to flush any data in the side file on the MCU to the
RCU. Data that does not make it to the RCU stored on the
bit map of the MCU. When failing back to the primary site
any data that was in the MCU side file that is now stored
on the bit map lost during resynchronization.
In synchronous mode with fence level NEVER, when the
Continuous Access link fails, the application continues
running and writing data to the PVOL. At this point the SVOL
contains non-current data. If there is another failure that
causes the package to fail over and start on the secondary
site, the PVOL will become PSUE and the SVOL will become
PSUS(SSWS). When failing back to the primary site, any
differential data that was on the PVOL prior to failover lost
during resynchronization.
NOTE: This variable is also used for the combination of
PVOL_PFUS and SVOL_PSUS. When either the side file or
journal volumes have reached threshold timeout, the PVOL
will become PFUS. If there is a Continuous Access link, or
some other hardware failure, and we fail over the secondary
site, the SVOL will become PSUS(SSWS) but the PVOL will
remain PFUS. Once the hardware failure has been fixed,
any data that is on the MCU bit map lost during
resynchronization. This variable will allow package startup
if changed from default value of 0 to 1.
If the package has been configured for a three data center
(3DC) environment, this parameter is applicable only when
the package is attempting to start up in either the primary
(DC1) or secondary (DC2) data center. This parameter is
not relevant in (the third data center) in the recovery cluster.
Use this parameter’s default value in the third data center.
Values:
0 – (DEFAULT) Do NOT failback to the PVOL side after an
outage to the PVOL side has been fixed. This will protect
any data that might have been in the MCU side file or
differential data in the PVOL when the outage occurred.
1–Allow the package to startup on the PVOL side. We failed
over to the secondary (SVOL) side due to an error state on
the primary (PVOL) side. Now we're ready to failback to
the primary side. The delta data between the MCU and
RCU resynchronized. This resynchronization will over write
any data that was in the MCU prior to the primary (PVOL)
side failure.
AUTO_PSUSSSWS (Default = 0)
This parameter applies when the PVOL is in the suspended
state PSUS, and SVOL is in the failover state PSUS(SSWS).
When the PVOL and SVOL are in these states, it is hard to
tell which side has the good latest data. When starting the
package in this state on the PVOL side, you run the risk of
losing any changed data in the PVOL.
Values:
0 – (Default) Do NOT startup the package at the primary
site. Require user intervention to choose which side has the
good data and resynchronizing the PVOL and SVOL or force
the package to start by creating the FORCEFLAG file.
90 Package attributes
1—Startup the package after resynchronize the data from
the SVOL side to the PVOL side. The risk of using this option
is that the SVOL data might not be a preferable one.
If the package has been configured for a three data center
(3DC) environment, this parameter is applicable only when
the package is attempting to start up in either the primary
(DC1) or secondary (DC2) data center. This parameter is
not relevant in (the third data center) in the recovery cluster.
Use this parameter’s default value in the third data center.
AUTO_SVOLPFUS (Default = 0)
This parameter applies when the PVOL and SVOL both have
the state of suspended (PFUS) due to the side file reaching
threshold while in Asynchronous mode only. When the PVOL
and SVOL are in this state, the Continuous Access link is
suspended, the data on the PVOL is not remotely protected,
and the data on the SVOL will not be current. When starting
the package in this state, you run the risk of losing any data
that has been written to the PVOL side.
Values:
0 – (Default) Do NOT startup the package at the secondary
site and allowing restart on another node. Require user
intervention to either fix the problem by resynchronizing the
PVOL and SVOL or force the package to start on this node
by creating the FORCEFLAG.
1 – Startup the package after making the SVOL writable.
The risk of using this option is that the SVOL data might
actually be non-current and the data written to the PVOL
side after the hardware failure might be loss.
This parameter is not required to be set if a package is
configured for three data centers environment because three
data center does not support Asynchronous mode of data
replication. Leave this parameter with its default value in all
data centers.
AUTO_SVOLPSUE (Default = 0)
This parameter applies when the PVOL and SVOL both have
the state of PSUE. This state combination will occur when
there is an Continuous Access link, or other hardware failure,
or when the SVOL side is in a PSUE state while we can not
communicate with the PVOL side. This will only apply while
in the Asynchronous mode.
The SVOL side will become PSUE after the Continuous
Access link timeout value has been exceeded at which time
the PVOL side will try and flush any outstanding data to the
SVOL side. If this flush is unsuccessful, then the data on the
SVOL side will not be current.
Values:
0 – (Default) Do NOT startup the package at the secondary
site and allow package to try another node. Require user
intervention to either fix the problem by resynchronizing the
PVOL and SVOL or force the package to start on this node
by creating the FORCEFLAG file.
1 – Startup the package on the SVOL side. The risk of using
this option is that the SVOL data might actually be
Package Attributes for Continentalcluster with Continuous Access for P9000 and XP 91
non-current and the data written to the PVOL side after the
hardware failure might be loss.
This parameter is not required to be set if a package is
configured for three data centers environment because three
data center does not support Asynchronous mode of data
replication. Leave this parameter with its default value in all
data centers.
AUTO_SVOLPSUS (Default = 0)
This parameter applies when the PVOL and SVOL both have
the state of suspended (PSUS). The problem with this situation
cannot determine the earlier state: COPY or PAIR. If the
earlier state was PAIR, it is completely safe to startup the
package at the remote site. If the earlier state was COPY,
the data at the SVOL site is likely to be inconsistent
Values:
0—(Default) Do NOT startup the package at the secondary
site. Require user intervention to either fix the problem by
resynchronizing the PVOL and SVOL or force the package
to start on this node by creating the FORCEFLAG file.
1 – Startup the package after making the SVOL writable.
The risk of using this option is the SVOL data might be
inconsistent and the application might fail. However, there
is also a chance that the data is actually consistent, and it
is okay to startup the application.
If the package has been configured for a three data center
environment, this parameter is applicable only when the
package is attempting to start up in either the primary (DC1)
or secondary (DC2) data center. This parameter is not
relevant in (the third data center) in the recovery cluster. Use
this parameter’s default value in the third data center.
CLUSTER_TYPE This parameter defines the clustering environment in which
the script is used. Must be set to “metro” if this is a
Metrocluster environment and “continental” if this is a
Continentalclusters environment. A type of “metro” is
supported only when the HP Metrocluster product is installed.
A type of “continental” is supported only when the HP
Continentalclusters product is installed.
If the package is configured for three data centers (3DC),
the value of this parameter must be set to “metro” for DC1
and DC2 nodes and “continental” for DC3 nodes.
DEVICE_GROUP The Raid Manager device group for this package. This
device group is defined in the /etc/horcm<#>.conf file.
This parameter is not required to be set for a package
configured for three data centers environment. Device groups
for three data center's packages have new parameters.
FENCE Fence level. Possible values are NEVER,DATA, and ASYNC.
Use ASYNC for improved performance over long distances.
If a Raid Manager device group contains multiple items
where either the PVOL or SVOL devices reside on more than
a single P9000 and XP Series array, then the Fence level
must be set to “data” in order to prevent the possibility of
inconsistent data on the remote side if an Continuous Access
link or an array goes down. The side effect of the “data”
92 Package attributes

fence level is that if the package is running and a link goes
down, an array goes down, or the remote data center goes
down, then write(1) calls in the package application will
fail, causing the package to fail.
NOTE: The Continuous Access Journal is used for
asynchronous data replication. Fence level ascyn is used
for a journal group pair.
If the package is configured for three data centers (3DC),
this parameter holds the fence level of device group between
DC1 and DC2. As the device group between DC1 and DC2
is always synchronous, the fence level either “data” or
“never”. The fence level of device group between DC2 and
DC3 or DC1 and DC3 is always assumed to be “async”
and user need not mention it.
HORCMINST This is the instance of the Raid Manager that the control
script will communicate with. This instance of Raid Manager
must be started on all the nodes before this package can
be successfully started. (Note: If this variable is not exported,
Raid Manager commands used in this script might fail).
HORCMPERM This variable supports the security feature, RAID Manager
Protection Facility on the Continuous Access devices. (Note:
If the RAID Manager Protection Facility is disabled, set this
variable to MGRNOINST. This is the default value).
HORCTIMEOUT (Default = 360)
This variable is used only in asynchronous mode when the
horctakeover command is issued; it is ignored in
synchronous mode. The value is used as the timeout value
in the horctakeover command, -t <timeout>. The
value is the time to wait while horctakeover re-synchronizes
the delta data from the PVOL to the SVOL. It is used for
swap-takeover and SVOL takeover. If the timeout value is
reached and a timeout occurs, horctakeover returns the
value EX_EWSTOT. The unit is seconds.
In asynchronous mode, when there is an Continuous Access
link failure, both the PVOL and SVOL sides change to a
PSUE state. However, this change will not take place until
the Continuous Access link timeout value, configured in the
Service Processor (SVP), has been reached. If the
horctakeover command is issued during this timeout
period, the horctakeover command will fail if its timeout
value is less than that of the Continuous Access link timeout.
Therefore, it is important to set the HORCTIMEOUT variable
to a value greater than the Continuous Access link timeout
value. The default Continuous Access link timeout value is
5 minutes (300 seconds). A suggested value for
HORCTIMEOUT is 360 seconds.
During package startup, the default startup timeout value of
the package is set to NO_TIMEOUT in the package ASCII
file. However, if there is a need to set a startup timeout
value, then the package startup timeout value must be
greater than the HORCTIMEOUT value, which is greater than
the Continuous Access link timeout value:
Pkg Startup Timeout > HORCTIMEOUT >
Continuous Access link timeout value
Package Attributes for Continentalcluster with Continuous Access for P9000 and XP 93

For Continuous Access Journal mode package, journal
volumes in PVOL might contain a significant amount of
journal data to be transferred to SVOL. Also, the package
startup time might increase significantly when the package
fails over and waits for all of the journal data to be flushed.
The HORCTIMEOUT must be set long enough to
accommodate the outstanding data transfer from PVOL to
SVOL.
MULTIPLE_PVOL_OR_SVOL_FRAME_FOR_PKG (Default = 0)
This parameter must be set to 1 if a PVOL or an SVOL for
this package resides on more than P9000 and XP frames.
Currently, only a value of 0 is supported for this parameter.
NOTE: Future releases might allow a value of 1.
Values:
0—(Default) Single frame.
1—Multiple frames. If this parameter is set to 1, then the
device group must be created with the “data” fence level,
and the FENCE parameter must be set to “data” in this
script.
DTS PKG DIR If the package is a legacy package, then this variable
contains the full path name of the package directory. If the
package is a modular package, then this variable contains
the full path name of the directory where the Metrocluster
xpca environment file is located.
WAITTIME Seconds to wait for every “pairevtwait” interval. (Note: do
not set this to less then 300 seconds because the disks have
some long final processing when the copy state reaches
100%).
The following list the monitor specific variables that have been modified or added for Metrocluster
with Continuous Access for P9000 and XP. If a monitor variable is not defined (commented out),
the default value is used:
MON_POLL_INTERVAL (Default = 10 minutes)
This parameter defines the polling interval for the monitor
service (if configured). If the parameter is not defined
(commented out), the default value is 10 minutes. Otherwise,
the value set to the desired polling interval in minutes.
MON_NOTIFICATION_FREQUENCY (Default = 0)
This parameter controls the frequency of notification
messages sent when the state of the device group remains
the same. If the value is set to 0, then the monitor will only
send notifications when the device group state changes. If
the value is set to n where n is greater than 0, the monitor
will send a notification every nth polling interval or when
the device group state has changed. If the parameter is not
defined (commented out), the default value is 0.
MON_NOTIFICATION_EMAIL (Default = empty string)
This parameter defines the email addresses that the monitor
will use to send email notifications. The variable must use
fully qualified email addresses. If multiple email addresses
are defined, the comma must be used as a separator. If the
parameter is not defined (commented out) or the default
94 Package attributes
value is an empty string, this will indicate to the monitor that
no email notifications sent.
MON_NOTIFICATION_SYSLOG (Default = 0)
This parameter defines whether the monitor will send
notifications to the syslog file. When the parameter is set to
0, the monitor will NOT send notifications to the syslog file.
When the parameter is set to 1, the monitor will send
notifications to the syslog file. If the parameter is not defined
(commented out), the default value is 0.
MON_NOTIFICATION_CONSOLE (Default = 0)
This parameter defines whether the monitor will send console
notifications. When the parameter is set to 0, the monitor
will NOT send console notifications. When the parameter
is set to 1, the monitor will send console notifications. If the
parameter is not defined (commented out), the default value
is 0.
AUTO_RESYNC This parameter defines the pre-defined resynchronization
actions that the monitor can perform when the package is
on the PVOL side and the monitor detects the Continuous
Access data replication link is down. If the variable is not
defined or commented, the default value of 0 is used.
Values:
0 — (Default) When the parameter is set to 0, the monitor
will not perform any resynchronization actions.
1 — When the parameter is set to 1 and the data replication
link is down, the monitor will split the remote BC (if
configured) and try to resynchronize the device. Until the
resynchronization starts, the monitor will try to resynchronize
every polling interval. Once the device group has been
completely resynchronized, the monitor will resynchronize
the remote BC.
2 – When the parameter is set to 2 and the data replication
link is down, the monitor will only try to perform
resynchronization if a file named MON_RESYNC exists in the
package directory (PKGDIR). The monitor will not perform
any operations to the remote BC (that is, split and
resynchronize the remote BC). Therefore, this setting is used
when you want to manage the remote BC
Package Attributes for Continentalcluster with Continuous Access EVA
This appendix lists all Package Attributes for Metrocluster with Continuous Access EVA. HP
recommends that you use the default settings for most of these variables, so exercise caution when
modifying them:
CLUSTER_TYPE This parameter defines the clustering environment in which
the script is used. You must set this to “metro” if this is a
Metrocluster environment and “continental” if this is a
Continentalclusters environment. A type of “metro” is
supported only when the HP Metrocluster product is installed.
A type of “continental” is supported only when the HP
Continentalclusters product is installed.
DTS PKG DIR If the package is a legacy package, this variable contains
the full path name of the package directory. If the package
is a modular package, this variable contains the full path
Package Attributes for Continentalcluster with Continuous Access EVA 95
name of the directory where the Metrocluster caeva
environment file is located.
DT_APPLICATION_STARTUP_POLICY This parameter defines the preferred policy to start the
application with respect to the state of the data in the local
volumes. It must be set to one of the following two policies:
Availability_Preferred: The user chooses this policy
if he prefers application availability. Metrocluster software
allows the application to start if the data is consistent even
if the data is not current.
Data_Currency_Preferred: The user chooses this policy
if he prefers the application to start on consistent and current
data. Metrocluster software allows the application to operate
only on current data. This policy only focuses on the state
of the local data (with respect to the application) being
consistent and current.
A package can be forced to start on a node by creating the
FORCEFLAG in the package directory.
WAIT_TIME (0 or greater than 0 [in minutes])
This parameter defines the timeout, in minutes, to wait for
completion of the data merging or copying for the DR group
before startup of the package on destination volume.
If WAIT_TIME is greater than zero, and if the state of DR
group is “merging in progress” or “copying in progress”,
Metrocluster software waits until WAIT_TIME value for the
merging or copying is complete. If WAIT_TIME expires and
merging or copying is still in progress, the package fails to
start with an error.
If WAIT_TIME is 0 (default value), and if the state of DR
group is “merging in progress” or “copying in progress”
state, Metrocluster software will not wait and will return an
exit 1 code to Serviceguard package manager. The package
fails to start with an error.
DR_GROUP_NAME The name of the DR group used by this package. The DR
group name is defined when the DR group is created.
DC1_STORAGE_WORLD_WIDE_NAME The world wide name of the EVA storage system that resides
in Data Center 1. This storage system name is defined when
the storage is initialized.
DC1_SMIS_LIST A list of the management servers that reside in Data Center
1. Multiple names can be defined by using commas as
separators.
If a connection to the first management server fails, attempts
are made to connect to the subsequent management servers
in their order of specification.
DC1_HOST_LIST A list of the clustered nodes that reside in Data Center 1.
Multiple names can be defined by using commas as
separators.
DC2_STORAGE_WORLD_WIDE_NAME The world wide name of the EVA storage system that resides
in Data Center 2. This storage system name is defined when
the storage is initialized.
DC2_SMIS_LIST A list of the management servers that reside in Data Center
2. Multiple names can be defined by using commas as
separators.
96 Package attributes
If a connection to the first management server fails, attempts
are made to connect to the subsequent management servers
in their order of specification..
DC2_HOST_LIST A list of the clustered nodes that reside in Data Center 2.
Multiple names can be defined by using commas as
separators.
QUERY_TIME_OUT(Default 120
seconds)
Sets the time in seconds to wait for a response from the
SMI-S CIMOM in storage management appliance. The
minimum recommended value is 20 seconds. If the value is
set to be smaller than 20 seconds, Metrocluster software
might time out before getting the response from SMI-S, and
the package fails to start with an error.
Package Attributes for Continentalcluster with EMC SRDF
This appendix lists all Serviceguard package attributes that have been modified or added for
Metrocluster with EMC SRDF. HP recommends that you use the default settings for most of these
variables, so exercise caution when modifying them:
AUTOR1RWSUSP Default: 0
This variable is used to indicate whether a package must be
automatically started when it fails over from an R1 host to another R1
host and the device group is in suspended state. If it sets to 0, the
package will halt unless ${PKGDIR}/FORCEFLAG file has been
created. The package halts because it is not known what has caused
this condition. This caused by an operational error or a Symmetrix
internal event, such as primary memory full. If in this situation you want
to automatically start the package, AUTOR1RWSUSP must be set to
1.
AUTOR1RWNL Default: 0
This variable indicates that when the package is being started on an
R1 host, the Symmetrix is in a Read/Write state, and the SRDF links
are down, the package automatically started. Although the script
cannot verify the state of the Symmetrix on the R2 side to validate
conditions, the Symmetrix on the R1 side is in a ‘normal’ state. To
require operator intervention before starting the package under these
conditions, set AUTOR1RWNL=1 and create the file
/etc/cmcluster/package_name/FORCEFLAG.
AUTOR1UIP Default: 1
This variable indicates that when the package is being started on an
R1 host and the Symmetrix is being synchronized from the Symmetrix
on the R2 side, the package will halt unless the operator creates the
$PKGDIR/FORCEFLAG file. The package halts because performance
degradation of the application will occur while the resynchronization
is in progress. More importantly, it is better to wait for the
resynchronization to finish to guarantee that the data are consistent
even in the case of a rolling disaster where a second failure occurs
before the first failure is recovered from. To always automatically start
the package even when resynchronization is in progress, set
AUTOR1UIP=0. Doing so will result in inconsistent data in case of a
rolling disaster.
AUTOR2WDNL Default: 1
AUTOR2WDNL=1 indicates that when the package is being started
on an R2 host, the Symmetrix is in a Write-disabled state, and the
SRDF links are down, the package will not be started. Since we cannot
verify the state of the Symmetrix on the R1 side to validate conditions,
Package Attributes for Continentalcluster with EMC SRDF 97
the data on the R2 side might be non-current and thus a risk that data
loss will occur when starting the package up on the R2 side. To have
automatic package startup under these conditions, set
AUTOR2WDNL=0
AUTOR2RWNL Default: 1
AUTOR2RWNL=1 indicates that when the package is being started
on an R2 host, the Symmetrix is in a read/write state, and the SRDF
links are down, the package will not be started. Since we cannot verify
the state of the Symmetrix on the R1 side to validate conditions, the
data on the R2 side might be non-current and thus a risk that data loss
will occur when starting the package up on the R2 side. To have
automatic package startup under these conditions, set
AUTOR2RWNL=0
AUTOR2XXNL Default: 0
A value of 0 for this variable indicates that when the package is being
started on an R2 host and at least one (but not all) SRDF links are
down, the package automatically started. This will normally be the
case when the ‘Partitioned+Suspended’ RDF Pairstate exists. We cannot
verify the state of all Symmetrix volumes on the R1 side to validate
conditions, but the Symmetrix on the R2 side must be in a ‘normal’
state. To require operator intervention before starting the package
under these conditions, set AUTOR2XXNL=1.
AUTOSWAPR2 Default: 0
A value of 0 for this variable indicates that when the package is failing
over to Data Center 2, it will not perform R1/R2 swap. To perform an
R1/R2 swap, set AUTOSWAPR2=1/AUTOSWAPR2=2. This allows an
automatic R1/R2 swap to occur only when the SRDF link and the two
Symmetrix are properly functioning. When AUTOSWAPR2 is set to 1,
the package will attempt to failover the device group to Data Center
2, followed by R1/R2 swap. If either of these operations fails, the
package will fail to start on Data Center 2. When AUTOSWAPR2is set
to 2, the package will continue to start up even if R1/R2 swap fails,
provided the failover succeeds. In this scenario, the data will not be
protected remotely. AUTOSWAPR2 cannot be set to 1 or 2 if
CONSISTENCYGROUPS is set to 1.
Verify you have the minimum requirements for R1/R2 Swapping by
referring to most up-to-date version of the Metrocluster release notes.
AUTOSPLITR1 Default: 0
This variable is used to indicate whether a package is allowed to start
when it fails over from an R1 host to another R1 host when the device
group is in the split state. A value of 0 for this variable indicates that
the package startup attempt will fail. To allow startup of the package
in this situation, the variable must be set to a value of 1.
CLUSTER_TYPE This parameter defines the clustering environment in which the script
is used. This is, set to “metro” if this is a Metrocluster environment and
“continental” if this is a Continentalclusters environment. A type of
“continental” is supported only when the HP Continentalclusters product
is installed.
CONSISTENCYGROUPS Default: 0
This parameter tells Metrocluster whether or not consistency groups
were used in configuring the R1 and R2 volumes on the Symmetrix
frames. A value of 0 is the normal setting if you are not using
consistency groups. A value of 1 indicates that you are using
98 Package attributes
consistency groups. (Consistency groups are required for M by N
configurations.)
If CONSISTENCYGROUPS is set to 1, AUTOSWAPR2 cannot be set to
1. Ensure that you have the minimum requirements for Consistency
Groups by referring to Metrocluster release notes.
DEVICE_GROUP This variable contains the name of the Symmetrix device group for the
package on that node, which contains the name of the consistency
group in an M by N configuration.
DTS_PKG_DIR If the package is a legacy package, then this variable contains the full
path name of the package directory. If the package is a modular
package, then this variable contains the full path name of the directory
where the Metrocluster SRDF environment file is located.
RDF_MODE Default:
This parameter defines the data replication modes for the device group.
The supported mode are “sync” for synchronous and “async” for
Asynchronous. If RDF_MODE is not defined, synchronous mode is
assumed.
RETRY Default: 60.
This is the number of times a SymCLI command is repeated before
returning an error. Use the default value for the first package, and
slightly larger numbers for additional packages making sure that the
total of RETRY*RETRYTIME is approximately 5 minutes.
Larger values for RETRY might cause the start-up time for the package
to increase when there are multiple packages starting concurrently in
the cluster that access the Symmetrix arrays.
RETRYTIME Default: 5.
This is the is the number of seconds between retries. The default value
of 5 seconds must be used for the first package. The values must be
slightly different for other packages. RETRYTIME must increase by two
seconds for every package. The product of RETRY * RETRYTIME must
be approximately five minutes. These variables are used to decide
how often and how many times to retry the Symmetrix status and state
change commands. Larger values for RETRYTIME might cause the
start-up time for the package to increase when there are multiple
packages starting concurrently in the cluster that access the Symmetrix
arrays.
SYNCTIMEOUT Default: 0.
This variable denotes the number of seconds to wait for resync to
complete after failback of the Symmetrix device group. If you set the
value to 0, then the package will start after failback without waiting
for resynchronization to complete. If you set the value to 1, then the
package waits till resynchronization is complete before starting up. If
SYNCTIMEOUT is set to any value from 5 to 36000, then the package
will wait the specified time for resynchronization to complete after
failback. If resynchronization does not complete even after the specified
time, then the package will fail to start up; if resynchronization
completes before that, then package will start up immediately after
resynchronization is complete.
Package Attributes for Continentalcluster with EMC SRDF 99

F Legacy packages
Migrating complex workloads using Legacy SG SMS CVM/CFS Packages
to Modular SG SMS CVM/CFS Packages with minimal downtime
The procedure to migrate all the legacy SG SMS CVM/CFS packages managed by a Site Controller
package to modular SG SMS CVM/CFS packages as follows:
1. Complete the following steps on the recovery cluster where the complex workload packages
are not running:
a. Take a backup of the application package configurations and delete the application
packages managed by the Site Controller on the recovery cluster. After completing this
step, dependents must not exist on the legacy CFS mount point MNP packages. In case
CFS mount point MNP packages have not been configured, this step will ensure that there
are no dependents on the legacy CVM diskgroup MNP packages:
# cmgetconf -p <application_pkg_name>
<backedup_application_config>
# cmdeleteconf -p <application_pkg_name>
b. Use the cfsmntadm command to delete all the legacy disk group and mount point MNP
packages managed by the Site Controller from a node in the recovery cluster. Use the
cfsdgadm command if there are no CFS mounts configured.
# cfsmntadm delete <mount point>
or
# cfsdgadm delete <cvm_diskgroup_name>
c. Configure all the CVM diskgroups and the mount points required by an application in a
single modular SMS CFS /CVM package. Add the EMS resource and apply the
configuration.
# cmapplyconf -P <modular_cfs_package_file>
d. Edit the application's configuration file and change its dependency from legacy CFS
mount point or CVM disk group MNP packages to the newly created modular SMS
CFS/CVM package. Apply this package configuration:
# cmapplyconf -P <backedup_application_config>
e. Get the current configuration of the Site Controller package on recovery cluster. Modify
the Site Controller configuration with the new set of packages that must be managed on
the recovery cluster.
2. Halt the Site Controller package in the primary cluster. This will halt all the complex workload
packages that are running on the primary site.
3. Restart the Site Controller in the primary cluster. The complex workload will start up on the
recovery site using the new modular SMS CFS/CVM packages.
4. Repeat step 1 that was performed on the recovery cluster initially, in the primary cluster.
5. Move the site controller back to the primary cluster.
Migrating legacy to modular packages
Migrating legacy monitor package
With Continentalclusters version A.08.00, the monitoring daemon ccmonpkg that was previously
configured as a legacy package can be migrated to a modular style package.
To migrate the monitoring package, ccmonpkg, to a modular package:
100 Legacy packages

1. Halt the monitoring daemon package.
# cmhaltpkg ccmonpkg
2. Generate the modular configuration file.
# cmmigratepkg -p <package_name> -o <modular__ccmonpkg.conf>
3. Validate the package configuration file.
# cmcheckconf –P modular_ccmonpkg.conf
4. Apply the package configuration.
# cmapplyconf –P modular_ccmonpkg.conf
5. Start the monitoring daemon package.
# cmmodpkg -e ccmonpkg
Migrating legacy style primary and recovery packages to modular packages
Migrating legacy style primary and recovery packages to modular packages when using Continuous
Access P9000 and XP
Primary and recovery packages configured as legacy packages in an existing Continentalclusters
environment using Continuous Access P9000 and XP, can be migrated to modular packages using
the procedure described in this section. However, the migration steps vary based on the HP
Serviceguard version and the legacy package configuration. While completing the migration
procedure, multiple package configuration files are created. Only the final package configuration
file that is created at the end of the procedure must be applied.
To migrate legacy style primary and recovery packages to modular packages using
Continentalclusters A.08.00:
1. Create a modular package configuration file for the legacy package.
# cmmigratepkg -p <package_name> [-s] -o <modular_sg_conf>
IMPORTANT: This command generates a package configuration file. Do not apply this
configuration file until you complete the migration procedure. For more information on the
cmmigratepkg command, see the Managing Serviceguard manual available at http://
www.hp.com/go/hpux-serviceguard-docs —> HP Serviceguard.
2. If the Continentalclusters legacy package uses ECM Toolkit, then generate a new modular
package configuration file using the package configuration file generated in the step 1.
For Example, if the legacy package uses the ECM Oracle Toolkit, generate a new modular
package configuration file with the following command:
# cmmakepkg –i modular_sg.conf -m ecmt/oracle/oracle –t\
haoracle.conf modular_sg_ecm.conf
3. Create a modular package configuration file using the package configuration file created in
step 1.
When using HP Serviceguard A.11.18, complete the following steps to include
Continentalclusters modules in the new modular package configuration file:
a. Include the Continentalclusters module in the new configuration file.
# cmmakepkg –i <modular_sg_ecm.conf> -m dts/ccxpca\
<modular_sg_ecm_cc.conf>
b. Copy the environment variable values from the Metrocluster environment file present in
the package directory, to the variables present in the newly created modular package
configuration file.
When using HP Serviceguard A.11.19 or later versions, run the following command to include
the Continentalclusters modules in the new modular package configuration file:
# cmmakepkg –i <modular_sg_ecm.conf> -m dts/ccxpca -t\
Migrating legacy to modular packages 101

<path_to_env_file> <modular_sg_ecm_cc.conf>
4. Halt the package.
# cmhaltpkg <package_name>
5. Validate the new modular package configuration file.
# cmcheckconf -P <modular_sg_ecm_cc.conf>
6. Apply the package configuration with the modular configuration file created in step 3.
# cmapplyconf -P <modular_sg_ecm_cc.conf>
7. Run the package on a node in the Serviceguard cluster.
# cmrunpkg -n <node_name> <package_name>
8. Enable global switching for the package.
# cmmodpkg -e <package_name>
Migrating legacy style primary and recovery packages to modular packages using Continuous
access EVA
Legacy packages can be migrated to modular packages using the procedure described in this
section. However, the migration steps vary based on the HP Serviceguard version and the legacy
package configuration. While completing the migration procedure, multiple package configuration
files are created. Only the final package configuration file that is created at the end of the procedure
must be applied.
To migrate Continuous Access EVA legacy packages to modular packages using Continentalclusters
A.08.00:
1. Create a modular package configuration file for the Continentalclusters legacy package.
# cmmigratepkg -p <package_name> [-s] -o <modular_sg_conf>
IMPORTANT: This command generates a package configuration file. Do not apply this
configuration file until you complete the migration procedure. For more information on the
cmmigratepkg command, see the Managing Serviceguard manual available at http://
www.hp.com/go/hpux-serviceguard-docs —> HP Serviceguard.
2. If the Continentalclusters legacy package uses ECM Toolkit, then generate a new modular
package configuration file using the package configuration file generated in the step 1.
For Example, if the legacy package uses the ECM Oracle toolkit, generate a new modular
package configuration file with the following command:
# cmmakepkg –i modular_sg.conf -m ecmt/oracle/oracle –t\
haoracle.conf modular_sg_ecm.conf
3. Create a modular package configuration file using the package configuration file created in
step 1.
When using HP Serviceguard A.11.18, complete the following steps to include
Continentalclusters modules in the new modular package configuration file:
a. Include the Continentalclusters module in the new configuration file.
# cmmakepkg –i <modular_sg_ecm.conf> -m dts/cccaeva\
<modular_sg_ecm_cc.conf>
b. Copy the environment variable values from the Metrocluster environment file present in
the package directory, to the variables present in the newly created modular package
configuration file.
When using HP Serviceguard A.11.19 or later versions, run the following command to include
the Continentalclusters modules in the new modular package configuration file:
# cmmakepkg –i <modular_sg_ecm.conf> -m dts/cccaeva -t\
<path_to_env_file> <modular_sg_ecm_cc.conf>
102 Legacy packages

4. Halt the package.
# cmhaltpkg <package_name>
5. Validate the package configuration file.
# cmcheckconf -P <modular_sg_ecm_cc.conf>
6. Apply the package configuration with the modular configuration file created in step 3.
# cmapplyconf -P <modular_sg_ecm_cc.conf>
7. Run the package on a node in the Serviceguard cluster.
# cmrunpkg -n <node_name> <package_name>
8. Enable global switching for the package.
# cmmodpkg -e <package_name>
Migrating legacy style primary and recovery packages to modular packages using EMC SRDF
Continentalclusters legacy packages can be migrated to modular packages using the procedure
listed in this section. However, the migration steps vary based on the HP Serviceguard version and
the legacy package configuration. While completing the migration procedure, multiple package
configuration files are created. Only the final package configuration file that is created at the end
of the procedure must be applied.
To migrate Continentalclusters with EMC SRDF legacy packages to modular packages using
Continentalclusters A.08.00:
1. Create a modular package configuration file for the legacy package.
# cmmigratepkg -p <package_name> [-s] -o <modular_sg.conf>
IMPORTANT: This command generates a package configuration file. Do not apply this
configuration file until you complete the migration procedure. For more information on the
cmmigratepkg command, see the Managing Serviceguard manual available at http://
www.hp.com/go/hpux-serviceguard-docs —> HP Serviceguard.
2. If the Continentaclusters legacy package uses ECM toolkits, then generate a new modular
package configuration file using the package configuration file generated in the step 1.
For Example, if the legacy package uses the ECM Oracle toolkit, generate a new modular
package configuration file with the following command:
# cmmakepkg –i modular_sg.conf -m ecmt/oracle/oracle –t\
haoracle.conf modular_sg_ecm.conf
3. Create a modular package configuration file using the package configuration file created in
step 1.
When using HP Serviceguard A.11.18, complete the following steps to include
Continentalclusters modules in the new modular package configuration file:
a. Include the Continentalclusters module in the new configuration file.
# cmmakepkg –i <modular_sg_ecm.conf> -m dts/ccsrdf\
<modular_sg_ecm_cc.conf>
b. Copy the environment variable values from the Metrocluster environment file present in
the package directory, to the variables present in the newly created modular package
configuration file.
When using HP Serviceguard A.11.19 or later versions, run the following command to include
the Continentalclusters modules in the new modular package configuration file:
# cmmakepkg –i <modular_sg_ecm.conf> -m dts/ccsrdf –t\
<path_to_env_file> <modular_sg_ecm_cc.conf>
4. Halt the package.
# cmhaltpkg <package_name>
Migrating legacy to modular packages 103

5. Validate the new package configuration file.
# cmcheckconf -P <modular_sg_ecm_cc.conf>
6. Apply the package configuration with the modular configuration file created in step 3.
# cmapplyconf -P <modular_sg_ecm_cc.conf>
7. Run the package on a node in the Serviceguard cluster.
# cmrunpkg -n <node_name> <package_name>
8. Enable global switching for the package.
# cmmodpkg -e <package_name>
Configuring legacy packages
Configuring the monitor package in legacy style
To configure the monitoring daemon in legacy style:
1. On the node where the configuration is located, create a directory for the monitor package.
# mkdir /etc/cmcluster/ccmonpkg
2. Copy the template files from the /opt/cmconcl/scripts directory to the /etc/cmcluster/ccmonpkg
directory.
# cp /opt/cmconcl/scripts/ccmonpkg.* /etc/cmcluster/ccmonpkg
•ccmonpkg.config is the ASCII package configuration file template for the
Continentalclusters monitoring application.
•ccmonpkg.cntl is the control script file for the Continentalclusters monitoring application.
NOTE: HP recommends editing the ccmonpkg.cntl file. However, if preferred, change
the default SERVICE_RESTART value “-r 3” to a value that fits your environment.
3. Edit the package configuration file (suggested name of /etc/cmcluster/ccmonpkg/
ccmonpkg.config) to match the cluster configuration:
a. Add the names of all the nodes in the cluster on which the monitor might run.
b. AUTO_RUN must be set to YES so that the monitor package can fail over between local
nodes.
NOTE: For all primary and recovery packages, AUTO_RUN is always set to NO.
4. Skip this step if DR Rehearsal feature is not used.
If the rehearsal feature is configured, then provide the following information of the filesystem
and volume group used as a state directory in the monitor package control file
ccmonpkg.cntl.
•volume group name
•mount point
•logical volume name
•filesystem type
•mount and unmount options
•fsck options
For Example,
VG[0]="ccvg"
LV[0]=/dev/ccvg/lvol1;
FS[0]=/opt/cmconcl/statedir;
FS_MOUNT_OPT[0]="-o rw";
FS_UMOUNT_OPT[0]="";
104 Legacy packages
FS_FSCK_OPT[0]="";
FS_TYPE[0]="vxfs"
5. Use the cmcheckconf command to validate the package.
# cmcheckconf -P ccmonpkg.config
6. Copy the package configuration file ccmonpkg.config and control script ccmonpkg.cntl to the
monitor package directory (default name /etc/cmcluster/ccmonpkg) on all the other nodes
in the cluster. Ensure this file is executable.
7. Use the cmapplyconf command to add the package to the Serviceguard configuration.
# cmapplyconf -P ccmonpkg.config
The following sample package configuration file (comments have been left out) shows a typical
package configuration for a Continentalclusters monitor package:
PACKAGE_NAME ccmonpkg
PACKAGE_TYPE FAILOVER
FAILOVER_POLICY CONFIGURED_NODE
FAILBACK_POLICY MANUAL
NODE_NAME LAnode1
NODE_NAME LAnode2
AUTO_RUN YES
LOCAL_LAN_FAILOVER_ALLOWED YES
NODE_FAIL_FAST_ENABLED NO
RUN_SCRIPT /etc/cmcluster/ccmonpkg/ccmonpkg.cntl
RUN_SCRIPT_TIMEOUT NO_TIMEOUT
HALT_SCRIPT /etc/cmcluster/ccmonpkg/ccmonpkg.cntl
HALT_SCRIPT_TIMEOUT NO_TIMEOUT
SERVICE_NAME ccmonpkg.srv
SERVICE_FAIL_FAST_ENABLED NO
SERVICE_HALT_TIMEOUT 300
Configuring primary and recovery packages as legacy packages when using Continuous Access
P9000 and XP
To configure Primary or Recovery Package on the Source Disk Site or Target Disk Site in legacy
style:
1. Create a directory /etc/cmcluster/<pkgname> for the package.
# mkdir /etc/cmcluster/<pkgname>
2. Create a package configuration file.
# cd /etc/cmcluster/<pkgname>
# cmmakepkg -p <pkgname>.ascii
Customize the package configuration file as appropriate to your application. Be sure to include
the pathname of the control script (/etc/cmcluster/<pkgname>/<pkgname>.cntl) for
the RUN_SCRIPT and HALT_SCRIPT parameters.
Set the AUTO_RUN flag to NO. This is to ensure the package will not start when the cluster
starts. Only after primary packages start, use cmmodpkg to enable package switching on all
primary packages. Enabling package switching in the package configuration must automatically
start the primary package when the cluster starts. However, if there is a source disk site disaster,
resulting in the recovery package starting and running on the target disk site, the primary
package must not be started until after first stopping the recovery package.
Do not use cmmodpkg to enable package switching on any recovery package. Package
switching on a recovery package automatically set by the cmrecovercl command on the
target disk site when it successfully starts the recovery package.
Configuring legacy packages 105

3. Create a package control script.
# cmmakepkg -s pkgname.cntl
Customize the control script as appropriate to your application using the guidelines in the
Managing Serviceguard user’s guide. Standard Serviceguard package customizations include
modifying the VG, LV, FS, IP, SUBNET, SERVICE_NAME, SERVICE_CMD, and
SERVICE_RESTART parameters. Set LV_UMOUNT_COUNT to 1 or greater.
NOTE: Some of the control script variables, such as VG and LV, on the target disk site must
be the same as on the source disk site. Some of the control script variables, such as, FS,
SERVICE_NAME, SERVICE_CMD and SERVICE_RESTART are probably the same as on the
source disk site. Some of the control script variables, such as IP and SUBNET, on the target
disk site are probably different from those on the source disk site. Ensure that you review all
the variables accordingly.
4. Add customer-defined run and halt commands in the appropriate places according to the
needs of the application. Refer to the latest version of the Managing Serviceguard manual
available at http://www.hp.com/go/hpux-serviceguard-docs —> HP Serviceguard for more
detailed information on these functions.
5. Copy the environment file template /opt/cmcluster/toolkit/SGCA/ xpca.env to the
package directory, naming it pkgname_xpca.
# cp /opt/cmcluster/toolkit/SGCA/xpca.env \
/etc/cmcluster/pkgname/pkgname_xpca.env
6. Edit the environment file <pkgname>_xpca.env as follows:
a. If necessary, add the path where the Raid Manager software binaries have been installed
to the PATH environment variable. If the software is in the usual location, /usr/bin, you
can just uncomment the line in the script.
b. Uncomment the behavioral configuration environment variables starting with AUTO. HP
recommends that you retain the default values of these variables unless you have a specific
business requirement to change them. See “Package attributes” (page 88) for explanation
of these variables.
c. Uncomment the PKGDIR variable and set it to the full path name of the directory where
the control script has been placed. This directory, which is used for status data files, must
be unique for every package. For Example, set PKGDIR to/etc/cmcluster/package_name,
removing any quotes around the file names.
d. Uncomment the DEVICE_GROUP variable and set it to this package’s Raid Manager
device group name, as specified in the Raid Manager configuration file.
e. Uncomment the HORCMPERM variable and use the default value MGRNOINST if Raid
Manager protection facility is not used or disabled. If Raid Manager protection facility
is enabled set it to the name of the HORCM permission file.
f. Uncomment the HORCMINST variable and set it to the Raid Manager instance name
used by Metrocluster/Continuous Access.
g. Uncomment the FENCE variable and set it to either ASYNC, NEVER, or DATA according
to your business requirements or special Metrocluster requirements. This variable is used
to compare with the actual fence level returned by the array.
h. If using asynchronous data replication, set the HORCTIMEOUT variable to a value greater
than the side file timeout value configured with the Service Processor (SVP), but less than
the RUN_SCRIPT_TIMEOUT set in the package configuration file. The default setting is
the side file timeout value + 60 seconds.
i. Uncomment the CLUSTER_TYPE variable and set it to continental.
7. Distribute Metrocluster/Continuous Access configuration, environment and control script files
to other nodes in the cluster by using ftp, rcp or scp:
# rcp -p /etc/cmcluster/pkgname/* \
other_node:/etc/cmcluster/pkgname
See the example script Samples/ftpit to see how to semi-automate the copy using ftp.
106 Legacy packages

This script assumes the package directories already exist on all the nodes.
Using ftp might be preferable at your organization, because it does not require the use of a
.rhosts file for root. Root access via .rhosts might create a security issue.
8. Verify that every node in the Serviceguard cluster has the following files in the directory
/etc/cmcluster/pkgname:
pkgname.cntl Metrocluster/Continuous Access package control script
pkgname_xpca.env Metrocluster/Continuous Access environment file
pkgname.ascii Serviceguard package ASCII configuration file
pkgname.sh Package monitor shell script, if applicable
other files Any other scripts you use to manage Serviceguard packages.
9. Check the configuration using the cmcheckconf -P <pkgname>.config command, then
apply the Serviceguard package configuration using the cmapplyconf -P
<pkgname>.config ommand or SAM.
Configuring primary and recovery packages as legacy packages when using Continuous Access
EVA
To configure Primary or Recovery Package on the Source Disk Site or Target Disk Site in legacy
style:
1. Create a directory /etc/cmcluster/<pkgname> for the package.
# mkdir /etc/cmcluster/<pkgname>
2. Create a package configuration file.
# cd /etc/cmcluster/<pkgname>
# cmmakepkg -p <pkgname>.ascii
Customize the package configuration file as appropriate to your application. Be sure to include
the pathname of the control script (/etc/cmcluster/<pkgname>/<pkgname>.cntl) for
the RUN_SCRIPT and HALT_SCRIPT parameters.
Set the AUTO_RUN flag to NO. This is to ensure the package will not start when the cluster
starts. Only after primary packages start, use cmmodpkg to enable package switching on all
primary packages. Enabling package switching in the package configuration must automatically
start the primary package when the cluster starts. However, if there is a source disk site disaster,
resulting in the recovery package starting and running on the target disk site, the primary
package must not be started until after first stopping the recovery package.
Do not use cmmodpkg to enable package switching on any recovery package. Package
switching on a recovery package automatically set by the cmrecovercl command on the
target disk site when it successfully starts the recovery package.
3. Create a package control script.
# cmmakepkg -s pkgname.cntl
Customize the control script as appropriate to your application using the guidelines in the
Managing Serviceguard user’s guide. Standard Serviceguard package customizations include
modifying the VG, LV, FS, IP, SUBNET, SERVICE_NAME, SERVICE_CMD, and
SERVICE_RESTART parameters. Set LV_UMOUNT_COUNT to 1 or greater.
NOTE: Some of the control script variables, such as VG and LV, on the target disk site must
be the same as on the source disk site. Some of the control script variables, such as, FS,
SERVICE_NAME, SERVICE_CMD and SERVICE_RESTART are probably the same as on the
source disk site. Some of the control script variables, such as IP and SUBNET, on the target
disk site are probably different from those on the source disk site. Ensure that you review all
the variables accordingly.
4. Add customer-defined run and halt commands in the appropriate places according to the
needs of the application. Refer to the latest version of the Managing Serviceguard manual
Configuring legacy packages 107

available at http://www.hp.com/go/hpux-serviceguard-docs —> HP Serviceguard for more
detailed information on these functions.
5. Copy the environment file template /opt/cmcluster/toolkit/SGCA/caeva.env to
the package directory, naming it pkgname_caeva.env.
# cp /opt/cmcluster/toolkit/SGCA/caeva.env \
/etc/cmcluster/pkgname/pkgname_caeva.env
NOTE: If not using a package name as a filename for the package control script, it is
necessary to follow the convention of the environment file name. This is the combination of
the file name of the package control script without the file extension, an underscore and type
of the data replication technology (caeva) used. The extension of the file must be env.
The following examples demonstrate how the environment file name must be chosen.
For Example:
If the file name of the control script is pkg.cntl, the environment file name must be
pkg_caeva.env.
For Example:
If the file name of the control script is control_script.sh, the environment file name must
be control_script_caeva.env.
6. Edit the environment file <pkgname>_caeva.env as follows:
a. Set the CLUSTER_TYPE variable to continental.
b. Set the PKGDIR variable to the full path name of the directory where the control script
has been placed. This directory, which is used for status data files, must be unique for
every package.
For Example,
Set PKGDIR to /etc/cmcluster/package_name, removing any quotes around the
file names. The operator might create the FORCEFLAG file in this directory. See “Package
attributes” (page 88) for a description of these variables.
c. Set the DT_APPLICATION_STARTUP_POLICY variable to one of two policies:
Availability_Preferred, or Data_Currency_Preferred.
d. Set the WAIT_TIME variable to the timeout, in minutes, to wait for completion of the data
merge from source to destination volume before starting up the package on the destination
volume. If the wait time expires and merging is still in progress, the package will fail to
start with an error that prevents restarting on any node in the cluster.
e. Set the DR_GROUP_NAME variable to the name of DR Group used by this package. This
DR Group name is defined when the DR Group is created.
f. Set the DC1_STORAGE_WORLD_WIDE_NAME variable to the world wide name of the
EVA storage system which resides in Data Center 1. This WWN can be found on the
front panel of the EVA controller, or from command view EVA UI.
g. Set the DC1_SMIS_LIST variable to the list of Management Servers which resides in Data
Center 1. Multiple names are defined using a comma as a separator between the names.
If a connection to the first management server fails, attempts are made to connect to the
subsequent management servers in the order that they are specified.
h. Set the DC1_HOST_LIST variable to the list of clustered nodes which resides in Data
Center 1. Multiple names are defined using a comma as a separator between the names.
i. Set the DC2_STORAGE_WORLD_WIDE_NAME variable to the world wide name of the
EVA storage system which resides in Data Center 2. This WWN can be found on the
front panel of the EVA controller, or from command view EVA UI.
j. Set the DC2_SMIS_LIST variable to the list of Management Server, which resides in Data
Center 2. Multiple names are defined using a comma as a separator between the names.
If a connection to the first management server fails, attempts are made to connect to the
subsequent management servers in the order that they are specified.
108 Legacy packages
k. Set the DC2_HOST _LISTvariable to the list of clustered nodes which resides in Data
Center 2. Multiple names are defined using a comma as a separator between the names.
l. Set the QUERY_TIME_OUT variable to the number of seconds to wait for a response from
the SMI-S CIMOM in Management Server. The default timeout is 300 seconds. The
recommended minimum value is 20 seconds.
7. Distribute Metrocluster/Continuous Access configuration, environment and control script files
to other nodes in the cluster by using ftp, rcp or scp:
# rcp -p /etc/cmcluster/pkgname/* \
other_node:/etc/cmcluster/pkgname
See the example script /opt/cmcluster/toolkit/SGCAEVA/Samples/ftpit to see
how to semi-automate the copy using ftp.
This script assumes the package directories already exist on all the nodes.
Using ftp might be preferable at your organization, because it does not require the use of a
.rhosts file for root. Root access via .rhosts might create a security issue.
8. Verify that every node in the Serviceguard cluster has the following files in the directory
/etc/cmcluster/pkgname:
pkgname.cntl Serviceguard package control script
pkgname_caeva.env Metrocluster Continuous Access EVA environment file
pkgname.ascii Serviceguard package ASCII configuration file
pkgname.sh Package monitor shell script, if applicable
other files Any other scripts you use to manage Serviceguard packages.
9. Check the configuration using the cmcheckconf -P <pkgname>.config command, then
apply the Serviceguard package configuration using the cmapplyconf -P
<pkgname>.config command or SAM.
Configuring primary and recovery packages as legacy packages when using EMC SRDF
To configure Primary or Recovery Package on the Source Disk Site or Target Disk Site in legacy
style:
1. Create a directory /etc/cmcluster/<pkgname> for the package.
# mkdir /etc/cmcluster/<pkgname>
2. Create a package configuration file.
# cd /etc/cmcluster/<pkgname>
# cmmakepkg -p <pkgname>.ascii
Customize the package configuration file as appropriate to your application. Be sure to include
the pathname of the control script (/etc/cmcluster/<pkgname>/<pkgname>.cntl) for
the RUN_SCRIPT and HALT_SCRIPT parameters.
Set the AUTO_RUN flag to NO. This is to ensure the package will not start when the cluster
starts. Only after primary packages start, use cmmodpkg to enable package switching on all
primary packages. Enabling package switching in the package configuration must automatically
start the primary package when the cluster starts. However, if there is a source disk site disaster,
resulting in the recovery package starting and running on the target disk site, the primary
package must not be started until after first stopping the recovery package.
Do not use cmmodpkg to enable package switching on any recovery package. Package
switching on a recovery package automatically set by the cmrecovercl command on the
target disk site when it successfully starts the recovery package.
3. Create a package control script.
# cmmakepkg -s pkgname.cntl
Customize the control script as appropriate to your application using the guidelines in the
Managing Serviceguard user’s guide. Standard Serviceguard package customizations include
Configuring legacy packages 109

modifying the VG, LV, FS, IP, SUBNET, SERVICE_NAME, SERVICE_CMD, and
SERVICE_RESTART parameters. Set LV_UMOUNT_COUNT to 1 or greater.
NOTE: Some of the control script variables, such as VG and LV, on the target disk site must
be the same as on the source disk site. Some of the control script variables, such as, FS,
SERVICE_NAME, SERVICE_CMD and SERVICE_RESTART are probably the same as on the
source disk site. Some of the control script variables, such as IP and SUBNET, on the target
disk site are probably different from those on the source disk site. Ensure that you review all
the variables accordingly.
4. Add customer-defined run and halt commands in the appropriate places according to the
needs of the application. Refer to the latest version of the Managing Serviceguard manual
available at http://www.hp.com/go/hpux-serviceguard-docs —> HP Serviceguard for more
detailed information on these functions.
5. Copy the environment file template /opt/cmcluster/toolkit/SGSRDF/srdf.env to
the package directory, naming it pkgname_srdf.env.
# cp /opt/cmcluster/toolkit/SGSRDF/srdf.env \
/etc/cmcluster/pkgname/pkgname_srdf.env
NOTE: If not using a package name as a filename for the package control script, it is
necessary to follow the convention of the environment file name. This is the combination of
the file name of the package control script without the file extension, an underscore and type
of the data replication technology (srdf) used. The extension of the file must be env.
The following examples demonstrate how the environment file name must be chosen.
Example 1 Example 1
If the file name of the control script is pkg.cntl, the environment file name must be
pkg_srdf.env.
Example 2 Example 2
If the file name of the control script is control_script.sh, the environment file name must
be control_script_srdf.env.
6. Edit the environment file <pkgname>_srdf.env as follows:
a. Add the path where the EMC Solutions Enabler software binaries have been installed to
the PATH environment variable. The default location is /usr/symcli/bin.
b. Uncomment AUTO*environment variables. HP recommends to retain the default values
of these variables unless there is a specific business requirement to change them. See
“Package attributes” (page 88) for an explanation of these variables.
c. Uncomment the PKGDIR variable and set it to the full path name of the directory where
the control script has been placed. This directory must be unique for every package and
is used for status data files.
For Example,
Set PKGDIR to /etc/cmcluster/<pkg_name>.
d. Uncomment the DEVICE_GROUP variable and set them to the Symmetrix device group
names given in the ’symdg list’ command. The DEVICE_GROUP variable might also
contain the consistency group name if using a M by N configuration.
e. Uncomment the RETRY and RETRYTIME variables. The defaults must be used for the first
package. The values must be slightly different for other packages. RETRYTIME must increase
by two seconds for every package. The product of RETRY * RETRYTIME must be
approximately five minutes. These variables are used to decide how often and how many
times to retry the Symmetrix status commands.
For Example,
110 Legacy packages

If there are three packages with data on a particular Symmetrix pair (connected by SRDF),
then the values for RETRY and RETRYTIME might be as follows:
Table 8 RETRY and RETRYTIME Values
RETRYTIMERETRY
5 seconds60 attemptspkgA
7 seconds43 attemptspkgB
9 seconds33 attemptspkgC
f. Uncomment the CLUSTER_TYPE variable and set it to “continental”.
g. Uncomment the RDF_MODE and set it to “async” or “sync” as appropriate to your
application.
7. Distribute Metrocluster/Continuous Access configuration, environment and control script files
to other nodes in the cluster by using ftp, rcp or scp:
# rcp -p /etc/cmcluster/pkgname/* \
other_node:/etc/cmcluster/pkgname
When using ftp, be sure to make the file executable on any destination systems. This script
assumes the package directories already exist on all the nodes.
Using ftp might be preferable at your organization, because it does not require the use of a
.rhosts file for root.
Root access via .rhosts might create a security issue.
8. Verify that every node in the Serviceguard cluster has the following files in the directory
/etc/cmcluster/pkgname:
pkgname.cntl Serviceguard package control script
pkgname_srdf.env Metrocluster EMC SRDF environment file
pkgname.ascii Serviceguard package ASCII configuration file
pkgname.sh Package monitor shell script, if applicable
other files Any other scripts you use to manage Serviceguard packages.
9. Validate the configuration using the cmcheckconf -P <pkgname>.config command,
then apply the Serviceguard package configuration using the cmapplyconf -P
<pkgname>.config command
Configuring storage devices for complex workload
Configuring the storage device for the complex workload at the Source Disk Site
using SG SMS CFS or CVM
To configure a storage device using SG SMS CFS or CVM in a legacy style package:
1. Initialize the source disks of the replication pair
# /etc/vx/bin/vxdisksetup -i <replicated_disk_1>
# /etc/vx/bin/vxdisksetup -i <replicated_disk_2>
2. Create a disk group for the complex workload data.
# vxdg –s init <cvm_dg_name> <replicated_disk_1>\
<replicated_disk_2>
3. Create Serviceguard Disk Group MNP packages for the disk groups with a unique name in
the cluster.
# cfsdgadm add <cvm_dg_name><cvm_dg_pkg_name> all=sw\
<node1><node2>
Configuring storage devices for complex workload 111

where node1 and node2 are the nodes in the Source Disk Site.
4. Activate the CVM disk group in the Source Disk Site CFS sub-cluster.
# cfsdgadm activate <cvm_dg_name>
5. Create a volume from the disk group
# vxassist -g <cvm_dg_name> make <cvm_dg_vol_name> 4500m
6. NOTE: Skip the following steps if you want to use the storage devices as raw CVM volumes.
To configure the storage devices using CFS, do:
Create a file system using the created volume
# newfs -F vxfs \
/dev/vx/rdsk/<cvm_dg_name>/<cvm_dg_vol_name>
7. Create mount points for the complex workload data and set appropriate permissions
# mkdir /cfs
# chmod 775 /cfs
# mkdir /cfs/<cvm_dg_name>
8. Create the Mount Point MNP package with a unique name in the cluster
# cfsmntadm add <cvm dg name> <cvm_dg_vol_name> \
/cfs/<cvm_dg_name> <cfs_mount_point_pkg_name> all=rw \
<node1><node2>
where node1 and node2 are the nodes in the Source Disk Site.
Configuring the storage device for complex workload at the target disk site using SG
SMS CFS or CVM
To import CVM disk groups on the nodes in the target disk site and to create CFS disk group and
mount point MNP packages:
1. From the CVM master node at the target disk site, import the disk groups used by the complex
workload.
# vxdg -stfC import <cvm_dg_name>
2. Create Serviceguard disk group MNP packages for the disk groups with a unique name in
the cluster
# cfsdgadm add <cvm_dg_name><cvm_dg_pkg_name> all=sw\
<node 1> <node 2>
Where node1 and node2 are the nodes at the target disk site
3. Activate the complex workload disk groups in the CFS sub-cluster.
# cfsdgadm activate <cvm_dg_name>
4. NOTE: Skip the following steps if you want to use the storage devices as raw CVM volumes.
Create the mount point directories for the complex workload cluster file systems
# mkdir /cfs
# chmod 775 /cfs
# mkdir /cfs/<cvm_dg_name>
5. Create the Mount Point MNP package with a unique name in the cluster.
# cfsmntadm add <cvm_dg_name><cvm_dg_vol_name>\
cvm_dg_name> /cfs/<cfs_mount_point_pkg_name> all=rw\
<node1> <node2>
112 Legacy packages
Where node1 and node2 are the nodes at the target disk site.
6. Mount the cluster file systems in this CFS sub-cluster.
# cfsmount /cfs/<cvm_dg_name>
Configuring storage devices for complex workload 113

G Configuration rules for using modular style packages in
Continentalclusters
Table 9 (page 114) summarizes the rules to use modular style packages for various Continentalclusters
entities.
Table 9 Configuration rules for using Modular style packages in Continentalclusters packages
Logical Replication
3PAR Remote
Copy
Continuous
Access SRDF
Continuous Access
EVA
Continuous Access
P9000 or XP
Continentalclusters
Package Type
Use supplied
modular package
Use supplied
modular package
Use supplied
modular package
Use supplied
modular package
Use supplied
modular package
Monitor Package
template. Notemplate. Notemplate. Notemplate. Notemplate. No
ContinentalclustersContinentalclustersContinentalclustersContinentalclustersContinentalclusters
Specific module
required
Specific module
required
Specific module
required
Specific module
required.
Specific module
required.
Use any
Serviceguard
Use dts/cc3parrc
module along with
Use dts/ccsrdf
module along
Use dts/cccaeva
module along with
Use dts/ccxpca
module along with
Primary package
supported module.any otherwith any otherany otherany other
Noapplication
specific modules
application
specific modules
application
specific modules
application
specific modules Continentalclusters
specific module
required.
Use any
Serviceguard
Use dts/cc3parrc
module along with
Use dts/ccsrdf
module along
Use dts/cccaeva
module along with
Use dts/ccxpca
module along with
Recovery
package
supported module.any otherwith any otherany otherany other
Noapplication
specific modules
application
specific modules
application
specific modules
application
specific modules Continentalclusters
specific module
required.
Use any
Serviceguard
Use all modules
used to create the
Use all modules
used to create the
Use all modules
used to create the
Use all modules
used to create the
Rehearsal
Package
supported module.recovery package,recoveryrecovery package,recovery package,
Noexceptpackage, exceptexceptexcept dts/ccxpca
module Continentalclustersdts/cc3parrc
module
dts/ccsrdf
module
dts/cccaeva
module specific module
required
Use any
Serviceguard
Not ApplicableData Sender
Package
supported module.
No
Continentalclusters
specific module
required.
Use any
Serviceguard
Data Receiver
Package
supported module.
No
Continentalclusters
specific module
required.
114 Configuration rules for using modular style packages in Continentalclusters

H Sample Continentalclusters ASCII configuration file
Sample Continentalclusters ASCII configuration file:
Section 1 of the Continentalclusters ASCII configuration file
################################################################
#### #### Continentalclusters CONFIGURATION FILE #### ####
#### #### This file contains Continentalclusters #### ####
#### #### configuration data. #### ####
#### #### The file is divided into three sections, #### ####
#### #### as follows: #### ####
#### #### 1. Cluster Information #### ####
#### #### 2. Recovery Groups #### ####
#### #### 3. Events, Alerts, Alarms, and #### ####
#### #### Notifications #### ####
#### #### #### ####
#### #### For complete details about how to set the #### ####
#### #### parameters in this file, consult the #### ####
#### #### cmqueryconcl(1m) manpage or your manual. #### ####
################################################################
#### #### Section 1. Cluster Information #### ####
#### #### This section contains the name of the #### ####
#### #### Continentalclusters,name of the state #### ####
#### #### directory, followed by the names of member #### ####
#### #### clusters and all their nodes.The #### ####
#### #### Continentalclusters name can be any string #### ####
#### #### you choose, up to 40 characters in length. #### ####
#### #### The continentalclusters state directory #### ####
#### #### must be string containing the directory #### ####
#### #### location. The state directory must be #### ####
#### #### always an absolute path. The state #### ####
#### #### directory must be created on a shared #### ####
#### #### disk in the recovery cluster. This #### ####
#### #### parameter is optional, if maintenance mode #### ####
#### #### feature recovery groups is not required. #### ####
#### #### This parameter is mandatory, if maintenance #### ####
#### #### mode feature for recovery groups is #### ####
#### #### required. #### ####
#### #### Each member cluster name must be the same #### ####
#### #### as it appears in the MC/ServiceGuard cluster ########
#### #### configuration ASCII file for that cluster. #### ####
#### #### In addition to the cluster name, include a #### ####
#### #### domain name for the nodes in the cluster. #### ####
#### #### Node Names must be the same as those that #### ####
#### #### appear in the cluster configuration ASCII #### ####
#### #### file. A minimum of two member cluster needs #### ####
#### #### to be specified. You might configure one #### ####
#### #### cluster to serve as recovery cluster for #### ####
#### #### one or more other clusters. #### ####
#### #### #### ####
#### #### In the space below, enter the continental #### ####
#### #### cluster name, then enter a cluster name for #### ####
#### #### every member cluster, followed by the names #### ####
#### #### of all the nodes in that cluster.Following #### ####
#### #### the node names, enter the name of a monitor #### ####
#### #### package that will run the continental #### ####
#### #### cluster monitoring software on that cluster.#### ####
#### #### It is strongly recommended that you use the #### ####
#### #### same name for the monitoring package on all #### ####
#### #### clusters; "ccmonpkg" is suggested. #### ####
#### #### Monitoring of the recovery cluster by the #### ####
#### #### primary cluster is optional. If you do not #### ####
Section 1 of the Continentalclusters ASCII configuration file 115
#### #### wish to monitor the recovery cluster, you #### ####
#### #### must delete or comment out the #### ####
#### #### MONITOR_PACKAGE_NAME and MONITOR_INTERVAL #### ####
#### #### lines that follow the name of the primary #### ####
#### #### cluster. #### ####
#### #### After the monitor package name, enter a #### ####
#### #### monitor interval,specifying a number of #### ####
#### #### minutes and/or seconds. The default is 60 #### ####
#### #### seconds, the minimum is 30 seconds, and the #### ####
#### #### maximum is 5 minutes. #### ####
#### #### #### ####
#### #### CLUSTER_NAME westcoast #### ####
#### #### CLUSTER_DOMAIN westnet.myco.com #### ####
#### #### NODE_NAME system1 #### ####
#### #### NODE_NAME system2 #### ####
#### #### MONITOR_PACKAGE_NAME ccmonpkg #### ####
#### #### MONITOR_INTERVAL 1 MINUTE 30 SECONDS#### ####
#### #### #### ####
#### #### #### ####
#### #### CLUSTER_NAME eastcoast #### ####
#### #### CLUSTER_DOMAIN eastnet.myco.com #### ####
#### #### NODE_NAME system3 #### ####
#### #### NODE_NAME system4 #### ####
#### #### MONITOR_PACKAGE_NAME ccmonpkg #### ####
#### #### MONITOR_INTERVAL 1 MINUTE 30 SECONDS #### ####
#### #### #### ####
#### #### CONTINENTAL_CLUSTER_NAME ccluster1 #### ####
#### #### CONTINENTAL_CLUSTER_STATE_DIR #### ####
#### #### CLUSTER_NAME #### ####
#### #### CLUSTER_DOMAIN #### ####
#### #### NODE_NAME #### ####
#### #### NODE_NAME #### ####
#### #### MONITOR_PACKAGE_NAME ccmonpkg #### ####
#### #### MONITOR_INTERVAL 60 SECONDS #### ####
#### #### CLUSTER_NAME #### ####
#### #### CLUSTER_DOMAIN #### ####
#### #### NODE_NAME #### ####
#### #### NODE_NAME #### ####
#### #### MONITOR_PACKAGE_NAME ccmonpkg #### ####
#### #### MONITOR_INTERVAL 60 SECONDS #### ####
Section 2 of the Continentalclusters ASCII configuration file
###############################################################
#### #### Section 2. Recovery Groups #### ####
#### #### This section defines recovery groups--sets #### ####
#### #### of ServiceGuard packages that are ready to #### ####
#### #### recover applications in case of cluster #### ####
#### #### failure. Recovery groups allow one cluster #### ####
#### #### in the Continentalclusters configuration to #### ####
#### #### back up another member cluster's packages. #### ####
#### #### You create a separate recovery group for #### ####
#### #### every ServiceGuard package that #### ####
#### #### started on the recovery cluster when the #### ####
#### #### cmrecovercl(1m) command is issued. #### ####
#### #### #### ####
#### #### A recovery group consists of a primary #### ####
#### #### package running on one cluster, a recovery #### ####
#### #### package that is ready to run on a different #### ####
#### #### cluster. In some cases, a data receiver #### ####
#### #### package runs on the same cluster as the #### ####
#### #### recovery package, and in some cases, a data #### ####
#### #### sender package runs on the same cluster #### ####
#### #### as the primary package.For rehearsal #### ####
#### #### operations a rehearsal package forms a part #### ####
116 Sample Continentalclusters ASCII configuration file
#### #### of the recovery group. The rehearsal package #### ####
#### #### is configured always in the recovery cluster.#### ####
#### #### During normal operation, the primary package #### ####
#### #### is running an application program on the #### ####
#### #### primary cluster, and the recovery package, #### ####
#### #### which is configured to run the same #### ####
#### #### application, is idle on the recovery cluster.#### ####
#### #### If the primary package performs disk I/O, #### ####
#### #### the data that is written to disk is #### ####
#### #### replicated and made available for possible #### ####
#### #### use on the recovery cluster. #### ####
#### #### For some data replication techniques, this #### ####
#### #### involves the use of a data receiver package #### ####
#### #### running on the recovery cluster. #### ####
#### #### In the event of a major failure on the #### ####
#### #### primary cluster, the user issues the #### ####
#### #### cmrecovercl(1m) command to halt any data #### ####
#### #### receiver packages and start up all the #### ####
#### #### recovery packages that exist on the #### ####
#### #### recovery cluster. #### ####
#### #### During rehearsal operation, before starting #### ####
#### #### the rehearsal packages,care must be taken #### ####
#### #### that the replication between the primary and #### ####
#### #### the recovery sites is suspended. For some #### ####
#### #### data replication techniques which involve #### ####
#### #### the use of a data receiver package, #### ####
#### #### rehearsal operations must be commenced only #### ####
#### #### after shutting down the data receiver #### ####
#### #### package at the recovery cluster. Rehearsal #### ####
#### #### packages are started using the #### ####
#### #### cmrecovercl -r command. #### ####
#### #### Enter the name of every package recovery #### ####
#### #### group together with the fully qualified #### ####
#### #### names of the primary and recovery packages. #### ####
#### #### If appropriate, enter the fully qualified #### ####
#### #### name of a data receiver package. Note that #### ####
#### #### the data receiver package must be on the #### ####
#### #### same cluster as the recovery package. #### ####
#### #### The primary package name includes the #### ####
#### #### primary cluster name followed by a slash #### ####
#### #### ("/") followed by the package name on the #### ####
#### #### primary cluster. The recovery package name #### ####
#### #### includes the recovery cluster name, followed #### ####
#### #### by a slash ("/")followed by the package name #### ####
#### #### on the recovery cluster. #### ####
#### #### #### ####
#### #### The data receiver package name includes the #### ####
#### #### recovery cluster name, followed by a slash #### ####
#### #### ("/") followed by the name of the data #### ####
#### #### receiver package on the recovery cluster. #### ####
#### #### The rehearsal package name includes the #### ####
#### #### recovery cluster name, followed by a slash #### ####
#### #### ("/"). #### ####
#### #### Up to 29 recovery groups can be entered. #### ####
#### #### #### ####
#### #### Example: #### ####
#### #### RECOVERY_GROUP_NAME nfsgroup #### ####
#### #### PRIMARY_PACKAGE westcoast/nfspkg #### ####
#### #### DATA_SENDER_PACKAGE westcoast/nfssenderpkg #### ####
#### #### RECOVERY_PACKAGE eastcoast/nfsbackuppkg #### ####
#### #### DATA_RECEIVER_PACKAGE eastcoast/nfsreplicapkg#### ####
#### #### REHEARSAL_PACKAGE eastcoast/nfsrehearsalpkg #### ####
#### #### #### ####
#### #### RECOVERY_GROUP_NAME hpgroup #### ####
#### #### PRIMARY_PACKAGE westcoast/hppkg #### ####
Section 2 of the Continentalclusters ASCII configuration file 117
#### #### DATA_SENDER_PACKAGE westcoast/hpsenderpkg #### ####
#### #### RECOVERY_PACKAGE eastcoast/hpbackuppkg #### ####
#### #### DATA_RECEIVER_PACKAGE eastcoast/nfsreplicapkg#### ####
#### #### REHEARSAL_PACKAGE eastcoast/hprehearsalpkg #### ####
Section 3 of the Continentalclusters ASCII configuration file
################################################################
#### #### Section 3. Monitoring Definitions #### ####
#### #### This section of the file contains monitoring #### ####
#### #### definitions. Well planned monitoring #### ####
#### #### definitions will help in making the decision #### ####
#### #### whether or not to issue the cmrecovercl(1m) #### ####
#### #### command. Each monitoring definition specifies#### ####
#### #### a cluster event along with the messages #### ####
#### #### that must be sent to system administrators #### ####
#### #### or other IT staff. #### ####
#### #### All messages are appended to the default log #### ####
#### #### /var/opt/resmon/log/cc/eventlog as well as to#### ####
#### #### the destination you specify below. #### ####
#### #### A cluster event takes place when a monitor #### ####
#### #### that is located on one cluster detects a #### ####
#### #### significant change in the condition of #### ####
#### #### another cluster. The monitored cluster #### ####
#### #### conditions are: #### ####
#### #### UNREACHABLE - the cluster is unreachable. #### ####
#### #### This will occur when the communication link #### ####
#### #### to the cluster has gone down, as in a WAN #### ####
#### #### failure, or when the all nodes in the #### ####
#### #### cluster have failed. #### ####
#### #### DOWN - the cluster is down but nodes are #### ####
#### #### responding. This will occur when the cluster #### ####
#### #### is halted, but some or all of the member #### ####
#### #### nodes are booted and communicating with the #### ####
#### #### monitoring cluster. #### ####
#### #### UP - the cluster is up. #### ####
#### #### ERROR - there is a mismatch of cluster #### ####
#### #### versions or a security error. #### ####
#### #### A change from one of these conditions to #### ####
#### #### another one is a cluster event. You can #### ####
#### #### define alert or alarm states based on the #### ####
#### #### length of time since the cluster event was #### ####
#### #### observed. Some events are noteworthy at the #### ####
#### #### time they occur, and some are noteworthy #### ####
#### #### when they persist over time. Setting the #### ####
#### #### elapsed time to zero results in a message #### ####
#### #### being sent as soon as the event takes place. #### ####
#### #### Setting the elaspsed time to 5 minutes results#### ####
#### #### in a message being sent when the condition #### ####
#### #### has persisted for 5 minutes. #### ####
#### #### An alert is intended as informational only. #### ####
#### #### Alerts might be sent for any type of cluster #### ####
#### #### condition. For an alert, a notification is #### ####
#### #### sent to a system administrator or other #### ####
#### #### destination. Alerts are not intended to #### ####
#### #### indicate the need for recovery. The #### ####
#### #### cmrecovercl(1m) command is disabled. #### ####
#### #### #### ####
#### #### An alarm is an indication that a condition ####
#### #### exists that might require recovery. For an ####
#### #### alarm, a notification is sent, and in ####
#### #### addition, the cmrecovercl(1m) command is ####
#### #### enabled for immediate execution, allowing ####
#### #### the administrator to carry out cluster ####
#### #### recovery. An alarm can only be defined for ####
118 Sample Continentalclusters ASCII configuration file
#### #### an UNREACHABLE or DOWN condition in the ####
#### #### monitored cluster. ####
#### #### A notification defines a message that is ####
#### #### appended to the log file ####
#### #### /var/opt/resmon/log/cc/eventlog and sent ####
#### #### to other specified destinations, including ####
#### #### email addresses, SNMP traps, the system ####
#### #### console, or the syslog file. The message ####
#### #### string in a notification can be no more than ####
#### #### 170 characters. Enter notifications in one of ####
#### #### the following forms: ####
#### #### NOTIFICATION CONSOLE ####
#### #### <message> ####
#### #### Message written to the console. ####
#### #### ####
#### #### NOTIFICATION EMAIL <address> ####
#### #### <message> ####
#### #### Message emailed to a fully qualified email ####
#### #### address. ####
#### #### #####
#### #### NOTIFICATION OPC <level> ####
#### #### <message> ####
#### #### The <message> is sent to OpenView IT/Operations)####
#### #### The value of <level> might be 8 (normal), ####
#### #### 16 (warning), 64 (minor), 128 (major),32 ####
#### #### (critical). ####
#### #### NOTIFICATION SNMP <level> ####
#### #### <message> ####
#### #### The <message> is sent as an SNMP trap. ####
#### #### The value of <level> might be 1 (normal), ####
#### #### 2 (warning), 3 (minor), 4 (major),5 (critical). ####
#### #### NOTIFICATION SYSLOG ####
#### #### <message> ####
#### #### A notice of the event is appended to the syslog ####
#### #### file. ####
#### #### ####
#### #### NOTIFICATION TCP <nodename>:<portnumber> #####
#### #### <message> ####
#### #### Message is sent to a TCP port on the specified ####
#### #### node. ####
#### #### ####
#### #### NOTIFICATION TEXTLOG <pathname> ####
#### #### <message> ####
#### #### A notice of the event is written to a user- ####
#### #### specified log file.<pathname> must be a full ####
#### #### path for the user-specified file. The user ####
#### #### specified file must be under /var/opt/resmon/log ####
#### #### directory. ####
#### #### NOTIFICATION UDP <nodename>:<portnumber> ####
#### #### <message> ####
#### #### Message is sent to a UDP port on the specified ####
#### #### node. ####
#### #### For the cluster event, enter a cluster name ####
#### #### followed by a slash ("/") and a cluster condition ####
#### #### (UP, DOWN, UNREACHABLE,ERROR) that might be detected ####
#### #### by a monitor program. ####
#### #### #####
#### #### Each cluster event must be paired with a ####
#### #### monitoring cluster. Include the name of the ####
#### #### cluster on which the monitoring will take place. ####
#### #### Events can be monitored from either the primary #####
#### #### cluster or the recovery cluster. ####
#### #### ####
#### #### Alerts, alarms, and notifications have the ####
#### #### following syntax. ####
Section 3 of the Continentalclusters ASCII configuration file 119
#### #### ####
#### #### CLUSTER_ALERT <min> MINUTES <sec> SECONDS ####
#### #### Delay before the software issues an alert ####
#### #### notification about the cluster event. ####
#### #### ####
#### #### CLUSTER_ALARM <min> MINUTES <sec> SECONDS ####
#### #### Delay before the software issues an alarm ####
#### #### notification about the cluster event and ####
#### #### enables the cmrecovercl(1m) command for ####
#### #### immediate execution. ####
#### #### NOTIFICATION <type> ####
#### #### <message> ####
#### #### A string value which is sent from the monitoring ####
#### #### cluster for a given event to a specified ####
#### #### destination. The <message>, which can be no more ####
#### #### than 170 characters, is also appended to the ####
#### #### /var/opt/resmon/log/cc/eventlog file on the ####
#### #### monitoring node in the cluster where the event ####
#### #### was detected. ####
#### #### ####
#### #### ####
#### #### Example: ####
#### #### ####
#### #### CLUSTER_EVENT westcoast/UNREACHABLE ####
#### #### MONITORING_CLUSTER eastcoast ####
#### #### CLUSTER_ALERT 5 MINUTES ####
#### #### NOTIFICATION EMAIL admin@primary.site ####
#### #### "westcoast status unknown for 5 min. Call ####
#### #### secondary site." ####
#### #### NOTIFICATION EMAIL admin@secondary.site ####
#### #### "Call primary admin. (555) 555-6666." ####
#### #### ####
#### #### CLUSTER_ALERT 10 MINUTES ####
#### #### NOTIFICATION EMAIL admin@primary.site ####
#### #### "westcoast status unknown for 10 min. Call ####
#### #### secondary site." ####
#### #### NOTIFICATION EMAIL admin@secondary.site ####
#### #### "Call primary admin. (555) 555-6666." ####
#### #### NOTIFICATION CONSOLE ####
#### #### "Cluster ALERT: westcoast not responding." ####
#### #### ####
#### #### CLUSTER_ALARM 15 MINUTES ####
#### #### NOTIFICATION EMAIL admin@primary.site ####
#### #### "westcoast status unknown for 15 min. Takeover ####
#### #### advised." ####
#### #### NOTIFICATION EMAIL admin@secondary.site ####
#### #### "westcoast still not responding. Use ####
#### #### cmrecovercl command." ####
#### #### NOTIFICATION CONSOLE ####
#### #### "Cluster ALARM: Issue cmrecovercl command to take ####
#### #### over "westcoast." ####
#### #### ####
#### #### CLUSTER_EVENT westcoast/UP ####
#### #### MONITORING_CLUSTER eastcoast ####
#### #### CLUSTER_ALERT 0 MINUTES ####
#### #### NOTIFICATION EMAIL admin@secondary.site ####
#### #### "Cluster westcoast is up." ####
#### #### ####
#### #### CLUSTER_EVENT westcoast/DOWN ####
#### #### MONITORING_CLUSTER eastcoast ####
#### #### CLUSTER_ALERT 0 MINUTES ####
#### #### NOTIFICATION EMAIL admin@secondary.site ####
#### #### "Cluster westcoast is down." ####
#### #### ####
#### #### CLUSTER_EVENT westcoast/ERROR ####
120 Sample Continentalclusters ASCII configuration file
#### #### MONITORING_CLUSTER eastcoast ####
#### #### CLUSTER_ALERT 0 MINUTES ####
#### #### NOTIFICATION EMAIL admin@secondary.site ####
#### #### "Error in monitoring cluster westcoast." ####
#### #### ####
#### #### CLUSTER_EVENT <cluster_name>/UNREACHABLE ####
#### #### MONITORING_CLUSTER CLUSTER_ALERT ####
The following is a sample Continentalclusters configuration file with two recovery pairs. Both cluster1
and cluster2 are configured to have cluster3 as their recovery cluster for package pkg1 and pkg2,
and cluster3 is configured to have cluster1 as its recovery cluster for pkg3.
# Section1: Cluster Information
# Section1: Cluster Information
CONTINENTAL_CLUSTER_NAME sampleCluster
CONTINENTAL_CLUSTER_STATE_DIR /opt/cmconcl/statedir
CLUSTER_NAME cluster1
CLUSTER_DOMAIN cup.hp.com
NODE_NAME node11
NODE_NAME node12
MONITOR_PACKAGE_NAME ccmonpkg
MONITOR_INTERVAL 60 seconds
CLUSTER_NAME cluster2
CLUSTER_DOMAIN cup.hp.com
NODE_NAME node21
NODE_NAME node22
CLUSTER_NAME cluster3
CLUSTER_DOMAIN cup.hp.com
NODE_NAME node31
NODE_NAME node32
MONITOR_PACKAGE_NAME ccmonpkg
MONITOR_INTERVAL 60 seconds
RECOVERY_GROUP_NAME ccRG1
PRIMARY_PACKAGE cluster1/pkg1
RECOVERY_PACKAGE cluster3/pkg1’
REHEARSAL_PACKAGE cluster3/pkg4’
RECOVERY_GROUP_NAME ccRG2
PRIMARY_PACKAGE cluster2/pkg2
RECOVERY_PACKAGE cluster3/pkg2’
RECOVERY_GROUP_NAME ccRG3
RECOVERY_PACKAGE cluster3/pkg3
DATA_RECEIVER_PACKAGE cluster1/pkg3’
# Section 3. Monitoring Definitions ####
CLUSTER_EVENT cluster1/DOWN
MONITORING_CLUSTER cluster3
CLUSTER_ALERT 30 SECONDS
NOTIFICATION TEXTLOG /var/opt/resmon/log/CCTextlog
“DRT: (Ora-test) DOWN alert”
NOTIFICATION SYSLOG
“DRT: (Ora-test) cluster1 DOWN alert”
CLUSTER_ALARM 30 SECONDS
NOTIFICATION TEXTLOG /var/opt/resmon/log/CCTextlog
“DRT: (Ora-test) DOWN alarm”
NOTIFICATION SYSLOG
“DRT: (Ora-test) cluster1 DOWN alarm”
# Section1: Cluster Information 121
CLUSTER_EVENT cluster2/DOWN
MONITORING_CLUSTER cluster3
CLUSTER_ALERT 30 SECONDS
NOTIFICATION TEXTLOG /var/opt/resmon/log/CCTextlog
“DRT: (Ora-test) DOWN alert”
NOTIFICATION SYSLOG
“DRT: (Ora-test) cluster2 DOWN alert”
CLUSTER_ALARM 30 SECONDS
NOTIFICATION TEXTLOG /var/opt/resmon/log/CCTextlog
“DRT: (Ora-test) DOWN alarm”
NOTIFICATION SYSLOG
“DRT: (Ora-test) cluster2 DOWN alarm”
CLUSTER_EVENT cluster3/DOWN
MONITORING_CLUSTER cluster1
CLUSTER_ALERT 30 SECONDS
NOTIFICATION TEXTLOG /var/opt/resmon/log/logging
“DRT: (Ora-test) DOWN alert”
NOTIFICATION SYSLOG
“DRT: (Ora-test) cluster3 DOWN alert”
CLUSTER_ALARM 30 SECONDS
NOTIFICATION TEXTLOG /var/opt/resmon/log/CCTextlog
“DRT: (Ora-test) DOWN alarm”
NOTIFICATION SYSLOG
“DRT: (Ora-test) cluster3 DOWN alarm”
CLUSTER_EVENT cluster1/UP
MONITORING_CLUSTER cluster3
CLUSTER_ALERT 30 SECONDS
NOTIFICATION TEXTLOG /var/opt/resmon/log/CCTextlog
“DRT: (Ora-test) UP alert”
NOTIFICATION SYSLOG
“DRT: (Ora-test) cluster1 UP alert”
CLUSTER_EVENT cluster2/UP
MONITORING_CLUSTER cluster3
CLUSTER_ALERT 30 SECONDS
NOTIFICATION TEXTLOG /var/opt/resmon/log/CCTextlog
“DRT: (Ora-test) UP alert”
NOTIFICATION SYSLOG
“DRT: (Ora-test) cluster2 UP alert”
CLUSTER_EVENT cluster3/UP
MONITORING_CLUSTER cluster1
CLUSTER_ALERT 30 SECONDS
NOTIFICATION TEXTLOG /var/opt/resmon/log/CCTextlog
“DRT: (Ora-test) UP alert”
NOTIFICATION SYSLOG
“DRT: (Ora-test) cluster3 UP alert”
122 Sample Continentalclusters ASCII configuration file

I Sample input and output files for cmswitchconcl
command
The following is a sample of input and output files for running
cmswitchconcl -C sample.input -c clusterA -F Sample.out
sample.input
============
### Section 1. Cluster Information
CONTINENTAL_CLUSTER_NAME Sample_CC_Cluster
CLUSTER_NAME ClusterA
CLUSTER_DOMAIN cup.hp.com
NODE_NAME node1
NODE_NAME node2
MONITOR_PACKAGE_NAME ccmonpkg
CLUSTER_NAME ClusterB
CLUSTER_DOMAIN cup.hp.com
NODE_NAME node3
NODE_NAME node4
MONITOR_PACKAGE_NAME ccmonpkg
MONITOR_INTERVAL 60 SECONDS
### Section 2. Recovery Groups
RECOVERY_GROUP_NAME RG1
PRIMARY_PACKAGE ClusterA/pkgX
RECOVERY_PACKAGE ClusterB/pkgX'
RECOVERY_GROUP_NAME RG2
PRIMARY_PACKAGE ClusterA/pkgY
RECOVERY_PACKAGE ClusterB/pkgY'
DATA_RECEIVER_PACKAGE ClusterB/pkgR1
RECOVERY_GROUP_NAME RG3
PRIMARY_PACKAGE ClusterB/pkgZ
RECOVERY_PACKAGE ClusterA/pkgZ'
RECOVERY_GROUP_NAME RG4
PRIMARY_PACKAGE ClusterB/pkgW
RECOVERY_PACKAGE ClusterA/pkgW'
DATA_RECEIVER_PACKAGE ClusterA/pkgR2
### Section 3. Monitoring Definitions
CLUSTER_EVENT ClusterA/DOWN
MONITORING_CLUSTER ClusterB
CLUSTER_ALERT 60 SECONDS
NOTIFICATION TEXTLOG /var/opt/resmon/log/data/events.log “CC alert: DOWN”
NOTIFICATION SYSLOG “CC alert: DOWN”
CLUSTER_ALARM 90 SECONDS
NOTIFICATION TEXTLOG /var/opt/resmon/log/data/events.log “CC alarm: DOWN”
NOTIFICATION SYSLOG
“CC alarm: DOWN”
Sample output
### Section1. Cluster Information
CONTINENTAL_CLUSTER_NAME Sample_CC_Cluster
CLUSTER_NAME ClusterA
CLUSTER_DOMAIN cup.hp.com
NODE_NAME node1
NODE_NAME node2
MONITOR_PACKAGE_NAME ccmonpkg
MONITOR_INTERVAL 60 SECONDS
CLUSTER_NAME ClusterB
CLUSTER_DOMAIN cup.hp.com
NODE_NAME node3
NODE_NAME node4
### Section 2. Recovery Groups
RECOVERY_GROUP_NAME RG1
123
PRIMARY_PACKAGE ClusterB/pkgX'
RECOVERY_PACKAGE ClusterA/pkgX
RECOVERY_GROUP_NAME RG2
PRIMARY_PACKAGE ClusterB/pkgY'
RECOVERY_PACKAGE ClusterA/pkgY
DATA_RECEIVER_PACKAGE ClusterA/pkgR1
RECOVERY_GROUP_NAME RG3
PRIMARY_PACKAGE clusterB/pkgZ
RECOVERY_PACKAGE ClusterA/pkgZ'
RECOVERY_GROUP_NAME RG4
PRIMARY_PACKAGE ClusterB/pkgW
RECOVERY_PACKAGE ClusterA/pkgW'
DATA_RECEIVER_PACKAGE ClusterA/pkgR2
### Section 3. Monitoring Definitions
CLUSTER_EVENT ClusterB/DOWN
MONITORING_CLUSTER ClusterA
CLUSTER_ALERT 0 MINUTES
NOTIFICATION SYSLOG “CC alert: DOWN”
CLUSTER_ALARM 0 MINUTES
NOTIFICATION SYSLOG
“CC alarm: DOWN”CLUSTER_EVENT ClusterB/UNREACHABLE
MONITORING_CLUSTER ClusterA
CLUSTER_ALERT 0 MINUTES
NOTIFICATION SYSLOG “CC alert: UNREACHABLE”
CLUSTER_ALARM 0 MINUTES
NOTIFICATION SYSLOG “
CC alarm: UNREACHABLE”CLUSTER_EVENT ClusterB/ERROR
MONITORING_CLUSTER ClusterA
CLUSTER_ALERT 0 MINUTES
NOTIFICATION SYSLOG
“CC alert: ERROR” CLUSTER_EVENT ClusterB/UP
MONITORING_CLUSTER ClusterA
CLUSTER_ALERT 0 MINUTES
NOTIFICATION SYSLOG "CC alert: UP”
124 Sample input and output files for cmswitchconcl command
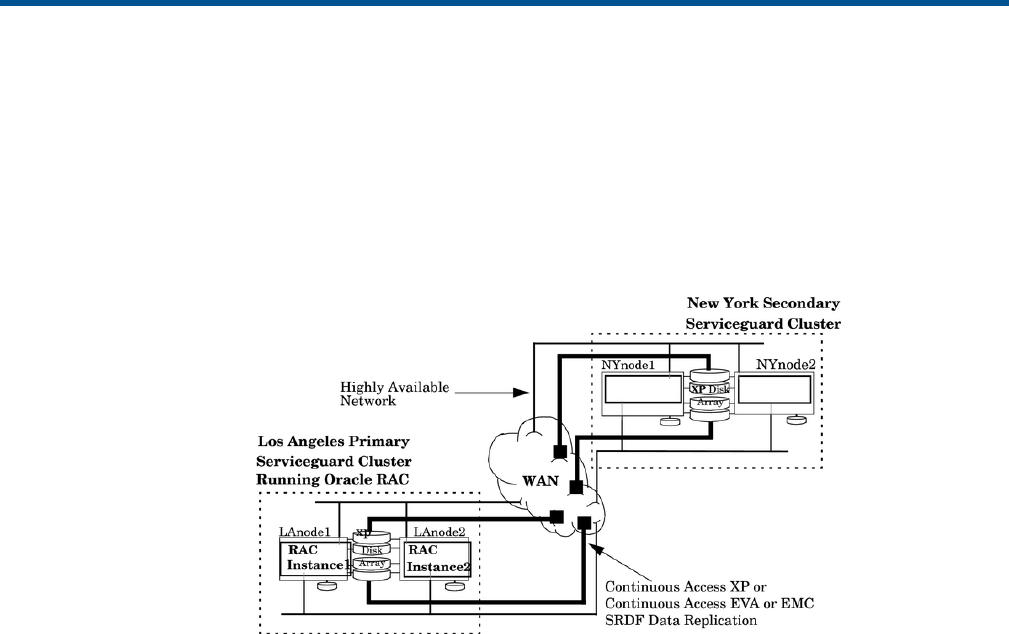
J Configuring Oracle RAC in Continentalclusters in Legacy
style
Support for Oracle RAC instances in a Continentalclusters environment
When the primary cluster fails, the clients database requests are served by the support of Oracle
RAC instances that are restarted by the Continantalclusters on the recovery cluster. Figure 3
(page 125) is a sample of Oracle RAC instances running in the Continentalclusters environment.
Figure 3 Oracle RAC instances in a Continentalclusters environment
As shown in Figure 3 (page 125), Oracle RAC instances are configured to run in Serviceguard
packages. The instance packages are running in the primary cluster and recovered on the recovery
cluster upon a primary cluster failure. Figure 4 (page 126) shows a recovery using an Oracle RAC
configuration after failover.
Oracle RAC instances are only supported in the Continentalclusters environment for physical
replication set up using HP StorageWorks Continuous Access P9000 and XP, HP StorageWorks
Continuous Access EVA or EMC Symmetrix Remote Data Facility (SRDF) using an SLVM or Cluster
Volume Manager (CVM) or Cluster File System (CFS) or Automatic Storage Management (ASM)
for volume management. In Continentalclusters, the Oracle RAC with ASM can be configured using
the SADTA. For more information, see “Configuring Oracle RAC database with ASM in
Continentalclusters using SADTA” (page 136).
Continentalclusters Oracle RAC support is available for a cluster environment configured with only
Serviceguard and SGeRAC (For example, an environment running with Oracle RAC 9i, 10g or
11g).
Starting with Continentalclusters version A.05.01, recovery of an Oracle RAC instance in a cluster
environment running Serviceguard and Oracle Clusterware is supported. There is a special
configuration required for the environment running both Oracle Clusterware and
Serviceguard/Serviceguard Extension for RAC (SGeRAC) for the Continentalclusters RAC instance
recovery protection.
For more information, see “Configuring the environment for Continentalclusters to support Oracle
RAC” (page 126).
Support for Oracle RAC instances in a Continentalclusters environment 125
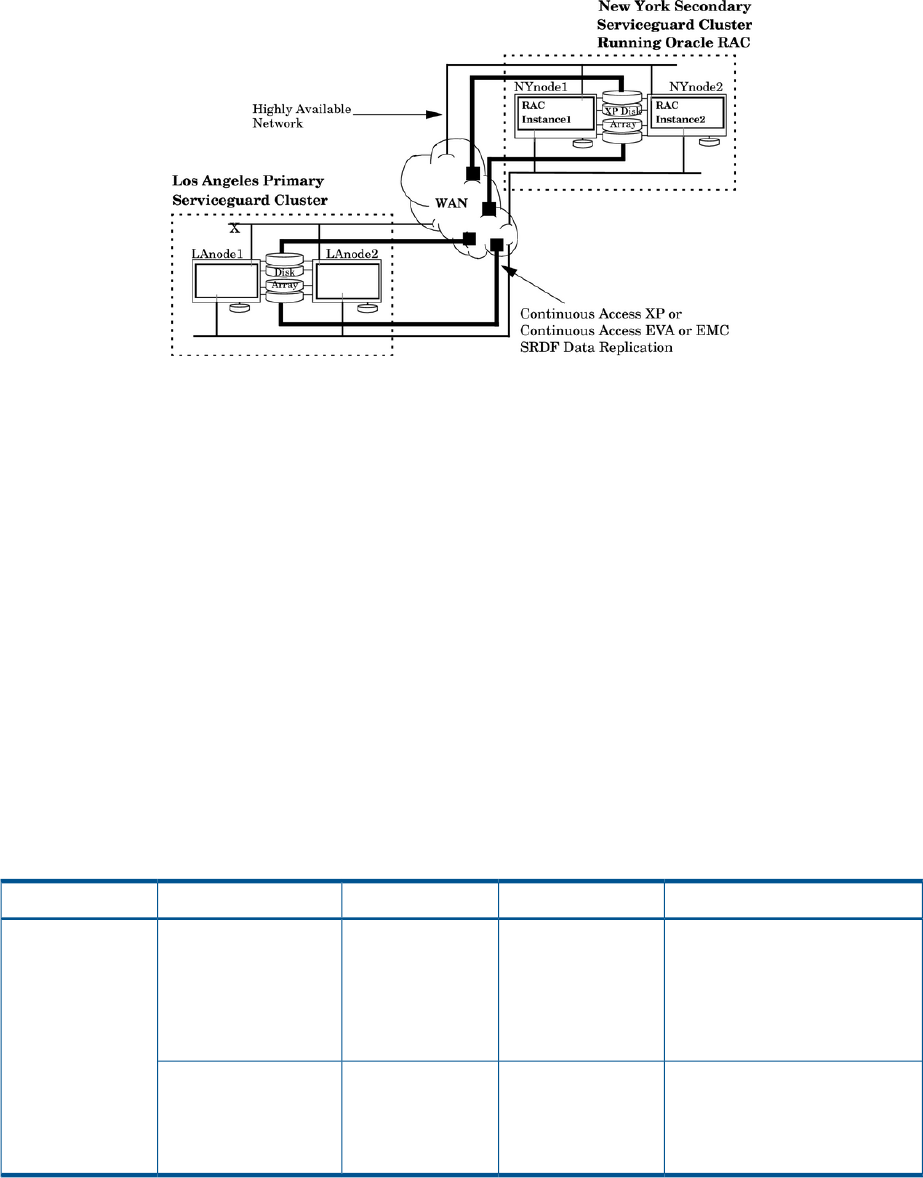
Figure 4 Sample Oracle RAC instances in a Continentalclusters environment after failover
The Oracle RAC workloads can also be deployed in Continentalclusters using Site Aware Disaster
Tolerant Architecture (SADTA). For more information on using SADTA for deploying Oracle RAC
Workloads in Continentalclusters, see “Configuring Oracle RAC database with ASM in
Continentalclusters using SADTA” (page 136).
Configuring the environment for Continentalclusters to support Oracle RAC
In order to enable Continentalclusters support for Oracle RAC, there must be a set of configurations,
which include either Continuous Access P9000 and XP, or Continuous Access EVA, Oracle RAC,
and Continentalclusters.
To support this feature, Continentalclusters must be configured with an environment that has physical
replication set up using HP StorageWorks Continuous Access P9000 and XP, HP StorageWorks
Continuous Access EVA or EMC Symmetrix Remote Data Facility (SRDF) using an SLVM or Cluster
Volume Manager (CVM) or Cluster File System (CFS) for volume management. For more information
on specific Oracle RAC configurations that are supported, see Table 10 (page 126).
For complete installation and configuration information of Oracle and HP StorageWorks products,
see the Oracle RAC and HP StorageWorks manuals.
Table 10 (page 126) provides configuration information for RAC support of Continentalclusters.
Table 10 Supported Continentalclusters and RAC configuration
Required MetroclusterCluster File SystemVolume ManagersDisk ArraysOracle RAC
Metrocluster with Continuous
Access P9000
Serviceguard
Storage
HP SLVM
Serviceguard
Storage
Management CVM
HP StorageWorks
P9000 Disk Array
family or HP
StorageWorks XP Disk
Array series with
Continuous Access
Oracle RAC with
or without
Clusterware Management Suite
CFS
Metrocluster with Continuous
Access EVA P6000
Serviceguard
Storage
HP SLVM
Serviceguard
Storage
Management CVM
HP StorageWorks
EVA series with
Continuous Access Management Suite
CFS
To enable Continentalclusters recovery support for Oracle RAC instances:
126 Configuring Oracle RAC in Continentalclusters in Legacy style

1. Configure either Continuous Access P9000 and XP, or Continuous Access EVA for data
replication between disk arrays associated with primary and recovery clusters.
2. Configure the database storage using one of the following software:
•Shared Logical Volume Manager (SLVM)
•Cluster Volume Manager (CVM)
•Cluster File Systems (CFS)
You must configure the SLVM volume groups or CVM disk groups on the disk arrays to store
the Oracle database. Configure the volume groups or disk groups on both primary and
recovery clusters. Ensure that the volume groups names or disk group names on both the
clusters are identical. You must also setup data replication between the disk arrays associated
with primary and recovery clusters.
Only the volume groups or disk groups configured to store the database must be configured
for replication across primary and recovery clusters. In an environment running with Oracle
Clusterware, you must configure the storage used by Oracle Clusterware to reside on disks
that are not replicated.
If you use CVM or CFS in your environment for storage infrastructure, you must complete the
following steps at both, primary and recovery clusters.
a. Ensure that the primary and recovery clusters are running.
b. Configure and start the CFS or CVM multi-node package using the command cfscluster
config -s. When CVM starts, it automatically selects the master node. This master
node is the node from which you must run the disk group configuration commands. To
determine the master node, run the following command from any node in the cluster.
# vxdctl -c mode
c. Create disk groups and mount points. For more information on creating disk groups and
mount points, see Using Serviceguard Extension for RAC user's guide.
NOTE: When you use CVM disk groups, Continentalclusters does not support configuring
the CVM disk groups in the RAC instance package files using the CVM_ACTIVATION_CMD
and CVM_DISK_GROUP variables. The instance packages must be configured to have a
dependency with the required CVM disk group multi-node package.
d. Run the following commands of the CFS scripts to add and configure the disk groups and
file system mount points multi-node packages (MNP) to the clusters. These multi-node
packages manipulate the disk group, and mount-point activities in the cluster.
•# cfsdgadm add <disk group name> all=sw
For example:
# cfsdgadm add racdgl all=sw
•# cfsmntadm add <disk group name> <volume name> <mount point>
all=rw
For example:
# cfsmntadm add racdgl vol4 /cfs/mntl all=rw
e. Set the AUTO_RUN flag to NO with the following commands:
•# cfsdgadm set_autorun <disk group name> NO
•# cfsmntadm set_autorun < mount point name> NO
f. Activate the disk group MNP:
# cfsdgadm activate <diskgroup>
g. Start the mount point MNP:
# cfsmount <mount point>
Support for Oracle RAC instances in a Continentalclusters environment 127

NOTE: After you configure the disk group and mount point multi-node packages, you
must deactivate the packages on the recovery cluster. During a recovery process, the
cmrecovercl command automatically activates these multi-node packages.
h. Set the access rights for volumes and disk groups to persistent:
# vxedit -g <Disk Group Name> set user=<User Name> group=<User
Group> set mode=<Permissions> <Logical Volumes>
This step is required because when you import disks or volume groups to the recovery
site, the access rights for the imported disks or volume groups are set to root by default.
As a result, the database instances do not start. To eliminate this behavior, you must set
the access rights to persistent.
3. Configure Oracle RAC. You must configure all the database files to reside on SLVM volume
groups, CVM disk groups or CFS file systems that you have configured in your environment.
Ensure that the configuration of the Oracle RAC instances that must be recovered in the
Continentalclusters environment are identical on the primary and recovery clusters. For more
information on configuring Oracle RAC, refer to the Oracle RAC installation and configuration
user’s guide.
If you have Oracle Clusterware and Serviceguard running in your environment, you must
complete certain additional configuration procedures.
4. Configure Continentalclusters.
5. Configure Oracle RAC instances in Serviceguard packages. Continentalclusters supports
recovery only for applications running in Serviceguard packages. In a multiple recovery pair
scenario, where more than one primary cluster share the same recovery cluster, the primary
RAC instance package name must be unique on every primary cluster.
Configure the Oracle RAC instance packages on both primary and recovery clusters based
on the number of RAC instances configured to run on that cluster. Ensure that the same number
of Oracle RAC instances are configured on both the primary and recovery clusters. Set the
AUTO_RUN parameter in the package configuration file to NO. This ensures Continentalclusters
recovery protection.
In the Continentalclusters environment, the RAC database can be configured using the HP
Serviceguard extension for RAC (SGeRAC) toolkit. In addition, the RAC database can be
configured either as a legacy package or as a modular package. For more information on
configuring the RAC database as a multi-node package, see http://www.hp.com/go/
hpux-serviceguard-docs -> HP Serviceguard Extension for RAC -> Using Serviceguard Extension
for RAC .
NOTE: While configuring the RAC database as a modular package, do not use the
pre-integrated physical replication modules, such as ccxpca,cccaeva, and ccsrdf.
6. Set up the environment file. Instead of one environment file for every Continentalclusters
application package, there is only one environment file for every set of Oracle RAC instance
packages accessing the same database. This file can be located anywhere except the directory
where the Oracle RAC instance package configuration and control files are located. Only
one environment file can reside under one directory.
The value of the PKGDIR variable must be the directory where this environment file is located.
Be sure to place this environment file in the same path on all the nodes of both the primary
and recovery clusters in a recovery pair. You must name the environment file using your
package name as the prefix. For example, <package name>_xpca.env. You must
uncomment all the AUTO variables in the environment file.
7. Set up the Continentalclusters Oracle RAC specification file. The existence of the file /etc/
cmconcl/ccrac/ccrac.config serves as an enabler for Continentalclusters Oracle RAC
support. A template of this file is available in the /opt/cmconcl/scripts directory.
Edit this file to suit your environment. After editing, move the file to the /etc/cmconcl/
ccrac/ccrac.config directory on all the nodes in the participating clusters:
128 Configuring Oracle RAC in Continentalclusters in Legacy style
a. Log in as root on one node of the primary cluster.
b. Change to your own directory:
# cd <your own directory>
c. Copy the file:
# cp /opt/cmconcl/scripts/ccrac.config ccrac.config.mycopy
d. Edit the file ccrac.config.mycopy to suit your environment.
The following parameters must be edited:
CCRAC_ENV - fully qualified Metrocluster environment file name.
This file naming convention is required by the Metrocluster
software. It must be appended with _<DataReplication>.env where
<DataReplication> is the name of the data replication scheme
being used. See the Metrocluster documents for the environment
file naming convention.
This parameter is mandatory
CCRAC_SLVM_VGS - SLVM volume groups configured for the device
specified in the above environment file for variable DEVICE_GROUP.
These are the volume groups used by the associated RAC instance
packages. It is important that all of the volume groups configured
for the specified DEVICE_GROUP are listed. If only partial of
the configured volume groups are listed, the device will not be
prepared properly and the storage will result in an inconsistent
state.
This parameter is mandatory when SLVM volume groups are used.
This parameter must not be declared when only CVM disk groups
are used.
CCRAC_CVM_DGS - CVM disk groups configured for the device
specified in the above environment file for variable DEVICE_GROUP.
These are the disk groups used by the associated RAC instance
packages. It is important that all of the disk groups configured
for the specified DEVICE_GROUP are listed. If configured disk
groups are partially listed, the device will not be prepared
properly and the storage results in an inconsistent state.
This parameter is mandatory when CVM disk groups or CFS file
syatems are used. This parameter cannot be declared when SLVM
volume groups are used.
CCRAC_INSTANCE_PKGS - the names of the configured RAC instance
packages accessing in parallel the database stored in the
specified volume groups.
This parameter is mandatory.
CCRAC_CLUSTER - Serviceguard cluster name configured as the
primary cluster of the corresponding RAC instance package set.
This parameter is mandatory.
CCRAC_ENV_LOG - logfile specification for the storage preparation
output.
This parameter is optional. If not specified, ${CCRAC_ENV}.log
used.Sample setup:
CCRAC_ENV[0]=/etc/cmconcl/ccrac/db1/db1EnvFile_xpca.env
CCRAC_SLVM_VGS[0]=ccracvg1 ccracvg2
CCRAC_INSTANCE_PKGS[0]=ccracPkg1 ccracPkg2
CCRAC_CLUSTER[0]=PriCluster1
CCRAC_ENV_LOG[0]=/tmp/db1_prep.log
Support for Oracle RAC instances in a Continentalclusters environment 129
(Multiple values for CCRAC_SLVM_VGS and CCRAC_INSTANCE_PKGS must
be separated by space).
If multiple sets of Oracle instances accessing different databases
are configured in your environment, and require
Continentalclusters recovery support, repeat this set of
parameters with an incremented index. For Example,
CCRAC_ENV[0]=/etc/cmconcl/ccrac/db1/db1EnvFile_xpca.env
CCRAC_SLVM_VGS[0]=ccracvg1
ccracvg2CCRAC_INSTANCE_PKGS[0]=ccracPkg1
ccracPkg2CCRAC_CLUSTER[0]=PriCluster1
CCRAC_ENV_LOG[0]=/tmp/db1_prep.log
CCRAC_ENV[1]=/etc/cmconcl/ccrac/db2/db2EnvFile_srdf.env
CCRAC_CVM_DGS[1]=racdg01 racdg02
CCRAC_INSTANCE_PKGS[1]=ccracPkg3 ccrac
Pkg4CCRAC_CLUSTER[1]=PriCluster2
CCRAC_ENV_LOG[1]=/tmp/db2_prep.log
CCRAC_ENV[2]=/etc/cmconcl/ccrac/db3/db3EnvFile_xpca.env
CCRAC_SLVM_VGS[2]=ccracvg5 ccracvg6
CCRAC_INSTANCE_PKGS[2]=ccracPkg5 ccracPkg6
CCRAC_CLUSTER[2]=PriCluster2
e. Copy the edited file to the final directory:
# cp ccrac.config.mycopy /etc/cmconcl/ccrac/ccrac.config
f. Copy file /etc/cmconcl/ccrac/ccrac.config to all the other nodes of the cluster.
g. Log in as root on one node of the recovery cluster and repeat steps “b” through “f”. If
the recovery cluster is configured to recover the Oracle RAC instances for more than one
primary cluster, the ccrac.config file on the recovery cluster must contain information
for all the primary clusters.
8. Configure Continentalclusters Recovery Group for Oracle RAC instance. If you are using an
individual package for every RAC instance, define one recovery group for every Oracle RAC
instance recovery. The PRIMARY_PACKAGE specified for the Oracle RAC instance recovery
group is the name of the instance package configured in the primary cluster. The
RECOVERY_PACKAGE specified for the RAC instance recovery group is the corresponding
instance package name configured on the recovery cluster. For Example:
RECOVERY_GROUP_NAME instanceRG1
PRIMARY_PACKAGE ClusterA/instancepkg1
RECOVERY_PACKAGE ClusterB/instancepkg1'
RECOVERY_GROUP_NAME instanceRG2
PRIMARY_PACKAGE ClusterA/instancepkg2
RECOVERY_PACKAGE ClusterB/instancepkg2'
The packages instancepkg1 and instancepkg2 are configured to run in the primary
cluster “ClusterA”. The packages instancepkg1’and instancepkg2’are configured
to be restarted or recovered on the recovery cluster “ClusterB” upon primary cluster failure.
If you are using one multi-node package to package all the RAC instances, define only one
recovery group for the RAC MNP Package. For example:
RECOVERY_GROUP_NAME manufacturing_recovery
PRIMARY_PACKAGE ClusterA/man_rac_mnp
RECOVERY_PACKAGE ClusterB/man_rac_mnp
When recovering a recovery group with multi-node packages, Continentalclusters starts an
instance in every cluster node configured in the MNP.
After editing the Continentalclusters configuration file to add in the recovery group specification
for Oracle RAC instance packages, you must manually apply the new configuration by running
the cmapplyconcl command.
130 Configuring Oracle RAC in Continentalclusters in Legacy style
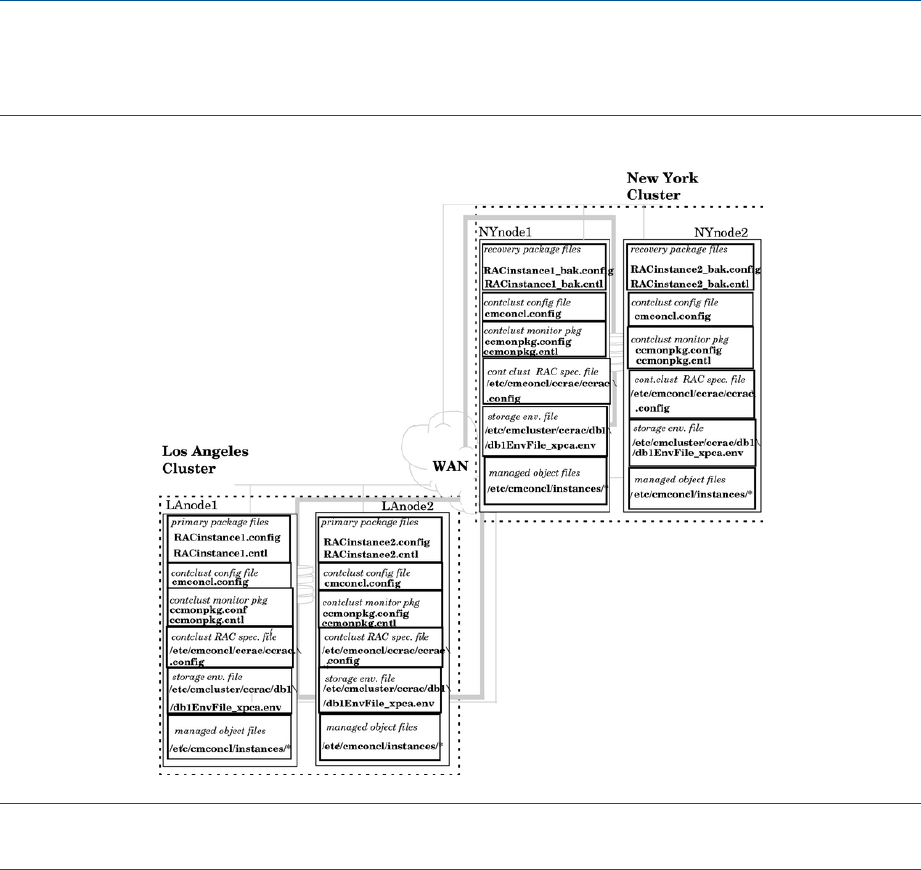
When you finish configuring a recovery pair with RAC support, your systems must have sets
of files similar to those shown in Figure 5.
NOTE: If you are configuring Oracle RAC instances in Serviceguard packages in a CFS or CVM
environment, do not specify the CVM_DISK_GROUPS, and CVM_ACTIVATION_CMD fields in the
package control scripts as CVM disk group manipulation is addressed by the disk group multi
node package.
Figure 5 Continentalclusters configuration files in a recovery pair with RAC support
NOTE: Starting from Continentalclusters Version A.08.00, there are no managed object files in
the /etc/cmconl/instances directory.
Serviceguard/Serviceguard extension for RAC and Oracle Clusterware configuration
The following configurations are required for Continentalclusters RAC instance recovery support
for the cluster environment that has with Serviceguard/Serviceguard Extension for RAC and CRS
(Oracle Cluster Software):
1. The Oracle RAC environment having Serviceguard/Serviceguard Extension for RAC and
Oracle Cluster Software must follow all the recommendations listed in the Serviceguard and
SGeRAC manuals for running with CRS (Oracle Cluster Software).
2. At start up, CRS must not automatically activate the volume groups that are configured for the
database. The file /var/opt/oracle/oravg.conf must not exist on any node of the
primary and recovery cluster.
3. The CRS storage (OCR and voting disk) must be configured on a separate volume group that
is separate from the databases which are accessed by the RAC instances.
4. The RAC instance attribute AUTO_START listed in the CRS service profile must be set to 2 on
both primary and recovery clusters so that the instance does not automatically start when the
node rejoins the cluster. Log in as the oracle administrator and change the attribute value:
Support for Oracle RAC instances in a Continentalclusters environment 131

a. Generate the resource profile.
# crs_stat -p instance_name >
$CRS_HOME/crs/public/instance_name.cap
b. Edit the resource profile and set AUTO_START value to 2.
c. Register the value.
# crs_register -u instance_name
d. Verify the value.
# crs_stat -p instance_name
Initial startup of Oracle RAC instance in a Continentalclusters environment
To ensure that the disk array is ready for access in shared mode for the Oracle RAC instances, HP
recommends that you run the Continentalclusters tool /opt/cmconcl/bin/ccrac_mgmt.ksh
to initially startup the configured instance packages. This tool ensures that the configured disk array
is ready in writable mode for shared access before starting up the RAC instance packages. If this
tool is not used, manually verify to ensure the storage is ready in writable and shared access mode
before starting the RAC instance packages.
NOTE: HP recommends that ccrac_mgmt.ksh bè used for the initial startup of the RAC instance
package, or for failing back the RAC instance packages. This tool must not be used at the recovery
site for recovering RAC instance packages, instead cmrecovercl must be used.
After the initial startup, use the Serviceguard commands cmhaltpkg,cmrunpkg,cmmodpkg as
required to halt and restart the packages in the primary cluster.
To startup the Oracle RAC instance packages on any node of the primary cluster:
1. If the cluster is running with Serviceguard and Oracle CRS, ensure that the CRS daemons and
the required Oracle services, such as listener, GSD, ONS, and VIP are up and running on all
the nodes the RAC database instances are configured to run.
2. Ensure the /etc/cmconcl/ccrac/ccrac.config file exists and was edited to contain
the appropriate information.
3. To start all the RAC instance packages configured to run as primary packages on the local
cluster.
# /opt/cmconcl/bin/ccrac_mgmt.ksh start
To start a specific set of RAC instance packages.
# /opt/cmconcl/bin/ccrac_mgmt.ksh -i <indexNumber> start
<IndexNumber> is the index used in the /etc/cmconcl/ccrac/ccrac.config file for
the target set of the Oracle RAC instance packages.
4. To stop all the RAC instance packages configured to run as primary packages on the local
cluster.
# /opt/cmconcl/bin/ccrac_mgmt.ksh stop
To stop a specific set of RAC instance packages.
# /opt/cmconcl/ccrac_mgmt.ksh -i <indexNumber> stop
<IndexNumber> is the index used in the /etc/cmconcl/ccrac/ccrac.config file for
the target set of the Oracle RAC instance packages.
Failover of Oracle RAC instances to the recovery site
Upon a disaster that disables the primary cluster, to start up a Continentalclusters recovery process,
run the following command:
# cmrecovercl
For the cluster environment having Serviceguard and Oracle Clusterware, confirm that the
Clusterware daemons and the required Oracle services, such as listener, GSD, ONS, and VIP, are
132 Configuring Oracle RAC in Continentalclusters in Legacy style

started on all the nodes, which the database instance are configured to run before initiating the
recovery process.
If you have configured CFS or CVM in your environment, ensure the following:
•The SG-CFS-PKG (system multi-node package) is up and running.
The SG-CFS-PKG package is not part of the continentalclusters configuration.
•The cmrecovercl command is run from the CVM master node. Use the following command
to find out the CVM master node:
# vxdctl -c mode
Starting with Continentalclusters A.07.00, recovery groups of applications using CFS or CVM
can be recovered by running the cmrecovercl command from any node at the recovery
cluster.
NOTE: Ensure that the primary site is unavailable and all of the Oracle RAC instance packages
are not running in the primary cluster before initiating the recovery process.
The Continentalclusters command, cmrecovercl prepares the configured storage for Oracle RAC
instances shared access only when the file /etc/cmconcl/ccrac/ccrac.config exists. If
this file does not exist, the configured storage is not prepared for shared access before recovering
the Oracle RAC instance packages. As a result, if Continentalclusters recovery group configuration
includes Oracle RAC instance packages, these packages do not start or operate successfully.
The recovery process will startup the configured Oracle RAC instance packages as well as other
application packages configured in the Continentalclusters environment.
If the Continentalclusters Oracle RAC support is enabled (that is, the /etc/cmconcl/ccrac/
ccrac.config file exists), when the command cmrecovercl is invoked and confirmations are
required for the process to proceed, the following messages are displayed:
WARNING: This command will take over for the primary cluster LACluster
by starting the recovery package on the recovery cluster NYCluster. You
must follow your site disaster recovery procedure to ensure that the
primary packages on LACluster are not running and that recovery on
NYCluster is necessary. Continuing with this command while the
applications are running on the primary cluster might result in data
corruption.
Are you sure that the primary packages are not running and will not
come back, and are you certain that you want to start the recovery
packages [y/n]? y
cmrecovercl: Attempting to recover Recovery Groups from cluster
LACluster.
NOTE: The configuration file /etc/cmconcl/ccrac/ccrac.config for cluster
shared storage recovery exists. Data storage specified in the file for
this cluster prepared for this recovery process. If you choose "n" -
not to prepare the storage for this recovery process, ensure that the
required storage for this recovery process has been properly prepared.
Is this what you intend to do [y/n]? y
The Oracle RAC instance package can be started in sequence.
# cmrecovercl -g <recoverygroupname>
The option -g is used to start up the first instance package, wait until the disk arrays are
synchronized before starting up the second instance package.
If the option -g is used with the command cmrecovercl, the following messages are displayed:
WARNING: This command will take over for the primary cluster
primary_cluster by starting the recovery package on the recovery cluster
secondary_cluster. You must follow your site disaster recovery procedure
to ensure that the primary packages on primary_cluster are not running
Support for Oracle RAC instances in a Continentalclusters environment 133

and that recovery on secondary_cluster is necessary. Continuing with
this command while the applications are running on the primary cluster
might result in data corruption.
Are you sure that the primary packages are not running and will not
come back, and are you certain that you want to start the recovery
packages [y/n]? y
cmrecovercl: Attempting to recover RecoveryGroup subsrecovery1 on cluster
secondary_cluster
NOTE: The configuration file /etc/cmconcl/ccrac/ccrac.config for cluster
shared storage recovery exists. If the primary package in the target
group is configured within this file, the corresponding data storage
prepared before starting the recovery package. If you choose "n" - not
to prepare the storage for this recovery process, ensure that the
required storage for the recovery package has been properly prepared.
Is this what you intend to do [y/n]? y
Enabling recovery package racp-cfs on recovery cluster secondary_cluster
Running package racp-cfs\
Running package racp-cfs on node atlanta
Successfully started package racp-cfs on node atlanta
Running package racp-cfs on node miami
Successfully started package racp-cfs on node miami
Successfully started package racp-cfs.
cmrecovercl: Completed recovery process for every recovery group.
Recovery packages have been started. Use cmviewcl or verify package log
file to verify that the recovery packages are successfully started.
These message prompts can be disabled by running the cmrecovercl command with the option
-y.
If you have configured the Oracle RAC instance package such that there is one instance for every
package, the instance or recovery group can be recovered individually. If you have configured
all instances as a single multi-node package (MNP), recovering the recovery group of this package
starts all instances.
NOTE: At the recovery time, Continentalclusters is responsible for recovering the configured
Oracle RAC instance packages. The data integrity and currency at the recovery site are based on
the data replication configuration in the Oracle environment.
Failback of Oracle RAC instances after a failover
After failover, the configured disk array at the old recovery cluster becomes the primary storage
of the database. The Oracle RAC instances are running at the recovery cluster after a successful
recovery.
Before failing back the Oracle RAC instances, ensure that the data in the original primary site disk
array is in an appropriate state. Follow the disk array specific procedures for data resynchronization
between two clusters, and the Oracle RAC failback procedures before restarting the instance.
NOTE: Ensure the AUTO_RUN flag for all the configured Continentalclusters packages is disabled
before restarting the cluster.
To failback the Oracle RAC instances to the primary cluster:
1. Fix the problems that caused the primary site failure.
2. Stop the Oracle RAC instance packages running on the recovery cluster. On any node of the
recovery cluster.
# /opt/cmconcl/bin/ccrac_mgmt.ksh stop
134 Configuring Oracle RAC in Continentalclusters in Legacy style

If you have configured CVM or CFS in your environment:
a. Unmount the CFS mount points:
# cfsumount <Mount Point Name>
b. Deactivate the disk groups:
# cfsdgadm deactivate <Disk Group Name>
c. Deport the disk groups using the following command:
# vxdg deport <Disk Group Name>
The recovery cluster is now ready to failback packages and applications to the primary
cluster.
3. Synchronize the data between the two participating clusters. Ensure that the data integrity
and the data currency are at the expected level at the primary site.
4. Verify that the primary cluster is up and running.
# cmviewcl
5. If the cluster is running with Serviceguard and Oracle CRS, ensure that CRS and the required
services, such as listener, GSD, ONS, and, VIP are up and running on all of the instance
nodes. By default, when CRS is started, these Oracle services are initiated.
NOTE: Ensure that the SG-CFS-PKG (system multi-node) package is running for the CFS/CVM
environment.
6. Startup the Oracle RAC instance packages on the primary cluster. If you have configured CFS
or CVM in your environment, run the following command from the master node:
# /opt/cmconcl/bin/ccrac_mgmt.ksh start
Alternatively, you can run the command on any node in the primary cluster.
This command fails back all of the RAC instance packages configured to adopt to this cluster
as the primary cluster.
To failback only a specific set of the Oracle RAC instance package set:
# /opt/cmconcl/bin/ccrac_mgmt.ksh [-i <indexNumber>] \ start
<indexNumber>is the index used in the/etc/cmconcl/ccrac/ccrac.config file for
the target set of the Oracle RAC instance packages.
Rehearsing Oracle RAC databases in Continentalclusters
Special precaution is required for running disaster recovery (DR) rehearsal for Oracle RAC
databases. For information on configuring and running rehearsal for RAC databases, see Disaster
Recovery Rehearsal in Continentalclusters whitepaper.
Support for Oracle RAC instances in a Continentalclusters environment 135
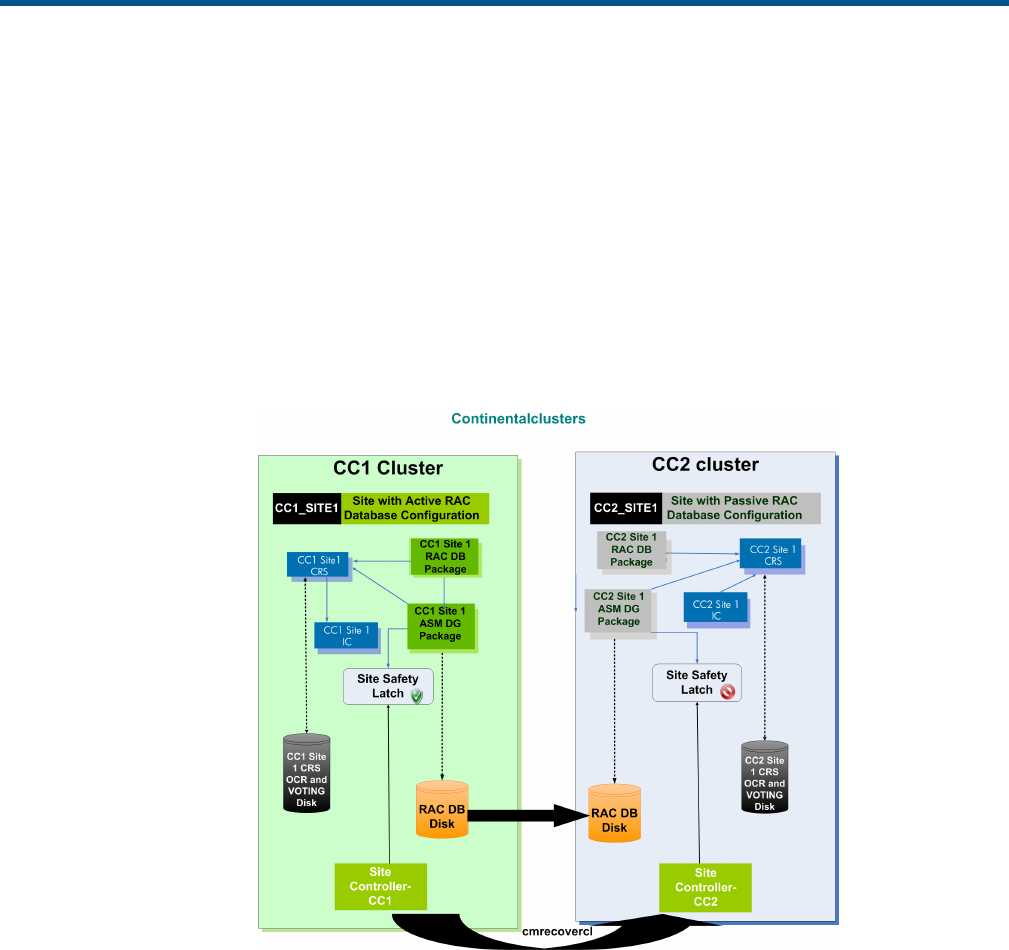
K Configuring Oracle RAC database with ASM in
Continentalclusters using SADTA
Automatic Storage Management (ASM) is a feature in Oracle Database 10g and 11g that provides
the database administrator with a simple storage management interface that is consistent across
all server and storage platforms. In Continentalcluster, Oracle RAC with ASM must be configured
using the SADTA.
Figure 6 (page 136) illustrates two Oracle RAC databases that are replicas of each other, and are
configured one at each cluster in Continentalclusters using SADTA. The database workload at each
cluster has its own Site Controller package and Site Safety Latch. The arrows in the Figure 6
(page 136) indicate the package dependencies. The Oracle Clusterware software must be installed
at every cluster in the Continentalclusters.
Figure 6 Sample Oracle RAC database with ASM in SADTA
The CRS daemons at the clusters must be configured as a Serviceguard package using the HP
Serviceguard extension for RAC (SGeRAC) toolkit in every Serviceguard cluster. The CRS Home
must be installed on a file system that is local to the cluster. The CRS voting and OCR disks must
not be configured for replication.
The RAC database software must be installed at every cluster in the Continentalclusters. Create
ASM disk groups at the nodes in the primary cluster and configure an identical ASM disk group
at the recovery cluster. The ASM disk group (ASM DG) must be configured as a Serviceguard
package using the SGeRAC toolkit at every cluster.
The ASM DG package must have dependency on the CRS package on the cluster. Two replicas
of the RAC database must be configured; one at the primary cluster and the other at the recovery
cluster. The database must be created at the nodes in source site of the replication and the
configuration and data must be replicated to the nodes in the other site.
The RAC database (RAC DB) must be configured using the SGeRAC toolkit at every site. The RAC
DB package must have dependency on the CRS package and the ASM DG packages on the
cluster.
136 Configuring Oracle RAC database with ASM in Continentalclusters using SADTA

This section describes the procedures that must be followed to configure SADTA with Oracle RAC
database with ASM. To explain these procedures, it is assumed that the Oracle RAC home directory
is /opt/app/oracle/product/11.1.0/db_1/dbs and the database name is hrdb.
Tto configure Oracle RAC database with ASM in Continentalclusters using SADTA:
1. Set up replication between the primary cluster and the recovery cluster.
2. Configure a primary cluster with a single site defined in the Serviceguard cluster configuration
file.
NOTE: If Three Data Center (3DC) configuration using P9000 and XP Continuous Access
3DC replication technology is being created, then the primary cluster must be configured as
a Metrocluster with two sites.
3. Configure a recovery cluster with a single site defined in the Serviceguard cluster configuration
file.
4. Install and configure Oracle Clusterware in both primary cluster and recovery cluster.
5. Install Oracle Real Application Clusters (RAC) software in both primary and recovery cluster.
6. Create the RAC database with ASM in the primary cluster:
a. Configure ASM disk group in the primary cluster.
b. Configure SGeRAC Toolkit Packages for the ASM disk group in the primary cluster.
c. Create the RAC database using the Oracle Database Configuration Assistant in the
primary cluster.
d. Configure and test the RAC MNP stack at primary cluster.
e. Halt the RAC database at primary cluster.
7. Configure the Site Controller Package in the primary cluster.
8. Configure the Site Safety Latch dependencies in the primary cluster.
9. Suspend the replication to the recovery cluster.
10. Configure the identical ASM instance at the recovery cluster.
NOTE: Step 10 is required only for Oracle 11g R1 and 10g R2. Step 10 is no longer
required for Oracle 11g R2.
11. Set up the identical RAC database at the recovery cluster.
12. Configure the Site Controller Package in the recovery cluster.
13. Configure the Site Safety Latch dependencies in the recovery cluster.
14. Resume the replication to the recovery cluster.
15. Configure Continentalclusters.
16. Configure Continentalclusters recovery group.
17. Start the Disaster Tolerant RAC Database in the primary cluster.
The subsequent sections elaborate on every of these steps.
Setting up replication
The procedure for setting up replication is identical to the procedure for setting up replication to
configure Oracle RAC with SADTA. For more information on setting up replication in SADTA for
configuring Oracle RAC database with ASM, see “Setting up replication” (page 44).
Configure a primary cluster with a single site
The procedure for configuring Continentalclustrers with sites for Oracle RAC database with ASM
is identical to the procedure for configuring Oracle RAC with SADTA. For more information on
configuring Continentalclusters with sites for SADTA, see “Configuring the primary cluster with a
single site” (page 44).
Setting up replication 137

Configure a recovery cluster with a single site
The procedure for configuring Continentalclustrers with sites for Oracle RAC database with ASM
is identical to the procedure for configuring Oracle RAC with SADTA. For more information on
configuring Continentalclusters with sites for SADTA, see “Configuring the recovery cluster with a
single site” (page 45).
Installing and configuring Oracle Clusterware
After setting up replication in your environment, you must install Oracle Clusterware. Use the Oracle
Universal Installer to install and configure the Oracle Clusterware. Install and configure Oracle
Clusterware in both the primary cluster and recovery cluster. When you install Oracle Clusterware
at a cluster, the cluster installation is confined in a cluster and the Clusterware storage is not
replicated. As a result, Oracle Clusterware must be installed on a local file system on every node
in the cluster. The Oracle Cluster Registry (OCR) and Voting disks must be shared only among the
nodes in the cluster.
For every Oracle RAC 11g R2 clusterware installation, one Single Client Access Name (SCAN)
is required, which must resolve to one public IP. SCAN allows clients to use one name in the
connection strings to connect to every cluster as whole. A client connection request can be handled
by any CRS cluster node. Since in a Continentalclusters, there are two CRS clusters, you must
configure a separate SCAN for every CRS cluster.
To configure the storage device for installing Oracle clusterware, see the latest edition of Using
Serviceguard Extension for RAC available at http://www.hp.com/go/hpux-serviceguard-docs ->
HP Serviceguard Extension for RAC -> Using Serviceguard Extension for RAC
To configure SADTA, the Clusterware daemons must be managed through HP Serviceguard. As a
result, the clusterware at both clusters must be packaged using the HP Serviceguard extension for
RAC toolkit. This configuration must be done on all the clusters in Continentalclusters. Also, ensure
that the package service is configured to monitor the Oracle Clusterware. For information on
configuring the Clusterware packages, see the HP SGeRAC Toolkit README available at http://
www.hp.com/go/hpux-serviceguard-docs -> HP Serviceguard Extension for RAC -> Using
Serviceguard Extension for RAC.
SGeRAC toolkit packages can be created using the Package Easy Deployment feature available
in Serviceguard Manager version B.03.10. For more details, see Using Easy Deployment in
Serviceguard and Metrocluster Environments on HP-UX 11i v3 available at http://www.hp.com/
go/ hpux-serviceguard-docs —> HP Serviceguard.
Installing Oracle Real Application Clusters (RAC) software
The Oracle RAC software must be installed in the Continentalclusters, once at every Serviceguard
cluster. Also, the RAC software must be installed in the local file system on all the nodes in a cluster.
To install Oracle RAC, use the Oracle Universal Installer (OUI). After installation, the installer
prompts you to create the database. Do not create the database until you install Oracle RAC in
both the clusters. You must create identical RAC databases only after installing RAC at both clusters.
For information on installing Oracle RAC, see the documents available at the Oracle documentation
site.
Creating the RAC database with ASM in the primary cluster
After installing Oracle RAC, create the RAC database in the primary cluster which has the source
disks of the replication. The RAC database creation is replicated to the recovery cluster through
physical replication and the identical RAC database can be configured on the recovery cluster
from the replication target disks.
Configuring the ASM disk group in the primary cluster
After installing Oracle RAC software, configure the ASM disk group for RAC database from the
primary cluster which has the source disks of the replication. The ASM disk group configuration is
replicated to the recovery cluster through physical replication. To configure the storage device for
configuring ASM disk group, see the latest edition of the Using Serviceguard Extension for RAC ,
138 Configuring Oracle RAC database with ASM in Continentalclusters using SADTA

available at http://www.hp.com/go/hpux-serviceguard-docs -> HP Serviceguard Extension for
RAC -> Using Serviceguard Extension for RAC.
Configuring SGeRAC toolkit packages for the ASM disk group in the primary cluster
To configure Oracle RAC database with ASM in Continentalclusters using SADTA, the ASM disk
group must be packaged in Serviceguard MNP packages in both the clusters. Configure ASM Disk
group MNP package dependency on the Clusterware MNP package on both the clusters.
Creating the Oracle RAC database in the primary cluster
After setting up the ASM disk group for the RAC database data files, you must create the RAC
database. You can use the Oracle Database Configuration Assistant (DBCA) to create the RAC
database. After you login to the DBCA, select the Automatic Storage Management option as the
storage mechanism for the database and select the Use Oracle-managed files option to store
database files and provide the ASM DG that you created earlier.
Configuring and testing the RAC MNP stack in the primary cluster
To configure Oracle RAC Database with ASM in SADTA, the RAC database must be packaged
in Serviceguard MNP packages in both clusters. Also, automatic startup of RAC database instances
and services at Clusterware startup must be disabled. For more information on disabling automatic
startup of RAC databases, see the How To Remove CRS Auto Start and Restart for a RAC Instance
document available at the Oracle documentation site. For information on configuring the RAC
database in the MNP packages, see the Using Serviceguard Extension for RAC available at http://
www.hp.com/go/hpux-serviceguard-docs -> HP Serviceguard Extension for RAC -> Using
Serviceguard Extension for RAC.
Configure the RAC MNP package to have dependency on the Clusterware MNP package and
ASM disk group MNP package. This step completes the configuration of the RAC MNP stack in
the primary cluster. Ensure that in RAC MNP package, the service is configured to monitor the
Oracle RAC database. Before halting the RAC MNP stack, test the configuration to ensure that the
packages are configured appropriately and can be started.
Halting the RAC database in the primary cluster
After creating the RAC database in the primary cluster, you must halt it to replicate it on the recovery
cluster. If you are using 11g R2 RAC, you must change the remote_listener for the database before
halting the RAC database MNP stack as explained in step1.
1. When using Oracle 11g R2 with ASM, the remote_listener for the database is set to the
<SCAN name>: <port number> by default. But, in the Continentalclusters configuration, the
SCAN name is different for every cluster CRS. So, the remote_listener for the database must
be changed to the net service name configured in the tnsnames.ora for the database. This
task must be done before halting the RAC database stack in the primary cluster:
a. Log in as the Oracle user.
# su – oracle
b. Export the database instance on the node. In this example, hrdb1 is the database instance
running on this node.
# export ORACLE_SID=”hrdb1”
c. Alter the remote listener:
# sqlplus “/ as sysdba”
d. At the prompt, enter the following:
SQL>show parameter remote_listener;
SQL> alter system set remote_listener=’hrdb’
2. Halt the RAC MNP Stack on the replication primary cluster node:
# cmhaltpkg <cluster1_rac_db_pkg> <cluster1_asmdg_pkg1>
Creating the RAC database with ASM in the primary cluster 139
Suspending the replication to the recovery cluster
In the earlier procedures, the RAC database and Site Controller packages were created at the
primary cluster with the source disk of the replication disk group. A RAC MNP stack was also
created in that cluster. Now, an identical RAC database using the target replicated disk must be
configured with the RAC MNP stack in the recovery cluster.
Prior to setting up an identical RAC database at the recovery cluster, ensure that the Site Controller
package is halted in the primary cluster. Split the data replication such that the target disk is in the
Read/Write mode. The procedure to split the replication depends on the type of arrays that are
configured in the environment. Based on the arrays in your environment, see the respective chapters
of this manual to configure replication. After preparing the replicated disk at the recovery cluster,
a storage device must be configured. For more information on configuring a storage device, see
“Configuring the storage device for the complex workload at the recovery cluster” (page 51).
Configuring the identical ASM instance in the recovery cluster
This procedure is required only if you are using Oracle 11g R1 with ASM. This procedure is not
required for Oracle 11g R2. In this procedure, the primary cluster is referred as cluster1 and the
recovery cluster is referred as cluster2.
To configure the identical ASM disk group for Oracle 11g R1 with ASM:
1. Create the Oracle admin directory in the recovery cluster, if it is not already created. In this
example, run the following command from the first node in cluster1:
# cd /opt/app/oracle
# rcp -r admin <cluster2_node1>:$PWD
# rcp -r admin <cluster2_node2>:$PWD
2. Run the following command on all the nodes in the recovery cluster:
# chown -R oracle:oinstall /opt/app/oracle/admin
3. Copy the first ASM instance pfile and password file from the primary cluster to the first ASM
instance node in the recovery cluster.
# cd /opt/app/oracle/admin/+ASM/pfile
# rcp -p init.ora <cluster2_node1>:$PWD
# cd /opt/app/oracle/product/11.1.0/db_1/dbs
# rcp -p orapw+ASM1 <cluster2_node1>:$PWD
The -p option retains the permissions of the file.
4. Set up the first ASM instance on the recovery cluster. In this example, run the following
commands from node1 in the cluster2.
# cd /opt/app/oracle/product/11.1.0/db_1/dbs
# ln –s /opt/app/oracle/admin/+ASM/pfile/init.ora init+ASM1.ora
# chown -h oracle:oinstall init+ASM1.ora
# chown oracle:oinstall orapw+ASM1
5. Copy the second ASM instance pfile and password file from cluster1 to the second ASM
instance node in cluster2.
# cd /opt/app/oracle/admin/+ASM/pfile
# rcp -p init.ora <cluster2_node1>:$PWD
# cd /opt/app/oracle/product/11.1.0/db_1/dbs
# rcp -p orapw+ASM1 <cluster2_node1>:$PWD
The -p option retains the permissions of the file.
6. Set up the second ASM instance on the recovery cluster. In this example, run the following
commands from node2 of cluster2.
# cd /opt/app/oracle/product/11.1.0/db_1/dbs
140 Configuring Oracle RAC database with ASM in Continentalclusters using SADTA
# ln –s /opt/app/oracle/admin/+ASM/pfile/init.ora init+ASM2.ora
# chown -h oracle:oinstall init+ASM2.ora
# chown oracle:oinstall orapw+ASM2
7. Add the ASM instances with the CRS cluster on the recovery cluster. In this example, run the
following commands from any node on cluster2:
# export ORACLE_SID=”+ASM”
# srvctl add asm -n <cluster2_node1> -i “+ASM1” –o
/opt/app/oracle/product/11.1.0/db_1/
# srvctl add asm -n <cluster2_node2> -i “+ASM2” –o
/opt/app/oracle/product/11.1.0/db_1/
Configuring the identical RAC database in the recovery cluster
Complete the following procedure to configure the replica RAC database. To explain this procedure,
it is assumed that the database name is hrdb and the instance hrdb1 is the first instance on the
first node and hrdb2 is the second instance on second node of the primary cluster.
To configure the identical RAC database:
1. Copy the first RAC database instance pfile and password file from the primary cluster to the
first RAC database instance node in the recovery cluster.
In this example, run the following commands from the first node in cluster1:
# cd /opt/app/oracle/product/11.1.0/db_1/dbs
# rcp -p inithrdb1.ora <cluster2_node1>:$PWD
# rcp -p orapwhrdb1 <cluster2_node1>:$PWD
The -p option retains the permissions of the file.
2. Set up the first RAC database instance on the recovery cluster. In this example, run the following
commands from the first node in cluster2:
# cd /opt/app/oracle/product/11.1.0/db_1/dbs
# chown oracle:oinstall orapwhrdb1
# chown oracle:oinstall initrhrdb1.ora
3. Copy the second RAC database instance pfile and password file from the primary cluster to
the second RAC database instance node in the recovery cluster. In this example, run the
following commands from the second node in cluster1:
# cd /opt/app/oracle/product/11.1.0/db_1/dbs
# rcp -p inithrdb2.ora <cluster2_node2>:$PWD
# rcp -p orapwhrdb2 <cluster2_node2>:$PWD
The -p option retains the permissions of the file.
4. Set up the second RAC database instance on the recovery cluster. In this example, run the
following commands from the second node in cluster2:
# cd /opt/app/oracle/product/11.1.0/db_1/dbs
# chown oracle:oinstall orapwhrdb2
# chown oracle:oinstall inithrdb2.ora
5. Create the directory for the database (in this example “hrdb”) that is replicated to the recovery
cluster, in the Oracle admin directory.
# cd /opt/app/oracle
# rcp -r admin/hrdb <cluster2_node1>:$PWD
# rcp -r admin/hrdb <cluster2_node2>:$PWD
Configuring the identical RAC database in the recovery cluster 141
6. Run the following command at the remote site.
# chown -R oracle:oinstall /opt/app/oracle/admin/hrdb
7. Log in to any of the nodes in the remote site using the oracle user credentials.
# su – oracle
8. Configure a listener for the database on this site using the Oracle Network Configuration
Assistant (NETCA).
9. Copy the tnsnames.ora file from the primary cluster CRS and modify it to fit the local
environment.
In this example, the file contents will appear as follows:
# rcp <cluster1_node1>:$ORACLE_HOME/network/admin/tnsnames.ora
<cluster2_node1>:$ORACLE_HOME/network/admin/tnsnames.ora
# rcp <cluster1_node2>:$ORACLE_HOME/network/admin/tnsnames.ora
<cluster2_node2>:$ORACLE_HOME/network/admin/tnsnames.ora
10. Edit the tnsnames.ora file on the nodes in the recovery cluster and modify the HOST =
keywords to suit the recovery cluster environment.
In this example, you must edit the tnsnames.ora file on every node in this site.
11. Register the database with the CRS on recovery cluster.
# srvctl add database -d hrdb -o /opt/app/oracle/product/11.1.0/db_1
# srvctl add instance -d hrdb -i hrdb1 -n <cluster2_node1>
# srvctl add instance -d hrdb -i hrdb2 -n <cluster2_node2>
After registering the database with the CRS on the recovery cluster, you can view the health status
of the database by running the following command:
# srvctl status
Configuring the Site Controller package in the primary cluster
The site controller package needs to be configured in the primary cluster. The procedure to configure
the Site Controller Package is identical to the procedure in configuring complex workload in
Continentalclusters using SADTA. For more information on configuring the Site Controller Package
for Oracle RAC database with ASM in SADTA, see “Configuring the Site Controller package in
the recovery cluster” (page 52).
Configuring the Site Safety Latch dependencies at the primary cluster
After the Site Controller Package configuration is applied, the corresponding Site Safety Latch is
also configured automatically in the cluster. This section describes the procedure to configure the
Site Safety Latch dependencies.
To configure the Site Safety Latch dependencies in the primary cluster:
1. Add the EMS resource details in ASM DG package configuration file.
RESOURCE_NAME /dts/mcsc/hrdb_sc
RESOURCE_POLLING_INTERVAL 120
RESOURCE_UP_VALUE != DOWN
RESOURCE_START automatic
You must apply the modified ASM DG package configuration using the cmapplyconf
command.
2. Verify the Site Safety Latch resource configuration at both sites. Run the following command
to view the EMS resource details:
# cmviewcl -v –p <ASM_DG_pkg_name>
142 Configuring Oracle RAC database with ASM in Continentalclusters using SADTA

3. Configure the Site Controller Package in the primary cluster with the RAC MNP stack in primary
cluster:
# site cc1_site1
# critical_package <cluster1_RAC_DB_pkg_name>
# managed_package <cluster1_ASM_DG_pkg_name>
NOTE: Do not add any comments after specifying the critical and managed packages.
4. Re-apply the Site Controller Package configuration.
# cmapplyconf -v -P <site_controller_configuration_file>
After applying the Site Controller Package configuration, run the cmviewcl command to
view the packages that are configured.
5. Repeat the above steps in the Recovery cluster as well.
Configuring the Site Controller package in the recovery cluster
The site controller package needs to be configured in the recovery cluster. The procedure to
configure the Site Controller Package is identical to the procedure in configuring complex workload
in Continentalclusters using SADTA. For more information on configuring the Site Controller Package
for Oracle RAC database with ASM in SADTA, see “Configuring the Site Controller package in
the recovery cluster” (page 52).
Configuring the Site Safety Latch dependencies at the recovery cluster
After the Site Controller Package configuration is applied, the corresponding Site Safety Latch is
also configured automatically in the cluster. This section describes the procedure to configure the
Site Safety Latch dependencies.
To configure the Site Safety Latch dependencies in the recovery cluster:
1. Add the EMS resource details in ASM DG package configuration file.
RESOURCE_NAME /dts/mcsc/hrdb_sc
RESOURCE_POLLING_INTERVAL 120
RESOURCE_UP_VALUE != DOWN
RESOURCE_START automatic
You must apply the modified ASM DG package configuration using the cmapplyconf
command .
2. Verify the Site Safety Latch resource configuration at both sites. Run the following command
to view the EMS resource details:
# cmviewcl -v –p <ASM_DG_pkg_name>
3. Configure the Site Controller Package in the recovery cluster with the RAC MNP stack in the
recovery cluster.
site cc2_site1
critical_package <cluster2_RAC_DB_pkg_name>
managed_package <cluster2_ASM_DB_pkg_name>
NOTE: Do not add any comments after specifying the critical and managed packages.
4. Re-apply the Site Controller Package configuration.
# cmapplyconf -v -P <site_controller_configuration_file>
After applying the Site Controller Package configuration, run the cmviewcl command to
view the packages that are configured.
Configuring the Site Controller package in the recovery cluster 143
Database with ASM in the Continentalclusters in the primary cluster
The procedure to start the disaster recovery Oracle RAC database with ASM is identical to the
procedure for starting a complex workload in a Continentalclusters. Run the cmrunpkg command
with the site controller package name managing the Oracle RAC/ASM workload in the primary
cluster as the argument.
# cmrunpkg siteController1
144 Configuring Oracle RAC database with ASM in Continentalclusters using SADTA

Glossary
A
application restart Starting an application, usually on another node, after a failure. Application can be restarted
manually, which might be necessary if data must be restarted before the application can run
(example: Business Recovery Services work like this.) Applications can by restarted by an operator
using a script, which can reduce human error. Or applications can be started on the local or
remote site automatically after detecting the failure of the primary site.
arbitrator Nodes in a disaster recovery architecture that act as tie-breakers in case all of the nodes in a
data center go down at the same time. These nodes are full members of the Serviceguard cluster
and must conform to the minimum requirements. The arbitrator must be located in a third data
center to ensure that the failure of an entire data center does not bring the entire cluster down.
See also quorum server.
B
BC (Business Copy) A PVOL or SVOL in an HP StorageWorks XP series disk array that can be split
from or merged into a normal PVOL or SVOL. It is often used to create a snapshot of the data
brought at a known point in time. Although this copy, when split, is often consistent, it is not
usually current.
BCV (Business Continuity Volume) An EMC Symmetrix term that refers to a logical device on the EMC
Symmetrix that might be merged into or split from a regular R1 or R2 logical device. It is often
used to create a snapshot of the data brought at a known point in time. Although this copy, when
split, is often consistent, it is not usually current.
Business Recovery
Service
Service provided by a vendor to host the backup systems required to run mission critical
applications following a disaster.
C
campus cluster A single cluster that is geographically dispersed within the confines of an area owned or leased
by the organization such that it has the right to run cables above or below ground between
buildings in the campus. Campus clusters are usually spread out in different rooms in a single
building, or in different adjacent or nearby buildings. See also extended distance cluster.
cluster A cluster in production that has packages protected by the HP Continentalclusters product.
cluster alarm Time at which a message is sent indicating that the cluster is probably in need of recovery. The
cmrecoverclcommand is enabled at this time.
cluster alert Time at which a message is sent indicating a problem with the cluster.
cluster event A cluster condition that occurs when the cluster goes down or enters an UNKNOWN state, or
when the monitor software returns an error. This event might cause an alert messages to be sent
out, or it might cause an alarm condition to be set, which allows the administrator on the Recovery
Cluster to issue the cmrecovercl command. The return of the cluster to the UP state results in
a cancellation of the event, which might be accompanied by a cancel event notice. In addition,
the cancellation disables the use of the cmrecovercl command.
cluster quorum A dynamically calculated majority used to determine whether any grouping of nodes is sufficient
to start or run the cluster. Cluster quorums prevent split-brain syndrome which can lead to data
corruption or inconsistency. Currently at least 50% of the nodes plus a tie-breaker are required
for a quorum. If no tie-breaker is configured, then greater than 50% of the nodes is required to
start and run a cluster.
complex workload Complex workloads are applications that are configured using multiple inter-related packages
that are managed collectively
Continentalclusters
A group of clusters that use routed networks and/or common carrier networks for data replication
and cluster communication to support package failover between separate clusters in different
145
data centers. Continentalclusters are often located in different cities or different countries and can
span 100s or 1000s of kilometers.
Continuous Access A facility provided by the Continuos Access software option available with the HP StorageWorks
P9000 Disk Array family, HP StorageWorks E Disk Array XP series. This facility enables physical
data replication between P9000 and XP series disk arrays.
D
data center A physically proximate collection of nodes and disks, usually all in one room.
data consistency Whether data are logically correct and immediately usable; the validity of the data after the last
write. Inconsistent data, if not recoverable to a consistent state, is corrupt.
data currency Whether the data contain the most recent transactions, and/or whether the replica database has
all of the committed transactions that the primary database contains; speed of data replication
might cause the replica to lag behind the primary copy, and compromise data currency.
data loss The inability to take action to recover data. Data loss can be the result of transactions being
copied that were lost when a failure occurred, non-committed transactions that were rolled back
as pat of a recovery process, data in the process of being replicated that never made it to the
replica because of a failure, transactions that were committed after the last tape backup when a
failure occurred that required a reload from the last tape backup. transaction processing monitors
(TPM), message queuing software, and synchronous data replication are measures that can
protect against data loss.
data replication The scheme by which data is copied from one site to another for disaster tolerance. Data replication
can be either physical (see physical data replication) or logical (see logical data replication). In
a Continentalclusters environment, the process by which data that is used by the cluster packages
is transferred to the Recovery Cluster and made available for use on the Recovery Cluster in the
event of a recovery.
disaster An event causing the failure of multiple components or entire data centers that render unavailable
all services at a single location; these include natural disasters such as earthquake, fire, or flood,
acts of terrorism or sabotage, large-scale power outages.
disaster recovery The process of restoring access to applications and data after a disaster. Disaster recovery can
be manual, meaning human intervention is required, or it can be automated, requiring little or
no human intervention.
disaster recovery
architecture
A cluster architecture that protects against multiple points of failure or a single catastrophic failure
that affects many components by locating parts of the cluster at a remote site and by providing
data replication to the remote site. Other components of disaster recovery architecture include
redundant links, either for networking or data replication, that are installed along different routes,
and automation of most or all of the recovery process.
disaster recovery
services
Services and products offered by companies that provide the hardware, software, processes,
and people necessary to recover from a disaster.
E, F
Environment File Metrocluster uses a configuration file that includes variables that define the environment for the
Metrocluster to operate in a Serviceguard cluster. This configuration file is referred to as the
Metrocluster environment file. This file needs to be available on all the nodes in the cluster for
Metrocluster to function successfully.
event log The default location (/var/opt/resmon/log/cc/eventlog) where events are logged on
the monitoring Continentalclusters system. All events are written to this log, as well as all
notifications that are sent elsewhere.
failback Failing back from a backup node, which might or might not be remote, to the primary node that
the application normally runs on.
failover The transfer of control of an application or service from one node to another node after a failure.
Failover can be manual, requiring human intervention, or automated, requiring little or no human
intervention.
146 Glossary
G
gatekeeper A small EMC Symmetrix device configured to function as a lock during certain state change
operations.
H, I
high availability A combination of technology, processes, and support partnerships that provide greater application
or system availability.
J, K, L
local cluster A cluster located in a single data center. This type of cluster is not disaster recovery.
local failover Failover on the same node; this most often applied to hardware failover, For Example local LAN
failover is switching to the secondary LAN card on the same node after the primary LAN card
has failed.
logical data
replication
A type of on-line data replication that replicates logical transactions that change either the
filesystem or the database. Complex transactions might result in the modification of many diverse
physical blocks on the disk.
M
Maintenance mode A recovery group is in the maintenance mode when it is disabled. The cmrecovercl
-dcommand moves a recovery group is moved into maintenance mode. The cmrecovercl -e
command moved the recovery group out of the maintenance mode. When a recovery group is
in the maintenance mode, recovery is not allowed.
manual failover Failover requiring human intervention to start an application or service on another node.
mirrored data Data that is copied using mirroring.
mirroring Disk mirroring hardware or software, such as MirrorDisk/UX. Some mirroring methods might
allow splitting and merging.
multiple system
high availability
Cluster technology and architecture that increases the level of availability by grouping systems
into a cooperative failover design.
mutual recovery
configuration
Continentalclusters configuration in which every cluster serves the roles of primary and recovery
cluster for different recovery groups. Also known as a bi-directional configuration.
N
network failover The ability to restore a network connection after a failure in network hardware when there are
redundant network links to the same IP subnet.
notification A message that is sent following a cluster or package event.
O
off-line data
replication.
Data replication by storing data off-line, usually a backup tape or disk stored in a safe location;
this method is best for applications that can accept a 24-hour recovery time.
on-line data
replication
Data replication by copying to another location that is immediately accessible. On-line data
replication is usually done by transmitting data over a link in real time or with a slight delay to
a remote site; this method is best for applications requiring quick recovery (within a few hours
or minutes).
P
package alert Time at which a message is sent indicating a problem with a package.
package event A package condition such as a failure that causes a notification message to be sent. Package
events can be accompanied by alerts, but not alarms. Messages are for information only; the
cmrecovercl command is not enabled for a package event.
147
package recovery
group
A set of one or more packages with a mapping between their instances on the cluster and their
instances on the Recovery Cluster.
physical data
replication
An on-line data replication method that duplicates I/O writes to another disk on a physical block
basis. Physical replication can be hardware-based where data is replicated between disks over
a dedicated link (For Example, EMC’s Symmetrix Remote Data Facility or the HP StorageWorks
E Disk Array XP Series Continuous Access), or software-based where data is replicated on multiple
disks using dedicated software on the primary node (For Example, MirrorDisk/UX).
planned downtime An anticipated period of time when nodes are brought down for hardware maintenance, software
maintenance (OS and application), backup, reorganization, upgrades (software or hardware),
etc.
primary package The package that normally runs on the cluster in a production environment.
PVOL A primary volume configured in an P9000 and XP series disk array that uses Continuous Access.
PVOLs are the primary copies in physical data replication with Continuos Access on the P9000
and XP.
Q
quorum See See cluster quorum..
quorum server A cluster node that acts as a tie-breaker in a disaster recovery architecture in case all of the nodes
in a data center go down at the same time. See also arbitrator.
R
R1 The Symmetrix term indicating the data copy that is the primary copy.
R2 The Symmetrix term indicating the remote data copy that is the secondary copy. It is normally
read-only by the nodes at the remote site.
Recovery Cluster A cluster on which recovery of a package takes place following a failure on the cluster.
recovery group
failover
A failover of a package recovery group from one cluster to another.
recovery package The package that takes over on the Recovery Cluster in the event of a failure on the cluster.
rehearsal package The recovery cluster package used to validate the recovery environment and procedure as part
of a rehearsal operation.
remote failover Failover to a node at another data center or remote location.
resynchronization The process of making the data between two sites consistent and current once systems are restored
following a failure. Also called data resynchronization.
S
single system high
availability
Hardware design that results in a single system that has availability higher than normal. Hardware
design examples are:
•n+1 fans
•n+1 power supplies
•multiple power cords
•on-line addition or replacement of I/O cards, memory, etc.
special device file The device file name that the HP-UX operating system gives to a single connection to a node, in
the format /dev/devtype/filename.
split-brain
syndrome
When a cluster reforms with equal numbers of nodes at every site, and every half of the cluster
thinks it is the authority and starts up the same set of applications, and tries to modify the same
data, resulting in data corruption. Serviceguard architecture prevents split-brain syndrome in all
cases unless dual cluster locks are used.
SRDF (Symmetrix Remote Data Facility) A level 1-3 protocol used for physical data replication between
EMC Symmetrix disk arrays.
148 Glossary
sub-clusters Sub-clusters are clusterwares that run above the Serviceguard cluster and comprise only the nodes
in a Metrocluster site. Sub-clusters have access only to the storage arrays within a site.
SVOL A secondary volume configured in an P9000 and XP series disk array that uses Continuous
Access. SVOLs are the secondary copies in physical data replication with Continuos Access on
the P9000 and XP.
synchronous data
replication
Each data replication I/O waits for the preceding I/O to complete before beginning another
replication. Minimizes the chance of inconsistent or corrupt data in the event of a rolling disaster.
T
transparent
failover
A client application that automatically reconnects to a new server without the user taking any
action.
transparent IP
failover
Moving the IP address from one network interface card (NIC), in the same node or another node,
to another NIC that is attached to the same IP subnet so that users or applications might always
specify the same IP name/address whenever they connect, even after a failure.
U-Z
volume group In LVM, a set of physical volumes such that logical volumes can be defined within the volume
group for user access. A volume group can be activated by only one node at a time unless you
are using Serviceguard OPS Edition. Serviceguard can activate a volume group when it starts a
package. A given disk can belong to only one volume group. A logical volume can belong to
only one volume group.
WAN data
replication
solutions
Data replication that functions over leased or switched lines. See also Continentalclusters.
149

Index
Symbols
3PAR Remote Copy, 63
A
adding a node to Continentalclusters configuration, 59
C
cluster
continental, 95
recovery, 29
cmdeleteconcl command, 25
cmrecovercl, 29
command line
cmrecovercl, 29
configuring
additional nodes in Continentalclusters, 59
Continentalcluster Recovery cluster hardware, 29
Continentalclusters recovery cluster, 29
data replication for Continentalclusters, 19
monitoring in Continentalclusters
monitor packages in Continentalclusters, 33
Primary cluster, 29
configuring Continentalclusters
configuring, 36
configuring for Continentalclusters, 19
Continentalclusters, 42, 95
checking status, 59
configuration file, 12
deleting, 25
log files, 69
monitor package, 33
Recovery Group Rehearsal, 39
creating, 30
CVM/CFS, 125
D
data replication, 12, 19
restoring after a disaster, 32
deleting Continentalclusters, 25
Disaster Recovery
Performing, 39
disaster recovery
Continentalclusters, 36
using Continentalclusters, 29
disaster tolerance
restoring to Continentalclusters, 32
disk
resynchronization, 63
E
EMC SRDF with Continentalclusters
Continentalcluster with EMC SRDF, 19
EMC Symmetrix
Remote Data Facility, 63
H
hardware for Continentalclusters Recovery cluster, 29
L
log files, 69
M
Maintenance Mode
cmrecovercl -d -g, 61
monitoring, 61
receiving Continentalclusters notification, 29
N
node
adding to Continentalclusters, 59
notifications
receiving, 29
O
Oracle Cluster Software/CRS, 131
Oracle RAC instances, 125
P
package
worksheet, 67
package switching via cmrecovercl command, 29
power planning
worksheet, 75, 76
Primary cluster
configuring, 29
R
RAC, 125
recovery cluster, 29
Recovery Groups
configuring with rehearsal package, 30
Maintenance Mode, 61
rehearsal package
IP address, 40, 57
replicating data, 12
RUN_SCRIPT_TIMEOUT, 65
S
scripts
Continentalclusters configuration, 59
Serviceguard
cluster, 34
with Continentalclusters, 42
Shared Disk
configuration, 36
SRDF links, 66
status, 59
checking status of Continentalclusters objects, 54
switching to a recovery cluster using Continentalclusters,
29
150 Index
