Hp Serviceguard Toolkit For Oracle Data Guard Users Manual Enterprise Cluster Master User Guide
Hp-Serviceguard-Enterprise-Cluster-Master-Toolkit-Users-Manual-156153 hp-serviceguard-enterprise-cluster-master-toolkit-users-manual-156153
2015-01-05
: Hp Hp-Serviceguard-Toolkit-For-Oracle-Data-Guard-Users-Manual-156156 hp-serviceguard-toolkit-for-oracle-data-guard-users-manual-156156 hp pdf
Open the PDF directly: View PDF ![]() .
.
Page Count: 140 [warning: Documents this large are best viewed by clicking the View PDF Link!]
- HP Serviceguard Enterprise Cluster Master Toolkit User Guide
- Contents
- 1 Introduction
- 2 Using the Oracle Toolkit in an HP Serviceguard Cluster
- Overview
- Supported versions
- Support For Oracle Database without ASM
- Supporting Oracle ASM instance and Oracle database with ASM
- What is Automatic Storage Management (ASM)?
- Why ASM over LVM?
- Configuring LVM Volume Groups for ASM Disk Groups
- Sample Command Sequence for Configuring LVM Volume Groups
- Serviceguard support for ASM on HP-UX 11i v3 onwards
- Framework for ASM support with Serviceguard
- Installing, Configuring, and Troubleshooting
- Setting up DB instance and ASM instance
- Setting Up the Toolkit
- ASM Package Configuration Example
- Modifying a legacy database package using an older version of Oracle ECMT scripts to use the scripts provided for ASM support
- Adding the Package to the Cluster
- Node-specific Configuration
- Error Handling
- Network Configuration
- Database Maintenance
- Configuring and packaging Oracle single-instance database to co-exist with SGeRAC packages
- Configuring Oracle single-instance database that uses ASM in a Coexistence Environment
- Attributes newly added to ECMT Oracle toolkit
- Configuring a modular failover package for an Oracle database using ASM in a Coexistence Environment
- Configuring a legacy failover package for an Oracle database using ASM in a Coexistence Environment
- ECMT Oracle Toolkit Maintenance Mode
- Supporting EBS database Tier
- Oracle ASM Support for EBS DB Tier
- 3 Using the Sybase ASE Toolkit in a Serviceguard Cluster on HP-UX
- Overview
- Sybase Information
- Setting up the Application
- Setting up the Toolkit
- Sybase Package Configuration Example
- Creating the Serviceguard package using Modular method
- Adding the Package to the Cluster
- Configuring Access Roles
- Node-specific Configuration
- Error-Handling
- Network Configuration
- Database Maintenance
- 4 Using the DB2 database Toolkit in a Serviceguard Cluster in HP-UX
- 5 Using MySQL Toolkit in a HP Serviceguard Cluster
- MySQL Package Configuration Overview
- Setting Up The Database Server Application
- Setting Up MySQL with the Toolkit
- Package Configuration File and Control Script
- Creating Serviceguard package using Modular method.
- Applying the Configuration and Running the Package
- Database Maintenance
- Do's and Don't with MySQL Toolkit
- 6 Using an Apache Toolkit in a HP Serviceguard Cluster
- 7 Using Tomcat Toolkit in a HP Serviceguard Cluster
- Tomcat Package Configuration Overview
- Multiple Tomcat Instances Configuration
- Configuring the Tomcat server with Serviceguard
- Shared Configuration
- Setting Up The Package
- Creating Serviceguard package using Modular method.
- Setting up The Toolkit
- Error Handling
- Tomcat Server Maintenance
- Configuring Apache web server with Tomcat in a single package
- 8 Using SAMBA Toolkit in a Serviceguard Cluster
- 9 Support and other resources

HP Serviceguard Enterprise Cluster Master
Toolkit User Guide
HP Part Number: 5900-1606
Published: April 2011
Edition: J06.03 and subsequent J-series RVUs, H06.03 and subsequent
Edition: H-series RVUs, and G06.24 and subsequent G-series RVUs
© Copyright 2011 Hewlett-Packard Development Company, L.P.
Confidential computer software. Valid license from HP required for possession, use or copying. Consistent with FAR 12.211 and 12.212, Commercial
Computer Software, Computer Software Documentation, and Technical Data for Commercial Items are licensed to the U.S. Government under
vendor's standard commercial license.
The information contained herein is subject to change without notice. The only warranties for HP products and services are set forth in the express
warranty statements accompanying such products and services. Nothing herein should be construed as constituting an additional warranty. HP shall
not be liable for technical or editorial errors or omissions contained herein.
Intel®, Itanium® are trademarks of Intel Corporation in the U.S. and other countries.

Contents
1 Introduction...............................................................................................6
Overview................................................................................................................................6
2 Using the Oracle Toolkit in an HP Serviceguard Cluster...................................8
Overview................................................................................................................................8
Supported versions...................................................................................................................8
Support For Oracle Database without ASM..................................................................................9
Setting Up The Application....................................................................................................9
Setting Up the Toolkit.........................................................................................................13
Toolkit Overview...........................................................................................................13
Support for multiple listeners...........................................................................................17
Support for database hang detection...............................................................................17
Cluster Verification for ECMT - Oracle Toolkit.........................................................................18
Oracle Package Configuration Example................................................................................18
Package Setup and Configuration ...................................................................................18
If you are using LVM or VxVM....................................................................................19
If you are using CFS.................................................................................................19
If you are using LVM.................................................................................................20
If you are using VxVM..............................................................................................21
Supporting Oracle ASM instance and Oracle database with ASM................................................26
What is Automatic Storage Management (ASM)?..................................................................26
Why ASM over LVM?.........................................................................................................28
Configuring LVM Volume Groups for ASM Disk Groups...........................................................28
Sample Command Sequence for Configuring LVM Volume Groups...........................................29
Serviceguard support for ASM on HP-UX 11i v3 onwards........................................................31
Framework for ASM support with Serviceguard......................................................................31
How Toolkit Starts, Stops and Monitors the Database instance............................................32
Serviceguard Toolkit Internal File Structure........................................................................33
ASM File Descriptor Release...........................................................................................35
Installing, Configuring, and Troubleshooting..........................................................................35
Setting up DB instance and ASM instance..................................................................................36
Setting Up the Toolkit .............................................................................................................37
ASM Package Configuration Example.......................................................................................40
Modifying a legacy database package using an older version of Oracle ECMT scripts to use the
scripts provided for ASM support..............................................................................................47
Adding the Package to the Cluster............................................................................................49
Node-specific Configuration.....................................................................................................50
Error Handling.......................................................................................................................50
Network Configuration............................................................................................................50
Database Maintenance...........................................................................................................51
Configuring and packaging Oracle single-instance database to co-exist with SGeRAC packages......52
Configuring Oracle single-instance database that uses ASM in a Coexistence Environment..........52
Attributes newly added to ECMT Oracle toolkit......................................................................53
Configuring a modular failover package for an Oracle database using ASM in a Coexistence
Environment......................................................................................................................54
Configuring a legacy failover package for an Oracle database using ASM in a Coexistence
Environment......................................................................................................................55
ECMT Oracle Toolkit Maintenance Mode..............................................................................57
Supporting EBS database Tier..................................................................................................57
Oracle ASM Support for EBS DB Tier........................................................................................58
Contents 3
3 Using the Sybase ASE Toolkit in a Serviceguard Cluster on HP-UX ..................59
Overview..............................................................................................................................59
Sybase Information.................................................................................................................59
Setting up the Application........................................................................................................60
Setting up the Toolkit...............................................................................................................62
Sybase Package Configuration Example....................................................................................64
Creating the Serviceguard package using Modular method.........................................................66
Adding the Package to the Cluster............................................................................................67
Configuring Access Roles.........................................................................................................67
Node-specific Configuration.....................................................................................................68
Error-Handling........................................................................................................................68
Network Configuration............................................................................................................68
Database Maintenance...........................................................................................................69
4 Using the DB2 database Toolkit in a Serviceguard Cluster in HP-UX................71
DB2 Information.....................................................................................................................71
Setting Up the Application ......................................................................................................71
Multiple Instance Configurations..........................................................................................75
Set up additional database logical volumes...........................................................................75
Setting Up the Toolkit..............................................................................................................75
Toolkit Overview................................................................................................................75
DB2 Package Configuration Example........................................................................................77
Assuming DB2 is already installed. .....................................................................................77
Creating Serviceguard package using Modular method.....................................................79
Creating Serviceguard package using legacy method........................................................82
Adding the Package to the Cluster............................................................................................85
Database Maintenance...........................................................................................................85
5 Using MySQL Toolkit in a HP Serviceguard Cluster.......................................87
MySQL Package Configuration Overview...................................................................................88
Setting Up The Database Server Application..............................................................................89
Setting Up MySQL with the Toolkit............................................................................................90
Toolkit Overview................................................................................................................90
MySQL Configuration File (my.cnf).......................................................................................91
Toolkit Configuration File (hamysql.conf)...............................................................................91
Package Configuration File and Control Script............................................................................92
Creating Serviceguard package using Modular method...............................................................94
Applying the Configuration and Running the Package..................................................................94
Database Maintenance...........................................................................................................95
Do's and Don't with MySQL Toolkit...........................................................................................96
Do's.................................................................................................................................96
Don'ts..............................................................................................................................96
6 Using an Apache Toolkit in a HP Serviceguard Cluster..................................97
Apache Package Configuration Overview..................................................................................99
Local Configuration............................................................................................................99
Shared Configuration.........................................................................................................99
Multiple Apache Instances Configuration..............................................................................99
Configuring the Apache Web Server with Serviceguard.............................................................100
Local Configuration..........................................................................................................100
Shared Configuration.......................................................................................................101
Setting up the package.........................................................................................................103
4 Contents
Setting up The Toolkit ...........................................................................................................105
Toolkit Overview..............................................................................................................105
Toolkit User Configuration.................................................................................................106
Creating Serviceguard package using Modular method.............................................................107
Error Handling.....................................................................................................................108
Apache Web Server Maintenance..........................................................................................108
7 Using Tomcat Toolkit in a HP Serviceguard Cluster......................................110
Tomcat Package Configuration Overview.................................................................................112
Local Configuration..........................................................................................................112
Shared Configuration.......................................................................................................112
Multiple Tomcat Instances Configuration..................................................................................113
Configuring the Tomcat server with Serviceguard......................................................................113
Shared Configuration............................................................................................................113
Setting Up The Package ........................................................................................................115
Creating Serviceguard package using Modular method.............................................................117
Setting up The Toolkit............................................................................................................118
Toolkit Overview..............................................................................................................118
Toolkit User Configuration.................................................................................................119
Error Handling.....................................................................................................................121
Tomcat Server Maintenance...................................................................................................121
Configuring Apache web server with Tomcat in a single package...............................................122
8 Using SAMBA Toolkit in a Serviceguard Cluster..........................................125
HP CIFS Server Package Configuration Overview......................................................................126
Setting Up the Application.....................................................................................................127
Setting Up the Package.........................................................................................................129
Setting Up the Toolkit............................................................................................................131
Toolkit Overview..............................................................................................................131
Creating Serviceguard package using Modular method........................................................132
Toolkit User Configuration.................................................................................................133
CIFS Server Maintenance Mode.............................................................................................135
Special Notes......................................................................................................................136
9 Support and other resources....................................................................138
Information to collect before contacting HP...............................................................................138
How to contact HP................................................................................................................138
Registering for software technical support and update service.....................................................138
How to use your software technical support and update service.............................................138
Warranty information.......................................................................................................138
HP authorized resellers..........................................................................................................139
Documentation feedback.......................................................................................................139
Related information...............................................................................................................139
Typographic conventions.......................................................................................................139
Contents 5

1 Introduction
The Enterprise Cluster Master Toolkit (ECMT) is a set of templates and scripts that allow the
configuration of Serviceguard packages for internet servers as well as for third-party Database
Management Systems. This unified set of high availability tools is being released on HP-UX 11i v2
and 11i v3.
Each Toolkit is a set of scripts specifically for individual application to start, stop, and monitor the
application.
This set also helps to integrate popular applications into a Serviceguard cluster.
Overview
The ECMT is a collection of toolkits for popular applications to integrate them with the Serviceguard
environment. ECMT consists of the following toolkits:
Toolkits for database applications:
•Oracle Toolkit
•Sybase Toolkit
•DB2 Toolkit
•MySQL Toolkit
Toolkits for internet applications:
•Apache Toolkit
•Tomcat Toolkit
•CIFS (Samba) Toolkit
For more information on the application versions supported by toolkit, see the compatibility matrix
at HP Serviceguard Toolkit Compatibility Matrix (published April 2011 or later). See www.hp.com/
go/hpux-serviceguard-docs -> HP Serviceguard Enterprise Cluster Master Toolkit.
All ECMT Toolkits, except the Sybase toolkit, support both the modular style and the legacy style
of packaging. The Sybase toolkit supports only Modular style of packaging. It is recommended
that modular style of packaging is used because it has multiple advantages over the legacy style
of packaging.
Users can use either the CLI or the SGMgr GUI interface to create the packages using Toolkits.
See the http://www.hp.com/go/hpux-serviceguard-docs —>HP Serviceguard Manager.
The following toolkit supports deploying of applications over cluster file systems (CFS) storage.
•Oracle
•Apache
•Samba
These toolkit deployment over the CFS storage can reduce failover time for single instance
applications.
Packages created using ECMT toolkit log messages to the package log file and also has the feature
to send alert mails, whenever there is a major issue with the package. The location of the log and
mail id is configurable for each package.
Apart from the ECMT Toolkit, there are set of other toolkits and application extensions which can
be used to integrate other applications in Serviceguard. Table 1 (page 7) below shows the Toolkit
name and applications supported by the toolkits.
6 Introduction

Table 1 Toolkit Name/Application Extension and Application Name
Application NameToolkit Name/ Application Extension
Oracle Real application clustersServiceguard Extension for RAC (SGeRAC)
SAPServiceguard Extension for SAP (SGeSAP)
Oracle E-Business SuiteServiceguard Extension for E-Business Suite (SGeEBS)
Oracle Data GuardServiceguard toolkit for Oracle Data Guard (ODG)
Network File System (NFS)HA NFS Toolkit
HP VM GuestHP VM Toolkit
To package applications that are not covered by the Serviceguard Toolkits, users can use the
Serviceguard Developers toolbox. Using this framework, users can create their own toolkits. This
framework can be downloaded for free available at: http://software.hp.com -> HP-UX 11i software
-> High availability -> Serviceguard Developer's ToolBox.
Overview 7

2 Using the Oracle Toolkit in an HP Serviceguard Cluster
This chapter describes the High Availability Oracle Toolkit designed for use in a HP Serviceguard
environment. This chapter covers the basic steps for configuring an Oracle instance in a HP-UX
cluster, and is intended for users who want to integrate an Oracle Database Server with
Serviceguard.
It is assumed that its readers are already familiar with Serviceguard configuration, as well as with
Oracle Database Server concepts, including installation and configuration procedures.
This toolkit can be used to configure only single instance Oracle database and if the user wants
to configure Oracle RAC, then user's must use SGeRAC. For more information, see www.hp.com/
go/hpux-serviceguard-docs -> HP Serviceguard Extension for RAC.
Overview
The Oracle Toolkit for Serviceguard consists of a set of shell scripts that are used to start, stop, and
monitor an Oracle database instance, Automatic Storage Management (ASM) instance and the
configured listener(s).
The Oracle toolkit is designed to work in either of two modes:
•As a database instance failover package.
•As an ASM Multi-Node Package (MNP).
There can be only one ASM MNP package configured per cluster, while there can be multiple
database instance packages per cluster.
To use this toolkit in legacy style, the toolkit scripts must be integrated into the Serviceguard package
control script. See the sections “Support For Oracle Database without ASM” (page 9) and
“Supporting Oracle ASM instance and Oracle database with ASM” (page 26) for examples to
create a legacy package.
For more information on creating modular packages, see “Support For Oracle Database without
ASM” (page 9) “Supporting Oracle ASM instance and Oracle database with ASM” (page 26)
and the whitepaper Modular package support in Serviceguard for Linux and ECM Toolkits available
at http://www.hp.com/go/hpux-serviceguard-docs —>HP Serviceguard Enterprise Cluster Master
Toolkit.
Supported versions
It is assumed that the user has already installed the supported and compatible versions of
Serviceguard, Oracle, and the Enterprise Cluster Master Toolkit (ECMT), which contains the Oracle
toolkit.
Unless otherwise stated, this toolkit supports all storage and volume managers that Serviceguard
supports.
To find the latest supported versions of these products on Serviceguard, Oracle, Cluster File System
(CFS) and HP-UX versions, check the compatibility matrix available at http://www.hp.com/go/
hpux-serviceguard-docs —>HP Serviceguard .
To use CFS, you must install the appropriate version of HP Serviceguard Storage Management
Suite.
For more details, see the Serviceguard Release Notes at http://www.hp.com/go/
hpux-serviceguard-docs ->HP Enterprise Cluster Master Toolkit.
In a Serviceguard cluster, packages created using the ECMT Oracle toolkit can co-exist with
packages created using the SGeRAC toolkit. In such cases, the single-instance database failover
packages must be made dependent on the SGeRAC clusterware multi-node package (OC MNP
8 Using the Oracle Toolkit in an HP Serviceguard Cluster
package). For more information, see the section “Configuring and packaging Oracle single-instance
database to co-exist with SGeRAC packages” (page 52).
Support For Oracle Database without ASM
Setting Up The Application
To set up the application, it is assumed that the Oracle should be installed in /home/Oracle on
all the cluster nodes by 'Oracle' as the database administrator, and that shared storage must be
configured.
1. Make sure all database instances in the cluster have unique names (as identified by the
user-defined variable SID_NAME in the haoracle.conf configuration file).
2. Make sure that the 'Oracle' user has the same user id and group id on all nodes in the cluster.
3. Some of the possible configurations are as follows:
•Configuring shared file system using LVM
Create a volume group, logical volume, and file system to hold the necessary configuration
information and symbolic links to the Oracle executables. This file system will be defined
as ORACLE_HOME in the package control scripts. Since the volume group and file system
must be uniquely named within the cluster, use the name of the database instance
(SID_NAME) in the names:
Assuming that the name of the database is 'ORACLE_TEST0', create the following:
A volume group: /dev/vg0_ORACLE_TEST0
A logical volume: /dev/vg0_ORACLE_TEST0/lvol1
A file system: /dev/vg0_ORACLE_TEST0/lvol1 mounted at
/ORACLE_TEST0
After the volume group, logical volume and file system have been created on one node,
it must be imported to the other nodes that will run this database. Create the directory
/ORACLE_TEST0 on all nodes so that /dev/vg0_ORACLE_TEST0/lvol1 can be
mounted on that node if the package is to be run on the node.
•Configuring shared file system using VxVM
Create a disk group, logical volume, and file system to hold the necessary configuration
information and symbolic links to the Oracle executables. This file system will be defined
as ORACLE_HOME in the package control scripts. Since the disk group and file system
must be uniquely named within the cluster, use the name of the database instance
(SID_NAME ) in the names:
Assuming ORACLE_TEST0 the name of the database create the following:
◦A disk group /dev/vx/dsk/DG0_ORACLE_TEST0
◦A logical volume /dev/vx/dsk/DG0_ORACLE_TEST0/lvol1
◦A file system /dev/vx/dsk/DG0_ORACLE_TEST0/lvol1 mounted at
/ORACLE_TEST0
After the disk group, logical volume and file system have been created on one node, it
must be deported.
Execute the following command on all cluster nodes to allow them to access the disk
groups:
$ vxdctl enable
Create the directory /ORACLE_TEST0 on all nodes so that /dev/vx/dsk/
DG0_ORACLE_TEST0/lvol1 can be mounted on that node if the package is to be run
on the node.
Support For Oracle Database without ASM 9

If you need help creating, importing, or managing the volume group or disk group and
filesystem, see Building an HA Cluster Configuration in the Serviceguard user manual
available at http://www.hp.com/go/hpux-serviceguard-docs-> HP Serviceguard.
•Configuring shared file system using CFS
The shared file system can be a CFS mounted file system.
To configure an Oracle package in a CFS environment, the Serviceguard CFS packages
need to be running in order for the Oracle package to access CFS mounted file systems.
Create a directory /ORACLE_TEST0 on all cluster nodes. Mount the CFS file system on
/ORACLE_TEST0 using the Serviceguard CFS packages. Use /ORACLE_TEST0 to hold
the necessary configuration information and symbolic links to the Oracle executables.
NOTE: For information on other Volume Managers, see the Managing ServiceGuard
manual available at http://www.hp.com/go/hpux-serviceguard-docs —>HP Serviceguard
manual.
4. The control files, table spaces, and redo-log files must be located in the file system
/ORACLE_TEST0 during the initial creation of the database. It is also recommended to configure
trace files and alert logs in /ORACLE_TEST0 for ease of manageability. See Oracle
documentation for information on setting up trace files and alert logs.
5. ORACLE_HOME=/ORACLE_TEST0 needs to be set in the toolkit configuration file haoracle.conf.
6. /ORACLE_TEST0/dbs is the configuration directory for the 'ORACLE_TEST0' database. This
directory contains the Oracle parameter file (pfile/spfile) and the password file for
ORACLE_TEST0.
Symbolic links need to be created for all subdirectories in /home/Oracle other than dbs,
like "/ORACLE_TEST0/bin --> /home/Oracle/bin" and so on.
10 Using the Oracle Toolkit in an HP Serviceguard Cluster

NOTE: If you opted to store the configuration information on a local disk and propagate
the information to all nodes, ensure that pfile/spfile, the password file, and all control files
and data files are on shared storage. For this set up, you will need to set up symbolic links to
the pfile and the password file from /home/Oracle/dbs as follows:
ln -s /ORACLE_TEST0/dbs/initORACLE_TEST0.ora \
${ORACLE_HOME}/dbs/initORACLE_TEST0.ora
ln -s /ORACLE_TEST0/dbs/orapwORACLE_TEST0.ora \
${ORACLE_HOME}/dbs/orapwORACLE_TEST0.ora)
•Multiple Instance Configuration
If multiple instances will be run in the same cluster, repeat the preceding steps for each
instance. For example, if a second instance (ORACLE_TEST1) is to be included in the
configuration you would:
◦For LVM
Create a second volume group (for example, /dev/vg0_ORACLE_TEST1), logical
volume and filesystem with mount point (/ORACLE_TEST1) for the second instance.
All configuration information for ORACLE_TEST1 will reside in /ORACLE_TEST1/dbs.
Similar to ORACLE_TEST0, symbolic links need to be created for all subdirectories
(other than /ORACLE_TEST1/dbs/), to link /ORACLE_TEST1 to /home/Oracle.
◦For VxVM
Create a second disk group (example, /dev/vx/dsk/DG0_ORACLE_TEST1), logical
volume and filesystem with mount point (/ORACLE_TEST1) for the second instance.
All configuration information for ORACLE_TEST1 will reside in /ORACLE_TEST1/dbs.
Similar to ORACLE_TEST0, symbolic links need to be created for all subdirectories
(other than /ORACLE_TEST1/dbs/), to link /ORACLE_TEST1 to /home/Oracle.
◦For CFS
Create another directory /ORACLE_TEST1. Another CFS file system would then be
mounted on /ORACLE_TEST1 by the Serviceguard CFS packages. All configuration
information for ORACLE_TEST1 will reside in /ORACLE_TEST1/dbs. Similar to
ORACLE_TEST0, symbolic links need to be created for all subdirectories (other than
/ORACLE_TEST1/dbs/), to link /ORACLE_TEST1 to /home/Oracle.
This configuration makes it possible to run several Oracle instances on one node,
facilitating failover or failback of Oracle packages between nodes in the cluster.
•Here is an alternate setup for Oracle 10g/11g single-instance database:
If you are using LVM or VxVM (supported on Oracle 10gR2 and 11g only):
For nodes that will run only one database instance, the configuration described
above could be simplified by installing Oracle entirely on the shared volume/file
◦
system (/ORACLE_TEST0, in our example). The installation is simplified, since no
symbolic links are required. In this case, all Oracle binaries and configuration is
migrated to the standby node on failover.
Support For Oracle Database without ASM 11

NOTE: This setup is not supported if Oracle 10g Release 1 is configured with LVM
or VxVM. If Oracle 10g Release 1 is configured with LVM or VxVM then local
configuration is recommended. The above configuration is supported in Oracle 10g
Release 2 and Oracle 11g, but subject to a condition that Oracle's Automatic Storage
Management (ASM) is not configured on that node.
◦If you are using CFS:
In this setup, Oracle can be optionally installed on a CFS mounted file system
(/ORACLE_TEST0, in our example) with all Oracle binaries and configuration files
in a CFS mounted file system.
NOTE: An Oracle license must be installed on every node that might potentially
run Oracle in the cluster.
•Set up additional database logical volumes, with LVM
It is possible to have the database reside on the same volume group or logical volume
as $ORACLE_HOME/dbs, but more commonly, the database will probably reside on
several volume groups and logical volumes, which all need to be shared among the nodes
that are able to run the Oracle instances. Again, using a naming convention for the
volume group(s) that includes the instance name (${SID_NAME}) could be used to associate
a volume group with a unique instance.
For example:
Raw disk access for Oracle data:
/dev/vg01_ORACLE_TEST0/rlvol1 # Raw logical volume Oracle data
/dev/vg02_ORACLE_TEST0/rlvol1 # Raw logical volume Oracle data
/dev/vg02_ORACLE_TEST0/rlvol2 # Raw logical volume Oracle data
or for use with Asynchronous disk access and file systems:
/dev/vg01_ORACLE_TEST0/lvol1 # Logical volume Oracle data
/dev/vg02_ORACLE_TEST0/lvol1 # Logical volume Oracle data
/dev/vg02_ORACLE_TEST0/lvol2 # Logical volume Oracle data
See the Oracle documentation to determine which format is more appropriate for your
environment.
All data belonging to the database must reside on shared logical volumes (raw or file
system), space needs to be allocated and shared for the following data:
◦Oracle tablespaces
◦Oracle rollback segments
◦Oracle logfiles
After defining the shared volume groups/logical volumes/file systems for these
entities, see the Oracle documentation for creating the database.
12 Using the Oracle Toolkit in an HP Serviceguard Cluster

NOTE: If you are using VxVM, create appropriate disk groups as required.
If you are using CFS mounted file systems, you can have ${ORACLE_HOME}/dbs and
database reside in the same CFS file system. You can also have multiple Oracle databases
corresponding to multiple Oracle packages residing in the same CFS file system. However,
it is recommended to have different CFS file systems for different Oracle packages.
Setting Up the Toolkit
Toolkit Overview
It is assumed that users have used swinstall to properly install both Serviceguard and the Enterprise
Cluster Master Toolkit (referred to as the ECMT), which includes the scripts for Oracle.
After installing the toolkit, six scripts and a README file will be in the/opt/cmcluster/toolkit/
Oracle directory. Two more scripts and one file will be installed which will be used only for
modular packages. The two scripts will be in the /etc/cmcluster/scripts/ecmt/Oracle
directory and the third file will be installed in the /etc/cmcluster/modules/ecmt/Oracle
directory.
For legacy packages, there will be one toolkit configuration script (haOracle.conf ) and nine
functional scripts (toolkit.sh ,haoracle.sh,haoracle_sql.sh,haoracle.mon,
halistener.mon,hadbhang.mon,hagetdbstatus.sh,hatimeoutdbhang.sh and
SGAlert.sh)that work with each other to integrate Oracle database with the Serviceguard
package control script.
Table 2 Legacy Package Scripts
DescriptionScript Name
This script contains a list of pre-defined variables that the user must customize
for use with a particular database instance. This is a configuration file which
is read by the toolkit script, haoracle.sh.Table 3 (page 14) shows a list
of variables in haoracle.conf which need to be set for the database
package.
haoracle.conf (toolkit configuration file)
This script contains a list of internally used variables and functions that support
the starting and stopping of an Oracle database or ASM instance. This script
will be called by toolkit.sh to perform the following:
•On package startup, it starts the database or ASM instance, a listener
process in case of a database instance as well as launches monitor
processes.
•On package halt, it stops the database or ASM instance, the listener process
in case of a database instance, and monitor process.
•Oracle instance start/stop script (haoracle_sql.sh) This script contains
functions for starting and stopping Oracle instances and the listeners. This
script is invoked by the main script (haoracle.sh) to start up and shut
down Oracle.
Main Script (haoracle.sh )
This script contains a list of internally used variables and functions for
monitoring an Oracle server instance. This script will be called by
haoracle.sh. By default, the following processes are monitored:
ora_pmon_$SID_NAME, ora_smon__$SID_NAME, ora_lgwr_$SID_NAME,
ora_dbwr_$SID_NAME, ora_ckpt_$SID_NAME, and ora_reco_$SID_NAME
($SID_NAME is the session id name of the Oracle instance). These process
names are contained in the variable MONITOR_PROCESSES.
To include other processes to be monitored, the user needs to add the names
of the processes to MONITOR_PROCESSES array in the toolkit configuration
file (haOracle.conf). For example, if Oracle archiver is enabled, then
archiver process name can be added to theMONITOR_PROCESSES array
(ora_arc0_${SID_NAME}).
Monitor Script (haoracle.mon)
Support For Oracle Database without ASM 13

Table 2 Legacy Package Scripts (continued)
DescriptionScript Name
This script will be called by haoracle.sh to monitor the configured listeners.
The script makes use of a command supplied by Oracle to check the status of
the listener.
Listener Monitor Script (halistener.mon)
The hadbhang.mon script will be called by haOracle.sh to monitor the
Oracle instance for possible 'hung' state. hadbhang.mon script inturn uses
hagetdbstatus.sh and hatimeoutdb hang.sh to check the database status.
Database Hang Monitor Scripts
(hadbhang.mon, hagetdbstatus.sh,
hatimeoutdbhang.sh)
This script is used to send an e-mail to the e-mail address specified by the
value of the ALERT_MAIL_ID package attribute, whenever there are critical
problems with the package.
Alert Notification Scriptv(SGAlert.sh)
This script is the interface between the Serviceguard package control script
and the Oracle toolkit.
Interface Script (toolkit.sh)
Table 3 Variable or Parameter Name in haoracle.conf file
DescriptionVariable/Parameter Name
This parameter determines whether the instance is an ASM instance or a database
instance. Set this parameter to "database".
INSTANCE_TYPE
The home directory of Oracle.ORACLE_HOME
User name of the Oracle database administrator. This will be used for starting and
stopping of the database.
ORACLE_ADMIN
The Oracle session name. This is sometimes called the session ID (SID). (for example,
ORACLE_TEST0) and uniquely identifies an Oracle database instance.
SID_NAME
This parameter defines the Oracle database startup mode. Valid options are "no
mount", "mount" and "open". Default mode is "open".
START_MODE
Set to "yes" if you want this toolkit to start and stop the Oracle Listener.LISTENER
The name(s) of the listener process(es) (typically the SID_NAME )LISTENER_NAME
The password(s) of the listener process(es).LISTENER_PASS
This parameter defines the number of attempts to be made to restart the listener. If the
listener does not restart after "LISTENER_RESTART" number of consecutive attempts,
the package will be failed over. If the listener restart is successful, then the next time
listener fails, the toolkit again tries "LISTENER_RESTART" number of times to restart the
listener.
LISTENER_RESTART
Oracle database parameter file. If not specified, Oracle picks this up from the Oracle
configuration directory $ORACLE_HOME/dbs. This parameter when configured
overrides the default file/location. If both pfile and spfile are present and this parameter
left unspecified, then ECM Oracle Toolkit will make use of pfile as the parameter file.
To make use of spfile in the toolkit do not configure this parameter and remove the
default pfile from its default location.
PFILE
The names of all processes that should be executing.MONITOR_PROCESSES
14 Using the Oracle Toolkit in an HP Serviceguard Cluster

Table 3 Variable or Parameter Name in haoracle.conf file (continued)
This variable will enable or disable maintenance mode for the Oracle database
package. By default this is set to "yes". In order to disable this feature
MAINTENANCE_FLAG should be set to "no". When Oracle Database or ASM needs
to be maintained, then a "<package directory>/Oracle.debug" file needs to be
touched. During this maintenance period Oracle database or ASM instance's process
monitoring is paused. Even if an Oracle instance is brought down, its package will
not be failed over to the standby node. To continue monitoring and come back from
the maintenance mode, remove the Oracle.debug file. It is the user's responsibility
to ensure that Oracle instance is properly running after the maintenance phase.
NOTE: Setting MAINTENANCE_FLAG to "yes" and touching the Oracle.debug
file in the package directory will put the package in toolkit maintenance mode.
Serviceguard A.11.19 release has a new feature which allows individual components
of the package to be maintained while the package is still up. This feature is called
Package Maintenance mode and is available only for modular packages. For more
information using Package Maintenance mode, see Modular package support in
Serviceguard for Linux and ECM Toolkits available at http://www.hp.com/go/
hpux-serviceguard-docs —>HP Serviceguard Enterprise Cluster Master Toolkit.
If the Oracle database package is dependent on the SGeRAC clusterware package
(OC MNP), then the Oracle database package will automatically go into toolkit
maintenance mode if the SGeRAC OC MNP is put into toolkit maintenance mode. To
put the SGeRAC OC MNP into toolkit maintenance mode, its MAINTENANCE_FLAG
attribute must be set to 'yes' and a file oc.debug must be created manually in the
OC MNP working directory on that node. More details about how to put the SGeRAC
OC MNP package in toolkit maintenance mode can be found in the SGeRAC toolkit
user guide. If the MAINTENANCE_FLAG attribute of the SGeRAC OC MNP is set to
'yes', this parameter must also be set to 'yes' in the single-instance Oracle database
package.
MAINTENANCE_FLAG
This parameter must be set only in case where Oracle database packages created
using ECMT Oracle toolkit and SGeRAC packages run in the same cluster. This
parameter must be set to the Oracle Clusterware home directory.
ORA_CRS_HOME
The time interval script (in seconds) will wait between checks to ensure that the Oracle
instance is running. Default value is 30 seconds.
MONITOR_INTERVAL
The amount of time, in seconds, to wait for the Oracle abort to complete before killing
the Oracle processes defined in MONITOR_PROCESSES. The TIME_OUT variable is
used as protection against a worst-case scenario where a hung instance prevents the
package halt script from completing, therefore preventing the standby node from
starting the instance. The value of TIME_OUT must be less than the
HALT_SCRIPT_TIMEOUT value set in the package configuration file. If
HALT_SCRIPT_TIMEOUT is not defined then, it is the sum of all the
SERVICE_HALT_TIMEOUT defined in the package. This variable has no effect on
the package failover times.
TIME_OUT
This is used to mention if the Oracle user's shell should be invoked as a new shell or
as a subshell that inherits the variables set in the parent shell. This can be set to only
yes or no. Set to 'yes' if the Oracle user's shell should be invoked as a subshell. Set
to 'no' if the Oracle user's shell should be invoked as a new shell. If set to no, the
Oracle user's profile file is executed and the variables set in this profile file are available
to the new shell.
PARENT_ENVIRONMENT
This parameter indicates whether 'shutdown abort' needs to be executed before the
startup of the Oracle or ASM instance. 'shutdown abort' ensures the cleanup of
uncleared shared memory or semaphores. This parameter can be set to only 'yes' or
'no'. Default value is no.
CLEANUP_BEFORE_STARTUP
This parameter is used to specify the database shutdown mode only when a shutdown
is initiated by the user and not due to a failure of a service. This parameter can take
values "abort" or "immediate" only. If "abort" is specified, the database is shutdown
using the abort option. If "immediate" is specified, the database is shutdown using
the immediate option.
USER_SHUTDOWN_MODE
This parameter is used to specify the e-mail address for sending alerts.ALERT_MAIL_ID
Support For Oracle Database without ASM 15

Table 3 Variable or Parameter Name in haoracle.conf file (continued)
This parameter must be populated only in case of Oracle database packages being
created using ECMT Oracle toolkit provided that SGeRAC packages are also running
in the same cluster and Oracle database packages being dependent on SGeRAC OC
MNP package. This parameter must point to the working directory of the SGeRAC
OC MNP. In case of modular packages, the value for this parameter is automatically
populated when the package is created using the cmapplyconfcommand. In case
of legacy packages, this attribute must be populated manually in the haoracle.conf
file. This parameter can be set only using the CLI and cannot be set using the
Serviceguard Manager.
OC_TKIT_DIR
The amount of time, in seconds, to wait for the Oracle abort to complete before killing
the Oracle processes defined in MONITOR_PROCESSES. The TIME_OUT variable is
used as protection against a worst-case scenario where a hung instance prevents the
package halt script from completing, therefore preventing the standby node from
starting the instance. The value of TIME_OUT must be less than the
HALT_SCRIPT_TIMEOUT value set in the package configuration file.
IfHALT_SCRIPT_TIMEOUT is not defined then, it is the sum of all the
SERVICE_HALT_TIMEOUT's defined in the package. This variable has no effect on the
package failover times.
TIME_OUT
This is used to mention if the Oracle user's shell should be invoked as a new shell or
as a subshell that inherits the variables set in the parent shell. This can be set to only
yes or no. Set to 'yes' if the Oracle user's shell should be invoked as a subshell. Set
to no if the Oracle user's shell should be invoked as a new shell. If set to 'no', the
Oracle user's profile file is executed and the variables set in this .profile file are
available to the new shell.
PARENT_ENVIRONMENT
This parameter indicates whether 'shutdown abort' needs to be executed before the
startup of the Oracle/ASM instance. 'shutdown abort' ensures the cleanup of uncleared
shared memory or semaphores. This parameter can be set to only yes or no. Default
value is 'no'.
CLEANUP_BEFORE_STARTUP
This parameter is used to specify the database shutdown mode only when a shutdown
is initiated by the user and not due to a failure of a service. This parameter can take
values "abort" or "immediate" only. If "abort" is specified, the database is shutdown
using the abort option. If "immediate" is specified, the database is shutdown using
the immediate option.
USER_SHUTDOWN_MODE
This parameter is used to specify the e-mail address for sending alerts.ALERT_MAIL_ID
This parameter must be populated only in case of Oracle database packages being
created using ECMT Oracle toolkit provided that SGeRAC packages are also running
in the same cluster and Oracle database packages being dependent on SGeRAC OC
MNP package. This parameter must point to the working directory of the SGeRAC
OC MNP. In case of modular packages, the value for this parameter is automatically
populated when the package is created using the cmapplyconf command. In case of
legacy packages, this attribute must be populated manually in the haoracle.conf file.
OC_TKIT_DIR
For modular packages, there is an Attribute Definition File (ADF) - oracle.1, a Toolkit Module Script
(tkit_module.sh) and a Toolkit Configuration File Generator Script (tkit_gen.sh) that work with
the six scripts mentioned above for legacy packages, to integrate Oracle with the Serviceguard
Master Control Script.
16 Using the Oracle Toolkit in an HP Serviceguard Cluster

NOTE: The following three scripts are used only during the modular method of packaging.
Table 4 Modular Package Scripts
DescriptionScript Name
For every parameter in the legacy toolkit user configuration file, there is an
attribute in the ADF. It also has an additional attribute TKIT_DIR which is
analogous to the package directory in the legacy method of packaging. The
ADF is used to generate a package ASCII template file.
Attribute Definition File (oracle.1)
This script is called by the Master Control Script and acts as an interface
between the Master Control Script and the Toolkit interface script
(toolkit.sh). It is also responsible for calling the Toolkit Configuration File
Generator Script (described below).
Module Script (tkit_module.sh)
This script is called by the Module Script when the package configuration is
applied using cmapplyconf to generate the user configuration file in the
package directory (TKIT_DIR).
Toolkit Configuration File Generator
Script (tkit_gen.sh)
Support for multiple listeners
This feature provides support for multiple listeners with the ECM Oracle Toolkit. It enables the user
to configure:
1. Single service to monitor all the listeners together. This is the default behavior. To enable single
service to monitor all listeners, the listener name must not be passed to the service command.
The service_cmd in the package configuration file would appear as service_name
Oracle_listener_monitor service_cmd "$SGCONF/scripts/ecmt/Oracle/tkit_module.sh
Oracle_monitor_listener" service_restart none service_fail_fast_enabled no service_halt_timeout
300.
2. A separate service to monitor each listener. In this case, the default service_cmd in the package
configuration file has to be changed to include the listener name.
For example: service_name Oracle_listener_monitor_1 service_cmd
"$SGCONF/scripts/ecmt/Oracle/tkit_module.sh Oracle_monitor_listener <listener_name1>"
service_restart none service_fail_fast_enabled no service_halt_timeout 300 The above lines
have to be repeated for each listener. The user should ensure that the listener name passed
to this service_cmd, must match to one of those specified in the LISTENER_NAME array.
NOTE: It is not recommended to combine these two configurations together, that is, it is not
allowed to configure some listeners in a single service and the others in a separate service. The
user should either configure all the listeners in a single service or in a separate service for each of
them but not both together.
The user should ensure that the elements in LISTENER_RESTART array and LISTENER_PASS array
correspond to those in LISTENER_NAME array in the package configuration file. When some
listeners do not require a restart value and some do not require a password, ordering the elements
in the arrays becomes difficult. In such cases, to avoid confusion, it is recommended that
LISTENER_RESTART is set to '0' and LISTENER_PASS to 'empty quotes'(""), if they are not required.
Support for database hang detection
This feature enables the user to configure a separate service which will detect the database hang
and then take appropriate action if a hang is detected. Database hang is detected by connecting
to the database and checking its status. If this process takes an unusually long time or if toolkit is
unable to retrieve the database status, then it is assumed that the database is hung. The user has
the option to configure two attributes when configuring this service:
1. TIMEOUT: This attribute defines how long the script should wait for the database hang check
to return success. If the database health cannot be determined within this time after connecting
Support For Oracle Database without ASM 17

to the database, then it is assumed that the database is hung. It can have any positive integer
as value. The default value for TIMEOUT is 30 (seconds). This should not be confused with
the TIME_OUT package attribute or the service_halt_timeout attribute.
2. ACTION: This attribute defines the action that must be taken if a database hang is detected.
Currently, this attribute can take one of the following values:
•log - Log a message. A message is logged to the package log everytime a hang is
detected. If the MONITOR_INTERVAL attribute is set to 30 seconds, then a message is
logged to the package log file every 30 seconds.
•alert - Send an alert mail. An alert mail is sent to the email address specified with the
ALERT_MAIL_ID attribute. The mail is sent only the first time a database hang is detected.
•failover - Failover the package to adoptive node.
The default value for ACTION is 'failover'.
The syntax of the service command is as follows: service_cmd
"$SGCONF/scripts/ecmt/Oracle/tkit_module.sh Oracle_hang_monitor <TIMEOUT> <ACTION>"
Following is an example in which the TIMEOUT is set to 40 seconds and the ACTION is set to
'alert':
service_name db_hang_check
service_cmd "$SGCONF/scripts/ecmt/Oracle/tkit_module.sh Oracle_hang_monitor 40 alert"
service_restart none
service_fail_fast_enabled no
service_halt_timeout 300
Cluster Verification for ECMT - Oracle Toolkit
Cluster verification is proactive identification of cluster inconsistency that will adversely affect toolkit
package failover to a node. It is a check for Serviceguard, Toolkit and Oracle database versions
on all package nodes of the cluster. Cluster verification is supported in Serviceguard A.11.20.00
and ECMT B.06.00 Patch A or later. It will not fail cmcheckconf command if there is any
inconsistency but appropriate warning messages will be logged. It facilitates future addition of
new checks in an incremental fashion, transparent to Serviceguard.
Sample Demonstration:
Consider a two-node cluster, both nodes having Serviceguard A.11.20.00 and ECMT B.06.00
but different Oracle database versions. Use cmcheckconf command to check package configuration.
node1# cmcheckconf -P pkg.conf
On node2, validation of package Oracle_pkg succeeded with:
The toolkit configuration file in the toolkit configuration directory will be backed up and a new file
will be created when the package configuration is applied.
On node1, validation of package Oracle_pkg succeeded with:
WARNING! Oracle database version on all package nodes does not match. Check syslog for
more details.
cmcheckconf Verification completed with no errors found.
Use the cmapplyconf command to apply the configuration.
Oracle Package Configuration Example
Package Setup and Configuration
Assuming Oracle is already installed in its default home directory (for example, /home/Oracle),
perform the following steps to make necessary directories shareable by all clustered nodes:
18 Using the Oracle Toolkit in an HP Serviceguard Cluster

If you are using LVM or VxVM
Follow the instructions in the chapter Building an HA Cluster Configuration in the manual Managing
ServiceGuard manual available at http://www.hp.com/go/hpux-serviceguard-docs —>HP
Serviceguard to create a logical volume infrastructure on a shared disk. The disk must be available
to all clustered nodes that will be configured to run this database instance. Create a file system to
hold the necessary configuration information and symbolic links to the Oracle executables. This
file system will be used as ORACLE_HOME in the package control scripts. Since the volume group
and file system have to be uniquely named within the cluster, use the name of the database instance
($SID_NAME) in the name. Assuming the name of the database is 'ORACLE_TEST0', follow the
instructions in the manual Building an HA Cluster Configuration in the manual Managing
ServiceGuard manual available at http://www.hp.com/go/hpux-serviceguard-docs —>HP
Serviceguard to create the following:
LVM
----
/dev/vg0_ORACLE_TEST0 (the volume group)
/dev/vg0_ORACLE_TEST0/lvol1 (the logical volume)
/dev/vg0_ORACLE_TEST0/lvol1 (the filesystem)
mounted at /ORACLE_TEST0
VxVM
-----
/dev/vx/dsk/DG0_ORACLE_TEST0 (the disk group)
/dev/vx/dsk/DG0_ORACLE_TEST0/lvol1 (the logical volume)
/dev/vx/dsk/DG0_ORACLE_TEST0/lvol1 (the filesystem)
mounted at /ORACLE_TEST0
If you are using CFS
Make sure that the Serviceguard CFS packages are running in order for the Oracle package to
access CFS mounted file systems. See Serviceguard Manual for information on how to configure
Servicegaurd CFS packages. Create a directory /ORACLE_TEST0 on all cluster nodes. Mount the
CFS file system on /ORACLE_TEST0 using the Servicegurad CFS packages. Use /ORACLE_TEST0
to hold the necessary configuration information and symbolic links to the Oracle executables.
•Assuming Oracle is installed in /home/Oracle, create symbolic links to all subdirectories
under /home/Oracle with the exception of the dbs directory (dbs contains important instance
configuration files, and should reside in the shared storage in ${SID_NAME}, example,
/ORACLE_TEST0/dbs).
•Test the setup to ensure Oracle can be properly brought up. Log on as 'Oracle'. Set environment
variables ORACLE_HOME to /home/Oracle and ORACLE_SID to ORACLE_TEST0. Test Oracle
to ensure that it can be properly started.
$ sqlplus '/ as sysdba'
SQL> startup
SQL> exit
After few minutes, check for the existence of Oracle processes (there should be several,
identified by "ora_")
$ ps -fu Oracle
Bring the database down,
$ sqlplus '/ as sysdba'
SQL> shutdown immediate
SQL> exit
If you are using LVM - unmount and deactivate the volume group,
$ umount /ORACLE_TEST0
$ vgchange -a n /dev/vg0_ORACLE_TEST0
Support For Oracle Database without ASM 19

If you are using VxVM - unmount and deport the disk group,
$ umount /ORACLE_TEST0
$ vxdg deport /dev/vx/dsk/DG0_ORACLE_TEST0
Repeat this step on all other cluster nodes to be configured to run the package to ensure Oracle
can be brought up and down successfully.
•Create the Serviceguard package using legacy method.
The following steps in this section describes the method for creating the Serviceguard package
using the legacy method. For information on creating the Serviceguard package using the
modular method, see Modular package support in Serviceguard for Linux and ECM Toolkits
available at http://www.hp.com/go/hpux-serviceguard-docs —>HP Serviceguard Enterprise
Cluster Master Toolkit.
$ mkdir /etc/cmcluster/pkg/ORACLE_TEST0
Copy the toolkit files from Oracletoolkit
$ cd /etc/cmcluster/pkg/ORACLE_TEST0/
$ cp /opt/cmcluster/toolkit/oracle/*
Create a package configuration file (ORACLE_TEST0.conf) and package control script
(ORACLE_TEST0.cntl) as follows:
$ cmmakepkg -p ORACLE_TEST0.conf
$ cmmakepkg -s ORACLE_TEST0.cntl
There should be one set of configuration and control script files for each Oracle instance.
The Serviceguard package control script (ORACLE_TEST0.cntl). Below are some examples of
modifications to the Serviceguard package control script you need to make to customize to
your environment.
If you are using LVM
VOLUME GROUPS
Define the volume groups that are used by the Oracle instance. File systems associated with these
volume groups are defined as follows:
VG[0]=/dev/vg00_${SID_NAME}
For example:
VG[0]=/dev/vg00_ORACLE_TEST0
Define the file systems which are used by the Oracle instance.
20 Using the Oracle Toolkit in an HP Serviceguard Cluster

NOTE: One of these file systems must be the shared file system/logical volume containing the
Oracle Home configuration information ($ORACLE_HOME). The name of the instance is used to
name the volume groups, logical volumes and file systems.
LV[0]=/dev/vg00_${SID_NAME}/lvol1
FS[0]=/${SID_NAME}
For example:
LV[0]=/dev/vg00_ORACLE_TEST0/lvol1
FS[0]=/ORACLE_TEST0
If you are using VxVM
•DISK GROUPS
Define the disk groups that are used by the Oracle instance. File systems associated with these
disk groups are defined as follows:
VXVM_DG[0]=/dev/vx/dsk/DG00_${SID_NAME}
For example:
VXVM_DG[0]=/dev/vx/dsk/DG00_ORACLE_TEST0
Define the file systems which are used by the Oracle instance.
NOTE: One of these file systems must be the shared file system/logical volume containing
the Oracle Home configuration information ($ORACLE_HOME). The name of the instance is
used to name the disk groups, logical volumes and file systems.
LV[0]=/dev/vx/dsk/DG00_${SID_NAME}
FS[0]=/${SID_NAME}
For example:
LV[0]=/dev/vx/dsk/DG00_ORACLE_TEST0/lvol1
FS[0]=/ORACLE_TEST0
NOTE: If you are using CFS mounted file systems, you must NOT configure volume groups,
logical volumes, and file systems in the package control script, but configure dependency on
Serviceguard CFS packages.
The service name must be the same as defined in the package configuration file. Always call
the Oracle executable script with "start" for the SERVICE_CMD definitions.
SERVICE_NAME[0]=ORACLE_${SID_NAME}
SERVICE_CMD[0]="/etc/cmcluster/pkg/${SID_NAME}/tookit.sh monitor"
SERVICE_RESTART[0]="-r 2"
For example:
SERVICE_NAME[0]=ORACLE_TEST0
SERVICE_CMD[0]="/etc/cmcluster/pkg/ORACLE_TEST0/toolkit.sh monitor"
SERVICE_RESTART[0]="-r 2"
If Listener is also chosen to be monitored, then another service for listener has to be added
as shown below:
SERVICE_NAME[1]=LSNR_0
SERVICE_CMD[1]="/etc/cmcluster/pkg/ORACLE_TEST0/toolkit.sh monitor_listener"
SERVICE_RESTART[1]="-r 2"
Support For Oracle Database without ASM 21

If the database must be monitored for a 'hang' condition, then another service has to be added
as shown below:
SERVICE_NAME[2]=DB_HANG_0
SERVICE_CMD[2]="/etc/cmcluster/pkg/ORACLE_TEST0/toolkit.sh hang_monitor 30 failure"
SERVICE_RESTART[2]="-r 2"
The service restart counter can be reset to zero for this service by using Serviceguard command
cmmodpkg. The service restart counter is incremented each time the service fails. It is used to
determine when a package has exceeded its restart limit as defined by the SERVICE_RESTART
parameter in the package control script.
To reset the restart counter execute the following command:
cmmodpkg [-v] [-n node_name] -R -s service_name package_name
NOTE: If listener monitoring is not required, then do NOT configure a new service for listener.
Edit the customer_defined_run_cmds function to execute the toolkit.sh script with the start
option. In the example below, the line /etc/cmcluster/pkg/ORACLE_TEST0/
toolkit.sh start was added, and the ":" null command line deleted.
For example:
function customer_defined_run_cmds
{
# Start the Oracle database.
/etc/cmcluster/pkg/ORACLE_TEST0/toolkit.sh start
test_return 51
}
Edit the customer_defined_halt_cmds function as shown below to include the check to get the
reason for package halt, that is, whether the package halt is due to a failure of a service or
a user initiated shutdown. Also, execute the toolkit.sh script with the stop option.
For example:
function customer_defined_halt_cmds
{
# Stops the database with a "shutdown abort" or a
# "shutdown immediate" command.
if [ $SG_HALT_REASON = "user_halt" ]; then
reason="user"
else
reason="auto"
fi
/etc/cmcluster/pkg/ORACLE_TEST0/toolkit.sh stop $reason
test_return 52
}
•The Serviceguard package configuration file (ORACLE_TEST0.conf).
The package configuration file is created with "cmmakepkg -p", and should be put in the
following location:
'/etc/cmcluster/pkg/${SID_NAME}/${SID_NAME}.conf'
For example:
/etc/cmcluster/pkg/ORACLE_TEST0/ORACLE_TEST0.conf
22 Using the Oracle Toolkit in an HP Serviceguard Cluster

The configuration file should be edited as indicated by the comments in that file. The package
name must be unique within the cluster. For clarity, use the $SID_NAME to name the package.
PACKAGE_NAME <SID_NAME>
PACKAGE_NAME ORACLE_TEST0
List the names of the clustered nodes to be configured to run the package, using the NODE_NAME
parameter:
NODE_NAME node1
NODE_NAME node2
The service name must match the service name used in the package control script. The service
name should include the Oracle instance name (that is, ${SID_NAME}). In the following
example, since there is only one service for this package, the ${SID_NAME} (that is,
ORACLE_TEST0) is assigned to the SERVICE_NAME parameter.
For example:
SERVICE_NAME ORACLE_TEST0
SERVICE_FAIL_FAST_ENABLED NO
SERVICE_HALT_TIMEOUT 300
If the listener should also be monitored, another service must be added.
SERVICE_NAME LSNR_0
SERVICE_FAIL_FAST_ENABLED NO
SERVICE_HALT_TIMEOUT 300
NOTE: If listener monitoring is not intended, do not create a new service.
The run and halt scripts are (typically) identified as the control script, as follows: RUN_SCRIPT
/etc/cmcluster/pkg/ORACLE_TEST0/ORACLE_TEST0.cntl HALT_SCRIPT
/etc/cmcluster/pkg/ORACLE_TEST0/ORACLE_TEST0.cntl .
If you are using a CFS mounted file system for the Oracle package, you need to configure
dependency of the Oracle package on a Serviceguard CFS package(for example,.
SG-CFS-MP-1, CFS mount point package).
If the Oracle package is configured to depend on a Serviceguard CFS package, the Oracle
package will run as long as the dependee package is running. If the dependee package fails,
then the dependent Oracle package will also fail.
To configure dependency of the Oracle package, you must set the following configurable
parameters in the package configuration file:
DEPENDENCY_NAME
DEPENDENCY_CONDITION
DEPENDENCY_LOCATION
For example:
DEPENDENCY_NAME Oracle_dependency
DEPENDENCY_CONDITION SG-CFS-MP-1 = up
DEPENDENCY_LOCATION SAME_NODE
Support For Oracle Database without ASM 23

NOTE: If the Oracle database is running in a cluster where SGeRAC packages are also
running, then the ECMT Oracle single-instance database package must be made dependent
on the SGeRAC Oracle clusterware multi-node package (OC MNP). The dependency type
should be 'SAME_NODE=up'. This is because, when the Oracle clusterware is halted, it halts
the Oracle single-instance database. By putting this dependency, we ensure that the database
package is always halted first and then the SGeRAC OC MNP is halted. Also, the Oracle
database must be disabled from being started automatically by the Oracle Clusterware. This
can be done by following the below steps:
1. Log in as the Oracle administrator and run the following command to set the database
management policy to manual:
For Oracle 10g:
# $ORACLE_HOME/bin/srvctl modify database -d <dbname> —y manual
For Oracle 11g:
# $ORACLE_HOME/bin/srvctl modify database -d <dbname> —y MANUAL
•The Oracle toolkit user configuration file.
In the package directory, modify the haoracle.conf configuration file for this Oracle
instance.
NOTE: In case of a modular package, the user need not specify the parameter values in
thehaoracle.conf file. The toolkit populates haoracle.conf on its own.
For example:
Edit the haoracle.conf script as indicated by the comments in that script. You will have to
set the variables as shown in the example below:
INSTANCE_TYPE=database
ORACLE_HOME=/ORACLE_TEST0
ORACLE_ADMIN=Oracle
SID_NAME=ORACLE_TEST0
START_MODE=open
ASM=no
LISTENER=yes
LISTENER_NAME=LISTENER_ORACLE_TEST0
LISTENER_PASS=
LISTENER_RESTART=
PFILE=${ORACLE_HOME}/dbs/init${SID_NAME}.ora
MONITOR_PROCESSES[0]=ora_pmon_${SID_NAME}
MONITOR_PROCESSES[1]=ora_dbw0_${SID_NAME}
MONITOR_PROCESSES[2]=ora_ckpt_${SID_NAME}
MONITOR_PROCESSES[3]=ora_smon_${SID_NAME}
MONITOR_PROCESSES[4]=ora_lgwr_${SID_NAME}
MONITOR_PROCESSES[5]=ora_reco_${SID_NAME}
MAINTENANCE_FLAG=yes
MONITOR_INTERVAL=30
TIME_OUT=30
PARENT_ENVIRONMENT=no
CLEANUP_BEFORE_STARTUP=no
USER_SHUTDOWN_MODE=abort
ALERT_MAIL_ID=
The parameters ASM_DISKGROUP, ASM_VOLUME_GROUP, ASM_HOME, ASM_USER,
ASM_SID, and KILL_ASM_FOREGROUNDS need to be set only for a database package
using ASM. For more information on ASM, see “Supporting Oracle ASM instance and Oracle
database with ASM” (page 26).
24 Using the Oracle Toolkit in an HP Serviceguard Cluster

After setting up the Serviceguard environment, each clustered Oracle instance should have
the following files in the related package directory. For example, the ORACLE_TEST0 package,
located at /etc/cmcluster/pkg/ORACLE_TEST0, would contain the following files:
Table 5 Files in ORACLE_TEST0
DescriptionFile Name
Serviceguard package configuration file${SID_NAME}.conf
Serviceguard package control script${SID_NAME}.cntl
Toolkit Interface Scripttoolkit.sh
Toolkit user configuration filehaoracle.conf
Toolkit main scripthaoracle.sh
Oracle start/stop scripthaoracle_sql.sh
Toolkit Monitor Scripthalistener.mon
Listener Monitor Scripthalistener.mon
Another example to create the Serviceguard package using modular method:
1. Create the modular package configuration file "pkg.conf" by including the ECMT Oraclt toolkit
module.
# cmmakepkg -m ecmt/Oracle/Oracle pkg.conf
where,
'ecmt/Oracle/Oracle' is the ECMT Oracle toolkit module name.
pkg.conf is the name of the package configuration file.
2. Configure the following Serviceguard parameters in the pkg.conf file:
package_name — Set to any name desired.
package_type — Set to failover.
Edit the service parameters if necessary. The service parameters are preset to:
service_name Oracle_service
service_cmd "$SGCONF/scripts/ecmt/Oracle/tkit_module.sh Oracle_monitor"
service_restart none
service_fail_fast_enabled no
service_halt_timeout 300
service_name Oracle_listener_service
service_cmd "$SGCONF/scripts/ecmt/Oracle/tkit_module.sh Oracle_monitor_listener"
service_restart none
service_fail_fast_enabled no
service_halt_timeout 300
service_name oracle_hang_service
service_cmd "$SGCONF/scripts/ecmt/oracle/tkit_module.sh oracle_hang_monitor 30 failover"
service_halt_timeout 300
If the listener is not configured, comment the second set of service parameters which are used
to monitor the listener.
3. Configure the toolkit parameter TKIT_DIR. This parameter is synonymous to the package
directory. On a cmapplyconf,TKIT_DIR will contain the toolkit configuration file
haoracle.conf on all configured nodes. Configure the other toolkit parameters for the
database package .
4. Apply the package configuration using the following command:
# cmapplyconf -P pkg2.conf
This command creates the package using the values specified in the package configuration
file. It also creates the toolkit configuration directory defined by TKIT_DIR parameter on all
target nodes, if not already present and then creates the toolkit configuration file in it with the
values specified in thepkg.conf file.
Support For Oracle Database without ASM 25

For more information on modular packages, see the whitepaper Modular package support
in Serviceguard for Linux and ECM Toolkits available at http://www.hp.com/go/
hpux-serviceguard-docs —>HP Serviceguard Enterprise Cluster Master Toolkit.
Also, refer the whitepaper "Migrating Packages from Legacy to Modular Style, October 2007"
for more information. You can find this whitepaper at http://www.hp.com/go/
hpux-serviceguard-docs -> HP Enterprise Cluster Master Toolkit .
5. For a running database package, if the value of any of the package attribute needs to be
modified, then the package needs to be restarted. The following steps should be followed to
update the attribute values of a running database package:
a. Edit the package configuration file and populate the new values.
b. Halt the package.
c. Apply the package configuration file.
d. Start the package.
Supporting Oracle ASM instance and Oracle database with ASM
This section discusses the use of the Oracle database server feature called Automatic Storage
Management (ASM) in HP Serviceguard for single database instance failover. Serviceguard
Extension for RAC (SGeRAC) supports ASM with Oracle RAC on both ASM over raw devices and
ASM over SLVM. For Oracle single-instance failover, Serviceguard support is for ASM over LVM
where the members of the ASM disk groups are raw logical volumes managed by LVM. LVM
provides the necessary I/O fencing mechanism and also the multipathing capability not present
in HP-UX 11i v2. When using ASM with Oracle single-instance database versions earlier to 11gR2,
the ASM file descriptors were kept open on ASM disk group members even after the disk groups
had been dismounted. Oracle has released patches which address the ASM descriptor issue and
meets the Serviceguard requirement for supporting ASM. Note that these patches are not required
for Oracle 11gR2 or later versions. This whitepaper describes how Oracle failover packages can
now use Oracle ASM with the interim patches provided by Oracle. The framework for ASM
integration with Serviceguard makes use of a Multi-Node Package (MNP) to encapsulate the ASM
instance and to have the ASM instance running on all nodes, with one or more Oracle
single-instance failover packages dependent on this MNP. Customers wishing to use the proposed
framework for ASM integration with Serviceguard should use this whitepaper in conjunction with
a bundle of Oracle Enterprise Cluster Master Toolkit (ECMT) scripts, provided by HP.
What is Automatic Storage Management (ASM)?
Automatic Storage Management is a feature provided in Oracle 10g or later to simplify the
database files management. It provides the database administrator with a simple storage
management interface that is consistent across all server and storage platforms. ASM provides file
system and volume management capabilities directly inside the Oracle database kernel, allowing
volumes and disk management with familiar SQL statements in Oracle. This is an alternative to
platform file systems and volume managers for the management of most file types used to store the
Oracle database, including Oracle datafiles, control files, and online and archived redo log files.
File types not supported by ASM include Oracle database server binaries, trace files, audit files,
alert logs, backup files, export files, tar files, and core files. Storage for application binaries and
data cannot be managed by ASM. ASM uses disk groups to store datafiles; an ASM disk group
is a collection of disks that ASM manages as a unit. Within a disk group, ASM exposes a file
system interface for Oracle database files. The contents of files that are stored in a disk group are
evenly distributed, or striped to eliminate hot spots and to provide uniform performance across the
disks.
This section describes the High Availability Scripts for Oracle ASM support with Serviceguard.
Support is for Automatic Storage Management (ASM) over LVM where the ASM disk group members
are raw logical volumes managed by LVM.
26 Using the Oracle Toolkit in an HP Serviceguard Cluster

Following are the supported versions of HP Serviceguard:
•A.11.19
•A.11.20
Oracle versions supported with ASM are 10.2.0.4, 11.1.0.6, and 11.1.0.7 with interim patches
7330611 and 7225720 installed. Before these patches were released by Oracle, ASM kept
descriptors open on ASM disk group member volumes even after the ASM disk group had been
dismounted. This prevented the deactivation of the LVM volume groups. These two patches address
the ASM descriptor issue and meets the Serviceguard requirement for supporting ASM. Oracle
version 11gR2 is also supported but does not require interim patches to be installed.
NOTE: For information on the proposed framework for ASM integration with Serviceguard,
please refer to the whitepaper High Availability Support for Oracle ASM with Serviceguard
available at: www.hp.com/go/hpux-serviceguard-docs —> HP Enterprise Cluster Master Toolkit
.
The Oracle toolkit uses Multi-Node Package (MNP) and the package dependency feature to
integrate Oracle ASM with HP Serviceguard. An MNP is used to encapsulate the per-node ASM
instances with one or more Oracle single-instance failover packages that are dependent on this
MNP. This configuration enables database instance to start up in the right order in relation to the
ASM instance, and in the event of a failover, to relocate to a node where an ASM instance is
available.
The Oracle toolkit scripts for ASM support with Serviceguard consists of a set of shell scripts that
are used to start, stop, and monitor an Oracle ASM and database instance and the configured
listeners. To use these scripts, the scripts must be integrated into the Serviceguard package control
script in case of legacy packages. In the case of modular packages, the scripts must be integrated
with the Serviceguard master control script. Subsequent sections provide guidelines for integrating
these scripts with the Serviceguard package control script and the master control script.
In a Serviceguard cluster, packages created using the Oracle toolkit can co-exist with packages
created using the SGeRAC toolkit. In such an environment where the Oracle toolkit and the SGeRAC
toolkit coexist, the ASM MNP package need not be created using the Oracle toolkit. The
single-instance database failover packages must be made dependent on the SGeRAC Clusterware
multi-node package (OC MNP package). Also, the package should be created using the command
line interface and Serviceguard Manager must not be used to create the packages.
A major advantage of ASM is the ease of management it provides for database files:
•The system administrator has only to specify the set of raw devices to be used in an ASM disk
group; the tasks of configuring and administering volume/disk groups and file systems are
eliminated. Oracle ASM makes use of the Oracle feature called Oracle-Managed Files and
performs the tasks of creating, deleting, and extending files on behalf of database instances;
additionally, it manages their mirroring and striping.
•If a device is added to, or deleted from, an ASM disk group, ASM automatically rebalances
database file striping based on the new disk layout.
Figure 1, contrasts the Oracle storage hierarchy as it appears when platform or 3rd party volume
managers and file systems are used for Oracle data files, compared to when ASM is used. The
layers corresponding to file systems and volume managers are absorbed into ASM. The files and
directories in the storage hierarchy are not visible using standard operating system commands; to
display them the customer must use Oracle utilities.
Supporting Oracle ASM instance and Oracle database with ASM 27
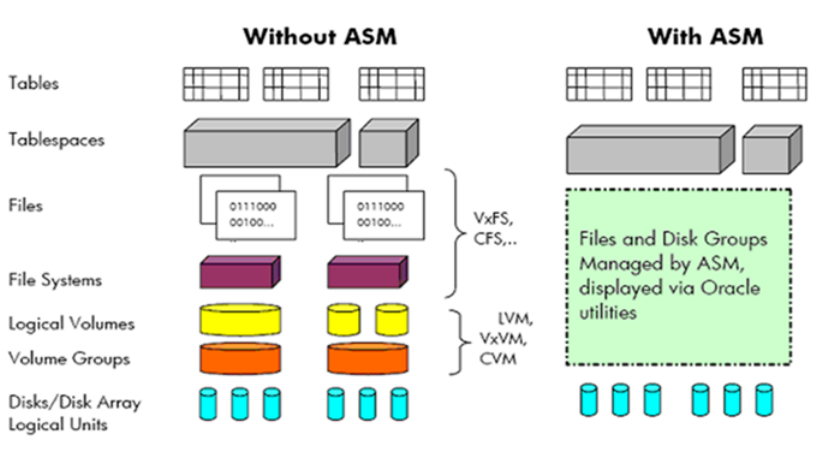
Figure 1 Oracle database storage hierarchy without and with ASM
Why ASM over LVM?
As mentioned above, we require ASM disk group members in Serviceguard configurations to be
raw logical volumes managed by LVM. We leverage existing HP-UX capabilities to provide
multipathing for LVM logical volumes, using either the PV Links feature, or separate products such
as HP StorageWorks Secure Path that provide multipathing for specific types of disk arrays. Another
reason for using LVM is that, it is the responsibility of Serviceguard to provide the necessary I/O
fencing when it provides failover for a single-instance Oracle database instance. Serviceguard
ensures I/O fencing for a failover package via a feature in the volume manager - exclusive activation
of volume groups. Other advantages of the "ASM-over-LVM" configuration are as follows:
•ASM-over-LVM ensures that the HP-UX devices used for disk group members will have the
same names (the names of logical volumes in LVM volume groups) on all nodes, easing ASM
configuration.
•ASM-over-LVM protects ASM data against inadvertent overwrites from nodes inside/outside
the cluster. If the ASM disk group members are raw disks, there is no protection currently
preventing these disks from being incorporated into LVM or VxVM volume/disk groups.
The disadvantages of the ASM-over-LVM configuration are as follows:
•Additional configuration and management tasks are imposed by the extra layer of volume
management (administration of volume groups, logical volumes, physical volumes).
•There is a small performance impact from the extra layer of volume management.
Configuring LVM Volume Groups for ASM Disk Groups
We require ASM disk group members in Serviceguard configurations to be raw logical volumes
managed by LVM. But these logical volumes presented to ASM should resemble raw disks, as far
as possible. Hence, each LVM logical volume (LV) used as a member of an ASM disk group is
required to be laid out to occupy the usable space, in contiguous fashion, of exactly one single
physical volume (PV). This implies that the LV:
•should be contiguous,
•should not be striped or mirrored,
28 Using the Oracle Toolkit in an HP Serviceguard Cluster
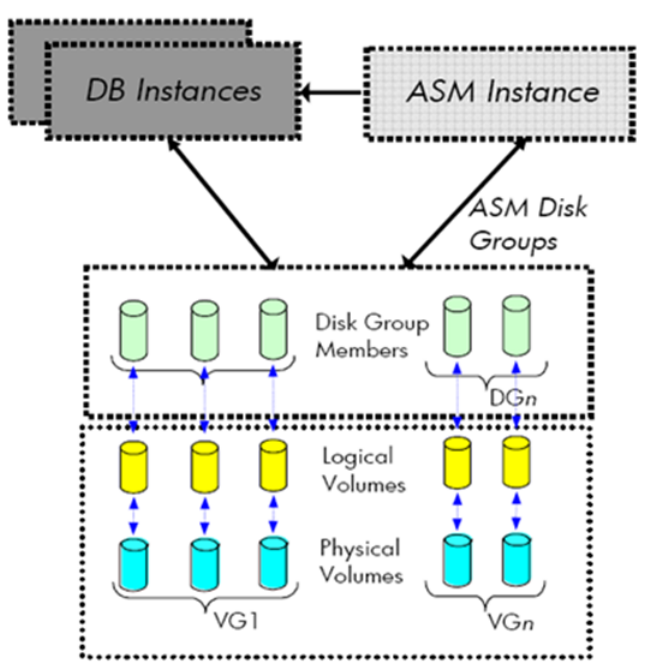
•should not span multiple PVs
•and should not share a PV with other LVs.
The idea is that ASM provides the mirroring, striping, slicing, and dicing functionality as needed
and LVM supplies the multipathing functionality not provided by ASM. Figure 2 indicates this
one-to-one mapping between LVM PVs and LVs used as ASM disk group members.
Further, the default retry behavior of LVM could result in an I/O operation on an LVM LV taking
an indefinitely long period of time. This behavior could impede ASM retry and rebalance
capabilities; hence a finite timeout must be configured for each LVM LV.
For example, the timeout could be configured to the value (total number of physical paths to the
PV * PV timeout), providing enough time for LVM to try all available paths, if needed.
The PVs used in an ASM disk group can be organized into LVM volume groups as desired by the
customer. In the example shown in Figure 2, for each ASM disk group, the PVs corresponding to
its members are organized into a separate LVM volume group.
The LVM volume groups are marked as exclusive volume groups and exported across the
Serviceguard cluster using standard Serviceguard procedures. As noted above, multiple physical
paths to each physical volume should be configured using the LVM PV Links feature or a separate
multipathing product such as HP StorageWorks Secure Path.
Figure 2 Oracle database storage hierarchy without and with ASM
Sample Command Sequence for Configuring LVM Volume Groups
Here is an example of a command sequence that can be used to prepare LVM Logical Volumes
for use by ASM to meet the requirements specified above. The scenario for the example is that we
are preparing a new volume group named vgora_asm with two PVs, each with two physical paths.
The physical paths for the first PV are /dev/dsk/c9t0d1 and /dev/dsk/c10t0d1 and those
for the second PV are /dev/dsk/c9t0d2 and /dev/dsk/c10t0d2.
Supporting Oracle ASM instance and Oracle database with ASM 29
1. Create the volume group with the two PVs, incorporating the two physical paths for each
(choosing hh to be the next hexadecimal number that is available on the system, after the
volume groups that are already configured).
# pvcreate -f /dev/rdsk/c9t0d1
# pvcreate -f /dev/rdsk/c9t0d2
# mkdir /dev/vgora_asm
# mknod /dev/vgora_asm/group c 64 0xhh0000
# vgcreate /dev/vgora_asm /dev/dsk/c9t0d1
# vgextend /dev/vgora_asm /dev/dsk/c9t0d2
# vgextend /dev/vgora_asm /dev/dsk/c10t0d1
# vgextend /dev/vgora_asm /dev/dsk/c10t0d2
2. For each of the two PVs, create a corresponding LV.
•Create an LV of zero length.
•Mark the LV as contiguous.
•Extend each LV to the maximum size possible on that PV (the number of extents available
in a PV can be determined via vgdisplay -v <vgname>)
•Configure LV timeouts, based on the PV timeout and number of physical paths, as
described in the previous section. If a PV timeout has been explicitly set, its value can be
displayed via pvdisplay -v. If not, pvdisplay will show a value of default, indicating that
the timeout is determined by the underlying disk driver. For SCSI devices, in HP-UX 11i
v2, the default timeout is 30 seconds.
•Null out the initial part of each LV user data area to ensure ASM accepts the LV as an
ASM disk group member. Note that we are zeroing out the LV data area, not its metadata.
It is the ASM metadata that is being cleared.
# lvcreate -n lvol1 vgora_asm
# lvcreate -n lvol2 vgora_asm
# lvchange -C y /dev/vgora_asm/lvol1
# lvchange -C y /dev/vgora_asm/lvol2
# Assume vgdisplay shows each PV has 2900 extents in our example
# lvextend -l 2900 /dev/vgora_asm/lvol1 /dev/dsk/c9t0d1
# lvextend -l 2900 /dev/vgora_asm/lvol2 /dev/dsk/c9t0d2
# Assume a PV timeout of 30 seconds.
# There are 2 paths to each PV, so the LV timeout value is 60 seconds
# lvchange -t 60 /dev/vgora_asm/lvol1
# lvchange -t 60 /dev/vgora_asm/lvol2
# dd if=/dev/zero of=/dev/vgora_asm/rlvol1 bs=8192 count=12800
# dd if=/dev/zero of=/dev/vgora_asm/rlvol2 bs=8192 count=12800
3. Export the volume group across the Serviceguard cluster and mark it as exclusive, as specified
by Serviceguard documentation. Assign the right set of ownerships and access rights to the
raw logical volumes on each node as required by Oracle (oracle:dba and 0660, respectively).
We can now use the raw logical volume device names as disk group members when
configuring ASM disk groups using the Oracle database management utilities. There are a
few ways to configure the ASM disk groups, for example, the dbca database creation wizard
and sqlplus.
The same command sequence can be used for adding new disks to an existing volume group
that is being used by ASM to store one or more database instances.
30 Using the Oracle Toolkit in an HP Serviceguard Cluster

Serviceguard support for ASM on HP-UX 11i v3 onwards
This document describes how to configure Oracle ASM database with Serviceguard for high
availability using the ECMT Oracle toolkit. Look at the ECMT support matrix available at http://
www.hp.com/go/hpux-serviceguard-docs -> HP Enterprise Cluster Master Toolkit for the supported
versions of ECMT, Oracle, and Serviceguard.
Note that for a database failover, each database should store its data in its own disk group. Refer
to Oracle documentation for limitation imposed by ASM on the number of disk groups. The disk
group members must be logical volumes managed by HP Logical Volume Manager (LVM). Initial
release of HP-UX 11i v3 did not support LVM version 2. With HP-UX 11i v3 0803, LVM version
2 logical volumes are also supported as members of the ASM disk groups.
A new I/O infrastructure that enables the native built-in multipathing functionality is introduced in
HPUX 11i v3. This feature offers users a continuous I/O access to a LUN or disk if any of the paths
fails. This feature is enabled in the operating system by default. In addition, new DSF (device
special file) format is introduced in this operating system known as persistent DSF. An example of
persistent DSF is /dev/disk/disk1, compared to the legacy DSF, /dev/rdsk/cxtydz.
A new cluster wide DSF format is introduced in HP-UX 11i v3 known as cDSF. Serviceguard
A.11.20 requires the Serviceguard patch PHSS_41225 to support this feature. An example of
cDSF is /dev/cdisk/disk1, compared to the persistent DSF, /dev/disk/disk1. ASM cannot
detect cDSF format and hence this format cannot be used to create the ASM disk groups.
It is the responsibility of Serviceguard to provide the necessary I/O fencing when failover is provided
for a single-instance Oracle database instance. Serviceguard ensures I/O fencing for a failover
package via a feature in the volume manager - exclusive activation of volume groups. Hence it is
required that the ASM disk group members be LVM logical volumes.
Framework for ASM support with Serviceguard
The framework for ASM integration with Serviceguard makes use of a Multi-Node Package (MNP)
to encapsulate the per-node ASM instances, with one or more Oracle single-instance failover
packages dependent on this MNP. This configuration enables the database instance to start up in
the right order in relation to the ASM instance, and in the event of failover, to relocate to a node
where an ASM instance is available. The benefits of this package framework for single-instance
Oracle database using ASM-based storage are:
•Avoid failing over ASM instance. This reduces the failover time due to ASM instance restart.
•Many database instances can share one ASM instance per node.
•Sequencing between Oracle database instance and ASM instance during
startup/shutdown/failover.
•Flexibility of the database instances to fail over independently.
HP provides a set of scripts known as the Enterprise Cluster Master Toolkit (ECMT) scripts which
provides for the integration of ASM with Serviceguard. The operation of the Toolkit is described
below.
The start function switches to the ASM software owner user id by executing the su command. It
starts the ASM instance specified by the user using the sqlplus commands. The mounting of the
ASM disk groups associated with a database instance will be done before database instance
startup after volume group activation during the database package startup.
The stop function executes su to the ASM software owner user id. It stops the ASM instance using
sqlplus commands.
The monitor function contains a continuous loop to check if the ASM instance processes specified
are healthy. If the monitor function finds any process to have died, it means that the ASM instance
has either failed or been inappropriately shut down, that is, without using cmhaltpkg. The service
Supporting Oracle ASM instance and Oracle database with ASM 31
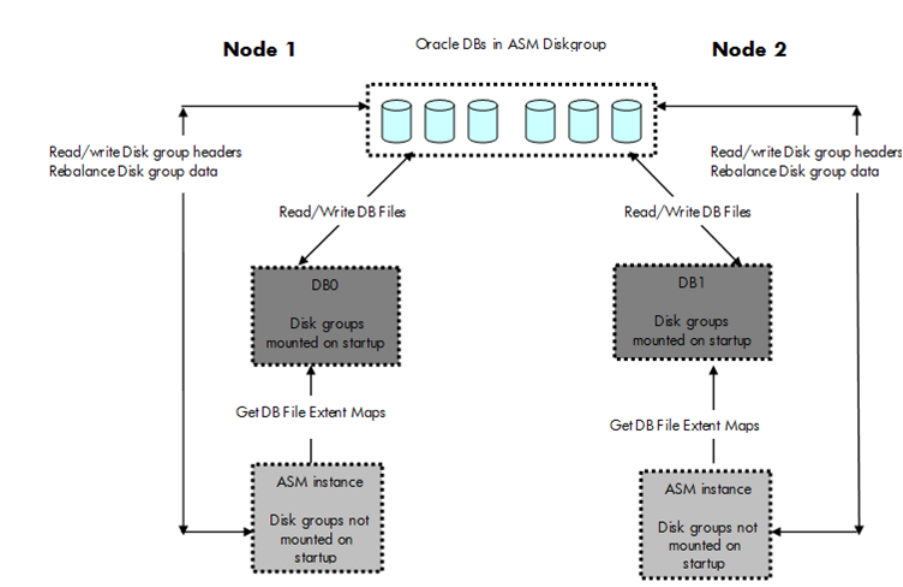
that invokes the function fails at this point and the Serviceguard package manager fails the
corresponding ASM MNP instance.
On ASM instance failure, all dependent database instances will be brought down and will be
started on the adoptive node.
How Toolkit Starts, Stops and Monitors the Database instance
The Toolkit failover package for the database instance provides start and stop functions for the
database instance and has a service for checking the status of the database instance.
There will be a separate package for each database instance. Each database package has a
simple dependency on the ASM package. The package activates the volume groups in exclusive
mode. The start function executes su to the Oracle software owner user id. This function mounts
the ASM disk groups associated with the instance and starts the database instance specified by
the user using the sqlplus commands.
The stop function executes su to the Oracle software owner user id. The database instance is
shutdown using the sqlplus commands and the disk groups associated with the instance are
dismounted. After dismounting the disk groups, the logical volumes are checked to see if ASM has
closed its file descriptors. If file descriptors are still open, necessary steps are taken to ensure that
file descriptors are closed. The package then deactivates the volume groups.
The monitor function contains a continuous loop to check if the database instance processes
specified are healthy. If the monitor function finds any process to have died, it means that the
database instance has either failed or been inappropriately shut down, that is, without using
cmhaltpkg. The service that invokes the function fails at this point and the Serviceguard package
manager fails the corresponding database failover package.
Consider two database instances DB0 and DB1. Each database instance uses its own disk group
with the disk group members on its own volume group. Figure 3, depicts the scenario when the
ASM instance and the database instances DB0 and DB1 start on nodes 1 and 2 respectively.
Figure 3 Serviceguard ASM environment
Figure 4, shows the scenario when DB1 fails on node 2.
32 Using the Oracle Toolkit in an HP Serviceguard Cluster

Figure 4 ASM environment when DB1 fails on node 2
Serviceguard Toolkit Internal File Structure
HP provides a set of scripts for the framework proposed for ASM integration with Serviceguard.
The ECMT Oracle scripts contain the instance specific logic to start/stop/monitor both the ASM
and the database instance. These scripts support both legacy and the modular method of packaging.
Even though, Legacy method of packaging is supported, it is deprecated now and will not be
supported in future. Hence, it is recommended to use modular style of packaging. For more
information on creating a modular package, look at the Serviceguard manual Managing
ServiceGuard manual available at http://www.hp.com/go/hpux-serviceguard-docs —>HP
Serviceguard latest edition at http://www.hp.com/go/hpux-serviceguard-docs -> HP Serviceguard.
Serviceguard provides tools to migrate existing legacy packages to modular packages. For more
information, look at the whitepaper “Migrating Packages from Legacy to Modular Style” available
at http://www.hp.com/go/hpux-serviceguard-docs -> HP Serviceguard.
Legacy packages use the package configuration file and the package control script for the ASM
or database instance on the Serviceguard specific side. The package configuration file parameters
are stored in the Serviceguard configuration database (CDB) at cmapplyconf time, and are used
by the package manager in its actions on behalf of this package. The control script invokes the
ASM or the database instance specific functions for start/stop/monitor through the toolkit interface
script (toolkit.sh). On the instance specific side, there is a toolkit configuration file (haoracle.conf)
which is sourced by the start/stop/monitor (haoracle.sh,haoracle_sql.sh,
haoracle.mon, and halistener.mon) script files. The toolkit interface script allows the
start/stop/monitor calls to remain unaffected by changes in the instance specific scripts. Figure 5,
shows the internal file structure for legacy packages.
Supporting Oracle ASM instance and Oracle database with ASM 33
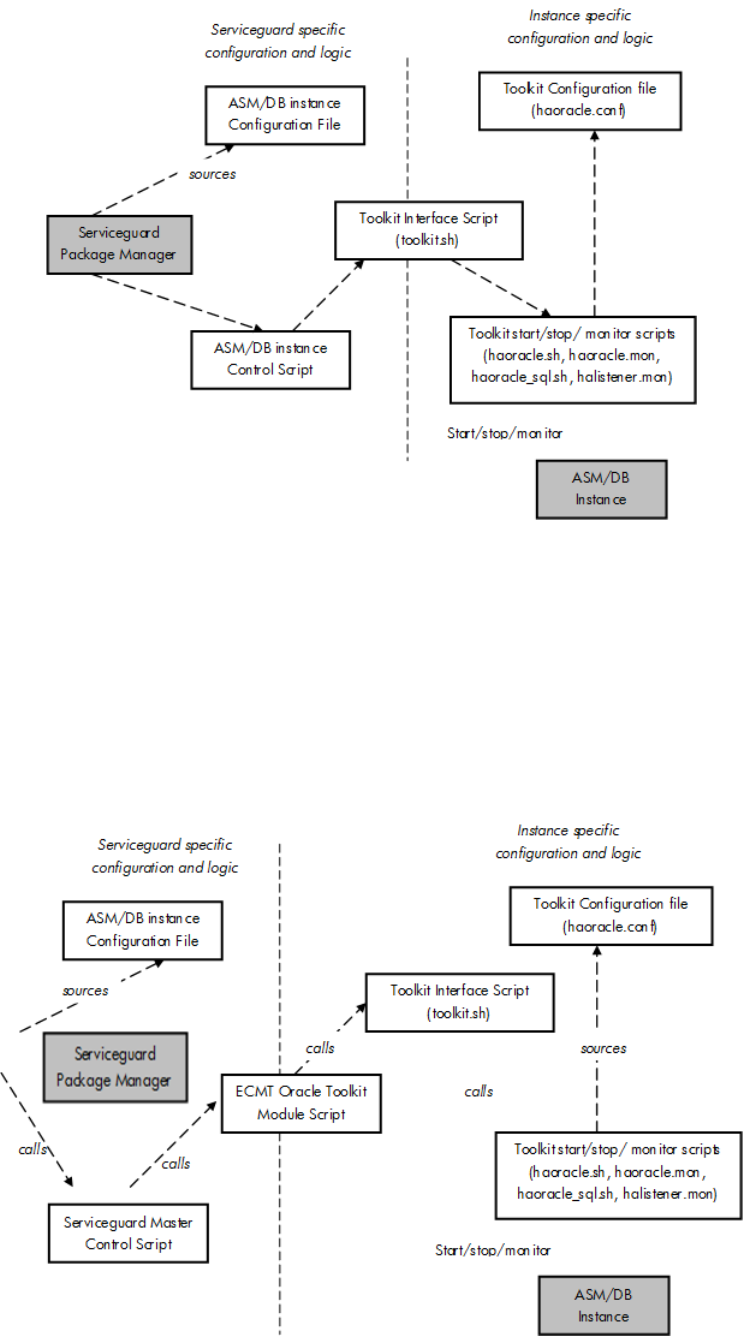
Figure 5 Internal file structure for legacy packages
Modular packages use the package configuration file for the ASM or database instance on the
Serviceguard specific side. The package configuration parameters are stored in the Serviceguard
configuration database at cmapplyconf time, and are used by the package manager in its actions
on behalf of this package. The Serviceguard master control script invokes the ASM or the database
instance specific functions for start, stop and monitor through the Oracle toolkit module script. The
toolkit module script in turn calls the legacy scripts toolkit.sh, haoracle.sh, haoracle_sql.sh,
haoracle.mon, haoracle.conf, and halistener.mon to start, stop and monitor the ASM or database
instance.Figure 6, shows the internal file structure for modular packages.
Figure 6 Internal file structure for modular packages
34 Using the Oracle Toolkit in an HP Serviceguard Cluster
ASM File Descriptor Release
When an ASM disk group is dismounted on a node in the Serviceguard cluster, it is expected that
the ASM instance closes the related descriptors of files opened on the raw volumes underlying the
members of that ASM disk group. However, there may be a possibility that processes of the ASM
instance and client processes to the ASM instance may not close the descriptors.
Consider a configuration in which there are multiple databases using ASM to manage their storage
in a Serviceguard cluster. Assume each database stores its data in its own exclusive set of ASM
disk groups. If the database instance is shutdown on a node and then its ASM disk groups are
dismounted on that node, some ASM background and client processes may still hold open file
descriptors to the underlying raw logical volumes. Hence an attempt at this point to deactivate the
corresponding LVM volume group(s) on the node may fail.
Oracle has provided interim patches with which the ASM background processes close the file
descriptors on the dismounted disk group volumes.
However, any client connections into the ASM instance using sqlplus or Oracle Enterprise Manager
(OEM) results in ASM foreground processes opening file descriptors on all the disk group volumes
of all the database instances. These descriptors may not close on dismount of the disk group.
Oracle allows for terminating these foreground processes.
The toolkit package parameter KILL_ASM_FOREGROUNDS determines whether the scripts should
kill the ASM foregrounds if the file descriptors are open on the dismounted disk group volumes.
The ASM PMON process will recover any foreground processes that were killed. This parameter
can be set either to yes or no only. The default value is “yes”.
The scripts will check to see if any ASM foreground processes of the form oracle <ASM_SID> have
file descriptors open on the dismounted disk group volumes of the database instance. If this
parameter is set to “yes”, and the ASM foregrounds have file descriptors open after dismount of
the disk group, they will be removed using a SIGTERM signal by the scripts. Before removing the
ASM foreground processes, the scripts will check every 3 seconds for a maximum of 12 seconds
to see if the foreground processes have closed the file descriptors. If the file descriptors are closed
within this 12 second timeout, then volume groups will be deactivated without waiting for the
completion of this timeout. If this parameter is set to “no”, the ASM foregrounds will not be killed.
However, when this parameter is set to “no”, and if ASM foregrounds have file descriptors open,
volume group deactivation and hence the database instance package halt will fail.
Installing, Configuring, and Troubleshooting
Oracle ASM is part of the Oracle database server installation and does not require additional
software from HP to operate in the Serviceguard environment.
Oracle 11gR2 onwards, the Oracle Clusterware software must be installed to use Oracle ASM.
Oracle ASM and ASM disk groups may be configured at the time of creating a database or before
creating the database. Ensure that the LVM volume groups and raw disks have been prepared
and activated prior to ASM disk group configuration or reconfiguration, as discussed in this
document. Use the names of raw LVs contained in the LVM volume groups when configuring ASM
disk groups. Ensure that each database instance uses different disk groups.
It is important to note that Oracle 11gR2 onwards, by default, the spfile of the ASM instance is
stored on the ASM diskgroup. This is true only for the ASM instance and not for the database
instance that uses the ASM diskgroup. For an ASM instance, the ECM Toolkit cannot verify the
existence of the spfile on the ASM diskgroup. So, it is mandatory that a pfile is created from the
spfile on the local disk, at a location that ECMT can access. The value of the PFILE attribute of the
ASM instance package must point to the pfile that is created on the local disk.
Supporting Oracle ASM instance and Oracle database with ASM 35

Assume that the Serviceguard cluster, ASM instance and one or more database instances are
already installed and configured.
•Halt the ASM and database instances.
•Configure the ASM MNP using the ECMT Oracle scripts provided by HP following the
instructions in the README file in the scripts bundle.
•Start the ASM instance on all the configured nodes by invoking cmrunpkg on the ASM MNP.
•Next, configure the database failover package using the ECMT Oracle scripts provided by
HP following the instructions in the README file in the scripts bundle.
•Start the database instance on the node by invoking cmrunpkg on the database package. For
troubleshooting, it may be useful to look at subdirectories for database and ASM instances
under $ORACLE_BASE/admin/, where log and trace files for these instances are deposited.
Also look at HP-UX syslog and Serviceguard package logs.
Setting up DB instance and ASM instance
This section describes the sequence of steps to be followed to set up an ASM instance or a database
instance using ASM storage.
Configuring ASM in a Serviceguard environment and creating the ASM instance
1. Configure the raw logical volumes to be used in the ASM disk groups as mentioned in the
whitepaper "High Availability Support for Oracle ASM with Serviceguard" present at: http://
www.hp.com/go/hpux-serviceguard-docs -> HP Enterprise Cluster Master Toolkit
Assign the right set of ownership and permissions to the raw logical volumes (Oracle:dba and
0660 respectively).
2. Install the ASM binaries on local storage in ASM_HOME on all the nodes. ASM can have its
own home to keep the database and ASM homes separate and to have a simpler configuration.
Install interim patches 7330611 and 7225720 on all the nodes (these patches are not required
for 11gR2). Verify that the patch has been installed correctly on all the nodes. Set your current
directory to where the patch is located. Issue command opatch lsinventory to check
that the Oracle inventory has been set up properly on all the nodes.
3. Create the ASM instance on one node. Create disk groups and specify the raw logical volumes
configured to be members of the disk groups on that node.
4. Create the ASM instance on the other nodes and specify the ASM_DISKSTRING on each
node. There is no need to create the disk groups on these nodes.
ASM_DISKSTRING is an initialization parameter that specifies a comma-separated list of
strings that limits the set of disks that ASM discovers.
Creating an Oracle database on an ASM disk group in a Serviceguard environment.
1. Install the Oracle binaries on local storage in ORACLE_HOME on all the nodes configured in
the cluster.
2. Create the database instance on one node. Specify the storage type as Automatic Storage
Management and provide the disk groups that the database instance is going to use.
3. Configure a listener (if required).
4. Since the Oracle binaries are installed on local storage on all the nodes, copy the parameter
file or server parameter file of the database instance to all the nodes. Also, distribute the
listener.ora file which is the listener configuration file from $ORACLE_HOME/network/admin,
if a listener is configured.
5. Copy the directories from $ORACLE_BASE/admin to all the nodes. Halt the database instance
and listener and ASM instance, (if configured) on all the nodes.
36 Using the Oracle Toolkit in an HP Serviceguard Cluster

NOTE: If the Oracle database is running in a cluster where SGeRAC packages are also
running, then the Oracle database must be disabled from being started automatically by the
Oracle Clusterware. This can be done by following the below steps:
Log in as the Oracle administrator and run the following command to set the database
management policy to manual:
For Oracle 10g:
: $ORACLE_HOME/bin/srvctl modify database -d <dbname> —y manual
For Oracle 11g:
: $ORACLE_HOME/bin/srvctl modify database -d <dbname> —y MANUAL
Setting Up the Toolkit
The internal structure of the Oracle Toolkit Scripts is the same for ASM Support as well. See to
“Support For Oracle Database without ASM” (page 9) for information about the various Oracle
toolkit scripts.
There are new variables introduced for ASM support, namely, INSTANCE_TYPE, ASM,
ASM_HOME, ASM_USER, ASM_SID, ASM_DISKGROUP, ASM_VOLUME_GROUP ,and
KILL_ASM_FOREGROUNDS. The following variables contained in haoracle.conf will help
understanding these parameters better:
Table 6 Variables or Parameters in haoracle.conf file
DescriptionParameter Name
This parameter must be set only in case where Oracle database packages
created using ECMT Oracle toolkit and SGeRAC packages run in the same
cluster. This parameter must be set to the Oracle Clusterware home directory.
This parameter can be set only using the CLI and cannot be set using the
Serviceguard Manager.
ORA_CRS_HOME
This parameter determines whether the instance is an ASM instance or a
database instance. This can be set either to "database" or "ASM" only. This
parameter must be set accordingly for both the database and ASM instance
packages.
INSTANCE_TYPE
The home directory of Oracle. This parameter must be set only for the database
instance package.
ORACLE_HOME
User name of the Oracle database administrator. Will be used for starting and
stopping of the database. This parameter must be set only for the database
instance package.
ORACLE_ADMIN
The Oracle session name. This is called the session ID (SID). This parameter
must be set only for the database instance package. This parameter is set to
"Oracle" by default.
SID_NAME
This option determines whether Automatic Storage Management (ASM) must
be used to manage the storage for the database instance. This parameter can
be set to either "yes" or "no". Set it to "yes" if an ASM database is being used.
In all other cases, set it to no. By default, this parameter is set to no.
ASM
Setting Up the Toolkit 37

Table 6 Variables or Parameters in haoracle.conf file (continued)
DescriptionParameter Name
This parameter gives the list of all ASM disk groups used by the database
instance. This parameter must be set only for the ASM database instance
package.
NOTE: For ASM instance package, no value must be set for this parameter.
ASM_DISKGROUP
This parameter gives the list of volume groups used in the disk groups for the
ASM database instance. This parameter must be set only for the ASM database
instance package.
NOTE: For ASM instance package, no value must be set for this parameter.
ASM_VOLUME_GROUP
The home directory where ASM is installed. This parameter must be set for both
the ASM and the ASM database instance packages.
ASM_HOME
The user name of the Oracle ASM administrator. This parameter must be set
for both ASM instance and ASM database instance packages.
ASM_USER
The ASM session name. This uniquely identifies an ASM instance. If the database
instance package depends on the ASM MNP package, then this parameter
needs to be set for both the ASM and the database instance packages. This
parameter need not be set in case the database instance package depends on
the SGeRAC clusterware package (OC MNP). This parameter is set to "+ASM"
by default.
ASM_SID
Oracle database /ASM parameter file. If not specified, Oracle picks this up
from the Oracle configuration directory $ORACLE_HOME/dbs or
$ASM_HOME/dbs depending on the INSTANCE_TYPE.
PFILE
This parameter, when configured, overrides the default file or location. If both
PFILE and SPFILE are present and this parameter is not specified, then the Oracle
scripts will make use of PFILE as the parameter file. To make use of SPFILE in
the scripts, do not configure this parameter and remove the default PFILE from
its default location. This parameter must be set for both the ASM and the
database instance packages.
NOTE: For Oracle 11gR2, by default, the spfile of the ASM instance is stored
on the ASM diskgroup. This is true only for the ASM instance and not for the
database instance that uses the ASM diskgroup.For an ASM instance, the ECM
Toolkit cannot verify the existence of the spfile on the ASM diskgroup. So, it is
mandatory that a pfile is created from the spfile on the local disk, at a location
that ECMT can access. For 11gR2 ASM instance, the value of the PFILE attribute
must point to the pfile that is created on the local disk.
SPFILE
Set to "yes" if you want the scripts to start and stop the Oracle Listener. This
parameter must be set only in the database instance package.
LISTENER
The name of the listener process. This parameter must be set only in the database
instance package.
LISTENER_NAME
The password of the listener process. This parameter must be set only in the
database instance package.
LISTENER_PASS
The names of all processes that should be executing. This parameter must be
set for the ASM and the database instance packages. The description of this
attribute in the package configuration file has a sample of processes that must
be monitored for ASM and database instances.
MONITOR_PROCESSES
38 Using the Oracle Toolkit in an HP Serviceguard Cluster

Table 6 Variables or Parameters in haoracle.conf file (continued)
DescriptionParameter Name
This variable will enable or disable toolkit maintenance mode for the Oracle
database package and ASM MNP. By default, this is set to "yes". To disable
this feature, MAINTENANCE_FLAG must be set to "no". When Oracle Database
or ASM must be maintained, then a file "<package directory >/Oracle.debug”
must be created. During this maintenance period, the Database or ASM
instance's process monitoring is paused. Even if the instance is brought down,
its package will not be failed over to the standby node.
To continue monitoring and to exit from the maintenance mode, you must
remove the Oracle.debug file. It is user's responsibility to ensure that the
instance is properly running after the maintenance phase. This parameter can
be set in the ASM and database instance package.
NOTE: If the Oracle database package is dependent on the SGeRAC
clusterware multi-node package (OC MNP), then the Oracle database package
will automatically go into toolkit maintenance mode if the SGeRAC OC MNP
is put into toolkit maintenance mode. To put the SGeRAC OC MNP into toolkit
maintenance mode, its MAINTENANCE_FLAG attribute must be set to 'yes' and
a file oc.debug must be created manually in the OC MNP working directory
on that node. More details about how to put the SGeRAC OC MNP package
in toolkit maintenance mode can be found in the SGeRAC toolkit README file.
If the MAINTENANCE_FLAG attribute of the SGeRAC OC MNP is set to 'yes',
then this parameter must also be set to 'yes' in the Oracle database package.
MAINTENANCE_FLAG
The time interval (in seconds) the script waits between checks to ensure that the
Oracle instance is running. Default is 30 seconds. This parameter must be set
in the ASM and database instance packages.
MONITOR_INTERVAL
The amount of time, in seconds, the script waits during package halt for the
Oracle database shutdown to complete before removing the Oracle processes
defined in MONITOR_PROCESSES. The TIME_OUT variable is used to protect
against a worst-case scenario where a hung instance prevents the package
halt script from completing, therefore preventing the standby node from starting
the instance. This parameter must be set for the ASM and database instance
packages.
TIME_OUT
This is used to mention if the Oracle or ASM administrator's shell should be
invoked as a new shell or as a sub-shell that inherits the variables set in the
parent shell. This can be set to either 'yes' or 'no' only. Set to 'yes' if the Oracle
or ASM administrator's shell should be invoked as a sub-shell. Set to 'no' if the
Oracle or ASM administrator's shell should be invoked as a new shell. If set to
'no', the Oracle or ASM administrator's .profile file is executed and the variables
set in this .profile file are available to the new shell. This parameter can be set
in the ASM and database instance package.
PARENT_ENVIRONMENT
This parameter indicates whether 'shutdown abort' must be executed before
the startup of the Oracle or ASM instance. 'shutdown abort' ensures the cleanup
of uncleared shared memory or semaphores. This parameter can be set to only
yes or no. Default value is no. This parameter can be set in the ASM and
database instance package.
CLEANUP_BEFORE_STARTUP
This parameter is used to specify the instance shutdown mode only when a
shutdown is initiated by the user and not due to a failure of a service. this
parameter can take values "abort" or "immediate" only. If "abort" is specified,
the instance is shutdown using the abort option. If "immediate" is specified,
the instance is shutdown using the immediate option. The default value is
"abort". This parameter can be set in the ASM and database instance package.
USER_SHUTDOWN_MODE
Setting Up the Toolkit 39

Table 6 Variables or Parameters in haoracle.conf file (continued)
DescriptionParameter Name
When ASM is being used, this parameter is used to specify if the ASM
foreground processes of the form Oracle <ASM_SID> having file descriptors
open on the dismounted disk group volumes should be killed during database
package halt. The Oracle scripts will wait for a timeout of 12 seconds before
terminating the foreground processes that continue to have file descriptors open
on the dismounted disk group volumes. This parameter can be set to either
"yes" or "no". The default value is 'yes'. This parameter must be set only in the
case of an ASM database instance package.
KILL_ASM_FOREGROUNDS
This parameter should be populated only in case the Oracle database package
is dependent on the SGeRAC OC MNP package. This parameter should point
to the working directory of the SGeRAC OC MNP. In case of modular packages,
the value for this parameter is automatically populated when the package is
created using the cmapplyconf command. In case of legacy packages, this
attribute must be populated manually in the haoracle.conf file. This parameter
can be set only using the CLI and cannot be set using the Serviceguard
Manager.
OC_TKIT_DIR
ASM Package Configuration Example
Oracle Legacy Package Configuration Example
1. ASM Multi-Node Package Setup and Configuration
NOTE: This package must not be created if SGeRAC packages are created in the same
cluster.
Create your own ASM package directory under /etc/cmcluster and copy over the scripts in
the bundle.
Log in as root:
# mkdir /etc/cmcluster/asm_package_mnp
# cd /etc/cmcluster/asm_package_mnp
Then copy the framework scripts provided to this location : cp /opt/cmcluster/toolkit/Oracle/*
.
Edit the configuration file haoracle.conf for the ASM MNP to fit your specific Oracle
environment as indicated by the comments in that script. You will have to set the variables as
shown in the example below:
INSTANCE_TYPE=ASM
ASM_HOME=/ASM_TEST0
ASM_USER=Oracle
ASM_SID=+ASM
PFILE=${ASM_HOME}/dbs/init${ASM_SID}.ora
LISTENER=no (Change from default value "yes" to "no")
MONITOR_PROCESSES[0]=asm_pmon_${ASM_SID}
MONITOR_PROCESSES[1]=asm_dbw0_${ASM_SID}
MONITOR_PROCESSES[2]=asm_ckpt_${ASM_SID}
MONITOR_PROCESSES[3]=asm_smon_${ASM_SID}
MONITOR_PROCESSES[4]=asm_lgwr_${ASM_SID}
MONITOR_PROCESSES[5]=asm_rbal_${ASM_SID}
MONITOR_PROCESSES[6]=asm_gmon_${ASM_SID}
MAINTENANCE_FLAG=yes
MONITOR_INTERVAL=30
TIME_OUT=30
PARENT_ENVIRONMENT=yes
CLEANUP_BEFORE_STARTUP=no
USER_SHUTDOWN_MODE=abort
40 Using the Oracle Toolkit in an HP Serviceguard Cluster
Generate the ASM MNP package configuration file, control script and edit the parameters in
these files for the ASM MNP in the package directory.
# cmmakepkg -p asmpkg.conf
# cmmakepkg -s asmpkg.cntl
In the package configuration file asmpkg.conf, edit the following parameters:
PACKAGE_NAME - Set to any name desired.
PACKAGE_TYPE - Set to MULTI_NODE.
FAILOVER_POLICY, FAILBACK_POLICY - Should be commented out.
RUN_SCRIPT /etc/cmcluster/asm_package_mnp/asmpkg.cntl
HALT_SCRIPT /etc/cmcluster/asm_package_mnp/asmpkg.cntl
SERVICE_NAME ORACLE_ASM_SRV
SERVICE_FAIL_FAST_ENABLED NO
SERVICE_HALT_TIMEOUT 300
In the package control script asmpkg.cntl, edit the following parameters:
Configure the package service:
SERVICE_NAME[0]="ORACLE_ASM_SRV"
SERVICE_CMD[0]="/etc/cmcluster/asm_package_mnp/toolkit.sh monitor"
SERVICE_RESTART[0]="-r 2"
Add in the customer_defined_run_cmds function:
/etc/cmcluster/asm_package_mnp/toolkit.sh start
Add in the customer_defined_halt_cmds function:
if [ $SG_HALT_REASON = "user_halt" ]; then
reason="user"
else
reason="auto"
fi
/etc/cmcluster/asm_package_mnp/toolkit.sh stop $reason
Here, "user" indicates that the package halt is a user initiated halt and "auto" indicates that
the package is being failed over automatically due to package dependencies, failure of a
service, or due to dependent package failures.
Distribute the package configuration file, package control script, and the framework scripts
to all nodes, and then apply the package configuration.
# cmapplyconf -P asmpkg.conf
Run the ASM package.
cmrunpkg asmpkg_name
Check the package status using cmviewcl. Verify that the ASM instance is running on all
the nodes.
2. Database Failover Package Setup and Configuration
Create your own database package directory under /etc/cmcluster and copy over the files
shipped in the bundle.
Log in as root:
# mkdir /etc/cmcluster/db1_package
# cd /etc/cmcluster/db1_package
Copy the framework scripts provided to this location:
cp /opt/cmcluster/toolkit/Oracle/* .
Edit the configuration file haoracle.conf for the database failover package to fit your Oracle
environment. Set the following parameters in the configuration file:
ASM Package Configuration Example 41
ORA_CRS_HOME=/app/Oracle/crs # . This attribute is needed only when this toolkit is used
in an SGeRAC cluster.
INSTANCE_TYPE=database
ORACLE_HOME=/ORACLE_TEST0
ORACLE_ADMIN=Oracle
SID_NAME=ORACLE_TEST0
ASM=yes
ASM_DISKGROUP[0]=asm_dg1
ASM_DISKGROUP[1]=asm_dg2
ASM_VOLUME_GROUP[0]=vgora_asm1
ASM_VOLUME_GROUP[1]=vgora_asm2
ASM_HOME=/ASM_TEST0
ASM_USER=Oracle
ASM_SID=+ASM
LISTENER=yes
LISTENER_NAME=LSNR_TEST0
LISTENER_PASS=
PFILE=${ORACLE_HOME}/dbs/init${SID_NAME}.ora
MONITOR_PROCESSES[0]=ora_pmon_${SID_NAME}
MONITOR_PROCESSES[1]=ora_dbw0_${SID_NAME}
MONITOR_PROCESSES[2]=ora_ckpt_${SID_NAME}
MONITOR_PROCESSES[3]=ora_smon_${SID_NAME}
MONITOR_PROCESSES[4]=ora_lgwr_${SID_NAME}
MONITOR_PROCESSES[5]=ora_reco_${SID_NAME}
MONITOR_PROCESSES[6]=ora_rbal_${SID_NAME}
MONITOR_PROCESSES[7]=ora_asmb_${SID_NAME}
MAINTENANCE_FLAG=yes
MONITOR_INTERVAL=30
TIME_OUT=30
KILL_ASM_FOREGROUNDS=yes
PARENT_ENVIRONMENT=yes
CLEANUP_BEFORE_STARTUP=no
USER_SHUTDOWN_MODE=abort
OC_TKIT_DIR=/etc/cmcluster/crs # This attribute is needed only when this toolkit is used in
an SGeRAC cluster.
Generate the database package configuration file and the control script in the database
package directory. Then edit the parameters of these files as mentioned for the database
package.
# cmmakepkg -p db1pkg.conf
# cmmakepkg -s db1pkg.cntl
Edit the package configuration file db1pkg.conf as shown below:
PACKAGE_NAME - Set to any name desired.
PACKAGE_TYPE - Set to FAILOVER.
RUN_SCRIPT /etc/cmcluster/db1_package/db1pkg.cntl
HALT_SCRIPT /etc/cmcluster/db1_package/db1pkg.cntl
DEPENDENCY_NAME asm_dependency
DEPENDENDY_CONDITION <ASM MNP PACKAGE_NAME>=UP
DEPENDENCY_LOCATION SAME_NODE
If SGeRAC packages are configured in the same cluster, then the ASM MNP package should
not be created and the Oracle database package should depend on the SGeRAC Clusterware
package instead of the ASM MNP. In this case, use the definition below instead of the one
above this paragraph:
DEPENDENCY_NAME asm_dependency
DEPENDENDY_CONDITION <SGeRAC OC MNP PACKAGE_NAME>=UP
DEPENDENCY_LOCATION SAME_NODE
42 Using the Oracle Toolkit in an HP Serviceguard Cluster
Configure the service parameters:
SERVICE_NAME ORACLE_DB1_SRV
SERVICE_FAIL_FAST_ENABLED NO
SERVICE_HALT_TIMEOUT 300
If listener is configured and needs to be monitored, configure another set of service parameters:
SERVICE_NAME ORACLE_LSNR_SRV
SERVICE_FAIL_FAST_ENABLED NO
SERVICE_HALT_TIMEOUT 300
Edit the package control script db1pkg.cntl as shown below:
Since LVM logical volumes are used in disk groups, Set VGCHANGE to "vgchange -a e" and
specify the name(s) of the volume groups in VG[0], VG[1].
Configure the package service:
SERVICE_NAME[0]="ORACLE_DB1_SRV"
SERVICE_CMD[0]="/etc/cmcluster/db1_package/toolkit.sh monitor"
SERVICE_RESTART[0]="-r 2"
If a listener service is configured in the package configuration file, set the following parameters:
SERVICE_NAME[1]="ORACLE_LSNR_SRV"
SERVICE_CMD[1]="/etc/cmcluster/db1_package/toolkit.sh monitor_listener"
SERVICE_RESTART[1]="-r 2"
Configure the Package IP and the SUBNET.
Add in the customer_defined_run_cmds function:
/etc/cmcluster/db1_package/toolkit.sh start
Add in the customer_defined_halt_cmds function:
if [ $SG_HALT_REASON = "user_halt" ]; then
reason="user"
else
reason="auto"
fi
/etc/cmcluster/db1_package/toolkit.sh stop $reason
"user" indicates that the package halt is a user initiated halt and "auto" indicates that the
package is being failed over automatically due to package dependencies, failure of a service
or due to dependent package failures.
Distribute the package configuration file, package control script and the framework scripts to
all nodes, and then apply the package configuration:
# cmapplyconf -P db1pkg.conf
Run the database package:
# cmrunpkg dbpkg_name
Check the package status using cmviewcl. Verify that the database instance is running.
Repeat the above steps for each database instance:
Oracle Modular Package Configuration Example
Install and Configuration directory operations:
With modular packages, there are two modes of operation available. By default, the toolkit
scripts that were previously used in legacy packages will be installed in the /opt/cmcluster/
toolkit/Oracle directory. This directory is called the Installation directory. The user can
copy these scripts to a configuration directory and define this location in the parameter
ASM Package Configuration Example 43

"TKIT_DIR" in the modular package configuration file. Serviceguard uses the toolkit scripts in
the configuration directory by default. If the scripts are not found in the configuration directory,
Serviceguard takes them from the installation directory.
This feature is useful for customers wanting to use modified versions of the toolkit.
1. ASM Multi-Node Package Setup and Configuration
NOTE: This package must not be created if SGeRAC packages are created in the same
cluster.
Create the modular package configuration file asmpkg.conf in any location, (for example,
/etc/cmcluster/asm_package_mnp). This includes all the toolkit attributes which need
to be configured later by the user.
# cmmakepkg -m ecmt/Oracle/Oracle asmpkg.conf
Configure the Serviceguard parameters as mentioned below:
package_name - Set to any name desired.
package_type - Set to "multi_node".
Edit the service parameters if necessary. The service parameters are preset to:
service_name Oracle_service
service_cmd "$SGCONF/scripts/ecmt/Oracle/tkit_module.sh Oracle_monitor"
service_restart none
service_fail_fast_enabled no
service_halt_timeout 300
service_name Oracle_listener_service
service_cmd "$SGCONF/scripts/ecmt/Oracle/tkit_module.sh Oracle_monitor_listener"
service_restart none
service_fail_fast_enabled no
service_halt_timeout 300
Uncomment the second set of service parameters in the package configuration file which are
used to monitor the listener.
Configure the toolkit parameter TKIT_DIR. This parameter is synonymous to the legacy
package directory (for example, /etc/cmcluster/asm_package_mnp). On a
cmapplyconf, TKIT_DIR will contain the toolkit configuration file haoracle.conf on
all configured nodes.
Configure the other toolkit parameters for the ASM package.
Apply the package configuration using:
# cmapplyconf -P asmpkg.conf
This command applies the package configuration to the Serviceguard Configuration Database
(CDB). It also creates a toolkit configuration directory defined by TKIT_DIR on all target
nodes, if not already present and then creates the toolkit configuration file in it with the values
specified in the asmpkg.conf file.
2. Database Failover Package Setup and Configuration
Create the modular package configuration file db1pkg.conf by including the toolkit attributes
that need to be configured later.
# cmmakepkg -m ecmt/Oracle/Oracle db1pkg.conf
Configure the following Serviceguard parameters:
package_name - Set to any name desired.
package_type - Set to "failover".
Edit the service parameters if necessary. The service parameters are preset to:
service_name Oracle_service
service_cmd "$SGCONF/scripts/ecmt/Oracle/tkit_module.sh Oracle_monitor"
44 Using the Oracle Toolkit in an HP Serviceguard Cluster

service_restart none
service_fail_fast_enabled no
service_halt_timeout 300
service_name Oracle_listener_service
service_cmd "$SGCONF/scripts/ecmt/Oracle/tkit_module.sh Oracle_monitor_listener"
service_restart none
service_fail_fast_enabled no
service_halt_timeout 300
If the listener is not configured, comment the second set of service parameters which are used
to monitor the listener.
Edit the dependency parameters as shown:
dependency_name asm_dependency
dependency_condition <ASM MNP package_name>=up
dependency_location same_node
If SGeRAC packages are configured in the same cluster, then the ASM MNP package should
not be created and the Oracle database package should depend on the SGeRAC Clusterware
package instead of the ASM MNP. In this case, use the definition below instead of the one
above this paragraph:
DEPENDENCY_NAME asm_dependency
DEPENDENDY_CONDITION <SGeRAC OC MNP PACKAGE_NAME>=UP
DEPENDENCY_LOCATION SAME_NODE
Since LVM logical volumes are used in disk groups, specify the name(s) of the volume groups
on which the ASM diskgroups reside on, for the attribute "vg".
Configure the ip_subnet and ip_address parameters.
Configure the toolkit parameterTKIT_DIR. This parameter is synonymous to the legacy
package directory (for example, /etc/cmcluster/dg1_package). On a cmapplyconf,
TKIT_DIR will contain the toolkit configuration file haoracle.conf on all configured nodes.
Note that the TKIT_DIR for this package should be different from the TKIT_DIR configured
for the ASM MNP.
Configure the other toolkit parameters for the database package as mentioned in “Support
For Oracle Database without ASM” (page 9) for the database failover legacy package.
Apply the package configuration using:
# cmapplyconf -P db1pkg.conf
This command "applies" the package configuration to the CDB (Serviceguard Configuration
Database). It also creates toolkit configuration directory defined by TKIT_DIR on all target
nodes, if not already present and then creates the toolkit configuration file in it with the values
specified in the db1pkg.conf file.
For more information on modular packages, see whitepaper Modular package support in
Serviceguard for Linux and ECM Toolkits available at http://www.hp.com/go/
hpux-serviceguard-docs —>HP Serviceguard Enterprise Cluster Master Toolkit.
Also refer the whitepaper Migrating Packages from Legacy to Modular Style, October 2007
for more information. You can find this whitepaper at http://www.hp.com/go/
hpux-serviceguard-docs —>HP Serviceguard Enterprise Cluster Master Toolkit
3. To configure a ECMT modular failover package for an Oracle database using ASM in a
Serviceguard cluster where SGeRAC packages are also running.
ASM Package Configuration Example 45

NOTE: When configuring a Oracle package in a SGeRAC cluster, command line interface
should be used to create the package and the Serviceguard Manager interface should not be
used.
a. Disable the Oracle database instance from being managed automatically by the Oracle
Clusterware.
Log in as the Oracle administrator and run the following command to set the database
management policy to manual:
For Oracle 10g:
# $ORACLE_HOME/bin/srvctl modify database -d <dbname> -y manual
For Oracle 11g:
# $ORACLE_HOME/bin/srvctl modify database -d <dbname> -y MANUAL
b. Log in as root and create the database package directory:
# mkdir /etc/cmcluster/db1_package
c. Create the modular package configuration file db1pkg.conf by including the toolkit
attributes that need to be configured later by the user.
# cmmakepkg -m ecmt/Oracle/Oracle db1pkg.conf
Edit the package configuration file pkg.conf and configure the Serviceguard parameters
as mentioned below:
package_name - Set to any name desired.
package_type - Set to "failover".
Edit the service parameters if necessary. The service parameters are preset to:
service_name Oracle_service
service_cmd "$SGCONF/scripts/ecmt/Oracle/tkit_module.sh Oracle_monitor"
service_restart none
service_fail_fast_enabled no
service_halt_timeout 300
service_name Oracle_listener_service
service_cmd "$SGCONF/scripts/ecmt/Oracle/tkit_module.sh Oracle_monitor_listener"
service_restart none
service_fail_fast_enabled no
service_halt_timeout 300
If the listener is configured, uncomment the second set of service parameters which are
used to monitor the listener.
Edit the dependency parameters as shown:
dependency_name oc_dependency
dependency_condition <SGeRAC OC MNP Package name>=up
dependency_location same_node
If the Oracle database is created on LVM logical volumes, specify the name(s) of the
volume groups for the parameter "vg".
Configure the ip_subnet and ip_address parameters.
d. Configure the toolkit parameter TKIT_DIR. This parameter is synonymous to the legacy
package directory. On a cmapplyconf, TKIT_DIR will contain the toolkit configuration
file haoracle.conf on all configured nodes. For example, TKIT_DIR /etc/
cmcluster/db1_package.
Configure the other toolkit parameters for the database package for the database failover
legacy package.
e. Configure the ASM Disk Group using the following attributes:
46 Using the Oracle Toolkit in an HP Serviceguard Cluster
1) Set attribute ASM to yes.
ASM = yes
2) Specify all the ASM Disk Groups used by the database using the ASM_DISKGROUP
attribute.
ASM_DISKGROUP[0]=asm_dg1
ASM_DISKGROUP[1]=asm_dg2
3) Specify all the LVM Volume Groups used by the ASM Disk Groups using the
ASM_VOLUME_GROUP attribute.
ASM_VOLUME_GROUP[0]=vgora_asm1
ASM_VOLUME_GROUP[1]=vgora_asm2
4) For the ASM_HOME attribute, specify the ASM Home directory. In case of Oracle
11g R2 this is same as Oracle clusterware home directory.
ASM_HOME=/ASM_TEST0
5) For the ASM_USER attribute, specify the UNIX user account for administering ASM
Instances
ASM_USER=Oracle
6) For the ASM_SID attribute, specify "+ASM". ECMT will automatically discover the
ASM SID on a node.
ASM_SID=+ASM
7) Apply the package configuration.
# cmapplyconf -P db1pkg.conf
This command applies the package configuration to the cluster It also creates the
toolkit configuration directory defined by the package attribute TKIT_DIR on all target
nodes, if it is not already present, and then creates the toolkit configuration file in it
with the values specified in the db1pkg.conf file.
8) Open the haoracle.conf file generated in the package directory (TKIT_DIR ) .
Ensure the attribute ORA_CRS_HOME is set to the Oracle Clusterware Home directory
and the attribute OC_TKIT_DIR is set to the SGeRAC OC MNP package directory.
9) For a running database package, if the value of any of the package attributes need
to be modified, then the package needs to be restarted. The given below steps should
be followed to update the attribute values of a running database packages :
a) Edit the package configuration file and populate the new values.
b) Halt the package
c) Apply the package configuration file.
d) Start the package
Modifying a legacy database package using an older version of Oracle
ECMT scripts to use the scripts provided for ASM support
A customer can migrate from an older ECMT version database package to use the Oracle ECMT
scripts provided for ASM support. The new legacy or modular database package may or may not
use ASM.
1. Migration to a legacy database package not using ASM:
•Halt the database package.
•Copy the framework scripts provided in the bundle to the package directory on one node.
Modifying a legacy database package using an older version of Oracle ECMT scripts to use the scripts provided for ASM
support 47

•Edit the configuration file haoracle.conf in the package directory. Leave the
INSTANCE_TYPE to the default value "database". Configure values for all parameters
that were present in the older toolkit configuration file, that is, ORACLE_HOME,
ORACLE_ADMIN, SID_NAME, LISTENER, LISTENER_NAME,
LISTENER_PASSWORD, PFILE, MONITORED_PROCESSES, MAINTENANCE_FLAG,
MONITOR_INTERVAL, TIME_OUT. Leave the value of ASM to the default value "no".
The new parameters can be left as they are by default.
•Copy all the scripts from the package directory from this node to all the configured nodes.
•Start the database package. There is no need to re-apply the package configuration since
no changes are being made to the package ASCII file.
2. Migration to a legacy database package using ASM:
•Halt the database package.
•Configure ASM on all the configured nodes as mentioned in this document. Create ASM
disk groups, configure the raw logical volumes and make the database instance use the
ASM storage. Steps to migrate a database to ASM can be found in Oracle manuals.
•Configure an ASM MNP as mentioned in this document.
•Apply the ASM MNP configuration.
•Run the ASM MNP.
•Copy the framework scripts provided in the bundle to the database instance package
directory.
•Configure the configuration file haoracle.conf file as mentioned in this document for the
database package.
•Create a new package ASCII file and control script or edit the existing package ASCII
and control scripts in the database package directory. Configure the parameters as
mentioned for the database package.
•Copy the scripts from the package directory to all the configured nodes.
•Remove the older database package configuration if a new package for the database
instance is being configured.
•Apply the database package configuration.
•Run the database package.
3. Migration to a modular database package not using ASM:
•Halt the database package.
•In case of configuration directory mode of operation to be used, copy the new Oracle
scripts to another package directory.
•Migrate the older legacy package to a modular package containing Serviceguard
parameters.
# cmmigratepkg -p <legacy_pkg_name> -s -o <modular_pkg_name>
Refer to the Whitepaper "Migrating Packages from Legacy to Modular Style, October
2007" and also the Whitepaper Modular package support in Serviceguard for Linux
and ECM Toolkits available at http://www.hp.com/go/hpux-serviceguard-docs —>HP
Serviceguard Enterprise Cluster Master Toolkit
•To add the values to this modular package configuration file, from the older toolkit
configuration file, issue the following command:
# cmmakepkg -i modular.ascii -m ecmt/Oracle/Oracle -t <older toolkit configuration file>
modular1.ascii
48 Using the Oracle Toolkit in an HP Serviceguard Cluster

"modular1.ascii" now has values for certain attributes that were present in the older toolkit
configuration file. Edit the value for TKIT_DIR (where the new toolkit configuration file
should be generated or where the toolkit scripts are copied to in case of a configuration
directory mode of operation). Leave the INSTANCE_TYPE to the default value database.
Leave the value of ASM to the default value “no". The new toolkit parameters can be left
as they are by default.
•Apply the new modular package configuration using cmapplyconf.
•Start the database package.
4. Migration to a modular database package using ASM:
•Halt the database package.
•Configure ASM on all configured nodes as mentioned in this document. Create ASM disk
groups, configure the raw logical volumes and make the database instance use the ASM
storage. Steps to migrate a database to ASM can be found in Oracle manuals.
•Configure a modular ASM MNP as mentioned in this document.
•Apply the ASM MNP configuration.
•Run the ASM MNP.
•For the database package, in case of configuration directory mode of operation to be
used, copy the new Oracle scripts to another package directory.
•Migrate the older legacy package to a modular package containing Serviceguard
parameters.
# cmmigratepkg -p <legacy_pkg_name> -s -o <modular_pkg_name>
Refer to the Whitepaper Migrating Packages from Legacy to Modular Style,October 2007
and also the Whitepaper on modular package support in Serviceguard at http://
www.hp.com/go/hpux-serviceguard-docs -> HP Enterprise Cluster Master Toolkit
•To add the values to this modular package configuration file, from the older toolkit
configuration file, issue the following command:
# cmmakepkg -i modular.ascii -m ecmt/Oracle/Oracle -t <older toolkit configuration file>
modular1.ascii
•"modular1.ascii" now has values for certain attributes which were present in the older
toolkit configuration file. Parameters like ORACLE_HOME, ORACLE_ADMIN, SID_NAME,
PFILE, LISTENER, LISTENER_NAME, LISTENER_PASS, MONITOR_PROCESSES,
MAINTENANCE_FLAG, MONITOR_INTERVAL , and TIME_OUT will have values from
the old toolkit configuration file. They can be edited if needed for the new environment.
Edit the value for TKIT_DIR (where the new toolkit configuration file should be generated
or where the toolkit scripts are copied to in case of a configuration directory mode of
operation). Leave the INSTANCE_TYPE to the default value "database". Edit the parameters
ASM, ASM_DISKGROUP, ASM_VOLUME_GROUP, ASM_HOME, ASM_USER, ASM_SID,
KILL_ASM_FOREGROUNDS, CLEANUP_BEFORE_STARTUP, and
USER_SHUTDOWN_MODE as mentioned for the database package.
•Apply the new modular package configuration using cmapplyconf.
•Start the database package.
Adding the Package to the Cluster
After the setup is complete, add the package to the Serviceguard cluster and start it.
$ cmapplyconf -P ORACLE_TEST0
Adding the Package to the Cluster 49

$ cmmodpkg -e -n <node1> -n <node2> ORACLE_TEST0
$ cmmodpkg -e ORACLE_TEST0
If necessary, consult the manual Managing ServiceGuard manual available at http://www.hp.com/
go/hpux-serviceguard-docs —>HP Serviceguard for information on managing packages.
Node-specific Configuration
On many clusters, the standby nodes might be lower end systems than the primary node. An SMP
machine might be backed up by a uniprocessor, or a machine with a large main memory may be
backed up by a node with less memory.
From Oracle's point of view, we must make sure that any packaged instance can run on any
specified node in the corresponding package configuration. The Oracle shell script handles this
situation in the following way:
If node-specific tuning is required, set up a node-specific 'init.ora' file for each node in
${ORACLE_HOME}/dbs. This file should be named 'init${SID_NAME}.ora', and there should be
one such file for each host.
For Example:
/ORACLE_TEST0/dbs/initORACLE_TEST0.ora.host1
/ORACLE_TEST0/dbs/initORACLE_TEST0.ora.host2
When the Oracle shell script executes the Oracle commands, they will check for the existence of
such a file before starting the Oracle database. If no host specific init file exists, a 'global'
init${SID_NAME}.ora file is assumed.
NOTE: If using this configuration, the 'PFILE' parameter in the haoracle.conf configuration file
should be set to the specific pfile on a given host. For example, the PFILE in haoracle.conf on node1
should be set to /ORACLE_TEST0/dbs/initORACLE_TEST0.ora.node1.
Error Handling
On startup, the Oracle shell script will check for the existence of the init${SID_NAME}.ora or
spfile${SID_NAME}.ora file in the shared ${ORACLE_HOME}/dbs directory. If this file does not
exist, the database cannot be started on any node until the situation is corrected. The action by
the Oracle shell script is to halt the package on that node and try it on the standby node.
Network Configuration
This document does not cover detailed instructions on how to configure the Oracle network products
for a Serviceguard cluster. This section contains a few basic suggestions on how to configure a
TCP/IP listener for a clustered environment. Consult Oracle documentation for a detailed description
on how to set up the networking products.
/etc/hosts
If you want to access your Oracle instance through a 'hostname', you need to add entries for the
relocatable IP-addresses to your /etc/hosts file (or nameserver). This will allow you to connect to
your database using a logical name with a telnet or rlogin. Thus, /etc/hosts would contain names
of services (database servers) in addition to real physical hostnames. From Serviceguard's point
of view, these are relocatable hostnames:
EXAMPLE:
Assume a Serviceguard package for the Oracle instance ORACLE_TEST0, is assigned the IP address
192.10.10.1
Add the following entry to your hosts files:
192.10.10.1 ORACLE_TEST0
50 Using the Oracle Toolkit in an HP Serviceguard Cluster

The 'ORACLE_TEST0' instance should now be reachable using the name 'ORACLE_TEST0' regardless
of the node on which it is running.
Listener:
Set up a listener process for each Oracle instance that executes on a Serviceguard cluster, making
sure that the listener can move with the instance to another node. Effectively, ensure the listener
configured to a specific Oracle instance is assigned to a unique port.
In the current release you can configure ONE listener to be monitored by the toolkit.
However you can configure multiple listeners for the Oracle instance outside the Serviceguard
environment to provide more HA to the listener.
NOTE: It is recommended to use encrypted passwords for password protected listeners.
The password specified for a listener in the parameter PASSWORDS_<listener_name> in the
file LISTENER.ORA, must be copied to the LISTENER_PASS parameter in the haoracle.conf file.
If there are multiple passwords configured for a single listener, you can use any one of them for
the LISTENER_PASS parameter in the haoracle.conf.
In particular, for Oracle 10g and 11g, there is a new listener feature called "Local OS
Authentication" activated by default, which permits the user who started it to administer the listener
without requiring password authentication. To disable this feature, you need to specify
"LOCAL_OS_AUTHENTICATION_listener_name = OFF" in LISTENER.ORA. Please note, in this
situation, due to a change in Oracle 10g, you will have to specify the plain text password for the
LISTENER_PASS parameter in haoracle.conf (and not the encrypted password found in
LISTENER.ORA).
By default Local OS Authentication is enabled for Oracle 10g and 11g with default value of
"LOCAL_OS_AUTHENTICATION_listener_name = ON". The absence of this parameter in
LISTENER.ORA file implies the feature is enabled. In case if it has been disabled, it can be re-enabled
by commenting or removing "LOCAL_OS_AUTHENTICATION_listener_name = OFF" from
LISTENER.ORA or by setting it to "LOCAL_OS_AUTHENTICATION_listener_name = ON".
NOTE: Plain text listener passwords cannot contain white spaces ( " " ) when used with Oracle
toolkit.
Database Maintenance
There might be situations, when the Oracle database has to be taken down for maintenance
purposes like changing configuration, without having the instance to migrate to standby node. The
following procedure should be followed:
NOTE: This feature is enabled only when the package attribute MAINTENANCE_FLAG is set to
"yes".
The example assumes that the package name is ORACLE_TEST0, package directory is
/etc/cmcluster/pkg/ORACLE_TEST0 and the ORACLE_HOME is configured as /ORACLE_TEST0.
•Disable the failover of the package through cmmodpkg command:
$ cmmodpkg -d ORACLE_TEST0
•Pause the monitor script.
Create an empty file /etc/cmcluster/pkg/ORACLE_TEST0/Oracle.debug as shown below:
$ touch /etc/cmcluster/pkg/ORACLE_TEST0/Oracle.debug
Toolkit monitor scripts (both database instance and listener monitoring scripts) which
continuously monitor Oracle process daemons' processes and the listener process, would now
stop monitoring these daemon processes. Two messages, "Oracle toolkit pausing monitoring
and entering maintenance mode" and "Oracle toolkit pausing Listener <Listener_Name>
Database Maintenance 51

monitoring and entering maintenance mode" appears in the Serviceguard Package Control
script log.
•If required, stop the Oracle database instance as shown below:
$ cd /etc/cmcluster/pkg/ORACLE_TEST0/
$ $PWD/toolkit.sh stop
•Perform maintenance actions (for example, changing the configuration parameters in the
parameter file of the Oracle instance. If this file is changed, please remember to distribute the
new file to all cluster nodes).
•Re-start the Oracle database instance again if you manually stopped it prior to maintenance
$ cd /etc/cmcluster/pkg/ORACLE_TEST0/
$ $PWD/toolkit.sh start
•Allow monitoring scripts to continue normally as shown below:
$ rm -f /etc/cmcluster/pkg/ORACLE_TEST0/Oracle.debug
Two messages "Starting Oracle toolkit monitoring again after maintenance" and "Starting
Oracle Listener monitoring again after maintenance" appear in the Serviceguard Package
Control script log.
•Enable the package failover
$ cmmodpkg -e ORACLE_TEST0
NOTE: If the package fails during maintenance (example, the node crashes), the package
will not automatically fail over to an adoptive node. It is the responsibility of the user to start
the package up on an adoptive node. See the manual Managing ServiceGuard manual
available at http://www.hp.com/go/hpux-serviceguard-docs —>HP Serviceguard for more
details.
If the Oracle database package is dependent on the SGeRAC OC MNP, then the Oracle
database package will automatically go to toolkit maintenance mode when the SGeRAC OC
MNP is put into toolkit maintenance mode. To put the SGeRAC OC MNP into toolkit
maintenance mode, its MAINTENANCE_FLAG attribute must be set to 'yes' and a file 'oc.debug'
must exist in its package directory. See the SGeRAC toolkit README file for information details
on how to put the SGeRAC OC MNP in toolkit maintenance mode. If the MAINTENANCE_FLAG
attribute of the SGeRAC OC MNP is set to 'yes', then this parameter must also be set to 'yes'.
Configuring and packaging Oracle single-instance database to co-exist
with SGeRAC packages
This section describes the way in which ECMT Oracle toolkit package must be configured for
single-instance Oracle databases to work in a Serviceguard cluster, along with RAC database
packages configured using SGeRAC Toolkit.
NOTE: The environment in which both ECMT Oracle packages and SGeRAC packages are
running together will be referred to as ‘coexistence environment’ in this document.
Configuring Oracle single-instance database that uses ASM in a Coexistence
Environment
single-instance Oracle databases using ASM are supported in SGeRAC/Serviceguard clusters only
when ASM Disk Groups are configured using LVM Logical Volumes. In a coexistence environment,
the following additional conditions also apply:
52 Using the Oracle Toolkit in an HP Serviceguard Cluster
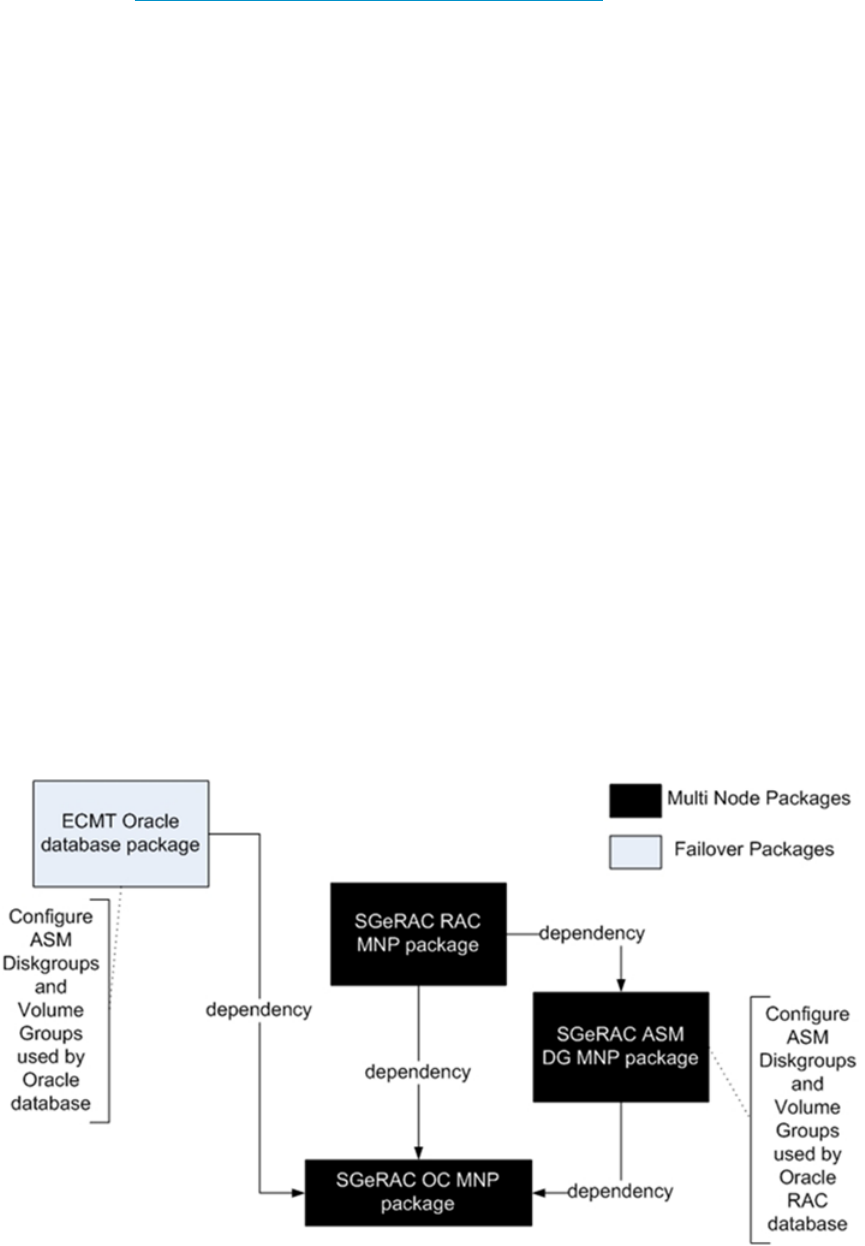
1. The Oracle Clusterware must be configured in a MNP package using SGeRAC Toolkit. See
the Using Serviceguard Extension for RAC" User Guide (published March 2011 or later)
available at http://www.hp.com/go/hpux-serviceguard-docs —>HP Serviceguard Extension
for RAC/opt/cmcluster/SGeRAC/toolkit/README file for configuring Oracle Clusterware
(SGeRAC OC MNP package) as a package.
2. The ASM Multi-node package (MNP) must not be created using the ECMT toolkit. The ASM
instances will be managed by the SGeRAC Oracle Clusterware package.
3. single-instance databases must be disabled for automatic startup by Oracle Cluster Ready
Service (CRS).
The ECMT failover package for single-instance Oracle database must have the following additional
configuration:
1. The ASM Disk Groups and underlying LVM volume groups used by the single-instance Oracle
database must be configured as part of the database’s ECMT failover package.
2. A SAME_NODE UP package dependency on SGeRAC Oracle Clusterware package must be
configured in the ECMT failover package for the Oracle single-instance database.
3. The attributes: ORA_CRS_HOME and OC_TKIT_DIR must be specified with appropriate values
as specified in section “Attributes newly added to ECMT”.
Attributes newly added to ECMT Oracle toolkit
The following attributes are added to ECMT oracle toolkit. These attributes are required to be
populated only for coexistence in a SGeRAC cluster. When there are no SGeRAC packages
configured in the same cluster, these attributes must be left empty.
1. ORA_CRS_HOME: When using ECMT oracle toolkit in a coexistence environment, this attribute
must be set to Oracle CRS HOME.
2. OC_TKIT_DIR: When using ECMT Oracle in a coexistence environment, this attribute must be
set to the SGeRAC Toolkit’s Oracle Clusterware (OC) package directory.
Figure 7 describes the various package dependencies between the single-instance Oracle database
package created using ECMT and the Oracle RAC packages created using SGeRAC.
Figure 7 Packages in a coexistence environment
Configuring and packaging Oracle single-instance database to co-exist with SGeRAC packages 53
Configuring a modular failover package for an Oracle database using ASM in a
Coexistence Environment
To configure an ECMT modular failover package for an Oracle database:
1. Log in as the Oracle administrator and run the following command to set the database
management policy to manual:
$ORACLE_HOME/bin/srvctl modify database -d <dbname> -y MANUAL
2. Create a database package directory under /etc/cmcluster
Log in as root:
# mkdir /etc/cmcluster/db1_package
3. Create the modular package configuration file "pkg2.conf”:
#cmmakepkg -m ecmt/oracle/oracle pkg2.conf
4. Configure the package attributes as mentioned below:
package_name - Set to any name desired.
package_type - Set to "failover".
Edit the service parameters if necessary. The service parameters are preset to:
service_name oracle_service
service_cmd "$SGCONF/scripts/ecmt/oracle/tkit_module.sh oracle_monitor"
service_restart none
service_fail_fast_enabled no
service_halt_timeout 300
service_name oracle_listener_service
service_cmd "$SGCONF/scripts/ecmt/oracle/tkit_module.sh oracle_monitor_listener"
service_restart none
service_fail_fast_enabled no
service_halt_timeout 300
service_name oracle_hang_service
service_cmd "$SGCONF/scripts/ecmt/oracle/tkit_module.sh oracle_hang_monitor 30
failover"
service_restart none
service_fail_fast_enabled no
service_halt_timeout 300
If the listener is configured, uncomment the second set of service parameters which are used
to monitor the listener.
Edit the dependency parameters as shown:
dependency_name oc_dependency
dependency_condition <SGeRAC OC MNP Package name>=up
dependency_location same_node
Since LVM logical volumes are used in disk groups, specify the name(s) of the volume groups
on which the ASM diskgroups reside, for the parameter "vg".
Configure the ip_subnet and ip_address parameters.
5. Configure the toolkit package attribute TKIT_DIR. This parameter is synonymous to the legacy
package directory. On a cmapplyconf, TKIT_DIR will contain the toolkit configuration file
haoracle.conf on all configured nodes.
Configure the other toolkit parameters for the database package as mentioned in this README
for the database failover legacy package under “Supporting Oracle ASM instance and Oracle
database with ASM” (page 26).
6. Configure the ASM Disk Group using the following attributes:
•Set attribute ASM to yes:
ASM yes
•Specify all the ASM Disk Groups used by the database using the ASM_DISKGROUP
attribute:
ASM_DISKGROUP[0] asm_dg1
54 Using the Oracle Toolkit in an HP Serviceguard Cluster
ASM_DISKGROUP[1] asm_dg2
•Specify all the LVM Volume Groups used by the ASM Disk Groups using the
ASM_VOLUME_GROUP attribute:
ASM_VOLUME_GROUP[0] vgora_asm1
ASM_VOLUME_GROUP[1] vgora_asm2
•For the ASM_HOME attribute, specify the ASM Home directory. In case of Oracle 11g
R2 this is same as CRS Home:
ASM_HOME /ASM_TEST0
•For the ASM_USER attribute, specify the UNIX user account for administering ASM
Instances:
ASM_USER oracle
•For the ASM_SID attribute, Specify "+ASM" in a coexistence environment, ECMT will
automatically discover the ASM SID on a node:
ASM_SID +ASM
•Apply the package configuration file:
# cmapplyconf -P pkg2.conf
This command "applies" the package configuration to the CDB (Serviceguard
Configuration Database). It also creates toolkit configuration directory defined by TKIT_DIR
on all target nodes, if not already present and then creates the toolkit configuration file
in it with the values specified in the pkg2.conf file.
•Open the haoracle.conf file generated in the package directory (TKIT_DIR).
Configuring a legacy failover package for an Oracle database using ASM in a
Coexistence Environment
To configure an ECMT legacy package for an Oracle database:
1. Log in as the Oracle administrator and run the following command to set the database
management policy to manual:
$ORACLE_HOME/bin/srvctl modify database -d <dbname> -y MANUAL
2. Create your own database package directory under /etc/cmcluster and copy over the files
shipped in the bundle.
Log in as root:
# mkdir /etc/cmcluster/db1_package
# cd /etc/cmcluster/db1_package
Copy the framework scripts provided to this location.
3. Edit the configuration file haoracle.conf for the database failover package to fit your Oracle
environment. Set the following parameters in the configuration file:
INSTANCE_TYPE=database
ORACLE_HOME=/ORACLE_TEST0
ORACLE_ADMIN=oracle
SID_NAME=ORACLE_TEST0
ASM=yes
ASM_DISKGROUP[0]=asm_dg1
ASM_DISKGROUP[1]=asm_dg2
ASM_VOLUME_GROUP[0]=vgora_asm1
ASM_VOLUME_GROUP[1]=vgora_asm2
Configuring and packaging Oracle single-instance database to co-exist with SGeRAC packages 55
ASM_HOME=/ASM_TEST0
ASM_USER=oracle
ASM_SID=+ASM
LISTENER=yes
LISTENER_NAME=LSNR_TEST0
LISTENER_PASS=LSNR_TEST0_PASS
PFILE=${ORACLE_HOME}/dbs/init${SID_NAME}.ora
MONITOR_PROCESSES[0]=ora_pmon_${SID_NAME}
MONITOR_PROCESSES[1]=ora_dbw0_${SID_NAME}
MONITOR_PROCESSES[2]=ora_ckpt_${SID_NAME}
MONITOR_PROCESSES[3]=ora_smon_${SID_NAME}
MONITOR_PROCESSES[4]=ora_lgwr_${SID_NAME}
MONITOR_PROCESSES[5]=ora_reco_${SID_NAME}
MONITOR_PROCESSES[6]=ora_rbal_${SID_NAME}
MONITOR_PROCESSES[7]=ora_asmb_${SID_NAME}
MAINTENANCE_FLAG=yes
MONITOR_INTERVAL=30
TIME_OUT=30
KILL_ASM_FOREGROUNDS=yes
PARENT_ENVIRONMENT=yes
CLEANUP_BEFORE_STARTUP=no
USER_SHUTDOWN_MODE=abort
ORA_CRS_HOME=/opt/oracle/crs
OC_TKIT_DIR=/etc/cmcluster/oc
4. Generate the database package configuration file and the control script in the database
package directory and edit the parameters of these files as mentioned for the database
package.
# cmmakepkg -p db1pkg.conf
# cmmakepkg -s db1pkg.cntl
Edit the package configuration file db1pkg.conf as shown below:
PACKAGE_NAME - Set to any name desired.
PACKAGE_TYPE - Set to FAILOVER.
RUN_SCRIPT /etc/cmcluster/db1_package/db1pkg.cntl
HALT_SCRIPT /etc/cmcluster/db1_package/db1pkg.cntl
DEPENDENCY_NAME oc_dependency
DEPENDENDY_CONDITION <SGeRAC OC MNP Package>=UP
DEPENDENCY_LOCATION SAME_NODE
Configure the service parameters:
SERVICE_NAME ORACLE_DB1_SRV
SERVICE_FAIL_FAST_ENABLED NO
SERVICE_HALT_TIMEOUT 300
If listener is configured and needs to be monitored, configure another set of service parameters:
SERVICE_NAME ORACLE_LSNR_SRV
SERVICE_FAIL_FAST_ENABLED NO
SERVICE_HALT_TIMEOUT 300
Edit the package control script db1pkg.cntl as shown below:
Since LVM logical volumes are used in disk groups, set VGCHANGE to "vgchange -a e" and
specify the name(s) of the volume groups in VG[0], VG[1].
Configure the package service:
SERVICE_NAME[0]="ORACLE_DB1_SRV"
SERVICE_CMD[0]="/etc/cmcluster/db1_package/toolkit.sh monitor"
SERVICE_RESTART[0]="-r 2"
If listener service is configured in the package configuration file, set the following parameters:
56 Using the Oracle Toolkit in an HP Serviceguard Cluster

SERVICE_NAME[1]="ORACLE_LSNR_SRV"
SERVICE_CMD[1]="/etc/cmcluster/db1_package/toolkit.sh monitor_listener"
SERVICE_RESTART[1]="-r 2"
Configure the Package IP and the SUBNET.
Add in the customer_defined_run_cmds function:
/etc/cmcluster/db1_package/toolkit.sh start
Add in the customer_defined_halt_cmds function:
if [ $SG_HALT_REASON = "user_halt" ]; then
reason="user"
else
reason="auto"
fi
/etc/cmcluster/db1_package/toolkit.sh stop $reason
"user" indicates that the package halt is a user initiated halt and "auto" indicates that the
package is being failed over automatically due to package dependencies, failure of a service
or due to dependent package failures.
5. Distribute the package configuration file, package control script, and the framework scripts
to all nodes in the cluster on which the package is configured to run, and then apply the
package configuration.
# cmapplyconf -P db1pkg.conf
6. Run the database package:
# cmrunpkg <dbpkg_name>
Check the package status using cmviewcl. Verify that the database instance is running. Repeat
these steps for each database instance.
ECMT Oracle Toolkit Maintenance Mode
To put the single-instance ECMT Oracle toolkit package in maintenance mode, the package attribute
MAINTENANCE_FLAG must be set to ‘yes’ and a file named ‘oracle.debug’ must exist in the package
directory.
In a coexistence environment, the single-instance database will go into toolkit maintenance mode
if any of the following condition is met:
1. If the MAINTENANCE_FLAG is set to ‘yes’ in the ECMT package configuration for single-instance
Oracle and if oracle.debug file exists in the package directory.
2. If the SGeRAC OC MNP package is put in toolkit maintenance mode by creating an oc.debug
file in the SGeRAC OC MNP package directory.
Supporting EBS database Tier
ECMT Oracle toolkit has been enhanced to support the packaging of EBS DB Tier. High availability
for the EBS database tier is achieved using the very same technique that many standalone Oracle
database implementations with Serviceguard have used in production for a considerable time.
NOTE: ECMT Oracle Toolkit can be used only to configure the EBS Database Tier and to configure
the EBS APPs Tier, user needs to purchase SGeEBS.
Using re-locatable storage devices and a special “floating” IP network address, the database can
failover from one physical server to another within the Serviceguard cluster while retaining the
same outward appearance to applications.
From a network communications point of view, the Oracle database is not configured to bind to
the network address associated with the actual physical server but rather to a specially-reserved
Supporting EBS database Tier 57

“floating” IP address. This floating IP address is called as package IP in Serviceguard terms. The
floating IP address is one that is defined for exclusive use by the database as its networking end
point and is normally included in the Domain Name Service so that the database can be located
by its applications. The symbolic name that is associated with the floating IP address is the “virtual
hostname” and it is this name that will be used as the database’s hostname within the EBS topology
configuration.
From the EBS APPS Tier point of view, the database failover from one machine to the other does
not alter the single network end point at which it connect for service. As there is no change in the
networking end point, no special reconfiguration of applications is required to handle the database
failover sequence.
Much of the process of setting up the virtual hostname environment for the EBS database tier is
automated during the installation process by using the –servername flag with the RapidInstall
EBS Installer command. Details on this command option can be found in the Oracle Applications
Release 12 installation guide.
As an example, to install the database tier with the virtual hostname ebs database, the RapidInstall
command used to install the database tier needs to be started with the –servername ebsdatabase
command line option. This will install the database product components, build the appropriate
configuration files and file system directory layout automatically and use the virtual hostname
ebsdatabase in place of the actual server hostname on which the install was run.
Oracle ASM Support for EBS DB Tier
Automatic Storage Management (ASM) simplifies administration of Oracle EBS DB Tier related
files by allowing administrator to reference disk groups rather than individual disks and files. It
provides functionalities like managing disk groups, disk redundancies, and allows management
of database objects without specifying mount points and filenames.
Currently Oracle EBS DB Tier Rapid installation allows user to house the database in either shared
file system or local file system. Automatic Storage Management is currently not supported using
EBS DB Tier Rapid Install.
To support ASM for EBS DB Tier, Migrate from non-ASM storage to ASM storage. The following
steps are for migrating EBS DB from Non-ASM storage to ASM storage:
NOTE: While performing the migration procedure, a scheduled downtime is needed for the
application.
1. Halt the SGeEBS APPS Tier Packages on all nodes which are currently using DB Tier package
whose database storage needs to be migrated.
2. Ensure that approximately 200GB free disk space is needed to create the ASM disk groups
for EBS database.
3. Perform the migration procedure as per the Oracle document. "Steps To Migrate/Move a
Database From Non-ASM to ASM [ID 252219.1]".
NOTE: Refer to the latest Oracle document available in Oracle support website.
4. Set up the ASM and EBS DB packages with ASM. For details, see the section “Supporting
Oracle ASM instance and Oracle database with ASM” (page 26) in this user guide.
58 Using the Oracle Toolkit in an HP Serviceguard Cluster

3 Using the Sybase ASE Toolkit in a Serviceguard Cluster
on HP-UX
This chapter describes the High Availability Sybase Adaptive Server Enterprise (ASE) Toolkit
designed for use in a Serviceguard environment. This document covers the basic steps to configure
a Sybase ASE instance in Serviceguard Cluster, and is intended for users who want to integrate
a Sybase ASE Server with Serviceguard in HP-UX environments.
It is assumed that its readers are already familiar with the Serviceguard configuration, as well as
with Sybase ASE concepts, including installation and configuration procedures.
NOTE: This toolkit supports:
•HP Serviceguard versions
◦A.11.19
◦A.11.20
•Sybase ASE version 15.0.2 or later
•HP-UX 11i v2 and HP-UX 11i v3
Unless otherwise stated, this toolkit runs on all distributions and all hardware supported by
Serviceguard.
It is recommended to set appropriate roles for users managing the cluster and packages so that
unauthorized users are restricted from viewing sensitive package attribute values like the Sybase
administrator password. See section configuring Role Based Access (RBA) for more details.
Overview
The Sybase ASE Toolkit for Serviceguard consists of a shell script that is used to start, stop, and
monitor a single-instance of Sybase ASE.
Note that this toolkit supports only modular packages.
NOTE: This toolkit does NOT support the Sybase ASE HA Failover feature.
To use this toolkit, the toolkit script must be integrated with the Serviceguard master control script.
Subsequent sections “Setting up the Application” (page 60),“Setting up the Toolkit” (page 62)
and “Sybase Package Configuration Example” (page 64)of this document provide guidelines for
integration of this toolkit with Serviceguard master control script.
NOTE: It is assumed that the user has already installed Serviceguard, Sybase ASE and the Sybase
ASE Toolkit on all the nodes in the cluster.
Sybase Information
Sybase ASE should be accessible from the same location on all nodes in the cluster that will run
the package.
The ASE instance can be configured in different ways:
•Shared Config - where all Sybase ASE installed binaries and the database files are on a
shared file system on LVM.
•Local Config -where the Sybase ASE instance is installed and configured on single node and
the files are replicated on all the other nodes in the cluster. The application datafiles should
be on shared file system on LVM.
Local Configuration
Overview 59

If the choice is to store the configuration files on a local disk, the configuration must be replicated
to local disks on all nodes configured to run the package. Here the Sybase ASE binaries reside
on the local storage. If any change is made to the configuration files, the file must be copied to all
nodes. The user is responsible to ensure the systems remain synchronized.
Shared Configuration
This is the recommended configuration. Here, the configuration and database files are kept on
shared disks (but the Sybase ASE binaries can be on the local storage). Since the configuration
files and data files reside on a shared location, there is no additional work to ensure all nodes
have the same configuration at any point in time. Another alternative setup is to put the Sybase
ASE binaries too on the shared location along with the configuration and database files.
Sybase supports multiple ASE instances running on the same node simultaneously. This allows the
system administrator the ability to move one instance from its own node while leaving another
instance up. Each node can potentially run several instances. Each Sybase ASE Package corresponds
to a separate Sybase ASE instance with its own ASE_SERVER instance name, unique volume groups,
logical volume and file system for storing ASE binaries, configuration files, data files, system
databases, log files and so on. This means the configuration information for each instance must
be identical for each node that will be configured to run that instance. See Building an HA Cluster
Configuration in the Serviceguard user manual available at:http://www.hp.com/go/
hpux-serviceguard-docs-> HP Serviceguard for information on volume group creation and logical
volume management.
NOTE: As previously stated, shared configuration can be stored on a local disk. If the choice is
to do this, it is the user's responsibility to ensure the data is propagated to all the nodes, and is
consistently maintained across the nodes. A disadvantage of storing the configuration on local
disks is that this can increase the chance of the configuration for a database instance becoming
inconsistent if changes are made to the configuration in one node. This configuration data is not
distributed to all nodes that can run that database instance.
It is therefore recommended that the master database and other ASE system database files -
likemaster.dat ,sysprocs.datand sybsysdb.dat be on shared disk.
The user is adviced to get the appropriate license for this type of setup. In case of a license that is
server specific, each node will require a license to be generated with the corresponding MAC of
that node. In case of local configuration, the license for each node can be separately put on the
corresponding node under the $SYBASE/$SYBASE_SYSAM2/licenses directory. In case of a
shared configuration, ensure that both nodes can access the corresponding license in the same
path.
However, in case of a local configuration, note that the Sybase ASE instance specific files MUST
be identical on all nodes; and in a shared configuration, all files must be on shared storage and
be accessible from any one node at any given time.)
Setting up the Application
NOTE: This chapter assumes that Sybase ASE has already been installed in /home/Sybase ASE
on all nodes in the cluster, and that shared storage has been configured.
1. Make sure all database instances in the cluster have unique names (as identified by the
user-defined variable 'ASE_SERVER' in the package configuration file). This can be done at
the time of configuring the ASE server processes, with entries made in the <ASE_SERVER.cfg>
file while configuring with the default configuration tool, or in the
$SYBASE/$SYBASE_ASE/init/sample_resource_files/srvbuild.adaptive_server.rs and similarly
for the other servers.
60 Using the Sybase ASE Toolkit in a Serviceguard Cluster on HP-UX

NOTE: The dataserver and the monitor server, both need to be installed on the same disk
as monitor server is dependent on the presence of the dataserver for its working.
2. Make sure that the 'sybase' user has the same user id and group id on all nodes in the cluster.
Create the user or group with the following commands and ensure the uid/gid by editing the
/etc/passwd file:
# groupadd sybase
# useradd -g sybase -d <installpath> -p <Passwd> sybase
3. Create a volume group, logical volume, and file system to hold the necessary configuration
information and symbolic links to the Sybase ASE executables. This file system will be defined
as SYBASE in the package configuration file and master control script. Since the volume group
and file system must be uniquely named within the cluster, use the name of the database
instance (ASE_SERVER) in the names:
Assuming that the name of the ASE instance is 'SYBASE0', create the following:
A volume group: /dev/vg0_SYBASE0
A logical volume: /dev/vg0_SYBASE0/lvol1
A file system: /dev/vg0_SYBASE0/lvol1 mounted at /SYBASE0
After the volume group, logical volume, and file system have been created on one node, it
must be imported to the other nodes that will run this database. Create the directory /SYBASE0
on all nodes so that /dev/vg0_SYBASE0/lvol1 can be mounted on that node, if the package
is to be run on the node.
For more information on creating, importing, or managing the VG and file system, refer to
the chapter entitled Building an HA Cluster in the Managing ServiceGuard manual available
at http://www.hp.com/go/hpux-serviceguard-docs —>HP Serviceguard manual for explicit
instructions.
4. The ASE system files, data tablespaces and files must be located in the file system /SYBASE0
during the initial creation of database. See Sybase ASE documentation for information on
setting up these files.
Multiple Instance Configuration
If multiple instances will be run in the same cluster, repeat the preceding steps for each instance.
For example, if a second instance (SYBASE_TEST1) is to be included in the configuration, create
a second volume group (for example, /dev/vg0_SYBASE_TEST1), logical volume and file system
with mount point (/SYBASE_TEST1) for the second instance. All configuration information for
SYBASE_TEST1 will reside in /SYBASE_TEST1/dbs. Similar to SYBASE0, symbolic links need to
be created for all subdirectories (other than /SYBASE_TEST1/dbs/), to link /SYBASE_TEST1 to
$SYBASE for that instance.
This configuration makes it possible to run several Sybase ASE instances on one node, facilitating
failover/failback of Sybase ASE packages between nodes in the cluster.
Set up additional database logical volumes.
It is possible to have the database reside on the same VG/LVOL as $Sybase ASE_HOME/dbs,
but more commonly, the database will probably reside on several volume groups and logical
volumes, all of which need to be shared among the nodes that are able to run the Sybase ASE
instance. Again, using a naming convention for the VG(s) that includes the instance name
(${ASE_SERVER}) could be used to associate a VG with a unique instance.
For Example:
Use with Asynchronous disk access and file systems:
/dev/vg01_SYBASE0/lvol1 #Logical volume Sybase ASE data
Setting up the Application 61

/dev/vg02_SYBASE0/lvol1 #Logical volume Sybase ASE data
/dev/vg02_SYBASE0/lvol2 #Logical volume Sybase ASE data
See the Sybase ASE documentation to determine which format is more appropriate for the setup
environment that user prefers.
File system for Sybase ASE data files:
/SYBASE0 - mount point for /dev/vg03_SYBASE0/lvol1
All data belonging to the database must reside on shared logical volumes (file system), space
needs to be allocated and shared for the following:
•Sybase ASE system data tables
•Sybase ASE indexes
•Sybase ASE stored procedures
•Sybase ASE transaction log files
After defining the shared volume groups/logical volumes/file systems for these entities, see Sybase
ASE documentation for creating the database.
Setting up the Toolkit
•Toolkit Setup
After installing the toolkit, this README and SGAlert.sh file will be in the
/opt/cmcluster/toolkit/sybase directory. One script will be present in the
/etc/cmcluster/scripts/ecmt/sybase directory. The other file for package attribute definition
file will be present in the /etc/cmcluster/modules/ecmt/sybase directory. Copy the
SGAlert.sh file to the TKIT_DIR directory.
For modular packages, there is an Attribute Definition File (ADF) and a Toolkit Module Script
(tkit_module.sh)
•Attribute Definition File (sybase.1)
The ADF is used to generate a package ASCII template file. This file contains a list of
pre-defined variables that will be added to the package configuration file during cmmakepkg,
which the user must customize for use with a particular Sybase ASE instance. It has an attribute
TKIT_DIR which will have the path of the package directory. For every parameter which
requires user input in the package configuration file, there is an attribute in the ADF. The
Sybase ASE attributes are discussed in Table 7 (page 62)
Table 7 Sybase ASE attributes
DescriptionSybase ASE Attributes
The location where the Sybase products are installed.
NOTE: This is also a SYBASE ENV variable and has to be set for Sybase ASE instance
to start. Install different instances of Sybase ASE on different paths/LUNs.
SYBASE
The directory name under $SYBASE where the ASE products are installed. Note: This
is also a SYBASE ENV variable and has to be set for Sybase ASE instance to start
SYBASE_ASE
The directory name under $SYBASE where the OCS products are installed. This directory
bin should contain the binary file isql.
NOTE: This is also a SYBASE ENV variable and has to be set for Sybase ASE instance
to start.
SYBASE_OCS
The base directory of Sybase ASE where sybase is installedSYBASE_ASE_HOME
System login name of the Sybase ASE administrator. User will be logged in using this
account for starting and stopping of the database
SYBASE_ASE_ADMIN
62 Using the Sybase ASE Toolkit in a Serviceguard Cluster on HP-UX

Table 7 Sybase ASE attributes (continued)
DescriptionSybase ASE Attributes
Name of the Sybase ASE instance set during installation or configuration of the ASE.
This uniquely identifies an ASE instance
ASE_SERVER
Sends an e-mail message to the specified e-mail address when packages fail. This e-mail
is generated only when packages fail, and not when a package is halted by the operator.
To send this e-mail message to multiple recipients, a group e-mail ID must be created
and specified for this parameter. When an e-mail ID is not specified for this parameter,
the script does not send out this e-mail
ALERT_MAIL ID
ASE Login with system administrator capabilitySALOGIN
ASE Password for Login with system administrator capability.
NOTE: Along with other package attributes, the ASE password is also stored in the
Cluster Database. If users are not restricted access based on their roles, this password
can be viewed by unauthorized users using the cmviewcl command. It is highly
recommended to grant access to users based only on their roles in managing the cluster
and packages. See “Configuring Access Roles” (page 67) in this chapter for more
details on configuring Role Based Access (RBA).
SAPASSWD
Path of the script to start ASE instance.ASE_RUNSCRIPT
This parameter is used to specify the instance shutdown mode only when a shutdown
is initiated by the user and not due to a failure of a service. This parameter can take
values "wait" or "nowait". If "wait" is specified, the instance is shutdown using the wait
option, which will be a clean shutdown. If "nowait" is specified, the instance is shutdown
using the nowait option. The default value is "wait".
USER_SHUTDOWN_MODE
The interval of time, in seconds, which this script should wait between checks to ensure
of the Sybase database running. Default value is 30 seconds.
MONITOR_INTERVAL
The interval of time, in seconds, to wait for Sybase abort to complete before killing the
Sybase processes defined in MONITOR_PROCESSES. The TIME_OUT variable is used
to protect against a worst case scenario where a hung database prevents the halt script
from completing, therefore preventing the standby node from starting the database. The
value of TIME_OUT must be less than the time-out set in the package configuration file.
TIME_OUT variable has no effect on package failover times. Default value is 30 seconds.
TIME_OUT
The maximum amount of time in seconds to wait for an ASE to complete recovery before
determining that the server has failed to start up. This value must be set to allow enough
time for all the databases to recover and come online.
RECOVERY_TIMEOUT
The names of all processes that must be executing to ensure this instance is up and
running.
MONITOR_PROCESSES
Maintenance flag will enable or disable the maintenance mode for the Sybase package.
By default this is set to "yes". In order to disable this feature, MAINTENANCE_FLAG
should be set to "no". If the Sybase ASE instance needs to be maintained, a file
$TKIT_DIR/sybase.debug needs to be touched. During this maintenance period
the Sybase ASE instance's monitoring is paused. Even if the ASE instance is brought
down, the package will not be failed over to the standby node. To continue monitoring
and come back from the maintenance mode, the sybase.debug file should be removed.
It is the user's responsibility to ensure that the ASE instance is running properly after the
maintenance phase.
MAINTENANCE_FLAG
•Module Script (tkit_module.sh)
This script contains a list of internally used variables and functions that support the starting
and stopping of an Sybase ASE database instance. This script is called by the Master Control
Script to perform the following:
Setting up the Toolkit 63

1. On package start-up, it starts the Sybase ASE instance and launches the monitor process.
2. On package halt, it stops the Sybase ASE instance and monitor process.
This script also contains the functions for monitoring the Sybase ASE instance. By default,
only the "€˜dataserver€" process of ASE is monitored. This process is contained in the
variable MONITOR_PROCESSES.
Sybase Package Configuration Example
•Package Setup and Configuration
Assuming Sybase ASE is already installed in its default home directory (for example,
/home/sybase), perform the following steps to make necessary directories shareable by
all clustered nodes.
Follow the instructions in the chapter Building an HA Cluster Configuration in the
Managing ServiceGuard manual available at http://www.hp.com/go/
1.
hpux-serviceguard-docs —>HP Serviceguard manual to create a logical volume
infrastructure on a shared disk. The disk must be available to all clustered nodes that will
be configured to run this database instance. Create a file system to hold the necessary
configuration information and symbolic links to the Sybase ASE executables. This file
system will be used as SYBASE_HOME in the package control scripts. Since the volume
group and file system have to be uniquely named within the cluster, use the name of the
database instance ($ASE_SERVER) in the name. Assuming the name of the database is
'SYBASE0', follow the instructions in the "Managing Serviceguard" manual ("Building
an HA Cluster Configuration") to create the following:
/dev/vg0_SYBASE0 (the volume group)
/dev/vg0_SYBASE0/lvol1 (the logical volume)
/dev/vg0_SYBASE0/lvol1 (the filesystem) mounted at /SYBASE0
2. Assuming Sybase ASE is installed in /home/sybase; create symbolic links to all
subdirectories under /home/sybase with the exception of the dbs directory (dbs contains
important instance configuration files, and should reside in the shared storage in
${ASE_SERVER}, for example, /SYBASE0/dbs).
3. Test the set up to ensure Sybase ASE can be properly brought up.
Repeat this step on all other clustered nodes to be configured to run the package to ensure
Sybase ASE can be brought up and down successfully.
4. Create the Serviceguard package using modular package method
Create a package configuration file (SYBASE0.conf) as follows:
cmmakepkg -m ecmt/sybase/sybase -p SYBASE0.conf
The configuration file should be edited as indicated by the comments in that file. The
package name needs to be unique within the cluster. For clarity, use the $ASE_SERVER
to name the package "package_name <ASE_SERVER>"
•The Serviceguard package configuration file (SYBASE0.conf)
Described below are some examples of modifications to the Serviceguard package
configuration file, which need to made to customize your environment.
For example:
package_name SYBASE0
List the names of the clustered nodes to be configured to run the package, using the node_name
parameter:
node_name node1
node_name node2
64 Using the Sybase ASE Toolkit in a Serviceguard Cluster on HP-UX

The following is an example of specifying Sybase ASE specific variables:
ecmt/sybase/sybase/TKIT_DIR /tmp/SYBASE0
ecmt/sybase/sybase/SYBASE /home/sybase
ecmt/sybase/sybase/SYBASE_ASE ASE-15_0
ecmt/sybase/sybase/SYBASE_OCS OCS-15_0
ecmt/sybase/sybase/SYBASE_ASE_ADMIN sybase
ecmt/sybase/sybase/SALOGIN sa
ecmt/sybase/sybase/SAPASSWD somepasswd
NOTE: Keep this commented if the password for the administrator is not set. Along with
other package attributes, this password is also stored in the Cluster Database. If users are not
restricted access based on their roles, this password can be viewed by unauthorized users
using the cmviewcl command. It is highly recommended to grant access to users based only
on their roles in managing the cluster and packages. See “Configuring Access Roles” (page 67)
in this chapter for more details on configuring Role Based Access (RBA).
ecmt/sybase/sybase/ASE_SERVER SYBASE0
ecmt/sybase/sybase/ASE_RUNSCRIPT /home/sybase/ASE-15_0/install/RUN_SYBASE0
ecmt/sybase/sybase/USER_SHUTDOWN_MODE wait
The default is "wait". If the user requires that the ASE instance should abort immediately and
do an unclean shutdown, this should be specified as "nowait".
ecmt/sybase/sybase/MONITOR_INTERVAL 5
ecmt/sybase/sybase/TIME_OUT 30
ecmt/sybase/sybase/RECOVERY_TIMEOUT 30
ecmt/sybase/sybase/MONITOR_PROCESSES dataserver
ecmt/sybase/sybase/MAINTENANCE_FLAG yes
Define the volume groups that are used by the Sybase ASE instance. File systems associated
with these volume groups are defined as follows:
vg /dev/vg00_SYBASE0
vg /dev/vg01_SYBASE0
Define the file systems which are used by the Sybase ASE instance. Note that one of these
file systems must be the shared file system/logical volume containing the Sybase ASE home
configuration information ($SYBASE_HOME). The name of the instance is used to name the
volume groups, logical volumes and file systems.
fs_name /dev/vg00_SYBASE0/lvol1
fs_directory /SYBASE0
fs_type "ext3"
fs_mount_opt "-o rw"
Define the service related parameters. The service name should include the Sybase ASE
instance name (that is ${ASE_SERVER}). In the following example, since there is only one
service for this package, the ${ASE_SERVER} (that is SYBASE0) is assigned to the 'service_name'
parameter.
service_name SYBASE_${ASE_SERVER}
service_cmd
"/opt/cmcluster/conf/scripts/ecmt/sybase/tkit_module.sh
sybase_monitor"
service_restart "-r 3"
The service restart counter can be reset to zero for this service by using Serviceguard command
:cmmodpkg. The service restart counter is incremented each time the service fails. It is used
Sybase Package Configuration Example 65

to determine when a package has exceeded its restart limit as defined by the "service_restart"
parameter in the package control script.
To reset the restart counter execute the following command cmmodpkg [-v] [-n
node_name] -R -s service_name package_name
After setting up the Serviceguard environment, each clustered Sybase ASE Instance should
have the following files in the toolkit specific directories:
/etc/cmcluster/scripts/ecmt/sybase/tkit_module.sh
/etc/cmcluster/modules/ecmt/sybase/sybase (this is a
symbolic link)
/etc/cmcluster/modules/ecmt/sybase/sybase.1
/opt/cmcluster/toolkit/sybase/README
/opt/cmcluster/toolkit/sybase/SGAlert.sh
Creating the Serviceguard package using Modular method
Follow the steps below to create Serviceguard package using Modular method:
1. Create a directory for the package.
#mkdir /etc/cmcluster/pkg/sybase_pkg/
2. Copy the toolkit template and script files from sybase directory.
#cd /etc/cmcluster/pkg/sybase_pkg/
#cp /opt/cmcluster/toolkit/sybase/*./
3. Create a configuration file (pkg.conf) as follows.
#cmmakepkg -m ecmt/sybase/sybase pkg.conf
4. Edit the package configuration file.
NOTE: Sybase toolkit configuration parameters in the package configuration file have been
prefixed by ecmt/sybase/sybase when used in Serviceguard A.11.19.00.
For Example:
/etc/cmcluster/pkg/sybase_pkg/pkg.conf
The configuration file should be edited as indicated by the comments in that file. The package
name needs to be unique within the cluster.
For Example:
PACKAGE_NAME sybase
NODE_NAME node1
NODE_NAME node2
Set the TKIT_DIR variable as the path of <package_directory>. For example, TKIT_DIR
/etc/cmcluster/pkg/pkg01.
5. Use cmcheckconf command to check for the validity of the configuration specified.
For Example:
#cmcheckconf -P pkg.conf
6. If the cmcheckconf command does not report any errors, use the cmapplyconf command
to add the package into Serviceguard environment.
For Example:
#cmapplyconf -P pkg.conf
66 Using the Sybase ASE Toolkit in a Serviceguard Cluster on HP-UX

Adding the Package to the Cluster
After the setup is complete, add the package to the Serviceguard cluster and start it up.
cmapplyconf -P SYBASE0
cmmodpkg -e -n <node1> -n <node2> SYBASE0
cmmodpkg -e SYBASE0
If necessary, consult the Managing ServiceGuard manual available at http://www.hp.com/go/
hpux-serviceguard-docs —>HP Serviceguard manual for information on managing packages.
Configuring Access Roles
To restrict unauthorized users from viewing the values of package attributes, set appropriate roles
for users who manage the cluster and packages. Set the Sybase administrator password using the
SAPASSWD package attribute. Along with other package attributes, password set for the
SAPASSWD package attribute is also stored in the Cluster Database.
If you do not restrict access of users for the SAPASSWD package attribute, then unauthorized users
can use the cmviewcl command to view the Sybase administrator password. HP recommends to
granting access to users based only on their roles in managing the cluster and packages. Configure
Role Based Access (RBA) using the following configuration parameters in the cluster:
•USER_NAME
•USER_HOST
•USER_ROLE
Specify one of the following values for the USER_ROLE parameter:
Table 8 Parameters in USER_ROLE
DescriptionUser Role
Allowed to perform cluster and package view operations.MONITOR
Allowed to perform package administration, and use cluster and package view commands.PACKAGE_ADMIN
Allowed to perform cluster administration, package administration, and cluster and package view
operations.
FULL_ADMIN
Assign any of these roles to users who are not configured as root users. Root users are usually
given complete control on the cluster using the FULL_ADMIN value.
When any of these values are specified for users who are not root users, they can view the Sybase
administrator password using the cmviewclcommand. Only those users who are not configured
with any of these values cannot view the Sybase administrator password using the cmviewcl
command.
For more information on configuring security for a Serviceguard cluster, see the Securing
Serviceguard, March 2009 whitepaper available at http://www.hp.com/go/
hpux-serviceguard-docs —>HP Serviceguard .
Serviceguard allows the Role Based Access feature to be switched off, in which case only the root
user will be able to view the package attributes.
As the Sybase administrator password is also entered in the package configuration ASCII file, it
is recommended that this file is secured either by using file permissions feature provided by the
operating system or by deleting the file after the package is applied.
Adding the Package to the Cluster 67
Node-specific Configuration
Ensure that all files that are required by Sybase ASE to start up cleanly are updated and present
on each node in the cluster or accessible through shared storage. It is the user's responsibility to
replicate all files across all nodes, when using local configuration.
Error-Handling
During start up, the ASE server would require the IP/hostname that is mentioned in the interfaces
file to be associated with a node name that it is configured to run on. If the IP is not configured,
or ping-able, the ASE instance may fail to come up. Correct this using the guidelines specified in
the next section.
Ensure that the setup has been done for all nodes in the cluster (or on shared storage) as specified
by Sybase. Contact Sybase support for any issues.
Network Configuration
It is beyond the scope of this document to give detailed instructions on how to configure the Sybase
ASE for a Serviceguard cluster. This section contains a few basic steps that user would require to
68 Using the Sybase ASE Toolkit in a Serviceguard Cluster on HP-UX

do for setting up a single-instance of ASE for failover in a Serviceguard cluster. Consult Sybase
ASE documentation for a detailed description on how to setup ASE in a cluster.
•Sybase ASE interfaces file
For setting up a single-instance of ASE in a Serviceguard cluster, the ASE instance should be
available at the same IP address across all nodes in the cluster. To achieve this, the interfaces
file of the ASE instance, available at the $SYBASE directory of that instance, should be edited.
For example, a default setup of ASE would have an interface entry for the dataserver as:
MIG29
master tcp ether mig29 5000
query tcp ether mig29 5000
This needs to be edited to have the re-locatable IP-address, as follows:
MIG29
master tcp ether 192.168.10.1 5000
query tcp ether 192.168.10.1 5000
If user requires a re-locatable hostname to be associated with this re-locatable IP-address,
there are two important things to be taken care of:
1. Use the re-locatable hostname in the srvbuild.adaptive_server.rs and similar files for all
the other 'server' processes and use srvbuildres utility to configure the servers.
2. Make the (relocatable_,P relocatable_hostname) pairs entry in the /etc/hosts (and also
in the nameserver, if necessary). The /etc/hosts, should then contain the <IP-address,
hostname> associated with each ASE instance along with the physical IP-address and
corresponding physical hostname entries.
- /etc/hosts
Ensure that the entries mentioned above are present in the /etc/hosts file before an
attempt is made to bring up the ASE processes.
For example, assume that the IP 192.168.10.1 is the associated IP and sybase0 is the
associated hostname with the ASE instance SYBASE0. The entry required in /etc/hosts
is:
192.168.10.1 sybase0
And in the adaptive server configuration file, the re-locatable hostname sybase0 should
be put in place of the hostname:
sqlsrv.network_hostname_list: PUT_YOUR_HOSTNAME_HERE
as -
sqlsrv.network_hostname_list: sybase0
NOTE: If user does not wish to use a re-locatable hostname with the ASE instance, the
/etc/hosts file on each node should contain the re-locatable IP-address associated
with the physical hostname of that node. For example, if node1_hostname and
node2_hostname are the physical hostnames of two nodes in the cluster, and if
192.168.10.1 is the re-locatable IP-address for the ASE instance, then the /etc/hosts of
node1 should have an entry like: 192.168.10.1 node1_hostname
And the /etc/hosts file of node2 should have an entry like: 192.168.10.1
node2_hostname.
Database Maintenance
There might be situations, when the Sybase ASE database has to be taken down for maintenance
purposes like changing configuration, without having the instance to migrate to standby node. The
Database Maintenance 69

following procedure should be used:
NOTE: The example assumes that the package name is SYBASE0, the package directory is
/opt/cmcluster/pkg/SYBASE0, and the SYBASE_HOME is configured as /SYBASE0.
•Disable the failover of the package through cmmodpkg command:
$ cmmodpkg -d SYBASE0
•Pause the monitor script.
Create an empty file <TKIT_DIR>/sybase.debug as shown below:
$ touch <TKIT_DIR>/sybase.debug
The toolkit monitors script, that continuously checks the Sybase ASE process, would now stop
monitoring this process. A message, "Sybase ASE toolkit pausing monitoring and entering
maintenance mode" appears in the Serviceguard Package Control script log.
•If required, stop the Sybase ASE database instance as shown below:
$ export SG_PACKAGE=SYBASE0
$ $SGCONF/scripts/ecmt/sybase/tkit_module.sh stop
•Perform maintenance actions (for example, changing the configuration parameters in the
parameter file of the Sybase ASE instance. If this file is changed, remember to distribute the
new file to all cluster nodes).
•Start the Sybase ASE database instance again if it has been stopped:
$ export SG_PACKAGE=SYBASE0
$ SGCONF/scripts/ecmt/sybase/tkit_module.sh start
•Allow monitoring scripts to continue normally as shown below:
$ rm -f /opt/cmcluster/pkg/SYBASE0/sybase.debug
A message "Starting Sybase ASE toolkit monitoring again after maintenance" appears in the
Serviceguard Package Control script log.
•Enable the package failover:
$ cmmodpkg -e SYBASE0
NOTE: If the package fails during maintenance (for example, the node crashes), the package
will not automatically fail over to an adoptive node. It is the responsibility of the user to start
the package up on an adoptive node. See the manual Managing ServiceGuard manual
available at http://www.hp.com/go/hpux-serviceguard-docs —>HP Serviceguard for more
details.
This feature is enabled only when the configuration variable MAINTENANCE_FLAG is set to
"yes" in the package configuration file.
70 Using the Sybase ASE Toolkit in a Serviceguard Cluster on HP-UX

4 Using the DB2 database Toolkit in a Serviceguard Cluster
in HP-UX
DB2 is a RDBMS product from IBM. This chapter describes the High Availability toolkit for DB2
V9.1, V9.5 and V9.7 designed to be used in a Serviceguard environment. This chapter covers
the basic steps to configure DB2 instances in a Serviceguard cluster. For more information on
support matrix, see compatibility matrix available at http://www.hp.com/go/
hpux-serviceguard-docs —>HP Serviceguard .
This chapter assumes that the readers are already familiar with Serviceguard configuration, as
well as with DB2 database server concepts, including installation and configuration procedures.
NOTE: This toolkit runs on 11i v2 and 11i v3 HP-UX distributions. This toolkit is not supported
on 11i v1 HP-UX distribution and it is supported in all hardware supported by the Serviceguard.
Database Partitioning Feature (DPF) is supported only with the following versions:
•DB2 V9.1.
•DB2 V9.7 with Fix Pack 2.
The DB2 Database Toolkit for Serviceguard consists of a set of shell scripts that are used to start,
stop, and monitor the DB2 database instances. This toolkit can be used with the legacy and modular
style Serviceguard packages. It is strongly recommended to use the modular style of packaging
as the legacy style of packaging will be obsolete in future. Subsequent sections of this chapter
provide guidelines for integrating this toolkit with the Serviceguard package control script (for
legacy packages), or with the master control script (for modular packages). The DB2 Database
Toolkit for Serviceguard can also be configured using the Serviceguard manager graphical user
interface.
NOTE: This chapter assumes that the user has already installed Serviceguard, a DB2 Database,
and the Enterprise Cluster Master toolkit version B.06.00 on all cluster nodes.
DB2 Information
Each cluster member requires a local copy of DB2 server. DB2 instances are configured as packages
under Serviceguard. Clients connect to the DB2 database using an IP address that is assigned to
the Serviceguard package. Serviceguard monitors the health of the DB2 Database Server using
the DB2 Database utility tool "db2gcf". In case of a failure of DB2 system on one node, Serviceguard
fails over all the necessary resources and starts up an identical DB2 instance on one of the standby
nodes.
Setting Up the Application
The steps below outline the installation procedures and the necessary checks required to provide
high availability for DB2 UDB Enterprise Server Edition V9.5 /V9.7 in Serviceguard. For additional
details see Quick Beginning for DB2 Servers available at ftp://ftp.software.ibm.com/ps/products/
db2/info/vr95/pdf/en_US/db2ise952.pdf.
1. Create a volume group, a logical volume, and a file system to hold the database. The volume
group, logical volume and file system parameters have to be defined in the Serviceguard
package configuration file. Since the volume group and file system must be uniquely named
within the cluster, include the identity of the database instance in their names. For step-by-step
instructions on creating a volume group, see chapter Building an HA Cluster Configuration in
DB2 Information 71

the Serviceguard user manual available at http://www.hp.com/go/hpux-serviceguard-docs
-> HP Serviceguard.
2. Make sure that the minimum hardware and the software prerequisites are met before the
product installation is initiated. The latest installation requirements are listed on IBM web site:
http://www-306.ibm.com/software/data/db2/9/sysreqs.html.
3. Use the DB2 Setup Wizard or db2install script to install the database server deferring the
instance creation. The destination directory for DB2 server must be the same on all cluster
nodes. DB2 installation must be done by a root user.
4. IBM provides a utility called /opt/IBM/DB2/V9.5/bin/db2osconf in determining the
minimum recommended kernel values for DB2 server. As root, run /opt/IBM/DB2/V9.5/
bin/db2osconf or /opt/IBM/DB2/V9.7/bin/db2osconf utility to aid administrators
in determining the minimum recommended kernel values for the DB2 server. Login as root,
modify the kernel parameters using kctune command or kcweb (graphical browser) based
utility. For example, to modify the value of maxuprc execute as root the following:
root@hp46t191:/home/root>kctune maxuprc=256.
For more information regarding the recommended kernel values for DB2 server, see IBM DB2
Information center.
https://publib.boulder.ibm.com/infocenter/db2luw/v9r5/index.jsp
https://publib.boulder.ibm.com/infocenter/db2luw/v9r7/index.jsp
5. Create required users and groups on all cluster members.
To create required groups using command line utilities, execute as root:
root@node1/]> groupadd -g 400 db2iadm1
[root@node1/]> groupadd -g 500 db2fadm1
[root@node1/]> groupadd -g 600 dasadm1
To create required users using command line utilities, execute as root:
[root@node1/]> useradd -u 400 -g db2iadm1 -m -d /home/payroll_inst payrollinst
[root@node1/]> useradd -u 500 -g db2fadm1 -m -d /home/db2fenc1 db2fenc1
[root@node1/]> useradd -u 600 -g dasadm1 -m -d /home/dasusr1 dasusr1
see useradd (1M) and groupadd (1M) man pages for additional details.
NOTE: The user names, user ID and groups shown here are for illustration purposes only.
6. Create a DB2 instance using db2icrt. The DB2 instances should be created on shared volume
group.
[root@node1 /]><DB2_installation_dir>/instance/db2icrt -a client -u db2fenc1 payroll_inst
7. In case of logical multi-partitioned database installation, edit DB2 node configuration file
db2nodes.cfg in the exported instance owner home directory to define the database
partitions that participate in a DB2 instance.
For example:
[payroll_inst@node1 ~]> vi /home/payroll_inst/sqllib/db2nodes.cfg
0 node1 0 node1
1 node1 1 node1
8. In case of physical multi-partitioned database installation, edit the DB2 node configuration
file db2nodes.cfg in the exported instance owner home directory to define the physical
and logical database partitions that participate in a DB2 instance.
For example:
[payroll_inst@node1 ~]> vi /home/payroll_inst/sqllib/db2nodes.cfg
0 node1 0 node1
1 node1 1 node1
72 Using the DB2 database Toolkit in a Serviceguard Cluster in HP-UX
2 node2 0 node2
3 node2 1 node2
9. To enable the communication between the partitions, edit the /etc/services, /etc/
hosts,.rhosts file with the required entries.
Edit the/etc/hosts file by adding the IP address and hostname of the DB2 server.
For example:
[payroll_inst@node1 ~]> vi /etc/hosts
10.0.0.1 DBNODE.domainname.com DBNODE
Edit the ~/.rhosts file for the instance owner:
For example:
[payroll_inst@node1 ~]> vi home/payroll_inst/.rhosts
node1 payroll_inst
node2 payroll_inst
10. As root, edit the /etc/services file to ensure that enough ports are reserved for Fast
Communication Manager (FCM) to allow inter-partition communications. Add the following
entries in the /etc/services file. The number of ports reserved depends upon the
requirement.
[root@node1/]>vi /etc/services
db2c_payroll_inst 50000/tcp # DB2 connection service port
DB2_payroll_inst 60000/tcp
DB2_payroll_inst_1 60001/tcp
DB2_payroll_inst_2 60002/tcp
DB2_payroll_inst_3 60003/tcp
DB2_payroll_inst_4 60004/tcp
DB2_payroll_inst_5 60005/tcp
DB2_payroll_inst_6 60006/tcp
DB2_payroll_inst_7 60007/tcp
DB2_payroll_inst_8 60008/tcp
DB2_payroll_inst_END 60009/tcp
Setting Up the Application 73

NOTE: In case of multiple physical and logical partition configuration of DB2, the number
of ports added in the services file has to be sufficient for the number of partitions created in
the current node as well as the number of partitions created on the other nodes. This is to
ensure that enough ports are available for all partitions to startup on a single node if all
packages managing different partitions are started on that node.
In case of multiple physical and logical partition configuration of DB2, number of ports added
in services file has to be sufficient for the number of partitions created in the current node as
well as the number of partitions created on the other nodes. This is to ensure that enough ports
are available for all partitions to startup on a single node if all packages managing different
partitions are started on that node.
As an instance owner execute the following:
[payroll_inst@node1/]> db2set DB2COMM=tcpip
[payroll_inst@node1/]> update database manager configuration using svcename db2c_payroll_inst
[payroll_inst@node1/]> db2stop
[payroll_inst@node1/]> db2start
NOTE: For multi-partitioned database using DB2 V9.7, a parameter called
DB2_PMODEL_SETTINGS needs to be set to SERIAL_RESTART:TRUE. This parameter along
with the respective Fix Pack installation, provides fix for Database Partitioning Feature (DPF)
issue reported by IC66748:DB2START RESTART NEEDS SERIAL FAILOVER CODE RE-USE
FROM V91 IN V97 case.
For example:
[payroll_inst@node1/]> db2set DB2_PMODEL_SETTINGS=SERIAL_RESTART:TRUE
11. Start the database manager and examine the database log for any errors.
[payroll_inst@node1 ~]> db2start
07/15/2008 18:10:32 1 0 SQL1063N DB2START processing was successful.
04/15/2008 18:10:32 0 0 SQL1063N DB2START processing was successful.
SQL1063N DB2START processing was successful.
12. Define the DBNAME and MNTPOINT variables. Create the database on the mount point defined,
connect to it locally, and terminate the connection.
As an instance owner, execute,
payroll_inst@node1 ~]> db2 create database $DBNAME on $MNTPOINT
payroll_inst@node1 ~]> db2 connect to $DBNAME (as instance owner)
Check the DB2 log for errors in
$HOME/sqllib/db2dump/db2diag.log
On other cluster nodes catalog the already created database:
payroll_inst@node1 ~]> db2 catalog database $DBNAME on $MNTPOINT \
authentication client
13. Terminate the connection and release the logical volume.
[payroll_inst@node1 ~]> db2 terminate (as instance owner)
[payroll_inst@node1 ~]> db2stop (as instance user)
[root@node1 /]> umount $MNTPOINT (as root user)
[root@node1 /]> vgchange -a n $VG (as root user)
14. Stop database manager and correct errors (if any).
[payroll_inst@node1 ~]> db2stop
74 Using the DB2 database Toolkit in a Serviceguard Cluster in HP-UX

NOTE: In a Serviceguard cluster environment, the fault monitor facility provided by DB2
must be turned off. Fault monitor facility is a sequence of processes that work together to
ensure that DB2 instance is running. Fault monitor facility is specifically designed for
non-clustered environments and has the flexibility to be turned off if the DB2 instance is running
in a cluster environment. In Serviceguard environment, DB2 instance start/stop is controlled
by Serviceguard and hence the fault monitor facility should be turned off.
For more information on this, please look at the IBM DB2 documentation available at https://
publib.boulder.ibm.com/infocenter/db2luw/v9r5/index.jsp and https://
publib.boulder.ibm.com/infocenter/db2luw/v9r7/index.jsp .
The above steps from 1 to 12 have to be repeated on all nodes in the cluster. Steps 5-12
mentioned above are applicable for multi-partition database setup. Single partition users need
not defer the instance creation while installing as mentioned in step 4. After the installation
users can continue from step 11 onwards.
Multiple Instance Configurations
If multiple instances run in the same cluster, repeat the preceding steps for each instance. For
example, if a second instance (employee) is to be included in the configuration, you would create
a second volume group (for example, /dev/vg_employee ), logical volume, and filesystem with
mount point (/mnt/employee ) for the second instance. This configuration makes it possible to
run several DB2 instances on one node, facilitating failover/failback of DB2 packages between
nodes in the cluster.
Set up additional database logical volumes
The database will reside on several volume groups and logical volumes, which need to be shared
among the nodes that are able to run the DB2 instances. Again, using a naming convention for
the VG(s) that includes the instance name could be used to associate a VG with a unique instance.
NOTE: Refer Step1 above, for creating logical volumes.
For example:
Raw disk access for DB2 data:
/dev/vg01_payroll/rlvol1 #Raw logical volume DB2 data
/dev/vg02_payroll/rlvol1 #Raw logical volume DB2 data
/dev/vg03_payroll/rlvol2 #Raw logical volume DB2 data
or for use with Asynchronous disk access and file systems:
/dev/vg01_payroll/lvol1 #Logical volume DB2 data
/dev/vg02_payroll/lvol1 #Logical volume DB2 data
/dev/vg03_payroll/lvol2 #Logical volume DB2 data
Setting Up the Toolkit
Toolkit Overview
After installing this toolkit, three scripts and the README file will be present in the /opt/
cmcluster/toolkit/db2/ directory. Two more scripts and one Attribute Definition File will
be present which will be used only by modular packages. These scripts will be in the /etc/
cmcluster/scripts/ecmt/db2/ directory. The Attribute Definition file for modular packages
Setting Up the Toolkit 75

will be predefined, include the identity of the database instance as per the name set in the /etc/
cmcluster/modules/ecmt/db2/ directory.
For legacy packages, there will be one user configuration script (hadb2.conf) and three
functional scripts (toolkit.sh),hadb2.sh and hadb2.mon) which work with each other to
integrate DB2 with the Serviceguard package control scripts.
For modular packages, there is an Attribute Definition File (ADF), a Toolkit Module Script
(tkit_module.sh), and a Toolkit Configuration File Generator Script (tkit_gen.sh) which
work with the three scripts mentioned above for legacy packages to integrate DB2 with the
Serviceguard Master Control Script.
Table 9 (page 76) lists these scripts:
Table 9 Legacy Package Scripts
DescriptionScript Name
This script contains a list of pre-defined variables that the user must customize
for use with a particular database instance. This is a configuration file which
is read by the toolkit script, hadb2.sh. The table Table 10 (page 76) shows
variables that are contained in hadb2.conf.
hadb2.conf (user configuration file)
This script contains a list of internally used variables and functions that support
starting and stopping of a DB2 database instance. This script will be called
by toolkit.sh to perform the following:
•On package startup, it starts the DB2 instance and monitor process.
•On package halt, it stops the DB2 instance and monitor process.
Main Script (hadb2.sh)
This script contains a list of internally used variables and functions for
monitoring a DB2 server instance. This script will be called by hadb2.sh . It
uses a tool called "db2gcf" to monitor the database.
Monitor Script (hadb2.mon)
This script is the interface between the Serviceguard package control script
and the DB2 toolkit.
Interface Script (toolkit.sh)
Table 10 Variables in hadb2.conf File
DescriptionVariable Name
The DB2 instance name.INSTANCE_NAME
The list of the logical database partitions that participate in a DB2 instance
and are intended to run on single server. Physical partitions should be
packaged separately.
PARTITION_NUMBER
76 Using the DB2 database Toolkit in a Serviceguard Cluster in HP-UX

Table 10 Variables in hadb2.conf File (continued)
DescriptionVariable Name
This is the list of critical processes of a DB2 instance.
NOTE: These processes must not be running after DB2 is shutdown. If the
processes are still running they will be killed by sending a SIGKILL.
MONITOR_PROCESSES
This variable will enable or disable maintenance mode for DB2 package. By
default, this is set to "yes". In order to disable this feature MAINTENANCE_FLAG
should be set to "no". When DB2 Database needs to be maintained then a
file "<package directory>/db2.debug" needs to be touched. During this
maintenance period DB2 database instance's process monitoring is paused.
Even if DB2 instance is brought down, package will not be failed over to the
standby node. To continue monitoring and come out of the maintenance mode,
you should remove the file "db2.debug" from the package configuration
directory. It is user's responsibility to ensure that db2 instance is properly
running after the maintenance phase.
NOTE: Setting MAINTENANCE_FLAG to "yes" and touching the db2.debug
file in the package directory will put the package in toolkit maintenance mode.
Serviceguard A.11.19 release has a new feature which allows individual
components of the package to be maintained while the package is still up.
This feature is called Package Maintenance mode and is available only for
modular packages. For more information on using Package Maintenance
mode, see the whitepaper "Modular package support in Serviceguard for
Linux and ECM Toolkits" available at http://www.hp.com/go/
hpux-SG-ECMT-docs.
MAINTENANCE_FLAG
The time interval in seconds between the checks to ensure that the DB2
database is running. Default value is 30 seconds.
MONITOR_INTERVAL
The amount of time, in seconds, to wait for the DB2 shutdown to complete
before killing the DB2 processes defined in MONITOR_PROCESSES. The
TIME_OUT variable is used to protect against a worst case scenario where a
hung database prevents the package halt script from completing, thereby
preventing the standby node from starting the database. The value of
TIME_OUT must be less than the HALT_SCRIPT_TIMEOUT value set in the
package configuration file. This variable has no effect on the package failover
times.
TIME_OUT
The following ADF file and scripts are used only during the modular method of packaging.
Table 11 Modular Package Scripts
DescriptionScript Name
For every parameter, in the legacy toolkit user configuration file, there is an
attribute in the ADF. It also has an additional attribute TKIT_DIR which is
analogous to the package directory in the legacy method of packaging. The
ADF is used to generate the package ASCII template file.
Attribute Definition File (db2)
This script is called by the Master Control Script and acts as an interface
between the Master Control Script and the Toolkit interface script (toolkit.sh).
It is responsible for calling the Toolkit Configuration File Generator Script.
Module Script (tkit_module.sh)
This script is called by the Module Script when the package configuration is
applied using cmapplyconf command to generate the toolkit user
configuration file in the package directory (TKIT_DIR).
Toolkit Configuration File Generator
Script (tkit_gen.sh)
DB2 Package Configuration Example
Assuming DB2 is already installed.
1. To create a logical volume infrastructure on a shared disk, see Building an HA Cluster
Configuration chapter of Managing ServiceGuard manual available at http://www.hp.com/
go/hpux-serviceguard-docs —>HP Serviceguard . The disk must be exposed to all clustered
DB2 Package Configuration Example 77

nodes that will be configured to run this database instance. Since the volume group and file
system have to be uniquely named within the cluster, use the name of the database instance
in the name. Assuming, the name of the database instance is 'payroll_inst', follow the
instructions in the see Building an HA Cluster Configuration chapter of Managing ServiceGuard
manual available at http://www.hp.com/go/hpux-serviceguard-docs —>HP Serviceguard
to create the following:
/dev/vg0_payroll (the volume group)
/dev/vg0_payroll/lvol1 (the logical volume)
/dev/vg0_payroll/lvol1 (the filesystem) mounted at /mnt/payroll
2. Test the set up to ensure that DB2 can be properly brought up. Tert st DB2 to ensure that it
can be properly started by executing the script toolkit.sh.
For example,
cd /tmp/db2
cp /opt/cmcluster/toolkit/db2/* .
Edit the DB2 toolkit configuration file hadb2.conf
./toolkit.sh start
After waiting for a few minutes, check for the existence of DB2 processes (there should be
several, identified by "db2") ps -ef | grep db2. Bring the database down, unmount, and
deactivate the volume group.
./toolkit.sh stop
umount /mnt/payroll
vgchange -a n /dev/vg0_payroll
Repeat this step on all other clustered nodes to be configured to run the package to ensure
DB2 can be brought up and down successfully.
78 Using the DB2 database Toolkit in a Serviceguard Cluster in HP-UX

NOTE: Following section below describe the methods for creating Serviceguard package
using the modular and legacy method. For more information on creating Serviceguard package
using modular method, see white paper Modular package support in Serviceguard for Linux
and ECM Toolkits available at http://www.hp.com/go/hpux-serviceguard-docs —>HP
Serviceguard Enterprise Cluster Master Toolkit.
Creating Serviceguard package using Modular method.
DB2 Package Configuration Example 79

•Create the Serviceguard package using Modular method.
Follow these steps to create Serviceguard package using Modular method:
1. Create a directory for the package:
#mkdir /etc/cmcluster/pkg/db2_pkg/
2. Copy the toolkit template and script files from db2 directory:
#cd /etc/cmcluster/pkg/db2_pkg/
#cp /opt/cmcluster/toolkit/db2/* ./
3. Create a configuration file (pkg.conf) as follows:
#cmmakepkg -m ecmt/db2/db2 pkg.conf
4. Edit the package configuration file.
NOTE: DB2 toolkit configuration parameters in the package configuration file have
been prefixed by ecmt/db2/db2 when used in Serviceguard A.11.19.00. For example,
/etc/cmcluster/pkg/db2_pkg/pkg.conf
The configuration file should be edited as indicated by the comments in that file. The
package name needs to be unique within the cluster. For clarity, use the name of the
database instance to name the package. For example,
PACKAGE_NAME db2_payroll
List the names of the clustered nodes to be configured to run the package, using the
NODE_NAME parameter.
NODE_NAME node1
NODE_NAME node2
Set the script_log_file variable. For example,
script_log_file /etc/cmcluster/pkg/<pkg_dir>/log
Set the TKIT_DIR variable as the path of <package_directory>. For example,
TKIT_DIR /etc/cmcluster/pkg/pkg01
Set the INSTANCE_NAME variable as the DB2 instance name. For example,
INSTANCE_NAME db2_payroll_inst
Set the PARTITION_NUMBER variable to the partition numbers of the database which
need to be started, stopped and monitored using this package. By default it is set to 0.
Repeat the above variable to add additional partitions. For example,
PARTITION_NUMBER 0
PARTITION_NUMBER 1
NOTE: Logical partitions of a database can be grouped to run in a single package
while physical partitions need separate packages for each.
Set the MONITOR_PROCESSES variable to process names, which must be monitored and
cleaned up to ensure fail safe shutdown of the DB2 Instance or Partition. The actual
monitoring is done by a command called db2gcf. The MONITOR_PROCESSES is only
used to kill the processes that remain alive after the shutdown of the database. By default,
.db2sysc. is configured in this variable. Repeat the variable to additional processes if
required. For example,
MONITOR_PROCESSES db2sysc
Set the MAINTENANCE_FLAG variable to “yes” or “no”, to “enable” or “disable” the
maintenance mode feature for the package. For example,
MAINTENANCE_FLAG yes
80 Using the DB2 database Toolkit in a Serviceguard Cluster in HP-UX
Set the MONITOR_INTERVAL in seconds to specify how often the partition or instance is
monitored. For example,
MONITOR_INTERVAL 30
Set the TIME_OUT variable to the time that the toolkit must wait for completion of a normal
shut down, before initiating a forceful halt of the application. For example,
TIME_OUT 30
Set the monitored_subnet variables to the subnet that is monitored for the package.
Set the monitored_subnet_access variable to full if the subnet is available on all
nodes, else set it to partial.
monitored_subnet_access full
Set the variables for adding the package relocatable IP address. For example,
ip_subnet x.x.x.x
Set the ip_subnet_node to the node names where the subnet is valid. For example,
ip_subnet_node node1
ip_subnet_node node2
Set theip_address to a valid package IP. For example,
ip_address x.x.x.x
Create a separate vg variable for each volume group. For example,
vg vg_dd0
Create a separate fs_name,fs_directory,fs_type, and fs_mount_opt variables
for each database partition. For example,
fs_name /dev/vg_dd0/lvol1
fs_directory /dbpath/db2_payroll_inst/NODE0000
fs_type "ext3"
fs_mount_opt "-o rw"
fs_umount_opt ""
fs_fsck_opt ""
fs_name /dev/vg_dd0/lvol2
fs_directory /dbpath/db2_payroll_inst2/NODE0001
fs_type "ext3"
fs_mount_opt "-o rw"
fs_umount_opt ""
fs_fsck_opt ""
The example above defines the variable for two database partitions that is, partition 0
and partition 1, NODE0000 and NODE0001. The variables are named NODE0000
in accordance with DB2 directory structure.
DB2 Package Configuration Example 81
5. Use cmcheckconf command to check for the validity of the configuration specified. For
example,
#cmcheckconf -P pkg.conf
6. If the cmcheckconf command does not report any errors, use the cmapplyconf
command to add the package into Serviceguard environment. For example,
#cmapplyconf -P pkg.conf
Creating Serviceguard package using legacy method.
82 Using the DB2 database Toolkit in a Serviceguard Cluster in HP-UX

•Create the Serviceguard package using legacy method.
Follow these steps to create Serviceguard package using legacy method.
mkdir /etc/cmcluster/pkg/db2_pkg/
Copy the toolkit files from db2
cd /etc/cmcluster/pkg/db2_pkg/
cp /opt/cmcluster/toolkit/db2/* ./
Create a configuration file (pkg.conf) and package control script pkg.cntl) as follows:
cmmakepkg -p pkg.conf
cmmakepkg -s pkg.cntl
NOTE: There should be one set of configuration and control script files for each DB2 instance.
The Serviceguard package control script (pkg.cntl).
Below are some examples of modifications to the Serviceguard package control script you
need to make to customize to your environment.
◦VOLUME GROUPS
Define the volume groups that are used by the DB2 instance. File systems associated with
these volume groups are defined as follows:
VG[0]=/dev/vg0_payroll
For example:
VG[0]=/dev/vg0_payroll
Define the file systems which are used by the DB2 instance.
NOTE: One of these file systems must be the shared file system/logical volume containing
the DB2 home configuration information ($DB2_HOME). The name of the instance is
used to name the volume groups, logical volumes and file systems. For example,
LV[0]=/dev/vg0_payroll/lvol1
FS[0]=/mnt/payroll
The service name must be the same as defined in the package configuration file. Always
call the toolkit.sh script with "monitor" for the SERVICE_CMD definitions. For example,
SERVICE_NAME[0]=payroll_inst_service
SERVICE_CMD[0]="/etc/cmcluster/pkg/db2_pkg/tookit.sh monitor"
SERVICE_RESTART[0]="-r 3
Edit the customer_defined_run_cmds function to execute the toolkit.sh script with
the start option. For example,
function customer_defined_run_cmds
{
# Start the DB2 database.
/etc/cmcluster/pkg/db2_pkg/toolkit.sh start
test_return 51
}
Edit the customer_defined_halt_cmds function to execute the toolkit.sh script with
the stop option. For example,
function customer_defined_halt_cmds
{
DB2 Package Configuration Example 83
/etc/cmcluster/pkg/db2_pkg/toolkit.sh stop
test_return 52
}
The Serviceguard package configuration file (pkg.conf).
The package configuration file is created with cmmakepkg -p, and should be put in the
following location:
/etc/cmcluster/pkg/db2_pkg/
For example:
/etc/cmcluster/pkg/db2_pkg/pkg.conf
The configuration file should be edited as indicated by the comments in that file. The
package name needs to be unique within the cluster. For clarity, use the name of the
database instance to name the package.
PACKAGE_NAME db2_payroll
For example:
PACKAGE_NAME db2_payroll
List the names of the clustered nodes to be configured to run the package, using the
NODE_NAME parameter:
NODE_NAME node1
NODE_NAME node2
The service name must match the service name used in the package control script. The
service name can include the DB2 instance name (that is, $DB2_INSTANCE). In the
following example, since there is only one service for this package, the ${DB2_INSTANCE}
(that is,payroll_inst) is assigned to the SERVICE_NAME parameter. For example,
SERVICE_NAME payroll_inst_service
SERVICE_FAIL_FAST_ENABLED NO
SERVICE_HALT_TIMEOUT 300
The run and halt scripts are (typically) identified as the control script, as follows:
RUN_SCRIPT /etc/cmcluster/pkg/db2_pkg/pkg.cntl
HALT_SCRIPT /etc/cmcluster/pkg/db2_pkg/pkg.cntl
The DB2 Configuration file, in the package directory, modify the hadb2.conf
configuration file for this DB2 instance. Edit the hadb2.conf as indicated by the
comments in that script. For example,
INSTANCE_NAME=db2_payroll_inst
PARTITION_NUMBER[0]=0
PARTITION_NUMBER[1]=1
MONITOR_PROCESSES[0]=db2sysc
MONITOR_PROCESSES[1]=db2acd
MAINTENANCE_FLAG=YES
MONITOR_INTERVAL=30
TIME_OUT=30
After setting up the Serviceguard environment, each clustered DB2 instance should have
the following files in the related package directory. For example, the DB2 package,
located at /etc/cmcluster/pkg/db2_pkg, would contain the following files:
84 Using the DB2 database Toolkit in a Serviceguard Cluster in HP-UX

Table 12 DB2 Package Files
DescriptionFile Name
Serviceguard package control script for legacy packaging style.$PKG.cntl
Serviceguard package configuration file.$PKG.conf
Main shell script of the toolkit.hadb2.sh
Monitor the health of the application.hadb2.mon
Toolkit DB2 configuration file.hadb2.conf
Interface between pkg.cntl and hadb2.sh.toolkit.sh
Adding the Package to the Cluster
After the setup is complete, add the package to the SG cluster and start it up.
cmapplyconf -P pkg.conf
cmmodpkg -e -n <node1> —n <node2> db2_payroll
cmmodpkg —e db2_payroll
For more information, see Managing ServiceGuard manual available at http://www.hp.com/go/
hpux-serviceguard-docs —>HP Serviceguard .
Database Maintenance
Sometimes, when the DB2 database has to be taken down for maintenance purposes like changing
configuration, without having the instance to migrate to standby node. The following procedure
should be used:
NOTE: The example assumes that the package name is db2_payroll, package directory is/etc/
cmcluster/pkg/db2_pkg.
•Disable the failover of the package through the cmmodpkg command:
$ cmmodpkg -d db2_payroll
•Pause the monitor script.
Create an empty file /etc/cmcluster/pkg/db2_pkg/db2.debug, as shown below:
$ touch /etc/cmcluster/pkg/db2_pkg/db2.debug
The toolkit monitor script (database instances) that continuously monitosr DB2 partitions would
now stop monitoring these partitions.
The message, "DB2 toolkit pausing, monitoring, and entering maintenance mode", appears
in the Serviceguard Package Control script log in case of legacy packages and package
configuration log file in case of modular style of packaging.
•If required, stop the DB2 database instance as shown below:
$ cd /etc/cmcluster/pkg/db2_pkg/
$ $PWD/toolkit.sh stop
•Perform maintenance actions (For example, changing the configuration parameters in the
parameter file of the DB2 instance. If this file is changed, remember to distribute the new file
to all cluster nodes).
•Start the DB2 database instance again if you have stopped it:
Adding the Package to the Cluster 85

$ cd /etc/cmcluster/pkg/db2_pkg/
$ $PWD/toolkit.sh start
•Enable monitoring scripts to continue monitoring by removing db2.debug file:
$ rm -f /etc/cmcluster/pkg/db2_pkg/db2.debug
The message "Starting DB2 toolkit monitoring again after maintenance" appears in the
Serviceguard Package Control script log.
•Enable the package failover:
$ cmmodpkg -e db2_payroll
If the package fails during maintenance (for example, the node crashes) the package will not
automatically fail over to an adoptive node. It is the responsibility of the user to start the package
up on an adoptive node. For more information, see Managing ServiceGuard manual available at
http://www.hp.com/go/hpux-serviceguard-docs —>HP Serviceguard .
This feature is enabled only when the configuration variable MAINTENANCE_FLAG is set to "yes"
in the DB2 toolkit configuration file.
86 Using the DB2 database Toolkit in a Serviceguard Cluster in HP-UX

5 Using MySQL Toolkit in a HP Serviceguard Cluster
This chapter describes the MySQL Toolkit for use in the HP Serviceguard environment. The ideal
audience is of those who want to configure the MySQL Database Server application toolkit under
HP Serviceguard cluster environment using MySQL Toolkit. This toolkit supports the Enterpise MySQL
Database Server Application 5.0.56 and later.
It is assumed that readers are already familiar with the HP Serviceguard cluster configuration as
well as MySQL Database server concepts and their installation and configuration procedures.
NOTE: This toolkit supports:
•HP Serviceguard versions
◦A.11.19
◦A.11.20
•HP-UX 11i v2 and HP-UX 11i v3
At the time of publication, this version supports the above mentioned SG, application, and HP-UX
versions. More recent versions of these products may be certified with B.06.00. For the latest
information, see the compatibility matrix available at http://www.hp.com/go/
hpux-serviceguard-docs —>HP Serviceguard .
NOTE: This version of the toolkit supports both, legacy and modular style packages, but this
version of the toolkit is not supported with VxVM and CFS.
This toolkit consists of a set of shell scripts used by a Package Control Script to start, stop, and
monitor the MySQL Database Server. The toolkit works with the Serviceguard package control
script, managed by Serviceguard in case of legacy packages and Serviceguard master control
script in case of modular packages. Each MySQL Database server instance is configured in its
own Serviceguard package. This chapter assumes that users have used swinstall to properly install
both Serviceguard and the Enterprise Cluster Master Toolkit (ECMT), which includes the scripts for
MySQL.
For legacy packages, there will be one user configuration script (hamysql.conf) and three
functional scripts (toolkit.sh, hamysql.sh, hamysql.mon) which work with each other
to integrate MySQL with the Serviceguard package control scripts.
For modular packages, there is an Attribute Definition File (ADF), a Toolkit Module Script
(tkit_module.sh) and a Toolkit Configuration File Generator Script (tkit_gen.sh) which
work with the four scripts mentioned above for legacy packages to integrate MySQL with the
Serviceguard Master Control Script.
During ECMT installation, you can use the files listed in Table 13 (page 87). The following files
are located in: /opt/cmcluster/toolkit/mysql.
Table 13 Files in Legacy Packages in MySQL
DescriptionFile Name
The contents of the README file have been moved to this user guide.README
User defined variables for configuring MySQL in a specific environment.hamysql.conf
The main shell script.hamysql.sh
Script to monitor MySQL to ensure it is running.hamysql.mon
Interface between the Serviceguard package control script and hamysql.sh in case of legacy
packages and interface between the Serviceguard master control script and hamysql.sh in case
of modular packages.
toolkit.sh
87

The following three files are also installed and they are used only for the modular method of
packaging.
The following Attribute Definition File (ADF) is installed in /etc/cmcluster/modules/ecmt/
mysql.
Table 14 ADF File in Modular Package in MySQL
DescriptionFile Name
For every parameter in the legacy toolkit user configuration file, there is an attribute in the ADF. It also has
an additional attribute TKIT_DIR which is analogous to the package directory in the legacy method of
packaging. The ADF is used to generate a modular package ASCII template file.
mysql.1
For the alert mail notification feature, an additional parameter called ALERT_MAIL_ID is introduced
in the ADF. ALERT_MAIL_ID sends an e-mail message to the specified e-mail address when
packages fail. This e-mail is generated only when packages fail, and not when a package is halted
by the operator. To send this e-mail message to multiple recipients, a group e-mail ID must be
created and specified for this parameter. When an e-mail ID is not specified for this parameter,
the script does not send out this e-mail.
The following files are located in /etc/cmcluster/scripts/ecmt/mysql after installation:
Table 15 Script Files
DescriptionFile Name
This script is called by the Master Control Script and acts as an interface between the Master Control
Script and the Toolkit interface script (toolkit.sh). It is responsible for calling the Toolkit Configuration
File Generator Script .
tkit_module.sh
This script is called by the Module Script when the package configuration is applied using
cmapplyconf to generate the toolkit user configuration file in the package directory (TKIT_DIR).
tkit_gen.sh
The MySQL database server must be installed on all nodes that will run the MySQL Packages in
the HP Serviceguard Cluster. The node where this runs is termed as PRIMARY node. The other
nodes that are ready to take up the service in case of failure are termed as STANDBY nodes. The
MySQL Database Server application runs on the primary node servicing MySQL Database requests
from clients. In an event of a failure on the primary node, the package will fail over to the standby
node. This means that all necessary configuration information on all nodes must be identical and
the resources must be available to all supporting nodes. The data must be stored on shared disks
and these disks must be accessible by the same pathnames on each node.
MySQL database server supports multiple DB instances running on the same node. This toolkit
helps in creating multiple MySQL packages. Each package corresponds to a separate DB server
instance with its own database, toolkit files, and configuration.
MySQL Package Configuration Overview
The database server can be configured in two different ways:
•Local Configuration— by putting the configuration files on a single node, then replicating the
files to all other nodes in the cluster.
•Shared Configuration —by putting the configuration files in a shared filesystem.
Local Configuration
If you decide to store the configuration files on a local disk, the configuration must be replicated
to local disks on all nodes configured to run the package. If any change is made to the configuration,
the file must be copied to all nodes. As it is up to the user to ensure the systems remain synchronized,
the recommendation is to put all configuration and data files on shared storage.
Shared Configuration
88 Using MySQL Toolkit in a HP Serviceguard Cluster

This is the recommended configuration. Here, the configuration and database files are on shared
disks, visible to all nodes. Since the storage is shared, there is no additional work to ensure all
nodes have the same configuration at any point in time.
To run MySQL in a HP Serviceguard environment:
•Each node must have the same version of the MySQL Database Server software installed.
•Each node that will be configured to run the package must have access to the configuration
files. The most efficient way to ensure all nodes have access to the configuration files is to put
the configuration files on shared storage that is accessible to all nodes.
•Multiple databases configured in the same cluster will require unique configuration per
database. Each DB instance will require its own volume group, set of configuration files, and
copy of the toolkit customized for the unique instance.
•All data files must be accessible to all nodes configured to run the package. This means that
all data files will need to reside on shared storage that is accessible to all nodes.
•Each package is assigned an IP address called the relocatable (or package) IP address.
When the package fails over from one node to another, the following actions occur:
•Primary Node
The package is halted on the node where it is currently running. As a result, all (package)
resources are halted.
1.
2. The relocatable IP address is removed from this node.
3. File systems are unmounted and all volume groups assigned to this package are
deactivated.
•Standby Node
Volume groups are activated and file systems are mounted.1.
2. The relocatable IP address is moved over to the new node.
3. All resources are started up, and the database is brought up.
4. Clients will (continue to) connect through the same (relocatable) IP address.
Multiple Database Instances
MySQL database server supports multiple DB instances running on the same node. Using the toolkit,
multiple MySQL packages can be easily configured to run on the same node. One copy of the
toolkit can serve exactly one package. So, to configure multiple packages, you must create separate
directories, that is, one directory per package and configure each package to run a unique database
instance.
Setting Up The Database Server Application
Before creating the packages, you must configure the shared storage and create the database.
1. For the volume group (VG) and file system creation, see Building an HA Cluster Configuration
chapter of Managing ServiceGuard manual available at http://www.hp.com/go/
hpux-serviceguard-docs —>HP Serviceguard. Create a unique VG and filesystem on shared
storage for each instance of the DB to be included in the configuration.
2. On each node, create a mount point for each filesystem. The mount point for a specified
instance/package must be the same for all nodes.
The following example shows a configuration of MySQL for a filesystem named “/MySQL_1" on
/dev/vg01.
1. Assuming that LVM has been set up on the shared storage, create a filesystem (for example,
/MySQL_1) on the LV and mount point (for example,., /MySQL_1) on each of the nodes to
mount the filesystem. For more information in creating the VG and filesystem, see to Building
Setting Up The Database Server Application 89

an HA Cluster Configuration chapter of Managing ServiceGuard manual available at http://
www.hp.com/go/hpux-serviceguard-docs —>HP Serviceguard .
2. Following the instructions in the documentation for MySQL, create a database on the lvol in
/MySQL_1. This information may be viewed online at the following link http://
www.mysql.com/documentation/mysql/bychapter/manual_Tutorial.html#Creating_database.
3. Copy the configuration file /etc/my.cnf to /MySQL_1/my.cnf.
4. Modify /MySQL_1/my.cnf to configure the DB for your unique environment. Changes may
include specific assignments to the following parameters:
[mysqld]
* datadir=/MySQL_1/mysql
* socket=/MySQL_1/mysql/mysql.sock
* port=<UNIQUE PORT NUMBER>
mysqld_safe]
* err-log=/MySQL_1/mysql/mysqld.err
* pid-file=/etc/cmcluster/pkg/mysql1/mysqld.pid
Since each database instance resides in its own filesystem, multiple database instances can be
configured in the environment using this method.
Setting Up MySQL with the Toolkit
Toolkit Overview
The following files, in Table 16 (page 90), are included in the toolkit for MySQL:
Table 16 Files in MySQL toolkit
DescriptionFile Name
The contents of the README file have been moved to this user guide.README
Toolkit Interface Script. This script interfaces between the Package Control Script and the
toolkit main script (hamysql.sh).
toolkit.sh
Toolkit Configuration File. This file contains a list of pre-defined variables that may be changed
for your unique environment.
hamysql.conf
Toolkit Main Script. Contains the internal functions that support start/stop of a MySQL instance.hamysql.sh
Toolkit Monitor Script. Contains the internal functions for monitoring a DB server instance.hamysql.mon
The following scripts, in Table 17 (page 90) , are used only during the modular method of
packaging.
Table 17 Scripts used in Modular Method of Packaging
DescriptionFile Name
For every parameter in the legacy toolkit user configuration file, there is an attribute in the
ADF. It also has an additional attribute TKIT_DIR which is analogous to the package directory
in the legacy method of packaging. The ADF is used to generate a package ASCII template
file.
Attribute
Definition File
(mysql)
This script is called by the Master Control Script and acts as an interface between the Master
Control Script and the Toolkit interface script (toolkit.sh). It is also responsible for calling the
Toolkit Configuration File Generator Script (see description below).
Module Script
(tkit_module.sh)
Toolkit Configuration File. This file contains a list of pre-defined variables that may be changed
for your unique environment.
Toolkit
Configuration
File Generator
Script
(tkit_gen.sh)
90 Using MySQL Toolkit in a HP Serviceguard Cluster

MySQL Configuration File (my.cnf)
The following parameters are contained in the configuration file /etc/my.cnf. This file must be
copied to the file system on the shared storage (in our for example, /etc/my.cnf would be
copied to /MySQL_1/my.conf). Then parameters need to be manually set with unique values
for each DB instance configured.
Table 18 Parameters in MySQL Configuration File (my.cnf)
DescriptionFile/Directory name
[mysqld]
# Data Directory for MySQL DBdatadir=/MySQL_1/
mysql
# Socket file for Client
# Communication
socket=/MySQL_1/
mysql/mysql.sock
# Port Number for Client
# Communication
port=3310
[mysqld_safe]
# Safe-mysqld's
# Error Log file
err-log=/MySQL_1/
mysql/mysqld.
# pid file Pathpid-file=/etc/
cmcluster/pkg/
MySQL1/mysqld.pid
NOTE: mysqld_safe was previously known as safe_mysqld. For an older version of MySQL,
the user needs to modify suitable sections in the my.cnf file.
To run MySQL toolkit with the older versions of the MySQL follow the steps below:
1. Create a soft link named “mysqld_safe" in the MySQL, installation directory (typically /usr/
bin for RH to point to "safe_mysqld".
CMD> ln -s /usr/bin/mysqld_safe /usr/bin/safe_mysqld
2. Grant the execute permission to the newly created link:
CMD> chmod 755 mysqld_safe
The following sections in this chapter describe the legacy mode of Serviceguard packages. For
information on creating the Serviceguard package using the modular method, see the whitepaper
Modular package support in Serviceguard for Linux and ECM Toolkits available at http://
www.hp.com/go/hpux-serviceguard-docs —>HP Serviceguard Enterprise Cluster Master Toolkit.
Toolkit Configuration File (hamysql.conf)
All the toolkit user configuration variables are stored in a single file - hamysql.conf, in Shell script
format. User variables and sample values are included below, in Table 19 (page 92).
Setting Up MySQL with the Toolkit 91

Table 19 User Variables in hamysql.conf file
DescriptionFile name
Only one of the two variables (either CONFIGURATION_FILE_PATH
or DATA_DIRECTORY) should be defined. If both are defined,
CONFIGURATION_FILE_PATH is used and DATA_DIRECTORY is
ignored.
NOTE: If DATA_DIRECTORY is used, my.cnf MUST reside in the
DATA_DIRECTORY location. This directory is also used as the data
directory for this instance of the database server.
CONFIGURATION_FILE_PATH="/MySQL_1/mysql/my.cnf"
or DATA_DIRECTORY="/MySQL_1/mysql"
This is the path where PID file for the MySQL daemon is created for
the Parent PID. If this variable is defined, it overrides the "pid-file"
defined in the MySQL configuration file my.cnf. The PID identified
in this file is monitored by the toolkit monitor, "hamysql.mon".
PID_FILE="/var/run/mysql/mysqld.pid"
This variable will enable or disable maintenance mode for the MySQL
package. By default this is set to "yes". In order to disable this feature
MAINTENANCE_FLAG should be set to "no". When MySQL needs
to be maintained, the file <package directory>/mysql.debug
needs to be touched. During this maintenance period, the MySQL
process monitoring is paused. Even if the MySQL instance is brought
down the package will not be failed over to the adoptive node. To
continue monitoring and turn off maintenance mode, you should
remove the mysql.debugfile. The user should ensure that the
MySQL instance is running properly before exiting the maintenance
phase, since monitoring of the instance will resume once out of the
maintenance phase.
MAINTENANCE_FLAG (for example,
MAINTENANCE_FLAG="yes")
This variable is recommended to be set to "0". This will multiply the
SERVICE_RESTART of the MySQL package service (monitor).
For example, If the package service is set to SERVICE_RESTART = 2
& RETRY_TIMES=2 then actual retries = (SERVICE_RESTART + 1) *
RETRY_TIMES.
RETRY_TIMES=0
This is the interval at which hamysql.mon will monitor the process
with PID in the PID_FILE (mysqld parent process).
MONITOR_INTERVAL=5 # Seconds.
The time unit granularity is seconds. So, setting MONITOR_INTERVAL=5 means the parent process
is monitored every 5 seconds.
Package Configuration File and Control Script
The following steps identify the changes needed to the Serviceguard package configuration file
and control script templates to customize them for your specific configuration. This information was
extracted from the chapter entitled "Configuring Packages and Their Services" of the Managing
ServiceGuard manual available at http://www.hp.com/go/hpux-serviceguard-docs —>HP
Serviceguard manual. For detailed information on configuring and managing a package, please
refer to the "Managing Serviceguard" manual.
The following parameters are either in the configuration file or control script as identified below,
and must be manually edited for your unique environment. In the followingTable 20 (page 92),
values are assigned for a package named "mysql_1".
Table 20 Package Configuration File Parameters
DescriptionConfiguration file
Parameter Name [configuration
file parameters]
# Package Namemysql_1PACKAGE_NAME
# nodes that can run the packagenode1, node2NODE_NAME NODE_NAME
Script to start up the service<control script>RUN_SCRIPT
92 Using MySQL Toolkit in a HP Serviceguard Cluster

Table 20 Package Configuration File Parameters (continued)
DescriptionConfiguration file
Parameter Name [configuration
file parameters]
# Script to halt the service<control script>HALT_SCRIPT
# Service Name"mysql_monitor"SERVICE_NAME
Table 21 Package Control Script Parameters
DescriptionControl script
Parameter Name [control script
parameters]
# VG created for this packagevgMySQLVG
# Logical vol created in VT/dev/vgMySQL/lvol1LV
# File system for DB/MySQL_1FS
# FS type is "Extended 2""ext2"FS_TYPE
# mount with read/write options"-o rw"FS_MOUNT_OPT
# Package Subnet"192.70.183.0"SUBNET
# Relocatable IP"192.70.183.171"IP
#The service name must be the same as defined in the package.
#configuration file.
SERVICE_NAME="mysql1_monitor"
SERVICE_CMD="/etc/cmcluster/pkg/MYSQL1/toolkit.sh monitor"
SERVICE_RESTART="-r 0"
In addition to the variables, modify the following functions in the package control script:
Table 22 Functions in Package Control Script
Change
Functions in Package Control
Script
Replace the "empty" line (": #do nothing...") with /etc/cmcluster/pkg/MySQL1/
toolkit.sh start.
customer_defined_run_cmds
Replace the "empty" line (": #do nothing...") with /etc/cmcluster/pkg/MySQL1/
toolkit.sh stop.
customer_defined_halt_cmds
Replace the "empty" line (": #do nothing...") with /etc/cmcluster/pkg/MySQL1/
toolkit.sh stop.
customer_defined_halt_cmds
Assuming the cluster has already been configured, edit the cluster configuration file to update the
"MAX_CONFIGURED_PACKAGES" (for example, increase MAX_CONFIGURED_PACKAGES by
the number of packages you are adding to the cluster). After editing the configuration file apply
the change via the cmapplyconf -C <cluster_config_file> command.
Distribute the cluster configuration file to all the nodes of the cluster using rcp (this is optional but
recommended).
The cluster has been updated so that you can add packages. To actually bring the cluster up, issue
the command cmruncl, then cmviewcl to see the cluster up and running.
For more information on cluster configuration, management, and maintenance, see Managing
ServiceGuard manual available at http://www.hp.com/go/hpux-serviceguard-docs —>HP
Serviceguard manual.
Package Configuration File and Control Script 93

Creating Serviceguard package using Modular method.
Follow the steps below to create Serviceguard package using Modular method:
1. Create a directory for the package.
#mkdir /etc/cmcluster/pkg/mysql_pkg/
2. Copy the toolkit template and script files from mysql directory.
#cd /etc/cmcluster/pkg/mysql_pkg/
#cp /opt/cmcluster/toolkit/mysql/* ./
3. Create a configuration file (pkg.conf) as follows.
#cmmakepkg -m ecmt/mysql/mysql pkg.conf
4. Edit the package configuration file.
NOTE: Mysql toolkit configuration parameters in the package configuration file have been
prefixed by ecmt/mysql/mysql when used in Serviceguard A.11.19.00.
For Example:
/etc/cmcluster/pkg/mysql_pkg/pkg.conf
The configuration file should be edited as indicated by the comments in that file. The package
name needs to be unique within the cluster.
For Example:
PACKAGE_NAME mysql
NODE_NAME node1
NODE_NAME node2
Set the TKIT_DIR variable as the path of <package_directory>. For example, TKIT_DIR
/etc/cmcluster/pkg/pkg01.
5. Use cmcheckconf command to check for the validity of the configuration specified.
For Example:
#cmcheckconf -P pkg.conf
6. If the cmcheckconf command does not report any errors, use the cmapplyconf command
to add the package into Serviceguard environment.
For Example:
#cmapplyconf -P pkg.conf
Applying the Configuration and Running the Package
After the database is set upon the shared storage, configure the toolkit and package.
1. Create a directory in the cmcluster directory for each package (for example, /etc/
cmcluster/pkg/MySQL1).
2. Copy the toolkit files from /opt/cmcluster/toolkit/mysql to the package directory
(/etc/cmcluster/pkg/MySQL1), and change directory to the package directory.
3. Configure hamysql.conf for your unique configuration as described in the section entitled
“Toolkit Configuration File (hamysql.conf)” (page 91) of this document.
4. In the package directory, generate the package configuration and control templates with
cmmakepkg command.
For example:
cmmakepkg -p MySQL1.conf (configuration template)
For example:
94 Using MySQL Toolkit in a HP Serviceguard Cluster

cmmakepkg -s MySQL1.cntl (control template)
5. Using any editor modify the package templates with your specific information, as described
in the preceding section“Package Configuration File and Control Script” (page 92) of this
chapter.
6. Change the owner and group of the package directory to the "mysql" user.
For Example:
chown mysql:mysql /etc/cmcluster/pkg/MySQL1
7. Ensure both root and mysql users have read, write, and execute permissions for the package
directory.
8. Distribute the package directory to all nodes in the cluster.
9. Apply the Serviceguard package configuration using the command cmapplyconf -P
MySQL1.conf
10. Enable package switching for MySQL package using:
cmmodpkg -e -n node1 -n node2 mysql_1
cmmodpkg -e mysql_1
11. The package should now be running. If it is not, start the package by issuing the cmrunpkg
command.
cmrunpkg mysql_1
Repeat these procedures to create multiple MySQL instances running in the Serviceguard
environment.
Database Maintenance
There might be situations, when the MySQL database has to be taken down for maintenance
purposes like changing configuration, without having the instance to migrate to standby node. The
following procedure should be followed during maintenance:
NOTE: The example assumes that the package name is mysql_1, package directory is /etc/
cmcluster/pkg/MySQL1 and the MySQL DATADIR is configured as/MySQL_1/mysql.
•Disable the failover of the package through the cmmodpkg command.
$ cmmodpkg -d mysql_1
•Pause the monitor script.
Create an empty file /etc/cmcluster/pkg/MySQL1/mysql.debug as shown below:
$ touch /etc/cmcluster/pkg/MySQL1/mysql.debug
Toolkit monitor script which continuously monitors MySQL process, would now stop monitoring
this daemon process. A message "MySQL toolkit pausing monitoring and entering maintenance
mode" appears in the Serviceguard Package Control script log.
•If required, stop the MySQL database instance as shown below:
$ /etc/cmcluster/pkg/MySQL1/toolkit.sh stop
•Perform maintenance actions (For example, changing the configuration parameters in the
parameter file of the MySQL instance. If this file is changed, remember to distribute the new
file to all cluster nodes).
•Start the MySQL database instance again if you stopped it:
$ /etc/cmcluster/pkg/MySQL1/toolkit.sh start
•Allow monitoring scripts to continue normally as shown below:
$ rm -f /etc/cmcluster/pkg/MySQL1/mysql.debug
Database Maintenance 95

A message "Starting MySQL toolkit monitoring again after maintenance" appears in the
Serviceguard Package Control script log.
•Enable the package failover.
$ cmmodpkg -e mysql_1
NOTE: If the package fails during maintenance (for example, the node crashes), the package
will not automatically fail over to an adoptive node. It is the responsibility of the user to start
the package up on an adoptive node. Please refer to the manual Managing ServiceGuard
manual available at http://www.hp.com/go/hpux-serviceguard-docs —>HP Serviceguard
for more details.
This feature is enabled only when the configuration variable MAINTENANCE_FLAG is set to
"yes" in the MySQL toolkit configuration file.
Do's and Don't with MySQL Toolkit
Each of the Toolkits are designed with few assumptions that integrate with the respective application
and with HP Serviceguard. It is recommended to follow the below mentioned guidelines for setting
up the Package using MySQL Toolkit:
Do's
1. Name the package name, and the package configuration file name, Package control script
name in a consistent and self-explanatory protocol.
For example, PACKAGE NAME mysql1
Package configuration file mysql1.ascii
Package control script mysql1.cntl
2. Keep the package configuration file, package control file, and toolkit files in separate directories
for each of the packages.
3. Add <Package directory path> /toolkit.sh start | stop in the customer_defined_run_cmds |
customer_defined_halt_cmds functions respectively for the MySQL toolkit.
4. Ensure that the toolkit.sh, hamysql.sh, hamysql.mon and package control script
have execute permission.
Don'ts
Do not enable "HA_APP_SERVER" in package control script for each of the MySQL packages.
For example, #HA_APP_SERVER="pre-IP"
#HA_APP_SERVER="post-IP"
96 Using MySQL Toolkit in a HP Serviceguard Cluster

6 Using an Apache Toolkit in a HP Serviceguard Cluster
This chapter describes the toolkit that integrates and runs HP Apache in the HP Serviceguard
environment. This chapter is intended for users who want to install, configure, and execute the
Apache web server application in a Serviceguard clustered environment. It is assumed that users
of this document are familiar with Serviceguard and the Apache web server, including installation,
configuration, and execution.
NOTE: This toolkit supports:
•HP Serviceguard versions
◦A.11.19
◦A.11.20
•Apache version that is available with HP Web Server Suite(WSS) 2.X and 3.X and,
•HP-UX 11i v2 and HP-UX 11i v3
At the time of publication, this version supports the above mentioned SG, application, and HPUX
versions. More recent versions of these products may be certified with B.06.00. For the latest
information, see the compatibility matrix available at: http://www.hp.com/go/
hpux-serviceguard-docs —>HP Serviceguard
NOTE: This version of the toolkit supports both, legacy and modular style packages.
Unless otherwise stated, this toolkit supports all filesystems, storage and volume managers that
Serviceguard supports.
This toolkit includes support for the following:
•HP Serviceguard A.11.19 with VERITAS Cluster File System (CFS) 5.0 on HP-UX 11i v2, and
HP-UX 11i v3.
•HP Serviceguard A.11.19 with CFS 5.0.1 on HP-UX 11i v3.
•HP Serviceguard A.11.20 with CFS 5.1 SP1 on HP-UX 11i v3
To use CFS, install the appropriate version of HP Serviceguard Storage Management Suite. For
more details see the Serviceguard Release Notes at: http://www.hp.com/go/
hpux-serviceguard-docs ->Serviceguard and the Storage Management Suite Release Notes .
This toolkit consists of a set of shell scripts for configuring, starting, monitoring, and stopping the
Apache web server application. The toolkit works with the Serviceguard package control script,
managed by Serviceguard in case of legacy packages and Serviceguard master control script in
case of modular packages. Each Apache instance is configured in its own Serviceguard package.
This chapter assumes that users have used swinstall to properly install both Serviceguard and the
Enterprise Cluster Master Toolkit (referred to as the ECMT), which includes the scripts for Apache.
Table 23 (page 97) lists the files needed during installation, that are in/opt/cmcluster/
toolkit/apache.
Table 23 Files in Apache Toolkit
DescriptionFile Name
The content of this README has been moved to this user guide.README
User defined variables for customizing this toolkit for your environment.hahttp.conf
The main shell script.hahttp.sh
Script that monitors the health of the Server application.hahttp.mon
97

Table 23 Files in Apache Toolkit (continued)
DescriptionFile Name
Interface between the package control script and the Apache Toolkit main shell
script.
toolkit.sh
This generates the Alert mail based on package failureSGAlert.sh
The following three files, listed in Table 24 (page 98) are also installed and they are used only for
the modular method of packaging. The following Attribute Definition File (ADF) is installed in
/etc/cmcluster/modules/ecmt/apache.
Table 24 Files in Modular Method Packaging
DescriptionFile Name
This script is called by the Master Control Script and acts as an interface
between the Master Control Script and the Toolkit interface script (toolkit.sh).
It is responsible for calling the Toolkit Configuration File Generator Script
(described below).
tkit_module.sh
The tkit_gen.sh file is located in /etc/cmcluster/scripts/ecmt/
apache after installation.
This script is called by the Module Script when the package configuration is
applied using 'cmapplyconf' to generate the toolkit user configuration file in
the package directory (TKIT_DIR).
tkit_gen.sh
The apache.1 file is located in /etc/cmcluster/scripts/ecmt/apache
after installation.
For every parameter in the legacy toolkit user configuration file, there is an
attribute in the ADF. It also has an additional attribute TKIT_DIR which is
analogous to the package directory in the legacy method of packaging. The
ADF is used to generate a modular package ASCII template file.
apache.1
The HP-UX Web Server suite, which includes the Apache application, has to be installed on all
nodes that will be configured to run the package. A typical clustered configuration for an Apache
Web Server application is configuring one node as a primary node and the other nodes as standby
nodes. The application runs on the primary node accepting HTTP/HTTPS requests, sending responses
to the clients. In the event of a failure on the primary node, a standby node will take over the
application. This means that all necessary configuration information on each node must be identical
and the resources must be available to all supporting nodes. The dynamic web pages and shared
data must be stored on shared disks and these disks must be accessible to each node.
Apache Web Server supports multiple instances of the server daemons running on a node
simultaneously. Each Apache package corresponds to a separate Apache server instance with its
own SERVER_ROOT directory. SERVER_ROOT is a user configurable variable present in the toolkit
user configuration file hahttp.conf. Each instance may support one or more web sites, depending
on whether or not it has been configured to use "virtual hosts".
After Apache has been installed, the SERVER_ROOT directory defines an Apache server instance.
This directory will contain the appropriate configuration file directory named "conf" that specifies
how an Apache server instance is configured. The Apache configuration directives within this file
will determine locations of log files, web documents, and domain name address for a specific
Apache server instance.
98 Using an Apache Toolkit in a HP Serviceguard Cluster

NOTE: In an HP-UX 11.x environment, the Apache server is usually installed in the location
/opt/hpws22/apache and the configuration file httpd.conf resides in the "conf" sub-directory
under the "SERVER ROOT" directory.
Apache Package Configuration Overview
Apache starts up by reading the httpd.conf file from the "conf" sub-directory of the
SERVER_ROOT directory which is configured in the toolkit user configuration file hahttp.conf.
Configuration rules include the following:
•Each node must have the same version of the HP-UX based Apache Web Server.
•Each node must have the same SERVER_ROOT directory where identical copies of the
configuration file for each instance are placed.
•Each node must have the same document root directory where identical copies of the web
document for each instance are placed.
Apache Web Server can be configured in two different ways:
•(local config) by putting the configuration and other web-site files on a single node, then
replicating the files to all other nodes in the cluster
•(shared config) with document root files (and optionally, configuration file) in a shared file
system
Local Configuration
In a typical local configuration, nothing is shared between the nodes. Identical copies of the Apache
server configuration file and web documents reside in exactly the same locations on each node.
The user is responsible for maintaining identical copies of the apache components on the different
nodes. This is useful when the information on the web-page is static.
If the user chooses to do this, it is the user's responsibility to ensure the data is propagated to all
nodes, and is consistently maintained. A disadvantage of storing the configuration on local disks
is that this can increase the chance of the configuration for an Apache instance becoming
inconsistent if changes are made, but not distributed to all nodes that can run that Apache instance.
Shared Configuration
In a typical shared configuration, the document root directories are all on the shared file system.
(Placing the SERVER_ROOT directory in the shared file system is optional.) Since the web documents
(along with the apache configuration file) are on shared storage - accessible to all nodes in the
cluster - there is no need to maintain local identical copies of the files on each node. The mount
point of the shared file system should be identical across all the Apache package nodes. Hence
this is the recommended Apache package configuration.
Each web site is assigned IP addresses (or domain addresses that maps to particular IP addresses)
through the configuration file. These relocatable IP addresses are created for each Apache package
and added to its Package Control Script in case of legacy packages or the Package ASCII file in
case of modular packages. When the Apache package is switched over from one node to another,
this particular instance is stopped and IP addresses are removed on the primary node, then the IP
addresses are reallocated and the instance is started on the adoptive node. Clients will then be
automatically connected through these IP addresses to the web site on the adoptive node.
Multiple Apache Instances Configuration
Apache Web Server is a multi-instance application, which means more than one instance of the
Apache Web Server can run on a single node at the same time. For example, if two nodes are
each running an instance of Apache and one node fails, the Apache instance on the failed node
can be successfully failed over to the healthy node. In addition, the healthy node can continue to
Apache Package Configuration Overview 99

run its own instance as well. Multiple Apache instance configuration can either be done as a local
configuration or shared configuration or a combination of both.
Configuring the Apache Web Server with Serviceguard
To manage an Apache Web Server by Serviceguard, the default Apache configuration needs to
be modified. Before creating and configuring Serviceguard packages, make sure that the following
configurations have been completed for the Apache Web Server application for all cluster nodes:
When the Apache Server is installed, the default instance may be automatically configured to be
started during system startup via the runlevel (rc) script "hpws22_apacheconf" in the
/etc/rc.config.d/ directory by setting "HPWS22_APACHE_START=1". You should make sure this
is disabled by setting "HPWS22_APACHE_START=0".
The httpd.conf file associated with the default Apache instance has a Listen directive "Listen
80", which is equivalent to listening for all IP addresses at port 80. If an Apache instance needs
to be configured so that it listens to specific IP Addresses, this has to be changed to "Listen <IP
Address> <Port>”.
NOTE: The default configuration file is available at: /opt/hpws22/apache/conf/httpd.conf
You should disable the automatic start of the standard Apache default installation if Apache is run
from Serviceguard so that nothing is running on the server at the system startup time.
You must create a separate, distinct SERVER_ROOT directory for each Apache Serviceguard
package.
You must configure all Apache instances to listen to package re-locatable IP addresses using
BindAddress or Listen directives. (Refer to the Apache Web Server documentation for detailed
information on configuring virtual hosts.) For example, the configuration file for an Apache instance
that combines IP-based and name-based virtual hosts would include following directive:
Listen 192.168.0.1:80
Listen 192.168.0.2:80
NameVirtualHost 192.168.0.2:80
<VirtualHost web.site1.url:80>
ServerName web.site1.url
DocumentRoot /shared/httpd/www-site1
</VirtualHost>
<VirtualHost web.site2.url:80>
ServerName web.site2.url
DocumentRoot /shared/httpd/www-site2
</VirtualHost>
Local Configuration
For a local configuration, install and configure Apache in the same location on the primary and
all backup nodes and set up identical (or equivalent) configuration files in the same server root
directory on all nodes. Also, all document root directories must exist on all nodes and should
contain identical files.
For a shared configuration, typically configure document root directory on shared file system. Note
that one or more shared file systems may be used. Ensure that all required components which are
on shared storage will be available at the same time. (It is not mandatory to place the SERVER_ROOT
directory on a shared file system in order to make use of shared storage. Choose a local
SERVER_ROOT directory for configuration files and place only the document root directories on a
shared file system. However, configure identical SERVER_ROOT directories and identical
configuration files on all nodes.)
100 Using an Apache Toolkit in a HP Serviceguard Cluster

Shared Configuration
To configure a shared file system which is managed by LVM, create volume group(s) and logical
volume(s) on the shared disks and construct a new file system for each logical volume for the
Apache Web Server document root (and server root).
Static web data such as web pages with no data update features may reside on local disk. However,
all web data that needs to be shared must reside on shared storage. This data may contain dynamic
data generated and updated by a client's HTTP POST request.
The following is an example of configuring an Apache instance that uses shared storage for all
Apache instance data. The procedures below assume that all Apache instance files are configured
on a shared file system /shared/apache_1 directory, which resides on a logical volume "lvol1"
from a shared volume group "/dev/vg01":
1. Create a Volume Group "vg01" for a shared storage.
2. Create a Logical Volume "lvol1" on the volume group "vg01".
3. Construct a new file system on the Logical Volume "lvol1".
4. Create a directory named /shared/apache_1 on a local disk. Repeat this step on all nodes
configured to run the package.
5. Mount device /dev/vg01/lvol1 to the /shared/apache_1.
6. Copy all files from /opt/hpws22/apache/conf to /shared/apache_1/conf.
7. Create a directory "logs" under the /shared/apache_1/.
8. Create a symbolic link between /shared/apache_1/modules and /opt/hpws22/
apache/modules.
9. Update the Apache configuration files present in /shared/apache_1/conf directory and
change the Apache instance configurations to suit your requirement.
To configure a shared file system which is managed by VxVM, create disk group(s) and logical
volume(s) on the shared disks and construct a new file system for each logical volume for the
Apache Web Server document root (and server root).
The following is an example of configuring the above steps using VxVM:
1. Create a Disk Group "DG_00" on the shared storage.
2. Create Logical volume "LV_00" on the Disk Group "DG_00".
3. Construct a new file system on the Logical Volume "LV_00".
4. Create a directory named /shared/apache_1 on a local disk. Repeat this step on all nodes
configured to run the package.
5. Mount device "/dev/vx/dsk/DG_00/LV_00" on "/shared/apache_1"
Follow steps 6 to 9 described above.
Multiple Apache instances can be configured in the cluster using the same method. See Managing
ServiceGuard manual available at http://www.hp.com/go/hpux-serviceguard-docs —>HP
Serviceguard for more detailed instruction on creating volumes and logical volumes.
To configure an Apache Web Server package in a CFS environment, the SG CFS packages need
to be running in order for the Apache package to access CFS mounted file systems. See Managing
ServiceGuard manual available at http://www.hp.com/go/hpux-serviceguard-docs —>HP
Serviceguard for information on how to configure SG CFS packages. Create a directory
/shared/apache on all cluster nodes. Mount the CFS filesystem on /shared/apache to hold
necessary files and configuration information.
In a Veritas Cluster File System environment Apache Web Server can be configured in the following
two ways:
Active - Active
In an active-active configuration, multiple nodes can run an Apache instance concurrently serving
the same document root. To coordinate the startup and shutdown of Apache instances with cluster
Configuring the Apache Web Server with Serviceguard 101

node startup and shutdown, create a one-node package for each node that runs an Apache
instance.
Active - Passive
In an active-passive configuration, an instance of Apache Web Server can run on only one node
at any time. A package of this configuration is a typical failover package. The active - passive
support on CFS comes with a caution or limitation that, when an Apache instance is up on one
node, no attempts should be made to start the same instance of Apache on any another node.
NOTE: In both active-active and active-passive Apache configurations the Apache installation
on all nodes reside on the single shared CFS mount point. For complete details on how to setup
Apache Web server on CFS, please refer the Apache whitepaper on CFS or CVM support
referenced from the ECMT Release Notes of this version.
Under shared configuration, choose to put Apache binaries as well in shared file system. This can
be configured by 2 methods:
To create a shared configuration for the Apache Web Server on the shared file system mounted
at /mnt/apache:
Method #1
1. Create the shared storage that will be used to store the apache files for all nodes configured
to run the Apache package. Once that storage has been configured, create the mount point
for that shared storage on these nodes. For this example, the mount point is /mnt/apache.
2. Copy all files from /opt/hpws22/apache to /mnt/apache on any one node.
3. Remove or rename /opt/hpws22/apache on all nodes configured to run the apache
package.
4. Create a symbolic link between /opt/hpws22/apache and /mnt/apache on all nodes
configured to run the package.
Method #2
1. Create the shared storage that will be used to store the apache files for all nodes configured
to run the Apache package. Once that storage has been configured, create the mount point
for that shared storage on these nodes. For this example, the mount point is /mnt/apache.
2. On any one node in the cluster that is configured to run the package, activate the shared
storage and mount it at the mount point /mnt/apache. Copy the Apache files to the shared
storage using the altroot.sh utility:$ /opt/hpws22/util/altroot.sh --apache /mnt/apache
Besides moving the files in the /opt/hpws22/apache directory to the new directory
/mnt/apache, one additional apache file will need to be copied to all the other nodes in the
cluster that are configured to run the package. The next step explains which file needs to be
moved.
3. On the same node as above, copy the following file to the other nodes in the cluster that are
configured to run the package: /etc/rc.config.d/hpws22_apacheconf.
4. On the other nodes in the cluster remove or rename the /opt/hpws22/apache directory if
desired.
5. Now configure the hahttp.conf file as required for the Apache Server package on all
nodes in case of legacy packages and the Apache toolkit parameters in the package ASCII
file in case of modular packages.
102 Using an Apache Toolkit in a HP Serviceguard Cluster

NOTE: The following sections describe the method for creating the Serviceguard package using
the legacy method. For information on creating the Serviceguard package using the modular
method, see the white paper Modular package support in Serviceguard for Linux and ECM Toolkits
available at http://www.hp.com/go/hpux-serviceguard-docs —>HP Serviceguard Enterprise
Cluster Master Toolkit
Setting up the package
The following procedures include the steps to configure a Serviceguard package running the
Apache instance, which includes customizing the Serviceguard package configuration file and
package control script. (See Managing ServiceGuard manual available at http://www.hp.com/
go/hpux-serviceguard-docs —>HP Serviceguard " for more detailed instructions on cluster
configuration.
The procedures below assume that the user is configuring a Serviceguard Apache package named
"http_pkg1", consisting of one service named "http1_monitor". The Apache instance is listening
to a relocatable IP address "192.168.0.201" and all of its configuration and document files are
on a file system "/shared/apache_1" directory, which resides on a logical volume "lvol1" in a
shared volume group "/dev/vg01". Here, it is assumed that the user has already determined the
Serviceguard cluster configuration, including cluster name, node names, heartbeat IP addresses,
and so on. See the Managing ServiceGuard manual available at http://www.hp.com/go/
hpux-serviceguard-docs —>HP Serviceguard for more detail.
NOTE: To increase the number of packages that may be added to this cluster, modify the cluster
configuration file and set the variable MAX_CONFIGURED_PACKAGES to reflect the number of
packages to be added to the cluster. After the edit, apply the change to the cluster via
cmapplyconf -C cluster_config_file
Before working on the package configuration, create a directory (for example, /etc/cmcluster/
pkg/http_pkg1) for this package to run. This directory should belong to a single Apache package.
Copy all Apache toolkit scripts from the directory /opt/cmcluster/toolkit/apache to the
package directory.
For example:
$ mkdir /etc/cmcluster/pkg/http_pkg1
$ cd/etc/cmcluster/pkg/http_pkg1
$ cp/opt/cmcluster/toolkit/apache/*.
To create both the package configuration (http_pkg.conf) and package control
(http_pkg.cntl) files, cd to the package directory (example, cd /etc/cmcluster/pkg/http_pkg1).
1. Create a Serviceguard package control file with command cmmakepkg -s http_pkg.cntl.
The package control file must be edited as indicated by the comments in that file. The package
control file must be customized to your environment.
For Example:
PACKAGE_NAME http_pkg1
NODE_NAME node1
NODE_NAME node2
Setting up the package 103

NOTE: When configuring an Active - Active configuration the package configuration file
should hold the name of that single node only on which the instance will run. For example,
on node1, NODE_NAME parameter in the package configuration file would be edited as
NODE NAME node1 and in node2 as, NODE NAME node2
RUN_SCRIPT /etc/cmcluster/pkg/http_pkg1/http_pkg.cntl
RUN_SCRIPT /etc/cmcluster/pkg/http_pkg1/http_pkg.cntl
HALT_SCRIPT /etc/cmcluster/pkg/http_pkg1/http_pkg.cntl
SERVICE_NAME http1_monitor
If CFS mounted file system is used configure dependency of this Apache package on SG CFS
package. If the Apache package is configured to depend on a SG CFS package, the Apache
package will run as long as the dependee package is running. If the dependee package fails,
then the dependent Apache package will also fail.
To configure the dependency of the Apache package, set the following configurable parameters
in the package configuration file:
DEPENDENCY_NAME
http1_dependency
DEPENDENCY_CONDITION SG-CFS-MP-1 = up
DEPENDENCY_LOCATION SAME_NODE
2. Create a Serviceguard package control file with command cmmakepkg -s http_pkg.cntl.
The package control file must be edited as indicated by the comments in that file. The package
control file must be customized to your environment.
#The service name must be the same as defined in the package #configuration file.
For example:
LVM | VxVM
----- | ------
|
VG[0]="vg01" | VXVM_DG[0]="DG_00"
|
LV[0]="/dev/vg01/lvol1" | LV[0]="/dev/vx/dsk/DG_00/LV_00
FS[0]="/shared/apache1" | FS[0]="/shared/apache1"
FS_TYPE[0]="vxfs" | FS_TYPE[0]="vxfs"
FS_MOUNT_OPT[0]="-o rw" | FS_MOUNT_OPT[0]="-o rw"
IP[0]="192.168.1"
SUBNET[0]="192.168.0.0"
SERVICE_NAME="http1_monitor"
SERVICE_CMD="/etc/cmcluster/pkg/http_pkg1/toolkit.sh monitor"
SERVICE_RESTART="-r 0"
Edit the customer_defined_run_cmds function to execute the toolkit.sh script with the
start option. In the example below, the line /etc/cmcluster/pkg/http_pkg1/
toolkit.sh start was added, and the ":" null command line deleted.
Edit the customer_defined_halt_cmds function to execute the toolkit.sh script with the stop
option. In the example below, the line /etc/cmcluster/pkg/http_pkg1/toolkit.sh
stop was added, and the ":" null command line deleted.
For example:
function customer_defined_run_cmds
{
# Start the Apache Web Server.
104 Using an Apache Toolkit in a HP Serviceguard Cluster

/etc/cmcluster/pkg/http_pkg1/toolkit.sh start
test_return 51
}
For example:
function customer_defined_halt_cmds
{
# Stop the Apache Web Server.
/etc/cmcluster/pkg/http_pkg1/toolkit.sh stop
test_return 51
}
NOTE: If CFS mounted file systems are used then volume groups, logical volumes and file
systems must not be configured in the package control script but dependency on SG CFS
packages must be configured.
3. Configure the Apache user configuration file hahttp.conf as explained in the next section.
4. Copy this package configuration directory to all other package nodes.
Use the same procedure to create multiple Apache packages (multiple Apache instances) that will
be running on the cluster.
Setting up The Toolkit
Toolkit Overview
After installing the toolkit, four scripts and one README file will be installed in the location /opt/
cmcluster/toolkit/apache. Two more scripts and one file will be installed which will be
used only for modular packages. The two scripts will be in the /etc/cmcluster/scripts/
ecmt/apache directory. The third file will be in the /etc/cmcluster/modules/ecmt/apache
directory.
For legacy packages, one user configuration script (hahttp.conf) and three functional scripts
(toolkit.sh, hahttp.sh and hahttp.mon) will work together to integrate Apache web server with the
Serviceguard package control script.
Table 25 (page 105) lists the scripts used in legacy packages are:
Table 25 Scripts in Legacy Packages
DescriptionScript Name
This script contains a list of pre-defined variables that may be customized
for the user's environment. This script provides the user a simple format of
the user configuration data. This file will be included (that is, sourced) by
the toolkit main script hahttp.sh.
User Configuration file (hahttp.conf)
This script contains a list of internal-use variables and functions that support
the start and stop of an Apache instance. This script will be called by the
Toolkit Interface Script to do the following:
•On package start, it starts the Apache server instance.
•On package stop, it stops the Apache server instance.
Main Script (hahttp.sh)
Monitoring functionality will be initiated by calling the toolkit with the
"monitor" parameter as "toolkit.sh monitor".
Monitor Script (hahttp.mon)
This script is an interface between the Serviceguard package control script
and the toolkit main script (hahttp.sh).
Interface Script (toolkit.sh)
Setting up The Toolkit 105

Toolkit User Configuration
All the user configuration variables are kept in a single file hahttp.conf in shell script format.
The variable names and their sample values are listed in Table 26 (page 106):
Table 26 Configuration Variables
DescriptionConfiguration Variables
This is the base directory where HP Apache web server is installed. By
default HP Apache is installed in the directory /opt/hpws22/apache
and hence this is also the default value.
HP_APACHE_HOME (for example,
HP_APACHE_HOME="/opt/hpws22/apache")
This variable holds the root directory of an Apache server instance. Each
Apache instance must have its own root directory that contains its own
server configuration file (httpd.conf). The Apache's system default
server root directory is /opt/hpws22/apache. However, to have
multiple instances running in a cluster, set a value for this variable.
SERVER_ROOT (for example,
SERVER_ROOT="/opt/hpws22/apache")
This variable holds the Process ID file path of the Apache server instance.
Each Apache instance must have its own PID file that keeps the main
process ID of the running Apache server instance. If this variable is not
set then the PID file is assumed to be <package_directory>/httpd.pid.
PID_FILE (for example,
PID_FILE="/var/run/httpd_s1.pid")
When this variable is set to "yes" the Apache web server runs in secured
mode where the Apache web server can listen to HTTPS requests
otherwise. When set to "no" Apache web server is started in non secure
mode and Apache can only listen to HTTP requests.
SSL (for example: SSL="no")
This variable will enable or disable maintenance mode for the Apache
package. By default this is set to "yes”. In order to disable this feature
MAINTENANCE_FLAG should be set to "no". When Apache needs to
be maintained the file "<package directory apache.debug" needs to
be touched. During this maintenance period apache process monitoring
is paused. Even if the apache instance is brought down the package
will not be failed over to the adoptive node. To continue monitoring and
turn off maintenance mode, remove the apache.debug file. It is the
user's responsibility to ensure that the Apache instance is running
properly after the maintenance phase.
NOTE: Setting MAINTENANCE_FLAG to "yes" and touching the
apache.debug file in the package directory will put the package in
toolkit maintenance mode. Serviceguard A.11.19 release has a new
feature which allows individual components of the package to be
maintained while the package is still up. This feature is called Package
Maintenance mode and is available only for modular packages. For
more information using Package Maintenance mode, see theModular
package support in Serviceguard for Linux and ECM Toolkits available
at http://www.hp.com/go/hpux-serviceguard-docs —>HP Serviceguard
Enterprise Cluster Master Toolkit
MAINTENANCE_FLAG (for example,
MAINTENANCE_FLAG ="yes")
This is the tomcat server listening port. This should be same as the port
configured in the Tomcat configuration file $CATALINA_BASE/conf/
server.xml. The toolkit checks the existence of the Tomcat process
by periodically checking whether this port is listening. If multiple instances
of tomcat are configured, this port needs be unique for each instance.
The default value is 8081.
MONITOR_INTERVAL (for example,
MONITOR_INTERVAL=5)
This variable holds a time interval (in seconds) for monitoring the Apache
instance. That is, the monitor process checks the running of httpd
daemons every 'interval' seconds. If not defined, its default value will
be 5 seconds.
MONITOR_INTERVAL (for example,
MONITOR_INTERVAL=5)
This variable holds the number of times to attempt to check the 'httpd'
daemon processes before giving up and exiting to fail state. If not
defined, its default value will be 2.
RETRY_TIMES (for example,
RETRY_TIMES=2)
For the alert mail notification feature, an additional parameter called ALERT_MAIL_ID is introduced
in the ADF. ALERT_MAIL ID sends an e-mail message to the specified e-mail address when
106 Using an Apache Toolkit in a HP Serviceguard Cluster

packages fail. This e-mail is generated only when packages fail, and not when a package is halted
by the operator. To send this e-mail message to multiple recipients, a groupe-maill ID must be
created and specified for this parameter. When e-mail ID is not specified for this parameter, the
script does not send out this e-mail.
The following information provides the steps for configuring the toolkit and running the package.
This includes configuring the Apache toolkit user configuration file.
NOTE: Before working on the toolkit configuration, the package directory (for example, /etc/
cmcluster/pkg/http_pkg1) must be created and all toolkit scripts copied to the package
directory.
1. Edit the Apache Toolkit user configuration file.
In the package directory, edit the user configuration file ( hahttp.conf) as indicated by the
comments in that file.
For example:
SERVER_ROOT="/shared/apache1/httpd"
PID_FILE="/var/run/httpd1.pid"
SSL="yes"
MAINTENANCE_FLAG="yes"
2. Copy the entire package directory at the same path on all nodes configured for the package.
For this example, each package node must have the following files in the package directory:
http_pkg.conf #Package configuration file
http_pkg.cntl #Package control file
hahttp.conf #Apache toolkit user configuration file
hahttp.mon #Apache toolkit monitor program
hahttp.sh #Apache toolkit main script
toolkit.sh #Interface file between the package
#control file and the toolkit
3. Apply the Serviceguard package configuration using the command cmapplyconf -P
http_pkg.conf.
Use the same procedures to create multiple Apache instances for Serviceguard packages that
will be running on the cluster.
Creating Serviceguard package using Modular method.
Follow the steps below to create Serviceguard package using Modular method:
1. Create a directory for the package.
#mkdir /etc/cmcluster/pkg/apache_pkg/
2. Copy the toolkit template and script files from apache directory.
#cd /etc/cmcluster/pkg/apache_pkg/
#cp /opt/cmcluster/toolkit/apache/* ./
3. Create a configuration file (pkg.conf) as follows.
#cmmakepkg -m ecmt/apache/apache pkg.conf
4. Edit the package configuration file.
NOTE: Apache toolkit configuration parameters in the package configuration file have been
prefixed by ecmt/apache/apache when used in Serviceguard A.11.19.00 or later.
For Example:
/etc/cmcluster/pkg/apache_pkg/pkg.conf
Creating Serviceguard package using Modular method. 107

The configuration file should be edited as indicated by the comments in that file. The package
name needs to be unique within the cluster.
For Example:
PACKAGE_NAME apache
NODE_NAME node1
NODE_NAME node2
Set the TKIT_DIR variable as the path of <package_directory>. For example, TKIT_DIR
/etc/cmcluster/pkg/apache_pkg.
5. Use cmcheckconf command to check for the validity of the configuration specified.
For Example:
#cmcheckconf -P pkg.conf
6. If the cmcheckconf command does not report any errors, use the cmapplyconf command
to add the package into Serviceguard environment.
For Example:
#cmapplyconf -P pkg.conf
Error Handling
On startup, the Apache server application will check for the existence of the httpd.conf file in
the directory <SERVER ROOT>/conf/httpd.conf. If the configuration file does not exist in this
location or Apache does not start for some other reason the action by the Apache toolkit script is
to halt the package on that node and try it on another node. In order to troubleshoot why Apache
has not been started correctly one has to look at the Apache error log files. The Apache log files
can be located by the value set for the ErrorLog directive in the Apache instance configuration file
httpd.conf. Usually this value is <SERVER ROOT>/logs/error_log.
Apache Web Server Maintenance
There might be situations, when the Apache Web Server has to be taken down for maintenance
purposes like changing the configuration, without having the instance to migrate to another node.
This procedure should be followed:
NOTE: The example assumes that the package name is http_pkg1, package directory is /etc/
cmcluster/pkg/http_pkg1 and the Apache SERVER ROOT is configured as /shared/
apache1/httpd.
•Disable the failover of the package through cmmodpkg command cmmodpkg -d http_pkg1
•Pause the monitor script. Create an empty file, /etc/cmcluster/pkg/http_pkg1/
apache.debug, as shown below:
touch/etc/cmcluster/pkg/http_pkg1/apache.debug.
The toolkit monitor script which continuously monitored the Apache daemons, would now stop
monitoring these daemons. A message "Apache toolkit pausing monitoring and entering
maintenance mode" is logged in the package control script log.
◦If required, stop the apache application as shown below:
cd /etc/cmcluster/pkg/http_pkg1/ $PWD/toolkit.sh stop
◦Perform maintenance actions (for example, changing the configuration of the Apache
instance, or making changes to the toolkit configuration file, hahttp.conf for starting
up Apache web server application in secured mode. If this file is changed, remember to
distribute the new file to all cluster nodes).
108 Using an Apache Toolkit in a HP Serviceguard Cluster

◦Start the apache instance again if stopped, cd /etc/cmcluster/pkg/http_pkg1/
$PWD/toolkit.sh start
◦Allow monitoring scripts to continue normally as shown below:
rm -f /etc/cmcluster/pkg/http_pkg1/apache.debug
A message "Starting Apache toolkit monitoring again after maintenance" appears in the
Serviceguard Package Control script log.
◦Enable the package failover
cmmodpkg -e http_pkg1
NOTE: If the package fails during maintenance (for example, the node crashes), it will not
automatically fail over to an adoptive node. It is the responsibility of the user to start the package
up on an adoptive node. See Managing ServiceGuard manual available at http://www.hp.com/
go/hpux-serviceguard-docs —>HP Serviceguard for more details
This feature is enabled only when the configuration variable, MAINTENANCE_FLAG, is set to "yes"
in the apache toolkit configuration file: /etc/cmcluster/pkg/http_pkg1/hahttp.conf
Apache Web Server Maintenance 109

7 Using Tomcat Toolkit in a HP Serviceguard Cluster
This chapter describes the toolkit that integrates and runs HP Tomcat in the HP Serviceguard
environment. It is intended for users who want to install, configure, and execute the Tomcat servlet
engine application in a Serviceguard clustered environment. It is assumed that users of this document
are familiar with Serviceguard and the Tomcat Servlet engine, including installation, configuration,
and execution.
This toolkit supports:
HP Serviceguard versions:
•A.11.19
•A.11.20
Tomcat version that is available with HP Web Server Suite (WSS)
•2.X and 3.X
HP-UX 11i v2 and HP-UX 11i v3
At time of publication, this version supports the above mentioned SG, application and HPUX
versions. More recent versions of these products may be certified with B.06.00. For the latest
information, see the compatibility matrix available at: http://www.hp.com/go/
hpux-serviceguard-docs —>HP Serviceguard .
NOTE: This version of the toolkit supports both, legacy and modular style packages.
NOTE: Unless otherwise stated, this toolkit supports all filesystems, storage and volume managers
that Serviceguard supports other than CFS.
This toolkit consists of a set of shell scripts for configuring, starting, monitoring, and stopping the
Tomcat Servlet engine application. The toolkit works with the Serviceguard package control script,
managed by Serviceguard in case of legacy packages or the Serviceguard master control script
in case of modular packages. Each Tomcat instance is configured in its own Serviceguard package.
This chapter assumes that users have used swinstall to properly install both Serviceguard and the
Enterprise Cluster Master Toolkit (referred to as the ECMT), which includes the scripts for Tomcat.
During installation, you can use these files, listed in Table 27 (page 110). They are located in:
/opt/cmcluster/toolkit/tomcat
Table 27 Files in Tomcat Toolkit
DescriptionFile Name
User defined variables for customizing this toolkit for your environment.hatomcat.conf
The script that monitors the health of the Server application.hatomcat.mon
The interface between the package control script and the Tomcat Toolkit main
shell script.
toolkit.sh
This script generates Alert mails in case of package failure.SGAlert.sh
The following three files in Table 28 (page 111) and Table 29 (page 111) are also installed and
they are used only for the modular method of packaging.
The following Attribute Definition File (ADF) is installed in /etc/cmcluster/modules/ecmt/
tomcat.
110 Using Tomcat Toolkit in a HP Serviceguard Cluster

Table 28 ADF File for Modular Method of Packaging
DescriptionFile Name
For every parameter in the legacy toolkit user configuration file, there is an
attribute in the ADF. It also has an additional attribute TKIT_DIR which is
analogous to the package directory in the legacy method of packaging. The
ADF is used to generate a modular package ASCII template file.
tomcat.1
The following files are located in /etc/cmcluster/scripts/ecmt/tomcat after installation.
Table 29 Files For Modular Method of Packaging
DescriptionFile Name
This script is called by the Master Control Script and acts as an interface
between the Master Control Script and the Toolkit interface script (toolkit.sh).
It is responsible for calling the Toolkit Configuration File Generator Script
(described below).
tkit_module.sh
This script is called by the Module Script when the package configuration is
applied using cmapplyconf to generate the toolkit user configuration file in
the package directory (TKIT_DIR).
tkit_gen.sh
The HP-UX Web Server suite, which includes the Tomcat application, has to be installed on all
nodes that will be configured to run the package. A typical clustered configuration for a Tomcat
Servlet engine application is configuring one node as a primary node and the other nodes as
standby nodes. The application runs on the primary node accepting client requests and sending
responses to the clients. In the event of a failure on the primary node, a standby node will take
over the application. This means that all necessary configuration information on each node must
be identical and the resources must be available to all supporting nodes. The dynamic web pages
and shared data must be stored on shared disks and these disks must be accessible to each node.
The Tomcat Servlet engine supports multiple instances of the server daemons running on a node
simultaneously. Each Tomcat package corresponds to a separate Tomcat server instance with its
own CATALINA_BASE directory. CATALINA_BASE is a user configurable variable present in the
toolkit user configuration file hatomcat.conf. After Tomcat has been installed, the
CATALINA_BASE directory defines a Tomcat server instance. This directory will contain the
appropriate configuration files directory named "conf" that specifies how a Tomcat server instance
is configured. The Tomcat configuration directives, within this file, will determine locations of log
files, web documents, and the domain name address for a specific Tomcat server instance.
Tomcat will calculate all relative references for files in the following directories based on the value
for CATALINA_BASE instead of CATALINA_HOME:
•conf - Server configuration files (including server.xml).
•logs - Log and output files.
•webapps - Automatically loaded web applications.
•work - Temporary working directories for web applications.
•temp - Directory used by the JVM for temporary files (java.io.tmpdir)
If you do not set CATALINA_BASE to an explicit value, it will be initialized to the same value as
is set for CATALINA_HOME (which means that the same directory is used for all relative path
resolutions).
111

NOTE: In an HP-UX 11.x environment, the Tomcat server is usually installed in the location /opt/
hpws22/tomcat and the default configuration file server.xml resides in the conf sub-directory
under this directory. If HP-UX WSS 2.X is installed, then the Tomcat server will be installed in the
location /opt/hpws/tomcat.
Tomcat Package Configuration Overview
Tomcat starts up by reading the server.xml file from the conf sub-directory of the
CATALINA_BASE directory which is configured in the toolkit user configuration file
hatomcat.conf.
The configuration rules include the following:
•Each node must have the same version of the HP-UX based Tomcat Servlet Engine.
•Each node must have the same CATALINA_BASE directory where identical copies of the
configuration file for each instance are placed.
•Each node must have the same document root directory where identical copies of the web
document for each instance are placed.
Tomcat servlet engine can be configured in two different ways:
•Local Config: Putting the configuration and other web-site files on a single node, and then
replicating the files to all other nodes in the cluster
•Shared config: with configuration files and document root files in a shared file system
NOTE: Under a shared configuration, you can choose to put tomcat binaries as well in a shared
file system. The steps to configure this is covered in this document later.
Local Configuration
In a typical local configuration, nothing is shared between the nodes. Identical copies of the Tomcat
server configuration file and web documents reside in exactly the same locations on each node.
The user is responsible for maintaining identical copies of the tomcat components on the different
nodes. This is useful when the information on the web-page is static.
If the user chooses to use this configuration, it is the user's responsibility to ensure the data is
propagated to all nodes, and is consistently maintained. A disadvantage of storing the configuration
on local disks is that this can increase the chance of the configuration for a Tomcat instance
becoming inconsistent if changes are made, but not distributed to all nodes that can run that Tomcat
instance.
Shared Configuration
In a typical shared configuration, the web application directories are all on the shared file system.
(Placing the CATALINA_BASE directory in the shared file system is optional.) Since the web
applications (along with the tomcat configuration directory) are on shared storage - accessible to
all nodes in the cluster - there is no need to maintain local identical copies of the files on each
node. The mount point of the shared file system should be identical across all the tomcat package
nodes. Hence this is the recommended Tomcat package configuration.
Each web site is assigned IP addresses (or domain addresses that maps to particular IP addresses)
through the configuration file. These relocatable IP addresses are created for each Tomcat package.
They are added to the Package Control Script in case of legacy packages or the Package ASCII
file in case of modular packages. When the Tomcat package is switched over from one node to
another, this particular instance is stopped and IP addresses are removed on the primary node,
then the IP addresses are reallocated and the instance is started on the adoptive node. Clients will
then be automatically connected through these IP addresses to the web site on the adoptive node.
112 Using Tomcat Toolkit in a HP Serviceguard Cluster

Multiple Tomcat Instances Configuration
Tomcat servlet engine is a multi-instance application. More than one instance of the Tomcat can
run on a single node simultaneously. For example, if two nodes are each running an instance of
Tomcat and one node fails, the Tomcat instance on the failed node can be successfully failed over
to the healthy node. In addition, the healthy node can continue to run its own instance as well.
Multiple Tomcat instance configuration can either be done as a local configuration or shared
configuration or a combination of both. CATALINA_BASE needs to be unique for each Tomcat
instance.
Configuring the Tomcat server with Serviceguard
To manage a Tomcat Server with Serviceguard, the default Tomcat configuration needs to be
modified. Before creating and configuring Serviceguard packages, make sure that the following
configurations have been completed for the Tomcat Server application for all cluster nodes:
When the Tomcat Server is installed, the default instance may be automatically configured to be
started during system startup via the runlevel (rc) script "hpws22_tomcatconf" in the /etc/rc.config.d/
directory by setting "HPWS22_TOMCAT_START=1". Make sure this is disabled by setting
"HPWS22_TOMCAT_START=0".
The connector component to be used is defined as an element in the Tomcat server configuration
file server.xml. The connector component has a port attribute that needs to be unique for each
Tomcat instance.
NOTE: The default server configuration file is available at /opt/hpws22/tomcat/conf/
server.xml. If WSS 2.x is installed it will be installed at /opt/hpws22/tomcat/conf/
server.xml.
The default installation for Tomcat is set to automatic start, when configuring Tomcat with
Serviceguard this should be disabled.
Create a separate, distinct CATALINA_BASE directory for each Tomcat Serviceguard package.
Configure all Tomcat instances to listen to package relocatable IP addresses. (Refer to the Tomcat
Server documentation for detailed information on configuring virtual hosts.)
For a local configuration, install and configure the Tomcat in the same location on the primary and
all backup nodes and set up identical (or equivalent) configuration files in the same server root
directory on all nodes. Also, all web application directories must exist on all nodes and should
contain identical files.
Shared Configuration
For a shared configuration, typically configure web application directories on a shared file system.
Note that one or more shared file systems may be used. Ensure all required components that are
on shared storage will be available at the same time. (It is not mandatory to place the
CATALINA_BASE directory on a shared file system in order to make use of shared storage. Choose
a local CATALINA_BASE directory for configuration files and place only the web application
directories on a shared file system. However, configure identical CATALINA_BASE directories and
identical configuration files on all nodes.)
1. Using LVM
To configure a shared file system which is managed by LVM, create volume group(s) and
logical volume(s) on the shared disks and construct a new file system for each logical volume
for the Tomcat Server web applications (and CATALINA_BASE).
Static web data such as web pages with no data update features, may reside on a local disk.
However, all web data that needs to be shared must reside on shared storage. This data may
contain dynamic data generated and updated by a client's HTTP POST request.
Multiple Tomcat Instances Configuration 113

The following is an example of configuring a Tomcat instance that uses shared storage for all
Tomcat instance data.
NOTE: The procedures below assume that configuring all Tomcat instance files on a shared
file system "/shared/tomcat_1" directory, that resides on a logical volume "lvol1" from a
shared volume group "/dev/vg01":
a. Create a Volume Group "vg01" for a shared storage.
b. Create a Logical Volume "lvol1" on the volume group "vg01".
c. Construct a new file system on the Logical Volume "lvol1".
d. Create a directory named “/shared/tomcat_1” on a local disk. Repeat this step on all
nodes configured to run the package.
e. Mount device "/dev/vg01/lvol1" to the "/shared/tomcat_1".
f. Copy all files from "/opt/hpws22/tomcat/conf" to "/shared/tomcat_1/conf"
g. Create a directory "logs" under the "/shared/tomcat_1/".
h. Update the Tomcat configuration files present in "/shared/tomcat_1/conf" directory and
change the Tomcat instance configurations to suit your requirement.
2. Using VxVM
To configure a shared file system which is managed by VxVM, create disk group(s) and logical
volume(s) on the shared disks and construct a new file system for each logical volume for the
Tomcat Web applications (and CATALINA_BASE).
The following is an example of configuring the above steps using VxVM:
a. Create a Disk Group "DG_00" on the shared storage.
b. Create Logical volume "LV_00" on the Disk Group "DG_00".
c. Construct a new file system on the Logical Volume "LV_00".
d. Create a directory "/shared/tomcat_1" on a local disk. Repeat this step on all nodes
configured to run the package.
e. Mount device "/dev/vx/dsk/DG_00/LV_00" on "/shared/tomcat_1".
Configure multiple Tomcat instances in the cluster using the same method. See Managing
ServiceGuard manual available at http://www.hp.com/go/hpux-serviceguard-docs —>HP
Serviceguard " for more detailed instruction on creating volumes and logical volumes.
114 Using Tomcat Toolkit in a HP Serviceguard Cluster

NOTE: As mentioned before, under shared configuration, you can choose to put the Tomcat
binaries as well in a shared file system. This can be configured by 2 methods:
To create a shared configuration for the Tomcat Server on the shared file system mounted at
/mnt/tomcat:
a. Method 1
1) Create the shared storage that will be used to store the Tomcat files for all nodes
configured to run the Tomcat package. Once that storage has been configured,
create the mount point for that shared storage on these nodes. For this example, the
mount point is "/mnt/tomcat".
2) Copy all files from /opt/hpws22/tomcat to /mnt/tomcat on any one node.
3) Remove or rename /opt/hpws22/tomcat on all nodes configured to run the
Tomcat package.
4) Create a symbolic link between /opt/hpws22/tomcat and /mnt/tomcat on all
nodes configured to run the package.
b. Method 2
1) Create the shared storage that will be used to store the Tomcat files for all nodes
configured to run the Tomcat package. Once that storage has been configured,
create the mount point for that shared storage on these nodes. For this example, the
mount point is "/mnt/tomcat".
2) On any one node in the cluster that is configured to run the package, activate the
shared storage and mount it at the mount point "/mnt/tomcat". Copy the Tomcat
files to the shared storage using the altroot.sh utility: $ /opt/hpws22/util/
altroot.sh --tomcat /mnt/tomcat
Besides moving the files in the /opt/hpws22/tomcat directory to the new directory
/mnt/tomcat, one additional Tomcat file will need to be copied to all the other nodes
in the cluster that are configured to run the package. Step 3 explains which file needs
to be moved.
3) On the same node as above, copy the following file to the other nodes in the cluster
that are configured to run the package:/etc/rc.config.d/hpws22_tomcatconf
.
4) On the other nodes in the cluster remove or rename the /opt/hpws22/tomcat
directory if desired.
5) Now configure the hatomcat.conf file as required for the Tomcat Server package
on all nodes in case of legacy packages and the Tomcat toolkit parameters in the
package ASCII file in case of modular packages.
NOTE: The following sections describe the method for creating the Serviceguard package
using the legacy method. For information on creating the Serviceguard package using the
modular method, see the white paper Modular package support in Serviceguard for Linux
and ECM Toolkits available at http://www.hp.com/go/hpux-serviceguard-docs —>HP
Serviceguard Enterprise Cluster Master Toolkit.
Setting Up The Package
The following procedures here show how to configure a Serviceguard package running the Tomcat
instance, which includes customizing the Serviceguard package configuration file and package
control script. See Managing ServiceGuard manual available at http://www.hp.com/go/
hpux-serviceguard-docs —>HP Serviceguard for more detailed instructions on cluster configuration.
The procedures below assume that the user is configuring a Serviceguard Tomcat package named
"tomcat_pkg1", consisting of one service named "tomcat1_monitor". The Tomcat instance is listening
to a relocatable IP address "192.168.0.201" and all of its configuration and document files are
Setting Up The Package 115

on a file system "/shared/tomcat_1" directory, that resides on a logical volume "lvol1" in a shared
volume group "/dev/vg01". Here, it is assumed that the user has already determined the
Serviceguard cluster configuration, including cluster name, node names, heartbeat IP addresses,
and so on. See the Managing ServiceGuard manual available at http://www.hp.com/go/
hpux-serviceguard-docs —>HP Serviceguard for more detail.
NOTE: To increase the number of packages that may be added to this cluster, modify the cluster
configuration file and set the variable MAX_CONFIGURED_PACKAGES to reflect the number of
packages to be added to the cluster. After the edit, apply the change to the cluster via
cmapplyconf -C cluster_config_file.
Before working on the package configuration, create a directory (for example, /etc/cmcluster/
pkg/tomcat_pkg1) for this package to run. This directory should belong to a single Tomcat
package. Copy all Tomcat toolkit scripts from the directory /opt/cmcluster/toolkit/tomcat
to the package directory.
To create both the package configuration (tomcat_pkg.conf) and package control
(tomcat_pkg.cntl) files, cd to the package directory (example, cd
/etc/cmcluster/pkg/tomcat_pkg1).
For Example:
$ mkdir /etc/cmcluster/pkg/tomcat_pkg1
$ cd /etc/cmcluster/pkg/tomcat_pkg1
$ cp /opt/cmcluster/toolkit/tomcat/*.
1. Create a Serviceguard package configuration file with the command cmmakepkg -p
tomcat_pkg1.conf. The package configuration file tomcat_pkg1.conf must be edited
as indicated by the comments in that file. The package name must be unique within the cluster.
For Example:
PACKAGE_NAME tomcat_pkg1
NODE_NAME node1
NODE_NAME node2
RUN_SCRIPT /etc/cmcluster/pkg/tomcat_pkg1/http_pkg.cntl
HALT_SCRIPT /etc/cmcluster/pkg/tomcat_pkg1/http_pkg.cntl
SERVICE_NAME tomcat1_monitor
2. Create a Serviceguard package control file with command cmmakepkg -s
tomcat_pkg.cntl. The package control file must be edited as indicated by the comments
in that file. The package control file must be customized to your environment.
116 Using Tomcat Toolkit in a HP Serviceguard Cluster

Example 1 For example:
LVM | VxVM
----- | ------
|
VG[0]="vg01" | VXVM_DG[0]="DG_00"
|
LV[0]="/dev/vg01/lvol1" | LV[0]="/dev/vx/dsk/DG_00/LV_00
FS[0]="/shared/tomcat_1" | FS[0]="/shared/tomcat_1"
FS_TYPE[0]="vxfs" | FS_TYPE[0]="vxfs"
FS_MOUNT_OPT[0]="-o rw" | FS_MOUNT_OPT[0]="-o rw"
IP[0]="192.168.0.1"
SUBNET[0]="192.168.0.0"
#The service name must be the same as defined in the package
#configuration file.
SERVICE_NAME[0]="tomcat1_monitor"
SERVICE_CMD=[0]"/etc/cmcluster/pkg/tomcat_pkg1/toolkit.sh monitor"
SERVICE_RESTART[0]="-r 0"
Edit the customer_defined_run_cmds function to execute the
toolkit.sh script with the start option. In the example below, the
line "/etc/cmcluster/pkg/tomcat_pkg1/toolkit.sh start" was added,
and the ":" null command line deleted.
For example:
function customer_defined_run_cmds
{
# Start the Tomcat Web Server.
/etc/cmcluster/pkg/tomcat_pkg1/toolkit.sh start
test_return 51
}
Edit the customer_defined_halt_cmds function to execute the
toolkit.sh script with the stop option. In the example below, the
line "/etc/cmcluster/pkg/tomcat_pkg1/toolkit.sh stop" was added,
and the ":" null command line deleted.
For example:
function customer_defined_halt_cmds
{
# Stop the Tomcat Web Server.
/etc/cmcluster/pkg/tomcat_pkg1/toolkit.sh stop
test_return 51
}
3. Configure the Tomcat user configuration file hatomcat.conf as explained in the next section.
4. Copy this package configuration directory to all other package nodes.
Use the same procedure to create multiple Tomcat packages (multiple Tomcat instances) that will
be running on the cluster.
Creating Serviceguard package using Modular method.
Follow the steps below to create Serviceguard package using Modular method:
1. Create a directory for the package.
Creating Serviceguard package using Modular method. 117

#mkdir /etc/cmcluster/pkg/tomcat_pkg/
2. Copy the toolkit template and script files from tomcat directory.
#cd /etc/cmcluster/pkg/tomcat_pkg/
#cp /opt/cmcluster/toolkit/tomcat/* ./
3. Create a configuration file (pkg.conf) as follows.
#cmmakepkg -m ecmt/tomcat/tomcat pkg.conf
4. Edit the package configuration file.
NOTE: Tomcat toolkit configuration parameters in the package configuration file have been
prefixed by ecmt/tomcat/tomcat when used in Serviceguard A.11.19.00 or later.
For Example:
/etc/cmcluster/pkg/tomcat_pkg/pkg.conf
The configuration file should be edited as indicated by the comments in that file. The package
name needs to be unique within the cluster.
For Example:
PACKAGE_NAME tomcat
NODE_NAME node1
NODE_NAME node2
Set the TKIT_DIR variable as the path of <package_directory>. For example, TKIT_DIR
/etc/cmcluster/pkg/tomcat_pkg.
5. Use cmcheckconf command to check for the validity of the configuration specified.
For Example:
#cmcheckconf -P pkg.conf
6. If the cmcheckconf command does not report any errors, use the cmapplyconf command
to add the package into Serviceguard environment.
For Example:
#cmapplyconf -P pkg.conf
Setting up The Toolkit
Toolkit Overview
After installing the toolkit, four scripts and one README file will be installed in the location /opt/
cmcluster/toolkit/tomcat. Two more scripts and one file will be installed which will be
used only for modular packages. The two scripts will be in the /etc/cmcluster/scripts/
ecmt/tomcat directory. The third file will be in the /etc/cmcluster/modules/ecmt/tomcat
the directory.
Table 30 (page 119) shows the scripts used in legacy packages are:
118 Using Tomcat Toolkit in a HP Serviceguard Cluster

Table 30 Legal Package Scripts
DescriptionScript Name
This script contains a list of pre-defined variables that may be customized for
the user's environment. This script provides the user a simple format of the
user configuration data. This file will be included (that is, sourced) by the
toolkit main script hatomcat.sh.
User Configuration file (hatomcat.conf)
This script contains a list of internal-use variables and functions that support
the start and stop of a Tomcat instance. This script will be called by the Toolkit
Interface Script to do the following:
•On package start; it starts the Tomcat server instance.
•On package stop; it stops the Tomcat server instance.
Main Script (hatomcat.sh)
This script contains a list of internal variables and functions that supports
monitoring of a Tomcat instance. Monitoring functionality will be initiated by
calling the toolkit interface script with the "monitor" parameter.
Monitor Script (hatomcat.mon)
This script is an interface between the Serviceguard package control script
and the toolkit main script (hatomcat.sh).
Interface Script (toolkit.sh)
Toolkit User Configuration
All the user configuration variables are kept in a single file hatomcat.conf in shell script format.
The variable names and their sample values are given below in Table 31 (page 119):
Table 31 User Configuration Variables
DescriptionUser Configuration Variables
This is the base directory where HP Tomcat web server is installed. By default
HP Tomcat is installed in the directory /opt/hpws22/tomcat and hence this
is also the default value.
CATALINA_HOME (for example,
CATALINA_HOME="/opt/hpws22/tomcat")
This variable holds the specific configuration file path of a Tomcat server
instance. Each Tomcat instance must have its own configuration directory that
contains its own server configuration file (server.xml). The Tomcat server
default server root directory is "/opt/hpws22/tomcat". However, to have
multiple instances running in a cluster, set a value for this variable.
CATALINA_BASE (for example,
CATALINA_BASE="/opt/hpws22/tomcat")
This is the base directory of Java Development kit. This software is a
prerequisite for running Tomcat.
JAVA_HOME (for example,
JAVA_HOME=/opt/java1.5)
Setting up The Toolkit 119

Table 31 User Configuration Variables (continued)
DescriptionUser Configuration Variables
This variable will enable or disable maintenance mode for the Tomcat package.
By default, this is set to "yes". In order to disable this feature,
MAINTENANCE_FLAG should be set to "no". When Tomcat needs to be
maintained the file, <package directory>/tomcat.debug needs to be
touched. During this maintenance period, the tomcat process monitoring is
paused. Even if the tomcat instance is brought down, the package will not be
failed over to the adoptive node. To continue monitoring and turning off
maintenance mode, remove the tomcat.debug file. It is the user's
responsibility to ensure that the tomcat instance is running properly after the
maintenance phase.
NOTE: Setting MAINTENANCE_FLAG to "yes" and touching the
tomcat.debug file in the package directory will put the package in toolkit
maintenance mode. Serviceguard A.11.19 release has a new feature which
allows individual components of the package to be maintained while the
package is still up. This feature is called Package Maintenance mode and is
available only for modular packages. For more information using Package
Maintenance mode, see Modular package support in Serviceguard for Linux
and ECM Toolkits available at http://www.hp.com/go/hpux-serviceguard-docs
—>HP Serviceguard Enterprise Cluster Master Toolkit.
MAINTENANCE_FLAG (for example,
MAINTENANCE_FLAG ="yes")
This is the tomcat server listening port. This should be as same as the port
configured in the Tomcat configuration file $CATALINA_BASE/conf/
server.xml. The toolkit checks the existence of the Tomcat process by
periodically checking whether this port is listening. If multiple instances of
tomcat are configured, this port needs be unique for each instance. The default
value is 8081.
MONITOR_PORT (for example:
MONITOR_PORT=8081)
Specify a time interval in seconds for monitoring the Tomcat instance. The
monitor process checks the Tomcat daemons at this interval to validate they
are running. The default value will be 5 seconds.
MONITOR_INTERVAL (for example,
MONITOR_INTERVAL=5)
This variable holds the number of times to attempt to check the 'tomcat' daemon
processes before giving up and exiting to fail state. If not defined, its default
value will be 2.
RETRY_TIMES (for example,
RETRY_TIMES=2)
For the alert mail notification feature, an additional parameter called ALERT_MAIL_ID is introduced
in the ADF. It sends an e-mail message to the specified e-mail address when packages fail. This
e-mail is generated only when packages fail, and not when a package is halted by the operator.
To send this e-mail message to multiple recipients, a group e-mail ID must be created and specified
for this parameter. When an e-mail ID is not specified for this parameter, the script does not send
out this e-mail.
The following information provides the steps for configuring the toolkit and running the package.
This includes configuring the Tomcat toolkit user configuration file:
NOTE: Before working on the toolkit configuration, the package directory (for example,
/etc/cmcluster/pkg/tomcat_pkg1) must be created and all toolkit scripts copied to the package
directory.
1. Edit the Tomcat Toolkit user configuration file.
In the package directory, edit the user configuration file (hatomcat.conf ) as indicated by
the comments in that file.
For Example:
CATALINA_HOME="/opt/hpws22/tomcat"
CATALINA_BASE="/shared/tomcat_1"
120 Using Tomcat Toolkit in a HP Serviceguard Cluster

MAINTENANCE_FLAG="yes"
MONITOR_PORT=8081
2. Distribute all package files in the package directory to the other package nodes. All nodes
should have an identical file path for these files. For this example, each package node must
have the following files in the package directory:
For Example:
tomcat_pkg.conf #Package configuration file
tomcat_pkg.cntl #Package control file
hatomcat.conf #Tomcat toolkit user configuration file
hatomcat.mon #Tomcat toolkit monitor program
hatomcat.sh #Tomcat toolkit main script
toolkit.sh #Interface file between the package
#control file and the toolkit
3. Apply the Serviceguard package configuration using the command cmapplyconf -P
tomcat_pkg.conf.
Use the same procedures to create multiple Tomcat instances for Serviceguard packages that will
be running on the cluster.
Error Handling
On startup, the Tomcat server application will check for the existence of the server.xml file in
the directory <CATALINA_BASE/conf>. If the configuration file does not exist in this location or if
the Tomcat does not start for some other reason the action by the Tomcat toolkit script is to halt the
package on that node and try it on another node. In order to troubleshoot why Tomcat has not
been started correctly, one has to look at the Tomcat error log files. The Tomcat log files can be
available at $CATALINA_BASE/logs directory.
Tomcat Server Maintenance
There might be situations, when the Tomcat Server has to be taken down for maintenance. For
example, when a user wants to change configuration of Tomcat but does not want to migrate to
another node. See the example that follows:
NOTE: The example assumes that the package name is tomcat_pkg1, package directory is /etc/
cmcluster/pkg/tomcat_pkg1 and the Tomcat CATALINA_BASE is configured as
/shared/tomcat_1
1. Disable the failover of the package through the cmmodpkg command cmmodpkg -d
tomcat_pkg1.
2. Pause the monitor script .
•Create an empty file, /etc/cmcluster/pkg/tomcat_pkg1/tomcat.debug as,
shown below:
touch/etc/cmcluster/pkg/tomcat_pkg1/tomcat.debug
The toolkit monitor script, which continuously monitored the Tomcat daemons, would now
stop monitoring these daemons. A message "Tomcat toolkit pausing monitoring and
entering maintenance mode" is logged in the package control script log.
3. If required stop the tomcat application as shown below:-
cd /etc/cmcluster/pkg/tomcat_pkg1/
$PWD/toolkit.sh stop
Error Handling 121

4. Perform maintenance actions (for example, changing the configuration of the Tomcat instance,
or making changes to the toolkit configuration file, hatomcat.conf. If this file is changed,
remember to distribute the new file to all cluster nodes).
5. Start the tomcat instance again if it is stopped using cd /etc/cmcluster/pkg/
tomcat_pkg1/ $PWD/toolkit.sh start.
6. Allow monitoring scripts to continue normally as shown below:
rm -f /etc/cmcluster/pkg/tomcat_pkg1/tomcat.debug
A message "Starting Tomcat toolkit monitoring again after maintenance" appears in the
Serviceguard Package Control script log.
7. Enable the package failover:
cmmodpkg -e tomcat_pkg1
NOTE: If the package fails during maintenance (for example, the node crashes), the package
will not automatically fail over to an adoptive node. It is the responsibility of the user to start the
package up on an adoptive node. See Managing ServiceGuard manual available at http://
www.hp.com/go/hpux-serviceguard-docs —>HP Serviceguard " for more details.
NOTE: This feature is enabled only when the configuration variable MAINTENANCE_FLAG is set
to "yes" in the tomcat toolkit configuration file /etc/cmcluster/pkg/tomcat_pkg1/
hatomcat.conf.
Configuring Apache web server with Tomcat in a single package
NOTE: This section contains details on configuring Apache web server with Tomcat in a single
package only for the legacy method of packaging. For configuring Apache and Tomcat in a single
package using the modular method of packaging, see whitepaper Modular package support in
Serviceguard for Linux and ECM Toolkits available at http://www.hp.com/go/
hpux-serviceguard-docs —>HP Serviceguard Enterprise Cluster Master Toolkit.
Tomcat can be setup in a stand alone configuration that allows web browsers to be connected
directly to the tomcat servlet or through web server such as Apache. To integrate Tomcat with
Apache, the JK Connector is used. The mod_jk component needs to be configured in Apache in
order to make Apache work with Tomcat. When the user chooses this type of configuration and
it needs to be deployed in a highly available Serviceguard environment then both the Apache and
Tomcat toolkit need to be configured in a single package. The example below gives the steps for
configuring such a package. This example assumes that both Apache and Tomcat server are
configured on a single Volume group vg01 (in case of LVM) and a single mount point /share/pkg_1.
1. mkdir -p /etc/cmcluster/pkg/http_pkg1 /etc/cmcluster.
2. Copy the Apache and Tomcat toolkits files into the respective directories.
3. Edit the user configuration files of both Apache and Tomcat and make suitable changes. See
“Using an Apache Toolkit in a HP Serviceguard Cluster” (page 97) and “Using Tomcat Toolkit
in a HP Serviceguard Cluster” (page 110)
4. cd /etc/cmcluster/pkg/tomcat_pkg1
5. Create the Serviceguard Package configuration and Package control scripts
cmmakepkg -p pkg1.ascii (Serviceguard Package configuration script)
cmmakepkg -s pkg1.cntl (Serviceguard Package control script).
6. Edit the Package Configuration script "pkg1.ascii" and configure it. Also configure two services
"http_pkg1.monitor" and "tomcat_pkg1.monitor" as shown below:
SERVICE_NAME tomcat_pkg1.monitor
SERVICE_FAIL_FAST_ENABLED NO
SERVICE_HALT_TIMEOUT 300
122 Using Tomcat Toolkit in a HP Serviceguard Cluster

SERVICE_NAME http_pkg1.monitor
SERVICE_FAIL_FAST_ENABLED NO
SERVICE_HALT_TIMEOUT 300
7. Edit the Package Control script "pkg1.cntl" and configure the two toolkits as show below:-
Example 2 For example:
VG[0]="vg01"
LV[0]="/dev/vg01/lvol1"
FS[0]="/share/pkg_1"
FS_MOUNT_OPT[0]="-o rw"
FS_UMOUNT_OPT[0]=""
FS_FSCK_OPT[0]=""
FS_TYPE[0]="vxfs"
Configure the two services one for Tomcat and Apache instances
respectively
SERVICE_NAME[0]="tomcat_pkg1.monitor"
SERVICE_CMD[0]="/etc/cmcluster/pkg/tomcat_pkg1/toolkit.sh monitor"
SERVICE_RESTART[0]=""
SERVICE_NAME[1]="http_pkg1.monitor"
SERVICE_CMD[1]="/etc/cmcluster/pkg/http_pkg1/toolkit.sh monitor"
SERVICE_RESTART[1]=""
Edit the customer_defined_run and customer_defined_halt function
as shown below:-
function customer_defined_run_cmds
{
# ADD customer defined run commands.
/etc/cmcluster/pkg/tomcat_pkg1/toolkit.sh start
/etc/cmcluster/pkg/http_pkg1/toolkit.sh start
test_return 51
}
function customer_defined_halt_cmds
{
# ADD customer defined run commands.
/etc/cmcluster/pkg/tomcat_pkg1/toolkit.sh stop
/etc/cmcluster/pkg/http_pkg1/toolkit.sh stop
test_return 51
}
See Managing ServiceGuard manual available at http://www.hp.com/go/hpux-serviceguard-docs
—>HP Serviceguard and, see “Using an Apache Toolkit in a HP Serviceguard Cluster” (page 97)
for more details.
Configuring Apache web server with Tomcat in a single package 123

NOTE: While bringing down Apache or Tomcat application for maintenance, touch the files
tomcat.debug and apache.debug in Tomcat and Apache package directories /etc/
cmcluster/pkg/tomcat_pkg1/ and /etc/cmcluster/pkg/http_pkg1/ respectively.
This will ensure that monitoring services of both Apache and Tomcat is paused during the
maintenance period.
Both Tomcat and Apache applications, are configured in a single package. For troubleshooting
and debugging, the user needs to look at Serviceguard package logs in the directory where the
package control file resides. For application related logs the user needs to look for error and logs
directory in $SERVER_ROOT and $CATALINA_BASE for Apache and Tomcat applications
respectively
124 Using Tomcat Toolkit in a HP Serviceguard Cluster

8 Using SAMBA Toolkit in a Serviceguard Cluster
This chapter describes the High Availability SAMBA Toolkit for use in the Serviceguard environment.
The chapter is intended for users who want to install and configure the SAMBA toolkit in a
Serviceguard cluster. Readers should be familiar with Serviceguard configuration as well as HP
CIFS Server application concepts and installation/configuration procedures.
NOTE: This toolkit supports:
•HP Serviceguard versions:
◦A.11.19
◦A.11.20
•The version of HP CIFS Server included with HP-UX.
•HP-UX 11i v2 and HP-UX 11i v3.
At the time of publication, this version supports the above mentioned SG, application and HPUX
versions. More recent versions of these products may be certified with B.06.00. For the latest
information, see the compatibility matrix available at : http://www.hp.com/go/
hpux-serviceguard-docs —>HP Serviceguard .
NOTE: This version of the toolkit supports both, legacy and modular style packages.
Unless otherwise stated, this toolkit supports all filesystems, storage and volume managers that
Serviceguard supports.
This toolkit includes support for the following:
•HP Serviceguard A.11.19 with VERITAS Cluster File System (CFS) 5.0 on HP-UX 11i v2, and
HP-UX 11i v3.
•HP Serviceguard A.11.19 with CFS 5.0.1 on HP-UX 11i v3.
•HP Serviceguard A.11.20 with CFS 5.1 SP1 on HP-UX 11i v3
To use CFS, you must install the appropriate version of HP Serviceguard Storage Management
Suite.
For more details please refer to the Serviceguard Release Notes at:http://www.hp.com/go/
hpux-serviceguard-docs ->HP Enterprise Cluster Master Toolkit
The SAMBA Toolkit for Serviceguard consists of a set of shell scripts for configuring, starting,
halting, and monitoring the HP CIFS Server application. These scripts work together with a
Serviceguard Package Control Script. This chapter assumes that users have installed Serviceguard
and the Enterprise Cluster Master Toolkit (ECMT) containing the SAMBA toolkit on all cluster nodes.
As delivered, this toolkit contains the following files in the/opt/cmcluster/toolkit/samba
directory:
Table 32 Scripts in SAMBA Directory
DescriptionFile Name
The contents of the README file have been moved to this user guide.README
User defined variables required for customization of the toolkit for your environment.hasmb.conf
The main shell script.hasmb.sh
The script provided to monitor the health of the running HP CIFS Server application.hasmb.mon
Interface between the package control script and the toolkit main shell script (hasmb.sh).toolkit.sh
125

The following three files are also installed and they are used only for the modular method of
packaging.
Attribute Definition File (ADF) is installed in /etc/cmcluster/modules/ecmt/samba .
Table 33 Attribute Definition File (ADF)
DescriptionFile Name
For every parameter in the legacy toolkit user configuration file, there is an
attribute in the ADF. It also has an additional attribute TKIT_DIR which is
analogous to the package directory in the legacy method of packaging. The
ADF is used to generate a modular package ASCII template file.
samba.1
For the alert mail notification feature, an additional parameter called ALERT_MAIL_ID is
introduced in the ADF. ALERT_MAIL_ID sends an e-mail message to the specified e-mail address
when packages fail. This e-mail is generated only when packages fail, and not when a package
is halted by the operator. To send this e-mail message to multiple recipients, a group e-mail ID must
be created and specified for this parameter. When an e-mail ID is not specified for this parameter,
the script does not send out this e-mail.
The following files are located in /etc/cmcluster/scripts/ecmt/samba after installation:
Table 34 Scripts name
DescriptionFile Name
This script is called by the Master Control Script and acts as an interface between the Master
Control Script and the Toolkit interface script (toolkit.sh). It is responsible for calling the Toolkit
Configuration File Generator Script (described below).
tkit_module.sh
This script is called by the Module Script when the package configuration is applied using
cmapplyconf to generate the toolkit user configuration file in the package directory (TKIT_DIR
).
tkit_gen.sh
The HP CIFS Server application must be installed on all nodes that will run the HP CIFS Server
packages in the Serviceguard cluster. A typical clustered configuration is configuring one node as
a primary node and the other nodes as standby nodes. The HP CIFS Server runs on the primary
node serving HP CIFS Server requests from the clients. In the event of a failure on the primary node,
the package will fail over to the standby node. This means that all necessary configuration
information on all nodes must be identical and the resources must be available to all supporting
nodes. The file systems providing access to clients must be stored on shared disks and these disks
must be accessible by the same path names on each node.
HP CIFS Server Package Configuration Overview
Configuration rules include the following:
•Each node has the same version of the HP CIFS Server application. All nodes configured to
run the package must contain the HP CIFS Server file system and configuration files.
•A file system containing HP CIFS Server data must reside on shared storage. Configuration
files (as well as executables) may either reside on shared or local storage. However, for ease
of maintenance, it is recommended to place configuration files on shared storage.
•Each node has the same configuration directory, where identical copies of the configuration
files for each instance are placed on a local or shared hard disk.
•Each node has the same HP CIFS Server file system directories to access the shared storage.
The following information discusses configuration options of either using a combination of shared
and local storage, or using shared storage only. The choice of local or shared storage is left to
the user's discretion. However, shared storage is recommended, as it is easier to maintain.
Local Configuration
126 Using SAMBA Toolkit in a Serviceguard Cluster
In a typical local configuration, identical copies of the HP CIFS Server configuration files reside in
exactly the same locations on the local file system on each node. All HP CIFS Server file systems
are shared between the nodes. It is the responsibility of the toolkit administrator to maintain identical
copies of the HP CIFS Server components on all nodes. If the shared file system allows only read
operations, then local configuration is easy to maintain. But if the file system allows write operations
also, it is the administrator's responsibility to propagate updates to all the package nodes.
Shared Configuration
In a typical shared configuration, the HP CIFS Server file systems and configuration files are all on
the shared storage. The same HP CIFS Server file systems and configuration files are shared between
the cluster nodes, so there is no need to maintain identical copies of configuration files on each
node.
In a cluster environment each HP CIFS Server instance should have unique IP addresses. One or
more relocatable IP addresses are created for each HP CIFS Server when the package is created.
When the HP CIFS Server package is switched over from one node to another, this particular
instance is stopped, IP addresses are removed from the primary node, IP addresses are reallocated
to a standby node, and the instance is started on that node. Clients will then be automatically
connected or manually reconnected through these IP addresses to the identical HP CIFS Server file
systems on the standby node.
Multiple HP CIFS Server Instances Configuration
The HP CIFS Server permits multiple instances of its NetBIOS and SMB master daemons.
Each HP CIFS Server has its own smb.conf file to define its configuration. The NetBIOS name
and IP address that the client connects to will determine which smb.conf file is used to serve that
connection. This multiple HP CIFS Server master daemon configuration allows CIFS Server to run
multiple Serviceguard packages simultaneously.
Setting Up the Application
Before configuring the Serviceguard package, the following configuration tasks must be performed
for the application:
1. When the CIFS Server is installed, the default HP CIFS Server may be automatically configured
to start during system startup. If the Server is already installed and configured, simply stop it
with the /opt/samba/bin/stopsmb command.
2. Ensure the RUN_SAMBA parameter in the /etc/rc.config.d/samba file is set to 0 on
all nodes. This disables Automatic Startup when the machine boots.
Here is a simple example of a multiple-instance configuration.
"<netbios_name>" used in the following steps needs to be replaced with the appropriate name
of the CIFS server.
1. Create directories:
/var/opt/samba/<netbios_name>
/var/opt/samba/<netbios_name>/locks
/var/opt/samba/<netbios_name>/logs
For example,
$mkdir /var/opt/samba/smb1
$mkdir /var/opt/samba/smb1/locks
$mkdir /var/opt/samba/smb1/logs
2. Create a file /etc/opt/samba/smb.conf.<netbios_name> (For example, /etc/opt/
samba/smb.conf.smb1) with the following lines:
[global]
workgroup = ha_domain
Setting Up the Application 127

netbios name = smb1
interfaces = XXX.XXX.XXX.XXX/xxx.xxx.xxx.xxx
bind interfaces only = yes
log file = /var/opt/samba/smb1/logs/log.%m
lock directory = /var/opt/samba/smb1/locks
pid directory = /var/opt/samba/smb1/locks
Replace the "XXX.XXX.XXX.XXX/xxx.xxx.xxx.xxx" with one (space separated) relocatable IP
address and subnet mask for the Serviceguard package.
Copy the workgroup line from the /etc/opt/samba/smb.conf file.
Copy the NetBIOS name line from the same file, or, if there is no NetBIOS name line, enter
the UNIX host name for the server on the NetBIOS name line.
Add in the rest of desired configuration items.
Include all HP CIFS Server users and their passwords of all instances in all nodes using the
command smbpasswd <username>, where the username must be a name that already
exists in the standard UNIX passwd file.
To use a shared file system, the file system must reside on shared storage.
Shared Configuration
1. Using LVM
To configure a shared file system managed by LVM, you need to create volume group(s) and
logical volume(s) on the shared disks, then construct a new file system for each logical volume
for the HP CIFS Server file system (and HP CIFS Server configuration files). See the Managing
ServiceGuard manual available at http://www.hp.com/go/hpux-serviceguard-docs —>HP
Serviceguard for information on configuring LVM and creating a file system. (For a local
configuration, you must install and configure the HP CIFS Server in the same location on both
the primary and all backup nodes and set up identical (or equivalent) configuration files in
the same directory on all nodes.)
The following is an example of configuring shared storage for a CIFS Server package. The
procedures below assumes that /shared/smb1 is a shared file system directory, which
resides on a logical volume "lvol1" in a shared volume group "/dev/vg01".
a. Create a Volume Group "vg01" for a shared storage.
b. Create a Logical Volume "lvol1" for the "vg01".
c. Construct a new file system on the Logical Volume "lvol1".
d. Create a directory "/shared/smb1" on a local disk.
e. Mount device "/dev/vg01/lvol1" to the "/shared/smb1" .
f. Copy all the necessary files depending on the configuration.
g. Unmount "/shared/smb1".
2. Using VxVM
To configure a shared file system which is managed by VxVM, you need to create disk group(s)
and logical volume(s) on the shared disks and construct a new file system for each logical
volume for the HP CIFS Server file system and HP CIFS Server configuration files.
The following is an example of configuring the above steps using VxVM:
a. Create a Disk Group "DG_00" on the shared storage.
b. Create Logical volume "LV_00" on the Disk Group "DG_00".
c. Construct a new file system on the Logical Volume "LV_00".
d. Create a directory "/shared/smb1" on a local disk.
e. Mount device "/dev/vx/dsk/DG_00/LV_00" on "/shared/smb1".
128 Using SAMBA Toolkit in a Serviceguard Cluster

f. Copy all the necessary files depending on the configuration.
g. Unmount "/shared/smb1".
3. Using CFS
To configure a Samba package in a CFS environment, the SG CFS packages need to be
running in order for the Samba package to access CFS mounted file systems. Please see your
Serviceguard Manual for information on how to configure SG CFS packages. Create a directory
/shared/smb1 on all cluster nodes. Mount the CFS filesystem on /shared/smb1 using the
CFS packages. Use /shared/smb1 to hold the necessary files and configuration information.
NOTE: CIFS supports CFS with a limitation. A running package will fail if another cluster
node tries to start samba using the configuration used by this package. Do NOT attempt to
start another samba instance on a different cluster node using the shared configuration that
is being used by any samba package.
If you need help creating, importing or managing the volume group or disk group and
filesystem, see chapter titled Building an HA Cluster Configuration in the Serviceguard user
manual available at:http://www.hp.com/go/hpux-serviceguard-docs-> HP Serviceguard
You can configure more shared storage for additional HP CIFS Server instances using the
same method.
NOTE: Under shared configuration, you can choose to put samba binaries as well in shared
file system. You may have to create soft links on the local file system, to these binaries residing
in shared file system.
The following sections describe the method for creating the Serviceguard package using the
legacy method. For more information on creating the Serviceguard package using the modular
method, see Modular package support in Serviceguard for Linux and ECM Toolkits available
at http://www.hp.com/go/hpux-serviceguard-docs —>HP Serviceguard Enterprise Cluster
Master Toolkit
Setting Up the Package
The following procedures include the steps to configure a package running the HP CIFS Server
instance, which includes customizing the package configuration file and package control script.
The procedures below assume that the user is configuring an HP CIFS Server package named
"smb1", consisting of one service named "smb1_monitor". The HP CIFS Server instance is listening
to a relocatable IP address "192.168.0.1" and all of its configuration and document files are in
a file system /shared/smb1 directory. Here, it is assumed that the user has already determined
the cluster configuration, including cluster name, node names, heartbeat IP addresses, and so on.
See the Managing ServiceGuard manual available at http://www.hp.com/go/
hpux-serviceguard-docs —>HP Serviceguard for specific details on cluster configuration.
NOTE: To increase the number of packages that may be added to this cluster, please modify the
cluster configuration file and set the variable MAX_CONFIGURED_PACKAGES to reflect the number
of packages to be added to the cluster. After the edit, apply the change to the cluster via
cmapplyconf -C cluster_config_file.
Before working on the package configuration, create a directory (example, /etc/cmcluster/
smb1) for this package. This directory should belong to a single HP CIFS Server package (that is,
each package will have its own directory). Copy all SAMBA toolkit scripts from the directory /opt/
cmcluster/toolkit/samba to the package directory.
For example:
$ mkdir /etc/cmcluster/smb1
Setting Up the Package 129

$ cd /etc/cmcluster/smb1
$ cp /opt/cmcluster/toolkit/samba/* . #copy to $PWD
To create both the package configuration (smb_pkg.conf) and package control
(smb_pkg.cntl) files, cd to the package directory (for example, cd /etc/cmcluster/smb1)
1. Create a package configuration file with the command cmmakepkg -p. The package
configuration file must be edited as indicated by the comments in that file. The package name
must be unique within the cluster.
For example:
PACKAGE_NAME smb1
NODE_NAME node1
NODE_NAME node2
RUN_SCRIPT /etc/cmcluster/smb1/smb_pkg.cntl
HALT_SCRIPT /etc/cmcluster/smb1/smb_pkg.cntl
SERVICE_NAME smb1_monitor
If you are using CFS mounted file system you need to configure dependency of this Samba
package on SG CFS package. If the Samba package is configured to depend on a SG CFS
package, the Samba package will run as long as the dependee package is running. If the
package fails, then the dependent Samba package will also fail.
To configure dependency of the Samba package, you must set the following configurable
parameters in the package configuration file:
DEPENDENCY_NAME smb1_dependency
DEPENDENCY_CONDITION SG-CFS-MP-1 = up
DEPENDENCY_LOCATION SAME_NODE
2. Create a package control file with command cmmakepkg -s. The package control file must
be edited as indicated by the comments in that file. The package control file must be customized
to your environment.
Example:
LVM | VxVM
----- | ------
VG[0]="vg01" | VXVM_DG[0]="DG_00"
|
LV[0]="/dev/vg01/lvol1" | LV[0]="/dev/vx/dsk/DG_00/LV_00
FS[0]="/shared/smb1" | FS[0]="/shared/smb1"
FS_TYPE[0]="vxfs" | FS_TYPE[0]="vxfs"
FS_MOUNT_OPT[0]="-o rw" | FS_MOUNT_OPT[0]="-o rw"
IP[0]="192.168.0.1" SUBNET="192.168.0.0"
SERVICE_NAME[0]="smb1_monitor"
SERVICE_CMD[0]="/etc/cmcluster/smb1/toolkit.sh monitor"
SERVICE_RESTART[0]="-r 2"
NOTE: If you are using CFS mounted file systems you must NOT configure volume groups,
logical volumes and file systems in the package control script but configure dependency on
SG CFS packages.
3. Edit the customer_defined_run_cmds function in the package control script to execute the
toolkit.sh script with the start option. In the example below, the line /etc/cmcluster/
smb1/toolkit.sh start was added, and the ":" null command line deleted.
For example:
function customer_defined_run_cmds
{
# Start the HP CIFS Server.
130 Using SAMBA Toolkit in a Serviceguard Cluster

/etc/cmcluster/smb1/toolkit.sh start
test_return 51
}
4. Edit the customer_defined_halt_cmds function in the package control script to execute the
toolkit.sh script with the stop option. In the example below, the line /etc/cmcluster/smb1/
toolkit.sh stop was added, and the ":" null command line deleted.
EXAMPLE:
function customer_defined_halt_cmds
{
# Stop the HP CIFS Server.
/etc/cmcluster/smb1/toolkit.sh stop
test_return 51
}
5. Configure the user configuration file hasmb.conf as explained in the next section and
customize it for your environment.
6. Copy this package configuration directory to all other package nodes.
You can use the same procedure to create multiple HP CIFS Server packages (multiple HP
CIFS Server instances) that will be managed by Serviceguard.
Setting Up the Toolkit
Toolkit Overview
After installing the toolkit, four scripts and one README file will be installed in the location /opt/
cmcluster/toolkit/samba. Two more scripts and one file will be installed which will be used
only for modular packages. The two scripts will be in the /etc/cmcluster/scripts/ecmt/
samba directory. The third file will be in the /etc/cmcluster/modules/ecmt/samba directory.
For legacy packages, one user configuration script ( hasmb.conf) and three functional scripts (
toolkit.sh, hasmb.sh and hasmb.mon) will work together to integrate the HP CIFS server
with the Serviceguard package control script.
The scripts used in legacy packages are:
Table 35 Legacy Package Scripts
DescriptionScript Name
This script contains a list of pre-defined variables that may be customized for
your environment. This script provides you with a simple format for (user)
configuration data. This file will be included (that is, sourced) by the toolkit
main script ( hasmb.sh).
User Configuration file User
(hasmb.conf)
This script contains a list of internal-use variables and functions that support
start or stop of an HP CIFS Server instance. This script will called by the toolkit
interface script (toolkit.sh) to do the following:
•On package start, it starts an HP CIFS Server instance and launches a
monitor process by calling hasmb.mon.
•On package stop, it stops the HP CIFS Server server instance and halts
hasmb.mon.
Main Script (hasmb.sh)
Setting Up the Toolkit 131

Table 35 Legacy Package Scripts (continued)
DescriptionScript Name
This script contains a list of internal-use variables and functions for monitoring
an HP CIFS Server server instance. This script will be called by the toolkit main
script ( hasmb.sh) and will constantly monitor two HP CIFS Server daemons,
smbd and nmbd.
Monitor Script (hasmb.mon)
This script is an interface between a package control script and the toolkit
main script (hasmb.sh ).
Interface Script (toolkit.sh)
Creating Serviceguard package using Modular method.
Follow the steps below to create Serviceguard package using Modular method:
1. Create a directory for the package.
#mkdir /etc/cmcluster/pkg/samba_pkg/
2. Copy the toolkit template and script files from samba directory.
#cd /etc/cmcluster/pkg/samba_pkg/
#cp /opt/cmcluster/toolkit/samba/* ./
3. Create a configuration file (pkg.conf) as follows.
#cmmakepkg -m ecmt/samba/samba pkg.conf
4. Edit the package configuration file.
NOTE: Samba toolkit configuration parameters in the package configuration file have been
prefixed by ecmt/samba/samba when used in Serviceguard A.11.19.00.
For Example:
/etc/cmcluster/pkg/samba_pkg/pkg.conf
The configuration file should be edited as indicated by the comments in that file. The package
name needs to be unique within the cluster.
For Example:
PACKAGE_NAME samba
NODE_NAME node1
NODE_NAME node2
Set the TKIT_DIR variable as the path of <package_directory>. For example, TKIT_DIR
/etc/cmcluster/pkg/pkg01.
SERVICE_NAME smb1_monitor
If you are using CFS mounted file system you need to configure dependency of this Samba
package on SG CFS package. If the Samba package is configured to depend on a SG CFS
package, the Samba package will run as long as the dependee package is running. If the
package fails, then the dependent Samba package will also fail.
To configure dependency of the Samba package, you must set the following configurable
parameters in the package configuration file:
DEPENDENCY_NAME smb1_dependency
DEPENDENCY_CONDITION SG-CFS-MP-1 = up
DEPENDENCY_LOCATION SAME_NODE
5. Use cmcheckconf command to check for the validity of the configuration specified.
For Example:
132 Using SAMBA Toolkit in a Serviceguard Cluster

#cmcheckconf -P pkg.conf
6. If the cmcheckconf command does not report any errors, use the cmapplyconf command
to add the package into Serviceguard environment.
For Example:
#cmapplyconf -P pkg.conf
Toolkit User Configuration
All the user configuration variables are kept in a single file in shell script format. The variable
names and their sample values are in Table 36 (page 133):
Table 36 User Configuration Variables
DescriptionConfiguration Variables
This variable holds the NetBIOS Name of the server.
If the configuration of HP CIFS Server is done using
/opt/samba/bin/samba_setup command, the
NetBIOS ame can be found in /etc/opt/samba/
smb.conf. If you are configuring multiple HP CIFS
Server packages, ensure the NetBIOS name is unique
for each of the packages.
NETBIOS_NAME (for example, NETBIOS_NAME=smb1)
This variable holds the path of the
"smb.conf.<netbios_name>". By default, the path is
/etc/opt/samba/smb.conf.${NETBIOS_NAME}.
If the path is different, modify the variable.
CONF_FILE (for example,
CONF_FILE=/etc/opt/samba/smb.conf.${NETBIOS_NAME})
This variable holds the log directory path of the CIFS
Server instance of the particular package. By default,
the path is /var/opt/samba/${NETBIOS_NAME}/
logs. If the path is different, modify the variable.
LOG_DIRECTORY (for example,
LOG_DIRECTORY=/var/opt/samba/${NETBIOS_NAME}/logs)
This variable holds the PID File path of smbd process
of the particular package. By default, the path is
/var/opt/samba/${NETBIOS_NAME}/locks/
smbd.pid. If the path is different, modify the variable.
SMBD_PID_FILE (for example,
SMBD_PID_FILE=/var/opt/samba/${NETBIOS_NAME}/locks/smbd.pid)
This variable holds the PID File path of nmbd process
of the particular package. By default, the path is
/var/opt/samba/${NETBIOS_NAME}/locks/
nmbd.pid. If the path is different, modify the variable.
NMBD_PID_FILE (for example,
NMBD_PID_FILE=/var/opt/samba/${NETBIOS_NAME}/locks/nmbd.pid)
Setting Up the Toolkit 133

Table 36 User Configuration Variables (continued)
DescriptionConfiguration Variables
This variable will enable or disable maintenance mode
for the Samba package. By default, this is set to "yes".
In order to disable this feature MAINTENANCE_FLAG
should be set to "no". When Samba needs to be
maintained then a file <package directory>/
samba.debug needs to be touched. During this
maintenance period Samba process monitoring is
paused. Even if Samba is brought down, its package
will not be failed over to the standby node. To
continue monitoring and come back from the
maintenance mode, remove the samba.debug file.
It is the user's responsibility to ensure that Samba is
properly running after the maintenance phase.
NOTE: Setting MAINTENANCE_FLAG to "yes" and
touching the samba.debug file in the package
directory will put the package in toolkit maintenance
mode. Serviceguard A.11.19 release has a new
feature which allows individual components of the
package to be maintained while the package is still
up. This feature is called Package Maintenance mode
and is available only for modular packages. For more
information using Package Maintenance mode, see
white paper Modular package support in Serviceguard
for Linux and ECM Toolkits available at http://
www.hp.com/go/hpux-serviceguard-docs —>HP
Serviceguard Enterprise Cluster Master Toolkit.
MAINTENANCE_FLAG (for example,
(MAINTENANCE_FLAG=yes)
This variable holds a time interval (in seconds) for
monitoring the CIFS Server instance. The monitor
process checks to ensure the smbd and nmbd daemons
are running every MONITOR_INTERVAL seconds. If
not defined, its default value will be 5 seconds.
MONITOR_INTERVAL (for example, MONITOR_INTERVAL=5)
This variable holds the number of times to attempt to
check the CIFS Server daemons before giving up and
exiting to fail state. If not defined, its default value will
be 0 times. It is preferred to keep this as 0.
SERVICE_RESTART * RETRY_TIMES = total restart
count.
RETRY_TIMES (for example, RETRY_TIMES=0)
The following information provides the steps for configuring the toolkit and running the package.
This includes configuring the SAMBA toolkit user configuration file.
NOTE: Before working on the toolkit configuration, the package directory (example, /etc/
cmcluster/smb1) must be created and all toolkit scripts copied to the package directory.
1. Edit the SAMBA Toolkit user configuration file.
In the package directory, edit the user configuration file (hasmb.conf) as indicated by the
comments in that file.
For example:
NETBIOS_NAME=smb1
CONF_FILE=/etc/opt/samba/smb.conf.${NETBIOS_NAME}
LOG_DIRECTORY=/var/opt/samba/${NETBIOS_NAME}/logs
SMBD_PID_FILE=/var/opt/samba/${NETBIOS_NAME}/locks/smbd.pid
NMBD_PID_FILE=/var/opt/samba/${NETBIOS_NAME}/locks/nmbd.pid
2. Copy the entire package directory at the same path on all nodes configured for the package.
For this example, each package node must have the following files in the package directory:
134 Using SAMBA Toolkit in a Serviceguard Cluster

smb_pkg.conf #Package configuration file
smb_pkg.cntl #Package control file
hasmb.conf #SAMBA toolkit user config file
hasmb.mon #SAMBA toolkit monitor program
hasmb.sh #SAMBA toolkit main script
toolkit.sh #Interface file between the package
#control file and the toolkit
3. Apply the package configuration using the command cmapplyconf -P smb_pkg.conf.
Repeat the preceding procedures to create multiple HP CIFS Server packages.
CIFS Server Maintenance Mode
There might be situations, when a CIFS Server instance has to be taken down for maintenance
purposes like changing configuration, without having the instance to migrate to standby node. The
following procedure should be implemented:
NOTE: The example assumes that the package name is SMB_1, package directory is /etc/
cmcluster/pkg/SMB_1.
•Disable the failover of the package through cmmodpkg command.
$ cmmodpkg -d SMB_1
•Pause the monitor script.
Create an empty file /etc/cmcluster/pkg/SMB_1/samba.debug as shown below:
$ touch /etc/cmcluster/pkg/SMB_1/samba.debug
Toolkit monitor scripts which continuously monitors Samba daemon processes, would now
stop monitoring these daemon processes. A message, "Samba toolkit pausing, monitoring
and entering maintenance mode" appears in the Serviceguard Package Control script log.
•If required stop the CIFS Server instance and as shown below:
$ cd /etc/cmcluster/pkg/SMB_1/
$ $PWD/toolkit.sh stop
•Perform maintenance actions (for example, changing the configuration parameters. If files are
changed, remember to distribute the new file to all cluster nodes as needed).
•Start the CIFS Server instance again, if you stopped it as below:
$ cd /etc/cmcluster/pkg/SMB_1/
$ $PWD/toolkit.sh start
•Allow monitoring scripts to continue normally as shown below:
$ rm -f /etc/cmcluster/pkg/SMB_1/samba.debug
A message "Starting Samba toolkit monitoring again after maintenance" appears in the
Serviceguard Package Control script log.
•Enable the package failover.
$ cmmodpkg -e SMB_1
CIFS Server Maintenance Mode 135

NOTE: If the package fails during maintenance (for example, the node crashes), the package
will not automatically fail over to an adoptive node. It is the responsibility of the user to start
the package up on an adoptive node. See the manual Managing ServiceGuard manual
available at http://www.hp.com/go/hpux-serviceguard-docs —>HP Serviceguard for more
details.
This feature is enabled only when the configuration variable, MAINTENANCE_FLAG, is set to
"yes" in the Samba toolkit configuration file.
Special Notes
Please consider the following areas when implementing HP CIFS Server in the Serviceguard HA
framework.
•Client Applications
HA CIFS Server cannot guarantee that client applications with open files on a CIFS Server
share or applications launched from CIFS Server share, will recover from a switchover. In
these instances there may be cases where the application will need to be restarted and the
files reopened, as a switchover is a logical shutdown and restart of the CIFS Server.
•File Locks
File locks are not preserved during failover, and applications are not advised about any lost
file locks.
•Print Jobs
If a failover occurs when a print job is in process, the job may be printed twice or not at all,
depending on the job state at the time of the failover.
•Symbolic Links
Symbolic links in the shared directory trees may point to files outside of any shared directory.
If symbolic links point to files that are not on shared file systems, after a failover occurs, the
symbolic links may point to different files or to no file. Keeping the targets of all shared symbolic
links, synchronized with all nodes at all times, could be difficult in this situation.
Alternatives would either be to set wide links to "no", or to be sure that every file or directory
pointed to is on a shared file system.
•Security Files and Encrypted Passwords
Authentication is dependent on several entries in different security files. An important security
file is the user password file, smbpasswd. If your CIFS Server is configured with encrypted
passwords set to "yes", use an smbpasswd file. By default, this file is located in the path
/var/opt/samba/private but a different path may be specified via the smb passwd
file parameter.
Another important security file is secrets.tdb. Machine account information is among the
important contents of this file. Since this file will be updated periodically (as defined in
smb.conf by 'machine password timeout', 604800 seconds by default), HP recommends
that you locate secrets.tdb on a shared storage. As with the smbpasswd file, discussed above,
the location of this file is defined by the smb.conf parameter smb passwd file. For example,
smb passwd file = /var/opt/samba/shared_vol_1/private/smbpasswd will
result in the file/var/opt/samba/shared_vol_1/private/secrets.tdb .
To summarize, both the machine account file ( secrets.tdb) and the password file
(smbpasswd) should be put on shared storage.
136 Using SAMBA Toolkit in a Serviceguard Cluster
•Username Mapping File
If the HP CIFS Server configuration is set to use a username mapping file, it should be located
on a shared file system. This way, if changes are made, all the nodes will always be up-to-date.
The username mapping file location is defined in smb.conf by the parameter 'username
map', example, 'username map = /var/opt/samba/shared_vol_1/username.map'. There is
no username map file by default.
•HP CIFS Server as a WINS Server
If HP CIFS Server is configured as a WINS server (that is, the WINS support parameter is set
to "yes"), the database /var/opt/samba/locks/browse.tdb will be stored.
If this file is not on a shared file system, when a failover occurs, there will be a short period
of time when all the WINS clients update the CIFS WINS server with their address. However,
if this short period of time to restore the WINS database is not acceptable, you can reduce
the period of time to restore the full WINS service.
To do so, configure /var/opt/samba/locks/browse.tdb to be a symbolic link to a
browse.tdb file on a shared file system. It is not recommended to put the entire
/var/opt/samba/locks directory on a shared file system, because the locking data may not
be correctly interpreted after a failover.
•HP CIFS Server as a Master Browser
If HP CIFS Server is configured as the domain master browser (that is, the domain master
support parameter is set to "yes"), the database will be stored in the /var/opt/samba/
locks/browse.tdb file. HP does not recommend doing this in an HA configuration.
However, if the CIFS Server is configured as the domain master browser, /var/opt/samba/
locks/browse.tdb should be set as a symbolic link to browse.tdb on the shared file
system. HP does not recommend putting the entire directory (/var/opt/samba/locks) on the
shared file system, as the locking data may not be correctly interpreted after a failover.
•Automatic Printer Sharing
If network/shared printers are configured, ensure all nodes configured to run the HP CIFS
Server also have access to the printers. Otherwise, when a failover occurs, the list of shared
printers will differ across clustered nodes, resulting in problems for clients accessing those
printers.
•HP CIFS Server's LMHOSTS File
If the file LMNHOSTS is used to store static addresses of netbios names, put this file in the
shared file system. When invoking nmbd, specify the path for LMNHOSTS with the -H option.
Ensure all package and tookit scripts include the -H option where nmbd is invoked. Also edit
the script /opt/samba/bin/startsmb to add the -H option where nmbd is invoked.
Example:
Assuming that the LMHOSTS file is in the /etc/cmcluster/smb1 directory, the following
lines need to be changed in hasmb.sh:
In the start_samba_server function, change as follows:
(old) /opt/samba/bin/nmbd -D -1${LOG_DIRECTORY} -s ${CONF_FILE}
(new) /opt/samba/bin/nmbd -D -1${LOG_DIRECTORY} -s ${CONF_FILE} \
-H /etc/cmcluster/smb1/lmhosts
For more information see lmhosts (1M) manpage.
Special Notes 137

9 Support and other resources
Information to collect before contacting HP
Be sure to have the following information available before you contact HP:
•Software product name
•Hardware product model number
•Operating system type and version
•Applicable error message
•Third-party hardware or software
•Technical support registration number (if applicable)
How to contact HP
Use the following methods to contact HP technical support:
•In the United States, see the Customer Service / Contact HP United States website for contact
options:
http://welcome.hp.com/country/us/en/contact_us.html
•In the United States, call 1-800-HP-INVENT (1-800-474-6836) to contact HP by telephone.
This service is available 24 hours a day, 7 days a week. For continuous quality improvement,
conversations might be recorded or monitored.
•In other locations, see the Contact HP Worldwide website for contact options:
http://welcome.hp.com/country/us/en/wwcontact.html
Registering for software technical support and update service
HP Insight software includes one year of 24 x 7 HP Software Technical Support and Update Service.
This service provides access to HP technical resources for assistance in resolving software
implementation or operations problems.
The service also provides access to software updates and reference manuals in electronic form as
they are made available from HP. Customers who purchase an electronic license are eligible for
electronic updates.
With this service, Insight software customers benefit from expedited problem resolution as well as
proactive notification and delivery of software updates. For more information about this service,
see the following website:
http://www.hp.com/services/insight
Registration for this service takes place following online redemption of the license certificate.
How to use your software technical support and update service
After you have registered, you will receive a service contract in the mail containing the Customer
Service phone number and your Service Agreement Identifier (SAID). You need your SAID when
you contact technical support. Using your SAID, you can also go to the Software Update Manager
(SUM) web page at http://www.itrc.hp.com to view your contract online.
Warranty information
HP will replace defective delivery media for a period of 90 days from the date of purchase. This
warranty applies to all Insight software products.
138 Support and other resources

HP authorized resellers
For the name of the nearest HP authorized reseller, see the following sources:
•In the United States, see the HP U.S. service locator web site:
http://www.hp.com/service_locator
•In other locations, see the Contact HP worldwide web site:
http://welcome.hp.com/country/us/en/wwcontact.html
Documentation feedback
HP welcomes your feedback. To make comments and suggestions about product documentation,
send a message to:
docsfeedback@hp.com
Include the document title and manufacturing part number in your message. All submissions become
the property of HP.
Related information
•HP ProLiant servers:
ProLiant BL BladeSystem servers:
http://www.hp.com/go/blades
◦
◦ProLiant DL series rack mount servers:
http://www.hp.com/servers/dl
◦ProLiant ML series tower servers:
http://www.hp.com/servers/ml
◦ProLiant SL series scalable system servers:
http://h10010.www1.hp.com/wwpc/us/en/sm/WF02a/15351-15351-3896136.html
•HP Integrity servers: http://www.hp.com/go/integrity
•HP NonStop servers: http://www.hp.com/go/nonstop
Typographic conventions
This document uses the following typographical conventions:
Book title The title of a book. On the web, this can be a hyperlink to the
book itself.
Command A command name or command phrase, For example ls -a.
Computer output Information displayed by the computer.
Ctrl+x or Ctrl-x A key sequence that indicates you must hold down the keyboard
key labeled Ctrl while you press the letter x.
ENVIRONMENT VARIABLE The name of an environment variable, For example, PATH.
Key The name of a keyboard key. Return and Enter both refer to the
same key.
Term A term or phrase that is defined in the body text of the document,
not in a glossary.
User input Indicates commands and text that you type exactly as shown.
HP authorized resellers 139
Replaceable The name of a placeholder that you replace with an actual value.
[ ] In command syntax statements, these characters enclose optional
content.
{ } In command syntax statements, these characters enclose required
content.
| The character that separates items in a linear list of choices.
... Indicates that the preceding element can be repeated one or more
times.
WARNING An alert that calls attention to important information that, if not
understood or followed, results in personal injury.
CAUTION An alert that calls attention to important information that, if not
understood or followed, results in data loss, data corruption, or
damage to hardware or software.
IMPORTANT An alert that calls attention to essential information.
NOTE An alert that contains additional or supplementary information.
TIP An alert that provides helpful information.
140 Support and other resources
