Hp Tv Converter Box 11793A Users Manual
HP 11793A to the manual 24ba8577-721a-4983-b8cb-713b1efe97f2
2015-02-09
: Hp Hp-Tv-Converter-Box-Hp-11793A-Users-Manual-550241 hp-tv-converter-box-hp-11793a-users-manual-550241 hp pdf
Open the PDF directly: View PDF ![]() .
.
Page Count: 50
OPERATING
AND
SERVICE
MANUAL
HP
11793A
M
I
C
R
0
WAVE
CONVERTER
September
1990
1 1793-9001 1
111111111111111111111111111111111111111111111111111111111111ll111
HEWLETT
PACKARD

CERTl FlCATlON
Hewlett-Packard Company certifies
that
this
product met its published specifications
ut
the time of shipment
from the factory. Hewlett-Packard further certifies that its calibration measurements are traceable to the United
States National Bureau of Standards, to the extent allowed by the Bureau’s calibration facility, and to the
calibration facilities of other International Standards Organization members.
WARRANTY
This Hewlett-Packard instrument product
is
warranted against defects in material and workmanship for a period
of one year from date
of
shipment. During the warranty period, Hewlett-Packard Company will at its option,
either repair or replace products which prove to be defective.
For warranty service or repair, this product must be returned
to
a service facility designated by HP. Buyer shall
prepay shipping charges to HP and
HP
shall pay shipping charges
to
return the product
to
Buyer. However, Buyer
shall pay all shipping charges, duties, and taxes for products returned
to
HP from another country.
HP warrants that its software
and
firmware designated by HP for use with an instrument will execute
its
programming instructions when properly installed on that instrument. HP does not warrant that the operation
of the instrument, or software, or firmware will be uninterrupted or error free.
LIMITATION OF WARRANTY
The foregoing warranty shall not apply
to
defects resulting from improper or inadequate maintenance by Buyer,
Buyer-supplied software or interfacing, unauthorized modification or misuse, operation outside
of
the environmental
specifications for the product, or improper site preparation or maintenance.
NO OTHER WARRANTY
IS
EXPRESSED OR IMPLIED. HP SPECIFICALLY DISCLAIMS THE IMPLIED
WARRANTIES OF MERCHANTABILITY AND FITNESS FOR A PARTICULAR PURPOSE.
EXCLUSIVE
REMEDIES
THE REMEDIES PROVIDED HEREIN ARE BUYERS SOLE AND EXCLUSIVE REMEDIES. HP SHALL
NOT BE LIABLE FOR ANY DIRECT, INDIRECT, SPECIAL, INCIDENTAL, OR CONSEQUENTIAL
DAMAGES, WHETHER BASED ON CONTRACT, TORT, OR ANY OTHER LEGAL THEORY.
ASSISTANCE
Product maintenance agreements and other customer assistance agreements are available
for
Hewlett-Packard
products.
For
any assistance, contact your nearest Hewlett-Packard Sales and Service Office. Addresses are provided at
the back of
this
manual.

Agilent Technologies.
Inc
24001
E
Mission
Liberty take, WA
99019
www
agilent
corn
e.
,
.'::is:.
.
Ag
i
I
en
t
Techno
Io
g
i
es
:
-
:
.
Innovating the
HP
Way
.*a*..
June
8,2000
Dear Customer,
As of November
1,
1999,
four
of
Hewlett-Packard's businesses, test and measurement,
semiconductor products, health care solutions, and chemical analysis became a new company,
Agilent Technologies. Now, many of your Hewlett-Packard products and services are in the care of
Agilent Technologies.
At Agilent Technologies, we are working diligently to make this transition as smooth as possible for
you. However, as a result of this transition, the products and related documentation contained in this
shipment may be labeled with either the Hewlett-Packard name and logo, the Agilent Technologies
name and logo, or a combination of both. Information in this package may refer to Hewlett-Packard
(HP), but applies to your Agilent Technologies product. Hewlett-Packard and Agilent branded
products with the same model number are interchangeable.
Whatever logo you see, the information, products, and services come from the same reliable source.
If
you have questions about Agilent Technologies products and services, please visit our website at
httR://www.aqilent.com.
Sincerely,
Rebranding
Team
HP
11793A
MICROWAVE
CONVERTER
SERIAL
NUMBERS
Operating and Service Manual Part
No.
11793-90011
Microfiche Operating and Service Manual Part
No.
11793-90012 Printed.
MAY
1985
This manual applies directly to instruments with serial
numbers prefixed 2520A.
With changes described
in
Paragraph
31,
this manal
also applies
to
instruments with serial numbers pre-
fixed
2407A.
For
additional important information about serial
numbers, see INSTRUMENTS
COVERED
BY
THIS
MANUAL in Paragraph
4.
First Edition
OHEWLElT-PACKARD COMPANY 1985
EAST 24001
MISSION
AVENUE, TAF C-34, SPOKANE, WASHINGTON, U.S.A., 99220

Regulatory Information (Updated March
1999)
Safety Considerations
GENERAL
This product and related documentation must be reviewed for familiarization with safety
markings and instructions before operation.
This product
has
been designed and tested
in
accordance
with
IEC
Publication
1010,
"Safety Requirements for Electronic Measuring Apparatus," and
has
been supplied in
a
safe condition. This instruction documentation contains information and warnings which
must be followed by the
user
to ensure safe operation and to maintain the product in
a
safe
condition.
SAFETY EARTH
GROUND
A
uninterruptible safety
earth
ground must be provided
from
the
main
power source to the
product input wiring terminals, power cord, or supplied power cord set.
SAFETY
SYMBOLS
A
Indicates instrument damage can occur if indicated operating limits are exceeded.
A
Indicates hazardous voltages.
1-
Indicates
earth
(ground) terminal
WARNING
A
WARNING
note denotes a hazard. It calls attention to a procedure,
practice, or the like, which,
if
not correctly performed or adhered to,
could result in personal injury.
Do
not proceed beyond a
WARNING
sign
until the indicated conditions are fully understood and met.
CAUTION
A
CAUTION
note denotes
a
hazard.
It
calls attention to an operation
procedure, practice, or the like, which, if not correctly performed or adhered
to, could result in damage to or destruction of part or
all
of the product.
Do
not proceed beyond
an
CAUTION note
until
the indicated conditions are fully
understood and met.
2
Chapter
1
Regulatory Information (Updated March
1999)
Safety Considerations for this Instrument
WARNING
This product
is
a
Safety Class
I
instrument (provided with a
protective earthing ground incorporated in the power cord). The
mains plug shall only be inserted
in
a socket outlet provided with
a
protective earth contact. Any interruption of the protective
conductor inside or outside
of
the product is likely to make the
product dangerous. Intentional interruption is prohibited.
Whenever it
is
likely that the protection has been impaired, the
instrument must be made inoperative and be secured against any
unintended operation.
If
this instrument is to be energized via an auto transformer (for
voltage reduction), make sure the common terminal
is
connected to
the earth terminal of the power source.
If
this product
is
not used as specified, the protection provided by
the equipment could be impaired. This product must be used in
a
normal condition (in which all means
for
protection are intact) only.
No
operator serviceable parts in this product. Refer servicing to
qualified personnel. To prevent electrical shock, do not remove
covers.
Servicing instructions are
for
use by qualified personnel only.
To
avoid electrical shock, do not perform any servicing unless you are
qualified to do
so.
The opening of covers
or
removal of parts is likely to expose
dangerous voltages. Disconnect the product
from
all
voltage sources
while it
is
being opened.
The power cord
is
connected to internal capacitors that my remain
live for
5
seconds after disconnecting the plug from
its
power supply.
For Continued protection against fire hazard, replace the line fuse(s)
only with
250
V
fuse(s)
or
the same current rating and type
(for
example, normal blow or time delay).
Do
not use repaired fuses
or
short circuited fuseholders.
Always
use the three-prong ac power cord supplied with this
product. Failure to ensure adequate earth grounding by not using
this cord may cause product damage.
This product
is
designed
for
use in Installation Category
I1
and
Pollution Degree
2
per
IEC
1010
and
IEC
664
respectively.
FOR
INDOOR
USE
ONLY.
This product has autoranging line voltage input, be sure the supply
voltage
is
within the specified range.
3
Regulatory
information
(Updated
March
1999)
To prevent electrical shock, disconnect instrument
from
mains (line)
before cleaning.
Use
a
dry cloth
or
one slightly dampened with water
to clean the external case parts.
Do
not attempt to clean internally.
Ventilation Requirements: When installing the product in a cabinet,
the convection into and out
of
the product must not be restricted.
The ambient temperature (outside the cabinet) must be less than the
maximum operating temperature
of
the product by
4"
C
for
every
100
watts dissipated in the cabinet.
If
the total power dissipated in the
cabinet
is
greater than
800
watts, then forced convection
must
be
used.
Product
Markings
CE
-
the CE mark
is
a
registered trademark
of
the European Community.
A
CE mark
accompanied by
a
year indicated the year the design was proven.
CSA
-
the
CSA
mark
is
a
registered trademark
of
the Canadian Standards Association.
4
Chapter
1
Model Safety Considerations
SAFETY
CONSIDERATIONS
GENERAL
This product and related documentation must be
reviewed before operation for familiarization with
safety markings
and
instructions.
This product
is
a Safety Class
I
instrument (pro-
vided with
a
protective earth terminal).
BEFORE APPLYING POWER
Verify that the product
is
set
to
match the available
line voltage and the correct fuse is installed.
SAFETY EARTH GROUND
An uninterruptible safety earth ground must be
provided from the main power source
to
the prod-
uct input wiring terminals, power cord, or supplied
power cord set.
SAFETY SYMBOLS
Instruction manual symbol: the product
A
will be marked with this symbol when
it
is
necessary for the user
to
refer
to
the instruction
manual (refer
to
Table of Contents).
Indicates hazardous voltages.
1,
Indicates earth (ground)
terminal.
f
-
The WARNING sign denotes
a
hazard. It calls attention to a
procedure, practice, or the like, which,
if
not cor-
rectly performed
or
adhered
to,
could result in per-
sonal injury.
Do
not proceed beyond
a
WARNING
sign until the indicated conditions are
fully
under-
stood and met.
The CAUTION sign denotes
a
hazard. It calls attention
to
an
operating procedure, practice, or the like, which,
if
not correctly performed or adhered
to,
could result
in
damage
to
or destruction of
part
or
all
of the
product.
Do
not proceed beyond a CAUTION sign
until the indicated conditions are fully understood
and met.
I
WARNING
1
Interrupting
the
protective (grounding) conductor
(inside
or
outside
the
instrument)
or
disconnecting
the protective earth terminal will cause a potential
shock
hazard that could result
in
personal injury.
(Grounding one conductor of a two conductor outlet
is
not sufficient protection).
Whenever
it
is
likely that
the
protection has been
impaired,
the
instrument
must
be made inopera-
tive and be secured against any unintended
operation.
If
this
instrument
is
to be energized via an auto-
transformer (for voltage reduction), make sure the
common terminal
is
connected to the earth termi-
nal of
the
power source.
Servicing instructions are
for
use by
service-trained personnel only.
To
avoid dangerous
electric shock, do not perform any servicing unless
qualified to do
so.
Adjustments described
in the
manual are per-
formed with power supplied to the instrument
while protective covers are removed. Energy avail-
able at many points may,
if
contacted, result
in
per-
sonal
injury.
Capacitors inside the instrument may still be
charged even
if
the instrument
has
been discon-
nected from its source of supply.
For
continued protection against fire hazard, re-
place
the
line fuse(s) only with
250V
fuse(s) of the
same current rating and type (for example, normal
blow, time delay, etc.).
Do
not use repaired fuses
or
short-circuited fuseholders.
..
11
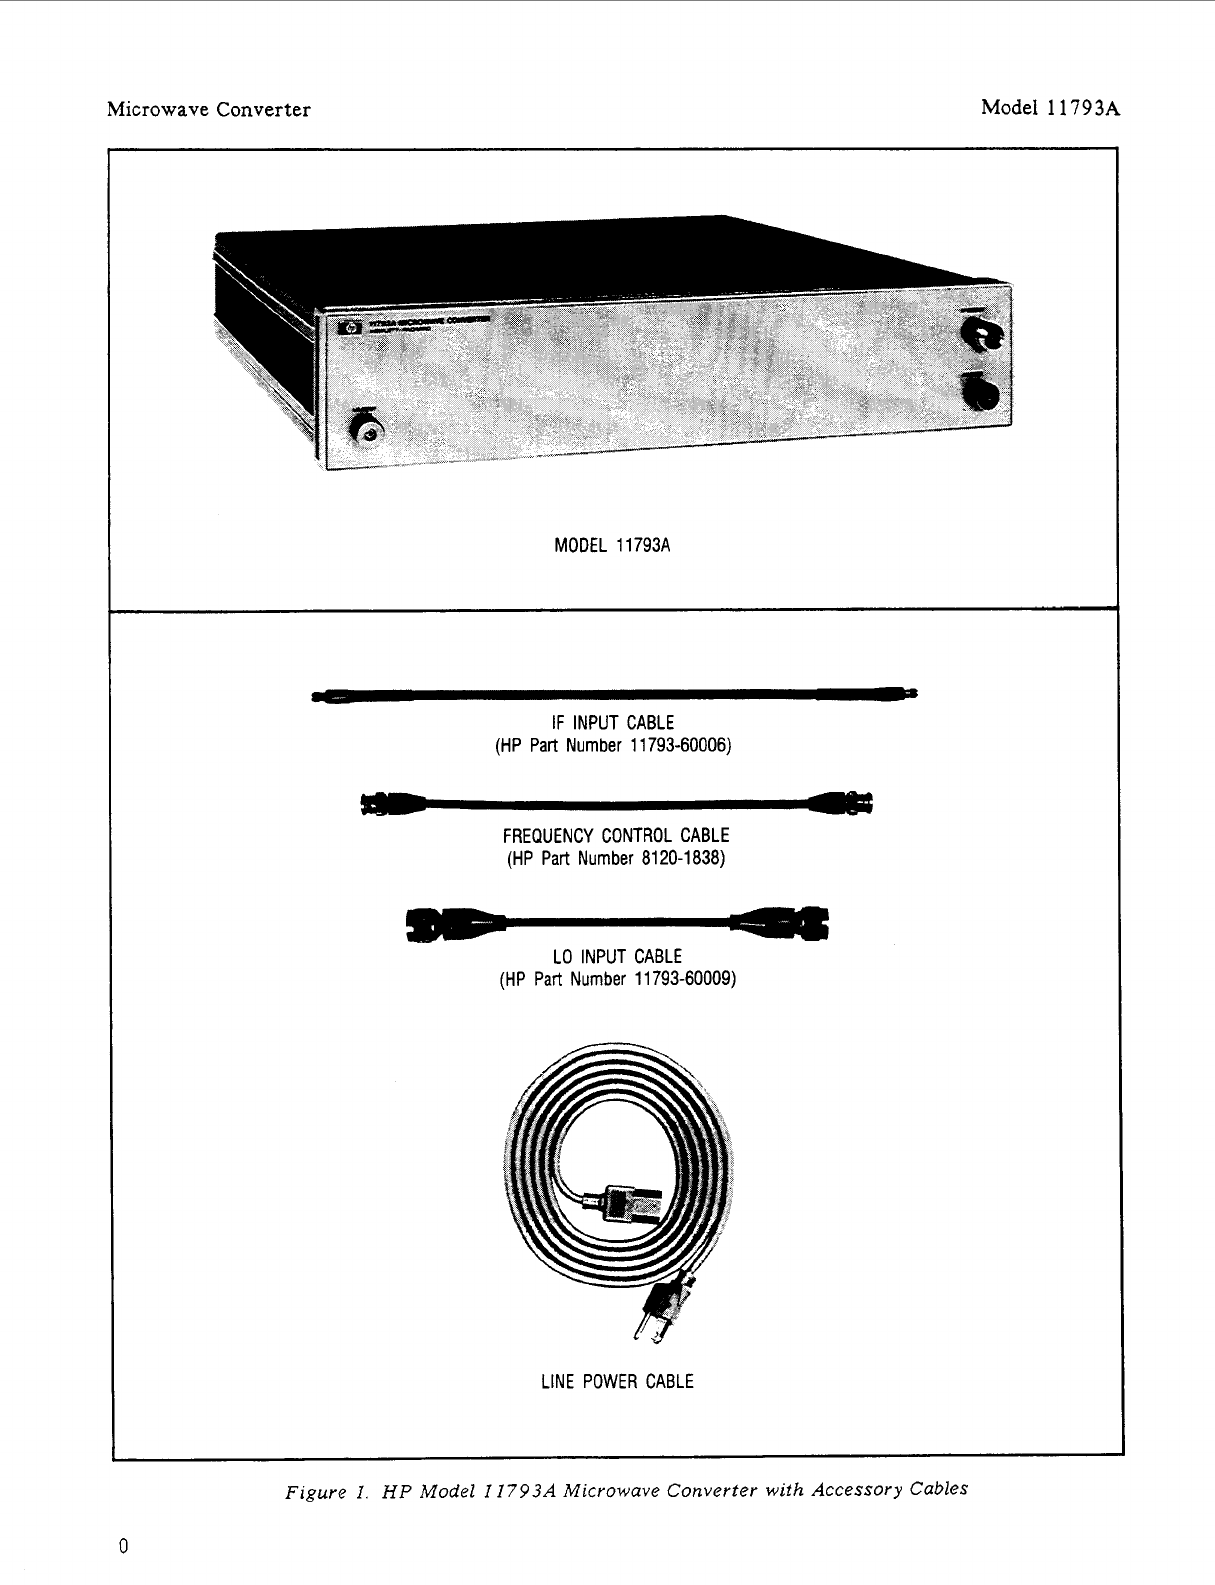
Microwave
Converter
Model
11793A
MODEL 11793A
IF
INPUT CABLE
(HP Part Number 11 793-60006)
FREQUENCY CONTROL CABLE
(HP Part Number 8120-1838)
--
LO INPUT CABLE
(HP Part Number 11793-60009)
LINE POWER CABLE
Figure
1.
HP
Model
II793A
Microwave
Converter
with
Accessory
Cables
0
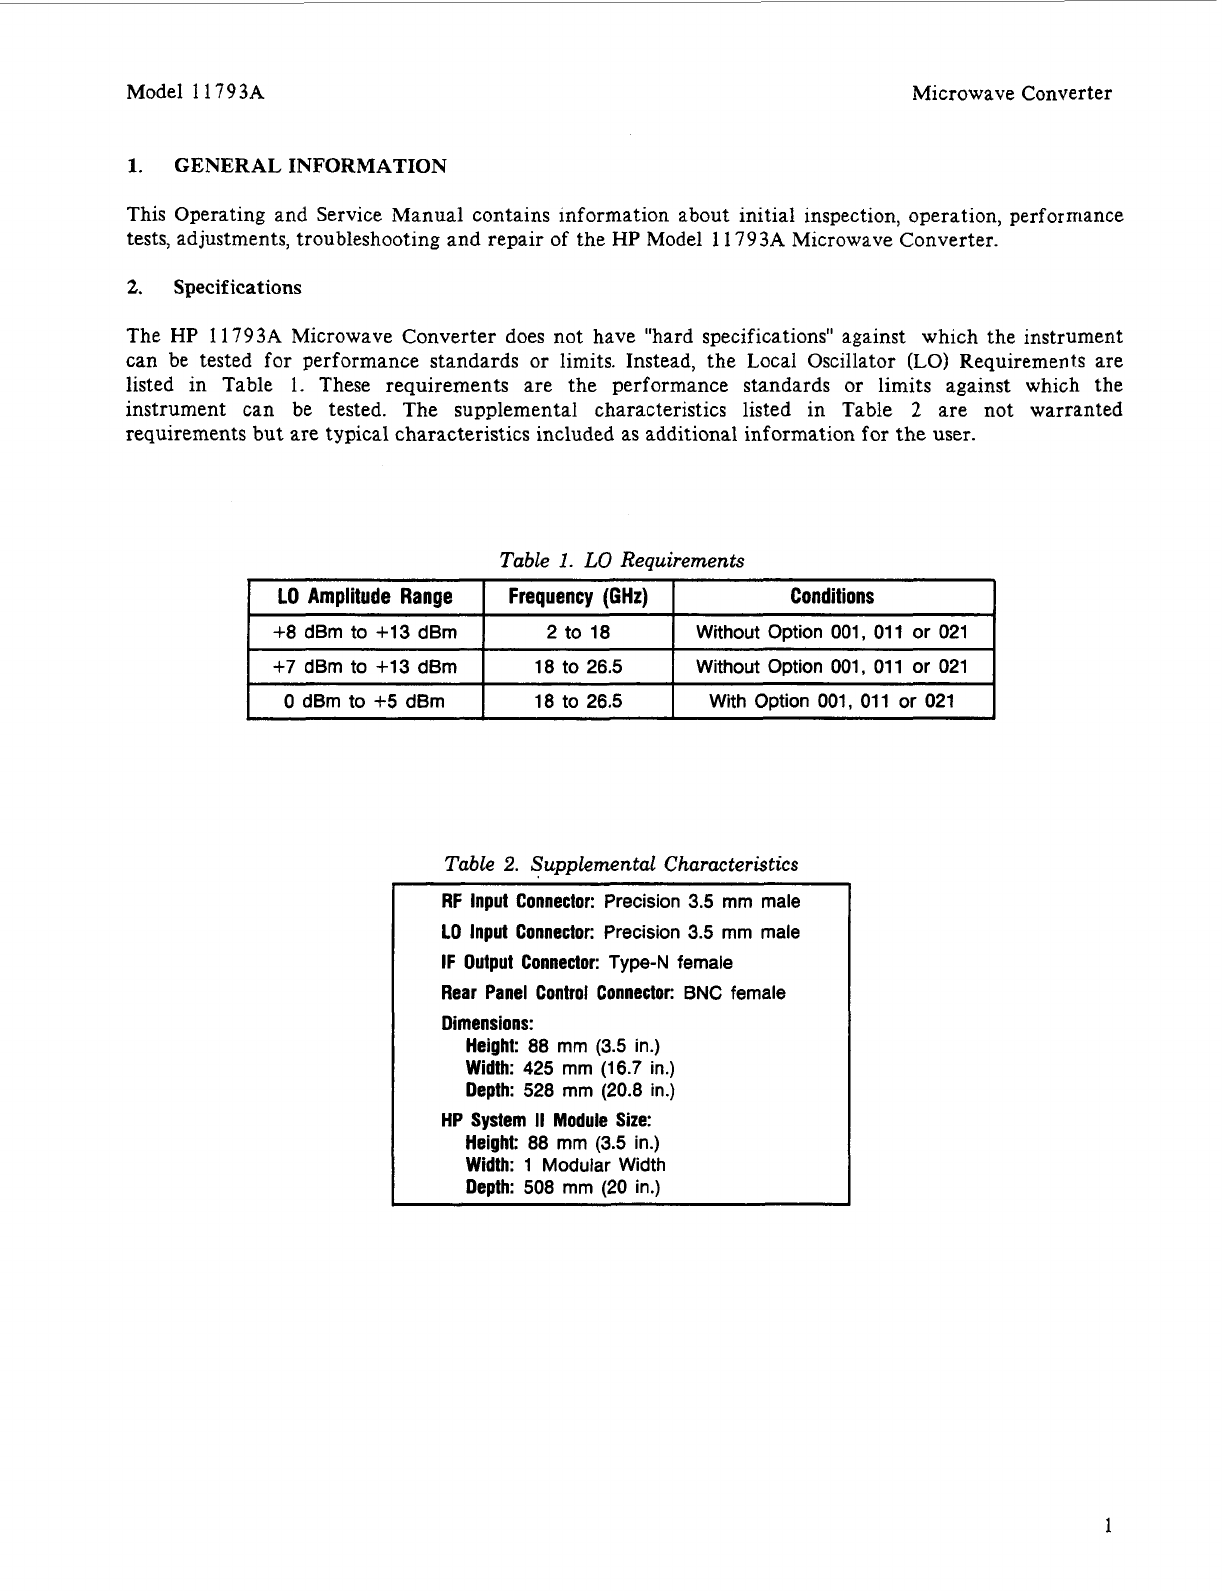
Model
1
1793A
Microwave Converter
LO
Amplitude Range
+8
dBm to
+13
dBm
$7
dBm to
+13
dBm
0 dBm to
+5
dBm
1.
GENERAL INFORMATION
Frequency
(GHz)
Conditions
2
to
18
18
to
26.5
18
to
26.5
Without Option
001, 011
or
021
Without Option
001, 011
or
021
With Option
001, 011
or
021
This Operating and Service Manual contains information about initial inspection, operation, performance
tests, adjustments, troubleshooting and repair of the
HP
Model
1
1793A
Microwave Converter.
2,
Specifications
The
HP
1
1793A
Microwave Converter does not have "hard specifications" against which the instrument
can be tested for performance standards or limits. Instead, the Local Oscillator
(LO)
Requirements are
listed in Table
1.
These requirements are the performance standards or limits against which the
instrument can be tested. The supplemental characteristics listed in Table
2
are not warranted
requirements but are typical characteristics included as additional information for the user.
Table
2.
Supplemental Characteristics
RF
Input Connector:
Precision
3.5
mm male
LO
Input Connector:
Precision
3.5
mm male
IF
Output Connector:
Type-N female
Rear Panel Control Connector:
BNC
female
Dimensions:
Height:
88
mm
(3.5
in.)
Width:
425
mm
(16.7
in.)
Depth:
528
mm
(20.8
in.)
HP System
II
Module Size:
Height:
88
mm
(3.5
in.)
Width:
1
Modular Width
Depth:
508
mm
(20
in.)
1
Microwave Converter Model 11793A
3.
Safety Considerations
This product
is
a Safety Class
I
instrument; that is, one provided with a prctective earth terminal. The
Microwave Converter and all related documentation must be reviewed before operation for complete
familiarization with safety markings and instructions. Refer to the Safety Considerations page found at
the beginning of this manual for a summary of the safety information. Safety information pertinent to
the task at hand (that is, installation, operation, performance testing, or service) is found throughout this
manual.
4.
Instruments Covered
by
This Manual
This instrument has a two-part serial number. The first four digits and the letter comprise the serial
number prefix. The prefix
is
the same for all identical instruments; it changes only when a change is made
to the instrument. The last five digits form a sequential suffix which is unique to each instrument. The
contents of this manual apply directly to instruments having the serial prefix listed under Serial Numbers
on the title page.
An instrument manufactured after the printing of this manual may have a serial prefix that is not listed
on the title page. This unlisted serial prefix indicates that the manual for this instrument is supplied with
a Manual Changes supplement that documents the differences.
In addition to change information, the supplement may contain information for correcting errors in the
manual. To keep this manual as current and accurate as possible, Hewlett-Packard recommends that you
periodically request the latest Manual Changes supplement. The supplement is identified with the manual
print date and part number that appear on the title page. Complimentary copies of the supplement are
available on request from your nearest Hewlett-Packard office.
For information concerning a serial prefix not listed on the title page or in the Manual Changes
supplement, contact your nearest Hewlett-Packard office.
5.
Description
The HP Model 11793A Microwave Converter down-converts microwave input signals in the range from
1.3 to 26.5 GHz. For frequencies below 1.3 GHz, signals are routed directly to the input of the measuring
instrument. Instruments suitable for lower frequency measuring are the HP
890
1B
Modulation Analyzer
or the HP 8902A Measuring Receiver.
For input signals above 1.3 GHz, the Microwave Converter routes the signal through an internal mixer
which mixes the input signal with an external local oscillator. The difference frequency (that is, the
intermediate frequency or
IF)
is filtered, amplified, and then appears at the
IF
OUTPUT connector. The
IF
should be between 10 and 700 MHz.
The Microwave Converter requires a +8 dBm leveled output from the LO. For
LOs
with insufficient
power above 18 GHz, an optional internal amplifier
(1
8
GHz to 26.5 GHz) is available. The measuring
instrument controls switching of the RF path and of the
LO
amplifier via a rear-panel connection on the
Microwave Converter.
2
Model 11793A Microwave Converter
1
I
Not
installed Standard Option
010
Option
020
installed Option
001
Option
011
Option 021
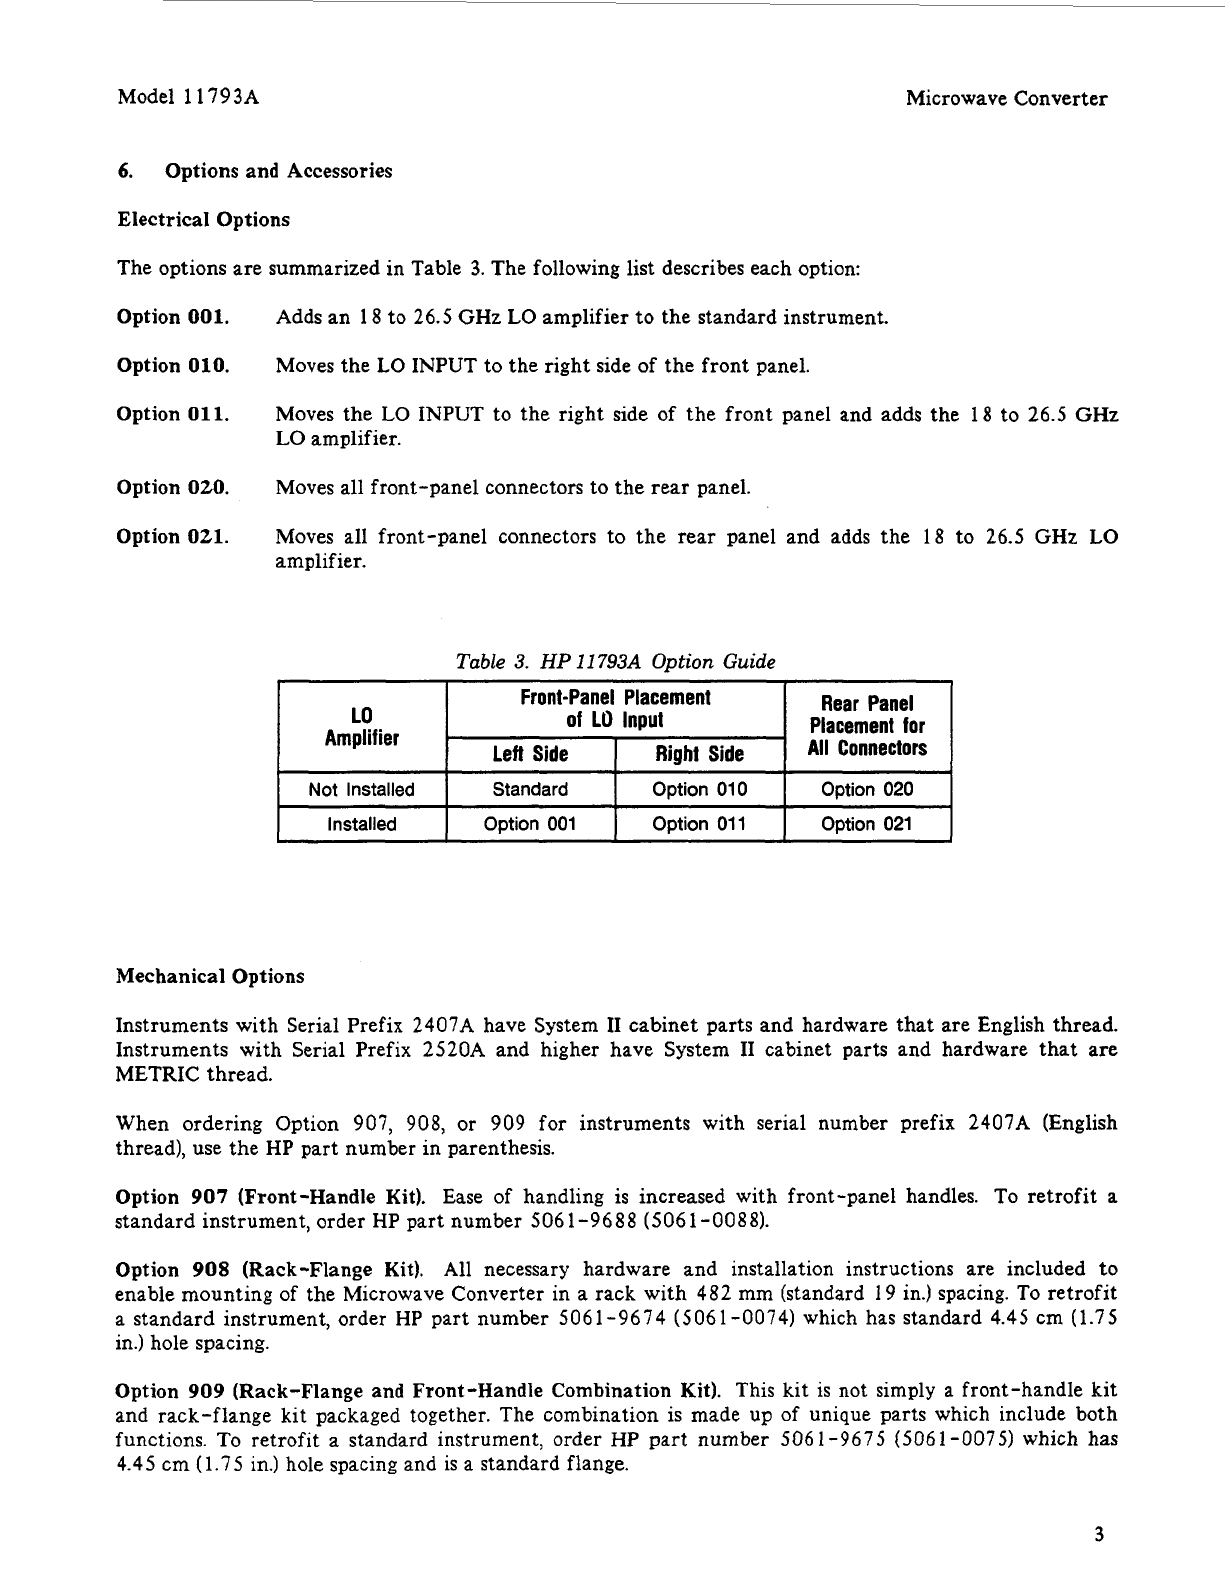
6.
Options and Accessories
Electrical Options
The options are summarized in Table
3.
The following list describes each option:
Option
001.
Option
010.
Adds an 18 to 26.5
GHz
LO
amplifier to the standard instrument.
Moves the LO INPUT to the right side of the front panel.
Option
011.
Moves the
LO
INPUT to the right side of the front panel and adds the 18 to 26.5
GHz
LO
amplifier.
Option
020.
Moves all front-panel connectors to the rear panel.
Option
021.
Moves all front-panel connectors to the rear panel and adds the 18 to 26.5 GHz
LO
amplif ier.
Table
3.
HP
11
793A Option
Guide
Front-Panel Placement Rear Panel
of
LO
Input Placement
for
I
Len Side Right Side
All
Connectors
LO
Amplifier
Mechanical Options
Instruments with Serial Prefix 2407A have System
11
cabinet parts and hardware that are English thread.
Instruments with Serial Prefix 2520A and higher have System
I1
cabinet parts and hardware that are
METRIC thread.
When ordering Option 907, 908, or 909 for instruments with serial number prefix 2407A (English
thread), use the HP part number in parenthesis.
Option
907
(Front-Handle Kit). Ease of handling is increased with front-panel handles. To retrofit a
standard instrument, order
HP
part number 5061-9688 (5061-0088).
Option
908
(Rack-Flange Kit). All necessary hardware and installation instructions are included to
enable mounting
of
the Microwave Converter in a rack with 482 mm (standard 19 in.) spacing.
To
retrofit
a standard instrument, order HP part number 5061-9674 (5061-0074) which has standard 4.45 cm (1.75
in.) hole spacing.
Option
909
(Rack-Flange and Front-Handle Combination Kit). This kit
is
not simply a front-handle kit
and rack-flange kit packaged together. The combination is made up of unique parts which include both
functions.
To
retrofit a standard instrument, order HP part number
SO6
1-9675
(SO6
1-0075) which has
4.45 cm (1.75 in.) hole spacing and is a standard flange.
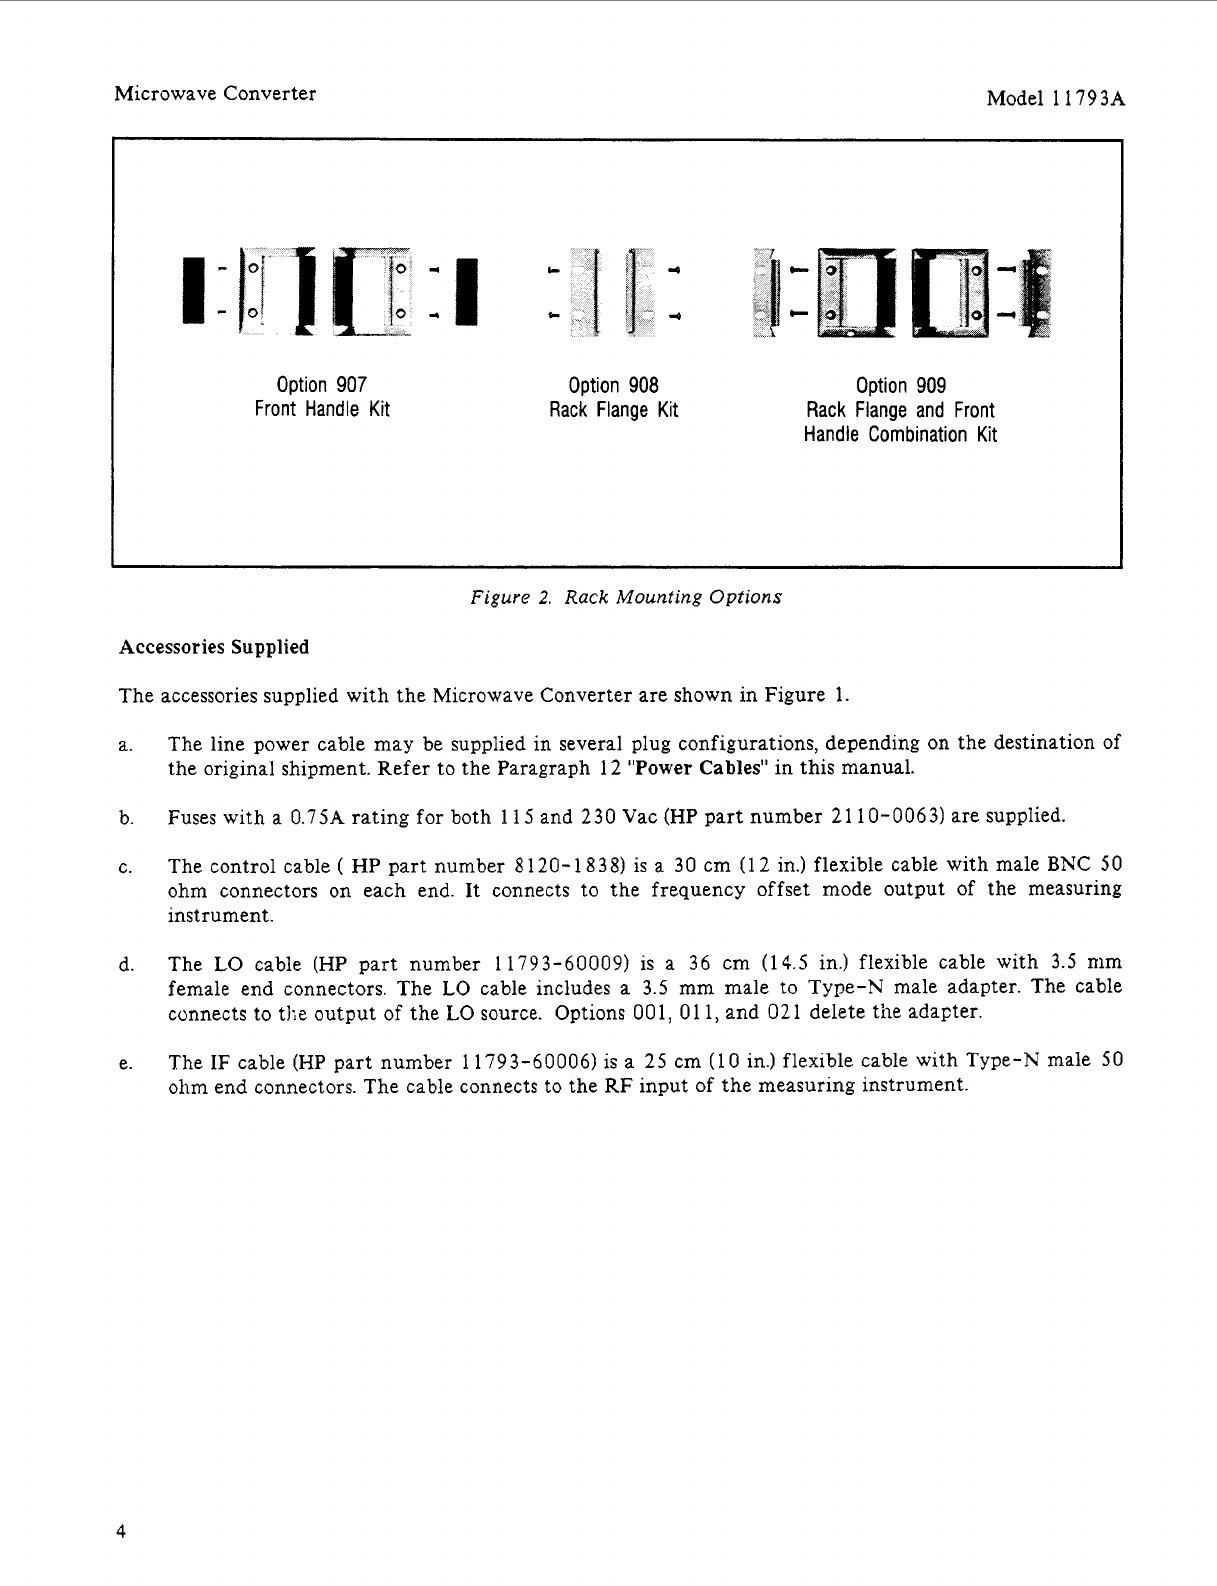
Microwave Converter Model 11793A
Option 907
Front Handle Kit Option 908 Option 909
Rack Flange
Kit
Rack Flange and Front
Handle Combination
Kit
Figure
2.
Rack
Mounting
Options
Accessories Supplied
The accessories supplied with the Microwave Converter are shown in Figure 1.
a.
b.
C.
d.
e.
The line power cable may be supplied in several plug configurations, depending on the destination of
the original shipment. Refer to the Paragraph 12
"Power Cables"
in this manual.
Fuses with a 0.7SA rating for both
11
5
and 230 Vac (HP part number 21 10-0063) are supplied.
The control cable
(
HP
part number 8 120- 18 38) is a 30 cm
(1
2 in.) flexible cable with male BNC 50
ohm connectors on each end. It connects to the frequency offset mode output of the measuring
instrument.
The
LO
cable (HP part number 11793-60009) is a 36 cm (14.5 in.) flexible cable with
3.5
mm
female end connectors. The
LO
cable includes a 3.5 mm male to Type-N male adapter. The cable
connects to tlie output
of
the
LO
source. Options
001,
01
1, and 021 delete the adapter.
The
IF
cable (HP part number 11793-60006)
is
a 25 cm (10 in.) flexible cable with Type-N male
50
ohm end connectors. The cable connects to the
RF
input of the measuring instrument.
4
Model
11793A
Microwave Converter
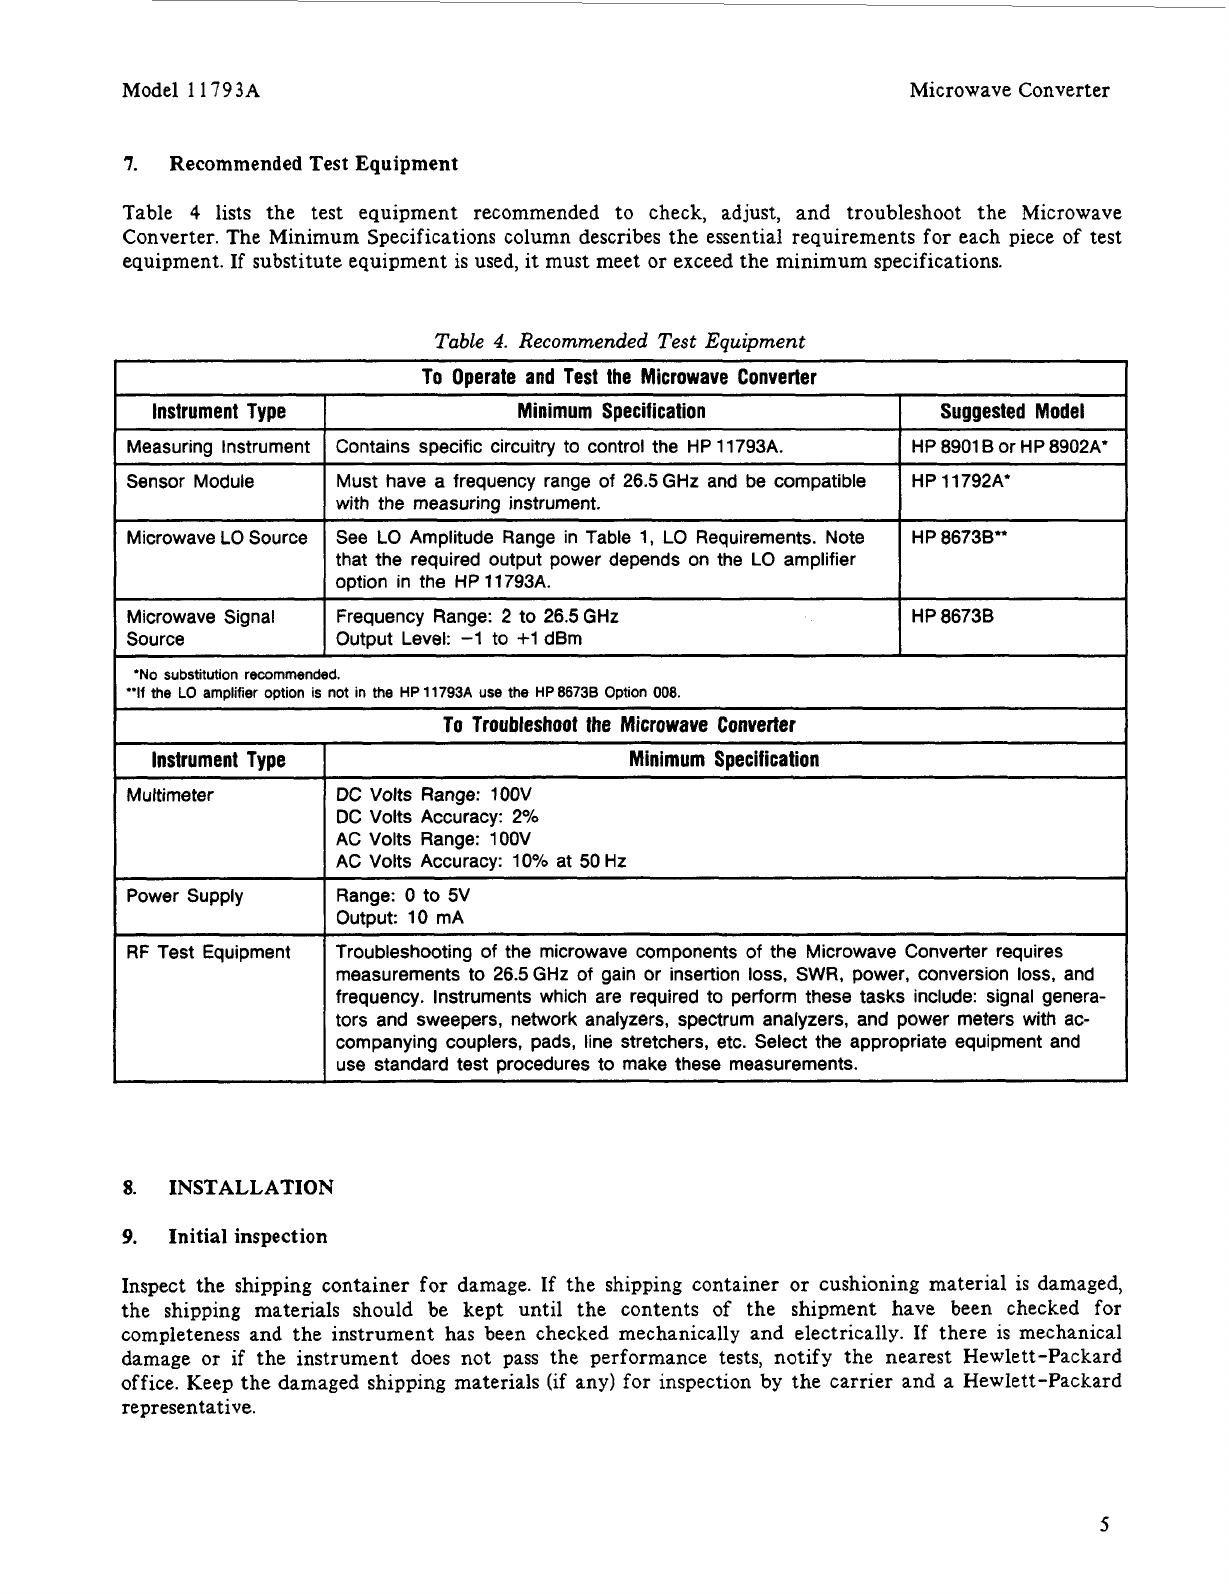
Instrument Type
Measuring Instrument
Sensor Module
7.
Recommended
Test
Equipment
Minimum Specification Suggested Model
Contains specific circuitry to control the HP 11793A.
Must have a frequency range of 26.5 GHz and be compatible
with the measuring instrument.
HP 8901 B or HP 8902A'
HP 11792A'
Table
4
lists the test equipment recommended to check, adjust, and troubleshoot the Microwave
Converter. The Minimum Specifications column describes the essential requirements for each piece of test
equipment. If substitute equipment is used, it must meet or exceed the minimum specifications.
Microwave LO Source
Microwave Signal
Source
Table
4.
Recommended Test Equipment
See
LO
Amplitude Range in Table 1,
LO
Requirements. Note
that the required output power depends on the LO amplifier
option in the HP
11
793A.
Frequency Range:
2
to 26.5GHz
Output Level:
-1
to +1 dBm
HP 86738"
HP 86738
I
To Troubleshoot the Microwave Converter
I
[
Instrument Type
I
Minimum Specification
I
Multimeter DC Volts Range: 1OOV
DC Volts Accuracy: 2%
AC Volts Range: lOOV
AC Volts Accuracy: 10% at 50 Hz
RF Test Equipment Troubleshooting of the microwave components of the Microwave Converter requires
measurements to 26.5GHz of gain or insertion
loss,
SWR,
power, conversion
loss,
and
frequency. Instruments which are required to perform these tasks include: signal genera-
tors and sweepers, network analyzers, spectrum analyzers, and power meters with ac-
companying couplers, pads, line stretchers, etc. Select the appropriate equipment and
use standard test procedures to make these measurements.
8.
INSTALLATION
9.
Initial
inspection
Inspect the shipping container for damage. If the shipping container or cushioning material
is
damaged,
the shipping materials should be kept until the contents
of
the shipment have been checked for
completeness and the instrument has been checked mechanically and electrically. If there
is
mechanical
damage or if the instrument does not pass the performance tests, notify the nearest Hewlett -Packard
office. Keep the damaged shipping materials
(if
any) for inspection by the carrier and a Hewlett-Packard
representative.
5
Microwave Converter Model
1
1793A
10. Power Requirements
The Microwave Converter requires a power source of
115,
230 Vac (+lo%,-20%),
48
to 66
Hz.
Power
consumption is
20
VA maximum.
11. Line Voltage Selection
Before the instrument is plugged in, it must
De
set to the voltage of
the power source, or damage to the instrument may result.
A
line voltage switch enables selection of either 11SV or 230V. The line voltage is indicated on this
rear-panel switch. Slide the switch to the proper line voltage for operation.
12. Power Cables
BEFORE CONNECTING THIS INSTRUMENT, the protective earth
terminal of the instrument must be connected to
the
protective
conductor
of
the (Mains) power cord. The Mains plug shall only
be
inserted in
a
socket outlet provided with
a
protective earth contact.
The protective action must not be negated
by
the use of an extension
cord (power cable) without
a
protective conductor (grounding).
Grounding one conductor of a two-conductor outlet is not sufficient
protection.
This instrument
is
provided with a three-wire power cable. When connected to an appropriate ac power
receptacle, this cable grounds the instrument cabinet. The type of power-cable plug shipped with the
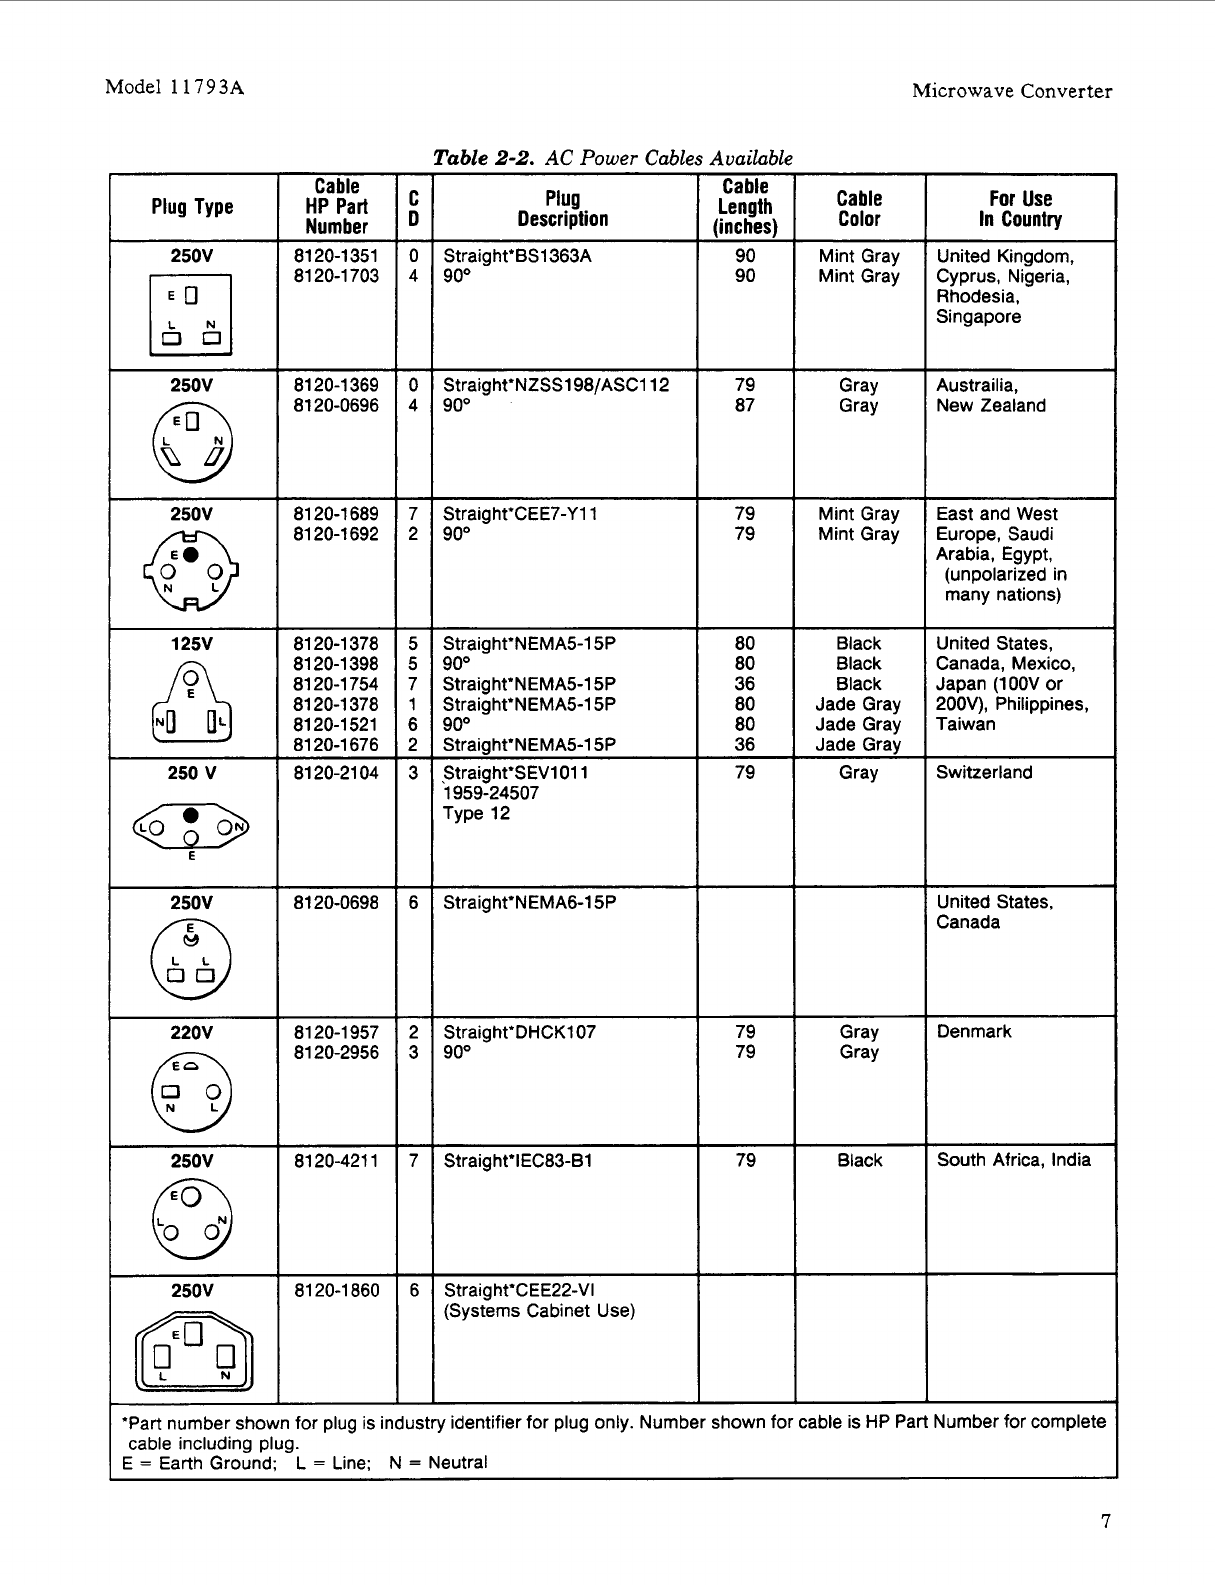
instrument depends on the country of destination. See Table
5
for part numbers
of
the available power
cables and Mains plugs.
13.
Mating Connectors
All coaxial connectors (except the
RF
Input) used with the Microwave Converter are provided on the
three accessory cables supplied with the instrument listed under Paragraph 6,
I'
Accessories Supplied
'I.
The
RF Input connector should be of the APC
3.5
mm female
SO
ohm type. Refer to Table
2,
Supplemental
Characteristics
for the correct type and location for mating each connector.
Use the correct torque wrench when installing sub-miniature
connectors.
Tighten 3.5 mm connectors to
0.7
N.m (6.3 in.Eb). Tighten Type-N
connectors to
0.7
Nm
(6.3
in.lb).
6
Model
1
179
3A
I
8120-1351
8120-1703
Microwave Converter
0
4
Table
2-2.
AC Power Cables Available
8120-1378
8120-1398
8120-1754
8120-1378
8120-1521
8120-1676
8120-2104
8120-0698
8120-1957
8120-2956
8120-4211
8120-1860
z!q
Number
5
5
7
1
6
2
3
6
2
3
7
6
Cable
Color
For
Use
In Country
Cable
Length
(inches)
90
90
Plug
Description
I
250V
Straight'BS1363A
90" Mint Gray
Mint Gray United Kingdom,
Cyprus, Nigeria,
Rhodesia,
Singapore
I:".J
00
I
250V
Gray
Gray Austrailia,
New Zealand
79
87
79
79 Mint Gray
Mint Gray East and West
Europe, Saudi
Arabia, Egypt,
(unpolarized in
many nations)
Straight'CEE7-Y11
goo
81 20-1 692
I
125V
United States,
Canada, Mexico,
Japan (1OOV or
200V), Philippines,
Taiwan
Straight'NEMA5-15P
90"
Straight'NEMA5-15P
Straight'NEMA5-l5P
90"
Straight'NEMA5-15P
Straight'SEVl 01
1
Type 12
1959-24507
80
80
36
80
80
36
79
Black
Black
Black
Jade Gray
Jade Gray
Jade Gray
Gray
I
250 V
Switzerland
~~
United
States,
Canada
Straight'NEMAG-15P
79
79 Gray
Gray Denmark
Straight'DHCK107
90"
I
250V
Straight'lEC83-B1 79 Black South Africa, India
Straig ht'CEE22-VI
(Systems Cabinet Use)
'Part number shown for plug
is
industry identifier for plug only. Number shown for cable
is
HP Part Number for complete
cable including plug.
E
=
Earth Ground; L
=
Line;
N
=
Neutral
7
Microwave Converter Model 11793A
14.
Operating Environment
The operating environment should be within the following limitations:
Temperature
..........................
0°C to +55"C
Humidity
..............................
~95% relative at 40°C
Altitude
...............................
44570 meters
(1
5
000
feet)
15.
Bench Operation
The instrument cabinet
has
plastic feet which are shaped to insure self-alignment when stacked in a
system configuration.
16.
Rack Mounting
Rack mounting information is provided with the rack mounting kits. If the kits were not ordered with the
instrument as options, they may be ordered through the nearest Hewlett-Packard office. Refer to
Paragraph
6,
under "Mechanical Options" for kit information. See Figure 2,
Rack
Mounting Options.
17.
Storage and Shipment
The instrument should be stored in a clean, dry environment. The following environmental limitations
apply to both storage and shipment.
Temperature (Standard)
.......................
-
5
5°C
to
+7
S"C
Temperature (Options 001,
01
1, and 021)
....
-25°C to +7S"C
Humidity
......................................
49
5%
relative
Altitude
.......................................
15
300
meters
(SO
000
feet)
18.
Packaging
Original Packaging. Containers and materials identical to those used in factory packaging are available
through Hewlett -Packard offices. If the instrument
is
being returned to Hewlett -Packard for servicing;
attach a tag indicating the type of service required, return address, model number, and full serial number.
Also, mark the container
FRAGILE
to ensure careful handling. In any correspondence refer to the
instrument by model number and full serial number.
Other Packaging. The following general instructions should be used for repackaging the instrument with
commercially available materials.
a. Wrap the instrument
in
heavy paper
or
plastic. (If shipping to a Hewlett-Packard office or
service center, attach a tag indicating the type of service required, return address, model number,
and full serial number.)
b. Use a strong shipping container.
A
double-wall carton made of 2.4 MPa
(350
psi) test material is
adequate.
8
Model
11
793A
Microwave Converter
c. Use enough shock-absorbing material; a
7.5
to
10.0
cm
(3
to
4
in.) layer around all sides of the
instrument to provide a firm cushion and to prevent movement in the container. Protect the
front panel with cardboard.
d. Seal the shipping container securely.
e. Mark the shipping container
FRAGILE
to ensure careful handling.
19.
Operation
Before the Microwave Converter is plugged in,
all
protective earth
terminals, extension cords, auto -transformers, and devices connected
to
it
should be connected
to
a protective earth grounding socket. Any
interruption
of
the protective earth grounding will cause a potential
shock hazard that could result in personal injury.
Before the Microwave Converter is plugged
in,
it must be set
to
the
same line voltage as the power source
or
damage
to
the instrument
may result.
The
HP
11
793A
Microwave Converter is designed to be operated remotely by the measuring instrument
in its frequency offset mode. Operation of the Microwave Converter is, therefore, under control of the
measuring instrument.
20.
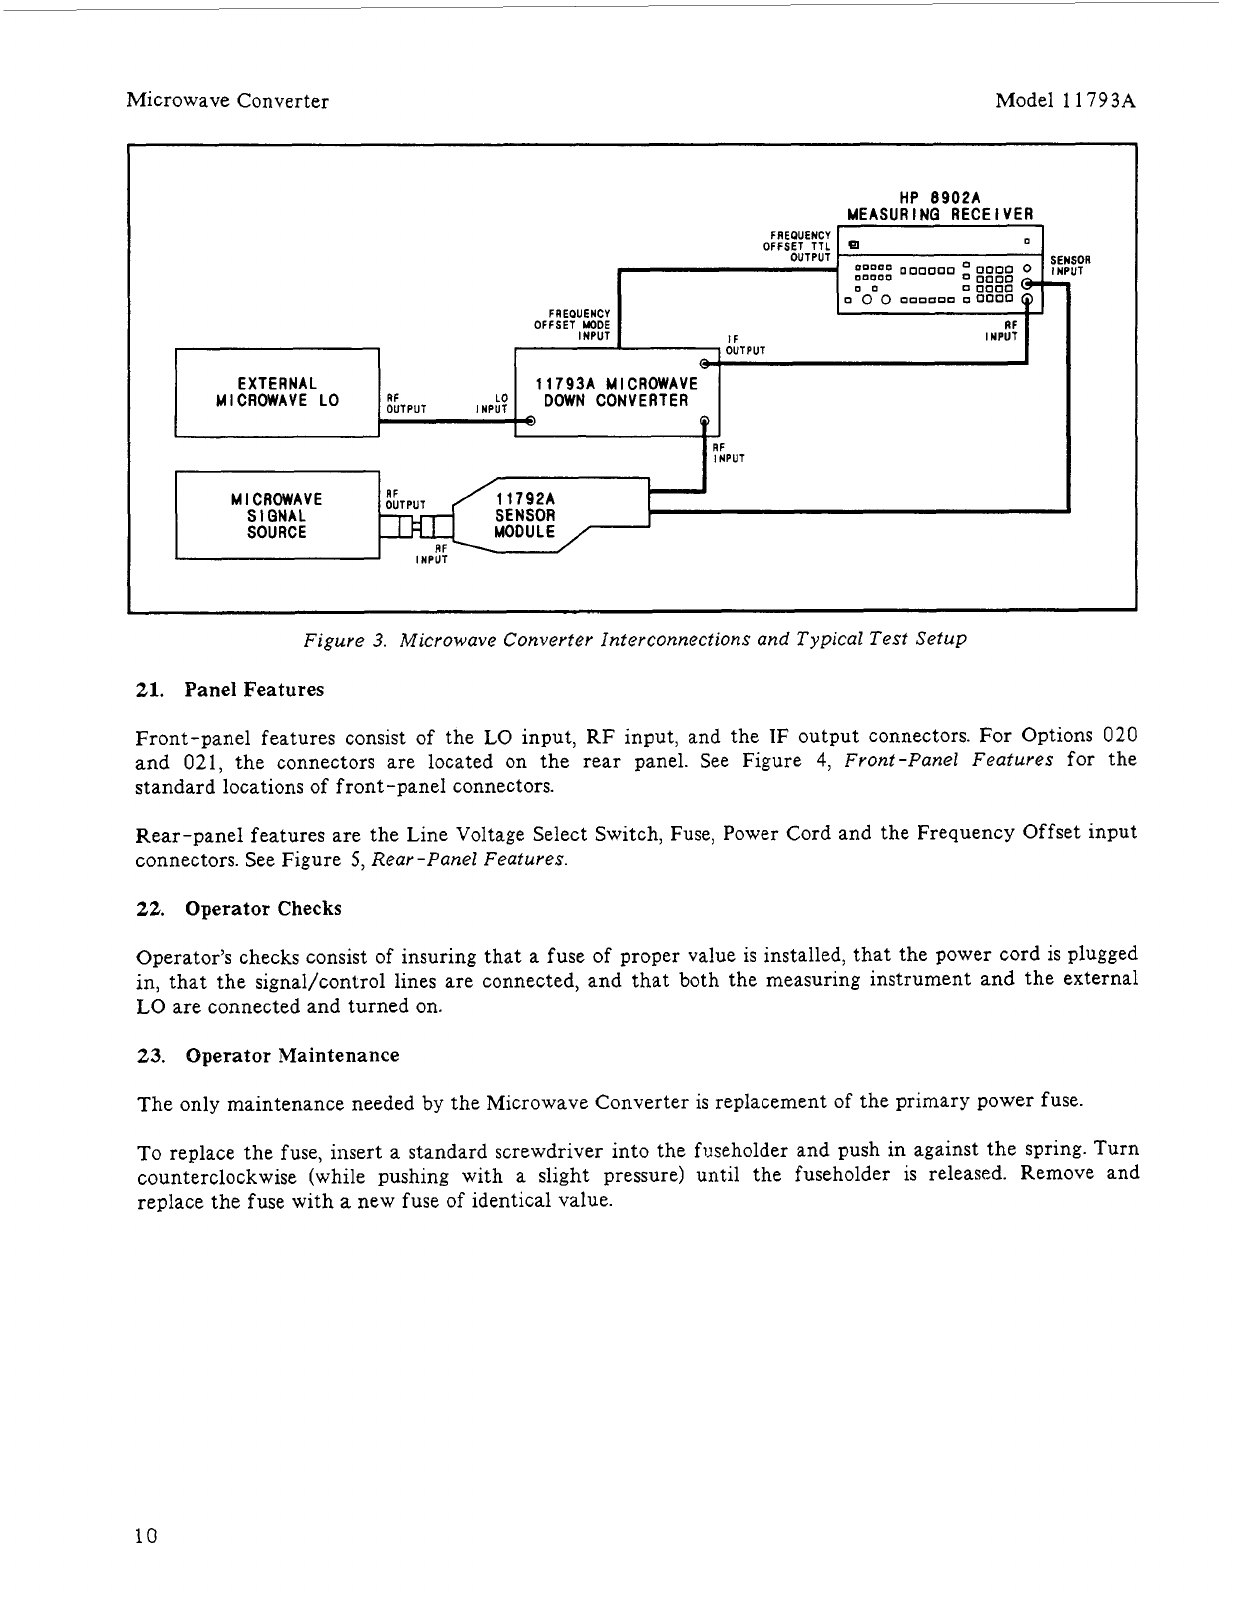
Operating Instructions
To
operate the Microwave Converter, plug
in
the power cord and connect the signal and control cables as
indicated in Figure
3,
Microwave Converter Interconnections
and
Test Set-up.
Refer to Table
1,
LO
Requirements,
for
LO
power requirements.
This instrument does
not
have an
orl/off
switch
or
front-panel
power indicator light. Power is supplied
to
the instrument as soon as
the power cord is plugged in
to
the line voltage source.
9
Microwave Converter Model
11793A
FREPUENCY
OUTPUT
OFFSET TTL
0
I
:::::
D00000
0000
0
0
0000
00
0
0000
0
0
0
000000
00000
Q
HP
6902A
MEASURING RECEIVER
SI
II
FREOUENCY
I
OFFSET MODE RF
INPUT INPUT
I
OR
1
Figure
3.
Microwave Convertor Interconnections and Typical Test Setup
21.
Panel Features
Front-panel features consist of the
LO
input, RF input, and the IF output connectors. For Options
020
and
021,
the connectors are located on the rear panel. See Figure
4,
Front-Panel Features
for the
standard locations of front-panel connectors.
Rear-panel features are the Line Voltage Select Switch, Fuse, Power Cord and the Frequency Offset input
connectors. See Figure
5,
Rear -Panel Features.
22.
Operator Checks
Operator’s checks consist of insuring that a fuse of proper value is installed, that the power cord is plugged
in, that the signal/control lines are connected, and that both the measuring instrument and the external
LO
are connected and turned on.
23.
Operator Maintenance
The only maintenance needed by the Microwave Converter is replacement of the primary power fuse.
To replace the fuse, insert a standard screwdriver into the fuseholder and push in against the spring. Turn
counterclockwise (while pushing with a slight pressure) until the fuseholder is released. Remove and
replace the fuse with
a
new fuse of identical value.
10

Model
11793A
Microwave Converter
IF OUTPUT: The
IF
output,
Type-N connector, couples the IF
output signal into measuring in-
strument
RF
input.
LO INPUT: The LO input, 3.5 mm
connector, couples an external
oscillator signal source to the
instrument.
RF
INPUT: The RF input, 3.5mm
connector couples the microwave
input signal into the instrument.
The maximum allowable input
power is +30 dBm (lwatt), the
input impedance is 50 ohms
nominal.
Figure
4.
Front-Panel Features
RF INPUT is a rear-panel input
for the
RF
signal (instead of the
standard front-panel connection)
for option
020,
021 instruments.
IF OUTPUT is a rear-panel out-
put for the
IF
signal (instead of
the standard front-panel connec-
tion) for the option 020, 021
instruments.
FREQ OFFSET INPUT enables
the measuring instrument to con-
trol the switching circuitry.
T
T
I
LINE VOLTAGE SELECTION
SWITCH:
11
5
or 230 Vac
LO INPUT is a rear-panel input
for the LO signal (instead of the
standard, front-panel connection)
for the option
020,
021
instruments.
LINE VOLTAGE POWER CORD
CONNECTION
-1
FUSE HOLDER AND
.75A
FUSE
Figure
5.
Rear -Panel Features
11
Microwave Converter Model
1
1793A
24.
Performance Tests
Description
Performance testing consists of a general functional check to verify the instrument down-converts and
switches RF paths properly. Since the Microwave Converter is designed to operate with specific HP
instrumentation, no substitution is recommended.
Equipment
Measuring Instrument
.................
HP 8901B or HP 8902A
Sensor Module
.........................
HP
1
1
7
9 2A
Microwave
LO
Source
.................
See Table
4
Microwave Signal Source
..............
HP 8673B (up to 26 GHz Amplifier)
HP
8673B Option 008 (up to
26
GHz,
(w/o Amplifier)
HP 8672A Option
008
(up to 18 GHz,
w/o Amplifier)
RF
Signal Source
......................
HP 8642B, HP 8660C/86602B, HP 8662A,
HP
8663A
Procedure
1.
Connect the equipment as shown in Figure 3. Set the two microwave sources to
CW.
Set the
microwave signal source to
0
dBm.
NOTE
Check that the measuring instrument's RF Power calibration factors
match the sensor module. The measuring instrument must be in
frequency offset mode in order to enter the
RF
Power calibration
factors into the Frequency Offset mode RF Power Cal Factor Table.
2.
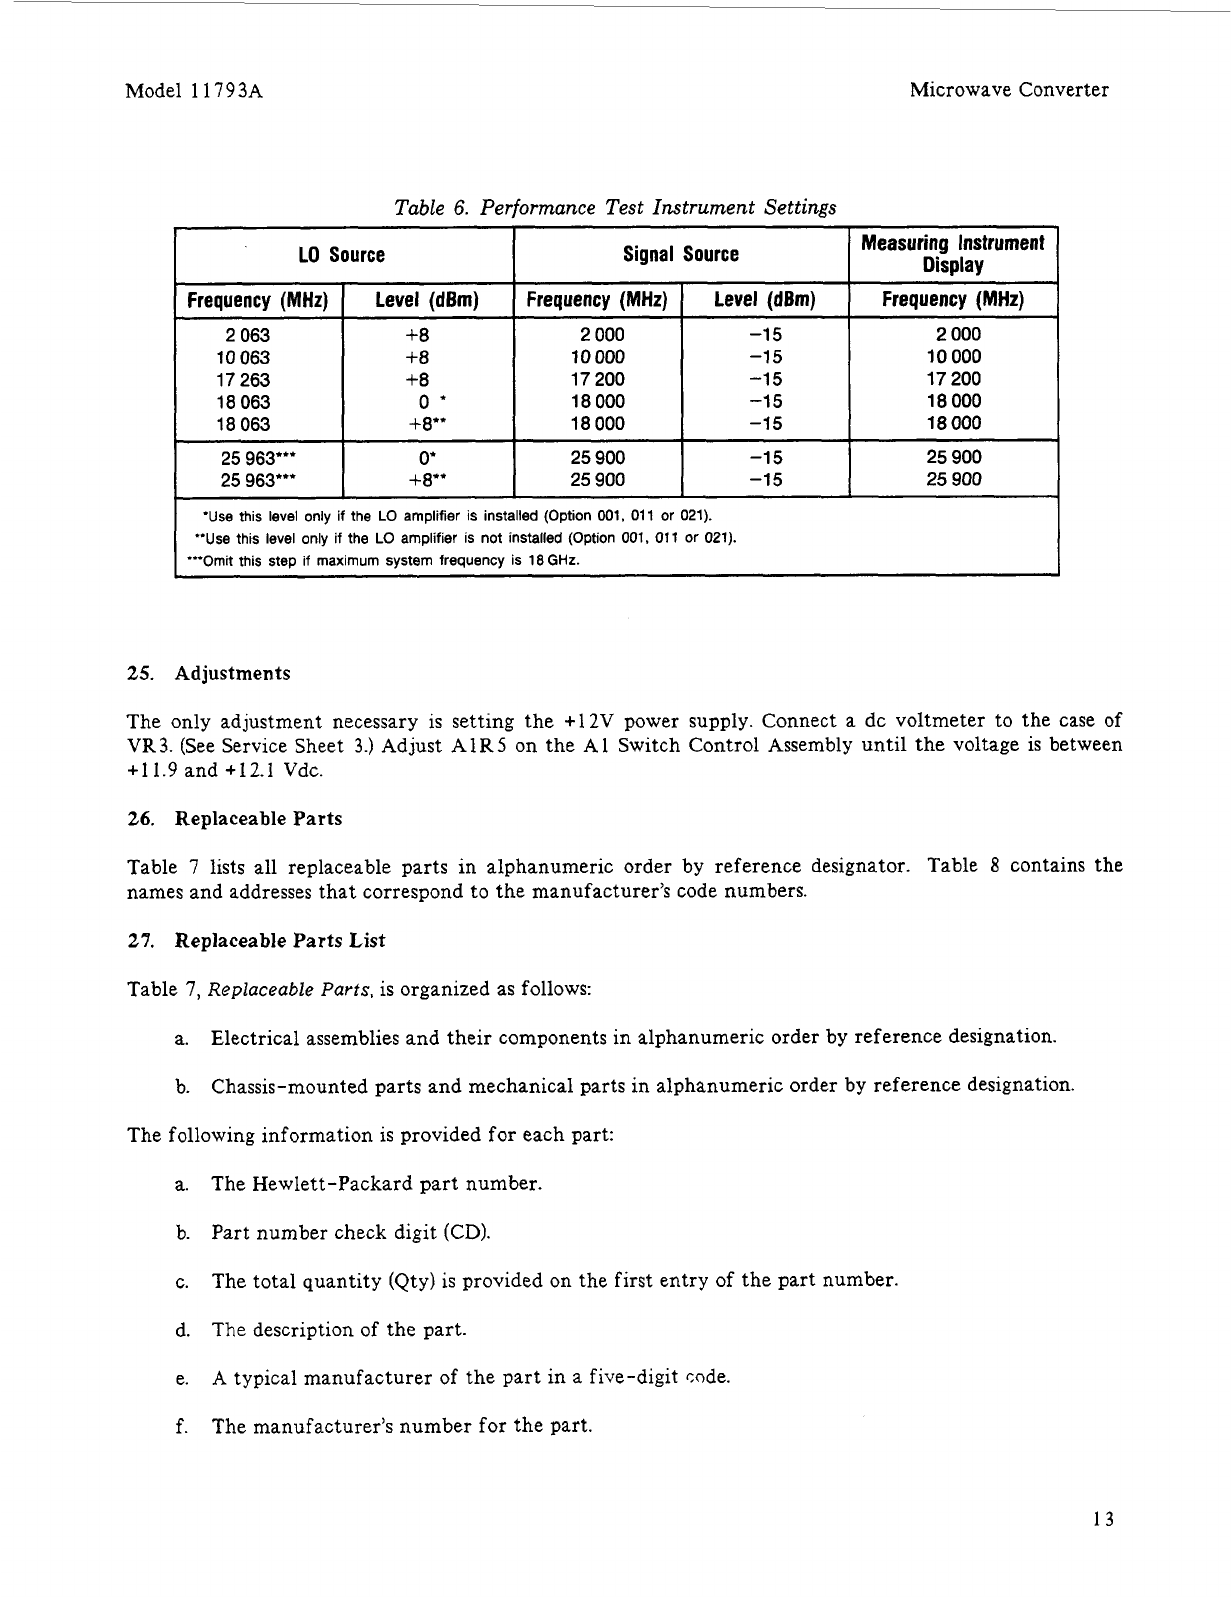
Set the microwave
LO
source frequency and level as listed in Table
6.
Performance Tests
Znstrument Settings.
For each setting, perform the following steps:
a. Set the frequency of the microwave signal source as listed.
b.
On the measuring instrument, key in 27.3 SPCL. Key in the frequency of the microwave LO
source (in
MHz),
then press the MHz key.
c. On the measuring instrument, measure RF frequency and
RF
Power (in that order). The
measuring instrument's display should read as indicated in table
6.
(The listed frequency is a
nominal value.)
3.
Set the RF signal source
to
1270 MHz. and level
-
10 dBm.
4.
On the measuring instrument, key in 27.3 SPCL and enter
0
MHz. This leaves the measuring
instrument in frequency offset mode with
0
MHz offset. Measure RF Frequency and RF Power
(in that order).
12
Model 11793A
Frequency
(MHz)
2
000
1
0
000
17
200
18
000
18 000
Microwave Converter
level
(dBm)
Frequency
(MHz)
-1
5
2
000
-1
5
10
000
-1
5
17
200
-1
5
18
000
-15 18
000
Table
6.
Performance Test Instrument Settings
25
900
25
900
LO
Source
-1
5
25
900
-15
25
900
Frequency
(MHz)
I
Level
(dBm)
2 063
10
063
17
263
18
063
18
063
+8
+8
+8
0'
+8'*
25
963'"
0'
25
963"'
I
+8"
Signal Source Measuring Instrument
I
Display
'Use
this
level
only if the
LO
amplifier is installed (Option
001,
011
or
021).
"Use this
level
only if the
LO
amplifier
is
not installed (Option
001.
011
or
021).
"'Omit this step if maximum system frequency is
18
GHz.
25.
Adjustments
The only adjustment necessary is setting the +12V power supply. Connect a dc voltmeter to the case of
VR3. (See Service Sheet
3.)
Adjust AIR5 on the AI Switch Control Assembly until the voltage
is
between
+11.9
and
+I21
Vdc.
26.
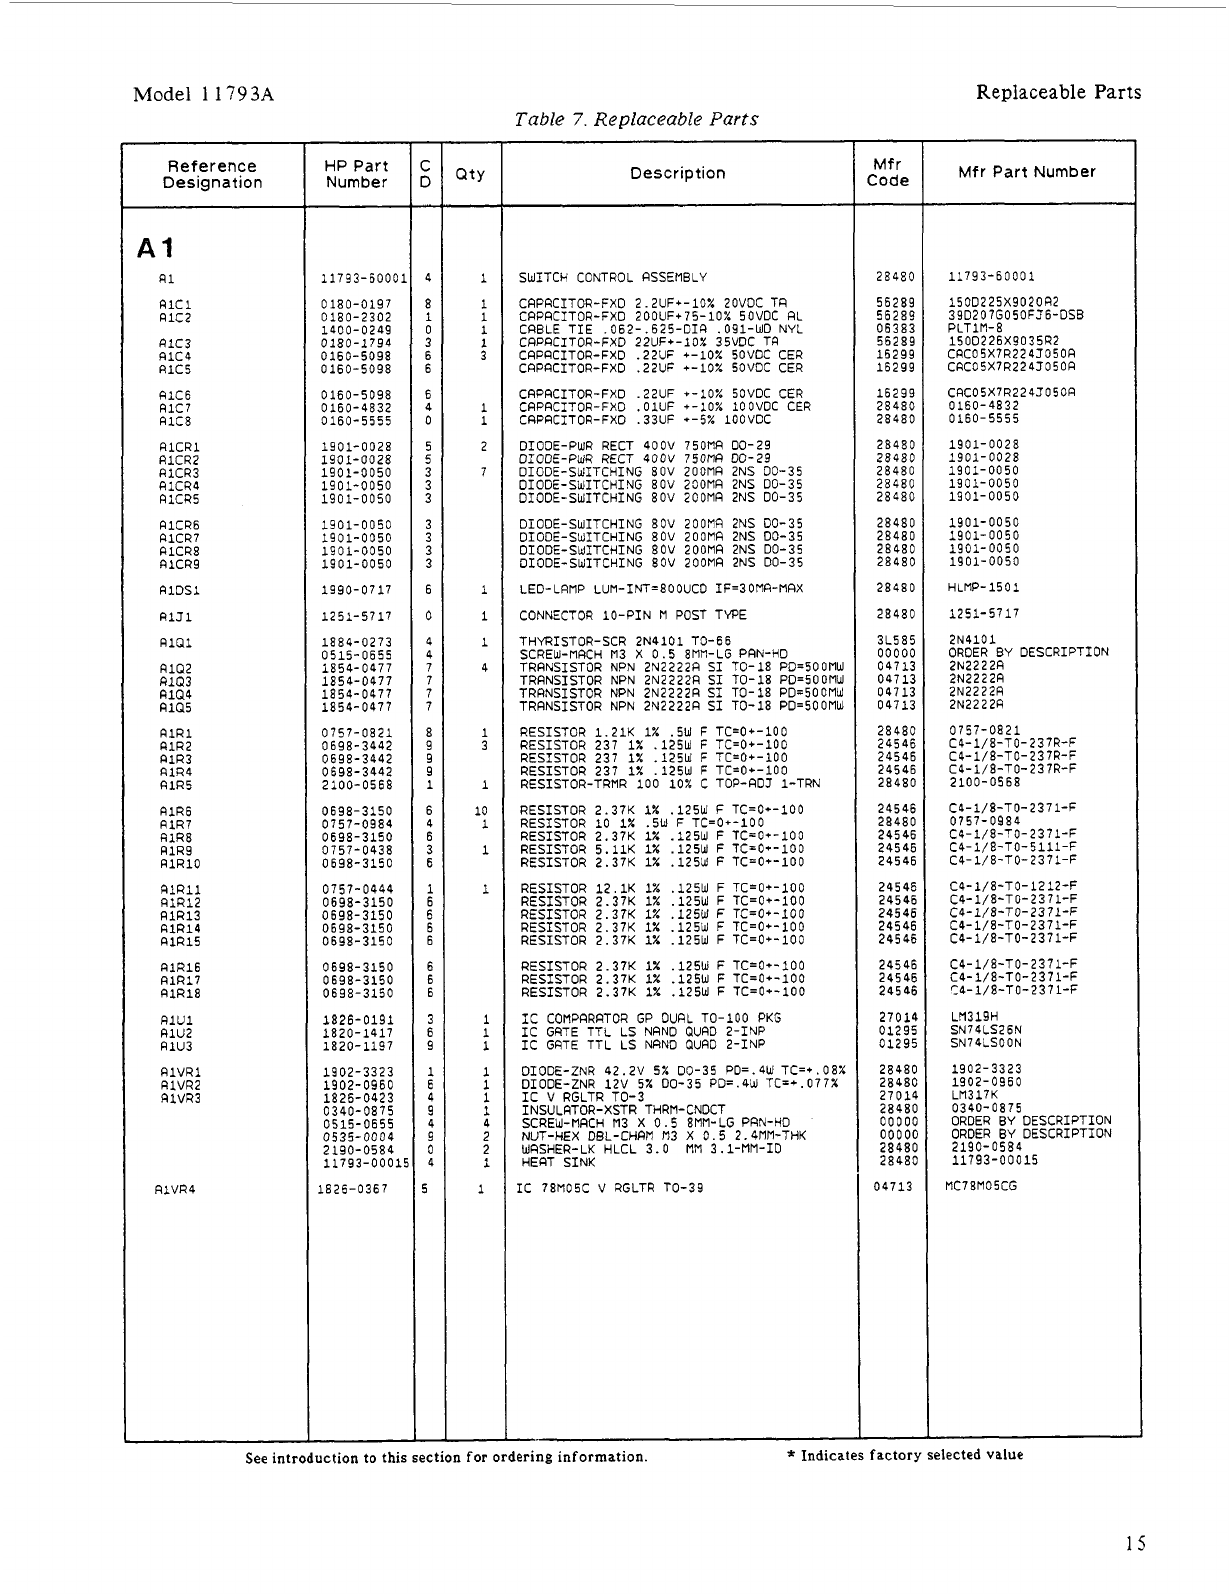
Replaceable Parts
Table
7
lists all replaceable parts
in
alphanumeric order by reference designator. Table
8
contains the
names and addresses that correspond to the manufacturer's code numbers.
27.
Replaceable Parts
List
Table 7,
Replaceable Parts.
is organized as follows:
a. Electrical assemblies and their components in alphanumeric order by reference designation.
b. Chassis-mounted parts and mechanical parts in alphanumeric order by reference designation.
The following information
is
provided for each part:
a. The Hewlett-Packard part number.
b.
Part number check digit
(CD).
c. The total quantity (Qty) is provided on the first entry of the part number.
d.
The
description of the part.
e.
A
typical manufacturer of the part in a five-digit code.
f.
The manufacturer's number for the part.
13
Microwave Converter Model
1
1793A
28.
Parts List Updating (Manual Changes Supplement)
Production changes to the instrument made after the publication date of this manual are denoted by a
change in the serial-number prefix. Changes to the parts list are recorded by serial prefix on a Manual
Changes supplement. Also, errors in the manual are noted in the Errata portion of the Manual Changes
supplement.
29.
Illustrated Parts Breakdowns
The components that compose the Microwave Converter are illustrated in the component locator diagrams
in Figure 13, and in the illustrated parts breakdown photographs of Figures
7
and
8.
14
Model
11793A
Table
7.
Replaceable
Parts
Replaceable
Parts
Reference
Designation
I
A1
R1
RlCl
R1C2
RlC3
RlC4
RlC5
A1C6
R1C7
R1C8
AlCRl
RlCR2
RlCR3
RlCR4
R1CR5
RlCR6
A1CR7
RlCR8
RlCRO
RlDSl
RlJl
R1Q1
R1Q2
R1Q3
RlQ4
RlQ5
RlRl
R1R2
R1R3
R1R4
R1R5
RlR6
R1R7
R1R8
R1R9
RlRlO
PlRll
RlR12
R1R13
R1R14
RlR15
RlR16
FllR17
RlR18
RlUl
RlU2
RlU3
RlVRl
RlVR2
RlVR3
RlVR4
HP
Part
Number
11793-6000:
0120-0197
0180-2302
1400-0249
0180-1794
0160-5098
0160-5098
0160-5098
0160-4832
0160-5555
190
1-002
8
1901-0028
1901-0050
1901-0050
1901-0050
190
1-
0050
1901-0050
1901-0050
1901-0050
1990-0717
1251-5717
1884-0273
0515-0655
1854- 0477
1854-0477
1854-0477
1854-0477
0757-0821
0698-3442
0698-3442
0698-3442
2100-0568
0698-3150
0757-0984
0698-3150
0757-0438
0698-3150
0757-0444
0698-3150
0698-3150
0698-3150
0698-3150
0698-3150
0698-3150
0698-3150
3826-0191
1820-1417
1820-1197
1902-3323
1902-0460
1826-0423
0340-0875
0515-0655
0535-0004
2190-0584
11793-0001
1826-0367
-
1
I
4
8
1
0
3
6
6
6
4
0
5
5
3
3
3
3
3
3
3
6
0
4
4
7
7
7
7
8
9
9
9
1
6
4
6
3
6
1
6
6
6
6
6
6
6
3
6
9
1
6
!
I
I
(
5
-
ItY
-
1
1
1
1
1
3
1
1
2
7
1
1
1
4
1
3
1
10
1
1
1
1
1
1
1
1
1
1
4
2
2
1
1
-
Description
SWITCH CONTROL
RSSEMBLY
CRPRCITOR-FXD .22UF
+-lo%
5CVDC CER
CRPRCITOR-FXO .OlUF
+-lo%
lOOVDC CER
CRPRCITOR-FXD .33UF +-5% lOOVOC
DIODE-PWR RECT 400V 750MR 00-29
DIODE-PUR RECT 400V 750MF) DO-29
DIODE-SWITCHING 8OV 200MR 2NS 00-35
DIODE-SWITCHING
8OV
200MA
2NS DO-35
DIODE-SWITCHING 8OV 200MR 2NS DO-35
DIODE-SWITCHING 8OV 200MR 2NS 00-35
DIODE-SWITCHING 8OV
ZOOMFI
2NS 00-35
DIODE-SWITCHING 8OV
200MA
2NS 00-35
DIODE-SWITCHING 8OV 200MA 2NS DO-35
LED-LRMP LUM-INT=800UCD IF=30MR-MRX
CONNECTOR 10-PIN
M
POST TWE
RESISTOR 1.21K
1%
.5W F TC=0+-100
RESISTOR 23i-l% .125W F TC=0+-100
RESISTOR 237
1%
.125W F TC=0+-100
RESISTOR 237
1%
.125W
F
TC=0+-100
RESISTOR-TRMR
100
10%
C TOP-RDJ 1-TRN
RESISTOR 2.37K
1%
.125W
F
TC=0+-100
RESISTOR
10
1%
.5W
F
TC=0+-100
RESISTOR 2.37K
1%
.125W F TC=O*-100
RESISTOR 5.11K
1%
.125W
F
TC=0+-100
RESISTOR 2.37K
1%
.125W
F
TC=0+-100
RESISTOR 12.1K
1%
.125W
F
TC=0+-100
RESISTOR 2.37K
1x
.l25W F TC=0+-100
RESISTOR 2.37K
1%
.125W
F
TC=O+-100
RESISTOR 2.37K
1%
,125W
F
TC=0+-100
RESISTOR 2.37K
1%
.125W
F
TC=0+-100
RESISTOR 2.37K
1%
.125W
F
TC=0+-100
RESISTOR 2.37K
1%
.125W
F
TC=0+-100
RESISTOR 2.37K
1x
.125W
F
TC=0+-100
IC COMPQRRTOR GP
DUQL
TO-100
PKC
IC GRTE TTL LS NRND QURD 2-INP
IC GATE TIL
LS
NRND OUR0 2-INP
DIODE-ZNR 42.2V 5% 00-35 PD=.4W TC=*.08X
DIODE-ZNR 12V
5%
DO-35 PD=.4W TC=+.077%
IC V RGLTR TO-3
INSULATOR-XSTR THRM-CNDCT
SCREW-MACH M3 X 0.5 8MM-LG PRN-HD
NUT-HFX
DBL-CHRM
M3
X
0.5
2.4MM-THK
WASHER-Lk-HLtL 3.0-
MM
3.1-MM-ID
HERT SINK
IC 78M05C V RGLTR TO-39
-.
See introduction to this section for ordering information.
Mf
r
Code
28480
56289
56289
06383
56289
16299
16299
16299
28480
28480
28420
28480
28480
28480
28480
28480
28480
28480
28480
28480
28420
3L585
00000
04713
04713
04713
04713
28480
24546
24546
24546
28480
24546
28480
24546
24546
24546
24546
24546
24546
24546
24546
24546
24546
24546
27014
01295
01295
28480
28480
2701r
28481
0000l
00001
28481
28481
04713
Mfr Part Number
11793-60001
150D225X9020R2
39D207G050FJS-DSB
PLTlM-8
150D226X9035R2
CRC05X7R224J050R
CRC05X7R224J050R
CRC05X7R224J050R
0160-4832
0160-5555
1901-0028
1901-0028
1901-0050
1901-0050
1901-0050
1901-00
50
190
1-
00
5
0
1901-
00
50
1901-0050
HLMP- 150
1
1251-5717
2N4101
ORDER
BY
DESCRIPTION
2N2222fi
2N2222R
2N2222Q
2N2222A
0757-0821
C4-1/8-TO-237R-F
C4-1/8-TO-237R-F
C4- 1/8-TO- 23 7R-F
2100-0568
C4- 1/8-TO- 23 71-F
0757-0984
C4-1/8-TO-2371-F
C4-1/8-TO-5111-F
C4-1/8-TO-2371-F
C4-
1/
8-T
0
-
12
12
-F
C4-1/8-TO-23 71-F
C4-1/8-TO-2371-F
C4-1/8-TO-2371-F
C4-1/8-TO-2371-F
C4-
1/8-TO-
23 71-F
C4-1/8-TO-2371-F
‘4-1/8-T0-2371-F
Lfl319H
SN7 4LS2
6N
SN74LSOON
MC78M05CG
f
Indicates factory selected value
15

Replaceable
Parts
Model
11793A
Table
7.
Replaceable Parts
Reference
Designation
FIT
1
F1
FL1
J1
J2
J3
J4
J5
J6
J7
J8
J9
J10
ZS2OA
AND
ABOVE
MPI
MPZ
24071
ONLY
HP
I
MP
2
HP Part
Number
11793-60003
2110-0063
2110-0566
2110-0565
2110-0569
2190-0068
9135-0229
1400-0025
0515-0381
0535-0006
2190-0586
3050-0893
08673-60040
2190-0016
2950-0043
11793-60008
1250-0914
1250-0915
5040-0306
08671-2027
08555-20093
08555-20094
2190-0104
2950-0132
08673-60040
2190-0016
2 950-
0
043
08673-6004C
2190-0016
2950- 0043
08673-6004C
2190-0016
2950-0043
08673-6004C
2190-0016
2950-0043
11793-60001
1250-0914
1250-0915
5040-0306
08671-2027
08555-2009:
08555-2009d
2190-0104
2950-0132
1250-0870
5 021- 5801
0515-1227
5021-5832
0515-1331
5020-8801
0515-1227
5020-8832
2510-0192
-
- -
1
-
6
2
0
9
3
5
1
0
3
1
2
9
9
3
8
1
7
8
0
5
5
6
0
6
9
3
8
9
3
8
9
3
8
9
3
8
1
7
8
0
5
5
6
0
6
4
0
8
7
5
4
8
1
6
-
QtY
-
1
1
1
1
1
1
1
2
17
1
22
3
5
5
5
2
2
2
2
2
2
2
2
6
1
1
6
2
8
1
6
2
8
Description
3
DB RTTENURTOR
FUSE .75A 250V NTD 1.25X.25 UL
FUSEHOLDER-EXTR POST 12R 250
V
FUSEHOLDER CAP 12R MRX FOR UL
FUSEHOLDER COMPONENT NUT; THRERD M12.7
WASHER-LK INTL T 1/2 IN ,505-IN-ID
FILTER-LOW PRSS
DC
TO
800MHZ;
M/F
SUR
CLAMP-CRBLE .5-DIR .5-WD NYL
SCREW-MRCH M4 X 0.7 10MM-LG PAN-HD
NUT-HEX OBL-CHRM M4 X 0.7 3.2Mfl-THK
WASHER-LK HLCL 4.0
MM
4.1-MU-ID
WRSHER-FL MTLC 4.0
MM
4.4-MM-ID
CONNECTOR ASSEMBLY "LO INPUT"
(LEFT SIDE: STRNDRRO ONLY)
WASHER-LK INTL T 3/8 IN ,377-IN-ID
NUT-HEX-DBL-CHRM 3/8- 32-THD
.09
4-IN-THK
CONNECTOR ASSEMBLY TYPE-N "IF OUTPUT"
_.
(STRNDRRD
AND
OPTION
010
ONLY)
CONNECTOR-RF RPC-N FEM UNMTD 50-OHM
TONTFITT-RF CONN
SER
RPC-N FEMRLE
BODY, BULKHERD
WRSHER-LK INTL T 7/16 IN .439-IN-I0
NUT-HEX-DBL-CHRM 7/16-28-THD .094-IN-THK
CONNECTOR QSSEMBLY
"RF
INPUT"
(STANDARD AND OPTION
010
ONLY)
WASHER-LK INTL T 3/8 IN ,377-IN-ID
NUT-HEX-DBL-CHAM 3/8-32-THD .094-IN-THK
CONNECTOR QSSEMBLY "LO INPUT"
(RIGHT SIDE: OPTION
010
ONLY)
WASHER-LK INTL T 3/8 IN .377-1N-ID
NUT-HEX-DBL-CHAM 3/8-32-THD ,094-IN-THK
CONNECTOR ASSEMBLY "RF INPUT"
(REAR PRNEL: OPTION 020 ONLY)
WRSHER-LK INTL T 3/8 IN ,377-IN-ID
NUT-HEX-DEL-CHRM 3/8-32-THD .094-IN-THK
CONNECTOR ASSEMBLY "LO INPUT"
__
__
-
___
~~
(RERR PANEL: OPTION 020 ONLY)
WASHER-LK INTL T 3/8 IN ,377-IN-ID
NUT-HEX-DBL-CHRM 3/8-32-THD .094-IN-THK
CONNECTOR ASSEMBLY TYPE-N "IF OUTPUT"
(RERR PRNEL: OPTION 020 RND 021 ONLY)
CONNECTOR-RF APC-N FEU UNMTD 50-OHM
CONTACT-RF CONN SER RPC-N FEMRLE
INSULRTOR
INSULATOR
CONTACT JRCK
BODY, BULKHERO
WASHER-LK INTL T 7/16 IN ,439-IN-IO
NUT-HEX-DBL-CHRM 7/16-28-THD .094-IN-THb
CONNECTOR-RF BNC FEM SGL-HOLE-RR 50-OHM
FREQUENCY OFFSET INPUT"
PART OF W12 (NOT SEPRRRTELY REPLRCERBLE
PRRT OF
WlO/W11
(NOT SEPARRTELY
REPLACEABLE)
FRRME FRONT
SCREW-MRCH
M3
X 0.5 Sflfl-LG 90-DEG-FLH-HD
SIDE STRUT
SCREW-MACH M4
X
0.7 6MM-LG FLRTHD
FRONT FRAME
SCREW-MFICH M3 X 0.5 6MM-LG 90-DEG-FLH-HI
SIDE STRUT
SCREW-MACH 8-32 .25-IN-LG
100
DEG
Mf
r
Eode
28480
28480
28480
28480
28480
28480
28480
28480
00000
00000
28480
28480
28480
28480
00000
28480
28480
9D949
28480
28480
28480
28480
28480
00000
2848C
2848C
ooooc
2848C
2848C
ooooc
2848C
2848(
OOOO(
2848(
2848(
OOOO(
2848(
2848(
9D94!
2848t
28481
28481
28481
28481
00001
28481
28480
00000
28480
00000
28481
2848
28481
0000
Mfr Part Number
11793-60003
2110-0063
2110-0566
2110-0565
2110-0569
2190-0068
9135-0229
1400-0025
ORDER BY DESCRIPTION
ORDER BY DESCRIPTION
2190-0586
3050-0893
08673-60040
2190-0016
ORDER BY DESCRIPTION
11793-60008
1250-0914
131-149
5040-0306
08671-2027
08555-20093
08555-20094
2190-0104
ORDER BY OESCRIP
TION
08673-60040
2190-0016
ORDER BY DESCRIPTION
08673-60040
2190-0016
ORDER BY DESCRIPTION
08673-60040
2190-0016
ORDER BY DESCRIPTION
08673-60040
2190-0016
ORDER BY DESCRIPTION
11793-60008
1250-0914
131-149
5040-0306
086
7 1-2 027
08555-20093
08555-20094
2190-0104
ORDER BY DESCRIPTION
1250-0870
5021-5801
ORDER BY DESCRIPTION
5021-5832
ORDER BY DESCRIPTION
5020-8801
0515-1227
5020-8832
ORDER BY DESCRIPTION
See
introduction
to
this section for ordering information.
*
Indicates factory selected value
16
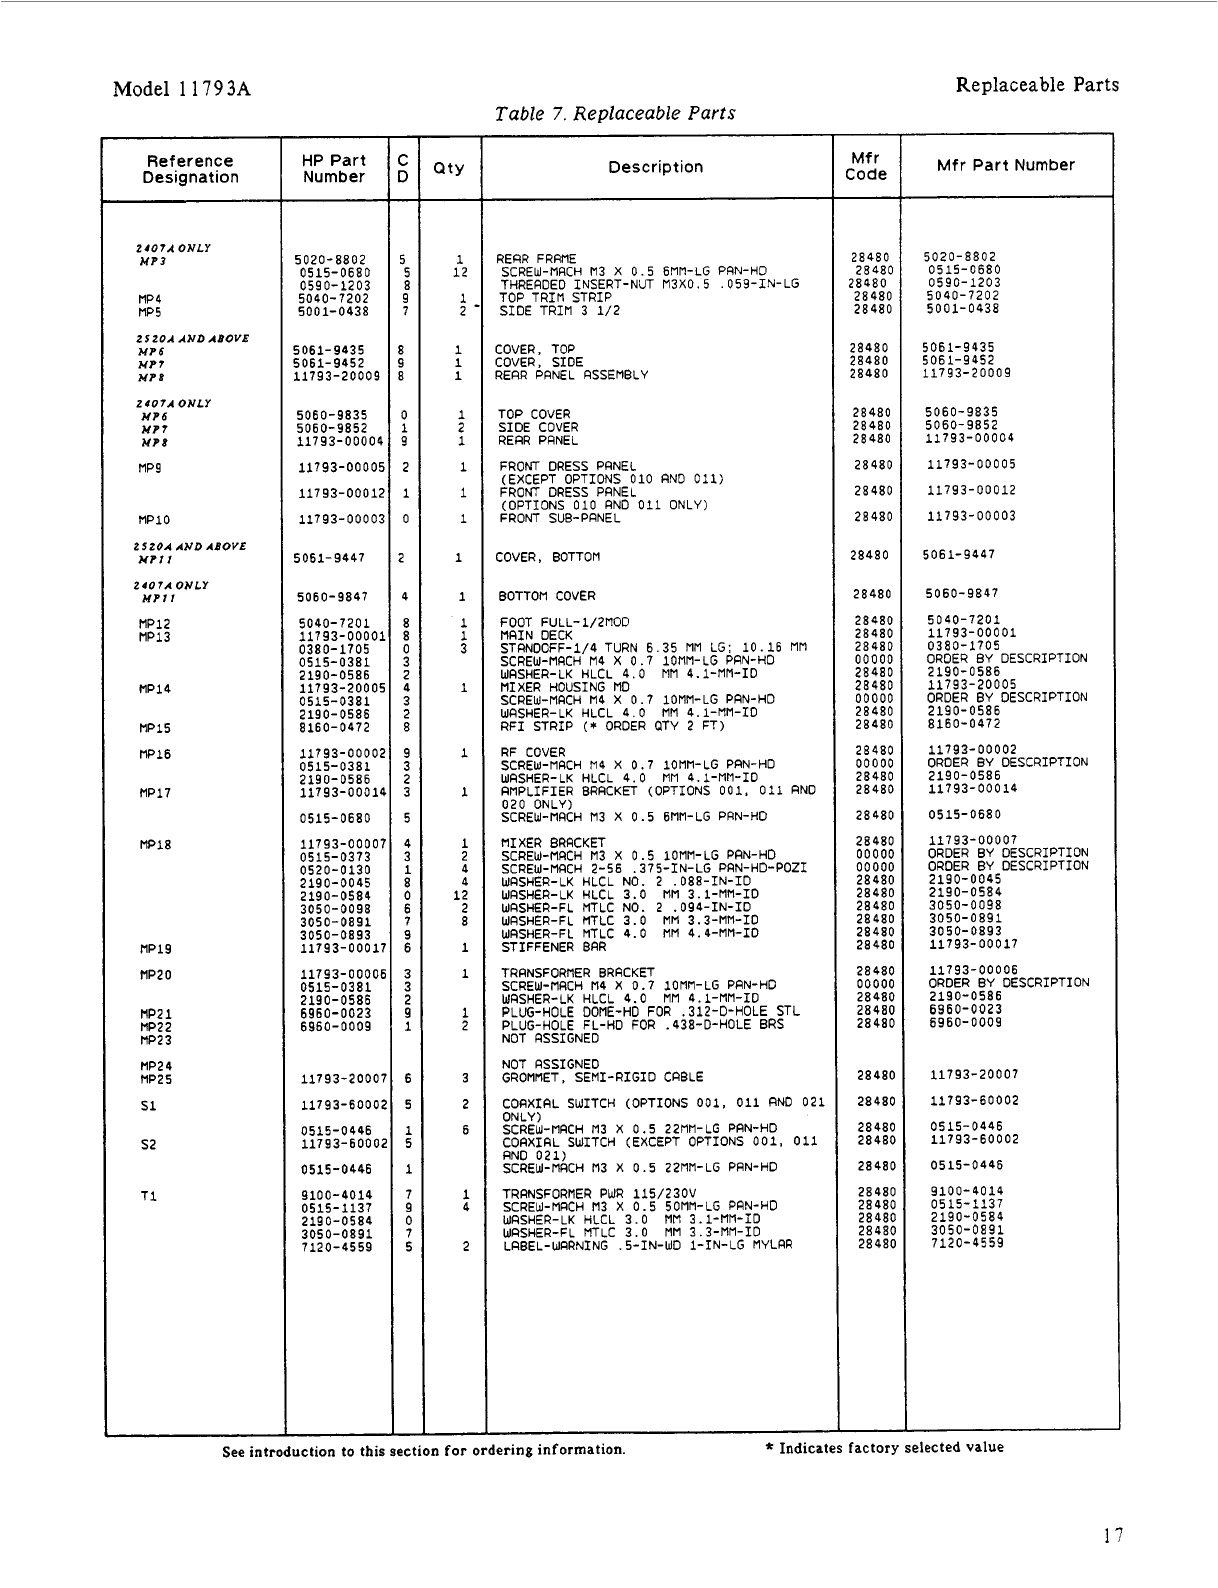
Model
11793A
Replaceable
Parts
Reference
Designation
2401AOWLY
MP3
MP4
MP
5
2520.4
AWD ABOVE
MP6
MPl
MPB
21071
OWLY
MP6
MP1
MP8
MP9
MPlO
25201
AWD ABOVE
WPll
24014
ONLY
MPll
MP12
NP13
NP14
MP15
MP16
MP17
MP19
NP20
MP21
MP22
MP2 3
NP24
MP25
s1
52
T1
HP Part
Number
5020-8802
5001-043a
0515-0680
0590-1203
5040-7202
5
06
1-
943
5
5061-9452
11793-20001
5060-9a35
50.so-ga52
11793-0000
11793-0000
11793-0001
11793-0000
5061-9447
5060-9847
03ao-i705
05i5-03ai
2i90-05a6
5040-7201
11793-0000
0515-0381
2190-0586
11793-2000
8160-0472
11793-0000
0515-0381
11793-0001
2190-05a6
05i5-06ao
11793-0000
0515-0373
0520-0130
2190-0045
2190-osa4
3050-009a
3050-0891
3050-0893
11793-0001
11793-0000
05i5-03ai
2i90-05a6
6960-0023
6960-0009
11793-200C
11793-6001:
0515-0446
11793-6OOC
0515-0446
9100-4014
0515-1137
2igo-osa4
3050-0agi
7120-4559
-
-
u
3
-
a
5
9
7
a
l
3
l
0
1
9
2
1
0
?
4
a
a
0
3
2
4
3
2
8
9
3
2
3
5
4
3
1
0
6
7
9
6
3
3
2
9
1
a
6
5
1
5
1
7
9
0
7
5
-
1
12
1
2
1
1
1
1
2
1
1
1
1
1
1
1
1
3
1
1
1
1
2
4
4
12
2
1
1
a
1
2
3
2
6
1
4
2
-
Table
7.
Replaceable Parts
Description
RERR FRRME
SCREW-MRCH M3 X 0.5 6MM-LG PAN-HD
THREROEO INSERT-NUT M3X0.5 ,059-IN-LG
TOP TRIM STRIP
SIDE TRIM 3
1/2
COVER, TOP
COVER, SIDE
RERR PRNEL RSSEMBLY
TOP COVER
SIDE COVER
RERR PRNEL
FRONT DRESS PRNEL
(EXCEPT OPTIONS
010
FIND
011)
FRONT DRESS PRNEL
(OPTIONS
010
RNO
011
ONLY)
FRONT SUB-PANEL
COVER. BOTTOM
BOTTOM COVER
FOOT FULL-l/2MOD
MRIN DECK
STANOOFF-1/4 TURN 6.35
MM
LG:
10.16
MM
SCREW-MRCH
M4
X 0.7 10MM-LG PAN-HD
WASHER-LK HLCL 4.0
MM
4.1-MM-ID
NIXER HOUSING
MD
SCREW-MRCH
M4
X 0.7 10MM-LG PAN-HO
WgSHER-LK HLCL
4.0
MM
4.1-MM-IO
RFI STRIP
(*
ORDER QTY
2
FT)
RF COVER
SCREW-MRCH
M4
X 0.7 10MM-LG PRN-HO
WASHER-LK HLCL 4.0
MM
4.1-MM-IO
RMPLIFIER BRACKET (OPTIONS
001,
011
RND
020
ONLY)
SCREW-MRCH M3 X
0.5
SMM-LG PRN-HD
MIXER BRACKET
SCREW-MACH M3 X
0.5
10MM-LG PRN-HO
SCREW-MRCH 2-56 .375-IN-LG PRN-HO-PO21
HLCL
HLCL
MTLC
MTLC
MTLC
ERR
NO.
3.0
NO.
3.0
4.0
TRRNSFORMER BRRCKET
2
.oaa-IN-Io
MM
3.1-MM-ID
2
.094-IN-I0
MM
3.3-MM-ID
MM
4.4-MM-IO
NOT ASSIGNED
NOT RSSIGNEO
GRONNET, SEMI-RIGID CRBLE
CORXIRL SWITCH (OPTIONS
001,
011
AN0
021
ONLY)
SCREW-MACH M3 X
0.5
22MM-LG PRN-HO
CORXIRL SWITCH (EXCEPT OPTIONS
001,
011
AND
021)
SCREW-MRCH M3 X
0.5
22MM-LG PAN-HD
TRRNSFORMER PWR 115/230V
SCREW-MRCH M3 X
0.5
50MM-LG PRN-HO
WASHER-LK HLCL 3.0
MM
3.1-MM-ID
WRSHER-FL MTLC 3.0
MM
3.3-MM-IO
LABEL-WRRNING .S-IN-WO 1-IN-LG MYLRR
Mfr Part Number
5020-8802
0515-0680
0590-1203
5040-7202
5001-0438
5061-9435
5061-9452
11793-20009
5060-9835
11793-00004
5060-9a5~
11793-00005
11793-00012
11793-00003
5061-9447
5060-9847
5040-7201
11793-00001
ORDER BY DESCRIPTION
11793-20005
ORDER BY DESCRIPTION
8160-0472
03ao-i705
2190-05a6
2190-05a6
11793-00002
ORDER BY DESCRIPTION
11793-00014
2190-0586
0515-0680
11793-00007
ORDER BY DESCRIPTION
ORDER BY DESCRIPTION
2190-0045
2190-0584
3050-009a
3050-0agi
3050-0a93
11793-00017
11793-00006
ORDER BY DESCRIPTION
2190-05a6
6960-0023
6960-0009
11793-20007
11793-60002
0515-0446
11793-60002
0515-0446
9100-4014
0515-
1137
3050-0891
2i90-05a4
See introduction to this section
for
ordering information.
*
Indicates factory selected value
17
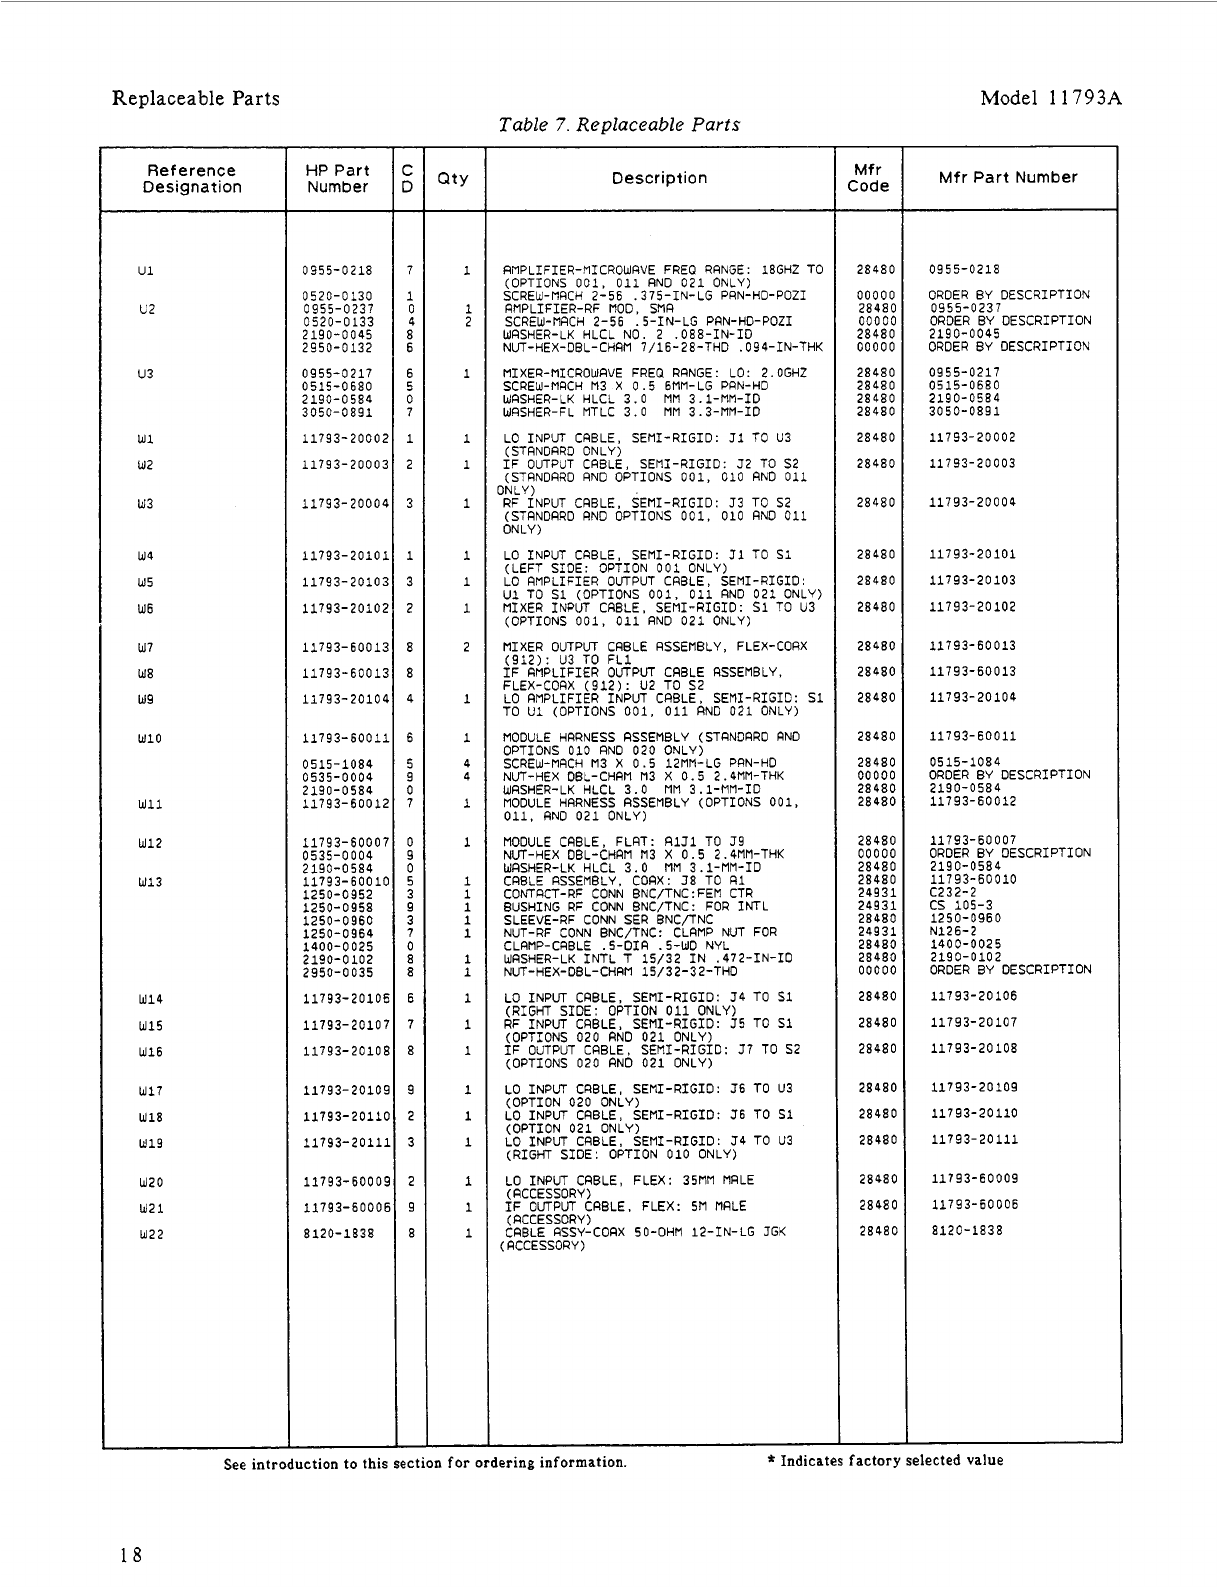
Replaceable
Parts
Model
1
1793A
Reference
Designation
u1
U2
u3
w1
w2
w3
w4
w5
W6
w7
W8
w9
w10
w11
w12
W13
W14
W15
W16
W17
W18
w19
w20
w21
w22
HP
Part
Number
0955-0218
0520-0130
0955-0237
0520-0133
2190-0045
2950-0132
0955-0217
0515-0680
2190-0584
3050-0891
11793-20002
11793-20003
11793-20004
11793-20101
11793-20103
11793-20102
11793-60013
11793-60013
11793-20104
11793-60011
0515-1084
0535-0004
2190-0584
11793-60012
11793-60007
0535-0004
2190-0584
11793-60010
1250-0952
1250-0958
1250-0960
1250-0964
1400-0025
2190-0102
2950-0035
11793-20106
11793-20107
11793-20108
11793-20109
11793-20110
11793-20111
11793-60009
11793-60006
8120-1838
-
-
I
3
-
7
1
0
4
8
6
6
5
0
7
1
2
3
1
3
2
8
8
4
6
5
9
0
7
0
9
0
5
3
9
3
7
0
8
8
6
7
8
9
2
3
2
9
8
-
1
1
2
1
1
1
1
1
1
1
2
1
1
4
4
1
1
1
1
1
1
1
1
1
1
1
1
1
1
1
1
1
1
-
Table
7.
Replaceable
Parts
Description
RMPLIFIER-MICROWRVE FREQ RRNGE: l8GHZ TO
(OPTIONS
001,
011
RND 021 ONLY)
SCREW-MRCH 2-56 .375-IN-LG PRN-HO-PO21
AMPLIFIER-RF
MOD.
SMR
__
__
-
SCREW-MRCH 2-56 .5-IN-LG PRN-HO-PO21
WRSHER-LK HLCL NO. 2 .088-IN-I0
NUT-HEX-OBL-CHRM 7/16-28-THO ,094-IN-THK
MIXER-MICROWFIVE FREQ RRNGE: LO: 2.0GHZ
SCREW-MRCH M3
X
0.5
6MM-LG PRN-HO
WRSHER-FL MTLC 3.0
MM
3.3-MM-ID
WRSHER-LK
HLCL
3.0
nn
3.1-MM-IO
LO INPUT CRBLE, SEMI-RIGID:
J1
TO U3
(STANORRO ONLY)
IF OUTPUT CRBLE, SEMI-RIGID: J2 TO S2
ISTRNORRO
RNO
OPTIONS
001.
010
RNO
011
nNi
v\
RF
iNPUT CRBLE, SEMI-RIGIO: J3 TO 52
(STRNORRD RND OPTIONS
001,
010
FINO 011
ONLY)
MIXER OUTPUT CRBLE RSSEMBLY, FLEX-CORX
(912): U3 TO FL1
:F
RMPLIFIER OUTPUT CABLE RSSEMBLY,
1
FLEX-CORX (912): U2
TO
S2
LO RMPLIFIER INPUT CRBLE, SEMI-RIGID:
S1
TO U1 (OPTIONS
001.
011
RND 021 ONLY)
MODULE HRRNESS RSSEMBLY (STRNORRO AN0
OPTIONS
010
RND 020 ONLY)
SCREW-MACH
M3
X
0.5
12MM-LG PRN-HO
NUT-HEX OEL-CHRM M3 X 0.5 2.4MM-THK
MODULE HRRNESS RSSEMBLY (OPTIONS
001,
011,
AN0 021 ONLY)
WRSHER-LK
HLCL
3.0
nn
3.1-MM-ID
MoouLE
CRBLE,
FLRT:
~i~i
TO
~9
NUT-HEX DBL-CHRM 113 X
0.5
2.4MM-THK
WRSHER-LK HLCL 3.0
MM
3.1-MM-ID
COiVRCT-RF CONN BNC/TNC:FEM CTR
SLEEVE-RF CONN
SER
BNC/TNC
CLRMP-CRBLE .5-DIR .5-WD NYL
WRSHER-LK INTL
T
15/32 IN .472-IN-I0
NUT-HEX-DBL-CHAM 15/32-32-THO
CRBLE RSSEMBLY. CORX:
38
TO
R1
BUSHING RF CONN BNC/TNC: FOR INTL
NUT-RF
CONN
BNCITNC:
cLRnP
NUT
FOR
LO INPUT CABLE, SEMI-RIGID:
J4
TO
S1
(RIGHT SIDE: OPTION
011
ONLY)
RF INPUT CRBLE, SEMI-RIGID: J5 TO
S1
(OPTIONS 020 AND 021 ONLY)
IF OUTPUT CRBLE, SEMI-RIGID: J7 TO 52
(OPTIONS 020 RND 021 ONLY)
LO
INPUT CRBLE, SEMI-RIGID:
36
TO
(OPTION 020 ONLY)
LO INPUT CRBLE, SEMI-RIGID:
J6
TO
(OPTION 021 ONLY)
LO INPUT CRBLE, SEMI-RIGID: J4 TO
(RIGHT SIDE: OPTION
010
ONLY)
LO INPUT CRBLE, FLEX: 35MM MRLE
(ACCESSORY)
(RCCESSORY)
CRBLE RSSY-COAX 50-OHM 12-IN-LG
J
IF
OUTPUT
CABLE.
FLEX:
SM
MRLE
(ACCESSORY)
u3
s1
u3
GK
Mf
r
Code
28480
00000
28480
00000
28480
00000
28480
28480
28480
28480
28480
28480
28480
28480
28480
28480
28480
28480
28480
28480
28480
00000
28480
28480
28480
00000
28480
28480
24931
24931
28480
24931
28480
28480
00000
28480
28480
28480
28480
28480
28480
28480
28480
2848C
Mfr Part Number
0955-0218
ORDER
BY DESCRIPTION
0955-0237
ORDER BY DESCRIPTION
2190-0045
ORDER BY DESCRIPTION
0955-0217
0515-0680
2190-0584
3050-0891
117 93- 20002
11793-20003
11793-20004
11793-20101
11793-20103
11793-20102
11793-60013
11793-60013
11793-20104
11793- 60011
0515-1084
ORDER EY DESCRIPTION
2190-0584
11793-60012
11793-60007
ORDER
BY DESCRIPTION
2190-0584
11793-60010
C232-2
CS
105-3
1250-0960
N126-2
1400-0025
2190-0102
ORDER BY DESCRIPTION
11793-20106
11793-20107
11793-20108
11793-20109
11793-20110
11793-20111
11793-60009
11793-60006
8120-1838
See introduction to this section for ordering information.
*
Indicates factory selected value
18
Model
1
1793A
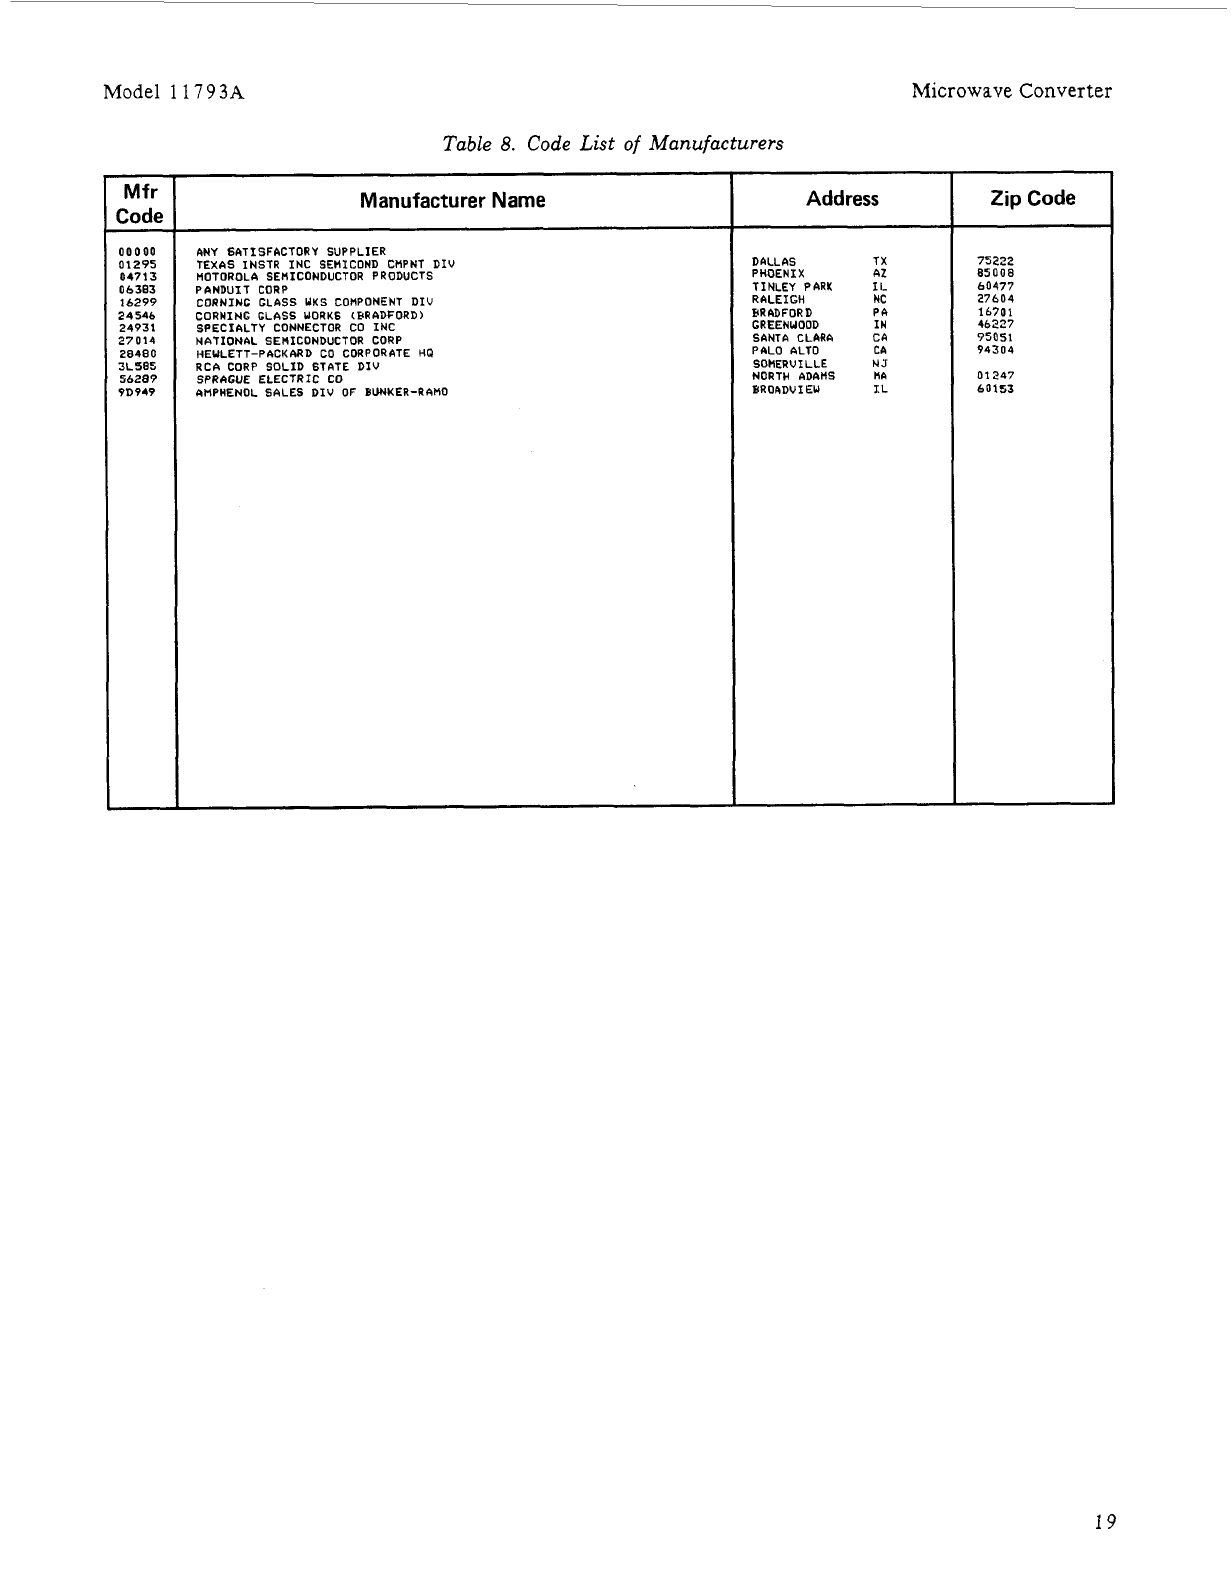
Microwave Converter
Mf
r
Manufacturer Name
Code
Table
8.
Code List
of
Manufacturers
Address
ANY 6ATISFACTORY SUPPLIER
TEXAS INSTR INC SEHICOND CBPNT DIU
BOTOROLA SEBICONDUCTOR PRODUCTS
Zip Code
I
PANDUIT CORP
CORNING GLASS
UKS
COHPONENT DIU
CORNING GLASS
WORKS
(BRADFORD)
SPECIALTY CONNECTOR CO INC
NbTIONnL
SEBICONDUCTOR CORP
HEULETT-PACKARD
CO
CORPORATE
HQ
RCA CORP SOLID STATE DIV
SPRhCUE ELECTRIC CO
AHPWENOL SALES DIU
OF
BUNKER-RABO
DALLAS TX
PHOENIX
A,?
TINLEY PARK
11..
RALEIGH
NC
BRADFOR D PA
GREENWOOD IN
SANTA CLARA
CA
PAL0
ALTO CA
SOMERUILLE
NY
NORTH
ADABS
HA
BROADUIEW
IL
Zip Code
75222
85008
60477
27604
16701
46227
94304
01247
60153
95051
75222
85008
60477
27604
16701
46227
94304
95051
01247
60153
19
Microwave Converter Model
11793A
M P8
MP7\\\
MPlO
1 1
,/
/MP9
MP12
NOTE:
MP21
AND
MP22
ARE
HOLE PLUGS.
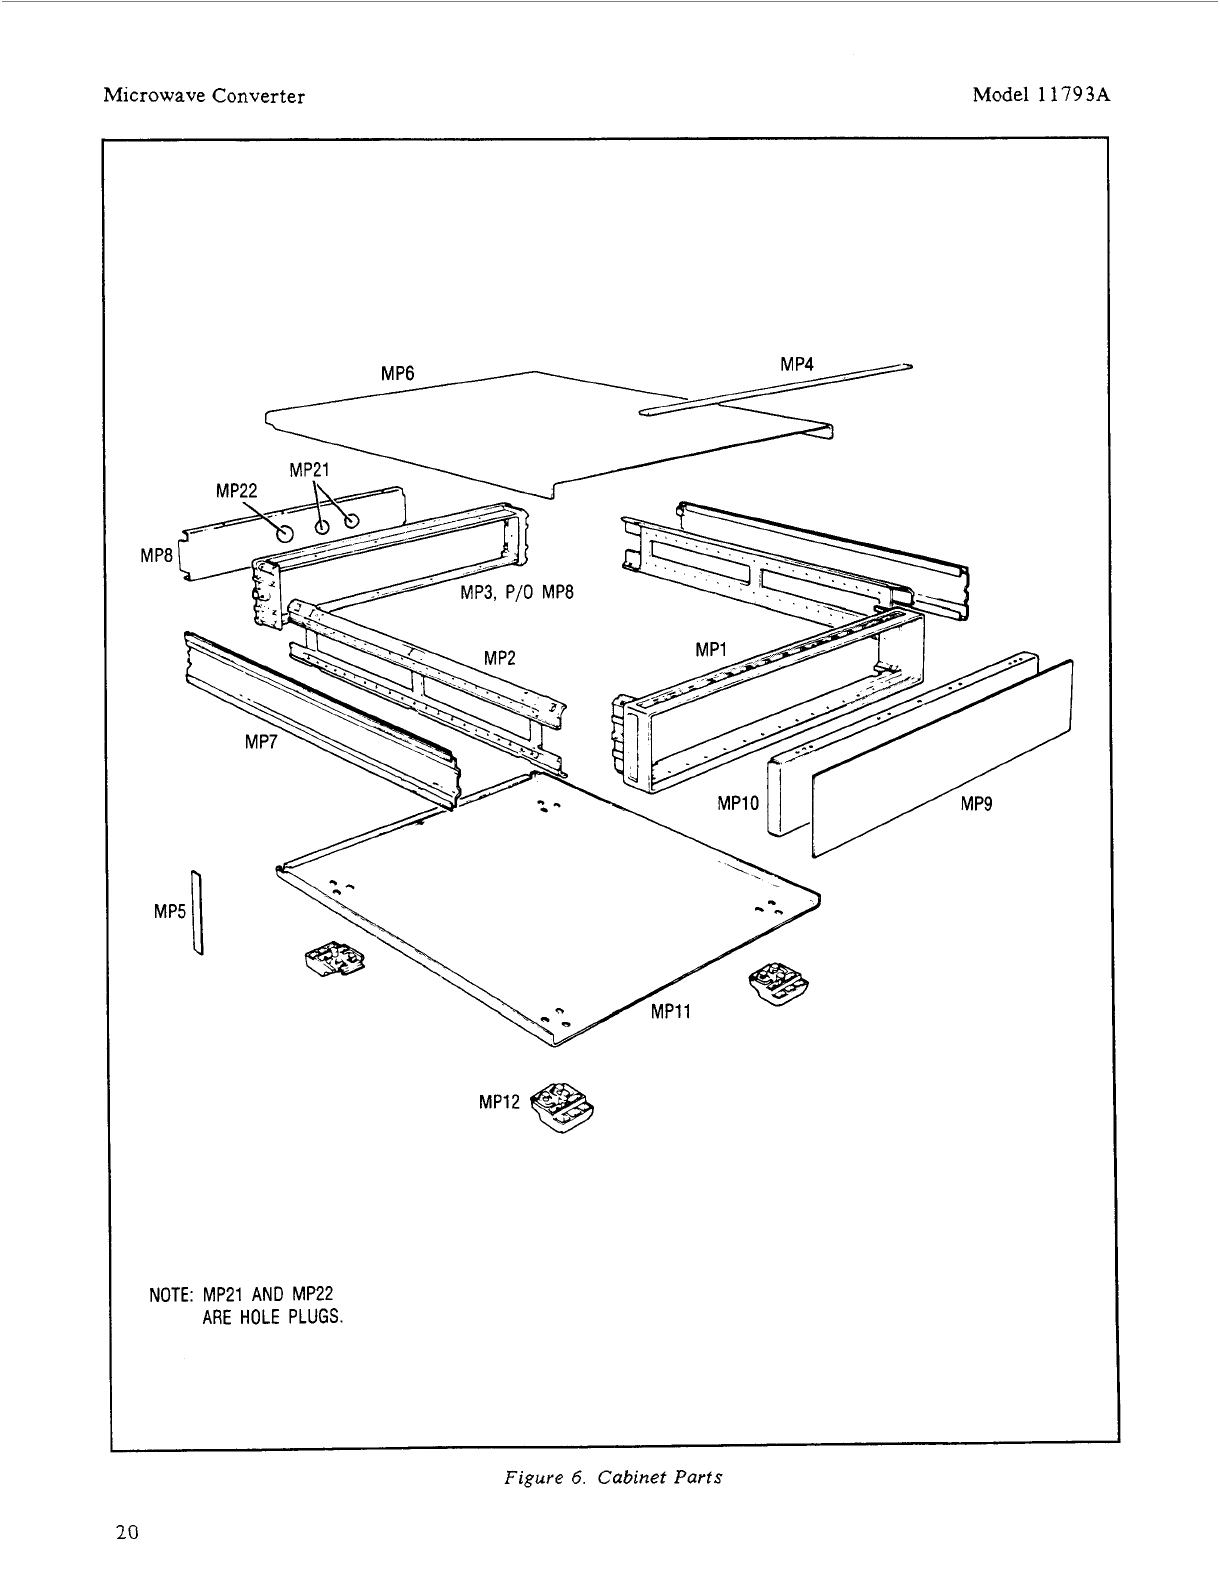
Figure
6.
Cabinet Parts
20
Model
11793A
Microwave Converter
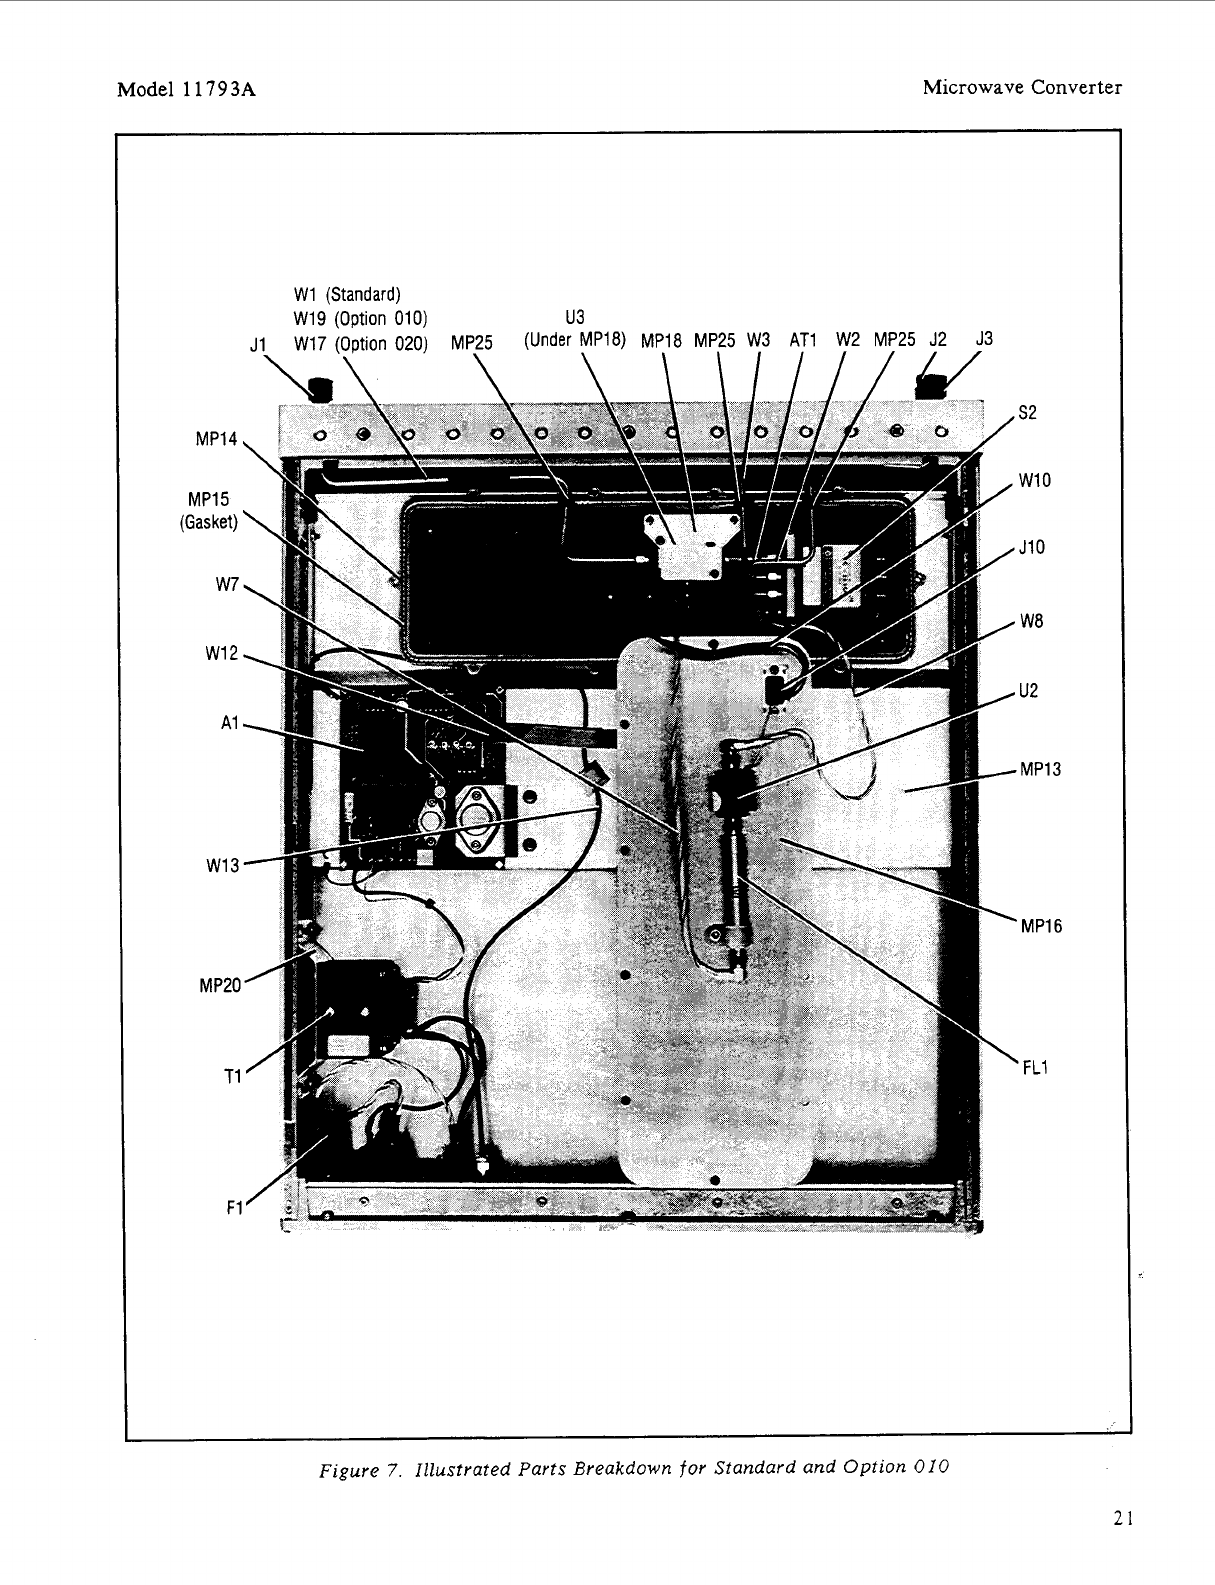
W1 (Standard)
W19 (Option 010) u3
J1 W17 (Option 020) MP25 (Under MP18) MP18 MP25 W3 AT1 W2 MP25 J2 J3
\
\
\
\
\Ill///
MP14
MPl5
(Gasket)
w7
w12
A1
W13
MP20
T1
F1
52
w10
J10
W8
u2
MP13
MP16
f11
Figure
7.
Illustrated Parts Breakdown
for
Standard and Option
010
21
Microwave Converter Model
11
793A
J1
(1
J4
(I
J6
(I
Dption
001
3ption
011
3ption 021
s1
MP14
MP15
(Gasket)
A1
MP20-
W13’
T1
F1’
only) W4 (Option
001
only)
W6
u1
MP18
u3
W3 W2 J2
only) W14 (Option 011 only)
I
I
/
/
/
(Under
/
52
/
W8
/
,w11
eJ11
,
w7
u2
MP13
f11
MP16
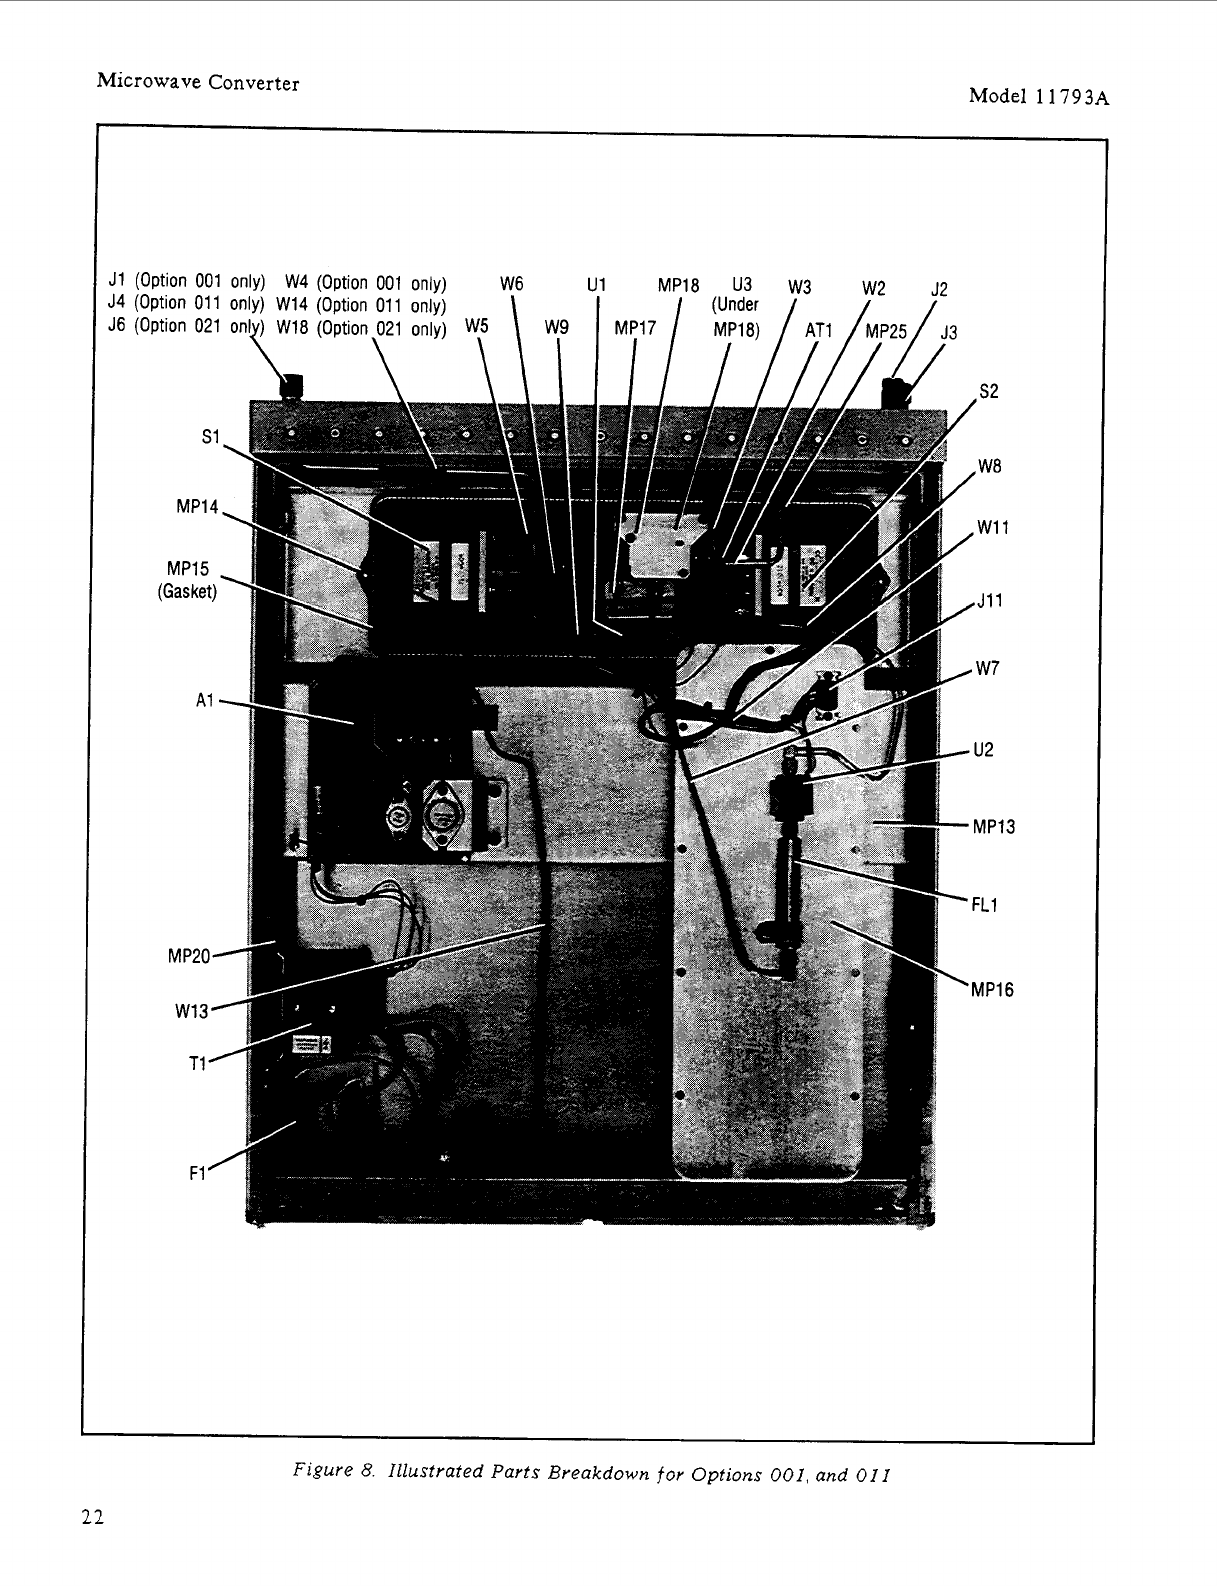
Figure
8.
Illustrated Parts Breakdown
for
Options
001,
and
0
I I
22

Model 11793A Microwave Converter
30.
Ordering Information
To
order a part listed in the replaceable parts table, include the Hewlett-Packard part number (with the
check digit) and the quantity required. Address your order to the nearest Hewlett-Packard office. The
check digit will ensure accurate and timely processing of your order. To order a part that is not listed in
the replaceable parts table, include the instrument model number, instrument serial number, description
and function of the part, and the quantity of parts required. Address the order to the nearest
Hewlett -Packard office.
31.
Manual Changes
These paragraphs contain manual change instructions for backdating this manual for HP Model
Microwave Converters with the serial number prefix 2407A. 1793A
Instruments with Serial Prefix 2407A have System I1 cabinet parts and hardware that are English thread.
Instruments with Serial Prefix 2520A and higher have System I1 cabinet parts and hardware that are
METRIC thread.
In Table
7.
Replaceable
PUY~S,
both English and Metric thread part numbers are listed for the System I1
cabinet parts. These correct part numbers are referenced under the instrument’s serial number prefix.
Instruments with the serial number prefix 2407A have MP3 (rear frame), MP8 (rear panel), and associated
english thread hardware, that are screwed together. These parts have been changed to a riveted, one piece
assembly that
is
referenced to MP8. To replace MP8 you must order the Rear Panel Assembly
1
1793-20009, and the metric screws for the side struts and rear feet.
32.
SERVICE
33.
Principles of Operation
Simplified
Block
Diagram
A
simplified block diagram of the Microwave Converter is shown in Figure
10.
The signal at the RF
INPUT connector is routed through an input switch either to the Direct Path (and out the IF OUTPUT
connector), or to the Down-Convert Path. The Down-Convert Path has a
3
dB RF Attenuator (to improve
input
SWR),
a
Mixer (tte down-converter), an IF Low-pass Filter (to remove the
sum
component of the
mixing process while passing the difference component), and a
+1S
dB IF Amplifier (to restore signal loss
through the Down-Convert Path).
Usually, the
LO
frequency selected is higher than the frequency of the input signal. (The measuring
instrument assumes this.) The difference frequency (the IF) is filtered by the IF Low-Pass Filter, which
has a
3
dB corner of
800
MHz. The IF should be kept between the range of 10 and 700 MHz.
If the instrument has the optional LO Amplifier installed, the measuring instrument automatically
switches in the amplifier whenever an LO frequency greater than
18
GHz is selected.
23
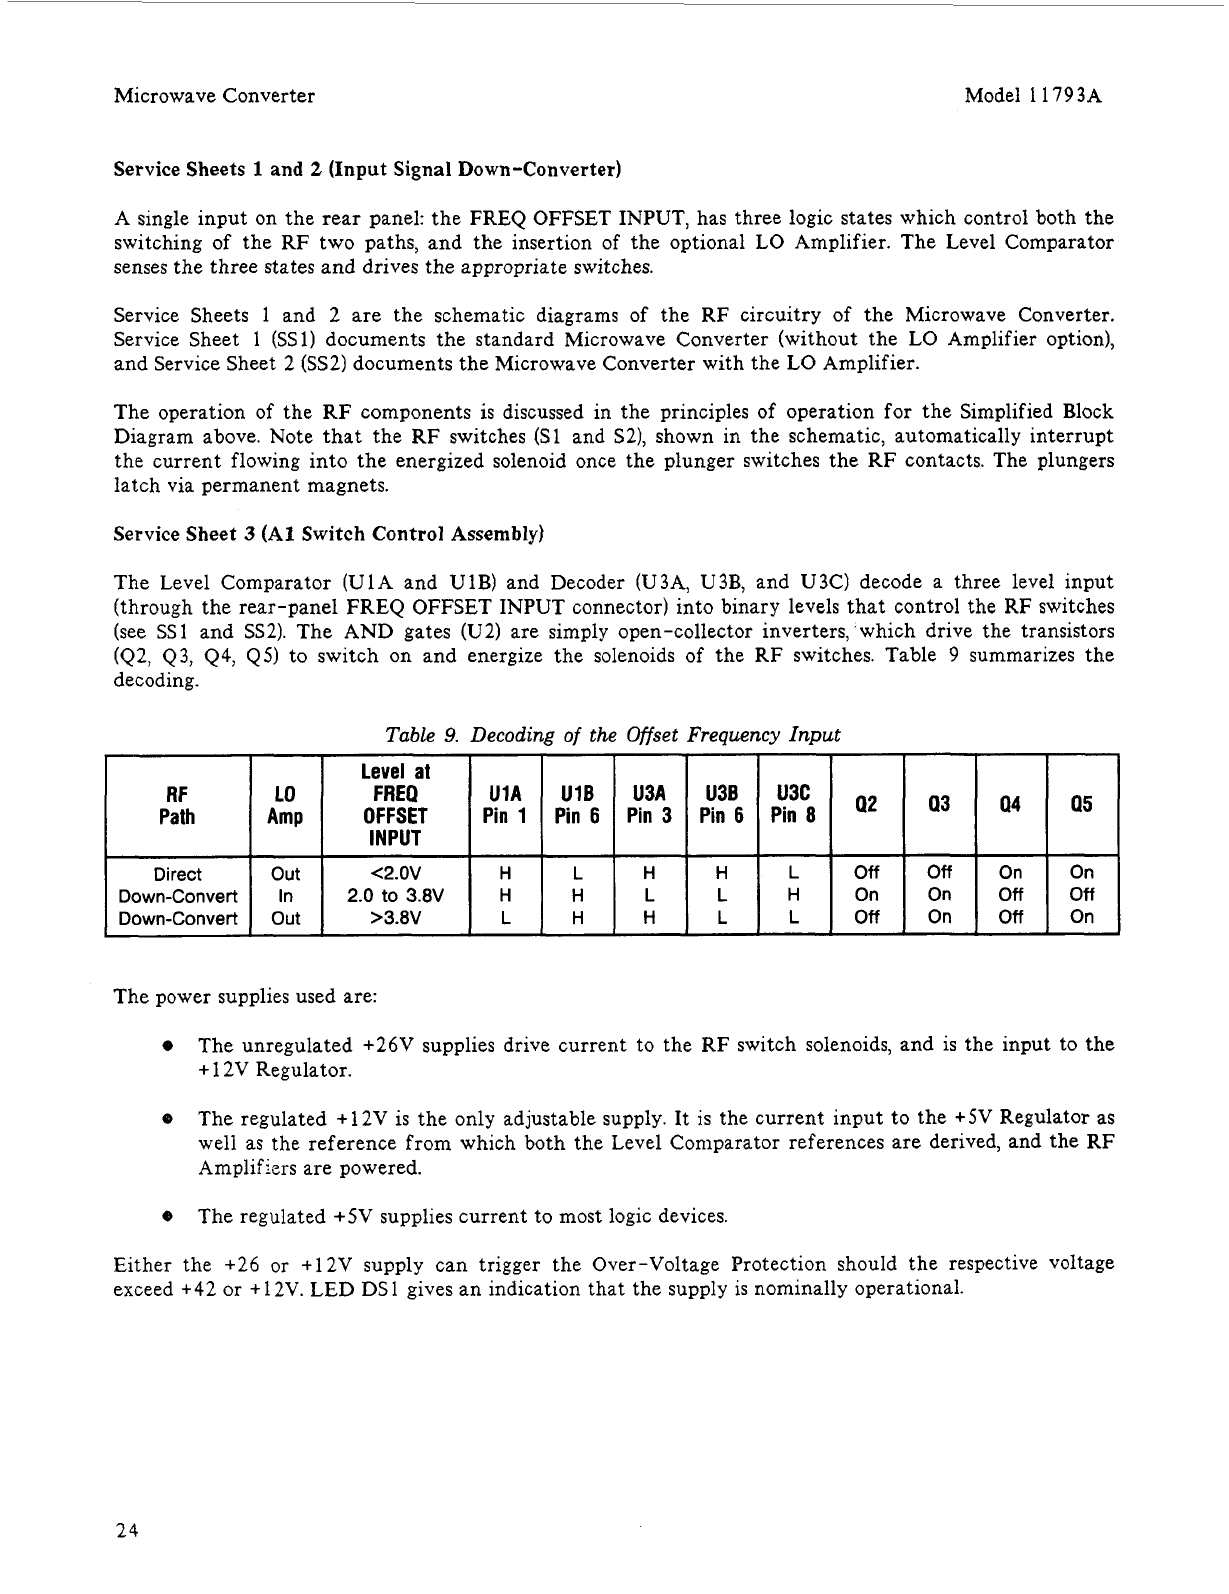
Microwave Converter Model
1
1793A
Level
at
INPUT
RF
LO
FREQ
U1A U1B U3A U3B
Path
Amp
OFFSET
Pin
1
Pin
6
Pin 3 Pin
6
Direct out
<2.0v
H
L
H H
Down-Convert In
2.0 to
3.w
H
H
L L
Down-Convert Out
>3.av
L
H
H
L
Service Sheets
1
and
2
(Input Signal Down-Converter)
U3C
Q2
Q3
Q4
Q5
Pin
8
L
Off
Off On On
H On On
Off
Off
L
Off
On
Off
On
A single input on the rear panel: the FREQ OFFSET INPUT, has three logic states which control both the
switching of the RF two paths, and the insertion of the optional LO Amplifier. The Level Comparator
senses the three states and drives the appropriate switches.
Service Sheets
1
and
2
are the schematic diagrams of the RF circuitry of the Microwave Converter.
Service Sheet
1
(SS
1)
documents the standard Microwave Converter (without the LO Amplifier option),
and Service Sheet 2 (SS2) documents the Microwave Converter with the LO Amplifier.
The operation of the RF components
is
discussed in the principles of operation for the Simplified Block
Diagram above. Note that the RF switches
(SI
and S2), shown in the schematic, automatically interrupt
the current flowing into the energized solenoid once the plunger switches the RF contacts. The plungers
latch via permanent magnets.
Service Sheet
3
(AI Switch
Control
Assembly)
The Level Comparator (UIA and U1B) and Decoder (U3A, U3B, and U3C) decode a three level input
(through the rear-panel FREQ OFFSET
INPUT
connector) into binary levels that control the
RF
switches
(see SS1 and SS2). The AND gates (U2) are simply open-collector inverters,'which drive the transistors
(42,
43,
44, QS) to switch on and energize the solenoids of the RF switches. Table
9
summarizes the
decoding
.
The power supplies used are:
m
The unregulated +26V supplies drive current to the RF switch solenoids, and
is
the input to the
+
12V Regulator.
8
The regulated
+
12V
is
the only adjustable supply. It
is
the current input to the
+SV
Regulator as
well as the reference from which both the Level comparator references are derived, and the RF
Amplifiers are powered.
e
The regulated +SV supplies current to most logic devices.
Either the
+26
or +12V supply can trigger the Over-Voltage Protection should the respective voltage
exceed +42 or
+
12V. LED DS
1
gives an indication that the supply is nominally operational.
24
Model
11793A
34.
Troubleshooting
Microwave Converter
Primary
AC
power is present within instrument when line voltage
power cord is connected to the instrument.
Maintenance described herein is performed with power supplied to
the instrument and with protective covers removed. Such maintenance
should be performed only by service-trained personnel who are aware
of the hazards involved.
Use the correct torque wrench when installing sub -miniature
connectors.
Do
not
exceed the following torque settings for this instrument:
1.5
N.m for the
3
mm
(TlO) screws
2.0
N.m
for the
4
mm
(T15) screws
0.7
N.m
(6.3
in.lb) for
SMA
connectors
0.7
N’m
(6.3
in.lb) for Type-N connectors
General
Troubleshooting information is broken down into three categories:
0
RF
devices,
control devices, and
0
power supplies.
Either a compatible measuring instrument or a power supply connected to the
FREQ OFFSET
INPUT,
can
be used to control the
RF
switches. If a power supply is used, set it to
0,
+3,
or
+S
Vdc as dictated by Table
9.
2s
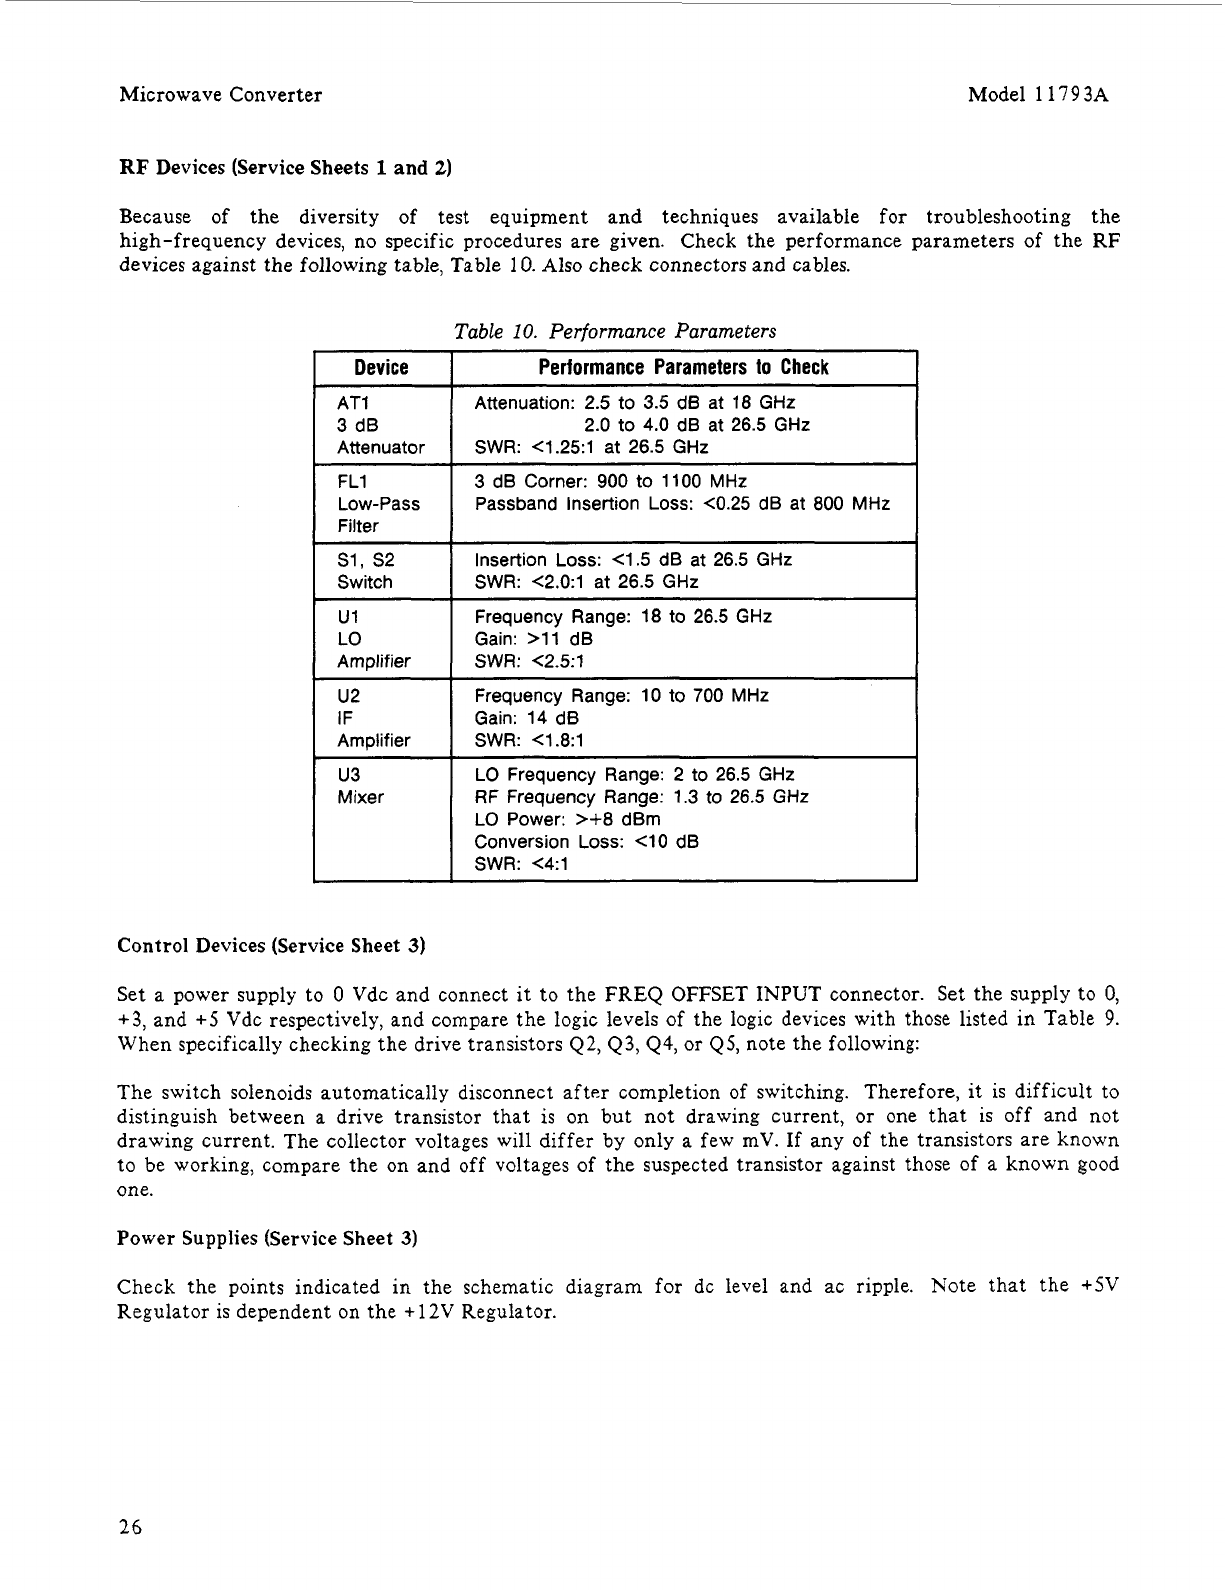
Microwave Converter Model
1
1793A
RF
Devices (Service Sheets
1
and
2)
Because of the diversity
of
test equipment and techniques available
for
troubleshooting the
high-frequency devices, no specific procedures are given. Check the performance parameters of the
RF
devices against the following table, Table
10.
Also check connectors and cables.
Table
10.
Performance Parameters
Device
AT1
3 dB
Attenuator
FL1
Low-Pass
Filter
s1,
s2
Switch
u1
LO
Amplifier
Performance Parameters
to
Check
Attenuation:
2.5
to 3.5 dB at 18
GHz
2.0
to
4.0
dB at
26.5
GHz
SWR:
4.251
at
26.5
GHz
~~ ~~
3 dB Corner:
900
to
1100
MHz
Passband Insertion Loss:
<0.25
dB at
800
MHz
Insertion Loss:
4.5
dB at
26.5
GHz
SWR:
<2.0:1
at
26.5
GHz
Frequency Range:
18
to
26.5
GHz
Gain:
>11
dB
SWR:
C2.51
u2
IF
Amplifier
u3
Mixer
Frequency Range:
10
to
700
MHz
Gain: 14 dB
SWR:
<1.8:1
LO Frequency Range:
2
to
26.5
GHz
RF
Frequency Range: 1.3 to
26.5
GHz
LO Power:
>+8
dBm
Conversion Loss:
<lo
dB
SWR:
<4:1
Control Devices (Service Sheet
3)
Set a power supply to
0
Vdc and connect it to the FREQ OFFSET INPUT connector. Set the supply to
0,
+3,
and
+S
Vdc respectively, and compare the logic levels
of
the logic devices with those listed in Table
9.
When specifically checking the drive transistors 42, Q3,Q4, or QS, note the following:
The switch solenoids automatically disconnect after completion of switching. Therefore,
it
is difficult to
distinguish between a drive transistor that
is
on but not drawing current, or one that is off and not
drawing current. The collector voltages will differ by only a few
mV.
If any of the transistors are known
to be working, compare the on and
off
voltages of the suspected transistor against those of a known
good
one.
Power Supplies (Service Sheet
3)
Check the points indicated in the schematic diagram for dc level and ac ripple. Note that the
+SV
Regulator is dependent on the
+
12V Regulator.
26
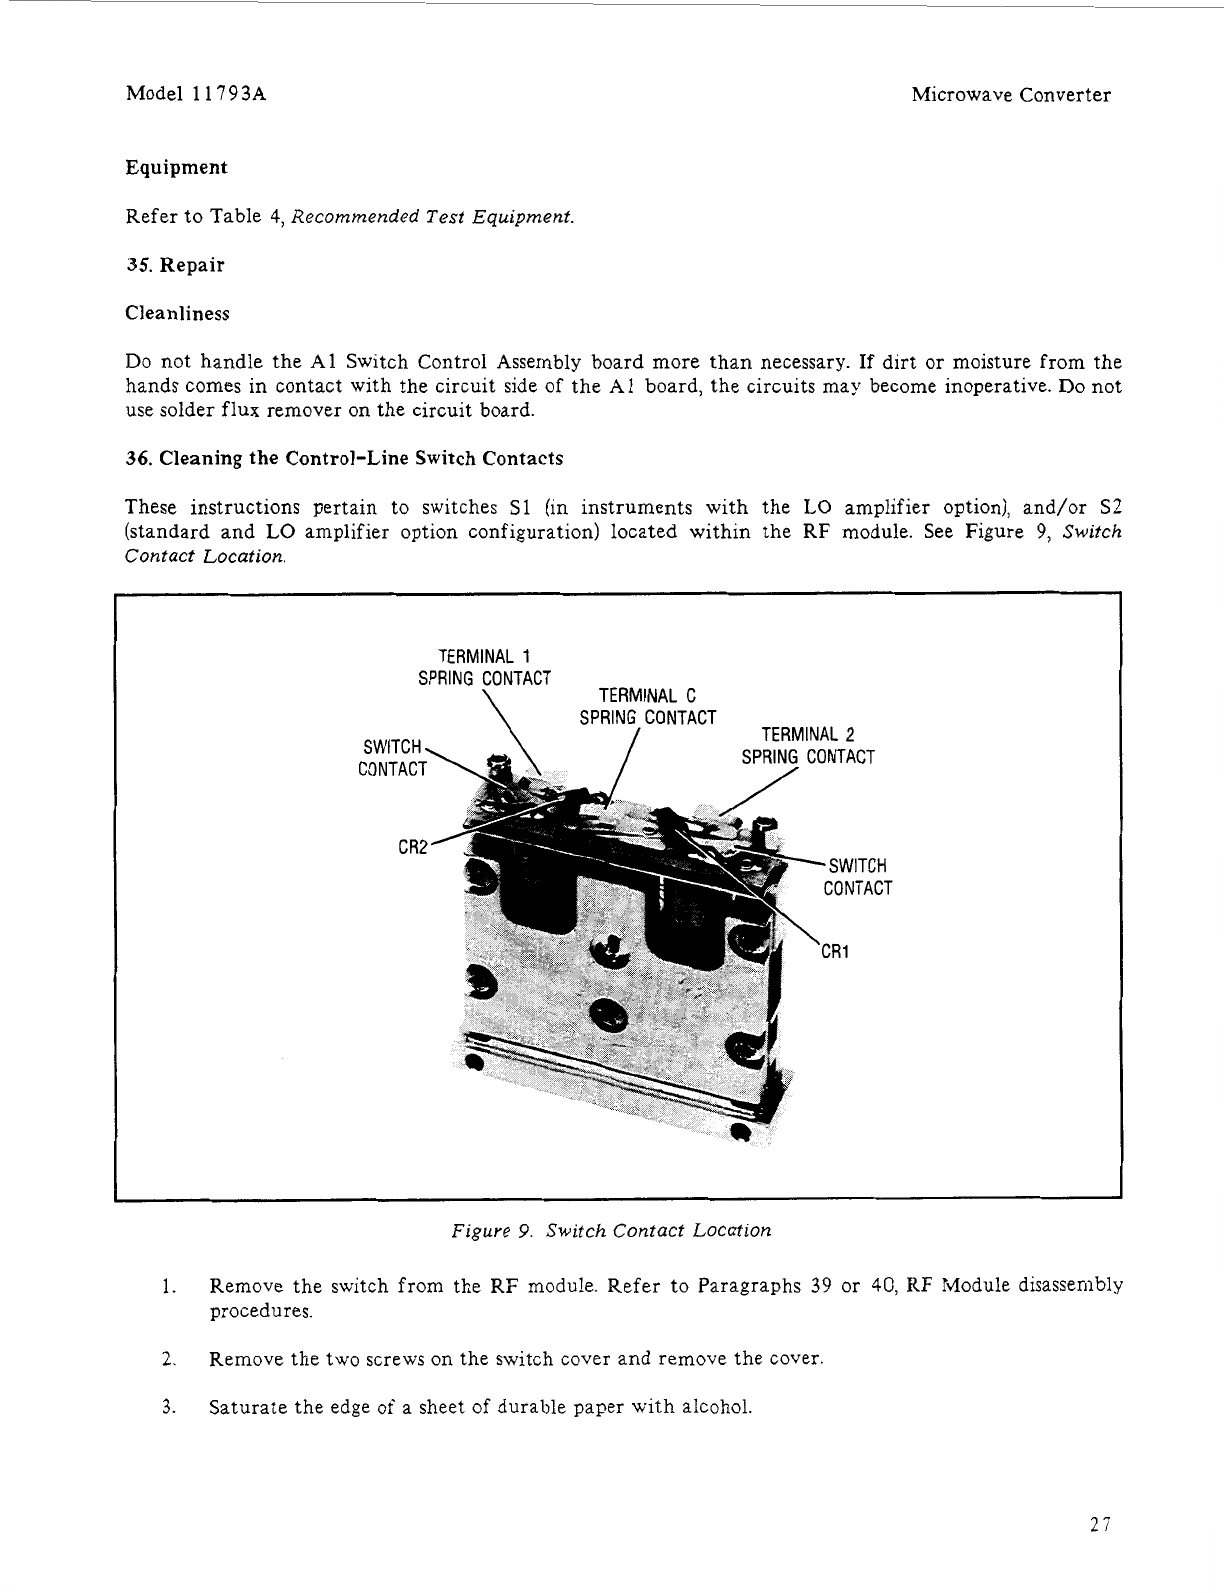
Model
11793A
Microwave Converter
Equipment
Refer to Table
4,
Recommended Test Equipment.
35.
Repair
Cleanliness
Do not handle the A1 Switch Control Assembly ,,oard more than necessary.
If
dirt or moisture from the
hands comes in contact with the circuit side of the A1 board, the circuits may become inoperative.
Do
not
use solder flux remover on the circuit board.
36.
Cleaning the Control-Line Switch Contacts
These instructions pertain to switches
S1
(in instruments with the
LO
amplifier option), and/or
S2
(standard and
LO
amplifier option configuration) located within the
RF
module. See Figure
9,
Switch
Contact Location.
TERMINAL
1
SPRING CONTACT
\
TERMINAL C
SWITCH.
CONTACT
CR2
TERMINAL
2
\
SPRING CONTACT
/
Figure
9.
Switch Contact Location
1.
Remove the switch from the
RF
module. Refer to Paragraphs
39
or
40,
RF
Module disassembly
procedures.
2.
Remove the two screws on the switch cover and remove the cover.
3.
Saturate the edge of a sheet
of
durable paper with alcohol.
27

Microwave Converter Model 11793A
4. Insert the paper under one of the contacts, and while pressing gently on the contact, slide the
paper through.
Do
not allow the alcohol to run inside the switch assembly.
Do
not
allow the paper
to shred.
Do this several times and repeat for the other switch contact.
5.
Saturate the edge
of
another sheet of paper with a freon-type degreaser and repeat step
4.
6.
Remove any shreds of paper that may have lodged in the contacts.
7. Reinstall the switch cover. Note the orientation of the feedthrough terminals on the cover with
respect to the switch contacts.
8. Replace the switch according to Paragraphs
4
1 or 42, RF Module assembly procedures.
37.
Instrument Disassembly Procedure
The 11793A Microwave Converter uses metric connecting hardware in the form of
3
mm (T10) and 4
mm (TlS) Torxhead screws (except for two small English thread Pozidriv screws mounting U1 to MP17).
Use the Torxhead size T 1
0
and T 1
5
bits that are provided, to disassemble and re-assemble the instrument.
The recommended torque wrench for use with the Torxhead bits
may
be
ordered as
HP
part number
8 7 3
0-00
12.
The major component blocks of the 11793A Microwave Converter are MP14 (RF Signal Processing
Module), A1 (A1 Switch Control Assembly), and T1 (Power Transformer). The
RF
module and the A1
assembly are mounted on MP13 (the Main Deck). The power transformer is mounted on MP2, the
instrument chassis left side strut. See Figures
6,
7,
and
8
to locate and identify parts and assemblies.
Note that Option 020 and 021 instruments differ from the standard and other option models
in
that the
main deck and transformer locations inside the instrument are reversed when compared to the standard
and other option models as shown in Figures 7 and
8.
In Option 020 and 021 models, the RF module
is
in
the rear of the instrument), and the transformer is mounted in the front left corner.
The following procedures allow the removal of the Microwave Converter components from within the
instrument chassis.
1.
Remove the top and bottom covers by loosening the screw in the middle of each cover rear edge.
These are captive screws and will cause the cover to push away from the front frame. Slide each
cover toward rear of the instrument to disengage, then lift up and away from the instrument.
2. Remove the side covers in the same manner as that of the top and bottom covers.
3.
Remove the plastic trim from the top of the front frame by inserting a screwdriver into the rear
slots and gently prying up the strip.
4.
Disconnect
J8
on the rear panel by removing the
9/16
inch retaining nut and lock washer.
5.
Instruments with serial number prefix 2S20A have MP8 (back panel) riveted to MP3 (rear
frame). To remove the rear frame, unscrew the four corner screws that connect MP2 (side struts)
to MP3. Pull off the two wires
05
and
0
(black/green and black) on the LINE VOLTAGE switch
(both wires are
of
the quick disconnect type).
For instruments with serial number prefix 2407A, remove MP8 (back panel) from MP3 (rear
frame) by unscrewing eight screws. Pull off the two wires
OS
and
0
(black/green and black) on
the LINE VOLTAGE switch (both wires are of the quick disconnect type).
28

Model 11793A Microwave Converter
6. Turn the instrument around
so
that the front of the instrument faces to the operator's left.
Desolder the 6, 5, 4, and
0
(blue, green, yellow, and black) wires from the A1 assembly.
7.
To
remove
T1
power transformer and its mounting bracket, unscrew the four screws located on
MP20 (mounting bracket). Separate transformer and the mounting bracket
by
removing the four
long screws passing through the transformer case.
8.
To remove the A1 assembly disconnect W12 (gray ribbon cable) at AlJl board connector,
unscrew the two screws at the VR3 heat sink, and turn the three board mounting stand-offs a
1/4 turn counterclockwise.
9.
To
remove MP 13 (main deck) and MP
14
(RF
module), remove the six Torxhead screws located on
the top and bottom of MPl (front frame). Remove the
six
screws connecting MP2 (side struts) to
MP13 (main deck). While supporting MP9, MPlO (front- and sub-panel) in one hand, carefully
slide MP13 (main deck) forward through the front frame opening just enough to reach the inside
cable connections.
Be careful that
you
do not bend the coax cables. Possible attenuation
or
interference
of
the
RF
signal may result.
a. When inside connections can be reached, use a 5/16 open-end wrench to disconnect the
semi-rigid coaxial cables from the front -panel connectors.
b. Carefully set aside the front panel and slide the main deck assembly out
of
the instrument
chassis.
To
remove the main deck on Options 020 and 021, disconnect the input cable connectors at the
back panel. Remove the main deck screws, then lift one side of the Main deck up until it clears
the side strut.
10.
To
remove MP14
(RF
module) from MP13 (main deck), remove the four screws that hold the
module to the main deck.
38.
Instrument
Assembly
Procedure
Note that Option 020 and 021 instruments differ from the standard and other option models in that the
main deck and transformer locations inside the instrument are reversed, when compared to the standard
and other option models as shown in Figures 7 and
8.
In Option
020
and 021 models, the RF module is in
the rear of the instrument), and the transformer is mounted in the front left corner.
Use the correct torque wrench when installing
sub
-miniature
connectors.
Do
not exceed the following torque settings
for
this instrument:
1.5
N'm
for
the
3
mm
(T
IO)
screws,
2.0
N.m
for the
4
mm
(TIS)
screws.
29
Microwave Converter Model 11793A
1.
2.
3.
4.
5.
6.
7.
8.
9.
10.
11.
12.
30
Place the RF Module upside down with the semi-rigid coax cables pointing to the left. Position
the main deck over the module with the four holes in the deck aligning with the four screw
holes in the module base. (The A1 assembly mounting stand-offs on MP13 (main deck) should be
upside down and on the opposite side of
MP
13 from the assembler.) Attach with four screws.
Take the main deck assembly (coax cables facing to the left) and slide into the main chassis
through the front frame (the two notches indicate the bottom edge and should be down). When
the coax cables are within two inches of the front frame edge, carefully connect the semi-rigid
coax cables to their respective front-panel connectors, using
a
S/16
inch open-end wrench.
For Option 020 and 021 instruments, main deck reassembly is just the opposite of disassembly.
Be careful that
you
do
not
bend the coax cables. Possible attenuation
or interference
of
the
RF
signal may result.
Carefully slide the main deck assembly into the instrument chassis until the front panel is within
the front frame and the mounting holes are aligned. Attach the front panel with the
six
Torxhead screws: 3 top,
3
bottom.
Attach the main deck assembly to the side struts using the
six
screws: three screws to a side.
Turn the instrument over. With the three A1 assembly mounting stand-offs on the main deck
(MP13) adjacent to the assembler, mount the A1 assembly to the main deck assembly. The three
large holes in the A1 assembly must align with the three mounting stand-offs, and the heat sink
holes must align with the deck mounting holes. Firmly seat the A1 assembly on the mounting
stand-offs and lock the stand-offs by turning the screw heads a
1/4
turn clockwise.
Fasten the transistor heat sink to the deck with two screws.
Connect W12 to AlJ1.
Mount transformer to the mounting bracket using the four long transformer screws. Mount the
bracket to the left side strut at the third and eighth holes (counting forward from the rear
frame) with four screws. Make sure that the transformer secondary wires (4,
5,
6)
face the corner
of
the A1 Switch Control Assembly.
Replace rear frame assembly to the side struts by connecting with four screws at the frame
corners. On instruments with serial number prefix 2407A, mount the rear panel to the rear
frame using eight screws. Ensure that the panel is aligned
so
that the electrical hardware is in
the same corner as the transformer.
Connect the black/green primary wire
(05)
on the transformer to the bottom right LINE
VOLTAGE lug (underneath the white/brown/gray wire
(9
1
81).
Connect the black primary wire
(0)
to the upper right LINE VOLTAGE lug.
Solder the colored secondary wires from the transformer to their respective solder pads on the
A1 Assembly: yellow to 4, green to
5:
and blue to
6.
Solder the black wire to the GND pad.
Reconnect
J8
(on
W
1
Sj
to the rear panel (in the
FREQ
OFFSET INPUT opening) using the
9/
16
inch lock washer and nut.
Model 11793A Microwave Converter
13. Replace the side panels by centering each panel in the track formed by the side strut edges. Slide
the panel from the rear forward until the captive screw on the rear edge of the panel
is
in
contact with the rear frame. The screw should be in position to be tightened into the frame. The
panel will move forward into place as the screw is tightened.
14. Replace the top cover by placing the cover onto the upper frame of instrument, then slide cover
toward front of instrument. Tighten screw in middle of rear edge of cover while applying a
slight upward pressure on the leading edge (to keep the edge from jamming on front frame).
Guide cover into slot in the top of the front frame. Turn instrument over and repeat for the
bottom cover.
39.
RF
Module Disassembly Procedure for Std, Option
010,
&
020
Instruments
1.
2.
3.
4.
5.
6.
7.
8.
9.
NOTE
When referring to switch ports: port
#I
is
the
far
left
(SMA)
connector, port
#2
is
the second
SMA
connector, etc., when holding
the switch (label
up)
with the
SMA
connectors facing
you.
Disconnect
W
I
2
(gray ribbon cable) at
A
1
J1.
Remove module cover (MP
16)
by removing the ten cover screws.
Disconnect cables
W7
and
W8
using a
5/16
open-end wrench:
W7
from U3 Mixer and FL1
Filter, W8 from U2 IF Amp and
S2
Switch, port #4.
Unsolder orange wire from
U2.
Remove
U2
and FL1 from MP16 by removing the two screws securing
U2,
then loosening the
filter clamp screw, and sliding the assembly out.
Disconnect the
LO
input semi-rigid coax cable
(W
1
in Standard instruments,
W
19
in Option
0
10
instruments, or W17 in Option
020
instruments) at U3, being careful not to bend, crimp, or kink
the cable. The radio frequency interference (RFI) shielding grommet can be removed by slipping
the grommet off of the cable via the cable access slit.
Repeat step
6
for
W2
(RF/IF Output) at
S2
port #3.
Repeat step
6
for W3 (RF Input) at
S2
port #2.
Unscrew the two Torxhead screws that secure the MP18 mixer mounting bracket to the MP14
module base.
NOTE
Remember the order in which the stiffener bar and mixer bracket are
assembled. The stiffener
bar
and
mixer bracket assembly order is
different between each brand of mixer used.
10. Disconnect
U3
Mixer from
AT1
Attenuator.
U3
Mixer and bracket can then be disassembled.
11. Disconnect
AT1
from S2.
31
Microwave Converter Model 11793A
12.
13.
14.
Remove
S2
from MP14 module base by removing the two corner screws.
Unsolder the three control wires
(1,
2,
5)
from S2.
Remove the Spira Shield (RF "EMI" gasket situated in the module base lip) only if damaged, or
replacement
of
MP14 module base.
40.
RF
Module Disassembly Procedure
for
Option
001,
011,
&
021
Instruments
1.
2.
3.
4.
5.
6.
7.
8.
9.
10.
11.
NOTE
When referring to switch ports: port
#I
is the far left (SMA)
connector, port
#2
is the second
SMA
connector, etc., when holding
the switch (label
up)
with the SMA connectors facing
you.
Disconnect W
1
2 (gray ribbon cable) at A 1
J
1.
Remove MP16 module cover by removing the 10 cover screws.
Disconnect cables W7 and W8 using
a
5/16
open-end wrench: W7 from
U3
mixer and FL1
Filter, W8 from
U2
IF Amp and S2 Switch, port #4.
Unsolder the orange and white/orange wires (3, 93) from U2. Unsolder the gray and
white/orange wires
(8,
9
3)
from
U
1.
Remove U2 and FL1 from MP16 by removing the two screws securing U2, then loosen the filter
clamp screw and slide the assembly
out.
Disconnect W9 from S1, port #1 and U1.
Disconnect the
LO
input semi-rigid coax cable (W4 in Option
001;
W14 in Option 01
1;
or
W18
in Option 021) from S1, port #2, being careful not to bend, crimp, or kink the cable. The radio
frequency interference
(RFI)
shielding grommet can be removed by slipping the grommet off of
the cable via the cable access slit.
Disconnect W6 from S1, port #3 and
U3.
Disconnect W5 from Sl, port #4 and U1 (power terminal side).
Unscrew the two Torxhead screws that secure the UlMP17 Amplifier mounting bracket to
MP
14 module base. The
U
1
amplifier and bracket can then be removed.
Unscrew the two Torxhead screws that secure the MP18 mixer mounting bracket to MP14
module base.
NOTE
Remember the order in which the stiffener bar and mixer bracket are
assembled. The stiffener bar and mixer bracket assembly
order
is
different between each brand
of
mixer used.
12. Disconnect
U3
from the Attenuator (AT
1).
U3 Mixer and bracket can then be disassembled.
32
Model 11793A Microwave Converter
13. Disconnect
W2
from
S2,
port #3, being careful not to bend, crimp, or kink the cable.
14.
15.
Disconnect
W3
from
S2,
port
#2,
being careful not to bend, Lrimp, or kink the cable.
Disconnect AT1 from
S2,
port
#l.
16.
Remove switches S1 and
S2
from MP14 module base by removing the two screws that secure
each switch.
Unsolder the control wires on each switch
(6,
4,
&
92
on
SI;
5,
1,
&
2
on
S2).
17.
18. Remove the Spira Shield
(RF
gasket situated in the module base lip) only
if
damaged, or
necessary for
MP
14
module base replacement.
41.
RF
Module
Assembly
Procedure
for
Std, Option
010,
&
020
Instruments
1.
2.
3.
4.
5.
6.
Spira Shield (RF gasket) replacement:
Spira Shield
is
inserted into a groove
in
the module base
(MP
14). Within the groove at spaced
intervals, are a series of rectangular protrusions called bosses. Insertion and seaming should begin
and finish at
a
boss.
a. Use finger protection (such as a rubber finger protector) when working with the Spira Shield.
b.
Start at a boss on a straight section of the groove. Push the shielding into the groove using a
protected finger. Guide and twist the shielding to the next boss with the other hand.
c. At the next boss twist the shielding into a tight curl, guide it through the groove, then allow
the shielding to expand to hold itself in place.
d. When an opening in the outer wall
of
the module
is
encountered, the shielding should be cut
diagonally. Begin the threading procedure on the other side of the opening.
e. Twist the shielding tighter when rounding corners.
Solder the three control wires to the
S2
terminals
as
follows: green to
1,
brown to
2,
and red to
C(+).
With the cable slots of the module facing towards the assembler, mount
S2
(label up and the
ports pointing to the center of the module) in the left hand side
of
the module base.
Connect AT
1
to port
#
1
of
S2.
Connect
U3
to the mixer bracket, ensuring that the mixer side port (which connects to the
IF
output) faces opposite to the bracket mounting holes.
Connect U3 to AT1, but do not tighten.
NOTE
Mixer construction varies with manufacturer, and thus, is assembled
within
the
RF
Module differently.
For
example, a Norsal mixer has a
sfiffener bar placed between the mixer mounting bracket and the base
mounting castings. An
RHG
mixer has
a
stiffener bar placed above
the mixer mounting bracket.
33
Microwave Converter Model 1 1 79 3A
7.
8.
9.
10.
11.
12.
13.
14.
15.
16.
17.
18.
19.
Attach the mixer assembly to the module base, but do not tighten the screws.
Tighten the connection to AT 1, then tighten the Mixer assembly screws.
Connect W
1
(in Standard instruments), W
19
(in Option 01
0
instruments), or W 17 (in Option 020
instruments) to the right port of the mixer (cable slots in module should be facing assembler).
Ensure that the radio frequency interference (RFI) shielding grommet cradles the cable in the
slot with the cable access slit facing to the side.
Connect W2 to S2, port #3. Ensure that the RFI Grommet
is
in place as above in step 9.
Repeat step 10 for W3 to S2, port #2.
Attach U2
to
the module cover.
Solder the orange wire to the U2 amplifier terminal.
Place filter clamp around FL1 and attach loosely to the cover.
Connect FL
1
to
U2.
Tighten FL
1
clamp.
Connect W7 to U3 and FL1.
Connect W8 to U2 and S2, port #4.
Secure module cover to base. Snug the screws down finger tight, then tighten the screws, working
from the center out.
Connect W12 to AlJ1.
42.
RF
Module Assembly Procedure for Option
001,
011,
&
021
Instruments
1.
2.
3.
4.
5.
6.
For Spira Shield (RF gasket) replacement, refer to step 1 under Paragraph 41 above.
Wrap and solder the control wires to the S1 and S2 terminals as follows: blue to
SI
terminal
1,
yellow to
S
1 terminal
2,
white/red to
S
1
terminal C(+);
green to S2 terminal
1,
brown to S2 terminal 2, orange, white/red to S2 terminal C(+).
With the cable slots of
MP
14 RF module facing towards the assembler, mount
S
1
(label up and
the ports pointing to the center of the module) in the right side of the module base; mount S2 in
the left side of the module base. Secure the switches with the four long Torxhead screws.
Connect AT1 to S2, port
#I.
Connect
U3
to the mixer bracket, ensuring that the mixer side port (which connects
to
the IF
output) faces opposite to the bracket mounting holes.
Connect U3 to
ATI,
but do not tighten.
34
Model
11793A
Microwave Converter
NOTE
Mixer construction varies with manufacturer, and thus,
is
assembled
within the
RF
Module differently. For example, a Norsa2 mixer has a
stiffener bar placed between the mixer mounting bracket and the base
mounting castings. An
RHG
mixer has a stiffener bar placed above
the mixer mounting bracket.
10.
11.
12.
13.
14.
15.
16.
17.
18.
19.
2
0.
21.
22.
23.
2
4.
Attach the mixer assembly to the module base, but do not tighten the screws.
Tighten the connection to
AT1,
then tighten the mixer assembly screws.
Assemble
U1
HF LO
Amplifier and the
UlMP17
Mounting Bracket. Ensure that the
U1
power
terminal labels are up, and that the terminals face towards switch
S2.
Attach and secure
U
1
Amplifier assembly to
MP
1
4
module base.
Connect
W3
to
S2,
port
#2
(cable slots in module should be facing assembler). Insure that the
radio frequency interference
(RFI)
shielding grommet cradles the cable in the slot with the cable
access slit facing to the side.
Connect
W2
to
S2,
port
#3.
Ensure that the
RFI
Grommet
is
in place as described in step 11.
Connect
W
5
to the left port of
U1
Amplifier and to S1, port
#4.
Connect
W6
to the right port of
U3
mixer and to
S1,
port
#3.
Connect the
LO
input semi-rigid coax cable
(W4
in Option
001
instruments;
W
14
in Option
01
1
instruments; or
W18
in Option 021 instruments) to
S1,
port
#2.
Insure that the
RF
grommet
is
in
place as described in steps
11.
Connect
W9
to the right port of
U1
and to S1, port #l.
Attach
U2
to
MPl6
module cover.
Solder both the orange and white/orange wires
(3,
93)
to the
U2
amplifier terminal.
Place filter clamp around
FL1
and attach loosely to the cover.
Connect
FL
1
to
U2.
Tighten
FL
I
clamp.
Connect
W7
to
U3
and
FL1.
Connect
W
8
to
U2
and
S2,
port
#4.
Secure module cover to base. Snug the screws down finger tight, then tighten the screws,
working from the center out.
Connect
W12
to AlJ1.
35
MICROWAVE SIGNAL DOWN-CONVERSION
L
El
INPUT
I
CONTROL ASSEMBLY
I
--1
--
--
r--
I
I
1
I I
I
"_.
'I
I
I
-
-
I
I
I
UNREGULATED
t12v
t26V
FULL WAVE
RECTIFIER
POWER
TRANSFCRHER
t12v
REGULATOR
0
-
t5v
I
I
t5v
REGULATOR
--
--
BD
1
Figure
10.
MICROWAVE CONVERTER
Simplified
Block
Diagram
37/30
(NOTE
11
i26V
TO
SWITCHES
SIGNAL OIRECT PATH
SIGNAL OOHN CONVERT PATH
t12V TO AMPLIFIERS
J9
!!!?'_?
JiO
w10
10
>-
5
'(7t
7
>i
,
A1
SWITCH
CONTROL
NC
'(
9t
NC
NC
1
NOTES
1.
ALL CIRCUITRY EXCEPT
W12
IS
ENCASE0 IN A R.F.I.
SHIELDED MOOULE.
2.
J9
AN0
JlO
ARE
PART
OF Y12 AN0
Hi0
RESPECTIVELY. AN0 CANNOT
BE OROEREO SEPARATELY.
3.
J?
010
ONLY1
I
[NOTE
31
L_--d
(OPTION 020
ONLY1
[LEFT SIOEI
J?
ISTO
ONLYl
I
(NOTE
3)
4.
SEE FIGURE
7
FOR HELP IN COMPONENT
LOCATION AND IOENTIFICATION.
(RIGHT
SIDE1
J?
I
IOPTION
010
ONLY1
I
.---..
JB
L___>
lOPfION
020
ONLY1
INPUT SIQNAL DOWN CONVERTER
I
Ill
I.+
S2
RF INPUT SWITCH
EO0
MHz U2 IF 15dE
U3 MIXER AMPLIFIER
AT1 368
ATTENUATOR
(STD
AND OPTION
I
010
ONLYl
I
(NOTE
31
ss
1
Figure
11.
INPUT SIQNAL DOWN CONVERTER
Option
010,
and Option
0201
(Schematic Diagram
for
Standard
39/40
(NOTE
11
INPUT
SIGNAL
DOWN
CONVERTER
t26 VOC
TO
SUITCHES
I
SIGNAL DIRECT PATH
I
SIGNAL DOWN CONVERT PATH
8
5>1
I
c23
S2
RF INPUT SWITCH
0
1 CI
(I
LO
AMP
OUT
PATH
LO AMPLIFIER IN PATH
GND
1-
T
NOTES
1.
ALL CIRCUITRY EXCEPT
W12
IS
ENCASE0 IN A R.F.I.
SHIELOING MODULE.
2
-9
bhO
,110
ARt
PAHT
CF
"12
b1D
111
2ESPFC'IVt.l. Ah0 CbhhOT
BE
OROEREO
SFPARA1i.l
3.
INPUT VOLTAGE TO
LO
AMPLIFIER
CANNOT EXCEED
t51
(0.6V)
OF
t12
VdC
SUPPLY.
LO AMP OPT
001
011 021
5.
SEE FIGURE
0
FOR
HELP IN COMPONENT
LOCATION AND IDENTIFICATION
I
ONLY)
I
I
(OPTION
021
ONLYI
I
K2
T
I
'I
-
BOO
HHz
I
=z
e-----
AT1
340
FLl
LOU
-
ATTENUATOR PASS
FILTER
IPTIONAL LO AMPLIFIER AND SWITCH
L---
CR1
AMPLIFIER
18-26
6H2 (NOTE
31
I
f-
IF
15d0
'L
I
FI
ER
D
(OPTIONS
001
I
AND
011
ONLYI
I
[NOTE
4)
ss2
Figure
12.
INPUT SIGNAL DOWN CONVERTER
(Schemetlc
Diagram
for
Options
001,
Ol1,and
021)
41
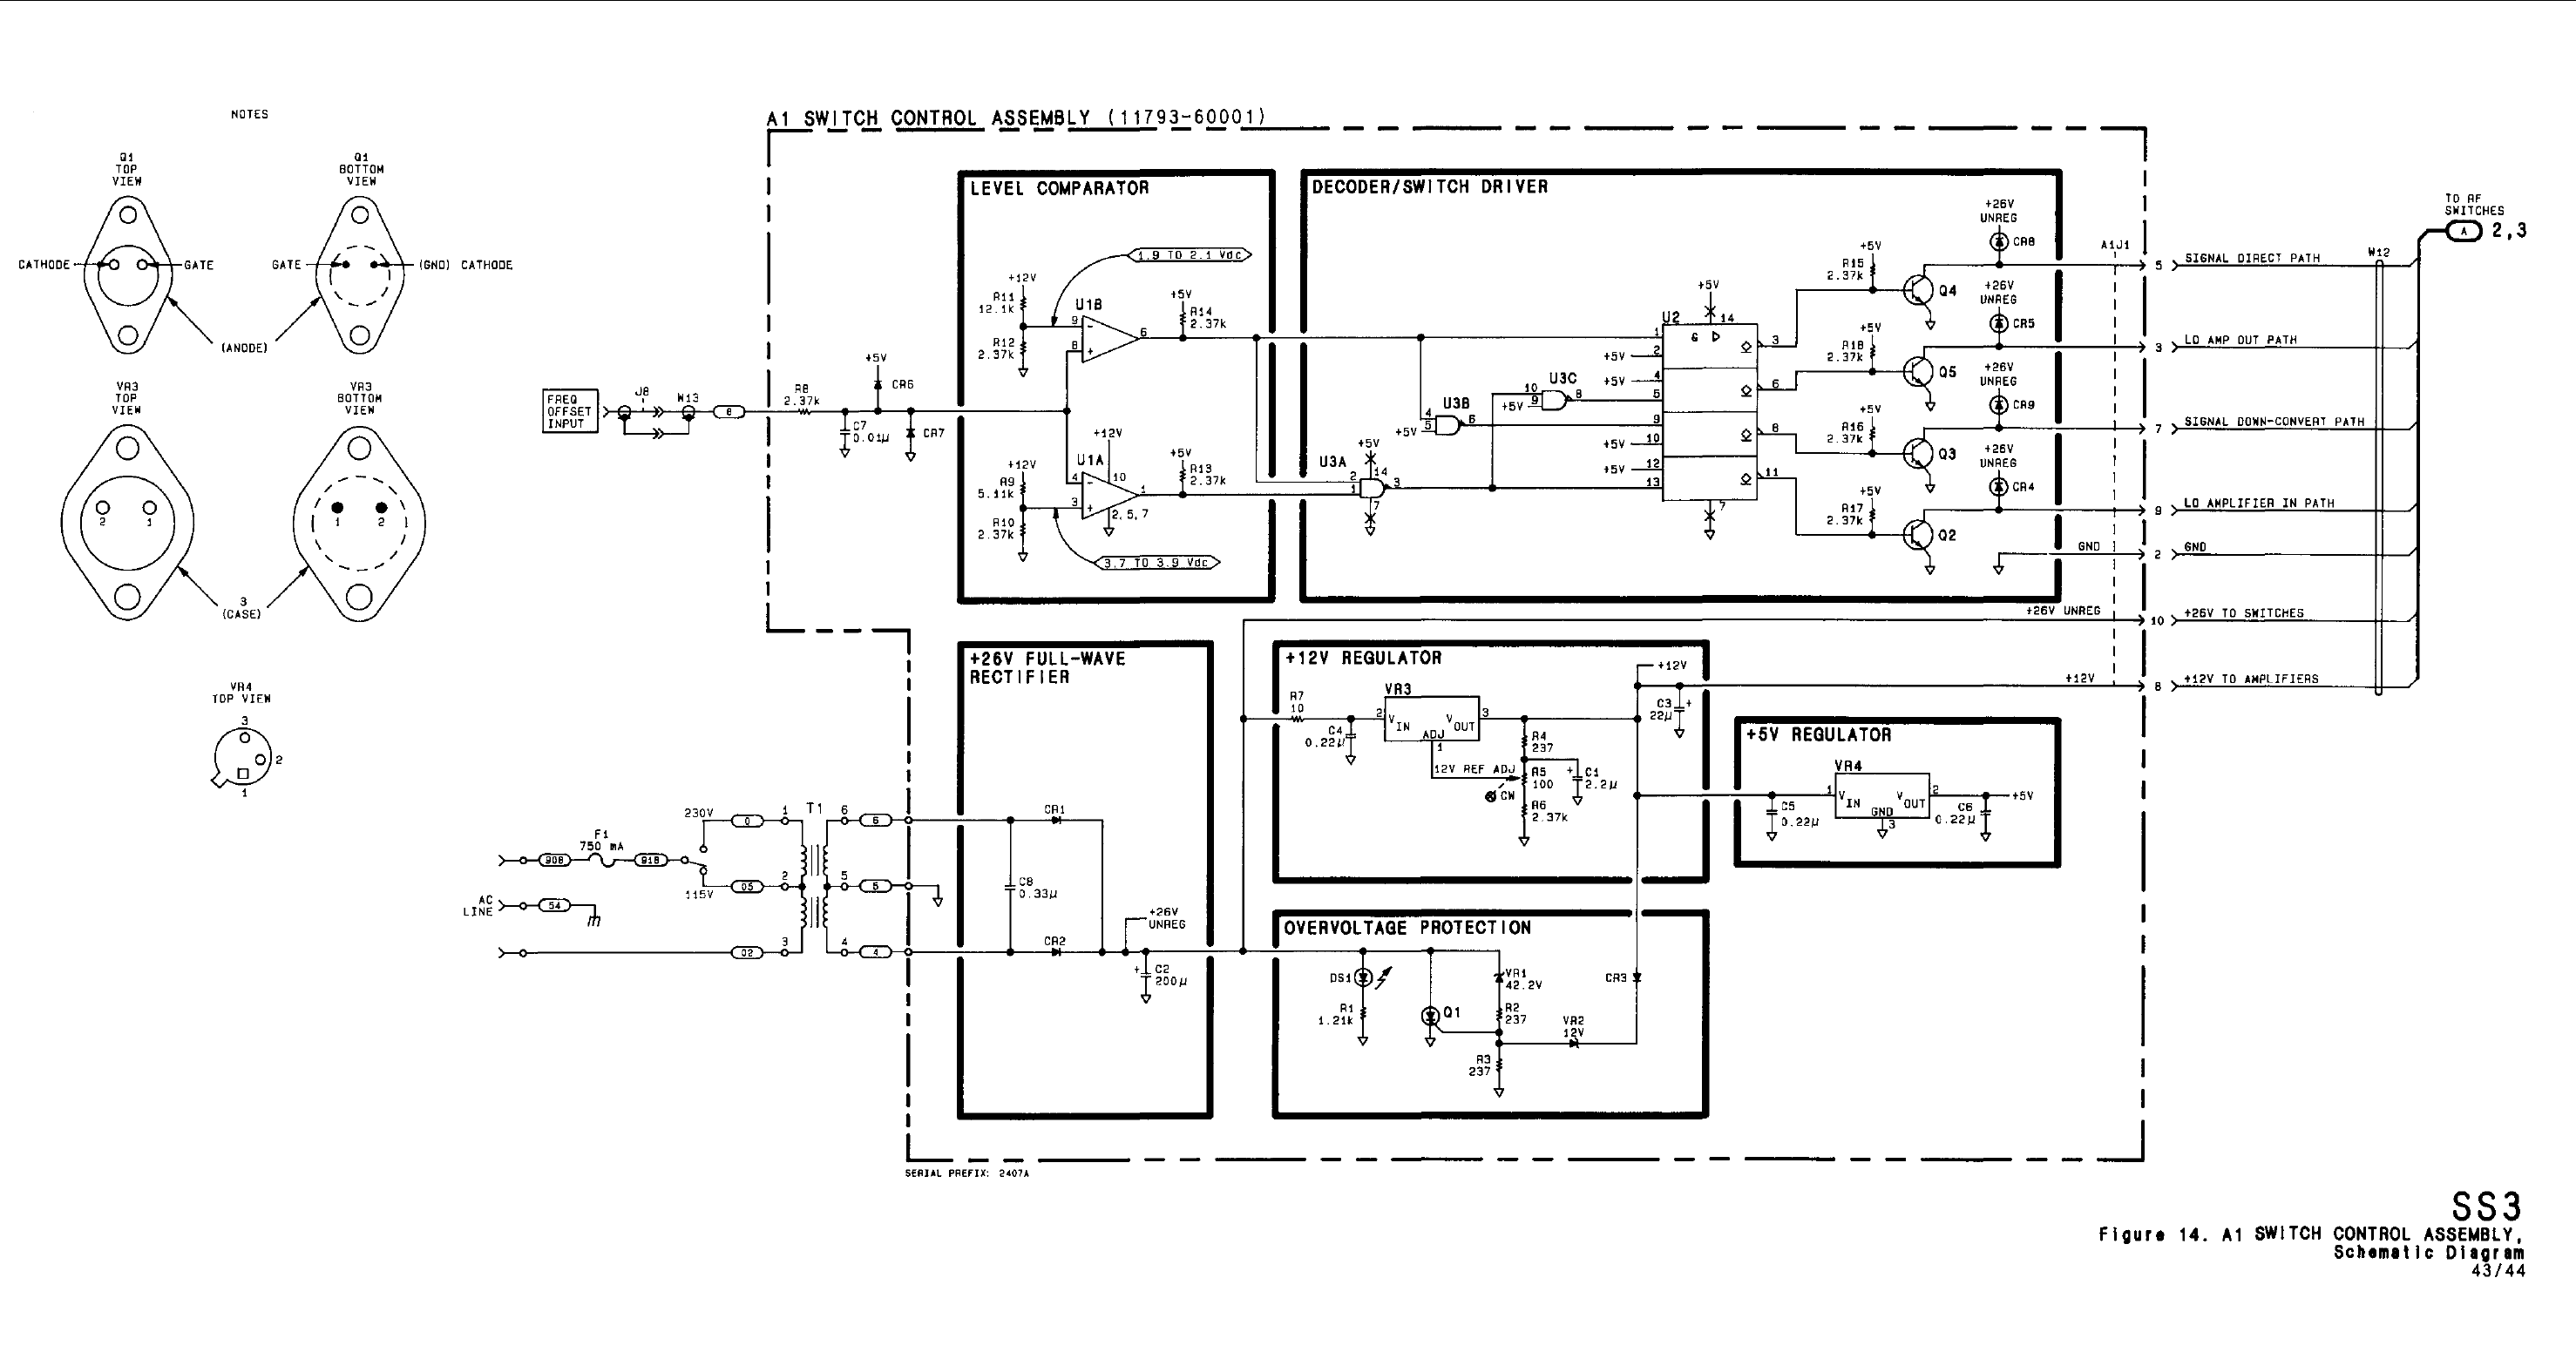
C
A T
H
0
0
E
1
-- --
--
--
--
NOTES
A1
SWITCH
CONTROL
ASSEMBLY
(11793-60001)
--
--
I--
01
01
TOP BOTTOM
VIEW VIEW
IANOOEI
VR3 VR3
TOP BOTTOM
VIEY VIEW
(j
3
(CASE1
VR4
TOP
VIEW
TO
RF
swci iES
2,3
ss3
~~~
Figure
14.
AI
SWITCH
CONTROL
ASSEMBLY,
Schematic
Diagram
43/44
REGIONAL SALES AND
SERVICE OFFICES
NORTH/CENTRAL AFRICA
Hewlett-Packard S.A.
7, Rue du Bois-du-Lan
CH-1217
MEYRIN
2, Switzerland
Tel: (022) 83 12 12
Telex: 27835 hpse
Cable: HEWPACKSA Geneve
ASIA
Hewlett-Packard Asia Ltd.
6th Floor, Sun Hung Kai Centre
30 Harbour Rd.
G.P.O. Box 795
HONG KONG
Tel: 5-832 3211
After
Jan.
1,
1984
47th Floor, China Resources Bldg.
26 Harbour Rd., Wanchai
HONG KONG
Telex: 66678 HEWPA HX
Cable: HEWPACK HONG KONG
CANADA
Hewlett-Packard (Canada) Ltd.
6877 Goreway Drive
MISSISSAUGA,
Ontario L4V 1 M8
Tel: (416) 678-9430
Telex: 61 0-492-4246
MEDITERRANEAN AND
MIDDLE EAST
Hewlett-Packard S.A.
Mediterranean and Middle East
Operations
Atrina Centre
32 Kifissias Ave.
Paradissos-Amarousion,
ATHENS
Greece
Tel: 682 88 11
Telex: 21-6588 HPAT GR
Cable: HEWPACKSA Athens
EASTERN EUROPE
Hewlett-Packard Ges.m.b.h.
Lieblgasse 1
P.O. Box 72
A-1222
VIENNA,
Austria
Tel: (222) 2365110
Telex:
1
3 4425 HEPA A
NORTHERN EUROPE
Hewlett-Packard S.A.
Uilenstede 475
P.O. Box 999
The Netherlands
Tel: 20 437771
N L-1180 AZ
AMSTELVEEN
SOUTH EAST EUROPE
Hewlett-Packard S.A.
7,
Rue du Bois-du-Lan
CH-1217
MEYRIN
2, Switzerland
Tel: (022) 83 12 12
Telex: 27835 hpse
Cable HEWPACKSA Geneve
OTHER EUROPE
Hewlett-Packard S.A.
P.O. Box
150, Rte du Nant-D’Avril
CH-1217
MEYRIN
2, Switzerland
Tel: (022) 83 8111
Telex: 22486 hpsa
Cable: HEWPACKSA Geneve
EASTERN USA
Hewlett-Packard Co.
4 Choke Cherry Road
ROCKVILLE,
MD 20850
Tel: (301) 258-2000
MIDWESTERN USA
Hewlett-Packard Co.
5201 Tollview Drive
ROLLING
MEADOWS,
IL 60008
Tel: (312) 255-9800
SOUTHERN USA
Hewlett-Packard Co.
2000 South Park Place
P.O. Box 105005
ATLANTA,
GA 30348
Tel: (404) 955-1500
WESTERN USA
Hewlett-Packard Co.
3939 Lankershim Blvd.
P.O.
Box 3919
LOS ANGELES,
CA 91604
Tel: (213) 506-3700
OTHER INTERNATIONAL AREAS
Hewlett-Packard Co.
Intercontinental Headquarters
3495 Deer Creek Road
PAL0 ALTO,
CA 94304
Tel: (415) 857-1501
Telex: 034-8300
Cable: HEWPACK
