Huawei Technologies CP12V HSDPA USB Stick User Manual Part 2
Huawei Technologies Co.,Ltd HSDPA USB Stick Part 2
Contents
- 1. User Manual Part 1
- 2. User Manual Part 2
- 3. User Manual Part 3
User Manual Part 2
HUAWEI K4505 HSPA+ USB
Stick
Quick Start
Thank you for choosing this USB Stick. With the
USB Stick, you can access the Internet through
wireless network at a high speed.
Note:
This manual describes the appearance, installation and removal of the USB Stick.
For the operation of the management program, refer to the User Manual.
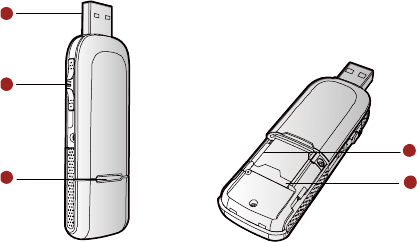
Getting to Know Your USB Stick
The following figure shows the appearance of the USB Stick. It is only for your
reference. The actual product may differ.
1
5
2
34
n USB Interface
It connects the USB Stick to a computer.
o Stick
It reveals the USB connector
p Indicator
It indicates the status of the USB Stick.
Green, blinking (on for 100ms and off for 100ms; then on for 100ms and off for
2700ms), the USB Stick is powered on.
Green, blinking (on for 100ms and off for 2900ms), the USB Stick is registered
to a GSM/GPRS/EDGE network.
Blue, blinking (on for 100ms and off for 2900ms), the USB Stick is registered to
a UMTS network.
Green, on, the USB Stick is connected to a GPRS/EDGE network.
Blue, on, the USB Stick is connected to a WCDMA network.
Cyan, on, the USB Stick is connected to a HSPA+ network.
Off, the USB Stick is removed.
q SIM/USIM Card Slot
It is where you insert the subscriber identity module/UMTS subscriber identity
module (SIM/USIM) card.
r Micro SD Card Slot
It is where you insert the Micro Secure Digital Memory (SD) card
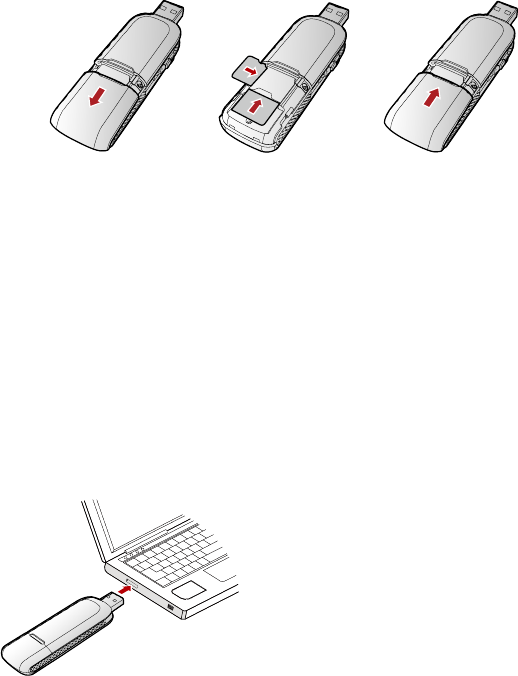
Getting Your USB Stick Ready
1. Remove the back cover of the USB Stick.
2. Insert the USIM/SIM card and the micro SD card into the card slots. Make sure
that the cards are properly inserted.
3. Install the back cover of the USB Stick.
Note:
Do not remove the Micro SD card when it is being used. Removing the card during
an operation may damage the Micro SD card as well as the device, and data stored
on the card may be corrupted.
Installation/Removal Guide
On different operating systems (OSs), the installation and removal procedures
may differ. Follow the system prompts during operation.
Connecting the USB Stick with a Computer
Note:
First, power on the computer. Then connect the USB Stick with the computer.
Otherwise, the USB Stick cannot be installed as normal.
1. Plug the USB Stick into the USB interface of the laptop or desktop computer.
2. The OS automatically detects and recognises new hardware and starts the
installation wizard.
3. Follow the prompts of the installation wizard.
4. After the program is installed, a shortcut icon for the USB Stick management
program is displayed on the desktop.
Starting the Management Program
After the USB Stick is installed, the management program is launched
automatically. Then every time the USB Stick is connected to the PC, the
management program is launched automatically.
You can also double-click the shortcut icon on the desktop to launch the
management program.
Removing the USB Stick
Exit the management program and then remove the USB Stick directly.
Removing the Management Program
1. Click Start Menu.
2. Click Control Panel.
3. Click Add/Remove Program to remove the management program of the USB
Stick.
Note:
Before removing the management program, exit the management program.
Version: V100R001_01 Part Number: 31010AEG