Huawei Technologies DS363 HD DVB-S2 STB User Manual
Huawei Technologies Co.,Ltd HD DVB-S2 STB
User Manual

DS363 Satellite Digital TV Set-Top Box
User Guide
(Version 01)
HUAWEI TECHNOLOGIES CO., LTD.
i
Contents
1 Warnings and Precautions ....................................................................... 1
2 Packing List ............................................................................................... 4
3 Panels ......................................................................................................... 5
3.1 Front Panel .......................................................................................................... 5
3.2 Rear Panel ........................................................................................................... 6
4 Remote Control ......................................................................................... 7
4.1 Appearance.......................................................................................................... 7
4.2 Keys and Functions ............................................................................................ 8
4.3 Learning function................................................................................................ 9
5 Connecting Cables................................................................................... 10
5.1 Using the AV Cable.......................................................................................... 10
5.2 Using the Coaxial Cable................................................................................... 11
5.3 Using the HDMI Cable..................................................................................... 12
6 Inserting the Smart Card ....................................................................... 13
7 Main Menu Overview ............................................................................. 14
7.1 Accessing the Main Menu................................................................................ 14
7.2 Channel Management ....................................................................................... 14
7.3 Record Management ......................................................................................... 14
7.4 System Installation ........................................................................................... 17
7.5 System Setup ..................................................................................................... 18
7.6 CA Menu ........................................................................................................... 20
7.7 Information........................................................................................................ 22
ii
8 Basic Operations ..................................................................................... 24
8.1 EPG.................................................................................................................... 24
8.2 Viewing the Program Information Banner...................................................... 24
8.3 Displaying the program list .............................................................................. 25
8.4 Recording and playback ................................................................................... 25
9 Troubleshooting ...................................................................................... 28
10 Specifications ........................................................................................ 30

1
1 Warnings and Precautions
To use the device properly and safely, read these warnings and precautions carefully
and strictly observe them during operation. Unless otherwise specified, the term
"device" refers to the device and its accessories.
Basic Requirements
During storage, transportation, and operation of the device, keep it dry and
prevent it from colliding with other objects.
Do not dismantle the device. In case of any fault, contact an authorized service
center for assistance or repair.
Without authorization, no organization or individual can change the mechanical,
safety, or performance design of the device.
When using the device, observe all applicable laws and regulations and respect the
legal rights of other people.
Environmental Requirements for Using the Device
Before connecting and disconnecting cables, stop using the device, and then
disconnect it from the power supply. Ensure that your hands are dry during
operation.
Keep the device far from sources of heat and fire, such as a heater or a candle.
Keep the device far from electronic appliances that generate strong magnetic or
electric fields, such as a microwave oven or a refrigerator.
Place the device on a stable surface.
Place the device in a cool and well-ventilated indoor area. Do not expose the
device to direct sunlight.
Use the device in an area with a temperature ranging from 0°C to 45°C.
Do not block the openings on the device with any object. Reserve a minimum
space of 10 cm around the device for heat dissipation.
Do not place any object (such as a candle or a water container) on the device. If
any foreign object or liquid enters the device, stop using the device immediately,
power it off, remove all the cables connected to it, and then contact an authorized
service center.
During thunderstorms, power off the device, and then remove all the cables
connected to it to prevent it from getting damaged due to lightning strikes.
2
Areas with Inflammables and Explosives
Do not use the device where inflammables or explosives are stored, for example,
in a gas station, oil depot, or chemical plant. Otherwise, explosions or fires may
occur. In addition, follow the instructions indicated in text or symbols.
Do not store or transport the device in the same box as inflammable liquids, gases,
or explosives.
Accessory Requirements
Use only the accessories supplied or authorized by the device manufacturer.
Otherwise, the performance of the device may get affected, the warranty for the
device or the laws and regulations related to telecommunications terminals may
become null and void, or an injury may occur.
Do not use the power adapter if its cable is damaged. Otherwise, electric shocks or
fires may occur.
Ensure that the power adapter meets the specifications indicated on the device
nameplate.
Ensure that the power adapter meets the requirements of Clause 2.5 in
IEC60950-1/EN60950-1 and it is tested and approved according to national or
local standards.
Safety of Children
Keep the device and its accessories out of the reach of children. Otherwise, they may
damage the device and its accessories by mistake, or they may swallow the small
components of the device, causing suffocation or other dangerous situations.
Maintenance
If the device is not used for a long time, power it off, and then remove all the
cables connected to it.
If any exception occurs, for example, if the device emits any smoke or unusual
sound or smell, stop using the device immediately, power it off, remove all the
cables connected to it, and then contact an authorized service center.
Do not trample, pull, or overbend any cable. Otherwise, the cable may get
damaged, causing malfunction of the device.
Before cleaning the device, stop using it, power it off, and then remove all the
cables connected to it.
3
Use a clean, soft, and dry cloth to clean the device shell. Do not use any cleaning
agent or spray to clean the device shell.
Environmental Protection
Do not dispose of the device and the accessories in a garbage can.
Dispose of the device according to the local regulations on disposing of packing
materials, exhausted batteries and abandoned devices, and support the recycling
activity.
4
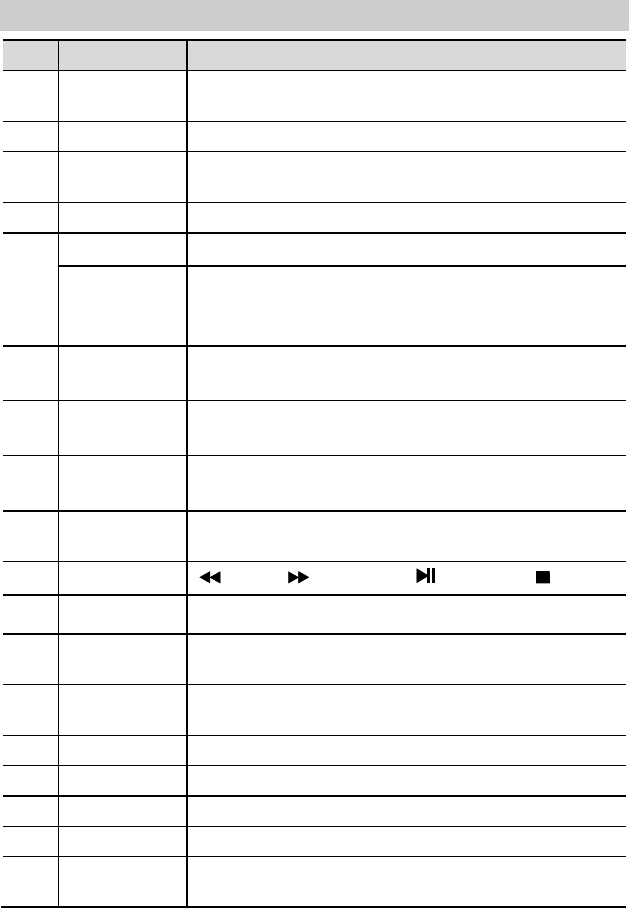
2 Packing List
The following table lists the accessories in the product package.
No.
Item
Quantity
1 Set-Top Box 1
2 Remote control 1
3 AA batteries 2
4 Power adapter 1
5 AV cable 1
6 User Gu ide 1
If you find any item missing or damaged, contact your service
provider.
5
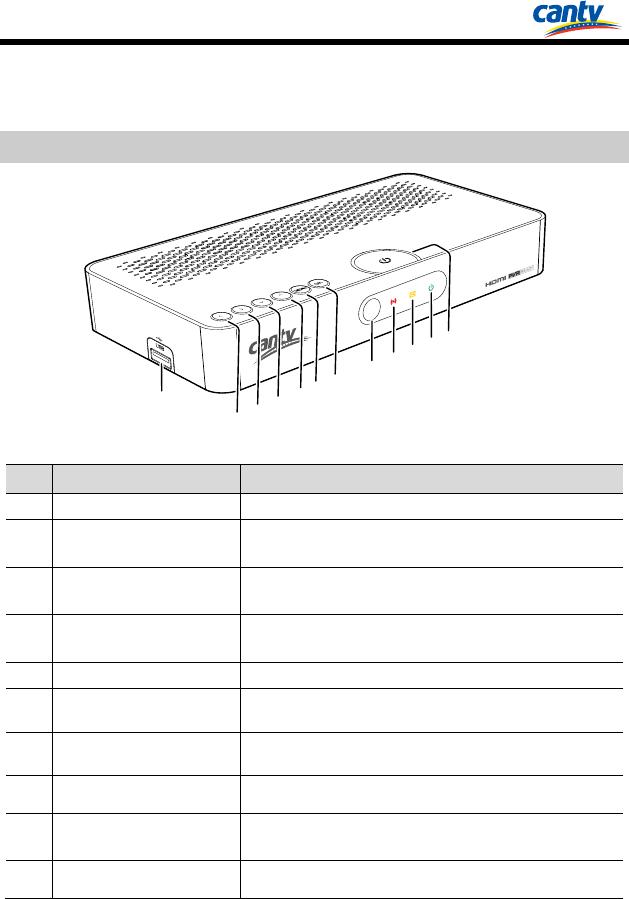
3 Panels
The figures of the set-top box (STB) shown in the following sections are only for your
reference. The actual appearance may differ slightly from that shown depending on
the product you purchased.
3.1 Front Panel
No. Item Description
1 USB interface Connect a USB storage device.
2~3 Left/Right button Move the cursor left or right in a menu.
Adjust the volume in the viewing mode.
4~5 Up/Down button Move the cursor up or down in a menu.
Change the channel in the viewing mode.
6 MENU button Display the main menu in the viewing mode.
Return to the previous screen in a menu.
7 OK button Confirm a selected option.
8 Remote control signal
receiver Receive the remote control's infrared signal.
9 Remote control signal
indicator
Flash red when the STB receives the remote control's
infrared signal.
10 Message indicator Turn yellow when the STB receives a message.
11 Standby indicator
Turn green when the STB is in active mode.
Turn red when the STB is in standby mode.
12 Standby button Switch the STB between active and standby modes.
50 0m A M ax
1
2
3
4
56
7
8
9
10 11 12
6
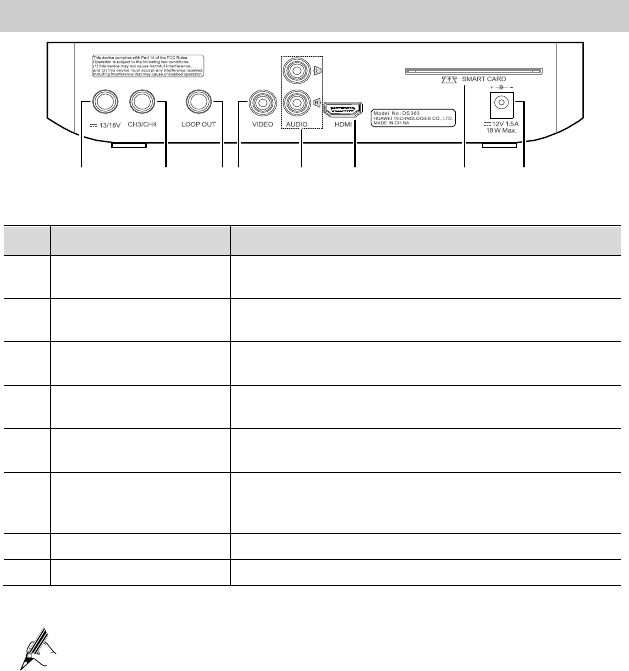
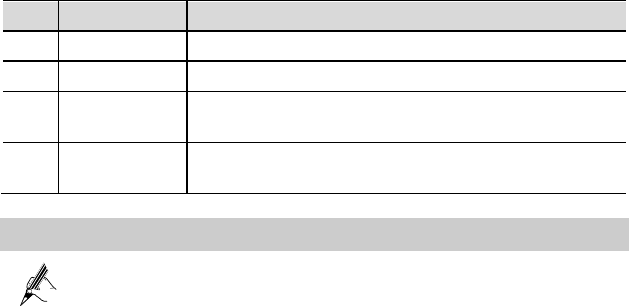
3.2 Rear Panel
No. Item Description
1 LNB In interface Connect a satellite antenna cable to the STB to receive
satellite signals.
2 CH3/CH4 interface Connect the coaxial cable to the STB to send analog video
signals to your TV.
3 LOOP OUT interface Connect the coaxial cable to the STB to send satellite signals
to another STB.
4 VIDEO interface Connect the video cable to the STB to send analog video
signals to your TV.
5 AUDIO L/R interface Connect the audio cable to the STB to send analog audio
signals to your TV or other audio devices.
6 HDMI interface
Connect a High-Definition Multimedia Interface (HDMI)
cable to the STB to send digital audio and video signals to
your TV.
7 Smart c ard slot House a smart card that enables you to watch programs.
8 Power interface Connect the power adapter to the STB.
USB interface on the STB supply 500mA.
A USB storage device using an automatic recognition program may
not be recognized.
A USB storage device which uses its own driver may not be
recognized.
L N B I N
3 0 0 mA M ax
1 2 3 4 5 6 7 8
7
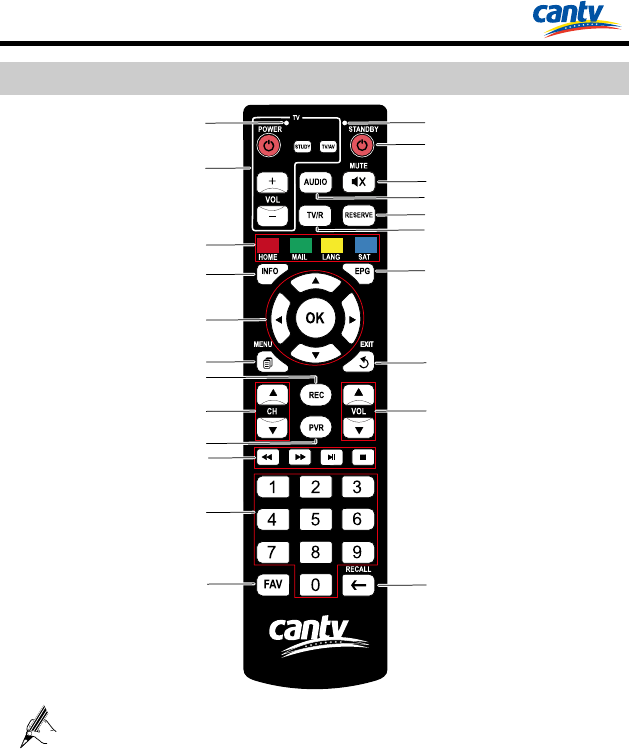
4 Remote Control
4.1 Appearance
Upgrading the STB may lead to some changes in the functions of
remote control keys. For specific functions, see the instructions
provided on the user interface (UI).
When using the STB, do not expose the STB's infrared signal
receiver to direct sunlight.
The figures of the remote control shown in this document are only for
your reference. The actual appearance may differ slightly from that
shown depending on the product you purchased.
2
1
3
4
5
6
7
8
9
10
11
12 13
14
15
16
17
18
19
20
21
22
8
4.2 Keys and Functions
No. Item Description
1 The red
indicator Flash red when you press the keys in the TV learning.
2 Learning keys Learn some key features of the TV remote control.
3 Function keys For more information about the color keys, see the
instructions provided on the user interface.
4 INFO key Display information available on shows.
5
OK key Select (Enter) a menu or Confirm a selected option.
Navigation
keys
Move the cursor.
Adjust the volume by the left or right key.
Switch the channels by the up or down key.
6 MENU key Display the main menu in the viewing mode.
Return to the previous screen in a menu.
7 REC key Instant record the programs in living broadcast.
Stop recording the programs in living broadcast.
8 CH keys Go to the previous or next screen.
Go to the previous or next channel.
9 PVR key Enter the Record Management menu in the viewing
mode.
10 Control keys Rewind, Fast Forward, Play/Pause, Stop.
11 0-9 keys Select channels or enter numbers.
12 FAV key Favorite zap key to browse through all the favorite
channels after the program banner displays.
13 RECALL key Switch between the current channel and the previous
channel.
14 VOL keys Adjust the volume in the viewing mode.
15 EXIT key Exit to the living broadcast.
16 EPG key Display the Electronic Program Guide.
17 TV/R key Switch between TV programs and Radio programs.
18 RESERVE
key Enter the booking management interface.
9
No. Item Description
19 AUDIO key Switch the audio feed for the channel (when available).
20 MUTE key Mute or unmute the STB.
21 STANDBY
key Switch the STB between active and standby modes.
22 The green
indicator
Flash when you press the remote control keys (but the
learning keys).
4.3 Learning function
If you don’t press any button or send a signal in 10 seconds, it will
quit from learning mode automatically.
There are only 4 keys in the TV learning with learning function. The
other keys for set-top box are without learning function.
Through the set up for learning function, the 4 learnable keys can be
updated by learning other different brands TV remote control.
This remote control can be suitable for most of television, but not all
television. If you have any questions, please contact with the
manufactory immediately.
The remote control cannot learn the universal TV remote control.
(For example: Learn the POWER key from the TV remote control)
Step 1 Press the STUDY key in the TV learning keypad panel continuously for 2
seconds. Until the LED gradually flash red to keep lighting, release the key.
Step 2 Press the P OWE R key on the remote control within 10 seconds, then the
red LED is flashing; it means this button is ready to receive the code.
Step 3 Aim the emission port of the original TV remote control at the emission port
of your set-top box remote control (distance between these two ports is
about 2~3 cm).
Step 4 Then press the Power key of your original TV remote control continuously
for 10 seconds to transmit the learning signal.
1. If the LED will flash quickly for three times and keep lighting, it means
the set-top box remote control succeeds in receiving the signal and you
have completed the study procedure of the POWER key.
2. If the LED doesn’t display the same as in step 4, which means the
learning signal is not accepted by the set-box remote control, and you
should repeat step 2-4.
Step 5 Repeat the above process to learn the other three keys. Once you finished to
10
learn all the keys, press the STUDY key to save the present setting and exit
the learning mode.
5 Connecting Cables
Before connecting or disconnecting a cable, power off the STB, TV
and all the devices connected to them.
Before connecting, check that all the necessary cables are available.
Then connect the cables as shown in the following figures.
Do not plug or unplug a cable when a device is powered on.
The figures shown in the following sections are only for your
reference. The actual appearance may differ slightly from that shown
depending on the product you purchased.
There are three manners to connect the STB and your TV, depends on the components
that you intend to connect and the desired signal quality and the styles of your TV.
5.1 Using the AV Cable
Step 1 Use a satellite antenna cable to connect a dish to the STB's LNB in
interface.
Step 2 Connect the AV cable's yellow, white, and red connectors at one end to the
STB's VIDEO, AUDIO L, and AUDIO R interfaces respectively.
L N B I N
300m A Max
Antena
11
Step 3 Connect the video and audio cable's yellow, white, and red connectors at the
other end to your TV's corresponding video and audio interfaces.
Step 4 Use the power adapter to connect the STB's DC IN interface to a working
power socket, extension cord or surge protector.
5.2 Using the Coaxial Cable
Step 1 Use a satellite antenna cable to connect a dish to the STB's LNB in
interface.
Step 2 Connect one end of a coaxial cable to the STB's CH3/ CH4 interface.
Step 3 Connect the other end of the coaxial cable to your TV's TV interface.
Step 4 Use the power adapter to connect the STB's DC IN interface to a working
power socket, extension cord or surge protector.
Antena
L N B I N
3 0 0 m A M a x
A B L E I
12
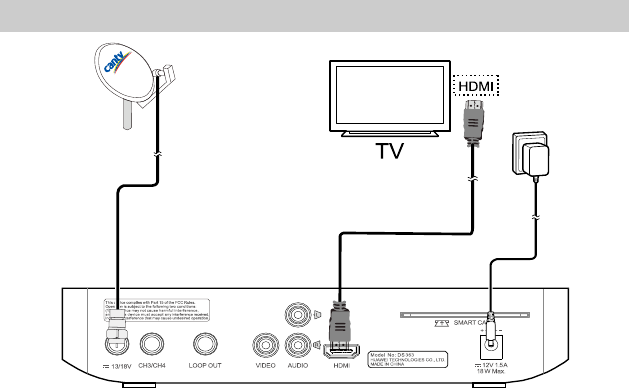
5.3 Using the HDMI Cable
Step 1 Use a satellite antenna cable to connect a dish to the STB's LNB in
interface.
Step 2 Connect one end of an HDMI cable to the STB's HDMI interface.
Step 3 Connect the other end of the HDMI cable to your TV's HDMI interface.
Step 4 Use the power adapter to connect the STB's DC IN interface to a working
power socket, extension cord or surge protector.
Antena
L N B I N
3 0 0 m A M a x
A B L E I
13
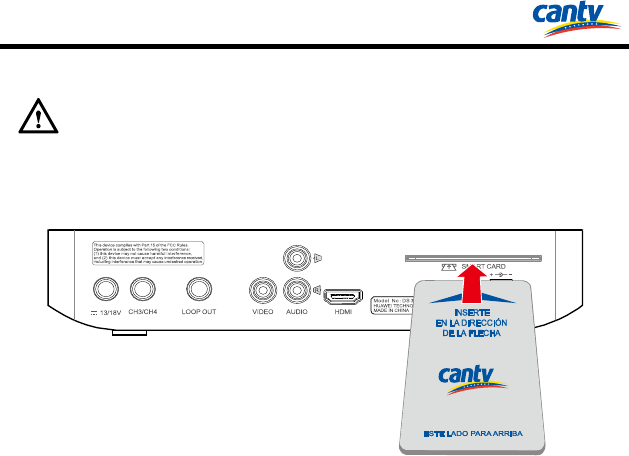
6 Inserting the Smart Card
To prevent damage to the STB or the smart card:
Do not insert or remove the smart card when STB is powered on.
Do not frequently insert or remove the smart card.
Step 1 Record the serial number that appears in the back of your smart card.
Step 2 Call the local service providers to activate the service.
Step 3 Insert the smart card.
Insert the smart card with the metal chip facing downwards into the smart card slot of
the STB.
L N B I N
3 0 0 m A M a x
14
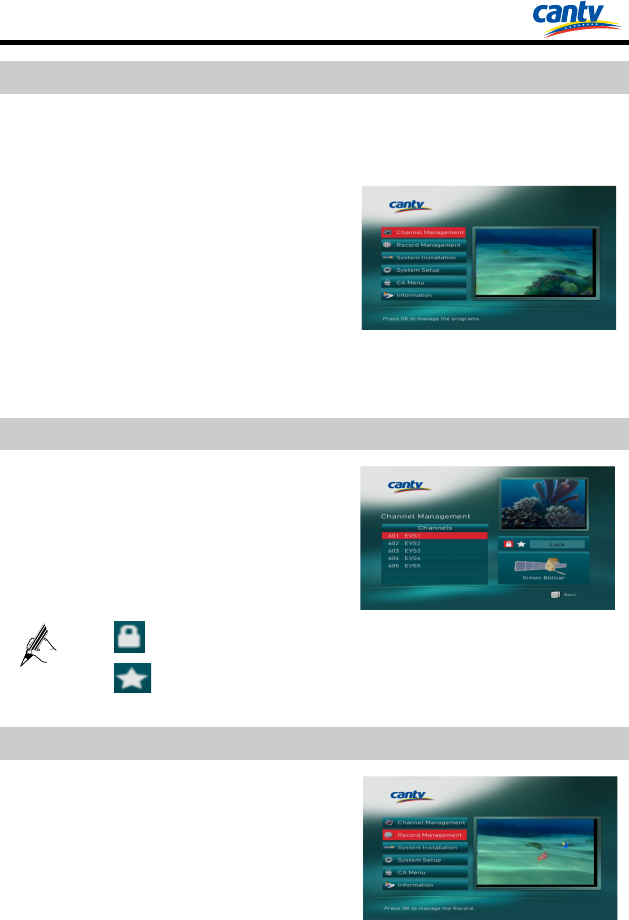
7 Main Menu Overview
7.1 Accessing the Main Menu
Press MENU to access the main menu,
which includes the following sub-menus:
Channel Management: manage the
programs.
Record Management: manage the
record.
System Installation:search the
programs.
System Setup:set up
the system
properties.
CA Menu: set up the CA properties.
Information:view detail.
7.2 Channel Management
1. Select the Channel Management.
2. Press OK to access the sub-menu.
3. Input the default pins(000000).
: Lock the selected program.
: Set the selected program to your favorite program.
7.3 Record Management
1. Select the Record Management.
2. Press OK to access the sub-menu.
15
Press OK to management the Record.
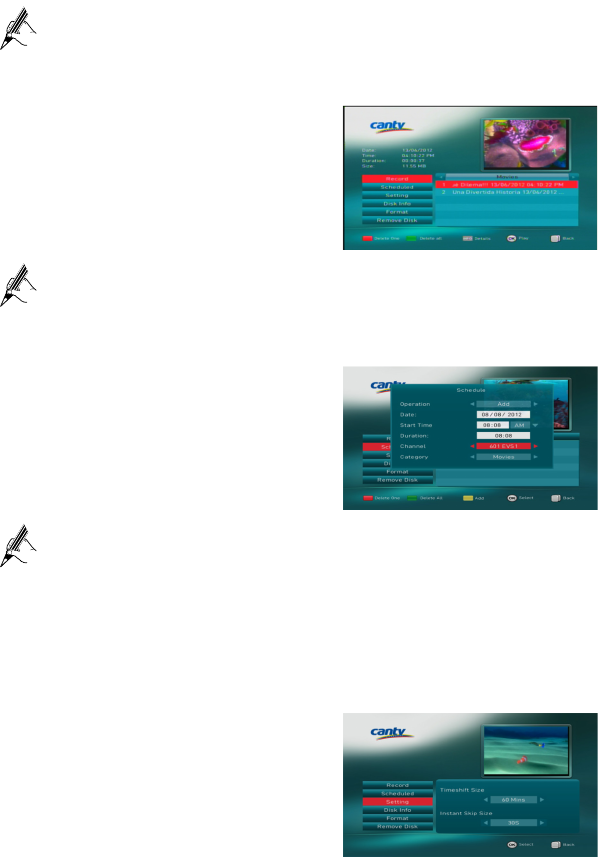
7.3.1 Record
When you select the Record, it will d isplay
the information of record list.
Press OK to enter the selected file.
Press MENU to return to the last viewed guide.
7.3.2 Scheduled
When you select the Scheduled, you can
easily set the recording reservations for
future programs.
Press OK to edit the parameters of a reservation.
Press MENU to return to the last viewed guide.
Press Function key (red) to delete one recording reservation.
Press Function key (green) to delete all recording reservations.
Press Function key (yellow) to add one recording reservation.
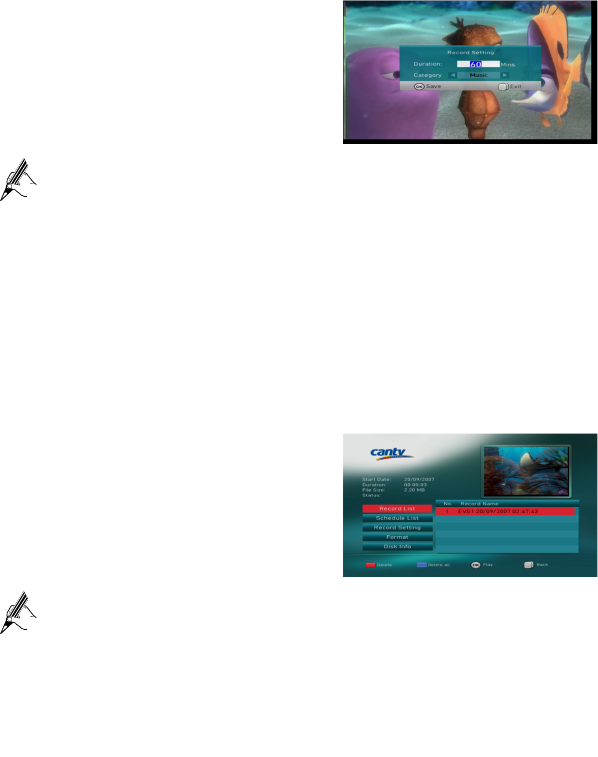
7.3.3 Setting
When you select the Setting, you can edit
the parameters of Timeshift Size and
Instant Skip Size.

16
Press OK to edit the parameters.
Press MENU to return to the last viewed guide.
Timeshift Size: set the time segment of the pause live TV (PLTV).
Instant Skip Size: set the time segment of the step.
7.3.4 Disk Info
When you select the Disk Info, you can
view the information of the USB storage
device.
Press MENU to return to the last viewed guide.
USB storage device with capacity of more than 10 GB in order to meet
the recording requirements.
USB storage devices below USB 2.0 are supported as well. But they
may not work properly.
The system may require a longer time to read large amounts of data
stored in a USB device.
7.3.5 Format
Be sure to back up important files since data stored in a USB storage
device may be damaged. We will not be responsible for any data loss.
When you select the Format, you can
format a USB storage device.
17
Press OK to format a USB storage device.
Press MENU to return to the last viewed guide.
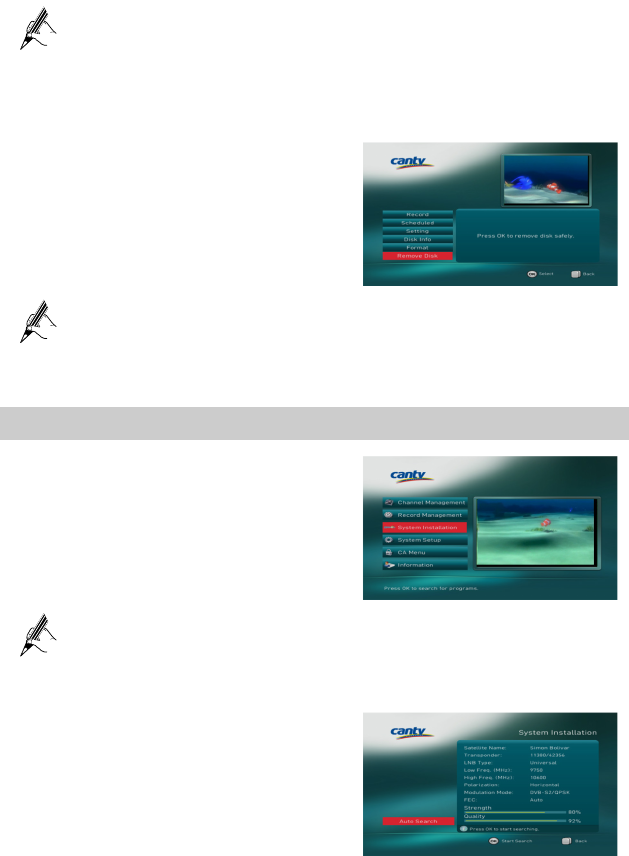
7.3.6 Remove Disk
When you select Remove Disk, you can
remove the USB storage device safely.
Press OK to remove the USB storage device safely.
Press MENU to return to the last viewed guide.
7.4 System Installation
1. Select the System Installation.
2. Press OK to access the sub-menu.
Press OK to search for programs.
7.4.1 Auto Search
When you select the Auto Search, the STB
will start search the programs
automatically.
18
When the frequency of signal sound becomes faster and the parameter
value of quality and strength are more than 65%, then press OK to
start search the programs.
Press MENU to return to the last viewed guide.
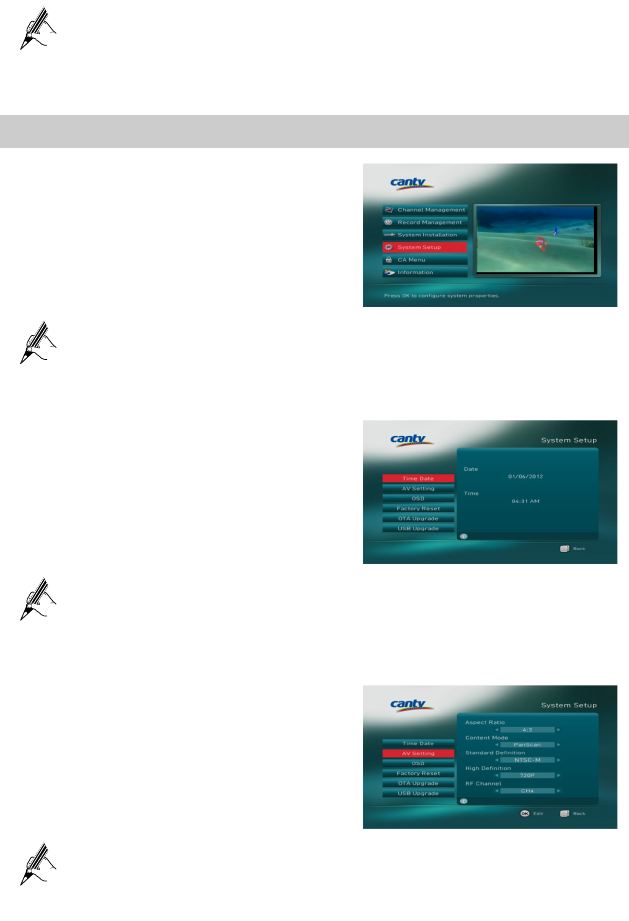
7.5 System Setup
1. Select the System Setup.
2. Press OK to access the sub-menu.
Press OK to configure system properties.
7.5.1 Time Date
When you select the Time Date, you can
view the information of the time and date.
Press MENU to return to the last viewed guide.
7.5.2 AV Setting
When you select the AV Setting, you can
change the display mode of the output of
the program by modifying the parameters.
Press OK to edit the parameters the first,press OK to save the
parameters again.
Press MENU to return to the last viewed guide.
19
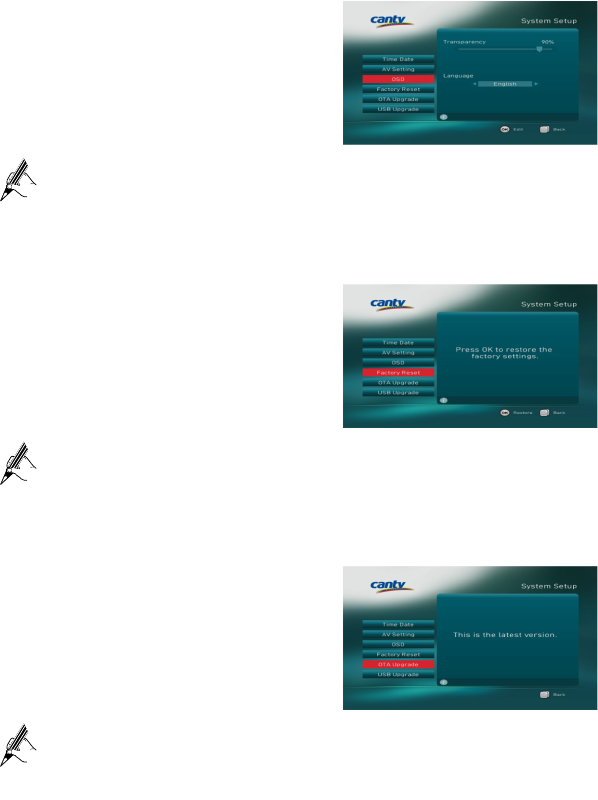
7.5.3 OSD
When you select the OSD, you can change
the information of the transparency and
language.
Press OK to edit the parameters the first,press OK to save the
parameters again.
Press MENU to return to the last viewed guide.
7.5.4 Factory Reset
When you select the Factory Reset, you
can restore the default settings. The default
pins is 000000.
Press OK to restore the settings.
Press MENU to return to the last viewed guide.
7.5.5 OTA Upgrade
If current version
is not the latest version
you can upgrade to the latest version by
selecting the OTA Upgrade.
Press MENU to return to the last viewed guide.
20
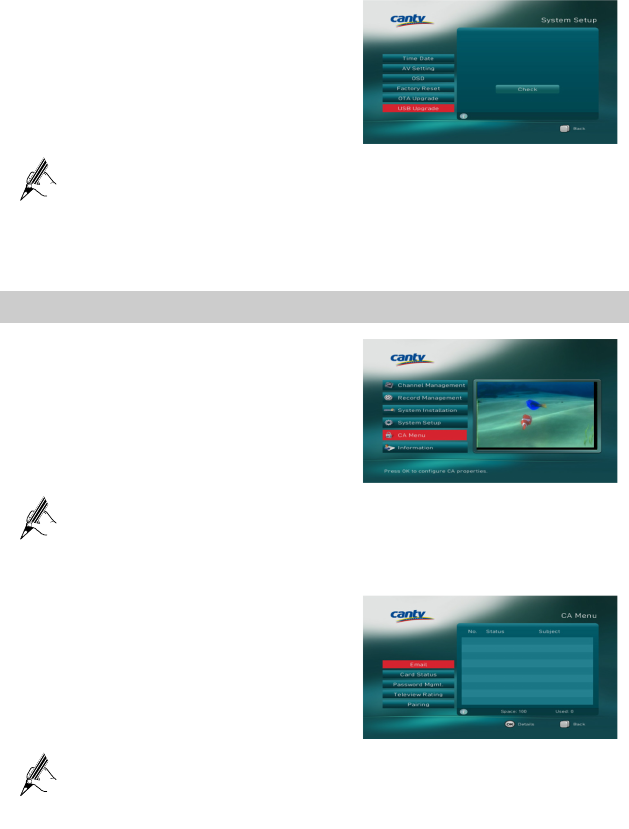
7.5.6 USB Upgrade
If you want to upgrade the software for
STB through USB disk, you can select the
USB Upgrade.
Press MENU to return to the last viewed guide.
Users or maintenance staffs who obtain the USB disk upgrade file
from the local service providers could use this method to upgrade the
software.
7.6 CA Menu
1. Select the CA Menu.
2. Press OK to access the sub-menu.
Press OK to configure CA properties.
7.6.1 Email
When you select the Email, you can watch
the information of the Email.
Press OK to show more details of the email.
Press MENU to return to the last viewed guide.
21
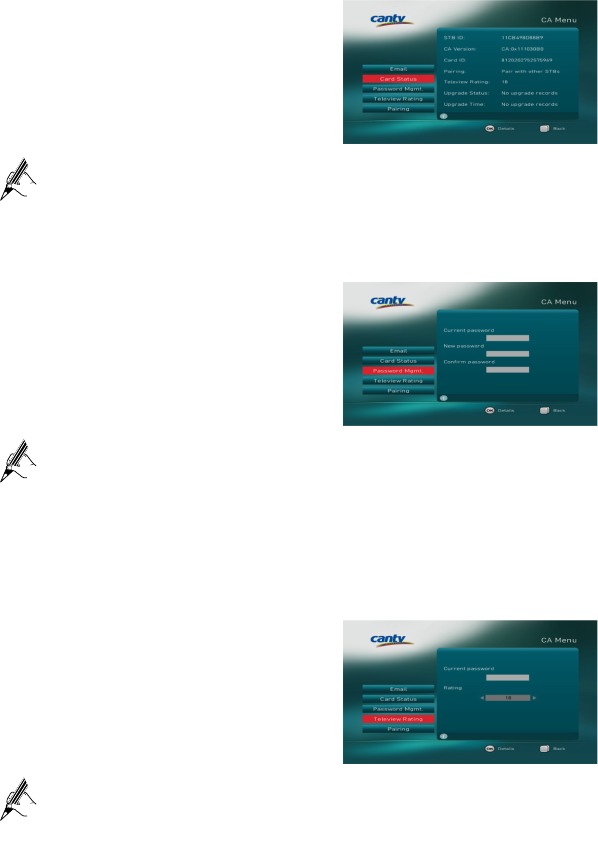
7.6.2 Card Status
When you select the Card Status, you can
watch the information of the Smart card.
Press OK to show more details of the Smart card.
Press MENU to return to the last viewed guide.
7.6.3 Password Mgmt.
When you select the Password Mgmt.,
you can change the passwords.
The password requirement is 6 digits.
If you forget your new password, please contact the local service
providers.
Press OK to edit the passwords.
Press MENU to return to the last viewed guide.
7.6.4 Teleview Rating
When you select the Teleview Rating, you
can set the level of watching television
programs.
Press OK to edit the parameter.
Press MENU to return to the last viewed guide.
22
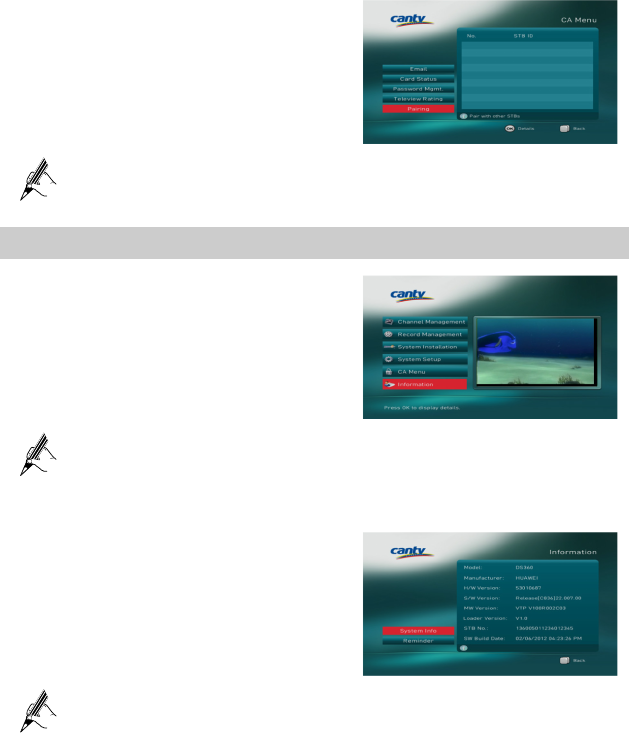
7.6.5 Pairing
When you select the Pairing, you can view
the pairing information between the smart
card and STB.
Press OK to start pairing.
Press MENU to return to the last viewed guide.
7.7 Information
1. Select the Information.
2. Press OK to access the sub-menu.
Press OK to display details.
7.7.1 System Info
When you select the System Info, you can
view the information of STB.
Press MENU to return to the last viewed guide.

23
7.7.2 Reminder
When you select the Reminder, you can
view
the TV programs that you have
reserved.
Press MENU to return to the last viewed guide.
24
8 Basic Operations
8.1 EPG
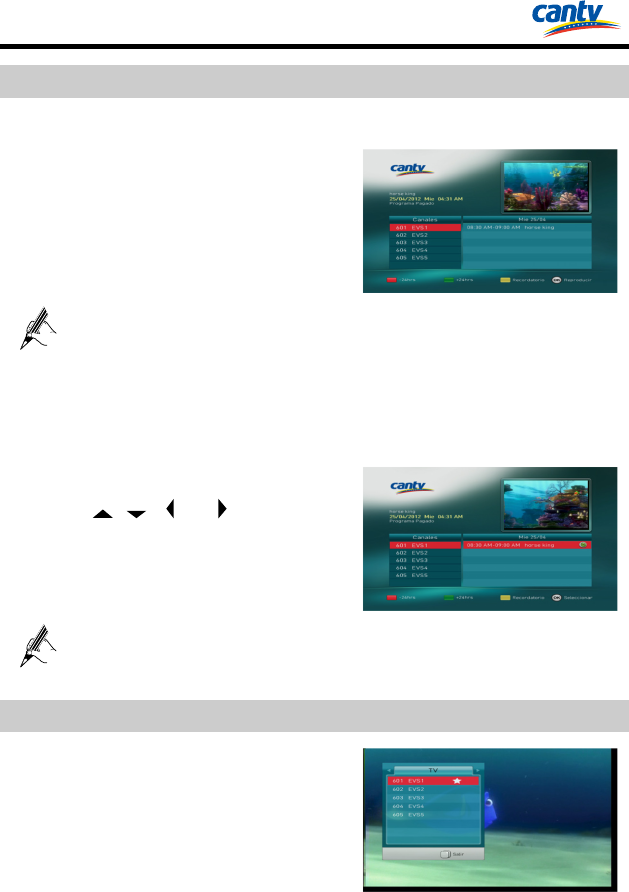
8.1.1 Program Guide
Press EPG to display the program guide
that provided
scheduling information for
upcoming programs in a week on full
screen with no banner.
Press Function key (red) to view programs in previous day.
Press Function key (green) to view programs in next day.
Press Function key (yellow) to reserve the program.
Press OK to play the program.
8.1.2 Setting a Reminder
1、 Press EPG to enter the EPG interface.
2、 Press ,, or to highlight
an upcoming program in the program
guide or the program banner.
3、 Press OK reserve the program.
Press OK (Select) to show the details of the program.
8.2 Viewing the Program Information Banner
Press INFO
to display the program
information banner and view program
information on full screen with no banner.
25
For more information of the currently program please press INFO twice.
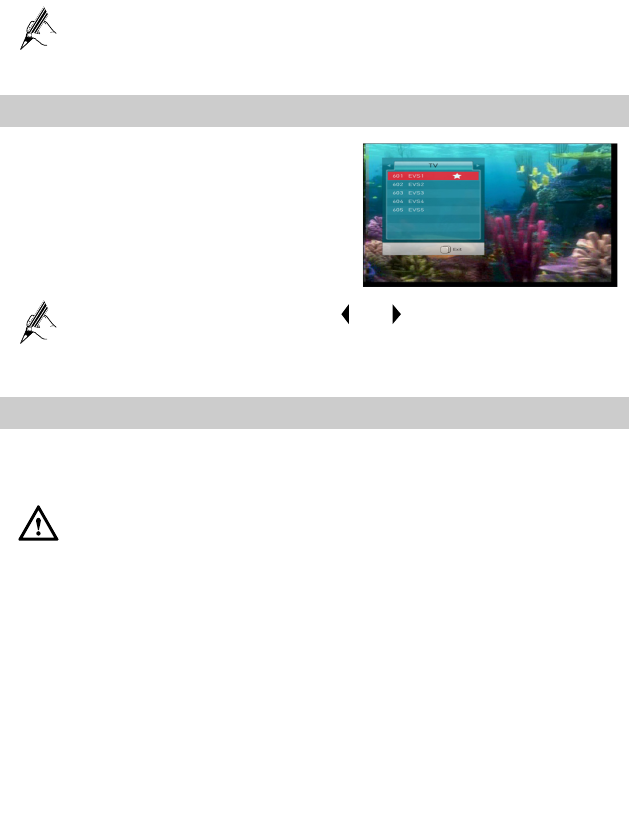
8.3 Displaying the program list
Press OK to display the program list on
full screen.
If you set favorite programs, press or to switch to the list of
favorite programs.
8.4 Recording and playback
8.4.1 Recording the program
Please use only the USB storage device which was formatted with
FAT32 file system.
Please do not frequently plug or unplug the USB storage device.
Some USB storage devices may not be supported or operated
smoothly.
Please connect the power cable to a USB storage device which requires
an external power supply. If not, the device may not be recognized.
Please connect a USB storage device with the cable offered by the
device maker. If not, the device may not be recognized.
Please do not disconnect directly the USB storage device while
recording or playing back. If do this, the stored files or the USB
storage device may be damaged.
Programs can only be played with the STB where they were recorded.
26
Press REC to instantly record the current
program.
Press OK to save the edited parameter, then starts recording the
program.
Press MENU to exit the setting interface, then you can watch TV.
Please prepare a dedicated USB storage device to store recorded
programs for the STB
, we do not recommend that you use it to connect
to a computer or other devices.
You can record programs using the STB even when it is in standby
mode.
8.4.2 Playback
Press MENU to enter the main menu, then
select Record Management > Record.
The STB may require a longer time to read large amounts of data
stored in a USB storage device.
If the USB storage device does not work properly, you can restart
STB. How fast a USB storage device is detected differs from device to
device.
We cannot guarantee compatibility (operation or bus power) with all
USB mass storage devices when connected to the STB.
8.4.3 Time shift
Time shift is a service enabling you to freeze live TV and continue watching it later
from the exact point you paused.

27
Press to freeze live TV . Then press
to continue watching TV again.
1 Play time
2 Present time of time shift
3 Total time of time shift
The STB may require a longer time to read large amounts of data
stored in a USB storage device.
If the USB storage device does not work properly, you can remove it
safely then reconnect it again. How fast a USB storage device is
detected differs from device to device.
We cannot guarantee compatibility (operation or bus power) with all
USB mass storage devices when connected to the STB.

28
9 Troubleshooting
The following table lists the common STB problems and their possible causes and
solutions.
Problem Possible Cause Solution
The standby
indicator on the
front panel does not
turn on.
The power adapter is
not correctly connected.
Correctly connect the power
adapter to the STB, and then
plug the power adapter into a
power outlet.
There is no audio or
video when the STB
is powered on.
The video and audio
cable is not correctly
connected.
Use the video and audio cable
to connect the STB to your TV
correctly.
The antenna is not
correctly connected.
Correctly connect the antenna.
The TV is powered off. Power the TV on.
The HDMI cable is not
correctly connected.
Correctly connect the HDMI
cable.
The STB is in standby
mode.
Press the STANDBY key on
the STB's remote control.
When the STB is
powered on, there is
no signal.
The STB cannot receive
satellite signals.
Correctly connect the antenna
cable. If the problem persists,
change the cable.
Adjust the location of the
antenna by following the
instruction.
The remote control
does not work.
No battery is installed
in the remote control, or
the batteries in the
remote control have run
out of power.
Correctly install batteries in the
remote control. If the problem
persists, change the batteries.
Pop-up Tip: the
password is
incorrect
Forget the new
password.
Please contact the local service
provider.
Pop-up Tip: not
authorized
The smart card not
authorized currently
viewing the program.
Please contact the local service
provider.
Pop-up Tip: Teleview Rating of the Please change the Teleview

29
Problem Possible Cause Solution
Teleview Rating is
not enough
smart card is set too
low.
Rating.
Pop-up Tip: STB is
not in working
hours
The time is not on the
working hours of smart
card.
Please change the working
hours of the smart card.
STB automatically
enter the upgrade
interface When you
open STB.
The software of STB
has been damaged
Please contact the local service
provider.
The language of
television programs
is not the native
language
(multi-language
programs)
The language setting is
not the correct.
Press LANG to change the
language.
The video quality is
poor.
Signal loss by the cable. Install the antenna in a place
free of obstacles.
Keep the power and the antenna
cable for the satellite apart from
each other.
Check the signal level, and
adjust the antenna position if
the level is too low.
NOTE
The signal level may be
affected by weather
conditions.
Less channels in
scanning.
Cannot use the USB
storage device.
Incompatible or not
connect right.
Restart the STB.
Format the USB storage device
on the STB.
Cannot record
programs.
The USB storage device
is full.
Delete unnecessary programs
and make space for new
recording.
Check if recording is
conflicted with another
channel.
Stop the current recording or
wait until the recording is
fin ished.

30
10 Specifications
The product specifications are subject to changes without notification.
Tuner and Demodulator
Parameter Specifications
Input Frequency Range 950 MHz to 2150 MHz
RF Input Signal Level -25 dBm to -65 dBm
RF Impedance 75Ω
LNB Power 13/18 V DC, Max 350 mA
LNB Tone Switch 22 kHz +/-2kHz, 0.6 Vpp +/-0.2 V
Demodulation DVB-S (QPSK) & DVB-S2 (QPSK, 8PSK)
Symbol Rate DVB-S (1 Ms/s to 45Ms/s)
DVB-S2 (5 Ms/s to 33Ms/s)
MPEG Transport Stream A/V Decoding
Parameter Specifications
Transport Stream MPEG-2 ISO/IEC 13818 Transport Stream
Specification
Video MPEG-2 MP@ML, H.264/AVC
Audio
MPEG-1/2 Audio Layer 1, 2
MPEG2 AAC
MPEG4 AAC+ HE
Aspect Ratio 4:3 or 16:9
Active Pixel 720 × 480i, 720 × 480p, 1280 × 720p, 1920 × 1080i
Audio Mode Stereo
Audio Sampling
Frequency 32/44.1/48 kHz
Connector
Port Specifications
LNB IF Input F-type (IEC 60169-24), Female connector

31
Port Specifications
Video RCA (CVBS)
Audio RCA (Audio L,R)
Environmental
Parameter Specifications
Input Voltage DC- IN 12V (Power Adapter)
Power Consumption < 24W
Dimension (L × W × H) About 248 mm × 132 mm × 45 mm
Weight About 0.572 kg
Working Temperature 0°C to 45°C
Working Humidity 5% to 90%, non-condensing
Smartcard Interface
Parameter Specifications
Smartcard Slot 1-Slot, ISO 7816

32
Copyright © Huawei Technologies Co., Ltd. 2013. All rights
reserved.
No part of this document may be reproduced or transmitted in any form or by any
means without prior written consent of Huawei Technologies Co., Ltd.
Trademarks and Permissions
, , and are trademarks or registered trademarks of Huawei
Technologies Co., Ltd.
Other trademarks, product, service and company names mentioned are the property of
their respective owners.
Notice
The information in this document is subject to change without notice. Every effort has
been made in the preparation of this document to ensure accuracy of the contents, but
all statements, information, and recommendations in this document do not constitute
the warranty of any kind, express or implied.
HDMI, the HDMI logo and High-Definition Multimedia Interface are trademarks or
registered trademarks of HDMI Licensing LLC in the United States and other
countries.
Changes or modifications not expressly approved by the party responsible for
compliance could void the user’s authority to operate the equipment.
This equipment has been tested and found to comply with the limits for a Class B
digital device, pursuant to Part 15 of the FCC Rules. These limits are designed to
provide reasonable protection against harmful interference in a residential installation.
This equipment generates, uses and can radiate radio frequency energy and, if not
installed and used in accordance with the instructions, may cause harmful interference
to radio communications. However, there is no guarantee that interference will not
occur in a particular installation.
If this equipment does cause harmful interference to radio or television reception,
which can be determined by turning the equipment off and on, the user is encouraged
to try to correct the interference by one or more of the following measures:
1、Reorient or relocate the receiving antenna.
2、Increase the separation between the equipment and receiver.
3、Connect the equipment into an outlet on a circuit different from that to which the
receiver is connected.
4、Consult the dealer or an experienced radio/TV technician for help.
COPYRIGHT NOTICE AND WARRANTY DISCLAIMER
33
This product incorporates open source software components covered by the terms of
third party copyright notices and license agreements contained below.
Kernel 2.6.18_7.7:
Copyright(C) The Kernel.Org Organization,Inc.
GNU General Public License:http://www.kernel.org
Busybox 1.11.1:
Copyright (C) 1999-2004 by Erik Andersen. All rights reserved.
Copyright (C) 2005-2006 Rob Landley.
GNU General Public License:http://www.busybox.net
Zlib 1.1.4/0.95:
Copyright (C) 1995-1998 Jean-loup Gailly and Mark Adlerr
Zlib/libpng License:http://www.opensource.org/licenses/zlib-license.php
PolarSSL:
Copyright (C) 2006-2010, Brainspark B.V.
The PolarSSL License: http://www.polarssl.org
WARRANTY DISCLAIMER
This software is provided by the author ''as is'' and any express or implied warranties,
including, but not limited to, the implied warranties of merchantability and fitness for
a particular purpose are disclaimed. in no event shall the author be liable for any
direct, indirect, incidental, special, exemplary, or consequential damages (including,
but not limited to, procurement of substitute goods or services; loss of use, data, or
profits; or business interruption) however caused and on any theory of liability,
whether in contract, strict liability, or tort (including negligence or otherwise) arising
in any way out of the use of this software, even if advised of the possibility of such
damage.
WRITTEN OFFER
If you would like a copy of the GPL source code contained in this product shipped on
a CD, for a charge no more than the cost of preparing and mailing a CD to you, please
contact mobile @huawei.com
Privacy Policy
Please refer to our privacy policy on our websites for the information about how we
protect your personal information.
Please visit www.huaweidevice.com/worldwide/support/hotline for recently updated
hotline and email address in your country or region.
HUAWEI TECHNOLOGIES CO., LTD.
Huawei Industrial Base
Bantian, Longgang
Shenzhen 518129
People's Republic of China
www.huawei.com