Huawei Technologies EC-W820 GSM/GPRS/EDGE/WCDMA/HSUPA/HSDPA/BT/WiFi portable device User Manual
Huawei Technologies Co.,Ltd GSM/GPRS/EDGE/WCDMA/HSUPA/HSDPA/BT/WiFi portable device
User Manual

HIC
User Guide
1 Safety Precautions
Number 02 (2010-05-20)
Huawei Proprietary and Confidential Copyright ©
Huawei Technologies Co., Ltd.
1-1
Contents
1 Safety Precautions .................................................................................................................................................... 1-1
2 Overview .................................................................................................................................................................... 2-1
2.1 Description ........................................................................................................................................................................... 2-1
2.2 Appearance ........................................................................................................................................................................... 2-1
2.3 Product List .......................................................................................................................................................................... 2-4
3 Preparations ............................................................................................................................................................... 3-5
3.1 Insert the battery into the main unit ...................................................................................................................................... 3-5
3.2 Installing the Rubber Protector for the Bracket .................................................................................................................... 3-5
3.3 Charger ................................................................................................................................................................................. 3-6
3.4 Switching on the Main Unit ................................................................................................................................................. 3-6
4 Basic Services ............................................................................................................................................................. 4-9
4.1 How to Use the Call Function .............................................................................................................................................. 4-9
4.1.1 How to make a voice call ......................................................................................................................................... 4-9
4.1.2 How to make a video call ....................................................................................................................................... 4-10
4.1.3 How to Use the Call Record ................................................................................................................................... 4-10
4.1.4 How to Manage Contacts ....................................................................................................................................... 4-11
4.2 How to Send and View Messages ...................................................................................................................................... 4-11
4.2.1 How to Compose and Send an SMS Message ........................................................................................................ 4-11
4.2.2 How to Compose and Send an MMS Message ...................................................................................................... 4-12
4.2.3 How to Compose and Send an Email ..................................................................................................................... 4-12
4.3 How to Use the Album ....................................................................................................................................................... 4-13
4.3.1 How to Browse Photos ........................................................................................................................................... 4-13
4.3.2 How to Set Album Parameters ............................................................................................................................... 4-13
4.3.3 Copying photos to the local album ......................................................................................................................... 4-14
4.4 Using widgets ..................................................................................................................................................................... 4-15
4.4.1 Weather .................................................................................................................................................................. 4-15
4.4.2 News ...................................................................................................................................................................... 4-15
4.4.3 Horoscope .............................................................................................................................................................. 4-15
4.4.4 Sports ..................................................................................................................................................................... 4-15
4.4.5 Maps ....................................................................................................................................................................... 4-15
4.4.6 Stock Market .......................................................................................................................................................... 4-15
4.4.7 Traffic .................................................................................................................................................................... 4-16
4.5 How to browse the Internet ................................................................................................................................................ 4-16
4.6 How to Use the Multimedia Player .................................................................................................................................... 4-16
4.7 How to Use the Calendar .................................................................................................................................................... 4-16
4.8 How to Use Other Applications.......................................................................................................................................... 4-17
4.8.1 Memos.................................................................................................................................................................... 4-17
4.8.2 Search ..................................................................................................................................................................... 4-17
4.8.3 Tasks ...................................................................................................................................................................... 4-17
4.8.4 ActiveSync ............................................................................................................................................................. 4-18
4.9 How to Update the Main Unit Software ............................................................................................................................. 4-18
5 Configuration .......................................................................................................................................................... 5-19
5.1 How to set sounds .............................................................................................................................................................. 5-19

1 Safety Precautions
User Guide
2
Huawei Proprietary and Confidential Copyright ©
Huawei Technologies Co., Ltd.
Number 02 (2010-05-20)
5.2 How to configure the telephone setting on the Main Unit .................................................................................................. 5-19
5.3 How to Set the Clock and Alarm ........................................................................................................................................ 5-19
5.4 How to Set the Screensaver ................................................................................................................................................ 5-20
5.5 How to Set the Wi-Fi .......................................................................................................................................................... 5-20
5.6 How to configure the Bluetooth ......................................................................................................................................... 5-21
5.7 How to Configure the GPRS Connection ........................................................................................................................... 5-21
6 Troubleshooting ...................................................................................................................................................... 6-22
6.1 Power Supply Problem ....................................................................................................................................................... 6-22
6.2 Display Problem ................................................................................................................................................................. 6-22
6.2.1 No Signal Is Displayed ........................................................................................................................................... 6-22
6.2.2 The Main Unit is Slow to Respond ........................................................................................................................ 6-22
6.2.3 Screen Does Not Respond to Stylus Taps .............................................................................................................. 6-23
6.3 Resetting the Main Unit...................................................................................................................................................... 6-23
6.4 Restoring to Factory Settings ............................................................................................................................................. 6-23
7 Warnings and Precautions .................................................................................................................................... 7-24

HIC
User Guide
1 Safety Precautions
Number 02 (2010-05-20)
Huawei Proprietary and Confidential Copyright ©
Huawei Technologies Co., Ltd.
1-1
1 Safety Precautions
Please read the following safety precautions to ensure correct use of the Main Unit. For more information please read the
“Warnings and Precautions” section.
Do not knock, throw or perforate the device. Do not drop, step on or bend the device.
Do not use the device in humid environments such as bathrooms. Avoid getting the device wet or cleaning it using
liquids.
Do not switch on the device when its use is prohibited or when it may cause interference or involve risk.
Do not use the device while driving.
Please comply with rules and regulations of hospitals and medical centers. Switch off the device when near to medical
equipment.
Switch off the device when on board an aircraft. The device may cause interference with the aircraft's control equipment.
Switch off the device when nearby high precision electronic devices as it may affect the performance of such equipment.
Do not try to take apart the device or its accessories. Only qualified persons are authorized to repair and maintain the
device.
Do not place the device or its accessories on items with an intense electromagnetic field.
Do not place magnetic storage systems near the device. The radiation from the device may delete the information they
contain.
Do not place the device anywhere where temperatures are high and do not use it in places where flammable gases are
present, such as gas stations.
Keep the device and its accessories out of the reach of children. Do not allow children to use the device unsupervised.
Use only authorized batteries and chargers to avoid risk of explosion.
Comply with regulations and laws relating to the use of wireless devices. Respect the privacy and rights of others when
using the wireless device.
Read the relevant instructions of this manual carefully prior to using the USB cable. If you do not do this, you may
damage your device or computer.
Use only cylindrical nickel hydrogen (NiH2) 1.2 V 800 mAh rechargeable batteries.
Use the Cordless phone at ambient temperatures between 0° and 40°C.
Keep the Cordless phone power supply within the following ranges: 100 to 240 V, 50 to 60 Hz and 0.15 A max.
Install the Cordless phone battery correctly, as per the positive/negative labels on the Cordless phone.
HIC
User Guide
2 Overview
Number 02 (2010-05-20)
Huawei Proprietary and Confidential Copyright ©
Huawei Technologies Co., Ltd.
2-1
2 Overview
2.1 Description
7-inch high definition color LCD with an aspect ratio of 16:9 and a resolution of 800 x 480
Camera lens with 2.0 mega pixels
WCDMA network
256 MB of memory and 1 GB hard drive
SD card up to 16 GB
USB 2.0 disk up to 16 GB
Dual-track stereo speaker and earphone output
Adjustable bracket 0 to 135 degrees
Real-time clock chip supporting system time updating after power off
Good quality 12 V DC lithium battery
Earphones available
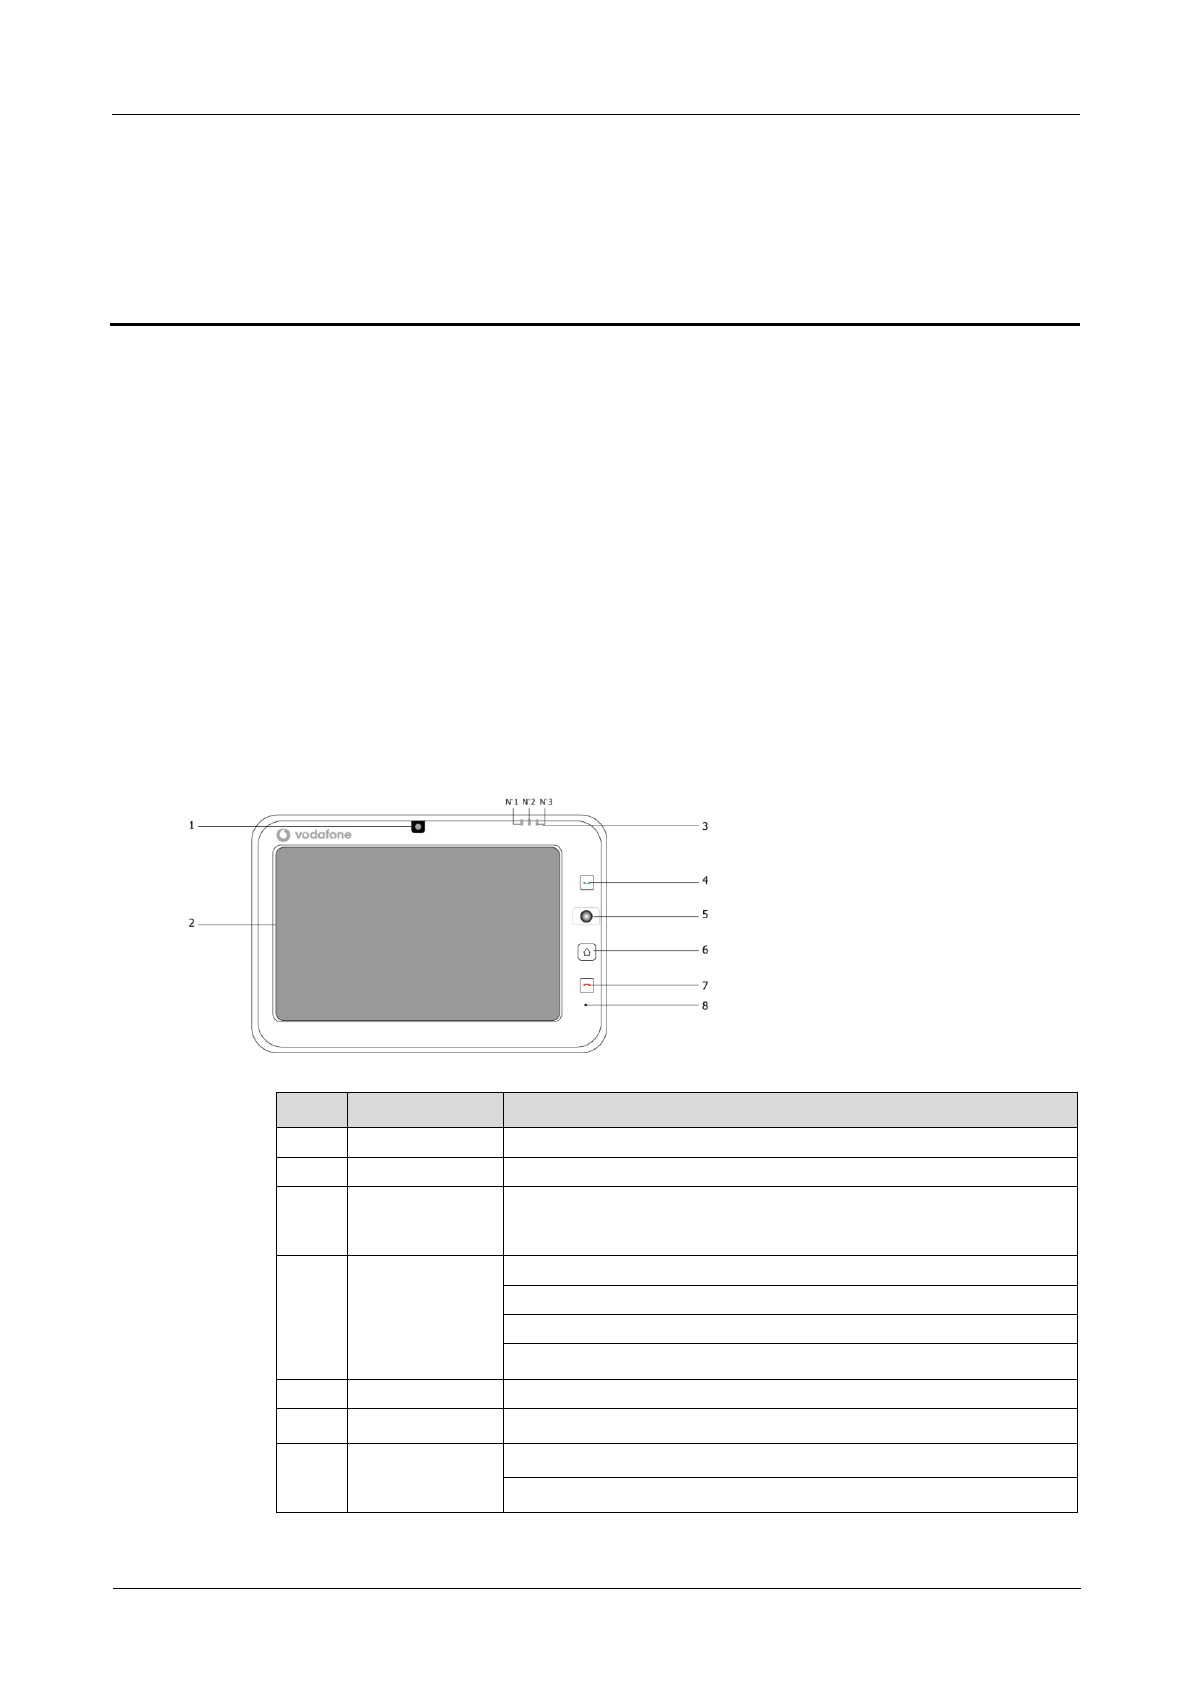
2.2 Appearance
Front View
No.
Component
Description
1
Camera
Used for video calls.
2
Touch screen
You can use the stylus to tap an item on the screen or enter text.
3
LED indicators
The device has three LED indicators: No.1, No.2 and No.3, from left to right.
The indicators are used to indicate statuses of power and alarm, Bluetooth,
and Wi-Fi.
4
Speaking key
Change from a screen to the keyboard screen.
Enter a phone number and dial it.
Dial a number in the call history.
Answer an incoming call.
5
Scroll ball
Move the ball to select an item or perform a function on certain screens.
6
Home screen key
Touch this key to return the home screen.
7
End key
End a call or reject an incoming call.
Return to the home screen from other screens.
2 Overview
HIC
User Guide
2-2
Huawei Proprietary and Confidential Copyright ©
Huawei Technologies Co., Ltd.
Number 02 (2010-05-20)
No.
Component
Description
8
Microphone
Serves as the microphone during a call.
No.
Indicator
Description
1
LED NO.1
In different situations, the indicator statuses are as follows:
The indicator is green when the Main Unit is in sleep mode, the battery is
normal and there are no notifications displayed.
The indicator flashes red when the Main Unit is in sleep mode and the battery
level is low.
The indicator flashes red when the Main Unit is in standby mode and a
message is displayed.
The indicator is orange when the Main Unit is charging while switched on.
The indicator changes to green when the battery is fully charged.
The indicator is orange when the Main Unit is charging while switched off.
The indicator changes to green (with a charging icon) when the battery is
fully charged.
The indicator is red when the Main Unit cannot be switched on due to a low
battery.
2
LED NO.2
In different situations, the indicator statuses are as follows:
The indicator is orange during standard voice calls, and video calls.
The indicator is off when the Main Unit is not in call mode.
3
LED NO.3
In different situations, the indicator statuses are as follows:
The indicator is orange when the Wi-Fi is enabled but the Bluetooth is
disabled.
The indicator is blue when the Bluetooth is enabled but the Wi-Fi is disabled.
The indicator flashes orange and blue when both the Wi-Fi and the Bluetooth
are enabled.
The indicator is off when both the Wi-Fi and Bluetooth are disabled.
Note: The No.1, No.2, and No.3 LED indicators do not come on when the device is in sleep mode. In this situation, the Main
Unit is still operational but does not display any information on-screen.
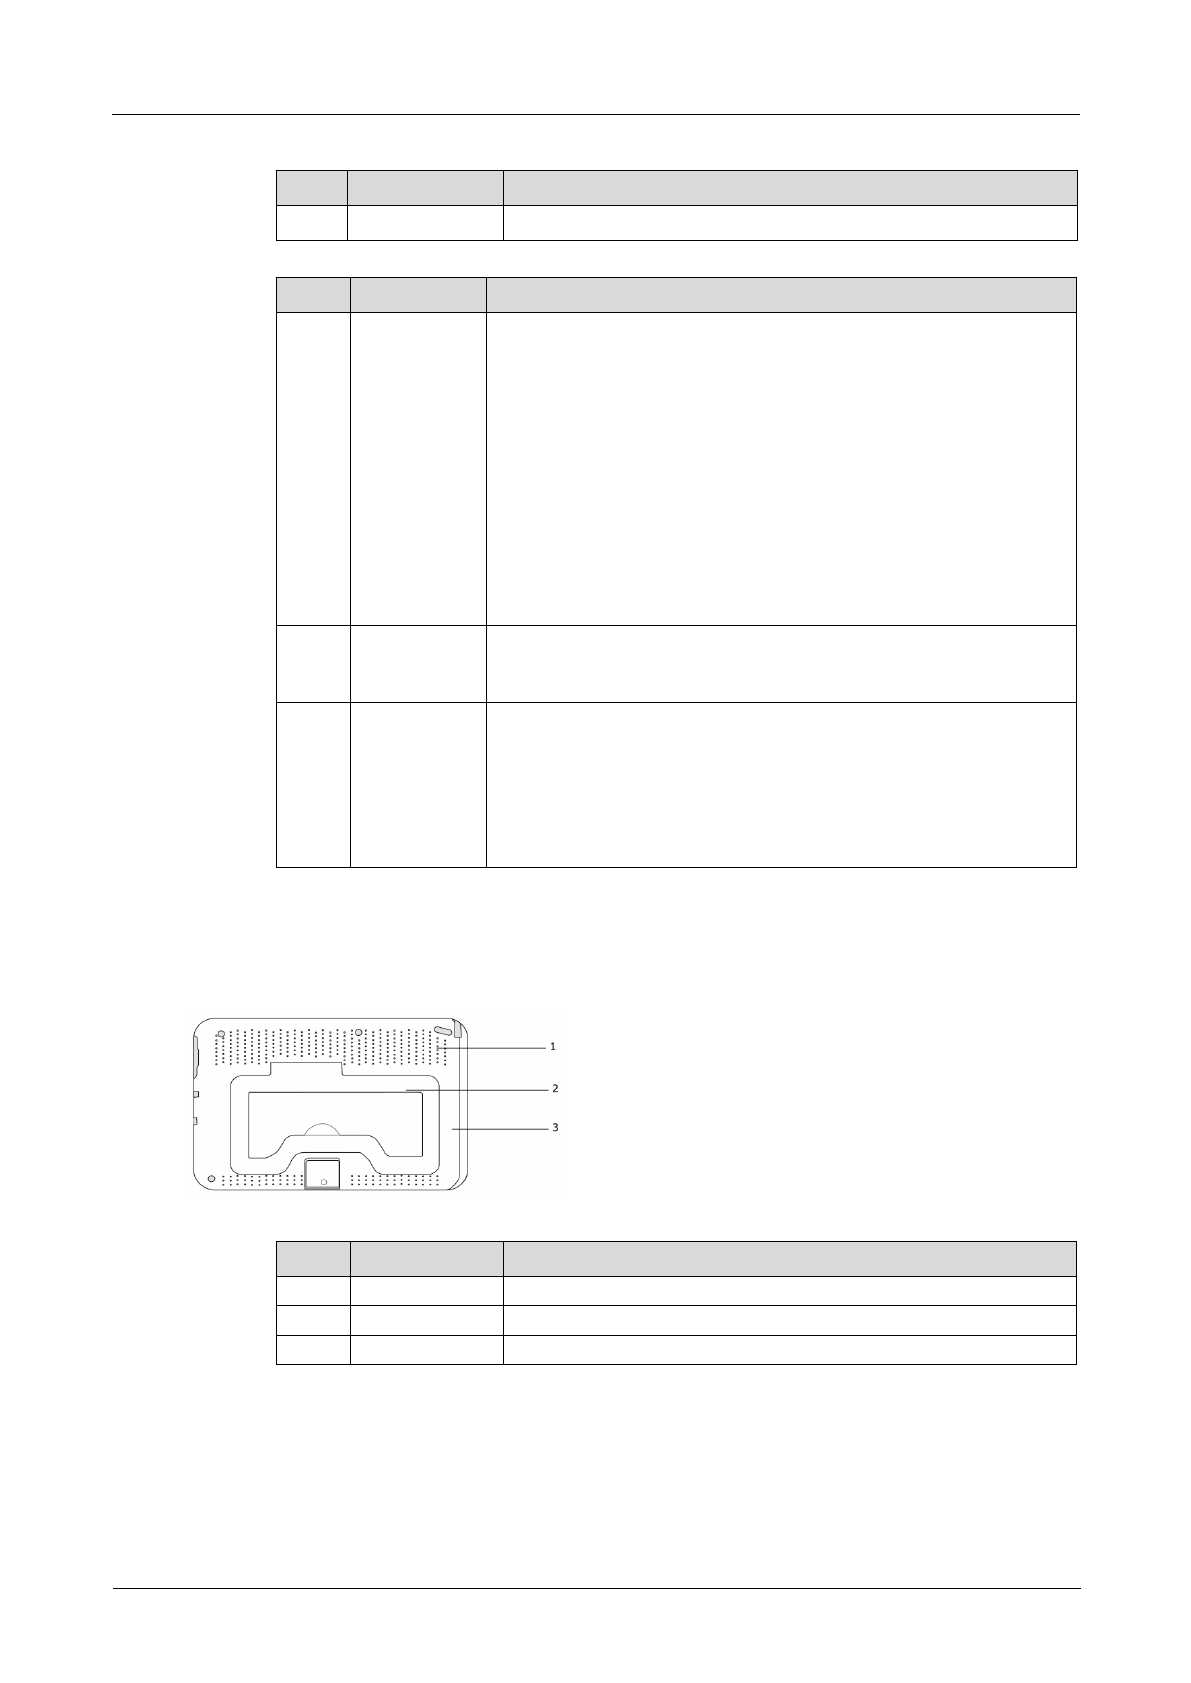
Rear View
No.
Component
Description
1
Speaker
Plays tones, such as dial tones, alarm tones, and music.
2
Bracket
Supports angle adjustment between 0 and 135 degrees.
3
Back cover
Covers the battery and SIM card.
HIC
User Guide
2 Overview
Number 02 (2010-05-20)
Huawei Proprietary and Confidential Copyright ©
Huawei Technologies Co., Ltd.
2-3
Side View
No.
Component
Description
1
Stylus
Presses and writes on the screen.
2
Volume adjustment
key
Adjusts volume.
3
Reset hole
Resets the Main Unit to its original configuration.
4
SD card slot
Enables direct data exchange (the Main Unit does not need to be switched
off). The Main Unit's archive system is compatible with FAT and FAT32.
5
Earphone socket
Connects the device to the stereo earphones.
6
Mini-USB port
Connects the Main Unit to the computer in order to transmit data and enable
direct data exchange. The Main Unit's archive system is compatible with
FAT and FAT32.
USB port
Connects to the USB disk.
The Mini-USB, USB, and SD card ports are used only to copy and transfer files. Installing invalid programs through
the ports may cause a system error.
Users cannot connect the Main Unit to the network while in ActiveSync mode using the Mini USB port.
Top and Bottom
No.
Component
Description
1
Power button
Provides the following functions:
Press: switch between the Main Unit's active and standby modes (screen
switched off).
Hold down: switch the Main Unit on or off.
2
Power supply port
Connects to the charger.
2 Overview
HIC
User Guide
2-4
Huawei Proprietary and Confidential Copyright ©
Huawei Technologies Co., Ltd.
Number 02 (2010-05-20)
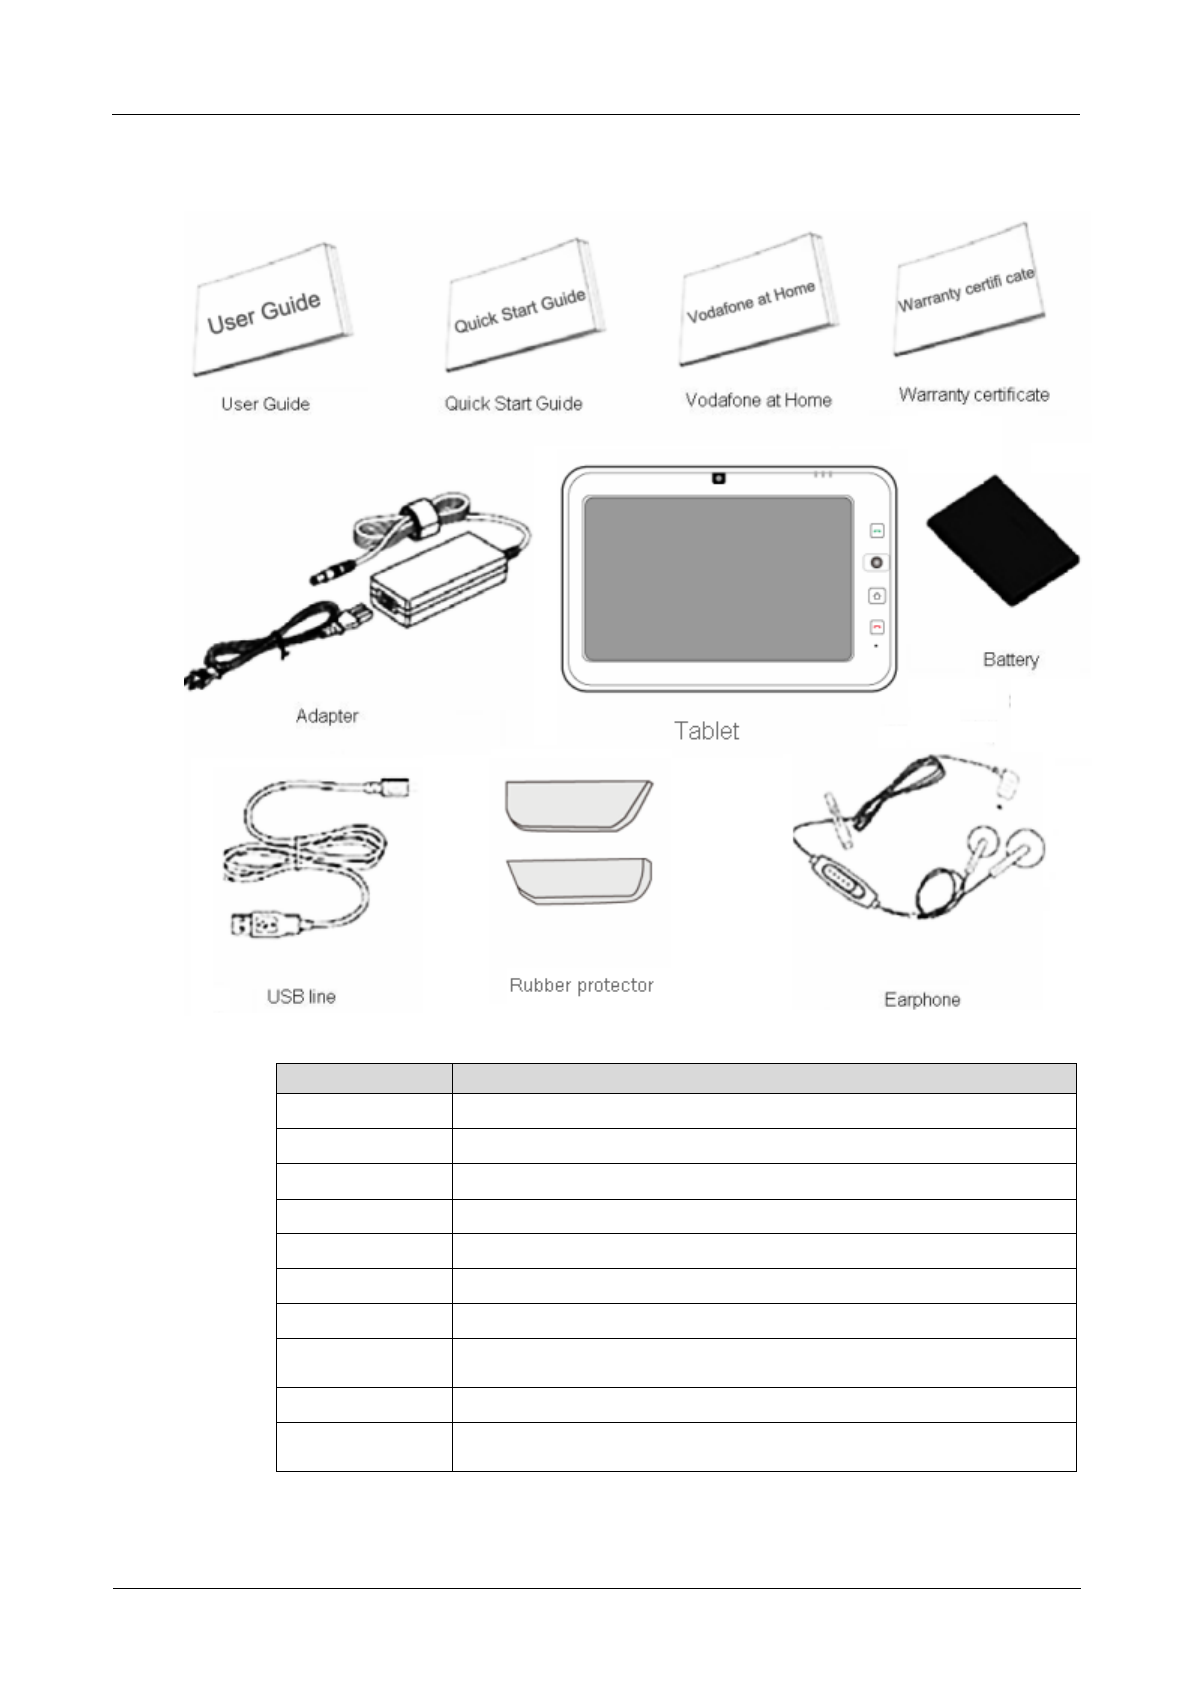
2.3 Product List
Component
Description
User Guide
User product guide.
Quick Start Guide
Instructs users to quickly learn about the basic functions of the product.
Vodafone at Home
Brochure with specific information about Vodafone's fixed line service.
Warranty Certificate
Warranty certificate.
Battery
Rechargeable lithium polymer battery.
Power cable adaptor
Power cable adaptor for charging the Main Unit.
Main Unit
Home information center.
Earphones
Earphones with microphone for answering calls and listening to music and other
audio.
USB cable
Cable for connecting the Main Unit to the computer.
Rubber protector
This is placed on the bottom of the metal bracket to stop the bracket damaging the
surface on which it is placed and to stop it from slipping.
HIC
User Guide
3 Preparations
Number 02 (2010-05-20)
Huawei Proprietary and Confidential Copyright ©
Huawei Technologies Co., Ltd.
3-5
3 Preparations
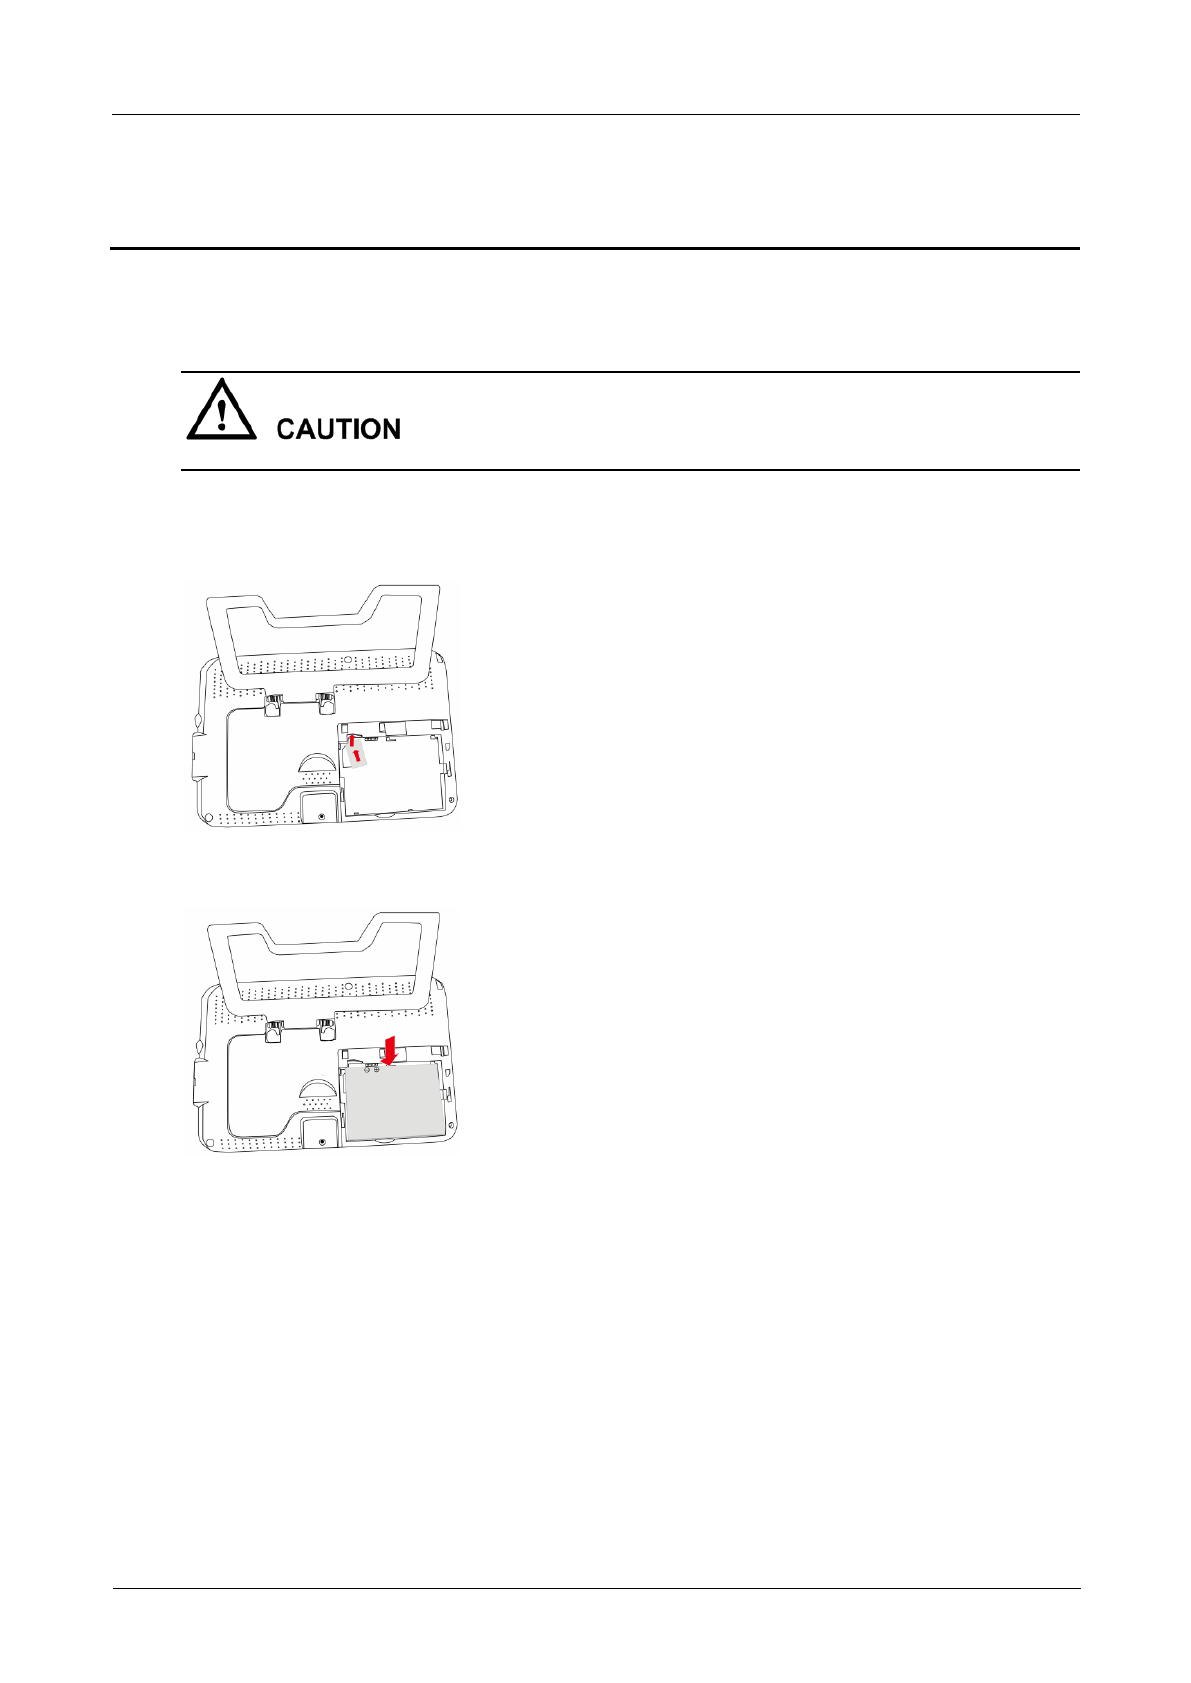
3.1 Insert the battery into the main unit
Always switch off the Main Unit when inserting or changing the SIM card or battery.
Once the SIM card has been inserted, you can use the Internet and telephone functions as well as using the communication
services of the Main Unit.
Step 1 Open the battery cover on the Main Unit and slide it downwards.
Step 2 Insert the SIM card into the SIM card holder.
Step 3 Insert the battery.
Step 4 Ensure that the battery is inserted correctly and close the cover.
3.2 Installing the Rubber Protector for the Bracket
The rubber protector for the bracket on the Main Unit can be installed to stop the metal bracket damaging the surface on
which the Main Unit is placed and to stop it from sliding about.
3 Preparations
HIC
User Guide
3-6
Huawei Proprietary and Confidential Copyright ©
Huawei Technologies Co., Ltd.
Number 02 (2010-05-20)
3.3 Charger
Before you use the charger, make sure that the battery is inserted correctly.
Before using the Main Unit for the first time, charge the battery for at least eight hours.
Remove the charger only after the battery is full. When LED No.1 is green, this means that the battery is fully charged.
We recommend that the Main Unit should be connected to the external power supply whilst in use.
Step 1 Connect the AC cable to the adaptor.
Step 2 Insert the DC end of the charger into the power port at the bottom of the Main Unit, and then turn the charger on at the socket.
3.4 Switching on the Main Unit
The Main Unit can be charged via its built-in battery or using an external power supply. If a built-in battery is used, charge the
battery for at least eight hours for the first time.
Insert the fully charged battery into the Main Unit and hold down the power button for at least five seconds. The startup image
is displayed, and the LED No.1 indicator is on.
The user must enter the PIN code when using a SIM card for the first time.
If the power button is pressed during active mode, the Main Unit will revert to standby mode.
If the power button is pressed while in standby mode, the Main Unit will revert to active mode.

HIC
User Guide
3 Preparations
Number 02 (2010-05-20)
Huawei Proprietary and Confidential Copyright ©
Huawei Technologies Co., Ltd.
3-7
No.
Component
Description
1
Signal icon
Indicates the network signal strength. When pressed, the wireless network
control screen will appear.
2
Battery icon
Indicates the battery strength.
3
Wi-Fi icon
Indicates the Wi-Fi function. Displays when the Main Unit is connected to
the network using Wi-Fi.
4
Bluetooth icon
Indicates the Bluetooth function. You can tap it to configure the Bluetooth.
5
Call icon
Indicates missed calls.
6
Messages icon
Indicates that there are unread SMS or MMS messages.
7
Email icon
Indicates unread emails.
8
Date display area
Displays the current date.
9
Time display area
Displays the current time.
10
Next screen button
Goes to the next screen. You can also touch the screen and slide to the left
to go the next screen.
11
Previous screen button
Go to the previous screen. You can also touch the screen and slide to the
right to go the previous screen.
Icon
Meaning
Description
Phone
Accesses the call screen. Using this screen you can make voice and
video calls, view call history and configure the phone.
Messages
Accesses the messages screen. Using this screen you can receive or
send SMS, multimedia messages (MMS) and emails.
Weather
Accesses the screen where you can view weather forecasts. Using
this screen you can select a city and view relevant weather
information.
Photo Frame
Accesses the photo album screen. Using this screen you can view
thumbnails or a slideshow, automatically search for images stored
on external devices and set photo album parameters.
3 Preparations
HIC
User Guide
3-8
Huawei Proprietary and Confidential Copyright ©
Huawei Technologies Co., Ltd.
Number 02 (2010-05-20)
Icon
Meaning
Description
Multimedia
Press to enable the multimedia player. Allows you to play music and
videos on the Main Unit and on the network.
Internet
Accesses the Internet browser.
Configuration
Accesses the configuration screen. Using this screen you can adjust
the volume, phone, time, alarm and Bluetooth settings.
News
Accesses the news application.
Calendar
Accesses the calendar.
Email
Accesses the email screen. Using this screen you can set up your
email account, and receive and send emails.
Horoscope
Accesses the horoscope application. Using this screen you can tap
on and view the zodiac sign you are interested in.
Sport
Accesses the sport application. Using this screen you can tap on and
view the sport you are interested in.
Utilities
Accesses the utilities menu. Using this screen you can access
utilities such as Search, Tasks, ActiveSync, Calculator or Memos.
Stock Exchange
Accesses stock market information. Using this screen you can view
information relating to stock exchange activity.
Maps
Accesses the maps application.
Traffic
Accesses the traffic information app. Using this screen you can view
traffic information.
Help
Accesses the help screen. Using this screen you can quickly
familiarize yourself with the Main Unit.
HIC
User Guide
4 Basic Services
Number 02 (2010-05-20)
Huawei Proprietary and Confidential Copyright ©
Huawei Technologies Co., Ltd.
4-9
4 Basic Services
4.1 How to Use the Call Function
4.1.1 How to make a voice call
Making a call from the main screen
Step 1 Tap the icon or press on the Main Unit to display the keypad.
Step 2 Use the keypad to dial the required phone number. If the number is incorrect, tap to delete it.
Step 3 Tap , or press on the right hand side of the Main Unit to call the number dialed.
You can tap directly, or press to redial the most recently dialed number.
Step 4 To make an international call, follow the steps below:
1. Hold down number 0 for at least two seconds.
The plus sign (+) is displayed.
2. Dial the complete telephone number you would like to call, and then tap , or press . A complete
international phone number consists of the international code, area code (the first 0 does not need to be entered), and
phone number.
Making a Voice Call by Dialing a Number from the Call History
Step 1 Tap the icon or press on the Main Unit to display the keypad.
Step 2 Tap to display the Call Register screen.
Step 3 Select a contact from the Call History and tap Llamar to make the call.
Accepting or Rejecting a Voice Call
When receiving a call, the Main Unit alerts you using your chosen settings and displays the telephone number and name of
the person calling. If the caller is not in your address book, it will only display the telephone number.
To accept an incoming call, tap Aceptar or press .
To reject an incoming call, tap Rechazar or press .
Functional Keys for Voice Calls
During a call, several functions can be activated using the on-screen keys.
Icon
Description
Ends a call.
Accesses the address book.

4 Basic Services
HIC
User Guide
4-10
Huawei Proprietary and Confidential Copyright ©
Huawei Technologies Co., Ltd.
Number 02 (2010-05-20)
Holds a call when tapped once, and resumes a call when tapped again.
Forwards a call to the Cordless phone.
Creates a note to record calls and call information.
Displays the dial pad.
4.1.2 How to make a video call
Making a Video Call
Step 1 Tap the icon or press on the Main Unit to display the keypad.
Step 2 Use the keypad to dial the required phone number. If the number is incorrect, press to delete it.
Step 3 Tap to access the video call screen.
Accepting or Rejecting a Video Call
When receiving a call, the Main Unit alerts you using your chosen settings and displays the telephone number and name of
the person calling. If the caller is not in your address book, it will only display the telephone number.
To accept an incoming call, tap Aceptar or press .
To reject an incoming call, tap Rechazar or press .
Functional Keys for Video Calls
Icon
Description
Displays the “microphone mute” function during the conversation. When
tapped once the microphone will be muted, when tapped again, the
microphone will be reactivated.
Displays the dial pad.
Pauses the local video.
Opens the note function to record information about calls.
Accesses the address book.
Forwards a call to the Cordless phone.
Hangs up the phone and ends the conversation. The dialog box indicating
that the call has ended is displayed. The call duration is displayed in the
dialog box.
4.1.3 How to Use the Call Record
Step 1 Tap the icon or press on the Main Unit to display the keypad.
Step 2 Tap using the keypad to display the Call Register screen.
HIC
User Guide
4 Basic Services
Number 02 (2010-05-20)
Huawei Proprietary and Confidential Copyright ©
Huawei Technologies Co., Ltd.
4-11
and : voice and video calls received.
and : missed voice and video calls.
y : voice and video calls made.
Select a number and tap Llamar to make the call.
Select a number and tap Menú to save the number, delete the record or send an SMS message.
4.1.4 How to Manage Contacts
Creating a contact
Step 1 Tap the icon or press on the Main Unit to display the keypad.
Step 2 Tap to access the address book.
Step 3 Tap Nuevo to view the contact type selection screen.
Step 4 Select a mode for storing a contact.
Tap Contacto de Outlook to enter information such as name, mobile phone number and email address.
Tap Contacto SIM to enter the name and telephone number.
Contacto de Outlook: contact information is stored on the Main Unit. Contacto SIM: contact information is stored on the SIM card. If
there is no SIM card installed, this option will not appear and the new contact information will be saved directly to the Main Unit
Step 5 Tap to save the contact information.
Searching for a Contact
To search for a contact, proceed as follows:
Step 1 Tap the icon or press on the Main Unit to display the keypad.
Step 2 Tap to access the address book.
Enter the name of the contact you are searching for in the text box. The system automatically searches for the contact in the
address book and displays the names of relevant contacts.
4.2 How to Send and View Messages
4.2.1 How to Compose and Send an SMS Message
Step 1 In the main menu, tap .
Step 2 Select Menú
> Nuevo > SMS.
Step 3 Enter one or various numbers, separating these with a semicolon (;).
You can also select a number from your phone book by selecting Menú > Agregar destinatario…
Step 4 Enter the message content.
To enter commonly used phrases quickly, select Menú > Mi texto and select an option
Step 5 Tap Enviar.
4 Basic Services
HIC
User Guide
4-12
Huawei Proprietary and Confidential Copyright ©
Huawei Technologies Co., Ltd.
Number 02 (2010-05-20)
4.2.2 How to Compose and Send an MMS Message
Step 1 In the main menu, tap .
Step 2 Select Menú
> Nuevo > MMS.
The maximum MMS message size is 300 KB.
Step 3 Enter one or various numbers, separating these with a semicolon (;).
You can also select Menú > Agregar destinatario and insert the number you want to send your message to using Desde
Contactos... or Desde Historial....
Step 4 Enter the subject of the MMS message.
Tap Insertar imagen/vídeo to select the photo or video you would like to attach.
You can also select Menú > Insertar > Imagen/Vídeo... to select the photo or video you would like to attach.
Tap Insertar texto aquí to enter text.
You can also select Menú > Insertar > Texto... to enter text.
Tap Insertar audio to select the audio file you would like to include.
You can also select Menú > Insertar > Audio... to insert the audio file you would like to include.
Select Menú > Adjunto…to add an attachment.
− Select Menú > Agregar vCard… to add a contact card.
− Select Menú > Agregar vCalendar… to add a calendar and tasks.
− Select Menú > Agregar Archivo… to add files.
Step 5 Tap Enviar.
4.2.3 How to Compose and Send an Email
When using email for the first time, follow these steps to create an email account (Hotmail, for example).
Step 1 In the main menu, tap .
Step 2 Select Menú
> Herramientas > Nueva cuenta... to create a new email account.
Enter the Correo electrónico and Contraseña.
Step 3 Tap Siguiente.
Decide whether to automatically obtain mailbox settings from the Internet. Here, select Yes.
Step 4 Tap Siguiente.
Obtain mailbox settings from the Internet.
Step 5 Tap Siguiente.
Select a e-mail provider. Here, select Hotmail, for example.
Step 6 Select your personalized account name and tap Next.
Step 7 Type hotmail.com and tap Siguiente.
Step 8 Tap Siguiente to set up your email account and download emails.
These same steps can be followed when setting up an email account with another provider.
If you already have an e-mail account, follow the steps below to write and send an email.
Step 1 In the main menu, tap .
Step 2 Select Menú
> Nuevo.
Step 3 Enter one or various numbers, separating these with a semicolon (;).
You can also select a number from your phone book by selecting Menú > Agregar destinatario…
Step 4 Enter a title.
Step 5 Enter the email content.
Select Menú > Comprobar nombres to check that the addressee is correct.
Select Menú > Insertar and select a photo, file, audio message or voice memo you would like to include.
Select Menú > Mi texto to quickly insert a commonly used message.
HIC
User Guide
4 Basic Services
Number 02 (2010-05-20)
Huawei Proprietary and Confidential Copyright ©
Huawei Technologies Co., Ltd.
4-13
Select Menú > Guardar en Borradores to save the message you are editing to your drafts folder.
Select Menú > Ortografía to check that the text entered is spelled correctly.
Select Menú > Cancelar mensajes… to cancel editing the message. This takes you back to the email screen.
Step 6 Tap Enviar.
4.3 How to Use the Album
4.3.1 How to Browse Photos
Step 1 Tap on the main screen to access the screen containing the folders list.
: to search for photos on the local album, including photos copied from a data storage device.
: to search for photos on an SD card or USB disk.
You can move the photos in the local album to the portable storage device.
To browse photos in the local album, proceed as follows:
Step 2 Tap to access the album selection screen.
Step 3 Select an album from the thumbnails screen.
Step 4 Tap a photo to display it in full screen.
Step 5 Tap the photo in full screen mode.
Functional keys are displayed.
Icon
Description
Returns to the photos screen in thumbnail mode.
Sets the photo parameters. For more information, see 4.3.2 . How to Set Album Parameters.
or
Zooms in or out of a photo.
or
Rotates a photo clockwise or counterclockwise.
Deletes the current photo.
Displays photos in slideshow mode.
or
Displays the previous or next photo. You can tap the screen and slide it to the left or right to
view the next or previous photo.
4.3.2 How to Set Album Parameters
By setting the album parameters, you can set the slide demonstration mode and aspect ratio, and view the photo details.
To set the local album parameters, proceed as follows:
4 Basic Services
HIC
User Guide
4-14
Huawei Proprietary and Confidential Copyright ©
Huawei Technologies Co., Ltd.
Number 02 (2010-05-20)
Step 1 In the main menu, tap .
Step 2 Tap to access the album selection screen.
Step 3 Select an album from the thumbnails screen.
Step 4 Tap a photo to display it in full screen.
Step 5 Tap the photo in full screen mode.
Functional keys are displayed.
Step 6 Tap .
The setting menu is displayed.
Opciones de presentación
The slideshow display includes Efecto, Velocidad, Orden, and Pie de foto.
− When selecting Efecto you can choose from various modes: Sin efectos, Persiana, Barrido irisado and Tablero de
ajedrez.
− The Velocidad options include: Rápido, Normal, and Lento.
− The Orden options include: En orden, Inverso, and Aleatorio.
− The Pie de foto options include: Abrir and Cerrar.
Tamaño
The size ratio options include Tamaño original and Tamaño de la pantalla.
− Tamaño original: displays photo using original size.
− Tamaño de la pantalla: adjusts the photo dimensions to the screen size provided the photo is smaller than the screen.
Música de fondo
Set the background music type.
− Ninguna
− Música moderna
− Música clásica
Detalles de la foto
The following information is displayed:
− Resolución
− Emisor
− Recibido el
− Descripción de la foto
4.3.3 Copying photos to the local album
Step 1 In the main menu, tap .
Step 2 Insert an SD card or USB disk and tap . The storage unit (SD card or USB disk) will be displayed.
Step 3 Open the unit to view the photos and folders it contains. You will only be able to view photos; files will not appear in .doc
format, for example.
Step 4 You can browse through the folders stored on the SD card or USB disk to search for photos you would like to copy to your
local album.
Step 5 Tap .
Step 6 Select one or more photos to be moved.
Step 7 Tap to move the photos selected to the local album.
Photos can only be copied to the local album from an SD card or USB disk. Photos taken using the camera on the Main Unit
can also be stored. Photos received via Bluetooth, MMS, email or any other method cannot be added to the local album.
HIC
User Guide
4 Basic Services
Number 02 (2010-05-20)
Huawei Proprietary and Confidential Copyright ©
Huawei Technologies Co., Ltd.
4-15
4.4 Using widgets
4.4.1 Weather
Step 1 In the main menu, tap .
Step 2 Tap SELECCIONE OTRA CIUDAD. The dialog box will appear with options for selecting a region.
Step 3 Select a region and a province from the drop-down list boxes.
The Main Unit will then automatically load all the cities within that province.
Step 4 Select a city a tap .
Weather information about this city is displayed.
4.4.2 News
Step 1 In the main menu, tap .
Step 2 The Noticias screen will appear where you can tap on the tabs for the news articles of interest.
Details of the news will be displayed.
4.4.3 Horoscope
Step 1 In the main menu, tap .
The 12 signs of zodiac are displayed.
Step 2 Click the sign of zodiac that you are interested in.
Details of the sign of zodiac are displayed.
4.4.4 Sports
Step 1 In the main menu, tap .
Sport icons are displayed.
Step 2 Tap the icon that represents the sport you are interested in.
Up-to-date information about this sport is displayed.
4.4.5 Maps
Step 1 In the main menu, tap .
Before using this widget for the first time, you must install the Google Maps program.
Step 2 Tap to download Google Maps. Once downloaded, the Maps application will install automatically. When
installation is complete, the application launches automatically and the map of your current location will be displayed.
Step 3 Select Menú > Buscar. Write the name of the place you want to search for in the text box Buscar en el mapa.
The voice activated search function can also be used. To do this, press the call button and say the address you are searching for
loudly and clearly.
Step 4 Tap Aceptar.
The map of this location will be displayed.
4.4.6 Stock Market
Step 1 In the main menu, tap .
4 Basic Services
HIC
User Guide
4-16
Huawei Proprietary and Confidential Copyright ©
Huawei Technologies Co., Ltd.
Number 02 (2010-05-20)
Step 2 Select the stock exchange index you would like to check, and then select the index value to find out current information.
Step 3 You can also access related news or articles.
4.4.7 Traffic
Step 1 In the main menu, tap .
Step 2 Tap .
Step 3 Enter the name of the region in the text box and then tap .
Traffic information about this region is displayed.
4.5 How to browse the Internet
Step 1 In the main menu, tap .
Step 2 The default setting for the Internet browser's initial home page is set to www.google.es. This will enable you to perform a
simple search by entering the information you are searching for and then tapping the Buscar button.
Step 3 You can also access some popular websites which are already bookmarked. To do this tap the bottom-left button and select
to access El mundo, El Pais, Marca, Facebook, YouTube, etc.
You cannot use the Microsoft Internet Explorer to download Jar files.
4.6 How to Use the Multimedia Player
The multimedia player can be used to play digital music and videos stored on the Main Unit. It can also play multimedia
content stored on an SD card or USB disk.
The media player supports files in Windows Media Audio (WMA), Windows Media Video (WMV), and Motion Picture
Experts Group-2 Audio Layer-3 (MP3) formats, i.e, .asf, .wma, and .wmv, and .mp3 files can be played.
Step 1 In the main menu, tap .
Step 2 Tap .
Step 3 Select Menú > Biblioteca... to select the music, videos and television programs you would like to play.
Step 4 Select Menú > Orden aleatorio/Repetir to select play mode.
Step 5 Select Menú > Opciones... to configure your multimedia settings.
4.7 How to Use the Calendar
The calendar stores your schedule, includes meetings, appointments and other tasks. The calendar and schedule can be
displayed in day, week, month or year view.
Step 1 In the main menu, tap .
Step 2 Select Menú > Nueva cita. Enter the required information, such as Asunto and Ubicación.
Step 3 Once entered, tap to save the information and return to the appointment list.
Sending an appointment in wireless mode
To send information about an appointment in wireless mode, select Menú > Transferir cita...
Deleting an appointment
Select Menú > Eliminar cita to delete the appointment selected.
Sorting appointments
Select Menú > Filtro to display all appointments or select appointments by category.
HIC
User Guide
4 Basic Services
Number 02 (2010-05-20)
Huawei Proprietary and Confidential Copyright ©
Huawei Technologies Co., Ltd.
4-17
Forwarding to a date
Select Menú > Ir a fecha to move to the date selected.
Forwarding to today
Select Menú > Ir a Hoy to move to today's date.
4.8 How to Use Other Applications
4.8.1 Memos
This application allows you to save memos including text, drawings or voice recordings.
Step 1 In the main menu, tap .
Step 2 Tap .
Step 3 Tap Nuevo and enter new memo details.
Step 4 Tap to save the memo and return to the memo list.
The other functions available are as follows:
Deleting a memo
Select and hold down a memo, and then tap Eliminar.
Sending a memo
Select and hold down the memo. Then tap Enviar... or Transferir archivo... to send the memo in an MMS or wirelessly.
Renaming or moving a memo
Select and hold down the memo, and then select Cambiar de nombre o mover....
4.8.2 Search
The search tool allows you to search content and files stored in the Main Unit's memory.
Step 1 In the main menu, tap .
Step 2 Tap .
Step 3 Tap <....> and enter the keywords you are searching for.
Step 4 Tap Todos los datos to specify file types. You can search for all file types or specify Excel or Word files, memos, messages,
contacts, etc.
Step 5 Tap Buscar y espere a que los resultados se muestren en pantalla.
4.8.3 Tasks
This application allows you to save and manage tasks.
Step 1 In the main menu, tap .
Step 2 Tap .
Step 3 Select Menú > Nueva tarea and enter the information required.
Step 4 Tap to save the task and return to the task list.
The other functions available are as follows:
Deleting a task
Select a task and then select Menú > Eliminar tarea.
Sending a task
Select a task and then select Menú > Transferir tarea... to send wirelessly.
Sorting tasks
Select a task and then select Menú > Filtro. You can sort tasks by type.
4 Basic Services
HIC
User Guide
4-18
Huawei Proprietary and Confidential Copyright ©
Huawei Technologies Co., Ltd.
Number 02 (2010-05-20)
4.8.4 ActiveSync
The user can use the synchronization tools to synchronize files stored on the Main Unit and a PC. Make sure the ActiveSync
program has been installed on the PC before synchronization.
You can obtain the ActiveSync installation program using the Microsoft Internet Explorer.
Step 1 Connect the Main Unit to the computer using a USB cable.
Connect one end to the Main Unit's Mini-USB port and the other to the USB port on the computer.
The computer automatically searches the connected devices and displays the synchronization guide when it locates the Main
Unit.
Step 2 The user sets the synchronization file types on the PC according to the synchronization guide.
The ActiveSync screen appears once the settings have been made. The screen will display a message indicating that you are
searching for content and will begin synchronization. The screen will also indicate synchronization progress, information
types and status.
Step 3 In the main menu, tap .
Step 4 Tap .
The user can view the synchronization progress on the ActiveSync screen on the Main Unit. Tap Sincronizar to continue file
synchronization.
4.9 How to Update the Main Unit Software
The software updating process is performed automatically. The Main Unit checks for any new software versions available
periodically. When it detects new software available for download, it will display a message on the Main Unit and you can
either choose to accept or ignore the update.
When is tapped, the software will automatically download and install. Once the update is complete, it will
ask you to restart the device. If a message appears telling you to install the software update and restart the device, please
tap “ok”.
If you select the installation will not be completed. The Main Unit will ask you again whether you would
like to perform the update in seven days time.
The process of checking for the availability of new versions and downloading software is totally free of charge and Vodafone will not
charge you for these connections.

HIC
User Guide
5 Configuration
Number 02 (2010-05-20)
Huawei Proprietary and Confidential Copyright ©
Huawei Technologies Co., Ltd.
5-19
5 Configuration
5.1 How to set sounds
Step 1 In the main menu, tap to access the system settings screen.
Step 2 Tap .
Step 3 On the Sonidos tab you can activate or deactivate audio alerts for events and programs. You can also adjust the volume of
screen tap and button pressing.
Press the button on the left side of the Main Unit to adjust the earphone volume.
Step 4 On the Notificaciones tab you can set the type of ring tone for a certain event, as well as being able to play the ring tone.
Ring type
Specify the way you wish to be notified of an event. For example, Timbre, Timbre en aumento, Sonar una vez, or
Ninguno.
Ringer
You can play the different ring tones available on the list and the select the one you want.
Step 5 Tap to save settings.
5.2 How to configure the telephone setting on the Main Unit
Step 1 In the main menu, tap to access the system settings screen.
Step 2 Tap .
Step 3 On the Teléfono tab you can set the sound to be played when tapping the screen, the ring tone and the ring type for calls
received.
Step 4 On the Seguridad tab you can set whether or not you need to enter a PIN to use the phone.
In addition, you also can change the PIN and PIN2 on this tab.
Step 5 On the Servicios tab you can set services such as call control, local number, call transfer, call waiting, in addition to messages
and voicemail.
Step 6 On the Red tab you can configure the current network, preferred network and other options.
Step 7 Tap the Configuracion de registro de red to set your preferred network type.
5.3 How to Set the Clock and Alarm
Setting the Clock
Step 1 In the main menu, tap to access the system settings screen.
Step 2 Tap .
Step 3 Tap the Hora tab, select a time zone and change the date and time. You can also set which city you live in and a city of
interest.
Step 4 Tap to save settings.
5 Configuration
HIC
User Guide
5-20
Huawei Proprietary and Confidential Copyright ©
Huawei Technologies Co., Ltd.
Number 02 (2010-05-20)
Setting the Alarm
Step 1 In the main menu, tap to access the system settings screen.
Step 2 Tap .
Step 3 Tap the Alarmas tab.
Tap Descripción and type the alarm name.
Tap on one or more dates when the alarm should be played. If you tap a date you have selected before again, it will cancel
the selection.
Select a time to be reminded in the alarm clock.
Tap to adjust the alarm tone.
Step 4 Tap to save settings.
5.4 How to Set the Screensaver
Step 1 In the main menu, tap to access the system settings screen.
Step 2 Tap .
To activate the screensaver you must select the wait time and mode.
Wait Time: You can set the wait time to between one and five minutes, or you can deactivate the screensaver by selecting
the desactivado option.
If the screensaver is left desactivado, to avoid screen damage, the screen brightness will automatically dim after five
minutes. Depending on the power settings, the device will revert to standby mode (screen display off) when the time set in
the Configuración > Fuente de alimentación > Avanzado settings has elapsed.
Mode: Two modes can be selected: El tiempo or Marco de Fotos. When the screensaver is desactivado the Modo
selected does not apply.
− If El tiempo is selected, the screensaver will activate once the Tiempo de espera set has elapsed, displaying the
weather forecast. The screen brightness will dim when the Tiempo de espera set elapses again. Then, depending
on the power settings, the device will revert to standby mode (screen display off) when the time set in the
Configuración > Fuente de alimentación > Avanzado settings has elapsed.
− If Marco de Fotos is selected, the screensaver will activate once the Tiempo de espera set has elapsed, displaying a
slideshow of photos from your local album. In this Modo the screen brightness never dims so you are able to to see
the photos properly. The device will not revert to standby mode (screen display off) when the time set in the
Configuración > Fuente de alimentación > Avanzado. settings has elapsed either.
Step 3 Tap to save settings.
5.5 How to Set the Wi-Fi
You can use the Wi-Fi function to connect to a wireless network for Internet surfing.
Most wireless networks require a password. The connection may fail if the network signal is weak.
The Wi-Fi function is disabled by default. Once you have finished using the Wi-Fi, you can press and to deactivate
the Wi-Fi function.
The wifi function is that for devices marketed to the US/Canada only channels 1 ~ 11 may be selected.
Step 1 In the main menu, tap to access the system settings screen.
Step 2 Tap .
Step 3 Tap Buscar redes to view all the available wireless networks.
HIC
User Guide
5 Configuration
Number 02 (2010-05-20)
Huawei Proprietary and Confidential Copyright ©
Huawei Technologies Co., Ltd.
5-21
Step 4 Tap on an available wireless network to access the settings screen.
Step 5 Tap Siguiente and enter your password in the Clave de red.
Step 6 Select Siguiente > Finalizar.
5.6 How to configure the Bluetooth
Enabling and disabling the Bluetooth
The Bluetooth function is disabled by default. Disable the Bluetooth function when not in use to reduce power consumption.
Step 1 In the main menu, tap to access the system settings screen.
Step 2 Tap .
Step 3 Tap the Modo tab.
Step 4 Select Activar Bluetooth and Permitir que este dispositivo sea visible para otros dispositivos.
To deactivate the Bluetooth function, cancel the Activar Bluetooth selection and Permitir que este dispositivo sea visible
para otros dispositivos.
Step 5 Tap to save settings.
Transmitting Data Using Bluetooth
The Main Unit is working normally.
The option Permitir que este dispositivo sea visible para otros dispositivos is selected.
The distance between the Main Unit and the bluetooth device must be 10 meters or less.
Step 1 In the main menu, tap to access the system settings screen.
Step 2 Tap .
Select Recibir todas las transferencias entrantes por Bluetooth.
When the message appears asking if you would like to receive data, tap Aceptar.
5.7 How to Configure the GPRS Connection
Step 1 In the main menu, tap to access the system settings screen.
Step 2 Tap .
In reply to the question “Would you like to set data connections automatically?”, select the appropriate option.
Step 3 Tap Aceptar to save settings.

6 Troubleshooting
HIC
User Guide
6-22
Huawei Proprietary and Confidential Copyright ©
Huawei Technologies Co., Ltd.
Number 02 (2010-05-20)
6 Troubleshooting
6.1 Power Supply Problem
Symptom
The Main Unit won't switch on.
Cause
The battery level is too low.
The Main Unit charger is not connected to the power supply.
Solution
Connect the charger to a power supply. Wait several minutes before switching the Main Unit on again.
6.2 Display Problem
6.2.1 No Signal Is Displayed
Symptom
The Main Unit does not work once switched on
Cause
If you press the power button and the LED indicator flashes red, this means that the battery needs to be charged.
Solution
Connect the charger to the power supply.
If the problem persists, reset the Main Unit.
6.2.2 The Main Unit is Slow to Respond
Symptom
The Main Unit does not respond immediately when the screen is pressed.
Cause
The battery strength is low.
Too many applications are running.
Solution
Connect the charger to the outlet.
Close some applications.
Tap on the main menu to view all applications. Then tap to close an open application.
If the problem persists, reset the Main Unit.
HIC
User Guide
6 Troubleshooting
Number 02 (2010-05-20)
Huawei Proprietary and Confidential Copyright ©
Huawei Technologies Co., Ltd.
6-23
6.2.3 Screen Does Not Respond to Stylus Taps
Symptom
When you use the stylus, the screen does not respond.
Cause
The screen sensitivity is too low.
Solution
Step 1 In the main menu, tap to access the system settings screen.
Step 2 Tap to access the screen settings.
Move the thumb slider to the middle.
6.3 Resetting the Main Unit
To reset the Main Unit, insert the stylus into the reset hole, located on the left side of the device.
Unsaved data will be lost upon resetting the Main Unit.
6.4 Restoring to Factory Settings
In certain cases, for example, if you forget your password, you will have to restore the Main Unit to factory settings.
After restoration, all data that you have created and applications that you have installed are deleted.
To ensure that the data (including all files, settings, and installed applications) remains intact when you clear the memory,
back up the data periodically.
To restore the Main Unit to factory settings, proceed with the following steps:
Step 1 Tap to access the system settings screen.
Step 2 Tap to enter the verification code, which is preset to 1234. Tap Aceptar.

7 Warnings and Precautions
HIC
User Guide
7-24
Huawei Proprietary and Confidential Copyright ©
Huawei Technologies Co., Ltd.
Number 02 (2010-05-20)
7 Warnings and Precautions
This section contains important information relating to the use of this device. It also includes information about how to use
the device safely. Please read this information carefully before using the device.
Electronic device
Switch off the device where its use is prohibited. Do not use the device when its use may cause a hazard or interference with
other electronic devices.
Medical devices
Follow the rules set out by hospitals and medical centers. Do not use the device when its use is prohibited.
Pacemaker manufacturers recommend maintaining a distance of at least 15 metres between a pacemaker and the device
so as to avoid possible interference with the pacemaker. If you use a pacemaker, use the device on the opposite side to the
side where the pacemaker is located and do not carry the device in a shirt pocket.
Consult your doctor and the device manufacturer to find out whether use of this device may interfere with the operation of
your medical device.
Potentially explosive atmospheres
Switch off the device whenever you are in an area with a potentially explosive atmosphere, and comply with all signs and
instructions. Potentially explosive atmospheres include zones where it is normally recommended that you switch of your
vehicle's engine. If sparks are produced in these types of zone, this may cause an explosion or fire, which may cause injury or
death. Do not switch on the device at fuel refilling establishments such as, for example, gas stations. Comply with restrictions
relating to the use of radio equipment in warehouses, storage and distribution zones, as well as chemical plants. Likewise, you
should respect restrictions in place relating to areas where demolition work is in progress. Before using the device, make sure
that you are not in a potentially explosive atmosphere zone. Although these zones are usually clearly signed, they aren't
always. These zones may include: undercover zones of boats, warehousing installations or installations where the transfer of
chemical products occurs, and areas where the air contains chemical products or particles, such as fibres or metal particles.
Ask LPG (such as propane or butane) vehicle manufacturers whether you can use this device safely in the immediate vicinity
of their vehicles.
Road safety
Respect local regulations and laws when using this device. Also, if you use this device whilst driving, you must comply with
the following guidelines:
Concentrate on driving. Your primary concern is to drive safely.
Do not talk via the device whilst driving. Use hands-free accessories.
When you need to answer a call, stop the vehicle at the side of the road before using the device.
Radio frequency (RF) signals may affect the electronics systems of motor vehicles. For more information, consult the
vehicle manufacturer.
When you are inside a vehicle, do not place the device on top of the airbag or in the space where the air bag will inflate.
Otherwise, the airbag may damage the device due to the intense force with which the airbag inflates.
Do not use the device on board an aircraft. Before boarding an aircraft, switch off the device. The use of wireless devices
on an aircraft may be hazardous to the operation of the aircraft itself and may affect the wireless telephony system.
Furthermore, it may be illegal.
Operating environment
Do not use or recharge the device in wet, dirty or dusty areas, nor should you do this in places where there is a magnetic
field. Otherwise the device may malfunction.
The device complies with RF specifications provided that it is used close to the ear or at a distance of 1.5 cm from the
body. Ensure that the device accessories, such as sleeves or cases, do not contain metal parts. Hold the device 1.5 cm from
the body in order to comply with the aforementioned requirement.
To avoid possible accidents caused by lightning strikes, on stormy days when thunder is present, do not use this device
whilst being charged.
Do not touch the antenna when speaking on the phone. Touching the antenna affects the quality of the call and increases
power consumption. It also reduces the phone charge both while the phone is in use and while on standby.

HIC
User Guide
7 Warnings and Precautions
Number 02 (2010-05-20)
Huawei Proprietary and Confidential Copyright ©
Huawei Technologies Co., Ltd.
7-25
When you use the device, respect local regulations and laws in addition to the privacy and rights of others.
Ensure the ambient temperature remains between –0 and +40°C while charging the device. Ensure the ambient
temperature remains between –0 and +40°C when using this device while powered by the built-in battery.
During normal use, the cordless phone casing reaches a maximum of 40ºC at ambient temperature.
Preventing ear damage
The use of earphones and high volume levels may damage your hearing. To reduce the risk of ear damage, turn down the
earphone volume to a safe and comfortable level.
Accessories
Use only accessories supplied by the manufacturer. The use of accessories produced by any other manufacturer may
invalidate the warranty, cause the device to malfunction, or be dangerous.
Battery and charger
When not in use, disconnect the charger from the device and the power supply.
The battery can be charged and discharged hundreds of times before going flat. Replace the battery when the standby time
and conversation time become shorter than normal.
Use the AC power source indicated in the charger specifications. An inadequate supply voltage could cause a fault in the
charger or even a fire.
Do not connect the two battery terminals to conductive materials, such as metal objects, keys or jewellery. Otherwise this
may cause the battery to short circuit and cause injuries or burns to the body.
Do not remove the battery or solder its terminals. This may cause electrolyte creepage, overheating, fire or an explosion.
In the event of electrolyte creepage, ensure that said electrolyte does not come into contact with the skin or eyes. If the
electrolyte does come into contact with the skin or splashes in the eyes, flush the eyes with clean water immediately and
consult a doctor.
If the battery becomes deformed, changes color or becomes abnormally hot when being charged or stored, remove it
immediately and stop using it. Otherwise the battery may leak, overheat or cause an explosion or fire.
If you break the power cable (for example, you either don't realise it's broken or it has broken) or the plug comes off, stop
using it immediately. Otherwise it may cause an electric shock, a short circuit in the charger or a fire.
Do not throw batteries into a fire as they may explode. Batteries may also explode when damaged.
Cleaning and maintenance
The device, battery and charger are not water-resistant. Ensure they are kept dry. Protect the device, battery and charger
from water and vapour. Do not touch the device or the charger with wet hands. This may cause a short circuit, a fault in
the device or it may result in the user receiving an electric shock.
Do not place the device, battery or charger where it may get knocked and break. This may cause battery leakage,
malfunctions, overheating, fire or explosions.
Do not place magnetic storage devices, such as magnetic cards or disks, near the device. The radiation from the device
may delete the information stored on these.
Do not leave the device, battery or charger anywhere where temperatures are above 40ºC or below 0ºC. Otherwise it may
not work properly and could cause a fire or explosion. When the temperature is below 0°C, battery performance is
reduced.
Do not expose the device to temperatures above 75ºC or below –40ºC.
Relative humidity for the device while operational: between 20% and 80% (without condensation).
Relative humidity for the device while switched off: between10% and 95% (without condensation).
Before cleaning or performing other maintenance tasks on the equipment, switch off the device and disconnect it from the
charger.
Do not use chemical detergents or powders, nor any other type of chemical products (such as alcohol or benzene) to clean
the device or charger. Otherwise it may damage some of the device's components or cause a fire. The device and its
charger can be cleaned using a damp soft anti-static cloth.
Do not take the device or its accessories apart. Otherwise, the product warranty relating to both the device and its
accessories will no longer be valid and the manufacturer will not be responsible for any damage.
7 Warnings and Precautions
HIC
User Guide
7-26
Huawei Proprietary and Confidential Copyright ©
Huawei Technologies Co., Ltd.
Number 02 (2010-05-20)
Emergency calls
The device can be used to make emergency calls when in an area with service coverage. However, it is not possible to guarantee
connection in each and every circumstance. You should not rely solely upon this device for essential communications.
Certification information (SAR, Specific Absorption Rate)
This mobile device complies with guidelines relating to radio wave exposure. This device is a low intensity radio transmitter
and receiver. As recommended by international guidelines, this mobile device is designed not to exceed radio wave exposure
limits. These guidelines were developed by the independent scientific organisation, the International Commission on
Non-Ionizing Radiation Protection (ICNIRP) and include safety measures designed to guarantee the safety of all users,
regardless of their age or health.
The Specific Absorption Rate (SAR) is the unit used to measure the amount of radio frequency energy absorbed by the body
when using a device. The SAR value is determined according to the highest level of energy recorded under laboratory
conditions, however the true SAR level of a device when used under normal conditions may be much lower. This is due to the
fact that the device has been designed to use the minimum amount of power required to connect to the network.
The SAR adopted by Europe is 2.0 W/kg averaged over 10 grams of body tissue. The highest SAR value for this type of
device when tested at the ear is 0.956 W/kg, and when carried appropriately on the body is 0.42 W/kg. This device has been
tested in typical situations of use on the body with the flat part of the device 15mm away from the body.
Disposal and recycling information
This symbol, which appears on the device (and on all batteries it contains), indicates that the product must not be disposed of
via normal domestic waste. Do not dispose of this device or its batteries in unclassified urban waste. Please deposit these in a
certified collection point for recycling or treatment at the end of their useful life. For more information about recycling this
device and its batteries, contact your local government's waste disposal office, your waste disposal service or the
establishment where you purchased the device.
The European Union's Waste Electrical and Electronic Equipment Directive (WEEE) regulates activities relating to the
disposal of this type of device. The aim of this is to ensure that electrical and electronic equipment and the batteries and other
associated waste products are separated from other waste products, thus minimising the impact of these products on the
environment and human health as a result of the hazardous substances these may contain.
Compliance with EU regulations
By way of this document, Huawei Technologies Co., Ltd. declares that the device complies with mandatory requirements and
with all other stipulations relating to Directive 1999/5/EC.
To view the Compliance Declaration, please visit www.huaweidevice.com/certification.
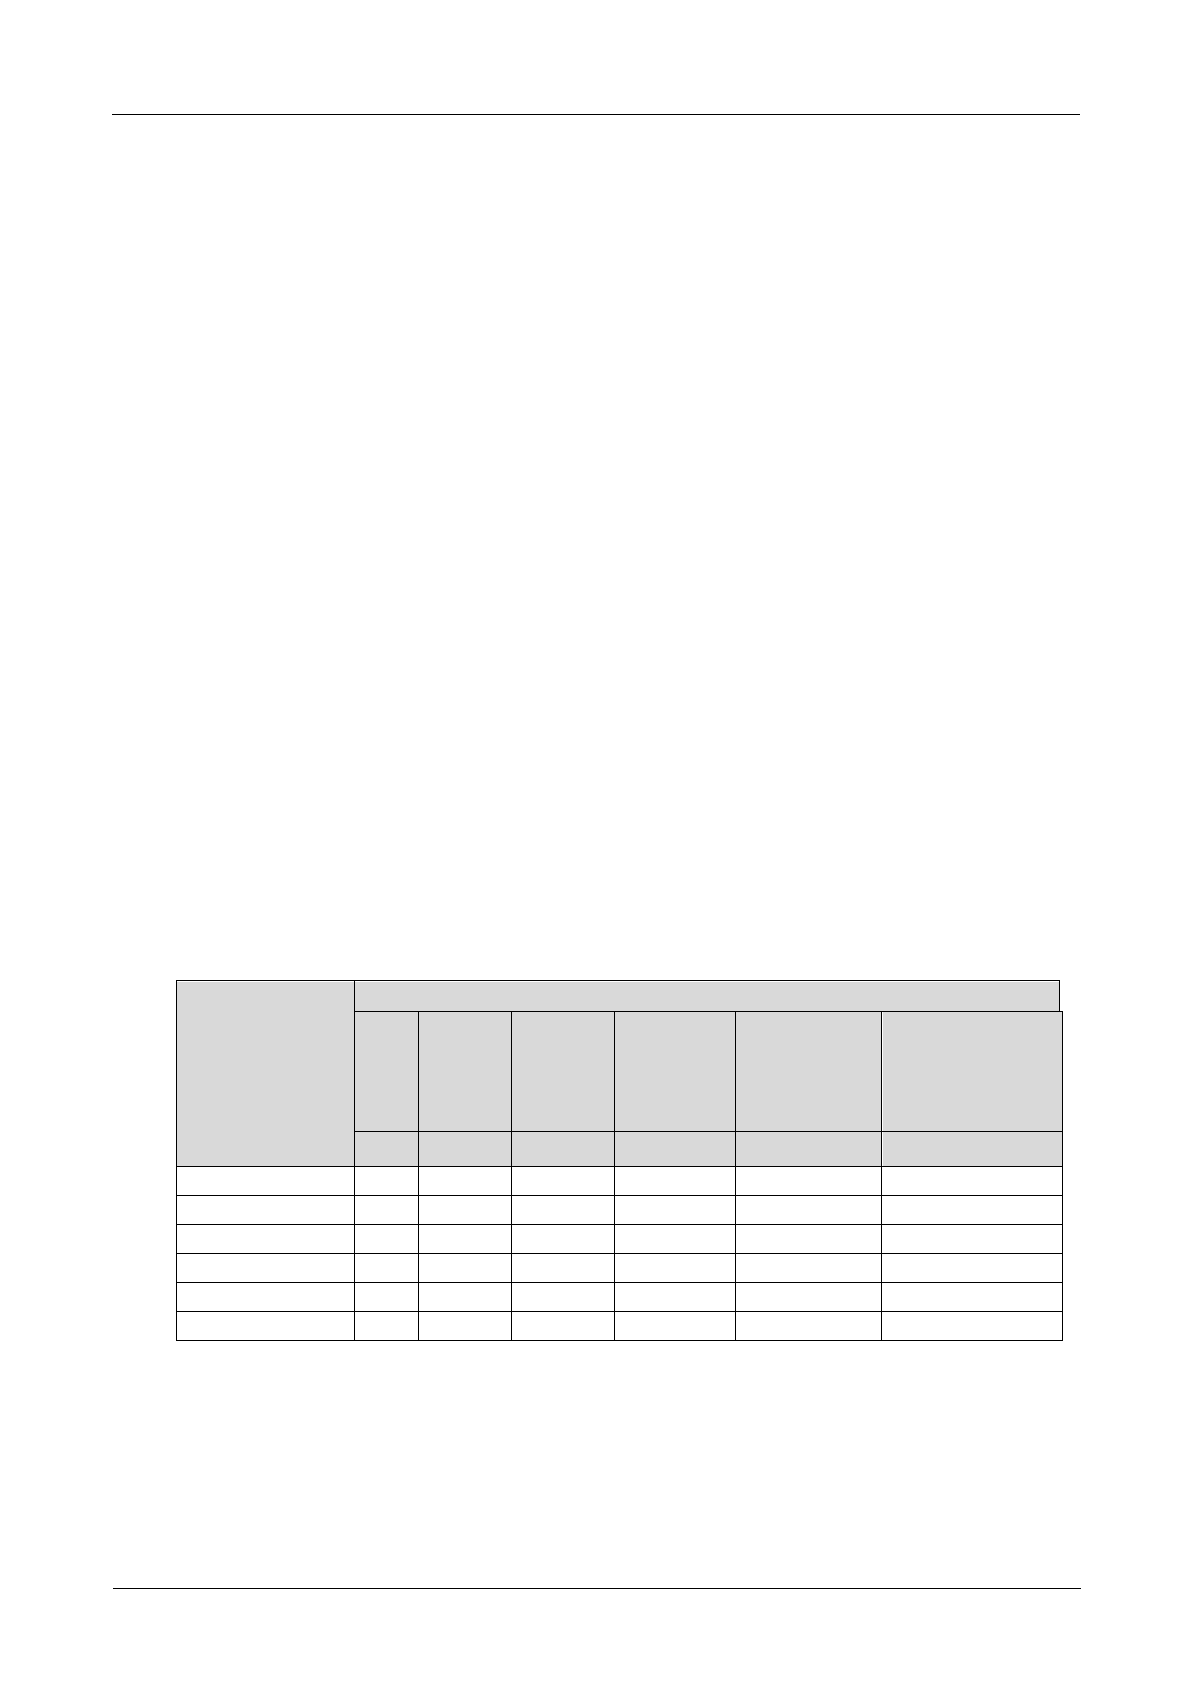
Toxic or hazardous substances and elements
Component
Toxic or Hazardous Substances and Elements
Lead
Mercury
Cadmium
Hexavalent
Chromium
Polybrominated
Biphenyl
Polybrominated
Diphenyl Ether
(excluding
decabromodiphenyl
ether)
Pb
Hg
Cd
Cr6+
PBB
PBDE
Shell
O
O
O
O
O
O
LCD
O
O
O
O
O
O
Circuit board
O
O
O
O
O
O
Electronic components
O
O
O
O
O
O
Battery
×
O
O
O
O
O
Accessory
×
O
O
O
O
O
Meanings of O and x:
− O: The amount of this toxic or hazardous substance contained in all the homogenous materials of this component is
below the limit established in SJ/T-11363-2006.
− X: The amount of this toxic or hazardous substance contained in all homogenous materials of this component is above
the limits established in SJ/T-11363-2006.

HIC
User Guide
7 Warnings and Precautions
Number 02 (2010-05-20)
Huawei Proprietary and Confidential Copyright ©
Huawei Technologies Co., Ltd.
7-27
The battery may contain lead. This complies with article 5 of the RoHS directive (restricting the use of certain hazardous
substances).
The charger may contain lead, which is a type of high temperature solder.
Compliance with FCC Regulations
FCC Section 15.105 (b)
This equipment has been tested and found to comply with the limits for a Class B digital
device, pursuant to part 15 of the FCC Rules. These limits are designed to provide reasonable
protection against harmful interference in a residential installation. This equipment generates,
uses and can radiate radio frequency energy and, if not installed and used in accordance with
the instructions, may cause harmful interference to radio communications. However, there is
no guarantee that interference will not occur in a particular installation. If this equipment
doescause harmful interference to radio or television reception, which can be determined by
turningthe equipment off and on, the user is encouraged to try to correct the interference by
one ormore of the following measures:
• Reorient or relocate the receiving antenna.
• Increase the separation between the equipment and receiver.
• Connect the equipment into an outlet on a circuit different from that to which the receiver is
connected.
• Consult the dealer or an experienced radio/TV technician for help.
FCC Section 15.21 Information to the user
Changes or modifications not expressly approved by the party responsible for compliance
could void the user's authority to operate the equipment.
FCC Section 15.19 Labelling requirements
This device complies with Part 15 of the FCC Rules.
Operation is subject to the following two conditions:
1.This device may not cause harmful interference, and
2.This device must accept any interference received,
including interference that may causeundesired operation.
SAR INFORMATION
The SAR limit of USA (FCC) is 1.6 W/kg averaged over one gram of tissue.
Device types (FCC ID: QISEC-W820 ) has also been tested against this SAR limit.
The highest SAR value reported under this standard during product certification
for use at the body is 1.33 W/kg.
This device was tested for typical body-worn operations with the Top of
the Device kept 0 cm from the body. To maintain compliance with FCC RF
exposure requirements, use accessories that maintain a 0 cm separation
distance between the user's body and the back of the Device. The use of belt
clips, holsters and similar accessories should not contain metallic components in
its assembly. The use of accessories that do not satisfy these requirements may
not comply with FCC RF exposure requirements, and should be avoided.