Huawei Technologies ETS3223 GSM850M/PCS1900M User Manual
Huawei Technologies Co.,Ltd GSM850M/PCS1900M
User Manual
Wonderful Communication, Mobile Life.
Thank you for choosing HUAWEI ETS3023/3223 Fixed Wireless Terminal.
HUAWEI ETS3023/3223 Fixed Wireless Terminal
User Guide

Copyright © 2007 Huawei Technologies Co., Ltd.
All Rights Reserved
No part of this manual may be reproduced or transmitted in any form or by any
means without prior written consent of Huawei Technologies Co., Ltd.
Trademarks
and HUAWEI are trademarks of Huawei Technologies Co., Ltd. All other
trademarks and trade names mentioned in this manual are the property of their
respective holders.
Notice
The information in this manual is subject to change without notice. Every effort
has been made in the preparation of this manual to ensure accuracy of the contents,
but all statements, information, and recommendations in this manual do not
constitute the warranty of any kind, expressed or implied.
Please observe the national local regulations in the location where product is to be
used. This product may be restricted for use in some or all countries of European
Union.
Warning: This is a radio frequency device! The spectrum usage is regulated on a
country base, by the spectrum authorities. National restrictions may apply! Please
read the user manual carefully and check the local regulation before importing this
product to any particular country.
Warning: When carrying or using the wireless device, keep the antenna at least 25
centimeters away from your body, to avoid negative impact on your health caused
by radio frequency leakage.
Warning: Do not go closer that 20 cm to the device while in operation.
i
Table of Contents
1 Warnings and Precautions.....................................................................................................1
2 Introduction...........................................................................................................................5
Packing List ...................................................................................................................5
Appearance of the FWT ................................................................................................5
Menu Tree......................................................................................................................8
Icons...............................................................................................................................8
Hardware Specifications................................................................................................9
3 Installation...........................................................................................................................11
Installing the SIM Card (Optional) .............................................................................11
Installing the Power Adapter or Battery......................................................................11
Installing the Antenna..................................................................................................12
Placing the FWT..........................................................................................................13
Validating.....................................................................................................................14
4 Basic Operations .................................................................................................................15
Powering On or Off the FWT......................................................................................15
Making a Call ..............................................................................................................15
Answering a Call .........................................................................................................16
Operations During a Call.............................................................................................16
5 Recent Calls ........................................................................................................................17
6 Text Entry............................................................................................................................18
Text Input Mode ..........................................................................................................18
Entering Letters ...........................................................................................................18
7 Messages .............................................................................................................................20
Writing and Sending a Message..................................................................................20
Viewing a Message......................................................................................................20
Voice Mail....................................................................................................................21
Message Settings .........................................................................................................21
Memory Status.............................................................................................................22
8 Phonebook...........................................................................................................................23

ii
Adding a Contact.........................................................................................................23
View a Contact.............................................................................................................23
Memory Status.............................................................................................................23
9 Phone Settings.....................................................................................................................24
Profiles.........................................................................................................................24
Auto Dialing ................................................................................................................24
Time & Date ................................................................................................................25
Languages....................................................................................................................25
Network Service ..........................................................................................................25
Security........................................................................................................................25
Version .........................................................................................................................26
10 Applications.......................................................................................................................27
Alarm Clock ................................................................................................................27
Calculator.....................................................................................................................27
11 Maintenance and Troubleshooting....................................................................................28
Maintenance.................................................................................................................28
Troubleshooting...........................................................................................................28

1
1 Warnings and Precautions
Before using HUAWEI Fixed Wireless Terminal (hereinafter referred to as the FWT), read
the following cautions and let your children know these, so that you can use your FWT
correctly and safely.
Basic Cautions
According to the packing list, check items in the package box to make sure that they are
complete and undamaged.
Before installing and using the FWT, read the user manual carefully.
Electronic Device
Switch off your FWT near high-precision electronic devices. The FWT may affect the
performance of these devices.
Such devices include hearing aids, pacemakers, fire alarm systems, automatic gates, and
other automatic-control devices. If you are using an electronic medical device, consult the
device manufacturer and confirm whether the radio waves affect the operation of the
electronic device.
Hospital
Pay attention to the following points in hospitals or health care facilities:
y Do not take your FWT into the Operating Room (OR), Intensive Care Unit (ICU), or
Coronary Care Unit (CCU).
y Switch off your FWT near medial devices.
y Observe any instructions wherever the use of wireless device is prohibited.
Traffic Safety
y Do not use your FWT while driving. Secure the FWT on its holder. Do not place the
FWT on the seat or other places where it can get loose in a sudden stop or collision.
y Observe the rules and regulations of airline companies. Switch off your FWT before
boarding an aircraft.

2
Operating Environment
y Do not place magnetic storage media such as magnetic cards and floppy disks near the
FWT. Radiation from the FWT may erase the information stored on them.
y Do not put your FWT, battery, or other accessories in containers with strong magnetic
field, such as the induction cooker and microwave oven. Otherwise, circuit failure, fire,
or explosion may result.
y Do not place or use the FWT, battery or power adapter near any heat sources such as fire
or a heater; or places with flammable gases; or areas with electrical appliances that give
out heat. Otherwise, it will cause fire, explosion and breakdown of the FWT
y Because the FWT eliminates heat during working, put the FWT and the power supply in
a ventilated and shadowy place. Never airproof the FWT or put something on it or place
it near water, fire as well as inflammable and explosive materials.
y Place the FWT in a dry place. When using it, do not put a towel over the FWT, or put it
in a box or a suitcase.
y Because the FWT contains precision devices, you should put it in a dry place and away
from moist materials.
y Before cleaning the FWT, turn off the FWT. Then disconnect the power supply and take
out the battery. Before moving the FWT, disconnect the external power supply.
y Do not subject your FWT, battery, and power adapter to serious collision or shock.
Otherwise, battery leakage, FWT malfunction, overheats, fire, or explosion may result.
y Do not place sharp metal objects such as pins near the earpiece. The earpiece may attract
these objects and hurt you when you use the FWT.
y Do not place the FWT in the area over the air bag or in the air bag deployment area.
Otherwise, the FWT may hurt you owing to the strong force when the air bag inflates.
y Put your FWT, battery, and power adapter in places beyond the reach of children. Do not
allow children to use the FWT, battery, or power adapter without guidance.
y Do not touch the antenna when a call is going on. Touching the antenna may affect call
quality and cause the FWT to operate at a power level higher than needed.
y The network signal condition will directly affect the quality and stability of a call.
Consequently, you should place the FWT in a place where it can receive network signals
well. Do not put the FWT in a building with an iron or metal roof. The distance between
the FWT and other metal materials (such as metal brackets or metal doors and windows)
should be greater than 25 cm and the distance between FWTs should be greater than 30
cm.
y Do not open the chassis in any case and the device should be maintained by a qualified
maintenance department.
y Without permission, you are not allowed to modify the architecture and security design
of the FWT. Otherwise, you bear any consequence resulted from the operation without
permission.
y Your FWT is designed to conform to the authoritative international Radio Frequency (RF)
specifications. Use FWT accessories approved by Huawei only.
y The antenna(s) used for this transmitter must be installed with providing a separation
distance of at least 20 cm from all persons.
y Warning: Do not go closer that 20 cm to the device while in operation

3
Emergency Call
You can use your FWT for emergency calls; however, connections in all conditions cannot
be guaranteed. You should never rely solely on the FWT for essential communications.
Battery
y If the battery fluid gets into eyes, do not rub them. Wash with clean water and seek
medical assistance immediately.
y If the battery fluid contacts skin or cloth, wash with clean water immediately to avoid
irritation to the skin.
y Do not dispose of the battery in fire. Otherwise, the battery may ignite or explode.
y When installing the battery on your FWT, do not push the battery by force lest battery
fluid leaks out or the battery cracks.
y Do not connect two poles of the battery with metallic materials, such as cables.
y Do not disassemble the battery or solder the battery poles. Otherwise fluid leakage,
overheat, fire, or explosion may result.
y If there is battery leakage, smoke, or strange smell, stop using the battery and keep it
away from open flame to avoid fire or explosion.
y Disconnect the power adapter and take out the battery when the FWT is not used for a
long time.
y Do select its self-contained complete battery and power adapter; otherwise, the FWT
may be spoiled. Dispose of used batteries according to the instructions.
y Dispose of the battery according to local laws or regulations.
Power Adapter
y Use AC power as specified for the power adapter. Any violation of this rule may result in
fire or malfunction of the power adapter.
y Do not short-circuit the power adapter. Short-circuiting the power adapter may cause fire
or malfunction of the power adapter.
y Remove the dust on the power plug regularly.
y Do not use worn-out power cords. Otherwise, electric shock, short-circuiting of the
power adapter or fire may result.
y Do not put the power adapter near the container filled with liquid, such as water. If the
liquid comes into the power adapter, electrical leakage or other faults may result.
y If the liquid such as water comes into the power adapter accidentally, remove the plug of
the power adapter from the socket immediately.
y Disconnect the power adapter from the socket before cleaning or maintaining it.
Otherwise, electric shock or short-circuiting of the battery or power adapter may result.
y Ensure the plug of the power adapter is properly inserted into the power socket when
charging the battery. Improper insertion may result in electric shock, fire, or explosion.
y Do not place any heavy object on the power cord of the power adapter. Do not damage,
change, or pluck the power cord.
y Maximum operation temperature is 45℃ when supply by adaptor, and 55℃ when
operated by battery.

4
Environmental Protection
This HUAWEI device complies with Directive 2002/95/EC on the restriction of the use of
certain hazardous substances in electrical and electronic equipment.
Abide by the local laws in disposing of the package materials of your FWT, consumed
batteries and the used FWT, and try to recycle them.
Observe the national local regulations in the location where the product is to be used. This
product may be restricted for use in some or all countries of European Union.
5
2 Introduction
Packing List
The FWT package box contains the following items. If any of the items is lost or damaged,
contact your local dealer.
Item Quantity Item Quantity
Main unit, handset, and coiled cord 1 Certificate of Quality 1
Power adapter 1 Battery 1
Fixed Wireless Terminal User Guide 1 Antenna 1
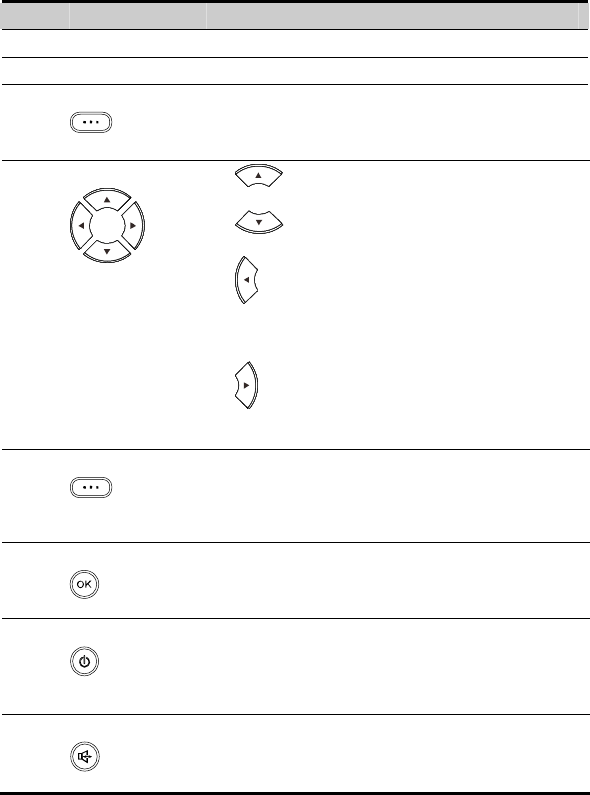
Appearance of the FWT
Front View
1
2
3
4
5
6
7
8
9
11 10
12
6
No. Item Description
1 Display Screen To display information.
2 Antenna To receive signals.
3 Left soft key
z In the standby mode, press it to access the home screen.
z In the non-standby mode, press it to perform the
operation displayed on the lower left corner of the
screen.
4 Navigation keys
z : In the standby mode, press it to access the
Write interface for writing a message.
z : In the standby mode, press it to access the
Phonebook interface.
z
: In the standby mode, press it to access the Recent
Calls interface. In the edit mode, press it to move the
cursor to the left. During a call, press it to adjust the
volume.
z
: In the standby mode, press it to access the Alarm
interface. In the edit mode, press it to move the cursor to
the right. During a call, press it to adjust the volume.
5 Right soft key
z In the standby mode, press it to access the Phonebook
interface.
z In the non-standby mode, press it to perform the
operation displayed on the lower right corner of the
screen.
6 OK key
z In the standby mode, press it to access the main menu.
z In the non-standby mode, press it to perform the
operation displayed on the lower left corner of the
screen.
7 End key
z Press it to end a call or cancel the dialing.
z Press and hold it for two seconds to power on or off the
FWT.
z In the non-standby mode, press it to return to the standby
mode.
8 Hands-free key
z In the standby mode, press it to make or answer a call
without lifting the handset.
z In the hands-free mode, press it to cancel the dialing.
z In the hands-free mode, press it to end an ongoing call.
7
No. Item Description
9 Call/Redial key
z Press it to make or answer a call.
z In the standby mode, press it to view the call history.
10 # key
z Enter the "#".
z In the edit mode, press it to switch between input
methods.
11 * key
z Enter the "*".
z In the edit mode, press it to display a symbol list.
12 Number keys z Press keys 0–9 to enter numbers or characters.
z In the standby mode, press and hold a key to speed dial a
phone number.
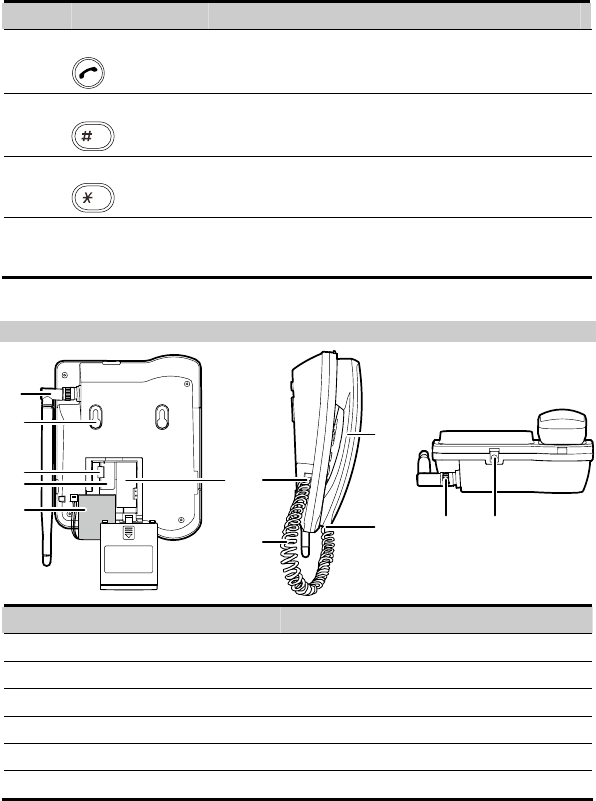
Back View
1
2
3
4
5
67
8
10
91211
No. Item No. Item
1 Antenna 7 Coiled cord jack on the main unit
2 Hook 8 Coiled cord
3 Battery cord jack 9 Coiled cord jack on the handset
4 SIM card slot 10 Handset
5 Battery 11 Antenna jack
6 Battery case 12 Power jack
8
Menu Tree
Messages Phonebook Recent Calls
1. Write Message
2. Inbox
3. Outbox
4. Draft
5. Voice Mail
6. Settings
7. Broadcast
8. Memory Status
1. Name list
2. Add New
3. Speed Dial
4. Memory Status
1. Missed Calls
2. Answered Calls
3. Dialed Calls
Applications Phone Settings STK
1. Alarm
2. Calculator
3. Voice Memo
1. Profiles
2. Auto Dial
3. Time & Date
4. Languages
5. Network Service
6. Security
7. Version
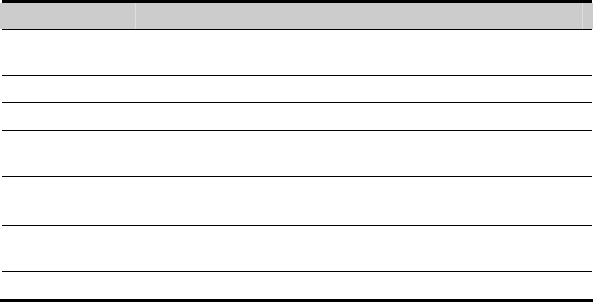
Icons
Icon Description
Indicates the signal strength. The more the bars are, the stronger the signal
strength is.
There is an ongoing call.
The alarm clock is activated.
The FWT is in the hands-free mode.
There is a new message.
There is a new voice message.
The FWT is powered by the power adapter.
Indicates the battery power level. The more the bars are, the higher the power
level is.

9
Hardware Specifications
Item Description
Technical standard GSM
900M Frequency Band
Uplink: 880.2–914.8 MHz
Downlink: 925.2–959.8 MHz
ETS3023
1800M Frequency Band
Uplink: 1710.2–1784.8 MHz
Downlink: 1805.2–1879.8 MHz
850M Frequency Band
Uplink: 824–849 MHz
Downlink: 869–894 MHz
Working
frequency
ETS3223
1900M Frequency Band
Uplink: 1850–1910 MHz
Downlink: 1930–1990 MHz
USB interface: USB 1.1, for the parameter configuration
Power supply interface: 1 pin connector
Antenna interface: TNC
External interface
SIM card interface: standard 6-pin SIM card interface
Maximum
transmit power >30 dBm
Receiving
sensibility Better than –104 dBm
Power supply AC: 100V to 240V
DC: 5V,0.65A
Type: NiMH
Capacity: 3.6 V 1000 mAh
Maximum talk time: (depending on the network)
5 hours (Capacity of battery: 1000 mAh)
Spare rechargeable
battery
Maximum standby time: (depending on the network)
120 hours (Capacity of battery: 1000 mAh)
Power
consumption Typical power consumption during a call: 1.5 W
Typical standby power consumption: 40 mW
10
Item Description
Dimensions
(W × D × H) 166 mm ×216 mm × 86 mm
Weight Less than 700g (including the battery)
LCD 128 × 64 dots matrix
Backlight Provides backlight for the LCD and keypad (green LCD backlight
and red keypad backlight)
Temperature Working temperature: –10°C to +55°C
Charging temperature: –10°C to +45°C
Working relative
humidity 5% to 95%
Placement Horizontally placed or wall-mounted
11
3 Installation
Installing the SIM Card (Optional)
Caution:
y Consult your service provider to decide whether to use a Subscriber Identity
Module (SIM) card.
y The SIM card and its golden contact can be easily damaged by a scratch or bend.
Be careful when installing or removing the SIM card.
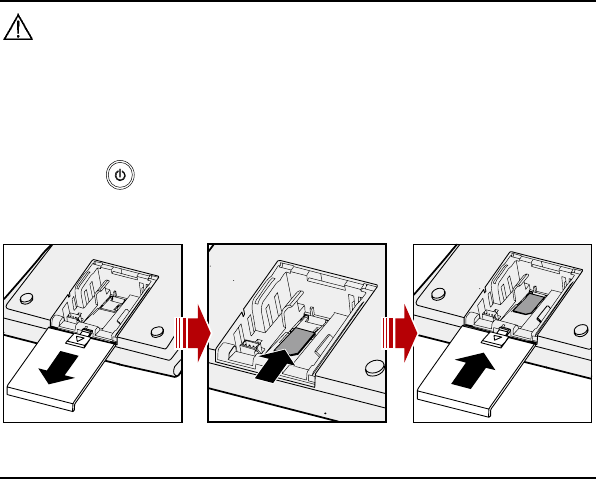
Press and hold
to power off your FWT and then disconnect it from the power socket.
Install the SIM card according to the following figure. Make sure that the golden contact of
the SIM card is facing downwards.
Installing the Power Adapter or Battery
Note:
y The FWT can be powered by the power adapter or the battery.
y If the FWT is connected to the power adapter and the battery is inserted, the
FWT is powered by the power adapter, and meanwhile, the battery is charged.
y Charge the battery for at least eight hours for the first time. If a fully-charged
battery is left unused for a long time, charge it before using it again.
12
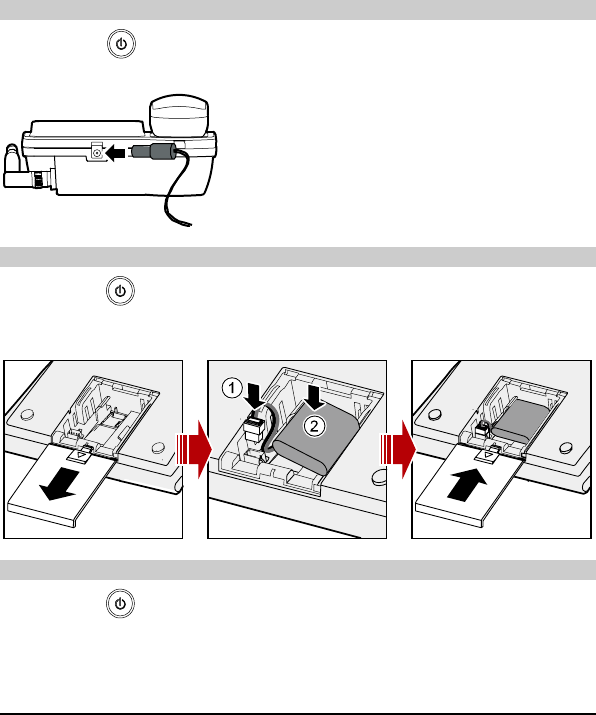
Installing the Power Adapter
Press and hold
to power off your FWT. Connect the power adapter to the FWT, and
plug it to the power socket.
Installing the Battery
Press and hold
to power off your FWT and then disconnect the FWT from the power
socket. Then install the battery as shown in the following figure. When installing the battery,
make sure that the battery cord plug matches the battery jack. Do not insert reversely.
Removing the Battery
Press and hold
to power off your FWT and then disconnect the FWT from the power
socket. Then remove the battery case cover. Disconnect the battery cord and take out the
battery.
Installing the Antenna
Power off your FWT and disconnect the FWT from the power socket. Then connect the
Antenna to the antenna jack on the main unit. Make sure that the antenna is stably
connected to the antenna jack.
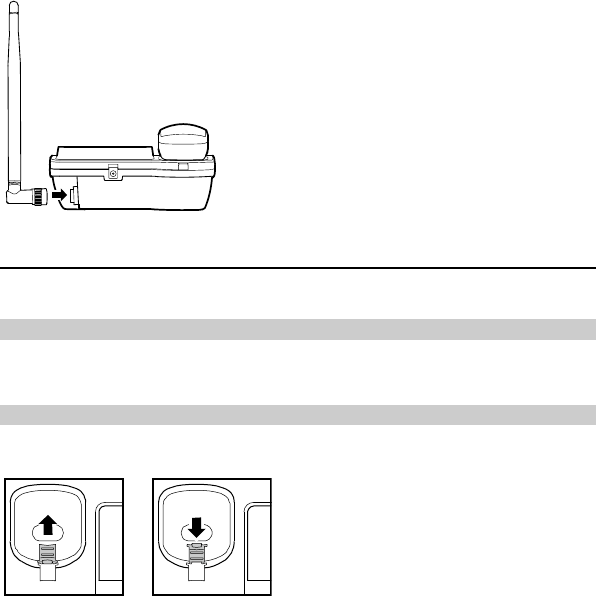
13
Placing the FWT
You can place the FWT horizontally or vertically.
Horizontally
Place the FWT on a flat surface. Select a cool and ventilated place for the FWT to dissipate
the heat.
Vertically
1. Pull out the handset retaining clip from the slot and turn it around. Then push it back,
so that the handset will not fall down when the FWT is placed vertically.
2. According to the distance between the two hooks (7.7 cm), hammer two nails into the
wall with 3 mm end left out.
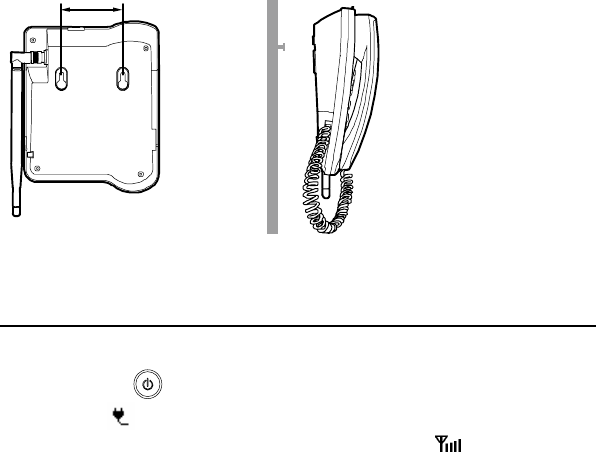
14
7.7 cm
3. Snap the hooks to the nails.
Validating
After installing the FWT, you can make a call to check whether it is correctly installed.
1. Press and hold
to power on your FWT. After connecting the FWT to the power
socket, the icon appears, indicating that the FWT is powered normally.
2. Lift the handset. In the standby mode, the signal strength icon appears normally.
3. If a call can be made, it indicates that the FWT is installed correctly.
15
4 Basic Operations
Powering On or Off the FWT
When the FWT is off, press and hold
to power it on.
In the standby mode, press and hold
to power it off.
Making a Call
Making a Call through the Keypad
1. In the standby mode, press number keys to enter a phone number.
If the number is wrong, press (Delete) to clear it.
2. Press
to dial the phone number.
3. Press
or (End) to end the call or cancel the dialing.
Note:
When you enable the auto dial function, an entered phone number is dialed
automatically. If the activation time is too short, an incomplete phone number may
be dialed.
Making a Call from the Dialed Calls List
1. In the standby mode, press
.
2. Press /
to scroll call records.
3. Press
to dial.
16
Making a Call from the Phonebook
1. In the standby mode, press the right soft key; or press (Menu) and select
Phonebook.
2. Press /
to scroll the contacts.
3. Press
to dial.
Speed Dialing
If a number key is set as the speed dial key of a phone number, you can press and hold it to
call the number.
1. Press (Menu) and select Phonebook > Speed Dial
2. Press /
to scroll the items and select a number.
3. Press
and enter a phone number, or press (PB) to select a contact from
the phonebook.
4. Press (OK) to confirm.
Answering a Call
Answering a Call
In the standby mode, you can lift the handset or press
, , or (Accept) to
answer an incoming call.
Rejecting a Call
To reject an incoming call, press
or (Reject).
Operations During a Call
During a call, press (Option) to select an option:
y Contacts: Access the Phonebook interface.
y Hold: Hold a call.
y Mute/Unmute: Mute or unmute a call.
If the call is muted, the other party cannot hear your voice.
y Send SMS: Access the Write interface to write a message.
y Messages: Access the Messages interface.
y Scratchpad: Make a multiparty call.
Maximum seven parties are supported.

17
5 Recent Calls
The FWT can store a maximum of 20 missed calls, answered calls, and dialed calls
respectively.
In standby mode, press (Menu) and select Recent Calls. Then select Missed calls,
Answered calls or Dialed Calls.
When viewing the records, press (Option) for the following operations:
y View: View the details of a record.
y Call: Dial the phone number.
y Save: Save the phone number to the phonebook.
y Send SMS: Write and send a message to the phone number.
y Delete: Delete the record.
y Delete all: Delete all the call records.
Note:
In the standby mode, the prompt and the number of missed calls are displayed.
Select View to view the record.
18
6 Text Entry
Text Input Mode
While entering text, you can press to change the input mode.
Note:
In the edit mode, press (Delete) once to delete the letter on the left of the
cursor. Press and hold (Delete) for over two seconds to delete all letters.
Entering Letters
In the "Abc", "ABC" and "abc" input mode, you can enter English letters.
You can press the number key labeled with desired letters once to enter the first letter on the
key, twice to enter the second letter on the key, and so on.
If the letter you want to enter is on the same key as the previous one, you can enter the
latter only after the cursor appears again or after you move the cursor to the next space.
If you hope the initial letter is capitalized, you need to change the input mode into "Abc"
manually before you enter the word.
Note:
y Press once to enter a space; press repeatedly to enter a
commonly-used symbol (",", "+", "-" or "=").
y Press repeatedly to enter a commonly-used symbol (".", "?", "!", ";" or
":").
y Press to display the symbol list.
19
Entering Numbers
Do as follows to enter numbers:
y In the "123" input mode, press the number key labeled with the desired digit.
y In the "Abc", "ABC" or "abc" input mode, press the number key repeatedly until the
desired digit appears on the screen.
Entering Symbols
1. In any text input mode, press
to display the symbol list.
2. Press /
to scroll the symbol list.
3. Press (Select) to enter a symbol.
20
7 Messages
Writing and Sending a Message
1. Press (Menu) and select Messages > Write Message.
2. Write a message.
3. After writing the message, press (Option) for the following operations:
y Save: Save the message to the Draft.
y Send: Add the recipient(s) and send the message.
Note:
Select Send, and press to add up to ten recipients by the following options:
y New Entry: Enter the phone number directly.
y Phonebook: Select the phone numbers of contact(s) from the phonebook.
4. Press (Send) to send the message.
Viewing a Message
Viewing the Inbox
The inbox stores received messages.
When there is a new message, the FWT rings and appears on the screen. If blinks,
it indicates that the message memory is full. To view the inbox, do as follows:
1. Press (Menu) and select Messages > Inbox.
2. Press /
to scroll the messages.
3. Select and view a message by the following options:
y Press
.
y Press (Select) and select View.
4. When viewing a message, press (Option) for the following operations:
y Reply: Reply to the message.
y Forward: Forward the message.
21
y Delete: Delete the message.
y Save Number: Save the message sender as a contact and save the phone number.
y Call: Call the message sender.
Viewing the Outbox/Draft
The Outbox stores messages that are sent successfully. You can view, re-send, forward,
delete a message or delete all the messages stored in the Outbox.
The Draft can store up to ten drafts and messages that are not sent successfully. You can
edit, delete a message or delete all the messages stored in the Draft.
Voice Mail
The voice mail function is network dependent, so you need to subscribe this service first.
For the voice mail number and other information, consult your service provider.
When there is a new voice message, the FWT alerts and appears on the screen.
When you set the voice mailbox number correctly, you can press and hold in the
standby mode to access the voice mailbox.
Setting the Voice Mailbox Number
Press (Menu) and select Messages > Voice Mail > Set Voice Mail.
When the voice mailbox number is set, you can view and edit voice mails; otherwise, enter
the voice mailbox number and press (OK).
Calling the Voice Mail Center
After setting the voice mailbox number, you can call the voice mail center.
1. Press (Menu) and select Messages > Voice Mail.
2. Select Voice Mail and press (Select) or to call the voice mail center.
Message Settings
Press (Menu) and select Messages > Settings to display the Settings interface.
Setting the SMSC Number
The service provider provides you the Short Message Service Center (SMSC) number.
Make sure that the number is correct before sending messages.

22
Press (Menu) and select Messages > Settings > Service Center to view the SMSC
number.
Setting the Validity Period
The validity period means how long a message is stored in the SMSC.
1. Press (Menu) and select Messages > Settings > Validity.
2. Select 1 hour, 1 day, 1 week, or Max.
Setting the Status Report
If the status report function is enabled, a delivery report is received after you send a
message, telling you the status of the message.
Press (Menu) and select Messages > Settings > Status Report.
y Off: Disable the status report function.
y On: Enable the status report function.
Setting the Auto-Save Function
If the auto-save function is enabled, messages are automatically saved after being sent.
Messages sent successfully are saved to the Outbox. Messages sent unsuccessfully are
saved to the Draft.
Press (Menu) and select Messages > Settings > Auto Save.
y Send Only: Disable the auto-save function.
y Send And Save: Enable the auto-save function.
Memory Status
Press (Menu) and select Messages > Memory Status to view the memory status
of the SIM card and the FWT.
23
8 Phonebook
Adding a Contact
1. Press (Menu) and select Phonebook > Add New.
2. Select the memory in use.
y Phone: Save the contact to the FWT.
y SIM: Save the contact to the SIM card.
3. Press
to set the Name and Mobile Number of the contact.
4. Press (Save) to save the contact or press (Back) to cancel.
Note:
There is a length limit for a contact name. The length limit of the SIM card is
subject to different SIM cards used in different countries and areas.
View a Contact
Press (Menu) and select Phonebook > Name List to view the contacts.
When you view the contact, press (Option) for the following operations:
y Edit: Edit the name or mobile number of the contact.
y Copy: If the SIM card is available, you can copy the contact from the FWT to the SIM
card or from the SIM card to the FWT.
y Delete: Delete the contact.
y Call Number: Dial the number.
y Send SMS: Write and send a message to the number.
Memory Status
The number of contacts stored in the SIM card is determined by the capacity of the SIM
card. You can save up to 250 contacts in the SIM card.
Press (Menu) and select Phonebook > Memory Status to view the memory status
of the SIM card and FWT for the phonebook.
24
9 Phone Settings
Profiles
The FWT provides two profiles. You can enable and customize a profile.
Selecting a Profile
1. In the standby mode, press (Menu) and select Phone Settings > Profiles.
2. Press /
to select General or Outdoor.
3. Press to enable it.
Editing a Profile
1. In the standby mode, press (Menu) and select Phone Settings > Profiles.
2. Press /
to scroll profiles: General and Outdoor.
3. Press (Select) and select Edit.
You can set the following options:
y Call Ring: Select a ringtone for incoming calls. Ten ringtones are available.
y Message Ring: Select a message tone. Ten message tones are available.
y Key Tone: Select On/Off to enable/disable the keypad tone.
y Ring Volume: Adjust the volume of rings.
Auto Dialing
When you enable the auto dial function, an entered phone number is dialed automatically.
1. Press (Menu) and select Phone Settings > Auto Dial.
2. Select one of the following options: Off, After 3 Seconds, After 4 Seconds, After 5
Seconds, After 6 Seconds, After 7 Seconds, After 8 Seconds, or After 9 Seconds.
25
Time & Date
You can set the current time and date.
1. Press (Menu) and select Phone Settings > Time & Date.
2. Press /
to select Date or Time.
3. Press (Select) or , and set the time or date.
4. Press (OK) to save the settings.
Languages
You can set the displayed language.
1. Press (Menu) and select Phone Settings > Languages.
2. Press /
to select the desired language.
3. Press (Select) or to save the settings.
Network Service
You can set network-related functions, such as Call Waiting, Call Forward, Call Barring
or Network Select.
All the services are network dependent. Consult your network provider for details.
Security
The Personal Identification Number (PIN) code protects the SIM card from unauthorized
use. The PIN Unblocking Key (PUK) code can unblock the PIN code. The PIN and PUK
codes are provided with your SIM card. For details, consult your service provider.
Note:
y If you enter wrong PIN codes for three consecutive times, the FWT prompts
you to enter the correct PUK code.
y If you enter wrong PUK codes for several times, consult your service provider
for the correct PUK code.
y If you enter wrong PUK codes for ten consecutive times, the SIM card is
invalidated. Contact your service provider for a new card.
26
Setting the PIN Lock
If the PIN code is activated, you have to enter the PIN code every time you power on the
FWT. Enter the correct PIN code and press (OK).
To set the PIN code, do as follows:
1. Press (Menu) and select Phone Settings > Security > PIN.
2. Enter the PIN code.
3. Select On or Off to activate or deactivate the PIN lock.
Changing the PIN Code
When the FWT works normally and the PIN lock is activated, you can change the PIN
code.
1. Press (Menu) and select Phone Settings > Security > Change PIN Pwd.
2. Enter the PIN code.
3. Then enter the new PIN lock code and PUK code, and press (OK) to save it.
Caution:
Keep your password in an appropriate place. Do not lose your password or
disclose it to others.
Version
You can press (Menu) and select Phone Settings > Version to check the software
version.
27
10 Applications
Alarm Clock
If the alarm clock is activated, the FWT rings at the preset time when it is powered on. You
can set up to three alarm clocks.
1. Press (Menu) and select Applications > Alarm.
2. Press /
to scroll the alarm clocks.
3. Press (Select) to select an alarm clock.
4. Press /
to set state, time and period of the alarm clock.
5. Press
to save the settings.
Calculator
You can do simple arithmetic with the calculator. Press the navigation keys up, down, left,
and right to select the following operations: add, subtract, multiply and divide.
The calculator supports fractional arithmetic. You can press to enter a decimal
point.

28
11 Maintenance and
Troubleshooting
Maintenance
1. Place the FWT in a clean and dry environment. The temperature of the place should be
between –10°C and 55°C.
2. If the FWT is covered with dust, clean it with fine and clean cloth. Do not clean it with
cleanser or other chemical solvents.
3. If the FWT does not operate normally due to a battery failure, replace the battery in
time or use the power adapter to power the FWT.
4. If the FWT does not work normally, contact your service provider.
Troubleshooting
The screen does not turn on after the FWT is powered on (the FWT is
not connected to the power adapter).
1. Make sure that the battery is installed.
2. The battery level is low. Connect the FWT to the power adapter.
The screen does not turn on after the FWT is powered on (the FWT is
connected to the power adapter).
1. The output voltage of the power adapter does not meet the requirement of the FWT.
Check whether the AC input is normal and the power adapter is the approved one.
2. The external voltage of the power adapter is low or unstable, which disrupts the normal
functioning of the FWT. Check whether the external voltage of the power adapter is
normal. You can also install the battery in the FWT.
The signal icon does not appear on the screen.
1. Make sure that the antenna is installed properly.
2. If the problem persists, contact your service provider to check whether the FWT is in
the signal coverage area.
29
Time is not displayed.
1. Make sure that the antenna is installed properly.
2. Adjust the antenna direction or move the FWT to a place covered with strong signals.
3. If the problem persists, contact your service provider to check whether the FWT is in
the signal coverage area.
After the FWT is powered off, sometimes there is no display;
sometimes the power supply icon and blinking battery icon are
displayed.
After the FWT is powered off, it is normal when no display is on the screen The power
supply icon and blinking battery icon indicate that the battery is being charged.
There is a ringtone after the busy tone.
It indicates that there is an incoming call. If you are not in a conversation, you can answer
the call.
After you lift the handset, there is a ringtone when you are to dial or
are dialing a phone number.
It indicates that there is an incoming call. If you are not in a conversation, you can answer
the call.
Only the battery icon is displayed on the screen.
It indicates that the FWT is powered by the battery. If the FWT is powered solely by the
battery and the battery icon is blinking without any bar inside, it indicates that the battery
level is low. Use the power adapter to charge the battery or replace the battery.
Version: V100R001_01 Part Number: 3101****