Huawei Technologies G6151A GSM Mobile Phone User Manual G6151 User Guide
Huawei Technologies Co.,Ltd GSM Mobile Phone G6151 User Guide
(G6151) User Guide

G6151
GSM Mobile Phone
User Guide

Copyright © Huawei Technologies Co., Ltd. 2011. All
rights reserved.
No part of this document may be reproduced or transmitted in
any form or by any means without prior written consent of
Huawei Technologies Co., Ltd.
The product described in this manual may include copyrighted
software of Huawei Technologies Co., Ltd. and possible
licensors. Customers shall not in any manner reproduce,
distribute, modify, decompile, disassemble, decrypt, extract,
reverse engineer, lease, assign, or sublicense the said software,
unless such restrictions are prohibited by applicable laws or
such actions are approved by respective copyright holders
under licenses.
Trademarks and Permissions
, HUAWEI, and are trademarks or registered
trademarks of Huawei Technologies Co., Ltd.
Other trademarks, products, services, and company names
mentioned are the property of their respective owners.
Notice
Some features of the product and its accessories described
herein rely on the software installed, capacities and settings of
the local network, and may not be activated or may be limited
by local network operators or network service providers. Thus,
the descriptions herein may not exactly match the product or
its accessories you purchase.
Huawei Technologies Co., Ltd. reserves the right to change or
modify any information or specifications contained in this
manual without prior notice or obligation.
NO WARRANTY
THE CONTENTS OF THIS MANUAL ARE PROVIDED “AS IS”.
EXCEPT AS REQUIRED BY APPLICABLE LAWS, NO WARRANTIES
OF ANY KIND, EITHER EXPRESS OR IMPLIED, INCLUDING BUT
NOT LIMITED TO, THE IMPLIED WARRANTIES OF
MERCHANTABILITY AND FITNESS FOR A PARTICULAR PURPOSE,
ARE MADE IN RELATION TO THE ACCURACY, RELIABILITY OR
CONTENTS OF THIS MANUAL.
TO THE MAXIMUM EXTENT PERMITTED BY APPLICABLE LAW,
IN NO CASE SHALL HUAWEI TECHNOLOGIES CO., LTD BE
LIABLE FOR ANY SPECIAL, INCIDENTAL, INDIRECT, OR
CONSEQUENTIAL DAMAGES, OR LOST PROFITS, BUSINESS,
REVENUE, DATA, GOODWILL OR ANTICIPATED SAVINGS.
Import and Export Regulations
Customers shall comply with all applicable export or import laws and regulations
and will obtain all necessary governmental permits and licenses in order to export,
re-export or import the product mentioned in this manual including the software
and technical data therein.
1
Contents
1 Getting to Know Your Phone ................................................1
Your Phone ........................................................................................... 1
Keys and Functions ........................................................................... 2
Screen Icons......................................................................................... 4
2 Getting Started .......................................................................6
Installing the SIM Card and the Battery................................... 6
Removing the Battery and the SIM Card................................. 6
Installing a microSD Card............................................................... 7
Charging the Battery........................................................................ 7
Working with the Main Menu ...................................................... 8
Automatically Switching Between Profiles.............................. 8
Phone Lock ........................................................................................... 9
Mass Storage ....................................................................................... 9
PIN and PUK ......................................................................................10
Locking the Keypad ........................................................................11
Other Applications ..........................................................................11
3 Voice Services ...................................................................... 12
Making a Call.....................................................................................12
Answering a Call...............................................................................12
4 Text Input ............................................................................. 13
Changing the Text Input Mode..................................................13
Entering a Letter in Traditional Input Mode.........................14
2
Entering a Word in Predictive Input Mode...........................14
Entering a Digit in Number Input Mode ...............................14
Using the FN Key .............................................................................15
Entering Symbols .............................................................................15
5 Messaging ............................................................................ 16
Writing and Sending a Text Message .....................................16
Writing and Sending a Multimedia Message......................16
6 Phonebook ........................................................................... 17
Creating a Contact ..........................................................................17
Searching for a Contact ................................................................17
Setting the Preferred Storage.....................................................18
Copying Contacts ............................................................................18
7 WiFi ....................................................................................... 19
8 Video Recorder .................................................................... 19
9 Video Player ......................................................................... 20
10 Sound Recorder ................................................................. 21
11 Ebook Reader..................................................................... 21
12 Camera................................................................................ 22
13 Audio Player....................................................................... 23
14 FM Radio ............................................................................ 24
15 Java Applications .............................................................. 25
16 Services............................................................................... 27
Network Settings .............................................................................27
Selecting a SIM card.......................................................................28
Connecting to a Network.............................................................28
3
17 Bluetooth............................................................................ 28
Connecting a Bluetooth Headset to Your Phone...............29
Transferring Data .............................................................................29
18 STK ...................................................................................... 30
19 Warnings and Precautions ............................................... 30
1
1 Getting to Know Your Phone
Your Phone
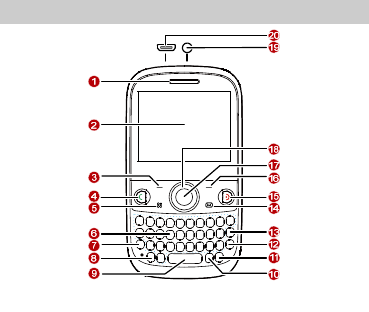
1 Earpiece 11 Input switch key
2 Screen 12 Enter key
3 Left soft key 13 Delete key
4 Call/Answer key 14 Message key
5 Menu key 15 End/Power key
6 Keypad 16 Right soft key
7 Fn key 17 Ok/Confirm key
2
8 A/a key 18 Navigation keys
9 Space key 19 Headset jack
10 sym key 20 Charger jack/Universal serial
bus (USB) port
The figure above shows the appearance of your phone
and is provided only for your reference.
Keys and Functions
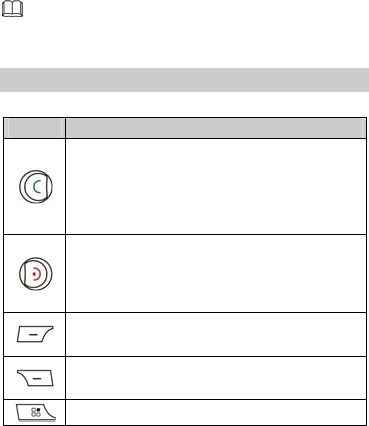
Press… To…
z Make a call from the SIM1 or SIM2 card in
standby mode.
z Answer an incoming call.
z View call logs of SIM1 and SIM2 cards in standby
mode.
z Power on or power off the phone (by pressing
and holding the key for about 3s).
z End or reject a call.
z Return to the standby mode.
Select the option displayed in the lower left corner
of the screen.
Select the option displayed in the lower right
corner of the screen.
Access the main menu in standby mode.
3
Press… To…
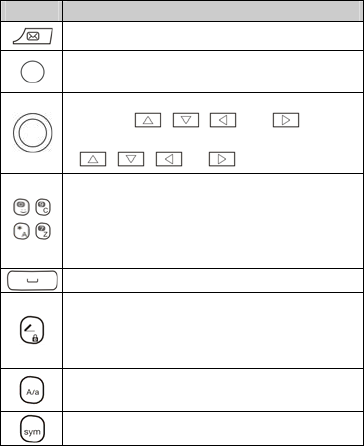
Access Messaging in standby mode.
z Access the dial screen in standby mode.
z Confirm a selection.
z Scroll to the desired icon in main menu (by
pressing , , , and ).
z Access the desired shortcut menu by pressing
, , , or in standby mode.
–
–
z Enter numbers, letters, and symbols.
z Call the voicemail in standby mode (by pressing
and holding the 1 key for about 3 seconds).
z Select a submenu (by pressing the
corresponding number key).
Enter a space in text editing mode.
z Lock the keypad in standby mode (by pressing
and holding the key for about 3s).
z Switch between input methods in text editing
mode.
Switch between the upper case and the lower case
in text editing mode.
Display the Select symbol list in text editing mode.
4
Screen Icons
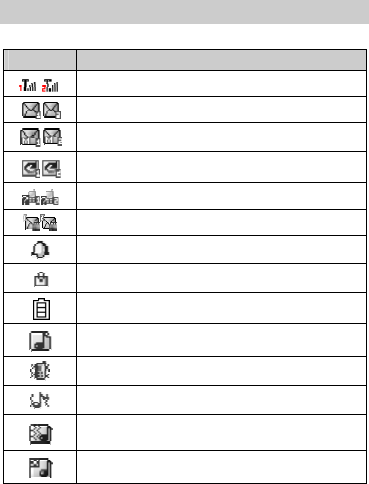
Icon Indicates…
Signal strength.
New text messages.
New multimedia messages.
Call forwarding enabled.
Missed calls.
New voicemail messages.
Enabled alarms.
Keypad locked.
Battery level.
The alert type is Ring only.
The alert type is Vib. Only.
The alert type is Vib. and ring.
The alert type is Vib. then ring.
Silent profile activated.

5
Icon Indicates…
Headset connected to the phone.
WiFi is connected.
6
2 Getting Started
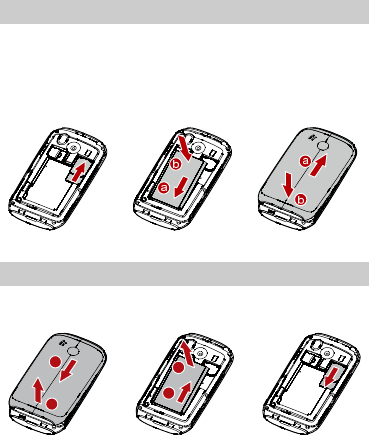
Installing the SIM Card and the Battery
You can install up to two subscriber identity module (SIM) cards
in the phone at the same time.
When installing a SIM card, ensure that the gold contact area
faces down, and that the beveled edge of the SIM card aligns
with that of the SIM card slot.
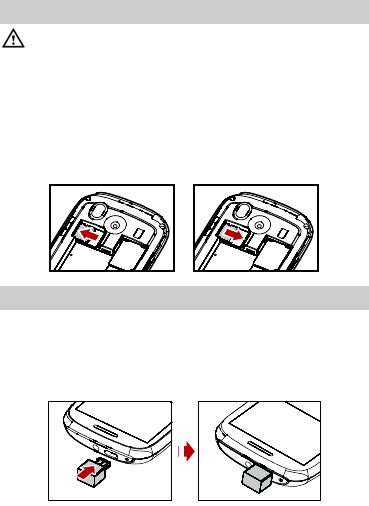
Removing the Battery and the SIM Card
Before removing the battery and the SIM cards, ensure that
your phone is powered off.
a
ba
b
7
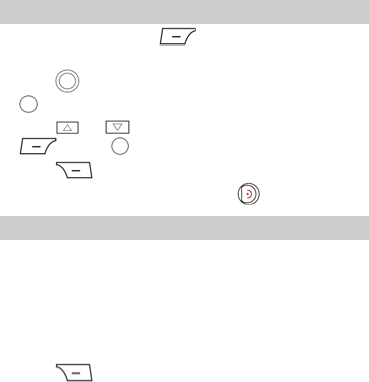
Installing a microSD Card
Before installing or removing a microSD card, power off
the phone. Once the phone is powered on, it will indicate
whether the microSD card has been installed properly.
You can install a microSD card to expand the memory capacity
of your phone. When inserting the microSD card, ensure that
the golden contact area on the microSD card is facing
downward.
Charging the Battery
To charge the battery, do the following:
1. Connect the smaller end of the USB cable to the charger jack
of the phone and the larger end to the charger.
2. Connect the charger to a power socket.
8
3. Wait until the battery is fully charged.
During the charging, the charging icon is displayed in
animation. When the charging icon becomes static, it
indicates that the battery is fully charged.
4. Disconnect the charger from the power socket and then
from the phone.
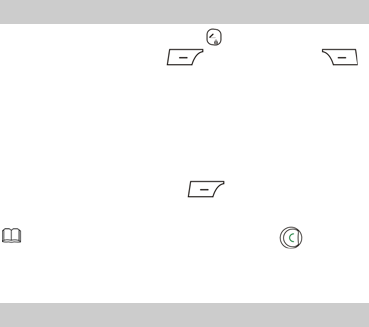
Working with the Main Menu
1. In standby mode, press (Menu) to access the main
menu.
2. Press to scroll to the desired submenu, and then press
to access the submenu.
3. Press or to scroll to an option, and then press
(OK) or to access the option.
4. Press (Back) to return to the previous menu.
To return to the standby mode, press .
Automatically Switching Between Profiles
You can set your phone to activate different profiles at different
times. The phone can automatically switch between profiles
according to your settings.
1. Select Menu > User profiles > Profile Switch Timing.
2. Select a clock.
3. Set the status, time, profile, and repetition days.
4. Press (Done) to save the settings.

9
Phone Lock
The phone lock protects your phone from unauthorized use. By
default, the phone lock is disabled. Once the phone lock is
enabled, you are required to enter the phone code each time
you power on the phone.
The phone code is set to 1234 by default. You can select Menu
> Settings > Security settings > Phone security > Change
password > to change the phone code to any numeric string of
4 to 8 digits.
Do remember your phone code.
If you forget the phone code, contact the service provider.
Mass Storage
When the phone is connected to a personal computer (PC)
through a USB cable, options such as Mass storage are
displayed on the phone screen.
When you select Mass storage, you can manage the files
stored in the phone memory and on the microSD card.
The microSD card and the phone memory are displayed as
removable disks on the PC. You can perform the following
operations:
z Double-click a disk to open it.
z Copy, paste, or delete files on a disk.
z Disconnect the phone from the PC.

10
z Ensure that you connect and disconnect the USB cable
properly.
z Do not run the formatting command on the PC to
format the phone memory. Otherwise, the phone
memory may get permanently damaged.
z You can transfer data and charge the battery by
connecting the phone to the PC through the USB
cable.
PIN and PUK
The personal identification number (PIN) protects your SIM
card from unauthorized use. The PIN unblocking key (PUK)
unlocks the blocked PIN. Both the PIN and the PUK are
provided with the SIM card. For details, contact your service
provider.
SIM1 and SIM2 PINs are configured separately.
To enable the PIN lock, do the following:
1. Select Menu > Settings > Security settings > SIM1or
SIM2 security > PIN lock.
2. Enter the PIN, and then press (OK).
If you enter wrong PINs a specified number of times
consecutively, the phone prompts you to enter the PUK.
If you enter wrong PUKs a specified number of times
consecutively, the SIM card becomes permanently invalid. In
that case, contact your service provider for a new SIM card.
11
Locking the Keypad
To lock the keypad, press and hold in standby mode for 3s.
To unlock the keypad, press (Unlock) and then
(OK).
If the Auto keypad lock function is enabled and if the phone is
in standby mode for a preset period, the phone locks the
keypad automatically.
To enable the Auto keypad lock function, select Menu >
Settings > Security settings > Auto keypad lock, scroll to a
preset duration, and then press (OK) to select the
duration.
When the keypad is locked, you can press to
answer a call or make an emergency call.
Other Applications
z Calculator: to perform simple calculation.
z Stopwatch: to time a process.
z Ebook reader: to read the ebooks.
z Calendar: to view dates and set events.
z Tasks: to view and set tasks.
z Alarm: to set alarms.
z Fun&
Games: to play games.
z Java: to run Java applications.
12
3 Voice Services
Making a Call
1. In standby mode, enter the phone number.
z To make an international call, press to enter the plus
sign (+), and then enter the country or region code, area
code, and phone number in sequence.
z To call an extension, enter the phone number, press to
enter P, and then enter the extension number.
2. Press to dial the number.
3. Press to end the call.
z You can also make calls through call logs, contacts, and
messages.
z During a call, you can press or to adjust the
volume.
Answering a Call
When there is an incoming call, do the following:
z Press to answer the call.
z Press (Answer) to answer the call.
z Press to reject the call.
13
z Press (Silent) to mute the speaker, and then press
(Reject) to reject the call.
z Press (Silent) to mute the speaker, press
(Answer ) to answer the call.
If the Any key answer function is enabled, you can press any
key except and to answer a call.
4 Text Input
Changing the Text Input Mode
The indicator of the current text input mode is displayed in the
upper left corner of the screen. You can press to change
the text input mode.
Indicator Text Input Mode
abc Traditional input mode
eZi abc Predictive input mode
123 Number input mode
14
z Press (Clear) or to delete the character on
the left of the cursor. Press and hold (Clear) for
about 3s to clear all the characters.
z Press to enter a space.
z Press to move the cursor to the next line.
z Press to switch to the upper case or the lower case.
Entering a Letter in Traditional Input Mode
In traditional input mode, press the key labeled with the desired
letter.
Entering a Word in Predictive Input Mode
In predictive input mode, do the following to enter a word:
1. Press each key once according to the spelling sequence of
the desired word.
The phone displays the candidate words.
2. Press or to scroll left or right, and press
or to turn pages.
3. Press to enter desired word.
Entering a Digit in Number Input Mode
In "123" text input mode, press the number key labeled with the
desired digit.
15
Using the FN Key
Press and then press a key labeled with the number or
symbol to enter the corresponding number or symbol labeled
in the upper right part of the key.
Press twice consecutively, and then press keys labeled with
numbers or symbols to enter corresponding numbers or
symbols labeled in the upper right part of the keys
continuously.
Entering Symbols
1. Press to enter symbols.
2. Press to scroll to the desired symbol.
3. Press to enter the symbol.
In any text input mode, press , and then press the keys
labeled with the commonly used symbols to enter the
symbols.
16
5 Messaging
z You can contact your service provider for the availability
of the Multimedia Messaging Service (MMS) and the
method for subscribing to the service.
z Your phone supports a multimedia message of a
maximum size of 300 KB.
z Open multimedia messages with caution. Objects in
multimedia messages may contain viruses (such as
malicious software) that can damage your phone.
Writing and Sending a Text Message
1. Select Menu > Messaging > Write message > Tex t
message.
2. Edit the message.
3. Press to add the recipient(s).
You can enter the phone number of the recipient or add the
recipient through Phonebook.
4. Press , then select From SIM1 or From SIM2 to send
the message.
Writing and Sending a Multimedia
Message
1. Select Menu > Messaging > Write message > Multimedia
message.
2. Edit the message.

17
3. Press (Options) for the following options:
z Add subject: to add a subject to the message.
z Add picture: to add a picture to the message.
z Add sound: to add an audio clip to the message.
z Add video: to add a video clip to the message.
4. Press to add the recipient(s).
You can enter the phone number of the recipient or add the
recipient through Phonebook.
5. Press , then select From SIM1 or From SIM2 to send
the message.
6 Phonebook
Creating a Contact
1. Select Menu > Phonebook > Add new contact.
2. Select To SIM 1 , To SIM2, or To ph one for saving the
contact.
3. Edit the contact.
4. Press (Done) to save the contact.
Searching for a Contact
1. Select Menu > Phonebook.
2. Enter the first letter of the contact name.
3. Press or to scroll to the desired contact.

18
Setting the Preferred Storage
You can set the storage where you want to save new contacts.
1. Select Menu > Phonebook.
2. Press (Options), and then select Phonebook
settings > Preferred storage.
3. Scroll to SIM1, SIM2, Phone, or All as desired.
4. Press (OK) to select the preferred storage.
Copying Contacts
You can copy contacts to the phone, the SIM1 card, the SIM2
card, or a file.
Copying One Contact
1. Select Menu > Phonebook.
2. Press or to scroll to the desired contact.
3. Press (Options), and then select Copy.
4. Select To pho ne, To S IM1, To SIM2 , or To file to copy the
contact to the desired location.
Copying Multiple Contacts
1. Select Menu > Phonebook.
2. Press (Options), and then select Phonebook
settings > Copy contacts.
3. Press or to scroll to the desired option, such as
From phone, From SIM1 or From SIM2.
4. Press to mark the desired contacts.

19
5. Press (OK) to copy the marked contacts to the
desired location.
7 WiFi
To access WAP sites through WiFi, you don’t need to set your
data account and WAP parameters.
Select WiFi, press Options, You can do the following:
z Connect: to connect to the selected Wi-Fi.
z Add: to manually enter relevant parameters to add a new
wireless LAN network.
z Define access point: to view or edit the list of the wireless
LAN networks to which you selected.
z WLAN status: to view your phone’s MAC address.
z Disable WLAN: to turn off WiFi.
z Refresh: to search for available wireless LAN networks.
8 Video Recorder
To record a video clip, do the following:
1. Select Menu > Multimedia > Video recorder.
2. In video recording mode, do the following:
z Press to configure the relevant settings.
20
z Press to start recording or pause.
z Press or to adjust brightness.
z Press to zoom in or to zoom out.
z Press to stop recording and save the video clip as
prompted.
9 Video Player
The video player plays downloaded or recorded video clips that
are stored in the Videos folder in File manager of Phone or
Memory card.
To play a video clip, do the following:
1. Select Menu > Multimedia > Video player.
2. Press and to select a video clip.
3. Press to play the video clip.
When the video clip is being played, you can do the
following:
z Press or to adjust the volume.
z Press to rewind the video clip or to
fast-forward the video clip.
z Press to pause or continue.
4. Press to stop playing the video clip.

21
Files in .mp4 and .3gp formats are supported. Files in
other formats may fail to be played.
10 Sound Recorder
The sound recorder functions as a digital recorder.
To record an audio clip, do the following:
1. Select Menu > Multimedia > Sound recorder.
2. Press (Options), and then select New record to
record an audio clip.
During the recording, you can press (Pause or Cont.)
to pause or continue.
3. Press (Stop) to stop recording the audio clip, and
then save the recorded clip as prompted.
11 Ebook Reader
Your phone supports ebooks in .txt format.
1. Select Menu > Extra > Ebook reader to display the
bookshelf.
The phone automatically adds the ebooks stored in Ebook
in the phone memory or on the microSD card to the
bookshelf.
2. Scroll to the desired ebook.

22
3. Press (Options), and then select Open ebook to
start reading the ebook.
You can also press (Options), and then select Global
settings to configure settings such as Font size, scroll by,
Auto scroll, and Alignment.
4. Press (Back) to stop reading the ebook.
z When reading an ebook, you can press and
to turn pages.
z It is recommended that you store ebooks in Ebook in
the phone memory or on the microSD card. When you
open an ebook stored in a folder other than Ebook,
the phone automatically moves the ebook to Ebook
so that you can find it easily next time your want to
open it.
12 Camera
The phone is equipped with a built-in 3.0-megapixel
complementary metal-oxide-semiconductor (CMOS) camera.
1. Select Menu > Multimedia > Camera.
2. On the picture taking screen, do the following:
z Press to view pictures or configure relevant settings.
z Press or to adjust brightness.
z Press to zoom in or to zoom out.
23
z Press the 1, 2, 4, 6, and 7 keys to configure the
corresponding settings quickly.
z Press to switch to the simplified mode.
3. Focus the camera on the scene, and then press to take a
picture.
4. Press (Back) to save the picture; or press
(Options), and then select Delete to delete the picture.
13 Audio Player
The audio player plays audio clips that are stored in My music
in the phone memory or on the microSD card. It is
recommended that you listen to audio clips by using the
headset so that you can enjoy enhanced quality sound.
1. Select Menu > Multimedia > Audio player; or in standby
mode, press .
2. Press to start playing audio clips.
When audio clips are being played, you can do the
following:
z Press and to adjust the volume.
z Press and to switch between audio clips.
z Press the button on the headset cable to switch between
audio clips.
z Press (List) to view the audio clip list, and then press
(Options) to configure the relevant settings.
24
3. Press to pause or continue.
4. Press to stop playing audio clips.
14 FM Radio
The headset cable also functions as an antenna. To ensure
reception of radio programs, do not disconnect the headset
from the phone or bend the headset cable with strength.
1. Connect the headset to the phone.
2. Select Menu > Multimedia > FM radio.
When listening to the radio, you can do the following:
z Press to pause or continue.
z Press or to adjust the volume.
z Press or to adjust the frequency at a precision
of 0.1 MHz.
z Press and hold or , and then release the key to
switch to an adjacent channel.
z Press (Options), and then select Auto search to
search for and save channels.
z Press a number key to switch to the corresponding channel
based on Channel list.
z Press the button on the headset cable to switch between
channels.
z Press (Options), and then select Record to record a
radio program.

25
z Press (Options) to view or edit the channel list,
manually set a frequency, automatically search for and save
channels, and configure the relevant settings.
15 Java Applications
You can install third-party Java applications to expand the
capabilities of your phone.
z Not all Java applications are compatible with your
phone. If you have trouble in installing or running a
Java application, press to return to the standby
mode, and then remove the application from your
phone.
z Certain Java applications require network connections.
Therefore, ensure that the General Packet Radio
Service (GPRS) connection is properly set up.
Installing a Java Application
To install a Java application on your phone, do the following:
1. Select a Java installation file in .jar or .jad format from Phone
or Memory card, press (Options), and then select
Install to start the installation.
2. Press (Yes) to confirm the certification information.
3. Select Phone or Memory card to install the Java application.
When the installation is successful, the message “Installed” is
displayed.

26
Running a Java Application
To run a Java application, do the following:
1. Select Menu > Fun&
Games > Java.
2. Select a Java application, and then press (Options).
3. Select Launch to run the Java application.
Deleting or Removing a Java Application
To delete or remove a Java application installed on your phone,
do the following:
1. Select Menu > Fun&
Games > Java.
2. Select a Java application, and then press (Options).
3. Select Delete to delete the application.
4. Press (Yes) to confirm the certification information.
When the Java application is deleted, the message “Deleted”
is displayed.

27
16 Services
You can access Wireless Application Protocol (WAP) sites and
use WAP-based services on your phone. To access WAP sites on
your phone, you need to subscribe to the corresponding
service from your service provider and set the relevant
parameters on your phone.
For details about the service and the charges, contact your
service provider.
Network Settings
To access WAP sites on your phone, you need to set your data
account and WAP parameters first.
Setting the Connection Profile
1. Select Menu > Settings > Connectivity > Data account.
2. Press (Options), and then select Add PS account.
3. Set the parameters based on the information provided by
your service provider.
4. Press (OK) to save the settings.
If the data account provided by your service provider
already exists, you do not need to create a data account.
Setting the WAP profile
1. Select Menu > Services > Internet service > Settings >
Data account.
2. Select your service provider, press (OK) to activate it.

28
Selecting a SIM card
Only one SIM card can be used to connect to the Internet at a
time.
To select a SIM card, do the following:
1. Select Menu > Services > Internet service > Settings >
Select profile.
2. Scroll to SIM1, SIM2, WLAN, or Always ask as desired.
3. Press (OK) to select the SIM card.
Connecting to a Network
1. Press Menu > Services > Internet service > Input address.
2. Enter a Uniform Resource Locator (URL) address.
3. Press (Options), and then select Go to to access the
address.
17 Bluetooth
By using the Bluetooth function, you can exchange data with
other Bluetooth devices, and connect a Bluetooth headset to
your phone.
You can turn on the Bluetooth function by configuring
Bluetooth settings.

29
Connecting a Bluetooth Headset to Your
Phone
1. Select Menu > Settings > Connectivity > Bluetooth >
Power > On to turn on the Bluetooth function.
2. Select Search audio device to search for available Bluetooth
headsets.
3. Scroll to the desired Bluetooth headset, and then press
(Pair).
4. Enter the password for pairing the Bluetooth headset with
your phone.
When the Bluetooth headset is connected to your phone, the
headset icon is displayed on the standby screen, indicating that
you can use the headset.
No Bluetooth headset is included in the product
package. If you want to use a Bluetooth headset, you
need to purchase it individually.
Transferring Data
1. Select Menu > Settings > Connectivity > Bluetooth >
Power > On to turn on the Bluetooth function.
2. Select My device > Search new device to search for
available Bluetooth devices.
3. Scroll to the desired Bluetooth device, and then press
(Pair).
When the Bluetooth device is connected to your phone for
30
the first time, you need to enter the password for pairing the
device with your phone.
4. Exchange data between your phone and the Bluetooth
device.
18 STK
The SIM Tool Kit (STK) function is a value-added service
provided by your service provider, and you can use it to send
text messages, view news, and use other applications. For more
information, contact your network operator.
19 Warnings and Precautions
This section contains important information pertaining to the
operating instructions of your device. It also contains
information about how to use the device safely. Read this
information carefully before using your device.
Electronic Device
Power off your device if using the device is prohibited. Do not
use the device when using the device causes danger or
interference with electronic devices.
Medical Device
z Follow rules and regulations set forth by hospitals and
health care facilities. Do not use your device when using the
device is prohibited.
31
z Pacemaker manufacturers recommend that a minimum
distance of 15 cm be maintained between a device and a
pacemaker to prevent potential interference with the
pacemaker. If you are using a pacemaker, use the device on
the opposite side of the pacemaker and do not carry the
device in your front pocket.
Potentially Explosive Atmosphere
Power off your device in any area with a potentially explosive
atmosphere, and comply with all signs and instructions. Areas
that may have potentially explosive atmospheres include the
areas where you would normally be advised to turn off your
vehicle engine. Triggering of sparks in such areas could cause
an explosion or a fire, resulting in bodily injuries or even deaths.
Do not power on your device at refueling points such as service
stations. Comply with restrictions on the use of radio
equipment in fuel depots, storage, and distribution areas, and
chemical plants. In addition, adhere to restrictions in areas
where blasting operations are in progress. Before using the
device, watch out for areas that have potentially explosive
atmospheres that are often, but not always, clearly marked.
Such locations include areas below the deck on boats, chemical
transfer or storage facilities, and areas where the air contains
chemicals or particles such as grain, dust, or metal powders.
Ask the manufacturers of vehicles using liquefied petroleum
gas (such as propane or butane) whether this device can be
safely used in their vicinity.
32
Traffic Security
Observe local laws and regulations while using the device. In
addition, if using the device while driving a vehicle, comply with
the following guidelines:
z Concentrate on driving. Your first responsibility is to drive
safely.
z Do not talk on the device while driving. Use hands-free
accessories.
z When you have to make or answer a call, park the vehicle at
the road side before using your device.
z RF signals may affect electronic systems of motor vehicles.
For more information, consult the vehicle manufacturer.
z In a motor vehicle, do not place the device over the air bag
or in the air bag deployment area. Otherwise, the device
may hurt you owing to the strong force when the air bag
inflates.
z Do not use your device while flying in an aircraft. Power off
your device before boarding an aircraft. Using wireless
devices in an aircraft may cause danger to the operation of
the aircraft and disrupt the wireless telephone network. It
may also be considered illegal.
Operating Environment
z Do not use or charge the device in dusty, damp, and dirty
places or places with magnetic fields. Otherwise, it may
result in a malfunction of the circuit.
z The device complies with the RF specifications when the
device is used near your ear or at a distance of 1.5 cm from
your body. Ensure that the device accessories such as a
33
device case and a device holster are not composed of metal
components. Keep your device 1.5 cm away from your body
to meet the requirement earlier mentioned.
z On a stormy day with thunder, do not use your device when
it is being charged, to prevent any danger caused by
lightning.
z When you are on a call, do not touch the antenna. Touching
the antenna affects the call quality and results in increase in
power consumption. As a result, the talk time and the
standby time are reduced.
z While using the device, observe the local laws and
regulations, and respect others' privacy and legal rights.
z Keep the ambient temperature between 0°C and 40°C while
the device is being charged. Keep the ambient temperature
between 0°C to 40°C for using the device powered by a
battery.
Prevention of Hearing Damage
Using a headset at high volume can damage your hearing. To
reduce the risk of damage to hearing, lower the headset
volume to a safe and comfortable level.
Safety of Children
Comply with all precautions with regard to children's safety.
Letting the child play with your device or its accessories, which
may include parts that can be detached from the device, may
be dangerous, as it may present a choking hazard. Ensure that
small children are kept away from the device and accessories.
34
Accessories
Use the accessories delivered only by the manufacturer. Using
accessories of other manufacturers or vendors with this device
model may invalidate any approval or warranty applicable to
the device, result in the non-operation of the device, and cause
danger.
Battery and Charger
z Unplug the charger from the electrical plug and the device
when not in use.
z The battery can be charged and discharged hundreds of
times before it eventually wears out. When the standby time
and the talk time are shorter than the normal time, replace
the battery.
z Use the AC power supply defined in the specifications of the
charger. An improper power voltage may cause a fire or a
malfunction of the charger.
z Do not connect two poles of the battery with conductors,
such as metal materials, keys, or jewelries. Otherwise, the
battery may be short-circuited and may cause injuries and
burns on your body.
z Do not disassemble the battery or solder the battery poles.
Otherwise, it may lead to electrolyte leakage, overheating,
fire, or explosion.
z If battery electrolyte leaks out, ensure that the electrolyte
does not touch your skin and eyes. When the electrolyte
touches your skin or splashes into your eyes, wash your eyes
with clean water immediately and consult a doctor.
35
z If there is a case of battery deformation, color change, or
abnormal heating while you charge or store the battery,
remove the battery immediately and stop using it. Otherwise,
it may lead to battery leakage, overheating, explosion, or
fire.
z If the power cable is damaged (for example, the cord is
exposed or broken), or the plug loosens, stop using the
cable at once. Otherwise, it may lead to an electric shock, a
short circuit of the charger, or a fire.
z Do not dispose of batteries in fire as they may explode.
Batteries may also explode if damaged.
z Danger of explosion if battery is incorrectly replaced. Recycle
or dispose of used batteries according to the local
regulations or reference instruction supplied with your
device.
Cleaning and Maintenance
z The device, battery, and charger are not water-resistant.
Keep them dry. Protect the device, battery, and charger from
water or vapor. Do not touch the device or the charger with a
wet hand. Otherwise, it may lead to a short circuit, a
malfunction of the device, and an electric shock to the user.
z Do not place your device, battery, and charger in places
where they can get damaged because of collision. Otherwise,
it may lead to battery leakage, device malfunction,
overheating, fire, or explosion.
z Do not place magnetic storage media such as magnetic
cards and floppy disks near the device. Radiation from the
device may erase the information stored on them.
36
z Do not leave your device, battery, and charger in a place
with an extreme high or low temperature. Otherwise, they
may not function properly and may lead to a fire or an
explosion. When the temperature is lower than 0°C,
performance of the battery is affected.
z Do not place sharp metal objects such as pins near the
earpiece. The earpiece may attract these objects and hurt
you when you are using the device.
z Before you clean or maintain the device, power off the
device and disconnect it from the charger.
z Do not use any chemical detergent, powder, or other
chemical agents (such as alcohol and benzene) to clean the
device and the charger. Otherwise, parts of the device may
be damaged or a fire can be caused. You can clean the
device and the charger with a piece of damp and soft
antistatic cloth.
z Do not dismantle the device or accessories. Otherwise, the
warranty on the device and accessories is invalid and the
manufacturer is not liable to pay for the damage.
Emergency Call
You can use your device for emergency calls in the service area.
The connection, however, cannot be guaranteed in all
conditions. You should not rely solely on the device for
essential communications.
Certification Information (SAR)
This device meets guidelines for exposure to radio waves.
Your device is a low-power radio transmitter and receiver. As
recommended by international guidelines, the device is
37
designed not to exceed the limits for exposure to radio waves.
These guidelines were developed by the independent scientific
organization International Commission on Non-Ionizing
Radiation Protection (ICNIRP) and include safety measures
designed to ensure safety for all users, regardless of age and
health.
The Specific Absorption Rate (SAR) is the unit of measurement
for the amount of radio frequency energy absorbed by the
body when using a device. The SAR value is determined at the
highest certified power level in laboratory conditions, but the
actual SAR level of the device when being operated can be well
below the value. This is because the device is designed to use
the minimum power required to reach the network.
The SAR limit adopted by USA and Canada is 1.6
watts/kilogram (W/kg) averaged over one gram of tissue. The
highest SAR value reported to the FCC and IC for this device
type when tested for use at the ear is 1.090 W/kg, and when
properly worn on the body is 1.090 W/kg.
The SAR limit also adopted by Europe is 2.0 W/kg averaged
over 10 grams of tissue. The highest SAR value for this device
type when tested at the ear is Z.ZZZ W/kg, and when properly
worn on the body is S.SSS W/kg.
FCC Statement
This equipment has been tested and found to comply with the
limits for a Class B digital device, pursuant to Part 15 of the FCC
Rules. These limits are designed to provide reasonable
protection against harmful interference in a residential
installation. This equipment generates, uses and can radiate
radio frequency energy and, if not installed and used in
38
accordance with the instructions, may cause harmful
interference to radio communications. However,there is no
guarantee that interference will not occur in a particular
installation.If this equipment does cause harmful interference
to radio or television reception,which can be determined by
turning the equipment off and on, the user is encouraged to try
to correct the interference by one or more of the following
measures:
z Reorient or relocate the receiving antenna.
z Increase the separation between the equipment and
receiver.
z Connect the equipment into an outlet on a circuit different
from that to which the receiver is connected.
z Consult the dealer or an experienced radio/TV technician for
help.
This device complies with Part 15 of the FCC Rules. Operation is
subject to the following two conditions: (1) this device may not
cause harmful interference, and (2) this device must accept any
interference received, including interference that may cause
undesired operation.
Warning: Changes or modifications made to this device not
expressly approved by Huawei Technologies Co., Ltd. may void
the FCC authorization to operate this device.
EU Regulatory Conformance
Hereby, Huawei Technologies Co., Ltd. declares that this device
is in compliance with the essential requirements and other
relevant provisions of Directive 1999/5/EC.
For the declaration of conformity, visit the Web site
www.huaweidevice.com/certification.

39
Notice: Observe the national local regulations in the location
where the device is to be used. This device may be restricted for
use in some or all member states of the European Union (EU).
Version: 01 NO.: