Huawei Technologies IPP8950 IP Phone User Manual 1
Huawei Technologies Co.,Ltd IP Phone 1
Contents
- 1. User Manual 1
- 2. User Manual 2
- 3. User Manual 3
- 4. User Manual 4
User Manual 1
eSpace 8950 IP Phone
V100R001C00
User Guide
Issue 01
Date 2014-06-30
HUAWEI TECHNOLOGIES CO., LTD.

Issue 01 (2014-06-30) Huawei Proprietary and Confidential
Copyright © Huawei Technologies Co., Ltd. i
Copyright © Huawei Technologies Co., Ltd. 2014. All rights reserved.
No part of this document may be reproduced or transmitted in any form or by any means without prior
written consent of Huawei Technologies Co., Ltd.
Trademarks and Permissions
and other Huawei trademarks are trademarks of Huawei Technologies Co., Ltd.
All other trademarks and trade names mentioned in this document are the property of their respective
holders.
Notice
The purchased products, services and features are stipulated by the contract made between Huawei and
the customer. All or part of the products, services and features described in this document may not be
within the purchase scope or the usage scope. Unless otherwise specified in the contract, all statements,
information, and recommendations in this document are provided "AS IS" without warranties, guarantees or
representations of any kind, either express or implied.
The information in this document is subject to change without notice. Every effort has been made in the
preparation of this document to ensure accuracy of the contents, but all statements, information, and
recommendations in this document do not constitute a warranty of any kind, express or implied.
Huawei Technologies Co., Ltd.
Address: Huawei Industrial Base
Bantian, Longgang
Shenzhen 518129
People's Republic of China
Website: http://enterprise.huawei.com
eSpace 8950 IP Phone
User Guide About This Document
Issue 01 (2014-06-30) Huawei Proprietary and Confidential
Copyright © Huawei Technologies Co., Ltd.
ii
About This Document
Overview
This document describes the eSpace 8950 IP phone (eSpace 8950 for short) features,
configurations, and usage.
Intended Audience
This document is intended for end users.
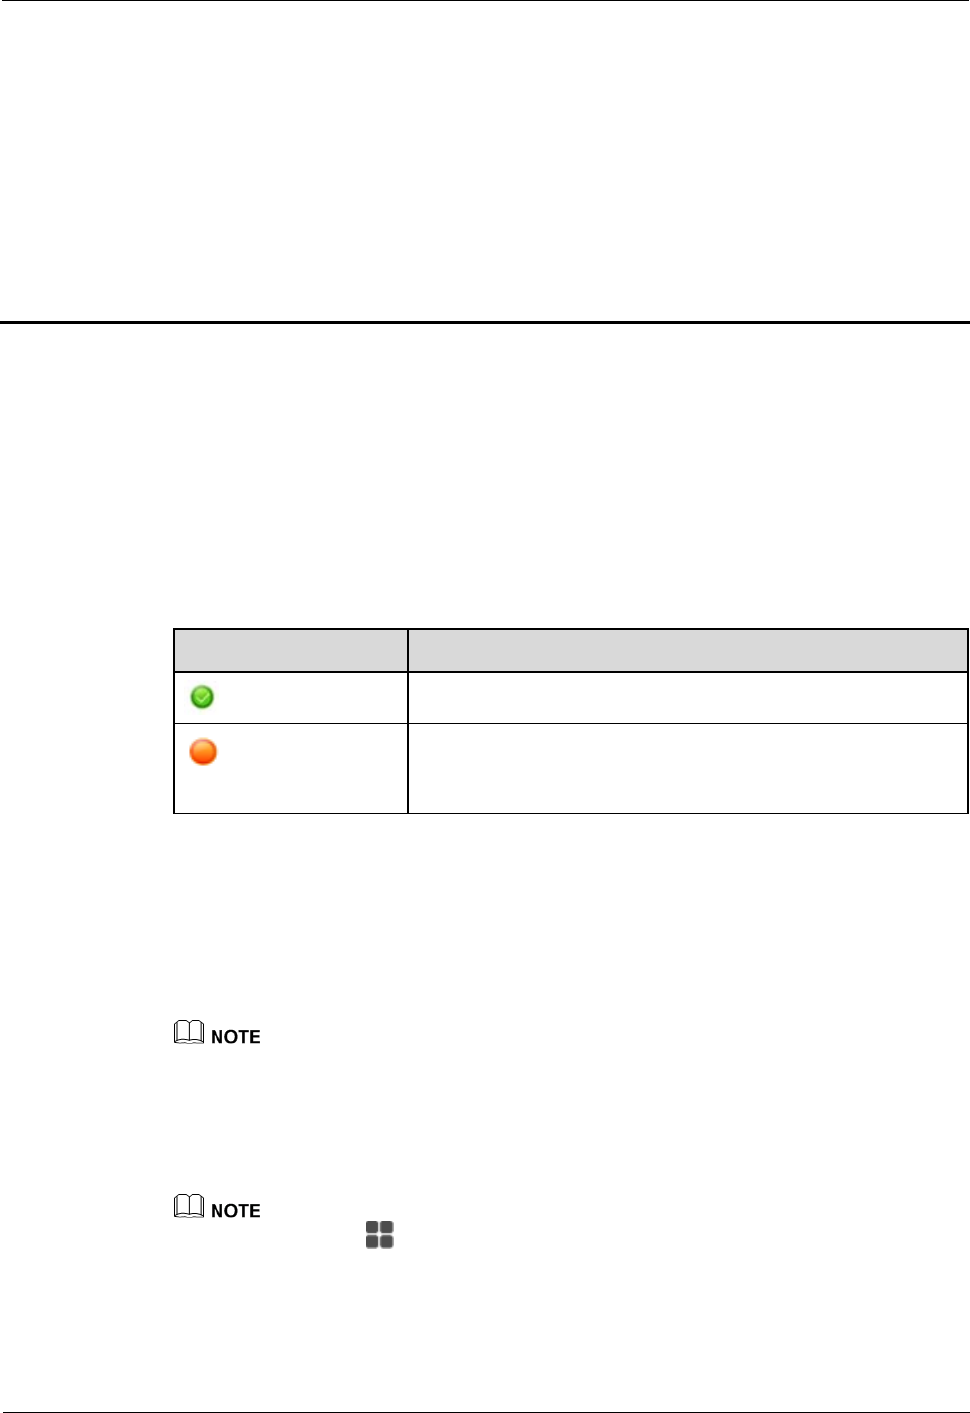
Symbol Conventions
The symbols that may be found in this document are defined as follows.
Symbol Description
Indicates an imminently hazardous situation which, if not
avoided, will result in death or serious injury.
Indicates a potentially hazardous situation which, if not
avoided, could result in death or serious injury.
Indicates a potentially hazardous situation which, if not
avoided, may result in minor or moderate injury.
Indicates a potentially hazardous situation which, if not
avoided, could result in equipment damage, data loss,
performance deterioration, or unanticipated results.
NOTICE is used to address practices not related to
personal injury.
Calls attention to important information, best practices
and tips.
NOTE is used to address information not related to
personal injury, equipment damage, and environment
deterioration.

eSpace 8950 IP Phone
User Guide About This Document
Issue 01 (2014-06-30) Huawei Proprietary and Confidential
Copyright © Huawei Technologies Co., Ltd.
iii
Change History
Changes between document issues are cumulative. The latest document issue contains all the
changes made in earlier issues.
Issue 01 (2014-06-30)
This issue is used for first office application (FOA).

eSpace 8950 IP Phone
User Guide Contents
Issue 01 (2014-06-30) Huawei Proprietary and Confidential
Copyright © Huawei Technologies Co., Ltd.
iv
Contents
About This Document .................................................................................................................... ii
1 Getting Started............................................................................................................................... 1
1.1 Knowing Your eSpace 8950 .......................................................................................................................................... 1
1.1.1 Appearance ................................................................................................................................................................ 1
1.1.2 LEDs .......................................................................................................................................................................... 2
1.1.3 (Optional) Camera ..................................................................................................................................................... 2
1.2 Touchscreen Experience ............................................................................................................................................... 4
1.3 Home Screen ................................................................................................................................................................. 8
1.4 Status Icons ................................................................................................................................................................. 10
1.5 Network ...................................................................................................................................................................... 11
1.5.1 Wired Network......................................................................................................................................................... 11
1.5.2 Wi-Fi ........................................................................................................................................................................ 11
1.6 Language and Input .................................................................................................................................................... 13
1.6.1 Language and Input ................................................................................................................................................. 13
1.7 Date and Time ............................................................................................................................................................. 13
1.8 Locking and Unlocking the Phone Screen .................................................................................................................. 14
1.9 Help ............................................................................................................................................................................ 15
1.10 Power Supply ............................................................................................................................................................ 15
1.11 Power-off and Restart ............................................................................................................................................... 15
1.12 Energy Conservation ................................................................................................................................................. 15
1.13 Maintenance .............................................................................................................................................................. 16
2 Login .............................................................................................................................................. 17
3 Multi-line Support ...................................................................................................................... 18
4 Presence ......................................................................................................................................... 20
5 Video Control............................................................................................................................... 23
6 Call ................................................................................................................................................. 24
6.1 Answering Calls .......................................................................................................................................................... 24
6.1.1 Answering Incoming Calls ....................................................................................................................................... 24
6.1.2 Auto-answering Calls ............................................................................................................................................... 25
6.1.3 Call Divert ............................................................................................................................................................... 25

eSpace 8950 IP Phone
User Guide Contents
Issue 01 (2014-06-30) Huawei Proprietary and Confidential
Copyright © Huawei Technologies Co., Ltd.
v
6.1.4 One Button to Voicemail .......................................................................................................................................... 26
6.1.5 Ignoring Calls .......................................................................................................................................................... 26
6.1.6 Rejecting Calls ......................................................................................................................................................... 26
6.2 Placing Calls ............................................................................................................................................................... 26
6.2.1 Placing Calls by Directly Entering Numbers ........................................................................................................... 26
6.2.2 Placing Calls Using the Speed Dial Widget ............................................................................................................. 27
6.2.3 Placing Calls Using Contacts ................................................................................................................................... 27
6.2.4 Placing Calls Using the Call History ....................................................................................................................... 27
6.2.5 Placing Calls Using the Corporate Directory ........................................................................................................... 27
6.2.6 Placing Calls Using the Linked eSpace Desktop ..................................................................................................... 28
6.2.7 Placing Emergency Calls ......................................................................................................................................... 28
6.2.8 Abbreviated Dialing ................................................................................................................................................. 28
6.3 Performing Operations During a Call ......................................................................................................................... 29
6.3.1 Viewing a Contact's Name, Department, and Profile Picture .................................................................................. 29
6.3.2 Muting Calls ............................................................................................................................................................ 29
6.3.3 Switching Between the Handset, Speaker, and Headset .......................................................................................... 30
6.3.4 Performing Video-Related Operations During a Call .............................................................................................. 30
6.3.5 Two-Stage Dialing ................................................................................................................................................... 31
6.3.6 Initiating Another Call While on a Call ................................................................................................................... 31
7 Audio Source ................................................................................................................................ 32
8 Call Waiting ................................................................................................................................. 33
9 Call Hold ....................................................................................................................................... 35
10 Call Transfer .............................................................................................................................. 36
11 Call Forward ............................................................................................................................... 38
12 Bluetooth Context-Awareness ................................................................................................ 40
13 DND ............................................................................................................................................. 41
14 Advanced Secretary .................................................................................................................. 43
15 Intercom ...................................................................................................................................... 46
16 Distinctive Ring......................................................................................................................... 49
17 Auto Callback (for IMS+UC) .................................................................................................. 50
18 Linkage ........................................................................................................................................ 51
19 Mobile Connect (for IMS+UC) ............................................................................................... 54
20 Extension Mobility ................................................................................................................... 55
21 Contacts ....................................................................................................................................... 56
21.1 My Contacts .............................................................................................................................................................. 56
21.1.1 Adding Contacts ..................................................................................................................................................... 56

eSpace 8950 IP Phone
User Guide Contents
Issue 01 (2014-06-30) Huawei Proprietary and Confidential
Copyright © Huawei Technologies Co., Ltd.
vi
21.1.2 Searching for Contacts ........................................................................................................................................... 57
21.1.3 Viewing Contact Details ........................................................................................................................................ 57
21.1.4 Editing Contacts ..................................................................................................................................................... 58
21.1.5 Deleting Contacts ................................................................................................................................................... 58
21.1.6 Exporting Contacts ................................................................................................................................................ 58
21.1.7 Importing Contacts ................................................................................................................................................ 59
21.1.8 Clearing Contacts ................................................................................................................................................... 59
21.2 Groups ...................................................................................................................................................................... 60
21.2.1 Adding Groups and Members ................................................................................................................................ 60
21.2.2 Editing Groups ....................................................................................................................................................... 60
21.2.3 Deleting Groups ..................................................................................................................................................... 61
21.3 Corporate Directory .................................................................................................................................................. 61
21.3.1 Searching for Contacts ........................................................................................................................................... 61
21.3.2 Adding Contacts in the Corporate Directory to My Contacts ................................................................................ 62
22 Call History ................................................................................................................................ 63
22.1 Viewing Call Records ............................................................................................................................................... 63
22.2 Viewing Call Details ................................................................................................................................................. 63
22.3 Deleting Call Records ............................................................................................................................................... 64
22.4 Clearing Call Records ............................................................................................................................................... 64
22.5 Adding an Unknown Number to Contacts ................................................................................................................ 64
23 Voicemail .................................................................................................................................... 65
24 Conferences ................................................................................................................................ 68
24.1 Local Conferences .................................................................................................................................................... 68
24.2 Instant Conferences (for IMS+UC) .......................................................................................................................... 70
24.3 Group Conferences (for IMS+UC) ........................................................................................................................... 72
24.4 Conference Notification ............................................................................................................................................ 73
24.5 Conference List ......................................................................................................................................................... 74
25 Applications ............................................................................................................................... 75
25.1 Call Widgets ............................................................................................................................................................. 75
25.1.1 Call Forward .......................................................................................................................................................... 75
25.1.2 Speed Dial .............................................................................................................................................................. 75
25.1.3 Quick Setting ......................................................................................................................................................... 76
25.2 Applications .............................................................................................................................................................. 77
25.2.1 Email ...................................................................................................................................................................... 77
25.2.2 Calculator ............................................................................................................................................................... 79
25.2.3 Browser .................................................................................................................................................................. 79
25.2.4 Calendar ................................................................................................................................................................. 80
25.2.5 Clock ...................................................................................................................................................................... 81
25.2.5.1 Alarm .................................................................................................................................................................. 82
25.2.5.2 Clock ................................................................................................................................................................... 83

eSpace 8950 IP Phone
User Guide Contents
Issue 01 (2014-06-30) Huawei Proprietary and Confidential
Copyright © Huawei Technologies Co., Ltd.
vii
25.2.5.3 Timer ................................................................................................................................................................... 83
25.2.5.4 Stopwatch ........................................................................................................................................................... 83
25.2.6 Search .................................................................................................................................................................... 84
25.2.7 Gallery ................................................................................................................................................................... 84
25.2.8 Download ............................................................................................................................................................... 86
25.3 Widgets ..................................................................................................................................................................... 86
26 Settings ........................................................................................................................................ 87
26.1 Wireless and Network Settings ................................................................................................................................. 87
26.1.1 Ethernet .................................................................................................................................................................. 87
26.1.2 Wi-Fi ...................................................................................................................................................................... 87
26.1.3 Bluetooth ............................................................................................................................................................... 89
26.2 Device Settings ......................................................................................................................................................... 90
26.2.1 Sound ..................................................................................................................................................................... 90
26.2.2 Display ................................................................................................................................................................... 91
26.2.3 Camera ................................................................................................................................................................... 92
26.2.4 Storage ................................................................................................................................................................... 92
26.2.5 Applications ........................................................................................................................................................... 92
26.3 Personal Settings ....................................................................................................................................................... 93
26.3.1 Account .................................................................................................................................................................. 93
26.3.2 Call Service ............................................................................................................................................................ 93
26.3.3 Security .................................................................................................................................................................. 94
26.3.4 Language and Input ............................................................................................................................................... 94
26.3.5 Backup and Reset .................................................................................................................................................. 95
26.4 System Settings ......................................................................................................................................................... 95
26.4.1 Date and Time ........................................................................................................................................................ 95
26.4.2 Accessibility ........................................................................................................................................................... 96
26.4.3 Developer Options ................................................................................................................................................. 96
26.4.4 About Phone .......................................................................................................................................................... 97
26.5 Advanced Settings .................................................................................................................................................... 97
27 Safety Precautions ..................................................................................................................... 98
eSpace 8950 IP Phone
User Guide 1 Getting Started
Issue 01 (2014-06-30) Huawei Proprietary and Confidential
Copyright © Huawei Technologies Co., Ltd.
1
1 Getting Started
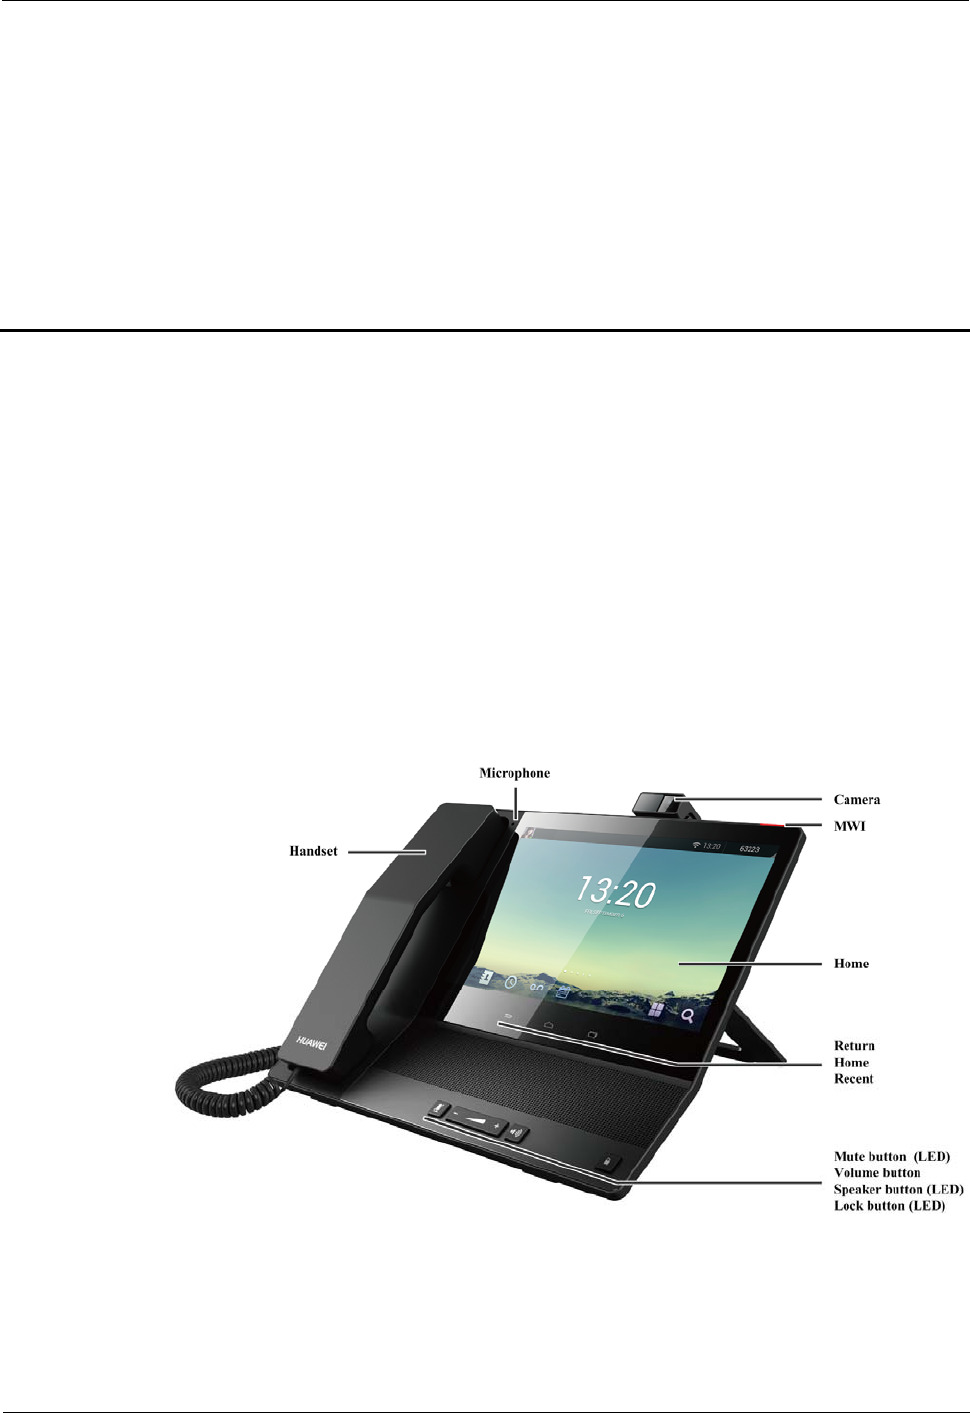
1.1 Knowing Your eSpace 8950
eSpace 8950 is an Android-based video phone that features a sleek, elegant design. With a
wide-viewing capacitive touchscreen, eSpace 8950 delivers an unmatched high-definition
(HD) video calling and conferencing experience. You can also access the Internet on eSpace
8950 to download and install the applications you want.
1.1.1 Appearance
1.1.2 LEDs
1.1.3 (Optional) Camera
1.1.1 Appearance
eSpace 8950 IP Phone
User Guide 1 Getting Started
Issue 01 (2014-06-30) Huawei Proprietary and Confidential
Copyright © Huawei Technologies Co., Ltd.
2
1.1.2 LEDs
Table 1-1 describes the LEDs on eSpace 8950. For details about the positions of these LEDs,
see the first picture in 1.1.1 Appearance.
Table 1-1 LEDs
LED Description
MWI LED Blinking red at 1s intervals: A call comes in.
Blinking red at 3s intervals: eSpace 8950 has unread
voice messages.
Mute LED Steady red: eSpace 8950 is muted.
Speaker LED Steady red: eSpace 8950 is dialing or engaged in a call in
speaker mode.
Lock LED Steady white: eSpace 8950 is locked.
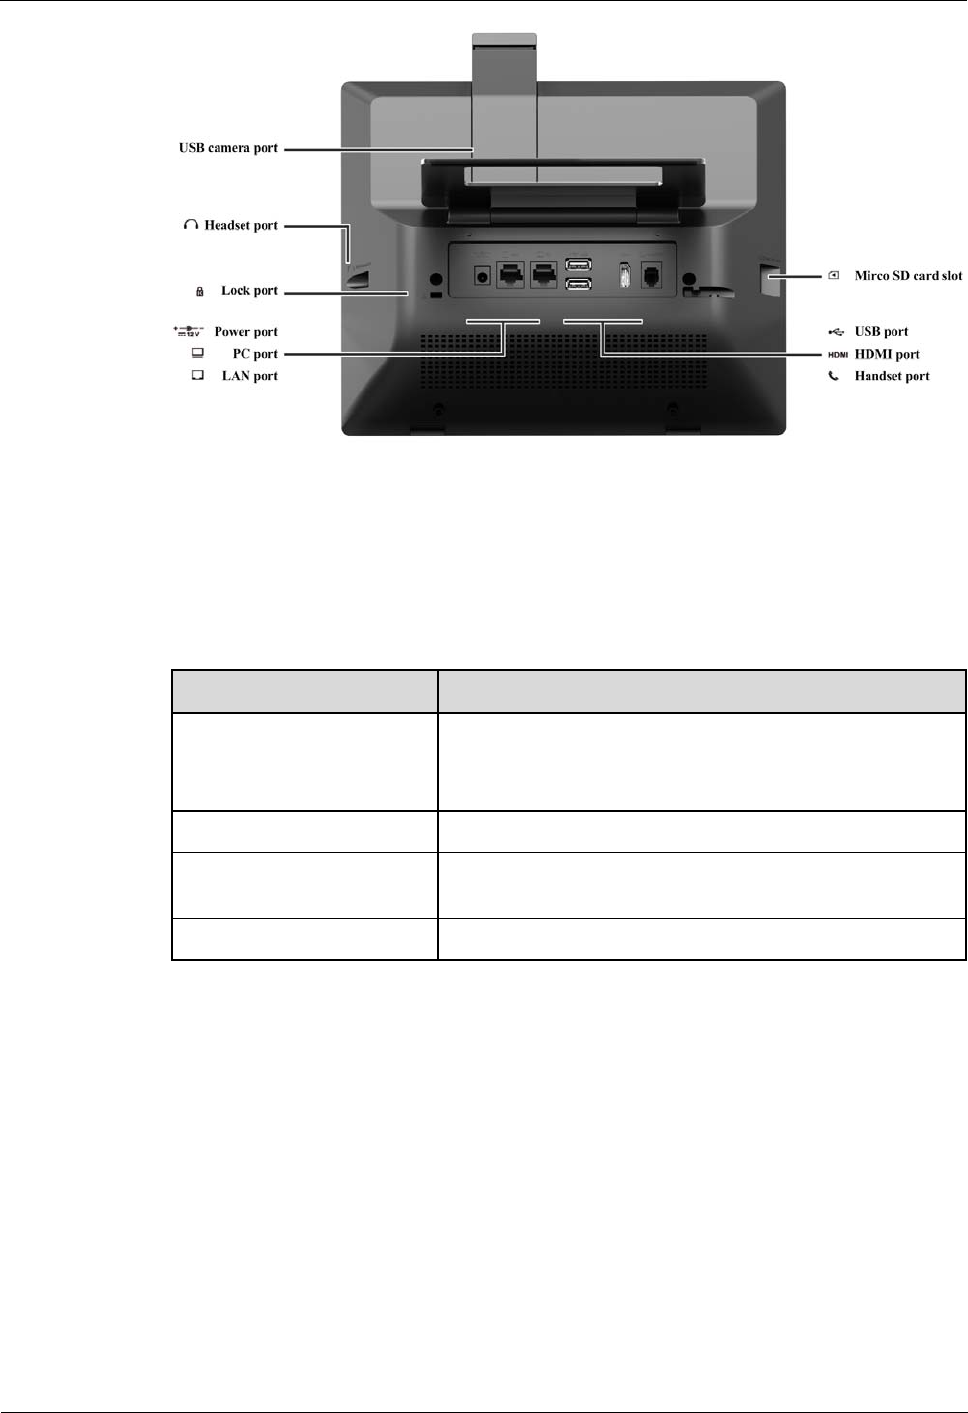
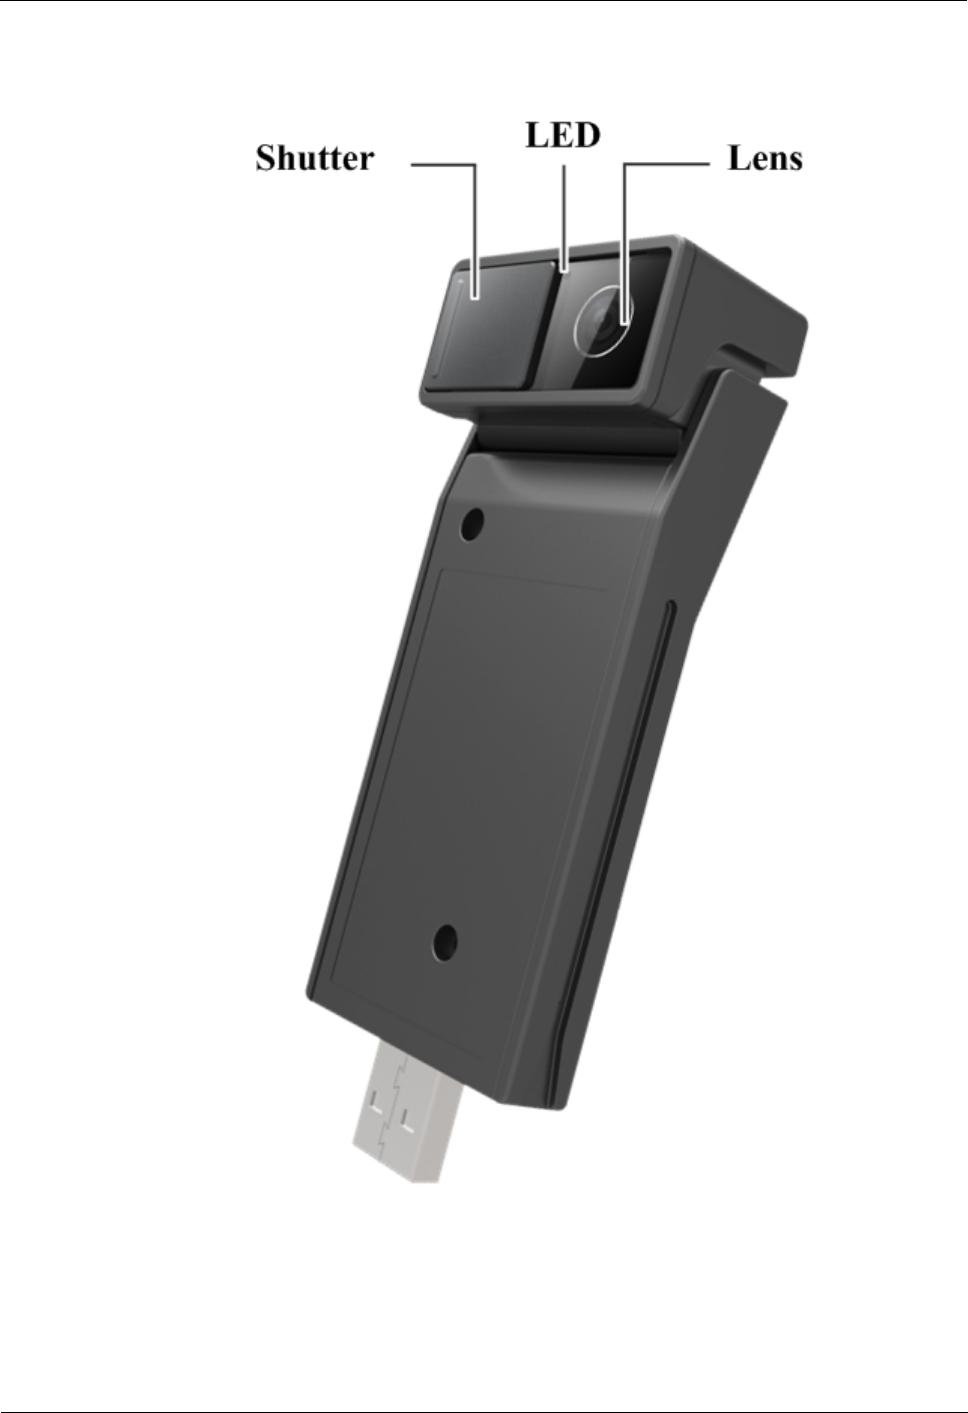
1.1.3 (Optional) Camera
eSpace 8950 can be equipped with a USB camera (which is optional) for you to access video
call or conference services.
Figure 1-1 illustrates the USB camera.
eSpace 8950 IP Phone
User Guide 1 Getting Started
Issue 01 (2014-06-30) Huawei Proprietary and Confidential
Copyright © Huawei Technologies Co., Ltd.
3
Figure 1-1 USB camera
Shutter: blocks the camera. Then, the local video window becomes black.
LED: indicates the camera status.
Lens: shoots video.
eSpace 8950 IP Phone
User Guide 1 Getting Started
Issue 01 (2014-06-30) Huawei Proprietary and Confidential
Copyright © Huawei Technologies Co., Ltd.
4
Installing Your USB Camera
Step 1 Take the camera out of the plastic bag.
Step 2 Remove the back cover of your phone and connect the camera to the USB camera port.
----End
Understanding the Camera LED
If the camera LED is steady red, the camera is being connected. The camera LED will be
off after the camera is successfully connected and initialized.
If the camera LED is steady blue, video is being shot.
Previewing Your Video
You can preview the video of yourself when eSpace 8950 is idle or engaged in a call.
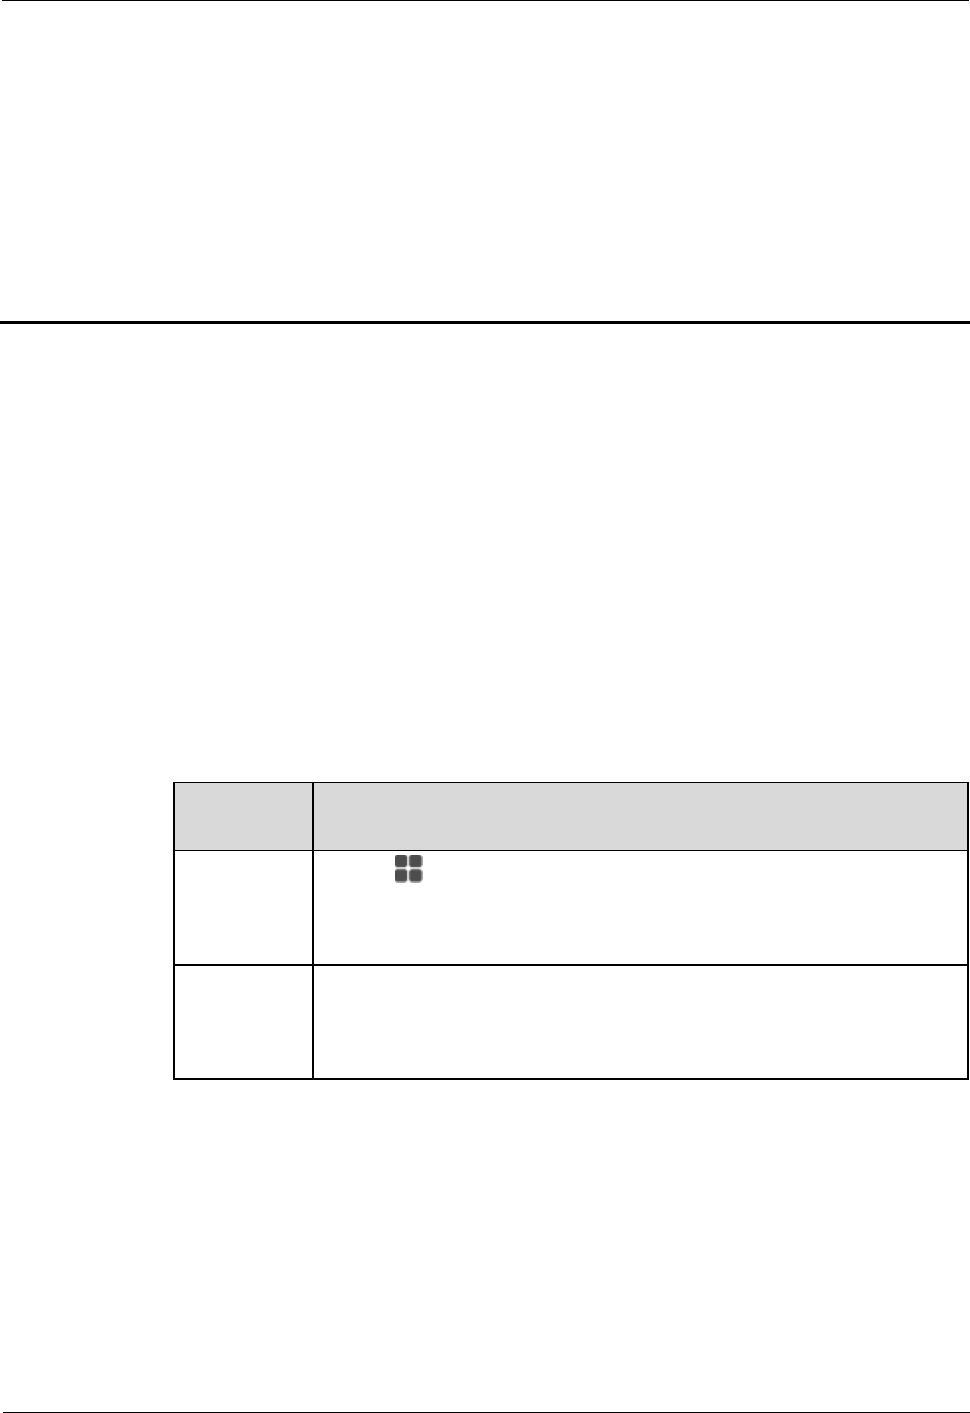
When the phone is idle, tap in Quick Setting to preview your video. For details
about how to add Quick Setting, see 25.1.3 Quick Setting.
If your phone is engaged in a video call, you can also preview your video during the
video call.
During video preview, you can adjust the camera angle to adjust your video image. The supported
angle ranges from –25° to +15°.
You can also adjust the brightness, contrast, and digital zoom of your camera as required. For
detailed settings, see 26.2.3 Camera.
Maintaining Your Camera
Do not frequently remove and reseat your camera. The frequent reseat operations may
cause poor contact of the USB camera port.
Do not use rough, unclean materials to wipe the lens. If you do so, the lens' image
quality may be affected.
Close the shutter to protect your camera if you do not use it, or remove the camera and
seal it in a plastic bag with desiccant if the camera is not to be used for a long time.
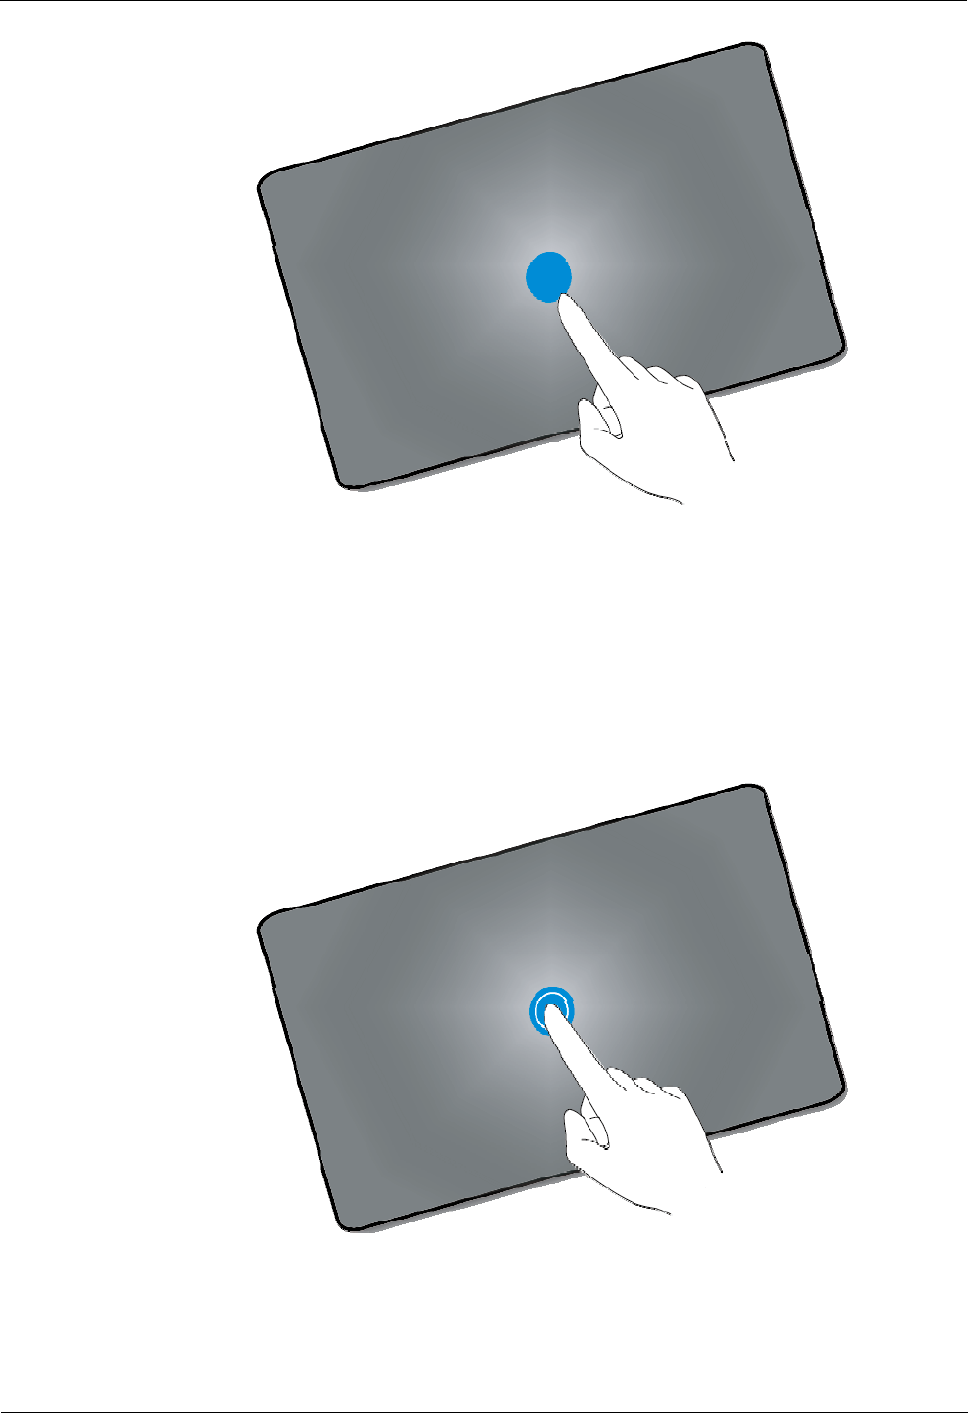
1.2 Touchscreen Experience
Do not use any sharp object to touch the screen or tap the screen too hard with your fingertip;
otherwise, the touchscreen may be damaged.
Tap
Touch the object once. For example, tap to select or open an application.
eSpace 8950 IP Phone
User Guide 1 Getting Started
Issue 01 (2014-06-30) Huawei Proprietary and Confidential
Copyright © Huawei Technologies Co., Ltd.
5
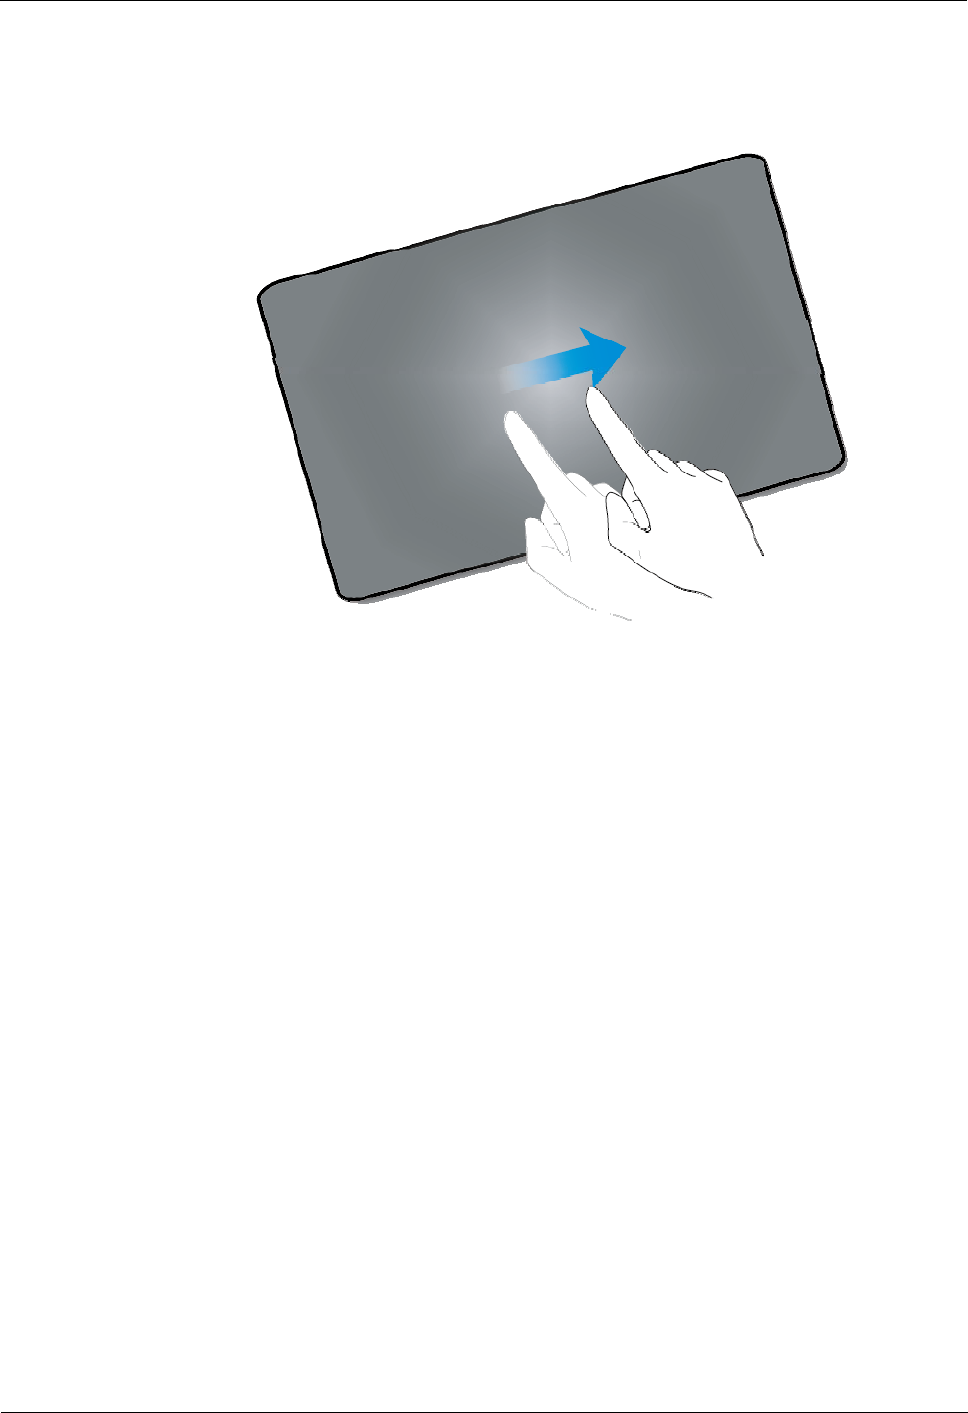
Tap and Hold
Touch and hold the object for at least 2s. For example, you can tap and hold an application, a
tool, or in the blank area to open a menu.
eSpace 8950 IP Phone
User Guide 1 Getting Started
Issue 01 (2014-06-30) Huawei Proprietary and Confidential
Copyright © Huawei Technologies Co., Ltd.
6
Slide
Swipe your finger on the screen. For example, on the applications screen, swipe left or right to
switch between the tabs.
Drag
Tap and hold the object, and drag it to a new location on the screen. For example, on the home
screen, you can drag a tool or icon to a new location.
eSpace 8950 IP Phone
User Guide 1 Getting Started
Issue 01 (2014-06-30) Huawei Proprietary and Confidential
Copyright © Huawei Technologies Co., Ltd.
7
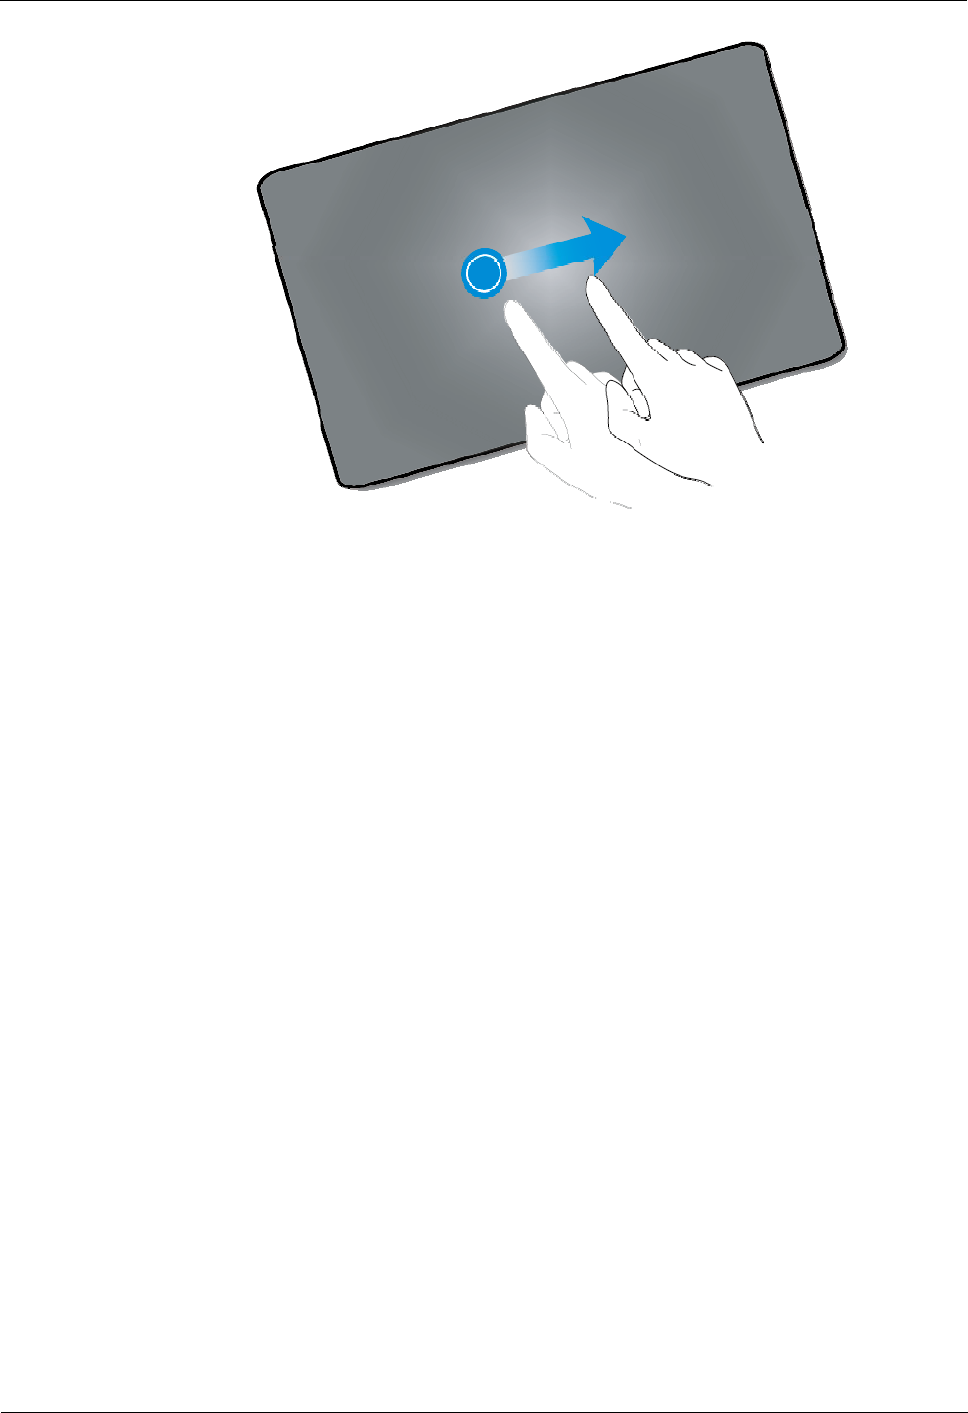
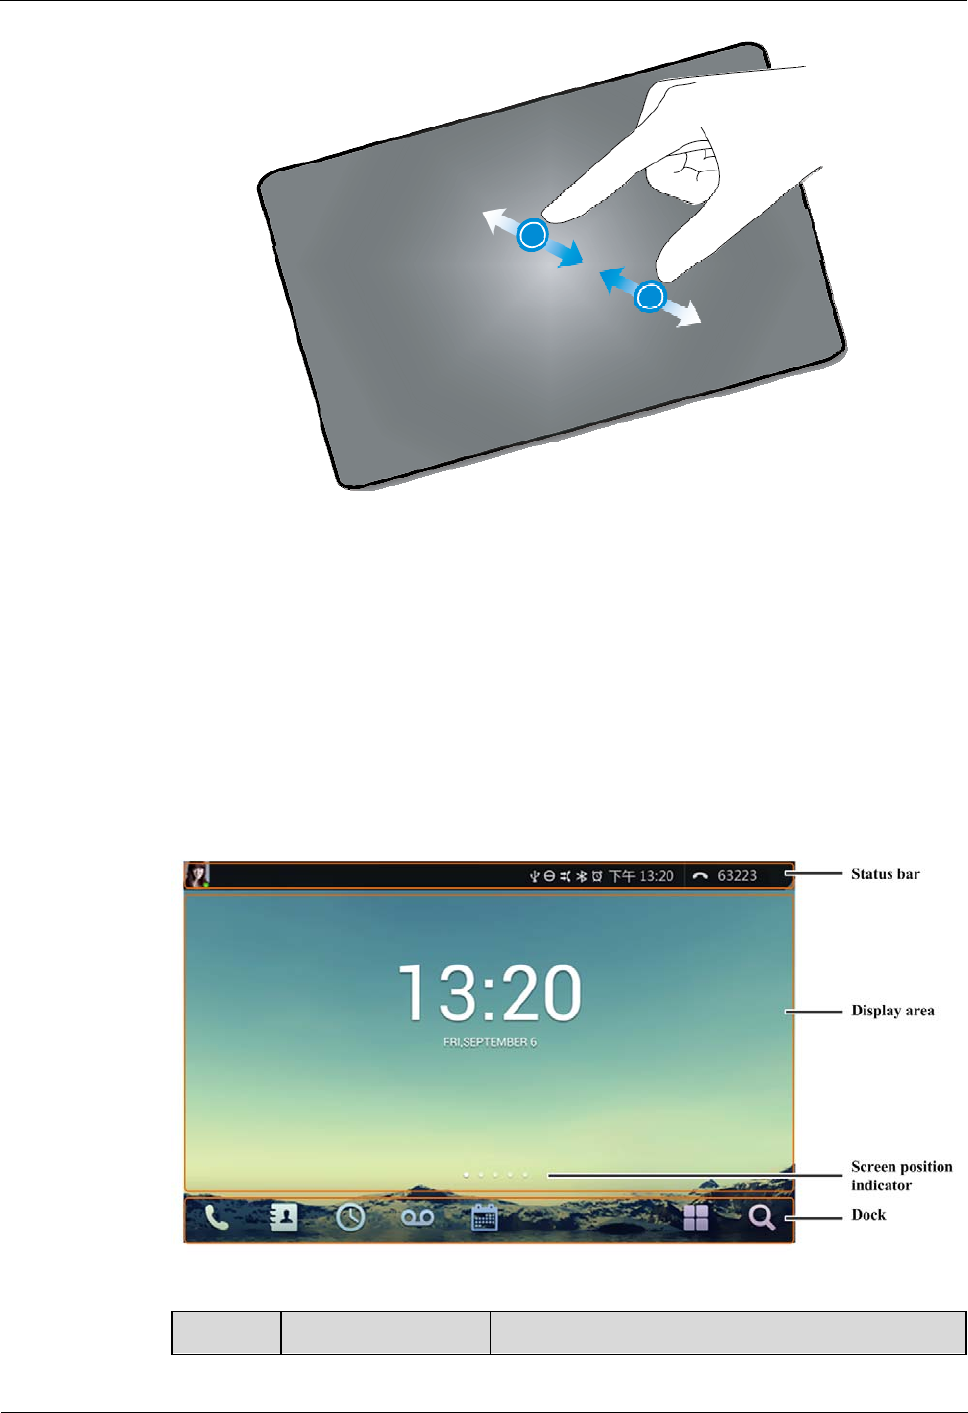
Pinch and Stretch
Tap with two fingers and move your fingers together to zoom out. Tap with two fingers and
move your fingers apart to zoom in. For example, you can pinch or stretch a photo or web
page to zoom out or zoom in.
eSpace 8950 IP Phone
User Guide 1 Getting Started
Issue 01 (2014-06-30) Huawei Proprietary and Confidential
Copyright © Huawei Technologies Co., Ltd.
8
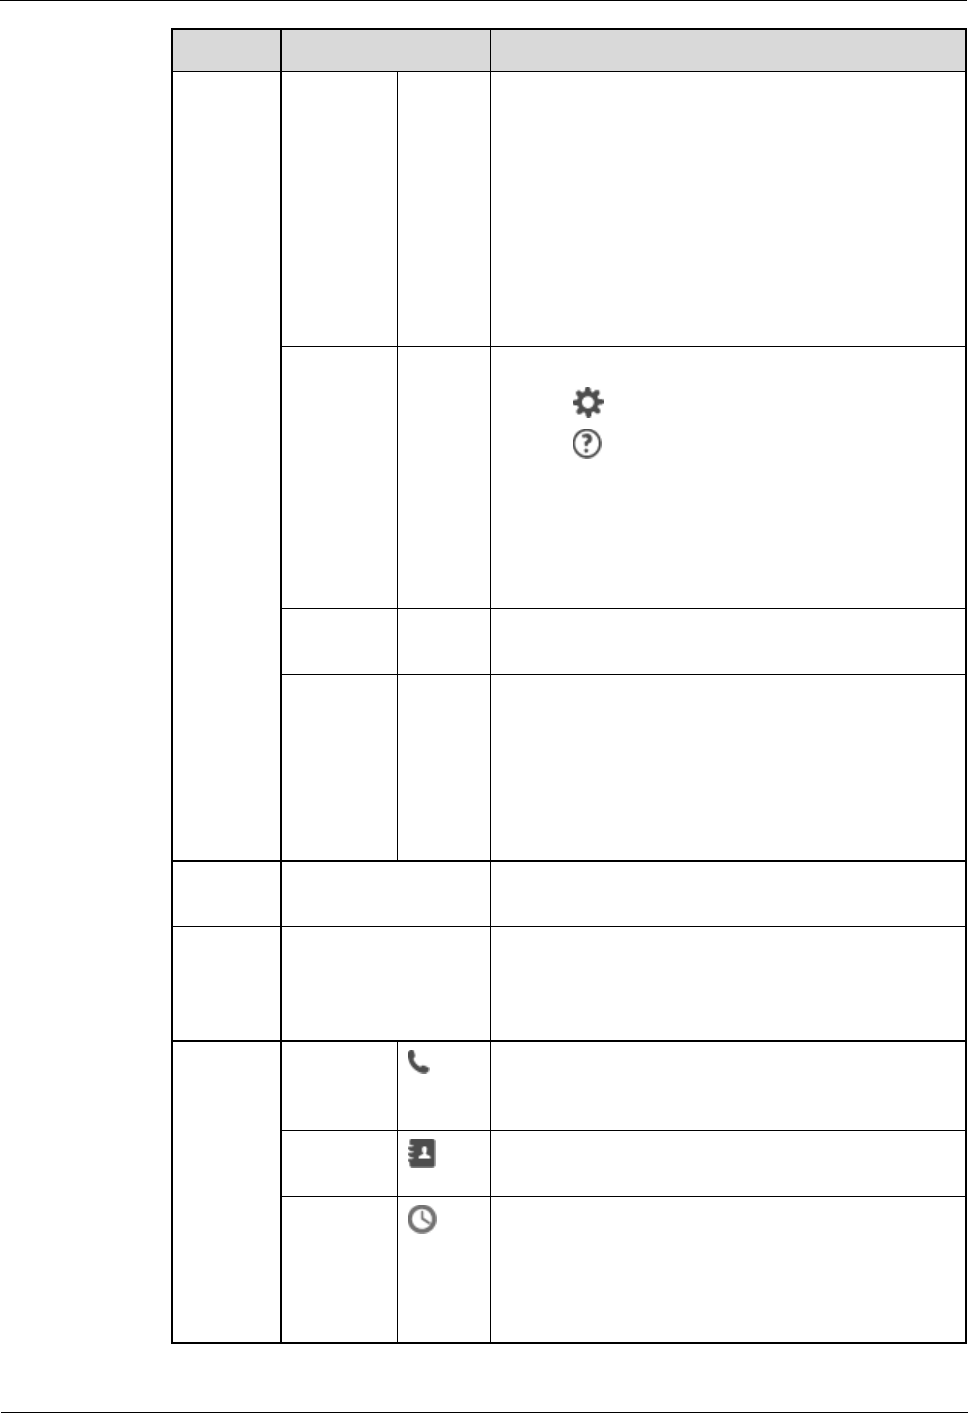
1.3 Home Screen
Figure 1-2 shows the home screen of eSpace 8950.
Figure 1-2 Home screen
Layout Details Description
eSpace 8950 IP Phone
User Guide 1 Getting Started
Issue 01 (2014-06-30) Huawei Proprietary and Confidential
Copyright © Huawei Technologies Co., Ltd.
9
Layout Details Description
Status bar User
informatio
n
Profile
picture
Displays a user's profile picture and status. Swipe
down in the profile picture area. On the screen that is
displayed, you can see user details, access the online
help, set a user status, and log out the phone.
In the IMS+UC network environment, the user
status is displayed in the lower right corner of the
profile picture area.
In the UC2.X network environment, the user
status is not displayed in the lower right corner of
the profile picture area.
Notificatio
n icons
In the
middle
of the
status
bar
Swipe down in this area, and then you can:
Tap to access the settings screen.
Tap to open the online help screen.
Tap the corresponding icon to enable or disable
Bluetooth, enable or disable Wi-Fi, and set the
screen brightness.
View notifications such as missed calls,
download, upgrade, and third-party applications.
System
status
- Displays the phone time and status, for example,
network, alarm, and do not disturb (DND).
Number
area
In the
rightmo
st
portion
of the
status
bar
Swipe down in this area to display information about
the registered number.
Display
area
- Displays the screen wallpaper, phone widgets, and
other application icons.
Home
screen
scroll
indicator
- Displays the current screen. By default, eSpace 8950
supports five screens. The third screen is the home
screen.
Shortcut
operation
area
Keypad Tap the keypad, enter the number, and then place a
call. If you are not logging in to the IP phone, you
can only place emergency calls.
Contacts Tap to enter the My Contacts tab by default. You
can switch to the Groups or CorpDir tab.
Call
history A number on the icon indicates the number of
missed calls. For example, 3 indicates that there
are three missed calls.
Tap to enter the All tab by default. You can
switch to the Missed tab.
eSpace 8950 IP Phone
User Guide 1 Getting Started
Issue 01 (2014-06-30) Huawei Proprietary and Confidential
Copyright © Huawei Technologies Co., Ltd.
10
Layout Details Description
Voicemail A number on the icon indicates the number of unread
voice messages. For example, 3 indicates that there
are three unread voice messages.
Conferenc
e Tap to enter the conference list screen. On this
screen, you can check conference records, join a
conference, and create a conference.
NOTE
This icon is not available in the UC2.X network
environment.
Applicatio
ns Tap to enter the APPLICATION tab by default. You
can switch to the CALL WIDGET or WIDGET tab.
Search Tap to search the Internet or eSpace 8950 for the
information you want to know.
Changing a Wallpaper
Tap and hold the home screen. The Choose wallpaper from screen is then displayed. On this
screen, choose any of the following options:
Wallpapers: View and select a system built-in wallpaper.
Live Wallpapers: View and select a dynamic wallpaper.
Gallery: View and select a locally stored photo as a wallpaper.
You can use other methods to change a wallpaper. For detailed operations, see 26.2.2 Display.
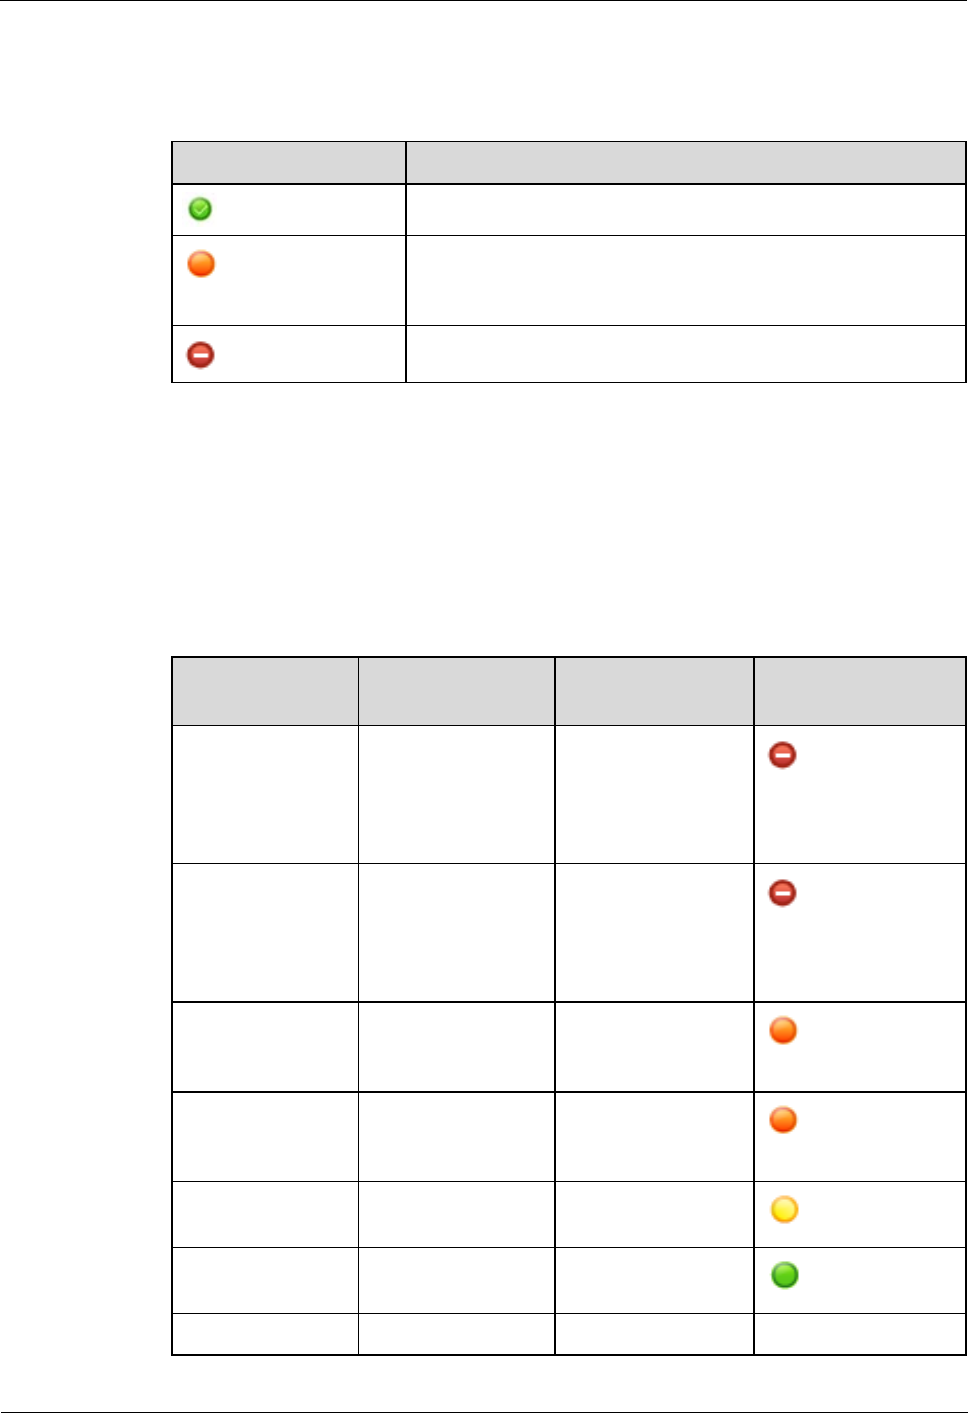
1.4 Status Icons
Table 1-2 describes the status icons on eSpace 8950.
Table 1-2 Status icons on eSpace 8950
Icon Description
eSpace 8950 is not correctly connected to the network.
eSpace 8950 is correctly connected to the network, but an IP conflict occurs.
eSpace 8950 is connected to a USB device.
eSpace 8950 is connected to a Wi-Fi network.
eSpace 8950 has detected available Wi-Fi networks.
eSpace 8950 has Bluethooth enabled.
eSpace 8950 has the incoming call tone disabled
eSpace 8950 IP Phone
User Guide 1 Getting Started
Issue 01 (2014-06-30) Huawei Proprietary and Confidential
Copyright © Huawei Technologies Co., Ltd.
11
Icon Description
eSpace 8950 has DND enabled.
eSpace 8950 has call forward enabled.
eSpace 8950 has auto answer enabled.
eSpace 8950 has auto callback (ACB) enabled.
eSpace 8950 has alarms enabled.
eSpace 8950 has missed calls.
eSpace 8950 has unread voice messages.
eSpace 8950 receives a conference invitation.
eSpace 8950 is downloading data.
1.5 Network
IP telephony is a real-time voice transmission service over the Internet. Before using IP
telephony services on your eSpace 8950, ensure that you have correctly connected the IP
phone to the network.
eSpace 8950 can be connected only to either a wired network (Ethernet) or wireless network (Wi-Fi).
1.5.1 Wired Network
1.5.2 Wi-Fi
1.5.1 Wired Network
Step 1 Plug one end of the network cable, the other end of which is already connected to the switch,
to the network port on your IP phone.
Step 2 Power on your IP phone. Tap . On the APPLICATION tab, tap Settings..
Step 3 In the WIRELESS & NETWORKS area, tap Ethernet.
Step 4 Set related parameters. For detailed operations, consult your system administrator.
----End
1.5.2 Wi-Fi
Turning Wi-Fi on and Connecting to a Wi-Fi Network
Step 1 Tap . On the APPLICATION tab, tap Settings..
Step 2 In the WIRELESS & NETWORKS area, tap the Wi-Fi switch to turn Wi-Fi on.

eSpace 8950 IP Phone
User Guide 1 Getting Started
Issue 01 (2014-06-30) Huawei Proprietary and Confidential
Copyright © Huawei Technologies Co., Ltd.
12
The IP phone automatically scans and lists all available, in-range Wi-Fi networks.
Step 3 Select a Wi-Fi network and tap Connect.
To connect to an encrypted Wi-Fi network, you must enter the correct password.
----End
Manually Adding a Wi-Fi Network
Step 1 In the WIRELESS & NETWORKS area, tap the Wi-Fi switch to turn Wi-Fi on.
Step 2 In the Wi-Fi network list, tap .
Step 3 Complete the required settings in the Network SSID and Security areas, and set relevant
parameters (for example, the password) following the on-screen instructions.
Step 4 Tap Save.
----End
Connecting to a Wi-Fi Network Using WPS PIN
You can use WLAN Protected Setup (WPS) to simplify connection to a Wi-Fi network.
Simply enter a PIN, and a secure Wi-Fi connection is then automatically set up. You do not
need to perform complex configurations on the management software for the Wi-Fi hotspot
(for example, a wireless router).
Step 1 In the WIRELESS & NETWORKS area, tap the Wi-Fi switch to turn Wi-Fi on.
Step 2 In the Wi-Fi network list, tap .
Step 3 Tap WPS Pin Entry.
The IP phone automatically generates a PIN.
Step 4 Enter the PIN on the Wi-Fi hotspot.
----End
Using the Wi-Fi Direct Function
Wi-Fi Direct enables any two devices to easily connect with each other to conveniently
transmit and share data.
Step 1 In the WIRELESS & NETWORKS area, tap the Wi-Fi switch to turn Wi-Fi on.
Step 2 In the Wi-Fi network list, tap .
Step 3 Tap Wi-Fi Direct.
The IP phone automatically scans for and lists all connectable devices.
Step 4 Tap a device to connect.
----End

eSpace 8950 IP Phone
User Guide 1 Getting Started
Issue 01 (2014-06-30) Huawei Proprietary and Confidential
Copyright © Huawei Technologies Co., Ltd.
13
Configuring Advanced Wi-Fi Settings
Step 1 In the Wi-Fi network list, tap .
Step 2 Tap ADVANCED.
Step 3 Set parameters based on the site requirements.
----End
1.6 Language and Input
1.6.1 Language and Input
1.6.1 Language and Input
Step 1 Tap . On the APPLICATION tab, tap Settings..
Step 2 In the PERSONAL area, tap Language & input.
The language and input settings screen is then displayed. On this screen, you can set the
following parameters:
Language: Select a language for your IP phone.
Spell checker: Select to enable spelling correction for your contact information.
Personal dictionary: Add words and shortcut keys to your personal dictionary.
Default: Set a default input method for your IP phone.
Android keyboard (AOSP): Select and set specific Android keyboard (AOSP) options.
Huawei IME: Select and set specific Huawei input method options.
Text-to-speech output: Set the text-to-speech speed and default language.
Pointer speed: Set the pointer speed of the mouse or trackpad.
----End
1.7 Date and Time
Step 1 Tap . On the APPLICATION tab, tap Settings..
Step 2 In the SYSTEM area, tap Date & time.
The date and time settings screen is then displayed. On this screen, you can set the following
parameters:
Automatic date & time: Set your IP phone to automatically time-synchronize with the
network. When setting Automatic date & time, you need to specify the IP address of
the time synchronization server.
Set date: Set the date for your IP phone.
Set time: Set the time for your IP phone.
Select time zone: Set the time zone for your IP phone.
Use 24–hour format: Set the 24-hour format as the time format for your IP phone.
eSpace 8950 IP Phone
User Guide 1 Getting Started
Issue 01 (2014-06-30) Huawei Proprietary and Confidential
Copyright © Huawei Technologies Co., Ltd.
14
Choose date format: Set the date format for your IP phone.
Time Synchronization Server: Set the IP address of the time synchronization server.
You can set the time synchronization server only after your administrator password has
been verified. For any questions, contact your system administrator.
----End
Setting the Date and Time on the Web Page
Step 1 On the web page, choose System > Date & Time.
Step 2 Select either Automatic or Manual from Time Update Mode.
When Manual is selected, you can only set the time zone. In this case, you can set the specific date and
time on the phone LCD screen.
Step 3 Set the desired time zone in Time Zone.
Step 4 Click Save.
----End
1.8 Locking and Unlocking the Phone Screen
You can lock the IP phone screen to prevent unauthorized or accidental phone operations.
Setting a Screen Lock Mode
Step 1 Tap . On the APPLICATION tab, tap Settings..
Step 2 In the PERSONAL area, tap Security.
Step 3 In the SCREEN SECURITY area, tap Screen lock.
Step 4 Set the screen lock mode to None, Pattern, PIN, or Password.
If you have set the screen lock mode to Pattern, PIN, or Password, you can perform additional
tasks; for example, setting the amount of time for your IP phone to be idle before your IP phone
automatically locks and setting the lock button to implement the screen lock function.
You can download your preferred screen lock modes from the Android market to your IP phone.
To ensure information security, periodically change your screen lock password.
----End
Locking the Phone Screen
Your IP phone screen can be manually locked. To do so, tap .
Before manually locking your IP phone screen, make sure that you have enabled the screen lock
function for .

eSpace 8950 IP Phone
User Guide 1 Getting Started
Issue 01 (2014-06-30) Huawei Proprietary and Confidential
Copyright © Huawei Technologies Co., Ltd.
15
Your IP phone screen can automatically lock. To achieve so, you need to set the amount
of time for automatic screen lock. When your IP phone is idle for such amount of time,
the screen automatically locks.
Unlocking the Phone Screen
Step 1 Tap the screen or press any button on your IP phone.
Step 2 Unlock the IP phone screen based on your settings.
----End
1.9 Help
Your IP phone provides a comprehensive Online Help system, helping you understand and use
the phone more conveniently and efficiently.
On the notification screen, tap .
Another method of opening the Online Help system: Tap . On the APPLICATION tab, tap
Help.
You can also swipe down in the profile picture area of the phone's status bar and tap Help to open
the Online Help system.
To learn more about phone services, see this user guide.
1.10 Power Supply
You can use a power adapter or Power over Ethernet (PoE) to power your IP phone:
Power adapter: Insert one end of the power adapter into the power port on your IP phone
and insert the other end into a power outlet.
PoE: Connect your IP phone to a switch that provides PoE.
1.11 Power-off and Restart
Tap and hold . Then tap Power off or Reboot.
1.12 Energy Conservation
Putting your IP phone to sleep or reducing the screen brightness saves energy.
To put your IP phone to sleep
1. Tap . On the APPLICATION tab, tap Settings..
2. In the DEVICE area, tap Display > Sleep.

eSpace 8950 IP Phone
User Guide 1 Getting Started
Issue 01 (2014-06-30) Huawei Proprietary and Confidential
Copyright © Huawei Technologies Co., Ltd.
16
3. Set the amount of time before your idle IP phone automatically goes to sleep.
To adjust the screen brightness
1. Tap . On the APPLICATION tab, tap Settings..
2. In the DEVICE area, tap Display > Brightness.
3. Set an appropriate brightness.
You can enable the IP phone to automatically adjust its brightness by tapping Display > Auto
Brightness. Set the amount of time before your idle IP phone automatically adjusts its brightness.
1.13 Maintenance
Periodically clean and maintain your IP phone so that it can function properly for a long time.
A protective film on the phone screen can effectively prevent dust and scratch.
Use a soft, dry cloth to wipe the screen. Never use the cloth with liquid or powder. This
may cause component failures.
Do not expose your IP phone to moisture or direct sunlight. This is to extend the lifespan
of your IP phone.
Do not place your IP phone in an environment with dense magnetic fields. Otherwise,
dusts may adhere to the speaker diaphragm, which degrades the speaker performance.
If your IP phone is equipped with a USB camera, properly maintain the USB camera. For
details, see Maintaining Your Camera.
eSpace 8950 IP Phone
User Guide 2 Login
Issue 01 (2014-06-30) Huawei Proprietary and Confidential
Copyright © Huawei Technologies Co., Ltd.
17
2 Login
Logging In to Your IP Phone
Step 1 Power on your IP phone and connect it to the network.
Step 2 Tap Log In on the right of the status bar.
Step 3 Enter your account and password, and click Log In.
When you are logging in, make sure that your IP phone is correctly connected to the network. That is,
or is not displayed in the status bar. If you cannot log in, contact your system administrator.
----End
Logging In to the Phone Web Page
Step 1 On a PC, open a web browser and enter your IP address, for example, http://192.169.1.72. (To
obtain your IP phone's address, follow the instructions in 26.4.4 About Phone.)
It is recommended that you use Internet Explorer 8.0.
Step 2 Enter your account and password. (The default account and password are the account and
password you use to log in to the IP phone.)
Step 3 Click Log In.
----End

eSpace 8950 IP Phone
User Guide 3 Multi-line Support
Issue 01 (2014-06-30) Huawei Proprietary and Confidential
Copyright © Huawei Technologies Co., Ltd.
18
3 Multi-line Support
Line: Each line corresponds to a phone number that others can use to call you.
Call: Each line supports multiple calls. Your system administrator can adjust the number
of calls supported according to your needs. Only one call can be active at any time; other
calls are automatically placed on hold.
Line button: located in the drop-down list box in the upper right corner of your IP
phone's screen. Each line button supports multiple lines.
eSpace 8950 provides 24 line buttons. Each line button can be assigned a maximum of 24
lines. eSpace 8950 supports a maximum of 24 lines and 24 concurrent calls. To view the line
button status, swipe down in the number area on the right of the status bar.
Using Multiple Lines
eSpace 8950 supports multiple concurrent calls using the same or different lines.
When a line is occupied, you can press the line button to switch to another available line.
You can switch lines in multiple scenarios, for example, when you are dialing a number,
when a call comes in, or when you are engaged in an ongoing call.
Line switching is required in services such as call waiting, call transfer, and local
conference. Therefore, you need to configure at least two lines for the account that uses
such services.
On the phone LCD screen or web page, navigate to Advanced and configure lines or query line
configurations. For detailed operations, consult your system administrator. In the IMS+UC network
environment, eSpace 8950 only supports query of line configurations.
Modifying the Label Displayed for a Line Button
Step 1 Tap . On the APPLICATION tab, tap Settings..
Step 2 In the PERSONAL area, tap Account > Line Button Label.
Step 3 Tap a line button and modify its label.
Step 4 Tap OK.
----End
eSpace 8950 IP Phone
User Guide 3 Multi-line Support
Issue 01 (2014-06-30) Huawei Proprietary and Confidential
Copyright © Huawei Technologies Co., Ltd.
19
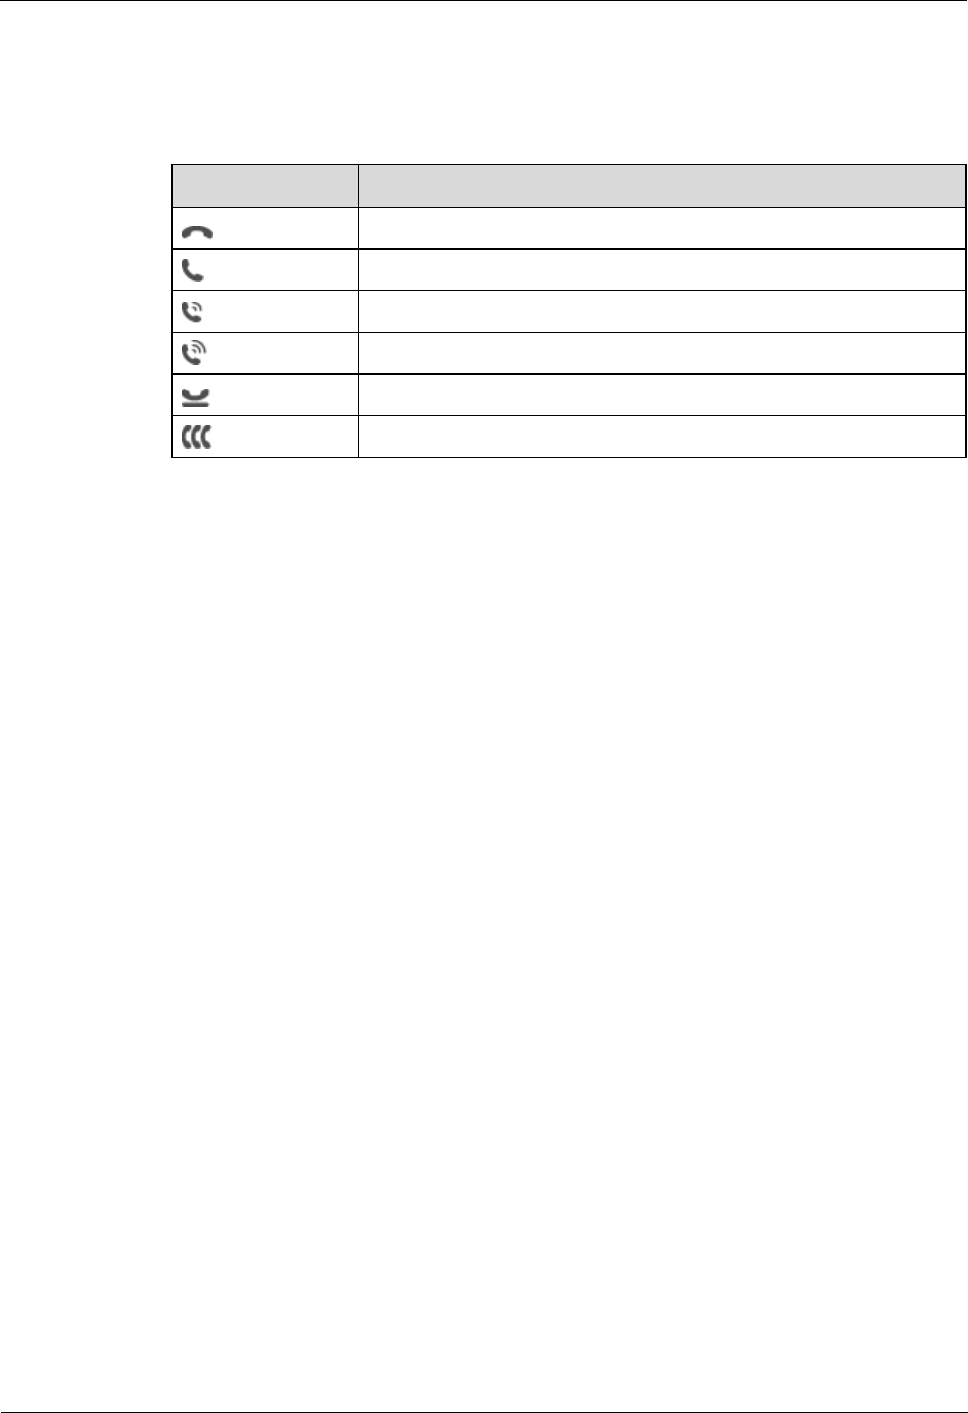
Understanding the Icons Displayed for a Line Button
Table 3-1 describes the line button-related icons.
Table 3-1 Line button-related icons
Icon Description
The line is in standby state (or called idle state).
The line is in dialing state.
The line is in callout state.
The line is in talking state.
The line is in active call hold state.
The line is in a conference call.
eSpace 8950 IP Phone
User Guide 4 Presence
Issue 01 (2014-06-30) Huawei Proprietary and Confidential
Copyright © Huawei Technologies Co., Ltd.
20
4 Presence
In the UC2.X Network Environment
On the phone LCD screen, you can quickly check the status (for example, online or busy) of
contacts in the speed dial list.
In the speed dial list, the icon in the lower right corner of a contact's profile picture indicates
the status of the contact.
Table 4-1 Status description
Icon Description
The contact is in online state.
The contact is in busy state, which can be subdivided into
offhook, dialing, absent, receiving a call, placing a call, and
being engaged in a call.
In the IMS+UC Network Environment
On your phone LCD screen, you can view or set your phone status, and view the status of
your contacts in your speed dial list, contact list, call history, and conference participant list.
This function provided is known as presence.
Before using the presence function, ensure that your account has been assigned the presence service
rights on the IP phone and server. For any questions, contact your system administrator.
To set a presence status
1. Swipe down in the profile picture area of the status bar.
2. Tap to set a desired status.
You can also choose > Settings > PERSONAL > Account > Status Settings and then tap to set a
desired status.
To view a presence status
− To view your own status
eSpace 8950 IP Phone
User Guide 4 Presence
Issue 01 (2014-06-30) Huawei Proprietary and Confidential
Copyright © Huawei Technologies Co., Ltd.
21
You can view your own status in the profile picture area of the phone's status bar.
Table 4-2 describes statuses available.
Table 4-2 Status description
Icon Description
You are online and in idle state.
You are in busy state, which can be subdivided into offhook,
dialing, absent, receiving a call, placing a call, and being
engaged in a call.
You are in DND state.
− To view the status of your contacts
Your phone displays the converged status of your contacts. If a contact has an IP
phone number and a soft terminal number, your phone displays only one status icon
for this contact, which is the converged status of this contact. You can view the status
of your contacts in your speed dial list, contact list, call history, and conference
participant list. Table 4-3 describes the status convergence rules.
Table 4-3 Status convergence
Status of the IP
Phone Number
Status of the Soft
Terminal Number
Converged Status Icon
DND Online, busy, DND,
offline, away,
unknown, or NA
(NA: no soft
terminal number)
DND
Online, busy,
DND, offline,
unknown, or NA
(NA: no IP phone
number)
DND DND
Busy Online, busy,
offline, away,
unknown, or NA
Busy
Online, busy,
offline, unknown,
or NA
Busy Busy
Online, offline,
unknown, or NA
Away Away
Online, offline,
unknown, or NA
Online Online (soft terminal
icon)
Online, offline, Unknown Unknown No icon

eSpace 8950 IP Phone
User Guide 4 Presence
Issue 01 (2014-06-30) Huawei Proprietary and Confidential
Copyright © Huawei Technologies Co., Ltd.
22
Status of the IP
Phone Number
Status of the Soft
Terminal Number
Converged Status Icon
unknown, or NA
Online, offline,
unknown, or NA
Offline Offline
Online, offline, or
unknown
NA Online (IP phone
icon), offline, or
unknown
, , or no icon
eSpace 8950 IP Phone
User Guide 5 Video Control
Issue 01 (2014-06-30) Huawei Proprietary and Confidential
Copyright © Huawei Technologies Co., Ltd.
23
5 Video Control
If the IP phone is equipped with a USB camera, you can perform a video call on the IP phone.
You can set the video control options, including setting whether to enable automatic video call
placing or answering or whether to enable local video.
You can set the video control function on your phone LCD screen or web page. For detailed
operations, see Table 5-1.
Video: sets the phone to automatically select video call placing or answering when
placing or answering a call.
Always Send Video: sets the phone to automatically enable local video while on a video
call.
If you have not set Always Send Video, you need to manually enable local video while
placing or answering a video call; otherwise, the peer party cannot see your local video.
Table 5-1 Video Control
If You Want
to...
Then...
Set video
control on the
phone LCD
screen.
1. Tap . On the APPLICATION tab, tap Settings.. Choose
PERSONAL > Call Settings > Video Control.
2. Tap Video or Always Send Video.
Set video
control on the
phone web
page
1. Choose Call Settings > Video Control.
2. Click Enable or Disable for Video (perform the same for Always Send
Video).
3. Click Save.
eSpace 8950 IP Phone
User Guide 6 Call
Issue 01 (2014-06-30) Huawei Proprietary and Confidential
Copyright © Huawei Technologies Co., Ltd.
24
6 Call
6.1 Answering Calls
6.1.1 Answering Incoming Calls
6.1.2 Auto-answering Calls
6.1.3 Call Divert
6.1.4 One Button to Voicemail
6.1.5 Ignoring Calls
6.1.6 Rejecting Calls
6.1.1 Answering Incoming Calls
When your IP phone is in idle state and receives an incoming call, you can pick up the phone
to answer it.
If you have stored the calling party's name, phone number, department, and profile picture in your
contact list or corporate directory, all such information is displayed on your phone screen.
You can answer a call in different ways. For detailed operations, see Table 6-1.
Table 6-1 Methods of answering a call
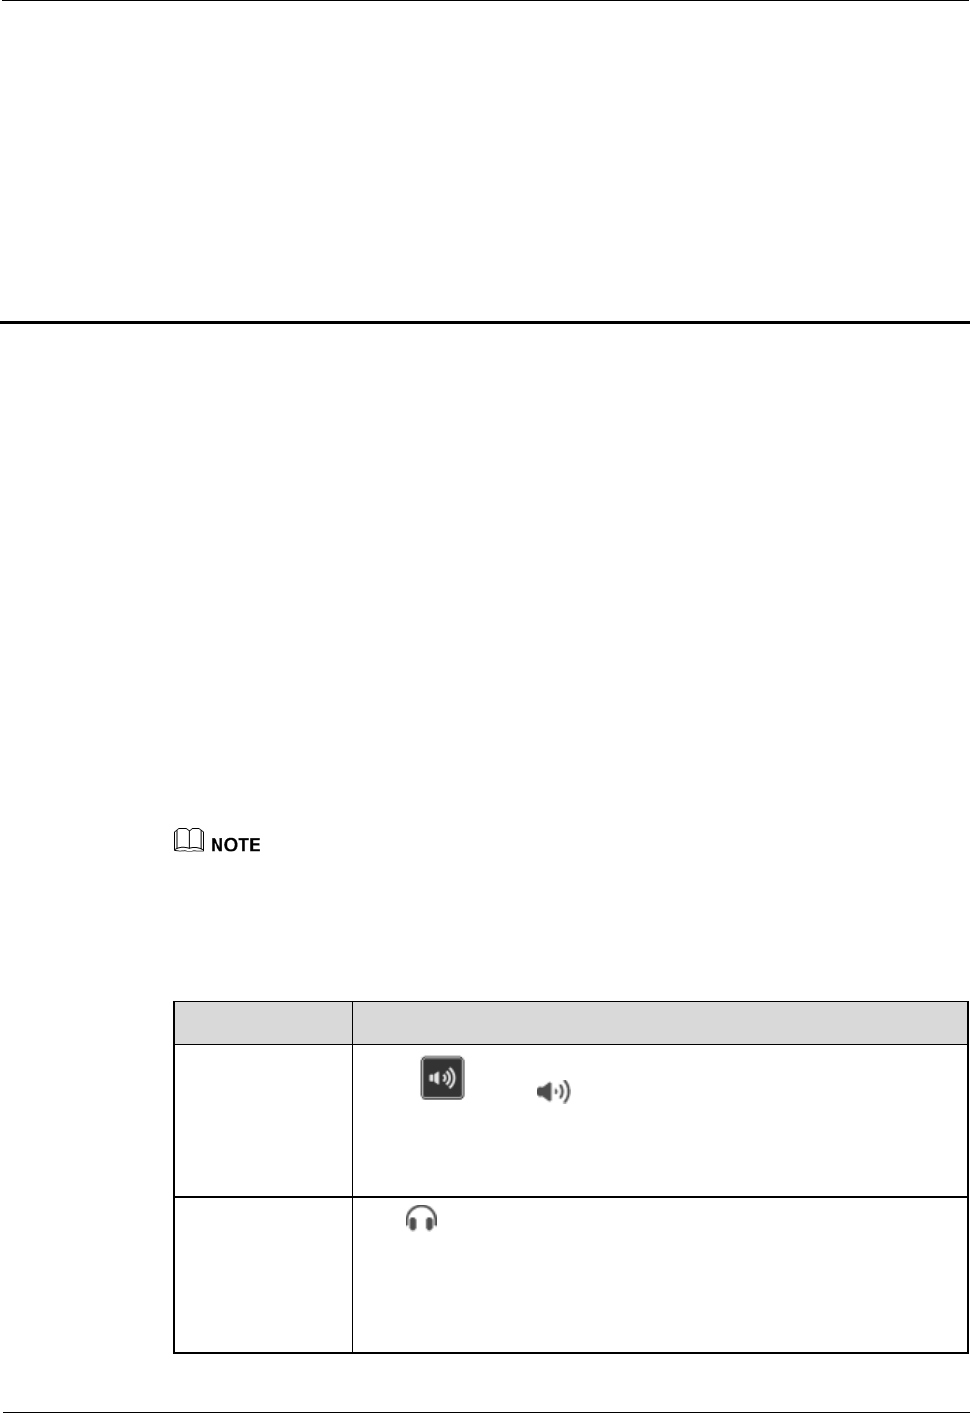
If You Want to... Then...
Answer with the
speaker Press or tap .
If you have set the audio source to speaker, you can tap Answer or tap
the line button corresponding to the incoming call to answer it with
the speaker.
Answer with a
headset Tap .
If you have set the audio source to headset, you can tap Answer or tap
the line button corresponding to the incoming call to answer it with
the headset.
NOTE
eSpace 8950 IP Phone
User Guide 6 Call
Issue 01 (2014-06-30) Huawei Proprietary and Confidential
Copyright © Huawei Technologies Co., Ltd.
25
If You Want to... Then...
Ensure that your phone has connected to a headset.
Auto-answer a
call
Enable the auto answer function. For detailed operations, see 6.1.2
Auto-answering Calls.
If you have enabled automatic video call placing or answering, your phone will automatically
start video call answering when a call comes in, irrespective of whether you answer it using a
handset, speaker, or headset. If you do not want to use video call answering, tap Audio
Answer.
6.1.2 Auto-answering Calls
After the auto answer function is enabled, your IP phone will automatically answer an
incoming call if you do not answer it within a specific period of time (for example, 10s). The
time is configurable.
You can enable or disable the auto answer function of the phone on the web page.
Enabling Auto Answer
Step 1 One the web page, choose Call Settings > Auto Answer.
Step 2 Select Enable for Auto Answer.
Step 3 Set the amount of time in Delay Time.
Step 4 Click Save.
----End
Disabling Auto Answer
Step 1 One the web page, choose Call Settings > Auto Answer.
Step 2 Select Disable for Auto Answer.
Step 3 Click Save.
----End
6.1.3 Call Divert
The call divert function allows you to transfer a call to a third party directly.
Before using the call divert function, ensure that your account has been assigned the call divert service
rights. For any questions, contact your system administrator.
Step 1 When a call comes in, tap Transfer.
Step 2 Enter a third-party number.
You can also directly select a contact from the contact list or call history.
eSpace 8950 IP Phone
User Guide 6 Call
Issue 01 (2014-06-30) Huawei Proprietary and Confidential
Copyright © Huawei Technologies Co., Ltd.
26
Step 3 Tap .
----End
6.1.4 One Button to Voicemail
When you are unable to answer a call, use the one button to voicemail function to forward the
call to your voicemail. You can retrieve the voice message later when convenient.
Before using the one button to voicemail function, ensure that your account has been assigned the one
button to voicemail rights. For any questions, contact your system administrator.
When a call comes in, during a call, or when your call is placed on hold, tap Voicemail. When
you hang up, the other party will leave a voice message to your voicemail.
You can tap on the home screen to retrieve the voice message. For detailed operations,
see 23 Voicemail.
6.1.5 Ignoring Calls
When a call comes in, tap Ignore. Your phone stops ringing.
6.1.6 Rejecting Calls
When a call comes in, tap Hang Up. Your phone closes the incoming call screen.
6.2 Placing Calls
6.2.1 Placing Calls by Directly Entering Numbers
6.2.2 Placing Calls Using the Speed Dial Widget
6.2.3 Placing Calls Using Contacts
6.2.4 Placing Calls Using the Call History
6.2.5 Placing Calls Using the Corporate Directory
6.2.6 Placing Calls Using the Linked eSpace Desktop
6.2.7 Placing Emergency Calls
6.2.8 Abbreviated Dialing
With abbreviated dialing enabled, the phone allows you to dial an abbreviated number instead
of a complete called number to connect to the called party.
6.2.1 Placing Calls by Directly Entering Numbers
Pick up the phone handset, enter a number, and then tap .
Your IP phone supports number matching. When you are entering a number, your favorites (including
their phone numbers and the first letter of their names) that most match your search criteria will be
automatically displayed in the left pane. When you are only entering a single digit, only the first letter of
contact names is displayed, but not their phone numbers.
eSpace 8950 IP Phone
User Guide 6 Call
Issue 01 (2014-06-30) Huawei Proprietary and Confidential
Copyright © Huawei Technologies Co., Ltd.
27
You can enter the dialing screen by tapping , pressing , or swiping down in the
number area on the right of the status bar and tapping an idle line. Then, from the favorites list
on the left of the screen, select a contact and tap on the right to call the contact.
6.2.2 Placing Calls Using the Speed Dial Widget
If you have added a contact to the Speed Dial widget, tap the contact in the Speed Dial
widget to directly call him or her.
For details about how to add the Speed Dial widget, see 25.1.2 Speed Dial.
6.2.3 Placing Calls Using Contacts
If a contact has been added to Contacts, you can call the contact on the Contacts screen.
Step 1 Tap .
Step 2 Tap on the right of a contact to call him or her.
You can tap and hold a contact. On the screen that is displayed, tap Edit Dial, change the contact's
number, and then call him or her.
You can tap a contact. On the contact details screen, call the contact's other numbers.
----End
6.2.4 Placing Calls Using the Call History
Step 1 Tap .
Step 2 On the All or Missed tab, tap on the right of a contact to call him or her.
You can tap and hold a contact. On the screen that is displayed, tap Edit Dial, change the contact's
number, and then call him or her.
----End
6.2.5 Placing Calls Using the Corporate Directory
Step 1 Tap .
Step 2 On the CorpDir tab, tap a contact.
Step 3 On the contact details screen, tap next to the number you want to call.
You can tap and hold a contact. On the screen that is displayed, tap Edit Dial, change the contact's
number, and then call him or her.
----End
eSpace 8950 IP Phone
User Guide 6 Call
Issue 01 (2014-06-30) Huawei Proprietary and Confidential
Copyright © Huawei Technologies Co., Ltd.
28
6.2.6 Placing Calls Using the Linked eSpace Desktop
After your phone is linked to the eSpace Desktop, you can place calls using the eSpace
Desktop. For detailed operations, see 18 Linkage.
6.2.7 Placing Emergency Calls
Before using the emergency call service, ensure that your IP phone has the call source configured
and has emergency call service rights enabled. For any questions, contact your system administrator.
In the factory defaults of an IP phone, the emergency call service is not enabled for the IP phone.
You can still place emergency calls (for example, 911) when a phone is unregistered or
locked.
In the IMS+UC network environment, you can place LBS-enabled emergency calls. LBS is
short for location based service. When you are placing an LBS-enabled emergency call, the
emergency call center can obtain your current location in real time, so that further actions can
be taken promptly.
Using a Locked IP Phone
Step 1 Tap EMERGENCY CALL.
Directly pick up your phone or tap to enter the emergency call screen.
Step 2 Enter an emergency number.
Step 3 Tap .
----End
Using an Unregistered IP Phone
Step 1 Tap in the lower left corner of the screen.
Directly pick up your phone or tap to enter the emergency call screen.
Step 2 Enter an emergency number.
Step 3 Tap .
----End
6.2.8 Abbreviated Dialing
With abbreviated dialing enabled, the phone allows you to dial an abbreviated number instead
of a complete called number to connect to the called party.
eSpace 8950 IP Phone
User Guide 6 Call
Issue 01 (2014-06-30) Huawei Proprietary and Confidential
Copyright © Huawei Technologies Co., Ltd.
29
Before using the abbreviated dialing function, ensure that your account has been assigned the
abbreviated dialing service rights on the IP phone and server. For any questions, contact your system
administrator.
The abbreviated numbers are set on eSpace Portal. For detailed operations, see the eSpace UC
Product Documentation.
On the dialing screen, enter an abbreviated number and press Abbreviated Dial.
For example, if you have abbreviated 0571666666 to 1, dial 1 and tap Abbreviated Dial to
reach 0571666666.
6.3 Performing Operations During a Call
6.3.1 Viewing a Contact's Name, Department, and Profile Picture
6.3.2 Muting Calls
6.3.3 Switching Between the Handset, Speaker, and Headset
6.3.4 Performing Video-Related Operations During a Call
6.3.5 Two-Stage Dialing
6.3.6 Initiating Another Call While on a Call
6.3.1 Viewing a Contact's Name, Department, and Profile Picture
If you have saved detailed information about a contact, such as name, number, department,
and profile picture, in Contacts, the contact information is displayed on the screen when you
are placing a call to or receiving a call from the contact or when you are engaged in a call
with the contact.
If the calling party matches a contact in CorpDir, you can also see the contact's name,
department, and profile picture.
6.3.2 Muting Calls
After muting a call, you can hear the other party but the other party cannot hear you. The
mute function is effective in the handset, speaker, or headset mode.
Enabling the Mute Function
During a call, press or tap .
Disabling the Mute Function
During a call, press or tap .
The mute function is effective only during the call, but not when a call comes in or is placed on hold.
eSpace 8950 IP Phone
User Guide 6 Call
Issue 01 (2014-06-30) Huawei Proprietary and Confidential
Copyright © Huawei Technologies Co., Ltd.
30
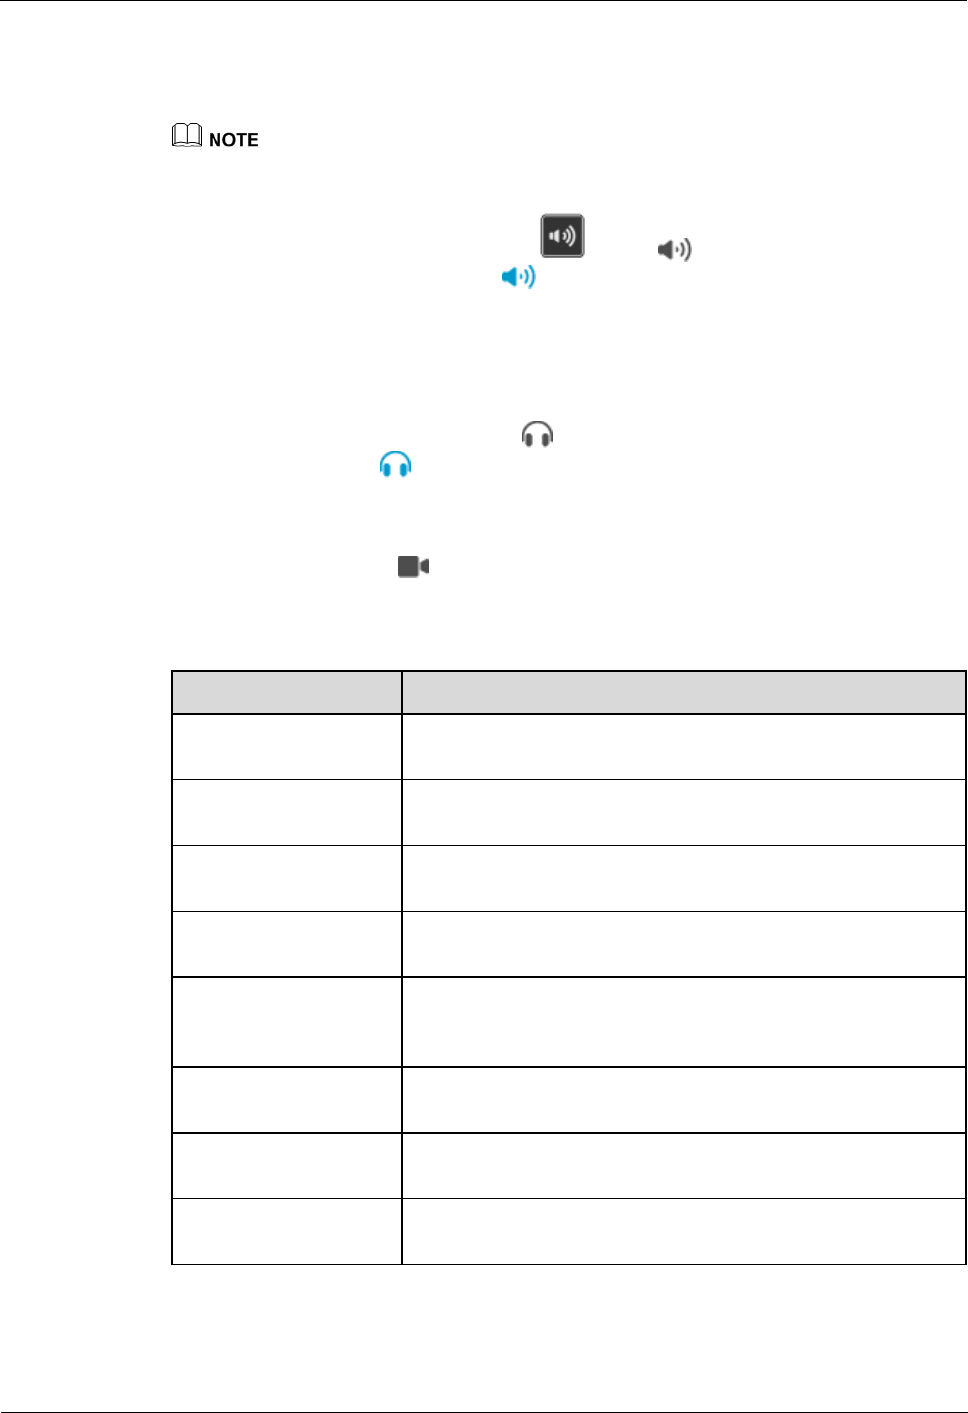
6.3.3 Switching Between the Handset, Speaker, and Headset
During a call, you can easily switch between the handset, speaker, and headset.
To switch to the headset, make sure that you have a headset ready.
To switch to the speaker
In the handset or headset mode, press or tap . eSpace 8950 is then switched
to the speaker mode. At the time, is displayed in the call control area.
To switch to the handset
In speaker or headset mode, you can pick up the handset and eSpace 8950 is then
switched to the handset mode.
To switch to the headset
In the handset or speaker mode, tap . eSpace 8950 is then switched to the headset
mode. At the time, is displayed in the call control area.
6.3.4 Performing Video-Related Operations During a Call
During a call, you can tap and then perform video-related operations described in Table
6-2.
Table 6-2 Video-related operations
If You Want to... Then...
Switch an audio call to a
video call
Tap Video Call. After your peer accepts your video call
request, you can see each other's video.
Switch a video call to an
audio call
Tap Audio Call. Then, the video call screen is closed, and the
audio call screen is displayed.
Stop video Tap Stop Video. Your IP phone stops your local camera, and
your peer can no longer view your video.
Start video Tap Start Video. Your IP phone starts your local camera, and
your peer can view your video.
Switch between the
small and large video
panes
Tap Switch. Then, the two video panes on the screen are
switched.
Disable self-video (local
video preview)
Tap Close Self-Video. Then, your local video is stopped.
Enable self-video (local
video preview)
Tap Show Self-Video. Then, your local video is started.
Move the small video
pane
Drag the small video pane to the desired location.
eSpace 8950 IP Phone
User Guide 6 Call
Issue 01 (2014-06-30) Huawei Proprietary and Confidential
Copyright © Huawei Technologies Co., Ltd.
31
6.3.5 Two-Stage Dialing
Two-stage dialing is usually used in interactive voice response (IVR). For example, when you
call a customer service center, you can hear the system announcements. Then, you dial a
number as prompted.
Step 1 During a call, tap .
Step 2 On the two-stage dialing screen, enter digits as prompted.
----End
6.3.6 Initiating Another Call While on a Call
While on a call, you can initiate another call, without the need to end the ongoing call.
Tap . On the dialing screen, enter a number and tap .
You can select contacts on the favorites list, contact list, or call history tab, and then tap .
You can also swipe down in the number area on the right of the status bar, tap an idle line button
(you can select different accounts), and select a contact or directly enter a number to call.
eSpace 8950 IP Phone
User Guide 7 Audio Source
Issue 01 (2014-06-30) Huawei Proprietary and Confidential
Copyright © Huawei Technologies Co., Ltd.
32
7 Audio Source
The audio source is the one you use to have audio conversations with others on your phone
after you tap Answer, Call, or a line button on your phone screen.
You can set the audio source on your phone LCD screen or web page. For detailed operations,
see Table 7-1.
Table 7-1 Audio source settings
If You Want to... Then...
Set the audio source on
the phone LCD screen
1. Tap . On the APPLICATION tab, tap Settings..
2. In the Call Settings area, tap Audio Source.
3. Tap to select the desired audio source.
Set the audio source on
the phone web page
1. Choose Call Settings > Audio Source.
2. Click to select the desired audio source.
3. Click Save.
eSpace 8950 supports multiple headsets, including Bluetooth headset, USB headset, and 3.5 mm headset.
The Bluetooth headset has the highest priority and the 3.5 mm headset has the lowest priority.
eSpace 8950 IP Phone
User Guide 8 Call Waiting
Issue 01 (2014-06-30) Huawei Proprietary and Confidential
Copyright © Huawei Technologies Co., Ltd.
33
8 Call Waiting
After the call waiting function is enabled, if the phone that is engaged in an active call has a
new incoming call, the phone LCD screen displays a message notifying the user of this new
incoming call.
Before using the call waiting function, ensure that a line is configured to support at least two
concurrent calls.
Before using the call waiting function, ensure that your account has been assigned the call waiting
service rights on the IP phone and server. For any questions, contact your system administrator.
How to Set
You can set the call waiting function on your phone LCD screen or web page. For detailed
operations, see Table 8-1.
Table 8-1 Call waiting setting
If You Want to... Then...
Set call waiting on the
phone LCD screen
1. Tap . On the APPLICATION tab, tap Settings..
2. In the Call Settings area, tap Call Waiting.
Set call waiting on the
web page
1. Choose Call Settings > Call Waiting.
2. Select Enable or Disable.
3. Click Save.
How to Use
Call waiting takes precedence over auto answer, call forward busy, and call forward no answer,
but call forward all and DND take precedence over call waiting.
If the phone that is engaged in an active call has a new incoming call, you can:

eSpace 8950 IP Phone
User Guide 8 Call Waiting
Issue 01 (2014-06-30) Huawei Proprietary and Confidential
Copyright © Huawei Technologies Co., Ltd.
34
Tap Answer.
Answer the new call and hold the original call.
In the UC2.X network environment, to answer a new incoming video call, tap Audio Answer or
Video Answer.
In the IMS+UC network environment, to answer a new incoming video call, tap Video Answer.
Tap Hang Up.
Hang up the new call and go back to the original call screen.
You can tap More and select Ignore, Transfer, or Voicemail.
If you tap Ignore, the ring of the new call is stopped
. Before the calling party hangs up, you can still tap Answer to answer the call.
If you tap Transfer, the incoming call is transferred to another party
.
If you tap Voicemail, the incoming call is transferred to the voicemail
.
Your phone number must have the call divert function enabled; otherwise, the incoming call notification
screen will not display the Transfer and Voicemail buttons.

eSpace 8950 IP Phone
User Guide 9 Call Hold
Issue 01 (2014-06-30) Huawei Proprietary and Confidential
Copyright © Huawei Technologies Co., Ltd.
35
9 Call Hold
During call hold, the two parties in the call cannot hear each other.
To place an ongoing call on hold, tap Hold.
To resume a call placed on hold, tap Resume.
If your phone has been assigned two or more calls and one or more of them are idle, you can
place a new call after you place your current call on hold. For details about how to place a
new call during call hold, see 6.3.6 Initiating Another Call While on a Call.
You cannot end a call that is placed on hold by yourself. If the call placed on hold is the only call on
your phone, the phone reminds you that there is a call on hold by means of periodic sound
notifications and the MWI.
When multiple calls are connected on the phone, you can tap the line button to hold or resume a call.
eSpace 8950 IP Phone
User Guide 10 Call Transfer
Issue 01 (2014-06-30) Huawei Proprietary and Confidential
Copyright © Huawei Technologies Co., Ltd.
36
10 Call Transfer
You can transfer an ongoing call to a third party.
A call can be transferred in any of the following three modes:
Blind transfer
A call is transferred to a third party directly without waiting for the third-party to start
ringing.
Semi-consult transfer (for UC2.X only)
A call is transferred to a third party after the phone of the third party rings.
Consult transfer
A call is transferred to a third party after the third party answers the call.
Before enabling the call transfer service for a number, ensure that the number has been assigned at
least two calls and that there are idle calls.
If call transfer fails, you can tap Resume to resume your call.
Blind Transfer
Step 1 Tap Transfer during a call.
The call is placed on hold.
Step 2 Enter a number and tap .
You can also select a number from the contact list, call history, or favorites list and then tap .
----End
Semi-consult Transfer (for UC2.X only)
Step 1 Tap Transfer during a call.
The call is placed on hold.
Step 2 Enter a number and tap .
You can also select a number from the contact list, call history, or favorites list and then tap .

eSpace 8950 IP Phone
User Guide 10 Call Transfer
Issue 01 (2014-06-30) Huawei Proprietary and Confidential
Copyright © Huawei Technologies Co., Ltd.
37
Step 3 When hearing the ring back tone, tap Transfer.
----End
Consult Transfer
Step 1 Tap Transfer during a call.
The call is placed on hold.
Step 2 Enter a number and tap .
After the third party answers the call, ask him or her whether to answer the call.
You can also select a number from the contact list, call history, or favorites list and then tap .
Step 3 If the third party accepts the call, tap Transfer.
----End
eSpace 8950 IP Phone
User Guide 11 Call Forward
Issue 01 (2014-06-30) Huawei Proprietary and Confidential
Copyright © Huawei Technologies Co., Ltd.
38
11 Call Forward
After the call forward function is enabled, incoming calls are forwarded to voicemail or a
specified phone number when the call forward conditions are met The phone does not ring or
log such incoming calls.
The phone supports four types of call forward, namely, call forward all, call forward busy, call
forward no answer, and call forward offline in descending order of priority.
Call forward all
All incoming calls are forwarded to voicemail or a specified phone number.
Call forward busy
When the phone is offhook, dialing, or in an active call, incoming calls are forwarded to
voicemail or a specified phone number.
Call forward no answer
When an incoming call is not answered within a specified period, the call is forwarded to
voicemail or a specified phone number.
Call forward offline
When the phone is offline, incoming calls are forwarded to voicemail or a specified
phone number.
Before using the call forward function, ensure that your account has been assigned the call forward
service rights on the IP phone and server. For any questions, contact your system administrator.
The call forward function is available only for the current number. For a new number, you must
enable the call forward function again.
In the IMS+UC network environment, incoming calls cannot be forwarded to voicemail.
You can set the call forward function on your phone LCD screen or web page. For detailed
operations, see Table 11-1.
Table 11-1 Call forward setting
If You Want to... Then...
Set call forward on the
phone LCD screen
Enable call forward
1. Tap . On the APPLICATION tab, tap Settings..
2. In the Call Settings area, tap the desired call forward mode.
NOTE

eSpace 8950 IP Phone
User Guide 11 Call Forward
Issue 01 (2014-06-30) Huawei Proprietary and Confidential
Copyright © Huawei Technologies Co., Ltd.
39
If You Want to... Then...
You can tap in Call Forward or in Quick Setting to quickly
access the setting screen. For details about how to add the Call Forward
and Quick Setting widgets, see 25.1.1 Call Forward and 25.1.3 Quick
Setting, respectively.
3. Select a call forward destination.
Voicemail: Incoming calls are forwarded to voicemail.
Number: Enter the number of a third party and tap OK.
NOTE
If the Number or Voicemail option is not displayed, contact your
system administrator.
If your Call Forward has setting records, you can directly select the
desired call forward mode.
Disable call forward
1. Tap . On the APPLICATION tab, tap Settings..
2. In the Call Settings area, deselect the call forward mode you
want to disable.
NOTE
You can also directly deselect the call forward mode in Call Forward.
Set call forward on the
web page
Enable call forward
1. Choose Call Settings > Call Forward.
2. Select a call forward mode and click Enable.
3. Select Voicemail or Number.
Voicemail: Incoming calls are forwarded to voicemail.
Number: Enter the number of a third party.
NOTE
If the Number or Voicemail option is not displayed, contact your system
administrator.
4. Click Save.
Disable call forward
1. Choose Call Settings > Call Forward.
2. Select a call forward mode and click Disable.
3. Click Save.
When the call forward function is set, is displayed in the status bar of the phone screen.
eSpace 8950 IP Phone
User Guide 12 Bluetooth Context-Awareness
Issue 01 (2014-06-30) Huawei Proprietary and Confidential
Copyright © Huawei Technologies Co., Ltd.
40
12 Bluetooth Context-Awareness
Before using the Bluethooth context-awareness function, ensure that your IP phone has the
call forward function enabled. For detailed operations, see 11 Call Forward.
You can set the Bluethooth context-awareness function on your phone LCD screen or web
page. For detailed operations, see Table 12-1.
Table 12-1 Bluetooth context-awareness setting
If You Want to... Then...
Set Bluethooth
context-awareness on
the phone LCD screen
1. Tap . On the APPLICATION tab, tap Settings..
2. In the Call Settings area, tap Bluetooth.
3. Tap to set the desired Bluethooth context-awareness mode.
Auto Call Forward: After the auto call forward function is
enabled, all incoming calls are automatically forwarded to the
preset number when the Bluetooth headset is disconnected
from the IP phone.
Set Bluethooth
context-awareness on
the phone web page
1. Choose Call Settings > Bluetooth.
2. Click Enable or Disable for the desired Bluetooth
context-awareness mode.
Auto Call Forward: After the auto call forward function is
enabled, all incoming calls are automatically forwarded to the
preset number when the Bluetooth headset is disconnected
from the IP phone.
3. Click Save.
eSpace 8950 IP Phone
User Guide 13 DND
Issue 01 (2014-06-30) Huawei Proprietary and Confidential
Copyright © Huawei Technologies Co., Ltd.
41
13 DND
After the DND function is enabled, all incoming calls are automatically rejected but you can
still place calls.
Before using the Server DND function, ensure that your account has been assigned the Server DND
service rights on the IP phone and server. For any questions, contact your system administrator.
The Server DND function is available only for the current number. For a new number, you must
enable the Server DND function again.
Setting DND
In the UC2.X network environment, you can set the DND function on your phone LCD screen
or web page. For detailed operations, see Table 13-1.
Table 13-1 DND setting
If You Want to... Then...
Set DND on the phone
LCD screen
1. Tap . On the APPLICATION tab, tap Settings..
2. In the Call Settings area, tap DND Settings.
3. Tap a desired DND mode.
Server DND: The phone does not receive any calls.
Local DND: Tap either Call Reject or Ringer Off.
Set DND on the web
page
1. Choose Call Settings > DND.
2. Select a DND mode.
Server DND: The phone does not receive any calls.
Local DND: Select either Call Reject or Ringer Off.
3. Click Save.
Enabling or Disabling DND
You can use either of the following methods to enable or disable DND:
Tap in Quick Setting to enable DND. Tap to disable DND.

eSpace 8950 IP Phone
User Guide 13 DND
Issue 01 (2014-06-30) Huawei Proprietary and Confidential
Copyright © Huawei Technologies Co., Ltd.
42
Tap > Settings > PERSONAL > Account > Status Settings and tap to
enable DND. Tap any other states to disable DND.
In the IMS+UC network environment, you can swipe down in the profile picture area of the status bar
and tap to enable DND. Tap any other states to disable DND.
After the DND function is enabled, is displayed in the status bar of the phone screen.
eSpace 8950 IP Phone
User Guide 14 Advanced Secretary
Issue 01 (2014-06-30) Huawei Proprietary and Confidential
Copyright © Huawei Technologies Co., Ltd.
43
14 Advanced Secretary
A line is shared by a manager and secretary. When a call for the manager comes in, the
secretary answers the call and decides whether to forward the call to the manager. The
manager can view all incoming calls and directly answer important calls, without the call
transfer by the secretary.
Before using the advanced secretary function, ensure that your account has been assigned the advanced
secretary service rights on the IP phone and server. For any questions, contact your system administrator.
Assume that User A is the manager of a company, and User B and User C are User A's
secretaries. Figure 14-1 describes line mappings between A, B, and C.
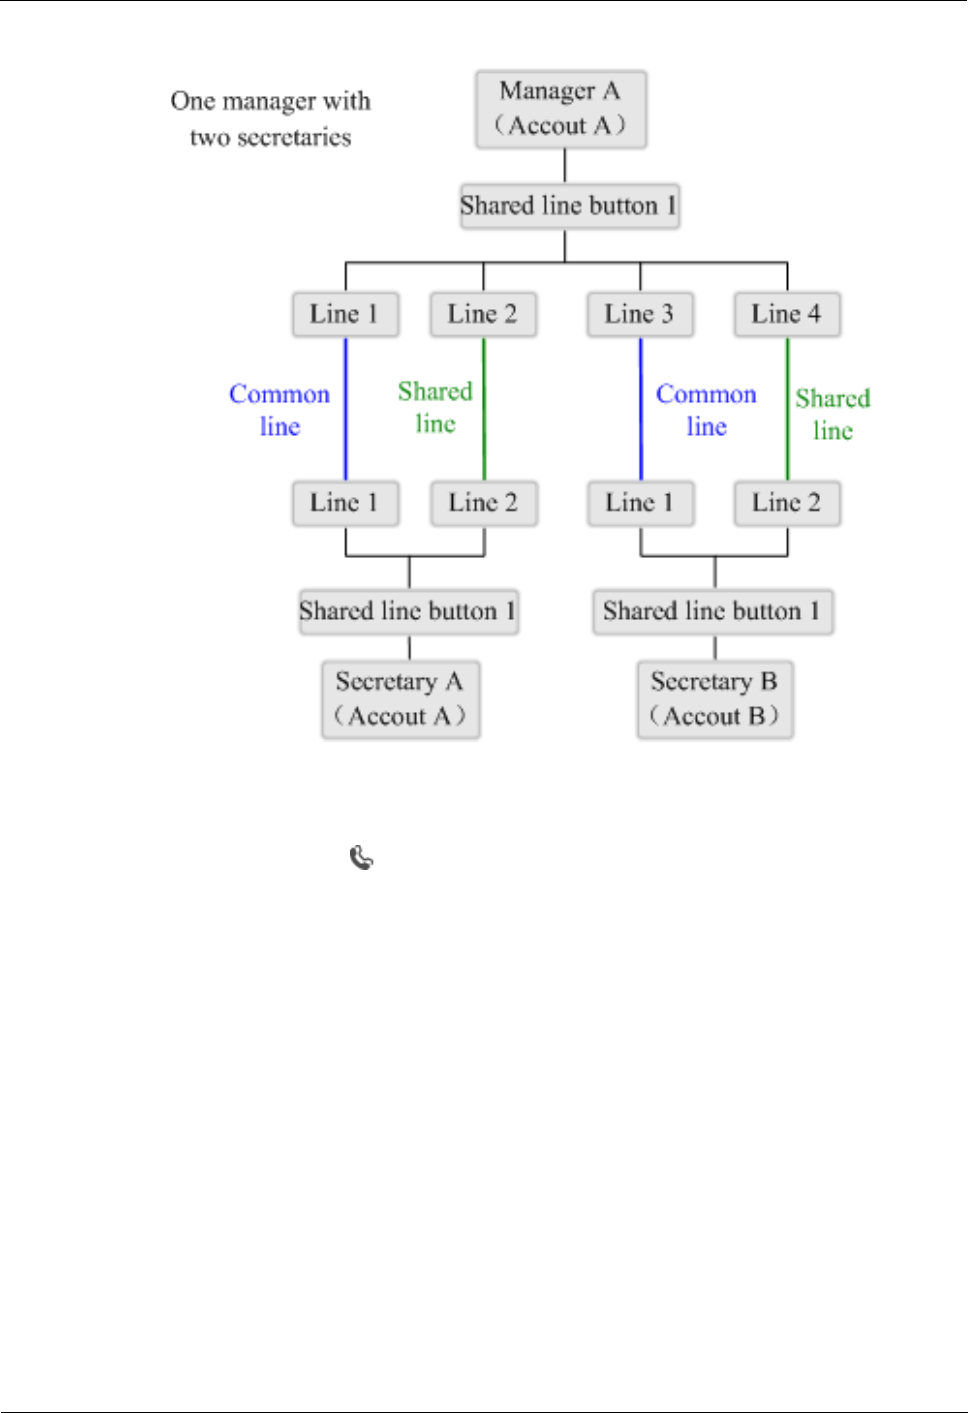
eSpace 8950 IP Phone
User Guide 14 Advanced Secretary
Issue 01 (2014-06-30) Huawei Proprietary and Confidential
Copyright © Huawei Technologies Co., Ltd.
44
Figure 14-1 Line mappings between A, B, and C
The manager's line and secretaries' lines are shared. When a user calls the shared line, the
phones of both the manager and secretaries ring at the same time. After a shared line is
configured, the icon is displayed for the line button.
A Third Party Calls a Shared Line and the Manager Directly Answers the Call
A third-party user D calls A who then directly answers the call.
Step 1 D calls A.
The phones of A, B, and C ring simultaneously.
Step 2 A directly answers the call, because this call is from a VIP.
The phones of B and C stop ringing. The shared line is in talking state, which is displayed on
the phones of A, B, and C.
Step 3 A or D hangs up to end the call.
The shared line is in idle state, which is displayed on the phones of A, B, and C.
----End

eSpace 8950 IP Phone
User Guide 14 Advanced Secretary
Issue 01 (2014-06-30) Huawei Proprietary and Confidential
Copyright © Huawei Technologies Co., Ltd.
45
A Third Party Calls a Shared Line and a Secretary Answers and Transfers the
Call to the Manager
A third-party user D calls A. B answers the call and transfers it to A.
Step 1 D calls A.
The phones of A, B, and C ring simultaneously.
Step 2 B answers the call.
The phones of A and C stop ringing. The shared line is in talking state, which is displayed on
the phones of A, B, and C.
Step 3 After conversation with D, B places the call on hold and asks A whether to answer the call
using a common line (not a shared line).
Step 4 A agrees to answer the call. Then A presses the shared line button, selects the line to reach D,
and tap Retrieve to have a conversation with D.
----End
When the Manager or a Secretary Places a Call on Hold, They Can Retrieve the
Call for Each Other
If the manager's call is placed on hold, the secretary can retrieve the call for the manager. The
manager can also do this for the secretary if the secretary's call is placed on hold.
In this example, A can tap Hold to place a call on hold, and then a Retrieve icon is displayed
on the phone of B or C. B or C can press the shared line button, select the line to reach D, and
tap Retrieve to have a conversation with D.
When the Manager or a Secretary Is on a Call, They Can Start the Private Hold
Service to Stop Others from Retrieving the Call
When the manager or a secretary is on a call over the shared line, they can start the private
hold service so that others cannot retrieve the call.
In this example, A can tap Private Hold to place a call on hold, and then a Retrieve icon is
not displayed on the phone of B or C.
eSpace 8950 IP Phone
User Guide 15 Intercom
Issue 01 (2014-06-30) Huawei Proprietary and Confidential
Copyright © Huawei Technologies Co., Ltd.
46
15 Intercom
The intercom function enables users within an enterprise to easily communicate with each
other.
Before using the intercom function, ensure that your account has been assigned the intercom service
rights on the IP phone and server and that the intercom function has been configured for an idle line
button. For any questions, contact your system administrator.
When the intercom function is configured, the corresponding line button is displayed as an
intercom button, and the intercom icon is displayed.
The intercom function takes precedence over DND and call waiting, but call forward all takes
precedence over intercom.
Placing Intercom Calls
Table 15-1 describes the detailed operations for placing intercom calls.
Table 15-1 Placing intercom calls
On Your IP
Phone, If...
Then...
The target
number has been
set
Tap the intercom button directly to place an intercom call.
The target
number has not
been set
Tap the intercom button. The dialing screen is displayed. You can
directly enter a number or select a number from your contact list,
corporate directory, or call history to place an intercom call.
An intercom call
is ongoing and
you start a new
intercom call
The phone ends the ongoing intercom call first and starts a new call.
eSpace 8950 IP Phone
User Guide 15 Intercom
Issue 01 (2014-06-30) Huawei Proprietary and Confidential
Copyright © Huawei Technologies Co., Ltd.
47
On Your IP
Phone, If...
Then...
A common call is
ongoing and you
start an intercom
call
The phone places the common call on hold first.
Intercom Call in Progress
When an intercom call is set up, the phone displays the intercom call screen, on which only
the hangup button is available.
The ongoing intercom call will be automatically ended if you place or receive a new call.
Answering Intercom Calls
You can configure the auto answer and auto mute functions on the phone web page, which
helps you answer intercom calls.
To set auto answer
Step 1 Choose Call Settings > Intercom.
Step 2 Select Enable or Disable for Auto Answer.
Step 3 Click Save.
----End
To set auto mute
Step 1 Choose Call Settings > Intercom.
Step 2 Select Enable or Disable for Auto Mute.
Step 3 Click Save.
----End
Table 15-2 describes the detailed operations for answering intercom calls.
Table 15-2 Answering intercom calls
On Your IP
Phone, If...
Then...
Auto answer has
not been enabled
Hear the incoming call tone and see the incoming call screen on the IP
phone when a call comes in.
Auto answer has
not been enabled
and a common
call is ongoing
When an intercom call comes in, you can hear the incoming call
notification tone. After you answer the intercom call, the existing
common call is placed on hold.

eSpace 8950 IP Phone
User Guide 15 Intercom
Issue 01 (2014-06-30) Huawei Proprietary and Confidential
Copyright © Huawei Technologies Co., Ltd.
48
On Your IP
Phone, If...
Then...
Auto answer has
been enabled and
a common call is
ongoing
You can hear the peer parties of the intercom call and the common call
at the same time
Auto mute has
not been enabled
A two-way intercom call is set up after you answer the call.
Auto mute has
been enabled
A one-way intercom call is set up after you answer the call.
You need to press again or tap to resume the two-way
intercom call.
eSpace 8950 IP Phone
User Guide 16 Distinctive Ring
Issue 01 (2014-06-30) Huawei Proprietary and Confidential
Copyright © Huawei Technologies Co., Ltd.
49
16 Distinctive Ring
Before using the distinctive ring function, ensure that your account has been assigned the distinctive ring
service rights on the IP phone and server. For any questions, contact your system administrator.
You can set distinctive rings for internal and external calls.
For details about how to set the distinctive ring service, see 26.2.1 Sound.
The ring priorities in descending order are as follows: contact ring, group ring, internal or
external call ring, and default ring.
In the IMS+UC environment, the IP phone supports distinctive rings for contacts both inside and outside
of the IMS group.
eSpace 8950 IP Phone
User Guide 17 Auto Callback (for IMS+UC)
Issue 01 (2014-06-30) Huawei Proprietary and Confidential
Copyright © Huawei Technologies Co., Ltd.
50
17 Auto Callback (for IMS+UC)
When the number you dialed is busy, you can enable the auto callback (ACB) function. After
that, the system automatically calls you and the desired number to set up a call once the
desired number is idle.
Using the ACB Function
Before using the ACB function, ensure that your account has been assigned the ACB service rights on
the IP phone and server. For any questions, contact your system administrator.
Step 1 If the party you are calling is busy, you can register the ACB service as prompted.
If ACB registration is successful, you will hear a success announcement.
Step 2 When detecting that the peer party is available, the system initiates a call to you.
Step 3 After you answer the call, the system initiates a call to the peer party.
Step 4 After the peer party answers the call, the call between you and the peer party is set up.
----End
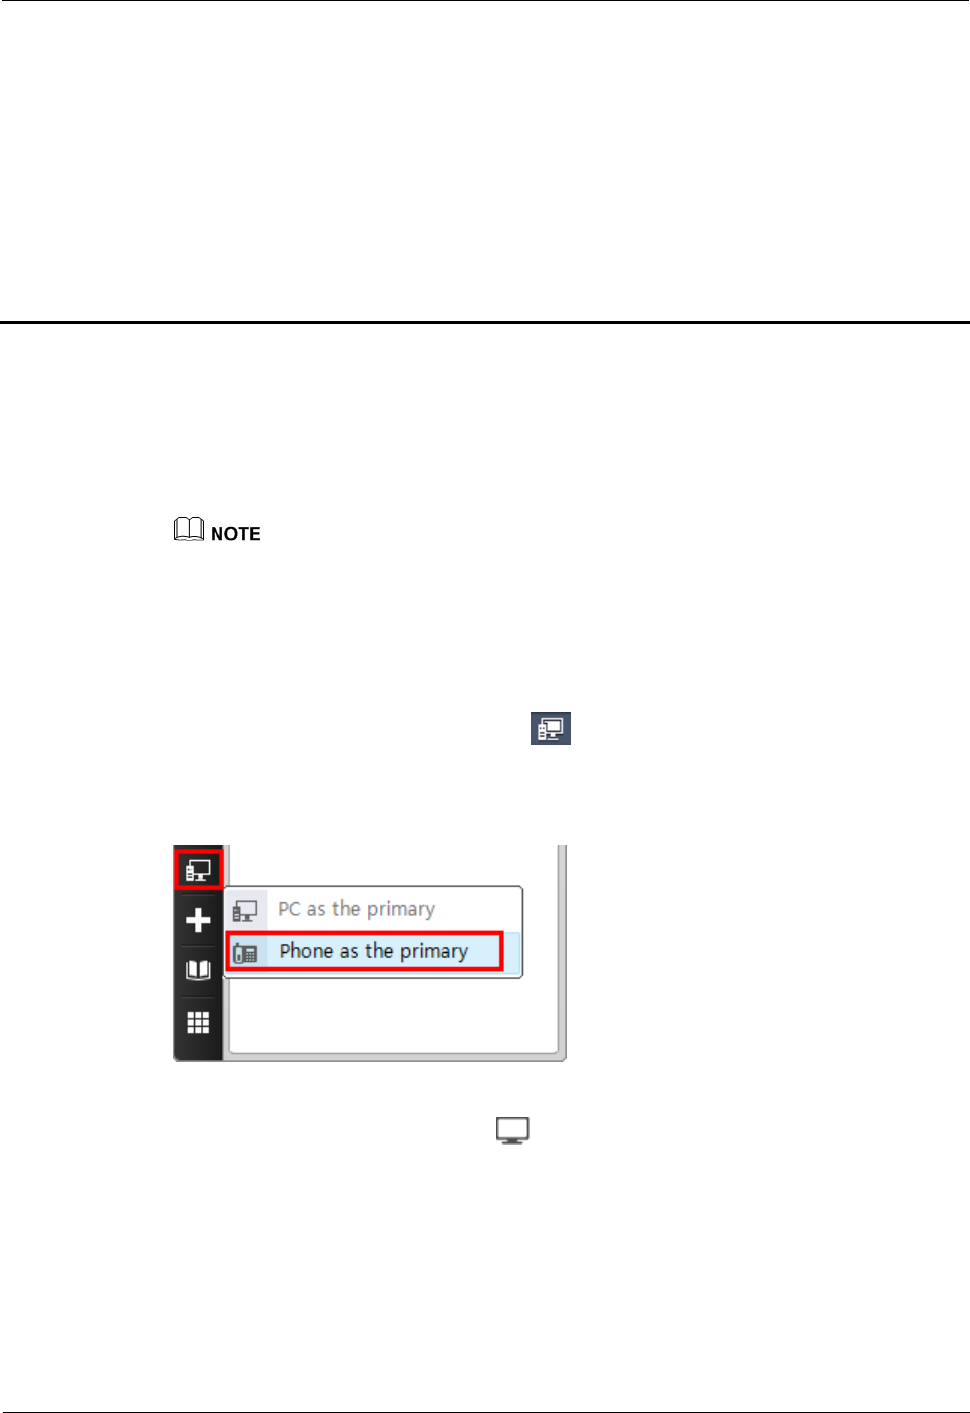
eSpace 8950 IP Phone
User Guide 18 Linkage
Issue 01 (2014-06-30) Huawei Proprietary and Confidential
Copyright © Huawei Technologies Co., Ltd.
51
18 Linkage
The linkage function is to link your IP phone with an eSpace Desktop (an eSpace PC client).
With the linkage function enabled, the status between your IP phone and the linked eSpace
Desktop is synchronized, and also you can use the linked eSpace Desktop to place, answer, or
end calls for your IP phone.
Before using the linkage function, ensure that your account has been assigned the linkage service
rights on the IP phone and server. For any questions, contact your system administrator.
The operations of placing, answering, and ending calls are performed using the linked eSpace
Desktop, but your IP phone carries the audio.
Enabling Linkage
After you log in to eSpace Desktop, click on the left of the eSpace Desktop screen and
choose Phone as the primary, as shown in Figure 18-1.
Figure 18-1 Screen for enabling linkage in the UC2.0 or IMS+UC network environment
After the linkage function is enabled, is displayed for the line button corresponding to
the phone number.
Using Linkage
After linkage is enabled, you can perform the operations described in the following table.

eSpace 8950 IP Phone
User Guide 18 Linkage
Issue 01 (2014-06-30) Huawei Proprietary and Confidential
Copyright © Huawei Technologies Co., Ltd.
52
Table 18-1 Using linkage
If You Want to Use
the Linked eSpace
Desktop to...
Then...
Place a call for your IP
phone
Enter and dial the number of the called party on the linked
eSpace Desktop.
Your IP phone and the linked eSpace Desktop both display the
calling screen/window.
NOTE
Ensure that the linkage-enabled number of your IP phone has an idle
line in this scenario.
Perform a call pickup When the linkage-enabled account of your IP phone has an
incoming call, your IP phone and the linked eSpace Desktop
both display the incoming call notification screen/window.
Click Answer on the linked eSpace Desktop.
End a call for your IP
phone
When the linkage-enabled account of your IP phone is engaged
in a call, your IP phone and the linked eSpace Desktop both
display the talking screen/window.
Click Hang Up on the linked eSpace Desktop.
Two-stage dialing When the linkage-enabled account of your IP phone is engaged
in a call, your IP phone and the linked eSpace Desktop both
display the talking screen/window.
Open the keypad for two-stage dialing on the linked eSpace
Desktop and perform two-stage dialing.
Start a conference for
your IP phone (for
IMS+UC)
Use the conference function on the linked eSpace Desktop to
start a conference. Then, your IP phone displays the conference
screen.
During the conference, you can also use the linked eSpace
Desktop to add, delete, or mute participants, start a data
conference, place the conference on hold, or end the
conference.
NOTE
On the phone LCD screen, you can add, delete, or mute participants,
place the conference on hold, or end the conference.
Blind transfer When the linkage-enabled account of your IP phone is engaged
in a call, your IP phone and the linked eSpace Desktop both
display the talking screen/window.
Click Transfer and enter the transfer-to number on the linked
eSpace Desktop.
View the phone status The phone status is displayed in real time on the linked eSpace
Desktop when your perform operations over the first line for
the linkage-enabled number of your IP phone. The phone
status information includes onhook/offhook status,
incoming/outgoing call notification, call process, and
conference information.
NOTE

eSpace 8950 IP Phone
User Guide 18 Linkage
Issue 01 (2014-06-30) Huawei Proprietary and Confidential
Copyright © Huawei Technologies Co., Ltd.
53
If You Want to Use
the Linked eSpace
Desktop to...
Then...
The eSpace Desktop displays the status of only the first line for the
linkage-enabled number of your IP phone in real time.
eSpace 8950 IP Phone
User Guide 19 Mobile Connect (for IMS+UC)
Issue 01 (2014-06-30) Huawei Proprietary and Confidential
Copyright © Huawei Technologies Co., Ltd.
54
19 Mobile Connect (for IMS+UC)
After the mobile connect function is enabled, the phone can transfer a call to another phone or
a mobile phone, and resume the transferred call if necessary.
Before using the mobile connect function, ensure that your account has been assigned the mobile
connect service rights on the IP phone and server. For any questions, contact your system administrator.
Setting the Destination Number for Mobile Connect
In the IMS+UC environment, you can set the destination number for mobile connect only
using eSpace Portal. For detailed operations, see the eSpace UC Product Documentation.
Switching an Ongoing Call to Another IP Phone or a Mobile Phone
Step 1 On the talking screen, tap Switch.
Step 2 Enter the number of another IP phone or the number of a mobile phone and tap .
If the destination number for mobile connect has been set, tap Switch. The IP phone then automatically
calls this number.
Step 3 Use the specified IP phone or mobile phone to answer the call.
----End
Taking Back a Call from Another IP Phone or a Mobile Phone
To take back a call, tap in Quick Setting on the home screen of your IP phone.
Taking back a call as the calling party is not supported.
eSpace 8950 IP Phone
User Guide 20 Extension Mobility
Issue 01 (2014-06-30) Huawei Proprietary and Confidential
Copyright © Huawei Technologies Co., Ltd.
55
20 Extension Mobility
Extension mobility allows you to use your IP phone's extension number and password to log
in to any other IP phone of the eSpace 8950 series. Your configurations (such as the call
history and contacts) and services to which you have subscribed will be automatically
downloaded to the IP phone you newly log in.
If the IP phone you newly log in is a different model from your original one, only the functions that
the new login IP phone supports take effect.
In extension mobility, only the primary account (first account) of the original IP phone can be used
to log in to another IP phone.
Step 1 On the phone login screen, enter the account and password.
If the IP phone you want to log in has any registered account, log out of the account first.
Step 2 Tap Log In.
If the current login number is a roaming number (which is a number logged in to another phone for
extension mobility), the phone automatically logs out of this number and returns to the login screen
when a specific period (configured by your system administrator) expires.
In the IMS+UC network environment, if the phone has registered a number before the roaming
number is logged in, the phone is automatically logged in using the registered number after the
roaming number is logged out.
----End
eSpace 8950 IP Phone
User Guide 21 Contacts
Issue 01 (2014-06-30) Huawei Proprietary and Confidential
Copyright © Huawei Technologies Co., Ltd.
56
21 Contacts
21.1 My Contacts
21.1.1 Adding Contacts
21.1.2 Searching for Contacts
21.1.3 Viewing Contact Details
21.1.4 Editing Contacts
21.1.5 Deleting Contacts
21.1.6 Exporting Contacts
21.1.7 Importing Contacts
21.1.8 Clearing Contacts
21.1.1 Adding Contacts
You can add contacts on the phone LCD screen or web page.
Table 21-1 Adding contacts
If You Want
to...
Then...
Add contacts
on the phone
LCD screen
1. Tap .
2. On the Contacts tab, tap .
3. Enter contact information, such as name and office number.
NOTE
You can tap the contact's number type and modify it.
on the left of a contact's number indicates that the number is the primary
number. If a contact has only one number, this number is the primary number. If
a contact has multiple numbers, you can set one of them as the primary number.
4. Optional: You can tap a contact's profile picture icon and set a profile
picture for the contact.
NOTE
By default, the system has ten profile pictures.
eSpace 8950 IP Phone
User Guide 21 Contacts
Issue 01 (2014-06-30) Huawei Proprietary and Confidential
Copyright © Huawei Technologies Co., Ltd.
57
If You Want
to...
Then...
5. Tap Done.
Add contacts
on the phone
web page
1. Choose Preferences > Contacts.
2. On the My Contacts tab, click Add.
3. Enter contact information, such as name and office number.
NOTE
on the right of a contact's number indicates that the number is the primary
number. If a contact has only one number, this number is the primary number. If a
contact has multiple numbers, you can set one of them as the primary number.
4. Optional: You can click Edit next to a contact's profile picture icon
and set a profile picture for the contact.
5. Click Finish.
21.1.2 Searching for Contacts
Step 1 Tap .
Step 2 Tap and enter keywords of a contact, for example, the name or phone number.
For example, if you want to search for John, you can enter John or J in the search text box.
You can swipe up or down in the contact list to find the desired contact.
When you are using the search text box, the search results are quickly displayed and the matched
texts in the search results become blue.
If you do not find the desired contact in Contacts, tap Search the corporate directory to find him
or her in the corporate directory.
----End
21.1.3 Viewing Contact Details
You can view contact details on the phone LCD screen or web page.
Table 21-2 Viewing contact details
If You Want
to...
Then...
View contact
details on the
phone LCD
screen
1. Tap .
2. Tap the desired contact.
Detailed contact information is displayed on the right.
View contact
details on the
phone web
page
1. Choose Preferences > Contacts.
2. On the My Contacts tab, click the desired contact.
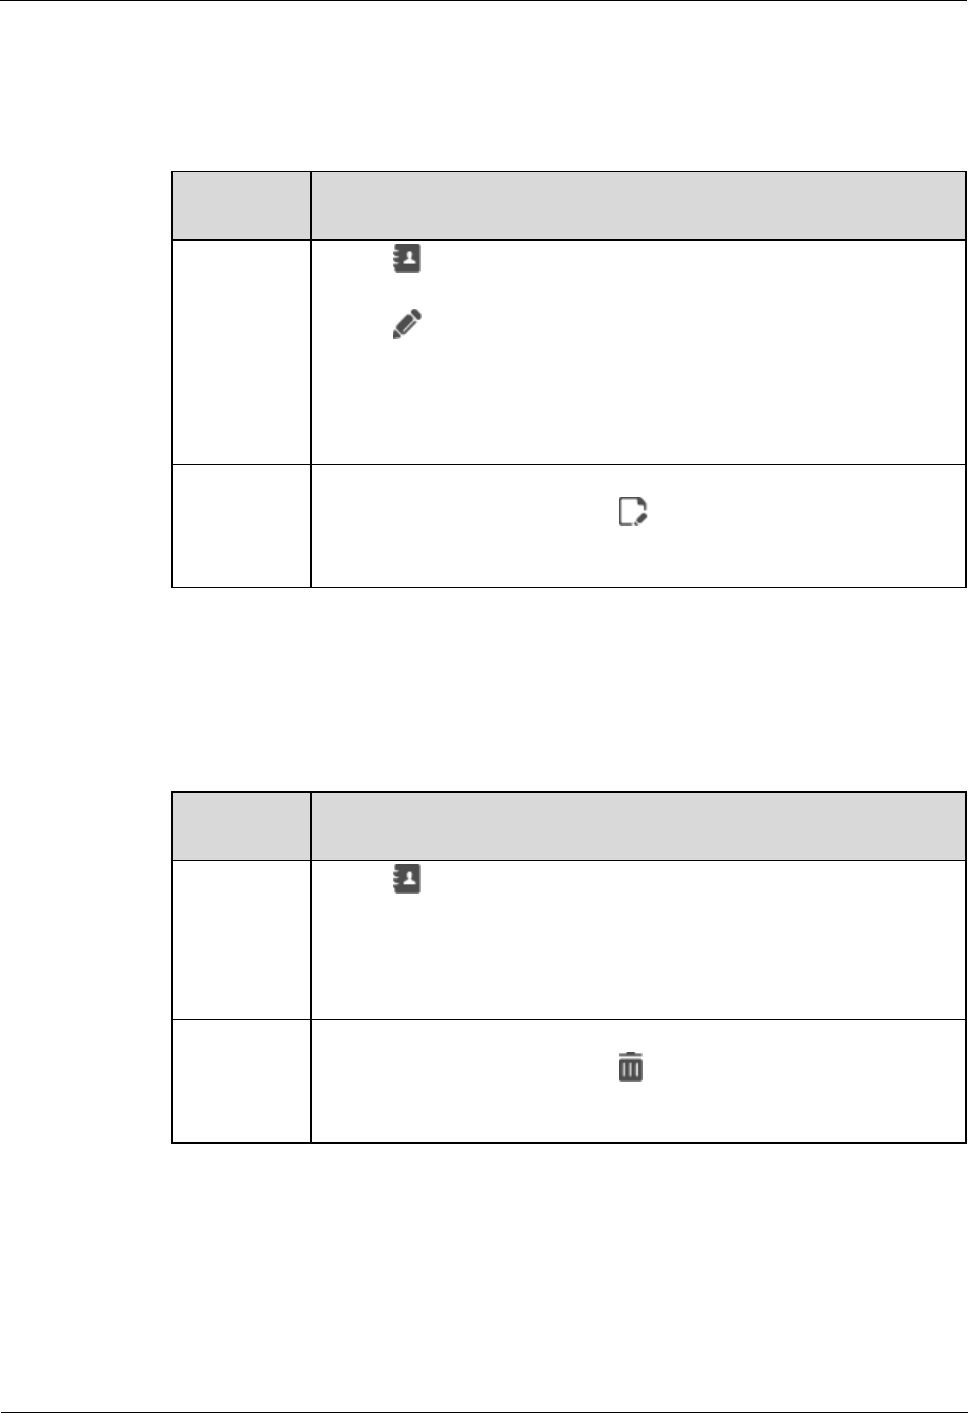
eSpace 8950 IP Phone
User Guide 21 Contacts
Issue 01 (2014-06-30) Huawei Proprietary and Confidential
Copyright © Huawei Technologies Co., Ltd.
58
21.1.4 Editing Contacts
You can edit contacts on the phone LCD screen or web page.
Table 21-3 Editing contacts
If You Want
to...
Then...
Edit contacts
on the phone
LCD screen
1. Tap .
2. On the Contacts tab, tap the contact you want to edit.
3. Tap on the upper right corner.
NOTE
You can tap and hold a contact. On the screen that is displayed, select Edit.
4. Edit contact information.
5. Tap Done.
Edit contacts
on the phone
web page
1. Choose Preferences > Contacts.
2. On the My Contacts tab, click on the right of the contact you
want to edit.
3. Edit contact information and click Finish.
21.1.5 Deleting Contacts
You can delete contacts on the phone LCD screen or web page.
Table 21-4 Deleting contacts
If You Want
to...
Then...
Delete
contacts on
the phone
LCD screen
1. Tap .
2. Tap and hold a contact. On the screen that is displayed, select Del.
3. In the dialog box that is displayed, tap Delete.
NOTE
You can delete a contact on the Edit screen.
Delete
contacts on
the phone
web page
1. Choose Preferences > Contacts.
2. On the My Contacts tab, click on the right of the contact you want
to delete.
3. In the dialog box that is displayed, click OK.
21.1.6 Exporting Contacts
You can export contacts in CSV or vCard format on the phone LCD screen or web page.
eSpace 8950 IP Phone
User Guide 21 Contacts
Issue 01 (2014-06-30) Huawei Proprietary and Confidential
Copyright © Huawei Technologies Co., Ltd.
59
Table 21-5 Exporting contacts
If You Want
to...
Then...
Export
contacts on
the phone
LCD screen
1. Tap .
2. On the Contacts tab, tap and select Export Contacts.
3. Tap the contact file to export.
Export
contacts on
the phone
web page
1. Choose Preferences > Contacts.
2. On the My Contacts tab, click Export.
3. Select the contact file format and click Export.
21.1.7 Importing Contacts
You can import contacts in CSV or vCard format on the phone LCD screen or web page.
Table 21-6 Importing contacts
If You Want
to...
Then...
Import
contacts on
the phone
LCD screen
1. Connect a USB device or SD card storing the contact file to the IP
phone.
2. Tap .
3. On the Contacts tab, tap and select Import.
4. Tap the contact file to import.
Import
contacts on
the phone
web page
1. Choose Preferences > Contacts.
2. On the My Contacts tab, click Import.
3. Double-click the contact file to import.
Contacts saved in Windows Outlook of the English version can be imported.
When you import a modified .csv contact file to the phone as a new one, ensure that the contact file
information is correct and the encoding format is UTF-8.
For example, you can open the .csv file using Excel, change the cell format to the text format, edit
the contact information, and save the file in the CSV (comma delimited) format. After the file is
saved, open the file in Notepad and change the file encoding format to UTF-8.
21.1.8 Clearing Contacts
You can clear contacts on the phone web page.
eSpace 8950 IP Phone
User Guide 21 Contacts
Issue 01 (2014-06-30) Huawei Proprietary and Confidential
Copyright © Huawei Technologies Co., Ltd.
60
Clearing contacts will delete contact information in all contact groups.
Step 1 On the web page, choose Preferences > Contacts.
Step 2 On the Contacts tab, click Clear.
Step 3 In the dialog box that is displayed, click OK.
----End
21.2 Groups
21.2.1 Adding Groups and Members
21.2.2 Editing Groups
21.2.3 Deleting Groups
21.2.1 Adding Groups and Members
You can add groups and members on the phone LCD screen or web page. You can add a
maximum of 32 groups. Each group can have a maximum of 400 members.
Table 21-7 Adding groups and members
If You Want
to...
Then...
Add groups
and members
on the phone
LCD screen
1. Tap .
2. On the Groups tab, tap .
3. Enter a group name.
4. Optional: Select Ringtone.
5. Select contacts.
6. Tap Done.
Add groups
and members
on the phone
web screen
1. Choose Preferences > Contacts.
2. On the Groups tab, click Add Group.
3. Enter a group name.
4. Select contacts in Select Group Member.
5. Click Finish.
21.2.2 Editing Groups
You can edit groups on the phone LCD screen or web page.
eSpace 8950 IP Phone
User Guide 21 Contacts
Issue 01 (2014-06-30) Huawei Proprietary and Confidential
Copyright © Huawei Technologies Co., Ltd.
61
Table 21-8 Editing groups
If You Want
to...
Then...
Edit groups
on the phone
LCD screen
1. Tap .
2. On the Groups tab, tap the group you want to edit.
3. Tap .
4. Edit group information.
5. Tap Done.
Edit groups
on the phone
web page
1. Choose Preferences > Contacts.
2. On the Groups tab, click the group you want to edit.
3. Click Edit.
4. Edit group information and click Finish.
21.2.3 Deleting Groups
You can delete groups on the phone LCD screen or web page.
Table 21-9 Deleting groups
If You Want
to...
Then...
Delete groups
on the phone
LCD screen
1. Tap .
2. On the Groups tab, tap the group you want to delete.
3. Tap and select Delete.
4. In the dialog box that is displayed, tap Delete.
Delete groups
on the phone
web page
1. Choose Preferences > Contacts.
2. On the Groups tab, click the group you want to delete.
3. Click Delete.
4. In the dialog box that is displayed, click Finish.
21.3 Corporate Directory
21.3.1 Searching for Contacts
21.3.2 Adding Contacts in the Corporate Directory to My Contacts
21.3.1 Searching for Contacts
Before using the corporate directory, ensure that your account has been assigned the corporate directory
service rights on the IP phone and server. For any questions, contact your system administrator.
Step 1 Tap .
eSpace 8950 IP Phone
User Guide 21 Contacts
Issue 01 (2014-06-30) Huawei Proprietary and Confidential
Copyright © Huawei Technologies Co., Ltd.
62
Step 2 On the CorpDir tab, enter keywords of a contact, for example, the name or phone number, in
the search text box.
For example, if you want to search for John, you can enter John or J in the search text box.
Step 3 Tap Search.
You can swipe up or down in the contact list to find the desired contact.
In the IMS+UC network environment, you can tap the department list under the corporate directory
and find the department for the contact you want to search for. This approach helps you quickly find
the desired contact.
----End
21.3.2 Adding Contacts in the Corporate Directory to My Contacts
You can add a contact in the corporate directory to my contacts. This helps you quickly find
or edit the contact subsequently.
Step 1 Tap .
Step 2 On the CorpDir tab, tap a contact.
Step 3 On the contact details screen, tap Save as New Contact.
Step 4 Edit contact information.
Step 5 Tap Done.
----End
eSpace 8950 IP Phone
User Guide 22 Call History
Issue 01 (2014-06-30) Huawei Proprietary and Confidential
Copyright © Huawei Technologies Co., Ltd.
63
22 Call History
22.1 Viewing Call Records
eSpace 8950 records all received, missed, and placed calls.
Table 22-1 describes different call record icons.
Table 22-1 Call record icons
Icon Description
Indicates a missed audio call record.
Indicates a received audio call record.
Indicates a placed audio call record.
Indicates a missed video call record.
Indicates a received video call record.
Indicates a placed video call record.
22.2 Viewing Call Details
Step 1 Tap .
Step 2 On the All or Missed tab, tap a desired call record.
The IP phone combines consecutive call records for the same number into one, and only
displays the call type of the latest record on the call history screen.
Received and placed call records are merged together, and missed call records are
merged together.
Audio call records and video call records are separately merged and displayed.
----End

eSpace 8950 IP Phone
User Guide 22 Call History
Issue 01 (2014-06-30) Huawei Proprietary and Confidential
Copyright © Huawei Technologies Co., Ltd.
64
22.3 Deleting Call Records
Step 1 Tap .
Step 2 On the All or Missed tab, tap the call record you want to delete.
Step 3 Select Delete. In the dialog box that is displayed, tap OK.
----End
22.4 Clearing Call Records
Step 1 Tap .
Step 2 Tap and select Clear.
Step 3 In the dialog box that is displayed, tap OK.
----End
22.5 Adding an Unknown Number to Contacts
If a call is from unknown person, you can add the person to your contacts on the call record
details screen.
Tap Save as New Contact to add the person to your local contacts.
Tap Add to Existing Contact to add the person to your existing contacts.
eSpace 8950 IP Phone
User Guide 23 Voicemail
Issue 01 (2014-06-30) Huawei Proprietary and Confidential
Copyright © Huawei Technologies Co., Ltd.
65
23 Voicemail
The voicemail function allows the calling party to leave voice messages so that you will not
miss any calls.
Setting Voicemail
Before using the voicemail function, ensure that your account has been assigned the
call-forward-to-voicemail service rights, one-button-to-voicemail service rights, or both. For any
questions, contact your system administrator.
In the IMS+UC network environment, the call-forward-to-voicemail function is not supported.
In the UC2.X network environment, you can enable the call forward function and set the call
forward to voicemail. For details, see 11 Call Forward.
In the IMS+UC network environment, you can set whether the voicemail is visual on the
phone web page.
In the UC2.X network environment, visual voicemail is not supported.
After you set a visual voicemail, you can perform operations on voice messages, such as
fast forward, rewind, pause, and resume.
After you set a non visual voicemail, you can perform only few operations on voice
messages, such as retrieve and delete.
Step 1 One the web page, choose Call Settings > Voicemail.
Step 2 Select Enable or Disable for Visual Voicemail.
Step 3 Click Save.
----End
Understanding Voice Message Notification Modes
The red number in the upper right corner of the voicemail icon in the navigation area of
the home screen indicates the number of unread voice messages. For example,
indicates that there are three unread voice messages related to all accounts.
The status bar of the IP phone displays the voicemail icon. The notification screen shows
information about unread voice messages.
The MWI LED of the IP phone blinks every 3 seconds.
eSpace 8950 IP Phone
User Guide 23 Voicemail
Issue 01 (2014-06-30) Huawei Proprietary and Confidential
Copyright © Huawei Technologies Co., Ltd.
66
Retrieving Voice Messages
Non Visual Voicemail
If your account has not been assigned the visual voicemail service rights, you can
perform operations described in the following table.
Table 23-1 Non visual voicemail
If You Want to... Then...
View voice
messages
On the home screen, tap to access the voicemail screen.
You can view the number of unread voice messages and the number
of total voice messages for different accounts of your phone.
Retrieve voice
messages
Tap a voice message you want to retrieve.
You can perform operations as prompted, for example, deleting the
voice message or calling the number who left the message.
Visual Voicemail
If your account has been assigned the visual voicemail service rights, you can perform
operations described in the following table.
Table 23-2 Visual voicemail
If You Want to... Then...
View voice
messages
1. On the home screen, tap to access the voicemail screen.
2. Tap the number area in the upper left corner of the screen and
select a number to view related voice messages.
Unread voice messages are marked in red, and read voice
messages are marked in gray.
Tap a voice message to view its details.
Retrieve voice
messages
Tap to the right of a voice message. The voice message is then
played, with its details displayed on the right of the screen. When a
voice message is being played, you can perform the following
operations:
Pause/Resume: Tap to pause; tap to resume.
Fast forward/Rewind: Tap to fast forward; tap to
rewind.
Play the previous or next voice message: Tap to play the
next voice message; tap to play the previous voice message.
Delete voice
messages
You can delete a voice message using either of the following
methods:
Tap and hold a voice message to delete, and select Delete. In the
dialog box that is displayed, tap OK.
On the voice message details screen, tap . In the dialog box
that is displayed, tap OK.
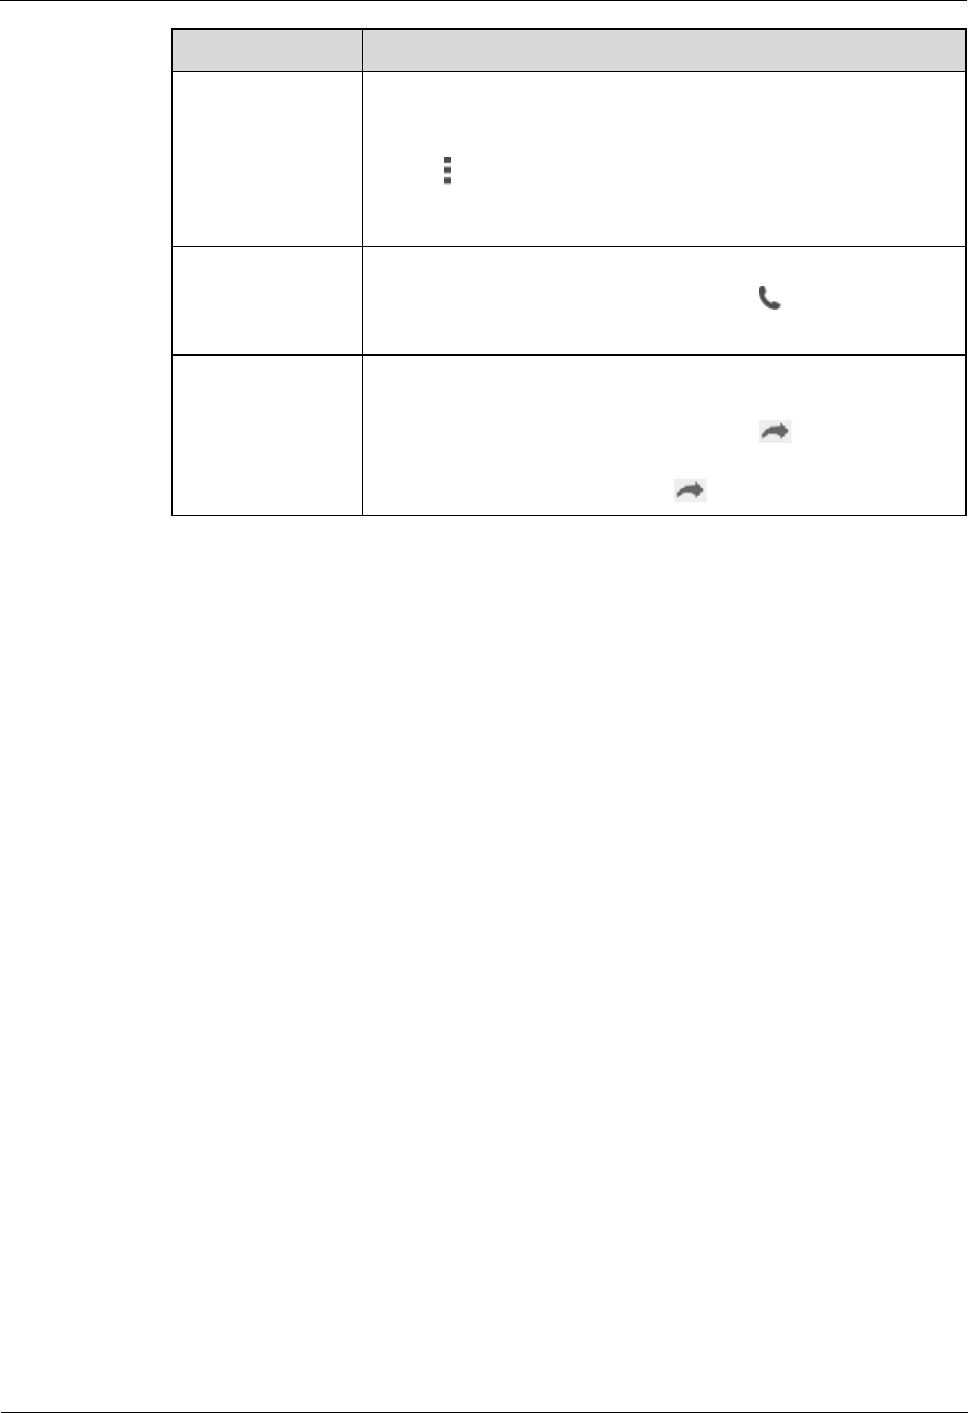
eSpace 8950 IP Phone
User Guide 23 Voicemail
Issue 01 (2014-06-30) Huawei Proprietary and Confidential
Copyright © Huawei Technologies Co., Ltd.
67
If You Want to... Then...
Clear voice
messages
NOTICE
Clearing voice messages will delete all voice messages of the current account.
Exercise caution when performing this operation.
1. Tap in the upper right corner of the screen, and select Delete
All.
2. In the dialog box that is displayed, tap OK.
Call back You can call back using either of the following methods:
On the voice message playing screen, tap .
Tap and hold a voice message to call back and select Edit Dial.
Forward voice
messages
You can forward voice messages using either of the following
methods:
On the voice message playing screen, tap .
Tap and hold a voice message, select Forward, enter or select
the forward-to number, and tap .
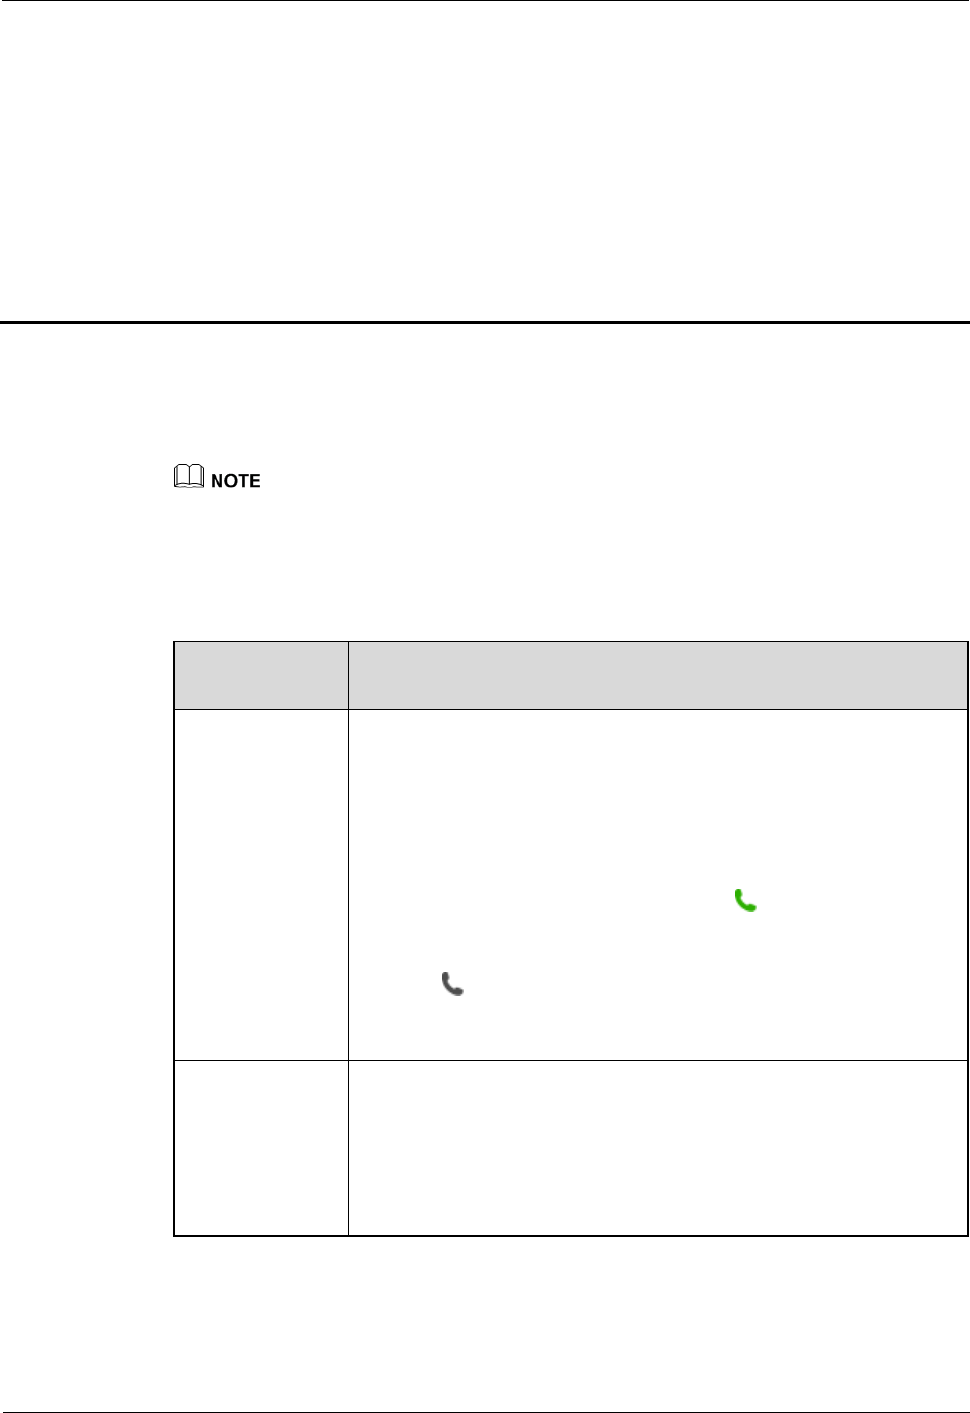
eSpace 8950 IP Phone
User Guide 24 Conferences
Issue 01 (2014-06-30) Huawei Proprietary and Confidential
Copyright © Huawei Technologies Co., Ltd.
68
24 Conferences
24.1 Local Conferences
A line must have at least two calls configured to create a local conference.
You can create a local conference using Join or Call Merge. For detailed operations, see
Table 24-1.
Table 24-1 Creating a local conference
If You Want
to...
Then...
Create a local
conference using
Join
1. You (for example, User A) are talking with User B. You tap
Conference.
NOTE
If you have set Conference on hold when adding participants on the phone
web page, the current call is placed on hold when you enter the dialing screen. If
you have set Conference unhold when adding participants, other participants
are not affected when you enter the dialing screen.
2. You enter the number of User C and tap .
NOTE
You can select contacts on the favorites list, contact list, or call history tab, and
then tap .
3. User C answers the call and you can talk with user C. Then you tap
Join to create a local conference.
Create a local
conference using
Merge Call
The call between you and User B is in ongoing, and the call between
you and User C is placed on hold.
You tap Merge Call to create a local conference.
NOTE
If there are multiple calls on the current line, you can tap Merge Call. In the
dialog box that is displayed, you can merge calls.
After a local conference is created, the conference initiator can manage the conference. Table
24-2 describes detailed operations.

eSpace 8950 IP Phone
User Guide 24 Conferences
Issue 01 (2014-06-30) Huawei Proprietary and Confidential
Copyright © Huawei Technologies Co., Ltd.
69
Table 24-2 Local conference management
If You Want to... Then...
Add a participant 1. Tap .
2. Enter the number of a user and tap .
NOTE
You can select contacts on the favorites list, contact list, or call history tab, and
then tap .
3. Tap Join when the user answers the call.
NOTE
A local conference supports audio conversation among a maximum of six
parties.
Mute a participant 1. Tap the profile picture of a participant.
2. Tap Mute.
NOTE
To unmute a participant, tap Unmute.
View the details of
a participant
1. Tap the profile picture of a participant.
2. Tap Details.
Change the display
sequence of a
participant
1. Tap a participant in the participant list.
2. Tap Replace and tap the replacing participant.
Mute or unmute
yourself To mute yourself: Press or tap while on a call.
To unmute yourself: Press or tap while in the mute
state.
Delete a
participant
1. Tap the profile picture of a participant.
2. Tap Delete.
3. In the dialog box that is displayed, tap OK.
End a conference 1. Tap .
2. In the dialog box that is displayed, tap End.
NOTE
The conference initiator can tap to end the conference.
Participants can tap Hang Up to quit the conference.

eSpace 8950 IP Phone
User Guide 24 Conferences
Issue 01 (2014-06-30) Huawei Proprietary and Confidential
Copyright © Huawei Technologies Co., Ltd.
70
24.2 Instant Conferences (for IMS+UC)
Ensure that your account is a UC account and has been assigned the instant conference service rights
on the server.
Ensure that on the phone web page, you have enabled the instant conference service rights.
For any questions, contact your system administrator.
Table 24-3 describes three methods you can use to create an instant conference.
Table 24-3 Creating an instant conference
If You Want
to...
Then...
Create an instant
conference using
1. Tap .
2. In the conference list screen, tap .
3. Enter the number of a participant and tap .
NOTE
You can select contacts on the favorites list, contact list, or call history tab,
and then tap .
If you want to change the number of a participant, you can tap and hold the
participant. On the participant details screen, select the target number and
then tap OK.
4. Tap Continue to add more participants.
5. Tap Audio Conference or Video Conference.
NOTE
You can upgrade an audio conference to a video conference, but you cannot
change a video conference to an audio conference.
You can create an instant conference during a call. If the create operation
fails, your phone automatically changes the instant conference to a local
conference.
Create an instant
conference using
Join
1. You (for example, User A) are talking with User B. You tap
Conference.
2. You enter the number of User C and tap .
NOTE
You can select contacts on the favorites list, contact list, or call history tab, and
then tap .
3. User C answers the call and you can talk with user C. Then you tap
Join to create a local conference.
Create an instant
conference using
Merge Call
The call between you and User B is in ongoing, and the call between
you and User C is placed on hold.
You tap Merge Call to create a local conference.
NOTE
If there are multiple calls on the current line, you can tap Merge Call. In the
dialog box that is displayed, you can merge calls.
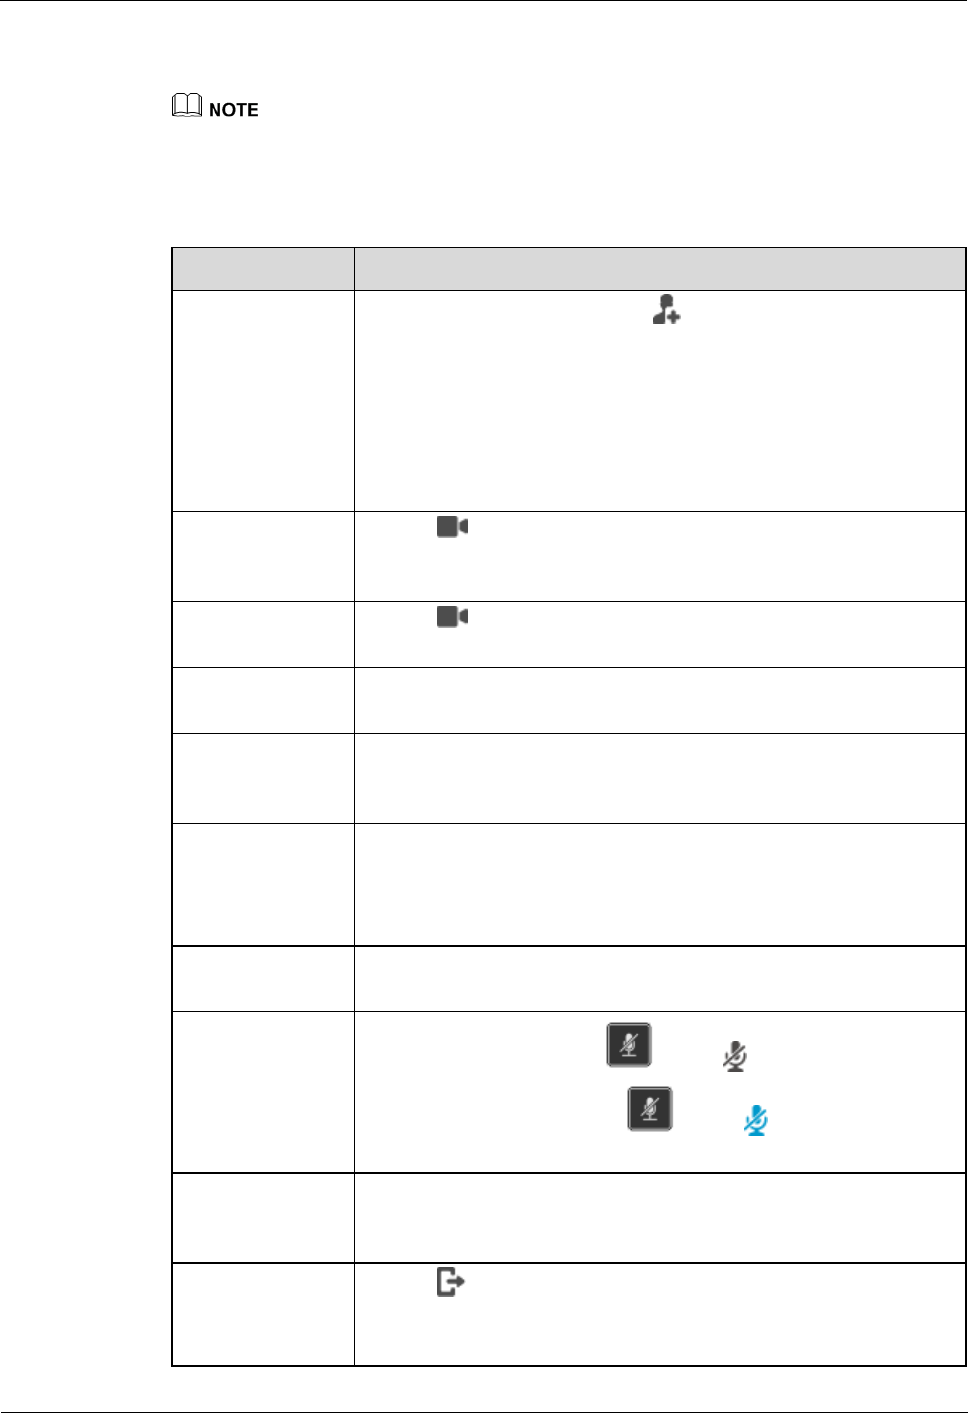
eSpace 8950 IP Phone
User Guide 24 Conferences
Issue 01 (2014-06-30) Huawei Proprietary and Confidential
Copyright © Huawei Technologies Co., Ltd.
71
After you create an instant conference, you can perform operations described in the following
table.
During a conference, a conference participant can perform only the following operations: viewing
participant details, mute himself/herself, and quitting the conference. In a video conference, common
participants can enable or disable local video and display video in full screen.
Table 24-4 Instant conference
If You Want to... Then...
Add a participant 1. On the conference screen, tap to access the dialing screen.
2. Add a participant.
3. Tap OK.
NOTE
eSpace 8950 supports a maximum of six instant conferences, with each
conference supporting a maximum of 20 participants. If more than 20
participants are in the participant list, only the first 20 participants can join the
conference.
Change an audio
conference to a
video conference
1. Tap .
2. Tap Video Conference.
Enable or disable
local video
1. Tap .
2. Tap Stop Video or Start Video.
Display video in
full screen
1. Tap a participant in the participant list.
2. Tap Full Screen.
Change the display
sequence of a
participant
1. Tap a participant in the participant list.
2. Tap Replace and tap the replacing participant.
Mute a participant 1. Tap the profile picture of a participant.
2. Tap Mute.
NOTE
To unmute a participant, tap Unmute.
View the details of
a participant
1. Tap the profile picture of a participant.
2. Tap Details.
Mute or unmute
yourself To mute yourself: Press or tap while on a call.
To unmute yourself: Press or tap while in the mute
state.
Delete a
participant
1. Tap the profile picture of a participant.
2. Tap Delete.
3. In the dialog box that is displayed, tap OK.
End a conference 1. Tap .
2. In the dialog box that is displayed, tap End.
NOTE
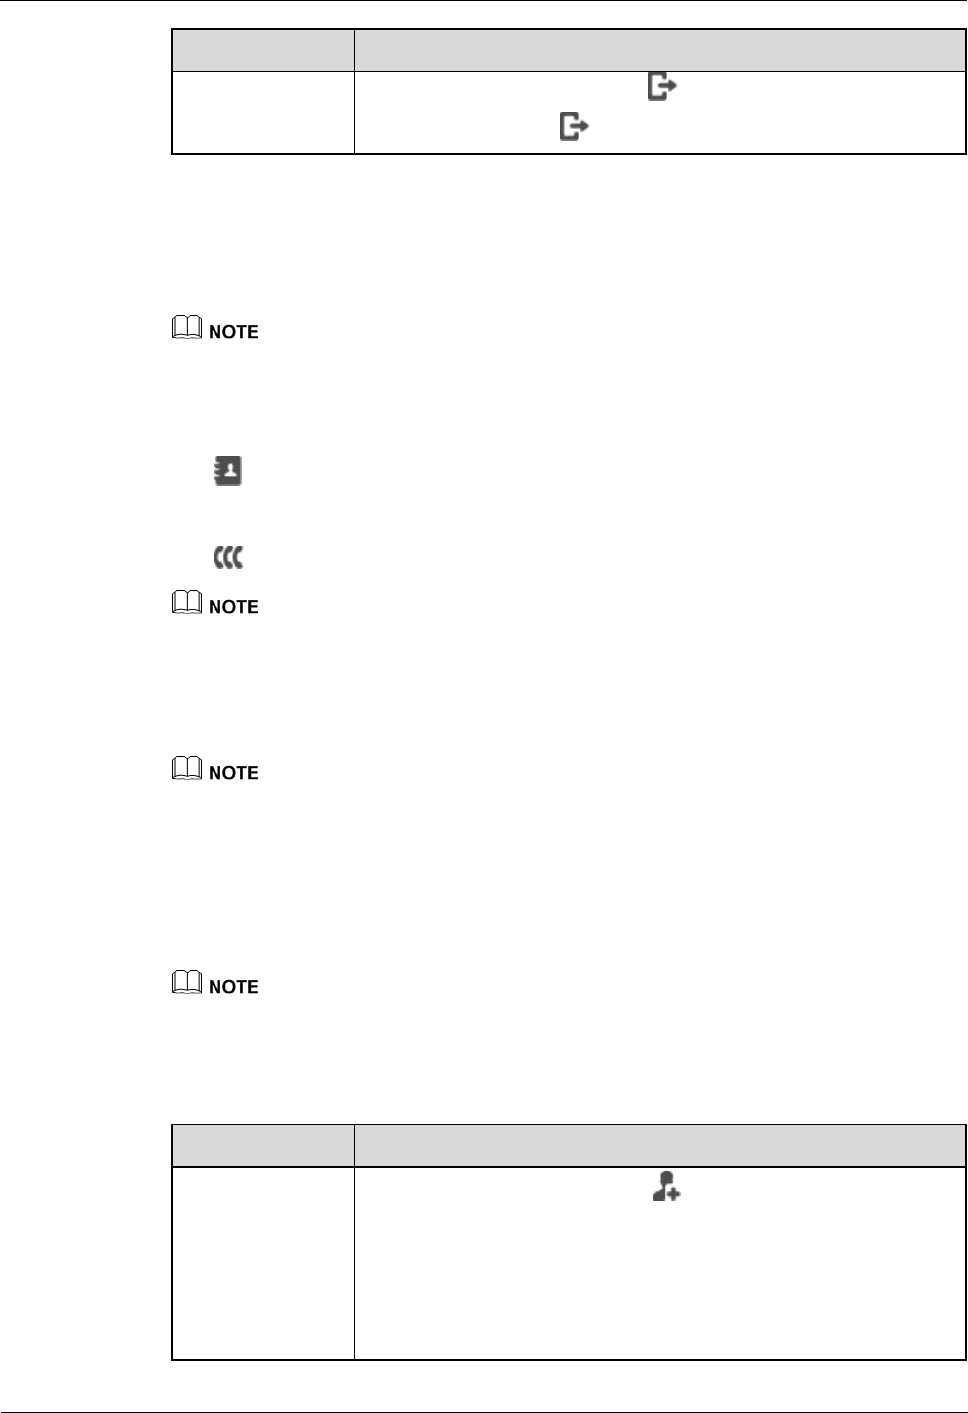
eSpace 8950 IP Phone
User Guide 24 Conferences
Issue 01 (2014-06-30) Huawei Proprietary and Confidential
Copyright © Huawei Technologies Co., Ltd.
72
If You Want to... Then...
The conference initiator can tap to end the conference.
Participants can tap to quit the conference.
24.3 Group Conferences (for IMS+UC)
Ensure that your account is a UC account and has been assigned the instant conference service rights
on the server.
Ensure that on the phone web page, you have enabled the instant conference service rights.
For any questions, contact your system administrator.
Step 1 Tap .
Step 2 On the Groups tab, tap a group.
Step 3 Tap on the group details screen.
If you want to change the number of a participant, you can tap and hold the participant. On the
participant details screen, select the target number and then tap OK.
Step 4 Optional: Tap Continue to add more participants.
Step 5 Tap Audio Conference or Video Conference.
You can upgrade an audio conference to a video conference, but you cannot change a video conference
to an audio conference.
----End
After you create a group conference, you can perform operations described in the following
table.
During a conference, a conference participant can perform only the following operations: viewing
participant details, mute himself/herself, and quitting the conference. In a video conference, common
participants can enable or disable local video and display video in full screen.
Table 24-5 Group conference
If You Want to... Then...
Add a participant 1. On the conference screen, tap to access the dialing screen.
2. Add a participant.
3. Tap OK.
NOTE
eSpace 8950 supports a maximum of six group conferences, with each
conference supporting a maximum of 20 participants. If more than 20
participants are in the participant list, only the first 20 participants can join the
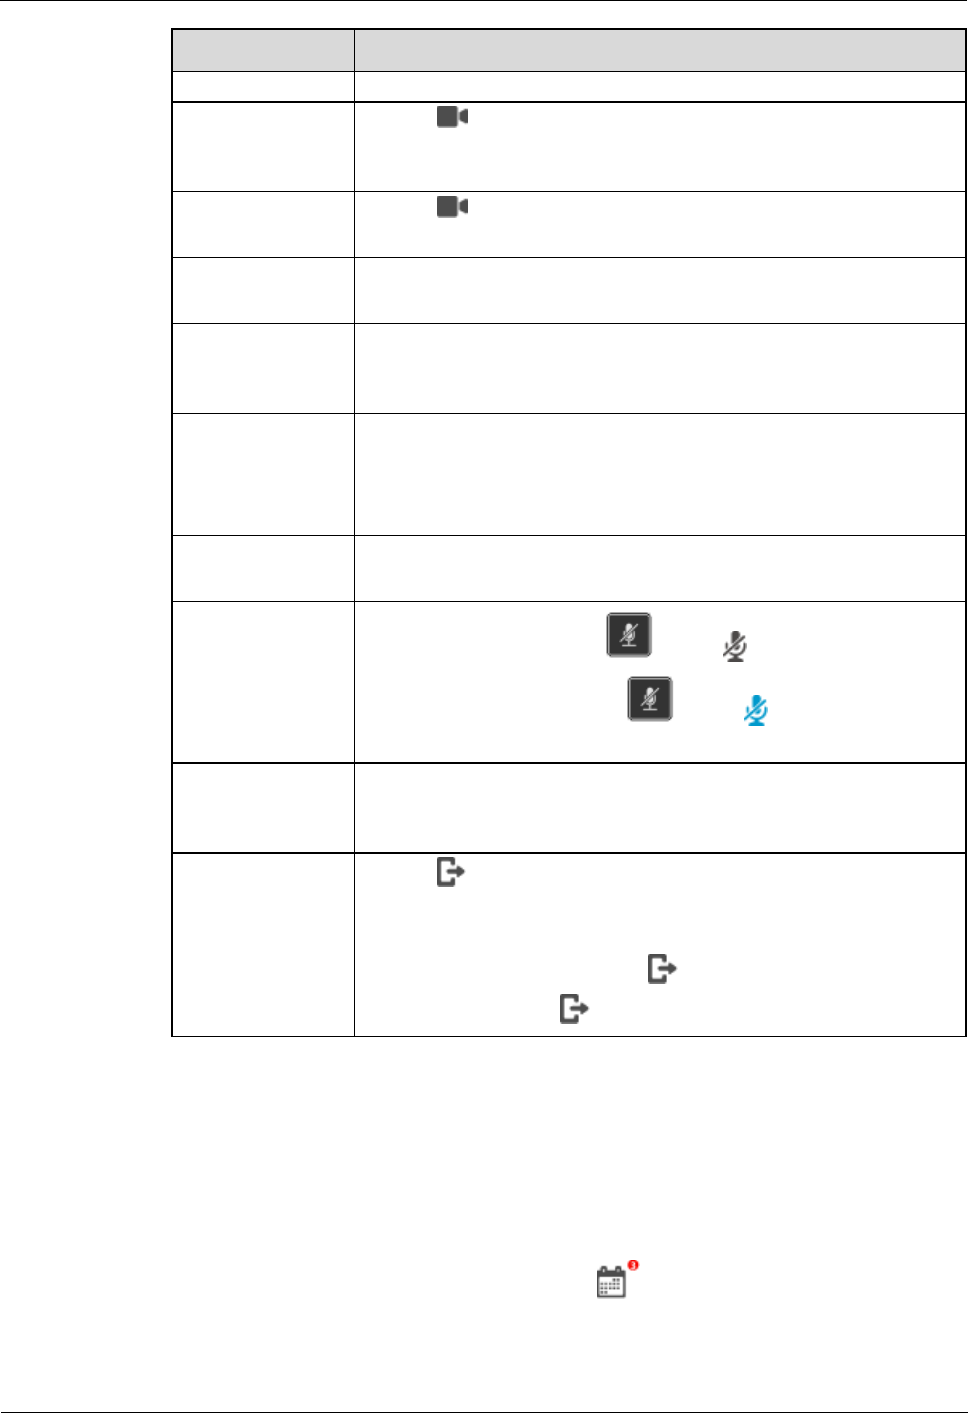
eSpace 8950 IP Phone
User Guide 24 Conferences
Issue 01 (2014-06-30) Huawei Proprietary and Confidential
Copyright © Huawei Technologies Co., Ltd.
73
If You Want to... Then...
conference.
Change an audio
conference to a
video conference
1. Tap .
2. Tap Video Conference.
Enable or disable
local video
1. Tap .
2. Tap Stop Video or Start Video.
Display video in
full screen
1. Tap a participant in the participant list.
2. Tap Full Screen.
Change the display
sequence of a
participant
1. Tap a participant in the participant list.
2. Tap Replace and tap the replacing participant.
Mute a participant 1. Tap the profile picture of a participant.
2. Tap Mute.
NOTE
To unmute a participant, tap Unmute.
View the details of
a participant
1. Tap the profile picture of a participant.
2. Tap Details.
Mute or unmute
yourself To mute yourself: Press or tap while on a call.
To unmute yourself: Press or tap while in the mute
state.
Delete a
participant
1. Tap the profile picture of a participant.
2. Tap Delete.
3. In the dialog box that is displayed, tap OK.
End a conference 1. Tap .
2. In the dialog box that is displayed, tap End.
NOTE
The conference initiator can tap to end the conference.
Participants can tap to quit the conference.
24.4 Conference Notification
If you or the conference initiator has scheduled a conference on eSpace Portal,
A red number is displayed in the upper right corner of the conference icon, indicating the
number of conferences to join. For example, indicates that there are three
conferences to join. This number is related to all accounts.
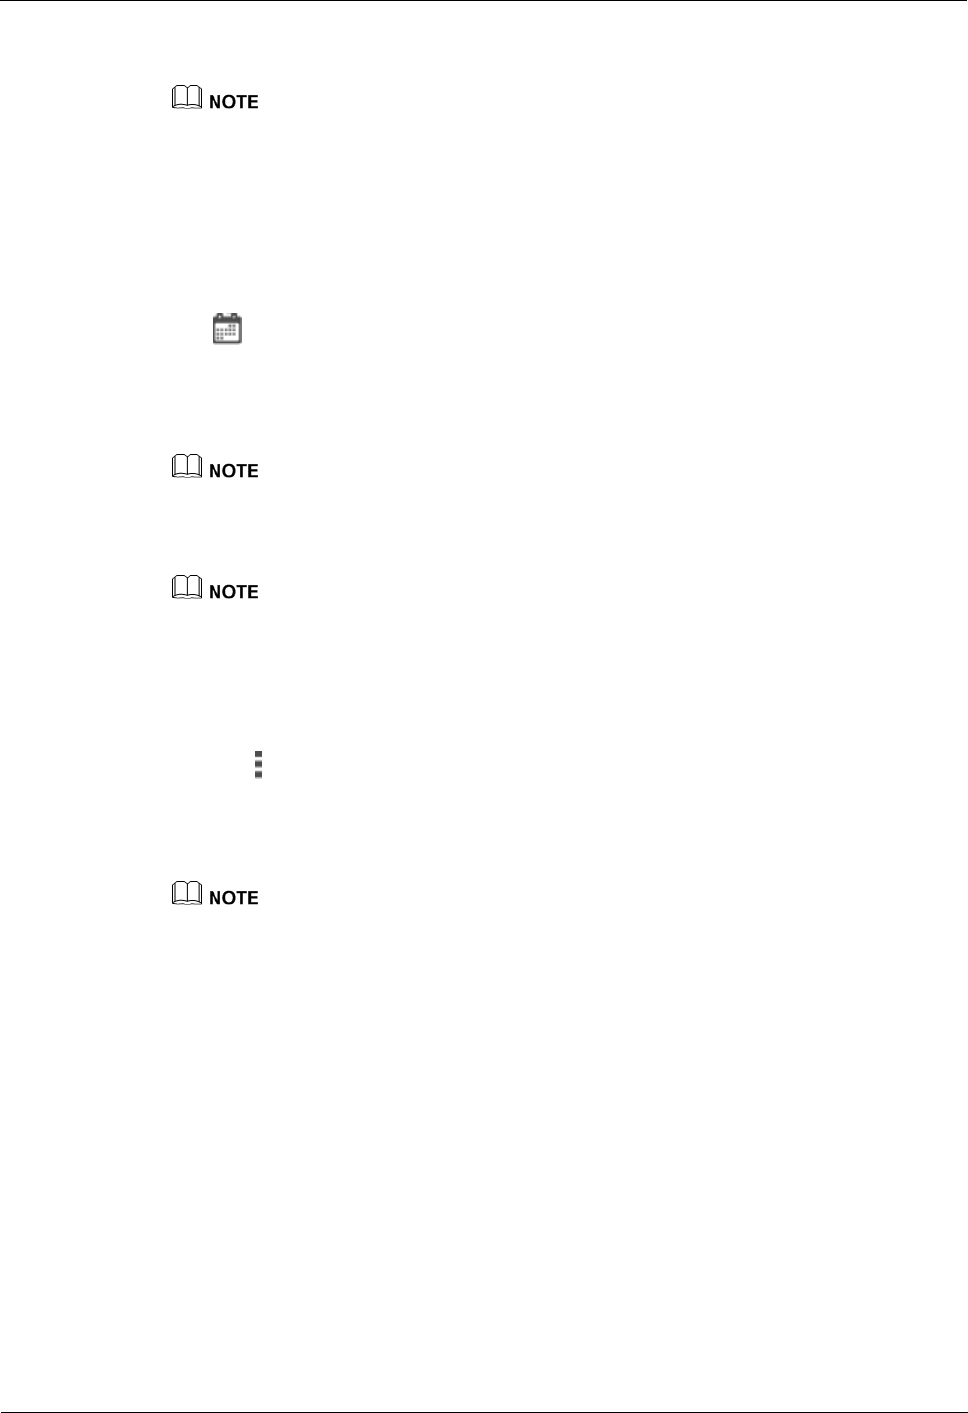
eSpace 8950 IP Phone
User Guide 24 Conferences
Issue 01 (2014-06-30) Huawei Proprietary and Confidential
Copyright © Huawei Technologies Co., Ltd.
74
The status bar of the IP phone displays the conference icon. The notification screen
shows information about conferences.
For details about how to schedule a conference using eSpace Portal, see the eSpace UC Product
Documentation.
24.5 Conference List
You can view conference records on the IP phone.
Tap to access the conference list screen to view conference records.
To view conference details
Tap a conference record. On the conference details screen, view the conference time,
duration, and participants.
Alternatively, you can tap and hold a conference record and select Details.
To hold a conference again
Tap Start Again on the right of a conference record.
Alternatively, you can tap Start Again on the conference details screen.
To delete a conference record
Tap and hold a conference record to delete, and select Delete. In the dialog box that is
displayed, tap OK.
To clear conference records
Tap and select Clear. In the dialog box that is displayed, tap OK.
To join a conference
If you or the conference initiator has scheduled a conference on eSpace Portal, you can
tap Join on the right of a conference record to join the conference.
Alternatively, you can tap Join on the conference details screen.
For details about how to schedule a conference using eSpace Portal, see the eSpace UC Product
Documentation.

eSpace 8950 IP Phone
User Guide 25 Applications
Issue 01 (2014-06-30) Huawei Proprietary and Confidential
Copyright © Huawei Technologies Co., Ltd.
75
25 Applications
25.1 Call Widgets
25.1.1 Call Forward
25.1.2 Speed Dial
25.1.3 Quick Setting
25.1.1 Call Forward
The call forward widget allows you to quickly configure the call forward function, for
example, enabling or disabling a specific call forward mode, accessing the call forward
settings screen, and setting information related to call forward.
You can drag the call forward widget to the home screen for more convenient operations.
Step 1 Tap .
Step 2 On the CALL WIDGET tab, tap and hold the Call Forward widget, and drag it to the home
screen.
To access the call forward settings screen
Tap in the upper right corner of the Call Forward widget.
To enable or disable a call forward mode
Select or deselect a specific call forward mode.
----End
25.1.2 Speed Dial
You can add desired contacts to the speed dial widget so that you can call these contacts by
simply tapping the contact icons. eSpace 8950 supports a maximum of 45 speed dial contacts.
You can drag the speed dial widget to the home screen if necessary.
Step 1 Tap .
Step 2 On the CALL WIDGET tab, tap and hold the Speed Dial widget, and drag it to the home
screen.
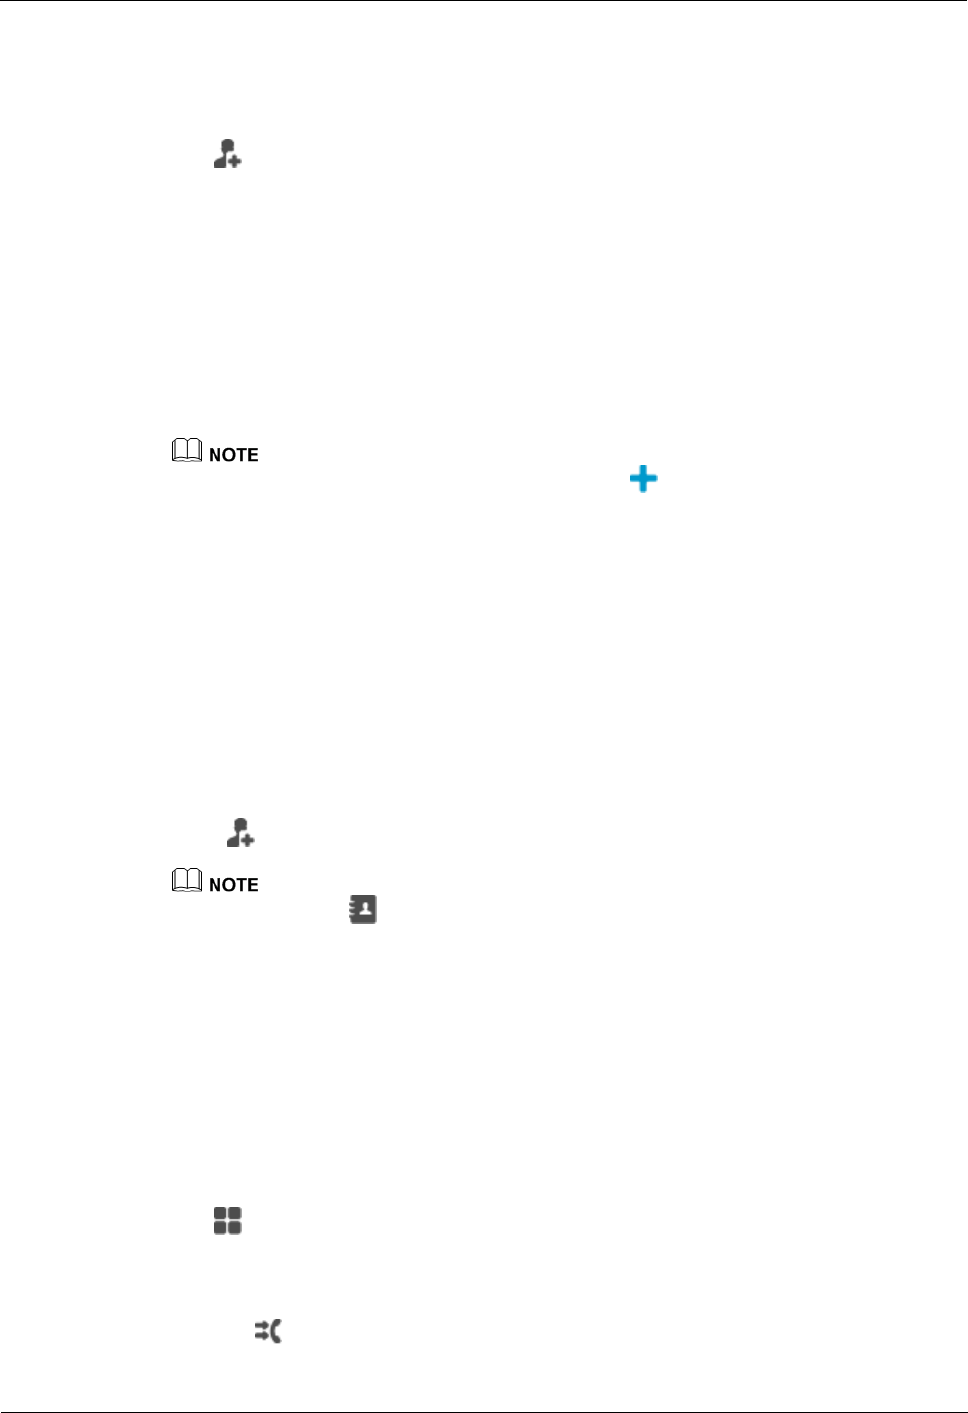
eSpace 8950 IP Phone
User Guide 25 Applications
Issue 01 (2014-06-30) Huawei Proprietary and Confidential
Copyright © Huawei Technologies Co., Ltd.
76
----End
Adding a Contact for Speed Dial on the Phone LCD Screen
Step 1 Tap in the Speed Dial widget to access the screen for adding a speed dial contact.
Step 2 Enter related information.
Phone Number: indicates the phone number for speed dial.
Label: indicates the displayed name of the contact for speed dial.
BLF: monitors the status (namely, online, busy, or offline) of the phone number in real
time. In the IMS+UC network environment, the away status is additionally supported.
The status monitoring function is available only after relevant service rights are assigned.
For any questions, contact your system administrator.
Account: indicates the line used for speed dial.
On the left-hand Contact or History tab, you can tap next to a contact and add this contact to
speed dial.
You can also tap and hold a contact on the contacts screen, and tap Add to Speed Dial.
Step 3 Tap Done.
----End
Adding a Contact for Speed Dial on the Phone Web Page
If you want to add contacts for speed dial on the phone web page, create a speed dial widget
and add a contact for speed dial on the phone LCD screen first.
Step 1 On the phone web page, choose Preferences > Speed Dial.
Step 2 Click . In the Add Speed Dial dialog box, enter related information.
You can also click , select a contact for speed dial, and click Add.
Step 3 Click Save.
----End
25.1.3 Quick Setting
The Quick Setting widget allows you to quickly enable or disable functions such as call
forward, DND, privacy, self-video (local video preview), and mobile connect.
You can drag the Quick Setting widget to the home screen for easy access.
Step 1 Tap .
Step 2 On the CALL WIDGET tab, tap and hold the Quick Setting widget, and drag it to the home
screen.
Tap to access the call forward settings screen.

eSpace 8950 IP Phone
User Guide 25 Applications
Issue 01 (2014-06-30) Huawei Proprietary and Confidential
Copyright © Huawei Technologies Co., Ltd.
77
Tap to enable DND; tap to disable DND.
Tap to access the privacy settings screen.
Tap to show self-video; tap any button to stop showing self-video.
Tap to access the mobile connect settings screen.
----End
25.2 Applications
25.2.1 Email
25.2.2 Calculator
25.2.3 Browser
25.2.4 Calendar
25.2.5 Clock
25.2.6 Search
25.2.7 Gallery
25.2.8 Download
25.2.1 Email
You can use this application to send and receive emails.
Tap . On the APPLICATION tab, tap Email.
Adding Email Accounts
When adding an email account, you may be required to set relevant parameters. For any
questions, contact your email service provider.
Step 1 On the email settings screen, enter an email address and a password, and tap Next.
Step 2 Select an email server.
Step 3 Follow the on-screen instructions to complete the configuration.
After an account is added, the Inbox screen is displayed by default.
----End
If you want to add more email accounts, you can perform the following steps:
Step 1 On the email screen, tap and select Settings.
Step 2 Tap Add account.
Step 3 Follow the on-screen instructions to complete the configuration.
----End
eSpace 8950 IP Phone
User Guide 25 Applications
Issue 01 (2014-06-30) Huawei Proprietary and Confidential
Copyright © Huawei Technologies Co., Ltd.
78
Switching Email Accounts
Step 1 Tap the email address bar to open the email account list.
Step 2 Tap the email account you want to use.
----End
Sending Emails
Step 1 Tap .
Step 2 Set the recipient email address, enter the subject, and compose the message.
If you want to change the email account, tap the email address bar and tap the email account you want to
use.
----End
Checking Emails
Step 1 Switch to the desired email account.
Step 2 On the Inbox screen, tap the email you want to check.
----End
Deleting Email Accounts
Step 1 On the email screen, tap and select Settings.
Step 2 Tap Account setup.
Step 3 Tap .
Step 4 Select the email account you want to delete.
Step 5 Tap Delete.
Step 6 In the dialog box that is displayed, tap OK.
After an email account is deleted, all emails and contacts under this email account and other data related
to this email account are deleted accordingly.
----End
Modifying Email Account Settings
Step 1 On the email screen, tap and select Settings.
Step 2 Tap General settings.
Step 3 Set related information about an email account.
----End

eSpace 8950 IP Phone
User Guide 25 Applications
Issue 01 (2014-06-30) Huawei Proprietary and Confidential
Copyright © Huawei Technologies Co., Ltd.
79
25.2.2 Calculator
You can use this application to calculate.
Tap . On the APPLICATION tab, tap Calculator.
25.2.3 Browser
You can use this application to search for information and browse web pages.
Tap . On the APPLICATION tab, tap Browser.
Browsing a Web Page
Step 1 Enter a URL in the address box of the browser.
eSpace 8950 automatically retrieves and lists similar websites.
Step 2 Tap the website you want to visit.
----End
Managing Bookmarks
You can bookmark web pages you frequently visit.
To add a bookmark
Step 1 On the browser screen, open the web page you want to bookmark.
Step 2 Tap .
Step 3 Enter a bookmark name and tap OK.
----End
To open a bookmark
Step 1 On the browser screen, tap .
Step 2 Tap the bookmark you want to open.
----End
To edit a bookmark
Step 1 On the browser screen, tap .
Step 2 Tap and hold the bookmark you want to edit.
Step 3 In the menu that is displayed, tap Edit bookmark.
Step 4 Edit the bookmark.
Step 5 Tap OK.

eSpace 8950 IP Phone
User Guide 25 Applications
Issue 01 (2014-06-30) Huawei Proprietary and Confidential
Copyright © Huawei Technologies Co., Ltd.
80
----End
To delete a bookmark
Step 1 On the browser screen, tap .
Step 2 Tap and hold the bookmark you want to delete.
Step 3 In the menu that is displayed, tap Delete bookmark.
Step 4 In the dialog box that is displayed, tap OK.
----End
Setting a Home Page
You can set the web page you visit most frequently as the home page. Then, each time you
open the browser, this web page is automatically opened.
Step 1 On the browser screen, tap .
Step 2 Choose Settings > General > Set homepage.
Step 3 In the menu that is displayed, tap the web page you want to set as the home page.
You can also tap and hold a web page in BOOKMARKS and select Set as homepage.
----End
Clearing the Browsing History
You can periodically clear your browsing history to protect your privacy and prevent
information disclosure.
Step 1 On the browser screen, tap .
Step 2 Choose Settings > Privacy & security > Clear history.
Step 3 In the dialog box that is displayed, tap OK.
----End
Modifying Browser Settings
Step 1 On the browser screen, tap .
Step 2 Tap Settings.
Step 3 Customize the browser style you prefer.
----End
25.2.4 Calendar
You can use this application as a reminder or to manage and arrange your events.
eSpace 8950 IP Phone
User Guide 25 Applications
Issue 01 (2014-06-30) Huawei Proprietary and Confidential
Copyright © Huawei Technologies Co., Ltd.
81
Tap . On the APPLICATION tab, tap Calendar.
Adding Calendar Accounts
You must add at least one calendar account and display a calendar before adding events.
Step 1 Tap .
Step 2 In the No calendars dialog box, tap Add account.
Step 3 Enter related information following the on-screen instructions.
----End
Adding Events
Step 1 Tap .
In the Day or Week view, double-tap the desired time.
Step 2 On the screen for adding events, enter the event details, including the event name, place, and
time.
----End
Checking Events
On the calendar screen, you can check the information about an event you have added.
Tap the icon in the upper right corner of the calendar screen to switch between the year,
month, week, day, and agenda views. In the agenda view, all the events you have added are
displayed.
Configuring Calendar Settings
Step 1 Tap and select Settings.
Step 2 In General settings, set the calendar view, reminder mode, and notification mode.
----End
25.2.5 Clock
You can use this application to set an alarm, check the time of any place in the world,
calculate the lasting time of an event, set a timer, and configure it as the on-screen clock.
Tap . On the APPLICATION tab, tap Clock. The Clock tab is displayed by default on
eSpace 8950.
25.2.5.1 Alarm
25.2.5.2 Clock
25.2.5.3 Timer

eSpace 8950 IP Phone
User Guide 25 Applications
Issue 01 (2014-06-30) Huawei Proprietary and Confidential
Copyright © Huawei Technologies Co., Ltd.
82
25.2.5.4 Stopwatch
25.2.5.1 Alarm
Setting an Alarm
Step 1 On the Clock tab, tap in the lower left corner.
Step 2 Tap in the upper right corner of the screen.
Step 3 Enter the alarm time and tap OK.
If you have set the system time of eSpace 8950 as 12-hour time, you need to select AM or PM when
setting the alarm time.
The alarm you have set is displayed on the Alarms screen.
To enable or disable an alarm
Tap the enable/disable switch on the right side of an alarm.
To edit the alarm time
Tap the alarm time you want to edit, and enter the time you want.
To add a label for an alarm
Tap the arrow under the enable/disable switch, tap Label, and enter the label name you
prefer.
To set repeated alarm time
Tap the arrow under the enable/disable switch, select REPEAT, and set the alarm time.
To change the alarm sound
Tap the sound name and select the sound you prefer.
----End
Setting the Alarm Sound Parameters
Step 1 On the Alarms or Clock screen, tap and select Settings.
Step 2 In the ALARMS area, tap and set the alarm parameters you want to modify.
Silence after
Select the duration of the alarm sound.
Snooze length
Select the alarm snooze duration.
Alarm volume
Adjust the alarm volume.
Volume buttons
Select the operation that you want the volume buttons to execute: snooze, stop, or no
operation.
----End

eSpace 8950 IP Phone
User Guide 25 Applications
Issue 01 (2014-06-30) Huawei Proprietary and Confidential
Copyright © Huawei Technologies Co., Ltd.
83
Deleting an Alarm
Step 1 Tap and hold an alarm until it turns blue.
Step 2 Tap in the upper right corner of the screen.
Step 3 In the dialog box that is displayed, tap OK.
----End
25.2.5.2 Clock
Tap . Then you can check the current date and time.
Tap . Then you can add the clocks of any other cities around the globe.
Configuring the Clock Display Mode
Step 1 On the Alarms or Clock screen, tap and select Settings.
Step 2 In the CLOCK area, tap and set the clock options you want to change.
Style
Select an analog or digital clock.
Automatic home clock
Select this option if you want to get informed of your home time in real time, even when
you are travelling.
Home time zone
Set your home time zone.
----End
25.2.5.3 Timer
Step 1 Tap .
Step 2 Enter the time you want and tap START.
When the timer is going, you can add an additional minute, pause the timer, or delete the
current timer.
The timer beeps when the time is up. It keeps beeping until you tap to stop.
----End
25.2.5.4 Stopwatch
Step 1 Tap .
Step 2 Tap START.
To pause the stopwatch, tap STOP. You can also add laps while the stopwatch is running by
touching the icon to the left of the stopwatch.
eSpace 8950 IP Phone
User Guide 25 Applications
Issue 01 (2014-06-30) Huawei Proprietary and Confidential
Copyright © Huawei Technologies Co., Ltd.
84
----End
25.2.6 Search
You can use this application to search the Internet or eSpace 8950 for the information you
want to know.
Step 1 Tap . On the APPLICATION tab, tap Search.
Step 2 Enter keywords.
You can also tap on the home screen for a search.
----End
Setting the Search Scope
Step 1 Tap in the upper right corner of the search screen.
Step 2 Select Search settings.
Step 3 In Searchable items, select the items you want to search.
----End
25.2.7 Gallery
You can use this application to view photos and videos.
Tap . On the APPLICATION tab, tap Gallery.
Viewing Photos and Videos
Gallery saves photos and videos in different folders.
Step 1 Tap the photo or video folder you want to view.
Step 2 Tap the photo or video you want to view.
When viewing a photo, you can pinch or stretch to zoom out or zoom in.
----End
Playing Slides
Step 1 Tap the folder you want to view.
Step 2 Tap in the upper right corner of the screen and select Slideshow to start a slide show of the
photos in the folder.
You can tap the screen to stop the slide show.
eSpace 8950 IP Phone
User Guide 25 Applications
Issue 01 (2014-06-30) Huawei Proprietary and Confidential
Copyright © Huawei Technologies Co., Ltd.
85
----End
Editing Photos
You can easily edit photos, including cropping a photo, adding a photo frame, and performing
light compensation.
Step 1 Tap a photo you want to edit.
Step 2 Tap and select Edit.
Tap to add filters.
Tap to rotate or crop the photo.
Tap to perform light compensation and add or remove background for the photo.
Tap to add a photo frame.
----End
Rotating a Photo
Step 1 Tap a photo you want to rotate.
Step 2 Tap and select Rotate left or Rotate right.
----End
Cropping a Photo
Step 1 Tap a photo you want to crop.
Step 2 Tap and select Crop.
Tap inside the grid and move the grid.
Tap the grid frame and resize the grid.
Step 3 Tap Apply Crop.
----End
Deleting Photos and Videos
Step 1 Tap the photo or video you want to delete.
Step 2 Tap and select Delete.
Step 3 In the dialog box that is displayed, tap OK.
----End

eSpace 8950 IP Phone
User Guide 25 Applications
Issue 01 (2014-06-30) Huawei Proprietary and Confidential
Copyright © Huawei Technologies Co., Ltd.
86
Sharing Photos and Videos
You can share your photos and videos using email or Bluetooth.
Step 1 Tap the photo or video you want to share.
Step 2 Tap .
Step 3 Select a sharing means and share your photo or video following the on-screen instructions.
----End
Setting a Photo as the Wallpaper
Step 1 Tap the photo you want to set as the wallpaper.
Step 2 Tap and select Set picture as.
Step 3 Drag the grid to resize the wallpaper.
Step 4 Tap OK.
----End
25.2.8 Download
You can use this application to check the downloaded files.
Tap . On the APPLICATION tab, tap Downloads. By default, the downloaded files are
listed by date on eSpace 8950.
In the download list, you can perform the following operations:
Tap a file to open it.
Tap Sort by date to sort the files by date.
Tap Sort by size to sort the files by size.
Tap to select a file, and tap to delete the file.
25.3 Widgets
Widgets are small applications that you can place on the home screen. Widgets provide
at-a-glance information and some functions from full applications.
Step 1 Tap .
Step 2 On the WIDGET tab, tap and hold a widget, and drag it to the home screen.
Step 3 Tap and hold the widget, and drag it to the place you prefer on the home screen. Drag the
frame to resize the widget.
Step 4 Tap any area on the home screen to save the position of the widget.
----End

eSpace 8950 IP Phone
User Guide 26 Settings
Issue 01 (2014-06-30) Huawei Proprietary and Confidential
Copyright © Huawei Technologies Co., Ltd.
87
26 Settings
26.1 Wireless and Network Settings
26.1.1 Ethernet
26.1.2 Wi-Fi
26.1.3 Bluetooth
26.1.1 Ethernet
Step 1 Tap . On the APPLICATION tab, tap Settings..
Step 2 In the WIRELESS & NETWORKS area, tap Ethernet.
On the Ethernet settings screen, you can set the IP phone's IP address and enable the proxy
function to facilitate access to websites. For detailed operations, consult your system
administrator.
----End
26.1.2 Wi-Fi
Turning Wi-Fi on and Connecting to a Wi-Fi Network
Step 1 Tap . On the APPLICATION tab, tap Settings..
Step 2 In the WIRELESS & NETWORKS area, tap the Wi-Fi switch to turn Wi-Fi on.
The IP phone automatically scans and lists all available, in-range Wi-Fi networks.
Step 3 Select a Wi-Fi network and tap Connect.
To connect to an encrypted Wi-Fi network, you must enter the correct password.
----End
Manually Adding a Wi-Fi Network
Step 1 In the WIRELESS & NETWORKS area, tap the Wi-Fi switch to turn Wi-Fi on.

eSpace 8950 IP Phone
User Guide 26 Settings
Issue 01 (2014-06-30) Huawei Proprietary and Confidential
Copyright © Huawei Technologies Co., Ltd.
88
Step 2 In the Wi-Fi network list, tap .
Step 3 Complete the required settings in the Network SSID and Security areas, and set relevant
parameters (for example, the password) following the on-screen instructions.
Step 4 Tap Save.
----End
Connecting to a Wi-Fi Network Using WPS PIN
You can use WLAN Protected Setup (WPS) to simplify connection to a Wi-Fi network.
Simply enter a PIN, and a secure Wi-Fi connection is then automatically set up. You do not
need to perform complex configurations on the management software for the Wi-Fi hotspot
(for example, a wireless router).
Step 1 In the WIRELESS & NETWORKS area, tap the Wi-Fi switch to turn Wi-Fi on.
Step 2 In the Wi-Fi network list, tap .
Step 3 Tap WPS Pin Entry.
The IP phone automatically generates a PIN.
Step 4 Enter the PIN on the Wi-Fi hotspot.
----End
Using the Wi-Fi Direct Function
Wi-Fi Direct enables any two devices to easily connect with each other to conveniently
transmit and share data.
Step 1 In the WIRELESS & NETWORKS area, tap the Wi-Fi switch to turn Wi-Fi on.
Step 2 In the Wi-Fi network list, tap .
Step 3 Tap Wi-Fi Direct.
The IP phone automatically scans for and lists all connectable devices.
Step 4 Tap a device to connect.
----End
Configuring Advanced Wi-Fi Settings
Step 1 In the Wi-Fi network list, tap .
Step 2 Tap ADVANCED.
Step 3 Set parameters based on the site requirements.
----End

eSpace 8950 IP Phone
User Guide 26 Settings
Issue 01 (2014-06-30) Huawei Proprietary and Confidential
Copyright © Huawei Technologies Co., Ltd.
89
26.1.3 Bluetooth
Nearby Bluetooth devices can easily exchange data or media files by setting up direct wireless
connections.
Take appropriate security measures while sharing or receiving data through Bluetooth. Ensure that
devices are trusted ones. If there are barriers between two Bluetooth devices, the
Bluetooth-supported distance may be shortened.
Bluetooth devices of different models may not be fully compatible. If two Bluetooth devices cannot
set up a wireless connection, try other Bluetooth devices.
Turning Bluetooth On
Step 1 Tap . On the APPLICATION tab, tap Settings..
Step 2 In the WIRELESS & NETWORKS area, tap the Bluetooth switch to turn Bluetooth on.
After Bluetooth is enabled, your IP phone name will be displayed on the Bluetooth screen.
You can tap your IP phone name to set whether your IP phone is visible to other
Bluetooth-enabled devices.
----End
Searching for and Pairing Bluetooth Devices
Step 1 In the WIRELESS & NETWORKS area, tap Bluetooth.
The IP phone automatically scans for and lists nearby Bluetooth devices.
Step 2 In the device list, tap the device you want to pair with your IP phone.
If you want to rename a Bluetooth device or unpair your IP phone with a Bluetooth device,
tap to the right of the device name and then tap Rename or Unpair.
----End
Sending and Receiving Data
Using Bluetooth devices, you can easily share files, such as photos and music files, to your
coworkers and friends, without consuming any Internet resources.
The following example describes how to share a photo in Gallery:
Step 1 Select a photo in Gallery.
Step 2 Tap the Bluetooth icon in the upper right corner of the screen.
Step 3 Tap a Bluetooth device in the device list and send the photo to this device.
Step 4 Have the device accept the Bluetooth connection and receive the photo.
Files transmitted through Bluetooth are saved in the Bluetooth folder.
To see details of these files, tap and select Show received files on the Bluetooth settings
screen.
----End
eSpace 8950 IP Phone
User Guide 26 Settings
Issue 01 (2014-06-30) Huawei Proprietary and Confidential
Copyright © Huawei Technologies Co., Ltd.
90
26.2 Device Settings
26.2.1 Sound
26.2.2 Display
26.2.3 Camera
26.2.4 Storage
26.2.5 Applications
26.2.1 Sound
Step 1 Tap . On the APPLICATION tab, tap Settings..
Step 2 In the DEVICE area, tap Sound.
The sound settings screen is then displayed. On this screen, you can set the following
parameters:
Volumes: Adjust the volumes of music, videos, ringtones, notifications, and alarms.
You can also adjust the volumes using the volume button on the home screen, during a call, or while
playing music or a video.
RINGTONE: Select a built-in system ringtone or a piece of music stored locally on your
IP phone for incoming calls.
eSpace 8950 allows you to download ringtones from third-party applications and to
import ringtones from a USB device or an SD card or on the web page.
SYSTEM: Select a built-in system notification tone; determine whether to play tones
when locking or unlocking the screen, using the keypad, or making an on-screen
selection.
eSpace 8950 allows you to set keybad touch tones on the web page.
----End
Setting Phone Sounds on the Web Page
To import a ringtone
Step 1 On the web page, choose Preferences > Ringtone.
Step 2 Click Import and select a ringtone you want to import.
Ringtones in common formats can be easily imported to eSpace 8950.
The icon is displayed for a newly imported ringtone, indicating that the imported ringtone can
be deleted. The built-in system ringtones have no such an icon, because they cannot be deleted.
----End
To enable or disable the keypad touch tone
Step 1 On the web page, choose Preferences > KeyTone.
Step 2 Choose Enable or Disable.

eSpace 8950 IP Phone
User Guide 26 Settings
Issue 01 (2014-06-30) Huawei Proprietary and Confidential
Copyright © Huawei Technologies Co., Ltd.
91
Step 3 Click Save.
----End
26.2.2 Display
Step 1 Tap . On the APPLICATION tab, tap Settings..
Step 2 In the DEVICE area, tap Display.
The display settings screen is then displayed. On this screen, you can set the following
parameters:
Brightness: Adjust the screen brightness.
Auto Brightness: Set the amount of time for your IP phone to be idle before the phone
automatically adjusts its brightness.
Wallpaper: Select a built-in system wallpaper or a wallpaper locally stored on your IP
phone.
eSpace 8950 allows you to download wallpapers from third-party applications and to
import wallpapers from a USB device or an SD card or on the web page.
Sleep: Set the amount of time for your IP phone to be idle before your IP phone screen
automatically goes to sleep (goes dark). This function helps reduce energy consumption.
Daydream: Enable or disable the screen saver.
Font size: Set the font size.
Wireless display: Query all available, in-range wireless devices.
Advanced display: Set the width and height of images when your IP phone is connected
to other display devices through the HDMI interface.
----End
Setting Phone Display on the Web Page
To set your IP phone to automatically adjust the brightness
Step 1 On the web page, choose System > Power Saving.
Step 2 In Auto Brightness, set the amount of time for your IP phone to be idle before your IP phone
automatically adjusts the brightness.
Step 3 Click Save.
----End
To set phone sleep mode
Step 1 On the web page, choose System > Power Saving.
Step 2 In Sleep After, set the amount of time for your IP phone to be idle before your IP phone
automatically goes to sleep.
Step 3 Click Save.
----End

eSpace 8950 IP Phone
User Guide 26 Settings
Issue 01 (2014-06-30) Huawei Proprietary and Confidential
Copyright © Huawei Technologies Co., Ltd.
92
To import a wallpaper
Step 1 On the web page, choose Preferences > Wallpaper.
Step 2 Click Import and select a wallpaper you want to import.
On the web page, you can import .png, .bmp, and .jpg wallpapers to your IP phone, but you cannot set
phone wallpapers.
----End
26.2.3 Camera
Step 1 Tap . On the APPLICATION tab, tap Settings..
Step 2 In the DEVICE area, tap Camera.
The camera settings screen is then displayed. On this screen, you can set the following
parameters:
Parameter Settings: Adjust the video image brightness, contrast, and digital zoom of the
camera.
View Status: Check the camera information, including its software, Uboot, and hardware
version information.
Camera Factory Reset: Restore the camera to its factory defaults.
----End
26.2.4 Storage
You can view the IP phone's internal storage space as well as SD card and USB device storage
information.
Step 1 Tap . On the APPLICATION tab, tap Settings..
Step 2 In the DEVICE area, tap Storage.
The operating system and built-in applications occupy some storage space. Therefore, the actual
available space will be smaller than the nominal space. Updates on the operating system and software
version may cause changes to the available space.
----End
26.2.5 Applications
You can view and manage applications on your IP phone.
Step 1 Tap . On the APPLICATION tab, tap Settings..
Step 2 In the DEVICE area, tap Apps.
On the applications screen, you can view applications you have downloaded, applications in
the SD card, applications that are running, and all applications on your IP phone.
----End

eSpace 8950 IP Phone
User Guide 26 Settings
Issue 01 (2014-06-30) Huawei Proprietary and Confidential
Copyright © Huawei Technologies Co., Ltd.
93
26.3 Personal Settings
26.3.1 Account
26.3.2 Call Service
26.3.3 Security
26.3.4 Language and Input
26.3.5 Backup and Reset
26.3.1 Account
Step 1 Tap . On the APPLICATION tab, tap Settings..
Step 2 In the PERSONAL area, tap Account.
The account settings screen is then displayed. On this screen, you can set the following
parameters:
Status Settings (only for IMS+UC): Set your IP phone to the idle, busy, or DND state.
Line Button Label: Modify the displayed name of a line button.
Log Out: Log out of the IP phone.
The logout function must be enabled by the administrator. For any questions, contact your system
administrator.
----End
26.3.2 Call Service
Step 1 Tap . On the APPLICATION tab, tap Settings..
Step 2 In the PERSONAL area, tap Call Settings.
The call settings screen is then displayed. On this screen, you can set the following
parameters:
Call Forward: Set a call forward mode, for example, Call Forward All (CFA), Call
Forward Busy (CFB), Call Forward No Answer (CFNA), or Call Forward Offline (CFO).
For detailed operations, see 11 Call Forward.
Call Waiting: Set whether to enable call waiting. For detailed operations, see 8 Call
Waiting.
Audio Source: Set the IP phone's default audio input and output mode to speaker or
headset. For detailed operations, see 7 Audio Source.
Switch (for IMS+UC): Set the destination number for the mobile connect function. For
detailed operations, see 19 Mobile Connect (for IMS+UC).
Video Control: Set whether to automatically select video call placing and answering
when placing and answering a call. For detailed operations, see 5 Video Control.
Bluetooth: Set whether to automatically enable the call forward function when the
Bluetooth headset is being used. For detailed operations, see 12 Bluetooth
Context-Awareness.

eSpace 8950 IP Phone
User Guide 26 Settings
Issue 01 (2014-06-30) Huawei Proprietary and Confidential
Copyright © Huawei Technologies Co., Ltd.
94
Intercom: Set whether to automatically mute or answer intercom calls. For detailed
operations, see 15 Intercom.
DND Settings (for UC2.X): Set the DND mode to server DND or local DND. For
detailed operations, see 13 DND.
----End
26.3.3 Security
Step 1 Tap . On the APPLICATION tab, tap Settings..
Step 2 In the PERSONAL area, tap Security.
The security settings screen is then displayed. On this screen, you can set the following
parameters:
Screen lock: Set the screen lock mode to None (slide), Pattern, PIN, or Password.
Make pattern visible: Set the phone to display the pattern when you are drawing the
pattern to unlock the screen.
Automatically lock: Set the amount of time before the screen automatically locks.
Power button instantly locks: Set the phone to lock the screen immediately you press
the power button.
Encrypt phone: Set whether to enter a PIN or password each time the IP phone is
powered on.
Owner info: Set the phone to display the owner information or any custom information
on the locked screen.
Make passwords visible: Set whether to show passwords as you enter them on the
phone.
Device administrators: Check the device manager installed on the IP phone. You can
enable or disable it.
Unknown sources: Set whether to allow installation of any applications.
Verify apps: Set whether to verify applications are secure before installing them.
Trusted credentials: Use certificates and credentials to secure the usage of applications.
Install from SD card: Install encrypted certificates stored on the SD card.
Clear credentials: Delete all credentials from the IP phone and reset the password.
----End
26.3.4 Language and Input
Step 1 Tap . On the APPLICATION tab, tap Settings..
Step 2 In the PERSONAL area, tap Language & input.
The language and input settings screen is then displayed. On this screen, you can set the
following parameters:
Language: Select a language for your IP phone.
Spell checker: Select to enable spelling correction for your contact information.
Personal dictionary: Add words and shortcut keys to your personal dictionary.
eSpace 8950 IP Phone
User Guide 26 Settings
Issue 01 (2014-06-30) Huawei Proprietary and Confidential
Copyright © Huawei Technologies Co., Ltd.
95
Default: Set a default input method for your IP phone.
Android keyboard (AOSP): Select and set specific Android keyboard (AOSP) options.
Huawei IME: Select and set specific Huawei input method options.
Text-to-speech output: Set the text-to-speech speed and default language.
Pointer speed: Set the pointer speed of the mouse or trackpad.
----End
26.3.5 Backup and Reset
Step 1 Tap . On the APPLICATION tab, tap Settings..
Step 2 In the PERSONAL area, tap Backup & reset.
On the backup and reset settings screen, you can back up the data on your IP phone and
restore your IP phone to its factory defaults.
Tap Factory data reset > Reset phone > Erase everything.
If you have set a screen lock password, you need to enter the password after tapping Reset phone.
Resetting the phone will remove all personal information and downloaded applications from your IP
phone.
If you tap and hold for 15s or longer, the IP phone will reset to factory defaults.
----End
26.4 System Settings
26.4.1 Date and Time
26.4.2 Accessibility
26.4.3 Developer Options
26.4.4 About Phone
26.4.1 Date and Time
Step 1 Tap . On the APPLICATION tab, tap Settings..
Step 2 In the SYSTEM area, tap Date & time.
The date and time settings screen is then displayed. On this screen, you can set the following
parameters:
Automatic date & time: Set your IP phone to automatically time-synchronize with the
network. When setting Automatic date & time, you need to specify the IP address of
the time synchronization server.
Set date: Set the date for your IP phone.
Set time: Set the time for your IP phone.
Select time zone: Set the time zone for your IP phone.

eSpace 8950 IP Phone
User Guide 26 Settings
Issue 01 (2014-06-30) Huawei Proprietary and Confidential
Copyright © Huawei Technologies Co., Ltd.
96
Use 24–hour format: Set the 24-hour format as the time format for your IP phone.
Choose date format: Set the date format for your IP phone.
Time Synchronization Server: Set the IP address of the time synchronization server.
You can set the time synchronization server only after your administrator password has
been verified. For any questions, contact your system administrator.
----End
Setting the Date and Time on the Web Page
Step 1 On the web page, choose System > Date & Time.
Step 2 Select either Automatic or Manual from Time Update Mode.
When Manual is selected, you can only set the time zone. In this case, you can set the specific date and
time on the phone LCD screen.
Step 3 Set the desired time zone in Time Zone.
Step 4 Click Save.
----End
26.4.2 Accessibility
Step 1 Tap . On the APPLICATION tab, tap Settings..
Step 2 In the SYSTEM area, tap Accessibility.
The accessibility settings screen is then displayed. On this screen, you can set the following
parameters:
Magnification gestures: Set whether to enable the magnification gestures function.
After this function is enabled, you can easily magnify what's on the screen by simply
tapping the screen three times.
Large text: Set a larger text size for your IP phone.
Accessibility shortcut: Set whether to enable accessibility shortcut mode.
Touch & hold delay: Set the touch and hold delay to short, medium, or long time.
Enhance web accessibility: Set whether to allow applications to install scripts from
Google.
----End
26.4.3 Developer Options
Step 1 Tap . On the APPLICATION tab, tap Settings..
Step 2 In the SYSTEM area, tap Developer options.
On the develop options screen, you can set the desktop backup password, enable the screen to
stay awake, and configure read-write protection for the SD card. It is not recommended for
you to set developer options. If needed, contact your system administrator.
----End

eSpace 8950 IP Phone
User Guide 26 Settings
Issue 01 (2014-06-30) Huawei Proprietary and Confidential
Copyright © Huawei Technologies Co., Ltd.
97
26.4.4 About Phone
Step 1 Tap . On the APPLICATION tab, tap Settings..
Step 2 In the SYSTEM area, tap About Phone.
The About Phone screen lets you access important phone information, including the
peripheral status, network status, and version information.
----End
Viewing Status
On the About Phone screen, tap Status. Then you can view information about the peripheral
status, network status, and MAC address.
PERIPHERAL: View the usage status of the SD Card, Bluetooth, USB camera and
USB storage device.
NETWORK STATUS: View the phone's IP address, gateway address, and subnet mask
information.
MAC: View the phone's Wi-Fi MAC Address, Ethernet MAC Address, and Bluetooth
MAC Address.
802.1X: View the information of 802.1x authentication.
Viewing Phone Version Information
On the About Phone screen, you can view your phone's model, Android version, and
software version information.
Viewing Phone Status on the Web Page
On the phone web page, choose View Status.
Network: View the phone's IP address, gateway address, and subnet mask information.
Peripheral Status: View the usage status of the USB camera and USB storage device.
About Phone: View the phone's software version, BOOT version, and hardware version
information.
26.5 Advanced Settings
Tap . On the APPLICATION tab, tap Settings..
You can perform some advanced settings, including configuring network security, account,
and server address parameters.
Authentication of the administrator password is required to perform advanced settings. If you want to
access the ADVANCED screen to perform advanced settings, contact your system administrator.

eSpace 8950 IP Phone
User Guide 27 Safety Precautions
Issue 01 (2014-06-30) Huawei Proprietary and Confidential
Copyright © Huawei Technologies Co., Ltd.
98
27 Safety Precautions
Carefully read and observe these safety precautions.
Basic Requirements
Keep the product dry and prevent damage during storage, transportation, and operation.
Do not attempt to dismantle the product. In case of any fault, contact an authorized
maintenance center for assistance or repair.
No organization or individual is permitted to make any change to the structure or safety
and performance design of the product without prior written consent.
While using the product, observe all applicable laws, directives and regulations, and
respect the legal rights of others.
Environment Requirements
Keep the product in a well-ventilated place. Do not expose the product to direct sunlight.
Keep the product clean and free of dust and stains.
Do not place the product near a water source or in a damp area.
Place the product on a stable surface.
Do not place any object on the top of the product. Reserve sufficient space around the
product for heat dissipation.
Do not place the product on or near flammable materials such as foam.
Keep the product away from heat source or flames, such as radiators or candles.
Keep the product away from any household appliances that generate strong magnetic or
electromagnetic fields, such as microwave ovens, refrigerators, or mobile phones.
Usage Requirements
Do not allow children to play with the product or accessories. Swallowing the
accessories may be fatal.
Use only accessories (such as the power adapter and the battery) provided or authorized
by the manufacturer.
Ensure that the product does not get wet. If water gets into the product, disconnect the
power supply immediately and unplug all the cables connected to the product, such as
the power cable and telephone cable, and then contact an authorized maintenance center.

eSpace 8950 IP Phone
User Guide 27 Safety Precautions
Issue 01 (2014-06-30) Huawei Proprietary and Confidential
Copyright © Huawei Technologies Co., Ltd.
99
When installing the product, comply with IEC60950-1 Limited Power Source (LPS) and
local electric security standards, and use SELV-compliant power supplies (SELV stands
for safety extra low voltage).
Before connecting or disconnecting any cable, shut down the product and disconnect the
power supply.
While connecting or disconnecting any cable, ensure that your hands are dry.
Do not step on, pull, or bend any cable excessively; doing so may damage the cable,
leading to product malfunction.
Do not use old or damaged cables.
Keep the power plug clean and dry, to prevent electric shock or dangerous situations.
During lightning, disconnect the product from the power supply, and unplug all the
cables connected to the product, such as the power cable and telephone cable, to avoid
lightning strikes.
If the product is unused for a long time, disconnect the power supply and pull the power
plug.
If smoke, unusual sounds, or smells are emitted from the product, stop using the product
immediately, disconnect the power supply, and unplug the power supply and other cables.
Contact an authorized maintenance center for advice and repair.
Make sure that no objects (such as metal shavings) enter the product through the speaker.
Cleaning Requirements
Before cleaning the product, stop using it, disconnect the power supply, and unplug all
the cables connected to the product, such as the power cable and telephone cable.
Do not clean the product exterior with any cleaning agents or cleanser spray. Use a piece
of soft cloth to clean the product shell.
LCD Usage Requirements
Do not expose the LCD to direct sunlight.
Do not press, scratch, or damage the LCD; do not place heavy objects on top of it.
Do not stare at the display screen for an extended period. This may harm your eyes or
cause blurred vision.
LCD Cleaning Requirements
According to the instructions given in the attached manual, use a piece of soft cloth to
remove dust from the surface of the LCD.
Do not clean the screen with volatile solvent, such as alcohol, benzene, or a dilution
agent. Do not expose the screen to rubber or plastic material for an extended period. This
will deteriorate the surface gloss of the LCD.
Environment Protection
Do not dispose of the product and its accessories in a garbage can. Dispose of the product
according to local regulations for disposing of packing materials, exhausted batteries, and
abandoned products. Support local recycling efforts.