Huawei Technologies K3773 HSPA USB Stick User Manual
Huawei Technologies Co.,Ltd HSPA USB Stick
Contents
- 1. Safety Instructions
- 2. User Manual
User Manual
HiLink K3773 HSPA USB Stick
Quick Start
Thank you for choosing this USB Stick. With the USB Stick, you
can access the Internet through wireless network at a high
speed.
Note:
This manual describes the appearance of the USB Stick, as well as the procedures for preparation, and
connection steps.
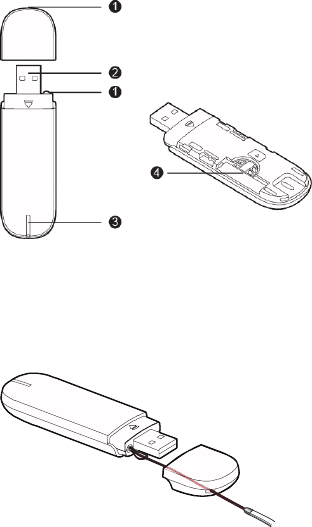
Getting to Know Your USB Stick
The following figure shows the appearance of the USB Stick. It is only for your reference. The actual
product may differ.
n Strap Hole
You can tie the cap and the USB Stick together by threading a strap through the strap holes, so that the
cap will not be easily lost.
o USB Connector
It connects the USB Stick to a PC.
p Indicator
It indicates the status of the USB Stick.
Green, blinking twice every 3s: The USB Stick is powered on.
Green, blinking once every 3s: The USB Stick is registering with a 2G network.
Blue, blinking once every 3s: The USB Stick is registering with a 3G/3G+ network.
Green, solid: The USB Stick is connected to a 2G network.
Blue, solid: The USB Stick is connected to a 3G network.
Cyan, solid: The USB Stick is connected to a 3G+ network.
Off: The USB Stick is removed.
q SIM/USIM Card Slot
It holds a Subscriber Identity Module (SIM)/Universal Subscriber Identity Module (USIM) card.
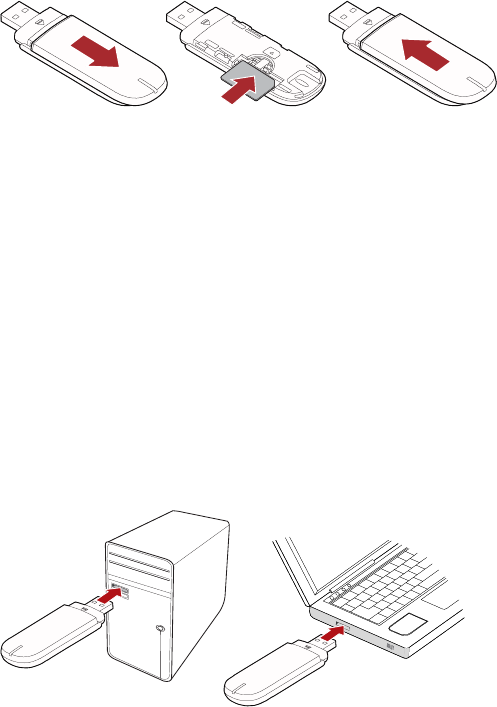
Getting Your USB Stick Ready
Install the SIM/USIM card
1. Slide the front cover to remove it from the USB Stick.
2. Insert the SIM/USIM card into the card slot, as shown in the following figure.
3. Replace the front cover and slide it into place.
Note:
Ensure that the beveled edge of the SIM/USIM card is properly aligned with that of the SIM/USIM
card slot.
Do not remove the SIM/USIM card when the card is in use. Otherwise, the card as well as your USB
Stick may get damaged and the data stored on the card may be corrupted.
Using Your USB Stick
Different operating system (OS) may have different situation for the connection. The following sections
take Windows XP as an example.
Connecting the USB Stick with a Computer
Note:
First, power on the computer. Then connect the USB Stick with the computer. Otherwise, the USB Stick
cannot be run as normal.
1. If it is the first time to use the USB stick, plug the USB Stick into the USB port of your PC directly.
2. Then, the OS will detect and recognize the device and starts the installation automatically.
3. After the installation is finished, a web page for the management program will be open and the USB
stick will connect the network automatically.
Note:
z If you cannot access the network normally, find the AutoRun.exe file in the driver path. Then
double-click AutoRun.exe to run the program.
z When you cannot access the network, please access the URL (http://192.168.1.1) to check the
device status.
z If the URL (http://192.168.1.1) cannot be opened, please disconnect other devices connected to the
network, such as Wi-Fi, Ethernet cable, and then insert again the USB stick or restart the PC.
Disconnect from the Network
To disconnect the network, just remove the USB stick from the PC directly.
Note:
If there is no need for using the network, you’d better remove the USB stick to avoid the waste of flux.
View the Device Status
To view the information for the device status, open the browser and enter the URL: http://192.168.1.1.
Version: V100R001_01 Part Number: 31010FHJ