Huawei Technologies K5160 LTE mobile wifi User Manual UserManual
Huawei Technologies Co.,Ltd LTE mobile wifi UserManual
Contents
- 1. UserManual.pdf
- 2. UserManual_Safety.pdf
UserManual.pdf
Quick Start
Thank you for choosing the Mobile Broadband USB
Stick. With your USB Stick, you can access a wireless
network at high speed.
Note:
This manual describes the appearance of the USB Stick, as well as the procedures for
preparation, connection steps.
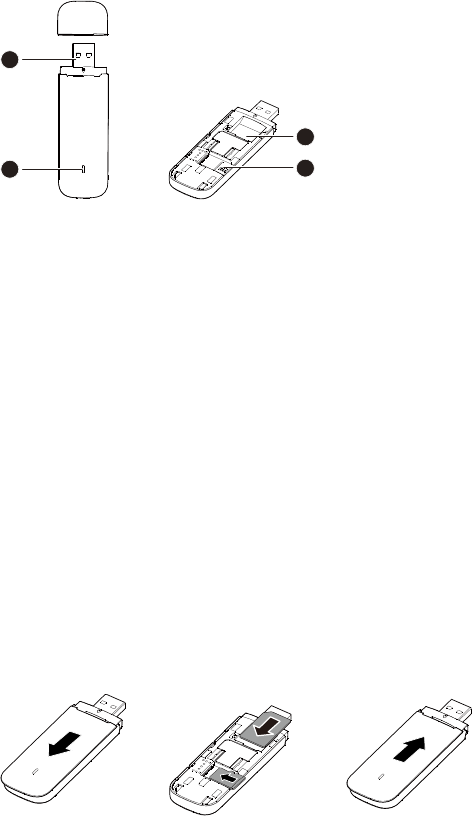
Getting to Know Your USB Stick
The following figure shows the appearance of the USB Stick. It is provided only for your
reference. The actual product may be different.
1
3
4
2
USB Connector
It connects the USB Stick to a PC.
Indicator
It indicates the status of the USB Stick.
Green, blinking twice every 2s: The USB Stick is powered on.
Green, blinking once every 0.2s: The software of the USB Stick is being upgraded.
Green, blinking once every 2s: The USB Stick is registering with a 2G network.
Blue, blinking once every 2s: The USB Stick is registering with a 3G/3G+ network.
Purple, blinking once every 2s: The USB Stick is registering with an LTE network.
Green, solid: The USB Stick is connected to a 2G network.
Blue, solid: The USB Stick is connected to a 3G network.
Cyan, solid: The USB Stick is connected to a 3G+ network.
Purple, solid: The USB Stick is connected to a LTE network.
Off: The USB Stick is removed.
SIM Card Slot
It holds a Subscriber Identity Module (SIM) card.
microSD Card Slot
It holds a microSD card.
Getting Your USB Stick Ready
1. Slide the cover to remove it from the USB Stick.
2. Insert the SIM card and the microSD card into the corresponding card slots, as shown in
the following figure.
3. Replace the cover and slide it into place.
Note:
The microSD card is an optional accessory. If it is not provided in the package, you can
buy one yourself.
Ensure that the beveled edge of the SIM card is properly aligned with that of the SIM
card slot and the microSD card is inserted according to the direction as labeled on the
microSD card slot.
Do not remove the microSD or SIM card when the card is in use. Otherwise, the card as
well as your USB Stick may get damaged and the data stored on the card may be
corrupted.
Using Your USB Stick
The procedure for installation depends on your computer's operating system. The
following sections are based on Windows OS.
Connecting to a Network
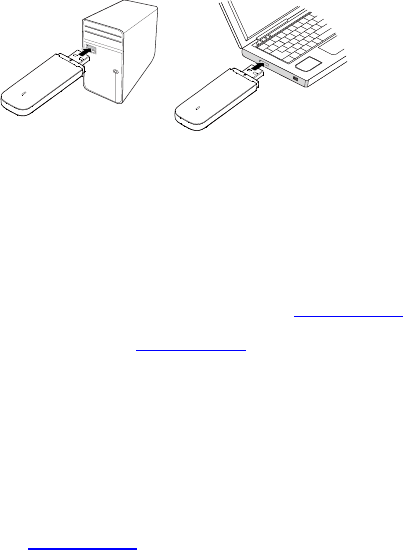
1. Insert the USB Stick into one of your computer's USB ports.
The computer identifies the new hardware and starts its installation automatically.
2. When the installation is complete, the USB Stick's web management page is displayed
and the USB Stick connects to the network automatically. The USB Stick's web
management page will be automatically displayed every time the USB Stick is inserted
into the computer.
Note:
If the computer does not start the USB Stick's installation automatically, find the
AutoRun.exe file in the USB Stick's root directory, and double-click the file to run it.
If you are not connected to the network, access http://192.168.9.1 to check the device
status.
If you cannot access http://192.168.9.1, disconnect other network connections, such
as an Ethernet or Wireless Fidelity (Wi-Fi) connection, remove and then insert the USB
Stick, or restart the computer.
Disconnecting from a Network
Remove the USB Stick from the computer.
Note:
If you do not need to connect to a network, it is recommended that you remove the USB
Stick from your computer to eliminate unwanted data traffic.
Viewing Service Information
Visit http://192.168.9.1 to view your service information.
LTE is a trademark of ETSI.
Version: V100R001_01 Part Number: 31010***