Huawei Technologies M750 CDMA1X Digital Mobile Phone User Manual User Guide
Huawei Technologies Co.,Ltd CDMA1X Digital Mobile Phone User Guide
User Guide

M750
Safety Precautions
Before using the phone, read safety precautions and inform your
children about using the phone correctly and safely. For details,
see "Warnings and Precautions".
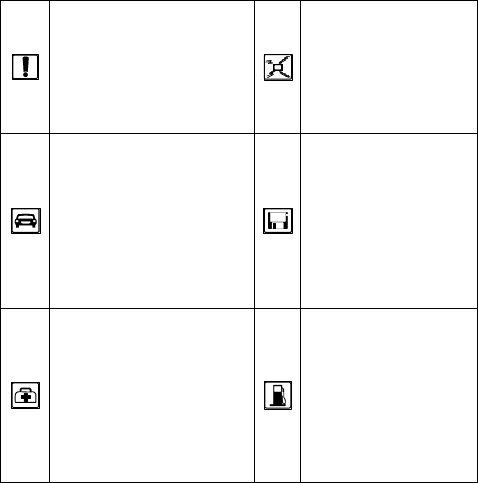
Do not switch on your
phone when using the
phone is prohibited or
when using the phone may
cause interference or
danger.
Do not place your
phone or the
accessories in
containers with strong
electromagnetic field.
Do not use your phone
while driving. Do not place magnetic
storage media near
your phone. Radiation
emitted from the
phone may erase the
information stored on
the magnetic storage
media.
Follow the rules or
regulations set forth by the
hospitals and health care
facilities. Switch off your
phone near medical
apparatus.
Do not place your
phone near a
high-temperature area.
Do not place your
phone where it can
come in contact with
flammable gas such as
a gas station.
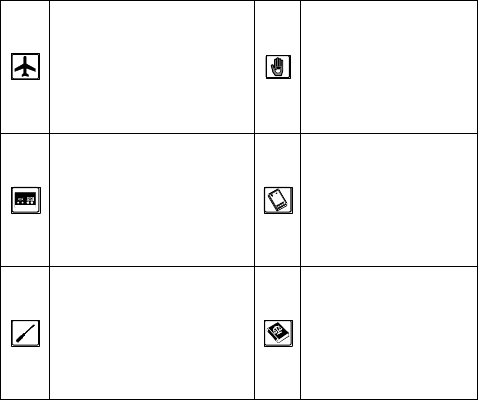
Switch off your phone in
an aircraft. The phone may
cause interference to
control signals of the
aircraft.
Keep your phone and
its accessories away
from children. Do not
allow children to use
your phone without
guidance.
Switch off your phone
near high-precision
electronic devices. The
phone may affect the
performance of these
devices.
Use only the approved
batteries and chargers
to avoid explosion.
Do not attempt to
disassemble your phone or
its accessories. Only
qualified personnel are
allowed to service or
repair the phone.
Observe the laws or
regulations on using
the phone. Respect
others' privacy and
legal rights when using
your phone.

Copyright © Huawei Technologies Co., Ltd.
2009. All rights reserved.
No part of this document may be reproduced or
transmitted in any form or by any means without prior
written consent of Huawei Technologies Co., Ltd.
The product described in this manual may include
copyrighted software of Huawei Technologies Co., Ltd
and possible licensors. Customers shall not in any manner
reproduce, distribute, modify, decompile, disassemble,
decrypt, extract, reverse engineer, lease, assign, or
sublicense the said software, unless such restrictions are
prohibited by applicable laws or such actions are
approved by respective copyright holders under licenses.
Trademarks and Permissions
, HUAWEI, and are trademarks or registered
trademarks of Huawei Technologies Co., Ltd.
Other trademarks, product, service and company names
mentioned are the property of their respective owners.
Notice
Some features of the product and its accessories described
herein rely on the software installed, capacities and
settings of local network, and may not be activated or
may be limited by local network operators or network
service providers, thus the descriptions herein may not
exactly match the product or its accessories you purchase.
Huawei Technologies Co., Ltd reserves the right to
change or modify any information or specifications
contained in this manual without prior notice or
obligation.
NO WARRANTY
THE CONTENTS OF THIS MANUAL ARE
PROVIDED “AS IS”. EXCEPT AS REQUIRED BY
APPLICABLE LAWS, NO WARRANTIES OF ANY
KIND, EITHER EXPRESS OR IMPLIED, INCLUDING
BUT NOT LIMITED TO, THE IMPLIED
WARRANTIES OF MERCHANTABILITY AND
FITNESS FOR A PARTICULAR PURPOSE, ARE
MADE IN RELATION TO THE ACCURACY,
RELIABILITY OR CONTENTS OF THIS MANUAL.
TO THE MAXIMUM EXTENT PERMITTED BY
APPLICABLE LAW, IN NO CASE SHALL HUAWEI
TECHNOLOGIES CO., LTD BE LIABLE FOR ANY
SPECIAL, INCIDENTAL, INDIRECT, OR
CONSEQUENTIAL DAMAGES, OR LOST PROFITS,
BUSINESS, REVENUE, DATA, GOODWILL OR
ANTICIPATED SAVINGS.
Import and Export Regulations
Customers shall comply with all applicable export or
import laws and regulations and will obtain all necessary
governmental permits and licenses in order to export,
re-export or import the product mentioned in this manual
including the software and technical data therein.
Conventions
Term Conventions
This manual refers to HUAWEI M750 CDMA mobile phone as
"the phone" or "your phone".
Operation Conventions
Operation Meaning
Press and
hold Press a key for two to three seconds and then release
it.
Press Press a key and release it quickly.
GUI Conventions
Format Meaning
Bold Any string displayed on the phone screen is in
boldface, such as "Menu".
> Multi-level menus are spearated by ">". For
example, "Menu > Messages" indicates "Messages"
is the submenu of "Menu".
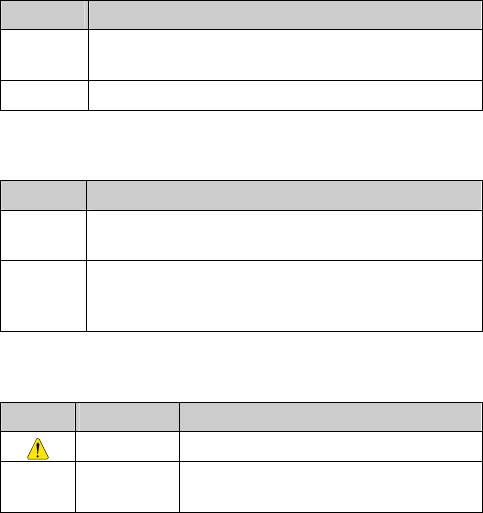
Symbols
Symbol Description Meaning
Caution Warnings and precautions for operations
Note Complementary descriptions for
operations
Table of Contents
1 Getting to Know Your Phone................................... 1
Your Phone............................................................................ 1
Keys and Functions ............................................................... 3
Screen Icons .......................................................................... 5
Interfaces............................................................................... 6
2 Getting Started .......................................................... 7
Charging the Battery.............................................................. 7
Powering On/Off the Phone................................................... 7
Using the Stylus..................................................................... 8
Dragging and Flicking........................................................... 8
Standby Screen...................................................................... 9
3 Voice Services .......................................................... 11
Making a Call.......................................................................11
Answering a Call..................................................................11
Operations During a Call..................................................... 12
4 Text Entry................................................................ 14
On-Screen Keyboard Mode................................................. 14
5 SMS........................................................................... 15
Writing and Sending a Message .......................................... 15
Reading a Message.............................................................. 16
6 MMS......................................................................... 17
Writing and Sending a Multimedia Message....................... 17
Receiving a Multimedia Message........................................ 17
Viewing a Multimedia Message .......................................... 18
i
7 Contacts.................................................................... 19
Adding a Contact................................................................. 19
Searching for a Contact ....................................................... 19
8 @metro..................................................................... 21
Accessing @metro............................................................... 21
Changing Your @metro Settings ......................................... 22
Using On-line Help ............................................................. 22
9 Alarm Clock............................................................. 25
Enabling an Alarm Clock .................................................... 25
Disabling an Alarm Clock ................................................... 25
10 Music Player .......................................................... 26
Adding a Playlist ................................................................. 26
Playing Music...................................................................... 26
11 Camera................................................................... 30
Taking a Picture................................................................... 30
Viewing a Picture ................................................................ 31
Taking Pictures Sequentially ............................................... 32
Taking a Picture in Self-Timer Mode .................................. 33
Setting a Picture Effect........................................................ 33
12 Security................................................................... 34
Enabling or Disabling the Phone Lock................................ 34
Changing the Phone Lock Code .......................................... 34
Locking the Keypad ............................................................ 34
13 Bluetooth Connection............................................ 36
Sending Data Through a Bluetooth Connection .................. 36
Receiving Data Through a Bluetooth Connection ............... 37
Listening to Music Through a Bluetooth Stereo Headset .... 38
ii
Sending a Contact Through a Bluetooth Connection........... 39
Other Bluetooth Operations................................................. 39
14 TTY Operation...................................................... 41
Using the TTY Device......................................................... 41
Setting the TTY Mode......................................................... 41
15 Troubleshooting..................................................... 42
16 Warnings and Precautions ................................... 44
17 Huawei Technologies Co., Ltd. Limited
Warranty..................................................................... 54
iii
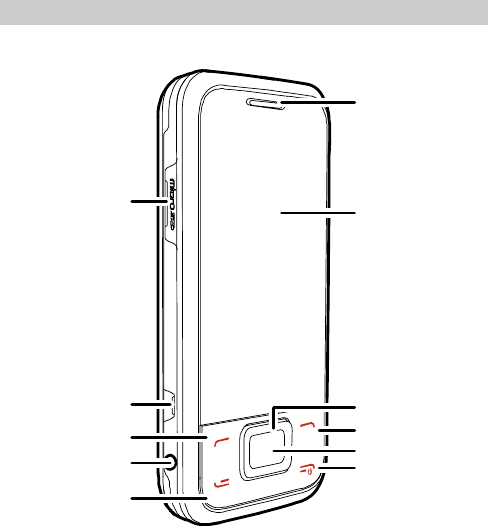
1 Getting to Know Your Phone
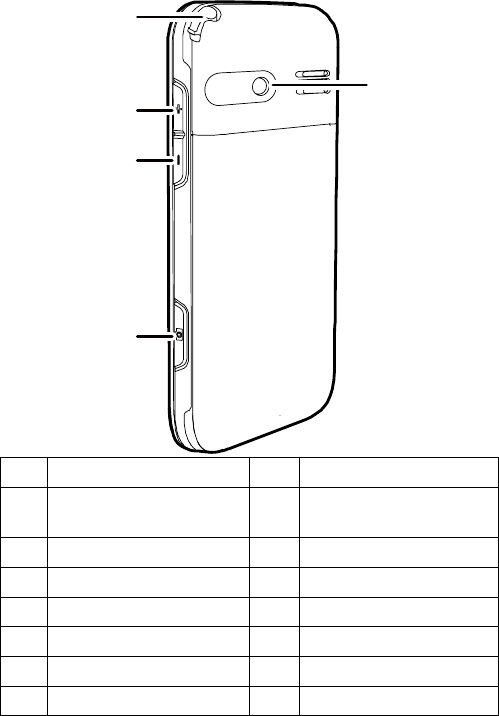
Your Phone
6
7
2
5
10
11
3
1
8
9
4
1
12
13
14
15
16
1 microSD Slot 9 Right Soft Key
2 Charger Interface/ Data
Cable Connecter 10 OK Key
3 Left Soft Key 11 End/Power Key
4 Headset Jack 12 Stylus Pen
5 Talk/Send Key 13 Volume Up Ley
6 Earpiece 14 Volume Down Key
7 Screen 15 Camera Key
8 Navigation Keys 16 Camera
2

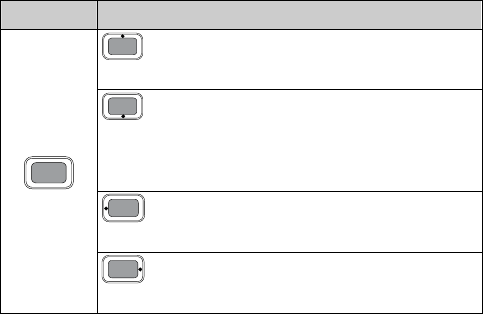
Keys and Functions
Press … To …
z Access the All Calls menu in standby mode.
z Dial a number or answer a call.
z Power on or power off the phone by pressing and
holding the key.
z End a call or reject a call.
z Return to the standby screen.
z Turn on or turn off the screen backlight in
standby mode.
z Access Contacts in standby mode.
z Select the option displayed in the lower left
corner of the screen.
z Access @metro in standby mode.
z Select the option displayed in the lower right
corner of the screen.
z Launch the camera in standby mode by pressing
and holding the key.
z Take a picture after the camera is launched.
z Access Menu in standby mode.
z Confirm a selection in menu mode.
z Start playing music after the music player is
launched.
Increase the volume during a call or music playing.
Decrease the volume during a call or music playing.
3
Press … To …
: Access Contacts in standby mode; increase
the volume during a call.
: Access the Messages menu in standby
mode; access the screen for writing a message by
pressing and holding the key; decrease the volume
during a call.
: Access Metro WEB in standby mode;
decrease the volume during a call.
: Access @metro in standby mode; increase
the volume during a call.
4
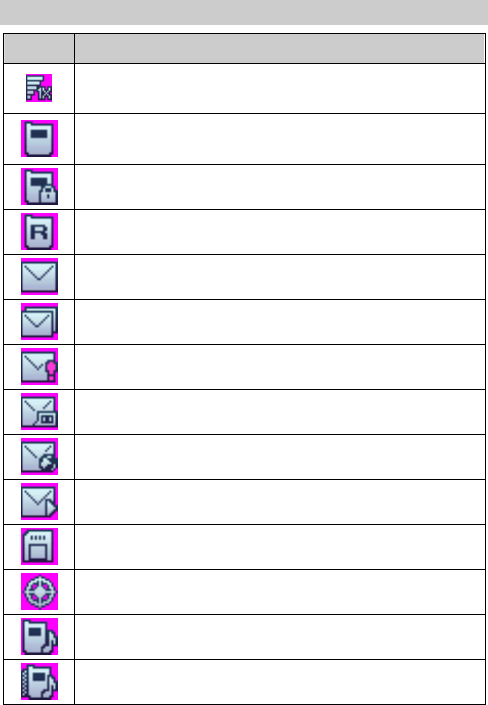
Screen Icons
Icon Description
Indicates the signal strength. The more the bars are, the
stronger the signal is.
There is an incoming call; a call is being set up; or the
phone is in conversation.
The voice privacy function is enabled.
The phone is in the roaming status.
A new message is received.
The memory for messages is full.
An urgent message is received.
A new voice mail is received.
A new PUSH message is received.
A new MMS is received.
MicroSD Card.
The AGPS indicator mode is Location On.
The alert type is Ring.
The alert type is Ring & Vibration.
5
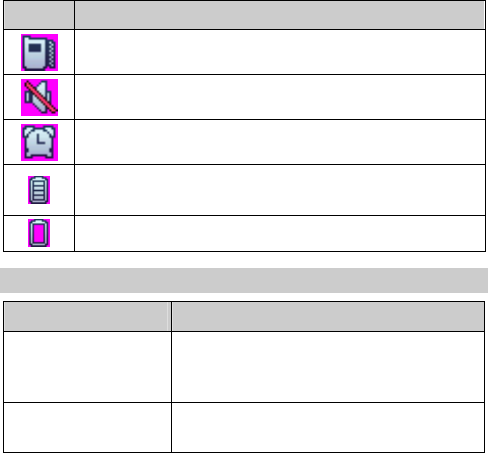
Icon Description
The alert type is Vibration.
The alert type is Silence.
An alarm clock is set.
Indicates the battery power level. The more the bars
are, the higher the remaining battery level is.
The battery power level is extremely low.
Interfaces
Interface Description
Charger interface
/Data cable connector
It is at the right side of your phone. You
can connect the travel charger or data
cable to it.
Headset jack It is at the right side of your phone. You
can connect the headset to it.
6
2 Getting Started
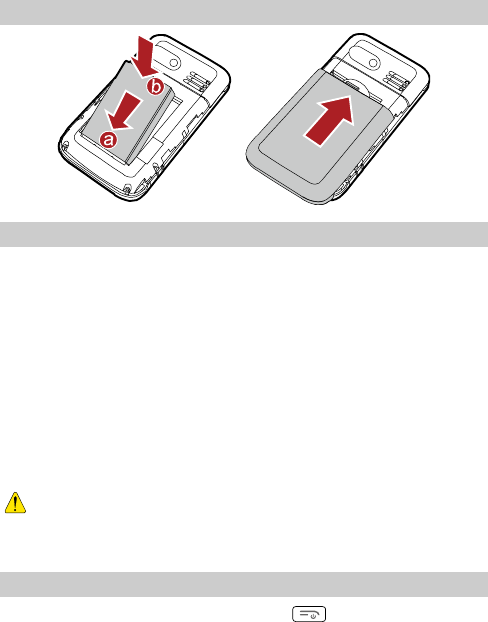
Installing the Battery
Charging the Battery
To charge the battery, do as follows:
1. Connect the travel charger to the charger interface at the bottom
of your phone.
2. Connect the charger to an AC power socket.
During the charging process, the icon on the upper right corner
of the screen is in an animated status.
3. Wait until the phone is completely charged.
If the icon becomes static, the battery is completely charged.
4. Disconnect the charger from the AC power socket.
5. Disconnect the charger from the phone.
z Do not use a damaged battery or charger.
z Before using the travel charger, ensure that the battery is
installed in your phone.
Powering On/Off the Phone
To power on the phone, press and hold until the screen
backlight is on.
7

To power off the phone, press and hold until the power-off
prompt is displayed.
Using the Stylus
You can use the stylus to select an item or enter text by tapping on
the touch screen of your phone.
Stylus Operations
To perform an operation with the stylus, you can do as follows:
z Tap: Select an item or display a menu by touching the stylus to
the screen.
z Drag: Select multiple characters in on-screen keyboard mode or
move an object by moving the stylus on the screen.
Screen Calibration
When operating the phone with the stylus, if the phone cannot
respond to your operation correctly, you can calibrate the screen as
follows:
z Select Menu > Settings > Display Settings > Screen
Calibration to access the screen for calibration.
z Calibrate the screen by tapping the center of + displayed on the
screen according to the instructions.
During the calibration, tap the center of + accurately, to
ensure that the phone can respond to your tap and text
entry on the screen correctly after the calibration.
Dragging and Flicking
On following screens, you can perform some operations
conveniently through dragging on the touch screen:
z On the standby screen, tap and drag the title, clock, or date to
change the position of the selected item.
z In the menu list, drag up or down to scroll. Then tap a submenu
to select it.
8
z When viewing pictures, flick right or left to switch a picture to
the next or previous one.
The resolution of the phone screen is 240 × 320.
Therefore, when viewing pictures, a picture with a
resolution higher than 240 × 320 may be displayed
improperly.
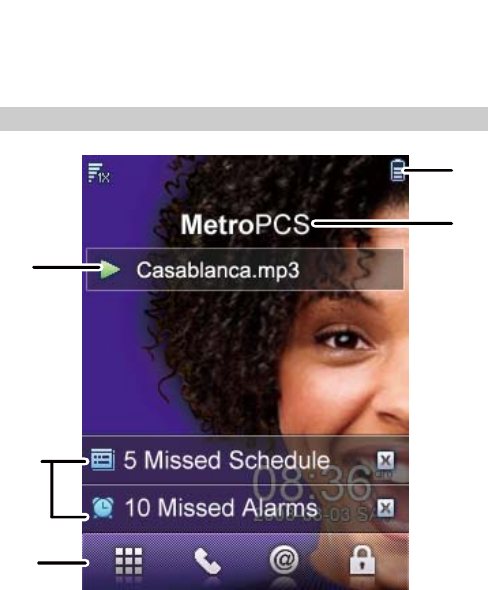
Standby Screen
1
2
3
5
4
9
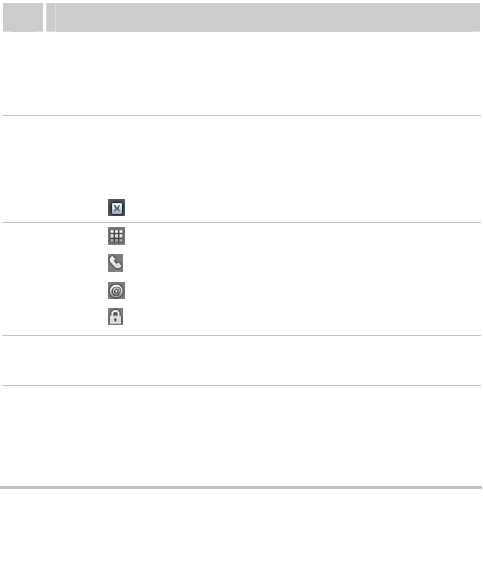
Description
1
z The information about the playing music player is
displayed.
z Tap this area to access the music player.
2
z The notifications such as the information about missed
calls and new messages are displayed.
z Tap this area to view the details.
z Tap to close a notification bar.
3
z Tap to access Menu.
z Tap to access the dialer.
z Tap to access @metro.
z Tap to lock the keypad.
4 The icons indicating the status, such as the signal
strength, battery level, and current profile are displayed.
5
z By default, the name of the network operator is
displayed. You can tap it to set a customized title.
z Select Menu > Settings > Display Settings > Banner
to change the title content.
To prevent the slow response of the system, you are
recommended not to set a picture in the GIF format as
the wallpaper.
10
3 Voice Services
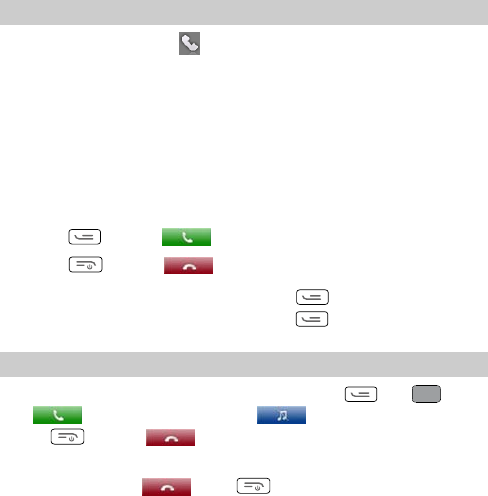
Making a Call
1. In standby mode, tap to access the dialer.
2. Enter the phone number on the dialer.
z For international calls, tap * twice consecutively to enter the
plus sign (+). Then enter the country or region code, area code,
and phone number in sequence.
z For extension numbers, enter the phone number, tap * three or
four times consecutively to enter P or T, and then enter the
extension number.
3. Press or tap to dial the number.
4. Press or tap to end the call or cancel the dialing.
In standby mode, you can press to view call logs.
Then select a number and press to dial the number.
Answering a Call
When there is an incoming call, you can press or , or
tap to answer the call; tap to silence the phone;
press or tap to reject the call.
z When the any-key answer function is enabled, you can press
any key (except and ) to answer the call.
z When the Headset Auto Answer function is enabled and the
headset is properly connected to the phone, the phone answers
the call automatically.
z The Headset Auto Answer function is available only when a
wired headset is used.
11
You can set the any-key answer function in the Settings >
Call Settings > Answer Mode, and set the headset
auto-answer function in the Settings > Call Settings >
Headset Auto Answer.
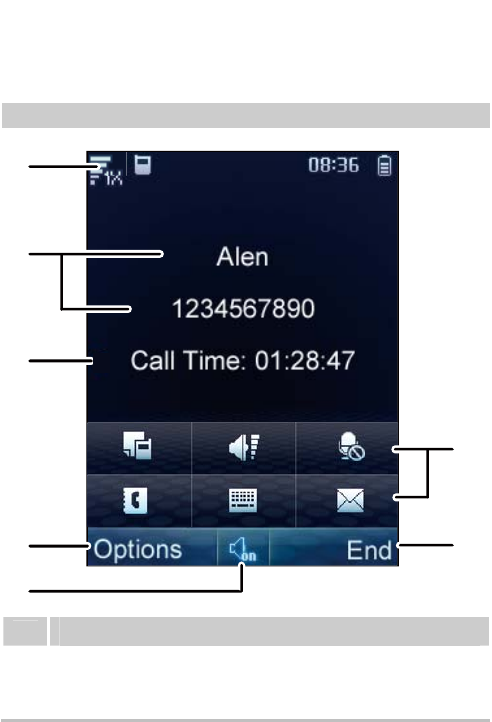
Operations During a Call
1
2
7
6
4
5
3
Description
1 The icons indicating the status, such as the signal
strength, battery level, and current profile, and the current
time are displayed.
12
Description
2 The contact name and the number of an ongoing call are
displayed.
3 Call duration is displayed.
4
Select Options for the following options:
z Mute: Mute the microphone.
z Save Number: Save the number to Contacts.
z Use Bluetooth Headset:Use bluetooth headset.
z Contacts: Search for or create a contact.
z Messages: Access the Messages menu.
z Call Memo: Write information during a call.
z Voice Privacy: Enable voice encryption.
z TTY Setup:Setting the TTY mode.
5 Tap this icon to switch between the hands-free mode and
the hand-held mode.
6
z Tap to access the Call Memo menu.
z Tap to access the screen for adjusting the
volume.
z Tap mute the microphone.
z Tap to access the Contacts menu.
z Tap to display the on-screen keyboard.
z Tap to access the Messages menu.
7 Select
End to end the call.
13
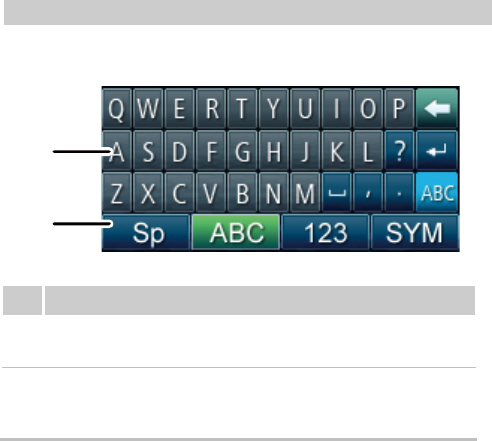
4 Text Entry
On-Screen Keyboard Mode
In on-screen keyboard mode, the following bar is displayed at the
bottom of the screen.
1
2
Description
1 On-screen keyboard: Tap keys on the keyboard to enter
letters, numbers, or symbols.
2 Text input modes: Tap Sp, ABC, 123, or SYM to enter
letters, numbers, or symbols through the on-screen
keyboard.
You can tap keys on the on-screen keyboard to enter
corresponding letters, numbers, or symbols.
14

5 SMS
Writing and Sending a Message
To write and send a text message, do as follows:
1. Select Menu > Messages > SMS > Create Message, or press
and hold .
2. Write a message and then select Options for the following
options:
z Send: Send the message.
z Save: Save the message to Drafts.
z Insert Quick Text: Insert a commonly used phrase into the
message.
z Insert Contact: Select a contact from the phonebook and insert
the phone number into the message.
z Insert Special Symbol: Insert a preset website-related symbol
into the message.
z Priority: Set the message priority that can be Normal,
Interactive, Urgent, or Emergency.
z Callback Number: Set the callback number. The callback
number will be sent to the message recipient with the message.
You can set it to either your phone number or another number.
After receiving your message, the recipient can call you back
though the callback number.
3. Select Options > Send or tap to add the recipient(s) of the
message. Up to 100 recipients can be added
by using one of the following methods:
z Enter the phone number(s) of the recipient(s) directly.
15
z Select Search > Contacts or tap to select the recipients
from the phonebook.
z Select Search > Groups or tap to select a group of
recipients.
4. Press or tap to send the message
Reading a Message
Inbox stores the received text messages. To read a text message in
the inbox, do as follows:
1. Select Menu > Messages > SMS > Inbox.
2. Select Options > View or tap to select and read the desired
message.
3. Select Options for the following options:
z Reply: Write a new text message to reply to the message sender.
z Delete: Delete the message.
z Forward: Forward the message.
z Extract: Extract the number(s) contained in the message.
z Extract URL: Extract the URL address(es) contained in the
message.
16

6 MMS
Writing and Sending a Multimedia Message
To write and send a multimedia message, do as follows:
1. Select Menu > Messages > MMS > Create MMS.
2. Edit the message by adding contents to the following fields:
z Recipient: Add the recipient(s) of the message. Up to 20
recipients can be added.
z Subject: Enter the subject of the message.
z Slides: Insert pictures, audio files, video files, and text into a
slide.
3. After you write the message, select Options > Send to send the
message.
The MMS function is network dependent. If you cannot
send or receive multimedia messages, contact your service
provider.
Receiving a Multimedia Message
After you select Menu > Messages > MMS > MMS Settings >
Receive options > Download timing > Manual, a message
notification will be received and saved in the inbox before you
receive a multimedia message. Then you need to press to
read the message notification and select Options > Download to
receive the multimedia message.
After you select Menu > Messages > MMS > MMS Settings >
Receive options > Download timing > Automatic, the phone
will automatically download a multimedia message to the inbox.
17

Viewing a Multimedia Message
Inbox stores the received multimedia messages. To view a
multimedia message in the inbox, do as follows:
1. Select Menu > Messages > MMS > Inbox.
2. Press to select a message.
3. Press to view the contents of the message.
4. Select Options for the following options:
z Open: View the contents of the message.
z Reply: Write a new multimedia message to reply to the message
sender.
z Reply All: Write a new multimedia message to reply to the
message sender and all other message recipients.
z Forward:Forward the message.
z Move to Folders: Move the message to MMS > My Folders.
z Delete: Delete the message.
z Delete All: Delete all the messages in the inbox.
z Sort: Sort the messages in the inbox according to Date or
Address.
z Filter View: List the messages that comply with your specified
condition that can be Show All, MMS, or High Priority.
18
7 Contacts
Adding a Contact
To add a contact to the phonebook, do as follows:
1. Select Menu > Contacts > Add New.
2. Enter the information about the contact. Information can be
entered in the following fields, including Name, Mobile
Number, Home Number, Office Number, Fax Number,
E-Mail, Notes, Custom Tone, Custom Image, and URL. (For
each contact, at least one number needs to be entered.)
3. Press to scroll to the desired field and then press ,
or directly tap the desired field to select it.
4. Enter the corresponding information with the stylus.
5. Save or cancel the edit of the contact.
z Select Save or tap to save the contact to the phonebook.
z Select Cancel, and then select Yes or No to cancel or continue
with the edit of the contact.
Searching for a Contact
To search for a contact, do as follows:
1. Select Menu > Contacts > Search.
2. Enter the name of the contact. Then select Search.
3. After the contact is found, select Options for the following
options:
z View: View details of the contact.
z Edit: Edit the contact, such as changing the name, number, or
other fields of the contact.
z Add New: Add a new contact.
19
z Send Message: Edit and send a text or multimedia message to
the contact.
z Send Via Bluetooth: Send the contact through Bluetooth.
z Delete: Delete the contact.
z Call: Call the contact.
z Edit Before call: Edit the number before you call it.
20

8 @metro
With Mobile Shop, you can download full featured applications
over the air including games, personalized ring tones, pictures, and
more. You can send and receive instant messages and email, or
browse the web to catch up on all the latest news.
This section outlines how to obtain games and other applications
for your phone. For more information about this function, consult
your service provider.
Accessing @metro
Applications Shopping and Downloading
Download games, ring tones, e-mail, and more using the Mobile
Shop. For information on airtime charges, consult your service
provider.
1. In the standby mode, press to launch @metro.
2. Press to select the Mobile Shop, then press . Your
phone takes a moment to connect, then the Mobile Shop
Catalog menu appears in the display.
The first time you access the Mobile Shop, an "airtime
warning" message appears in the display along with
instructions on how to remove this message.
3. Follow the instructions in your phone's display.
Please check with your Wireless Carrier for availability of
applications.
21
Changing Your @metro Settings
Use the Settings menu in Mobile Shop to manage, move, order
applications, and much more.
1. In the standby mode, press to launch @metro.
2. At the @metro menu, Press to select Settings, then
press . The following options appear in the display:
z Order Apps: Download applications over the network.
z Move Apps: Move previously downloaded applications
between available folders.
z Manage Apps: View used and available memory.
z Main Menu View: Select whether you wish to view the main
Mobile Shop menu in a list or icon format.
z View Log: View the Mobile Shop log, which displays
information about recent activity using Mobile Shop.
3. Press to select the desired option.
4. Press to enter the option's sub-menu and view or change
settings.
Using On-line Help
The Help sub-menu within @metro is a short tutorial on several
@metro-Mobile Shop features. View information about charges,
cancelling subscriptions, buying apps, disabling apps, and more.
1. Within in the @metro menu, use to select Help.
2. Press . The Help subjects described in the following
subsections appear in the display.
3. Use to select the desired Help subject.
4. Press to view the selected Help information.
22
Buying New Apps
To buy new and exciting apps, visit the Mobile Shop. It provides
you with a variety of apps you can choose from.
What do I pay?
When you buy an app, you will be charged for the purchase cost
of the app.
Demo Apps
A Demo app is free and is designed to demonstrate the app's main
features. It usually expires after a certain period of time or a
number of uses and often has limited functions. When you run a
demo app, you will be presented with a purchase option so you
won't have to look for the app in the Mobile Shop.
Removing Apps
You may remove apps that are no longer needed. When you
remove an app, you cannot use the application unless you
purchase it again. To remove an app, choose Settings > Manage
Apps. Then, select the app you want to remove.
Disabled Apps
You can install new apps even if the memory of your phone is full
by partially removing (disabling) apps you haven't used recently.
When you need to use a disabled app, you can restore it at no
additional purchase cost.
Restoring Apps
Disabled apps can be quickly restored at no additional purchase
cost. To restore an app, run the application you want to restore
from the Main Menu. You will be guided through the restoration
process.
23
Expired Apps
Apps that were purchased based on the number of uses or for a
specified period of time expire. You can purchase additional uses
from the Mobile Shop.
24
9 Alarm Clock
After an alarm clock is enabled, the phone notifies you at a preset
time if the phone is powered on. You can set up to five alarm
clocks.
Enabling an Alarm Clock
1. Select Menu > Tools > Alarms.
2. Select an alarm clock, select Edit, and then press or tap
to set the title, time, alert cycle (days), and alert tone of the
alarm clock.
3. Select On to enable the alarm clock.
4. Select Save to save the settings of the alarm clock.
z When an alarm clock alerts, select Stop to stop it or
select Snooze to snooze it for five minutes.
z If you perform no operation to an alarm clock that
alerts, the alarm clock stops temporarily after
45-second ringing and alerts again five minutes later.
The alarm clock alerts five times before it stops
thoroughly.
z After selecting Cycleing> Custom, you can select the
days on which an alarm clock needs to repeat from the
seven days in a week.
Disabling an Alarm Clock
1. Select Menu > Tools > Alarms.
2. Select an alarm clock. Then select Off to disable the alarm
clock, or select Cancel All to disable all alarm clocks.
25
10 Music Player
Adding a Playlist
1. In standby mode, select Menu > Multimedia > Add New
Playlist to add a new playlist.
2. Enter the name of the playlist, and then select Save to save it.
3. Select Add to add songs to the playlist.
If a playlist has been saved on the phone, you need to
move the cursor to the playlist, and then select Options >
Add New Playlist to add a new playlist. You can select
From My File or From Playlist to add songs to the new
playlist.
4. Press or tap (or ) to select a storage location:
phone or microSD card.
5. Press to scroll through the songs. Then press or tap
to select a song and add it to the playlist. (Press again
or tap to remove the song from the playlist.)
6. Select Options > Add to save the playlist.
Playing Music
In standby mode, select Menu > Music player > Music NOW! to
launch the music player.
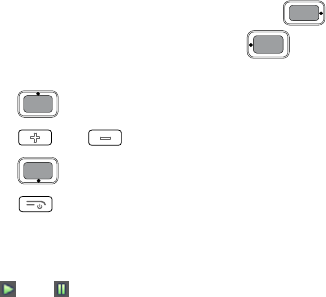
z Press to play a song. During playback of a song, you can
press to pause the song; press it again to resume playback.
z Press to play the next track; press to play the
previous track.
26
z During playback of a song, press and hold to
fast-forward the song; press and hold to rewind the
song.
z Press to access the current playlist.
z Press or to increase or decrease the volume.
z Press to stop playing a song.
z Press to return to the standby screen. Then the music
player plays the song at the background. The screen displays the
name of the current song on the status bar of the music player.
You can tap the status bar to access the music player again, or
tap (or ) to pause or resume playback.
27
You can also control the music player through tapping the icons on
the player screen.
1
3
4
2
7
8
5
6
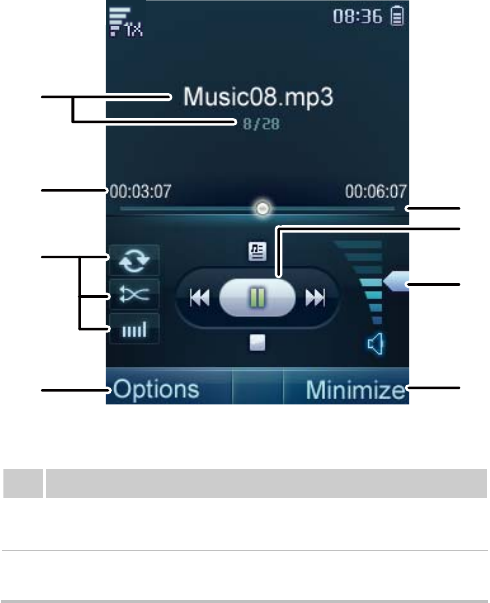
Description
1 Title bar, displaying the name and the number of the
current song.
2 Time bar, displaying the total time and the played
duration of a song.
28
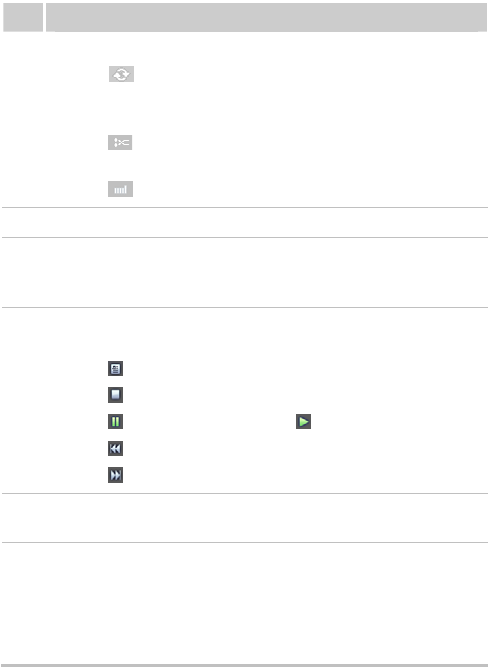
Description
3
Shortcut icons. You can perform the following operations:
z Tap to set the phone to repeat all songs in a
playlist, to repeat the current song, or not to repeat
songs.
z Tap to set the phone to play songs in order or to
shuffle songs.
z Tap to switch between the settings of the equalizer.
4 Options menu.
5 Progress slider, displaying the playing progress of the
current song. You can drag the progress slider to the point
that you want the file to play.
6
Playback control icons. You can perform the following
operations:
z Tap to access the current playlist.
z Tap to stop playing a song.
z Tap to pause the song; tap to resume playback.
z Tap to play the previous track.
z Tap to play the next track.
7 Volume control slider. You can drag the slider to adjust
the volume.
8
z When the music player is playing a song, select
Minimize to minimize the music player and return to
the previous menu.
z When the music player is stopped, select Minimize to
close the music player and return to the previous menu.
29
11 Camera
Taking a Picture
1. In standby mode, select Menu > Camera or press and hold
to launch the camera.
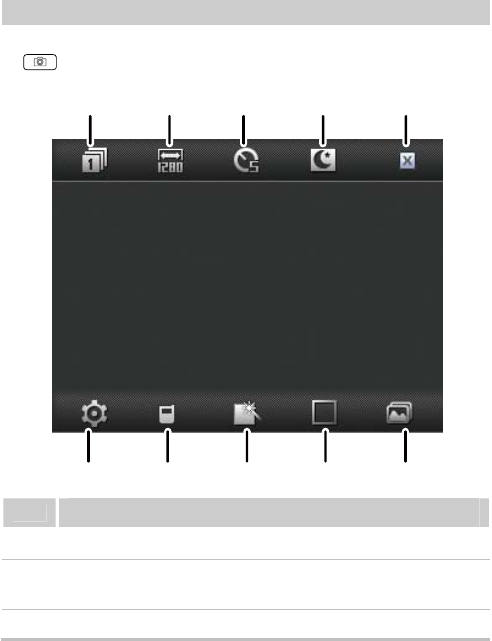
1234 5
678910
Description
1 Capture modes: Tap the icon to select a capture mode.
2 Resolutions: Tap the icon to switch between picture
resolutions.
3 Self-timer mode: Tap the icon to set the time delay of
30
Description
taking a picture after the shutter release.
4 Night mode: Tap the icon to enable or disable the night
mode.
5 Back: Tap the icon to return to the previous menu.
6 Settings: Tap the icon to access the setting menu.
7 Location: Save location
8 Effects: Tap the icon to switch between the picture
effects.
9 Frames: Tap the icon to switch between fun frames.
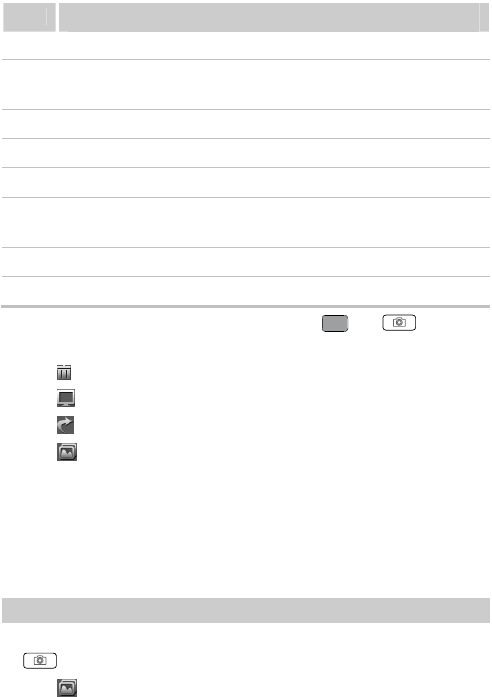
10 Album: Tap the icon to access the album.
2. Focus the camera on the scene and press or to take
a picture. Then you can preview the picture and save it.
z Tap to delete the picture.
z Tap to set the picture as the wallpaper or a contact image.
z Tap to send the picture through the MMS or Bluetooth.
z Tap to access the album.
In preview mode, you can drag up or down on the screen
to zoom out or zoom in (for the resolutions of 1280 ×
1024 and 1280 × 960, the camera can be neither zoomed
in nor zoomed out). You can also flick left or right to
decrease or increase the brightness.
Viewing a Picture
1. In standby mode, select Menu > Camera, or press and hold
to launch the camera.
2. Tap to access the album.
31
3. Press or tap (or ) to select a storage location:
phone or microSD card.
4. Press to select a picture.
5. Tap or directly tap the desire picture to view it.
z Press , or flick left or right to switch between the
pictures.
z Tap or tap the picture to view the picture in full screen
mode. Tap the picture again or press to exit from the full
screen mode.
6. Tap Options for the following options:
z Full Screen: View the picture in full screen mode.
z Slide Show: Play all pictures as a slide show.
z Rotate: Rotate the picture.
z Set as: Set the picture as the wallpaper or a contact image.
z Send: Send the picture through the MMS or Bluetooth.
z Delete: Delete the picture.
z File Info: View the name, size, creation date, and resolution of
the picture.
7. Select Back to return to the picture list.
You can also select Menu > My Files > Pictures to
select a storage location (phone or microSD card), and
then view the corresponding pictures.
Taking Pictures Sequentially
1. In standby mode, select Menu > Camera, or press and hold
to launch the camera.
2. Tap to select to take a succession of four or nine pictures.
32
3. Focus the camera on the scene and press or to take
pictures. The phone will take a preset number of pictures
sequentially and then save them automatically.
Taking a Picture in Self-Timer Mode
1. In standby mode, select Menu > Camera, or press and hold
to launch the camera.
2. Tap to switch between the 5-second and 10-second
self-timer modes.
You can tap to access the setting menu. Then select
Shot Tone to enable or disable the self-timer alert tone.
3. Focus the camera on the scene and press or . Then
the phone will take a picture after a preset countdown and then
save it automatically.
Setting a Picture Effect
1. In standby mode, select Menu > Camera, or press and hold
to launch the camera.
2. Tap to switch between the picture effects.
33

12 Security
Enabling or Disabling the Phone Lock
The phone lock protects your phone from unauthorized use. By
default, the phone lock is not enabled. You can change the default
phone lock code (Last four number of the MDN) to any numeric
string of four to eight digits.
1. Select Menu > Settings > Security Settings > Phone Lock.
2. Select one of the following phone lock modes:
z Immediate: Enable the phone lock immediately.
z Power On: Enable the phone lock when the phone is powered
on next time.
z Off: Disable the phone lock.
Changing the Phone Lock Code
Do remember your phone lock code. If you forget it, contact your
local dealer.
1. Select Menu > Settings > Security Settings > Change Phone
Code.
2. Enter the correct phone lock code and select OK.
3. Enter the new phone lock code and select OK.
4. Enter the new phone lock code again and select OK.
Locking the Keypad
When the keypad is locked, you can still answer incoming calls by
pressing or tapping .
Manually Locking the Keypad
To avoid misoperations, you can tap on the standby screen to
lock the keypad.
34

Automatically Locking the Keypad
If the auto keyguard function is enabled, after the phone is idle for
a preset period of time in standby mode, the keypad is locked
automatically.
1. Select Menu > Settings > Phone Settings > Auto Keyguard.
2. Select one of the following options:
z Off: Disable the auto keyguard function.
z 15 Seconds, 30 Seconds, or 1 Minute: Set the keypad to be
locked after the phone is idle for 15 seconds, 30 seconds, or one
minute.
Unlocking the Keypad
In standby mode, you can unlock the keypad by using one of the
following methods:
1. Drag in the lower left corner of the screen to the
designated position.
2. Press and then to unlock the keypad.
35

13 Bluetooth Connection
Your phone supports Bluetooth wireless connections. Through
Bluetooth, you can set up wireless connections between your
phone and other Bluetooth-compatible devices to exchange data.
Bluetooth wireless connections can be set up between the devices
within a maximum range of 10 meters, however, the connections
can be disturbed by other electronic devices or blocked by
obstacles such as walls.
z In certain areas, the use of Bluetooth devices might be
restricted or prohibited. Observe local laws and
regulations.
z Do not accept the connection request of an unknown
device. Thus you can prevent your mobile phone from
the intrusion of harmful contents.
Sending Data Through a Bluetooth Connection
1. To enable the Bluetooth function, select Menu > Settings >
Connectivity Settings > Blue Tooth > Switch On.
2. Launch the application that saves the contents to be sent. For
example, if you want to send a picture to another device, you
need to launch the My Files application.
3. Select the contents you want to send. Then select Options >
Send > BlueTooth.
36

If the Bluetooth function is not enabled yet, the phone
displays "Switch On Bluetooth ?" on the screen.
z Select Yes to enable Bluetooth and access Device
List.
z Select No to reject enabling of Bluetooth and return to
the previous menu.
4. After accessing Device List, you need to select the device to be
connected from the list.
z You can set up only one Bluetooth connection each
time.
z If the device list contains the devices that are already
paired with your phone, select the desired device to
send data.
z When the device list is empty or the device to be
connected to is not in the list, select Search to search
for other Bluetooth-enabled devices in the effective
range. The names of the found devices will be
displayed on the screen. Select Back to stop searching.
5. Select Options > Send to send the contents through
Bluetooth.If the other Bluetooth device requires verification
before the connection, your phone displays Input pair
password on the screen. Then create a password that is to be
used together with the other party. After both parties enter the
same password, the Bluetooth connection can be set up.
6. After the connection is set up, information about the data being
transmitted is displayed on the screen.
Receiving Data Through a Bluetooth Connection
1. When another device sends data to your phone through
Bluetooth, your phone displays "Accept Bluetooth transfer
request?" on the screen. Select Yes to receive the data. The
37

filename and the receiving progress are displayed on the screen.
Select No to reject the data.
When your phone sets up a Bluetooth connection with
another device for the first time, the phone displays
Input pair password on the screen for verification.
Then enter a password of one to eight digits and select
OK. After the other party enters the same password,
your phone begins to receive data.
2. The phone displays "Receive Success, save to phone" on the
screen, indicating that the data is received and saved to My
Files.
If a microSD card is installed on your phone, the phone
saves the received data to the microSD card by default;
otherwise, the phone saves the received data to the
phone memory.
Listening to Music Through a Bluetooth Stereo
Headset
You can listen to music on the phone through a Bluetooth stereo
headset.
1. In standby mode, select Menu > Music player > Music NOW!
to launch the music player. Then switch on your Bluetooth
headset for pairing.
2. Select Options > Play via BT.
3. When the phone displays "Switch On Bluetooth?", select Ye s to
access the device list.
4. Select Search to search for Bluetooth-compatible devices. In
the list of newly found devices, select the corresponding
Bluetooth headset. Then select Options > Send to access the
screen for pairing devices.
38

5. Enter the password for pairing the Bluetooth headset and select
OK.
6. After the phone sets up the Bluetooth connection, you can listen
to music through the Bluetooth stereo headset.
After your phone is connected to a Bluetooth headset,
music, voice broadcast messages, and navigation voice
messages are played through the headset.
Sending a Contact Through a Bluetooth
Connection
Your phone can send a contact through Bluetooth.
1. In standby mode, select Options > Contacts > Contacts List to
access the contact list.
2. Select a contact to be sent, and then select Options > Send Via
> Bluetooth.
3. When the phone displays "Switch On Bluetooth?", select Ye s to
access the device list.
4. Select Search to search for Bluetooth-compatible devices. In
the list of newly found devices, select the corresponding
Bluetooth headset. Then select Options > Send to access the
screen for pairing devices.
5. Enter the pairing password, and then select OK.
6. After the Bluetooth connection is set up, the phone begins to
send the contact.
Other Bluetooth Operations
z Switch On/Off: Enable or disable the Bluetooth function.
z Search new device: Search for Bluetooth-compatible devices.
z Device List: View all paired Bluetooth devices.
39
z My device properties: View the name, visibility, hardware
address, type, and supported mode of the phone.
40

14 TTY Operation
Using the TTY Device
The Teletypewriter (TTY) is a typewriting device. By connecting
the phone to the TTY device, you can use the TTY functions to
send/receive messages.
When you use the TTY function, do as follows:
1. Connect the TTY device to the headset jack of the phone and set
the phone to the TTY mode.
2. Make or answer calls as normal.
3. When the call is put through, use the TTY device to send or
receive the letters.
4. Press or select End to end the call.
Setting the TTY Mode
1. In standby mode, select Menu > Settings > Phone Settings >
TTY Setup.
2. Select the TTY mode, and then press Select or to confirm.
z Voice: The standard voice speaking mode and the listening
mode.
z TTY: Transmit and receive the TTY characters.
z VCO: Receive TTY characters but transmit by speaking into the
microphone.
z HCO: Transmit TTY characters but receive by listening to the
earpiece.
41
15 Troubleshooting
If you encounter any problem when using your phone, try to
rectify the problem according to the following table. If the
problem persists, contact the service provider or the dealer.
Problem Ensure that…
The battery cannot be
charged.
The charger is properly connected
to your phone and the power
socket.
The phone cannot be
powered on.
The battery power is sufficient.
The battery is properly installed.
Press and hold .
You cannot make a call
except an emergency call.
1 The phone number is correct.
2 You are in the network
service area.
3 You have not enabled the call
restriction function.
Bad call quality.
1 The signal strength is strong
enough.
2 If you are staying indoors,
move close to a window.
During a call, the other side
cannot hear your voice. The microphone is not covered.
The signal strength is not
strong enough or your
phone is often off line.
1 The antenna is in a good
condition.
2 Move close to a place with
strong signal strength.
42

Problem Ensure that…
Your phone displays "No
service found", "Service
unavailable" or "Network
problem".
1 You are not in an area with
weak magnetic field (in a
tunnel or surrounded by
buildings). If so, move to
another area and try again.
2 Do not visit the service
option without obtaining
authorization from your
service provider.
43
16 Warnings and Precautions
Electronic Device
z Power off your phone near high-precision electronic devices.
The phone may affect the performance of these devices.
z Pacemaker manufacturers recommend that a minimum
separation of 7 inches (20 cm) be maintained between a mobile
phone and a pace-maker to avoid potential interference with the
pace-maker. To maintain this distance, it is recommended that
you use the phone on the opposite ear from your pacemaker and
do not carry it in a breast pocket. If you have reason to believe
interference is occurring, power off your phone immediately
and consult with your physician.
z Some wireless phones may interfere with some hearing aids. In
the event of such interference, consult your service provider or
consult with your physician.To ensure that the Hearing Aid
Compatibility rating for your phone is maintained, secondary
transmitters such as Bluetooth and WLAN components must be
disabled during a call.
Health Care Facilities
Note the following concerning use of your phone in health care
facilities:
z Do not take your phone into the operating room (OR), intensive
care unit (ICU), or coronary care unit (CCU).
z Do not use your phone in any area of a health care facility
where mobile phone use is prohibited.
Area with Inflammables and Explosives
In any area with flammables and explosives, power off your phone
and do not take out, install or charge the battery, to prevent
44
explosion and fire. Areas with inflammables and explosives may
include, but are not limited to:
z Gas stations
z Areas for storing fuels (such as below deck on a ship)
z Devices/Vehicles transporting and storing fuels or chemical
products
z Areas containing chemical substances or particles (such as sand,
dust, or metal powder) in the air
z Areas with posted signs warning of "Explosives"
z Areas advising to "Power off bi-direction wireless equipment"
z Any Area where it is recommended to turn off the engine of a
vehicle.
Traffic Safety
z Please observe federal, state, and local laws and regulations
concerning phone use while driving.
z Secure the phone in its holder. Do not place the phone on the
seat or other places where it could become loose in a sudden
stop or collision.
z Do not place the phone over the air bag or in the air bag
deployment area. The phone may cause injury due to the strong
force created by the inflating air bag.
z Observe all rules and regulations during air travel. When
boarding an airplane, power off the phone and take out the
battery. In areas where phone use is prohibited, power-off the
phone. The radio signal of the phone may interfere with the
airplane's navigation or instrumentation systems.
Storage Environment
z Do not place magnetic storage media such as magnetic cards
and floppy disks near the phone. Electromagnetic radiation from
the phone may erase the information stored on them.
45
z Do not put your phone, battery, or other accessories in
containers with a strong magnetic field, such as an induction
oven or a microwave oven. Otherwise, circuit failure, fire, or
explosion may occur.
z Do not leave your phone, battery, or charger in a very hot or
cold place. Otherwise, malfunction, fire, or explosion may
occur.
z Do not place sharp metal objects such as pins near the earpiece.
The earpiece emits a magnetic field that may attract objects,
causing injury.
Operating Environment
z The phone, battery, and charger are not water-resistant. Keep
them dry. Protect the phone, battery and charge from water or
steam. Do not touch the phone with a wet skin. Otherwise,
short-circuit and malfunction of the product or electric shock
may occur.
z Do not use the phone in dusty, damp and dirty places or areas
with excessive magnetic fields. Otherwise, malfunction of the
circuitry may occur.
z The phone meets applicable radio frequency exposure
guidelines when used in the normal when positioned at least 1.5
cm away from the body. When a carry pouch or belt clip is used,
it should not contain metallic objects, and the phone should be
positioned at the above-stated distance from your body.
z Do not subject your phone, battery, and charger to serious
collision or shock. Otherwise, battery leakage, phone
malfunction, overheating, fire, or explosion may occur.
z If you experience discomfort (such as becoming nauseous or
dizzy) after playing games on your phone for long periods of
time, consult a physician immediately.
z During electrical storms, do not use your phone outdoors or
while it is charging.
46
z Do not touch the antenna when during a call. Touching the
antenna may affect call quality and may cause the phone to
expend additional power. As a result, the talk time and standby
time may be shortened.
z Use only phone accessories authorized by the manufacturer.
Use of unauthorized accessories will void warranty.
z While using the mobile phone, observe all federal, state, and
local laws and regulations, and respect others' privacy and legal
rights.
Child Safety
z Keep your phone, battery, and charger beyond the reach of
children. Do not allow children to use the phone, battery, or
charger without adult supervision.
z Do not allow children to place batteries in their mouths. The
electrolyte in the battery is poisonous.
z Your phone contains small parts with small edges that may
cause choking.
Clearing and Maintenance
z Before you clean or maintain the phone, power off the phone
and disconnect it from the charger. Otherwise, electric shock or
short-circuit of the battery or charger may occur.
z Do not use any chemical detergent, powder, or other chemical
agent (such as alcohol or benzene) to clean the phone and the
charger. Otherwise, damage or fire could occur. Clean the phone
and the charger with a piece of soft damp antistatic cloth.
z Keep the plug dry during cleaning to prevent fire.
z If the phone or any of its fittings does not work, return to a local
authorized service center for repair.
z Do not dismantle the mobile phone or accessories. Only an
authorized service center is allowed to disassemble the mobile
phone. Any disassembly of the mobile phone beyond what is
47
necessary for routine maintenance (such as changing the battery)
will void the warranty.
Environmental Protection
z Please observe all federal, state, and local regulations regarding
the disposal of your packaging materials, dead battery and used
phone. Do not dispose of dead battery or used phone in
municipal waste or by incineration. Otherwise, explosion may
occur. Please recycle.
z This HUAWEI device complies with Directive 2002/95/EC on
the restriction of the use of certain hazardous substances in
electrical and electronic equipment.
Emergency Call
Your phone can be used to place emergency calls. However,
connections in all conditions cannot be guaranteed. Never rely
solely on the phone for essential communications.
Battery
z Use batteries approved by the manufacturer only. Otherwise,
malfunction, fire, or explosion may occur.
z Do not dispose of the battery by incineration. Otherwise, the
battery might ignite or explode.
z Do not connect the two poles of the battery with conductors
such as cables, jewelry, or any other metal. Otherwise, the
battery may short-circuit, causing injury.
z Keep mobile phone at a temperature between 0 ºC and 45 ºC
while the battery is being charged. Store the battery at a
temperature between –20 ºC and 60 ºC. Storage at temperatures
that are too low (especially blow 0 ºC) or too high, will reduce
the capacity and life of the battery. More importantly, improper
storage may destabilize the battery, rendering it unsafe.
48
z Do not disassemble the battery or solder the battery poles.
Otherwise fluid leakage, overheating, fire, or explosion may
occur.
z If battery leakage, smoke, or strange smells occur, remove
battery from phone and keep it away from open flame to avoid
fire or explosion. Then take to local authorized service center
for repair.
z If battery fluid contacts your skin or clothing, wash with clean
water immediately to avoid skin irritation.
z If battery fluid gets into eyes, do not rub them. This could cause
injury. Wash with clean water and consult a doctor immediately.
z If battery deformation, color change or abnormal heating occurs
during storage or charging, remove battery immediately and
properly dispose. Otherwise, battery leakage, overheating,
explosion, or fire may occur.
z Do not force battery into place during installation.
z Do not remove the battery while the phone is turned on.
Charger
z Use only manufacturer-approved chargers. Use of a
non-approved charger may cause malfunction, and will also
void warranty.
z Do not short-circuit the charger. Short-circuiting the charger
may cause fire or malfunction of the charger.
z If the power cord is damaged (for example, if the wire is
exposed or broken), or the plug becomes loose, stop using the
cable at once. Otherwise, electric shock, short-circuit, or fire
may occur.
z Do not use the charger in a dusty or damp environment. Keep
the power cord away from excessive heat or flame.
z Use only the AC-power supply defined in the specifications of
the charger. Improper power voltage or current can cause fire or
malfunction of the charger.
49
z During charging, do not touch the plug, power cord or the
charger itself with wet skin. Otherwise, electric shock could
occur.
z If liquid leaks into the charger, remove the plug of the charger
from the socket immediately. Otherwise, overheating, fire or
other malfunction may occur.
z The Travel Adaptor for this phone meets UL 1310 safety
requirements. Please adhere to the safety instructions per UL
guidelines.
Certification Information (SAR)
THIS DEVICE MEETS THE CANADIAN AND UNITED
STATES GOVERNMENTS' REQUIREMENTS FOR
EXPOSURE TO RADIO FREQUENCY ELECTROMAGNETIC
FIELD.
Your mobile phone is a low-power radio transmitter and receiver.
When it is turned on, it emits low levels of radio frequency energy
("RF") (also known as radio waves or radio frequency fields).
Governments around the world have adopted comprehensive
international safety guidelines, developed by scientific
organizations, like ICNIRP (International Commission on
Non-Ionizing Radiation Protection) and IEEE (Institute of
Electrical and Electronics Engineers Inc.), through periodic and
thorough evaluation of scientific studies. These guidelines
establish permitted levels of radio wave exposure for the general
population. The levels include a safety margin designed to assure
the safety of all persons, regardless of age and health, and to
account for any variations in measurements.
Specific Absorption Rate (SAR) is the unit of measurement for the
amount of radio frequency energy absorbed by the body when
using a mobile phone. The SAR value is determined at the highest
certified power level in laboratory conditions, but the actual SAR
level of the mobile phone while operating can be well below the
50
value. This is because the mobile phone is designed to use the
minimum power required to reach the network.
All models of Huawei's mobile phones are designed to meet radio
frequency exposure guidelines. Before a phone model is available
for sale to the public, it must be tested and certified by the FCC
that it does not exceed the limit established by the
government-adopted requirement for RF exposure. The tests are
performed in positions and locations (that is, at the ear and worn
on the body) as required by the FCC for each model. For body
worn operation, this phone has been tested and meets FCC RF
exposure guidelines when the handset is positioned a minimum of
15 mm from the body with an accessory that contains no metal
part. Use of other accessories may not ensure compliance with
FCC RF exposure guidelines.
The SAR limit adopted for this particular device by the USA and
Canada is 1.6 watts/kilogram (W/kg) averaged over one gram of
tissue. The highest SAR value reported to the FCC and IC for this
device type when tested for use at the ear is 1.14 W/kg, and when
properly worn on the body is 0.943 W/kg.
Hearing Aid Compatibility (HAC) regulations for
Mobile phones
In 2003, the FCC adopted rules to make digital wireless
telephones compatible with hearing aids and cochlear implants.
Although analog wireless phones do not usually cause interference
with hearing aids or cochlear implants, digital wireless phones
sometimes do because of electromagnetic energy emitted by the
phone's antenna, backlight, or other components.
Your phone is compliant with FCC HAC regulations (ANSI
C63.19).
51

While some wireless phones are used near some hearing devices
(hearing aids and cochlear implants), users may detect a buzzing,
humming, or whining noise.
Some hearing devices are more immune than others to this
interference noise, and phones also vary in the amount of
interference they generate.
The wireless telephone industry has developed a rating system for
wireless phones, to assist hearing device users find phones that
may be compatible with their hearing devices. Not all phones have
been rated. Phones that are rated have the rating on their box or a
label located on the box. The ratings are not guarantees. Results
will vary depending on the user's hearing device and hearing loss.
If your hearing device happens to be vulnerable to interference,
you may not be able to use a rated phone successfully. Trying out
the phone with your hearing device is the best way to evaluate it
for your personal needs.
M-Ratings: Phones rated M3 or M4 meet FCC requirements and
are likely to generate less interference to hearing devices than
phones that are not labeled.
M4 is the better/higher of the two ratings. Your phone meets the
M4 level rating.Hearing devices may also be rated. Your hearing
device manufacturer or hearing health professional may help you
find this rating.
For more information about the FCC Hearing Aid Compatibility
please go to
http://www.fcc.gov/cgb/dro
FCC Statement
This device complies with Part 15 of the FCC Rules. Operation is
subject to the following two conditions: (1) this device may not
cause harmful interference, and (2) this device must accept any
52
interference received, including interference that may cause
undesired operation.
Warning: Changes or modifications made to this equipment not
expressly approved by HUAWEI may void the FCC authorization
for the user to operate this equipment.
Proposition 65 Compliance Statement
WARNING: This product contains chemicals known to the State
of California to cause cancer and birth defects or other
reproductive harm. Wash hands after handling.
53
17 Huawei Technologies Co., Ltd.
Limited Warranty
Huawei Technologies Co., Ltd. ("Huawei") represents and
warrants to the original purchaser ("Purchaser") that Huawei's
phones and accessories ("Product") are free from material defects,
including improper or inferior workmanship, materials, and design,
during the designated warranty period, and subject to the
following terms and conditions, when used normally and in
accordance with all operating instructions:
1. Warranty Period: Coverage under this warranty is limited to
the following time periods:
a) Phone: a period of 12 months from the date of purchase.
b) Battery and Charger: a period of 12 months from the date
of purchase.
c) Other accessories (If included in the box set): a period of
3 months from the date of purchase.
2. This limited warranty only applies to products manufactured
by or for Huawei and that can be identified by the "Huawei"
trademark, trade name, or logo affixed to them. The limited
warranty does not apply to any non-Huawei products or
software.
3. The Warranty extends only to Purchasers who purchased the
Product in the United States of America and is not assignable or
transferable to any subsequent purchaser/customer.
4. During the limited warranty period, Huawei will repair or
replace at Huawei's sole option, any parts of the Product that are
defective or malfunction during normal usage. Huawei reserves
the right to use new or refurbished replacement parts in repair of
the Product.
54
5. This limited warranty covers only the costs of parts and labor.
Other related costs such as shipping and delivery costs may be
born by purchaser at Huawei's option.
6. At Huawei's request, Purchaser must prove the date of the
original purchase of the Product by a dated bill of sale or dated
itemized receipt.
7. This warranty does not cover damage resulting from:
a) Abuse, accident, misuse, improper storage, exposure to
liquid, moisture, or dampness;
b) External causes such as from collision, fire, flooding,
sand, dirt, windstorm, lightning, or earthquake;
c) Exposure to extreme weather conditions, Acts of God,
theft, blown fuse, or improper use of any electrical
source;
d) Computer or internet viruses, bugs, worms, Trojan Horses,
cancelbots;
e) Use with non-Huawei products or products not
recommended for use with Huawei products;
f) normal wear and tear of the equipment;
g) Usage of equipment other than its normal and customary
manner;
h) Improper testing, operation, maintenance, installation, or
any alteration or modification of Product;
i) Consumable parts, such as batteries, unless damage has
occurred due to a defect in Huawei materials and
workmanship;
j) Service performed by anyone who is not a Huawei
representative or an authorized Huawei service provider;
k) Other acts which are not the fault of Huawei, including
damage caused by shipping;
l) Cosmetic damages, including but not limited to dents or
scratches in decorative, structural, or non-operative parts
resulting from normal customer use;
m) Spillage of food or liquid, corrosion, rust or incorrect
voltage; and
55

n) The defective function of the cellular system or
inadequate signal reception by the external antenna, or
viruses or other software problems introduced into the
Product.
8. Huawei does not warrant that the operation of this product
will be uninterrupted or error-free.
9. This warranty will also be null and void in any of the
following events:
a) The serial number or warranty seal on the equipment has
been altered, defaced or removed;
b) Any term contained in this warranty has been altered or
modified in any way without prior written consent of
Huawei;
c) Huawei has not been notified by Purchaser of the alleged
defect or malfunction of the Product during the applicable
warranty period.
10. If Product is returned to Huawei after the expiration of the
warranty period, Huawei's normal service policies shall apply
and Purchaser will be charged accordingly.
a) Huawei assumes no obligation or liability beyond that
which is expressly provided for in this limited warranty.
b) All warranty information, pricing, product features and
specifications are subject to change.
11. This limited warranty provides Purchaser's sole and
exclusive remedy to be provided by Huawei. The agents,
employees, distributors, and dealers of Huawei products are not
authorized to make modifications to this limited warranty, or
make additional warranties binding on Huawei.
LIMIT OF LIABILITY
12. HUAWEI'S LIMIT OF LIABILITY UNDER THIS
LIMITED WARRANTY SHALL BE THE ACTUAL CASH
VALUE OF THE PRODUCT AT THE TIME PURCHASER
RETURNS THE PRODUCT FOR REPAIR, AS
56

DETERMINED BY THE PRICE PAID BY THE PURCHASER
FOR THE PRODUCT LESS A REASONABLE AMOUNT OF
USAGE. HUAWEI SHALL NOT BE LIABLE FOR ANY
OTHER LOSSES OR DAMAGES SUCH AS SPECIAL,
INCIDENTAL, CONSEQUENTIAL, OR PUNITIVE
DAMAGES (INCLUDING BUT NOT LIMITED TO LOSS OF
ANTICIPATED BENEFITS OR PROFITS, LOSS OF
SAVINGS OR REVENUE, LOSS OF DATA, LOSS OF USE
OF THE PRODUCT OR ANY ASSOCIATED EQUIPMENT,
COST OF CAPITAL, COST OF ANY SUBSTITUTE
EQUIPMENT OR FACILITIES, DOWNTIME, ANY COSTS
OF RECOVERING, REPROGRAMMING, OR
REPRODUCING ANY PROGRAM OR DATA, ANY
FAILURE TO MAINTAIN THE CONFIDENTIALITY OF
DATA STORED ON THE PRODUCT, THE CLAIMS OF ANY
THIRD PARTIES, INCLUDING SUBSEQUENT
PURCHASERS, AND INJURY TO PROPERTY, RESULTING
FROM THE PURCHASE OR USE OF THE PRODUCT OR
ARISING FROM BREACH OF THIS WARRANTY, BREACH
OF CONTRACT, NEGLIGENCE, STRICT LIABILITY, OR
ANY OTHER LEGAL OR EQUITABLE THEORY, EVEN IF
HUAWEI KNEW OF THE LIKELIHOOD OF SUCH
DAMAGES). HUAWEI SHALL NOT BE LIABLE FOR
DELAY IN RENDERING SERVICE UNDER THE LIMITED
WARRANTY, OR LOSS OF USE DURING THE PERIOD
THAT THE PRODUCT IS BEING REPAIRED.
DISCLAIMER OF WARRANTY
13. HUAWEI'S LIABILITY UNDER EITHER THE IMPLIED
WARRANTY OF MERCHANTABILITY OR FITNESS FOR A
PARTICULAR PURPOSE, SHALL BE LIMITED TO THE
DURATION OF THE FOREGOING LIMITED WRITTEN
WARRANTY. OTHERWISE, THE FOREGOING LIMITED
WARRANTY IS PURCHASER'S SOLE AND EXCLUSIVE
57

REMEDY AND IS IN LIEU OF ALL OTHER WARRANTIES,
EXPRESS OR IMPLIED.
14. Some states do not allow exclusion or limitation of
incidental, consequential, or punitive damages, or permit
limitations on the length of implied warranties, so certain of
these warranty limitations may not apply to Purchaser. This
limited warranty gives Purchaser specific legal rights; Purchaser
may also have other rights which vary from state to state. If any
term of this limited warranty is held to be illegal or
unenforceable, the legality or enforceability of the remaining
terms shall not be affected or impaired.
15. This limited warranty allocates risk of Product failure
between Purchaser and Huawei, and Huawei's Product pricing
reflects this allocation of risk and the limitations of liability
contained in this limited warranty.
Contact Huawei
TEL: 1877 - 4 - HUAWEI
WEB SITE: HTTP://MOBILE.HUAWEI.COM
* This contact information may change without notice. Please
contact your authorized Huawei retailer for updated contact
information.
58