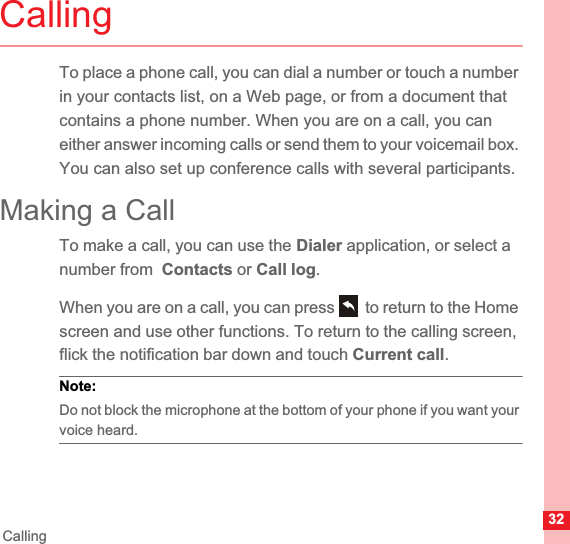
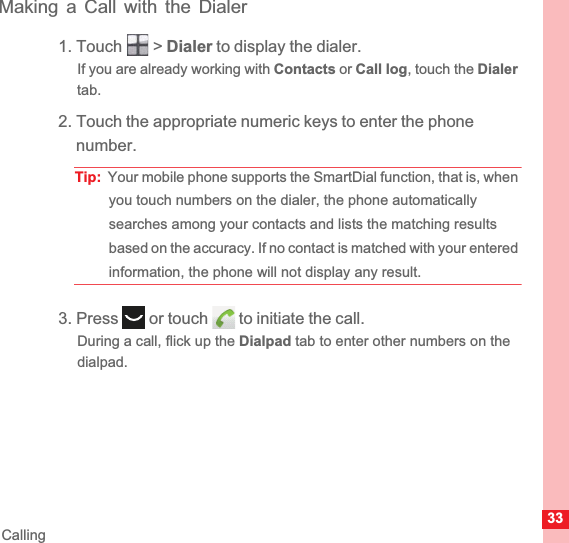
Huawei Technologies M860 cdma2000 Digital Mobile Phone User Manual Normal
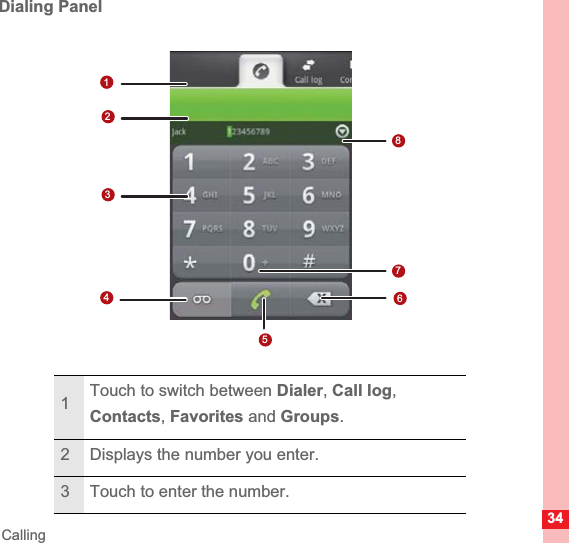
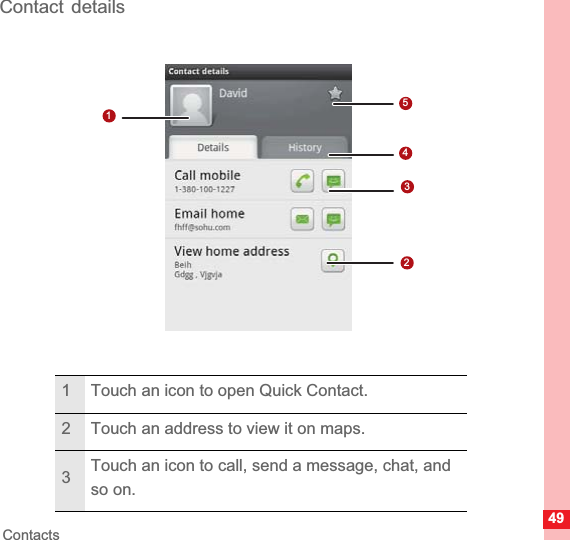
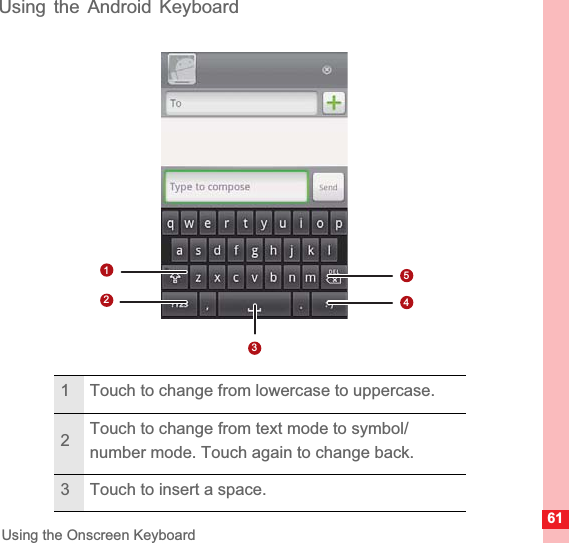
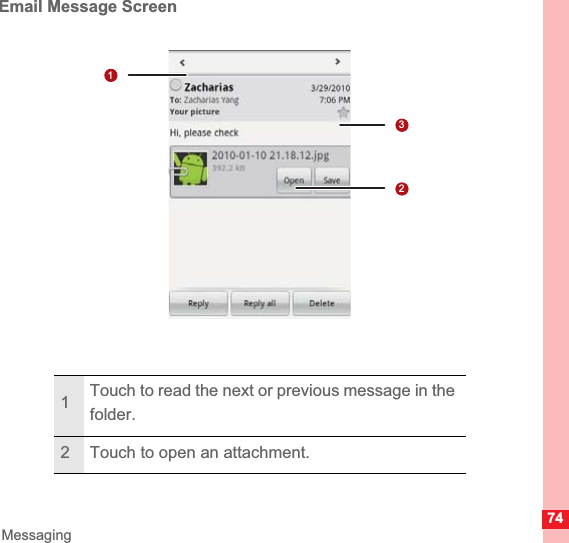
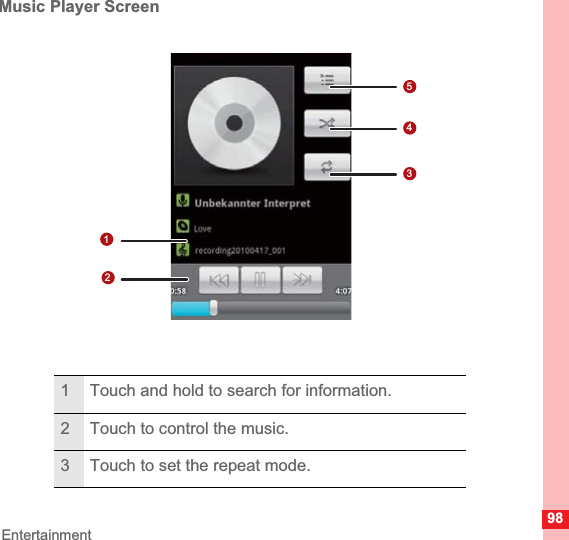
Huawei Technologies Co.,Ltd cdma2000 Digital Mobile Phone Normal
UserManual.wiki
>
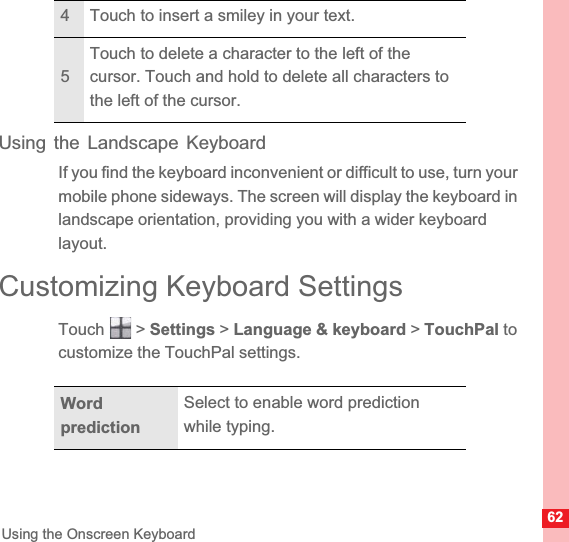
Huawei Technologies
>
M860 User Manual
User Manual
Navigation menu
Upload a User Manual
Namespaces
Wiki Guide
HTML
PDF
Info
Views
User Manual
Discussion / Help
Navigation


![153$SSHQGL[:KLOHXVLQJWKHGHYLFHREVHUYHWKHORFDOODZVDQGUHJXODWLRQVDQGUHVSHFWRWKHUVSULYDF\DQGOHJDOULJKWV.HHSWKHDPELHQWWHPSHUDWXUHEHWZHHQ&DQG&ZKLOHWKHGHYLFHLVEHLQJFKDUJHG.HHSWKHDPELHQWWHPSHUDWXUHEHWZHHQ±&WR&IRUXVLQJWKHGHYLFHSRZHUHGE\DEDWWHU\Prevention of Hearing Damage8VLQJDKHDGVHWDWKLJKYROXPHFDQGDPDJH\RXUKHDULQJ7RUHGXFHWKHULVNRIGDPDJHWRKHDULQJORZHUWKHKHDGVHWYROXPHWRDVDIHDQGFRPIRUWDEOHOHYHOSafety of Children&RPSO\ZLWKDOOSUHFDXWLRQVZLWKUHJDUGWRFKLOGUHQVVDIHW\/HWWLQJWKHFKLOGSOD\ZLWK\RXUGHYLFHRULWVDFFHVVRULHVZKLFKPD\LQFOXGHSDUWVWKDWFDQEHGHWDFKHGIURPWKHGHYLFHPD\EHGDQJHURXVDVLWPD\SUHVHQWDFKRNLQJKD]DUG(QVXUHWKDWVPDOOFKLOGUHQDUHNHSWDZD\IURPWKHGHYLFHDQGDFFHVVRULHVAccessories8VHWKHDFFHVVRULHVGHOLYHUHGRQO\E\WKHPDQXIDFWXUHU8VLQJDFFHVVRULHVRIRWKHUPDQXIDFWXUHUVRUYHQGRUVZLWKWKLVGHYLFHPRGHOPD\LQYDOLGDWHDQ\DSSURYDORUZDUUDQW\DSSOLFDEOHWRWKH](https://usermanual.wiki/Huawei-Technologies/M860/User-Guide-1315717-Page-158.png)
![155$SSHQGL[UHPRYHWKHEDWWHU\LPPHGLDWHO\DQGVWRSXVLQJLW2WKHUZLVHLWPD\OHDGWREDWWHU\OHDNDJHRYHUKHDWLQJH[SORVLRQRUILUH,IWKHSRZHUFDEOHLVGDPDJHGIRUH[DPSOHWKHFRUGLVH[SRVHGRUEURNHQRUWKHSOXJORRVHQVVWRSXVLQJWKHFDEOHDWRQFH2WKHUZLVHLWPD\OHDGWRDQHOHFWULFVKRFNDVKRUWFLUFXLWRIWKHFKDUJHURUDILUH'RQRWGLVSRVHRIEDWWHULHVLQILUHDVWKH\PD\H[SORGH%DWWHULHVPD\DOVRH[SORGHLIGDPDJHG'RQRWPRGLI\RUUHPDQXIDFWXUHDWWHPSWWRLQVHUWIRUHLJQREMHFWVLQWRWKHEDWWHU\LPPHUVHRUH[SRVHWRZDWHURURWKHUOLTXLGVH[SRVHWRILUHH[SORVLRQRURWKHUKD]DUG$YRLGGURSSLQJWKHGHYLFHRUEDWWHU\,IWKHGHYLFHRUEDWWHU\LVGURSSHGHVSHFLDOO\RQDKDUGVXUIDFHDQGWKHXVHUVXVSHFWVGDPDJHWDNHLWWRDTXDOLILHGVHUYLFHFHQWHUIRULQVSHFWLRQ,PSURSHUEDWWHU\XVHPD\UHVXOWLQDILUHH[SORVLRQRURWKHUKD]DUG3URPSWO\GLVSRVHRIXVHGEDWWHULHVLQDFFRUGDQFHZLWKORFDOUHJXODWLRQV7KHGHYLFHVKRXOGRQO\EHFRQQHFWHGWRSURGXFWVWKDWEHDUWKH86%,)ORJRRUKDYHFRPSOHWHGWKH86%,)FRPSOLDQFHSURJUDP](https://usermanual.wiki/Huawei-Technologies/M860/User-Guide-1315717-Page-160.png)
![156$SSHQGL[2QO\XVHWKHEDWWHU\ZLWKDFKDUJLQJV\VWHPWKDWKDVEHHQTXDOLILHGZLWKWKHV\VWHPSHUWKLVVWDQGDUG,(((6WG8VHRIDQXQTXDOLILHGEDWWHU\RUFKDUJHUPD\SUHVHQWDULVNRIILUHH[SORVLRQOHDNDJHRURWKHUKD]DUG5HSODFHWKHEDWWHU\RQO\ZLWKDQRWKHUEDWWHU\WKDWKDVEHHQTXDOLILHGZLWKWKHV\VWHPSHUWKLVVWDQGDUG,(((6WG8VHRIDQXQTXDOLILHGEDWWHU\PD\SUHVHQWDULVNRIILUHH[SORVLRQOHDNDJHRURWKHUKD]DUGCleaning and Maintenance7KHGHYLFHEDWWHU\DQGFKDUJHUDUHQRWZDWHUUHVLVWDQW.HHSWKHPGU\3URWHFWWKHGHYLFHEDWWHU\DQGFKDUJHUIURPZDWHURUYDSRU'RQRWWRXFKWKHGHYLFHRUWKHFKDUJHUZLWKDZHWKDQG2WKHUZLVHLWPD\OHDGWRDVKRUWFLUFXLWDPDOIXQFWLRQRIWKHGHYLFHDQGDQHOHFWULFVKRFNWRWKHXVHU'RQRWSODFH\RXUGHYLFHEDWWHU\DQGFKDUJHULQSODFHVZKHUHWKH\FDQJHWGDPDJHGEHFDXVHRIFROOLVLRQ2WKHUZLVHLWPD\OHDGWREDWWHU\OHDNDJHGHYLFHPDOIXQFWLRQRYHUKHDWLQJILUHRUH[SORVLRQ'RQRWSODFHPDJQHWLFVWRUDJHPHGLDVXFKDVPDJQHWLFFDUGVDQGIORSS\GLVNVQHDUWKHGHYLFH5DGLDWLRQIURPWKHGHYLFHPD\HUDVHWKHLQIRUPDWLRQVWRUHGRQWKHP](https://usermanual.wiki/Huawei-Technologies/M860/User-Guide-1315717-Page-161.png)
![157$SSHQGL['RQRWOHDYH\RXUGHYLFHEDWWHU\DQGFKDUJHULQDSODFHZLWKDQH[WUHPHKLJKRUORZWHPSHUDWXUH2WKHUZLVHWKH\PD\QRWIXQFWLRQSURSHUO\DQGPD\OHDGWRDILUHRUDQH[SORVLRQ:KHQWKHWHPSHUDWXUHLVORZHUWKDQ&SHUIRUPDQFHRIWKHEDWWHU\LVDIIHFWHG'RQRWSODFHVKDUSPHWDOREMHFWVVXFKDVSLQVQHDUWKHHDUSLHFH7KHHDUSLHFHPD\DWWUDFWWKHVHREMHFWVDQGKXUW\RXZKHQ\RXDUHXVLQJWKHGHYLFH%HIRUH\RXFOHDQRUPDLQWDLQWKHGHYLFHSRZHURIIWKHGHYLFHDQGGLVFRQQHFWLWIURPWKHFKDUJHU'RQRWXVHDQ\FKHPLFDOGHWHUJHQWSRZGHURURWKHUFKHPLFDODJHQWVVXFKDVDOFRKRODQGEHQ]HQHWRFOHDQWKHGHYLFHDQGWKHFKDUJHU2WKHUZLVHSDUWVRIWKHGHYLFHPD\EHGDPDJHGRUDILUHFDQEHFDXVHG<RXFDQFOHDQWKHGHYLFHDQGWKHFKDUJHUZLWKDSLHFHRIGDPSDQGVRIWDQWLVWDWLFFORWK'RQRWGLVPDQWOHWKHGHYLFHRUDFFHVVRULHV2WKHUZLVHWKHZDUUDQW\RQWKHGHYLFHDQGDFFHVVRULHVLVLQYDOLGDQGWKHPDQXIDFWXUHULVQRWOLDEOHWRSD\IRUWKHGDPDJH,IWKHGHYLFHVFUHHQLVEURNHQE\FROOLGLQJZLWKKDUGREMHFWVGRQRWWRXFKRUWU\WRUHPRYHWKHEURNHQSDUW,QWKLVFDVHVWRSXVLQJWKHGHYLFHLPPHGLDWHO\DQGWKHQFRQWDFWDQDXWKRUL]HGVHUYLFHFHQWHULQWLPH](https://usermanual.wiki/Huawei-Technologies/M860/User-Guide-1315717-Page-162.png)
![158$SSHQGL[Emergency Call<RXFDQXVH\RXUGHYLFHIRUHPHUJHQF\FDOOVLQWKHVHUYLFHDUHD7KHFRQQHFWLRQKRZHYHUFDQQRWEHJXDUDQWHHGLQDOOFRQGLWLRQV<RXVKRXOGQRWUHO\VROHO\RQWKHGHYLFHIRUHVVHQWLDOFRPPXQLFDWLRQVCertification Information (SAR)7KLVGHYLFHPHHWVJXLGHOLQHVIRUH[SRVXUHWRUDGLRZDYHV<RXUGHYLFHLVDORZSRZHUUDGLRWUDQVPLWWHUDQGUHFHLYHU$VUHFRPPHQGHGE\LQWHUQDWLRQDOJXLGHOLQHVWKHGHYLFHLVGHVLJQHGQRWWRH[FHHGWKHOLPLWVIRUH[SRVXUHWRUDGLRZDYHV7KHVHJXLGHOLQHVZHUHGHYHORSHGE\WKHLQGHSHQGHQWVFLHQWLILFRUJDQL]DWLRQ,QWHUQDWLRQDO&RPPLVVLRQRQ1RQ,RQL]LQJ5DGLDWLRQ3URWHFWLRQ,&1,53DQGLQFOXGHVDIHW\PHDVXUHVGHVLJQHGWRHQVXUHVDIHW\IRUDOOXVHUVUHJDUGOHVVRIDJHDQGKHDOWK7KH6SHFLILF$EVRUSWLRQ5DWH6$5LVWKHXQLWRIPHDVXUHPHQWIRUWKHDPRXQWRIUDGLRIUHTXHQF\HQHUJ\DEVRUEHGE\WKHERG\ZKHQXVLQJDGHYLFH7KH6$5YDOXHLVGHWHUPLQHGDWWKHKLJKHVWFHUWLILHGSRZHUOHYHOLQODERUDWRU\FRQGLWLRQVEXWWKHDFWXDO6$5OHYHORIWKHGHYLFHZKHQEHLQJRSHUDWHGFDQEHZHOO](https://usermanual.wiki/Huawei-Technologies/M860/User-Guide-1315717-Page-163.png)
![160$SSHQGL[5HRULHQWRUUHORFDWHWKHUHFHLYLQJDQWHQQD,QFUHDVHWKHVHSDUDWLRQEHWZHHQWKHHTXLSPHQWDQGUHFHLYHU&RQQHFWWKHHTXLSPHQWLQWRDQRXWOHWRQDFLUFXLWGLIIHUHQWIURPWKDWWRZKLFKWKHUHFHLYHULVFRQQHFWHG&RQVXOWWKHGHDOHURUDQH[SHULHQFHGUDGLR79WHFKQLFLDQIRUKHOS7KLVGHYLFHFRPSOLHVZLWK3DUWRIWKH)&&5XOHV2SHUDWLRQLVVXEMHFWWRWKHIROORZLQJWZRFRQGLWLRQVWKLVGHYLFHPD\QRWFDXVHKDUPIXOLQWHUIHUHQFHDQGWKLVGHYLFHPXVWDFFHSWDQ\LQWHUIHUHQFHUHFHLYHGLQFOXGLQJLQWHUIHUHQFHWKDWPD\FDXVHXQGHVLUHGRSHUDWLRQCaution: &KDQJHVRUPRGLILFDWLRQVPDGHWRWKLVGHYLFHQRWH[SUHVVO\DSSURYHGE\+XDZHL7HFKQRORJLHV&R/WGPD\YRLGWKH)&&DXWKRUL]DWLRQWRRSHUDWHWKLVGHYLFHHearing Aid Compatibility (HAC) regulations for Mobile phones,QWKH)&&DGRSWHGUXOHVWRPDNHGLJLWDOZLUHOHVVWHOHSKRQHVFRPSDWLEOHZLWKKHDULQJDLGVDQGFRFKOHDULPSODQWV$OWKRXJKDQDORJZLUHOHVVSKRQHVGRQRWXVXDOO\FDXVHLQWHUIHUHQFHZLWKKHDULQJDLGVRUFRFKOHDULPSODQWVGLJLWDO](https://usermanual.wiki/Huawei-Technologies/M860/User-Guide-1315717-Page-165.png)
![161$SSHQGL[ZLUHOHVVSKRQHVVRPHWLPHVGREHFDXVHRIHOHFWURPDJQHWLFHQHUJ\HPLWWHGE\WKHSKRQHVDQWHQQDEDFNOLJKWRURWKHUFRPSRQHQWV<RXUSKRQHLVFRPSOLDQWZLWK)&&+$&UHJXODWLRQV$16,&:KLOHVRPHZLUHOHVVSKRQHVDUHXVHGQHDUVRPHKHDULQJGHYLFHVKHDULQJDLGVDQGFRFKOHDULPSODQWVXVHUVPD\GHWHFWDEX]]LQJKXPPLQJRUZKLQLQJQRLVH6RPHKHDULQJGHYLFHVDUHPRUHLPPXQHWKDQRWKHUVWRWKLVLQWHUIHUHQFHQRLVHDQGSKRQHVDOVRYDU\LQWKHDPRXQWRILQWHUIHUHQFHWKH\JHQHUDWH7KHZLUHOHVVWHOHSKRQHLQGXVWU\KDVGHYHORSHGDUDWLQJV\VWHPIRUZLUHOHVVSKRQHVWRDVVLVWKHDULQJGHYLFHXVHUVILQGSKRQHVWKDWPD\EHFRPSDWLEOHZLWKWKHLUKHDULQJGHYLFHV1RWDOOSKRQHVKDYHEHHQUDWHG3KRQHVWKDWDUHUDWHGKDYHWKHUDWLQJRQWKHLUER[RUDODEHOORFDWHGRQWKHER[7KHUDWLQJVDUHQRWJXDUDQWHHV5HVXOWVZLOOYDU\GHSHQGLQJRQWKHXVHUVKHDULQJGHYLFHDQGKHDULQJORVV,I\RXUKHDULQJGHYLFHKDSSHQVWREHYXOQHUDEOHWRLQWHUIHUHQFH\RXPD\QRWEHDEOHWRXVHDUDWHGSKRQHVXFFHVVIXOO\7U\LQJRXWWKHSKRQHZLWK\RXUKHDULQJGHYLFHLVWKHEHVWZD\WRHYDOXDWHLWIRU\RXUSHUVRQDOQHHGV](https://usermanual.wiki/Huawei-Technologies/M860/User-Guide-1315717-Page-166.png)