Huawei Technologies RRU3942-1900M Remote Radio Unit User Manual Commissioning Guide
Huawei Technologies Co.,Ltd Remote Radio Unit Commissioning Guide
Contents
- 1. User Manual
- 2. User Manual II
User Manual

3900 Series Multi-Mode Base Station
V100R003
Commissioning Guide
Issue 02
Date 2010-07-30
HUAWEI TECHNOLOGIES CO., LTD.

Copyright © Huawei Technologies Co., Ltd. 2010. All rights reserved.
No part of this document may be reproduced or transmitted in any form or by any means without prior written
consent of Huawei Technologies Co., Ltd.
Trademarks and Permissions
and other Huawei trademarks are trademarks of Huawei Technologies Co., Ltd.
All other trademarks and trade names mentioned in this document are the property of their respective holders.
Notice
The purchased products, services and features are stipulated by the contract made between Huawei and the
customer. All or part of the products, services and features described in this document may not be within the
purchase scope or the usage scope. Unless otherwise specified in the contract, all statements, information,
and recommendations in this document are provided "AS IS" without warranties, guarantees or representations
of any kind, either express or implied.
The information in this document is subject to change without notice. Every effort has been made in the
preparation of this document to ensure accuracy of the contents, but all statements, information, and
recommendations in this document do not constitute the warranty of any kind, express or implied.
Huawei Technologies Co., Ltd.
Address: Huawei Industrial Base
Bantian, Longgang
Shenzhen 518129
People's Republic of China
Website: http://www.huawei.com
Email: support@huawei.com
Issue 02 (2010-07-30) Huawei Proprietary and Confidential
Copyright © Huawei Technologies Co., Ltd.
i
About This Document
Purpose
This document describes the commissioning and verification of the multi-mode base station.
The commissioning ensures that the base station operates properly, as designed.
Version
The following table lists the product versions related to this document.
Product Name Version
DBS3900 V100R003
BTS3900 V100R003
BTS3900A V100R003
BTS3900L V100R003
Intended Audience
This document is intended for:
lField engineers
lCommissioning engineers
3900 Series Multi-Mode Base Station
Commissioning Guide About This Document
Issue 02 (2010-07-30) Huawei Proprietary and Confidential
Copyright © Huawei Technologies Co., Ltd.
iii

Contents
About This Document...................................................................................................................iii
1 Changes in 3900 Series Multi-Mode Base Station Commissioning Guide....................1-1
2 Introduction to MBTS Commissioning In Typical Scenarios...........................................2-1
3 Procedure for Commissioning the Base Station that Starts to Provide Services of One
Mode................................................................................................................................................3-1
4 Commissioning the MBTS in GU Mode on the M2000......................................................4-1
4.1 Procedure for MBTS Commissioning in GU Mode on the M2000................................................................4-3
4.2 Preparing for MBTS Commissioning.............................................................................................................4-4
4.3 Creating an MBTS Commissioning Task.......................................................................................................4-6
4.3.1 Creating an MBTS Commissioning Task (Deploying Both the GBTS and the NodeB).......................4-6
4.3.2 Creating an MBTS Commissioning Task (Deploying a NodeB When the GBTS Is Normal)..............4-8
4.3.3 Creating an MBTS Commissioning Task (Deploying a GBTS When the NodeB Is Normal)............4-10
4.4 Manually Intervening the MBTS Transmission Detection...........................................................................4-12
4.5 Automatic Commissioning of the MBTS on the M2000..............................................................................4-13
4.6 Monitoring the MBTS Commissioning.........................................................................................................4-15
4.6.1 Viewing the Progress and Status of an MBTS Commissioning Task..................................................4-16
4.6.2 Handling MBTS Alarms......................................................................................................................4-18
4.6.3 Diagnosing MBTS Faults.....................................................................................................................4-19
4.6.4 Viewing the Service Verification Results of an MBTS.......................................................................4-20
4.6.5 Restarting/Deleting MBTS Commissioning Tasks..............................................................................4-22
4.7 Confirming the Completion of MBTS Commissioning................................................................................4-22
4.8 Obtaining the MBTS Commissioning Report...............................................................................................4-23
4.9 References for the MBTS Commissioning Interface....................................................................................4-23
4.9.1 Interface Description: MBTS Commissioning.....................................................................................4-24
4.9.2 Parameters for the MBTS Deployment List.........................................................................................4-26
4.9.3 Parameters for MBTS Service Verification Performance Counters....................................................4-31
5 Commissioning the MBTS in GL or UL Mode on the M2000...........................................5-1
5.1 Procedure for MBTS Commissioning in GL or UL Mode on the M2000......................................................5-3
5.2 Creating a Commissioning Task.....................................................................................................................5-5
5.2.1 Creating a GBTS Commissioning Task.................................................................................................5-5
5.2.2 Creating a NodeB Commissioning Task................................................................................................5-6
3900 Series Multi-Mode Base Station
Commissioning Guide Contents
Issue 02 (2010-07-30) Huawei Proprietary and Confidential
Copyright © Huawei Technologies Co., Ltd.
v

5.2.3 Creating an eNodeB Commissioning Task............................................................................................5-8
5.3 Intervening the GBTS Transmission.............................................................................................................5-13
5.4 Commissioning the MBTS on the M2000....................................................................................................5-17
5.4.1 Procedure for Automatically Commissioning the GBTS by the M2000.............................................5-18
5.4.2 Procedure for Automatically Commissioning the NodeB by the M2000............................................5-22
5.5 Monitoring the GBTS Commissioning Task................................................................................................5-24
5.5.1 Viewing the GBTS Alarm Status.........................................................................................................5-24
5.5.2 Performing the GBTS Fault Diagnosis................................................................................................5-25
5.5.3 Viewing the GBTS Service Verification Results.................................................................................5-26
5.5.4 Restarting a GBTS Commissioning Task............................................................................................5-27
5.6 Monitoring the NodeB Commissioning Task...............................................................................................5-28
5.6.1 Viewing the NodeB Commissioning Progress.....................................................................................5-28
5.6.2 Viewing NodeB Alarms.......................................................................................................................5-29
5.6.3 Viewing Service Verification Results..................................................................................................5-30
5.6.4 Performing a NodeB Task Again or Deleting the Task.......................................................................5-31
5.7 Monitoring the eNodeB Commissioning Task..............................................................................................5-32
5.7.1 Viewing the eNodeB Commissioning Progress...................................................................................5-32
5.7.2 Pausing/Retrying the eNodeB Commissioning Task...........................................................................5-34
5.7.3 Restarting/Deleting the eNodeB Commissioning Task.......................................................................5-34
5.8 Obtaining the Commissioning Report...........................................................................................................5-34
5.8.1 Obtaining a GBTS Commissioning Report..........................................................................................5-35
5.8.2 Obtaining a NodeB Commissioning Report.........................................................................................5-36
5.8.3 Obtaining an eNodeB Commissioning Report.....................................................................................5-36
5.9 Checking the Operating Status of the Base Station.......................................................................................5-37
5.9.1 Checking the Running Status of the GBTS..........................................................................................5-37
5.9.2 Checking the Running Status of the NodeB.........................................................................................5-38
5.9.3 Checking the Running Status of the eNodeB.......................................................................................5-38
5.10 Testing the Basic Services of the eNodeB..................................................................................................5-41
5.11 Confirming the Commissioning Task.........................................................................................................5-42
5.11.1 Confirming a GBTS Commissioning Task........................................................................................5-42
5.11.2 Confirming a NodeB Commissioning Task.......................................................................................5-43
5.11.3 Confirming an eNodeB Commissioning Task...................................................................................5-43
5.12 Reference to the GBTS Commissioning Interface......................................................................................5-43
5.12.1 Interface Description: GBTS Commissioning...................................................................................5-44
5.12.2 Parameters for a GBTS Commissioning Task...................................................................................5-47
5.12.3 Parameters of the GBTS Commissioning Report..............................................................................5-47
5.12.4 Parameters of the Performance Counters for GBTS Service Verification.........................................5-50
5.13 Reference to the NodeB Commissioning Interface.....................................................................................5-51
5.13.1 Interface Description: NodeB Commissioning..................................................................................5-51
5.13.2 Parameters of the NodeB Deployment List........................................................................................5-54
6 Commissioning the MBTS by Using USB and M2000.......................................................6-1
6.1 Procedure for Commissioning the MBTS by Using USB and M2000...........................................................6-2
Contents
3900 Series Multi-Mode Base Station
Commissioning Guide
vi Huawei Proprietary and Confidential
Copyright © Huawei Technologies Co., Ltd.
Issue 02 (2010-07-30)

6.2 Preparing the USB Disk for Local Commissioning........................................................................................6-5
6.2.1 Arranging the USB Disk for Local GBTS Commissioning...................................................................6-5
6.2.2 Arranging the USB Disk for Local NodeB Commissioning..................................................................6-7
6.2.3 Arranging the USB Disk for Local eNodeB Commissioning................................................................6-8
6.2.4 Configuring the Security Equipment....................................................................................................6-10
6.3 Upgrading Software and Configuring Data by Using the USB Disk............................................................6-12
6.3.1 Upgrading the GBTS Software and Downloading the Data Configuration File (on the BTS Side)
.......................................................................................................................................................................6-13
6.3.2 Upgrading the NodeB Software and Downloading the Data Configuration File (on the NodeB Side)
.......................................................................................................................................................................6-15
6.3.3 Upgrading the eNodeB Software and Downloading the Data Configuration File (on the eNodeB Side)
.......................................................................................................................................................................6-17
6.4 Checking the Status of the LEDs and Rectifying the Faults.........................................................................6-21
6.5 Set the Download Control Right...................................................................................................................6-25
7 Commissioning the MBTS by Using Local Maintenance Terminal and M2000...........7-1
7.1 Procedure for Commissioning the MBTS Using Local Maintenance Terminal and M2000..........................7-3
7.2 Running the GBTS SMT.................................................................................................................................7-6
7.2.1 Setting the IP address of the SMT Client...............................................................................................7-6
7.2.2 Connecting the SMT Client and the Base Station..................................................................................7-7
7.2.3 Logging In to the SMT...........................................................................................................................7-8
7.3 Configuring the Basic Data of the GBTS........................................................................................................7-9
7.3.1 Obtaining the Site Management Rights...............................................................................................7-10
7.3.2 Configuring Base Station Boards.........................................................................................................7-11
7.3.3 Configuring BTS Logical Objects........................................................................................................7-16
7.4 Checking the Transmission Between the BBU and the BSC on the BTS Side............................................7-28
7.5 Running the NodeB LMT.............................................................................................................................7-31
7.5.1 Setting the IP address of the LMT Client.............................................................................................7-31
7.5.2 Connecting the LMT Client and the Base Station................................................................................7-33
7.5.3 Logging In to the LMT.........................................................................................................................7-34
7.6 Upgrading the NodeB Software and Downloading the Data Configuration File..........................................7-36
7.7 Running the eNodeB LMT ...........................................................................................................................7-37
7.8 Upgrading the eNodeB Software and Downloading the Data Configuration File........................................7-39
7.9 Downloading the eNodeB License................................................................................................................7-41
7.10 Data Sheet for Commissioning...................................................................................................................7-41
7.10.1 Data Sheet for GBTS Commissioning...............................................................................................7-42
7.10.2 Data Sheet for NodeB Commissioning..............................................................................................7-44
7.10.3 Data Sheet for eNodeB Commissioning............................................................................................7-45
8 Communication Port for Multi-Mode Base Station............................................................8-1
3900 Series Multi-Mode Base Station
Commissioning Guide Contents
Issue 02 (2010-07-30) Huawei Proprietary and Confidential
Copyright © Huawei Technologies Co., Ltd.
vii

Figures
Figure 3-1 Procedure for commissioning the base station that starts to provide services of one mode...............3-2
Figure 3-2 Procedure for commissioning the base station that starts to provide services of one mode...............3-3
Figure 4-1 Flowchart for MBTS commissioning (in GU mode on the M2000)..................................................4-3
Figure 4-2 Main window for MBTS commissioning.........................................................................................4-24
Figure 4-3 MBTS alarm monitoring window.....................................................................................................4-25
Figure 4-4 MBTS service verification window..................................................................................................4-26
Figure 5-1 Flowchart for commissioning the MBTS in GL or UL mode on the M2000.....................................5-4
Figure 5-2 eNodeB Auto Deployment tab page...............................................................................................5-10
Figure 5-3 Import dialog box............................................................................................................................5-11
Figure 5-4 Set Stepsdialog box..........................................................................................................................5-12
Figure 5-5 Dialog box for selecting Intervening transmission........................................................................5-14
Figure 5-6 Dialog box for intervening transmission..........................................................................................5-15
Figure 5-7 Dialog box for querying the E1/T1 port status.................................................................................5-16
Figure 5-8 Dialog box for confirmation.............................................................................................................5-17
Figure 5-9 eNodeB Auto Deployment tab page...............................................................................................5-33
Figure 5-10 GBTS List tab page.......................................................................................................................5-44
Figure 5-11 Monitor tab page............................................................................................................................5-46
Figure 5-12 Service Verification tab page........................................................................................................5-47
Figure 5-13 Summary information in the GBTS commissioning report............................................................5-48
Figure 5-14 Page of details of a GBTS in the commissioning report (1)...........................................................5-49
Figure 5-15 Page of details of a GBTS in the commissioning report (2)...........................................................5-50
Figure 5-16 NodeB Auto Deployment window-NodeB List tab page.............................................................5-52
Figure 5-17 NodeB Auto Deployment window-Monitor tab page..................................................................5-53
Figure 5-18 NodeB Auto Deployment window-Validate tab page.................................................................5-54
Figure 6-1 Procedure for commissioning the MBTS using USB and M2000..................................................... 6-3
Figure 6-2 USB port on the GTMU...................................................................................................................6-13
Figure 6-3 Plugging the USB disk into the USB port on the WMPT................................................................6-16
Figure 6-4 Inserting the USB storage device.....................................................................................................6-19
Figure 7-1 Procedure for commissioning the MBTS using local maintenance terminal and M2000..................7-4
Figure 7-2 SMT login interface............................................................................................................................7-8
Figure 7-3 Communication failed dialog box...................................................................................................... 7-9
Figure 7-4 Set Communication Port Parameter dialog box................................................................................. 7-9
Figure 7-5 Warning Message dialog box...........................................................................................................7-10
3900 Series Multi-Mode Base Station
Commissioning Guide Figures
Issue 02 (2010-07-30) Huawei Proprietary and Confidential
Copyright © Huawei Technologies Co., Ltd.
ix

Figure 7-6 Site Management Rights dialog box.................................................................................................7-11
Figure 7-7 Board Configuration window...........................................................................................................7-12
Figure 7-8 Board Configuration window...........................................................................................................7-13
Figure 7-9 Configuring the MRFU....................................................................................................................7-14
Figure 7-10 Topology Configuration window...................................................................................................7-14
Figure 7-11 Board Configuration window.........................................................................................................7-15
Figure 7-12 Parameter Management dialog box................................................................................................7-16
Figure 7-13 Site Configuration dialog box (1)...................................................................................................7-17
Figure 7-14 Site Configuration dialog box (2)...................................................................................................7-18
Figure 7-15 Site Configuration dialog box (3)...................................................................................................7-19
Figure 7-16 Site Configuration dialog box (4)...................................................................................................7-20
Figure 7-17 Site Configuration dialog box (5)...................................................................................................7-21
Figure 7-18 User Error dialog box.....................................................................................................................7-22
Figure 7-19 Site Configuration dialog box (6)...................................................................................................7-23
Figure 7-20 Configured cell and channels..........................................................................................................7-24
Figure 7-21 Site Opstart dialog box...................................................................................................................7-25
Figure 7-22 Cell Opstart dialog box...................................................................................................................7-25
Figure 7-23 BT Opstart dialog box....................................................................................................................7-26
Figure 7-24 RC Attributes Management dialog box..........................................................................................7-26
Figure 7-25 RC Opstart successfully dialog box................................................................................................7-27
Figure 7-26 Board Management window...........................................................................................................7-28
Figure 7-27 Physical loopback of the E1/T1 cable at the DDF..........................................................................7-30
Figure 7-28 IP addresses in remote maintenance mode.....................................................................................7-32
Figure 7-29 User Login dialog box....................................................................................................................7-34
Figure 7-30 Switching the language...................................................................................................................7-35
Figure 7-31 BSC6000 local maintenance terminal window...........................................................................7-38
Figure 7-32 Download and Activate Software interface.................................................................................7-40
Figures
3900 Series Multi-Mode Base Station
Commissioning Guide
x Huawei Proprietary and Confidential
Copyright © Huawei Technologies Co., Ltd.
Issue 02 (2010-07-30)

Tables
Table 2-1 Recommended solutions of MBTS commissioning.............................................................................2-2
Table 4-1 Preparing for MBTS commissioning (in case of new deployment of both GBTS and NodeB)..........4-4
Table 4-2 Preparing for MBTS commissioning at GBTS....................................................................................4-5
Table 4-3 Preparing for MBTS commissioning at NodeB...................................................................................4-5
Table 4-4 Automatic commissioning procedures of the MBTS.........................................................................4-13
Table 4-5 Description of the commissioning statuses........................................................................................4-17
Table 4-6 Procedure of automatic service verification.......................................................................................4-20
Table 4-7 Description.........................................................................................................................................4-24
Table 4-8 Description.........................................................................................................................................4-25
Table 4-9 Parameters for the MBTS deployment list.........................................................................................4-27
Table 4-10 Parameters of performance counters................................................................................................4-31
Table 5-1 Process of automatic GBTS commissioning......................................................................................5-18
Table 5-2 Item list of the NodeB commissioning procedure..............................................................................5-23
Table 5-3 Description of the commissioning statuses........................................................................................5-29
Table 5-4 Automatic eNodeB commissioning process......................................................................................5-32
Table 5-5 eNodeB health checklist.....................................................................................................................5-39
Table 5-6 GBTS List tab page...........................................................................................................................5-45
Table 5-7 Monitor tab page...............................................................................................................................5-46
Table 5-8 Page of summary information in the GBTS commissioning report...................................................5-48
Table 5-9 Page of details of a GBTS in the commissioning report (1)..............................................................5-49
Table 5-10 Page of details of a GBTS in the commissioning report (2)............................................................5-50
Table 5-11 Parameters in the NodeB deployment list........................................................................................5-54
Table 6-1 Saving path of the file..........................................................................................................................6-7
Table 6-2 Tools required for the local commissioning through the USB storage device.....................................6-9
Table 6-3 Security GW configuration................................................................................................................6-10
Table 6-4 Status..................................................................................................................................................6-14
Table 6-5 LEDs on the USB disk and the WMPT.............................................................................................6-16
Table 6-6 LED status..........................................................................................................................................6-19
Table 6-7 LED status of the functional base station...........................................................................................6-21
Table 6-8 The corresponding MML commands of setting the download control right versus the BTS Systems
.............................................................................................................................................................................6-25
Table 7-1 Configurable RF units on the BTS.....................................................................................................7-11
Table 7-2 IP parameters of the LMT client for commissioning on the NodeB side..........................................7-33
Table 7-3 Parameters for setting the route from the PC to the gateway.............................................................7-33
3900 Series Multi-Mode Base Station
Commissioning Guide Tables
Issue 02 (2010-07-30) Huawei Proprietary and Confidential
Copyright © Huawei Technologies Co., Ltd.
xi

Table 7-4 Fields in the User Login dialog box...................................................................................................7-34
Table 7-5 Data sheet for GBTS commissioning.................................................................................................7-42
Table 7-6 Data sheet for NodeB commissioning................................................................................................7-44
Table 7-7 Data sheet for eNodeB commissioning..............................................................................................7-46
Table 8-1 Communication ports on the GBTS.....................................................................................................8-1
Table 8-2 Communication ports on the NodeB....................................................................................................8-1
Table 8-3 Communication ports on the eNodeB..................................................................................................8-3
Tables
3900 Series Multi-Mode Base Station
Commissioning Guide
xii Huawei Proprietary and Confidential
Copyright © Huawei Technologies Co., Ltd.
Issue 02 (2010-07-30)
1 Changes in 3900 Series Multi-Mode Base
Station Commissioning Guide
This chapter describes the changes in the 3900 Series Multi-Mode Base Station Commissioning
Guide.
02 (2010-07-30)
This is the first commercial release of V100R003.
Compared with issue 01 (2010-05-04), this issue incorporates the following new topics:
l3 Procedure for Commissioning the Base Station that Starts to Provide Services of
One Mode
Compared with issue 01 (2010-05-04), this issue incorporates the following changes:
Topic Change Description
2 Introduction to MBTS
Commissioning In Typical
Scenarios
Commissioning scenarios are differentiated according to the
mode of the MBTS to be commissioned, and several
commissioning solutions for the commissioning scenarios are
provided.
4 Commissioning the
MBTS in GU Mode on the
M2000
The description of the preparation and procedure for
commissioning the MBTS using the MBTS plug-and-play
commissioning function is optimized.
5 Commissioning the
MBTS in GL or UL Mode
on the M2000
The remote commissioning solution is optimized.
6 Commissioning the
MBTS by Using USB and
M2000
The commissioning procedure and operations using USB
locally and M2000 remotely are optimized.
7 Commissioning the
MBTS by Using Local
Maintenance Terminal
and M2000
The commissioning procedure and operations using local
maintenance terminal locally and M2000 remotely are
optimized.
3900 Series Multi-Mode Base Station
Commissioning Guide
1 Changes in 3900 Series Multi-Mode Base Station
Commissioning Guide
Issue 02 (2010-07-30) Huawei Proprietary and Confidential
Copyright © Huawei Technologies Co., Ltd.
1-1

Compared with issue 01 (2010-05-04), this issue excludes the following topics:
Topic Deletion Description
Commissioning resources The description of commissioning resources and prerequisites
is integrated into the description of commissioning modes.
Commissioning
prerequisites
01 (2010-05-04)
This is the draft release of V100R003.
1 Changes in 3900 Series Multi-Mode Base Station
Commissioning Guide
3900 Series Multi-Mode Base Station
Commissioning Guide
1-2 Huawei Proprietary and Confidential
Copyright © Huawei Technologies Co., Ltd.
Issue 02 (2010-07-30)

2 Introduction to MBTS Commissioning In
Typical Scenarios
This section describes the solutions of MBTS commissioning in typical scenarios.
Introduction to Scenarios of MBTS Commissioning
The scenarios of MBTS commissioning increase with the expansion of the MBTS application
scope.
lThe base station starts to provide services of only one mode.
In this scenario, the base station is physically an MBTS when it is deployed. However, the
base station provides services of only one mode because of insufficient resources, and the
base station does not provide services of the other mode until resources are sufficient.
lThe base station starts to provide services of two modes.
In this scenario, when a base station is deployed, it is physically an MBTS and does not
provide services of the two modes. Now, the base station starts to provide services of two
modes.
lThe base station has been providing services of one mode and now starts to provide
services of the other mode.
In this scenario, when a base station is deployed, it is physically an MBTS and has been
providing services of one mode. Therefore, the base station starts to provide services of the
other mode.
NOTE
SRAN 5.0 supports three modes of an MBTS: GU, GL, and UL, and the UL mode supports only the co-
cabinet solution.
Solutions of MBTS Commissioning
Table 2-1 describes solutions of MBTS commissioning in typical scenarios in terms of the
feature and mode of MBTS commissioning.
3900 Series Multi-Mode Base Station
Commissioning Guide
2 Introduction to MBTS Commissioning In Typical
Scenarios
Issue 02 (2010-07-30) Huawei Proprietary and Confidential
Copyright © Huawei Technologies Co., Ltd.
2-1

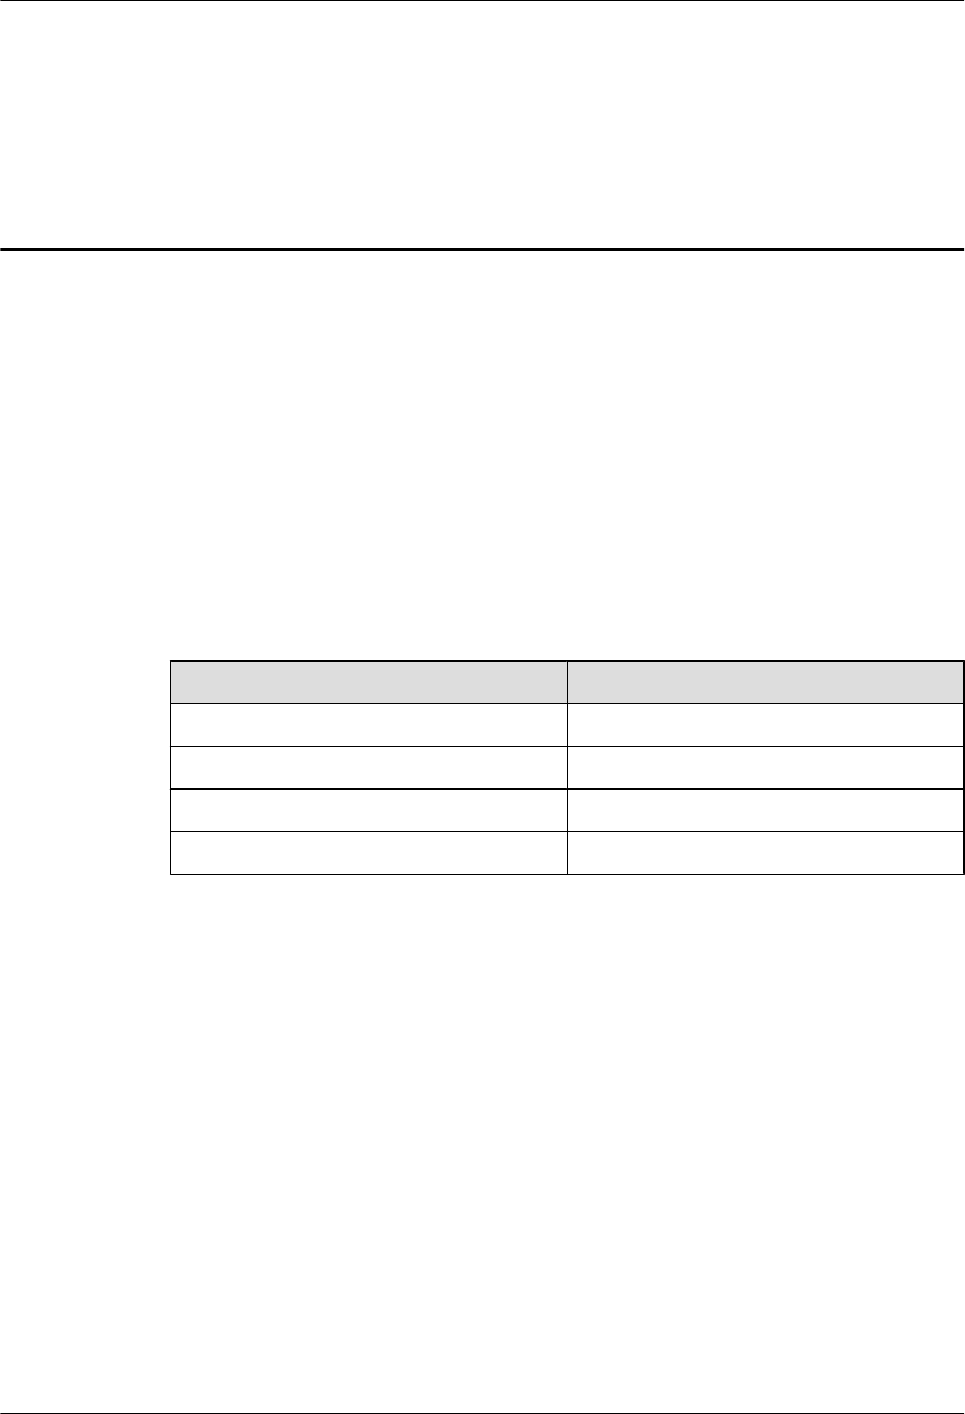
Table 2-1 Recommended solutions of MBTS commissioning
No. Commissioning Scenario Commissioning Solution
1
The base
station starts to
provide
services of only
one mode.
No co-
transmission
Configure the data of the BBU
subrack and main control board of
the base station that does not
provide services, and then
commission the base station that
provides services. For details, see 3
Procedure for Commissioning
the Base Station that Starts to
Provide Services of One Mode.
2Co-
transmission
Assume that the modes of an MBTS
are categorized into mode A and
mode B and that mode A shares its
transmission routes with mode B. In
this case, the solution of MBTS
commissioning is as follows:
lIf the base station starts to
provide services of mode A, see
the preceding commissioning
solution without co-
transmission.
lIf the base station starts to
provide services of mode B,
configure the base station in
mode A and then commission the
base station in mode B. For
details, see 3 Procedure for
Commissioning the Base
Station that Starts to Provide
Services of One Mode.
3
One scenario: The base station
starts to provide services of two
modes. The other scenario: The
base station has been providing
services of one mode and starts to
provide services of the other
mode.
MBTS
commissioning
using the
M2000
When the
network
transmission is
normal, you can
commission an
MBTS by using
the M2000 in a
central
equipment
room.
lFor a base
station in GU
mode: Use
the plug-
and-play
commissioni
ng function.
2 Introduction to MBTS Commissioning In Typical
Scenarios
3900 Series Multi-Mode Base Station
Commissioning Guide
2-2 Huawei Proprietary and Confidential
Copyright © Huawei Technologies Co., Ltd.
Issue 02 (2010-07-30)

No. Commissioning Scenario Commissioning Solution
4
For details,
see 4
Commission
ing the
MBTS in
GU Mode on
the M2000.
lFor a base
station in GL
or UL mode:
Commission
the base
station in
each mode
respectively
on the
M2000. For
details, see 5
Commission
ing the
MBTS in GL
or UL Mode
on the
M2000.
3900 Series Multi-Mode Base Station
Commissioning Guide
2 Introduction to MBTS Commissioning In Typical
Scenarios
Issue 02 (2010-07-30) Huawei Proprietary and Confidential
Copyright © Huawei Technologies Co., Ltd.
2-3

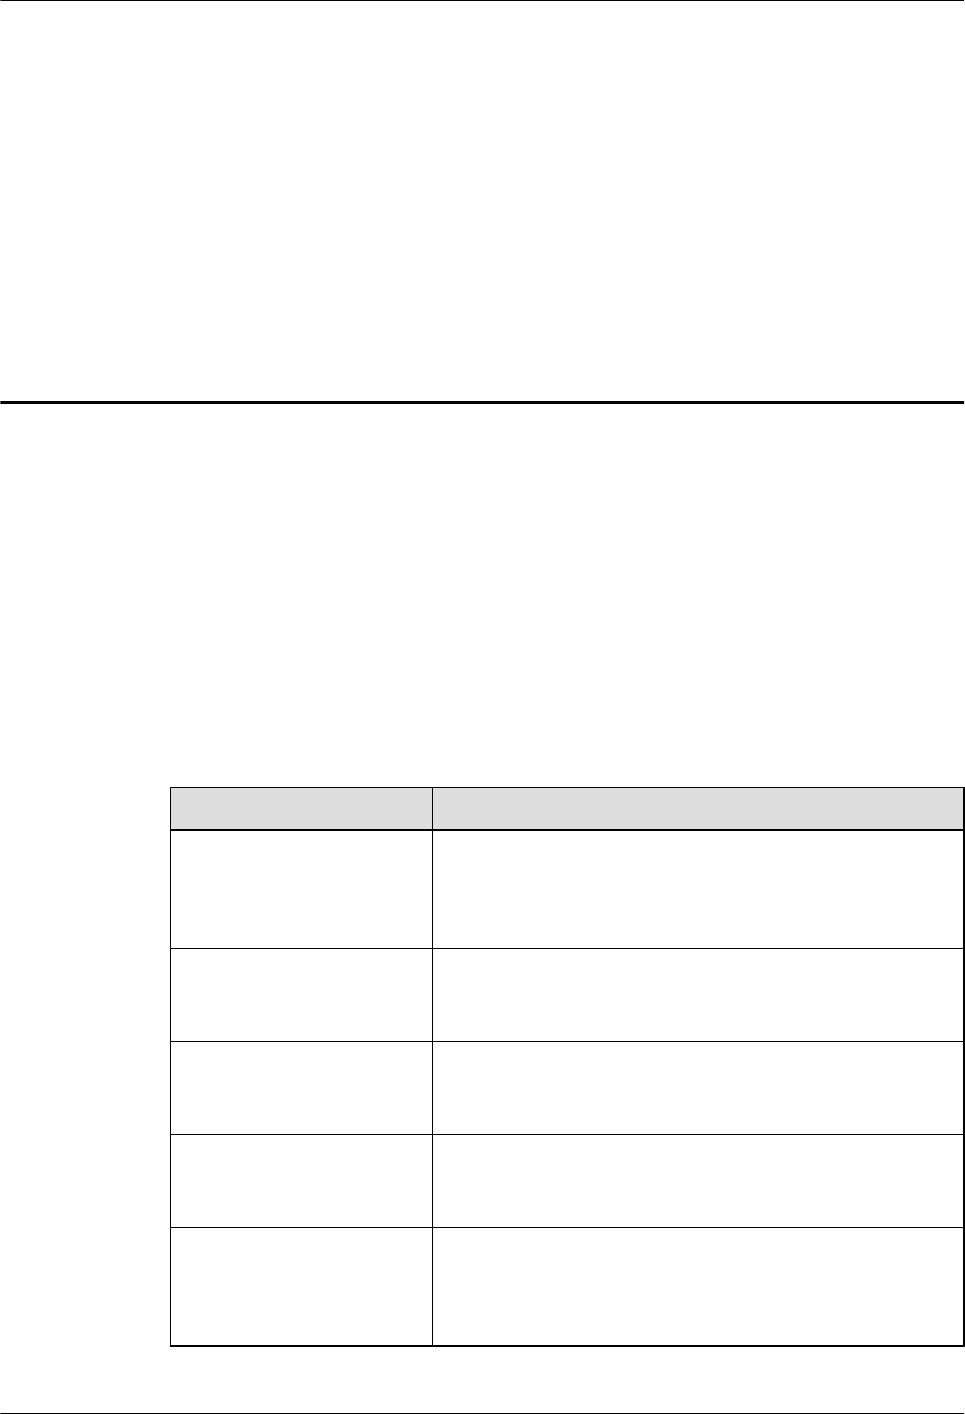
No. Commissioning Scenario Commissioning Solution
5
MBTS
commissioning
using the USB
disk and M2000
When
transmission is
unavailable,
upgrade the
MBTS software
and configure
the MBTS data
using a USB
disk (no
portable
computer is
required)
locally at the
MBTS. After
the MBTS
software is
upgraded and
the MBTS data
is configured,
detect faults
according to the
LED status and
rectify the faults
immediately. In
this way,
maintenance
personnel do not
need to go to the
site twice. For
details, see 6
Commissionin
g the MBTS by
Using USB and
M2000.
2 Introduction to MBTS Commissioning In Typical
Scenarios
3900 Series Multi-Mode Base Station
Commissioning Guide
2-4 Huawei Proprietary and Confidential
Copyright © Huawei Technologies Co., Ltd.
Issue 02 (2010-07-30)

No. Commissioning Scenario Commissioning Solution
6
MBTS
commissioning
using local
maintenance
terminal and
M2000
When
transmission is
unavailable,
upgrade the
MBTS software
and configure
the MBTS data
using local
maintenance
terminal (for
GBTS, the local
maintenance
terminal refers
to SMT; for the
NodeB or
eNodeB, the
local
maintenance
terminal refers
to LMT) locally
at the MBTS, to
establish a
remote OM link
quickly. This
commissioning
mode requires a
portable
computer and
has a high
demand on the
skill of
commissioning
personnel. In
addition, the
deployment cost
is high in this
commissioning
mode.
Therefore, this
commissioning
mode serves as
an auxiliary
solution. For
details, see 7
Commissionin
g the MBTS by
Using Local
Maintenance
Terminal and
M2000.
3900 Series Multi-Mode Base Station
Commissioning Guide
2 Introduction to MBTS Commissioning In Typical
Scenarios
Issue 02 (2010-07-30) Huawei Proprietary and Confidential
Copyright © Huawei Technologies Co., Ltd.
2-5

2 Introduction to MBTS Commissioning In Typical
Scenarios
3900 Series Multi-Mode Base Station
Commissioning Guide
2-6 Huawei Proprietary and Confidential
Copyright © Huawei Technologies Co., Ltd.
Issue 02 (2010-07-30)

3 Procedure for Commissioning the Base
Station that Starts to Provide Services of One
Mode
This section describes the procedure for commissioning the base station that starts to provide
services of one mode.
Prerequisites
Before commissioning the MBTS, the MBTS, MBSC, and M2000 must meet following
requirements:
lThe MBTS hardware such as the cabinets, cables, antenna system, and auxiliary devices,
is installed and passes the installation check. In addition, check that the MBTS is powered
on and passes the power-on check.
lThe hardware of the MBSC is installed and commissioned, and the system works properly.
The negotiation data of the MBTS to be commissioned is configured and recorded.
lThe M2000 server is installed with an adaptation layer whose version matches the version
of the MBTS to be commissioned.
Commissioning Procedure Without Co-transmission
Assume that the MBTS supports mode A and mode B, that co-transmission is unavailable to the
two modes, and that services of only mode A starts to be provided.
NOTE
The alarm Inter-System Communication Failure may be reported when the base station in mode A is
commissioned, and the alarm RRU Network Topology Type and Configuration Mismatch, Inter-
System Control Rights Conflict may be reported in a dual-mode scenario. These alarms do not affect the
commissioning and services, and therefore you can shield them manually.
lThe MBTS works in GU or GL mode and GSM services are provided at first. Or, the
MBTS works in UL mode and services of one mode are provided at first.
Figure 3-1 shows the commissioning procedure.
3900 Series Multi-Mode Base Station
Commissioning Guide
3 Procedure for Commissioning the Base Station that Starts
to Provide Services of One Mode
Issue 02 (2010-07-30) Huawei Proprietary and Confidential
Copyright © Huawei Technologies Co., Ltd.
3-1
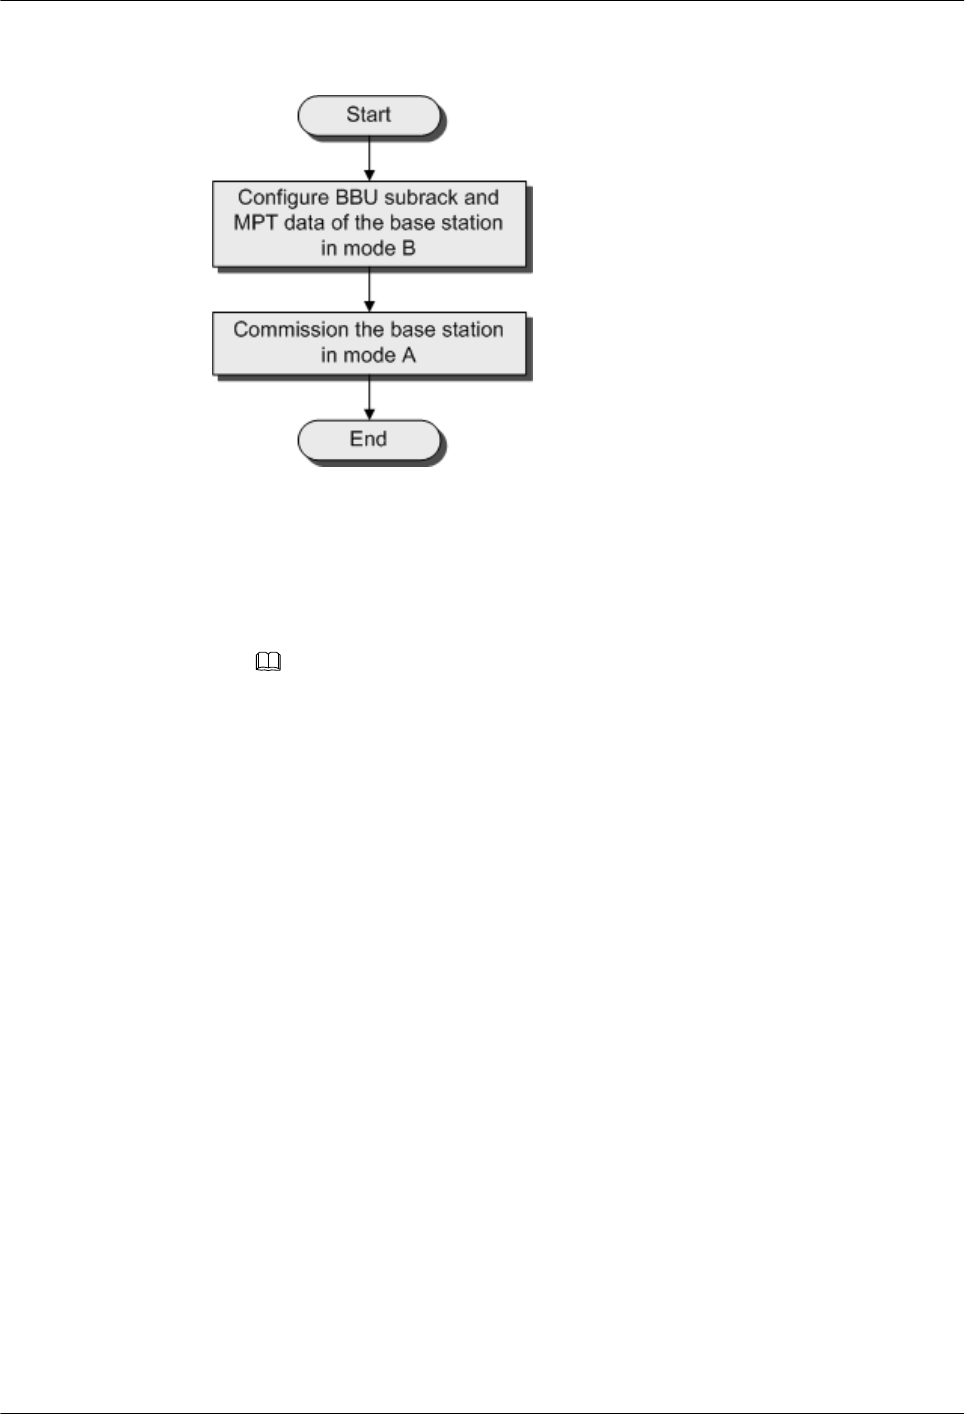
Figure 3-1 Procedure for commissioning the base station that starts to provide services of
one mode
1. Create the data configuration file, which includes only the device configuration data
of the BBU subrack and main control board, for mode B by using CME. Then,
download the data configuration file to the main control board of mode B to validate
the data configuration file.
NOTE
The data configuration file for mode B must not include the configuration data of the RF unit,
PMU, FUN, or USCU. Otherwise, an alarm indicating configuration conflict will be reported
when the base station that provides services of mode A is commissioned.
2. Commission the MBTS in mode A by following the procedure for commissioning a
single-mode base station. For details, see the GBTS Commissioning Guide, NodeB
Commissioning Guide, or eNodeB Commissioning Guide accordingly.
lThe MBTS works in GU mode and UMTS services are provided at first. Or, the MBTS
works in GL mode and LTE services are provided at first.
Commission the MBTS in mode A by following the procedure for commissioning a single-
mode base station. For details, see the GBTS Commissioning Guide, NodeB Commissioning
Guide, or eNodeB Commissioning Guide accordingly.
Commissioning Procedure With Co-transmission
Assume that the MBTS supports mode A and mode B, that mode A provides transmission, and
that mode B shares the transmission provided by mode A.
lThe commissioning procedure with co-transmission is the same as that without co-
transmission when services of mode A starts to be provided.
lFigure 3-2 shows the procedure for commissioning the MBTS that starts to provide services
of mode B.
3 Procedure for Commissioning the Base Station that Starts
to Provide Services of One Mode
3900 Series Multi-Mode Base Station
Commissioning Guide
3-2 Huawei Proprietary and Confidential
Copyright © Huawei Technologies Co., Ltd.
Issue 02 (2010-07-30)
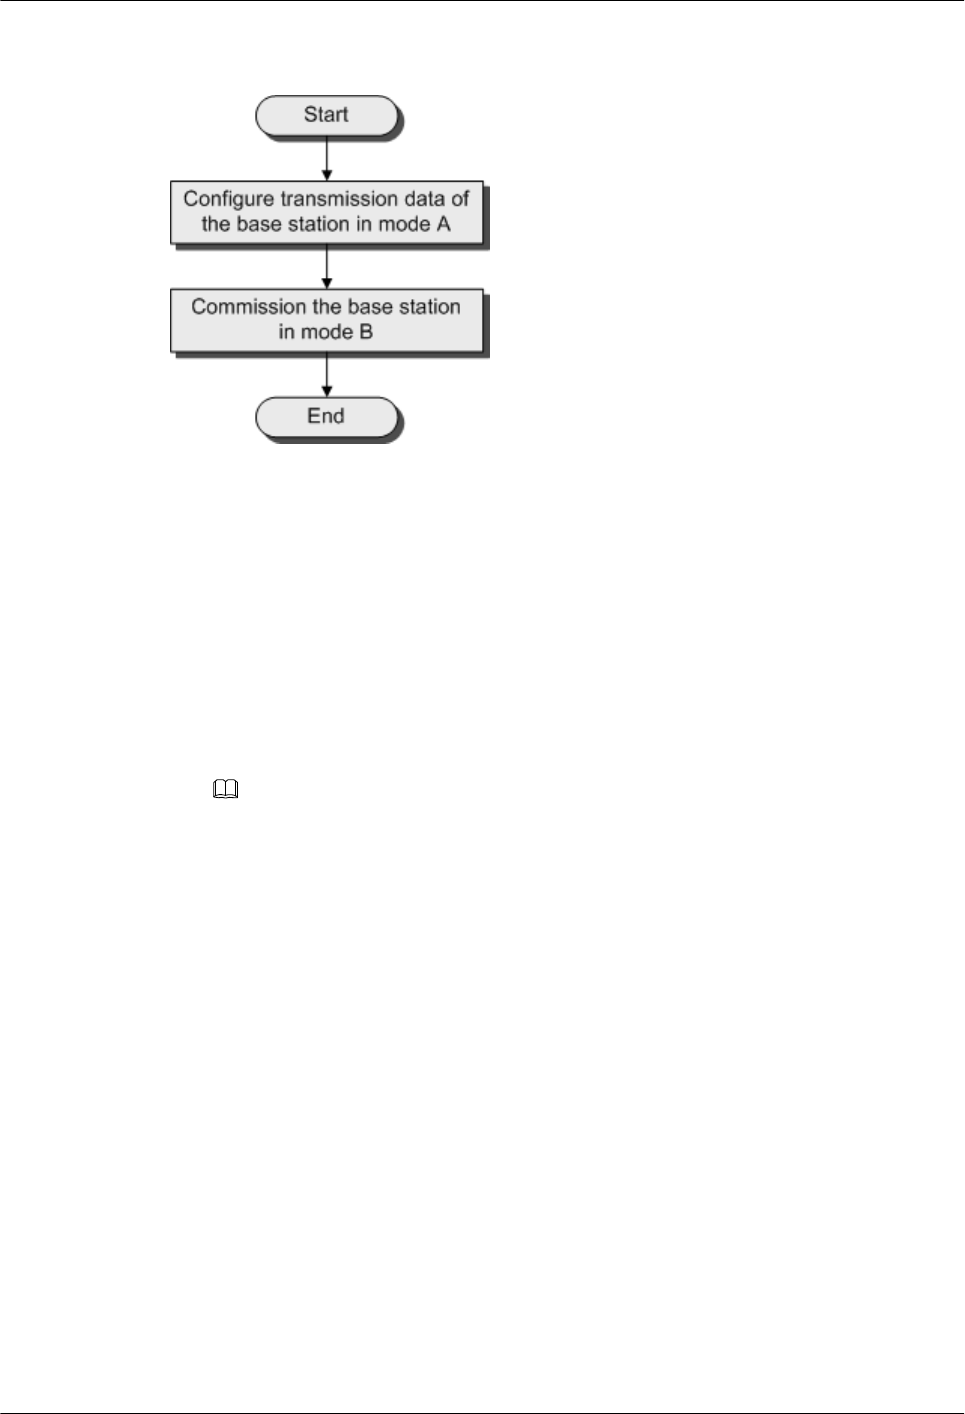
Figure 3-2 Procedure for commissioning the base station that starts to provide services of one
mode
1. Configure the transmission data of the MBTS in mode A. The transmission data includes
but is not limited to E1, MP link, MP group, IP address, routing information, DHCP (used
at the MBTS in mode B) relay information, and VLAN.
(1) Configure the transmission data and export the data configuration file using the CME.
For details, see the GBTS Initial Configuration Guide, NodeB Initial Configuration
Guide, or eNodeB Initial Configuration Guide accordingly.
(2) Load the data configuration file to the base station in mode A. You are advised to load
the data configuration file locally using a USB disk. For details, see 6.3 Upgrading
Software and Configuring Data by Using the USB Disk.
NOTE
You can configure other data of the base station in mode A after it is planned. The data configuration
of boards such as PMU and FUN in mode A must comply with mode B. Otherwise, alarm are reported
because of configuration conflict.
2. Commission the MBTS in mode B by following the procedure for commissioning a single-
mode base station. For details, see the GBTS Commissioning Guide, NodeB Commissioning
Guide, or eNodeB Commissioning Guide accordingly.
3900 Series Multi-Mode Base Station
Commissioning Guide
3 Procedure for Commissioning the Base Station that Starts
to Provide Services of One Mode
Issue 02 (2010-07-30) Huawei Proprietary and Confidential
Copyright © Huawei Technologies Co., Ltd.
3-3

4 Commissioning the MBTS in GU Mode on
the M2000
About This Chapter
The M2000 provides the plug-and-play commissioing function for GU MBTSs. This function
is applicable to GU MBTSs in the following three scenarios: Both a GBTS and a NodeB are
deployed, a NodeB is newly deployed while a GBTS is running normally, and a GBTS is newly
deployed while a NodeB is running normally. The M2000 commissions multiple GU MBTSs
simultaneously in a central equipment room, including establishing OM channels, upgrading
software and configuring data, and verifying alarms, services, and sites. In addition, the
M2000 provides a fault diagnosis entrance to help users locate faults quickly.
4.1 Procedure for MBTS Commissioning in GU Mode on the M2000
When the network transmission is available and works normally, you can commission a GU
MBTS using the plug-and-play commissioning function on the M2000 in a central equipment
room.
4.2 Preparing for MBTS Commissioning
This section describes how to prepare for MBTS commissioning.
4.3 Creating an MBTS Commissioning Task
This chapter describes how to create an MBTS commissioning task. After completing MBTS
commissioning preparations, you can create an MBTS commissioning task on the M2000 and
enable the M2000 to commission the MBTS automatically.
4.4 Manually Intervening the MBTS Transmission Detection
This section describes how to manually intervene GBTS transmission during MBTS
commissioning. By intervening GBTS transmission, you can query the real-time status of the
E1/T1 port to ensure that the GBTS transmission is normal and that you can proceed with the
GBTS deployment.
4.5 Automatic Commissioning of the MBTS on the M2000
After creating the MBTS commissioning task, the M2000 starts to commission the MBTS
automatically.
4.6 Monitoring the MBTS Commissioning
This chapter describes how to monitor the MBTS commissioning, thus helping you to obtain
the progress and status of the MBTS commissioning and then rectify faults in real time.
3900 Series Multi-Mode Base Station
Commissioning Guide 4 Commissioning the MBTS in GU Mode on the M2000
Issue 02 (2010-07-30) Huawei Proprietary and Confidential
Copyright © Huawei Technologies Co., Ltd.
4-1

4.7 Confirming the Completion of MBTS Commissioning
This chapter describes how to confirm an MBTS commissioning task. After the service
verification of an MBTS is complete, the MBTS commissioning task changes to the status for
confirmation. You need to manually confirm the completion of the MBTS commissioning.
4.8 Obtaining the MBTS Commissioning Report
A MBTS commissioning report records the task information about the commissioned MBTS
and the information about the commissioning process. When a commissioning task is still in
progress or is complete, you can obtain and analyze the commissioning report to learn the
commissioning details, to view the exceptions that occur during the commissioning, or to
determine whether to complete the commissioning.
4.9 References for the MBTS Commissioning Interface
This chapter describes the interfaces and parameters for MBTS commissioning, which help you
to commission MBTSs.
4 Commissioning the MBTS in GU Mode on the M2000
3900 Series Multi-Mode Base Station
Commissioning Guide
4-2 Huawei Proprietary and Confidential
Copyright © Huawei Technologies Co., Ltd.
Issue 02 (2010-07-30)
4.1 Procedure for MBTS Commissioning in GU Mode on the
M2000
When the network transmission is available and works normally, you can commission a GU
MBTS using the plug-and-play commissioning function on the M2000 in a central equipment
room.
Prerequisite
Prepare for MBTS commissioning by referring to 4.2 Preparing for MBTS Commissioning.
Commissioning Flowchart
Figure 4-1 shows the procedure for commissioning an MBTS (in GU mode).
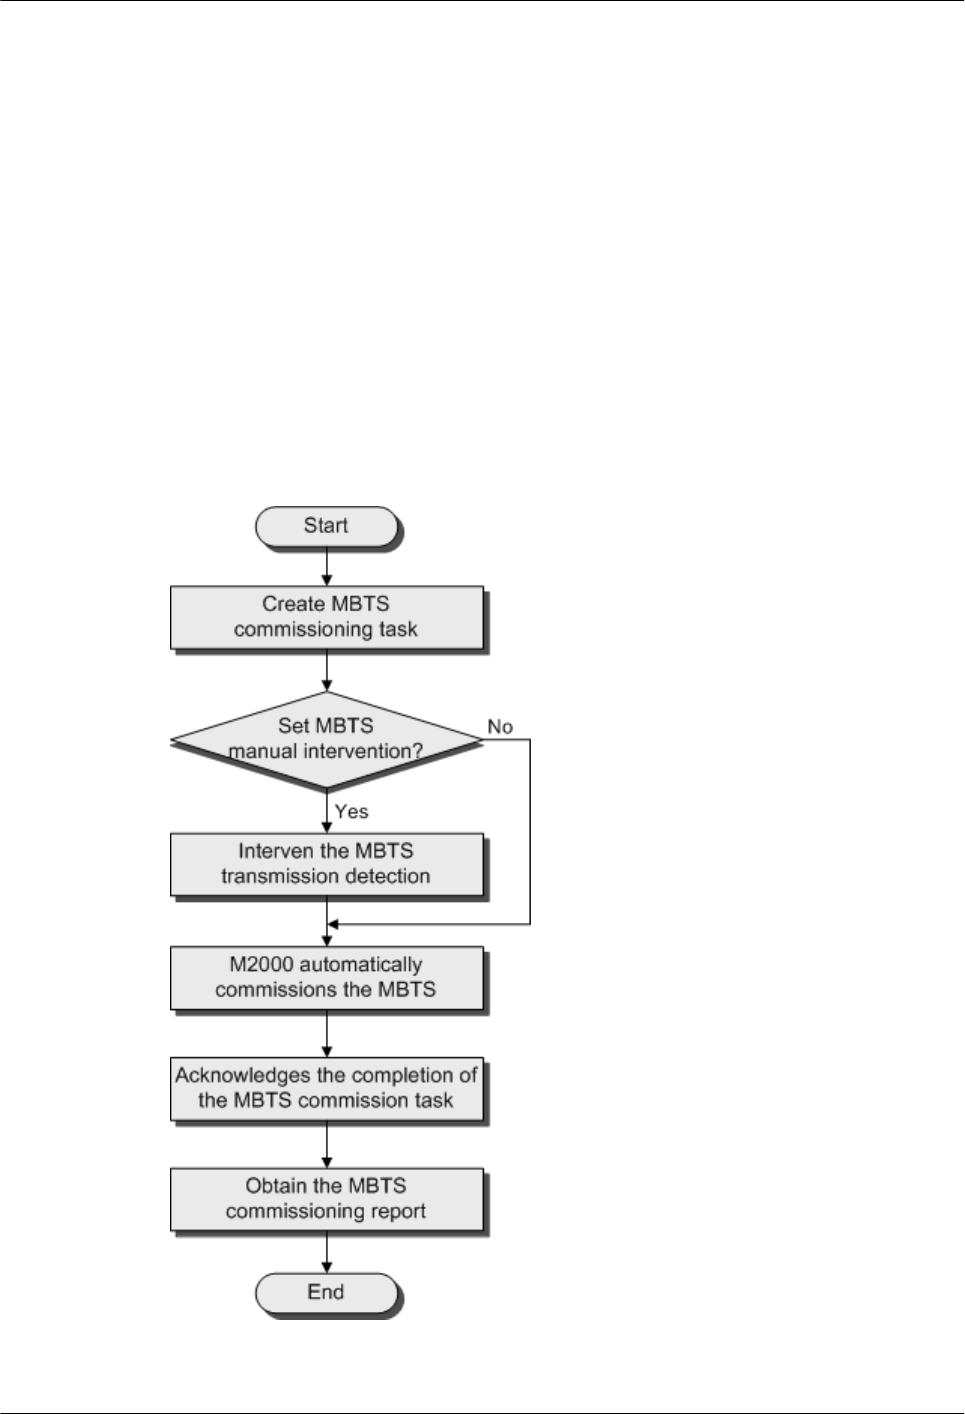
Figure 4-1 Flowchart for MBTS commissioning (in GU mode on the M2000)
3900 Series Multi-Mode Base Station
Commissioning Guide 4 Commissioning the MBTS in GU Mode on the M2000
Issue 02 (2010-07-30) Huawei Proprietary and Confidential
Copyright © Huawei Technologies Co., Ltd.
4-3

Procedure
Step 1 Create an MBTS commissioning task by referring to 4.3 Creating an MBTS Commissioning
Task.
Step 2 Perform operations according to whether Intervene Transmission is selected when a
commissioning task is created.
If... Then...
Intervene Transmission is selected when a
commissioning task is created,
Go to Step 3.
Intervene Transmission is not selected
when a commissioning task is created,
Go to Step 4.
Step 3 Check the transmission state and rectify faults (if any) manually. For details, see 4.4 Manually
Intervening the MBTS Transmission Detection.
Step 4 The M2000 automatically commissions the MBTS. For details on the commissioning process,
see 4.5 Automatic Commissioning of the MBTS on the M2000. During the commissioning
process, view the commissioning progress, rectify faults (if any) to ensure that the
commissioning is successful. For details, see 4.6 Monitoring the MBTS Commissioning.
Step 5 After the MBTS service verification passes, the commissioning status is displayed . Check
that the MBTS commissioning is completed. For details, see 4.7 Confirming the Completion
of MBTS Commissioning.
Step 6 Obtain the MBTS commissioning report. For details, see 4.8 Obtaining the MBTS
Commissioning Report.
----End
4.2 Preparing for MBTS Commissioning
This section describes how to prepare for MBTS commissioning.
Prepare for MBTS commissioning by referring to Table 4-1.
Table 4-1 Preparing for MBTS commissioning (in case of new deployment of both GBTS and
NodeB)
Step Operation
1Check that the MBTS hardware, such as the cabinets, cables, antenna system, and
auxiliary devices, is installed and passes the installation check. In addition, check
that the MBTS is powered on and passes the power-on check.
2 Check that the controller hardware is installed and commissioned successfully and
the controller runs normally. In addition, check that the negotiation data of the
base station to be commissioned is configured and recorded.
3 Check that the M2000 is commissioned, that the M2000 is connected to the
corresponding controller, and that the configuration synchronization is completed.
4 Commissioning the MBTS in GU Mode on the M2000
3900 Series Multi-Mode Base Station
Commissioning Guide
4-4 Huawei Proprietary and Confidential
Copyright © Huawei Technologies Co., Ltd.
Issue 02 (2010-07-30)

Step Operation
4Prepare the data configuration file of the MBTS to be commissioned. This file can
be created and exported using CME, and provided by configuration engineers.
5 Prepare the target version software package of the MBTS to be commissioned.
You can download the package from the website http://support.huawei.com/.
6 Prepare the deployment list. For details on the parameters in the deployment list,
see 4.9.2 Parameters for the MBTS Deployment List.
7Check that the network is normal.
Prepare for MBTS commissioning at GBTS by referring to Table 4-2.
NOTE
Before both a GBTS and a NodeB are newly deployed or before a GBTS is newly deployed while a NodeB
is running normally, prepare for MBTS commissioning at GBTS by referring to Table 4-2.
Table 4-2 Preparing for MBTS commissioning at GBTS
Step Operation
1Run the ACT BTS command to activate the GBTS.
2 Upload the GBTS configuration data to the controller and validate it on the
controller side.
3 Upload the GBTS target version software package to the controller.
Prepare for MBTS commissioning at NodeB by referring to Table 4-3.
NOTE
Before both a GBTS and a NodeB are newly deployed or before a NodeB is newly deployed while a GBTS
is running normally, prepare for NodeB commissioning by referring to Table 4-3.
Table 4-3 Preparing for MBTS commissioning at NodeB
Step Operation
1Check that the M2000 is installed with an adaptation layer whose version matches
the version of the NodeB to be commissioned.
2 Check that the NodeB relay server is set correctly.
The NodeB relay server is usually set to the controller that controls the NodeB.
3900 Series Multi-Mode Base Station
Commissioning Guide 4 Commissioning the MBTS in GU Mode on the M2000
Issue 02 (2010-07-30) Huawei Proprietary and Confidential
Copyright © Huawei Technologies Co., Ltd.
4-5

4.3 Creating an MBTS Commissioning Task
This chapter describes how to create an MBTS commissioning task. After completing MBTS
commissioning preparations, you can create an MBTS commissioning task on the M2000 and
enable the M2000 to commission the MBTS automatically.
4.3.1 Creating an MBTS Commissioning Task (Deploying Both the GBTS and the NodeB)
This section describes how to create an MBTS commissioning task when you need to deploy
both the GBTS and the NodeB. After making MBTS commissioning preparations, you can create
an MBTS commissioning task on the M2000 and enable the M2000 to commission the MBTS
automatically.
4.3.2 Creating an MBTS Commissioning Task (Deploying a NodeB When the GBTS Is Normal)
This section describes how to create an MBTS commissioning task when the GBTS is normal
and you need to deploy a NodeB. After making MBTS commissioning preparations, you can
create an MBTS commissioning task on the M2000 and enable the M2000 to commission the
MBTS automatically.
4.3.3 Creating an MBTS Commissioning Task (Deploying a GBTS When the NodeB Is Normal)
This section describes how to create an MBTS commissioning task when the NodeB is normal
and you need to deploy a GBTS. After making MBTS commissioning preparations, you can
create an MBTS commissioning task on the M2000 and enable the M2000 to commission the
MBTS automatically.
4.3.1 Creating an MBTS Commissioning Task (Deploying Both the
GBTS and the NodeB)
This section describes how to create an MBTS commissioning task when you need to deploy
both the GBTS and the NodeB. After making MBTS commissioning preparations, you can create
an MBTS commissioning task on the M2000 and enable the M2000 to commission the MBTS
automatically.
Prerequisite
lThe M2000 client is started.
lMBTS commissioning preparations are complete.
lThe controller to which the MBTS to be commissioned belongs is properly connected to
the M2000.
Context
The M2000 can commission a maximum of 500 base stations at a time, where one MBTS is
equal to two base stations (the NodeB and the GBTS are not differentiated).
Procedure
Step 1 Choose Configuration > Auto Deployment > MBTS Auto Deployment. The MBTS Auto
Deployment window is displayed.
Step 2 Keep ready the NodeB deployment list.
4 Commissioning the MBTS in GU Mode on the M2000
3900 Series Multi-Mode Base Station
Commissioning Guide
4-6 Huawei Proprietary and Confidential
Copyright © Huawei Technologies Co., Ltd.
Issue 02 (2010-07-30)
Option Description
Exporting the
MBTS Deployment
List from the CME
Obtain and open the exported MBTS deployment list, and then add the
related data according to the planned data that is confirmed with the
network planning engineers.
For the data that needs to be added, see 4.9.2 Parameters for the MBTS
Deployment List.
Exporting the
Template of MBTS
Deployment List
from the M2000
Client
1. Click . The Save dialog box is displayed.
2. Specify the save path, enter the filename, and then click Save.
3. Add the related data according to the planned data that is confirmed
with the network planning engineers.
NOTE
lThe exported template of MBTS deployment list is in .csv format. By
default, the filename is
MBTS_GU_Auto_Deployment_List_Template.csv. You can change the
filename as required.
lThe exported template of MBTS deployment list contains three records,
which represent three deployment scenarios. Edit the records according to
the actual situation of the template.
lIf Auto Deployment Type is set to MBTS, it indicates that you need
to create both the GBTS and the NodeB.
lIf Auto Deployment Type is set to NodeB, it indicates that you need
to add a NodeB when the GBTS is normal.
lIf Auto Deployment Type is set to GBTS, it indicates that you need to
add a GBTS when the NodeB is normal.
Step 3 Click on the toolbar to import the MBTS deployment list.
Only GBTS deployment lists in .csv format can be imported to the M2000. After the MBTS
deployment list is imported, the M2000 checks whether any mandatory parameter in the list is
null and whether the MBTS is valid. In addition, the information indicating whether the import
succeeded or failed is displayed on the Operation Information tab page.
lThe import succeeded: M2000 automatically creates a commissioning task for each MBTS
and displays the task in both the GBTS List area and the NodeB List area.
lThe import failed: The Operation Information tab page displays the MBTS that failed to
be imported and the causes for the failure. For details about failure symptoms and solutions,
see What Should I Do When a Failure Message Is Displayed During the Import of the MBTS
Deployment List?.
Step 4 Upload the target software package and configuration file of the NodeB.
NOTE
You need to upload only the target software package for the GBTS. For details, see 4.2 Preparing for
MBTS Commissioning.
1. Right-click a record in the NodeB List area, and then choose Upload versions and config
files from the shortcut menu. The Upload versions and config files dialog box is displayed.
2. Select the file to be uploaded.
3. After the upload is complete, click Close.
3900 Series Multi-Mode Base Station
Commissioning Guide 4 Commissioning the MBTS in GU Mode on the M2000
Issue 02 (2010-07-30) Huawei Proprietary and Confidential
Copyright © Huawei Technologies Co., Ltd.
4-7
Step 5 In MBTS List, select an MBTS to be commissioned, and then click on the toolbar. The
Customize Process dialog box is displayed.
Option Description
Manual
Transmission
Detection
Intervention Is
Required
1. Select the check box in front of Intervene Transmission.
2. Perform step 6.
For details about how to manually intervene GBTS transmission
detection, see 4.4 Manually Intervening the MBTS Transmission
Detection.
Manual
Transmission
Detection
Intervention Is
Not Required
Perform step 6.
Step 6 Click OK. The M2000 starts commissioning the MBTS automatically.
M2000, see 4.5 Automatic Commissioning of the MBTS on the M2000.
----End
Postrequisite
During the commissioning, you can monitor the MBTS commissioning status through the
M2000 to handle commissioning exceptions in time and ensure that the commissioning can be
performed successfully. For details, see 4.6.1 Viewing the Progress and Status of an MBTS
Commissioning Task.
4.3.2 Creating an MBTS Commissioning Task (Deploying a NodeB
When the GBTS Is Normal)
This section describes how to create an MBTS commissioning task when the GBTS is normal
and you need to deploy a NodeB. After making MBTS commissioning preparations, you can
create an MBTS commissioning task on the M2000 and enable the M2000 to commission the
MBTS automatically.
Prerequisite
lThe M2000 client is started.
lMBTS commissioning preparations are complete.
lThe controller to which the MBTS to be commissioned belongs is properly connected to
the M2000.
Context
The M2000 can commission a maximum of 500 base stations at a time, where one MBTS is
equal to two base stations (the NodeB and the GBTS are not differentiated).
4 Commissioning the MBTS in GU Mode on the M2000
3900 Series Multi-Mode Base Station
Commissioning Guide
4-8 Huawei Proprietary and Confidential
Copyright © Huawei Technologies Co., Ltd.
Issue 02 (2010-07-30)
Procedure
Step 1 Choose Configuration > Auto Deployment > MBTS Auto Deployment. The MBTS Auto
Deployment window is displayed.
Step 2 Keep ready the NodeB deployment list.
Option Description
Exporting the
MBTS Deployment
List from the CME
Obtain and open the exported MBTS deployment list, and then add the
related data according to the planned data that is confirmed with the
network planning engineers.
For the data that needs to be added, see 4.9.2 Parameters for the MBTS
Deployment List.
Exporting the
Template of MBTS
Deployment List
from the M2000
Client
1. Click . The Save dialog box is displayed.
2. Specify the save path, enter the filename, and then click Save.
3. Add the related data according to the planned data that is confirmed
with the network planning engineers.
NOTE
lThe exported template of MBTS deployment list is in .csv format. By
default, the filename is
MBTS_GU_Auto_Deployment_List_Template.csv. You can change the
filename as required.
lThe exported template of MBTS deployment list contains three records,
which represent three deployment scenarios. Edit the records according to
the actual situation of the template.
lIf Auto Deployment Type is set to MBTS, it indicates that you need
to create both the GBTS and the NodeB.
lIf Auto Deployment Type is set to NodeB, it indicates that you need
to add a NodeB when the GBTS is normal.
lIf Auto Deployment Type is set to GBTS, it indicates that you need to
add a GBTS when the NodeB is normal.
Step 3 Click on the toolbar to import the MBTS deployment list.
Only GBTS deployment lists in .csv format can be imported to the M2000. After the MBTS
deployment list is imported, the M2000 checks whether any mandatory parameter in the list is
null and whether the MBTS is valid. In addition, the information indicating whether the import
succeeded or failed is displayed on the Operation Information tab page.
lThe import succeeded: The M2000 automatically creates a commissioning task for each
MBTS and displays the task in both the GBTS List area and the NodeB List area. The GBTS
List area displaying the commissioning tasks of the GBTSs that need not be deployed is
unavailable.
lThe import failed: The Operation Information tab page displays the MBTS that failed to
be imported and the causes for the failure. For details about failure symptoms and solutions,
see What Should I Do When a Failure Message Is Displayed During the Import of the MBTS
Deployment List?.
Step 4 Upload the target software package and configuration file of the NodeB.
3900 Series Multi-Mode Base Station
Commissioning Guide 4 Commissioning the MBTS in GU Mode on the M2000
Issue 02 (2010-07-30) Huawei Proprietary and Confidential
Copyright © Huawei Technologies Co., Ltd.
4-9

1. Right-click a record in the NodeB List area, and then choose Upload versions and config
files from the shortcut menu. The Upload versions and config files dialog box is displayed.
2. Select the file to be uploaded.
3. After the upload is complete, click Close.
Step 5 In MBTS List, select an MBTS to be commissioned, and then click on the toolbar. The
M2000 starts commissioning the MBTS automatically.
lAfter the deployment starts, the M2000 deploys only the NodeB.
lFor details about the automatic commissioning performed by the M2000, see 4.5 Automatic
Commissioning of the MBTS on the M2000.
----End
Postrequisite
During the commissioning, you can monitor the MBTS commissioning status through the
M2000 to handle commissioning exceptions in time and ensure that the commissioning can be
performed successfully. For details, see 4.6.1 Viewing the Progress and Status of an MBTS
Commissioning Task.
4.3.3 Creating an MBTS Commissioning Task (Deploying a GBTS
When the NodeB Is Normal)
This section describes how to create an MBTS commissioning task when the NodeB is normal
and you need to deploy a GBTS. After making MBTS commissioning preparations, you can
create an MBTS commissioning task on the M2000 and enable the M2000 to commission the
MBTS automatically.
Prerequisite
lThe M2000 client is started.
lMBTS commissioning preparations are complete.
lThe controller to which the MBTS to be commissioned belongs is properly connected to
the M2000.
Context
The M2000 can commission a maximum of 500 base stations at a time, where one MBTS is
equal to two base stations (the NodeB and the GBTS are not differentiated).
Procedure
Step 1 Choose Configuration > Auto Deployment > MBTS Auto Deployment. The MBTS Auto
Deployment window is displayed.
Step 2 Keep ready the NodeB deployment list.
4 Commissioning the MBTS in GU Mode on the M2000
3900 Series Multi-Mode Base Station
Commissioning Guide
4-10 Huawei Proprietary and Confidential
Copyright © Huawei Technologies Co., Ltd.
Issue 02 (2010-07-30)
Option Description
Exporting the
MBTS Deployment
List from the CME
Obtain and open the exported MBTS deployment list, and then add the
related data according to the planned data that is confirmed with the
network planning engineers.
For the data that needs to be added, see 4.9.2 Parameters for the MBTS
Deployment List.
Exporting the
Template of MBTS
Deployment List
from the M2000
Client
1. Click . The Save dialog box is displayed.
2. Specify the save path, enter the filename, and then click Save.
3. Add the related data according to the planned data that is confirmed
with the network planning engineers.
NOTE
lThe exported template of MBTS deployment list is in .csv format. By
default, the filename is
MBTS_GU_Auto_Deployment_List_Template.csv. You can change the
filename as required.
lThe exported template of MBTS deployment list contains three records,
which represent three deployment scenarios. Edit the records according to
the actual situation of the template.
lIf Auto Deployment Type is set to MBTS, it indicates that you need
to create both the GBTS and the NodeB.
lIf Auto Deployment Type is set to NodeB, it indicates that you need
to add a NodeB when the GBTS is normal.
lIf Auto Deployment Type is set to GBTS, it indicates that you need to
add a GBTS when the NodeB is normal.
Step 3 Click on the toolbar to import the MBTS deployment list.
Only GBTS deployment lists in .csv format can be imported to the M2000. After the MBTS
deployment list is imported, the M2000 checks whether any mandatory parameter in the list is
null and whether the MBTS is valid. In addition, the information indicating whether the import
succeeded or failed is displayed on the Operation Information tab page.
lThe import succeeded: M2000 automatically creates a commissioning task for each MBTS
and displays the task in both the GBTS List area and the NodeB List area. The NodeB
List area that displays the commissioning tasks of NodeBs that need not be deployed is
unavailable.
lThe import failed: The Operation Information tab page displays the MBTS that failed to
be imported and the causes for the failure. For details about failure symptoms and solutions,
see What Should I Do When a Failure Message Is Displayed During the Import of the MBTS
Deployment List?.
Step 4 In MBTS List, select an MBTS to be commissioned, and then click on the toolbar. The
Customize Process dialog box is displayed.
3900 Series Multi-Mode Base Station
Commissioning Guide 4 Commissioning the MBTS in GU Mode on the M2000
Issue 02 (2010-07-30) Huawei Proprietary and Confidential
Copyright © Huawei Technologies Co., Ltd.
4-11

Option Description
Manual Transmission
Detection Intervention Is
Required
1. Select the check box in front of Intervene Transmission.
2. Perform step 5.
For details about how to manually intervene GBTS
transmission detection, see 4.4 Manually Intervening the
MBTS Transmission Detection.
Manual Transmission
Detection Intervention Is
Not Required
Perform step 5.
Step 5 Click OK. The M2000 starts commissioning the MBTS automatically.
lAfter the deployment starts, the M2000 deploys only the GBTS.
lM2000, see 4.5 Automatic Commissioning of the MBTS on the M2000.
----End
Postrequisite
During the commissioning, you can monitor the MBTS commissioning status through the
M2000 to handle commissioning exceptions in time and ensure that the commissioning can be
performed successfully. For details, see 4.6.1 Viewing the Progress and Status of an MBTS
Commissioning Task.
4.4 Manually Intervening the MBTS Transmission
Detection
This section describes how to manually intervene GBTS transmission during MBTS
commissioning. By intervening GBTS transmission, you can query the real-time status of the
E1/T1 port to ensure that the GBTS transmission is normal and that you can proceed with the
GBTS deployment.
Prerequisite
The automatic software commissioning already starts, and the GBTS transmission is being
manually intervened.
Context
If you have set intervention on the commissioning task when starting the commissioning, the
task switches to the intervention status after the OML detection is complete, regardless of
whether the OML is normal. In addition, the function of querying the E1/T1 port status is
provided.
Procedure
Step 1 Choose Configuration > Auto Deployment > MBTS Auto Deployment. The MBTS Auto
Deployment window is displayed.
4 Commissioning the MBTS in GU Mode on the M2000
3900 Series Multi-Mode Base Station
Commissioning Guide
4-12 Huawei Proprietary and Confidential
Copyright © Huawei Technologies Co., Ltd.
Issue 02 (2010-07-30)
Step 2 In MBTS List, select the GBTS to be intervened, and then click on the toolbar. The
transmission intervention dialog box is displayed.
1. Troubleshoot connection faults.
2. Type a query condition to query the E1/T1 port status.
NOTE
Querying the E1/T1 port status does not affect the transmission.
3. Transmission intervention is complete. You are prompted whether to continue the
commissioning.
lIf you select Continue, the subsequent commissioning operations are automatically
performed.
lIf you select Stop, the commissioning stops and switches to the status, that is, the
commissioning is abnormal.
----End
4.5 Automatic Commissioning of the MBTS on the M2000
After creating the MBTS commissioning task, the M2000 starts to commission the MBTS
automatically.
Table 4-4 describes the automatic commissioning procedures of the MBTS. If a commissioning
procedure is normal, the M2000 proceeds with the next commissioning procedure. If the
commissioning procedure is not normal, the M2000 terminates the commissioning and reminds
the user of the situation.
Table 4-4 Automatic commissioning procedures of the MBTS
Commissioning
Procedure
Description
Establishing OM
channel automatically
The M2000 can automatically establishes an OM channel with the
base station based on the deployment list, provided that the
transport network is functional. Then, the M2000 commissions the
MBTS and performs other OM tasks through this channel.
After detecting the MBTS, the M2000 automatically sets Status of
the MBTS to Processing, such that no alarms reported by the
MBTS during the commissioning procedure are displayed on the
M2000 alarm interface and the normal networking monitoring is
not affected.
After the OM channel is established, you can start the automatic
commissioning of the MBTS by creating a commissioning task on
the M2000.
NOTE
You can proceed with the next step only when the OM channel for both
GSM and UMTS is established.
3900 Series Multi-Mode Base Station
Commissioning Guide 4 Commissioning the MBTS in GU Mode on the M2000
Issue 02 (2010-07-30) Huawei Proprietary and Confidential
Copyright © Huawei Technologies Co., Ltd.
4-13

Commissioning
Procedure
Description
Checking GBTS OML
automatically
The M2000 automatically checks whether the OML between the
GBTS and its homing BSC is normal.
lIf the link is normal and you do not set manual intervention when
creating the commissioning task, the M2000 proceeds with the
next procedure automatically.
lIf the link is not normal and you do not set manual intervention
when creating the commissioning task, the M2000 terminates
the commissioning automatically. In this situation, you need to
solve the problem first.
lIf you have set manual intervention when creating the
commissioning task, you need to decide whether to proceed with
the next commissioning procedure regardless whether the link
is normal or not.
Automatic software
upgrade
Based on the target version information included in the deployment
list, the M2000 automatically checks whether the target software
version is consistent with that on the base station. If the software
version is inconsistent, then the upgraded is failed.
NOTE
lIf the USB disk is used for the base station upgrade, ensure that the
software version and configuration data of the base station are upgraded
to the target ones. After confirmed, the M2000 skips this step and directly
proceeds with the automatic software commissioning.
lFor the NodeB, the M2000 downloads the target software and data
configuration file from the server to the NodeB, and completes software
upgrade and configuration activation automatically.
lFor the GBTS, the M2000 instructs the BSC to start upgrading the GBTS
software, and the GBTS downloads the target version from the BSC and
upgrades the software. After the GBTS software is upgraded and the
GBTS is reset, the GBTS automatically sends a request to the BSC for
loading configuration data.
lIn scenarios where both GBTS and NodeB need to be deployed, only the
MBTS upgrade as a whole is supported. In scenarios where only one
RAT needs to be deployed, perform the upgrade individually for the
RAT. In the preceding scenarios, the upgrade is not supported for
unmatched versions.
lOnly when the software upgrade and configuration activation are
completed for both GBTS and NodeB, the commission can go to next
stage.
4 Commissioning the MBTS in GU Mode on the M2000
3900 Series Multi-Mode Base Station
Commissioning Guide
4-14 Huawei Proprietary and Confidential
Copyright © Huawei Technologies Co., Ltd.
Issue 02 (2010-07-30)

Commissioning
Procedure
Description
Automatic software
commissioning
During NodeB software commissioning, the M2000 performs fault
diagnose to ensure that the service check is performed normally. It
is carried out automatically, and you need to focus only on faults.
The M2000 displays all reported alarms on the monitor interface
and provides an easy fault diagnose entry to help you locate faults
fast and provide troubleshooting suggestions.
The software commissioning on the GBTS side involves the sub-
processes. When detecting that the cell initialization of the base
station is complete and there is an available cell for use, the
M2000 proceeds with the next phase automatically.
lCheck cell initialization status of the base station.
lQuery base station information.
lCheck high-precision VSWR. This operation is optional, based
on the setting done when the commissioning task is created.
lMonitor base station alarms.
lCheck cell serviceability status.
NOTE
In the software commissioning phase, you can view base station alarms and
perform fault diagnose as required, and then take actions accordingly to
solve problems.
Automatic service
check
The M2000 automatically collects the following CS-related and
PS-related counters of the NE to check whether the NE is operating
normally. When non-zero values exist for all the counters, the
service check is passed; otherwise, the service check phase is
always sustained.
Completing
commissioning
After service check is completed, the deployment task state is
displayed as Confirm Completed Deployment. After you confirm
that the commissioning task is completed, the M2000 automatically
cancels the Testing state of the MBTS and then proceeds with the
site location check.
NOTE
Site location check is the process of checking whether the ESN reported by
the site is consistent with that included in the deployment list. The purpose
is to check for situations where the USB disk is inserted incorrectly in IP
networking mode.
4.6 Monitoring the MBTS Commissioning
This chapter describes how to monitor the MBTS commissioning, thus helping you to obtain
the progress and status of the MBTS commissioning and then rectify faults in real time.
4.6.1 Viewing the Progress and Status of an MBTS Commissioning Task
This section describes how to view the progress and status of an automatic MBTS commissioning
task that is being performed by the M2000.
3900 Series Multi-Mode Base Station
Commissioning Guide 4 Commissioning the MBTS in GU Mode on the M2000
Issue 02 (2010-07-30) Huawei Proprietary and Confidential
Copyright © Huawei Technologies Co., Ltd.
4-15

4.6.2 Handling MBTS Alarms
This section describes how to handle MBTS alarms. After the automatic software commissioning
starts, you can use the M2000 to monitor the alarms of an MBTS and the relevant alarms of the
controller that manages the MBTS in real time. If exceptions occur during the commissioning,
you can view the alarm information to locate and handle faults in time.
4.6.3 Diagnosing MBTS Faults
In the case of GBTS/NodeB board alarms, GBTS/NodeB E1T1 alarms, and GBTS/NodeB
antenna alarms, if the causes of the fault cannot be located in the alarm information, you can
perform fault diagnosis and then take corresponding measures to handle the alarms.
4.6.4 Viewing the Service Verification Results of an MBTS
This section describes how to view the service verification results of an MBTS. After the
automatic service verification starts, the M2000 automatically collects the performance data
related to the GBTS and NodeB services and checks whether the services are normal.
4.6.5 Restarting/Deleting MBTS Commissioning Tasks
This section describes how to restart or delete ongoing MBTS commissioning tasks.
4.6.1 Viewing the Progress and Status of an MBTS Commissioning
Task
This section describes how to view the progress and status of an automatic MBTS commissioning
task that is being performed by the M2000.
Prerequisite
The automatic software commissioning already starts.
Context
User admin can view commissioning tasks created by any user, whereas other users can view
only the commissioning tasks created by themselves.
Procedure
Step 1 Choose Configuration > Auto Deployment > MBTS Auto Deployment. The MBTS Auto
Deployment window is displayed.
Step 2 View the status and progress of an MBTS commissioning task.
Option Description
Deploying a GBTS and a
NodeB at the same time
View the commissioning progress and status of the GBTS and
that of the NodeB in the GBTS List and NodeB List areas.
Deploying a NodeB when
the GBTS is normal
View the commissioning progress and status of the NodeB in the
NodeB List area.
Deploying a GBTS when
the NodeB is normal
View the commissioning progress and status of the GBTS in the
GBTS List area.
4 Commissioning the MBTS in GU Mode on the M2000
3900 Series Multi-Mode Base Station
Commissioning Guide
4-16 Huawei Proprietary and Confidential
Copyright © Huawei Technologies Co., Ltd.
Issue 02 (2010-07-30)
TIP
You can choose either of the following methods to quickly view the progress and status of the MBTS
commissioning:
lClick the table heading field of the task list to sort the commissioning tasks.
lClick next to the table heading field of the task list to set the filtering condition. The task list displays
only the tasks that meet the filtering condition. If no filtering condition is set, the list of commissioning
tasks displays all the tasks that you are authorized to view.
Select a field in the task list, click , and then select Custom from the drop-down list. Set the filtering
condition in the displayed dialog box.
lGBTS commissioning status (GBTS List area): The statuses of commissioning tasks are
displayed in Status. The progress of the current task is displayed in Current Phase. The
details of each stage under each status are displayed in Description.
lNodeB commissioning status (NodeB List area): The statuses of commissioning tasks are
displayed in Status. The progress of the current task is displayed in Current Phase. The
details of each stage under each status are displayed in Description.
For example, when a commissioning task is in the state (that is, the commissioning is being
performed), the operations such as version download, software upgrade, and configuration file
upgrade are performed.
For details about each status, see Table 4-5.
Table 4-5 Description of the commissioning statuses
Status Description
Start the MBTS commissioning task.
The commissioning is abnormal. View the alarm information, and then
handle alarms and perform fault diagnosis and alarm in time. For
details, see 4.6.2 Handling MBTS Alarms and 4.6.3 Diagnosing
MBTS Faults.
Pay attention to the commissioning. For example, an exception occurs
in a certain procedure, which does not affect the commissioning and
does not need to be handled.
Manually intervene the commissioning of GBTS transmission. For
details, see 4.4 Manually Intervening the MBTS Transmission
Detection.
No operation needs to be performed. The commissioning is being
performed normally.
Confirm whether to complete the commissioning. For details, see 4.7
Confirming the Completion of MBTS Commissioning.
The commissioning is complete without errors. Obtain and archive the
commissioning report. For details, see 4.8 Obtaining the MBTS
Commissioning Report.
----End
3900 Series Multi-Mode Base Station
Commissioning Guide 4 Commissioning the MBTS in GU Mode on the M2000
Issue 02 (2010-07-30) Huawei Proprietary and Confidential
Copyright © Huawei Technologies Co., Ltd.
4-17

4.6.2 Handling MBTS Alarms
This section describes how to handle MBTS alarms. After the automatic software commissioning
starts, you can use the M2000 to monitor the alarms of an MBTS and the relevant alarms of the
controller that manages the MBTS in real time. If exceptions occur during the commissioning,
you can view the alarm information to locate and handle faults in time.
Prerequisite
The automatic software commissioning already starts, and you have not confirmed the
completion of the commissioning yet.
Context
M2000displays all the alarms reported during the MBTS commissioning based on object types.
lThe alarms of GBTSs are categorized as the following types: E1T1 alarms, IP alarms,
software alarms, board alarms, antenna alarms, cell service alarms, and other alarms. Other
alarms refer to the alarms that cannot be categorized on the basis of specific objects.
lThe alarms of NodeBs are categorized as the following types: E1T1 alarms, IP alarms,
antenna alarms, board alarms, cell alarms, external alarms, and other alarms. Other alarms
refer to the alarms that cannot be categorized on the basis of specific objects.
Procedure
Step 1 Choose Configuration > Auto Deployment > MBTS Auto Deployment. The MBTS Auto
Deployment window is displayed.
Step 2 From MBTS List, select an MBTS whose alarms you need to view, and then click on the
toolbar. The alarm monitoring window is displayed.
For details about the alarm monitoring window, see Interface Description: MBTS
Commissioning.
Step 3 Select the object to be viewed in the left pane of the alarm monitoring window, and then view
the alarm information about this object in the corresponding area in the right pane.
NOTE
lIf you select an MBTS to view its alarms, you can view the alarms of both the GBTS and the NodeB.
If one base station is normal and only the other base station is deployed, the deployed base station
provides the entries of alarm classification and fault diagnosis, whereas the normal base station displays
all the alarms without providing the entries.
lYou can also choose to view the alarm information about only the GBTS or the NodeB. In the GBTS
List or NodeB List area of the MBTS Auto Deployment window, right-click a record, and then choose
Open Monitor Window from the shortcut menu. The alarm monitoring window of the GBTS or NodeB
is displayed.
Step 4 Handle MBTS alarms.
1. Double-click an alarm to be handled, and then click the link provided in Reason in the
displayed dialog box of details.
2. Rectify the alarm according to the alarm handling suggestions.
----End
4 Commissioning the MBTS in GU Mode on the M2000
3900 Series Multi-Mode Base Station
Commissioning Guide
4-18 Huawei Proprietary and Confidential
Copyright © Huawei Technologies Co., Ltd.
Issue 02 (2010-07-30)
4.6.3 Diagnosing MBTS Faults
In the case of GBTS/NodeB board alarms, GBTS/NodeB E1T1 alarms, and GBTS/NodeB
antenna alarms, if the causes of the fault cannot be located in the alarm information, you can
perform fault diagnosis and then take corresponding measures to handle the alarms.
Prerequisite
The automatic software commissioning already starts, and you have not confirmed the
completion of the commissioning yet.
Context
CAUTION
E1T1 fault diagnosis leads to the interruption of all services on the port; antenna fault diagnosis
leads to the interruption of all carrier services of the GBTS. Therefore, you need to perform the
fault diagnosis when the GBTS services are in idle state or are segregated.
lAfter the fault diagnosis starts, the M2000 creates a diagnosis task and displays the
troubleshooting progress. After the fault diagnosis is complete, you can obtain the fault
diagnosis report to view fault location information.
lIf you delete a fault diagnosis task, the corresponding diagnosis report is deleted
accordingly. If you restart the M2000 server, all fault diagnosis tasks and reports are deleted.
Procedure
Step 1 Choose Configuration > Auto Deployment > MBTS Auto Deployment. The MBTS Auto
Deployment window is displayed.
Step 2 From MBTS List, select an MBTS whose alarms you need to view, and then click on the
toolbar. The alarm monitoring window is displayed.
For details about the alarm monitoring window, see Interface Description: MBTS
Commissioning.
Step 3 Perform fault analysis on board alarms, E1T1 alarms, and antenna alarms.
1. Select an object (board, E1/T1, or antenna) in the left pane of the alarm monitoring window,
or select a specific alarm of an object (board, E1/T1, or antenna) from the alarm list in the
right pane.
2. Right-click the selected object or alarm, and then choose Diagnose from the shortcut menu.
In the displayed dialog box, select the diagnosis type, enter the diagnosis parameters, and
then click OK. The M2000 starts the fault diagnosis.
A new diagnosis task is added to the diagnosis list. The diagnosis task list is located in the
lower part of the alarm monitoring window.
3. In the diagnosis task list, right-click a fault diagnosis task, and then choose Details or
Diagnosis Report from the shortcut menu. Then, view the diagnosis details or conclusion.
----End
3900 Series Multi-Mode Base Station
Commissioning Guide 4 Commissioning the MBTS in GU Mode on the M2000
Issue 02 (2010-07-30) Huawei Proprietary and Confidential
Copyright © Huawei Technologies Co., Ltd.
4-19

4.6.4 Viewing the Service Verification Results of an MBTS
This section describes how to view the service verification results of an MBTS. After the
automatic service verification starts, the M2000 automatically collects the performance data
related to the GBTS and NodeB services and checks whether the services are normal.
Prerequisite
The automatic software commissioning already starts, and you have not confirmed the
completion of the commissioning yet.
Context
For details about the process of MBTS service verification, see Table 4-6. For details about the
service verification window, see Interface Description: Commissioning the MBTS.
Table 4-6 Procedure of automatic service verification
Step Description Operation Performed
by Users
1. The M2000
collects the
performance data
related to the
GBTS and
NodeB services.
If you do not restart the MBTS
commissioning or confirm the completion
of the commissioning after the service
verification starts, the M2000 collects the
performance counter data related to the
GBTS and NodeB services according to the
shortest measurement period currently
supported by the NEs.
The performance counters of an MBTS
consist of the performance counters of the
GBTS and the performance counters of the
NodeB. For details, see 4.9.3 Parameters
for MBTS Service Verification
Performance Counters.
Not involved.
4 Commissioning the MBTS in GU Mode on the M2000
3900 Series Multi-Mode Base Station
Commissioning Guide
4-20 Huawei Proprietary and Confidential
Copyright © Huawei Technologies Co., Ltd.
Issue 02 (2010-07-30)
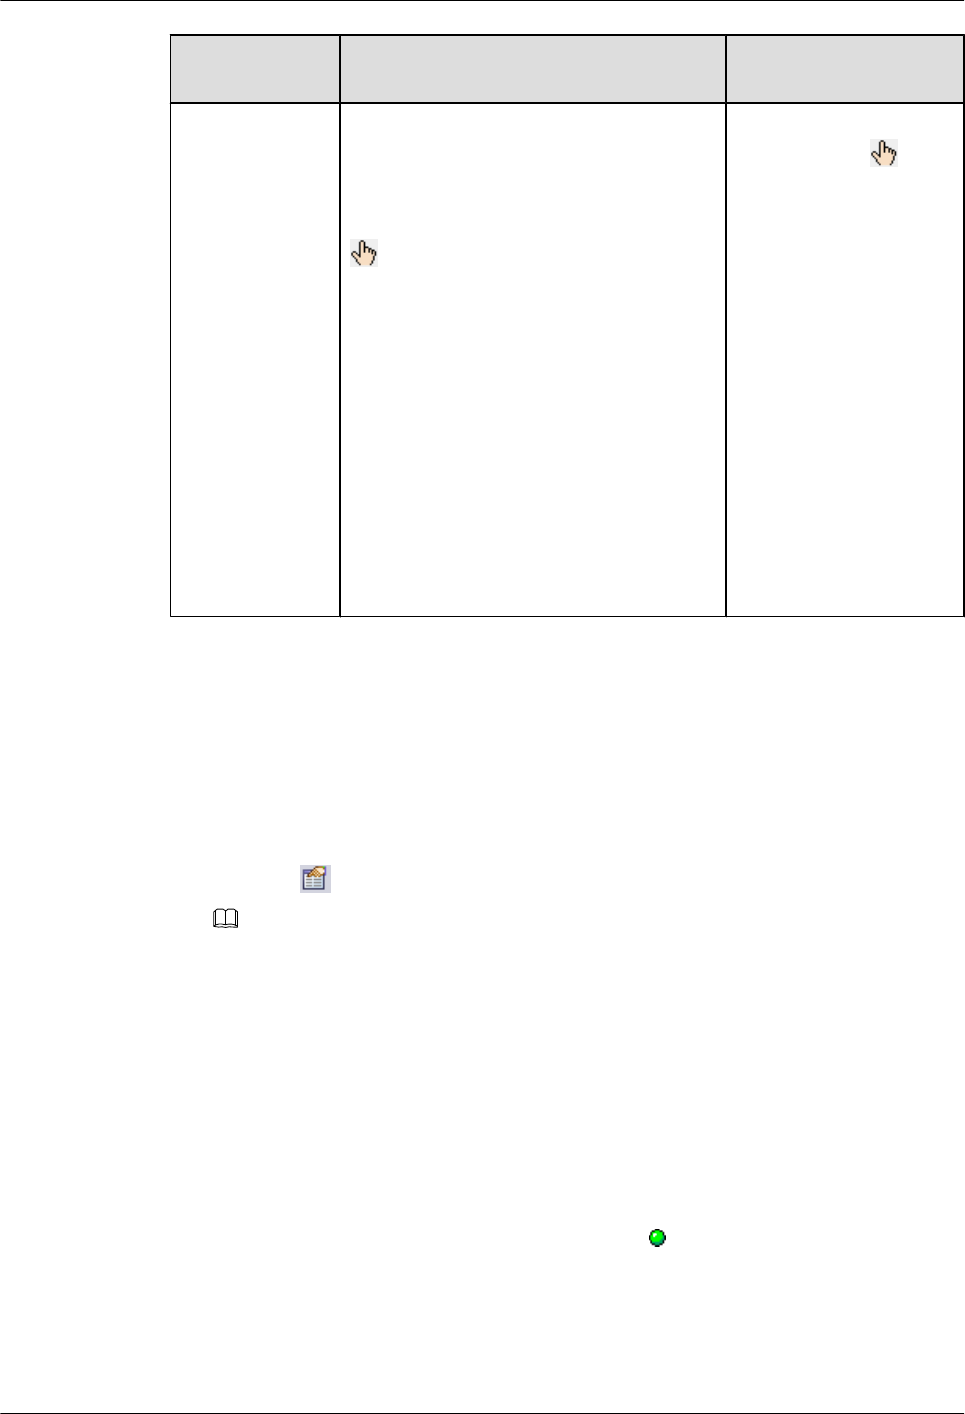
Step Description Operation Performed
by Users
2. The M2000
checks whether
the MBTS
services are
running normally
according to the
values of the
performance
counters.
If each GBTS and NodeB performance
counter once has a non-zero value, the
M2000 considers that the service
verification is successful. At this time, the
status of the commissioning task changes to
, that is, waiting for you to manually
confirm the completion of the
commissioning. Otherwise, the
commissioning task remains at the service
verification stage.
lIf the commissioning
task is in the state,
you need to check
whether the
commissioning is
complete. For details,
see 4.7 Confirming
the Completion of
MBTS
Commissioning.
lIf the commissioning
task remains at the
service verification
stage, it is
recommended that you
view the service
verification results to
obtain the actual
performance data.
Procedure
Step 1 Choose Configuration > Auto Deployment > MBTS Auto Deployment. The MBTS Auto
Deployment window is displayed.
Step 2 View the service verification results of the MBTS.
1. In MBTS List, select an MBTS whose service verification results need to be viewed, and
then click on the toolbar. The service verification window is displayed.
NOTE
lIf you select an MBTS to view the service verification results, you can view the results on both
the GBTS side and the NodeB side.
lYou can also choose to view only the service verification results on the GBTS side or the NodeB
side. In the GBTS List or NodeB List area of the MBTS Auto Deployment window, right-click
a record, and then choose Open Service Verification Window from the shortcut menu. The
service verification window of the GBTS or NodeB is displayed.
2. View the service verification results and perform corresponding operations.
The accumulated values of the counters, which are collected in the time range between the
start of the service verification and the restart of the commissioning or the confirmation of
the commissioning completion, are displayed in the service verification window.
lIf the value of each counter is once displayed as (indicates a non-zero value), you
can infer that the service verification is successful. Confirm whether to complete the
commissioning.
3900 Series Multi-Mode Base Station
Commissioning Guide 4 Commissioning the MBTS in GU Mode on the M2000
Issue 02 (2010-07-30) Huawei Proprietary and Confidential
Copyright © Huawei Technologies Co., Ltd.
4-21
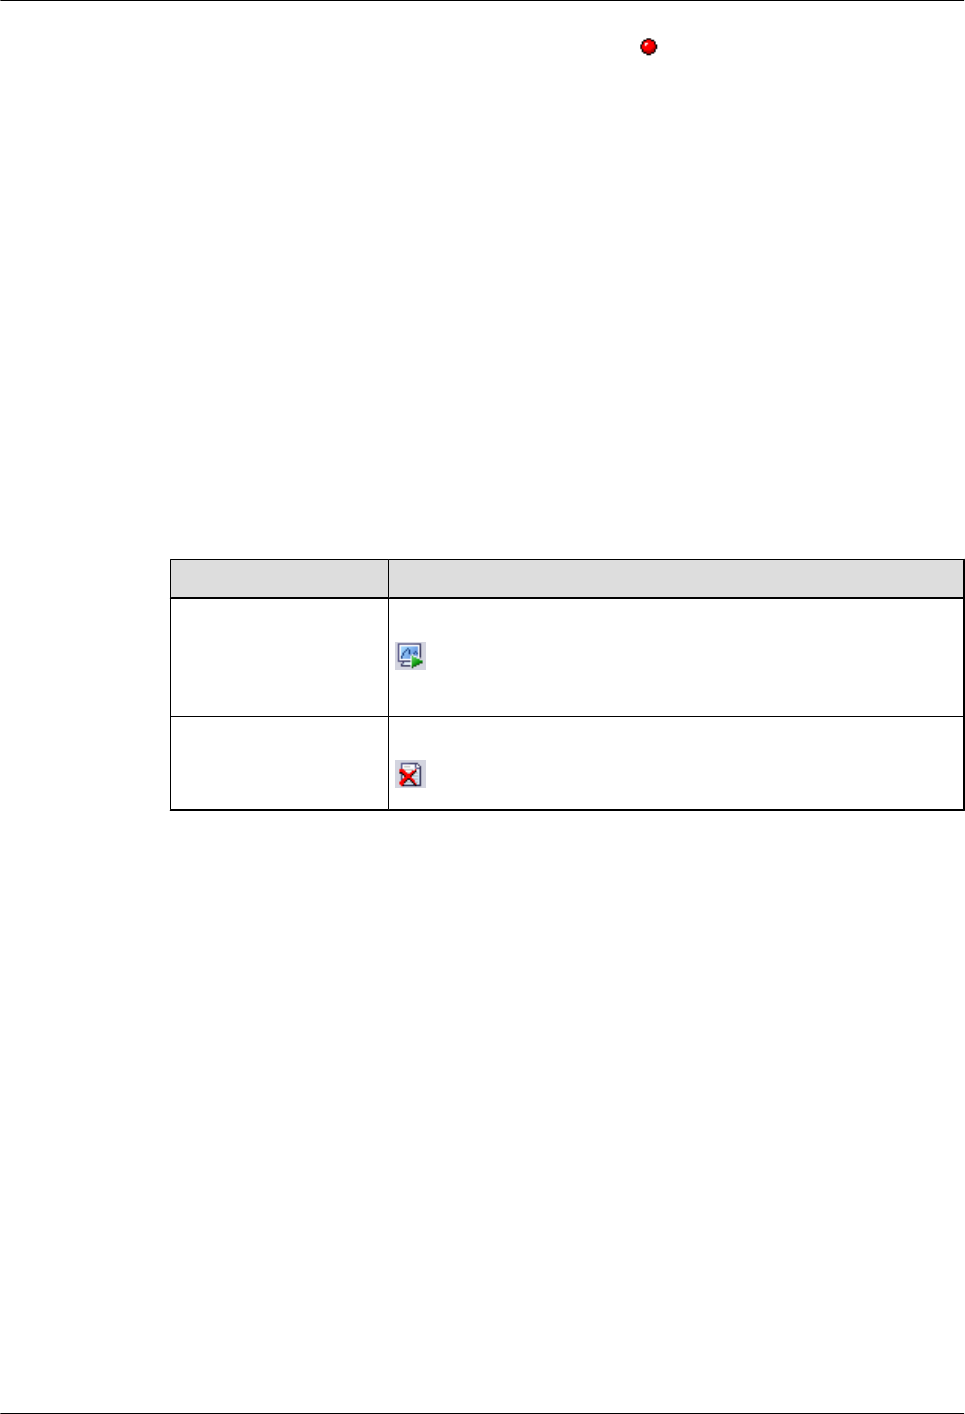
lIf the value of a counter is always displayed as (indicates the value zero), you can
infer that the services related to this counter are faulty. Rectify the fault.
----End
4.6.5 Restarting/Deleting MBTS Commissioning Tasks
This section describes how to restart or delete ongoing MBTS commissioning tasks.
Prerequisite
Certain MBTS commissioning tasks are created.
Procedure
Step 1 Choose Configuration > Auto Deployment > MBTS Auto Deployment. The MBTS Auto
Deployment window is displayed.
Step 2 Restart or delete MBTS commissioning tasks as required.
Option Description
Restarting MBTS
commissioning tasks
Select one or multiple MBTSs from MBTS List, and then click
on the toolbar to restart the selected MBTS commissioning
tasks.
Deleting MBTS
commissioning tasks
Select one or multiple MBTSs from MBTS List, and then click
on the toolbar to delete the selected MBTS commissioning tasks.
----End
4.7 Confirming the Completion of MBTS Commissioning
This chapter describes how to confirm an MBTS commissioning task. After the service
verification of an MBTS is complete, the MBTS commissioning task changes to the status for
confirmation. You need to manually confirm the completion of the MBTS commissioning.
Prerequisite
The MBTS service verification is complete.
Context
lIf some alarms are still not cleared during the commissioning, it is recommended that you
do not confirm the completion of the commissioning task, so that you can view and handle
these alarms easily.
lAfter you confirm that the commissioning task is complete, the alarms related to all the
GBTS and NodeB commissioning procedures cannot be viewed any longer.
4 Commissioning the MBTS in GU Mode on the M2000
3900 Series Multi-Mode Base Station
Commissioning Guide
4-22 Huawei Proprietary and Confidential
Copyright © Huawei Technologies Co., Ltd.
Issue 02 (2010-07-30)

Procedure
Step 1 Choose Configuration > Auto Deployment > MBTS Auto Deployment. The MBTS Auto
Deployment window is displayed.
Step 2 In MBTS List, select a commissioning task to be confirmed, and then click on the toolbar
to confirm the completion of this task.
After the commissioning is complete, the M2000 stops monitoring the alarms on the GBTSs,
NodeBs, and related controllers. In addition, it stops subscribing to the service verification
performance counters of the GBTSs and NodeBs.
----End
4.8 Obtaining the MBTS Commissioning Report
A MBTS commissioning report records the task information about the commissioned MBTS
and the information about the commissioning process. When a commissioning task is still in
progress or is complete, you can obtain and analyze the commissioning report to learn the
commissioning details, to view the exceptions that occur during the commissioning, or to
determine whether to complete the commissioning.
Prerequisite
A commissioning task is in progress.
Procedure
Step 1 Choose Configuration > Auto Deployment > MBTS Auto Deployment. The MBTS Auto
Deployment window is displayed.
Step 2 (Optional) In MBTS List, select a commissioning task to be confirmed, and then click on
the toolbar to export the commissioning report.
In the exported file, select index.html to view the detailed commissioning information.
----End
4.9 References for the MBTS Commissioning Interface
This chapter describes the interfaces and parameters for MBTS commissioning, which help you
to commission MBTSs.
4.9.1 Interface Description: MBTS Commissioning
This section describes the MBTS Auto Deployment window displayed when you commission
MBTSs.
4.9.2 Parameters for the MBTS Deployment List
The MBTS deployment list provides the parameters required for commissioning MBTSs. After
you import the MBTS deployment list into the M2000, the M2000 creates a MBTS
commissioning task to implement automatic MBTS commissioning.
4.9.3 Parameters for MBTS Service Verification Performance Counters
3900 Series Multi-Mode Base Station
Commissioning Guide 4 Commissioning the MBTS in GU Mode on the M2000
Issue 02 (2010-07-30) Huawei Proprietary and Confidential
Copyright © Huawei Technologies Co., Ltd.
4-23
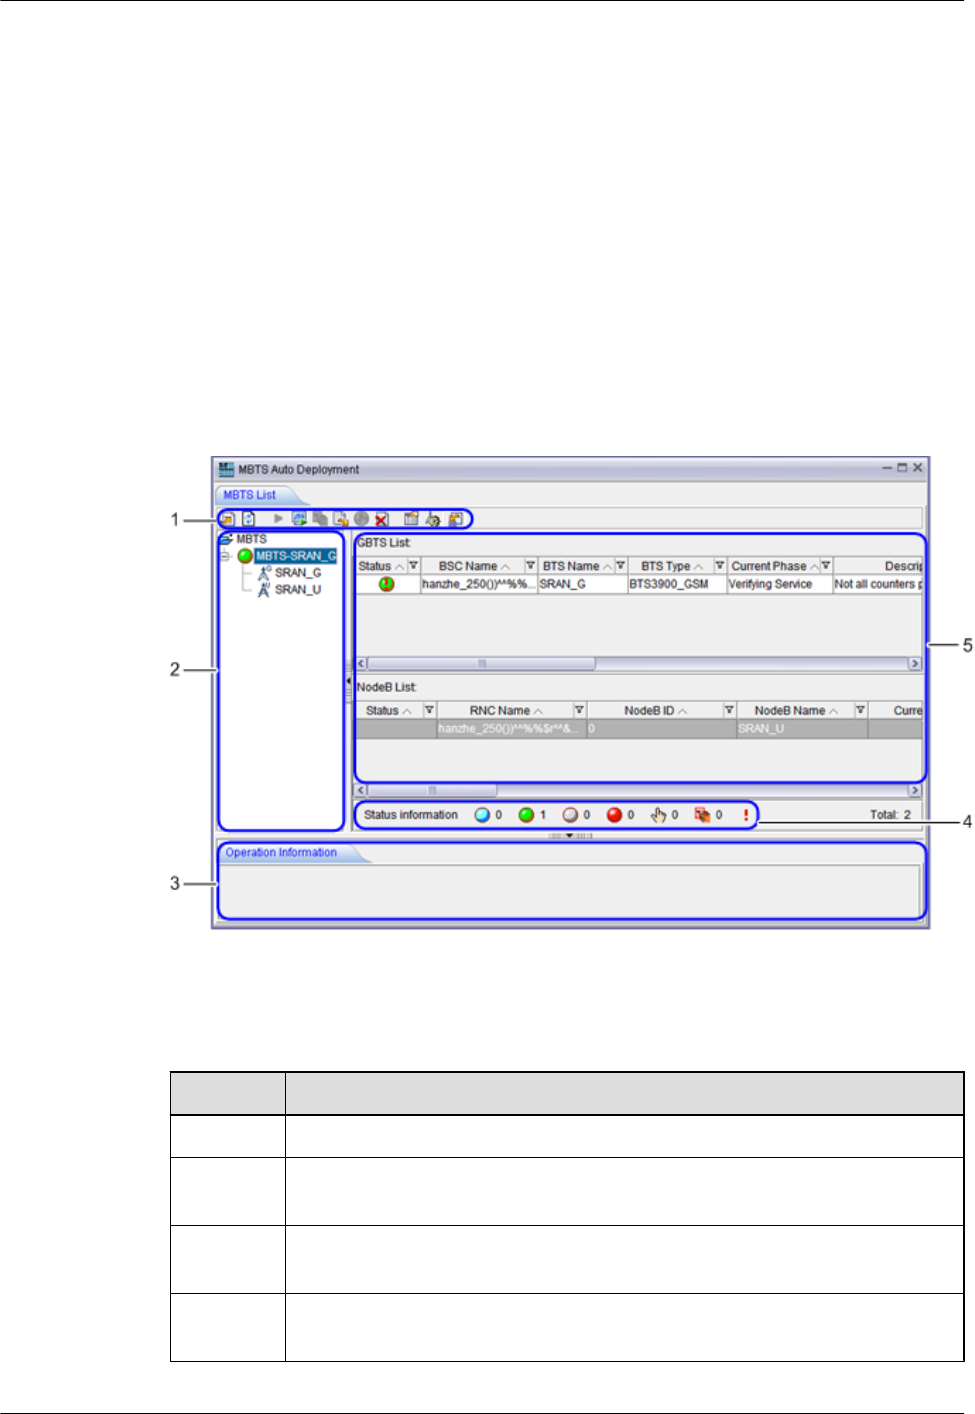
This section describes the parameters of the performance counters that are monitored at the
service verification stage during MBTS commissioning.
4.9.1 Interface Description: MBTS Commissioning
This section describes the MBTS Auto Deployment window displayed when you commission
MBTSs.
Main Window
The MBTS commissioning task list contains GBTS commissioning tasks and NodeB
commissioning tasks. Figure 4-2 shows the main window for MBTS commissioning. Table
4-7 describes the window.
Figure 4-2 Main window for MBTS commissioning
Table 4-7 Description
No. Description
1Toolbar: provides operation entries for commissioning MBTSs.
2 MBTS list: displays all the MBTSs to be commissioned in the commissioning
tasks.
3 Operation result area: displays the results of the operations performed during
the commissioning.
4 Status bar of commissioning tasks: displays the total number of commissioning
tasks and number of commissioning tasks in each status.
4 Commissioning the MBTS in GU Mode on the M2000
3900 Series Multi-Mode Base Station
Commissioning Guide
4-24 Huawei Proprietary and Confidential
Copyright © Huawei Technologies Co., Ltd.
Issue 02 (2010-07-30)
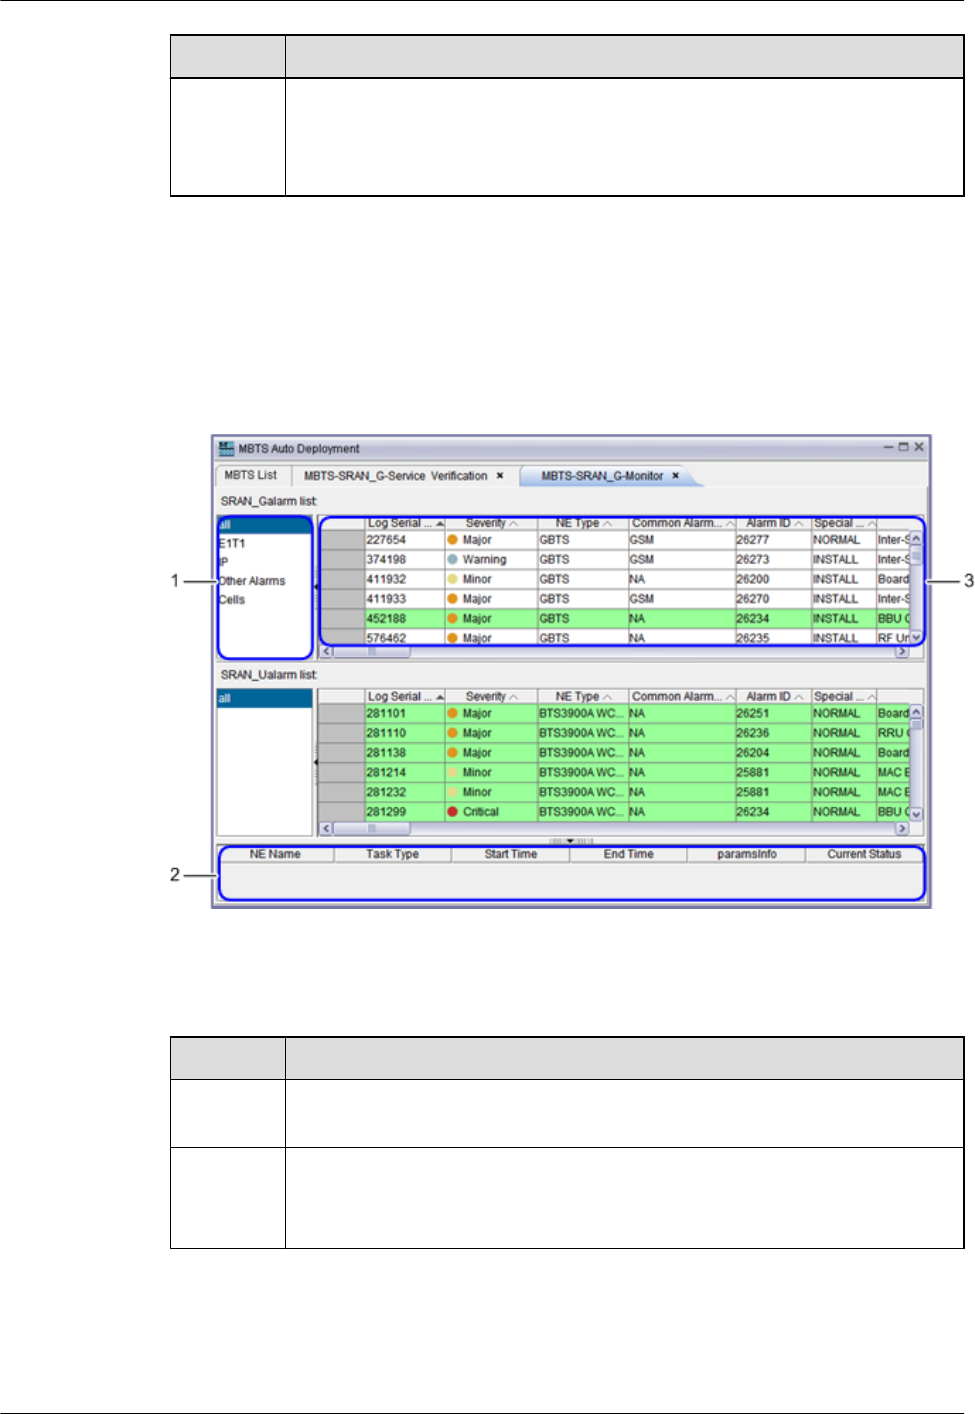
No. Description
5Commissioning task list: displays all commissioning tasks and the
commissioning progress of each task. You can right-click a commissioning task
and then choose a menu item from the shortcut menu to perform the related
operation.
Alarm Monitoring Window
The MBTS alarm monitoring window consists of the GBTS alarm pane and the NodeB alarm
pane. Figure 4-3 shows the MBTS alarm monitoring window. Table 4-8 describes the window.
Figure 4-3 MBTS alarm monitoring window
Table 4-8 Description
No. Description
1Object type: After selecting an object type, you can view all the alarms of this
object type in the alarm list on the right.
2 Alarm list: After selecting an object type, you can view all the alarms of this
object type in this list. You can right-click an alarm in the alarm list and then
choose a menu item from the shortcut menu to perform the related operation.
3900 Series Multi-Mode Base Station
Commissioning Guide 4 Commissioning the MBTS in GU Mode on the M2000
Issue 02 (2010-07-30) Huawei Proprietary and Confidential
Copyright © Huawei Technologies Co., Ltd.
4-25
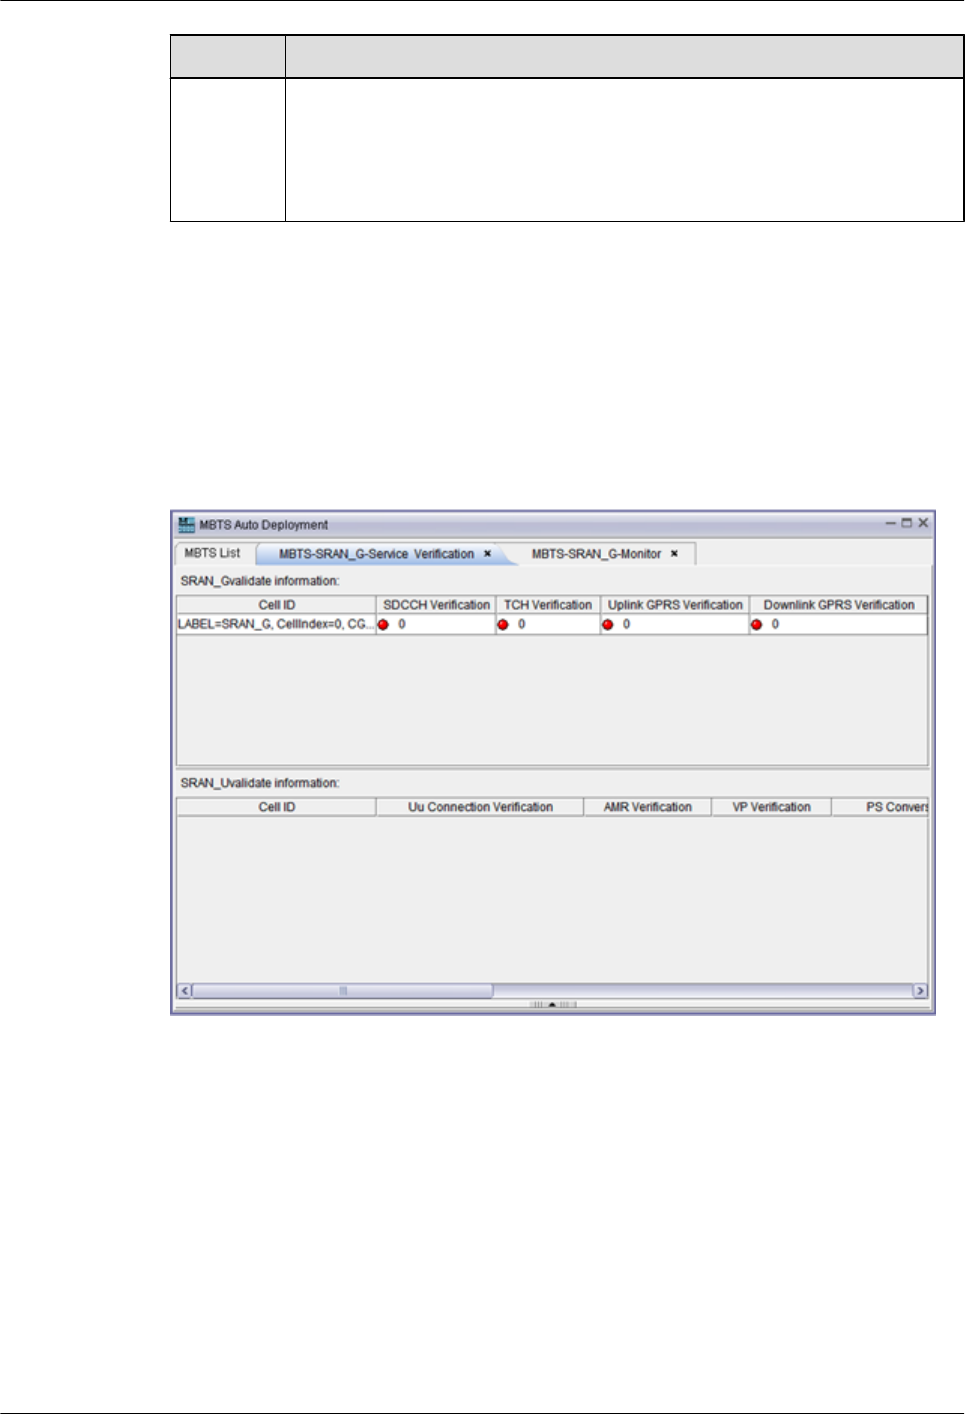
No. Description
3Fault diagnosis task list: You can right-click an object type or an alarm and then
choose Diagnose from the shortcut menu to diagnose faults. The M2000 creates
a fault diagnosis task and displays the diagnosis progress. After the fault
diagnosis is complete, you can obtain the fault diagnosis report to view fault
locating information.
Service Verification Window
The MBTS service verification window consists the GBTS service verification pane and the
NodeB service verification pane, as shown in Figure 4-4. The service verification window
displays the accumulated values of the performance counters related to the GBTS and NodeB.
It also indicates whether the accumulation values are normal.
Figure 4-4 MBTS service verification window
4.9.2 Parameters for the MBTS Deployment List
The MBTS deployment list provides the parameters required for commissioning MBTSs. After
you import the MBTS deployment list into the M2000, the M2000 creates a MBTS
commissioning task to implement automatic MBTS commissioning.
Table 4-9 describes the parameters in the MBTS deployment list.
4 Commissioning the MBTS in GU Mode on the M2000
3900 Series Multi-Mode Base Station
Commissioning Guide
4-26 Huawei Proprietary and Confidential
Copyright © Huawei Technologies Co., Ltd.
Issue 02 (2010-07-30)

NOTE
lIf the CME is deployed, and you has used the CME to initially configure the MBTS, you are
recommended to export the MBTS deployment list through the CME.For details, see Exporting the
MBTS deployment list and configuration file in the online help. The principles for the CME to export
the information about the parameter fields are as follows:
lIf the parameter is configured, the CME exports the value of the parameter.
lIf the parameter is not configured, the CME cannot export the value of the parameter.
lIf the CME is not deployed, you can export the template of the MBTS deployment list template the
MBTS Auto Deployment window in the M2000 client. For details, see 4.3.1 Creating an MBTS
Commissioning Task (Deploying Both the GBTS and the NodeB), 4.3.2 Creating an MBTS
Commissioning Task (Deploying a NodeB When the GBTS Is Normal) or 4.3.3 Creating an MBTS
Commissioning Task (Deploying a GBTS When the NodeB Is Normal).
Table 4-9 Parameters for the MBTS deployment list
Parameter Field Description
GU ID GU ID.
The value of this parameter is mandatory to be exported, and the
parameter cannot be edited in the MBTS Auto Deployment window.
Auto Deployment
Type
ID of the type of the commissioning MBTS.
The value of this parameter is mandatory to be exported, and the
parameter can be edited in the MBTS Auto Deployment window (If
the CME cannot export the value of this parameter, you need to edit
it manually).
RNC ID ID of the RNC to which the NodeB belongs
The value of this parameter is mandatory to be exported, and the
parameter cannot be edited in the MBTS Auto Deployment window.
RNC Name Name of the RNC to which the NodeB belongs.
The value of this parameter is mandatory to be exported, and the
parameter cannot be edited in the MBTS Auto Deployment window.
NodeB ID eNodeB ID.
The value of this parameter is mandatory to be exported, and the
parameter cannot be edited in the MBTS Auto Deployment window.
NodeB Name Name of the NodeB.
The value of this parameter is mandatory to be exported, and the
parameter cannot be edited in the MBTS Auto Deployment window.
NodeB ESN1 Electronic serial number of the NodeB active control board (If the
parameter is configured, the value is mandatory to be exported).
The value of this parameter is optional to be exported, and the
parameter cannot be edited in the MBTS Auto Deployment window.
NodeB ESN2 Electronic serial number of the NodeB standby control board (If the
parameter is configured, the value is mandatory to be exported).
The value of this parameter is optional to be exported, and the
parameter cannot be edited in the MBTS Auto Deployment window.
3900 Series Multi-Mode Base Station
Commissioning Guide 4 Commissioning the MBTS in GU Mode on the M2000
Issue 02 (2010-07-30) Huawei Proprietary and Confidential
Copyright © Huawei Technologies Co., Ltd.
4-27

Parameter Field Description
NodeB TRANS IP
address
The IP address of the OM channel configured for the NodeB by the
RNC.
The value of this parameter is mandatory to be exported, and the
parameter cannot be edited in the MBTS Auto Deployment window.
NodeB TRANS IP
Subnet mask
The IP subnet mask of the OM channel configured for the NodeB by
the RNC.
The value of this parameter is mandatory to be exported, and the
parameter cannot be edited in the MBTS Auto Deployment window.
NodeB Interface IP
address
The interface IP address configured for the NodeB by the RNC (If the
port type of the NodeB is ETH or THUNK, the value is mandatory to
be exported).
The value of this parameter is optional to be exported, and the
parameter cannot be edited in the MBTS Auto Deployment window.
NodeB Interface IP
Subnet mask
The interface IP address configured for the NodeB by the RNC (If the
port type of the NodeB is ETH or THUNK, the value is mandatory to
be exported).
The value of this parameter is optional to be exported, and the
parameter cannot be edited in the MBTS Auto Deployment window.
DHCP Server IP
address
The DHCP server IP address configured for the NodeB (If this
parameter is configured, the value is mandatory to be exported).
The value of this parameter is optional to be exported, and the
parameter cannot be edited in the MBTS Auto Deployment window.
DHCP Server IP
Subnet mask
The DHCP server IP subnet mask configured for the NodeB
The value of this parameter is optional to be exported, and the
parameter cannot be edited in the MBTS Auto Deployment window.
AACP Server IP
address
The AACP server IP address configured for the NodeB (If this
parameter is configured, the value is mandatory to be exported).
The value of this parameter is optional to be exported, and the
parameter cannot be edited in the MBTS Auto Deployment window.
AACP Server IP
Subnet mask
The AACP server IP subnet mask configured for the NodeB
The value of this parameter is not exported, and the parameter cannot
be edited in the MBTS Auto Deployment window.
Next Hop IP address
to DHCP Server
Next hop IP address of the route from the NodeB to the DHCP server.
(If this parameter is configured, the value is mandatory to be exported).
The value of this parameter is optional to be exported, and the
parameter cannot be edited in the MBTS Auto Deployment window.
Next Hop IP Subnet
mask to DHCP
Server
Next hop IP subnet mask of the route from the NodeB to the DHCP
server. (If this parameter is configured, the value is mandatory to be
exported).
The value of this parameter is optional to be exported, and the
parameter cannot be edited in the MBTS Auto Deployment window.
4 Commissioning the MBTS in GU Mode on the M2000
3900 Series Multi-Mode Base Station
Commissioning Guide
4-28 Huawei Proprietary and Confidential
Copyright © Huawei Technologies Co., Ltd.
Issue 02 (2010-07-30)

Parameter Field Description
Next Hop IP address
to AACP Server
Next hop IP address of the route from the NodeB to the AACP server.
(If this parameter is configured, the value is mandatory to be exported).
The value of this parameter is optional to be exported, and the
parameter cannot be edited in the MBTS Auto Deployment window.
Next Hop IP Subnet
mask to AACP
Server
Next hop IP subnet mask of the route from the NodeB to the AACP
server. (If this parameter is configured, the value is mandatory to be
exported).
The value of this parameter is optional to be exported, and the
parameter cannot be edited in the MBTS Auto Deployment window.
Peer IP address Peer IP address of the OM channel configured by the NodeB.
The value of this parameter is mandatory to be exported, and the
parameter cannot be edited in the MBTS Auto Deployment window.
Peer IP Subnet mask Peer IP subnet mask of the OM channel configured by the NodeB.
The value of this parameter is mandatory to be exported, and the
parameter cannot be edited in the MBTS Auto Deployment window.
OM VLAN ID The VLAN ID configured for the NodeB by the RNC (If the VLAN
is configured, the value is mandatory to be exported).
The value of this parameter is optional to be exported, and the
parameter cannot be edited in the MBTS Auto Deployment window.
OM VLAN Priority The VLAN priority configured for the NodeB by the RNC (If the
VLAN is configured, the value is mandatory to be exported).
The value of this parameter is optional to be exported, and the
parameter cannot be edited in the MBTS Auto Deployment window.
DHCP VLAN ID The value is the same as the OM VLAN ID (If the VLAN is configured,
the value is mandatory to be exported).
The value of this parameter is optional to be exported, and the
parameter cannot be edited in the MBTS Auto Deployment window.
PING VLAN ID The value is the same as the OM VLAN ID (If the VLAN is configured,
the value is mandatory to be exported).
The value of this parameter is optional to be exported, and the
parameter cannot be edited in the MBTS Auto Deployment window.
OM PING IP
address
OM PING IP address
The value of this parameter is mandatory to be exported, and the
parameter cannot be edited in the MBTS Auto Deployment window.
OM PING IP Subnet
mask
OM PING IP subnet mask
The value of this parameter is mandatory to be exported, and the
parameter cannot be edited in the MBTS Auto Deployment window.
NodeB Type The type of the NodeB to be commissioned.
The value of this parameter is mandatory to be exported, and the
parameter cannot be edited in the MBTS Auto Deployment window.
3900 Series Multi-Mode Base Station
Commissioning Guide 4 Commissioning the MBTS in GU Mode on the M2000
Issue 02 (2010-07-30) Huawei Proprietary and Confidential
Copyright © Huawei Technologies Co., Ltd.
4-29

Parameter Field Description
NodeB BaseLine
Software Version
The baseline version of the target NodeB (If the target version is
configured, the value is mandatory to be exported).
The value of this parameter is optional to be exported, and the
parameter cannot be edited in the MBTS Auto Deployment window.
NodeB Cold Patch
Version
The cold patch version of the target NodeB (If the target version is
configured, the value is mandatory to be exported).
The value of this parameter is optional to be exported, and the
parameter cannot be edited in the MBTS Auto Deployment window.
NodeB Hot Patch
Version
The hot patch version of the target NodeB (If the target version is
configured, the value is mandatory to be exported).
The value of this parameter is optional to be exported, and the
parameter cannot be edited in the MBTS Auto Deployment window.
NodeB
Configuration File
CRC
The CRC value of the NodeB data configuration file.
The value of this parameter is optional to be exported, and the
parameter cannot be edited in the MBTS Auto Deployment window.
NodeB FTP Server
IP address
FTP server IP address of the NodeB.
The value of this parameter is optional to be exported, and the
parameter cannot be edited in the MBTS Auto Deployment window.
NodeB FTP Path The FTP path of the NodeB.
The value of this parameter is optional to be exported, and the
parameter cannot be edited in the MBTS Auto Deployment window.
NodeB FTP User
Name
The FTP user of the NodeB.
The value of this parameter is optional to be exported, and the
parameter cannot be edited in the MBTS Auto Deployment window.
NodeB FTP
Password
The FTP password of the NodeB.
The value of this parameter is optional to be exported, and the
parameter cannot be edited in the MBTS Auto Deployment window.
BSC ID The ID of the BSC to which the GBTS belongs (If the parameter is
configured, the value is mandatory to be exported).
The value of this parameter is optional to be exported, and the
parameter cannot be edited in the MBTS Auto Deployment window.
BSC Name The name of the BSC to which the GBTS belongs.
The value of this parameter is optional to be exported, and the
parameter cannot be edited in the MBTS Auto Deployment window.
GBTS ID GBTS ID.
The value of this parameter is mandatory to be exported, and the
parameter cannot be edited in the MBTS Auto Deployment window.
4 Commissioning the MBTS in GU Mode on the M2000
3900 Series Multi-Mode Base Station
Commissioning Guide
4-30 Huawei Proprietary and Confidential
Copyright © Huawei Technologies Co., Ltd.
Issue 02 (2010-07-30)
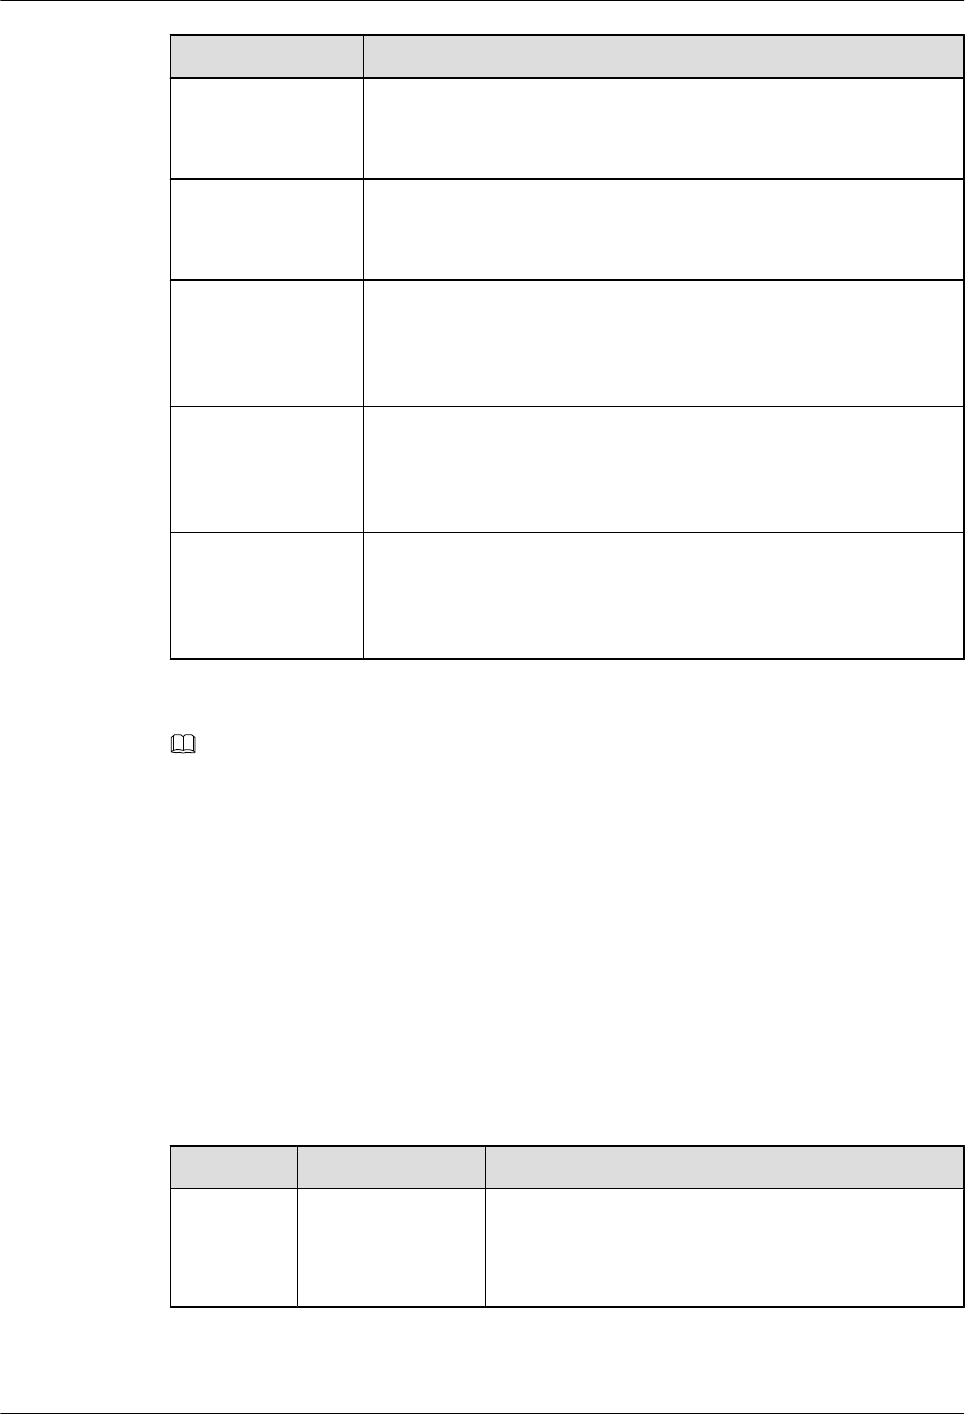
Parameter Field Description
GBTS Name GBTS name
The value of this parameter is mandatory to be exported, and the
parameter cannot be edited in the MBTS Auto Deployment window.
GBTS Type The type of the GBTS to be commissioned.
The value of this parameter is mandatory to be exported, and the
parameter cannot be edited in the MBTS Auto Deployment window.
GBTS Software
Version
The target version of the GBTS (If the target version is configured, the
value is mandatory to be exported).
The value of this parameter is optional to be exported, and the
parameter cannot be edited in the MBTS Auto Deployment window.
GBTS Hot Patch
Version
The hot patch version of the target GBTS (If the target version is
configured, the value is mandatory to be exported).
The value of this parameter is optional to be exported, and the
parameter cannot be edited in the MBTS Auto Deployment window.
Contact Contact of the frontline MBTS engineers for the engineers who
perform remote commissioning to view conveniently.
The value of this parameter is optional to be exported, and the
parameter cannot be edited in the NodeB Auto Deployment window.
NOTE
When the GBTS side is being commissioned, the Auto Deployment Type should be GBTS.
When the NodeB side is being commissioned, theAuto Deployment Type should be NodeB.
When the MBTS is being commissioned, the Auto Deployment Type should be MBTS.
4.9.3 Parameters for MBTS Service Verification Performance
Counters
This section describes the parameters of the performance counters that are monitored at the
service verification stage during MBTS commissioning.
Table 4-10 describes the service performance counters of monitored GBTSs and NodeBs at the
service verification stage during MBTS commissioning.
Table 4-10 Parameters of performance counters
NE Type Parameter Description
GBTS SDCCH
Verification
Refers to the number of times the SDCCH is occupied
successfully. If the value of this counter is not zero, it
indicates that this counter passes the service
verification.
3900 Series Multi-Mode Base Station
Commissioning Guide 4 Commissioning the MBTS in GU Mode on the M2000
Issue 02 (2010-07-30) Huawei Proprietary and Confidential
Copyright © Huawei Technologies Co., Ltd.
4-31

NE Type Parameter Description
TCH Verification Refers to the number of times the TCH is occupied
successfully. If the value of this counter is not zero, it
indicates that this counter passes the service
verification.
Uplink GPRS
Verification
Refers to the number of times the uplink GPRS TBF is
set up successfully. If the value of this counter is not
zero, it indicates that this counter passes the service
verification.
Downlink GPRS
Verification
Refers to the number of times the downlink GPRS TBF
is created successfully. If the value of this counter is not
zero, it indicates that this counter passes the service
verification.
NodeB Uu Connection
Verification
Refers to the total number of times the radio resource
control (RRC) is created successfully. If the value of
this counter is not zero, it indicates that the air interface
is available.
AMR Verification Refers to the number of times the radio access bearer
(RAB) is successfully set up for the conversation AMR
service. If the value of this counter is not zero, it
indicates that the AMR voice service is available.
VP Verification Refers to the number of times the RAB is successfully
set up for the CS conversation VP service. If the value
of this counter is not zero, it indicates that the VP
service is available.
PS Conversation
Verification
Refers to the number of times the PS conversation
service is created successfully. If the value of this
counter is not zero, it indicates that the PS conversation
service is available.
PS Streaming
Verification
Refers to the number of times the PS streaming service
is created successfully. If the value of this counter is not
zero, it indicates that the PS streaming service is
available.
PS Interactive
Verification
Refers to the number of times the PS interaction service
is created successfully. If the value of this counter is not
zero, it indicates that the PS interaction service is
available.
PS Background
Verification
Refers to the number of times the PS background
service is created successfully. If the value of this
counter is not zero, it indicates that the PS background
service is available.
HSDPA
Verification
Refers to the number of times the HSDPA RAB is
created successfully. If the value of this counter is not
zero, it indicates that the HSDPA service is available.
4 Commissioning the MBTS in GU Mode on the M2000
3900 Series Multi-Mode Base Station
Commissioning Guide
4-32 Huawei Proprietary and Confidential
Copyright © Huawei Technologies Co., Ltd.
Issue 02 (2010-07-30)

NE Type Parameter Description
HSUPA
Verification
Refers to the number of times the HSUPA RAB is
created successfully. If the value of this counter is not
zero, it indicates that the HSUPA service is available.
3900 Series Multi-Mode Base Station
Commissioning Guide 4 Commissioning the MBTS in GU Mode on the M2000
Issue 02 (2010-07-30) Huawei Proprietary and Confidential
Copyright © Huawei Technologies Co., Ltd.
4-33

5 Commissioning the MBTS in GL or UL Mode
on the M2000
About This Chapter
You can remotely commission an MBTS in GL or UL mode on the M2000 in a central equipment
room, including upgrading software and configuring data, monitoring alarms, and obtaining the
commissioning report.
5.1 Procedure for MBTS Commissioning in GL or UL Mode on the M2000
You can commission a base station in GL or UL mode on the M2000 in a central equipment
room, including upgrading software and configuring data, monitoring alarms, and obtaining the
commissioning report.
5.2 Creating a Commissioning Task
This chapter describes how to create a base station commissioning task on the M2000. The
operations of creating a base station commissioning task vary according to the mode of the base
station. Therefore, the commissioning task must be created based on the mode of the base station
to be commissioned. After the commissioning task is created, it can be activated immediately.
Then, the M2000 starts to commission the base station automatically.
5.3 Intervening the GBTS Transmission
This section describes how to intervene the GBTS transmission. By intervening the GBTS
transmission, you can query the real-time status of the E1/T1 port to ensure that the GBTS
transmission is normal and that you can proceed with the GBTS deployment.
5.4 Commissioning the MBTS on the M2000
The procedure for automatically commissioning the MBTS by the M2000 involves detecting
OM channels, upgrading software and configuring data, monitoring software commissioning,
and verifying services. The procedure for automatically commissioning the MBTS by the M2000
varies according to the base station mode. Refer to the procedure for the commissioning
accordingly.
5.5 Monitoring the GBTS Commissioning Task
This chapter describes how to monitor a GBTS commissioning task. By monitoring the GBTS
commissioning task, you can learn the commissioning progress and status, and then rectify
commissioning faults (if any) in time.
5.6 Monitoring the NodeB Commissioning Task
3900 Series Multi-Mode Base Station
Commissioning Guide
5 Commissioning the MBTS in GL or UL Mode on the
M2000
Issue 02 (2010-07-30) Huawei Proprietary and Confidential
Copyright © Huawei Technologies Co., Ltd.
5-1

This chapter describes how to monitor a NodeB commissioning task. By monitoring the NodeB
commissioning task, you can learn the commissioning progress and status, and then rectify
commissioning faults (if any) in time.
5.7 Monitoring the eNodeB Commissioning Task
This section describes how to monitor an eNodeB commissioning task. By monitoring the
eNodeB commissioning task, you can learn the eNodeB commissioning progress and status, and
then perform operations on the eNodeB commissioning task.
5.8 Obtaining the Commissioning Report
The commissioning report records the operation details, results, and error information obtained
during the commissioning. The eNodeB commissioning report can be viewed during the
commissioning task for handling problems in time, or be obtained after the commissioning task
for report archiving.
5.9 Checking the Operating Status of the Base Station
The operating status of a base station can be viewed in the commissioning report.
5.10 Testing the Basic Services of the eNodeB
This section describes how to test the basic services of the eNodeB.
5.11 Confirming the Commissioning Task
After the M2000 finishes commissioning a base station automatically, the commissioning task
enters the to-be-confirmed state, waiting for manual confirmation that the commissioning is
complete.
5.12 Reference to the GBTS Commissioning Interface
This section describes the interfaces and parameters for GBTS commissioning and facilitates
you to perform relevant operations for GBTS commissioning.
5.13 Reference to the NodeB Commissioning Interface
This section describes the interfaces and parameters for NodeB commissioning and facilitates
you to perform relevant operations for NodeB commissioning.
5 Commissioning the MBTS in GL or UL Mode on the
M2000
3900 Series Multi-Mode Base Station
Commissioning Guide
5-2 Huawei Proprietary and Confidential
Copyright © Huawei Technologies Co., Ltd.
Issue 02 (2010-07-30)

5.1 Procedure for MBTS Commissioning in GL or UL Mode
on the M2000
You can commission a base station in GL or UL mode on the M2000 in a central equipment
room, including upgrading software and configuring data, monitoring alarms, and obtaining the
commissioning report.
Prerequisite
Before you commission the MBTS, the MBTS, RNC, and M2000 must meet following
requirements:
lThe MBTS hardware such as the cabinets, cables, antenna system, and auxiliary devices,
is installed and passes the installation check. The MBTS is powered on and passes the
power-on check.
lThe controller hardware is installed and commissioned, and the system works properly.
The negotiation data of the MBTS to be commissioned is configured and recorded.
lThe M2000 is commissioned, it is connected to the corresponding controller, and the
configuration synchronization is completed.
In addition, the following requirements should be met:
lCheck that the network is normal.
lThe data configuration file and target version software package that map the mode of the
base station to be commissioned are ready. If a GBTS is to be commissioned, the data
configuration file and target version software package must be uploaded to the BSC.
lThe GBTS is activated using the ACT BTS command if one mode of an MBTS is GBTS.
Commissioning Flowchart
Figure 5-1 shows the procedure for remotely commissioning an MBTS in GL or UL mode on
the M2000.
3900 Series Multi-Mode Base Station
Commissioning Guide
5 Commissioning the MBTS in GL or UL Mode on the
M2000
Issue 02 (2010-07-30) Huawei Proprietary and Confidential
Copyright © Huawei Technologies Co., Ltd.
5-3
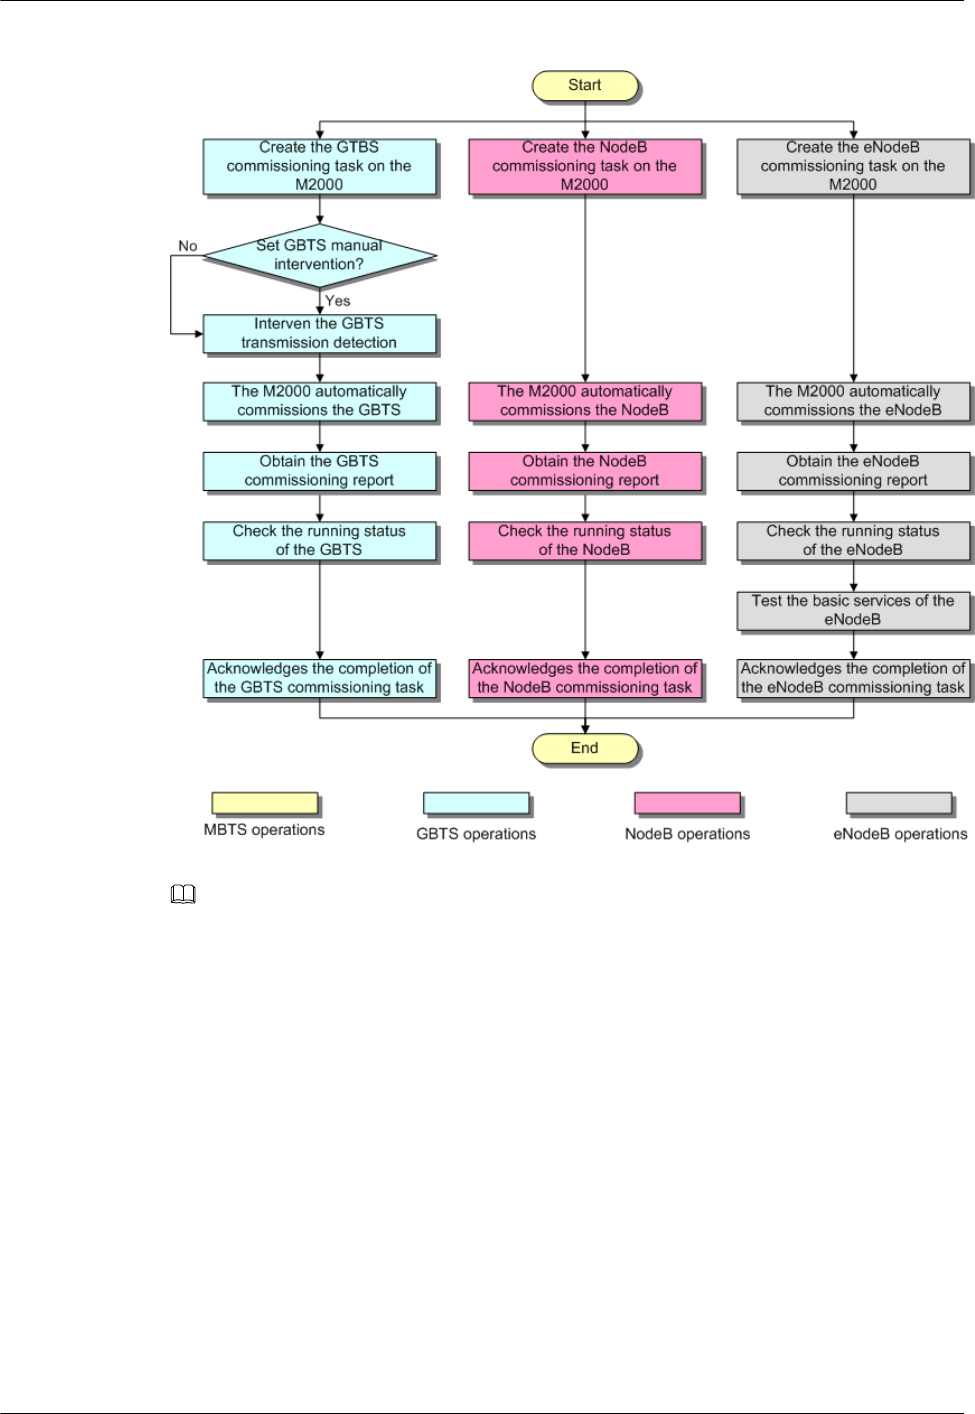
Figure 5-1 Flowchart for commissioning the MBTS in GL or UL mode on the M2000
NOTE
lThe priority of a mode does not need to be considered during the MBTS commissioning.
lIn the case of a dual-mode base station, you can consider the dual-mode base station as two single-
mode base stations. During the process of upgrading software and activating the data configuration
file, a large number of alarms may be generated because of configuration conflict. These alarms do not
need to be handled, because they will be cleared automatically after the software is upgraded and the
data configuration file is activated for base stations of each mode.
Procedure
Step 1 Create a commissioning task on the M2000. For details, see 5.2 Creating a Commissioning
Task.
Step 2 Optional: If a GBTS is to be commissioned and Intervening transmission is selected when a
commissioning task is created, manually check the GBTS transmission state and rectify faults
(if any). For details, see 5.3 Intervening the GBTS Transmission.
Step 3 The M2000 automatically commissions the MBTS. For details, see 5.4 Commissioning the
MBTS on the M2000. During the process of the MBTS commissioning, monitor the
commissioning progress and alarms, and rectify faults (if any). The monitoring operations vary
5 Commissioning the MBTS in GL or UL Mode on the
M2000
3900 Series Multi-Mode Base Station
Commissioning Guide
5-4 Huawei Proprietary and Confidential
Copyright © Huawei Technologies Co., Ltd.
Issue 02 (2010-07-30)

according to modes. For details on the operations in each mode, see 5.5 Monitoring the GBTS
Commissioning Task, 5.6 Monitoring the NodeB Commissioning Task, and 5.7 Monitoring
the eNodeB Commissioning Task.
Step 4 Obtain the commissioning report from the M2000. For details, see 5.8 Obtaining the
Commissioning Report.
Step 5 View the commissioning report to check the MBTS operating status. For details, see 5.9
Checking the Operating Status of the Base Station.
Step 6 Verify eNodeB services. For details, see 5.10 Testing the Basic Services of the eNodeB.
Step 7 Confirm the MBTS commissioning task. For details, see 5.11 Confirming the Commissioning
Task.
----End
5.2 Creating a Commissioning Task
This chapter describes how to create a base station commissioning task on the M2000. The
operations of creating a base station commissioning task vary according to the mode of the base
station. Therefore, the commissioning task must be created based on the mode of the base station
to be commissioned. After the commissioning task is created, it can be activated immediately.
Then, the M2000 starts to commission the base station automatically.
5.2.1 Creating a GBTS Commissioning Task
This section describes how to create a GBTS commissioning task. After you create a GBTS
commissioning task, the M2000 automatically commissions the GBTS. You can enable the
M2000 to automatically commission GBTSs in batches.
5.2.2 Creating a NodeB Commissioning Task
This section describes how to create a NodeB commissioning task. The M2000 creates a
commissioning task for each NodeB based on the planned data in the imported NodeB
deployment list. After obtaining the software package and configuration file, you can activate
the commissioning task so that it starts automatic commissioning.
5.2.3 Creating an eNodeB Commissioning Task
After the preparations for eNodeB commissioning are complete, create the eNodeB
commissioning task on the M2000. This task will be automatically performed by the M2000.
The M2000 supports automatic commissioning of multiple eNodeBs.
5.2.1 Creating a GBTS Commissioning Task
This section describes how to create a GBTS commissioning task. After you create a GBTS
commissioning task, the M2000 automatically commissions the GBTS. You can enable the
M2000 to automatically commission GBTSs in batches.
Prerequisite
lThe preparations for GBTS commissioning are made. For details. see Preparing for GBTS
Commissioning.
lThe connection between the GBSC managing the GBTS to be commissioned and the
M2000 is normal.
3900 Series Multi-Mode Base Station
Commissioning Guide
5 Commissioning the MBTS in GL or UL Mode on the
M2000
Issue 02 (2010-07-30) Huawei Proprietary and Confidential
Copyright © Huawei Technologies Co., Ltd.
5-5

Procedure
Step 1 Choose Configuration > Auto Deployment > GBTS Auto Deployment from the main menu
of the M2000 client to open the GBTS Auto Deployment window.
For details about the GBTS Auto Deployment window, see 5.12.1 Interface Description:
GBTS Commissioning.
Step 2 Click to import the GBTS deployment list. For details about the GBTS deployment list, see
Exporting the Deployment List and Configuration Files of GBTSs.
TIP
If you do not export the GBTS deployment list through the CME, you can export the template of the GBTS
deployment list on the M2000 client and then enter the related data based on the planned data confirmed
with network planning engineers. To export the GBTS deployment list template, perform the following
operations:
1. Click . The Save dialog box is displayed.
2. Specify the save path, enter the filename, and then click Save.
The exported template of GBTS deployment list is in .csv format. By default, the filename is
GBTS_Auto_Deployment_List_Template.csv. You can change the filename as required.
lIf the import succeeds, a message is displayed on the Operation Information tab page,
informing you of the success. In addition, the M2000 creates a commissioning task for each
GBTS contained in the deployment list and displays the tasks on the GBTS List tab page.
lIf the import fails, the GBTSs that fail to be imported and the failure causes are displayed on
the Operation Information tab page. For details about failure symptoms and solutions, see
What Should I Do When a Failure Message Is Displayed During the Import of the GBTS
Deployment List?.
Step 3 If the version of the imported GBTS software or patch is incorrect or the contact person
information is incorrect, double-click the corresponding information record on the GBTS List
tab page, and then type the correct information.
----End
Postrequisite
Start the GBTS commissioning task to enable the M2000 to automatically commission the
GBTS. For details, see Starting a GBTS Commissioning Task.
5.2.2 Creating a NodeB Commissioning Task
This section describes how to create a NodeB commissioning task. The M2000 creates a
commissioning task for each NodeB based on the planned data in the imported NodeB
deployment list. After obtaining the software package and configuration file, you can activate
the commissioning task so that it starts automatic commissioning.
Prerequisite
NodeB version files and configuration files are saved on the local PC. The configuration file of
each NodeB is saved in the folder named after the NodeB, and all the NodeB configuration files
are saved in the same upper-layer folder. In this way, you can select the upper-layer folder to
upload all the configuration files at a time.
5 Commissioning the MBTS in GL or UL Mode on the
M2000
3900 Series Multi-Mode Base Station
Commissioning Guide
5-6 Huawei Proprietary and Confidential
Copyright © Huawei Technologies Co., Ltd.
Issue 02 (2010-07-30)
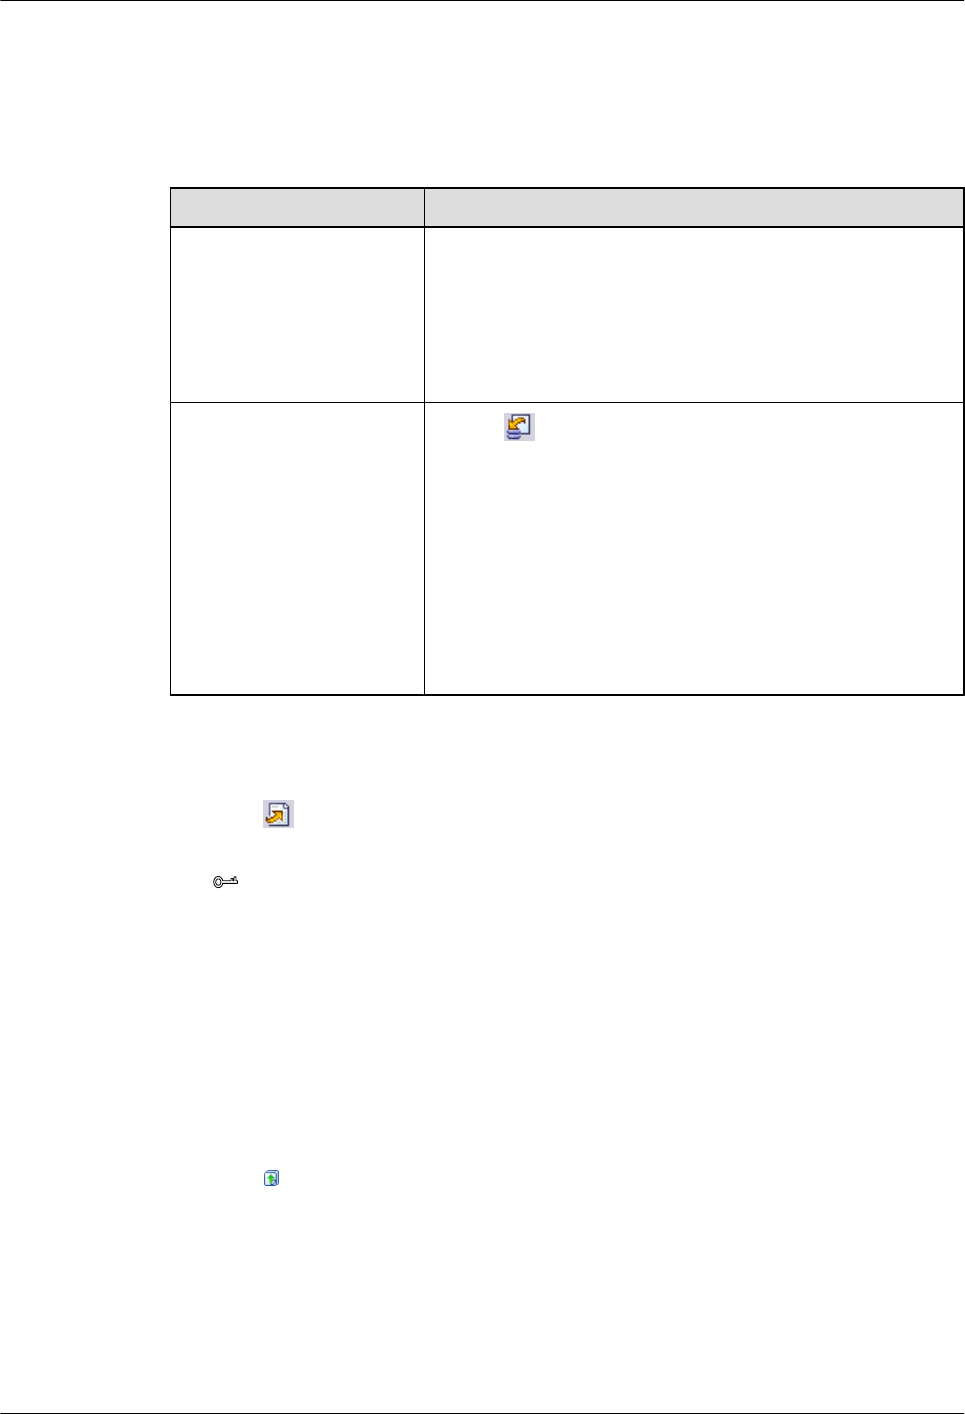
Procedure
Step 1 Choose Configuration > Auto Deployment > NodeB Auto Deployment. The NodeB Auto
Deployment window is displayed.
Step 2 Keep ready the NodeB deployment list.
Option Description
Exporting the NodeB
Deployment List from the
CME
Obtain and open the exported NodeB deployment list, and then
add the related data according to the planned data that is
confirmed with the network planning engineers.
For the data that needs to be added, see 5.13.2 Parameters of
the NodeB Deployment List.
Exporting the Template of
NodeB Deployment List
from the M2000 Client
1. Click . The Save dialog box is displayed.
2. Specify the save path, enter the filename, and then click
Save.
3. Add the related data according to the planned data that is
confirmed with the network planning engineers.
NOTE
The exported template of NodeB deployment list is in .csv format.
By default, the filename is
NodeB_Auto_Deployment_List_Template.csv. You can change
the filename as required.
Step 3 Import the NodeB deployment list.
The M2000 performs the commissioning based on the planned data in the imported NodeB
deployment list.
1. Click .
2. Select the NodeB deployment list to be imported.
TIP
If you find that the ESN of a NodeB in the list is inconsistent with the actual ESN after importing
the NodeB deployment list, you can manually change the value of the ESN. In this way, the
M2000 performs the commissioning task based on the correct data.
3. Click Finish.
The NodeBs whose commissioning tasks are created successfully are displayed in the task
list.
Step 4 Upload version files and configuration files.
For details about the save paths of version files and configuration files on the M2000, see Save
Paths of Version Files and Configuration Files on the M2000 Server.
1. Click .
2. In the displayed Upload version and config files window, set the local path of the files to
be uploaded.
You can select the version files and configuration files to be uploaded according to the
actual requirements.
lIn the Upload Versions area, the Is Exist in Server parameter shows whether the target
version file exists on the current M2000 server. You can click the button next to Local
3900 Series Multi-Mode Base Station
Commissioning Guide
5 Commissioning the MBTS in GL or UL Mode on the
M2000
Issue 02 (2010-07-30) Huawei Proprietary and Confidential
Copyright © Huawei Technologies Co., Ltd.
5-7

Path, and then specify a local save path of the version files to facilitate the upload of
the version files.
lIn the NE navigation tree in the Upload Configuration Files area, select the NEs whose
configuration files need to be uploaded. After selecting the NodeB, you can click the
button next to Local Path to specify the upper-layer folder for the folder of each NE
configuration file to facilitate the upload of configuration files.
TIP
lTo upload version files, you need to select the upper-layer folder of version files such as the .csp
files after you decompress the software package in a local path.
lTo upload configuration files, you need to save the configuration file of each NodeB in the folder
whose name is the NodeB name and then save the folders of all the NodeB configuration files in
one upper-layer folder. When uploading configuration files, you need to select the upper-layer
folder to which the NodeB name folders belong.
After the upload starts, the information about the source path, destination path, upload
progress, and upload result is displayed at the bottom of the Upload version and config
files window.
3. After the upload is complete, click Close.
----End
Save Paths of Version Files and Configuration Files on the M2000 Server
After version files and configuration files are uploaded to the M2000 server, they are stored in
the following paths:
lBasic version: /export/home/sysm/ftproot/unKnownNodeB/Software/version
number/, where version number refers to the uploaded basic version number, such as
V200R012C00.
lPatch version: /export/home/sysm/ftproot/unKnownNodeB/Patch/version number/,
where version number refers to the version of the uploaded patch, such as
V200R012C00SPC001.
lConfiguration file: /export/home/sysm/ftproot/unKnownNodeB/Configuration/NodeB
name/, where NodeB name refers to the name of the NodeB of the configuration file, for
example, NodeB-Shanghai.
5.2.3 Creating an eNodeB Commissioning Task
After the preparations for eNodeB commissioning are complete, create the eNodeB
commissioning task on the M2000. This task will be automatically performed by the M2000.
The M2000 supports automatic commissioning of multiple eNodeBs.
Prerequisite
lThe M2000 server and client are connected and are running properly. You have logged in
to the M2000 client.
lIf the eNodeB and M2000 server are not in the same network segment, the router or switch
between the eNodeB and M2000 server must be configured as DHCP Relay.
5 Commissioning the MBTS in GL or UL Mode on the
M2000
3900 Series Multi-Mode Base Station
Commissioning Guide
5-8 Huawei Proprietary and Confidential
Copyright © Huawei Technologies Co., Ltd.
Issue 02 (2010-07-30)

NOTE
lIf there is no security GW, you should set the IP address of the DHCP server of the M2000 on the
DHCP Relay.
lIf there is a security GW, you should set the IP address of the public DHCP server on the DHCP Relay.
In addition, set the IP address of the DHCP server of the M2000 on the security GW.
lThe eNodeB name, eNodeB ID, and ESN are collected.
lThe eNodeB is powered on.
lThe software and files required for eNodeB automatic deployment are ready.
Context
After the eNodeB is powered on, it sends the DHCP message to the M2000 requesting for the
OM IP address. The DHCP message contains the eNodeB ESN and the GPS information of the
eNodeB. If the eNodeB ID is not preset and a laptop is available on site, you can run the MOD
ENODEB command to set the eNodeB ID on the LMT. If the eNodeB ID is successfully set,
the DHCP message will contain the eNodeB ID.
The EDS file, which is the self-configuration file, includes the eNodeB ID, electronic serial
number (ESN), and GPS information about the eNodeB. This file is used to be bound to the
eNodeB. The eNodeB ID is unique and is used to identify an eNodeB. In an EDS file, the eNodeB
ID is mandatory and the GPS information and ESN are optional.
The self-configuration data imported to the M2000 is bound with the ESN automatically in the
following scenarios:
lIf the EDS file contains the ESN of the eNodeB, the ESN reported by the eNodeB and the
imported self-configuration data on the M2000 are automatically bound in the case that the
ESN reported by the eNodeB is consistent with the ESN in the EDS file.
lIf the M2000 receives the message containing the eNodeB ID, the imported self-
configuration data and the ESN reported by the eNodeB are automatically bound after the
mapping between the eNodeB ID reported by the eNodeB and the eNodeB ID in the EDS
file.
lIf the M2000 receives the message containing the eNodeB location information, which is
within the error of 100 m compared with the latitude and longitude predefined in the EDS
file, the imported self-configuration data and the ESN reported by the eNodeB are
automatically bound after the mapping between the GPS information reported by the
eNodeB and the location information in the EDS file.
If automatic binding fails, the information about the new eNodeB will be displayed in the
Reported ESN tab page below the eNodeB Auto Deployment tab page. The user can obtain
the ESN/eNodeB ID from the field engineer, and then binds the ESN/eNodeB ID and the
imported self-configuration data.
Procedure
Step 1 On the M2000 client, choose Configuration > Auto Deployment > eNodeB Auto
Deployment. The eNodeB Auto Deployment tab page is displayed, as shown in Figure 5-2.
3900 Series Multi-Mode Base Station
Commissioning Guide
5 Commissioning the MBTS in GL or UL Mode on the
M2000
Issue 02 (2010-07-30) Huawei Proprietary and Confidential
Copyright © Huawei Technologies Co., Ltd.
5-9
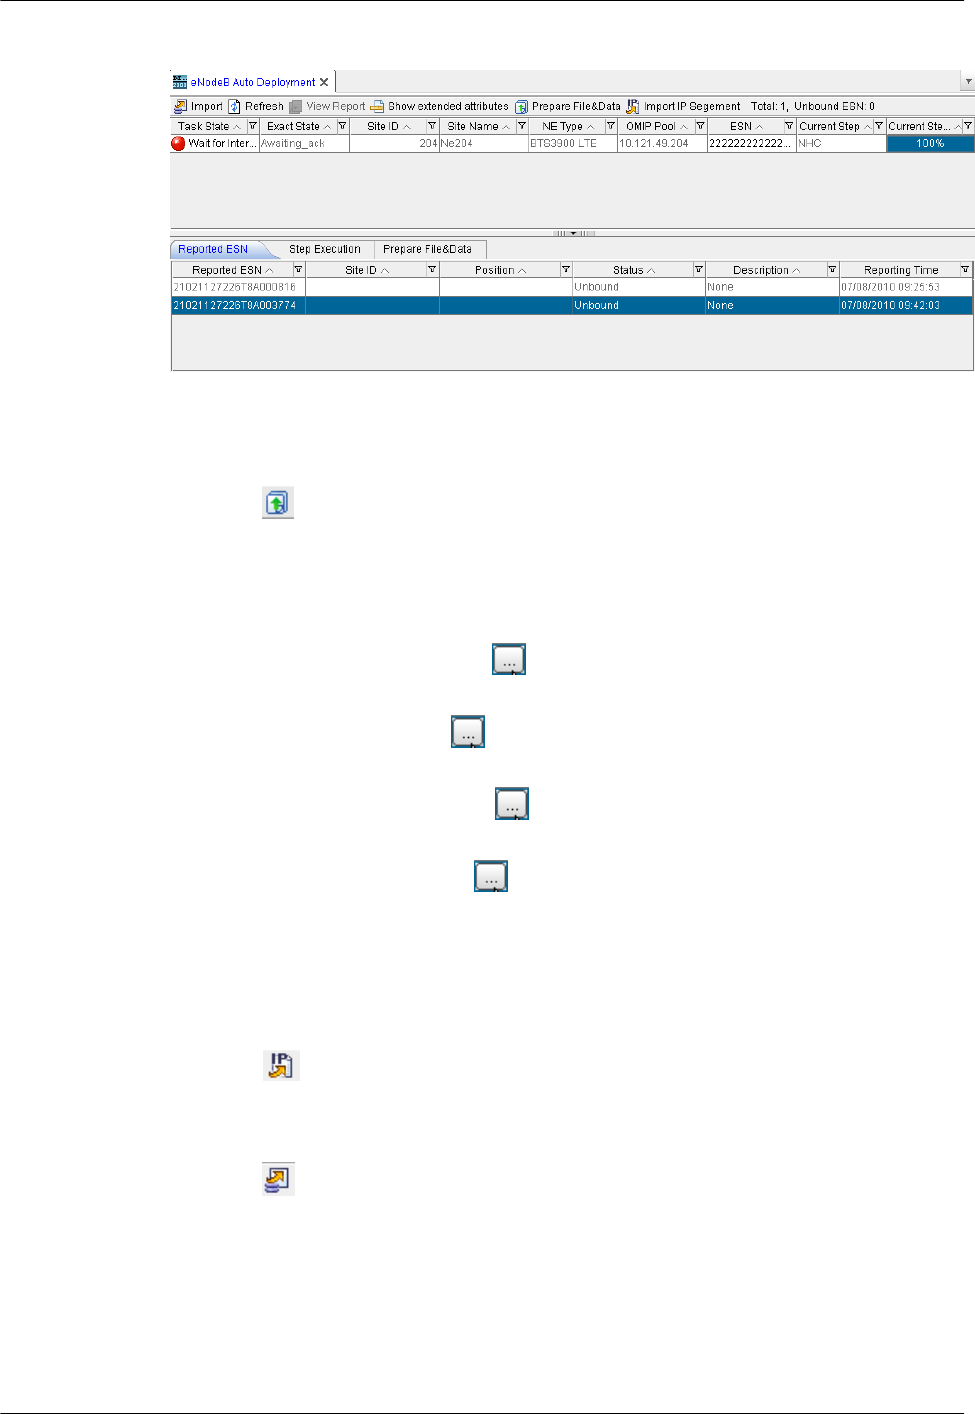
Figure 5-2 eNodeB Auto Deployment tab page
Step 2 Upload the software and files required for eNodeB commissioning on the M2000.
1. Click on the eNodeB Auto Deployment tab page. The Prepare File&Data dialog box
is displayed.
2. In the NE Software Version area, click Add. The Add dialog box is displayed. Specify
the related parameters in the displayed dialog box, such as NE type, version type, and local
file path.
3. In the RET Software area, click and select one or more RET files to be uploaded in
the local PC.
4. In the RET Data area, click and select one or more RET data configuration files to be
uploaded in the local PC.
5. In the RET Template area, click and select the RET commissioning data template to
be uploaded in the local PC.
6. In the Test License area, click and select the eNodeB commissioning license to be
uploaded in the local PC.
7. In the Prepare File&Data dialog box, click OK to return to the eNodeB Auto
Deployment tab page.
8. View the file uploading progress on the Prepare File&Data tab page below the eNodeB
Auto Deployment tab page.
9. Click in the eNodeB Auto Deployment tab page. The Open dialog box is displayed.
Select the OM IP data template to be uploaded in the local PC.
Step 3 Import the EDS file.
1. Click on the upper left of the eNodeB Auto Deployment tab page. The Import dialog
box is displayed, as shown in Figure 5-3.
5 Commissioning the MBTS in GL or UL Mode on the
M2000
3900 Series Multi-Mode Base Station
Commissioning Guide
5-10 Huawei Proprietary and Confidential
Copyright © Huawei Technologies Co., Ltd.
Issue 02 (2010-07-30)
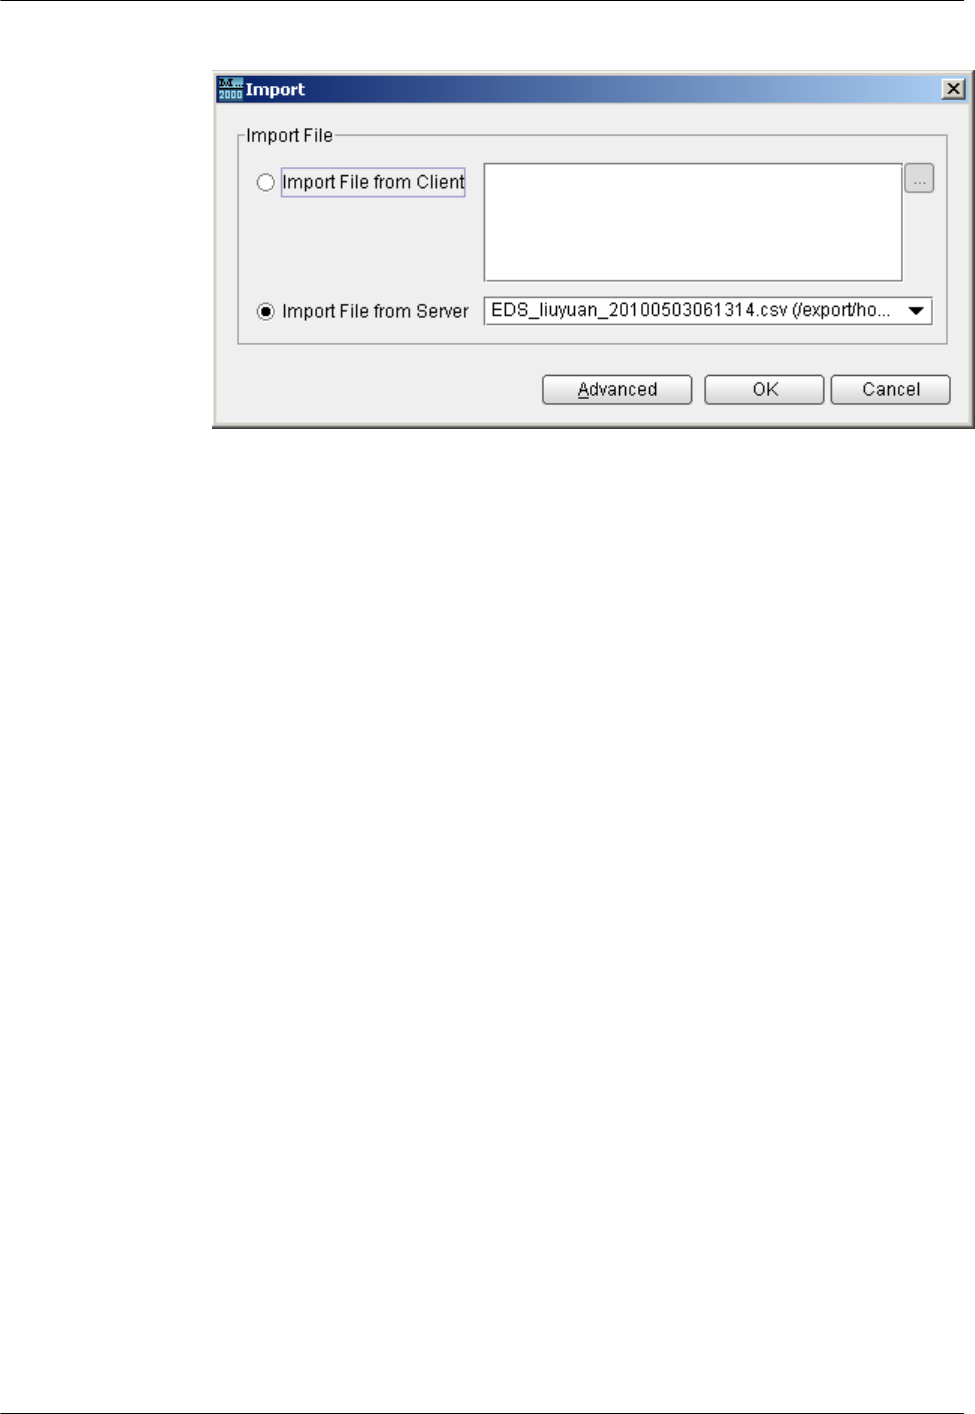
Figure 5-3 Import dialog box
2. According to the save path of the EDS file, select Import File from Client or Import File
from Server to import the EDS file to the M2000 server. The EDS file to be imported from
the client is stored in the local computer. The EDS file to be imported from the server is
stored at a specified directory of the server.
3. Click Advanced. The Set Steps dialog box is displayed, as shown in Figure 5-4.
3900 Series Multi-Mode Base Station
Commissioning Guide
5 Commissioning the MBTS in GL or UL Mode on the
M2000
Issue 02 (2010-07-30) Huawei Proprietary and Confidential
Copyright © Huawei Technologies Co., Ltd.
5-11
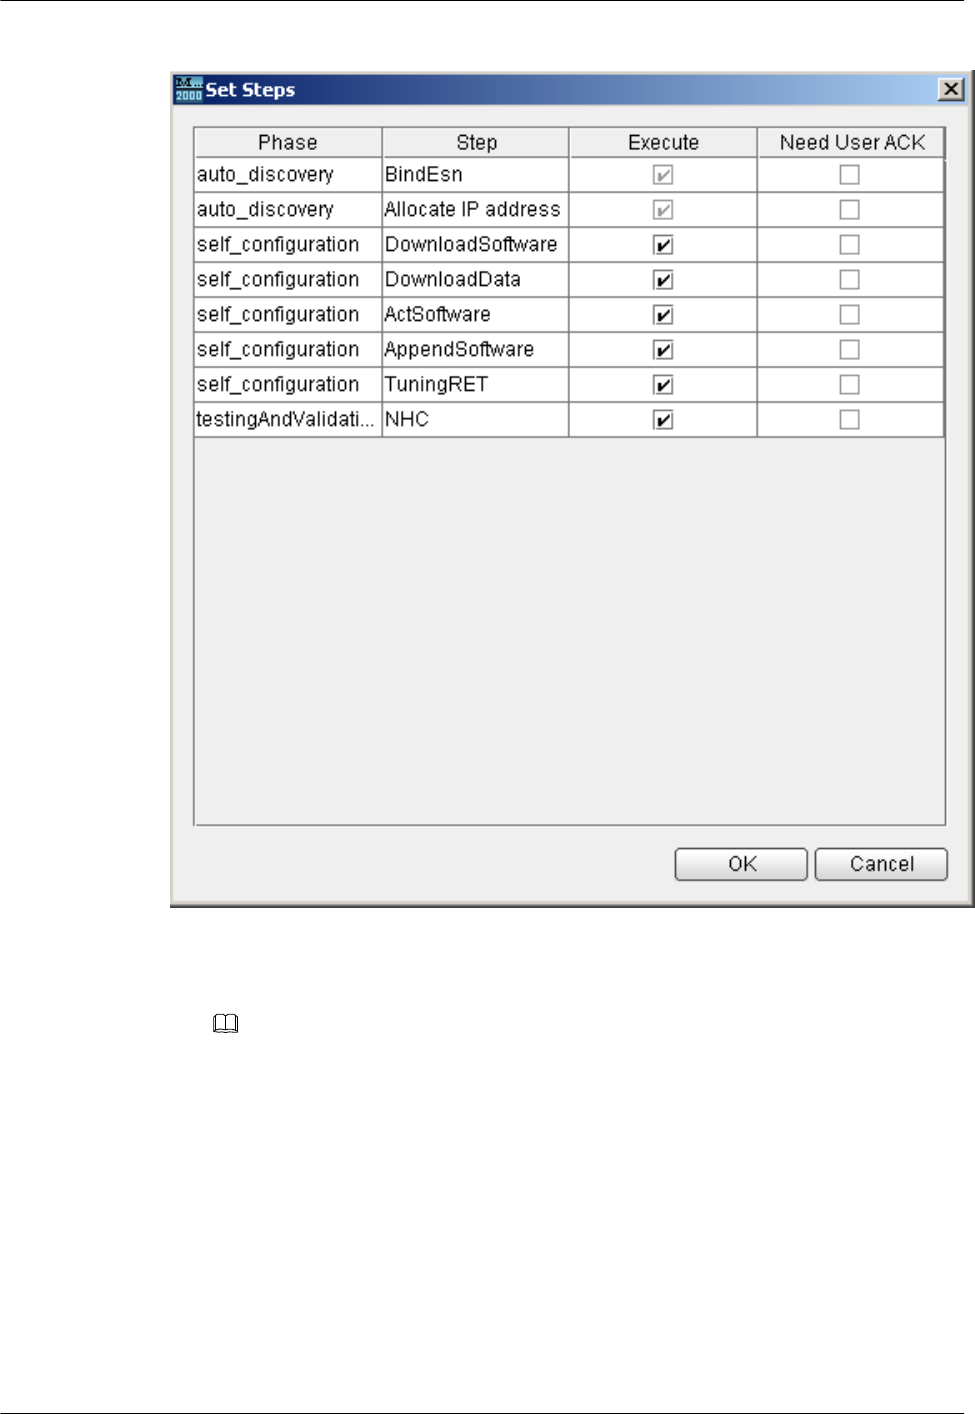
Figure 5-4 Set Stepsdialog box
4. Set the commissioning steps and then click OK. The Import dialog box is displayed.
NOTE
If the eNodeB software and data configuration are already upgraded to the target version through the USB
storage device on site, click Advanced when importing the EDS file on the M2000, and then clear the
DownloadSoftware, DownloadData, and ActSoftware check boxes in the displayed Set Steps dialog
box. In this case, these cleared steps are skipped in the automatic eNodeB commissioning.
5. Click OK to import the EDS file. The basic configuration information about each new
eNodeB is displayed in the eNodeB Auto Deployment tab page.
Step 4 Check whether the imported self-configuration data and the ESN reported by the eNodeB are
automatically bound.
5 Commissioning the MBTS in GL or UL Mode on the
M2000
3900 Series Multi-Mode Base Station
Commissioning Guide
5-12 Huawei Proprietary and Confidential
Copyright © Huawei Technologies Co., Ltd.
Issue 02 (2010-07-30)
If ... Then ...
The ESN field on the eNodeB Auto
Deployment tab page indicates the ESN of
the new eNodeB
The imported self-configuration data and
ESN are automatically bound. The eNodeB
software and data configuration file are
automatically downloaded from the M2000
server to the eNodeB. The eNodeB
commissioning task is created.
The ESN field on the eNodeB Auto
Deployment tab page indicates
The imported self-configuration data and
ESN are not automatically bound. The
eNodeB software and data configuration file
cannot be automatically downloaded from the
M2000 server to the eNodeB. Go to step Step
5.
Step 5 According to the eNodeB ID and ESN reported by the field engineer, manually bind the ESN
and the self-configuration data that is imported.
1. In the eNodeB Auto Deployment tab page, select the corresponding eNodeB and click
. The Bind ESN dialog box is displayed.
2. Select the target ESN of the eNodeB, and then click OK. After the binding succeeds, the
ESN information is displayed in the eNodeB Auto Deployment tab page. The eNodeB
automatically downloads the software and data configuration file from the M2000 server.
Step 6 Repeat step Step 5 to manually bind all ESNs of the eNodeBs that are not automatically bound
to the imported self-configuration data.
----End
5.3 Intervening the GBTS Transmission
This section describes how to intervene the GBTS transmission. By intervening the GBTS
transmission, you can query the real-time status of the E1/T1 port to ensure that the GBTS
transmission is normal and that you can proceed with the GBTS deployment.
Context
If you have set intervention on the commissioning task when starting the deployment, the task
switches to intervention status after the OML detection regardless of whether the OML is normal
or abnormal, and the function of querying the E1/T1 port status is provided.
Procedure
Step 1 When starting the deployment task, choose Intervening transmission, as shown in Figure
5-5.
3900 Series Multi-Mode Base Station
Commissioning Guide
5 Commissioning the MBTS in GL or UL Mode on the
M2000
Issue 02 (2010-07-30) Huawei Proprietary and Confidential
Copyright © Huawei Technologies Co., Ltd.
5-13
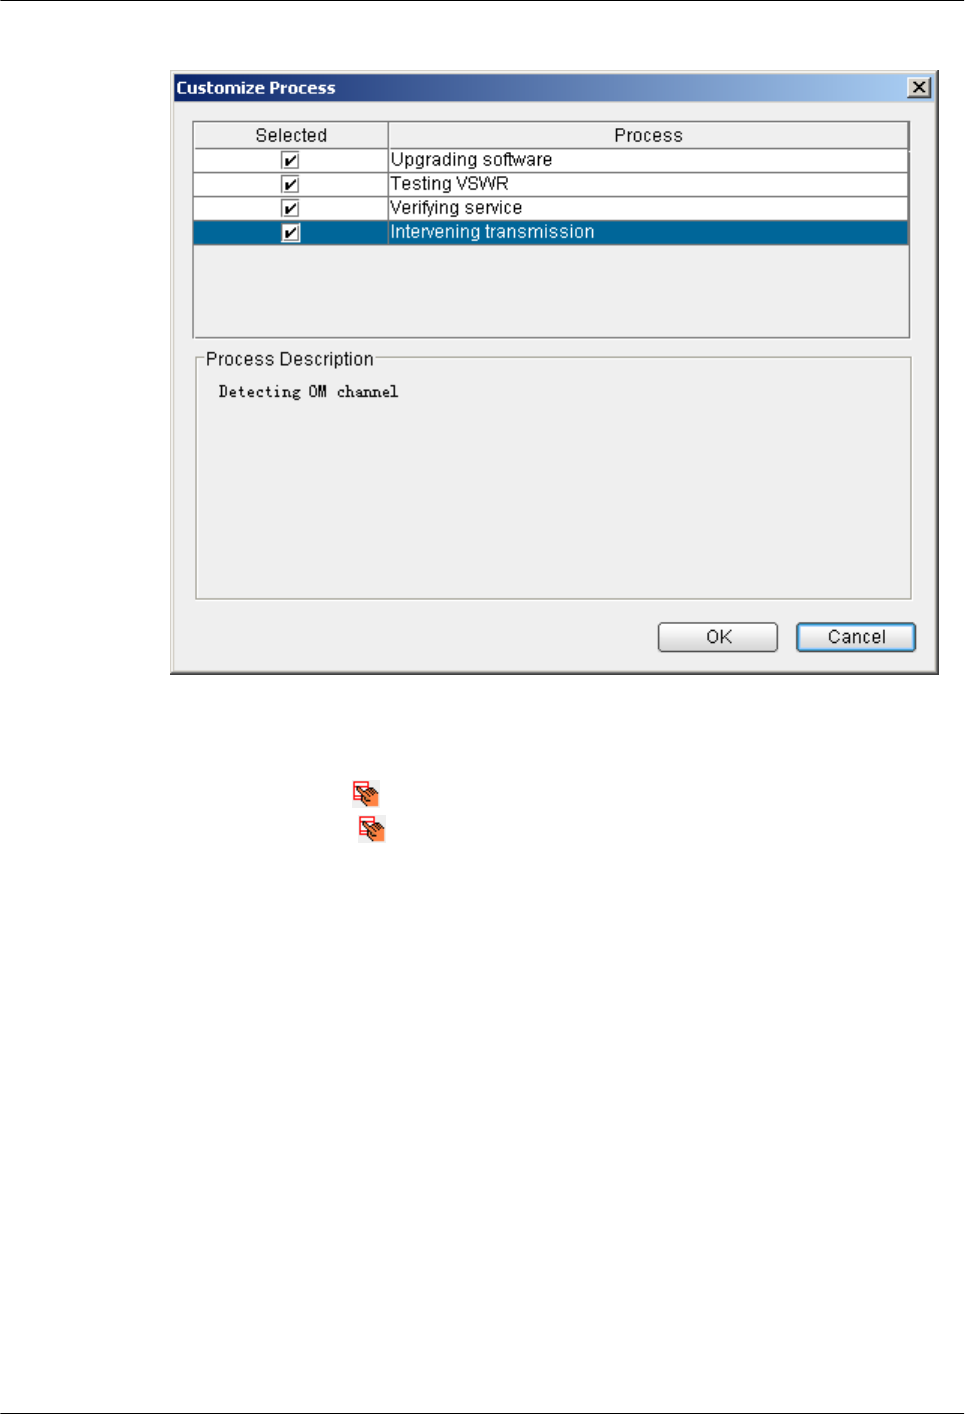
Figure 5-5 Dialog box for selecting Intervening transmission
Step 2 After the automatic deployment approaches the step where intervention is set, the status of the
GBTS is displayed as . In this case, you can right-click the task, and then choose Intervening
transmission or click on the toolbar to open the dialog box for intervening transmission.
1. Figure 5-6 shows the dialog box for intervening transmission.
5 Commissioning the MBTS in GL or UL Mode on the
M2000
3900 Series Multi-Mode Base Station
Commissioning Guide
5-14 Huawei Proprietary and Confidential
Copyright © Huawei Technologies Co., Ltd.
Issue 02 (2010-07-30)
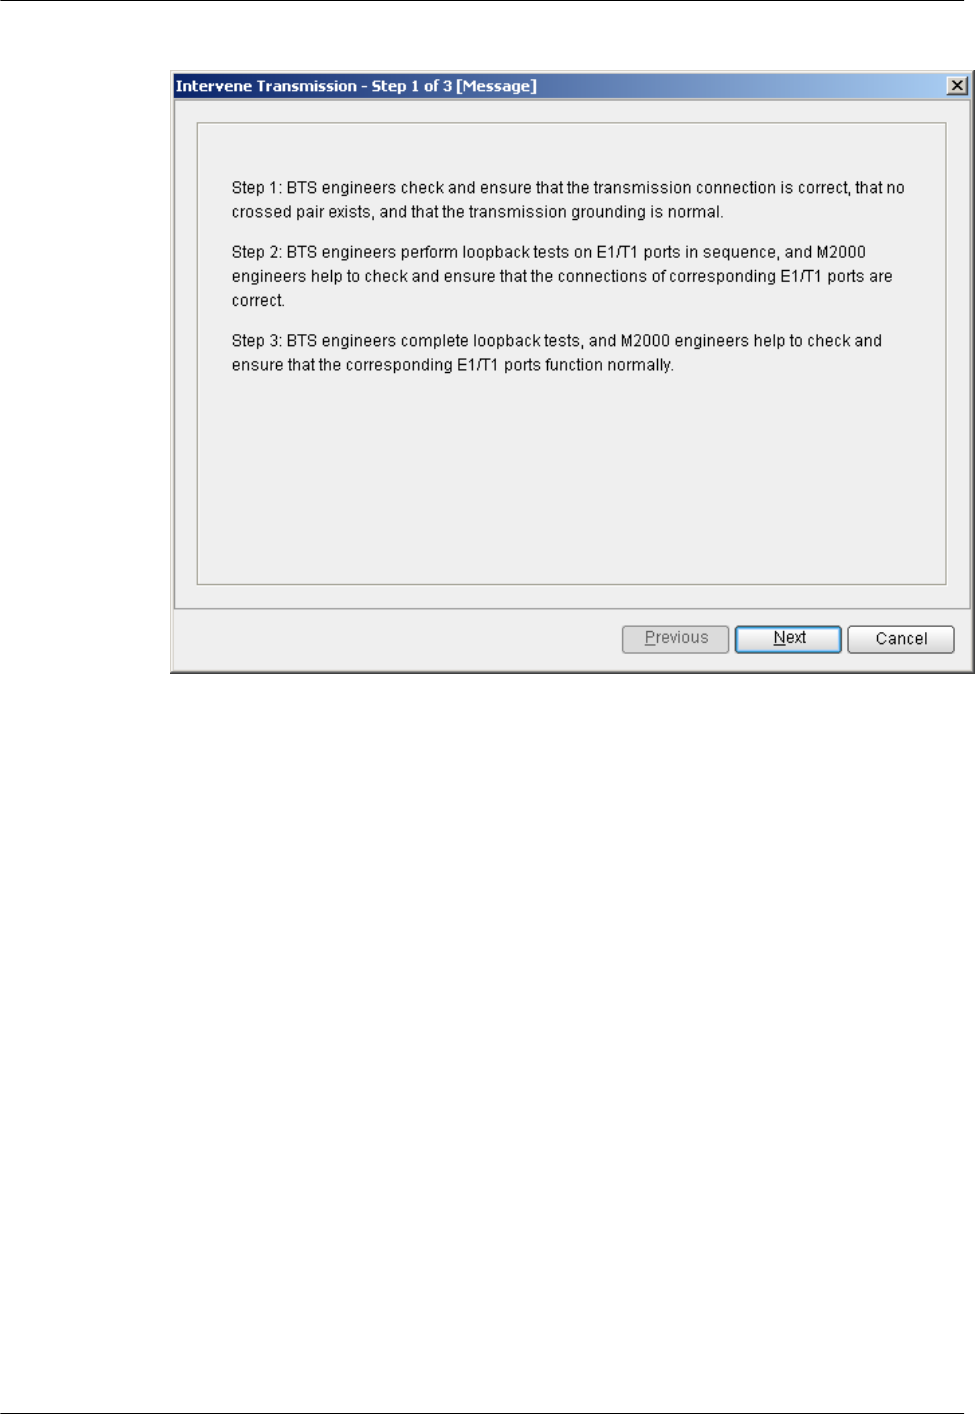
Figure 5-6 Dialog box for intervening transmission
2. Figure 5-7 shows the dialog box for querying the E1/T1 port status.
3900 Series Multi-Mode Base Station
Commissioning Guide
5 Commissioning the MBTS in GL or UL Mode on the
M2000
Issue 02 (2010-07-30) Huawei Proprietary and Confidential
Copyright © Huawei Technologies Co., Ltd.
5-15
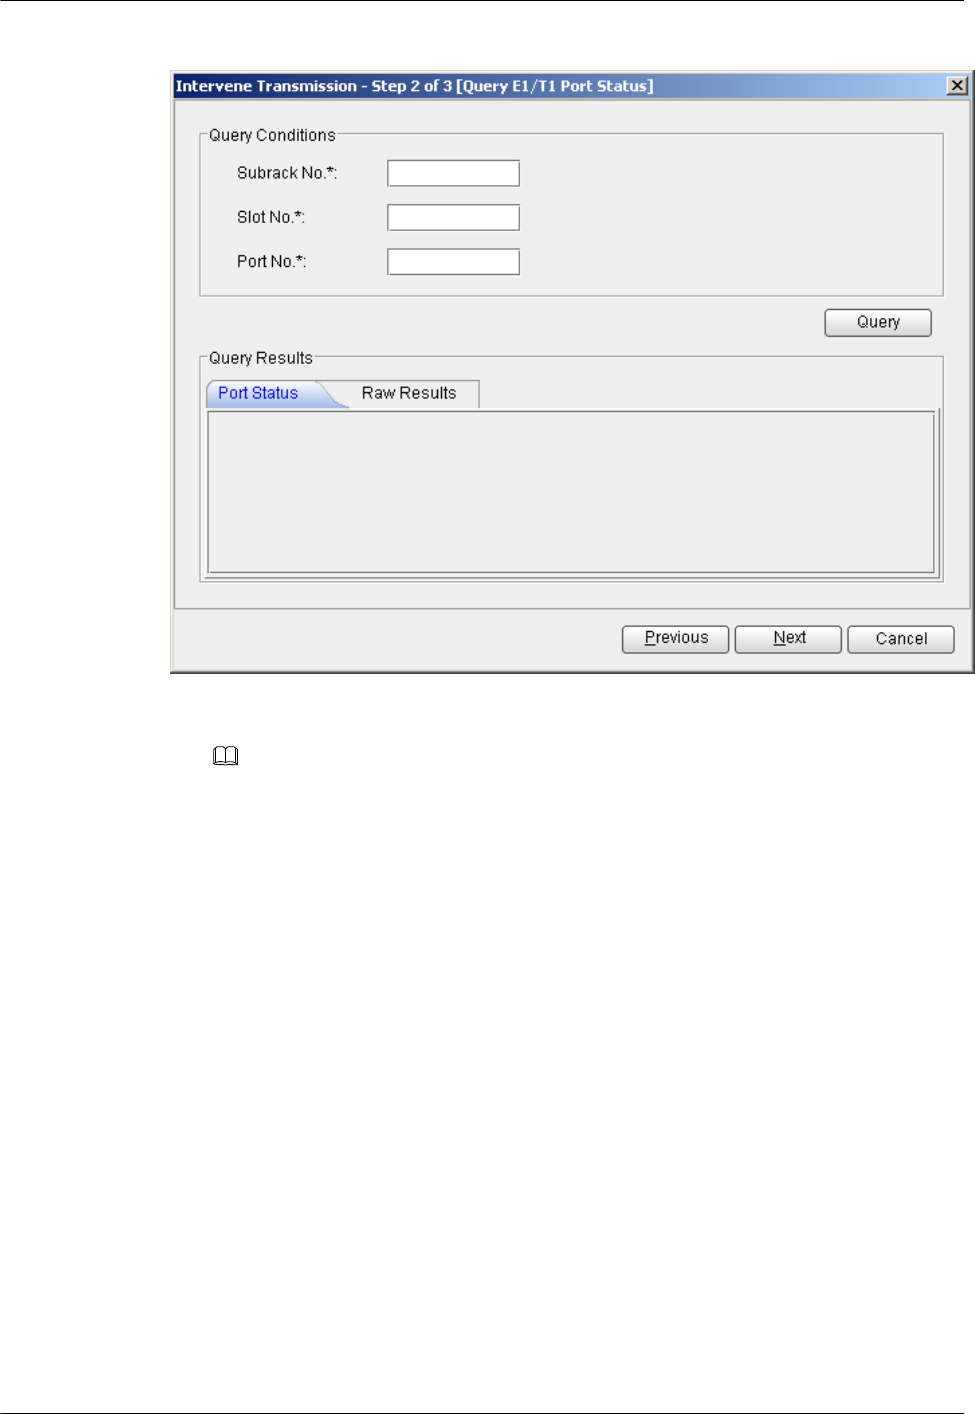
Figure 5-7 Dialog box for querying the E1/T1 port status
NOTE
lYou must type the subrack number, slot number, and port number. By default, they are set to 0.
lQuerying the E1/T1 port status does not affect the transmission.
3. Figure 5-8 shows the dialog box for confirmation.
5 Commissioning the MBTS in GL or UL Mode on the
M2000
3900 Series Multi-Mode Base Station
Commissioning Guide
5-16 Huawei Proprietary and Confidential
Copyright © Huawei Technologies Co., Ltd.
Issue 02 (2010-07-30)
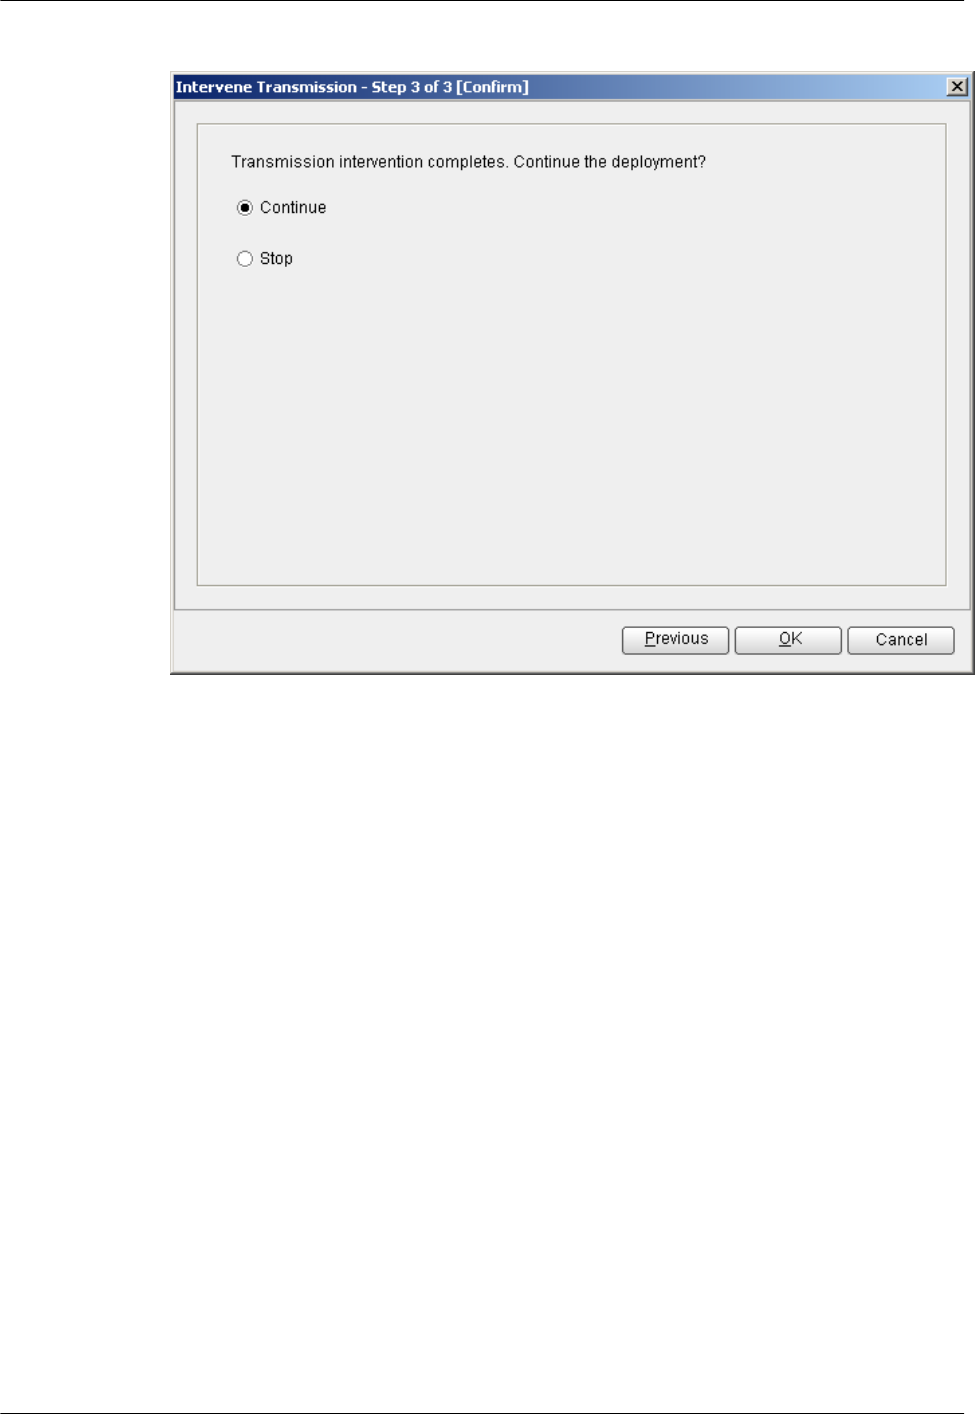
Figure 5-8 Dialog box for confirmation
lSelect Continue. The deployment proceeds with the version management and
subsequent procedures.
lSelect Stop to stop the deployment. Status stays in the intervention step, and Current
Phase stays in the OML detection step. The description information shows that you
have stopped the deployment.
----End
5.4 Commissioning the MBTS on the M2000
The procedure for automatically commissioning the MBTS by the M2000 involves detecting
OM channels, upgrading software and configuring data, monitoring software commissioning,
and verifying services. The procedure for automatically commissioning the MBTS by the M2000
varies according to the base station mode. Refer to the procedure for the commissioning
accordingly.
5.4.1 Procedure for Automatically Commissioning the GBTS by the M2000
This section describes the process of automatic GBTS commissioning performed by the
M2000.
5.4.2 Procedure for Automatically Commissioning the NodeB by the M2000
The procedure for automatically commissioning the NodeB by the M2000 involves detecting
the OM channel, upgrading the software and configuration, monitoring the software
commissioning, and verifying the services.
3900 Series Multi-Mode Base Station
Commissioning Guide
5 Commissioning the MBTS in GL or UL Mode on the
M2000
Issue 02 (2010-07-30) Huawei Proprietary and Confidential
Copyright © Huawei Technologies Co., Ltd.
5-17

5.4.1 Procedure for Automatically Commissioning the GBTS by the
M2000
This section describes the process of automatic GBTS commissioning performed by the
M2000.
Table 5-1 describes the process of automatic GBTS commissioning. After the automatic
software commissioning starts, you can manually complete the commissioning according to the
actual requirement. For details, see 5.11.1 Confirming a GBTS Commissioning Task.
Table 5-1 Process of automatic GBTS commissioning
No
.
Procedu
re
Description Standards for Continuing the
Commissioning
1Automati
cally set
the
maintena
nce mode
of the
GBTS
After locating the GBTS, the
M2000 automatically sets the
maintenance mode of the GBTS to
testing so that all alarms reported by
the GBTS during the
commissioning are not to be
displayed on the M2000 alarm
interface by default. This avoids the
alarms from affecting normal
network monitoring.
You can use the monitoring
function provided by the GBTS
commissioning to query all alarms
generated during the GBTS
commissioning. For details, see
5.5.1 Viewing the GBTS Alarm
Status.
Regardless of whether the
maintenance mode of the GBTS is
set successfully, the M2000
automatically proceeds with the
next procedure.
5 Commissioning the MBTS in GL or UL Mode on the
M2000
3900 Series Multi-Mode Base Station
Commissioning Guide
5-18 Huawei Proprietary and Confidential
Copyright © Huawei Technologies Co., Ltd.
Issue 02 (2010-07-30)

No
.
Procedu
re
Description Standards for Continuing the
Commissioning
2Automati
cally
detect the
OML
The M2000 automatically checks
the status of the OML between the
GBTS and the GBSC managing the
GBTS.
The M2000 automatically proceeds
with the next procedure only when
the OML between the GBTS and
the GBSC managing the GBTS is
normal. The details are as follows:
lIf the OML is normal and you
have not set intervention on the
commissioning task during the
task startup, the M2000
automatically proceeds with the
next procedure.
lIf the OML is normal and you
have set intervention on the
commissioning task during the
task startup, the commissioning
switches to the Intervening
transmission status and a
transmission loopback test is
required.
lIf the OML is abnormal after the
OML detection is performed
three times, the M2000
determines that the OML is
faulty. In this case, the
commissioning automatically
stops and switches to the
Abnormal status.
3900 Series Multi-Mode Base Station
Commissioning Guide
5 Commissioning the MBTS in GL or UL Mode on the
M2000
Issue 02 (2010-07-30) Huawei Proprietary and Confidential
Copyright © Huawei Technologies Co., Ltd.
5-19

No
.
Procedu
re
Description Standards for Continuing the
Commissioning
3Automati
cally
upgrade
the
software
The M2000 automatically checks
whether the target GBTS version
and the current GBTS version are
consistent according to the target
version information provided in the
deployment list.
lIf the versions are consistent, the
GBTS software need not be
upgraded.
lIf the versions are inconsistent,
the M2000 instructs the GBSC to
start upgrading the GBTS
software. The GBTS downloads
the target version from the
M2000 and upgrades the
software.
The parameters for upgrading
the GBTS software are as
follows:
–Load mode: Load by
Configuration and Abis Quick
Load(No Service).
–Automatically Load and
Activate Switch: Determined
by the vercfg.xml file in the
software package.
NOTE
The upgrade of the GBTS
configuration data is not controlled by
the M2000. After the GBTS software
is upgraded and the GBTS is reset, the
GBTS automatically sends a request to
the GBSC for loading configuration
data.
You can set the M2000 to skip the
software upgrade when starting the
commissioning task.
lIf the software need not be
upgraded or is already upgraded
successfully, the M2000
automatically proceeds with the
next procedure.
lIf the software fails to be
upgraded, the commissioning
automatically stops and switches
to the Abnormal status.
5 Commissioning the MBTS in GL or UL Mode on the
M2000
3900 Series Multi-Mode Base Station
Commissioning Guide
5-20 Huawei Proprietary and Confidential
Copyright © Huawei Technologies Co., Ltd.
Issue 02 (2010-07-30)

No
.
Procedu
re
Description Standards for Continuing the
Commissioning
4Automati
cally
commissi
on the
software
The automatic software
commissioning consists of the
following sub-procedures:
lGBTS cell initialization
detection: Checks the
initialization status of each cell
under the GBTS.
If all cells under the GBTS are
initialized, the GBTS cell
initialization detection succeeds.
If any cell fails to be initialized
after the GBTS cell initialization
detection is performed three
times, the commissioning
automatically stops and switches
to the Abnormal status.
lGBTS information query: The
query results are saved in the
commissioning report.
Regardless of whether the query
succeeds, the M2000
automatically proceeds with the
next sub-procedure after the
query.
lStanding wave ratio test: The
standing wave ratio test is used
to check whether the antenna
system of the GBTS is faulty.
This test is performed according
to the settings that you configure
during the startup of the
commissioning task. The test
results are saved in the
commissioning report.
Regardless of whether the test
succeeds, the M2000
automatically proceeds with the
next sub-procedure after the test.
lGBTS alarm monitoring:
Monitors all alarms of a certain
GBTS and all relevant alarms of
the GBSC managing the GBTS
and provides the fault diagnosis
function.
lCell serviceability detection:
Checks the serviceability status
of each cell under the GBTS.
You can set the M2000 to skip the
standing wave ratio test when
starting the commissioning task.
Note that the GBTS cell
initialization detection and cell
serviceability detection must be
performed successfully.
3900 Series Multi-Mode Base Station
Commissioning Guide
5 Commissioning the MBTS in GL or UL Mode on the
M2000
Issue 02 (2010-07-30) Huawei Proprietary and Confidential
Copyright © Huawei Technologies Co., Ltd.
5-21

No
.
Procedu
re
Description Standards for Continuing the
Commissioning
If one cell is serviceable, the
detection succeeds. Otherwise,
the software commissioning
persists, and the system displays
a message, indicating that no cell
is serviceable.
5 Automati
cally
verify
services
The M2000 automatically collects
the performance counters related to
GBTS CS and PS services and
checks that the GBTS services are
normal. The involved performance
counters are as follows:
lCS services: SDCCH
Verification and TCH
Verification
lPS services: Uplink GPRS
Verification and Downlink
GPRS Verification
You can set the M2000 to skip the
service verification when starting
the commissioning task.
If each performance counter is once
displayed as a value that is not 0, the
service verification succeeds and
the commissioning switches to the
Confirming completed status.
Otherwise, the service verification
persists.
6Complete
the
commissi
oning
When the commissioning switches
to the Confirming completed
status, you need to confirm the
completion of the GBTS
commissioning. After the
commissioning is complete, the
M2000 automatically restores the
GBTS status to normal status so that
the GBTS alarms can be monitored
normally.
Not involved.
5.4.2 Procedure for Automatically Commissioning the NodeB by
the M2000
The procedure for automatically commissioning the NodeB by the M2000 involves detecting
the OM channel, upgrading the software and configuration, monitoring the software
commissioning, and verifying the services.
For details on the NodeB commissioning procedure, see Table 5-2.
5 Commissioning the MBTS in GL or UL Mode on the
M2000
3900 Series Multi-Mode Base Station
Commissioning Guide
5-22 Huawei Proprietary and Confidential
Copyright © Huawei Technologies Co., Ltd.
Issue 02 (2010-07-30)

Table 5-2 Item list of the NodeB commissioning procedure
Commissionin
g Item
Description
Detecting the
OM channel
When the transmission network is functional, the M2000 automatically
sets up the OM channel with the NodeB according to the NodeB
deployment list. The OM channel is used to commission and maintain the
NodeB.
After the OM channel is set up, the M2000 automatically sets Special
Status of the NodeB to Testing, so that the invalid alarms can be shielded
during commissioning.
Upgrading the
software and
configuration
According to the version information in the NodeB deployment list, the
M2000 automatically checks whether the current NodeB version is the
same as the target version. If the current NodeB version differs from the
target software version, the target software and data configuration file are
downloaded from the server to the NodeB and activated automatically.
NOTE
If the USB disk is used for the upgrade on the NodeB side, and the NodeB software
and data configuration file are upgraded to the target version, the M2000 skips this
step and proceeds with the automatic software commissioning.
Monitoring the
software
commissioning
The purpose of software commissioning is to verify the services. Software
commissioning starts automatically. During the commissioning, only
faults need to be noted. All the reported alarms are displayed on the
monitoring interface of the M2000. In addition, the fault diagnosis access
that facilitates quick fault location is available, and the associated handling
suggestions are provided.
Verifying the
services
When detecting that the logical cell of the NodeB is available, the
M2000 starts service verification. The M2000 determines whether service
verification succeeds according to key performance counters, and then
displays the results.
Completing the
NodeB
deployment
After a NodeB passes the service verification, the status of the
commissioning task changes to Waiting for Acknowledgement. When
the user acknowledges the completion of commissioning tasks, the
M2000 automatically cancels the Testing state of the NodeB and verifies
the NodeB location.
NOTE
lCancel the Testing state of the NodeB and resume the alarm reporting of the
NodeB.
lNodeB location verification refers to the process in which the M2000
automatically checks whether the ESN reported by the NodeB is the same as the
ESN in the NodeB deployment list. Through the NodeB location verification,
you can check whether the USB disk for upgrade is the correct one in IP
networking mode.
3900 Series Multi-Mode Base Station
Commissioning Guide
5 Commissioning the MBTS in GL or UL Mode on the
M2000
Issue 02 (2010-07-30) Huawei Proprietary and Confidential
Copyright © Huawei Technologies Co., Ltd.
5-23

5.5 Monitoring the GBTS Commissioning Task
This chapter describes how to monitor a GBTS commissioning task. By monitoring the GBTS
commissioning task, you can learn the commissioning progress and status, and then rectify
commissioning faults (if any) in time.
5.5.1 Viewing the GBTS Alarm Status
This section describes how to view the GBTS alarm status. After the automatic software
commissioning starts, you can use the M2000 to monitor the alarms of the GBTS and the relevant
alarms of the GBSC managing the GBTS in real time. If exceptions occur during the
commissioning, you can view the alarm information to locate and handle the exceptions in time.
5.5.2 Performing the GBTS Fault Diagnosis
This section describes how to perform the GBTS fault diagnosis. When exceptions occur during
GBTS commissioning, you can use the automatic fault diagnosis function provided by the
M2000 to check whether the GBTS that is being commissioned is faulty. E1T1s and antennas
support the automatic fault diagnosis function.
5.5.3 Viewing the GBTS Service Verification Results
This section describes how to view the GBTS service verification results. After the automatic
service verification starts, the M2000 automatically collects the performance data related to
GBTS CS and PS services and checks whether the GBTS services are normal. If the service
verification persists, it is recommended that you view the service verification results to learn the
actual performance data. This ensures the commissioning success.
5.5.4 Restarting a GBTS Commissioning Task
This section describes how restart a GBTS commissioning task that is still in progress according
to the actual requirement. A GBTS commissioning task in progress indicates that it is not in
Waiting or Completed status. If you restart a commissioning task, all commissioning operations
that are already performed are cleared, and the commissioning restarts from the OML detection.
5.5.1 Viewing the GBTS Alarm Status
This section describes how to view the GBTS alarm status. After the automatic software
commissioning starts, you can use the M2000 to monitor the alarms of the GBTS and the relevant
alarms of the GBSC managing the GBTS in real time. If exceptions occur during the
commissioning, you can view the alarm information to locate and handle the exceptions in time.
Prerequisite
The automatic software commissioning already starts, and you have not confirmed the
completion of the GBTS commissioning yet.
Context
The M2000 displays all alarms reported during the GBTS commissioning in real time according
to object types. The objects consist of E1T1s, IP addresses, software, boards, antennas, cell
services, and other objects that cannot be categorized.
You can select multiple commissioning tasks at a time to view the alarm status. The M2000
displays all the alarms of one task in one monitoring window. One M2000 client supports a
maximum of 10 open window at a time, including all subwindows of the GBTS Auto
5 Commissioning the MBTS in GL or UL Mode on the
M2000
3900 Series Multi-Mode Base Station
Commissioning Guide
5-24 Huawei Proprietary and Confidential
Copyright © Huawei Technologies Co., Ltd.
Issue 02 (2010-07-30)
Deployment window. For example, the alarm monitoring window and service verification
window.
Procedure
Step 1 Choose Configuration > Auto Deployment > GBTS Auto Deployment to open the GBTS
Auto Deployment window.
Step 2 On the GBTS List tab page, select one or multiple commissioning tasks, and then click .
Alternatively, right-click the tasks, and then choose Open Monitor Window from the shortcut
menu.
Step 3 In the displayed alarm monitoring window, select the object type in the left area and view the
alarms of the object in the right area.
For details about the alarm monitoring window, see 5.12.1 Interface Description: GBTS
Commissioning.
Step 4 If the cause of a E1T1, a board, or an antenna alarm cannot be located according to the alarm
information, you can perform the fault diagnosis. For details about how to perform the fault
diagnosis, see 5.5.2 Performing the GBTS Fault Diagnosis.
Step 5 Perform the following steps to handle an alarm:
1. Double-click the alarm to be handled, and then click the link in Reason And Advice in the
displayed dialog box that shows the alarm details.
2. Handle the fault according to the alarm reference.
----End
5.5.2 Performing the GBTS Fault Diagnosis
This section describes how to perform the GBTS fault diagnosis. When exceptions occur during
GBTS commissioning, you can use the automatic fault diagnosis function provided by the
M2000 to check whether the GBTS that is being commissioned is faulty. E1T1s and antennas
support the automatic fault diagnosis function.
Prerequisite
The automatic software commissioning already starts, and you have not confirmed the
completion of the GBTS commissioning yet.
Context
The fault diagnosis operations supported by different objects vary.
lE1T1s: E1 port fault diagnosis on the GBSC side and E1 loopback fault diagnosis on the
GBSC peer side
lAntennas: Antenna fault diagnosis including the standing wave ratio test
CAUTION
E1T1 fault diagnosis leads to the interruption of all services on the port; antenna fault diagnosis
leads to the interruption of all carrier services of the GBTS. Therefore, you need to perform the
fault diagnosis when the GBTS services are in idle state or are segregated.
3900 Series Multi-Mode Base Station
Commissioning Guide
5 Commissioning the MBTS in GL or UL Mode on the
M2000
Issue 02 (2010-07-30) Huawei Proprietary and Confidential
Copyright © Huawei Technologies Co., Ltd.
5-25

After one fault diagnosis operation is performed, the M2000 creates a fault diagnosis task and
displays the diagnosis progress. After the fault diagnosis is complete, you can obtain the fault
diagnosis report.
If you delete a fault diagnosis task, the corresponding diagnosis report is deleted accordingly.
If you restart the M2000 server, all fault diagnosis tasks and reports are deleted.
Procedure
Step 1 Choose Configuration > Auto Deployment > GBTS Auto Deployment to open the GBTS
Auto Deployment window.
Step 2 On the GBTS List tab page, select one or multiple commissioning tasks, and then click .
Alternatively, right-click the tasks, and then choose Open Monitor Window from the shortcut
menu.
Step 3 Perform the fault diagnosis.
1. In the Monitor window, select one object or select one alarm of a certain object from the
alarm list in the right pane.
2. Right-click the object or alarm, and then choose Diagnose... from the shortcut menu to set
diagnosis parameters.
After the diagnosis parameters are set, a diagnosis task is added to the diagnosis task list.
The diagnosis task list is located in the lower part of the Monitor window.
3. Right-click a fault diagnosis task in the diagnosis task list, and then choose Diagnosis
Report... from the shortcut menu to view the diagnosis results.
Step 4 Perform the following steps to handle an alarm:
1. Double-click the alarm to be handled, and then click the link in Reason And Advice in the
displayed dialog box that shows the alarm details.
2. Handle the fault according to the alarm reference.
----End
5.5.3 Viewing the GBTS Service Verification Results
This section describes how to view the GBTS service verification results. After the automatic
service verification starts, the M2000 automatically collects the performance data related to
GBTS CS and PS services and checks whether the GBTS services are normal. If the service
verification persists, it is recommended that you view the service verification results to learn the
actual performance data. This ensures the commissioning success.
Prerequisite
The automatic service verification already starts, and you have not confirmed the completion of
the GBTS commissioning yet.
Context
During the service verification, the performance measurement period is the shortest
measurement period supported by the GBTS. By default, the shortest measurement period is 15
minutes. The involved performance counters are as follows:
lCS services: SDCCH Verification and TCH Verification
5 Commissioning the MBTS in GL or UL Mode on the
M2000
3900 Series Multi-Mode Base Station
Commissioning Guide
5-26 Huawei Proprietary and Confidential
Copyright © Huawei Technologies Co., Ltd.
Issue 02 (2010-07-30)

lPS services: Uplink GPRS Verification and Downlink GPRS Verification
If every performance counter related to the CS and PS services is once displayed as a value that
is not 0, the M2000 considers the service verification a success, and the commissioning task
automatically switches to Confirming completed. Otherwise, the service verification persists.
NOTE
The performance data collected for service verification is saved on theM2000 for 14 days. After 14 days,
the M2000 automatically deletes the data to release system resources.
Procedure
Step 1 Choose Configuration > Auto Deployment > GBTS Auto Deployment to open the GBTS
Auto Deployment window.
Step 2 On the GBTS List tab page, select one or multiple commissioning tasks, and then click .
Alternatively, right-click the tasks, and then choose Open Service Verification Window from
the shortcut menu.
For details about the service verification window, see 5.12.1 Interface Description: GBTS
Commissioning.
Step 3 View the service verification results and perform corresponding operations.
The accumulation values of the counters, which are collected in the time range between the start
of the service verification and the restart of the commissioning or the confirmation of the
commissioning completion, are displayed in the service verification window.
lIf is displayed in each counter value, you can infer that the GBTS service verification
succeeds. In this case, you can check and confirm the completion of the commissioning. For
details, see 5.11.1 Confirming a GBTS Commissioning Task.
lIf is displayed in the value of a certain counter, you can infer that the services related to
this counter are running abnormally. In this case, you need to rectify the fault. If the system
output indicates that the PS services are abnormal but no PS services exist actually, you can
confirm the completion of the commissioning.
----End
5.5.4 Restarting a GBTS Commissioning Task
This section describes how restart a GBTS commissioning task that is still in progress according
to the actual requirement. A GBTS commissioning task in progress indicates that it is not in
Waiting or Completed status. If you restart a commissioning task, all commissioning operations
that are already performed are cleared, and the commissioning restarts from the OML detection.
Prerequisite
A GBTS commissioning task is created.
Procedure
Step 1 Choose Configuration > Auto Deployment > GBTS Auto Deployment to open the GBTS
Auto Deployment window.
3900 Series Multi-Mode Base Station
Commissioning Guide
5 Commissioning the MBTS in GL or UL Mode on the
M2000
Issue 02 (2010-07-30) Huawei Proprietary and Confidential
Copyright © Huawei Technologies Co., Ltd.
5-27

Step 2 On the GBTS List tab page, select one or multiple commissioning tasks, and then click .
Alternatively, right-click the tasks, and then choose Restart from the shortcut menu.
----End
5.6 Monitoring the NodeB Commissioning Task
This chapter describes how to monitor a NodeB commissioning task. By monitoring the NodeB
commissioning task, you can learn the commissioning progress and status, and then rectify
commissioning faults (if any) in time.
5.6.1 Viewing the NodeB Commissioning Progress
You can view the stage and progress of a NodeB commissioning task.
5.6.2 Viewing NodeB Alarms
After the NodeB software is upgraded automatically during the NodeB commissioning, you can
view the alarms of this NodeB and the relevant alarms of the RNC managing this NodeB through
the M2000. All the alarms related to the NodeB are categorized according to objects. This helps
you query required alarms. In addition, the M2000 provides the function of automatically
diagnosing NodeB board alarms, NodeB antenna alarms, and E1T1 alarms. You can take
corresponding measures to rectify the faults based on the diagnosis results.
5.6.3 Viewing Service Verification Results
After a NodeB commissioning task is at the service verification stage, the M2000 automatically
subscribes to the performance counters of the logical cells of this NodeB and checks whether
the NodeB services are normal based on the counter values. At this stage, you can check whether
each cell of the NodeB has passed the service verification and view the accumulated value of
each counter.
5.6.4 Performing a NodeB Task Again or Deleting the Task
When a NodeB commissioning task is running, you can perform this task again or delete this
task.
5.6.1 Viewing the NodeB Commissioning Progress
You can view the stage and progress of a NodeB commissioning task.
Prerequisite
The NodeB deployment list is imported successfully.
Procedure
Step 1 Choose Configuration > Auto Deployment > NodeB Auto Deployment. The NodeB Auto
Deployment window is displayed.
Step 2 In the commissioning task list, view the status and progress of a commissioning task.
The commissioning task status is displayed in Status. The current task execution progress is
displayed in Current Phase. The specific stage information about the task in each status is
displayed in Description. For example, when a commissioning task is in the state (that is,
the commissioning is being performed), the operations such as version download, software
upgrade, and configuration file upgrade are performed.
5 Commissioning the MBTS in GL or UL Mode on the
M2000
3900 Series Multi-Mode Base Station
Commissioning Guide
5-28 Huawei Proprietary and Confidential
Copyright © Huawei Technologies Co., Ltd.
Issue 02 (2010-07-30)
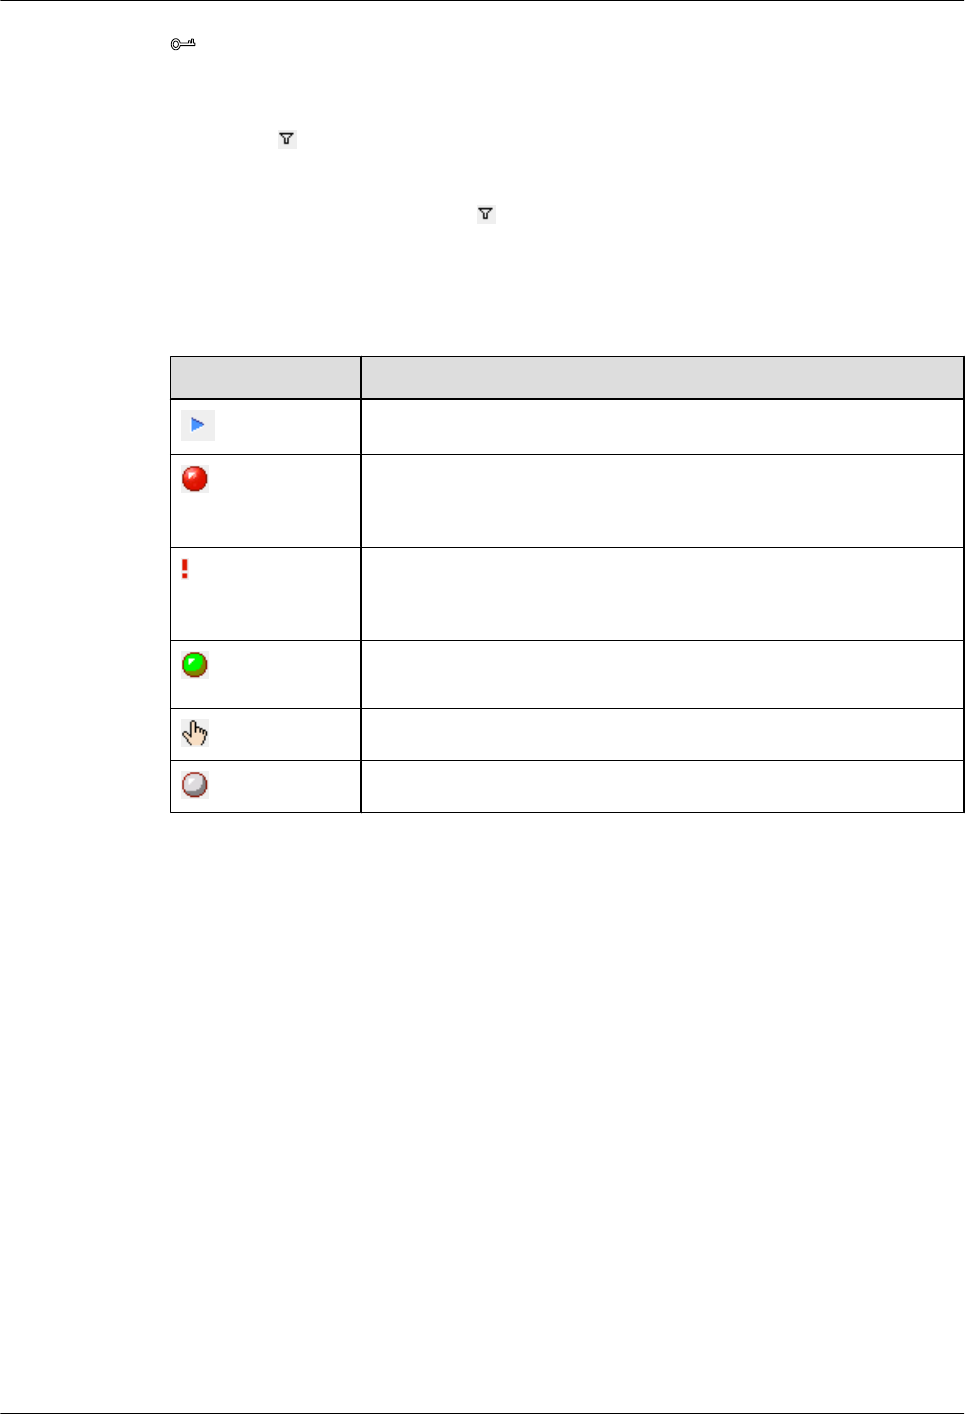
TIP
You can use either of the following methods to quickly view the NodeB commissioning status:
lClick the table heading field of the task list to sort the commissioning tasks.
lClick next to the table heading field of the task list to set the filtering condition. The task list displays
only the tasks that meet the filtering condition. If no filtering condition is set, the list of commissioning
tasks displays all the tasks that you are authorized to view.
Select a field in the task list, click , and then select Custom from the drop-down list. Set the filtering
condition in the displayed dialog box.
For details about each status, see Table 5-3.
Table 5-3 Description of the commissioning statuses
Status Operation
Start a NodeB commissioning task.
The commissioning is abnormal. In this case, you can view the alarm
information and then perform fault diagnosis and alarm handling in
time.
Pay attention to the commissioning. For example, an exception occurs
in a certain procedure, which does not affect the commissioning and
need not be handled.
No operation needs to be performed. The commissioning is being
performed normally.
You need to confirm whether to complete the commissioning.
The commissioning is complete without errors.
----End
5.6.2 Viewing NodeB Alarms
After the NodeB software is upgraded automatically during the NodeB commissioning, you can
view the alarms of this NodeB and the relevant alarms of the RNC managing this NodeB through
the M2000. All the alarms related to the NodeB are categorized according to objects. This helps
you query required alarms. In addition, the M2000 provides the function of automatically
diagnosing NodeB board alarms, NodeB antenna alarms, and E1T1 alarms. You can take
corresponding measures to rectify the faults based on the diagnosis results.
Context
According to objects, alarms are categorized into physical transmission port alarms, transmission
path alarms, antenna alarms, board alarms, cell alarms, external alarms, and other alarms. Other
alarms refer to the alarms that cannot be categorized on the basis of specific objects.
3900 Series Multi-Mode Base Station
Commissioning Guide
5 Commissioning the MBTS in GL or UL Mode on the
M2000
Issue 02 (2010-07-30) Huawei Proprietary and Confidential
Copyright © Huawei Technologies Co., Ltd.
5-29

Procedure
Step 1 Choose Configuration > Auto Deployment > NodeB Auto Deployment to open the NodeB
Auto Deployment window.
Step 2 Right-click the commissioning task whose alarms are to be viewed, and then choose Open
Monitor Window from the shortcut menu.
In the displayed window, you can view the alarms of this NodeB and the relevant alarms of the
RNC managing this NodeB according to monitored objects. For details about the alarm
monitoring window, see 5.13.1 Interface Description: NodeB Commissioning.
TIP
After you confirm the commissioning task, no alarm generated during the commissioning can be viewed
on the basis of a single NodeB on the Monitor tab page. If any uncleared alarm exists during the
commissioning, the alarm is reported again under Normal.
Step 3 Perform the following steps to diagnose the faults of boards, antennas, and E1T1s based on board
alarms, antenna alarms, and E1T1 alarms:
1. On the Monitor tab page, select a board, an antenna, or a physical transmission port, or
select an alarm of a certain object from the alarm list in the right pane.
2. Right-click the board, antenna, port, or alarm, and then choose Diagnose from the shortcut
menu.
3. Set the required diagnosis parameters.
After the diagnosis parameters are set, a diagnosis task is added to the diagnosis task list.
4. Right-click the fault diagnosis task, and then choose Diagnose Report from the shortcut
menu to view the diagnosis result.
Step 4 Perform the following steps to handle an alarm:
1. Double-click the alarm to be handled.
2. In the displayed dialog box that shows the alarm details, click the link in Reason And
Advice.
3. Rectify the fault based on the alarm reference.
----End
5.6.3 Viewing Service Verification Results
After a NodeB commissioning task is at the service verification stage, the M2000 automatically
subscribes to the performance counters of the logical cells of this NodeB and checks whether
the NodeB services are normal based on the counter values. At this stage, you can check whether
each cell of the NodeB has passed the service verification and view the accumulated value of
each counter.
Context
lWhen the management status of a logical cell of the RNC to which the NodeB belongs is
Unblocked and the operation status is Enable, it indicates that the commissioning is at the
service verification stage. You can check whether a task is at the service verification stage
by referring to Description of the task.
lAt the service verification stage, the performance measurement period is the shortest
measurement period supported by the NodeB. There are certain rules for checking whether
NodeB services are normal. For details, see Service Verification Rules.
5 Commissioning the MBTS in GL or UL Mode on the
M2000
3900 Series Multi-Mode Base Station
Commissioning Guide
5-30 Huawei Proprietary and Confidential
Copyright © Huawei Technologies Co., Ltd.
Issue 02 (2010-07-30)

lIf a NodeB passes the service verification, the status of its commissioning task
automatically changes to Waiting for Acknowledgement. In such a case, you need to
manually confirm that the commissioning is complete.
lThe M2000 automatically clears the service verification measurement data that is generated
two weeks ago. This avoids a large amount of unnecessary history data on the M2000 server.
Procedure
Step 1 Choose Configuration > Auto Deployment > NodeB Auto Deployment to open NodeB Auto
Deployment.
Step 2 Right-click the commissioning task whose alarms are to be viewed, and then choose Open
Service Verification Window from the shortcut menu.
In the displayed window, you can view the verification result of each cell and the accumulated
values of all the performance counters based on cells. For details about the service verification
window, see 5.13.1 Interface Description: NodeB Commissioning.
----End
Service Verification Rules
lIf the value of a single performance counter is not 0 during the service verification, it
indicates that this counter has passed the verification.
lIf all the performance counters of a cell have passed the verification, it indicates that this
cell has passed the verification.
lIf all the logical cells of a NodeB have passed the verification, it indicates that this NodeB
has passed the verification.
5.6.4 Performing a NodeB Task Again or Deleting the Task
When a NodeB commissioning task is running, you can perform this task again or delete this
task.
Prerequisite
The NodeB deployment list is imported successfully.
Context
When the NodeB version software is being downloaded, the restart is performed after the FTP
service is complete. Therefore, you need to wait for a certain period to view the operation result
on the M2000.
Procedure
Step 1 Choose Configuration > Auto Deployment > NodeB Auto Deployment to open NodeB Auto
Deployment.
Step 2 In the commissioning task list, select the commissioning task to be performed again or deleted.
You can select multiple commissioning tasks.
Step 3 Right-click a commissioning task, and then choose the required menu item from the shortcut
menu.
3900 Series Multi-Mode Base Station
Commissioning Guide
5 Commissioning the MBTS in GL or UL Mode on the
M2000
Issue 02 (2010-07-30) Huawei Proprietary and Confidential
Copyright © Huawei Technologies Co., Ltd.
5-31

lYou can choose Restart to perform the commissioning task again.
lYou can choose Delete to delete this task.
----End
5.7 Monitoring the eNodeB Commissioning Task
This section describes how to monitor an eNodeB commissioning task. By monitoring the
eNodeB commissioning task, you can learn the eNodeB commissioning progress and status, and
then perform operations on the eNodeB commissioning task.
5.7.1 Viewing the eNodeB Commissioning Progress
After the eNodeB commissioning task is created, the user can view the task progress and related
information to handle problems during the eNodeB commissioning.
5.7.2 Pausing/Retrying the eNodeB Commissioning Task
During the automatic eNodeB commissioning on the M2000, the commissioning task can be
paused and retried as required.
5.7.3 Restarting/Deleting the eNodeB Commissioning Task
During the automatic eNodeB commissioning on the M2000, a commissioning task can be
deleted and a terminated commissioning task can be restarted as required.
5.7.1 Viewing the eNodeB Commissioning Progress
After the eNodeB commissioning task is created, the user can view the task progress and related
information to handle problems during the eNodeB commissioning.
Prerequisite
The eNodeB commissioning task is created.
Context
Table 5-4 describes the automatic eNodeB commissioning process.
Table 5-4 Automatic eNodeB commissioning process
eNodeB
Commiss
ioning
Process
Description
Automatic
deploymen
t
After the eNodeB ESN and imported EDS file are bound together, the M2000
automatically allocates the IP address for the eNodeB. In this way, the OM
channel can be established automatically between the M2000 and the eNodeB
for remote commissioning and routine maintenance.
After the M2000 discovers an eNodeB, the M2000 automatically sets the
eNodeB to TESTING mode. Thus, all alarms generated during the eNodeB
commissioning are not reported on the M2000.
5 Commissioning the MBTS in GL or UL Mode on the
M2000
3900 Series Multi-Mode Base Station
Commissioning Guide
5-32 Huawei Proprietary and Confidential
Copyright © Huawei Technologies Co., Ltd.
Issue 02 (2010-07-30)
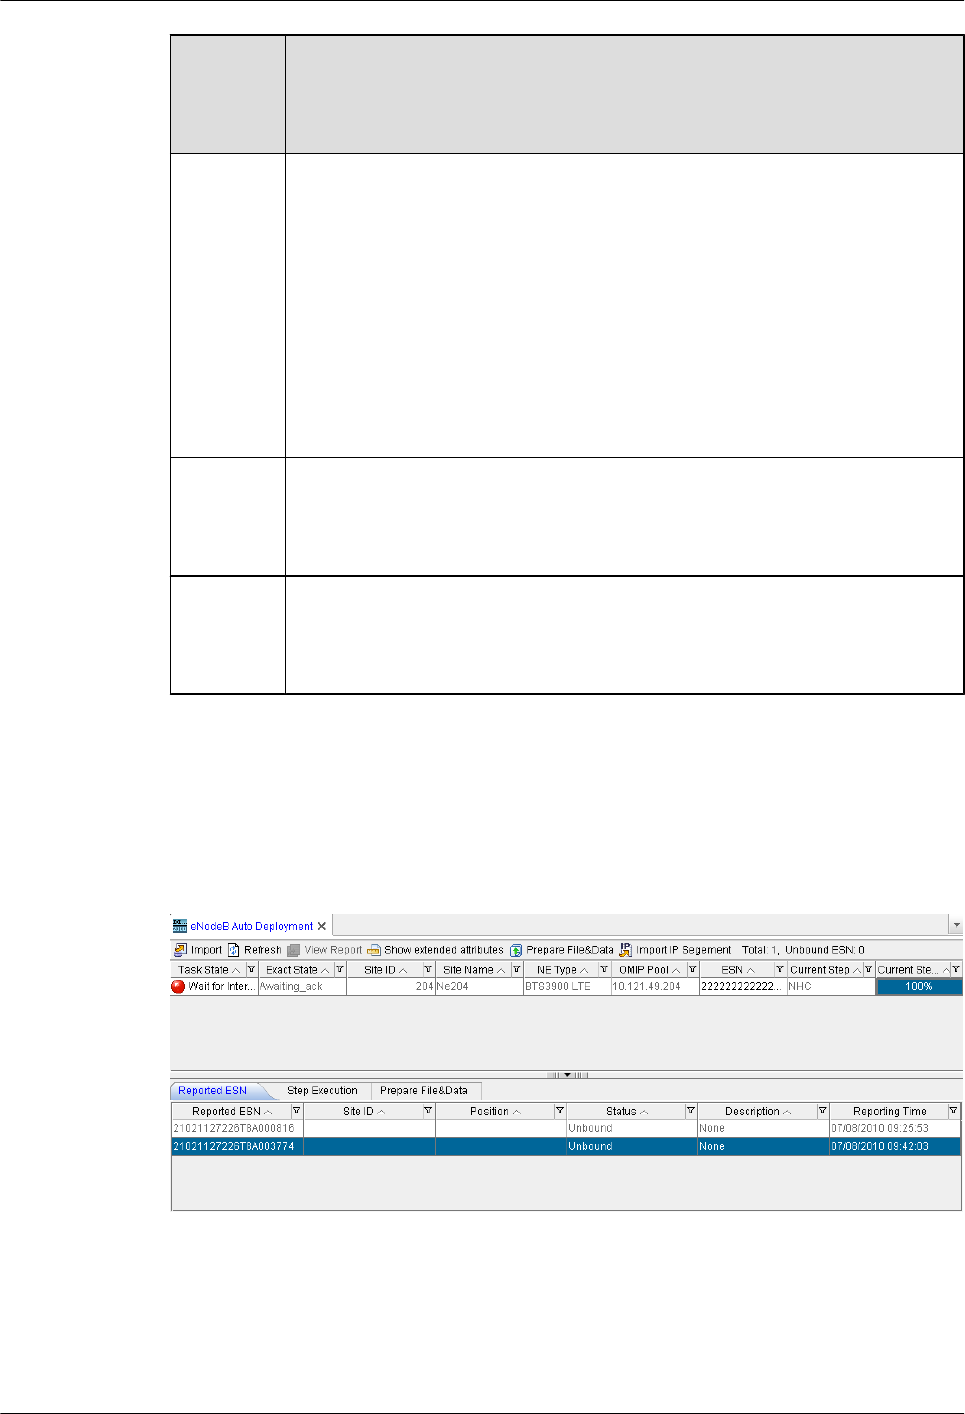
eNodeB
Commiss
ioning
Process
Description
Automatic
configurati
on
Automatic configuration includes the steps listed as follows. If you deselect a
step when importing the EDS file, or if the file related to a step does not exist,
the automatic eNodeB commissioning skips this step and proceeds.
lDownloading the eNodeB software
lDownloading the data configuration file
lActivating the eNodeB software and data configuration file
lSupplementing the software automatically
lUpdating the license file
lCommissioning the RET antenna
Testing
and
verificatio
n
The M2000 automatically performs the eNodeB health check, which involves
checking for active alarms.
eNodeB
deploymen
t complete
After the testing and verification is complete, the user decides whether to end
the eNodeB commissioning based on the actual situations. When the eNodeB
commissioning is complete, the M2000 restores the eNodeB to the normal state.
Thus, the eNodeB alarms can be reported as usual.
Procedure
Step 1 On the M2000 client, choose Configuration > Auto Deployment > eNodeB Auto
Deployment. The eNodeB Auto Deployment tab page is displayed, as shown in Figure 5-9.
Figure 5-9 eNodeB Auto Deployment tab page
Step 2 View Current Step and Current Step Progress of the commissioning task. Click the Step
Execution tab page, and view Status, Progress, and Details of the steps of each phase.
----End
3900 Series Multi-Mode Base Station
Commissioning Guide
5 Commissioning the MBTS in GL or UL Mode on the
M2000
Issue 02 (2010-07-30) Huawei Proprietary and Confidential
Copyright © Huawei Technologies Co., Ltd.
5-33

5.7.2 Pausing/Retrying the eNodeB Commissioning Task
During the automatic eNodeB commissioning on the M2000, the commissioning task can be
paused and retried as required.
Prerequisite
The automatic eNodeB deployment is in progress or is paused.
Procedure
Step 1 On the M2000 client, choose Configuration > Auto Deployment > eNodeB Auto
Deployment. The eNodeB Auto Deployment tab page is displayed.
Step 2 Right-click a commissioning task and choose Pause or Retry from the shortcut menu.
NOTE
More than one commissioning task can be paused or retried at a time.
----End
Result
lWhen you choose Pause from the shortcut menu, the commissioning task stops after the
current step is complete.
lWhen you choose Retry from the shortcut menu, the commissioning task proceeds at the
paused step.
5.7.3 Restarting/Deleting the eNodeB Commissioning Task
During the automatic eNodeB commissioning on the M2000, a commissioning task can be
deleted and a terminated commissioning task can be restarted as required.
Prerequisite
The eNodeB commissioning task is created.
Procedure
Step 1 On the M2000 client, choose Configuration > Auto Deployment > eNodeB Auto
Deployment. The eNodeB Auto Deployment tab page is displayed.
Step 2 Right-click one or multiple commissioning tasks and choose Restart or Delete from the shortcut
menu.
----End
5.8 Obtaining the Commissioning Report
The commissioning report records the operation details, results, and error information obtained
during the commissioning. The eNodeB commissioning report can be viewed during the
commissioning task for handling problems in time, or be obtained after the commissioning task
for report archiving.
5 Commissioning the MBTS in GL or UL Mode on the
M2000
3900 Series Multi-Mode Base Station
Commissioning Guide
5-34 Huawei Proprietary and Confidential
Copyright © Huawei Technologies Co., Ltd.
Issue 02 (2010-07-30)

5.8.1 Obtaining a GBTS Commissioning Report
This section describes how to obtain a GBTS commissioning report. A GBTS commissioning
report records the task information about a commissioned GBTS and the information about the
commissioning process. When a commissioning task is still in progress or is complete, you can
obtain and analyze the commissioning report to learn the commissioning details, to view the
exceptions that occur during the commissioning, or to determine whether to complete the
commissioning.
5.8.2 Obtaining a NodeB Commissioning Report
A NodeB commissioning report records detailed commissioning operations, operation results,
and exceptions that occur during the commissioning. You can obtain the commissioning report
to view the detailed information when a commissioning task is running. You can also obtain the
commissioning report for archive after the commissioning task is complete.
5.8.3 Obtaining an eNodeB Commissioning Report
The eNodeB commissioning report includes the operation details, results, and error information
obtained during commissioning. It also includes the eNodeB health check report. The eNodeB
commissioning report can be viewed during the commissioning task for handling problems in
time, or be obtained after the commissioning task for report archiving.
5.8.1 Obtaining a GBTS Commissioning Report
This section describes how to obtain a GBTS commissioning report. A GBTS commissioning
report records the task information about a commissioned GBTS and the information about the
commissioning process. When a commissioning task is still in progress or is complete, you can
obtain and analyze the commissioning report to learn the commissioning details, to view the
exceptions that occur during the commissioning, or to determine whether to complete the
commissioning.
Prerequisite
A commissioning task is in progress.
Context
You can select multiple commissioning tasks at a time to obtain their reports. In this case, the
M2000 combines and displays all information contained in these reports in one report. If you
manually deletes a commissioning task, the corresponding commissioning report is deleted
accordingly.
For details about the GBTS commissioning report, see 5.12.3 Parameters of the GBTS
Commissioning Report.
Procedure
Step 1 Choose Configuration > Auto Deployment > GBTS Auto Deployment to open the GBTS
Auto Deployment window.
Step 2 On the GBTS List tab page, select one or multiple commissioning tasks whose commissioning
reports are to be viewed, and then click . Alternatively, right-click the tasks, and then choose
Export Report from the shortcut menu.
You can customize the filename of the commissioning report. If you do not specify the filename,
the M2000 names the file in user name@report exporting time format by default. For example,
admin@2009_10_16_15_37_21.
3900 Series Multi-Mode Base Station
Commissioning Guide
5 Commissioning the MBTS in GL or UL Mode on the
M2000
Issue 02 (2010-07-30) Huawei Proprietary and Confidential
Copyright © Huawei Technologies Co., Ltd.
5-35

Step 3 In the exported commissioning report folder, select index.html to view the commissioning
report.
----End
5.8.2 Obtaining a NodeB Commissioning Report
A NodeB commissioning report records detailed commissioning operations, operation results,
and exceptions that occur during the commissioning. You can obtain the commissioning report
to view the detailed information when a commissioning task is running. You can also obtain the
commissioning report for archive after the commissioning task is complete.
Prerequisite
A commissioning task is running.
Context
The exported commissioning report records the information about the procedures of only the
selected commissioning tasks. If you manually delete a commissioning task, the generated
commissioning report does not contain the information about this task any longer.
Procedure
Step 1 Choose Configuration > Auto Deployment > NodeB Auto Deployment to open NodeB Auto
Deployment.
Step 2 Select one or multiple commissioning tasks whose commissioning report you want to view.
Step 3 Click .
Step 4 Specify a local save path, and then click Confirm.
You can customize the file name of a commissioning report. If you do not specify the file name,
the M2000 uses user name@report exporting time as the file name by default. For example,
admin@2009_10_16_15_37_21.
----End
5.8.3 Obtaining an eNodeB Commissioning Report
The eNodeB commissioning report includes the operation details, results, and error information
obtained during commissioning. It also includes the eNodeB health check report. The eNodeB
commissioning report can be viewed during the commissioning task for handling problems in
time, or be obtained after the commissioning task for report archiving.
Prerequisite
The eNodeB commissioning task is in progress.
Context
The exported commissioning report records the information about only the selected
commissioning task. If a commissioning task is deleted manually, the corresponding
commissioning report cannot be generated.
5 Commissioning the MBTS in GL or UL Mode on the
M2000
3900 Series Multi-Mode Base Station
Commissioning Guide
5-36 Huawei Proprietary and Confidential
Copyright © Huawei Technologies Co., Ltd.
Issue 02 (2010-07-30)

Procedure
Step 1 On the M2000 client, choose Configuration > Auto Deployment > eNodeB Auto
Deployment. The eNodeB Auto Deployment tab page is displayed.
Step 2 Select one or more commissioning tasks.
Step 3 Click to view the automatic deployment report, which includes the health check report.
----End
5.9 Checking the Operating Status of the Base Station
The operating status of a base station can be viewed in the commissioning report.
5.9.1 Checking the Running Status of the GBTS
You can analysis the GBTS commissioning report to infer the running status of the GBTS.
5.9.2 Checking the Running Status of the NodeB
You can analysis the NodeB commissioning report to infer the running status of the NodeB.
5.9.3 Checking the Running Status of the eNodeB
You can analysis the eNodeB commissioning report to infer the running status of the eNodeB.
5.9.1 Checking the Running Status of the GBTS
You can analysis the GBTS commissioning report to infer the running status of the GBTS.
Context
NOTE
lWhen the status of the GBTS commissioning task is Waiting for Acknowledgement, you can infer
that the service verification is complete. The obtained commissioning report can help you determine
the running status of the GBTS.
lThe commissioning report records all the commissioning information generated from the start of the
commissioning task to the moment the report is generated. Therefore, the commissioning report that
records the information about the whole commissioning process can be obtained only when the status
of the GBTS commissioning task is Finished, that is, at the end of the GBTS commissioning task.
Procedure
Step 1 View the GBTS commissioning report to infer the running status of the GBTS.
Step 2 View the alarm list and clear the active alarms according to the BSC6900 GSM Alarm
Reference.
NOTE
There are two methods of viewing the alarm list:
lExport the alarm list when the commission report is exported. Then, the commissioning report includes
the alarm list.
lOpen the alarm list window according to step 1 and step 2 in 5.5.1 Viewing the GBTS Alarm
Status.
3900 Series Multi-Mode Base Station
Commissioning Guide
5 Commissioning the MBTS in GL or UL Mode on the
M2000
Issue 02 (2010-07-30) Huawei Proprietary and Confidential
Copyright © Huawei Technologies Co., Ltd.
5-37

Step 3 Optional: View the service verification results to learn about service verification counters. For
details, see 5.5.3 Viewing the GBTS Service Verification Results.
----End
5.9.2 Checking the Running Status of the NodeB
You can analysis the NodeB commissioning report to infer the running status of the NodeB.
Context
NOTE
lWhen the status of the NodeB commissioning task is Waiting for Acknowledgement, you can infer
that the service verification is complete. The obtained commissioning report can help you determine
the running status of the NodeB.
lThe commissioning report records all the commissioning information generated from the start of the
commissioning task to the moment the report is generated. Therefore, the commissioning report that
records the information about the whole commissioning process can be obtained only when the status
of the NodeB commissioning task is Finished, that is, at the end of the NodeB commissioning task.
Procedure
Step 1 View the NodeB commissioning report to infer the running status of the NodeB.
Step 2 View the alarm list and clear the active alarms according to the NodeB Alarm Reference.
NOTE
There are two methods of viewing the alarm list:
lExport the alarm list when the commission report is exported. Then, the commissioning report includes
the alarm list.
lOpen the alarm list window according to step 1 and step 2 in 5.6.2 Viewing NodeB Alarms.
Step 3 Optional: View the service verification results to learn about service verification counters. For
details, see 5.6.3 Viewing Service Verification Results.
----End
5.9.3 Checking the Running Status of the eNodeB
You can analysis the eNodeB commissioning report to infer the running status of the eNodeB.
Prerequisite
eNodeB health check is complete in the eNodeB commissioning task.
Context
Table 5-5 describes the eNodeB health checklist.
5 Commissioning the MBTS in GL or UL Mode on the
M2000
3900 Series Multi-Mode Base Station
Commissioning Guide
5-38 Huawei Proprietary and Confidential
Copyright © Huawei Technologies Co., Ltd.
Issue 02 (2010-07-30)

Table 5-5 eNodeB health checklist
Check Item Check Sub-Item Description
eNodeB software
version check
eNodeB software version check Check the active eNodeB
software, including the version
and running status.
Environment status
check
RRU temperature check Check the temperature of the
RRU.
Environment temperature and
humidity check
Check the temperature and
humidity of the environment.
eNodeB type check eNodeB type check Check the eNodeB type in data
configuration.
Data configuration
check
Consistency check on the data
configuration
Check the consistency between
the effective data applied to
modules and the configured data
in the database.
Active alarm query Check for active alarms of an NE.
Cell status check Cell status check Check the cell status.
MBTS alarm check Inter-system communication
alarm check
Check the status of inter-system
communication.
Inter-system BBU board
parameter settings conflict alarm
check
Check the consistency of inter-
system parameter settings for the
BBU board.
Inter-system cabinet
configuration conflict alarm
check
Check the consistency of inter-
system configurations for the
cabinet.
Inter-system monitoring device
parameter settings conflict alarm
check
Check the consistency of inter-
system parameter settings for the
monitoring device.
Inter-system board object
configuration conflict alarm
check
Check the consistency of inter-
system configurations for the
board object.
Inter-system RF unit parameter
settings conflict alarm check
Check the consistency of inter-
system parameter settings for the
RF unit.
Inter-system site-level
configuration conflict alarm
check
Check the consistency of inter-
system configurations on site
level.
Inter-system control rights
conflict alarm check
Check the consistency of inter-
system control rights.
3900 Series Multi-Mode Base Station
Commissioning Guide
5 Commissioning the MBTS in GL or UL Mode on the
M2000
Issue 02 (2010-07-30) Huawei Proprietary and Confidential
Copyright © Huawei Technologies Co., Ltd.
5-39

Check Item Check Sub-Item Description
RF unit working mode and board
capability mismatch alarm check
Check the matching between the
RF unit working mode and the
board capability.
Hardware status
check
CPU usage check Check the CPU usage.
Transmit channel check Check the status of the transmit
channel.
Receive channel check Check the status of the receive
channel.
RRU status check Check the status of an RF unit.
Board status check Check the status of a board.
Interface status check X2-interface link check Check the status of the current X2
interface and the information
about the peer eNodeB.
S1-interface link check Check the parameters of the
current S1 interface and the
information about the peer
MME.
GE/FE port status check Check the parameter settings of
the Ethernet port.
E1/T1 port status check Check the parameter settings of
the E1/T1 port.
Remote maintenance channel
status check
Check the data configuration on
all the remote maintenance
channels of the eNodeB.
SCTP link status check Check the parameter settings of
the SCTP link.
IP Path status check Check the parameter settings
related to IP Path.
CPRI port status check Check the parameter settings of
the CPRI port.
Clock status check Clock status check Check the current clock of the
main cabinet, including the
current reference clock, clock
quality, clock priority, clock
working mode, and status of the
phase-locked loop.
5 Commissioning the MBTS in GL or UL Mode on the
M2000
3900 Series Multi-Mode Base Station
Commissioning Guide
5-40 Huawei Proprietary and Confidential
Copyright © Huawei Technologies Co., Ltd.
Issue 02 (2010-07-30)
Procedure
Step 1 Open the eNodeB commissioning report and view the health check report. Learn the running
status of the eNodeB.
Step 2 If the result of the eNodeB health check fails, check for active alarms and rectify the related
faults by referring to the eNodeB Alarm Reference. If all active alarms are cleared but the health
check still fails, contact Huawei for technical support.
----End
5.10 Testing the Basic Services of the eNodeB
This section describes how to test the basic services of the eNodeB.
Prerequisite
lThe eNodeB and the MME/S-GW are properly connected.
lThe negotiation data of the eNodeB to be commissioned is added to the MME/S-GW.
lThe testing UE is functional and is registered in the HSS.
lThe FTP server for testing the basic services is available.
lThe WWW server for testing the basic services is available.
Procedure
lTest the web page browsing service.
Testing Method Access the WWW server and browse the web pages through a UE.
Perform the test 20 times.
Expectation Success rate > 95%. Web browsing is normal.
lTest the file uploading service.
Testing Method Access the FTP server and upload files through a UE. Perform the
test 10 times.
Expectation Success rate > 90%. The upload rate is stable.
lTest the file downloading service.
Testing Method Access the FTP server and download files through a UE. Perform the
test 10 times.
Expectation Success rate >90%. The download rate is stable.
lTest the VoIP services.
Testing Method Use the testing UE to call another UE 20 times.
3900 Series Multi-Mode Base Station
Commissioning Guide
5 Commissioning the MBTS in GL or UL Mode on the
M2000
Issue 02 (2010-07-30) Huawei Proprietary and Confidential
Copyright © Huawei Technologies Co., Ltd.
5-41
Expectation Connection success rate > 95%. The calls are uninterrupted and none
of the calls get dropped till they are released. The voice is clear with
no loud noise.
----End
5.11 Confirming the Commissioning Task
After the M2000 finishes commissioning a base station automatically, the commissioning task
enters the to-be-confirmed state, waiting for manual confirmation that the commissioning is
complete.
5.11.1 Confirming a GBTS Commissioning Task
This section describes how to confirm the completion of GBTS commissioning. After the GBTS
service verification is complete, the commissioning task switches to Confirming completed
status, and you need to manually confirm the completion.
5.11.2 Confirming a NodeB Commissioning Task
This section describes how to confirm a NodeB commissioning task. After a NodeB passes the
service verification, the status of the NodeB commissioning task changes to Waiting for
Acknowledgement. You need to manually confirm that the commissioning is complete.
5.11.3 Confirming an eNodeB Commissioning Task
After the eNodeB health check is complete, the status of the commissioning task changes to
Awaiting_ack. In this case, you need to acknowledge the eNodeB commissioning.
5.11.1 Confirming a GBTS Commissioning Task
This section describes how to confirm the completion of GBTS commissioning. After the GBTS
service verification is complete, the commissioning task switches to Confirming completed
status, and you need to manually confirm the completion.
Context
If some alarms are still not cleared during the commissioning, it is recommended that you not
confirm the completion of the commissioning task so that you can view and handle these alarms
easily. After you confirm the completion, all GBTS alarms, which are generated during the
commissioning, cannot be viewed on the monitoring tab page on the basis of a single GBTS.
The alarms that are not cleared during the commissioning are reported again as common alarms.
Procedure
Step 1 Choose Configuration > Auto Deployment > GBTS Auto Deployment to open the GBTS
Auto Deployment window.
Step 2 In the commissioning task list, select the commissioning task to be confirmed.
Step 3 Click on the toolbar to confirm the completion of the commissioning task.
After the commissioning is complete, the M2000 performs the following operations:
lStop monitoring the alarms of the GBTS and the GBSC managing the GBTS.
5 Commissioning the MBTS in GL or UL Mode on the
M2000
3900 Series Multi-Mode Base Station
Commissioning Guide
5-42 Huawei Proprietary and Confidential
Copyright © Huawei Technologies Co., Ltd.
Issue 02 (2010-07-30)

lStop subscribing to the performance counters of the GBTS for service verification.
----End
5.11.2 Confirming a NodeB Commissioning Task
This section describes how to confirm a NodeB commissioning task. After a NodeB passes the
service verification, the status of the NodeB commissioning task changes to Waiting for
Acknowledgement. You need to manually confirm that the commissioning is complete.
Context
If some alarms are still not cleared during the commissioning, it is recommended that you not
confirm the commissioning task. After you confirm the commissioning task, any alarm generated
during the commissioning cannot be viewed on the basis of a single NodeB on the Monitor tab
page. If any uncleared alarm exists during the commissioning, the alarm is reported again in the
Normal status.
Procedure
Step 1 Choose Configuration > Auto Deployment > NodeB Auto Deployment. The NodeB Auto
Deployment window is displayed.
Step 2 In the commissioning task list, select the commissioning task to be confirmed.
Step 3 Click on the toolbar to confirm that the commissioning is complete.
After the commissioning is complete, the M2000 performs the following operations:
lStop monitoring the alarms on the NodeB and its RNC.
lStop subscribing to the service verification performance counters of the NodeB.
----End
5.11.3 Confirming an eNodeB Commissioning Task
After the eNodeB health check is complete, the status of the commissioning task changes to
Awaiting_ack. In this case, you need to acknowledge the eNodeB commissioning.
Procedure
Step 1 On the M2000 client, choose Configuration > Auto Deployment > eNodeB Auto
Deployment. The eNodeB Auto Deployment tab page is displayed.
Step 2 Right-click the target commissioning task and choose Acknowledge from the shortcut menu.
The commissioning task is acknowledged.
----End
5.12 Reference to the GBTS Commissioning Interface
This section describes the interfaces and parameters for GBTS commissioning and facilitates
you to perform relevant operations for GBTS commissioning.
5.12.1 Interface Description: GBTS Commissioning
3900 Series Multi-Mode Base Station
Commissioning Guide
5 Commissioning the MBTS in GL or UL Mode on the
M2000
Issue 02 (2010-07-30) Huawei Proprietary and Confidential
Copyright © Huawei Technologies Co., Ltd.
5-43
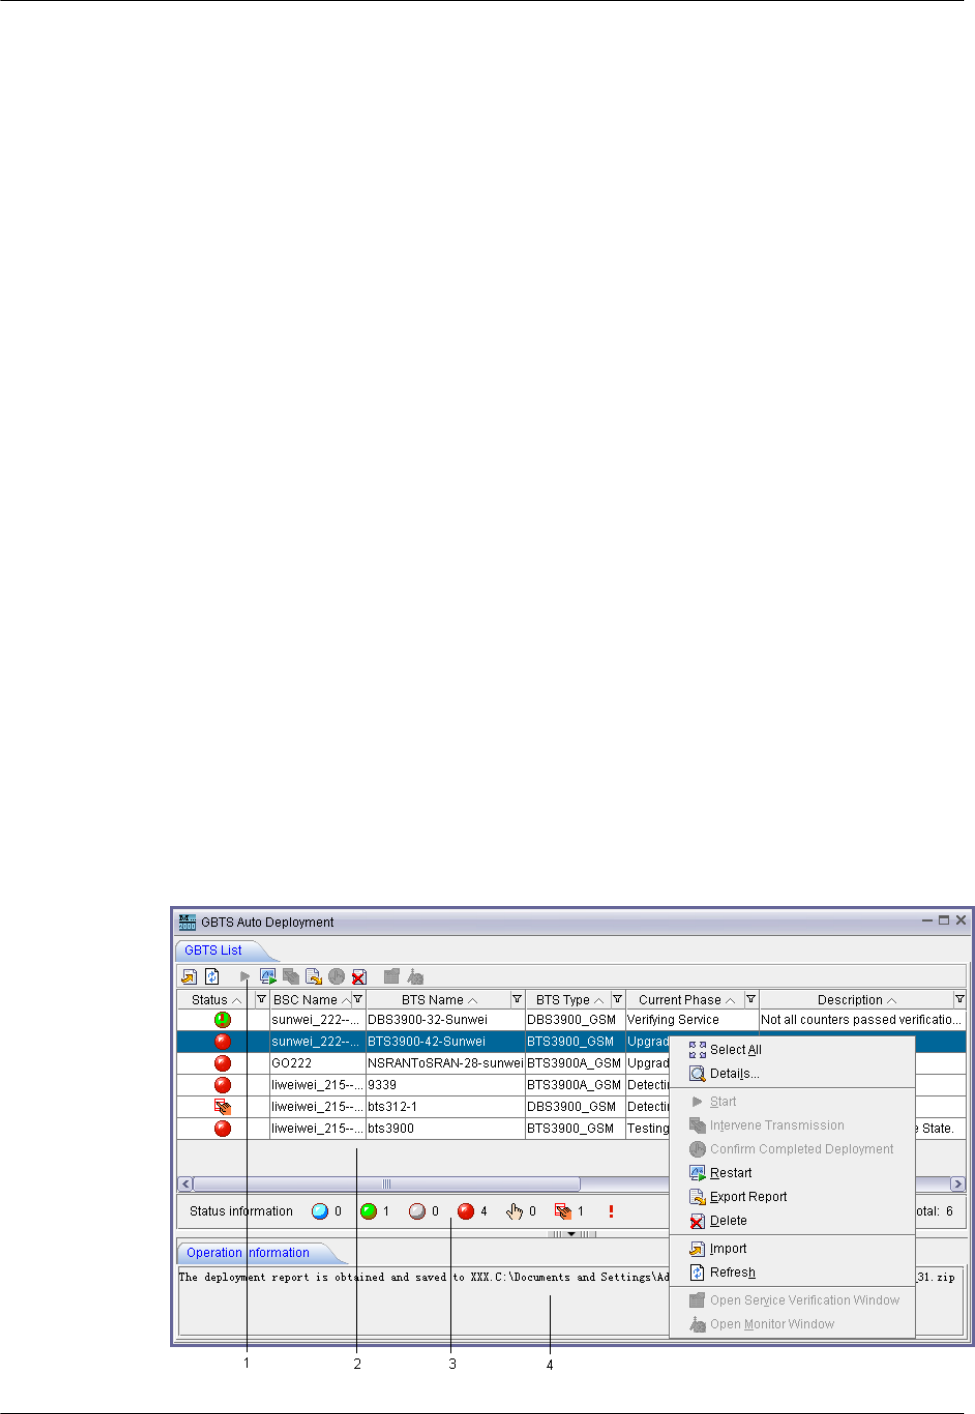
This section describes the layout of the GBTS Auto Deployment window for commissioning
GBTSs and provides the information about each element displayed in the window.
5.12.2 Parameters for a GBTS Commissioning Task
This section describes the parameters for a GBTS commissioning task that are displayed on the
GBTS List tab page of the GBTS Auto Deployment window. You can refer to this part when
viewing the GBTS commissioning progress.
5.12.3 Parameters of the GBTS Commissioning Report
This section describes the parameters displayed in the GBTS commissioning report and the
format of the GBTS commissioning report.
5.12.4 Parameters of the Performance Counters for GBTS Service Verification
This section describes the parameters of the performance counters that are monitored in the
service verification procedure during GBTS commissioning.
5.12.1 Interface Description: GBTS Commissioning
This section describes the layout of the GBTS Auto Deployment window for commissioning
GBTSs and provides the information about each element displayed in the window.
This section mainly describes the following tab pages in the GBTS Auto Deployment window:
lGBTS List tab page
lMonitor tab page
lService Verification tab page
GBTS List Tab Page
Figure 5-10 shows the GBTS List tab page that provides the operation access for commissioning
GBTSs. For details, see Table 5-6. You can choose Configuration > Auto Deployment >
GBTS Auto Deployment to open this tab page.
Figure 5-10 GBTS List tab page
5 Commissioning the MBTS in GL or UL Mode on the
M2000
3900 Series Multi-Mode Base Station
Commissioning Guide
5-44 Huawei Proprietary and Confidential
Copyright © Huawei Technologies Co., Ltd.
Issue 02 (2010-07-30)
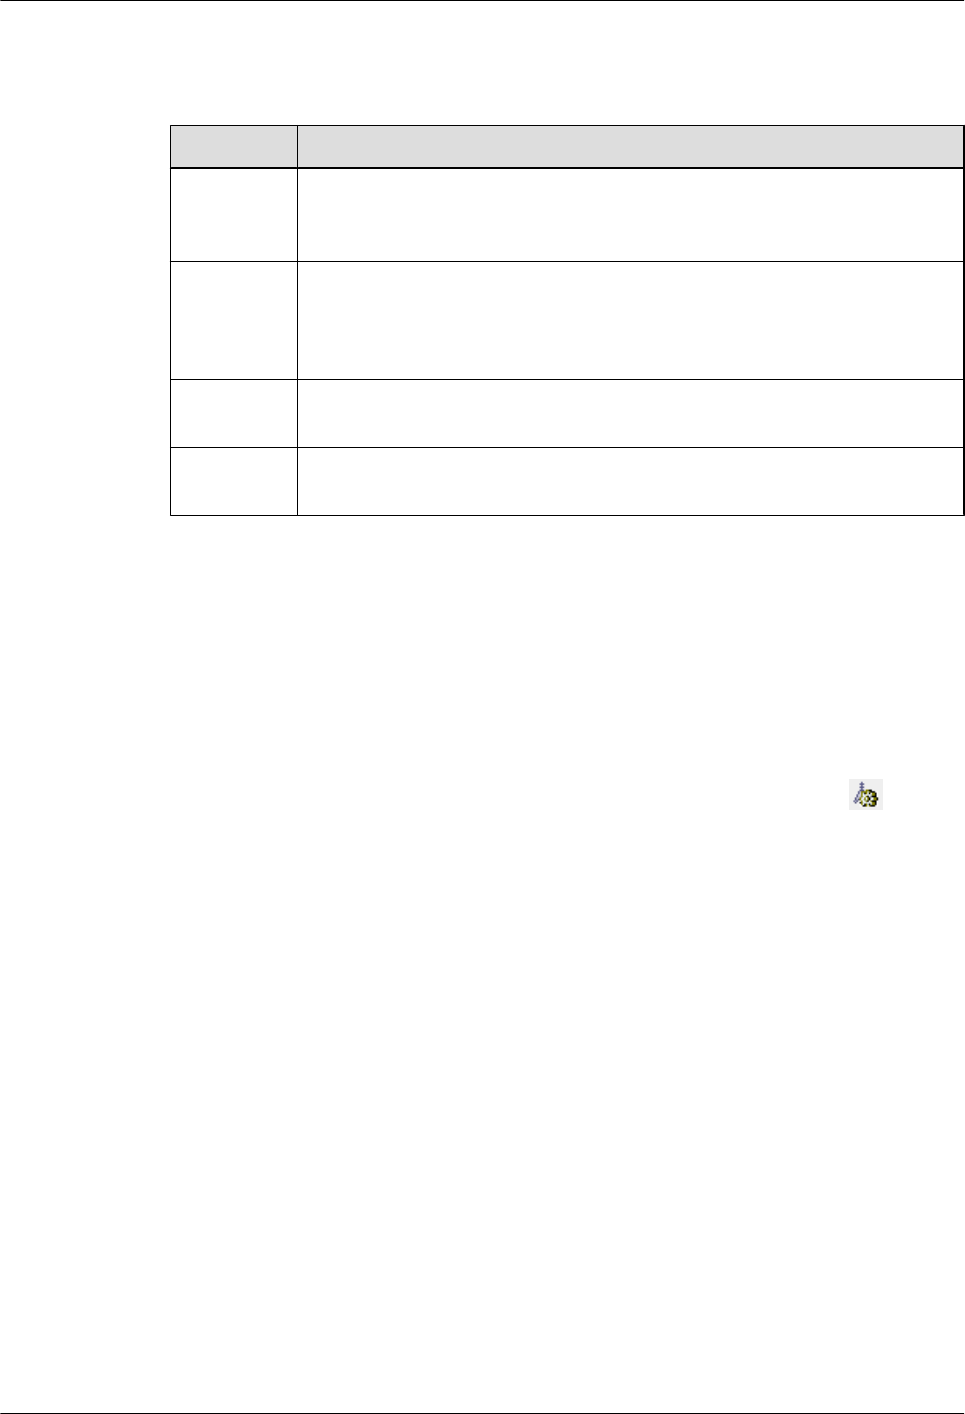
Table 5-6 GBTS List tab page
No. Description
1Toolbar, providing the operation access for commissioning GBTSs. You can
locate the cursor on each icon on the toolbar to learn the meaning of this icon
according to the displayed message.
2 Commissioning task list, displaying all commissioning tasks that you create
and the commissioning progress of each task. You can right-click a task, and
then choose the corresponding item from the shortcut menu to perform a
certain operation.
3 Status bar of commissioning tasks, displaying the total number of
commissioning tasks and number of commissioning tasks in each status.
4 Operation results, that is, the results of the operations that you perform in the
GBTS Auto Deployment window.
Monitor Tab Page
Figure 5-11 shows the Monitor tab page. The Monitor tab page displays all alarms of a certain
GBTS and all relevant alarm of the GBSC managing the GBTS, which are generated during the
commissioning. If the fault cause cannot be located according to the alarm information, you can
select one object or alarm to perform the fault diagnosis. For details about Figure 5-11, see
Table 5-7.
You can select a commissioning task on the GBTS List tab page, and then click .
Alternatively, right-click the task, and then choose Open Monitor Window from the shortcut
menu to open this tab page.
3900 Series Multi-Mode Base Station
Commissioning Guide
5 Commissioning the MBTS in GL or UL Mode on the
M2000
Issue 02 (2010-07-30) Huawei Proprietary and Confidential
Copyright © Huawei Technologies Co., Ltd.
5-45
Figure 5-11 Monitor tab page
Table 5-7 Monitor tab page
No. Description
1Object type. After selecting an object type, you can view the alarms of all the
objects of this type in the alarm list located in the right pane.
2 Alarm list. After an object type is selected, the alarms of all the objects of this
type are displayed in the alarm list. You can right-click an alarm in the alarm list,
and choose corresponding items from the shortcut menu to perform required
operations easily.
3 Fault diagnosis task list. You can right-click an object type or alarm, and then
choose Diagnose... from the shortcut menu to perform the fault diagnosis. The
M2000 creates a fault diagnosis task and displays the diagnosis progress. After
the fault diagnosis is complete, you can obtain the fault diagnosis report to view
fault location information.
NOTE
E1T1s and antennas support the fault diagnosis.
Service Verification Tab Page
Figure 5-12 shows the Service Verification tab page. The Service Verification tab page
displays the accumulation values of the performance counters related to GBTS CS and PS
services. It also displays information, indicating that the accumulation values are normal or
abnormal. You can select a commissioning task on the GBTS List tab page, and then click
5 Commissioning the MBTS in GL or UL Mode on the
M2000
3900 Series Multi-Mode Base Station
Commissioning Guide
5-46 Huawei Proprietary and Confidential
Copyright © Huawei Technologies Co., Ltd.
Issue 02 (2010-07-30)
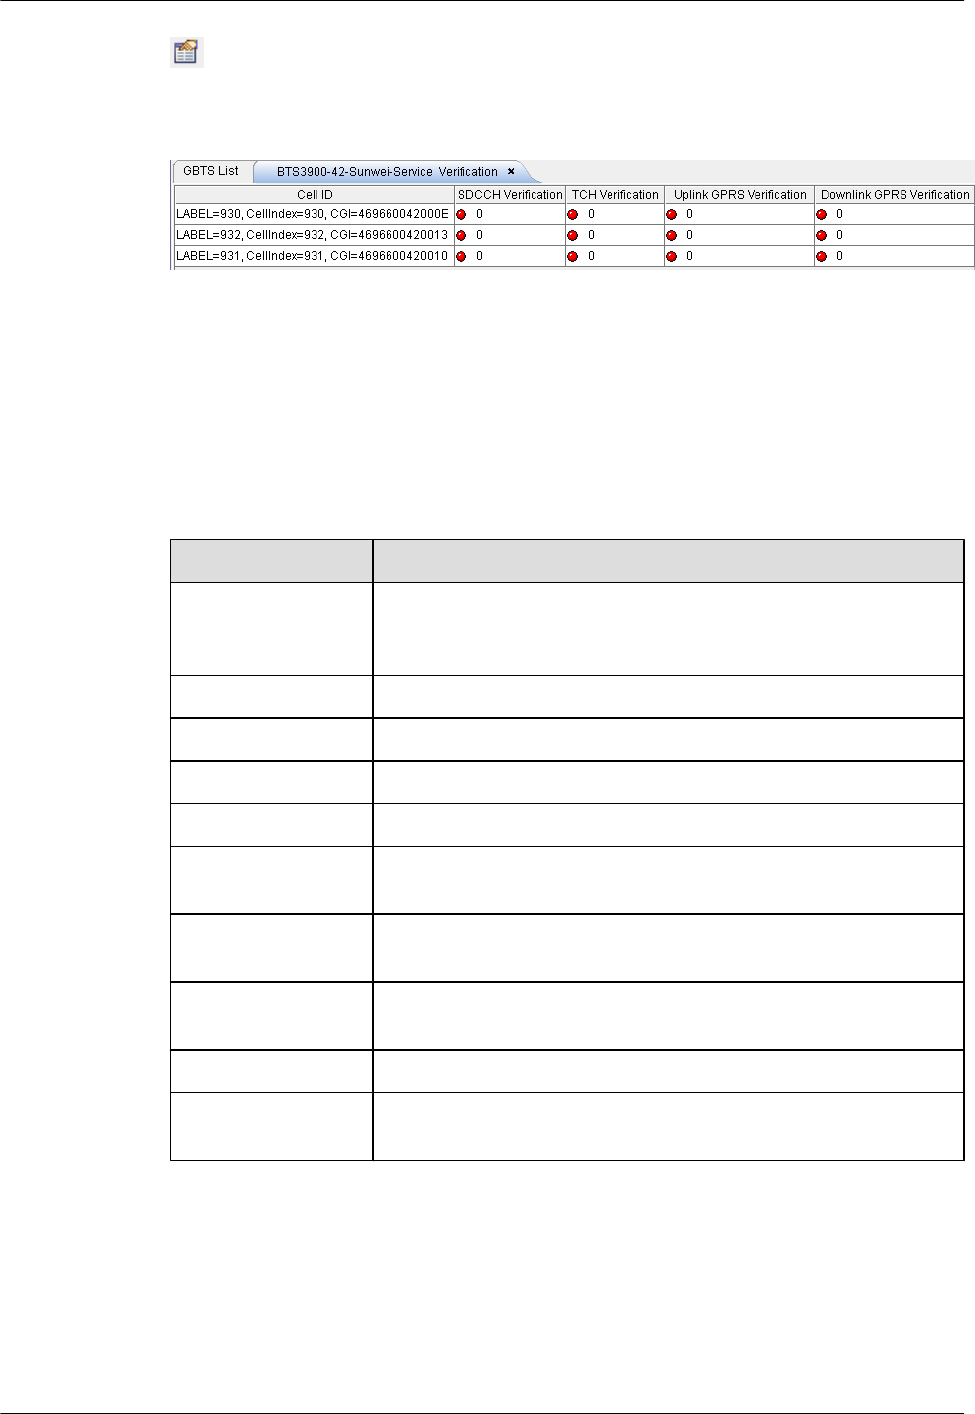
. Alternatively, right-click the task, and then choose Open Service Verification Window
from the shortcut menu to open this tab page.
Figure 5-12 Service Verification tab page
5.12.2 Parameters for a GBTS Commissioning Task
This section describes the parameters for a GBTS commissioning task that are displayed on the
GBTS List tab page of the GBTS Auto Deployment window. You can refer to this part when
viewing the GBTS commissioning progress.
Parameter Description
Parameter Description
Status Current status of a commissioning task. For the meaning of each
commissioning task status, see the description of the task status bar
on the GBTS List tab page.
BSC Name Name of a GBSC.
BTS Name Name of a GBTS.
BTS Type Type of a GBTS.
Current Phase Current commissioning procedure that a commissioning task is in.
Description Details of the current commissioning procedure that a commissioning
task is in.
BTS Software
Version
Version of the target GBTS software.
BTS Hot Patch
Version
Version of the target hot patch.
User Name Name of the user who creates a commissioning task.
Contact Contact person of the GBTS to be commissioned and his or her
contact information.
5.12.3 Parameters of the GBTS Commissioning Report
This section describes the parameters displayed in the GBTS commissioning report and the
format of the GBTS commissioning report.
If you select multiple commissioning tasks at a time to obtain related reports, the M2000
combines and displays all information contained in these reports in one report so that you can
3900 Series Multi-Mode Base Station
Commissioning Guide
5 Commissioning the MBTS in GL or UL Mode on the
M2000
Issue 02 (2010-07-30) Huawei Proprietary and Confidential
Copyright © Huawei Technologies Co., Ltd.
5-47
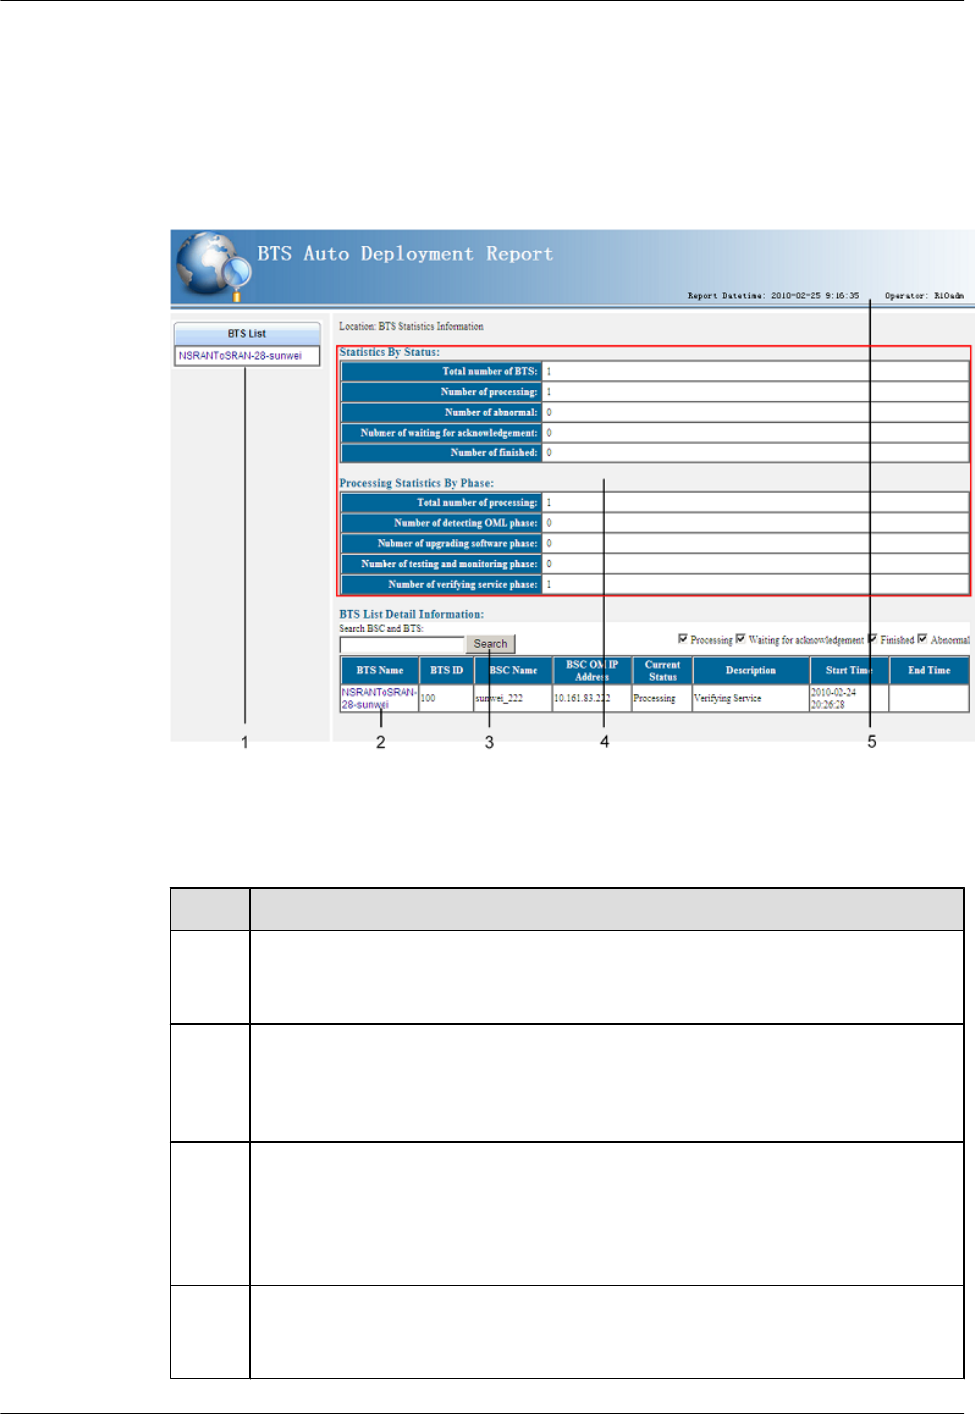
view the information easily. The commissioning report is in .html format and contains the
summary information about commissioning tasks and the details of the commissioning process
of each GBTS. Figure 5-13 shows the page of summary information. Figure 5-14 and Figure
5-15 show the pages of details. For details about these pages, see Table 5-8, Table 5-9, and
Table 5-10, respectively.
Figure 5-13 Summary information in the GBTS commissioning report
Table 5-8 Page of summary information in the GBTS commissioning report
No. Description
1This area lists all the GBTSs involved in the current commissioning report. You can
click a GBTS name to navigate to the pages of details of this GBTS. For the examples
of the pages of details, see Figure 5-14 and Figure 5-15.
2GBTS list. This list displays the basic information about each GBTS and the current
status, start time, and end time of each GBTS commissioning task. You can click a
GBTS name to navigate to the pages of details of this GBTS. For the examples of
the pages of details, see Figure 5-14 and Figure 5-15.
3Filtering conditions of the GBTS list. If the information about multiple GBTSs is
contained in the commissioning report, you can type the name of a GBTS or the
name of the GBSC managing the GBTS to locate the GBTS that you want to query.
In addition, you can select a commissioning task status to filter the commissioning
tasks that are in this status.
4 Summary information about commissioning tasks. This area displays the total
number of commissioning tasks contained in the commissioning report and number
of commissioning tasks in each procedure.
5 Commissioning the MBTS in GL or UL Mode on the
M2000
3900 Series Multi-Mode Base Station
Commissioning Guide
5-48 Huawei Proprietary and Confidential
Copyright © Huawei Technologies Co., Ltd.
Issue 02 (2010-07-30)
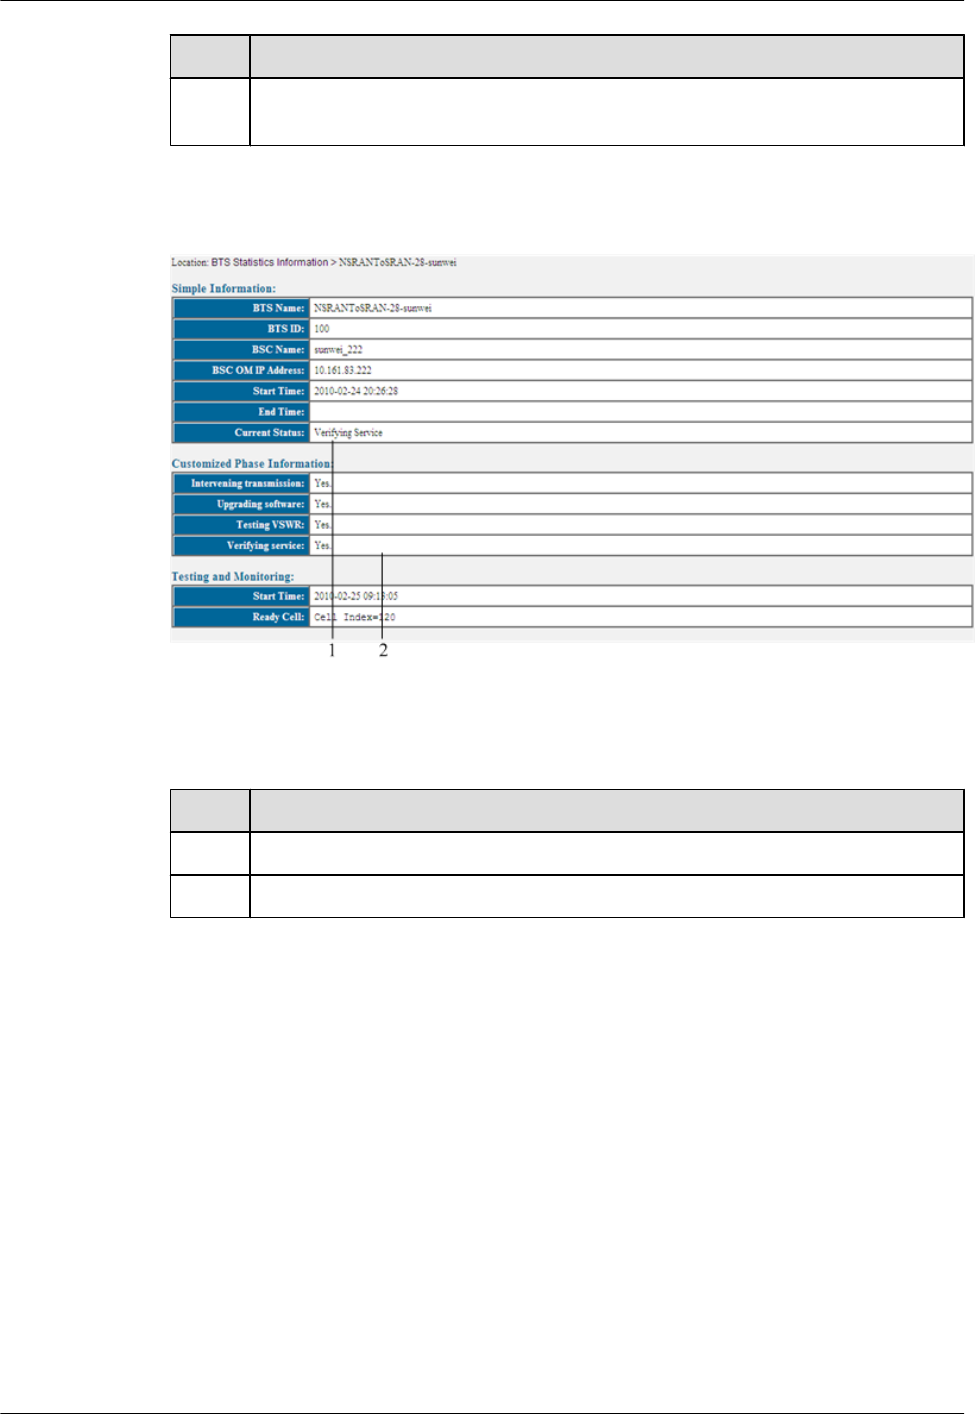
No. Description
5This area displays the generation time of the report and the names of the users who
obtain this report.
Figure 5-14 Page of details of a GBTS in the commissioning report (1)
Table 5-9 Page of details of a GBTS in the commissioning report (1)
No. Description
1This area displays the basic information about a commissioned GBTS.
2 This area displays the details of a commissioned GBTS.
If the service verification starts and you have manually triggered the automatic fault diagnosis,
the information shown in Figure 5-15 is also displayed in this area.
3900 Series Multi-Mode Base Station
Commissioning Guide
5 Commissioning the MBTS in GL or UL Mode on the
M2000
Issue 02 (2010-07-30) Huawei Proprietary and Confidential
Copyright © Huawei Technologies Co., Ltd.
5-49
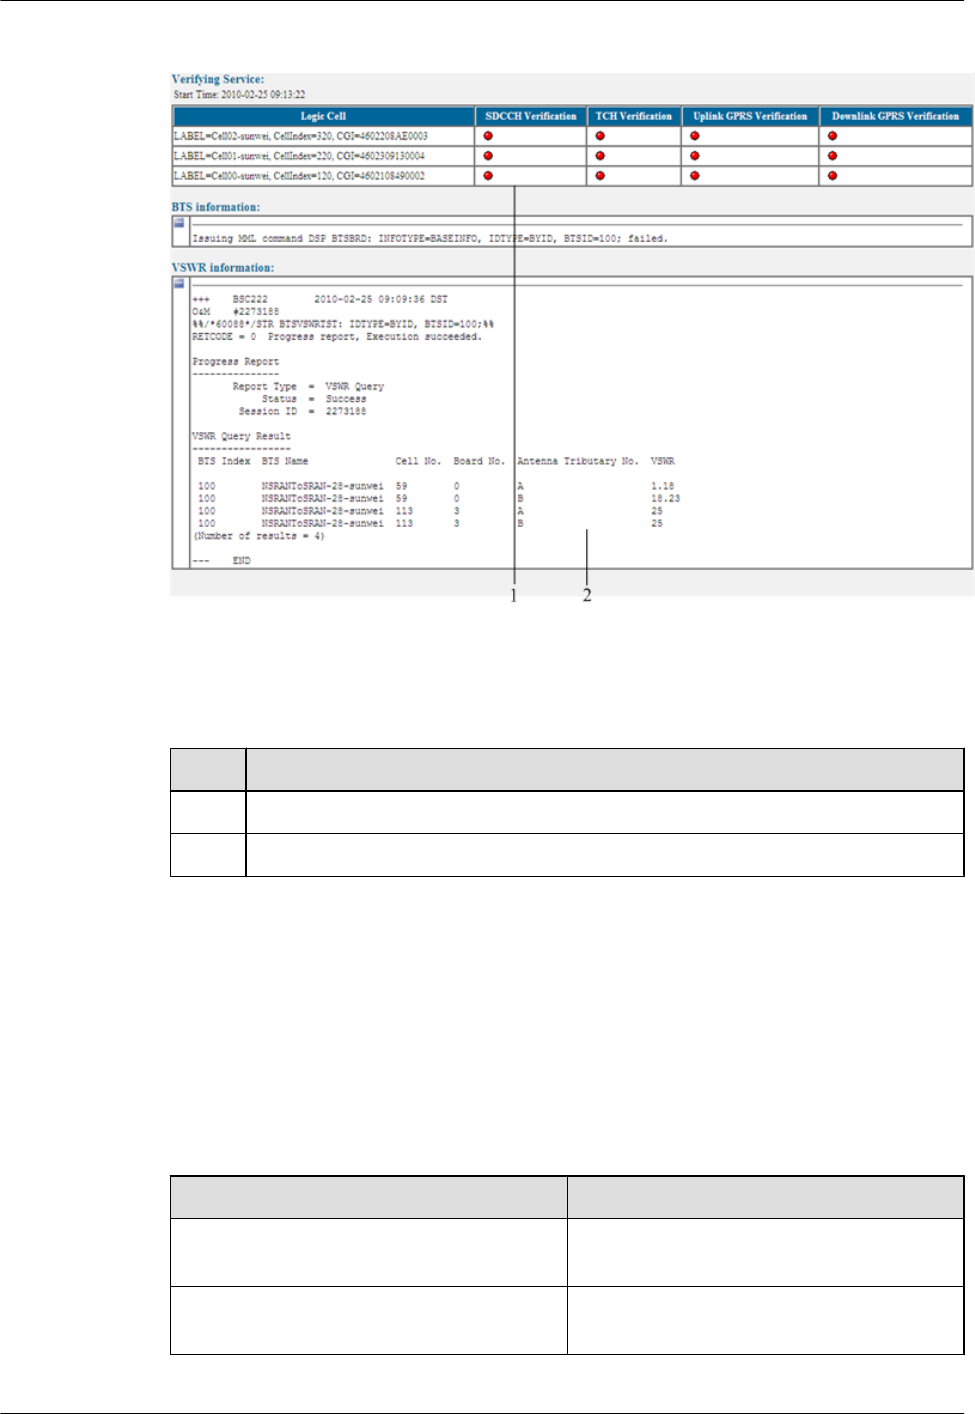
Figure 5-15 Page of details of a GBTS in the commissioning report (2)
Table 5-10 Page of details of a GBTS in the commissioning report (2)
No. Description
1Service verification results of a commissioned GBTS.
2 Automatic fault diagnosis results of a commissioned GBTS.
5.12.4 Parameters of the Performance Counters for GBTS Service
Verification
This section describes the parameters of the performance counters that are monitored in the
service verification procedure during GBTS commissioning.
Parameter Description
Parameter Description
SDCCH Verification If the value is not 0, you can infer that the
counter meets the requirement.
TCH Verification If the value is not 0, you can infer that the
counter meets the requirement.
5 Commissioning the MBTS in GL or UL Mode on the
M2000
3900 Series Multi-Mode Base Station
Commissioning Guide
5-50 Huawei Proprietary and Confidential
Copyright © Huawei Technologies Co., Ltd.
Issue 02 (2010-07-30)

Parameter Description
Uplink GPRS Verification If the value is not 0, you can infer that the
counter meets the requirement.
Downlink GPRS Verification If the value is not 0, you can infer that the
counter meets the requirement.
NOTE
lIf the values of SDCCH Verification and TCH Verification are not 0, you can infer that the
corresponding CS service verification succeeds.
lIf the values of Uplink GPRS Verification and Downlink GPRS Verification are not 0, you can infer
that the corresponding PS service verification succeeds.
5.13 Reference to the NodeB Commissioning Interface
This section describes the interfaces and parameters for NodeB commissioning and facilitates
you to perform relevant operations for NodeB commissioning.
5.13.1 Interface Description: NodeB Commissioning
This section describes the NodeB Auto Deployment window during NodeB commissioning.
You can learn about the components of this window.
5.13.2 Parameters of the NodeB Deployment List
The NodeB deployment list records the parameter information required for NodeB
commissioning. After the NodeB deployment list is imported to the M2000, the M2000 can
automatically commission the NodeBs in the NodeB deployment list.
5.13.1 Interface Description: NodeB Commissioning
This section describes the NodeB Auto Deployment window during NodeB commissioning.
You can learn about the components of this window.
NodeB Auto Deployment window-NodeB List tab page
On the M2000 client, you can choose Configuration > Auto Deployment > NodeB Auto
Deployment to open the NodeB auto-deployment window. By default, NodeB List tab page is
displayed in the NodeB auto-deployment window, as shown in Figure 5-16.
3900 Series Multi-Mode Base Station
Commissioning Guide
5 Commissioning the MBTS in GL or UL Mode on the
M2000
Issue 02 (2010-07-30) Huawei Proprietary and Confidential
Copyright © Huawei Technologies Co., Ltd.
5-51
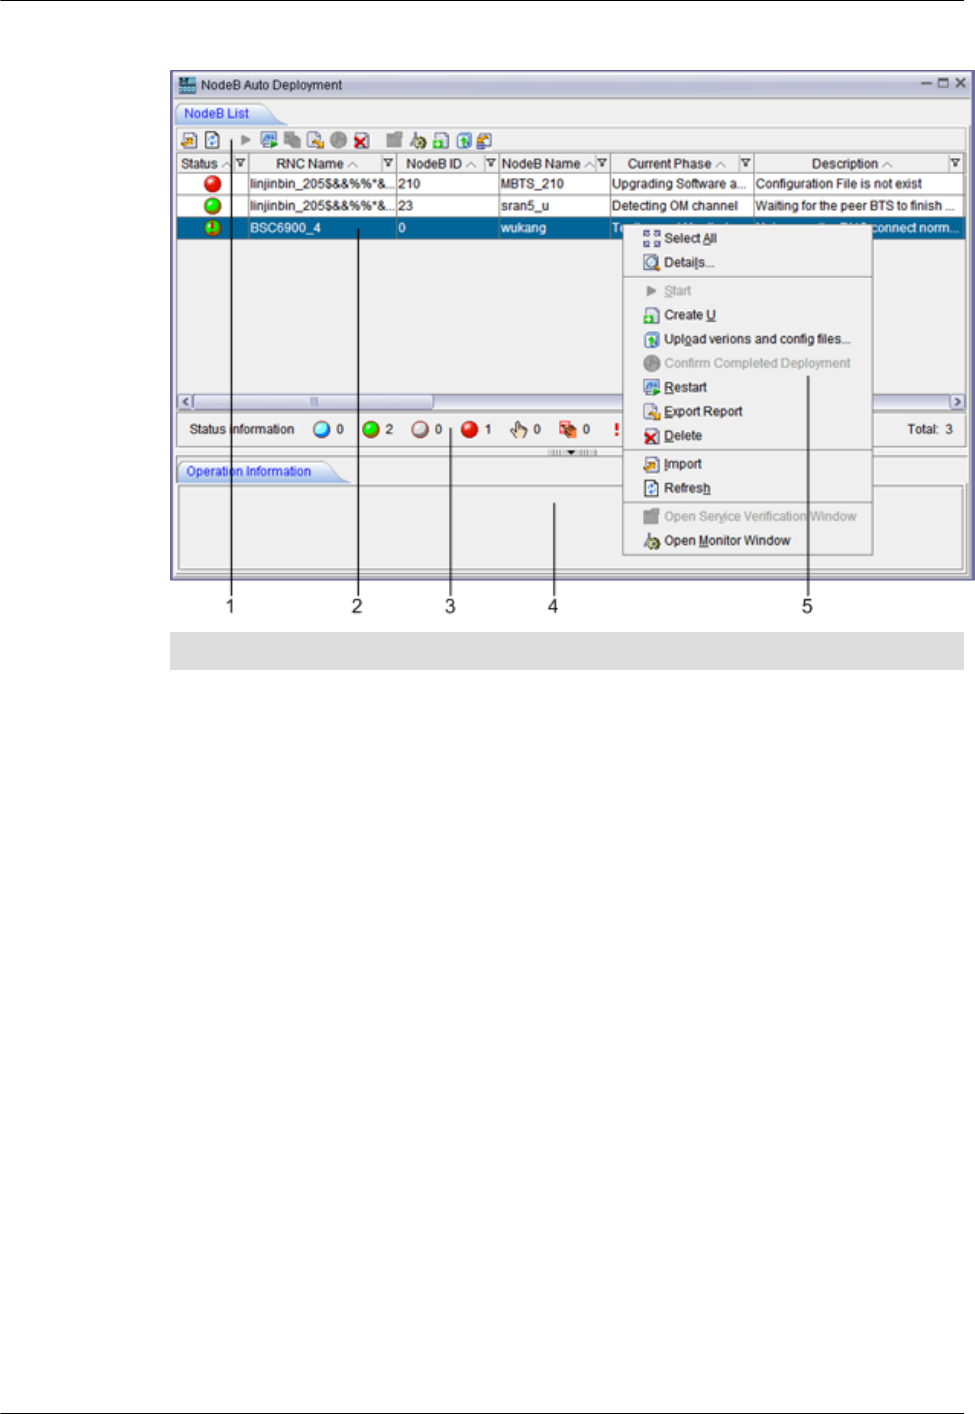
Figure 5-16 NodeB Auto Deployment window-NodeB List tab page
No. Description
1Buttons. You can perform different operations by clicking the corresponding buttons. From
the left to the right, the buttons on the NodeB List tab page are used for importing the NodeB
deployment list, refreshing the interface, uploading versions and configuration files, activating
commissioning tasks, restarting commissioning tasks, confirming commissioning tasks,
exporting commissioning reports, deleting commissioning tasks, filtering commissioning
tasks, and obtaining the NodeB deployment list template.
2 Commissioning task list. This list displays all the created commissioning tasks. You can right-
click a task and then choose a menu item from the shortcut menu to perform the corresponding
operation.
TIP
If you use the admin user account, you can view the commissioning tasks created by all
users. You can also filter the commissioning tasks created by a user by specifying User
Name.
3Status bar of commissioning tasks. The status bar displays the total number of commissioning
tasks and number of commissioning tasks in each status.
4 Operation result area. This area displays the results of operations performed in the NodeB
Auto Deployment window.
NodeB Auto Deployment window-Monitor tab page
The Monitor tab page displays all the alarms generated on the NodeB and the related alarms on
the RNC to which the NodeB belongs during NodeB commissioning. On the M2000 client, you
can choose Configuration > Auto Deployment > NodeB Auto Deployment to open the NodeB
auto-deployment window. By default, NodeB List tab page is displayed in the NodeB auto-
deployment window. On the NodeB List tab page, you can right-click a commissioning task for
5 Commissioning the MBTS in GL or UL Mode on the
M2000
3900 Series Multi-Mode Base Station
Commissioning Guide
5-52 Huawei Proprietary and Confidential
Copyright © Huawei Technologies Co., Ltd.
Issue 02 (2010-07-30)
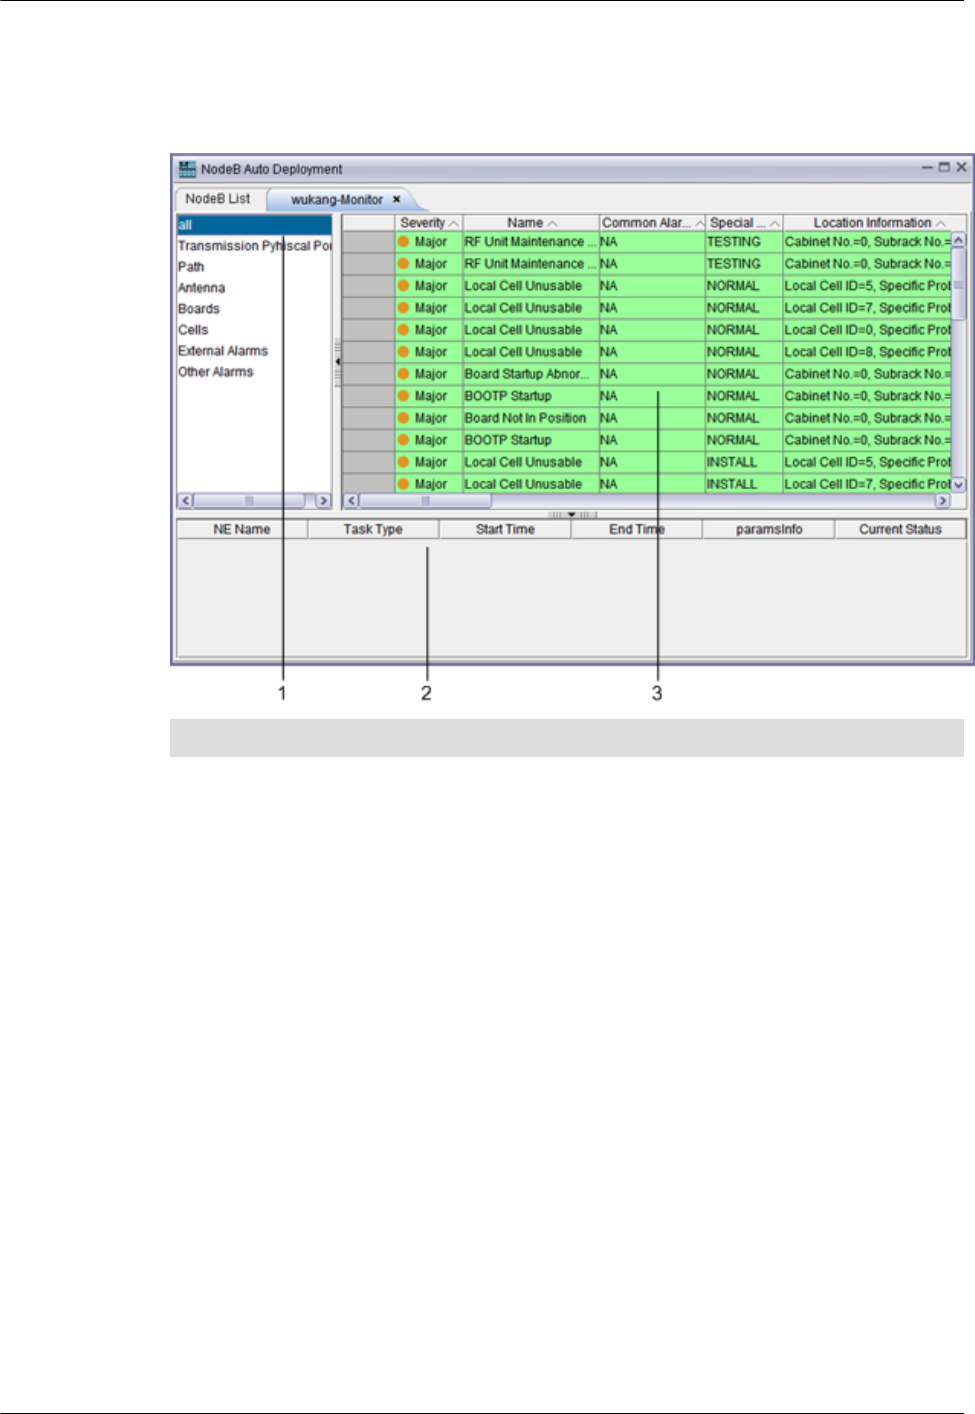
which the alarms need to be monitored and then choose Open Monitor Window from the
shortcut menu to open the corresponding tab page.
Figure 5-17 NodeB Auto Deployment window-Monitor tab page
No. Description
1Object type. After selecting an object type, you can view all the alarms of this object type in
the alarm list on the right.
2 Alarm list. After an object type is selected, this area displays all the alarms of this object type.
After selecting an alarm from the alarm list, you can perform the required operations through
the shortcut menu.
3 Diagnosis task list. You can right-click an object type or alarm, and then choose Diagnose
from the shortcut menu to run the automatic diagnosis script. At the same time, the
corresponding diagnosis task is created in this area.
After the diagnosis task is complete, you can right-click it and then choose Diagnose
Report from the shortcut menu to view the diagnosis result.
NOTE
The objects that support automatic diagnosis are boards, transmission physical ports, and
antennas.
NodeB Auto Deployment window-Validate tab page
The Validate tab page displays the accumulated values of the performance counters monitored
by the M2000 during service verification of all logical cells. On the M2000 client, you can choose
Configuration > Auto Deployment > NodeB Auto Deployment to open the NodeB auto-
deployment window. By default, NodeB List tab page is displayed in the NodeB auto-
deployment window. On the NodeB List tab page, you can right-click a commissioning task
3900 Series Multi-Mode Base Station
Commissioning Guide
5 Commissioning the MBTS in GL or UL Mode on the
M2000
Issue 02 (2010-07-30) Huawei Proprietary and Confidential
Copyright © Huawei Technologies Co., Ltd.
5-53
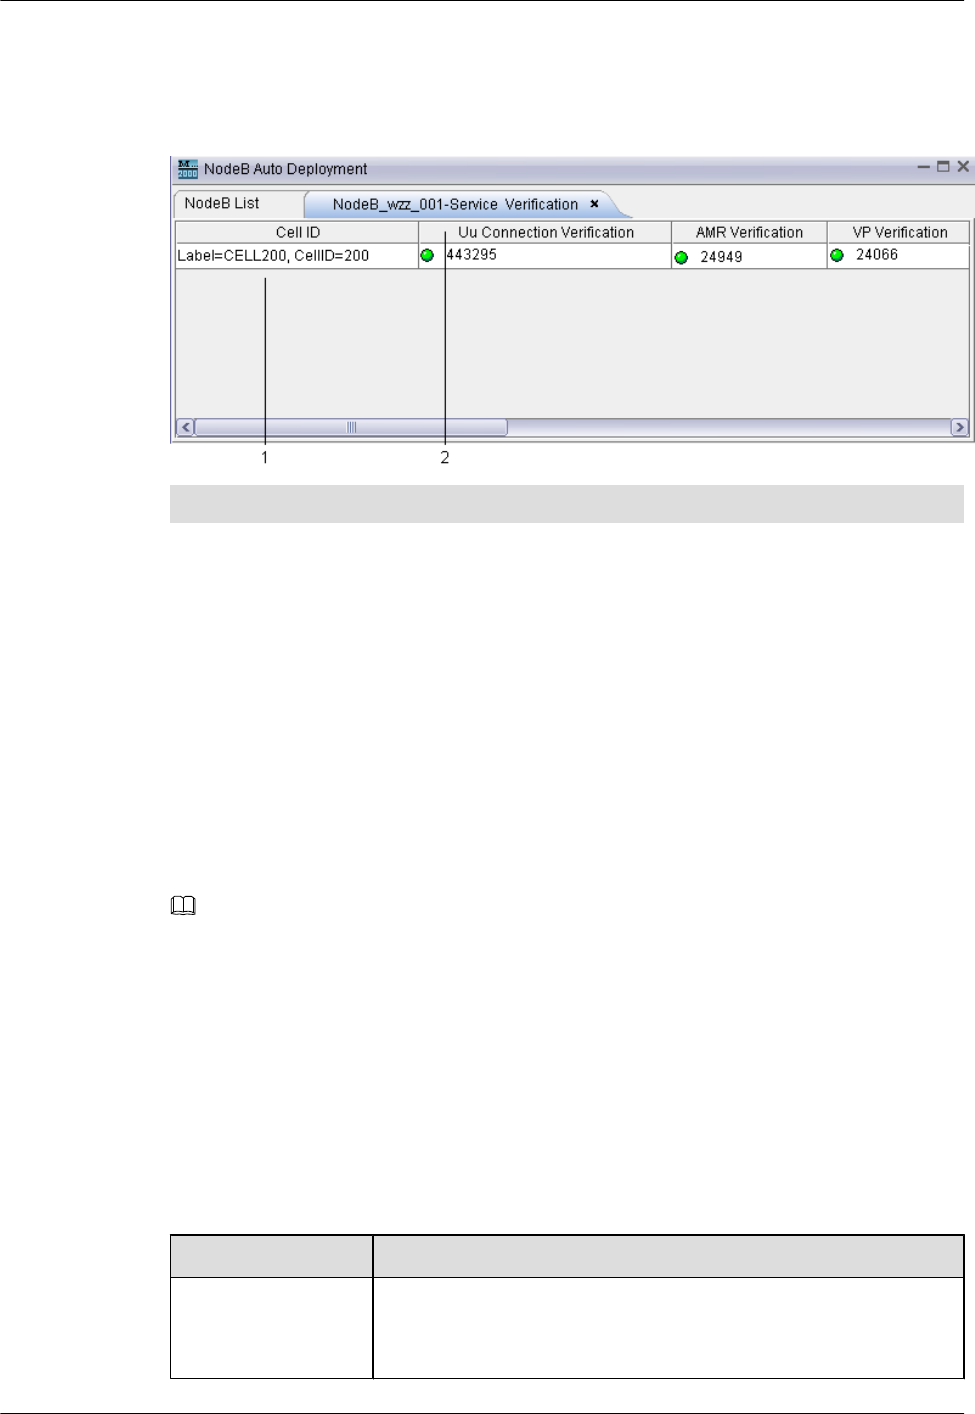
whose service verification result you want to view and then choose Open Service Verification
Window from the shortcut menu to open the corresponding tab page.
Figure 5-18 NodeB Auto Deployment window-Validate tab page
No. Description
1Verification objects, that is, all the logical cells of the NodeB to be commissioned.
2 Verification result. This area displays the accumulated values of all the performance counters
that are verified during service verification.
5.13.2 Parameters of the NodeB Deployment List
The NodeB deployment list records the parameter information required for NodeB
commissioning. After the NodeB deployment list is imported to the M2000, the M2000 can
automatically commission the NodeBs in the NodeB deployment list.
Table 5-11 describes the parameters in the NodeB deployment list.
NOTE
lIf the CME is deployed and the initial configuration of the NodeB is finished by using the CME,
exporting the NodeB deployment list from the CME is recommended. For the detailed operations, see
the Exporting the Deployment List and Configuration Files of Physical NodeBs section in the
online help. The principles of exporting parameters using the CME are listed as follows:
lThe planned information must be exported from the CME.
lThe unplanned information cannot be exported from the CME.
lIf the CME is not deployed, export the template of NodeB deployment list from the NodeB Auto
Deployment window on the M2000 client. For the detailed operation, see 5.2.2 Creating a NodeB
Commissioning Task.
Table 5-11 Parameters in the NodeB deployment list
Parameter Description
RNC ID ID of the RNC to which the NodeB belongs
This parameter must be exported from the CME. It is not configurable
in the NodeB Auto Deployment window.
5 Commissioning the MBTS in GL or UL Mode on the
M2000
3900 Series Multi-Mode Base Station
Commissioning Guide
5-54 Huawei Proprietary and Confidential
Copyright © Huawei Technologies Co., Ltd.
Issue 02 (2010-07-30)

Parameter Description
RNC Name Name of the RNC to which the NodeB belongs
This parameter can be optionally exported from the CME. It is not
configurable in the NodeB Auto Deployment window.
NodeB ID ID of the NodeB
This parameter must be exported from the CME. It is not configurable
in the NodeB Auto Deployment window.
NodeB Name Name of the NodeB
This parameter must be exported from the CME. It is not configurable
in the NodeB Auto Deployment window.
NodeB ESN1 Electronic serial number (ESN) of the active main control board of a
NodeB (it must be exported from the CME if it is planned)
The ESN uniquely identifies one NodeB. The ESN is usually labeled
as the bar code on the main control board of the NodeB. The site
engineer should record the ESN before leaving the site, so as to assist
the commissioning engineer in the remote check on the site.
This parameter can be optionally exported from the CME. It is
configurable in the NodeB Auto Deployment window.
NodeB ESN2 ESN of the standby main control board of the NodeB (it must be
exported from the CME if it is planned)
This parameter can be optionally exported from the CME. It is
configurable in the NodeB Auto Deployment window.
NodeB TRANS IP
address
OM IP address of the NodeB configured at the RNC
This parameter must be exported from the CME. It is not configurable
in the NodeB Auto Deployment window.
NodeB TRANS IP
Subnet mask
OM IP subnet mask of the NodeB configured at the RNC
This parameter must be exported from the CME. It is not configurable
in the NodeB Auto Deployment window.
NodeB Interface IP
address
IP address of the port on the NodeB configured at the RNC (it must
be exported from the CME if the port type of the NodeB is set to ETH/
TRUNK)
This parameter can be optionally exported from the CME. It is not
configurable in the NodeB Auto Deployment window.
NodeB Interface IP
Subnet mask
IP subnet mask of the port on the NodeB configured at the RNC (it
must be exported from the CME if the port type of the NodeB is set
to ETH/TRUNK)
This parameter can be optionally exported from the CME. It is not
configurable in the NodeB Auto Deployment window.
3900 Series Multi-Mode Base Station
Commissioning Guide
5 Commissioning the MBTS in GL or UL Mode on the
M2000
Issue 02 (2010-07-30) Huawei Proprietary and Confidential
Copyright © Huawei Technologies Co., Ltd.
5-55

Parameter Description
DHCP Server IP
address
Planned IP address of the DHCP server of the NodeB (it must be
exported from the CME if it is configured)
If the M2000 is set to the DHCP server, the IP address of the
M2000 is automatically obtained. This parameter does not need to be
set.
This parameter can be optionally exported from the CME. It is
configurable in the NodeB Auto Deployment window.
DHCP Server IP
Subnet mask
Planned IP subnet mask of the DHCP server of the NodeB
This parameter is not exported from the CME. It is configurable in
the NodeB Auto Deployment window.
AACP Server IP
address
Planned IP address of the AACP server of the NodeB (it must be
exported from the CME if it is configured)
This parameter can be optionally exported from the CME. It is not
configurable in the NodeB Auto Deployment window.
AACP Server IP
Subnet mask
Planned IP subnet mask of the AACP server of the NodeB
This parameter is not exported from the CME. It is not configurable
in the NodeB Auto Deployment window.
Next Hop IP address
to DHCP Server
IP address of the next hop from the NodeB to the DHCP server (it
must be exported from the CME if it is configured)
This parameter can be optionally exported from the CME. It is not
configurable in the NodeB Auto Deployment window.
Next Hop IP Subnet
mask to DHCP
Server
IP subnet mask of the next hop from the NodeB to the DHCP server
(it must be exported from the CME if it is configured)
This parameter can be optionally exported from the CME. It is not
configurable in the NodeB Auto Deployment window.
Next Hop IP address
to AACP Server
IP address of the next hop from the NodeB to the AACP server (it
must be exported from the CME if it is configured)
This parameter can be optionally exported from the CME. It is not
configurable in the NodeB Auto Deployment window.
Next Hop IP Subnet
mask to AACP
Server
IP subnet mask of the next hop from the NodeB to the AACP server
(it must be exported from the CME if it is configured)
This parameter can be optionally exported from the CME. It is not
configurable in the NodeB Auto Deployment window.
Peer IP address Peer IP address of the OM channel configured at the NodeB
This parameter must be exported from the CME. It is not configurable
in the NodeB Auto Deployment window.
Peer IP Subnet mask Peer IP subnet mask of the OM channel configured at the NodeB
This parameter must be exported from the CME. It is not configurable
in the NodeB Auto Deployment window.
5 Commissioning the MBTS in GL or UL Mode on the
M2000
3900 Series Multi-Mode Base Station
Commissioning Guide
5-56 Huawei Proprietary and Confidential
Copyright © Huawei Technologies Co., Ltd.
Issue 02 (2010-07-30)

Parameter Description
OM VLAN ID VLAN ID of the NodeB configured at the RNC (it must be exported
from the CME if the VLAN is planned)
This parameter can be optionally exported from the CME. It is not
configurable in the NodeB Auto Deployment window.
OM VLAN Priority VLAN priority of the NodeB configured at the RNC (it must be
exported from the CME if the VLAN is planned)
This parameter can be optionally exported from the CME. It is not
configurable in the NodeB Auto Deployment window.
DHCP VLAN ID Same value as OM VLAN ID (it must be exported from the CME if
the VLAN is planned)
This parameter can be optionally exported from the CME. It is not
configurable in the NodeB Auto Deployment window.
PING VLAN ID Same value as OM VLAN ID (it must be exported from the CME if
the VLAN is planned)
This parameter can be optionally exported from the CME. It is not
configurable in the NodeB Auto Deployment window.
OM PING IP address OM ping IP address
This parameter must be exported from the CME. It is not configurable
in the NodeB Auto Deployment window.
OM PING IP Subnet
mask
OM ping subnet mask
This parameter must be exported from the CME. It is not configurable
in the NodeB Auto Deployment window.
NodeB Type Type of the NodeB to be commissioned
This parameter must be exported from the CME. It is not configurable
in the NodeB Auto Deployment window.
NodeB BaseLine
Software Version
Baseline version of the target NodeB (it must be exported from the
CME if the target version is planned)
This parameter can be optionally exported from the CME. It is
configurable in the NodeB Auto Deployment window.
NodeB Cold Patch
Version
Version of the cold patch of the target NodeB (it must be exported
from the CME if the target version is planned)
This parameter can be optionally exported from the CME. It is
configurable in the NodeB Auto Deployment window.
NodeB Hot Patch
Version
Version of the hot patch of the target NodeB (it must be exported
from the CME if the target version is planned)
This parameter can be optionally exported from the CME. It is
configurable in the NodeB Auto Deployment window.
NodeB Configuration
File CRC
CRC value of the NodeB data configuration file
This parameter can be optionally exported from the CME. It is not
configurable in the NodeB Auto Deployment window.
3900 Series Multi-Mode Base Station
Commissioning Guide
5 Commissioning the MBTS in GL or UL Mode on the
M2000
Issue 02 (2010-07-30) Huawei Proprietary and Confidential
Copyright © Huawei Technologies Co., Ltd.
5-57
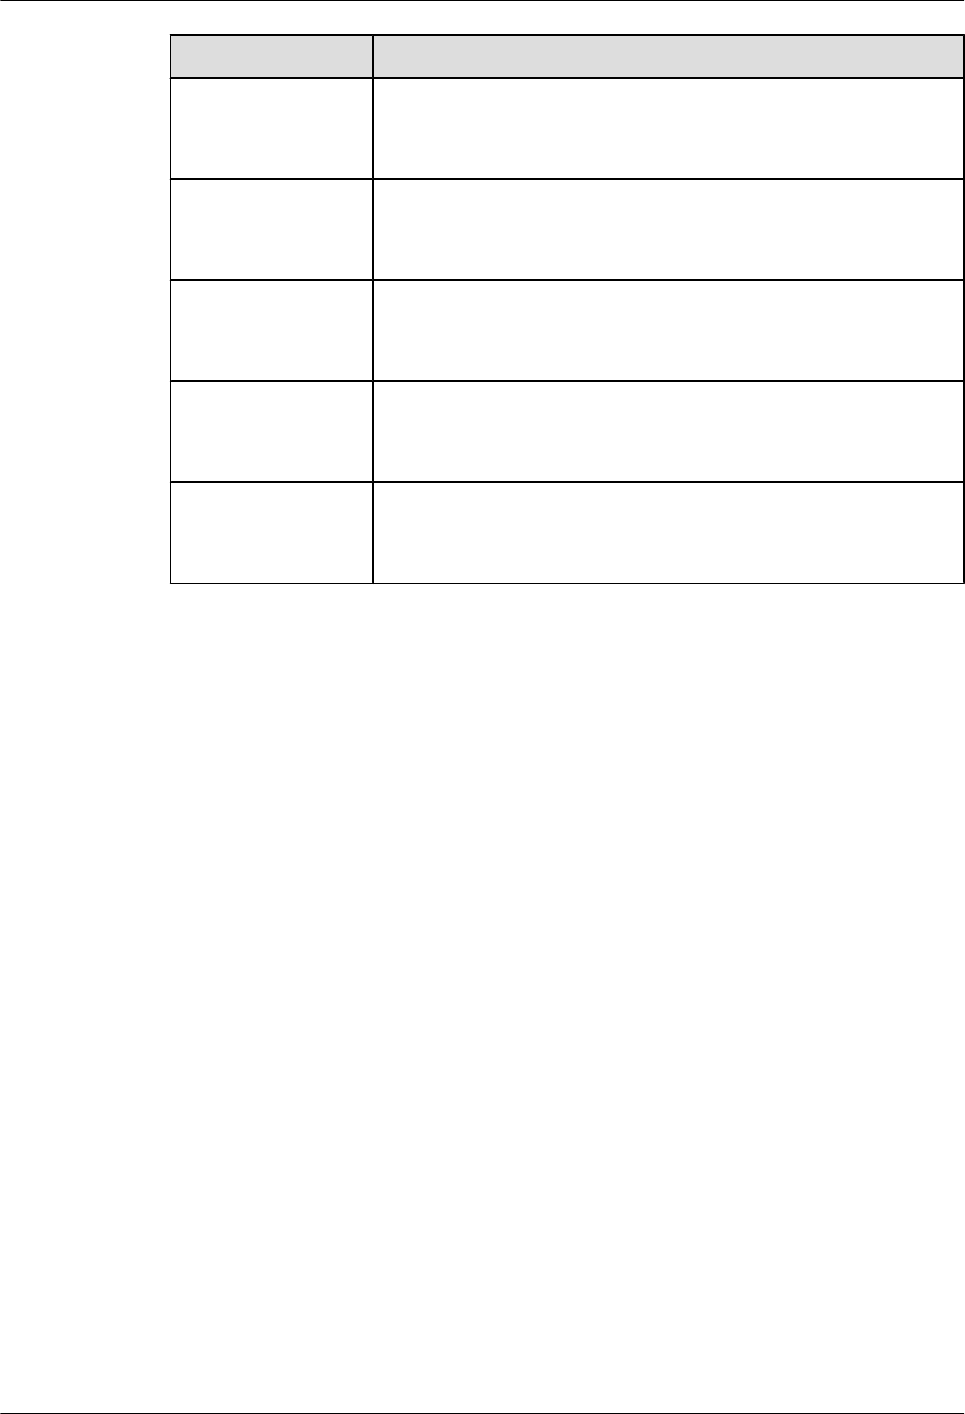
Parameter Description
NodeB FTP Server IP
address
IP address of the FTP server of the NodeB
This parameter can be optionally exported from the CME. It is not
configurable in the NodeB Auto Deployment window.
NodeB FTP Path Path on the FTP server of the NodeB
This parameter can be optionally exported from the CME. It is not
configurable in the NodeB Auto Deployment window.
NodeB FTP User
Name
User name for login to the FTP server of the NodeB
This parameter can be optionally exported from the CME. It is not
configurable in the NodeB Auto Deployment window.
NodeB FTP
Password
Password for login to the FTP server of the NodeB
This parameter can be optionally exported from the CME. It is not
configurable in the NodeB Auto Deployment window.
Contact Information about the contact person in the field
This parameter can be optionally exported from the CME. It is
configurable in the NodeB Auto Deployment window.
5 Commissioning the MBTS in GL or UL Mode on the
M2000
3900 Series Multi-Mode Base Station
Commissioning Guide
5-58 Huawei Proprietary and Confidential
Copyright © Huawei Technologies Co., Ltd.
Issue 02 (2010-07-30)

6 Commissioning the MBTS by Using USB
and M2000
About This Chapter
This chapter describes how to upgrade software and configure data using a USB disk, check the
operating status of the MBTS hardware, and rectify the MBTS hardware faults (if any) in time
at the MBTS. This section also describes how to check the operating status of the MBTS on the
M2000.
6.1 Procedure for Commissioning the MBTS by Using USB and M2000
At the local end of the MBTS, you can use a USB disk to upgrade the MBTS software and data,
and check whether the MBTS hardware status is normal according to the board status and LED
status, to locate and rectify faults in time. At the remote end of the MBTS, you can perform fault
diagnosis on the MBTS and verify services of the MBTS on the M2000.
6.2 Preparing the USB Disk for Local Commissioning
The USB disk should be ready before it is used for local commissioning. The preparation of the
USB disk for local commissioning varies according to the base station mode. Therefore, you
must prepare the USB disk based on the mode of the base station to be commissioned.
6.3 Upgrading Software and Configuring Data by Using the USB Disk
You can locally upgrade software and configure data of a base station by using the USB disk on
the base station side.
6.4 Checking the Status of the LEDs and Rectifying the Faults
This section describes how to check the operating status of the LEDs according to the states of
the LEDs on the modules of the base station.
6.5 Set the Download Control Right
If the BTS is working in the co-module scenario, the download control right needs to be set. The
system with the download control right upgrades the co-modulated RRU3908/MRFU and the
USCU software during software upgrade.
3900 Series Multi-Mode Base Station
Commissioning Guide 6 Commissioning the MBTS by Using USB and M2000
Issue 02 (2010-07-30) Huawei Proprietary and Confidential
Copyright © Huawei Technologies Co., Ltd.
6-1

6.1 Procedure for Commissioning the MBTS by Using USB
and M2000
At the local end of the MBTS, you can use a USB disk to upgrade the MBTS software and data,
and check whether the MBTS hardware status is normal according to the board status and LED
status, to locate and rectify faults in time. At the remote end of the MBTS, you can perform fault
diagnosis on the MBTS and verify services of the MBTS on the M2000.
Prerequisite
Before you commission the MBTS, the MBTS, RNC, and M2000 must meet following
requirements:
lThe MBTS hardware such as the cabinets, cables, antenna system, and auxiliary devices,
is installed and passes the installation check. The NodeB is powered on and passes the
power-on check.
lThe controller hardware is installed and commissioned, and the system works properly.
The negotiation data of the MBTS to be commissioned is configured and recorded.
lThe M2000 is commissioned, it is connected to the corresponding controller, and the
configuration synchronization is completed.
The USB disk for local commissioning should be ready for this commissioning mode. For details,
see 6.2 Preparing the USB Disk for Local Commissioning.
NOTE
lThe USB disk type and the files saved in the USB disk vary according to the base station mode. Prepare
a USB disk accordingly.
lFiles required for both modes must be saved to the USB disk when base stations of two modes are
deployed.
Commissioning Flowchart
Figure 6-1 shows the procedure for commissioning the MBTS using local USB and M2000.
6 Commissioning the MBTS by Using USB and M2000
3900 Series Multi-Mode Base Station
Commissioning Guide
6-2 Huawei Proprietary and Confidential
Copyright © Huawei Technologies Co., Ltd.
Issue 02 (2010-07-30)
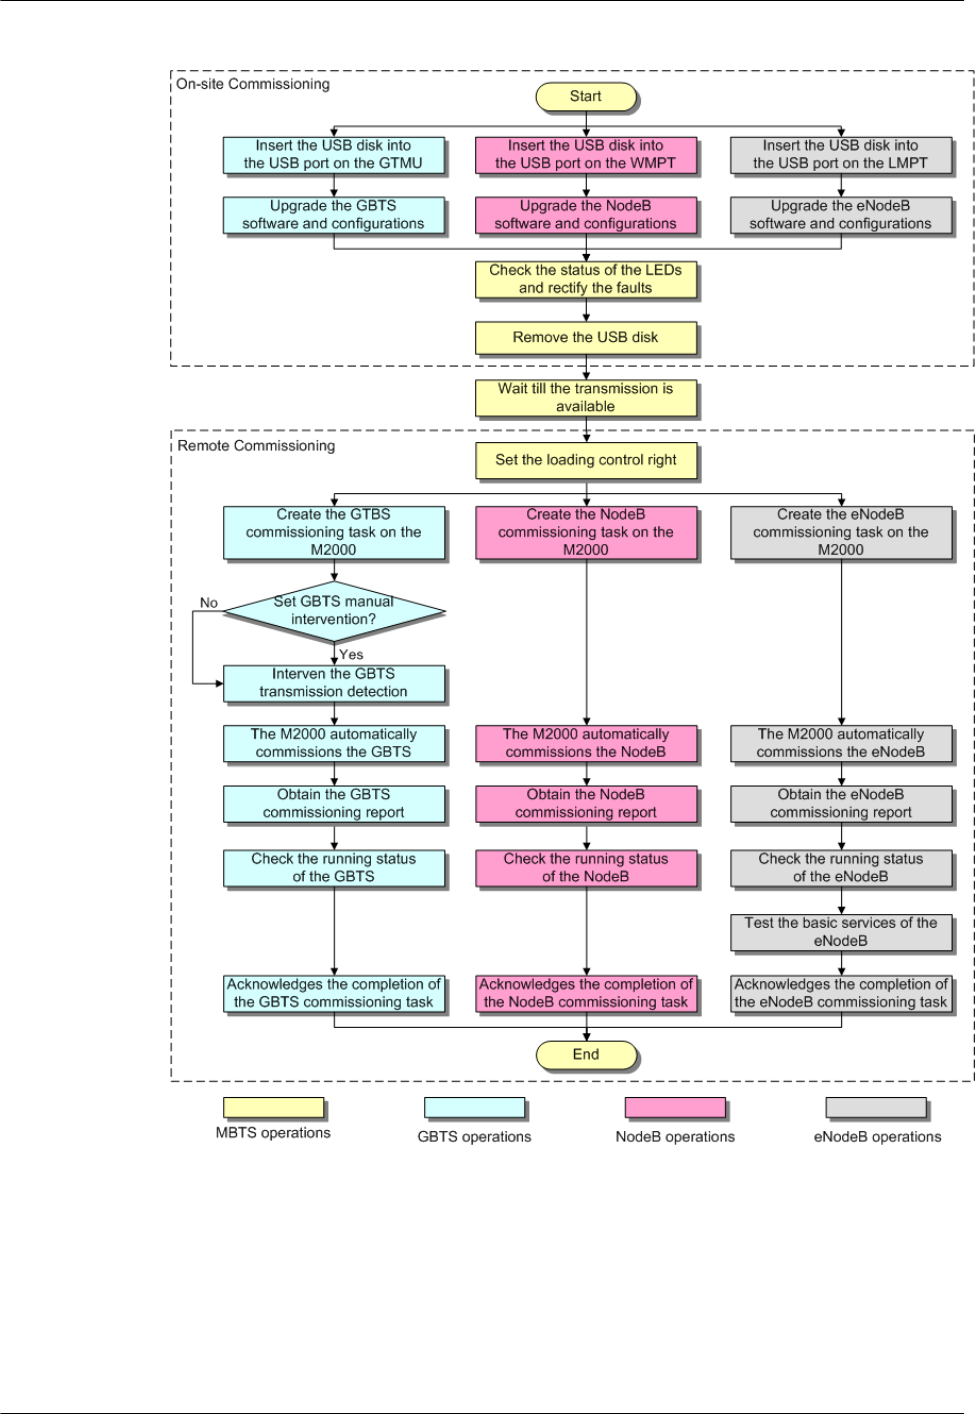
Figure 6-1 Procedure for commissioning the MBTS using USB and M2000
3900 Series Multi-Mode Base Station
Commissioning Guide 6 Commissioning the MBTS by Using USB and M2000
Issue 02 (2010-07-30) Huawei Proprietary and Confidential
Copyright © Huawei Technologies Co., Ltd.
6-3
NOTE
lThe priority of a mode does not need to be considered during the MBTS commissioning.
lWhen a base station supporting two modes is deployed,
lThe two modes must be upgraded separately if only one USB disk is available for the upgrade on
site.
lThe two modes can be upgraded simultaneously by inserting the two USB disks into the USB ports
on the main control boards in the two modes if two USB disks are available for the upgrade on site.
lIf the MBTS that works in the co-module scenario is not connected with Base Station Controler, to
upgrade with a USB disk locally will raise the Inter-System Control Rights Conflict alarm. This
alarm will not affect the commissioning and the services. After the BTS connects with Base Station
Controler, manually sets the download control right, which will clear this alarm.
Procedure
lLocal end of the MBTS
1. Insert the USB disk into the USB port on the panel of the main control board in specific
mode. Choose an appropriate operation based on the active software version and data
configuration of the MBTS.
If... Then...
The active software version and data
configuration are inconsistent with
those in the USB disk,
Go to step Step 2.
The active software version and data
configuration are consistent with those
in the USB disk,
Remove the USB disk, because the
software and data of the base station in
the specific mode have been upgraded.
2. The base station automatically upgrades the software and data. For details, see 6.3
Upgrading Software and Configuring Data by Using the USB Disk.
3. Check whether the MBTS hardware is normal according to the LED status. For details,
see 6.4 Checking the Status of the LEDs and Rectifying the Faults.
4. Remove the USB disk before leaving the site.
lRemote end of the MBTS
NOTE
When the MBTS is commissioned remotely on the M2000, commission the base station of a mode,
and then commission the base station of the other mode. The two modes are equal in priority.
1. Wait till the transmission is available.
2. Optional: If the MBTS is working in the co-module scenario, the download control
right needs to be set. During the commissioning on the M2000, the M2000
automatically compares the software version of the system with the download control
right to the software version of the current co-module MRFU/RRU3908, and check
their consistency. If the versions are not consistent, the MBTS automatically upgrade
the MRFU/RRU3908. For detail of setting the download control right, see 6.5 Set the
Download Control Right.
3. Create a commissioning task on the M2000. For details, see 5.2 Creating a
Commissioning Task.
4. Optional: If a GBTS is to be commissioned and Intervening transmission is selected
when a commissioning task is created, manually check the GBTS transmission state
6 Commissioning the MBTS by Using USB and M2000
3900 Series Multi-Mode Base Station
Commissioning Guide
6-4 Huawei Proprietary and Confidential
Copyright © Huawei Technologies Co., Ltd.
Issue 02 (2010-07-30)

and rectify faults (if any). For details, see 5.3 Intervening the GBTS
Transmission.
5. The M2000 automatically commissions the MBTS. For details, see 5.4
Commissioning the MBTS on the M2000. During the process of the MBTS
commissioning, monitor the commissioning progress and alarms, and rectify faults (if
any). The monitoring operations vary according to modes. for details on the operations
in each mode, see 5.5 Monitoring the GBTS Commissioning Task, 5.6 Monitoring
the NodeB Commissioning Task, and 5.7 Monitoring the eNodeB Commissioning
Task.
6. Obtain the commissioning report from the M2000. For details, see 5.8 Obtaining the
Commissioning Report.
7. View the commissioning report to check the MBTS operating status. For details, see
5.9 Checking the Operating Status of the Base Station.
8. Verify eNodeB services. For details, see 5.10 Testing the Basic Services of the
eNodeB.
9. Confirm the MBTS commissioning task. For details, see 5.11 Confirming the
Commissioning Task.
----End
6.2 Preparing the USB Disk for Local Commissioning
The USB disk should be ready before it is used for local commissioning. The preparation of the
USB disk for local commissioning varies according to the base station mode. Therefore, you
must prepare the USB disk based on the mode of the base station to be commissioned.
Context
NOTE
Files required for both modes must be saved to the USB disk when base stations supporting two modes are
deployed.
6.2.1 Arranging the USB Disk for Local GBTS Commissioning
The USB disk should be ready before it is used for local GBTS commissioning.
6.2.2 Arranging the USB Disk for Local NodeB Commissioning
The USB disk should be ready before it is used for local NodeB commissioning.
6.2.3 Arranging the USB Disk for Local eNodeB Commissioning
Before the local eNodeB commissioning through the USB storage device, you need to save the
required files in a specified directory in the USB storage device.
6.2.4 Configuring the Security Equipment
When the security gateway (GW) is deployed in the network, you need to configure data for the
security GW. In the case that the IEEE 802.1x authentication is adopted, the authentication access
equipment and the authentication server should be configured. Generally, an authentication
server is the Authentication, Authorization and Accounting (AAA) server.
6.2.1 Arranging the USB Disk for Local GBTS Commissioning
The USB disk should be ready before it is used for local GBTS commissioning.
3900 Series Multi-Mode Base Station
Commissioning Guide 6 Commissioning the MBTS by Using USB and M2000
Issue 02 (2010-07-30) Huawei Proprietary and Confidential
Copyright © Huawei Technologies Co., Ltd.
6-5
Context
CAUTION
1. Data configuration through a USB disk is applicable only to the BTS supporting IP over FE
or IP over E1.
2. Data configuration through a USB disk can be used with the software upgrade using a USB
disk. The prerequisite is that the active BTS software supports the data configuration using
a USB disk.
3. A USB disk contains the configuration file of only a BTS.
4. Ensure that the route from the BTS to the BSC is configured on the Web LMT before the
conversion into the configuration file. Thus, the related MML commands and parameters
have the route information and are converted into the configuration file containing the route
information.
Procedure
Step 1 Prepare the USB disk with a LED. The requirements are as follows: when there is no read or
write operation on the USB disk, the LED on the USB disk is ON; when there is any read or
write operation on the USB disk, the LED on the USB disk is blinking.
Step 2 Check the compatibility of the USB disk with the NodeB. Do as follows to test the USB disk:
Insert the USB disk into the USB port on the WMPT of a GBTS that runs normally, and wait
for 3 seconds. If the LED on the USB disk blinked once, it indicates that the USB disk is
functional. If the USB disk fails the preceding test, change the USB disk.
Step 3 Obtain the software package for the upgrade.
1. Three days before the upgrade, visit the website http://support.huawei.com and click
Software to download the software package.
2. Decompress BTS3000V100R012C00SPCXXX_VER.zip to obtain the software package
BTS3000V100R012C00SPXX.csp.
NOTE
In V100R012C00SPCXXX, XXX is three digits indicating the SPC version.
Step 4 Prepare the configuration script.
CAUTION
The software loading may fail if the configuration file is not used in the case of the pre-
deployment upgrade. In the pre-deployment upgrade, if the configuration file that specifies the
boards to be loaded is not used, all the board software stored in the USB storage device is loaded
into the flash of the GTMU. Thus, the software loading may fail due to the insufficient flash
memory.
1. Create a .txt file, and rename the file Precfg.ini. Edit the Precfg.ini file to add the following
contents into the Precfg.ini file.
[PRECONFIG]
6 Commissioning the MBTS by Using USB and M2000
3900 Series Multi-Mode Base Station
Commissioning Guide
6-6 Huawei Proprietary and Confidential
Copyright © Huawei Technologies Co., Ltd.
Issue 02 (2010-07-30)
ALL=GTMU|DRFU|GRFU
Where, ALL=XXXX is set by the user manually and it specifies the type of the board onto
which the software is to be loaded. In the preceding example, the software is to be loaded
onto the GTMU, DRFU, and GRFU.
CAUTION
lAll letters are in capitals, and different board names are separated by "|". Do not add
any comment or press the space or TAB key before or after "=" or the name of each
board.
lThe base stations using different configurations cannot use the same configuration file.
New configuration files should be created for the base stations of different
configurations.
2. Save the configuration script in ANSI characters.
Step 5 The data configuration file is made and exported through the CME. This is usually performed
by configuration engineers.
Step 6 Store the files according to the following path, as shown in Table 6-1.
Table 6-1 Saving path of the file
File Specified Path of the USB Storage
Device
Upgrade software package \\BTS3900 GSM
Configuration script \\BTS3900 GSM\Precfg.ini
Data configuration file \\BTS3900 GSM\SiteName\TranCfg.ini
----End
6.2.2 Arranging the USB Disk for Local NodeB Commissioning
The USB disk should be ready before it is used for local NodeB commissioning.
Procedure
Step 1 Prepare the USB disk with a LED. The requirements are as follows: when there is no read or
write operation on the USB disk, the LED on the USB disk is ON; when there is any read or
write operation on the USB disk, the LED on the USB disk is blinking.
Step 2 Check the compatibility of the USB disk with the NodeB. Do as follows to test the USB disk:
Insert the USB disk into the USB port on the WMPT of a NodeB that runs normally, and wait
for 3 seconds. If the LED on the USB disk blinked once, it indicates that the USB disk is
functional. If the USB disk fails the preceding test, change the USB disk.
Step 3 Save the related files in the USB disk according to the specified path.
1. Prepare the NodeB software package, data configuration file, and VSWR check script file.
3900 Series Multi-Mode Base Station
Commissioning Guide 6 Commissioning the MBTS by Using USB and M2000
Issue 02 (2010-07-30) Huawei Proprietary and Confidential
Copyright © Huawei Technologies Co., Ltd.
6-7
lObtain the NodeB software package from the support website.
lThe data configuration file can be made and exported through the CME. This is usually
performed by configuration engineers.
2. Store the files according to the following path.
File Specified Path of the USB Storage
Device
NodeB software \\NodeB\Software\Software.csp
Data configuration file \\NodeB\Configuration\NodeBCfg.xml
CAUTION
After you have downloaded the file from the PC into the USB disk, unplug the USB disk
according to the system prompt. If not, errors may occur when you use the USB disk.
----End
6.2.3 Arranging the USB Disk for Local eNodeB Commissioning
Before the local eNodeB commissioning through the USB storage device, you need to save the
required files in a specified directory in the USB storage device.
Prerequisite
lThe operator already obtains the cross certificate signed by Huawei if cross certification is
used.
NOTE
Before Huawei signs the cross certificate for the operator, the operator is required to provide the
request file of cross certificate for Huawei. The request file of cross certificate is in format of
PKCS#10, which is generated by the operator's root CA certificate, or the operator's child CA
certificate that is used for the certification of eNodeB, security GW, and M2000.
lThe CR/CRL database is deployed on the server of the DeMilitarized Zone (DMZ) of the
operator, and supports FTP. Thus, the files on the CR/CRL database can be downloaded
in FTP mode.
lThe USB storage device is ready.
lThe eNodeB software package and data configuration file are available.
lWhen the security GW is deployed on the network, the common configuration file and
digital certificate to be imported to the eNodeB are saved in the USB storage device.
Context
When the security GW is deployed in the network, the eNodeB and the security GW need to
identify each other through the digital certificate. Therefore, the digital certificate is required
for the eNodeB commissioning. The digital certificate on the eNodeB side incorporates the
operator's cross certificate signed by Huawei, operator's root certification authority (CA)
certificate (or CA certificate chain with the root CA certificate), and operator's certificate
6 Commissioning the MBTS by Using USB and M2000
3900 Series Multi-Mode Base Station
Commissioning Guide
6-8 Huawei Proprietary and Confidential
Copyright © Huawei Technologies Co., Ltd.
Issue 02 (2010-07-30)
revocation list (CRL). The digital certificate on the security GW side incorporates Huawei root
CA certificate and Huawei CRL file.
NOTE
The cross certificates involved in this document are signed by Huawei for the operator.
If the operator's certificate chain with the root CA certificate is used instead of the operator's root CA
certificate, you can replace the operator's root CA certificate in this document with the operator's certificate
chain with the root CA certificate.
Procedure
Step 1 Arrange for the tools required for the local commissioning through the USB storage device, as
described in Table 6-2.
Table 6-2 Tools required for the local commissioning through the USB storage device
Tool Description
USB storage device lThe USB storage device is equipped with an indicator that
indicates the data transmission status.
lCapacity ≥ 256 MB
lRecommended models: Netac U208, Netac U180, Netac U215,
and Netac U210.
lThe USB storage device has no additional function. The
additional functions include but are not limited to encryption,
antivirus, bootstrap, MP3, MP4, and smart mobile phone.
Step 2 Obtain the digital certificate required by the eNodeB. That is, save the operator's cross certificate,
operator's root CA certificate, and operator's CRL file(optional) to the USB storage device.
NOTE
You can save either or both of the cross certificate and operator's root CA certificate to the USB storage
device.
Step 3 Obtain the eNodeB software package and data configuration file.
NOTE
The eNodeB software package is ready, and can be downloaded from http://support.huawei.com/.
The name of the data configuration file should be CFGDATA.XML. The file name is case sensitive.
Complete the configuration by referring to the eNodeB Initial Configuration Guide. Then, save the data
configuration file in the local computer.
The name of the common configuration file should be PreInfo.xml. The file name is case sensitive.
Step 4 Save the files required for local commissioning in the following specified paths in the USB
storage device. The save path is case sensitive.
lThe security GW is not deployed on the network
File Specified File Path in the USB Storage Device
eNodeB software package usb:\eNodeB\Software\
Data configuration file usb:\eNodeB\
3900 Series Multi-Mode Base Station
Commissioning Guide 6 Commissioning the MBTS by Using USB and M2000
Issue 02 (2010-07-30) Huawei Proprietary and Confidential
Copyright © Huawei Technologies Co., Ltd.
6-9
lThe security GW is deployed on the network
File Specified File Path in the USB Storage Device
Common configuration file usb:\eNodeB\
Cross certificate granted by
Huawei
usb:\eNodeB\Certificates\CrossCACert\
Operator's root CA
certificate
usb:\eNodeB\Certificates\CACert\
Operator's CRL file usb:\eNodeB\Certificates\CRL\
eNodeB software package usb:\eNodeB\Software\
Data configuration file usb:\eNodeB\
----End
6.2.4 Configuring the Security Equipment
When the security gateway (GW) is deployed in the network, you need to configure data for the
security GW. In the case that the IEEE 802.1x authentication is adopted, the authentication access
equipment and the authentication server should be configured. Generally, an authentication
server is the Authentication, Authorization and Accounting (AAA) server.
Prerequisite
lThe Quidway S6500 Series Ethernet Switches Operation Manual is ready, and can be
downloaded from http://support.huawei.com/.
lThe infoX AAA Commissioning Guide is ready, and can be downloaded from http://
support.huawei.com/.
lIf the IEEE 802.1x authentication is adopted, the operator should use the authentication
access equipment that supports 802.1x authentication and the corresponding AAA server
that supports Extensible Authentication Protocol (EAP).
Context
lTable 6-3 describes the configuration items that you need to pay special attention to when
the security GW is used.
Table 6-3 Security GW configuration
Item Description
IP address Both the public security GW and the serving security GW should be
configured with the IP address of the interface for the untrusted domain
on the eNodeB side and IP address of the interface for the trusted domain
on the EPC side.
6 Commissioning the MBTS by Using USB and M2000
3900 Series Multi-Mode Base Station
Commissioning Guide
6-10 Huawei Proprietary and Confidential
Copyright © Huawei Technologies Co., Ltd.
Issue 02 (2010-07-30)

Item Description
Route lPublic security GW: The routes to the M2000, eNodeB, and
temporary OM IP address should be configured.
lServing security GW: The routes to the M2000, S-GW, MME, IP
address of the interface to the eNodeB, S1 signaling, S1 services, and
OM IP address should be configured.
ike local
name
The public security GW and serving security GW should be configured.
ike proposal lThe authentication method item should be digital certificate mode or
pre-shared key mode according to the actual network.
lThe authentication algorithm item must be SHA1.
lThe encryption algorithm item must be AES.
lThe DH group item must be DH group2.
acl It is recommended that permit ip be configured.
ike peer lPublic security GW: The key or certificate domain should be
configured according to the authentication mode specified in the ike
proposal. The local id type item must be name, the remote name item
must be p-segw, the ike proposal item should be configured
according to previous configurations, and the ike version item can be
V1 or V2. The ip pool item should be configured to allocate the
temporary OM IP for the eNodeB.
lServing security GW: The key or certificate domain should be
configured according to the authentication mode specified in the ike
proposal. The local id type item must be name, the remote name item
must be s-segw, the ike proposal item should be configured according
to previous configurations, and the ike version item can be V1 or V2.
ipsec
proposal
The encapsulation mode item must be tunnel, the transform item must
be esp, the esp authentication item must be shal, and the esp encryption
item must be aes.
ipsec policy-
template
The public security GW and serving security should be set to the
template mode. The Acl should be configured according to previous
configurations. If the public security GW and serving security GW are
the same, different acl values must be configured. The psf group must
be DH group2. The public security GW and serving security GW must
correspond to different ike peer values. The ipsec proposal item should
be configured according to previous configurations.
ipsec policy This item must be configured according to the template in the ipsec
policy-template.
ipsec binding
to port
The policy can be bound to the planned port according to the
configuration in the ipsec policy.
3900 Series Multi-Mode Base Station
Commissioning Guide 6 Commissioning the MBTS by Using USB and M2000
Issue 02 (2010-07-30) Huawei Proprietary and Confidential
Copyright © Huawei Technologies Co., Ltd.
6-11

lWhen the authentication access equipment is used, the authentication mode of Radius
(remote authentication dial-in user service) and the authentication method of EAP should
be configured, because certificate authentication is adopted at present.
lWhen the AAA server is used, the CA certificates of terminal users should be uploaded,
and the file names of the user certificate and private key should be configured for the AAA
server.
Procedure
Step 1 Check the configuration of the security GW according to Table 6-3.
Step 2 Ensure that Huawei root CA certificate and Huawei CRL file are configured on the security GW.
Step 3 Configure the authentication access equipment. The authentication access equipment may vary
with different operators. The example here describes a typical configuration of an authentication
access equipment. Take the Quidway S6500 series Ethernet switch as an example. Run the
dot1x command to enable the global 802.1x feature. Run the dot1x [ interface interface-
list ] command to enable the 802.1x feature on a specified port. Run the dot1x authentication-
method { chap | pap | eap } command to set the EAP authentication method. For details, see
the Quidway S6500 Series Ethernet Switches Operation Manual.
Step 4 Configure the eNodeB CA certificate for the AAA server. The AAA server may vary with
different operators. The descriptions here take the infoX AAA as an example. For details, see
the infoX AAA Commissioning Guide.
1. Upload the CA certificate of a terminal user to the iscc2/config/secert directory of infoX
AAA.
2. Change the file names of the user certificate and private key in the SCPCFG.INI file. Ensure
that the file names are consistent with the file names of the user certificate and private key
uploaded in step Step 4.1.
----End
6.3 Upgrading Software and Configuring Data by Using the
USB Disk
You can locally upgrade software and configure data of a base station by using the USB disk on
the base station side.
Context
CAUTION
lIf a USB disk is to be used repeatedly, the target software and data configuration file in the
USB disk should be updated before the USB disk is used for a base station deployment.
lWhen you save the software and data configuration file to the USB disk, ensure that the write
lock (if any) on the USB disk is unlocked. Otherwise, the software and data configuration
file cannot be updated to the USB disk.
6 Commissioning the MBTS by Using USB and M2000
3900 Series Multi-Mode Base Station
Commissioning Guide
6-12 Huawei Proprietary and Confidential
Copyright © Huawei Technologies Co., Ltd.
Issue 02 (2010-07-30)
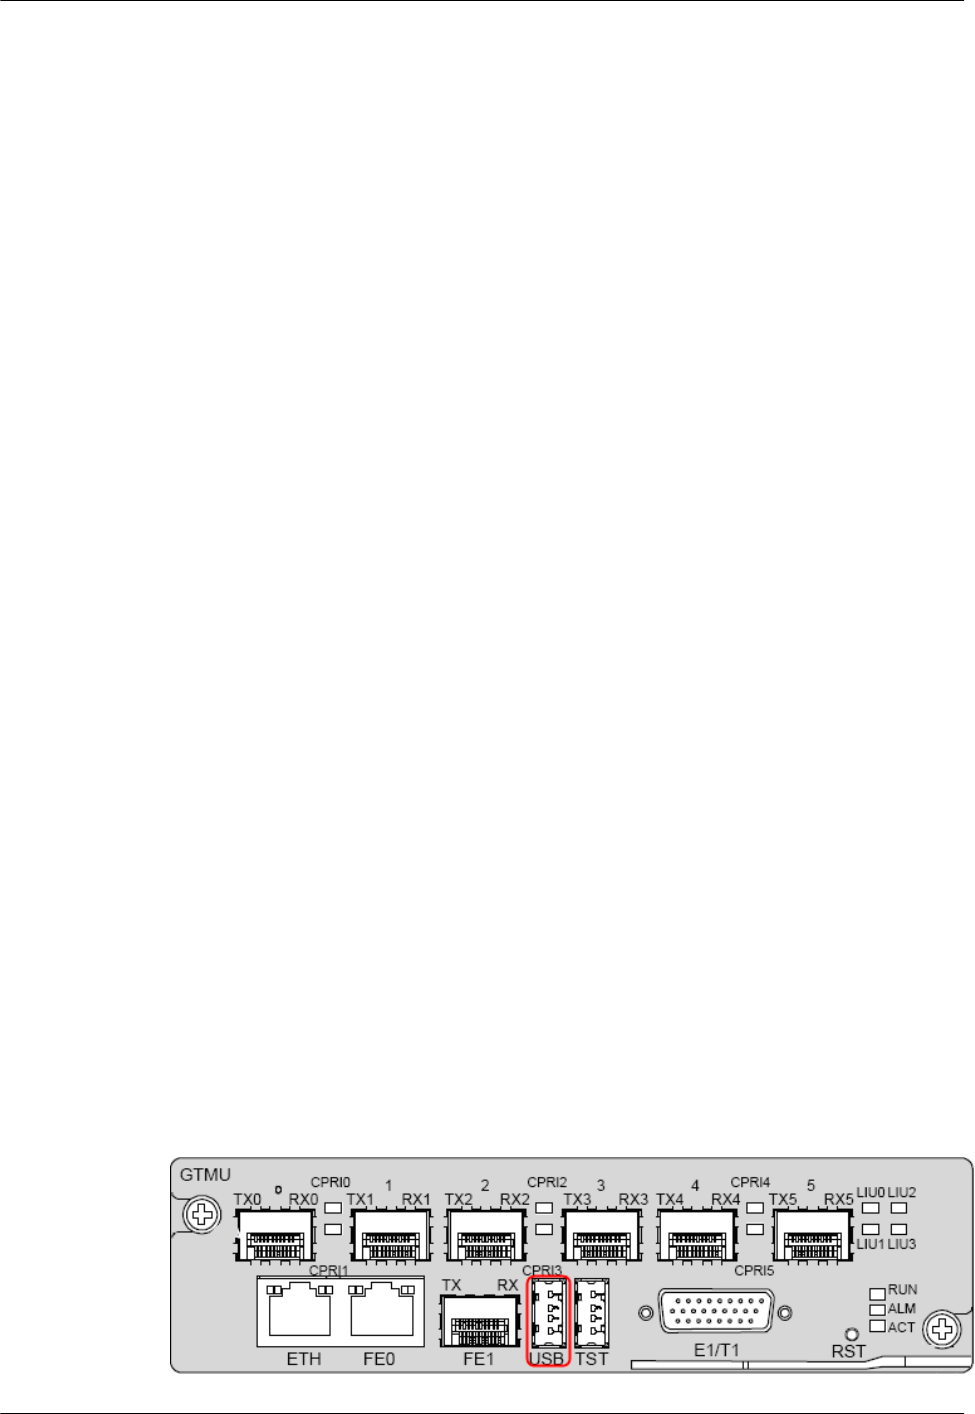
6.3.1 Upgrading the GBTS Software and Downloading the Data Configuration File (on the BTS
Side)
The GBTS supports direct software and data configuration file downloading from the USB disk.
After the downloading, the GBTS automatically activates the software, and then resets.
6.3.2 Upgrading the NodeB Software and Downloading the Data Configuration File (on the
NodeB Side)
The NodeB supports direct software and data configuration file downloading from the USB disk.
After the downloading, the NodeB automatically activates the software, and then resets.
6.3.3 Upgrading the eNodeB Software and Downloading the Data Configuration File (on the
eNodeB Side)
This section describes how to download and activate the eNodeB software and data configuration
file through the USB storage device. The eNodeB automatically downloads the software and
data configuration file from the USB storage device, and then activates them. The software and
data configuration take effect after the eNodeB resets.
6.3.1 Upgrading the GBTS Software and Downloading the Data
Configuration File (on the BTS Side)
The GBTS supports direct software and data configuration file downloading from the USB disk.
After the downloading, the GBTS automatically activates the software, and then resets.
Context
lSoftware upgrade by using a USB disk is supported from GSM BTS3000
V100R009C00SPC058.
lTransmission configuration by using a USB disk is supported from GSM BTS3000
V100R009SPC072.
lWithin 3 minutes after GBTS started, GBTS cannot perform the USB upgrade or
configuration. During the 3-minute period, GBTS is trying to connect with BSC and is not
using the date files in the USB disk. After the GBTS started for 3 minutes, it is sure that
the GBTS cannot connect to the BSC, and the GBTS starts the configuration by
downloading the board software according to the pre-configured script with the data
configuration files on USB.
lIf the GBTS is not connected with BSC, only the transmission data can be configured with
the USB disk, other data will not be configured. Also, the GBTS only upgrades the software
on GTMU, and will not upgrade the software on other boards(For example, DRFU, MRFU,
UTRP). After the GBTS connects BSC, the GBTS finishs the data configuration, and
upgrades the software on other boards except GTMU.
Procedure
Step 1 Insert the USB disk to the USB port on the GTMU, as shown in Figure 6-2.
Figure 6-2 USB port on the GTMU
3900 Series Multi-Mode Base Station
Commissioning Guide 6 Commissioning the MBTS by Using USB and M2000
Issue 02 (2010-07-30) Huawei Proprietary and Confidential
Copyright © Huawei Technologies Co., Ltd.
6-13
Step 2 When the LED on the USB disk is blinking, the GBTS loads the version and parses the
configuration file and saves it to the flash memory of the GBTS.
CAUTION
Do not remove the USB disk during this period. Otherwise, the file parsing fails.
Step 3 Check and ensure that the GBTS configuration is successful, as shown in Table 6-4.
Table 6-4 Status
Status of the LED
on the USB Disk
State of the RUN
LED on the GTMU
Duration
Plug the USB disk
into the USB port and
detect the USB disk
automatically.
ON Blinking (on for 1s
and off for 1s)
About 1s to 2s
The GTMU
downloads the
software and data
configuration file
from the USB disk.
Blinking Blinking (ON for
0.125s and OFF for
0.125s)
About 8 minutes
The GTMU
downloads the
software and data
configuration file
from the USB disk.
Blinking Blinking (ON for
0.125s and OFF for
0.125s)
About 10s
The GTMU activates
the software.
ON Blinking (ON for
0.125s and OFF for
0.125s)
About 3 to 4 minutes
The GTMU resets. ON first, OFF for a
while, and then ON
ON first, OFF for a
while, and then ON
About 2 minutes
The GTMU is
running properly.
ON Blinking (on for 1s
and off for 1s)
-
The BTS configuration is successful when the following phenomena continue over a minute:
lThe LED on the USB disk is ON.
lThe RUN LED on the GTMU blinks slowly.
The BTS configuration fails if any of the following phenomena occurs:
lAfter the USB disk is inserted, the RUN LED on the GTMU blinks slowly, and the LED on
the USB disk is ON.
6 Commissioning the MBTS by Using USB and M2000
3900 Series Multi-Mode Base Station
Commissioning Guide
6-14 Huawei Proprietary and Confidential
Copyright © Huawei Technologies Co., Ltd.
Issue 02 (2010-07-30)

lDuring the upgrade, the LED on the USB disk is OFF, and the RUN LED on the GTMU
blinks slowly.
lThe LED on the USB disk is OFF during the configuration.
Rectify the fault in the hardware of the USB disk. Verify that the TranCfg.ini file is saved in the
directory of \BTS3900 GSM\SiteName in the USB disk and that the active BTS software
supports the configuration using the USB disk.
Step 4 Remove the USB disk from the GBTS.
----End
6.3.2 Upgrading the NodeB Software and Downloading the Data
Configuration File (on the NodeB Side)
The NodeB supports direct software and data configuration file downloading from the USB disk.
After the downloading, the NodeB automatically activates the software, and then resets.
Prerequisite
lThe NodeB passes a power-on status check and is powered on.
lThe USB disk for local commissioning is ready. For details, see 6.2.2 Arranging the USB
Disk for Local NodeB Commissioning.
Context
When the USB disk is plugged into the corresponding port on the WMPT in the BBU3900, the
BBU3900 automatically detects the USB disk and installs the USB disk driver. After the
installation, the NodeB automatically reads the software and data configuration file in the fixed
directories of the USB disk and verifies their names and formats.
When the system reads the software package and data configuration file, the NodeB checks the
consistency between the active software version and configuration data and the software version
and configuration data in the USB disk. If they are inconsistent, the software and configuration
upgrade is automatically started. If they are consistent, the upgrade is not performed.
Note the following situations when the software and configurations are upgraded from the USB
disk:
lBy default, the NodeB downloads the software and data configuration file from the USB
disk by configuration. The NodeB also supports the supplementary download. For example,
When the RRU is not connected to the BBU3900 through the optical cable, the software
and data configuration file related to the RRU are not downloaded. After the RRU is
connected, the software and data configuration file related to the RRU are automatically
downloaded from the USB disk.
lIf the USB disk saves only the software, the NodeB automatically upgrades the software.
lIf the USB disk is only saved with the data configuration file, the NodeB automatically
downloads the data configuration file.
lIn any of the following situations, the NodeB does not upgrade the software or download
the data configuration file from the USB disk.
–The directory or the file does not exist.
–The file format is illegal.
3900 Series Multi-Mode Base Station
Commissioning Guide 6 Commissioning the MBTS by Using USB and M2000
Issue 02 (2010-07-30) Huawei Proprietary and Confidential
Copyright © Huawei Technologies Co., Ltd.
6-15
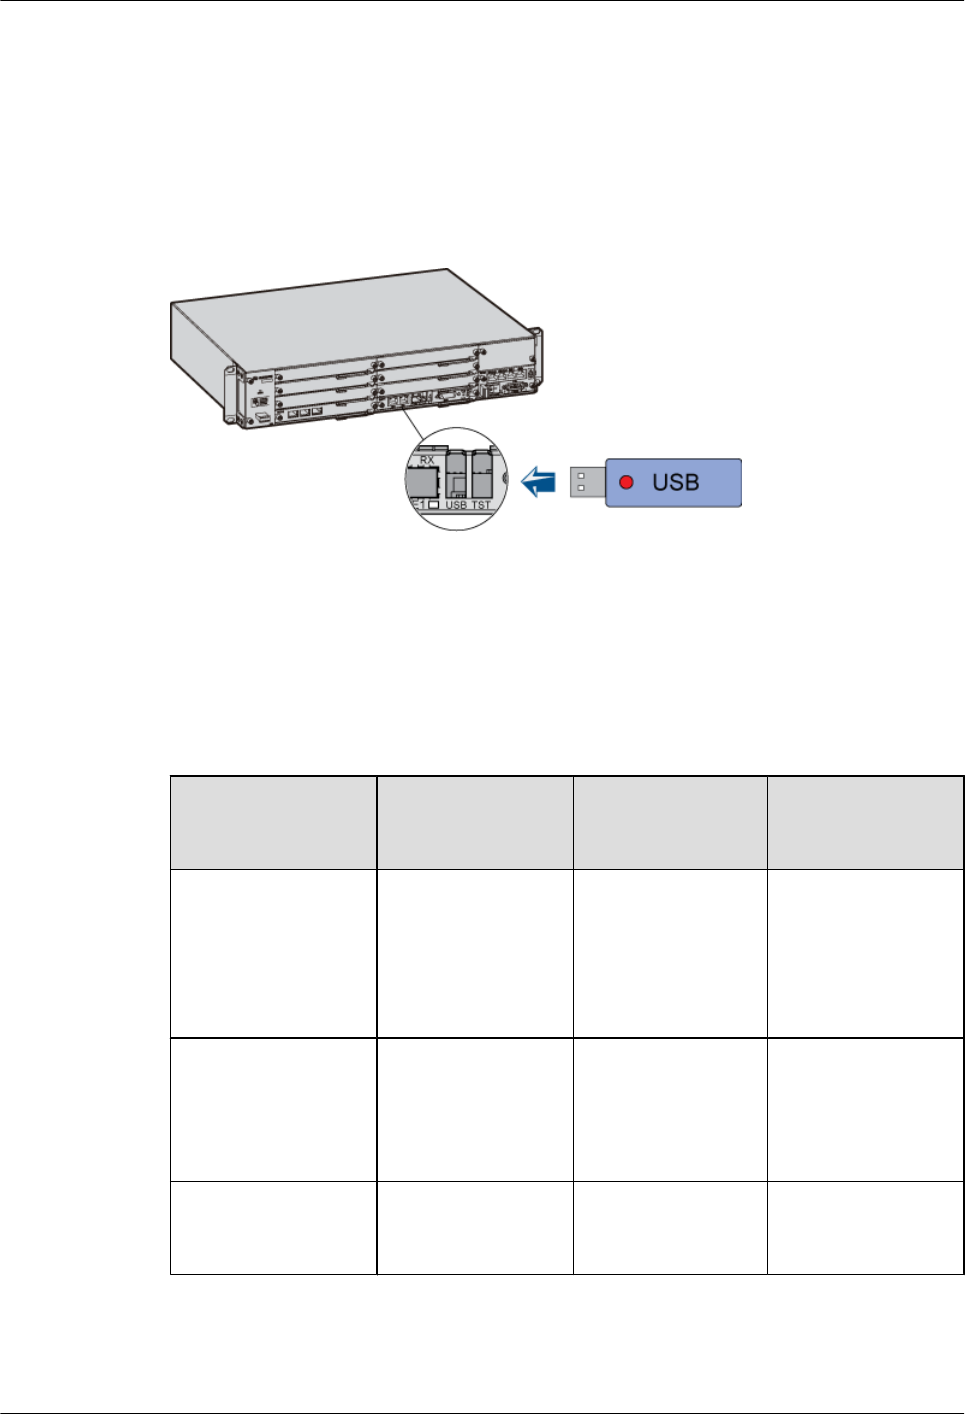
–The software version to be used is the same as the active software version.
–The data to be used in the configuration file is the same as the active configuration data.
Procedure
Step 1 Plug the USB disk into the USB port on the WMPT of the BBU3900, as shown in Figure 6-3.
Figure 6-3 Plugging the USB disk into the USB port on the WMPT
Step 2 The NodeB automatically downloads the software and data configuration file, and activates the
software. After the activation, the NodeB resets. Wait until the NodeB reset is complete. For
details on the status of the LED on the USB disk and the status of the RUN LED on the WMPT
in this process, see Table 6-5.
Table 6-5 LEDs on the USB disk and the WMPT
Status of the LED
on the USB Disk
State of the RUN
LED on the
WMPT
Duration
When the USB disk is
plugged into the
corresponding port on
the WMPT, the
WMPT automatically
detects the USB disk.
ON Blinking (on for 1s
and off for 1s)
About 1s to 2s
The WMPT
downloads the
software and data
configuration file
from the USB disk.
Blinking Blinking (ON for
0.125s and OFF for
0.125s)
About 12 minutes
The WMPT activates
the software.
ON Blinking (ON for
0.125s and OFF for
0.125s)
About 3 to 4 minutes
6 Commissioning the MBTS by Using USB and M2000
3900 Series Multi-Mode Base Station
Commissioning Guide
6-16 Huawei Proprietary and Confidential
Copyright © Huawei Technologies Co., Ltd.
Issue 02 (2010-07-30)
Status of the LED
on the USB Disk
State of the RUN
LED on the
WMPT
Duration
The NodeB resets. ON first, OFF for a
while, and then
blinking
ON first, OFF for a
while, and then
blinking (ON for
0.125s and OFF for
0.125s)
About 2 minutes
The NodeB runs
normally.
ON Blinking (on for 1s
and off for 1s)
-
NOTE
The time for downloading software and data configuration file from the USB disk and the time for the
NodeB to activate the software may differ from those in Table 6-5, according to the version and
configuration.
----End
6.3.3 Upgrading the eNodeB Software and Downloading the Data
Configuration File (on the eNodeB Side)
This section describes how to download and activate the eNodeB software and data configuration
file through the USB storage device. The eNodeB automatically downloads the software and
data configuration file from the USB storage device, and then activates them. The software and
data configuration take effect after the eNodeB resets.
Prerequisite
The USB storage device is ready for use. The required files are saved in the USB storage device.
For details, see 6.2.3 Arranging the USB Disk for Local eNodeB Commissioning.
CAUTION
If one USB storage device is used repeatedly, the target eNodeB software and data configuration
file in the USB storage device should be updated before the USB storage device is used for an
eNodeB deployment.
When you save the eNodeB software and data configuration file to the USB storage device,
ensure that the locking switch on the USB storage device is disabled. In other words, the USB
storage device should be writable.
Context
When the LMPT of the BBU3900 is started, it automatically detects the USB storage device,
reads the related software and data configuration file in the USB storage device, and verifies the
file names and formats.
If you install the BBU before installing the RRU, you can install and power on the RRU during
the process of BBU software downloading. After the BBU software is downloaded and activated
3900 Series Multi-Mode Base Station
Commissioning Guide 6 Commissioning the MBTS by Using USB and M2000
Issue 02 (2010-07-30) Huawei Proprietary and Confidential
Copyright © Huawei Technologies Co., Ltd.
6-17

successfully, and the RRU is powered on, reset the LMPT for automatic upgrade of the RRU
software.
You should pay attention to the following points when you download and activate the software
and the configuration file through the USB storage device:
lIf the USB storage device contains the common configuration file of the site, digital
certificate and eNodeB software, the eNodeB parses the common configuration file, loads
the digital certificate, and then downloads and activates the eNodeB software and data
configuration. If the eNodeB cannot parse the common configuration file, it does not
proceed with the subsequent process.
lIf the USB storage device contains only the eNodeB software and data configuration, the
eNodeB downloads and activates the eNodeB software, and then downloads and activates
the data configuration.
lIf the eNodeB software or data configuration file is missing in the USB storage device, the
eNodeB performs the following steps:
–If the eNodeB software is missing in the USB storage device, the eNodeB
commissioning through the USB storage device is not performed.
–If the data configuration file is missing in the USB storage device, the eNodeB upgrades
to the minimum configuration of the target version and skips the download and
activation of data configuration.
lIf the eNodeB software upgrade fails, the eNodeB rolls back to the pre-upgrade version.
lBefore downloading and activating data configuration, the eNodeB does not check the
compatibility between the data configuration file and the eNodeB software version. The
eNodeB performs the following activities:
–If the eNodeB software is upgraded successfully but is not compatible with the data
configuration file, or if the download and activation of data configuration fail, the
eNodeB uses the minimum configuration of the target version.
–When the active eNodeB software is consistent with the target software version,
software upgrade is not performed. After the eNodeB resets, if the active eNodeB
software is not compatible with the data configuration file or if the download and
activation of data configuration fail, the eNodeB uses the data configuration of the
earlier version.
lIf any of the following situations occurs, the eNodeB would not download or activate the
eNodeB software or data configuration file from the USB storage device.
–The directory or the file does not exist.
–The eNodeB software is missing in the USB storage device, and therefore the software
and data cannot be downloaded or activated.
–The target software version is consistent with the active eNodeB software, and therefore
the eNodeB software is not downloaded or activated. The download and activation of
data configuration is still normal.
–The data configuration file is consistent with the active data configuration, and therefore
data configuration is not downloaded. The download and activation of the software is
still normal.
Procedure
Step 1 Insert the USB storage device into the USB port on the LMPT of the BBU3900, as shown in
Figure 6-4.
6 Commissioning the MBTS by Using USB and M2000
3900 Series Multi-Mode Base Station
Commissioning Guide
6-18 Huawei Proprietary and Confidential
Copyright © Huawei Technologies Co., Ltd.
Issue 02 (2010-07-30)
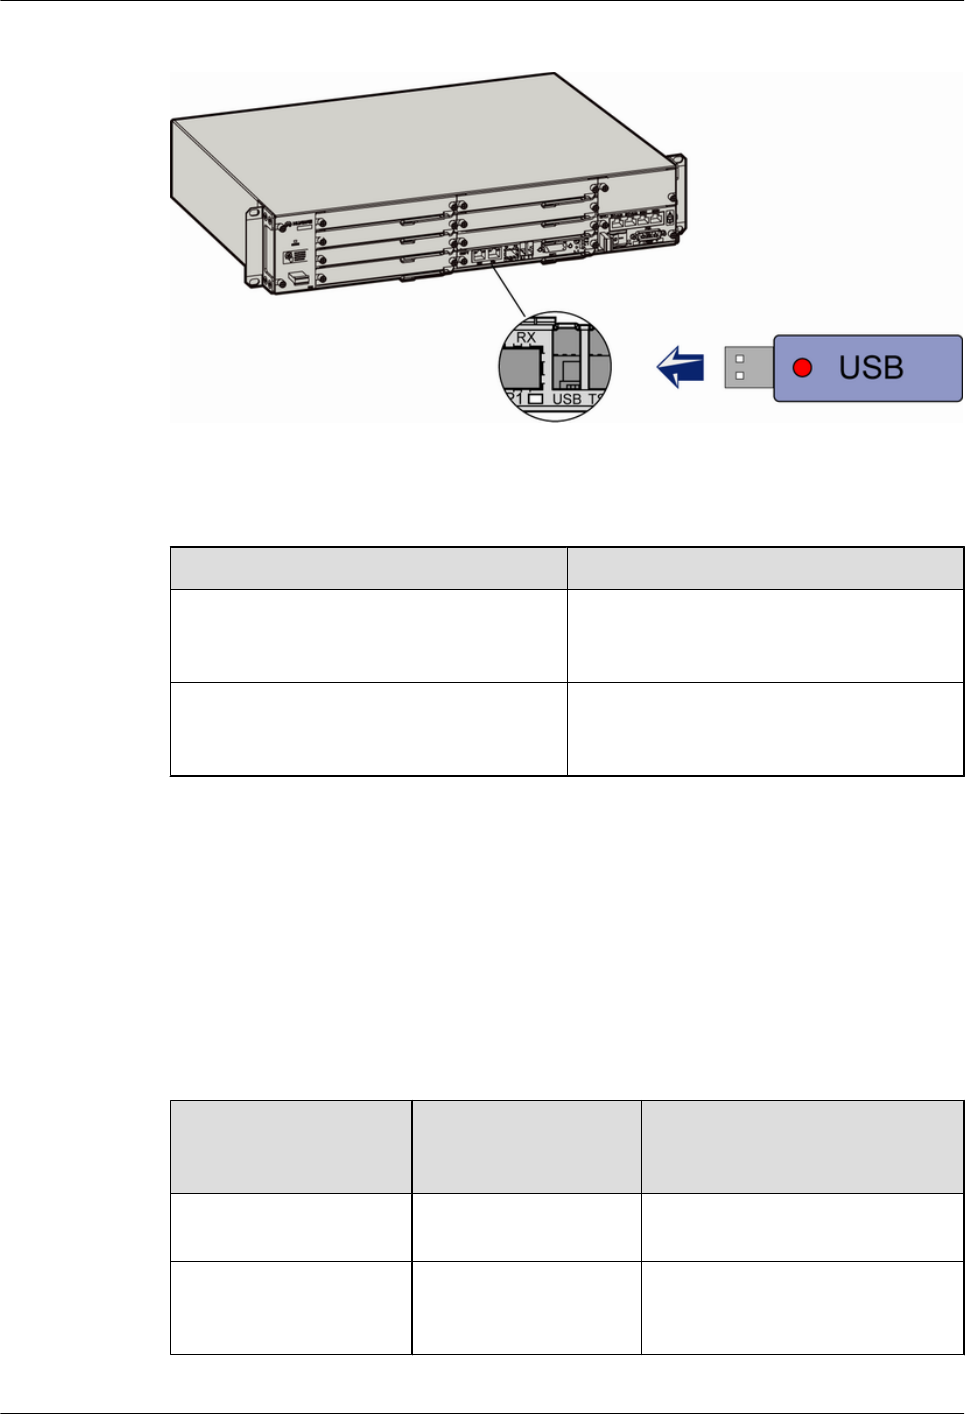
Figure 6-4 Inserting the USB storage device
Step 2 Check whether the eNodeB is powered on.
If ... Then ...
The eNodeB is not powered on Power on the eNodeB. The eNodeB
automatically detects the USB storage device
during startup.
The eNodeB is powered on Power off the eNodeB and power it on again.
The eNodeB automatically detects the USB
storage device during startup.
Step 3 After the eNodeB is started, it automatically upgrades the eNodeB software and data
configuration.
If the download or activation fails, reinsert or replace the USB storage device, power off the
eNodeB and power it on again, and then perform the commissioning through the USB storage
device. If the download or activation still fails, perform the local eNodeB commissioning on the
LMT. Table 6-6 lists the status of LEDs when the software and data configuration file are
downloaded and activated through the USB storage device.
Table 6-6 LED status
Status of the LED on
the USB Storage
Device
Status of the RUN LED on the
LMPT
Automatically detecting
the USB storage device
On Blinking (on for 1s and off for 1s)
Downloading the software
from the USB storage
device
Blinking Blinking (on for 0.125s and off for
0.125s)
3900 Series Multi-Mode Base Station
Commissioning Guide 6 Commissioning the MBTS by Using USB and M2000
Issue 02 (2010-07-30) Huawei Proprietary and Confidential
Copyright © Huawei Technologies Co., Ltd.
6-19
Status of the LED on
the USB Storage
Device
Status of the RUN LED on the
LMPT
Downloading the data
configuration file from the
USB storage device
Blinking Blinking (on for 0.125s and off for
0.125s)
Activating the software On Blinking (on for 0.125s and off for
0.125s)
Activating the data
configuration file
On Blinking (on for 0.125s and off for
0.125s)
Resetting the base station On, and then off On, and then blinking (on for 0.125s
and off for 0.125s)
Base station operating
normally
Off Blinking (on for 1s and off for 1s)
WARNING
Do not remove the USB storage device or reset the eNodeB during the download or activation
of eNodeB software and data configuration through the USB storage device. After the files are
downloaded, the eNodeB automatically activates the software and data configuration. Then, the
eNodeB resets.
Step 4 When the download and activation are successful, unplug the USB storage device, and proceed
with checking the status of the LEDs and rectifying the faults.
----End
Postrequisite
CAUTION
The eNodeB software package contains the LMT software. To reduce the eNodeB deployment
duration, some of the files of the LMT software are automatically downloaded to the eNodeB
four hours after the eNodeB deployment. If you need to use the LMT immediately after the
eNodeB deployment, run the SPL SOFTWARE command on the M2000 after the eNodeB is
connected to the M2000. Set Delay Download File Supply Flag to YES(Supply File that
Support Delay). Thus, the remaining files of LMT software are downloaded to the eNodeB.
6 Commissioning the MBTS by Using USB and M2000
3900 Series Multi-Mode Base Station
Commissioning Guide
6-20 Huawei Proprietary and Confidential
Copyright © Huawei Technologies Co., Ltd.
Issue 02 (2010-07-30)
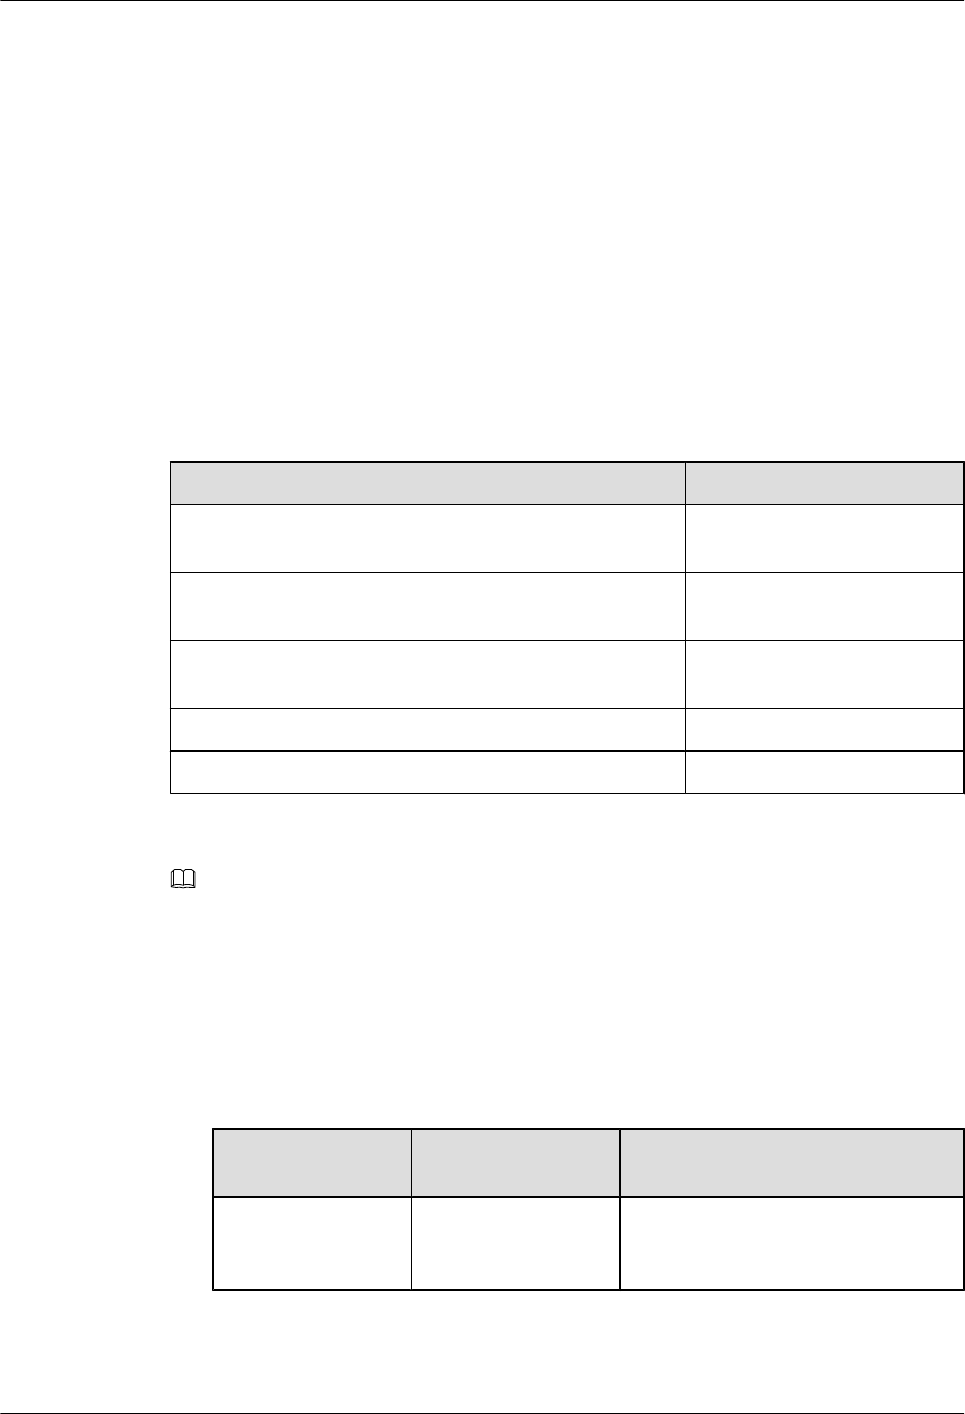
6.4 Checking the Status of the LEDs and Rectifying the
Faults
This section describes how to check the operating status of the LEDs according to the states of
the LEDs on the modules of the base station.
Context
LED status of functional eNodeB
If the status of the LEDs on the boards and auxiliary devices are the same as that shown in Table
6-7, you can infer that the base station runs properly.
Table 6-7 LED status of the functional base station
LED Status
RUN LED on each board in the base station Blinking (ON for 1s and OFF
for 1s)
ALM LEDs on the GTMU/WMPT/LMPT/WBBP/LBBP/
UERI/UTRP/PMU/AFMU/EMUA/MRFU/RRU3908
OFF
STATE LED on the FAN of the BBU3900 Blinking (green, ON for 1s and
OFF for 1s)
CPRI LED on the GTMU/WBBP/LBBP/MRFU/RRU3908 ON (green)
VSWR LED on the MRFU/RRU3908 OFF
NOTE
If the transmission is unavailable in the local USB commissioning scenario, the GBTS automatically resets at
intervals of 10 minutes. During this period, you need not check the status of the ALM LEDs on the MRFU/
RRU3908 working in the GSM system, GTMU, and UBRI. Check the status of co-cabinet MRFU/RRU3908
modules when you check the hardware status of the NodeB or eNodeB.
Procedure
Step 1 Check the LEDs on each board in the base station.
1. Check the RUN LED on each board.
If the RUN LED
Is...
It Indicates That... Then...
Blinking at 0.5 Hz
(ON for 1s and OFF
for 1s)
The board works
properly.
Go to Step 1.2.
3900 Series Multi-Mode Base Station
Commissioning Guide 6 Commissioning the MBTS by Using USB and M2000
Issue 02 (2010-07-30) Huawei Proprietary and Confidential
Copyright © Huawei Technologies Co., Ltd.
6-21

If the RUN LED
Is...
It Indicates That... Then...
ON The power supply is
available but the board
is faulty.
Reinstall the board to check whether
the fault is rectified. If the fault persists,
replace the board.
Blinking at 4 Hz (ON
for 0.125s and OFF
for 0.125s)
The software is being
loaded or the board is
inserted in the wrong
slot.
Wait for five minutes to check the
status of the RUN LED again.
If the RUN LED still blinks at 4 Hz,
check whether the board is inserted in
the correct slot. If not, reinstall the
board.
OFF The power supply is
unavailable or the
board is faulty.
lCheck whether the base station is
powered on. If not, power on the
base station.
lReinstall the board to check whether
the fault is rectified. If the fault
persists, replace the board.
2. Check the ALM LEDs on the GTMU/WMPT/LMPT/WBBP/LBBP/UERI/UTRP/MRFU/
RRU3908.
If the ALM LED
Is...
It Indicates That... Then...
OFF The GTMU/WMPT/
LMPT/WBBP/LBBP/
UERI/UTRP/MRFU/
RRU3908 are not
faulty.
Go to Step 1.3.
ON The GTMU/WMPT/
LMPT/WBBP/LBBP/
UERI/UTRP/MRFU/
RRU3908 are faulty.
Reinstall the board to check whether the
fault is rectified. If the fault persists,
replace the board.
6 Commissioning the MBTS by Using USB and M2000
3900 Series Multi-Mode Base Station
Commissioning Guide
6-22 Huawei Proprietary and Confidential
Copyright © Huawei Technologies Co., Ltd.
Issue 02 (2010-07-30)
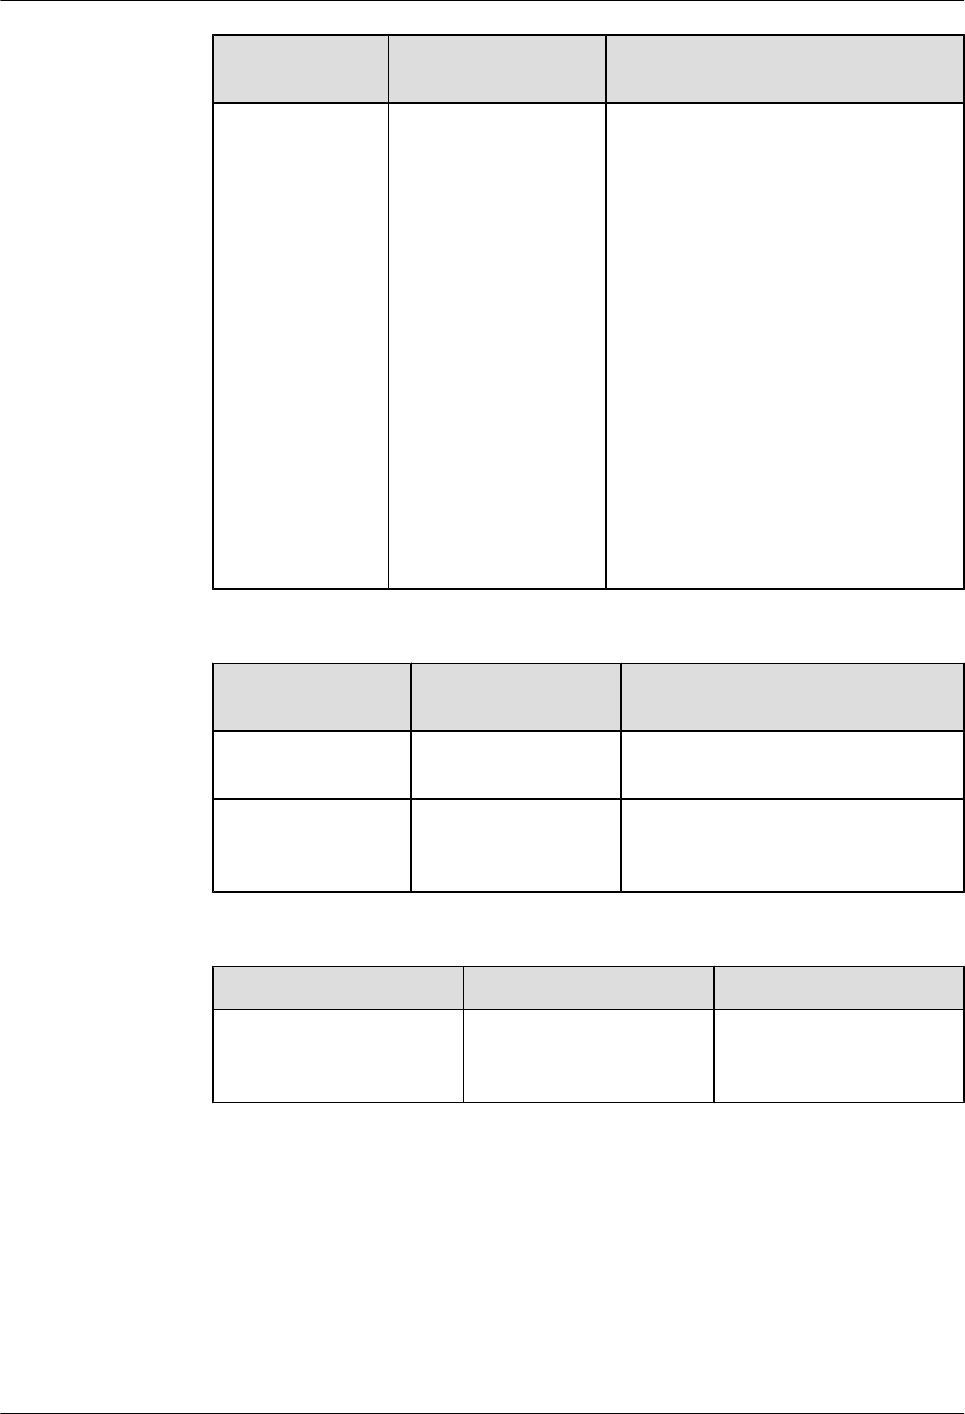
If the ALM LED
Is...
It Indicates That... Then...
Blinking An alarm is generated
but the board may not
need to be changed.
Check whether this
alarm is due to faults
caused by the
associated boards or
ports.
lCheck whether the RUN LEDs on the
other boards blink quickly.
–If the RUN LED on the EMUA
blinks quickly, check the RS485
signal cable connection.
–Check the RUN LED on each
board in the BBU.
lCheck whether the dry contact alarm
signal cable is properly connected to
the corresponding port on the UPEU.
lPlug in the GTMU/WMPT/LMPT/
WBBP/LBBP/UERI/UTRP again or
restart the MRFU/RRU3908 to check
whether the fault is rectified.
lIf the GPS antenna system is
configured, check whether it is
properly connected.
3. Check the STATE LED on the FAN.
If the STATE LED
Is...
It Indicates That... Then...
Blinking (green) The board works
properly.
Go to Step 1.4.
Blinking (red) The board is faulty. Reinstall the board to check whether
the fault is rectified. If the fault
persists, replace the board.
4. Check the CPRI LEDs on the GTMU/WBBP/LBBP/MRFU/RRU3908.
If the CPRI LED Is... It Indicates That... Then...
ON (green) The CPRI link is normal,
and the MRFU/RRU3908
is functioning properly.
Go to Step 2.
3900 Series Multi-Mode Base Station
Commissioning Guide 6 Commissioning the MBTS by Using USB and M2000
Issue 02 (2010-07-30) Huawei Proprietary and Confidential
Copyright © Huawei Technologies Co., Ltd.
6-23

If the CPRI LED Is... It Indicates That... Then...
OFF The port of the optical
module is not configured,
the optical module is
powered off, or the LED is
faulty.
If the MRFU or RRU3908
is connected to this port,
check the installation of
BBU and RRU according to
configuration
requirements.
lIf the installation is
inconsistent with
configuration
requirements, reinstall
the RRU according to
configuration
requirements.
lIf the installation is
consistent with
configuration
requirements, replace
the boards.
ON (red) The port of optical module
is configured, but the
optical module is not in
position, or the CPRI
optical cable is improperly
connected.
Handle the alarm according
to the suggestions. For
details, see Alarm
Reference.
Blinking red, ON for 1s,
OFF for 1s)
The RRU or LRFU on the
CPRI link reports the
VSWR alarm.
Handle the alarm according
to the suggestions. For
details, see Alarm
Reference.
Blinking (red, ON for
0.25s, OFF for 0.25s)
The RRU or LRFU on the
CPRI link is faulty.
Handle the alarm according
to the suggestions. For
details, see Alarm
Reference.
Step 2 Check the ALM LEDs on the PMU/AFMU/EMUA.
If the ALM LED Is... It Indicates That... Then...
OFF The module or the
device is functioning
properly.
The check is complete.
ON The module or the
device is faulty.
Reinstall the module or power on the
device again to check whether the fault is
rectified.
Step 3 Check the VSWR LED status of the MRFU/RRU3908, and perform the next step based on the
status of the VSWR LED.
6 Commissioning the MBTS by Using USB and M2000
3900 Series Multi-Mode Base Station
Commissioning Guide
6-24 Huawei Proprietary and Confidential
Copyright © Huawei Technologies Co., Ltd.
Issue 02 (2010-07-30)
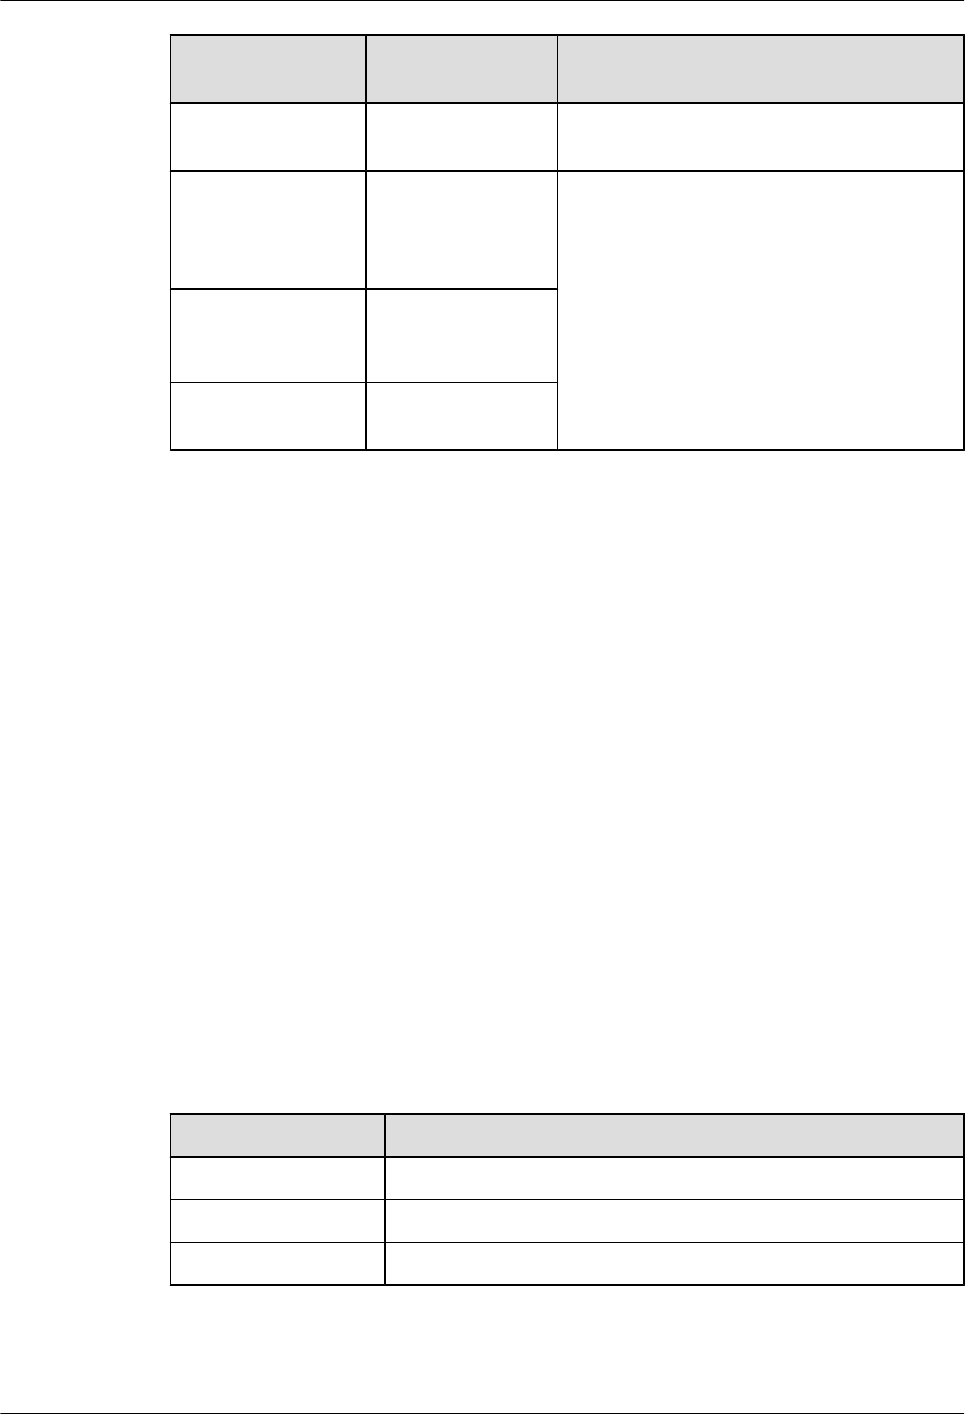
If the VSWR LED
is...
It Indicates That... Then...
OFF No VSWR alarm is
generated.
Wait till the transmission is available.
Blinking (ON for
0.125s and OFF for
0.125s)
There are alarms on
the ANT_TX/RXA
port and ANT_RXB
port.
Check whether the antenna system is properly
connected to the MRFU or RRU3908.
If the fault persists, record the fault and the
LED status in the 7.10 Data Sheet for
Commissioning. Then, rectify the fault on the
LMT or M2000.
ON There is an alarm on
the ANT_TX/RXA
port.
Blinking (ON for 1s
and OFF for 1s)
There is an alarm on
the ANT_RXB port.
----End
6.5 Set the Download Control Right
If the BTS is working in the co-module scenario, the download control right needs to be set. The
system with the download control right upgrades the co-modulated RRU3908/MRFU and the
USCU software during software upgrade.
Prerequisite
lM2000 server/terminal is working properly, and M2000 is logged on.
lThe connection between BTS and M2000 is working properly. If the BTS is GSM BTS,
the connection between the BSC and M2000 needs to work properly.
Procedure
Step 1 Run the corresponding MML command to set the download control right according to the actual
system of BTS, see Table 6-8.
Table 6-8 The corresponding MML commands of setting the download control right versus the
BTS Systems
BTS Systems MML Commands
GSM SET BTSLOADCTRL
UMTS SET LOADCTRL
LTE SET LOADCTRL
----End
3900 Series Multi-Mode Base Station
Commissioning Guide 6 Commissioning the MBTS by Using USB and M2000
Issue 02 (2010-07-30) Huawei Proprietary and Confidential
Copyright © Huawei Technologies Co., Ltd.
6-25

7 Commissioning the MBTS by Using Local
Maintenance Terminal and M2000
About This Chapter
This chapter describes how to use local maintenance terminal at the MBTS to upgrade MBTS
software and configure MBTS data, check MBTS hardware status, rectify MBTS hardware faults
(if any) to facilitate the establishment of MBTS OM channels. This chapter also describes how
to check the operating status of the MBTS on the M2000.
NOTE
The GBTS local maintenance terminal is named SMT, the NodeB local maintenance terminal is named
NodeB LMT, and the eNodeB local maintenance terminal is named eNodeB LMT. Select a local
maintenance terminal according to the mode of the base station to be commissioned.
7.1 Procedure for Commissioning the MBTS Using Local Maintenance Terminal and M2000
At the local end of the MBTS, you can use local maintenance terminal to upgrade MBTS software
and configure MBTS data and to facilitate the establishment of MBTS OM at the MBTS. You
can also check whether the MBTS hardware status is normal according to the board status and
LED status, to locate and rectify faults (if any) in time. At the M2000, you can check the MBTS
operating status.
7.2 Running the GBTS SMT
To run the GBTS site maintenance terminal (SMT), you need to first set the IP address of the
SMT client, connect the base station and the SMT, and then log in to the SMT.
7.3 Configuring the Basic Data of the GBTS
This section describes how to configure the basic data of the GBTS such as the GBTS boards
and logical objects. You must configure the basic data of the GBTS before performing the local
commissioning on the GBTS side.
7.4 Checking the Transmission Between the BBU and the BSC on the BTS Side
This section describes how to check the status of the LEDs on the panels of the GTMU and
UTRP (if the UTRP is installed) and how to check the connections of the E1 cable and E1 surge
protection transfer cable to ensure that the BBU properly communicates with the BSC.
7.5 Running the NodeB LMT
To run the NodeB LMT, you need to first set the IP address of the LMT client, connect the base
station and the LMT, and then log in to the LMT.
3900 Series Multi-Mode Base Station
Commissioning Guide
7 Commissioning the MBTS by Using Local Maintenance
Terminal and M2000
Issue 02 (2010-07-30) Huawei Proprietary and Confidential
Copyright © Huawei Technologies Co., Ltd.
7-1

7.6 Upgrading the NodeB Software and Downloading the Data Configuration File
This section describes how to upgrade the NodeB software, download the data configuration
file, and activate the NodeB on the LMT. The software and the configuration data take effect
after the NodeB resets automatically.
7.7 Running the eNodeB LMT
You can maintain the eNodeB by logging on to the LMT. Alternatively, you can maintain the
eNodeB on the M2000.
7.8 Upgrading the eNodeB Software and Downloading the Data Configuration File
This section describes how to upgrade the eNodeB software and data configuration file on the
LMT. The upgraded eNodeB software and data configuration file take effect after the eNodeB
is automatically reset. The process for upgrading the eNodeB software and data configuration
file takes about 45 minutes.
7.9 Downloading the eNodeB License
By downloading the license to the eNodeB on the LMT, you are authorized to use the eNodeB
software.
7.10 Data Sheet for Commissioning
This chapter provides the data sheet that is used to record the process and result of the
commissioning.
7 Commissioning the MBTS by Using Local Maintenance
Terminal and M2000
3900 Series Multi-Mode Base Station
Commissioning Guide
7-2 Huawei Proprietary and Confidential
Copyright © Huawei Technologies Co., Ltd.
Issue 02 (2010-07-30)

7.1 Procedure for Commissioning the MBTS Using Local
Maintenance Terminal and M2000
At the local end of the MBTS, you can use local maintenance terminal to upgrade MBTS software
and configure MBTS data and to facilitate the establishment of MBTS OM at the MBTS. You
can also check whether the MBTS hardware status is normal according to the board status and
LED status, to locate and rectify faults (if any) in time. At the M2000, you can check the MBTS
operating status.
Prerequisite
Before you commission the MBTS, the MBTS, RNC, and M2000 must meet following
requirements:
lThe MBTS hardware such as the cabinets, cables, antenna system, and auxiliary devices,
is installed and passes the installation check. The MBTS is powered on and passes the
power-on check.
lThe controller hardware is installed and commissioned, and the system works properly.
The negotiation data of the MBTS to be commissioned is configured and recorded.
lThe M2000 is commissioned, it is connected to the corresponding controller, and the
configuration synchronization is completed.
In addition, the following requirements must be met:
lA portable computer used for local commissioning is ready.
lThe portable computer is installed with local maintenance terminal mapping with the mode
of the base station to be commissioned.
lThe target version software package and data configuration file of the base station to be
commissioned are ready and saved on the portable computer.
Commissioning Flowchart
Figure 7-1 shows the procedure for commissioning the MBTS using local maintenance terminal
and M2000.
3900 Series Multi-Mode Base Station
Commissioning Guide
7 Commissioning the MBTS by Using Local Maintenance
Terminal and M2000
Issue 02 (2010-07-30) Huawei Proprietary and Confidential
Copyright © Huawei Technologies Co., Ltd.
7-3
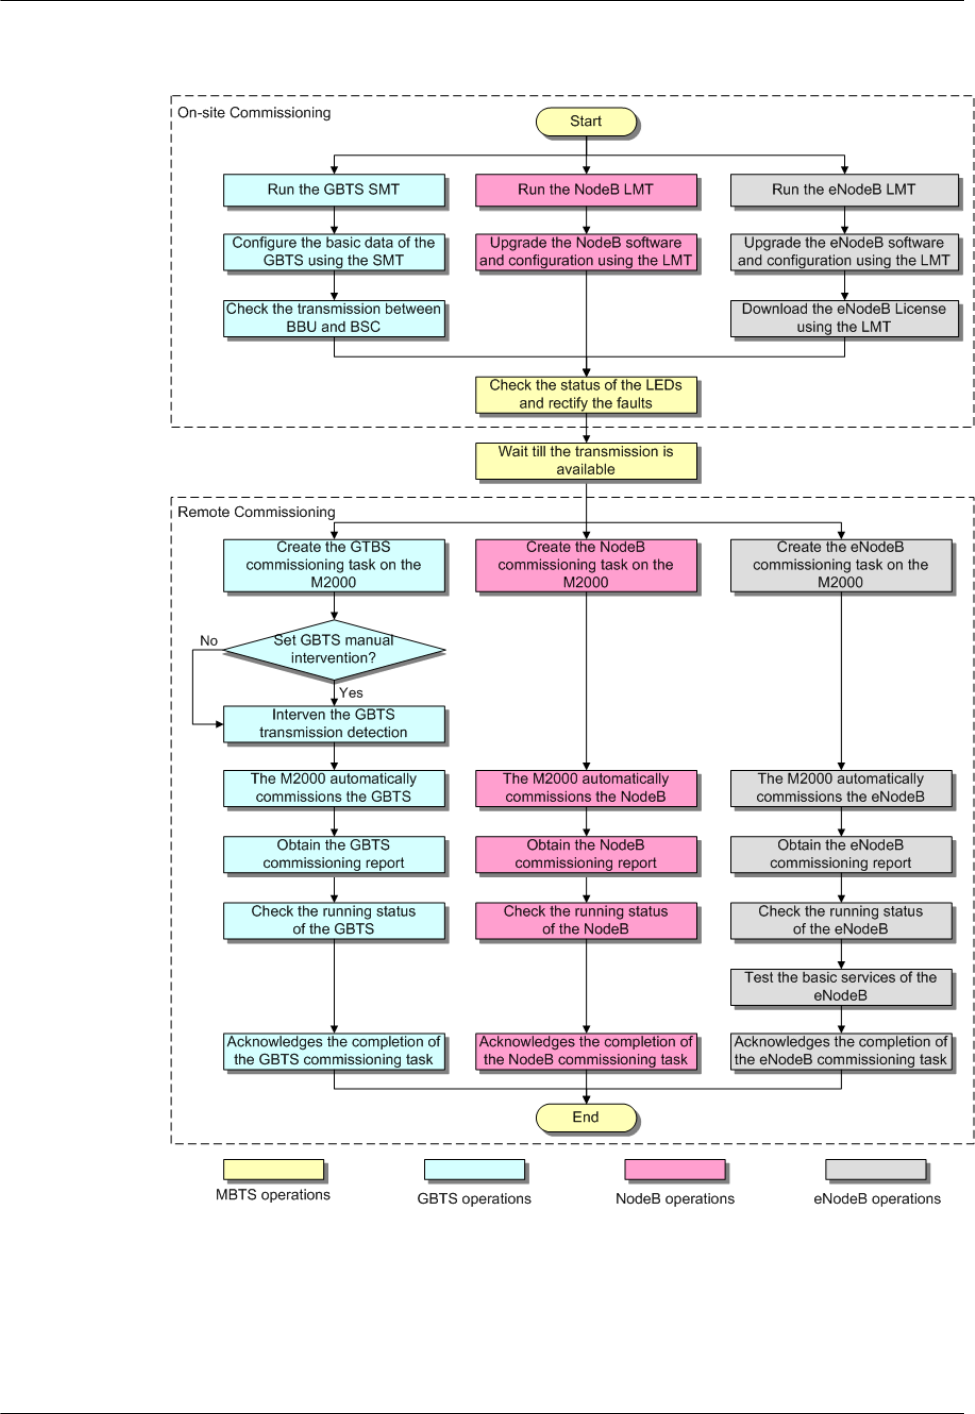
Figure 7-1 Procedure for commissioning the MBTS using local maintenance terminal and
M2000
7 Commissioning the MBTS by Using Local Maintenance
Terminal and M2000
3900 Series Multi-Mode Base Station
Commissioning Guide
7-4 Huawei Proprietary and Confidential
Copyright © Huawei Technologies Co., Ltd.
Issue 02 (2010-07-30)

NOTE
lThe priority of a mode does not need to be considered during the MBTS commissioning.
lBefore upgrading the dual-mode MRFU or RRU3908 to a target version on the local maintenance
terminal, check in which mode (GSM, UMTS, or LTE) the MRFU or RRU3908 is upgraded and obtain
the upgrade control rights on the local maintenance terminal in the mode.
Procedure
lLocal end of the MBTS
1. Start the GBTS SMT to commission the GBTS on the base station side. For details,
see 7.2 Running the GBTS SMT.
2. Configure the basic data of the GBTS on the SMT. For details, see 7.3 Configuring
the Basic Data of the GBTS.
3. Optional: Check the transmission between the BBU and the BSC. For details, see
7.4 Checking the Transmission Between the BBU and the BSC on the BTS
Side.
4. Start the NodeB LMT. For details, see 7.5 Running the NodeB LMT.
5. Upgrade the NodeB software and data configuration file using the NodeB LMT. For
details, see 7.6 Upgrading the NodeB Software and Downloading the Data
Configuration File.
6. Start the eNodeB LMT. For details, see 7.7 Running the eNodeB LMT .
7. Upgrade the eNodeB software and data configuration file using the eNodeB LMT.
For details, see 7.8 Upgrading the eNodeB Software and Downloading the Data
Configuration File.
8. Download the eNodeB commissioning license file using the eNodeB LMT. For
details, see 7.9 Downloading the eNodeB License.
9. Check the connection status of the base station, and rectify faults if any. For details,
see 6.4 Checking the Status of the LEDs and Rectifying the Faults.
lRemote end of the MBTS
NOTE
When the MBTS is commissioned remotely on the M2000, commission the base station of a mode,
and then commission the base station of the other mode. The two modes are equal in priority.
1. Wait till the transmission is available.
2. Create a commissioning task on the M2000. For details, see 5.2 Creating a
Commissioning Task.
3. Optional: If a GBTS is to be commissioned and Intervening transmission is selected
when a commissioning task is created, manually check the GBTS transmission state
and rectify faults (if any). For details, see 5.3 Intervening the GBTS
Transmission.
4. The M2000 automatically commissions the MBTS. For details, see 5.4
Commissioning the MBTS on the M2000. During the process of the MBTS
commissioning, monitor the commissioning progress and alarms, and rectify faults (if
any). The monitoring operations vary according to modes. For details on the operations
in each mode, see 5.5 Monitoring the GBTS Commissioning Task, 5.6 Monitoring
the NodeB Commissioning Task, and 5.7 Monitoring the eNodeB Commissioning
Task.
3900 Series Multi-Mode Base Station
Commissioning Guide
7 Commissioning the MBTS by Using Local Maintenance
Terminal and M2000
Issue 02 (2010-07-30) Huawei Proprietary and Confidential
Copyright © Huawei Technologies Co., Ltd.
7-5

5. Obtain the commissioning report from the M2000. For details, see 5.8 Obtaining the
Commissioning Report.
6. View the commissioning report to check the MBTS operating status. For details, see
5.9 Checking the Operating Status of the Base Station.
7. Verify eNodeB services. For details, see 5.10 Testing the Basic Services of the
eNodeB.
8. Confirm the MBTS commissioning task. For details, see 5.11 Confirming the
Commissioning Task.
----End
7.2 Running the GBTS SMT
To run the GBTS site maintenance terminal (SMT), you need to first set the IP address of the
SMT client, connect the base station and the SMT, and then log in to the SMT.
7.2.1 Setting the IP address of the SMT Client
This section describes how to set the IP address of the SMT client. The IP address of the SMT
client is on the same network segment as the IP address (192.168.0.72/255.255.255.0) of the
GTMU.
7.2.2 Connecting the SMT Client and the Base Station
This section describes how to connect the SMT client to the ETH port on the GTMU of the base
station through an Ethernet cable. After the connection is established, you can operate and
maintain the base station on the SMT.
7.2.3 Logging In to the SMT
This section describes how to log in to the base station through the SMT.
7.2.1 Setting the IP address of the SMT Client
This section describes how to set the IP address of the SMT client. The IP address of the SMT
client is on the same network segment as the IP address (192.168.0.72/255.255.255.0) of the
GTMU.
Prerequisite
The TCP/IP protocol is applied on the SMT client.
Procedure
Step 1 To set the IP address of the SMT client, perform the following steps. This section takes the
Windows XP operating system as an example. Choose Start > Setting > Control Panel.
Step 2 Double-click Network Connections in the displayed Control Panel window. Right-click Local
Area Connection in the displayed dialog box.
Step 3 Choose Properties from the shortcut menu. The Local Area Connection Properties dialog
box is displayed.
Step 4 Select Internet Protocol (TCP/IP), and click Properties. The Internet Protocol (TCP/IP)
Properties dialog box is displayed.
7 Commissioning the MBTS by Using Local Maintenance
Terminal and M2000
3900 Series Multi-Mode Base Station
Commissioning Guide
7-6 Huawei Proprietary and Confidential
Copyright © Huawei Technologies Co., Ltd.
Issue 02 (2010-07-30)

Step 5 Select Use the following IP address.
Step 6 Enter the correct IP address, subnet mask, and default gateway. Ensure that the IP address of the
SMT client is on the same network segment as the IP address (192.168.0.72/255.255.255.0) of
the base station, so that a local OM channel can be established.
Step 7 Click OK to complete the settings.
----End
7.2.2 Connecting the SMT Client and the Base Station
This section describes how to connect the SMT client to the ETH port on the GTMU of the base
station through an Ethernet cable. After the connection is established, you can operate and
maintain the base station on the SMT.
Prerequisite
The IP address and subnet mask of the SMT client are set correctly. The IP address of the SMT
client is on the same network segment as the IP address (192.168.0.72/255.255.255.0) of the
base station.
Procedure
Step 1 Use an Ethernet cable to connect the SMT client and the base station. One end is connected to
the ETH port on the GTMU of the main cabinet, and the other end is connected to the Ethernet
port on the SMT client (generally a laptop).
Step 2 Open an MS-DOS command prompt window.
lIn the case of the Windows 2000/XP operating system, choose Start > Run at the lower-left
corner of the computer's desktop. In the Run dialog box, enter cmd and click "OK". The
MS-DOS command prompt window is displayed.
Step 3 Run ping 192.168.0.72 to verify the network connection between the SMT client and the base
station.
NOTE
192.168.0.15 is the IP address of the base station.
lIf the information similar to that in the following example is returned, you can infer that the
SMT client and the BBU can communicate normally.
Pinging 192.168.0.72 with 32 bytes of data:
Reply from 192.168.0.72: bytes=32 time=1ms TTL=253
Reply from 192.168.0.72: bytes=32 time=1ms TTL=253
Reply from 192.168.0.72: bytes=32 time=1ms TTL=253
Reply from 192.168.0.72: bytes=32 time=1ms TTL=253
Ping statistics for 192.168.0.72:
Packets: Sent = 4, Received = 4, Lost = 0 (0% loss),
Approximate round trip times in milli-seconds:
Minimum = 1ms, Maximum = 1ms, Average = 1ms
lIf the SMT client and the BBU cannot communicate properly, the possible causes are as
follows:
–The GTMU is faulty.
–The Ethernet cable is disconnected or in poor contact.
–The COM port of the SMT client is faulty.
–The base station is resetting.
3900 Series Multi-Mode Base Station
Commissioning Guide
7 Commissioning the MBTS by Using Local Maintenance
Terminal and M2000
Issue 02 (2010-07-30) Huawei Proprietary and Confidential
Copyright © Huawei Technologies Co., Ltd.
7-7
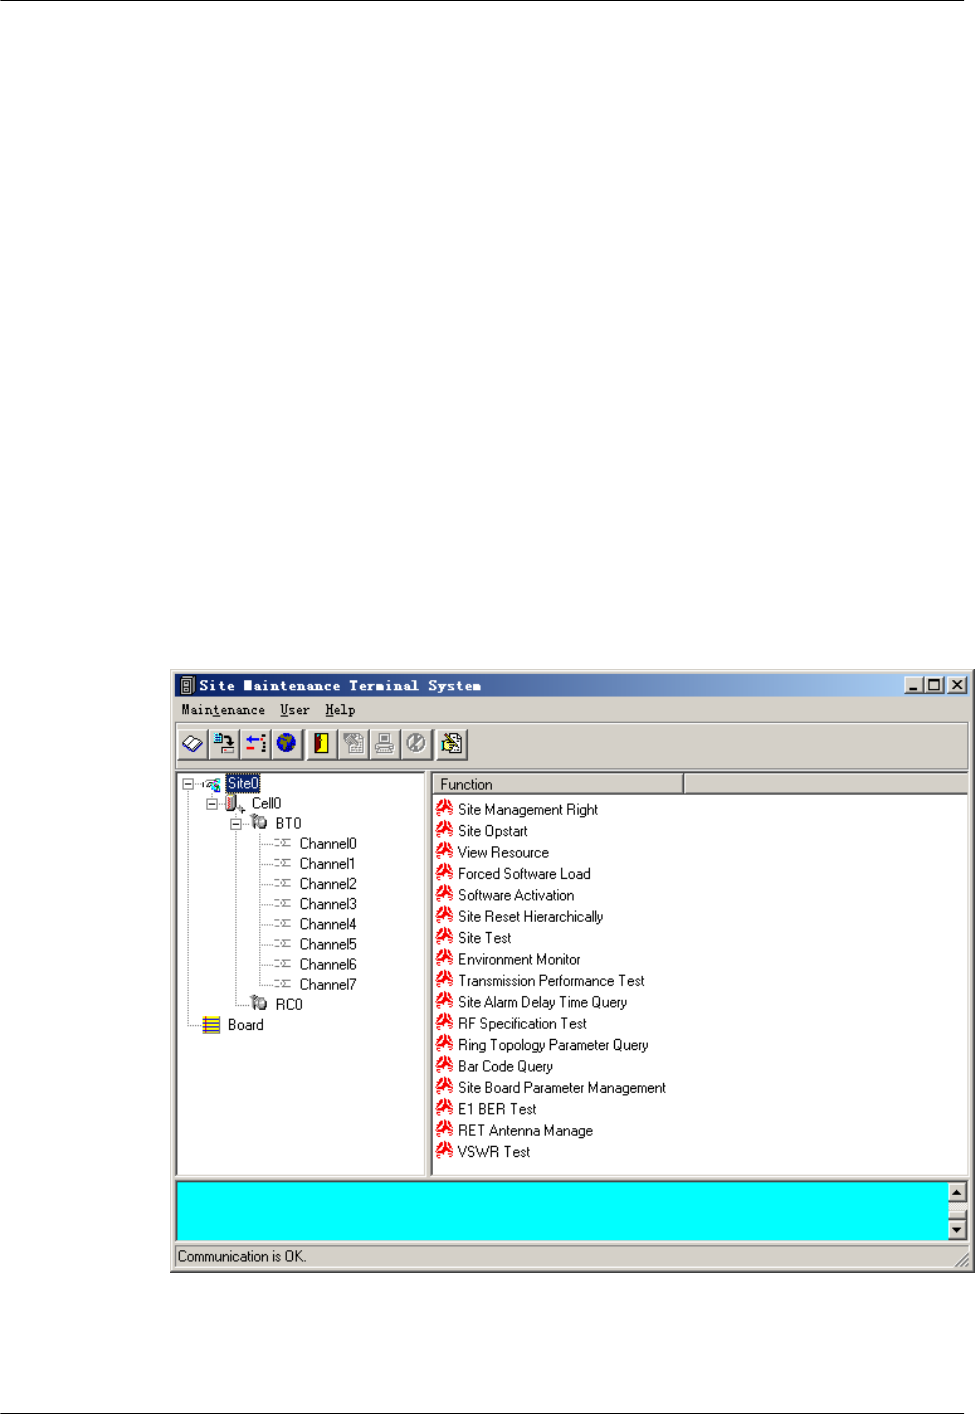
–The IP address is incorrect.
----End
7.2.3 Logging In to the SMT
This section describes how to log in to the base station through the SMT.
Prerequisite
lThe SMT client is properly connected to the base station.
lThe latest software of the SMT is installed on the SMT client.
Procedure
Step 1 Start the SMT.
lIf the connection between the SMT client and the base station is established, a dialog box
shown in Figure 7-2 is displayed. The SMT is successfully started.
lIf the SMT client cannot communicate with the base station, the Communication failed
dialog box is displayed, as shown in Figure 7-3. Go to Step 2.
Figure 7-2 SMT login interface
7 Commissioning the MBTS by Using Local Maintenance
Terminal and M2000
3900 Series Multi-Mode Base Station
Commissioning Guide
7-8 Huawei Proprietary and Confidential
Copyright © Huawei Technologies Co., Ltd.
Issue 02 (2010-07-30)
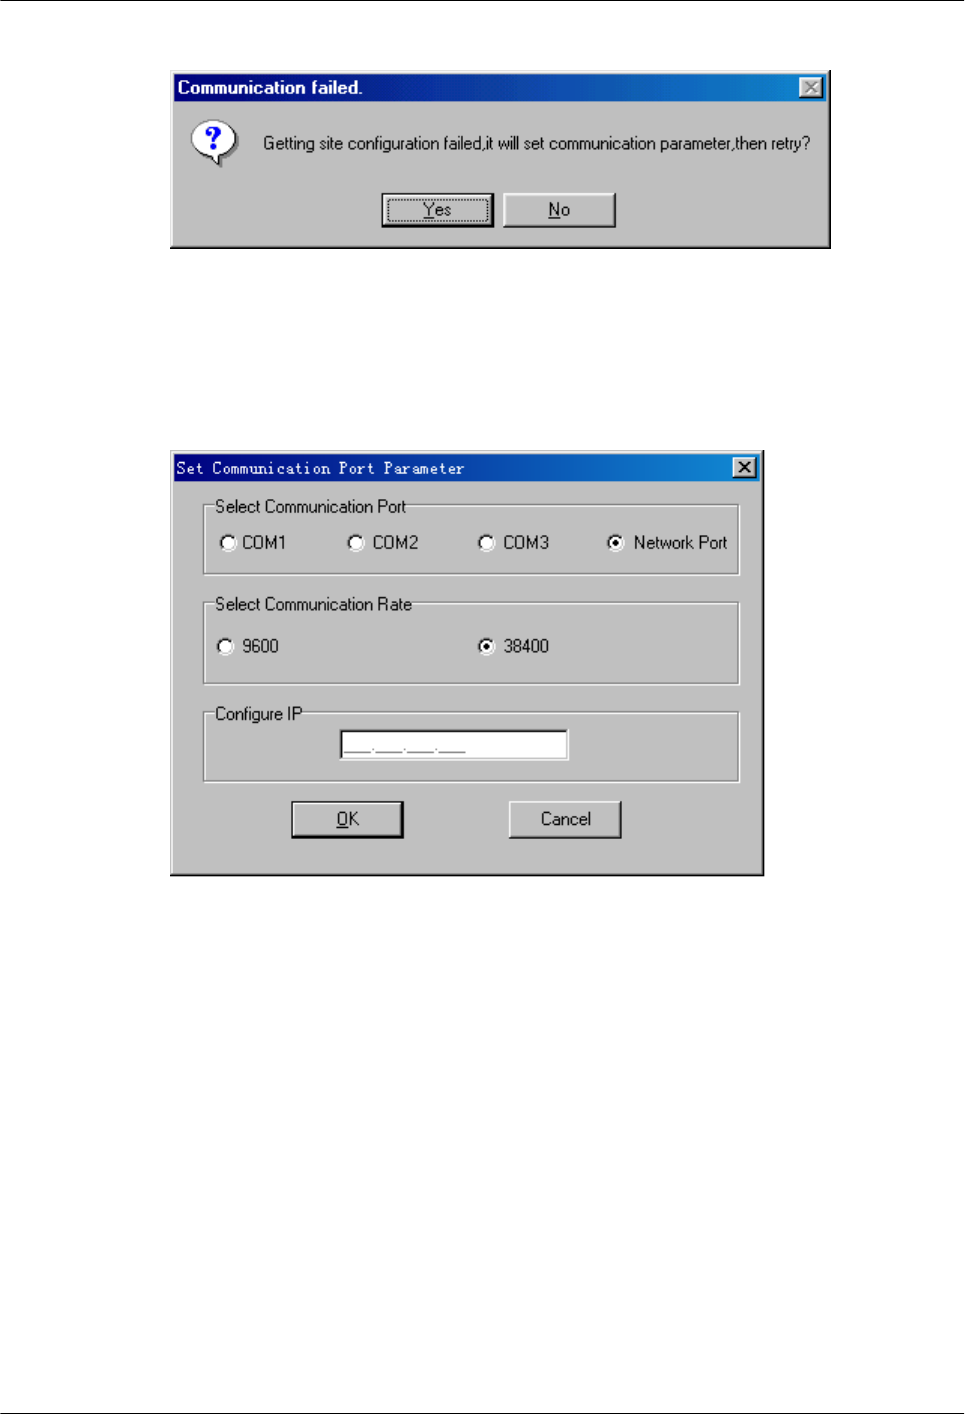
Figure 7-3 Communication failed dialog box
Step 2 Click Yes.
The Set Communication Port Parameter dialog box is displayed, as shown in Figure 7-4.
Figure 7-4 Set Communication Port Parameter dialog box
Step 3 In the Select Communication Port area, click Network Port. In the Configure IP area, set the
IP address to 192.168.0.72.
Step 4 Click OK.
The interface shown in Figure 7-2 is displayed.
Step 5 In the Site Maintenance Terminal System window, click User, and select User Login. Enter
User Name (Omc by default) and User Password (omc by default).
----End
7.3 Configuring the Basic Data of the GBTS
This section describes how to configure the basic data of the GBTS such as the GBTS boards
and logical objects. You must configure the basic data of the GBTS before performing the local
commissioning on the GBTS side.
3900 Series Multi-Mode Base Station
Commissioning Guide
7 Commissioning the MBTS by Using Local Maintenance
Terminal and M2000
Issue 02 (2010-07-30) Huawei Proprietary and Confidential
Copyright © Huawei Technologies Co., Ltd.
7-9
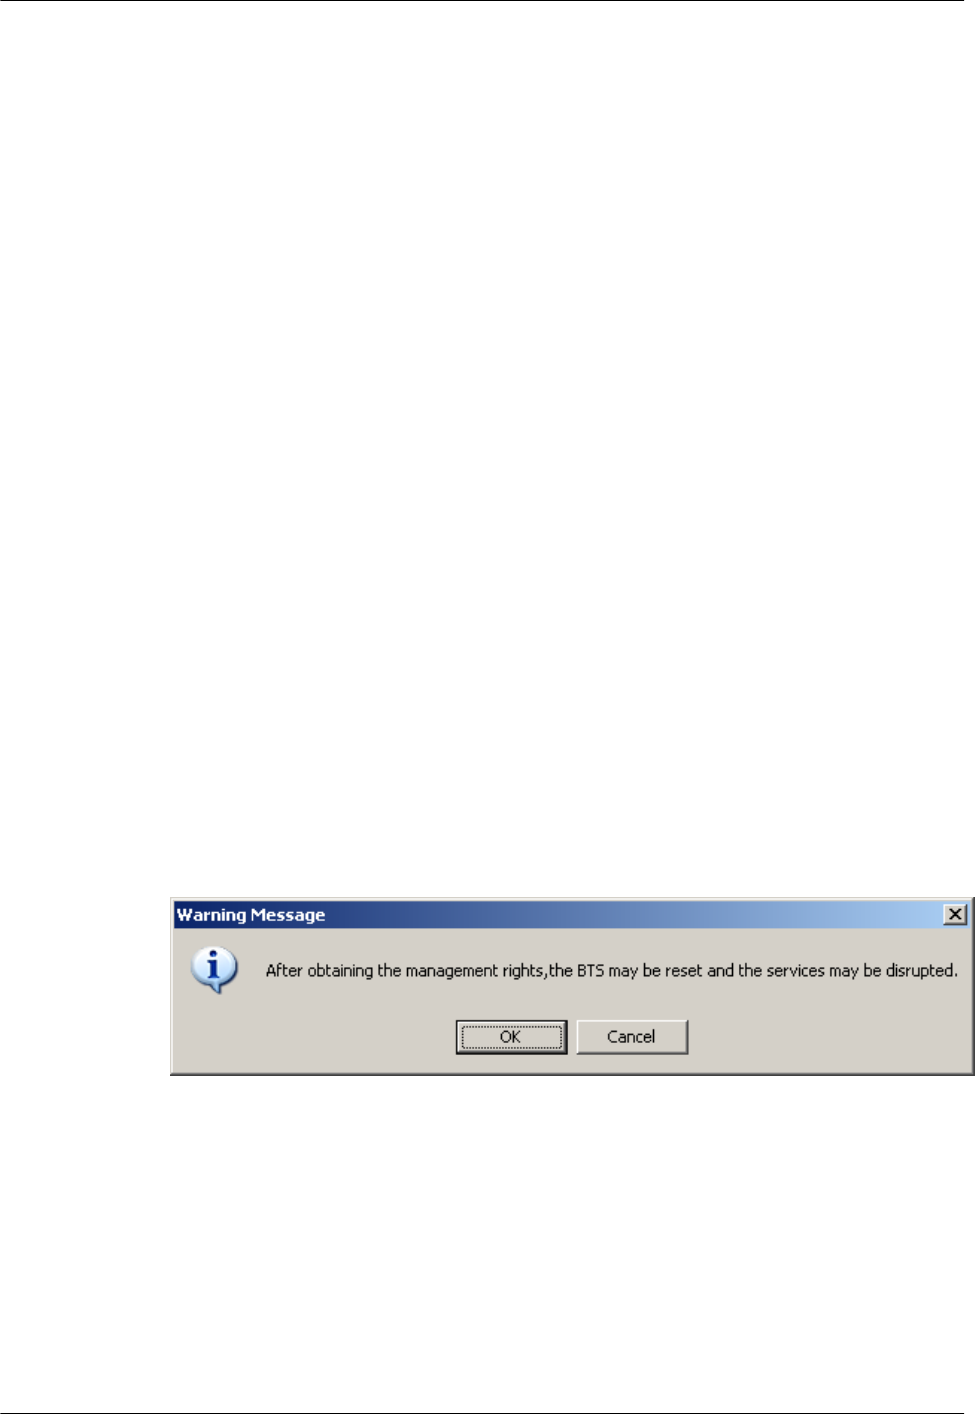
7.3.1 Obtaining the Site Management Rights
This section describes how to obtain the site management rights. Before configuring the base
station boards and logical objects, you must obtain the site management rights after logging into
the base station at the local end.
7.3.2 Configuring Base Station Boards
This section describes how to configure RF units and other boards of the base station on the
SMT.
7.3.3 Configuring BTS Logical Objects
This section describes how to configure logical objects of the BTS. The BTS logical object
configuration consists of the cell configuration, carrier binding, and activation of cell
configuration data.
7.3.1 Obtaining the Site Management Rights
This section describes how to obtain the site management rights. Before configuring the base
station boards and logical objects, you must obtain the site management rights after logging into
the base station at the local end.
Prerequisite
You have logged in to the base station through the SMT.
Procedure
Step 1 In the Site Maintenance Terminal System window, select Site, and double-click Site
Management Right.
The Site Management Right dialog box is displayed.
Step 2 Click Obtain. The Warning Message dialog box is displayed, as shown in Figure 7-5.
Figure 7-5 Warning Message dialog box
Step 3 Click OK, and wait for the response.
lIf the site management rights are successfully obtained, a dialog box is displayed, as shown
in Figure 7-6.
lIf failed, the probable cause is that engineers are configuring or managing base station data
on the LMT side. Wait till the operations are complete and then perform Step 2 and Step
3.
7 Commissioning the MBTS by Using Local Maintenance
Terminal and M2000
3900 Series Multi-Mode Base Station
Commissioning Guide
7-10 Huawei Proprietary and Confidential
Copyright © Huawei Technologies Co., Ltd.
Issue 02 (2010-07-30)
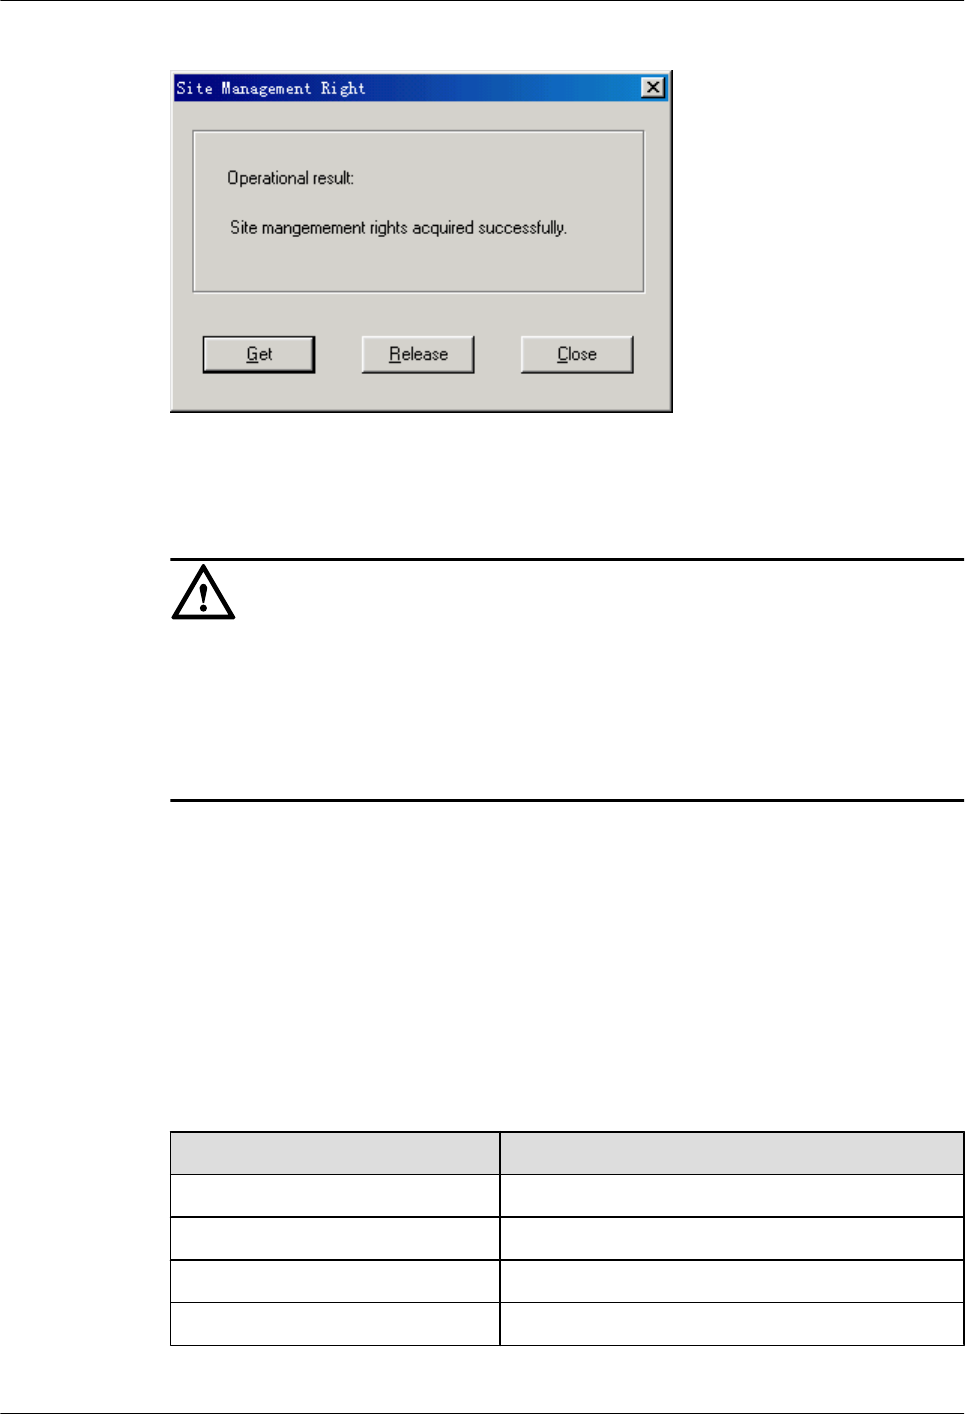
Figure 7-6 Site Management Rights dialog box
Step 4 Click Close to close the Site Management Rights dialog box.
CAUTION
After commissioning on the SMT is complete, you need to release the site management rights.
Otherwise, you cannot log in to the LMT within 15 minutes.
To release the site management rights, perform the following steps:
Click Release on the Site Management Rights dialog box. When Releasing site management
rights successfully. is displayed, click Close.
----End
7.3.2 Configuring Base Station Boards
This section describes how to configure RF units and other boards of the base station on the
SMT.
Context
Table 7-1 shows the types of configurable RF units on the BTS.
Table 7-1 Configurable RF units on the BTS
BTS Type Configurable TRX Types
BTS3900 GSM DRFU, GRFU, and MRFU
BTS3900A GSM DRFU, GRFU, and MRFU
BTS3900L GSM DRFU, GRFU, and MRFU
DBS3900 GSM DRRU, GRRU, and MRRU
3900 Series Multi-Mode Base Station
Commissioning Guide
7 Commissioning the MBTS by Using Local Maintenance
Terminal and M2000
Issue 02 (2010-07-30) Huawei Proprietary and Confidential
Copyright © Huawei Technologies Co., Ltd.
7-11
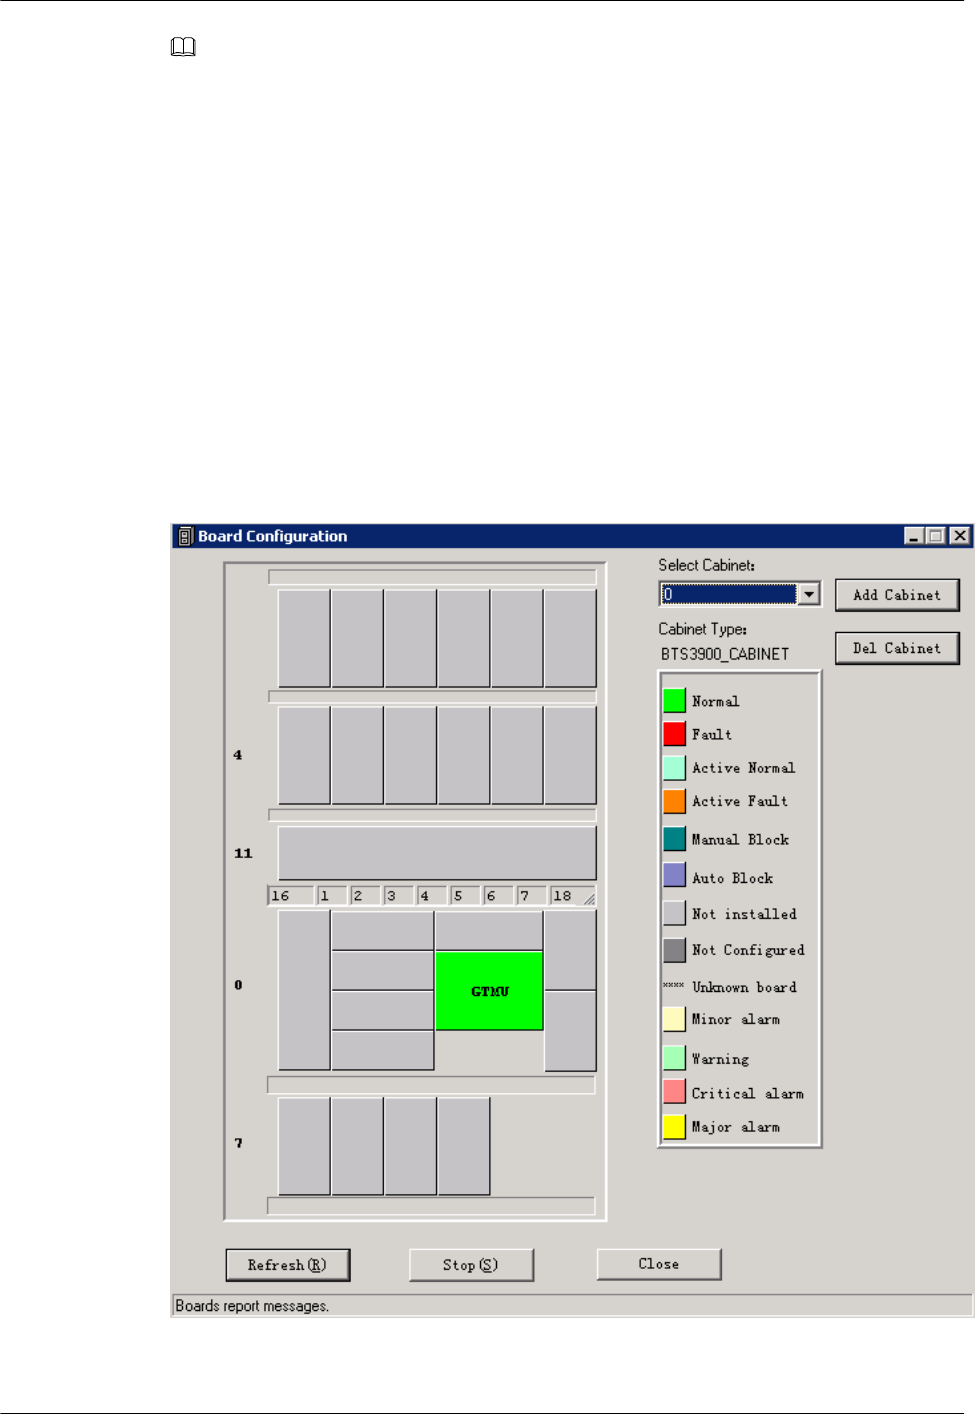
NOTE
lThe following description takes the MRFU as an example to explain the procedure of configuring the
RF units for the BTS3900.
lThe RF units of the BTS3900A are installed in the RFC. Thus, the RF units must be configured on the
RFC interface of the SMT.
lThe configuration of the BTS3900L is the same as the BTS3900. Right-click an idle RFU slot in the
Board Configuration window and perform the configuration.
lThe RF units of the DBS3900 must be configured in the Topology Configuration window.
Procedure
Step 1 Click Board in the navigation tree.
The Board Configuration and Board Management windows are displayed.
Step 2 Double-click Board Configuration.
The Board Configuration window is displayed, as shown in Figure 7-7.
Figure 7-7 Board Configuration window
7 Commissioning the MBTS by Using Local Maintenance
Terminal and M2000
3900 Series Multi-Mode Base Station
Commissioning Guide
7-12 Huawei Proprietary and Confidential
Copyright © Huawei Technologies Co., Ltd.
Issue 02 (2010-07-30)
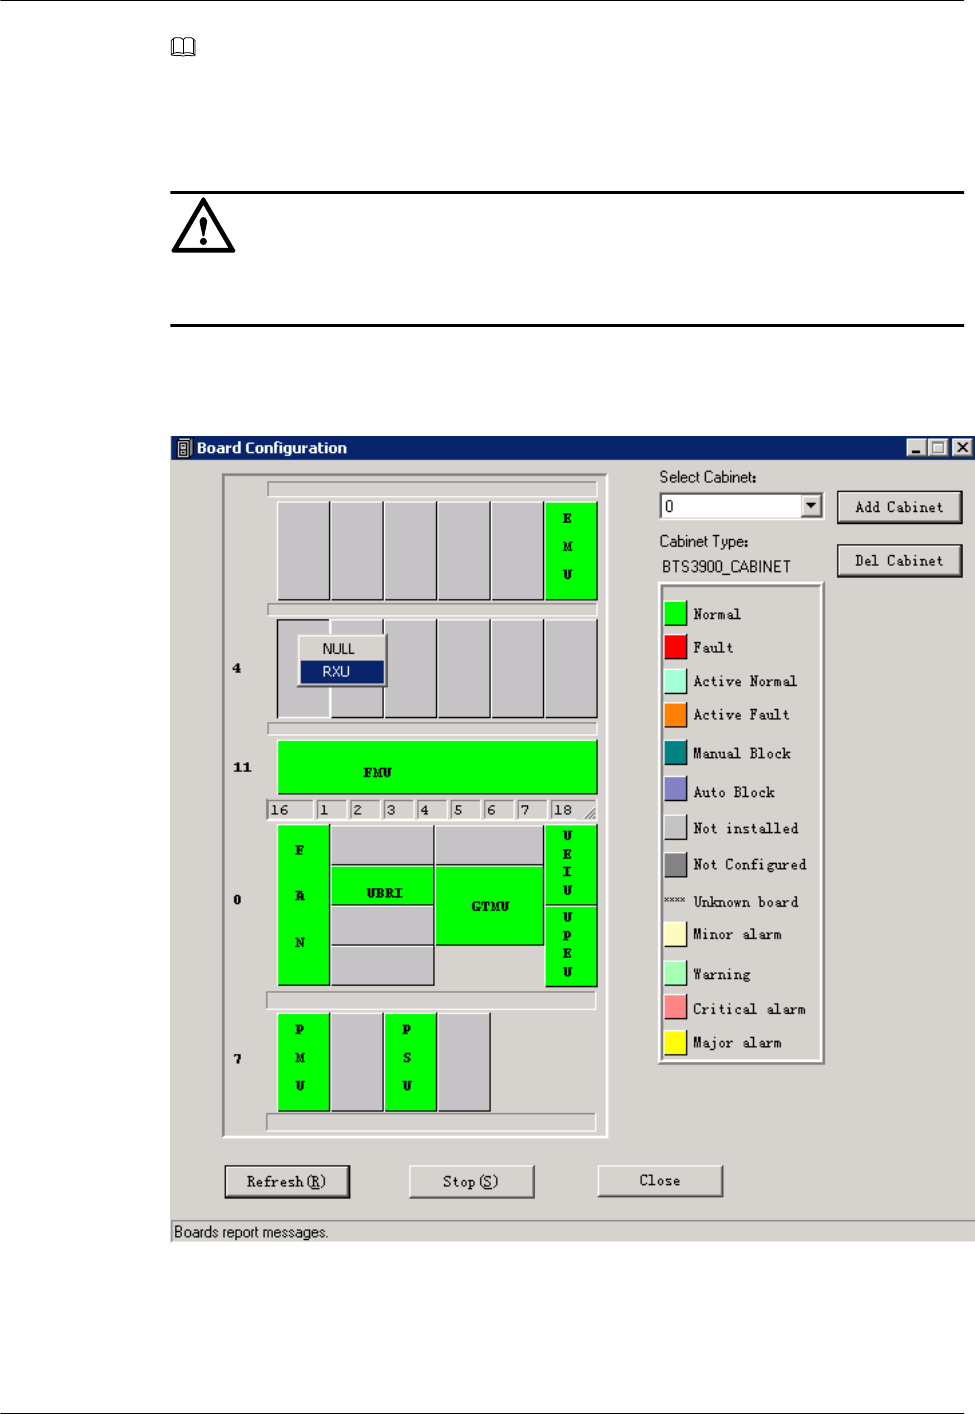
NOTE
When no site information is configured, there is only the GTMU on the Board Configuration window.
The status of the GTMU is Active Fault.
Step 3 Right-click an idle RFU slot in the Board Configuration window,
CAUTION
Double-click GTMU. Then, configure RXUs in the displayed Topology Configuration
window.
as shown in Figure 7-8.
Figure 7-8 Board Configuration window
Step 4 Choose RXU from the shortcut menu, as shown in Figure 7-8.
The Deploy RXU dialog box is displayed. Set Card Type to MRFU, as shown in Figure 7-9.
3900 Series Multi-Mode Base Station
Commissioning Guide
7 Commissioning the MBTS by Using Local Maintenance
Terminal and M2000
Issue 02 (2010-07-30) Huawei Proprietary and Confidential
Copyright © Huawei Technologies Co., Ltd.
7-13
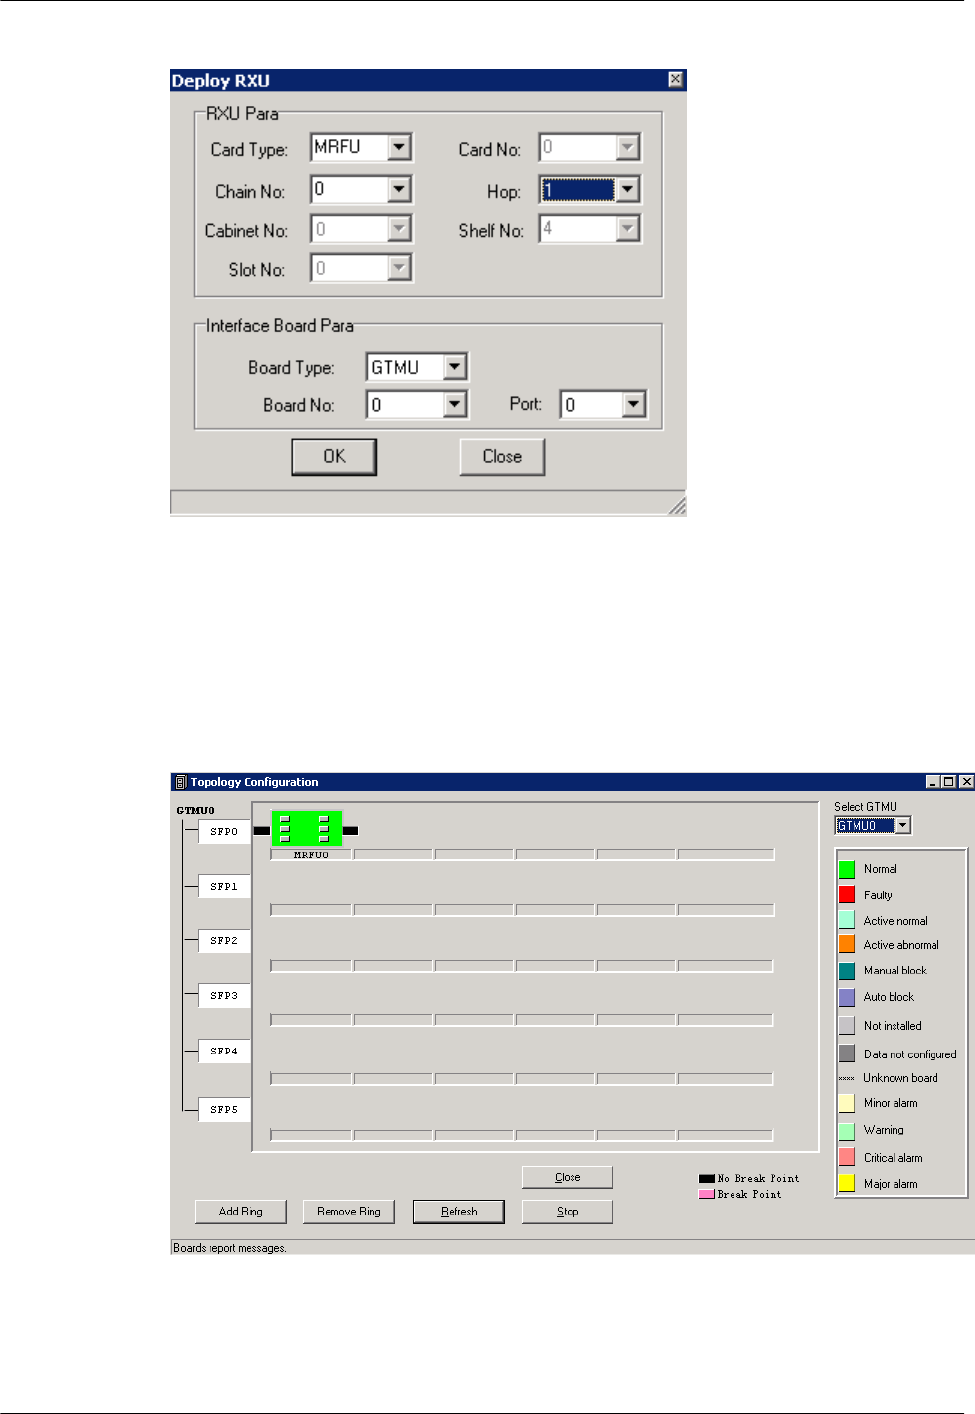
Figure 7-9 Configuring the MRFU
Step 5 Set Card No., Chain No., and Hop for the MRFU in the Deploy RXU dialog box.
Step 6 In the Deploy RXU dialog box, click OK. The configuration of a new MRFU is complete.
Double-click GTMU. The Topology Configuration window is displayed, as shown in Figure
7-10.
Figure 7-10 Topology Configuration window
Step 7 Click Close. The Board Configuration window is displayed. Right-click an idle slot, and then
choose the board to be configured from the shortcut menu.
7 Commissioning the MBTS by Using Local Maintenance
Terminal and M2000
3900 Series Multi-Mode Base Station
Commissioning Guide
7-14 Huawei Proprietary and Confidential
Copyright © Huawei Technologies Co., Ltd.
Issue 02 (2010-07-30)
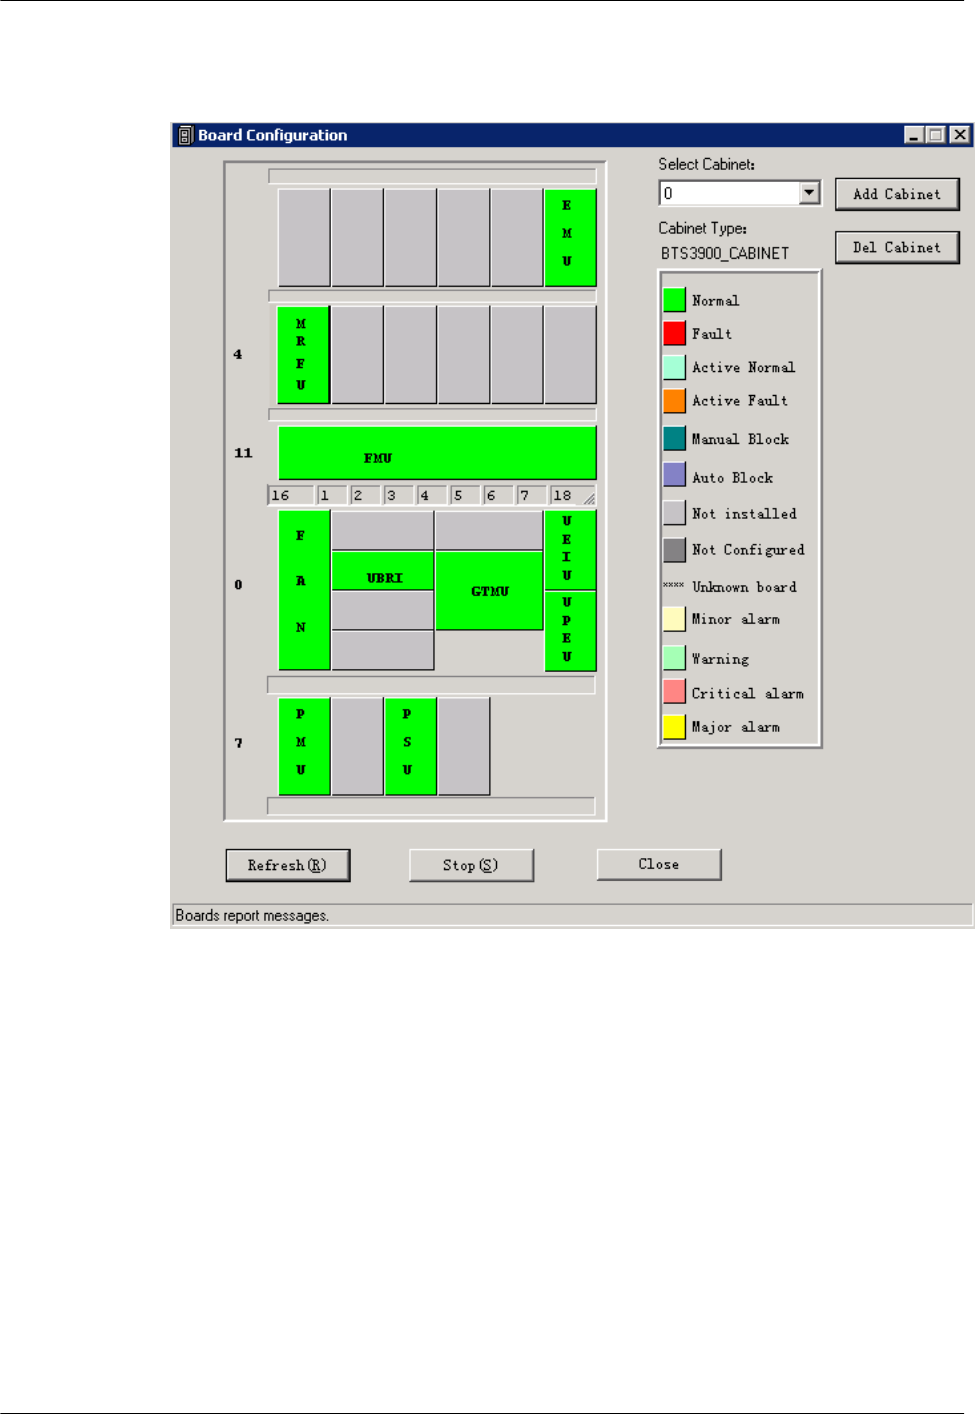
Add PMU and FMU, as shown in Figure 7-11.
Figure 7-11 Board Configuration window
Step 8 Set the related parameters. On the SMT, the parameters of EMU cannot be set and the parameters
of PMU are default values. Therefore, no parameter setting is required.
Step 9 Configure the APMU. The PMU is added for the BTS3900A and DBS3900. Perform the
following steps to configure the new types of PMU, such as APM100 and APM30.
1. Click Board in the navigation tree.
The Board Configuration and Board Management windows are displayed.
2. Double-click Board Management. The Board Management window is displayed.
3. In the Board Management window, right-click PMU, and then choose Parameter
Management from the shortcut menu.
The Parameter Management dialog box is displayed.
4. On the Parameter Management dialog box, click Parameter Set. Select APM30 or other
options under APMU Type according to the configuration data, as shown in Figure
7-12.
3900 Series Multi-Mode Base Station
Commissioning Guide
7 Commissioning the MBTS by Using Local Maintenance
Terminal and M2000
Issue 02 (2010-07-30) Huawei Proprietary and Confidential
Copyright © Huawei Technologies Co., Ltd.
7-15
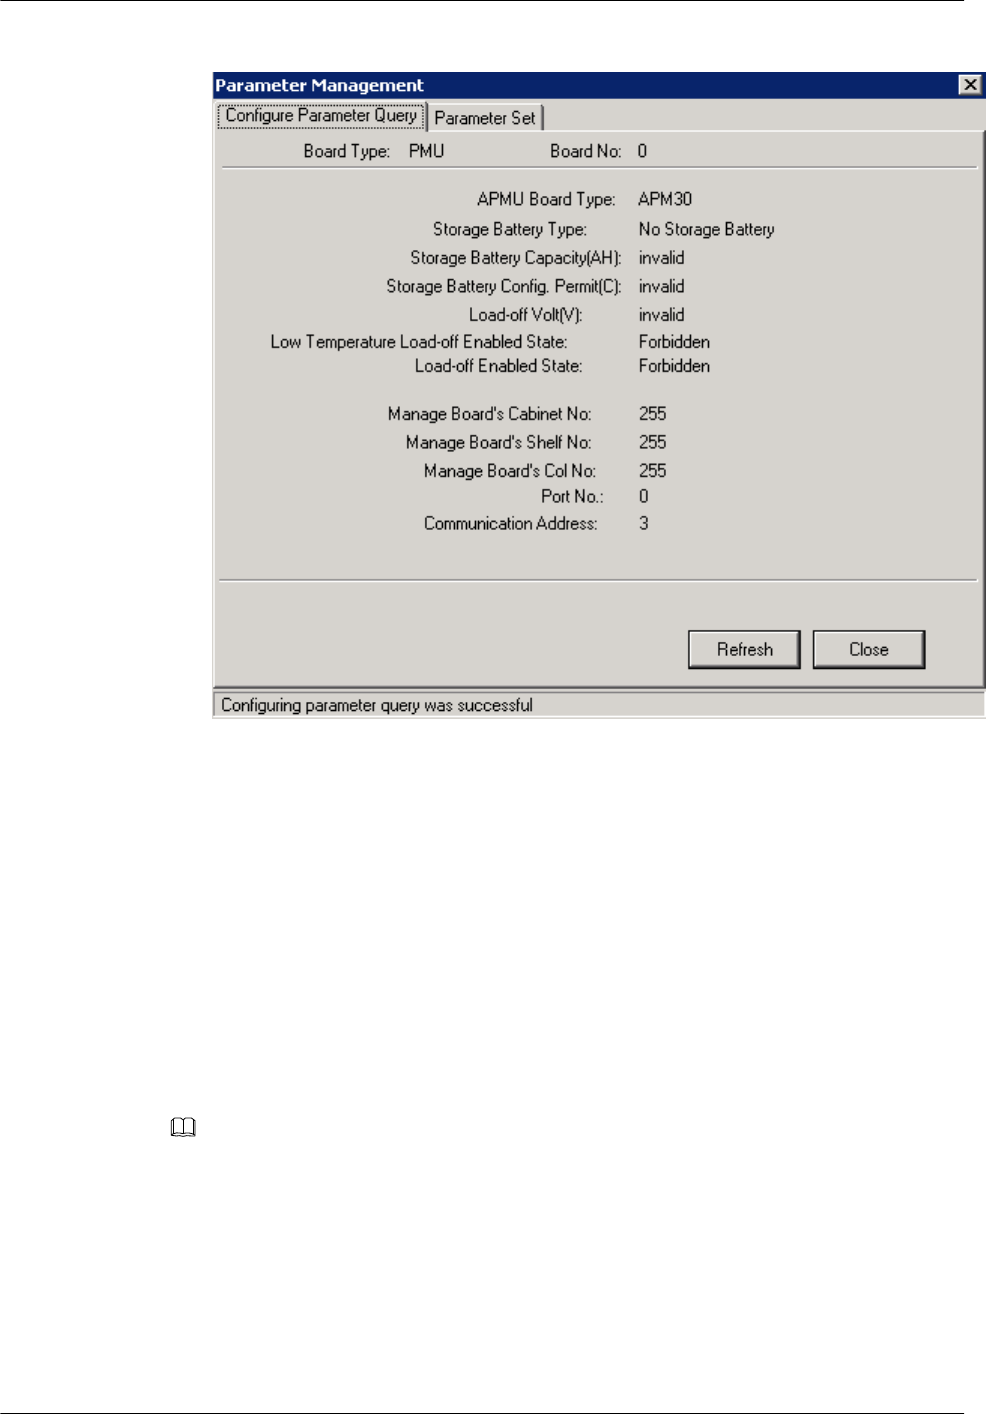
Figure 7-12 Parameter Management dialog box
Step 10 Click Close to complete the configuration of BTS boards.
----End
7.3.3 Configuring BTS Logical Objects
This section describes how to configure logical objects of the BTS. The BTS logical object
configuration consists of the cell configuration, carrier binding, and activation of cell
configuration data.
Context
NOTE
The following part describes the configuration and binding of carriers based on one MRRU configured
with two carriers.
Procedure
Step 1 Add a cell. Click Site0, and double-click Site Configuration in the Function area.
The Site Configuration dialog box is displayed, as shown in Figure 7-13.
7 Commissioning the MBTS by Using Local Maintenance
Terminal and M2000
3900 Series Multi-Mode Base Station
Commissioning Guide
7-16 Huawei Proprietary and Confidential
Copyright © Huawei Technologies Co., Ltd.
Issue 02 (2010-07-30)
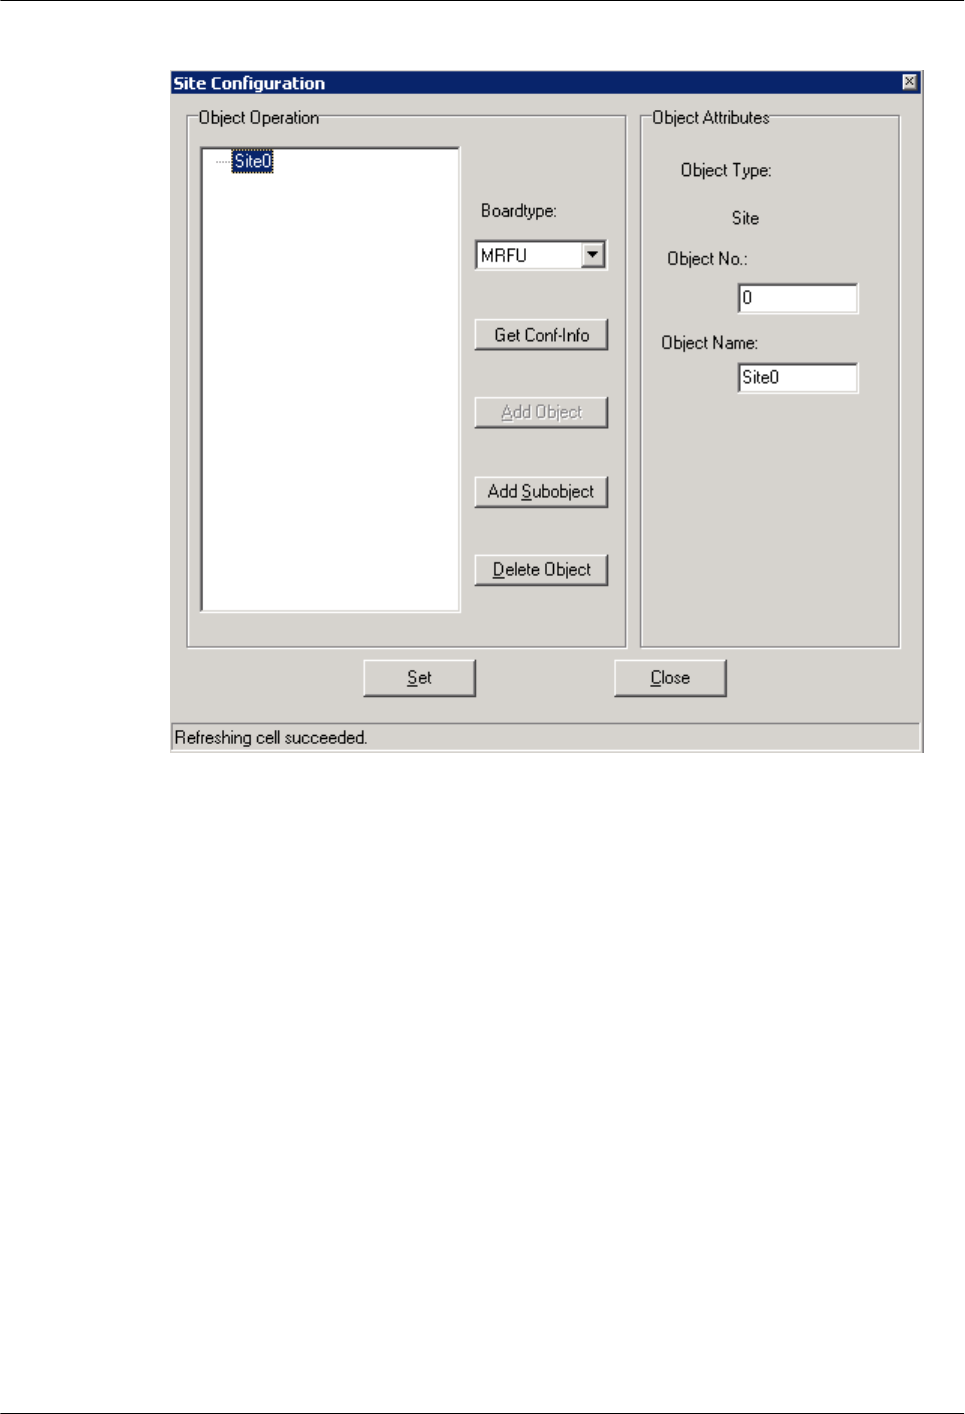
Figure 7-13 Site Configuration dialog box (1)
Step 2 Click Site0, and then click Add Subobject. In the Object Attributes area, specify Object
No. and Object Name.
In the Object Operation area, Cell0 is added, as shown in Figure 7-14.
3900 Series Multi-Mode Base Station
Commissioning Guide
7 Commissioning the MBTS by Using Local Maintenance
Terminal and M2000
Issue 02 (2010-07-30) Huawei Proprietary and Confidential
Copyright © Huawei Technologies Co., Ltd.
7-17
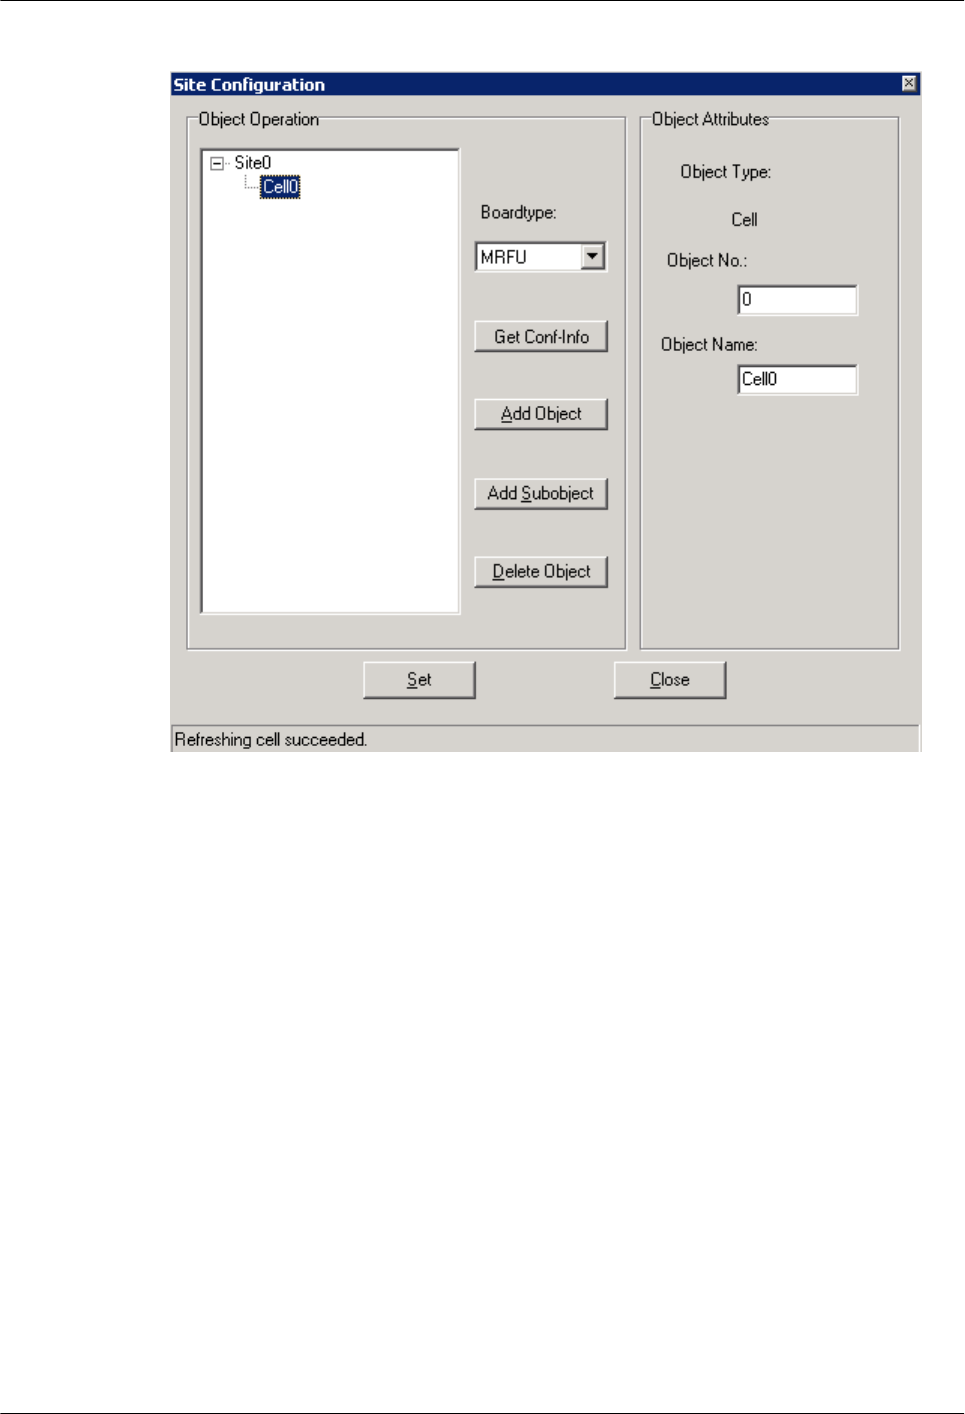
Figure 7-14 Site Configuration dialog box (2)
Step 3 Bind the carrier. Click Cell0, and select the TRX to be configured in the Boardtype drop-down
list box. Set the board type to MRRU, as shown in Figure 7-15.
7 Commissioning the MBTS by Using Local Maintenance
Terminal and M2000
3900 Series Multi-Mode Base Station
Commissioning Guide
7-18 Huawei Proprietary and Confidential
Copyright © Huawei Technologies Co., Ltd.
Issue 02 (2010-07-30)
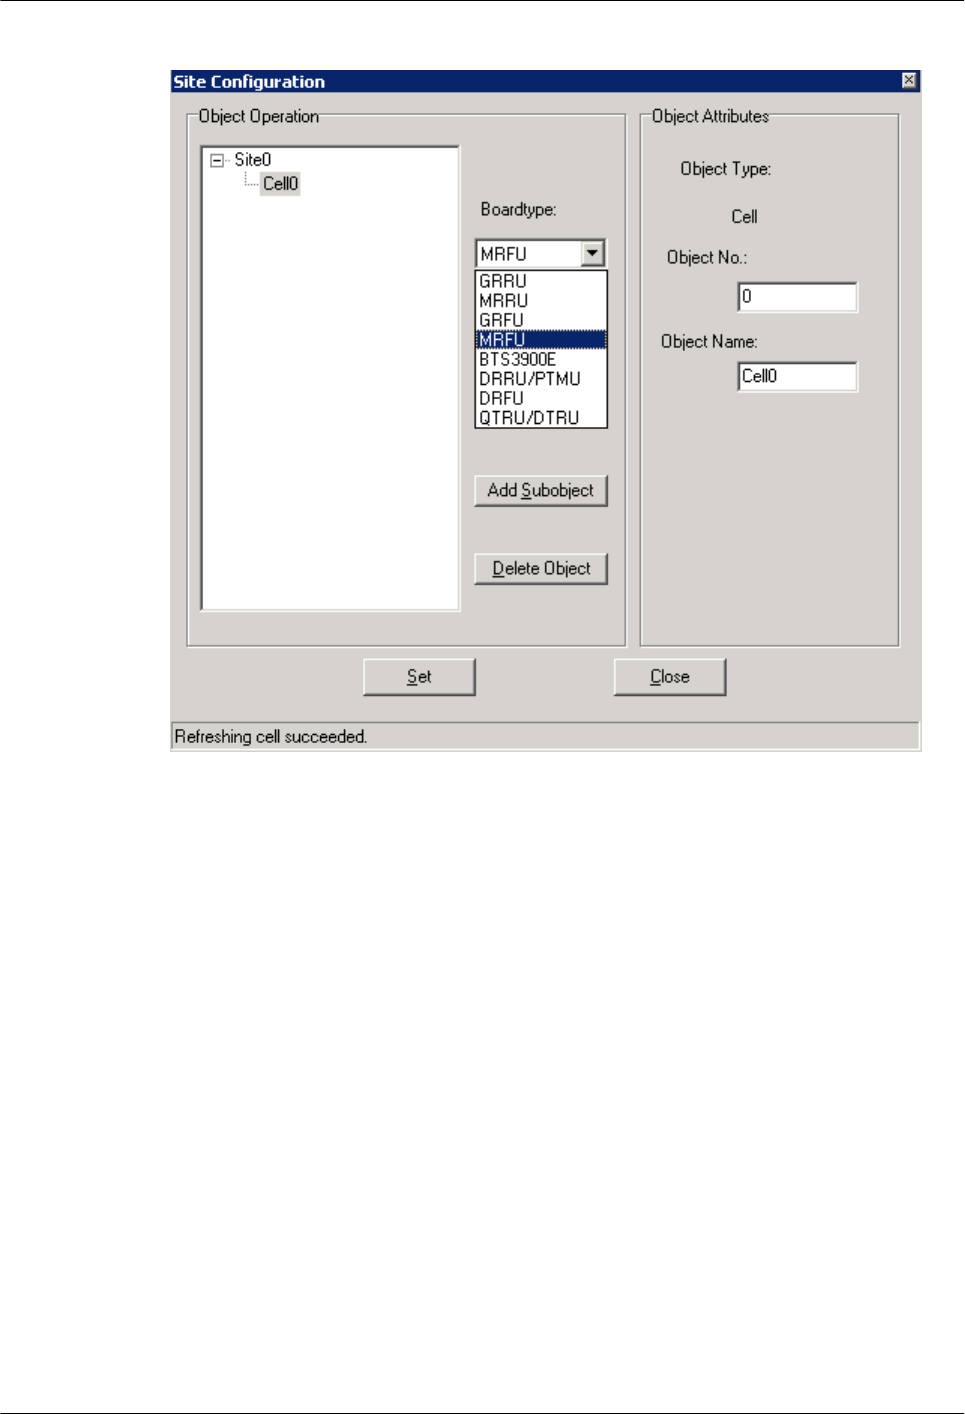
Figure 7-15 Site Configuration dialog box (3)
Step 4 Click Add Subobject. In the Object Attributes area, specify Object No., Object Name, Board
No., and Pass No.. In the Object Operation area, Carrier0 is added. The carrier is bound to
the number 0 pass of the TRX whose Board No. is 0, as shown in Figure 7-16. Pass 0 is also
called carrier A. The pass number of the TRX depends on the carrier number.
3900 Series Multi-Mode Base Station
Commissioning Guide
7 Commissioning the MBTS by Using Local Maintenance
Terminal and M2000
Issue 02 (2010-07-30) Huawei Proprietary and Confidential
Copyright © Huawei Technologies Co., Ltd.
7-19
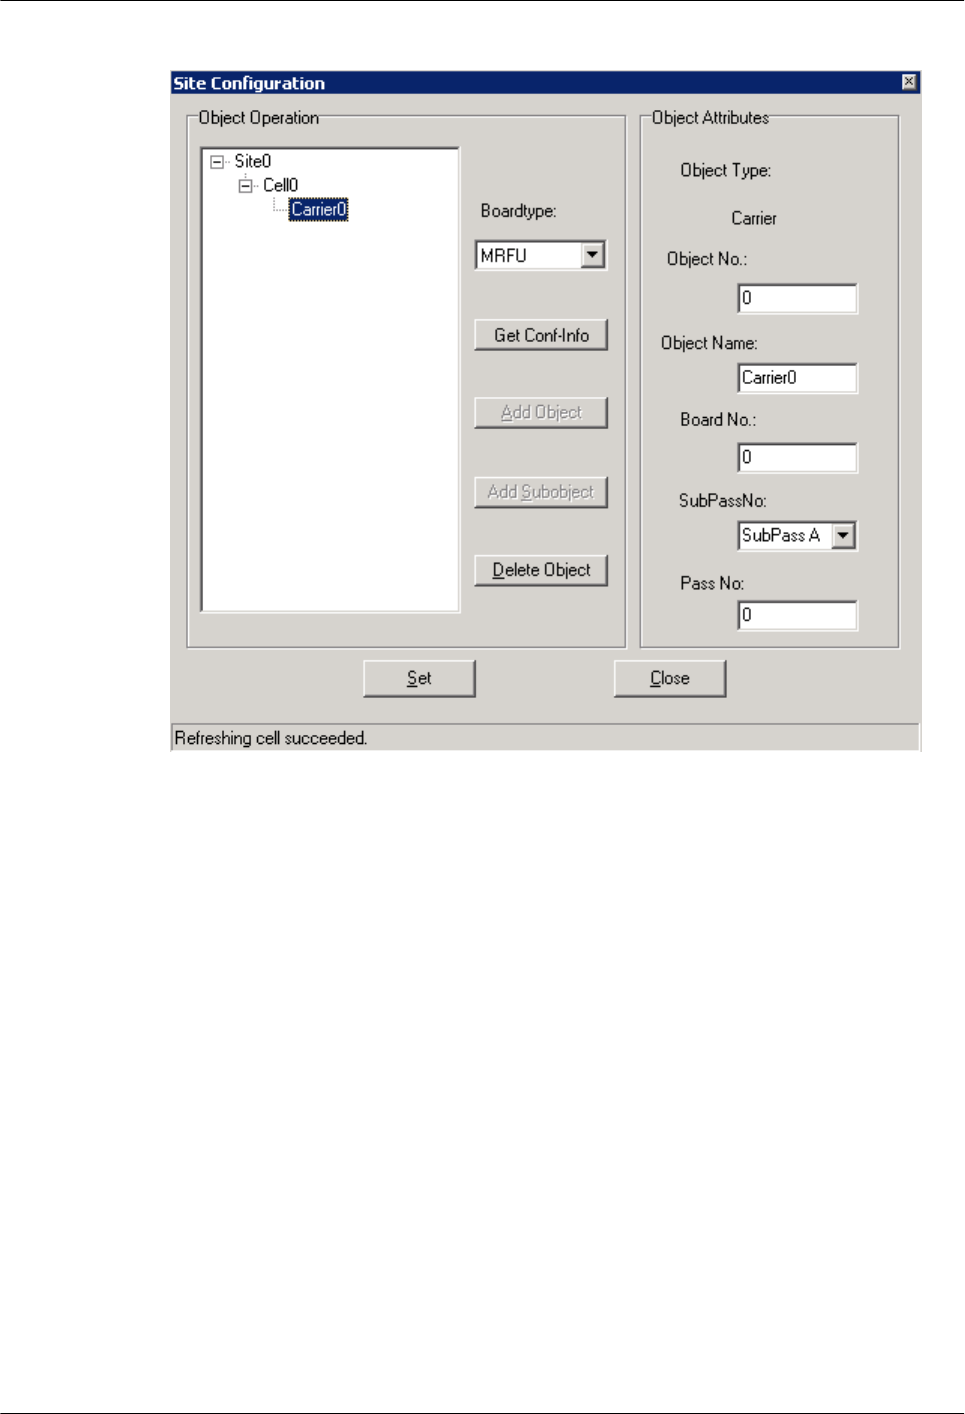
Figure 7-16 Site Configuration dialog box (4)
Step 5 Configure the second carrier: Set Object Name to Carrier1, Board No. to 0, and Pass No. to
1, as shown in Figure 7-17. The MRRU 0 is configured with two carriers.
7 Commissioning the MBTS by Using Local Maintenance
Terminal and M2000
3900 Series Multi-Mode Base Station
Commissioning Guide
7-20 Huawei Proprietary and Confidential
Copyright © Huawei Technologies Co., Ltd.
Issue 02 (2010-07-30)

Figure 7-17 Site Configuration dialog box (5)
3900 Series Multi-Mode Base Station
Commissioning Guide
7 Commissioning the MBTS by Using Local Maintenance
Terminal and M2000
Issue 02 (2010-07-30) Huawei Proprietary and Confidential
Copyright © Huawei Technologies Co., Ltd.
7-21
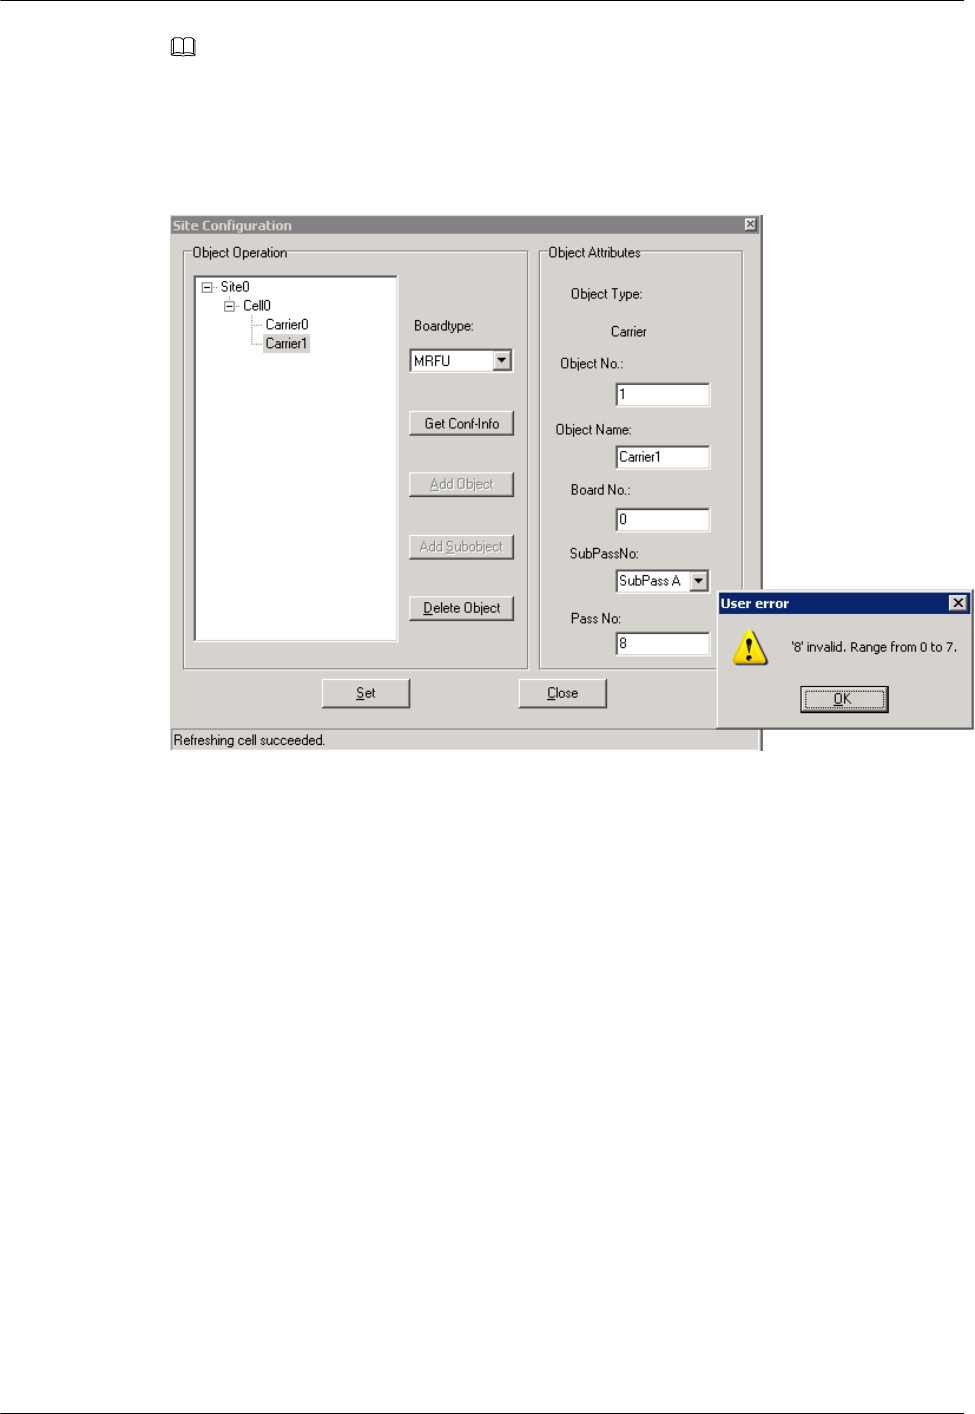
NOTE
lThe procedure for adding carriers for other TRX boards is the same as adding carrier for the MRRU.
lThe SMT provides the self-check function. When an invalid value is specified, the User Error dialog
box is displayed, as shown in Figure 7-18.
Figure 7-18 User Error dialog box
Step 6 Click Site0.
The Set button is available. Click Set. Configuring cell succeeded is available, as shown in
Figure 7-19.
7 Commissioning the MBTS by Using Local Maintenance
Terminal and M2000
3900 Series Multi-Mode Base Station
Commissioning Guide
7-22 Huawei Proprietary and Confidential
Copyright © Huawei Technologies Co., Ltd.
Issue 02 (2010-07-30)
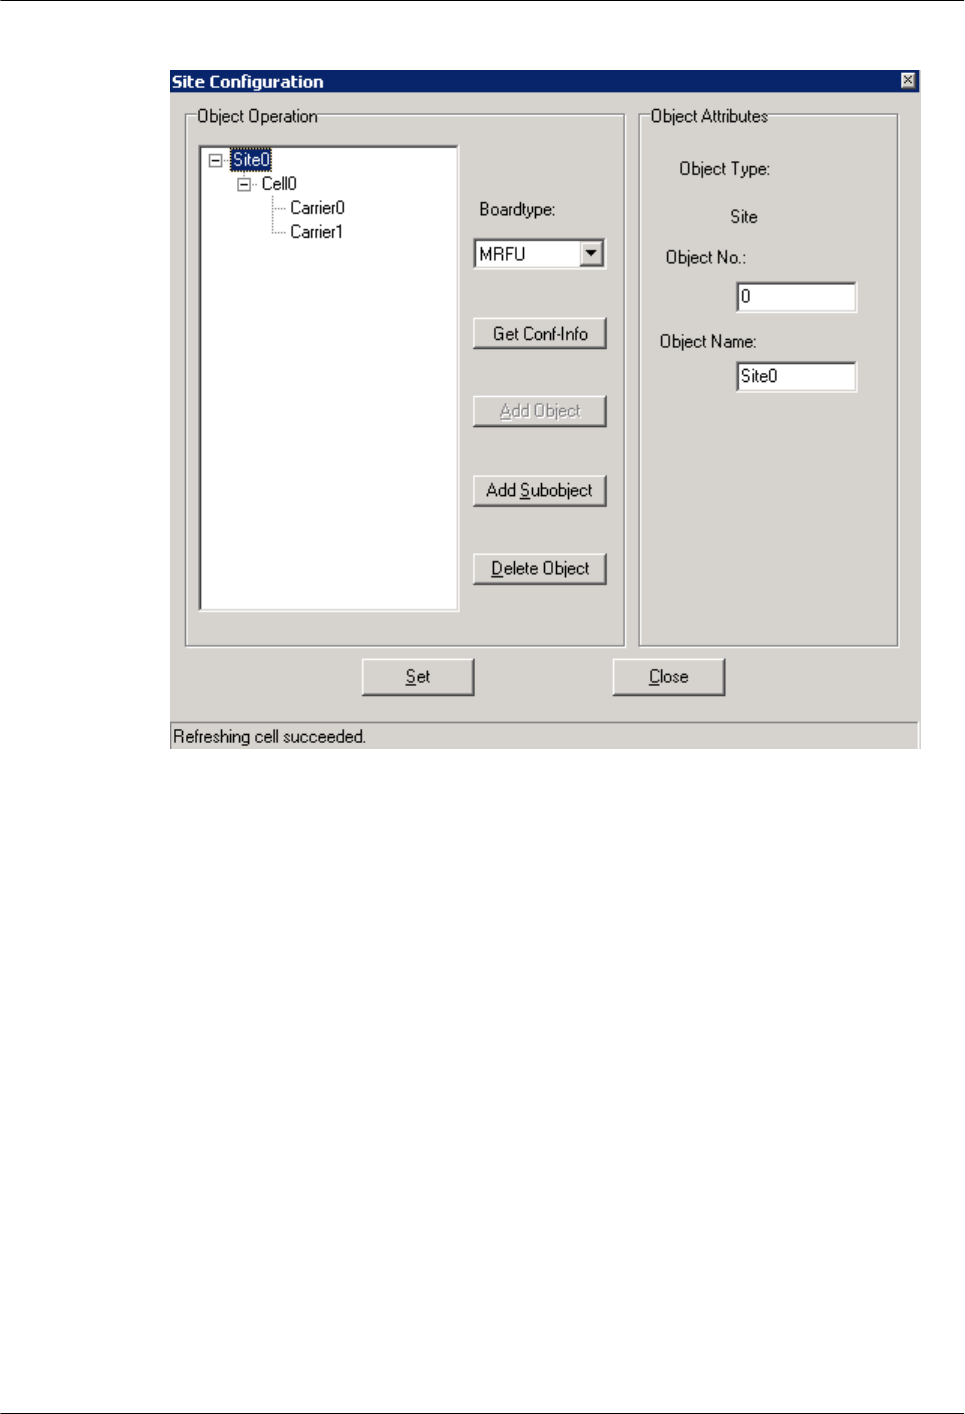
Figure 7-19 Site Configuration dialog box (6)
Step 7 Close the dialog box.
The configured cell is displayed in the navigation pane, as shown in Figure 7-20. The data is
configured but not activated. To activate the data, go to Step 8.
3900 Series Multi-Mode Base Station
Commissioning Guide
7 Commissioning the MBTS by Using Local Maintenance
Terminal and M2000
Issue 02 (2010-07-30) Huawei Proprietary and Confidential
Copyright © Huawei Technologies Co., Ltd.
7-23
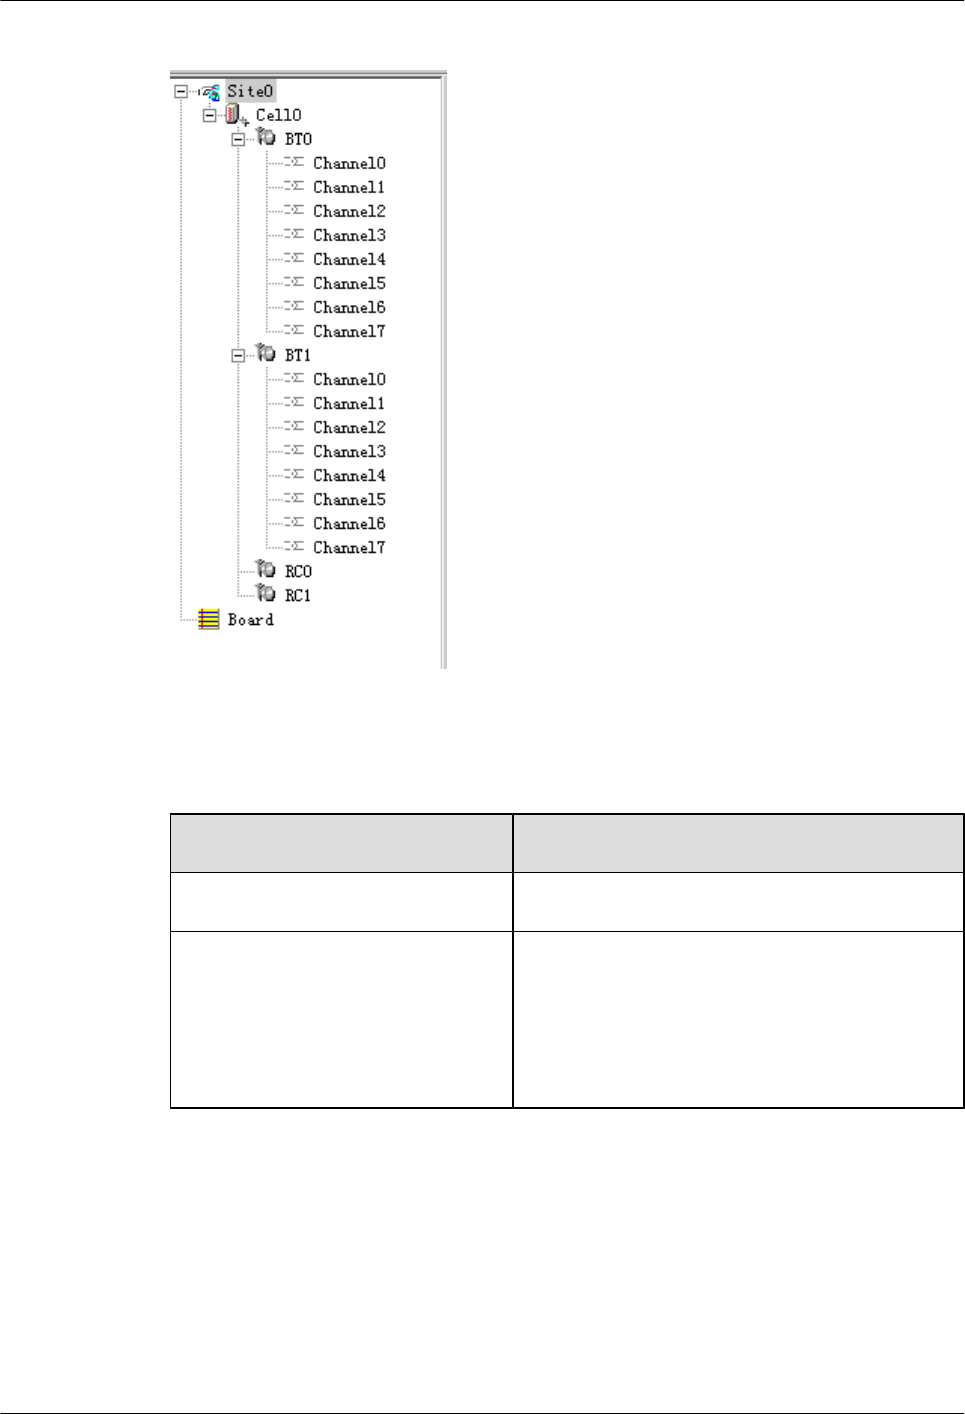
Figure 7-20 Configured cell and channels
Step 8 Choose Site0 > Site Opstart > OK. The Site Opstart dialog box is displayed, as shown in
Figure 7-21.
If... Then...
Site Opstart successfully is displayed Click Close and proceed with the next step.
Site operation start fails 1. Repeat Step 8. If the operation succeeds, go to
Step 9. If the operation fails, go to 8.2.
2. Check whether data configuration conflict exists.
If there is configuration conflict, modify the
configuration. If the configuration is incorrect,
turn to GBTS engineers for help.
7 Commissioning the MBTS by Using Local Maintenance
Terminal and M2000
3900 Series Multi-Mode Base Station
Commissioning Guide
7-24 Huawei Proprietary and Confidential
Copyright © Huawei Technologies Co., Ltd.
Issue 02 (2010-07-30)
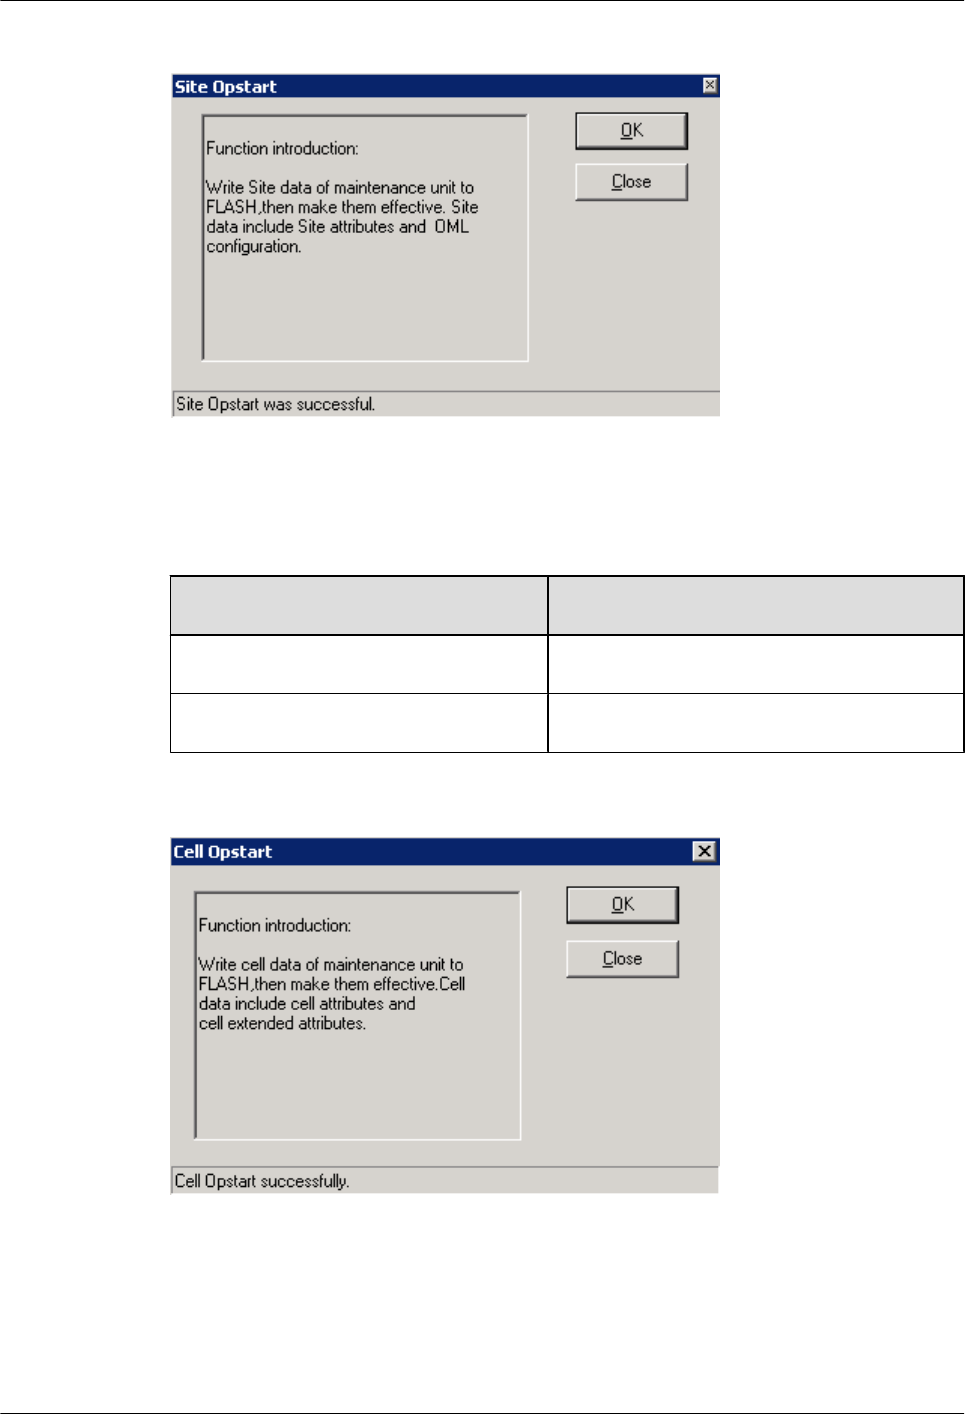
Figure 7-21 Site Opstart dialog box
Step 9 Choose Cell0 > Cell Opstart > OK. The Cell Opstart dialog box is displayed, as shown in
Figure 7-22.
If... Then...
Cell Opstart successfully is displayed Click Close and proceed with the next step.
Cell operation start fails See Step 8.
Figure 7-22 Cell Opstart dialog box
Step 10 The site configuration takes effect.
Step 11 Make the attributes of other TRXs take effect: Choose BT0 > BT Opstart > OK. The BT
Opstart dialog box is displayed, as shown in Figure 7-23.
3900 Series Multi-Mode Base Station
Commissioning Guide
7 Commissioning the MBTS by Using Local Maintenance
Terminal and M2000
Issue 02 (2010-07-30) Huawei Proprietary and Confidential
Copyright © Huawei Technologies Co., Ltd.
7-25
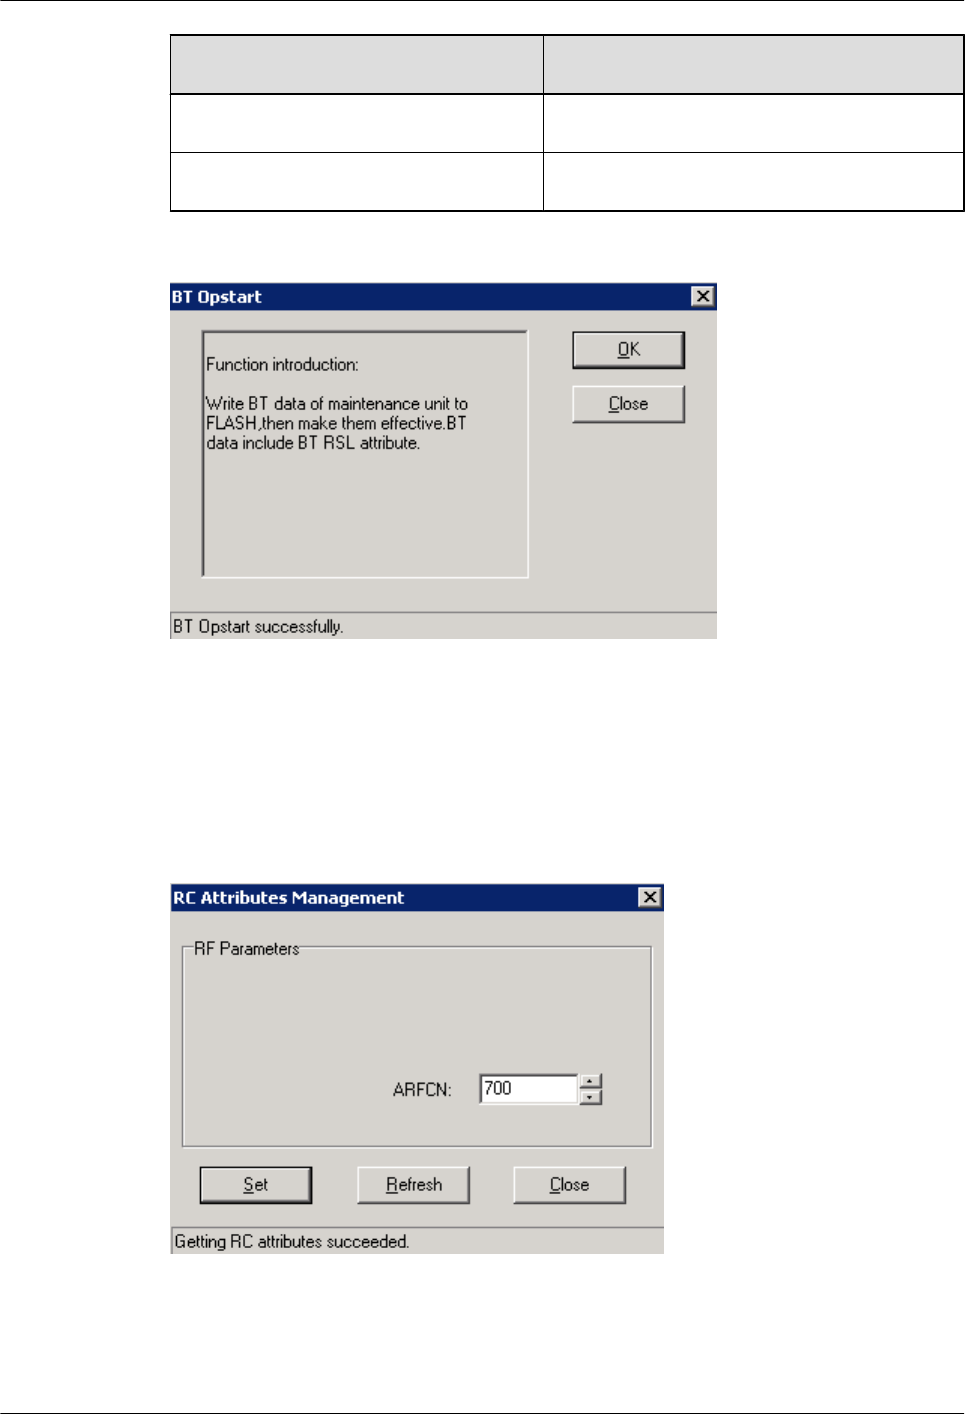
If... Then...
BT Opstart successfully is displayed Click Close and proceed with the next step.
Baseband operation start fails See Step 8.
Figure 7-23 BT Opstart dialog box
Step 12 Choose RC0 > RC Attributes Management. Specify frequency in ARFCN, and click Set.
Getting RC attributes succeeded is displayed. Click Close.
Repeat Step 12 to set the frequencies of other carriers. The RC Attributes Management dialog
box is displayed, as shown in Figure 7-24.
Figure 7-24 RC Attributes Management dialog box
Step 13 Choose RC0 > RC Opstart > OK. The RC Opstart dialog box is displayed, as shown in Figure
7-25.
7 Commissioning the MBTS by Using Local Maintenance
Terminal and M2000
3900 Series Multi-Mode Base Station
Commissioning Guide
7-26 Huawei Proprietary and Confidential
Copyright © Huawei Technologies Co., Ltd.
Issue 02 (2010-07-30)
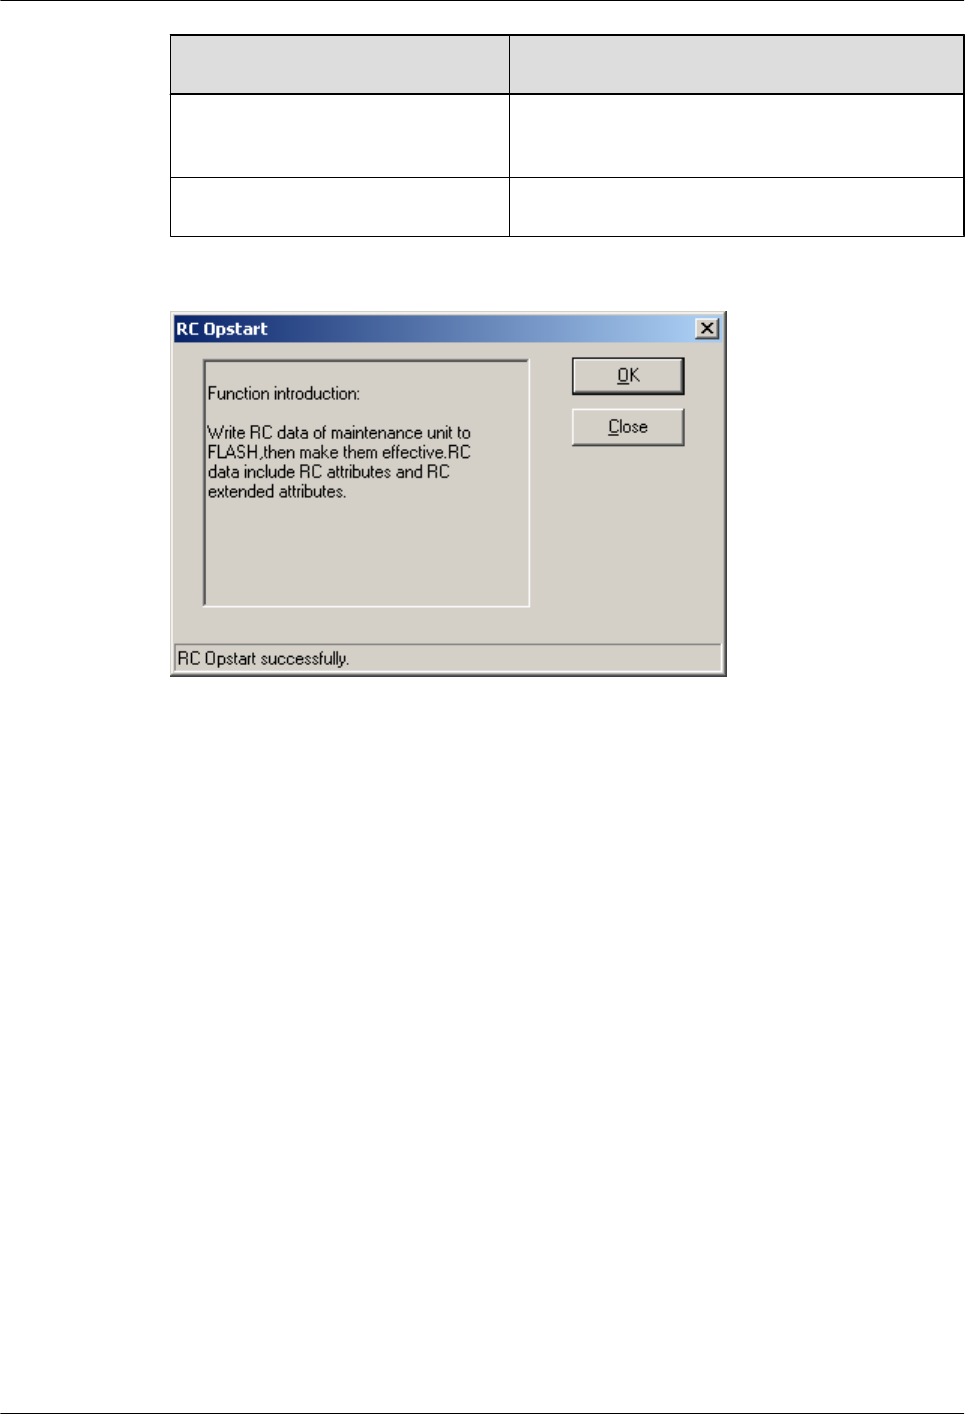
If... Then...
RC Opstart successfully is displayed Click Close. Repeat Step 13 to validate the
frequencies of other carriers.
Carrier operation start fails See Step 8.
Figure 7-25 RC Opstart successfully dialog box
Step 14 SFP Port Logic Inconsistency Alarm is not displayed. The transmission is unavailable and the
LAPD Alarm persists. Therefore, the GTMU state is Active Fault.
As shown in Figure 7-26.
3900 Series Multi-Mode Base Station
Commissioning Guide
7 Commissioning the MBTS by Using Local Maintenance
Terminal and M2000
Issue 02 (2010-07-30) Huawei Proprietary and Confidential
Copyright © Huawei Technologies Co., Ltd.
7-27
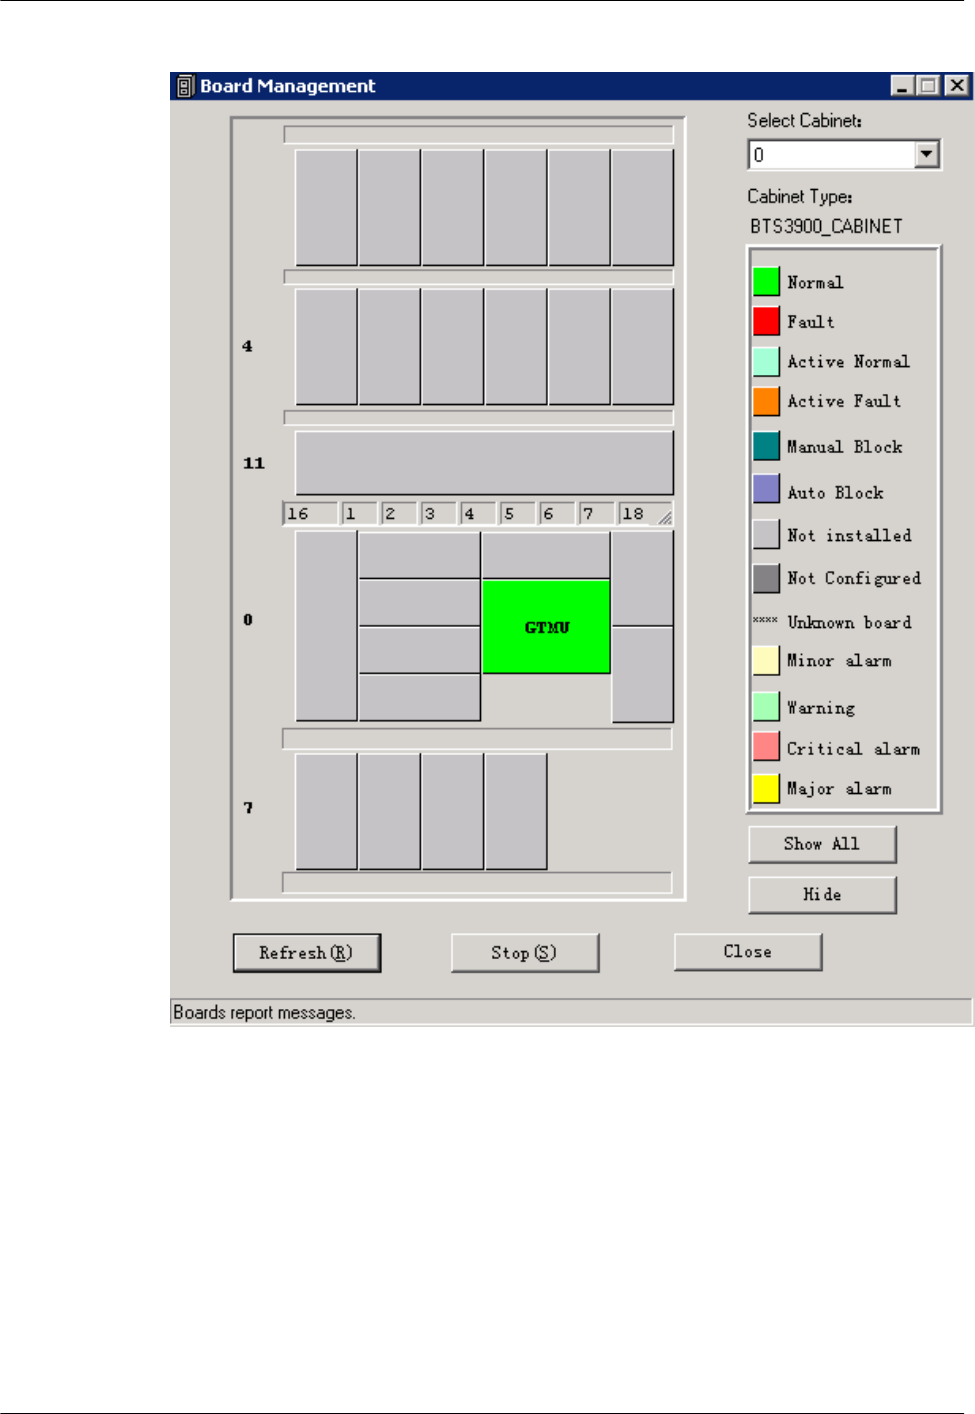
Figure 7-26 Board Management window
----End
7.4 Checking the Transmission Between the BBU and the
BSC on the BTS Side
This section describes how to check the status of the LEDs on the panels of the GTMU and
UTRP (if the UTRP is installed) and how to check the connections of the E1 cable and E1 surge
protection transfer cable to ensure that the BBU properly communicates with the BSC.
7 Commissioning the MBTS by Using Local Maintenance
Terminal and M2000
3900 Series Multi-Mode Base Station
Commissioning Guide
7-28 Huawei Proprietary and Confidential
Copyright © Huawei Technologies Co., Ltd.
Issue 02 (2010-07-30)
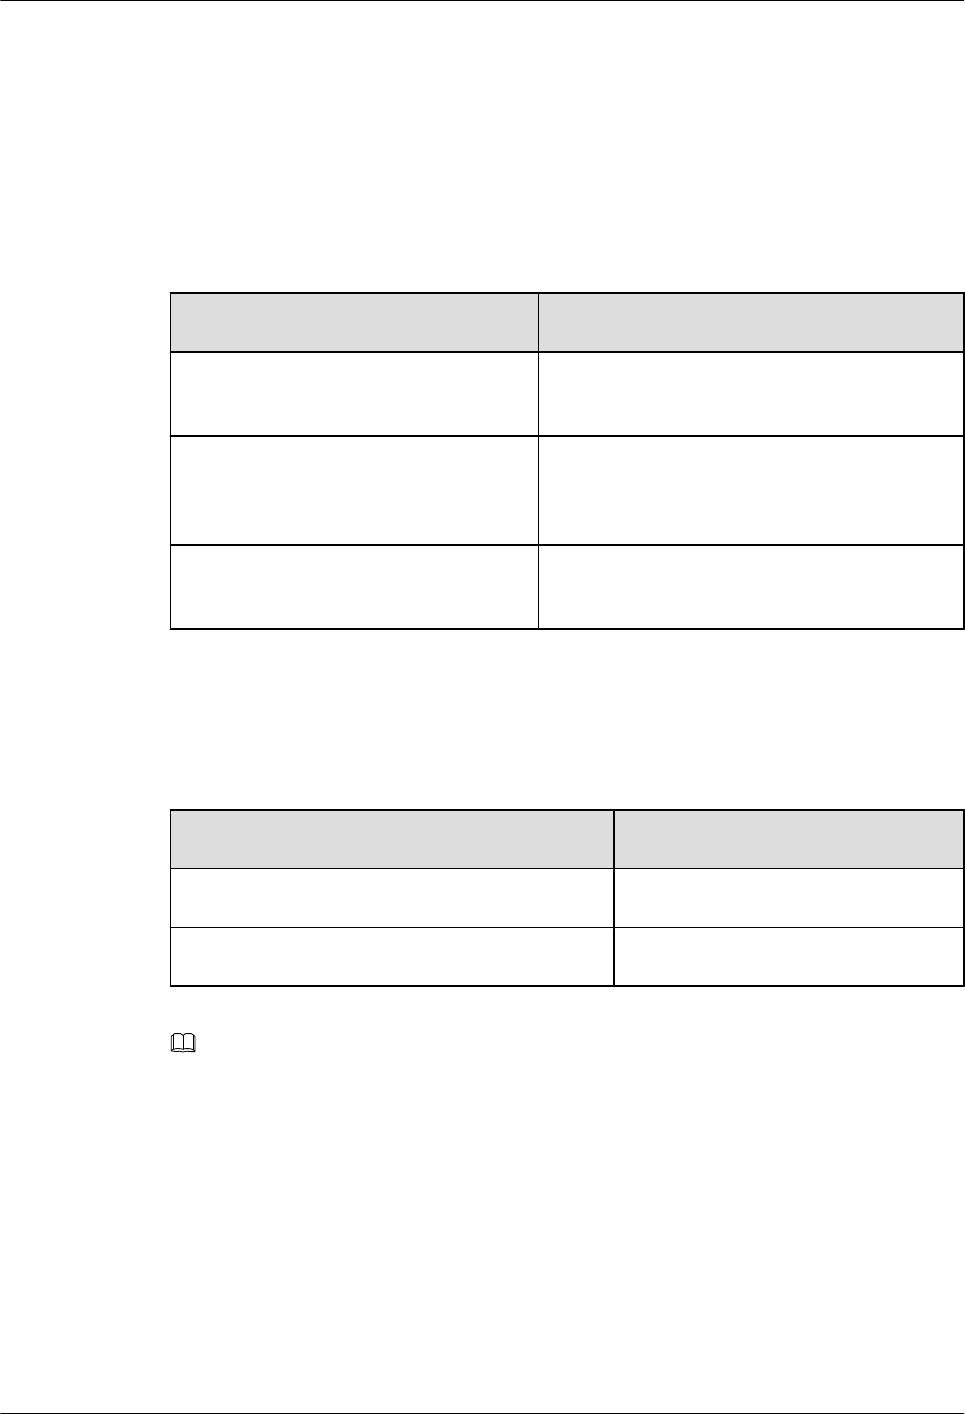
Prerequisite
lThe BBU is properly connected to the BSC through an E1/T1 cable.
lThe BBU and the BSC are successfully powered on.
Procedure
Step 1 Check whether the UTRP is installed. If it is installed, perform the check based on the following
table. If it is not installed, go to Step 2.
If ... Then ...
The RUN LED is oN for 1s and off for 1s
and the ALM LED is off.
The board properly works according to the
configuration. Then, go to Step 2.
The RUN LED is on for 0.125s and off
for 0.125s.
The board is not configured or software is being
loaded to the board. After the board is configured
or the loading is complete, go to Step 2.
The RUN and ALM LED are in other
states.
The E1/T1 link is faulty. Go to Step 4.
Step 2 Check whether the settings of DIP switch meet the field requirements. if not, modify the settings
of DIP switch as required.
Step 3 Check the status of the LEDs LIU0 to LIU3 on the panel of the GTMU in the BBU. The LEDs
LIU0 to LIU3 correspond to links 1 to 4 of the E1/T1 cable respectively. Each link has one TX
line and one RX line.
If ... Then ...
The LED is OFF The E1/T1 link is normal. End this task.
The LED is on or on for 0.125s and off for 0.125s. The E1/T1 link is faulty. Go to Step 4.
NOTE
You need to check the status of only the LIU LED corresponding to the E1/T1 link in use. The LIU LEDs
corresponding to the unused E1/T1 links are on.
lFor the BBUs that are not connected in cascading mode, if the LIU LED for the E1/T1 link is off, the
communication between the BBU and the BSC is normal. If the LIU LED is on, the communication
is abnormal.
lFor the BBUs that are connected in cascading mode, if the LIU LEDs on the E1 ports corresponding
to level 1 BBU and level 2 BBU are off, the communication is normal. If multiple BBUs are connected
in cascading mode, check the LEDs of the corresponding links.
lIf the BBU and the BSC form a ring, check the LIU LEDs corresponding to the links in the ring. To
check the inter-BBU connections, check the corresponding LEDs of the cascaded BBUs.
Step 4 Check the connections and connectors at both ends of the cables. If a connector is damaged,
replace it.
3900 Series Multi-Mode Base Station
Commissioning Guide
7 Commissioning the MBTS by Using Local Maintenance
Terminal and M2000
Issue 02 (2010-07-30) Huawei Proprietary and Confidential
Copyright © Huawei Technologies Co., Ltd.
7-29
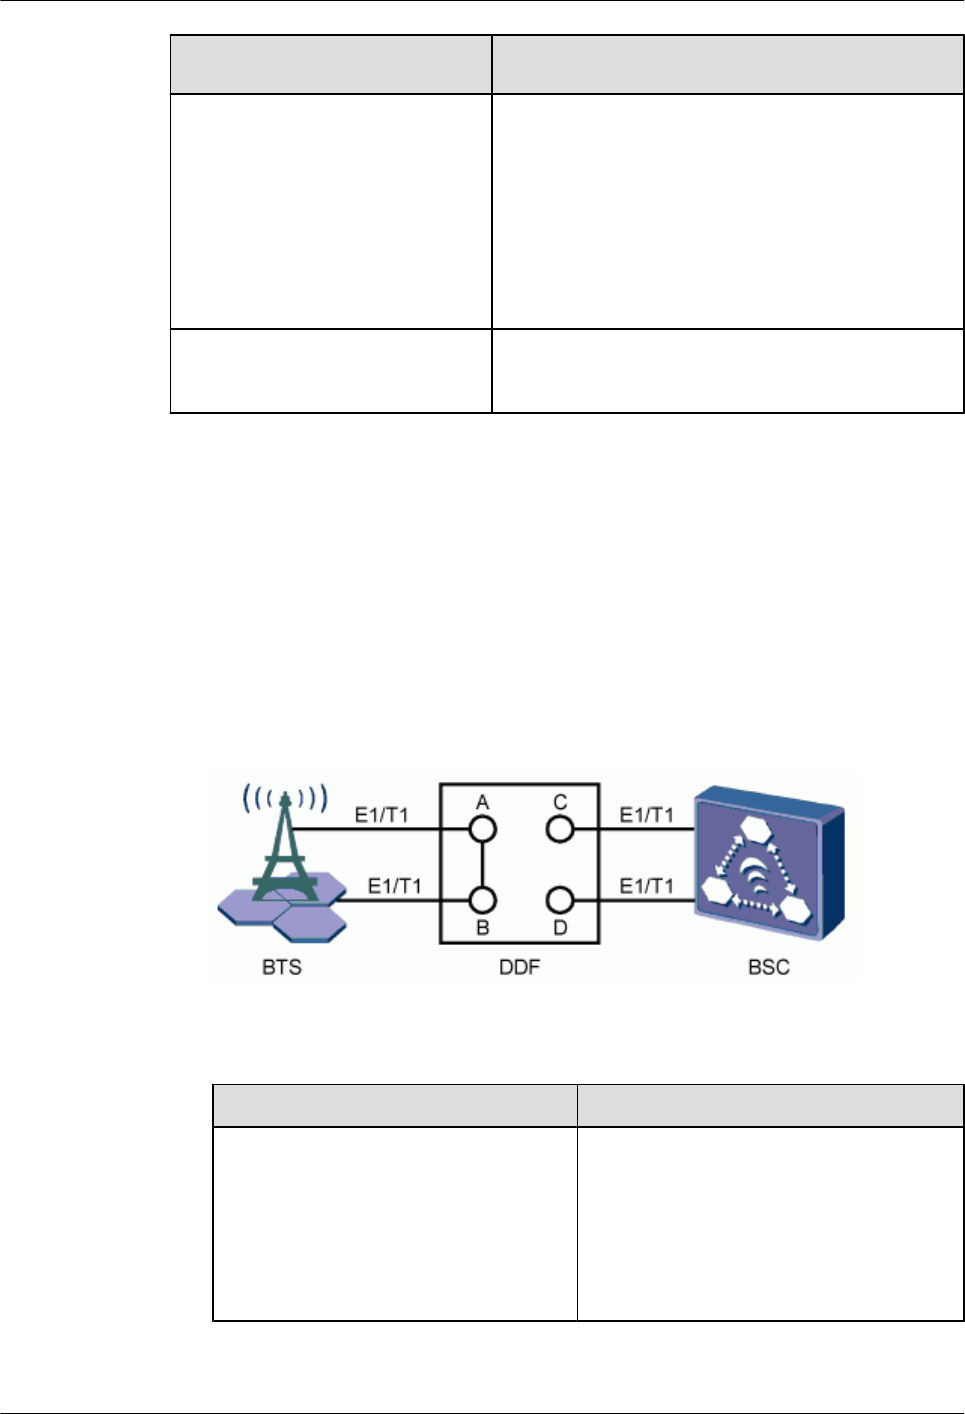
If ... Then ...
The UELP is configured lCheck the connection between the E1/T1 cable and
the OUTSIDE port on the panel of the UELP.
lCheck the connection between the E1 surge
protection transfer cable and the INSIDE port on the
panel of the UELP.
lCheck the connection between the E1 surge
protection transfer cable and the E1/T1 port on the
panel of the GTMU.
The UELP is not configured Check the connection between the E1/T1 cable and the
E1/T1 port on the panel of the GTMU.
Step 5 At the DDF on the BTS side, check whether the connectors of the E1/T1 link on which the
communication is abnormal are properly soldered. Poor jointing may cause poor E1/T1
connection.
Step 6 Perform a physical loopback test on the E1/T1 cable where the communication is abnormal.
Check whether the transmission of the E1/T1 cable is normal on the BTS side.
1. For a pair of E1s/T1s connecting the BTS and BSC through the DDF, port A is connected
to port C, and port B is connected to port D. In the loopback test, disconnect port A from
port C, and port B from port D, and then connect port A to port B, as shown in Figure
7-27. In this way, the TX end and RX end of the E1/T1 cable are connected and the physical
loopback is formed on the BTS side.
Figure 7-27 Physical loopback of the E1/T1 cable at the DDF
2. Check the status of the LIU LEDs on the panel of the GTMU.
If ... Then ...
The LEDs are off. The E1/T1 connections are normal on the
BTS side. The problem may be the abnormal
connection between the BTS and the BSC or
the abnormal connection on the BSC side.
In this case, end the check, and contact the
technical support engineer on the BSC side
to clear the fault.
7 Commissioning the MBTS by Using Local Maintenance
Terminal and M2000
3900 Series Multi-Mode Base Station
Commissioning Guide
7-30 Huawei Proprietary and Confidential
Copyright © Huawei Technologies Co., Ltd.
Issue 02 (2010-07-30)
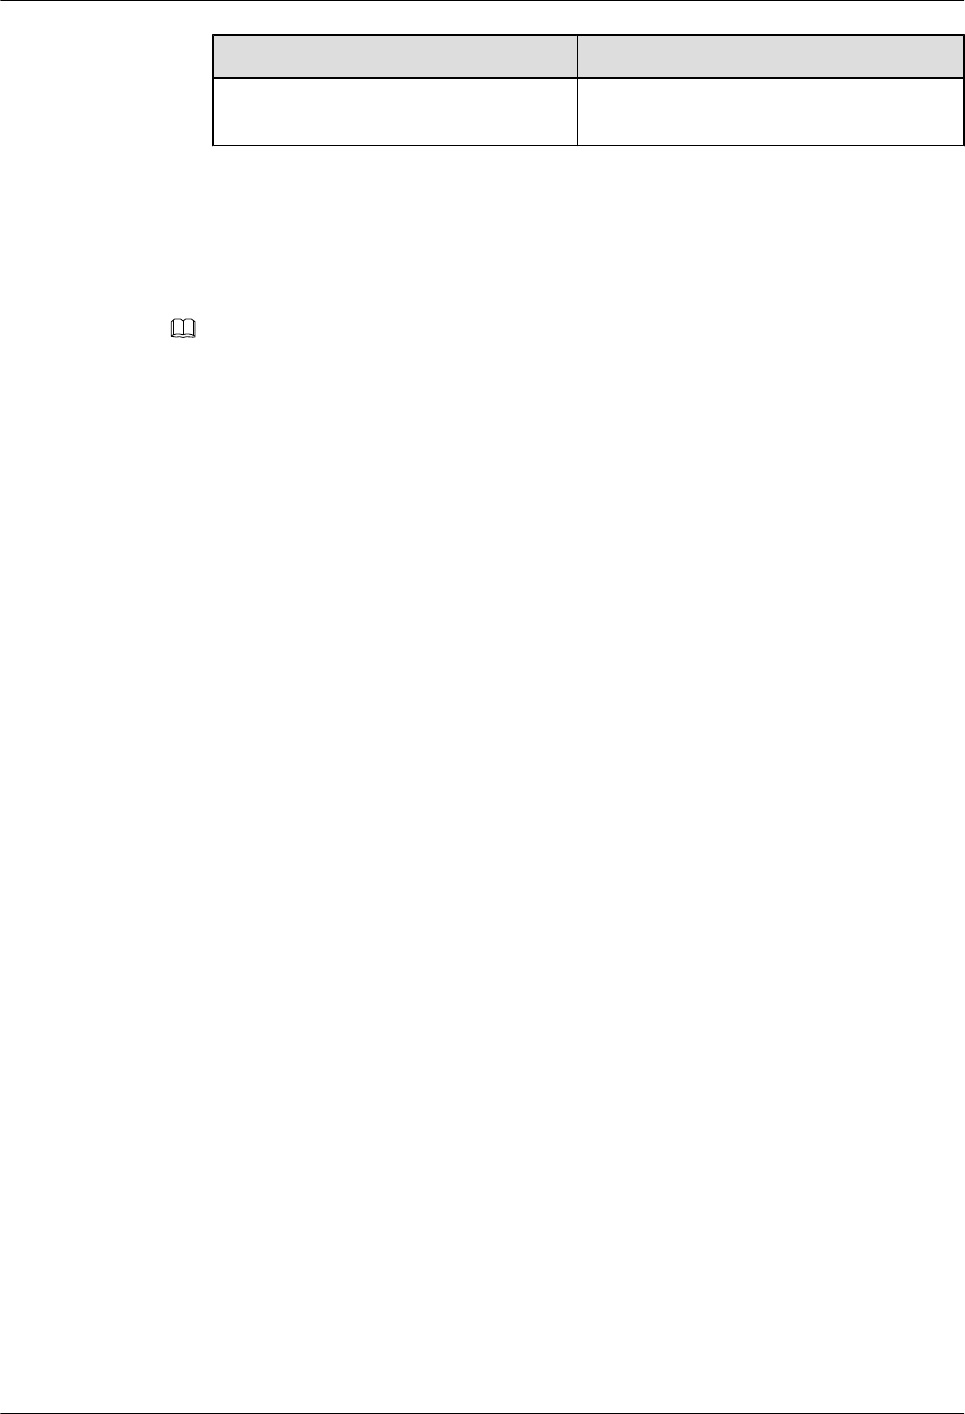
If ... Then ...
The LEDs are on or on for 0.125s and off
for 0.125s
The cable connections on the BTS side are
abnormal. Clear the fault on the BTS side.
3. Set the E1s/T1s at the DDF on the BTS side from physical loopback to normal connection.
Ensure that the connections are sound.
Step 7 Check the E1/T1 connections at the DDF. Ensure that the TX and RX ends of the E1 cables are
connected properly.
NOTE
Do as follows to distinguish the E1 RX end from the E1 TX end:
Connect a pin of an LED to the wire of the E1/T1 cable, and the other pin to the shielding layer of the E1/
T1 cable. If the LED is on, this end is the TX end. If the LED is off, this end is the RX end.
----End
7.5 Running the NodeB LMT
To run the NodeB LMT, you need to first set the IP address of the LMT client, connect the base
station and the LMT, and then log in to the LMT.
7.5.1 Setting the IP address of the LMT Client
This section describes how to set the IP address of the LMT client. You must set a correct IP
address of the LMT client before logging in to the LMT. The following procedure is performed
on the Windows XP system.
7.5.2 Connecting the LMT Client and the Base Station
This section describes how to set the route from the LMT client to the NodeB in remote
maintenance mode. If you do not set the route in remote maintenance mode, you fail to log in
to the NodeB through the LMT client.
7.5.3 Logging In to the LMT
This section describes how to log in to the NodeB LMT.
7.5.1 Setting the IP address of the LMT Client
This section describes how to set the IP address of the LMT client. You must set a correct IP
address of the LMT client before logging in to the LMT. The following procedure is performed
on the Windows XP system.
Prerequisite
The TCP/IP protocol is installed on the LMT client.
Context
In remote maintenance mode, you need ; IP 1, and IP 2. IP 1 stands for the IP address of the
LMT client. IP 2 stands for the external IP address of the entity directly connected to the LAN
where the LMT client is located, for example, the external IP address of the RNC BAM. IP 1
and IP 2 must be on the same network segment, as shown in Figure 7-28.
3900 Series Multi-Mode Base Station
Commissioning Guide
7 Commissioning the MBTS by Using Local Maintenance
Terminal and M2000
Issue 02 (2010-07-30) Huawei Proprietary and Confidential
Copyright © Huawei Technologies Co., Ltd.
7-31
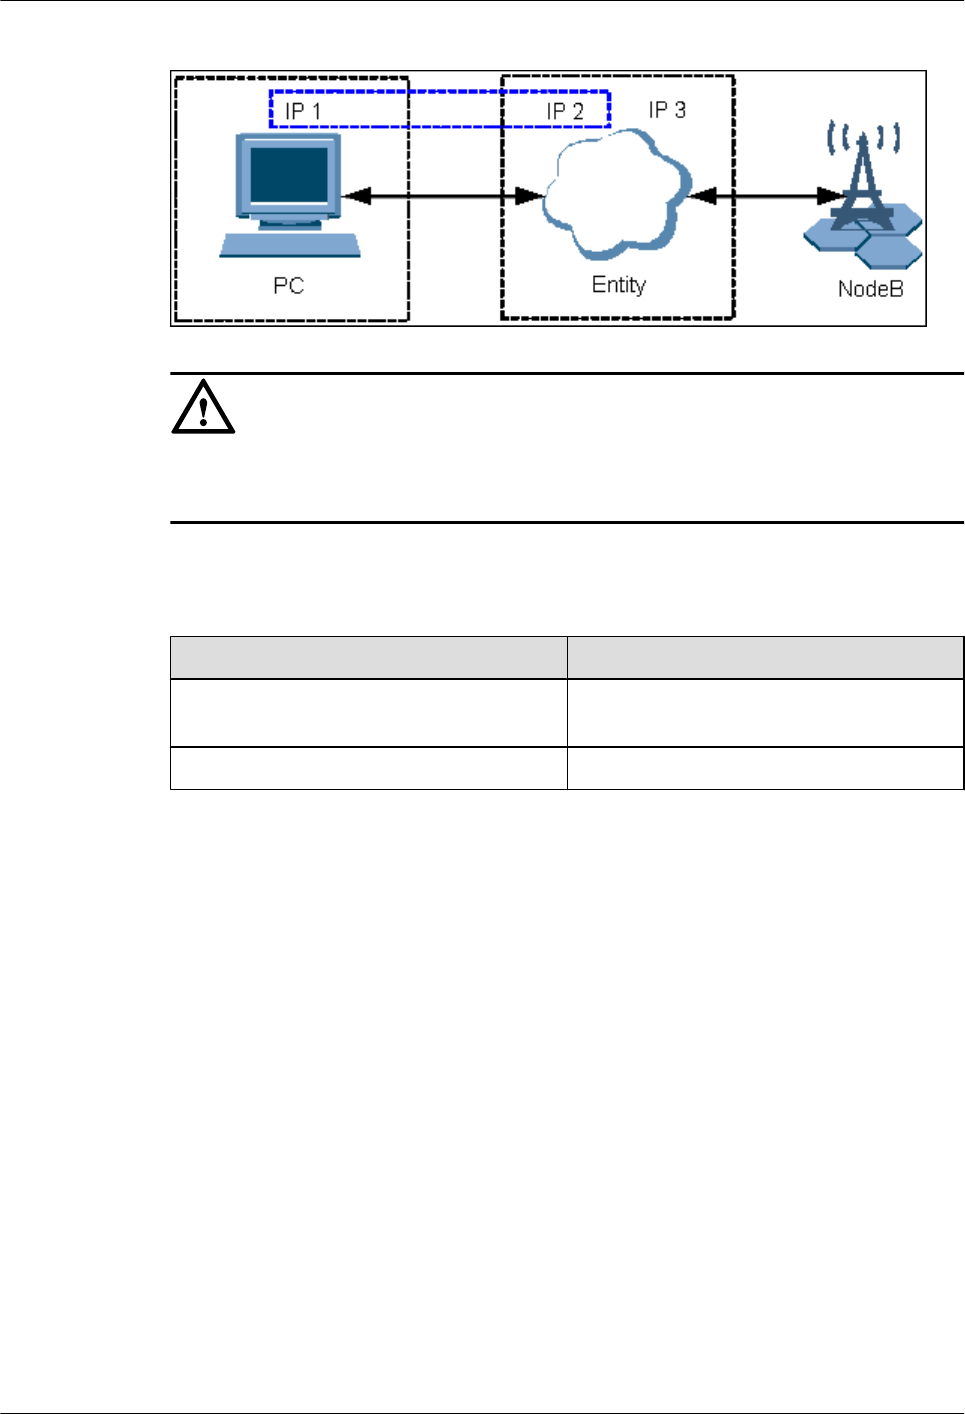
Figure 7-28 IP addresses in remote maintenance mode
CAUTION
Ensure that the IP address of the LMT client does not conflict with the IP address of another
computer within the same LAN.
Procedure
Step 1 On Windows XP, choose Start > Control Panel.
If... Then...
The control panel is displayed in category
view
Go to Step 2.
The control panel is displayed in classic view Go to Step 3.
Step 2 Click Network and Internet Connections, and then go to Step 3.
Step 3 Double-click Network Connections. The Network Connections dialog box is displayed. Right-
click Local Area Connection.
Step 4 Choose Properties from the shortcut menu. The Local Area Connection Properties dialog
box is displayed.
Step 5 Select Internet Protocol (TCP/IP).
Step 6 Click Properties. The Internet Protocol (TCP/IP) Properties dialog box is displayed.
Step 7 Select Use the following IP address.
Step 8 Set the IP address, subnet mask, and default gateway of the LMT client. For details, see Table
7-2.
7 Commissioning the MBTS by Using Local Maintenance
Terminal and M2000
3900 Series Multi-Mode Base Station
Commissioning Guide
7-32 Huawei Proprietary and Confidential
Copyright © Huawei Technologies Co., Ltd.
Issue 02 (2010-07-30)
Table 7-2 IP parameters of the LMT client for commissioning on the NodeB side
Parameter Description
IP Address The IP address of the LMT client is on the same network segment
as the IP address of the NodeB local maintenance channel.
In local maintenance mode, the IP address of the NodeB is
17.21.2.15 by default.
Subnet Mask The subnet mask of the LMT client is the same as that of the NodeB
local maintenance channel.
Default Gateway
NOTE
The IP addresses on the same network segment correspond to the same subnet masks and subnet addresses
(subnet mask AND IP address).
Step 9 Click OK to complete the settings.
----End
7.5.2 Connecting the LMT Client and the Base Station
This section describes how to set the route from the LMT client to the NodeB in remote
maintenance mode. If you do not set the route in remote maintenance mode, you fail to log in
to the NodeB through the LMT client.
Procedure
Step 1 On the LMT client, choose Start > Run, and then run the cmd command. The command window
is displayed.
Step 2 Run the ROUTE ADD Networkaddress MASK netmask gatewayaddress command in the
command window to add a route from the PC to the gateway. Then, set "Networkaddress",
"netmask", and "gatewayaddress". For details, see Table 7-3.
Table 7-3 Parameters for setting the route from the PC to the gateway
Parameter Description
Networkaddress OM IP address of the NodeB.
netmask Subnet mask of the PC is the same as the
external subnet mask of the RNC BAM.
gatewayaddress External IP address of the BAM.
3900 Series Multi-Mode Base Station
Commissioning Guide
7 Commissioning the MBTS by Using Local Maintenance
Terminal and M2000
Issue 02 (2010-07-30) Huawei Proprietary and Confidential
Copyright © Huawei Technologies Co., Ltd.
7-33
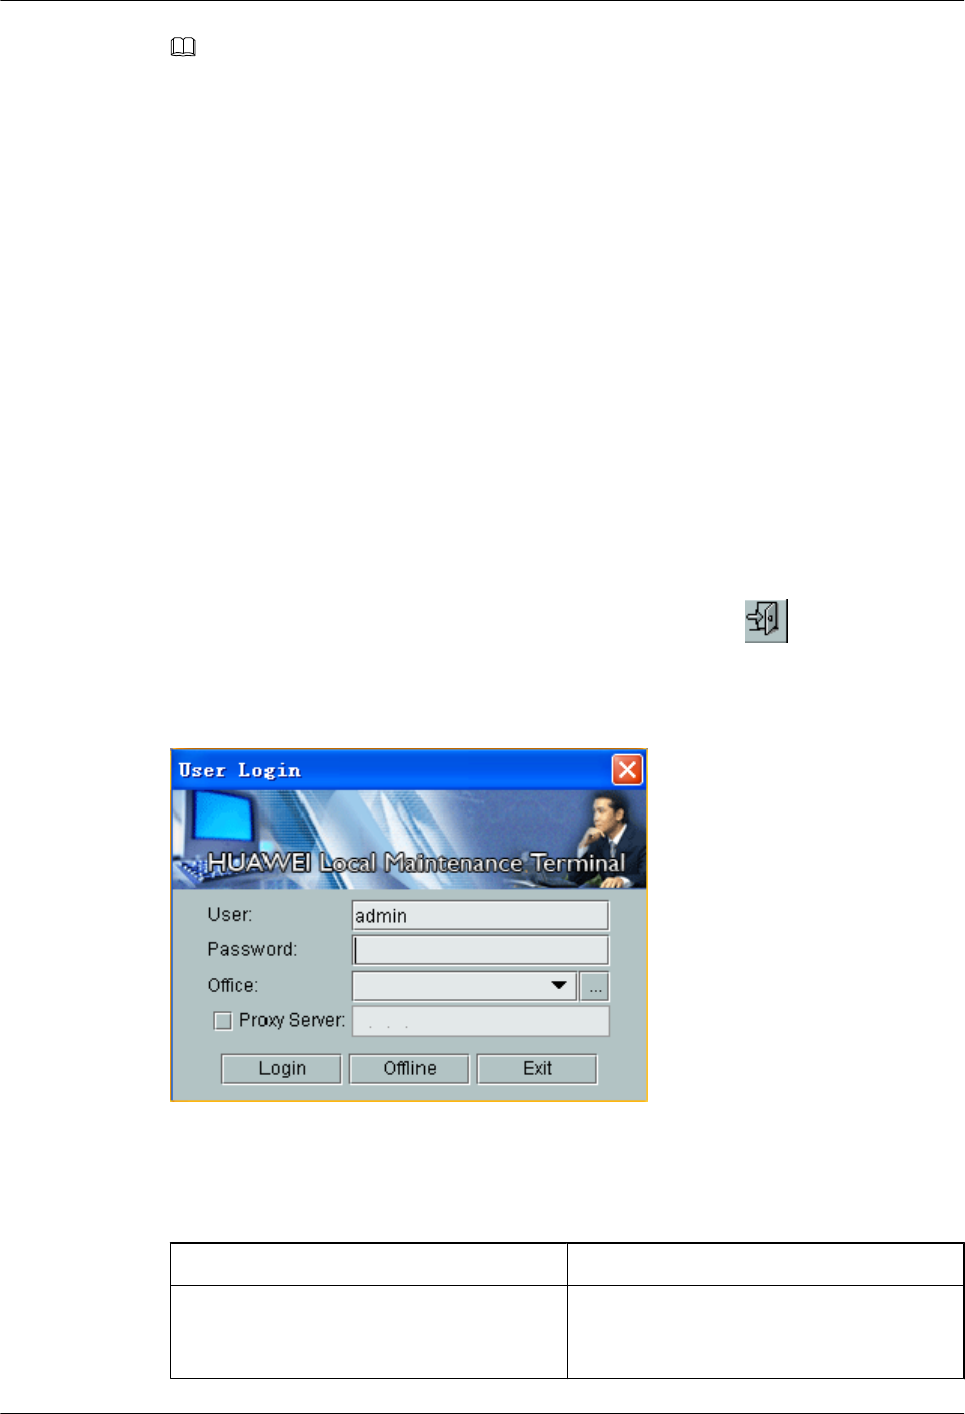
NOTE
lDifferent devices must correspond to different IP addresses.
lThe IP addresses on the same network segment correspond to the same subnet masks and subnet addresses
(subnet mask AND IP address).
Step 3 Run ping target_name -t in the command window to check the connection between the LMT
client and the NodeB. "target_name" is the OM IP address of the base station.
----End
7.5.3 Logging In to the LMT
This section describes how to log in to the NodeB LMT.
Prerequisite
The communication between the LMT client and the NodeB is normal.
Procedure
Step 1 Choose Start > All Programs > HUAWEI Local Maintenance Terminal. If the Local
Maintenance Terminal is started, choose System > Logout, or click . The User Login
dialog box is displayed, as shown in Figure 7-29.
Figure 7-29 User Login dialog box
Table 7-4 describes the fields in the User Login dialog box.
Table 7-4 Fields in the User Login dialog box
Field Description
User Name Type the user name of the NodeB. By default,
the user name is admin. The user name is
mandatory and case-sensitive.
7 Commissioning the MBTS by Using Local Maintenance
Terminal and M2000
3900 Series Multi-Mode Base Station
Commissioning Guide
7-34 Huawei Proprietary and Confidential
Copyright © Huawei Technologies Co., Ltd.
Issue 02 (2010-07-30)
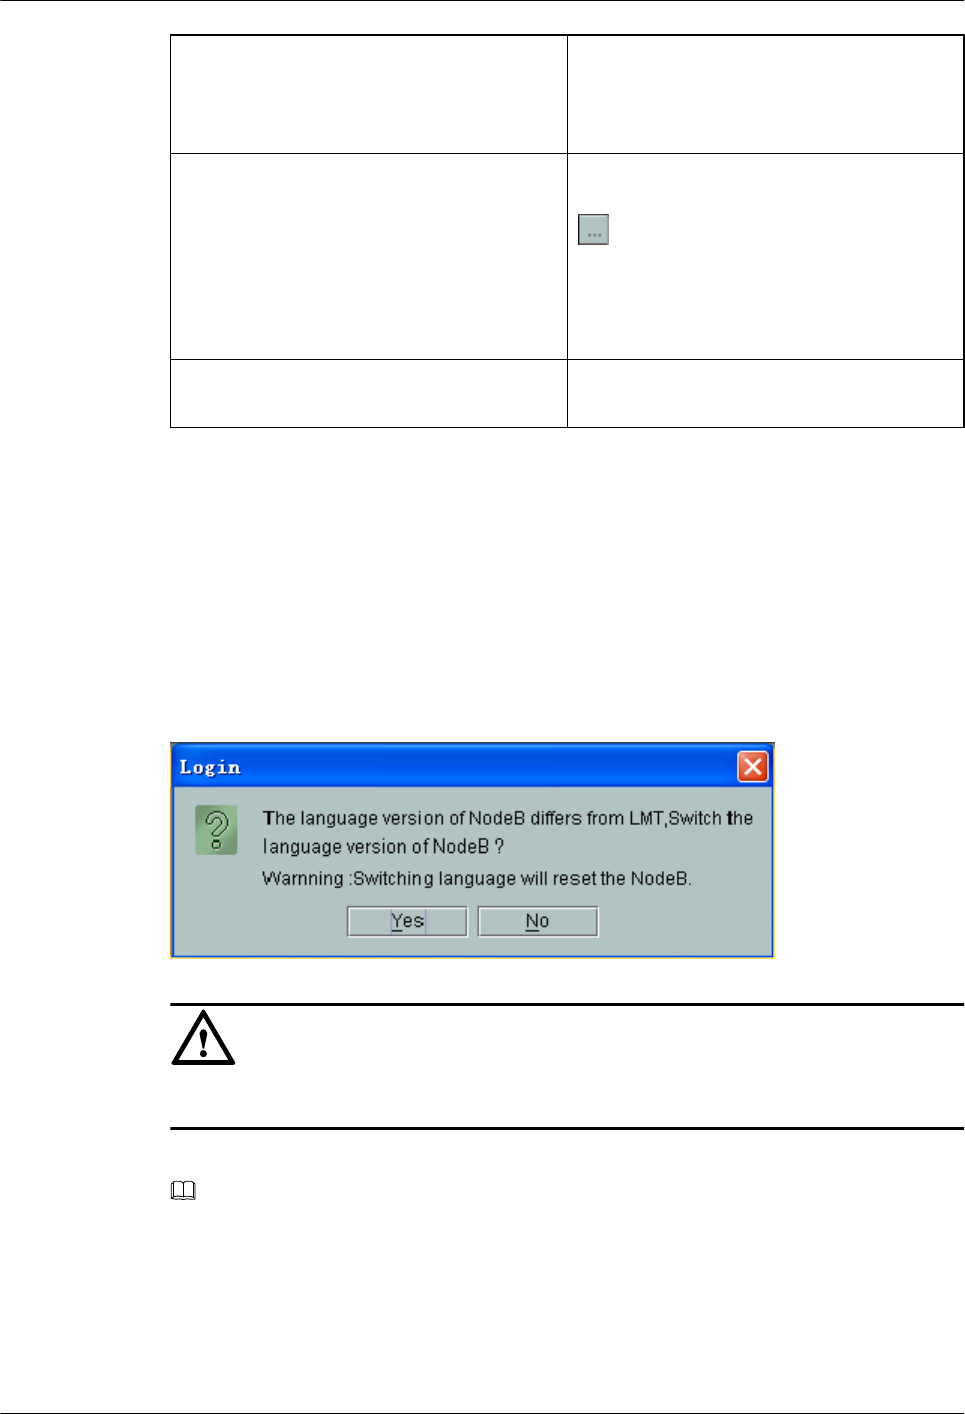
Password Password of the NodeB. By default, the
password is NodeB. The password consists of
6 to 16 alphanumeric and case-sensitive
characters.
Office Select the name and IP address of the LMT
client that is connected to the NodeB. Click
to edit the office information. When you
log in to the NodeB locally through the LMT,
the IP address of the office is the same as the
IP address of the NodeB local maintenance
channel.
Proxy Server Leave this field blank. Ensure that you do not
select the check box.
Step 2 In the Office area, set IP Address and Office.
Step 3 Type the user name and password in corresponding text boxes.
Step 4 Click Login to log in to the NodeB.
Step 5 If a dialog box is displayed, as shown in Figure 7-30, you can infer that the language version
of the NodeB does not match that of the LMT. In this case, switch the NodeB language so that
you can log in to the NodeB through the LMT.
Figure 7-30 Switching the language
CAUTION
The NodeB is reset after you switch the NodeB language.
Step 6 Click Yes to switch the NodeB language.
NOTE
If you click No, a dialog box is displayed, indicating The language of NE differs from LMT. Click OK and
you can still log in to the NodeB. This operation, however, may cause the following effects:
lThe language of the message reported by the NodeB does not match that of the LMT.
lThe message cannot be parsed during software management.
----End
3900 Series Multi-Mode Base Station
Commissioning Guide
7 Commissioning the MBTS by Using Local Maintenance
Terminal and M2000
Issue 02 (2010-07-30) Huawei Proprietary and Confidential
Copyright © Huawei Technologies Co., Ltd.
7-35
7.6 Upgrading the NodeB Software and Downloading the
Data Configuration File
This section describes how to upgrade the NodeB software, download the data configuration
file, and activate the NodeB on the LMT. The software and the configuration data take effect
after the NodeB resets automatically.
Prerequisite
lYou have logged in to the NodeB LMT.
lThe FTP server functions properly and is connected to the NodeB in the same Intranet.
lThere is no firewall between the FTP server and the NodeB.
lThe FTP user can access a specified directory.
Procedure
Step 1 In the navigation tree of the NodeB LMT window, click the MML Commands tab. Run the
LST VER command to query the active software version.
If... Then...
The active software version is consistent with
the target software version,
Download only the data configuration file
and check that it takes effect.
The active software version is inconsistent
with the target software version,
Download the target version software
package and data configuration file, check
that the data configuration file takes effect,
and activate the NodeB.
Step 2 Click the Maintenance tab in the navigation tree.
Step 3 Choose Software Management > Software Update. The Software Update dialog box is
displayed.
Step 4 Select Upgrade NodeB Software in the dialog box. Click Next. The Update NodeB Software
dialog box is displayed.
Step 5 Select Download Data Configuration File, Download NodeB Software Package, Download
by Configuration, Effective Data Configuration File, and Activate NodeB Software in
sequence, and set the directory for downloading the data configuration file and NodeB software
package.
NOTE
lYou are advised to select Download by Configuration. If it is not selected, a dialog box is displayed,
prompting that this may cause software download failure. Click OK to start downloading the software.
Click Cancel to select again, and download the software by configuration.
lIf you select Download by Configuration, the NodeB selectively downloads required board software
packages from the relay server according to the configured board type. In this manner, the total amount
of data to be downloaded is reduced, thus reducing download time and saving storage space.
Step 6 Click Next. A confirmation dialog box is displayed.
7 Commissioning the MBTS by Using Local Maintenance
Terminal and M2000
3900 Series Multi-Mode Base Station
Commissioning Guide
7-36 Huawei Proprietary and Confidential
Copyright © Huawei Technologies Co., Ltd.
Issue 02 (2010-07-30)
Step 7 Click Yes. A dialog box is displayed, indicating the status and the progress of the procedure.
CAUTION
lThe NodeB is automatically reset, and the new version of the NodeB software is enabled
after the activation.
lIf the software activation fails, the NodeB software cannot operate properly. You need to
reactivate the NodeB software in the standby file directory or reinstall the NodeB software.
----End
7.7 Running the eNodeB LMT
You can maintain the eNodeB by logging on to the LMT. Alternatively, you can maintain the
eNodeB on the M2000.
Prerequisite
The JRE plug-in jre-6u11-windows-i586-p-s.exe is installed before you use the LMT. JAVA
Platform Standard Edition Runtime Environment (JRE) is a standard JAVA plug-in and it must
be installed on the LMT computer in advance. You can download the JRE plug-in at http://
java.com/ or http://support.huawei.com/.
lIf the JRE plug-in is not installed, you are prompted to install it when using the LMT.
lIf installed JRE is not the latest version, you are prompted to upgrade it when logging on
to the LMT. You are advised to remove the early version and then to install the latest version.
lIf you cannot log on to the LMT after JRE upgrade, restart the browser and log on to the
LMT again.
Context
There are two types of LMT users, local user and emergency (EMS) user.
lLocal user: refer to the accounts (including the default account admin) that are separately
managed by the LMT. The users can operate and maintain the eNodeB when the LMT is
disconnected from the M2000 server.
lEMS users: refer to the accounts managed by the M2000 server in centralized mode. The
users are created, changed, authenticated, and authorized through the M2000 server. After
the users are authorized, they can manage the eNodeB through the LMT or manage the
M2000 server through the M2000 client. If you log in to the eNodeB as an EMS user, ensure
that the eNodeB is connected to the M2000 server normally.
WARNING
Do not change the system time or time zone of the computer installed with the LMT when the
LMT is in progress. Otherwise, a critical fault may occur in the system. If you need to modify
the system time and time zone on the server, stop the LMT application first.
3900 Series Multi-Mode Base Station
Commissioning Guide
7 Commissioning the MBTS by Using Local Maintenance
Terminal and M2000
Issue 02 (2010-07-30) Huawei Proprietary and Confidential
Copyright © Huawei Technologies Co., Ltd.
7-37

CAUTION
lThe refresh function of the Internet Explorer (IE) is unavailable on the LMT. When you use
the refresh function on the main interface of the LMT, the main interface exits. If you use
the refresh function on the monitoring page, a script error occurs.
lWhen the LMT runs in the IE browser, do not change the properties of the file system.
Otherwise, the IE is automatically refreshed, and therefore the interface of the LMT becomes
abnormal.
lIf you start the FTP service through choosing Start > Run, the LMT window is replaced
with the login dialog box of the FTP server. To avoid this problem, perform the following
settings: Choose Tools > Internet Options from the menu of the IE. On the Advanced tab
page, clear Reuse windows for launching shortcuts under Browse.
lIf the colors of the LMT window cannot be displayed, perform the following settings: Choose
Tools > Internet Options from the menu of the IE. On the General tab page, click
Accessibility. Then, clear Ignore colors specified on Web pages under Formatting.
lIn the case of an LMT version upgrade or rollback, you need to clear the buffer and cookies
of the IE.
Procedure
lLogging in to the eNodeB through LMT.
1. In the IE address bar, enter the IP address for local maintenance of the eNodeB main
control board. By default, the IP address is 192.168.0.49.
2. Click Go. The Local Maintenance Terminal dialog box is displayed, as shown in
Figure 7-31.
Figure 7-31 BSC6000 local maintenance terminal window
7 Commissioning the MBTS by Using Local Maintenance
Terminal and M2000
3900 Series Multi-Mode Base Station
Commissioning Guide
7-38 Huawei Proprietary and Confidential
Copyright © Huawei Technologies Co., Ltd.
Issue 02 (2010-07-30)

3. Type the user name and the password in the Name, Password, and Verify Code text
boxes. Set User Type to Local.
NOTE
By default, the user name and password is admin.
If the verify code is indistinct, click Change the verify code to change the verify code.
4. Click Login. The LMT window is displayed.
NOTE
If the login fails due to entered incorrect information, click Reset and enter the correct information
in the Name, Password, and Verify Code text boxes. If the login failure persists, check the
connection between the LMT and the LMPT on the eNodeB
lLogging in to the eNodeB through M2000
1. Type the IP address for OM of the LMPT in the address box of the browser.
NOTE
Assume that the IE browser is used. Perform the following settings before typing the IP address:
1. Start the IE, and then choose Tools > Internet Options from the menu bar. On the
Connections tab page, click LAN Settings. In the displayed LAN Settings dialog box, under
Proxy server, select Use a proxy server for your LAN, and then type the IP address of the
M2000 in the Address box and set Port Number to 80.
2. Start the IE, and then choose Tools > Internet Options from the menu bar. On the Advanced
tab page, select Use HTTP1.1 through proxy connections under HTTP 1.1 settings.
2. Click Go. The Local Maintenance Terminal dialog box is displayed, as shown in
Figure 7-31.
3. Type the user name and the password in the Name, Password, and Verify Code text
boxes. Set User Type to EMS.
NOTE
The EMS user names and passwords are authorized by the M2000 server.
If the verify code is indistinct, click Change the verify code to change the verify code.
4. Click Login. The LMT window is displayed.
NOTE
If the login fails due to entered incorrect information, click Reset and enter the correct information
in the Name, Password, and Verify Code text boxes. If the login failure persists, check the
connection between the LMT and the LMPT on the eNodeB
----End
7.8 Upgrading the eNodeB Software and Downloading the
Data Configuration File
This section describes how to upgrade the eNodeB software and data configuration file on the
LMT. The upgraded eNodeB software and data configuration file take effect after the eNodeB
is automatically reset. The process for upgrading the eNodeB software and data configuration
file takes about 45 minutes.
Prerequisite
lThe LMT communicates properly with the eNodeB.
3900 Series Multi-Mode Base Station
Commissioning Guide
7 Commissioning the MBTS by Using Local Maintenance
Terminal and M2000
Issue 02 (2010-07-30) Huawei Proprietary and Confidential
Copyright © Huawei Technologies Co., Ltd.
7-39
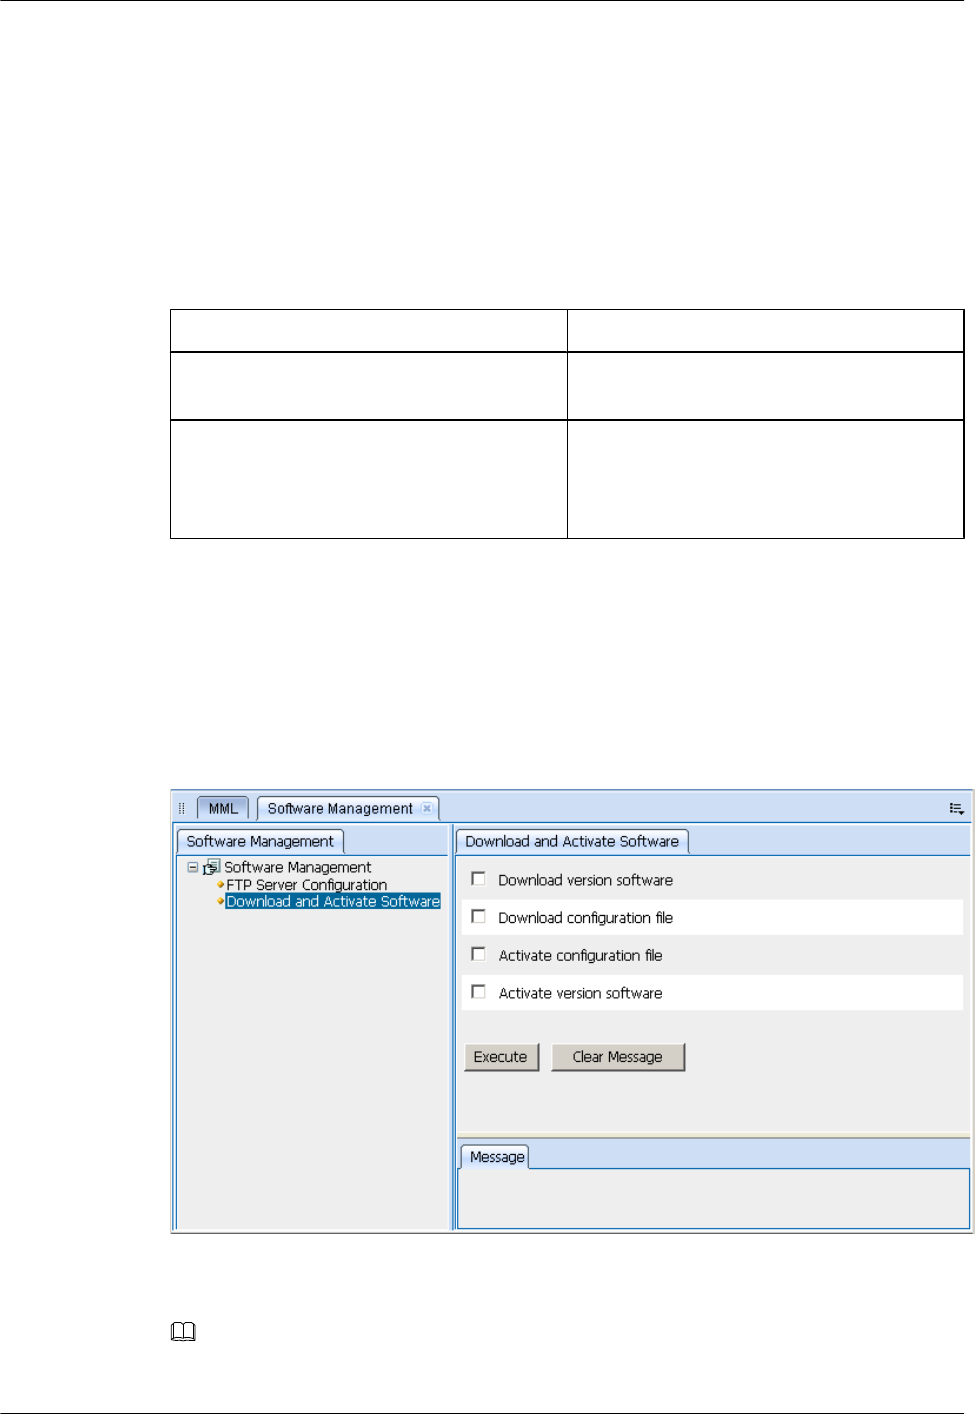
lThe FTP server functions properly and is connected to the eNodeB on the same network
segment.
lThe FTP user can access the specified directory.
lThere is no firewall between the FTP server and the eNodeB.
Procedure
Step 1 In the MML interface on the LMT, run the command to query the active eNodeB software
version.
If... Then...
The active software version is the target
software version
Download and activate only the data
configuration file.
The active software version is not the target
software version
Download the eNodeB software and data
configuration file, and then activate the data
configuration file and eNodeB software in
sequence.
Step 2 On the LMT, click the Software Management button. The Software Management tab page is
displayed.
Step 3 In the navigation tree, double-click Download and Activate Software. The Download and
Activate Software interface is displayed, as shown in Figure 7-32.
Figure 7-32 Download and Activate Software interface
Step 4 Select the tasks to be performed according to step step 1 and set the parameters related to the
tasks.
NOTE
If a task is not selected, the eNodeB skips the task and proceeds with the next task.
7 Commissioning the MBTS by Using Local Maintenance
Terminal and M2000
3900 Series Multi-Mode Base Station
Commissioning Guide
7-40 Huawei Proprietary and Confidential
Copyright © Huawei Technologies Co., Ltd.
Issue 02 (2010-07-30)

Step 5 Click the Execute button. The eNodeB performs the selected tasks from top to bottom. There
is a progress bar under the Execute button, indicating the current progress and status of the task.
When the progress bar of each task displays 100%, the upgrade is complete.
CAUTION
If a task fails, the eNodeB stops the task and does not proceed with subsequent tasks. If only the
data configuration file is downloaded and activated during the upgrade, you need to manually
reset the eNodeB after the data configuration file is activated so that the updated data takes effect.
The eNodeB is automatically reset after the eNodeB software is activated. Before the eNodeB
is automatically reset, do not send any reset command to the eNodeB or boards, and do not power
off the eNodeB or remove the boards. If you perform any of the preceding operations before the
eNodeB is automatically reset, the upgrade fails, and the software and files on the boards may
be cleared or damaged.
----End
7.9 Downloading the eNodeB License
By downloading the license to the eNodeB on the LMT, you are authorized to use the eNodeB
software.
Prerequisite
lThe LMT communicates properly with the eNodeB.
lThe license is already obtained.
Procedure
Step 1 Run the INS LICENSE command to download and activate the license on the eNodeB.
----End
7.10 Data Sheet for Commissioning
This chapter provides the data sheet that is used to record the process and result of the
commissioning.
7.10.1 Data Sheet for GBTS Commissioning
This section provides the data sheet that is used to record the process and results of the GBTS
commissioning.
7.10.2 Data Sheet for NodeB Commissioning
This section provides the data sheet that is used to record the process and results of the NodeB
commissioning
7.10.3 Data Sheet for eNodeB Commissioning
This section provides the data sheet that is used to record the process and results of the eNodeB
commissioning. The Data Sheet for Commissioning used at different sites may be different. This
table serves as a reference only.
3900 Series Multi-Mode Base Station
Commissioning Guide
7 Commissioning the MBTS by Using Local Maintenance
Terminal and M2000
Issue 02 (2010-07-30) Huawei Proprietary and Confidential
Copyright © Huawei Technologies Co., Ltd.
7-41

7.10.1 Data Sheet for GBTS Commissioning
This section provides the data sheet that is used to record the process and results of the GBTS
commissioning.
Table 7-5 Data sheet for GBTS commissioning
Site Name
GBTS Type
Commission Time
Commissioning
Engineer
Commissioning
Mode
□ Local USB + remote commissioning □ SMT/LMT + remote
commissioning □ Remote commissioning
Commissioning
Result
□ Successful □ Failed
Commissioning Item Conclusion Handling
Exceptional Case
Commissioning
Preparation Phase
The resources required for
commissioning are available.
The commissioning
requirements are met.
Commis
sioning
Phase
Local
eNodeB
Commiss
ioning
Through
the USB
Storage
Device
The GBTS is upgraded.
The GBTS hardware is
functional.
SMT/
LMT +
Remote
Commiss
ioning
You have logged in to the
GBTS through the SMT.
The GBTS board and logical
objects are available.
The active software version is
correct.
The transmission between the
BBU and the MRFU/
RRU3908 is normal.
Only the alarms related to the
transmission are reported.
7 Commissioning the MBTS by Using Local Maintenance
Terminal and M2000
3900 Series Multi-Mode Base Station
Commissioning Guide
7-42 Huawei Proprietary and Confidential
Copyright © Huawei Technologies Co., Ltd.
Issue 02 (2010-07-30)
The hardware connections are
correct.
Site management rights are
released.
The transmission between the BBU and the
BSC is available.
Remote
Commiss
ioning
The transmission between
BBU and MRFU, BBU and
RRU3908, and BBU and BSC
are normal.
The transmission between the
cascaded GBTSs is normal.
The transmission between the
GBTSs in ring topology is
normal.
The board configuration is
correct and the boards are
working properly.
The active software version is
correct.
The hardware installation and
the data configuration are
consistent with each other.
No alarm related to the GBTS
is reported.
The CS service test is
successful.
The PS service test is
successful.
The environment monitoring
alarm can be reported
normally.
The VSWR is correct. Record
the value of the VSWR.
The output power of the TRX
is normal. Record the value of
the output power per carrier.
The antenna system is properly
connected.
3900 Series Multi-Mode Base Station
Commissioning Guide
7 Commissioning the MBTS by Using Local Maintenance
Terminal and M2000
Issue 02 (2010-07-30) Huawei Proprietary and Confidential
Copyright © Huawei Technologies Co., Ltd.
7-43

Commis
sioning
Result
Unsolved Problems Impact
Unsolved Problems
After
Commissioning
7.10.2 Data Sheet for NodeB Commissioning
This section provides the data sheet that is used to record the process and results of the NodeB
commissioning
Table 7-6 Data sheet for NodeB commissioning
Site Name
NodeB Type
Commission Time
Commissioning
Engineer
Commissioning Mode □ Local USB + remote commissioning □ SMT/LMT + remote
commissioning □ Remote commissioning
Commissioning
Result
□ Successful □ Failed
Commissioning Item Conclusion Handling
Exceptional Case
Commissioning
Preparation Phase
Faults in the NodeB hardware
installation are rectified.
□ Yes; □
No
Transmission links between
the NodeB and RNC are
ready.
□ Yes; □
No
Negotiation data of the NodeB
to be commissioned is added
to the RNC.
□ Yes; □
No
Commission
ing Phase
Local
Com
missio
ning
throug
h USB
The NodeB is upgraded. □ Yes; □
No
The NodeB hardware is
functional.
□ Yes; □
No
7 Commissioning the MBTS by Using Local Maintenance
Terminal and M2000
3900 Series Multi-Mode Base Station
Commissioning Guide
7-44 Huawei Proprietary and Confidential
Copyright © Huawei Technologies Co., Ltd.
Issue 02 (2010-07-30)

SMT/
LMT
Com
missio
ning
The NodeB software and
BootROM software are
upgraded through the LMT.
□ Yes; □
No
The data configuration file of
the NodeB is downloaded
from the LMT.
□ Yes; □
No
The NodeB hardware status is
checked.
□ Yes; □
No
Remot
e
Com
missio
ning
The UMTS transmission is
normal.
□ Yes; □
No
The commissioning project of
the NodeB is created.
□ Yes; □
No
The commissioning report of
the NodeB is obtained.
□ Yes; □
No
The NodeB hardware status is
checked.
□ Yes; □
No
The NodeB services are
commissioned.
□ Yes; □
No
The NodeB environment
alarms are commissioned.
□ Yes; □
No
Problem Description Impact
Unsolved
Problems
After
Commission
ing
Component P/N
Faulty
Board
Record
7.10.3 Data Sheet for eNodeB Commissioning
This section provides the data sheet that is used to record the process and results of the eNodeB
commissioning. The Data Sheet for Commissioning used at different sites may be different. This
table serves as a reference only.
3900 Series Multi-Mode Base Station
Commissioning Guide
7 Commissioning the MBTS by Using Local Maintenance
Terminal and M2000
Issue 02 (2010-07-30) Huawei Proprietary and Confidential
Copyright © Huawei Technologies Co., Ltd.
7-45

Table 7-7 Data sheet for eNodeB commissioning
Site
Name
eNodeB
Type
ESN
Commiss
ion Time
Commiss
ioning
Engineer
Commiss
ioning
Result
□ Successful □ Failed
Commissioning Item Conclusion Handling Exceptions
Commiss
ioning
Preparati
on Phase
Faults in the eNodeB hardware
installation are rectified.
□ Yes; □
No
The transmission links between
the S1 port and X2 port are
ready.
□ Yes; □
No
Negotiation data of the eNodeB
to be commissioned is added to
the MME/S-GW.
□ Yes; □
No
Software and data configuration
file are ready.
□ Yes; □
No
Remote
Commiss
ioning on
the
M2000
Local
end of
the
eNod
eB
The information
regarding the eNodeB,
such as name, ID, and
ESN, is reported.
□ Yes; □
No
The eNodeB is
powered on.
□ Yes; □
No
Remo
te end
of the
eNod
eB
The ESN is bound. □ Yes; □
No
The software and data
configuration file are
loaded through the
M2000.
□ Yes; □
No
The software is
upgraded to the target
version.
□ Yes; □
No
7 Commissioning the MBTS by Using Local Maintenance
Terminal and M2000
3900 Series Multi-Mode Base Station
Commissioning Guide
7-46 Huawei Proprietary and Confidential
Copyright © Huawei Technologies Co., Ltd.
Issue 02 (2010-07-30)

The test result of the
external environment
alarm is correct.
□ Yes; □
No
The running status of
the eNodeB is normal.
□ Yes; □
No
The test result of the
basic services is
correct.
□ Yes; □
No
Local
eNodeB
Commiss
ioning
Through
the USB
Storage
Device
Local
end of
the
eNod
eB
The ESN is reported. □ Yes; □
No
The software and data
configuration file are
loaded through the
USB disk.
□ Yes; □
No
The eNodeB is reset. □ Yes; □
No
The indicator status is
normal.
□ Yes; □
No
The test result of the
external environment
alarm is correct.
□ Yes; □
No
The running status of
the eNodeB is normal.
□ Yes; □
No
The test result of the
basic services is
correct.
□ Yes; □
No
Remo
te end
of the
eNod
eB
The ESN is bound. □ Yes; □
No
The OM channel is
established.
□ Yes; □
No
Local
eNodeB
Commiss
ioning on
the LMT
Local
end of
the
eNod
eB
The ESN is reported. □ Yes; □
No
The software and data
configuration file are
loaded through the
LMT.
□ Yes; □
No
The software is
upgraded to the target
version.
□ Yes; □
No
All the active alarms
are cleared.
□ Yes; □
No
3900 Series Multi-Mode Base Station
Commissioning Guide
7 Commissioning the MBTS by Using Local Maintenance
Terminal and M2000
Issue 02 (2010-07-30) Huawei Proprietary and Confidential
Copyright © Huawei Technologies Co., Ltd.
7-47

The test result of the
external environment
alarm is correct.
□ Yes; □
No
The running status of
the eNodeB is normal.
□ Yes; □
No
The test result of the
basic services is
correct.
□ Yes; □
No
Remo
te end
of the
eNod
eB
The ESN is bound. □ Yes; □
No
The OM channel is
established.
□ Yes; □
No
Problem Description Impact
Unsolved
Problems
After
Commiss
ioning
Component P/N
Faulty
Board
Record
7 Commissioning the MBTS by Using Local Maintenance
Terminal and M2000
3900 Series Multi-Mode Base Station
Commissioning Guide
7-48 Huawei Proprietary and Confidential
Copyright © Huawei Technologies Co., Ltd.
Issue 02 (2010-07-30)
8 Communication Port for Multi-Mode Base
Station
This chapter describes communication ports on multi-mode base stations.
Figure Table 8-1, Table 8-2, and Table 8-3 show these communication ports on multi-mode
base stations.
Table 8-1 Communication ports on the GBTS
Prot
ocol
A Side A Side
Port
Numb
er (RX)
B Side B Side Port
Number
(TX)
Service Author
ity
Manag
ement
TCP GBTS 700 SMT 1024-65535 Before the GBTS is
connected to the BSC,
the local OM of the
GBTS can be
implemented through
this port on the SMT.
None
Table 8-2 Communication ports on the NodeB
Prot
ocol
A Side A
Side
Port
Num
ber
(RX)
B
Side
B Side
Port
Number
(TX)
Service Authority
Managem
ent
TCP NodeB 6000 LMT 1024-6553
5
For the LMT to deliver
the maintenance
command to the NodeB
User name/
password
TCP NodeB 6001 LMT 1024-6553
5
For the NodeB to report
alarm
None
3900 Series Multi-Mode Base Station
Commissioning Guide 8 Communication Port for Multi-Mode Base Station
Issue 02 (2010-07-30) Huawei Proprietary and Confidential
Copyright © Huawei Technologies Co., Ltd.
8-1

Prot
ocol
A Side A
Side
Port
Num
ber
(RX)
B
Side
B Side
Port
Number
(TX)
Service Authority
Managem
ent
TCP NodeB 6006 LMT 1024-6553
5
For maintenance, the
format is BIN.
None
TCP NodeB 6007 M200
0
server
1024-6553
5
For M2000. Integration
port for MML, alarm, and
BIN
User name/
password
TCP NodeB 20 Comm
issioni
ng
consol
e
1024-6553
5
For FTP; debug mode;
local maintenance FE
port only
None
TCP NodeB 21 Comm
issioni
ng
consol
e
1024-6553
5
For FTP; debug mode;
local maintenance FE
port only
User name/
password
TCP NodeB 23 Comm
issioni
ng
consol
e
1024-6553
5
For telnet; debug mode;
local maintenance FE
port only
User name/
password
UDP NodeB 67/68 M200
0
server
or any
other
DHCP
server
67/68 For DHCP services None
UDP M2000
server
or any
other
DHCP
server
67/68 NodeB 67/68 For DHCP services None
UDP M2000
server,
RNC
BAM,
or any
other
SNTP
server
123 NodeB 1024-6553
5
For synchronizing SNTP
clock
None
8 Communication Port for Multi-Mode Base Station
3900 Series Multi-Mode Base Station
Commissioning Guide
8-2 Huawei Proprietary and Confidential
Copyright © Huawei Technologies Co., Ltd.
Issue 02 (2010-07-30)

Prot
ocol
A Side A
Side
Port
Num
ber
(RX)
B
Side
B Side
Port
Number
(TX)
Service Authority
Managem
ent
TCP LMT,
M2000
server,
RNC
BAM,
or any
other
FTP
server
20 NodeB 1024-6553
5
For FTP: upload
configuration file, logs
from the NodeB to the
FTP server; download
configuration file,
software packages to the
NodeB from the FTP
server
None
TCP LMT,
M2000
server,
RNC
BAM,
or any
other
FTP
server
21 NodeB 1024-6553
5
For FTP control User name/
password
Table 8-3 Communication ports on the eNodeB
Prot
ocol
A
Side
A Side
Port
Number
(RX)
B Side B Side Port
Number
(TX)
Service Author
ity
Manag
ement
TCP eNod
eB
6000 LMT 1024-65535 For the LMT to
deliver the
maintenance
command and for
the UE to respond.
Format: MML
User
name/
passwor
d
TCP eNod
eB
6001 LMT 1024-65535 For the NE to report
alarm. Format:
MML
None
TCP eNod
eB
6006 LMT 1024-65535 For maintenance.
Format: BIN
None
TCP eNod
eB
6007 M2000
server
1024-65535 For M2000.
Integration port for
MML, alarm, and
BIN.
User
name/
passwor
d
3900 Series Multi-Mode Base Station
Commissioning Guide 8 Communication Port for Multi-Mode Base Station
Issue 02 (2010-07-30) Huawei Proprietary and Confidential
Copyright © Huawei Technologies Co., Ltd.
8-3

Prot
ocol
A
Side
A Side
Port
Number
(RX)
B Side B Side Port
Number
(TX)
Service Author
ity
Manag
ement
TCP eNod
eB
21 Commiss
ioning
console
1024-65535 For FTP.
Commissioning
mode. Local
maintenance FE
port only
User
name/
passwor
d
TCP eNod
eB
23 Commiss
ioning
console
1024-65535 For telnet.
Commissioning
mode. Local
maintenance FE
port only
User
name/
passwor
d
UDP eNod
eB
67/68 M2000
server or
any other
DHCP
server
67/68 For DHCP services None
UDP M200
0
server
or any
other
DHC
P
server
67/68 eNodeB 67/68 For DHCP services None
UDP M200
0
server
or any
other
DHC
P
server
123 eNodeB 1024-65535 For synchronizing
the NTP time
None
TCP M200
0
server
or any
other
FTP
server
21 eNodeB 1024-65535 For FTP control User
name/
passwor
d
8 Communication Port for Multi-Mode Base Station
3900 Series Multi-Mode Base Station
Commissioning Guide
8-4 Huawei Proprietary and Confidential
Copyright © Huawei Technologies Co., Ltd.
Issue 02 (2010-07-30)