Huawei Technologies T7200 GSM/GPRS/EDGE mobile phone with Bluetooth User Manual T7200
Huawei Technologies Co.,Ltd GSM/GPRS/EDGE mobile phone with Bluetooth T7200
Contents
Manual
Make the most of now.
HUAWEI T7200 Mobile Phone
User Guide
T7200.book Page 1 Sunday, September 30, 2007 3:54 PM

1
Getting to Know Your Phone 1
Packing List ................................................1
Your Phone ................................................2
Getting Started 6
Loading the SIM Card ................................6
Unloading the SIM Card .............................7
Charging the Battery ..................................7
Loading/Removing a Memory Card............8
Powering On/Off.........................................9
Call Service 11
Making or Answering Calls.......................11
Operations During a Voice Call ...............12
Calls .........................................................13
Text Input 14
T9® Input Method ....................................14
Traditional Input Method ..........................14
"123" Numeric Input Method ....................15
Symbol Input Method ...............................15
Input Different Languages........................15
Contacts 16
Making Calls from the Contacts ...............16
Searching for a Contact............................16
Viewing Contacts in Phone/SIM ...............16
Other Operations......................................16
Groups......................................................17
Messaging 19
Messages.................................................19
Email ........................................................ 21
Broadcast Inbox.......................................24
Templates ................................................ 24
Music 25
Music Library............................................ 25
Playlists.................................................... 26
Organiser & Tools 27
Alarms...................................................... 27
Calendar ..................................................27
Task ......................................................... 28
Memo ....................................................... 29
Synchronise ............................................. 29
Calculator ................................................. 30
Unit Converter.......................................... 30
Currency Converter.................................. 31
Voice Recorder ........................................ 31
World Time...............................................32
Stopwatch ................................................ 32
Timer........................................................ 32
Service Dial Number ................................ 32
My Files 33
Browser 34
Open homepage ...................................... 34
Open new page........................................ 34
Bookmarks ............................................... 34
Saved pages............................................34
History...................................................... 35
Resume.................................................... 35
Table of Contents
T7200.book Page 1 Sunday, September 30, 2007 3:54 PM

2
Settings ....................................................35
Entertainment 36
Games......................................................36
Camera.....................................................36
Music........................................................38
Connections 39
Bluetooth®...............................................39
USB..........................................................41
Settings 44
Phone Settings .........................................44
Display Settings........................................45
Message Settings.....................................46
Call Settings .............................................46
Contacts Settings .....................................48
JavaTM Settings.......................................48
Connectivity..............................................48
Network ...................................................48
Security ...................................................49
DRM Setting .............................................50
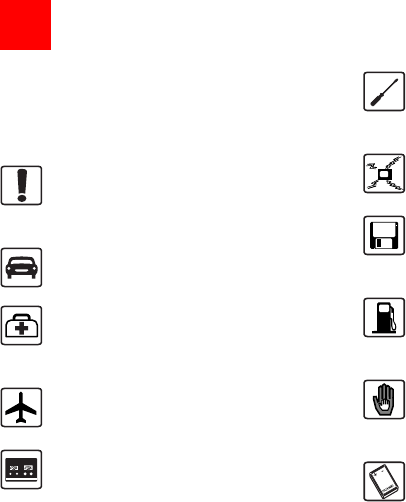
Warnings and Precautions 51
Electronic Device......................................51
Hospital ....................................................51
Storage Environment................................52
Children Safety.........................................52
Operating Environment ............................53
Cleaning and Maintenance.......................53
Environmental Protection .........................54
Emergency Calls ......................................54
Battery...................................................... 54
Charger .................................................... 55
Using the USB Cable ...............................56
Certification Information (SAR) ................ 56
Acronyms and Abbreviations 60
Appendix 61
Index 1
T7200.book Page 2 Sunday, September 30, 2007 3:54 PM
1Please read the safety precautions carefully to
ensure the correct and safe use of your wireless
device. For detailed information, refer to the
2section “Warnings and Precautions”.
Do not switch on your phone when it is
prohibited to use mobile phones or
when the phone may cause interfer-
ence or danger.
Do not use your phone while driving.
Follow any rules or regulations in
hospitals and health care facilities.
Switch off your phone near medical
apparatus.
Switch off your phone in aircraft. The
phone may cause interference to
control signals of the aircraft.
Switch off your phone near high-preci-
sion electronic devices. The phone may
affect the performance of these
devices.
Do not attempt to disassemble your
phone or its accessories. Only qualified
personnel are allowed to service or
repair the phone.
Do not place your phone or its accesso-
ries in containers with strong electro-
magnetic field.
Do not place magnetic storage media
near your phone. Radiation from the
phone may erase the information stored
on them.
Do not put your phone in a high-
temperature place or use it in a place
with flammable gas such as a gas
station.
Keep your phone and its accessories
away from children. Do not allow
children to use your phone without
guidance.
Use only approved batteries and
chargers to avoid the risk of explosions.
Safety Precautions
T7200.book Page 4 Sunday, September 30, 2007 3:54 PM

Observe any laws or regulations on the
use of wireless device. Respect others’
privacy and legal rights when using
your wireless device.
Strictly follow the relevant instructions
on 56 of this manual while using the
USB cable. Otherwise your phone or
PC may be damaged.
T7200.book Page 5 Sunday, September 30, 2007 3:54 PM

1
1
Getting to Know Your Phone
1Getting to Know Your Phone
Your phone can operate in virtually all countries,
automatically switching between
GSM/GPRS/EDGE 850/900/1800/1900 networks.
This allows you to enjoy communication wherever
you use your mobile phone.
Note
The services supported by your phone
should be also supported by the network
from where you use the phone. For details,
please contact your local network operator.
Packing List
Your phone package box contains the following:
1One T7200 mobile phone
2One travel charger
3One Li-polymer battery
4One User Guide
5One stereo headset (optional)
6One USB data cable (optional)
T7200.book Page 1 Sunday, September 30, 2007 3:54 PM

Your Phone
2
Your Phone
Clear key
• In the editing mode, press this key to
delete a character before the cursor.
Scroll key
• Press this key to scroll through a menu.
• In standby mode,
press the up scroll key to access Quick
Menu, press the down scroll key to access
Contacts, press the left scroll key to
access the New SMS screen, and then
press the right scroll key to access My
Files.
Left function key
• Press this key to activate the function
indicated at the left of the prompt bar.
• In standby mode, press this key to
access the main menu.
Send key
• Press this key to make or answer a call.
• Press this key to access the Calls
screen in standby mode.
Right function key
• Press this key to activate the function indi-
cated at the right of the prompt bar on the
screen.
• In standby mode, press this key to access
homepage.
OK key
• Press this key to start the selected func-
tion in the menu.
• In standby mode, press this key to
access the main menu.
Power/End key
• Press this key to end an ongoing call or
reject an incoming call.
• Press this key to return to the Home
screen.
• Press and hold it to power on or power off
the phone.
Character/Number keys
• Use to enter numbers or characters.
• Press and hold the # key to switch to the
silent profile from the current profile.
Microphone
T7200.book Page 2 Sunday, September 30, 2007 3:54 PM
Your Phone
3
1
Getting to Know Your Phone
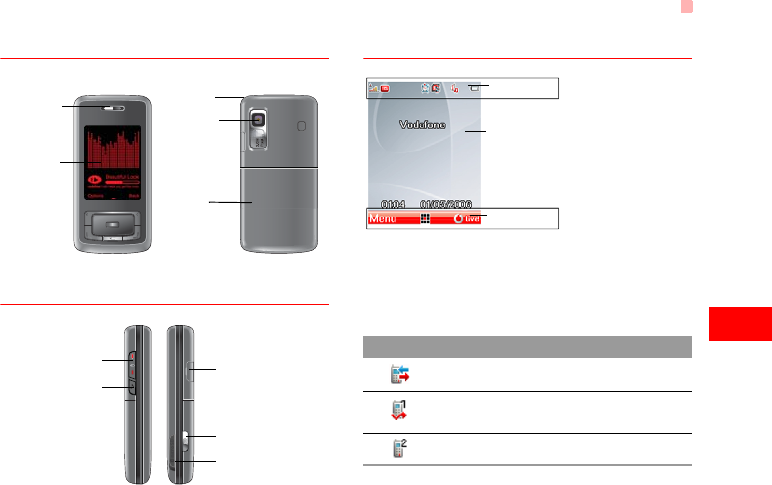
Front View and Back View
Side View
Home Screen
◆ Icon bar
This area displays the phone status. The following
table illustrates the icons that may appear on this bar.
Earpiece
Camera
Battery
Strap hole
Screen
Volume keys
Memory card
Music key
• Press this key to access
the Music screen in the
standby mode.
Charger connector/Cable
connector/Headset Jack
Camera shortcut key
• Press and hold this key
for few seconds to
activate the camera in
the standby mode..
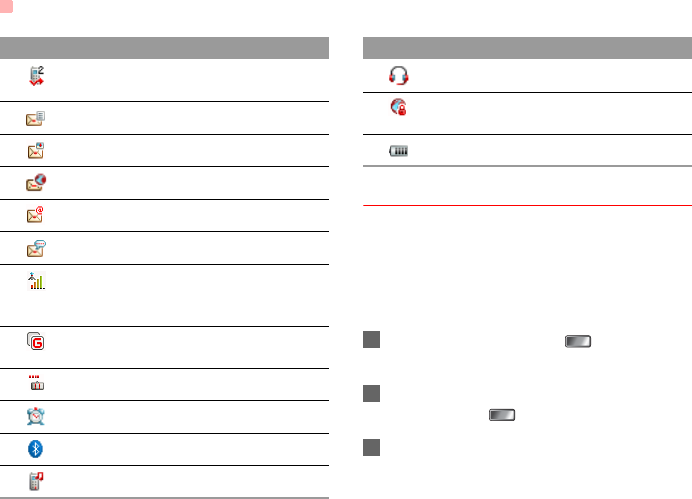
Icon Description
The phone is in a call.
Forwarding all incoming voice calls to
line 1.
Call line 2 is enabled currently.
Icon bar
Prompt bar
To display the operations and the function
options.
Desktop
To display the operations currently available.
T7200.book Page 3 Sunday, September 30, 2007 3:54 PM
Your Phone
4
Introduction to the Menu
Your phone provides an extensive range of functions.
You can use these functions by navigating the follow-
ing menus: Entertainment, Music, Calls, Browser,
Messaging, My Files, Organiser & Tools, Contacts,
Camera, Profiles, Camera and Settings.
1In the standby mode, press to display the
main menu.
2Press the scroll key to scroll through the menu,
and then press to select the desired item.
3If the menu contains further submenus, repeat
step 2.
Forwarding all incoming voice calls to
line 2.
You have new text messages.
You have new multimedia messages.
You have new PUSH messages.
You have new emails.
You have new voice mail.
Indicates signal strength. The more hori-
zontal bars that appear, the stronger the
signal.
The phone is currently in a GSM
network.
You are using the roaming service.
Alarm clock is enabled.
Bluetooth is enabled.
The normal profile is activated.
Icon Description
The headset is plugged in.
Your PC connects to the Internet
through your phone.
Indicates power level of the battery.
Icon Description
T7200.book Page 4 Sunday, September 30, 2007 3:54 PM

Your Phone
5
1
Getting to Know Your Phone
4Use the selected function according to the
prompts on the screen.
5Select Back to return to the previous menu.
Press to return to the standby mode.
T7200.book Page 5 Sunday, September 30, 2007 3:54 PM
6
2Getting Started
Loading the SIM Card
Load your SIM card before using your phone. To use
the SIM card properly, please read the following
instructions carefully.
Note
• Keep the SIM card out of the reach of chil-
dren.
• The SIM card and its metal contacts can
be easily damaged by scratching or bend-
ing. Ensure care when you carry, load or
remove it.
• Always disconnect the charger from the
phone before loading or removing the SIM
card.
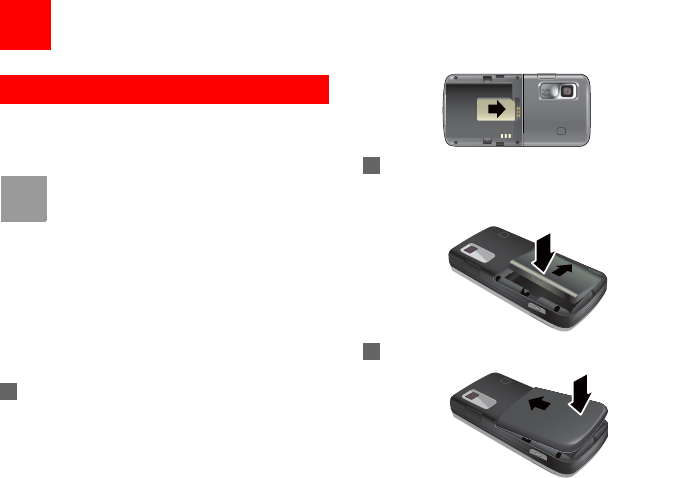
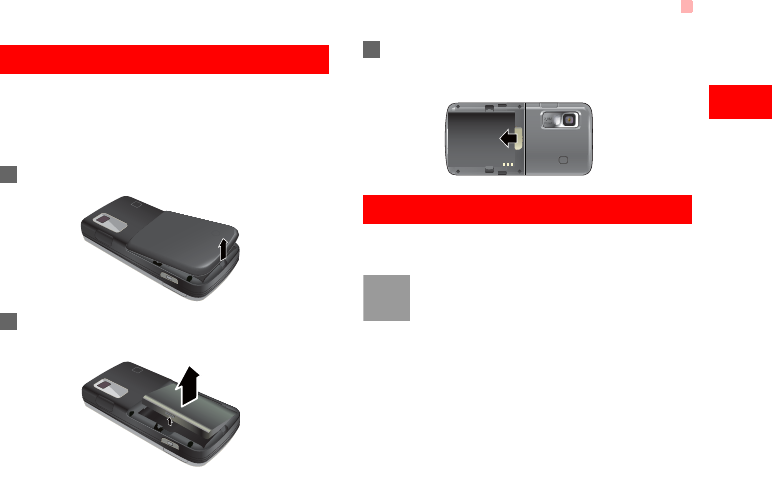
To load the SIM card, do as follows:
1Position the card at the card slot entrance, mak-
ing sure it is facing the same way as shown in
the diagram below, with the notched corner at
the top right. Then slide in as shown.
2Fit the battery into the battery slot on back of the
phone. Press the battery down until it clicks into
place.
3Slide the back cover to the phone.
T7200.book Page 6 Sunday, September 30, 2007 3:54 PM
Unloading the SIM Card
7
Getting Started
2
Unloading the SIM Card
Only unload the SIM card and the battery after pow-
ering off your phone. Otherwise, your phone may be
damaged.
To unload the SIM card:
1Unload the back cover out of the phone.
2Please unload the battery according to the fol-
lowing picture.
3Press the SIM card with one finger and slide it
out of the slot.
Charging the Battery
Before charging the battery, please read the following
precautions carefully.
Note
• When you charge the battery for the first
time, please charge it for a minimum of 12
hours.
• The battery discharges even while not
being used. If you have not used it for a
long time, please recharge it first.
• The charging time depends on the envi-
ronmental temperature and the age of the
battery.
• The battery can be recharged but eventu-
ally wears out. If the battery lasts for a
T7200.book Page 7 Sunday, September 30, 2007 3:54 PM

Loading/Removing a Memory Card
8
shorter time period than usual after being
charged normally, replace it with a battery
of the same type.
• Do not strike, throw or cause any kind of
violent shock to the battery, otherwise liq-
uid leakage, body damage, overheating,
explosion or fire may occur.
• Charge the battery by using the charger
supplied with your phone.
Charging with a Cable Charger
Before charging the battery with a cable charger,
ensure that the battery has been properly loaded into
your phone.
To charge the battery, do as follows:
1Insert the plug of the charger into the connector
of the phone as shown in the following figure.
2Plug in the connector of the charger to a power
socket.
Note
• When the battery power level is very low,
the phone makes alert sounds and dis-
plays a prompt. When the battery power
level is too low, the phone will power off
automatically.
• When the battery is being charged, the
charging indicator blinks continuously.
When the charging indicator stops blink-
ing, it indicates that the battery is full.
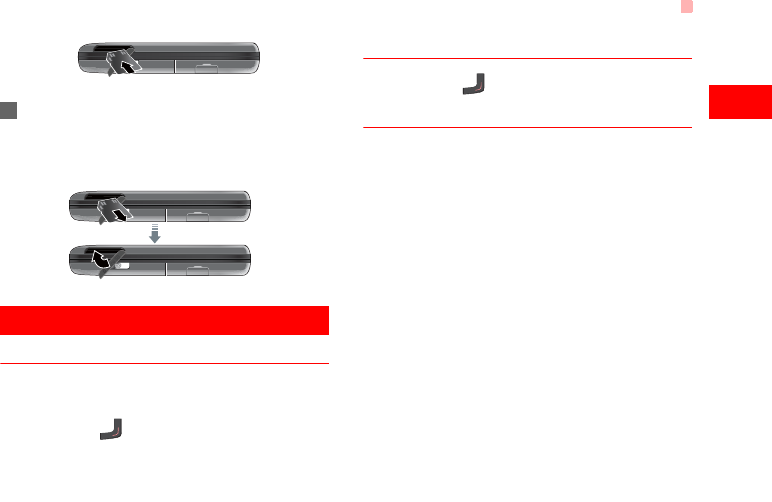
Loading/Removing a Memory Card
The phone supports a memory card (micro-SD) with
a capacity up to 2 GB.
1Insert the memory card into the slot, as shown in
the following figure.
T7200.book Page 8 Sunday, September 30, 2007 3:54 PM
Powering On/Off
9
Getting Started
2
2To remove a memory card, open the rubber cap
and press the memory card gently. Now the
memory card will pop up automatically. Then
take it out as shown in the following figure.
Powering On/Off
Powering On
Ensure that the SIM card is in your phone and that
the battery has been charged.
Press and hold to power on your phone.
Powering Off
Press and hold to power off your phone.
Access Codes
If you have set the phone password and the PIN is
ON, you have to enter the corresponding access
codes when you power on your phone. For setting
and changing the access codes, please refer to "Set-
tings/Security Setup" on page 49.
◆ Phone Password
The phone password is used to protect your phone
from unauthorized use. The phone password is
preset as 0000 for your phone.
◆ PIN
The personal identification number (PIN) code is
used to protect your SIM card from unauthorized use.
The PIN code is usually provided when you get the
SIM card from your service provider. If you have not
received a PIN code or if you have forgotten it, con-
tact your service provider.
T7200.book Page 9 Sunday, September 30, 2007 3:54 PM

Powering On/Off
10
◆ PIN2
Some SIM cards provide a PIN2 code. Some special
functions such as the "Fixed Dialer Number" are not
available until you enter the PIN2 code. At the same
time, your SIM card should support these functions.
◆ PUK
To unlock a locked SIM card, you need to enter the
PIN Unblocking Key (PUK) code. The PUK code is
usually provided when you get the SIM card from
your service provider. If you have not received a PUK
code or if you have forgotten it, contact your service
provider.
◆ PUK2
Some SIM cards provide a PUK2 code that is used to
unlock a locked PIN2 code. The PUK2 code is usu-
ally provided when you get the SIM card from your
service provider. If you have not received a PUK2
code or if you have forgotten it, contact your service
provider.
T7200.book Page 10 Sunday, September 30, 2007 3:54 PM
11
3Call Service
Making or Answering Calls
Making a Voice Call
1Enter or edit a phone number in one of the fol-
lowing ways:
• Enter a phone number through the keypad.
• Select a number from the Calls screen.
• Select a number from the Contacts screen.
2Press to dial.
3Press to end the call.
Making Voice Calls Using SDN
You can make a voice call through speed dialing. For
instructions on assigning speed dialing numbers,
refer to "Contacts/Other Operations" on page 16.
To make a call by speed dialing number (SDN), press
and hold the number key until the phone dials the
corresponding phone number.
Answering or Rejecting Calls
You can set the answer mode to Slide up, Any key
or Send key. For details, refer to "Settings/Call Set-
tings/Answer Mode".
The following describes how to answer or reject a call
in different answer modes:
Operation Description
Answer
a call
• If the answer mode is Slide up, slide
the front flip up.
• If the answer mode is Any key, press
any key except .
• If the answer mode is Send key,
press .
• If the headset is in use, press the con-
trol key on the headset.
Reject
a call
Press or select Options > Reject.
End a call • If the headset is not in use, you can
slide the front flip down or press .
• If the headset is in use, press the con-
trol key of the headset.
T7200.book Page 11 Sunday, September 30, 2007 3:54 PM

Operations During a Voice Call
12
Note
When the phone is closed and there is no
ongoing call, you can press and hold the
camera key to mute the ringtone of an
incoming call. You can also press and hold
the volume keys to reject the call.
You can also set the auto answer mode to Immedi-
ate answer, Text message or Recorded voice.
For details, refer to “Settings/Call settings/Auto
Answer”.
Operations During a Voice Call
Icon Description
: A call is ongoing.
: The call is on hold.
Operations
During a voice call, you can select Options to per-
form the following operations.
• Hold/Resume: To hold or resume the call during a
call.
• End call: To end all calls, the active call, the current
call or the on hold call.
• Handfree/Earpiece: To switch between the Hand-
free and the Earpiece modes during a call.
• Recording started /recording stopped: to record or
stop recording the conversation.
• Other Applications: To access he Contacts screen,
the Messaging screen, the Calls screen or the
Calendar screen.
• Answer/Reject: Your phone allows you to handle
two calls simultaneously. During a call, if there is a
new incoming call, select Options > Answer to
answer it or select Options > Reject to reject it.
• Swap: To swap between calls during a 3-party call.
• Conference call/Private call: To switch to the con-
ference call during a 3-party call or to talk with a
party privately during a conference call.
Reply by
message
To send a predefined message to the
caller.
Operation Description
T7200.book Page 12 Sunday, September 30, 2007 3:54 PM

Calls
13
Call Service
3
Calls
The recently dialed calls, received calls and missed
calls are saved automatically.
Select Calls in the main menu and then press
the left/right scroll key to select All calls ,
Missed , Received or Dialed . Then select
Options for the following options.
• Send message: To send a message or MMS.
• Save number: To save the numbers of the selected
record.
• Call: To make a voice call.
• Display mode: You can select Normal to display all
records or select Simple to ignore the duplicated
records.
• Delete: To delete the selected record.
• Mark/Unmark: To mark/unmark a record or all
records.
• Calls status: To display the information on voice
calls and data services. In the voice call and data
page, you can select Reset to clear all records.
T7200.book Page 13 Sunday, September 30, 2007 3:54 PM

14
4Text Input
You can use the keypad to enter alphanumeric char-
acters and symbols. For example, you can add
entries to the contacts, write messages or schedule
events on the calendar.
Note
While entering text:
• Press to switch between input meth-
ods. Press and hold the key to enable
or disable the T9 input mode.
• Press to display the symbols list.
Press and hold the key to set the input
language.
• Press to delete the letter before the
cursor.
T9® Input Method
With the T9 input method, you can easily and quickly
enter words. T9 is a predictive text entry mode. It
allows you to easily and quickly enter words. Press
the relevant key that corresponds to the desired letter
and T9 will offer you candidate words.
Press each key carrying the desired letter once, and
then the predictive text scheme will present the can-
didate words composed by the letters you have
entered in the drop-down menu.
For example, to enter the word "good" with the T9
input method, follow these steps.
1Press successively the keys , , , and
which "g", "o", "o", and "d" belong to, and the
candidate words "good", "home" etc. composed
by these letters will be shown in the drop-down
menu.
2Use the up/down scroll key to select "good".
Then press to enter a space for entering the
next word.
Note
Press repeatedly and you will see "T9
abc", "T9 Abc" and "T9 ABC" on the upper
left corner of the screen successively. It indi-
cates the words to be entered will be in
lower case, first letter capitalized or in upper
case.
Traditional Input Method
When T9 input method is off, you can use the tradi-
tional input method for entering alphabetic charac-
T7200.book Page 14 Sunday, September 30, 2007 3:54 PM

"123" Numeric Input Method
15
Text Input
4
ters. Repeatedly press the key that carries the letter
to be entered when it appears on the screen.
For example, to enter the word "Hello" with the tradi-
tional input method, follow these steps.
1Press that carries "h" repeatedly and all let-
ters carried by this key will be displayed succes-
sively on the screen. You can scroll through this
list and select the character you want. Stop when
you see an "h" on the screen.
2After entering the first letter, you can directly
press another key (except ) to enter the next
letter. If the next desired letter is on the same
key as the current one, wait until the cursor
appears to the right of the current letter and then
you can enter the next one.
3Enter "e", "l", "l" and "o" in the same way.
Note
Press repeatedly and you will see "abc",
"Abc" or "ABC" on the upper left corner of
the screen successively. It indicates the
words to be entered will be in lower case,
first letter capitalized or in upper case.
"123" Numeric Input Method
In a text editing screen, press and hold the character/
number keys to enter corresponding numeric charac-
ters.
You can also press successively the key to switch
to the "123" numeric input method, and enter corre-
sponding numeric characters by pressing the charac-
ter/number keys.
Symbol Input Method
You can press to display the symbols list and then
select Recent to display recent symbols.
You can also press to input the commonly-used
symbols in a text editing screen.
Input Different Languages
In a text editing screen, Press and hold the key to
set the language for the text. The selected language
will be displayed on the upper right part of the editing
screen.
T7200.book Page 15 Sunday, September 30, 2007 3:54 PM

16
5Contacts
Contacts enables you to save and manage such
information as phone numbers and addresses of your
contacts. You can save such information in your
phone or your SIM card. You can also assign fre-
quently-used numbers to speed dialing keys for your
convenience.
Making Calls from the Contacts
You can make a voice call with a contact selected
from the contacts list.
1In the Contacts screen, press the left/right
scroll key to select Contacts .
2Select a contact and select Options > Call.
Then, you can select Voice Call to make a call.
Alternatively, you can select Edit before call to
edit the number before making the call.
Searching for a Contact
You can find a contact from the contacts list easily
and quickly by using this function on the Contacts
screen. Select Options > Search, and then enter the
contact name you are searching for. The contact is
displayed.
You can also use quick search in the contacts list
screen. You can find a contact by entering the initials
of the first name or the last name of the contact. For
example, to find a contact named "Alice Green",
enter the initials "a" or "g". This contact is displayed in
the candidate list.
Viewing Contacts in Phone/SIM
In the Contacts screen, select Options > View con-
tacts in phone/View contacts in SIM. You can dis-
play the contacts list saved in the phone or that in the
SIM card. You can also select Options > Settings to
set the default contact list displayed in the contact
screen.
Other Operations
In the Contacts screen, select Options for the
following options.
• Details: To view the detailed information of the con-
tact.
T7200.book Page 16 Sunday, September 30, 2007 3:54 PM
Groups
17
Contacts
5
• Call: To make a voice call.
• Create message: To send a message or Email to
the selected contact.
• Add new contact: To create a new contact.
• Management: To back up your contacts from your
phone to a memory card or from your memory card
to your phone.
• Search: To find a contact from the contacts list.
• Send contact: To send a contact to other devices
supporting Message or Bluetooth.
• Copy to SIM/Copy to phone:To Copy one or more
contacts from your phone to the SIM card or from
your SIM card to the phone.
• Delete: To delete the selected contact.
• Mark/Unmark: To mark/unmark a record or all
records in your phone and SIM card.
• View contacts in Phone/SIM: To display the con-
tacts list saved in the phone or that in the SIM card.
• Speed Dial Number: To assign often-used numbers
to speed dialing keys "2" to "9".
• My business card: To save your own information to
a Business Card.
• Settings: To set the default contact list displayed in
the contact screen, to sort the contacts on the
Contacts screen or to set the save location.
• Memory status: To view the memory status of both
your phone and SIM card.
Groups
You can rename a group, add group members, or
delete a group.
Adding/Deleting Group Members
You can add a member to a group in your phone or
delete a member from it.
1In the Contacts screen, press the left/right
scroll key to select Groups .
2Select a group and press to view the details.
3Select Options > Add new Users. Select a con-
tact and press Add. The member you added is
displayed in the group member list.
T7200.book Page 17 Sunday, September 30, 2007 3:54 PM
Groups
18
To delete a group member, select a member from the
group member list, and then select Options >
Delete.
Managing a Group
1In the Contacts screen, press the left/right
scroll key to select Groups.
2Select a group and select Options for the follow-
ing options.
• Details: to view the details of a group.
• Rename: to change the name of a group.
• Send Message: to send a text message or
MMS to all members of a group.
• Remove all members: to delete all members of
the group.
T7200.book Page 18 Sunday, September 30, 2007 3:54 PM
19
6Messaging
Messages
The maximum content for a single text message is
160 characters. If the characters you enter exceed
this limit, the text is divided into two or more continu-
ous messages when it is sent.
Creating a Message
With this option, you can create new SMS, MMS,
MMS Postcard, and Email.
1Select Messaging > Create message in
the main menu.
•Message: To access the SMS or MMS editing
screen.
•From template: To edit the SMS or MMS from
template.
•Postcard: To access the postcard editing
screen.
•Email: To access the email editing screen.
2After editing the message, press or select
Options > Add Recipient to add a recipient’s
number.
3 Press or select Options > Send to send
the message.
Messages Mailboxes
The phone provides four mailboxes for messages,
namely, Inbox , Drafts , Outbox and
Sent .
◆ Inbox
You can save the received messages in Inbox.
Icons in Inbox
Icon Description
a read SMS or a read message report
an unread SMS or an unread message
report
a read MMS
an unread MMS
A read Push message
An unread Push message
T7200.book Page 19 Sunday, September 30, 2007 3:54 PM
Messages
20
Viewing Messages in Inbox
1Select Messaging > Inbox.
2Press the up/down scroll key to view the mes-
sages and then press to view the details.
3You can select Options for the following opera-
tions.
• Play: To play the multimedia message.
• Reply: To reply the message.
• Forward: To forward the message.
• Delete: To delete the message.
• Call sender: To call the message sender by a
voice call.
• Info.: To view the details of the message.
• Save text: To save the text of the MMS.
• Save as template: To save this message as a
template.
◆ Drafts
The Draft box is used to save the messages you cre-
ated and saved.
Icons in Drafts
: A text message saved to the phone.
: A multimedia message to the phone.
Viewing and Editing Messages in the Draft
1Select Messaging > Drafts.
2Press the up/down scroll key to select a mes-
sage and press to edit it.
◆ Outbox
Outbox is used to save the messages that failed to
be sent.
Icons in Outbox.
: A message that fails to be sent.
Viewing Messages in the Outbox
1Select Messaging > Outbox.
2Press the up/down scroll key to select a mes-
sage and press to edit it.
◆ Sent
Sent is used to save the messages that have been
sent successfully.
Icons in Sent
: A text message has been sent.
T7200.book Page 20 Sunday, September 30, 2007 3:54 PM

Email
21
Messaging
7
: A multimedia message has been sent.
Viewing Messages in Sent
1Select Messaging > Sent.
2Press the up/down scroll key to select a mes-
sage and press to view the details.
3You may select Options to do the same opera-
tions as those of Inbox.
Message Settings
You can change the message settings by performing
the following steps.
1Select Messaging > Settings > SMS & MMS
from the main menu.
2Set the parameters related to messages:
• Receiving settings: To set parameters related
to retrieval of messages.
• Sending settings: To set parameters related to
sending messages.
• Signature: To set whether your signature will
be sent along with the message. You can edit
the signature while creating a new message.
• Font size: To set the size of the character
entered in the message.
• Reply settings: To set whether to reply to a
message with the original text.
• MMS Account: To set the MMS account.
• Voice mail: The voice mail number is already
preset for you in the phone.
Email
Before sending an email, please set an email account
first. For details, please refer to "Email Settings" on
page 23.
Creating an Email
1Select Messaging > Email from the main menu.
Select Options > New Email to access the
email editing screen.
2Select 【To】 or 【Cc】and press .
T7200.book Page 21 Sunday, September 30, 2007 3:54 PM
Email
22
•Select Add from Contacts or Add From
Groups to select an email address.
•Select Enter Recipient to directly enter the
email address.
3In the email editing screen, select Subject and
press to edit the contents.
4In the email editing screen, select the Message
text box to edit the content.
5In the email editing screen, select Options >
Add attachment to attach picture, music, video,
or eBook.
6In the email editing screen, select Options >
send to send the email.
Mailboxes
Your phone provides five mailboxes for email,
namely, Inbox , Drafts , Sent messages ,
Outbox and Blocked messages .
◆ Inbox
All Emails received are saved in the inbox.
Icons in Inbox
: A read email.
: An unread email.
Viewing and Editing Emails in Inbox
1Select an email and press to view the con-
tent.
2In the Details screen, select Options for the fol-
lowing operations:
• Reply: To reply to the email sender.
• Reply all: To reply to the email sender and all
email receivers except the replier.
• Add to contacts: To save the details of the
sender to the contacts.
• Forward: To forward the selected email.
• Delete: To delete the selected email.
• Call sender: To call the email sender by a voice
call.
◆ Drafts
The saved new emails are saved in the drafts.
Icons in Drafts
: Emails to be sent.
T7200.book Page 22 Sunday, September 30, 2007 3:54 PM
Email
23
Messaging
7
Viewing and Editing Emails in Drafts
1Select the desired email in the drafts and press
to access the editing screen.
2Edit the related information. For details, perform
the same operations as in creating an email.
◆ Sent
The emails sent to server are saved in the sent box.
Icon for Sent
: A read email.
Viewing and Editing Emails in Sent
1Select an email and press to access the
editing screen.
2Edit the related information. For details, perform
the same operations as those of the Inbox.
◆ Outbox
Those emails which failed to be sent are retained in
the Outbox.
Icon for Outbox
: Emails failed to send.
Viewing and Editing Emails in Outbox
1Select an email and press to access the
editing screen.
2Edit the related information. For details, perform
the same operations as in creating an email.
◆ Blocked messages
The blocked emails are saved in this folder. You can
select Messaging > Settings > Email to set the
blocking conditions.
Email Settings
1Select Messaging > Settings > Email and
select an account.
2The related account information contains:
General, Incoming and Outgoing.
3Return to the Account screen. Select Options >
Set as default to activate this account.
After completing all settings, press Back.
Note
For the account settings, contact your
service provider.
T7200.book Page 23 Sunday, September 30, 2007 3:54 PM

Broadcast Inbox
24
Broadcast Inbox
The broadcast messages are saved in the broadcast
inbox. You can set the broadcast message.
Select Messaging > Settings > Broadcast to set the
following items.
• Service: to enable or disable this service.
• Subscription: to subscribe to broadcast channels or
cancel the subscription.
• Language: to select the language of the broadcast.
• Silent alert: to set whether to use an alert when
there is a new broadcast message.
• Auto delete: to set whether to auto delete earlier
messages when the broadcast inbox memory is
full.
Templates
You can save the frequently-used SMS or MMS as
template for your convenience.
T7200.book Page 24 Sunday, September 30, 2007 3:54 PM
25
7Music
Music enables you to manage your music files
easily and conveniently.
Music Library
You can play various music files, including those sup-
plied with the phone, recorded by using the phone,
downloaded from the Internet, and attached to email.
You can also enjoy the online audio files.
Function Options During Playing
During playing the music file, select Options for the
following operations.
• Now playing: To access the current playlist.
• Mute/Unmute: To mute or unmute the music.
• Playlist: To access the music playlist.
• Bookmarks: To access the bookmark list.
• Info.: To view the information of the music files.
• Video camera: To enable the video camera func-
tion.
• Shuffle: To enable/disable the random play.
• Loop: To play current music circularly, loop all
music or close.
• Equalizer: To select the music style.
• Streaming setting: To set the streaming setting.
• Exit: To exit the music play screen.
Screen Operations During Playing
During playing the music file, you can perform the fol-
lowing operations on the music file.
Operation Description
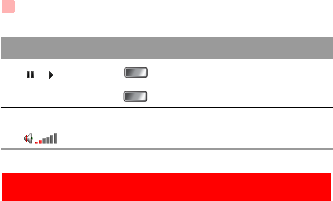
Press the up scroll key to access the
current playlist.
Press the down scroll key to go back to
the beginning of the current music file.
Press the right scroll key to access the
next music file. Press and hold the right
scroll key to fast forward the current
music file.
Press the left scroll key to access the
last music file. Press and hold the left
scroll key to fast backward the current
music file.
T7200.book Page 25 Sunday, September 30, 2007 3:54 PM
Playlists
26
Playlists
Selecting this option, you can rename and edit the
playlist as well as play the music in the playlist.
/Press to pause the playing.
Press again to resume the playing.
Press the volume keys to adjust the vol-
ume.
Operation Description
T7200.book Page 26 Sunday, September 30, 2007 3:54 PM
27
8Organiser & Tools
This function provides you with various helpful tools.
You can access the Organiser & Tools screen by
selecting from the main menu.
Alarms
You can set several alarm clocks. You can also set
alarm time, alarm tones and the cycle period for
alarm clocks.
Setting Alarm Clocks
Enter alarm function, you can select one alarm from
the list, and then press to set an alarm clock.
In the screen for editing alarm clock, you can set the
following items: alarm time, tips, the sound function,
the vibration function, Alert tone, the snooze function,
the alarm cycle.
Alarm Prompt
When it is time for an alarm clock to ring, the selected
alarm tone is played and a prompt displayed. You can
stop the ringing by pressing any key, or by closing or
opening your phone. The prompt allows you to
snooze or stop the alarm prompt.
If your phone is powered off, the alarm clock will still
ring. When the alarm rings, you can choose to power
on the phone.
Stopping the Alarm Clock
Select an alarm clock from the list, and press the left
function key to deactivate it.
Calendar
With this function, you can view the calendar and
manage your schedules.
New Schedule
Enter calendar function, you can select Options >
New to create the schedule events for the current
day.
In the screen for editing schedule, you can set the fol-
lowing items: schedule subject, start/end time of the
schedule, schedule location, schedule category,
schedule content, whether the sound is on, the
T7200.book Page 27 Sunday, September 30, 2007 3:54 PM

Task
28
vibration function, alert tone, alert type, alert cycle,
and alert image.
Note
You can create up to 500 schedules in total
and 15 for each day. While creating a new
schedule, you need to set the alarm on
before setting the alarm time, the alarm
cycle, the alarm tone and the image.
Calendar Functions
Enter calendar function and select Options. You can
perform the following operations.
• New: To create a new schedule.
• Go to: To go to a certain date directly from the
Month view screen.
• Display: To view all events, specified events, Calen-
dar files and to back up all schedules to a memory
card.
• View mode: To view the calendar in three different
modes: month view, week view, and day view.
• Delete event: To delete all past events, specific
period events or all events.
• Management: To backup all schedules to the mem-
ory card or to restore all schedules from the mem-
ory card to the phone.
• Settings: To set save location, main view, week
begin day.
• Memory status: To view the memory status, includ-
ing the used space and the total space.
Schedule Prompt
When it is time to remind you of a schedule, the
selected ringtone is played and a prompt displayed.
You can stop the ringing by pressing any key, or by
closing or opening your phone. From the prompt, you
can snooze or stop the prompt.
Task
You can define and manage tasks to be conducted
before a certain time. Your phone can remind you of
these tasks and track them automatically.
Select Task from Organiser & Tools .The tasks
are classified into three kinds: pending, done, and all
T7200.book Page 28 Sunday, September 30, 2007 3:54 PM

Memo
29
Organiser & Tools
9
tasks. You can define up to 1000 tasks on your
phone.
New Tasks
To define a new task, press or select Options >
New on the Tasks screen.
In the screen for editing task, you can set the follow-
ing items: the subject of the task, the deadline, the
priority level, the task status, the task alert, the
vibration function, the alert time, the task type.
Tasks Functions
On the Tasks screen, you can also perform the fol-
lowing operations: edit, new, set as done, send by
Message, Email or Bluetooth, copy, day view, delete,
delete all, and view the memory status.
Task Prompt
When it is time for the phone to remind you of a task,
it rings automatically and a prompt interface is dis-
played. You can stop the ringing by pressing any key,
or by closing or opening your phone. From the
prompt , you can snooze or stop the task prompt.
Memo
You can store important events on your phone. You
can save up to 100 such memos.
Select Memo from Organiser & Tools . If there is
no memo, you need to create one when you access
the Memo screen.
On the Memo Pad screen, you can perform the fol-
lowing operations: edit, new, delete, send by Mes-
sage or Bluetooth, view the memory status and
delete all.
Synchronise
You can synchronise contacts with your personal
phone book in the network.
Select Synchronise from Organiser & Tools to
create or edit a profile. Select Options > View log to
view the latest synchronisation log. Before you use
the synchronise function, you may need to set a pro-
file.
T7200.book Page 29 Sunday, September 30, 2007 3:54 PM
Calculator
30
1To create a profile, select Options > New to cre-
ate a profile.
2Press the left/right scroll key to switch between
Synchronise Item, Server Setting, and Network
Profile.
3In the Synchronise Item screen, select the item
to be synchronised and press to confirm it.
Then, enter the database name, User name, and
Password of the synchronisation items.
4In the Server Setting screen, enter server
address, user name, password.
5In the Network profile screen, enter the proxy
server address and the port. Then, enter the net-
work access point and select a desired profile.
6Return to the previous menu and select Options
> Synchronise to start synchronising.
Note
This service is not available in all networks.
For details, contact your service provider.
Calculator
You can perform addition, subtraction, multiplication,
division and extraction operations on your phone.
• Press the number keys to enter the figures.
• Press the scroll key to enter the operators.
• Press the left function key to clear.
• Press the right function key to exit Calculator.
• Press to enter a radix point.
• Press to delete the character to the left of the
cursor.
• Press to perform extraction.
• Press to enter an equal mark.
Unit Converter
You can convert units of length and weight between
different systems on your phone.
1Press the up/down scroll key to switch between
the setup items.
2On the unit type selection bar, press the left/right
scroll key to select weight or length.
T7200.book Page 30 Sunday, September 30, 2007 3:54 PM