Huawei Technologies U1211 WCDMA/GPRS/GSM Mobile Phone with BT User Manual U121
Huawei Technologies Co.,Ltd WCDMA/GPRS/GSM Mobile Phone with BT U121
Contents
- 1. User Manual Part 1
- 2. User Manual Part 2
User Manual Part 1
Wonderful Communication, Mobile Life
Welcome to U1211 Mobile Phone from Huawei Technologies Co., Ltd.
HUAWEI U1211 Mobile Phone
User Guide

Notice
Copyright © 2008 Huawei Technologies
Co., Ltd.
All Rights Reserved
1No part of this manual may be reproduced or
transmitted in any form or by any means without
prior written consent of Huawei Technologies
Co., Ltd.
2
3
Trademarks
4 and HUAWEI are trademarks of Huawei
Technologies Co., Ltd. All other trademarks men-
tioned in this manual are the properties of their
respective holders.
5
6
Notice
7The information in this manual is subject to
change without notice. Every effort has been
made in the preparation of this manual to ensure
accuracy of the contents, but all statements,
information, and recommendations in this man-
ual do not constitute a warranty of any kind,
expressed or implied.
8Please read the safety precautions carefully to
ensure the correct and safe use of your wireless
device. For detailed information, refer to the
9section “Warnings and Precautions”.
Huawei Technologies Co., Ltd.
Address:
10 Administration Building, Huawei Technologies
Co., Ltd., Bantian, Longgang District, Shenzhen,
P. R. China
Postal Code: 518129
Website: http://www.huawei.com
11 Please read the safety precautions carefully to
ensure the correct and safe use of your wireless
device. For detailed information, refer to the
12 section “Warnings and Precautions”.
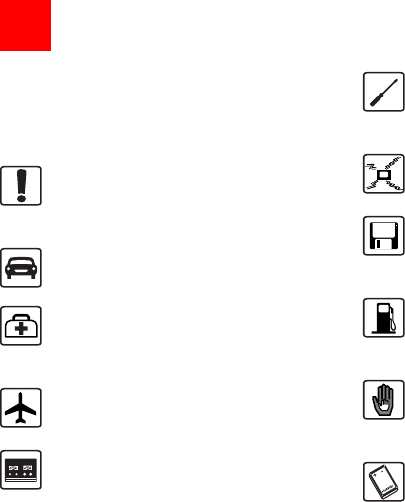
Do not switch on your phone when it is
prohibited to use mobile phones or
when the phone may cause interfer-
ence or danger.
Do not use your phone while driving.
Follow any rules or regulations in
hospitals and health care facilities.
Switch off your phone near medical
apparatus.
Switch off your phone in aircraft. The
phone may cause interference to
control signals of the aircraft.
Switch off your phone near high-preci-
sion electronic devices. The phone may
affect the performance of these
devices.
Do not attempt to disassemble your
phone or its accessories. Only qualified
personnel are allowed to service or
repair the phone.
Do not place your phone or its accesso-
ries in containers with strong electro-
magnetic field.
Do not place magnetic storage media
near your phone. Radiation from the
phone may erase the information stored
on them.
Do not put your phone in a high-
temperature place or use it in a place
with flammable gas such as a gas
station.
Keep your phone and its accessories
away from children. Do not allow
children to use your phone without
guidance.
Use only approved batteries and
chargers to avoid the risk of explosions.
Safety Precautions

Observe any laws or regulations on the
use of wireless device. Respect others’
privacy and legal rights when using
your wireless device.
Strictly follow the relevant instructions
on 69 of this manual while using the
USB cable. Otherwise your phone or
PC may be damaged.

1
1Table of Contents
Table of Contents 1
Getting to Know Your Phone 1
Packing List ................................................1
Your Phone ................................................2
Getting Started 6
Loading the Battery ....................................6
Unloading the Battery.................................6
Charging the Battery ..................................7
Loading/Removing the SIM Card ...............8
Loading/Removing a Memory Card............9
Powering On/Off.........................................9
Call Service 11
Making or Answering Calls.......................11
Operations During a Voice Call ................12
Operations During a Video Call...............13
Text Input 15
T9 Input Method .......................................15
Traditional Input Method ..........................16
"123" Numeric Input Method ....................16
Symbol Input Method ...............................16
Input Different Languages........................17
Contacts 18
Making Calls from the Contacts ...............18
Searching for a Contact............................18
Other Operations......................................19
Groups......................................................19
Call Log 21
Making Calls from Call Log ...................... 21
Other Operations .....................................21
Messaging 22
Text Messages.........................................22
Multimedia Messages ..............................25
Email ........................................................ 29
Push Inbox ............................................... 33
Broadcast Inbox.......................................34
Voice Mail number ...................................34
Common Phrases .................................... 34
Music 35
My music.................................................. 35
Playlist...................................................... 36
Organiser & Tools 37
SIM ToolKit .............................................. 37
Alarms...................................................... 37
Calendar ..................................................37
Task ......................................................... 38
Memo ...................................................... 39
Synchronise ............................................. 39
Calculator.................................................40
Unit converter........................................... 40
Currency converter .................................. 41
Voice recorder.......................................... 41
World Time............................................... 42
Stopwatch ................................................ 42
Timer........................................................ 42
Service dial number .................................42
2
My Files 43
Browser 44
Browser ....................................................44
Enter URL.................................................44
Bookmarks ...............................................45
Internet Settings .......................................45
Entertainment 46
Games......................................................46
Camera.....................................................46
Video Camera ..........................................47
Music ........................................................48
FM Radio..................................................48
Connections 50
Bluetooth ..................................................50
USB ..........................................................53
Settings 56
Phone settings..........................................56
Display settings ........................................57
Message settings .....................................58
Call settings..............................................58
Video call .................................................61
Connectivity..............................................61
Network ...................................................61
Security ....................................................61
Warnings and Precautions 64
Electronic Device......................................64
Hospital ....................................................64
Storage Environment ............................... 65
Children Safety ........................................65
Operating Environment ............................ 66
Cleaning and Maintenance ......................66
Environmental Protection......................... 67
Emergency Calls...................................... 67
Battery......................................................67
Charger ....................................................68
Using the USB Cable ...............................69
Certification Information (SAR) ................ 69
Acronyms and Abbreviations 73
Appendix 74
Index 1

1
1Getting to Know Your Phone
Your U1211 phone can operate in virtually all coun-
tries, automatically switching between
WCDMA 900/2100 and GSM/GPRS 900/1800/1900
networks. This allows you to enjoy communication
wherever you use your mobile phone.
Note
The services supported by your phone
should be also supported by the network
from where you use the phone. For details,
please contact your service provider.
Packing List
Your phone package box contains the following arti-
cles:
1One U1211 mobile phone
2One travel charger
3One Li-ion battery
4One user Guide
5One headset (optional)
6One USB data cable (optional)
7One CD-ROM disk which contains U1211 Mobile
Phone PC Assistant (optional)
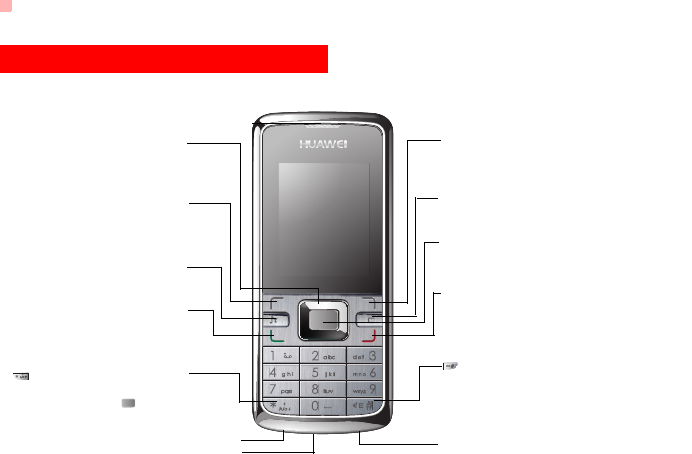
Your Phone
2
Your Phone
Send key
Music key
Left function key
Scroll key
Power/End key
Right function key
Clear key
To delete a character before the cursor in the
Earpiece
editing mode.
key
Press and hold it to lock the keypad in the standby
mode. Then press it and to unlock the keypad.
key
OK key
Charger connector/Cable connector
Microphone
Headset jack
• Press this key to scroll through a menu.
• To quick access Browser, Contacts, text message
editor and My Files.
• To activate the function indicated at the left of
the prompt bar on the screen.
• To access the main menu in standby mode.
• To access the play screen in the standby mode.
• To make a video call.
• To make or answer a call.
• To access the Call Log screen in the standby
mode.
• To activate the function indicated at the right of the
prompt bar on the screen.
• To access Homepage in standby mode.
• To start the selected function in the menu.
• To access the main menu in standby mode.
• To end an ongoing call or reject an incoming call.
• To return to the Home screen.
• Press and hold it to power on or power off the phone.
• Press and hold it to switch to the meeting profile
from the current profile.
• To select the check box of the option item.
Your Phone
3
Getting to Know Your Phone
1
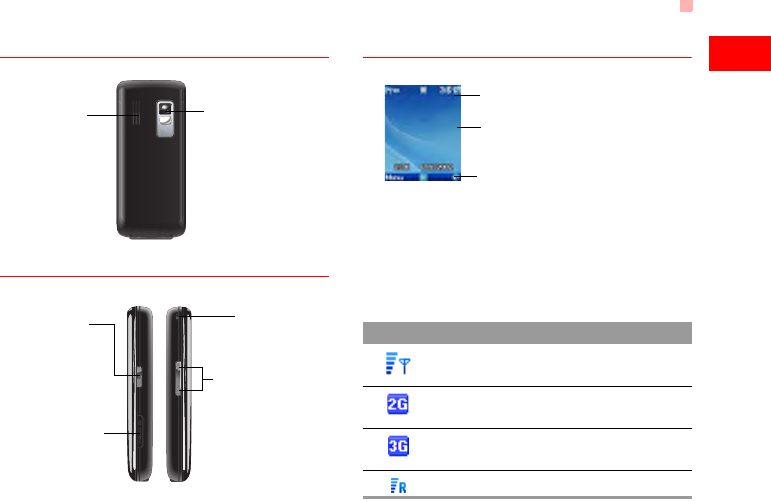
Back View
Side View
Home Screen
◆ Icon bar
This area displays the phone status. The following
table illustrates all the icons that may appear on this
bar.
Pixel
Mega
1.3
Pixel
Mega
1.3
Camera
Speaker
Volume keys
Memory card slot
Camera key
• To activate the camera
in the standby mode.
• To activate the voice
recorder during a call.
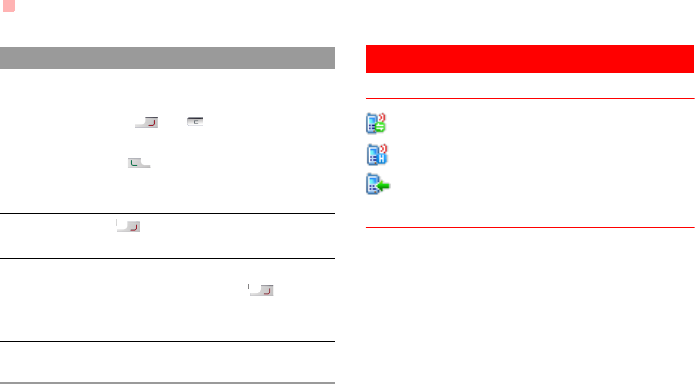
Strap hole Icon Description
Indicates signal strength. The more
bars that appear, the stronger the signal.
The phone is currently in a GSM
network.
The phone is currently in a WCDMA
network.
You are using the roaming service.
To display the operations currently available.
Icon bar
Desktop
To display the operations and the function
options.
Prompt bar
Your Phone
4
Introduction to the Menu
Your phone provides an extensive range of functions.
You can use these functions by navigating the follow-
ing menus: Entertainment, Music, Call Log, Browser,
Messaging, My Files, Organiser & Tools, Contacts
and Settings.
1In the standby mode, press to display the
main menu.
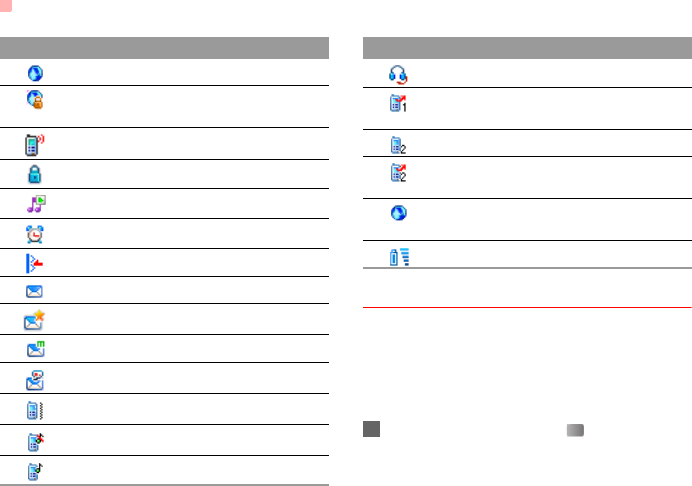
Indicates network connection state.
Indicates security connection state of
the network.
The phone is in a call.
The keypad is locked.
The background play is activated.
Alarm clock is enabled.
Bluetooth is enabled.
You have new text messages.
You have new PUSH messages.
You have new multimedia messages.
You have new voice mail.
The vibration mode is enabled.
The phone is in mute mode.
The normal profile is activated.
Icon Description
The headset is plugged in.
Forwarding all incoming voice calls to
line 1.
Call line 2 is enabled currently.
Forwarding all incoming voice calls to
line 2.
Your PC connects to the Internet
through your phone.
Indicates power level of the battery.
Icon Description

Your Phone
5
Getting to Know Your Phone
1
2Press the scroll key to scroll through the menu,
and then press to select.
3If the menu contains further submenus, repeat
step 2.
4Use the selected function according to the
prompts on the screen.
5Select Back to return to the previous menu.
Press to return to the standby mode.
6
2Getting Started
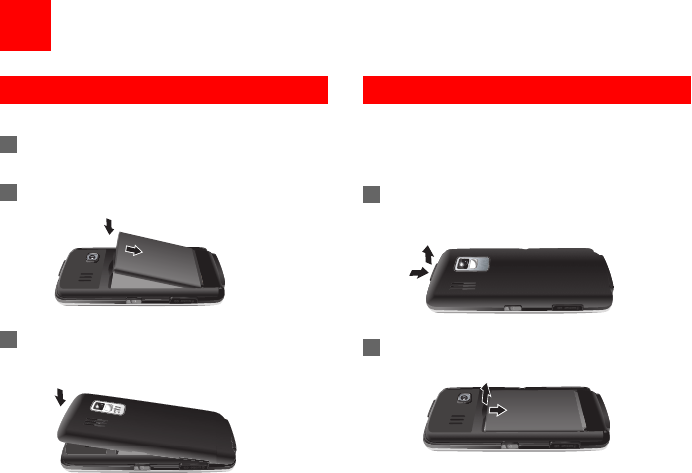
Loading the Battery
To load the battery, do as follows:
1Fit the battery into the battery slot on back of the
phone.
2Press the battery down until it clicks into place.
3Press the back cover down until it clicks into
place.
Unloading the Battery
Only unload the battery after powering off your
phone. Otherwise, your phone may be damaged.
To unload the battery, do as follows:
1Take the back cover out of the phone, as shown
in the following figure.
2Take out the battery.
Pixel
Mega
1.3
Pixel
Mega
1.3
Pixel
Mega
1.3
Pixel
Mega
1.3

Charging the Battery
7
Getting Started
2
Charging the Battery
Before charging the battery, please read the following
precautions carefully.
Note
• When charging the mobile phone, you
must use the battery and charger provided
with the mobile phone. Otherwise, you
should be responsible for all the
consequences caused by misusing other
batteries and chargers.
• When you charge the battery for the first
time, please charge it for a minimum of 12
hours.
• Do not strike, toss or cause any kind of
violent shock to the battery, otherwise liq-
uid leakage, body damage, overheating,
explosion or fire may occur.
• The battery can be recharged but eventu-
ally wears out. If the battery lasts for a
shorter time period than usual after being
charged normally, replace it with a battery
of the same type.
• The charging time depends on the envi-
ronmental temperature and the age of the
battery.
• The battery discharges even while not
being used. If you haven't used it for a
long time, please recharge it first.
Charging with a Cable Charger
Before charging the battery with a cable charger,
ensure that the battery has been properly loaded into
your phone.
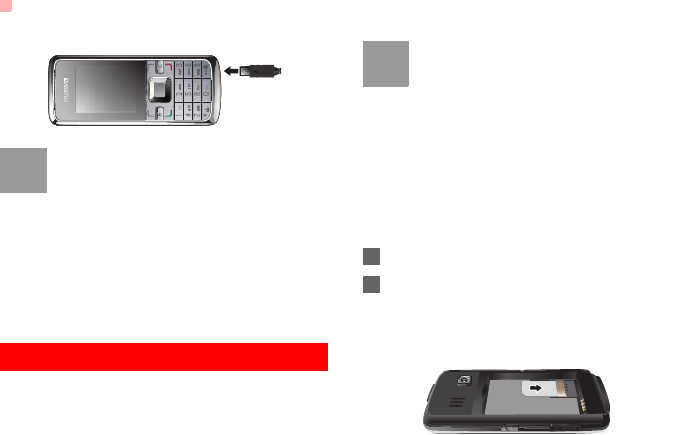
To charge the battery, do as follows:
1Insert the plug of the charger into the connector
of the phone as shown in the following figure.
Before inserting the plug, ensure that the arrow
on the charger output jack points to the front side
of the phone.
2Plug in the connector of the charger to a power
socket.
Loading/Removing the SIM Card
8
Note
• When the battery power level is very low,
the phone makes alert sounds and dis-
plays a prompt. When the battery power
level is too low, the phone will power off
automatically.
• When the battery is being charged, the
charging indicator blinks continuously.
When the charging indicator stops blink-
ing, it indicates that the battery is full.
Loading/Removing the SIM Card
Your SIM card contains such information as phone
numbers and contacts. Load your SIM card before
using your phone. To use the SIM card properly,
please read the following instructions carefully.
Note
• Keep the SIM card out of the reach of chil-
dren.
• The SIM card and its metal contacts can
be easily damaged by scratching or bend-
ing. Ensure care when you carry, load or
remove it.
• Always disconnect the charger from the
phone before loading or removing the SIM
card.
To load or remove the SIM card, do as follows:
1Power off the phone and remove the battery.
2Position the card at the card slot entrance, mak-
ing sure it is facing the same way as shown in
the diagram below, with the notched corner at
the bottom right. Then slide in as shown.
Loading/Removing a Memory Card
9
Getting Started
2
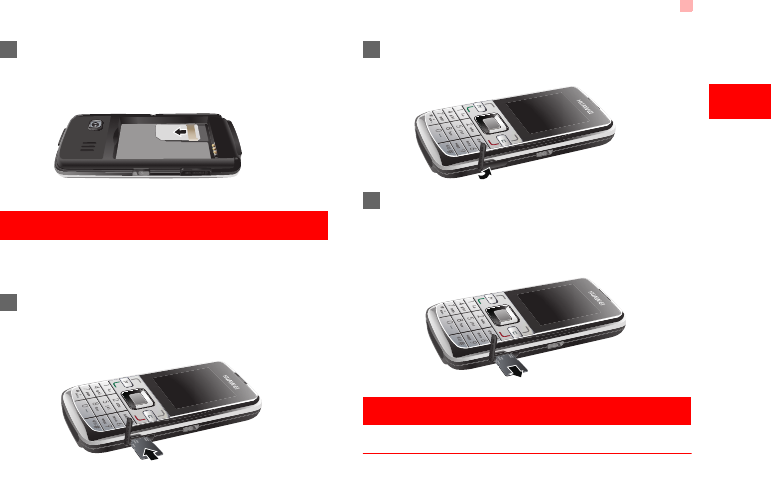
3To remove the SIM card, power off your phone
and take out the battery. Then press the SIM
card with one finger and slide it out of the slot.
Loading/Removing a Memory Card
The U1211 phone supports a memory card (micro-
SD) with a capacity up to 1 GB.
1Remove the rubber cap from the memory card
slot; then insert the memory card into the slot, as
shown in the following figure.
2After inserting the memory card completely,
replace the rubber cap.
3To remove a memory card, open the rubber cap
and press the memory card gently. Now the
memory card will pop up automatically. Then
take it out as shown in the following figure.
Powering On/Off
Powering On
Ensure that the SIM card is in your phone and that
the battery has been charged.

Powering On/Off
10
Press and hold to power on your phone.
Powering Off
Press and hold to power off your phone.
Access Codes
If you have set the phone password and the PIN is
ON, you have to enter the corresponding access
codes when you power on your phone. For setting
and changing the access codes, please refer to "Set-
tings/Security Setup" on page 61.
◆ Phone Password
The phone password is used to protect your phone
from unauthorized use. The phone password is
preset as 0000 for your phone.
◆ PIN
The personal identification number (PIN) code is
used to protect your SIM card from unauthorized use.
The PIN code is usually provided when you get the
SIM card from your service provider. If you have not
received a PIN code or if you have forgotten it, con-
tact your service provider.
◆ PIN2
Some SIM cards provide a PIN2 code. Some special
functions such as the "Fixed Dialer Number" are not
available until you enter the PIN2 code. At the same
time, your SIM card should support these functions.
◆ PUK
To unlock a locked SIM card, you need to enter the
PIN Unblocking Key (PUK) code. The PUK code is
usually provided when you get the SIM card from
your service provider. If you have not received a PUK
code or if you have forgotten it, contact your service
provider.
◆ PUK2
Some SIM cards provide a PUK2 code that is used to
unlock a locked PIN2 code. The PUK2 code is usu-
ally provided when you get the SIM card from your
service provider. If you have not received a Puk2
code or if you have forgotten it, contact your service
provider.

11
3Call Service
Making or Answering Calls
Making a Video Call
You can make a video call to other person whose
phone also supports video calls.
1Enter or edit a phone number in one of the fol-
lowing ways:
• Enter a phone number through the keypad.
• Select a number from the Call Log screen.
• Access the Contacts screen to select a phone
number from Phone or SIM.
2Press to dial.
3Press to end the video call.
Note
To delete a wrong number, press once to
delete the digit to the left of the cursor.
Making a Voice Call
1Enter or edit a phone number in one of the fol-
lowing ways:
• Enter a phone number through the keypad.
• Select a number from the Call Log screen.
• Access the Contacts screen to select a phone
number from Phone or SIM.
2Press to dial.
3Press to end the call.
Making Voice Calls Using SDN
You can make a voice call through speed dialing. For
instructions on assigning speed dialing numbers,
refer to "Contacts/Other Operations" on page 19.
To make a call by speed dial number (SDN), press
and hold the number key until the phone dials the
corresponding phone number.
Answering or Rejecting Calls
You can set the answer mode to Any key or Send
key. For details, refer to "Settings/Call Settings/
Answer mode".
The following describes how to answer or reject a call
in different answer modes:
Operations During a Voice Call
12
You can also set the auto answer mode to Immedi-
ate answer, Message or Recorded message.
For details, refer to “Settings/Call settings/Auto
answer”.
Operations During a Voice Call
Icon Description
: A call is ongoing.
: The call is on hold.
: There is a new incoming call during a call.
Operations
During a voice call, you can select Options to per-
form the following operations.
• Hold/Resume: To hold or resume the call during a
call.
• End: To end all calls, the active call, the current
call or the on hold call.
• New Call: To make a 3-party call during a call.
• Handsfree/Earpiece: To switch between the Hands-
free and the Earpiece modes during a call.
• Start recording/Stop recording: to record or stop
recording the conversation.
Operation Description
Answer
a call
• If the answer mode is Any key, open
the phone and press any key.
except and .
• If the answer mode is Send key,
press .
• If the headset is in use, press the con-
trol key on the headset.
Reject
a call
Press or select Options > Reject.
End a call • If the headset is not in use, you can
close the phone or press .
• If the headset is in use, press the con-
trol key of the headset.
Reply by
message
Select Options > Reply to send a pre-
defined message to the caller.
Operations During a Video Call
13
Call Service
3
• Other applications: To access the SMS screen, the
Contacts screen or the Call Log screen.
• Answer/Reject: Your phone allows you to handle
two calls simultaneously. During a call, if there is a
new incoming call, select Options > Answer to
answer it or select Options > Reject to reject it.
• Swap: To swap between calls during a 3-party call.
• Conference call/Private call: To switch to the con-
ference call during a 3-party call or to talk with a
party privately during a conference call.
• Mute/Unmute:To mute or unmute your voice during
a call.
Operations During a Video Call
Icon Description
Operations
During a video call, you can press to hold the call
and send a preset file to the other party. You can
press again to resume the call. Before you use
the function, you can preset a file in Settings/Video
call/Send specific file.
During a video call, you can select Options to per-
form the following operations.
• Switch picture: To switch display.
• Camera off/Open video: To forbid or allow the video
from your side.
• Audio off/Open audio:To forbid or allow the audio
from your side.
• Play file: To play a media file.
Icon Description
Press the up or down scroll key to adjust
the brightness.
Press the left or right scroll key to zoom
in or zoom out.
Press the volume keys to adjust the vol-
ume.
/Press to switch between the loud-
speaker mode and the earpiece mode.
Icon Description

Operations During a Video Call
14
• Handsfree/Earpiece: Switch between the loud-
speaker mode and the earpiece mode.
• Record: To record a video clip. A recorded video
clip is saved to the My Files/Videos directory.
• Other applications:To access the SMS screen, the
Contacts screen or the Call Log screen.
• Picture in picture: To set the P-in-P mode to off, top
left, top right, bottom right or bottom left.
• Image quality: To set the image quality to best qual-
ity or more smooth.

15
4Text Input
You can use the keypad to enter alphanumeric char-
acters and symbols. For example, you can add
entries to the contacts, write messages or schedule
events on the calendar.
Note
While entering text:
• Press to switch between input meth-
ods, including "abc", "Abc", "ABC", and
numbers.
• Press to enable or disable T9 input
method.
• Press to display the commonly-used
symbols list. You can use the scroll keys
to select.
• Press to delete the letter before the cur-
sor.
T9 Input Method
With the T9 input method, you can easily and quickly
enter words with predictive text scheme.
• Press each key carrying the desired letter once,
and then the predictive text scheme will present the
candidate words composed by the letters you have
entered in the drop-down menu.
• After entering all letters, if there is not the expected
one in the drop-down menu, you can select [Spell]
to enter the desired letter using the traditional input
method and then select Insert. The words you
inserted will be saved in the predictive text dictio-
nary. If the dictionary is full, the new word replaces
the oldest one.
For example, to enter the word "good" with the T9
input method, follow these steps.
1Press successively the keys , , , and
which "g", "o", "o", and "d" belong to, and the
candidate words composed by these letters will
be shown in the drop-down menu.
2Use the up/down scroll key to select "good".
Note
Press repeatedly and you will see "T9
abc", "T9 Abc" and "T9 ABC" on the upper
left corner of the screen successively. It indi-
cates the words to be entered will be in
lower case, first letter capitalized or in upper
case.

Traditional Input Method
16
Traditional Input Method
When T9 input method is off, you can use the tradi-
tional input method for entering alphabetic charac-
ters. Repeatedly press the key that carries the letter
to be entered when it appears on the screen.
For example, to enter the word "Hello" with the tradi-
tional input method, follow these steps.
1Press that carries "h" repeatedly and all let-
ters carried by this key will be displayed succes-
sively on the screen. Stop when you see an "h"
on the screen.
2After entering the first letter, you can directly
press another key (except ) to enter the next
letter. If the next desired letter is on the same
key as the current one, wait until the cursor
appears to the right of the current letter and then
you can enter the next one.
3Enter "e", "l", "l" and "o" in the same way.
Note
• Press repeatedly and you will see
"abc", "Abc" or "ABC" on the upper left
corner of the screen successively. It indi-
cates the words to be entered will be in
lower case, first letter capitalized or in
upper case.
• Press and hold number keys to enter
numbers.
"123" Numeric Input Method
With the "123" numeric input method, you can enter
corresponding numeric characters by pressing the
character/number keys. For example, to enter "1"
with the "123" numeric input method, you can
press . Then "1" appears on the screen.
Symbol Input Method
Your phone provides an independent symbol input
method. For example, to enter ":" with the symbol
input method, you can just press the scroll keys to
select ":" in the symbol list and then press .

Input Different Languages
17
Text Input
4
Input Different Languages
In a text editing screen, select Options > Input
language to set the language for the text. The
selected language will be displayed on the upper
middle part of the editing screen.
18
5Contacts
Contacts enables you to save and manage such
information as phone numbers and addresses of your
contacts. You can save such information in your
phone or your SIM card. You can also assign fre-
quently-used numbers to speed dialing keys for your
convenience.
Making Calls from the Contacts
You can make a voice/video call with a contact
selected from the contacts list.
1In the Contacts screen, press the left/right
scroll key to select Phone or SIM .
2Select a contact and select Options > Call.
Then, you can select Voice Call or Video Call to
make a call. Alternatively, you can select Edit
before call to edit the number before making the
call.
Searching for a Contact
You can find a contact from the contacts list easily
and quickly by using this function on both the Phone
screen and the SIM screen.
1In the Contacts screen, press the left/right
scroll key to select Phone or SIM .
2Select Options > Search.
3Select Options > Search, and then enter the
contact name you are searching for. The contact
is displayed.
Note
The search result includes all matched con-
tacts from both the phone and SIM memo-
ries, regardless of the screen (Phone or
SIM) from which you start searching.
You can also use quick search in the Phone or SIM
screen:
1In the Contacts screen, press the left/right
scroll key to select Phone or SIM .
2Enter a string (one or more letters or numbers)
contained in the contact name you are searching
for. Then the contacts whose names contain this
string are displayed.

Other Operations
19
5
Contacts
You can also find a contact by entering the initials of
the first name and the last name of the contact. For
example, to find a contact named "Alice Green",
enter the initials "ag". This contact is displayed in the
candidate list.
Other Operations
In the Contacts screen, press the left/right scroll
key to select Phone or SIM .Then select
Options for the following options.
• Details: To view the details of contact.
• Create message: To send a message, MMS or
Email to the selected contact.
• New: To create a new contact.
• Send contact: To send a contact to other devices
supporting SMS or Bluetooth.
• Copy to SIM/Copy to phone: To Copy one or more
contacts from your phone to the SIM card or from
your SIM card to the phone.
• Speed Dial Number: To assign often-used numbers
to speed dialing keys "2" to "9".
• My business card: To save your own information to
a Business Card. You can send the information by
SMS or Bluetooth.
• Backup contacts: To back up your contacts from
your phone to a memory card or from your memory
card to your phone.
• Delete: To delete the selected contact.
• Mark/Unmark: To mark/unmark a record or all
records in your phone and SIM card.
• Memory status: To view the memory status of both
your phone and SIM card.
• Settings: To sort the contacts in the phone and the
SIM card or to set an alert before saving.
Groups
You can rename a group, add group members, or
delete a group.
Adding/Deleting Group Members
You can add a member to a group in your phone or
delete a member from it.

Groups
20
1In the Contacts screen, press the left/right
scroll key to select Groups.
2Select a group and press to view the details.
3Select Options > Add. Select a contact and
press . The member you added is displayed
in the group member list.
To delete a group member, select a member from the
group member list, and then select Options >
Delete.
Managing a Group
1In the Contacts screen, press the left/right
scroll key to select Groups.
2Select a group and select Options for the follow-
ing options.
• Details: to view the details of a group.
• Rename: to change the name of a group.
• Create message: to send a text message or
MMS to all members of a group.
• Delete: to delete a group and all members of
the group.
Note
You cannot rename or delete any group pre-
set in your phone.
21
6Call Log
The recently dialed calls, received calls and missed
calls are saved automatically. This makes it easier to
refer to these calls.
Making Calls from Call Log
1Select Call Log in the main menu and then
press the left/right scroll key to switch between
All calls , Missed , Received and
Dialed .
2Press the up/down scroll key to select a record.
Press to make a voice call or press to
make a video call.
Other Operations
Press the left/right scroll key to select All calls ,
Missed , Received or Dialed . Then select
Options for the following options.
• Edit before call: To edit the number before making
the call.
• Create message: To send a message or MMS.
• Save number: To save the numbers of the selected
record to the phone, the SIM card, or an existing
contact.
• Call: To make a voice call or a video call.
• Display mode: You can select Normal to display all
records or select Simple to ignore the duplicated
records.
• Delete: To delete the selected record.
• Mark/Unmark: To mark/unmark a record or all
records.
• Calls status: To display the information on voice
calls, video calls and data services. In the voice
call, video call and data page, you can select Reset
to clear all records.
22
7Messaging
Text Messages
The maximum content for a single text message is
160 English letters. If the characters you enter
exceed this limit, the text is divided into two or more
continuous messages when it is sent.
Creating a Text Message
1Select Messaging > Write SMS in the main
menu.
2In the message editing screen, select Options:
• Send:To send the message.
• Insert number: You can insert a phone number
saved on the phone or the SIM card.
• Common phrases: You can use these to speed
up the process of entering text.
• T9 Switch: You can select this option to enable
or disable T9 input method.
• Input mode: You may select one of the input
methods to enter the message contents.
• Input language: You can select a language for
this message.
3After editing the message, press to access
the "Edit numbers" screen.
• Enter the phone number, and then select
Options > Send or press to send the mes-
sage.
• Select Options > Group or Contacts to
choose a number and send the message.
• Select Options > Save to drafts to save the
message.
SMS Mailboxes
The phone provides three mailboxes for SMS,
namely, Inbox , Drafts and Sent .
◆ Inbox
You can save the received messages in Inbox.
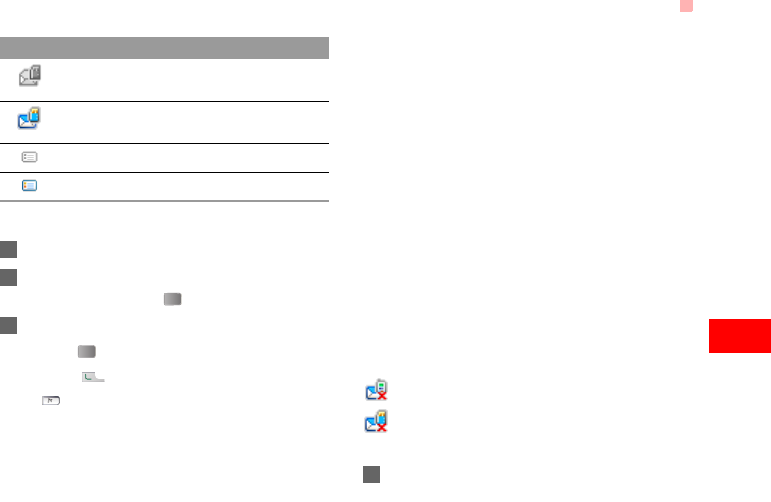
Icons in Inbox
Icon Description
a read message in the phone memory
an unread message in the phone mem-
ory
Text Messages
23
Messaging
7
Viewing Messages in Inbox
1Select Messaging > SMS > Inbox.
2Press the up/down scroll key to view the mes-
sages and then press to view the details.
3Reply or call back.
• Press to reply with a text message.
• Press to call back by a voice call or press
to call back with a video call.
You can select Options for the following operations.
• Reply: To reply the message.
• Forward: To forward the message.
• Edit before call: To edit the number before making
the call.
• Save number: To save the numbers retrieved from
an SMS to phone or SIM memory or an existing
entry in the contacts.
• Extract URL: To extract URL address from an SMS
for browsing web pages or stream media.
• Save Email address: To retrieve email address from
an SMS and save it.
• Copy to SIM: To back up the SMS to SIM memory.
• Call: To make a voice call or a video call.
• Delete: To delete the message.
◆ Drafts
The Draft box is used to save the messages you cre-
ated and saved and those which failed to send.
Icons in Drafts
: A text message saved to the phone.
: A text message saved to the SIM card.
Viewing and Editing Messages in the Draft
1Select Messaging > SMS > Drafts.
a read message on the SIM card mem-
ory
an unread message on the SIM card
memory
a read message report
an unread message report
Icon Description

Text Messages
24
2Press the up/down scroll key to select a mes-
sage and press to edit it.
◆ Sent
Sent is used to save the messages that have been
sent.
Icons in Sent
: A text message that has been sent and saved to
the phone.
: A text message that has been sent and saved to
the SIM card.
Viewing Messages in the Sent
1Select Messaging > SMS > Sent.
2Press the up/down scroll key to select a mes-
sage and press to view the details.
3Forward or make a call.
• Press to forward a text message.
• Press to make a voice call or press to
make a video call.
You may select Options to do the same operations
as those of SMS Inbox.
SMS Settings
You can change the SMS settings by performing the
following steps.
1Select Messaging > Settings > SMS from the
main menu.
2Set the parameters related to messages:
• Message center: The Phone can auto read the
number of the message centre from the SIM
card or the handset. If you have deleted the
information by accident, contact your service
provider.
• Valid period: The time a message is kept in the
message centre after it is sent.
• Auto save: You can set whether a message will
be saved automatically to Sent when it is sent.
• Save to: To set the position for saving newly
created messages, received messages, and
sent messages.
• Signature: To set whether your signature will
be sent along with the message. You can edit
the signature while creating a new message.