Huawei Technologies U1270-7 HSDPA/UMTS/GPRS/GSM/EDGE Mobile Phone with Bluetooth User Manual U1270userguide
Huawei Technologies Co.,Ltd HSDPA/UMTS/GPRS/GSM/EDGE Mobile Phone with Bluetooth U1270userguide
User Manual
Wonderful Communication,
Mobile life.
HUAWEI U1270-7 Mobile Phone
Quick Start Guide

Copyright © 2010 Huawei Technologies Co.,Ltd. All Rights
Reserved
Trademarks and Permission
,HUAWEI, and are trademarks or registered
trademarks of Huawei Technologies Co., Ltd.
Other product, service and company names mentioned are the
property of their respective owners.
NO WARRANTY
THE CONTENTS OF THIS MANUAL ARE PROVIDED “AS IS”.
EXCEPT AS REQUIRED BY APPLICABLE LAWS, NO
WARRANTIES OF ANY KIND, EITHER EXPRESS OR
IMPLIED, INCLUDING BUT NOT LIMITED TO, THE IMPLIED
WARRANTIES OF MERCHANTABILITY AND FITNESS FOR A
PARTICULAR PURPOSE, ARE MADE IN RELATION TO THE
ACCURACY, RELIABILITY OR CONTENTS OF THIS
MANUAL.
TO THE MAXIMUM EXTENT PERMITTED BY APPLICABLE
LAW, IN NO CASE SHALL HUAWEI TECHNOLOGIES CO.,
LTD BE LIABLE FOR ANY SPECIAL, INCIDENTAL, INDIRECT,
OR CONSEQUENTIAL DAMAGES, OR LOST PROFITS,
BUSINESS, REVENUE, DATA, GOODWILL OR ANTICIPATED
SAVINGS.
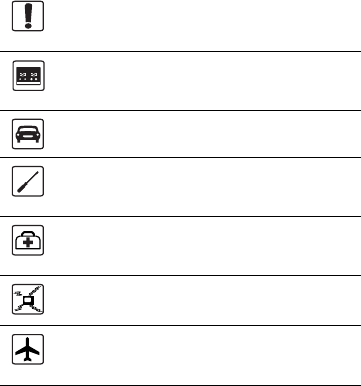
Safety Precautions
Please read the safety precautions carefully to ensure the
correct and safe use of your wireless device. For detailed
information, refer to the section “Warnings and Precautions” in
Safty Information.
Do not switch on your phone when it is prohibited
to use mobile phones or when the phone may
cause interference or danger.
Switch off your phone near high-precision
electronic devices. The phone may affect the
performance of these devices.
Do not use your phone while driving.
Do not attempt to disassemble your phone or its
accessories. Only qualified personnel are allowed
to service or repair the phone.
Follow any rules or regulations in hospitals and
health care facilities. Switch off your phone near
medical apparatus.
Do not place your phone or its accessories in
containers with strong electromagnetic field.
Switch off your phone in aircraft. The phone may
cause interference to control signals of the
aircraft.
Do not place magnetic storage media near your
phone. Radiation from the phone may erase the
information stored on them.
Do not put your phone in a high- temperature
place or use it in a place with flammable gas such
as a gas station.
Observe any laws or regulations on the use of
wireless device. Respect others’ privacy and
legal rights when using your wireless device.
Keep your phone and its accessories away from
children. Do not allow children to use your phone
without guidance.
Strictly follow the relevant instructions of this
manual while using the USB cable. Otherwise
your phone or PC may be damaged.
Use only approved batteries and chargers to
avoid the risk of explosions.
1
1. Introduction
Your phone can operate in virtually all countries,
automatically switching between WCDMA/HSDPA
850/2100 MHz and GSM/GPRS/EDGE 850/900/1800/1900
MHz networks.
NOTE: The services supported by your phone should be
also supported by the network from where you use the
phone. For details, contact your service provider.
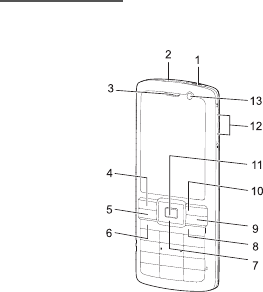
Your Phone
Appearance and Keys

Your Phone
2
1. Charger
connector/ Cable
connector
2. Headset
Jack
3. Earpiece
4. Left function
key
5. Send key 6. Music key
7. Scroll key 8. Clear key 9. Power/End
key
10. Right function
key
11. OK key 12. Volume
keys
13.Internal
Camera
Left
function
key
Active the function indicated at the left of
the prompt bar.
Music
key
Access the music menu in standby
mode.
Send key • Make or answer a call.
• Enter the Calls screen in standby
mode.
3
Your Phone
Screen
Scroll key • Scroll through a menu.
• Access the corresponding shortcut
menu in standby mode.
Right
function
key
Active the function indicated at the right
of the prompt bar.
Clear key Delete a character before the cursor.
Power/
End key
• End an ongoing call or reject an
incoming call.
• Return to the standby mode.
• Press and hold it to power on or power
off the phone.
OK key • Start the selected function in the
menu.
• Access the main menu in standby
mode.
1. Icon bar
2. Desktop
3. Prompt bar
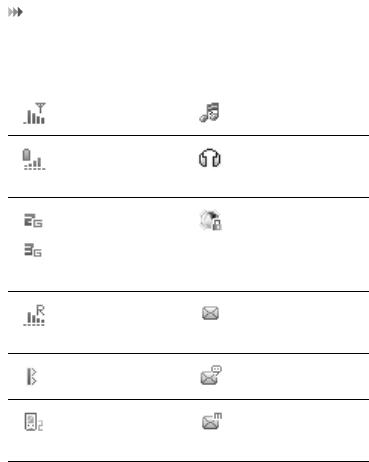
Your Phone
4
The icon bar displays the phone status. The following table
illustrates the icons that may appear on this bar.
Indicates signal
strength.
The normal profile
is activated.
Indicates power
level of the
battery.
The headset is
plugged in.
The phone is
currently in a
GSM or
WCDMA
network.
Your PC connects
to the Internet
through your
phone.
You are using
the roaming
service.
You have new text
messages.
Bluetooth is
enabled.
You have new
voice mails.
Call line 2 is
enabled
currently.
You have new
multimedia
messages.
5
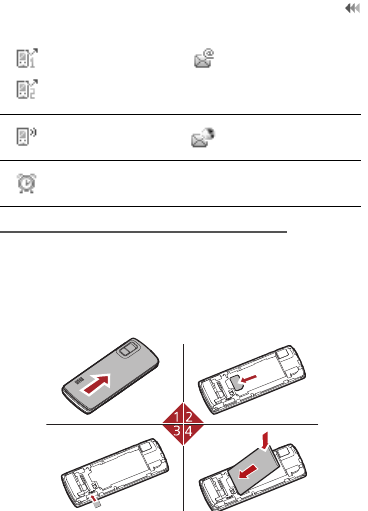
SIM Card and Memory Card
SIM Card and Memory Card
Load your SIM card before using your phone. Only unload
the SIM card and the battery after powering off your phone.
The following figure shows the installation of the SIM card
and memory card.
Forwarding all
incoming voice
calls to line 1 or
line 2.
You have new
Emails.
The phone is in
a call.
You have new
PUSH messages.
Alarm clock is
enabled.
Charging the Battery
6
Your phone supports a memory card (microSD) with a
capacity up to 8 GB.
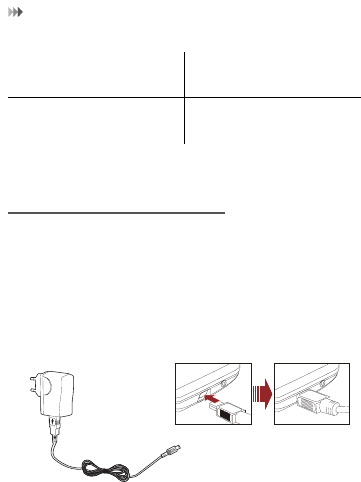
Charging the Battery
Before charging the battery with a cable charger, ensure
that the battery has been properly loaded into your phone.
To charge the battery, first plug in the charger connector to
a power socket, and then insert the plug of the cable into the
connector of the phone as shown in the following figure.
The figure is for reference only. The actual appearance is
subject to your mobile phone and accessories delivered.
1. Remove the battery
cover.
2. Install the SIM card.
3. Install the memory
card (Optional) .
4. Install the battery.

7
Text Input
NOTE: The plug of the charger is in trapezium shape.
Reversely inserting the plug may damage the mobile phone
and charger.
Text Input
NOTE: While entering text:
• Press the * key to switch between input methods.
Press and hold the * key to enable or disable the T9
input mode.
• Press repeatedly the * key and you will see
"Abc","abc", "ABC" on the upper left corner of the
screen successively. It indicates the words to be
entered will be in first letter capitalized, lower case, or
in upper case.
• Press the # key to display the symbols list. Press and
hold the # key to set the input language.
• Press the Clear key to delete the letter before the
cursor.
T9® Input Method
T9 is a predictive text entry mode. Press each key carrying
the desired letter once, and then the predictive text scheme
will present the candidate words composed by the letters
you have entered in the drop-down menu.
Traditional Input Method
When T9 input method is off, you can repeatedly press the
key that carries the letter to be entered when it appears on
the screen.

Text Input
8
Number Input Method
In a text editing screen, press and hold the
character/number keys to enter corresponding numeric
characters.
You can also press successively the * key to switch to the
"123" numeric input method, and enter corresponding
numeric characters by pressing the character/number keys.
Symbol Input Method
You can press the # key to display the symbols list and then
select symbols to input.
You can also press the key with number 1 to input the
commonly-used symbols in a text editing screen (except
numeric input method).

9
2. Calls Function
Creating a Contact
To add a new contact, perform one of the following
operations:
• Enter a number in standby mode, and then select
options to create a new contact.
•Select Contacts > Add new contact.
• Select a record from Calls screen, and then select
options to create a new contact.
Searching for a Contact
In the contacts screen, select Options > Advanced >
Search contacts, and then enter the contact name you are
searching for. The contact is displayed.
Viewing the Call Records
Select Calls in the main menu. You can view missed calls,
received calls, dialed calls in calls history.
Making or Ending a Call
NOTE: In the 3G network, you can make video calls,
provided that the called party has a device supporting the
video call function.
1. Enter a number or select a contact. Press the Send key
to make a voice call, or press the Music key to make a
video call. You can also select Options to make a
voice call or video call.

Answering or Rejecting a Call
10
2. During a call, you can select Options to perform
operations in the option list.
3. Press the End key to terminate the call.
Answering or Rejecting a Call
1. You can set the answer mode in Settings/Call
settings. Answer a call according to the different
answer modes.
2. Press the End key or select Options > Reject to reject
a call

11
3. Message Function
Message
Sending a Message
1. Select Messaging > Create message to access the
message editing screen.
2. During editing a message:
• You can press down scroll key to add attachment
files.
• You can select Options to perform operations in
the option list.
3. After editing the message, press OK key to add a
recipient’s number.
4. Press OK key to send the message.
Viewing a Message
Your phone provides four mailboxes for message. Inbox
stores received messages. Drafts stores created and
saved messages. Outbox stores the messages that failed
to be sent. Sent stores sent messages.
1. Select a mailboxes from Messaging.
2. Select a message, and then select Options to perform
the operations of the option list.

Email
12
Email
Sending an Email
1. Select Messaging > Email > Create Email to access
the email editing screen.
2. Select To and press OK key. Enter recipient or add
recipient from contacts.
3. In the email editing screen:
• Select Subject to edit the contents.
• Select Text Message to edit the content.
• Select Options to perform the operations.
4. In the email editing screen, select Options > Send to
send the email.
Viewing an Email
Your phone provides five mailboxes for Email. Inbox stores
received emails. Drafts stores created and saved emails.
Outbox stores the emails failed to be send. Sent stores
sent emails. Blocked stores screened emails.
1. Select a mailbox from Email.
2. Select an email, and then select Options to perform
the operations of the option list.

13
4. Connection Function
NOTE:
• Your phone supports USB 2.0.
• Your phone supports plug and play function.
• The PC assistant installation programme and USB
driver are embedded in the mobile phone.
• The PC Options software supplied on your phone will
run automatically after you connect your phone to the
PC .
•Select Settings > Connectivity. You can set the Blue-
tooth, network access point or select data connection
modes.
• Only Windows 2000, Windows XP and Windows Vista
are supported.
USB
You can synchronise data between your phone and PC,
surf the Internet with your phone and read the memory card
by USB cable.
1. Connect your phone with a PC through USB cable
delivered with your phone.
2. The PC Options software supplied on your phone will
run automatically
3. Select PC Assistant button to perform the USB-Based
Synchronization operation; select HUAWEI Mobile
Connect via the phone to perform the USB-Based

Bluetooth®
14
Internet access operation; and select File Transfer to
perform the microSD Card reader operation.
4. For the first time, follow the guide to complete the
installation.
NOTE:
• If the PC cannot recognise your phone when
connecting through the USB cable, power off and
restart the PC and then retry.
• Please do not plug the USB cable in and out of your
phone frequently.
USB-Based Internet Access
To access the Internet by USB, make sure that your PC
supports the USB function and your SIM card supports the
Internet access service. You may need the username and
the password. For details, please contact your service
provider.
microSD Card Reader
The function of microSD card reader and the other functions
using the USB cable are incompatible. If you enable the
microSD card reader, other functions using the USB cable
are unavailable.
Bluetooth®
Bluetooth-Based Synchronization
To operate the Bluetooth synchronization with your phone,
your PC needs to support Bluetooth function.

15
Bluetooth®
1. Install the PC Assistant supplied on your phone.
2. Select Settings > Connectivity > Bluetooth > Switch
On/Off > On to enable the Bluetooth function.
3. Run the driver software for Bluetooth on the PC, and
pair the phone. After the PC detects and recognizes
the phone serial port service, activate the Bluetooth
serial port service on the phone.
4. Run the PC Assistant on the PC.
5. You can now operate the synchronization. For details
of the operation, refer to the Help of the PC Assistant.
Bluetooth-Based Data Transfer
If you want to exchange data between your phone and
another device, that device must support Bluetooth and the
Bluetooth function must be enabled.
1. Select Settings > Connectivity > Bluetooth > Switch
On/Off > On to enable the Bluetooth function.
2. Select Settings > Connectivity > Bluetooth > My
devices. Select Search for devices to search a
Bluetooth device. When the Bluetooth device is found
for the first time, authentication is required.
Now you can exchange data between your phone and the
other Bluetooth device.

16
5. Other Functions
Music
During music playing, you can select Options to perform
the operations in the list or follow the displayed prompts and
use the scroll key to perform corresponding operations.
FM Radio
Connect the headset to your phone and select Music > FM
Radio to start FM radio.
Camera
Select Camera to start the camera. In the camera
viewfinder screen, press the right scroll key to switch to the
video camera function.
Browser
The built-in browser makes it easy to browse any webpage.
You can access the browser by selecting Browser from the
main menu.
File Management
Select My Files. You can manage the Pictures,
Ringtones, Music, Videos, Others, and Themes files
conveniently. Select a file, then select Options to perform
the operations of the list.

17
6. Important Information
Ambient Temperature
Keep the ambient temperature between -10 ℃ and 45 ℃ while
the device is being charged. Keep the ambient temperature
between -10 ℃ to 50 ℃ for using the device powered by battery.
Body-worn operation
The device complies with the RF specifications when the device
is used near your ear or at a distance of 1.5 cm from your body.
Ensure that the device accessories such as a device case and
a device holster are not composed of metal components. Keep
your device 1.5 cm away from your body to meet the
requirement earlier mentioned.
Certification Information (SAR)
This mobile device meets guidelines for exposure to radio
waves.
Your device is a low-power radio transmitter and receiver. As
recommended by international guidelines, the mobile device is
designed not to exceed the limits for exposure to radio waves.
These guidelines were developed by the independent scientific
organization International Commission on Non-Ionizing
Radiation Protection (ICNIRP) and include safety measures
designed to ensure safety for all users, regardless of age and
health.
The Specific Absorption Rate (SAR) is the unit of measurement
for the amount of radio frequency energy absorbed by the body
when using a device. The SAR value is determined at the
highest certified power level in laboratory conditions, but the
actual SAR level of the device when being operated can be well
Disposal and Recycling Information
18
below the value. This is because the device is designed to use
the minimum power required to reach the network.
The SAR limit adopted by USA and Canada is 1.6
watts/kilogram (W/kg) averaged over one gram of tissue. The
highest SAR value reported to the FCC and IC for this device
type when tested for use at the ear is 0.96W/kg, and when
properly worn on the body is 1.39W/kg.
The SAR limit also adopted by Europe is 2.0 W/kg averaged
over 10 grams of tissue. The highest SAR value for this device
type when tested at the ear is 1.0 W/kg.
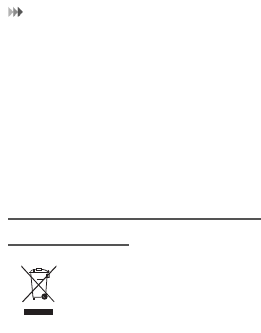
Disposal and Recycling
Information
This symbol on the device (and any included
batteries) indicates that they should not be disposed
of as normal household garbage. Do not dispose of
your device or batteries as unsorted municipal
waste. The device (and any batteries) should be
handed over to a certified collection point for
recycling or proper disposal at the end of their life.
For more detailed information about the recycling of the device
or batteries, contact your local city office, the household waste
disposal service, or the retail store where you purchased this
device.
The disposal of this device is subject to the Waste from Electrical
and Electronic Equipment (WEEE) directive of the European
Union. The reason for separating WEEE and batteries from
other waste is to minimize the potential environmental impacts
on human health of any hazardous substances that may be
present.

19
Reduction of Hazardous Substances
Reduction of Hazardous Substances
This device is compliant with the EU Registration, Evaluation,
Authorisation and Restriction of Chemicals (REACH) Regulation
(Regulation No 1907/2006/EC of the European Parliament and
of the Council) and the EU Restriction of Hazardous Substances
(RoHS) Directive (Directive 2002/95/EC of the European
Parliament and of the Council). For more information about the
REACH compliance of the device, visit the Web site
www.huaweidevice.com/certification. You are recommended to
visit the Web site regularly for up-to-date information.
FCC Statement
This equipment has been tested and found to comply with the
limits for a Class B digital device, pursuant to Part 15 of the FCC
Rules. These limits are designed to provide reasonable
protection against harmful interference in a residential
installation. This equipment generates, uses and can radiate
radio frequency energy and, if not installed and used in
accordance with the instructions, may cause harmful
interference to radio communications. However, there is no
guarantee that interference will not occur in a particular
installation. If this equipment does cause harmful interference to
radio or television reception, which can be determined by turning
the equipment off and on, the user is encouraged to try to correct
the interference by one or more of the following measures:
• Reorient or relocate the receiving antenna.
• Increase the separation between the equipment and
receiver.
• Connect the equipment into an outlet on a circuit different
from that to which the receiver is connected.

EU regulatory conformance
20
• Consult the dealer or an experienced radio/TV technician
for help.
This device complies with part 15 of the FCC Rules. Operation
is subject to the following two conditions: (1) This device may not
cause harmful interference, and (2) this device must accept any
interference received, including interference that may cause
undesired operation.
Warning: Changes or modifications made to this device not
expressly approved by Huawei Technologies Co., Ltd. may void
the FCC authorization to operate this device.
EU regulatory conformance
Hereby, Huawei Technologies Co., Ltd. declares that this device
is in compliance with the essential requirements and other
relevant provisions of Directive 1999/5/EC.
For the declaration of conformity, visit the Web site
www.huaweidevice.com/certification.
Note: Observe the national local regulations in the location
where the device is to be used. This device may be restricted for
use in some or all countries of European Union.
0682
Ver: 31010XXX V100R001_01