Huawei Technologies U7517 HSDPA/UMTS/GPRS/GSM/EDGE Mobile Phone with Bluetooth User Manual U7517 User Guide
Huawei Technologies Co.,Ltd HSDPA/UMTS/GPRS/GSM/EDGE Mobile Phone with Bluetooth U7517 User Guide
Contents
- 1. User Manual Part 1
- 2. User Manual Part 2
User Manual Part 1

Notice
Copyright © Huawei Technologies Co., Ltd. 2009. All rights reserved.
Trademarks and Permissions
, HUAWEI and are trademarks or registered trademarks of Huawei
Technologies Co., Ltd.
Other trademarks, product, service and company names mentioned are
the property of their respective owners.
NO WARRANTY
THE CONTENTS OF THIS MANUAL ARE PROVIDED “AS IS”. EXCEPT
AS REQUIRED BY APPLICABLE LAWS, NO WARRANTIES OF ANY
KIND, EITHER EXPRESS OR IMPLIED, INCLUDING BUT NOT LIMITED
TO, THE IMPLIED WARRANTIES OF MERCHANTABILITY AND
FITNESS FOR A PARTICULAR PURPOSE, ARE MADE IN RELATION
TO THE ACCURACY, RELIABILITY OR CONTENTS OF THIS MANUAL.
TO THE MAXIMUM EXTENT PERMITTED BY APPLICABLE LAW, IN NO
CASE SHALL HUAWEI TECHNOLOGIES CO., LTD BE LIABLE FOR
ANY SPECIAL, INCIDENTAL, INDIRECT, OR CONSEQUENTIAL
DAMAGES, OR LOST PROFITS, BUSINESS, REVENUE, DATA, GOOD-
WILL OR ANTICIPATED SAVINGS.

Introduction
Packing List . . . . . . . . . . . . . . P1
SIM Card and Memory Card . P1
Charging the Battery . . . . . . . P2
Appearance of Your Phone . . P4
Home Screen . . . . . . . . . . . . P6
Using the Touch Screen . . . . P7
Calibrating the Touch Screen P7
Dragging and Flicking . . . . . . P8
Accessing the Widget Bar . . . P9
Security Settings . . . . . . . . . . P9
Text Input
On-screen Keypad Mode . . P11
T9® Input Method . . . . . . . . P12
Traditional Input Method . . . P12
Call Service
Making a Call . . . . . . . . . . . P13
Answering or Rejecting a Call P14
Other Call Functions . . . . . . P14
Messaging
Sending a Message . . . . . . P15
Sending an Email . . . . . . . . P15
Viewing an Email . . . . . . . . . P16
Email Settings . . . . . . . . . . P16
Contacts
Adding a Contact . . . . . . . . . P17
Searching for a Contact . . . P17
Entertainment
Playing Music or Video . . . . P18
Using Camera or Video Camera .
P18
Using FM Radio (Optional) . P19
Accessing the Internet . . . . . P20
Managing files . . . . . . . . . . . P20
Connectivity
Using PC Options . . . . . . . . P21
Connecting to Other Bluetooth
Devices . . . . . . . . . . . . . . . . P22
Important Informations
Ambient Temperature . . . . . P23
FCC Statement . . . . . . . . . . P23
Certification Information (SAR) . .
P23
Contents

Introduction
1
1 Introduction
All the images in this guide are provided only for your reference. The actual
appearance and display depends on the phone that has been delivered.
Packing List
Your phone package box contains the following:
• One mobile phone
• One Li-ion battery
• One travel charger
• One USB data cablev
• One User Guide
• One Headset
SIM Card and Memory Card
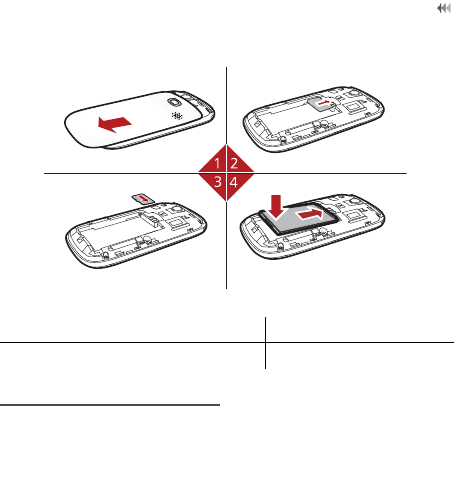
Insert your SIM card before using your phone. Remove the SIM card and
the battery only after powering off your phone.
Your phone supports a memory card (microSD) with a capacity of up to 8
GB.
2
Introduction
The following figures show the installation of the SIM card and memory
card.
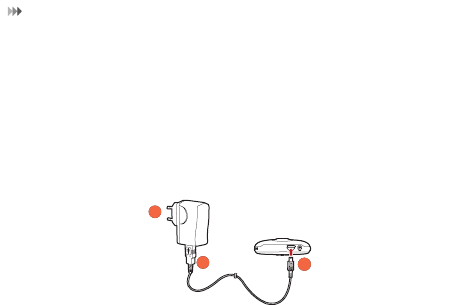
Charging the Battery
1. Connect the USB interface of the USB cable to the travel charger.
2. Plug in the travel charger to a power socket.
1 Remove the battery cover. 2 Inert the SIM card.
3 (Optional) Insert the memory card. 4 Insert the battery.
Introduction
3
3. Connect the mini USB interface of the USB cable to the charger
connector of your phone. When the battery is being charged, the
charging indicator blinks continuously.
4. When the charging indicator stops blinking, it indicates that the battery
is full.Disconnect the charger connector from the power socket.
5. Disconnect the USB cable from the phone.
2
3
1
4
Introduction
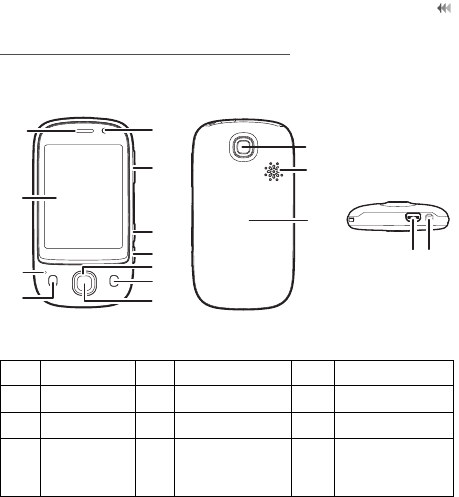
Appearance of Your Phone
1 Earpiece 2 Touch screen 3 Microphone
4 Send key 5 OK key 6 End key
7 Scroll key 8 Camera key 9 Shortcut key
10 Volume
Up/Down
Key
11 Internal
camera
(Optional)
12 Battery cover
1
2
3
45
6
7
11
12
13
14
15 16
8
9
10
Introduction
5
13 Speaker 14 Main camera 15 Charger
connector /
Cable
connector /
Headset jack
16 Power Key
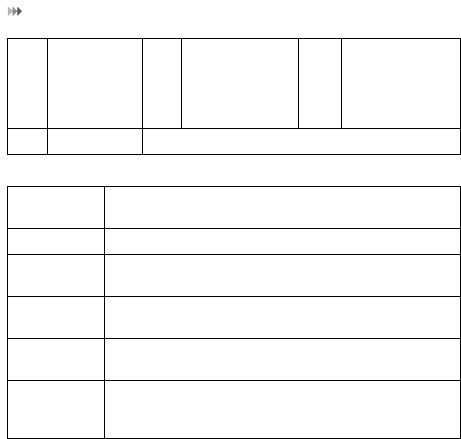
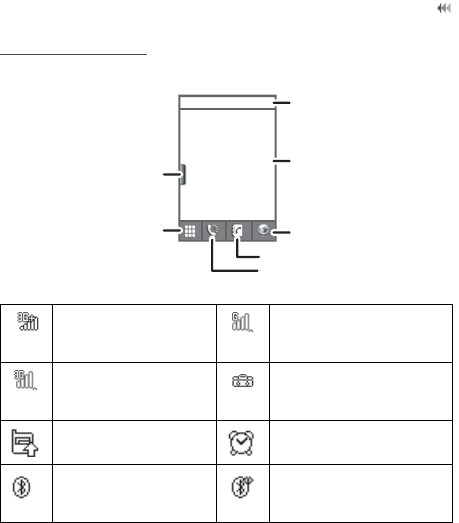
Send Key • Make or answer a call.
• Access the Calls screen in standby mode.
OK Key Confirm a selection.
End Key • End an ongoing call or reject an incoming call.
• Return to the standby mode.
Camera
Key Activate the camera in standby mode when the
screen is unlocked.
Shortcut
key Activate the corresponding application in standby
mode when the screen is unlocked.
Power Key • Press and hold it to power on or power off the
phone.
• Press it to lock or unlock the touch screen.
6
Introduction
Home Screen
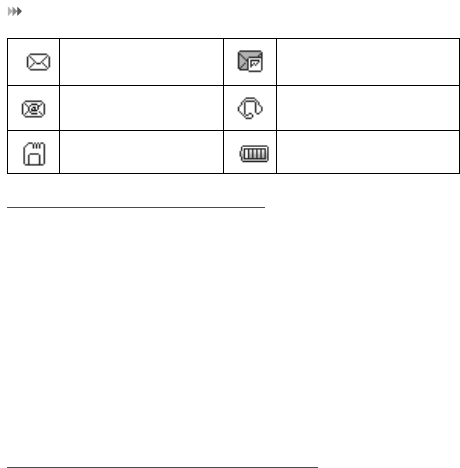
The phone is currently
in the HSDPA
network.
The phone is currently in
the GSM network.
The phone is currently
in the WCDMA
network.
You are using the
Roaming Service.
Call in progress. Alarm clock is enabled.
Bluetooth is enabled. Bluetooth connection is
being set up with another
device.
Icon bar
Tap it to access Widget Bar
Tap it to access the browser
Desktop
Tap it to access Contacts
Tap it to access the dialer
Tap it to access main menu
Introduction
7
Using the Touch Screen
You can select an item or enter text by tapping the touch screen.
NOTE:
• Tap the icon accurately to select an item.
• Tap gently to protect your touch screen.
• When the screen is locked, press the power key to unlock the touch
screen.
• When the screen is locked, press the send key, the OK key or the end
key to wake up the screen, and then unlock the screen by pressing
and holding the icon according to the instructions on screen.
Calibrating the Touch Screen
When operating the phone, if the phone cannot respond to your operation
correctly, calibrate the screen as follows.
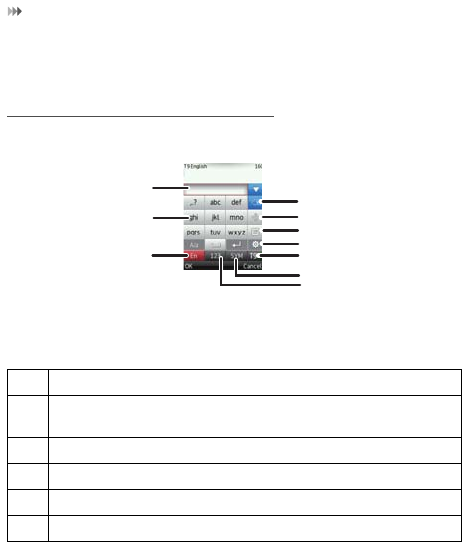
You have new text
messages. You have new multimedia
messages.
You have new Emails. The headset is
connected.
Memory card is
inserted. Indicates power level of
the battery.

8
Introduction
1. Select Settings> Touch settings> Calibration to access the screen
for calibration.
2. Calibrate the screen by tapping the center of calibration frame
displayed on the screen according to the instructions.
NOTE: During the calibration, tap the center of calibration frame accu-
rately to ensure that the phone can respond to your tapping and text entry
correctly after the calibration.
Dragging and Flicking
On the following screens, you can perform certain operations conveniently
through dragging on the touch screen.
• On the standby screen, tap and drag the profile to change the position
of the selected item.
• On the standby screen, tap and drag the widgets to change the posi-
tion of the selected item.
• In the menu list, drag up or down to scroll. Then tap a submenu to
select it.
• When viewing pictures, flick right or left to switch a picture to the next
or previous one.

Introduction
9
Accessing the Widget Bar
The widget bar provides quick access to the most frequently used items.
1. Tap the widget bar tab located on the left side of the screen to open
the widget bar.
2. Tap the item on the widget bar to use it.
3. Tap the widget bar tab again to close the widget bar.
NOTE: You can drag a widget to the desktop or drag it back to the widget
bar.
Security Settings
Select Settings> Security> Phone and SIM card> Desired item.
• Enter the password of your phone to restore factory defaults. The
initial password is 0000.
• If the phone lock or PIN lock is enabled, you need to enter the corre-
sponding password when you switch on your phone.
• Change the password of your phone, PIN code, or PIN2 code.

10
Introduction
• Set the fixed dialer number list to define the numbers that your phone
can dial. This function needs to be supported by the SIM card.
NOTE:
• For certain SIM cards, you need to enter the PIN2 code to use certain
special functions.
• If you enter a wrong PIN code or wrong PIN2 code thrice consecutive
attempts, the SIM card is locked. To unlock the SIM card, enter the
PIN Unblocking Key (PUK) code or PUK2 code.
• If you enter a wrong PUK code or a wrong PUK2 code for ten consec-
utive attempts, the SIM card will get invalidated permanently, and only
emergency calls will be permitted. Consult your service provider to
unlock the SIM card.
• The PIN code, PIN2 code, PUK code, or PUK2 code is provided with
the SIM card. For details, consult your service provider.
Text Input
11
2 Text Input
On-screen Keypad Mode
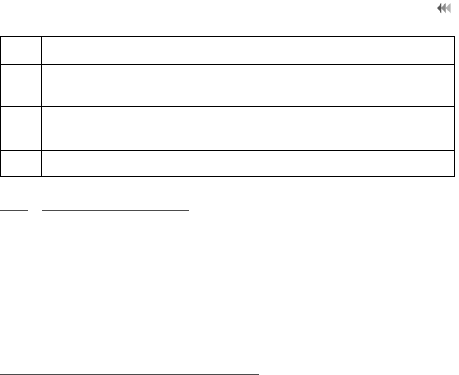
You can tap the keys on the on-screen keyboard to enter alphabets,
numbers, or symbols.
1 Candidate character area
2 On-screen keyboard: Tap the keys on the keyboard to enter
alphabets, numbers, or symbols.
3 Display the current input language.
4 Tap here to switch to the numeric input mode.
5 Tap here to switch to the symbols input mode.
6 Tap here to enable or disable the T9 input method.
1
2
3
4
5
6
7
8
9
10
12
Text Input
T9® Input Method
With the T9 input method, you can easily and quickly enter words. T9 is a
predictive text entry mode. Press the relevant key that corresponds to the
required letter and T9 will offer you candidate words.
Press each key carrying the desired letter once, and then the predictive
text scheme will present the candidate words composed by the letters you
have entered.
Traditional Input Method
When T9 input method is off, you can use the traditional input method for
entering alphabets. Repeatedly tap the key that carries the letter to be
entered till it appears on the screen.
7 Tap here to set the input language.
8 Tap here to insert a common phrase, a contact, or an email
message.
9Tap here, and then you can move the cursor by tapping the
arrow on the screen.
10 Tap here to delete the letter before the cursor.
Call Service
13
3 Call Service
Making a Call
Making a Call from Keyboard
1. In standby mode, tap to open the dialer.
2. Enter the phone number on the dialer. If you enter a wrong number,
tap to erase the number.
3. To make a call, perform either of the following operations:
• Tap to make a voice call.
• Tap to make a video call.
4. Press the end key to terminate a call.
NOTE:
•You can make video calls, provided that the 3G network supports
video call function and the called party has a device supporting the
video call function.You can consult your service provider for details.
• During a call, you can select Options to perform operations in the
option list.

14
Call Service
•You also can make a call from Contacts or Call History.
Answering or Rejecting a Call
When there is an incoming call, press the send key to answer the call, or
press the end key to reject the call. You can set the any key answer mode
or auto answer mode.
1. Select Settings > Call settings > General > Answer mode to set the
answer mode.
2. You can answer a call according to the settings that you have custom-
ized.
NOTE: Connect the headset to your phone while using the auto answer
mode.
Other Call Functions
To enable call forwarding, call waiting and call barring functions, consult
your service provider.
By selecting Settings > Call settings, you can enable or disable the
preceding functions.

Messaging
15
4 Messaging
Sending a Message
1. Select Messaging > Create message to create a message.
2. When you edit a message, you can tap the icons at the bottom of the
screen to insert pictures or other files.
3. After the message is completed, tap or press the OK key, and
then select Add from contacts or Enter number to add a recipient.
4. Select Send to send the message.
Sending an Email
1. Select E-mail > Create E-mail to create an email.
2. Select To. Select Add from contacts or Enter recipient to select an
email address.
3. Select Subject to edit the content.
4. Select Text message to edit the content.

16
Messaging
5. In the email editing screen, select Options to perform the operations
in the option list.
6. In the email editing screen, select Options > Send to send the email.
Viewing an Email
Your phone provides five mailboxes for emails. Inbox stores received
emails. Drafts stores created and saved emails. Outbox stores the emails
failed to be send. Sent stores sent emails. Blocked stores screened
emails.
1. Select a mailbox from E-mail, and then switch among five mail-boxes
through the scroll key.
2. Select an email, and then select Options to perform the operations of
the option list.
Email Settings
Settings > Applications > E-mail settings > Desired item, or E-mail >
E-mail Wizard > Desired item. Then, you can set the email account. Select
an account, and then choose Options.
• You can edit an account and set general, incoming, or outgoing attri-
butes.
• You can add a new account.
• You can set an account to the default account.

Contacts
17
5 Contacts
You can save or manage the information about contacts in Contacts. You
can also set a contact number as a speed dialing number.
Adding a Contact
1. Select Contacts > New Contacts.
2. Enter the information about the contact.
3. Select Save to save the contact.
Searching for a Contact
1. Select Contacts.
2. Tap the search bar to enter the contact name you are searching for.
3. The contacts with the information you enter is listed.
You can also use quick search in the contacts list screen. You can find a
contact by entering the initials of the name of the contact. For example, to
find a contact named "Alice Green", enter the initials "a" or "g". This contact
is displayed in the candidate list.

18
Entertainment
6 Entertainment
Playing Music or Video
1. Select music files, video files, or playlists.
2. Press the OK key to play music or video.
3. During the playing of a file, you can perform the following operations:
• Press the OK key to pause or resume the playing.
• Tap the icons on the player screen to control the player.
• Select Options to perform the operations in the option list.
• Select Exit to exit from the player.
NOTE: During music playing , press the End key or select Options > Play
in background to return to the standby screen. Then the player plays the
song at the background. The screen displays the name of the current song
on the status bar of the player. You can tap the status bar to access the
player again or tap the close icon to exit from the player.
Using Camera or Video Camera
1. Press the camera key or select Camera to launch the camera.

Entertainment
19
2. In the viewfinder screen, you can tap the icons to perform the desired
operations.
3. In the viewfinder screen, press the camera key or OK key to take a
picture or record a video clip.
• When recording a video clip, you can pause or continue
recording.
• When recording a video clip, press the camera key or OK key to
stop recording and save the video.
4. After taking a picture or recording a video clip, you can tap the icons
on screen to perform the desired operations.
Using FM Radio (Optional)
1. Connect the headset to your phone.
2. Select FM Radio.
3. If the channel list is empty, select Options > Automatic tuning /
Manual tuning to set channels.
4. Select Options > Exit to exit from FM radio.
NOTE: During the FM Radio playing , select Minimize to return to the
standby screen. Then the FM Radio plays at the background. The screen
displays the name of the channel on the status bar of the player. You can

20
Entertainment
tap the status bar to access the FM Radio again or tap the close icon to
exit from the FM Radio.
Accessing the Internet
By selecting Browser or Opera Mini, you can access the internet and
browse web pages.
Managing files
1. Select My Files > Desired item to manage pictures, music files, video
clips, documents, ringtones, and other files.
2. Select a file folder, and then select Options > Desired item to perform
operations in the option list.
When your phone finds the memory card, the memory card tab is automat-
ically lighted on the folder screen. Select the required files in the memory
card and perform operations as required. In addition, you can also format
the memory card.

Connectivity
21
7 Connectivity
Using PC Options
By using PC options software, you can synchronise data between your
phone and PC, surf the Internet with your phone and read the memory card
by USB cable.
To install a PC options software, perform the following operations:
1. Connect your phone to the PC by using the USB cable.
2. The USB driver is embedded in your phone, and will be installed auto-
matically.
3. The PC Options software supplied with your phone will run automati-
cally.Wait for the dialog box to appear (this may take up to 30
seconds). Buttons showing File Transfer, PC Assistant and HUAWEI
Mobile Connect via the phone should be displayed.
4. Select the desired button to install the software.
• Select File Transfer to perform the microSD Card Reader opera-
tion.
• Select PC Assistant button to install the PC Suite software, With
the PC Suite software, you can synchronize data between your
phone and PC.

22
Connectivity
• Select HUAWEI Mobile Connect via the phone to install the
DialUp software.With the HUAWEI Mobile Connect via the
phone, you can perform the internet access with your phone. For
details, refer to the help section in the DialUp software.
5. For the first time, follow the wizard to complete the installation.
NOTE: You also can connect your phone to the PC through Bluetooth,
and perform synchronization and internet access functions.
Connecting to Other Bluetooth Devices
You can exchange data between your Bluetooth phone and other Blue-
tooth devices. If you want to exchange data between your phone and
another device, that device must support Bluetooth and the Bluetooth func-
tion must be enabled.
1. Select Bluetooth > Bluetooth to enable the Bluetooth function.
2. Select Search devices to search a Bluetooth device. When a Blue-
tooth device is found for the first time, authentication is required.
3. After the authentication, you can exchange data between your phone
and the other Bluetooth device.
NOTE: You can talk by using the Bluetooth headset or Bluetooth loud-
speaker. For more information, refer to the user manuals of the relevant
devices.

Important Informations
23
8 Important Informations
Ambient Temperature
Keep the ambient temperature between 0℃ and 45 ℃ while the device is being
charged. Keep the ambient temperature between -10 ℃ to 55 ℃ for using the
device powered by battery.
FCC Statement
This device complies with part 15 of the FCC Rules. Operation is subject to the
following two conditions: (1)This device may not cause harmful interference, and
(2) This device must accept any interference received, including interference
that may cause undesired operation.
This equipment has been tested and found to comply with the limits for a Class
B digital device, pursuant to Part 15 of the FCC Rules. These limits are designed
to provide reasonable protection against harmful interference in a residential
installation. This equipment generates, uses and can radiate radio frequency
energy and, if not installed and used in accordance with the instructions, may
cause harmful interference to radio communications. However, there is no guar-
antee that interference will not occur in a particular installation. If this equipment
does cause harmful interference to radio or television reception, which can be
determined by turning the equipment off and on, the user is encouraged to try to
correct the interference by one or more of the following measures:
• Reorient or relocate the receiving antenna.
• Increase the separation between the equipment and receiver.
• Connect the equipment into an outlet on a circuit different from that to which
the receiver is connected.
• Consult the dealer or an experienced radio/TV technician for help.

24
Important Informations
Warning: Changes or modifications made to this device not expressly approved
by Huawei Technologies Co., Ltd. may void the FCC authorization to operate
this device.
Certification Information (SAR)
This mobile device meets guidelines for exposure to radio waves.
Your device is a low-power radio transmitter and receiver. As recommended by
international guidelines, the mobile device is designed not to exceed the limits
for exposure to radio waves. These guidelines were developed by the indepen-
dent scientific organization International Commission on Non-Ionizing Radiation
Protection (ICNIRP) and include safety measures designed to ensure safety for
all users, regardless of age and health.
The Specific Absorption Rate (SAR) is the unit of measurement for the amount
of radio frequency energy absorbed by the body when using a device. The SAR
value is determined at the highest certified power level in laboratory conditions,
but the actual SAR level of the device when being operated can be well below
the value. This is because the device is designed to use the minimum power
required to reach the network.
The device complies with the RF specifications when the device is used near
your ear or at a distance of 1.5 cm from your body. Ensure that the device acces-
sories such as a device case and a device holster are not composed of metal
components. Keep your device 1.5 cm away from your body to meet the require-
ment earlier mentioned.
The SAR limit adopted by the USA and Canada is 1.6 watts/kilogram (W/kg)
averaged over one gram of tissue. The highest SAR value reported to the FCC
and IC for this device type when tested for use at the ear is 0.964 W/kg, and
when properly worn on the body is 0.795 W/kg.