Huawei Technologies U8100-7 HSDPA/UMTS/GSM/GPRS/EDGE Mobile Phone with Bluetooth and WLAN User Manual part 3
Huawei Technologies Co.,Ltd HSDPA/UMTS/GSM/GPRS/EDGE Mobile Phone with Bluetooth and WLAN part 3
Contents
User manual part 3

168
Using Other Applications
Adding a n Alarm
1. On the alarm list screen, touch , and then touch Add
alarm.
2. Set the alarm, and then touch Done.
Setting a n Alarm
1. On the alarm list screen, touch one of the alarms on the
screen.
2. Touch Time to set the time of the alarm.
3. Touch Ringtone to select a ringtone for the alarm.
4. Select the Vibrate check box to have the phone vibrate, in
addition to playing the ringtone.
5. Touch Repeat to set the days when you want the alarm to
sound.
6. Touch Label to enter a name for the alarm.
7. Touch Done.
3 Touch to enable or disable an alarm.
MENU
key

169
Using Other Applications
Customizing Ala rm Settings
On the alarm list screen, touch , and then touch Settings.
• Alarm in silent mode: Select to sound alarms even when the
phone is in silent mode.
• Alarm volume: Touch to open a dialog where you can set the
volume of all alarms.
• Snooze duration: Touch to open a dialog where you can set
how long the alarm waits before it sounds again.
• Side button behavior: Touch to open a dialog where you can
set what happens if you press the Volume keys when an alarm
sounds.
Using Sound Recorder
Sound Recorder is useful for quickly recording thoughts. You
can also record your voice and set it as a ringtone.
MENU
key
170
Using Other Applications
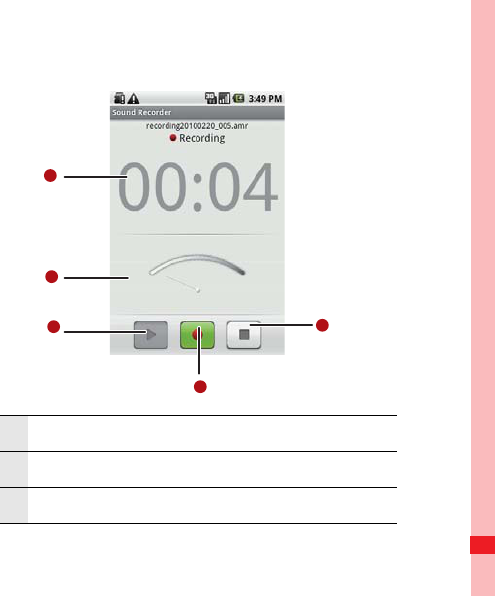
Sound Re corder Screen
1 Shows the recording duration.
2 Shows the volume of your audio files.
3 Touch to pause or play back the recording.
1 1
2
35
4
171
Using Other Applications
Starting a R ecording
1. Touch > Sound Recorder to open the application.
2. Touch the start button to start recording.
3. Record your desired message.
4. Touch the stop button to stop recording.
5. Touch , and then touch Recordings to view the voice clip.
Setting a Voi ce C lip as a Ri ngtone
1. On the sound recorder screen, touch , and then touch
Recordings.
2. Select the location where you have saved the recordings.
3. Select a voice clip, and then touch .
4. Touch Set as ringtone.
4 Touch to start recording.
5 Touch to stop recording.
MENU
key
MENU
key
MENU
key
172
Using Other Applications
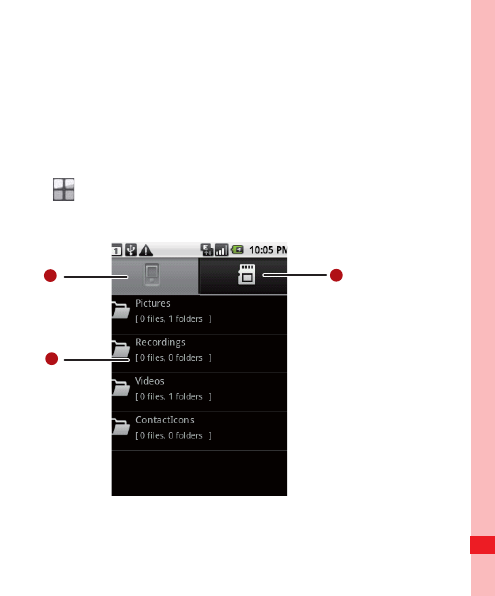
Using the File Manager
File manager is like having a pocket-sized personal assistant
(PA), letting you organize, edit, and delete files and folders.
Opening the F ile Manager
Touch > File Manager to open the application.
1
1
2
3
173
Using Other Applications
Tip: The options menu of the file manager may not be completely shown
on one page. You may need to flick the menu upward or downward,
or press the Navigation key to browse all options.
Creating a Folde r
1. On the File Manager screen, access the directory of the
folder you want to create.
2. Touch to open the options panel, and then touch New
folder.
3. Enter the name of the new folder in the text box.
4. Touch Save.
1Touch to show the files and folders in your mobile
phone memory.
2 Touch to show your list of files and folders.
3Touch to show the files and folders on the
microSD card.
MENU
key
174
Using Other Applications
Moving or Copyin g a File
1. On the File Manager screen, touch to show the options
panel, and then touch Cut or Copy.
2. Touch the file or folder you want to move or copy.
When selected, a check mark will appear.
Tip: To select all files, touch to open the options panel. Then touch
Select All to select all files in a folder (touch Unselect All to
cancel the selection).
3. Touch to open the options panel, and then touch Done to
cut or copy the file.
4. Now select the path to where you want the file to be copied or
moved. Touch to open the options panel, and then touch
Paste to move or copy the file to the selected path.
Doing a Quick Se arch for a Fil e
1. On the File Manager screen, touch a folder to access the
directory where the file you want is located.
MENU
key
MENU
key
MENU
key
MENU
key

175
Using Other Applications
2. Touch to open the options panel, and then touch Search.
3. Write a key word of the name of your file or folder in the
search box.
4. Touch Search. Your mobile phone will start the search.
5. A list of search results will be displayed. Touch a file in the list
to open it.
6. Touch New search for a new search or press the Back key to
return to the file manager screen.
Viewing Your Memory Sta tus
On the File Manager screen, touch to open the options
panel, and then touch Memory Status. The memory
management screen will be displayed. This screen allows you to
view the memory status and available memory on your mobile
phone and microSD card.
Using the Calculator
Use the calculator to solve simple arithmetic problems or use its
advanced operators to solve more complex equations.
MENU
key
MENU
key
176
Using Other Applications
Opening the Ca lculator
Touch > Calculator to open the application.
Switching to the Adva nced Panel
On the Calculator screen, flick the screen to the right or left to
switch between Advanced panel and Basic panel.
Using the Notepad
Notepad features a simple text processor and lists all notes in a
linear structure. You can add, edit, and delete notes.
1. Touch > Notepad to open the application.
2. Press , and then touch Add note to create a note.
3. After editing, press , and then touch Save.
MENU
key
MENU
key
177
Managing Your Mobile Phone
Managing Your Mobile Phone
To configure your mobile phone, touch > Settings.
Setting the Date and Time
By default, your mobile phone automatically uses the date, time
zone, and time provided by the network.
Note: When the time provided by the network is automatically used, you
cannot set the date, time, and time zone.
1. On the Settings screen, touch Date & time.
2. Clear the Automatic check box.
3. Touch Set date. On the set date screen, touch the up button
or the down button to adjust the date, month, and year, and
then touch Set when the configuration is complete.
4. Touch Select time zone, and then select the desired time
zone from the list. Scroll down the list to view more time
zones.

178
Managing Your Mobile Phone
5. Touch Set time. On the set time screen, touch the up button
or down button to adjust the hour and minute. Touch Set
when the configuration is complete.
Tip: If a 12-hour format is used, you can touch AM to change to PM or
vice versa.
6. Select or clear the Use 24-hour format check box to toggle
between using a 24-hour or 12-hour format.
7. Touch Select date format to select how you want the date to
display on your mobile phone.
Setting the Display
Adjusting the Screen Brightness
1. On the Settings screen, touch Sound & display >
Brightness.
2. Drag the slider left to make the screen darker, or right to make
it brighter.
3. Touch OK to save the adjustment.

179
Managing Your Mobile Phone
Adjusting the T ime Before the Screen Turns Off
If your mobile phone is idle for several minutes, it will turn off the
screen to save battery power. To set a longer or shorter idle time
do the following:
1. On the Settings screen, touch Sound & display > Screen
timeout.
2. Select the time you want the screen to be illuminated.
Calibrating the screen
Calibrate the screen if it does not respond accurately to touch.
1. On the Settings screen, touch Sound & display >
Calibration.
2. Touch the target on the screen.
3. After the calibration process, press the Send key to quit.
Setting Ringers
Turning On Si lent Mo de
1. On the Settings screen, touch Sound & display.

180
Managing Your Mobile Phone
2. Select the Silent mode check box. Then all sounds except
media and alarms are silenced.
Adjusting the Rin ger Volume
You can adjust the ringer volume when you are on the Home
screen or any application screens (except during a call or when
playing music or videos). Press the Volume keys to adjust the
ringer volume to the desired level.
You can also adjust the ringer volume on the settings screen.
1. On the Settings screen, touch Sound & display > Ringer
volume.
2. Drag the slider left to make the volume softer, or right to make
it louder.
3. Touch OK to save the adjustment.
Tip: On the Ringer volume screen, if you do not select Use incoming
call volume for notifications, you can set Incoming call volume
and Notification volume separately.

181
Managing Your Mobile Phone
Adjusting the Medi a Vo lume
When playing music or watching videos, press the Volume keys
to adjust the sound.
You can also adjust the sound on the settings screen.
1. On the Settings screen, touch Sound & display > Media
volume.
2. Drag the slider left to make the volume softer, or right to make
it louder.
3. Touch OK to save the adjustment.
Changing the Phon e Ringtone
1. On the Settings screen, touch Sound & display > Phone
ringtone.
2. Touch the ringtone you want to use, and then touch OK. The
ringtone plays when selected.
Tip: You can set a song as the ringtone. Open the Music application, and
then press and hold the song name, and select Use as phone
ringtone.

182
Managing Your Mobile Phone
Setting Yo ur Ph one to Vib rate for Incoming Calls
1. On the Settings screen, touch Sound & display.
2. Select the Phone vibrate check box. Then mobile phone will
vibrate when there is an incoming call.
Setting Phone Services
Customizing Ca ll Settings
That is just a fancy term for all the stuff like call forwarding, call
waiting, fixed dialing numbers and voicemail. Talk to your
operator to learn about the different services you can get.
On the Settings screen, touch Call settings to customize your
call function.
Turning on Data Roaming
1. On the Settings screen, touch Wireless & networks >
Mobile networks.
2. Select the Data roaming check box.

183
Managing Your Mobile Phone
Note: Accessing data services while roaming may incur additional
charges. Ask your wireless service provider about data roaming
fees.
Switching off the Data Service
Things like synchronizing updates and receiving multimedia
messages rely on a transfer of data, which is what the data
service does.
1. On the Settings screen, touch Wireless & networks >
Mobile networks.
2. Clear the Data service check box.
Note: When Data service is set to off, you cannot receive or send
multimedia messages.
Switching on Alw ays-on Mobile Da ta
If you have not selected Enable always-on mobile, after your
screen is locked for 30 minutes, your mobile phone will
automatically stop all data services (except MMS). For example,
your mobile phone will not check new emails or synchronize

184
Managing Your Mobile Phone
data in the background. The mobile phone will automatically
enable data services only after you have waken up your screen.
On the Settings screen, touch Wireless & networks > Mobile
network. Select Enable always-on mobile to enable this
function. By default, this function is disabled.
Setting Text-to-Speech
Use the Text-to-Speech settings to configure the Android text-
to-speech synthesizer, for applications that can take advantage
of it.
Installing Voi ce D ata
1. On the Settings screen, touch Text-to-speech > Install
voice data.
2. If your mobile phone does not have speech synthesizer data
installed, connect to Android Market and let it guide you
through the process of downloading and installing the data.
3. Follow the instructions to install the voice data.

185
Managing Your Mobile Phone
Adjusting the Spee ch R ate
1. On the Settings screen, touch Text-to-speech > Speech
rate.
2. Select a speed at which the text is to be spoken.
Protecting Your Mobile Phone
Turning on Your SIM Card PIN
1. On the Settings screen, touch Location & security > Set up
SIM card lock.
2. Select the Lock SIM card check box.
3. Use the keyboard to enter the SIM card PIN, and then touch
OK.
4. To change the SIM card PIN at any time, touch Change SIM
PIN.
Note: You can dial emergency numbers any time from your mobile
phone.

186
Managing Your Mobile Phone
Protecting Your Mob ile Pho ne with a Screen Lo ck
To keep your data more secure, lock the screen and/or require
a screen unlock pattern every time your mobile phone is turned
on or wakes up from sleep mode.
1. On the Settings screen, touch Location & security > Set
unlock pattern.
2. Connect at least four dots in a vertical, horizontal and/or
diagonal direction, and then lift your finger from the screen
when complete.
Tip: You must flick your finger on the screen to create the pattern and
not touch individual dots.
3. Your mobile phone will record the pattern. Touch Continue.
4. When prompted, draw the screen unlock pattern again, and
then touch Confirm.
Note: Clear the Use visible pattern check box if you do not want the
unlock pattern to be displayed on the screen when you unlock it.
Tip: To change your unlock screen pattern, touch Location & security
> Change unlock pattern on the Settings screen.

187
Managing Your Mobile Phone
Managing Applications
Viewing an In stalled Application
1. On the Settings screen, touch Applications > Manage
applications.
2. In the applications list, do any of the following:
• Touch , and then touch Sort by size. Then touch an
application to view its details.
• Touch , and then touch Filter. Select All, Running, or
Downloaded from the options menu. Then touch an
application to view its details.
• Touch an application to view its details directly.
Removing a n Install ed Application
1. On the Settings screen, touch Applications > Manage
applications.
2. Touch an application, and then touch Uninstall to remove the
application from your mobile phone.
MENU
key
MENU
key

188
Managing Your Mobile Phone
Ways to F ree Up Yo ur Mob ile Phone Memo ry
• Move files and email attachments to the microSD card.
• In Browser, clear all temporary Internet files and Browser
history information.
• Uninstall the downloaded programs that you no longer use.
• Reset your mobile phone.
Resetting Your Mobile Phone
Backing Up My Settings
You can back up your mobile phone’s settings to Google
servers, with your Google account. If you replace your mobile
phone, the settings you have backed up are stored on the new
mobile phone the first time you sign in with your Google account.
1. On the Settings screen, touch Privacy.
2. Select the Back up my settings check box. A wide variety of
settings are backed up, including your Wi-Fi passwords,
bookmarks, a list of the applications you have installed, the
words you have the dictionary that the onscreen keyboard

189
Managing Your Mobile Phone
uses, and most of the settings that you configured with the
Settings application.
Restoring Factory Data
If you reset your phone to the settings that were configured at
the factory, all of your personal data from internal phone
storage, including information about your Google Account, any
other accounts, your system and application settings, and any
downloaded applications will be erased. Resetting the phone
does not erase any system software updates you’ve
downloaded or any files on your microSD card, such as music or
photos.
1. On the Settings screen, touch Privacy > Factory data reset.
2. When prompted, touch Reset phone, and then touch Erase
everything. The mobile phone resets the settings to the
original factory settings, and then restarts.
Upgrading the Software Version
Before upgrading the software on your mobile phone, ensure
that your mobile phone is fully charged and the upgrade version
is correct. Back up important infomation such as the contacts,

190
Managing Your Mobile Phone
email messages, files, and other messages saved to your
mobile phone.
Downloading the Upgra de Package
You can download the software upgrade files from the following
websites:
•
Preparing for th e Upgrad e
1. Download the upgrade file from the appropriate websites.
2. The file you download will be compressed. Use the unzip
software on your PC to decompress the upgrade package.
The upgrade package has a folder structure — be careful you
do not change it. This folder is called dload — do not rename
it, either.
3. Use the USB cable to connect your mobile phone to your PC.
4. Copy the folder structure to the main directory (root directory)
of your microSD card.

191
Managing Your Mobile Phone
5. After you have copied the file to the microSD card, disable the
USB mass storage feature.
Upgrading the Softw are through the mi croSD Card
After copying the update files to the microSD card, do the
following:
1. On the Settings screen, touch SD card & phone storage >
Software Upgrade > SD card Upgrade.
2. Before the upgrade, the system of your mobile phone
automatically checks the battery level and the upgrade
version. If the version you have downloaded does not meet
the upgrade requirements, the upgrade will not work.
3. During the upgrade, your system may prompt you to back up
your data in advance.
4. When the next message appears, touch Confirm.
5. Touch Upgrade.
6. Your mobile phone restarts and the upgrade screen is
displayed.

192
Managing Your Mobile Phone
7. After the upgrade is complete, your mobile phone
automatically restarts and will switch on again.
8. Touch About phone > Build number on the Settings screen
to view the version information.

193
Appendix
Appendix
Warnings and Precautions
This section contains important information pertaining to the
operating instructions of your device. It also contains information
about how to use the device safely. Read this information
carefully before using your device.
Electronic Device
Power off your device if using the device is prohibited. Do not
use the device when using the device causes danger or
interference with electronic devices.
Medical Device
• Follow rules and regulations set forth by hospitals and health
care facilities. Do not use your device when using the device is
prohibited.
• Pacemaker manufacturers recommend that a minimum
distance of 15 cm be maintained between a device and a
pacemaker to prevent potential interference with the
pacemaker. If you are using a pacemaker, use the device on

194
Appendix
the opposite side of the pacemaker and do not carry the
device in your front pocket.
Potentially Expl osive Atmosphere
Power off your device in any area with a potentially explosive
atmosphere, and comply with all signs and instructions. Areas
that may have potentially explosive atmospheres include the
areas where you would normally be advised to turn off your
vehicle engine. Triggering of sparks in such areas could cause
an explosion or a fire, resulting in bodily injuries or even deaths.
Do not power on your device at refueling points such as service
stations. Comply with restrictions on the use of radio equipment
in fuel depots, storage, and distribution areas, and chemical
plants. In addition, adhere to restrictions in areas where blasting
operations are in progress. Before using the device, watch out
for areas that have potentially explosive atmospheres that are
often, but not always, clearly marked. Such locations include
areas below the deck on boats, chemical transfer or storage
facilities, and areas where the air contains chemicals or particles
such as grain, dust, or metal powders. Ask the manufacturers of
vehicles using liquefied petroleum gas (such as propane or
butane) whether this device can be safely used in their vicinity.

195
Appendix
Traffic Sec urity
Observe local laws and regulations while using the device. In
addition, if using the device while driving a vehicle, comply with
the following guidelines:
• Concentrate on driving. Your first responsibility is to drive
safely.
• Do not talk on the device while driving. Use hands-free
accessories.
• When you have to make or answer a call, park the vehicle at
the road side before using your device.
• RF signals may affect electronic systems of motor vehicles.
For more information, consult the vehicle manufacturer.
• In a motor vehicle, do not place the device over the air bag or
in the air bag deployment area. Otherwise, the device may
hurt you owing to the strong force when the air bag inflates.
• Do not use your device while flying in an aircraft. Power off
your device before boarding an aircraft. Using wireless
devices in an aircraft may cause danger to the operation of the
aircraft and disrupt the wireless telephone network. It may also
be considered illegal.

196
Appendix
Operating Environ ment
• Do not use or charge the device in dusty, damp, and dirty
places or places with magnetic fields. Otherwise, it may result
in a malfunction of the circuit.
• The device complies with the RF specifications when the
device is used near your ear or at a distance of 1.5 cm from your
body. Ensure that the device accessories such as a device
case and a device holster are not composed of metal
components. Keep your device 1.5 cm away from your body to
meet the requirement earlier mentioned.
• On a stormy day with thunder, do not use your device when it
is being charged, to prevent any danger caused by lightning.
• When you are on a call, do not touch the antenna. Touching
the antenna affects the call quality and results in increase in
power consumption. As a result, the talk time and the standby
time are reduced.
• While using the device, observe the local laws and
regulations, and respect others' privacy and legal rights.
• Keep the ambient temperature between -10°C and 45°C while
the device is being charged. Keep the ambient temperature
between -10°C to 55°C for using the device powered by a
battery.

197
Appendix
Prevention of Hearin g Damage
Using a headset at high volume can damage your hearing. To
reduce the risk of damage to hearing, lower the headset volume
to a safe and comfortable level.
Safety of Children
Comply with all precautions with regard to children's safety.
Letting the child play with your device or its accessories, which
may include parts that can be detached from the device, may be
dangerous, as it may present a choking hazard. Ensure that
small children are kept away from the device and accessories.
Accessories
Use the accessories delivered only by the manufacturer. Using
accessories of other manufacturers or vendors with this device
model may invalidate any approval or warranty applicable to the
device, result in the non-operation of the device, and cause
danger.

198
Appendix
Battery and Charger
• Unplug the charger from the electrical plug and the device
when not in use.
• The battery can be charged and discharged hundreds of times
before it eventually wears out. When the standby time and the
talk time are shorter than the normal time, replace the battery.
• Use the AC power supply defined in the specifications of the
charger. An improper power voltage may cause a fire or a
malfunction of the charger.
• Do not connect two poles of the battery with conductors, such
as metal materials, keys, or jewelries. Otherwise, the battery
may be short-circuited and may cause injuries and burns on
your body.
• Do not disassemble the battery or solder the battery poles.
Otherwise, it may lead to electrolyte leakage, overheating, fire,
or explosion.
• If battery electrolyte leaks out, ensure that the electrolyte does
not touch your skin and eyes. When the electrolyte touches
your skin or splashes into your eyes, wash your eyes with
clean water immediately and consult a doctor.
• If there is a case of battery deformation, color change, or
abnormal heating while you charge or store the battery,

199
Appendix
remove the battery immediately and stop using it. Otherwise, it
may lead to battery leakage, overheating, explosion, or fire.
• If the power cable is damaged (for example, the cord is
exposed or broken), or the plug loosens, stop using the cable
at once. Otherwise, it may lead to an electric shock, a short
circuit of the charger, or a fire.
• Do not dispose of batteries in fire as they may explode.
Batteries may also explode if damaged.
Cleaning a nd Maintenance
• The device, battery, and charger are not water-resistant. Keep
them dry. Protect the device, battery, and charger from water
or vapor. Do not touch the device or the charger with a wet
hand. Otherwise, it may lead to a short circuit, a malfunction of
the device, and an electric shock to the user.
• Do not place your device, battery, and charger in places where
they can get damaged because of collision. Otherwise, it may
lead to battery leakage, device malfunction, overheating, fire,
or explosion.
• Do not place magnetic storage media such as magnetic cards
and floppy disks near the device. Radiation from the device
may erase the information stored on them.

200
Appendix
• Do not leave your device, battery, and charger in a place with
an extreme high or low temperature. Otherwise, they may not
function properly and may lead to a fire or an explosion. When
the temperature is lower than 0°C, performance of the battery
is affected.
• Do not place sharp metal objects such as pins near the
earpiece. The earpiece may attract these objects and hurt you
when you are using the device.
• Before you clean or maintain the device, power off the device
and disconnect it from the charger.
• Do not use any chemical detergent, powder, or other chemical
agents (such as alcohol and benzene) to clean the device and
the charger. Otherwise, parts of the device may be damaged
or a fire can be caused. You can clean the device and the
charger with a piece of damp and soft antistatic cloth.
• Do not dismantle the device or accessories. Otherwise, the
warranty on the device and accessories is invalid and the
manufacturer is not liable to pay for the damage.
Emergency Call
You can use your device for emergency calls in the service area.
The connection, however, cannot be guaranteed in all

201
Appendix
conditions. You should not rely solely on the device for essential
communications.
Certification Informa tion (SAR )
This device meets guidelines for exposure to radio waves.
Your device is a low-power radio transmitter and receiver. As
recommended by international guidelines, the device is
designed not to exceed the limits for exposure to radio waves.
These guidelines were developed by the independent scientific
organization International Commission on Non-Ionizing
Radiation Protection (ICNIRP) and include safety measures
designed to ensure safety for all users, regardless of age and
health.
The Specific Absorption Rate (SAR) is the unit of measurement
for the amount of radio frequency energy absorbed by the body
when using a device. The SAR value is determined at the
highest certified power level in laboratory conditions, but the
actual SAR level of the device when being operated can be well
below the value. This is because the device is designed to use
the minimum power required to reach the network.

200
Appendix
The SAR limit adopted by USA and Canada is 1.6 watts/
kilogram (W/kg) averaged over one gram of tissue. The highest
SAR value reported to the FCC and IC for this device type when
tested for use at the ear is 0.763 W/kg, and when properly worn
on the body is 0.864 W/kg.
The SAR limit also adopted by Europe is 2.0 W/kg averaged
over 10 grams of tissue. The highest SAR value for this device
type when tested at the ear is 0.726 W/kg.
.
FCC Statement
This equipment has been tested and found to comply with the
limits for a Class B digital device, pursuant to Part 15 of the FCC
Rules. These limits are designed to provide reasonable
protection against harmful interference in a residential
installation. This equipment generates, uses and can radiate
radio frequency energy and, if not installed and used in
accordance with the instructions, may cause harmful
interference to radio communications. However,there is no
guarantee that interference will not occur in a particular
installation.If this equipment does cause harmful interference to

203
Appendix
radio or television reception,which can be determined by turning
the equipment off and on, the user is encouraged to try to correct
the interference by one or more of the following measures:
--Reorient or relocate the receiving antenna.
--Increase the separation between the equipment and receiver.
--Connect the equipment into an outlet on a circuit different from
that to which the receiver is connected.
--Consult the dealer or an experienced radio/TV technician for
help.
This device complies with Part 15 of the FCC Rules. Operation
is subject to the following two conditions: (1) this device may not
cause harmful interference, and (2) this device must accept any
interference received, including interference that may cause
undesired operation.
Caution: Changes or modifications made to this device not expressly ap-
proved by Huawei Technologies Co., Ltd. may void the FCC
authorization to operate this device.

204
Appendix
Disposal and Recyclin g Informatio n
This symbol on the device (and any included batteries) indicates
that they should not be disposed of as normal household
garbage. Do not dispose of your device or batteries as unsorted
municipal waste. The device (and any batteries) should be
handed over to a certified collection point for recycling or proper
disposal at the end of their life. For more detailed information
about the recycling of the device or batteries, contact your local
city office, the household waste disposal service, or the retail
store where you purchased this device.
For more detailed information about the recycling of the device
or batteries, contact your local city office, the household waste
disposal service, or the retail store where you purchased this
device.
The disposal of this device is subject to the Waste from
Electrical and Electronic Equipment (WEEE) directive of the
European Union. The reason for separating WEEE and

205
Appendix
batteries from other waste is to minimize the potential
environmental impacts on human health of any hazardous
substances that may be present.
Reduction of Haza rdous Substances
This device is compliant with the EU Registration, Evaluation,
Authorisation and Restriction of Chemicals (REACH) Regulation
(Regulation No 1907/2006/EC of the European Parliament and
of the Council) and the EU Restriction of Hazardous Substances
(RoHS) Directive (Directive 2002/95/EC of the European
Parliament and of the Council). For more information about the
REACH compliance of the device, visit the Web site
www.huaweidevice.com/certification. You are recommended to
visit the Web site regularly for up-to-date information.
EU Re gulatory Con formance
Hereby, Huawei Technologies Co., Ltd. declares that this device
is in compliance with the essential requirements and other
relevant provisions of Directive 1999/5/EC.
For the declaration of conformity, visit the Web site
www.huaweidevice.com/certification.
206
Appendix
Note: Observe the national local regulations in the location where the
device is to be used. This device may be restricted for use in some
or all member states of the European Union (EU).
Note: This device may be operated in all member states of the EU.
France: Outdoor use limited to 10 mW e.i.r.p. within the band
2454-2483.5 MHz.
Italy: For private use, a general authorisation is required if WAS/
RLAN’s are used outside own premises. For public use, a
general authorisation is required.
Luxembourg: General authorisation required for network and
service supply.
Norway: This subsection does not apply for the geographical
area within a radius of 20 km from the centre of Ny-Ålesund.
207Index
Numerics
12–key PhonePad . . . . . . . . . . . . . . . . . . . . . . . . . . . . . . . . . . . . . . . . . . .75
A
about canvas . . . . . . . . . . . . . . . . . . . . . . . . . . . . . . . . . . . . . . . . . . . . . . . 28
accept an invitation . . . . . . . . . . . . . . . . . . . . . . . . . . . . . . . . . . . . . . . . .142
add a favorite contact . . . . . . . . . . . . . . . . . . . . . . . . . . . . . . . . . . . . . . . . 64
add a new contact . . . . . . . . . . . . . . . . . . . . . . . . . . . . . . . . . . . . . . . . . . . 63
add a new friend . . . . . . . . . . . . . . . . . . . . . . . . . . . . . . . . . . . . . . . . . . . .141
add a new screen item . . . . . . . . . . . . . . . . . . . . . . . . . . . . . . . . . . . . . . .25
add an alarm . . . . . . . . . . . . . . . . . . . . . . . . . . . . . . . . . . . . . . . . . . . . . . . 168
add an email account . . . . . . . . . . . . . . . . . . . . . . . . . . . . . . . . . . . . . . . . 89
add an enrty to your contacts . . . . . . . . . . . . . . . . . . . . . . . . . . . . . . . . . . 55
add music to a playlist . . . . . . . . . . . . . . . . . . . . . . . . . . . . . . . . . . . . . . .131
add other email accounts . . . . . . . . . . . . . . . . . . . . . . . . . . . . . . . . . . . . .91
add slideshows . . . . . . . . . . . . . . . . . . . . . . . . . . . . . . . . . . . . . . . . . . . . . . 87
adjust the media volume . . . . . . . . . . . . . . . . . . . . . . . . . . . . . . . . . . . . . 181
adjust the ringer volume . . . . . . . . . . . . . . . . . . . . . . . . . . . . . . . . . . . . . 180
adjust the screen brightness . . . . . . . . . . . . . . . . . . . . . . . . . . . . . . . . . 178
adjust the speech rate . . . . . . . . . . . . . . . . . . . . . . . . . . . . . . . . . . . . . . .185
adjust the time before the screen turns off . . . . . . . . . . . . . . . . . . . . .179
advanced panel . . . . . . . . . . . . . . . . . . . . . . . . . . . . . . . . . . . . . . . . . . . . 176
agenda view . . . . . . . . . . . . . . . . . . . . . . . . . . . . . . . . . . . . . . . . . . . . . . . 160
airplane mode . . . . . . . . . . . . . . . . . . . . . . . . . . . . . . . . . . . . . . . . . . . . . . .57
alarm list screen . . . . . . . . . . . . . . . . . . . . . . . . . . . . . . . . . . . . . . . . . . . . 167
208Index
Album contents screen . . . . . . . . . . . . . . . . . . . . . . . . . . . . . . . . 117, 120
Android keyboard . . . . . . . . . . . . . . . . . . . . . . . . . . . . . . . . . . . . . . . . . . . . 76
Android keyboard settings . . . . . . . . . . . . . . . . . . . . . . . . . . . . . . . . . . . .80
answer a call . . . . . . . . . . . . . . . . . . . . . . . . . . . . . . . . . . . . . . . . . . . . . . . . 52
B
back key functions . . . . . . . . . . . . . . . . . . . . . . . . . . . . . . . . . . . . . . . . . . .12
back up my settings . . . . . . . . . . . . . . . . . . . . . . . . . . . . . . . . . . . . . . . . . 188
Bluetooth . . . . . . . . . . . . . . . . . . . . . . . . . . . . . . . . . . . . . . . . . . . . . . . . . .102
bookmark a web page . . . . . . . . . . . . . . . . . . . . . . . . . . . . . . . . . . . . . . . 101
browser settings . . . . . . . . . . . . . . . . . . . . . . . . . . . . . . . . . . . . . . . . . . . . 102
C
calculator . . . . . . . . . . . . . . . . . . . . . . . . . . . . . . . . . . . . . . . . . . . . . . . . . .175
Calendar . . . . . . . . . . . . . . . . . . . . . . . . . . . . . . . . . . . . . . . . . . . . . . . . . . 157
calendar panel . . . . . . . . . . . . . . . . . . . . . . . . . . . . . . . . . . . . . . . . . . . . . 158
call log . . . . . . . . . . . . . . . . . . . . . . . . . . . . . . . . . . . . . . . . . . . . . . . . . . . . . 54
call settings . . . . . . . . . . . . . . . . . . . . . . . . . . . . . . . . . . . . . . . . . . . . . . . .182
Capture screen . . . . . . . . . . . . . . . . . . . . . . . . . . . . . . . . . . . . . . . . . . . . . 110
change a theme . . . . . . . . . . . . . . . . . . . . . . . . . . . . . . . . . . . . . . . . . . . . .40
change a wallpaper . . . . . . . . . . . . . . . . . . . . . . . . . . . . . . . . . . . . . . . . . .40
change an account’s synchronization settings . . . . . . . . . . . . . . . . . .156
change email account settings . . . . . . . . . . . . . . . . . . . . . . . . . . . . . . . .92
change the calendar view . . . . . . . . . . . . . . . . . . . . . . . . . . . . . . . . . . . . 159
change the phone ringtone . . . . . . . . . . . . . . . . . . . . . . . . . . . . . . . . . . . 181
209Index
charge the battery . . . . . . . . . . . . . . . . . . . . . . . . . . . . . . . . . . . . . . . . . . . 15
check the network connection . . . . . . . . . . . . . . . . . . . . . . . . . . . . . . . . .96
close the notification panel . . . . . . . . . . . . . . . . . . . . . . . . . . . . . . . . . . . . 44
communicate with a contact . . . . . . . . . . . . . . . . . . . . . . . . . . . . . . . . . . .70
conference call . . . . . . . . . . . . . . . . . . . . . . . . . . . . . . . . . . . . . . . . . . . . . . 55
configure general sync settings . . . . . . . . . . . . . . . . . . . 152, 154, 155
connect a Bluetooth device . . . . . . . . . . . . . . . . . . . . . . . . . . . . . . . . . . 104
connect to a wireless network . . . . . . . . . . . . . . . . . . . . . . . . . . . . . . . . . 97
contacts details . . . . . . . . . . . . . . . . . . . . . . . . . . . . . . . . . . . . . . . . . . . . . .62
CooTek T+ . . . . . . . . . . . . . . . . . . . . . . . . . . . . . . . . . . . . . . . . . . . . . . . . .75
copy a file . . . . . . . . . . . . . . . . . . . . . . . . . . . . . . . . . . . . . . . . . . . . . . . . . 174
copy music to the microSD card . . . . . . . . . . . . . . . . . . . . . . . . . . . . . .127
copyright . . . . . . . . . . . . . . . . . . . . . . . . . . . . . . . . . . . . . . . . . . . . . . . . . . . . 5
create a folder . . . . . . . . . . . . . . . . . . . . . . . . . . . . . . . . . . . . . . . . .38, 173
create a Google account . . . . . . . . . . . . . . . . . . . . . . . . . . . . . . . . . . . . . 136
create a multimedia message . . . . . . . . . . . . . . . . . . . . . . . . . . . . . . . . .86
create a text message . . . . . . . . . . . . . . . . . . . . . . . . . . . . . . . . . . . . . . . .83
create an email . . . . . . . . . . . . . . . . . . . . . . . . . . . . . . . . . . . . . . . . . . . . . 138
create an email message . . . . . . . . . . . . . . . . . . . . . . . . . . . . . . . . . . . . . 94
create an event . . . . . . . . . . . . . . . . . . . . . . . . . . . . . . . . . . . . . . . . . . . . . 164
crop a picture . . . . . . . . . . . . . . . . . . . . . . . . . . . . . . . . . . . . . . . . 121, 126
customize the alarm settings . . . . . . . . . . . . . . . . . . . . . . . . . . . . . . . . . 169
customize the calendar settings . . . . . . . . . . . . . . . . . . . . . . . . . . . . . .165
customize your account synchronization . . . . . . . . . . . . . . . . . . . . . . . 154
customize your Gmail/Google Mail settings . . . . . . . . . . . . . . . . . . . . 140
210Index
cut a file . . . . . . . . . . . . . . . . . . . . . . . . . . . . . . . . . . . . . . . . . . . . . . . . . . . 174
D
date settings . . . . . . . . . . . . . . . . . . . . . . . . . . . . . . . . . . . . . . . . . . . . . . . 177
day view . . . . . . . . . . . . . . . . . . . . . . . . . . . . . . . . . . . . . . . . . . . . . . . . . . .161
delete a contact . . . . . . . . . . . . . . . . . . . . . . . . . . . . . . . . . . . . . . . . . . . . .64
delete an email accounts . . . . . . . . . . . . . . . . . . . . . . . . . . . . . . . . . . . . .91
dialer . . . . . . . . . . . . . . . . . . . . . . . . . . . . . . . . . . . . . . . . . . . . . . . . . . . . . . 50
dialpad . . . . . . . . . . . . . . . . . . . . . . . . . . . . . . . . . . . . . . . . . . . . . . . . . . . . .49
disconnect a Bluetooth device . . . . . . . . . . . . . . . . . . . . . . . . . . . . . . . .105
display area . . . . . . . . . . . . . . . . . . . . . . . . . . . . . . . . . . . . . . . . . . . . . . . . .23
download the upgrade package . . . . . . . . . . . . . . . . . . . . . . . . . . . . . .190
E
edit a contact . . . . . . . . . . . . . . . . . . . . . . . . . . . . . . . . . . . . . . . . . . . . . . .65
Email message screen . . . . . . . . . . . . . . . . . . . . . . . . . . . . . . . . . . . . . . . 94
end a call . . . . . . . . . . . . . . . . . . . . . . . . . . . . . . . . . . . . . . . . . . . . . . . . . . . 53
end key functions . . . . . . . . . . . . . . . . . . . . . . . . . . . . . . . . . . . . . . . . . . . . 12
entertainment . . . . . . . . . . . . . . . . . . . . . . . . . . . . . . . . . . . . . . . . . . . . . . 109
expand the Canvas . . . . . . . . . . . . . . . . . . . . . . . . . . . . . . . . . . . . . . . . . . 29
export regulations . . . . . . . . . . . . . . . . . . . . . . . . . . . . . . . . . . . . . . . . . . . . 7
F
file manager . . . . . . . . . . . . . . . . . . . . . . . . . . . . . . . . . . . . . . . . . . . . . . . 172
FM Radio screen . . . . . . . . . . . . . . . . . . . . . . . . . . . . . . . . . . . . . . . . . . . 133
fm radio widget . . . . . . . . . . . . . . . . . . . . . . . . . . . . . . . . . . . . . . . . . . . . . . 33
211Index
forward an email . . . . . . . . . . . . . . . . . . . . . . . . . . . . . . . . . . . . . . . . . . . . 139
free up your phone memory . . . . . . . . . . . . . . . . . . . . . . . . . . . . . . . . . . 188
Full QWERTY . . . . . . . . . . . . . . . . . . . . . . . . . . . . . . . . . . . . . . . . . . . . . . .75
G
gallery screen . . . . . . . . . . . . . . . . . . . . . . . . . . . . . . . . . . . . . . . . . . . . . . 114
get directions . . . . . . . . . . . . . . . . . . . . . . . . . . . . . . . . . . . . . . . . . . . . . . 145
H
home key functions . . . . . . . . . . . . . . . . . . . . . . . . . . . . . . . . . . . . . . . . . .12
I
import contacts from the SIM card . . . . . . . . . . . . . . . . . . . . . . . . . . . . .68
import regulations . . . . . . . . . . . . . . . . . . . . . . . . . . . . . . . . . . . . . . . . . . . . 7
important information about the battery . . . . . . . . . . . . . . . . . . . . . . . . . 15
input settings . . . . . . . . . . . . . . . . . . . . . . . . . . . . . . . . . . . . . . . . . . . . . . . .77
install an application . . . . . . . . . . . . . . . . . . . . . . . . . . . . . . . . . . . . . . . .148
install the battery . . . . . . . . . . . . . . . . . . . . . . . . . . . . . . . . . . . . . . . . . . . . 14
install the microSD card . . . . . . . . . . . . . . . . . . . . . . . . . . . . . . . . . . . . . .45
install the SIM card . . . . . . . . . . . . . . . . . . . . . . . . . . . . . . . . . . . . . . . . . .13
install the voice data . . . . . . . . . . . . . . . . . . . . . . . . . . . . . . . . . . . . . . . .184
Interface switching buttons . . . . . . . . . . . . . . . . . . . . . . . . . . . . . . . . . . . . 24
L
landscape keyboard . . . . . . . . . . . . . . . . . . . . . . . . . . . . . . . . . . . . . . . . .77
library panel . . . . . . . . . . . . . . . . . . . . . . . . . . . . . . . . . . . . . . . . . . . . . . . 129