Huawei Technologies U8520-1 HSDPA/UMTS/GPRS/GSM/EDGE Mobile Phone with Bluetooth User Manual U8520 UM normal 20110829
Huawei Technologies Co.,Ltd HSDPA/UMTS/GPRS/GSM/EDGE Mobile Phone with Bluetooth U8520 UM normal 20110829
Contents
Users Manual

U8520-1
User Guide

1
Reading Before Proceeding
Safety Precautions
Please read the safety precautions carefully to ensure the
correct use of your mobile phone.
Do not crash, throw, or puncture your mobile
phone. Avoid the falling, squeezing, and bending of
your mobile phone.
Do not use your mobile phone in a moist
environment, such as the bathroom. Prevent your
mobile phone from being soaked or washed in
liquid.
Do not switch on your mobile phone when it is
prohibited to use phones or when the phone may
cause interference or danger.
Do not use your mobile phone while driving.
Follow any rules or regulations in hospitals and
health care facilities. Switch off your mobile phone
near medical apparatus.
Switch off your mobile phone in aircraft. The phone
may cause interference to control equipment of the
aircraft.
Switch off your mobile phone near high-precision
electronic devices. The phone may affect the
performance of these devices.

2
Do not attempt to disassemble your mobile phone
or its accessories. Only qualified personnel are
allowed to service or repair the phone.
Do not place your mobile phone or its accessories
in containers with a strong electromagnetic field.
Do not place magnetic storage media near your
mobile phone. Radiation from the phone may erase
the information stored on them.
Do not put your mobile phone in a high-
temperature place or use it in a place with
flammable gas such as a gas station.
Keep your mobile phone and its accessories away
from children. Do not allow children to use your
mobile phone without guidance.
Use only approved batteries and chargers to avoid
the risk of explosions.
Observe any laws or regulations on the use of
wireless devices. Respect others’ privacy and legal
rights when using your wireless device.
Strictly follow the relevant instructions of this
manual while using the USB cable. Otherwise your
mobile phone or PC may be damaged.

3
Legal Notice
Copyright © Huawei Technologies Co., Ltd. 2011. All rights
reserved.
No part of this document may be reproduced or transmitted
in any form or by any means without prior written consent of
Huawei Technologies Co., Ltd.
The product described in this manual may include
copyrighted software of Huawei Technologies Co., Ltd. and
possible licensors. Customers shall not in any manner
reproduce, distribute, modify, decompile, disassemble,
decrypt, extract, reverse engineer, lease, assign, or
sublicense the said software, unless such restrictions are
prohibited by applicable laws or such actions are approved
by respective copyright holders under licenses.
Trademarks and Permissions
, , and are trademarks or registered
trademarks of Huawei Technologies Co., Ltd.
Other trademarks and product, service and company names
mentioned are the property of their respective owners.
Notice
Some features of the product and its accessories described
herein rely on the software installed, capacities and settings
of local network, and may not be activated or may be limited
by local network operators or network service providers.
Thus the descriptions herein may not exactly match the
product or its accessories you purchase.
4
Huawei Technologies Co., Ltd. reserves the right to change
or modify any information or specifications contained in this
manual without prior notice or obligation.
Huawei Technologies Co., Ltd. is not responsible for the
legitimacy and quality of any products that you upload or
download through this mobile phone, including but not limited
to the text, pictures, music, movies, and non-built-in software
with copyright protection. Any consequences arising from the
installation or usage of the preceding products on this mobile
phone shall be borne by yourself.
NO WARRANTY
THE CONTENTS OF THIS MANUAL ARE PROVIDED “AS
IS”. EXCEPT AS REQUIRED BY APPLICABLE LAWS, NO
WARRANTIES OF ANY KIND, EITHER EXPRESS OR
IMPLIED, INCLUDING BUT NOT LIMITED TO, THE
IMPLIED WARRANTIES OF MERCHANTABILITY AND
FITNESS FOR A PARTICULAR PURPOSE, ARE MADE IN
RELATION TO THE ACCURACY, RELIABILITY OR
CONTENTS OF THIS MANUAL.
TO THE MAXIMUM EXTENT PERMITTED BY
APPLICABLE LAW, IN NO CASE SHALL HUAWEI
TECHNOLOGIES CO., LTD. BE LIABLE FOR ANY
SPECIAL, INCIDENTAL, INDIRECT, OR
CONSEQUENTIAL DAMAGES, OR LOST PROFITS,
BUSINESS, REVENUE, DATA, GOODWILL OR
ANTICIPATED SAVINGS.
Import and Export Regulations
Customers shall comply with all applicable export or import
laws and regulations and will obtain all necessary
governmental permits and licenses in order to export, re-
5
export or import the product mentioned in this manual
including the software and technical data therein.
6
Getting Started
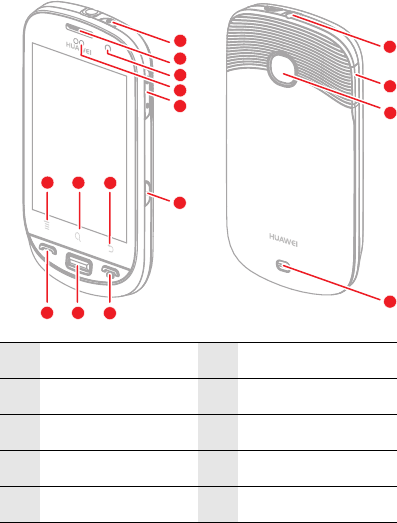
Appearance
Phone at a Glance
Note:
All the figures in this guide are for your reference only. The actual
appearance and display features depend on the mobile phone you
purchase.
1 Power key 2 Earpiece
3 Front camera 4 Proximity sensors
5 Volume keys 6 Capture key
7 End key 8 Home key
9 Send key 10 Menu key
6
7
8
9
13
14
15
16
12
11
10
1
2
3
4
5
7
Key Functions at Your Fingertips
11 Search key 12 Back key
13 Headset jack 14 Charging/Data
interface
15 Camera 16 Speaker
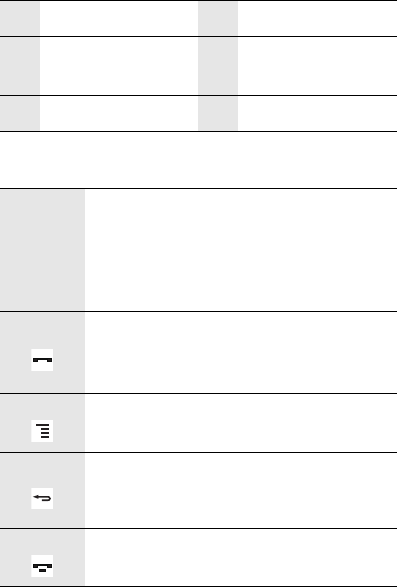
Power
key
• Press to power your phone on.
• Press and hold to open the Phone
options menu.
• Press to lock the screen when your
phone is powered on.
Send key • Press to go to the Call Log screen.
• Press to call an entered number.
• Press to answer a call.
Menu key Press to open the menu on an active
screen.
Back key • Press to return to the previous screen.
• Press to exit any application you are
running.
End key Press to end a call.
8
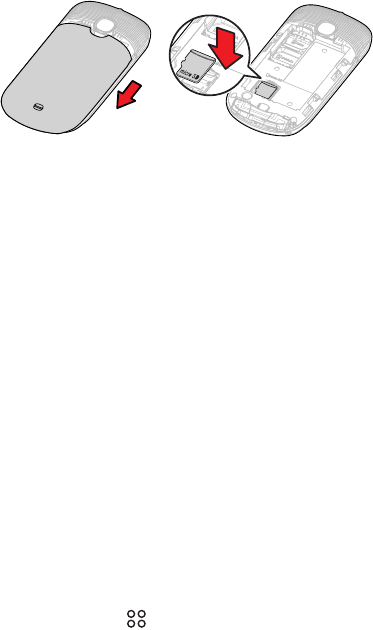
Setting Up Your Phone
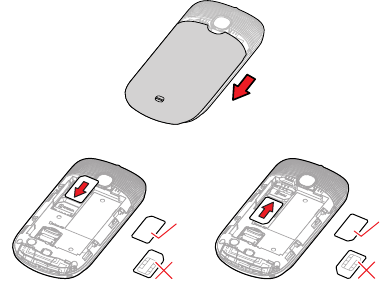
Installing the SIM Cards
1. Remove the battery cover.
2. Insert the subscriber identity module (SIM) cards as
shown in the figure.
Note:
When inserting a SIM card, ensure that the gold contact area faces
down.
Card slot 1 supports WCDMA and GSM networks while card slot 2
supports only GSM networks. If you want to use a SIM card
supporting WCDMA networks on your phone, insert the card in card
slot 1 for better network services.
SIM1 SIM2
9
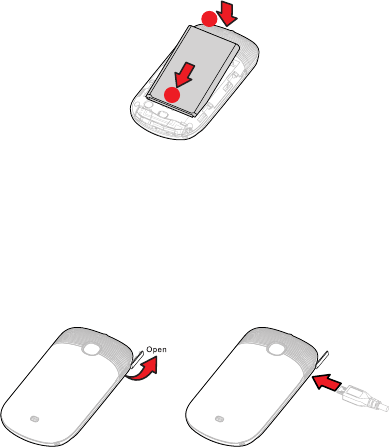
Installing the Battery
1. Remove the battery cover.
2. Insert the battery at a downward angle (a) and move it
slightly forward until it snaps into place at (b).
3. Replace the battery cover.
Charging the Battery
Before charging the battery, ensure that it has been properly
inserted on your phone.
1. Connect the USB cable that came with your mobile phone
to the charger.
2. Connect the other end of the USB cable to your phone.
Then, to start charging, plug the charger into an electrical
outlet.
a
b
10
Important Information About the Battery
• If the battery has not been used for a long time, you may not
be able to power on your mobile phone immediately after
you begin charging the battery. Allow the battery to charge
for a few minutes with the phone powered off before
attempting to power the phone on.
• Over time, the battery will not hold a charge for as long as
it did when it was new. When the battery life becomes
noticeably shorter than usual after being charged properly,
replace the battery with a new one of the same type.
• Using data services increases demand on the battery and
will reduce the length of time it can hold a charge.
• The time required to charge the battery depends on the
environmental temperature and the age of the battery.
• When the battery power level is low, the phone plays an
alert and displays a prompt. When battery power is almost
exhausted, your phone will power off automatically.
Powering Your Phone On or Off
Powering Your Phone On
Press the Power key to power your phone on.
Note:
If personal identification number (PIN) protection is enabled on your
phone, you must enter your PIN before using the phone.
Powering Your Phone Off
1. Press and hold the Power key to open the Phone options
menu.
2. Touch Power off > OK.
11
Using the Touchscreen
Touchscreen Actions
• Touch: Tap the screen with your finger to select an item,
confirm a selection, or start an application.
• Touch and hold: Touch an item with your fingertip and
continue to press down until your phone responds. For
example, to open the options menu for the active screen,
touch the screen and hold down until the menu appears.
• Flick: Move your finger across the screen either vertically
or horizontally. For example, flick left or right to switch
between pictures.
• Drag: Touch and hold the desired item with your finger.
Drag the item to any part of the screen. You can drag an
icon to move or delete it.
Rotating Your Phone Screen
The orientation of most screens will rotate with the phone as
you turn it from upright to sideways and back again.
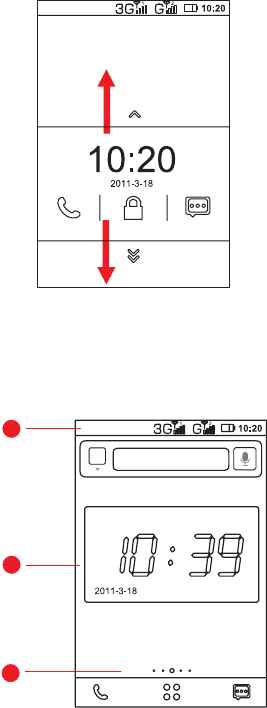
Locking and Unlocking the Screen
Locking the Screen
• When your phone is on, press the Power key to lock the
screen. When the screen is locked, you can still receive
messages and calls.
• If you leave your mobile phone undisturbed for a while, the
screen will lock automatically.
Unlocking the Screen
Press the Power key to wake up the screen. Then drag the
lock icon up or down to unlock the screen.
12
Note:
If you have set up a screen unlock pattern, you will be prompted to
draw the pattern on the screen to unlock it.
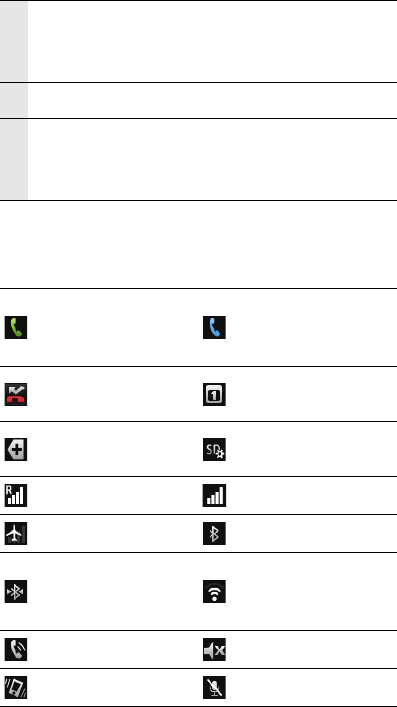
Home screen
1
2
3
g
13
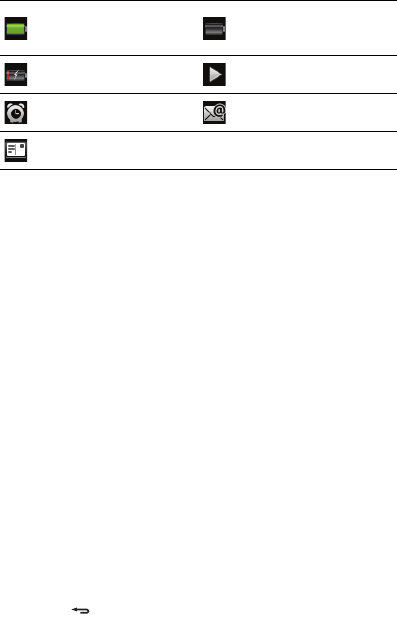
Notifications and Status Information
Notification and Status Icons
1
Notification bar: Displays notifications and status
icons for your mobile phone. Flick down to open
the notification panel.
2Display area: Shows the date and time.
3
Home screen and extension indicator: Indicates
the number of home screen extensions.The yellow
dot indicates the current screen.
Call in progress
Call in progress
using a Bluetooth
device
Missed call New calendar
reminder
More undisplayed
notifications
Preparing the
mircoSD card
Roaming Signal strength
Airplane mode Bluetooth on
Connected to
another Bluetooth
device
Connected to a Wi-Fi
network
Speaker on Sound off
Vibration mode Microphone off
14
Notification Panel
Your mobile phone will notify you when you receive a new
message or there is an incoming event. The notification
panel also informs you of alarms and settings. For example,
you will be notified when Call forwarding is activated. Open
the notification panel to see your network operator or to view
a message, reminder, or event notification.
Opening the Notification Panel
1. When a new notification icon appears on the notification
bar, touch and hold the notification bar, and flick down to
open the notification panel.
2. On the notification panel, you can:
• Touch a notification to open the relevant application.
• Touch Clear to clear all notifications.
Closing the Notification Panel
Touch and hold the bottom of the panel. Then flick up or
touch to close.
Adding a Home Screen Item
1. Touch and hold the blank area on the Home screen until
the Add to Home screen menu is displayed.
Battery full Extremely low
battery
Charging battery Music playing
Alarm enabled New email
New message
15
2. Select an item to add it to the Home screen.
Moving a Home Screen Item
1. Touch and hold an item on the Home screen until the item
enlarges and the phone vibrates.
2. Without lifting your finger, drag the item to the desired
position on the Home screen, and then release your finger.
Removing a Home Screen Item
1. Touch and hold an item on the Home screen until the item
enlarges and the phone vibrates.
2. Without lifting your finger, drag the item to the trash can.
3. When the item turn red,release your finger to remove it
from the Home screen.
Widgets
A widget works as a shortcut to let you preview or use an
application. Several widgets have been installed on your
phone by default. You can download more widgets from
Android Market.
To add a widget to the Home screen:
1. Touch and hold the blank area on the Home screen to
open the Add to Home screen menu.
2. Touch Widgets to open the Choose widget menu.
3. Touch the widget you want to add to the Home screen.

16
Folders
Adding a Folder to the Home screen
1. Touch and hold the blank area on the Home screen to
open the Add to Home screen menu.Touch Folders to
open the Select folder menu.
2. Select the folder you want to add to the Home screen.
Renaming a Folder on the Home screen
1. On the Home screen, touch the folder you want to rename
to open it. Touch and hold the title bar of the folder to open
the Rename folder dialog box.
2. In Folder name, enter the new folder name, and touch
OK.
Changing the Wallpaper
1. On the Home screen, press , and touch Wallpaper to
open the Select wallpaper from menu.
2. Do any of the following:
• Touch Gallery to select a picture and set it as the
wallpaper.
• Touch Live Wallpapers to select a picture and set it as
the wallpaper.
• Touch Wallpapers to select a picture and set it as the
wallpaper.
17
Using a microSD Card
Installing the microSD Card
1. Remove the battery cover.
2. Insert the microSD card into the card slot as shown in the
figure.
Note:
When inserting the microSD card, ensure that the gold contact area
faces down.
Using the microSD Card as USB Mass Storage
To transfer all your favorite music and pictures from your PC
to your phone’s microSD card, set the microSD card as USB
mass storage.
1. Connect your phone to your PC with the USB cable
provided. Your PC will detect the microSD card as a
removable storage device.
2. Touch Mount sdcard to your computer in the dialog box
that opens to confirm that you want to transfer files. You
can now transfer files from your PC to your phone’s
microSD card.
Tip:
You can also touch > Settings > USB connect settings > Auto
USB storage mode to use the microSD card as USB mass storage.

18
Note:
When your microSD card functions as USB mass storage, your phone
will not use this memory space.
Removing the microSD Card
1. Touch > Settings.
2. Scroll down the screen, and touch SD card & phone
storage > Unmount SD card.
3. Touch OK to remove the microSD card.

19
Calling
To make a phone call, you can dial a number using the dialer
or touch a number saved in your contact list, on a web page,
or in a document. When you are in a call, you can answer
other incoming calls or redirect them to your voicemail. You
can also set up conference calls with several participants.
Note:
Your phone is Dual-SIM, Dual-Standby. When you are in a call using
one SIM card, the other SIM card is out of service and you cannot use
it to receive other calls.
Making a Call
To make a call, you can use the Phone application, or select
a number from Contacts or Call Log.
When you are in a call, you can press to return to the
Home screen and use other functions. To return to the calling
screen, flick the notification bar down and touch Current
call.
Note:
Do not block the microphone at the bottom of your phone if you want
your voice heard by the other parties in a call.
Making a Call with the Dialer
1. Touch > Phone to display the dialer.
If you are already working with Contacts or Call Log, touch the
Dialer tab.
2. Touch the appropriate number keys to enter the phone
number.
Tip: Your phone supports the SmartDial function, that is, when you
touch numbers on the dialer, the phone automatically

20
searches among your contacts and lists the matching results
ordered according to the accuracy of the match. If no contact
matches the information entered, the phone will not display
any result.
3. Touch SIM1 or SIM 2 to initiate the call.
Making a Call from Contacts
1. Touch > Contacts to display the contact list.
If you are already working with Dialer or Call Log, touch the
Contacts tab.
2. In the list, touch the contact you want to call.
3. Touch Call and then select SIM1 or SIM 2 to dial the
phone number.
Making a Call from Call Log
1. Touch > Phone > Call Log to display the call log.
If you are already working with Contacts or Dialer, touch the Call
Log tab.
2. Touch the log entry you want to call.
Tip: If you touch and hold the log entry, a menu containing multiple
options will open.
Answering and Rejecting a Call
Answering a Call
When you receive a phone call, the incoming call screen
opens. If you have previously saved the caller's number in
Contacts, the caller's name and number are displayed. If the
caller's number is not saved in Contacts, the caller's number
is displayed.
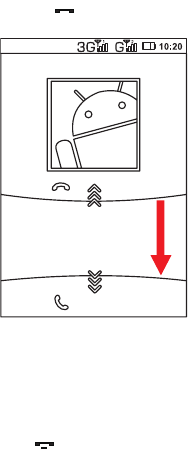
21
Drag down or press to answer the call.
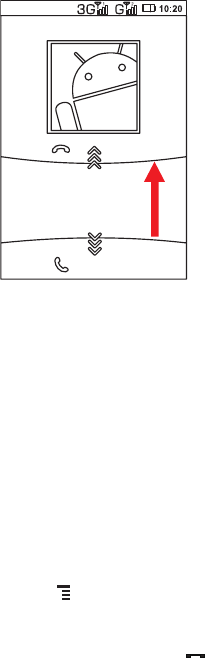
Ending a Call
During a call, press End call to hang up.
Rejecting a Call
Drag up or press to reject the call.
123456789
22
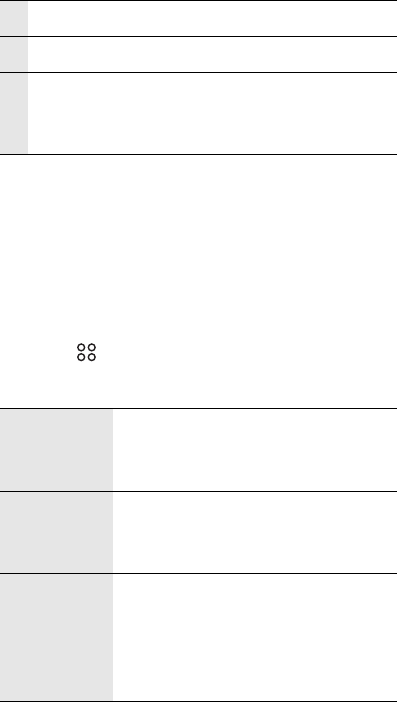
Other Operations During a Call
Making a Conference Call
If you receive a new call while you are already in a call, you
can add the second call to the call you are in. This feature is
known as conference calling. You can also set up a
conference call with multiple callers.
Note:
Contact your network operator to learn whether conference calls are
supported and if yes, how many parties can participate.
1. To initiate a conference call, dial the number of the first
participant. After you have connected to the first
participant, press , and touch Add call.
2. Enter the phone number of the next person you want to
invite for the conversation and press , or select
someone from your Call Log or Contacts. The first
123456789

23
participant is automatically placed on hold while you do
this.
3. Once you have connected to the second person, press
, and touch Merge calls to begin the conference call.
4. To add more people, touch Add call and repeat steps 2
and 3.
5. To disconnect someone from the call or to privately talk to
someone, press , and touch Manage conference call.
6. To end the conference call and disconnect from everyone,
press .
Switching Between Calls
If you are already in a call and a second call comes in, you
can press and touch Hold current call&answer to place
the first call on hold and connect to the second call.
Using Call Log
Call Log contains a list of calls that you have dialed,
received, or missed. You can use Call Log to quickly find a
recently called number or add an incoming number to your
contact list.
Adding an Entry to Contacts
1. Touch > Contacts> Call Log to display the call log.
2. Touch and hold the entry you want to add to Contacts.
3. In the displayed menu, touch Add to contacts.
24
4. Touch Save as new or Add to Existing.If you touch Add
to Existing, scroll through the contact list and touch an
existing contact name.
Using Airplane Mode
Some locations may require you to turn off your phone’s
wireless connections. Rather than powering your phone off,
you can place it in Airplane mode.
1. Press and hold the power key to open the Phone options
menu.
2. Touch Airplane mode.

25
Contacts
The Contacts application enables you to save and manage
information such as phone numbers and addresses of your
contacts. After you save contact information on your phone,
you have easy access to the people with whom you want to
communicate.
Opening the Contacts Application
If you have not yet added any contacts to your phone,
Contacts displays a message with hints on how to start
adding contact information.
To open the Contacts application:
• On the home screen, touch > Contacts.
• On the home screen, press , and touch the Contacts
tab.
All your contacts are alphabetically displayed in a list that you
can scroll through.Each contact is followed by a phone
number that you have set as the contact’s default phone
number.
Importing Contacts from a SIM Card
1. Open the contact list, press , and touch Import/Export
> Import from USIM/SIM card.
2. Touch Import all contacts or Select and import
contacts, then touch OK.
3. Wait for the SIM card contents to be loaded.If you have
touched Import all contacts > OK, all contacts saved on
your SIM card are imported.

26
4. If you have touched Select and import contacts > OK,
select the contacts you want to import, and touch in the
top right corner of the screen.
Adding a Contact
1. Open the contact list, press , and touch New contact.
Tip: you can also open the contact list, and touch +.
2. In the Save contact to menu, touch Phone, SIM1 card or
SIM2 card to select the storage where you want to save
the cantact.
3. Enter the contact's name, and add detailed information
such as the contact’s phone number or address.
4. When you are finished, touch Save to save the contact
information.
Adding a Contact to Your Favorites
To add a contact to your Favorites, open the contact list, and
do any of the following:
• Touch and hold the contact you want to add to Favorites.
Then touch Add to favorites.
• Touch a contact, and then touch the star next to the
contact’s name to make the star turn gold.
Searching for a Contact
1. Open the contact list, press , and touch Search.
Tip: You can also open the contact list, and touch .

27
2. Enter the name of the contact you want to search for. As
you type, contacts with matching names appear below the
search box.
Editing a Contact
You can make changes to the information you have stored
for a contact at any time.
1. Open the contact list, touch and hold the contact whose
details you want to edit, and touch Edit contact in the
displayed menu.
You can also press , and then touch Edit contact while viewing
a contact’s details.
2. Touch the text field where you want to make a change,
such as First name, Last name, Phone or Email.
3. Make the desired changes to the contact information, and
touch Save. To cancel all changes you made to the
contact information, touch Cancel.
Communicating with Your Contacts
From the Contacts or Favorites tab, you can quickly call or
send a text (SMS) or multimedia message (MMS) to a
contact’s default phone number. You can also open details to
view a list of all the ways you can communicate with that
contact. This section describes how to communicate with a
contact when you are viewing your contacts list.
Connecting Quickly with Your Contact
1. Touch the contact's picture or picture frame (if you have
not assigned a picture to the contact) to open Quick
28
Contact for Android, which allows you to quickly initiate a
connection to your contacts.
2. Touch the icon for the way you want to communicate with
the contact.
Note: The icons available depend on the information you have
entered for the contact, the applications installed on your
phone, and the accounts you have.
Communicating with a Contact
1. Open the contact list, and touch the contact that you want
to communicate with.
2. On the contact’s details screen, touch Message or Call to
send a message or make a call to the contact.
Deleting a Contact
1. Open the contact list, touch and hold the contact that you
want to delete, and touch Delete contact in the displayed
menu.
2. Touch OK to confirm that you want to delete the contact.

29
Using the Onscreen Keyboard
Displaying the Keyboard Panel
To enter text, use the onscreen keyboard. Some applications
automatically open the keyboard. In others, touch the text
field where you want to enter text to open the keyboard.
To hide the keyboard, press .
Tip:
Touch and hold a text field to open the Edit text menu.
Choosing an Input Method
1. Touch and hold a text field until the Edit text menu is
displayed.
2. Touch Input method.
3. Select the desired method.The onscreen keyboard is
automatically displayed.
Using the Android Keyboard
1 Touch to change from uppercase to lowercase.
2Touch to change from text mode to symbol/
number mode.
.:-)
DEL
QWERTYU IO
P
ASDFGHJKL
ZXCVBNM
234
15
30
Using the Landscape Keyboard
If you find the keyboard inconvenient or difficult to use, turn
your phone sideways. The screen will display the keyboard in
landscape orientation, providing you with a wider keyboard
layout.
Customizing Keyboard Settings
Touch > Settings > Language & keyboard > Android
keyboard to customize Android keyboard settings.
3 Touch to enter text by voice.
4 Touch to insert a space in your text.
5
Touch to delete the character to the left of the
cursor. Touch and hold to delete all characters to
the left of the cursor.
Vibrate on
keypress
Select to set the phone to vibrate each
time you touch a key on the onscreen
keyboard.
Sound on
keypress
Select to play a brief sound each time
you touch a key on the onscreen
keyboard.
Auto-
capitalization
Select to set the onscreen keyboard to
automatically capitalize the first letter
of the first word after a period, the first
word in a text field, and each word in
name fields.

31
Quick fixes Select to correct common spelling
mistakes as you type.
Show
suggestions
Select to display suggested words as
you type.
Auto-
complete
Select to automatically enter a
suggested word, highlighted in orange
in the strip above the keyboard, when
you enter a space or punctuation.
32
Message
The Message application allows you to exchange text and
multimedia messages with anyone using a phone supporting
the Short Message Service (SMS) and the Multimedia
Messaging Service (MMS). With the Email application you
can receive and send emails.
SMS and MMS
Opening Message
• On the home screen, touch .
• On the home screen, touch > Message.
Sending a Text Message
1. Touch > Message, then touch the icon in the top left
corner of the screen.
2. Enter a phone number in To, or touch + to select a contact
from Contacts.
As you enter the phone number, matching contacts appear. You
can touch a suggested recipient or continue entering the phone
number.
3. Touch Compose to start writing your message.
While writing the message, you can press to save the
message as a draft in your message list. To continue writing the
message, touch the message.
4. When you finish the message, touch Sim1 or Sim2 to
send the message.
The message list opens, and your name appears in the list,
followed by the message you just sent. Responses appear in

33
the window. As you view and send additional messages, a
message thread is created.
Sending a Multimedia Message
1. Touch > Message, then touch the icon in the top left
corner of the screen.
2. Enter a phone number in To, or touch + to select a contact
from Contacts.
3. Touch Compose to start editing your message.
Tip: If you want to enter a smiley, touch the icon next to the
Compose text field, and then touch smiley icon at the botttom
of the screen.
4. Press , and touch Add subject to add the message
subject.Your phone is now in multimedia message mode.
5. Touch the icon next to the Compose text field to add a
picture,audio file,or video file to the message.
6. When the message is finished, touch Sim1 MMS or Sim2
MMS to send the message.
Adding a Slideshow
If you want to attach more than one file to your message, use
the Slideshow option.
1. On the message-editing screen,touch the icon next to the
Compose text field.
2. In the displayed menu, touch Slideshow, select a slide
and start to edit it.

34
3. To add and edit another slide, press and touch Add
slide in the displayed menu.
While editing the slide, you can touch the yellow arrow icons to
switch between slides.
4. Touch Done to finish composing your message and return
to the multimedia message screen.
5. To alter your multimedia message, touch Edit on the
multimedia message screen. When the message is ready
to be sent, select Sim1 MMS or Sim2 MMS to send the
message.
Opening and Viewing a Multimedia Message
1. Open the message list, and touch the message thread to
open it.
2. Touch the multimedia message to view the message.
3. Flick up or down to view the previous or next slide.
Replying to a Message
1. Open the message list, and touch a text or multimedia
message thread to open it.
2. Touch Compose to compose your message.
3. When the message is finishied, touch Sim1 or Sim2 to
send the message.
Customizing Message Settings
Open the message list, press , and touch Settings to
customize message settings.

35
Email
Your phone also puts email at your fingertips. With your
phone’s Email application, you can add versions of Yahoo!,
AOL, and other popular email services to your phone. These
types of email accounts are known as POP3 or IMAP.
Adding an Email Account
When using the Email application for the first time, you must
configure an email account. The email setup wizard helps
you to configure your account. A number of popular email
systems are supported, You can work with the same email
service as you use on your PC or you can select another
email service.
1. Touch > Email.
2. To customize your email settings, follow the onscreen
instructions, and touch Next. If you want to set the email
server yourself, touch Manual setup.
Note: When you touch Manual setup, contact your email service
provider for the settings required for setting up your account
if you do not know what they are.
3. Enter the account name and the name you want other
people to see when they receive an email from you.
4. Touch Done.
Your phone will use the email account to access your email
server. You can use your phone to send and receive emails.
After the initial setup, your Email application opens to display
the contents of your Inbox.

36
Adding Another Email Account
1. After creating your initial email account, press on the
Inbox screen, and touch Accounts to access the account
list.
2. Press , and touch Add account to create another
email account.
Tip:
When adding an additional email account, you have the option to use
the new account to send all outgoing messages.
Viewing an Email
1. Open the account list, and touch the email account you
want to use.
2. Select a folder, and touch the message that you want to
view.
Sending an Email
1. Open the account list, and touch the email account you
want to use.
2. On the Inbox screen, press , and touch Compose.
3. In To, enter the recipient’s name or email address.
4. Enter the subject of your message and compose the
message.
To send an attachment with the message, press , and then
touch Add attachment.
5. When you are finished, touch Send.
If you are not ready to send the message, touch Save as draft or
press to save the message as a draft.

37
Replying to an Email
1. Open the account list, and touch the email account you
want to use.
2. Touch the email to which you want to reply.
3. Touch Reply or Reply all to reply to the email.
Deleting an Email Account
1. Open the account list, touch and hold the email account
you want to delete.
2. Touch Remove account> OK.
Changing Email Account Settings
You can change a number of account settings, including how
often you check for emails, how you are notified of a new
email, and details about the servers the account uses to send
and receive emails.
Note:
Your account’s incoming and outgoing settings depend on the type of
email service you are using: IMAP or POP3. You can manually enter
the necessary details, although you may need to contact your email
service provider to obtain the correct information.
1. Touch > Email.
2. In the accounts list, touch and hold the email account you
want to change.
3. Touch Account settings.
4. Change General settings, Notification settings, Server
settings or Messages storage.