Huawei Technologies U8860-51 HSPA/UMTS/GPRS/GSM/EDGE Mobile Phone with BT User Manual Part 2
Huawei Technologies Co.,Ltd HSPA/UMTS/GPRS/GSM/EDGE Mobile Phone with BT Part 2
Contents
- 1. User Manual Part 1
- 2. User Manual Part 2
- 3. User Manual Part 3
- 4. User Manual Part 4
User Manual Part 2
18
2.7.1 Moving Icons on the Application Screen
1. On the application screen, touch .
2. Touch and hold the icon you want to move on the application screen.
3. Without lifting your finger, drag the icon to the desired location, and then release it.
To move more icons, repeat steps 2 and 3.
4. Touch or to save.
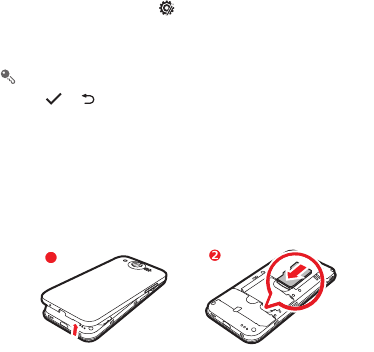
2.8 Using a microSD Card
2.8.1 (Optional) Installing the microSD Card
Your mobile phone is already equipped with a large-volume built-in embedded
MultiMediaCard (eMMC). If you want to expand your phone memory, you can also
insert a microSD card.
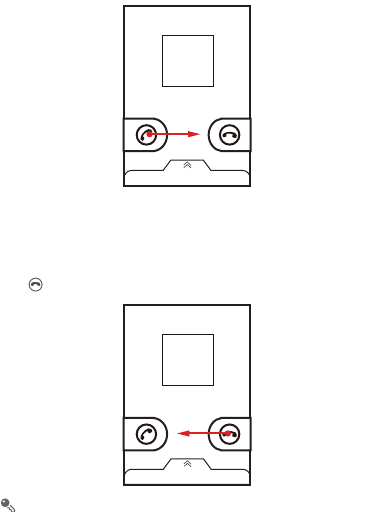
1. Remove the battery cover.
2. Insert the microSD card into the card slot as shown in the diagram.
2.8.2 Using the microSD Card as a USB Mass Storage
To transfer all your favorite music and pictures from your PC to your mobile phone’s
microSD card, set the microSD card as a USB mass storage.
1. Connect your mobile phone to your PC with the USB cable provided. Your PC will
detect the microSD card as a removable storage device.
2. Open the notification bar, and then touch
USB connected
.
3. Touch
Turn on USB storage
in the dialog box that opens to confirm that you want
to transfer files.
You can now transfer files from your PC to your mobile phone’s microSD card.
1

19
When your microSD card acts as a USB mass storage, your mobile phone will
not use this memory space. Ensure that you follow the correct procedures to
disconnect the USB mass storage device (your mobile phone) from the PC
when you have finished transferring files.
2.8.3 Removing the microSD Card
1. On the Home screen, touch >
Settings
.
2. Scroll down the screen, and then touch
Storage
>
Unmount SD card
.
3. Carefully remove the microSD card.
3 Calling
To make a phone call, you can dial a number using the keypad or touch a number
saved in your contact list, on a webpage, or in other places. When you are in a call,
you can answer other incoming calls or redirect them to your voicemail. You can also
set up conference calls with several participants.
3.1 Making a Call
To make a call, you can use the
Dialer
application, or select a number from
Contacts
or
Call log
.
When you are in a call, you can touch to use other functions. To return to the call
screen, flick the notification bar down and touch
Current call
.
Be careful not to block the microphone at the bottom of your phone if you want
your voice heard by the other parties in a call.
3.1.1 Making a Call with the Dialer Application
1. On the Home screen, touch >
Dialer
to display the dialer.
If you are already working with
Contacts
or
Call log
, touch the
Dialer
tab.
2. Touch the appropriate number keys to enter the phone number.
Your mobile phone supports the SmartDial function, that is, when you touch
numbers on the dialer, the phone automatically searches among your contacts
and lists the matching results ordered according to the accuracy of the match. If

20
no contacts match the information entered, the phone will not display any result.
3. Touch to initiate the call.
During a call, touch
Dialpad
to enter other numbers on the dialpad.
3.1.2 Making a Call from Contacts
1. On the Home screen, touch >
Contacts
to display the contact list.
If you are already working with
Dialer
or
Call log
, touch the
Contacts
tab.
2. In the list, touch the contact you want to call.
3. Touch to dial the phone number.
3.1.3 Making a Call from Call log
1. On the Home screen, touch >
Call log
to display the call log.
If you are already working with
Contacts
or
Dialer
, touch the
Call log
tab.
2. Touch to the right of the log entry to dial.
If you touch and hold a log entry, the options menu will open.
3.2 Answering or Rejecting a Call
3.2.1 Answering an Incoming Call
When you receive a phone call, the incoming call screen opens. If you have
previously saved the caller’s number in
Contacts
, the caller's name and number are
displayed. If the caller’s number is not saved in
Contacts
, the caller’s number is
displayed.
Drag to the right to answer the call.
21
3.2.2 Ending a Call
During a call, touch
End
to hang up.
3.2.3 Rejecting an Incoming Call
Drag to the left to reject the call.
You can also drag up the bar at the bottom of the screen to reject a call and send
the caller a message.

22
3.3 Other Operations During a Call
3.3.1 Making a Conference Call
If you receive a new call while you are already in a call, you can add the second call to
the call you are in. This feature is known as conference calling. You can also set up a
conference call with multiple callers.
Contact your network operator to ask if conference calls are supported and, if
yes, how many parties can participate.
1. To initiate a conference call, dial the number of the first participant. After you have
connected to the first participant, keep the connection open, touch
Add call
.
2. Enter the phone number of the next person you want to invite for the conversation
and touch , or select someone from your
Call log
or
Contacts
. The first
participant is automatically placed on hold while you do this.
3. Once you have connected to the second person, touch
Merge calls
to begin the
conference call.
4. To end the conference call and disconnect from everyone, touch
End
.
3.3.2 Switching Between Calls
If you receive a new call while you are already in a call, you can switch between the
two calls.
1. While you are in the first call and the second call comes in, answer the incoming
call, and then touch
Swap
.
2. The current call is placed on hold and you are connected to the first call.
3.4 Using the Call log
The
Call log
contains a list of calls that you have dialed, received, and missed. You
can use the call log to find a recently called number quickly or add a number from the
call log to your contact list.
3.4.1 Adding an Entry to Contacts
1. If you are already working with
Dialer
or
Contacts
, touch the
Call log
tab.
2. Touch and hold the entry you want to add to your
Contacts
.

23
3. Touch
Add to contacts
in the options menu.
4. Touch
Create contact
or scroll through the contact list and touch an existing
contact name.
3.5 Using Airplane Mode
Some locations may require you to turn off your phone’s wireless connections. Rather
than powering off your phone, you can place it in
Airplane mode
.
1. Press and hold .
2. Touch
Airplane mode
in the options menu.
4 Contacts
The
Contacts
application enables you to save and manage information such as
phone numbers and addresses of your contacts. After you save contact information
on your mobile phone, you have easy access to the people with whom you want to
communicate.
4.1 Opening the Contacts Application
If you have not yet added any contacts to your mobile phone,
Contacts
displays a
message with hints on how to start adding contacts information.
On the Home screen, touch >
Contacts
to open the
Contacts
application.
All of your contacts are displayed alphabetically in a list that you can scroll through.
4.2 Importing Contacts from a SIM Card
1. In the contact list, touch >
Manage contacts
.
2. Touch
Copy from SIM card
.
3. Wait for the SIM card contents to be loaded. Select the contacts you want to import
or touch
Select All
to select all contacts.
4. Touch
Copy
.
5. If you have more than one account on your phone, touch the account into which
you want to import the contacts.

24
4.3 Adding a Contact
1. In the contact list, touch >
Create contact
.
2. If you have more than one account with contacts, touch the account to which you
want to add the contact.
3. Enter the contact's name, and then add detailed information such as phone
number and address.
4. When you are finished, touch
Done
to save the contact information.
4.4 Adding a Contact to Your Favorites
• Touch and hold the contact you want to add to
Favorites
. Then touch
Add to
Favorites
.
• Touch a contact, and then touch the star to the right of the contact’s name. The star
turns gold.
4.5 Searching for a Contact
1. In the contact list, touch >
Search
.
2. Enter the name of the contact you wish to search for. As you type, contacts with
matching names appear below the search box.
On the contact list screen, you can touch a letter on the right to display contacts
starting with the touched letter.
4.6 Editing a Contact
You can make changes to the information you have stored for a contact at any time.
1. In the contacts list, touch and hold the contact whose details you want to edit, and
then touch
Edit contact
in the options menu.
2. Touch the category of contact information you wish to change: name, phone
number, email address, or any other information you recorded earlier.
3. Make the desired changes to the contact information, and then touch
Done
. To
cancel all of your changes, touch
Cancel
.

25
4.7 Communicating with Your Contacts
From the
Contacts
or
Favorites
tab, you can quickly call or send a text (SMS) or
multimedia (MMS) message to a contact’s default phone number. You can also open
details to view a list of all the ways you can communicate with that contact. This
section describes how to communicate with a contact when you view your contacts
list.
4.7.1 Using Quick Contact for Android
1. Touch the contact's picture or picture frame (if you have not assigned a picture to
the contact) to open Quick Contact for Android.
2. Touch the icon for the way you want to communicate with the contact.
The icons available depend on the information you have entered for the contact,
the applications installed on your phone, and the accounts you have.
4.7.2 Communicating with a Contact
1. In the contacts list, touch the contact that you want to communicate with.
2. On the contact’s details screen, touch the icon to the right of the number to call or
send messages.
4.8 Deleting a Contact
1. In the contacts list, touch and hold the contact that you want to delete, and then
touch
Delete contact
in the options menu.
2. Touch
OK
to confirm that you want to delete the contact.
4.9 Backing Up and Synchronizing
Contacts
You can back up contacts from your phone to a microSD card, or synchronize phone
contacts with a server using your Google account.

26
4.9.1 Using a microSD Card to Back Up Contacts
Backing Up Contacts
1. In the contact list, touch >
Manage contacts
.
2. Touch
Backup to SD card
in the displayed menu.
3. Touch
OK
to export your phone contact's information to the installed microSD card.
You can copy the .vcf files backed up on the microSD card to your computer. The files
are stored in the microSD card's
Contact
folder.
Restoring Contacts
1. In the contact list, touch >
Manage contacts
.
2. Touch
Restore from SD card
in the displayed menu.
If there is more than one .vcf files saved on the microSD card, you can choose to
restore one, multiple, or all the of them.
4.9.2 Using a Google Account to Synchronize Contacts
You can synchronize contacts using your Google account. For details, see Changing
an Account’s Synchronization Settings.
4.10 Streams
Streams
is a client that integrates social networking service (SNS) functions, such as
Facebook and Twitter. Using
Streams
, your SNS accounts can be closely linked with
Contacts.
To access the
Streams
screen, touch >
Streams
. You can also touch
Contacts
, and then flick left to switch to the
Streams
screen.
4.10.1 Logging in to an Account
1. The first time you access
Streams
, touch
Login to Social Network
.
2. Select the type of account that you want to log in to. Then follow the on-screen
setup instructions to complete login.
You can log in to different types of accounts at the same time. To add an account of
another type, touch >
Accounts
>
Add account
.

27
4.10.2 Importing Friends
After login, the phone asks you whether to import all friends. If you choose to import
friends,
Streams
will import the SNS accounts of all your friends to your phone. If not,
you can import your friends' accounts in Settings later.
After friends are imported, the group of imported accounts is automatically added to
the groups of
Contacts
.
4.10.3 Preference Settings
You can configure account settings, such as refresh mode, refresh frequency, and
notifications.
1. On the
Streams
screen, touch >
Accounts
. Then touch the account to be
configured.
2. On the account screen, touch
Social Preference Settings
to configure the
settings.
4.10.4 Adding the Streams Widget to the Home Screen
Touch and hold the blank area of the Home screen. In the displayed menu, touch
Add widget
>
Streams
to add it to the Home screen.
Using the widget, you can quickly access
Streams
, or directly browse the latest
events and update the status of your friends on the Home screen.
4.11 Managing Groups
4.11.1 Creating a Group
1. On the Home screen, touch >
Contacts
. Then flick the tab bar to the left and
touch
Groups
.
2. In the groups list, touch , and then touch
Create group
.
3. Enter the name and picture you want to assign to the group, and then set a ringtone
for it.
4. Touch >
Add Members
to add members to the group.
5. Select the contacts to be added to the group, and then touch
OK
.
6. When you are finished, touch
Done
to save the group information.

28
You can only add contacts saved in the phone memory to a group.
4.11.2 Editing a Group
You can always make changes to the information you have saved for a group.
1. In the groups list, touch and hold the group whose details you want to edit, and then
touch
Edit group
in the options menu.
2. Make the desired changes to the group information, and then touch
Done
. To
cancel all changes you made to the group information, touch
Cancel
.
4.11.3 Adding a Contact to Your Groups
To add a contact to your groups, you can do any of the following:
• Touch and hold the contact you want to add to
Groups
. Then touch
Add to
groups
.
• When editing a group, touch , and then touch
Add Members
to select the
contacts you want to add to group.
You can add contacts in phone memory rather than in SIM/UIM card to a group.
4.12 Joining and Separating Contacts
You may have duplicate contacts if you import contacts by:
• Adding an account, such as a Gmail account.
• Using the social networking services such as Facebook or Twitter. (If your phone
has the
Streams
function, you can use it to access Facebook or Twitter.)
• Using other methods, such as exchanging emails.
To avoid duplication, join two or more contacts together to form a single contact.
Availability of Facebook or Twitter may vary depending on your country or
carrier. Please use them according to local laws and regulations.
4.12.1 Joining Contacts
1. On the Home screen, touch >
Contacts
.
2. Touch a duplicated contact.

29
3. Touch
Joined Contacts
, and then touch
Add contact
.
4. Select the contact to be joined to combine two duplicate contacts.
Two contacts will be joined together and displayed as one contact. Touch the contact
to view the joined information. You can see that the contact is joined together by two
contacts. You can also combine more than two contacts.
4.12.2 Separating Contacts
If contact information from different sources was joined together in error, you can
separate the contacts.
1. On the Home screen, touch >
Contacts
.
2. Touch the joint contact to be separated.
3. Touch the option for separating a contact.
4. Select the contact to be separated from the joint contact.
The joint contact is then separated into two contacts displayed separately in
Contacts
.
4.13 Sending Contacts
You can send contacts as a .vcf file via Bluetooth or Email.
1. In the contacts list, touch .
2. Select contacts that you want to send.
3. Touch
Send
.
4. Select the way you prefer to send the contacts you have selected, for example
Bluetooth or Email.
You can send one contact by another way. Touch and hold a contact, touch
Send contact
, and then select the way you prefer to send.
30
5 Using the Onscreen Keyboard
5.1 Displaying the Keyboard
To enter text, use the onscreen keyboard. Some applications open the keyboard
automatically. In others, touch a text field to open the keyboard.
Touch to hide the keyboard.
Touch and hold a text field to open the
Edit text
menu.
5.1.1 Choosing an Input Method
1. Touch and hold a text field until the
Edit text
menu is displayed.
2. Touch
Select input method
.
3. Select the input method.
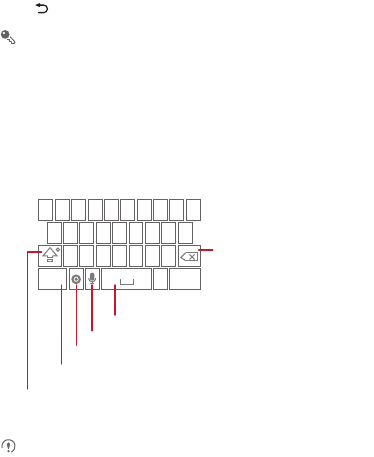
5.1.2 Using the Android Keyboard
The keyboard layout may vary slightly depending on the field where you are
entering text. The previous figure is provided for your reference only.
q w e r t y u i o p
a s d f g h j k
z x c v b n m
.
?123
l
Touch once to capitalize the next letter you type.
Touch twice to capitalize all letters to be entered.
Touch to change from the text mode to the symbol/number mode.
Touch to enter text by voice.
Touch to insert a space.
Touch to delete a character
to the left of the cursor.
Touch and hold to delete all
characters to the left of the
cursor.
......
Touch to select or set input method.
:-)
...

31
On the Home screen, touch >
Settings
>
Language & keyboard
>
Android keyboard
>
Voice input
to turn on or turn off voice input.
5.1.3 Using the Landscape Keyboard
If you find the keyboard inconvenient or difficult to use, turn your mobile phone
sideways. The screen will display the keyboard in landscape orientation, providing
you with a wider keyboard layout.
5.2 Customizing Keyboard Settings
1. On the Home screen, touch >
Settings
>
Language & keyboard
.
2. In
Keyboard settings
, select an input method to customize the keyboard settings.
6 Messaging
The
Messaging
application allows you to exchange text messages (SMS) and
multimedia messages (MMS) with anyone using an SMS-or-MMS-capable phone.
With the
Email
application you can read and send emails.
6.1 SMS and MMS
6.1.1 Opening Messaging
Touch >
Messaging
.
6.1.2 Creating and Sending a Text Message
1. Touch >
Messaging
>
New message
.
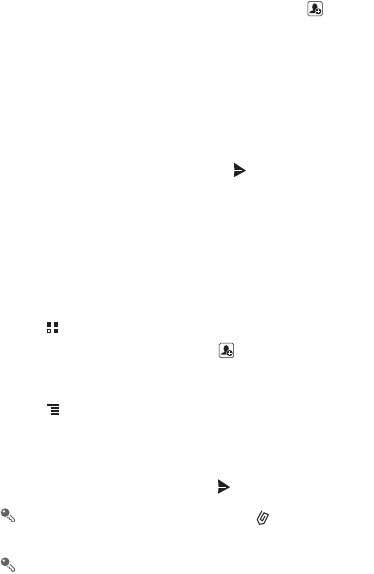
32
2. Enter a phone number or a contact's name in the
To
field, or touch to select a
contact from
Contacts
or
Groups
.
As you enter the phone number or the contact's name, the phone displays
possible matches from your contacts. Select a contact from the list of possible
matches or continue entering.
After you select a contact or finish entering a number, add a comma and you can
enter another recipient. You can also touch a previously entered contact again
to edit or delete it.
3. Touch the composition text box to start entering your message.
4. When you are ready to send the message, touch .
Sent and received messages will be displayed in a message thread, grouping
together the messages in a conversation.
6.1.3 Creating and Sending a Multimedia Message
You can use multimedia messages to make everyday communications very special.
You can record a message and send it as an audio file, sing 'Happy Birthday' and
send it to friend, or send a slideshow of photographs of a special event. The
possibilities are endless.
1. Touch >
Messaging
>
New message
.
2. Enter a phone number in the
To
field, or touch to select a contact from
Contacts
or
Groups
.
3. Touch the composition text box to start entering your message.
4. Touch to display the options panel.
• Touch
Add subject
to add the message subject. Your mobile phone is now in
multimedia message mode.
• Touch
Add
to add a picture, music, or video file.
5. When the message is ready to be sent, touch .
On the message editing screen, you can also touch , and then select your
desired files to add.
You can select a media file (music, video or picture) and send it as an attachment
in a multimedia message. In
File Manager
, touch and hold a media file, and then

33
touch
Share
>
Messaging
.
Adding a Slideshow
If you want to attach more than one file to your message, use the
Slideshow
option.
1. On the message editing screen, touch to display the options panel.
2. Touch
Add
>
Slideshow
, and then select a slide to start editing it.
3. Touch and then touch
More
>
Add slide
to add more slides.
4. Touch
Done
to finish composing your message and return to the multimedia
message screen.
5. To alter your multimedia message, touch the slideshow on the multimedia
message screen. When the message is ready to be sent, touch .
6.1.4 Opening and Viewing a Multimedia Message
1. In the message list, touch the message thread you wish to view.
2. Touch the multimedia message to view the message.
6.1.5 Replying to a Message
1. In the message list, touch a text or multimedia message thread to open it.
2. Touch the text box to compose your message. Once finished, touch .
You can also do the following to reply to a message: Touch >
Multiselect
,
select one or more message threads, and touch
Reply
.
6.1.6 Copying a Text Message to Notepad or Calendar
1. In the message list, touch a text message thread to open it.
2. Touch and hold one of the messages, and then touch
Copy message to
.
3. Touch
Notepad
or
Calendar
to save it as a note or an event.
For information about how to use
Notepad
or
Calendar
, see the relevant sections of
this guide.
6.1.7 Customizing Message Settings
In the message list, touch , and then touch
Settings
to customize the message
settings.

34
6.2 Email
Your mobile phone also puts email at your fingertips. With your phone’s
Email
application, you can use your email account with Yahoo!, AOL, or other popular email
services on your phone.
6.2.1 Adding an Email Account
When using the
Email
application for the first time, you must configure an email
account. The Email setup wizard helps you to configure your account. A number of
popular email systems are supported. You can work with the same email service that
you use on your PC or you can select another email service.
1. On the Home screen, touch >
Email
.
2. In the email system list, select a system, or select
Others
.
3. To customize your email settings, follow the onscreen instructions, and then touch
Next
.
4. Enter the account name and the name you want other people to see when they
receive an email from you.
5. Touch
Done
.
Adding Other Email Accounts
1. After creating your initial email account, touch on the
Inbox
screen, and then
touch
More
>
Accounts
to access the accounts screen.
2. Touch on the accounts screen, and then touch
Add account
to create
another email account.
When adding an additional email account, you have the option to use the new
account to send all outgoing messages.
6.2.2 Viewing an Email Message
1. On the accounts screen, touch the email account you want to use.
2. Access a folder, and then touch the message that you want to view.
6.2.3 Saving an Email Attachment
1. On the accounts screen, touch the email account you want to use.

35
2. Touch the email message you want to view.
3. Touch
Save
next to the attachment in the email.
4. Select a path for saving the attachment and touch
Save
.
6.2.4 Creating and Sending an Email Message
1. On the accounts screen, touch the email account you want to use.
2. On the
Inbox
screen, touch , and then touch
Compose
in the options panel.
3. In the
To
field, enter the recipients’ name or email address.
4. Enter the subject of your message and compose the message.
To send an attachment with the message, touch , and then touch
Add
attachment
.
5. When you are finished, touch
Send
.
If you are not ready to send the message, touch
Save as draft
or touch to
save the message as a draft.
6.2.5 Replying to an Email Message
1. On the accounts screen, touch the email account you want to use.
2. Touch the email message to which you want to reply.
3. Touch
Reply
or
Reply all
to reply to the email message.
6.2.6 Deleting an Email Account
1. On the accounts screen, touch and hold the email account you want to delete.
2. Touch
Remove account
.
3. Touch
OK
.
6.2.7 Changing Email Account Settings
You can change a number of account settings, including how often you check for
emails, how you are notified of a new mail, and details about the servers the account
uses to send and receive mails.
Your account’s incoming and outgoing settings depend on the kind of email
service you are using. You can enter the necessary details manually, although
you may need to contact your email service provider to obtain the correct

36
information.
1. Touch >
Email
.
2. On the accounts screen, touch and hold the email account you want to change.
3. Touch
Account settings
.
4. Change
General settings
,
Notification settings
, or
Server settings
.
7 Getting Connected
7.1 Mobile Networks
Your mobile phone will be automatically configured to use your network operator’s
2G/3G service (if available) when you turn on the phone for the first time. Note that the
SIM/UIM card must be inserted (some CDMA mobile phones have an integrated UIM
card and do not need a separate UIM card)
7.1.1 Checking the Network Connection
1. Touch >
Settings
.
2. Touch
Wireless & networks
>
Mobile networks
.
3. Touch
Network operators
or
Access Point Names
to check the network
connection.
Your mobile phone will automatically read the access point settings from the
SIM/UIM card (if any). For this reason, do not change the access point
parameters; otherwise, you might not be able to access network resources.
7.1.2 Turning on the Data Service
1. Touch >
Settings
.
2. Touch
Wireless & networks
>
Mobile networks
.
3. Select the
Data enabled
check box to turn on the data connection.

37
7.2 Wi-Fi
Wi-Fi gives you wireless access to broadband Internet. To use Wi-Fi on your mobile
phone, you must have an access to wireless access points (hotspots). Obstacles that
block the Wi-Fi signal will reduce its strength.
7.2.1 Turning On Wi-Fi
1. Touch >
Settings
.
2. Touch
Wireless & networks
, and then select the
Wi-Fi
check box to turn on Wi-Fi.
7.2.2 Connecting to a Wireless Network
1. After turning on Wi-Fi, touch >
Settings
.
2. Touch
Wireless & networks
>
Wi-Fi settings
. You will see a list of detected Wi-Fi
networks in the
Wi-Fi networks
section.
3. Touch a Wi-Fi network to connect to it.
• If you select an open network, you will be automatically connected to the
network.
• If you select a network that is secured with Wired Equivalent Privacy (WEP)
and connect to it for the first time, enter the password as prompted, and then
touch
Connect
. If you connect to a secured wireless network that you have
already used, you will not be prompted to enter the password again unless you
have reset your mobile phone to its default settings.
On the
Wi-Fi settings
screen, touch
Add Wi-Fi network
to add a new Wi-Fi
network.
7.3 Sharing Your Phone’s Data
Connection
You can share your mobile phone's data connection with a single computer via a USB
cable: USB tethering. You can share your mobile phone's data connection with a
number of devices at the same time, by turning your phone into a portable Wi-Fi
hotspot.

38
7.3.1 Sharing Your Phone’s Data Connection via USB
To use USB tethering in different operating systems, you may need to prepare your
computer to establish a network connection via USB.
You cannot share your mobile phone’s data connection and access its microSD
card via USB at the same time.
1. Touch >
Settings
.
2. Touch
Wireless & networks
>
Tethering & portable hotspot
.
3. Select the
USB tethering
check box to share your data connection.
7.3.2 Sharing Your Phone’s Data Connection as a Portable
Wi-Fi Hotspot
1. Touch >
Settings
.
2. Touch
Wireless & networks
>
Tethering & portable hotspot
.
3. Select the
Portable Wi-Fi hotspot
check box to share your data connection.
When
Portable Wi-Fi hotspot
is selected, you can touch
Portable Wi-Fi
hotspot settings
to change its network name or secure it.
7.4 WPS
The Wi-Fi Protected Setup (WPS) function simplifies the operations to set up Wi-Fi
networks and configure network security settings.
When connecting to a Wi-Fi network via WPS, ensure that the Wi-Fi access
point to be connected supports the WPS function.
7.4.1 Connecting to a Wireless Network via the WPS Button
1. Turn on Wi-Fi, and then access the
Wi-Fi settings
screen.
2. Touch
WPS button connection
.
3. Press the WPS button of the Wi-Fi access point. When your phone connects to the
network, it displays a message.

39
7.4.2 Connecting to a Wireless Network via the WPS PIN
1. Turn on Wi-Fi, and then access the
Wi-Fi settings
screen.
2. In the
Wi-Fi networks
section, press and hold the Wi-Fi network to be connected.
Then select
WPS PIN connection
in the options menu. Your phone displays the
PIN of the selected Wi-Fi access point.
3. Enter the PIN on the Wi-Fi access point. When your phone connects to the
network, it displays a message.
To add a new Wi-Fi network, touch
Add Wi-Fi network
on the
Wi-Fi settings
screen, and then enter the Service Set Identifier (SSID) of the network.
7.5 Browser
Your mobile phone comes with an Internet browser pre-installed.
7.5.1 Opening the Browser
Touch >
Browser
to open the home page.
When known or open Wi-Fi networks and mobile data networks are available at
the same time, your phone will preferably select a Wi-Fi network for Internet
access.
Touch to open the browser options menu and perform one of the following
operations:
•
New window
: Touch to open a new window.
•
Bookmarks
: Touch to display bookmarks.
•
Windows
: Touch to view thumbnails of open browser windows. You can switch to
another browser window or open a new one on this screen.
•
Refresh
: Touch to refresh the current webpage.
•
Forward
: Touch to browse the next web page.
•
More
: Touch to open other menus and perform operations such as searching,
selecting text, downloading, or setting options.