Huawei Technologies UAP2105 UMTS Access Point User Manual User Guide
Huawei Technologies Co.,Ltd UMTS Access Point User Guide
Installation Manual

UAP2105
V300R011C90
User Guide
Issue 03
Date 2009-08-20
Huawei Proprietary and Confidential
Copyright © Huawei Technologies Co., Ltd.

Huawei Technologies Co., Ltd. provides customers with comprehensive technical support and service. For any
assistance, please contact our local office or company headquarters.
Huawei Technologies Co., Ltd.
Address: Huawei Industrial Base
Bantian, Longgang
Shenzhen 518129
People's Republic of China
Website: http://www.huawei.com
Email: support@huawei.com
Copyright © Huawei Technologies Co., Ltd. 2009. All rights reserved.
No part of this document may be reproduced or transmitted in any form or by any means without prior written
consent of Huawei Technologies Co., Ltd.
Trademarks and Permissions
and other Huawei trademarks are the property of Huawei Technologies Co., Ltd.
All other trademarks and trade names mentioned in this document are the property of their respective holders.
Notice
The information in this document is subject to change without notice. Every effort has been made in the
preparation of this document to ensure accuracy of the contents, but the statements, information, and
recommendations in this document do not constitute a warranty of any kind, express or implied.
Huawei Proprietary and Confidential
Copyright © Huawei Technologies Co., Ltd.

Contents
About This Document.....................................................................................................................1
1 Changes in the UAP2105 User Guide.....................................................................................1-1
2 Safety Precautions......................................................................................................................2-1
3 Introduction to the UAP2105....................................................................................................3-1
3.1 Appearance of the UAP2105...........................................................................................................................3-2
3.2 LED on the UAP2105.....................................................................................................................................3-2
3.3 Ports and Buttons on the UAP2105.................................................................................................................3-4
3.4 Specifications of the UAP2105.......................................................................................................................3-5
3.4.1 Performance Specifications of the UAP2105.........................................................................................3-5
3.4.2 Technical Specifications of the UAP2105.............................................................................................3-6
4 Installing the UAP2105..............................................................................................................4-1
4.1 Selecting a Position for Installing the UAP2105............................................................................................4-2
4.2 Installing the SIM or USIM Card....................................................................................................................4-2
4.3 Connecting UAP2105 Cables..........................................................................................................................4-3
5 Configuring the UAP2105.........................................................................................................5-1
5.1 Initial Configuration........................................................................................................................................5-2
5.1.1 PPPoE Mode..........................................................................................................................................5-2
5.1.2 FE Direct Connection Mode..................................................................................................................5-4
5.2 Defining a Subscriber in the AHR..................................................................................................................5-5
5.2.1 Adding a Zone........................................................................................................................................5-5
5.2.2 Adding a User.........................................................................................................................................5-7
5.3 Setting Parameters on the AP Manager...........................................................................................................5-9
5.3.1 Activating a Zone...................................................................................................................................5-9
5.3.2 Setting Parameters in a Zone................................................................................................................5-11
6 Routine Operation and Maintenance of the UAP2105........................................................6-1
6.1 Commissioning Services.................................................................................................................................6-2
6.2 Diagnosing Faults............................................................................................................................................6-4
6.3 Handling Alarms.............................................................................................................................................6-5
6.4 Upgrading the Software..................................................................................................................................6-5
6.5 Uploading AP Terminal Files.........................................................................................................................6-8
UAP2105
User Guide Contents
Issue 03 (2009-08-20) Huawei Proprietary and Confidential
Copyright © Huawei Technologies Co., Ltd.
i


Figures
Figure 3-1 UAP2105............................................................................................................................................3-2
Figure 3-2 LED on the UAP2105.........................................................................................................................3-3
Figure 3-3 Ports and buttons on the UAP2105.....................................................................................................3-4
Figure 4-1 Installing the SIM or USIM card........................................................................................................4-3
Figure 4-2 Connecting the power adapter of the UAP2105.................................................................................4-4
Figure 4-3 Cable connections (with the modem having only one LAN port)......................................................4-5
Figure 4-4 Cable connections (with the modem having multiple LAN ports).....................................................4-5
Figure 4-5 Cable connections (in FE direct connection mode)............................................................................4-6
Figure 5-1 Configuring an AP..............................................................................................................................5-3
Figure 5-2 Checking the configuration of the AP................................................................................................5-3
Figure 5-3 FE direct connection mode.................................................................................................................5-4
Figure 5-4 Logging in to the AHR.......................................................................................................................5-5
Figure 5-5 Adding an AP zone.............................................................................................................................5-6
Figure 5-6 Completing settings............................................................................................................................5-6
Figure 5-7 Adding an AP user..............................................................................................................................5-7
Figure 5-8 Logging in to the AP Manager...........................................................................................................5-9
Figure 5-9 Configuring a zone...........................................................................................................................5-10
Figure 5-10 Activating a zone............................................................................................................................5-11
Figure 5-11 Configuring a zone.........................................................................................................................5-12
Figure 5-12 Setting the list of AP frequencies...................................................................................................5-12
Figure 5-13 Setting the list of AP scrambling codes..........................................................................................5-13
Figure 5-14 Configuration confirmation............................................................................................................5-13
Figure 6-1 Tracing management..........................................................................................................................6-3
Figure 6-2 Execute Trouble Diagnose ..............................................................................................................6-4
UAP2105
User Guide Figures
Issue 03 (2009-08-20) Huawei Proprietary and Confidential
Copyright © Huawei Technologies Co., Ltd.
iii

Tables
Table 3-1 LED on the UAP2105..........................................................................................................................3-3
Table 3-2 Ports and buttons on the UAP2105......................................................................................................3-4
Table 3-3 Performance specifications of the UAP2105.......................................................................................3-5
Table 3-4 Technical specifications of the UAP2105............................................................................................3-6
Table 5-1 Meanings of parameters.......................................................................................................................5-7
Table 6-1 Commissioning AP Services................................................................................................................6-2
Table 6-2 Alarm management options.................................................................................................................6-5
Table 7-1 Communication ports used by the UAP2105.......................................................................................7-1
UAP2105
User Guide Tables
Issue 03 (2009-08-20) Huawei Proprietary and Confidential
Copyright © Huawei Technologies Co., Ltd.
v

About This Document
Purpose
This document describes the features, specifications, installation, commissioning, and routine
operation and maintenance of Huawei UAP2105 (hereafter referred to as AP).
Product Version
The following table lists the product version related to this document.
Product Name Product Version
UAP2105 V300R011C90
Intended Audience
This document is intended for:
lSystem engineers
lSite maintainers
lNetwork administrators
Change History
For changes in the document, see 1 Changes in the UAP2105 User Guide.
Organization
1 Changes in the UAP2105 User Guide
This describes the changes in the UAP2105 User Guide.
2 Safety Precautions
This describes the safety precautions that are taken when installing, operating and maintaining
the equipment manufactured by Huawei.
3 Introduction to the UAP2105
Developed in compliance with the protocols of R99/R4/R5/R6 FDD, the UAP2105 provides
UMTS radio network access for home and Small Office and Home Office (SOHO) users.
UAP2105
User Guide About This Document
Issue 03 (2009-08-20) Huawei Proprietary and Confidential
Copyright © Huawei Technologies Co., Ltd.
1
4 Installing the UAP2105
This describes how to install the UAP2105, accessories, and related cables.
5 Configuring the UAP2105
This describes how to configure the UAP2105 through the WebUI or the AP Manager.
6 Routine Operation and Maintenance of the UAP2105
This describes how to perform commissioning, routine maintenance, and software management
of the AP after installation and configuration.
7 Communication Ports Used by the UAP2105
Conventions
Symbol Conventions
The symbols that may be found in this document are defined as follows.
Symbol Description
Indicates a hazard with a high level of risk, which if not
avoided,will result in death or serious injury.
Indicates a hazard with a medium or low level of risk, which
if not avoided, could result in minor or moderate injury.
Indicates a potentially hazardous situation, which if not
avoided,could result in equipment damage, data loss,
performance degradation, or unexpected results.
Indicates a tip that may help you solve a problem or save
time.
Provides additional information to emphasize or supplement
important points of the main text.
General Conventions
The general conventions that may be found in this document are defined as follows.
Convention Description
Times New Roman Normal paragraphs are in Times New Roman.
Boldface Names of files, directories, folders, and users are in
boldface. For example, log in as user root.
Italic Book titles are in italics.
Courier New Examples of information displayed on the screen are in
Courier New.
About This Document
UAP2105
User Guide
2 Huawei Proprietary and Confidential
Copyright © Huawei Technologies Co., Ltd.
Issue 03 (2009-08-20)

Command Conventions
The command conventions that may be found in this document are defined as follows.
Convention Description
Boldface The keywords of a command line are in boldface.
Italic Command arguments are in italics.
[ ] Items (keywords or arguments) in brackets [ ] are optional.
{ x | y | ... } Optional items are grouped in braces and separated by
vertical bars. One item is selected.
[ x | y | ... ] Optional items are grouped in brackets and separated by
vertical bars. One item is selected or no item is selected.
{ x | y | ... }*Optional items are grouped in braces and separated by
vertical bars. A minimum of one item or a maximum of all
items can be selected.
[ x | y | ... ]*Optional items are grouped in brackets and separated by
vertical bars. Several items or no item can be selected.
GUI Conventions
The GUI conventions that may be found in this document are defined as follows.
Convention Description
Boldface Buttons, menus, parameters, tabs, window, and dialog titles
are in boldface. For example, click OK.
>Multi-level menus are in boldface and separated by the ">"
signs. For example, choose File > Create > Folder .
Keyboard Operations
The keyboard operations that may be found in this document are defined as follows.
Format Description
Key Press the key. For example, press Enter and press Tab.
Key 1+Key 2 Press the keys concurrently. For example, pressing Ctrl+Alt
+A means the three keys should be pressed concurrently.
Key 1, Key 2 Press the keys in turn. For example, pressing Alt, A means
the two keys should be pressed in turn.
UAP2105
User Guide About This Document
Issue 03 (2009-08-20) Huawei Proprietary and Confidential
Copyright © Huawei Technologies Co., Ltd.
3

Mouse Operations
The mouse operations that may be found in this document are defined as follows.
Action Description
Click Select and release the primary mouse button without moving
the pointer.
Double-click Press the primary mouse button twice continuously and
quickly without moving the pointer.
Drag Press and hold the primary mouse button and move the
pointer to a certain position.
About This Document
UAP2105
User Guide
4 Huawei Proprietary and Confidential
Copyright © Huawei Technologies Co., Ltd.
Issue 03 (2009-08-20)

1 Changes in the UAP2105 User Guide
This describes the changes in the UAP2105 User Guide.
03(2009-09-20)
This is the second commercial release..
Compared with issue 02(2009-07-10) of V300R011C90, this issue does not add contents.
Compared with issue 02(2009-07-10) of V300R011C90, this issue incorporates the following
changes:
Topic Change Description
Logging in to the WebUI The user name and
password for logging in
to the WebUI are
changed. The
description of setting the
Internet Explorer 8.0
compatibility is added.
Compared with issue 02(2009-07-10) of V300R011C90, this issue does not delete contents.
02(2009-07-10)
This is the first commercial release.
Compared with issue 01 (2009-05-30) of V300R011C90, this issue does not add contents.
Compared with issue 01 (2009-05-30) of V300R011C90, this issue incorporates the following
changes:
UAP2105
User Guide 1 Changes in the UAP2105 User Guide
Issue 03 (2009-08-20) Huawei Proprietary and Confidential
Copyright © Huawei Technologies Co., Ltd.
1-1

Topic Change Description
3.4.1 Performance Specifications of the UAP2105 The description of the
capacity and service
capabilities of the
UAP2105 is modified.
Compared with issue 01 (2009-05-30) of V300R011C90, this issue does not delete contents.
01 (2009-05-30)
This is the first commercial release.
1 Changes in the UAP2105 User Guide
UAP2105
User Guide
1-2 Huawei Proprietary and Confidential
Copyright © Huawei Technologies Co., Ltd.
Issue 03 (2009-08-20)

2 Safety Precautions
This describes the safety precautions that are taken when installing, operating and maintaining
the equipment manufactured by Huawei.
Following All Safety Precautions
When installing, operating, and maintaining the devices, follow all instructions and precautions
on the equipment and in this document for the sake of personal and equipment safety. The
indications such as Danger, Caution, and Note in the related documents are additional
information. They do not contain all the safety precautions for operations.
Complying with the Local Safety Regulations
When operating devices, the personnel must comply with the local safety regulations.
Installation Requirements
The personnel installing and maintaining Huawei products should be trained. Before performing
any operation such as device installation and maintenance, the personnel should be familiar with
the proper operation methods and safety precautions.
lOnly trained and qualified personnel are allowed to install, operate, and maintain devices.
lOnly qualified specialists are allowed to check and repair the device and remove the safety
facilities.
lOnly personnel that are certificated or authorized by Huawei are allowed to replace or
change the device or accessories (including software).
lAny fault or error that might cause safety problems must be reported to the personnel in
charge immediately.
Safety of Personnel
lDo not perform operation on the device and related cables during thunderstorms.
lUnplug the device during thunderstorms.
lBefore installing the device and related cables, unplug the device.
lTake proper safety measures to protect your eyes and respiratory tract against the dust
before drilling holes.
UAP2105
User Guide 2 Safety Precautions
Issue 03 (2009-08-20) Huawei Proprietary and Confidential
Copyright © Huawei Technologies Co., Ltd.
2-1

lWear gloves before drilling holes.
Device Safety
lEnsure that the device is always kept in a dry environment and is protected against leakage.
lLeave sufficient space around the device for heat dissipation. Do not block the air vents of
the device.
lPlace the device in a dry, ventilated, and dustfree place that is neither exposed to direct
sunlight nor close to heat or fire.
lKeep the device far away from strong magnetic or electric fields.
2 Safety Precautions
UAP2105
User Guide
2-2 Huawei Proprietary and Confidential
Copyright © Huawei Technologies Co., Ltd.
Issue 03 (2009-08-20)

3 Introduction to the UAP2105
About This Chapter
Developed in compliance with the protocols of R99/R4/R5/R6 FDD, the UAP2105 provides
UMTS radio network access for home and Small Office and Home Office (SOHO) users.
3.1 Appearance of the UAP2105
The UAP2105 has a case structure. It is elegant, harmonious, and stylish.
3.2 LED on the UAP2105
The UAP2105 has only one LED, which indicates the working status of the UAP2105.
3.3 Ports and Buttons on the UAP2105
This describes the ports and buttons on the UAP2105. The ports are used for the power supply,
Ethernet cable, and SIM or USIM card. The RESTORE button is used to restore the login
password of the WebUI to the default password. The power switch is used to power on or power
off the UAP2105.
3.4 Specifications of the UAP2105
This describes the performance specifications and technical specifications of the UAP2105.
UAP2105
User Guide 3 Introduction to the UAP2105
Issue 03 (2009-08-20) Huawei Proprietary and Confidential
Copyright © Huawei Technologies Co., Ltd.
3-1
3.1 Appearance of the UAP2105
The UAP2105 has a case structure. It is elegant, harmonious, and stylish.
The UAP2105 is available in black or white. Figure 3-1 shows a black UAP2105.
Figure 3-1 UAP2105
3.2 LED on the UAP2105
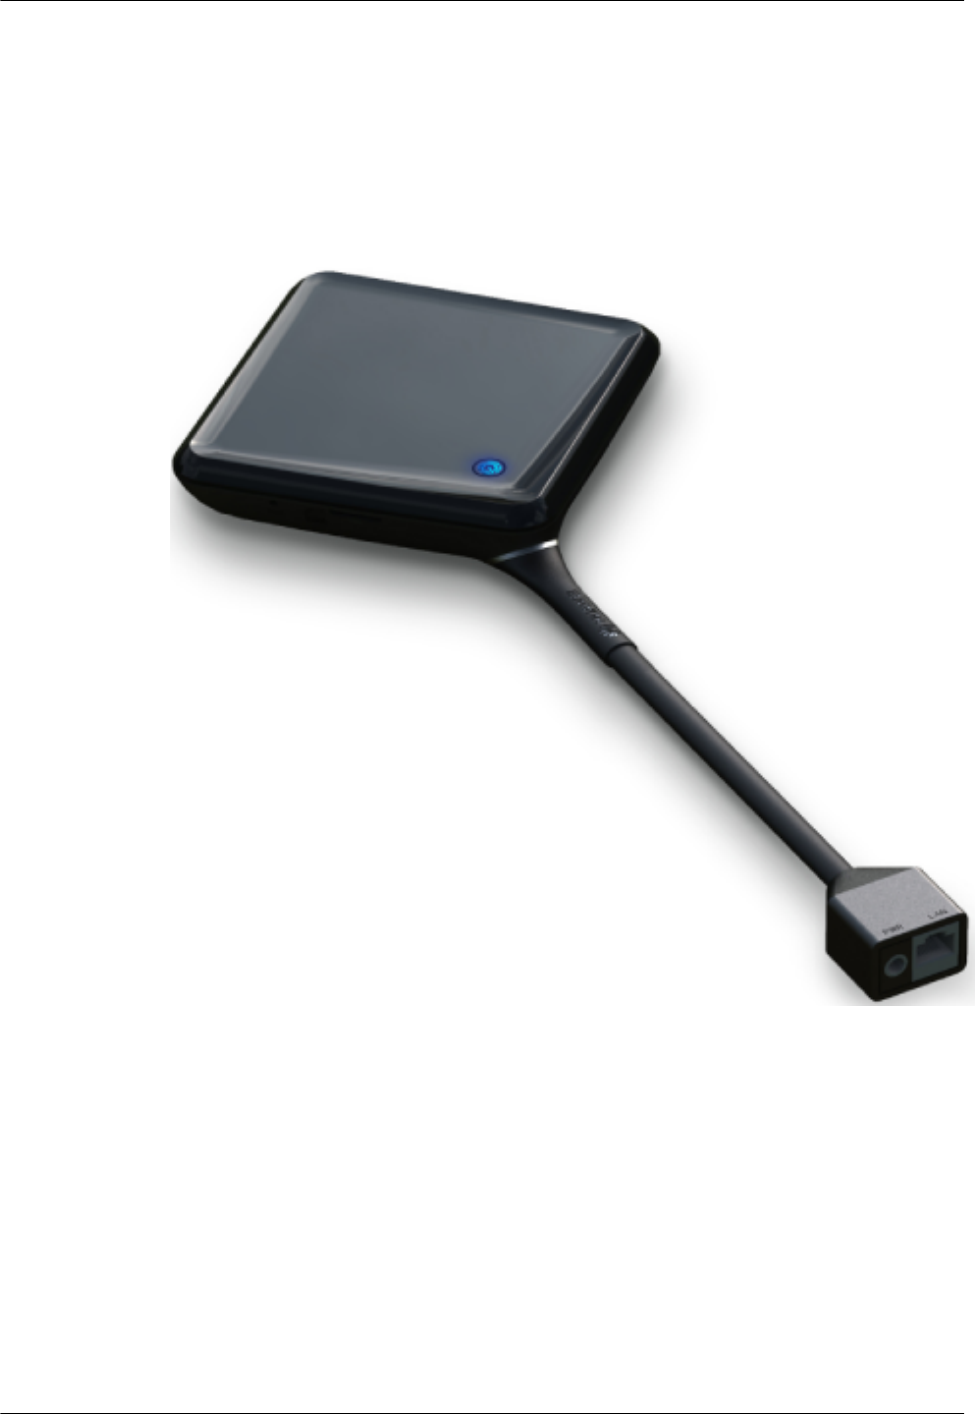
The UAP2105 has only one LED, which indicates the working status of the UAP2105.
Figure 3-2 shows the LED on the UAP2105.
3 Introduction to the UAP2105
UAP2105
User Guide
3-2 Huawei Proprietary and Confidential
Copyright © Huawei Technologies Co., Ltd.
Issue 03 (2009-08-20)
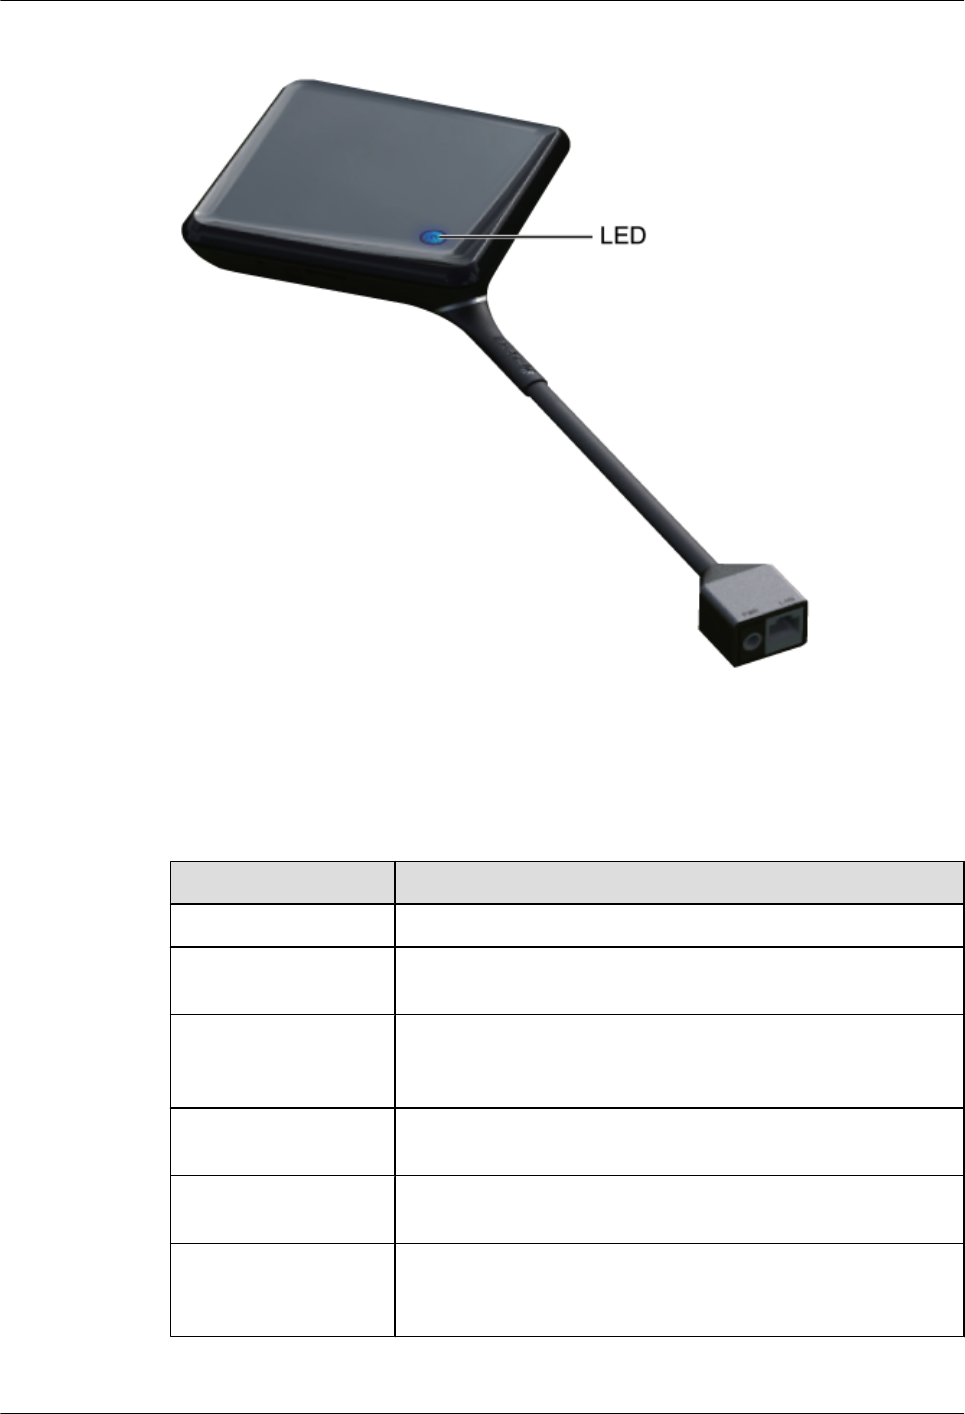
Figure 3-2 LED on the UAP2105
Table 3-1 describes the LED and its status.
Table 3-1 LED on the UAP2105
Status Description
ON (red) No AP cell is set up, or an alarm of cell setup failure is generated.
ON (blue) An AP cell is set up. No service is provided, and no interference
exists in the signals of the cell.
Blinking in red (ON for
1s and OFF for 1s)
Slight interference exists in the signals of an AP cell. The
UAP2105 works properly, but the quality of service (QoS)
deteriorates.
Blinking in red (ON for
0.25s and OFF for 0.25s)
Strong interference exists in the signals of an AP cell. The
UAP2105 cannot work properly.
Blinking in blue (ON for
1s and OFF for 1s)
An AP cell is set up successfully, and services are being provided
in the cell.
Blinking in blue (ON for
0.125s and OFF for
0.125s)
Software is being downloaded, or the system is being upgraded.
UAP2105
User Guide 3 Introduction to the UAP2105
Issue 03 (2009-08-20) Huawei Proprietary and Confidential
Copyright © Huawei Technologies Co., Ltd.
3-3
3.3 Ports and Buttons on the UAP2105
This describes the ports and buttons on the UAP2105. The ports are used for the power supply,
Ethernet cable, and SIM or USIM card. The RESTORE button is used to restore the login
password of the WebUI to the default password. The power switch is used to power on or power
off the UAP2105.
Figure 3-3 shows the ports and buttons on the panel of the UAP2105.
Figure 3-3 Ports and buttons on the UAP2105
Table 3-2 describes the ports and buttons on the UAP2105.
Table 3-2 Ports and buttons on the UAP2105
Port or Button Description
RESTORE Button for restoring the login password of the WebUI. After you
press the button for five seconds, Restore the AP to factory settings
(including the IP address for AP local maintenance and the user name
and password for logging in to the WebUI).
SIM SIM or USIM card holder, which is used for housing the SIM or
USIM card
3 Introduction to the UAP2105
UAP2105
User Guide
3-4 Huawei Proprietary and Confidential
Copyright © Huawei Technologies Co., Ltd.
Issue 03 (2009-08-20)

Port or Button Description
LAN Ethernet port for an Ethernet cable
PWR Power socket, which is connected to the 12 V DC power adapter
Power switch Used to power on or power off the UAP2105
3.4 Specifications of the UAP2105
This describes the performance specifications and technical specifications of the UAP2105.
3.4.1 Performance Specifications of the UAP2105
This describes the performance specifications of the UAP2105 in terms of the frequency bands,
maximum transmit power, number of TRXs, transmit and receive diversity, receiver sensitivity,
and clock precision.
3.4.2 Technical Specifications of the UAP2105
This describes the technical specifications of the UAP2105.
3.4.1 Performance Specifications of the UAP2105
This describes the performance specifications of the UAP2105 in terms of the frequency bands,
maximum transmit power, number of TRXs, transmit and receive diversity, receiver sensitivity,
and clock precision.
Performance Specifications
Table 3-3 Performance specifications of the UAP2105
Item Specification
Frequency bands Frequency band RX band (MHz) TX band (MHz)
BAND I (2100 MHz) 1920 to 1980 2110 to 2170
Band II (1900 MHz) 1850 to 1910 1930 to 1990
Band V (850 MHz) 824 to 849 869 to 894
Maximum
transmit power
13 dBm (20 mW)
Capacity Only one TRX is supported.
Only one cell is supported.
A maximum of 20 UL channel elements (CEs) and 20 DL CEs is
supported.
UAP2105
User Guide 3 Introduction to the UAP2105
Issue 03 (2009-08-20) Huawei Proprietary and Confidential
Copyright © Huawei Technologies Co., Ltd.
3-5

Item Specification
Service
capabilities
Common PS and CS services:
lA maximum of four concurrent AMR services is supported.
lA maximum of four concurrent VP services is supported.
lA maximum of eight concurrent PS services is supported.
lA maximum of four concurrent R99 384 kbit/s PS services is
supported.
lA maximum of four concurrent CS users is supported.
lA maximum of four concurrent PS users is supported.
HSDPA service:
lThe maximum supported HSDPA rate is 3.6 Mbit/s or 7.2 Mbit/s. The
default value is 3.6 Mbit/s. The license can be used to control the
maximum HSDPA rate of the UAP2105.
l3GPP R99, R4, R5, and R6 services can be provided at the same time.
lA maximum of four concurrent HSDPA users is supported.
lA maximum of 10 HS-PDSCH codes is supported.
HSUPA service
lThe maximum supported HSUPA rate is 1.44 Mbit/s.
l3GPP R99, R4, R5, and R6 services can be provided at the same time.
lA maximum of four concurrent HSUPA users is supported.
lThe 10 ms Transmission Time Interval (TTI) over the E-DCH is
supported.
Transmit and
receive diversity
No transmit diversity or receive diversity
Receiver
sensitivity
-110 dBm
Clock precision ±0.1 ppm
3.4.2 Technical Specifications of the UAP2105
This describes the technical specifications of the UAP2105.
Technical Specifications
Table 3-4 Technical specifications of the UAP2105
Item Specification
Dimensions (Height x Width x Depth) 33 mm x 125 mm x 125 mm
Weight 0.4 kg
3 Introduction to the UAP2105
UAP2105
User Guide
3-6 Huawei Proprietary and Confidential
Copyright © Huawei Technologies Co., Ltd.
Issue 03 (2009-08-20)

Item Specification
Power consumption < 8 W
Ambient temperature Working temperature: -5oC to +40oC
Storage temperature: -40oC to +70oC
Relative humidity 5% RH to 95% RH
Specifications of the power adapter Input voltage: 90 V AC to 264 V AC
Frequency range: 47 Hz to 63 Hz
UAP2105
User Guide 3 Introduction to the UAP2105
Issue 03 (2009-08-20) Huawei Proprietary and Confidential
Copyright © Huawei Technologies Co., Ltd.
3-7

4 Installing the UAP2105
About This Chapter
This describes how to install the UAP2105, accessories, and related cables.
4.1 Selecting a Position for Installing the UAP2105
This describes the requirements for the installation position of the UAP2105.
4.2 Installing the SIM or USIM Card
This describes how to install the SIM or USIM card. The data in the card enables the UAP2105
to perform user authentication and then to connect the core network after the authentication is
successful.
4.3 Connecting UAP2105 Cables
This describes how to connect the power adapter of the UAP2105 and how to connect the
Ethernet cable based on the network topology of the UAP2105.
UAP2105
User Guide 4 Installing the UAP2105
Issue 03 (2009-08-20) Huawei Proprietary and Confidential
Copyright © Huawei Technologies Co., Ltd.
4-1

4.1 Selecting a Position for Installing the UAP2105
This describes the requirements for the installation position of the UAP2105.
Requirements for the Installation Position
The UAP2105, a home device, is installed indoor areas that are away from children, such as
living rooms or studies. It supports the tabletop or wall-mounted installation. The UAP2105
mounted on a wall obtatains better coverage than that placed on a tabletop. Leave a minimum
of 20 cm space around the UAP2105 for heat dissipation. When selecting a position for installing
the UAP2105, adhere to the following rules:
lDo not place the AP near the window.
lDo not cover or block the AP.
lDo not overload the AP.
lDo not place AP near a microwave oven.
lDo not place the AP on an electrical device.
lDo not directly blow hot wind to the AP.
4.2 Installing the SIM or USIM Card
This describes how to install the SIM or USIM card. The data in the card enables the UAP2105
to perform user authentication and then to connect the core network after the authentication is
successful.
Prerequisite
Before installing the SIM or USIM card, power off the UAP2105 and disconnect the power
cable.
Procedure
Step 1 Insert the SIM or USIM card into the card holder, as shown in Figure 4-1.
4 Installing the UAP2105
UAP2105
User Guide
4-2 Huawei Proprietary and Confidential
Copyright © Huawei Technologies Co., Ltd.
Issue 03 (2009-08-20)
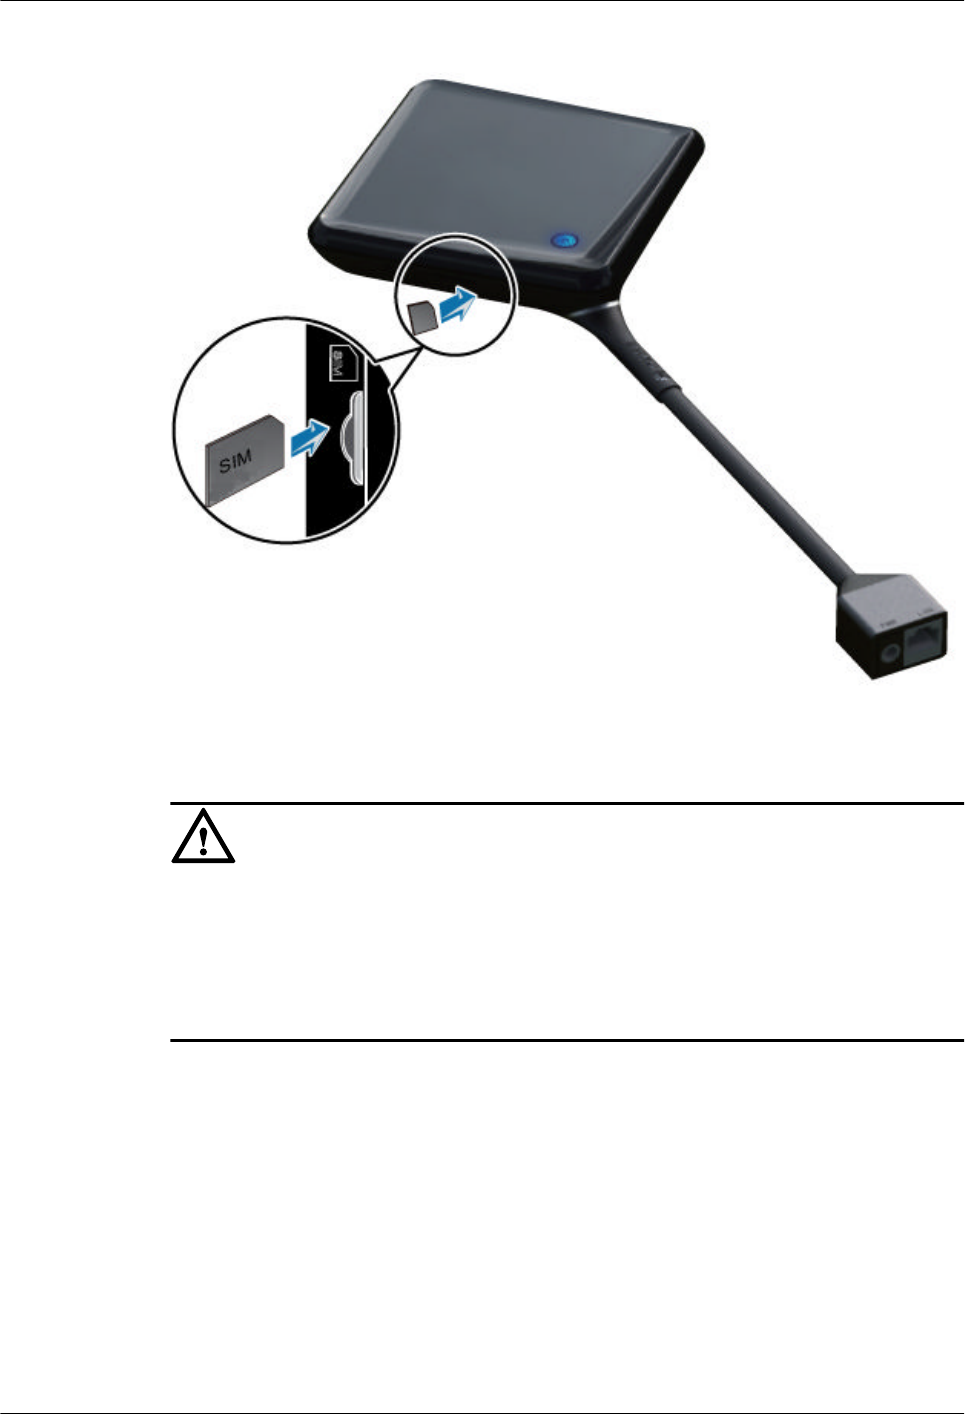
Figure 4-1 Installing the SIM or USIM card
CAUTION
lWhile inserting the SIM or USIM card into the card holder, ensure that the notch on the SIM
or USIM card faces the silkscreen.
lDo not remove the SIM or USIM card while the UAP2105 is running. Otherwise, the AP
cell cannot be set up. After the SIM or USIM card is re-inserted, the UAP2105 cell is
reestablished.
----End
4.3 Connecting UAP2105 Cables
This describes how to connect the power adapter of the UAP2105 and how to connect the
Ethernet cable based on the network topology of the UAP2105.
Context
A power adapter and straight-through cable are delivered with the UAP2105 and are placed in
the external packing box.
UAP2105
User Guide 4 Installing the UAP2105
Issue 03 (2009-08-20) Huawei Proprietary and Confidential
Copyright © Huawei Technologies Co., Ltd.
4-3
Procedure
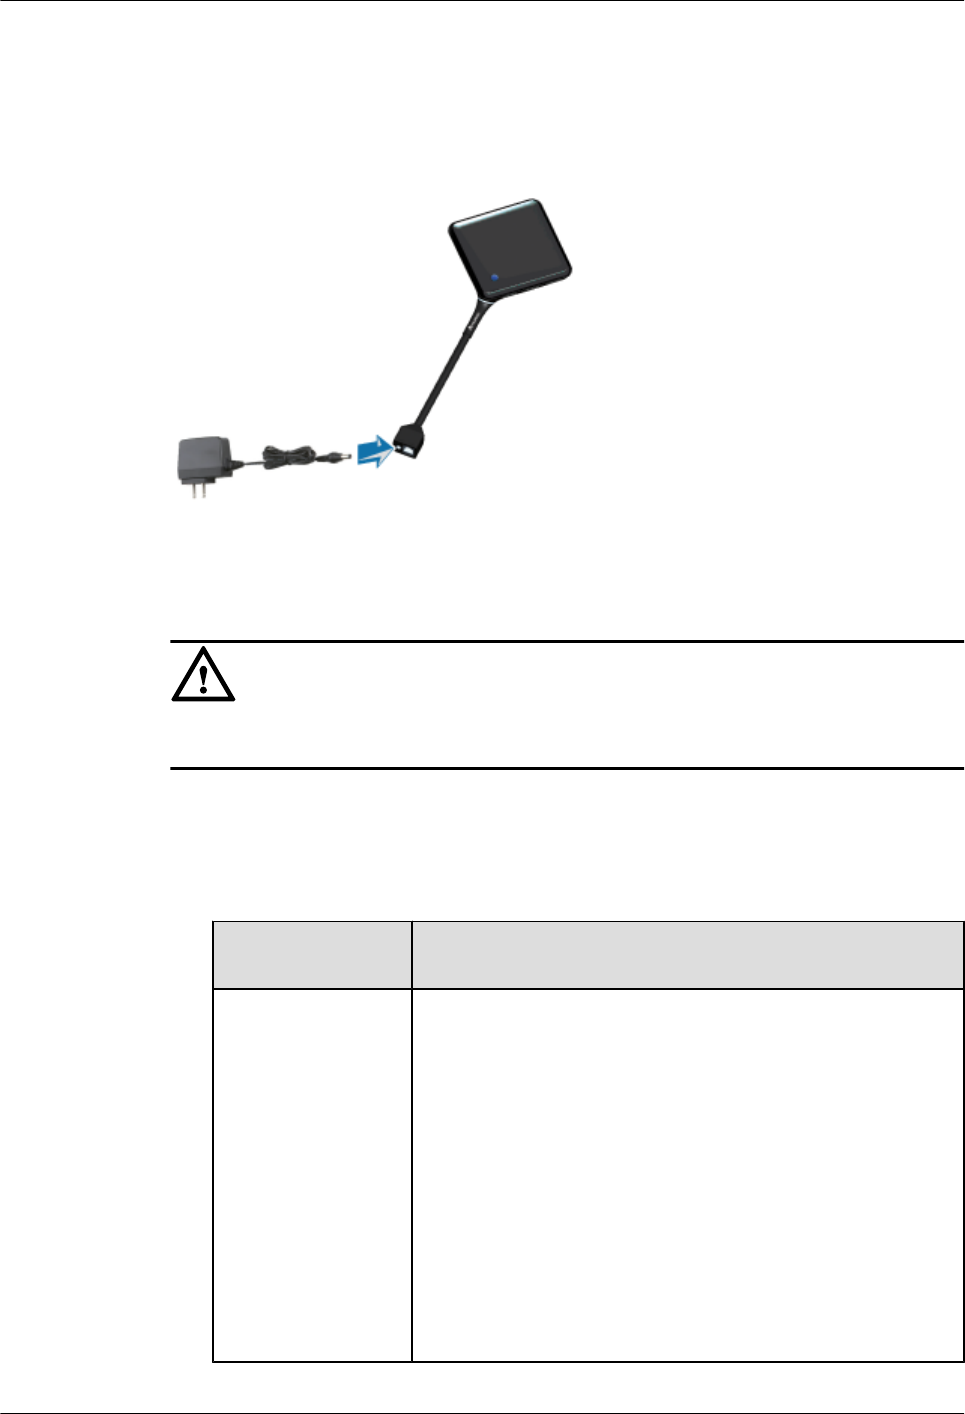
Step 1 Connect the power adapter, as shown in Figure 4-2.
Figure 4-2 Connecting the power adapter of the UAP2105
CAUTION
To ensure that the UAP2105 runs properly, use the power adapter delivered with the UAP2105.
Step 2 Connect the Ethernet cable.
lIn PPPoE mode
The UAP2105 is connected to the Ethernet through an xDSL device, such as a modem,
BAS, or DSLAM.
If the Modem
has ...
Then …
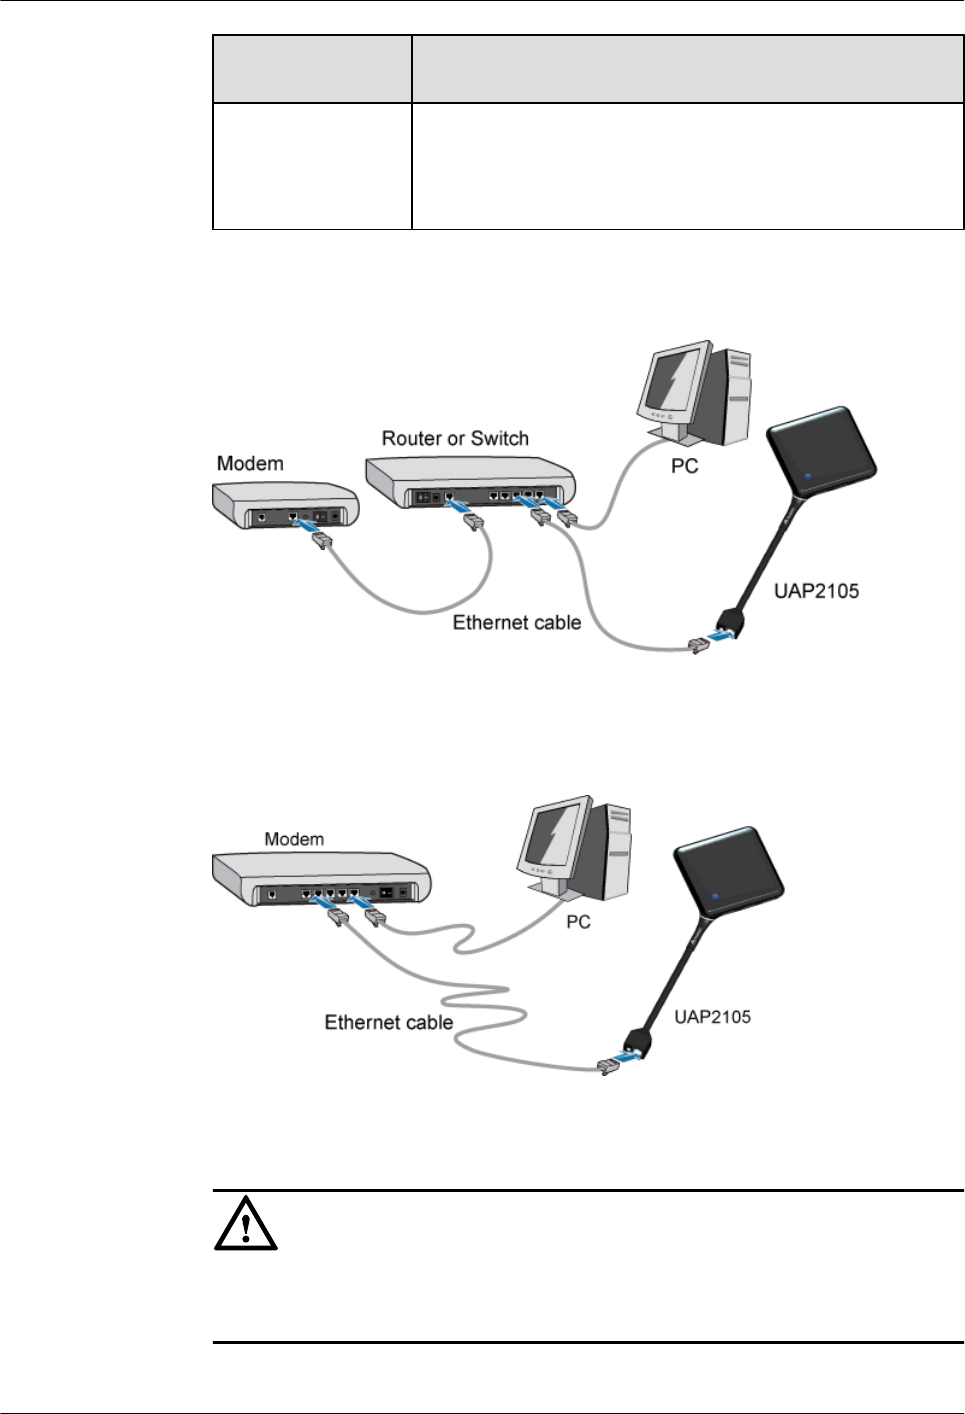
Only one LAN port 1. Use Ethernet cables to connect the UAP2105 and the
computer for local maintenance to idle LAN ports on a router
or switch.
2. Connect the router or switch to a modem.
For details on connections, see the documents delivered with
the router or switch.
Figure 4-3 shows the cable connections when the modem has
only one LAN port.
NOTE
If no router is configured, you can directly connect the computer for local
maintenance to the modem to configure the modem, and then connect
the computer to the UAP2105 to configure the UAP2105. After the
modem and the UAP2105 are configured, you can directly connect the
UAP2105 to the LAN port on the modem.
4 Installing the UAP2105
UAP2105
User Guide
4-4 Huawei Proprietary and Confidential
Copyright © Huawei Technologies Co., Ltd.
Issue 03 (2009-08-20)
If the Modem
has ...
Then …
Multiple LAN ports Connect the UAP2105 to an idle LAN port on the modem
through an Ethernet cable, as shown in Figure 4-4.
The UAP2105 and the computer for local maintenance should
be connected to the same modem.
Figure 4-3 Cable connections (with the modem having only one LAN port)
Figure 4-4 Cable connections (with the modem having multiple LAN ports)
CAUTION
If a cable modem is used (Cable Modem is labeled on the housing of the modem), connect
the cables according to the documents delivered with the cable modem.
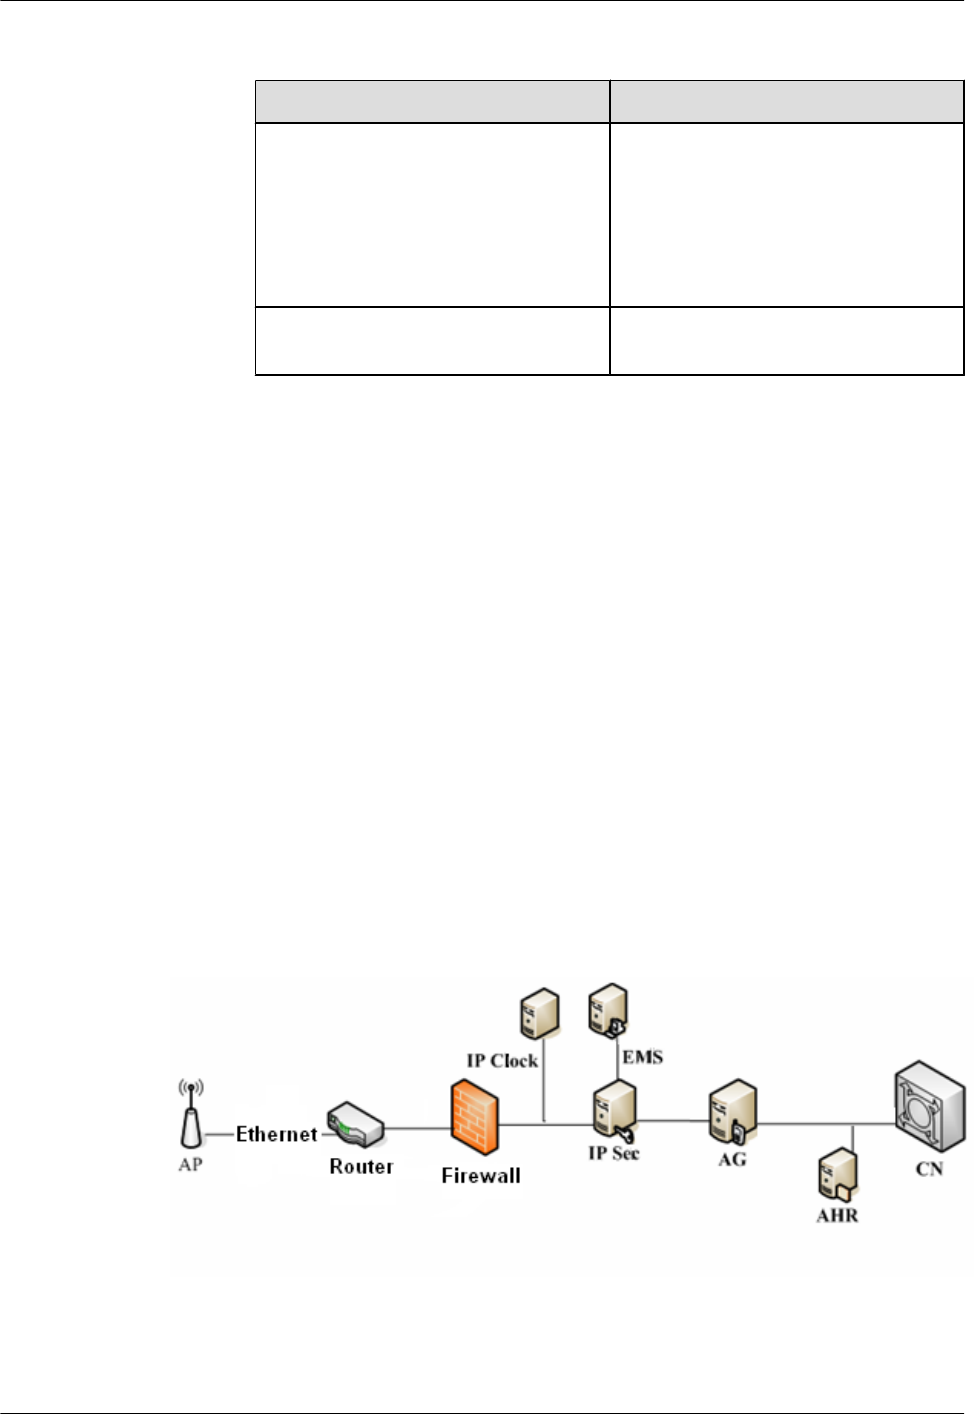
lIn FE direct connection mode
UAP2105
User Guide 4 Installing the UAP2105
Issue 03 (2009-08-20) Huawei Proprietary and Confidential
Copyright © Huawei Technologies Co., Ltd.
4-5
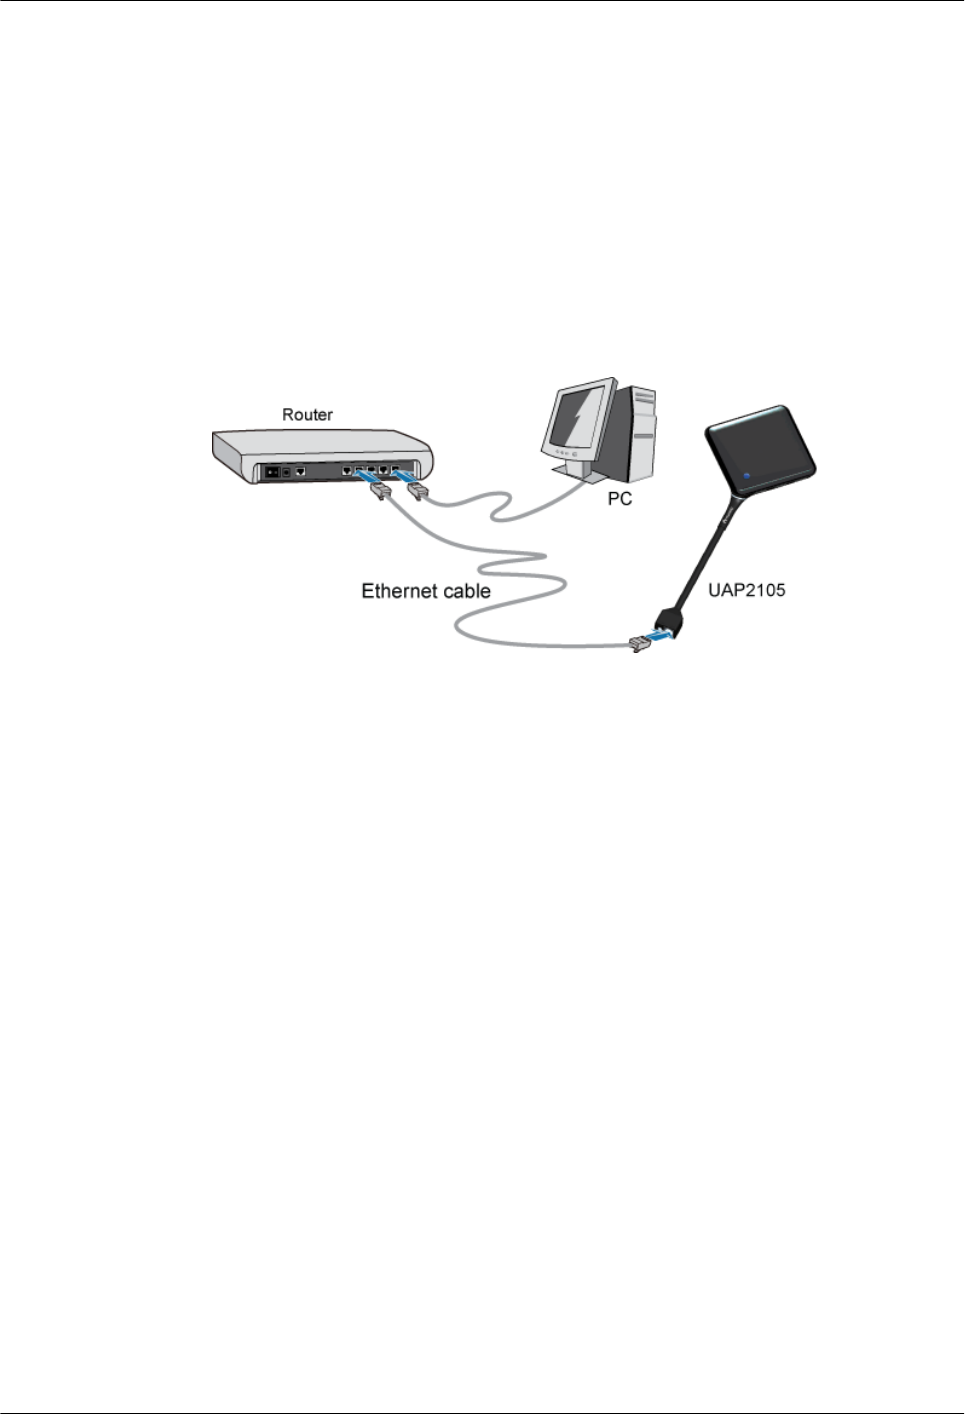
The UAP2105 is directly connected to the Ethernet through a device, such as a router. The
number of devices used in FE direct connection mode is smaller than the number of devices
used in PPPoE mode. As a result, the UAP2105 provides higher uplink and downlink rates.
1. Connect the UAP2105 to an idle LAN port on the router through an Ethernet cable.
The UAP2105 and the computer for local maintenance should be connected to the
same router.
2. Connect the router to the Ethernet.
For details on connections, see the documents delivered with the router.
Figure 4-5 shows the cable connections in FE direct connection mode.
Figure 4-5 Cable connections (in FE direct connection mode)
Step 3 Check the cables to ensure that all connections are secure.
----End
4 Installing the UAP2105
UAP2105
User Guide
4-6 Huawei Proprietary and Confidential
Copyright © Huawei Technologies Co., Ltd.
Issue 03 (2009-08-20)

5 Configuring the UAP2105
About This Chapter
This describes how to configure the UAP2105 through the WebUI or the AP Manager.
5.1 Initial Configuration
This describes how to configure the IP address of the AP and the connection mode through an
ADSL modem or router according to the network topology of the AP.
5.2 Defining a Subscriber in the AHR
This describes how to define an AP subscriber in the AHR. To define an AP subscriber in the
AHR, create an AP zone, and then add an AP user to the zone.
5.3 Setting Parameters on the AP Manager
This describes how to set AP parameters on the AP Manager. The parameter settings are
applicable to all APs managed by the AP Manager.
UAP2105
User Guide 5 Configuring the UAP2105
Issue 03 (2009-08-20) Huawei Proprietary and Confidential
Copyright © Huawei Technologies Co., Ltd.
5-1

5.1 Initial Configuration
This describes how to configure the IP address of the AP and the connection mode through an
ADSL modem or router according to the network topology of the AP.
5.1.1 PPPoE Mode
The PPPoE mode consists of PPPoE bridge mode and PPPoE route mode. Regardless of the
mode you choose, you need to set the parameters of the ADSL modem and the AP.
5.1.2 FE Direct Connection Mode
This describes how to configure the IP address of the AP and the connection of the router in FE
direct connection mode.
5.1.1 PPPoE Mode
The PPPoE mode consists of PPPoE bridge mode and PPPoE route mode. Regardless of the
mode you choose, you need to set the parameters of the ADSL modem and the AP.
Prerequisite
lYou have logged in to the WebUI. For details, see Logging in to the WebUI.
lThe IP address of the computer is set on the 192.168.1.x network segment.
Context
In PPPoE bridge mode
lThe connection mode when an ADSL modem works in bridge mode and the application
type of the modem is set to Bridge Only is called PPPoE bridge mode. In PPPoE bridge
mode, you need to enter the user name and password of each terminal connected to the
modem to initiate PPPoE dial-up connections for authentication.
In PPPoE route mode
lThe modem obtains the IP address and related information such as the IP address of the
gateway and subnet mask from the BAS through PPPoE dial-up connections. After the
modem passes the authentication, it is connected to Internet. In PPPoE route mode, the
modem works in DHCP Server mode. Each terminal connected to the modem can
automatically obtain the IP address of the LAN from the modem without PPPoE dial-up
connections.
Procedure
lIn PPPoE bridge mode
1. Configure the ADSL modem.
NOTE
To set WAN Configuration of the ADSL modem in PPPoE bridge mode, set the application
type of the ADSL modem to Bridge Only and the connection of the ADSL modem to RFC
2684 Bridge. The setting method varies according to the type of the ADSL modem. For details,
see the document delivered with the ADSL modem.
5 Configuring the UAP2105
UAP2105
User Guide
5-2 Huawei Proprietary and Confidential
Copyright © Huawei Technologies Co., Ltd.
Issue 03 (2009-08-20)
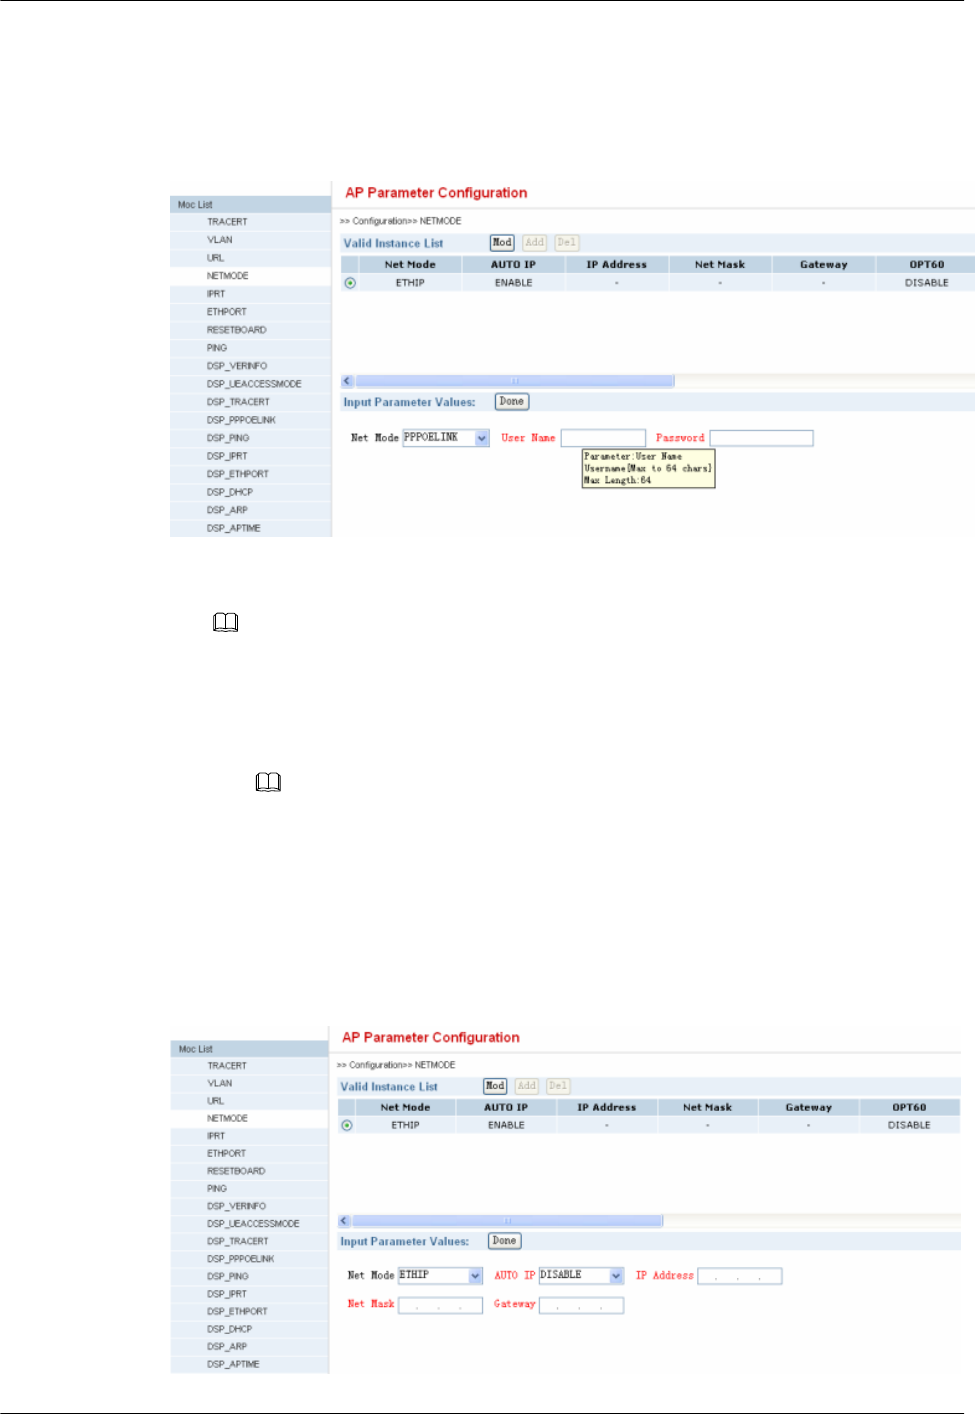
2. Configure the AP. On the WebUI, choose Transfer Basic > NETMODE . Click
Mod, set Net Mode to PPPOELINK, and then type the user name and password for
a PPPoE dial-up connection, as shown in Figure 5-1.
Figure 5-1 Configuring an AP
NOTE
After the networking mode of the AP is changed, the AP is automatically restarted. The existing
configurations are not modified.
lIn PPPoE route mode
1. Configure the ADSL modem.
NOTE
To set WAN Configuration, NAT, and DNS of the ADSL modem in PPPoE route mode, set
the application type of the ADSL modem to PPPoE, NAT to NAPT, DNS to Allow, and DHCP
to DHCP Server. The setting method varies according to the type of the ADSL modem. For
details, see the document delivered with the ADSL modem.
2. Check the configuration of the AP. On the WebUI, choose Transfer Basic >
NETMODE to check the configuration of the AP, as shown in Figure 5-2.
Figure 5-2 Checking the configuration of the AP
UAP2105
User Guide 5 Configuring the UAP2105
Issue 03 (2009-08-20) Huawei Proprietary and Confidential
Copyright © Huawei Technologies Co., Ltd.
5-3
If ... Then …
Net Mode is set to ETHIP and AUTO
IP to ENABLE
The configuration is complete. End the
operation.
NOTE
When an AP is delivered, Net Mode is set to
ETHIP and AUTO IP to ENABLE by
default. Therefore, in PPPoE route mode, it
is not necessary to configure the AP.
Net Mode is not set to ETHIP or AUTO
IP to ENABLE
Go to 3.
3. Configure the AP. On the WebUI, choose Transfer Basic > NETMODE . Click
Mod and set Net Mode to ETHIP and AUTO IP to ENABLE.0
----End
5.1.2 FE Direct Connection Mode
This describes how to configure the IP address of the AP and the connection of the router in FE
direct connection mode.
Prerequisite
lYou have logged in to the WebUI. For details, see Logging in to the WebUI.
lThe IP address of the computer is set on the 192.168.1.x network segment.
Context
Figure 5-3 shows the FE direct connection mode.
Figure 5-3 FE direct connection mode
5 Configuring the UAP2105
UAP2105
User Guide
5-4 Huawei Proprietary and Confidential
Copyright © Huawei Technologies Co., Ltd.
Issue 03 (2009-08-20)

Procedure
Step 1 For details, see the description of PPPoE route mode in 5.1.1 PPPoE Mode.
NOTE
The method of setting the router in FE direct connection mode is the same as the method of setting the ADSL
modem in PPPoE route mode.
----End
5.2 Defining a Subscriber in the AHR
This describes how to define an AP subscriber in the AHR. To define an AP subscriber in the
AHR, create an AP zone, and then add an AP user to the zone.
5.2.1 Adding a Zone
This describes how to add an AP zone in the AHR. Before adding an AP zone, obtain the
information about neighboring macro cells around the AP cell and the IP addresses of the AP
Manager, AG, SeGW, and CLK used in the AP network.
5.2.2 Adding a User
This describes how to perform AP user management in the AHR, for example, add an AP user
in the AHR.
5.2.1 Adding a Zone
This describes how to add an AP zone in the AHR. Before adding an AP zone, obtain the
information about neighboring macro cells around the AP cell and the IP addresses of the AP
Manager, AG, SeGW, and CLK used in the AP network.
Prerequisite
lYou have installed the AHR client that matches the version of the AHR server.
lYou have obtained the IMSI of the SIM or USIM card used in the AP and the IP addresses
of the AP Manager, AG, SeGW, and CLK used in the AP network.
Procedure
Step 1 Start the AHR client, and then type the user name, password, and IP address of the AHR server,
as shown in Figure 5-4.
Figure 5-4 Logging in to the AHR
UAP2105
User Guide 5 Configuring the UAP2105
Issue 03 (2009-08-20) Huawei Proprietary and Confidential
Copyright © Huawei Technologies Co., Ltd.
5-5

Step 2 Choose Area > AP Zone Management. The Zone Configuration page is displayed.
Step 3 Click Add. The Add AP Zone dialog box is displayed, as shown in Figure 5-5.
Figure 5-5 Adding an AP zone
Step 4 Type the zone where the AP is located and set SCTP Port to the port ID that is the same as the
port ID of the AG.
Step 5 Click Next to set the IP addresses of the AP Manager, AG, SeGW, and CLK and the information
about neighboring macro cells around the AP cell in sequence.
Step 6 Confirm the settings, and then click Finish, as shown in Figure 5-6.
Figure 5-6 Completing settings
5 Configuring the UAP2105
UAP2105
User Guide
5-6 Huawei Proprietary and Confidential
Copyright © Huawei Technologies Co., Ltd.
Issue 03 (2009-08-20)
----End
5.2.2 Adding a User
This describes how to perform AP user management in the AHR, for example, add an AP user
in the AHR.
Procedure
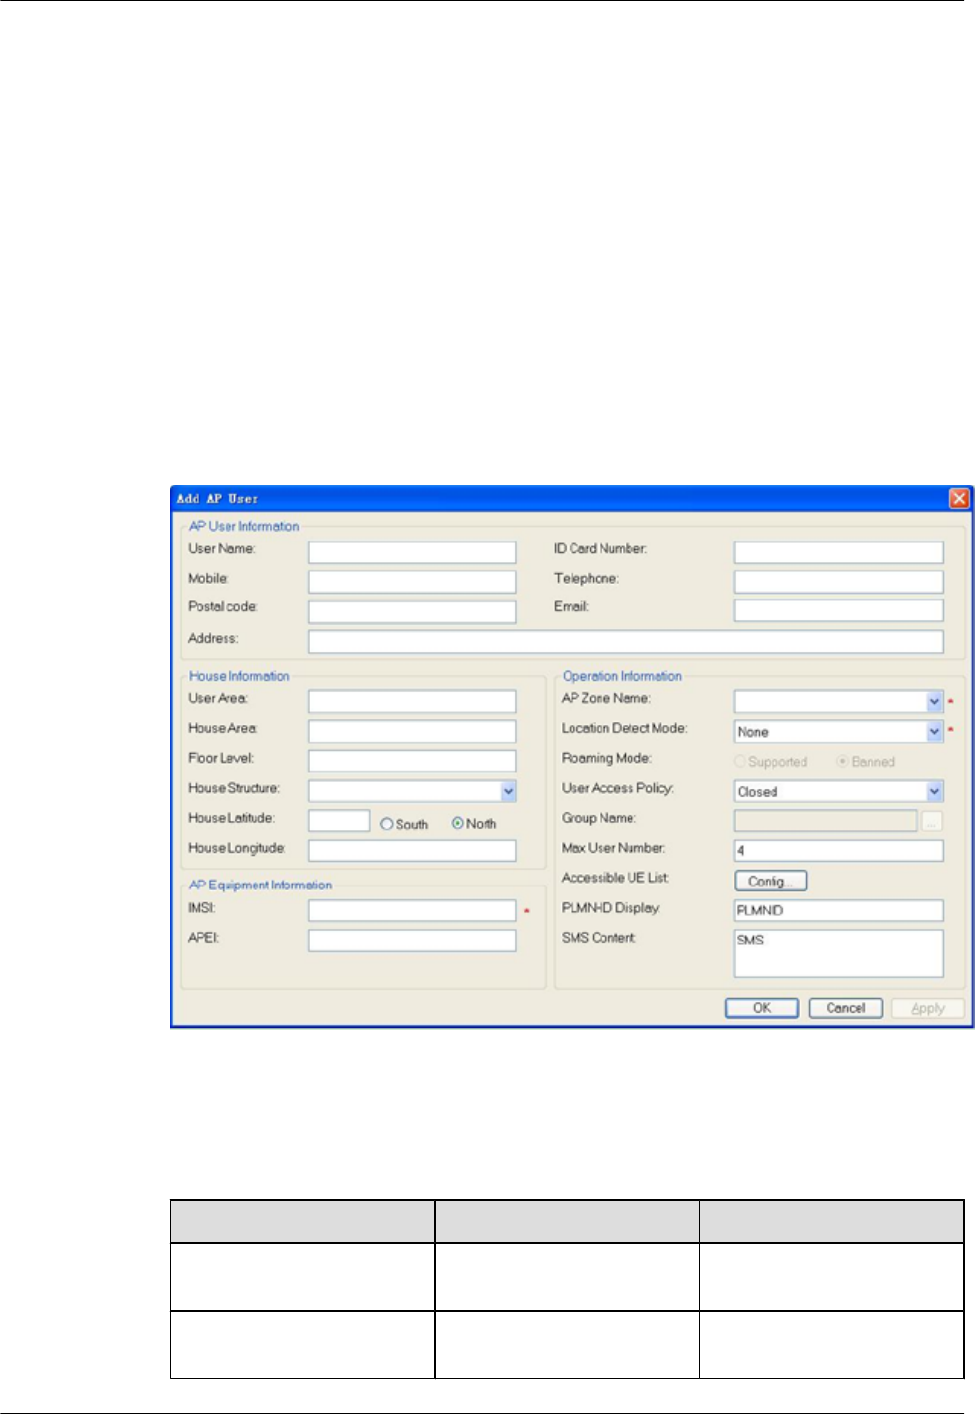
Step 1 Choose Service > AP User Management. The AP User Management page is displayed.
Step 2 Click OK.
The Add AP User page is displayed, as shown in Figure 5-7.
Figure 5-7 Adding an AP user
Table 5-1 describes the parameters.
Table 5-1 Meanings of parameters
Parameter Input Value Description
IMSI IMSI of the SIM or USIM
card used in the AP
-
AP Zone Name Name of the zone configured
in the 5.2.1 Adding a Zone
Name of the zone where the
AP is located
UAP2105
User Guide 5 Configuring the UAP2105
Issue 03 (2009-08-20) Huawei Proprietary and Confidential
Copyright © Huawei Technologies Co., Ltd.
5-7

Parameter Input Value Description
Location Detect Mode Cell ID Location detection is
performed according to the
macro cell reported by the
AP. The location detection is
used to check the validity of
the AP.
PLMNID Location detection is
performed according to the
PLMN ID reported by the
AP.
IP Address Location detection is
performed according to the
IP address reported by the
AP.
None No location detection is
performed for the AP.
User Access Policy Close Only the UEs in the UE
permission list set in the
AHR can connect to the AP
network.
Open All UEs under the AP
coverage can connect to the
AP network.
PLMNID Display Information about the
operator that provides
services
When the PLMNID
Display switch is enabled on
the AP Manager and a UE
camps on the AP cell, the
information about the
operator is displayed on the
UE.
SMS Content SMS content for location
indication
When the SMS Content
switch is enabled on the AP
Manager and a UE camps on
the AP cell, a message
containing the location
indication information is sent
to the UE.
Step 3 Type parameters (the parameters with red asterisks are mandatory), and then click OK. The AP
user is added successfully.
----End
5 Configuring the UAP2105
UAP2105
User Guide
5-8 Huawei Proprietary and Confidential
Copyright © Huawei Technologies Co., Ltd.
Issue 03 (2009-08-20)

5.3 Setting Parameters on the AP Manager
This describes how to set AP parameters on the AP Manager. The parameter settings are
applicable to all APs managed by the AP Manager.
5.3.1 Activating a Zone
Before setting the parameters in a zone on the AP Manager, activate the zone.
5.3.2 Setting Parameters in a Zone
Select the zone in which parameters need to be set, and then set the APCELLAC, list of AP
frequencies, and list of AP scrambling codes.
5.3.1 Activating a Zone
Before setting the parameters in a zone on the AP Manager, activate the zone.
Prerequisite
lYou have obtained the IP address, login user name, and password of the AP Manager.
lYou have obtained the Mobile Network Code (MNC), Mobile Country Code (MCC), Air
Mobile Country Code (MCCAIR), Air Mobile Network Code (MNCAIR), and Air
Location Area Code Range (LACAIR) used by the AP.
lYou have obtained the APCELLAC, list of frequencies, and list of scrambling codes in the
zone where the AP is located.
Procedure
Step 1 Open the Internet Explorer (IE), and then type the IP address and login port number (such as,
http://185.22.61.79:8080/apm) of the AP Manager. The login dialog box is displayed, as shown
in Figure 5-8.
Figure 5-8 Logging in to the AP Manager
UAP2105
User Guide 5 Configuring the UAP2105
Issue 03 (2009-08-20) Huawei Proprietary and Confidential
Copyright © Huawei Technologies Co., Ltd.
5-9
Step 2 Type the user name, password, and verify code to log in to the AP Manager.
NOTE
The default user name is admin, and the default password is 11111111.
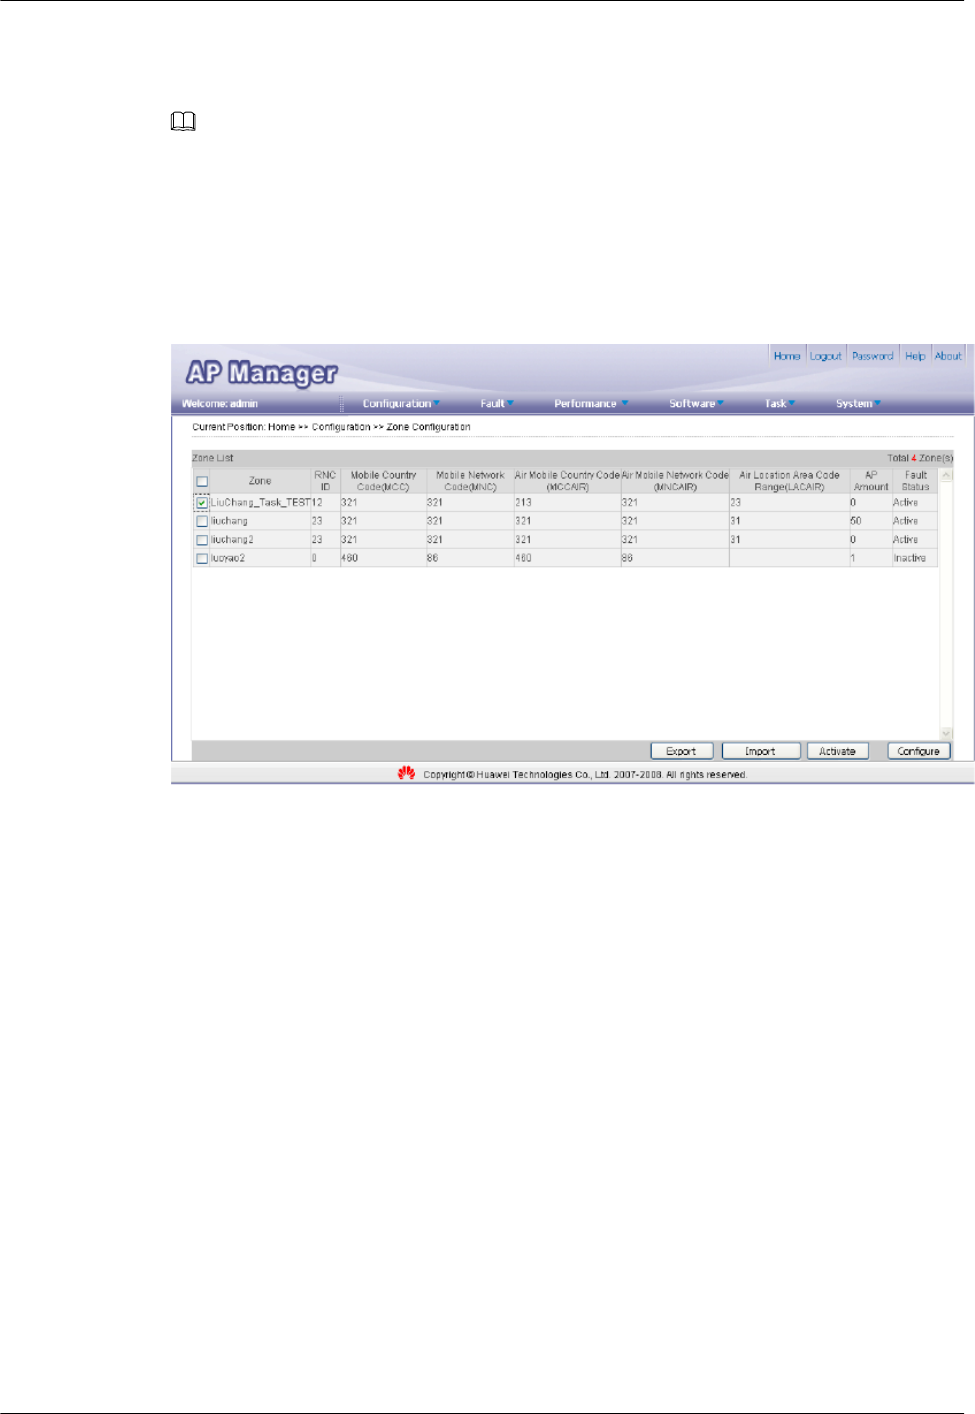
Step 3 Choose Configuration > Zone Configuration. The Zone Configuration page is displayed.
Step 4 Select the zone in which parameters need to be set, as shown in Figure 5-9. Then, click
Activate.
Figure 5-9 Configuring a zone
Step 5 Set the parameters based on network planning, and then click Activate to activate the zone, as
shown in Figure 5-10.
5 Configuring the UAP2105
UAP2105
User Guide
5-10 Huawei Proprietary and Confidential
Copyright © Huawei Technologies Co., Ltd.
Issue 03 (2009-08-20)
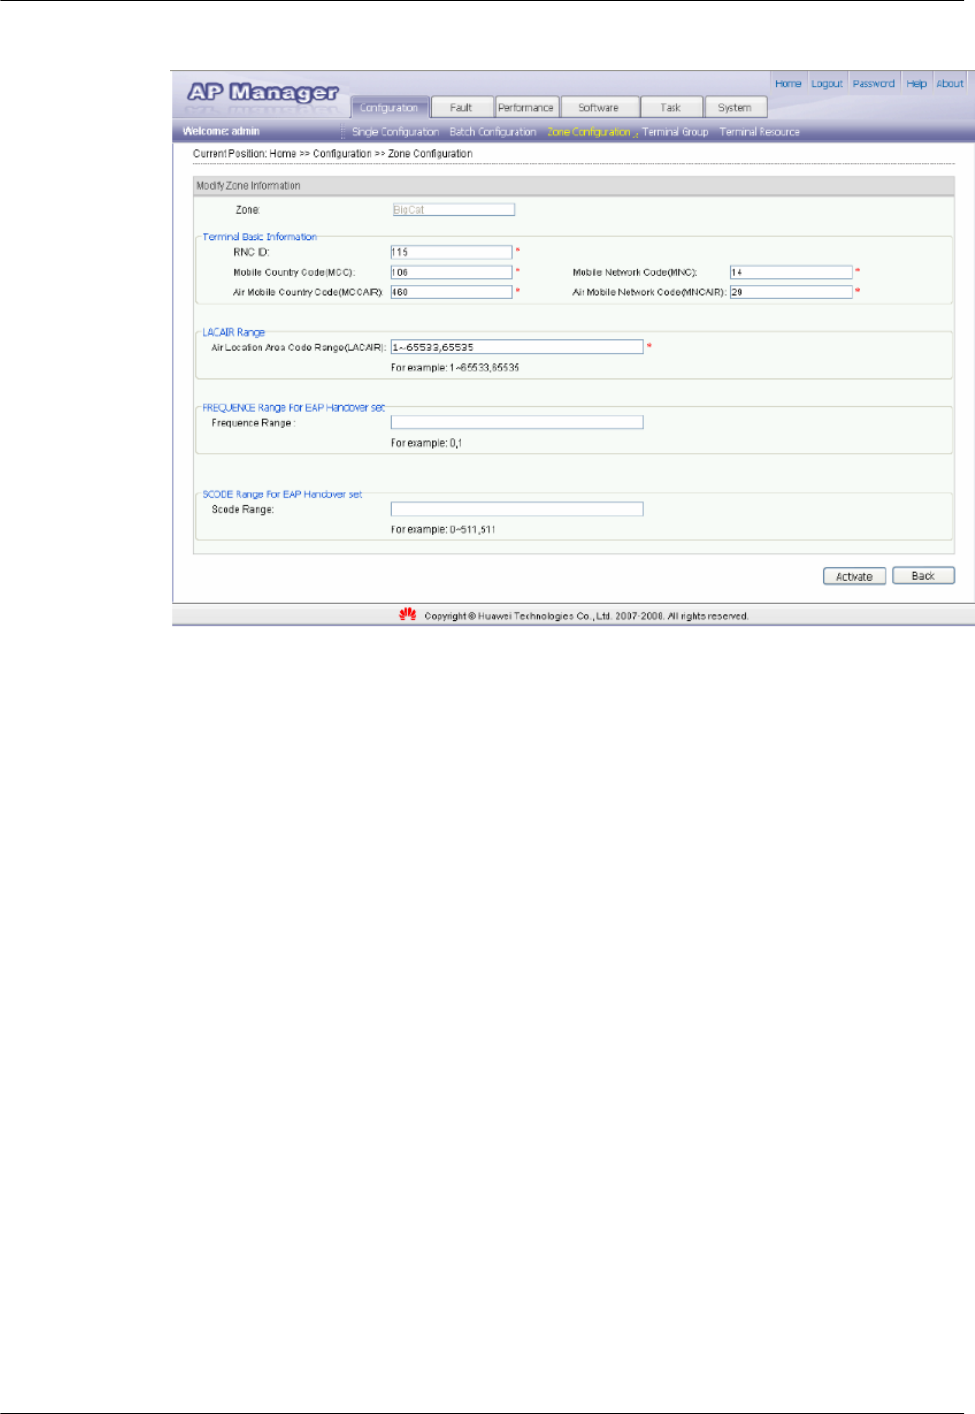
Figure 5-10 Activating a zone
----End
5.3.2 Setting Parameters in a Zone
Select the zone in which parameters need to be set, and then set the APCELLAC, list of AP
frequencies, and list of AP scrambling codes.
Prerequisite
The zone has been activated.
Procedure
Step 1 Choose Configuration > > Zone Configuration . The Zone Configuration page is displayed.
Step 2 Select the zone in which parameters need to be set, as shown in Figure 5-11. Then, click
Configure.
UAP2105
User Guide 5 Configuring the UAP2105
Issue 03 (2009-08-20) Huawei Proprietary and Confidential
Copyright © Huawei Technologies Co., Ltd.
5-11

Figure 5-11 Configuring a zone
Step 3 Select the target AP in the zone, and then click Next.
Step 4 Choose APCELLFREQ from the left pane and set the list of AP frequencies, as shown in
Figure 5-12.
Figure 5-12 Setting the list of AP frequencies
5 Configuring the UAP2105
UAP2105
User Guide
5-12 Huawei Proprietary and Confidential
Copyright © Huawei Technologies Co., Ltd.
Issue 03 (2009-08-20)
NOTE
Click Add Configuration to add a frequency of the AP.
Step 5 After completing the settings, click Confirm.
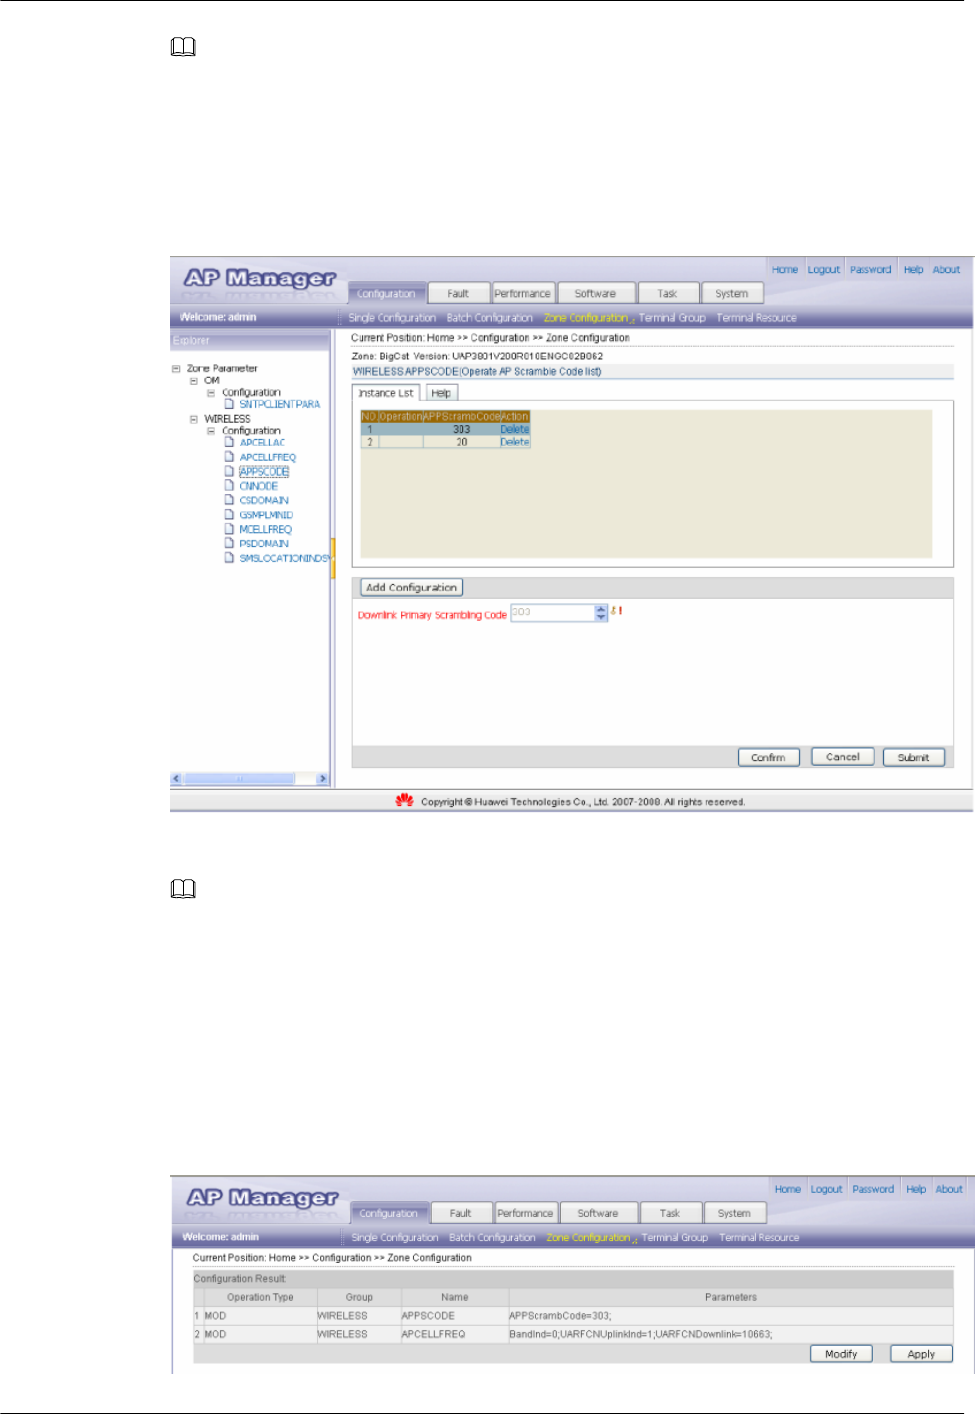
Step 6 Choose APPSCODE from the left pane and set the list of AP scrambling codes, as shown in
Figure 5-13.
Figure 5-13 Setting the list of AP scrambling codes
NOTE
Click Add Configuration to add a frequency of the AP.
Step 7 After completing the settings, click Confirm.
Step 8 Choose APCELLAC from the left pane and set the APCELLAC of the AP.
Step 9 After completing the settings, click Confirm.
Step 10 Click Submit after the APCELLAC, list of AP frequencies, and list of AP scrambling codes are
set. The configuration confirmation page is displayed, as shown in Figure 5-14.
Figure 5-14 Configuration confirmation
UAP2105
User Guide 5 Configuring the UAP2105
Issue 03 (2009-08-20) Huawei Proprietary and Confidential
Copyright © Huawei Technologies Co., Ltd.
5-13

Step 11 After confirming the settings, click Apply.
----End
5 Configuring the UAP2105
UAP2105
User Guide
5-14 Huawei Proprietary and Confidential
Copyright © Huawei Technologies Co., Ltd.
Issue 03 (2009-08-20)

6 Routine Operation and Maintenance of the
UAP2105
About This Chapter
This describes how to perform commissioning, routine maintenance, and software management
of the AP after installation and configuration.
6.1 Commissioning Services
This describes how to trace the Uu interface, Iu interface, and CDT messages to test the services
offered by the AP through the Trace Viewer tool of the Local Maintenance Terminal (LMT).
6.2 Diagnosing Faults
This describes how to diagnose the faults in the AP, faults at the radio network layer, and faults
at the transport network layer on the WebUI and how to view diagnosis results.
6.3 Handling Alarms
This describes how to manage AP alarms on the AP Manager. You can subscribe to alarms,
query alarm logs, and query and monitor active alarms.
6.4 Upgrading the Software
This describes how to upgrade the AP software on the FTP server.
6.5 Uploading AP Terminal Files
This describes how to upload the AP log, configuration file, and performance file to the FTP
server through the AP Manager for future analysis, use, or query.
UAP2105
User Guide 6 Routine Operation and Maintenance of the UAP2105
Issue 03 (2009-08-20) Huawei Proprietary and Confidential
Copyright © Huawei Technologies Co., Ltd.
6-1

6.1 Commissioning Services
This describes how to trace the Uu interface, Iu interface, and CDT messages to test the services
offered by the AP through the Trace Viewer tool of the Local Maintenance Terminal (LMT).
Prerequisite
lThe AP is powered on, and the AP cell is set up.
lTwo functional UEs, UE 1 and UE 2, are ready.
lIf the admission mode of the AP is set to Close or Group, the IMSIs of UE 1 and UE 2 are
added to the AP permission list.
For details about how to configure the AP permission list, see the AHR Operator Guide.
lA functional fixed-line phone is ready.
lThe LMT that matches the AP version works properly.
lThe CS and PS domains are functional.
Context
Table 6-1 describes the basic tasks involved in service commissioning.
Table 6-1 Commissioning AP Services
Task Method Expected Result
Test voice call services. UE 1 or UE 2 originates a
voice call to the fixed-line
phone.
The voice quality is good
without loud noise.
UE 1 originates a voice call to
UE 2.
The voice quality is good
without loud noise.
Test video call services. UE 1 originates a video call to
UE 2.
lThe voice is clear.
lThe video is clear and
fluent.
lThe voice is synchronized
with the video.
Test PS services. Browse web pages and upload
or download data through a
UE.
Web pages are browsed
normally, and data is uploaded
or downloaded successfully
within the specified time.
Procedure
Step 1 Log in to the LMT, and then choose Service > Trace Management > Interface Trace Task
to trace the Uu interface, Iu interface, and CDT messages, as shown in Figure 6-1.
6 Routine Operation and Maintenance of the UAP2105
UAP2105
User Guide
6-2 Huawei Proprietary and Confidential
Copyright © Huawei Technologies Co., Ltd.
Issue 03 (2009-08-20)
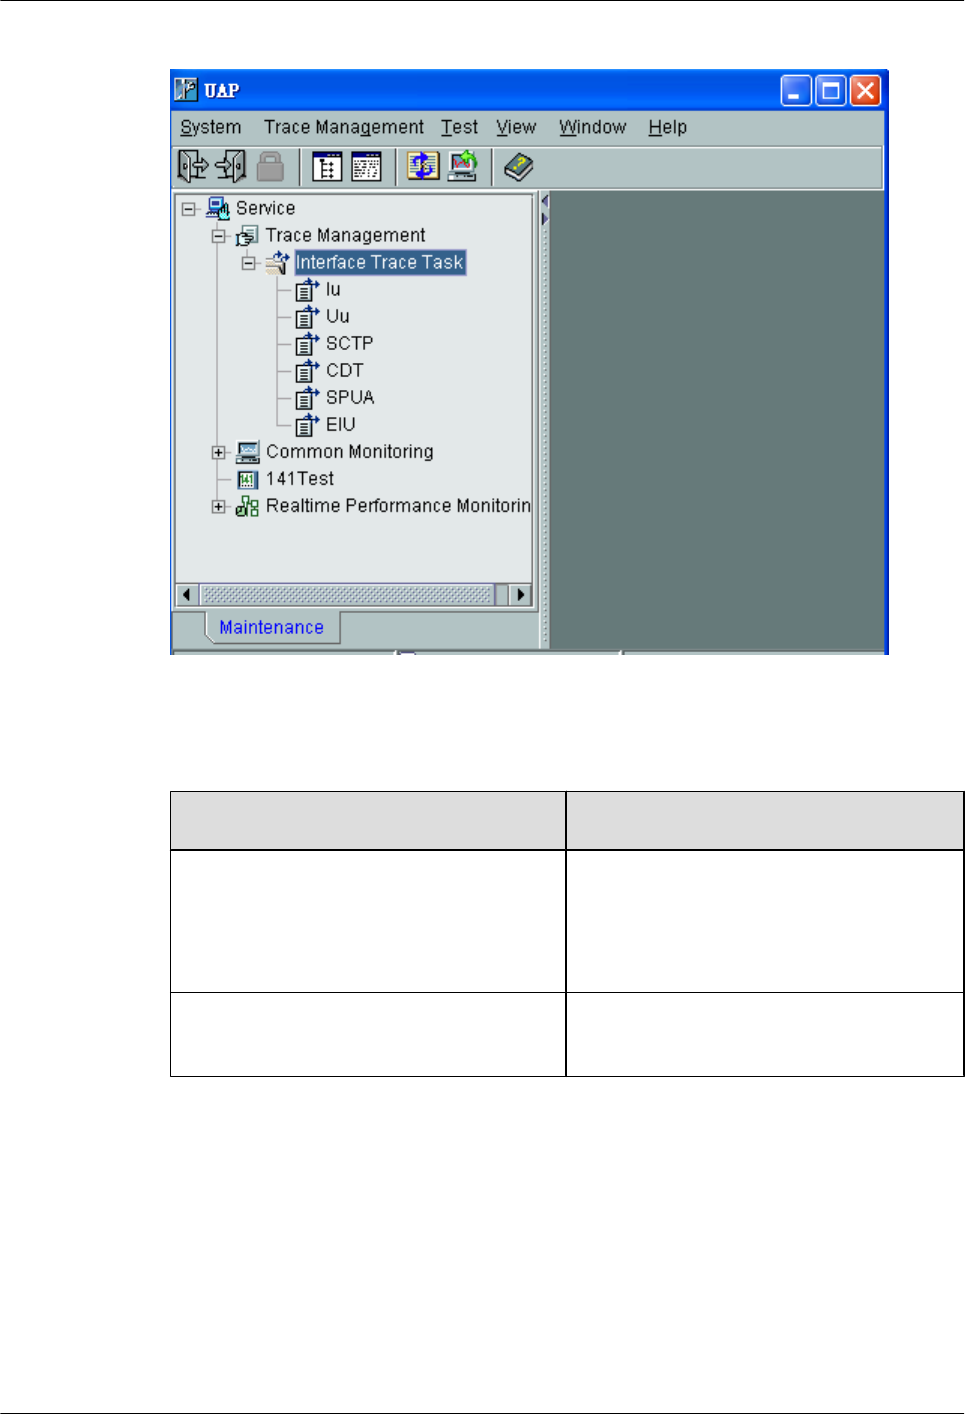
Figure 6-1 Tracing management
Step 2 Power on the UE under the coverage of the AP cell. Check whether the UE can automatically
search for the AP cell during startup.
If ... Then …
The UE fails to search for the AP cell 1. Identify and rectify the fault. For details, see
Failure of the UE to Search for the AP
Cell.
2. Go to Step 3.
The UE succeeds in searching for the AP
cell
Go to Step 3.
Step 3 Wait until the UE is under the coverage of the AP cell and the location update is complete.
If the AP fails to access the AP cell, identify and rectify the faulty. For details, see Failure of
the UE to Access the AP Cell.
Step 4 Test the services provided by the AP.
1. A UE originates a voice call to the fixed-line phone.
2. UE 1 originates a voice call to UE 2.
3. UE 1 originates a video call to UE 2.
4. Browse web pages and upload or download data through a UE.
----End
UAP2105
User Guide 6 Routine Operation and Maintenance of the UAP2105
Issue 03 (2009-08-20) Huawei Proprietary and Confidential
Copyright © Huawei Technologies Co., Ltd.
6-3
6.2 Diagnosing Faults
This describes how to diagnose the faults in the AP, faults at the radio network layer, and faults
at the transport network layer on the WebUI and how to view diagnosis results.
Procedure
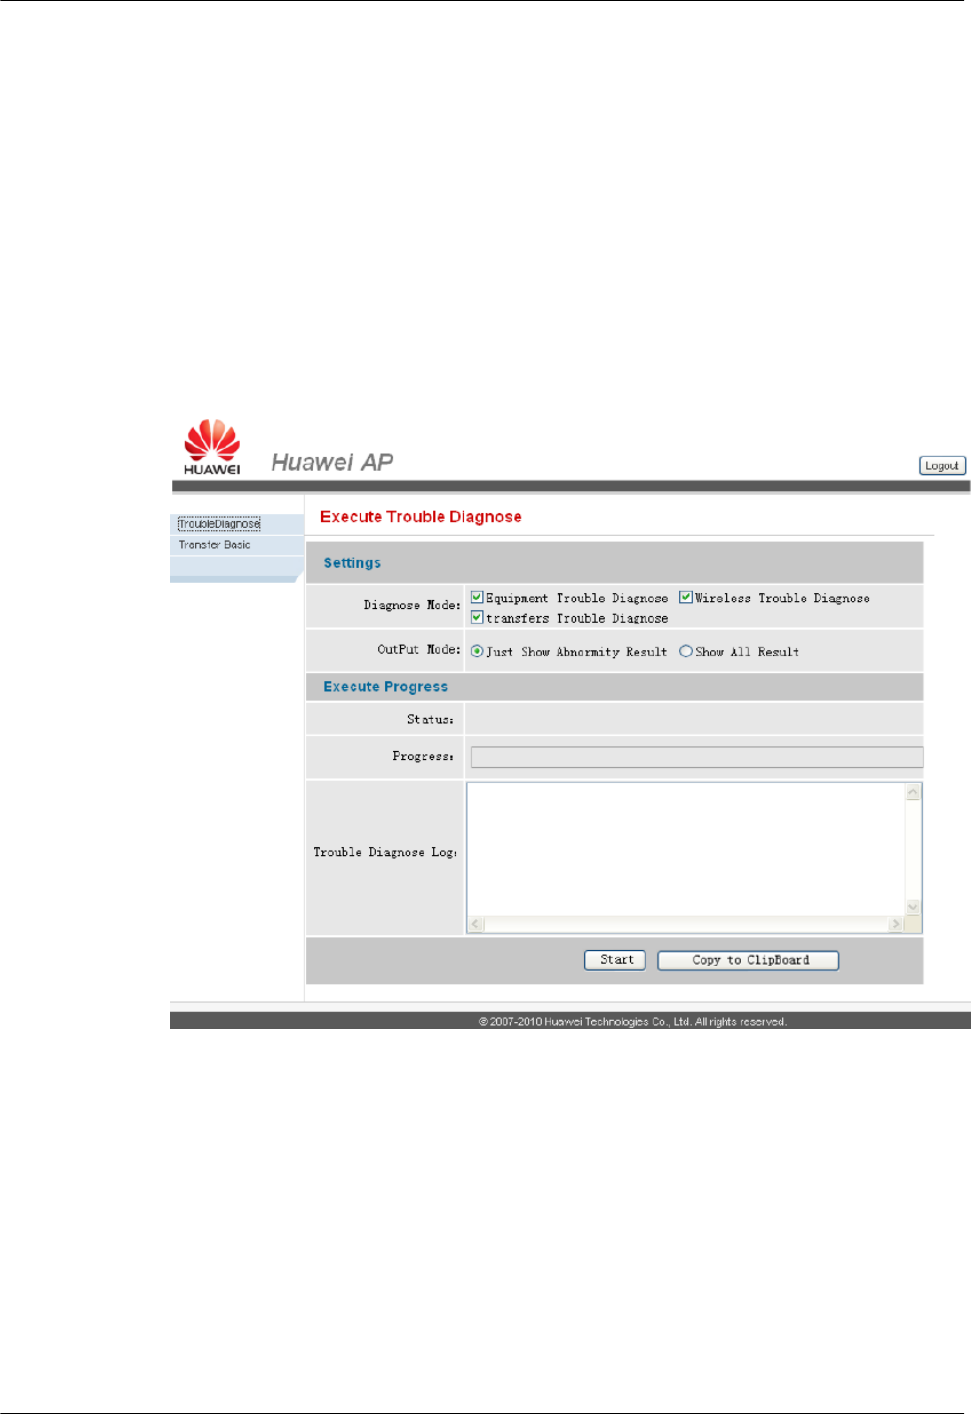
Step 1 Log in to the WebUI. For details, see Logging in to the WebUI. Then, choose
TroubleDiagnose. The Execute Trouble Diagnose page is displayed, as shown in Figure
6-2.
Figure 6-2 Execute Trouble Diagnose
Step 2 Set Diagnose Mode and determine the type of a fault.
lEquipment Trouble Diagnose: indicates the faults in the AP.
lWireless Trouble Diagnose: indicates the faults at the radio network layer.
ltransfers Trouble Diagnose: indicates the faults at the transport network layer.
Step 3 Set OutPut Mode and determine the output mode of the fault diagnosis result.
lJust Show Abnormity Result: indicates that only fault diagnosis results are displayed.
lShow All Result: indicates that all diagnosis results are displayed.
6 Routine Operation and Maintenance of the UAP2105
UAP2105
User Guide
6-4 Huawei Proprietary and Confidential
Copyright © Huawei Technologies Co., Ltd.
Issue 03 (2009-08-20)

Step 4 Click Start to diagnose the faults.
After the fault diagnosis is complete, diagnosis results are displayed in the Trouble Diagnose
Log pane.
----End
6.3 Handling Alarms
This describes how to manage AP alarms on the AP Manager. You can subscribe to alarms,
query alarm logs, and query and monitor active alarms.
Procedure
Step 1 Log in to the AP Manager, and then click the Fault tab. On the tab page, manage alarms.
Table 6-2 describes alarm management options.
Table 6-2 Alarm management options
Alarm Management Option Description
Alarm Subscribe Subscribe to the alarms of an AP or maintain
the list of the APs that have subscribed to
alarms. Active Alarm Monitor, Active
Alarm Query, and Alarm Log Query are
available for only the APs that subscribe to
alarms.
Active Alarm Monitor View the active alarms that are not cleared in
real time and delete the cleared active alarms.
Active Alarm Query Query the active alarms reported to the AP
Manager database by the AP. To query the
detailed information about an alarm, click
on the left of the alarm.
Alarm Log Query Query the alarm logs reported to the AP
Manager database by the AP.
Terminal Alarm Log Query Query the remaining alarm logs on the AP. If
the AP is offline, the AP Manager prompts
operation timeout.
----End
6.4 Upgrading the Software
This describes how to upgrade the AP software on the FTP server.
UAP2105
User Guide 6 Routine Operation and Maintenance of the UAP2105
Issue 03 (2009-08-20) Huawei Proprietary and Confidential
Copyright © Huawei Technologies Co., Ltd.
6-5

Prerequisite
lThe FTP server is available.
Log in to the AP Manager, and then choose Software > File Server. On the File
Servers tab page, check Status of the corresponding FTP server.
–If Status of the FTP Server is ... Then …
Available The AP Manager communicates with the
FTP server normally.
Unavailable The AP Manager cannot communicate
with the FTP server normally.
lSelect the option button before the
FTP server, and then click Modify.
Configure the FTP server on the
displayed File Server Information
page.
lThe target upgrade version of the AP is synchronized to the FTP server.
Log in to the AP Manager, and then choose Software.
–Choose File Server, and then query the version file of the FTP server on the File Servers
and Versions tab page.
–Choose Version, and then click Add to upload the version file. After the version file is
uploaded successfully, the AP Manager synchronizes the file to the available FTP server
automatically.
lThe zone where the AP is located is in the zone list of the FTP server.
Log in to the AP Manager, and then choose Software > File Server.
–Select the FTP server on the File Servers tab page, and then query the zone list of the
file server in the File Server Information dialog box.
–Configure the mapping between the zone and the FTP server on the Zone Servers
Configuration tab page.
Procedure
lUpgrading a single AP
1. Log in to the AP Manager, and then choose Software > Upgrade.
2. In the Terminal List pane, select the AP to be upgraded, and then click Upgrade.
3. The Terminal Upgrade page is displayed. On the page, set options related to the
upgrade task.
Option Description
Upgrade Version It refers to the target version that the AP software is upgraded
to.
Immediately
Reboot
It enables you to determine whether the AP is rebooted
immediately after the software is downloaded successfully.
4. Click Submit to complete the settings.
6 Routine Operation and Maintenance of the UAP2105
UAP2105
User Guide
6-6 Huawei Proprietary and Confidential
Copyright © Huawei Technologies Co., Ltd.
Issue 03 (2009-08-20)

If You Set Immediately Reboot to ... Then …
Yes The AP is rebooted immediately for
upgrade after the software is
downloaded successfully.
NOTE
Rebooting the AP disrupts the services
provided by the AP.
No After the software is downloaded
successfully, check whether services
are provided, and then reboot the AP.
lIf no service is provided, reboot the
AP for upgrade immediately.
lIf services are ongoing, reboot the
AP for upgrade after services are
performed.
lUpgrading APs in batches
1. Log in to the AP Manager, and then choose Software > Batch Upgrade.
2. The Task Information page is displayed. On the page, set options related to the
upgrade task.
Option Description
Target Version It refers to the target version that the AP software is
upgraded to.
Immediately Reboot It enables you to determine whether the AP is rebooted
immediately after the software is downloaded
successfully.
Allow Retry It enables you to determine whether the software is
upgraded again when sending an upgrade command
fails.
Triggering Mode It refers to the triggering mode for upgrading the
software. Options:
lTimer: indicates that you can specify the time for
performing the upgrade.
lImmediately: indicates that the software is
upgraded immediately.
lManual: indicates that the software is upgraded
manually.
Valid Time It refers to the validity period of an upgrade task. If
the validity period expires, the software is not
upgraded again even if the upgrade fails.
If the upgrade mode is set to Timer, this option is
enabled.
UAP2105
User Guide 6 Routine Operation and Maintenance of the UAP2105
Issue 03 (2009-08-20) Huawei Proprietary and Confidential
Copyright © Huawei Technologies Co., Ltd.
6-7

Option Description
Time Setting It is used to specify the time for starting the upgrade.
If the upgrade mode is set to Timer, this option is
enabled.
3. Click Next. On the displayed page, select the target APs.
You can select the target APs on the AP Manager in the following two ways:
–Special Terminal: indicates that you directly select APs to be upgraded.
–Special Condition: indicates that you select APs to be upgraded by special
conditions.
4. Click Submit to complete the settings.
If You Set Immediately Reboot to ... Then …
Yes The AP is rebooted immediately for
upgrade after the software is
downloaded successfully.
NOTE
Rebooting the AP disrupts the services
provided by the AP.
No After the software is downloaded
successfully, check whether services
are provided, and then reboot the AP.
lIf no service is provided, reboot the
AP for upgrade immediately.
lIf services are ongoing, reboot the
AP for upgrade after services are
performed.
----End
6.5 Uploading AP Terminal Files
This describes how to upload the AP log, configuration file, and performance file to the FTP
server through the AP Manager for future analysis, use, or query.
Prerequisite
The FTP server is available.
Log in to the AP Manager, and then choose Software > File Server. On the File Servers tab
page, check Status of the corresponding FTP server.
If Status of the FTP Server is ... Then …
Available The AP Manager communicates with the FTP
server normally.
6 Routine Operation and Maintenance of the UAP2105
UAP2105
User Guide
6-8 Huawei Proprietary and Confidential
Copyright © Huawei Technologies Co., Ltd.
Issue 03 (2009-08-20)

If Status of the FTP Server is ... Then …
Unavailable The AP Manager cannot communicate with
the FTP server normally.
lSelect the option button before the FTP
server, and then click Modify. Configure
the FTP server on the displayed File
Server Information page.
Procedure
Step 1 Log in to the AP Manager, choose Fault > Terminal Files, and then click Uploading Files.
Step 2 The Uploading Files page is displayed. On the page, type the APEI of the AP whose terminal
files need to be uploaded in the Serial NO. box and select a target file from the File Type drop-
down list.
The types of the AP terminal files to be uploaded are as follows:
lConfiguration File
lPerformance File
lAlarm Log
Alarm logs consist of CurrUserAlm.log, HisUserAlm.log, and OrigAlm.log. The AP saves
a maximum of 10,000 OrigAlm.log entries, 50 CurrUserAlm.log entries, and 1,000
HisUserAlm.log entries. After the number of saved entries reaches the threshold, the earliest
entries are deleted so that follow-up entries can be saved.
lRunning Log
The AP saves a maximum of 2,000 running log entries. After the number of saved entries
reaches 2,000, the earliest entries are deleted so that follow-up entries can be saved.
lCore Log
The latest three core log entries for abnormal resetting of the AP are saved.
Step 3 Click Uploading Files to upload the specified terminal files of the AP.
If ... Then …
View Files is displayed Click View Files. In the File List pane, Status indicates
the uploading status of the file.
View Files is not displayed, or a
message box is displayed
The connection to the FTP server through the AP
Manager is faulty. Choose System > System Setting >
Fault, and then reset the login information of the FTP
server.
UAP2105
User Guide 6 Routine Operation and Maintenance of the UAP2105
Issue 03 (2009-08-20) Huawei Proprietary and Confidential
Copyright © Huawei Technologies Co., Ltd.
6-9

NOTE
To view terminal files, click View Files, and store the terminal files on the local disk of the computer
according to the displayed system message.
The methods of viewing terminal files are the same. Choose Start > All Programs > Huawei Local
Maintenance Terminal, and then select the corresponding alarm browser tool. The following description
takes the method of viewing alarm logs for example:
1. Choose Start > All Programs > Huawei Local Maintenance Terminal > Alarmlog Browser
Tool.
2. Select the AP type and language type.
3. Click OK.
4. Select the alarm log to be viewed, and then click Open.
----End
6 Routine Operation and Maintenance of the UAP2105
UAP2105
User Guide
6-10 Huawei Proprietary and Confidential
Copyright © Huawei Technologies Co., Ltd.
Issue 03 (2009-08-20)

7 Communication Ports Used by the UAP2105
Table 7-1 lists the communication ports used by the UAP2105.
Table 7-1 Communication ports used by the UAP2105
Prot
ocol
Side
A
Port
Num
ber at
Side
A
(RX)
Side B Port
Number
at Side B
(TX)
Service Rights
Control
TCP UAP2
105
80 WebUI 1024-6553
5
WebUI port for local OM User name
and
password
TCP UAP2
105
6000 LMT,
WebUI
Proxy
1024-6553
5
MML port for local OM User name
and
password
TCP UAP2
105
6006 LMT,
WebUI
Proxy
1024-6553
5
Binary port for local OM User name
and
password
TCP UAP2
105
7547 AP
Manager
1024-6553
5
TR-069 protocol port -
TCP UAP2
105
500 SeGW 1024-6553
5
Default IKE port of the
IPSec
-
TCP UAP2
105
4500 SeGW 1024-6553
5
NAT protocol port of the
IPSec
-
TCP UAP2
105
3300
3
CLK
Server
1024-6553
5
Clock synchronization -
UAP2105
User Guide 7 Communication Ports Used by the UAP2105
Issue 03 (2009-08-20) Huawei Proprietary and Confidential
Copyright © Huawei Technologies Co., Ltd.
7-1