Huawei HG532f Quick Installation Guide
2016-08-09
User Manual: Huawei
Open the PDF directly: View PDF ![]() .
.
Page Count: 2
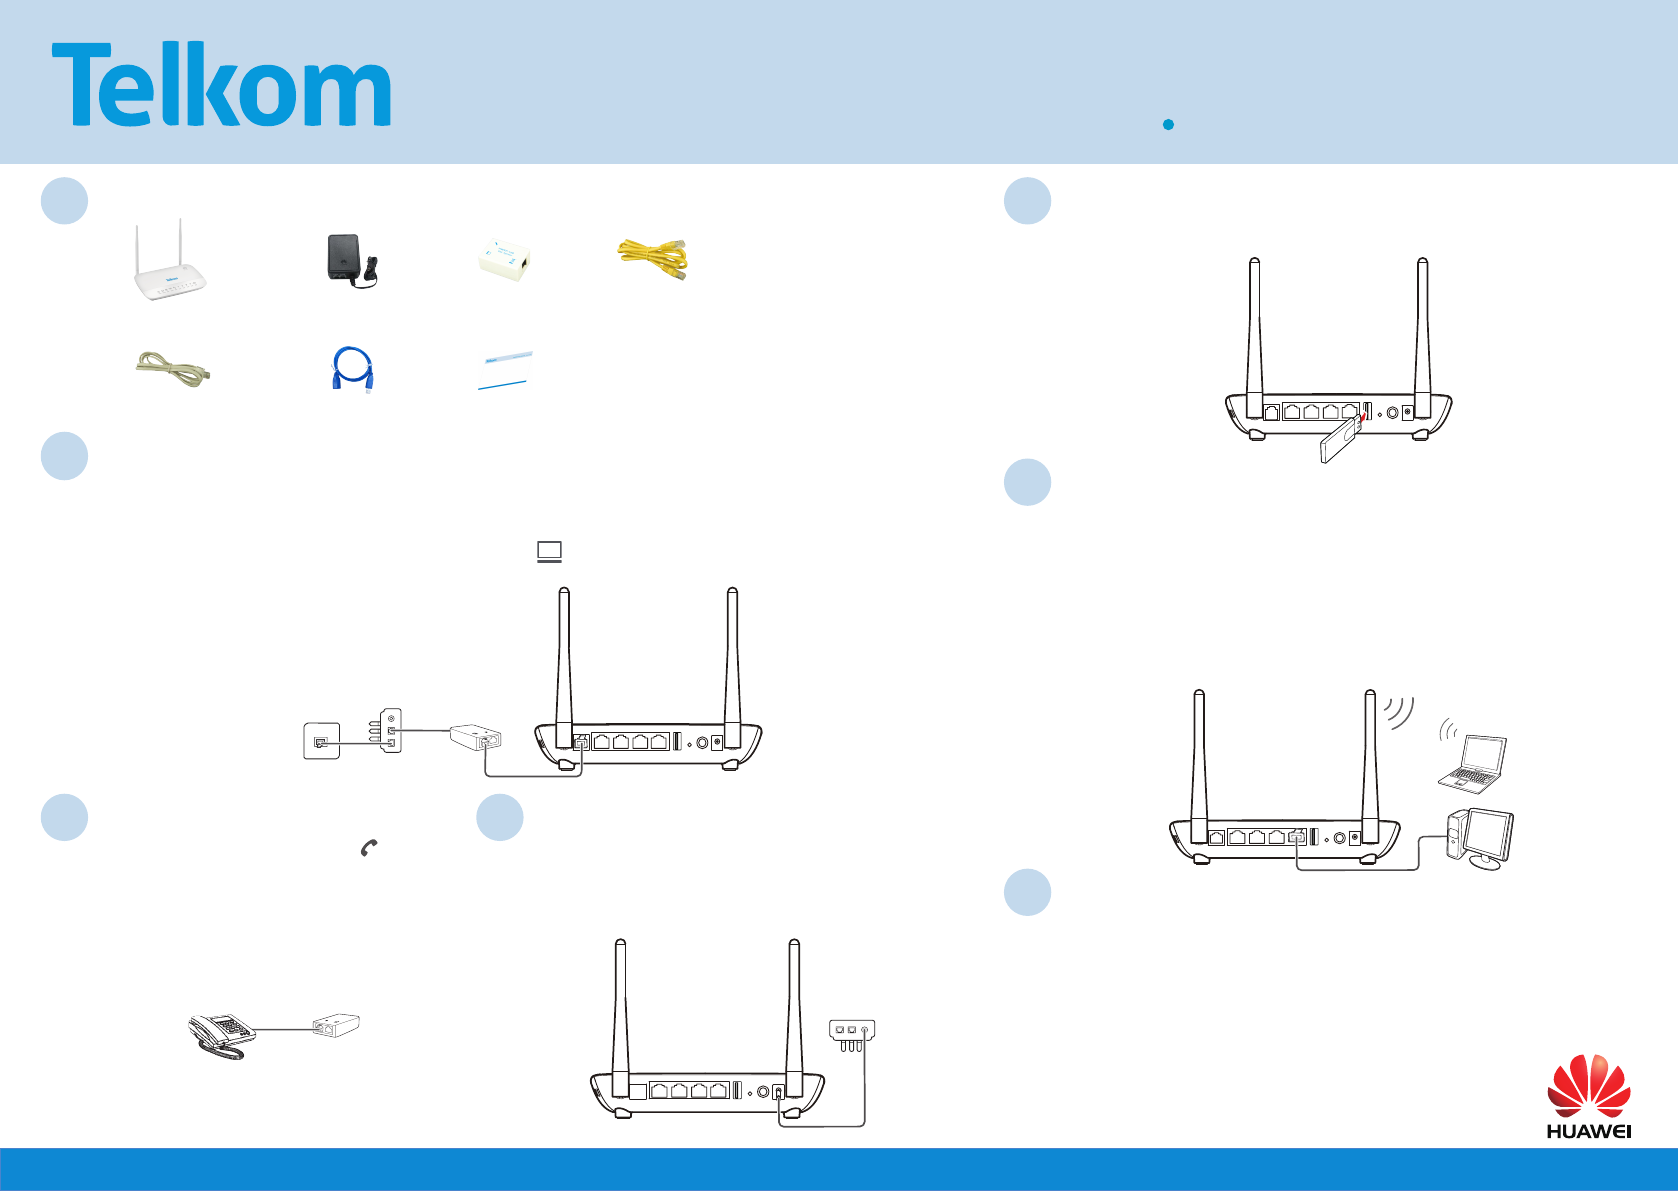
1Box Contents
4Power Adapter Connection
6Connect a device to your HG532f
2ADSL Port Connection
7
5USB Connection
ADSL LAN4 LAN3 LAN2 LAN1 Reset On/Off Power
USB
Line
IN
Line
OUT
Power Supply
HG532f
ADSL LAN4 LAN3 LAN2 LAN1 Reset On/Off Power
USB
PC
HG532f
Laptop
Line
IN
Line
OUT
MODEM
PHONE
LINE
Splitter
ADSL LAN4 LAN3 LAN2 LAN1 Reset On/Off PowerUSB
HG532f
Power Supply
Telephone
Wall Socket
ADSL LAN4 LAN3 LAN2 LAN1 Reset On/Off Power
USB
HG532f
Data Card
Optionally, a wireless Internet connection is available using a 3G data card (not supplied).
Storage devices and printers may also be attached via the USB port.
Connect the one end of the grey telephone cable to the telephone wall socket. Connect the other end of the cable to the IN socket of
the power supply.
Connect the one end of another grey telephone cable to the OUT socket of the power supply. Connect the other end to the LINE socket
of the splitter.
Connect the one end of the last grey telephone cable to the MODEM socket of the splitter. Connect the other end of the cable to
the grey ADSL port on the rear panel of the HG532f.
Connect the connector at the end of the power supply cable to
the Power port at the back of the HG532f.
Plug the power supply into the wall outlet and make sure the
wall outlet is switched on.
Press the Power On/Off button on the HG532f to switch it on.
You can connect a device to your gateway using either the Ethernet cable or Wi-Fi.
Ethernet cable:
• Connect one end of the yellow Ethernet cable to the Ethernet LAN port on your computer.
• Connect the other end of the yellow Ethernet cable to one of the yellow Ethernet LAN
ports on the back of your HG532f.
Wi-Fi:
• Ensure that the WLAN LED light on your HG532f is green. If it does not appear green,
press the WLAN on/off button on the side of the device for one second or more.
• Use the SSID and password to connect your Wi-Fi-enabled device to the HG532f. The
default SSID and password are displayed on the belly label of your HG532f.
HG532f 3-Pin Surge Protected
Power Supply Splitter Ethernet Cable
3 x Telephone Cables USB Cable Documents
3Telephone Set Connection
Connect your telephone to the PHONE socket of
the splitter, using the cable supplied with the telephone.
MODEM
PHONE
LINE
Telephone Splitter
HG532f Home Gateway Quick Installation Guide
Congure your HG532f
Launch an Internet browser (Google Chrome, Firefox, Internet Explorer, Safari, and etc.)
on your connected device.
In the URL web address eld of the browser, enter 10.0.0.2 and press enter or click Go.
Huawei login screen will display. Enter admin for the user name and admin as the
password.
Please follow the instructions of the conguration wizard that starts automatically.
Installation Overview
a
ADSL LAN4 LAN3 LAN2 LAN1 Reset On/Off Power
USB
Line
IN
Line
OUT
MODEM
PHONE
LINE
1
3
7
8
9
5
4
6
2b
c
def
g
h
i
1HG532f 2Telephone
3Splitter 43-Pin Surge Protected
Power Supply
5Telephone wall socket 6PC
7Laptop 8Mobile phone
9Tablet
aLINE port bPHONE port
cMODEM port dADSL port
e4 x LAN ports fUSB port
gReset button hOn/Off button
iPower port
Note
The modem and power supply are not guaranteed against surge or lightning
damage.
The default IP address of the HG532f webpage is 10.0.0.2.
The default login username is "admin" and the password is "admin".
To protect against unauthorized access, change the password after the rst login.
For more details please refer to the User Guide.
Support
Telkom DSL support: 10210
Mon-Fri: 06h00-21h00
Sat-Sun: 06h00-20h00
Copyright © Huawei Technologies Co., Ltd. 2015. All rights
reserved.
THIS DOCUMENT IS FOR INFORMATION PURPOSE ONLY, AND DOES NOT
CONSTITUTE ANY KIND OF WARRANTIES.
Privacy Policy
To better understand how we protect your personal information, please see the privacy policy
at http://consumer.huawei.com/privacy-policy.
96723694_02
HG532f Home Gateway Quick Installation Guide
