Huawei K4305_QSG_0912_en GB_110x110 Hi Link K4305 HSPA USB Stick Quick Start 01 EN IE F VDF Vender
2015-12-23
User Manual: Huawei
Open the PDF directly: View PDF ![]() .
.
Page Count: 24

User Guide
Vodafone Mobile
Broadband USB Stick
K4305
Designed
by Vodafone

Welcome
to the world of mobile communications
1 Welcome
3 Set up your USB Stick
4 Windows 8 installation and
user experience
8 Connection window
9 QuickStart window layout
10 QuickStart view: Current
network panel
11 SMS view
12 Account view
13 USB Stick LED lights
14 Hints and tips
18 Glossary
1
Your new Vodafone Mobile Broadband USB Stick connects your
computer to the internet over the Vodafone mobile phone
network. The Vodafone QuickStart technology built into the
device lets you connect quickly, simply and easily.
Browse the web
You can now access the web and any other internet service
wherever there’s a mobile phone network.
Pick up emails
Keep up to date with your emails, wherever you are.
Send and receive SMS text messages
You can send and receive SMS text messages straight from your
computer. The SMS application provides an easy way to view
messages, write new ones, and manage them.
Always Best Connected (ABCd)
ABCd allows you to prioritise available broadband connections
so that you can switch automatically between them as they
become available. Simple to set up so that automatic handover
occurs between WiFi and mobile broadband access.
Welcome

2
Note:
Linux users can access
the Vodafone Mobile
Broadband application
by entering either of the
following addresses into
your browser: http://
VodafoneMobile.vmb or
http://192.168.9.1.
Welcome System Requirements
To use this USB Stick and the Vodafone Mobile Broadband
application, you need:
A computer running Microsoft – ® Windows® 8, Windows® 7
(SP1 recommended), Windows Vista™ (SP2 recommended), or
Windows® XP (SP3 recommended), or an Apple Mac running
Mac OS® X 10.5 (Intel®), 10.6 or 10.7 (all with latest updates),
or a computer running Linux Ubuntu 11.10, 11.04, 10.10, 10.04;
OpenSUSE 11.4, 11.3; Fedora 14; Debian 6.0, 5.0 or Mandriva
2010.2, 2010.1, 2010.0. There may be some limitations in the
Linux implementation.
A USB socket –
Administrator rights on your computer. –
3
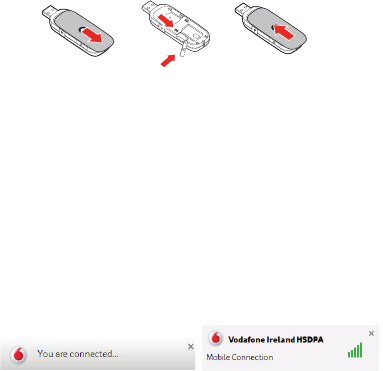
Step 1
Slide the front cover off the USB Stick, and insert your SIM as
shown. If you are using a MicroSD memory card with your Stick
(to allow your Stick to behave as a fl ash memory drive), insert
the card as shown. Replace the front cover. The back cover also
slides off to allow you to change covers.
Step 2
Plug the USB Stick fi rmly into your computer’s USB port.
You should see a progress bar whilst the Vodafone Mobile
Broadband service is installed on your computer from the
USB Stick. Once setup is complete, the Vodafone Mobile
Broadband application is started automatically, and you are
connected to the Vodafone network (if a PIN is required you
will see a popup screen requesting it before you can connect).
The LED on the USB Stick will change from fl ashing to solid, and
you will see 2 popup screens.
Set up your
USB Stick
Note: Some computers
may be set up to
prevent automatic
installation of the VMB
Lite service from your
USB Stick. In this case,
follow the steps in the
hints and tips section
to manually install the
VMB Lite service on your
computer.
On a Windows 8 PC
the user experience is
slightly different. This is
explained on the next
page.
SIM
card
MicroSD
card
4
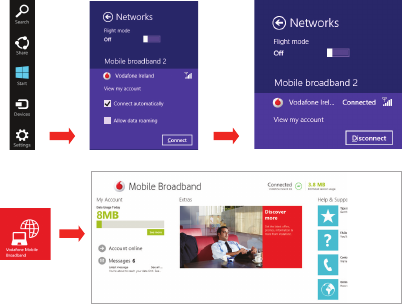
On a Windows 8 PC the Mobile Broadband user experience
is slightly different as the mobile network connectivity is
managed within the Windows 8 operating system. When you
plug in the USB Stick, you need to open the ‘charms’ (Search,
Share, Start, Device and Settings), and select Settings >
Networks > Mobile Broadband.
Select Connect Automatically if required, then click Connect.
Initially the Connection Manager will show ‘Get recommended
app’ and this will change to ‘View my account’ when the Mobile
Broadband application has been automatically downloaded by
Windows 8.
Windows 8
installation
and user
experience
Note:
The Mobile Broadband
application can be
launched by selecting
the application Tile or
View My Account Link in
the Networks area of the
Settings charm
5
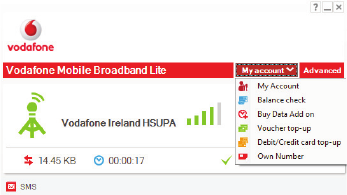
Setting up Pay as you go mobile broadband
To use Pay as you go mobile broadband, you need to have a Pay
as you go SIM. The Vodafone Mobile Broadband Lite application
Account Type must also be set to Prepay, so that the My Account
menu appears.
To change the Account Type, switch to Advanced view and click
on Application menu, Options, Account Type. Select Prepay.
This will enable you to use the following Pay as you go options in
the My Account drop down menu:
Balance check: Check the balance in your account or
what’s left in your broadband add on.
Buy Data Add on: You can purchase data add ons after
activating your top-up voucher.
Voucher top-up: This lets you activate your top-up
voucher.
Debit/Credit card top-up: Top-up your Pay as you go account
using your credit/debit card.
6
To use Pay as you go mobile broadband just follow these 3 easy
steps:
1 Register your Pay as you go SIM
You can get free credit by registering your Pay as you go mobile
broadband SIM on My Vodafone. Just follow these simple steps:
log on to vodafone.ie/myvodafone −
enter your mobile broadband number −
a text with the verifi cation code will be sent to that number −
you can view this text by clicking the SMS button on the −
Vodafone Mobile Broadband Lite menu
complete the new customer registration details −
set your account type to mobile broadband by selecting ‘I will −
mainly use for mobile broadband’. If an error message appears,
check at the top of the page for a registration complete
message. Then logout and login again to continue.
2 Add credit to your account
There are four ways in which you can add credit to your account:
click on the −Debit/Credit card top-up on the Vodafone Mobile
Broadband Lite menu
click ‘Top-Up’ in myvodafone.ie −
buy a top-up voucher in any Vodafone store or usual top-up −
outlets
by calling −1850 20 40 20.
If you have activated
your top-up and not
purchased a data add
on you will be charged
default data rates.
Buying a broadband
add on is simple to do
and gives you the best
value rates.
7
3 Purchase a broadband add on
Before you can purchase a broadband add on you need to have
credit on your account. Broadband add ons can be bought the
same way you buy credit:
by clicking −Buy Data Add on on the Vodafone Mobile
Broadband Lite menu
on vodafone.ie/myvodafone −
in store −
by calling −1850 20 40 20.
Choose from daily, weekly or monthly broadband add ons.
(Visit vodafone.ie for further information on current pricing and
broadband add ons.)
Important
Once you’ve bought your add on you will need to activate it. All
you have to do is disconnect and then reconnect your browser
session. This ensures that you do not get charged default data
rates.
(Note: If you have any remaining data balance in a previous add on
then it will be lost when you purchase a new add on.)
8
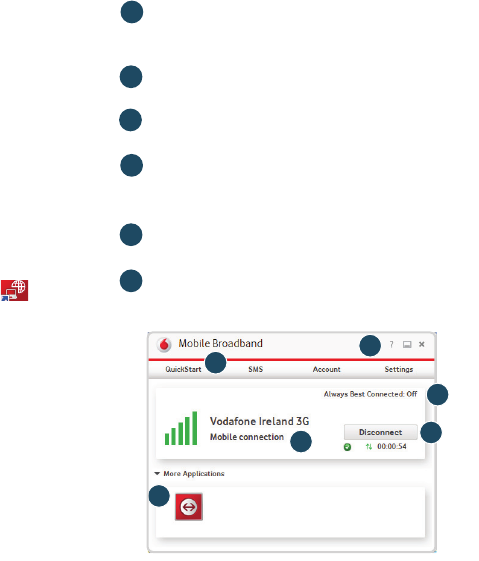
Connection
window
Connect/Disconnect
Connect to the internet via the mobile phone network or
Wi-Fi, to browse the web or use email
Status
Check the status of the current connection
Shortcuts
Select services, applications and tools
Menu bar
Device and network settings and diagnostics, SMS
functionality, manage your account.
Help
View Help topics
Always Best Connected
Confi gure connection preferences
4
5
3
1
2
6
Note: Once setup
is complete, you
can always access
the Vodafone
Mobile Broadband
application when
your USB Stick
is inserted into
your computer by
clicking the desktop
icon
4
5
3
21
6
9
3
5
1
2
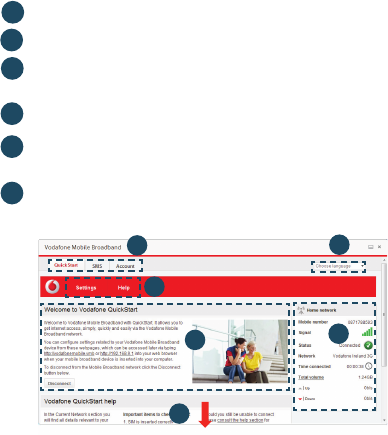
Note: Every window
in the QuickStart
application has this
same standard layout.
Context-sensitive
help for each window
is always available
at the bottom of the
window.
Sometimes an
additional Menu bar
will appear on the left
of the window
Navigation tabs – Select QuickStart, SMS or Account view
Navigation bar – Select an area within each view
Current network panel – Status of mobile broadband
network connection
Content area – Content for current area
Context help – Context-sensitive help for current area
(scroll down)
Language selection – Defaults to browser language
QuickStart
window
layout
4
6
In the QuickStart view Settings area you can:
Set options for automatic connection to the mobile network –
Specify the SIM PIN number (if required by your network) –
Set other options via the Menu bar on the left-hand side of the –
window.
6
1
2
43
5
10
Note: Whenever you
insert your USB Stick
into your computer
you are connected to
the mobile network.
If you are running
Linux you will need
to open the browser
manually.
Automatic network
connection can be
disabled from the
Settings area in the
QuickStart view.
The QuickStart
application can also
be accessed from
the Vodafone Mobile
Broadband desktop
icon.
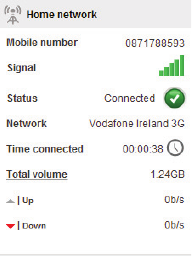
The Current network panel appears on the right-hand side
of every screen within the QuickStart application. ‘Roaming
network’ is displayed when you are roaming on another
operator’s network, or ‘Home network’.
Mobile number – Shown if permitted by your network operator
Signal – More bars indicates better mobile broadband network
signal
Status – Tick when connected to network; Cross when not
connected
Network – Name and type of currently connected network
Time connected – For current connection to network
Total volume – Approximate cumulative data usage
Up / Down – Approximate connection speed: ‘Up’ to the
network from your computer, and ‘Down’ from the network
QuickStart
view: Current
network panel
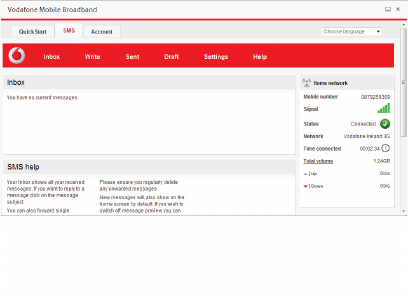
11
The SMS view has six options on the Navigation bar covering
all messaging functions: Inbox, Write, Sent, Draft, Settings
and Help.
Note: When you
select the checkbox
in the title bar of the
Inbox, Sent folder
or Draft folder, all
messages in that
folder are selected.
This is useful if
you want to delete
multiple messages.
It is not possible to
forward multiple
messages.
In the Settings area
you can select or
de-select the SMS
preview in the
QuickStart view.
SMS view
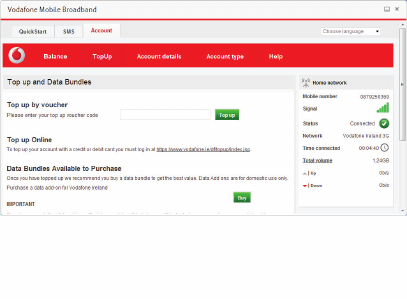
12
The Account view has fi ve options on the Navigation bar:
Balance, TopUp, Account details, Account type and Help.
Under TopUp prepaid account customers have 3 options:
They can TopUp by Voucher or Online and even add extra data
bundles. Under the Balance option prepaid customers can
view their current account balance. Click the Refresh button to
update the balance value.
Note: The options
that are displayed on
the Navigation bar
are dependent on the
account type selected.
Account
view

13
Signal strength
The LED light on your USB Stick shows which kind of mobile
network has been found, and whether the USB Stick is
connected to that network.
Green blinking
A GPRS network has been found – you could connect
Green solid
Connected via GPRS
Blue blinking
A 3G network has been found – you could connect
Blue solid
Connected via 3G
Light blue solid
Connected via 3G Broadband.
The strength of the mobile or Wi-Fi network signal is shown
by the symbol to the left of the Connect button, and by the
icon in the Windows Notifi cation area.
The more bars that are fi lled in, the better the signal quality.
At least one bar must be fi lled in order to connect.
USB Stick LED
lights
14
Vodafone Mobile Broadband software manual installation
On Microsoft Windows computers
Plug your USB Stick into your computer
Right-click on the VMB Lite 10.* drive in ‘My Computer’ –
(Start menu>Computer on Vista and Windows 7)
Select ‘Open’ or ‘Explore’ –
Double-click the fi le called setup_vmb_lite.exe on your –
USB Stick
You will see a progress bar. –
It may take a few minutes to set up your USB Stick, but
once setup is complete, the Vodafone Mobile Broadband
application will start and automatically connect you to the
mobile network. If for some reason the application does not
start, select Vodafone Mobile Broadband from the Windows
Start menu, or double-click the Vodafone Mobile Broadband
desktop icon.
On Mac OS X computers
When you plug your USB stick in for the fi rst time, a disk
named Vodafone Mobile Broadband will popup on your
desktop. Double click on the Vodafone Mobile Broadband
app to start installation. You will be asked to select your
account type during this process. Vodafone Mobile
Broadband will start automatically after installation.
Hints
and tips
15
The application won’t install on Windows
If the software does not install, or the install progress bar
keeps looping
From the Windows Start menu, select – Settings>
Control Panel>System>Hardware>Device Manager
Expand ‘Universal Serial Bus Controllers’ –
Right-click ‘USB Mass Storage Device’ and select ‘Uninstall’ –
If your devices are not reloaded, select ‘Scan for Hardware –
changes’ from the ‘Action’ menu.
Cannot open QuickStart application window
The following things may prevent you from opening the
Vodafone QuickStart application window by double-clicking
the desktop shortcut:
Your computer already has a connection via an ethernet –
LAN cable
Your computer already has a connection via a Wi-Fi network –
You may be using a VPN (Virtual Private Network). –
Unplugging the LAN cable, switching off Wi-Fi on your
computer, or exiting your VPN , and then re-inserting the
USB Stick, or re-starting the PC may solve the problem.
16
No network can be found
Change your physical location: in a building, move closer to a
window, move higher up, or go outside
Open the QuickStart application window –
Select the Settings heading on the Navigation bar –
Select the Network entry in the Menu bar on the left –
Click ‘Search’ to search for available networks –
See if you can connect to one of the allowed networks –
listed
Click ‘Save’ to save your change –
If you are abroad, contact Support, and check that data –
services and roaming are enabled on your account.
Re-installing the software
If you want to re-install the software from the USB Stick, you
need to fi rst delete the Vodafone Mobile Broadband Service
software from your computer.
From the Windows Start menu, select Settings> –
Control Panel>Add or Remove Programs (XP) or Programs
and Features (Windows 7)
Run the Vodafone Mobile Broadband Uninstaller –
Re-insert your USB Stick and the software will re-install. –
Note: If you can
see the application
window in your
browser, you can
find more hints
and tips in the Help
area. Selecting the
Help option on the
Navigation bar in
any view, and then
‘Diagnostics’ in
the Menu bar, may
help you to identify
a problem. This
area also shows
information that
may be required if
you need to contact
Support at your
mobile network
operator. Select
‘Support’ from the
Menu bar for more
information and local
support.
17
No connection can be opened (1)
Check the device status (click on desktop shortcut, select –
the QuickStart tab, Help on Settings bar, and select
Diagnostics from the menu). This may indicate the source
of the problem.
No connection can be opened (2)
Wait a few minutes and try to connect again. This is most
often a temporary problem, especially if an ‘Error 631’ or
‘Error 619’ isreferenced. If the problem persists, please call
Support.
Close the application window and then re-open it –
Re-start your computer –
Open the QuickStart application window –
Select the Settings heading on the Navigation bar –
Select the Network entry in the Menu bar on the left –
Check which option is selected. If the option is set to a –
‘Preferred’ option, set it to an ‘Only’ option
Click ‘Save’ to save your change –
If you are using a VPN (Virtual Private Network), contact the –
administrator of your VPN
Select the Account tab –
Select the Account type heading in the Navigation bar –
Check that the type of account you have with your mobile –
network operator is selected in the drop-down menu.
18
Bearer Communication method used for data transport over the mobile
network, eg. 3G Broadband, HSPA, 3G, etc.
Built-in data card Mobile data card built into notebook computer. Enables data
connections over the mobile phone network.
USB stick A device for your computer that you can use to open a data
connection over the mobile phone network.
EDGE An enhancement to the GPRS bearer offering higher speeds,
although not as fast as 3G Broadband.
GPRS The General Packet Radio Service is a bearer offering higher data
speeds than GSM, on which it is based.
GSM Global System for Mobile Communication.
Home network The network of the mobile operator who provided your SIM.
HSPA High-Speed Packet Access bearer, enhancing 3G, including both
HSUPA (Uplink) and HSDPA (Downlink).
HSUPA High-Speed Uplink Packet Access bearer.
3G The third-generation mobile phone service, as UMTS (Universal
Mobile Telecommunications System) is also known, is a bearer
providing higher data speeds.
3G broadband The latest enhancement to the 3G bearer.
Roaming You can use your mobile device on any other mobile network
that has a roaming agreement with your operator, whether in
your country or abroad.
SIM Your Subscriber Identity Module is the postage-stamp-sized chip
that you will have received together with your mobile contract.
Your SIM has gold contacts on one side.
Glossary

Product Code:
K4305 09/12_en_IE
© Vodafone 2012. Vodafone and the
Vodafone logos are trade marks of
the Vodafone Group. Any product or
company names mentioned herein
may be the trade marks of their
respective owners.
The term Mobile Broadband together with the
‘birds’ design is a trademark of GSMC Limited.
