Huawei Application Guide ME906s LTE M.2 Module (V100R001 02, English)
2018-05-24
User Manual: Huawei
Open the PDF directly: View PDF ![]() .
.
Page Count: 74
- About This Document
- Contents
- 1 Introduction
- 2 Basic Application Scenarios
- 3 Airplane Mode Application Scenarios
- 4 BodySAR Application Scenarios
- 4.1 Overview
- 4.2 Enabling/Disabling BodySAR
- 4.3 Adjusting the WCDMA Transmitted Power Using the BodySAR Feature
- 4.4 Adjusting the GSM Transmitted Power Using the BodySAR Feature
- 4.5 Adjusting the LTE Transmitted Power Using the BodySAR Feature
- 4.6 Usage Description Of BodySAR Feature
- 4.7 Setting the BodySAR Type
- 5 Network Searching and Registration Application Scenarios
- 6 SMS Application Scenarios
- 7 Phonebook Application Scenarios
- 8 Data Service Application Scenarios
- 9 Security Settings Application Scenarios
- 10 SIM Card Application Scenarios
- 11 Module Powering Off and Resetting Application Scenarios
- 12 DPTF Application Scenarios
- 13 ACT Application Scenarios
- 14 GPS Application Scenarios
- 15 Appendix

HUAWEI ME906s LTE M.2 Module
V100R001
Application Guide
Issue
02
Date
2017-12-11

Copyright © Huawei Technologies Co., Ltd. 2017. All rights reserved.
No part of this manual may be reproduced or transmitted in any form or by any means without prior written
consent of Huawei Technologies Co., Ltd. and its affiliates ("Huawei").
The product described in this manual may include copyrighted software of Huawei and possible licensors.
Customers shall not in any manner reproduce, distribute, modify, decompile, disassemble, decrypt, extract,
reverse engineer, lease, assign, or sublicense the said software, unless such restrictions are prohibited by
applicable laws or such actions are approved by respective copyright holders.
Trademarks and Permissions
, , and are trademarks or registered trademarks of Huawei Technologies Co., Ltd.
LTE is a trade mark of ETSI.
Other trademarks, product, service and company names mentioned may be the property of their respective
owners.
Notice
Some features of the product and its accessories described herein rely on the software installed, capacities
and settings of local network, and therefore may not be activated or may be limited by local network operators
or network service providers.
Thus, the descriptions herein may not exactly match the product or its accessories which you purchase.
Huawei reserves the right to change or modify any information or specifications contained in this manual
without prior notice and without any liability.
DISCLAIMER
ALL CONTENTS OF THIS MANUAL ARE PROVIDED “AS IS”. EXCEPT AS REQUIRED BY APPLICABLE
LAWS, NO WARRANTIES OF ANY KIND, EITHER EXPRESS OR IMPLIED, INCLUDING BUT NOT
LIMITED TO, THE IMPLIED WARRANTIES OF MERCHANTABILITY AND FITNESS FOR A PARTICULAR
PURPOSE, ARE MADE IN RELATION TO THE ACCURACY, RELIABILITY OR CONTENTS OF THIS
MANUAL.
TO THE MAXIMUM EXTENT PERMITTED BY APPLICABLE LAW, IN NO EVENT SHALL HUAWEI BE
LIABLE FOR ANY SPECIAL, INCIDENTAL, INDIRECT, OR CONSEQUENTIAL DAMAGES, OR LOSS OF
PROFITS, BUSINESS, REVENUE, DATA, GOODWILL SAVINGS OR ANTICIPATED SAVINGS
REGARDLESS OF WHETHER SUCH LOSSES ARE FORSEEABLE OR NOT.
THE MAXIMUM LIABILITY (THIS LIMITATION SHALL NOT APPLY TO LIABILITY FOR PERSONAL
INJURY TO THE EXTENT APPLICABLE LAW PROHIBITS SUCH A LIMITATION) OF HUAWEI ARISING
FROM THE USE OF THE PRODUCT DESCRIBED IN THIS MANUAL SHALL BE LIMITED TO THE
AMOUNT PAID BY CUSTOMERS FOR THE PURCHASE OF THIS PRODUCT.
Import and Export Regulations
Customers shall comply with all applicable export or import laws and regulations and be responsible to obtain
all necessary governmental permits and licenses in order to export, re-export or import the product mentioned
in this manual including the software and technical data therein.
HUAWEI ME906s LTE M.2 Module
Application Guide
About This Document
Issue 02 (2017-12-11)
Huawei Proprietary and Confidential
Copyright © Huawei Technologies Co., Ltd.
3
About This Document
Revision History
Document
Version
Date
Chapter
Description
01
2015-07-31
Creation
02
2017-12-11
Deleted privacy policy

HUAWEI ME906s LTE M.2 Module
Application Guide
Contents
Issue 01 (2015-07-31)
Huawei Proprietary and Confidential
Copyright © Huawei Technologies Co., Ltd.
4
Contents
1 Introduction.................................................................................................................................... 8
1.1 Overview .......................................................................................................................................................... 8
1.2 Conventions and Definitions ............................................................................................................................ 8
1.2.1 Conventions ............................................................................................................................................ 8
1.2.2 Definitions .............................................................................................................................................. 8
1.2.3 Legends ................................................................................................................................................... 9
1.3 Basic AT Command Processing Principles ..................................................................................................... 10
1.3.1 Ports ...................................................................................................................................................... 10
1.3.2 AT Command Processing Mechanism ................................................................................................... 10
1.3.3 Recommended Timeout Mechanism for AT Commands Processed by a Host...................................... 11
2 Basic Application Scenarios ...................................................................................................... 13
2.1 Querying the IMEI ......................................................................................................................................... 13
2.1.1 Reference Process ................................................................................................................................. 13
2.1.2 Troubleshooting .................................................................................................................................... 14
2.2 Querying Additional Information ................................................................................................................... 14
2.2.1 Reference Process ................................................................................................................................. 14
2.2.2 Troubleshooting .................................................................................................................................... 14
3 Airplane Mode Application Scenarios ................................................................................... 15
3.1 Overview ........................................................................................................................................................ 15
3.2 Setting the Flight Mode .................................................................................................................................. 15
3.2.1 Reference Process ................................................................................................................................. 15
3.2.2 Troubleshooting .................................................................................................................................... 16
4 BodySAR Application Scenarios ............................................................................................. 17
4.1 Overview ........................................................................................................................................................ 17
4.2 Enabling/Disabling BodySAR ....................................................................................................................... 17
4.2.1 Reference Process ................................................................................................................................. 17
4.2.2 Troubleshooting .................................................................................................................................... 17
4.3 Adjusting the WCDMA Transmitted Power Using the BodySAR Feature .................................................... 18
4.3.1 Reference Process ................................................................................................................................. 18
4.3.2 Troubleshooting .................................................................................................................................... 18
4.4 Adjusting the GSM Transmitted Power Using the BodySAR Feature ........................................................... 19
4.4.1 Reference Process ................................................................................................................................. 19

HUAWEI ME906s LTE M.2 Module
Application Guide
Contents
Issue 01 (2015-07-31)
Huawei Proprietary and Confidential
Copyright © Huawei Technologies Co., Ltd.
5
4.4.2 Troubleshooting .................................................................................................................................... 20
4.5 Adjusting the LTE Transmitted Power Using the BodySAR Feature ............................................................. 20
4.5.1 Reference Process ................................................................................................................................. 20
4.5.2 Troubleshooting .................................................................................................................................... 21
4.6 Usage Description Of BodySAR Feature ....................................................................................................... 21
4.6.1 Reference Description ........................................................................................................................... 21
4.6.2 Troubleshooting .................................................................................................................................... 22
4.7 Setting the BodySAR Type ............................................................................................................................ 22
4.7.1 Reference Process ................................................................................................................................. 22
4.7.2 Troubleshooting .................................................................................................................................... 22
5 Network Searching and Registration Application Scenarios............................................. 23
5.1 Searching and Registering Network ............................................................................................................... 23
5.1.1 Reference Process ................................................................................................................................. 23
5.1.2 Troubleshooting .................................................................................................................................... 25
6 SMS Application Scenarios ...................................................................................................... 26
6.1 Overview ........................................................................................................................................................ 26
6.2 Initializing SMS ............................................................................................................................................. 28
6.2.1 Reference Process ................................................................................................................................. 28
6.2.2 Troubleshooting .................................................................................................................................... 32
6.3 Sending Short Messages ................................................................................................................................. 32
6.3.1 Reference Process ................................................................................................................................. 32
6.3.2 Troubleshooting .................................................................................................................................... 34
6.4 Reading Short Messages ................................................................................................................................ 35
6.4.1 Reference Process ................................................................................................................................. 35
6.4.2 Troubleshooting .................................................................................................................................... 36
6.5 Deleting Short Messages ................................................................................................................................ 37
6.5.1 Reference Process ................................................................................................................................. 37
6.5.2 Troubleshooting .................................................................................................................................... 38
7 Phonebook Application Scenarios .......................................................................................... 39
7.1 Overview ........................................................................................................................................................ 39
7.2 Initializing the Phonebook ............................................................................................................................. 39
7.2.1 Reference Process ................................................................................................................................. 39
7.2.2 Troubleshooting .................................................................................................................................... 40
7.3 Reading Phonebook Entries ........................................................................................................................... 41
7.3.1 Reference Process ................................................................................................................................. 41
7.3.2 Troubleshooting .................................................................................................................................... 42
7.4 Writing Phonebook Entries ............................................................................................................................ 43
7.4.1 Reference Process ................................................................................................................................. 43
7.4.2 Troubleshooting .................................................................................................................................... 44
8 Data Service Application Scenarios ........................................................................................ 46

HUAWEI ME906s LTE M.2 Module
Application Guide
Contents
Issue 01 (2015-07-31)
Huawei Proprietary and Confidential
Copyright © Huawei Technologies Co., Ltd.
6
8.1 Overview ........................................................................................................................................................ 46
8.2 Initializing Data Service Settings ................................................................................................................... 47
8.2.1 Reference Process ................................................................................................................................. 47
8.2.2 Troubleshooting .................................................................................................................................... 47
8.3 Attaching/Detaching PS ................................................................................................................................. 47
8.3.1 Reference Process ................................................................................................................................. 47
8.3.2 Troubleshooting .................................................................................................................................... 48
8.4 Defining PDP Contexts .................................................................................................................................. 48
8.4.1 Reference Process ................................................................................................................................. 48
8.4.2 Troubleshooting .................................................................................................................................... 49
8.5 Activate PDP Contexts and Enter Data Mode ................................................................................................ 49
8.5.1 Reference Process ................................................................................................................................. 49
8.5.2 Troubleshooting .................................................................................................................................... 50
9 Security Settings Application Scenarios ................................................................................ 51
9.1 Changing the SIM PIN ................................................................................................................................... 51
9.1.1 Reference Process ................................................................................................................................. 51
9.1.2 Troubleshooting .................................................................................................................................... 52
9.2 Changing the SIM Card Configuration .......................................................................................................... 53
9.2.1 Reference Process ................................................................................................................................. 53
9.2.2 Troubleshooting .................................................................................................................................... 54
10 SIM Card Application Scenarios ........................................................................................... 55
10.1 SIM Card Access .......................................................................................................................................... 55
10.1.1 Reference Process ............................................................................................................................... 55
10.1.2 Troubleshooting .................................................................................................................................. 58
11 Module Powering Off and Resetting Application Scenarios ........................................... 59
11.1 Restarting the ME ......................................................................................................................................... 59
11.1.1 Reference Process ............................................................................................................................... 59
11.1.2 Troubleshooting .................................................................................................................................. 59
11.2 Powering Off the ME ................................................................................................................................... 59
11.2.1 Reference Process ............................................................................................................................... 59
11.2.2 Troubleshooting .................................................................................................................................. 60
12 DPTF Application Scenarios ................................................................................................... 61
12.1 Setting Thermal Sensor with the Threshold ................................................................................................. 61
12.1.1 Reference Process ............................................................................................................................... 61
12.1.2 Troubleshooting .................................................................................................................................. 61
12.2 Querying the Current Temperature of a Thermal Sensor.............................................................................. 61
12.2.1 Reference Process ............................................................................................................................... 61
12.2.2 Troubleshooting .................................................................................................................................. 62
13 ACT Application Scenarios ..................................................................................................... 63
13.1 Overview ...................................................................................................................................................... 63

HUAWEI ME906s LTE M.2 Module
Application Guide
Contents
Issue 01 (2015-07-31)
Huawei Proprietary and Confidential
Copyright © Huawei Technologies Co., Ltd.
7
13.2 Adaptive Clocking ........................................................................................................................................ 63
13.2.1 Reference Process ............................................................................................................................... 63
13.2.2 Troubleshooting .................................................................................................................................. 64
14 GPS Application Scenarios ..................................................................................................... 65
14.1 Introduction to GPS ...................................................................................................................................... 65
14.1.1 GPS Positioning Methods ................................................................................................................... 65
14.1.2 GPS Ports ............................................................................................................................................ 67
14.2 Standalone Positioning ................................................................................................................................. 68
14.3 MSB Positioning Using the User Plane Protocol ......................................................................................... 69
14.4 MSA Positioning Using the User Plane Protocol ......................................................................................... 70
14.5 GNSS Positioning ........................................................................................................................................ 70
15 Appendix .................................................................................................................................... 72
15.1 Relative Documents ..................................................................................................................................... 72
15.2 Acronyms and Abbreviations ....................................................................................................................... 72
HUAWEI ME906s LTE M.2 Module
Application Guide
Introduction
Issue 01 (2015-07-31)
Huawei Proprietary and Confidential
Copyright © Huawei Technologies Co., Ltd.
8
1 Introduction
1.1 Overview
This document is intended to provide references for customers to choose appropriate
command sequences to start using the ME906s module in a faster manner. This document also
contains examples and relevant description.
This document will be updated based on customers' requirements.
This document is only applicable for Windows 7. For Windows 8, Windows 8.1 and Windows 10, please
refer to the MBIM protocol.
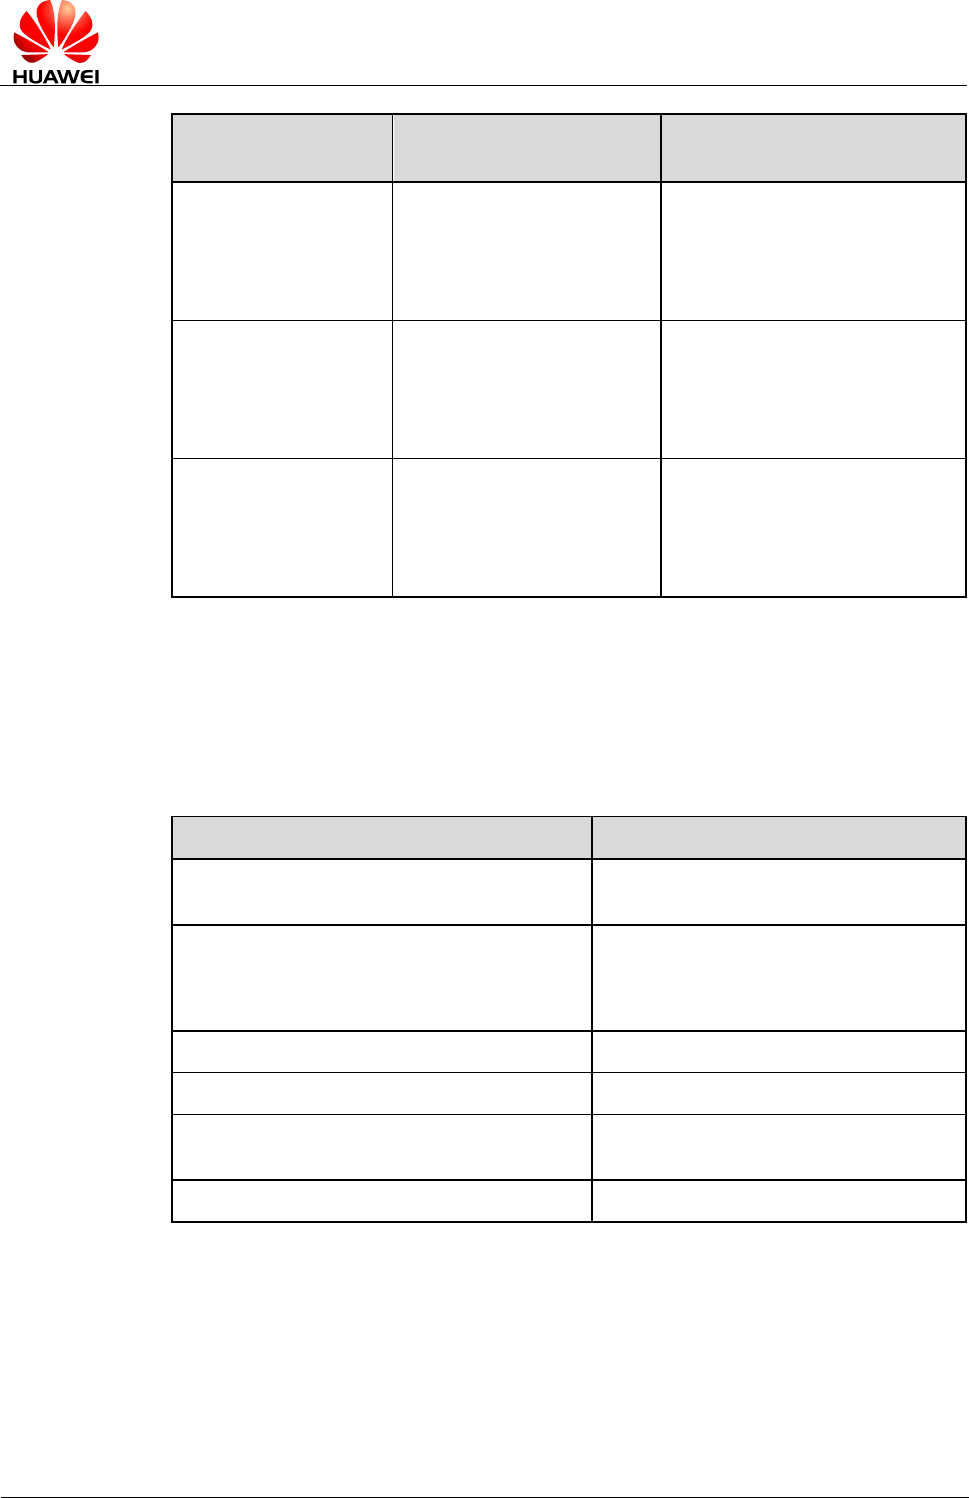
1.2 Conventions and Definitions
1.2.1 Conventions
Convention
Description
<...>
Value range of AT command parameters
XXXX
Personal identification number (PIN), Personal Unlock Key (PUK), or
password
1.2.2 Definitions
Term
Definition
Connected
Indicates that a link has been set up between two modules or a module
and a terminal.
Registered
Indicates that the module is registered with a mobile network.
Module
HUAWEI LTE module
HUAWEI ME906s LTE M.2 Module
Application Guide
Introduction
Issue 01 (2015-07-31)
Huawei Proprietary and Confidential
Copyright © Huawei Technologies Co., Ltd.
9
Term
Definition
Application Mobileequipment
GSM network
Mobile Network
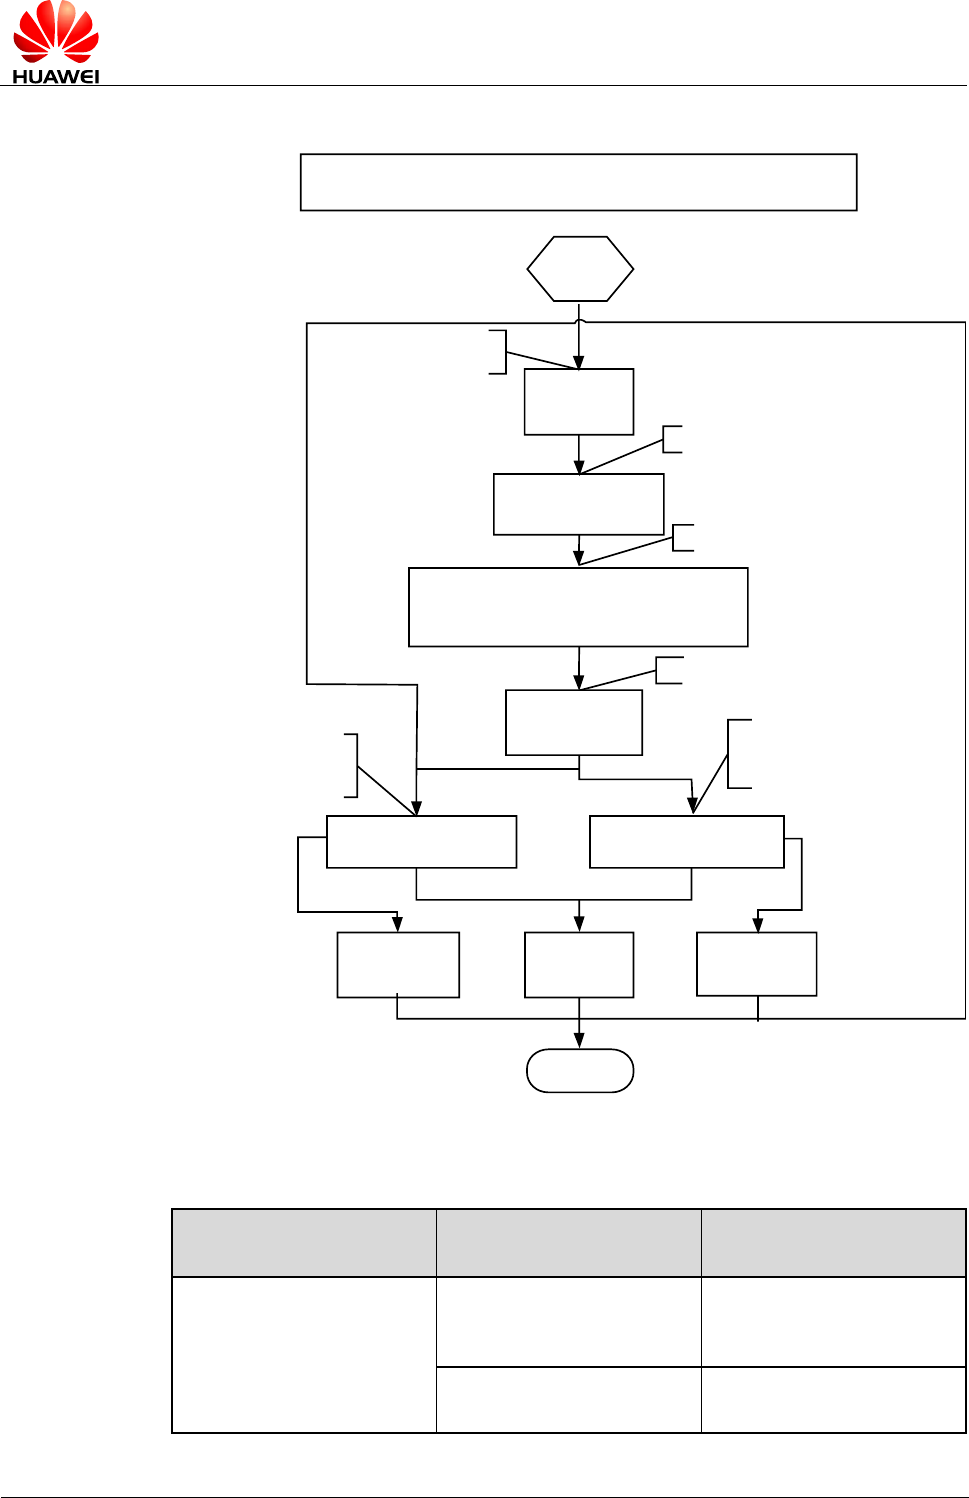
1.2.3 Legends
Legend
Description
Start.
Action: includes user input, reports from the module,
unsolicited indications from the module, and
communication between the module and the host.
Branch: determines the next step.
Comment
Comment: clarifies the scenario.
End.
Dataflow: indicates the next step to which the service goes
or the indication reported from an action.

HUAWEI ME906s LTE M.2 Module
Application Guide
Introduction
Issue 01 (2015-07-31)
Huawei Proprietary and Confidential
Copyright © Huawei Technologies Co., Ltd.
10
1.3 Basic AT Command Processing Principles
1.3.1 Ports
The ME906s provides three ports to interact with its host:
- Network Card port: simulated using USB, for establishing data connection.
Port name: HUAWEI Mobile Connect - Network Card
- PCUI port: simulated using USB, for AT command interaction only.
Port name: HUAWEI Mobile Connect - PCUI Interface
- GPS port: simulated using USB, for reporting NMEA data.
Port name: HUAWEI Mobile Connect - GPS Interface
The ME906s also provides a port for debugging:
- DIAG port: simulated using USB, for DIAG (diagnostic) command interaction (mainly
used to debug modules at present).
Port name: HUAWEI Mobile Connect - Application Interface
A host controls a module using AT commands. If AT commands are unavailable, a module can
be deemed as unavailable.
1.3.2 AT Command Processing Mechanism
A module processes AT commands from the ports (MODEM, PCUI, and GPS) in series. An
AT command can be processed when and only when the previous AT command processing
has been completed. If the module is processing an AT command, a new AT command from
the same port will be buffered and other commands from other ports will be buffered until the
current AT command is processed.
The processing of an AT command starts when the AT command is entered from the TE, and
ends when the UE (the module) returns all the results in response the command.
HUAWEI ME906s LTE M.2 Module
Application Guide
Introduction
Issue 01 (2015-07-31)
Huawei Proprietary and Confidential
Copyright © Huawei Technologies Co., Ltd.
11
Figure 1-1 AT command processing sequence diagram
TE UE
AT command 1
AT command 2
Return results of AT command 1
AT command 3
Ignore AT
command 2
Process AT
command 1
Process AT
command 3
Return results of AT command 3
1.3.3 Recommended Timeout Mechanism for AT Commands
Processed by a Host
A module processes AT commands in series. Do not send another AT command before the
result for the current command is returned or the current command times out (except when the
current command is an interruptible AT command). The following table lists AT command
timeout durations (starting from the time when an AT command arrives at a port).
Table 1-1 AT command timeout duration
AT Command
Timeout Duration
General AT commands
30s
AT+CMGS (used to send PDU messages)
60s
AT+COPS=? (used to search for networks)
120s
After an AT command times out, it is recommended that the host check whether the module is
functioning normally. The following procedure is provided for your reference:
- The host sends the AT command to the module.
- If the module returns failure information, go to step 5. Otherwise, go to step 3.
- If the module returns success information, the module is functioning normally.

HUAWEI ME906s LTE M.2 Module
Application Guide
Introduction
Issue 01 (2015-07-31)
Huawei Proprietary and Confidential
Copyright © Huawei Technologies Co., Ltd.
12
- If the host times out (the host waits for a response for over 30 seconds) three times when
waiting for the response from the module, go to step 5. Otherwise, go to step 1.
- The host deems that the current module does not exist or is unavailable. Close the port,
stop sending all AT commands, exit the procedure to determine whether the module is
normal, and re-search for modules.
HUAWEI ME906s LTE M.2 Module
Application Guide
Basic Application Scenarios
Issue 01 (2015-07-31)
Huawei Proprietary and Confidential
Copyright © Huawei Technologies Co., Ltd.
13
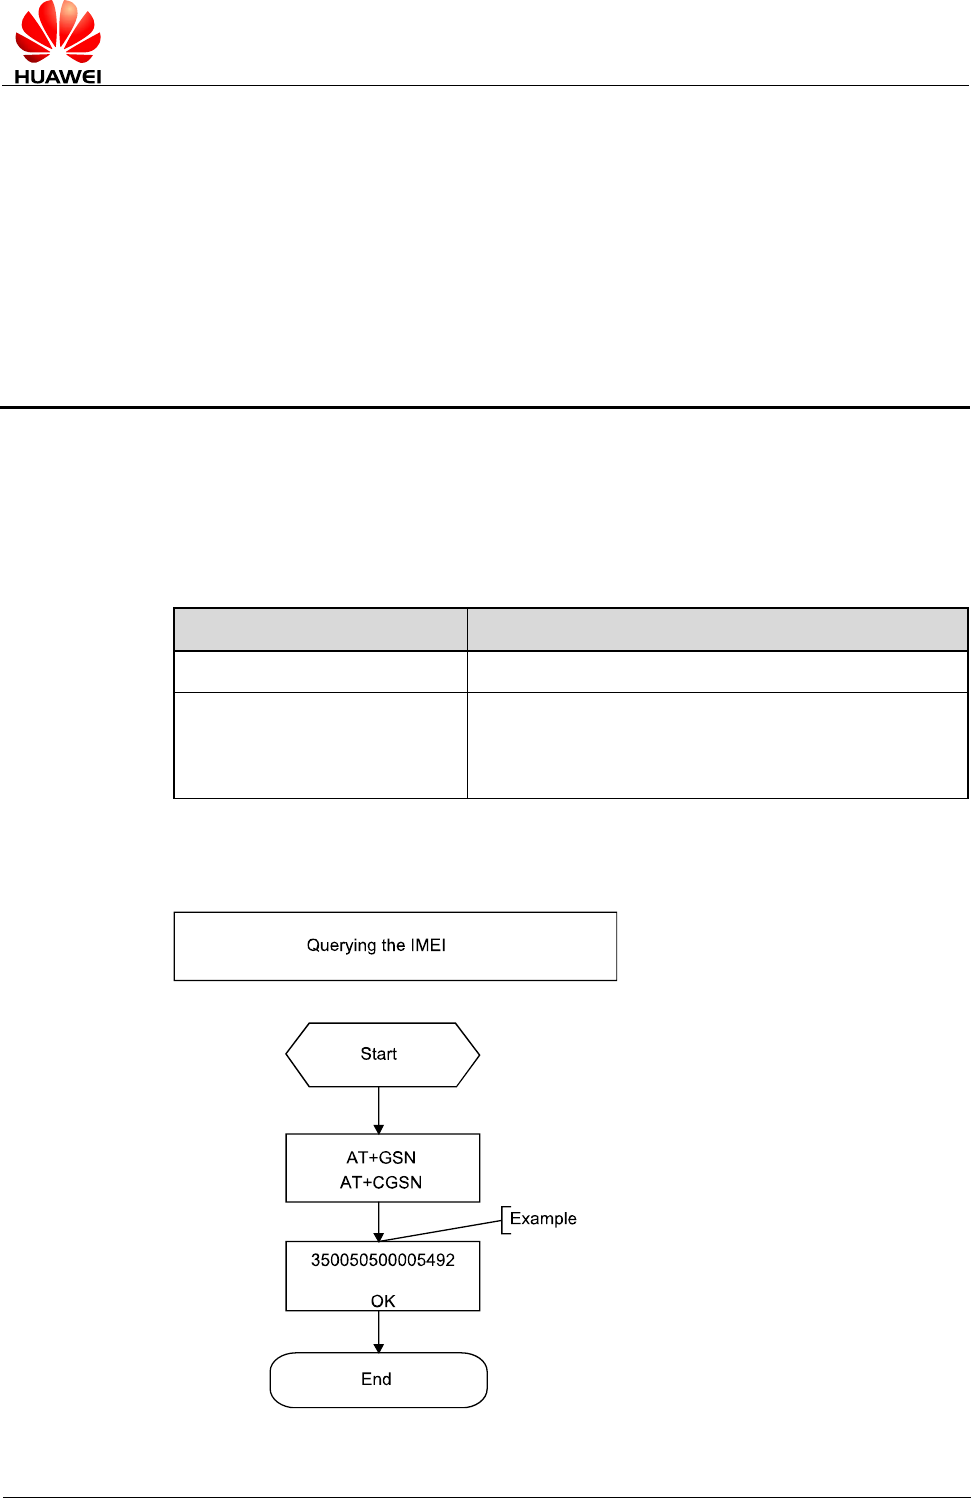
2 Basic Application Scenarios
2.1 Querying the IMEI
2.1.1 Reference Process
Command
Description
AT+GSN/AT+CGSN
Queries the IMEI.
IMEI
OK
For example: 350050500005492
Figure 2-1 Querying the IMEI

HUAWEI ME906s LTE M.2 Module
Application Guide
Basic Application Scenarios
Issue 01 (2015-07-31)
Huawei Proprietary and Confidential
Copyright © Huawei Technologies Co., Ltd.
14
2.1.2 Troubleshooting
None
2.2 Querying Additional Information
2.2.1 Reference Process
Command
Description
ATI
Queries the product information.
Product information
OK
For example:
Manufacturer: Huawei Technologies Co., Ltd.
Model: ME906s-158
Revision: 23.613.61.00.00
IMEI: 350050500005492
+GCAP: +CGSM,+DS,+ES
AT+GMR/AT+CGMR
Queries software version.
Software version
OK
Software version. e.g. 23.613.61.00.00
AT+GMI/AT+CGMI
Queries manufacturer information.
Manufacturer identification
OK
Huawei Technologies Co., Ltd.
AT+GMM/AT+CGMM
Queries model name.
Model identification
OK
ME906s-158
2.2.2 Troubleshooting
None
HUAWEI ME906s LTE M.2 Module
Application Guide
Airplane Mode Application
Scenarios
Issue 01 (2015-07-31)
Huawei Proprietary and Confidential
Copyright © Huawei Technologies Co., Ltd.
15
3 Airplane Mode Application Scenarios
3.1 Overview
Modules are usually embedded into equipments such as personal computers. The airplane
mode provided by the modules can be enabled or disabled as required. When the equipment
into which the module is embedded is in airplane mode, the radio frequency (RF) of the
module is disabled, and other functions of the equipment are still available.
3.2 Setting the Flight Mode
3.2.1 Reference Process
Command
Description
AT^RFSWITCH=1
Sets the software-controlled RF switch to be on.
OK
AT^RFSWITCH?
Queries the states of the software and hardware controlled
RF switches.
^RFSWITCH: 1,1
OK
Indicates the software switch is on, and the hardware
switch is on.
AT^RFSWITCH=0: sets the software-controlled RF switch to be off.
AT^RFSWITCH=1: sets the software-controlled RF switch to be on.
The value set by AT^RFSWITCH command is saved upon power-off. So the settings will be
used as the initial settings next time the module is powered on.
- The radio state of WWAN can be controlled by the software-controlled and hardware-controlled RF
switches. To check the states of the software-controlled and hardware-controlled RF switches, run
AT^RFSWITCH?.
- The radio state of WWAN is controlled in the following manner:

HUAWEI ME906s LTE M.2 Module
Application Guide
Airplane Mode Application
Scenarios
Issue 01 (2015-07-31)
Huawei Proprietary and Confidential
Copyright © Huawei Technologies Co., Ltd.
16
The radio of the module will be disabled when either the software-controlled or hardware-controlled
RF switch is off.
The radio of the module will be enabled only when both the software-controlled and
hardware-controlled RF switches are on.
3.2.2 Troubleshooting
None

HUAWEI ME906s LTE M.2 Module
Application Guide
BodySAR Application Scenarios
Issue 01 (2015-07-31)
Huawei Proprietary and Confidential
Copyright © Huawei Technologies Co., Ltd.
17
4 BodySAR Application Scenarios
4.1 Overview
Specific absorption rate (SAR) is a measure of the rate at which energy is absorbed by the
body when exposed to an RF electromagnetic field. It is commonly used to measure power
absorbed from mobile phones. The greater the SAR value, the greater the radiation effect on
humans.
For user equipment (UE) such as modules, their SAR value increases as their transmitted
power increases.
At present, most vendors' tablets have passed SAR tests. Generally, these products have
embedded proximity sensors. When the sensors detect that a human is in the proximity of or
in contact with the UE, they will notify the UE so that the UE will reduce the transmitted
power. When the human is no longer in the proximity of or in contact with the UE, the sensors
also notify the UE so that the UE will restore the transmitted power.
4.2 Enabling/Disabling BodySAR
4.2.1 Reference Process
Command
Description
AT^BODYSARON=1
Enables the BodySAR feature.
OK
AT^BODYSARON=0
Disables the BodySAR feature.
OK
If the BodySAR feature is enabled, the maximum transmitted power can be adjusted. If the
BodySAR feature is disabled, the system's default maximum transmitted power is used.
4.2.2 Troubleshooting
None
HUAWEI ME906s LTE M.2 Module
Application Guide
BodySAR Application Scenarios
Issue 01 (2015-07-31)
Huawei Proprietary and Confidential
Copyright © Huawei Technologies Co., Ltd.
18
4.3 Adjusting the WCDMA Transmitted Power Using the
BodySAR Feature
4.3.1 Reference Process
Command
Description
AT^BODYSARWCDMA=20
,00000001,18,00000092
Sets the maximum WCDMA transmitted power
threshold. Indicates that set the maximum WCDMA I Tx
power limit to 20 and the maximum WCDMA II,
WCDMA V and WCDMA VIII Tx power limit to 18.
OK
The WCDMA transmitted power is controlled by setting the maximum transmitted power
threshold. Affected by PDM and other factors, the test result may have an error of ±2 dB.
The command and parameters of AT^BODYSARWCDMA depend on the product.
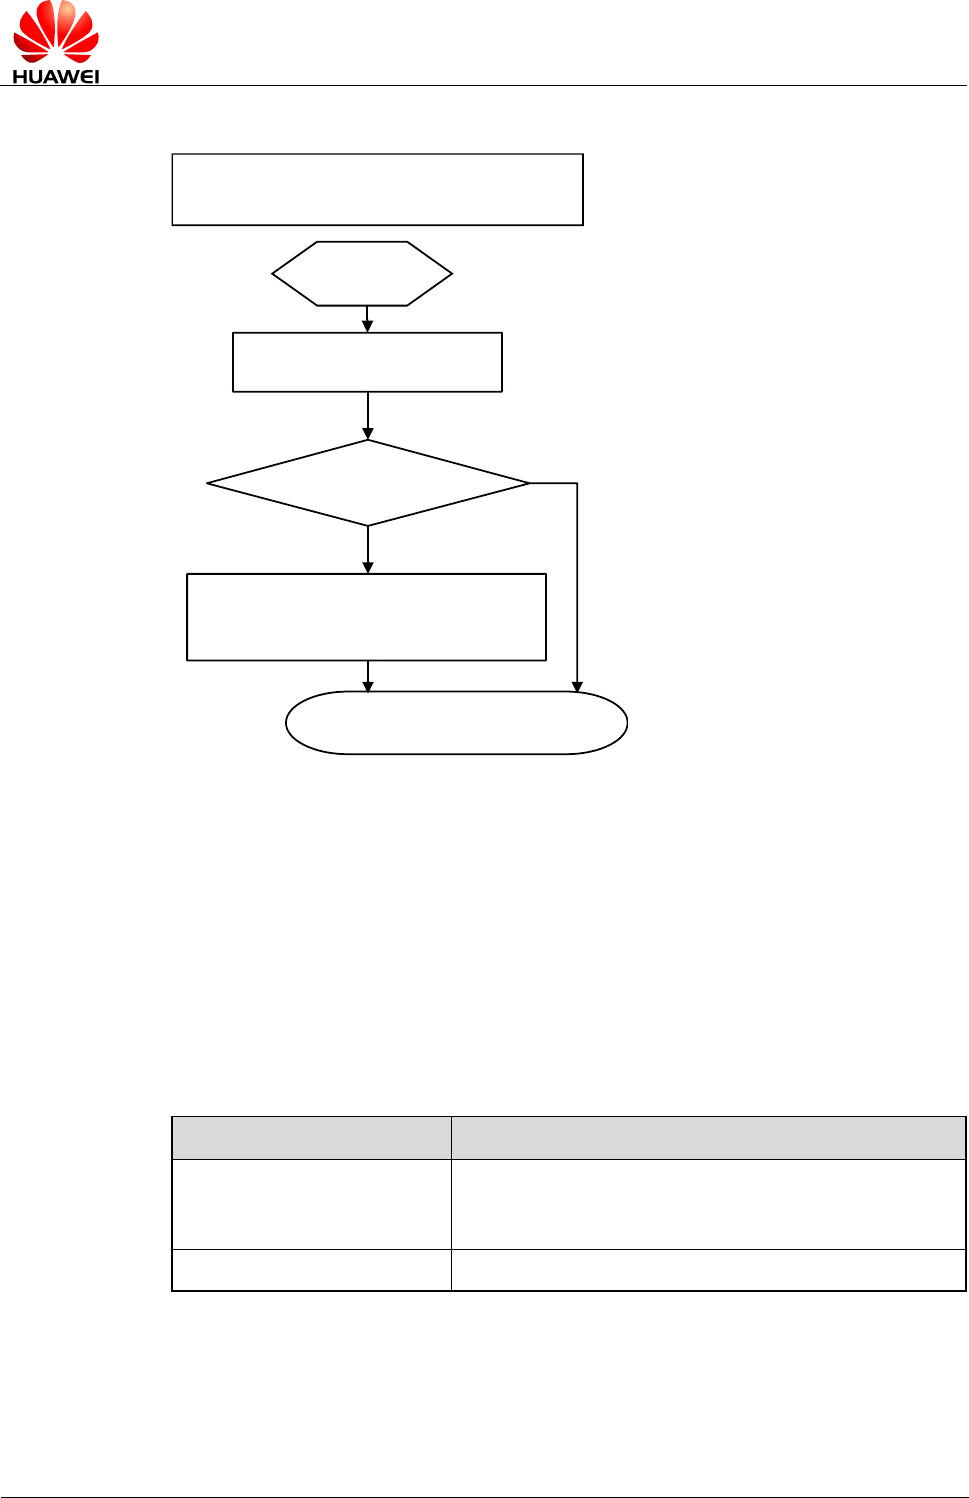
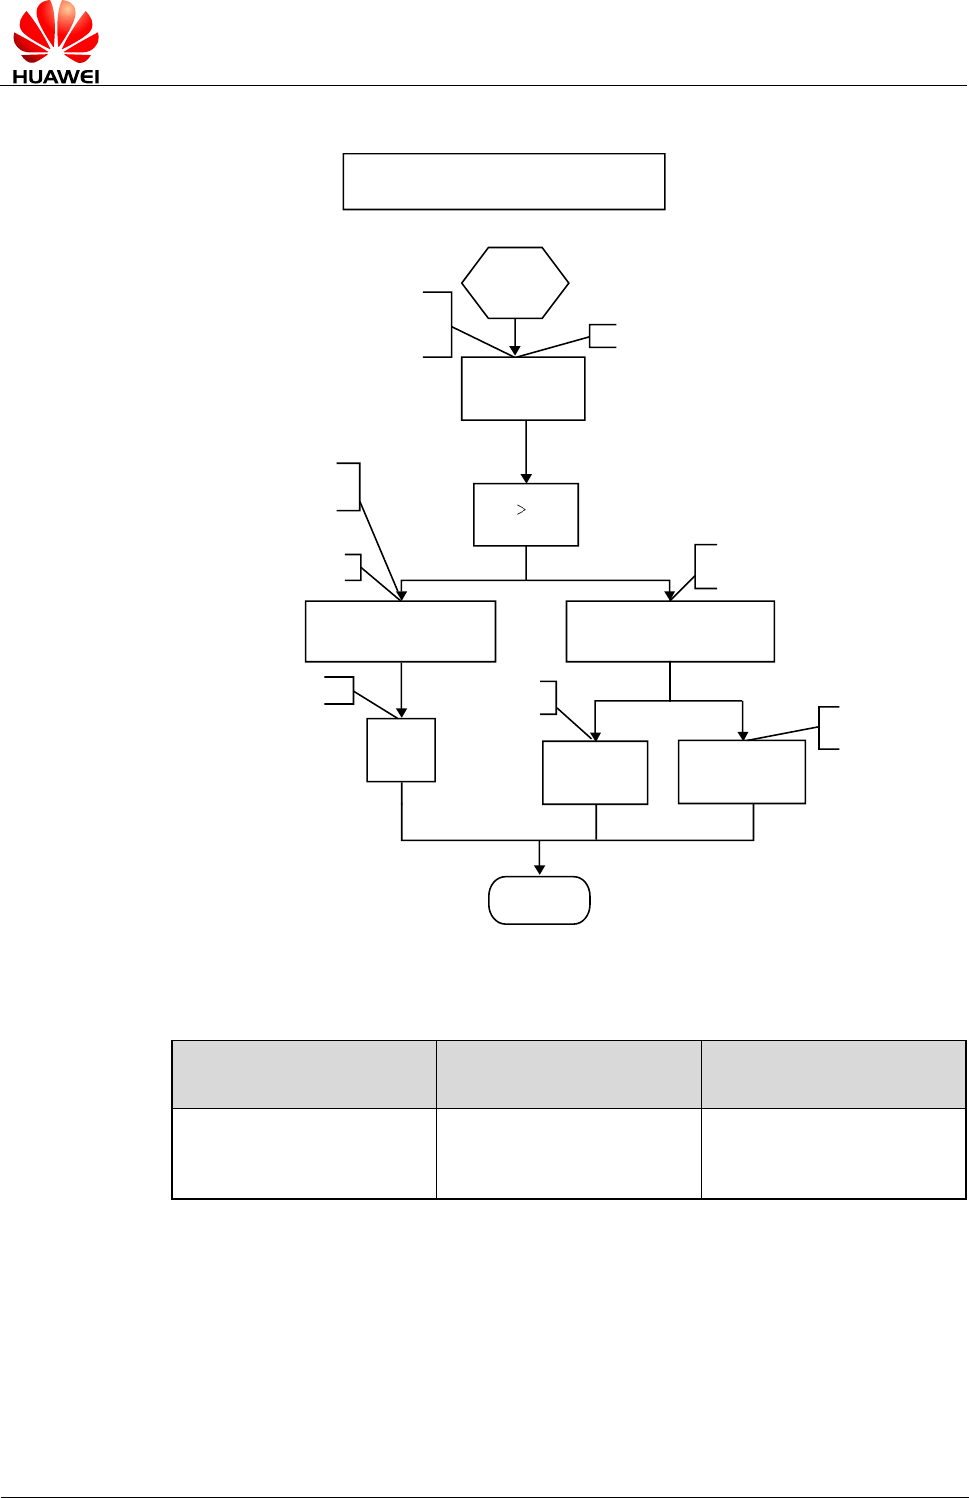
Figure 4-1 Adjusting the WCDMA transmitted power
User inputs
parameters.
Save the parameters.
Is the BodySAR
fearure enabled?
Adjust the maximum WCDMA
transmitted power to be less than the
specified value.
End
N
Y
Adjust the WCDMA transmitted power
using the BodySAR feature
4.3.2 Troubleshooting
None
HUAWEI ME906s LTE M.2 Module
Application Guide
BodySAR Application Scenarios
Issue 01 (2015-07-31)
Huawei Proprietary and Confidential
Copyright © Huawei Technologies Co., Ltd.
19
4.4 Adjusting the GSM Transmitted Power Using the
BodySAR Feature
4.4.1 Reference Process
Command
Description
AT^BODYSARGSM=28,00000
001,25,00000004
Sets the maximum GSM transmitted power thresholds.
Indicates that set the maximum GSM 850 GPRS Tx
power limit to 28 and the maximum GSM 1800 GPRS
Tx power limit to 25.
OK
The AT^BODYSARGSM set command sets the maximum Tx power limit of GSM, GPRS
and EGPRS for each band in single time-slot. When the module changes into multi-slot
configuration, the maximum Tx power limit of each time-slot will be reduced. The power
reduction in multi-slot configuration is as follow:
Number of timeslots in uplink
assignment
Reduction of maximum Tx power
(dB)
1
0
2
3
3
5
4
6
5
7
6
8
7
8.5
8
9
The transmitted power for each band of GSM GPRS and EGPRS (GSM 850, GSM 900, GSM
1800, and GSM 1900) is controlled by setting the maximum transmitted power thresholds.
Affected by PDM and other factors, the test result may have an error of ±2 dB.
The command and parameters of AT^BODYSARGSM depend on the product.
HUAWEI ME906s LTE M.2 Module
Application Guide
BodySAR Application Scenarios
Issue 01 (2015-07-31)
Huawei Proprietary and Confidential
Copyright © Huawei Technologies Co., Ltd.
20
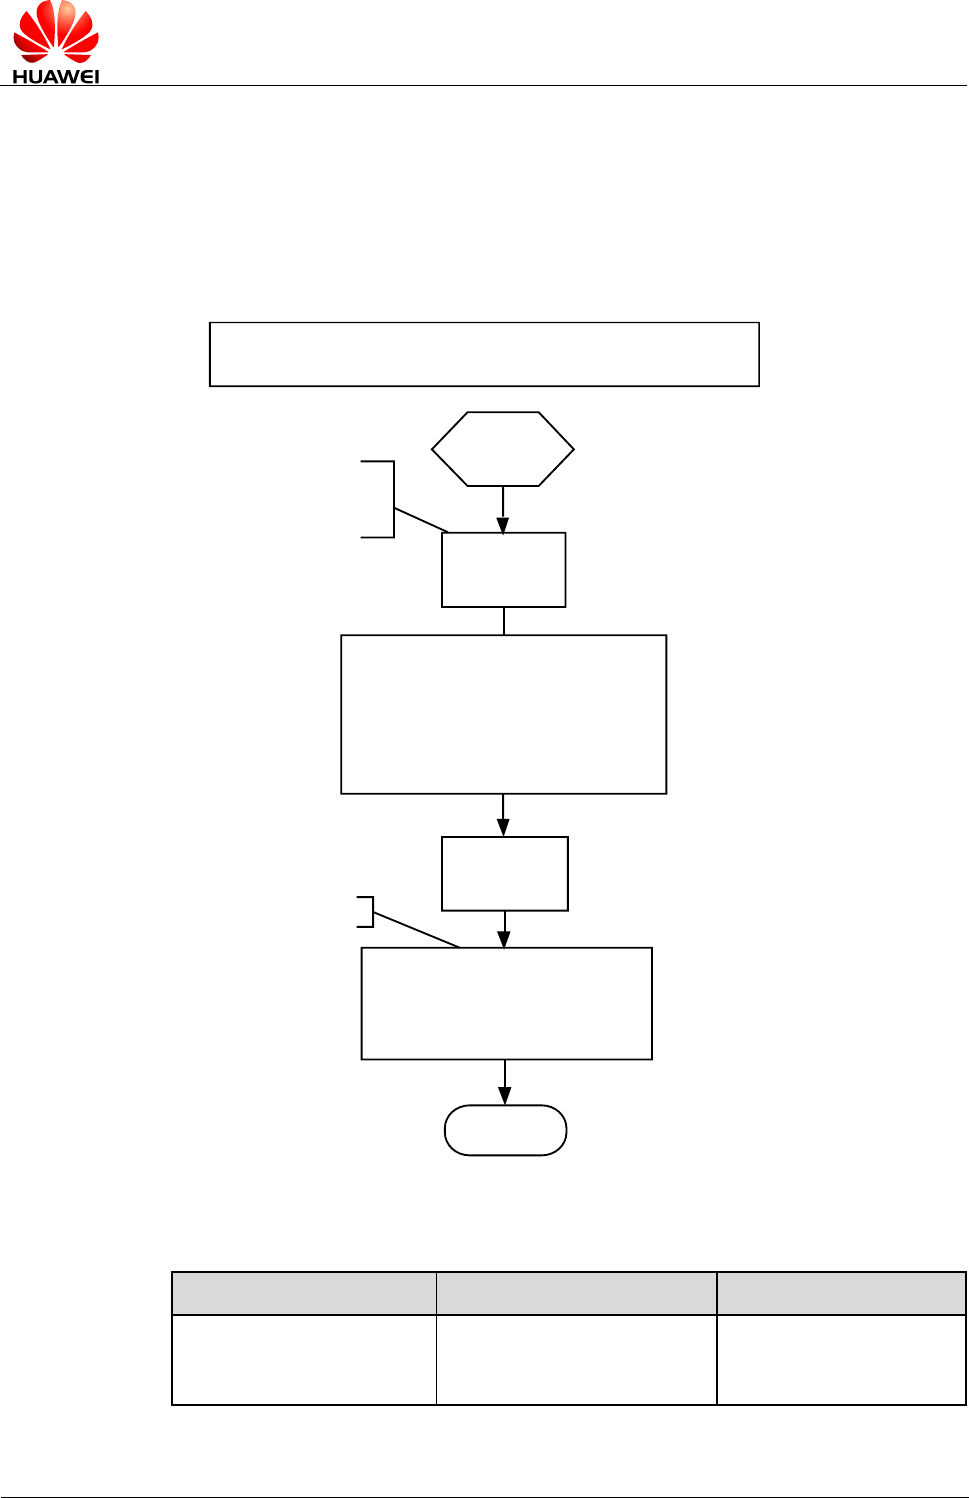
Figure 4-2 Adjust the GSM transmitted power
User inputs
parameters.
Save the parameters.
Is the BodySAR
fearure enabled?
Adjust the maximum GSM
transmitted power to be less than the
specified value.
End
N
Y
Adjust the GSM transmitted power
using the BodySAR feature
4.4.2 Troubleshooting
None
4.5 Adjusting the LTE Transmitted Power Using the
BodySAR Feature
4.5.1 Reference Process
Command
Description
AT^BODYSARLTE=20
Sets the maximum LTE transmitted power threshold.
Indicates that set the maximum LTE Tx power limit of
bands supported by firmware to 20.
OK
The LTE transmitted power is controlled by setting the maximum transmitted power threshold.
Affected by PDM and other factors, the test result may have an error of ±2 dB.
The command and parameters of AT^BODYSARLTE depend on the product.
HUAWEI ME906s LTE M.2 Module
Application Guide
BodySAR Application Scenarios
Issue 01 (2015-07-31)
Huawei Proprietary and Confidential
Copyright © Huawei Technologies Co., Ltd.
21
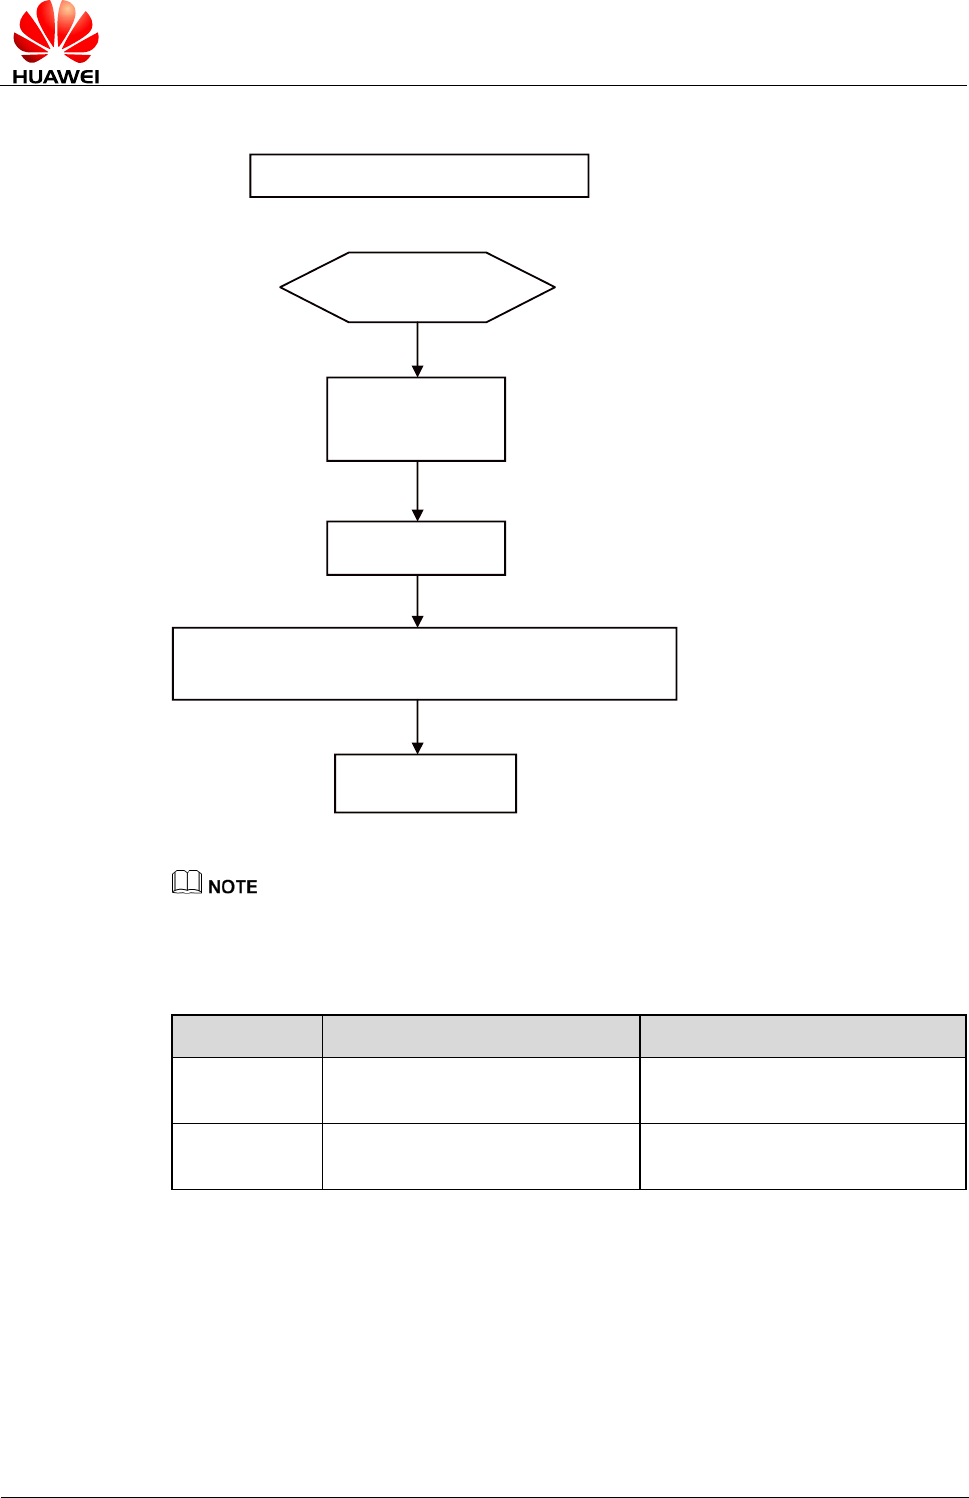
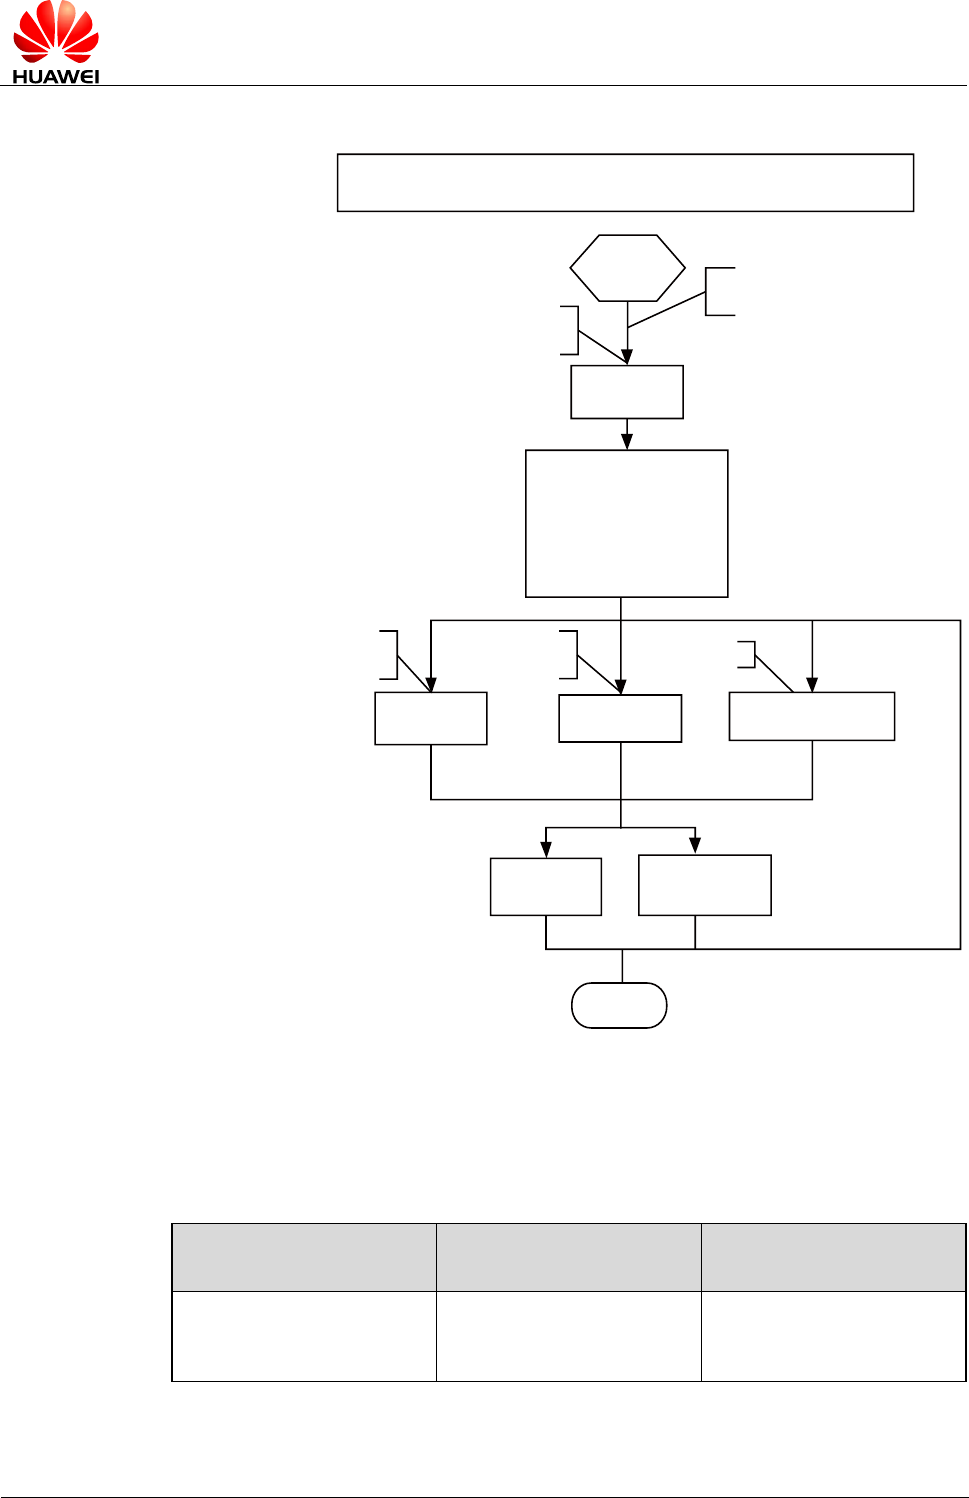
Figure 4-3 Adjusting the LTE transmitted power
User inputs
parameters.
Save the parameters.
Is the BodySAR
fearure enabled?
Adjust the maximum LTE
transmitted power to be less than the
specified value.
End
N
Y
Adjust the LTE transmitted power
using the BodySAR feature
4.5.2 Troubleshooting
None
4.6 Usage Description Of BodySAR Feature
4.6.1 Reference Description
After a module is powered on, the default BodySAR function status is disabled, and the
default power control function in the system is used.
The maximum transmitting power parameters take effect in real time only when the following
requirements are met:
- The AT^BODYSARWCDMA, AT^BODYSARGSM and AT^BODYSARLTE
commands are used to set the maximum transmitting power parameters successfully.
- The AT^BODYSARON=1 command is used to enable the BodySAR function.
When the maximum transmitting power parameters are not set or the BodySAR function is
disabled, the default power control function in the system is used.
After the maximum transmitting power parameters are set, the AT^BODYSARON=0
command can be used to disable the BodySAR function. Then the default maximum
transmitting power is resumed. If the AT^BODYSARON=1 command is used to enable the
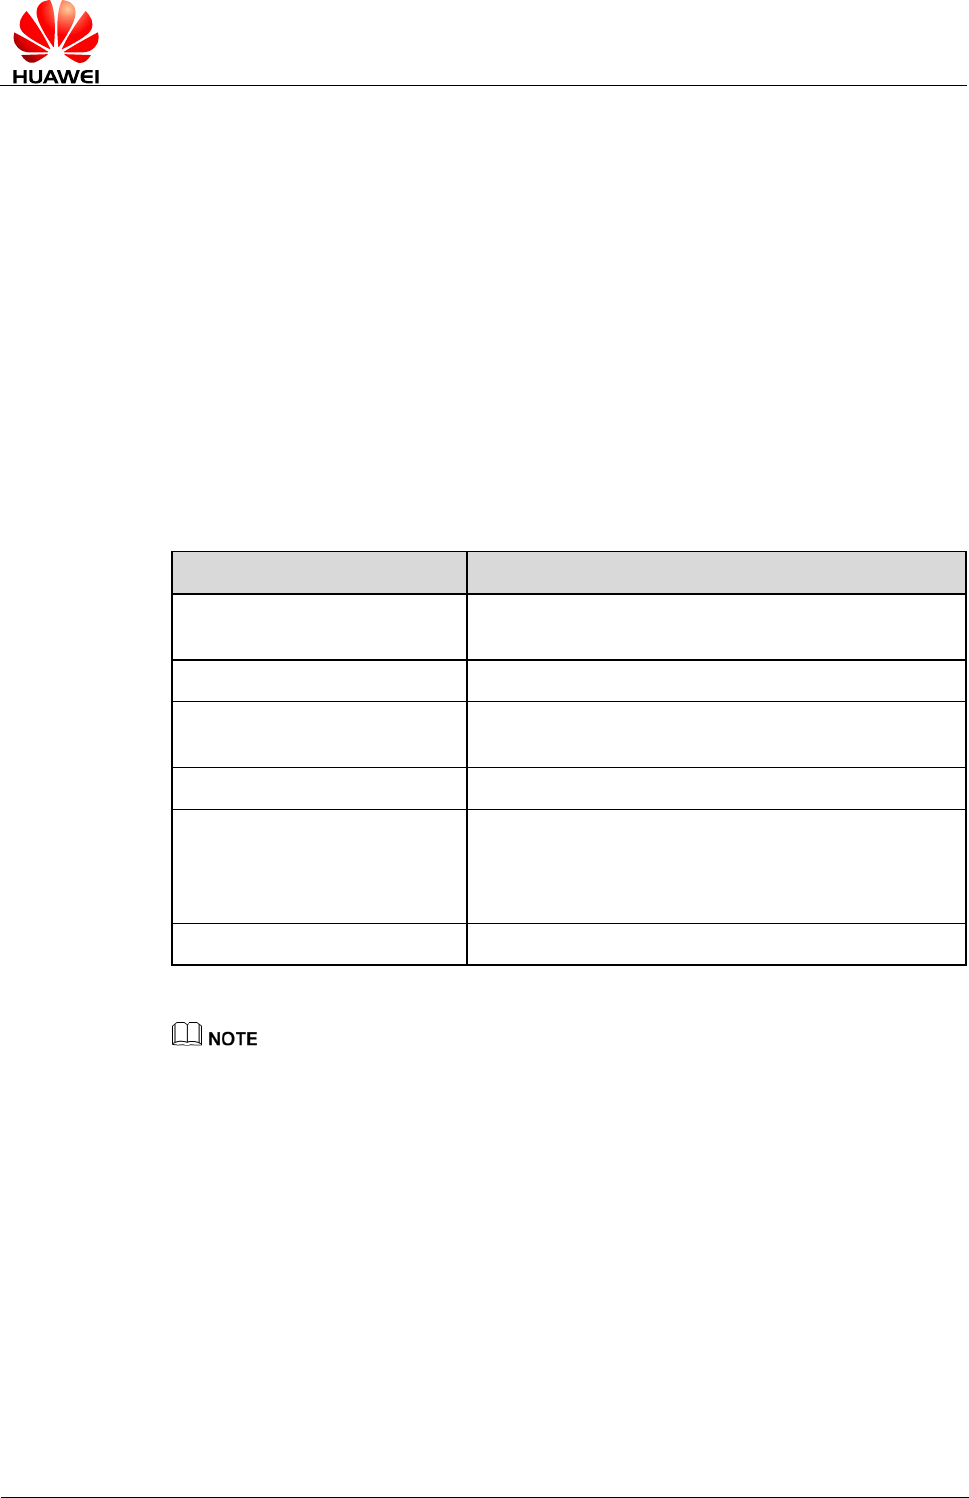
HUAWEI ME906s LTE M.2 Module
Application Guide
BodySAR Application Scenarios
Issue 01 (2015-07-31)
Huawei Proprietary and Confidential
Copyright © Huawei Technologies Co., Ltd.
22
BodySAR function again, the maximum transmitting power parameters that have been set
take effect in real time.
The maximum transmitting power parameters are saved in flash. As a contrast, the current
BodySAR function status is not saved. That means if the module restarts, the values of the
maximum transmitting power parameters are the same with which before restarting, but the
BodySAR function status is disabled.
4.6.2 Troubleshooting
None
4.7 Setting the BodySAR Type
4.7.1 Reference Process
Command
Description
AT^BODYSARCFG=0
Sets to OFF state. Indicates the BodySAR function is
disabled.
OK
AT^BODYSARCFG=1
Sets to ON state. Indicates the BodySAR function is
enabled. (default value)
OK
AT^BODYSARCFG=2
AUTO state. If the PLMN number of inserted SIM card
is in the BodySAR PLMN list configured in the module,
the BodySAR function is enabled. Otherwise, the
BodySAR function is disabled.
OK
Only when the BodySAR function is enabled, AT^BODYSARCFG command can be used.
4.7.2 Troubleshooting
None

HUAWEI ME906s LTE M.2 Module
Application Guide
Network Searching and Registration
Application Scenarios
Issue 01 (2015-07-31)
Huawei Proprietary and Confidential
Copyright © Huawei Technologies Co., Ltd.
23
5 Network Searching and Registration
Application Scenarios
5.1 Searching and Registering Network
5.1.1 Reference Process
Command
Description
AT+COPS=0
Enables automatic search for networks.
OK
AT+COPS=1,2,"46000"
Manual search for the appointed network.
OK
AT+COPS=?
Searches for all networks, and returns the
networks.
OK
AT+CREG=2
Enables the unsolicited indication when network
registration state changes.
OK
AT^SYSCFGEX="00",3FFFFFFF,1
,2,7FFFFFFFFFFFFFFF,,
Sets the system mode, network access order,
frequency band, roaming support, domain, and
other features.
OK
AT^SYSINFOEX
Queries the system service state, domain,
roaming status, and system mode.
^SYSINFOEX:
2,3,0,1,,1,"GSM",3,"EDGE"
OK
AT^HCSQ?
Queries the signal quality.

HUAWEI ME906s LTE M.2 Module
Application Guide
Network Searching and Registration
Application Scenarios
Issue 01 (2015-07-31)
Huawei Proprietary and Confidential
Copyright © Huawei Technologies Co., Ltd.
24
Command
Description
^HCSQ:"GSM",73
OK
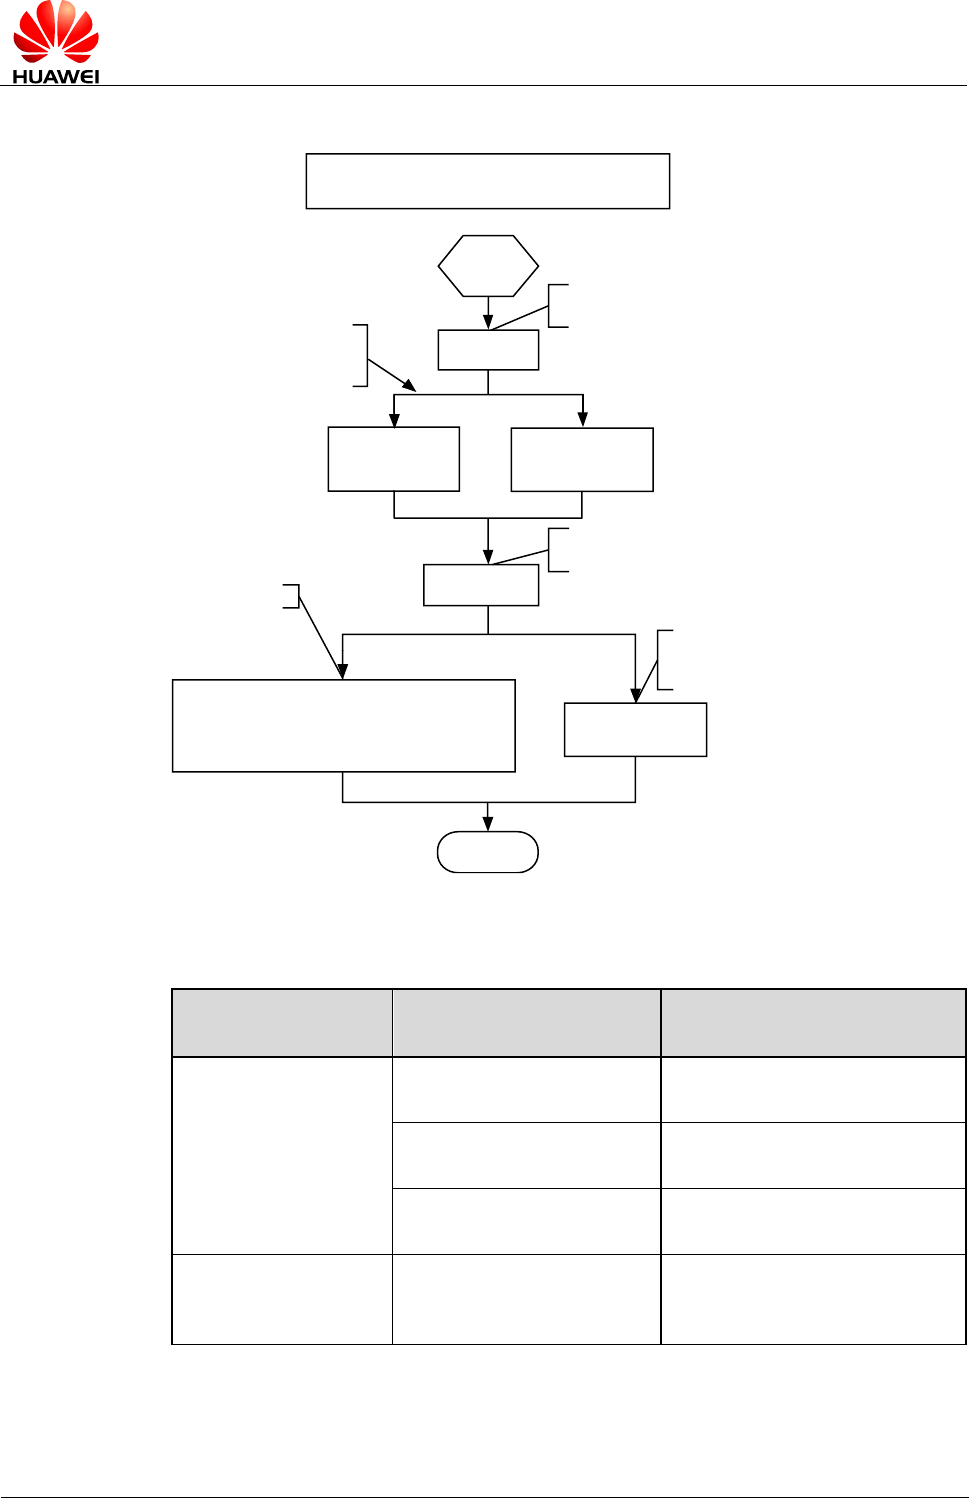
Figure 5-1 Automatic search for networks
Automatic search for networks
Start
Enable automatic search for
networks AT+COPS=0
Return OK
The unsolicited command
^SRVST indication for the
change of networks state
End
HUAWEI ME906s LTE M.2 Module
Application Guide
Network Searching and Registration
Application Scenarios
Issue 01 (2015-07-31)
Huawei Proprietary and Confidential
Copyright © Huawei Technologies Co., Ltd.
25
Figure 5-2 Manual search for networks
Manual search for networks
Start
Enable automatic
search for networks.
AT+COPS=?
Display the
networks found.
Select and register with a network.
AT+COPS=1[,<format>[,<oper>[,<rat>]]]
End
The application scenario is applicable for 3GPP (GSM/WCDMA/LTE), and UE is not in data service
state.
5.1.2 Troubleshooting
Scenario
Possible Error Information
Solution
AT+COPS?
+CME ERROR: SIM failure
No SIM card is detected. Insert a
SIM card.
AT+CREG?
+CME ERROR: SIM failure
No SIM card is detected. Insert a
SIM card.

HUAWEI ME906s LTE M.2 Module
Application Guide
SMS Application Scenarios
Issue 01 (2015-07-31)
Huawei Proprietary and Confidential
Copyright © Huawei Technologies Co., Ltd.
26
6 SMS Application Scenarios
6.1 Overview
Short Message Service (SMS) is a text messaging service using a service center (SC) to
transfer short text messages between GSM MEs and Short Message Entities (SMEs). ME906s
only supports protocol data unit (PDU) mode message.
A message must contain the following information before it is sent:
For a PDU mode message:
- Length of TPDU package
- Message content: To compose or send a PDU mode message, the message must contain
all the message attributes and be encoded in PDU format. A PDU consists of the
following:
− Service Center Address (SCA): composed of the address length, SCA type and SCA
reverse byte.
− First octet: contains the message type indicator, TP-RP, TP-UDHI, TP-SRR, TP-VPF,
TP-RD, and TP-MTI.
− Short text message statement.
− Destination address: consisting of the destination address, address length and
destination address type.
− Protocol identifier.
− Data encoding scheme.
− Validity duration.
− Data length.
− User data: consisting of the user data header and the data encoded in PDU format.
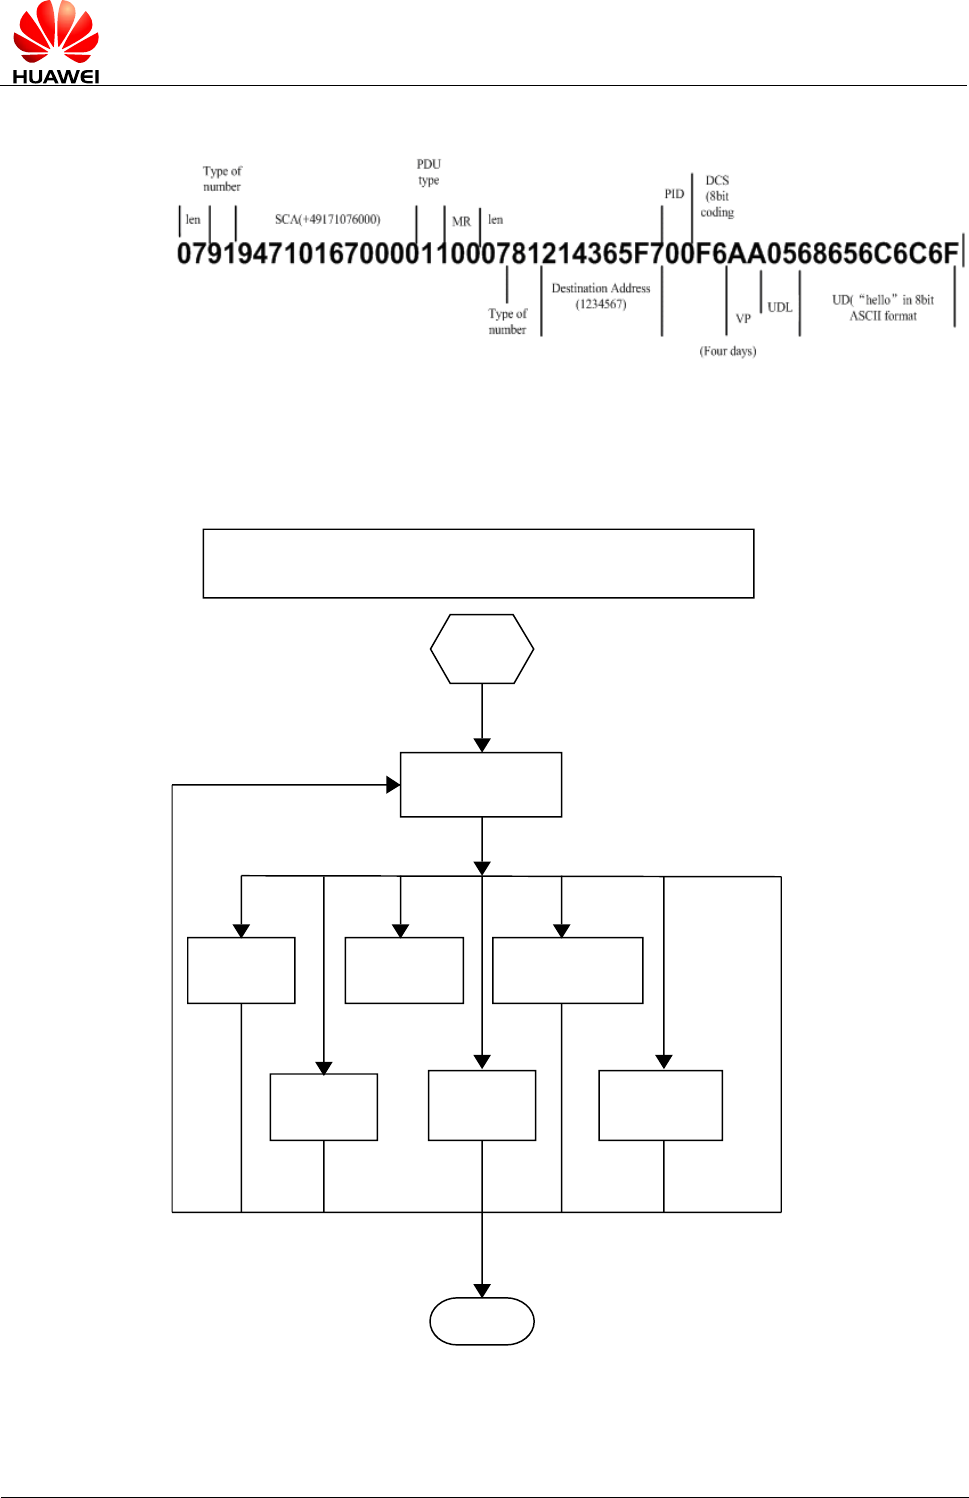
Figure 6-1 shows an example of data encoded in PDU format of submitted type.
HUAWEI ME906s LTE M.2 Module
Application Guide
SMS Application Scenarios
Issue 01 (2015-07-31)
Huawei Proprietary and Confidential
Copyright © Huawei Technologies Co., Ltd.
27
Figure 6-1 Example of data encoded in PDU format of submitted type
Figure 6-2 shows the general SMS process.
Figure 6-2 General SMS process
SMS
Start
SMS initialization
Delete short
messages
Write short
messages
Receive
short messages
Read short
messages
Send short
messages Status report
End

HUAWEI ME906s LTE M.2 Module
Application Guide
SMS Application Scenarios
Issue 01 (2015-07-31)
Huawei Proprietary and Confidential
Copyright © Huawei Technologies Co., Ltd.
28
6.2 Initializing SMS
6.2.1 Reference Process
Command
Description
AT+CSCA?
Queries the SMSC address.
+CSCA: "13800688509",129
OK
AT+CSCA="+8613800755500"
Sets the SMSC address to the SMSC number of
China Mobile's Shenzhen Branch.
OK
AT+CSMS?
Queries the short message service type.
+CSMS: 0,1,1,1
OK
AT+CNMI?
Queries the configuration of the new message
indications to TE.
+CNMI: 0,0,0,0,0
OK
AT+CNMI=2,1,2,2,0
Configures the new message indications to TE.
OK
AT+CPMS?
Queries the preferred short message storage.
+CPMS:
"SM",12,20,"SM",12,20,"SM",1
2,20
OK
AT+CPMS="SM"
Sets SM as short message storage medium.
OK
AT+CGSMS?
Queries the MO SMS bearer domain.
+CGSMS: 1
OK
AT+CMGF?
Queries the short message format.

HUAWEI ME906s LTE M.2 Module
Application Guide
SMS Application Scenarios
Issue 01 (2015-07-31)
Huawei Proprietary and Confidential
Copyright © Huawei Technologies Co., Ltd.
29
Command
Description
+CMGF: 0
OK
AT+CMGF=0
Sets the short message format to PDU.
OK
Use the AT+CMGF command to set short message format: AT+CMGF=0 sets the short
message format to PDU.
The SMSC address provided by the service provider must be specified. In PDU mode, the
SMSC address is contained in the PDU packets. Therefore, in PDU mode, the AT+CSCA
command is optional.
To use the SMS features specified in the GSM 07.05 Phase 2+, the AT+CSMS command
must be used to enable the features.
Use the AT+CNMI command to set the unsolicited indications.
Use the AT+CPMS command to select the preferred short message storage (SIM or ME). The
ME906s supports only the SM (SIM card) storage.
Use the AT+CGSMS command to select the MO SMS bearer domain (PS or CS domain). For
ME906s, the CS domain is the preferred MO bearer domain.
HUAWEI ME906s LTE M.2 Module
Application Guide
SMS Application Scenarios
Issue 01 (2015-07-31)
Huawei Proprietary and Confidential
Copyright © Huawei Technologies Co., Ltd.
30
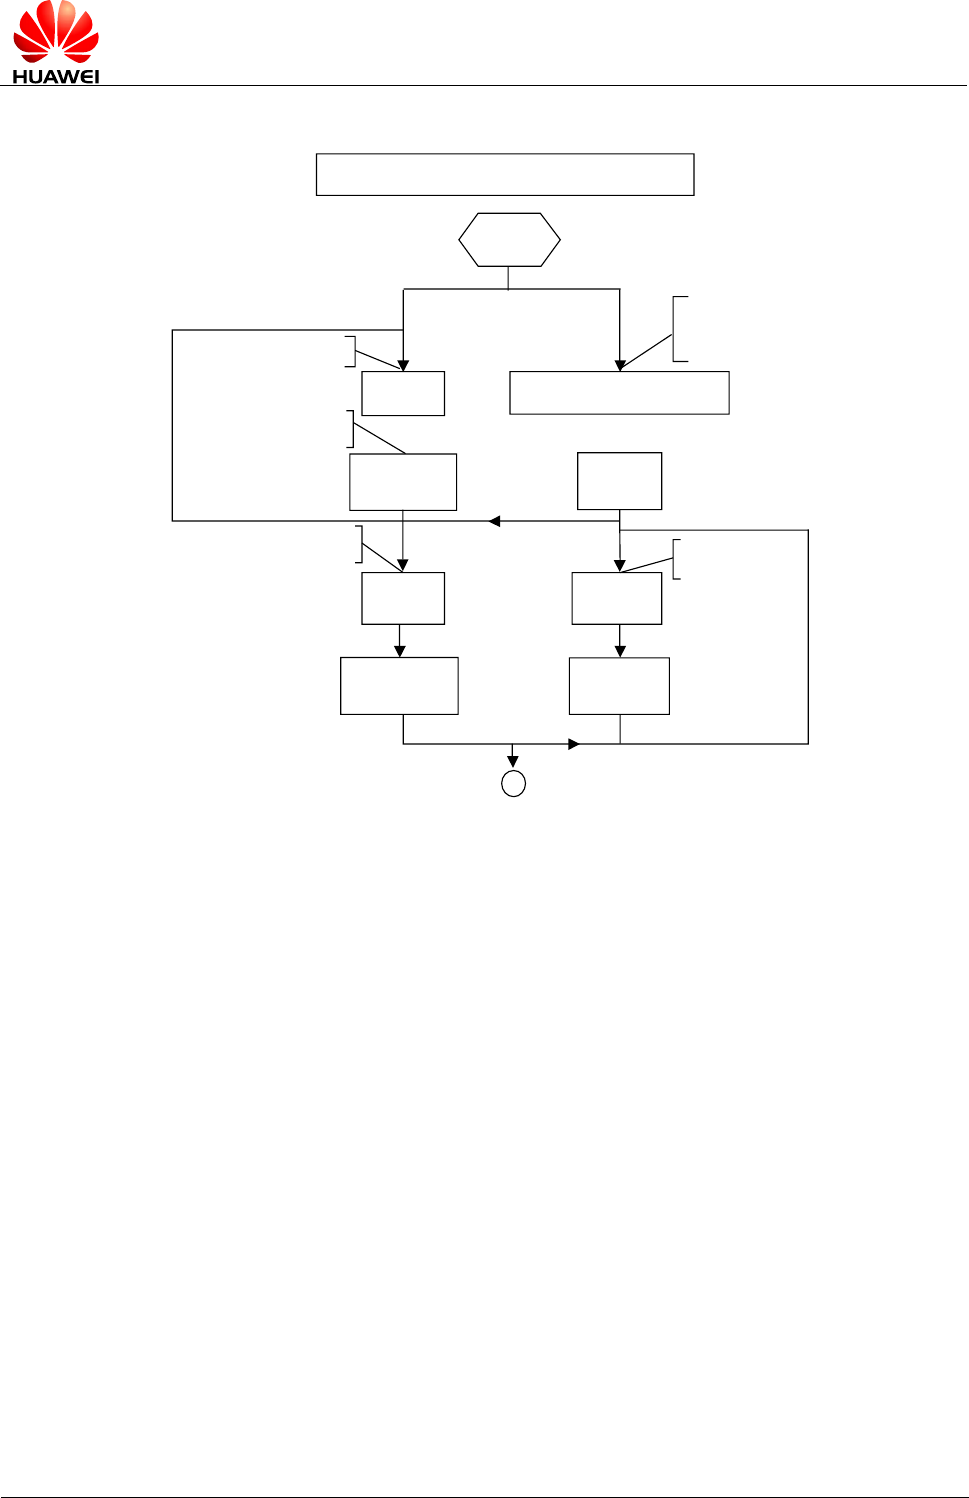
Figure 6-3 SMS initialization process - part 1
SMS initialization
Start
Query the SMSC
address.
Set the SMSC address to the SMSC
number of China Mobile's
Shenzhen Branch.
Set the message
service type.
Require the message
service type.
AT+CSCA?
AT+CSMS? AT+CSMS=1
+CSCA: "",129
OK
+CSMS: 0,1,1,1
OK
*
OK
AT+CSCA="+8613800755500"
+CSMS: 1,1,1
OK
Example: SMSC
address is not specified.
HUAWEI ME906s LTE M.2 Module
Application Guide
SMS Application Scenarios
Issue 01 (2015-07-31)
Huawei Proprietary and Confidential
Copyright © Huawei Technologies Co., Ltd.
31
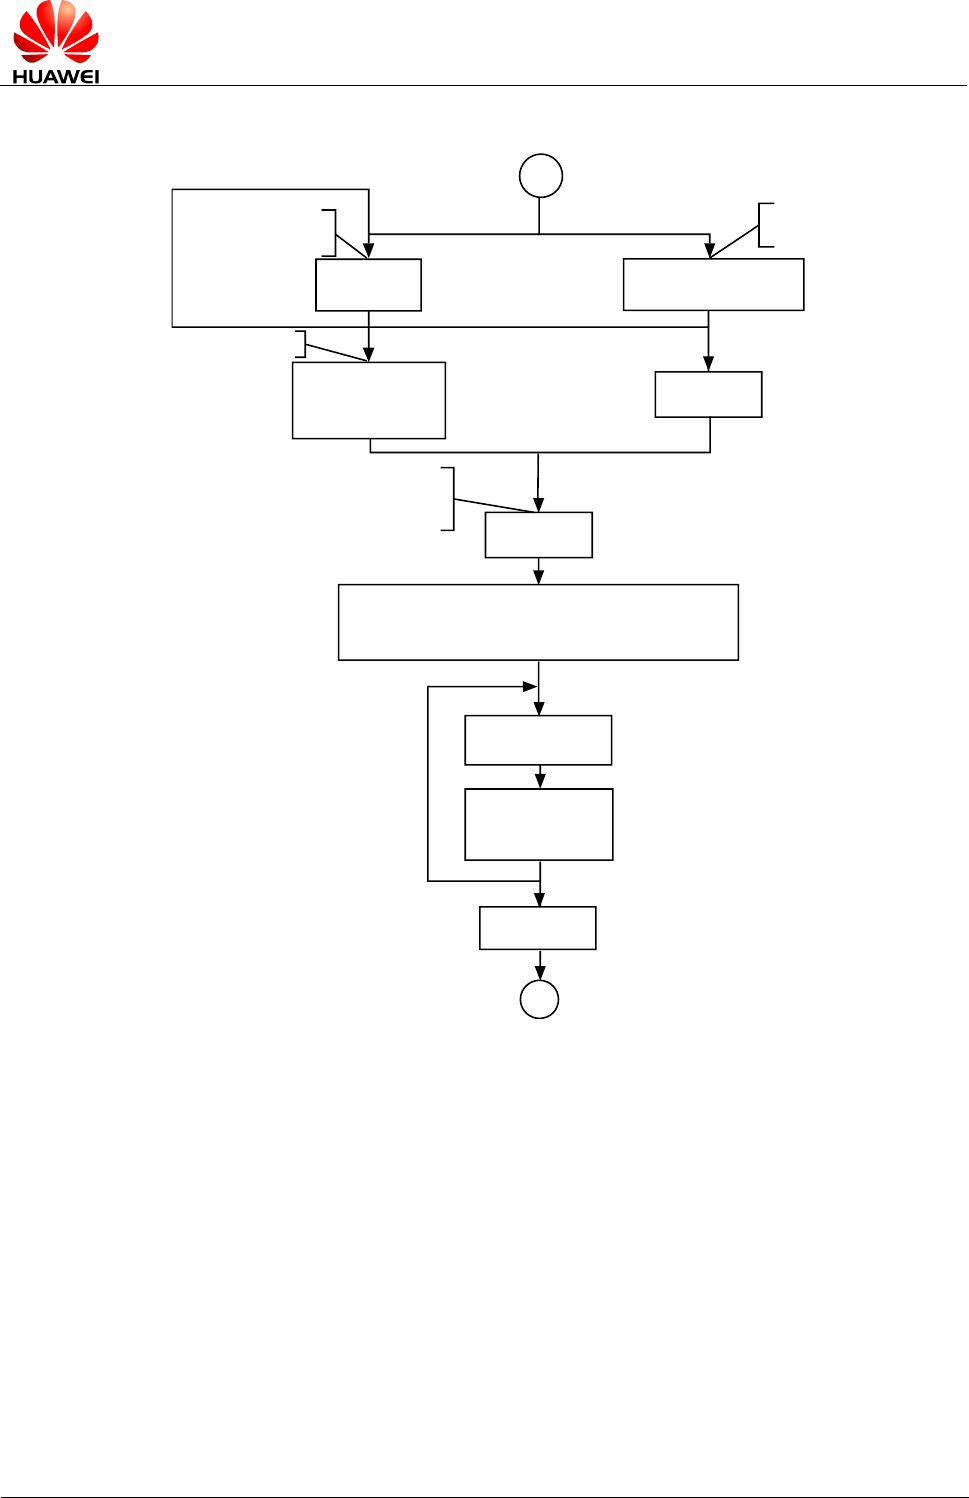
Figure 6-4 SMS initialization process - part 2
Query the unsolicited
indication state.
Enable the notification
of new messages.
Default values
Query the preferred storage
for the current message.
*
AT+CPMS?
AT+CGSMS?
+CNMI: 0,0,0,0,0
OK
AT+CNMI=2,1,2,2,0
+CGSMS: 1
OK
*
OK
+CPMS: "SM",13,20,"SM",13,20,"SM",13,20
OK
AT+CNMI?
AT+CMGF=0
HUAWEI ME906s LTE M.2 Module
Application Guide
SMS Application Scenarios
Issue 01 (2015-07-31)
Huawei Proprietary and Confidential
Copyright © Huawei Technologies Co., Ltd.
32
Figure 6-5 SMS initialization process - part 3
End
OK
AT+CMGF=0
AT+CMGF?
*
+CMGF: 0
OK
6.2.2 Troubleshooting
Scenario
Possible Error Information
Solution
Error information is
returned in response to
one of the previous
commands.
+CME ERROR: SIM PIN
required
Enter the correct PIN.
+CMS ERROR: SIM busy
SIM card initialization has not
completed. Try again later.
6.3 Sending Short Messages
6.3.1 Reference Process
Command
Description
AT+CMGF=0
Sets the short message format to PDU.
OK
AT+CSCA?
Queries the SMSC address.
+CSCA: "13800688509",129
OK

HUAWEI ME906s LTE M.2 Module
Application Guide
SMS Application Scenarios
Issue 01 (2015-07-31)
Huawei Proprietary and Confidential
Copyright © Huawei Technologies Co., Ltd.
33
Command
Description
AT+CMGS=18
>0031000B813109731147F40000FF04F
4F29C0E\x0A
Sends a PDU message without the service
center address. The value of SMSC address is
the setting of AT+CSCA command.
+CMGS: 168
OK
The message is successfully sent.
AT+CMGS=18
>0891683108608805F931000B81310973
1147F40000FF04F4F29C0E\x1A
Sends a PDU message with the correct
service center address.
+CMGS: 169
OK
The message is successfully sent.
AT+CMGS=18
>0891683108608805F031000B81310973
1147F40011FF04F4F29C0E\x1A
Sends a PDU message with the wrong service
center address.
+CMS ERROR: Network out of order
The message is unsuccessfully sent.
Messages in PDU format must be converted using external tools or users' software. Tools for
encoding and parsing messages in PDU format are available on the Internet.
HUAWEI ME906s LTE M.2 Module
Application Guide
SMS Application Scenarios
Issue 01 (2015-07-31)
Huawei Proprietary and Confidential
Copyright © Huawei Technologies Co., Ltd.
34
Figure 6-6 Sending short messages in PDU format
Sending messages in PDU format
Start
Send a short message
(given that the PDU length is 18) SMS initialization
PDU message
without SCA
Press <ctrl-Z> to send
the command.
Press <ESC> to cancel
the command
Example: Message
not sent Message sent
unsuccessfully
End
AT+CMGS=18
+CMS ERROR:
Network out of
order
OK
0031000B813109731147F4
0000FF04F4F29C0E
<ESC>
0891683108608805F931000B
813109731147F40000FF04F4
F29C0E<ctrl-Z>
+CMGS: 1
OK
Message sent
successfully
6.3.2 Troubleshooting
Scenario
Possible Error
Information
Solution
Error information is
returned in response to one
of the previous commands.
+CMS ERROR: Network
out of order
Check the validity of the
service center address or the
state of the current network.

HUAWEI ME906s LTE M.2 Module
Application Guide
SMS Application Scenarios
Issue 01 (2015-07-31)
Huawei Proprietary and Confidential
Copyright © Huawei Technologies Co., Ltd.
35
6.4 Reading Short Messages
6.4.1 Reference Process
Command
Description
AT+CMGL=0
Lists all received unread messages.
+CMGL: 2,0,,48
0891683108608805F9040D91683109732097F200
0001432619001001F506215744FD3D1A0E930C8
4296D9EC370BFDE86C2F23228FFAEFF00
+CMGL: 4,0,,64
0891683108608805F9040D91683109732097F200
000140326131050032506215744FD3D1A0E930C
84296D9EC370BFDBE83C2B0380F6A97416FF
7B80C6AVFE5E510
OK
The format of short messages can
refer to the AT+CMGL command.
AT+CMGR=4
Reads the message stored in the
message storage location 4.
+CMGR: 1,,64
0891683108608805F9040D91683109732097F200
000140326131050032506215744FD3D1A0E930C
84296D9EC370BFDBE83C2B0380F6A97416FF
7B80C6AVFE5E510
OK
The format of short messages can
refer to the AT+CMGR command.
There are two methods to read short messages:
- Method 1: Use the AT+CMGL command to list the messages that are in specified state
and stored in the preferred message storage. The following table describes the message
states. If the message sate is received unread messages, the REC UNREAD state will be
changed to REC READ after the AT+CMGL command is executed.
Message State
PDU Mode
Received unread messages
0
Received read messages
1
Stored unsent messages
2
Stored sent messages
3
All messages
4
HUAWEI ME906s LTE M.2 Module
Application Guide
SMS Application Scenarios
Issue 01 (2015-07-31)
Huawei Proprietary and Confidential
Copyright © Huawei Technologies Co., Ltd.
36
- Method 2: Use the AT+CMGR command to read a message from a specified storage
location in the message storage. If the message is a received unread message, its state
will be changed to REC READ after it is read using the AT+CMGR command.
You can use the AT+CMGL command to list all short messages so that you can view the
messages' storage locations.
Figure 6-7 Reading short messages
Reading short messages
Start
List received unread
messages in PDU format
+CMGL: <index1>,0,,<length>
<pdu> (messages in PDU format)
......
+CMGL: <indexn>,0,,<length>
<pdu> (messages in PDU format)
OK
PDU format
+CMGR: n,,<length>
<pdu> (messages in PDU format)
OK
End
AT+CMGL=0
AT+CMGR=n
6.4.2 Troubleshooting
Scenario
Possible Error Information
Solution
Error information is
returned in response to one
of the previous commands.
+CMS ERROR: invalid
memory index
Check the validity of the
index.

HUAWEI ME906s LTE M.2 Module
Application Guide
SMS Application Scenarios
Issue 01 (2015-07-31)
Huawei Proprietary and Confidential
Copyright © Huawei Technologies Co., Ltd.
37
6.5 Deleting Short Messages
6.5.1 Reference Process
Command
Description
AT+CMGF=0
Sets the message format to PDU mode.
OK
AT+CMGL=4
Lists all short messages (PDU mode).
+CMGL: 6,2,,30
0011000A9171798762130000A713C8329BF
D6681D0EF3B282C2F83F2EFFA0F
+CMGL: 11,1,,36
0791947106004013240C9194715982699000
003080413115748013C8329BFD6681D0EF
3B282C2F83F2EFFA0F
OK
AT+CMGD=1
Deletes the message stored in storage
location 1.
OK
- Either all messages stored in the preferred message storage or a message stored in the
specified storage location in the preferred message storage can be deleted.
- All read or unread messages that have been received can be deleted.
- If no messages are stored in the preferred message storage, "OK" is returned when the
action to delete messages is completed.
- Meanings of the DelFlag value:
− 1: Delete all read messages in the preferred message storage, and keep the unread,
sent and unsent messages.
− 2: Delete all read and sent messages in the preferred message storage, and keep the
unread and unsent messages.
− 3: Delete all read, sent, and unsent messages in the preferred message storage, and
keep the unread messages.
− 4: Delete all messages in the preferred message storage, including the unread
messages.
HUAWEI ME906s LTE M.2 Module
Application Guide
SMS Application Scenarios
Issue 01 (2015-07-31)
Huawei Proprietary and Confidential
Copyright © Huawei Technologies Co., Ltd.
38
Figure 6-8 Deleting short message
Deleting short messages
Start Prerequisite:
SMS hasbeen initialized.
Example: Lists all short
messages in PDU format.
Delete the message
stored in
location n in the preferred
storage.
Equivalent to
AT+CMGD=n
End
OK
+CMSERROR:
AT+CMGD=n AT+CMGD=n,0
AT+CMGL=4
AT+CMGD=x,DelFlag
X:(0-999)
+CMGL: 1,<parameters>
07919471060040
+CMGL: 2,<parameters>
07919471060040
......
invalid memory
index
OK
6.5.2 Troubleshooting
Scenario
Possible Error
Information
Solution
Error information is
returned in response to one
of the previous commands.
+CMS ERROR: invalid
memory index
Check the validity of the
index.

HUAWEI ME906s LTE M.2 Module
Application Guide
Phonebook Application Scenarios
Issue 01 (2015-07-31)
Huawei Proprietary and Confidential
Copyright © Huawei Technologies Co., Ltd.
39
7 Phonebook Application Scenarios
7.1 Overview
As a product embedded into a host, the phonebook scenarios include that read, write, query
and delete the phonebook entries in the SIM card.
Read phonebook: use the AT+CPBR command to read phonebook entries.
Write phonebook: use the AT+CPBW command to save the phonebook entries into the SIM
card.
Delete phonebook: use AT+CPBW command to delete the phonebook entries in the SIM
card.
7.2 Initializing the Phonebook
7.2.1 Reference Process
Command
Description
AT+CPBS?
Queries the current phonebook storage.
+CPBS: "SM",0,250
OK
AT+CPBS="SM"
Selects SM as the storage type.
OK
Note that the AT commands for reading and writing phonebook entries can be used only after
the phonebook storage is selected. To select a phonebook storage, use the AT+CPBS
command.

HUAWEI ME906s LTE M.2 Module
Application Guide
Phonebook Application Scenarios
Issue 01 (2015-07-31)
Huawei Proprietary and Confidential
Copyright © Huawei Technologies Co., Ltd.
40
Figure 7-1 Initializing the phonebook
Initializing the phonebook
Start Query the available
storage types for the phonebook.
Query the current phonebook storage.
Select SM as the storage type
End
OK
AT+CPBS="SM"
+CPBS: "ON",0,0
OK
AT+CPBS?
AT+CPBS=?
+CPBS: ("SM", "EN","ON")
OK
7.2.2 Troubleshooting
Scenario
Possible Error Information
Solution
Error information is
returned in response to
one of the previous
commands.
+CME ERROR: SIM busy
Phonebook initialization has
not completed. Try again
later.
+CME ERROR: SIM PIN
required
Enter the correct PIN.
+CME ERROR: SIM PUK
required
Enter the correct PUK.

HUAWEI ME906s LTE M.2 Module
Application Guide
Phonebook Application Scenarios
Issue 01 (2015-07-31)
Huawei Proprietary and Confidential
Copyright © Huawei Technologies Co., Ltd.
41
7.3 Reading Phonebook Entries
7.3.1 Reference Process
Command
Description
AT+CPBS?
Queries the phonebook
storage selection and the
maximum number of entries
that can be stored.
+CPBS: "SM",9,20
OK
AT+CPBR=1,20
Lists all phonebook entries
by their indexes.
+CPBR: 1,"+491765864491",145,"John Smith"
+CPBR: 2,"+44545896638",145,"Paul Williams"
+CPBR: 3,"+44556565657",145,"Joe Anderson"
+CPBR: 4,"+445636934485",145,"Oscar Thomso"
+CPBR: 5,"+445565656899",145,"Hannah Adams"
+CPBR: 6,"+447982865563",145,"Samantha Young"
+CPBR: 7,"+449585315798",145,"Alexis Wright"
+CPBR: 8,"+445415454646",145,"Abigail Cox"
+CPBR: 12,"+446565689115",145,"Kyla Clark"
OK
HUAWEI ME906s LTE M.2 Module
Application Guide
Phonebook Application Scenarios
Issue 01 (2015-07-31)
Huawei Proprietary and Confidential
Copyright © Huawei Technologies Co., Ltd.
42
Figure 7-2 Reading phonebook entries
Reading phonebook entries
Start
Query the current phonebook storage type.
Initialize the
phonebook.
FD phonebook can store
up to 10 entries; currently 3
entries are stored.
Correct response
Lists all phonebook entries from location x to location y.
The ending location is greater
than the greatest phonebook entry index.
End
+CPBS: "SM",4,250
OK
+CPBS: "ON",1,4
OK
AT+CPBR=x,y
+CME ERROR:
invalid index
+CPBR: 1,"+491765864491",145,"John Smith"
+CPBR: 2,"+445564854245",145,"Ashley Jones"
...
OK
7.3.2 Troubleshooting
Scenario
Possible Error
Information
Solution
Error information is
returned in response to
one of the previous
commands.
+CME ERROR: SIM busy
Phonebook initialization has not
completed. Try again later.
+CME ERROR: SIM PIN
required
Enter the correct PIN.
+CME ERROR: SIM PUK
required
Enter the correct PUK.
AT+CPBR=<index1>
+CME ERROR: invalid
index
The index is invalid. Check that
index 1 is within the supported
range.
HUAWEI ME906s LTE M.2 Module
Application Guide
Phonebook Application Scenarios
Issue 01 (2015-07-31)
Huawei Proprietary and Confidential
Copyright © Huawei Technologies Co., Ltd.
43
Scenario
Possible Error
Information
Solution
AT+CPBR=<index1>,
<index2>
+CME ERROR: invalid
index
The index is invalid. Check that
index 1 and index 2 are within
the supported range and that
index 1 is not greater than index
2.
AT+CPBR=<index1>
+CME ERROR: not found
No entries are found in the
storage locations in index 1.
Check that there have been
entries successfully written into
these locations.
AT+CPBR=<index1>,
<index2>
+CME ERROR: not found
No entries are found in the
storage locations between index
1 and index 2. Check that there
have been entries successfully
written into these locations.
7.4 Writing Phonebook Entries
7.4.1 Reference Process
Command
Description
AT+CPBR=?
Queries the ranges of parameters related
to the phonebook entries.
+CPBR: (1-250),80,14
OK
AT+CPBW="5","13903702805",,"test"
Writes a phonebook record.
OK
AT+CPBW=1
Deletes the entry in index 1 in the
phonebook.
OK
There are two methods to edit phonebook entries using the AT+CPBW command:
- Write an entry to a specified location. This method edits the location where a phonebook
entry exists or writes a new entry to a vacant location.
- Write a new phonebook entry to the next location of a location that already has a
phonebook entry. This method does not require a specified storage location. The
AT+CPBW command can be used to edit phonebook entries of the "SM" or "ON" type.
HUAWEI ME906s LTE M.2 Module
Application Guide
Phonebook Application Scenarios
Issue 01 (2015-07-31)
Huawei Proprietary and Confidential
Copyright © Huawei Technologies Co., Ltd.
44
Figure 7-3 Writing phonebook entries
Writing phonebook entries
Start
AT+CPBR=?
+CPBR: (1-250),20,16
OK
+CPBR: 1,"+491765864491",145,"John Smith"
+CPBR: 3,"+441236548545",145,"Emily Miller"
Query the ranges of
parameters related
to the phonebook
entries.
Parameter ranges
Read all phonebookentries.
Read all the returned results.
Writephonebook
parameters.
AT+CPBW=,"+44546465
4568",145,"Paul Williams"
OK
+CEM ERROR:
memory full
+CEM ERROR:
invalid index
AT+CPBW=1,"+44546465
4568",145,"Paul Williams"
Write a phonebook
entry to a vacant location.
Write a phonebookentry
to a specified location.
Note: If an entry already
exists in the location,
the entry will be overwritten.
End
OK
7.4.2 Troubleshooting
Scenario
Possible Error
Information
Solution
Error information is
returned in response to one
of the previous commands.
+CME ERROR: SIM busy
Phonebook initialization has
not completed. Try again
later.
+CME ERROR: SIM PIN
required
Enter the correct PIN.

HUAWEI ME906s LTE M.2 Module
Application Guide
Phonebook Application Scenarios
Issue 01 (2015-07-31)
Huawei Proprietary and Confidential
Copyright © Huawei Technologies Co., Ltd.
45
Scenario
Possible Error
Information
Solution
+CME ERROR: SIM PUK
required
Enter the correct PUK.
Error information is
returned when writing an
entry into the phonebook.
+CME ERROR: dial string
too long
Check that the phone
number is not too long.
Error information is
returned in response to one
of the previous commands.
+CME ERROR: invalid
index
Check that the location
index and phone number
type are valid.
Error information is
returned when writing an
entry into the phonebook.
+CME ERROR: invalid
characters in dial string
The phone number to be
written into the phonebook
contains invalid characters.
Delete the invalid characters
and try again.
AT+CPBW=,"12345678901
234567890123",128,"80534
E4E3A"
+CME ERROR: memory
full
The storage is full. Delete
some entries and try again.
HUAWEI ME906s LTE M.2 Module
Application Guide
Data Service Application Scenarios
Issue 01 (2015-07-31)
Huawei Proprietary and Confidential
Copyright © Huawei Technologies Co., Ltd.
46
8 Data Service Application Scenarios
8.1 Overview
Figure 8-1 General data service process
General data service process
Start End
Initialization
Define PDP contexts.
Activate PDP contexts. Enter data mode. Deactivate PDP contexts.
Attach PS Deattach
The procedure for starting data service is as follows:
- Initialize data service settings.
- Attach PS.
- Define packet data protocol (PDP) contexts.
- Activate PDP contexts and enter data mode.
HUAWEI ME906s LTE M.2 Module
Application Guide
Data Service Application Scenarios
Issue 01 (2015-07-31)
Huawei Proprietary and Confidential
Copyright © Huawei Technologies Co., Ltd.
47
General data service process is shown as Figure 8-1. To quit data mode, deactivate PDP
contexts, and then detach. For details about the processes of the steps in the previous
procedure, see the following sections.
8.2 Initializing Data Service Settings
8.2.1 Reference Process
Command
Description
AT+CGREG?
Queries the network registration state.
+CGREG: 0,0
OK
AT+CGREG=1
Enables the network registration state URC.
OK
8.2.2 Troubleshooting
Scenario
Possible Error Information
Solution
AT+CGREG?
+CGREG: 0,0
OK
The PS domain has not attached.
Run AT+CGATT=1 to manually
attach to the PS domain.
8.3 Attaching/Detaching PS
8.3.1 Reference Process
Command
Description
AT+CGATT=1
Attaches PS.
OK
AT+CGATT?
Queries the attach state.
+CGATT: 1
OK
HUAWEI ME906s LTE M.2 Module
Application Guide
Data Service Application Scenarios
Issue 01 (2015-07-31)
Huawei Proprietary and Confidential
Copyright © Huawei Technologies Co., Ltd.
48
Command
Description
AT+CGATT=0
Detaches PS.
OK
If PS has been attached or detached, the attached or detached command will be ignored, and
"OK" will be returned.
If the ME detaches PS, all activated PDP contexts will be automatically deactivated.
8.3.2 Troubleshooting
Scenario
Possible Error Information
Solution
AT+CGATT?
+CGATT: 0
OK
The PS domain has not attached.
Run AT+CGATT=1 to
manually attach to the PS
domain.
8.4 Defining PDP Contexts
8.4.1 Reference Process
Command
Description
AT+CGDCONT?
Queries the defined PDP contexts.
+CGDCONT:
11,"IPV4V6","","0.0.0.0",0,0
OK
AT+CGDCONT=1,"IP","1234"
Defines a new PDP context.
OK
AT+CGDCONT?
Queries the defined PDP context.
+CGDCONT: 1,"IP","1234","",0,0
OK
AT+CGDCONT=1
Deletes the PDP context with <cid>=1.
OK
AT+CGDCONT?
Queries the defined PDP contexts.

HUAWEI ME906s LTE M.2 Module
Application Guide
Data Service Application Scenarios
Issue 01 (2015-07-31)
Huawei Proprietary and Confidential
Copyright © Huawei Technologies Co., Ltd.
49
Command
Description
OK
The AT+CGDCONT command is used to define the context ID and specify the PDP type and
access point name (APN). Each PDP context has a context ID (specified by the <cid>
parameter of the AT+CGDCONT command), which is a sequence number starting from 0.
The PDP type describes the protocol between the ME and the network, and the APN specifies
the gateway between the mobile network and the Internet.
The range of <cid> supported by ME906s module is the integer from 0 to 11.
Send AT+CGDCONT=<cid>, PDP context returns not defined status.
8.4.2 Troubleshooting
None
8.5 Activate PDP Contexts and Enter Data Mode
8.5.1 Reference Process
Please refer to WWAN UI of related operating system.
For example, on Windows 7 operating system, users can click Connect in WWAN UI to enter
data mode.
HUAWEI ME906s LTE M.2 Module
Application Guide
Data Service Application Scenarios
Issue 01 (2015-07-31)
Huawei Proprietary and Confidential
Copyright © Huawei Technologies Co., Ltd.
50
Figure 8-2 WWAN UI
8.5.2 Troubleshooting
None
HUAWEI ME906s LTE M.2 Module
Application Guide
Security Settings Application
Scenarios
Issue 01 (2015-07-31)
Huawei Proprietary and Confidential
Copyright © Huawei Technologies Co., Ltd.
51
9 Security Settings Application Scenarios
9.1 Changing the SIM PIN
9.1.1 Reference Process
Command
Description
AT+CPWD="SC","9999","1234"
Changes the PIN. Current PIN=9999; new
PIN=1234.
OK
AT+CPWD="SC","1113","1233"
Enters an incorrect PIN (first attempt).
+CME ERROR: incorrect password
AT+CPWD="SC","3333","1255"
Enters an incorrect PIN (second attempt).
+CME ERROR: incorrect password
AT+CPWD="SC","4711","1331"
Enters an incorrect PIN (third attempt).
+CME ERROR: SIM PUK required
AT+CPIN?
Checks whether the password is requested.
+CPIN: SIM PUK
OK
AT+CPIN="12345678","0000"
Enters the SIM PUK and specify the new
SIM PIN (activate new "SC" lock).
OK
The AT+CPWD command can be used to change a SIM card's PIN. When the SIM card is
PIN protected, the correct PIN must be entered to unblock SIM card. If incorrect PINs are
entered three consecutive times, the PUK is required to unblock the SIM.
HUAWEI ME906s LTE M.2 Module
Application Guide
Security Settings Application
Scenarios
Issue 01 (2015-07-31)
Huawei Proprietary and Confidential
Copyright © Huawei Technologies Co., Ltd.
52
Figure 9-1 Changing the PIN
Changing the PIN
Start
AT+CPIN?
Check the PIN.
Change the PIN.
Incorrect input
End
+CPIN: READY
OK
+CPIN: SIM PUK
OK
AT+CPWD="SC","xxxx","yyyy"
OK +CME ERROR:
incorrect password
+CME ERROR:
SIM PUK required
9.1.2 Troubleshooting
Scenario
Possible Error
Information
Solution
AT+CPWD="SC",
<oldpwd>,<newpw
d>
+CME ERROR: incorrect
password
<oldpwd> must be the current PIN.
Like the PIN authentication, if
incorrect PINs are entered three
times, the PUK will be required. If
incorrect PUKs are entered 10
times, the SIM card will be
permanently blocked.

HUAWEI ME906s LTE M.2 Module
Application Guide
Security Settings Application
Scenarios
Issue 01 (2015-07-31)
Huawei Proprietary and Confidential
Copyright © Huawei Technologies Co., Ltd.
53
9.2 Changing the SIM Card Configuration
9.2.1 Reference Process
Command
Description
AT+CPIN?
Requests the PIN state.
+CPIN: READY
OK
AT+CLCK="SC",2
Requests the SIM card state.
+CLCK: 0
OK
"+CLCK: 0" means that the SIM card is not
blocked.
AT+CLCK="SC",1,"5555"
Uses an incorrect PIN to change the SIM card
lock.
+CME ERROR: incorrect password
AT+CLCK="SC",1,"0000"
Enables the SIM card lock.
OK
AT+CLCK="SC",2
Requests the SIM card state.
+CLCK: 1
OK
"+CLCK: 1" means that the SIM card is
blocked.
AT+CLCK="SC",0,"0000"
Disables the SIM card lock.
OK
AT+CLCK="SC",2
Requests the SIM card state.
+CLCK: 0
OK
"+CLCK: 0" means that the SIM card is not
blocked.
AT+CLCK="SC",1,"0000"
Enables the SIM card lock.
OK
If the SIM card is blocked, the PIN code (that is, the PIN) is requested when the module is
started. To enable the SIM card lock, the PIN is requested. A maximum of three attempts to
enter the PIN is allowed. The AT+CLCK="SC",<mode>,<PIN> command can be used to
block or unblock the SIM card. When <mode>=1, the SIM card will be blocked. When
<mode>=0, the SIM card will be unblocked. Before enabling the SIM card lock, it is
recommended that the AT+CPIN? command be used to check the current state of the SIM

HUAWEI ME906s LTE M.2 Module
Application Guide
Security Settings Application
Scenarios
Issue 01 (2015-07-31)
Huawei Proprietary and Confidential
Copyright © Huawei Technologies Co., Ltd.
54
card lock. If "+CPIN: SIM PUK" is returned, the correct PUK must be entered to change the
SIM card settings.
Figure 9-2 Changing the SIM card configuration
Changing the SIM card configuration
Start
AT+CPIN?
+CPIN: READY
OK
+CPIN: SIM PUK
OK
+CLCK: 0
OK
+CLCK: 0
OK
+CME ERROR:
SIM PUK required +CME ERROR:
incorrect password
AT+CLCK="SC",1,<PIN> AT+CLCK="SC",0,<PIN>
+CLCK: 1
OK
AT+CLCK="SC",2
Request the PIN state.
Request the SIM
card lock state.
Block the
SIM card. Unblock the
SIM card.
Incorrect input
End
+CLCK: 1
OK
9.2.2 Troubleshooting
Scenario
Possible Error
Information
Solution
AT+CLCK="SC",1,<pwd>
+CME ERROR: operation
not allowed
If PIN authentication has
been enabled, it cannot be
enabled again. Check
whether PIN authentication
has been enabled.

HUAWEI ME906s LTE M.2 Module
Application Guide
SIM Card Application Scenarios
Issue 01 (2015-07-31)
Huawei Proprietary and Confidential
Copyright © Huawei Technologies Co., Ltd.
55
10 SIM Card Application Scenarios
10.1 SIM Card Access
10.1.1 Reference Process
Command
Description
AT+CRSM=192,28483
Obtains response from the EF.
+CRSM:
144,0,000000026F43040011F05501020000
OK
AT+CRSM=176,12258,0,0,10
Reads binary data from the EF.
+CRSM: 144,0,980000000000000000F3
OK
AT+CRSM=178,28484,1,4,255
Reads records from the EF (incorrect
input).
+CRSM: 103,28
OK
The first parameter <sw1>='103'. '103' is
a decimal number corresponding to
hexadecimal number '67', which indicates
"illegal parameter <P3>". The second
parameter <sw2>='xx', which indicates
the correct length (28 in the example) or
indicates that no information is provided.
AT+CRSM=178,28484,1,4,28
Reads the record of the last dialed
number from the EF.
+CRSM:
144,0,FFFFFFFFFFFFFFFFFFFFFFFFFFF
F0581420010F6FFFFFFFFFFFFFFFF
OK

HUAWEI ME906s LTE M.2 Module
Application Guide
SIM Card Application Scenarios
Issue 01 (2015-07-31)
Huawei Proprietary and Confidential
Copyright © Huawei Technologies Co., Ltd.
56
The operations to access the SIM card depend on the value of <command>, as described in
Table 10-1.
Table 10-1 Values of <command>
Value
Read Binary Command
Function
176
READ BINARY
Read binary strings from the current data
domain.
178
READ RECORD
Read complete linear fixed or cyclic data domain
consisting of CURRENT, ABSOLUTE, NEXT,
and PREVIOUS.
192
GET RESPONSE
Return the basic information about the current
data domain, including the file type and size.
214
UPDATE BINARY
Update the current data domain.
220
UPDATE RECORD
Update all the records in the linear fixed or
cyclic data domain. There are four update
modes: CURRENT, ABSOLUTE, NEXT, and
PREVIOUS, of which only the PREVIOUS
mode can be used for cyclic files.
242
STATUS
Return the status information about the current
data domain.
The following table describes the components of the data returned in response to the READ
RECORD command.
Byte
Description
Length
1 to X
Alpha identifier
X byte(s)
X+1
BCD code length; number/SSC content
1 byte
X+2
TON and NPI
1 byte
X+3 to X+12
Dialed number/SSC string
10 bytes
X+13
Capacity/configuration identifier
1 byte
X+14
Extension1 record identifier
1 byte
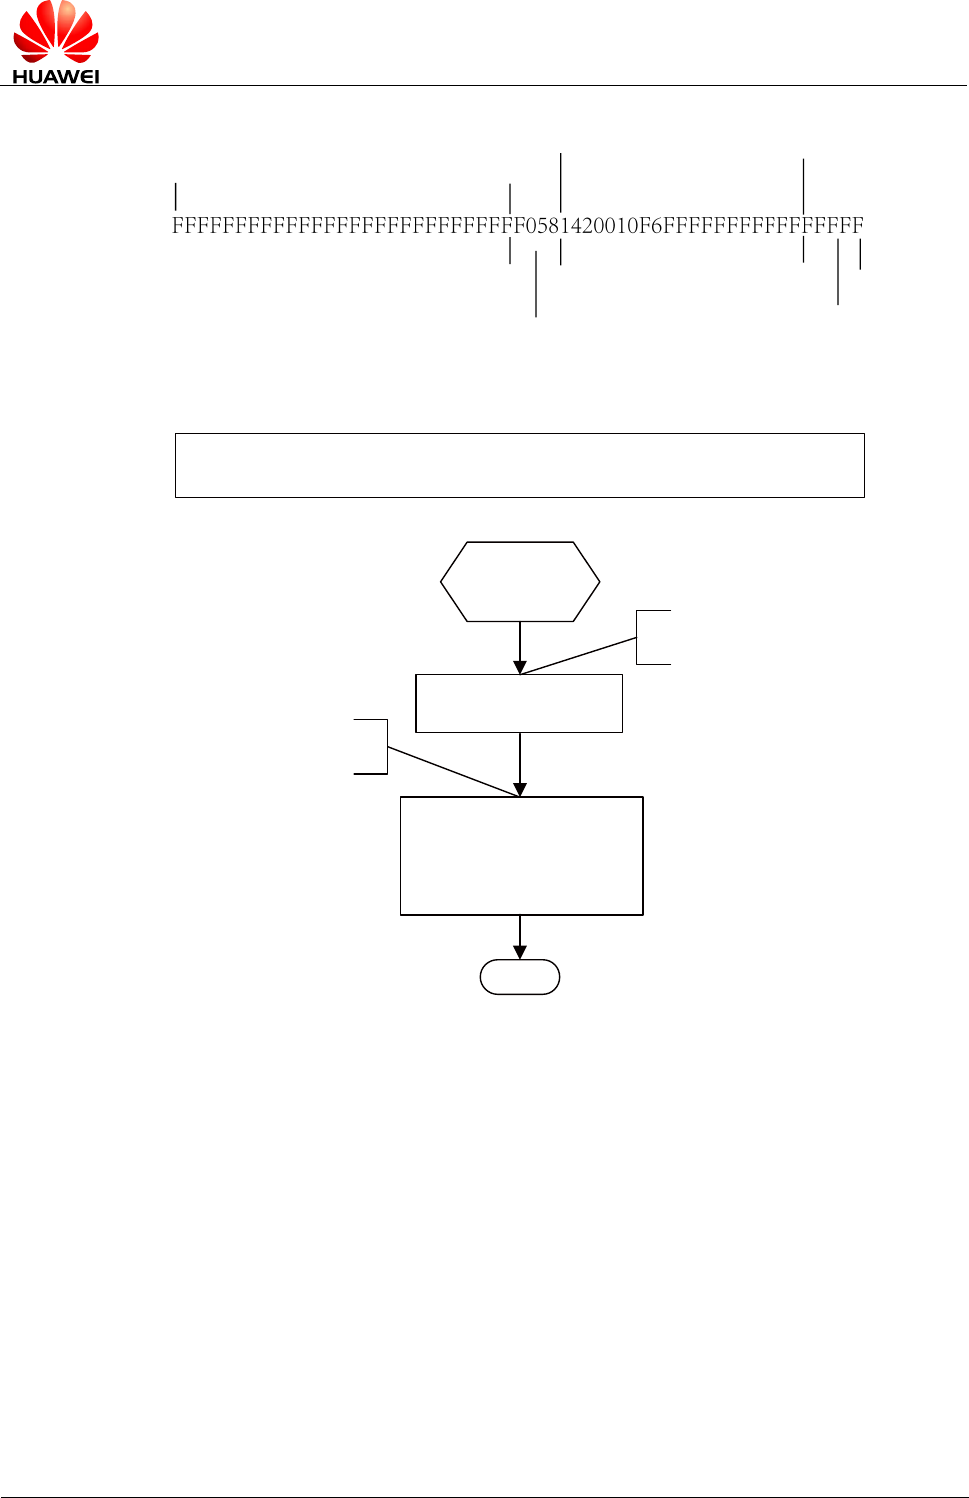
HUAWEI ME906s LTE M.2 Module
Application Guide
SIM Card Application Scenarios
Issue 01 (2015-07-31)
Huawei Proprietary and Confidential
Copyright © Huawei Technologies Co., Ltd.
57
Figure 10-1 Reading record response values
Alpha identifier Dialed number/SSC string
(24100016)
BCD code length,
number
/SSC content TON and NPI
Capacity/
configuration
identifier Extension
record identifier 1
Figure 10-2 Obtaining response
Obtaining response
Start
AT+CRSM=192,28483
+CRSM: 144,0,000000026
F43040011F05501020000
OK
Request EF
response: (SMS status)
Command ended
normally: 144, 0,...
End
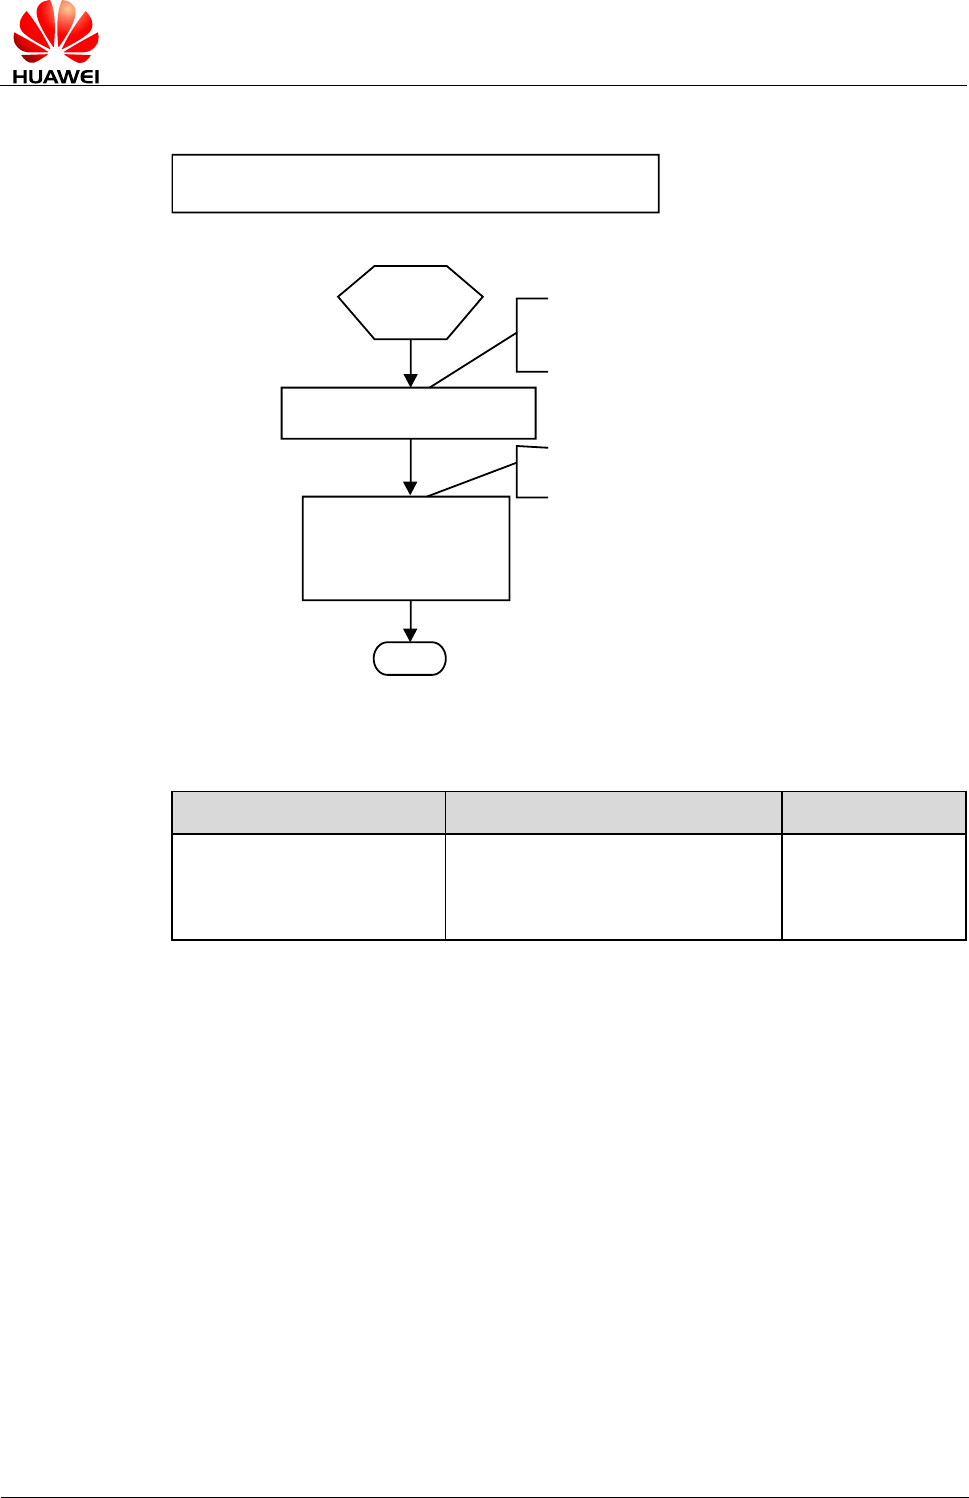
HUAWEI ME906s LTE M.2 Module
Application Guide
SIM Card Application Scenarios
Issue 01 (2015-07-31)
Huawei Proprietary and Confidential
Copyright © Huawei Technologies Co., Ltd.
58
Figure 10-3 Reading binary
Reading binary
Start
AT+CRSM=176,12258,0,0,10
+CRSM: 144,0,980000
000000000000F3
OK
Read binary of "ICC identification"
from the EF.
Return 144,0,....Command
ended normally.
End
10.1.2 Troubleshooting
Scenario
Possible Error Information
Solution
Error information is returned
in response to one of the
previous commands.
+CME ERROR: SIM not inserted
or
+CME ERROR: memory failure
Insert a SIM card.
HUAWEI ME906s LTE M.2 Module
Application Guide
Module Powering Off and Resetting
Application Scenarios
Issue 01 (2015-07-31)
Huawei Proprietary and Confidential
Copyright © Huawei Technologies Co., Ltd.
59
11 Module Powering Off and Resetting
Application Scenarios
11.1 Restarting the ME
11.1.1 Reference Process
Command
Description
AT+CFUN=1,1
Restarts the module.
OK
The ME can be reset or restarted using the AT+CFUN command. After the restart, the module
must register with the network and authenticate its SIM card's PIN.
11.1.2 Troubleshooting
None
11.2 Powering Off the ME
11.2.1 Reference Process
Command
Description
AT^MSO
Powers off the module.
OK
After the command is received, the module will only do the preparative work of power-off
such as deregister. The host should cut off the power in order to finish the power-off
operation.

HUAWEI ME906s LTE M.2 Module
Application Guide
Module Powering Off and Resetting
Application Scenarios
Issue 01 (2015-07-31)
Huawei Proprietary and Confidential
Copyright © Huawei Technologies Co., Ltd.
60
11.2.2 Troubleshooting
None
HUAWEI ME906s LTE M.2 Module
Application Guide
DPTF Application Scenarios
Issue 01 (2015-07-31)
Huawei Proprietary and Confidential
Copyright © Huawei Technologies Co., Ltd.
61
12 DPTF Application Scenarios
12.1 Setting Thermal Sensor with the Threshold
12.1.1 Reference Process
Command
Description
AT+XTSM=0,1,80000,3000,1000
Sets thermal sensor with the threshold. Indicates
that set the RF sensor 0 (only support 0) Alarm
ID 1,threshold is 80000-20000=60000
MilliDegC, Hysteresis is 3000 MilliDegC, and
the Sampling Period is 1000 ms.
OK
The DPTF feature is used for host to monitor module temperature environment by Thermal
Sensor. Host can set several groups threshold to module, and module will unsolicited response
to host when module temperature exceed the threshold that host configures.
12.1.2 Troubleshooting
None
12.2 Querying the Current Temperature of a Thermal
Sensor
12.2.1 Reference Process
Command
Description
AT+XTAMR=0
Queries the temperature of thermal sensor.

HUAWEI ME906s LTE M.2 Module
Application Guide
DPTF Application Scenarios
Issue 01 (2015-07-31)
Huawei Proprietary and Confidential
Copyright © Huawei Technologies Co., Ltd.
62
Command
Description
+XTAMR: 0,40000
OK
Indicates that the current temperature of RF sensor is 40°C.
12.2.2 Troubleshooting
None

HUAWEI ME906s LTE M.2 Module
Application Guide
ACT Application Scenarios
Issue 01 (2015-07-31)
Huawei Proprietary and Confidential
Copyright © Huawei Technologies Co., Ltd.
63
13 ACT Application Scenarios
13.1 Overview
The ACT (Adaptive Clocking Tuning) feature indicates that the host tunes the clock frequency
of components (such as display) which may interfere the WWAN (Wireless Wide Area
Network) radio of the module, according to the current frequency information of the module.
It can reduce the impact on the WWAN, and improve the performance of OTA (Over The
Air).
13.2 Adaptive Clocking
13.2.1 Reference Process
Command
Description
AT+XADPCLKFREQINFO=1
Enables ACT feature.
OK
AT+XADPCLKFREQINFO?
Queries the status of enabling/disabling the ACT
feature.
+XADPCLKFREQINFO: 1
OK
AT+XADPCLKFREQINFO=?
Queries Frequency information.
+XADPCLKFREQINFO:
2147600000,5000000,0
OK
The ACT feature is disabled when powered on. It can be enabled by using
AT+XADPCLKFREQINFO=1.

HUAWEI ME906s LTE M.2 Module
Application Guide
ACT Application Scenarios
Issue 01 (2015-07-31)
Huawei Proprietary and Confidential
Copyright © Huawei Technologies Co., Ltd.
64
After enabling the ACT feature, the AT command AT+XADPCLKFREQINFO=? can be
used to query the frequency information. If the ACT feature is not enabled, this command will
return ERROR.
When the frequency information has been changed, the unsolicited command
+XADPCLKFREQINFO will unsolicited present the frequency information.
13.2.2 Troubleshooting
Scenario
Possible Error
Information
Solution
AT+XADPCLKFREQINFO
=?
ERROR
Query current frequency
information returns error.
Run
AT+XADPCLKFREQINF
O=1 to enable ACT feature.

HUAWEI ME906s LTE M.2 Module
Application Guide
GPS Application Scenarios
Issue 01 (2015-07-31)
Huawei Proprietary and Confidential
Copyright © Huawei Technologies Co., Ltd.
65
14 GPS Application Scenarios
14.1 Introduction to GPS
14.1.1 GPS Positioning Methods
Table 14-1 GPS positioning methods
Positioning
methods
Description
Benefits
Drawbacks
Standalone
This is a traditional
GPS positioning
method. Using this
method, a module
receives satellite
signals directly and
makes calculations
to obtain positioning
results.
No communication
with the network is
invoked, incurring
no data traffic
between the module
and the network.
Long time to first fix
(TTFF) in code
mode.
Mobile Station
Based (MSB)
positioning using the
User Plane Protocol
Requests the
assistant data from
the network to assist
and accelerate the
positioning. This
method is one of the
Assisted GPS
(A-GPS) methods.
- Significantly
reduces the
TTFF after cold
start and
increases the rate
of successful
positioning.
- Enables
positioning in
environments
with very poor
satellite signals.
Requires the
assistant data from
the network,
incurring network
traffic.

HUAWEI ME906s LTE M.2 Module
Application Guide
GPS Application Scenarios
Issue 01 (2015-07-31)
Huawei Proprietary and Confidential
Copyright © Huawei Technologies Co., Ltd.
66
Positioning
methods
Description
Benefits
Drawbacks
Mobile Station
Assisted (MSA)
using the User Plane
Protocol
Requests data from
the network to assist
and accelerate the
positioning. After
receiving satellite
data, the module
sends the satellite
data to the network
for calculations, and
the network returns
the calculation
results to the
module. This
method is one of the
A-GPS methods.
- Reduces the
TTFF after cold
start and
increases the rate
of successful
positioning.
- Hands most
workload to the
network,
reducing the
module's
workload.
- Enables
positioning in
environments
with poor
satellite signals
(network
dependent).
Requires complex
interaction with the
network, incurring
network traffic.
Global navigation
satellite system
(abbreviated as
GNSS)
Uses both the GPS
and GLONASS for
positioning.
Using more
satellites, increases
the successful
positioning rate and
the positioning
accuracy.
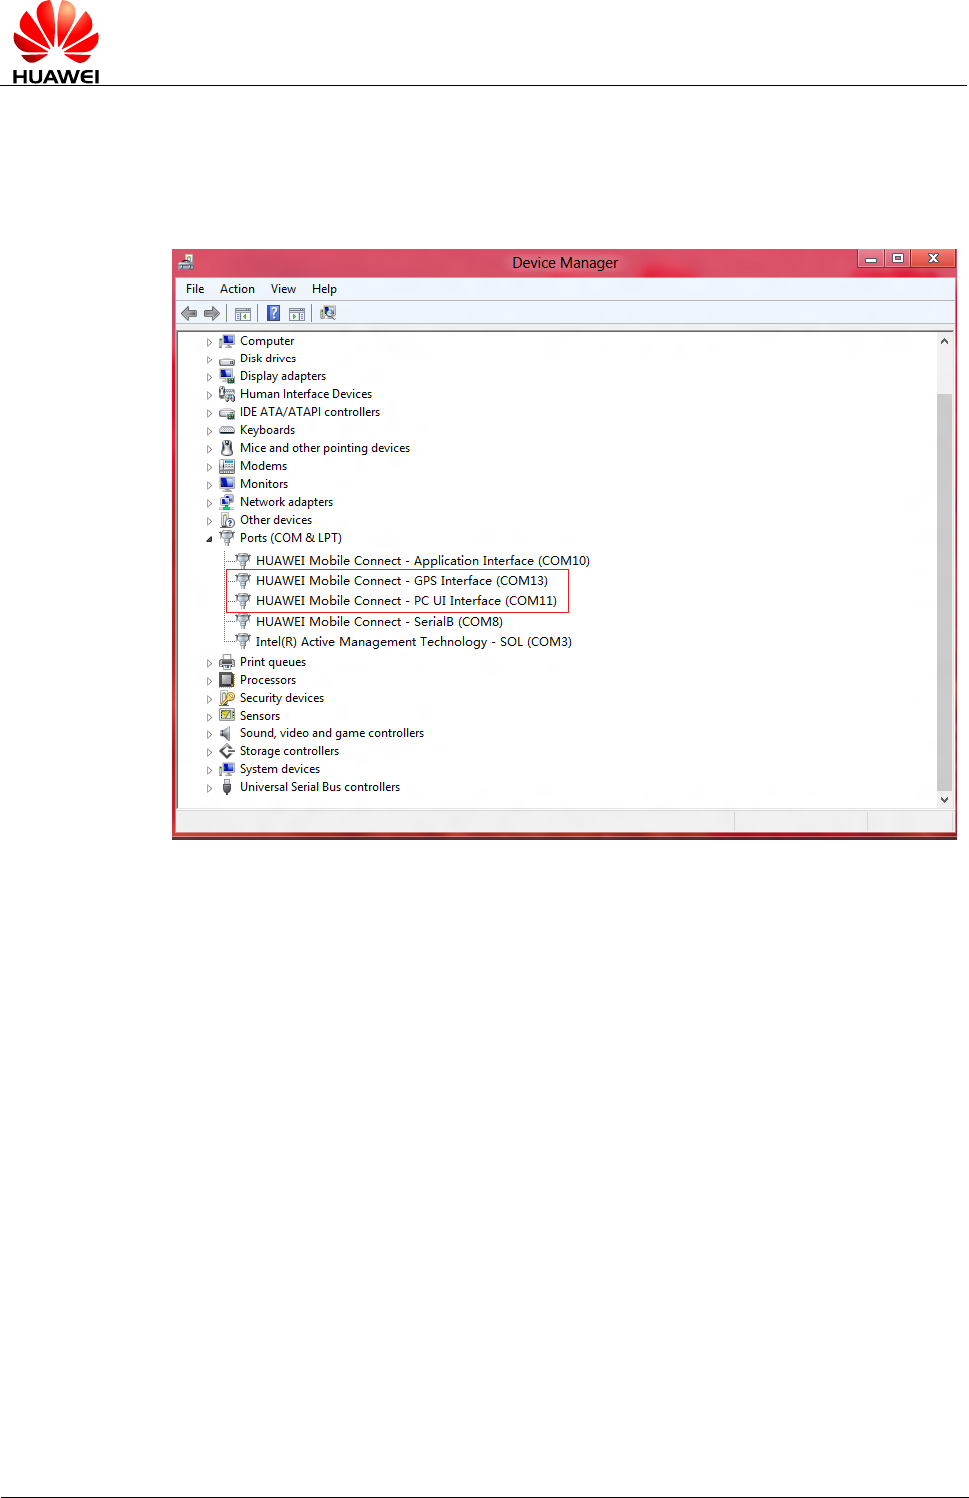
HUAWEI ME906s LTE M.2 Module
Application Guide
GPS Application Scenarios
Issue 01 (2015-07-31)
Huawei Proprietary and Confidential
Copyright © Huawei Technologies Co., Ltd.
67
14.1.2 GPS Ports
Figure 14-1 PC UI Interface and GPS Interface detected after the module is connected to a
computer
The PC UI Interface port could be used to send GPS-related AT commands, and the GPS
Interface port could be used to send unsolicited indications for NMEA positioning data.
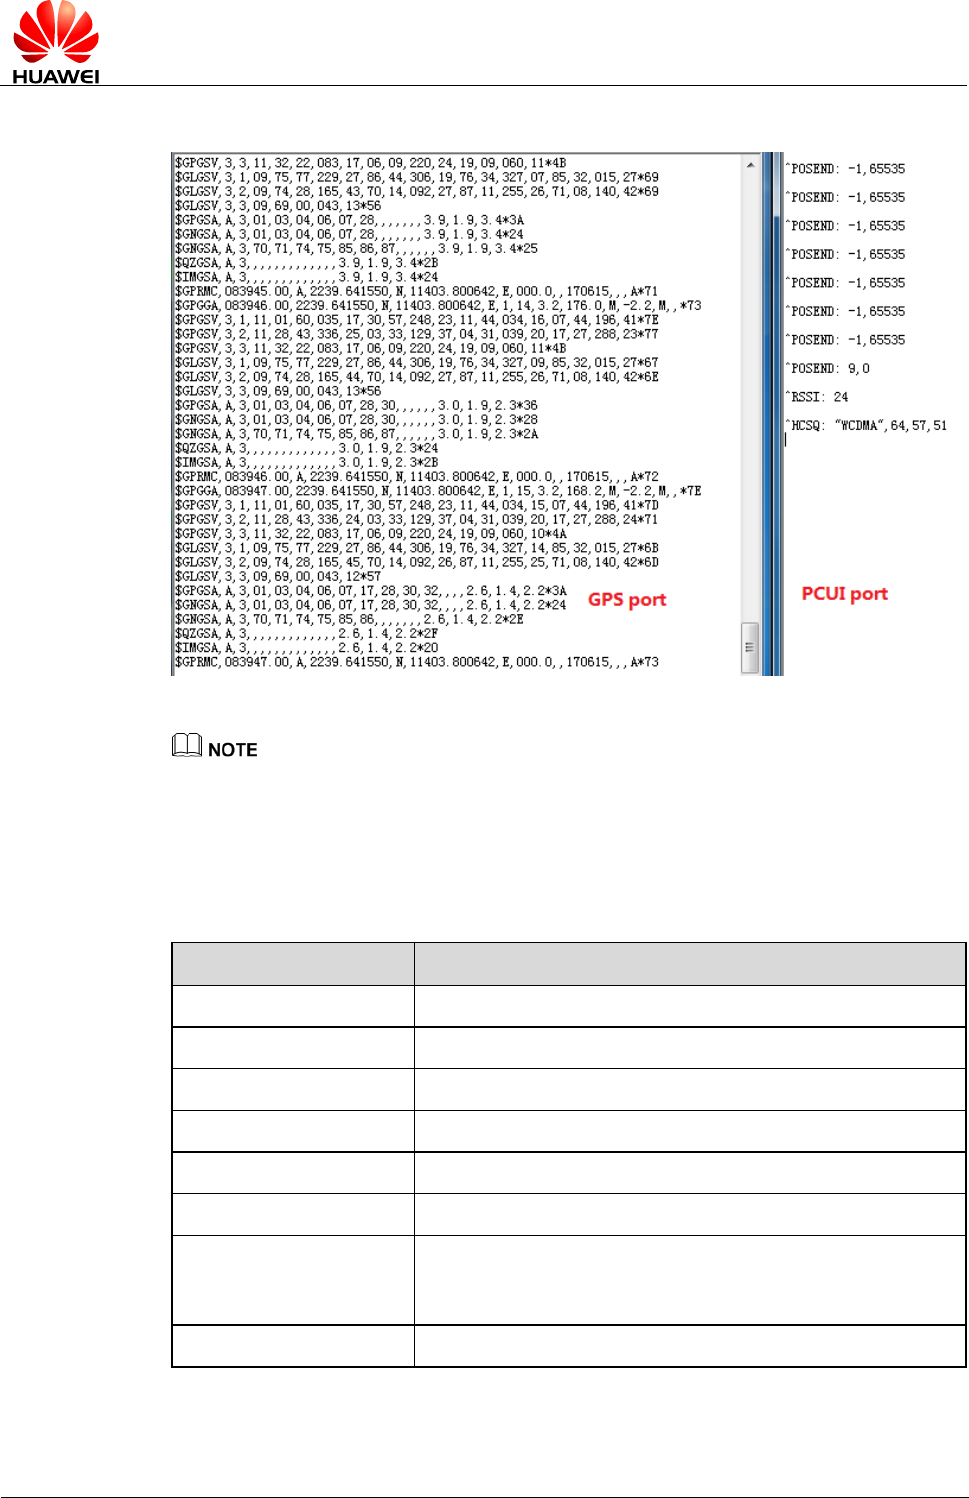
HUAWEI ME906s LTE M.2 Module
Application Guide
GPS Application Scenarios
Issue 01 (2015-07-31)
Huawei Proprietary and Confidential
Copyright © Huawei Technologies Co., Ltd.
68
Figure 14-2 Data sent through the GPS interface and PC UI interface ports
Open GPS Interface, then the positioning starts. So if you want to start the positioning by AT command
in PC UI Interface, you need execute AT^WPDGP command in PC UI Interface before opening GPS
Interface.
14.2 Standalone Positioning
Command
Description
AT^WPDOM=0
Sets the positioning method to Standalone.
OK
AT^WPDST=0
Sets the session type to single positioning.
OK
AT^WPDST=1
Sets the session type to tracking positioning.
OK
AT^WPDFR=0,1
Sets unlimited positioning times and the interval between each
positioning for the tracking and positioning. If the session is a
single positioning, you do not need to set these parameters.
OK
HUAWEI ME906s LTE M.2 Module
Application Guide
GPS Application Scenarios
Issue 01 (2015-07-31)
Huawei Proprietary and Confidential
Copyright © Huawei Technologies Co., Ltd.
69
Command
Description
AT^WPDFR=10,2
Sets the number of positioning times and the interval between
each positioning for the tracking and positioning. If the session
is a single positioning, you do not need to set these
parameters.
OK
AT^WPDGP
Starts positioning.
OK
^POSEND: -1,9
The first value indicates positioning end reason, and the
second indicates the left positioning times.
- The standalone method can be used when the module has no SIM card inserted.
- If there is an ongoing positioning session, the session must be terminated before setting the
positioning parameters so that the parameters can take effect for the positioning to be started. This
rule applies to all positioning methods.
- If the current positioning session is started by executing AT^WPDGP, execute AT^WPEND
command in the same interface can terminate it.
- If the current positioning session is started by opening GPS interface, close GPS interface can
terminate it.
14.3 MSB Positioning Using the User Plane Protocol
Command
Description
AT^WPDOM=5
Sets the positioning method to MSB.
OK
AT^WPDST=1
Sets the session type to tracking and positioning.
OK
AT^WPDFR=0,1
Sets unlimited positioning times and the interval
between each positioning for the tracking and
positioning.
OK
AT^WPURL=SUPL.EXAMPLE.
COM:7276
Sets the A-GPS server address and port number.
This address is just an example, not a real A-GPS
server. Some of the A-GPS server requires
certificate authentication.
OK
AT^WPDGP
Starts positioning.
OK
HUAWEI ME906s LTE M.2 Module
Application Guide
GPS Application Scenarios
Issue 01 (2015-07-31)
Huawei Proprietary and Confidential
Copyright © Huawei Technologies Co., Ltd.
70
Command
Description
^POSEND: -1,65535
The first value indicates positioning end reason, and
the second indicates the left positioning times.
The MSB method requires the module to register with a network, and will incur data traffic during
positioning. When the MSB positioning fails, the module will automatically switch to the standalone
positioning.
14.4 MSA Positioning Using the User Plane Protocol
Command
Description
AT^WPDOM=1
Sets the positioning method to MSA
OK
AT^WPURL=SUPL.EXAMPLE.
COM:7276
Sets the A-GPS server address and port number.
This address is just an example, not a real A-GPS
server. Some of the A-GPS server requires
certificate authentication.
OK
AT^WPDGP
Starts positioning.
OK
^POSEND: -1,0
The first value indicates positioning end reason, and
the second indicates the left positioning times.
The MSA method requires the module to register with a network, and will incur data traffic during
positioning. When the MSA positioning fails, the module will automatically switch to the standalone
positioning.
14.5 GNSS Positioning
The GNSS positioning uses both the GPS and GLONASS satellites for positioning.
Command
Description
AT^WPCAP=3
Sets GNSS as the positioning system to use both the
GPS and GLONASS satellites for positioning.
OK
HUAWEI ME906s LTE M.2 Module
Application Guide
GPS Application Scenarios
Issue 01 (2015-07-31)
Huawei Proprietary and Confidential
Copyright © Huawei Technologies Co., Ltd.
71
Command
Description
AT^WPDOM=a value within
the value range
For the MSA and MSB positioning methods, the data
obtained from the server is two-line orbital elements of
GPS satellites, which will not help the GLONASS
positioning, but the module will still search for
GLONASS satellites.
OK
AT^WPDST=1
Sets the session type to tracking and positioning.
OK
AT^WPDFR=0,1
Sets unlimited positioning times and the interval
between each positioning for the tracking and
positioning.
OK
AT^WPDGP
Starts positioning.
OK
^POSEND: -1,65535
The first value indicates positioning end reason, and the
second indicates the left positioning times.

HUAWEI ME906s LTE M.2 Module
Application Guide
Appendix
Issue 01 (2015-07-31)
Huawei Proprietary and Confidential
Copyright © Huawei Technologies Co., Ltd.
72
15 Appendix
15.1 Relative Documents
- HUAWEI ME906s LTE M.2 Module AT Command Interface Specification
- 3GPP TS 22.004 General on supplementary services
- 3GPP TS 23.040 Technical realization of the Short Message Service (SMS)
- 3GPP TS 24.008 Mobile radio interface Layer 3 specification; Core network protocols;
Stage 3
- 3GPP TS 27.005 Equipment (DTE-DCE) interface for Short Message Service (SMS) and
Cell Broadcast Service (CBS)
- 3GPP TS 27.007 AT command set for User Equipment (UE)
- 3GPP TS 29.002 Mobile Application Part (MAP) specification
- 3GPP TS 31.102 Universal Subscriber Identity Module (USIM) application
- ETSI TS 102.221Smart Cards; UICC-Terminal interface; Physical and logical
characteristics
- GSM 07.05 Equipment (DTE - DCE) interface for Short Message Service (SMS) and
Cell Broadcast Service (CBS)
15.2 Acronyms and Abbreviations
Table 15-1 List of Abbreviations
Abbreviation
Expansion
ACT
Adaptive Clocking Tuning
APN
Access Point Name
CDMA
Code Division Multiple Access
CS
Circuit Switched (CS) Domain
DPTF
Dynamic Power and Temperature Framework
GNSS
Global Navigation Satellite System

HUAWEI ME906s LTE M.2 Module
Application Guide
Appendix
Issue 01 (2015-07-31)
Huawei Proprietary and Confidential
Copyright © Huawei Technologies Co., Ltd.
73
Abbreviation
Expansion
GPRS
General Packet Radio Service
GPS
Global Position System
GSM
Global System for Mobile Communications
IMEI
International Mobile Equipment Identity
IMSI
International Mobile Subscriber Identity
IP
Internet Protocol
LTE
Long Term Evolution
ME
Mobile Equipment
MT
Mobile Terminal
NMEA
National Marine Electronics Association
OTA
Over The Air
PDP
Packet Data Protocol
PDU
Protocol Data Unit
PIN
Personal Identity Number
PLMN
Public Land Mobile Network
PPP
Point-to-Point Protocol
PUK
PIN Unblocking Key
PS
Packet Switched (PS) Domain
QoS
Quality of Service
RF
Radio Frequency
RSSI
Receive Signal Strength Indicator
SCA
Service Center Address
SIM
Subscriber Identity Module
SM
Short Message
SMS
Short Message Service
SMSC
Short Message Service Center
TE
Terminal Equipment
TPDU
Transfer Protocol Data Unit
UIM
User Identity Module
URC
Unsolicited Result Code
USIM
Universal Subscriber Identity Module
HUAWEI ME906s LTE M.2 Module
Application Guide
Appendix
Issue 01 (2015-07-31)
Huawei Proprietary and Confidential
Copyright © Huawei Technologies Co., Ltd.
74
Abbreviation
Expansion
USSD
Unstructured Supplementary Service Data
VP
Validity Period
WCDMA
Wideband CDMA
WWAN
Wireless Wide Area Network
Table 15-2 Phonebook-related abbreviations
Abbreviation
Full Name
SM
SIM phonebook
LD
MT last dialed number
EN
SIM emergency number
FD
SIM fixed dialing number
ON
SIM own numbers
RC
Recent call list on the MT
MC
MT missed call list
