Huawei Ascend Q Users Manual
HUAWEI Ascend Q to the manual 5dbac5a5-c4d7-4740-8138-e482685a2b5c
2015-01-24
: Huawei Huawei-Ascend-Q-Users-Manual-316502 huawei-ascend-q-users-manual-316502 huawei pdf
Open the PDF directly: View PDF ![]() .
.
Page Count: 155 [warning: Documents this large are best viewed by clicking the View PDF Link!]
- HUAWEI M660 UG-(V100R001_01,EN,Cricket,USA)
- 1 Reading Before Proceeding
- 2 Getting Started
- 2.1 Appearance
- 2.2 Setting Up Your Mobile Phone
- 2.3 Power On or Off Your Mobile Phone
- 2.4 Using the Touchscreen
- 2.5 Locking and Unlocking the Screen
- 2.6 Home Screen
- 2.7 Application Screen
- 2.8 Using a microSD Card
- 3 Calling
- 4 Contacts
- 4.1 Opening the Contacts Application
- 4.2 Adding a Contact
- 4.3 Adding a Contact to Your Favorites
- 4.4 Indexing Contacts
- 4.5 Searching for a Contact
- 4.6 Editing a Contact
- 4.7 Communicating with Your Contacts
- 4.8 Deleting a Contact
- 4.9 Streams
- 4.10 Managing Groups
- 4.11 Joining and Separating Contacts
- 4.12 Sending Contacts
- 5 Using the Onscreen Keyboard
- 6 Messaging
- 7 Getting Connected
- 8 Entertainment
- 9 Google Services
- 10 Synchronizing Information
- 11 Using Other Applications
- 12 Managing Your Mobile Phone
- 13 Appendix
- 13.1 FAQ
- How Can I Use a microSD Card to Import Contacts to My Phone from a Different Mobile Phone?
- How do I prevent automatic switching of orientation when rotating phone?
- How do I set the unlock pattern?
- How can I change the input method?
- How do I stop the song playing in the background?
- How do I return to the calling screen?
- How do I create an application shortcut on the Home screen?
- How do I hide the keyboard?
- 13.1 FAQ
- HUAWEI M660 UG-(V100R001_01,ES,Cricket,USA)
- 1 Lectura previa a las operaciones
- 2 Introducción
- 2.1 Aspecto
- 2.2 Configuración del teléfono móvil
- 2.3 Encendido o apagado del teléfono móvil
- 2.4 Uso de la pantalla táctil
- 2.5 Bloqueo y desbloqueo de la pantalla
- 2.6 Pantalla principal
- 2.6.1 Íconos de notificación y de estado
- 2.6.2 Panel de notificaciones
- 2.6.3 Cómo ver otras partes de la pantalla principal
- 2.6.4 Personalización de la pantalla principal
- 2.6.5 Accesos directos de servicio
- 2.6.6 Configuración de las animaciones de la pantalla principal
- 2.6.7 Cambio del papel tapiz
- 2.6.8 Cambio de temas
- 2.7 Pantalla de aplicaciones
- 2.8 Uso de la tarjeta microSD
- 3 Cómo realizar llamadas
- 4 Contactos
- 4.1 Cómo acceder a Contactos
- 4.2 Cómo agregar contactos
- 4.3 Cómo agregar contactos a favoritos
- 4.4 Índice de contactos
- 4.5 Búsqueda de contactos
- 4.6 Edición de contactos
- 4.7 Cómo comunicarse con los contactos
- 4.8 Eliminación de contactos
- 4.9 Redes sociales
- 4.10 Administración de Grupos
- 4.11 Asociación y separación de contactos
- 4.12 Envío de contactos
- 5 Uso del teclado en pantalla
- 6 Mensajería
- 6.1 SMS y MMS
- 6.1.1 Acceso a Mensajería
- 6.1.2 Creación y envío de mensajes de texto
- 6.1.3 Creación y envío de mensajes multimedia
- 6.1.4 Cómo abrir y ver mensajes multimedia
- 6.1.5 Contestación de mensajes
- 6.1.6 Cómo copiar mensajes de texto en el Bloc de notas o Calendario
- 6.1.7 Personalización de las configuraciones de los mensajes
- 6.2 Correo electrónico
- 6.2.1 Cómo agregar cuentas de correo electrónico
- 6.2.2 Visualización de correos electrónicos
- 6.2.3 Cómo guardar adjuntos de correos electrónicos
- 6.2.4 Creación y envío de correos electrónicos
- 6.2.5 Contestación de mensajes de correo electrónico
- 6.2.6 Eliminación de cuentas de correo electrónico
- 6.2.7 Modificación de configuraciones de cuentas de correo electrónico
- 6.1 SMS y MMS
- 7 Cómo establecer una conexión
- 8 Entretenimiento
- 9 Servicios de Google
- 10 Sincronización de información
- 11 Uso de otras aplicaciones
- 12 Administración del teléfono móvil
- 12.1 Configuración de fecha y hora
- 12.2 Configuración de la pantalla
- 12.3 Configuración del timbre
- 12.4 Configuración de servicios telefónicos
- 12.5 Configuración de la función texto a voz
- 12.6 Protección del teléfono móvil
- 12.7 Administración de aplicaciones
- 12.8 Restablecimiento de las configuraciones de fábrica del teléfono móvil
- 12.9 Configuración del Modo aho de energ
- 12.10 Actualización en línea
- 13 Apéndice
- 13.1 Preguntas frecuentes
- ¿Cómo se importan contactos al teléfono desde otro teléfono móvil por medio de una tarjeta microSD?
- ¿Cómo se puede evitar que cambie la orientación de la pantalla en forma automática al rotar el teléfono?
- ¿Cómo se configura el patrón de desbloqueo?
- ¿Cómo se cambia el modo de ingreso de texto?
- ¿Cómo se detiene la reproducción de una canción en segundo plano?
- ¿Cómo se vuelve a la pantalla de la llamada?
- ¿Cómo se crea el acceso directo de una aplicación en la pantalla principal?
- ¿Cómo se oculta el teclado?
- 13.1 Preguntas frecuentes
User Guide
Welcome to HUAWEI
HUAWEI Ascend Q
Contents
i
1 Reading Before Proceeding...................................................1
1.1 Safety Precautions....................................................................... 1
1.2 Personal Information and Data Security ...................................... 2
1.3 Legal Notice................................................................................. 3
2 Getting Started.......................................................................6
2.1 Appearance ................................................................................. 6
2.2 Setting Up Your Mobile Phone .................................................... 7
2.3 Power On or Off Your Mobile Phone ........................................... 9
2.4 Using the Touchscreen.............................................................. 10
2.5 Locking and Unlocking the Screen ............................................ 10
2.6 Home Screen............................................................................. 11
2.7 Application Screen..................................................................... 16
2.8 Using a microSD Card ............................................................... 17
3 Calling..................................................................................18
3.1 Making a Call............................................................................. 18
3.2 Answering or Rejecting a Call.................................................... 19
3.3 Other Operations During a Call ................................................. 20
3.4 Using the Call log....................................................................... 21
3.5 Using Airplane Mode ................................................................. 21
3.6 TTY Operation .......................................................................... 21
4 Contacts...............................................................................22
4.1 Opening the Contacts Application ............................................. 22
4.2 Adding a Contact ....................................................................... 23
4.3 Adding a Contact to Your Favorites........................................... 23
4.4 Indexing Contacts...................................................................... 23
4.5 Searching for a Contact ............................................................. 23
4.6 Editing a Contact ....................................................................... 24
4.7 Communicating with Your Contacts........................................... 24
ii
4.8 Deleting a Contact ..................................................................... 25
4.9 Streams ..................................................................................... 25
4.10 Managing Groups .................................................................... 26
4.11 Joining and Separating Contacts............................................. 27
4.12 Sending Contacts .................................................................... 28
5 Using the Onscreen Keyboard.............................................28
5.1 Displaying the Keyboard............................................................ 28
5.2 Customizing Keyboard Settings................................................. 30
6 Messaging ...........................................................................31
6.1 SMS and MMS........................................................................... 31
6.2 Email.......................................................................................... 33
7 Getting Connected...............................................................36
7.1 Mobile Networks ........................................................................ 36
7.2 Wi-Fi .......................................................................................... 36
7.3 WPS........................................................................................... 38
7.4 Browser...................................................................................... 39
7.5 Bluetooth.................................................................................... 40
8 Entertainment ......................................................................42
8.1 Taking Photos and Recording Videos ....................................... 42
8.2 Using the Gallery ....................................................................... 44
8.3 DTS Envelo™ ............................................................................ 45
9 Google Services ..................................................................46
9.1 Creating a Google Account........................................................ 46
9.2 Gmail ......................................................................................... 47
9.3 Talk............................................................................................ 48
9.4 Maps.......................................................................................... 49
9.5 YouTube .................................................................................... 50
9.6 Play Store .................................................................................. 51
10 Synchronizing Information .................................................51
iii
10.1 Managing Your Accounts......................................................... 52
10.2 Customizing Your Account Synchronization............................ 53
11 Using Other Applications ...................................................54
11.1 Traffic Manager........................................................................ 54
11.2 All Backup................................................................................ 55
11.3 Calendar .................................................................................. 55
11.4 File Manager............................................................................ 57
11.5 Clock........................................................................................ 59
11.6 Calculator................................................................................. 60
11.7 Notepad ................................................................................... 61
12 Managing Your Mobile Phone ...........................................61
12.1 Setting the Date and Time....................................................... 61
12.2 Setting the Display................................................................... 62
12.3 Setting Ringers ........................................................................ 62
12.4 Setting Phone Services ........................................................... 63
12.5 Configuring Text-to-Speech..................................................... 64
12.6 Protecting Your Mobile Phone ................................................. 64
12.7 Managing Applications............................................................. 65
12.8 Resetting Your Mobile Phone.................................................. 66
12.9 Setting Power saving mode ..................................................... 67
12.10 Online Update........................................................................ 67
13 Appendix............................................................................68
13.1 FAQ ......................................................................................... 68

1
1 Reading Before Proceeding
1.1 Safety Precautions
Please read the safety precautions carefully to ensure the correct use of your mobile
phone.
Do not crash, throw, or puncture your mobile phone. Avoid the
falling, squeezing, and bending of your mobile phone.
Do not use your mobile phone in a moist environment, such as the
bathroom. Prevent your mobile phone from being soaked or washed
in liquid.
Do not switch on your mobile phone when it is prohibited to use
phones or when the phone may cause interference or danger.
Do not use your mobile phone while driving.
Follow any rules or regulations in hospitals and health care facilities.
Switch off your mobile phone near medical apparatus.
Switch off your mobile phone in aircraft. The phone may cause
interference to control equipment of the aircraft.
Switch off your mobile phone near high-precision electronic devices.
The phone may affect the performance of these devices.
Do not attempt to disassemble your mobile phone or its accessories.
Only qualified personnel are allowed to service or repair the phone.

2
1.2 Personal Information and Data
Security
The use of some functions or third-party applications on your device could result in
your personal information and data being lost or becoming accessible to others.
Several measures are recommended to help you protect personal and confidential
information.
• Place your device in a safe area to prevent it from unauthorized use.
• Set your device screen to lock and create a password or unlock pattern to open it.
Do not place your mobile phone or its accessories in containers with
a strong electromagnetic field.
Do not place magnetic storage media near your mobile phone.
Radiation from the phone may erase the information stored on them.
Do not put your mobile phone in a high-temperature place or use it in
a place with flammable gas such as a gas station.
Keep your mobile phone and its accessories away from children. Do
not allow children to use your mobile phone without guidance.
Use only approved batteries and chargers to avoid the risk of
explosions.
Observe any laws or regulations on the use of wireless devices.
Respect others’ privacy and legal rights when using your wireless
device.
Strictly follow the relevant instructions of this manual while using the
USB cable. Otherwise your mobile phone or PC may be damaged.
3
• Periodically back up personal information kept on your memory card, or stored in
your device memory. If you change to a different device, be sure to move or delete
any personal information on your old device.
• If you are worried about viruses when you receive messages or emails from a
stranger, you can delete them without opening them.
• If you use your device to browse the Internet, avoid websites that might pose a
security risk to avoid theft of your personal information.
• If you use services such as Wi-Fi tether or Bluetooth, set passwords for these
services to prevent unauthorized access. When these services are not in use, turn
them off.
• Install or upgrade device security software and regularly scan for viruses.
• Be sure to obtain third-party applications from a legitimate source. Downloaded
third-party applications should be scanned for viruses.
• Install security software or patches released by Huawei or third-party application
providers.
• Some applications require and transmit location information. As a result, a third-
party may be able to share your location information.
• Your device may provide detection and diagnostic information to third-party
application providers. Third party vendors use this information to improve their
products and services.
• If you have concerns about the security of your personal information and data,
please contact mobile@huawei.com .
1.3 Legal Notice
Copyright © Huawei Technologies Co., Ltd. 2012. All rights reserved.
No part of this document may be reproduced or transmitted in any form or by any
means without prior written consent of Huawei Technologies Co., Ltd.
The product described in this manual may include copyrighted software of Huawei
Technologies Co., Ltd. and possible licensors. Customers shall not in any manner
reproduce, distribute, modify, decompile, disassemble, decrypt, extract, reverse
engineer, lease, assign, or sublicense the said software, unless such restrictions are
prohibited by applicable laws or such actions are approved by respective copyright
holders.

4
Trademarks and Permissions
, , and are trademarks or registered trademarks of Huawei
Technologies Co., Ltd.
Android is a trademark of Google Inc.
Other trademarks, product, service and company names mentioned are the property
of their respective owners.
Notice
Some features of the product and its accessories described herein rely on the
software installed, capacities and settings of local network, and therefore may not be
activated or may be limited by local network operators or network service providers.
Thus the descriptions herein may not match exactly the product or its accessories you
purchase.
Huawei Technologies Co., Ltd. reserves the right to change or modify any information
or specifications contained in this manual without prior notice and without any liability.
Third-Party Software Statement
Huawei Technologies Co., Ltd. does not own the intellectual property of the third-party
software and applications that are delivered with this product. Therefore, Huawei
Technologies Co., Ltd. will not provide any warranty of any kind for these third-party
software and applications. Neither will Huawei Technologies Co., Ltd. provide support
to customers who use these third-party software and applications, nor be responsible
or liable for the functions of these third-party software and applications.
Third-party software and applications services may be interrupted or terminated at
any time. Huawei Technologies Co., Ltd. does not guarantee that any content or
service would be maintained for any period during its availability. Third-party service
providers provide content and services through network or transmission tools outside
of the control of Huawei Technologies Co., Ltd. To the greatest extent permitted by
applicable law, it is explicitly stated that Huawei Technologies Co., Ltd. shall not
compensate or be liable for services provided by third-party service providers, or the
interruption or termination of third-party contents or services.
Huawei Technologies Co., Ltd. shall not be responsible for the legality , quality, or any
other aspects of any software installed on this product, or for any uploaded or
downloaded third-party works, such as texts, images, videos, or software. Customers
shall bear the risk for any and all effects, including incompatibility between the
software and this product, which result from installing software or uploading or
downloading the third-party works.
5
This product uses the open-source Android™ platform. Huawei Technologies Co.,
Ltd. has made necessary changes to the platform. Therefore, this product may not
support all the functions that are supported by the standard Android platform or may
be incompatible with third-party software. Huawei Technologies Co., Ltd. shall not be
liable for any of such situation.
DISCLAIMER OF WARRANTIES
THE CONTENTS OF THIS MANUAL ARE PROVIDED “AS IS”. EXCEPT AS
REQUIRED BY APPLICABLE LAWS, NO WARRANTIES OF ANY KIND, EITHER
EXPRESS OR IMPLIED, INCLUDING BUT NOT LIMITED TO, THE IMPLIED
WARRANTIES OF MERCHANTABILITY AND FITNESS FOR A PARTICULAR
PURPOSE, ARE MADE IN RELATION TO THE ACCURACY, RELIABILITY OR
CONTENTS OF THIS MANUAL.
LIMITATIONS OF LIABILITY
TO THE MAXIMUM EXTENT PERMITTED BY APPLICABLE LAW, IN NO EVENT
SHALL HUAWEI TECHNOLOGIES CO., LTD. BE LIABLE FOR ANY SPECIAL,
INCIDENTAL, INDIRECT, OR CONSEQUENTIAL DAMAGES, OR LOST
PROFITS, BUSINESS, REVENUE, DATA, GOODWILL OR ANTICIPATED
SAVINGS.
THE MAXIMUM LIABILITY (THIS LIMITATION SHALL NOT APPLY TO LIABILITY
FOR PERSONAL INJURY TO THE EXTENT APPLICABLE LAW PROHIBITS
SUCH A LIMITATION) OF HUAWEI TECHNOLOGIES CO., LTD. ARISING FROM
THE USE OF THE PRODUCT DESCRIBED IN THIS DOCUMENT SHALL BE
LIMITED TO THE AMOUNT PAID BY CUSTOMERS FOR THE PURCHASE OF
THIS PRODUCT.
Import and Export Regulations
Customers shall comply with all applicable export or import laws and regulations and
be responsible to obtain all necessary governmental permits and licenses in order to
export, re-export or import the product mentioned in this manual including the
software and technical data therein.
6
2 Getting Started
All the pictures in this guide are for your reference only. Your phone’s actual
display features may be different to those described here, depending on its
software version.
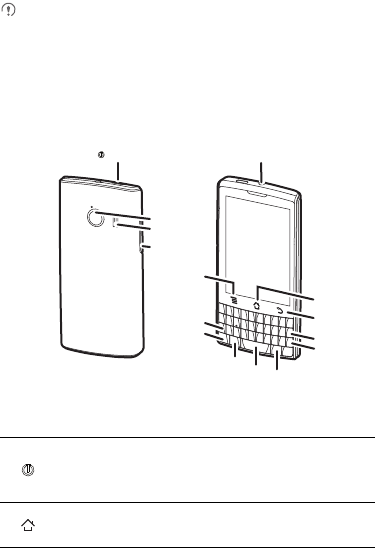
2.1 Appearance
2.1.1 Phone at a Glance
2.1.2 Key Functions at Your Fingertips
• Press and hold to power on your mobile phone.
• Press and hold to open the
Phone options
menu.
• Press to lock the screen when your mobile phone is active.
• Touch to return to the Home screen.
• Touch and hold to open
Recent
.
Power key
Back camera
Speaker
Volume keys
Headset jack
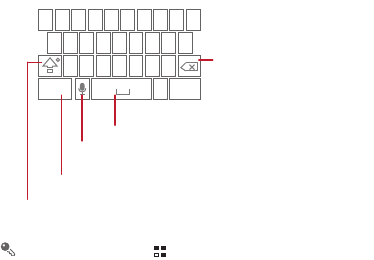
Home
Menu
Back
Delete
Enter
Alt
Cap
SmileySpace Symbol
7
2.2 Setting Up Your Mobile Phone
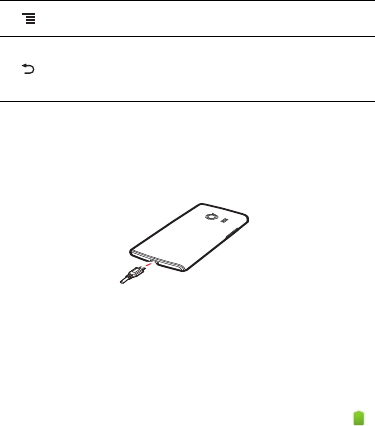
2.2.1 Charging the Battery
Before charging the battery, ensure that it has been properly installed on your phone.
1. Connect the USB cable that came with your mobile phone to the charger.
2. Connect the other end of the USB cable to your mobile phone. Then, to start
charging, plug the charger into an electrical outlet.
If you charge your mobile phone while it is powered on, the battery icon on the
notification bar indicates the charging status. When the battery icon changes to ,
your mobile phone is fully charged.
Touch to open the menu on an active screen.
• Touch to return to the previous screen.
• Touch to exit any application you are running.
• Touch to hide the keyboard.
8
Status Indicator
The color of the status indicator tells you the status of your mobile phone’s battery.
2.2.2 Important Information About the Battery
• If the battery has not been used for a long time, you may not be able to power on
your mobile phone immediately after you begin charging the battery. Allow the
battery to charge for a few minutes with the phone powered off before attempting
to power the phone on.
• As it ages, the battery’s performance will degrade, in particular it will not hold charge
as it did when it was new. When the battery life becomes noticeably shorter than
usual after being charged properly, replace the battery with a new one of the same
type.
• Using data services increases the power consumption of the phone and will
therefore reduce the length of time that the phone can be used between battery
charges.
• The time required to fully charge the battery depends on the ambient temperature
and the age of the battery.
• When the battery power is low, the phone will alert you and display a message.
When the battery power is almost exhausted, your phone will power off
automatically.
Status Indicator
Green: Fully charged (when connected to charger).
Orange: Charging in progress (when connected to charger).
Red: Battery low.

9
2.2.3 Power Saving Tips
The longevity of battery power depends on the network to which you connect, and
how you use your mobile phone.
Try the following to conserve battery power:
• When your mobile phone is not in use, turn off the screen backlight.
• Reduce the time it takes for your screen backlight to turn off when your phone is
idle.
• Lower the screen brightness.
• Turn off Bluetooth when you are not using it. Only make your phone visible to other
Bluetooth devices when you need to establish a Bluetooth connection.
• Turn off Wi-Fi when you are not using it.
• Turn off your phone’s GPS receiver when you are not using it.
• Lower the volume.
• Close power-draining programs, when you do not need them.
• Turn off the data service.
2.3 Power On or Off Your Mobile Phone
2.3.1 Powering On Your Mobile Phone
Press . The first time you power on your phone, you will be asked to sign in to
your account and set up your mobile phone.
2.3.2 Setting Up Your Mobile Phone
The first time you power on your mobile phone, the phone displays a setup wizard to
help you set up the phone.
The setup wizard helps you:
• Create or sign in to your account
• Make some initial decisions about how you want to use your mobile phone
2.3.3 Turning On Fast boot
1. Touch >
Settings
>
Applications
.
2. Select the
Fast boot
check box.

10
Do not turn on
Fast boot
while on an airplane.
2.3.4 Powering Off Your Mobile Phone
1. Press and hold to open the
Phone options
menu.
2. Touch
Power off
.
If
Fast boot
is enabled, the phone will enter the deep sleep mode. If
Fast boot
is disabled, touch
OK
to shut down the phone.
2.4 Using the Touchscreen
2.4.1 Touchscreen Actions
•
Touch
: Tap the screen with your finger to select an item, confirm a selection, or
start an application.
•
Touch and hold
: Touch an item with your finger and do not release it until the
mobile phone responds. For example, to open the options menu for the active
screen, touch and hold the screen until the menu appears.
•
Flick
: Move your finger either vertically or horizontally across the screen.
•
Drag
: Touch and hold the desired item with your finger. To move an item, drag the
item to any part of the screen. You can drag an icon to move or delete it.
2.4.2 Rotating Your Mobile Phone Screen
The orientation of most screens will change to landscape or portrait view when you
rotate your phone sideways.
On the Home screen, touch >
Settings
>
Display
>
Auto-rotate screen
to disable this function.
2.5 Locking and Unlocking the Screen
2.5.1 Locking the Screen
• When your phone is on, press to lock the screen. When the screen is locked,
you can still receive messages and calls.
11
• If your phone is idle for a while, the screen will lock automatically.
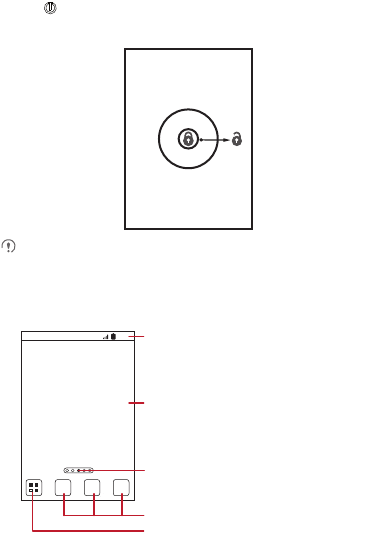
2.5.2 Unlocking the Screen
1. Press to wake up the screen.
2. Drag the lock icon from left to right to unlock the screen.
If you have set up a screen unlock pattern, you will be prompted to draw the
pattern on the screen to unlock it.
2.6 Home Screen
10:23
Touch to view all your applications.
Shortcuts
Notifications bar:
Displays the reminders and status icons of
your phone. Flick down to open the
notifications panel.
Display area:
Shows the operation and display areas of
your phone.
Indicates the current screen.
12
Touch and hold a shortcut until the mobile phone vibrates, you can then drag it
to your desired location or move it to the trash. You can also drag an icon from
another area of the screen to the shortcut position.
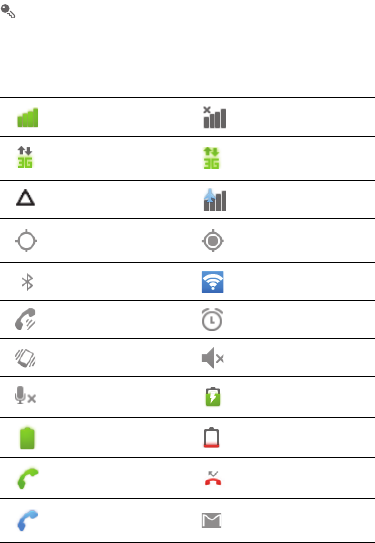
2.6.1 Notification and Status Icons
Signal strength No signal
Connected to 3G mobile
network 3G in use
Roaming Airplane mode
GPS on Receiving location data
from GPS
Bluetooth on Portable Wi-Fi hotspot on
Speakerphone on Alarm enabled
Vibration mode Ringer silenced
Call muted Charging battery
Battery full Battery exetremely low
Call in progress Missed call
Call in progress with a
Bluetooth headset used New mail from Gmail
13
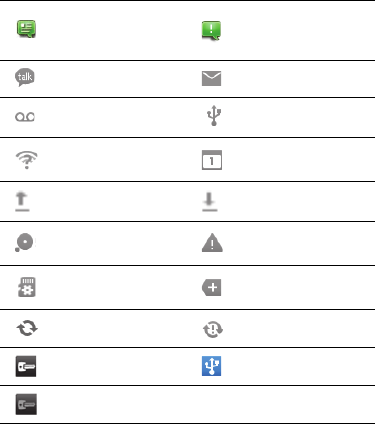
2.6.2 Notification Panel
Your mobile phone will notify you when you receive a new message or there is an
upcoming event. The notification panel also informs you of alarms and settings, for
example, you will be notified when
Call forwarding
is activated. Open the notification
panel to see your network operator or to view a message, reminder, or event
notification.
New text or multimedia
message
Problem with text or
multimedia message
delivery
New chat message New email
New voicemail Connected to a PC
Open Wi-Fi network
available Upcoming event
Uploading Downloading
Memory full Sign-in or synchronization
problem
Preparing the mircoSD
card
More undisplayed
notifications
Synchronizing data Synchronization failed
Connected to a VPN USB tethering on
Disconnected from a VPN
14
Opening the Notification Panel
1. When a new notification icon appears on the notification bar, place your finger on
the notification bar and flick down to open the notification panel.
You can also open the notification panel from the Home screen: Touch >
Notifications
to open the panel.
2. On the panel, you can:
• Touch a notification to open the related application.
• Touch
Clear
to clear all notifications.
Closing the Notification Panel
Touch and hold the bottom of the panel. Then flick up to close it.
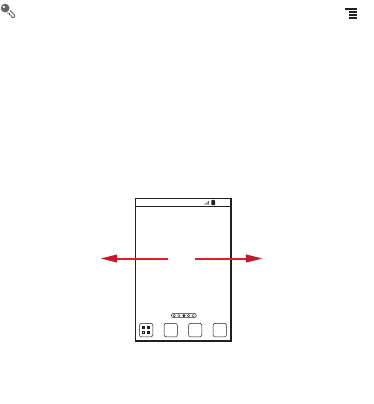
2.6.3 Viewing Other Parts of the Home Screen
10:23
Flick your finger left or
right across the Home
screen.
15
2.6.4 Customizing the Home Screen
Adding a New Home Screen Item
1. Touch and hold a blank area on the Home screen until the
Add to home screen
menu is displayed.
You can also touch >
Add
on the Home screen to display the
Add to
home screen
menu.
2. Select an item to add it to the Home screen.
Moving a Home Screen Item
1. Touch and hold an item on the Home screen until the item expands in size and the
mobile phone vibrates.
2. Without lifting your finger, drag the item to the desired position on the screen, and
then release it.
Removing a Home Screen Item
1. Touch and hold an item on the Home screen until the item expands and the mobile
phone vibrates.
2. Without lifting your finger, drag the item to the trash can. When the item and the
trash can turn red, the item is ready to be removed.
3. Release the item to remove it from the Home screen.
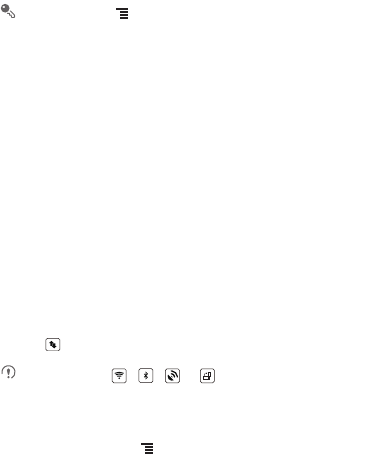
2.6.5 Service Shortcuts
1. Open the notification bar.
2. Touch at the top of the screen to switch data services on or off.
You can also touch , , or turn the corresponding services on
or off.
2.6.6 Setting a Home Screen Animation
1. On the Home screen, touch >
Home settings
>
Animation
.
2. Select an animation, and then touch
Save
.

16
2.6.7 Changing the Wallpaper
1. On the Home screen, touch >
Wallpaper
.
2. Touch the following menu items to select a picture and set it as the wallpaper:
•
Gallery
•
Live wallpapers
•
Wallpapers
2.6.8 Changing the Theme
1. On the Home screen, touch >
Home settings
.
2. Do any of the following:
• Touch
Theme
to select a theme.
• Touch
Application icons
to select a series of application icons.
3. Touch
Save
.
2.7 Application Screen
The Application screen holds icons for all of the applications on your phone. You can
touch on the Home screen to open the application screen.
2.7.1 Moving Icons on the Application Screen
1. On the application screen, touch .
2. Touch and hold the icon you want to move on the application screen.
3. Without lifting your finger, drag the icon to the desired location, and then release it.
To move more icons, repeat steps 2 and 3.
4. Touch or to save.
17
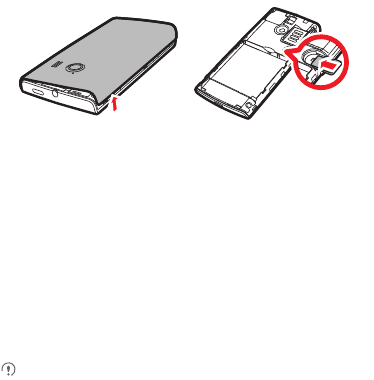
2.8 Using a microSD Card
2.8.1 (Optional) Installing the microSD Card
Your mobile phone is already equipped with a large-volume built-in embedded
MultiMediaCard (eMMC). If you want to expand your phone memory, you can also
insert a microSD card
1. Remove the battery cover.
2. Insert the microSD card into the card slot as shown in the diagram.
2.8.2 Using the microSD Card as a USB Mass Storage
To transfer all your favorite music and pictures from your PC to your mobile phone’s
microSD card, set the microSD card as a USB mass storage.
1. Connect your mobile phone to your PC with the USB cable provided. Your PC will
detect the microSD card as a removable storage device.
2. Open the notification bar, and then touch
USB connected
.
3. Touch
Turn on USB storage
in the dialog box that opens to confirm that you want
to transfer files.
You can now transfer files from your PC to your mobile phone’s microSD card.
When your microSD card acts as a USB mass storage, your mobile phone will
not use this memory space. Ensure that you follow the correct procedures to
disconnect the USB mass storage device (your mobile phone) from the PC
when you have finished transferring files.
18
2.8.3 Removing the microSD Card
1. On the Home screen, touch >
Settings
.
2. Scroll down the screen, and then touch
Storage
>
Unmount SD card
.
3. Carefully remove the microSD card.
3 Calling
To make a phone call, you can dial a number using the keypad or touch a number
saved in your contact list, on a webpage, or in a document. When you are in a call,
you can answer other incoming calls or redirect them to your voicemail. You can also
set up conference calls with several participants.
3.1 Making a Call
To make a call, you can use the
Dialer
application, or select a number from
Contacts
or
Call log
.
When you are in a call, you can touch to use other functions. To return to the call
screen, flick the notification bar down and touch
Current call
.
Be careful not to block the microphone at the bottom of your phone if you want
your voice heard by the other parties in a call.
3.1.1 Making a Call with the Dialer Application
1. On the Home screen, touch >
Dialer
to display the dialer.
If you are already working with
Contacts
or
Call log
, touch the
Dialer
tab.
2. Touch the appropriate number keys to enter the phone number.
Your mobile phone supports the SmartDial function, that is, when you touch
numbers on the dialer, the phone automatically searches among your contacts
and lists the matching results ordered according to the accuracy of the match. If
no contacts match the information entered, the phone will not display any result.
3. Touch to initiate the call.
During a call, touch
Dialpad
to enter other numbers on the dialpad.
19
3.1.2 Making a Call from Contacts
1. On the Home screen, touch >
Contacts
to display the contact list.
If you are already working with
Dialer
or
Call log
, touch the
Contacts
tab.
2. In the list, touch the contact you want to call.
3. Touch to dial the phone number.
3.1.3 Making a Call from Call log
1. If you are already working with
Contacts
or
Dialer
, touch the
Call log
tab.
2. Touch to the right of the log entry to dial.
If you touch and hold a log entry, the options menu will open.
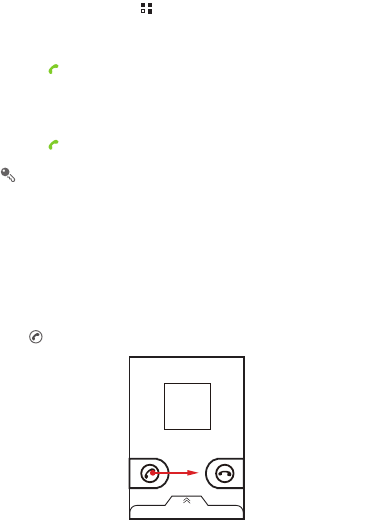
3.2 Answering or Rejecting a Call
3.2.1 Answering an Incoming Call
When you receive a phone call, the incoming call screen opens. If you have
previously saved the caller’s number in
Contacts
, the caller's name and number are
displayed. If the caller’s number is not saved in
Contacts
the caller’s number is
displayed.
Drag to the right to answer the call.
3.2.2 Ending a Call
During a call, touch
End
to hang up.
20
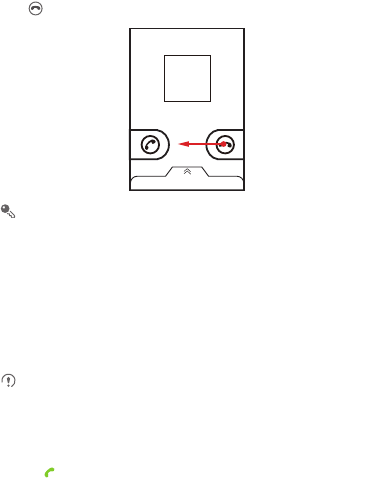
3.2.3 Rejecting an Incoming Call
Drag to the left to reject the call.
You can also drag up the bar at the bottom of the screen to reject a call and send
the caller a message.
3.3 Other Operations During a Call
3.3.1 Making a Conference Call
If you receive a new call while you are already on a call, you can connect the second
call to the call you are on. This feature is known as conference calling. You can also
set up a conference call with multiple callers.
Contact your network operator to learn if conference calls are supported and, if
yes, how many can participate.
1. To initiate a conference call, dial the number of the first participant. After you have
connected to the first participant, keep the connection open, touch
Add call
.
2. Enter the phone number of the next person you want to join the conversation and
touch , or select someone from your
Call log
or
Contacts
. The first participant
is automatically placed on hold while you do this.
3. Once you have connected to the second person, touch
Merge calls
to begin the
conference call.
4. To end the conference call and disconnect everyone, touch
End
.

21
3.3.2 Switching Between Calls
If you receive a new call while you are already in a call, you can switch between the
two calls.
1. While you are in the first call and the second call comes in, answer the incoming
call, and then touch
Manage calls
.
2. The current call is placed on hold and you are connected to the first call.
3.4 Using the Call log
The
Call log
contains a list of calls that you have dialed, received, and missed. You
can use the call log to find a recently called number quickly or add a number from the
call log to your contact list.
3.4.1 Adding an Entry to Contacts
1. If you are already working with
Dialer
or
Contacts
, touch the
Call log
tab.
2. Touch and hold the entry you want to add to your
Contacts
.
3. Touch
Add to contact
in the options menu.
4. Touch
Create contact
or scroll through the contact list and touch an existing
contact name.
3.5 Using Airplane Mode
Some locations may require you to turn off your phone’s wireless connections. Rather
than powering off your phone, you can place it in
Airplane mode
.
1. Press and hold .
2. Touch
Airplane mode
in the options menu.
3.6 TTY Operation
3.6.1 Using the TTY Device
The Teletypewriter (TTY) is a typewriting device. By connecting the phone to the TTY
device, you can use the TTY functions to send/receive messages. When you use the
TTY function, do as follows:

22
1. Connect the TTY device to the headset jack of the phone and set the phone to the
TTY mode.
2. Make or answer calls as normal.
3. When the call is put through, use the TTY device to send or receive the letters.
4. Press the
End
to end the call.
3.6.2 Setting the TTY Mode
1. Touch >
Settings
>
Call settings
>
TTY mode
.
2. Select one TTY mode.
•
TTY Off
: The standard voice speaking mode and the listening mode.
•
TTY Full
: Transmit and receive the TTY characters.
•
TTY HCO
: Transmit TTY characters but receive by listening to the earpiece.
•
TTY VCO
: Receive TTY characters but transmit by speaking into the
microphone.
4 Contacts
The
Contacts
application enables you to save and manage information such as
phone numbers and addresses of your contacts. After you save contact information
on your mobile phone, you have easy access to the people with whom you want to
communicate.
4.1 Opening the Contacts Application
If you have not yet added any contacts to your mobile phone,
Contacts
displays a
message with hints on how to start adding contacts information. On the Home screen,
touch
Contacts
to open the
Contacts
application.
On the Home screen, touch >
Contacts
to open the
Contacts
application.
All of your contacts are displayed alphabetically in a list that you can scroll through.

23
4.2 Adding a Contact
1. In the contact list, touch >
Create contact
.
2. If you have more than one account with contacts, touch the account to which you
want to add the contact.
3. Enter the contact's name, and then add detailed information such as phone
number and address.
4. When you are finished, touch
Save
to save the contact information.
4.3 Adding a Contact to Your Favorites
• Touch and hold the contact you want to add to
Favorites
. Then touch
Add to
Favorites
.
• Touch a contact, and then touch the star to the right of the contact’s name. The star
turns gold.
4.4 Indexing Contacts
You can index your
Contacts
to quickly find your desired contact.
1. On the Home screen, touch >
Contacts
.
2. Touch or move any letter in the alphabet to list all contacts starting with the letter.
4.5 Searching for a Contact
1. In the contact list, touch >
Search
.
2. Enter the name of the contact you wish to search for. As you type, contacts with
matching names appear below the search box.
On the contact list screen, you can touch a letter on the right to display contacts
starting with the touched letter.

24
4.6 Editing a Contact
You can make changes to the information you have stored for a contact at any time.
1. In the contacts list, touch and hold the contact whose details you want to edit, and
then touch
Edit contact
in the options menu.
2. Touch the category of contact information you wish to change: name, phone
number, email address, or any other information you recorded earlier.
3. Make the desired changes to the contact information, and then touch
Save
. To
cancel all of your changes, touch
Cancel
.
4.7 Communicating with Your Contacts
From the
Contacts
or
Favorites
tab, you can quickly call or send a text (SMS) or
multimedia (MMS) message to a contact’s default phone number. You can also open
details to view a list of all the ways you can communicate with that contact. This
section describes how to communicate with a contact when you view your contacts
list.
4.7.1 Using Quick Contact for Android
1. Touch the contact's picture or picture frame (if you have not assigned a picture to
the contact) to open Quick Contact for Android.
2. Touch the icon for the way you want to communicate with the contact.
The icons available depend on the information you have entered for the contact,
the applications installed on your phone, and the accounts you have.
4.7.2 Communicating with a Contact
1. In the contacts list, touch the contact that you want to communicate with.
2. On the contact’s details screen, touch the icon to the right of the number to call or
send messages.

25
4.8 Deleting a Contact
1. In the contacts list, touch and hold the contact that you want to delete, and then
touch
Delete contact
in the options menu.
2. Touch
OK
to confirm that you want to delete the contact.
4.9 Streams
Streams is a client that integrates social networking service (SNS) functions of
Facebook and Twitter. Using Streams, your SNS accounts can be closely linked with
Contacts.
To access the Streams screen, touch >
Streams
. You can also touch
Contacts
, and then flick left to switch to the Streams screen.
4.9.1 Logging in to an Account
1. The first time you access Streams, touch
Login to Social Network
.
2. Select the type of account that you want to log in to. Then follow the on-screen
setup instructions to complete login.
You can log in to different types of accounts at the same time. To add an account of
another type, touch >
Accounts
>
Add account
.
4.9.2 Importing Friends
After login, the phone asks you whether to import all friends. If you choose to import
friends, Streams will import the SNS accounts of all your friends to your phone. If not,
you can import your friends' accounts in Settings later.
After friends are imported, the group of imported accounts is automatically added to
the groups of
Contacts
.
4.9.3 Preference Settings
You can configure account settings, such as refresh mode, refresh frequency, and
notifications.
1. On the Streams screen, touch >
Accounts
. Then touch the account to be
configured.

26
2. On the account screen, touch
Social Preference Settings
to configure the
settings.
4.9.4 Adding the Streams Widget to the Home Screen
Touch and hold the blank area of the Home screen. In the displayed menu, touch
Add widget
>
Streams
to add Streams to the Home screen.
Using the widget, you can quickly access Streams, or directly browse the latest events
and update the status of your friends on the Home screen.
4.10 Managing Groups
4.10.1 Creating a Group
1. On the Home screen, touch >
Contacts
. Then flick the tab bar to the left and
touch
Groups
.
2. In the groups list, touch , and then touch
Create group
.
3. Enter the name and picture you want to assign to the group, and then set a
ringtone for it.
4. Touch >
Add Members
to add members to the group.
5. Select the contacts to be added to the group, and then touch
OK
.
6. When you are finished, touch
Save
to save the group information.
4.10.2 Editing a Group
You can always make changes to the information you have saved for a group.
1. In the groups list, touch and hold the group whose details you want to edit, and then
touch
Edit group
in the options menu.
2. Make the desired changes to the group information, and then touch
Save
. To
cancel all changes you made to the group information, touch
Cancel
.
4.10.3 Adding a Contact to Your Groups
To add a contact to your groups, you can do any of the following:
• Touch and hold the contact you want to add to
Groups
. Then touch
Add to
groups
.

27
• When editing a group, touch , and then touch
Add Members
to select the
contacts you want to add to group.
4.11 Joining and Separating Contacts
You may have duplicate contacts if you import contacts by:
• Adding an account, such as a Gmail account.
• Using the social networking services such as Facebook or Twitter. (If your phone
has the Streams function, you can use it to access Facebook or Twitter.)
• Using other methods, such as exchanging emails.
To avoid duplication, join two or more contacts together to form a single contact.
Availability of Facebook or Twitter may vary depending on your country or
carrier. Please use them according to local laws and regulations.
4.11.1 Joining Contacts
1. On the Home screen, touch >
Contacts
.
2. Touch a duplicated contact.
3. Touch
Joined Contacts
, and then touch
Add contact
.
4. Select the contact to be joined to combine two duplicate contacts.
Two contacts will be joined together and displayed as one contact. Touch the contact
to view the joined information. You can see that the contact is joined together by two
contacts. You can also combine more than two contacts.
4.11.2 Separating Contacts
If contact information from different sources was joined together in error, you can
separate the contacts.
1. On the Home screen, touch >
Contacts
.
2. Touch the joint contact to be separated.
3. Touch the option for separating a contact.
4. Select the contact to be separated from the joint contact.
The joint contact is then separated into two contacts displayed separately in
Contacts
.

28
4.12 Sending Contacts
You can send contacts as a .vcf file via Bluetooth or Email.
1. In the contacts list, touch .
2. Select contacts that you want to send.
3. Touch
Send
.
4. Select the way you prefer to send the contacts you have selected, for example
Bluetooth or Email.
You can send one contact by another way. Touch and hold a contact, touch
Send contact
, and then select the way you prefer to send.
5 Using the Onscreen Keyboard
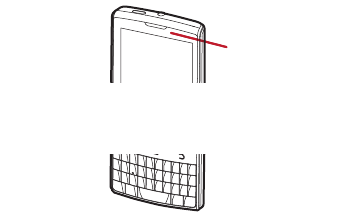
5.1 Displaying the Keyboard
To enter text, use the onscreen keyboard. Some applications open the keyboard
automatically. In others, touch a text field to open the keyboard.
Touch to hide the keyboard.
Touch and hold a text field to open the
Edit text
menu.
5.1.1 Choosing an Input Method
1. Touch and hold a text field until the
Edit text
menu is displayed.
2. Touch
Select Input method
.
3. Select the input method.
The keyboard panel will be displayed automatically.
29
5.1.2 Using the Android Keyboard
On the Home screen, touch >
Settings
>
Language & keyboard
>
Android keyboard
>
Voice input
to turn on or turn off voice input.
5.1.3 Using the Landscape Keyboard
If you find the keyboard inconvenient or difficult to use, turn your mobile phone
sideways. The screen will display the keyboard in landscape orientation, providing
you with a wider keyboard layout.
q w e r t y u i o p
a s d f g h j k
zxcvbnm
.
?123
l
Touch once to capitalize the next letter you type.
Touch twice to capitalize all letters to be entered.
Touch to change from the text mode to the symbol/number mode.
Touch to enter text by voice.
Touch to insert a space.
Touch to delete a character
to the left of the cursor.
Touch and hold to delete all
characters to the left of the
cursor.
......
:-)
...
30
5.1.4 Using the Landscape Keyboard
5.2 Customizing Keyboard Settings
1. On the Home screen, touch >
Settings
>
Language & keyboard
.
2. In
Keyboard settings
, select an input method to customize the keyboard settings.
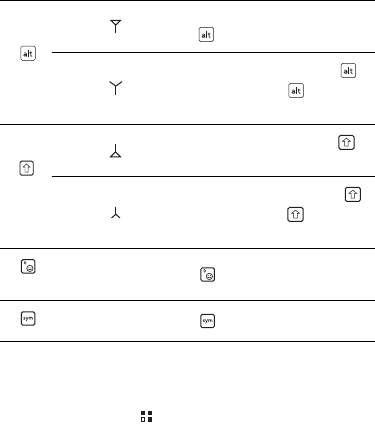
Cursor: To enter an upper character of one key,
press first and then the desired key.
Cursor:
To enter only upper characters, press
twice before typing. Press again to
switch back to lower-case letters.
Cursor: To enter one upper-case letter, press
first and then a key.
Cursor:
To enter only upper-case letters, press
twice before typing. Press again to input
lower-case letters.
Press to display all expressions.
Press to display all symbols.
aA
31
6 Messaging
The
Messaging
application allows you to exchange text messages (SMS) and
multimedia messages (MMS) with anyone using an SMS-or-MMS-capable phone.
With the
Email
application you can read and send emails.
6.1 SMS and MMS
6.1.1 Opening Messaging
Touch >
Messaging
.
6.1.2 Creating and Sending a Text Message
1. Touch >
Messaging
>
New message
.
2. Enter a phone number or a contact's name in the
To
field, or touch to select a
contact from
Contacts
or
Groups
.
As you enter the phone number or the contact's name, the phone displays
possible matches from your contacts. Select a contact from the list of possible
matches or continue entering.
After you select a contact or finish entering a number, add a comma and you can
enter another recipient. You can also touch a previously entered contact again
to edit or delete it.
3. Touch the composition text box to start entering your message.
While writing a message, you can touch >
Add
>
Contact
to insert contact
information.
4. When you are ready to send the message, touch .
Sent and received messages will be displayed in a message thread, grouping
together the messages in a conversation.
32
6.1.3 Creating and Sending a Multimedia Message
1. Touch >
Messaging
>
New message
.
2. Enter a phone number in the
To
field, or touch to select a contact from
Contacts
or
Groups
.
3. Touch the composition text box to start entering your message.
4. Touch to display the options panel.Touch
Add subject
to add the message
subject. Your mobile phone is now in multimedia message mode.
5. When the message is ready to be sent, touch .
On the message editing screen, you can also touch , and then select your
desired files to add.
You can direct select a multimedia file (audios, videos, or pictures) and send it
via MMS: Touch
File Manager
, touch and hold the multimedia file to be sent,
and then select
Share
>
Messaging
.
Adding a Slideshow
If you want to attach more than one file to your message, use the
Slideshow
option.
1. On the message editing screen, touch to display the options panel.
2. Touch
Add
>
Slideshow
, and then select a slide to start editing it.
3. Touch and then touch
More
>
Add slide
to add more slides.
4. Touch
Done
to finish composing your message and return to the multimedia
message screen.
5. To alter your multimedia message, touch the slideshow on the multimedia
message screen. When the message is ready to be sent, touch .
6.1.4 Opening and Viewing a Multimedia Message
1. In the message list, touch the message thread you wish to view.
2. Touch the multimedia message to view the message.

33
6.1.5 Replying to a Message
1. In the message list, touch a text or multimedia message thread to open it.
2. Touch the text box to compose your message. Once finished, touch .
You can also do the following to reply to a message: Touch >
Multiselect
,
select one or more message threads, and touch
Reply
.
6.1.6 Copying a Text Message to Notepad or Calendar
1. In the message list, touch a text message thread to open it.
2. Touch and hold one of the messages, and then touch
Copy message to
.
3. Touch
Notepad
or
Calendar
to save it as a note or an event.
For information about how to use
Notepad
or
Calendar
, see the relevant sections of
this guide.
6.1.7 Customizing Message Settings
In the message list, touch , and then touch
Settings
to customize the message
settings.
6.2 Email
Your mobile phone also puts email at your fingertips. With your phone’s
Email
application, you can use your email account with Yahoo!, AOL, or other popular email
services on your phone.
6.2.1 Adding an Email Account
When using the
Email
application for the first time, you must configure an email
account. The Email setup wizard helps you to configure your account. A number of
popular email systems are supported. You can work with the same email service that
you use on your PC or you can select another email service.
1. On the Home screen, touch >
Email
.
2. To customize your email settings, follow the onscreen instructions, and then touch
Next
.

34
3. Enter the account name and the name you want other people to see when they
receive an email from you.
4. Touch
Done
.
Adding Other Email Accounts
1. After creating your initial email account, touch on the
Inbox
screen, and then
touch
More
>
Accounts
to access the accounts screen.
2. Touch on the accounts screen, and then touch
Add account
to create
another email account.
When adding an additional email account, you have the option to use the new
account to send all outgoing messages.
6.2.2 Viewing an Email Message
1. On the accounts screen, touch the email account you want to use.
2. Access a folder, and then touch the message that you want to view.
6.2.3 Saving an Email Attachment
1. On the accounts screen, touch the email account you want to use.
2. Touch the email message you want to view.
3. Touch
Save
next to the attachment in the email.
4. Select a path for saving the attachment and touch
Save
.
6.2.4 Creating and Sending an Email Message
1. On the accounts screen, touch the email account you want to use.
2. On the
Inbox
screen, touch , and then touch
Compose
in the options panel.
3. In the
To
field, enter the recipients’ name or email address.
4. Enter the subject of your message and compose the message.
To send an attachment with the message, touch , and then touch
Add
attachment
.
5. When you are finished, touch
Send
.
If you are not ready to send the message, touch
Save as draft
or touch to
save the message as a draft.

35
6.2.5 Replying to an Email Message
1. On the accounts screen, touch the email account you want to use.
2. Touch the email message to which you want to reply.
3. Touch
Reply
or
Reply all
to reply to the email message.
6.2.6 Deleting an Email Account
1. On the accounts screen, touch and hold the email account you want to delete.
2. Touch
Remove account
.
3. Touch
OK
.
6.2.7 Changing Email Account Settings
You can change a number of account settings, including how often you check for
emails, how you are notified of a new mail, and details about the servers the account
uses to send and receive mails.
Your account’s incoming and outgoing settings depend on the kind of email
service you are using. You can enter the necessary details manually, although
you may need to contact your email service provider to obtain the correct
information.
1. Touch >
Email
.
2. On the accounts screen, touch and hold the email account you want to change.
3. Touch
Account settings
.
4. Change
General settings
,
Notification settings
, or
Server settings
.

36
7 Getting Connected
7.1 Mobile Networks
Your mobile phone will be automatically configured to use your network operator’s
2G/3G service (if available) when you turn on the phone for the first time. Note that the
SIM/UIM card must be inserted (some CDMA mobile phones have an integrated UIM
card and do not need a separate UIM card)
7.1.1 Checking the Network Connection
1. Touch >
Settings
.
2. Touch
Wireless & networks
>
Mobile networks
.
3. Touch
Network Settings
>
Access Point Names
to check the network
connection.
Your mobile phone will automatically read the access point settings from the
SIM/UIM card (if any). For this reason, do not change the access point
parameters; otherwise, you might not be able to access network resources.
7.1.2 Turning on the Data Service
1. Touch >
Settings
.
2. Touch
Wireless & networks
>
Mobile networks
.
3. Select the
Data enabled
check box to turn on the data connection.
7.2 Wi-Fi
Wi-Fi gives you wireless access to broadband Internet. To use Wi-Fi on your mobile
phone, you must have an access to wireless access points (hotspots). Obstacles that
block the Wi-Fi signal will reduce its strength.
7.2.1 Turning On Wi-Fi
1. Touch >
Settings
.
2. Touch
Wireless & networks
, and then select the
Wi-Fi
check box to turn on Wi-Fi.

37
7.2.2 Connecting to a Wireless Network
1. After turning on Wi-Fi, touch >
Settings
.
2. Touch
Wireless & networks
>
Wi-Fi settings
. You will see a list of detected Wi-Fi
networks in the
Wi-Fi networks
section.
3. Touch a Wi-Fi network to connect to it.
• If you select an open network, you will be automatically connected to the
network.
• If you select a network that is secured with Wired Equivalent Privacy (WEP)
and connect to it for the first time, enter the password as prompted, and then
touch
Connect
. If you connect to a secured wireless network that you have
already used, you will not be prompted to enter the password again unless you
have reset your mobile phone to its default settings.
On the
Wi-Fi settings
screen, touch
Add Wi-Fi network
to add a new Wi-Fi
network.
7.2.3 Sharing Your Phone’s Data Connection as a Portable
Wi-Fi Hotspot
1. Touch
> Settings
.
2. Touch
Wireless & networks > Tethering & portable hotspot
.
3. Select the
Portable Wi-Fi hotspot
check box to share your data connection.
When
Portable Wi-Fi hotspot
is selected, you can touch
Portable Wi-Fi
hotspot settings
to change its network name or secure it.
7.2.4 Sharing Your Phone’s Data Connection via USB
To use USB tethering in different operating systems, you may need to prepare your
computer to establish a network connection via USB.
You cannot share your mobile phone’s data connection and access its microSD
card via USB at the same time.
1. Touch
> Settings
.
2. Touch
Wireless & networks > Tethering & portable hotspot
.
3. Select the
USB tethering
check box to share your data connection.

38
7.3 WPS
The Wi-Fi Protected Setup (WPS) function simplifies the operations to set up Wi-Fi
networks and configure network security settings.
When connecting to a Wi-Fi network via WPS, ensure that the Wi-Fi access
point to be connected supports the WPS function.
7.3.1 Connecting to a Wireless Network via the WPS Button
1. Turn on Wi-Fi, and then access the
Wi-Fi settings
screen.
2. Touch
WPS button connection
.
3. Press the WPS button of the Wi-Fi access point. When your phone connects to the
network, it displays a message.
7.3.2 Connecting to a Wireless Network via the WPS PIN
1. Turn on Wi-Fi, and then access the
Wi-Fi settings
screen.
2. In the
Wi-Fi networks
section, press and hold the Wi-Fi network to be connected.
Then select
WPS PIN connection
in the options menu. Your phone displays the
PIN of the selected Wi-Fi access point.
3. Enter the PIN on the Wi-Fi access point. When your phone connects to the
network, it displays a message.
To add a new Wi-Fi network, touch
Add Wi-Fi network
on the screen, and then
enter the Service Set Identifier (SSID) of the network.

39
7.4 Browser
Your mobile phone comes with an Internet browser pre-installed.
7.4.1 Opening the Browser
Touch >
Browser
to open the home page.
When known or open Wi-Fi networks and mobile data networks are available at
the same time, your phone will preferably select a Wi-Fi network for Internet
access.
Touch to open the browser options menu and perform one of the following
operations:
•
New window
: Touch to open a new window.
•
Bookmarks
: Touch to display bookmarks.
•
Windows
: Touch to view thumbnails of open browser windows. You can switch to
another browser window or open a new one on this screen.
•
Refresh
: Touch to refresh the current webpage.
•
Forward
: Touch to browse the next web page.
•
More
: Touch to open other menus and perform operations such as searching,
selecting text, downloading, or setting options.
7.4.2 Opening a Webpage
1. In a browser window, touch the URL field at the top of the screen.
2. Use the keyboard to enter a webpage address. You can touch to enter the
web page address by voice.
3. As you enter the address, matching webpage addresses will appear on the screen.
If you see the address you want, touch it and go directly to that webpage or
complete entering your desired webpage.

40
7.4.3 Setting a Home Page
1. In a browser window, touch .
2. Touch
More
>
Settings
>
Set home page
.
3. Enter the address of the desired home page, and then touch
OK
.
7.4.4 Managing Bookmarks
You can store as many bookmarks as you want on your mobile phone.
Adding a Bookmark
1. In a browser window, go to the webpage you want to save as a bookmark.
2. Touch , and then touch
Bookmarks
>
Add
.
3. Edit the bookmark name and then touch
OK
.
Opening a Bookmark
1. In a browser window, touch , and then touch
Bookmarks
.
On the
Bookmarks
screen, touch the
History
tab to view the pages you have
visited, or touch the
Most visited
tab to view the pages you have visited most
frequently.
2. Touch the bookmark of the website you want to open.
7.4.5 Customizing Browser Settings
Customize the browser to suit your browsing style. Use
Browser
to set page content,
privacy, and security preferences. In the browser window, touch , and then touch
More
>
Settings
.
7.5 Bluetooth
Your mobile phone has Bluetooth, which allows you to create a wireless connection
with other Bluetooth devices so you can share files with your friends, talk hands-free
with a Bluetooth headset, or even transfer photos from your phone to your PC.
If you are using Bluetooth, remember to stay within 10 meters (33 feet) of the other
Bluetooth devices to which you want to connect. Be aware that obstacles like walls or
other electronic equipment may interfere with your Bluetooth connection.

41
7.5.1 Turning On Bluetooth
1. Touch >
Settings
.
2. Touch
Wireless & networks
, and then select the
Bluetooth
check box to turn on
Bluetooth. When Bluetooth is turned on, the Bluetooth icon appears in the
notification bar.
3. Touch
Bluetooth settings
, and then select the
Discoverable
to make your
mobile phone visible to other Bluetooth devices.
7.5.2 Pairing with and Connecting to a Bluetooth Device
Your mobile Bluetooth lets you do the following:
• Hands Free Profile (HFP): allows you to use a hands-free Bluetooth device.
• Headset Profile (HSP): allows you to use a mono Bluetooth headset.
• Object Push Profile (OPP): allows you to transfer files over a Bluetooth connection.
• Advanced Audio Distribution Profile (A2DP): allows you to use a stereo Bluetooth
headset.
• A/V Remote Control Profile (AVRCP): allows you to control audio playing using a
Bluetooth headset remotely.
Before you use Bluetooth, pair your mobile phone with another Bluetooth device as
follows:
1. Ensure that the Bluetooth function on your mobile phone is enabled.
2. On the Home screen, touch >
Settings
>
Wireless & networks
>
Bluetooth
settings
. Your mobile phone will then scan for Bluetooth devices in range.
3. Touch the device you want to pair your mobile phone with.
4. If required, enter the pairing password to complete the connection.

42
7.5.3 Sending Files via Bluetooth
With Bluetooth, you can share pictures, videos, or music files with your family and
friends. To send files via Bluetooth:
1. Touch and hold the file to be sent in your mobile phone or SD card. The active
options menu is displayed.
2. Touch
Share
, then
Bluetooth
to select a paired device.
7.5.4 Disconnecting from or Unpairing with a Bluetooth Device
1. Touch >
Settings
>
Wireless & networks
>
Bluetooth settings
.
2. Navigate to the
Bluetooth devices
section, and then touch and hold the device to
which you are connected.
3. Touch
Unpair
to disconnect from the device.
8 Entertainment
In addition to being a communication device and personal assistant, your mobile
phone also provides you with a multitude of entertainment possibilities. You can take
photos, create videos and audio clips, and download and listen to music.
8.1 Taking Photos and Recording Videos
The camera is a combination of camera and camcorder that you can use to shoot and
share pictures and videos.
8.1.1 Opening Your Camera
• Touch >
Camera
to open the camera. The camera opens in landscape
mode, ready to take a picture or record a video.
• Touch to close the camera.
43
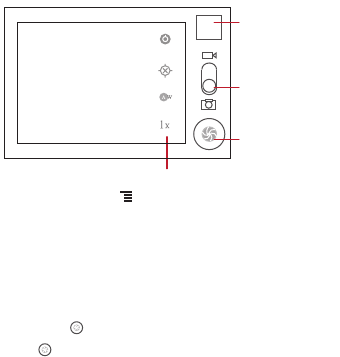
Capture Screen
On the capture screen, touch to show the capture panel.
8.1.2 Taking a Photo
1. Open your camera application and switch it to camera mode.
2. If necessary, change the camera settings. The preview changes as you change
the settings.
3. Frame your photo within the photo capture screen.
4. Touch and hold .
5. Release to take your photo.
Photos taken are displayed for a moment. You can take another photo or review your
photos.
8.1.3 Viewing Your Photos
1. After taking a photo, a thumbnail of the photo you have just taken is shown in the
upper right corner of the capture screen. Touch the thumbnail to view it.
2. Touch the onscreen button to do any of the following:
• Touch
Share
to send the photo in a message or post it online.
• Touch
Delete
to delete the photo.
• Touch
More
>
Set as
to set the photo as a contact icon or the wallpaper.
3
5
Touch to customize the camera settings.
Thumbnail of the
last photo. Touch
to preview the
photos or videos.
Slide up to record
videos; slide down
to take photos.
Touch to take a
photo.

44
8.1.4 Recording a Video
1. Open the camera application, and then switch it to camcorder mode.
2. If necessary, change the camcorder settings.
3. Frame the scene with which you want to start your video.
4. Touch to start recording a video.
5. Touch to stop recording.
8.1.5 Viewing Your Videos
1. After recording a video, a thumbnail of the video you have just recorded is shown in
the upper right corner of the capture screen. Touch the thumbnail to view it.
2. Touch the onscreen buttons to do any of the following:
• Touch
Share
to send the video in a message or post it online.
• Touch
Delete
to delete the video.
On the video playback screen, touch the controls to fast-forward or rewind or to
play or pause the video.
3. If you want to view more videos, flick your finger left or right across the screen.
8.2 Using the Gallery
Your
Gallery
application can automatically search for pictures and videos on your
mobile phone and microSD card. Use
Gallery
to sort photos and videos into folders,
view and edit pictures, watch videos, and set a picture as wallpaper or as a photo for
a contact.
8.2.1 Opening the Gallery
On the Home screen, touch >
Gallery
.
The
Gallery
application categorizes your pictures and videos by storage location and
displays these files in folders. Touch a folder to view the pictures or videos inside.
8.2.2 Viewing a Picture
1. In
Gallery
, touch the folder that contains the pictures you want to view.
2. Touch the picture to view it in full-screen mode.

45
3. Touch the screen. Then the zoom panel appears. You can zoom in or zoom out on
the picture.
The picture viewer supports the automatic rotation function. When you rotate
your mobile phone, the picture adjusts itself to the rotation.
8.2.3 Rotating a Picture
1. When viewing a picture, touch to display the operations panel.
2. Touch
More
.
3. Select either
Rotate Left
or
Rotate Right
. The picture is saved with the new
orientation.
8.2.4 Cropping a Picture
1. When viewing a picture, touch to display the operation panel, and then touch
More
>
Crop
.
2. Use the cropping tool to select the portion of the picture to crop.
• Drag from the inside of the cropping tool to move it.
• Drag an edge of the cropping tool to resize the image.
• Drag a corner of the cropping tool to resize the image without changing its
length to width ratio.
3. Touch
Save
to save the cropped picture. Touch
Discard
to discard the changes.
8.3 DTS Envelo™
DTS Envelo is a virtual surround sound solution for consumer electronics. It can
create virtual surround sound from any input source: mono, stereo, or 5.1 multi-
channel.
8.3.1 Using DTS Envelo
DTS can be used only with a headset and when music or movies are played
through music .
1. Touch
> Settings
.
2. Touch
Sound
>
DTS mode
.

46
9 Google Services
Availability of Google applications, services, and features may vary according to
your country or carrier. Please follow local laws and regulations to use them.
When you turn on your mobile phone for the first time, touch a Google services such
as
Talk
,
Gmail
, or
Play Store
, and you will be prompted to sign in to your Google
account.
Ensure that your mobile phone has an active data connection (3G) before you
sign in to your Google account.
If you already have a Google account, touch
Sign in
and enter your username and
password.
9.1 Creating a Google Account
If you do not have a Google account, you can create one:
1. After reading the setup information, touch
Next
.
2. Touch
Create
.
3. Enter the first name, last name, and user name for your Google account, and then
touch
Next
. The mobile phone will connect to a Google server to check whether the
username is available. If the username you entered is already in use, you will be
prompted to choose another one or select one from a list.
4. Enter and confirm your Google account password.
5. Select a security question from the drop-down menu, and then enter the answer.
6. Touch
Create
.
7. When the
Google Terms of Service
screen appears, touch
I agree, Next
.
8. Enter the characters that appear on the screen, and then touch
Next
.
To use another Google account, go to the
Accounts & sync settings
screen,
and touch
Add account
to select which type of accounts you want to add.
47
9.2 Gmail
Gmail
is Google’s web-based email service. When you first set up your phone, you
may have configured it to use an existing
Gmail
account or create a new account.
The first time you open the
Gmail
application on your phone, your
Inbox
will contain
the messages from your
Gmail
web account.
9.2.1 Opening Gmail
On the Home screen, touch >
Gmail
. The
Inbox
mail list appears. Any emails
you decide to keep on your mobile phone will go to your
Inbox
folder.
9.2.2 Switching Between Accounts
1. In the mail list, touch , and then touch
Accounts
.
2. Touch the account that contains the email you want to read.
9.2.3 Creating and Sending an Email
1. In the mail list, touch , and then touch
Compose
.
2. Enter the message recipient’s email address in the
To
field. If you are sending the
email to several recipients, separate the email addresses with commas. You can
add as many message recipients as you want.
If you want to send a copy (Cc) or a blind copy (Bcc) of the email to other
recipients, touch , and then touch
Add Cc/Bcc
.
3. Enter the email subject and write your email.
If you want to add a picture attachment, touch , and then touch
Attach
to
select the picture you want to attach.
4. After writing your email, touch .
9.2.4 Replying to or Forwarding an Email
1. In the mail list, touch the email that you want to reply to or forward.
2. Touch to reply. You can also touch , and then touch
Reply
,
Reply all
, or
Forward
.
3. Do one of the following:
48
• If you selected
Reply
or
Reply all
, enter your message.
• If you selected
Forward
, specify the message recipients and add any
additional text you want to include in the forwarded message.
4. Touch to send, or touch to save as a draft.
9.2.5 Customizing Your Gmail Settings
In the mail list, touch , and then touch
More
>
Settings
to customizing your
Gmail
.
9.3 Talk
Talk
is Google’s instant messaging service. You can use it to communicate in real
time with other people using
Talk
on a phone or on the web.
9.3.1 Opening Talk
On the Home screen, touch >
Talk
to open the application.
Your
Talk
account is based on the Google account you set up with your mobile
phone.
9.3.2 Adding a Friend
1. In the friends list, touch , and then touch
Add friend
.
2. Enter the
Talk
instant messaging ID or Gmail address of the friend you want to add.
3. Touch
Send invitation
.
9.3.3 Accepting an Invitation
1. If you have invited anyone to chat or if someone else has invited you to chat, this
information will appear in the friends list.
2. Touch a pending invitation, and then touch
Accept
.
9.3.4 Starting a Chat
1. In the friends list, touch a friend's name in the friends list.
2. Use the onscreen keyboard to enter text and chat with your friend.
49
3. After entering your message, touch
Send
.
9.3.5 Setting Notifications for New Instant Messages
Whenever you receive an instant message, your mobile phone can play a sound,
vibrate, or display an icon. To set up one of these handy notifications, start in the
friends list, and then touch . Then touch
Settings
. Now choose from one of the
following:
9.3.6 Signing out of Talk
On the friends list screen, touch , and then touch
Sign out
to quit
Talk
.
9.4 Maps
Maps
lets you find your current location, view real-time traffic conditions (depending
on availability in your locale), and get detailed directions to various destinations. You
can view satellite images, traffic maps, or other kinds of maps of your current or other
locations.
9.4.1 Enabling the Location Service
Before you open
Maps
to find your location or search for places of interest, you must
enable the location service.
1. On the Home screen, touch >
Settings
.
2. Touch
Location & security
.
Notifications
Select the check box to receive a notification on the
notification bar when you receive an instant message.
Ringtone
Touch to choose the ringtone used for a new instant
message. You will hear a short sample of the ringtone when
you select it. To turn the ringtone off, select
Silent
.
Vibrate
Select the check box to make your mobile phone vibrate
when you receive a new instant message.

50
3. In the
My Location
section, select the
Use wireless networks
check box, the
Use
GPS satellites
check box, or both.
9.4.2 Opening Maps
On the Home screen, touch >
Maps
to open the application.
9.4.3 Searching for Places of Interest
1. On the map, touch , and then touch
Search
.
2. Enter the place you want to search for in the search box, and then touch the Search
icon.
3. Your search results will then be displayed. Touch a place you are interested in and
the application will show where it is on the map.
9.4.4 Getting Directions
1. While viewing a map, touch , and then touch
Directions
.
2. Enter the starting point in the first text box, and then enter your destination in the
second text box.
3. Touch the icon for car, public transit, or walking directions.
4. Touch
Get directions
. Your directions will appear in a list.
5. Touch a direction item on the list to show it on the map.
6. When you finish viewing or following the directions, touch , and then touch
Clear Map
to reset the map.
9.5 YouTube
YouTube
is Google’s free online video streaming service for watching, searching for,
and uploading videos.
9.5.1 Opening YouTube
On the Home screen, touch >
YouTube
. You will then see the YouTube screen.
9.5.2 Searching for a Video
1. On the
YouTube
screen, touch , and then touch
Search
.

51
2. Enter a search keyword, and then touch the Search icon.
3. You will see a number of search results displayed below the notification bar. Scroll
through the results and touch a video to watch it.
9.5.3 Sharing a Video
From the video list on the
YouTube
screen, select a video clip and touch
More
>
Share
.
9.6 Play Store
Android Market provides direct access to applications and games which you can
download and install on your phone.
9.6.1 Opening Play Store
1. On the Home screen, touch >
Play Store
.
2. When you open
Play Store
for the first time, the
Google Play Terms of Service
window will appear. Touch
Accept
to continue.
9.6.2 Searching for Applications
There are a few different ways to find applications on the
Play Store
home screen,
including:
• Featured applications
• List of games
• Search function
• My apps
10 Synchronizing Information
Some applications on your mobile phone give you access to the same personal
information that you can add, view, and edit on your computer. If you add, change, or
delete your information in any of these applications on the web, the updated
information also appears on your mobile phone.
This is made possible through over-the-air data synchronization. The process occurs
in the background and does not interfere with use of your mobile phone. When your

52
phone is synchronizing, a data synchronization icon will be shown in the notification
bar.
10.1 Managing Your Accounts
You can synchronize contacts, email, and other information on your mobile phone
with multiple Google accounts or other kinds of accounts, depending on the
applications installed on your mobile phone.
For example, you can start by adding your personal Google account, so your
personal email, contacts, and calendar are always available. You could then add a
work account, so your work-related emails and work contacts are handy. If you like,
you may add multiple Google accounts or other accounts.
10.1.1 Adding an Account
When you add an account, the
Contacts
application compares contacts from the
newly synchronized account with contacts from your existing mobile phone accounts
and attempts to merge duplicates into a single entry in
Contacts
. While it is presented
as a single contact entry, the contact data itself is not merged.
1. Touch >
Settings
>
Accounts & sync
. The screen displays your current
synchronization settings and a list of your current accounts.
In some cases, you may need to obtain account details from IT support. For
example, you may need to know the account’s domain or server address.
2. Touch
Add account
.
3. Touch the kind of account to add.
4. Follow the onscreen steps to enter the required and optional information about the
account. Most accounts require a username and password, but the details depend
on the kind of account and the configuration of the service to which you are
connecting.
5. Configure the account. Depending on the kind of account, you may be asked to
configure what kind of data you want to synchronize to the mobile phone, to name
the account, and for other details. When you are finished, the account is added to
the list on the
Accounts & sync settings
screen.

53
10.1.2 Adding an Exchange Account
1. On the Home screen, touch >
Settings
>
Accounts & sync
.
2. Touch
Add account
>
Corporate
.
3. Follow the instructions and enter the required information about the exchange
account you want to add. For details, contact the server administrator.
4. Touch
Next
to display the
Account options
screen. Configure the
synchronization settings for this account.
5. Touch
Next
to finish configuring the account settings. If emails are not
synchronized properly, contact the server administrator.
10.1.3 Removing an Account
You can remove an account, deleting it and all information associated with it from your
mobile phone, including email, contacts, settings, and so on. You cannot, however,
remove some accounts, such as the first account you signed into on the mobile
phone. If you attempt to remove certain accounts, all personal information associated
with it will be deleted.
You can only remove the first Google Account by resetting the phone to factory
defaults.
1. On the
Accounts & sync settings
screen, touch the account to be deleted.
2. Touch
Sign Out
.
3. Confirm that you want to remove the account.
10.2 Customizing Your Account
Synchronization
You can configure background data use and synchronization options for all the
applications on your phone. You can also configure what kind of data you synchronize
for each account.
For some accounts, synchronization is bi-directional; changes that you make to the
information on your mobile phone are made to the copy of that information on the
web. Some accounts support only one-way synchronization; the information on your
mobile phone is read-only.
54
10.2.1 Configuring General Synchronization Settings
On the
Accounts & sync settings
screen, do the following:
• Select or clear the
Background data
check box to control whether applications
and services can transmit data when you are not working with them directly (that is,
when they are running in the background).
If you clear this option,
Gmail
stops receiving new mail,
Calendar
stops
synchronizing events, and so on, until you touch the
Refresh
option or send an
email.
• Select or clear the
Auto-sync
check box to control whether changes you make to
information on the phone or on the web are automatically synchronized with each
other.
For example, when this option is selected, changes that you make in
Contacts
on the phone are automatically made in Google Contacts on the web.
10.2.2 Changing an Account’s Synchronization Settings
1. On the
Accounts & sync settings
screen, touch the account whose
synchronization settings you want to change. The data and synchronization screen
opens, displaying a list of the kinds of information the account can synchronize.
2. Selected items are configured to synchronize to your mobile phone.
3. Select or clear the check box of information you want to synchronize with the
mobile phone.
11 Using Other Applications
11.1 Traffic Manager
Traffic Manager
allows you to enter the total amount of traffic included in your 2G/3G
monthly package and set traffic notification thresholds. When your traffic usage
reaches these thresholds, you will be notified.
11.1.1 Using Traffic Manager
When
Traffic Manager
is opened for the first time, it will request you to enter the
monthly traffic limit and notification thresholds.

55
1. On the Home screen, touch >
Traffic Manager
.
2. Enter the monthly traffic limit in the
Monthly package
field.
3. Touch
Next
.
4. Enter the notification thresholds in the
Set daily traffic reminder
and
Set monthly
traffic reminder
fields.
5. Touch
Finish
.
6. You can now view your data traffic in
Traffic statistics
.
You can modify the monthly traffic limit and notification thresholds in
Settings
.
11.2 All Backup
You can back up data using
All Backup
, which provides the following options:
Backup to SD
,
Restore from SD
,
Quick Backup
,
Schedule Backup
and
Applications
.
11.2.1 Backing Up data by using Backup to SD
1. On the Home screen, touch >
All Backup
.
2. Touch
Backup to SD
.
3. Enter a file name in the
Filename:
field.
4. In the
Backup contents:
field, select the contents you want to back up.
5. Touch
Backup
to back up the selected data.
To cancel the backup, touch
Cancel
.
11.3 Calendar
Use
Calendar
to create and manage events, meetings, and appointments.
Depending on your synchronization settings, the calendar on your phone can be
synchronized with the internet-based calendar you use.

56
11.3.1 Opening Calendar
Touch >
Calendar
to open the application.
When you add a Google Account that includes a calendar service to your phone,
you can access Google calendar: Touch , and then touch
More
>
Calendars
.
11.3.2 Creating an Event
1. In any calendar view, touch , and then touch
New event
to open the
Event
details
screen.
If you have more than one calendar, select the calendar where you want to save
the event.
2. Enter the event name.
• If there is a time frame for the event, touch
From
and
To
to set the beginning
and end times of the event.
• If the event is a special occasion such as a birthday or a day-long activity, set
the date for
From
and
To
, and then select the
All day
check box.
3. Enter the location of the event and a description.
4. Set the time of your event reminder in
Reminders
, and then specify in
Repetition
whether the event recurs and, if it does, how frequently.
5. Touch
Done
.
To quickly create an event in the
Day
,
Week
, or
Month
view, touch and hold an
empty time slot, and then touch
New event
. A new event details screen will
appear with the selected time slot and date in the
From
and
To
fields.
11.3.3 Setting an Event Reminder
1. In any calendar view, touch an event to view its details or an event summary.
2. Touch the
Add reminder
button to add a reminder, or touch the reminder’s “-”
button to delete an existing reminder.
3. Touch the reminder time, and then, from the list displayed, touch the length of time
before the event when you want to be reminded. When the time comes, you will
receive a notification about the event.

57
11.3.4 Setting Synchronization and Display
1. In any calendar view, touch . Then touch
More
>
Calendars
.
The Calendars screen displays all the calendars you have added or subscribed
to for each account that is configured to synchronize events to your phone,
organized by account. (Calendars for accounts you have configured not to
synchronize Calendar events are not included in the list.)
2. Touch the icon next to a calendar to change whether it is synchronize and whether
it is displayed.
You remain subscribed to Calendars that you configure not to store on the
phone and you can still work with them with Google Calendar on the web.
3. Touch
OK
.
11.3.5 Customizing Calendar Settings
In any calendar view, touch . Then touch
More
>
Settings
and choose from the
following:
•
Hide declined events
: Select to hide events for which you have declined
invitations.
•
Set alerts & notifications
: Touch to set event reminders to alert you, to send you
a notification, or to turn off event notifications on your mobile phone.
•
Select ringtone
: Touch to select the ringtone to sound when you receive an event
reminder.
•
Vibrate
: Select to vibrate the mobile phone when you receive an event notification.
•
Default reminder time
: Touch to select the default time before an event for event
reminders to occur.
11.4 File Manager
File Manager
is like having a pocket-sized personal assistant (PA), letting you
organize, edit, and delete files and folders.
11.4.1 Opening File Manager
On the Home screen, touch >
File Manager
to open the application.

58
11.4.2 Creating a Folder
1. On the
File Manager
screen, access the directory in which you want to create a
new folder.
2. Touch to open the options panel, and then touch
New folder
.
3. Enter the name of the new folder in the text box.
4. Touch
Save
.
11.4.3 Moving or Copying a File
1. On the
File Manager
screen, press to show the options panel, and then
touch
Multiselect
.
2. Touch the file or folder you want to move or copy. When a file or a folder is selected,
a check mark will appear.
To select all files, touch
Select all
to select all files in a folder (touch
Unselect all
to cancel the selection).
3. Touch
Cut
or
Copy
to cut or copy the file.
4. Select the path where you want the file to be copied or moved. Press to open
the options panel, and then touch
Paste
to move or copy the file to the selected
path.
11.4.4 Searching for a File
1. On the
File Manager
screen, touch a folder to access the directory where the file
you want is located.
2. Press to open the options panel, and then touch
Search
.
3. Write a key word of the name of your file in the search box.
4. Touch . Your mobile phone will start the search.
5. A list of search results will be displayed. Touch a file in the list to open it.
6. Touch
New search
for a new search or press the back key to return to the file
manager screen.
11.4.5 Compressing or Extracting Files
Your phone supports compressing and extracting files.

59
You can only compress files and folders into .zip files, but can extract both .zip
and .rar files.
Compressing Files
1. On the
File Manager
screen, Touch , and then touch
Multiselect
.
2. Select the files or folders you want to compress. When a file is selected, a check
mark will appear.
To select all files and folders, touch
Select all
or
Unselect all
to cancel the
selection.
3. Touch
Compress
.
4. Edit the save path and the name of the target file, and then touch
OK
to start
compressing the files and folders.
Extracting a File
1. Touch and hold a compressed file.
2. Touch
Extract
.
3. Edit the save path for the extracted files.
4. Touch
OK
to start extracting.
11.4.6 Viewing Your Memory Status
On the
File Manager
screen, press to open the options panel, and then touch
Memory Status
. The memory management screen will be displayed. This screen
allows you to view the memory status and available memory on your mobile phone
and microSD card.
11.5 Clock
In addition to displaying the date and time, the
Clock
application displays information
about the weather and your phone. You can also use
Clock
to turn your mobile
phone into an alarm clock.
11.5.1 Opening the Clock
On the Home screen, touch >
Clock
to open the application.

60
Clock
opens with the date and time displayed on your Home screen wallpaper, along
with your local weather and other useful information.
11.5.2 Opening the Alarms
On the
Clock
screen, touch to open the
Alarms
.
Adding an Alarm
1. On the alarm list screen, touch
Add alarm
.
2. Set the alarm, and then touch
Done
.
Setting an Alarm
1. On the alarm list screen, touch one of the alarms on the screen.
2. Touch
Time
to set the time of the alarm.
3. Touch
Repeat
to set the days when you want the alarm to sound.
4. Touch
Ringtone
to select a ringtone for the alarm.
5. Select the
Vibrate
check box to enable the phone to vibrate, in addition to playing
the ringtone.
6. Touch
Label
to enter a name for the alarm.
7. Touch
Done
.
The alarm clock still works when the phone is powered off.
Customizing Alarm Settings
On the alarm list screen, touch , and then touch
Settings
.
11.6 Calculator
Use
Calculator
to solve simple arithmetic problems or use its advanced operators to
solve more complex equations.
11.6.1 Opening Calculator
On the Home screen, touch >
Calculator
to open the application.

61
11.6.2 Switching Between Basic and Advanced panel
On the
Calculator
screen, flick the screen to the right or left to switch between
Advanced panel
and
Basic panel
.
11.7 Notepad
Notepad
features a simple text processor. In the note list, you can add, edit, and
delete notes.
1. On the Home screen, touch >
Notepad
to open the application.
2. Touch , and then touch
Add note
to create a note.
3. Touch to save the note.
12 Managing Your Mobile Phone
To configure your mobile phone, touch >
Settings
.
12.1 Setting the Date and Time
By default, your mobile phone automatically uses the date, time, and time zone
provided by the network.
When your mobile phone is using the date and time settings provided
automatically by the network, you cannot manually set the date, time, and time
zone.
1. On the
Settings
screen, touch
Date & time
.
2. Clear the
Automatic
check box.
3. Touch
Set date
. On the set date screen, touch or to adjust the date,
month, and year, and then touch
Set
when the configuration is complete.
4. Touch
Select time zone
, and then select the desired time zone from the list. Scroll
the list to view more time zones.
5. Touch
Set time
. On the set time screen, touch or to adjust the hour and
minute. Touch
Set
when the configuration is complete.
62
6. Select or clear the
Use 24-hour format
check box to switch between 24-hour and
12-hour formats.
7. Touch
Select date format
to select how you want the date to display on your
mobile phone.
12.2 Setting the Display
12.2.1 Adjusting the Screen Brightness
1. On the
Settings
screen, touch
Display
>
Brightness
.
2. Drag the slider left to make the screen darker, or right to make it brighter.
3. Touch
OK
to save the adjustment.
12.2.2 Adjusting the Time Before the Screen Turns Off
If your mobile phone is idle for several minutes, it will turn off the screen to save battery
power. To set a longer or shorter idle time:
1. On the
Settings
screen, touch
Display
>
Screen timeout
.
2. Select the duration you want the screen to be illuminated.
12.3 Setting Ringers
12.3.1 Turning On Silent Mode
1. On the
Settings
screen, touch
Sound
.
2. Select the
Silent mode
check box to silence all sounds except alarms, and music
and video media.
12.3.2 Adjusting the Volume
You can adjust the volume from the Home screen or any application screen (except
during a call or when playing music or videos). Press the Volume keys to adjust
volume to the level you desire.
You can also adjust the volume from the settings screen.
1. On the
Settings
screen, touch
Sound
>
Volume
.
2. Drag the slider left to make the volume lower, or right to make it higher.

63
3. Touch
OK
to save the adjustment.
12.3.3 Changing the Phone Ringtone
1. On the
Settings
screen, touch
Sound
>
Phone ringtone
.
2. Touch the ringtone you want to use, and then touch
OK
. The ringtone plays when
selected.
12.3.4 Changing the Message Ringtone
1. On the Home screen, touch >
Messaging
.
2. In the message list, touch >
Settings
>
Select ringtone
.
3. Touch the ringtone you want to use, and then touch
OK
. The ringtone plays when
selected.
12.4 Setting Phone Services
12.4.1 Customizing Call Settings
Mobile phone service providers offer different services such as call forwarding, call
waiting, fixed dialing numbers, and voicemail. You can customize many of these
services if they are part of your calling plan.
On the
Settings
screen, touch
Call settings
to customize your call functions.
12.4.2 Turning on Data Roaming
1. On the
Settings
screen, touch
Wireless & networks
>
Mobile networks
.
2. Select the
Data roaming
check box.
Accessing data services while roaming may incur additional charges. Ask your
wireless service provider about data roaming fees.
12.4.3 Switching off the Data Service
1. On the
Settings
screen, touch
Wireless & networks
>
Mobile networks
.
2. Clear the
Data enabled
check box.
64
12.5 Configuring Text-to-Speech
Use the Text-to-Speech settings to configure the Android text-to-speech synthesizer,
for applications that can take advantage of this feature.
12.5.1 Installing Voice Data
1. On the
Settings
screen, touch
Voice input & output
>
Text-to-speech settings
>
Install voice data
.
2. If your mobile phone does not have speech synthesizer data installed, connect to
Android Market and let it guide you through the process of downloading and
installing the data.
3. Follow the instructions to install the voice data.
12.5.2 Adjusting the Speech Rate
1. On the
Settings
screen, touch
Voice input & output
>
Text-to-speech settings
>
Speech rate
.
2. Select a speed at which the text is to be spoken.
12.6 Protecting Your Mobile Phone
12.6.1 Protecting Your Mobile Phone with a Screen Lock
To keep your data more secure, lock the screen and/or require a screen unlock
pattern every time your mobile phone is turned on or wakes up from sleep mode.
1. On the
Settings
screen, touch
Location & security
>
Set up screen lock
>
Pattern
.
2. Flick your finger vertically, horizontally or diagonally, connect at least four dots in
any order you choose. Lift your finger from the screen when you are finished.
You must drag your finger between the dots on the screen to create the pattern,
not simply touch individual dots.
3. Your mobile phone will record the pattern. Touch
Continue
.
4. When prompted, draw the screen unlock pattern again, and then touch
Confirm
.
To change your unlock screen pattern, touch
Location & security
>
Change screen
lock
.

65
12.6.2 Protecting Your Mobile Phone with a Numeric PIN
You can set up a numeric PIN to lock your phone.
1. On the
Settings
screen, touch
Location & security
>
Set up screen lock
>
PIN
.
2. Enter at least four characters.
3. Touch
Continue
.
4. Enter the same characters again and touch
OK
.
To change your PIN, touch
Location & security
>
Change screen lock
.
12.6.3 Unlocking Your Mobile Phone If You Forget the Screen
Lock Pattern
If you have already created a Google account, you can unlock your mobile phone
using the following methods.
• After you have entered the wrong sequence five times, a
Forgot pattern?
button
will appear. Touch this button to enter the Google account interface. After you have
entered your Google account password, you will be able to reset the unlock pattern.
• After you have entered the wrong pattern twenty times, you will be taken directly to
the Google account interface. After you have entered your Google account
password, you will be able to reset the unlock pattern.
12.7 Managing Applications
12.7.1 Viewing an Installed Application
1. On the
Settings
screen, touch
Applications
>
Manage applications
.
2. In the applications list, do either of the following:
• Touch , and then touch
Sort by size
. Then touch an application to view its
details.
• Touch an application directly to view its details.
12.7.2 Uninstalling an Application
You cannot uninstall the applications that are pre-installed on the system.
1. On the
Settings
screen, touch
Applications
>
Manage applications
.
66
2. Touch an application, and then touch
Uninstall
.
12.7.3 Moving an Application to the microSD Card
Some applications are designed to be stored on your phone’s USB storage or
microSD card (depending on the model of your phone), rather than in its internal
storage. Others are designed so you can change where they are stored. You may find
it helpful to move large applications off your internal storage, to make more room for
other applications that do not offer the option.
1. On the
Settings
screen, touch
Applications
>
Manage applications
.
2. Touch an application in the list. Then touch
Move to SD card
to move the bulk of
the application from the phone’s internal storage.
The
Storage
section of the application’s details screen shows details about the
memory used by the application. If the application can be moved, the
Move to
SD card
button is active.
Touch
Move to phone
to move the application back to the phone’s internal
storage.
12.7.4 Ways to Free Up Your Mobile Phone Memory
• Move files and email attachments to the microSD card.
• In
Browser
, clear all temporary Internet files and Browser history information.
• Move applications to the microSD card.
• Uninstall any downloaded programs that you no longer use.
• Reset your mobile phone.
12.8 Resetting Your Mobile Phone
12.8.1 Backing Up My Data
You can use your Google account to back up your mobile phone’s settings to Google
servers. If you replace your mobile phone, the settings you have backed up will be
transferred to the new mobile phone the first time you sign in to your Google account.
1. On the
Settings
screen, touch
Privacy
.
2. Select the
Back up my data
check box.

67
12.8.2 Restoring Factory Data
If you reset your phone to the settings that were configured at the factory, all of your
personal data stored on the phone, including information about your Google Account,
any other accounts, your system and application settings, and any applications you
have downloaded will be erased. Resetting the phone does not erase any system
software updates you have downloaded or any files on your microSD card, such as
music clips or photos.
1. On the
Settings
screen, touch
Privacy
>
Factory data reset
.
2. When prompted, touch
Reset phone
, and then touch
Erase everything
. The
mobile phone resets the settings to the original factory settings, and then restarts.
12.9 Setting Power saving mode
1. On the Home screen, touch >
Settings
>
Power saving mode
.
2. Select the
Power saving mode
check box.
12.10 Online Update
Your mobile phone has pre-installed the online update function. When there is new
software available, the version information appears and prompts you to update. You
can also touch
Settings
>
About phone
>
Online upgrade
to check whether the
new software is available.
When updating:
1.
Back up your personal information. All personal information will be
removed after the update.
2.
Make sure that your microSD card has sufficient space to store the new
software version.
3.
Perform the online update following the onscreen instructions.

68
13 Appendix
13.1 FAQ
How Can I Use a microSD Card to Import Contacts to My Phone from a
Different Mobile Phone?
Your mobile phone only supports contact files in the
.vcf
format.
1.
Save the contacts you want to import to your mobile phone to a microSD
card as a
.vcf
file.
2.
Insert the microSD card into your mobile phone and find the
.vcf
file
using the
File Manager
.
3.
Touch the
.vcf
file. The phone displays a prompt asking whether you
want to import the contacts.
4.
Touch
OK
to import the contacts.
Compatibility problems may occur with
.vcf
files created by different mobile
phones and certain contact information may be lost after contacts are imported.
You can also use Bluetooth to share and import contacts.
How do I prevent automatic switching of orientation when rotating phone?
On the Home screen, touch >
Settings
>
Display
>
Auto-rotate screen
to
disable the function.
How do I set the unlock pattern?
On the Home screen, touch >
Settings
>
Location & security
>
Set up screen
lock
>
Pattern
.
How can I change the input method?
Touch and hold the area where you write text and then select the input method you
prefer.
How do I stop the song playing in the background?
Touch the notification bar, flick downwards to open the notifications panel, touch the
music playing notification to go to the music playing screen, and then stop playing the
song.

69
How do I return to the calling screen?
While on a call, if you’re on another screen, you can touch the notification bar, and
drag downwards to open the notifications panel. Then touch the current call
notification to return to the calling screen.
How do I create an application shortcut on the Home screen?
Touch and hold an application icon on the application screen until the Home screen is
displayed. Then drag the icon where you want it to go and release your finger.
How do I hide the keyboard?
Touch to hide the keyboard.

HUAWEI M660
All the pictures in this guide are for your reference only. The actual
appearance and display features depend on the mobile phone you
purchase.
Android is a trademark of Google Inc. Use of this trademark is
subject to Google Permissions.
© Huawei Technologies Co., Ltd. 2012. All rights reserved.
Manufactured under license from DTS Licensing
Limited. DTS, the Symbol, & DTS and the Symbol
together are registered trademarks & DTS Envelo |
Headphone is a trademark of DTS, Inc. Product
includes software. © DTS, Inc. All Rights Reserved.
V100R001_01
HUAWEI Ascend Q
Guía del usuario
Bienvenido a HUAWEI
Contenido
i
1 Lectura previa a las operaciones...........................................1
1.1 Precauciones de seguridad ......................................................... 1
1.2 Seguridad de datos e información personal ................................ 2
1.3 Aviso legal ................................................................................... 4
2 Introducción ...........................................................................7
2.1 Aspecto........................................................................................ 7
2.2 Configuración del teléfono móvil.................................................. 8
2.3 Encendido o apagado del teléfono móvil................................... 10
2.4 Uso de la pantalla táctil.............................................................. 11
2.5 Bloqueo y desbloqueo de la pantalla......................................... 12
2.6 Pantalla principal ....................................................................... 13
2.7 Pantalla de aplicaciones............................................................ 18
2.8 Uso de la tarjeta microSD.......................................................... 18
3 Cómo realizar llamadas.......................................................19
3.1 Cómo realizar llamadas ............................................................. 20
3.2 Cómo responder o rechazar llamadas....................................... 21
3.3 Otras operaciones que se pueden realizar durante una
llamada ...................................................................................... 22
3.4 Utilización de la Registro de llamadas....................................... 23
3.5 Uso del modo avión ................................................................... 24
3.6 Operación TTY ......................................................................... 24
4 Contactos.............................................................................25
4.1 Cómo acceder a Contactos ....................................................... 25
4.2 Cómo agregar contactos ........................................................... 25
4.3 Cómo agregar contactos a favoritos.......................................... 25
4.4 Índice de contactos.................................................................... 26
4.5 Búsqueda de contactos ............................................................. 26
4.6 Edición de contactos.................................................................. 26
ii
4.7 Cómo comunicarse con los contactos ....................................... 27
4.8 Eliminación de contactos........................................................... 27
4.9 Redes sociales .......................................................................... 28
4.10 Administración de Grupos ....................................................... 29
4.11 Asociación y separación de contactos..................................... 30
4.12 Envío de contactos .................................................................. 31
5 Uso del teclado en pantalla .................................................31
5.1 Visualización del teclado ........................................................... 31
5.2 Personalización de las configuraciones del teclado .................. 33
6 Mensajería...........................................................................34
6.1 SMS y MMS............................................................................... 34
6.2 Correo electrónico ..................................................................... 36
7 Cómo establecer una conexión ...........................................39
7.1 Redes móviles ........................................................................... 39
7.2 Wi-Fi .......................................................................................... 40
7.3 WPS........................................................................................... 41
7.4 Navegador ................................................................................. 42
7.5 Bluetooth.................................................................................... 44
8 Entretenimiento....................................................................46
8.1 Cómo tomar fotografías y grabar videos ................................... 46
8.2 Utilización de la Galería............................................................. 48
8.3 DTS Envelo™ ............................................................................ 49
9 Servicios de Google.............................................................50
9.1 Creación de una cuenta de Google........................................... 50
9.2 Gmail ......................................................................................... 51
9.3 Talk............................................................................................ 52
9.4 Maps.......................................................................................... 54
9.5 YouTube .................................................................................... 55
9.6 Play Store .................................................................................. 56
iii
10 Sincronización de información...........................................56
10.1 Administración de las cuentas ................................................. 57
10.2 Personalización de la sincronización de cuentas .................... 58
11 Uso de otras aplicaciones..................................................60
11.1 Gestor de tráfico ...................................................................... 60
11.2 Cop seg de tod los arch........................................................... 60
11.3 Calendario ............................................................................... 61
11.4 Gestor de archivos................................................................... 63
11.5 Reloj......................................................................................... 65
11.6 Calculadora.............................................................................. 66
11.7 Bloc de notas ........................................................................... 67
12 Administración del teléfono móvil ......................................67
12.1 Configuración de fecha y hora................................................. 67
12.2 Configuración de la pantalla .................................................... 68
12.3 Configuración del timbre.......................................................... 68
12.4 Configuración de servicios telefónicos .................................... 69
12.5 Configuración de la función texto a voz................................... 70
12.6 Protección del teléfono móvil................................................... 71
12.7 Administración de aplicaciones ............................................... 72
12.8 Restablecimiento de las configuraciones de fábrica del
teléfono móvil ............................................................................ 74
12.9 Configuración del Modo aho de energ..................................... 74
12.10 Actualización en línea............................................................ 75
13 Apéndice............................................................................75
13.1 Preguntas frecuentes............................................................... 75

1
1 Lectura previa a las operaciones
1.1 Precauciones de seguridad
Lea las precauciones de seguridad cuidadosamente para garantizar el uso correcto
del teléfono móvil.
No lo golpee, no lo deje caer ni lo perfore. Evite que el teléfono móvil
se caiga, no lo doble ni ejerza presión sobre éste.
No utilice el teléfono móvil en ambientes húmedos, por ejemplo, en
un cuarto de baño. Evite mojar o lavar el teléfono móvil con líquidos.
No encienda el dispositivo en los lugares donde se prohiba el uso de
teléfonos móviles, o en aquellas zonas donde pueda causar
interferencias u ocasionar situaciones de riesgo.
No utilice el teléfono mientras conduce.
Obedezca las normas y regulaciones vigentes en los hospitales y
centros de salud. Apague el teléfono cuando se encuentre cerca de
dispositivos de uso médico.
Apague el teléfono cuando se encuentre dentro de una aeronave.
El teléfono podría causar interferencias con los equipos de control
de esta última.
Apague el teléfono móvil cuando se encuentre cerca de dispositivos
electrónicos de alta precisión. El teléfono podría afectar el
funcionamiento de dichos dispositivos.
No intente desarmar el teléfono ni sus accesorios. El teléfono sólo
puede ser reparado por personal calificado.

2
1.2 Seguridad de datos e información
personal
La utilización de algunas funciones o aplicaciones de terceros disponibles en el
dispositivo puede ocasionar la pérdida de datos o información personal, o permitir a
terceros acceder a dichos datos o información. Se recomienda la adopción de
distintas medidas para proteger la información confidencial y personal.
• Coloque el dispositivo en un lugar seguro para evitar su uso no autorizado.
• Configure el bloqueo de la pantalla y cree una contraseña o patrón de desbloqueo
para desbloquearla.
No coloque el teléfono ni sus accesorios en recipientes con
presencia de campos electromagnéticos de gran potencia.
No coloque medios de almacenamiento magnético cerca del
teléfono. La radiación del teléfono podría borrar la información
almacenada en éstos.
No exponga el teléfono a temperaturas elevadas ni lo utilice en
lugares con presencia de gases inflamables, por ejemplo, en
gasolineras.
Mantenga el teléfono móvil y sus accesorios fuera del alcance de
los niños. No permita que los niños utilicen el teléfono sin
supervisión de adultos.
Sólo utilice baterías y cargadores aprobados para evitar el riesgo de
una explosión.
Obedezca las leyes y regulaciones aplicables al uso de dispositivos
inalámbricos. Respete la privacidad y los derechos de terceros al
utilizar el dispositivo inalámbrico.
Cumpla estrictamente con las instrucciones de este manual al
utilizar el cable USB. De lo contrario, el teléfono móvil o la PC
podrían dañarse.
3
• En forma periódica, realice un backup de la información personal almacenada en
la tarjeta de memoria o en la memoria del dispositivo. Si cambia de dispositivo,
asegúrese de transferir o eliminar toda la información personal del dispositivo
anterior.
• Ante la duda de la existencia de virus en correos electrónicos o mensajes enviados
por un desconocido, elimínelos sin abrirlos.
• Si usa el dispositivo para navegar por Internet, evite acceder a sitios web que
puedan resultar inseguros para evitar el robo de información personal.
• Si utiliza servicios como Wi-Fi tether o Bluetooth, configure las contraseñas de
estos servicios para evitar el acceso no autorizado a éstos. Cuando dichos
servicios no se utilicen, desactívelos.
• Instale o actualice el software de seguridad de los dispositivos y realice análisis
regulares para detectar la existencia de virus.
• Asegúrese de obtener aplicaciones de terceros de fuentes legítimas. Analice las
aplicaciones de terceros que se hayan descargado con el fin de detectar la
existencia de virus.
• Instale parches o software de seguridad desarrollados por Huawei u otros
proveedores de aplicaciones.
• Algunas aplicaciones requieren y transmiten información de ubicación. Por lo
tanto, terceros pueden compartir su información de localización.
• El dispositivo puede proveer información de diagnóstico y detección a otros
proveedores de aplicaciones. Otros proveedores pueden utilizar esta información
para mejorar sus productos y servicios.
• Si tiene dudas sobre la seguridad de los datos e información personal, envíe un
correo electrónico a mobile@huawei.com.

4
1.3 Aviso legal
Copyright © Huawei Technologies Co., Ltd. 2012 Todos los derechos
reservados.
Este documento no podrá ser reproducido ni transmitido de ninguna manera sin el
consentimiento previo escrito de Huawei Technologies Co., Ltd.
El producto que se describe en este manual puede contener software cuyos
derechos de autor pertenecen a Huawei Technologies Co., Ltd. y sus posibles
licenciantes. Los clientes no podrán reproducir, distribuir, modificar, decompilar,
desarmar, decodificar, extraer, ceder ni arrendar dicho software de ningún modo,
como tampoco practicar ingeniería inversa, ni otorgar una sublicencia de éste, con
excepción del caso en que la ley aplicable disponga lo contrario, o que dichas
acciones hayan sido aprobadas por los titulares de los derechos de autor respectivos.
Marcas comerciales y permisos
, y son marcas comerciales o registradas de Huawei
Technologies Co., Ltd.
Android es una marca comercial de Google inc.
Toda otra marca comercial, producto, servicio o denominación social mencionada en
el presente es propiedad de sus respectivos titulares.
Aviso
Ciertas características del producto y de los accesorios aquí descriptos dependen del
software instalado, de las capacidades y de las configuraciones de la red local, y
pueden no estar activadas o estar limitadas por los operadores de la red local o por
los proveedores de servicios de red. Por lo tanto, es posible que las descripciones
contenidas en el presente documento no coincidan exactamente con el producto o
con los accesorios adquiridos.
Huawei Technologies Co., Ltd. se reserva el derecho de cambiar o modificar
cualquier información o especificación que aparezca en este manual sin notificación
previa y sin implicar responsabilidad alguna.
Declaración en relación con software de terceros
Huawei Technologies Co., Ltd. no es titular de la propiedad intelectual del software ni
de las aplicaciones de terceros que acompañan este producto. Por lo tanto, Huawei
Technologies Co., Ltd. no ofrece garantía alguna en relación con dichas aplicaciones
y software de terceros. Huawei Technologies Co., Ltd. no proveerá servicios de
5
soporte técnico a los clientes que utilizan el software y las aplicaciones de terceros, ni
será responsable respecto de las funciones de dicho software y dichas aplicaciones.
La provisión de servicios de aplicaciones y software de terceros puede interrumpirse
en forma temporal o permanente en cualquier momento. Huawei Technologies Co.,
Ltd. no garantiza el suministro del mismo contenido o servicio durante el período de
disponibilidad de éstos. Los terceros proveedores de servicios ofrecen contenido y
servicios a través de la red o de las herramientas de transmisión, y no están
supeditados al control de Huawei Technologies Co., Ltd. En la medida que lo permite
la ley aplicable, se deja constancia explícita que Huawei Technologies Co., Ltd. no
será responsable de los servicios que provea un tercero, ni de la interrupción
temporal ni permanente de la provisión de contenido o servicios de terceros, así
como tampoco abonará indemnización por daños en relación con lo anterior.
Huawei Technologies Co., Ltd. no será responsable del hecho de que el software
instalado en este producto sea o no legal, ni de la calidad ni de otros aspectos de
dicho software. Tampoco será responsable de los elementos de terceros que hayan
sido cargados o descargados, como texto, imágenes, videos o software. Los clientes
asumirán el riesgo de los efectos, incluso de la incompatibilidad entre el software y
este producto, resultantes de la instalación del software o de la carga o descarga de
elementos de terceros.
Este producto utiliza el sistema operativo Android™ de código abierto. Huawei
Technologies Co., Ltd. ha realizado los cambios necesarios al sistema. Por lo tanto,
es posible que este producto no soporte todas las funciones del sistema operativo
Android estándar o que no sea compatible con software de terceros. Huawei
Technologies Co., Ltd. no será responsable de las situaciones mencionadas.
EXCLUSIÓN DE GARANTÍA
LOS CONTENIDOS DE ESTE MANUAL NO ESTÁN SUJETOS A GARANTÍA
ALGUNA. A EXCEPCIÓN DE LOS CASOS EN QUE ASÍ LO REQUIERA LA LEY
APLICABLE, NO SE CONSTITUYEN GARANTÍAS DE NINGUNA CLASE, NI
EXPRESAS NI IMPLÍCITAS. ENTRE OTRAS, A TÍTULO MERAMENTE
ENUNCIATIVO, NO SE OFRECE NINGUNA GARANTÍA DE COMERCIABILIDAD
NI DE APTITUD PARA UN FIN ESPECÍFICO RESPECTO DE LA PRECISIÓN, LA
CONFIABILIDAD, NI DE LOS CONTENIDOS DE ESTE MANUAL.
LIMITACIÓN DE LA RESPONSABILIDAD
EN LA MEDIDA EN QUE LO PERMITAN LAS LEYES APLICABLES, HUAWEI
TECHNOLOGIES CO. LTD BAJO NINGUNA CIRCUNSTANCIA SERÁ
RESPONSABLE POR DAÑOS ESPECIALES, INCIDENTALES, INDIRECTOS O
6
EMERGENTES, NI POR EL LUCRO CESANTE, LA PÉRDIDA DE
OPORTUNIDADES COMERCIALES, LA PÉRDIDA DE INGRESOS, DE DATOS
O DE BUEN NOMBRE, NI POR LA PÉRDIDA DE AHORROS PREVISTOS.
LA RESPONSABILIDAD DE HUAWEI TECHNOLOGIES CO., LTD. DERIVADA
DEL USO DEL PRODUCTO DESCRITO EN ESTE DOCUMENTO SE LIMITARÁ
A LA SUMA ABONADA POR LOS CLIENTES AL ADQUIRIR ESTE PRODUCTO
(ESTA LIMITACIÓN NO SE APLICARÁ A LA RESPONSABILIDAD POR
LESIONES YA QUE LA LEY APLICABLE PROHÍBE DICHA LIMITACIÓN).
Normas de importación y exportación
Los clientes deberán cumplir con todas las leyes y reglamentaciones aplicables en
materia de importaciones y exportaciones, y deberán obtener las licencias y los
permisos gubernamentales necesarios a fin de exportar, reexportar o importar el
producto mencionado en este manual, lo que incluye el software y la información
técnica correspondiente.
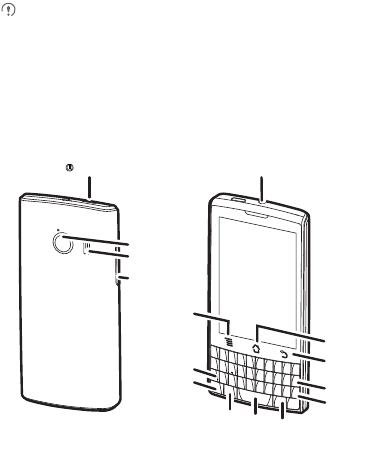
7
2 Introducción
Las imágenes de este documento se presentan sólo a modo de referencia. Las
funcionalidades de pantalla del teléfono adquirido pueden no coincidir con las
descripciones de este documento y dependen de la versión de software del
equipo.
2.1 Aspecto
2.1.1 Descripción rápida del teléfono móvil
Alimentación
Cámara
Altavoz
Tecla de
volumen
Entrada para auriculares
Inicio
Menú
Volver
Tecla
Eliminar
Enter
Tecla Alt
Tecla
Mayúsculas
Tecla de
emoticones Tecla de
espacio Tecla de
símbolos
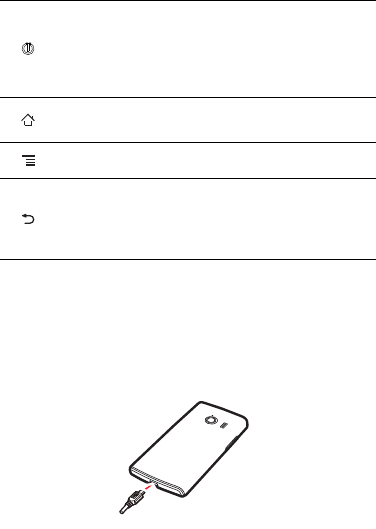
8
2.1.2 Funciones táctiles clave
2.2 Configuración del teléfono móvil
2.2.1 Carga de la batería
Antes de cargar la batería, asegúrese de que ésta haya sido correctamente insertada
en el teléfono.
1. Conecte al cargador el cable USB provisto con el teléfono móvil.
• Mantenga presionada esta tecla para encender el teléfono móvil.
• Mantenga presionada esta tecla para abrir el menú
Opciones de
teléfono
.
• Presione esta tecla para bloquear la pantalla del teléfono móvil
cuando éste se encuentre activo.
• Presione esta tecla para volver a la pantalla principal.
• Mantenga presionada esta tecla para activar el
Reciente
.
Presione esta tecla para acceder al menú en la pantalla activa.
• Presione esta tecla para volver a la pantalla anterior.
• Presione esta tecla para salir de cualquier aplicación que se
encuentre en ejecución.
• Presione esta tecla para ocultar el teclado.
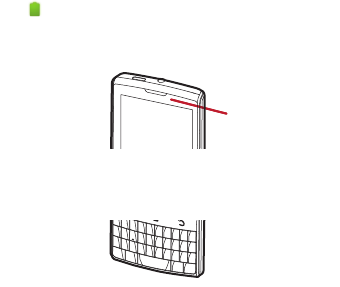
9
2. Conecte el extremo opuesto del cable USB al teléfono móvil. Luego, para iniciar la
carga, inserte el cargador en un tomacorriente.
Si el teléfono móvil está encendido durante la carga, el ícono de la batería muestra el
progreso de la carga en la barra de notificaciones. Cuando el ícono de la batería
cambia a , esto significa que el teléfono móvil está completamente cargado.
Indicador de estado
El color del indicador de estado muestra el estado de la batería del teléfono móvil.
2.2.2 Información importante de la batería
• Si la batería no ha sido utilizada por un largo período, es posible que no se pueda
encender el teléfono móvil inmediatamente después de comenzar a cargar la
batería. Deje cargar la batería durante unos minutos con el teléfono apagado antes
de tratar de encenderlo.
• Con el tiempo, el rendimiento de la batería disminuye y, en especial, no
permanecerá cargada tanto tiempo como cuando era nueva. Si la batería dura
menos tiempo que lo habitual después de haber sido cargada adecuadamente,
reemplácela por otra del mismo tipo.
• Cuando se utilizan servicios de datos, el teléfono consumirá más energía y, por lo
tanto, disminuirá el período durante el cual se puede utilizar el equipo entre carga
y carga.
SIndicador de estado
Verde: completamente cargada (cargador conectado).
Naranja: cargando (cargador conectado).
Rojo: batería baja.

10
• El tiempo necesario para cargar la batería en forma completa depende de la
temperatura ambiente y de la antigüedad de la batería.
• Cuando el nivel de carga de la batería es bajo, el teléfono da un aviso y muestra
un mensaje en pantalla. Cuando la batería se haya descargado casi por completo,
el teléfono se apagará en forma automática.
2.2.3 Sugerencias para el ahorro de energía
La duración de la carga de la batería depende de la red a la que está conectado el
usuario y del modo en el que el usuario utiliza el teléfono móvil.
Para preservar la carga de la batería, intente lo siguiente:
• Cuando el teléfono móvil no está en uso, apague la luz de fondo de la pantalla.
• Reduzca el tiempo de desactivación de la luz de fondo de la pantalla cuando el
teléfono está inactivo.
• Reduzca el brillo de la pantalla.
• Desactive la función Bluetooth cuando no esté en uso. Sólo haga el teléfono visible
a otros dispositivos Bluetooth cuando necesite establecer una conexión Bluetooth.
• Desactive la conexión Wi-Fi cuando no esté en uso.
• Apague el receptor de GPS del teléfono cuando no esté en uso.
• Baje el volumen.
• Cierre los programas que consumen energía cuando no los necesite.
• Desactive el servicio de datos.
2.3 Encendido o apagado del teléfono
móvil
2.3.1 Cómo encender el teléfono móvil
Presione la tecla . La primera vez que encienda el teléfono, deberá iniciar sesión
en la cuenta respectiva y configurar el teléfono móvil.
2.3.2 Configuración del teléfono móvil
Al encender el teléfono móvil por primera vez, éste muestra el asistente de
configuración, que lo guiará en la configuración del teléfono.

11
El asistente de configuración permite:
• Crear la cuenta o iniciar sesión en ésta
• Tomar decisiones iniciales sobre cómo desea utilizar el teléfono móvil
2.3.3 Activación del inicio rápido
1. Presione >
Configuraciones
>
Aplicaciones
.
2. Seleccione la casilla de verificación
Reinicio rápido
.
No active la función
Reinicio rápido
a bordo de una aeronave.
2.3.4 Cómo apagar el teléfono móvil
1. Mantenga presionada la tecla para acceder al menú
Opciones de teléfono
.
2. Presione
Apagar
.
Si se habilita
Reinicio rápido
, el teléfono entrará en modo de suspensión. Si
Reinicio rápido
está deshabilitado, presione
Aceptar
para apagar el teléfono.
2.4 Uso de la pantalla táctil
2.4.1 Acciones de la pantalla táctil
•
Presionar
: puntee la pantalla con el dedo para seleccionar un elemento, confirmar
una selección o iniciar una aplicación.
•
Mantener presionado
: presione un elemento con el dedo y continúe
presionándolo hasta que el teléfono móvil responda. Por ejemplo, para acceder al
menú de opciones de la pantalla activa, mantenga presionada la pantalla hasta
que aparezca el menú.
•
Deslizar
: mueva el dedo sobre la pantalla en forma vertical u horizontal.
•
Arrastrar
: mantenga presionado con el dedo el elemento deseado. Para mover el
elemento, arrástrelo hacia cualquier parte de la pantalla. Es posible arrastrar un
ícono para moverlo o eliminarlo.
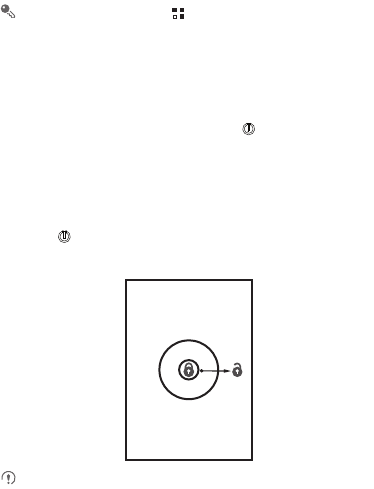
12
2.4.2 Rotación de la pantalla del teléfono móvil
La orientación de la mayoría de las pantallas cambiará de modo horizontal a modo
vertical al rotar el teléfono.
En la pantalla principal, presione >
Config.
>
Mostrar
>
Rotación aut. de
pant.
para deshabilitar esta función.
2.5 Bloqueo y desbloqueo de la pantalla
2.5.1 Bloqueo de la pantalla
• Cuando el teléfono móvil está encendido, presione para bloquear la pantalla.
Aunque la pantalla esté bloqueada, se pueden recibir mensajes y llamadas.
• Si el equipo no se utiliza durante un tiempo, la pantalla se bloqueará en forma
automática.
2.5.2 Desbloqueo de la pantalla
1. Presione para activar la pantalla.
2. Arrastre el ícono de bloqueo de izquierda a derecha para desbloquear la pantalla.
Si se ha configurado un patrón de desbloqueo para la pantalla, el teléfono
solicitará realizar dicho patrón en la pantalla para desbloquearla.
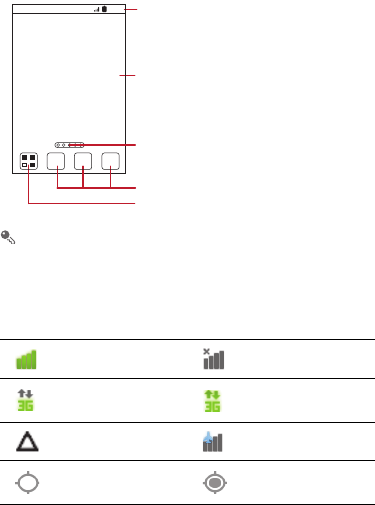
13
2.6 Pantalla principal
Mantenga presionado uno de los accesos directos hasta que el teléfono móvil
vibre. Arrastre el acceso directo hasta la ubicación deseada o hasta la papelera
de reciclaje. También es posible arrastrar un ícono desde un área de la pantalla
hasta la posición de accesos directos.
2.6.1 Íconos de notificación y de estado
Intensidad de la señal No hay señal
Conectado a una red
móvil 3G 3G en uso
Roaming Modo avión
GPS activado Recibiendo datos de
ubicación desde el GPS
10:23
Presione aquí para ver todas las aplicaciones.
Accesos directos
Barra de notificaciones:
Muestra los recordatorios e íconos de estado
del teléfono. Deslice el dedo hacia abajo
para acceder al panel de notificaciones.
Área de visualización:
Área principal de visualización del teléfono.
Pantalla principal e indicador de extensión.
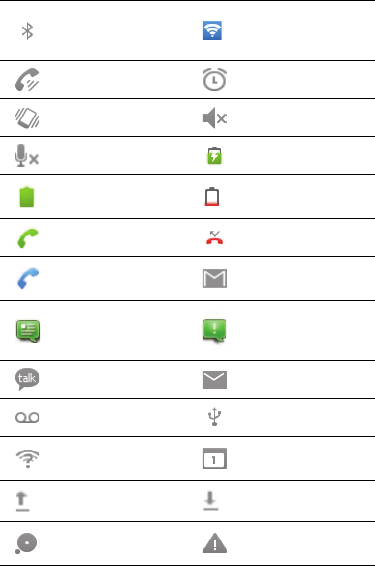
14
Bluetooth activado
Área de acceso
inalámbrico Wi-Fi portátil
activada
Altavoz activado Alarma activada
Modo vibración Tono silenciado
Llamada silenciada Cargando batería
Batería llena Batería extremadamente
baja
Llamada en curso Llamada perdida
Llamada en curso con
auriculares Bluetooth Nuevo correo de Gmail
Mensaje de texto o
multimedia nuevo
Problema con la entrega
del mensaje de texto o
multimedia
Mensaje de chat nuevo Correo electrónico nuevo
Correo de voz nuevo Conectado a una PC
Abrir la red Wi-Fi
disponible Evento próximo
Cargando Descargando
Memoria llena Problema de registro o de
sincronización
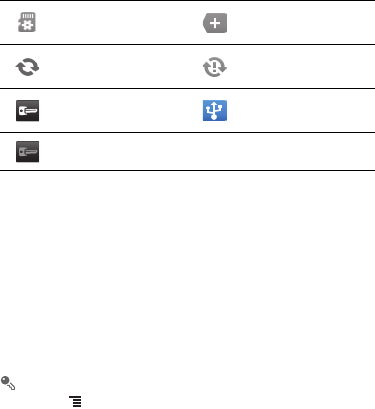
15
2.6.2 Panel de notificaciones
El teléfono móvil notificará al usuario la recepción de un mensaje nuevo o la
existencia de un evento próximo. El panel de notificaciones también informa al
usuario acerca de las alarmas y configuraciones; por ejemplo, cuando se activa la
función
Desvío de llamadas
. Abra el panel de notificaciones para ver quién es el
operador de red o para ver un mensaje, un recordatorio o una notificación de eventos.
Cómo acceder al panel de notificaciones
1. Cuando en la barra de notificaciones aparece un nuevo ícono de notificaciones,
mantenga presionada dicha barra y luego deslice el dedo hacia abajo para
acceder al panel de notificaciones.
También se puede abrir el panel de notificaciones desde la pantalla principal;
presione >
Notificaciones
para abrir el panel.
2. En el panel, podrá hacer lo siguiente:
• Presionar una notificación para abrir la aplicación correspondiente.
• Presionar
Borrar
para borrar todas las notificaciones.
Cómo salir del panel de notificaciones
Mantenga presionada la parte inferior del panel. Luego, deslice el dedo hacia arriba
para cerrarlo.
Preparando la tarjeta
microSD
Más notificaciones no
desplegadas en pantalla
Sincronizando datos No se pudo realizar la
sincronización
Conectado a una VPN Función tethering USB
activada
Desconectado de la VPN
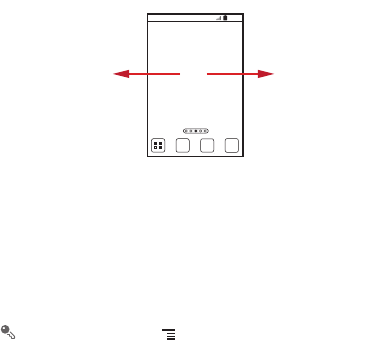
16
2.6.3 Cómo ver otras partes de la pantalla principal
2.6.4 Personalización de la pantalla principal
Cómo agregar elementos a la pantalla principal
1. Mantenga presionada un área en blanco de la pantalla principal hasta que
aparezca en pantalla el menú
Seleccionar acción
.
También es posible presionar >
Agregar
en la pantalla principal para
visualizar el menú
Seleccionar acción
.
2. Seleccione el elemento que desea agregar a la pantalla principal.
Cómo mover elementos de la pantalla principal
1. Mantenga presionado un elemento en la pantalla principal hasta que el elemento
se agrande y el teléfono móvil vibre.
2. Sin levantar el dedo, arrastre el elemento hasta la posición deseada en la pantalla y
luego suéltelo.
Eliminación de elementos de la pantalla principal
1. Mantenga presionado un elemento en la pantalla principal hasta que el elemento
se agrande y el teléfono móvil vibre.
10:23
Deslice el dedo hacia la
izquierda o derecha sobre
la pantalla principal.
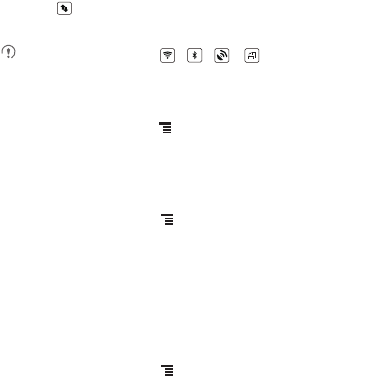
17
2. Sin levantar el dedo del elemento, arrástrelo hasta la papelera. Cuando el
elemento y la papelera se pongan de color rojo, el elemento podrá ser eliminado.
3. Libere el elemento para eliminarlo de la pantalla principal.
2.6.5 Accesos directos de servicio
1. Abra la barra de notificaciones.
2. Presione que aparece en la parte superior de la pantalla para activar o
desactivar los servicios de datos.
También es posible presionar , , o para activar o desactivar
los servicios correspondientes.
2.6.6 Configuración de las animaciones de la pantalla principal
1. En la pantalla principal, presione >
Configuraciones de pantalla principal
>
Animación
.
2. Seleccione una animación y luego presione
Guardar
.
2.6.7 Cambio del papel tapiz
1. En la pantalla principal, presione >
Fondo de pantalla
.
2. Presione los siguientes elementos del menú para seleccionar una imagen y
configurarla como papel tapiz.
•
Galería
•
Fondos de pantalla animados
•
Papeles tapiz
2.6.8 Cambio de temas
1. En la pantalla principal, presione >
Configuraciones de pantalla principal
.
2. Realice cualquiera de las siguientes acciones:
• Presione
Tema
para seleccionar un tema.
• Presione
Íconos de aplicaciones
para seleccionar una serie de íconos de
aplicaciones.
3. Presione
Guardar
.

18
2.7 Pantalla de aplicaciones
La pantalla de aplicaciones incluye íconos de todas las aplicaciones del teléfono. Es
posible presionar en la pantalla principal para acceder a la pantalla de
aplicaciones.
2.7.1 Cómo mover íconos de la pantalla de aplicaciones
1. En la pantalla de aplicaciones, presione .
2. Mantenga presionado el ícono de la lista de aplicaciones que desea mover hasta.
3. Sin levantar el dedo, arrastre el ícono hasta la posición deseada y luego suéltelo.
Para mover más íconos, repita los pasos 2 y 3.
4. Presione o para guardar.
2.8 Uso de la tarjeta microSD
2.8.1 Instalación de la tarjeta microSD (Opcional)
El teléfono móvil ya cuenta con una Tarjeta Multimedia Integrada (eMMC) de gran
capacidad. Si desea expandir la memoria del teléfono, se puede insertar una tarjeta
microSD.
1. Retire la tapa de la batería.
2. Inserte la tarjeta microSD en la ranura correspondiente como se muestra en el
diagrama.

19
2.8.2 Uso de la tarjeta microSD como dispositivo de
almacenamiento masivo USB
Para transferir todos los archivos favoritos de música e imágenes de la PC a la tarjeta
microSD del teléfono móvil, configure la tarjeta microSD como dispositivo de
almacenamiento masivo USB.
1. Conecte el teléfono móvil a la PC con el cable USB provisto. La PC detectará la
tarjeta microSD como un disco de almacenamiento extraíble.
2. Abra la barra de notificaciones y luego presione la opción
conectado al USB
.
3. Presione
Activar el almacenamiento USB
en el cuadro de diálogo que se abre
para confirmar que desea transferir archivos.
Es posible transferir archivos desde la PC a la tarjeta microSD del teléfono móvil.
Cuando la tarjeta microSD funciona como dispositivo de almacenamiento
masivo USB, el teléfono móvil no utilizará este espacio de memoria. Asegúrese
de seguir los procedimientos correctos para desconectar el dispositivo de
almacenamiento masivo USB (su teléfono móvil) de la PC cuando haya
finalizado la transferencia de archivos.
2.8.3 Extracción de la tarjeta microSD
1. En la pantalla principal, presione >
Config
.
2. Desplácese hacia abajo y luego presione
Espacio de almacenamiento
>
Desconexión de la tarjeta SD
.
3. Extraiga con cuidado la tarjeta microSD.
3 Cómo realizar llamadas
Para realizar una llamada telefónica, se puede marcar un número por medio del
teclado o presionar uno de los números de la lista de contactos, de una página web
o de un documento. Mientras se está manteniendo una conversación telefónica, es
posible responder llamadas entrantes o desviarlas al correo de voz. También es
posible establecer llamadas en conferencia con varios participantes.
20
3.1 Cómo realizar llamadas
Para hacer una llamada, es posible utilizar la aplicación
Teléfono
o seleccionar un
número de teléfono desde
Contactos
o
Registro de llamadas.
Durante una llamada en curso, se puede presionar para utilizar otras funciones.
Para volver a la pantalla de la llamada, deslice la barra de notificaciones hacia abajo
y presione
Llamada actual
.
Asegúrese de no bloquear el micrófono, que está en la parte inferior del teléfono,
para que la voz se escuche en forma clara durante la llamada.
3.1.1 Cómo hacer llamadas por medio de la aplicación
Marcador
1. En la pantalla principal, presione >
Teléfono
para acceder al marcador.
Si ya se encuentra dentro de las opciones
Contactos
o
Registro de llamadas
,
presione la pestaña
Teléfono
.
2. Presione las teclas numéricas que correspondan para ingresar un número de
teléfono.
El teléfono móvil soporta la función SmartDial, es decir, al presionar números en
el marcador, el teléfono automáticamente busca en los contactos y muestra las
coincidencias que detecta ordenadas según el nivel de exactitud de la
coincidencia. Si no hay contactos que coincidan con la información ingresada,
el teléfono no mostrará ningún resultado.
3. Presione para iniciar la llamada.
Durante el transcurso de una llamada, presione
Teclado telefónico
para
ingresar otros números en el panel de marcado.
3.1.2 Cómo realizar llamadas desde Contactos
1. En la pantalla principal, presione >
Contactos
para acceder a la lista de
contactos.
Si ya se encuentra dentro de las opciones
Teléfono
o
Registro de llamadas
,
presione la pestaña
Contactos
.
2. Dentro de la lista, presione el contacto al que desea llamar.
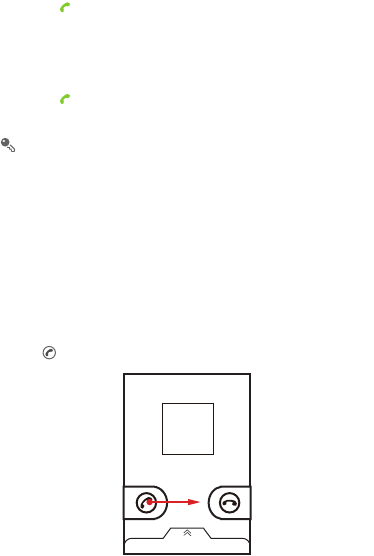
21
3. Presione para marcar el número de teléfono.
3.1.3 Cómo realizar llamadas desde
Registro de llamadas
1. Si ya se encuentra dentro de las opciones
Contactos
o
Teléfono
, presione la
pestaña
Registro de llamadas
.
2. Presione a la derecha de la entrada del registro para marcar el número
correspondiente.
Si mantiene presionada la entrada del registro, se abrirá el menú de opciones.
3.2 Cómo responder o rechazar
llamadas
3.2.1 Cómo contestar llamadas entrantes
Cuando se recibe una llamada telefónica, se despliega la pantalla de llamada
entrante. Si se ha guardado previamente el número del usuario llamante en
Contactos
, el nombre y el número de dicho usuario aparecerán en pantalla. Si el
número del usuario llamante no está guardado en
Contactos
, aparecerá en pantalla
el número de dicho usuario.
Arrastre hacia la derecha para contestar la llamada.

22
3.2.2 Cómo finalizar llamadas
Durante el transcurso de una llamada: presione
Finalizar
para cortar la
comunicación.
3.2.3 Cómo rechazar llamadas entrantes
Arrastre hacia la izquierda para rechazar la llamada.
También es posible arrastrar hacia arriba la barra que se encuentra en la parte
inferior de la pantalla para rechazar la llamada y enviar un mensaje al usuario
llamante.
3.3 Otras operaciones que se pueden
realizar durante una llamada
3.3.1 Cómo realizar llamadas en conferencia
Si se recibe una llamada nueva durante una llamada en curso, se puede agregar la
segunda llamada a la llamada en curso. Esta función se conoce como llamada en
conferencia. También es posible establecer una llamada en conferencia con
múltiples usuarios llamantes.
Comuníquese con el operador de red para saber si se soporta la función de
llamadas en conferencia y, de ser así, cuántos usuarios pueden participar de
ellas.

23
1. Para iniciar una llamada en conferencia, marque el número del primer usuario en
participar. Después de que el primer usuario se haya conectado, mantenga la
conexión abierta, presione
Agreg. Llam.
.
2. Ingrese el número de teléfono de la siguiente persona que desea agregar a la
conversación y presione , o seleccione a alguna persona de
Registro de
llamadas.
o
Contactos
. De esta forma, se retiene en forma automática la llamada
del primer usuario en participar.
3. Una vez que se haya conectado el segundo usuario, presione
Combinar
llamadas
para comenzar con la llamada en conferencia.
4. Para agregar más personas a la conferencia, presione
Agreg. Llam.
, y luego
repita los pasos 2 y 3.
5. Para finalizar la llamada en conferencia y desconectar a todos los participantes,
presione
Finalizar
.
3.3.2 Cómo pasar de una llamada a otra
Cuando se recibe una llamada nueva durante el transcurso de una llamada, se
puede pasar de una llamada a la otra.
1. Cuando se recibe una segunda llamada durante una llamada en curso, responda
la llamada entrante y luego presione
Administrar llamadas
.
2. La llamada en curso será retenida y se conectará la primera llamada.
3.4 Utilización de la Registro de llamadas.
El
Registro de llamadas.
contiene una lista de los números marcados y de las
llamadas recibidas o perdidas. Es posible utilizar el registro de llamadas para buscar
en forma rápida un número marcado recientemente, o para agregar un número del
registro de llamadas a la lista de contactos.
3.4.1 Cómo agregar entradas a Contactos
1. Si ya se encuentra dentro de las opciones
Teléfono
o
Contactos
, presione la
pestaña
Registro de llamadas.
.
2. Mantenga presionada la entrada que desee agregar a
Contactos
.
3. Presione
Agreg a cont
en el menú de opciones.

24
4. Presione
Nuevo contacto
o desplácese por la lista de contactos, y presione el
nombre de un contacto existente.
3.5 Uso del modo avión
En algunos lugares, se le pedirá que desactive las conexiones inalámbricas del
teléfono. En lugar de apagar el teléfono, se puede utilizar en
Modo avión
.
1. Mantenga presionada la tecla .
2. Presione
Modo avión
en el menú de opciones.
3.6 Operación TTY
3.6.1 Cómo utilizar el dispositivo TTY
El Teletipo (TTY) es un dispositivo telegráfico. Al conectar el teléfono con el
dispositivo TTY, se pueden usar las funciones TTY para enviar y recibir mensajes.
Cuando utilice la función TTY, haga lo siguiente:
1. Configure el teléfono en el modo TTY y conecte el dispositivo TTY en la entrada
para auriculares del teléfono.
2. Realice o responda llamadas como lo hace habitualmente.
3. Cuando la llamada esté establecida, use el dispositivo TTY para enviar y recibir
caracteres.
4. Presione
Finalizar
para finalizar la llamada.
3.6.2 Cómo configurar el modo TTY
1. Presione >
Config.
>
Config. de llamada
>
Modo TTY
.
2. Seleccione el modo TTY.
•
TTY apagado
: modo de transmisión de voz y modo de escucha estándares.
•
TTY total
: transmite y recibe caracteres TTY.
•
TTY HCO
: transmite los caracteres TTY pero los recibe a través del auricular.
•
TTY VCO
: recibe caracteres TTY pero los transmite mediante el micrófono.

25
4 Contactos
La aplicación
Contactos
permite guardar y administrar información, como los
números de teléfono y las direcciones de los contactos. Después de guardar la
información de contactos en el teléfono móvil, el usuario podrá acceder con facilidad
a los contactos con los que se desee comunicar.
4.1 Cómo acceder a Contactos
Si aún no ha agregado ningún contacto al teléfono móvil,
Contactos
mostrará un
mensaje con sugerencias sobre cómo comenzar a agregar la información de los
contactos. En la pantalla principal, presione
Contactos
para acceder a la aplicación
Contactos
.
En la pantalla principal, presione >
Contactos
para acceder a la aplicación
Contactos
.
Todos los contactos se mostrarán ordenados alfabéticamente en una lista por la que
es posible desplazarse.
4.2 Cómo agregar contactos
1. En la lista de contactos, presione >
Nuevo contacto
.
2. Si tiene más de una cuenta con contactos, presione la cuenta a la cual desea
agregar el contacto.
3. Ingrese el nombre del contacto y luego agregue información detallada, como el
número de teléfono o la dirección.
4. Cuando haya finalizado, presione
Guardar
para guardar la información del
contacto.
4.3 Cómo agregar contactos a favoritos
• Mantenga presionado el contacto que desee agregar a
Favoritos
. Luego
presione
Agregar a Favoritos
.
• Presione un contacto y luego la estrella que se encuentra a la derecha del nombre
del contacto. La estrella se pondrá color dorado.

26
4.4 Índice de contactos
Es posible crear un índice de los
Contactos
para buscar en forma rápida el contacto
deseado.
1. En la pantalla principal, presione >
Contactos
.
2. Presione o mueva cualquier letra del alfabeto para crear una lista de todos los
contactos que empiezan con la letra elegida.
4.5 Búsqueda de contactos
1. En la lista de contactos, presione >
Buscar
.
2. Ingrese el nombre del contacto que está buscando. A medida que se ingresan los
datos, aparecerán los contactos con nombres coincidentes debajo del cuadro de
búsqueda.
En la pantalla de la lista de contactos, presione una letra a la derecha para que
aparezcan en pantalla los contactos que comienzan con la letra presionada.
4.6 Edición de contactos
La información de un contacto que se encuentra almacenada se puede modificar en
todo momento.
1. En la lista de contactos, mantenga presionado el contacto cuyos detalles desea
editar y luego presione
Editar contacto
desde el menú de opciones.
2. Presione la categoría de la información del contacto que desea modificar: nombre,
número de teléfono, dirección de correo electrónico o cualquier otro dato
previamente registrado.
3. Realice los cambios que desee a la información del contacto y luego presione
Guardar
. Para cancelar todos los cambios, presione
Revertir
.

27
4.7 Cómo comunicarse con los contactos
Desde la pestaña
Contactos
o
Favoritos
, es posible llamar o enviar un mensaje de
texto (SMS) o un mensaje multimedia (MMS) al número de teléfono predeterminado
de un contacto en forma rápida. También es posible acceder a los detalles para
visualizar la lista de todos los modos en los que se puede comunicar con ese
contacto. Esta sección describe cómo comunicarse con un contacto cuando se
accede a la lista de contactos.
4.7.1 Uso de Búsqueda rápida de contactos para Android
1. Presione la imagen o el recuadro de imagen del contacto (si no ha asignado una
imagen al contacto) para acceder a la función Búsqueda rápida de contactos para
Android.
2. Presione el ícono correspondiente al modo en el que desea comunicarse con el
contacto.
Los íconos disponibles varían según la información del contacto con la que se
cuente, las aplicaciones instaladas en el teléfono y las cuentas existentes.
4.7.2 Cómo comunicarse con los contactos
1. Desde la lista de contactos, presione el contacto con el cual desea comunicarse.
2. En la pantalla de detalles del contacto, presione el ícono que se encuentra a la
derecha del número para llamar o enviar mensajes.
4.8 Eliminación de contactos
1. En la lista de contactos, mantenga presionado el contacto que desea eliminar y
luego presione
Eliminar contacto
desde el menú de opciones.
2. Presione
Aceptar
para confirmar que desea eliminar el contacto.

28
4.9 Redes sociales
Con el término "Redes sociales", se denomina al cliente que integra funciones de
servicio de redes sociales (SNS) de Facebook y Twitter. Utilizando Flujos, las cuentas
SNS pueden vincularse con los Contactos.
Para acceder a la pantalla Flujos, presione >
Redes sociales
. También es
posible presionar
Contactos
y luego deslizar el dedo hacia la izquierda para pasar a
la pantalla Flujos.
4.9.1 Inicio de sesión en una cuenta
1. Cuando acceda a Flujos por primera vez, presione
Iniciar sesión en la red social
.
2. Seleccione el tipo de cuenta en la que desea iniciar sesión. Luego, siga las
instrucciones de configuración que aparecen en pantalla para iniciar sesión.
Es posible iniciar sesión en diferentes tipos de cuentas al mismo tiempo. Para
agregar una cuenta de otro tipo, presione >
Cuentas
>
Agregar cuenta
.
4.9.2 Cómo importar amigos
Después de iniciar sesión, el teléfono le pregunta si desea importar todos los amigos.
Si decide importar amigos, Flujos importará al teléfono las cuentas SNS de todos sus
amigos. De lo contrario, podrá importar las cuentas de sus amigos más tarde desde
Configuraciones.
Una vez importados los amigos, el grupo de cuentas importadas se agrega
automáticamente a los grupos de
Contactos
.
4.9.3 Configuraciones de preferencia
Es posible establecer las configuraciones de las cuentas, como el modo y la
frecuencia de actualización y las notificaciones.
1. En la pantalla Flujos, presione >
Cuentas
. Luego presione la cuenta que
desea configurar.
2. En la pantalla de cuentas, presione
Configuraciones de preferencia social
para
establecer las configuraciones.

29
4.9.4 Cómo agregar el widget Flujos a la pantalla principal
Mantenga presionada el área en blanco de la pantalla principal. En el menú que
aparece en pantalla, presione
Agregar widget
>
Redes sociales
para agregar
Flujos a la pantalla principal.
Por medio de este widget, es posible acceder en forma rápida a Flujos, o buscar
directamente las últimas eventos y actualizar el estado de sus amigos en la pantalla
principal.
4.10 Administración de Grupos
4.10.1 Creación de grupos
1. En la pantalla principal, presione >
Contactos
. Luego deslice el dedo hacia la
izquierda sobre la barra tabuladora y presione
Grupos
.
2. En la lista de grupos, presione y luego presione
Crear grupo
.
3. Ingrese el nombre y la imagen que desee asignar al grupo y luego configure un
tono de llamada para dicho grupo.
4. Presione >
Agregar miembro
para agregar miembros al grupo.
5. Seleccione los contactos que desee agregar al grupo y luego presione
Aceptar
.
6. Cuando haya finalizado, presione
Guardar
para guardar la información del grupo.
4.10.2 Edición de grupos
La información de un grupo que se encuentra almacenada se puede modificar en
todo momento.
1. En la lista de grupos, mantenga presionado el grupo cuyos detalles desea editar y
luego presione la opción
Editar grupo
desde el menú de opciones.
2. Realice los cambios que desee a la información del grupo y luego presione
Guardar
. Para cancelar todos los cambios realizados a la información del grupo,
presione
Cancelar
.

30
4.10.3 Cómo agregar contactos a los Grupos
Para agregar un contacto a los grupos, se pueden llevar a cabo los siguientes pasos:
• Mantenga presionado el contacto que desee agregar a
Grupos
. Luego presione
Agregar a grupos
.
• Al editar un grupo, presione y luego
Agregar miembro
para seleccionar los
contactos que desea agregar al grupo.
4.11 Asociación y separación de
contactos
Es posible que los contactos se dupliquen si se importan de los siguientes modos:
• Agregando una cuenta, como una cuenta de Gmail.
• Utilizando los servicios de redes sociales, como Facebook o Twitter. (Si el teléfono
cuenta con la función Flujos, podrá acceder a Facebook o Twitter por medio de
ella.)
• Utilizando otros métodos, como el correo electrónico.
Para evitar la duplicación, es posible asociar dos o más contactos y formar de esta
manera un solo contacto.
La disponibilidad de Facebook o Twitter dependerá de los servicios disponibles
en el país o de la operadora en cuestión. Utilice estos servicios de acuerdo con
las leyes y reglamentaciones locales.
4.11.1 Cómo asociar contactos
1. En la pantalla principal, presione >
Contactos
.
2. Presione un contacto duplicado.
3. Presione
Contactos agregados
y luego,
Agregar contacto
.
4. Seleccione el contacto que desea asociar para combinar dos contactos
duplicados.
Los dos contactos se asociarán y se mostrarán como un solo contacto. Presione el
contacto para ver la información asociada. Es posible visualizar que el contacto está
asociado con otros dos contactos. También es posible asociar más de dos contactos.

31
4.11.2 Separación de los contactos
Si la información de los contactos de diferentes fuentes se asoció por error, es posible
separar los contactos.
1. En la pantalla principal, presione >
Contactos
.
2. Presione el contacto asociado que desea separar.
3. Presione la opción de separación de contactos.
4. Seleccione el contacto que desee separar del contacto asociado.
El contacto asociado se mostrará como dos contactos separados en
Contactos
.
4.12 Envío de contactos
Es posible enviar contactos como archivos .vcf vía Bluetooth o correo electrónico.
1. En la lista de contactos, presione .
2. Seleccione los contactos que desea enviar.
3. Presione
Enviar
.
4. Seleccione el modo en el que prefiere enviar los contactos seleccionados, por
ejemplo, vía Bluetooth o correo electrónico.
Es posible enviar un contacto de un modo diferente. Mantenga presionado un
contacto, presione
Enviar contacto
y luego seleccione el modo en que prefiere
enviar el contacto.
5 Uso del teclado en pantalla
5.1 Visualización del teclado
Para ingresar texto, utilice el teclado en pantalla. En algunas aplicaciones, se accede
al teclado en forma automática. En otras, se debe presionar un campo de texto para
acceder al teclado.
Presione para ocultar el teclado.
Mantenga presionado el campo de texto para acceder al menú
Editar texto
.
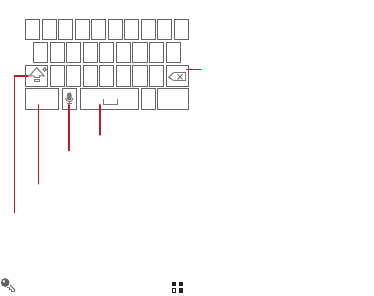
32
5.1.1 Selección de un modo de ingreso
1. Mantenga presionado un campo de texto hasta que el menú
Editar texto
aparezca en pantalla.
2. Presione
Selec. método de ingreso
.
3. Seleccione el modo de ingreso.
El panel del teclado aparecerá en pantalla automáticamente.
5.1.2 Uso del teclado Android
En la pantalla principal, presione >
Config.
>
Idioma y teclado
>
Teclado
de Android
>
Entrada por voz
para activar o desactivar la función de
reconocimiento de voz.
5.1.3 Uso del teclado horizontal
Si el teclado le resulta incómodo o difícil de usar, coloque el teléfono móvil en posición
horizontal. La pantalla mostrará el teclado en sentido horizontal, lo cual permite que
se vea un teclado más ancho.
q w e r t y u i o p
a s d f g h j k
z x c v b n m
.
?123
l
......
:-)
...
Presione esta tecla para borrar el
carácter que se encuentra a la
izquierda del cursor. Mantenenga
presionada esta tecla para borrar
todos los caracteres que se
encuentran a la izquierda del
cursor.
Presione esta tecla para insertar un espacio.
Presione esta tecla para ingresar texto por medio de la voz.
Presione esta tecla para pasar del modo de ingreso de texto al modo
de ingreso de símbolos/números.
Presione esta tecla una vez para que la próxima letra ingresada sea
mayúscula.
Presione esta tecla dos veces para que todas las letras ingresadas
sean mayúsculas.
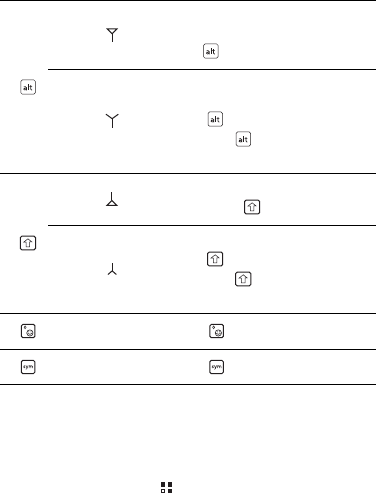
33
5.1.4 Cómo usar el teclado del teléfono
5.2 Personalización de las
configuraciones del teclado
1. En la pantalla principal, presione >
Config.
>
Idioma y teclado
.
2. En
Configuración de teclado
, seleccione un modo de ingreso para personalizar
la configuración del teclado.
Cursor:
Para ingresar un carácter que se encuentra en
la parte superior de una tecla, presione
primero y luego la tecla deseada.
Cursor:
Para ingresar sólo los caracteres que
aparecen en la parte superior de una tecla,
presione dos veces antes de tipear el
texto. Presione nuevamente para volver
al modo de ingreso de texto en minúsculas.
Cursor: Para ingresar una letra en mayúsculas,
presione primero y luego la tecla.
Cursor:
Para ingresar sólo caracteres en mayúsculas,
presione dos veces antes de tipear el
texto. Presione nuevamente para
ingresar texto en minúsculas.
Presione para ver todas las expresiones.
Presione para ver todos los símbolos.
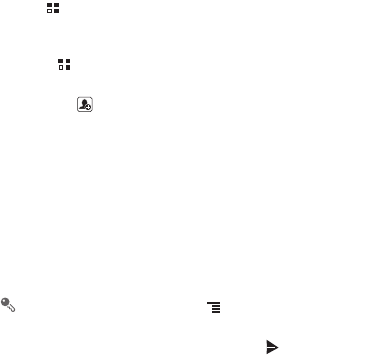
34
6 Mensajería
La aplicación
Mensajería
permite el intercambio de mensajes de texto (SMS) y de
mensajes multimedia (MMS) con quienes utilizan teléfonos que soportan SMS o
MMS. Por medio de la aplicación
Correo electrónico
, es posible leer y enviar
mensajes de correo electrónico.
6.1 SMS y MMS
6.1.1 Acceso a Mensajería
Presione >
Mensajería
.
6.1.2 Creación y envío de mensajes de texto
1. Presione >
Mensajería
>
Mensaje nuevo
.
2. Ingrese un número de teléfono o el nombre de un contacto en el campo
Para
o
bien presione para seleccionar un contacto desde
Contactos
o
Grupos
.
A medida que se ingresan los números de teléfono o el nombre del contacto, el
teléfono mostrará coincidencias posibles con los contactos almacenados.
Seleccione un contacto de la lista de coincidencias posibles o siga ingresando
los datos.
Después de seleccionar un contacto o una vez que haya ingresado todo el
número, agregue una coma para ingresar otro destinatario. También es posible
presionar nuevamente un contacto previamente ingresado para editarlo o
eliminarlo.
3. Presione el cuadro de texto de creación de mensajes para comenzar a ingresar el
mensaje.
Al escribir un mensaje, puede presionar >
Agregar
>
Contacto
para
insertar la información del contacto.
4. Cuando el mensaje esté listo para ser enviado, presione
Los mensajes enviados y recibidos se visualizarán en un hilo de mensajes que
agrupará todos los mensajes de una conversación.
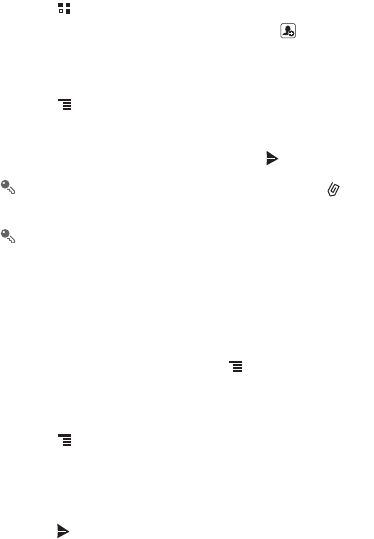
35
6.1.3 Creación y envío de mensajes multimedia
1. Presione >
Mensajería
>
Mensaje nuevo
.
2. Ingrese un número de teléfono en el campo
Para
o presione para seleccionar
un contacto desde
Contactos
o
Grupos
.
3. Presione el cuadro de texto de creación de mensajes para comenzar a ingresar el
mensaje.
4. Presione para acceder al panel de opciones.Presione
Agregar asunto
para
agregar el asunto del mensaje. Al realizar estos pasos, el teléfono móvil entrará en
modo de mensajes multimedia.
5. Cuando el mensaje esté listo para ser enviado, presione .
En la pantalla de edición de mensajes, también se puede presionar , y
luego seleccionar los archivos que se desean agregar.
Es posible seleccionar en forma directa un archivo multimedia (archivos de
audio, video o imágenes) y enviarlos vía MMS: presione
Gestor de archivos
,
mantenga presionado el archivo multimedia que desea enviar y seleccione
Compartir
>
Mensajería
.
Cómo agregar Presentación de diapositivas
Si desea adjuntar más de un archivo a un mensaje, utilice la opción
Presentación de
diapositivas
.
1. En la pantalla de edición de mensajes, presione para visualizar el panel de
opciones.
2. Presione
Agregar
>
Presentación de diapositivas
y luego seleccione una
diapositiva para comenzar a editarla.
3. Presione y
Más
>
Agregar diapositiva
para agregar más diapositivas.
4. Presione
Listo
para finalizar la redacción del mensaje y regresar a la pantalla de
mensajes multimedia.
5. Para modificar un mensaje multimedia, presione la opción de diapositivas en la
pantalla de mensajes multimedia. Cuando el mensaje esté listo para ser enviado,
presione .

36
6.1.4 Cómo abrir y ver mensajes multimedia
1. En la lista de mensajes, presione el hilo de mensajes que desea ver.
2. Presione el mensaje multimedia para verlo.
6.1.5 Contestación de mensajes
1. En la lista de mensajes, presione el hilo de mensajes de texto o multimedia para
abrirlo.
2. Presione el cuadro de texto para redactar el mensaje. Cuando haya finalizado,
presione .
Los mensajes también se pueden responder de la siguiente manera: presione
>
Selección múltiple
, seleccione uno o más hilos de mensajes y presione
Resp
.
6.1.6 Cómo copiar mensajes de texto en el Bloc de notas o
Calendario
1. En la lista de mensajes, presione un hilo de mensajes para abrirlo.
2. Mantenga presionado uno de los mensajes y luego presione
Copiar mensaje en
.
3. Presione
Bloc de notas
o
Calendario
para guardarlo como una nota o un evento.
Para obtener información sobre cómo utilizar
Bloc de notas
o
Calendario
, consulte
las secciones pertinentes de esta guía.
6.1.7 Personalización de las configuraciones de los mensajes
En la lista de mensajes, presione y luego presione
Configuración
para
personalizar las configuraciones de los mensajes.
6.2 Correo electrónico
El teléfono móvil también permite que el correo electrónico esté al alcance de la
mano. Con la aplicación
Correo electrónico
del teléfono, es posible utilizar la cuenta
de correo electrónico con Yahoo!, AOL u otros servicios de correo electrónico de uso
masivo.

37
6.2.1 Cómo agregar cuentas de correo electrónico
Cuando se utiliza la aplicación
Correo electrónico
por primera vez, se debe
configurar la cuenta de correo electrónico. El asistente de configuración de correo
electrónico guía al usuario durante la configuración de su cuenta. Se soporta una
cantidad de sistemas de correo electrónico de uso generalizado. Es posible utilizar el
mismo servicio de correo electrónico al que se accede por medio de la PC o se puede
seleccionar un servicio de correo electrónico distinto.
1. En la pantalla principal, presione >
Correo electrónico
.
2. Para personalizar las configuraciones de la cuenta de correo electrónico, siga las
instrucciones que aparecen en pantalla y luego presione
Siguiente
.
3. Ingrese el nombre de la cuenta y el nombre que desea que vean los destinatarios
al recibir los correos electrónicos enviados.
4. Presione
Listo
.
Cómo agregar otras cuentas de correo electrónico
1. Una vez creada la cuenta de correo electrónico inicial, presione en la pantalla
Bandeja de entrada
, y luego presione
Más
>
Cuentas
para acceder a la pantalla
de las cuentas.
2. Presione en la pantalla de las cuentas y luego presione
Agregar cuenta
para
crear otra cuenta de correo electrónico.
Cuando se agrega una cuenta de correo electrónico adicional, es posible utilizar
la cuenta nueva para enviar todos los mensajes salientes.
6.2.2 Visualización de correos electrónicos
1. En la pantalla de cuentas de correo electrónico, mantenga presionada la cuenta
que desea utilizar.
2. Acceda a una carpeta y luego presione el mensaje que desea ver.
6.2.3 Cómo guardar adjuntos de correos electrónicos
1. En la pantalla de cuentas de correo electrónico, mantenga presionada la cuenta
que desea utilizar.
2. Presione el mensaje de correo electrónico que desea ver en pantalla.
3. Presione
Guardar
junto al adjunto del correo electrónico.

38
4. Seleccione una ruta para guardar el adjunto y presione
Advertencia
.
6.2.4 Creación y envío de correos electrónicos
1. En la pantalla de cuentas de correo electrónico, mantenga presionada la cuenta
que desea utilizar.
2. En la pantalla
Bandeja de entrada
, presione y luego,
Redactar
en el panel
de opciones.
3. En el campo
Para
, ingrese el nombre o la dirección de correo electrónico del
destinatario.
4. Ingrese el asunto del mensaje y redacte el mensaje.
Para enviar un archivo adjunto al mensaje, presione y luego
Agregar
archivo adjunto
.
5. Cuando termine, presione
Enviar
.
Si no desea enviar el mensaje en ese momento, presione
Guardar borrador
o
para guardarlo como borrador.
6.2.5 Contestación de mensajes de correo electrónico
1. En la pantalla de cuentas de correo electrónico, mantenga presionada la cuenta
que desea utilizar.
2. Presione el mensaje de correo electrónico que desea contestar.
3. Presione
Responder
o
Responder a todos
para contestar el mensaje de correo
electrónico.
6.2.6 Eliminación de cuentas de correo electrónico
1. En la pantalla de cuentas de correo electrónico, mantenga presionada la cuenta
que desea eliminar.
2. Presione
Eliminar cuenta
.
3. Presione
Aceptar
.
6.2.7 Modificación de configuraciones de cuentas de correo
electrónico
Se pueden cambiar algunas configuraciones de una cuenta, inclusive la frecuencia
con la que se revisan los correos electrónicos, el tipo de notificación de correos

39
nuevos y los detalles de los servidores que utiliza la cuenta para enviar y recibir
correos electrónicos.
Las configuraciones de entrada y salida de la cuenta dependen del tipo de
servicio de correo electrónico que se esté utilizando. Se pueden ingresar los
detalles necesarios en forma manual, aunque es posible que deba
comunicarse con el proveedor de servicios de correo electrónico para obtener
la información correcta.
1. Presione >
Correo electrónico
.
2. En la pantalla de las cuentas, mantenga presionada la cuenta de correo
electrónico que desea modificar.
3. Presione
Configuración de la cuenta
.
4. Modifique
Configuración general
,
Configuración de notificación
o
Configuración del servidor
.
7 Cómo establecer una conexión
7.1 Redes móviles
El teléfono móvil se configurará automáticamente para el uso de los servicios 2G/3G
del operador de red (si están disponibles) al encender por primera vez el equipo.
Recuerde que la tarjeta SIM/UIM debe estar insertada (algunos teléfonos móviles
CDMA vienen equipados con una tarjeta UIM y no requieren una tarjeta UIM
independiente).
7.1.1 Verificación de la conexión de red
1. Presione >
Config
.
2. Presione
Redes inalám. y redes
>
Redes de celulares
.
3. Presione
Configuración de red
>
Nombres de puntos de acc.
para verificar la
conexión de red.
7.1.2 Activación del servicio de datos
1. Presione >
Config.
.

40
2. Presione
Redes inalám. y redes
>
Redes de celulares
.
3. Seleccione la casilla de verificación
Datos habilitados
para activar la conexión de
datos.
7.2 Wi-Fi
La función Wi-Fi provee acceso inalámbrico a Internet por banda ancha. Para utilizar
la función Wi-Fi en el teléfono móvil, se debe tener acceso a un punto de acceso
inalámbrico (hotspot). El alcance de la señal Wi-Fi se ve afectado por los obstáculos
que se le interpongan.
7.2.1 Activación de la función Wi-Fi
1. Presione >
Config.
.
2. Presione
Redes inalám. y redes
y luego seleccione la casilla de verificación
Wi-Fi
para activar la función Wi-Fi.
7.2.2 Conexión a redes inalámbricas
1. Después de activar la función Wi-Fi, presione >
Config.
.
2. Presione
Redes inalám. y redes
>
Configuración Wi-Fi
. Podrá ver una lista de
las redes Wi-Fi detectadas en la sección
Redes de Wi-Fi
.
3. Presione una red Wi-Fi para conectarse.
• Si selecciona una red abierta, se conectará automáticamente a dicha red.
• Si selecciona una red protegida por el algoritmo Privacidad Equivalente por
Cable (WEP) y se está conectando a ésta por primera vez, ingrese la
contraseña y luego presione
Conectar
. Si se conecta a una red inalámbrica
protegida que ha utilizado anteriormente, no se le solicitará que ingrese la
contraseña nuevamente, salvo que haya restablecido las configuraciones
predeterminadas del teléfono móvil.
En la pantalla
Configuración Wi-Fi
, presione
Agregar red de Wi-Fi
para
agregar una red Wi-Fi nueva.

41
7.2.3 Uso compartido de la conexión de datos del teléfono
como punto de acceso inalámbrico portátil
1. Presione >
Config.
.
2. Presione
Redes inalám. y redes
>
Anclaje a red y pto. de acc. inalám. portátil
.
3. Seleccione la casilla de verificación
Zona activa Wi-Fi portátil
para compartir la
conexión de datos.
Cuando se selecciona
Zona activa Wi-Fi portátil
, es posible presionar
Conf.
del pto. de acceso inalám. port.
para cambiar el nombre de la red o configurar
la seguridad de ésta.
7.2.4 Uso compartido de la conexión de datos del teléfono vía
USB
Para utilizar tethering por USB en diferentes sistemas operativos, quizá se deba
preparar la PC para establecer una conexión de red vía USB.
La tarjeta microSD y la conexión de datos del teléfono móvil no se pueden
compartir vía USB al mismo tiempo.
1. Presione >
Config.
.
2. Presione
Redes inalám. y redes
>
Anclaje a red y pto. de acc. inalám. portátil
.
3. Seleccione la casilla de verificación
Anclaje a red USB
para compartir la conexión
de datos.
7.3 WPS
La función WPS (Configuración protegida de Wi-Fi) simplifica el proceso de
configuración de redes Wi-Fi y de establecimiento de configuraciones de seguridad
de red.
Al conectarse a una red Wi-Fi por medio de WPS, asegúrese de que el punto
de acceso Wi-Fi en el cual desea establecer la conexión soporte la función
WPS.

42
7.3.1 Conexión a una red inalámbrica por medio del botón
WPS
1. Active la función Wi-Fi y luego acceda a la pantalla
Configuración Wi-Fi
.
2. Presione la opción
Botón de conexión WPS
.
3. Presione el botón WPS del punto de acceso Wi-Fi. Cuando el teléfono se conecta
a la red, aparece un mensaje en pantalla.
7.3.2 Conexión a una red inalámbrica por medio del PIN WPS
1. Active la función Wi-Fi y luego acceda a la pantalla
Configuración Wi-Fi
.
2. En la sección
Redes de Wi-Fi
, mantenga presionada la red Wi-Fi a la que desea
conectarse. Luego seleccione la opción
Conexión WPS por PIN
en el menú de
opciones. El teléfono mostrará el PIN del punto de acceso Wi-Fi seleccionado.
3. Ingrese el PIN en el punto de acceso Wi-Fi. Cuando el teléfono se conecta a la red,
aparece un mensaje en pantalla.
Para agregar una nueva red Wi-Fi, presione
Agregar red de Wi-Fi
en la
pantalla y luego ingrese el Identificador de Red (SSID) correspondiente a la red.
7.4 Navegador
El teléfono móvil viene equipado con un navegador de Internet.
7.4.1 Cómo abrir el navegador
Presione >
Navegador
para acceder a la página de inicio.
Cuando estén disponibles al mismo tiempo tanto redes de datos móviles como
redes Wi-Fi abiertas o conocidas, el teléfono seleccionará preferentemente una
red Wi-Fi para acceder a Internet.
Presione para abrir el menú de opciones del navegador y realice una de las
siguientes operaciones:
•
Ventana nueva
: presione esta opción para abrir una ventana nueva.
•
Marcadores
: presione esta opción para visualizar los marcadores.

43
•
Ventanas
: presione esta opción para ver las vistas en miniatura de las ventanas
del navegador. Puede pasar a otra ventana del navegador o abrir una ventana
nueva en esta pantalla.
•
Actualizar
: presione esta opción para actualizar la página web actual.
•
Adelante
: presione esta opción para navegar hacia la próxima página web.
•
Más
: presione esta opción para abrir otros menús y realizar operaciones de
búsqueda, selección de texto, descarga y configuración.
7.4.2 Cómo abrir páginas web
1. En la ventana del navegador, presione el campo de URL que se encuentra en la
parte superior de la pantalla.
2. Utilice el teclado para ingresar la dirección de una página web. Es posible
presionar para ingresar la dirección de la página web utilizando la voz.
3. A medida que se ingresa la dirección, las direcciones de las páginas web que
coincidan con el texto que se está ingresando aparecerán en pantalla. Si aparece
la dirección deseada, presiónela para ir directamente a la página web respectiva o
continúe ingresando la dirección de la página deseada.
7.4.3 Configuración de la Página de inicio
1. En la ventana del navegador, presione .
2. Presione
Más
>
Config.
>
Definir página de inicio
.
3. Ingrese la dirección de la página de inicio deseada y luego presione
Aceptar
.
7.4.4 Administración de marcadores
El teléfono móvil permite al usuario almacenar todos los marcadores que desee.
Cómo agregar marcadores
1. En la ventana del navegador, ingrese a la página web que desea guardar como
marcador.
2. Presione y luego,
Marcadores
>
Agregar
.
3. Edite el nombre del marcador de ser necesario y luego presione
Aceptar
.

44
Cómo abrir marcadores
1. En la ventana del navegador, presione y luego presione
Marcadores
.
En la pantalla
Marcadores
presione la pestaña
Historial
para ver las páginas
que ha visitado, o presione la pestaña
Más visitados
para ver las páginas que
ha visitado con mayor frecuencia.
2. Presione el marcador del sitio web que desea abrir.
7.4.5 Personalización de las configuraciones del navegador
El navegador se puede personalizar según las preferencias de navegación del
usuario. Utilice el
Navegador
para configurar las preferencias de contenidos,
privacidad y seguridad. En la ventana del navegador, presione y luego
Más
>
Config.
.
7.5 Bluetooth
El teléfono móvil ofrece la función Bluetooth, que permite crear una conexión
inalámbrica con otros dispositivos Bluetooth para compartir archivos con amigos,
utilizar la función de manos libres con auriculares Bluetooth o incluso transferir
fotografías del teléfono a la PC.
Si está utilizando la función Bluetooth, recuerde ubicarse a una distancia de hasta 10
metros (33 pies) respecto de otros dispositivos Bluetooth a los que se desea
conectar. Tenga en cuenta que los obstáculos, tales como paredes u otros equipos
electrónicos, pueden interferir con la conexión Bluetooth.
7.5.1 Activación de la función Bluetooth
1. Presione >
Config.
.
2. Presione
Redes inalám. y redes
y luego seleccione la casilla de verificación
Bluetooth
para activar la función Bluetooth. La función Bluetooth estará activada
cuando el ícono respectivo aparezca en la barra de notificaciones.
3. Presione
Config. de Bluetooth
y luego seleccione
Visible
para que el teléfono
móvil se haga visible para otros dispositivos Bluetooth.
7.5.2 Emparejamiento y conexión de dispositivos Bluetooth
La función Bluetooth del teléfono móvil permite lo siguiente:

45
• Perfil de manos libres (HFP): permite utilizar el dispositivo Bluetooth en modo
manos libres.
• Perfil de Auriculares (HSP): permite utilizar auriculares Bluetooth mono.
• Perfil de Transferencia de Objetos (OPP): permite transferir archivos a través de
una conexión Bluetooth.
• Perfil Avanzado de Distribución de Audio (A2DP): permite utilizar auriculares
Bluetooth estéreo.
• Perfil de Control Remoto A/V (AVRCP): permite controlar la reproducción de audio
por medio de los auriculares Bluetooth, de manera remota.
Antes de usar la función Bluetooth, se debe emparejar el teléfono móvil con el
dispositivo Bluetooth con el que se desea establecer una conexión, de la siguiente
forma:
1. Asegúrese de que la función Bluetooth del teléfono móvil esté habilitada.
2. En la pantalla principal, presione >
Config.
>
Redes inalám. y redes
>
Config. de Bluetooth
. El teléfono móvil buscará otros dispositivos Bluetooth en el
área.
3. Presione el dispositivo con el que desea emparejar el teléfono móvil.
4. De ser necesario, ingrese la contraseña de emparejamiento para terminar de
establecer la conexión.
7.5.3 Envío de archivos a través de Bluetooth
La función Bluetooth permite compartir archivos de imágenes, video o música con
familiares y amigos. Para enviar archivos a través de Bluetooth:
1. Mantenga presionado el archivo del teléfono móvil o la tarjeta SD que desea
enviar. El menú de opciones activas aparecerá en pantalla.
2. Presione
Compartir
y luego
Bluetooth
para seleccionar un dispositivo
emparejado.
7.5.4 Desconexión o desemparejamiento de dispositivos
Bluetooth
1. Presione >
Config.
>
Redes inalám. y redes
>
Config. de Bluetooth
.
2. Navegue hasta la sección
Dispositivos Bluetooth
y mantenga presionado el
dispositivo al cual está conectado.
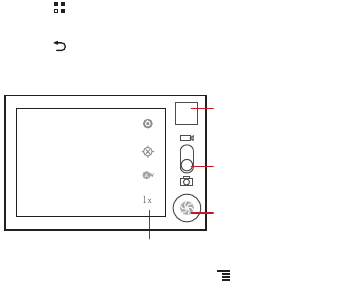
46
3. Presione
Desvincular
para desconectarse del dispositivo.
8 Entretenimiento
Además de ser un dispositivo de comunicación y un asistente personal, el teléfono
móvil también provee una amplia gama de posibilidades de entretenimiento. Se
pueden tomar fotografías, grabar clips de audio y video, y descargar y escuchar
música.
8.1 Cómo tomar fotografías y grabar
videos
La cámara es una combinación de cámara fotográfica y grabadora de video, que se
puede utilizar para capturar y compartir imágenes y videos.
8.1.1 Activación de la cámara
• Presione >
Cámara
para activar la cámara. La cámara se activa en modo
horizontal, lista para tomar una fotografía o grabar un video.
• Presione para desactivar la cámara.
Pantalla de captura de imágenes
En la pantalla de captura de imágenes, presione para ver el panel de captura.
3
5
Presione aquí para personalizar las configuraciones de la cámara.
Vista en miniatura de la
última fotografía.
Presione aquí para acceder
a la vista previa de las
fotografías o de los videos.
Deslice el dedo hacia arriba
para grabar videos y hacia
abajo para tomar fotografías.
Presione aquí para tomar
una fotografía.
47
8.1.2 Cómo tomar fotografías
1. Active la cámara y seleccione el modo cámara.
2. De ser necesario, modifique la configuración de la cámara. La vista previa cambia
al modificar las configuraciones.
3. Encuadre la imagen que desea fotografiar en la pantalla de captura de imágenes.
4. Mantenga presionada la tecla .
5. Presione para tomar la fotografía.
Las fotografías tomadas aparecen en pantalla un momento. Es posible tomar otras
fotografías o ver fotografías ya tomadas.
8.1.3 Visualización de fotografías
1. Después de tomar una fotografía, se mostrará una miniatura de la fotografía que
acaba de tomar en la esquina superior derecha de la pantalla de captura. Presione
la miniatura para visualizarla.
2. Presione el botón de la pantalla para realizar cualquiera de las siguientes acciones:
• Presionar
Compartir
para enviar la fotografía en un mensaje o publicarla en
línea.
• Presionar
Eliminar
para eliminar la fotografía.
• Presionar
Más
>
Configurar como
para configurar la foto como ícono de
contacto o papel tapiz.
8.1.4 Grabación de videos
1. Active la cámara y seleccione el modo grabadora de video.
2. De ser necesario, modifique la configuración de la grabadora de video.
3. Seleccione la escena donde desea comenzar a grabar el video.
4. Presione para comenzar a grabar el video.
5. Presione para detener la grabación.
8.1.5 Visualización de videos
1. Después de grabar un video, una miniatura del video que acaba de grabar
aparecerá en el vértice superior derecho de la pantalla de captura. Presione la
miniatura para visualizarla.

48
2. Presione el botón de la pantalla para realizar cualquiera de las siguientes acciones:
• Presionar
Compartir
para enviar el video en un mensaje o publicarlo en línea.
• Presionar
Eliminar
para eliminar el video.
En la pantalla de reproducción de video, presione los controles para adelantar,
retroceder, reproducir o pausar el video.
3. Si desea ver más videos, deslice el dedo hacia la izquierda o derecha sobre la
pantalla.
8.2 Utilización de la Galería
La aplicación
Galería
puede buscar automáticamente imágenes y videos
almacenados en el teléfono móvil y en la tarjeta microSD. Utilice
Galería
para
ordenar las fotografías y los videos en carpetas, para ver y editar las imágenes, para
ver los videos y para configurar una imagen como papel tapiz o como la foto de un
contacto.
8.2.1 Acceso a la Galería
En la pantalla principal, presione >
Galería
.
La aplicación
Galería
organiza las imágenes y los videos por categorías según la
ubicación de almacenamiento y muestra dichos archivos en carpetas. Presione una
carpeta para visualizar las imágenes o los videos que contiene.
8.2.2 Visualización de imágenes
1. En la
Galería
, presione la carpeta que contiene las imágenes que desea ver.
2. Presione la imagen para verla en modo de pantalla completa.
3. Presione la pantalla. Se mostrará el panel del zoom. Se puede acercar o alejar la
imagen.
El visor de imágenes soporta la función de rotación automática. Al rotar el
teléfono móvil, la imagen se ajusta a la rotación.
8.2.3 Rotación de imágenes
1. Al visualizar una imagen, presione para visualizar el panel de operaciones.
2. Presione
Más
.

49
3. Seleccione
Girar hacia la izquierda
o
Girar hacia la derecha
. La imagen se
guardará con la nueva orientación.
8.2.4 Cómo recortar una imagen
1. Cuando visualiza una imagen, presione para visualizar el panel de
operaciones, y luego presione
Más
>
Recortar
.
2. Utilice la herramienta que permite recortar para seleccionar la parte de la imagen
que desea recortar.
• Arrastre la herramienta para recortar desde la parte interna para moverla.
• Arrastre uno de los bordes de la herramienta que permite recortar para
cambiar el tamaño de la imagen.
• Arrastre una de las esquinas de la herramienta que permite recortar para
cambiar el tamaño de la imagen sin cambiar la proporción de largo por ancho.
3. Presione
Guardar
para guardar la imagen recortada. Presione
Eliminar
para no
aplicar los cambios.
8.3 DTS Envelo™
El DTS (Sistema de Cine Digital) Envelo es una solución de sonido envolvente virtual
desarrollada para dispositivos electrónicos de consumo. Produce sonido envolvente
virtual desde cualquier entrada: mono, estéreo o multicanal 5.1.
8.3.1 Uso del DTS Envelo
El DTS sólo se puede utilizar con auriculares y cuando se reproducen archivos
de música o películas a través de música.
1. Presione n >
Config.
.
2. Presione n
Sonido
>
Modo DTS
.

50
9 Servicios de Google
La disponibilidad de los servicios, las funciones y las aplicaciones de Google
pueden variar según el país o el proveedor de servicios del que se trate. Cumpla
con las disposiciones y leyes locales para utilizar dichos servicios, funciones y
aplicaciones.
Cuando se enciende el teléfono móvil por primera vez, presione un servicio de
Google, como
Talk
,
Gmail
o
Play Store
y el dispositivo le pedirá que inicie sesión en
su cuenta de Google.
Asegúrese de que el teléfono móvil cuente con una conexión de datos activa
(3G) antes de iniciar sesión en la cuenta de Google.
Si ya tiene una cuenta de Google, presione
Iniciar sesión
e ingrese el nombre de
usuario y la contraseña.
9.1 Creación de una cuenta de Google
Si no tiene una cuenta de Google, es posible crear una:
1. Después de leer la información de configuración, presione
Siguiente
.
2. Presione
Crear
.
3. Ingrese el primer nombre, el apellido y el nombre de usuario de su cuenta de
Google, y luego presione
Siguiente
. El teléfono móvil se conectará al servidor de
Google para verificar si el nombre de usuario está disponible. Si el nombre de
usuario ingresado ya está siendo utilizado, se le indicará que elija otro o que
seleccione uno de una lista.
4. Ingrese y confirme la contraseña de su cuenta de Google.
5. Seleccione una pregunta de seguridad del menú desplegable y luego ingrese la
respuesta.
6. Presione
Crear
.
7. Cuando aparezca la pantalla
Condiciones de uso de Google
, presione
Acepto,
Siguiente
.
8. Ingrese los caracteres que aparecen en pantalla y luego presione
Siguiente
.
Para utilizar otra cuenta de Google, acceda a la pantalla
Configuración de

51
cuentas y sincronización
y presione
Agregar cuenta
para seleccionar el tipo
de cuenta que desea agregar.
9.2 Gmail
Gmail
es el servicio de correo electrónico de Google basado en la Web. Durante la
primera configuración del teléfono, se puede establecer el uso de una cuenta de
Gmail
existente o crear una cuenta nueva. La primera vez que se accede a la
aplicación
Gmail
en el teléfono, la carpeta
Bandeja de entrada
contendrá los
mensajes de la cuenta web
Gmail
.
9.2.1 Acceso a Gmail
En la pantalla principal, presione >
Gmail
. Aparecerá en pantalla la lista de
mensajes de correo electrónico de
Bandeja de entrada
. Los correos electrónicos
que desee guardar en el teléfono móvil se almacenarán en la carpeta
Bandeja de
entrada
.
9.2.2 Cómo pasar de una cuenta a otra
1. En la lista de correo, presione y luego,
Cuentas
.
2. Presione la cuenta que contiene el correo electrónico que desea leer.
9.2.3 Creación y envío de correos electrónicos
1. En la lista de correo, presione y luego,
Redactar
.
2. Ingrese la dirección de correo electrónico del destinatario del mensaje en el campo
Para
. Si desea enviar un correo electrónico a muchos destinatarios, separe las
direcciones de correo electrónico por medio de comas. Es posible agregar la
cantidad de destinatarios que se desee.
Si desea enviar una copia (Cc) o una copia oculta (Cco) del correo electrónico
a otros destinatarios, presione y luego presione la opción
Agregar CC/
CCO
.
3. Ingrese el asunto del correo electrónico y escriba el mensaje.
Si desea adjuntar una imagen, presione y luego,
Adjuntar
para
seleccionar la imagen que desea adjuntar.
52
4. Una vez que haya finalizado la redacción del mensaje, presione .
9.2.4 Cómo contestar o reenviar correos electrónicos
1. Desde la lista de correo electrónico, presione el mensaje de correo electrónico que
desee contestar o reenviar.
2. Presione para contestar. También es posible presionar y luego
Responder
,
Responder a todos
o
Reenviar
.
3. Lleve a cabo una de las siguientes acciones:
• Si ha seleccionado
Responder
o
Responder a todos
, ingrese el mensaje
que desee.
• Si ha seleccionado
Reenviar
, especifique los destinatarios del mensaje y
agregue cualquier texto adicional que desee agregar al mensaje reenviado.
4. Presione para enviar el mensaje o presione para guardar el mensaje
como borrador.
9.2.5 Personalización de las configuraciones de Gmail
En la lista de correo, presione y luego,
Más
>
Configuración
para personalizar
Gmail
.
9.3 Talk
La aplicación
Talk
es el servicio de mensajería instantánea de Google. Es posible
utilizarlo para mantener conversaciones en tiempo real con otros usuarios por medio
de la aplicación
Talk
desde el teléfono o a través de la Web.
9.3.1 Acceso a Talk
En la pantalla principal, presione >
Talk
para acceder a la aplicación.
La cuenta
Talk
se basa en la cuenta de Google configurada a través del
teléfono móvil.
9.3.2 Cómo agregar amigos
1. En la lista de amigos, presione y luego,
Agregar amigo
.

53
2. Ingrese la ID de mensajería instantánea de
Talk
o la dirección de Gmail del amigo
que desee agregar.
3. Presione
Enviar invitación
.
9.3.3 Cómo aceptar invitaciones
1. Si ha invitado a alguien a chatear o si alguien le ha enviado una invitación para
chatear, la invitación aparecerá en la lista de amigos.
2. Presione la invitación pendiente y luego,
Aceptar
.
9.3.4 Cómo iniciar una conversación por chat
1. En la lista de amigos, presione el nombre de un amigo.
2. Utilice el teclado en pantalla para ingresar texto y chatear con un amigo.
3. Después de ingresar el mensaje, presione
Enviar
.
9.3.5 Configuración de notificaciones para mensajes
instantáneos nuevos
Cuando reciba un mensaje instantáneo, el teléfono móvil reproducirá un sonido,
vibrará o mostrará un ícono. Para configurar uno de estos útiles métodos de
notificación, acceda a la lista de amigos y luego presione . Luego presione
Configuración
. Seleccione una de las siguientes posibilidades:
Notificaciones
Seleccione esta casilla de verificación para recibir una
notificación en la barra de notificaciones cada vez que
reciba un mensaje instantáneo.
Tono de
llamada
Presione esta opción para seleccionar el tono de timbre
que se reproducirá cuando reciba un nuevo mensaje
instantáneo. Cuando seleccione el tono de timbre, se
reproducirá una muestra breve de éste. Para desactivar el
tono de timbre, seleccione
Silencioso
.
Vibrar
Seleccione esta casilla de verificación para que el teléfono
móvil vibre cuando reciba un mensaje instantáneo nuevo.

54
9.3.6 Cierre de sesión en Talk
En la pantalla de la lista de amigos, presione y luego
Cerrar sesión
para salir
de
Talk
.
9.4 Maps
La aplicación
Maps
permite conocer la ubicación actual del usuario, ver el estado del
tránsito en tiempo real (según la disponibilidad del lugar donde se encuentre), y
obtener instrucciones detalladas para llegar a distintos destinos. Es posible ver
imágenes satelitales, así como mapas de tránsito o de otro tipo con la ubicación
actual u otras ubicaciones.
9.4.1 Habilitación del servicio de ubicación
Antes de acceder a la aplicación
Maps
para encontrar una ubicación específica o
buscar lugares de interés, debe habilitar el servicio de ubicación.
1. En la pantalla principal, presione >
Configuración
.
2. Presione
Ubicación y seguridad
.
3. En la sección
Mi ubicación
, seleccione la casilla de verificación
Utilizar redes
inalám.
, la casilla de verificación
Utilizar satélites de GPS
o ambas.
9.4.2 Acceso a Maps
En la pantalla principal, presione >
Maps
para acceder a la aplicación.
9.4.3 Búsqueda de lugares de interés
1. En el mapa, presione y luego presione la opción
Buscar
.
2. Ingrese el lugar que desea encontrar en el cuadro de búsqueda y luego presione el
ícono Buscar.
3. Los resultados de la búsqueda aparecerán en pantalla. Presione el lugar en el que
está interesado, y la aplicación mostrará la ubicación de dicho lugar en el mapa.
9.4.4 Cómo obtener instrucciones
1. Mientras visualiza un mapa, presione y luego
Indicaciones
.

55
2. Ingrese el punto de inicio del recorrido en el primer cuadro de texto y luego ingrese
el punto de destino en el segundo cuadro de texto.
3. Presione el ícono correspondiente a automóvil, transporte público o a modo de a
pie.
4. Presione
Cómo llegar
. Las instrucciones aparecerán en una lista.
5. Presione un elemento de las instrucciones de la lista para que se muestre en el
mapa.
6. Cuando haya terminado de ver el mapa o de seguir las indicaciones, presione
y luego
Limpiar mapa
para restablecer el mapa.
9.5 YouTube
YouTube
es el nombre del servicio gratuito de difusión de video en línea de Google
que permite ver, buscar y cargar videos.
9.5.1 Acceso a YouTube
En la pantalla principal, presione >
YouTube
. Accederá a la pantalla de
YouTube.
9.5.2 Búsqueda de videos
1. En la pantalla
YouTube
, presione y luego,
Buscar
.
2. Ingrese una palabra clave de búsqueda y luego presione el ícono Buscar.
3. El sistema mostrará los resultados de la búsqueda debajo de la barra de
notificaciones. Desplácese por los resultados y presione el video que desee para
verlo.
9.5.3 Uso compartido de videos
Desde la lista de videos de la pantalla
YouTube
, seleccione un clip de video y
presione
Más
>
Compartir
.

56
9.6 Play Store
Android Play Store ofrece acceso directo a las aplicaciones y los juegos que se
pueden descargar e instalar en el teléfono.
9.6.1 Acceso a Play Store
1. En la pantalla principal, presione >
Play Store
.
2. La primera vez que se accede a la aplicación
Play Store
, aparecerá en pantalla la
ventana
Condiciones del servicio de Google Play
. Presione
Aceptar
para
continuar.
9.6.2 Búsqueda de aplicaciones
Existen diferentes maneras de buscar aplicaciones desde la página de inicio de
Play
Store
, como:
• Aplicaciones ofrecidas
• Lista de juegos
• Función Buscar
• Mis aplicaciones
10 Sincronización de información
Algunas aplicaciones del teléfono móvil permiten acceder a la misma información
personal que el usuario puede agregar, ver y editar en la PC. Cuando el usuario
agrega, modifica o borra información en cualquiera de estas aplicaciones desde la
Web, la información actualizada también aparece en el teléfono móvil del usuario.
Esto es posible a través de la sincronización de datos por aire. El proceso se lleva a
cabo en segundo plano y no afecta el uso del teléfono móvil. Durante la
sincronización del teléfono, aparecerá el ícono de sincronización de datos en la barra
de notificaciones.

57
10.1 Administración de las cuentas
Se pueden sincronizar contactos, correos electrónicos y otro tipo de información que
se encuentra en el teléfono móvil con varias cuentas de Google o con otros tipos de
cuentas, dependiendo de las aplicaciones instaladas en el teléfono.
Por ejemplo, se puede comenzar por agregar la cuenta personal de Google, de
manera que el correo electrónico, los contactos y el calendario estén siempre
disponibles. Luego, se puede agregar una cuenta laboral, para que resulte fácil
acceder a los correos electrónicos y contactos laborales. Si se desea, se pueden
agregar varias cuentas de Google u otras cuentas.
10.1.1 Cómo agregar cuentas
Cuando se agrega una cuenta, la aplicación
Contactos
compara los contactos
nuevos que el usuario sincroniza en el teléfono móvil con los contactos existentes e
intenta combinar los contactos que han sido ingresados dos veces en una sola
entrada en
Contactos
. Si la entrada del contacto está ingresada una sola vez, los
datos no se combinarán.
1. Presione >
Config.
>
Cuentas y sincronización
. La pantalla mostrará las
configuraciones de sincronización actuales y una lista de las cuentas que tiene el
usuario.
En algunos casos, será necesario solicitar los datos de la cuenta al soporte TI.
Por ejemplo, es posible que el usuario deba saber el dominio o la dirección del
servidor de la cuenta.
2. Presione
Agregar cuenta
.
3. Presione el tipo de cuenta que desea agregar.
4. Siga los pasos que aparecen en pantalla para ingresar la información obligatoria y
opcional de la cuenta. La mayoría de las cuentas requieren el ingreso de un
nombre de usuario y una contraseña. Sin embargo, la información depende del
tipo de cuenta y de la configuración del servicio al que el usuario se está
conectando.
5. Configuración de la cuenta. Según el tipo de cuenta, se solicitará al usuario
configurar qué tipo de datos desea sincronizar con el teléfono móvil, asignar un
nombre a la cuenta e ingresar otros datos. Una vez finalizada la operación, la
cuenta se agrega a la lista en la pantalla
Configuración de cuentas y
sincronización
.

58
10.1.2 Cómo agregar una cuenta de Exchange
1. En la pantalla principal, presione >
Config.
>
Cuentas y sincronización
.
2. Presione
Agregar cuenta
>
Corporativo
.
3. Siga las instrucciones e ingrese la información requerida sobre la cuenta de
exchange que desea agregar. Para obtener mayores detalles, comuníquese con
el administrador del servidor.
4. Presione
Siguiente
para visualizar la pantalla
Opciones de cuenta
. Establezca
las configuraciones de sincronización para esta cuenta.
5. Presione
Siguiente
para finalizar las configuraciones de la cuenta. Si los correos
electrónicos no se sincronizan de manera adecuada, contáctese con el
administrador del servicio.
10.1.3 Eliminación de cuentas
Se puede eliminar una cuenta del teléfono móvil y toda la información relacionada
con ésta, incluso los correos electrónicos, los contactos, las configuraciones, etc. Sin
embargo, algunas cuentas no pueden eliminarse, como la primera cuenta a la que
ingresó desde el teléfono móvil. Si intenta eliminar determinadas cuentas, se borrará
también toda la información personal relacionada con dichas cuentas.
Sólo es posible eliminar la primera cuenta de Google restableciendo las
configuraciones de fábrica del teléfono.
1. En la pantalla
Configuración de cuentas y sincronización
, presione la cuenta
que desea borrar.
2. Presione
Eliminar cuenta
.
3. Confirme que desea eliminar la cuenta.
10.2 Personalización de la sincronización
de cuentas
Se pueden configurar la utilización de datos en segundo plano y las opciones de
sincronización para todas las aplicaciones del teléfono. Asimismo, se puede
configurar para cada cuenta el tipo de datos que se desea sincronizar.
Para algunas cuentas, la sincronización de datos es bidireccional, es decir, los
cambios que se realizan en la información del teléfono móvil se ejecutan también en
59
la copia de dicha información que aparece en la Web. Algunas cuentas sólo soportan
sincronización unidireccional; es decir, la información del teléfono móvil es de sólo
lectura.
10.2.1 Configuraciones generales de sincronización
En la pantalla
Configuración de cuentas y sincronización
, haga lo siguiente:
• Seleccione o deseleccione la casilla de verificación
Datos de fondo
para verificar
si las aplicaciones y los servicios pueden transmitir datos cuando no los está
utilizando directamente (es decir, cuando se ejecutan en segundo plano).
Si desactiva esta opción,
Gmail
dejará de recibir correos electrónicos nuevos,
Calendario
dejará de sincronizar eventos, etc., hasta que presione el elemento
del menú
Actualizar
o envíe un correo electrónico.
• Seleccione o deseleccione la casilla de verificación
Sincroniz. automática
para
verificar si los cambios que hizo en la información que se encuentra en el teléfono
o en la Web se sincronizaron automáticamente entre sí.
Por ejemplo, cuando se selecciona esta opción, los cambios realizados en
Contactos
del teléfono se realizan automáticamente en los contactos de
Google que se encuentran en la Web.
10.2.2 Cambio de las configuraciones de sincronización de
una cuenta
1. En la pantalla
Configuración de cuentas y sincronización
, presione la cuenta
cuya configuración de sincronización desea modificar. Se abrirá la pantalla de
datos y sincronización, donde se visualizará una lista de los tipos de información
que puede sincronizar la cuenta.
2. Se configurarán los elementos seleccionados para ser sincronizados con el
teléfono móvil.
3. Seleccione o desactive la casilla de verificación de la información que desea
sincronizar con el teléfono móvil.

60
11 Uso de otras aplicaciones
11.1 Gestor de tráfico
Gestor de tráfico
permite ingresar el volumen total de tráfico correspondiente al
paquete mensual 2G/3G y configurar los umbrales de notificación de tráfico. El
equipo notificará al usuario cuando el valor de la utilización de tráfico alcance estos
umbrales.
11.1.1 Uso de Gestor de tráfico
Cuando se accede a
Gestor de tráfico
por primera vez, la aplicación solicitará el
ingreso de los umbrales de notificación y del límite de tráfico mensual.
1. En la pantalla principal, presione >
Gestor de tráfico
.
2. Ingrese el límite de tráfico mensual en el campo
Paquete mensual
.
3. Presione
Siguiente
.
4. Ingrese los umbrales de notificación en los campos
Configurar el recordatorio
de tráfico diario
y
Configurar el recordatorio de tráfico mensual
.
5. Presione
Finalizar
.
6. Es posible ver el tráfico de datos en
Estad de tráfico
.
Es posible modificar el límite de tráfico mensual y los umbrales de notificación
en
Config
.
11.2 Cop seg de tod los arch
Es posible crear copias de seguridad de los datos por medio de la aplicación
Copia
de seguridad
, que ofrece las siguientes opciones:
Backup en SD
,
Rest. desde SD
,
Backup rápido
,
Programar backup
y
Aplicaciones
.
11.2.1 Creación de copias de seguridad de datos por medio
de Backup en SD
1. En la pantalla principal, presione >
Cop seg de tod los arch
.
2. Presione
Backup en SD
.
61
3. Ingrese el nombre del archivo en el campo
Nombre del archivo:
.
4. En el campo
Contenido de la copia de seguridad:
, seleccione los contenidos de
los que desee crear copias de seguridad.
5. Presione
Backup
para crear una copia de seguridad de los datos seleccionados.
Para cancelar la creación de copias de seguridad, presione
Cancelar
.
11.3 Calendario
Utilice el
Calendario
para crear y administrar eventos, reuniones y citas. Según las
configuraciones de sincronización, el calendario del teléfono puede sincronizarse con
el calendario de la Web que utilice el usuario.
11.3.1 Acceso a Calendario
Presione >
Calendario
para acceder a la aplicación.
Si se agrega al teléfono una cuenta de Google que incluye el servicio de
calendario, se podrá acceder al calendario de Google: presione y luego
presione
Más
>
Calendarios
.
11.3.2 Creación de eventos
1. En la vista del calendario, presione y luego presione
Nuevo evento
para
acceder a la pantalla
Detalles del evento
.
Si hay más de un calendario, seleccione el calendario en el que desea guardar
el evento.
2. Ingrese el nombre del evento.
• Si hay un período de tiempo para el evento, presione
Desde
y
Hasta
para
configurar la hora de inicio y de finalización del evento.
• Si se trata de una ocasión especial, como un cumpleaños o un evento que
dura todo el día, configure la fecha de
Desde
y
Hasta
, y luego seleccione la
casilla de verificación
Todo el día
.
3. Ingrese la ubicación del evento y la descripción.

62
4. Configure la fecha y hora del recordatorio del evento en
Recordatorios
, y luego
especifique en
Repetición
si el recordatorio se debe repetir y la frecuencia de
repetición.
5. Presione
Listo
.
Para crear un evento rápidamente en la vista
Día
,
Semana
o
Mes
, mantenga
presionado un intervalo de tiempo vacío y luego presione
Nuevo evento
. Se
mostrará la pantalla de detalles del evento nuevo junto con la fecha y el intervalo
de tiempo seleccionados en los campos
Desde
y
Hasta
.
11.3.3 Configuración de recordatorios de eventos
1. En cualquier vista de calendario, presione un evento para visualizar los detalles o el
resumen del evento.
2. Presione el botón
Agregar recordatorio
para agregar un recordatorio o presione
el botón “-” del recordatorio para eliminar un recordatorio existente.
3. Presione la fecha y hora del recordatorio y luego, en la lista que aparece en
pantalla, presione el período de tiempo previo al evento para la activación del
recordatorio. Cuando llegue el momento, recibirá la notificación del evento.
11.3.4 Configuración de sincronización y de la pantalla
1. En cualquier vista del calendario, presione . Luego presione
Más
>
Calendarios
.
La pantalla Calendarios muestra todos los calendarios que el usuario ha
agregado o a los que se ha suscrito en relación con cada cuenta configurada de
modo que sincronice eventos en el teléfono, organizados por cuenta. (La lista
no incluye los calendarios de las cuentas que el usuario ha establecido que no
se sincronicen con los eventos del Calendario).
2. Presione el ícono que aparece al lado del calendario para configurar su
sincronización o su visualización en pantalla.
El usuario sigue suscrito a los Calendarios que ha configurado para que no se
guarden en el teléfono y podrá igualmente utilizarlos con la aplicación Google
Calendar en la Web.
3. Presione
Aceptar
.

63
11.3.5 Personalización de las configuraciones del calendario
En cualquier vista del calendario, presione . Luego presione
Más
>
Configuraciones
y seleccione entre las siguientes opciones:
•
Ocultar eventos rechazados
: seleccione esta opción para ocultar eventos de los
cuales ha rechazado invitaciones.
•
Configurar alertas y notificaciones
: presione esta opción para configurar
recordatorios de los eventos, para recibir una notificación o para desactivar la
notificación de eventos en el teléfono móvil.
•
Seleccionar tono de llamada
: presione esta opción para seleccionar el tono de
timbre que se activará cuando se reciba el recordatorio de un evento.
•
Vibrar
: seleccione esta opción para que el teléfono móvil vibre cuando se reciba la
notificación de un evento.
•
Hora predeterminada de recordatorio
: presione esta opción para seleccionar la
fecha y hora predeterminadas anteriores a un evento para que se activen los
recordatorios de eventos.
11.4 Gestor de archivos
El
Gestor de archivos
funciona como un asistente personal (PA) de bolsillo, que
permite organizar, editar, y eliminar archivos y carpetas.
11.4.1 Acceso a Gestor de archivos
En la pantalla principal, presione >
Gestor de archivos
para acceder a la
aplicación.
11.4.2 Creación de carpetas
1. En la pantalla
Gestor de archivos
, acceda al directorio en el cual desea crear una
carpeta nueva.
2. Presione para acceder al panel de opciones y luego presione
Carpeta
nueva
.
3. Ingrese el nombre de la carpeta nueva en el cuadro de texto.
4. Presione
Guardar
.

64
11.4.3 Cómo mover o copiar archivos
1. En la pantalla
Gestor de archivos
, presione para acceder al panel de
opciones y luego presione
Selec múlt
.
2. Presione el archivo o la carpeta que desea mover o copiar. Cuando se selecciona
un archivo o una carpeta, aparecerá una marca de verificación.
Para seleccionar todos los archivos, presione
Selec. todo
para seleccionar
todos los archivos de una carpeta (presione
Des. selec.
para cancelar la
selección).
3. Presione
Cortar
o
Copiar
para cortar o copiar el archivo.
4. Seleccione la ruta en la que desea copiar el archivo o a la cual desea moverlo.
Presione para acceder al panel de opciones y luego presione
Pegar
para
mover el archivo a la ruta seleccionada o copiarlo en ésta.
11.4.4 Búsqueda de archivos
1. En la pantalla
Gestor de archivos
, presione una carpeta para acceder al
directorio donde está el archivo que desea.
2. Presione para acceder al panel de opciones y luego presione
Buscar
.
3. En el cuadro de búsqueda, escriba una palabra clave del nombre del archivo.
4. Presione . El teléfono móvil iniciará la búsqueda.
5. Se mostrará en pantalla una lista de los resultados de la búsqueda. Presione un
archivo de la lista para abrirlo.
6. Presione
Nueva búsqueda
para iniciar una búsqueda nueva o presione la tecla
"Volver" para volver a la pantalla del administrador de archivos.
11.4.5 Compresión o extracción de archivos
El teléfono permite comprimir y extraer archivos.
Es posible extraer tanto archivos .zip como .rar, pero sólo se pueden comprimir
archivos y carpetas con extensión .zip.
Compresión de archivos
1. En la pantalla
Gestor de archivos
, presione y luego
Selec múlt
.

65
2. Seleccione los archivos o las carpetas que desea comprimir. Cuando se
seleccione un archivo, aparecerá una marca de verificación.
Para seleccionar todos los archivos y las carpetas, presione
Selec. todo
.
Presione
Des. selec.
para cancelar la selección.
3. Presione
Comprimir
.
4. Seleccione la ruta de almacenamiento y el nombre del archivo, y luego presione
Aceptar
para comenzar a comprimir los archivos y las carpetas.
Extracción de archivos
1. Mantenga presionado el archivo comprimido.
2. Presione
Extraer
.
3. Seleccione la ruta de almacenamiento de los archivos que desea extraer.
4. Presione
Aceptar
para comenzar la extracción.
11.4.6 Visualización del estado de la memoria
En la pantalla
Gestor de archivos
, presione para acceder al panel de opciones
y luego presione
Estado de la memoria
. Se mostrará la pantalla de administración
de memoria. Dicha pantalla permite ver el estado y la disponibilidad de la memoria del
teléfono móvil y de la tarjeta microSD.
11.5 Reloj
Además de mostrar la fecha y hora, la aplicación
Reloj
muestra información sobre el
clima y el teléfono. También es posible utilizar la aplicación
Reloj
para utilizar el
teléfono móvil como reloj despertador.
11.5.1 Acceso a la Reloj
En la pantalla principal, presione >
Reloj
para acceder a la aplicación.
Reloj
incluye la fecha y la hora que se muestran en el papel tapiz de la pantalla
principal, junto con el clima local y otra información útil.
11.5.2 Acceso a la Alarmas
En la pantalla
Reloj
, presione para acceder a la
Alarmas
.

66
Cómo agregar alarmas
1. En la pantalla de las listas de alarmas, presione
Agregar alarma
.
2. Configure la alarma y luego presione
Listo
.
Configuración de alarmas
1. En la pantalla de listas de alarmas, presione una de las alarmas.
2. Presione
Hora
para configurar la hora de la alarma.
3. Presione
Repetir
para configurar los días en los que desea que suene la alarma.
4. Presione
Tono
para seleccionar un tono de timbre para la alarma.
5. Seleccione la casilla de verificación
Vibrar
para habilitar la vibración del teléfono,
además de la reproducción del tono de timbre.
6. Presione
Etiqueta
para ingresar un nombre para la alarma.
7. Presione
Listo
.
La alarma funciona aun cuando el teléfono está apagado.
Personalización de las configuraciones de alarmas
En la pantalla de listas de alarmas, presione y luego,
Config.
11.6 Calculadora
Utilice la
Calculadora
para resolver problemas aritméticos simples. También es
posible resolver ecuaciones más complejas por medio de las funciones avanzadas.
11.6.1 Acceso a Calculadora
En la pantalla principal, presione >
Calculadora
para acceder a la aplicación.
11.6.2 Cómo alternar entre las funcionalidades básicas y
avanzadas del Panel avanzado
En la pantalla
Calculadora
, deslice el dedo hacia la derecha o la izquierda para
seleccionar
Panel avanzado
o
Panel básico
.

67
11.7 Bloc de notas
Bloc de notas
es un simple procesador de texto. En la lista de notas, se pueden
agregar, editar y eliminar notas.
1. En la pantalla principal, presione >
Bloc de notas
para acceder a la
aplicación.
2. Presione y luego presione
Agregar nota
para crear una nota.
3. Presione para guardar la nota.
12 Administración del teléfono móvil
Para configurar el teléfono móvil, presione la opción >
Config.
.
12.1 Configuración de fecha y hora
Por defecto, el teléfono móvil utiliza automáticamente la fecha, la hora y la zona
horaria suministradas por la red.
Cuando el teléfono móvil utiliza la configuración de fecha y hora provista por la
red en forma automática, la fecha, la hora y la zona horaria no se pueden
configurar manualmente.
1. En la pantalla
Configuración
, presione
Fecha y hora
.
2. Deseleccione la casilla de verificación
Automático
.
3. Presione
Establecer fecha
. En la pantalla de configuración de fecha, presione
o para ajustar el día, el mes y el año, y luego presione
Establecer
cuando la configuración esté completa.
4. Presione
Seleccionar zona horaria
y luego seleccione la zona horaria
correspondiente de la lista. Desplácese por la lista para ver más husos horarios.
5. Presione
Establecer la hora
. En la pantalla de configuración de la hora, presione
o para ajustar la hora y los minutos. Presione
Establecer
cuando la
configuración haya finalizado.
6. Seleccione o deseleccione la casilla de verificación
Usar formato de 24 hs
para
pasar del formato 24 horas al formato 12 horas.
68
7. Presione
Sel. el formato de fecha
para seleccionar la forma en que se mostrará la
fecha en el teléfono móvil.
12.2 Configuración de la pantalla
12.2.1 Ajuste del brillo de la pantalla
1. En la pantalla
Configuración
, presione
Mostrar
>
Brillo
.
2. Arrastre el deslizador hacia la izquierda para oscurecer la pantalla, o hacia la
derecha para aumentar el brillo.
3. Presione
Aceptar
para guardar el ajuste realizado.
12.2.2 Ajuste del tiempo de espera para que se apague la
pantalla
Si no utiliza el teléfono móvil durante varios minutos, la pantalla se apagará para
ahorrar energía de la batería. Para configurar un período de inactividad menor o
mayor:
1. En la pantalla
Configuración
, presione
Mostrar
>
Tiempo de espera de la pant.
.
2. Seleccione el tiempo durante el cual desea que la pantalla esté encendida.
12.3 Configuración del timbre
12.3.1 Activación del modo silencioso
1. En la pantalla
Configuración
, presione
Sonido
.
2. Seleccione la casilla de verificación
Modo silencioso
para silenciar todos los
sonidos con excepción de las alarmas y el sonido de videos y música.
12.3.2 Cómo ajustar el volumen
El volumen se puede ajustar desde la pantalla principal o la pantalla de cualquier
aplicación (excepto durante el transcurso de una llamada o durante la reproducción
de música o videos). Presione las teclas de volumen para ajustar el volumen como lo
desee.
El volumen también se puede ajustar desde la pantalla de configuración.
1. En la pantalla
Configuración
, presione
Sonido
>
Volumen
.

69
2. Arrastre el deslizador hacia la izquierda para bajar el volumen o hacia la derecha
para subirlo.
3. Presione
Aceptar
para guardar el ajuste realizado.
12.3.3 Cambio del tono de llamada del teléfono
1. En la pantalla
Configuración
, presione
Sonido
>
Tono de llamada del tel.
.
2. Presione el tono de llamada que desea utilizar, y luego presione
Aceptar
El tono
de llamada se escuchará al ser seleccionado.
12.3.4 Cambio del tono de timbre para mensajes
1. En la pantalla principal, presione >
Mensajería
.
2. En la lista de mensajes, presione >
Configuración
>
Seleccionar tono de
timbre
.
3. Presione el tono de timbre que desea utilizar, y luego presione
Aceptar
. El tono de
timbre se escuchará al ser seleccionado.
12.4 Configuración de servicios
telefónicos
12.4.1 Personalización de las configuraciones de llamada
El proveedor de servicios del teléfono móvil ofrece diferentes servicios como desvío
de llamadas, llamada en espera, números de marcación fija y correo de voz. Es
posible personalizar muchos de estos servicios si forman parte del plan de llamadas
del usuario.
En la pantalla
Configuración
, presione
Config. de llamada
para personalizar las
funciones de llamada.
12.4.2 Activación del roaming de datos
1. En la pantalla
Configuración
, presione
Redes inalám. y redes
>
Redes de
celulares
.
2. Seleccione la casilla de verificación
Roaming de datos
.
El acceso al servicio de roaming de datos puede generar gastos adicionales.
70
Consulte al proveedor de servicios inalámbricos sobre el costo del servicio de
roaming de datos.
12.4.3 Desactivación del servicio de datos
1. En la pantalla
Configuración
, presione
Redes inalám. y redes
>
Redes de
celulares
.
2. Deseleccione la casilla de verificación
Datos habilitados
.
12.5 Configuración de la función texto a
voz
Se puede utilizar la función de configuración de texto a voz para configurar el
sintetizador de texto a voz Android, para las aplicaciones que pueden hacer uso de
esta función.
12.5.1 Instalación de datos de voz
1. En la pantalla
Configuración
, presione
Entrada y salida de voz
>
Configuración de texto a voz
>
Instalar datos de voz
.
2. Si el teléfono móvil no tiene instalados los datos del sintetizador de voz, conéctese
a la aplicación Android Play Store para obtener instrucciones sobre cómo
descargar e instalar el servicio de datos.
3. Siga las instrucciones para la instalación del servicio de datos de voz.
12.5.2 Ajuste de la velocidad de voz
1. En la pantalla
Configuración
, presione
Entrada y salida de voz
>
Configuración de texto a voz
>
Velocidad de voz
.
2. Seleccione la velocidad en que se escuchará el texto.
71
12.6 Protección del teléfono móvil
12.6.1 Protección del teléfono móvil por medio del bloqueo de
pantalla
Para brindar mayor seguridad a los datos, se puede bloquear la pantalla y/o solicitar
un patrón de desbloqueo de la pantalla cada vez que el teléfono móvil se enciende o
sale del modo de suspensión.
1. En la pantalla
Configuración
, presione
Ubicación y seguridad
>
Configurar
bloqueo de pantalla
>
Patrón
.
2. Deslice el dedo en forma vertical, horizontal o en diagonal para conectar al menos
cuatro puntos en cualquier orden que desee. Levante el dedo de la pantalla
cuando haya finalizado.
Para crear un patrón, se debe deslizar el dedo entre los puntos que aparecen
en la pantalla, no basta con tocar puntos individuales.
3. El teléfono móvil grabará el patrón. Presione
Continuar
.
4. Cuando el teléfono lo indique, dibuje el patrón de desbloqueo nuevamente y luego
presione
Confirmar
.
Para cambiar el patrón de desbloqueo de la pantalla, presione
Ubicación y
seguridad
>
Cambiar bloqueo de pant.
12.6.2 Protección del teléfono móvil por medio de un PIN
numérico
Es posible configurar un PIN numérico para bloquear el teléfono.
1. En la pantalla
Configuración
, presione
Ubicación y seguridad
>
Configurar
bloqueo de pantalla
>
PIN
.
2. Ingrese al menos cuatro caracteres.
3. Presione
Continuar
.
4. Ingrese los mismos caracteres nuevamente y presione
Aceptar
.
Para cambiar el PIN, presione
Ubicación y seguridad
>
Cambiar bloqueo de
pant.

72
12.6.3 Desbloqueo del teléfono móvil en caso de no recordar
el patrón de bloqueo de la pantalla
Si ya ha creado una cuenta en Google, puede desbloquear el teléfono móvil
utilizando uno de los siguientes métodos.
• Después de ingresar una secuencia equivocada cinco veces seguidas, aparecerá
en pantalla el botón
¿Olvidaste el patrón?
Presione este botón para ingresar en
la interfaz de la cuenta de Google. Después de ingresar la contraseña de la cuenta
de Google, podrá restablecer el patrón de desbloqueo.
• Después de ingresar un patrón equivocado veinte veces será redirigido
directamente a la interfaz de la cuenta de Google. Después de ingresar la
contraseña de la cuenta de Google, podrá restablecer el patrón de desbloqueo.
12.7 Administración de aplicaciones
12.7.1 Visualización de aplicaciones instaladas
1. En la pantalla
Configuración
, presione
Aplicaciones
>
Administrar
aplicaciones
.
2. En la lista de aplicaciones, lleve a cabo una de las siguientes acciones:
• Presione y luego,
Ordenar por tamaño
. Presione una aplicación para
ver los detalles.
• Presione una aplicación directamente para ver los detalles correspondientes.
12.7.2 Desinstalación de aplicaciones
No es posible desinstalar las aplicaciones preinstaladas en el sistema.
1. En la pantalla
Configuración
, presione
Aplicaciones
>
Administrar
aplicaciones
.
2. Presione una aplicación y luego
Desinstalar...
73
12.7.3 Cómo mover una aplicación a la tarjeta microSD
Algunas aplicaciones están diseñadas para ser almacenadas en la tarjeta microSD o
en el dispositivo USB del teléfono (dependiendo del modelo del teléfono) y no en el
dispositivo interno de almacenamiento. Otras están diseñadas para poder cambiar el
lugar de almacenamiento. Es posible que le sea útil eliminar aplicaciones de gran
tamaño de su dispositivo de almacenamiento interno para crear espacio para otras
aplicaciones que no ofrezcan esta opción.
1. En la pantalla
Configuración
, presione
Aplicaciones
>
Administrar
aplicaciones
.
2. Presione una aplicación de la lista. Luego presione
Mover a la tarjeta SD
para
cambiar la ubicación de gran parte de la aplicación de la memoria de
almacenamiento interno.
La sección
Espacio de almacenamiento
de la pantalla de detalles de la
aplicación muestra detalles sobre la memoria utilizada por la aplicación. Si es
posible cambiar la ubicación de la aplicación, el botón
Mover a la tarjeta SD
estará activo.
Presione
Mover al teléfono
para que la aplicación se guarde nuevamente en
la memoria de almacenamiento interna del dispositivo.
12.7.4 Métodos para liberar espacio en la memoria del
teléfono móvil
• Siga estos pasos para mover archivos y adjuntos de correos electrónicos a la
tarjeta microSD.
• En
Navegador
, borre todos los archivos temporales de Internet y la información
del historial del Navegador.
• Mover aplicaciones a la tarjeta microSD.
• Desinstale los programas descargados que ya no se utilicen.
• Reinicie el teléfono móvil.

74
12.8 Restablecimiento de las
configuraciones de fábrica del teléfono
móvil
12.8.1 Copia de seguridad de los datos
Se puede realizar una copia de seguridad de las configuraciones del teléfono móvil
en los servidores de Google mediante una cuenta de Google. En caso de reemplazar
el teléfono móvil, las configuraciones de las que se hizo copia de seguridad se
transferirán al teléfono nuevo la primera vez que se inicie sesión en la cuenta de
Google.
1. En la pantalla
Configuración
, presione
Privacidad
.
2. Seleccione la casilla de verificación
Copia de seg. de mis datos
.
12.8.2 Restablecimiento de datos de fábrica
Si se restablecen las configuraciones de fábrica del teléfono, se eliminarán todos los
datos personales almacenados en éste, incluso la información sobre la cuenta de
Google y cualquier otra cuenta, las configuraciones de las aplicaciones y del sistema,
así como toda aplicación descargada. El restablecimiento de las configuraciones de
fábrica del teléfono no elimina las actualizaciones de software del sistema que se
hayan descargado ni los archivos de la tarjeta microSD, como archivos de música o
fotografías.
1. En la pantalla
Configuración
, presione
Privacidad
>
Restabl. datos de fábrica
.
2. Cuando reciba la indicación correspondiente, presione la opción
Restablecer
teléfono
y luego, la opción
Borrar todo
. Las configuraciones originales de fábrica
del teléfono móvil se restablecen. Luego, el dispositivo se reinicia.
12.9 Configuración del Modo aho de
energ
1. En la pantalla de inicio, presione >
Config.
>
Modo ahorro de energía
.
2. Seleccione la casilla de verificación
Modo aho de energ
.

75
12.10 Actualización en línea
El teléfono móvil viene equipado con la función de actualización en línea. Cuando
exista una nueva versión de software, se visualizará la información respectiva y se
recibirá un aviso de actualización. También es posible presionar
Configuración
>
Acerca del teléfono
>
Actualización en línea
para verificar si hay nuevo software
disponible.
Al actualizar:
1.
Haga una copia de seguridad de la información personal. Toda la
información personal será eliminada después de la actualización.
2.
Asegúrese de que la tarjeta microSD tenga espacio suficiente para
almacenar la nueva versión de software.
3.
Realice la actualización en línea siguiendo las instrucciones de la
pantalla.
13 Apéndice
13.1 Preguntas frecuentes
¿Cómo se importan contactos al teléfono desde otro teléfono móvil por
medio de una tarjeta microSD?
El teléfono móvil sólo soporta archivos de contacto en formato
.vcf
.
1.
Guarde los contactos que desee importar al teléfono móvil en una
tarjeta microSD como archivos
.vcf
.
2.
Inserte la tarjeta microSD en el teléfono móvil y busque el archivo
.vcf
por medio del
Gestor de archivos
.
3.
Presione el archivo
.vcf
. El teléfono mostrará un aviso en el que le
preguntará si desea importar los contactos.
4.
Presione
Aceptar
para importar los contactos.
Es posible que existan problemas de compatibilidad con los archivos
.vcf
creados por diferentes teléfonos móviles; además, es posible que se pierda
cierta información de los contactos después de importarlos.
También es posible utilizar la función Bluetooth para compartir e importar

76
contactos.
¿Cómo se puede evitar que cambie la orientación de la pantalla en forma
automática al rotar el teléfono?
En la pantalla principal, presione >
Config.
>
Mostrar
>
Rotación aut. de pant.
para deshabilitar esta función.
¿Cómo se configura el patrón de desbloqueo?
En la pantalla principal, presione >
Config.
>
Ubicación y seguridad
>
Configurar bloqueo de pantalla
>
Patrón
.
¿Cómo se cambia el modo de ingreso de texto?
Mantenga presionada el área donde se escribe el texto y seleccione el modo de
ingreso de texto que desee.
¿Cómo se detiene la reproducción de una canción en segundo plano?
Presione la barra de notificaciones, deslice el dedo hacia abajo para abrir el panel de
notificaciones, presione la notificación de reproducción de música para acceder a la
pantalla de reproducción de música y luego detenga la reproducción de la canción.
¿Cómo se vuelve a la pantalla de la llamada?
Si se ha accedido a otra pantalla durante una llamada, se puede presionar la barra de
notificaciones y arrastrarla hacia abajo para acceder al panel de notificaciones.
Luego, presione la notificación de llamada actual para volver a la pantalla de la
llamada.
¿Cómo se crea el acceso directo de una aplicación en la pantalla principal?
Mantenga presionado el ícono de una aplicación en la pantalla de aplicaciones hasta
que aparezca la pantalla principal. Luego arrastre el ícono hasta donde desee y
levante el dedo.
¿Cómo se oculta el teclado?
Presione para ocultar el teclado.

HUAWEI M660
V100R001_01
Fabricado bajo licencia de DTS Licensing Limited. DTS, el
Símbolo, y DTS y el Símbolo en conjunto son marcas
comerciales registradas, y DTS Envelo | Headphone es una
marca comercial de DTS, Inc. Producto incluye software. ©
DTS, Inc. Todos los derechos reservados.
Las imágenes de este documento se presentan sólo a modo de
referencia. El aspecto y la presentación reales dependen del teléfono
móvil adquirido.
Android es marca registrada de Google Inc. La utilización de esta
marca está sujeta a los permisos de Google.
© Huawei Technologies Co., Ltd. 2012. Todos los derechos
reservados.
