Huawei 31010TWA _V100R001_01,en_ EC315 EVO Wingle Quick Strat Guide(EC315 5, 01, EN)
2015-12-02
User Manual: Huawei
Open the PDF directly: View PDF ![]() .
.
Page Count: 28

Quick Start Guide
1
Thank you for choosing the 3G
EVO Wingle; a Wi-Fi USB that lets
you freely Mingle with multiple
Wi-Fi gadgets On-the-Go!
This guide briefly describes the appearance of the 3G EVO
Wingle and the procedures for using the 3G EVO Wingle.
For details about how to set the management parameters,
please see help information on the web management page.
2
Connection Scenarios
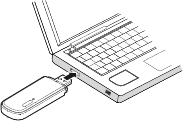
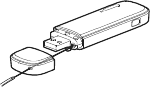
Scenario 1: One-device Internet access using computer
3
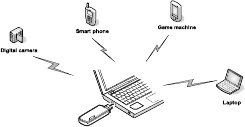
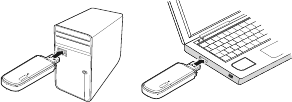
Scenario 2: Multi-device Internet access using Wi-Fi
(connected to a computer)
4
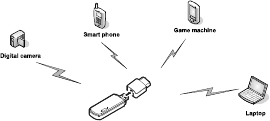
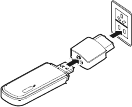
Scenario 3: Multi-device Internet access using Wi-Fi
(connected to the power adapter)
5
Getting to Know Your 3G EVO Wingle
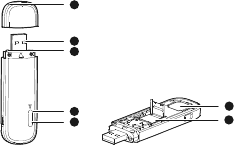
The following figure shows the 3G EVO Wingle. It is
provided only for your reference. The actual product may
be slightly different.
1
2
3
4
2
5
6
6
USB connector
It connects the 3G EVO Wingle to a computer.
Strap holes
You can tie the 3G EVO Wingle and its cap together by
threading a strap through the strap holes.
7
Wi-Fi indicator
It indicates the status of a Wi-Fi network.
- Blinking green once every 3 seconds: The 3G EVO
Wingle is powered on, and the Wi-Fi function is
available.
- Steady green: A Wi-Fi connection is set up.
- Off: The Wi-Fi function is turned off or fails, or the 3G
EVO Wingle has been removed.
2G/3G Indicator
It indicates the 3G EVO Wingle's status.
- Green, blinking twice every 2s: The 3G EVO Wingle is
powered on.
8
- Green, blinking once every 0.2s: The software of the 3G
EVO Wingle is being upgraded.
- Green, blinking once every 2s: The 3G EVO Wingle is
registering with a 2G network.
- Green, solid: The 3G EVO Wingle is transmitting data
for 2G network .
- Blue, blinking once every 2s: The 3G EVO Wingle is
registering with a 3G network.
- Blue, solid: The 3G EVO Wingle is transmitting data for
3G network.
- Off: The 3G EVO Wingle is removed.
9
UIM card slot
It holds a User Identity Module (UIM) card. Also known
commonly as SIM Card. Your 3G EVO Wingle is
pre-configured to PTCL EVO network; and hence does not
require a UIM/SIM card for service activation.
microSD card slot
It holds a microSD card.
10
Getting Started
Installing the microSD Card
1. Slide the front cover off.
2. Slide the microSD card holder door towards its hinges
to unlock it. Then open the door.
3. Place the microSD card into the holder. Ensure that the
gold contact area faces down and that the gold
contacts of the microSD card align with those of the
holder.
4. Close the microSD card holder door and slide it away
from its hinges to lock it.

11
5. Slide the front cover back onto the 3G EVO Wingle until
it snaps into place.
Note:
- The microSD card is an optional accessory. If it is not
included in the product package, purchase one
separately.
- When installing a microSD card, ensure that the
microSD card notch aligns with that of the microSD
card holder.
- Do not remove the microSD card when the card is in
12
use. Otherwise, the card and your 3G EVO Wingle may
be damaged and the data stored on the card may be
corrupted.
Using the Power Adapter
Connect the 3G EVO Wingle to the power adapter's USB
port, and connect the power adapter to a power outlet.
13
Note:
- Only use power adapters compatible with the 3G EVO
Wingle and provided by a designated manufacturer
(HW-050100E2W). Use of an incompatible power
adapter or one from an unknown manufacturer may
cause the 3G EVO Wingle to malfunction, fail, or could
even cause a fire. Such use voids all warranties, whether
expressed or implied, on the product.
- The power adapter is an optional accessory. Please note
that the power adapter is not included in the product
package and needs to be purchased separately.
14
Using Your 3G EVO Wingle
The procedure for installing the management program
depends on your computer's operating system. The
following sections are based on Windows 7.
Connecting to a Network
1. Connect the 3G EVO Wingle to one of your computer's
USB ports.
15
The installation wizard runs automatically.
2. Complete the installation as prompted.
When the installation is complete, the 3G EVO Wingle's
web management page is displayed.
3. A dial-up connection is set up and you are connected to
the network in automatic mode.
16
Note:
- If the installation wizard does not run automatically,
find the AutoRun.exe file in the driver path, and
double-click the file to run it.
- The default user name and password of the web
management page are admin.
- When using the 3G EVO Wingle to access a network,
do not use other devices to access the network,
because doing so may cause conflicts.
- A maximum of five WiFi devices can connect to the 3G
EVO Wingle to access the Internet.

17
- By default, the 3G EVO Wingle automatically
disconnects from the Internet when you are roaming
outside the network coverage area.
- If you are not connected to the network, access
http://192.168.1.1 to check the device status.
- If you cannot access http://192.168.1.1, disconnect
other network connections, such as an Ethernet or
Wireless Fidelity (Wi-Fi) connection, remove and then
insert the 3G EVO Wingle, or restart the computer.
18
Disconnecting from a Network
Remove the 3G EVO Wingle from your computer.
Note:
- By default, the 3G EVO Wingle automatically
disconnects from the network if no data is transferred
within 10 minutes.
- If you do not need to connect to the network, it is
recommended that you remove the 3G EVO Wingle
from your computer to reduce data traffic.
19
Setting Up a Wi-Fi Connection
1. Ensure that the Mobile WiFi Smart's Wi-Fi function is
on.
2. Select Start > Control Panel > Network and Internet >
Network and Sharing Center > Connect to a network.
Note:
Before establishing a Wi-Fi connection, ensure that the
computer is equipped with a wireless network adapter.
If the computer indicates a wireless network connection,
the wireless network adapter can be used. Otherwise,
verify that your wireless network adapter is working
properly.
20
3. Select the wireless network connection with the Mobile
WiFi Smart's SSID and click Connect.
Note:
- If a security mechanism is enabled for the wireless
network connection, enter the correct network key.
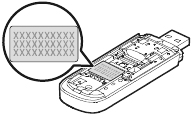
- The SSID and the network key are printed on the
Mobile WiFi Smart, as shown in the following figure.

21
4. Wait until a wireless network connection icon is
displayed in the lower right corner of the computer
screen. A wireless network connection is set up.
Viewing Service Information
Visit http://192.168.1.1 to view your service information.
Wi-Fi Sharing
1. Log in to the web management page
http://192.168.1.1. Login by entering the Username
“admin” and Password “admin”.
2. From the sharing page, choose the “Web share mode”.
22
3. Set up the following options according to your needs
then click “Select” > “Apply”.
4. Under web share mode settings you may select the
Access type as “Read only” or “Read/Write only”. Read
only option is only for viewing the files from SD card –
copying or downloading the file is restricted while with
Read/write option you can download the file from SD
card.
5. Under the Shared path option you can select the Entire
SD card or Custom setting. When you select the entire
SD card allow access to all files/folders on your SD card.
If you select the custom setting you may specify the
files/folders.

23
6. For uploading a file in the SD card you need to select
the upload option and then browse the file from your
PC which you want to upload followed by clicking the
upload button.
IP Sharing
1. Log in to the web management page
http://192.168.1.1. Login to the device by typing in
“admin” in both login and password fields.
2. Click on “Settings” option.
3. Check the IP address from “Settings” page click on
“System” > “Device Information” from here you can
check the Wan IP address.
24
4. From the “Settings” page, choose “Security” > “Firewall
Switch”.
5. Select the “Enable firewall” and “Open Wan IP sharing”,
and then click “Apply”.
6. The “IP Sharing” link now is available.
7. By typing the Wan IP address, the other users can
remotely access the web management page and view
the SD files.
25
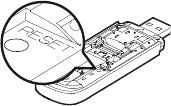
Restoring Factory Defaults
If you are uncertain of which settings you have configured
or changed, you can restore the factory defaults that come
with the 3G EVO Wingle, and reconfigure the device.
To restore the factory defaults, connect the 3G EVO Wingle
to a computer or a power outlet, and press and hold the
RESET button for 5 seconds.
26
Note:
Restoring factory defaults deletes all the device's
user-defined settings and restores all the settings on the
web management page to their defaults.
31010UGQ_01
