Huawei Hg655D Quick Start Guide
2014-07-06
: Huawei Huawei-Hg655D-Quick-Start-Guide huawei-hg655d-quick-start-guide huawei pdf
Open the PDF directly: View PDF ![]() .
.
Page Count: 8

HUAWEI HG655d
Home Gateway Quick Start
1
1 Contents in the Package
HG655d Splitter Power Adapter
DSL Cable Ethernet Cable User CD-ROM
Safety Information Warranty Card
2
2 Installation Guide
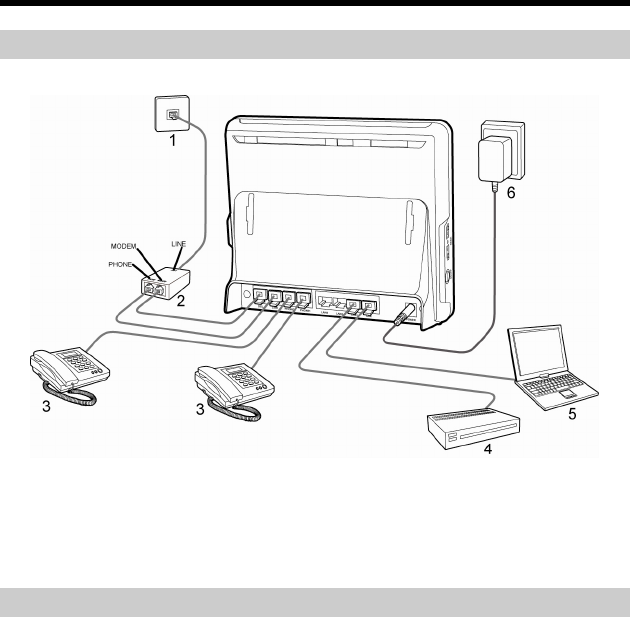
Connecting the Cables
To connect the cables for installing the HG655d, do as follows:
1 Phone jack on the wall 2 Splitter 3 Telephone
4 Set-top box 5 PC 6 Power adapter
Getting Started
To power on the HG655d, press the ON/OFF button on the side panel of the HG655d.
After you power on the HG655d, the DSL indicator blinks (for less than three minutes),
which indicates that the HG655d is being activated. Later, the DSL indicator turns solid
on. The POWER indicator is also solid on, which indicates that the HG655d is working
properly.

3
3 Accessing the Internet
The HG655d supports VDSL2 uplink and High-Speed Packet Access (HSPA) uplink
through Huawei HSPA data card. You can access the Internet through the DSL link and
HSPA link.
Please use the parameters provided by your internet service provider (ISP)
for configuration. If the configuration is wrong, you will not be able to
access the Internet.
Configuring the HSPA uplink
When the HG655d is working through the Huawei HSPA data card, you need to install
the Huawei HSPA data card on the HG655d. To create a HSPA uplink connection, do
as follows.
Step 1
Step 2
Step 3
Setting the WAN Parameters.
1. Launch the Internet Explorer and enter http://192.168.1.1 in the address
bar, and then press Enter.
2. Enter the user name and the password (admin and admin by default), and
then click Login.
3. Click Basic > WAN.
4. Click New.
5. Select UMTS1 from the Connection device drop-down combo box.
6. Select Enable for WAN connection.
7. Select IP_Route(PPP) from the Connection type drop-down combo box
8. Enter the user name and password in the User name and Password text
boxes.
9. Enter the APN and the Dial number that are provided by the Interner
Service Provider (ISP) in the APN and Dial number text boxes.
10. Keep the default vale for other parameters and click Submit.
Insert the Huawei HSPA data card that the ISP specified to the USB interface
on the HG655d.
Verify the PIN Code of SIM Card.
1. Click Advanced > PIN.
2. Enter the original PIN number in the PIN text box.
3. Click Submit.

Configuring the DSL uplink
By configuring the DSL uplink, you can choose any of the following methods to surf
the Internet:
z Using the Embedded PPP Dial-Up Software on the HG655d
z Using the PPP Dial-Up Software on Your Computer
Using the Embedded PPP Dial-Up Software on the HG655d
If you select this method for accessing the network, the HG655d starts to set up a
dial-up connection automatically after the startup. You can access the network after you
power on your computer.
To configure the HG655d and your computer for the network access, do as follows:
Step 1
Step 2
Log in to the web page.
Configure the PTM PVC and ATM PVC.
1. In the navigation tree, choose Basic > ATM.
2. Click New.
3. Enter VPI and VCI in the VPI/VCI text box provided by the Internet
Service Provider.
4. Select EoA from the DSL link type option button, and keep the default
settings of other parameters.
5. Click Submit.
Just keep the default settings for PTM settings.
Step 3 Enable the embedded dial-up function.
1. In the navigation tree on the left of the web page, choose Basic > WAN.
2. Click New.
3. Select a PVC from the Layer2 interface drop-down combo box.
z The HG655d supports ADSL/VDSL compliance uplink.
z When choose the ADSL uplink mode, the name of PVC should be
composed by the value of VPI and VCI. When choose the VDSL
uplink mode, the name of PVC should begin with ptm.
4. Select Enable check box for WAN connection.
5. Select VOICE_TR069_INTERNET from the Service list drop-down
combo box.
6. Select Route from the Connection mode drop-down combo box.
7. Select PPPoE option button for Connection type.
8. Select Enable check box for NAT.
4
5
Step 1
Step 2
9. Enter the user name and password that are provided by the ISP in the
User name and Password text boxes, and keep the default settings of
other parameters.
10. Click Submit.
After you complete the preceding settings, you can surf the Internet.
You need to perform the preceding operations on a computer once only. The next time
when you power on your computer, you can surf the Internet without any configuration.
Using the PPP Dial-Up Software on Your Computer
If you select this method for accessing the network, you need to install and configure
the dial-up software on your computer. In addition, you need to perform dial-up
operations on your computer upon each startup.
To configure the HG655d and your computer for the network access, do as follows:
Set the working mode of the HG655d to Bridge.
For details, refer to the procedure for enabling the embedded dial-up function described
in Step 2 in section "Using the Embedded PPP Dial-Up Software on the HG655d." Note
that Bridge is selected from the Connection mode drop-down combo box.
Install and configure the PPP dial-up software on your computer.
The PPP dial-up software is pre-installed on certain computer operating systems. To
create a dial-up connection, do as follows (taking the Windows XP operating system as
an example):
1. Choose Start > All Programs > Accessories > Communications >
Network Connections.
2. Click Create a new connection in Network Tasks to display the New
Connection Wizard window, and then click Next.
3. Select Connect to the Internet, and then click Next.
4. Select Set up my connection manually, and then click Next.
5. Select Connect using a broadband connection that requires a user
name and password, and then click Next.
6. Enter the name (as desired) of the dial-up connection in ISP Name, and
then click Next.
7. Select Anyone's use or My use only, and then click Next.
8. Enter the user name and password provided by the network operator and
used for the dial-up connection, and then click Next.
9. Select Add a shortcut to this connection to my desktop, and then click
Finish.
An icon for the dial-up connection is displayed on the desktop of your computer.
You need to perform the preceding operations only once for creating a network
connection. After the network connection is created, to access the network,

double-click the icon for the dial-up connection, and then click Connect in the
displayed dialog box.
6
4 Configuring the Wireless Network
Connection
If a wireless network adapter is installed on your computer, you can connect you
computer to the HG655d through a wireless connection.
The hardware installation methods and driver installation methods of
wireless network adapters provided by different companies vary from each
other. For details, see the installation guide provided by the wireless
network adapter provider.
Setting Up a Wireless Connection by WPS
The HG655d supports the Wi-Fi Protected Setup (WPS) function. If your network
adapter also supports the WPS function, you can use the WPS function to set up a
wireless connection between your PC and the HG655d quickly.
To set up a wireless connection by WPS, do as follows:
Step 1
Step 2
Enable the wireless network function.
The WLAN function is enabled by default and the WLAN indicator is on.
Press the WPS button to enable the HG655d to enter the WPS negotiation
state. The WPS indicator blinks.
If the WPS indicator does not blink, it indicates that the WPS function
cannot be enabled. Note that the WPS function can be used only when the
wireless network function is enabled and the wireless network security
mode of the WLAN is set to WPA-PSK or WPA2-PSK.
Step 3 Enable the WPS negotiation function of the wireless network adapter on your
PC within two minutes, and then wait for a moment (typically 10s and at most
2mins).
The WPS indicator of the HG655d becomes on from the blinking state, indicating that
the HG655d is connected to your PC through the WLAN.

7
Setting Up a Wireless Connection Manually
If your network adapter does not support the WPS function, you can set up a wireless
connection between your PC and the HG655d manually.
To manually set up a wireless connection, use either of the following methods:
z Use the tool provided by your network adapter.
For details, see the user guide of your network adapter.
z Use the wireless configuration software provided by the operating system of PC.
If your PC runs on Windows XP, you can use the Wireless Zero Configuration that is
provided by Windows XP to set up a wireless connection.
Takes Windows XP as an example, to set up a wireless connection, do as follows:
Step 1
Step 2
Step 3
Enable the wireless network function, and set the wireless network name and
access password of the HG655d.
1. Log in to the web page.
2. In the navigation tree on the left of the web page, choose Basic > WLAN.
3. Select the Enable WLAN.
4. Enter a wireless network name in the SSID text box.
5. Select WPA-PSK/WPA2-PSK from the Security drop-down combo
box.
6. Enter an access password in the WPA pre-shared key text box.
7. Select AES from the WPA encryption drop-down combo box.
8. Click Submit to save the settings.
Enable the wireless configuration service provided by Windows XP.
1. Right-click My Computer, and then choose Manage from the shortcut
menu.
2. In the Computer Management window, choose Computer
Management (Local) > Services and Applications > Services.
3. From the services listed in the right pane of the Computer Management
window, right-click Wireless Zero Configuration, and then choose
Properties from the shortcut menu.
4. In the Wireless Zero Configuration Properties (Local Computer)
dialog box, check whether Service status is Started. If not, click Start.
5. Click OK to close the dialog box, and then close the Computer
Management window.
Configure the wireless network connection on your computer.
1. Choose Start > All Programs > Accessories > Communications >
Network Connections.

2. In the Network Connections window, right-click Wireless Network
Connection to display a shortcut menu, and then select View Available
Wireless Networks from the shortcut menu.
3. In the Wireless Network Connection Properties dialog box, select
Wireless Networks.
4. Select Use Windows to configure my wireless network settings.
5. Click View Wireless Networks.
6. In the Wireless Network Connection dialog box, select the WLAN with
the same name that is configured in Step 1, and then click Connect in the
lower right corner of the window.
7. In the displayed dialog box, enter the access password that is preset in
Step 1, and then click Connect.
8. Close the Wireless Network Connection dialog box.
9. In the Wireless Network Connection Properties dialog box, click OK.
After the password is verified, Connected appears on the icon of the wireless network
in the wireless network list, which indicates that your computer is connected to the
HG655d through wireless connection.
Copyright © Huawei Technologies Co., Ltd. 2010. All rights reserved.
Trademarks and Permissions
, , and are trademarks or registered trademarks of Huawei Technologies Co., Ltd.
Other trademarks, product, service and company names mentioned are the property of their respective
owners.
NO WARRANTY
THE CONTENTS OF THIS MANUAL ARE PROVIDED “AS IS”. EXCEPT AS REQUIRED BY APPLICABLE
LAWS, NO WARRANTIES OF ANY KIND, EITHER EXPRESS OR IMPLIED, INCLUDING BUT NOT LIMITED
TO, THE IMPLIED WARRANTIES OF MERCHANTABILITY AND FITNESS FOR A PARTICULAR PURPOSE,
ARE MADE IN RELATION TO THE ACCURACY, RELIABILITY OR CONTENTS OF THIS MANUAL.
TO THE MAXIMUM EXTENT PERMITTED BY APPLICABLE LAW, IN NO CASE SHALL HUAWEI
TECHNOLOGIES CO., LTD BE LIABLE FOR ANY SPECIAL, INCIDENTAL, INDIRECT, OR
CONSEQUENTIAL DAMAGES, OR LOST PROFITS, BUSINESS, REVENUE, DATA, GOODWILL OR
ANTICIPATED SAVINGS.
Issue: 02 (2010-11-27)
Part Number: 201243
8
