Hughes Network Systems PICO-1900 1900 MHz Indoor Cellular Base Station User Manual
Hughes Network Systems 1900 MHz Indoor Cellular Base Station
EXB 10

11717 Exploration Lane, Germantown, MD 20876
Tel: (301) 428–5500 Fax: (301) 428–1868/2830
1026209–0001
Revision B
February 24, 2000
Installation and
Commissioning Manual
1026209–0001 Revision Bii
Copyright E1999–2000 Hughes Network Systems, a Hughes Electronics Corporation company
All rights reserved. This publication and its contents are proprietary to Hughes Network
Systems, a Hughes Electronics Corporation company. No part of this publication may be
reproduced in any form or by any means without the written permission of Hughes Network
Systems, 11717 Exploration Lane, Germantown, Maryland 20876.
Hughes Network Systems has made every effort to ensure the correctness and completeness
of the material in this document. Hughes Network Systems shall not be liable for errors
contained herein. The information in this document is subject to change without notice.
Hughes Network Systems makes no warranty of any kind with regard to this material,
including, but not limited to, the implied warranties of merchantability and fitness for a
particular purpose.
Trademarks
AIReach is a trademark of Hughes Network Systems. Other trademarks, marks, names, or
product names referenced in this publication are the property of their respective owners, and
Hughes Network Systems neither endorses nor otherwise sponsors any such products or
services referred to herein.

1026209–0001 Revision B iii
Revision record
Revision Date of issue Scope
ANovember 8, 1999 Initial release
BFebruary 24, 2000 Added instructions for several additional
procedures; minor revisions throughout.
1026209–0001 Revision Biv

1026209–0001 Revision B v
Contents
About this manual xi. . . . . . . . . . . . . . . . . . . . . . . . . . . . . . . . . . . . . . .
Important safety information xv. . . . . . . . . . . . . . . . . . . . . . . . . . . . . .
1 Introduction 1–1. . . . . . . . . . . . . . . . . . . . . . . . . . . . . . . . . . . . . . . . . . .
1.1 System components 1–1. . . . . . . . . . . . . . . . . . . . . . . . . . . . . . . . . . . . . .
1.2 System Controller 1–3. . . . . . . . . . . . . . . . . . . . . . . . . . . . . . . . . . . . . . .
Hardware 1–3. . . . . . . . . . . . . . . . . . . . . . . . . . . . . . . . . . . . . . . . . . .
Software 1–6. . . . . . . . . . . . . . . . . . . . . . . . . . . . . . . . . . . . . . . . . . . .
1.3 Picocell components 1–7. . . . . . . . . . . . . . . . . . . . . . . . . . . . . . . . . . . . .
1.4 Procedural flow chart 1–8. . . . . . . . . . . . . . . . . . . . . . . . . . . . . . . . . . . .
1.5 Tools and materials 1–11. . . . . . . . . . . . . . . . . . . . . . . . . . . . . . . . . . . . . .
Required tools 1–11. . . . . . . . . . . . . . . . . . . . . . . . . . . . . . . . . . . . . . .
Recommended tools 1–11. . . . . . . . . . . . . . . . . . . . . . . . . . . . . . . . . . .
Required materials 1–12. . . . . . . . . . . . . . . . . . . . . . . . . . . . . . . . . . . .
Other requirements 1–12. . . . . . . . . . . . . . . . . . . . . . . . . . . . . . . . . . . .
1.6 Configuration options 1–12. . . . . . . . . . . . . . . . . . . . . . . . . . . . . . . . . . . .
2 Adding cards to the System Controller 2–1. . . . . . . . . . . . . . . . . . . . .
2.1 Unpacking the picocells 2–4. . . . . . . . . . . . . . . . . . . . . . . . . . . . . . . . . .
2.2 System Controller card configurations 2–8. . . . . . . . . . . . . . . . . . . . . . .
Backplane slot identification 2–8. . . . . . . . . . . . . . . . . . . . . . . . . . . .
Standard (factory) configuration 2–9. . . . . . . . . . . . . . . . . . . . . . . . .
Fully loaded configuration 2–10. . . . . . . . . . . . . . . . . . . . . . . . . . . . . .
2.3 Adding cards to the System Controller (first steps) 2–11. . . . . . . . . . . . .
2.4 Jumper and DIP switch settings 2–13. . . . . . . . . . . . . . . . . . . . . . . . . . . .
Quad T1 card 2–13. . . . . . . . . . . . . . . . . . . . . . . . . . . . . . . . . . . . . . . .
TX2000 IP and TX2000 SS7 cards 2–15. . . . . . . . . . . . . . . . . . . . . . .
Conference card 2–18. . . . . . . . . . . . . . . . . . . . . . . . . . . . . . . . . . . . . .
LAN cards 2–19. . . . . . . . . . . . . . . . . . . . . . . . . . . . . . . . . . . . . . . . . .
Modem card 2–19. . . . . . . . . . . . . . . . . . . . . . . . . . . . . . . . . . . . . . . . .
Single board computer (SBC) 2–20. . . . . . . . . . . . . . . . . . . . . . . . . . .
2.5 Attaching the bus cables 2–23. . . . . . . . . . . . . . . . . . . . . . . . . . . . . . . . . .
2.6 Adding cards to the System Controller (final steps) 2–24. . . . . . . . . . . . .
2.7 Configuring System Controller cards 2–25. . . . . . . . . . . . . . . . . . . . . . . .
Specifying basic card information 2–25. . . . . . . . . . . . . . . . . . . . . . . .
2.8 Verifying the card configuration 2–27. . . . . . . . . . . . . . . . . . . . . . . . . . . .
Adding a Quad T1 card 2–30. . . . . . . . . . . . . . . . . . . . . . . . . . . . . . . .
Adding a TX2000 or conference card 2–31. . . . . . . . . . . . . . . . . . . . .
1026209–0001 Revision Bvi
3 Installing the Controller 3–1. . . . . . . . . . . . . . . . . . . . . . . . . . . . . . . .
3.1 Rack–mount configuration 3–2. . . . . . . . . . . . . . . . . . . . . . . . . . . . . . . .
3.2 Mounting the Controller chassis 3–4. . . . . . . . . . . . . . . . . . . . . . . . . . . .
3.3 Controller cabling 3–5. . . . . . . . . . . . . . . . . . . . . . . . . . . . . . . . . . . . . . .
3.4 Checking System Controller operation 3–6. . . . . . . . . . . . . . . . . . . . . . .
3.5 System cabling 3–7. . . . . . . . . . . . . . . . . . . . . . . . . . . . . . . . . . . . . . . . .
4 Verifying the System Controller configuration 4–1. . . . . . . . . . . . . . .
4.1 Data required 4–1. . . . . . . . . . . . . . . . . . . . . . . . . . . . . . . . . . . . . . . . . . .
4.2 Verifying the System Controller configuration 4–2. . . . . . . . . . . . . . . . .
Verifying the site information 4–2. . . . . . . . . . . . . . . . . . . . . . . . . . .
Verifying the card information 4–4. . . . . . . . . . . . . . . . . . . . . . . . . . .
Verifying the Network data information 4–9. . . . . . . . . . . . . . . . . . .
Verifying the Cell information 4–12. . . . . . . . . . . . . . . . . . . . . . . . . . .
Verifying the BTS information 4–14. . . . . . . . . . . . . . . . . . . . . . . . . .
Verifying the systemwide configuration 4–17. . . . . . . . . . . . . . . . . . .
Verifying the MSC configuration 4–19. . . . . . . . . . . . . . . . . . . . . . . . .
Configuring the HLR 4–21. . . . . . . . . . . . . . . . . . . . . . . . . . . . . . . . . .
5 Configuring the router 5–1. . . . . . . . . . . . . . . . . . . . . . . . . . . . . . . . . .
5.1 Installing the router 5–2. . . . . . . . . . . . . . . . . . . . . . . . . . . . . . . . . . . . . .
5.2 Configuring the router 5–2. . . . . . . . . . . . . . . . . . . . . . . . . . . . . . . . . . . .
Router configuration example 5–5. . . . . . . . . . . . . . . . . . . . . . . . . . .
5.3 Gateway access 5–7. . . . . . . . . . . . . . . . . . . . . . . . . . . . . . . . . . . . . . . . .
6 Testing picocells 6–1. . . . . . . . . . . . . . . . . . . . . . . . . . . . . . . . . . . . . . . .
6.1 Connecting a picocell for testing 6–2. . . . . . . . . . . . . . . . . . . . . . . . . . . .
Providing power to the picocell 6–4. . . . . . . . . . . . . . . . . . . . . . . . . .
6.2 Verifying software load 6–5. . . . . . . . . . . . . . . . . . . . . . . . . . . . . . . . . . .
6.3 Checking scanning picocell operation 6–6. . . . . . . . . . . . . . . . . . . . . . . .
6.4 Performing a test frequency band scan 6–10. . . . . . . . . . . . . . . . . . . . . . .
Switching to Setup mode 6–10. . . . . . . . . . . . . . . . . . . . . . . . . . . . . . .
Setting up the frequency band scan 6–11. . . . . . . . . . . . . . . . . . . . . . .
Starting the scan and observing the results 6–13. . . . . . . . . . . . . . . . .
6.5 Checking traffic picocell operation 6–17. . . . . . . . . . . . . . . . . . . . . . . . . .
6.6 Provisioning test mobile phones 6–20. . . . . . . . . . . . . . . . . . . . . . . . . . . .
Subscriber provisioning 6–20. . . . . . . . . . . . . . . . . . . . . . . . . . . . . . . .
6.7 Programming test mobile phones 6–22. . . . . . . . . . . . . . . . . . . . . . . . . . .
6.8 Registering test mobile phones 6–23. . . . . . . . . . . . . . . . . . . . . . . . . . . . .
6.9 Placing test calls 6–24. . . . . . . . . . . . . . . . . . . . . . . . . . . . . . . . . . . . . . . .
First transceiver test 6–24. . . . . . . . . . . . . . . . . . . . . . . . . . . . . . . . . . .
Testing the remaining transceivers 6–25. . . . . . . . . . . . . . . . . . . . . . . .
6.10 Additional phone programming procedures 6–26. . . . . . . . . . . . . . . . . . .
Home system ID 6–26. . . . . . . . . . . . . . . . . . . . . . . . . . . . . . . . . . . . . .
Home SOC 6–26. . . . . . . . . . . . . . . . . . . . . . . . . . . . . . . . . . . . . . . . . .
PSID/RSID number 6–26. . . . . . . . . . . . . . . . . . . . . . . . . . . . . . . . . . .
System ID number 6–26. . . . . . . . . . . . . . . . . . . . . . . . . . . . . . . . . . . .
Operator Code (SOC) 6–27. . . . . . . . . . . . . . . . . . . . . . . . . . . . . . . . . .
1026209–0001 Revision B vii
NAM status 6–27. . . . . . . . . . . . . . . . . . . . . . . . . . . . . . . . . . . . . . . . .
Initializing settings 6–28. . . . . . . . . . . . . . . . . . . . . . . . . . . . . . . . . . . .
7 Installing picocells 7–1. . . . . . . . . . . . . . . . . . . . . . . . . . . . . . . . . . . . . .
7.1 Preparing for picocell installation 7–1. . . . . . . . . . . . . . . . . . . . . . . . . . .
7.2 Mounting the picocells 7–2. . . . . . . . . . . . . . . . . . . . . . . . . . . . . . . . . . .
Installing the mounting plate 7–2. . . . . . . . . . . . . . . . . . . . . . . . . . . .
7.3 Installing and connecting picocells 7–7. . . . . . . . . . . . . . . . . . . . . . . . . .
Warnings and cautions 7–7. . . . . . . . . . . . . . . . . . . . . . . . . . . . . . . . .
Picocell connections 7–8. . . . . . . . . . . . . . . . . . . . . . . . . . . . . . . . . . .
Mounting the picocell 7–12. . . . . . . . . . . . . . . . . . . . . . . . . . . . . . . . .
T1 wiring and flip 7–16. . . . . . . . . . . . . . . . . . . . . . . . . . . . . . . . . . . .
Check for proper operation 7–17. . . . . . . . . . . . . . . . . . . . . . . . . . . . .
7.4 Performing the frequency band scan 7–18. . . . . . . . . . . . . . . . . . . . . . . . .
8 Connecting to external equipment 8–1. . . . . . . . . . . . . . . . . . . . . . . .
8.1 Connecting the Controller to the PBX 8–2. . . . . . . . . . . . . . . . . . . . . . .
8.2 Installing the SSL certificate 8–4. . . . . . . . . . . . . . . . . . . . . . . . . . . . . . .
Creating the request file 8–4. . . . . . . . . . . . . . . . . . . . . . . . . . . . . . . .
Requesting the certificate 8–4. . . . . . . . . . . . . . . . . . . . . . . . . . . . . . .
Completing the certificate 8–4. . . . . . . . . . . . . . . . . . . . . . . . . . . . . .
Installing the certificate 8–7. . . . . . . . . . . . . . . . . . . . . . . . . . . . . . . .
8.3 Repointing the HLR 8–8. . . . . . . . . . . . . . . . . . . . . . . . . . . . . . . . . . . . .
8.4 Installing a second LAN card and driver (optional) 8–9. . . . . . . . . . . . .
Installing the LAN card 8–9. . . . . . . . . . . . . . . . . . . . . . . . . . . . . . . .
Installing the LAN card driver 8–9. . . . . . . . . . . . . . . . . . . . . . . . . . .
8.5 Enabling alarm paging 8–11. . . . . . . . . . . . . . . . . . . . . . . . . . . . . . . . . . . .
Installing the external modem 8–11. . . . . . . . . . . . . . . . . . . . . . . . . . .
Configuring the AIReach OS for alarm paging 8–12. . . . . . . . . . . . . .
9 System testing 9–1. . . . . . . . . . . . . . . . . . . . . . . . . . . . . . . . . . . . . . . . . .
9.1 Testing RF coverage 9–1. . . . . . . . . . . . . . . . . . . . . . . . . . . . . . . . . . . . .
9.2 Performance testing 9–2. . . . . . . . . . . . . . . . . . . . . . . . . . . . . . . . . . . . . .
10 Installation inspection 10–1. . . . . . . . . . . . . . . . . . . . . . . . . . . . . . . . . . .
11 Provisioning 11–1. . . . . . . . . . . . . . . . . . . . . . . . . . . . . . . . . . . . . . . . . . .
11.1 Provisioning permanent subscribers 11–1. . . . . . . . . . . . . . . . . . . . . . . . .
12 Remote Client 12–1. . . . . . . . . . . . . . . . . . . . . . . . . . . . . . . . . . . . . . . . . .
12.1 AIReach OS Remote Client 12–1. . . . . . . . . . . . . . . . . . . . . . . . . . . . . . .
Requirements 12–1. . . . . . . . . . . . . . . . . . . . . . . . . . . . . . . . . . . . . . . .
12.2 Installing the Remote Client 12–2. . . . . . . . . . . . . . . . . . . . . . . . . . . . . . .
Windows 95 or Windows 98 12–2. . . . . . . . . . . . . . . . . . . . . . . . . . . .
12.3 Testing the Remote Client 12–3. . . . . . . . . . . . . . . . . . . . . . . . . . . . . . . . .
1026209–0001 Revision Bviii
13 Troubleshooting 13–1. . . . . . . . . . . . . . . . . . . . . . . . . . . . . . . . . . . . . . . .
13.1 Controller problems 13–1. . . . . . . . . . . . . . . . . . . . . . . . . . . . . . . . . . . . . .
13.2 Picocell problems 13–2. . . . . . . . . . . . . . . . . . . . . . . . . . . . . . . . . . . . . . .
Checking the IP addresses 13–2. . . . . . . . . . . . . . . . . . . . . . . . . . . . . .
Adding picocell IP addresses 13–4. . . . . . . . . . . . . . . . . . . . . . . . . . . .
13.3 General operational problems 13–6. . . . . . . . . . . . . . . . . . . . . . . . . . . . . .
13.4 Picocell alarms 13–8. . . . . . . . . . . . . . . . . . . . . . . . . . . . . . . . . . . . . . . . .
14 Maintaining Quad T1 cards 14–1. . . . . . . . . . . . . . . . . . . . . . . . . . . . . .
14.1 Replacing a Quad T1 card in the same slot 14–2. . . . . . . . . . . . . . . . . . . .
14.2 Moving or replacing a Quad T1 card to a different slot 14–5. . . . . . . . . .
Physical steps 14–5. . . . . . . . . . . . . . . . . . . . . . . . . . . . . . . . . . . . . . . .
Configuring the card 14–6. . . . . . . . . . . . . . . . . . . . . . . . . . . . . . . . . .
14.3 Removing (deleting) a Quad T1 card 14–9. . . . . . . . . . . . . . . . . . . . . . . .
Deleting the card from the configuration 14–9. . . . . . . . . . . . . . . . . . .
Physically removing the card 14–10. . . . . . . . . . . . . . . . . . . . . . . . . . . .
A Equipment specifications A–1. . . . . . . . . . . . . . . . . . . . . . . . . . . . . . . .
14.4 System Controller specifications A–1. . . . . . . . . . . . . . . . . . . . . . . . . . . .
Security A–1. . . . . . . . . . . . . . . . . . . . . . . . . . . . . . . . . . . . . . . . . . . .
Mechanical A–1. . . . . . . . . . . . . . . . . . . . . . . . . . . . . . . . . . . . . . . . . .
Electrical A–2. . . . . . . . . . . . . . . . . . . . . . . . . . . . . . . . . . . . . . . . . . .
Environmental A–3. . . . . . . . . . . . . . . . . . . . . . . . . . . . . . . . . . . . . . .
Acoustics A–4. . . . . . . . . . . . . . . . . . . . . . . . . . . . . . . . . . . . . . . . . . .
A.1 Picocell specifications A–4. . . . . . . . . . . . . . . . . . . . . . . . . . . . . . . . . . . .
Security A–4. . . . . . . . . . . . . . . . . . . . . . . . . . . . . . . . . . . . . . . . . . . .
Mechanical A–4. . . . . . . . . . . . . . . . . . . . . . . . . . . . . . . . . . . . . . . . . .
Electrical A–5. . . . . . . . . . . . . . . . . . . . . . . . . . . . . . . . . . . . . . . . . . .
Environmental specifications A–5. . . . . . . . . . . . . . . . . . . . . . . . . . . .
RF levels A–6. . . . . . . . . . . . . . . . . . . . . . . . . . . . . . . . . . . . . . . . . . . .
A.2 Picocell power supply A–6. . . . . . . . . . . . . . . . . . . . . . . . . . . . . . . . . . . .
B Standards compliance information B–1. . . . . . . . . . . . . . . . . . . . . . . .
B.1 FCC compliance B–1. . . . . . . . . . . . . . . . . . . . . . . . . . . . . . . . . . . . . . . .
B.2 Picocell regulatory compliance B–2. . . . . . . . . . . . . . . . . . . . . . . . . . . . .
B.3 System Controller regulatory compliance B–3. . . . . . . . . . . . . . . . . . . . .
B.4 Picocell power supply compliance B–4. . . . . . . . . . . . . . . . . . . . . . . . . .
B.5 Other compliance B–4. . . . . . . . . . . . . . . . . . . . . . . . . . . . . . . . . . . . . . .
C Equipment part numbers C–1. . . . . . . . . . . . . . . . . . . . . . . . . . . . . . . .
C.1 Customer documentation C–1. . . . . . . . . . . . . . . . . . . . . . . . . . . . . . . . . .
C.2 Component part numbers C–1. . . . . . . . . . . . . . . . . . . . . . . . . . . . . . . . .
D Updating software; backing up databases D–1. . . . . . . . . . . . . . . . . . .
D.1 Updating software with a new release D–1. . . . . . . . . . . . . . . . . . . . . . . .
D.2 Backing up and restoring databases D–2. . . . . . . . . . . . . . . . . . . . . . . . .
Backing up D–2. . . . . . . . . . . . . . . . . . . . . . . . . . . . . . . . . . . . . . . . . .
Restoring D–3. . . . . . . . . . . . . . . . . . . . . . . . . . . . . . . . . . . . . . . . . . .
Index Follows Appendix D. . . . . . . . . . . . . . . . . . . . . . . . . . . . . . . . . . . . . . .

1026209–0001 Revision B ix
Figures
1-1 System Controller 1–1. . . . . . . . . . . . . . . . . . . . . . . . . . . . . . . . . . . . . . . .
1-2 AIReach OS block diagram 1–2. . . . . . . . . . . . . . . . . . . . . . . . . . . . . . . .
1-3 Example of full rack mount 1–4. . . . . . . . . . . . . . . . . . . . . . . . . . . . . . . .
1-4 System Controller front panel 1–5. . . . . . . . . . . . . . . . . . . . . . . . . . . . . .
1-5 Flow chart: AIReach OS major installation and test tasks 1–9. . . . . . . . .
2-1 Unpacking the System Controller 2–3. . . . . . . . . . . . . . . . . . . . . . . . . . .
2-2 Unpacking the picocell 2–5. . . . . . . . . . . . . . . . . . . . . . . . . . . . . . . . . . . .
2-3 Unlocking the mounting plate from the picocell 2–6. . . . . . . . . . . . . . . .
2-4 Recording and entering serial number from each picocell 2–7. . . . . . . . .
2-5 Slot label on rear of System Controller 2–8. . . . . . . . . . . . . . . . . . . . . . .
2-6 Slot assignments: System Controller standard configuration 2–9. . . . . . .
2-7 Slot assignments: System Controller fully loaded configuration 2–10. . . .
2-8 Removing the System Controller cover 2–11. . . . . . . . . . . . . . . . . . . . . . .
2-9 DIP switches on Quad T1 card 2–13. . . . . . . . . . . . . . . . . . . . . . . . . . . . . .
2-10 H.100 bus termination 2–14. . . . . . . . . . . . . . . . . . . . . . . . . . . . . . . . . . .
2-11 Jumpers and address switch on TX2000 cards 2–15. . . . . . . . . . . . . . . . .
2-12 Conference card jumpers and address switch 2–18. . . . . . . . . . . . . . . . . .
2-15 SBC jumper and DIP switch locations 2–20. . . . . . . . . . . . . . . . . . . . . . .
2-16 H.100 and MVIP bus cables 2–23. . . . . . . . . . . . . . . . . . . . . . . . . . . . . . .
3-1 System Controller and associated components in a 19–inch rack 3–3. . .
3-2 Installing the chassis 3–4. . . . . . . . . . . . . . . . . . . . . . . . . . . . . . . . . . . . . .
3-3 System Controller connectors 3–5. . . . . . . . . . . . . . . . . . . . . . . . . . . . . . .
4-1 Recording and entering serial number from the picocell 4–15. . . . . . . . . .
5-1 AIReach OS IS–41 gateway network diagram 5–2. . . . . . . . . . . . . . . . . .
5-2 Typical AIReach OS IS–41 gateway network diagram 5–5. . . . . . . . . . .
6-1 Picocell connection for testing 6–3. . . . . . . . . . . . . . . . . . . . . . . . . . . . . .
6-2 Ports on Quad T1 card 6–4. . . . . . . . . . . . . . . . . . . . . . . . . . . . . . . . . . . .
6-3 LEDs on front of picocell 6–5. . . . . . . . . . . . . . . . . . . . . . . . . . . . . . . . . .
6-4 LEDs on Quad T1 card 6–7. . . . . . . . . . . . . . . . . . . . . . . . . . . . . . . . . . . .
6-5 Picocell slot numbers 6–24. . . . . . . . . . . . . . . . . . . . . . . . . . . . . . . . . . . . .
7-1 Placing the mounting plate to allow proper clearance 7–2. . . . . . . . . . . .
7-2 Position of the picocell on the mounting plate 7–3. . . . . . . . . . . . . . . . . .
7-3 Attaching the picocell mounting plate to wood or metal studs 7–5. . . . .
7-4 Attaching the picocell mounting plate – concrete, block, wallboard 7–6.
7-5 Cabling the picocell 7–9. . . . . . . . . . . . . . . . . . . . . . . . . . . . . . . . . . . . . .
7-6 T1 cable and power connections at the picocell 7–10. . . . . . . . . . . . . . . . .
7-7 T1 cabling for standalone and daisy–chained picocells 7–11. . . . . . . . . . .
7-8 Mounting the picocell 7–13. . . . . . . . . . . . . . . . . . . . . . . . . . . . . . . . . . . . .

1026209–0001 Revision Bx
7-9 Power terminal block connections 7–14. . . . . . . . . . . . . . . . . . . . . . . . . . .
7-10 Picocell connections at the telco closet 7–15. . . . . . . . . . . . . . . . . . . . . .
7-11 T568B–compliant wiring flip at patch panel 7–16. . . . . . . . . . . . . . . . . .
7-12 T568B–compliant wiring flip using modular jack 7–17. . . . . . . . . . . . . .
8-1 Example of a signed SSL certificate 8–6. . . . . . . . . . . . . . . . . . . . . . . . .
13-1 LEDs on front of picocell 13–8. . . . . . . . . . . . . . . . . . . . . . . . . . . . . . . . .
14-1 H.100 and MVIP bus cables 14–2. . . . . . . . . . . . . . . . . . . . . . . . . . . . . . .
14-2 MVIP bus adapter card 14–3. . . . . . . . . . . . . . . . . . . . . . . . . . . . . . . . . . .
Tables
2-1 Jumper settings for TX2000 IP and TX2000 SS7 cards 2–16. . . . . . . . . .
2-2 TX2000 card I/O address settings (switch S1) 2–17. . . . . . . . . . . . . . . . .
2-3 Conference card I/O address settings (switch S1) 2–19. . . . . . . . . . . . . .
2-5 SBC processor settings (switch SW1) 2–21. . . . . . . . . . . . . . . . . . . . . . . .
2-6 SBC card jumper settings 2–22. . . . . . . . . . . . . . . . . . . . . . . . . . . . . . . .
7-1 Approved mounting plate fasteners 7–4. . . . . . . . . . . . . . . . . . . . . . . . .
7-2 T1 (RJ–45) connector pinouts 7–8. . . . . . . . . . . . . . . . . . . . . . . . . . . . . .
7-3 Power supply and CAT 5 wire colors 7–14. . . . . . . . . . . . . . . . . . . . . . . .
13-1 Picocell alarms 13–9. . . . . . . . . . . . . . . . . . . . . . . . . . . . . . . . . . . . . . . .
A-1 System Controller environmental specifications A–3. . . . . . . . . . . . . . .
A-2 Picocell environmental specifications A–5. . . . . . . . . . . . . . . . . . . . . . .
A-3 Power supply environmental specifications A–6. . . . . . . . . . . . . . . . . . .
C-1 Major AIReach OS components, FRUs, and installation parts C–1. . . .

1026209–0001 Revision B About this manual xi
About this manual
This manual provides instructions for installing and
commissioning the AIReach Office System (AIReach OS).
This manual is written for installers responsible for installating
and commissioning the AIReach OS.
This manual is divided into the following chapters and appendices:
Chapter 1 – Introduction
Chapter 2 – Adding cards to the System Controller
Chapter 3 – Installing the Controller
Chapter 4 –Verifying the System Controller configuration
Chapter 5 – Installing and Configuring the Router
Chapter 6 – Testing picocells
Chapter 7 – Installing picocells
Chapter 8 – Connecting to external equipment
Chapter 9 – System testing
Chapter 10 – Installation inspection
Chapter 11 – Provisioning
Chapter 12 – Remote access
Chapter 13 – Troubleshooting
Chapter 14 – Maintaining Quad T1 cards
Appendix A – Equipment specifications
Appendix B – Standards compliance information
Appendix C – Equipment part numbers
Appendix D – Updating software; backing up databases
The instructions in this manual are organized according to tasks.
The instructions are intended to be followed in the order in which
they appear in the manual.
Scope
Audience
Organization
1026209–0001 Revision B xii About this manual
The AIReach Office documentation set for each user is listed
below with the documentation number and description of the
manual.
All audiences
AIReach Office CD–ROM (1026207–0001)
Contains PDF files of all documents for online viewing.
Phone user audience
AIReach Office Mobile Phone Network Features Quick Guide
(1027893–0001)
Describes how to use each of the features of the AIReach Office
System phone.
Network administrator audience
Site Preparation Manual (1026208–0001)
Describes the tasks required to prepare the site for the AIReach
Office System, including the System Controller and picocell
specifications.
Getting Started (1027677–0001)
Provides an introduction for using the system and its user
interface. Describes logging on and off, manipulating screens and
menus, navigating through the user interface and using Help are
included in this manual. (Also applicable for the provider
audience).
Network Administrator’s Guide (1027680–0001)
Describes the regular scheduled and non–scheduled tasks the
network administrator performs. This manual includes directions
for subscriber provisioning, software upgrade, backup, and
operator management and security. It also includes first–level
troubleshooting instructions.
Provider audience
Installation and Commissioning Manual (1026209–0001)
Describes how to install and commission the AIReach Office
system, including: picocell installation, System Controller
hardware and software configuration, System Controller
installation, cabling the system, commissioning the system, and
installation troubleshooting.
Configuring the System (1027678–0001)
Describes how to configure all of the elements that are a part of
the system, including the system, System Controller, picocells,
NSS/MSC, and BSCs.
Monitoring System Performance, Troubleshooting, and
Alarms (1027679–0001)
Describes how to monitor the status of the system and its
components, and how to troubleshoot the system when problems
occur. Also includes instructions for disaster recovery.
AIReach Office
documentation set
1026209–0001 Revision B About this manual xiii
This manual is provided in Adobe Systems’ Portable Document
Format (PDF) for online viewing and searching. To successfully
print the entire manual from the PDF file, and ensure optimum
print quality, you should use a Postscript printer and a computer
with ample free hard disk space or a network print queue. On
non–Postscript printers, print a relatively small number of pages at
a time. Try 30 pages—results will vary depending on printer
memory, hard disk space, printer drivers, and other factors.
The following conventions are used in the software instructions
included in this manual:
Select means to click the mouse to make a choice, such as a menu
selection. For example: Select Configure. Items you can select on
a software screen are shown in bold type.
To click or double–click, use the left mouse button unless the right
mouse button is specified.
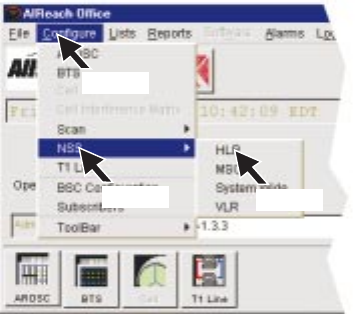
Select Configure → NSS → HLR means to make three selections
consecutively, as shown here:
Click (3)
Click (1)
Click (2)
T0001002
Printing PDF files
Conventions for
software instructions
1026209–0001 Revision B xiv About this manual
1026209–0001 Revision B Important safety information xv
Important safety information
For your safety and protection, read this entire manual before you
attempt to prepare the site for installation of the AIReach Office
System Controller and picocells. In particular, read this safety
section carefully. Keep this safety information where you can refer
to it if necessary.
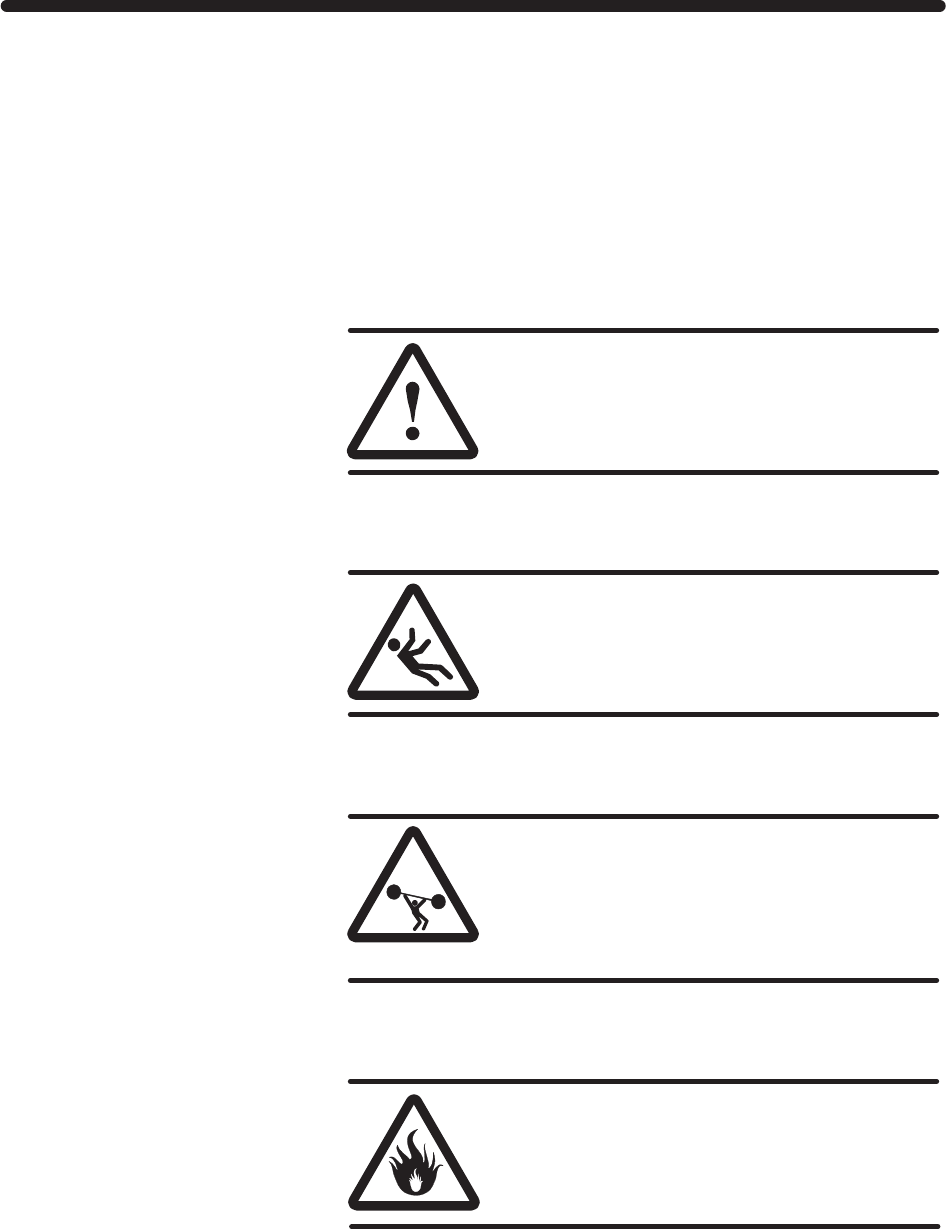
This section introduces the various types of warnings used in this
manual to alert you to possible safety hazards.
WARNING
Where you see this alert symbol and
WARNING heading, strictly follow the
warning instructions to avoid personal
injury.
WARNING
Fall hazard: Where you see this symbol and
WARNING heading, strictly follow the
warning instructions to prevent personal
injury.
WARNING
Heavy equipment hazard: Where you see
this symbol and WARNING heading, strictly
follow the warning instructions to prevent
personal injury due to lifting heavy
equipment.
WARNING
Potential fire hazard: Where you see this
symbol and WARNING heading, strictly
follow the warning instructions to prevent
personal injury or death due to fire.
Types of warnings used
in this manual
1026209–0001 Revision B xvi Important safety information
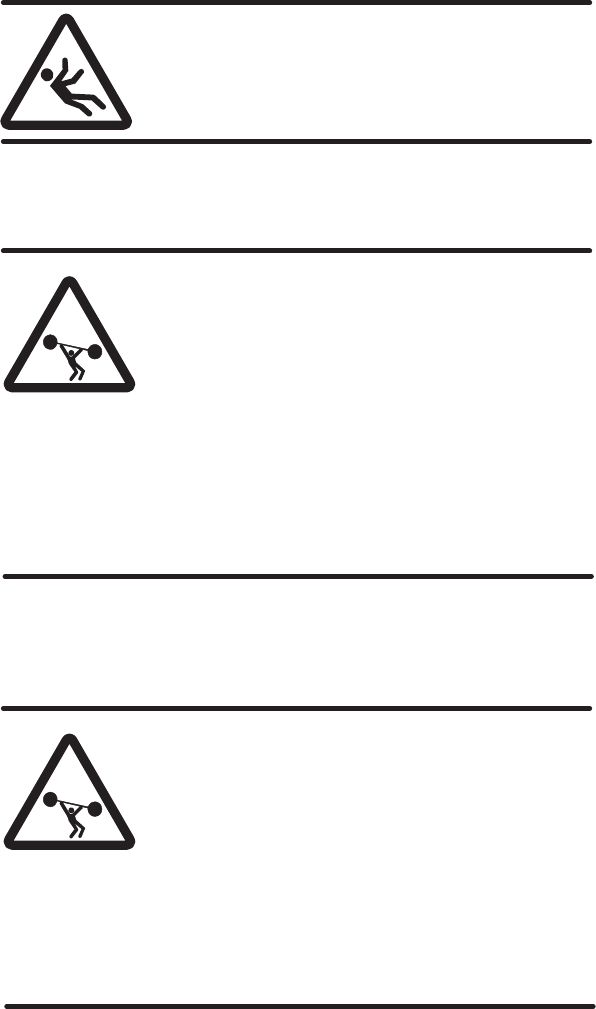
This manual includes the following safety warnings:
WARNING
When installing the picocell on the mounting
plate, use care to avoid falling and injuring
yourself.
WARNING
The AIReach Office System Controller can
weigh in excess of 50 pounds. To avoid
personal injury or damage to equipment,
follow these precautions:
•Do not attempt to move or install the
System Controller by yourself. Two
people are required for these tasks.
•If the System Controller will be rack
mounted, secure the rack to the floor
or wall so the rack cannot fall.
WARNING
The AIReach Office System Controller can
weigh in excess of 50 pounds. To avoid
personal injury or damage to equipment,
follow these precautions:
•Do not attempt to move or install the
System Controller by yourself. Two
people are required for these tasks.
•Do not stack more than three System
Controller boxes.
Warnings used in this
manual

1026209–0001 Revision B Important safety information xvii
WARNING
To reduce the risk of fire, use only No. 24
AWG or larger line cord to connect to the
picocell, and replace the fuse only with a
fuse of the type and rating identified on the
fuse label.
Failure to heed these warnings could result
in personal injury or death.
1026209–0001 Revision B Introduction 1–1
Chapter 1
Introduction
This chapter includes the following topics:
•System components – page 1–1
•System Controller – page 1–3
•Picocell components – page 1–7
•Procedural flow chart – page 1–8
•Tools and materials – page 1–11
•Configuration options – page 1–12
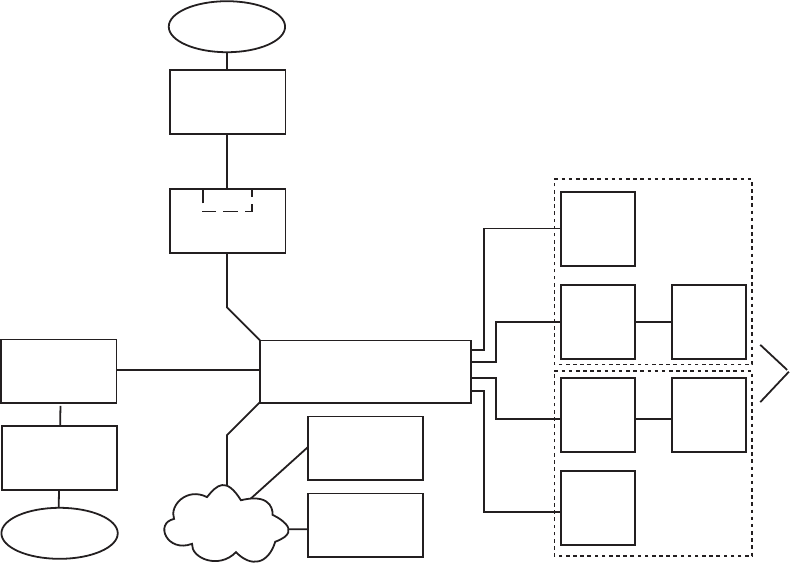
The AIReach Office System (AIReach OS) is a wireless
communications system designed to provide in–building voice
communications. The System is integrated with an existing hard
wired PBX phone system.
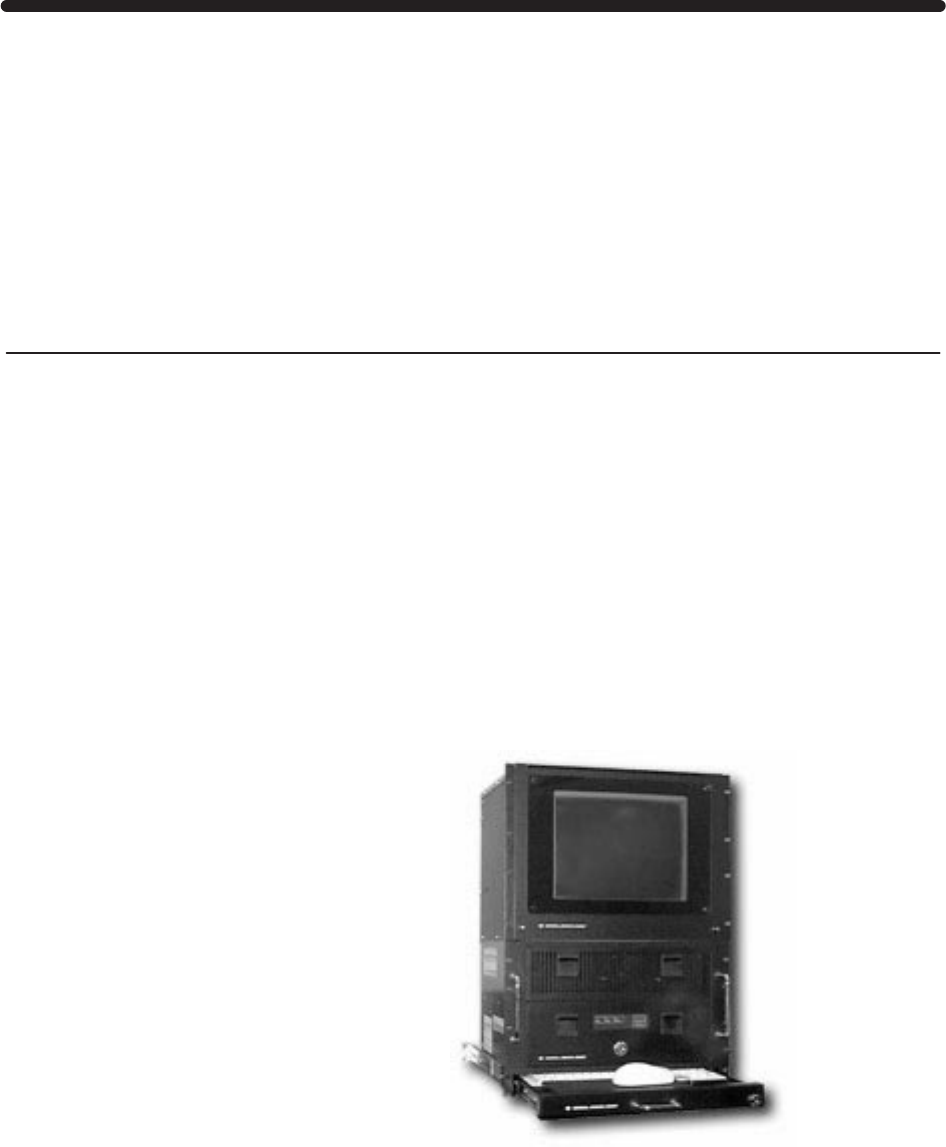
The AIReach OS is driven by an industrial computer that
processes cellular telephone calls. Operators use this computer, the
System Controller, to configure, control, monitor, and troubleshoot
the system.
The System Controller has most of the functionality of larger
macro cell Operation and Maintenance Centers (OMCs), including
Base Station Controllers (BSCs) and Mobile Switching Centers
(MSCs). These functions run as applications under Microsoft
Windows NT on the System Controller, which is equipped with
special cards to enable telephony support.
Figure 1-1 System Controller
1.1
System components
1026209–0001 Revision B 1–2 Introduction
The AIReach OS features:
•A Windows NT based System Controller with a graphical
user interface (GUI) for configuration, operation, and
troubleshooting
•Up to 64 picocells (line powered)
•A Primary Rate T1 connection from the Controller to the
PBX
•An IS–41 TCP/IP connection from the Controller to the
macro cellular system
•An optional LAN connection to a remote computer.
Controller
Alarm
printer
Remote
workstation
Corporate
LAN
56K leased line
Patch
panel
Router
DSU
PBX
PSTN
IS-4I
gateway
MACRO
Picocell
Picocell
Picocell
CAT-5
T1
CAT-5
T1
CAT-5
T1
Picocell
PicocellPicocell T1
T1
G-17007 F
11/05/99
Daisy-chained
picocells
10BaseT
TCP/IP IS-41
CAT-5 T1
ISDN PRI
Figure 1-2 AIReach OS block diagram
The System Controller is rack or table mounted in close proximity
to the PBX.
The picocells are small Base Transceiver Stations (BTSs) designed
to be mounted on office walls throughout a building. They are line
powered and connected to the System Controller using CAT 5 T1
cables.
The OMC functions of the AIReach OS can be performed at a
specially configured (customer provided) remote computer. This
computer can be located on an internal corporate LAN and
provide the network administrator with the ability to monitor and
control the system without having to be physically at the System
Controller location.

1026209–0001 Revision B Introduction 1–3
The System Controller consists of the following components:
•A Windows NT computer with an internal floppy disk
drive, a read/write CD–ROM drive, a 20–slot backplane,
and system software
•Telephony cards to support the AIReach OS. (For a
complete description, see Chapter 5.)
•A rack mounted 17–inch color monitor
•A rack mounted keyboard with integrated touchpad
The standard (factory) configuration includes the System
Controller with monitor and keyboard with integrated touchpad. A
telco rack is optional.
There are three options for mounting the System Controller:
•Desktop mount
•Chassis slide mount
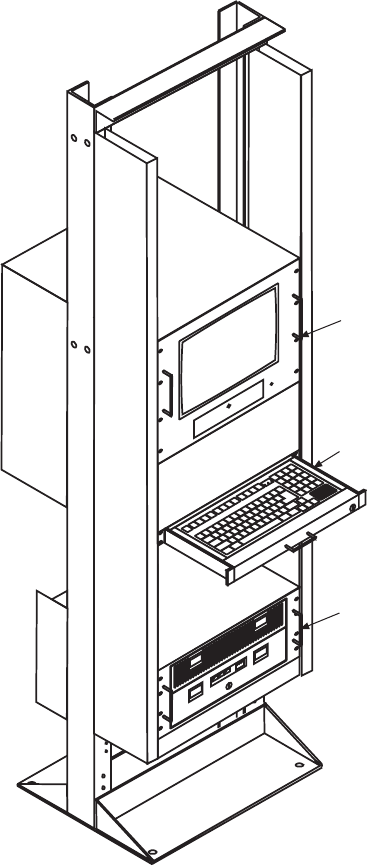
•Full rack mount (illustrated in Figure 1-3)
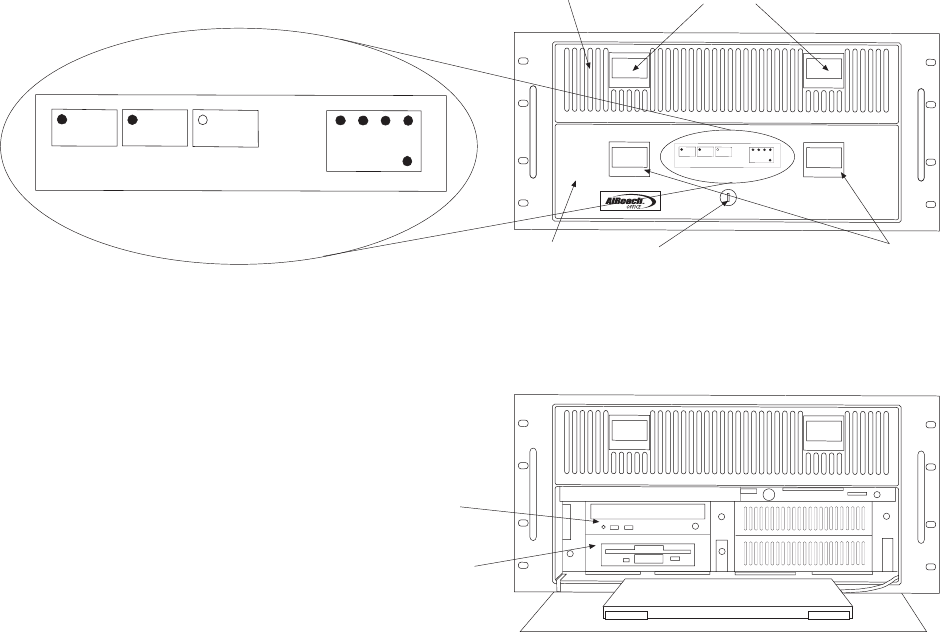
The Controller front panel has a power switch and indicators for
disk activity, CD–ROM read and write activity, and power supply
status. The Controller keyboard connects to the rear panel or
behind the locking front access door.
A remote computer, if used, connects to the System Controller
through a LAN or dial–up modem connection, using Windows NT
Remote Access Server (RAS).
1.2
System Controller
Hardware
1026209–0001 Revision B 1–4 Introduction
Keyboard with
integrated touchpad
Controller
G-14758 F
11/04/99
Monitor
Figure 1-3 Example of full rack mount
Both the CD–ROM R/W (read/write) drive and a 3.5 inch floppy
drive are accessible through a drop down panel on the front of the
unit. Status indicators are provided on the front for fan,
temperature, drive, and power. See Figure 1-4.
1026209–0001 Revision B Introduction 1–5
Figure 1-4 System Controller front panel
G-17022 F
08/04/99
Drive door open
Closed and locked
Door
lock
Drive
door Release
handles
FAN
STATUS TEMP
STATUS DRIVE
ACTIVITY -12 +12 -5 +5
POWER SUPPLY
POWER ON
Status indicators
FAN
STATUS TEMP
STATUS DRIVE
ACTIVITY -12 +12 -5 +5
POWER SUPPLY
POWER ON
Release handles
Filter
door
CD-ROM
R/W drive
3 1/2”
floppy
drive
1026209–0001 Revision B 1–6 Introduction
The System Controller is configured with a subset of the following
hardware:
•Hardware (cards): The cards that are installed in the
System Controller are standard plug–in type CPU cards that
are ISA or PCI compatible. The System Controller has eight
ISA slots and nine PCI slots. The following cards are
installed in the System Controller:
- Quad T1 cards (1 minimum, 6 maximum) with four T1
ports per card
- TX2000 IP card (1)
- Conference card (0, 1, or 2)
- CD–ROM SCSI card (1)
- 56K modem card (1)
- Ethernet cards (1 or 2)
-Optional: TX2000 SS7 card (1)
•Hardware (System Controller components)
- Keyboard with integrated touchpad
- Passive backplane supporting 8 ISA, 9 PCI, and
PICMG single board computers
- 512 MB PC100 error correcting synchronous DRAM
- 10/100BaseT PCI ethernet card
- 56K V.90 X2 modem, ISA bus
- 8.4 GB Ultra ATA hard drive (minimum, connected to
IDE interface number 1)
- 1.44 MB floppy drive
- CD–RW drive with SCSI interface (2X write mode, 6X
read mode minimum, installed in ISA slot 7)
- VGA monitor allowing a minimum of 640x480
resolution (optional)
- standard EIA 19 inch equipment chassis
The System Controller includes the following software:
- Windows NT computer
- Oracle database software
- System Controller and OMC software on CD–ROM
- Computer–based Training (CBT – available as a
separate CD–ROM)
- Online PDF documentation (available as a separate
CD–ROM)
Software

1026209–0001 Revision B Introduction 1–7
The picocell consists of a backplane covered by an external
housing and contains the following internal components:
•Master oscillator: Provides a reference frequency for
picocell signal timing.
•Power supply: Converts the –48 Vdc input power to –6.5
Vdc for internal picocell operation.
•Transceivers: Each traffic picocell includes up to four
transceivers, with each transceiver providing three full–rate
TDMA channels. One channel is used as the digital control
channel (DCCH) to provide access information to the
mobiles. The remaining full–rate channels are used as
digital traffic channels (DTC). Each picocell can handle 11
mobile voice channels simultaneously, when fully loaded.
Each mobile phone requires one voice channel.
Transceivers are used only in traffic picocells.
•Scanning receiver: This module is used in scanning or
traffic picocells to monitor the transmitter signal strength of
the neighboring base stations. One scanner (maximum) is
used per scanning picocell.
•Picocell Controller: This module is the processor of the
picocell. It configures and controls the transceivers
operation using a proprietary protocol via the ST–BUS. The
Picocell controller uses one T1 slot to communicate with
the System Controller. The remaining slots are used to
provide bearer services.
•Antenna and branching module: The transmit and
diversity receivers of the installed transceivers are
combined and split in this module. The picocell has a 360°
omnidirectional radiation pattern in azimuth.
•Locking tab, lock, and key: The lock and key secure the
picocell to the locking tab on the mounting plate.
•Mounting plate: To ensure secure mounting, the installer
attaches a mounting plate to the wall, and then mounts the
picocell to the mounting plate.
1.3
Picocell
components

1026209–0001 Revision B 1–8 Introduction
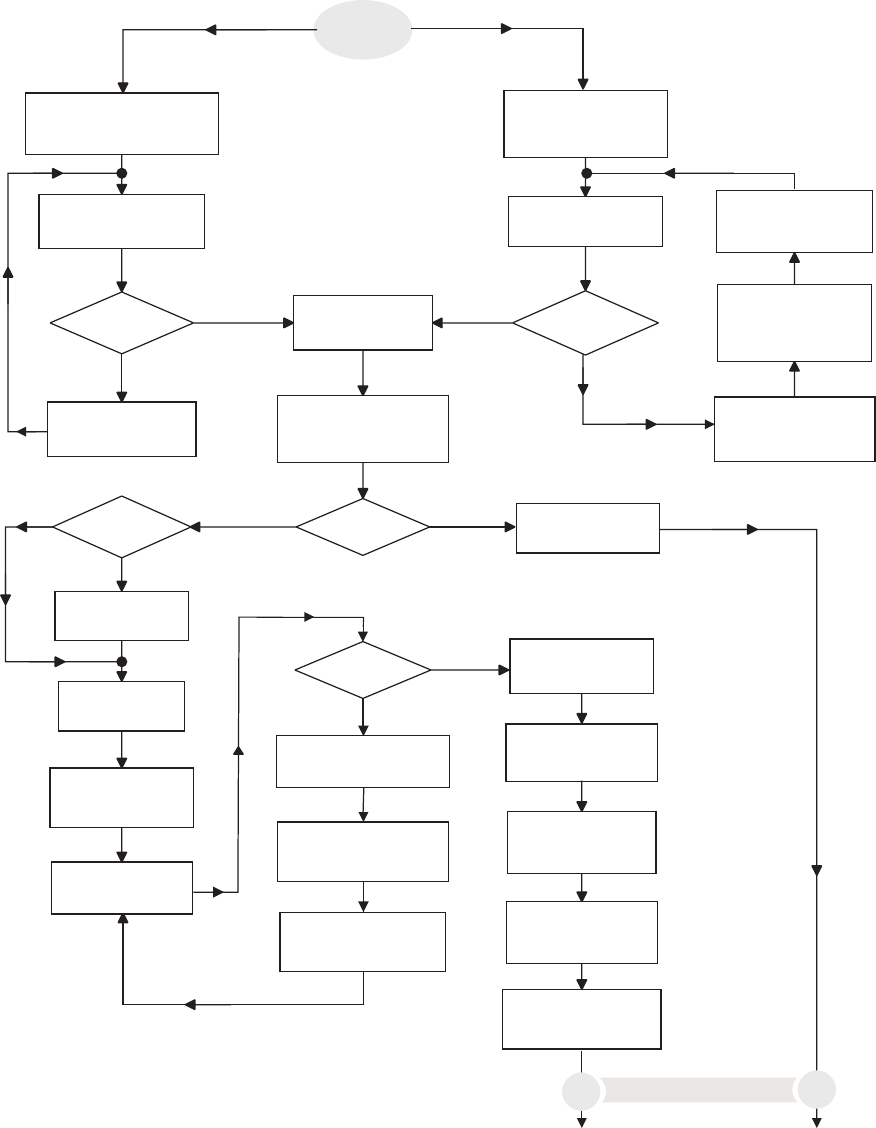
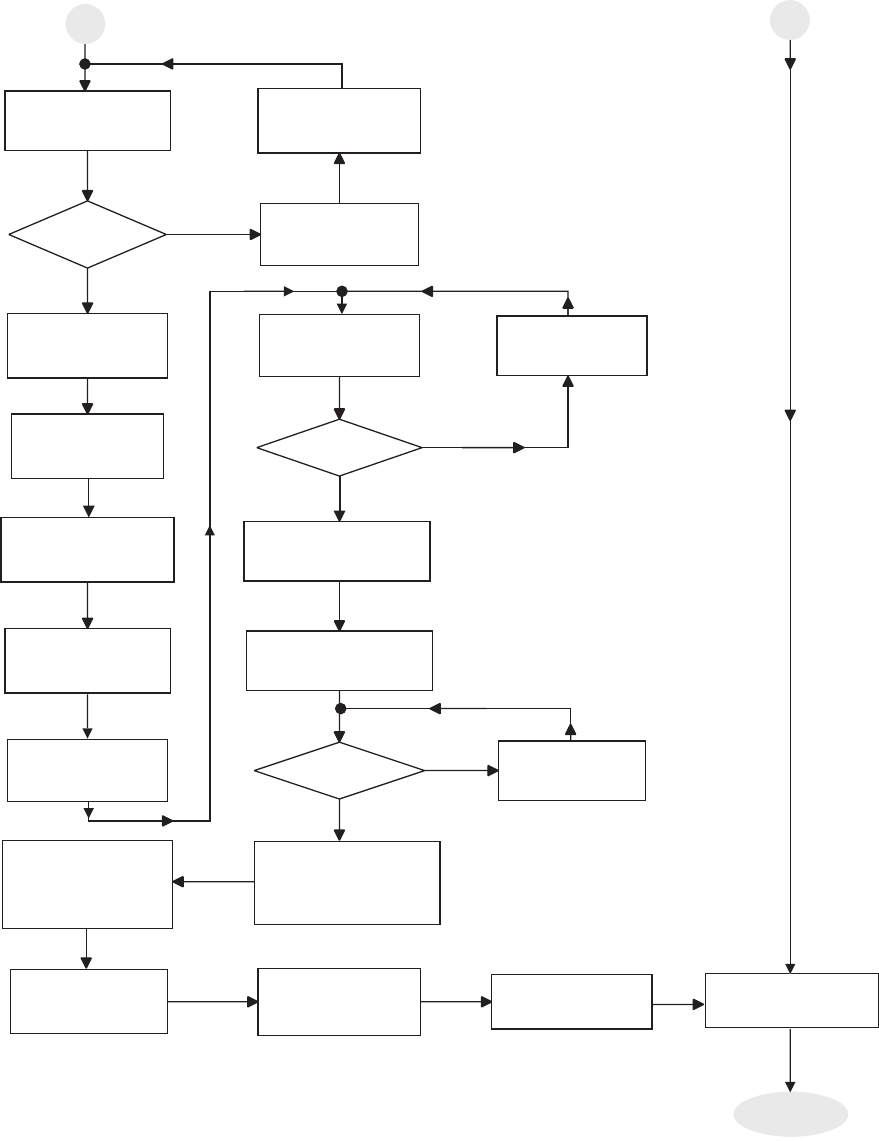
The following flow chart (Figure 1-5 on page 1–9) shows the
sequence of major tasks required for site preparation, installation,
and commissioning of the AIReach OS.
Test picocells at the System Controller site. Complete picocell
cabling before you install the System Controller and test picocells.
1.4
Procedural flow
chart
1026209–0001 Revision B Introduction 1–9
Figure 1-5 Flow chart: AIReach OS major installation and test tasks
Ship Damaged
Equipment to Material
Return Center (MRC)
Reschedule
Installation
See next page
Start
Provide Installation Package
to Implementation Team
Verify Contents of
Installation Package
Obtain Missing
Items
Ship AIReach OS
Equipment to
Implementation Team
Verify Contents
of Shipment(s)
Missing
Items
Ship Replacement or
Missing Equipment to
Implementation Team
MRC Ships Damaged
Equipment to
AIReach OS Vendor
Deploy to Site
with Equipment
Conduct Pre-Installation
Walk-Through with
Customer
Discrepancies
Site
Ready
Additional
Cards
Install Additional
Circuit Cards
Install Controller
Enter / Verify
Controller
Configuration
Test Controller
Performance
Install and
Configure Router
Configure Controller
for Gateway Access
Temporarily Connect
Scanning Picocell
to Controller
Initiate 6 Minute
Test Frequency
Band Scan
Temporarily Connect
Each Picocell
to Controller
Yes
No
Yes
No
Yes No
Yes
No
Ship Failed Controller
Component to MRC
Receive Replacement
Controller Component
from MRC
Install Replacement
Component into
Controller
Failures
Yes
No
AB
2/17/00
T0001030
1026209–0001 Revision B 1–10 Introduction
Leave Site
No
Verify RF Coverage
Yes
Yes
No
Finish
Send QA Inspection &
Operational Performance
Checklists to AIReach OS
Installation Manager
No
Ship Failed Picocell
to MRC
Receive Replacement
Picocell from MRC
Permanently Install
Scanning Picocell
Connect
Controller to PBX
and Dial-up Modem
Install SSL
Certificate
Discrepancies
Correct Identified
Discrepancies
Perform Installation
QA Inspection
Correct Identified
Discrepancies
Send "As-Built"
System Configuration
Report to
Network Planning
Enter Subscriber Data
Into Controller
(Provisioning)
Provide On-Site
Customer Training
and Support
Customer Accept
AIReach OS
Discrepancies
Yes
Test Picocell
Performance
Picocell
Failure
B
From previous page From previous page
2/17/00
T0001031
A
Conduct
Performance Test
Permanently Install
Traffic Picocells
Initiate Frequency
(24 Hour Minimum)
Band Scan
Figure 1-5 Flow chart: AIReach OS major installation and test tasks (Continued)

1026209–0001 Revision B Introduction 1–11
To install and service the AIReach OS, you need the tools and
materials listed below.
The following tools are required to complete the AIReach OS
installation:
•Cell phones (2 – Nokia 6160 or 6161 for PCS and 800
MHz; Nokia 6120 for 800 MHz only)
•Punchdown block tool with BIX, 66 block, and 110 die
•Step ladder (6 foot minimum, per team)
•Level
•Stud finder
•Tone chaser/generator
•Tape measure (10–foot minimum)
•Crimp tool with RJ–45 die
•Crimp tool with RJ–11 die
•Multimeter
•Hole saw
•Wire stripper/cutter
•Fish tape
•Flashlight
•Scissors
•Flushcuts
•Anti–static wrist strap
•Power strip (multi–socket extension cord)
•Common hand tools (screwdrivers, pliers, hammer)
•Tool case/bag
In addition, the following tools are recommended:
•Two–way radio (2 each)
•Mini–Champ (or equivalent) signal strength measurement tool
•Label maker (P–touch or equivalent)
•Cordless drill (with bits)
•Cable tester
•Staple gun
1.5
Tools and materials
Required tools
Recommended tools

1026209–0001 Revision B 1–12 Introduction
The following materials are required:
•Drywall screws
•E–Z Anchor self–drilling drywall anchors (plastic), light
duty
•Wood screws
•RJ–45 connectors
•RJ–11 connectors
•Pull string
•CAT 5 T1 cable
•CAT 5 T1 test cable (minimum 2 each, 6 feet, flipped and
terminated with an RJ–45 connector on each end)
•Cross–connect blocks (i.e. BIX, 66, 110 block)
•Cable ties
A –48 Vdc power supply is required for testing picocells.
Several options are available for system installation:
•The picocells are line powered and use an ac–to–dc power
supply providing –48 Vdc.
•The System Controller can be configured with up to six T1
cards, each supporting four T1 lines to picocells.
•A traffic picocell can be configured with one to four
transceiver cards.
•Picocells can be daisy–chained to one System Controller T1
port or individually connected to a System Controller T1
port.
•The System Controller can be installed as:
- Desktop mount
- Chassis slide mount
- Full rack mount
Required materials
Other requirements
1.6
Configuration
options

1026209–0001 Revision B Adding cards to the System Controller 2–1
Chapter 2
Adding cards to the System Controller
This chapter includes the following topics:
•Unpacking the System Controller – page 2–2
•Unpacking the picocells – page 2–4
•System Controller card configurations – page 2–8
•Adding cards to the System Controller (first steps) –
page 2–11
•Jumper and DIP switch settings – page 2–13
•Attaching the bus cables – page 2–23
•Adding cards to the System Controller (final steps) –
page 2–24
•Configuring System Controller cards – page 2–25
•Verifying the card configuration – page 2–27
The System Controller is shipped in a standard configuration with
all software and the following standard cards installed (one of
each):
•Quad T1 card
•TX2000 IP card
•Conference card
•LAN card
•56K modem card
If additional cards are required (typically to expand service), they
are installed and configured at the customer site.
Note
The System Controller’s hardware configuration is site–specific
and is specified in the AIReach Office Configuration Report. This
report is prepared by the HNS Network Planning Department.

1026209–0001 Revision B 2–2 Adding cards to the System Controller
The System Controller is delivered in three boxes containing:
•System Controller (chassis)
•Monitor
•Keyboard
The optional rack, if ordered, is shipped in a separate container.
Rack mounting the System Controller is recommended, but table
mounting is acceptable.
Unpack the Controller as follows:
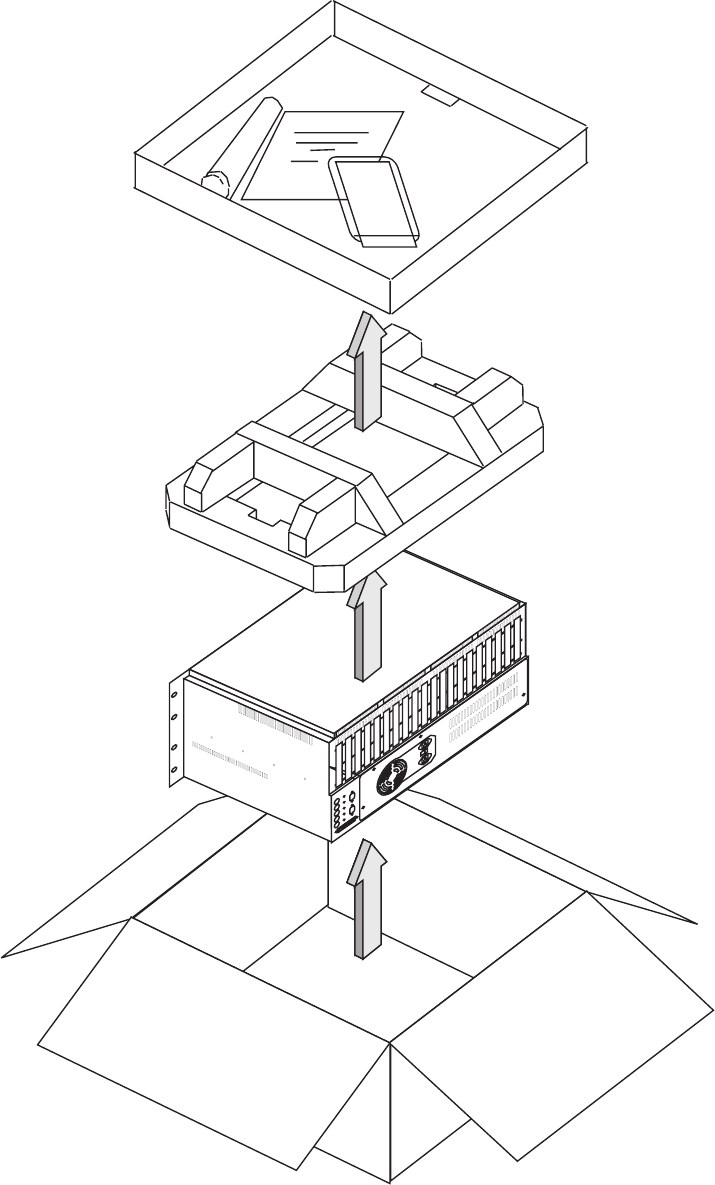
1. Remove the System Controller and accessory packages
from the packing container as shown in Figure 2-1.
Also refer to the unpacking instructions shipped with the
Controller.
2. Remove the monitor and keyboard from their respective
boxes.
3. Verify all parts against the enclosed packing lists. Visually
inspect the components for damage.
2.1
Unpacking the
System Controller
1026209–0001 Revision B Adding cards to the System Controller 2–3
G-17197 F
01/28/00
3. Lift unit out of
shipping container
Controller
2. Remove packing
1. Remove cardboard tray
and accessories
Figure 2-1 Unpacking the System Controller

1026209–0001 Revision B 2–4 Adding cards to the System Controller
After unpacking the Controller, unpack the picocells so you can
record their serial numbers. Picocells are not installed until later
(as explained in Chapter 7), but you need to record their serial
numbers so you can enter them when you verify the Controller
configuration (Chapter 4).
Each picocell is packaged in a cardboard box. Unpack the
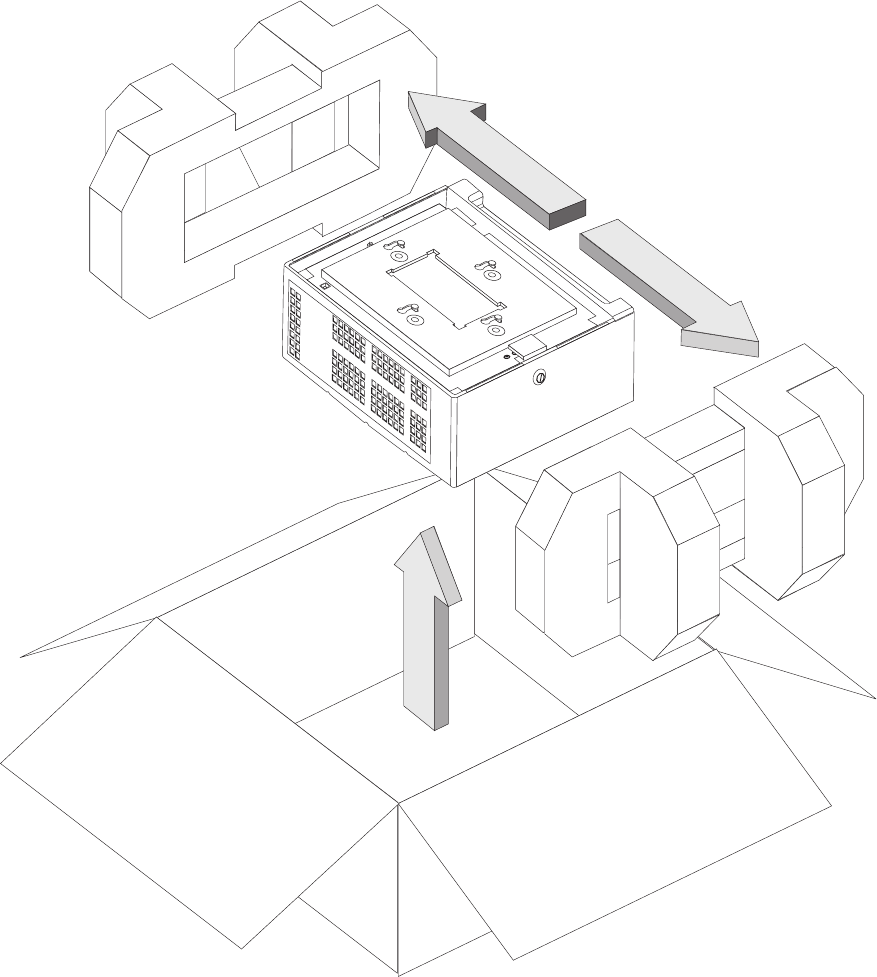
picocells using the following steps. See Figure 2-2.
1. Open the box at the top. Note that the picocell is supported
in the box by two end caps made of form–fitted foam
packing material.
2. Remove the picocell and packing from the box as one piece.
3. Remove both end caps from the picocell. Remove the
plastic bag covering the picocell.
Note that the mounting plate is mounted and locked to
the picocell.
2.2
Unpacking the
picocells
1026209–0001 Revision B Adding cards to the System Controller 2–5
G-14759 F
08/23/99
Picocell with
attached mounting plate
1. Lift unit out of
shipping container
2. Remove packing
Figure 2-2 Unpacking the picocell
1026209–0001 Revision B 2–6 Adding cards to the System Controller
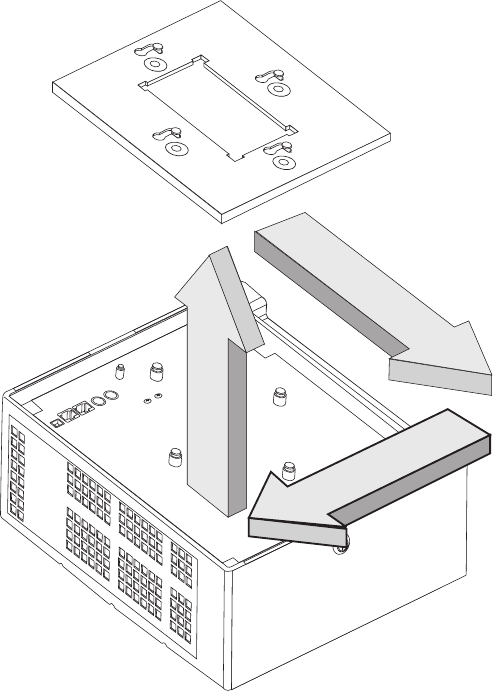
4. Remove the lock key that is taped to the outside of the
picocell mounting plate.
5. Use the key to unlock the picocell from the mounting plate.
Insert the key and turn it clockwise to a vertical position to
unlock the mounting plate, as shown in Figure 2-3.
G-17891 F
08/25/99
1
2
3
Figure 2-3 Unlocking the mounting plate from the picocell
6. Remove the mounting plate from the picocell.

1026209–0001 Revision B Adding cards to the System Controller 2–7
7. Record the serial numbers of all the picocells, from the label
on the back of each picocell.
Later you enter the picocell serial number as part of the base
transceiver station (BTS) configuration information for the
Controller. For proper picocell operation, you must enter
the serial number exactly as it appears on the label—as
indicated in figure 2-4.
AVPU-D--02025234
T0001001
Include 1 dash
the revision letter.
before
Include 2 dashes
the revision letter.
after
Picocell
revision letter
Enter all 8
digits, including
leading zeros,
as on the label.
Serial number
Figure 2-4 Recording and entering the serial
number from the back of each picocell
8. Visually inspect all contents for damage.
9. Save the boxes and packing material until the system
operation is verified and the system is released to the
customer. When packing materials are disposed of, recycle
the materials.
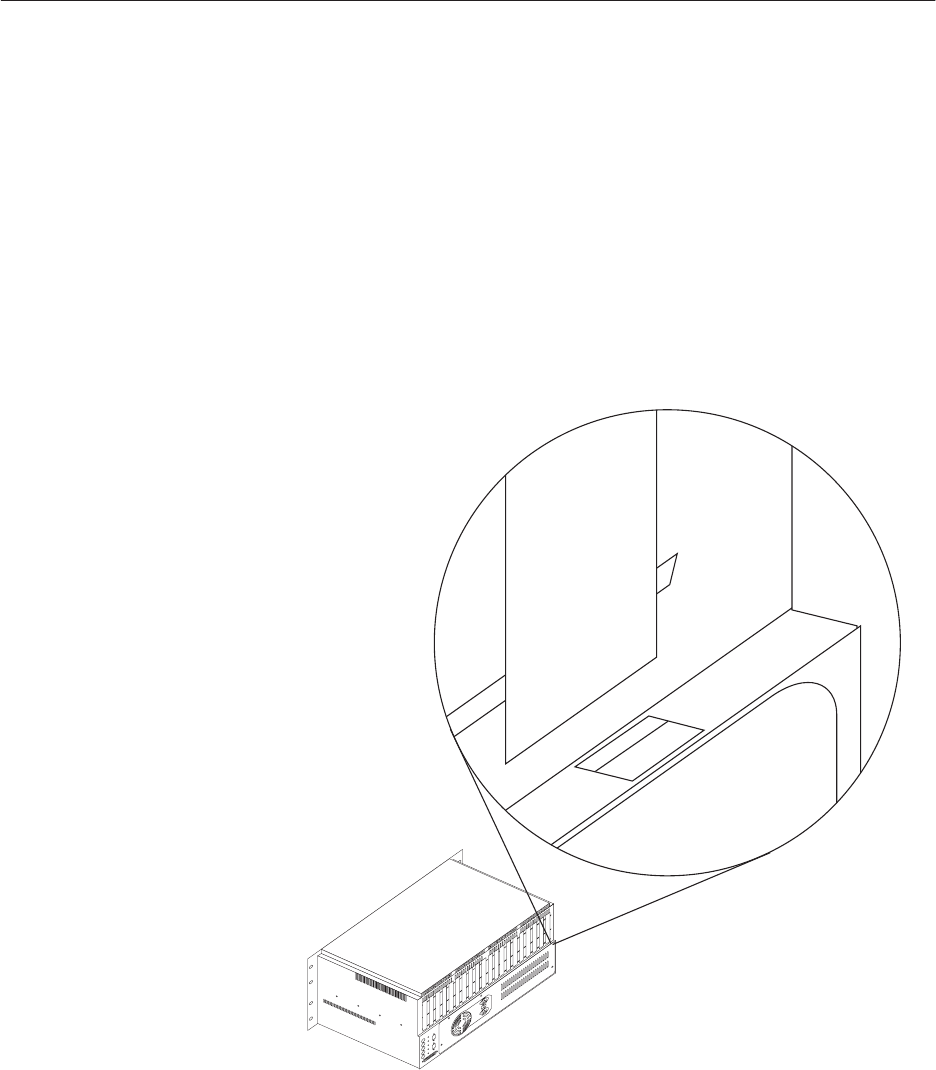
1026209–0001 Revision B 2–8 Adding cards to the System Controller
This section shows:
•How to identify the backplane slots of the System
Controller
•The standard and fully loaded Controller configurations
As shown in Figures 2-5 and 2-6, each slot is identified in two
ways:
•By slot number: Slots are labeled 1 through 20 on the rear
of the System Controller.
•By ISA or PCI number (slot type ID): PCI 1–9, ISA 1–8.
The slot type IDs are labeled on the inside of the Controller,
on the backplane.
Figure 2-5 Slot label on rear of System Controller
G-17011 F
10/04/99
MODEM
56K
SLOT 20
Cards are installed in PCI or ISA slots, as listed below:
PCI slots: Ethernet and T1 cards
ISA slots: TX2000, conference, and modem cards
2.3
System Controller
card configurations
Backplane slot
identification
1026209–0001 Revision B Adding cards to the System Controller 2–9
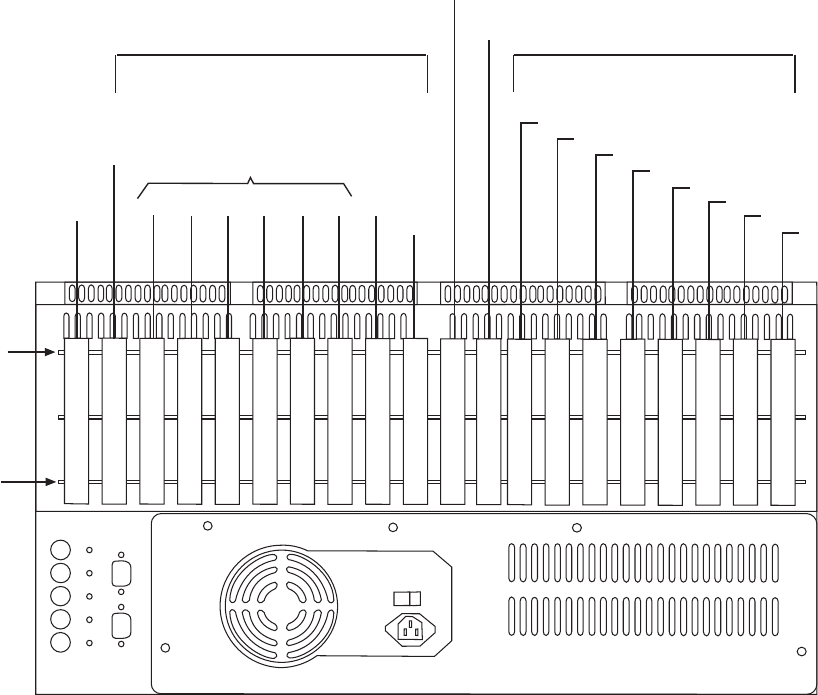
The following cards are installed in the System Controller at the
factory (one each):
•TX2000 IP card
•Quad T1 card
•Conference card
•LAN card
•56K modem card
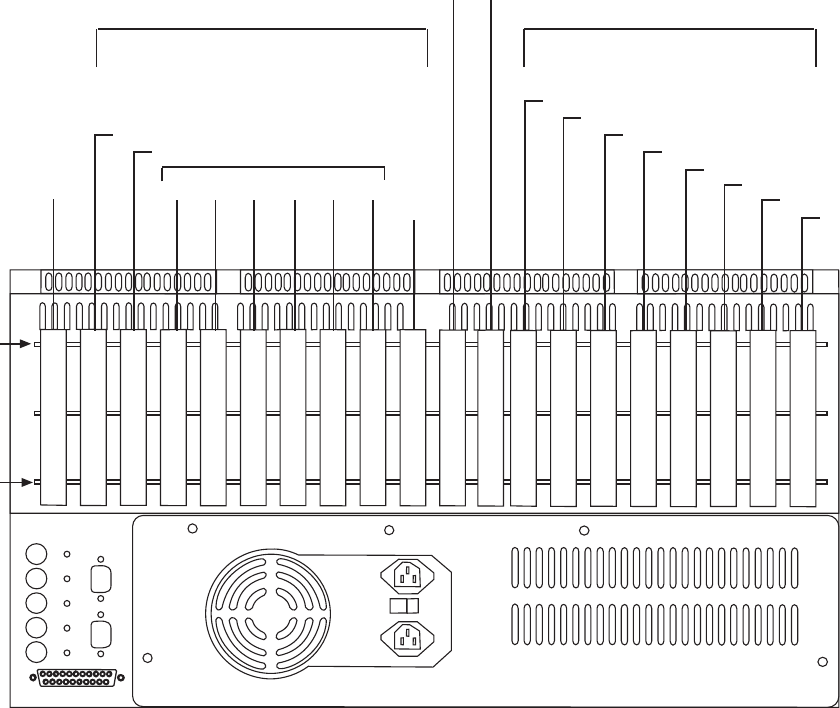
For backplane slot assignments for each card, see Figure 2-6. See
also Figure 2-7.
PCI
9PCI
8PCI
7PCI
6PCI
5PCI
4PCI
3PCI
2PCI
1ISA
1ISA
2ISA
3ISA
4ISA
5ISA
6ISA
7ISA
8
56K modem
Spare
Spare
Spare
TX2000 IP
Spare
Spare
Conf card 1
SBC
LAN 1
1
Spares
23456
Quad T1
Slot type ID
G-17192 F 02/24/00
PCI slots
ISA slots
Parallel
port
7
(Not used)
Spare
Slot
number 123 45 678910111213
14 15 16 17 18 19 20
Figure 2-6 Backplane slot assignments: System Controller standard configuration
Standard (factory)
configuration
1026209–0001 Revision B 2–10 Adding cards to the System Controller
A fully loaded System Controller has the backplane loaded as
shown in Figure 2-7. In this configuration, four card slots are
unused and available for future functions.
Figure 2-7 Backplane slot assignments: System Controller fully loaded configuration
PCI
9PCI
8PCI
7PCI
6PCI
5PCI
4PCI
3PCI
2PCI
1ISA
1ISA
2ISA
3ISA
4ISA
5ISA
6ISA
7ISA
8
56K Modem
Spare
Spare
Spare
TX2000 IP
TX2000 SS7
Conf card 2
Conf card 1
Parallel
port
LAN 1
1
LAN 2
Not
used 23456
Quad T1 Cards
G-17009 F 02/24/00
PCI Slots ISA Slots
Slot
number
12345678910111213
14 15 16 17 18 19 20
Slot
type ID
SBC
Spare
Fully loaded
configuration
1026209–0001 Revision B Adding cards to the System Controller 2–11
In addition to the factory–installed cards listed in Section 2.3, the
Site Configuration Report may specify additional cards:
•Additional Quad T1 cards
(up to 5 additional, for a total of 6)
•A TX2000 SS7 card
•A second conference card
•A second LAN card
If you need to replace, move, or remove a Quad T1 card see
Chapter 14 for important instructions.
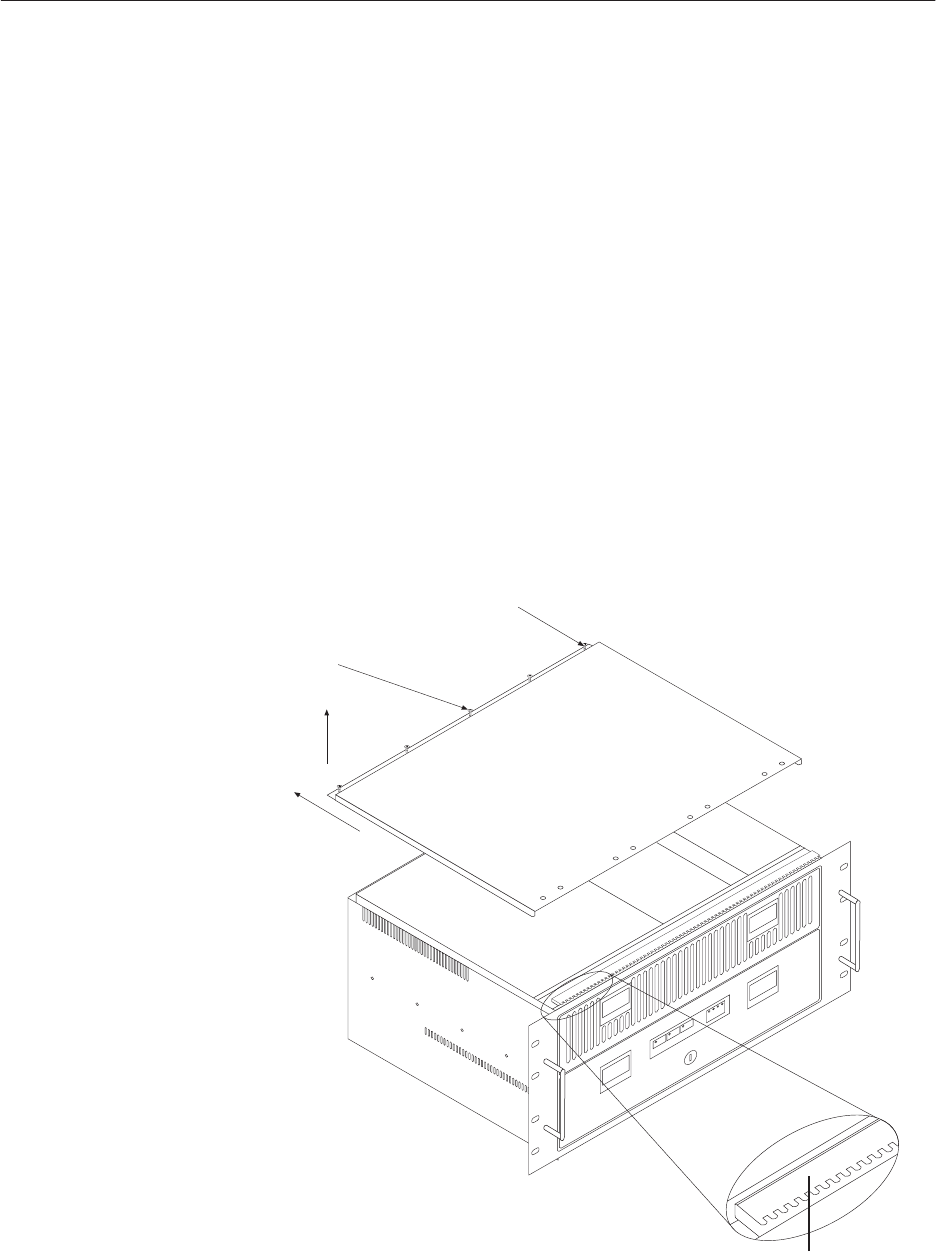
To install a card in the System Controller, follow these steps:
1. Make sure the Controller is powered off.
2. Remove the Controller chassis cover, as follows:
a. Loosen the five spring–loaded Phillips head screws at
the rear (top) of the chassis (Figure 2-8).
b. Remove the chassis top cover by lifting the back edge
of the cover (approximately 1 inch) and then sliding
the cover toward the rear of the chassis.
Use care to avoid damaging the copper finger stock under
the front of the cover.
G-17193 F
06/30/99
Copper finger stock
1. Loosen screws
3. Slide cover back
2. Lift cover up
Spring loaded
screws (5)
Figure 2-8 Removing the System Controller cover
2.4
Adding cards to the
System Controller
(first steps)

1026209–0001 Revision B 2–12 Adding cards to the System Controller
3. Unpack the card.
CAUTION
Before removing or installing electronic
components, make sure static electricity
has been discharged from yourself and any
object that may contact the component.
Wear a new or recently tested anti–static
wrist strap and use an anti–static pad while
handling components.
Failure to follow these instructions could
result in damage to components.
4. Check all dual inline package (DIP) switch and jumper
settings. You may need to change some settings. See
Section 2.5, Jumper and DIP switch settings.
1026209–0001 Revision B Adding cards to the System Controller 2–13
This section specifies all jumper and DIP switch settings for all
System Controller cards.
Before adding or replacing any card in the System Controller,
make sure all jumper switches and DIP switches on the new
card are set correctly. You may need to change some settings,
and should check all jumpers and switches to make sure they are
set correctly.
Note that for Quad T1, TX2000, and conference cards, settings are
different depending on whether the card is the first of its type
installed, or is a subsequently installed card of the same type.
The instructions below tell you which jumpers and DIP switches
you need to change, and they specify the correct settings for all
jumpers and switches (including those that do not need to be
changed). This is so you can check all settings and correct them if
necessary.
If you experience a problem with a card, make sure all jumpers
and DIP switches are set as specified here before contacting HNS
for customer support.
The jumper and switch settings indicated in the following sections
have been established for the combination of cards used the
AIReach System Controller. Do not use other settings.
DIP switches
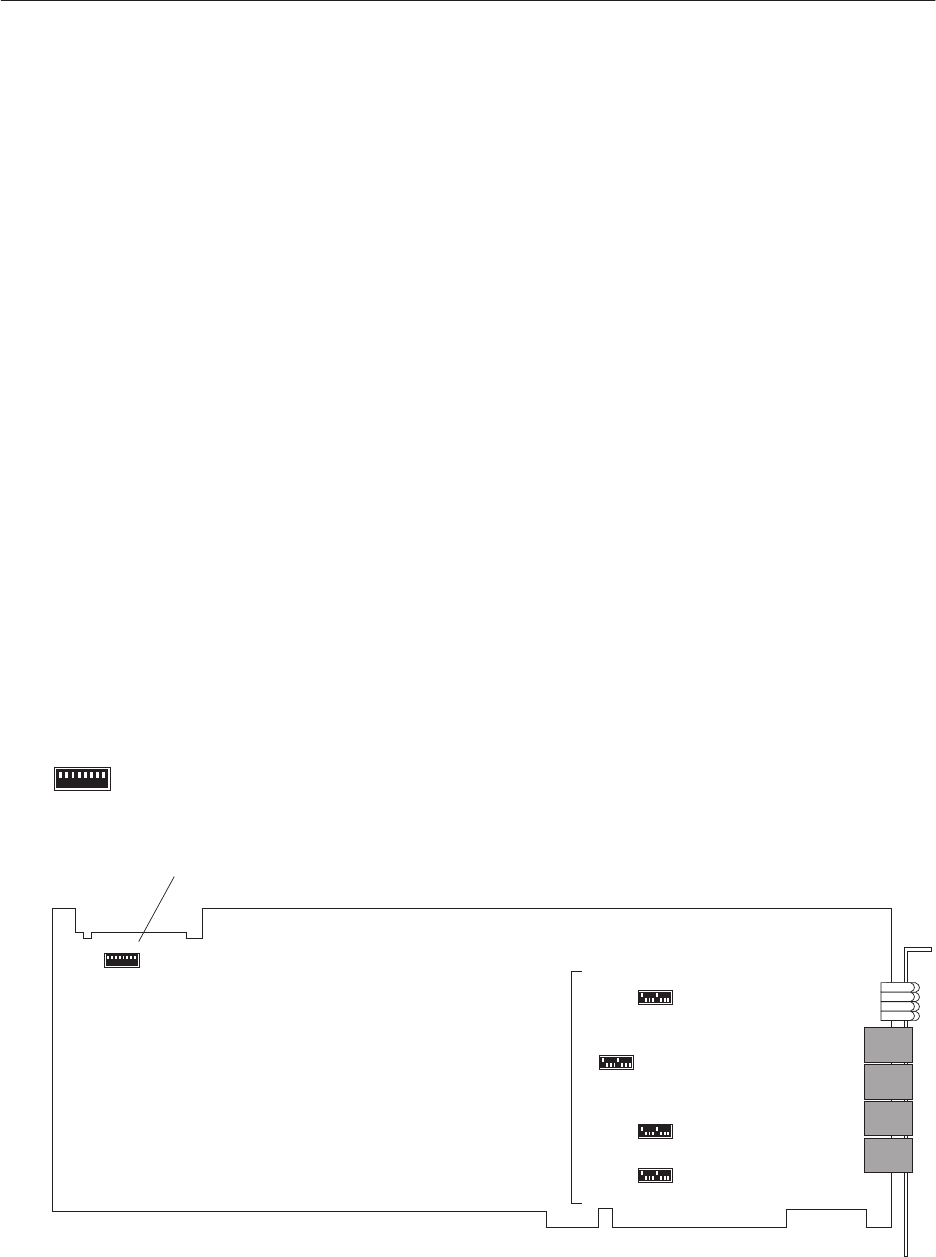
The only option on the Quad T1 card is to set DIP switch S1
(Figure 2-9) to enable or disable H.100 bus termination.
1
S2 ON
OFF
1
S4 ON
OFF
1
S5 ON
OFF
1
S3 ON
OFF
1
S1 OFF
ON
Do not change
these switches.
All S1 switches ON to terminate H.100 bus.
All OFF for unterminated.
T0001013
1
S1 OFF
ON
Detail, S1
Figure 2-9 DIP switches on Quad T1 card
2.5
Jumper and DIP
switch settings
Quad T1 card
1026209–0001 Revision B 2–14 Adding cards to the System Controller
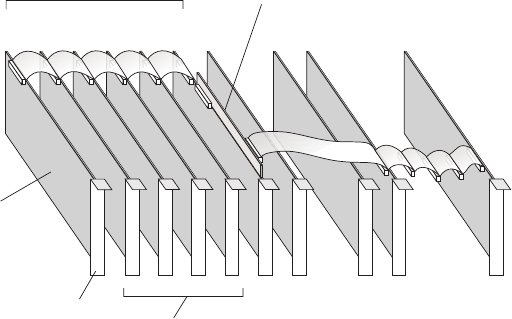
A Quad T1 card is factory installed in slot 9. When only one Quad
T1 card is installed (or if the card is replaced), set all S1 switches
to ON (terminated). This is the default setting.
If you add a Quad T1 card (in slots 4 through 8), the setting for
switch S1 depends on where the card is on the H.100 bus:
•If the Quad T1 card is the first or last Quad T1 card on the
H.100 bus, set all S1 switches to ON (H.100 bus
terminated).
•For cards that are not first or last on the H.100 bus, set all
S1 switches to OFF (unterminated). See Figure 2-10.
Termination reduces line noise caused by signal reflection off the
two ends of the bus, and is critical for correct transmission of
referenced T1 clock signals.
Switches S2 through S5 are factory configured with the following
default settings: Sx–1 and Sx–5 ON, and all others OFF. Do not
change these settings. Switches S2 through S5 may be covered
with an adhesive label.
MVIP bus
If the System Controller has two or more Quad T1 cards, the
ends of the MVIP bus should not be terminated. Remove jumpers
JP14 and JP16 from the TX2000 IP card in slot 16 (the last card
on the MVIP bus).
16
H.100 bus cable
MVIP bus cable
Enable
termination
(S1 ON)
Disable termination
(S1 OFF)
T0001014
TX2000 IP
card
Quad T1 cards
456789
Slot
Enable
termination
(S1 ON)
Figure 2-10 H.100 bus termination
See also
Figure 2-14.
For additional explanation of the H.100 and MVIP buses, see
Section 2.6.
IRQ and address
The Quad T1 card interrupt request (IRQ) and address are
automatically configured through the BIOS. They are not user
selectable.
1026209–0001 Revision B Adding cards to the System Controller 2–15
This section applies to both the TX2000 IP card (factory installed
in slot 16) and the TX2000 SS7 (optional, slot 15). Most settings
are the same for both cards; those that are different are clearly
pointed out.
The key settings to check on the TX2000 cards are the IRQ and
I/O address. All jumpers other than JP7 (IRQ selection) should be
left in their factory default positions.
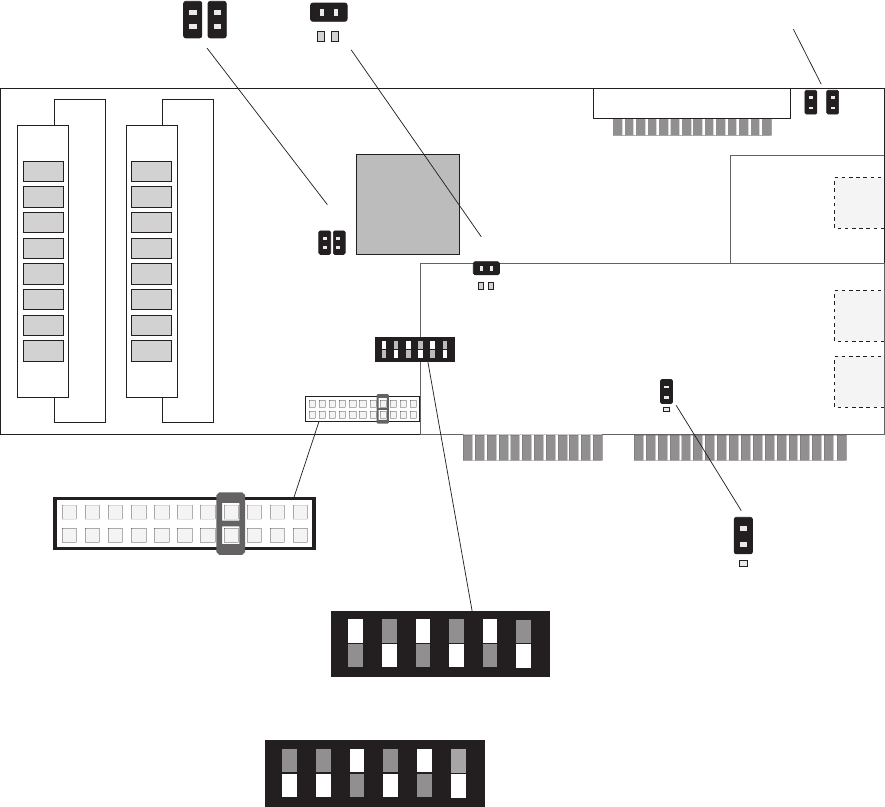
Jumpers
Make sure the IRQ selection jumper is in position 7, as shown in
Figure 2-11. (The factory default is IRQ 10. “NO” disables the
ISA bus.) Use IRQ 7 only.
Figure 2-11 Jumpers and address switch on TX2000 IP and TX2000 SS7 cards
JP1
JP9
JP2
JP16
JP14
S1
IRQ
ON
13
14
15
16
17
18
Address for 0xD4000
(ON, OFF, ON, OFF, ON, OFF, as shown)
TX2000 IP:
ON
13
14
15
16
17
18
Address for TX2000 SS7: 0xD6000
(OFF, OFF, ON, OFF, ON, OFF, as shown)
TX2000 IP:
TX2000 SS7:
Connect JP14 pins and connect JP16 pins, as shown.
connect these jumpers.
DO NOT
JP1: Connect two
jumpers vertically.
>8
32
JP2: Connect
top pins.
NO
15
14
12
11
10
9
7
5
4
3
Set to IRQ 7.
JP9: Connect
upper pins.
T0001015
TX2000 IP and
TX2000 SS7 cards

1026209–0001 Revision B 2–16 Adding cards to the System Controller
Figure 2-11 illustrates all the TX2000 jumpers. Table
2-1 identifies the function of each jumper and summarizes the
correct settings:
Table 2-1 Jumper settings for TX2000 IP and TX2000 SS7 cards
Use these settings.
Jumper Function TX2000 IP TX2000 SS7
IRQ Interrupt request
(IRQ) signal IRQ 7 IRQ 7
JP1 Boot type Both jumpers in
vertical position (for
dual port RAM); see
Figure 2-11.
Both jumpers in
vertical position (for
dual port RAM); see
Figure 2-11.
JP2 Boot device size >8 >8
JP9 Shared interrupts
between multiple
TX2000 cards
(enable/disable)
Upper 2 pins (1–2)
connected (enabled) Upper 2 pins (1–2)
connected (enabled)
JP14 MVIP bus terminator
(enable/disable) Connected (jumper
ON) (terminated) 1Not connected
(no jumper)
JP16 MVIP bus terminator
(enable/disable) Connected (jumper
ON) (terminated) 1Not connected
(no jumper)
1If multiple Quad T1 cards are used, remove this jumper. See
MVIP bus
on
page 2–14.
As shown in Table 2-1 , all jumper settings are the same for both
card types, except the MVIP bus termination jumpers, JP14 and
JP16. For the TX2000 SS7 card, jumpers JP14 and JP16
should not be connected under any circumstances. (Not
connected is the default setting for the TX2000 SS7 card.)
I/O address
For the TX2000 IP card, the I/O address selection (DIP switch S1)
is factory set to 0xD4000. If you add a TX2000 SS7 card, set the
TX2000 SS7 card address to OxD6000, as shown in Figure 2-11.
To set DIP switch 1, set all switches up, to ON, then push the
switches down (OFF) for the positions marked with an underscore
( __ ) in Table 2-2 . The addresses in Table 2-2 are provided for
troubleshooting purposes only. When installing a card, use only
the address specified above.

1026209–0001 Revision B Adding cards to the System Controller 2–17
Table 2-2 TX2000 card
I/O address settings (switch S1)
Address Setting Address Setting
8000 13 14 15 16 17 18 C000 13 14 15 16 17 __
8200 __ 14 15 16 17 18 C200 __ 14 15 16 17 __
8400 13 __ 15 16 17 18 C400 13 __ 15 16 17 __
8600 __ __ 15 16 17 18 C600 __ __ 15 16 17 __
8800 13 14 __ 16 17 18 C800 13 14 __ 16 17 __
8A00 __ 14 __ 16 17 18 CA00 __ 14 __ 16 17 __
8C00 13 __ __ 16 17 18 CC00 13 __ __ 16 17 __
8E00 __ __ __ 16 17 18 CE00 __ __ __ 16 17 __
9000 13 14 15 __ 17 18 D000 13 14 15 __ 17 __
9200 __ 14 15 __ 17 18 D200 __ 14 15 __ 17 __
9400 13 __ 15 __ 17 18 D400 113 __ 15 __ 17 __
9600 __ __ 15 __ 17 18 D600 2__ __ 15 __ 17 __
9800 13 14 __ __ 17 18 D800 13 14 __ __ 17 __
9A00 __ 14 __ __ 17 18 DA00 __ 14 __ __ 17 __
9C00 13 __ __ __ 17 18 DC00 13 __ __ __ 17 __
9E00 __ __ __ __ 17 18 DE00 __ __ __ __ 17 __
A000 13 14 15 16 __ 18 E000 13 14 15 16 __ __
A200 __ 14 15 16 __ 18 E200 __ 14 15 16 __ __
A400 13 __ 15 16 __ 18 E400 13 __ 15 16 __ __
A600 __ __ 15 16 __ 18 E600 __ __ 15 16 __ __
A800 13 14 __ 16 __ 18 E800 13 14 __ 16 __ __
AA00 __ 14 __ 16 __ 18 EA00 __ 14 __ 16 __ __
AC00 13 __ __ 16 __ 18 EC00 13 __ __ 16 __ __
AE00 __ __ __ 16 __ 18 EE00 __ __ __ 16 __ __
B000 13 14 15 __ __ 18 F000 13 14 15 __ __ __
B200 __ 14 15 __ __ 18 F200 __ 14 15 __ __ __
B400 13 __ 15 __ __ 18 F400 13 __ 15 __ __ __
B600 __ __ 15 __ __ 18 F600 __ __ 15 __ __ __
B800 13 14 __ __ __ 18 F800 13 14 __ __ __ __
BA00 __ 14 __ __ __ 18 FA00 __ 14 __ __ __ __
BC00 13 __ __ __ __ 18 FC00 13 __ __ __ __ __
BE00 __ __ __ __ __ 18 FE00 __ __ __ __ __ __
1Default for TX2000 IP (slot 16). 2Use for TX2000 SS7 (slot 15).
Note: Underline ( __ ) indicates switch in OFF position.
1026209–0001 Revision B 2–18 Adding cards to the System Controller
I/O address
I/O address 0x2140 is used for the first conference card (in slot
13). If you install a second conference card (in slot 14), use DIP
switch S1 to select address 0x2160, as shown in Figure 2-12.
T0001016
JP3
JP4
1
S1
4ON
14
ON
14
ON
Leave JP3
and JP4
unconnected
(no jumpers).
Address for :
0x2140 all OFF)
first conference card
((slot 13)
Address for (slot 14)second conference card :
0x2160 (OFF, OFF, OFF, ON)
Figure 2-12 Conference card jumpers and address switch
For troubleshooting purposes only, Table 2-3 shows all addresses
that can be assigned to a conference card. When installing a card,
use only the address specified above.
Jumpers (MVIP bus termination)
For either conference card (in slot 13 or 14), leave jumpers JP3
and JP4 unconnected. This disables MVIP bus termination for the
card.
IRQ
The conference card does not need an IRQ.
Conference card

1026209–0001 Revision B Adding cards to the System Controller 2–19
Table 2-3 Conference card
I/O address settings (switch S1)
Base addr S1–1 S1–2 S1–3 S1–4
0640 ON ON ON ON
0620 ON ON ON OFF
0560 ON ON OFF ON
0540 ON ON OFF OFF
0240 ON OFF ON ON
0220 ON OFF ON OFF
0160 ON OFF OFF ON
0140 ON OFF OFF OFF
2640 OFF ON ON ON
2620 OFF ON ON OFF
2560 OFF ON OFF ON
2540 OFF ON OFF OFF
2240 OFF OFF ON ON
2220 OFF OFF ON OFF
2160 1OFF OFF OFF ON
2140 2OFF OFF OFF OFF
1Use for second conference card (slot 14).
2Default for first conference card (slot 13).
The Ethernet LAN cards (slot 10, and slot 3 if a second LAN card
is used) are configured automatically through BIOS Plug and Play
(PnP); they have no user selectable jumpers.
The modem card (slot 20) is configured automatically through
BIOS Plug and Play (PnP); it has no user selectable jumpers. (The
modem uses COM2 and IRQ3.)
LAN cards
Modem card
1026209–0001 Revision B 2–20 Adding cards to the System Controller
In the event of a problem with the SBC (slot 12), make sure DIP
switch SW1 is set correctly, depending on the installed CPU, and
check all jumpers.
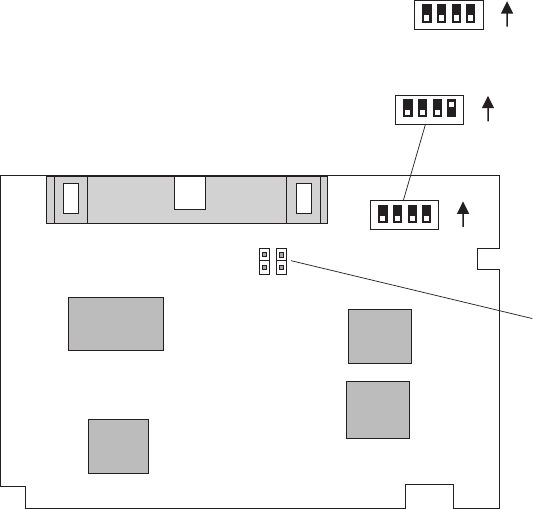
Processor configuration
The standard CPU shipped with the AIReach OS System
Controller is an Intel Pentium II, 450 MHz processor. Normally,
the system BIOS autodetects the CPU and sets the system bus
frequency accordingly. If the BIOS does not do this, or if you elect
to use a different processor, you must set DIP switch SW1 to the
correct bus frequency and processor multiplier for the CPU, as
specified in table 2-4 . The location of switch SW1 is shown in
Figure 2-13.
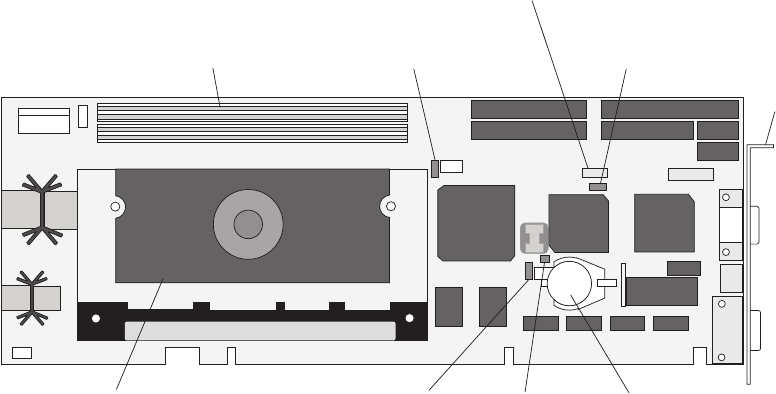
Figure 2-13 SBC jumper and DIP switch locations
T0001019
Rear
bracket
DIMM memory
Pentium II processor Battery
JP2 - CMOS
operation
JP3 - Watchdog
timeout interrupt
JP4 - PnP
and flash
BIOS
upgrade
J17 -
Watchdog
timer
DIP switch SW1
As shown in Table 2-4 , switch SW1–1 selects the processor front
side bus frequency (FSB), more commonly known as the bus or
memory frequency. Switches SW1–2 to SW1–5 select the
processor multiplier.
Single board computer
(SBC)

1026209–0001 Revision B Adding cards to the System Controller 2–21
To determine the proper FSB and multiplier for a particular
processor, first read the clock speed from the label on top of the
processor casing. Look at the last six numbers in the first row of
numbers and/or letters. For example, 450512 indicates a processor
clock speed (first three numbers) of 450 MHz, with 512K of
Level–2 (L2) cache (last three numbers). In general, any Pentium
II processor 333 MHz or slower uses a 66–MHz FSB, while any
processor 350 MHz or faster uses a 100–MHz FSB.
To determine the processor multiplier, divide the processor clock
speed by the FSB. For the 450–MHz processor, set the FSB to 100
MHz (SW1–1 OFF) and the multiplier at 4.5 (SW1–2 OFF,
SW1–2 ON, SW1–3 ON, and SW1–5 OFF). See the following
chart for other processor combinations and settings.
Table 2-4 SBC processor settings (switch SW1)
FSB SW1–1 X SW1–2 SW1–3 SW1–4 SW1–5
Processor (MHz) Selects
FSB Multiplier These switches select the multiplier.
Pentium II 233 MHz 66 ON 3.5 OFF ON OFF ON
Pentium II 266 MHz 66 ON 4 ON ON ON OFF
Pentium II 300 MHz 66 ON 4.5 OFF ON ON OFF
Pentium II 333 MHz 66 ON 5 ON ON OFF OFF
Pentium II 350 MHz 100 OFF 3.5 OFF ON OFF ON
Pentium II 400 MHz 100 OFF 4 ON ON ON OFF
Pentium II/III 450 MHz 100 OFF 4.5 OFF ON ON OFF
Pentium III 500 MHz 100 OFF 5 ON ON OFF OFF
SW1–6 to SW1–8 are reserved and should be left in the OFF position.
Highlighted (gray): Standard processor for AIReach OS Controller
Jumpers
Set all jumpers as specified in Table 2-5 . The location of each
jumper is shown in Figure 2-13.
The SBC uses the watchdog timer (jumper J17). Even though the
pre–timeout interrupt option (JP3) of the watchdog timer is not
used, leave a jumper across pins 2–3. A jumper over JP4 pins 2
and 3 enables PnP capabilities and the ability to upgrade the flash
BIOS.

1026209–0001 Revision B 2–22 Adding cards to the System Controller
Connect JP2 pins 2 and 3 for normal CMOS operation. In the
event that CMOS settings prevent the AIReach OS Controller
from booting, you can clear the CMOS settings by placing a
jumper over JP2 pins 1 and 2. Do this only in an emergency.
Clearing the CMOS helps correct only certain hardware problems.
Operating system or software problems cannot be remedied
through clearing the CMOS. If it is necessary to clear CMOS
settings, see HNS document 1027630 for the proper settings.
Table 2-5 SBC card jumper settings
Use these settings.
Jumper Function Setting
J17 Watchdog timer Enabled ON
JP2 Normal CMOS
operation Normal operation Connect pins
2–3
JP3 Watchdog timer
pre–timeout
interrupt option
Disabled Connect pins
2–3
JP4 PnP and BIOS
flash upgrade Enabled Connect pins
2–3
1026209–0001 Revision B Adding cards to the System Controller 2–23
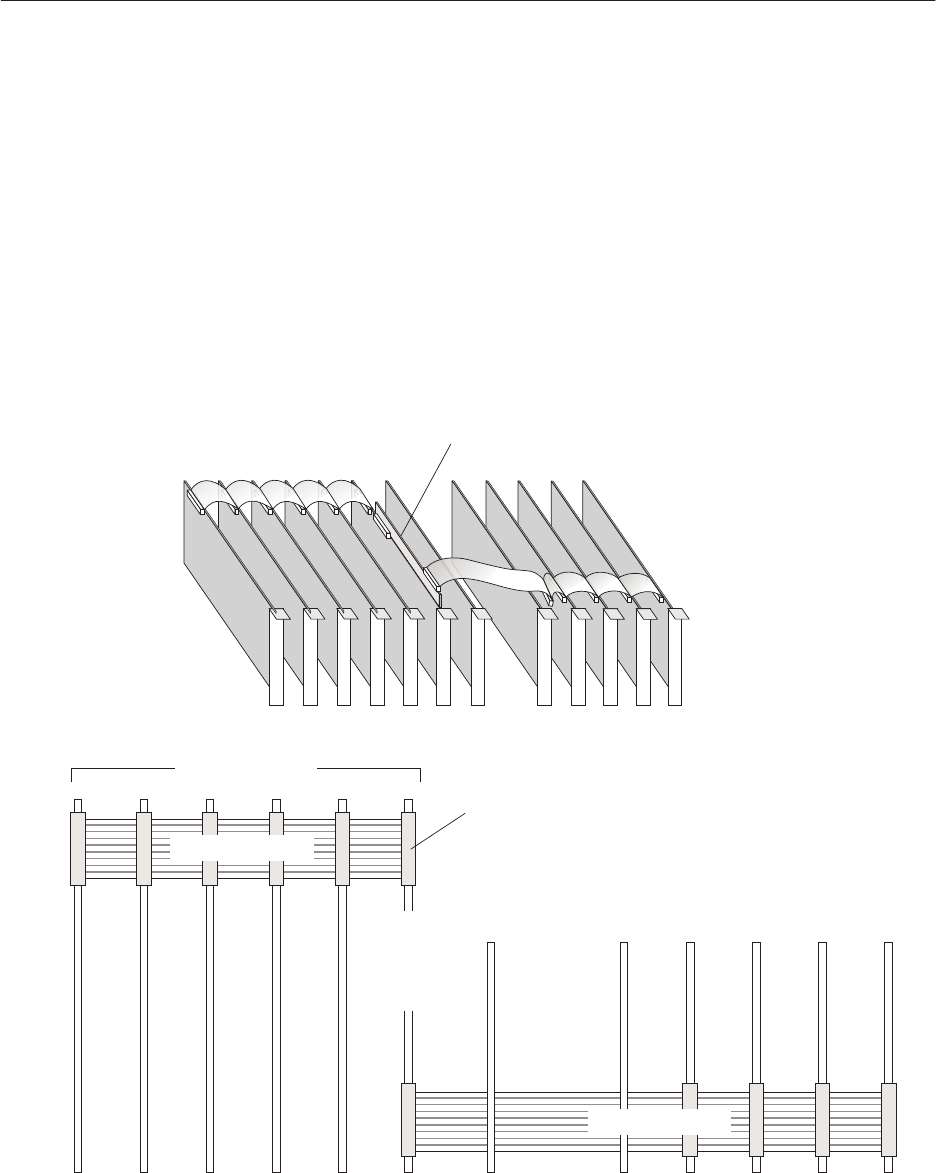
After all cards are installed, make sure the MVIP and H.100 bus
ribbon cables are connected to the cards as shown in Figure 2-14.
If you added any cards, connect the bus cables to the added
card(s), as shown.
The MVIP bus ribbon cable connects to:
•The small bus adapter card attached to the top of the first
Quad T1 card (in slot 9)
•Any TX2000 cards
•Any conference cards
The H.100 bus cable connects to all Quad T1 cards.
Make sure the bus adapter card is secure and in full contact
with the (slot 9) Quad T1 card.
Figure 2-14 H.100 and MVIP bus cables (2 views)
LAN 1
card
SBC
card
Conf
card 1
Conf
card 2
TX2000
SS7
card
TX2000
IP
card
SLOT 4
(PCI 7) SLOT 5
(PCI 6) SLOT 6
(PCI 5) SLOT 7
(PCI 4) SLOT 8
(PCI 3) SLOT 9
(PCI 2) SLOT 12 SLOT 13
(ISA 1) SLOT 14
(ISA 2) SLOT 15
(ISA 3) SLOT 16
(ISA 4)
SLOT
10
SLOT
Quad T1 cards
Backplane
Top view
Parallel
port
H.100 bus cable
MVIP bus cable
First
Quad
T1
card
Each rectangle
represents a connector.
H.100 bus cable
MVIP bus cable
(Connects all Quad T1 cards)
(Connects all Tx2000
and conference cards)
Bus adapter
card (slot 9)
T0001029
2.6
Attaching the bus
cables

1026209–0001 Revision B 2–24 Adding cards to the System Controller
After making sure all jumpers and DIP switches on the card are set
correctly:
1. Use a Phillips screwdriver to remove the screw from the
card slot cover (blank panel), and then remove the card slot
cover from the Controller chassis.
2. Slide the card into place. Fully insert the card’s edge
connector(s) into the sockets on the System Controller
backplane.
Install the card according to the manufacturer’s directions.
3. Replace and tighten the slot cover screw (now into the card
bracket) to secure the card to the Controller chassis.
4. When all cards are installed, replace the System Controller
top cover.
5. Connect power to the Controller.
6. Boot the Controller. (Power it on.)
2.7
Adding cards to the
System Controller
(final steps)
1026209–0001 Revision B Adding cards to the System Controller 2–25
Use the System Controller installation software to:
•Configure a new System Controller
•Configure a replacement card
•Reconfigure a card after moving it to a different slot
For a new System Controller, follow the configuration steps below
after all cards are installed.
If an installed card is replaced or moved, you must follow the
steps in this section to configure or reconfigure it.
Important: For values needed to configure the picocell, see the
site–specific AIReach Office Configuration Report. References to
specified values or parameters in this manual refer to values and
parameters specified in the Configuration Report. For values not
listed in the Configuration Report, use the default values shown in
the software or specified in these instructions.
Follow the steps below to enter basic configuration information
for newly installed cards.
If you are using the standard Controller configuration, with no
additional cards, verify that the standard cards are installed, and
verify the configuration information.
1. At the System Controller, start Windows NT.
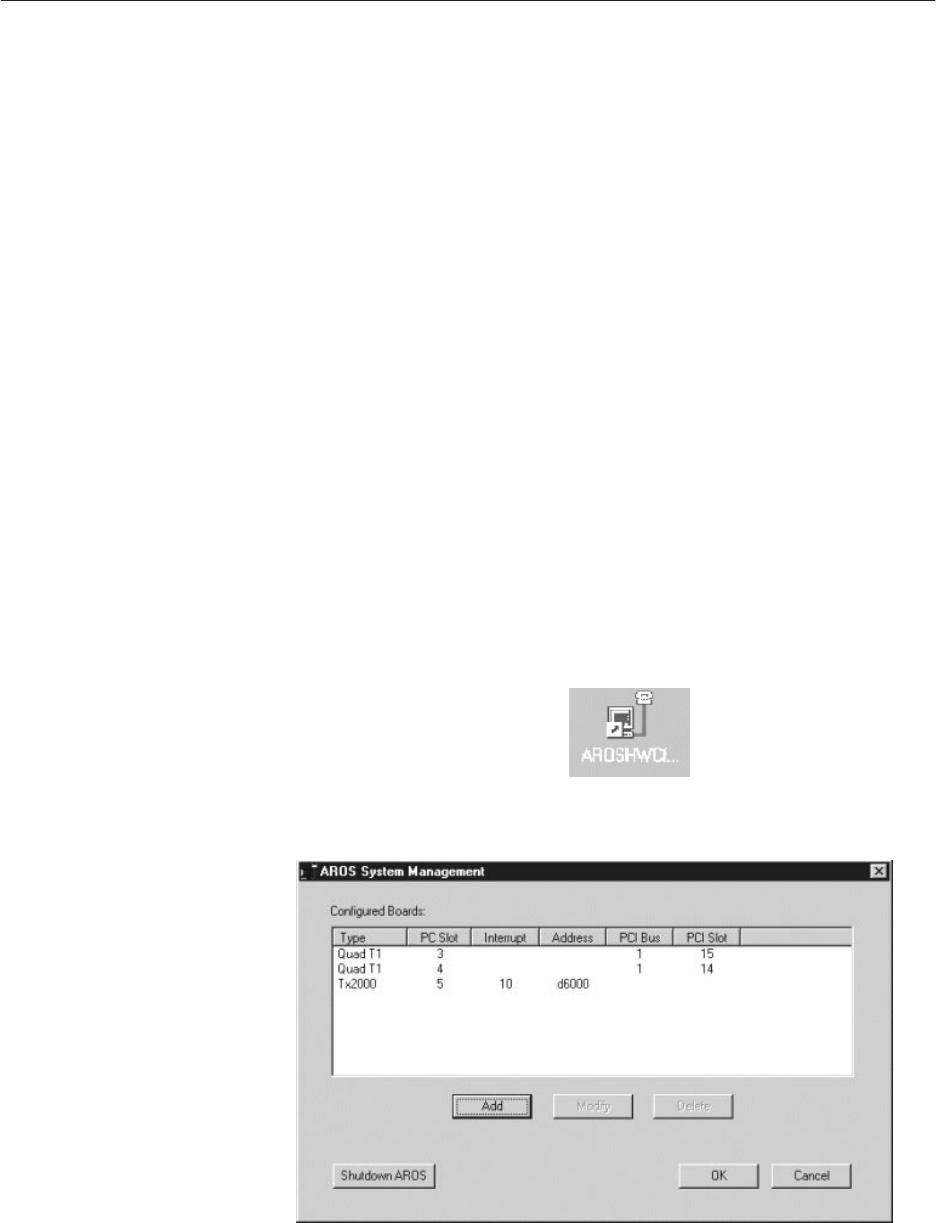
2. From the Windows NT desktop, double–click the
AROSHWCf . . . (hardware configuration) icon:
The AIReach OS software displays the AROS System
Management window, shown below:
3. If any AIReach OS applications are running, close them by
clicking Shutdown AROS.
2.8
Configuring System
Controller cards
Specifying basic card
information
1026209–0001 Revision B 2–26 Adding cards to the System Controller
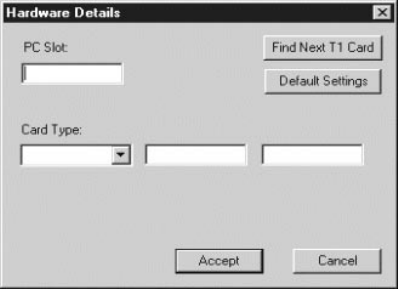
4. For newly installed cards only, click Add to display the
Hardware Details window:
5. For each newly installed card, enter the following
information:
a. Select the Card Type for the new card from the
dropdown list.
b. Enter the PC Slot, PCI Bus, and PCI Slot or Address
values specified in the Configuration Report.
If you click Find Next T1 Card, the software locates
the next Quad T1 card (not TX2000 or conference
cards) and automatically display detected
configuration data.
c. Click Accept.
6. Reboot the Controller: Click Start → Shut Down, select
Restart the computer?, and click Yes.
1026209–0001 Revision B Adding cards to the System Controller 2–27
After entering information for new cards (Section 2.8), verify the
card configuration as follows:
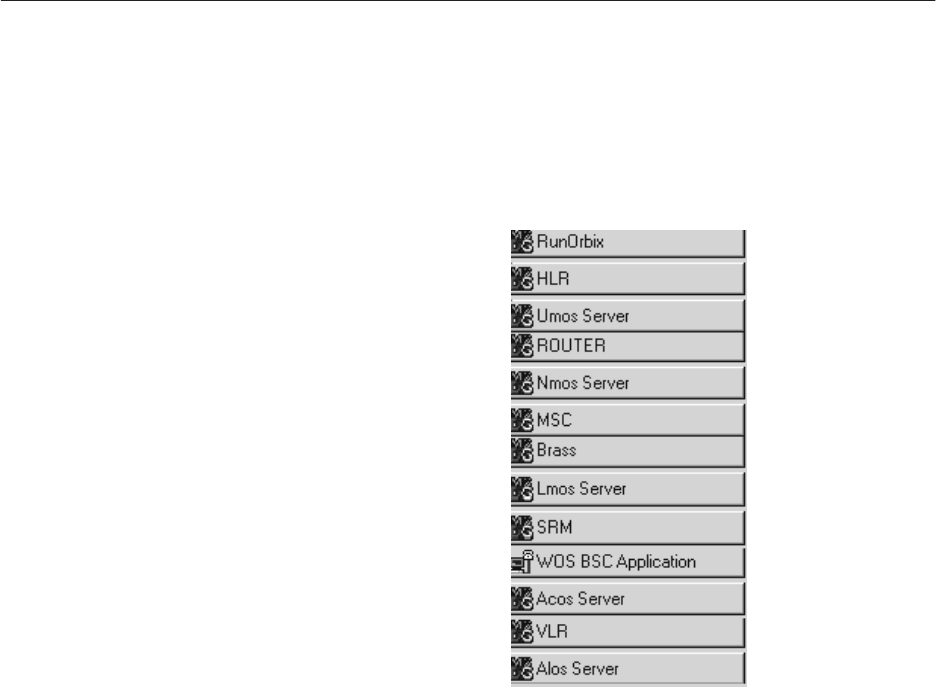
1. As the System Controller becomes operational (after
rebooting), several background processes appear on the
Windows taskbar. Verify that the AIReach OS software
applications are present, as indicated on the Windows
taskbar:
The taskbar may show other applications in addition to
those shown here.
(The taskbar is shown vertically here, so the labels can be
read. Typically, it appears horizontally across the bottom of
the screen.)
If any applications are missing, contact your HNS
Installation Manager.
2.9
Verifying the card
configuration
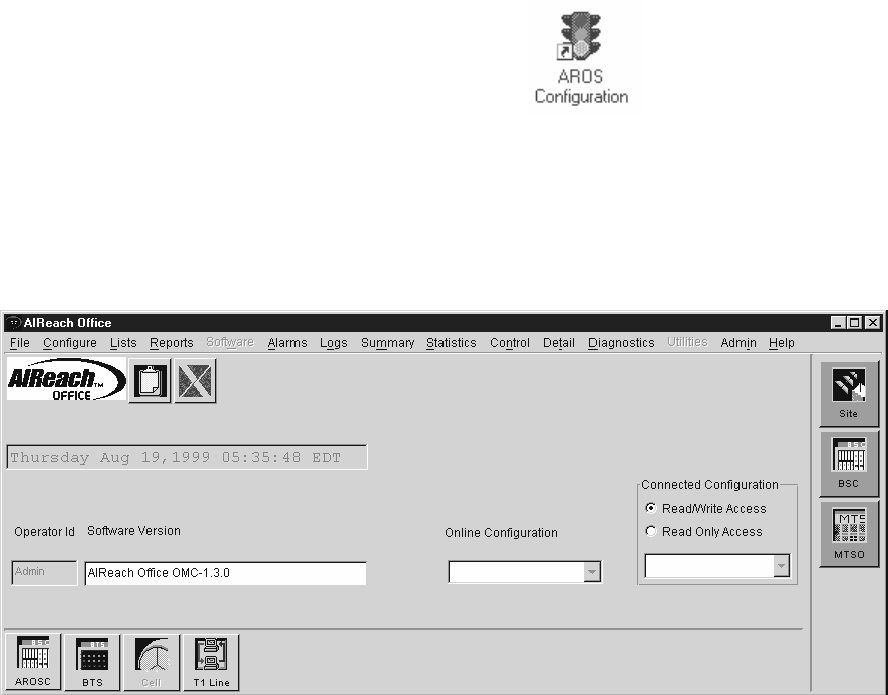
1026209–0001 Revision B 2–28 Adding cards to the System Controller
2. Launch the AIReach Office application by double–clicking
on the desktop icon labeled AROS Configuration (shown
below).
The software displays the AIReach Office banner window
shown below and a Login dialog box that shows
AROSC: Localhost. “Localhost,” the default Controller
selection, indicates that you are logging onto the local
Controller.
3. In the Login dialog box, enter:
- The name of the Controller you want to connect to
(after AROSC)
- User name
(No entry is needed if this field is grayed out.)
- Password
The default administrator password is “abc123.”
4. Click Connect.
The Login dialog box disappears.
5. After you successfully log in, change the administrator
password: Click File → Change Password, and enter a
password.
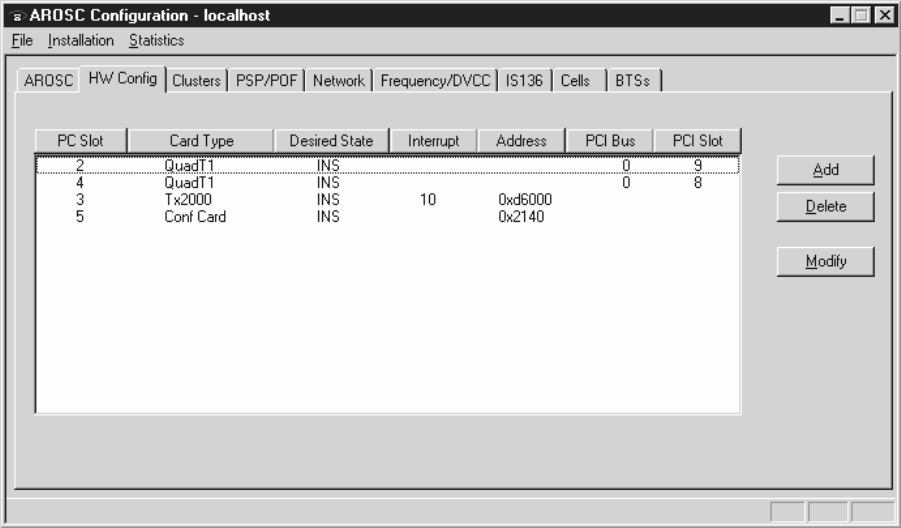
1026209–0001 Revision B Adding cards to the System Controller 2–29
6. From the AIReach banner window main menu, select
Configure → BSC Configuration.
7. Click the HW Config tab to display the AROSC
Configuration window shown below.
8. If any installed cards are not listed, click Add to add the
card(s).
9. The AIReach OS software prompts you to enter the type of
card you want to add.
After you enter the appropriate information, the software
displays a configuration window for the type of card you
indicated.
10. To add:
- A Quad T1 card, go to step 11.
- A TX2000 or conference card, go to step 14.
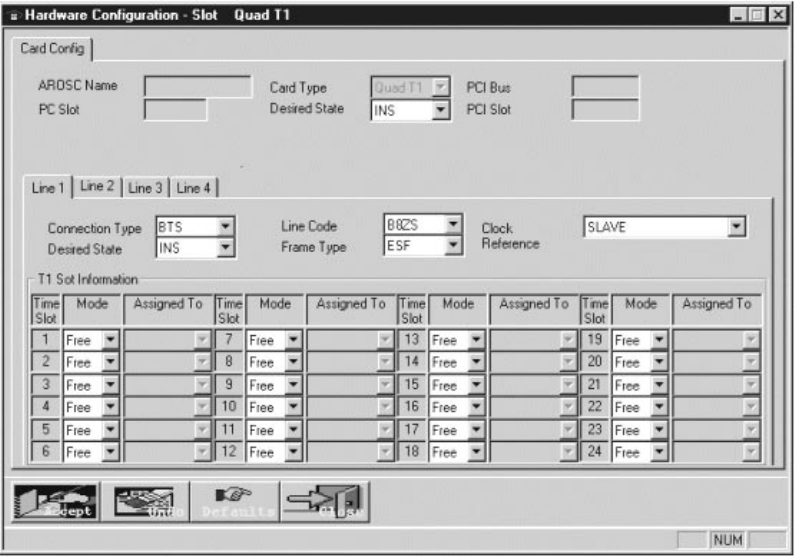
1026209–0001 Revision B 2–30 Adding cards to the System Controller
If you specified a Quad T1 card (in step 9), the software displays
this window, which shows parameters for configuring the Quad T1
card:
11. For each T1 line (Line 1, Line 2 . . . ), verify or select the
following values:
- PC Slot: Slot where the card is installed.
- Connection Type: BTS or PBX. Set according to
whether a BTS or PBX will be connected to the line.
If initially there will be no connection to a line,
select BTS.
- Desired State: INS (in service).
- Line Code: B8ZS.
- Frame Type: ESF.
- Clock Reference: SLAVE, MASTER_EXTERNAL,
or BACKUP.
Set all lines configured as BTS Connection Type to
SLAVE. Set one (and only one) PBX connection on
the Controller to MASTER_EXTERNAL. If a second
PBX connection is present, set it to BACKUP. Set an
other PBX connections to SLAVE.
- T1 Time Slot: All T1 slots should be set to Free.
12. Click Accept to save the information.
13. After adding cards or modifying any settings under the HW
Config tab, click Start → Shut Down to reboot the
Controller.
Adding a Quad T1 card
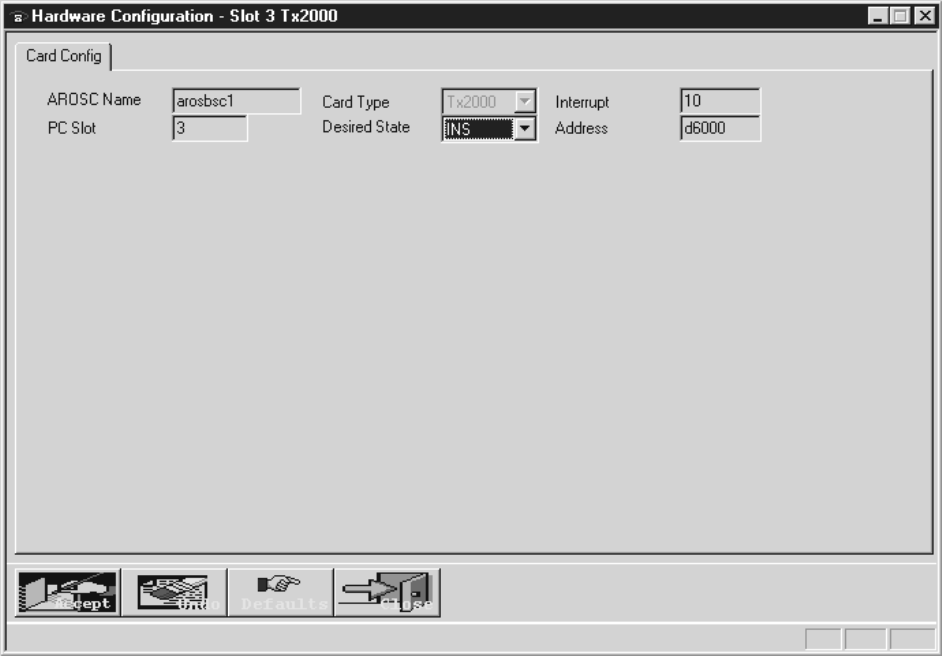
1026209–0001 Revision B Adding cards to the System Controller 2–31
If you specified a TX2000 card or conference card (in step 9), the
software displays this window, which shows parameters for
configuring the TX2000 card or conference card:
14. Select the TX2000 or conference card from the Card Type
dropdown list.
15. Verify the displayed values.
16. Select INS from the Desired State menu.
17. Click Accept to save the information.
18. After adding cards or modifying any settings under the HW
Config tab, click Start → Shut Down to reboot the
Controller.
Adding a TX2000 or
conference card

1026209–0001 Revision B Installing the Controller 3–1
Chapter 3
Installing the Controller
This chapter includes the following topics:
•Rack–mount configuration – page 3–2
•Mounting the Controller chassis – page 3–4
•Controller cabling – page 3–5
•Checking System Controller operation – page 3–6
•System cabling – page 3–7
The AIReach OS System Controller, monitor, and associated
components are typically installed in a rack. All cards must be
installed in the System Controller before the Controller is installed
in the rack.
To install cards in the Controller, see Chapter 2.
For verification information and procedures, see Chapter 4.
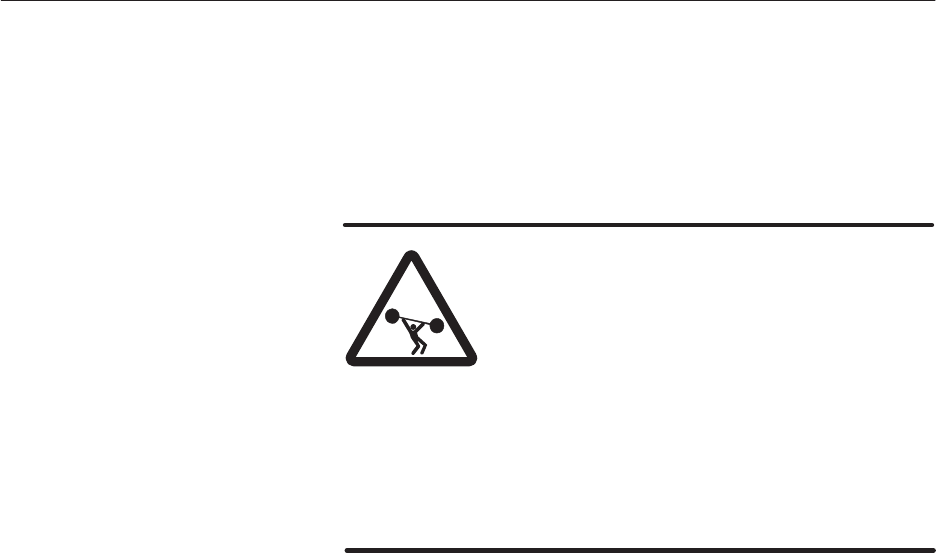
1026209–0001 Revision B 3–2 Installing the Controller
Mount the System Controller, monitor, and keyboard (with
touchpad) on an available 19–inch rack, as shown in Figure 3-1 .
Optionally, a UPS, power distribution tray, patch panel, and CSU
tray can be mounted on the same rack. (These components are also
shown in Figure 3-1.)
WARNING
The AIReach Office System Controller can
weigh in excess of 50 pounds. To avoid
personal injury or damage to equipment,
follow these precautions:
•Do not attempt to move or install the
System Controller by yourself. Two
people are required for these tasks.
•If the System Controller will be rack
mounted, secure the rack to the floor
or wall so the rack cannot fall.
3.1
Rack–mount
configuration
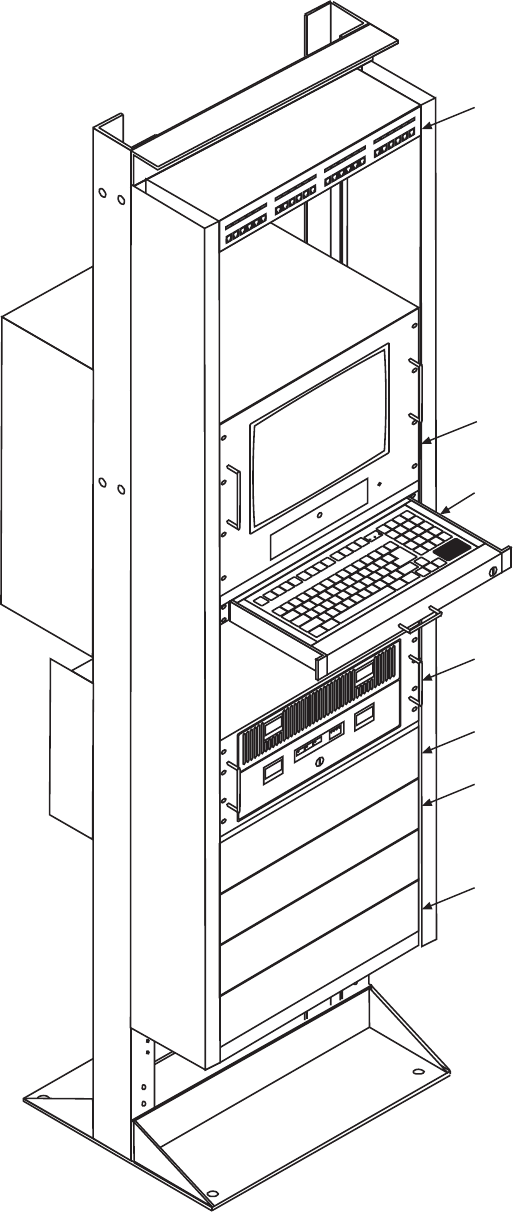
1026209–0001 Revision B Installing the Controller 3–3
Keyboard and mouse
UPS
G-17207 F
07/01/99
Monitor
Power distribution
CSU tray
Patch panel
Controller
Figure 3-1 System Controller and associated
components in a 19–inch rack (typical installation)
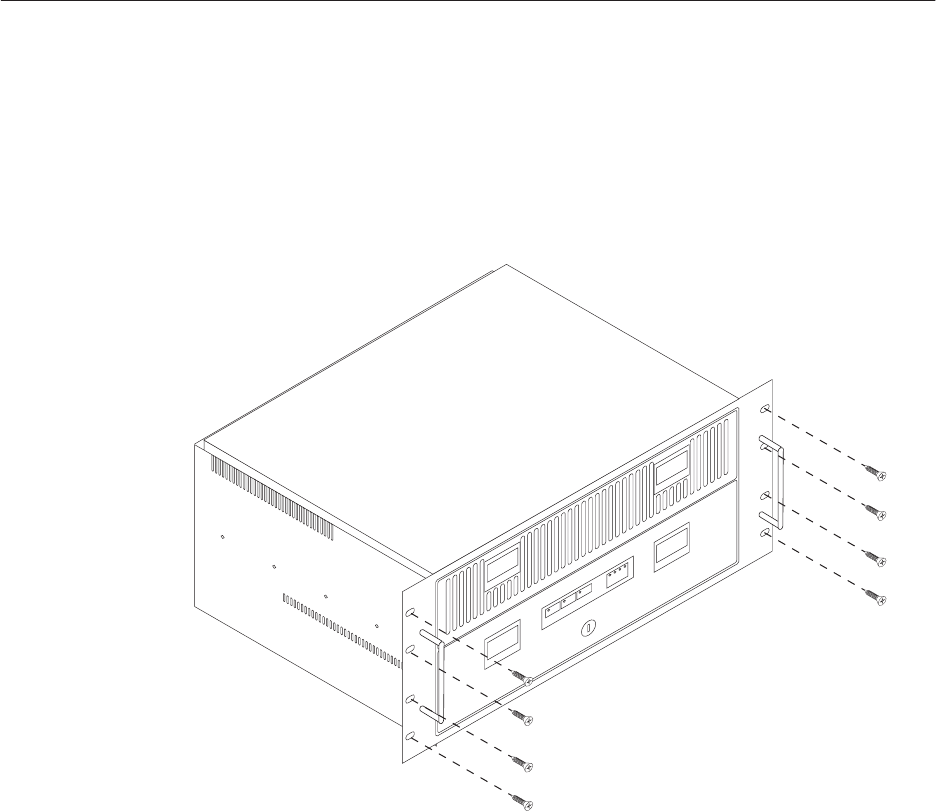
1026209–0001 Revision B 3–4 Installing the Controller
Mount the System Controller chassis to the rack as follows:
1. Choose a location in the rack that allows easy access to the
monitor, keyboard and rear of the Controller.
2. Position the Controller on the vertical side rails of the rack.
3. Secure the Controller to the front of the rack using the eight
provided mounting screws. See Figure 3-2, which shows the
screw holes on each side of the chassis (front).
Figure 3-2 Installing the chassis
G-17420 F
10/04/99
4. Tighten the mounting screws.
3.2
Mounting the
Controller chassis
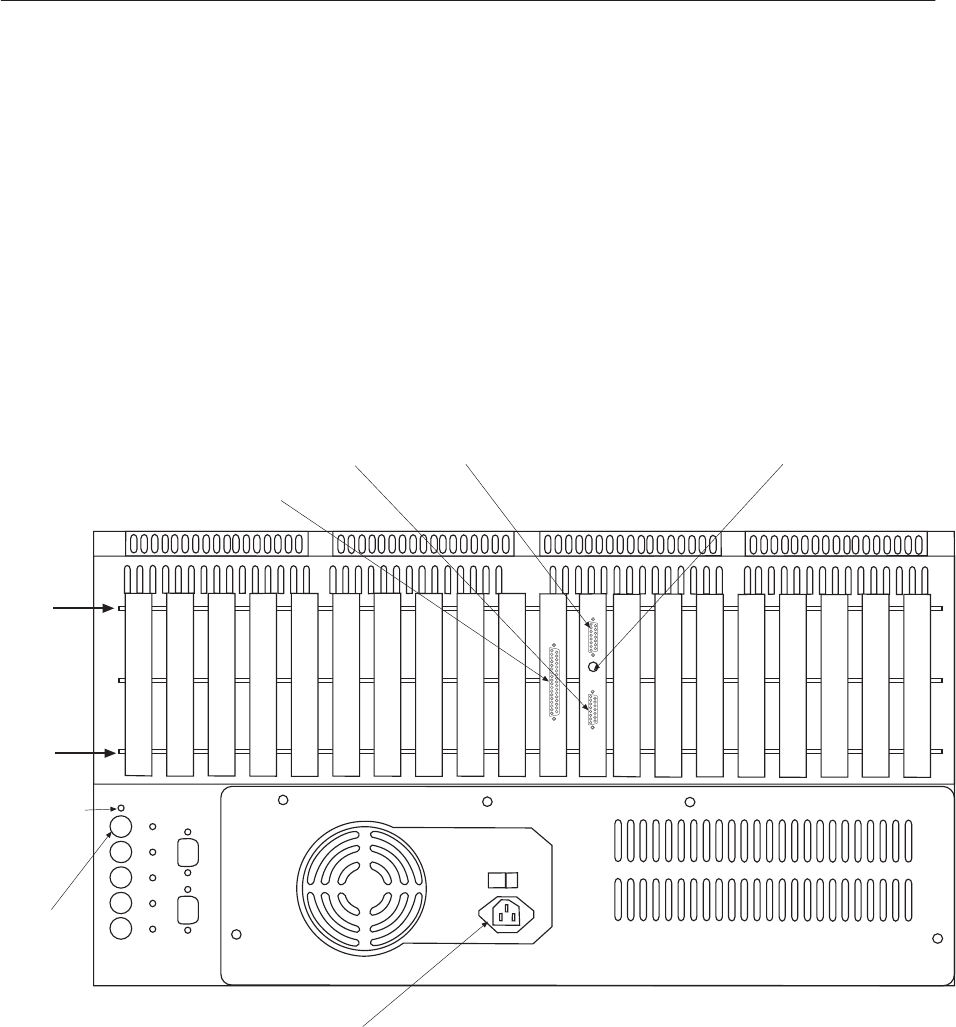
1026209–0001 Revision B Installing the Controller 3–5
After mounting the components in the rack, connect the keyboard,
monitor, touchpad cables, and printer (if used) to the ports shown
in Figure 3-3:
1. Connect the monitor video cable to the video port on the
rear of the single board computer (SBC) (slot 12).
2. Connect the touchpad to the mouse port on the rear of the
SBC card.
The touchpad and keyboard cables split off from a single
cable. The connectors on these cables are identified by
symbols that look like a computer mouse and a keyboard.
3. Connect the keyboard cable to the port on the left rear of the
System Controller.
4. If your configuration includes a printer (optional), connect
the printer to the parallel port (slot 11).
PCI
9PCI
8PCI
7PCI
6PCI
5PCI
4PCI
3PCI
2PCI
1ISA
1ISA
2ISA
3ISA
4ISA
5ISA
6ISA
7ISA
8
G-17206 F 02/14/00
COM1 port
COM1
Monitor port Mouse port
Power
connector
Keyboard
port
Power
Parallel port
(LPT1)
for optional printer
Power
indicator
Slot
number
12345 678910111213
14 15 16 17 18 19 20
Slot
type ID
System Controller, rear view
Figure 3-3 System Controller connectors for monitor, keyboard, touchpad, and power
3.3
Controller cabling
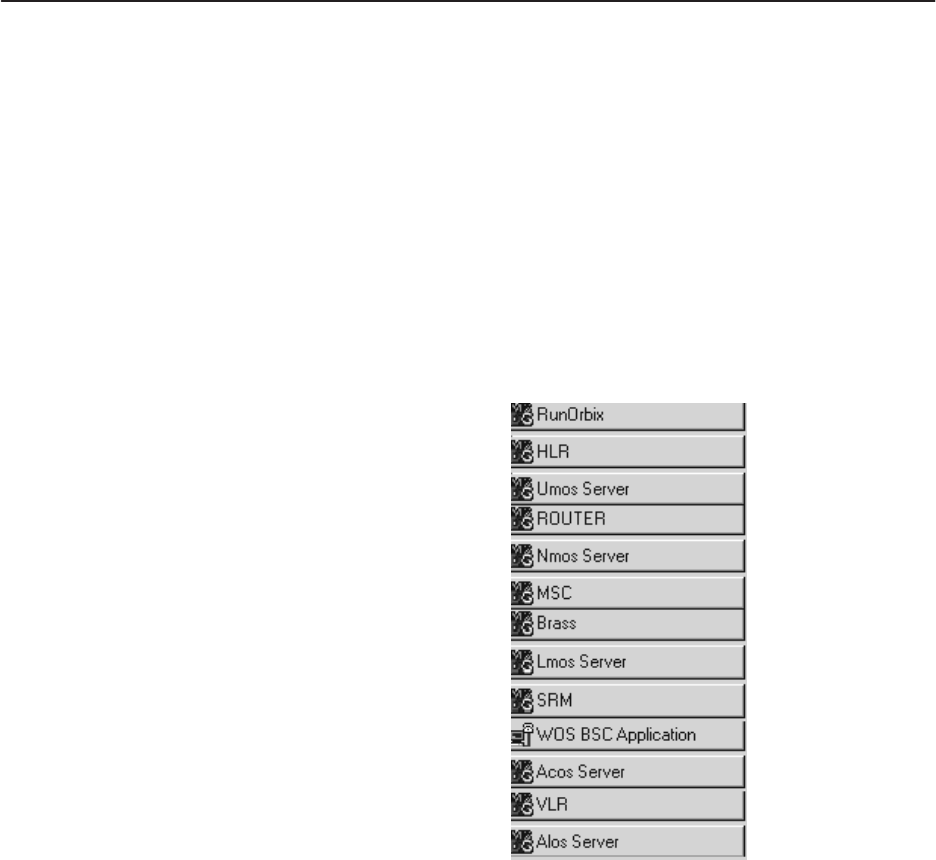
1026209–0001 Revision B 3–6 Installing the Controller
5. Provide power to the monitor and System Controller (110
Vac, 60 Hz). Figure 3-3 shows the Controller power
connector.
6. Verify that the System Controller power indicators are lit.
The power indicators on the front and rear of the Controller
are on only if power is connected to the Controller and the
front panel power switch is on.
To check System Controller operation:
1. Power on the System Controller.
2. Verify that the Controller successfully boots up. You should
see the Windows NT desktop on the monitor, with no error
messages.
If the Controller does not boot, make sure all cards in the
Controller are properly seated.
3. Verify that the keyboard, touchpad, and monitor are
operational.
4. As the System Controller becomes operational, several
background processes appear on the Windows taskbar.
Verify that the AIReach OS software applications are
present, as indicated on the Windows taskbar:
The taskbar may show other applications in addition to
those shown here.
(The taskbar is shown vertically here; typically, it appears
horizontally across the bottom of the screen.)
3.4
Checking System
Controller operation

1026209–0001 Revision B Installing the Controller 3–7
For information on system cabling, see the Site Preparation
Manual (1026208–0001).
3.5
System cabling

1026209–0001 Revision B Verifying the System Controller configuration 4–1
Chapter 4
Verifying the System Controller
configuration
After the System Controller has been unpacked, configured with
hardware (cards), and installed, verify the configuration as
explained in the following sections:
•Data required – page 4–2
•Verifying the System Controller configuration – page 4–1
To verify the System Controller configuration, the following data
must be available before you begin:
•Password (administrator level password used to access the
computer)
•IP address for:
- System Controller (or whether DHCP server
assigns it)
- IS–41 gateway
- optional second LAN card, if used
•IS–41 gateway socket number
•DNS (domain name servers) IP addresses
•Subnet mask
•Gateway for the subnet on which the System Controller
resides
•System identification (SID)
•Public system identification (PSID)
•System operator console (SOC)
4.1
Data required

1026209–0001 Revision B 4–2 Verifying the System Controller configuration
To verify the System Controller configuration, you use the
AIReach Office Operation and Maintenance Center (OMC)
software, as explained below. The OMC software runs on the
System Controller, under Microsoft Windows NT.
Important: For configuration values to enter in the AIReach OS
software windows, see the site–specific AIReach Office
Configuration Report. References to specified values or
parameters in this manual refer to values and parameters specified
in the Configuration Report. For values not listed in the
Configuration Report, use the default values shown in the
software or specified in these instructions.
Controller (BSC) configuration windows are available to only
one user (local or remote) at a time.
Starting from the Windows NT desktop, verify the site information
as follows:
1. Launch the AIReach Office application by double–clicking
on the traffic light icon labeled AROS Configuration,
shown below.
The software displays the AIReach Office banner window
and a Login dialog box.
If the application is already running, click its button on the
Windows taskbar (and skip step 2).
2. In the Login dialog box, enter:
- System to log into
To use the local Controller, leave the default,
Localhost, after AROSC.
- User name
(No entry is needed if this field is grayed out.)
- Password
The default administrator password is “abc123.”
3. Click Connect.
4. After you successfully log in, change the administrator
password if you have not already done so: Click File →
Change Password, and enter a password.
4.2
Verifying the
System Controller
configuration
Verifying the site
information
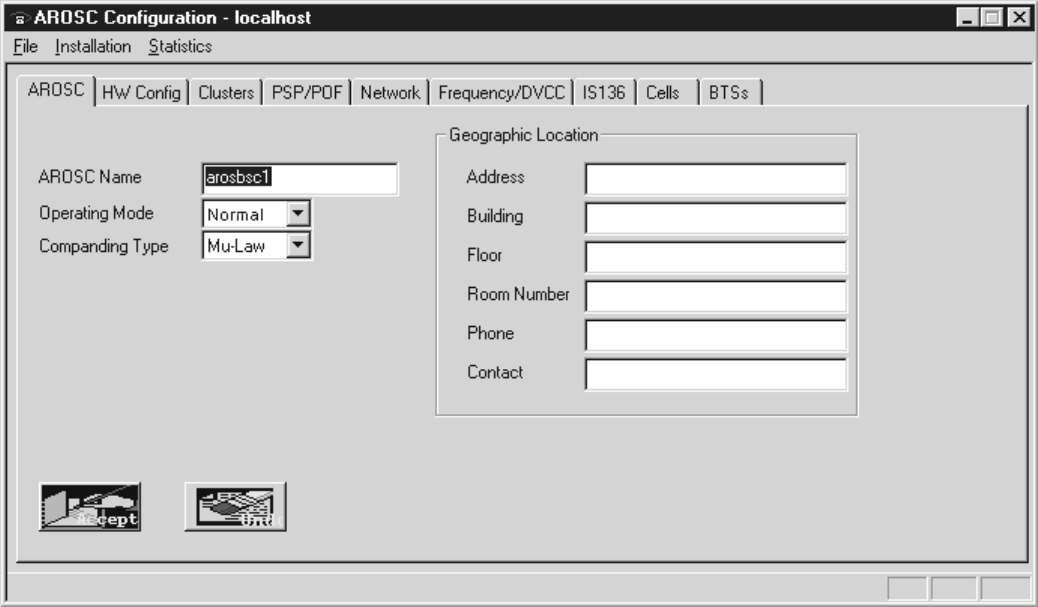
1026209–0001 Revision B Verifying the System Controller configuration 4–3
5. Select Configure → BSC Configuration from the
AIReach Office banner to display the main AROSC
Configuration window, shown below.
6. Verify the following information:
- AROSC Name
Verify that the AROSC Name matches the name
assigned to the Controller by clicking Start →
Settings → Control Panel → Network → Network
ID.
Do not change the AROSC Name unless the TAC
instructs you to do so.
- Operating Mode: Normal
- Companding Type: Mu–Law
7. Enter the Geographic Location information; then click
Accept.
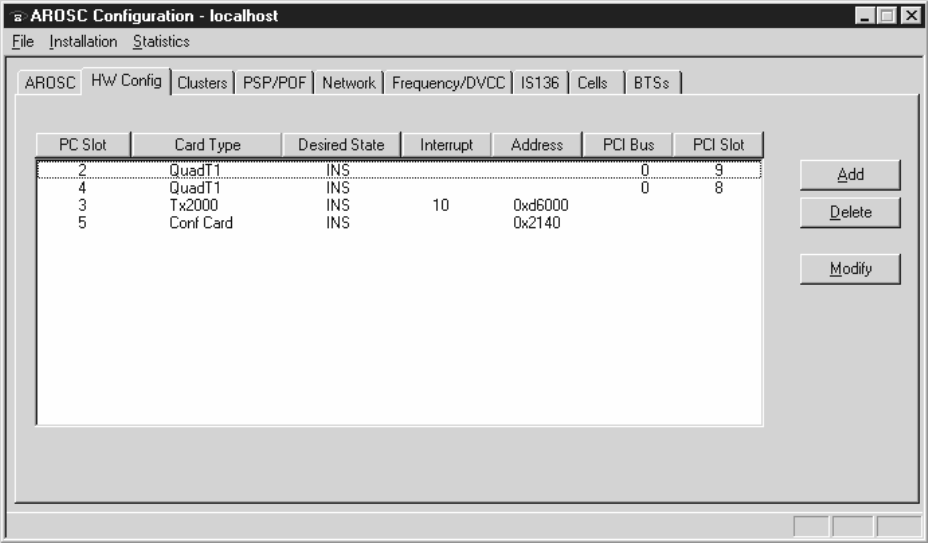
1026209–0001 Revision B 4–4 Verifying the System Controller configuration
Verify the card information for each card that is installed in the
System Controller.
1. Click the HW Config tab to see information for the
installed cards:
2. Verify that the cards installed in the Controller are configured
for the specific site.
At least one Quad T1 card, one TX2000 card, and one
conference card must be listed.
Verifying the card
information
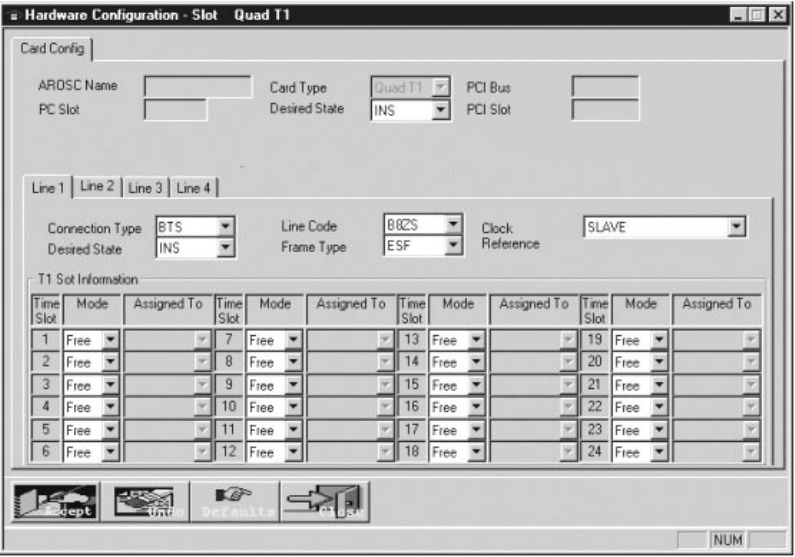
1026209–0001 Revision B Verifying the System Controller configuration 4–5
3. Select (highlight) the first Quad T1 card and double–click
on the card name to display the Hardware Configuration
window.
4. Select the Line 1, Line 2, Line 3, and Line 4 tabs, in order,
and verify the displayed information.
Select SLAVE clock reference for all line numbers except
those connected to the PBX.
For the Quad T1 port connected (or to be connected) to the
PBX, set the Clock Reference to MASTER_EXTERNAL.
A second PBX connection can be set to BACKUP. Set any
additional PBX connections to SLAVE.
5. Click Accept.
6. For each additional Quad T1 card, repeat steps 3 through 5
to verify the information for all T1 lines.
7. Click Close to return to the AROSC Configuration window.
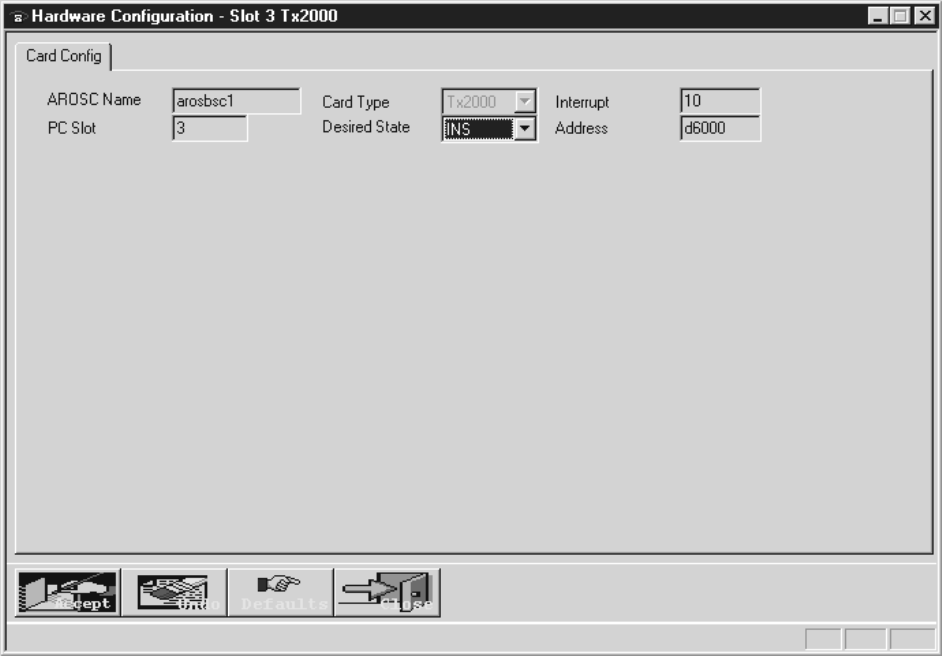
1026209–0001 Revision B 4–6 Verifying the System Controller configuration
8. Highlight the TX2000 card and double–click to display the
Hardware Configuration window.
9. Verify the Desired State—INS (in service); then click
Accept.
10. Highlight the conference card and double–click to display
the Hardware Configuration window.
11. Verify the Desired State—INS (in service); then click
Accept.
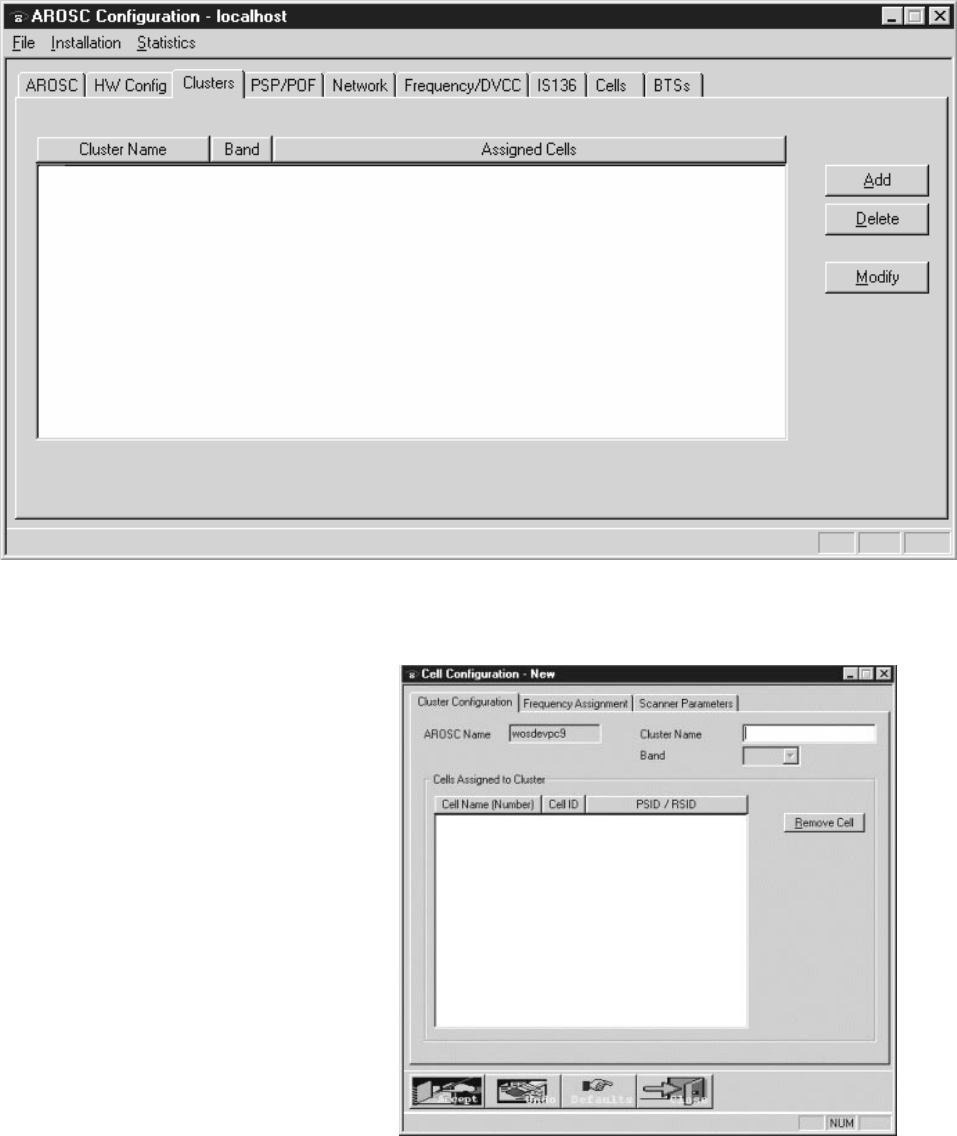
1026209–0001 Revision B Verifying the System Controller configuration 4–7
12. In the AROSC Configuration window, click the Clusters
tab.
13. If the specified clusters are not listed, click Add to display
the Cell Configuration – New window:
14. Enter the specified cluster name.
15. Select the band to use from the Band dropdown list, and
click Accept.
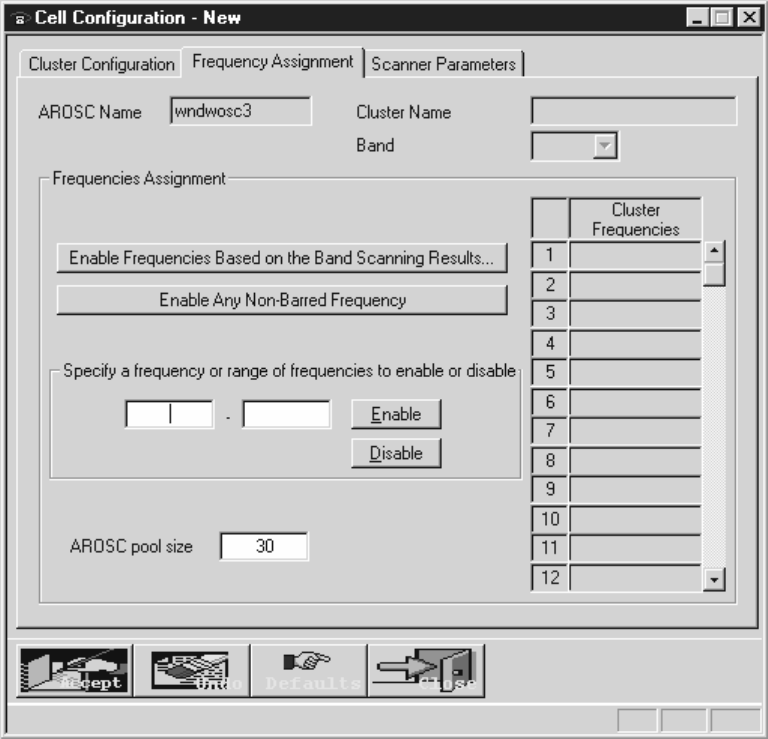
1026209–0001 Revision B 4–8 Verifying the System Controller configuration
16. Select the Frequency Assignment tab.
17. If no channels are listed in the Cluster Frequencies column
(values are channels, not frequencies):
a. For the specified band, enter the start channel in the
left box and the end channel in the right box below
“Specify a frequency or range . . . “
b. Click Enable.
c. Enter AROSC pool size: 30
d. Click Accept.
18. Click the Scanner Parameters tab.
(The screen for this tab is not shown.)
19. Verify or enter the specified values, and click Accept.
20. Close the Cell Configuration – New window.
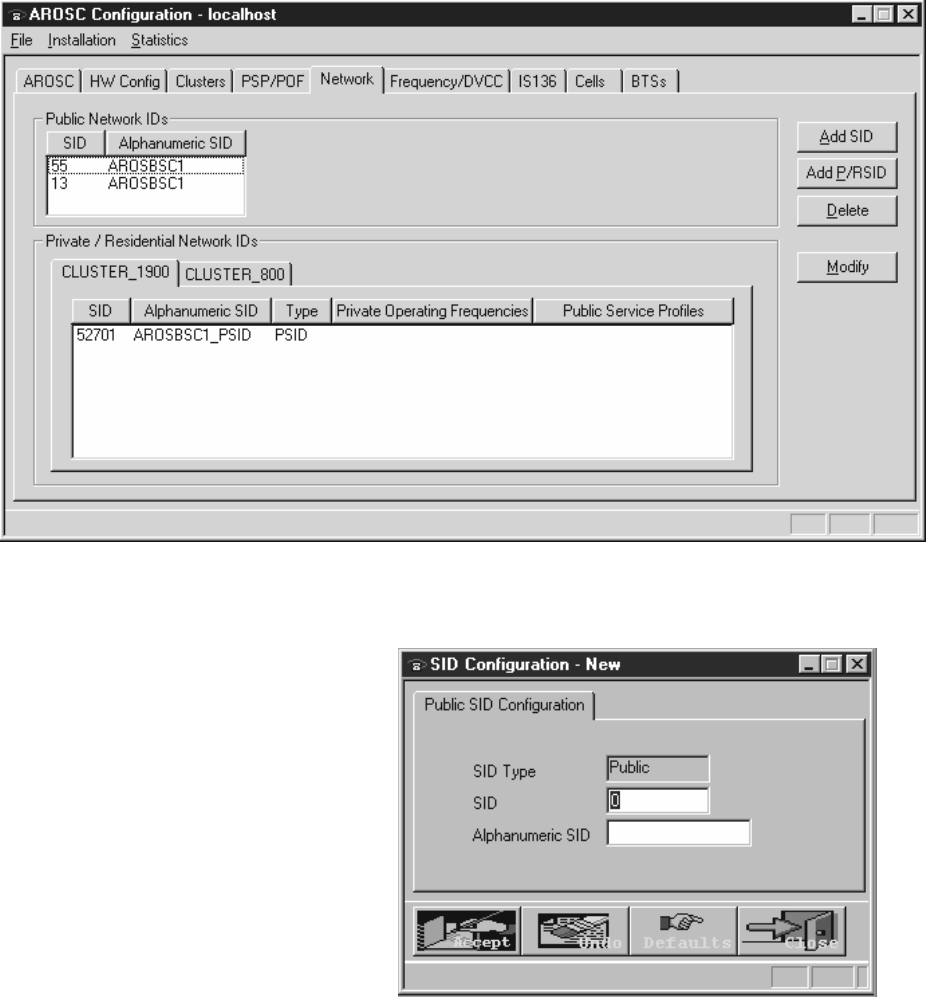
1026209–0001 Revision B Verifying the System Controller configuration 4–9
Configure or verify the information for the network data.
For all configuration windows shown or referred to through
the end of this chapter, do not change default information
unless you are instructed to do so in this manual or by the RF
engineer.
1. In the AROSC Configuration window, click the Network
tab to display the window shown below.
2. If the SID (system identification) is not displayed, click
Add SID to display the SID Configuration – New window.
3. Enter the SID and alphanumeric SID for the macro–cellular
provider in the region; then click Accept.
Verifying the Network
data information
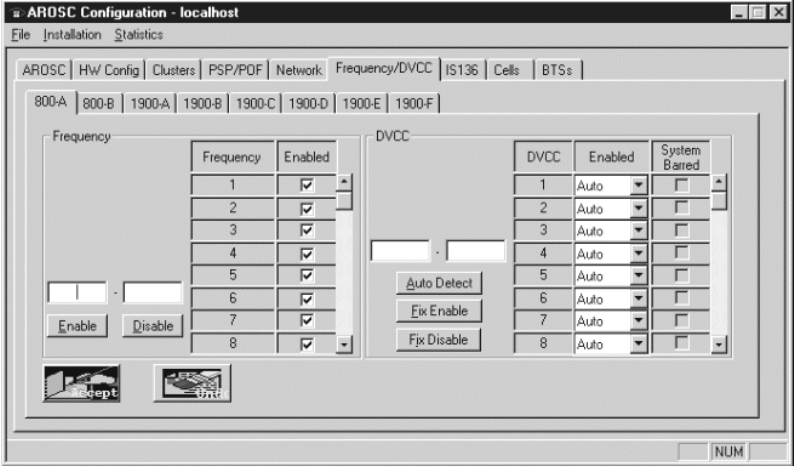
1026209–0001 Revision B 4–10 Verifying the System Controller configuration
4. If the PSID (public system identification) is not displayed
for the cluster, click Add P/RSID.
Make sure all AIReach Office clusters are assigned the
same PSID value.
5. Enter the specified PSID information for each cluster and
click Accept.
6. Click Close to return the AROSC Configuration window.
7. Click the Frequency/DVCC tab; then click the tab for the
specified band (800–A in the example below) to display the
window illustrated below:
8. Verify that all Frequency values (channels) are enabled (box
checked).
If the Frequency values are not enabled:
a. Enter the start channel value in the left Frequency
window and the end channel value in the right
Frequency window.
b. Click Enabled.
Note
In the PCS bands (1900 MHz), channels 1000 and
above are not available and must be disabled.
1026209–0001 Revision B Verifying the System Controller configuration 4–11
9. Click the IS136 tab (not shown) to display the AROSC
configuration window.
10. Click the Network Parameters tab.
11. Verify the Service Operator (SOC) and Mobile country
information; then click Accept.
12. Click the Mobile Call Control tab.
13. Verify the information displayed; then click Accept.
14. Click the AROSC Services tab.
15. Verify the information displayed; then click Accept.
16. Click the Call Control tab.
17. Verify the information displayed; then click Accept.
18. Click the Registration Control tab.
19. Verify the information displayed; then click Accept.
20. Click the Timers tab.
21. Verify the information displayed; then click Accept.
Use the scroll bar to view all timers.
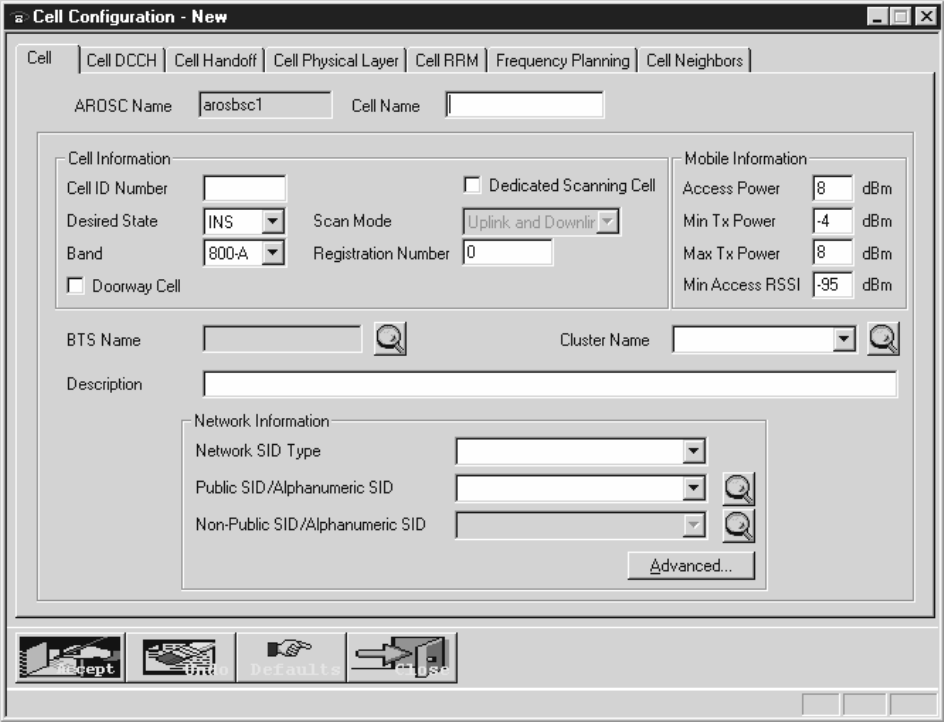
1026209–0001 Revision B 4–12 Verifying the System Controller configuration
Cell information is configured to provide the Controller with data
for each picocell’s DCCH, handoff, physical layers, RRM, and the
dedicated scanning picocell.
To configure the picocell information:
1. Click the Cells tab.
(The window displayed—not shown here—may or may not
contain data.)
2. Click Add to display the Cell Configuration – New
window.
3. Enter the data for the scanning picocell.
4. Make sure there is a check mark in the Dedicated Scanning
Cell box.
5. Click Accept.
Verifying the Cell
information
1026209–0001 Revision B Verifying the System Controller configuration 4–13
6. Click Close to return to the AROSC Configuration window.
The scanning picocell you added should now be listed.
7. Click Add to display the Cell Configuration – New
window.
8. Enter the required data for a traffic picocell.
9. Click the Cell DCCH tab. Verify the information displayed.
10. Click the Cell Handoff tab. Verify the information
displayed.
11. Click the Cell Physical Layer tab. Verify the information
displayed.
12. Click the Cell RRM tab. Verify the information displayed.
13. Click Close to return to the AROSC Configuration window.
If you made changes, the software prompts you to accept
them.
14. Repeat steps 7 through 13 until all traffic picocells are
listed in the AROSC Configuration window (Cell tab).
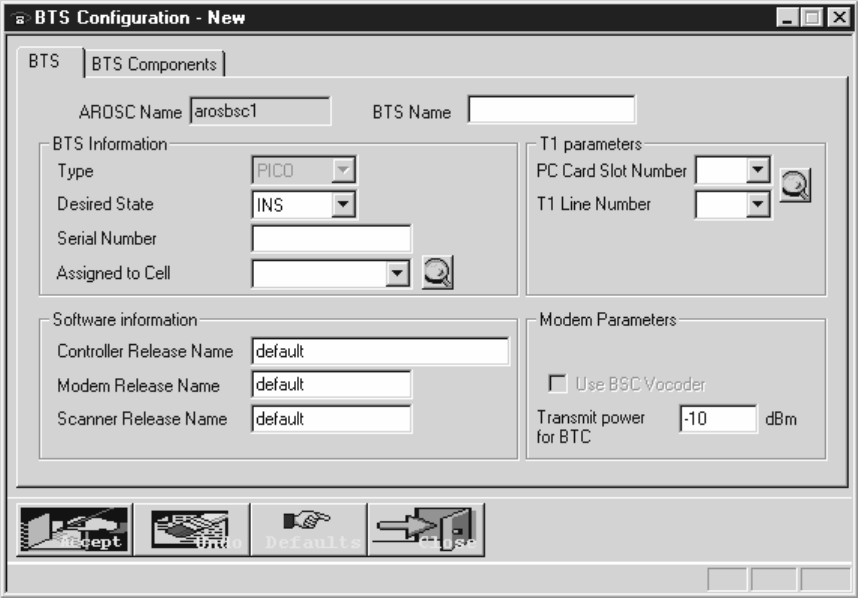
1026209–0001 Revision B 4–14 Verifying the System Controller configuration
To provide the System Controller with the BTS information,
follow these directions:
1. Click the BTSs tab.
(The BTSs window may or may not contain data.)
2. Click Add to display the BTS Configuration – New
window.
3. Enter or verify the information for the scanning picocell.
Verifying the BTS
information

1026209–0001 Revision B Verifying the System Controller configuration 4–15
When you enter the serial number (from the label on the
back of each picocell), you must enter the serial number
exactly as it appears on the label—as indicated in figure
4-1. If the serial number is entered incorrectly, the picocell
may not operate correctly.
AVPU-D--02025234
T0001001
Include 1 dash
the revision letter.
before
Include 2 dashes
the revision letter.
after
Picocell
revision letter
Enter all 8
digits, including
leading zeros,
as on the label.
Serial number
Figure 4-1 Recording and entering the serial
number from the back of the picocell
4. When you have verified all data in the BTS Configuration –
New window. click Accept.
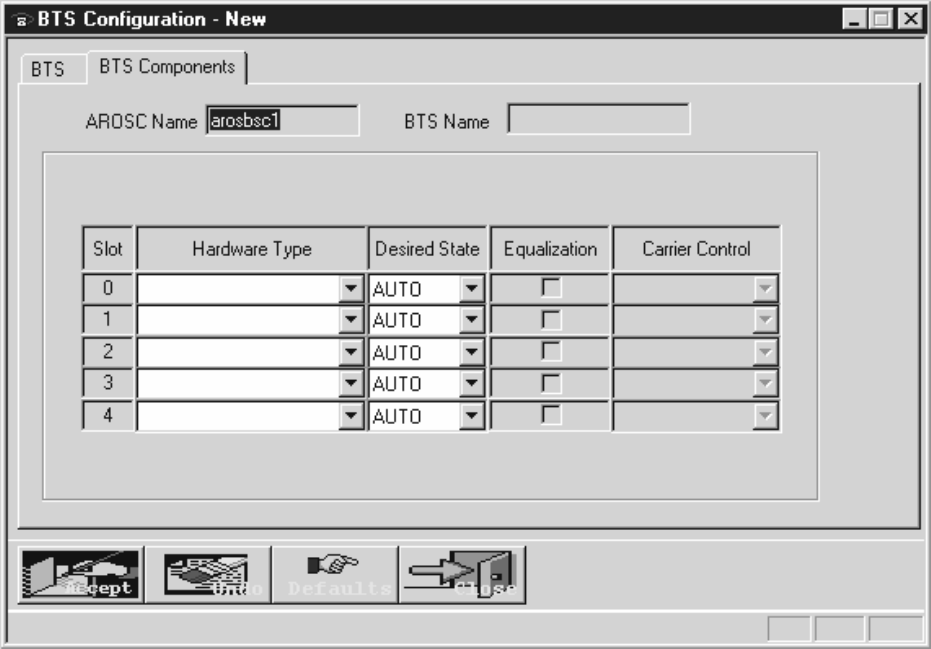
1026209–0001 Revision B 4–16 Verifying the System Controller configuration
5. Click the BTS Components tab.
6. Enter or verify the information for the BTS components.
The Desired State for all slots should be set to AUTO.
7. Click Accept.
8. Click Close to return to the AROSC Configuration window.
9. Repeat steps 1 through 5 until all traffic picocells are listed
in the AROSC Configuration window (BTSs tab).
10. Minimize the AROSC Configuration window to return to
the AIReach Office window.
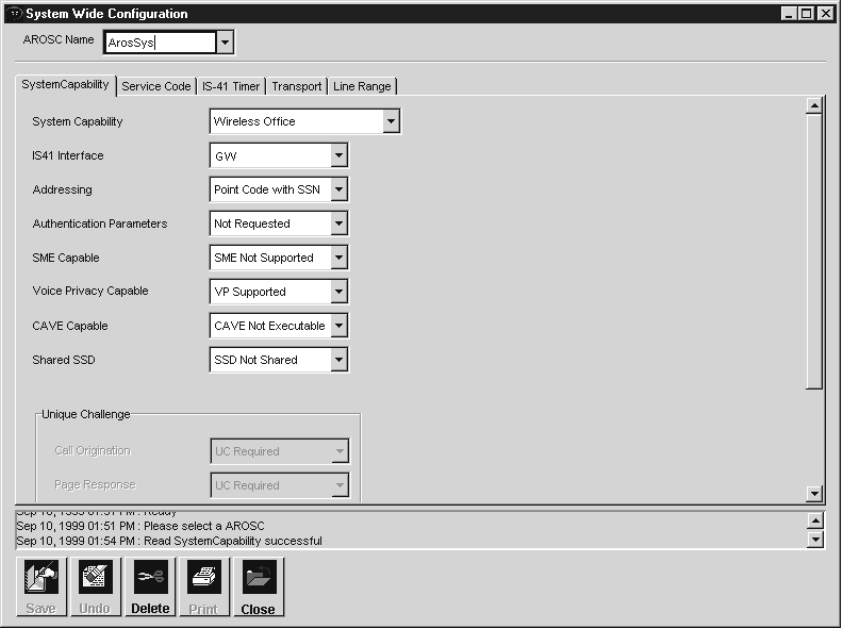
1026209–0001 Revision B Verifying the System Controller configuration 4–17
To verify the systemwide configuration:
1. From the AIReach Office banner menu, select
Configure → NSS → Systemwide to display the
System Wide Configuration window.
2. Click the System Capability tab.
3. Select the specified AROSC Name from the dropdown list.
4. Enter or verify the system capability information.
The default selection for IS41 Interface is GW (gateway). If
you change IS41 Interface to SS7, check all parameters to
make sure they are set correctly for an SS7 interface.
5. Click Save.
Notes
The customer may provide updated information at the time
of installation.
In the following steps, if you have not entered or changed
any information, you do not need to save; you can go on to
the next tab.
Verifying the
systemwide
configuration
1026209–0001 Revision B 4–18 Verifying the System Controller configuration
6. Click the Service Code tab.
The Service ID should display Emergency. The customer
may provide updated information during the time of
installation.
7. Enter or verify the information; then click Save.
8. Click the IS–41 Timer tab.
9. Enter or verify the information; then click Save.
10. Click the Transport tab.
11. Enter or verify the information for the WOS to Gateway
Server Address and Server Port values; then click Save.
12. Click the Line Range tab.
13. Verify the Line Range values.
14. If you need to modify the Line Range values:
a. Click ADD.
b. Check the Enabled box so you can enter values for
HLR Point Code, mobile phone Begin NpaNxx, and
mobile phone End NpaNxx.
If the AIReach OS is a standalone system, the local
HLR point code is 55 55 229.
If the AIReach OS is connected to a macro system
gateway, enter an invalid but non–zero point code
such as 1 1 1.
c. After entering the correct values, click Save.
15. Click Close to return to the AIReach Office window.
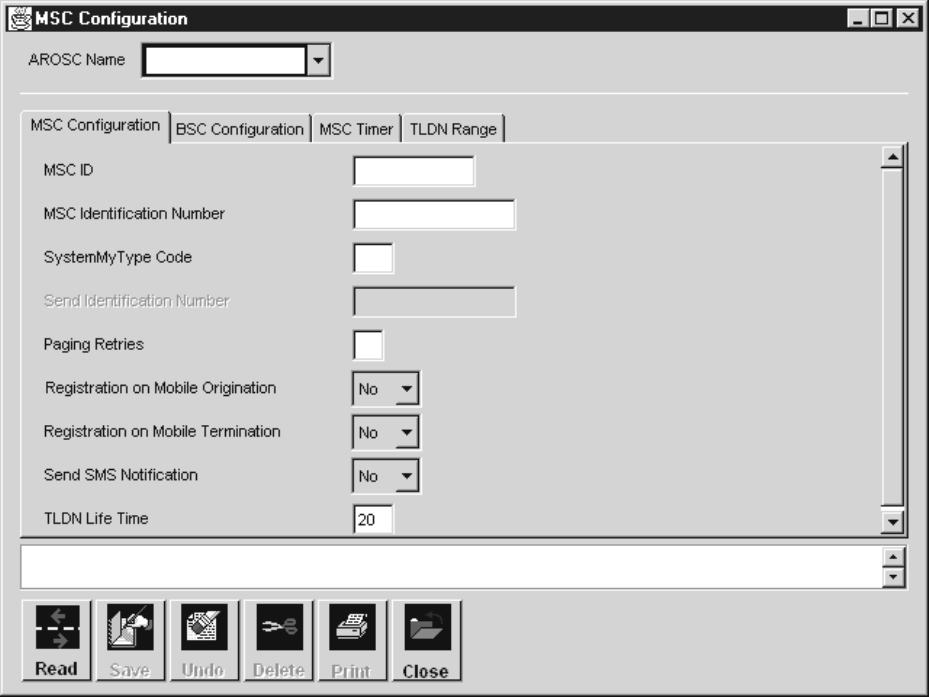
1026209–0001 Revision B Verifying the System Controller configuration 4–19
Verify the MSC Configuration as follows:
1. From the AIReach Office banner menu, select Configure
→ NSS → MSC → MSC Configuration.
2. Click the MSC configuration tab.
The parameters that appear in the MSC Configuration
window depend on whether you selected GW (for gateway)
or SS7 from the IS41 Interface dropdown list in the System
Wide Configuration window.
The screen shown below is for a gateway (GW)
configuration. If you selected SS7 as the IS41 Interface, the
MSC Configuration screen will be different.
3. Select the specified AROSC Name from the dropdown list.
4. Enter or verify the MSC configuration information; then
click Save.
Verifying the MSC
configuration
1026209–0001 Revision B 4–20 Verifying the System Controller configuration
5. Click the BSC Configuration tab.
6. Enter or verify the information.
Make sure all traffic picocells to be installed are assigned a
BSC.
Verify that all enabled BSC RNUM values are greater than
zero and match the Registration Number entered in the Cell
Configuration – New window (shown on page 4–12).
7. Click Save.
8. Click the MSC Timer tab.
9. Enter or verify the information.
Use the scrollbar to view all fields.
10. Click Save.
11. Click the TLDN Range tab.
A temporary local directory number (TLDN) enables a
macro user to communicate with a mobile registered on the
Controller.
The TLDN maximum range is 100 numbers.
The TLDN cannot be a duplicate of an LDN.
12. Enter or verify the information; then click Save.
13. Click Close to return to the AIReach Office window.
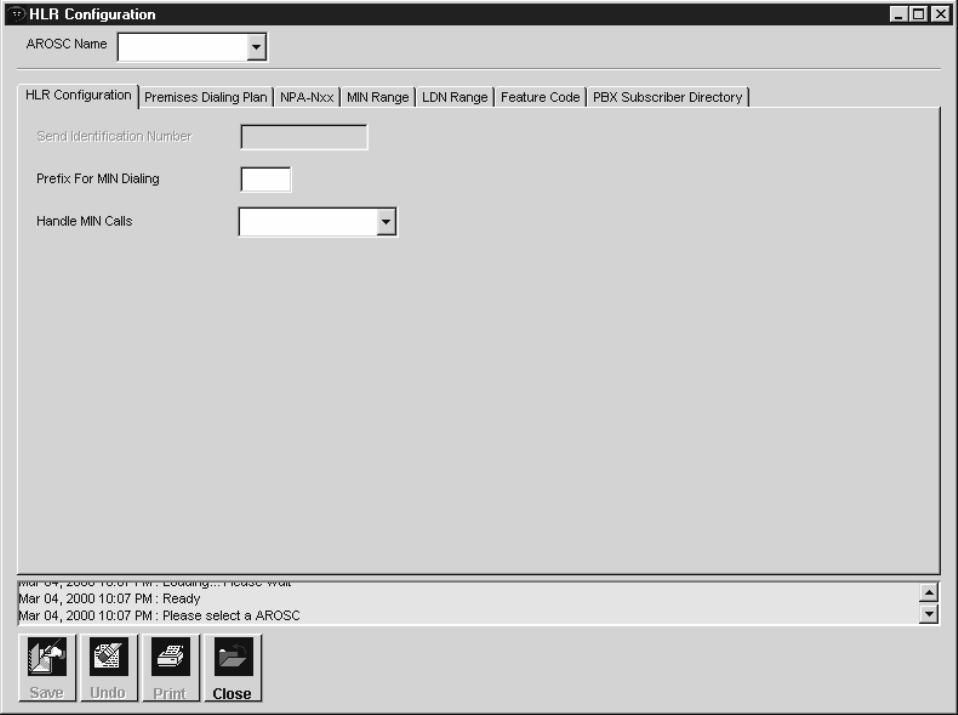
1026209–0001 Revision B Verifying the System Controller configuration 4–21
Configure the HLR (Home Location Register) as follows:
1. From the AIReach Office window, select Configure →
NSS → HLR to display the HLR Configuration window.
(This window initially contains no data.)
Note
You only need to configure the HLR once (not once for each
picocell).
2. Select the AROSC Name from the dropdown menu and
enter the specific values. Then click the Save button.
3. Select the NPA–Nxx tab.
You must configure the NPA–Nxx before you can enter the
premises dialing plan.
4. Enter the appropriate values, then click Save.
5. Select the Premises Dialing Plan tab.
6. Enter the appropriate values, then click Save.
Configuring the HLR
1026209–0001 Revision B 4–22 Verifying the System Controller configuration
7. Select the MIN Range tab.
8. Enter the following values for the first test mobile:
a. Begin MIN: Enter the test mobile MIN (mobile
identification number).
b. Allocation Type: Select Individually allocated from
the dropdown list.
c. MIN Type: Select AROS only subscriber from the
dropdown list.
9. Click Save.
10. Repeat steps 8 and 9 for the second test mobile phone.
Provision at least two test subscribers in the System
Controller to verify proper traffic picocell operation.
11. Select the LDN Range tab.
12. Enter the following for the first test mobile:
a. Begin Ldn Block: Enter the temporary LDN (local
directory number) assigned to the test mobile.
b. Allocation Type: Select Allocated Individually
from the dropdown list.
c. Ldn Type: Select Local Directory Number from the
dropdown list.
13. Click Save.
14. Repeat steps 12 and 13 for the second test mobile phone.
15. Click Close.

1026209–0001 Revision B Configuring the router 5–1
Chapter 5
Configuring the router
This chapter includes the following topics:
•Installing the router – page 5–2
•Configuring the router – page 5–2
•Configuring the Controller for gateway access – page 5–7
The AIReach OS supports the Cisco 1602–R router. The
information in this chapter applies to the Cisco 1602–R router. If
you use a different router, you may be able to apply some of this
information, but you will have to configure your router according
to the manufacturer’s instructions.
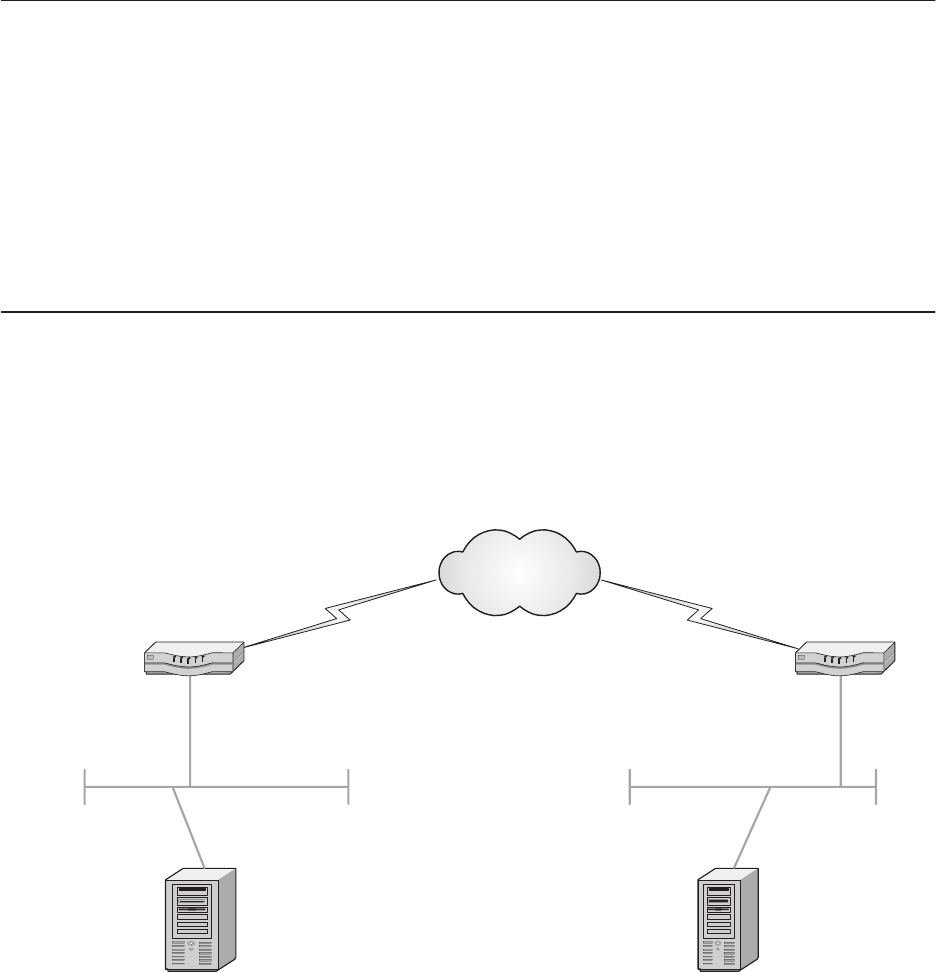
1026209–0001 Revision B 5–2 Configuring the router
When you install the router:
•Install the router in the location specified in the
Configuration Report.
•Install the router according to the manufacturer’s
instructions.
•Use CAT 5 T1 cable to connect the router to the Controller
and to the service provider’s gateway.
To configure the router, you need to obtain the gateway IP address
and circuit identification values from the customer.
To configure the Cisco 1602–R router for use in the AIReach OS:
1. Refer to the network diagram in Figure 5-1 and verify the
IS–41 gateway configuration and IP addresses.
AIReach Office
System Controller
Service provider
macro system network
S1
E0
S0
E1
Service provider
frame relay
DLCI = A DLCI = B
T0001027
Service provider
router
IP address Z
mask Z
IP address Y
mask Y
IP address X
mask X
IS-41
gateway
Controller IP
address
Customer router
(Cisco 1602-R)
Figure 5-1 AIReach OS IS–41 gateway network diagram
2. Use Notepad to open the standard router configuration text
file, which is loaded on the Controller.
The name of the router configuration file is site–specific.
Examples: router.txt, RELIATEL_bldg2.txt
3. Save the configuration file using a new file name (to
preserve the original file).
5.1
Installing the router
5.2
Configuring the
router
1026209–0001 Revision B Configuring the router 5–3
4. Edit the renamed router configuration file, listed below,
with the appropriate IP addresses, masks, and passwords
(if used):
service udp–small–servers
service tcp–small–servers
!
hostname <CUSTOMER NAME>
!
ip subnet–zero
no ip domain–lookup
!
interface Ethernet0
ip address <IP Address X> <Mask X>
!
interface Serial0
description Leased Line to AT&T (<A>–><B>)
ip address <IP Address Y> <Mask Y>
encapsulation frame–relay
bandwidth 56
frame–relay interface–dlci <
B
>
!
no router rip
!
ip route Z.Z.Z.0 255.255.255.224 <IP Address Z>
!
no ip http server
no ip classless
!
line con 0
line vty 0
password <customer determined>
login
line vty 1
password <customer determined>
login
length 0
line vty 2 4
password <customer determined>
login
!
end
For an example of a typical configuration file, see page 5–6.
5. Save the edited configuration file.
6. Connect an 8–conductor phone cable from the router
console port to the Controller, via the DB–9 adapter.
7. From the Windows desktop on the Controller (or a separate
PC), select Start → Programs → Accessories →
HyperTerminal.
1026209–0001 Revision B 5–4 Configuring the router
8. If a router HyperTerminal was previously configured:
a. Click the desired HyperTerminal icon.
b. Select Connect from the dropdown list.
9. If a router HyperTerminal was not configured:
a. Click the HyperTerminal icon.
b. Select Connect from the dropdown list.
c. Enter the name for the HyperTerminal (Cisco) and
select an icon.
d. Select Direct to com 1.
e. Click OK.
f. Select 9600 (bits per second) from the dropdown list.
g. Click OK to display an active HyperTerminal
window.
10. Connect power to the router and turn the power switch on.
The router displays a series of boot–up messages.
After bootup is complete, the router displays the user
prompt: Router > .
11. Enter the router privileged mode (Router #) by entering
enable at the Router > prompt.
You cannot modify the configuration file unless the
router is in router privileged mode.
12. Enter the router configuration mode (Router (config)
#) by entering config term at the Router > prompt.
You cannot enter the configuration file unless the router
is in configuration mode.
13. Copy and paste the router configuration text file created in
step 4 into the router. (Place the cursor after the
Router(config)# prompt; then paste.)
14. Save the router configuration file you entered by typing
write at the Router(config)# prompt.
15. Verify that the router configuration file is running by
entering sho run (show running program) at the Router
(config)# prompt.
You should see the contents of the file you edited and saved.
16. Verify that the router configuration file is also the startup
program by entering sho startup at the Router
(config)# prompt.
17. To exit configuration mode, enter exit at the Router
(config)# prompt.
Note
To see the router help screen, enter ? at the Router >
prompt.
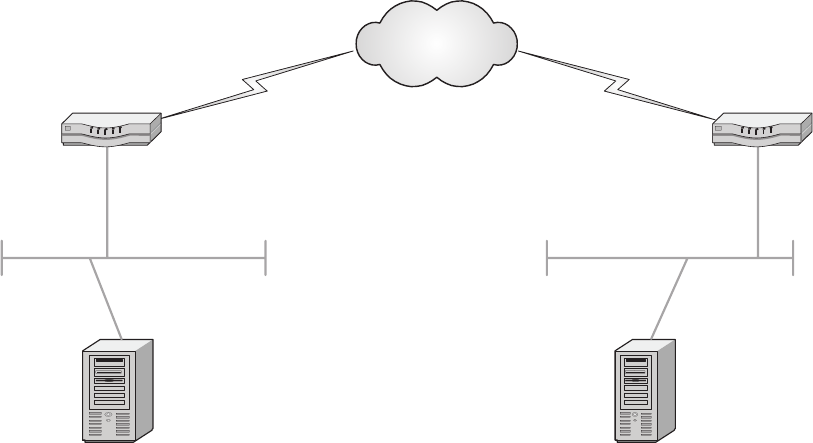
1026209–0001 Revision B Configuring the router 5–5
18. To exit router privileged mode, enter exit at the Router
> prompt.
19. Connect the router to the service provider frame relay
service.
Figure 5-2 and the file that follows are examples of a typical
router configuration.
Figure 5-2 Typical AIReach OS IS–41 gateway network diagram
AIReach Office
System Controller
RELIATEL INC
macro system network
S1
E0
S0
E1
RELIATEL INC
frame relay
DLCI = 500 DLCI = 300
T0001028
RELIATEL INC
router
142.148.254.102
255.255.255.252
142.146.254.17
255.255.255.252
142.146.254.101
255.255.255.252
142.146.254.97
255.255.255.252
IS-41
gateway
142.146.254.98
Acme Corporation
Cisco 1602-R router
Router configuration
example
1026209–0001 Revision B 5–6 Configuring the router
The file below is an example of a typical router configuration. It is
the configuration file for the network shown in Figure 5-2.
service udp–small–servers
service tcp–small–servers
!
hostname acme64
!
ip subnet–zero
no ip domain–lookup
!
interface Ethernet0
ip address 142.146.254.97 255.255.255.252
!
interface Serial0
description Leased Line to RELIATEL
ip address 142.146.254.102 255.255.255.252
encapsulation frame–relay
bandwidth 56
frame–relay interface–dlci 300
!
no router rip
!
ip route 142.146.254.0 255.255.255.224 142.146.254.101
!
no ip http server
no ip classless
!
line con 0
line vty 0
password mercury&4
login
line vty 1
password mercury&4
login
length 0
line vty 2 4
password mercury&4
login
!
end

1026209–0001 Revision B Configuring the router 5–7
To set up the AIReach OS System Controller to access the IS–41
gateway:
1. Using Notepad, edit the file C:\gwroutes.bat to
remove REM from the line
route ADD –p yyy.yyy.yyy.0 mask 255.255.255.0 xxx.xxx.xxx.xxx
2. Enter the first three digits of the IS–41 gateway IP address
in place of yyy.yyy.yyy .
For example, if the IS–41 gateway IP address is
198.225.8.1, enter 198.225.8, so the address (after –p)
would be 198.225.8.0.
3. In the xxx.xxx.xxx.xxx position, enter the IP address
of the router on the Controller side of the frame relay
connection to the IS–41 gateway.
4. Save the file and close Notepad.
5. Click Start → Settings → Control Panel.
6. Double–click the Network icon.
7. Click the Protocols tab.
8. Double–click TCP/IP Protocol.
9. In the Adapter dropdown list, select the first adapter card if
it is not selected by default.
10. In the IP Address window, enter the IP address designated
by the customer network administrator for the Controller’s
connection to the IS–41 gateway.
11. Enter 255.255.255.0 in the Subnet Mask window.
12. For the gateway address, enter the IP address of the router
on the Controller side of the frame relay.
13. Close all network windows.
You should be prompted to reboot the Controller when you
close the last network window.
14. Click OK to reboot the Controller.
5.3
Gateway access
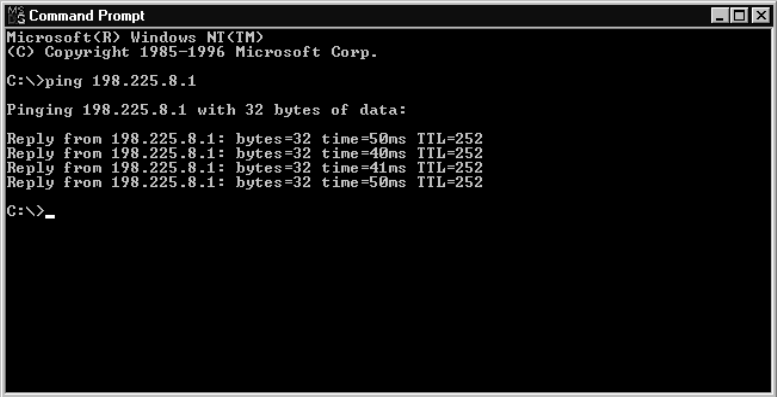
1026209–0001 Revision B 5–8 Configuring the router
15. After the Controller reboots, verify connectivity to the
IS–41 gateway by pinging the gateway IP address:
a. Select Start → Programs → Command Prompt
to open a DOS window.
b. At the DOS prompt (C:>\), enter
ping <IS–41 gateway IP address>
c. A successful ping from the device associated with the
IS–41 gateway IP address results in Pinging and
Reply from messages similar to those shown
below:

1026209–0001 Revision B Testing picocells 6–1
Chapter 6
Testing picocells
This chapter includes the following topics:
•Connecting a picocell for testing – page 6–2
•Verifying software load – page 6–5
•Checking scanning picocell operation – page 6–6
•Performing a test frequency band scan – page 6–10
•Checking traffic picocell operation – page 6–17
•Provisioning test mobile phones – page 6–20
•Programming test mobile phones – page 6–22
•Registering test mobile phones – page 6–23
•Placing test calls – page 6–24
•Additional phone programming procedures – page 6–26
Each picocell is tested at the System Controller location (staging
area), so that if a unit fails, it can be replaced before installation.
First you test the scanning picocell, then you test the traffic
picocells.
Important: References to specified values or parameters in this
manual refer to values and parameters specified in the AIReach OS
Configuration Report. For values not listed in the Configuration
Report, use the default values shown in the software or specified
in these instructions.

1026209–0001 Revision B 6–2 Testing picocells
This section explains how to connect a picocell (scanning picocell
or traffic picocell) at the staging area for testing (not for actual
installation).
Test cable: The test cable referred to below is a CAT 5 T1 cable
terminated with RJ–45 connectors at both ends. The cable is
“flipped” so the TX pinouts at one end connect to the RX pinouts
at the other end. (For pinout details, see page 7-12.)
For staging area testing, you connect power from a –48 Vdc power
supply to the test cable, which in turn connects to the picocell.
Connect the scanning picocell first (since it is tested first). Follow
these instructions to connect a scanning picocell or a traffic
picocell:
1. Connect the test cable to the picocell VOICE/DATA IN
(LINE POWER) port, as shown in Figure 6-1.
2. Connect the other end of the test cable to the first Quad T1
card (in slot 9) on the System Controller. See Figure 6-2:
-For a scanning picocell, connect to the second port
(from the top) of the first Quad T1 card.
-For a traffic picocell, connect to the third port (from
the top) of the first Quad T1 card.
CAUTION
Make sure the picocell power switch is OFF
(middle position) before connecting the
picocell to the Controller.
6.1
Connecting a
picocell for testing
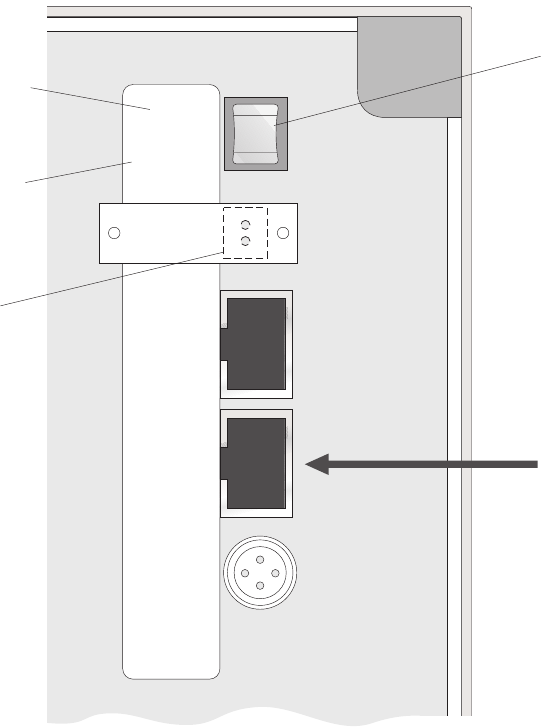
1026209–0001 Revision B Testing picocells 6–3
LINE I
OFF
o
LOCAL I
VOICE/
DATA
OUT
VOICE/
DATA
IN
(LINE POWER)
F
U
S
E
LOCAL -
POWER +
T0001005
Picocell
Line
power
Local
power
Local power
connector
(not used)
Connect test cable here.
(TX and RX pinouts
must be flipped).
Power switch
Figure 6-1 Picocell connection for testing (scanning
or traffic) picocell at System Controller location

1026209–0001 Revision B 6–4 Testing picocells
1
2
3
4T0001007
LEDs
Picocell
connections
All ports:
RJ-45
PBX connection (typically
first port of first Quad T1
card, in slot 9)
For all other Quad T1 cards:
picocell connection
Figure 6-2 Ports on Quad T1 card
Provide power to the picocell:
1. Connect a –48 Vdc power supply to the test cable.
2. Plug the power supply into a 120 Vac, 60 Hz ac outlet.
Power supply
The following symbols appear on the picocell power supply:
Symbols on power supply
T0001023
The house symbol indicates that the power supply should be used
only in a dry environment. The exclamation (!) symbol means to
read the instructions in this manual concerning the power supply.
As stated on the power supply, there are NO USER
SERVICEABLE PARTS INSIDE. Do not attempt to open or
repair the power supply.
For power supply specifications, see Appendix A, Section A.3.
Providing power to the
picocell
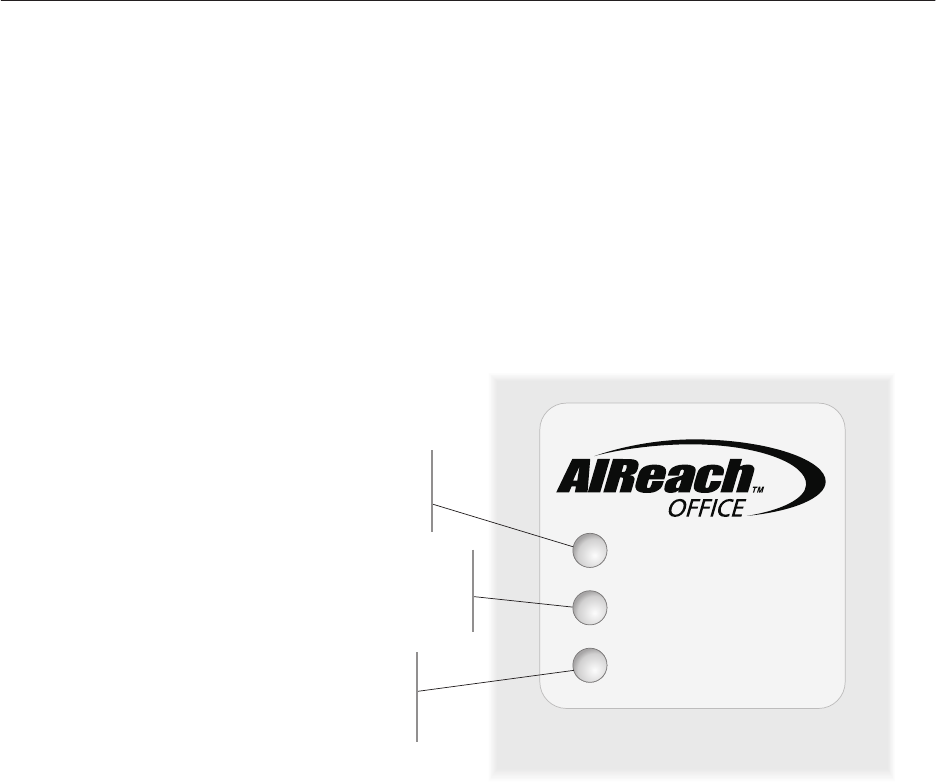
1026209–0001 Revision B Testing picocells 6–5
Power on the picocell, and observe the picocell LEDs as the
System Controller automatically downloads software to the
picocell:
1. Press the picocell power switch to the LINE (line power)
position.
2. Observe the LEDs for normal operation:
a. During software loading, the Temp LED on the front
of the picocell is orange. See Figure 6-3.
b. When the picocell is fully loaded and operational, the
Power and Temp LEDs display green, and the Alarm
LED is off.
T0001003
Power
Green - Voltage normal
Orange - Low voltage
Alarm (Controller)
Off - Normal
Orange - Minor alarm
Red - Major alarm
Temperature (power supply)
Green - Normal
Red - Exceeds 75° C
Power
Temp
Alarm
Alarm LED is orange while
the Controller boots.
Figure 6-3 LEDs on front of picocell
Note
The LED information above is for production picocells. LED
codes may be different for pre–production picocells.
6.2
Verifying software
load

1026209–0001 Revision B 6–6 Testing picocells
At the System Controller, verify scanning picocell operation first,
as explained in this section. Then verify traffic picocell operation,
as explained in Section 6.5.
Check the scanning picocell operability, as follows:
1. Verify that the scanning picocell is connected with the test
cable as explained in Section 6.1.
2. Make sure the picocell is powered on (power switch in the
LINE position).
3. Verify that scanning picocell–to–Controller connectivity is
good (green LED on the Quad T1 card, port where the
picocell is connected).
(The Quad T1 LEDs are explained in Figure 6-4.)
If a red or yellow LED is illuminated on the Quad T1 card:
a. Check the T1 test cable. Use a cable tester to verify
that the cable is good and correctly flipped (TX to
RX). Re–terminate the RJ–45 connectors if
necessary.
b. If the cable is good, reconnect the picocell to another
Quad T1 card port.
c. From the AIReach Office window, select Configure
→ BTS Configuration. This opens the BTS
Configuration window.
d. Select the scanning picocell from the BTS pulldown
list.
e. Select the new Quad T1 card port from the T1 Line
Number dropdown list, and click Save.
If the traffic picocell is connected to a new Quad T1
card, select the new card number from the T1 Card
Number pulldown list before selecting the T1 Line
Number.
It may take up to 3 minutes for the red LED to turn
off and the green LED to light up.
6.3
Checking scanning
picocell operation

1026209–0001 Revision B Testing picocells 6–7
f. If the red or yellow LED remains lit, repeat steps c
through e.
Figure 6-4 LEDs on Quad T1 card
1
2
3
4
T0001006
LEDs
Green
Yellow
Red
LED indications
Green = Operational
Red = Not operational;
error condition
Yellow = Not operational;
error condition.
Controller problem.
Ports
LED positions top
to bottom match
port positions.
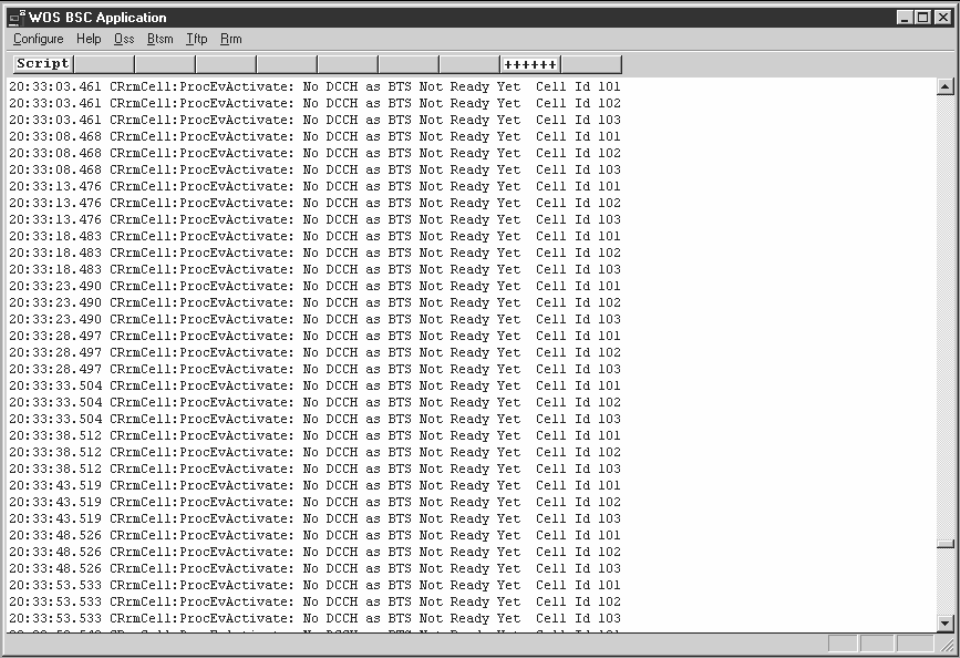
1026209–0001 Revision B 6–8 Testing picocells
4. Click WOS BSC Application to display the WOS BSC
Application window.
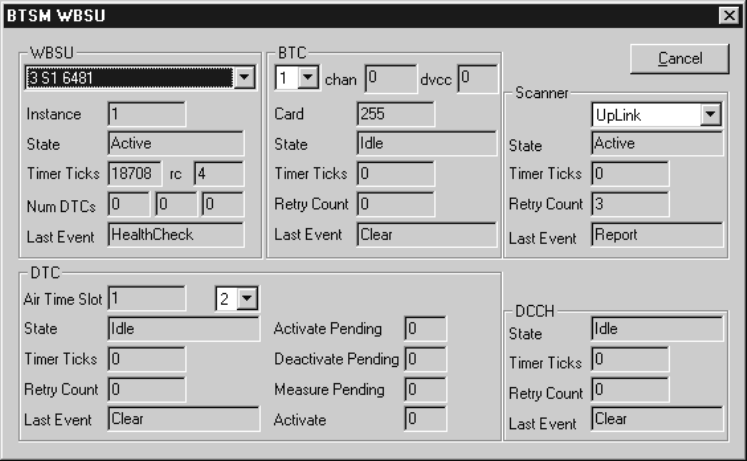
1026209–0001 Revision B Testing picocells 6–9
5. Select Btsm → State to display the Select BTS window.
6. Select the scanning picocell from the dropdown menu.
7. Verify that the scanning picocell self–test and software
download are successful:
a. BTC: Select each BTC (using the dropdown menu)
and verify that 0 appears in the chan window.
b. WBSU State: Verify that the state is Active.
c. Close the window and return to the WOS BSC
Application window.
8. Minimize the WOS BSC Application window to return to
the AIReach Office window.
Do not close the WOS BSC Application window. This
window is required during normal operation. (If you
inadvertently close this window, it will restart
automatically.)

1026209–0001 Revision B 6–10 Testing picocells
Perform an initial (test) 6–minute frequency band scan at the
System Controller location. The initial band scan is used to
quickly find a frequency that can be used to test all the picocells at
the Controller location. Later, you perform a 24–hour (or longer)
band scan to set up the system for normal operation.
Note
The system is not available for traffic during a band scan.
To initiate a frequency band scan, the Controller must be in
Setup mode.
Follow these steps to put the Controller in Setup mode:
1. From the AIReach Office banner, select Configure → BSC
Configuration → AROSC.
2. Select Setup from the Operating Mode dropdown list, then
click Accept.
Call processing is disabled while the Controller is in Setup
mode.
Clicking Accept disables all Controller T1 lines; therefore,
wait (a few minutes) until the Controller T1 line
connectivity is re–established before initiating the
frequency band scan.
6.4
Performing a test
frequency band
scan
Switching to
Setup mode
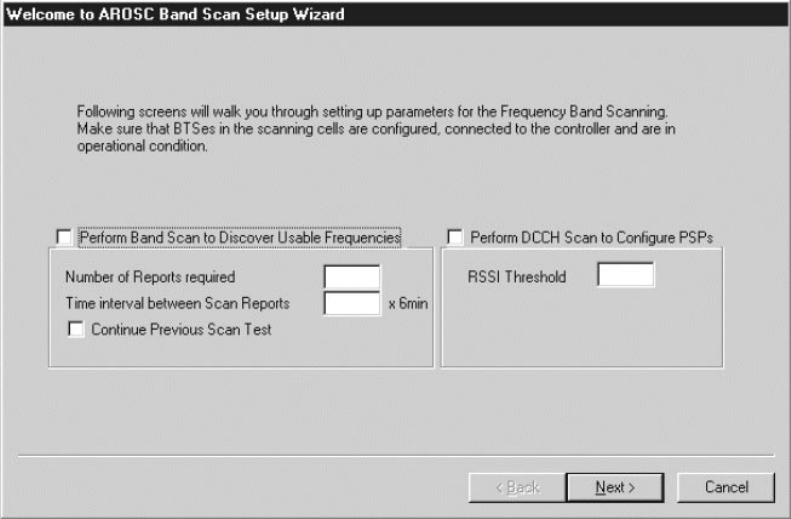
1026209–0001 Revision B Testing picocells 6–11
Set up the band scan as follows:
1. From the AIReach Office banner, select Installation →
Auto Setup.
The software displays the Welcome to AROSC Band Scan
Setup Wizard window:
2. Enter the following entries in the Setup Wizard window:
a. Perform Band Scan to Discover Usable Frequencies:
Check (Click the box so a check mark is displayed.)
b. Perform DCCH Scan to Configure PSPs: Check
c. Number of Reports required: 1.
d. Time interval between Scan Reports: 1.
e. Continue Previous Scan Test: Not checked.
f. RSSI Threshold: –105.
Setting up the
frequency band scan
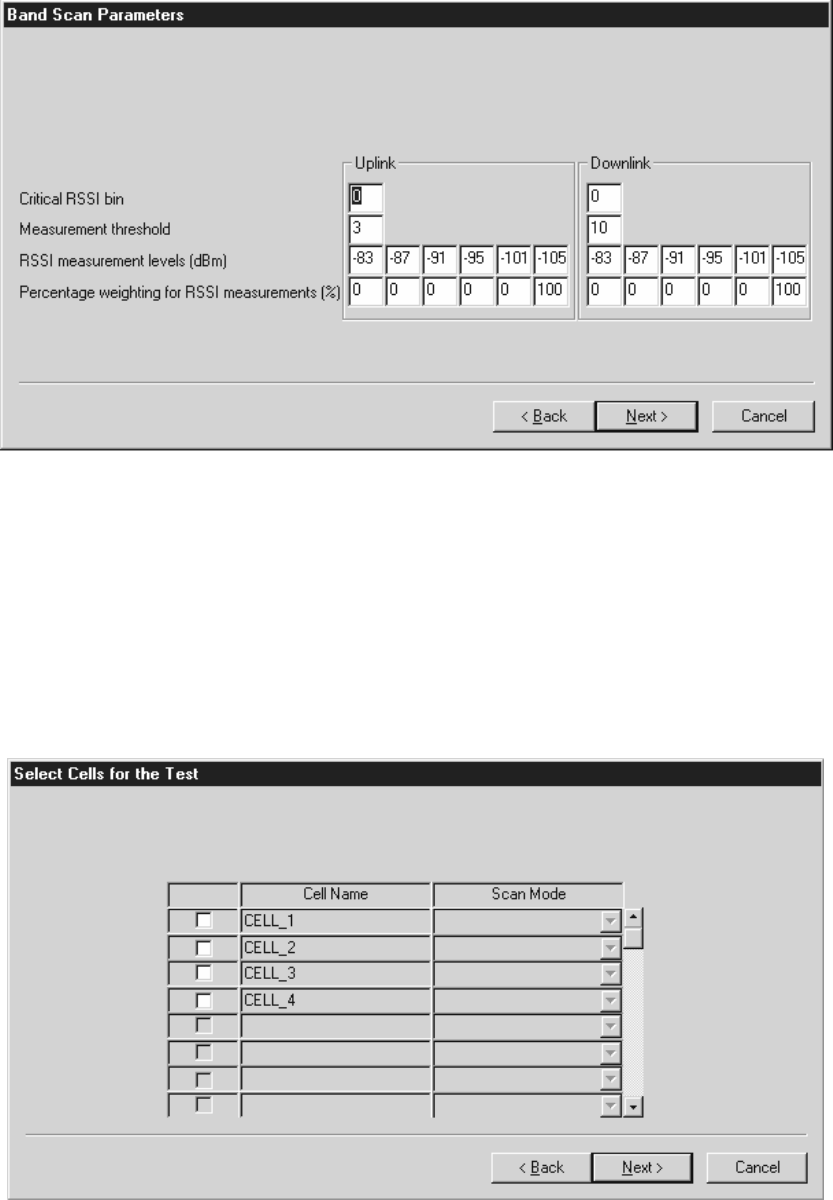
1026209–0001 Revision B 6–12 Testing picocells
3. Click Next to display the Band Scan Parameters window.
4. Set Critical RSSI bin Uplink and Downlink to 0 for the
6–minute band scan
(For the subsequent 24–hour band scan, set Critical RSSI
bin Uplink and Downlink to 3.)
5. In the remaining boxes, use the default parameters unless
otherwise instructed (for example, by the macro provider, or
in release notes).
6. Click Next to display the Select Cells for the Test window.
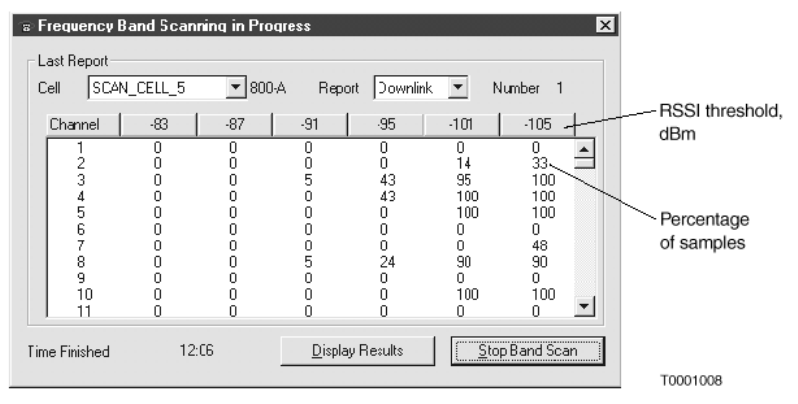
1026209–0001 Revision B Testing picocells 6–13
7. Check the box associated with the scanning picocell name
and select the Uplink / Downlink Scan in the Scan Mode
column when necessary.
8. Click Next to display the Start Scan Frequency Band Scan
window.
9. In the Start Scan Frequency Band Scan window (not shown
here), check these items only:
- View Band Scan results before generating Private
Operating and Traffic Frequencies
- View DCCH Scan results before generating Public
Service Profile information for AROS cell
Follow these steps to start the band scan and observe the results:
1. In the Start Scan Frequency Band Scan window, click Next
to start the frequency band scan.
When you click Next, the software displays a Measurement
in Progress window, and then (automatically) the Frequency
Band Scanning in Progress window.
2. Wait for the band scan to finish.
No results are shown until the frequency scan is finished.
The values shown in the Frequency Band Scanning in
Progress window are explained below:
The system continuously measures the received signal
strength indication (RSSI) for the whole band, and reports
the percentages above the given threshold as a cumulative
distribution. Each value is the percentage of samples above
the given RSSI, which is shown at the top of each column.
For example, for channel 2 above, 14% of the samples were
measured above –101 dBm (RSSI), and 33% were above
–105 dbm.
A “Time Started” message and value are shown in the lower
left corner of the window when the band scan is being
successfully performed.
Starting the scan and
observing the results
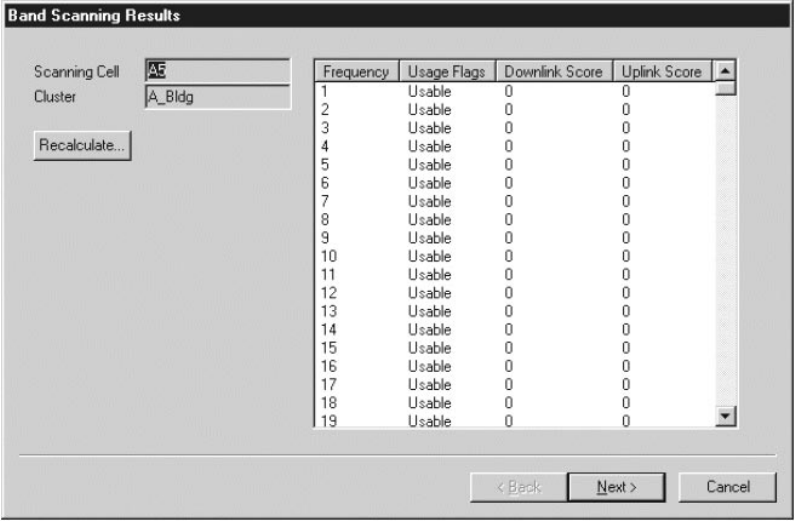
1026209–0001 Revision B 6–14 Testing picocells
Approximately 6 minutes after the band scan was started,
the Frequency Band Scanning in Progress window
automatically closes and the DCCH Scanning in Progress
window is automatically displayed (not shown here).
When the DCCH band scan is finished, the DCCH
Scanning in Progress window automatically closes, and the
Band Scanning Results window is automatically displayed:
The Band Scanning Results window indicates if frequencies
are usable or not, based on user–specified limits. Note that
it shows channels, not frequencies.
This data is used to generate an initial frequency list.
(Subsequently, all frequency management is dynamic.) The
score values indicate interference at the specified threshold.
Some frequencies are marked non–usable because the
system tries to avoid using adjacent channels.
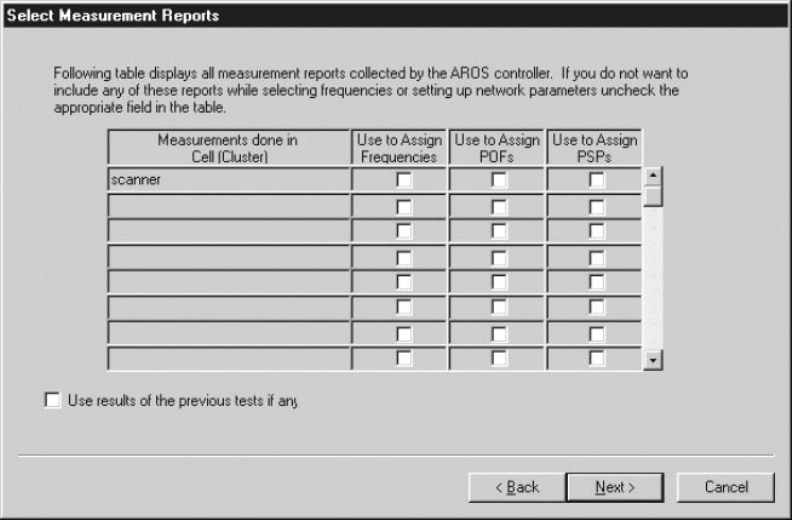
1026209–0001 Revision B Testing picocells 6–15
3. Click Next to see the DCCH Scanning Results window
(not shown here).
4. Click Next to access the Select Measurements Reports
window.
5. For the scanning picocell used to perform the frequency and
DCCH band scan:
a. Check:
- Use to Assign Frequencies
- Use to Assign POFs (private operating
frequencies)
- Use to Assign PSPs (public service profiles)
b. Do not check “Use results of previous tests if any.”
6. Click Next in succession to display these windows:
a. Initial PSP assignment window
b. Initial POF Assignment window (listing the available
channels and POFs)
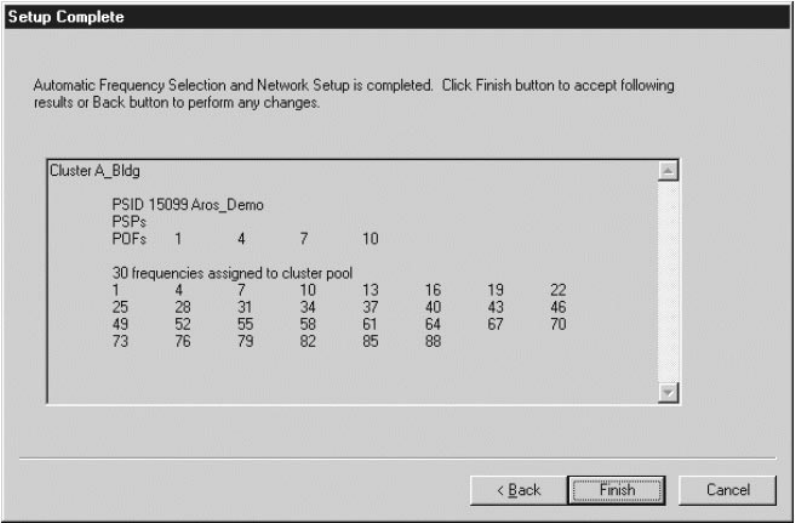
1026209–0001 Revision B 6–16 Testing picocells
7. Click Next again and the Setup Complete window is
displayed.
8. Click Finish and the AIReach Office banner window is
displayed.
The POFs and cluster pool are now automatically assigned.
Returning to normal operation
1. From the AIReach Office banner, select Configure → BSC
Configuration → AROSC.
2. Select Normal from the Operating Mode dropdown list,
then click Accept.
Clicking Accept disables the Controller T1 lines; therefore,
wait (a few minutes) until the Controller T1 line
connectivity is re–established before checking traffic
picocell operation (Section 6.5).

1026209–0001 Revision B Testing picocells 6–17
Perform this test sequence for each traffic picocell.
Temporarily connect the traffic picocell to the System Controller
to verify that the picocell is operating properly.
1. Verify that the traffic picocell is connected with the test
cable, as explained in Section 6.1.
2. Make sure the picocell is powered on (power switch in the
LINE position).
3. Verify that the traffic–picocell–to–Controller connectivity is
good (LED green on the corresponding Quad T1 card port).
(The Quad T1 LEDs are explained on page 6–7.)
If a red LED is illuminated on the Quad T1 card:
a. Check the T1 test cable. Use a cable tester to verify
that the cable is good and correctly flipped (TX to
RX). Re–terminate the RJ–45 connectors if
necessary.
b. If the cable is good, reconnect the traffic picocell to
another port.
c. From the AIReach Office window, select Configure
→ BTS. This opens the BTS Configuration window.
d. Select the new Quad T1 card port from the T1 Line
Number dropdown list, and click Save.
If the traffic picocell is connected to a new Quad T1
card, select the new card number from the T1 Card
Number pulldown list before selecting the T1 Line
Number.
It may take up to 3 minutes for the red LED to turn
off and the green LED to light up.
6.5
Checking traffic
picocell operation
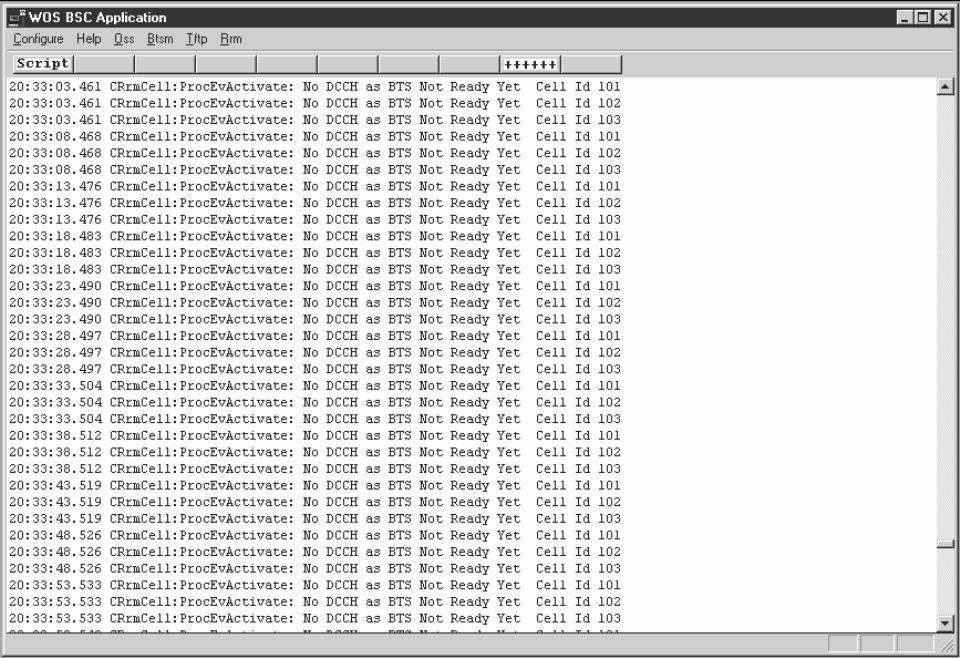
1026209–0001 Revision B 6–18 Testing picocells
4. Click WOS BSC Application to display the WOS BSC
Application window.
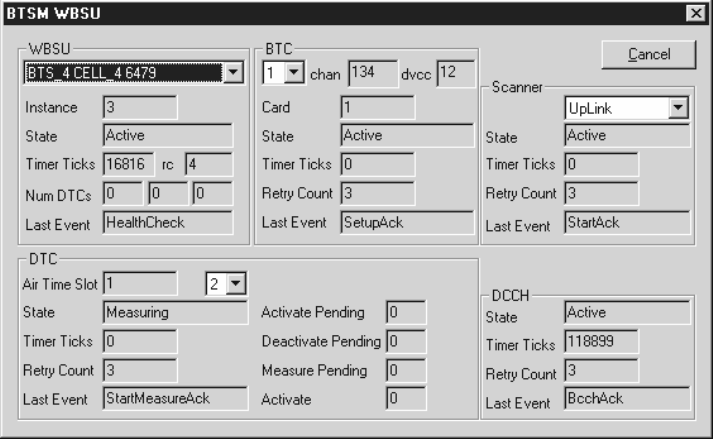
1026209–0001 Revision B Testing picocells 6–19
5. Select Btsm → State.
6. Select the traffic picocell using the dropdown menu below
“WBSU.”
7. Verify that the traffic picocell self–test and software
download are successful:
a. BTC: Verify that one of the channels identified as
usable from the test frequency band scan appears for
BTC 1.
b. WBSU State: Verify that the state is Active.
c. BTC State: Verify that the state is Active.
d. DCCH State: Verify that the state is Active.
8. Minimize the WOS BSC Application window to return to
the AIReach Office window.
Do not close the WOS BSC Application window. This
window is required during normal operation. (If you
inadvertently close this window, it will restart
automatically.)
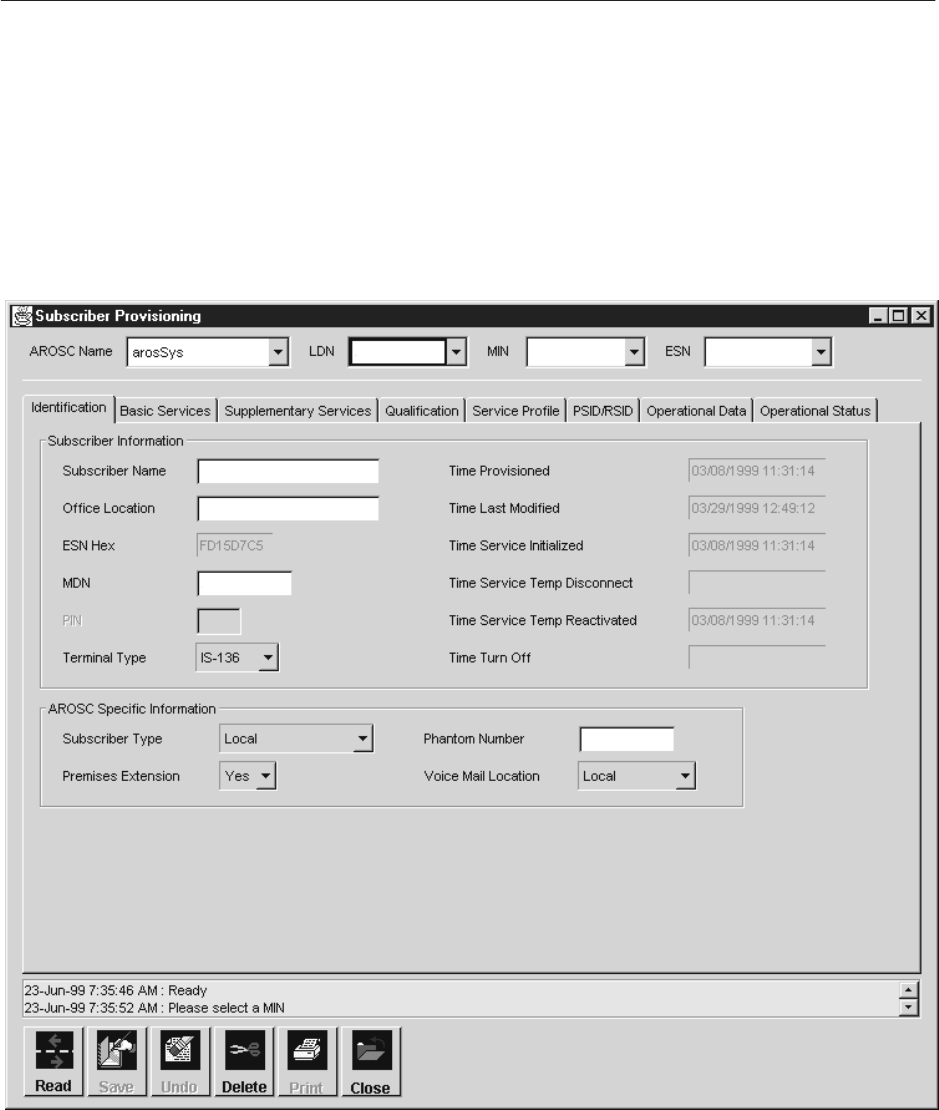
1026209–0001 Revision B 6–20 Testing picocells
This section explains how to provision test mobile phones so they
can be used to check traffic picocells.
Multiple users can access and use subscriber configuration
windows at the same time.
Enter and verify the subscriber provisioning information.
1. From the AIReach Office window:
a. Select the Configure → Subscribers.
b. Click the Identification tab.
Initially, this window does not contain data.
2. Select the AROSC Name using the pulldown menu.
3. Enter the first test mobile LDN, MIN, and ESN values, then
click Save.
4. Select Subscriber Type: Local.
5. Select Premises Extension: No.
6. Click Save.
6.6
Provisioning test
mobile phones
Subscriber
provisioning
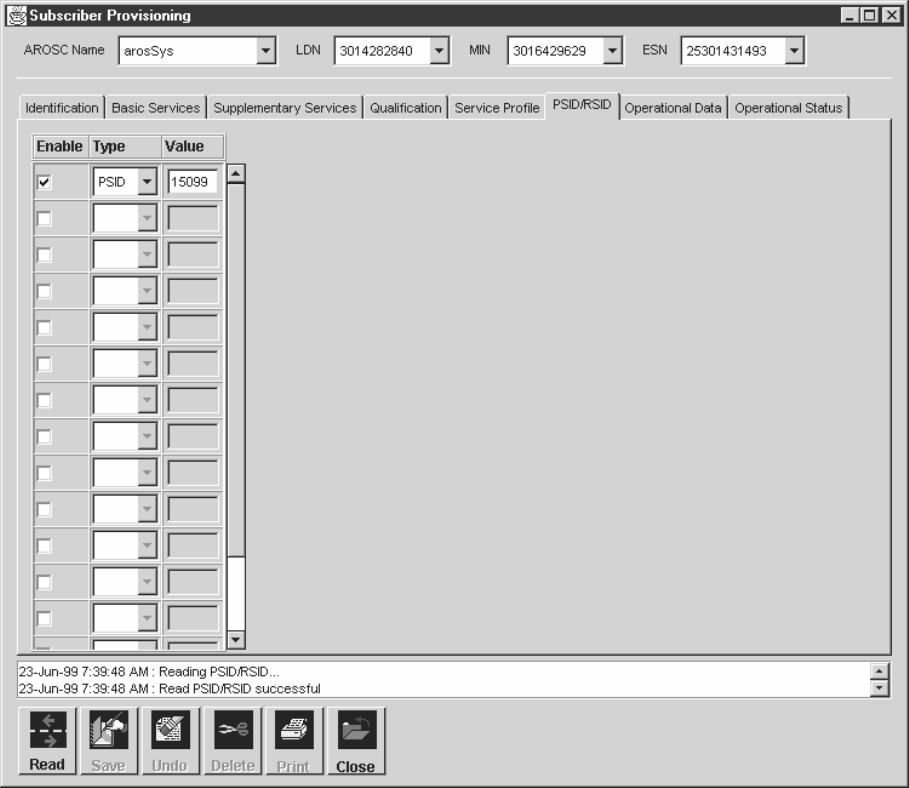
1026209–0001 Revision B Testing picocells 6–21
7. Click the Basic Services tab.
8. Enter the information; then click Save.
9. Select the Supplementary Services tab.
10. Enter the information; then click Save.
11. Select the Service Profile tab.
12. Enter the information; then click Save.
13. Select the PSID/RSID tab.
14. Enter the PSID value.
When you enter a value, press the Enter or Tab key
afterward. The Save button is “grayed” (not available) until
you press the Enter or Tab key.
15. After entering the information; click Save.
16. Click the Operational Data tab.
17. Enter or verify the specified values; then click Save.

1026209–0001 Revision B 6–22 Testing picocells
18. Click the Operational Status tab.
19. Verify that the specified HLR Flags and VLR Flags are
displayed.
The next step (detailed in Section 6.9) is to place test calls to test
the picocells. However, before phones can be used for testing, they
must be programmed for the customer system, as explained below,
and then registered (as explained in Section 6.8).
Installers use Nokia 6120, 6160, or 6161 mobile phones to test the
AIReach OS. To program a Nokia series 6000 mobile phone for
testing, follow the steps below. All other necessary values are
loaded when the phone is registered onto the AIReach OS.
1. Enter *3001#12345#.
2. Activate field test mode:
a. Press until Field Test is highlighted.
b. Press (OK).
c. Press until Enabled is highlighted.
d. Press .
3. Enter the assigned MIN:
a. Press until NAM1 is highlighted.
b. Press .
c. Press until Own Number is highlighted.
d. Verify that the MIN displayed is the correct MIN.
e. If the displayed MIN is not correct:
i. Press .
ii. Enter the correct MIN
iii. Press .
6.7
Programming test
mobile phones

1026209–0001 Revision B Testing picocells 6–23
To register the test mobile phones on the AIReach OS, follow the
steps below.
Prerequisites:
•The test phone must be provisioned, with the correct MIN
and ESN (Section 6.6).
•The phone must be in field test mode (Section 6.7).
Registration procedure:
These instructions are for Nokia 6120 and 6160 mobile phones.
1. Power the phone off, then on.
2. Make sure the phone is on the correct band:
The phone must be on the correct band before you initiate
registration. When the phone is in field test mode, the band
is displayed on the third line of window 01. A lowercase a
or b represent the two 850 MHz cellular bands, and
uppercase A through F represents the 1900 MHz PCS
bands. If the phone camps on an incorrect band, power
cycle the phone while shielding the antenna. The phone
should begin to search each band. Once it begins searching
the correct band, proceed with step 3 before the phone
moves to the next band.
3. Select Menu.
4. Scroll down the options and select System.
5. Select New Search and OK.
The phone should display Searching and then
New System – xxxxxx , where xxxxxx is the alpha
tag (alphanumeric SID) for the system.
6. If the displayed alpha tag is the alpha tag assigned to the
AIReach OS, select OK complete the registration.
(If you don’t know the AIReach OS alphanumeric SID, you
can find it on the Controller: From the AIReach Office
banner menu, select Configure → BSC Configuration,
and then click the Network tab.)
When the phone is registered on the system, the alpha
tag is displayed in window 07 of the test phone.
7. If the displayed alpha tag is not the alpha tag assigned to
the AIReach OS, select Next to continue searching.
If the phone displays No New Systems, verify that the
correct information is entered in the subscriber window
(Section 6.6), paying special attention to the MIN, ESN,
and PSID values. Then repeat steps 1 through 6 to register
the phone on the system.
6.8
Registering test
mobile phones
1026209–0001 Revision B 6–24 Testing picocells
The procedures below explain how to test all transceivers in each
installed traffic picocell.
1. Determine which picocell slots contain transceivers (BTCs).
A label attached to the picocell tells you which slots contain
BTCs. The slot arrangement and numbering scheme are
shown in Figure 6-5.
1
0
234
CPU
The CPU
slot is not
numbered.
Depending on the
picocell configuration,
slots 0 - 4 may contain
2 to 4 BTCs, a scanning
receiver or some slots
may be empty.
–
T0001032
Figure 6-5 Picocell slot numbers
2. From the AIReach Office Window, select Configure →
BSC Configuration.
3. Click the BTSs tab.
4. Highlight and double–click on the traffic picocell to be
tested, and click the BTS Components tab.
Test the first transceiver (any one) as follows:
1. Leave the transceiver to be tested in service (INS). Take all
other transceivers (BTCs) out of service (OOS).
a. For each slot that contains a BTC:
i. Select BTC from the Hardware Type
dropdown list.
ii. Select OOS from the Desired State dropdown
list.
b. Click Accept.
The software displays the AROSC Configuration
window.
2. Record the power level displayed on the test mobiles.
3. Initiate a mobile–to–mobile test call. (Dial the 4–digit LDN
assigned to the other test mobile.)
6.9
Placing test calls
First transceiver test
1026209–0001 Revision B Testing picocells 6–25
4. The test is successful if the transceiver processes the call
and the displayed power level reading varies no more than 5
units from all other picocells.
5. Notify the MRC and request an RMA if:
- The transceiver fails to process a test call.
- The power level reading varies by more than 5 units
compared with readings from all other picocells.
Test the remaining transceivers as follows:
1. Bring another traffic picocell transceiver into service:
a. Highlight the picocell to be tested and click the BTS
Components tab.
b. For the transceiver just tested, select OOS from the
Desired State dropdown list.
c. For the BTC to be tested:
i. Select BTC as the Hardware Type.
ii. Select AUTO from the Desired State
dropdown list.
d. Click Accept.
The software displays the AROSC Configuration
window.
2. Repeat the test call procedure for all transceivers installed in
the traffic picocell being tested.
(Record power level; initiate test call; observe power
level—steps 2 through 4 in the previous section.)
3. After testing all transceivers, turn off and disconnect the
traffic picocell from the Controller.
4. Repeat the test call procedure for each traffic picocell. (Test
all transceivers.)
5. In the event you find a failed transceiver, toe tag and ship
the picocell to the MRC, with assigned RMA number.
Do not ship any components without an RMA number.
Testing the remaining
transceivers

1026209–0001 Revision B 6–26 Testing picocells
The following programming procedures for Nokia Series 6000
mobile phones are provided for the installer’s convenience.
However, normally, these procedures are not required to complete
and test the installation.
To program the home system ID number for a Nokia 6000 series
mobile phone:
1. Enter *3001#12345#.
2. Press until Field Test displays, then press .
3. Press until Enabled is highlighted and press (OK).
4. Press until NAM1 is highlighted and press .
Verify Home System ID displays 13.
5. If 13 does not display, press , enter 13 and press .
To program the Home SOC for a Nokia series 6000 phone:
1. Press until Home SOC displays. Verify that the Home
SOC displays 4.
2. If the Home SOC is not correct, press , enter 4, and
press .
To program the PSID/RSID number:
1. Press until PSID/RSID displays and press .
2. Select P/RSID 1.
3. Press until the PSID/RSID displays. Verify that 15099
displays for the PSID.
4. If the PSID is incorrect, press , enter the PSID 15099,
and press .
To program the system ID number for a Nokia series 6000 phone:
1. Press until the System ID displays and press .
2. Verify that the System ID displays 13.
3. If the System ID is incorrect, press , enter 13, and press
.
6.10
Additional phone
programming
procedures
Home system ID
Home SOC
PSID/RSID number
System ID number

1026209–0001 Revision B Testing picocells 6–27
To program the Operator Code (SOC):
1. Press until the Operator Code (SOC) displays and
press .
2. Verify that the Operator Code displays 4.
3. If the Operator Code is incorrect, press , enter 4, and
press .
To program the NAM Status for a Nokia series 6000 phone:
1. Press or (right button) until NAM1 displays and press
.
2. Press until Change Defaults displays and press .
3. Verify that the NAM Status displays enabled.
4. If the NAM Status is incorrect, highlight enabled and press
.
5. Press (right button) until NAM1 is highlighted.
6. Press until NAM2 displays and press .
7. Press until Change Defaults displays and press .
8. Verify that the NAM Status displays disabled.
9. If the NAM Status is incorrect, highlight disabled and
press .
10. Press until NAM3 is highlighted and press .
11. Press until Change Defaults displays and press .
12. Verify that the NAM Status displays disabled.
13. If the NAM Status is incorrect, highlight disabled and
press .
Operator Code (SOC)
NAM status

1026209–0001 Revision B 6–28 Testing picocells
To initialize changed settings for a Nokia series 6000 phone:
(You do not need to do these steps after putting the phone into
field test mode and entering the MIN.)
1. Power off the cellular phone and then turn the power on.
2. Press (Menu) to display the menu.
3. Press or until Setting displays and press .
4. Press until Network Services displays.
5. Verify that digital & analog displays.
6. If digital & analog does not display, press until digital
& analog displays and press .
7. Press until Public System displays and press .
8. Press until Any System is highlighted and press .
9. Press (right button) until the main screen displays.
10. Press until System displays and press .
11. Highlight New Search and press .
12. Verify that Alpha Tag displays and press .
Initializing settings
1026209–0001 Revision B Installing picocell 7–1
Chapter 7
Installing picocells
This chapter describes how to install a picocell at the permanent
site. It includes the following sections:
•Preparing for picocell installation – page 7–1
•Mounting the picocells – page 7–2
•Installing and connecting picocells – page 7–7
•Performing the frequency band scan – page 7–18
Install the scanning picocell first, and then the traffic picocells.
Follow the instructions in the AIReach OS Configuration Report
for specifications on picocell location, cable labeling and telco
block assignments.
Important: All T1 wiring must comply with TIA/EIA–568A and
TIA/EIA–606. (In Canada, must comply with CSA Standards
T528 and 529.)
CAUTION
Before removing or installing electronic
components, make sure static electricity
has been discharged from yourself and any
object that will contact the component.
Wear a new or recently tested anti–static
wrist strap and use an anti–static pad while
handling components.
Failure to follow these instructions could
result in damage to components.
Before you begin installing picocells, ensure that . . .
•The power supply for line power is mounted in the telco
room and correctly connected to the telco block.
•The T1 cables are punched down and correctly labeled on
the telco block.
•The power supply voltage to the picocell is –48 Vdc.
•The picocell location will not interfere with door clearances.
•The picocell will not be located in an inappropriate room
(for example: a room without air conditioning).
7.1
Preparing for
picocell installation
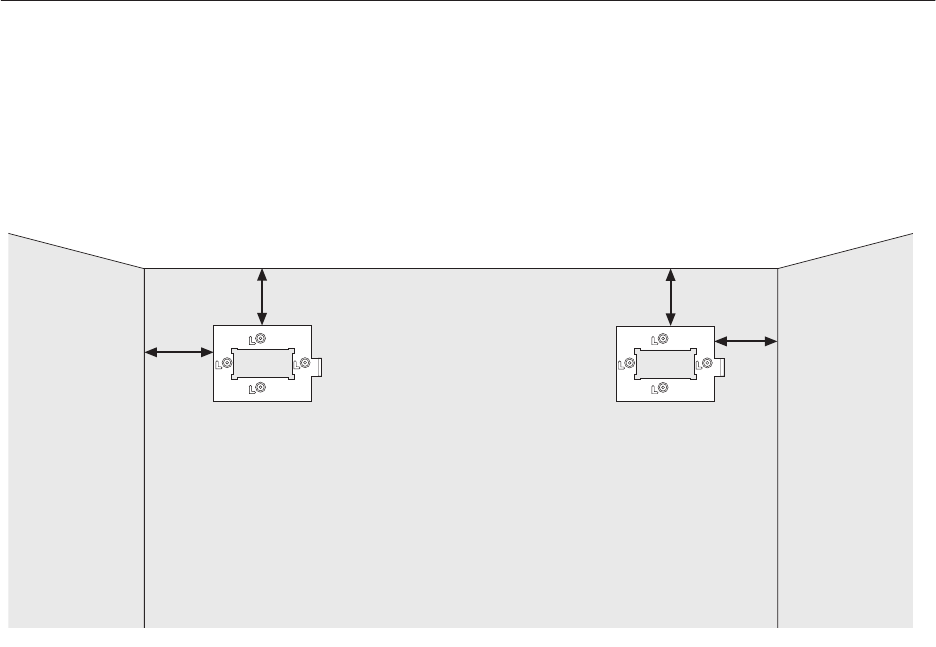
1026209–0001 Revision B 7–2 Installing picocell
The picocell is designed to be attached to different wall surfaces:
wallboard, concrete, wood, or metal or wood studs.
The mounting plate must have at least 4.5 to 5. inches of clearance
on all sides (from ceiling, floor, and walls) so the picocell will
have proper clearance (3 inches minimum) for mounting and
ventilation. See Figure 7-1.
4.5"
4.5" 4.5"
5"
The clearances shown above allow a 3-inch minimum clearance
on the sides and top of the picocell, when it is mounted.
Ceiling
Wall
T0001025
Mounting plate
Figure 7-1 Placing the mounting plate to allow proper clearance around the picocell
7.2
Mounting the
picocells
Installing the mounting
plate
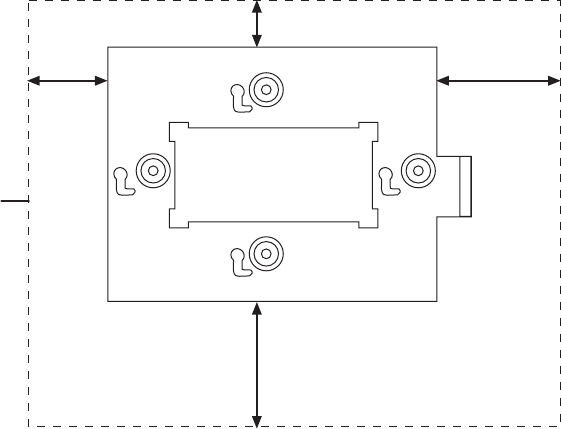
1026209–0001 Revision B Installing picocell 7–3
Figure 7-2 shows the position of the mounting plate relative to the
picocell.
1.5” 2.0”
1.375”
2.75”
G-17371 F 08/24/99
1
2
3
4
Figure 7-2 Position of the picocell on the mounting plate
Notice that clearance for the mounting
plate is not the same on each side.
Picocell
Note
This note applies only to pre–production picocells: Mounting plate
revisions are not upward compatible. This means you cannot use
Revision B plates on Revision C picocells, but you can use
Revision C plates on Revision B picocells.
Fasteners
To mount the picocell mounting plate to the wall surface, use only
the fasteners shown in Table 7-1 —these are the only approved
fasteners. See the AIReach Office Configuration Report for site
specifications.
For wood or metal studs, HNS recommends two fasteners. See
Table 7-1 and Figure 7-3.
For walls composed of concrete, block, or drywall, HNS
recommends four fasteners. See Table 7-1 and Figure 7-4.

1026209–0001 Revision B 7–4 Installing picocell
Table 7-1 Approved mounting plate fasteners
Surface Fastener Fastener part
number Hole locations 1
Drywall (hollow) E–Z Anchor self–drilling
drywall anchor and screw 9010193–0001 1, 2, 3, 4
Concrete block or
t
Lead anchor for 10–24 screw 9004929–0001 1, 2, 3, 4
concrete Phillips head machine screw,
10–24 x 3/4” 9003333–0074
Metal wall or
metal studs Sheet metal screw,
self–drilling, self–tapping,
10 x 3/4”
1028868–0018 1, 3
Wood wall or
wood studs Wood screw, 10 x 1–1/4” 1028228–0021 1, 3
1As shown in figures 7-3 and 7-4.
If the picocell is located near a door, make sure the door opens
without hitting the picocell:
1. Mount the picocell so the bottom of the picocell is above
the top of the door and door hardware, or
2. Mount the picocell far enough from the door so the door can
open fully without hitting the picocell.
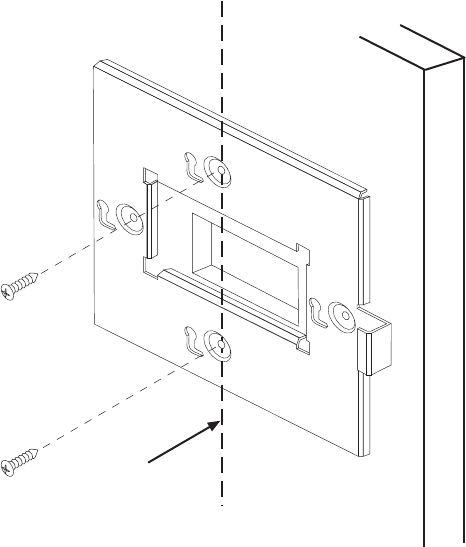
1026209–0001 Revision B Installing picocell 7–5
Note
If you use option 1 to mount the picocell near a door,
remember to maintain the proper clearance between the top
edge of the picocell and the ceiling.
G-17212 F
10/04/99
Mounting plate
Wood or
metal stud
This side up
1
2
3
4
Two fasteners
Figure 7-3 Attaching the picocell mounting plate to wood or metal studs
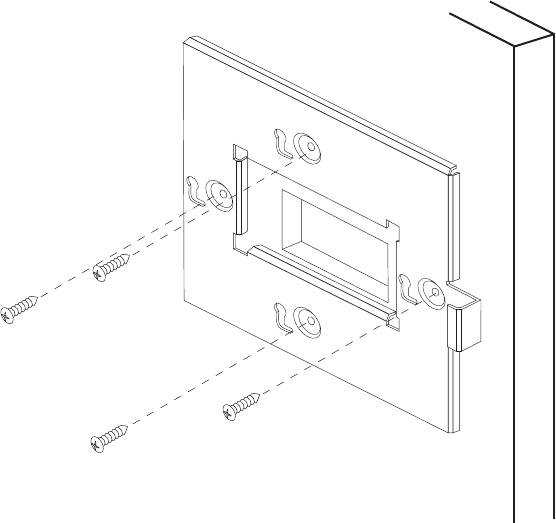
1026209–0001 Revision B 7–6 Installing picocell
G-17414 F
10/04/99
Mounting plate
Four fasteners
This side up
1
2
3
4
Figure 7-4 Attaching the picocell mounting plate to concrete, block, or wallboard
To attach the mounting plate (for all wall types):
1. Position the mounting plate on the wall:
a. Make sure the part labeled “This side up” is on top.
b. Allow at least the minimum clearance, as shown in
Figure 7-1.
c. Make sure the mounting plate is level.
2. Mark on the wall the position of each mounting screw.
3. If the cable to the picocell will be installed through the wall
and mounting plate:
a. Mark on the wall the outline of the rectangular hole
in the center of the mounting plate.
b. Remove the plate so you can cut the hole.
c. Cut the hole in the wall, inside the rectangular wall
marking.
4. Mount the mounting plate on the wall using the fasteners
specified in Table 7-1 .
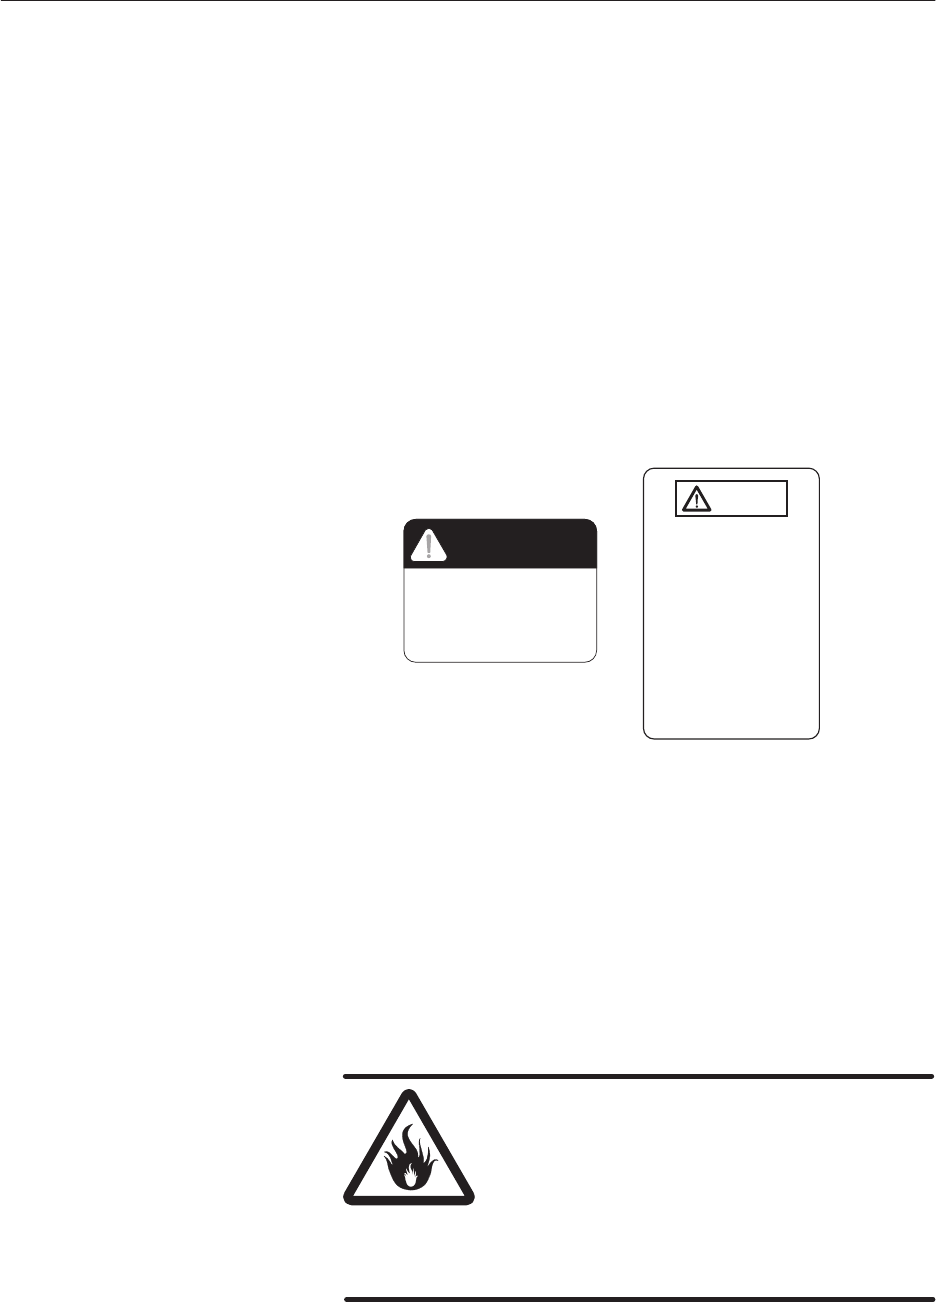
1026209–0001 Revision B Installing picocell 7–7
This procedure applies to both the scanning picocell and traffic
picocells.
Install the scanning picocell in its permanent location prior to
completing the 24–hour (minimum) frequency band scan (section
7.4).
To save time, initiate the 24–hour frequency band scan (Section
7.4) and then install the traffic picocells at their permanent
locations while the band scan is running.
Note
The site–specific AIReach Office Configuration Report contains
the information needed to install the picocells, including locations
where picocells are to be installed, cable labeling, punchdown
block assignments, and required fasteners.
The following labels appear on the picocell connector panel:
Labels on picocell
SWITCH POWER OFF
BEFORE CONNECTING
OR DISCONNECTING
CABLES
WARNING
CAUTION
TO REDUCE THE RISK OF
FIRE, USE ONLY No. 24
AWG OR LARGER LISTED
TELECOMMUNICATIONS
LINE CORD.
FOR CONTINUED
PROTECTION AGAINST
RISK OF FIRE, REPLACE
ONLY WITH SAME TYPE
AND RATING OF FUSE.
T0001022
As indicated by the WARNING label, make sure the picocell
power switch is OFF (middle position) before connecting or
disconnecting cables. This is to protect the picocell connectors
from possible damage.
As indicated by the CAUTION label, use only No. 24 AWG line
cord to connect to the VOICE/DATA ports. If you replace the
picocell fuse, use only a fuse of the type and rating identified on
the fuse label.
WARNING
To reduce the risk of fire, use only No. 24
AWG or larger line cord to connect to the
picocell, and replace the fuse only with a
fuse of the type and rating identified on the
fuse label.
Failure to heed these warnings could result
in personal injury or death.
7.3
Installing and
connecting
picocells
Warnings and cautions
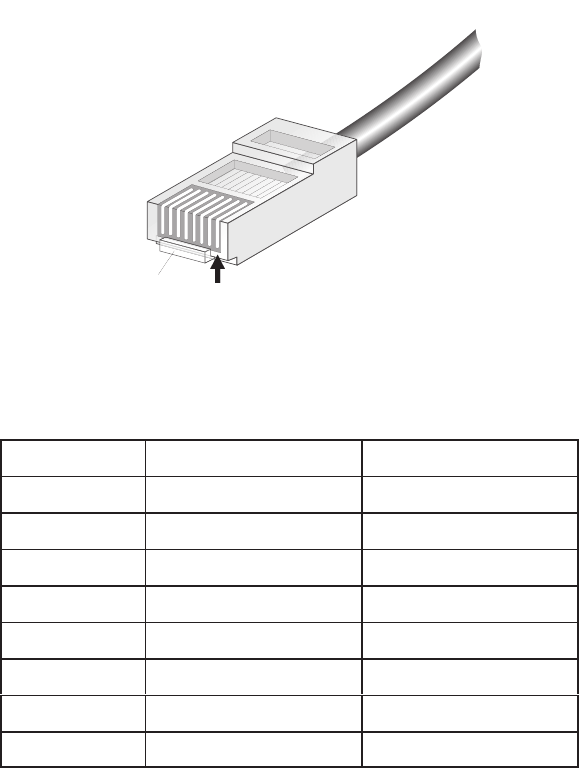
1026209–0001 Revision B 7–8 Installing picocell
Connect the T1/power cable as follows:
1. Terminate the T1 cable(s) with RJ–45 connectors on each
end using the pinout plan shown in Table 7-2 .
Plastic clip Pin 1
T0002001
RJ–45 connector, showing pin 1 position
Table 7-2 T1 (RJ–45) connector pinouts
Pin T1 connector signal CAT 5 color coding
1RX RING White–blue
2RX TIP Blue–white
3+VDC1 (GND) White–green
4TX RING White–orange
5TX TIP Orange–white
6–VDC1 Green–white
7+VDC2 (GND) White–brown
8–VDC2 Brown–white
2. Label the cable at the picocell end.
Picocell connections
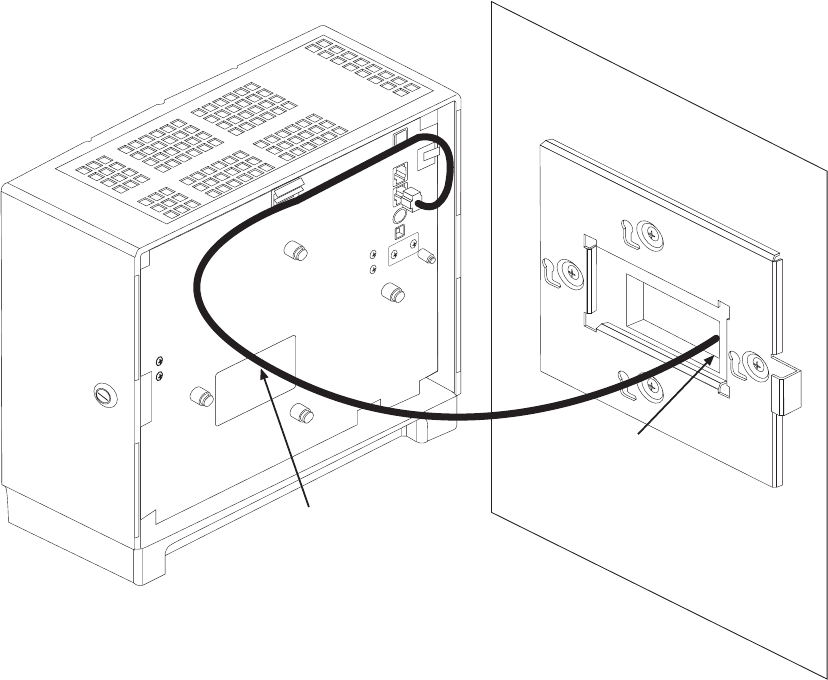
1026209–0001 Revision B Installing picocell 7–9
3. Route the T1/power cable through the opening in the wall
mounting plate (as shown in Figure 7-5).
An acceptable alternative is to run the cable down from the
ceiling, along the wall to the picocell.
G-14762 F
08/23/99
Cables routed
through wall
CAT 5 T1/power
cable to controller
Mounting plate
Picocell
Figure 7-5 Cabling the picocell
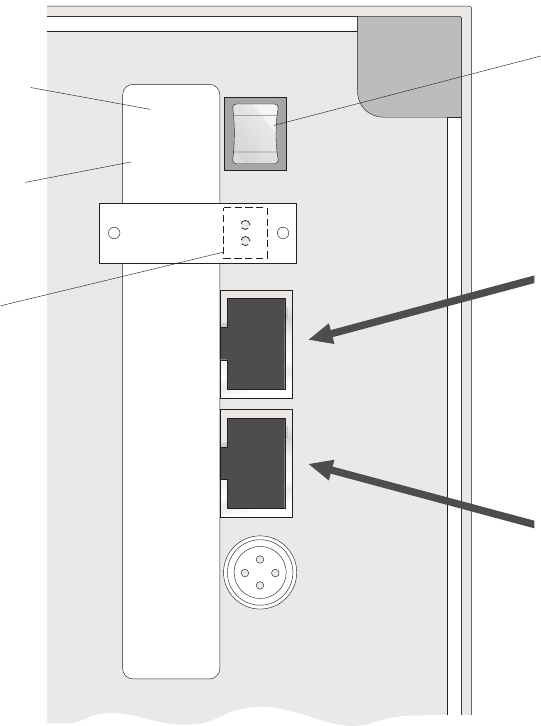
1026209–0001 Revision B 7–10 Installing picocell
4. Connect the T1 cable (with RJ–45 connector) to the
appropriate picocell port, as shown in Figure 7-6.
LINE I
OFF
o
LOCAL I
VOICE/
DATA
OUT
VOICE/
DATA
IN
(LINE POWER)
F
U
S
E
LOCAL -
POWER +
T0001010
Picocell
Line
power
Local
power
Local power
(not used)
Connect CAT 5 T1 cable
here for
picocell.daisy-chained
Connect CAT 5 T1/power
cable here for both
picocells.
standalone and daisy-
chained
Power switch
Figure 7-6 T1 cable and power connections at the picocell
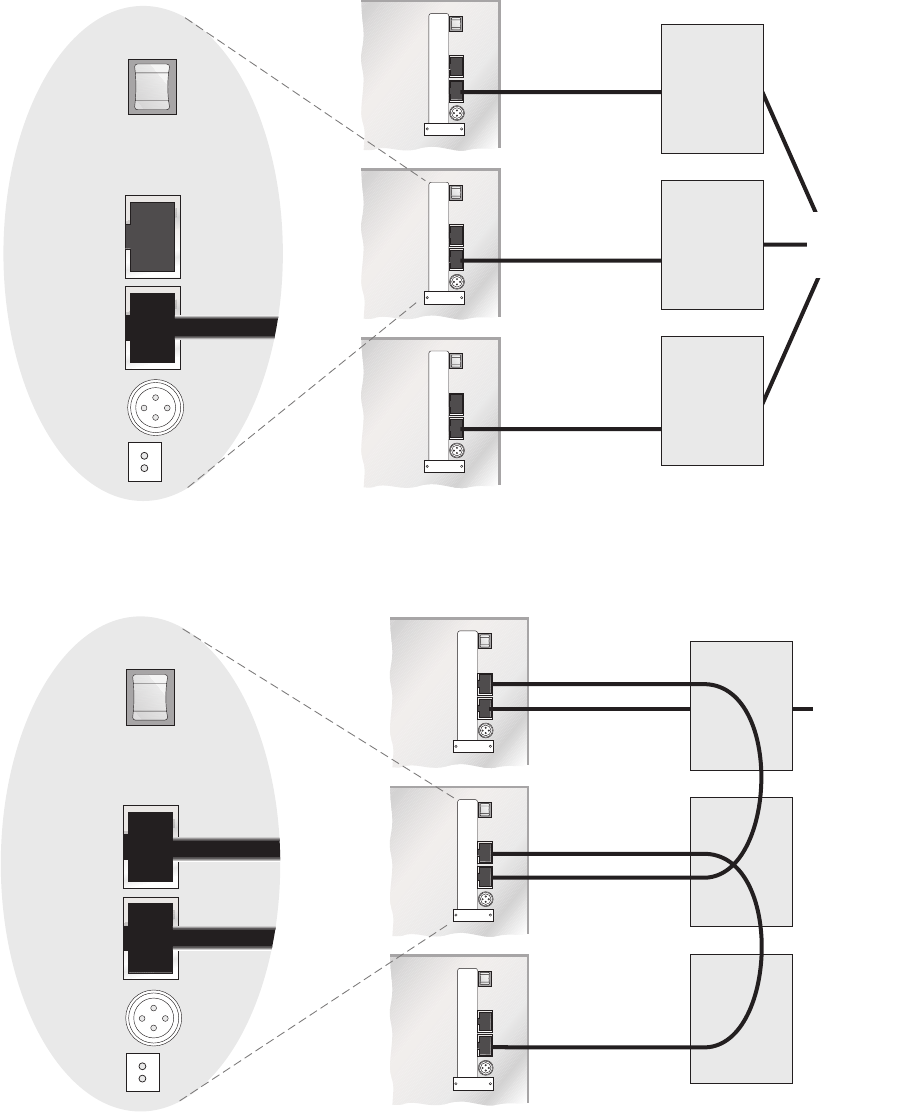
1026209–0001 Revision B Installing picocell 7–11
Figure 7-7 T1 cabling for standalone and daisy–chained picocells
T0001009
VOICE/
DATA
OUT
VOICE/
DATA
IN
Power
switch
VOICE/
DATA
OUT
VOICE/
DATA
IN
Power
switch
VOICE/DATA OUT
VOICE/DATA IN
VOICE/DATA OUT
VOICE/DATA IN
VOICE/DATA OUT
VOICE/DATA IN
Telco blocks
Picocells
CAT 5 T1 cabling
(single run)
To
Controller
CAT 5 T1 cabling
(double run)
VOICE/DATA OUT
VOICE/DATA IN
VOICE/DATA OUT
VOICE/DATA IN
VOICE/DATA OUT
VOICE/DATA IN
Telco blocks
Picocells
To
Controller
Standalone picocells
Daisy-chained picocells

1026209–0001 Revision B 7–12 Installing picocell
Mount the picocell as follows:
1. Power on the picocell by pressing the power switch to the
LINE position.
2. Mount the picocell to the mounting plate by aligning the
lock on the picocell housing with the positioning tab on the
mounting plate, as shown in Figure 7-8.
WARNING
When installing the picocell on the mounting
plate, use care to avoid falling and injuring
yourself.
3. Push the picocell into the mounting plate, and then slide it
down and to the right to the locking position.
4. Turn the lock key to the horizontal position to lock the unit
after it is mounted.
If the key is difficult or impossible to turn, the picocell may
not be properly mounted. If this is the case, reinstall the
picocell on the mounting plate.
Mounting the picocell
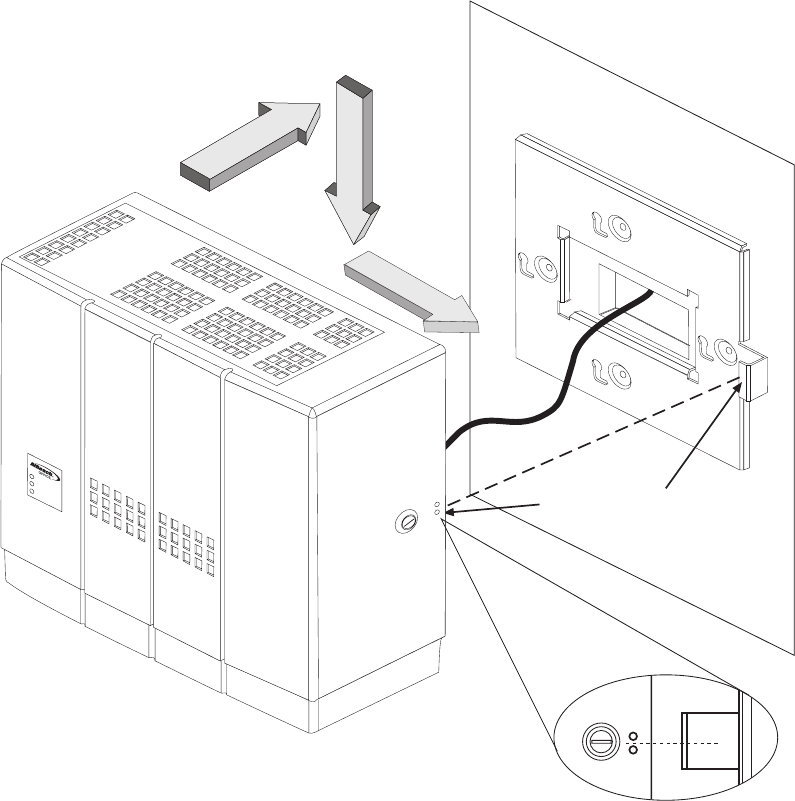
1026209–0001 Revision B Installing picocell 7–13
Figure 7-8 Mounting the picocell
Mounting plate
This side up
1
2
3
4
G-14764 F
08/24/99
Align locking tab
with alignment dots
on picocell
12
3
Align picocell with mounting plate,
push in, pull down, and push right
to secure
5. Punch down and label the T1 cables on the telco room
termination block.
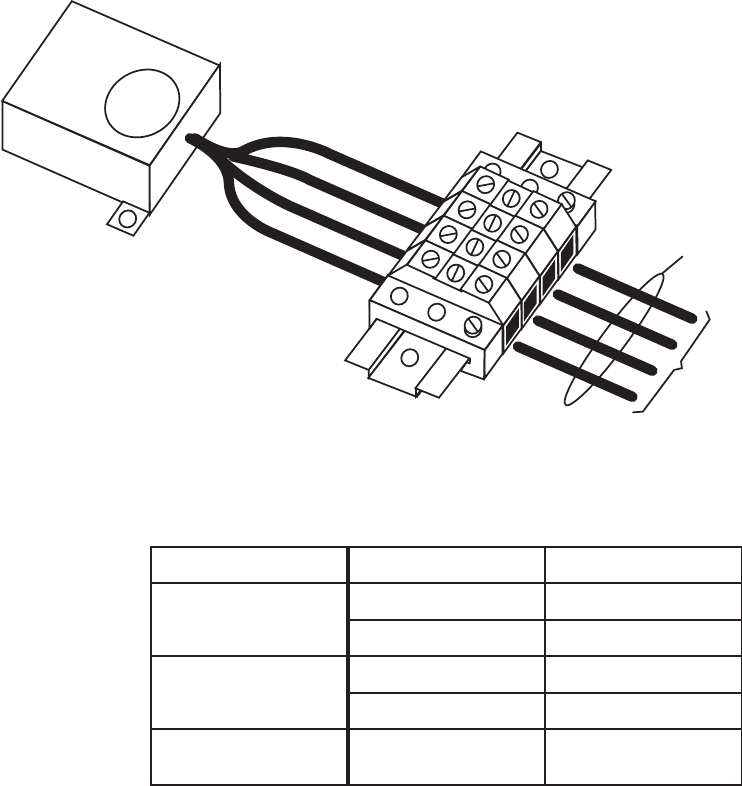
1026209–0001 Revision B 7–14 Installing picocell
6. Set up the power connection:
a. Mount the power supply in the telco room.
Typically, the power supply is mounted to plywood.
b. Remove the DIN connector from the power wire.
c. Strip the end of the wire.
d. Clip the green wire (not used), fold it back, and heat
shrink it.
e. Connect the wires from the power supply to the
terminal block, as shown in Figure 7-9 and Table
7-3 .
f. Plug the power cable into a 110 Vac outlet.
Figure 7-9 Power terminal block connections
CAT 5
Power
supply
G-17404 F
08/24/99
To picocell
Table 7-3 Power supply and CAT 5 wire colors
Power supply wire Cat 5 wire
48 Vdc load
White Green–white
–48 Vdc load Black Brown–white
48 Vdc return
Red White–green
–48 Vdc return Brown White–brown
AC ground
(not used) Green Not applicable
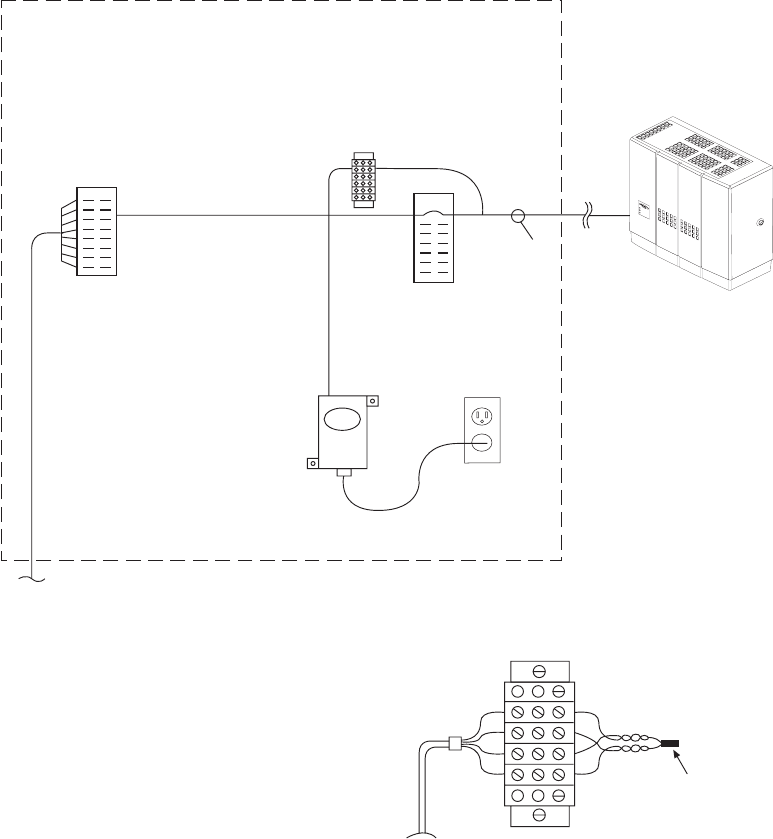
1026209–0001 Revision B Installing picocell 7–15
AC outlet
G-17890 F
10/04/99
Picocell
Power
supply
Terminal block
(see detail)
Telco block
for picocell T1
connections
Telco blocks can be:
- 66 block
- 110 block or
- Bix block
Building riser telco block for
T1 cross-connect to Controller
WIRING CLOSET
T1 bundle
to/from
Controller
CAT 5
cable
Terminal block detail
Two pairs of CAT 5
to merge with
cable to picocell
Heat shrink
To power supply
Figure 7-10 Picocell connections at the telco closet
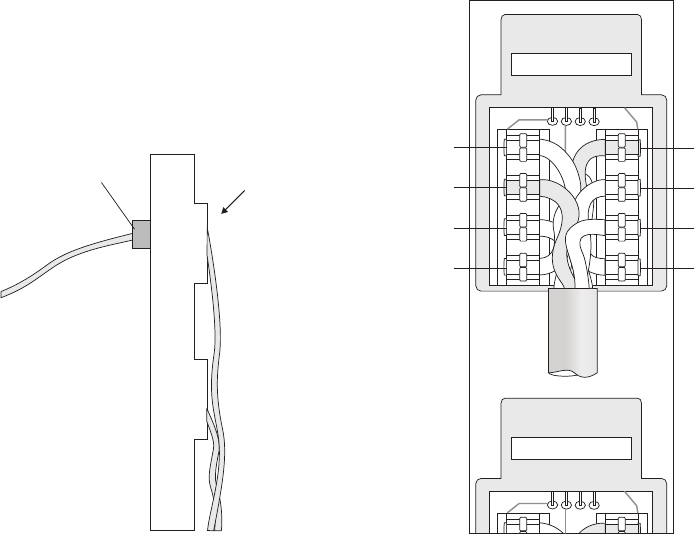
1026209–0001 Revision B 7–16 Installing picocell
Important: All T1 wiring must comply with TIA/EIA–568A and
TIA/EIA–606. (In Canada, T1 wiring must comply with CSA
Standards T528 and T529.) These standards are listed in Appendix
B, Section B.5.
A T568B–compliant wiring flip must be used between:
•The Controller and picocell
•Daisy–chained picocells (that is, between each
picocell–to–picocell connection)
The flip is accomplished at the patch panel (as shown in Figure
7-11) or using a modular jack (Figure 7-12). The flip must be
T568B compliant, as shown in these two illustrations.
T0001021
White/Green
Green/White
White/Brown
Brown/White
White/Blue
Blue/White
White/Orange
Orange/White
Side view Rear view
(flip detail, T568B)
Patch
panel
RJ-45
connector,
straight through
Patch
panel
Flip
To
picocell
Figure 7-11 T568B–compliant wiring flip at patch panel
T1 wiring and flip
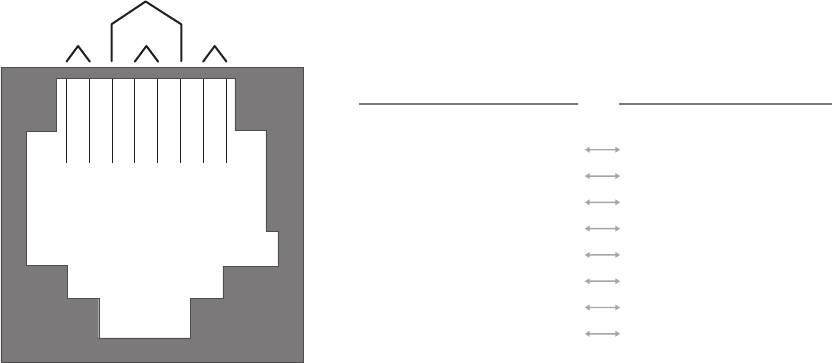
1026209–0001 Revision B Installing picocell 7–17
Figure 7-12 T568B–compliant wiring flip using modular jack
RJ-45 connector pinout for T568B-compliant flip
T568B Flipped end
Pin Signal Color code Pin Signal Color code
1 TX Ring White-orange 5 RX Ring White-blue
2 TX Tip Orange-white 4 RX Tip Blue-white
3 Pos DC White-green 3 Pos DC White-green
4 RX Tip Blue-white 1 TX Ring White-orange
5 RX Ring White-blue 2 TX Tip Orange-white
6 Neg DC Green-white 6 Neg DC Green-white
7 Pos DC White-brown 7 Pos DC White-brown
8 Neg DC Brown-white 8 Neg DC Brown-white
View from front
opening, tab down
12345678
W-O O
W-GBL
W-BL
G
W-BR
BR
Pin and color code
Pair 2 Pair 1 Pair 4
Pair 3
T0001020
1. Terminate and label the CAT 5 T1 cable on the specified
terminal block, using the specified pin assignments.
Label the cables in accordance with TIA/EIA–606.
2. Terminate the T1 cable with an RJ–45 connector at the
System Controller end.
3. Plug the RJ–45 connector into the first Quad T1 card (in
slot 9), second port from the top, at the back of the System
Controller.
Note
The physical port assignment for the T1 cable must match
the virtual port assignment made in the AIReach OS
software.
Verify that the picocell successfully completes its self test and that
the Power LED (top) and Temp LED (middle) are green after
approximately 2 minutes. The Alarm LED (bottom) is orange,
then turns off—this is normal cycling of the unit.
Check for proper
operation

1026209–0001 Revision B 7–18 Installing picocell
Section 6.3 explains how to initiate a test (6–minute) frequency
band scan (starting on page 6–10). Now that the system is
installed, you perform a band scan to set up the system for normal
operation—specifically, to determine what frequencies the
AIReach OS can use. The post–installation scan takes a
minimum of 24 hours. The AIReach Office Configuration Report
states the actual time requirement.
Initiate the 24–hour band scan as explained in Section 6.3
(page 6–10), except:
In the Band Scan Parameters window, set Critical RSSI bin
to 3 (Uplink and Downlink).
Otherwise, follow the directions in Section 6.3 (but ignore
references to a 6–minute band scan).
7.4
Performing the
frequency band
scan

1026209–0001 Revision B Connecting to external equipment 8–1
Chapter 8
Connecting to external equipment
This chapter includes:
•Connecting the Controller to the PBX – page 8–2
•Installing the SSL certificate – page 8–4
•Repointing the HLR – page 8–8
•Installing a second LAN card (optional) – page 8–9
•Enabling alarm paging – page 8–11
As shown in Figure 1-2 (page 1–2), the AIReach OS Controller
connects to:
•The customer’s PBX
•The macro cellular system
•The customer’s corporate LAN (optional)
The procedures explained in this chapter are related to these
connections.
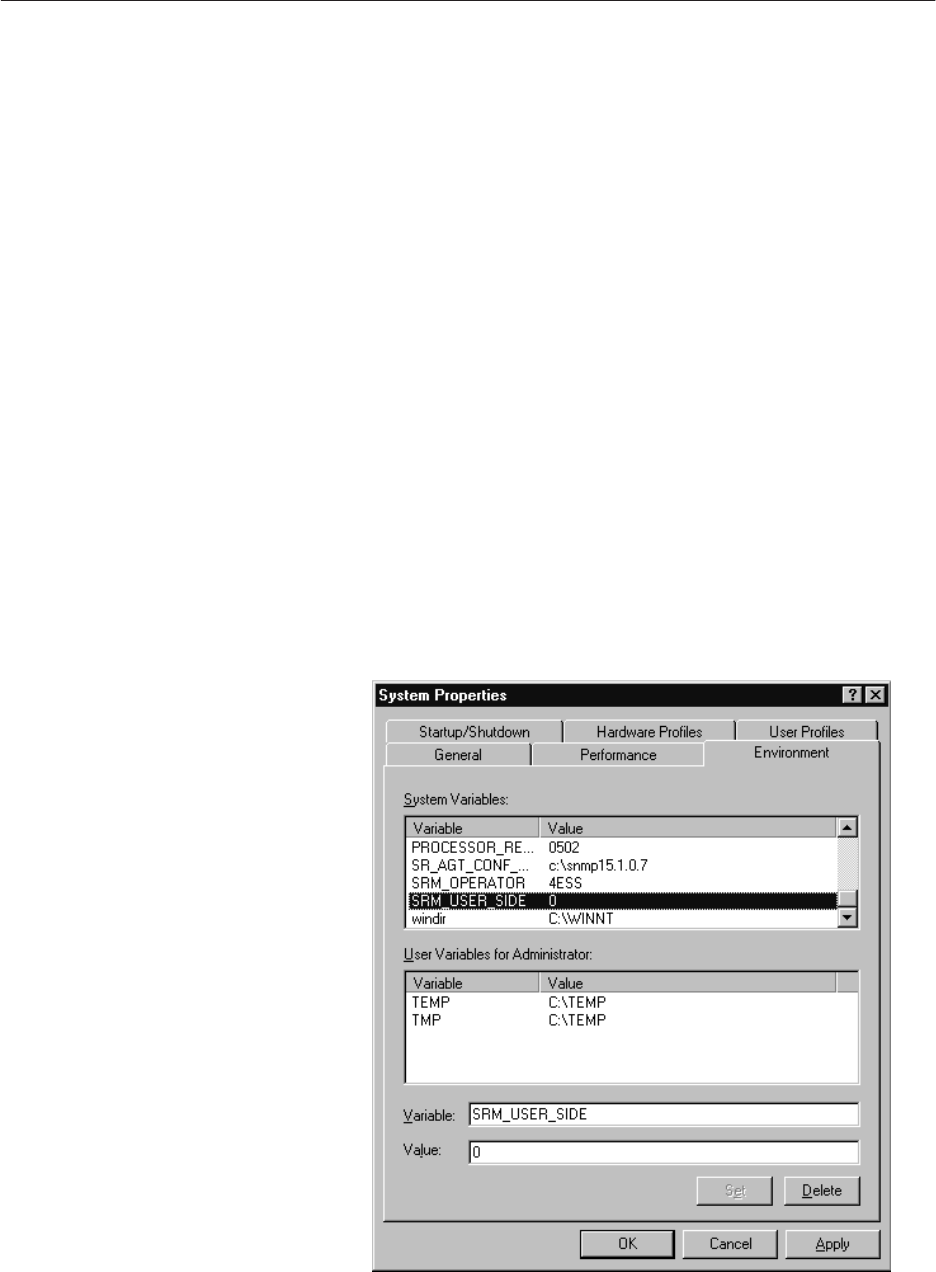
1026209–0001 Revision B 8–2 Connecting to external equipment
To establish final System Controller connectivity, connect the
Controller to the PBX and connect the analog line as follows:
1. Terminate the PBX T1 trunk CAT 5 cable with a RJ–45
connector.
2. Connect the PBX T1 trunk to port 1 of the assigned Quad
T1 card.
3. Verify that the Controller configuration values indicated
below are set to the values specified in the (customer
site–specific) AIReach OS Configuration Report. If any
values are not as specified, change them to the specified
values.
a. System Capability – For instructions concerning
System Capability configuration, see page 4–17.
b. Transport configuration – See page 4–18.
c. MSC Configuration – See page 4–19.
d. HLR Configuration – See page 4–21.
4. Configure the link between the Controller and the PBX:
a. On the Controller, click Start → Settings →
Control Panel.
b. Double–click the System icon.
c. Click the Environment tab (shown below).
8.1
Connecting the
Controller to the
PBX
1026209–0001 Revision B Connecting to external equipment 8–3
d. In the System Variables listing, search for
SRM_USER_SIDE and SRM_OPERATOR:
SRM_USER_SIDE
0 (default) – Set this variable to 0 if the Controller is
on the network side of the ISDN interface.
1 – Set the variable to 1 if the Controller is on the
user side of the ISDN interface.
SRM_OPERATOR
Protocol used on the ISDN link to the PBX:
4ESS (default)
Other possible values: DMS100, N12, and 5E10
If the variable is not present, the default value is
applied.
If the default value is acceptable, no action is
required if:
- The variable is not listed (because if the
variable is not listed, the default is effective) or
- The variable is listed with the default value
e. If you need to change a value and the variable is
present:
i. In the list of System Variables, click the
variable name to select it.
The variable and value appear in the boxes at
the bottom of the window.
ii. Change the value to the correct setting.
iii. Click Set to save the value.
iv. Reboot the Controller so the change will take
effect.
f. If you need to change a value and the variable is not
present:
i. Click on any variable name in the list of
System Variables.
The variable and value appear in the boxes at
the bottom of the window.
ii. In the Variable box at the bottom of the
window, delete the variable name and enter the
new variable name.
iii. In the Value box immediately below the
Variable box, delete the value and enter the
correct value.
iv. Click Set to save the value.
v. Reboot the Controller so the changes will take
effect.

1026209–0001 Revision B 8–4 Connecting to external equipment
Follow the instructions in this section to obtain and install a
Secure Socket Layer (SSL) certificate:
(SSL provides data encryption between the Controller and the
IS–41 gateway.)
First you create a file you will use to request an SSL certificate:
1. Open a DOS window by selecting Start → Programs →
Command Prompt.
2. At the DOS prompt (C:\>) enter
cd C:\Program Files\spst
3. At the DOS prompt (C:\Program Files\spst\>),
create the files csr.pem and spst.key by entering:
ssleay.exe req –new –nodes –out csr.pem –config install\ca\ssleay.cnf
4. Enter the information indicated below when prompted.
Substitute customer–specific information inside the brackets
[ ] as appropriate.
Country Name (2 letter code) [US]:
State or Province Name (full name) [Maryland]:
Locality Name (city, town, etc.) [Germantown]:
Organization Name (company) [Hughes Network Systems]:
Organizational Unit Name (division) [Wireless Office Service]:
Common Name (webserver hostname) [209.84.215.36]:
For Common Name (webserver hostname), enter
the IP address of the gateway’s hostname. Ask the gateway
provider what to use for the common name.
5. The program ssleay.exe generates the files csr.pem
and spst.key in the spst folder.
6. Use Notepad to open csr.pem and change the line
BEGIN CERTIFICATE REQUEST
to
BEGIN NEW CERTIFICATE REQUEST
7. At the end of the csr.pem file, change the line
END CERTIFICATE REQUEST
to
END NEW CERTIFICATE REQUEST
Request a certificate via e–mail from the appropriate service
provider representative, with the csr.pem file edited in steps 6
and 7 above attached.
The service provider representative sends back the information
you need to complete a certificate. (See Figure 8-1 for an example
of a certificate.)
To complete the certificate, refer to Figure 8-1 and follow these
instructions:
8.2
Installing the SSL
certificate
Creating the request
file
Requesting the
certificate
Completing the
certificate
1026209–0001 Revision B Connecting to external equipment 8–5
1. Copy the <WOSC Certificate Follows> block of
information, starting with (and including) the header
––––BEGIN CERTIFICATE––––
and ending with (and including) the footer
––––END CERTIFICATE––––
2. Paste the block just copied at the beginning of the
spst.key file created in step 3 on page 8–4.
3. Save the modified spst.key file created in steps 1 and 2
above as spst_c.pem.
4. Open the file spstca.pem.
5. If the CA certificate has already been installed—that is, if
<CA Certificate Follows> is already included in
the file, as shown in Figure 8-1, proceed to the next section,
Installing the certificate.
6. If the CA certificate has not been installed, follow these
steps:
a. Copy the <CA Certificate Follows> block
of information, starting with the header
––––BEGIN CERTIFICATE––––
and ending with the footer
––––END CERTIFICATE––––
b. Paste the block just copied at the end of the
spstca.pem file.
Note
The CA certificate may already be included in the
spstca.pem file.
c. Save the modified file created in steps a and b as
spstca.pem.
1026209–0001 Revision B 8–6 Connecting to external equipment
Figure 8-1 Example of a signed SSL certificate
> ===================<WOSC Certificate Follows>====================
>
> WOS Certificate follows:
>
> –––––BEGIN CERTIFICATE–––––
> MIICozCCAgygAwIBAgIBQTANBgkqhkiG9w0BAQQFADBoMQswCQYDVQQGEwJVUzEf
> MB0GA1UEChQWQVQmVCBXaXJlbGVzcyBTZXJ2aWNlczEQMA4GA1UECxMHVERHIExh
> YjEmMCQGA1UEAxMdVERHIExhYiBDZXJ0aWZpY2F0ZSBBdXRob3JpdHkwHhcNOTkx
> MTA4MTkzMjI0WhcNMDQxMTA2MTkzMjI0WjCBjjELMAkGA1UEBhMCVVMxETAPBgNV
> BAgTCE1hcnlsYW5kMRMwEQYDVQQHEwpHZXJtYW50b3duMR8wHQYDVQQKExZIdWdo
> ZXMgTmV0d29yayBTeXN0ZW1zMSAwHgYDVQQLExdXaXJlbGVzcyBPZmZpY2UgU2Vy
> dmljZTEUMBIGA1UEAxMLR01UV01EQUJEMDEwgZ8wDQYJKoZIhvcNAQEBBQADgY0A
> MIGJAoGBANFkiH/w8GNzFYX94D5amyPVuFH2kCVfF5SkS3oLyDlyoLtVuQifA+kf
> KXFAfy7FK7XSrWSwWTUusHt3RpQeNecpVDZLWV+yXEw8zV/G07RbUCLzSC+DETsX
> vSAfp48MkVXgMaSSiChuzKQxo2Rbzuwe9/t2ndI0UpLA8row18z9AgMBAAGjNjA0
> MBEGCWCGSAGG+EIBAQQEAwIAgDAfBgNVHSMEGDAWgBST+NNwPh0m0K0ZheiYX9yL
> buzkSTANBgkqhkiG9w0BAQQFAAOBgQADlh72BvdvtxnEueo7TbuOtbBwpmq8Uby3
> 5ST+U7is6XpkaYJP7FucsEamoPJH/DeO9Z3z/slha/QKvjQMX3W/Vadqg2kHk8QE
> XzR9HNHRss2xUs7F5c6ECbEwF3ciKpVZzzU1ACo9U7cp7qolWp1c782Jl1I31s8u
> lmjJ7NJ7Ww==
> –––––END CERTIFICATE–––––
>
>
> ====================<CA Certificate Follows>=====================
>
> –––––BEGIN CERTIFICATE–––––
> MIICiDCCAfGgAwIBAgIBATANBgkqhkiG9w0BAQQFADBoMQswCQYDVQQGEwJVUzEf
> MB0GA1UEChQWQVQmVCBXaXJlbGVzcyBTZXJ2aWNlczEQMA4GA1UECxMHVERHIExh
> YjEmMCQGA1UEAxMdVERHIExhYiBDZXJ0aWZpY2F0ZSBBdXRob3JpdHkwHhcNOTgw
> NzMxMjI0MzEyWhcNMDAwNzMwMjI0MzEyWjBoMQswCQYDVQQGEwJVUzEfMB0GA1UE
> ChQWQVQmVCBXaXJlbGVzcyBTZXJ2aWNlczEQMA4GA1UECxMHVERHIExhYjEmMCQG
> A1UEAxMdVERHIExhYiBDZXJ0aWZpY2F0ZSBBdXRob3JpdHkwgZ8wDQYJKoZIhvcN
> AQEBBQADgY0AMIGJAoGBAKKVRDrifhgJJYri2bJDEKebKu5L+1OzNVESS5DkgtGR
> UOA7eAhodsPqe7+kYr1WRtc8hou8Baglc406IbdtKPxh3i+nkXeQ9gkKjhZhrrAM
> sl2EkvzgmyAz9mtjdmFyGNWSXBgIWYy7mrQQn/S5Rx7NyrYwcB4aeH+W4tXJ1maH
> AgMBAAGjQjBAMB0GA1UdDgQWBBST+NNwPh0m0K0ZheiYX9yLbuzkSTAfBgNVHSME
> GDAWgBST+NNwPh0m0K0ZheiYX9yLbuzkSTANBgkqhkiG9w0BAQQFAAOBgQByb81c
> yIa8tDY8L23gQXjVs+Mjsk9+WqyjQH/jMcoQusnH2dKXcJuj2LJiDZd0SHNvM8nz
> NrsxvW+YWjNDwE9626o6vxroR7V9lrJIzWSYSgrySNZvLC7SdhIr41AxrlBI028R
> MKH5M/KKr8PIre/JorP8rnn6hCjGynSnGkraEw==
> –––––END CERTIFICATE–––––
>
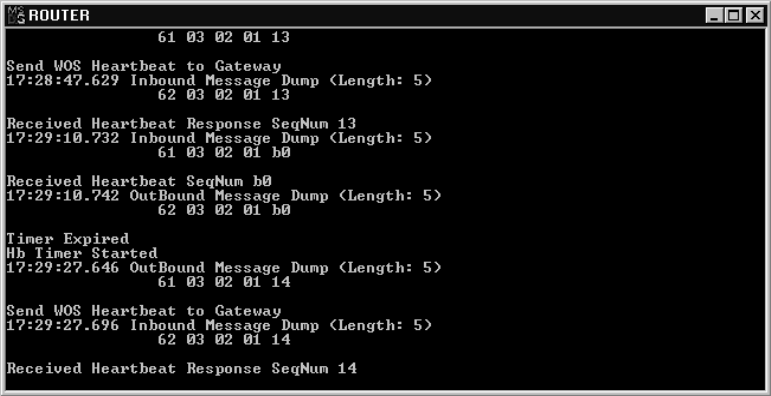
1026209–0001 Revision B Connecting to external equipment 8–7
Install the SSL certificate:
1. Open the AIReach Office Application if it is not already
open.
2. Select Configure → NSS → Systemwide to open the
System Configuration window.
3. Click the Transport tab.
4. In the WOS to Gateway Server Address line, enter the
gateway address and port number. (Obtain these from the
gateway provider.)
5. Click Save.
6. By default, the IS–41 link is configured to operate in secure
mode. If the IS–41 interface is operating in clear mode,
make these changes:
a. Enter the clear mode address and port in the
Transport window.
b. Edit the startup.dat file in the bin directory of
the current release: Change the router startup option
from –ATTSSL to –ATT (clear mode).
7. Click the ROUTER application on the taskbar to verify
router connectivity (heartbeat received) to the IS–41
gateway.
If the gateway connection is active, the ROUTER window
displays messages indicating that heartbeat has been
received:
If a heartbeat is not received, ping the gateway to try to determine
where the problem is. If you cannot resolve the problem, notify the
service provider representative responsible for establishing IS–41
connectivity.
Installing the certificate

1026209–0001 Revision B 8–8 Connecting to external equipment
Once the SSL link has been established and heartbeats are
received from the gateway, repoint the AIReach OS HLR to the
macro HLR, as follows:
1. From the AIReach Office banner menu, select Configure
→ NSS → SystemWide.
2. Select the Line Range tab.
3. Select the AROSC Name.
4. Change the HLR Point Code to an invalid but non–zero
number, such as 1.1.1.
5. Restart the Router application by closing the Router
window.
6. After the router restarts and heartbeats resume, update the
BSC point code with the new remote point code:
a. Open a Command Prompt window and enter
cd %aros_root_dir%\bin\msc
b. To open the file containing the remote point code,
enter
notepad inst1.ini
Note the value of the remotepc entry in this file.
c. Close inst1.ini.
d. In the Command Prompt window, enter
cd %aros_root_dir%\bin
e. Enter
notepad inst1.ini
f. Change the value of the localpc entry to the value
of remotepc noted in step 6b.
g. Save the file.
h. Reboot the Controller.
8.3
Repointing the HLR

1026209–0001 Revision B Connecting to external equipment 8–9
If a second LAN card is required for an administrative LAN,
follow the instructions below to install the second card and LAN
card driver:
Install the second LAN card in chassis slot 3, according to the
manufacturer’s instructions.
Note
The second LAN card must be the same brand and model as the LAN
card shipped from the factory. Any exceptions must be approved
through the TAC.
To install the driver for the second LAN card:
Editing gwroutes.bat
1. Power up the Controller.
2. Use Notepad to open the file C:\gwroutes.bat.
3. Remove the comments from the lines
route DELETE 0.0.0.0
and
route ADD –p 0.0.0.0 mask 0.0.0.0 xxx.xxx.xxx.xxx
4. Replace xxx.xxx.xxx.xxx with the IP address for the
administrative (second) LAN card.
Obtain the IP address from the customer’s network
administrator.
5. Save the changes.
Install the driver
1. Click Start → Settings → Control Panel.
2. Double–click the Network icon to launch the networking
window.
3. Click the Adapters tab.
There should be two adapters listed.
4. Click Add to open the new adapter card window.
5. If a driver was provided with the new LAN card, click on
Have Disk … to use the drivers provided with the LAN
card.
6. Place the floppy disk or CD containing the driver into the
Controller and select the appropriate disk drive.
7. If a driver was not provided with the LAN card, select the
LAN card from the list of drivers shown.
8. If a driver was not provided and is not listed, contact TAC
to obtain the correct driver.
9. Follow the on–screen instructions to install the driver.
10. Close the Network window.
8.4
Installing a second
LAN card and driver
(optional)
Installing the LAN card
Installing the LAN card
driver
1026209–0001 Revision B 8–10 Connecting to external equipment
Entering the IP address
1. Enter an IP address for the LAN card:
a. For the IP address, enter the administrative IP address
provided by the customer network administrator.
b. Use a subnet mask value of 255.255.255.0 unless
otherwise instructed by the network administrator.
c. Do not enter a value for the default gateway.
2. Click the DNS tab and enter the IP address provided by the
customer network administrator for the DNS server. If no
DNS server is available, leave this field blank.
3. Close all remaining network windows.
The software prompts you to reboot the Controller.
4. Click OK.
5. After the Controller reboots, verify that the IS–41 router
reconnects—if it was previously connected: Verify that
external IP addresses can be reached using a web browser
or by pinging a remote address.

1026209–0001 Revision B Connecting to external equipment 8–11
The AIReach OS can be configured to page the system operator
when a critical or major alarm occurs. To enable alarm paging,
you must:
•Install an external modem.
•Configure the operator’s pager information in
the AIReach OS.
Alarm paging also requires HipLink Lite software, which is
factory–installed on the System Controller.
Instructions for installing the external modem and configuring the
pager information are given below.
If the customer does not want to use alarm paging, proceed to
Chapter 3.
Alarm paging can be set up to use one or two analog lines. The
advantage of using two lines is that alarm pages are delivered even
when someone is dialed into the Controller. The disadvantage of
using two lines is the cost of the second line. The decision to use
one or two lines should be made by the customer.
Follow these instructions to install the external modem:
If one analog line is used:
1. Connect the line to the input jack on the internal modem.
2. Daisy chain the analog line from the internal modem to the
line–in jack on the external modem.
3. Connect the external modem to the serial port (COM1) on
the back of the Controller.
4. Attach the power cable to the modem and to an outlet, and
make sure the modem power switch (if present) is on.
5. Provide the dial–up number to the TAC—that is the direct
inward dialing (DID) number of the line coming into the
internal modem.
If two analog lines are used:
1. Connect one line to the input jack of the internal modem.
2. Connect the other line to the input jack on the external
modem.
3. Connect the external modem to the serial port (COM1) on
the back of the Controller.
4. Attach the power cable to the modem and to an outlet, and
make sure the modem power switch (if present) is on.
5. Provide the dial–up number to the TAC—that is the direct
inward dialing (DID) number of the line coming into the
internal modem.
Note
If two lines are used, the line used for alarm paging does not
have to be a DID line.
8.5
Enabling alarm
paging
Installing the external
modem
1026209–0001 Revision B 8–12 Connecting to external equipment
Configure the AIReach OS with the operator’s pager, mobile
phone, or beeper information, as explained below. (The HipLink
software must already be installed.)
Notes
If the AIReach OS is configured to direct alarm pages to a mobile
phone on the AIReach OS, the mobile phone may not receive an
alarm page in the event of an outage.
If you need assistance using HipLink, call the Cross Communi–
cations support hotline at (630) 964–4282.
Required information
Obtain the following information from the customer:
•Pager number
•PIN (for pagers)
•MIN (for mobile phones)
•Maximum character length
Editing the ArosPageInfo.dat file
You must enter the operator and page information in the file
C:\HipLink\ArosPageInfo.dat
A sample file is located in
C:\%OMC_ROOT_DIR%\config\ArosPageInfo.dat
To configure an operator to receive critical and major alarm pages:
1. Use Notepad to edit
C:\HipLink\ArosPageInfo.dat, as explained in the
following steps:
2. Edit ArosPageInfo.dat to include:
PagingEnabled yes
(Entries in ArosPageInfo.dat are not case–sensitive.)
3. Uncomment “UserData” (remove “ # ”) and change the
information to the Controller name or number (10
characters maximum), for example:
UserData AROSC1
In this example, AROSC1 is a text string that uniquely
identifies the Controller.
If alarms will be sent to a beeper or
non–alphanumeric pager, use numbers only.
When an alarm occurs, the Controller name or number you
enter is displayed on the pager.
Configuring the
AIReach OS for alarm
paging

1026209–0001 Revision B Connecting to external equipment 8–13
4. Uncomment (remove “ # ” from) the appropriate lines in
ArosPageInfo.dat, and add appropriate information to
identify the pager or beeper type, service provider, and (for
pagers only) personal identification number (PIN):
Required for alphanumeric pagers:
pagerType alpha
serviceProvider <provider ID>
pin <operator PIN>
Use the provider ID for the customer’s service provider,
as listed in Table 8-1 :
Table 8-1 Supported alphanumeric
service providers
Provider/service name Provider ID
AirTouch 408 AIR408
AirTouch 602 AIR602
Alert 702 ALR702
American Pager 210 AMP210
American Pager 800 AMP800
American Paging 512 AMP512
Ameritech 314 AMT314
AmeritechIL 708 AMT708
AT&T Paging 801 ATT801
AT&T Wireless 888 ATT888
Bell Atlantic 800–1 BAL800
Bell Mobility BELLMO
Cell One 888 CELL1
ComTech 800 CTH800
Cook Paging 206 CKP206
Cook Paging 209 CKP209
Cook Paging 415 CKP415
DeTeMobil TD1
FirstPage FSTPAG
MapComm 800 MAP800
Metro 200 407 M2_407
MetroCall 800 MCL800
MetroMedia 800 MTM800
Minn Comm 612 MNC612
MobileComm 410 MCM410
MobileComm 800 MCM800
MobileComm 910 MCM910
MobileMedia 800 A MM800A

1026209–0001 Revision B 8–14 Connecting to external equipment
Table 8-1 Supported alphanumeric
service providers
Provider/service name Provider ID
MobileMedia 800 B MM800B
MobileMedia 804 MM_804
MobileMedia 817 MM_817
Nextel 312 NXT312
Nextel 415 NXT415
Nextel 510 NXT510
Nextel 630 NXT630
Nextel 708 NXT708
Nextel 847 NXT847
Nextel 847–344 NEXTEL
PacBell 415 PAC415
PageBridge 407 PBR407
PageMart 800 PMR800
PageNet Nationwide 800 PAGENE
Page New England 800 PNE800
Page New York 716 PNY716
PageNet 404 PNT404
PageNet 408 PNT408
PageNet 415 PNT415
PageNet 503 PNT503
PageNet 510 PNT510
PageNet 602 PNT602
PageNet 617 PNT617
PageNet 619 A PN619A
PageNet 619 B PN619B
PageNet 714 PNT714
PageNet 800 CA PN800C
PageNet Nationwide PAGNET
PageNet Nationwide 888 PNT888
PageNet 818 PNT818
PageNet 908 PNT908
PagePlus 918 PPL918
Pagesouth 910 PSO910
ProNet 510 PRN510
SkyTel 707 SKY707
SkyTel 800 SKY800
SkyTel 2–Way SKY2WY
SkyTel Nationwide 800 1SKYTEL
Sprint SPRINT

1026209–0001 Revision B Connecting to external equipment 8–15
Table 8-1 Supported alphanumeric
service providers
Provider/service name Provider ID
TNI Paging 800 TNI800
Touch Tel Paging 510 TTP510
US West 520 USW520
Westlink Paging 602 WLP602
Westlink Paging 801 WLP801
1For SKYTEL alphanumeric users who have a
pin number instead of an 800 number, the
dialup number will be 1–800–679–2778. (See
Creating a new provider ID
below.)
Required for numeric pagers:
PagerType numeric
ServiceNumber <service provider phone
number>
PIN <operator PIN>
Required for beepers:
PagerType beeper
BeeperNumber <beeper number>
Required for alphanumeric mobile phones:
pagerType alpha
serviceProvider <provider ID>
min <operator MIN>
Required for numeric mobile phones:
PagerType numeric
ServiceNumber <service provider phone
number>
MIN <operator MIN>
Sample entries for ArosPageInfo.dat:
Sample entries for alphanumeric Skytel pager
with PIN number 8863647:
pagingEnabled yes
pagerType alpha
perviceProvider SKYTEL
pin 8863647
1026209–0001 Revision B 8–16 Connecting to external equipment
Sample entries for numeric pager with phone number
888–886–3647 and PIN number 348593:
pagingEnabled yes
pagerType numeric
serviceNumber 18888863647
pin 348593
Sample entries for beeper with beeper number 703–580–2077:
pagingEnabled yes
pagerType beeper
beeperNumber 17035802077
Creating a new provider ID
If the customer’s paging provider or service is not listed in Table
8-1 , follow the procedure illustrated below to create a new
provider ID.
The steps below illustrate how to add a new phone number for a
service provider and create a new provider ID. In this example, the
new provider is a TAC service provider with the phone number
1–800–679–2778:
1. Double–click the HipLink icon in the Windows system
tray.
2. Select Modify → Network service.
3. Click New.
4. In the Network description field, enter a description to
identify the service (30 characters maximum):
Tac New Service
5. Click the Phone field.
The Network Key field now shows TACNEW (in all capital
letters). This is the service provider name (6 characters
maximum) to be entered in the ArosPageInfo.dat file.
(See step 4 on page 8–13.)
6. Enter the phone number (800–679–2778) in the phone field.
7. Set the maximum message length to 200 characters.
Note
If the service supports a message length of less than 200
characters, the message may be truncated.
8. Leave all other (default) values as they are.
9. Save the modified Network service definition.
10. Enter TACNEW as the service provider name in the
ArosPageInfo.dat file, and save the file.

1026209–0001 Revision B System testing 9–1
Chapter 9
System testing
This chapter addresses the following tasks:
•Testing RF coverage – page 9–1
•Conducting performance tests – page 9–2
Verify operational performance by completing the Performance
Test Checklist referred to in Section 9.2. This verification is the
final step in commissioning the AIReach OS.
Using a test cell phone, perform a walk–through of the entire
customer site to confirm AIReach OS RF coverage and record
signal strengths:
1. Test interior coverage, with the customer representative
present:
Record signal strength readings at the test points outlined in
the (customer site–specific) AIReach OS RF Engineering
Plan.
Immediately notify the HNS TAC if:
•The RF coverage is not as specified in the RF
Engineering Plan
•Signal strength readings inside the facility are 5 dBm
above or below the specified values
2. Test exterior RF coverage, with the service provider
representative present:
a. Record signal strength readings at the test points
outlined in the RF Engineering Plan.
b. Make sure coverage does not extend beyond 30 feet
(9.1 meters) from the building: Make a call inside the
building, walk outside, and walk away from the
building.
The call should drop from the AIReach OS (and
reselect to the macro network) before you are 30 feet
(9.1 meters) from the building.
Immediately notify the HNS TAC if:
•The RF coverage is not as specified in the RF
Engineering Plan
•Signal strength readings outside the facility are
stronger than specified values
9.1
Testing RF coverage

1026209–0001 Revision B 9–2 System testing
To complete installation of the AIReach OS, conduct performance
tests as follows:
1. Obtain the Performance Test Checklist from your AIReach
OS Program Manager.
2. Complete this checklist by performing each listed test and
checking the associated box after each test is successfully
completed.
Note
A customer representative should witness the performance
tests.
3. Sign the completed checklist.
4. Obtain the customer’s representative’s signature.
5. Send the completed Performance Test Checklist to the HNS
Installation Manager.
6. Correct the Configuration Report to reflect the “as–built”
AIReach OS installation.
7. Correct (red line) the Configuration Report to reflect the
“as–built” installation.
8. Copy the AIReach OS default.cfg file to a floppy disk.
To find the AIReach OS current release directory, which
contains default.cfg, enter:
cd %AROS_Root_Dir%
from the DOS prompt.
9. Send the corrected Configuration Report and default.cfg
floppy disk to the HNS Installation Manager.
9.2
Performance testing

1026209–0001 Revision B Installation inspection 10–1
Chapter 10
Installation inspection
This chapter briefly discusses the installation quality inspection.
When all the initial AIReach Office subscribers have been entered
into the Controller, complete the Installation Quality Assurance
(QA) Inspection Checklist. Obtain this checklist from your
AIReach OS Program Manager.
Invite a customer representative to accompany the person
performing the QA inspection.
Complete the Installation Quality Assurance (QA) Inspection
Checklist as follows:
1. Check the Y box when an item is complete or the N box
when an item is NOT complete (discrepancy).
2. Correct any discrepancies and initial the associated
CLEARED box when the discrepancy is corrected.
3. Sign the checklist when the inspection is complete.
4. Obtain the customer’s representative’s signature.
5. Send the completed Installation Quality Assurance (QA)
Inspection Checklist to the HNS Installation Manager.

1026209–0001 Revision B Provisioning 11–1
Chapter 11
Provisioning
This chapter explains the procedure for provisioning permanent
subscribers. To provision temporary subscribers (visitors, for
example), see page 4–20.
After the system has been installed and verified, provision the
subscribers as follows:
1. If not already connected to the system, click the Connect
button in the Connect window to display the main AROSC
Configuration window.
2. Select Configure → NSS → HLR.
3. Click the MIN Range tab to display the HLR Configuration
window.
4. Select the specified AROSC Name from the dropdown list.
5. Enter the specified MIN range values, then click Save to
save them.
6. Repeat step 5 until the information for all subscribers is
entered.
Note
When using Allocation Type, Individually Allocated,
information must be entered for each subscriber.
7. Click the LDN Range tab.
8. Enter the LDN range values, and then click Save to save
them.
9. Repeat step 8 until the information for all subscribers is
entered.
Note
When using Allocation Type, Individually Allocated,
information must be entered for each subscriber.
10. When the information for all subscribers is entered, click
Close to return to the main AIReach Office window.
11. Select Configure → Subscriber.
12. Click the Identification tab to display the Subscriber
Provisioning window.
(Initially, this window may contain no data.)
11.1
Provisioning
permanent
subscribers
1026209–0001 Revision B 11–2 Provisioning
13. Select the specified AROSC Name from the dropdown list.
14. Enter each subscriber’s information, including LDN
extension, MIN, and ESN. Then click Save.
Note
Observe the status bar above the option windows. If the
status bar is red, a subscriber information error exists. Use
the vertical scroll bar to display the error message. Before
proceeding, review the message and correct the error. The
software shows a Successful Load message when the
subscriber information is entered correctly.

1026209–0001 Revision B Remote Client 12–1
Chapter 12
Remote Client
This chapter includes:
•Overview of the AIReach OS Remote Client – page 12–1
•Explains how to install the Remote Client – page 12–2
•Explains how to test the installation – page 12–3
The Remote Client can be installed on a Windows 95, Windows
98, or Windows NT computer to provide access from a remote
location to the AIReach OS. The Remote Client provides the
graphical user interface that allows you to access the System
Controller and AIReach Office software application. Through the
Client, you can execute Controller functions from the remote
computer.
The remote access service is typically provided by the Microsoft
Windows Remote Access Server (RAS). RAS answers incoming
phone connections and provides a PPP connection. Once a PPP
connection is established, the remote computer (client) functions
as if it were on the same physical network as the Controller. A
LAN intranet connection can be used as an alternative to RAS.
Typically, the System Controller is placed in a secure, limited
access area with the PBX. A separate operations room is typically
used for daily PBX and AIReach OS tasks, such as adding users
and deleting users. If desired, these operations can be performed
on a remote computer.
Note
Multiple users can access Subscriber configuration windows at the
same time, but only one user at a time can access Controller
configuration windows.
To use the Remote Client, the remote computer must have either:
•IP connectivity between the remote computer and the
Controller
•Dial–in access from the remote computer to the Controller
For dial–in access, the Controller must have a modem and
RAS configured and enabled.
12.1
AIReach OS Remote
Client
Requirements
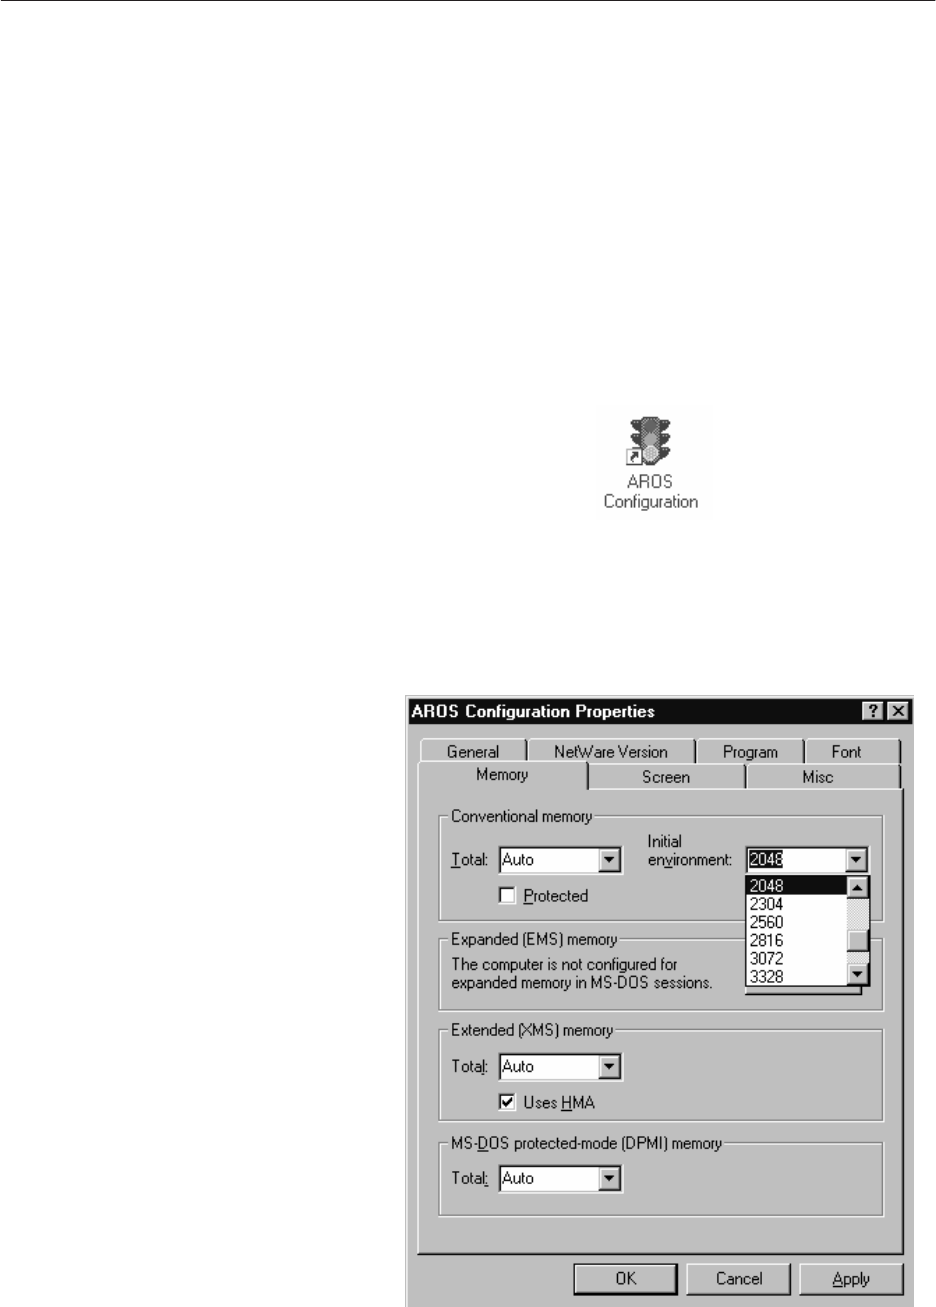
1026209–0001 Revision B 12–2 Remote Client
Follow these steps to install the Remote Client on a remote
computer:
1. Load the AIReach OS software CD into the computer’s CD
drive.
2. Using the Windows Explorer, find the folder called
GUIInst, and double–click to open it.
3. Double–click on the setup.exe file.
This starts the InstallShield.
4. Read the instruction file displayed by the InstallShield;
follow the on–screen instructions; and respond to the
questions.
After you complete the installation, InstallShield reboots the
computer, and the AROS Configuration icon (shown below)
appears.
If the remote computer is running Windows 95 or Windows 98, you
must change the GUI’s initial environment memory setting:
1. Right–click the AROS Configuration icon (shown in step
4), and select Properties.
2. Click the Memory tab.
12.2
Installing the
Remote Client
Windows 95 or
Windows 98

1026209–0001 Revision B Remote Client 12–3
3. Change the Initial Environment value from the default
setting to 2048.
4. Click OK.
Make sure the Remote Client connects to the Controller:
The instructions below are for Windows 95, Windows 98, or
Windows NT .
1. At the remote computer, double–click the AROS
Configuration icon:
The software displays the AIReach Office banner and a
Login dialog box.
2. In the Login dialog box, enter:
- The name of the Controller you want to connect to
(Replace the default entry, Localhost, after
AROSC, with the name of the Controller you want to
connect to.)
- User name
(No entry is needed if this field is grayed out.)
- Password
The default administrator password is “abc123.”
3. Click Connect.
The login window disappears, and the Remote Client
connects to the Controller you specified.
If the Remote Client cannot connect, it displays a message
stating that the connection failed.
12.3
Testing the Remote
Client
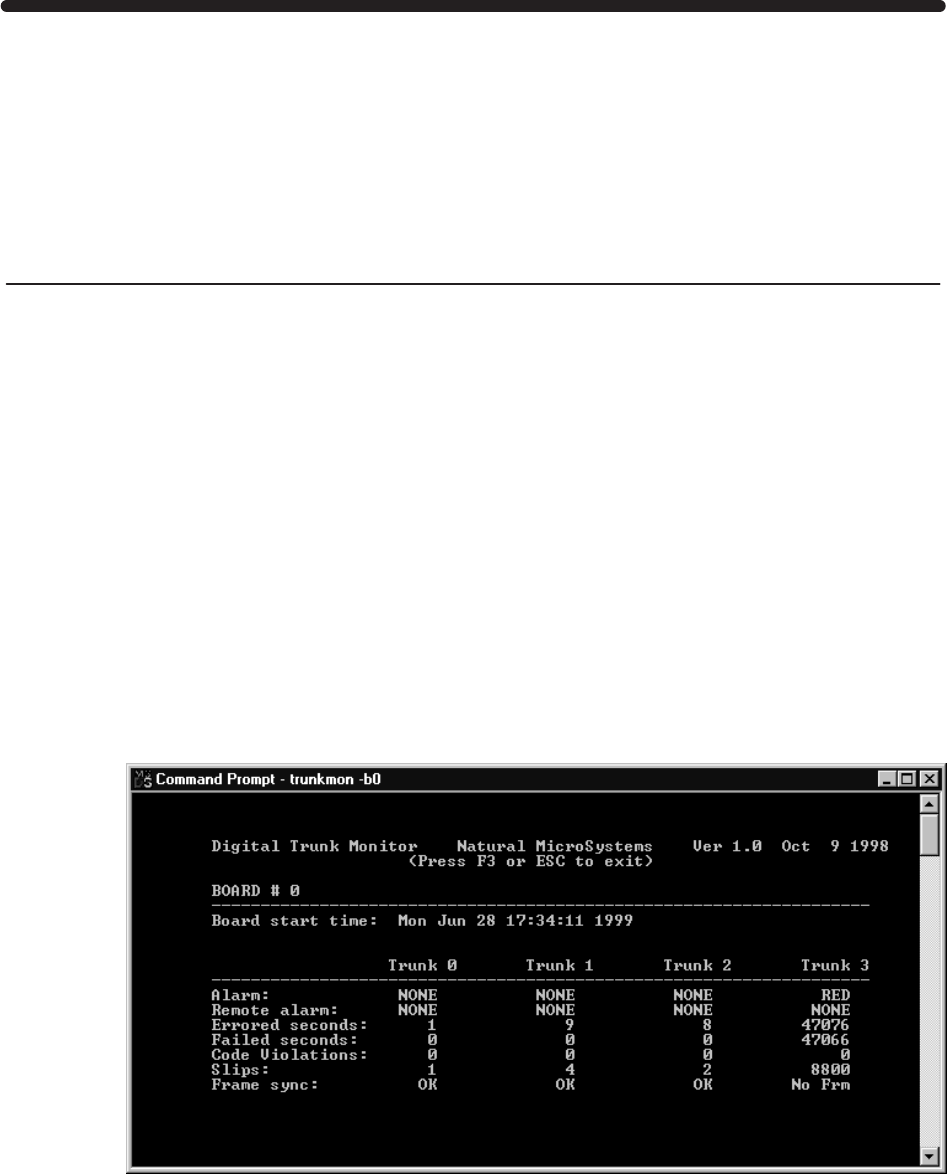
1026209–0001 Revision B Troubleshooting 13–1
Chapter 13
Troubleshooting
This chapter includes information for troubleshooting a newly
installed AIReach OS; it does not address troubleshooting for
routine (post–installation) operation. It addresses:
•Controller problems – page 13–1
•Picocell problems – page 13–2
•General operational problems – page 13–6
•Picocell alarms – page 13–8
Problems with System Controller cards
Make sure the card is properly seated in the Controller backplane
socket. Check cables and connections (if applicable). Make sure
all DIP switches and jumpers on the card are set correctly—as
explained in Section 2.5 (page 2–13).
Problems with a Quad T1 card or T1 line
To diagnose problems with a Quad T1 card or T1 line, access the
Digital Trunk Monitor utility on the Controller:
1. At the DOS prompt, enter
trunkmon –bX
where X can be 0 to n–1, where n = the number of
Quad T1 cards in the system
The utility is shown in a Command Prompt window:
13.1
Controller problems
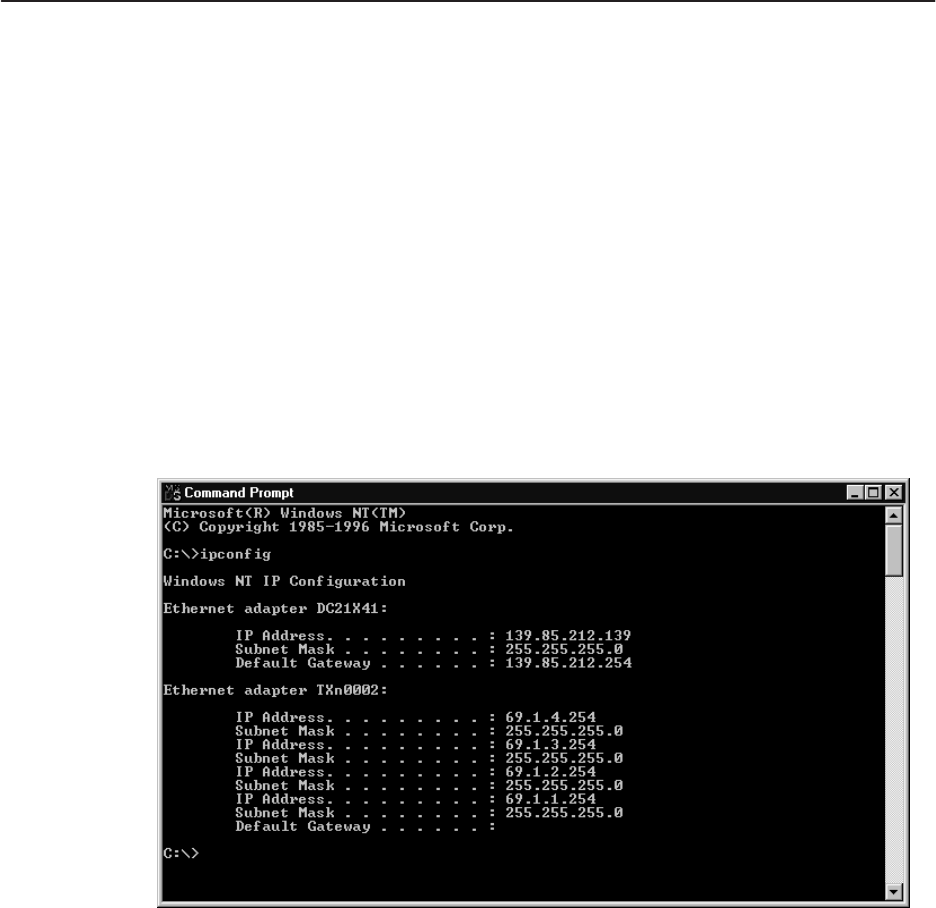
1026209–0001 Revision B 13–2 Troubleshooting
Indications that a T1 trunk is good are:
Alarms: NONE
Frame sync: OK
2. Press F3 or Esc to exit.
3. At the DOS prompt, enter Exit to close the Command
Prompt window.
(See also Section 13.4, Picocell alarms.)
Picocell won’t boot
If a picocell or picocells won’t boot:
•Verify that the correct picocell IP addresses are entered in
the Controller
•Add picocell IP addresses if necessary
Verify that the correct picocell IP addresses are entered in the
Controller:
1. Select Start → Program Files → Command Prompt to
display a Command Prompt window.
2. At the DOS prompt (C:\>), enter ipconfig to display
the system’s IP configuration:
13.2
Picocell problems
Checking the IP
addresses
1026209–0001 Revision B Troubleshooting 13–3
3. In the “Ethernet adapter TXn0002” section of the
configuration screen, make sure the correct IP addresses are
displayed for the picocells to be installed in the system.
An IP address must be listed for each picocell, in sequential
order, as illustrated below:
Picocell IP Address
1 69.1.1.254
2 69.1.2.254
3 69.1.3.254
4 69.1.4.254
..
..
Notes
When a picocell boots up, it is assigned the next available IP
address. Only picocell IP addresses are assigned to the
TX2000 IP card.
You will need to add picocell IP addresses (as explained in
the next section) if:
•The number of picocell IP addresses is less than
the number of picocells to be installed in the system
•The picocell IP addresses do not correspond in
sequence to the picocells installed
Notes
The number of addresses configured can exceed the number
of picocells; this will not cause a problem.
Up to eight addresses can be configured.
4. At the DOS prompt (C:\>), enter exit to return to the
Windows desktop.
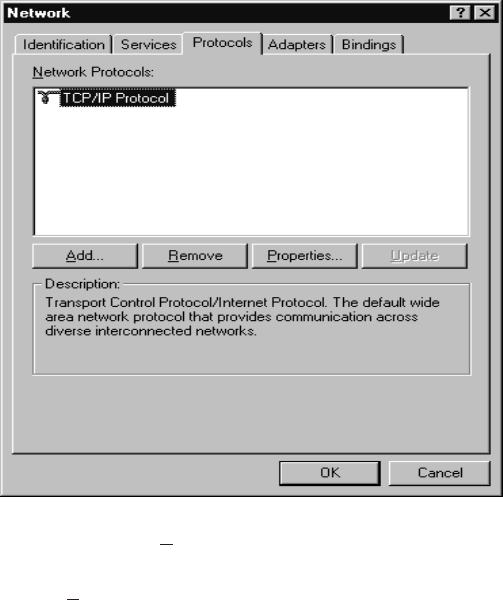
1026209–0001 Revision B 13–4 Troubleshooting
You need to add picocell IP addresses only if the number of
picocell addresses is incorrect, as explained in the previous
section (Checking the IP addresses). Skip this section if the
picocell IP addresses are configured correctly.
If you need to add picocell IP addresses:
1. Select Start → Settings → Control Panel → Network →
Protocols.
This opens the Network window:
2. Select TCP/IP → Properties → IP Address.
3. Highlight the NMS TXn000 LAN adapter <CP.1> from
the Adapter pulldown list and click Specify an IP address.
Adding picocell IP
addresses
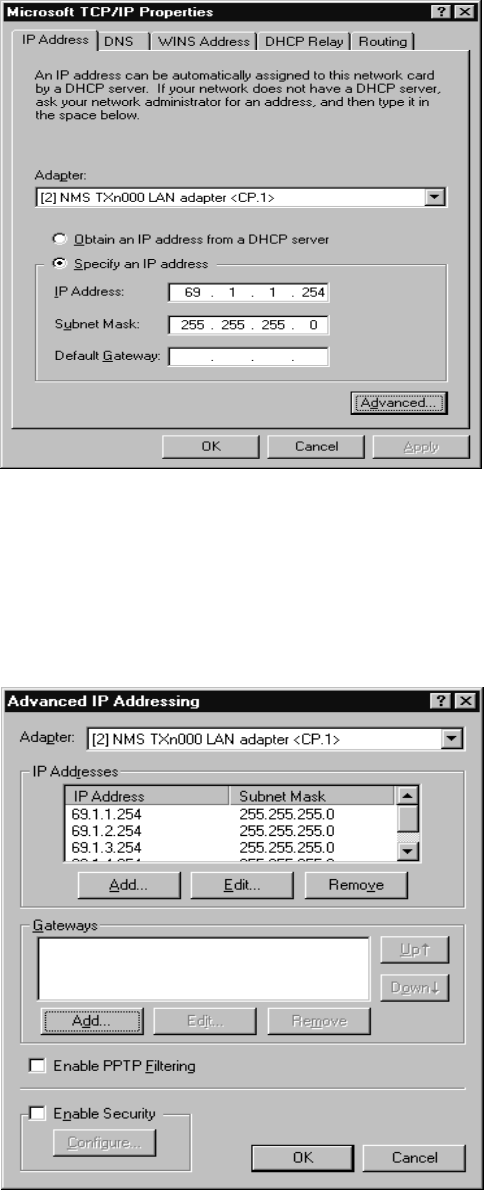
1026209–0001 Revision B Troubleshooting 13–5
This opens the Microsoft TCP/IP Properties window:
The initial TXn000 IP address must be 69.1.1.254 with a
Subnet Mask of 255.255.255.0.
Leave the Default Gateway field blank.
4. Click Advanced.
This opens the Advanced IP Addressing window:
5. Click Add under IP Addresses.
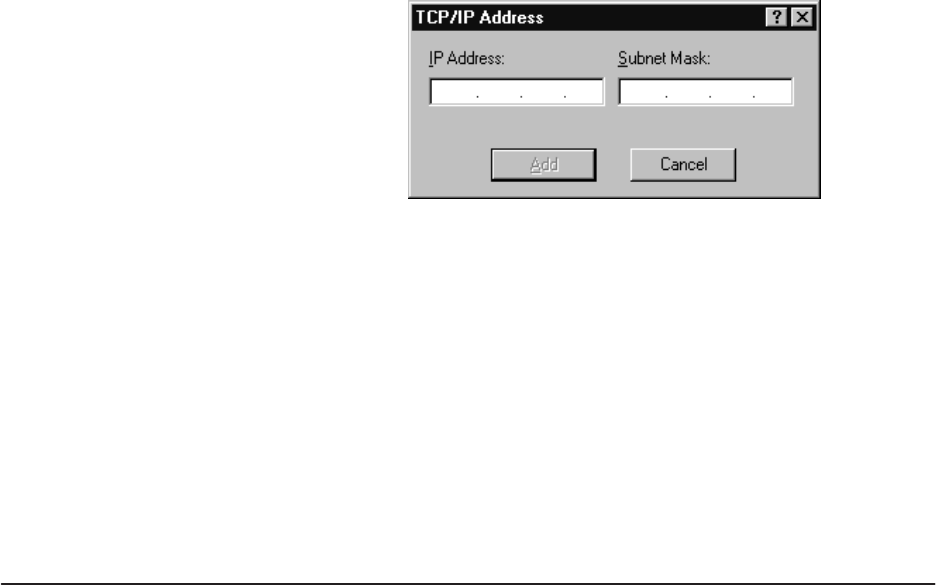
1026209–0001 Revision B 13–6 Troubleshooting
This opens the TCP/IP Address window:
6. Enter the appropriate picocell IP Address and Subnet Mask;
then click Add.
Picocell IP addresses are in the form: 69.1.X.254, where X
is the next available number in sequence, that is, 2, 3, 4, 5 ...
The Subnet Mask is always 255.255.255.0.
Note
The Add button is not activated until an IP Address is entered.
7. Repeat step 6 until a picocell IP address and subnet mask is
entered for all the picocells installed in the system.
Cells do not load
LEDs on the Quad T1 card should show green for each connected
port. If the LEDs do not show green, check the following:
•The wiring for proper wire schedule, crimps, etc.
•The power connections to the picocells.
•The software loads under the BTS tab. It should be set to
default settings.
•The serial numbers under the BTS tab. Make sure the serial
numbers are correct and that the correct cells are connected
to the correct port.
If some cells have booted, but others have not, substitute a
non–booting cell for a booting cell and change the serial number
under the BTS tab. Replace any faulty cells with spare cells and
contact TAC.
DCCHs are not available
Call TAC.
13.3
General operational
problems
1026209–0001 Revision B Troubleshooting 13–7
Phones do not lock or register
If the phones do not lock or register, check:
•The phone programming
•The subscriber entries on the provisioning screens
•The DCCH configuration
Mobile phones cannot contact each other
If two mobile phones cannot call each other, check:
•The PBX connection LED on the rear of the System
Controller.
•That the PBX administrator has activated the T1 and
entered the phantom numbers correctly.
•That all cells are listed under MSC Configuration, BSC
Configuration.
•The dialing plan in the configuration information. Make
sure the information has been entered correctly.
Coverage and handoff problems
Call TAC in case of:
•Bad signal strength
•Dragging calls
•Frequent handoffs
•System Controller cutoffs
•Signal strength outside the building
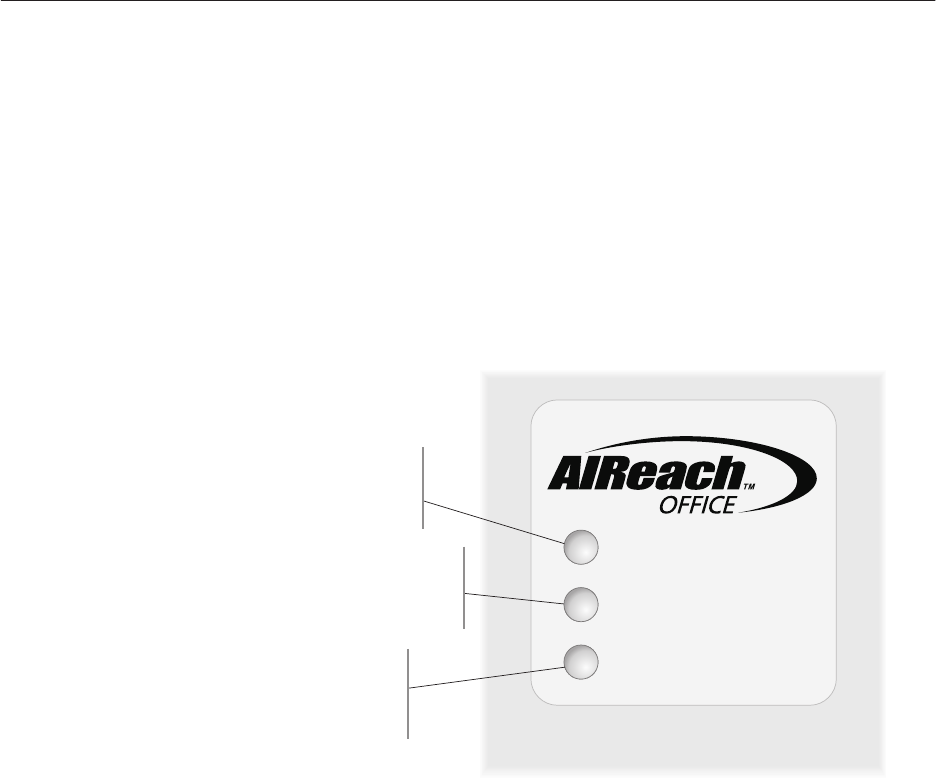
1026209–0001 Revision B 13–8 Troubleshooting
Table 13-1 describes the alarm codes from the picocell.
There are four categories of picocell alarms:
•Critical – BTS requires service immediately
•Major – Major performance or capacity loss
•Minor – Minor performance or capacity loss
•Info – Informational alarm
When critical or major alarms occur, the Alarm LED on the
picocell front panel is red. When a minor alarm occurs, the Alarm
LED is orange. When an information alarm occurs, the Alarm
LED is not lit: the information is sent to the System Controller for
information only.
Figure 13-1 LEDs on front of picocell
T0001003
Power
Green - Voltage normal
Orange - Low voltage
Alarm (Controller)
Off - Normal
Orange - Minor alarm
Red - Major alarm
Temperature (power supply)
Green - Normal
Red - Exceeds 75° C
Power
Temp
Alarm
Alarm LED is orange while
the Controller boots.
Note
The LED information above is for production picocells. LED
codes may be different for pre–production picocells.
13.4
Picocell alarms

1026209–0001 Revision B Troubleshooting 13–9
Table 13-1 Picocell alarms
Name Alarm Severity Meaning Suggested Action
WBSU Rebooting 2180 Info WBSU has been rebooted Perform WBSU startup
procedures
WBSU Restart 2181 Info WBSU has been warm
booted Perform WBSU startup
procedures
Get Time–of–day
Failed 2185 Minor WBSU could not contact
WOSC time server to get
time–of–day
Check IP address of time
server
CPU Busy 2188 Info CPU idle time < 5%
CPU Available 2189 Info CPU idle time > 5%
Master Oscillator
Failed 218A Critical Master oscillator failed Replace master oscillator
Power Supply
Voltage Alarm 2281 Critical Power supply output is
out of range Service required
Software Image
File Corrupt 2380 Major Download software image
has CRC error Check software download
image on WOSC
Software
Download
Started
2381 Info Software download in
progress
Software
Download
Completed
2382 Info Software download
finished
Abis Queue Full 2383 Minor Abis receive buffers
usage is 75% of
maximum capacity
Suspend forward
messaging to WBSU until
Abis Queue Available
Alarm received
Abis Queue
Available 2384 Minor Abis receive buffers
usage is below 25% Resume forward
messaging to WBSU
Card Insertion 3280 Info Card has been inserted Setup card
Card
Reboot/Reset 3281 Minor Card has been rebooted
or reset Setup card
Card Removed 3282 Minor Card has been removed Decommission card and
associated protocol
stacks
Card Failed 3283 Major Card does not respond Decommission card and
associated protocol
stacks
Traffic Channel
Failed 5280 Minor Fatal error in protocol
stack Decommission and then
re–commission protocol
stack

1026209–0001 Revision B Maintaining Quad T1 card 14–1
Chapter 14
Maintaining Quad T1 cards
This chapter includes the following topics:
•Replacing a Quad T1 card – page 14–2
•Moving a Quad T1 card – page 14–5
•Removing (deleting) a Quad T1 card – page 14–9
To add a Quad T1 card, see Sections 2.4 through 2.8.
The instructions in this chapter are not part of the initial
installation procedure. They are provided in case you need to
replace, move, or remove a Quad T1 card.
If you need to replace, move, or permanently remove (delete) a
Quad T1 card, you must exercise special care because specific
instructions for DIP switch settings, an adapter card, and bus
cables depend on the slot where the card is installed (or removed
from).
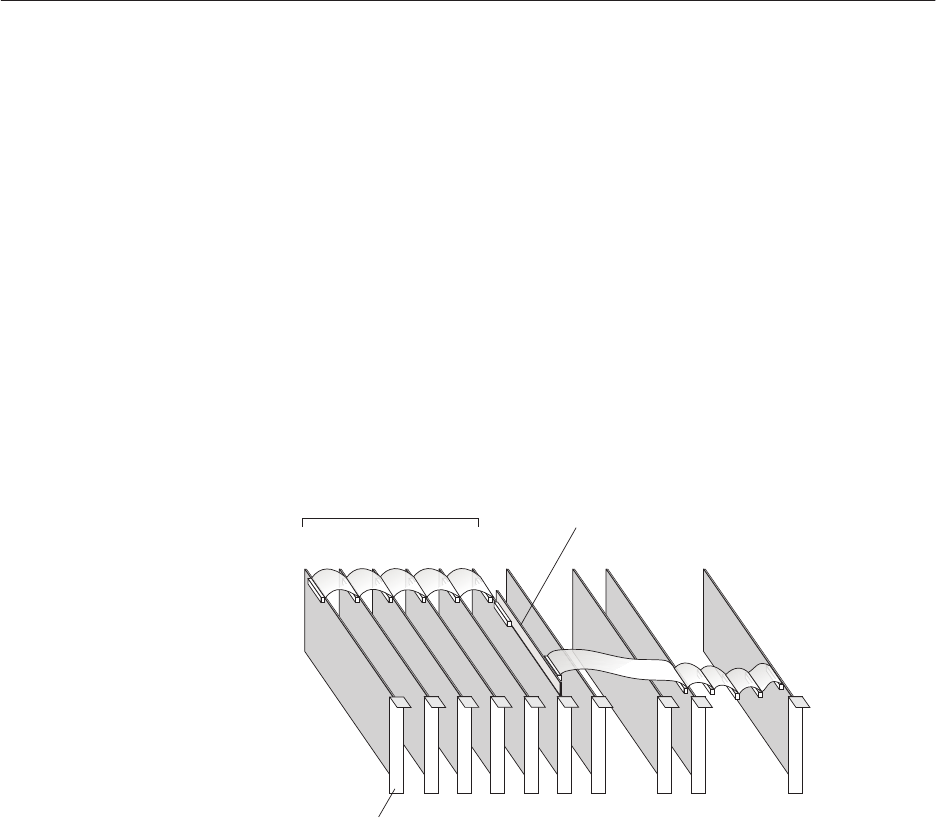
1026209–0001 Revision B 14–2 Maintaining Quad T1 card
To replace a Quad T1 card in the same slot, follow these steps:
Note
When you replace a Quad T1 card in the same slot, do not
make any software configuration changes.
1. Shut down the Controller: Click Start → Shutdown, select
Shut down the computer?, and click Yes.
2. After you see the message indicating that it’s OK to turn off
power to the computer, turn off the Controller power
switch.
3. Remove the Controller cover (as explained on page 2–11).
4. Remove any PBX or BTS connections to the back of the
Quad T1 card to be replaced.
5. Disconnect the H.100 ribbon cable (shown in Figure 14-1)
from the card to be replaced.
Figure 14-1 H.100 and MVIP bus cables
T0001026
16
H.100 bus cable
MVIP bus cable
Quad T1 cards
456789
Slot
Bus adapter card
6. If there are Quad T1 cards in both slots adjacent to the card
to be replaced (on each side), remove the cable from all
cards to the end of the cable in either direction (so you can
remove the card).
7. If the card to be replaced is the first one in a chain of Quad
T1 cards (typically in slot 9), remove the MVIP cable also.
See Figure 14-1.
8. Unscrew the hold–down screw for the card to be removed.
9. Remove the card by carefully lifting it up.
10. Set the S1 (termination) DIP switches on the new card to
match those on the removed card. (For the location of these
switches, see Figure 2-9 on page 2–13.)
14.1
Replacing a Quad
T1 card in the same
slot
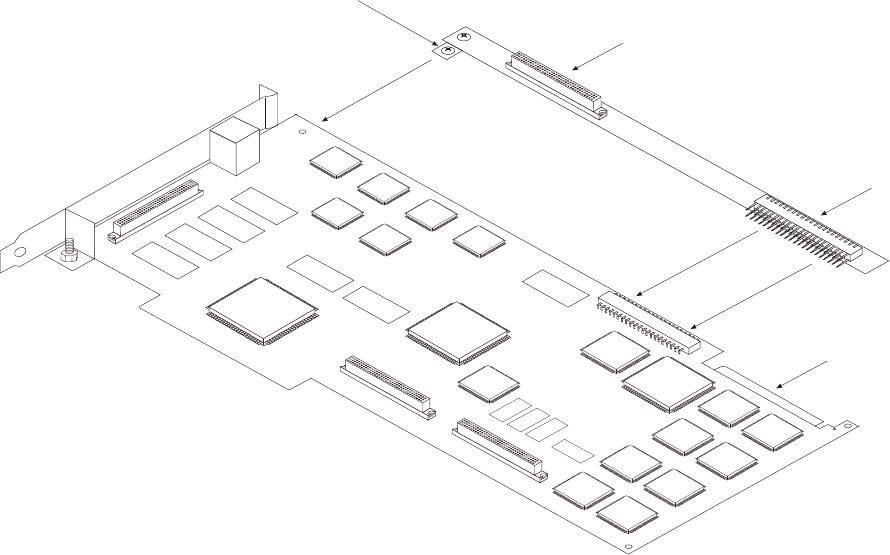
1026209–0001 Revision B Maintaining Quad T1 card 14–3
11. If the removed card was the first in a chain of Quad T1
cards, an MVIP–to–H.100 bus adapter card is attached at
the top of the Quad T1 card (Figure 14-1): Unscrew the bus
adapter card (or use a new bus adapter card) and connect it
to the new Quad T1 card, as shown in Figure 14-2.
The bus adapter card must be secure and in full contact
with the Quad T1 card.
Figure 14-2 MVIP bus adapter card (on the first Quad T1 card)
G-17195 F
09/30/99
Secure adapter card with No. 4
screw into Quad T1 card
Insert bus adapter
connection into
Quad T1 card
MVIP bus connector
H.100 bus connector
2.
1.
12. Insert the new Quad T1 card into the slot where the original
card was removed.
Press down carefully to seat the card in the motherboard
connector. Be especially careful if a bus adapter card is
attached to the Quad T1 card.
13. Insert and tighten the hold–down screw removed from the
original card.
14. Reconnect the H.100 cable to all Quad T1 cards. Refer to
Figure 14-1.
15. If the card replaced is the first card in a chain of Quad T1
cards, carefully reconnect the MVIP cable. See Figure 14-1.
16. Reconnect any PBX or BTS cables to the back of the card.
17. Replace the Controller cover.
Be careful not to damage the copper finger stock under the
front edge of the cover.
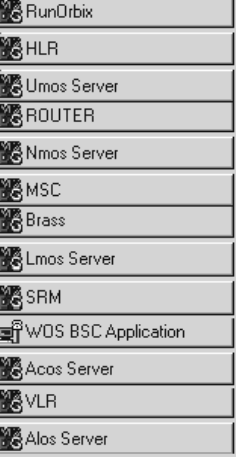
1026209–0001 Revision B 14–4 Maintaining Quad T1 card
18. Turn the power switch on and wait for the Controller to
boot up.
19. After you log in, make sure all AIReach OS software
application buttons are displayed on the Windows NT
desktop (taskbar buttons here are shown vertically stacked):
The taskbar may show other applications in addition to
those shown here.
If any applications are missing, contact your HNS
Installation Manager.
20. Verify that the new card is operational by checking the state
of any BTSs connected to the card and any PBX
connections to the card:
Checking the BTS state:
a. Open the WOS BSC Application window.
b. Select Btsm → State.
c. From the dropdown BTS name list, select each BTS
located on the new card.
d. Verify that each BTS has booted up and is Active.
Checking a single PBX connection:
Place a call from a mobile configured on the system
to a PBX extension or to an LDN, and answer the
desk phone.
Checking multiple PBX connections:
a. Disconnect all PBX connections except for the
connection on the card to be tested.
b. Place a call from a mobile configured on the system
to a PBX extension or to an LDN, and answer the
desk phone.

1026209–0001 Revision B Maintaining Quad T1 card 14–5
If you are moving a Quad T1 card to a different slot or replacing a
Quad T1 card to a different slot (original card removed from slot
x, but replacement installed in slot y), follow the steps below
(Physical steps and Configuring the card):
Moving a Quad T1 card is not recommended, because it may
result in a configuration mismatch. However, if a chassis slot is
malfunctioning or is suspected of malfunctioning, you might want
to move a card.
1. Shut down the Controller: Click Start → Shutdown, select
Shut down the computer?, and click Yes.
2. After you see the message indicating that it’s OK to turn off
power to the computer, turn off the Controller power
switch.
3. Remove the Controller cover (as explained on page 2–11).
4. Remove any PBX or BTS connections to the back of the
Quad T1 card to be moved or replaced.
5. Disconnect the H.100 ribbon cable (shown in Figure 14-1)
from the card to be moved or replaced.
6. If there are Quad T1 cards in both slots adjacent to the card
to be moved or replaced (that is, on each side), remove the
cable from all cards to the end of the cable in either
direction (so you can remove the card).
7. If the card to be moved or replaced is the first one in a
chain of Quad T1 cards (typically in slot 9), remove the
MVIP cable also. See Figure 14-1.
8. Remove the hold–down screw for the card to be removed.
9. Remove the card by carefully lifting it up.
10. Remove the hold–down screw and blank panel from the slot
where the card is to be installed and insert the blank panel
and screw into the slot the card was removed from.
11. If the card is to be replaced, set the S1 DIP switches
(termination) on the replacement card to match those on the
removed card.
12. If you move a card from the end of a Quad T1 chain to an
inside position, set the S1 DIP switches as follows:
Card on the inside – Disable termination (S1 OFF)
Card on the end – Enable termination (S1 ON)
For further details, see Section 2.5.
14.2
Moving or replacing
a Quad T1 card to a
different slot
Physical steps
1026209–0001 Revision B 14–6 Maintaining Quad T1 card
13. If the removed card was the first in a chain of Quad T1
cards, an MVIP–to–H.100 bus adapter card is attached at
the top of the card (Figure 14-1): If the card will no longer
be the first one in the chain or the card is being replaced,
unscrew the bus adapter card (or use a new bus adapter
card) and connect it to the Quad T1 card that will be the
first in the chain. See Figure 14-2.
The bus adapter card must be secure and in full contact
with the Quad T1 card.
You may have to temporarily remove an additional card to
make room so you can install the bus adapter card.
14. Insert the Quad T1 card being moved or the replacement
Quad T1 card into the proper slot.
Press down carefully to seat the card in the motherboard
connector. Be especially careful if a bus adapter card is
attached to the Quad T1 card.
15. Insert and tighten the hold–down screw.
16. Reconnect the H.100 cable to all Quad T1 cards. Refer to
Figure 14-1.
17. If the card replaced is the first card in a chain of Quad T1
cards, carefully reconnect the MVIP cable. See Figure 14-1.
18. Reconnect any PBX or BTS cables to the back of the card.
19. Replace the Controller cover.
Be careful not to damage the copper finger stock under the
front edge of the cover.
Follow these steps to configure the moved T1 Quad card or the
replacement card:
1. Turn the power switch on and wait for the Controller to
boot up.
2. After all processes on the Controller have started (as
explained in step 1 on page 2–27), open the AIReach Office
application and launch the BSC Configuration/ HW Config
window.
For details, see Section 2.9, steps 1 through 7.
Configuring the BTS
1. Select the Quad T1 card configured in the PC Slot where
the moved or replaced card was originally located.
2. Click Modify to open the Hardware Configuration window.
3. Write down the Card Number of the selected card and the
configuration for each line.
Note
The Card Number is not the same field as the PC Slot, PCI Bus,
or PCI Slot fields.
4. Click Close to close the window.
Configuring the card
1026209–0001 Revision B Maintaining Quad T1 card 14–7
5. Click on the BTSs tab of the BTS Configuration window.
This window lists all configured BTSs.
6. Move any BTSs configured on the Card Number of the old
card (original card or original card location) to a different
card number.
At this point, the BTSs may be configured on the same card
and port as another BTS.
7. To move a BTS:
a. Click on the BTS and then click Modify.
b. On the BTS Configuration window, change the card
number to a different card, then click Accept.
Write down which BTSs have been moved so you
will know which ones to move to the new card. If
there are no other Quad T1 cards in the system, the
BTSs must be deleted and then recreated after the
new card is added. Make sure all associated data,
such as RF parameters, are recorded prior to
deleting the BTS.
8. Click on the HW Config tab to return to the AROSC
Configuration window.
9. Click on the card in the old slot location; then click Delete
to remove the card.
10. Click Add and enter the information for the new PC slot
and the line configuration. Use the information you wrote
down from the old card configuration.
For detailed instructions, see Section 2.9, steps 9, 11, and
12.
11. Click the BTSs tab of the BTS Configuration window.
12. Click on any of the BTSs which were previously moved and
then click Modify.
13. In the BTS Configuration window, change the card number
to the number of the moved card, then click Accept.
The card number is the same as it was originally.
14. If you had to delete any BTSs, re–create them now using
the parameters you previously wrote down.
15. Click File → Exit to close the BTS Configuration window.
16. From the AIReach banner window, click File → Exit to
exit the AIReach Office application.

1026209–0001 Revision B 14–8 Maintaining Quad T1 card
Configuring the T1 Quad card
1. Launch the AROSHWCfg utility by double–clicking on the
AROSHWCf . . . (hardware configuration) icon:
2. Stop all AROS processes: Click Shutdown AROS and then
click Yes when prompted, “Do you really want to quit?”
3. The AROSHWCfg window lists the Quad T1 boards.
4. In the AROSHWCfg window, select the card that has been
moved by clicking on the PC slot number; then click Delete
to remove the card.
5. Click Add to add the moved card, in its new location, back
into the system.
6. In the configuration box that appears, click Find Next T1
Card.
The system should automatically locate the new T1 card.
7. If the new card is not found:
a. Open a Command Prompt window by clicking
Start → Programs → Command Prompt
b. Enter blocate <Enter>.
The system displays a list of all cards. Locate the new
board by finding the PCI bus / PCI slot number
combination that is not listed in the AROSHWCfg
window.
c. Enter the PCI bus and PCI slot numbers in the New
Card window.
8. Enter the new PC slot number.
The Find Next T1 Card function automatically enters the
card type (Quad T1) and the new PCI bus and PCI slot
number.
9. Exit the AROSHWCfg the utility: Click Accept and then
OK.
10. Reboot the Controller: Click Start → Shut Down, select
Restart the computer?, and click Yes.
11. After all processes on the Controller have started, verify
that the new card is operational by checking the state of any
BTSs connected to the card and any PBX connections to the
card.
For details, see steps 19 and 20 on page 14–4.

1026209–0001 Revision B Maintaining Quad T1 card 14–9
If you are removing—and not replacing—a Quad T1 card
(deleting the card), follow the instructions in this section.
When you remove and do not replace a Quad T1 card, remove
the last card added. If you need to delete a different card (not the
last added), you must:
1. Delete the last card added.
2. Move the card to be deleted to the position where the last
card was located.
For example, a system has Quad T1 cards in slots 4, 6, and
8. The card in slot 6 was the last card added to the system,
but the card in slot 4 is the card to be deleted. In this
example, delete the card in slot 6, and then move the card in
slot 4 to slot 6.
Follow the steps in the two sections below to delete the last card
added from the software configuration (Deleting the card from the
configuration) and then physically remove the card (Physically
removing the card).
Delete the last card added, as follows:
1. Verify which card was the last card added:
a. Open the BSC Configuration (HW Configuration)
window.
For detailed instructions, see Section 2.9, steps 1
through 7.
b. Select each Quad T1 card and then click Modify.
c. Observe the Card Number listed for each Quad T1
card.
The card with the highest number is the last card
installed.
d. Click Cancel to close each Quad T1 Hardware
Configuration window.
2. Delete the Quad T1 card with the highest number:
a. Select the Quad T1 card with the highest number.
b. Write down the PC slot for the card you are about to
delete.
c. Click Delete.
3. Click File → Exit to close the BTS Configuration window.
4. From the AIReach Office banner window, click File → Exit
to exit the AIReach Office application.
5. Launch the AROSHWCfg utility by double–clicking on the
AROSHWCf . . . (hardware configuration) icon:
6. Stop all AROS processes: Click Shutdown AROS and then
click Yes when prompted, “Do you really want to quit?”
14.3
Removing (deleting)
a Quad T1 card
Deleting the card from
the configuration
1026209–0001 Revision B 14–10 Maintaining Quad T1 card
7. The AROSHWCfg window lists the Quad T1 boards.
8. In the AROSHWCfg window, select the card with the same
PC slot number as the card previously deleted; then click
Delete to remove the card.
9. Click OK to exit the AROSHWCfg utility.
10. Shut down the Controller: Click Start → Shutdown, select
Shut down the computer?, and click Yes.
11. After you see the message indicating that it’s OK to turn off
power to the computer, turn off the Controller power
switch.
To remove the card from the chassis:
1. Remove the Controller cover (as explained on page 2–11).
2. Remove any PBX or BTS connections to the back of the
Quad T1 to be removed.
3. Disconnect the H.100 ribbon cable (shown in Figure 14-1)
from the card to be removed.
4. If the card to be removed is the first one in a chain of Quad
T1 cards (typically in slot 9), remove the MVIP cable also.
(This cable is shown in Figure 14-1.)
5. Unscrew the hold–down screw for the card to be removed.
6. Remove the card by carefully lifting it up.
7. Install a blank panel in the slot where the card was removed
and attach it with the hold–down screw from the card that
was removed.
8. Reconnect the H.100 cable (as necessary) so it connects to
all Quad T.1 cards (as shown in Figure 14-1).
9. If the card removed had the MVIP–to–H.100 bus adapter
card attached to it (Figure 14-1 on page 14–2), remove the
bus adapter card and install it on the card that is now at the
end of the Quad T1 card chain. See Figure 14-2 on
page 14–3.
10. If the card removed was at either end of the Quad T1 card
chain, set the S1 DIP switches on the card now at the end of
the chain to ON to enable termination.
11. Replace the Controller cover.
Be careful not to damage the copper finger stock under the
front edge of the cover.
12. Turn the power switch on and wait for the Controller to
boot up.
13. After all processes on the Controller have started, verify
that the new card is operational by checking the state of any
BTSs connected to the card and any PBX connections to the
card.
For details, see steps 19 and 20 on page 14–4.
Physically removing
the card

1026209–0001 Revision B Equipment specifications A–1
Appendix A
Equipment specifications
This appendix lists preliminary specifications for the AIReach OS
equipment:
•System Controller specifications – page A–1
•Picocell specifications – page A–4
•Picocell power supply specifications – page A–6
All specifications in this appendix are preliminary and are subject
to change.
The AIReach OS System Controller provides the mobile switching
functionality. The System Controller is connected to multiple
picocells to provide wireless coverage and to the internal PBX to
integrate with desktop phones and outside lines.
The drive bays are protected with a door that can be latched and
locked.
The mechanical requirements are:
•Height: 10.47 inches (6 rack units)
•Width: 19 inches
•Depth: 19 inches
•Weight: 50 pounds when all components are installed
Shipping size
•Height: 20 inches
•Width: 27.5 inches
•Depth: 24.5 inches
WARNING
The AIReach Office System Controller can
weigh in excess of 50 pounds. To avoid
personal injury or damage to equipment,
follow these precautions:
•Do not attempt to move or install the
System Controller by yourself. Two
people are required for these tasks.
•Do not stack more than three System
Controller boxes.
A.1
System Controller
specifications
Security
Mechanical
1026209–0001 Revision B A–2 Equipment specifications
The System Controller requires a standard electrical outlet
(NEMA 15P) located within 6 feet.
The power supply provides power only to the System Controller.
When battery backup is required, a UPS (uninterruptable power
source) unit is necessary.
The ac input connects to a single phase, two–wire service. This
interface occurs through a standard IEC 320 style connector. The
power cord is of a double reinforced insulation design as required
by safety agencies.
Voltage, frequency, and phase
The input voltage, frequency, and phase are:
•Input voltage:
- Low range: 95 Vac to 132 Vac nominal 110–125 Vac
- High range: 190 Vac to 263 Vac nominal 230–240 Vac
•Input frequency: range 47 Hz to 63 Hz
•Input phase: single, three–wire earthed interface
•Consumption: < 700 watts
AC input protection
The System Controller has an internal fuse. Limited protection is
provided from power surges or other transients on the dc input.
This meets with the levels provided by IFC–801–4 and
IEC–801–2.
AC input connection
The ac input connects to a single phase, three–wire service
through a standard IEC 320 connector. The power cord is a
double/reinforced insulation design as required by safety agencies.
Surge protection
The surge requirements on the ac power line meet the
requirements of the IEC 61–000–4–5 standards:
•±1 kV (DM)
•±2 kV (CM)
Power draw
For dc power, the maximum power draw of the System Controller
does not exceed 400 watts.
Bus support
The System Controller’s single–board computer is capable of
sinking up to 64 mA and source up to 32 mA for the ISA bus.
Electrical

1026209–0001 Revision B Equipment specifications A–3
The environmental specifications for the System Controller are
consistent with indoor commercial electronic communication products.
Table A-1 System Controller environmental specifications
Preliminary specifications – subject to change
Operational Non–operational
(unpackaged) Non–operational (packaged)
Temperature +5_C to +50_C
Temperature gradient of up
to 20_C per hour within the
operational temperature
range
–40_C to +60_C
Humidity 5% – 85% relative humidity
over the operational
temperature range
Up to 95% relative humidity
over the non–operational
temperature range
Vibration 0.21 g rms of random
vibration
Frequency PSD
(Hz) (g2/Hz)
5–350 0.0001
350–500*
500 0.00005
* Slope: –6 dB/Oct
2.09 g rms of random
vibration
Frequency PSD
(Hz) (g2/Hz)
5–100 0.0150
100–137*
137–350 0.0080
350–500*
500 0.0039
* Slope: –6 dB/Oct
The vibration limits for
transport in a turbo
propeller aircraft (3g peak
acceleration from 50 to 500
Hz) apply. The System
Controller was tested on all
three axes, 10 minutes per
axis.
Swept sine:
Freq. g Force Sweep Rate
(Hz) (g) octave/min
5–50 0.5 0.1
50–500 3.0 0.25
Resonant dwell: the System
Controller will not be damaged
as a result of a 0.5 g (0 to
peak) resonant search, from 5
Hz to 200 Hz at a sweep rate
of 1 octave per minute,
followed by a 5 minute dwell
at package resonance.
Random:
Frequency PSD
(Hz) (g2/Hz)
5–100 0.0150
100–200*
200 0.0039
* Slope: –6 dB/Oct
Environmental

A.2
1026209–0001 Revision B A–4 Equipment specifications
Table A-1 System Controller environmental specifications
Preliminary specifications – subject to change
Non–operational (packaged)Non–operational
(unpackaged)
Operational
Seismic
Vibration (per NEBS, Zone 4 upper
floors requirement)
Frequency Accel
(Hz) (g)
0.3 0.2
0.6 2.0
2.0 5.0
5.0 5.0
15.0 1.6
50.0 1.6
Shock 10g at 10 ms, 1/2 sine,
three shocks per each of
three axes
Non–operational: 55g at 10
ms, 1/2 sine, three axes
non–operational drop: 2 inch
drop complies with Bellcore
NEBS–TR–NWT–000063
test configuration
Non–operational drop: 36
inch drop complies with
Bellcore
NEBS–TR–NWT–000063
test configuration
Altitude 200 feet below sea level to
10,000 feet above sea level
when the specifications
meet temperature and
humidity limits specified
55,000 feet above sea level
Acoustic noise does not exceed 50dBA when measured 1 meter
from the System Controller’s midpoint.
The picocells provide the air interface to the mobile subscribers.
The picocells are wall–mounted inside customer buildings and are
adjusted to provide radio coverage to a given area within the
building. The picocells are placed throughout the building to
ensure complete building coverage. The picocells are connected to
the System Controller.
Each picocell is equipped with a locking tab on the mounting
bracket and a lock on the picocell housing. The lock is opened and
closed with a key.
The dimensions of the picocells are:
•Height: 13.2 inches
•Width: 12.5 inches
•Depth: 5.5 inches
The picocell weighs less than 20 pounds when all components are
installed.
Acoustics
Picocell
s
p
ecifications
Security
Mechanical

1026209–0001 Revision B Equipment specifications A–5
Shipping size
•Height:
•Width:
•Depth:
The picocell is line powered using the T1 cable. The picocell
operates over an input dc voltage range of –24 to –54 volts.
For dc power, the maximum power draw of the picocell does not
exceed 50 watts.
The environmental specifications for the picocell are consistent
with indoor commercial electronic communication products.
Table A-2 Picocell environmental specifications
Preliminary specifications – subject to change
Operational Non–operational
(unpackaged) Non–operational (packaged)
Temperature 0_C to +50_C
Temperature gradient of up
to 8.3_C per hour within the
operational temperature
range
–40_C to +65_C
Humidity 10% to 95% relative
humidity, non–condensing 10% to 95% relative
humidity non–condensing,
not powered
Vibration 0.5–g rms random, 5 to 500
Hz, three axes, 10 minutes
per axis
Frequency PSD
(Hz) (g2/Hz)
5–350 0.00060
350–500 0.00029
1.5 g peak acceleration
from 10 to 50 Hz 3g peak acceleration from
50 to 500 Hz (Example
transport in turbo propeller
aircraft).
Shock 10g at 11 ms, 1/2 sine,
three shocks applied to
each of the three axes.
Non–operational: 60g at 11
ms, 1/2 sine, three shocks
applied to each of the three
axes.
Non–operational drop: 12
inch drop complies with
Bellcore GR–63–CORE,
1995 test configuration
Non–operational: 36 inch
drop complies with Bellcore
GR–63–CORE, 1995 test
configuration
Altitude 200 feet below sea level to
10,000 feet above sea level
when the specifications
meet temperature and
humidity limits
Electrical
Environmental
specifications

A.3
1026209–0001 Revision B A–6 Equipment specifications
Maximum RF power output (Equivalent Radiated Power) for the
100 mW radio option of the Pico BTS is ±20 dBm with +1/–3 dB
accuracy. The BTS has a nominal dynamic range of at least 26 dB
(from ±20 dBm to –6 dBm), adjustable in steps of 1 dB.
For the 10 mW radio option, maximum RF power output
(Equivalent Radiated Power) of the Pico BTS is +10 dBm with
+1/–3 dB accuracy. The BTS has a nominal dynamic range of at
least 16 dB (from +10 dBm to –6 dBm), adjustable in steps of 1
dB. Power is measured at the antenna port.
Antenna
The antenna connections are male “SMA” connectors with nominal
impedance of 50 ohms. The return loss is 12 dB minimum. The
connections are labeled “Antenna A” and “Antenna B”.
A power supply is used to power each picocell. The mechanical
specifications of the power supply are:
•Height: 6.58 inches
•Width: 4.0 inches
•Depth: 1.98 inches
•Weight: 22 ounces (excludes cords)
The input specifications are:
•Input voltage: 100 Vac to 250 Vac –10%, +6%
•Input frequency: range 47 Hz to 63 Hz
•Current: 2.0 A max. at 100 VAC input
The output specifications are:
•1.875 amps at –48 volts (90 watts)
•Combined line and local voltage regulation of ±1%
•Transient response of 0.5 ms for 50% local change
•Hold time of 18 msec minimum at 120 Vac and 120 msec
minimum at 240 Vac.
•±10% “square” output current limiting
•Short circuit protection
•Over voltage crowbar
Table A-3 Power supply environmental specifications
Preliminary specifications – subject to change
Operational Non–operational
Temperature 0_C to +50_C –30_C to +85_C
Humidity 5% to 95% relative
humidity, non–condensing
Altitude 0 feet to 10,000 feet
An area must be available on the wall near the telco wiring blocks
and electrical outlet to fasten the power supply to the wall.
RF levels
Picocell power
su
pp
l
y

1026209–0001 Revision B Standards compliance information B–1
Appendix B
Standards compliance information
This appendix lists standards compliance information for the
AIReach OS components:
•FCC compliance – page B–1
•Picocell regulatory compliance – page B–2
•System Controller regulatory compliance – page B–3
•Picocell power supply compliance – page B–4
•Other compliance – page B–4
The AIReach Office System Controller and picocells have been
tested and found to comply with the limits for a Class B digital
device, pursuant to part 15 of the FCC Rules. These limits are
designed to provide reasonable protection against harmful
interference in a residential installation.
This equipment generates, uses and can radiate radio frequency
energy and, if not installed and used in accordance with the
instructions, may cause harmful interference to radio
communications. There is no guarantee that interference will not
occur in a particular installation. If this equipment does cause
harmful interference to radio or television reception, which can be
determined by turning the equipment off and on, the user is
encouraged to try to correct the interference by one of more of the
following measures:
•Reorient or relocate the receiving antenna
•Increase the separation between the equipment and receiver
•Connect the equipment to an outlet on a circuit different
from that to which the receiver is connected
•Consult an experienced radio/TV technician for help
B.1
FCC compliance

B.2
1026209–0001 Revision B B–2 Standards compliance information
Type acceptance
FCC Part 22 and 24, Personal Communications Services, October
1, 1997. Part 22 – Cellular band. Part 24 – PCS band.
Spurious emissions
FCC Part 15, Class B Radio Frequency Devices – Subpart B,
unintentional radiators, October 1, 1997 or April 16, 1999
EN 55022 Class A, Limits and methods of measurement of radio
disturbance characteristics of information technology equipment,
December 1, 1995
Telecom
FCC Part 68, February 1998
Safety
UL 1950 (without D3 deviations), Safety of Information
Technology Equipment, Including Electrical Business Equipment
EN 60950, Safety of Information Technology Equipment,
Including Electrical Business Equipment, 1992
CSA C22.2 No. 950, Safety of Information Technology
Equipment, Including Electrical Business Equipment, March 1,
1998
Immunity
EN 50082–1, Electromagnetic compatibility – Generic immunity
standard Part 1, Residential, commercial, and light industry, 1997
Picocell regulatory
com
p
liance

B.3
1026209–0001 Revision B Standards compliance information B–3
CSA C22.2 No. 950, Safety of Information Technology
Equipment, Including Electrical Business Equipment, March 1,
1998
EIA/TIA–232–F, Interface between data terminal equipment and
data circuit terminating equipment employing serial binary data
interchange, October 1997
EN 55022 Class A, conducted and radiated
EN 55022 Class A, Limits and methods of measurement of radio
disturbance characteristics of information technology equipment,
December 1, 1995
EN 60950 “Safety of Information Technology Equipment,
Including Electrical Business Equipment” 1992
MIL–HNDBK–217F Military Handbook, Reliability Predication
of Electronic Equipment
FCC Part 15, CFR47, Class B Radio Frequency Devices – Subpart
B unintentional radiators, October 1, 1997 or April 16, 1999
Type acceptance
FCC Part 68 February 1998
Emissions
FCC Part 15 Class B
EN 55022 Class B with 6 dB or margin on both radiated and
conducted units
Power Transients
IEEE 587 – System Controller power supplies adheres to these
power transient standards
Safety
UL 1950 (without D3 deviations), Safety of Information
Technology Equipment, Including Electrical Business Equipment,
Third Edition, March 1, 1998
Immunity
EN 50082–1, Electromagnetic compatibility – Generic immunity
standard Part 1, Residential, commercial, and light industry, 1997
IEC 61000–4–2, electrostatic discharge
IEC 61000–4–3, radiated RF
IEC 61000–4–4, electrically fast transients
IEC 61000–4–5, surge
IEC 61000–4–6, conducted RF
System Controller
regulatory
compliance

B.4
B.5
1026209–0001 Revision B B–4 Standards compliance information
CE compliant
CSA950
Complies with EMC Directives
In Case IEC320 with ground
TUV/IEC950
UL1950
AWS Wireless Office Service System Specification, Document
WOS–97–01, Rev 1.0
The BTS complies with the latest revision of TIA/EIA/IS–136.1A
and TIA/EIA/IS–136.2A.
EIA/TIA–232–F, Interface between data terminal equipment and
data circuit terminating equipment employing serial binary data
interchange, October 1997
TIA/EIA–568A, Commercial Building Telecommunications
Cabling Standard
TIA/EIA–606, Administration Standard for the
Telecommunications Infrastructure of Commercial Buildings
CSA Standard T528, Design Guidelines for Administration of
Telecommunications Infrastructure in Commercial Buildings
CSA Standard 529, Design Guidelines for Telecommunications
Wiring Systems in Commercial Buildings
EN 50082–1, Electromagnetic compatibility – Generic immunity
standard part 1. Residential, commercial, and light industry, 1997
IS130A, July 1997
IS135, April 1995
IS136A (updates provided per Terms of Conditions):
•IS136.1A specifies the Digital Control Channel
•IS–136.2A specifies the Digital Traffic Channel
•RF performance complies with the latest revision of
IS–138A, with the exception of delay interval compliance,
which is not required for this short–range base station
IS138A (updates provided per Terms of Conditions)
IEEE–C62.41 class A and B. The PSS complies with the
requirements of this standard.
MIL–HDBK–217F Military Handbook, Reliability prediction of
Electronic Equipment, 1992
National Electrical Code, Section 800 – latest code
WBSU–WOSC Interface Specification Avalcom document No.
A9.20.0002
Picocell power
su
pp
l
y
com
p
liance
Other compliance

C.2
1026209–0001 Revision B Equipment part numbers C–1
Appendix C
Equipment part numbers
This appendix lists part numbers for major components of the
AIReach OS:
•Customer documentation – page C–1
•Component part numbers – page C–1
For document numbers for AIReach OS customer documents, see
the About section of this manual.
Table C-1 lists the major components of the AIReach OS, field
replaceable units (FRUs), parts needed for installation, and their
part numbers.
Table C-1 Major AIReach OS components,
FRUs, and installation parts
Component HNS part number
System Controller and major components
AROSC System Controller with 1 Quad T1 card, 1 TX2000 IP card,
1 LAN card, and 1 conference card
1028007–0001
CD ROM drive, read/write, internal 9010029–0001
Hard drive, 8.4 Gb 9010025–0001
Floppy disk drive, 3.5 inch, 1.44 Mb 9010028–0001
TX2000 IP card 9010089–0002
TX2000 SS7 card 9010089–0001
Quad T1 card 9010087–0001
Conference card 9010086–0001
Ethernet 10/100 LAN card 9010111–0001
Modem, V.90/56K voice/fax ISA 9010027–0001
System Controller installation parts
MVIP to H.100 adapter card 9010118–0001
Short MVIP assembly for 1 Quad T1 cards 1028010–0002
H.100 ribbon cable (For Quad T1 cards), with 68–position CHAMP
connector
1028158–0001
C.1
Customer
documentation
Component part
numbers

1026209–0001 Revision B C–2 Equipment part numbers
Table C-1 Major AIReach OS components,
FRUs, and installation parts
Component HNS part number
Picocells and picocell components
Picocell base transceiver station (BTS)
Multiple types: 800 or 1900 MHz; 100 mW or 10 mW; T1 or E1.
1 scanner no radios; 2 radios with vocoder no scanner; 2 radios (no
vocoder) no scanner; Controller (no radios or scanners); radio
spares with vocoder.
For specific picocell type and part numbers for your site, refer to
the site–specific
AIReach OS Configuration Report
.
1026426–00xx
Transceiver, 800 MHz, 100 mW 1026426–0033
Transceiver, 800 MHz, 10 mW 1026426–0034
Transceiver, 1900 MHz, 100 mW 1026426–0035
Transceiver, 1900 MHz, 10 mW 1026426–0036
Scanning receiver (scanner), 800 MHz 1026426–0041
Scanning receiver (scanner), 1900 MHz 1026426–0042
Picocell power supply with bracket and screws
(90–264 Vac/48 Vdc 90 W)
1028482–0001
Picocell RF cable 1026426–0043
Picocell antenna (FRU) { TBD }
Picocell terminal block assembly (for connecting DC power supply
to picocell). Terminal block, rail, end bracket, and end cover.
1028211–0001
Cable, LAN CAT 5, 24 AWG, 4 pr. 9008537–0001
RJ–45 connector, plug 9010236–0001
Other components
17” video, monitor 1600x1200 resolution 9010043–0001
Keyboard, compact 104–key with touchpad 9009294–0002
Router 9010254–0001
Rack mounting items and options
Slide assembly, steel, 24–inch (allows Controller and monitor
to slide)
9010132–0001
Keyboard Frame 1028301–0001
Lock, cordset connector 9007022–0003
Junction box panel assembly, 12–port RJ–45 CAT5 9010215–0001
Junction box panel assembly, 24–port RJ–45 CAT5 9010216–0001
1026209–0001 Revision B Equipment part numbers C–3
Table C-1 Major AIReach OS components,
FRUs, and installation parts
Component HNS part number
Other options
Contact your AIReach OS Program Manager for information on the following additional
options:
Monitor enclosure options
UPS and power distribution options
Rack frame and frame mounting components options
Rack cable routing options
Rack frame bracing options (for ceiling or cable ladder)
Rack extenders (7–inch)
Router options
CSU options
D.1
1026209–0001 Revision B Updating software; backing up databases D–1
Appendix D
Updating software; backing up
databases
This chapter includes the following topics:
•Updating software – page D–1
•Backing up and restoring databases – page D–2
A new software release could be a release of the AIReach Office
application software, an OMC release, or both.
Install the new release during non–business hours. AIReach
Office functions are not available during this time.
To install a new release of AIReach software:
1. Read and follow all instructions in the software release
notes or Service Bulletin provided by the TAC.
2. Back up the current subscriber database on a floppy disk
following the instructions in Section D.2.
3. Close the AIReach Office application.
4. Exit any other programs that may be running, including any
connections to remote workstations.
CAUTION
When prompted during a software reload:
“Is the nss database, nss to be created
again?,” reply N. If you reply Y, you will
destroy parts of the existing database.
5. Insert the CD with the new software release into the drive
and follow the interactive instructions to install the
software.
6. Reboot the System Controller.
7. Start the AIReach Office application, and make sure the
main window (banner with AIReach logo) displays.
Updating software
with a new release

D.2
1026209–0001 Revision B D–2 Updating software; backing up databases
To safeguard system data, create regular backups of all databases
created and maintained by the AIReach Office software.
Databases may be restored to the Controller hard disk, if
necessary.
All AROS software applications are stopped during backup or
restore operations. Any calls in progress are dropped, and no
new calls can be made until the Controller restarts. Therefore,
backup and restore operations should be done when there are
no users on the network, and users should be informed that
the system will be down.
To backup the AIReach OS databases to a writable CD:
1. Close the AIReach OS banner window.
2. Load a formatted RW CD into the CD–ROM drive.
(If the CD is unformatted, format it before loading it. )
3. Enter these commands from a DOS prompt:
cd %omc_root_dir%\tools
backup <CD–ROM drive letter>
A db_log.LOG file opens.
4. When you see “Export terminated successfully without
warning” at the bottom of the log, close the file.
If you do not see this message, contact HNS TAC for
assistance.
Starting the software after backup
To start the AROS software after backup, follow these steps:
1. Select Start → Settings → Control Panel.
2. Double–click on Services.
3. Select WOS LOAD/Monitor and press Start.
4. Wait for all processes to start.
(For a list of the processes, see the taskbar illustration on
page 3–6, step 4.)
5. After all processes have started, you can open the AIReach
OS banner window. (Double–click on the AROS
Configuration icon and log in.)
Backing up and
restoring databases
Backing up
1026209–0001 Revision B Updating software; backing up databases D–3
To restore the databases from a CD to the Controller hard disk:
1. Enter these commands from a DOS prompt:
cd %omc_root_dir%\tools
cleanupdb
The cleanupdb script closes all AROS processes and
cleans the databases. After some time, the Controller
reboots itself, but no AROS services start.
2. After the Controller reboots, enter:
cd %omc_root_dir%\tools
restore <CD–ROM drive letter>
The Controller reboots again.
3. Launch the AIReach Office application and verify that the
database has been restored. Check the NSS, HLR, MSC and
systemwide configurations.
Restoring

1026209–0001 Revision B Index-1
Index
A
AIReach Office application
banner window, 2–28
launching, 2–28, 4–2
Alarm paging, 8–11
Alarms, picocells, 13–8
table, 13–9
Antenna, picocell, A–6
Applications (list of AIReach OS applications),
2–27
AROS Configuration icon, 2–28
AROSC Configuration window, 2–29, 4–3
AROSC Name, 4–3
ArosPageInfo.dat file, 8–12
B
Backing up databases, D–2
Backplane slots. See Controller, slots, and
Picocell, slots
Band scan. See Frequency band scan
Banner window for AIReach Office application,
2–28
Block diagram, 1–2
BTCs. See Transceivers (picocells)
BTS Configuration window, 4–14
Bus adapter card, 2–23, 14–3
C
Cables
H.100 bus, 2–23, 14–2
MVIP bus, 2–23, 14–2
picocells, 7–7
router connections, 5–2
test cable (picocell to Quad T1 card), 6–2
Cabling, 3–7
Controller, 3–5
Controller to PBX, 8–2
external modem, 8–11
picocell, 7–9
T1, picocells, 7–11, 7–16
wiring flip, 7–16
Cards (Controller)
adding, 2–11
configuring, 2–25
DIP switch settings, 2–13
fully loaded configuration, 2–10
jumper settings, 2–13
slot assignments, 2–9
standard configuration, 2–1, 2–9
types, 1–6
verifying configuration, 2–27, 4–4
Cell Configuration window, 4–12
Conference cards
adding to Controller configuration, 2–31
DIP switch settings, 2–18
jumper settings, 2–18
MVIP bus, 2–23
Configuration options, 1–12
Configuration Report, 2–1, 2–25, 4–2,
6–1, 7–7
correcting to reflect installation, 9–2
Configuring
Controller cards, 2–25
HLR, 4–21
Quad T1 cards, 14–6
router, 5–2
Connectors
picocells
illustrated, 7–10
T1 cable, 7–8
picocells (illustrated), 6–3
Quad T1 card, 6–4
Controller
cabling, 3–5
card types, 1–6
cards
adding, 2–11
configuring, 2–25
DIP switch settings, 2–13
fully loaded configuration, 2–10
jumper settings, 2–13
slot assignments, 2–9
standard configuration, 2–1, 2–9
verifying configuration, 2–27, 4–4
chassis cover, 2–11, 2–24
1026209–0001 Revision BIndex-2
checking operation, 3–6
compliance information, B–3
components, 1–3, 1–6
part numbers, C–1
configuring
cards, 2–25
gateway access, 5–7
description, 1–1, 1–6
dimensions, A–1
front panel illustration, 1–5
installing, 3–2
mounting options, 1–3
operating mode, 6–16
operating system, 1–2
PBX connections, 8–2
power indicator, 3–6
power requirements, 3–6
rack mounting, 3–4
setup mode, 6–10
slots
card assigned to each slot, 2–9
identification, 2–8
numbering, 2–8
types, 2–8
troubleshooting, 13–1
unpacking, 2–2
verifying configuration, 4–2
specifications, A–1
electrical, A–2
environmental, A–3
weight, A–1
Cover, Controller chassis, 2–11, 2–24
D
Databases, backing up and restoring, D–2
Deleting a Quad T1 card, 14–9
Description (AIReach OS), 1–1
DIP switch settings, Controller cards, 2–13
Documentation set for the AIReach OS, xii
E
Electrical specifications
Controller, A–2
picocells, A–5
Electrostatic discharge precautions, 2–12
Enabling alarm paging, 8–11
Environmental specifications
Controller, A–3
picocells, A–5
External modem, 8–11
F
Fasteners for picocell mounting plate, 7–3
FCC compliance, B–1
Field test mode (for mobile phones), 6–22
Flow chart, installation tasks, 1–8
Frequency, 4–10
assignment, 4–8
band scan
24–hour, 7–7, 7–18
initial (6–minute scan), 6–10
G
Gateway
access, configuring, 5–7
IP address, 5–2, 5–7
pinging, 5–8
H
H.100 bus, 2–13
cable, 2–23, 14–2
Hardware Details window, 2–26
Hazard warnings, xv
HLR
configuring, 4–21
repointing, 8–8
HLR Configuration window, 4–21
I
I/O address. See Jumper settings and DIP switch
settings
Icon, AROS Configuration, 2–28
Inspection, quality, 10–1
Installation QA Inspection Checklist, 10–1
Interference, B–1
IP addresses, 5–3
Controller, 4–1
gateway, 5–2, 5–7
LAN card, 8–10
picocells, 13–2
IRQ (interrupt). See Jumper settings and DIP
switch settings
1026209–0001 Revision B Index-3
J
Jumper settings, Controller cards, 2–13
L
LAN cards, 2–19
driver, 8–9
installing a second LAN card, 8–9
IP address, 8–10
Launching the AIReach Office application, 2–28,
4–2
LDN (local directory number), 4–22, 11–2
LEDs
picocells, 6–5, 7–17
illustrated, 13–8
Quad T1 cards, 6–6
illustrated, 6–7
Login, 2–28, 4–2
remote access, 12–3
M
Materials required for installation, 1–12
MIN (mobile identification number), 6–23
range, 4–22, 11–1
Mobile phones, configuration to receive alarms,
8–12
Modem
external, 8–11
internal, 2–19
Mounting, options, Controller, 1–3
Mounting – rack mount. See Rack mounting
Mounting, options, Controller, 2–2
Mounting plate, picocell, 1–7
fasteners, 7–3
installing, 7–2
locking, 7–12
unlocking, 2–6
Moving a Quad T1 card, 14–5
MSC Configuration window, 4–19
MVIP bus, 2–14
cable, 2–23
MVIP bus cable, 14–2
O
OMC software, description, 4–2
Operating mode, 6–16
Optional equipment, C–3
Organization of this manual, xi
P
Pagers, configuration to receive alarms, 8–12
Part numbers, C–1
Password, 2–28, 4–2, 12–3
PBX connections, 8–2
checking, 14–4
Performance testing, 9–2
checklist, 9–2
Picocells
alarms, 13–8
table, 13–9
antenna, A–6
cabling, T1, 7–11
cell information, 4–12
compliance information, B–2
components, 1–7
part numbers, C–2
connecting for testing, 6–2
connections at telco closet, 7–15
connectors, 7–8
illustrated, 6–3
pinouts, 7–8
controller, 1–7
description, 1–2
dimensions, A–4
installing, 7–2, 7–7
preparing for installation, 7–1
IP addresses, 13–2
LEDs, 6–5
illustrated, 13–8
line cord, 7–7
mounting. See Picocells, installing
mounting plate, 1–7
fasteners, 7–3
installing, 7–2
locking, 7–12
unlocking, 2–6
power requirements, 6–4
power supply, 1–7, 1–12, 6–2, 6–4, 7–1
connecting, 7–14
specifications, A–6
power switch, 6–6, 7–12
RF levels, A–6
scanning receiver, 1–7
1026209–0001 Revision BIndex-4
serial numbers, 2–7, 4–15
slots, numbering, 6–24
specifications, A–4
electrical, A–5
environmental, A–5
RF levels, A–6
weight, A–4
T1 wiring, 7–16
testing, 6–1, 6–17, 6–24
transceivers, 1–7
troubleshooting, 13–2
unpacking, 2–4
wiring flip, 7–16
pinouts, 7–17
Pin assignments
T1 cable for picocells, 7–8
wiring flip, 7–17
Pinging the gateway, 5–8
Ports. See Connectors
Power requirements
Controller, 3–6, A–2
picocell, 6–4
Power supply, picocells, 1–7, 1–12, 6–2,
6–4, 7–1, B–4
specifications, A–6
Programming mobile phones, 6–26
Programming test phones, 6–22
Provisioning
subscribers, 11–1
test mobile phones, 6–20
Q
Quad T1 cards
adding to Controller configuration, 2–30
bus adapter card, 2–23
configuring, 14–6
deleting, 14–9
DIP switch settings, 2–13
H.100 bus, 2–13, 2–23
cable, 14–2
jumper settings, 2–14
LEDs, 6–6
illustrated, 6–7
MVIP bus, 2–14
cable, 14–2
ports, illustrated, 6–4
removing, 14–9
replacing, 14–2, 14–5
T1 line settings, 2–30, 4–5
Quality inspection of installation, 10–1
R
Rack mounting
Controller, 3–4
illustrated, 1–4, 3–3
Registering test mobile phones, 6–23
Remote access. See Remote Client
Remote Client, 1–2, 12–1
installing, 12–2
requirements, 12–1
testing, 12–3
Removing a Quad T1 card, 14–9
Replacing a Quad T1 card, 14–2, 14–5
Repointing the HLR, 8–8
Restoring databases, D–3
RF coverage, testing, 9–1
RF levels, A–6
RJ–45 connectors
pinouts for wiring flip, 7–17
T1 cable for picocells, 7–8
Router
configuration example, 5–5
configuring, 5–2
installing, 5–2
supported model, 5–1
S
Safety information, xv, B–2, B–3
SBC (single board computer)
DIP switch settings, 2–20
jumper settings, 2–20
Scanning picocells, checking operation, 6–6
Scanning receiver (picocells), 1–7
Serial numbers, picocells, 2–7, 4–15
Service provider ID list, 8–13
Setup mode (Controller), 6–10
SID/PSID/RSID (system identification), 4–9,
6–21, 6–23, 6–26
Slots. See Controller, slots, and Picocell, slots
Specifications, A–1
Controller, A–1
picocells, A–4
SSL certificate, 8–4
example, 8–6
1026209–0001 Revision B Index-5
Standards compliance, FCC, B–1
Standards compliance information, B–1
Subscriber Provisioning window, 6–20
Subscribers, provisioning, 11–1
System
block diagram, 1–2
configuration options, 1–12
testing, 9–1
System Controller. See Controller
System description, 1–1
System Wide Configuration window, 4–17
T
T1 line settings, 2–30, 4–5
T1 wiring, 7–16
Task flow chart, 1–8
Test cable, 6–2
Test mobile phones
field test mode, 6–22
programming, 6–22
provisioning, 6–20
registering, 6–23
types used for installation, 6–22
Testing
picocells, 6–1, 6–17, 6–24
programming test phones, 6–22
provisioning test mobile phones, 6–20
registering test mobile phones, 6–23
RF coverage, 9–1
scanning picocells, 6–6
system performance, 9–2
transceivers (picocells), 6–24
TLDN (temporary local directory number), 4–20
Tools recommended for installation, 1–11
Tools required for installation, 1–11
Traffic picocells. See Picocells
Transceivers (picocell), 1–7
testing, 6–24
Troubleshooting, 13–1
Controller problems, 13–1
picocell problems, 13–2
TX2000 cards
adding to Controller configuration, 2–31
DIP switch settings, 2–16
jumper settings, 2–15
MVIP bus, 2–23
U
Unpacking
Controller, 2–2
picocells, 2–4
Updating AIReach software, D–1
V
Verifying
BTS information, 4–14
cell information, 4–12
Controller card configuration, 2–27, 4–4
Controller configuration, 4–2
MSC configuration, 4–19
network data, 4–9
scanning picocell operation, 6–6
software download to picocell, 6–5
systemwide information, 4–17
W
Windows taskbar, 2–27
Wiring flip, 7–16
WOS BSC Application window, 6–8